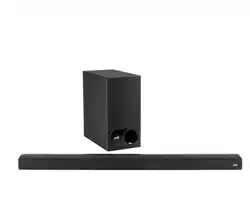
User manual Sound Bar
What’s in the Box
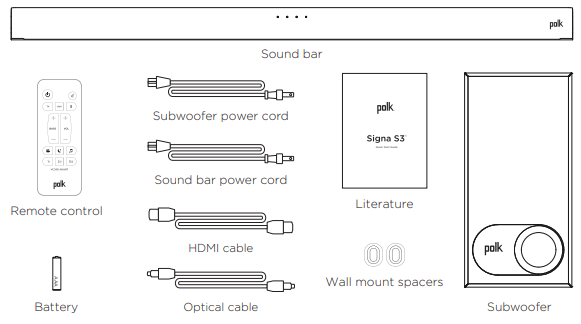
NOTE: The USB port on the underside of the sound bar is for maintenance. It is not for standard use.
Connecting Your Signa S3 to Your TV
1. Is an HDMI port on your TV labeled “ARC"?

Connect the included HDMI cable to the HDMI ports labeled with “ARC” on both the TV and the sound bar.
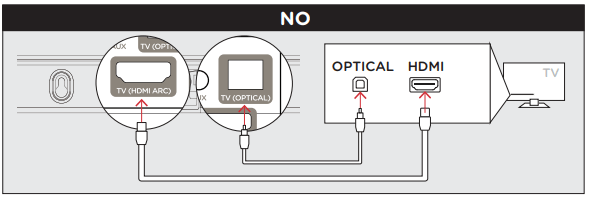
Connect the included Optical cable between the TV and sound bar.
Connect the included HDMI cable to any available HDMI port on the TV and to the “TV (HDMI ARC)” port on the sound bar.
NOTE: HDMI (ARC) and optical supports Dolby 5.1 decoding.
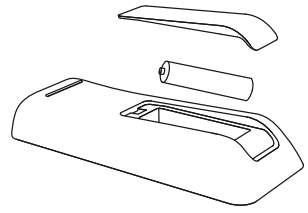
2. Insert the provided AAA battery.
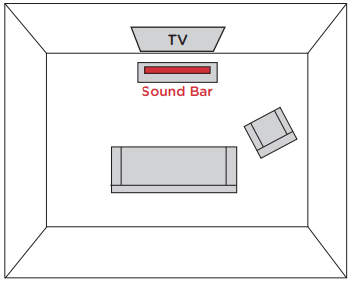
3. Position the sound bar.
(for the best listening experience, position the sound bar centered under your TV)
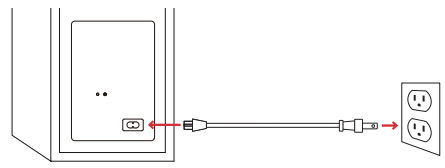
4. Connect the sound bar to an AC outlet.

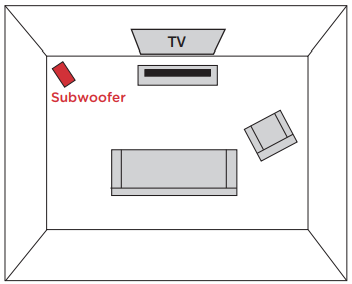
5. Position the subwoofer.
(for best performance place on the same wall as the TV)
6. Connect the subwoofer to an AC outlet.
7. Verify your connections.
- Turn on your TV to verify that you are seeing video on the TV and hearing sound from the sound bar. You may have to select the appropriate HDMI source on your TV.
- If you do not hear sound and do not see any lights on the front of your sound bar, press the power button (
 ) on the sound bar to turn it on.
- The subwoofer is automatically connected. When the connection is completed, the POWER LED on the back of the subwoofer solid green.
NOTE: If you are hearing sound from both your TV and your sound bar, you must manually turn off your TV speakers using the Settings Menu on your TV. Please refer to your TV’s owner’s manual for instructions.
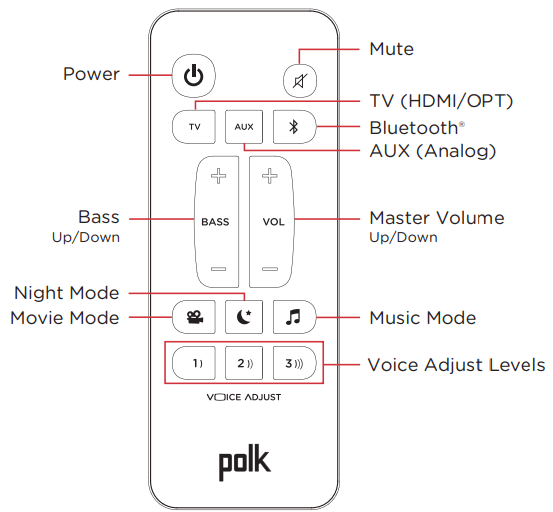
Remote Control
Sound Modes

Sound Bar Top Panel

※Source  button
Each time you press Source button, the input source changes in the order shown below.
(Default: HDMI (ARC))

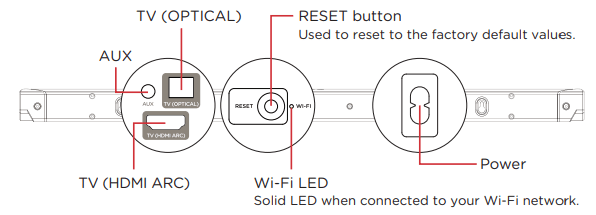
Sound Bar Back Panel
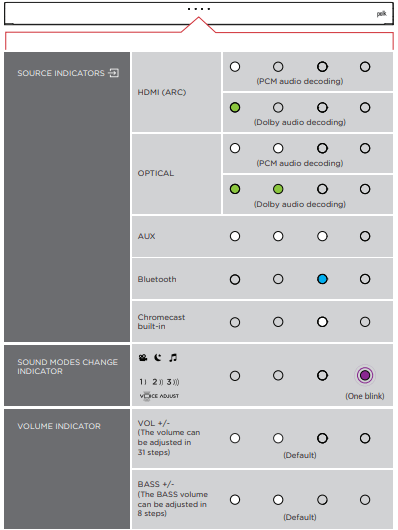
Sound Bar LEDs
The Signa S3 has a horizontal row of LED lights that provide status indications, like source, volume and sound modes.
Music Listening
Listening to Music via Chromecast built-in
【Chromecast built-in Benefi ts】
Signa S3 features Chromecast built-in which lets you easily:
- Stream music from your favorite apps over Wi-Fi.
- Create a whole-home audio experience. Multi-room sync let’s you play the same song across Chromecast built-in compatible speakers in your house at the same time.
- Use Google Assistant on a Google Home speaker to control music playback on the Signa S3 using voice commands.
【Chromecast built-in Setup】
1. Download the free Google Home app and follow the in-app instructions to connect the Polk Signa S3 to your Wi-Fi.

2. For more detailed setup information about Google Home and Chromecast built-in for audio.
3. When streaming from a Chromecast-enabled app, a white light will appear on the sound bar.

- If streaming operations are performed with a Chromecastenabled music app while this unit is in standby mode, this unit will turn on automatically.
Listening to Music via Bluetooth
1. To enable Bluetooth, press the Bluetooth button on the sound bar or remote control. A blue LED will blink on the sound bar.

2. Go to the Bluetooth devices section on your phone, tablet or computer and select “Signa S3”. The LED is solid blue when Bluetooth is connected.
- If a Bluetooth device is connected while this unit is in standby mode, this unit will turn on automatically.
NOTE: To take control when another device is connected, press and hold the Bluetooth  button for approximately 3 seconds.
Auto standby
When there is no input signal and operation for 20 minutes, this unit automatically enters the standby mode. The default setting is “ON”.
Press and hold the Night Mode  button for approximately 5 seconds to set the Auto standby function to on/off. The LEDs blink three times in the colors in the following table.

Deep standby
This unit can be placed into deep standby mode, in which its standby power consumption is lower than in normal standby mode. When this unit is in deep standby mode, it cannot be turned on by performing streaming operations with a Chromecast-enabled music app or with a Bluetooth connection. The automatic software update function is also disabled. Perform the following steps to put this unit into deep standby mode.
1. Press and hold the power button () for about 5 seconds.
- All of the status display LEDs blink in white 3 times before turning off and the unit enters deep standby mode.
NOTE: When in normal standby mode, if this unit is not connected to a Wi-Fi network for a continuous period of 60 minutes or more due to a problem with an external device such as a router or with the Wi-Fi environment, this unit automatically enters deep standby mode.
Automatic software update
The software of this unit can be updated automatically using a Wi-Fi network. Software updates include updating to the latest functions and improving the software of this unit. Simply download the free Google Home app onto an iOS or Android device and connect this unit to a Wi-Fi network to enable the automatic software update function. Automatic updates are performed when the unit is in standby mode at night.
NOTE: The automatic update function is not active when this unit is in deep standby mode.
Using Your TV or Cable/Satellite Remote to Control the Signa S3
There are several ways to use your TV, cable or satellite remote to control Signa S3.
First, please control the volume, etc. using the TV, cable or satellite remote control of the device connected to this unit. You can control this unit when the device compatible with the HDMI CEC CONTROL function or the PRELOADED IR CODES function is connected to this unit.
If you cannot control this unit, use the IR Learning function to memorize the operation of this unit on the TV, cable or satellite remote control.
HDMI CEC CONTROL
If your TV is connected via HDMI and your TV supports CEC (and it is enabled in the TV settings menu), you can control the volume and mute functions on Signa S3 from your TV without any further setup.
PRELOADED IR CODES
If your TV is connected via optical, you may be able control the volume and mute functions on Signa S3 from your TV without any further setup if your TV is one of supported brands and was manufactured within the last 5 years. Visit the Polk web site for details.
IR LEARNING FUNCTION
If your TV is connected via optical and it is not one of the more popular brands, you can teach your IR (infrared) remote to control volume, mute and other functions (such as source selection or bass volume) on your sound bar.
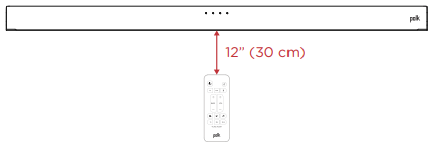
Using the IR Learning Function
IMPORTANT: Hold both remotes about 12” (30 cm) directly in front of the Signa S3 when pressing their respective buttons and make sure your remotes have fresh batteries.
1. Enter IR Learn Mode
Make sure your sound bar is powered on, then press and hold the Source button on the sound bar for about 3 seconds. You should now see white lights on the front of the sound bar moving repeatedly left and right round trip.
2. Select a button on your Signa S3 remote
Press and release the button on the Signa S3 remote that you want to learn (ex: Volume Up). You will see all white lights fading in and out together.
3. Select a button on your TV remote
Briefl y tap the corresponding button on your TV remote. You will see white lights counting down from left to right as the received IR command is processed.
4. Verify the results
- If you see the white lights fading in and out again, repeat step 2.
- If the rightmost LED on the front of the soundbar blinks in green three times.

→ The command was successfully learned.
- If the rightmost LED on the front of the soundbar blinks in red three times.

→ The command was not learned. Please try again.
5. Learn Another Code
When you see the white lights on the front of the sound bar moving repeatedly left and right round trip again, you are ready to select your next function to learn by repeating steps 1-3.
6. Exit IR Learn Mode
Press and hold the Source button on the sound bar again for about 3 seconds. When the rightmost LED on the front of the soundbar blinks in white three times, release the button.
CLEARING ALL LEARNED IR CODES
Press and hold the Source button on the sound bar for about 10 seconds. When the all LEDs on the front of the soundbar blink in purple five times, release the button.
BASIC TROUBLESHOOTING
The HDMI Control function does not work
- You cannot operate devices that are not compatible with the HDMI Control function. In addition, depending on the connected device or the settings, the HDMI Control function may not work. In this case, operate the external device directly.
- Check that the HDMI Control function setting is enabled on all devices connected to this unit.
No sound is produced from subwoofer
The Signa S3 sound bar and wireless subwoofer are preset at the factory to work together. Should your wireless subwoofer stop receiving an audio signal, follow these instructions to re-establish the connection:
1. Turn on your sound bar.
2. Press and hold the CONNECT button on the back of the subwoofer for 3 seconds.
3. Simultaneously press and hold Bluetooth  and Volume Up + buttons on the sound bar for 5 seconds.
The sound bar will search for a connection while the first and second LEDs on the sound bar will flash intermittently. The lights will stop flashing when the sound bar and subwoofer connect. If the sound bar and subwoofer fail to connect, the first and second LEDs will flash together 5 times. Repeat steps above to establish a connection.
Cannot pair with a Bluetooth device
- It may be that Bluetooth is not enabled on the Bluetooth device. See the Owner’s Manual of the Bluetooth device to enable the Bluetooth function.
- This device may be paired with another Bluetooth device. Select this unit from the list of devices displayed on the screen of the Bluetooth device.
- Bring the Bluetooth device near to this unit.
- Turn the power of the Bluetooth device off and on again, and then try again.
- Only 1 Bluetooth device can be connected at a time.
The sound from a Bluetooth device is cut off
- Bring the Bluetooth device near to this unit.
- Remove obstructions between the Bluetooth device and this unit.
- To prevent electromagnetic interference, locate this unit away from microwave ovens, wireless LAN devices and other Bluetooth devices.
- Pair with the Bluetooth device again.
Resetting factory settings
Perform this procedure if the display is abnormal or if operations cannot be performed. Various settings are reset to the factory default values. Make settings again.
1. Press the Power On/Off  button to turn on power to the unit.
2. Press and hold the back panel’s RESET button for at least 5 seconds.
- All the Front LEDs blink simultaneously 3 times in red.
- Signa S3 automatically restarts in a factory default values.
Specifications
| |
Sound bar
|
Subwoofer
|
| Power supply: |
AC 100 - 240 V, 50/60 Hz |
AC 100 - 240 V, 50/60 Hz |
| Operating temperature: |
5 °C - 35 °C |
5 °C - 35 °C |
| Power consumption: |
40 W |
40 W |
| Power consumption in standby mode: |
1.80 W |
0.35 W |
| Power consumption in deep standby mode: |
0.35 W |
0.35 W |