Owner Manual Lithium-Ion Cordless Mower
KNOW YOUR LAWN MOWER
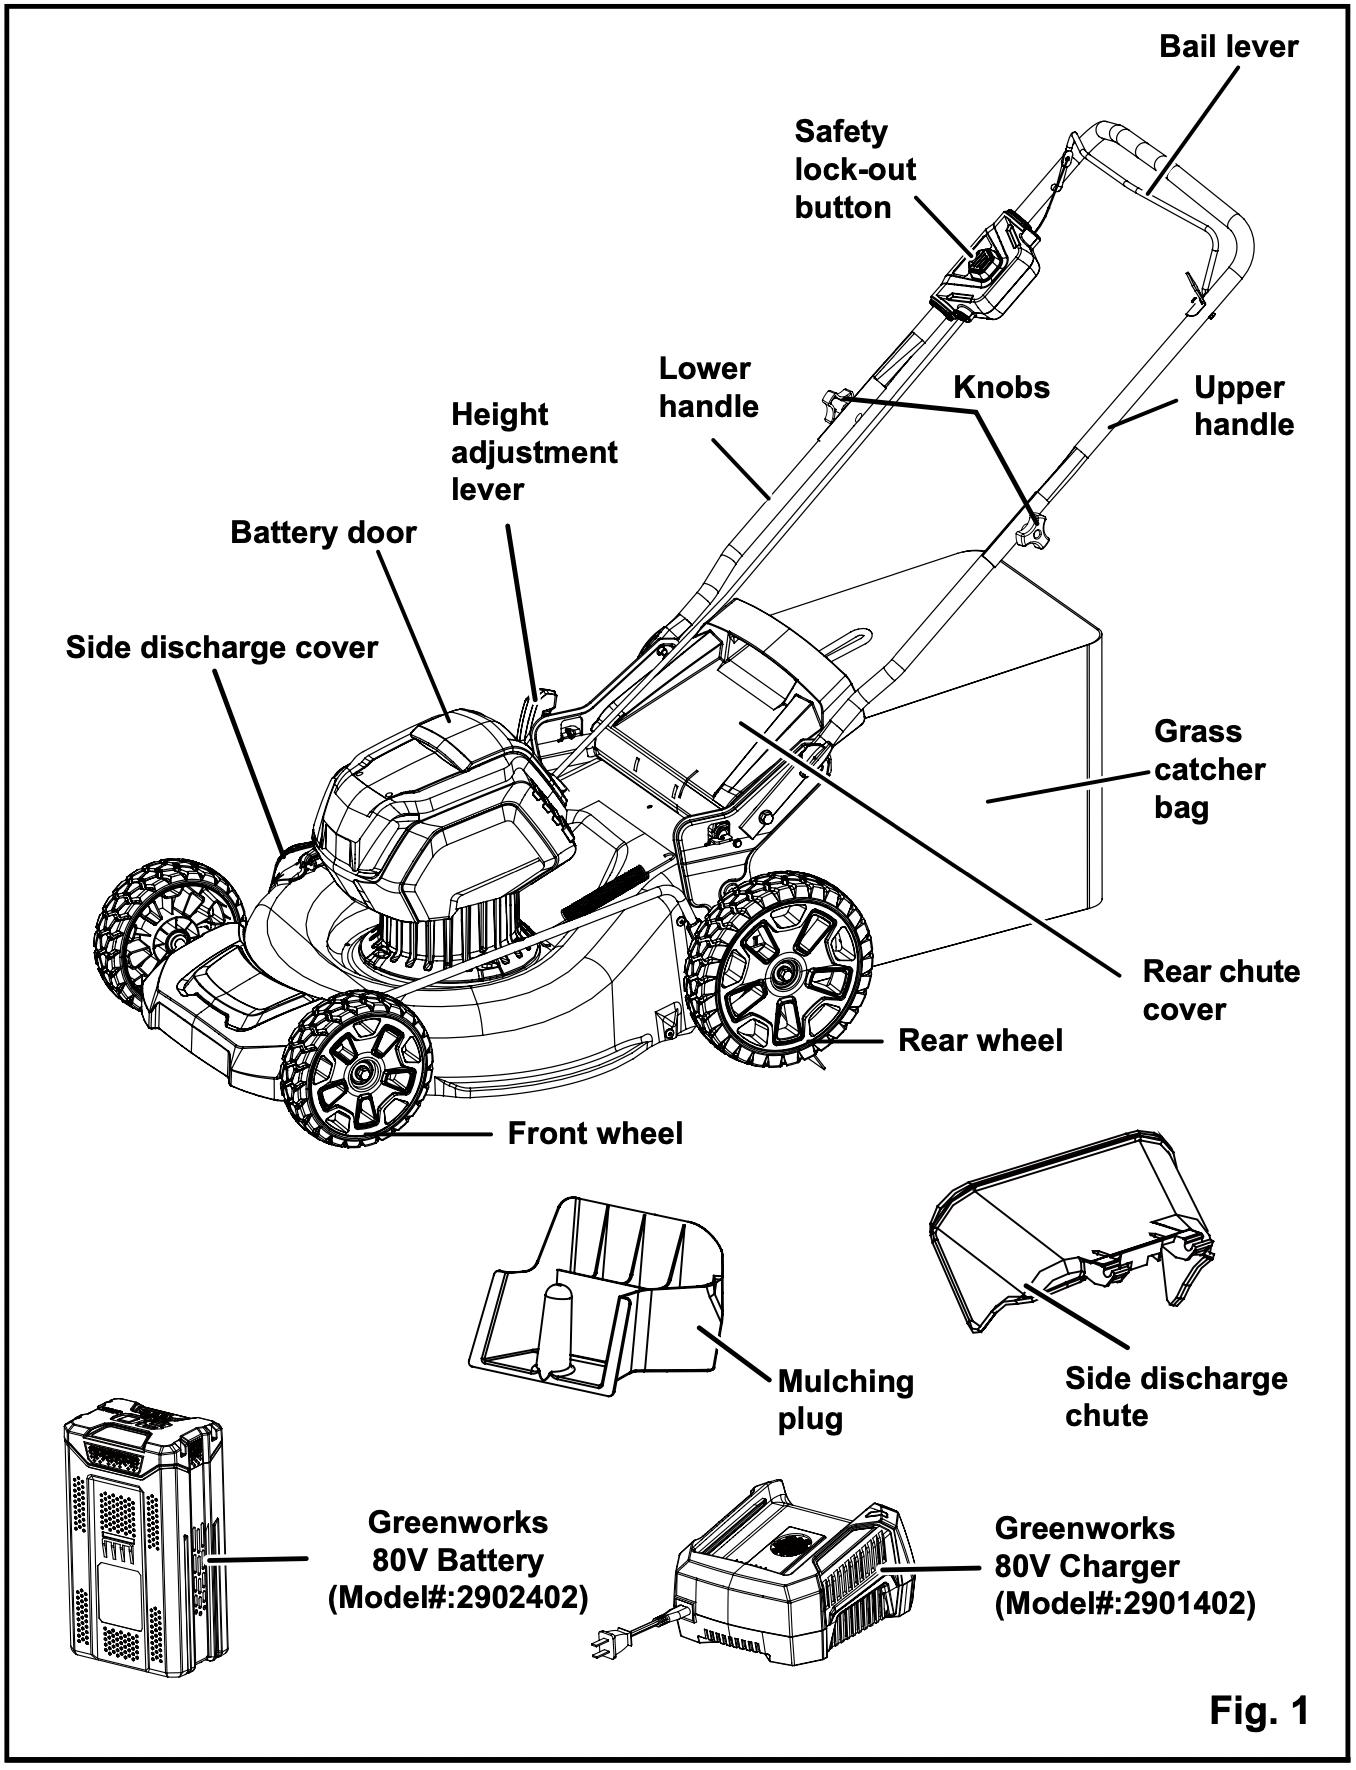
Read this operator's manual and safety rules before operating your lawn mower. Compare the illustration in Figure 1 to your lawn mower in order to familiarize yourself with the location of various controls and adjustments. Save this manual for future reference.
ASSEMBLY INSTRUCTIONS
UNPACKING
- Carefully remove the product and any accessories from the box. Make sure that all items listed in the packing list are included.
- Inspect the product carefully to make sure no breakage or damage occurred during shipping.
- Do not discard the packing material until you have carefully inspected and satisfactorily operated the product.
- If any parts are damaged or missing, please call 1 (855) 345-3934 for assistance.
PACKING LIST
- Lawn mower
- Knobs x 2
- Bolts x 2
- Mulching plug
- Grass catcher bag
- Side discharge chute
- 80V Battery
- 80V Charger
- Owner’s Manual
WARNING: If any parts are damaged or missing do not operate this product until the parts are replaced. Using a product with damaged or missing parts could result in serious personal injury.
WARNING: Do not attempt to modify this product or create accessories not recommended for use with this product. Any such alteration or moddification is misuse and could result in a hazardous condition leading to possible serious personal injury.
WARNING: Do not insert battery until assembly is complete and you are ready to mow. Failure to comply could result in accidental starting and possible serious personal injury.
WARNING: To prevent accidental starting that could cause serious personal injury, always remove the battery pack from the product when assembling parts.
WARNING: Never operate the mower without the proper safety devices in place and working. Never operate the mower with damaged safety devices. Operation of this product with damaged or missing parts could result in serious personal injury.
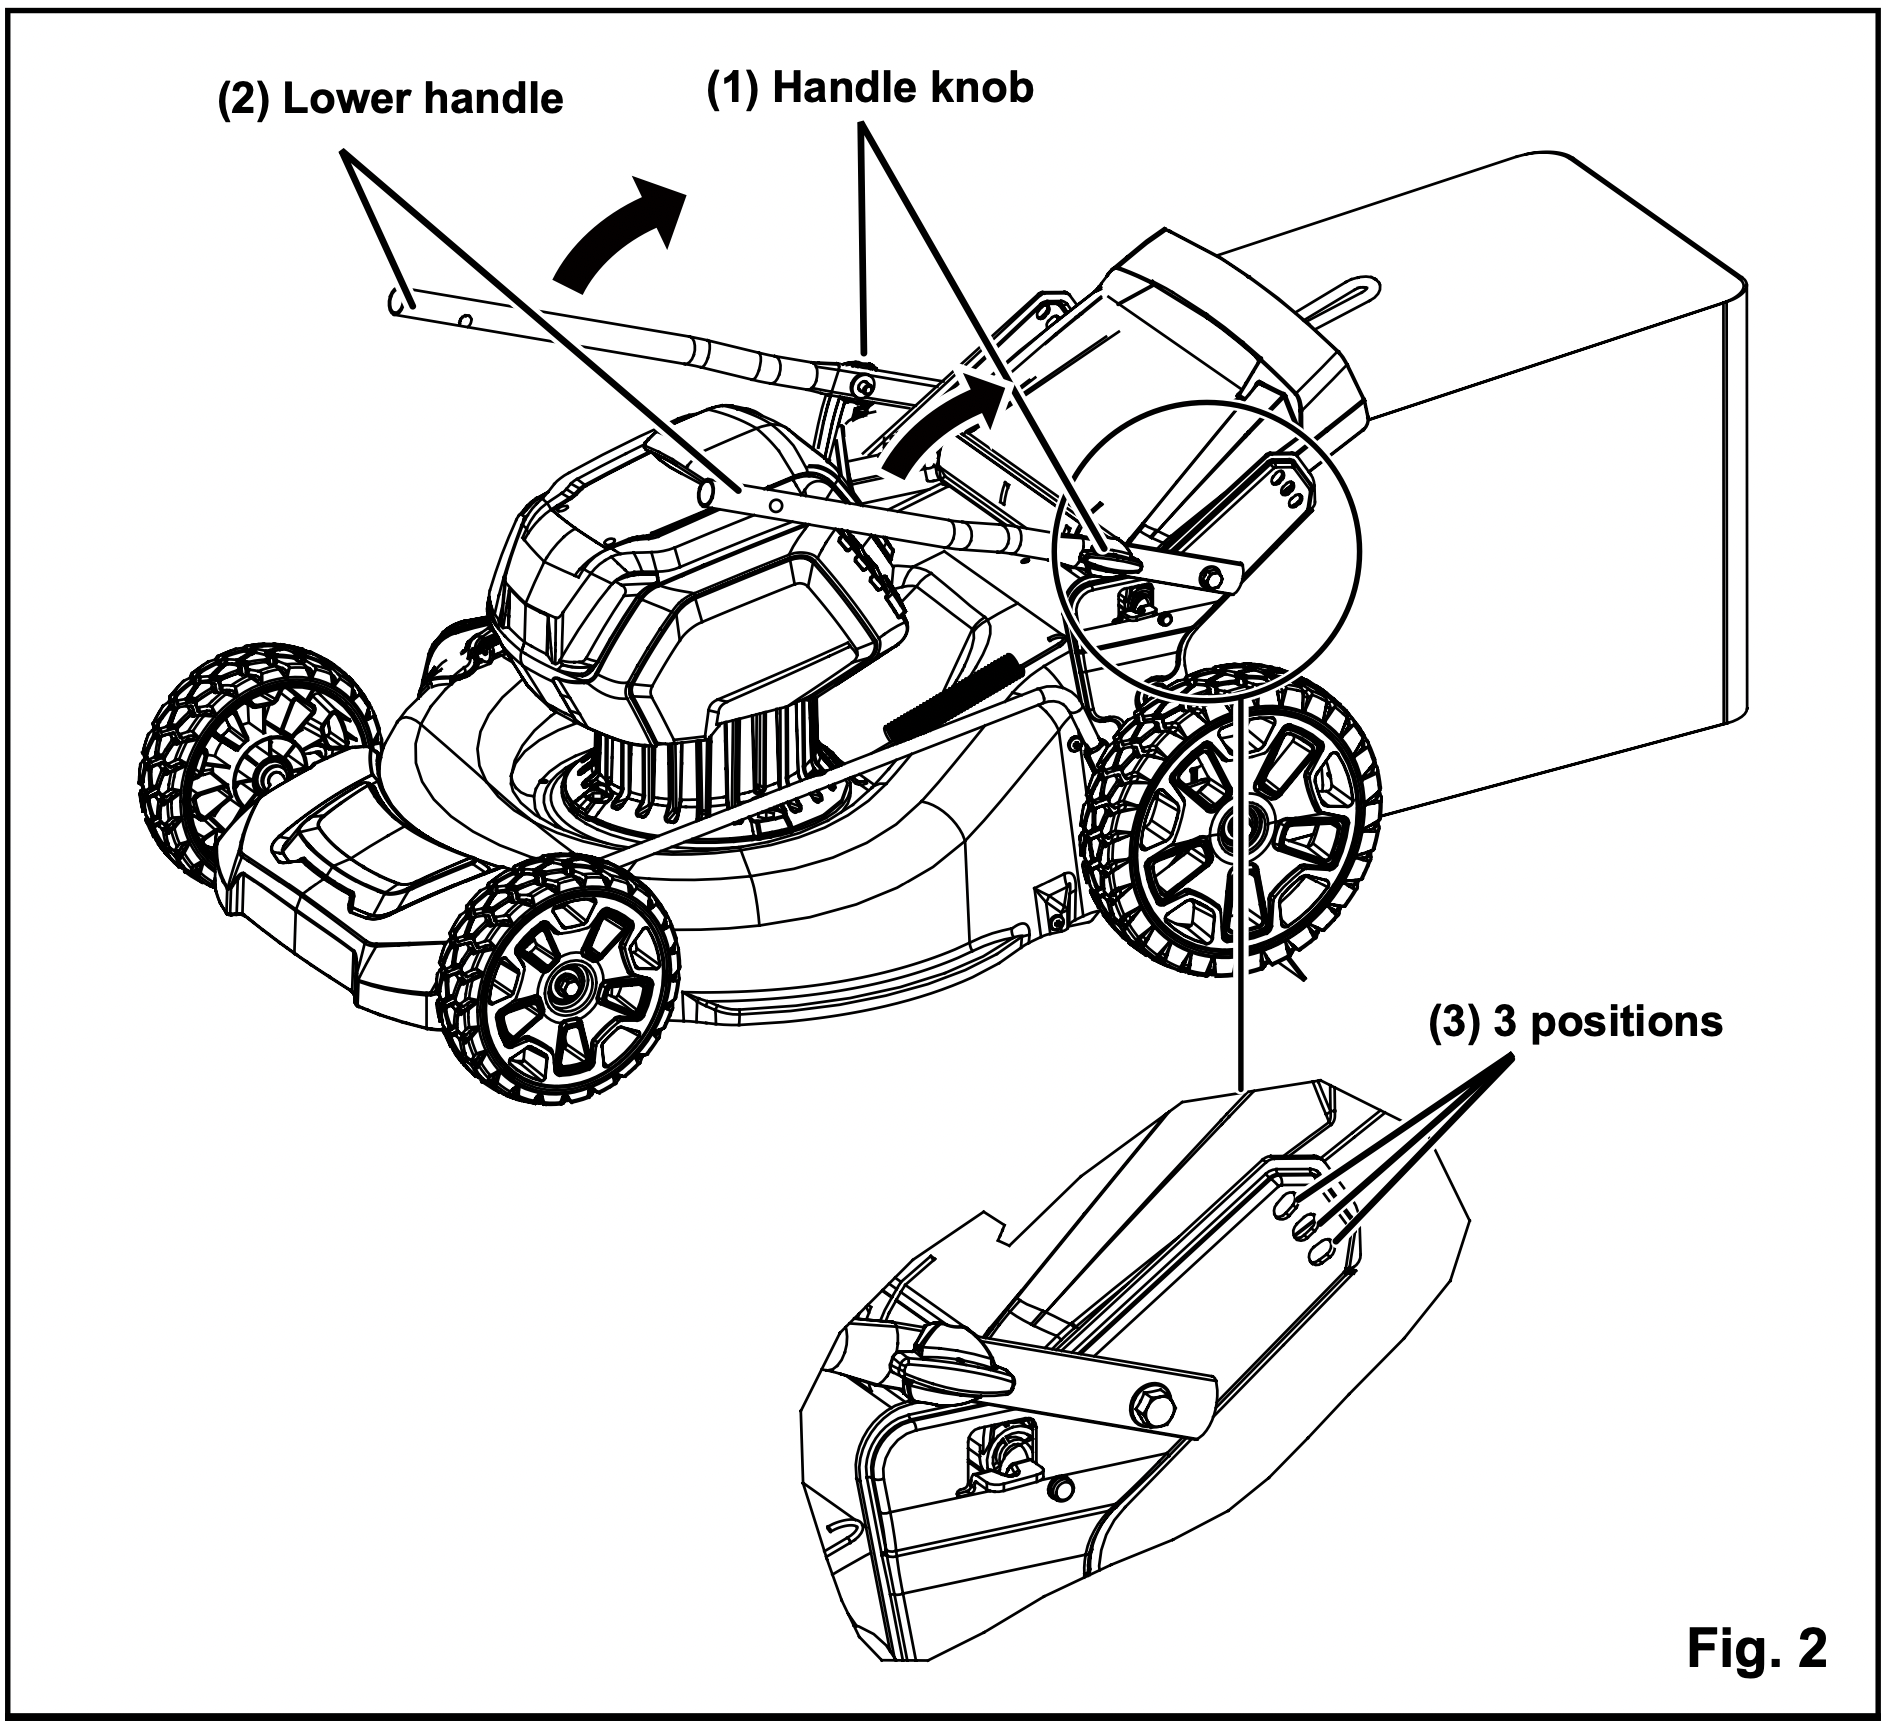
UNFOLDING AND ADJUSTING LOWER HANDLE (See Figure 2)
WARNING: Folding or unfolding the handle improperly can damage the cables, causing an unsafe operating condition.
- Do not damage the cables when folding or unfolding the handle.
- If a cable is damaged, contact an Authorized Service Dealer.
Pull and rotate the handle knobs (1) 90° on both sides to loosen the lower handles (2) on both sides.
Move the lower handles to the operating position. You may raise or lower the handle to a position comfortable for you. There are 3 positions (3) for you to choose. Release the handle knobs to lock the lower handle into position.
Note: Ensure both sides are set at the same position for proper assembly.
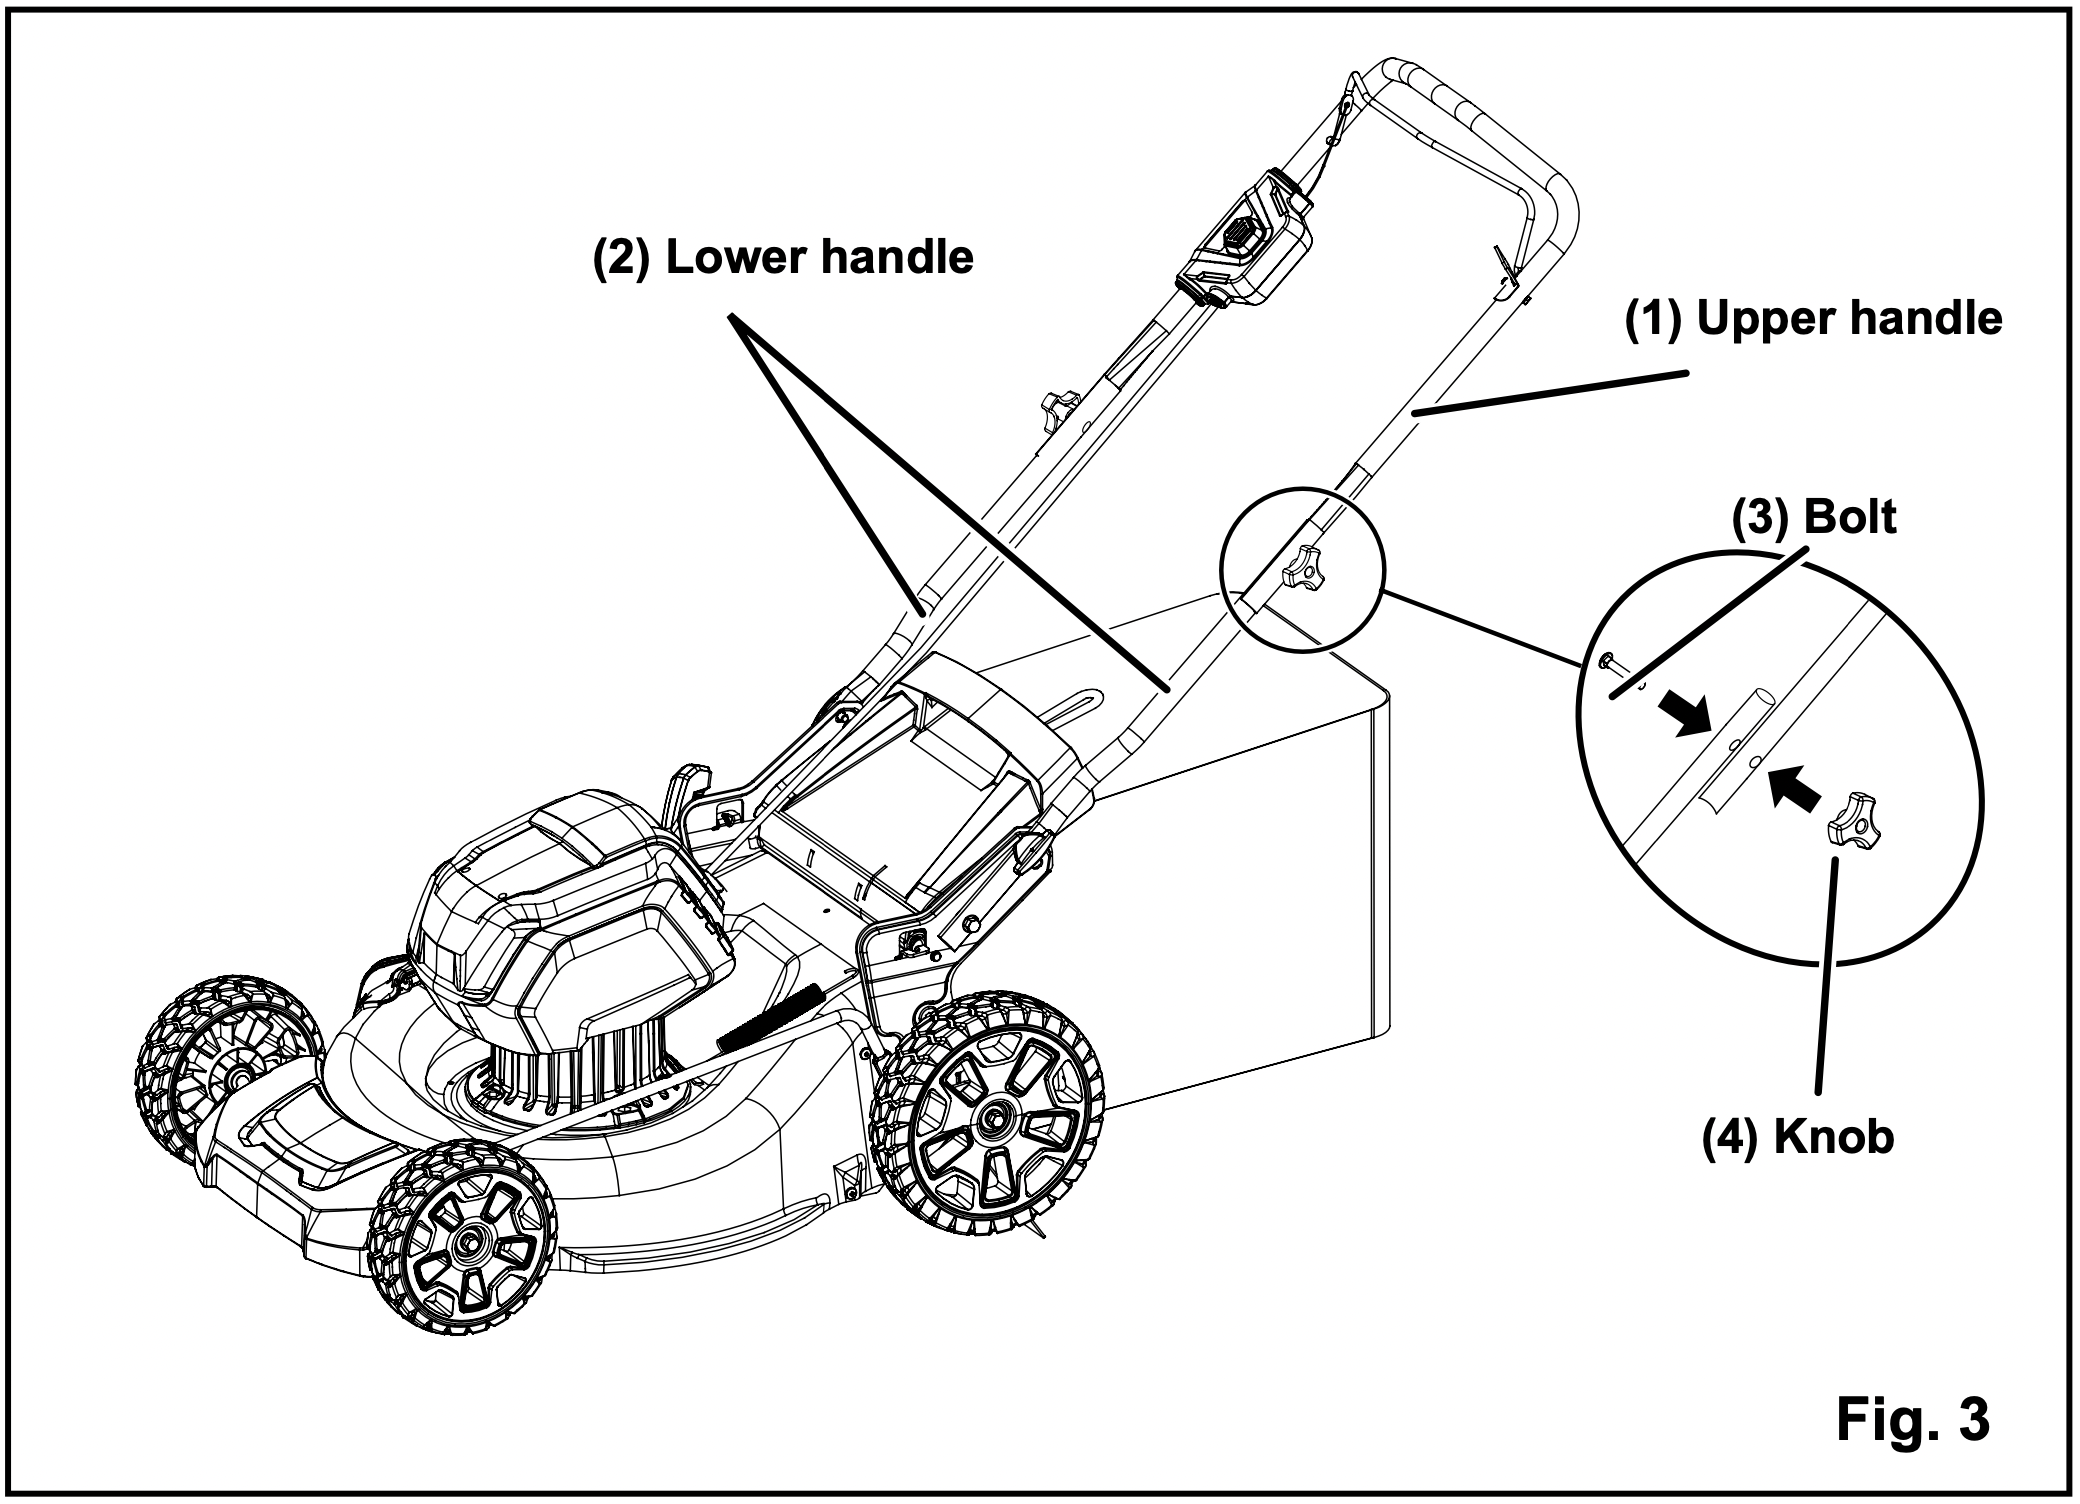
INSTALLING THE UPPER HANDLE (See Figure 3)
- Align the mounting holes on the upper handle (1) and the lower handle (2). Insert the carriage bolts (3) and use the knobs (4) to tighten them. Repeat the operation on the other side.
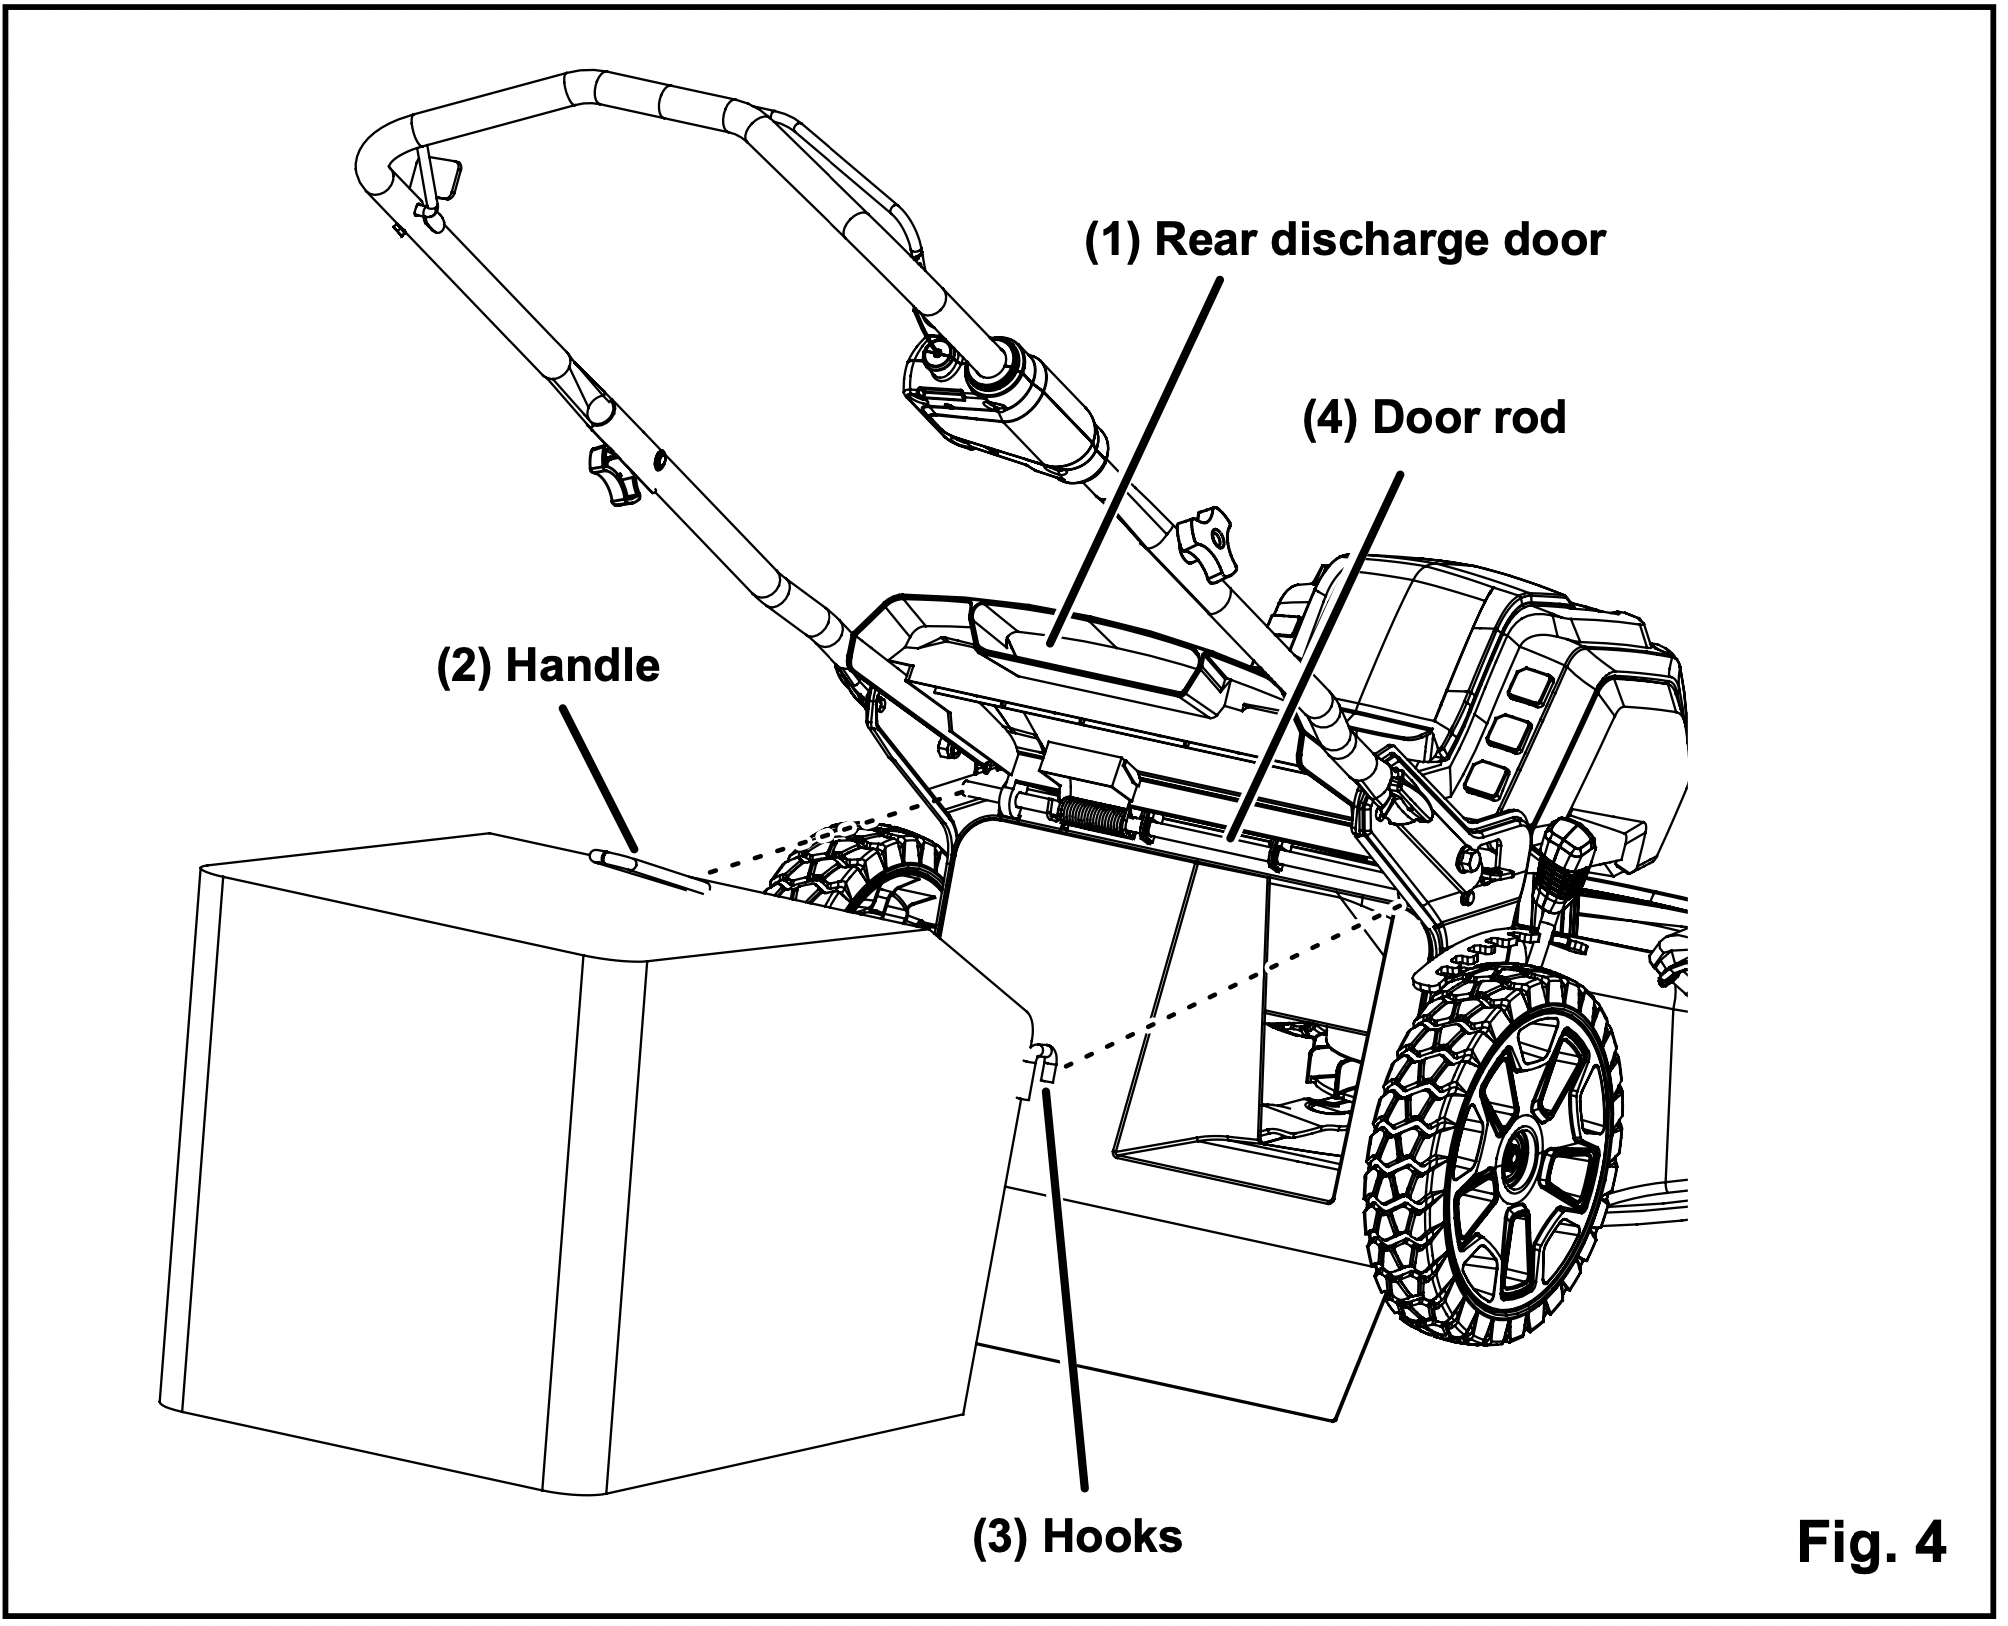
INSTALLING THE GRASS CATCHER BAG (See Figure 4)
- Lift the rear discharge door (1).
- Lift the grass catcher by its handle (2) and place under the rear discharge door so that the hooks (3) on the grass catcher are seated on the door rod (4).
- Release the rear discharge door. When installed correctly, the hooks on the grass catcher will extend through the openings on the rear discharge door.
NOTE: When using the grass catcher, do not install either the side discharge deflector or the mulching plug.
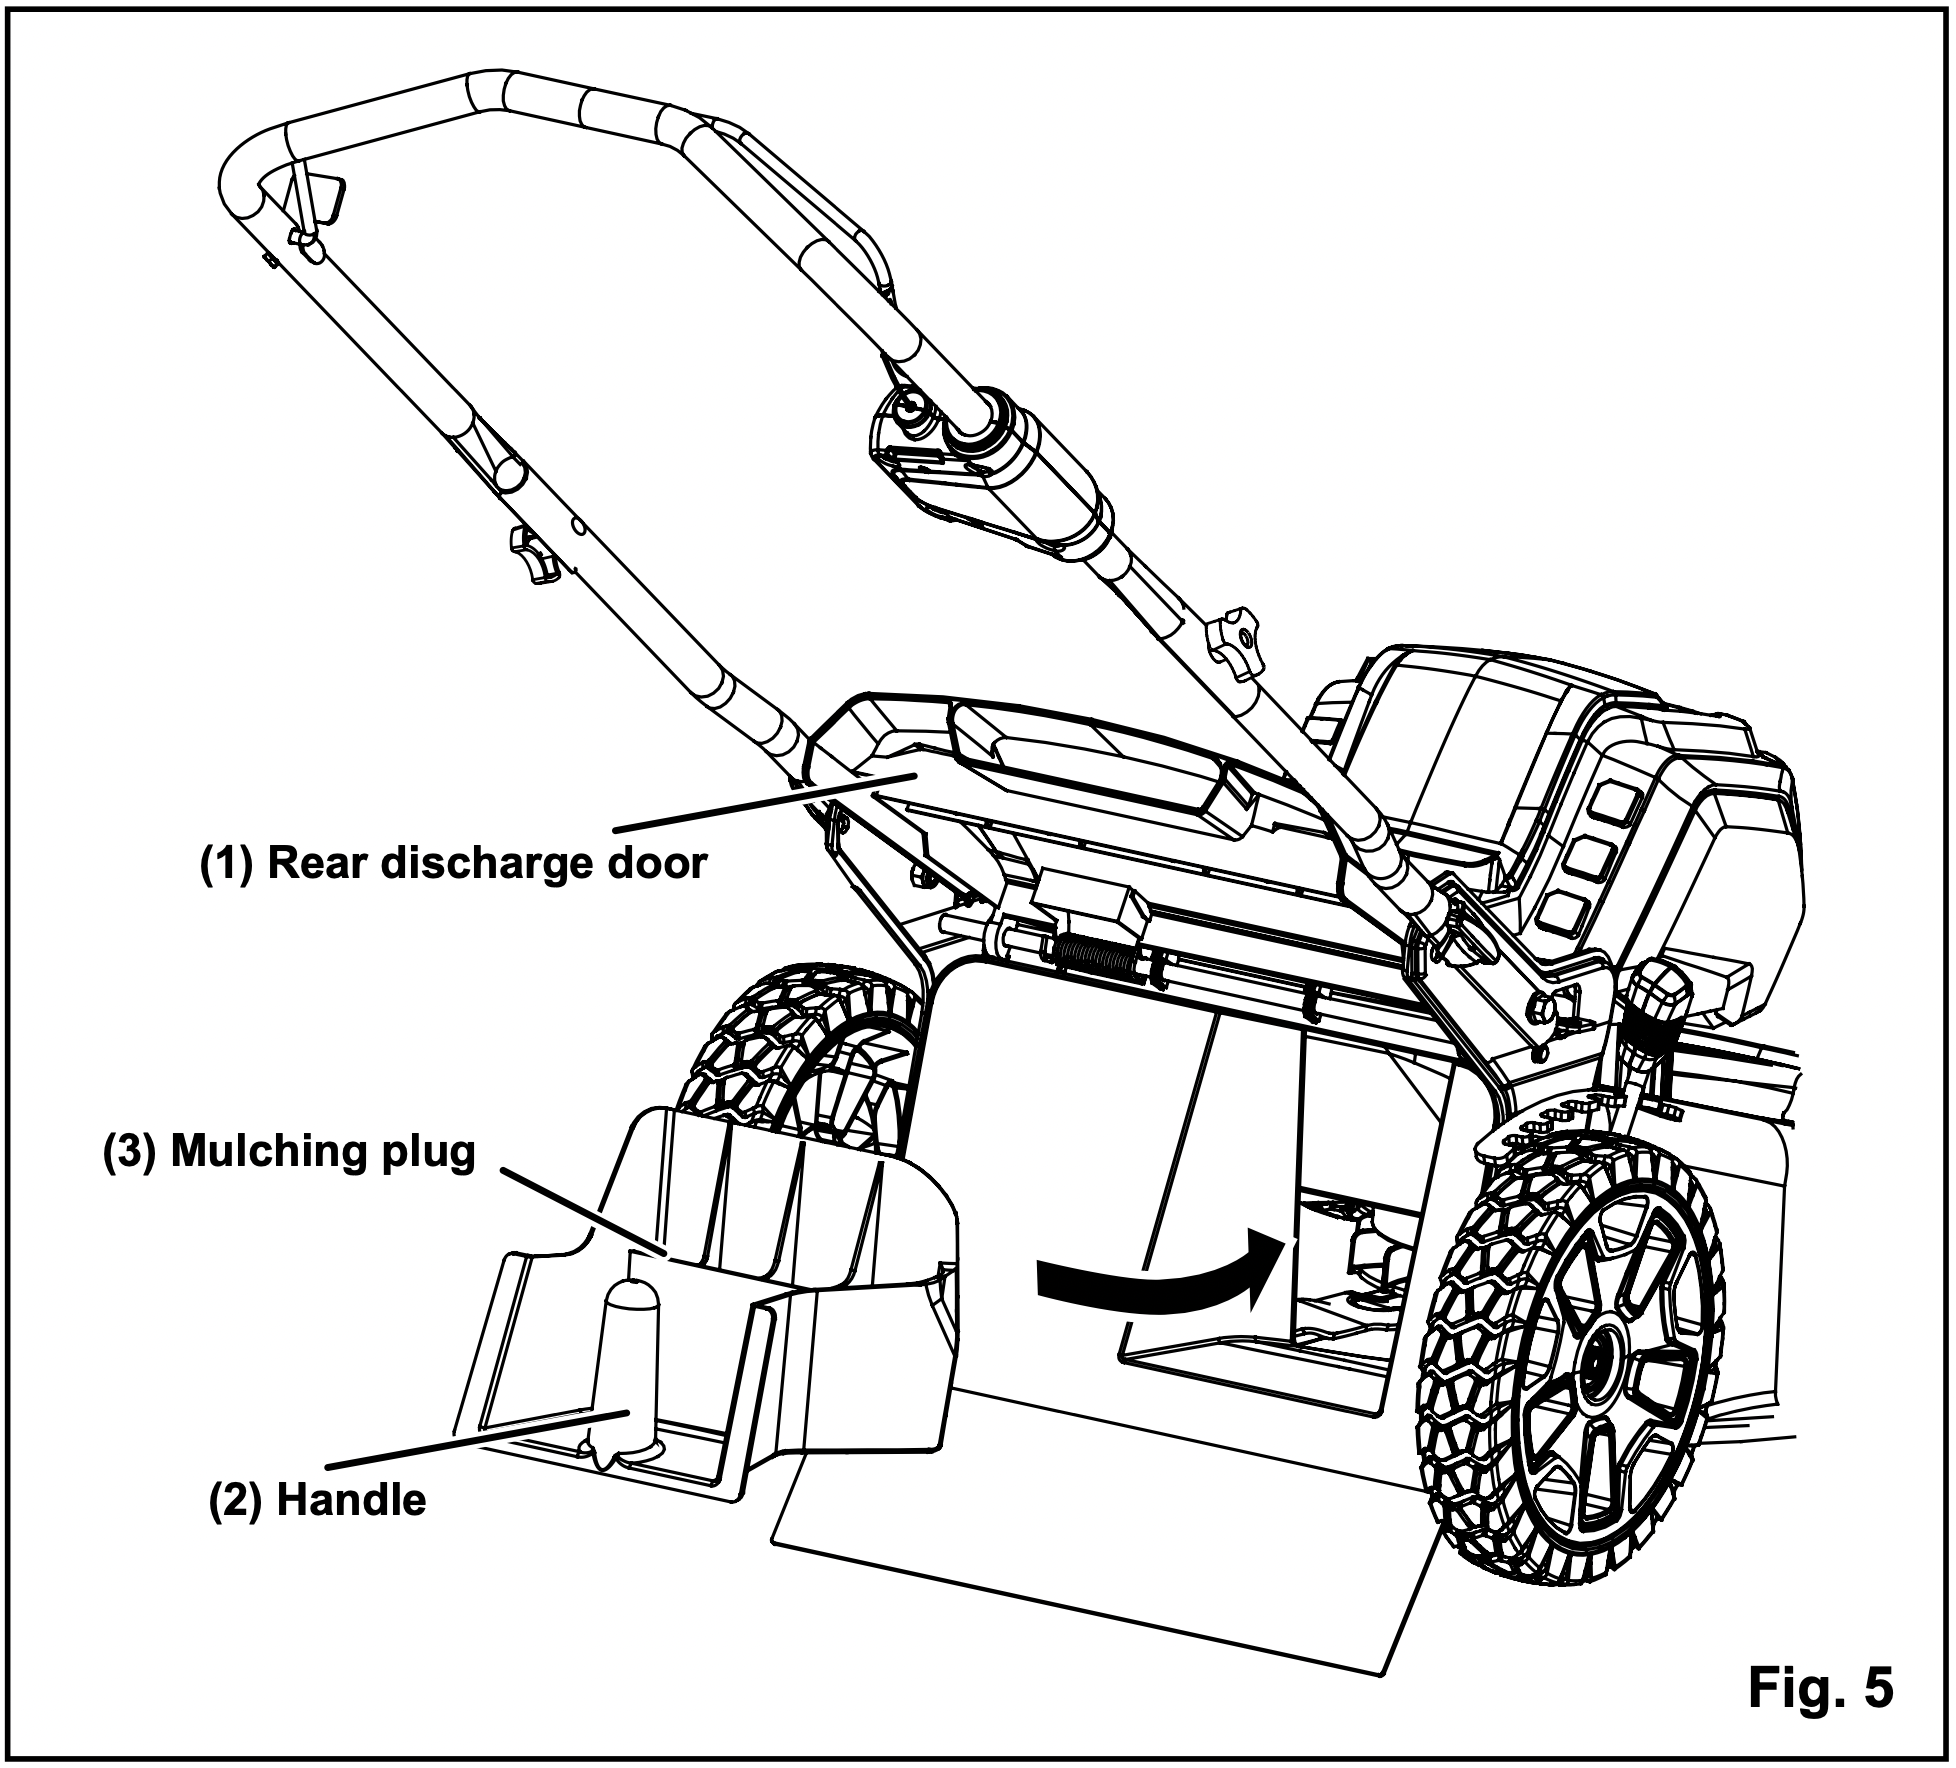
INSTALLING/REMOVING THE MULCHING PLUG (See Figure 5)
- To remove the mulching plug, lift the rear discharge door (1).
- Grasp the handle (2) of the mulching plug and pull the mulching plug out using the handle.
- The mulching plug (3) is inserted at an angle, so it requires some force to remove it.
- The mulching plug must be removed in order to install the grass catcher bag.
- The mulching plug must be re-installed when the grass catcher bag is removed.
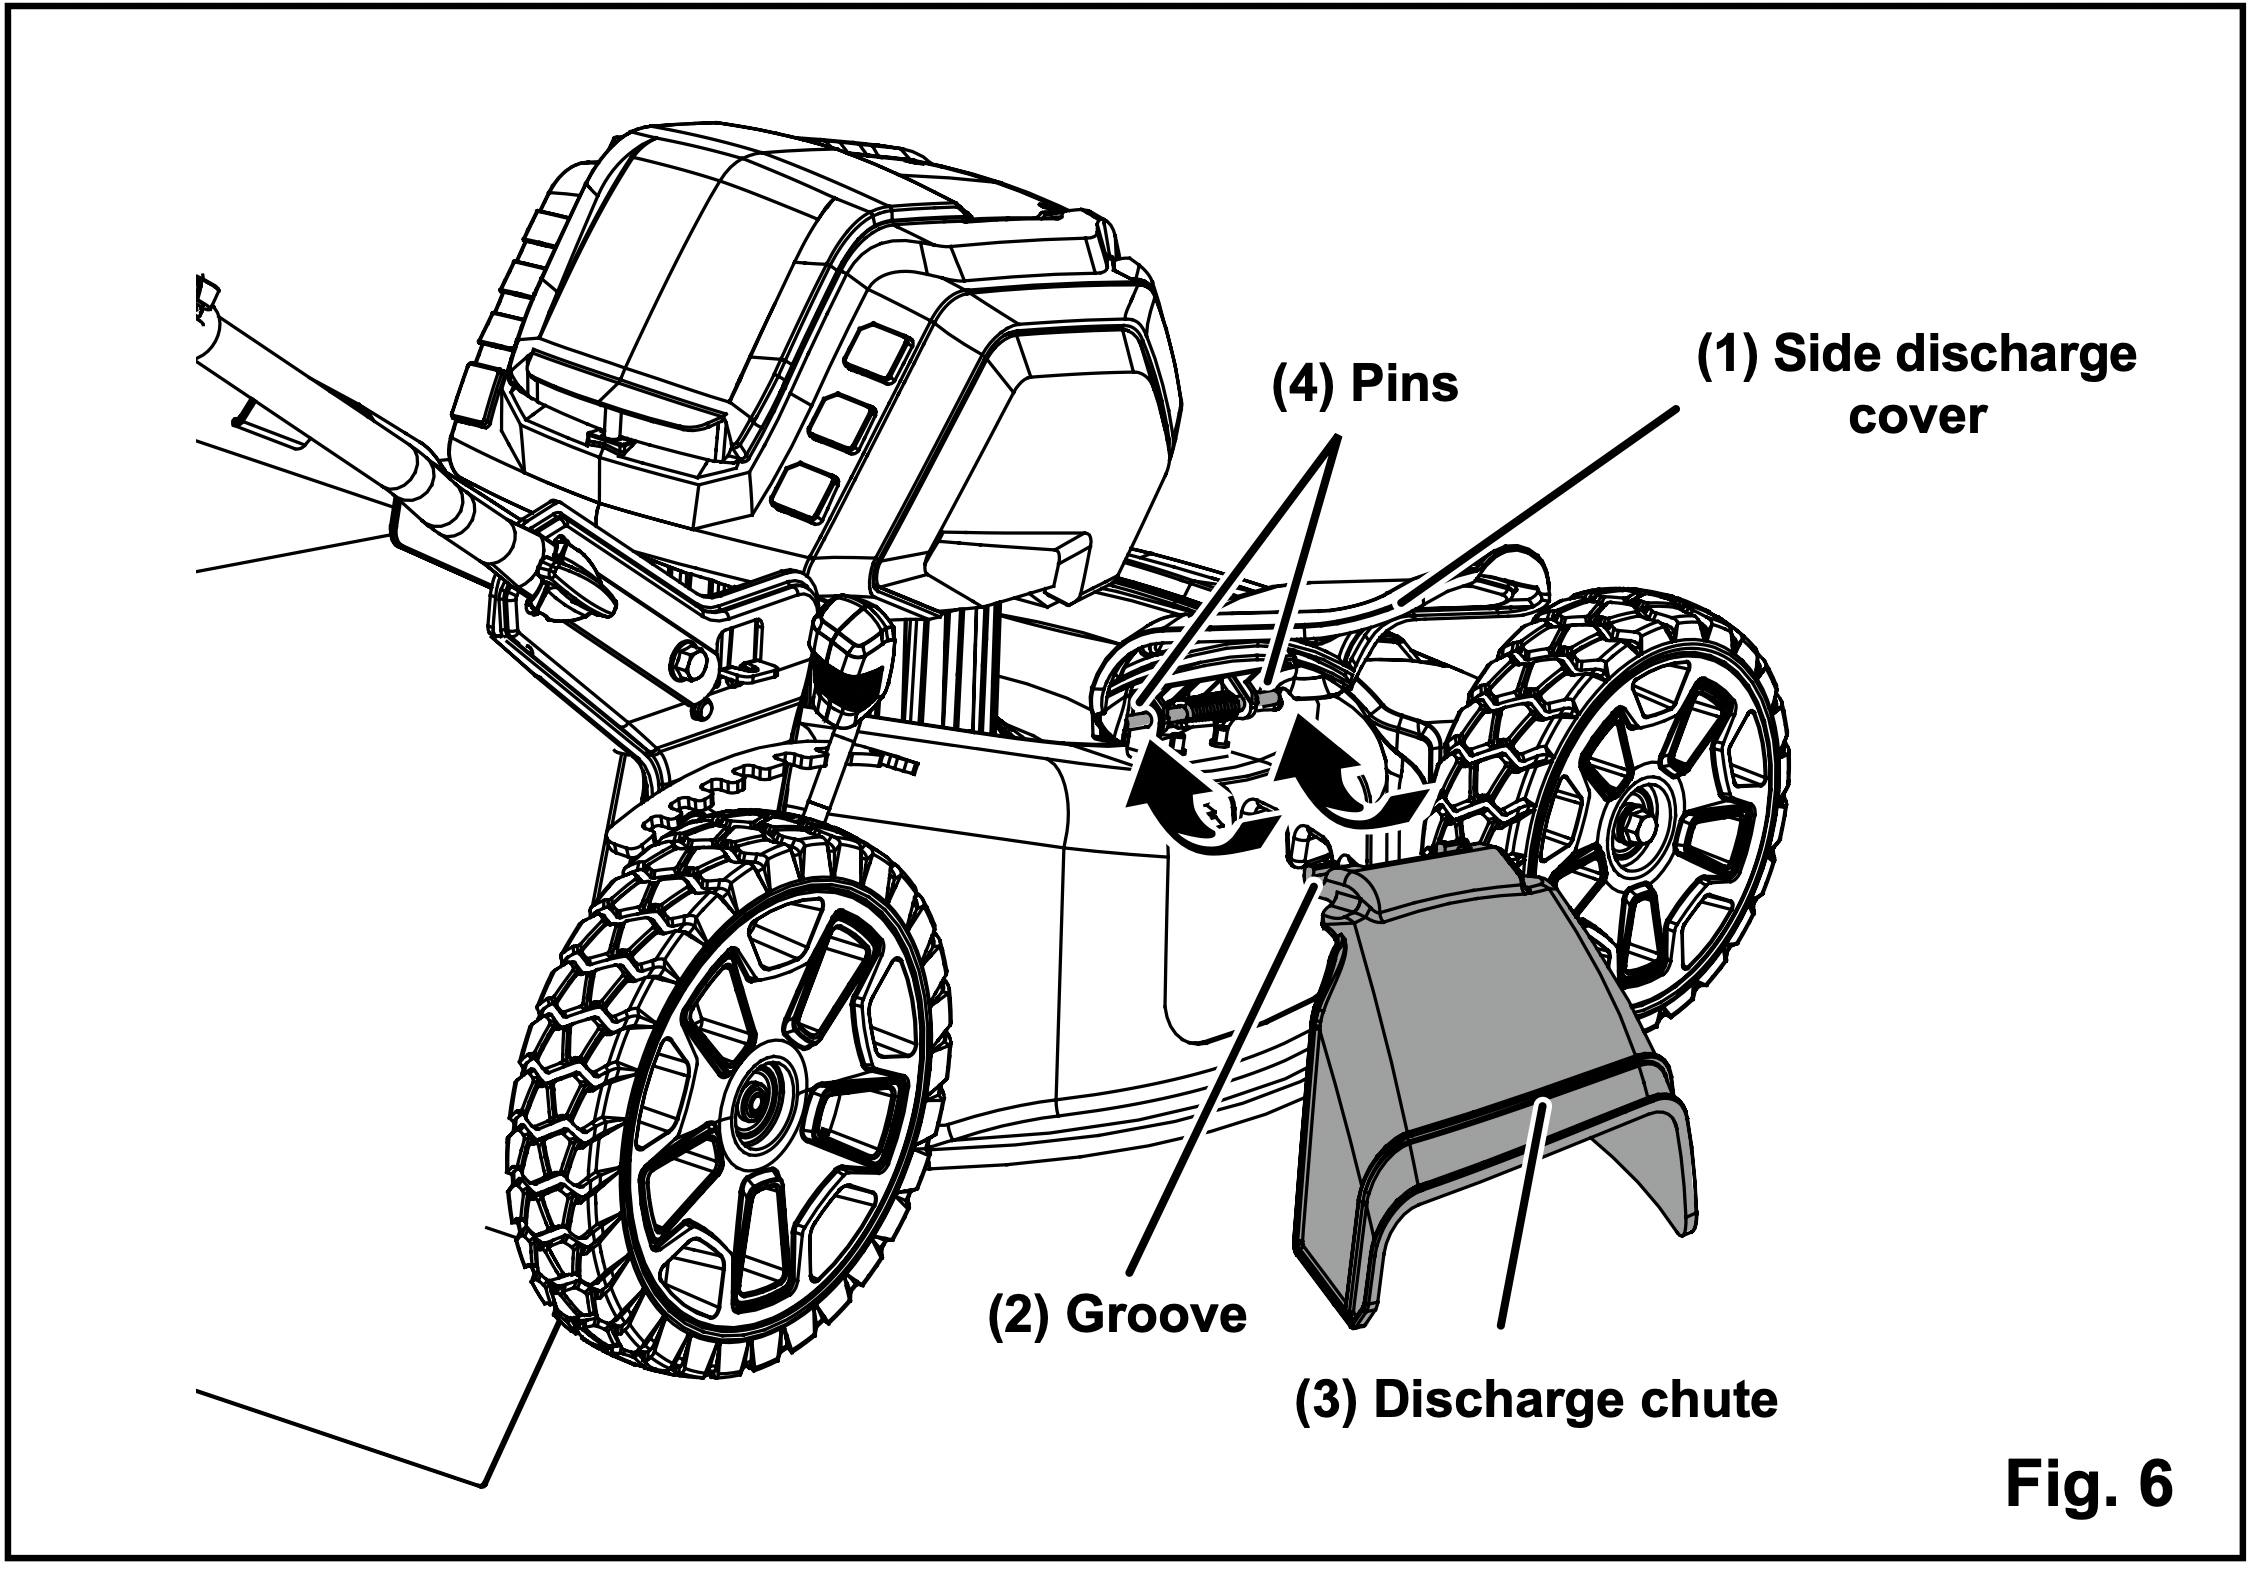
INSTALLING SIDE DISCHARGE CHUTE (See Figure 6)
- Lift the side discharge cover (1).
- Align the grooves (2) on the discharge chute (3) with the pins (4) on the underside of the discharge cover (1).
- Lower the discharge chute until the hooks on the mower deck are secured in the openings in the discharge chute.
- Release the side discharge cover.
TO INSTALL BATTERY PACK (See Figure 7)
- Lift and hold up the battery door (1).
- Align the battery (2) with the mower’s battery port.
- Make sure the battery release button (3) snaps in place and that battery is fully seated and secure in the mower before beginning operation.
- If the machine is not going to be used immediately, remove the battery.
- Close the door.
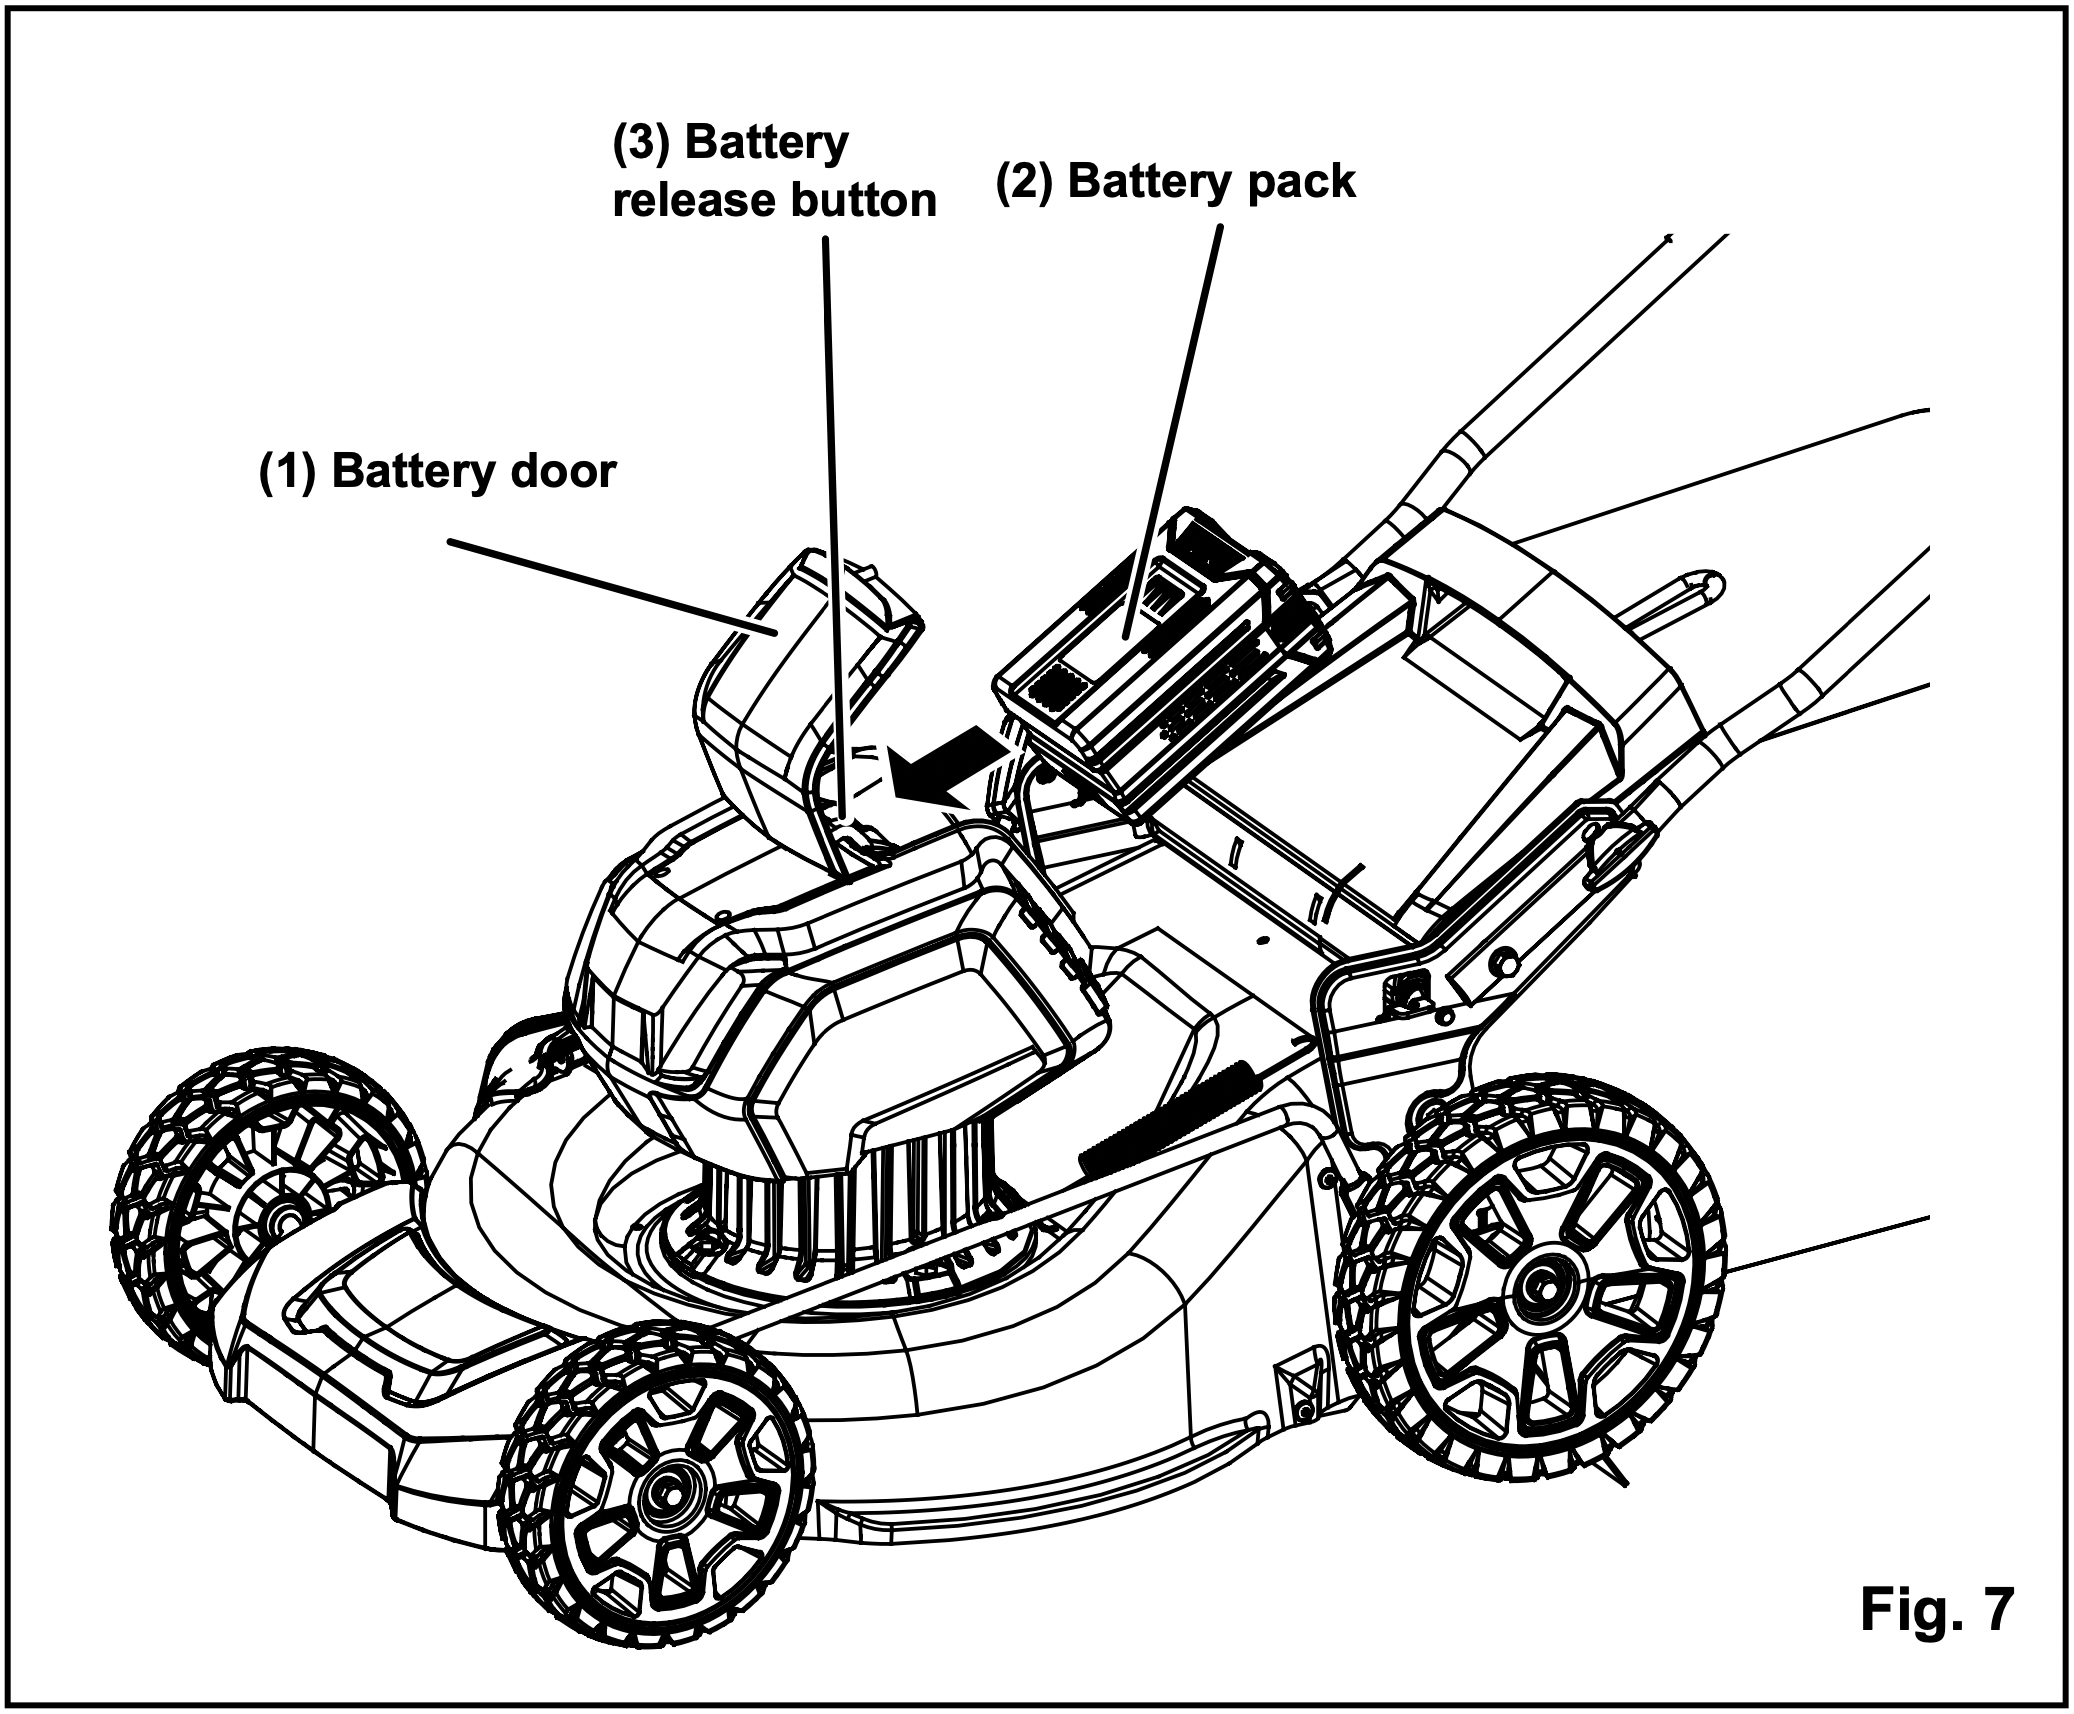
TO REMOVE BATTERY PACK (See Figure 7)
- Release the bail lever to stop the mower.
- Open the battery door.
- Press the battery release button (3) on the mower. This will cause the battery to raise out of the tool slightly.
- Remove battery from the mower.
OPERATING YOUR LAWN MOWER
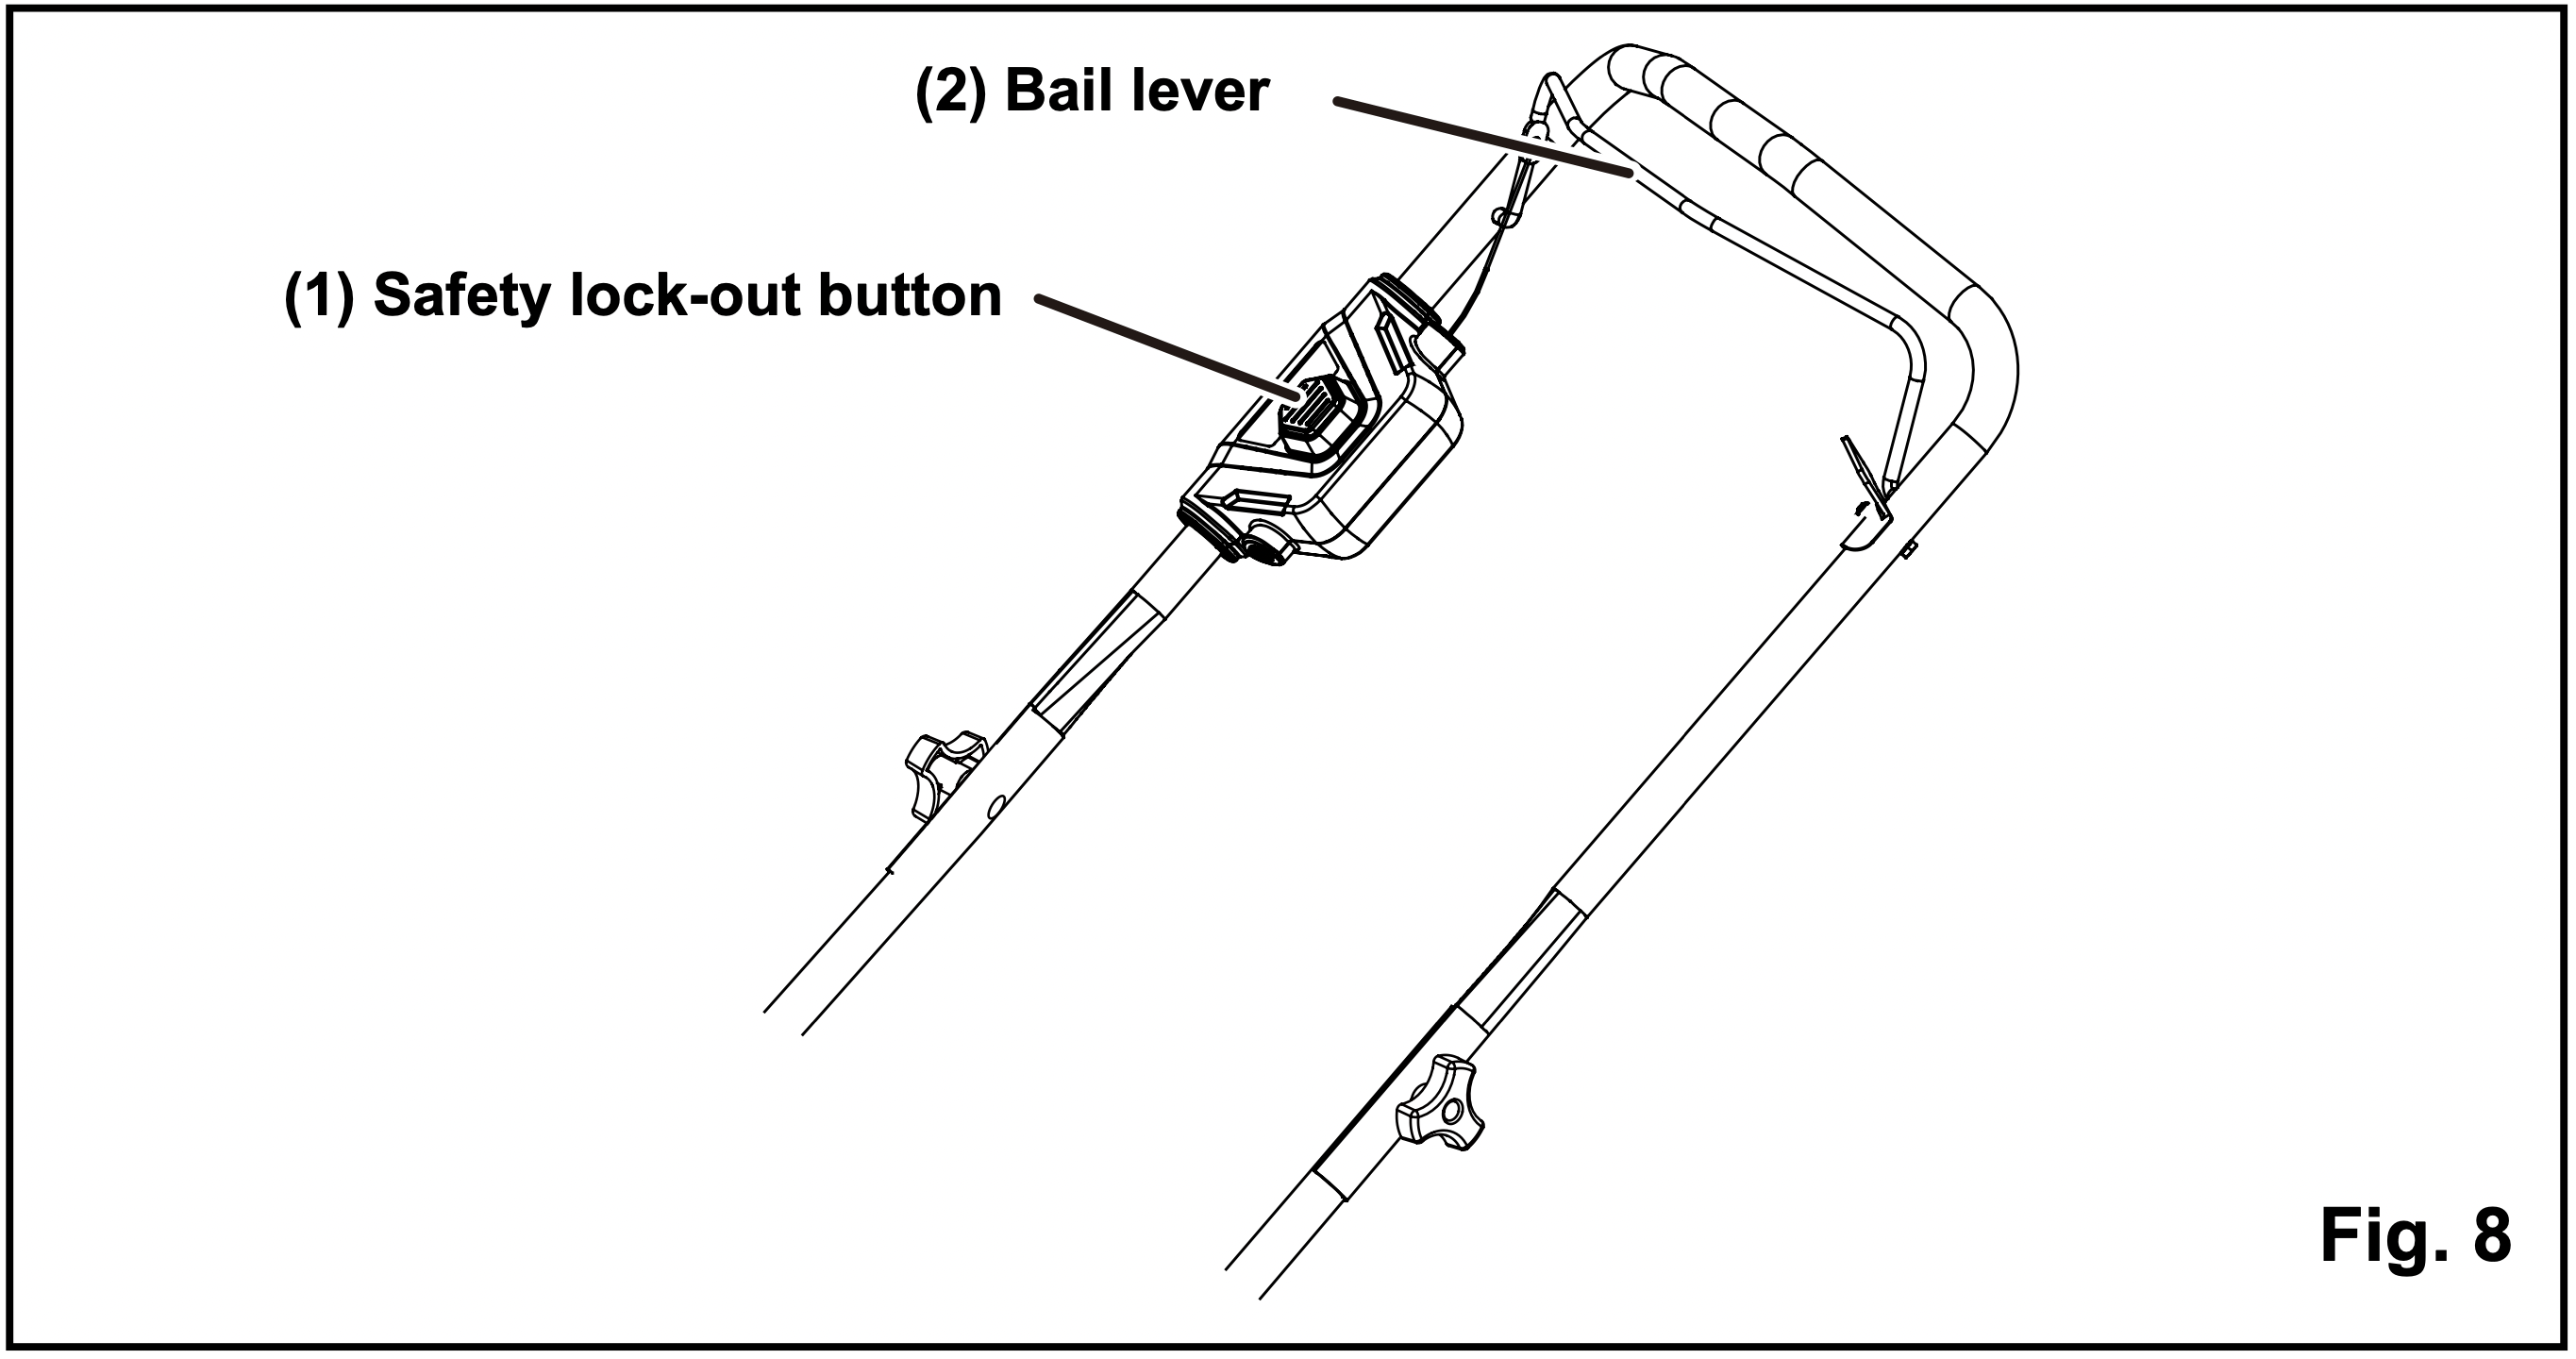
STARTING/STOPPING THE MOWER (See Figure 8)
To start the motor:
- Open the battery door.
- Insert the battery.
- Press and hold the safety lock-out button (1).
- Pull the bail lever (2) upward to the handle to start the mower and release the button.
To stop the motor:
CAUTION: Do not attempt to override the operation of the safety lock-out button or bail lever.
WARNING: The operation of any mower can result in foreign objects being thrown into the eyes, which can cause severe eye damage. Always wear safety glasses while operating the mower and while performing any adjustments or repairs.
WARNING: Ensure that other people and pets remain at least 100 feet (30 m) away when the mower is in use.
INSPECT THE CUTTING AREA. Remove all stones, sticks, wire, bones, and other debris that might be thrown by the rotating blades.
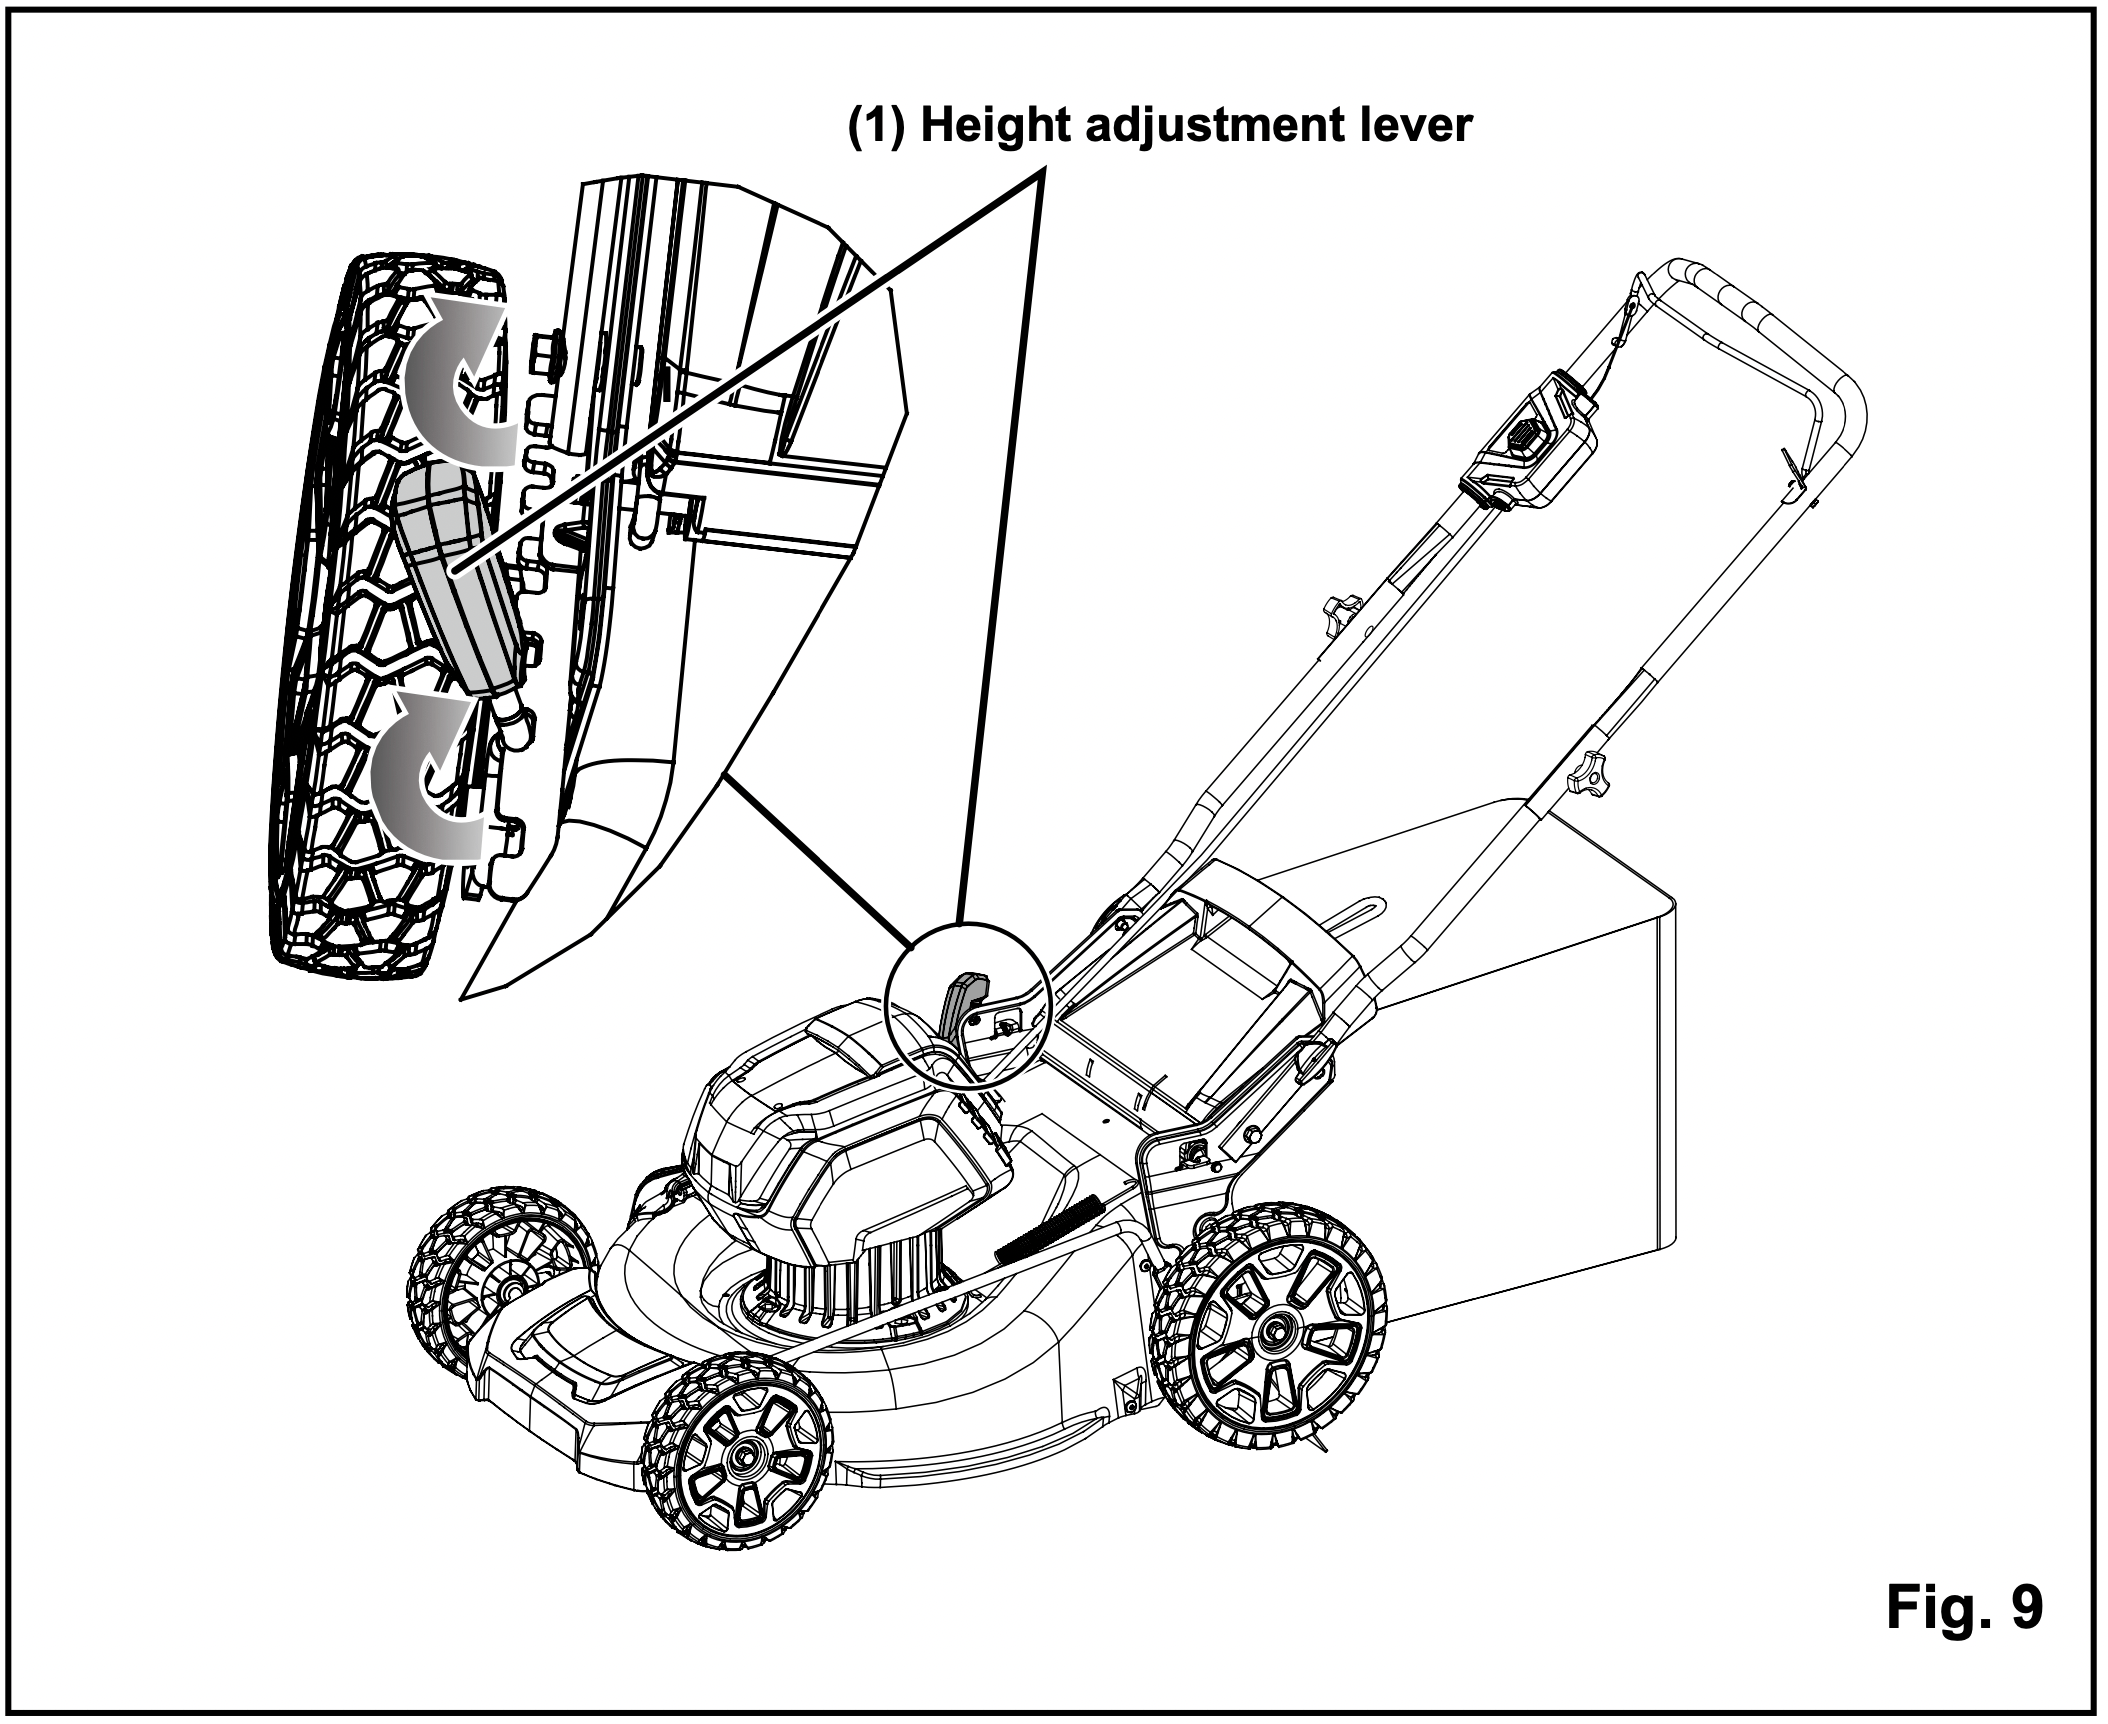
CUTTING HEIGHT ADJUSTMENT (See Figure 9)
When shipped, the wheels on the mower are set to a low-cutting position. Before using the mower for the first time, raise the cutting position to the height best suited for your lawn. The average lawn should be between 1 1/2" to 2" (3.8 to 5 cm) during cool months and between 2" and 3 1/2" (5 cm to 8.3 cm) during hot months.
To adjust the blade height:
- To raise the blade height, grasp the height adjustment lever (1) and move it toward the back of the mower.
- To lower the blade height, grasp the height adjustment lever (1) and move it toward the front of the mower.
SLOPE GAUGE (See Figure 10)
WARNING: Slopes are a major factor related to accidents involving slips and falls, which can result in severe injury. Operating the mower on a slope requires extra caution. If you feel uneasy on a slope, do not mow it. for your safety, use the slope gauge that is included as part of this manual to measure slopes before operating this unit on a sloped or hilly area.
- Mow across the face of a slope, and never up and down. Exercise extreme caution when changing direction on a slope.
- Watch for holes, ruts, rocks, hidden objects, or bumps that may cause a slip or a trip. Tall grass can hide obstacles.
- Always be sure of your footing. If you feel like you are losing your balance, release the blade/ motor control handle immediately. The blade will stop rotating within 3 seconds.
- Do not mow near drop-offs, ditches, or embankments, because you could lose your footing or balance.
- Do not mow a slope that has an angle of greater than 15°, as determined using the slope gauge.
- Do not mow wet or damp grass. Unstable footing can cause slipping.
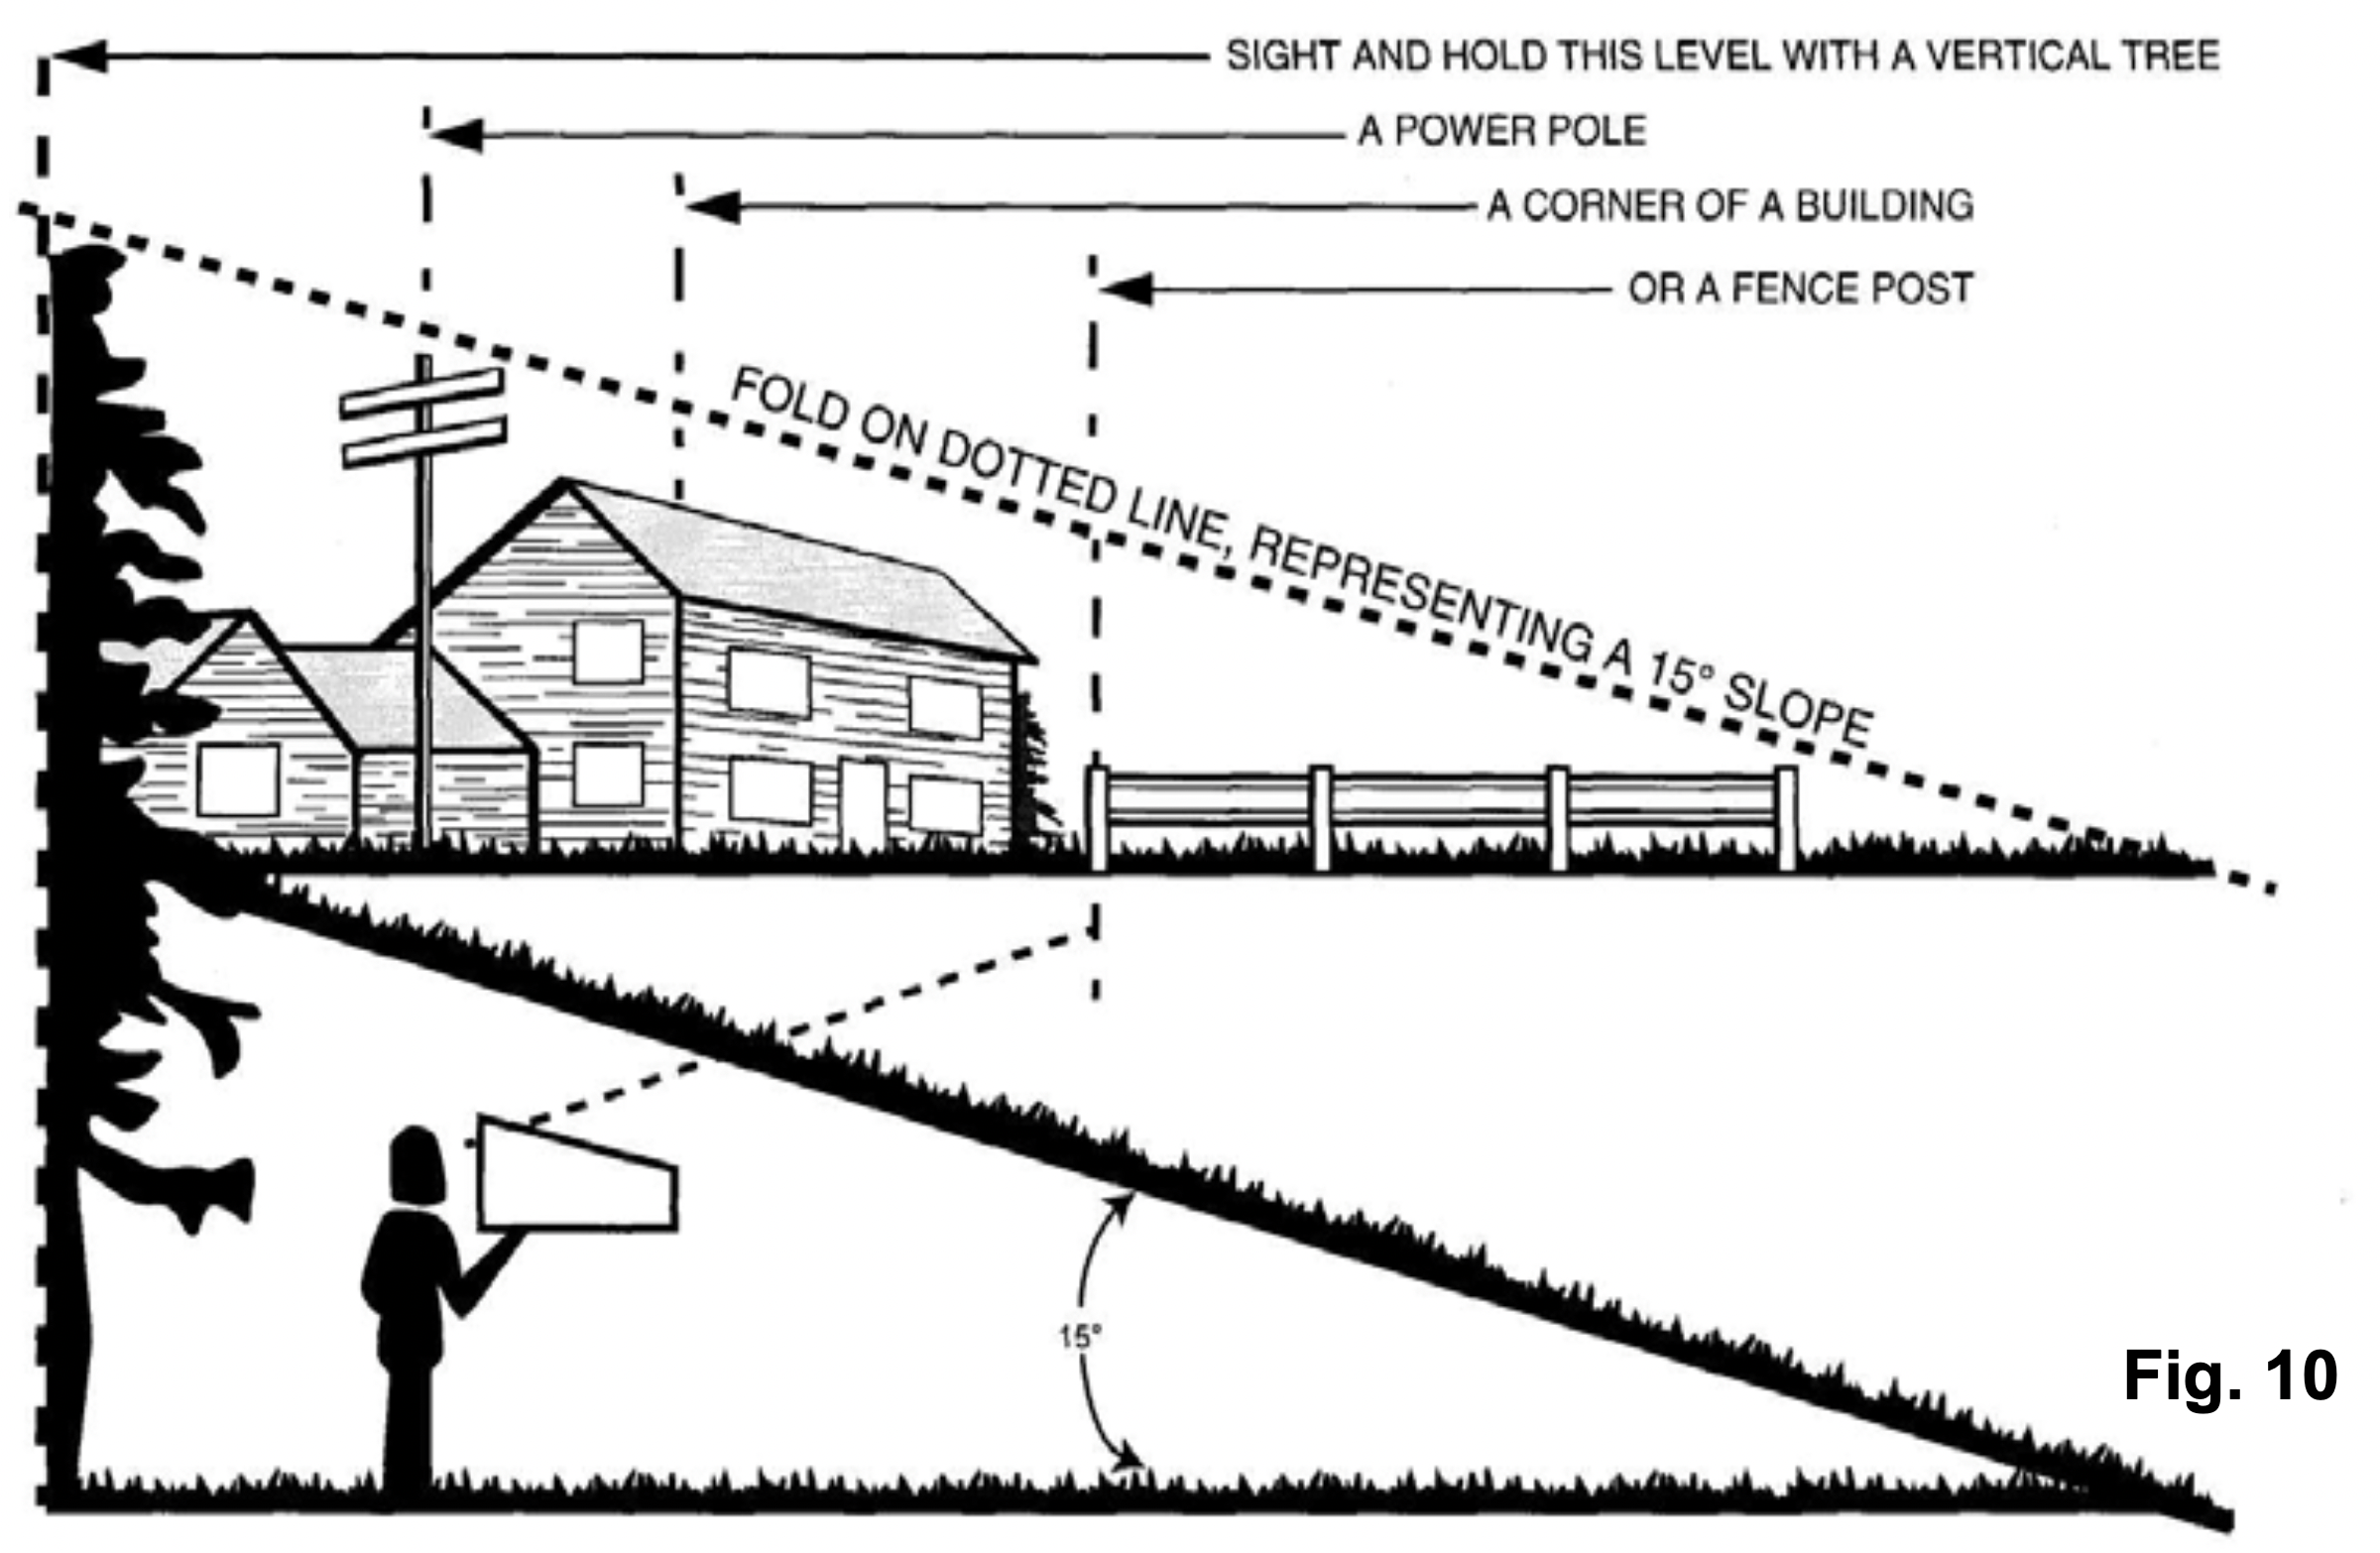
WARNING: Do not mow a slope that has an angle of greater than 15° (a rise of approximately 2 1/2 feet [.75 m] every 10 feet [3 m]). Mow across the face of a slope, and never up and down.
MOWING TIPS
NOTE: A sharp blade will greatly enhance the performance of the mower, especially when cutting high grass. Be sure to check the blade and to sharpen it at least once per year, as described in the Maintenance section.
- Verify that the lawn is free of stones, sticks, wires, and other objects that could damage the blades or the motor. These objects could be accidentally thrown by the mower in any direction, and could cause serious personal injury to the operator and to others. In order to prevent electric shock, do not operate the mower in damp or wet conditions.
- Do not mow in circles. Travel back and forth across the lawn.
- When cutting thick grass, reduce walking speed in order to allow for a more effective cut and a proper discharge of the clippings.
- For a healthy lawn, always cut off one-third or less of the total length of the grass. The average lawn should be approximately 1 1/2 to 2” (3.8 to 5 cm) long during cool months, and between 2" to 3 1/4" (5 cm to 8.3 cm) long during hot months. If there is growth, the lawn should be cut in the fall.
MULCHING TIPS
NOTE: INSPECT THE AREA WHERE THE MOWER IS TO BE USED, AND REMOVE ALL STONES, STICKS, WIRE, BONES, AND OTHER DEBRIS THAT MIGHT BE THROWN BY THE ROTATING BLADE.
- Release the bail lever to turn the Mower Off when crossing any graveled area (stones can be thrown by the blade).
- Set mower to the highest cutting height when mowing on uneven ground or in tall weeds.
- For effective mulching, do not cut wet grass, because it tends to stick to the underside of the deck, preventing proper mulching of grass clippings. new or thick grass may require a narrower cut. The ground speed should be adjusted to the condition of the lawn. If mowing has been delayed and the grass has been allowed to grow longer than 4" (10 cm), mow the lawn twice in order to reduce the grass height to a maximum of 3 1/4” (8.3 cm).
- Walk at a steady pace. Overlap the cutting rows. Do not let the grass get too tall. If the grass gets too long, start at the highest cutting position and work down to the desired cutting height.
WARNING: If you strike a foreign object, stop the motor and remove the battery. Thoroughly inspect the mower for any damage. Repair any damage before operating the mower. Excessive vibration of the mower during operation is an indication of damage. Thoroughly inspect the mower and repair any damage before operating the mower.
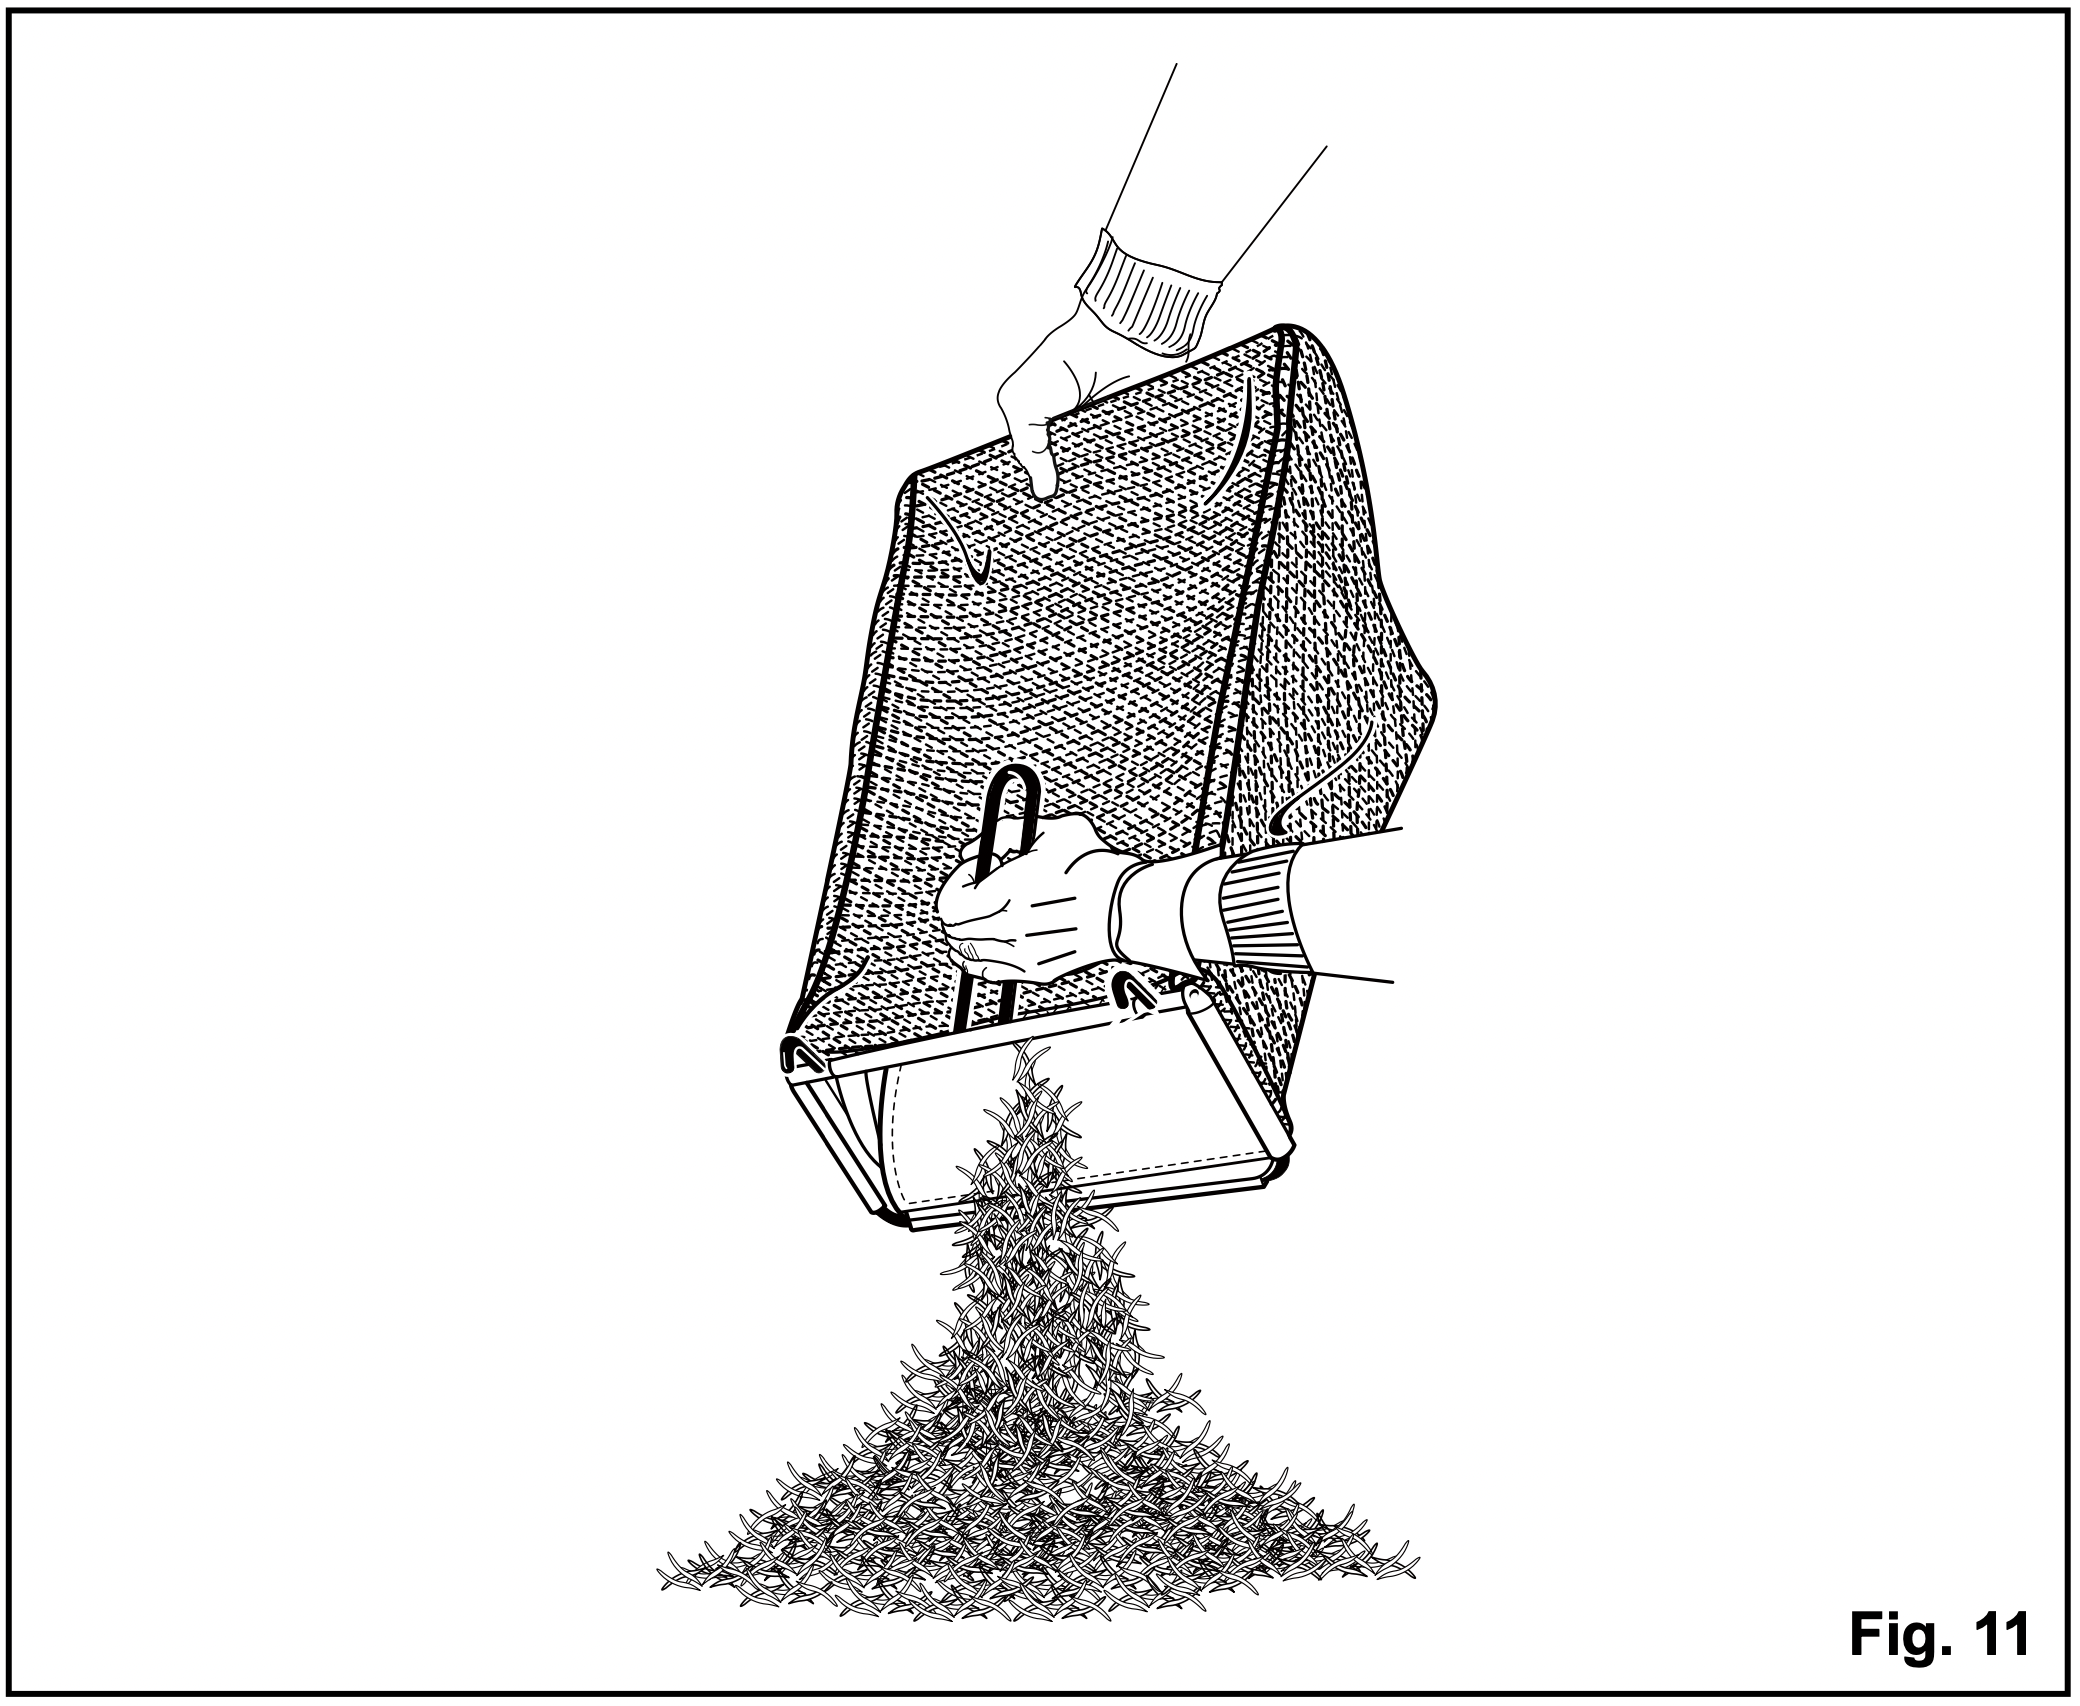
EMPTYING THE GRASS CATCHER BAG (See Figure 11)
- Stop mower, allow blades to completely stop, and remove the battery.
- Lift the rear discharge cover.
- Lift the grass catcher bag by its handle to remove from mower.
- Empty grass clippings.
- Lift the rear discharge cover and reinstall the grass catcher bag as described earlier in this manual.
MAINTENANCE
REPLACING THE CUTTING BLADE (See Figure 12-13)
WARNING: Always protect your hands by wearing heavy gloves and/or wrapping the cutting edges with rags or other materials when performing any maintenance on the blades. ALWAYS remove the battery when servicing or transporting the mower.
Use only a GREENWORKS replacement blade (Item#: 2903402).
- REMOVE BATTERY.
- While wearing leather padded gloves, wedge a block of wood between the blade and the mower deck in order to prevent the blade from turning when the bolt (1) is being removed.
- Using an adjustable wrench or 27 mm socket, loosen the bolt (1) and remove the blade (2). Turn the bolt “COUnTERCLOCKWISE” to loosen it and “CLOCKWISE” to tighten it.
- Remove the bolt (1) and the blade (2).
- To re-install the blade, position the blade with the cutting edges toward the ground. Assemble the bolt as shown. Using a 27 mm socket or wrench, turn the blade nut " CLOCKWISE” in order to secure the blade.

NOTE: Be sure to replace the parts in the exact order in which they were removed. When installing the cutting blade, verify that it is installed with the curved ends pointing toward the mower deck, and not toward the ground. Refer to the schematic drawing on page 30 of this manual.
CLEANING THE MOWER
WARNING: In order to reduce the risk of electric shock, do not expose the mower to water. The underside of the mower deck should be cleaned after each use, because grass clippings, leaves, dirt, and other debris will accumulate, which will cause rust and corrosion.
Remove any build-up of grass and leaves on or around the motor cover (do not use water). Occasionally wipe the mower clean with a dry cloth. If debris builds up on the underside of the mower during use, stop the motor, disconnect it from the battery, and then tilt the mower on its side, and scrape it clean using an appropriate tool.
STORING THE MOWER
The following steps should be taken in order to prepare the lawn mower for storage.
- Clean the mower as described in the previous section.
- Inspect the blade, and replace it or sharpen it, if required (refer to the Maintenance section).
- Store the mower in a dry, clean location. Do not store it next to corrosive materials, such as fertilizer or rock salt.
- Store the mower indoors, in a cool, dry place, out of the reach of children. Do not cover the lawn mower with a solid plastic sheet. Plastic coverings trap moisture around the mower, which causes rust and corrosion.
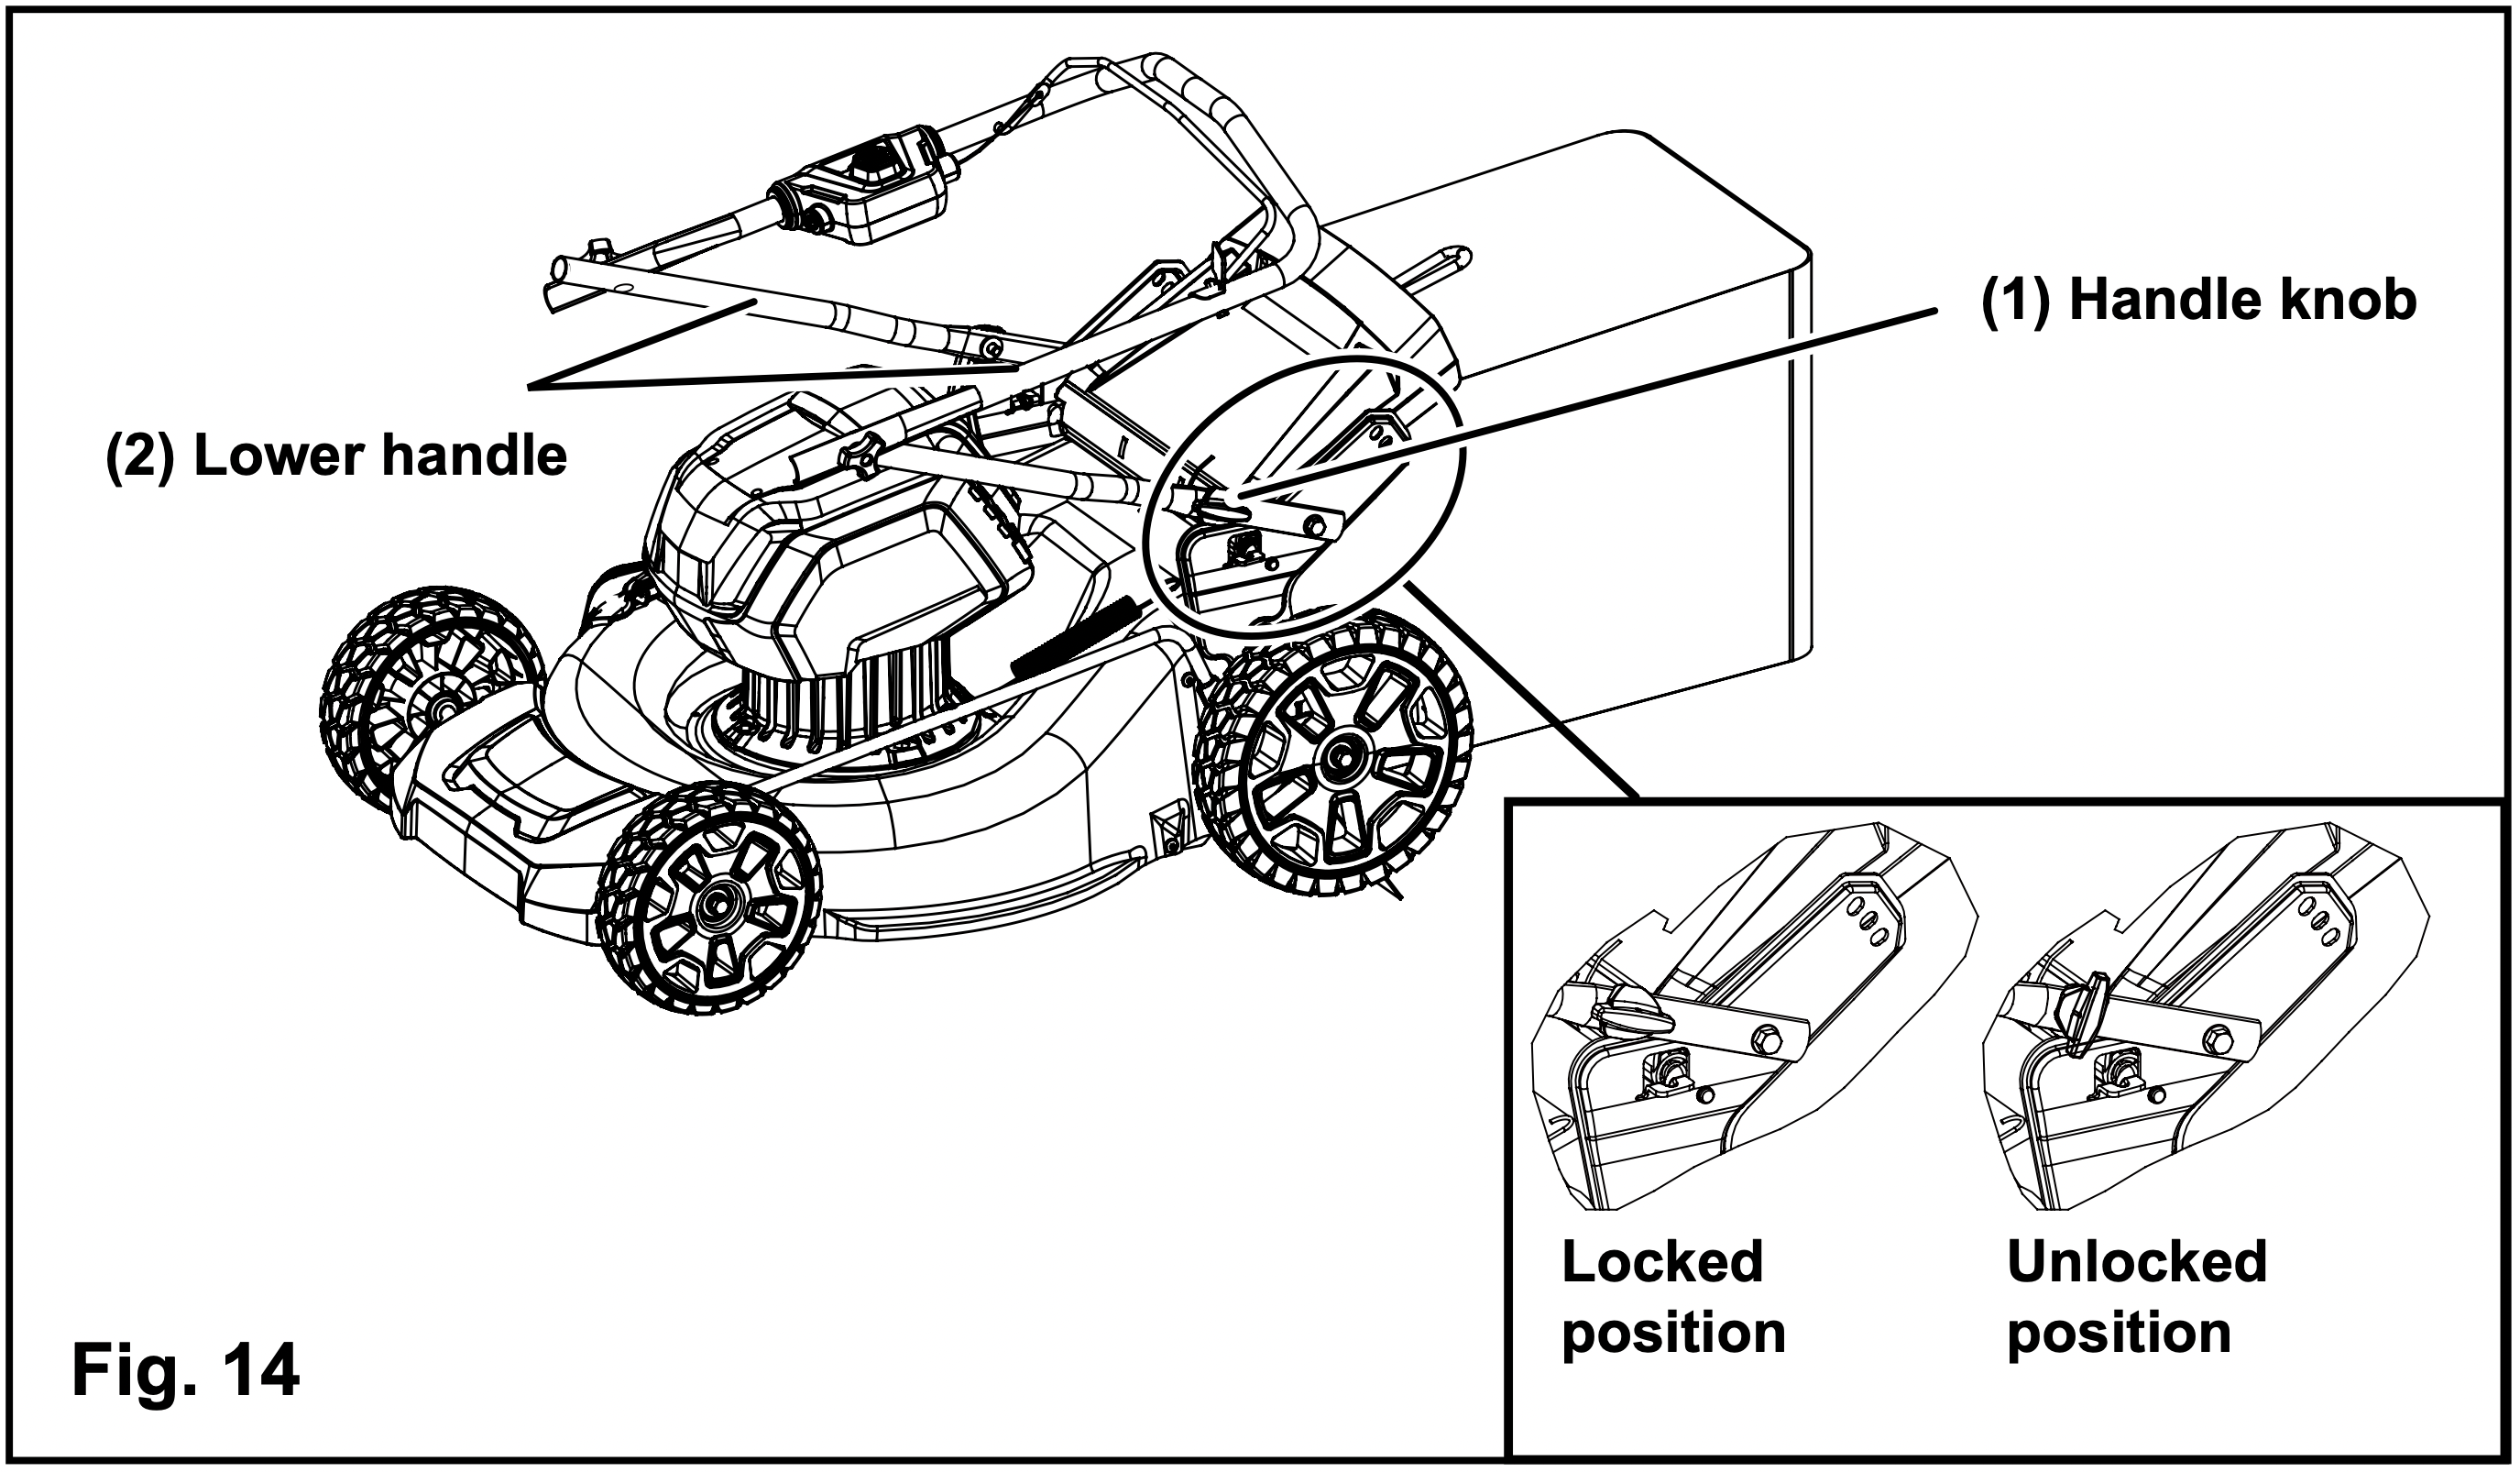
The handle may be folded away completely for storage. (See Figure 14)
- Pull and rotate the handle knobs (1) 90° on both sides to loosen the lower handles (2) on both sides. fold the lower handle forward. Make sure not to bend or kink the power cord.
- Remove the battery and store it in a cool dry location, if possible. Charge the battery every two months when not in use in order to increase its life.
- Remove the battery and store in a secure location out of the reach of children.
WARNING: This battery must be charged every 2 months while in storage to maintain maximum capacity.
TROUBLESHOOTING
| PROBLEM |
POSSIBLE CAUSE |
SOLUTION
|
| The mower does not start. |
The battery is not charged.
The switch is defective.
Grass jammed between the deck and blade.
The battery is not fully inserted in the mower.
Battery may require service or replacement.
|
Charge the battery.
Replace the switch (call the tollfree helpline, at 1 (855) 345-3934.
Remove battery; check under deck for jams.
Check the connection between the battery and the mower. Make sure the battery clicks into place.
Call toll free helpline, at 1 (855) 345-3934 or replace battery.
|
|
The mower cuts the grass unevenly.
|
The lawn is rough or uneven.
The cutting height is not set properly.
|
Check the mowing area.
Move the wheels to a higher setting.
|
|
The mower does not mulch properly.
|
Wet grass clippings are sticking to the underside of the deck.
The mulching plug is missing.
|
Wait until the grass dries before mowing.
Install the mulching plug.
|
|
The mower is hard to push.
|
The grass is too tall, or the cutting height is too low.
The rear of the grass catcher bag is dragging in thick grass.
|
Raise the cutting height.
Empty the grass clippings from the grass catcher bag.
|
|
The mower is excessively noisy and vibrates.
|
The motor shaft is bent.
The blade is unbalanced.
|
Stop the motor, and inspect for damage.
Repair before restarting. If vibration persists, call the toll free helpline 1(855) 345-3934.
|