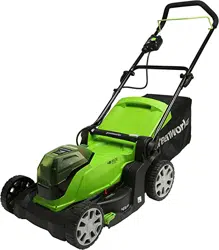
This machine is used for domestic lawn mowing. The cutting blade must be approximately parallel to the ground. All four wheels must touch the ground while you mow.
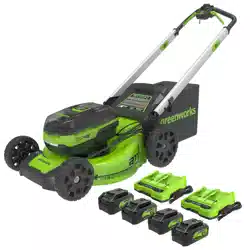
OVERVIEW
Start button
Start handle
Self-propel drive lever
Upper handle
Lower handle
Rear discharge door
Grass catcher
Height adjustment lever
Battery door
Mulch plug
Headlight
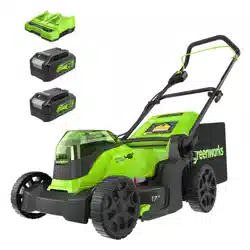
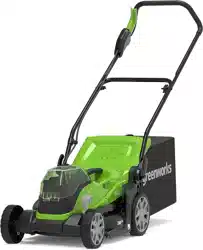
PACKING LIST
Lawn mower
Grass catcher
High lift blades
ManualLawn mower
INSTALLATION
WARNING: Do not change or make accessories that are not recommended by the manufacturer. Do not put in the safety key or the battery pack until you assemble all the parts.
UNPACK THE MACHINE
WARNING:
Make sure that you correctly assemble the machine before use.
If the parts are damaged, do not use the machine.
If you do not have all the parts, do not operate the machine.
If the parts are damaged or missing, speak to the service center.
Open the package.
Read the documentation in the box.
Remove all the unassembled parts from the box.
Remove the machine from the box.
Discard the box and package in compliance with local regulations.
PLACE THE MOWER UPRIGHT IN VERTICAL POSITION
Place the mower upright in vertical position.
Remove the packing material from the cable.
Remove the rubber edge guard (G) from the upper handle.
Insert the upper handle (4) into the lower handle (5).
Put the bolts (13) through the holes and tighten with the nuts (14), using a Philips head screwdriver (not included).
WARNING: Do not damage the cable while installing the upper handle
UNFOLD AND ADJUST THE HANDLES
Pull up on the handle holes (26) to release the handles.
Fold the handles up until the handle pins (12) lock into position.
NOTE: Make sure that the two handle pins are in the same position.
INSTALL THE GRASS CATCHER
Remove the mulch plug.
Open the rear discharge door (6) and hold it.
Hold the the grass catcher by its handle and engage the hooks on the slots (15).
Close the rear discharge door.
INSTALL THE MULCH PLUG
Remove the grass catcher.
Open the rear discharge door (6) and hold it.
Hold the mulch plug (10) by its handle and fit it in the discharge chute.
Close the rear discharge door
SET THE CUTTING HEIGHT
The machine can be set to different cutting heights.
Pull the height adjustment lever (8) rearward to increase the cutting height.
Pull the height adjustment lever forward to decrease the cutting height.
INSTALL THE BATTERY PACK
WARNING:
If the battery pack or charger is damaged, replace the battery pack or the charger.
Stop the machine and wait until the engine stops before you install or remove the battery pack.
Read, know, and do the instructions in the battery and charger manual.
NOTE: The machine has an automatic switch function that lets the other battery work when the first cannot operate.
Open the battery door (6).
Align the ribs on the battery pack with the grooves in the battery compartment.
Push the battery pack (17) into the battery compartment until the battery pack locks into place.
When you hear a click, the battery pack is installed.
Close the battery door.
NOTE: The motor starts only when you put in the safety key (16).
REMOVE THE BATTERY PACK
Remove the safety key (16). 2.
Open the battery door.
Push and hold the battery release button (18).
Remove the battery pack from the machine.
OPERATION
WARNING: Wear eye protection during operation.
START THE MACHINE
Make sure safety key is inserted into slot.
Push and hold the start button (1).
While you hold the start button (1), grab the start handles (2) in the direction of the handle bar.
Once the machine has started, you can release the start button (1).
Press the Turbo button (26) to speed up to 4,500 RPM
Battery capacity indicator (28)
Lights
Capacity
4 Green Lights
The battery is above 80% capacity
3 Green Lights
The battery is between 80% and 60% capacity
2 Green Lights
The battery is at between 60% and 40% capacity
1 Green Light
The battery is between 40% and 20% capacity
Lights go out
The battery is less than 20% capacity and requires charging immediately
STOP THE MACHINE
1. Release the start handle to stop the machine
WARNING: Wait until the blade fully stops before you start the machine again. Do not quickly turn the machine off and on. Always remove the safety key and battery pack after you complete the work.
OPERATE THE SELF-PROPEL DRIVE SYSTEM
1. Start the machine.
2. While you hold the start handles (2), grab either of the drive levers (3) and pull towards the handle bar.
3. Hold the start handles and the drive levers at the same time.
4. Release either set of start handle and drive lever from the same side.
5. Adjust the speed control (27) with your free hand.
Slide the speed control button in the direction of the Rabbit Symbol to increase the speed.
Pull the speed control button in the direction of the Turtle Symbol to decrease the speed.
6. Release the drive levers to close the self-propel system.
To engage the self-propel drive system while the mower is not running:
Press and hold the start button (1), then pull up on the drive lever (3).
OR
Pull up on the drive lever (3), then press the start button (1).
LED HEADLIGHT
When the mower is ready to start, you may grab the start handle (2) or the self-propel lever (3) to turn on the LED headlight (11).
Release the start handles and self-propel levers to turn off the headlight.
EMPTY THE GRASS CATCHER
Stop the machine.
Remove the safety key.
Remove the battery pack.
Open the rear discharge door and hold it.
Hold the grass catcher by its handle and unhook it from the slots.
Close the rear discharge door.
Empty the grass catcher.
OPERATE ON SLOPES
WARNING: Do not mow on the slopes with incline more than 15°. If you are not comfortable, do not mow on a slope. Please keep a low self-propelled speed when you mow on a slope.
Do not go up and down on a slope, mow across the face of the slope. Be careful when you change the direction on a slope.
Monitor the holes, ruts, rocks, and other hidden objects that can cause you to fall. Remove all obstacles such as rocks and tree limbs.
Make sure that your footing is stable. If you are out of balance, release the start handle immediately.
Do not mow near drop-offs, ditches, or embankments.
OPERATION TIPS
Do not try to override the operation of the start button or start handles.
Do not tilt the machine when you start it.
Do not put hands or feet near or below the turning parts.
Keep the discharge chute clean.
Do not cut wet grass.
Higher blade height is necessary for new or thick grass.
Clean the bottom of the mower deck after each use. Remove grass clippings, leaves, dirt, and other debris.
MAINTENANCE
WARNING:
Remove the safety key and battery pack from the machine before maintenance.
Keep the motor and battery pack free from grass, leaves or too much grease.
Use only approved replacement parts.
Do not let brake fluids, gasoline, petroleum-based materials touch the plastic parts. Chemicals can cause damage to the plastic, and make the plastic unserviceable.
Do not use strong solvents or detergents on the plastic housing or components.
GENERAL MAINTENANCE
Before each use, examine the machine for damaged, missing, or loose parts such as screws, nuts, bolts and caps.
Tighten correctly all the fasteners and caps.
Clean the machine with a dry cloth. Do not use water
REPLACE THE BLADE
WARNING: Use only approved replacement blades. Wear heavy gloves or wind cloth around the blade when you touch the blade.
1. Stop the machine.
2. Make sure that the blades fully stop.
3. Remove the safety key and battery pack.
4. Turn the machine to its side.
5. Use a piece of wood to prevent the movement of the blade.
6. Remove blades with a wrench or a socket:
Turn nut (24) to the right to remove blade A (20), spacer (25) and positioner (22);
Turn nut (24) to the left to remove blade B (21), spacer (25) and positioner (23).
7. Install the new blade. Position the blade with the cutting edges toward the ground. Make sure the two posts on positioner engage the holes on the blades.
8. Assemble the positioners and spacers as shown.
Positioner (22) for blade A only; positioner (23) for blade B only. Mounting nuts and spacers of blade A are interchangable with that of blade B.
HIGH LIFT BLADES
This mower comes with an extra set of high lift blades. Normal stock mower blades perform well on dry, shorter grasses, and are optimized for efficiency, while high lift blades work better in extreme conditions. The high-lift blade has deeper curves on the ends, which increase suction to circulate and expel the clippings. The higher air flow also helps prevent clogging when mowing tall or wet grass.
VERTICAL STORAGE
Remove the grass catcher.
Remove the battery and safety key.
Pull through the handle holes to fold away the handles.
Lock the handles into position.
Stand the machine on end and make sure that the brackets touch the floor.
STORE THE MACHINE
Clean the machine before storage.
Make sure the motor is not hot when you store the machine.
Make sure that the machine does not have loose or damaged parts. If it is necessary, do these steps/ instructions:
Replace the damaged parts.
Tighten the bolts.
Speak to a person at an approved service center.
Store the machine in a dry area.
Make sure that children cannot come near the machine.
TROUBLESHOOTING
Problem
Possible cause
Solution
The handle is not in position.
The bolts are not engaged correctly
Adjust the height of the handle and make sure that the bolts and nuts are aligned correctly
The machine does not start.
The battery capacity is low.
Charge the battery pack.
The start handle is defective
Replace the start handle.
The battery key is not put in.
Put in the battery key
The machine cuts grass unevenly
The lawn is rough.
Examine the mowing area.
The blade height is not set correctly
Move the wheels to a higher position.
The machine does not mulch correctly
Wet grass clippings attach to the deck.
Wait until the grass dries before mowing.
The mulch plug is missing.
Install the mulch plug.
The machine is hard to push.
The grass is too tall, or the blade height is too low.
Increase the blade height.
The grass catcher and the blade drags in thick grass.
Empty the grass clippings from the grass catcher.
There is a high vibration in the machine.
The machine stops during mowing.
The blade is unbalanced and worn
Replace the blade.
The motor shaft is bent
1. Stop the motor.
2. Remove the safety key and battery pack.
3. Disconnect the power source.
4. Inspect for damage.
5. Repair the machine before you start it again.
The machine stops during mowing.
The blade height is too low.
Increase the blade height.
The battery pack is out of power.
Charge the battery pack.
The grass clippings attach to the deck or the blade.