
14” 40V Cordless Lawn Mower
MO40B00
Read all safety rules and instructions carefully before operating this tool.
Owner’s Manual
TOLL-FREE HELPLINE: 1-888-90WORKS
(888.909.6757)
www.GreenWorksTools.com

2
Contents .............................................................................................................................. 2
Product specications .......................................................................................................... 2
Safety information ................................................................................................................ 3
Symbols ............................................................................................................................... 8
Know your lawn mower ...................................................................................................... 10
Assembly ............................................................................................................................11
Operation ........................................................................................................................... 16
Maintenance ...................................................................................................................... 21
Service .............................................................................................................................. 23
Environmentally safe battery disposal ............................................................................... 24
Troubleshooting ................................................................................................................. 25
Warranty ............................................................................................................................ 26
Exploded View ................................................................................................................... 27
Parts List............................................................................................................................ 28
PRODUCT SPECIFICATIONS
14” 40V CORDLESS LAWN MOWER
Battery type ............................................................................................ 40V Lithium-ion
Charger time ........................................................................................................ 2 hours
No-load speed ................................................................................................ 3600 RPM
Cutting deck width ......................................................................................... 14” (35 cm)
Height adjustments ...............................................................1 1/4” - 3 1/8” (3.0 - 8.0 cm)
Functions .................................................................................. 2-in-1: Mulch or rear bag
Unit weight (with battery) ............................................................................ 36 lbs (16 kg)
CONTENTS

3
SAFETY INFORMATION
GENERAL SAFETY RULES
WARNING: when using electric lawn mowers, basic safety precautions should always be
followed to reduce the risk of re, electric shock, and personal injury, including the following:
READ ALL INSTRUCTIONS CAREFULLY
WARNING
This symbol indicates important safety instructions. If these instructions are not followed, it could
endanger the personal safety and/or property of the operator and others. Read and understand
all instructions in this manual before attempting to operate the mower. Failure to comply with
these instructions may result in personal injury.
DANGER
This mower was built to be operated according to the rules for safe operation that are contained
in this manual. As with any type of power equipment, carelessness or error on the part of the
operator can result in serious injury. This mower is capable of amputating body parts and
throwing objects. Failure to observe the following safety rules could result in serious injury or
death.
WARNING
Basic safety precautions should always be followed when using electric lawn mowers, in order to
reduce the risk of re, electric shock, and personal injury.
WARNING
Use of this mower should be restricted to individuals who have read and understoood and will
follow the warnings and instructions that are printed in this manual and on the mower.
• Carefully read all instructions on the mower and in the manual before attempting to assemble and
operate the mower. Keep this manual in a safe place for future reference, and consult it regularly.
• Become familiar with all controls and their proper operation. Know how to stop the mower and
how to disengage the power in an emergency.
• In order to avoid contact with the blade or injury caused by a thrown object, stay in the
operating zone behind the handles, and keep children and bystanders at least 100’ (30 m)
away from the mower while it is in operation. Stop the motor immediately if someone enters
the mowing area.
• Thoroughly inspect the area where the mower is to be used. Remove all stones, sticks, wire,
bones, toys, and other objects that could be tripped over or thrown by the blade. Thrown
objects can cause serious personal injury.
• Plan your mowing pattern in such a way as to avoid discharging material toward roads,
sidewalks, bystanders, etc. Do not discharge material against a wall or obstruction. Doing so
may cause the discharged material to ricochet back toward the operator.

4
SAFETY INFORMATION
• Always wear proper eye protection that complies with ANSI Z87.1 in order to protect your
eyes while operating or performing any adjustment or repair. Thrown objects that ricochet can
cause serious eye injury.
• Always wear a face mask or a dust mask when operating the mower in a dusty environment.
• Dress properly. Do not wear loose clothing or jewelry that can get caught in moving parts. The
wearing of protective gloves and safety footwear is recommended.
• Many injuries occur as a result of the mower being pulled over the operator’s foot during a
fall caused by slipping or tripping. Do not operate this mower in bare feet, or while wearing
sandals or lightweight (e.g., canvas) shoes. Do not hold on to the mower if you are falling.
Release the handle immediately.
• Never pull the mower back toward you while you are walking. If you must back the mower
away from a wall or an obstruction, rst look down and behind in order to avoid tripping, and
then follow these steps:
• Step back from the mower in order to fully extend your arms.
• Be sure that you are well balanced.
• Pull the mower back slowly.
• Do not use the mower for any job except that for which it is intended. Do not force the mower.
• Do not operate the mower while under the inuence of alcohol or drugs.
• Stay Alert: Do not operate the mower when you are tired. Pay attention to what you are doing.
Use common sense.
• Do not put hands or feet near rotating parts or under the cutting deck. Contact with the blade
can amputate hands and feet.
• Do not attempt to adjust the wheels or the cutting height while the motor is running.
• Avoid dangerous environments. Do not operate the mower in the rain or in wet or damp grass.
• Mow only in daylight or in good articial light. Do not rush a mowing job.
• Stop the blade when crossing gravel driveways, walkways, or roads.
• If the mower starts to vibrate excessively, stop the motor , remove the battery and check for
the cause immediately. Vibration is generally a sign that the mower is not working properly or
needs repair.
• Stop the motor and wait until the blade comes to a complete stop before removing the grass
catcher or unclogging the chute. The cutting blade will continue to rotate for a few seconds
after the motor is shut off. Do not place any part of your body in the blade area until you are
sure that the blade has stopped rotating.
• Never operate mower without a proper trail shield, discharge cover, grass catcher, switch
control, or other safety device in place and in working order. Do not operate the mower with
damaged safety devices. Doing so can result in injury.
• Don’t force lawn mower. It will do the job better and safer at the rate for which it was designed.
• Store idle lawn mower indoors. When not in use, lawn mower should be stored in an indoor
dry and look-up place, out of reach of children.
• Maintain lawn mower. Keep cutting edges sharp and clean to ensure the best performance
and safety.
• If lawn mower strikes a foreign objects follow these steps:

5
SAFETY INFORMATION
• Stop lawn mower, release the switch.
• Remove the battery.
• Inspect for damage.
• Repair any damage before restarting and operating the lawn mower.
• Do not charge lawn mower in the rain or in a wet location.
• Remove or disconnect battery before servicing, cleaning or removing material from lawn
mower.
• Inspect lawn mower cord periodically and if damaged, have it repaired by an authorized
service facility.
• Use identical replacement blades only.
• Store indoors, and do not expose to rain or water, avoid direct sunshine.
CHILD SAFETY
Tragic accidents can occur if the operator is not aware of the presence of children.
• Keep children out of the mowing area and under the watchful care of a responsible adult.
• Do not allow children under the age of 14 to operate this mower. Children who are 14 years
of age and older must read and understand the operating instructions and safety rules in this
manual, and must be trained and supervised by a parent.
• Stay alert, and turn the mower off if a child or any other person enters the mowing area.
• Look behind and down for small children before and while moving backwards.
• Use extreme care when approaching blind corners, doorways, shrubs, trees, or other objects
that may obscure your view of a child who may run into the path of the mower.
BATTERY & CHARGER
CAUTION
USE ONLY GREENWORKS APPROVED REPLACEMENT BATTERIES, OTHER BATTERIES
MAY CAUSE INJURY OR DAMAGE TO THE MOWER. Use with GREENWORKS 40V battery
(#29472).
BATTERY SAFETY RULES
• Battery tools do not have to be plugged into an electrical outlet; therefore, they are always in
operating condition. Be aware of possible hazards when not using your battery tool or when
changing accessories. Following this rule will reduce the risk of electric shock, re, or serious
personal injury.
• Do not place battery tools or their batteries near fire or heat. This will reduce the risk of
explosion and injury.
• Do not crush, drop or damage battery pack. Do not use a battery pack or charger that has
been dropped or received a sharp blow. A damaged battery is subject to explosion. Properly
dispose of a dropped or damaged battery immediately.
• Batteries can explode in the presence of a source of ignition, such as a pilot light. To reduce
the risk of serious personal injury, never use any cordless product in the presence of open

6
SAFETY INFORMATION
PROPER CARE FOR BATTERY
Off-season storage
To obtain the longest possible battery life, we suggest the following:
• Remove the battery pack from the charger once it is fully charged and ready for use.
For battery pack storage longer than 30 days:
• Store the battery pack where the temperature is below 80°F and away from moisture.
• Store battery packs in a 30%-50% charged condition.
• Every two months of storage, charge the pack as normal.
CHARGER SAFETY RULES
• Charge the mower battery in a dry area that is protected from the weather. Do not expose the
mower or the charger to rain. Do not charge the battery in a wet location. Operate the battery
charger in temperatures between 45° and 104°F. In order to reduce the risk of electric shock,
use only the charger that is provided by the manufacturer to charge the battery.
• DO NOT ABUSE THE CHARGE CORD. Never carry the charger by the cord. Do not
disconnect the charger from the outlet or from the mower by pulling the charger cord.
• Do not use a damaged charger. Replace the charger cords or the charger immediately.
flame. An exploded battery can propel debris and chemicals. If exposed, flush with water
immediately. Do not charge battery tool in a damp or wet location. Following this rule will
reduce the risk of electric shock.
• For best results, your battery tool should be charged in a location where the temperature is
more than 45°F but less than 104°F. To reduce the risk of serious personal injury, do not store
outside or in vehicles.
• Under extreme usage or temperature conditions, battery leakage may occur. If liquid comes
in contact with your skin, wash immediately with soap and water. If liquid gets into your eyes,
ush them with clean water for at least 10 minutes, then seek immediate medical attention.
Following this rule will reduce the risk of serious personal injury.
• When battery pack is not in use, keep it away from other metal objects like: paper clips, coins,
keys, nails, screws, or other small metal objects that can make a connection from one terminal
to another. Shorting the battery terminals together may cause sparks, burns, or a re.
• Always remove battery pack from your tool when you are assembling parts, making
adjustments, cleaning, or when not in use. Removing battery pack will prevent accidental
starting that could cause serious personal injury.
• Always remove battery pack before storing the device. When battery becomes fully charged,
unplug the charger from the power supply and remove the battery pack from the charger.
• Always wear eye protection with side shields marked to comply with ANSI Z87.1, along with
hearing protection. Failure to do so could result in objects being thrown into your eyes and
other possible serious injuries.
• Keep battery pack dry, clean, and free from oil and grease. Always use a clean cloth when
cleaning. Never use brake fluids, gasoline, petroleum-based products, or any solvents to
clean battery pack.
• Do not open or mutilate the battery. Released electrolyte is corrosive and may cause damage
to the eyes or skin. It may be toxic if swallowed.

SAVE THESE INSTRUCTIONS
77
SAFETY INFORMATION
• Keep the mower and the charger away from water, heat sources (radiators, heaters, stoves,
etc.), ames, and chemicals.
• Make sure the battery pack is secured in the charger before beginning operation.
• The battery pack will become slightly warm to the touch while charging. This is normal and
does not indicate a problem.
• Do not place the charger and battery pack in an area of extreme heat or cold. They will work
best at normal room temperature.
• When batteries become fully charged, unplug the charger from the power supply and remove
the battery pack.
WARNING
When transporting or servicing unit, always remove the battery.
WARNING(PROPOSITION 65)
Some dust created by power sanding, sawing, grinding, drilling and other construction activities
contains chemicals known to the state of California to cause cancer, birth defects or other
reproductive harm. Some examples of these chemicals are:
• Lead from lead-based paints,
• Crystalline silica from bricks and cement and other masonry products, and
• Arsenic and chromium from chemically-treated lumber.
Your risk from these exposures varies, depending on how often you do this type of work. To
reduce your exposure to these chemical: work in a well ventilated area, and work with approved
safety equipment, such as those dust masks that are specially designed to lter out microscopic
particles.
88
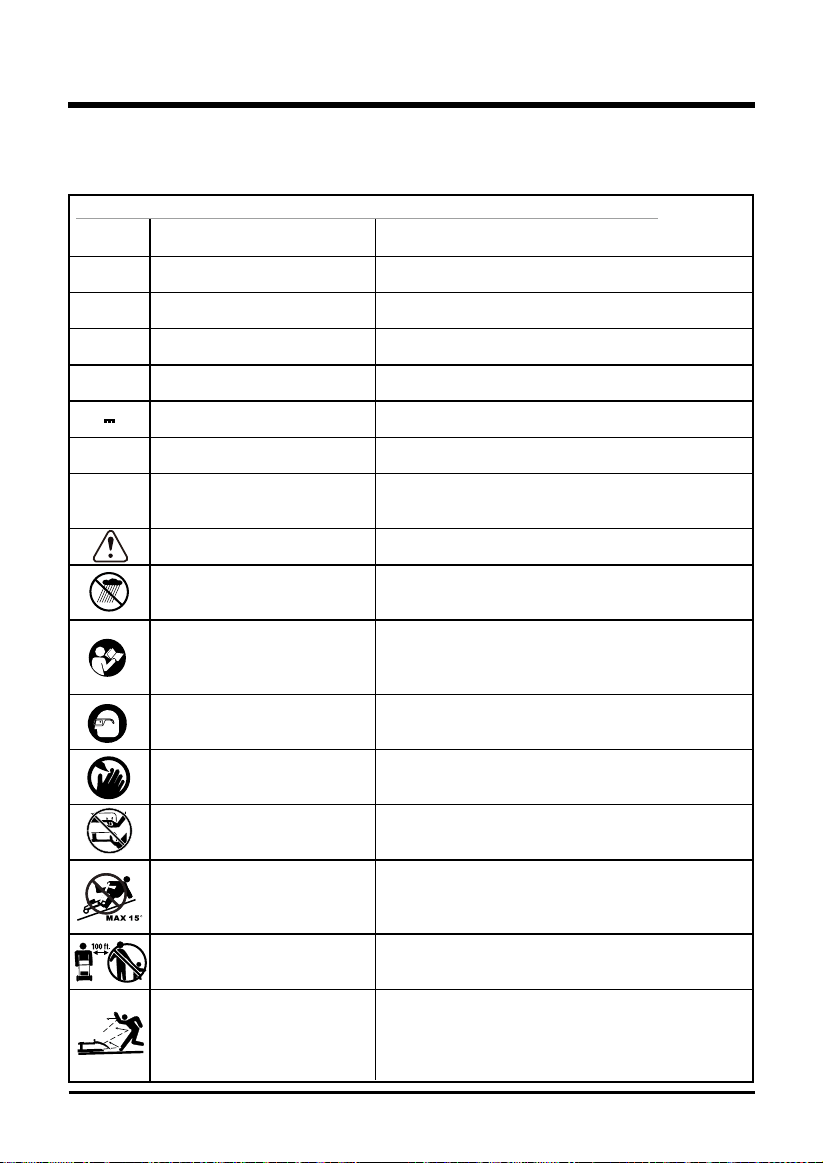
SYMBOLS
Some of the following symbols may be used on this product. Please study them and learn their
meaning. Proper interpretation of these symbols will allow you to operate the product better and safer.
n
o
SYMBOL NAME DESIGNATION/EXPLANATION
V Volts Voltage
A Amperes Current
Hz Hertz Frequency (cycles per second)
W Watts Power
min Minutes Time
Direct Current Type or a characteristic of current
No Load Speed Rational speed, at no load
/min Per Minute Revolutions, strokes, surface speed, orbits etc.,
per minute
Safety Alert Indicates a potential personal injury hazard.
Wet Conditions Alert Do not expose to rain or use in damp locations
Read The Operator’s Manual To reduce the risk of injury user must read and
understand operator’s manual before using this
product.
Eye Protection Always wear safety glasses with side shields that
are marked to comply with ANSI Z87.1.
Keep Hands and Feet Away Keep hands and feet away from blade and cutting
area.
No Reach Do not reach hands or feet under mower deck.
No Slope Do not operate on inclines greater than 15º. Mow
across the face of slopes, never up and down.
Keep Bystanders Away Keep all bystanders at least 100 ft. away.
Ricochet Pay attention that bystanders are not injured through
foreign objects thrown from the mower.
9
SAVE THESE INSTRUCTIONS
The following signal words and meanings are intended to explain the levels of risk associated
with this product.
ENVIRONMENTAL PROTECTION
Waste electrical products should not be disposed of with household waste. Please
recycle where facilities exist. Check with your local authority or retailer for recycling
advice.
The battery contains material which is hazardous to you and the environment. It must
be removed and disposed of separately at a facility that accepts lithium-ion batteries.
SERVICE
Servicing requires extreme care and knowledge and should be performed only by a qualified
service technician. For service we suggest you return the product to your nearest AUTHORIZED
SERVICE CENTER for repair. When servicing, use only identical replacement parts.
WARNING
To avoid serious personal injury, do not attempt to use this product until you have read this
Owner's Manual thoroughly and understand it completely. If you do not understand the warnings
and instructions in this Owner's Manual, do not use this product. Call the Toll-free Helpline (1-
888-909-6757) for assistance.
WARNING
The operation of any power tool can result in foreign objects being thrown into your
eyes, which can result in severe eye damage. Before beginning power tool operation,
always wear safety goggles or safety glasses with side shields and when needed, a
full face shield. We recommend Wide Vision Safety Mask for use over eyeglasses or
standard safety glasses with side shields. Always use eye protection which is marked
to comply with ANSI Z87.1.
SYMBOL SIGNAL MEANING
DANGER Indicates an imminently hazardous situation, which, if not
avoided, will result in death or serious injury.
WARNING Indicates a potentially hazardous situation, which, if not avoided,
could result in death or serious injury.
CAUTION Indicates a potentially hazardous situation, which, if not avoided,
may result in minor or moderate injury.
CAUTION (Without Safety Alert Symbol) Indicates a situation that may
result in property damage.
SYMBOLS
10
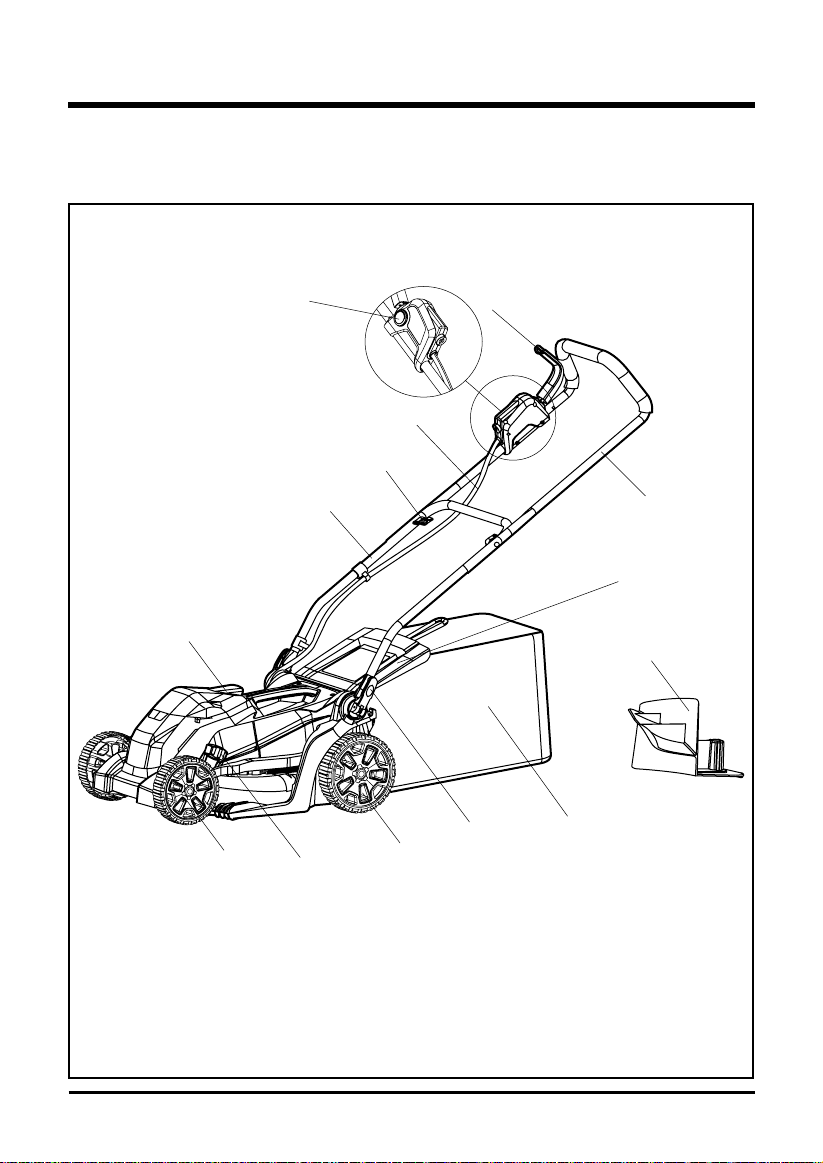
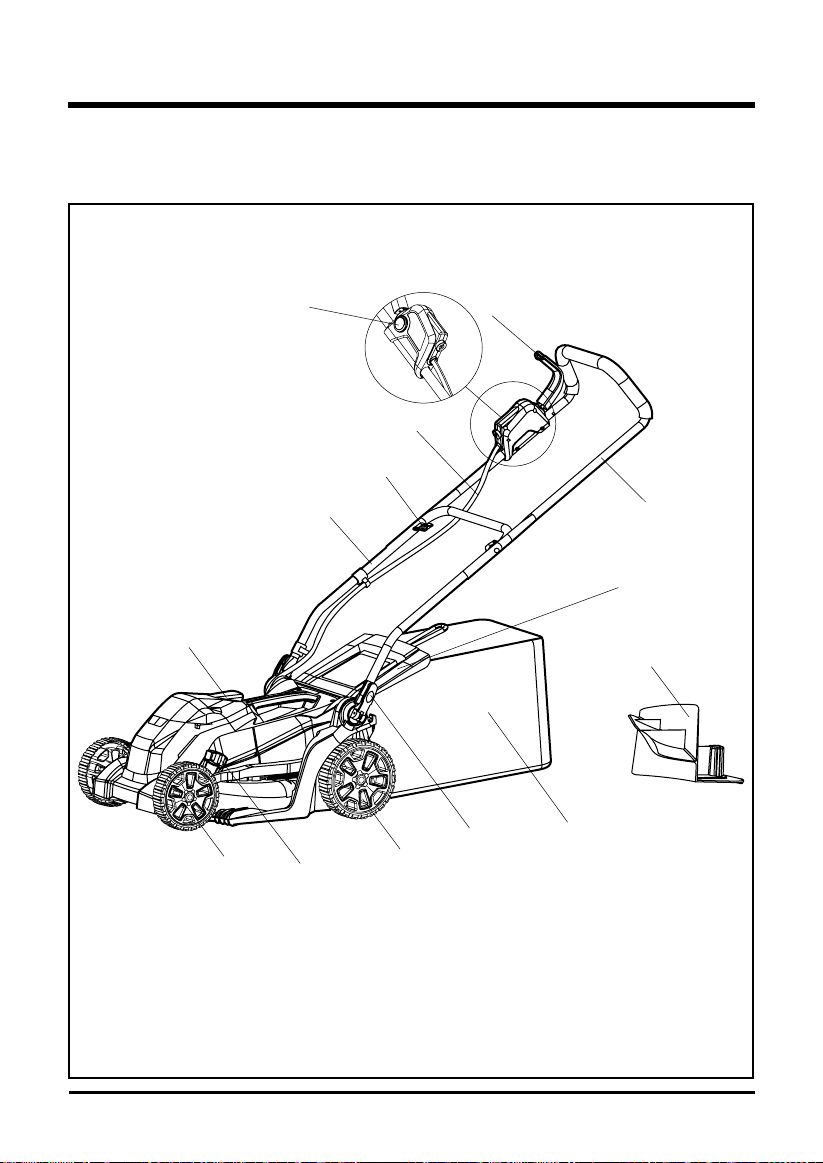
KNOW YOUR LAWN MOWER
Fig. 1
Read this operator's manual and safety rules before operating your lawn mower. Compare the
illustration in Figure 1 to your lawn mower in order to familiarize yourself with the location of
various controls and adjustments. Save this manual for future reference.
Switch box
handle
Start button
Motor control
cable
Nut
Lower
handle
Battery
door
Front
wheel
Height
adjustment
lever
Rear
wheel
Quick
release
fasteners
Grassbox
Rear discharge
door
Upper handle
Mulching plug

11
ASSEMBLY INSTRUCTIONS
UNPACKING
• Carefully remove the product and any accessories from the box. Make sure that all items
listed in the packing list are included.
• Inspect the product carefully to make sure no breakage or damage occurred during shipping.
• Do not discard the packing material until you have carefully inspected and satisfactorily
operated the product.
• If any parts are damaged or missing, please call 1-888-909-6757 for assistance.
PACKING LIST
• Lawn mower
• Mulching plug
• Grass catcher bag
WARNING
If any parts are damaged or missing do not operate this product until the parts are replaced.
Using a product with damaged or missing parts could result in serious personal injury.
WARNING
Do not attempt to modify this product or create accessories not recommended for use with this
product. Any such alteration or modication is misuse and could result in a hazardous condition
leading to possible serious personal injury.
WARNING
Do not insert the battery until assembly is complete and you are ready to mow. Failure to comply
could result in accidental starting and possible serious personal injury.
WARNING
To prevent accidental starting that could cause serious personal injury, always remove the battery
pack from the product when assembling parts.
WARNING
Never operate the mower without the proper safety devices in place and working. Never operate
the mower with damaged safety devices. Operation of this product with damaged or missing
parts could result in serious personal injury.
• Owner’s Manual
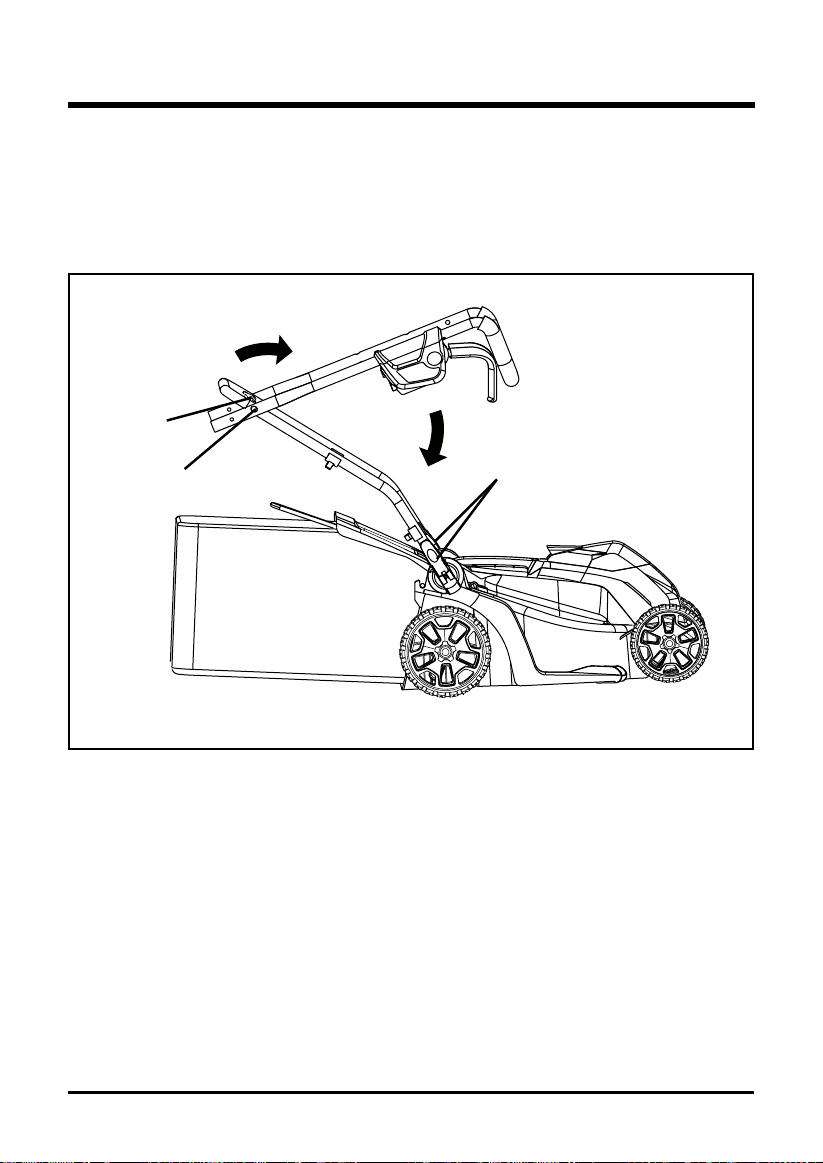
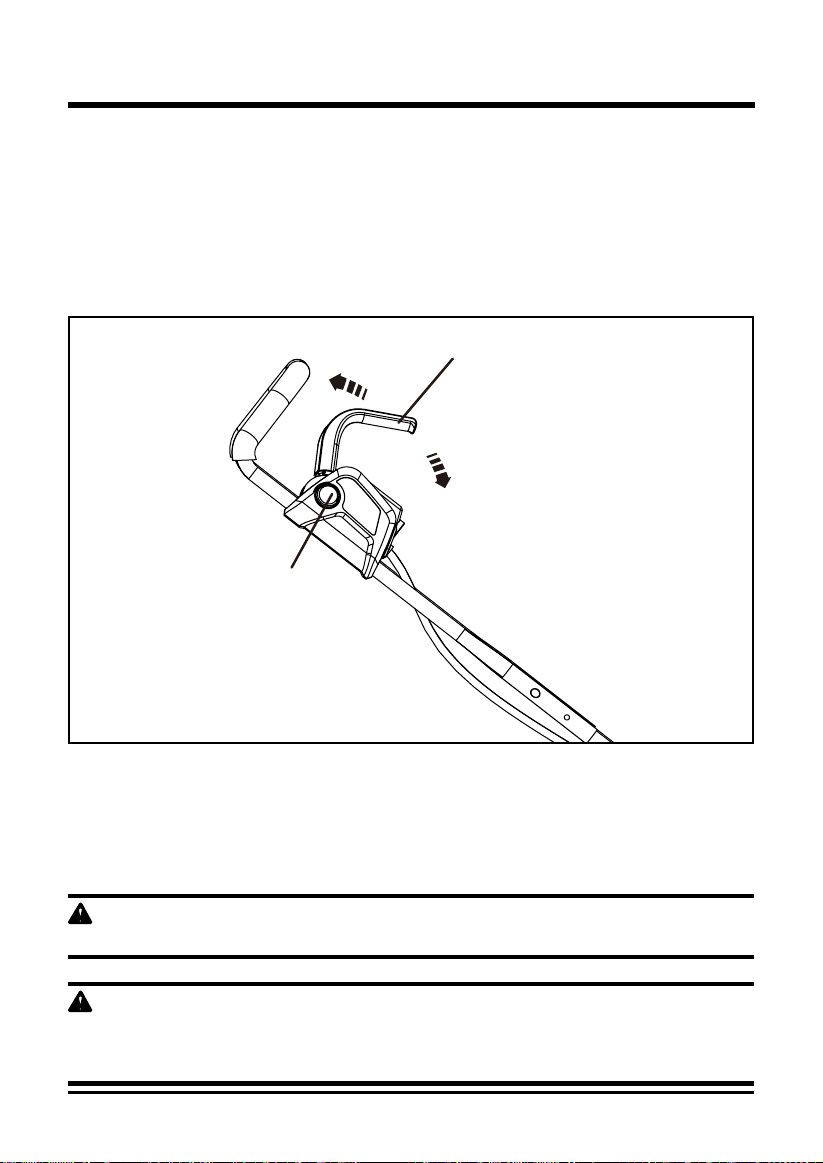
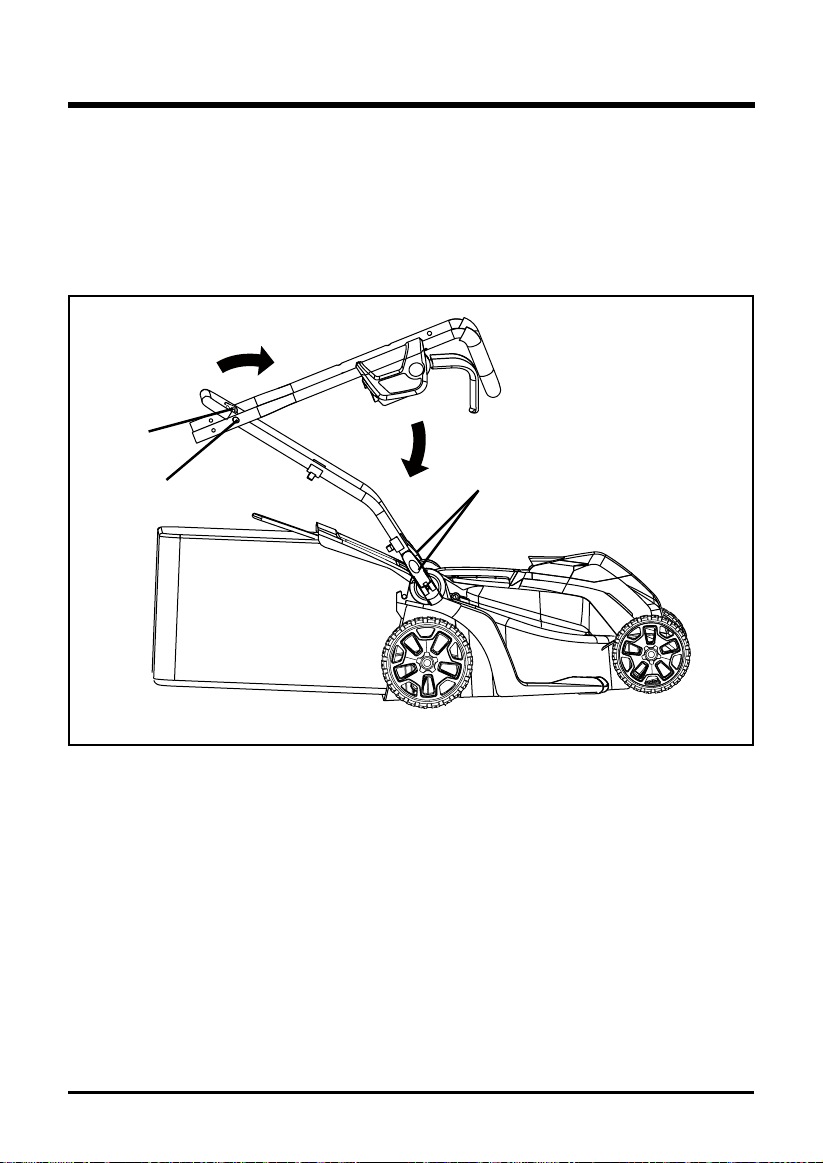
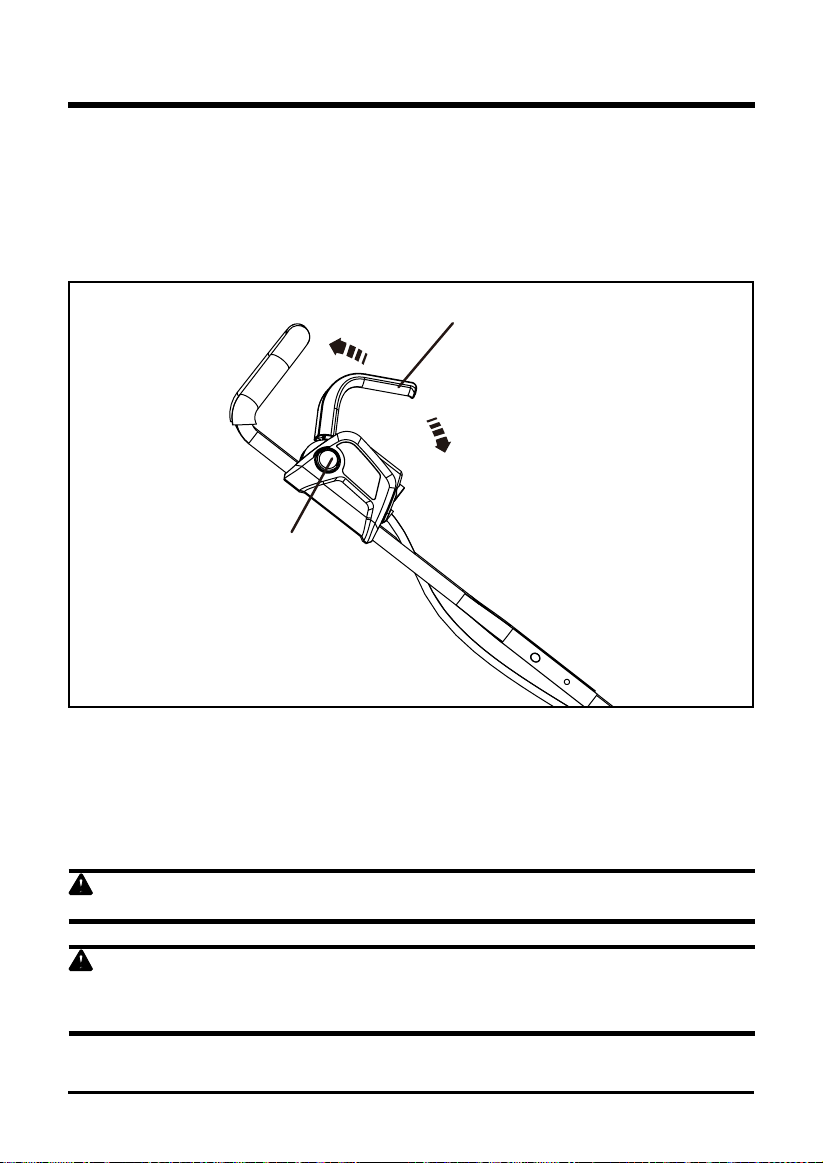
UNFOLDING AND ADJUSTING HANDLE (See Figure 2)
• Pull up and back on the upper handle to raise the handle into operating position. Make certain
the handles snap into place securely.
• Tighten the lower handle with the quick release fasteners on both sides.
• Tighten the upper handle with the nuts on both sides.
ASSEMBLY INSTRUCTIONS
12
Fig. 2
Nut
Handle bolt
Quick release
fasteners
13
ASSEMBLY INSTRUCTIONS
Fig. 3
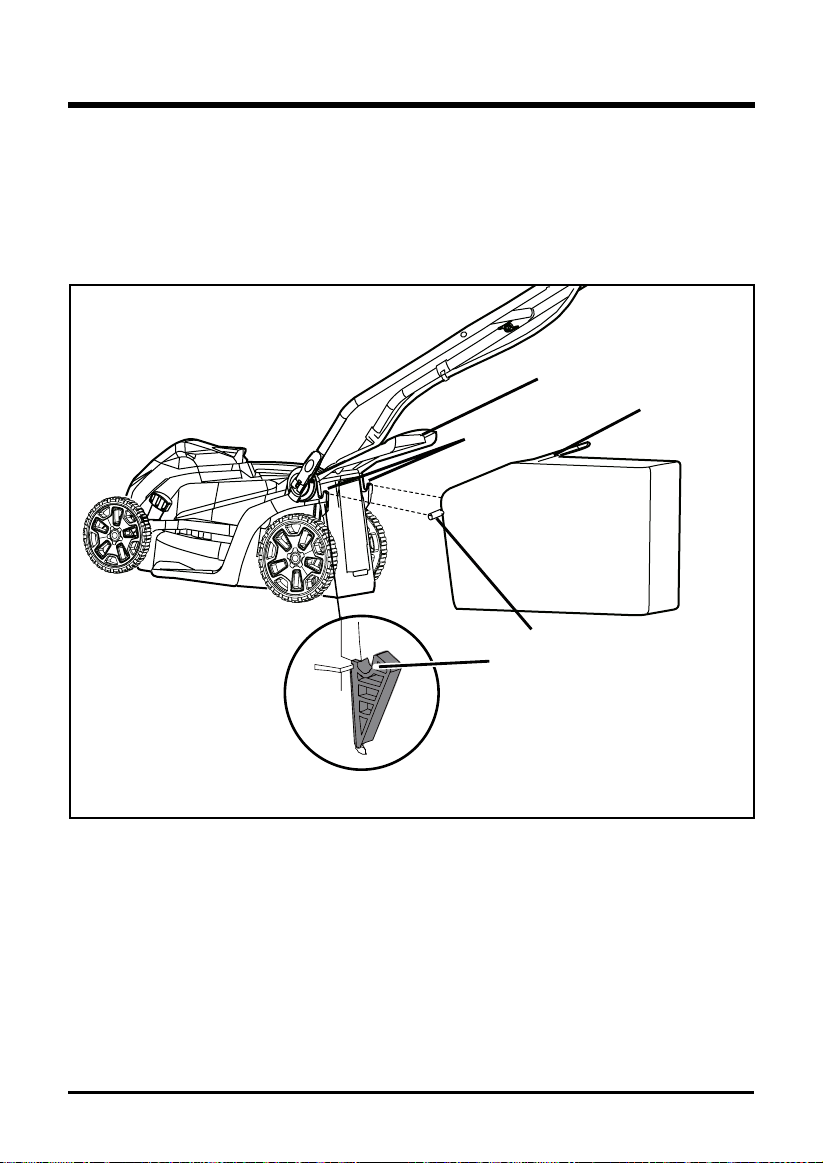
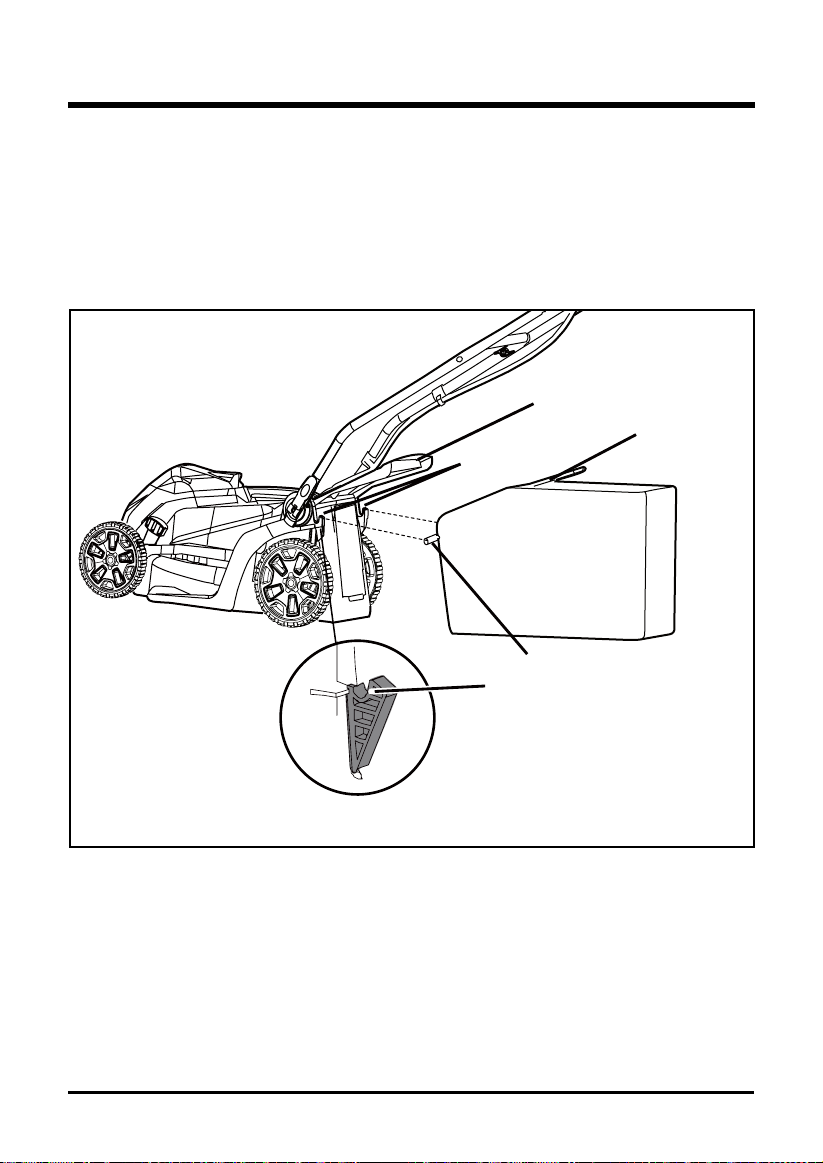
INSTALLING THE GRASS CATCHER BAG (See Figure 3)
• Lift the chute cover (1).
• Lift the grass catcher by its handle (2) and place under the chute cover so that the hooks (3)
on the grass catcher frame are seated into the slots in the handle bracket.
• Release the chute cover. When installed correctly, the hooks on the grass catcher will rest
securely in the slots on the handle brackets.
Slots
Slots
3
1
2
14
ASSEMBLY INSTRUCTIONS
Fig. 4
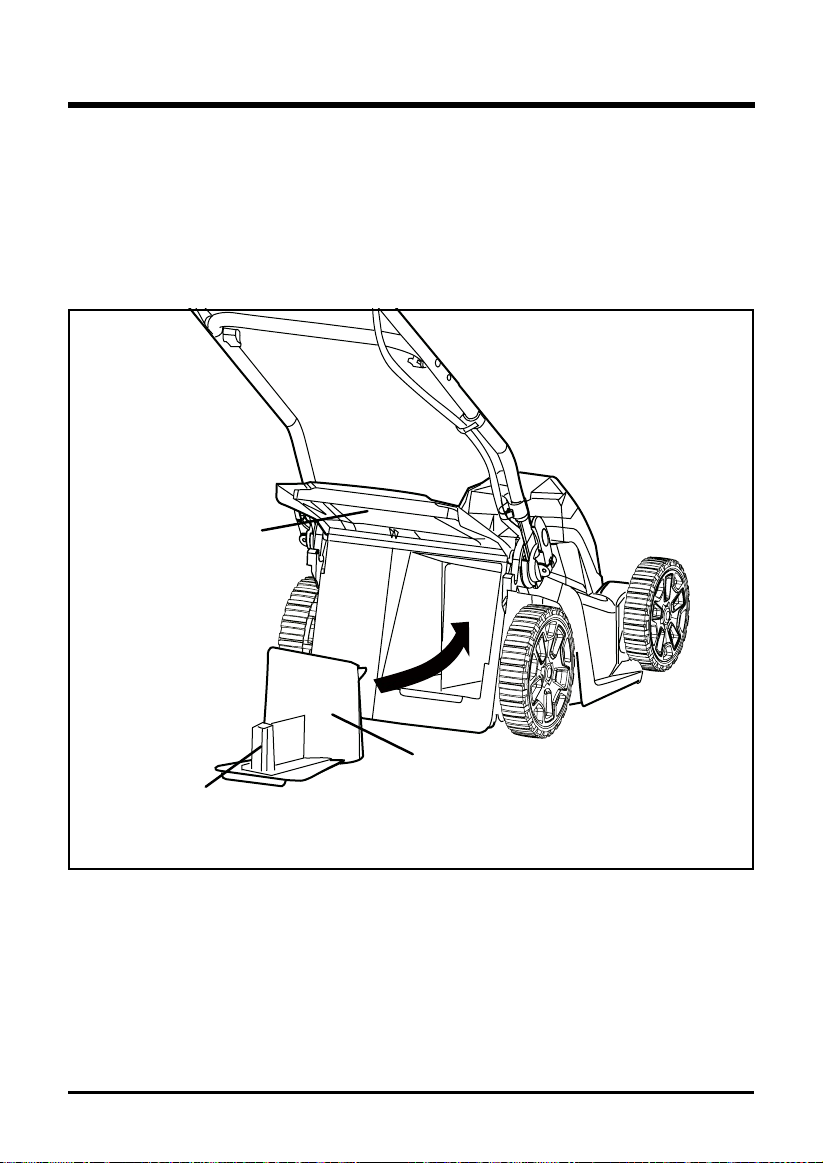
INSTALLING THE MULCHING PLUG (See Figure 4)
• To remove the mulching plug, lift the chute cover (1).
• Grasp the handle (2) of the mulching plug and pull the mulching plug out using the handle.
• The mulching plug (3) is inserted on an angle, so it requires some force to remove it.
• The mulching plug must be removed in order to install the grass catcher bag.
• The mulching plug must be re-installed when the grass catcher bag is removed.
2
1
3
ASSEMBLY INSTRUCTIONS
15
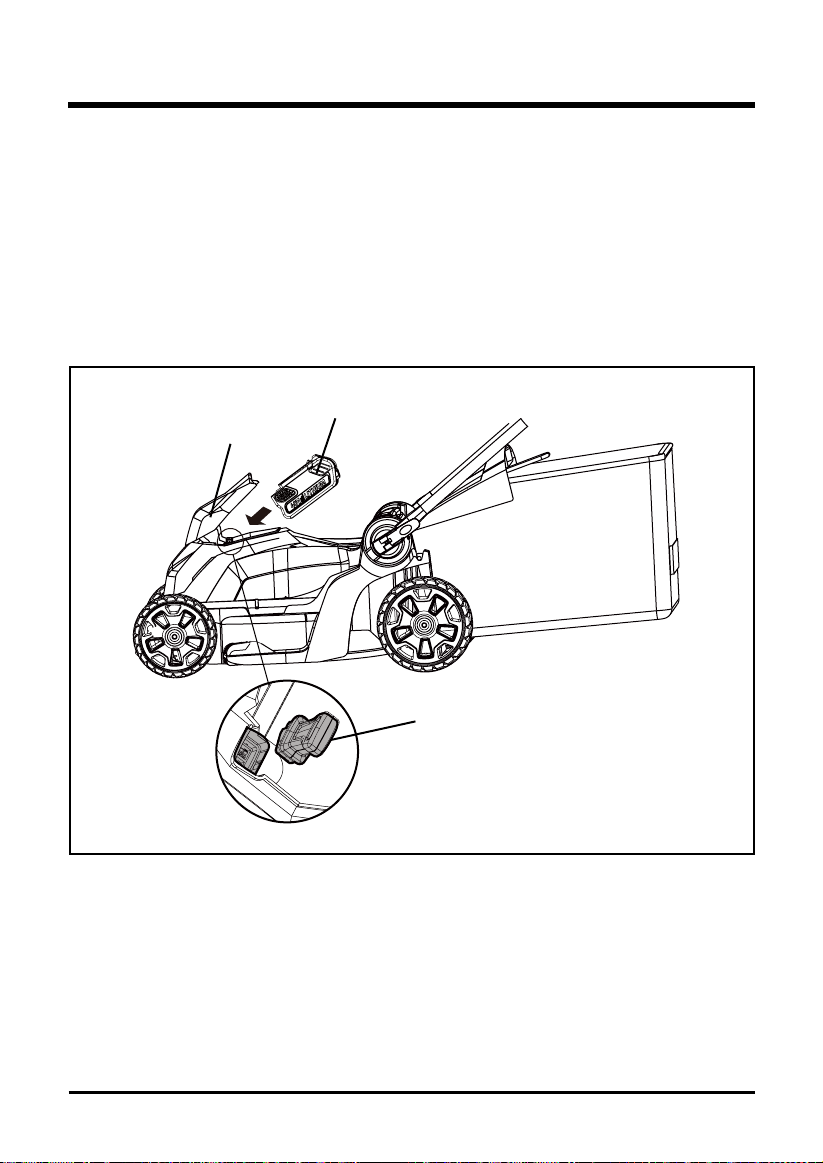
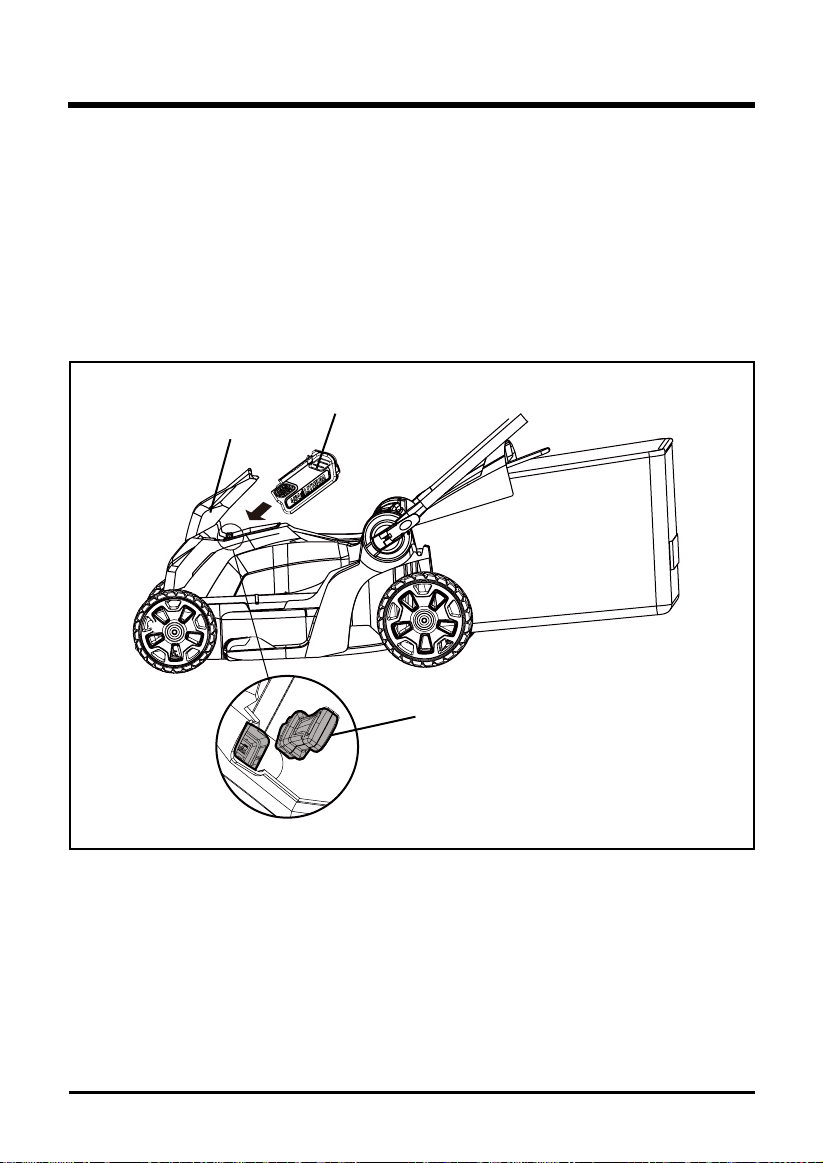
TO INSTALL BATTERY PACK (See Figure 5)
• Lift and hold up the battery door.
• Place the battery pack on the mower. Align guided ribs on battery pack with grooves in the
product’s battery port.
• Make sure the latch on bottom of the battery pack snaps in place and that battery pack is fully
seated and secure in the product before beginning operation.
• Insert the safety key.
• If the machine is not going to be used immediately, do not insert the safety key.
• Close the door.
TO REMOVE BATTERY PACK (See Figure 5)
• Release the power lever to stop the product.
• Remove the safety key.
• Press and hold the battery latch button at the bottom of the battery pack.
• Remove battery pack from the product.
Fig. 5
Battery
door
Battery
Pack
Safety key
16
OPERATING YOUR LAWN MOWER
STARTING/STOPPING THE MOWER (See Figure 6)
To start the motor:
• Press and hold the safety lock-out button (1).
• Pull the bail switch (2) upward to the handle to start the mower and release the button.
To stop the motor:
• Release the bail switch.
SOFT-START
This LI-ION Mower is equipped with a “Soft-start” feature. When initially starting up, the mower will
take approx. 3 seconds to get up to full speed. If the mower does not initially start: Remove the
battery and check under the mower deck to ensure there is nothing obstructing the blade and that the
blade can spin freely by hand. Even a small amount of grass on start up will prevent the “soft-start”
from turning the mower on.
CAUTION
Do not attempt to override the operation of the start button or bail lever.
WARNING
The operation of any mower can result in foreign objects being thrown into the eyes, which can
cause severe eye damage. Always wear safety glasses while operating the mower and while
performing any adjustments or repairs.
Fig. 6
1
2
17
Fig. 7
1
WARNING
Ensure that other people and pets remain at least 100 ft (30 m) away when the mower is in use.
INSPECT THE CUTTING AREA. Remove all stones, sticks, wires, bones, and other debris that
might be thrown by the rotating blades.
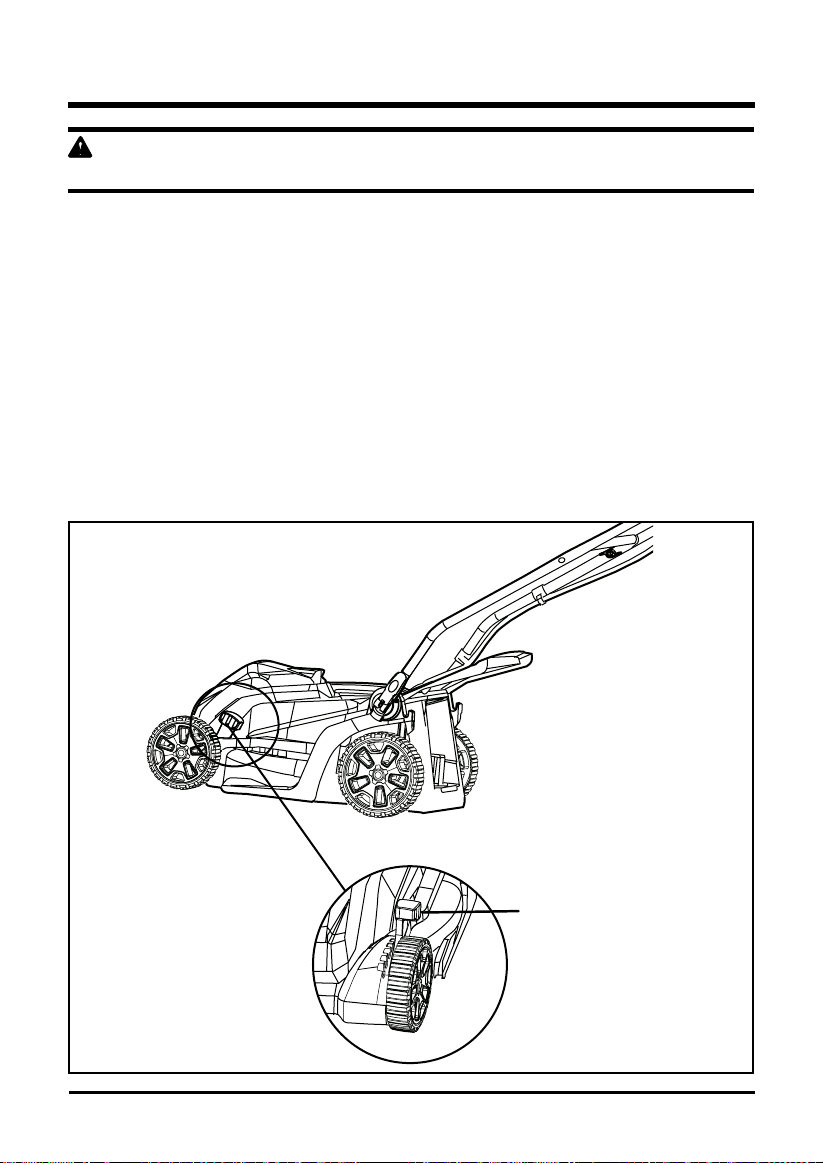
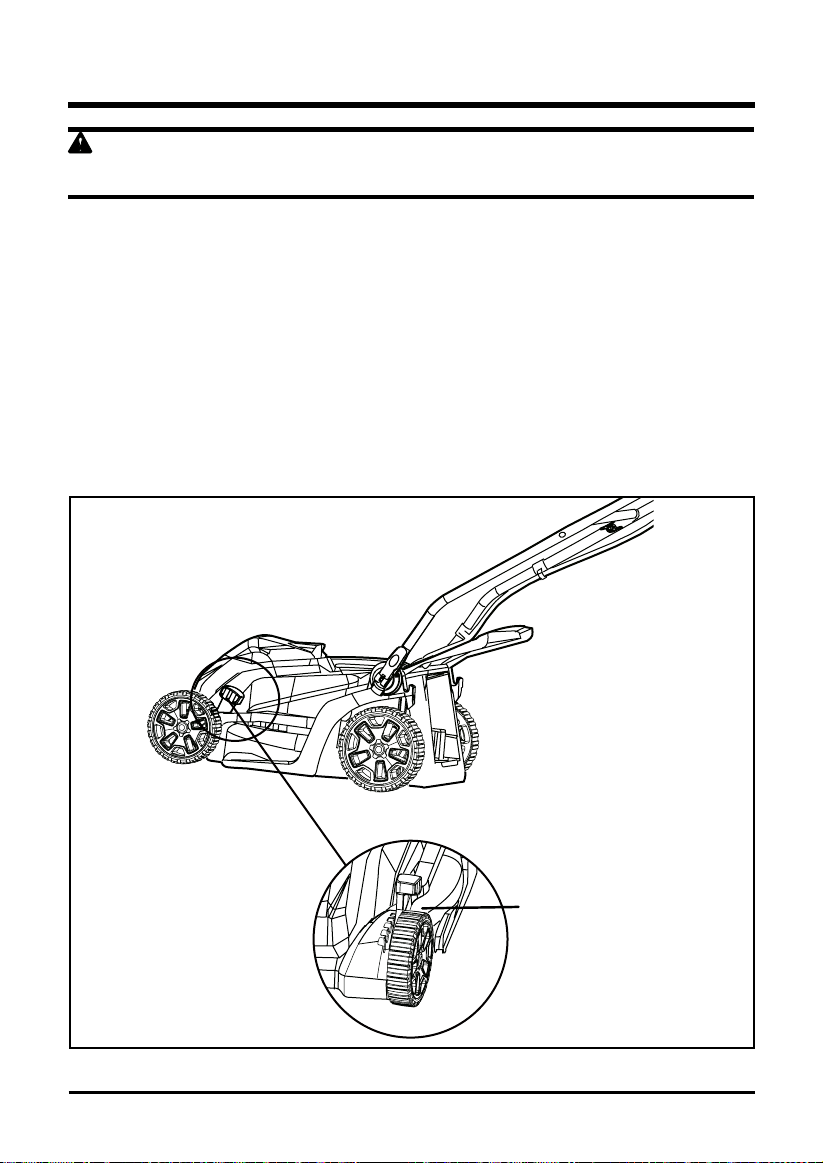
CUTTING HEIGHT ADJUSTMENT (See Figure 7)
When shipped, the wheels on the mower are set to the lowest cutting position. Before using the
mower for the rst time, raise the cutting position to the height best suited for your lawn. The
average lawn should be between 1 1/2" to 2" (3.8 to 5 cm) during cool months and between 2"
and 3 1/2" (5 cm to 8.3 cm) during hot months.
To adjust the blade height:
• To raise the blade height, grasp the height adjustment lever (1) and move it toward the back of
the mower.
• To lower the blade height, grasp the height adjustment lever (1) and move it toward the front of
the mower.
OPERATING YOUR LAWN MOWER
18
OPERATING YOUR LAWN MOWER
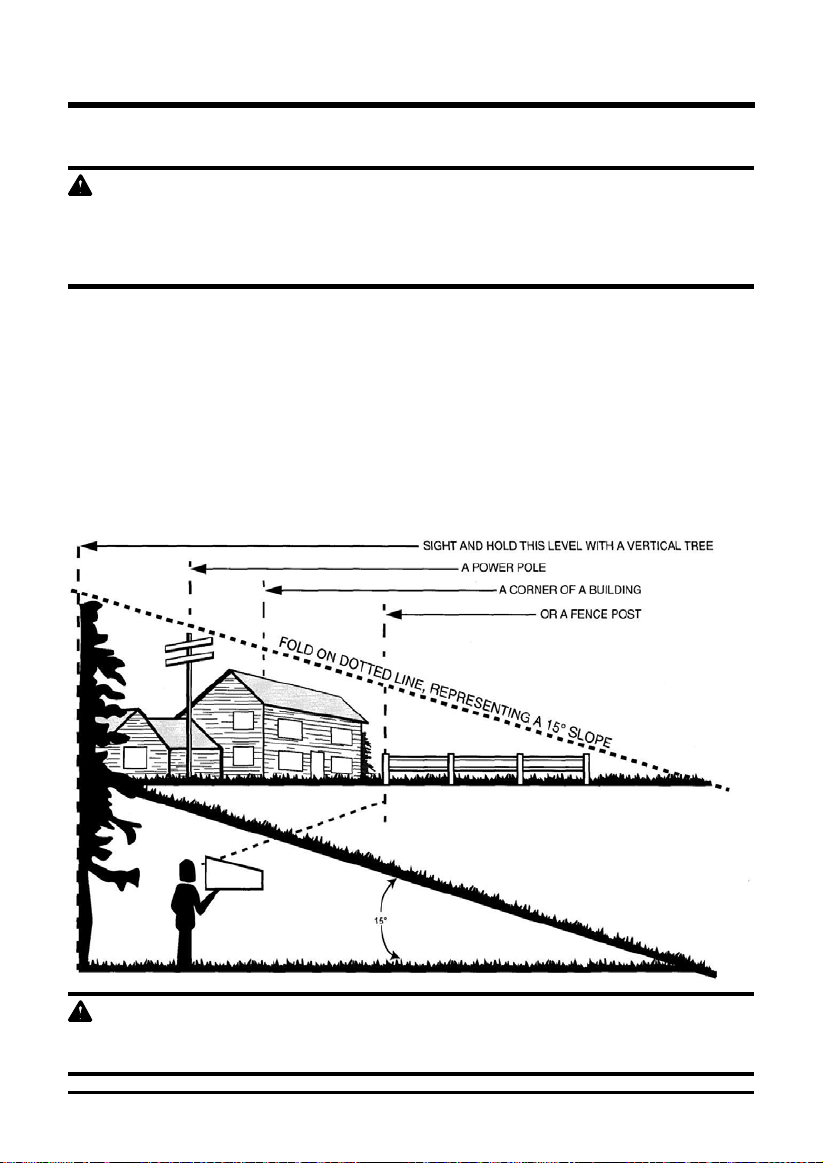
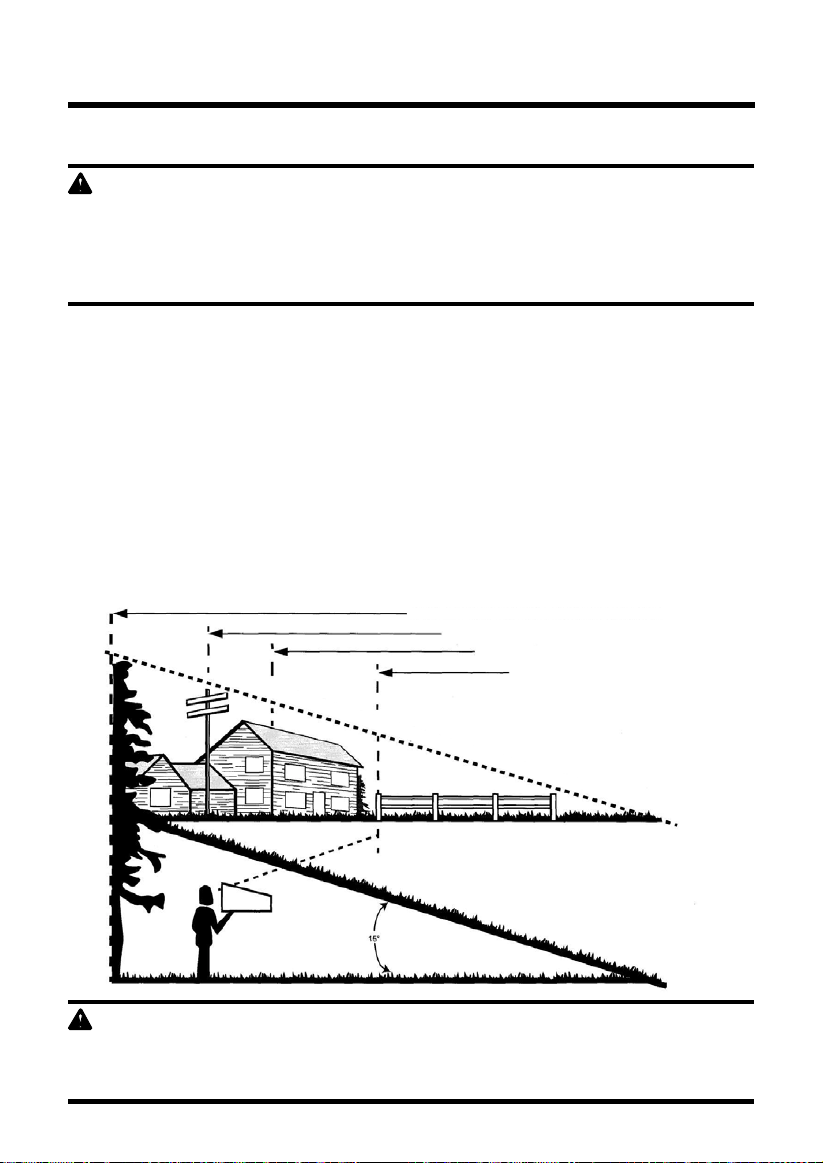
SLOPE GAUGE (See Figure 8)
WARNING
Slopes are a major factor related to accidents involving slips and falls, which can result in severe
injury. Operating the mower on a slope requires extra caution. If you feel uneasy on a slope,
do not mow it. For your safety, use the slope gauge that is included as part of this manual to
measure slopes before operating this unit on a sloped or hilly area.
• Mow across the face of a slope, and never up and down. Exercise extreme caution when
changing direction on a slope.
• Watch for holes, ruts, rocks, hidden objects, or bumps that may cause a slip or a trip. Tall
grass can hide obstacles.
• Always be sure of your footing. If you feel like you are losing your balance, release the blade/
motor control handle immediately. The blade will stop rotating within 3 seconds.
• Do not mow near drop-offs, ditches, or embankments, because you could lose your footing or
balance.
• Do not mow a slope that has an angle of greater than 15°, as determined using the slope gauge.
• Do not mow wet or damp grass. Unstable footing can cause slipping.
WARNING
Do not mow a slope that has an angle of greater than 15° (a rise of approximately 2 1/2’ [.75 m]
every 10’ [3 m]). Mow across the face of a slope, and never up and down.
Fig. 8

19
OPERATING YOUR LAWN MOWER
MOWING TIPS
NOTE: A sharp blade will greatly enhance the performance of the mower, especially when cutting high grass.
Be sure to check the blade and to sharpen it at least once per year, as described in the Maintenance section.
• Verify that the lawn is free of stones, sticks, wires, and other objects that could damage
the blades or the motor. These objects could be accidentally thrown by the mower in any
direction, and could cause serious personal injury to the operator and to others. In order to
prevent electric shock, do not operate the mower in damp or wet conditions.
• Do not mow in circles. Travel back and forth across the lawn.
• When cutting thick grass, reduce walking speed in order to allow for a more effective cut and
a proper discharge of the clippings.
• For a healthy lawn, always cut off one-third or less of the total length of the grass. The
average lawn should be approximately 1 1/2 to 2” (3.8 to 5 cm) long during cool months, and
between 2" to 3 1/4" (5 cm to 8.3 cm) long during hot months.
• MULCHING TIPS
NOTE: INSPECT THE AREA WHERE THE MOWER IS TO BE USED, AND REMOVE ALL STONES,
STICKS, WIRE, BONES, AND OTHER DEBRIS THAT MIGHT BE THROWN BY THE ROTATING BLADE.
• Release the switch to turn the mower OFF when crossing any graveled area (stones can be
thrown by the blade).
• Set mower to the highest cutting height when mowing on uneven ground or in tall weeds.
• For effective mulching, do not cut wet grass, because it tends to stick to the underside of
the deck, preventing proper mulching of grass clippings. New or thick grass may require a
narrower cut. The ground speed should be adjusted to the condition of the lawn. If mowing
has been delayed and the grass has been allowed to grow longer than 4" (10 cm), mow the
lawn twice in order to reduce the grass height to a maximum of 3 1/4” (8.3 cm).
• Walk at a steady pace. Overlap the cutting rows. Do not let the grass get too tall. If the grass
gets too long, start at the highest cutting position and work down to the desired cutting height.
WARNING
If you strike a foreign object, stop the motor and remove the battery. Thoroughly inspect the mower
for any damage. Repair any damage before operating the mower. Excessive vibration of the mower
during operation is an indication of damage. Thoroughly inspect the mower and repair any damage
before operating the mower.
20
OPERATING YOUR LAWN MOWER
Fig. 9
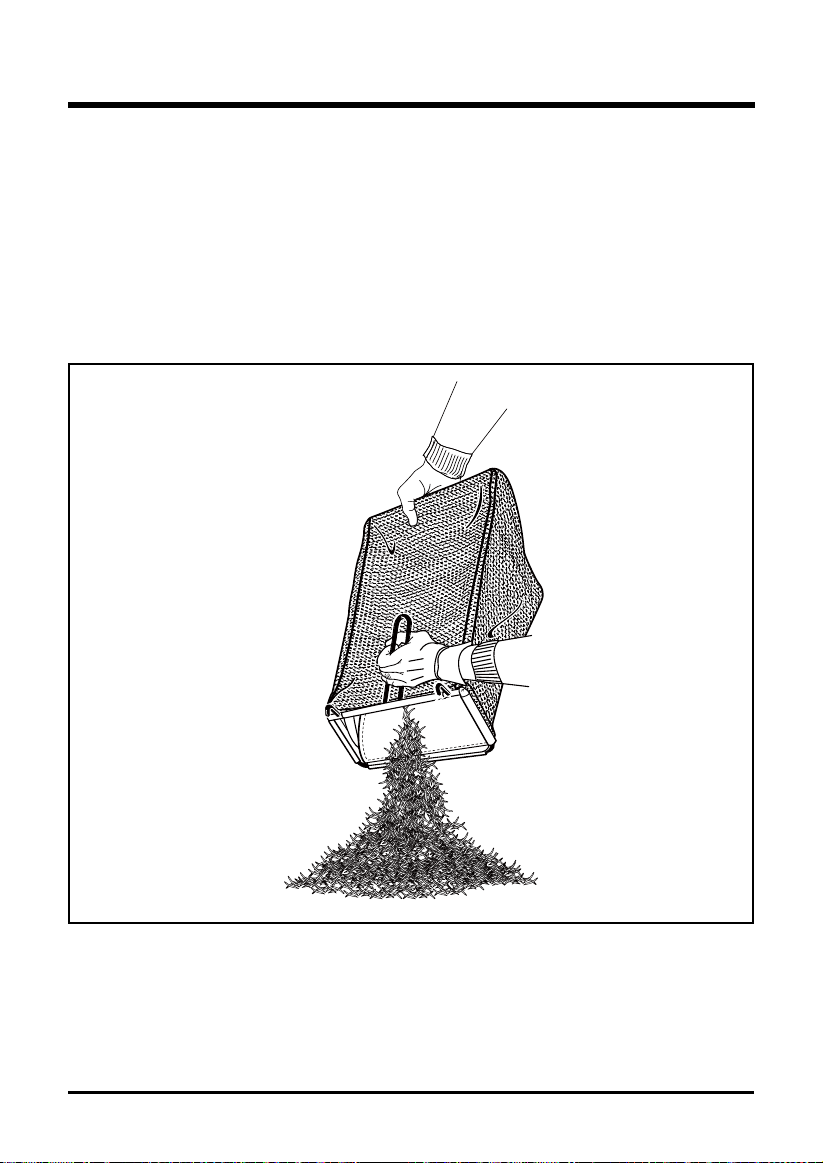
EMPTYING THE GRASS CATCHER BAG (See Figure 9)
• Stop mower, allow blades to completely stop, and remove the battery.
• Lift the rear chute cover.
• Lift the grass catcher bag by its handle to remove from mower.
• Empty grass clippings.
• Lift the rear chute cover and reinstall the grass catcher bag as described earlier in this
manual.
21
MAINTENANCE
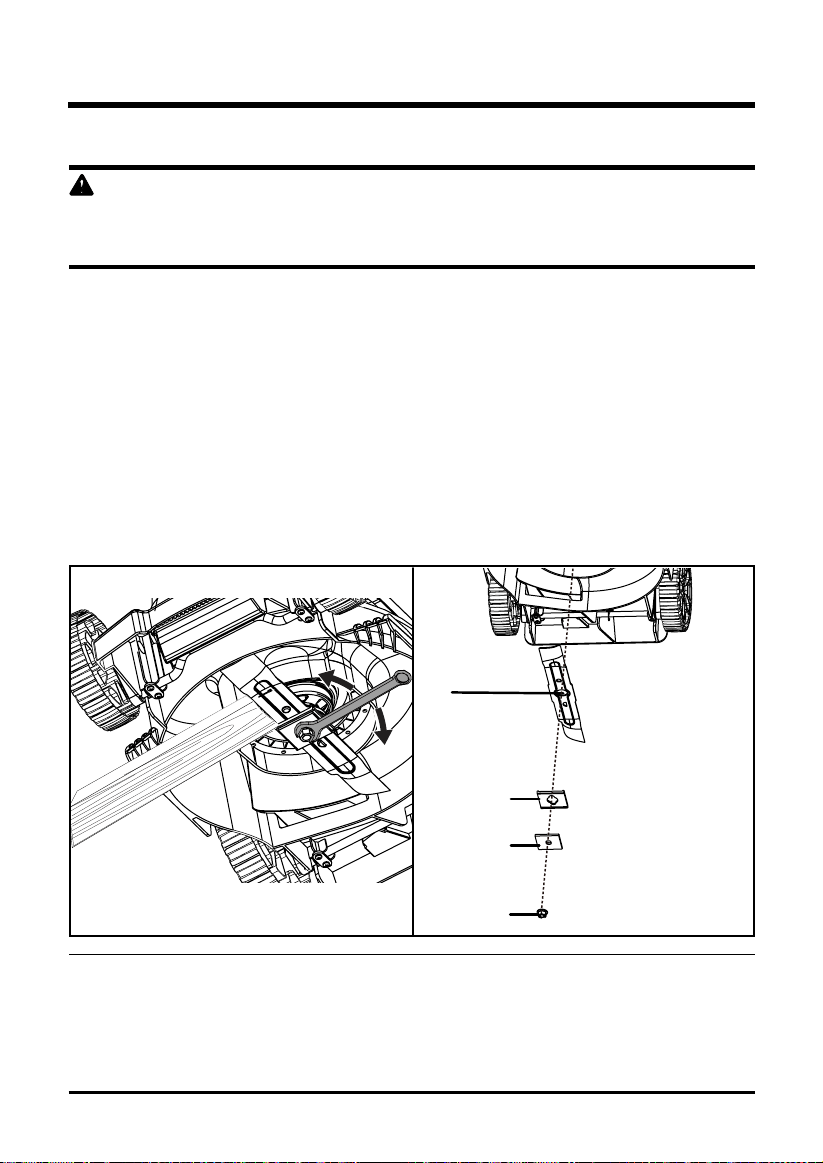
REPLACING THE CUTTING BLADE (See Figure 10-11)
WARNING
Always protect your hands by wearing heavy gloves and/or wrapping the cutting edges with rags
or other materials when performing any maintenance on the blades. ALWAYS remove the battery
when servicing or transporting the mower.
Use only a GREENWORKS replacement blade.
• REMOVE BATTERY.
• While wearing leather padded gloves, wedge a block of wood between the blade and the
mower deck in order to prevent the blade from turning when the nut is being removed.
• Using a 15 mm wrench or socket, loosen the blade nut (1) by turning the nut "COUNTER
CLOCKWISE" to loosen.
• Remove the blade nut (1), the square washer(2), the insulator washer(3), and the blade.
• To re-install the blade, position the blade with the cutting edges toward the ground. Assemble
the blade nut, the square washer, and the insulator washer as shown. Using a 15 mm socket
or wrench, turn the blade nut "CLOCKWISE” in order to secure the blade.
NOTE: Be sure to replace the parts in the exact order in which they were removed. When installing the cutting
blade, verify that it is installed with the curved ends pointing toward the mower deck, and not toward the
ground. Refer to the schematic drawing on page 29 of this manual.
Fig. 11Fig. 10
2
1
4
3

22
MAINTENANCE
CLEANING THE MOWER
WARNING
In order to reduce the risk of electric shock, do not expose the mower to water. The underside of
the mower deck should be cleaned after each use, because grass clippings, leaves, dirt, and other
debris will accumulate, which will cause rust and corrosion.
Remove any build-up of grass and leaves on or around the motor cover (do not use water).
Occasionally wipe the mower clean with a dry cloth. If debris builds up on the underside of the
mower during use, stop the motor, disconnect it from the battery, and then tilt the mower forward
or on its side, and scrape it clean using an appropriate tool.
STORING THE MOWER
The following steps should be taken in order to prepare the lawn mower for storage.
• Clean the mower as described in the previous section.
• Inspect the blade, and replace it or sharpen it, if required (refer to the Maintenance section).
• Lubricate the mower.
• Store the mower in a dry, clean location. Do not store it next to corrosive materials, such as
fertilizer or rock salt.
• Store the mower indoors, in a cool, dry place, out of the reach of children. Do not cover the
lawn mower with a solid plastic sheet. Plastic coverings trap moisture around the mower,
which causes rust and corrosion.
The handle may be folded away completely for storage.
(See Figure 2)
• Lift up the nuts on the sides of the upper handle to unlock, and fold the upper handle down.
• Lift up the quick release fasteners on the side of the lower handle to unlock, pull outwards
on each side of the lower handle, and lift the sides of the lower handle past the edges of the
handle mounting brackets. Fold the lower handle forward. Make sure not to bend or kink the
power cord.
• Remove the battery and store it in a cool dry location, if possible. Charge the battery every
two weeks when not in use in order to increase its life.
• Remove the battery and store in a secure location out of the reach of children. Removal of the
battery is not required for storage.
WARNING
This battery must be charged when in storage to maintain running life.

23
SERVICE
• When servicing the mower, use only replacement parts that are available from the
manufacturer. In order to obtain replacement parts, call the toll-free helpline, at 1-888-909-
6757. The use of parts that do not meet the original equipment specifications may lead to
improper performance, and may compromise safety.
• Before cleaning, repairing, or inspecting, verify that the blade and all moving parts have
come to a complete stop, and remove the battery. Remove the battery when making any
adjustments or when any of the four wheels must be lifted off the ground.
• Keep the handles dry, clean, and free of oil and grease.
• In order to reduce the risk of re, keep the motor free of grass, leaves, and debris build-up.
• Check the blade and motor mounting bolts for proper tightness frequently. Visually inspect
blade for damage (e.g., bent, cracked, or worn).
• For best and safest performance, maintain the mower with care. Keep the mower blade sharp
and clean. Mower blades are sharp, and can cut. Wrap the blades or wear gloves, and use
extracaution when servicing.
• Keep all nuts, bolts, and screws tight in order to be sure that the equipment is in safe working
condition.
• Never tamper with safety devices. Check them regularly for proper operation.
• After striking a foreign object, stop the motor.Thoroughly inspect the mower for any damage.
Repair any damage before operating the mower.
• The grass catcher components and trail shield are subject to wear and damage, which could
expose moving parts or allow objects to be thrown. As a safety precaution, check these
components frequently, and immediately replace any parts that show signs of wear, or that
are cracked or broken. Use original equipment manufacturer's (OEM) parts only, as listed in
this manual.
• When it is not in use, store the mower indoors in a dry area, and out of the reach of children.
WARNING
ALWAYS REMOVE THE BATTERY WHEN SERVICING OR TRANSPORTING THE MOWER.

24
ENVIRONMENTALLY SAFE BATTERY DISPOSAL
The batteries used in this mower's battery pack contain the following toxic and corrosive material:
LITHIUM-ION.
WARNING
Toxic materials must be disposed of in a specied manner in order to prevent contamination of the
environment. Before disposing of damaged or worn out Lithium-Ion battery packs, contact your
local waste disposal agency for information and specic instructions. Take the batteries to a local
recycling and/or disposal centre that is certied for disposal. If the battery pack cracks or breaks,
whether it leaks or not, do not recharge it and do not use it. Dispose of it and replace it with a new
battery pack. DO NOT ATTEMPT TO REPAIR IT!
Follow these instructions in order to avoid injury and the risk of re, explosion, or electric shock,
and to avoid damage to the environment:
• Cover the battery's terminals with heavy-duty adhesive tape.
• Do not attempt to remove or destroy any of the components of the battery pack.
• Do not attempt to open the battery pack.
• If a leak develops, the electrolytes that are released are corrosive and toxic. Do not get the
solution in the eyes or on the skin, and do not swallow it.
• Do not place batteries in regular household trash.
• DO NOT incinerate batteries.
• DO NOT place batteries where they will become part of any waste landll or municipal solid
waste stream.
• Dispose of batteries at a certied recycling or disposal centre.

25
TROUBLESHOOTING
PROBLEM POSSIBLE CAUSE SOLUTION
The mower does
not start.
The mower cuts
the grass unevenly.
The mower does
not mulch properly.
The mower is hard
to push.
The mower is
excessively noisy
and vibrates.
The battery is not charged.
The switch is defective.
Grass jammed at blade.
The battery is not attached to
the motor.
Battery may require service or
replacement.
The lawn is rough or uneven.
The cutting height is not set
properly.
Wet grass clippings are sticking
to the underside of the deck.
The mulching plug is missing.
The grass is too tall, or the
cutting height is too low.
The rear of the mower housing
and the blade are dragging in
thick grass.
The motor shaft is bent.
The blade is unbalanced.
Charge the battery.
Replace the switch (call the tollfree
helpline, at 1-888-909-6757
Remove battery; check under deck for
jams.
Check the connection between the motor
connector and the battery.
Call toll free helpline, at 1-888-909-6757
or replace battery.
Check the mowing area.
Move the wheels to a higher setting.
Wait until the grass dries before mowing.
Install the mulching plug.
Raise the cutting height.
Empty the grass clippings from the grass
catcher bag.
Stop the motor, and inspect for damage.
Repair before restarting. If vibration
persists, call the toll free helpline (1-888-
909-6757)

26
GREENWORKS™ hereby warranties this product, to the original purchaser with proof of
purchase, for a period of four (4) years against defects in materials, parts or workmanship.
GREENWORKS™, at its own discretion will repair or replace any and all parts found to be
defective, through normal use, free of charge to the customer. This warranty is valid only for
units which have been used for personal use that have not been hired or rented for industrial/
commercial use, and that have been maintained in accordance with the instructions in the
owners’ manual supplied with the product from new.
ITEMS NOT COVERED BY WARRANTY:
1. Any part that has become inoperative due to misuse, commercial use, abuse, neglect,
accident, improper maintenance, or alteration.
2. The unit, if it has not been operated and/or maintained in accordance with the owner's
manual.
3. Normal wear, except as noted below.
4. Routine maintenance items such as lubricants, blade sharpening.
5. Normal deterioration of the exterior nish due to use or exposure.
GREENWORKS HELPLINE (1 888 90WORKS):
Warranty service is available by calling our toll-free helpline at 1 888 909 6757 (1 888
90WORKS).
TRANSPORTATION CHARGES:
Transportation charges for the movement of any power equipment unit or attachment are the
responsibility of the purchaser. It is the purchaser’s responsibility to pay transportation charges
for any part submitted for replacement under this warranty unless such return is requested in
writing by GREENWORKS.
LIMITED FOUR-YEAR WARRANTY
27
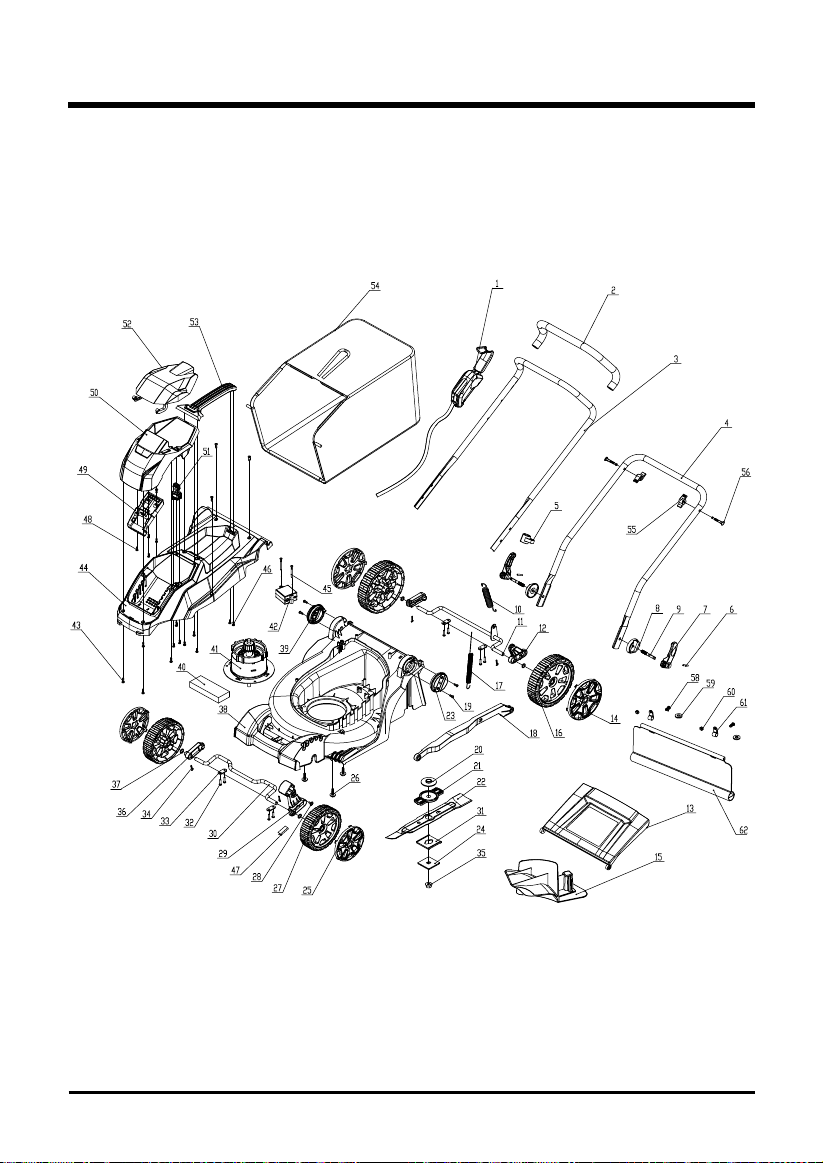
EXPLODED VIEW
42
41
51
54
22
4
38
44
39
23
35
21
31
15
13
17
56
8
55
53
24
20
49
50
52
26
30
11
28
32
12
33
29
10
18
37
36
5
48
46
19
43
47
3
1
2
7
6
9
45
27
25
16
14
40
34
58
59
60
61
62

28
PARTS LIST
ITEM NO. PART NO. DESCRIPTION QTY
1 311031558
Switch box assembly
1
2 34901461A
Sponge
1
3
4
5
333031558
Upper handle
Lower handle
Wire hook
1
1
1
333041558
3411135-1
8 341211558
Washer
2
9 322011558
Stud
2
7 34102466-1
Quick release fasteners
2
6 32901466
Pin
2
12 341191558
Rear wheel axle bracket
1
13 341051580
Rear cover
1
14 341131558
Decorative cover
2
11 311121558
Rear wheel axle
1
15 341091558
Mulching plug
1
16 341121558
7" Wheel
2
17 333071559
Tention spring (rear cover)
1
18 341081558
Height adjustment link bar
1
10 332031558
Height adjustment tension spring
1
19 3220505-1
Screw
4
23 341201558
Washer
1
20 3320238A-1
Axle sleeve
1
21 34117470
Blade holder
1
24 3331435A
Washer
1
25 341111558
Decorative cover
2
26 32200135
Bolt
3
31 3410535
Blade insulator
1
27 341101558
6" Wheel
2
28 322031558
Screw
1
29 341071558
Height adjustment handle
1
32 32204113
Screw
8
30 333011558
Front wheel axle
1
22 33304493
Blade
1

29
PARTS LIST
ITEM NO. PART NO. DESCRIPTION QTY
55 3410835AB
Screw cap
2
56 322021558
Bolt
2
57 3220518
Screw
2
58 3290305
Flat washer
2
59 3221237
Nut
2
60 3330490-1
Wire hook
2
61 34201493
14” rear shield
2
35 3221037
Nut
1
33 33306470
Height adjustment press plate
4
34 3290135
Cotter pin
4
36 34105493
Fixing block
2
37 33310488
Washer
4
38 341011580
14" Deck
1
39 341221558
Washer
1
40 339011558
Clump weight
1
41 36101470A
Motor
1
42 36202487T1
40V PCB board
1
43 322021527
Screw
9
44 341021558
Cover
1
45 322042558
Screw
2
46 3220504
Screw
5
47 322041558
Clip reed
1
48 32210302A
Screw
6
49 341141558
Block
1
50 341031558B
Battery door
1
51 311011337
Key assembly
1
52 341041558
Transparent cover
1
53 341061558
Handle
1
54 311061580 1Grass catcher bag assembly

TOLL-FREE HELPLINE: 1-888-90WORKS
(888.909.6757)
Greenworks Tools
P.O. Box 1238
Mooresville, NC 28115
Rev: 01 (11-01-2016) Printed in China on 100% Recycled Paper
MO40B00
Antes de hacer funcionar esta herramienta, lea cuidadosamente todas las
reglas de seguridad y las instrucciones.
Manual del Propietario
LÍNEA DE AYUDA GRATUITA: 1-888-90WORKS
(888.909.6757)
www.GreenWorksTools.com
Cortacésped de 14” de 40V sin cables

2
Índice ................................................................................................................................... 2
Especicaciones del producto ............................................................................................. 2
Información sobre seguridad ............................................................................................... 3
Símbolos .............................................................................................................................. 8
Conozca su podadora ........................................................................................................ 10
Armado ...............................................................................................................................11
Funcionamiento ................................................................................................................. 16
Mantenimiento ................................................................................................................... 21
Almacenamiento ................................................................................................................ 23
Eliminación de la batería que no daña el medio ambiente. ................................................ 24
Corrección de problemas ................................................................................................... 25
Garantía ............................................................................................................................. 26
Vista desarrollada .............................................................................................................. 27
Lista de piezas ................................................................................................................... 28
ESPECIFICACIONES DEL PRODUCTO
CORTACÉSPED DE 14” DE 40V SIN CABLES
Tipo de batería. ..................................................................................Ión de litio de 40 V
Tiempo de carga. ................................................................................................. 2 horas
Velocidad ........................................................................................................ 3600 RPM
Ancho de plataforma de corte ................................................................14 pulg. (35 cm)
Línea de corte ............................................................... 1 1/4 y 3 1/8 pulg. (3,0 - 8,0 cm)
Funciones ........................ 2-en-1: triturado de compuesto orgánico, almacenaje trasero
Peso (con batería) ......................................................................................36 lb s (16 kg)
ÍNDICE

3
INFORMACIÓN DE SEGURIDAD
FUNCIONAMIENTO GENERAL
ADVERTENCIA: cuando se utiliza maquina de cortadoras de césped, las precauciones básicas
de seguridad siempre debe ser seguido para reducir el riesgo de incendio, descarga eléctrica, y
lesiones personales, entre ellas las siguientes:
GUARDAR ESTAS INSTRUCCIONES
ADVERTENCIA
Este símbolo indica instrucciones importantes de seguridad. Si no se siguen estas instrucciones,
la seguridad o propiedad personal del operador y otras personas podrían verse en peligro. Lea
y comprenda todas las instrucciones en este manual antes de intentar usar la podadora. El
incumplimiento de estas instrucciones podría ocasionar lesiones personales.
PELIGRO
Esta podadora se diseñó para funcionar de acuerdo con las normas de uso seguro incluidas
en este manual. Como sucede con cualquier tipo de equipo eléctrico, un descuido o error del
operador pueden ocasionar lesiones graves. Esta podadora puede amputar partes del cuerpo
y arrojar objetos. El incumplimiento de las siguientes normas de seguridad puede resultar en
lesiones graves o la muerte. Cuando utilice podadoras eléctricas, tome siempre precauciones
de seguridad básicas para reducir el riesgo de incendios, descargas eléctricas y lesiones
personales.
ADVERTENCIA
Al utilizar podadoras de césped eléctricas, se debe siempre obedecer las precauciones básicas
de seguridad para reducir los riesgos de incendio, choques eléctricos y lesiones personales.
ADVERTENCIA
Sólo aquellas personas que leyeron, comprendieron y que seguirán las advertencias e
instrucciones en este manual y en la podadora deben utilizarla.
• Lea atentamente todas las instrucciones en la podadora y este manual antes de intentar
ensamblar y usar la podadora. Guarde el manual en un lugar seguro para referencias futuras
y consúltelo regularmente.
• Familiarícese con todos los controles y su correcto funcionamiento. Sepa cómo detener la
podadora y desactivar la alimentación ante una emergencia.
• Para evitar el contacto con la cuchilla o lesiones ocasionadas por un objeto lanzado,
permanezca en la zona de operación detrás de las manijas y mantenga a niños y transeúntes
a al menos 30 m (100 pies) de distancia de la podadora si está funcionando. Detenga el motor
de inmediato si alguien ingresa al área de trabajo.
• Inspeccione minuciosamente el área donde se utilizará la podadora. Elimine piedras, palos,
cables, juguetes y otros objetos con los que alguien se pueda tropezar o que la cuchilla
pueda lanzar. Los objetos que lance la podadora pueden ocasionar lesiones personales
graves.

4
INFORMACIÓN DE SEGURIDAD
• Establezca su patrón de poda de tal manera que evite descargar material del lado de calles,
aceras, transeúntes, etc. No descargue material contra una pared u obstrucción. Esto podría
hacer que el material descargado rebote contra el operador.
• Siempre use protección ocular adecuada para protegerse lo ojos cuando esté usando la
podadora o realizando algún ajuste o reparación. Los objetos lanzados por la podadora que
rebotan pueden ocasionar lesiones oculares graves.
• Siempre utilice una máscara facial o una máscara para polvo si usa la podadora en
condiciones de polvo.
• Use la ropa adecuada. No use ropa holgada ni joyas que puedan quedar atrapadas en las
piezas en movimiento. Se recomienda el uso de guantes de protección y calzado de seguridad.
• Muchas lesiones ocurren como resultado de pasar la podadora sobre los pies durante una
caída provocada por resbalones o tropiezos. No use la podadora con pies descalzos ni con
sandalias o zapatos livianos (de lona, por ejemplo). No se sostenga de la podadora si se está
cayendo. Suelte la manija inmediatamente.
• Nunca tire hacia usted la podadora mientras camina. Si debe retroceder la podadora para evitar
una pared u obstáculo, mire primero abajo y atrás para evitar tropezarse y luego siga estos pasos:
• Aléjese de la podadora hasta estirar completamente los brazos.
• Asegúrese de estar bien equilibrado.
• Tire la podadora lentamente hacia usted.
• No use la podadora en tareas que no sean para las que fue diseñada. No fuerce la podadora.
• No haga funcionar el cortacésped bajo los efectos de alcohol o cualquier sustancia.
• Manténgase alerta: No utilice el cortacésped cuando esté cansado. Preste atención a lo que
está haciendo. Utilice el sentido común.
• No ponga las manos ni los pies cerca de piezas giratorias o debajo de la plataforma de corte.
El contacto con las cuchillas puede producir la amputación de manos y pies.
• No intente ajustar las ruedas o la altura de corte con el motor en funcionamiento.
• Evite condiciones peligrosas. No use la máquina bajo la lluvia ni en césped mojado o
húmedo.
• Corte el césped solamente con luz de día o una buena luz articial. No apresure un trabajo
de poda.
• Detenga la cuchilla cuando cruce entradas de gravilla, senderos o caminos.
• Si el cortacésped empieza vibrando demasiado, detenga el motor, retire la batería y averigüe
la causa inmediatamente. La vibración es generalmente una señal de que el cortacésped no
funciona correctamente o necesita reparación.
• Apague el motor y espere a que la cuchilla se detenga completamente antes de retirar el
colector de césped o desobstruir el ducto. La cuchilla continúa girando por unos minutos
después de que el motor se ha apagado. No coloque ninguna parte del cuerpo en el área de
la cuchilla hasta estar seguro de que ha dejado de girar.
• Nunca use la podadora sin las guardas apropiadas, cubierta de descarga, colector de
césped, control del motor y la cuchilla u otros dispositivos de seguridad en su lugar y en
funcionamiento. No use la podadora si los dispositivos de seguridad están dañados, ya que
esto puede ocasionar lesiones.
• No fuerce el cortacésped. Realizará un trabajo mejor y más seguro a la velocidad para la que

5
INFORMACIÓN DE SEGURIDAD
ha sido diseñada.
• Guarde el cortacésped que no use en el interior. Cuando no está en uso, el cortacésped debe
guardarse en un lugar interior seco, bajo llave, fuera del alcance de los niños.
• Mantener el cortacésped. Mantenga los bordes de corte afilados y limpios para un mejor
rendimiento y seguridad.
• Si la máquina golpea un objeto extraño, siga estos pasos:
• Pare el cortacésped, suelte el interruptor.
• Quite la batería.
• Verique si hay algún daño.
• Repare cualquier daño antes de volver a poner en funcionamiento y utilizar el cortacésped.
• No cargue la podadora bajo la lluvia o en un lugar húmedo.
• Quite o desconecte la batería antes del mantenimiento, limpieza o retirada de material del
cortacésped.
• Inspeccione periódicamente los cables del cortacésped y si están dañados llévelos a un
centro de servicio autorizado.
• Utilice solamente cuchillas de recambio originales.
• Guardar en un lugar interior y no exponerlo a la lluvia ni al agua. Tampoco debe exponerse a
la luz directa del sol.
SEGURIDAD DE LOS NIÑOS
Pueden ocurrir accidentes trágicos si el operador no está atento a la presencia de niños.
• Mantenga a los niños fuera del área de trabajo y bajo estricta vigilancia de un adulto
responsable.
• No permita que niños menores de 14 años usen esta podadora. Los niños de 14 años o más
deben leer y comprender las instrucciones de funcionamiento y las normas de seguridad en
este manual, además de ser entrenados y supervisados por sus padres.
• Esté alerta y apague la podadora si un niño o cualquier otra persona ingresan al área de
trabajo.
• Antes y mientras se está moviendo hacia atrás, mire hacia abajo y atrás y verique que no
haya niños.
• Tenga extremo cuidado cuando se acerque a esquinas ciegas, entradas de puertas, arbustos,
árboles u otros objetos puedan bloquearle la vista de un niño que pudiera correr hacia la podadora.
BATERÍA Y CARGADOR
PRECAUCIÓN
UTILICE BATERÍAS DE REPUESTO APROBADAS ÚNICAMENTE. OTRAS BATERÍAS PUEDEN
OCASIONAR DAÑOS A LA PODADORA. Úsese con baterías GREENWORKS 4AH de 40 V
(#29472).
NORMAS DE SEGURIDAD DE LA BATERÍA
• No se necesita conectar a una toma de corriente las herramientas de baterías; por lo tanto,
siempre están en condiciones de funcionamiento. Esté consciente de los posibles peligros

6
INFORMACIÓN DE SEGURIDAD
cuando no esté usando la herramienta de baterías o cuando esté cambiando los accesorios
de la misma. Con el cumplimiento de esta regla se reduce el riesgo de una descarga
eléctrica, incendio o lesión corporal seria.
• No coloque las herramientas de batería o las pilas cerca del fuego o fuentes de calor. Esto
reducirá el riesgo de explosiones y lesiones.
• No aplaste, deje caer o dañe la batería. Nunca utilice una batería o cargador que se ha
caído, aplastado, recibido un golpe contundente o ha sido dañado(a) de alguna manera. Las
baterías dañadas pueden sufrir explosiones. Deseche de inmediato toda batería que haya
sufrido una caída o cualquier daño.
• Las baterías pueden explotar en presencia de una fuente de inamación, como una luz guía.
Para reducir el riesgo de lesiones corporales serias, nunca use un producto inalámbrico
en presencia de llamas vivas. La explosión de una batería puede lanzar fragmentos y
compuestos químicos. Si ha quedado expuesto a la explosión de una batería, lávese de
inmediato con agua.
• No cargue ninguna batería en lugares mojados o húmedos. Con el cumplimiento de esta
regla se reduce el riesgo de una descarga eléctrica.
• Para obtener resultados óptimos, debe cargarse la batería en un lugar donde la temperatura
esté entre 45°F (7°C) y 104°F (40°C). No la guarde a la intemperie ni en el interior de vehículos.
• En condiciones extremas de uso o temperatura las baterías pueden emanar líquido. Si el
líquido llega a tocarle la piel, lávese de inmediato con agua y jabón. Si le entra líquido en los
ojos, láveselos con agua limpia por lo menos 10 minutos, y después busque de inmediato
atención médica. Con el cumplimiento de esta regla se reduce el riesgo de lesiones
corporales serias.
• Cuando no esté utilizándose el paquete de baterías, manténgalo lejos de otros objetos
metálicos, como clips, monedas, llaves, clavos, tornillos o otros objetos metálicos, pequeños
que puedan establecer conexión entre ambas
• terminales. Establecer una conexión directa entre las dos
• terminales de las baterías puede causar quemaduras o incendios.
• Siempre retire el paquete de baterías de la herramienta cuando esté ensamblando partes,
realizando ajustes, limpiando o cuando ésta no esté en uso. Si retira el paquete de baterías,
evitará arranques accidentales que podrían provocar lesiones graves.
• Siempre retire el paquete de baterías antes de guardar el dispositivo.
• Cuando la batería esté completamente cargada, desconecte el cargador del suministro de
corriente y retire el paquete de baterías del cargador.
• Siempre póngase protección ocular con protección lateral con la marca de cumplimiento de la
norma ANSI Z87.1. Si no cumple esta advertencia, los objetos que salen despedidos pueden
producirle lesiones serias en los ojos.
• Mantenga el paquete de baterías seco, limpio y sin aceite ni grasa. Use siempre un paño
limpio para limpiar. Nunca use líquido de frenos, gasolina, productos derivados del petróleo o
solvente para limpiar el paquete de baterías.
• No abra ni desmonte la batería. El electrolito liberado es corrosivo y puede causar daño a los
ojos o la piel. Puede ser tóxico si se ingiere.
CUIDADO ADECUADO DE LA BATERÍA
Almacenamiento fuera de temporada

77
GUARDAR ESTAS INSTRUCCIONES
INFORMACIÓN DE SEGURIDAD
Para lograr la más larga duración posible de las baterías, se sugiere lo siguiente:
• Retire el paquete de baterías del cargador una vez cargado completamente y listo para
usarse.
Para guardar el paquete de baterías más de 30 días:
• Guarde la batería donde la temperatura sea inferior a 27°C (80°F) y lejos de la humedad.
• Guarde el paquete de baterías cargado 30%-50%.
• Cargue la batería de manera normal, cada seis meses de almacenamiento.
NORMAS DE SEGURIDAD PARA EL CARGADOR
• Cargue la batería en lugares secos exentos de la influencia del clima. No exponga la
podadora ni el cargador a la lluvia. No realice la carga en lugares húmedos. Use el cargador
de la batería en temperaturas de entre 7° y 40 ° C (45° y 104°F). Cuando cargue la batería,
use únicamente el cargador provisto por el fabricante para reducir el riesgo de descarga
eléctrica.
• No maltrate el cable del cargador. Nunca transporte el cargador del cable. No tire del cable
para desconectar el cargador del tomacorriente o de la podadora. No repare la máquina con
el cargador conectado ni con la llave de seguridad colocada.
• No utilice un cargador dañado. Cambie los cables o el cargador de inmediato.
• Mantenga la podadora y el cargador alejados de agua, fuentes de calor (radiadores,
calentadores, estufas, etc.), llamas y químicos. No incinere este producto ya que las baterías
en su interior podrían explotar o sufrir fugas.
• Asegúrese de que el paquete de baterías se asegura en el cargador antes de utilizar.
• El paquete de baterías se siente un poco caliente al tocarse mientras está cargándose. Esto
es normal y no indica ningún problema.
• No coloque el cargador ni el paquete de baterías en ningún área extremadamente calurosa o
fría. Funcionan mejor a la temperatura normal del interior.
• Una vez cargadas completamente las baterías, desconecte el cargador del suministro de
corriente y del paquete de baterías.
ADVERTENCIA
Al transportar o dar servicio a la unidad, quite siempre la batería.
ADVERTENCIA(PROPUESTA 65)
Algo del polvo provocado por las lijas, sierras, trituradoras y taladros eléctricos, y otras
actividades de construcción Contiene químicos reconocidos como causantes de cáncer y
defectos congénitos u otros daños en el aparato reproductivo. Algunos ejemplos de estos
químicos son:
• plomo de pinturas con base de plomo
• sílice cristalina de ladrillos, cemento y otros productos de mampostería
• arsénico y cromo de madera tratada con químicos
El riesgo que corre a la exposición de estos químicos varía dependiendo de la frecuencia con
que realiza estos tipos de trabajos. Para reducir la exposición a estos químicos: trabaje en un
área bien ventilada y con el equipamiento de seguridad aprobado, como por ejemplo máscaras
especialmente diseñadas para ltrar laspartículas microscópicas.
88
SÍMBOLOS
Algunos de los siguientes símbolos pueden ser usados en este producto. Obsérvelos y aprenda su
signi cado. Una correcta interpretación de estos símbolos le permitirá utilizar el producto mejor y de
una forma más segura.
n
o
SÍMBOLO NOM DENOMINACIÓN/EXPLICACIÓN
V Voltios Voltaje
A Amperios Corriente
Hz Hertz Frecuencia (ciclos por segundo)
W Watts Potencia
min Minutos Tiempo
Corriente continua Tipo o característica de corriente
Vitesse à vide Velocidad de giro al no haber carga
/min por minuto Revoluciones, carreras, velocidad supercial,
órbitas, etc. por minuto
Alerta de seguridad Indica un peligro posible de lesiones personales.
Moje Condiciones Ponen No exponga la unidad a la lluvia ni la use en
sobre aviso lugares húmedos.
Lea el manual del operador Para reducir el riesgo de lesiones, el usuario debe
leer y comprender el manual del operador antes de
usar este producto.
Protección ocular Siempre póngase protección ocular con la marca de
cumplimiento de la norma ANSI Z87.1.
Mantenga las manos y los Mantenga las manos y los pies alejados de las
pies alejados. cuchillas y del área de corte.
No extenderse No extienda las manos o los pies por debajo de
la cubierta de la podadora.
No utilizar sobre pendientes No utilice la podadora sobre pendientes superiores
a los 15º. Corte sobre la supercie de las pendientes
y nunca de arriba a abajo.
Mantenga alejadas a las Mantenga a los circunstantes a una distancia
personas presentes mínima de 30 m (100 pies).
Riesgo de rebote Tenga cuidado para que los espectadores que
puedan estar cerca no resulten heridos por objetos
extraños que puedan salir despedidos del
cortacésped.
9
PROTECCIÓN DEL MEDIO AMBIENTE
Los productos eléctricos de desperdicio no deben desecharse con desperdicios
caseros. Por favor recíclelos donde existan dichas instalaciones. Compruebe con su
autoridad local o minorista para reciclar.
La batería contiene material que es peligroso para usted y el medio ambiente. Deberá
extraerla y desecharla por separado en una instalación que acepte baterías de ión-litio.
SERVICIO
El servicio de la producto requiere extremo cuidado y conocimientos técnicos, por lo cual sólo
debe ser efectuado por un técnico de servicio calicado. Para dar servicio a la herramienta, le
sugerimos llevarla al ESTABLECIMIENTO DE SERVICIO AUTORIZADO de su preferencia para
que la reparen. Al dar servicio a la unidad, sólo utilice piezas de repuesto idénticas.
ADVERTENCIA
Para evitar lesiones corporales serias, no intente utilizar este producto sin haber leído y
comprendido totalmente el manual del operador. Si no comprende los avisos de advertencia y
las instrucciones del manual del operador, no utilice este producto. Llame al departamento de
atención al consumidor (1-888-909-6757), y le brindaremos asistencia.
ADVERTENCIA
Cualquier producto en funcionamiento puede lanzar objetos hacia los ojos, lo
cual puede causar serios daños a los mismos. Antes de iniciar la operación de
herramientas de corriente, siempre utilice gafas de seguridad, gafas de seguridad
con protección lateral, y en la medida en que sea necesario, un protector para toda
la cara. Recomendamos la careta protectora de visión amplia encima de los anteojos
normales, o los anteojos protectores estándar con protección lateral. Siempre póngase
protección ocular con la marca de cumplimiento de la norma ANSI Z87.1.
SÍMBOLOS
Las siguientes palabras de señalización y sus signicados tienen el objeto de explicar los niveles
de riesgo relacionados con este producto.
SÍMBOLO SEÑAL SIGNIFICADO
PELIGRO: Indica una situación peligrosa inminente, la cual, si no se evita,
causará la muerte o lesiones serias.
ADVERTENCIA: Indica una situación peligrosa posible, la cual, si no se evita,
podría causar la muerte o lesiones serias.
PRECAUCIÓN: Indica una situación potencialmente peligrosa la cual, si no se
evita, puede causar lesiones leves o moderadas.
PRECAUCIÓN: (Sin el símbolo de alerta de seguridad) Indica una situación que
puede producir daños materiales.
10
Fig. 1
Lea el manual del operador y las normas de seguridad antes de manejar la podadora. Compare
la ilustración en Fig. 1 con la podadora para familiarizarse con la ubicación de los diferentes
controles y ajustes. Guarde este manual para referencia futura.
CONOZCA SU PODADORA
Mango de la caja de
seccionamiento
Botón de arranque
Cable de control
del motor
Tuerca
Baje el
mango
Tapa de la
batería
Rueda
delantera
Palanca de
ajuste de
altura
Rueda
trasera
Tornillos de
liberación
rápida
Caja de la
hierba
Caja de la
hierba
Asa superior
Conector de
triturado

11
DESEMPAQUETADO
• Extraiga cuidadosamente de la caja la herramienta y los accesorios. Asegúrese de que estén
presentes todos los artículos enumerados en la lista de empaquetado.
• Inspeccione cuidadosamente la herramienta para asegurarse de que no haya sufrido ninguna
rotura o daño durante el transporte.
• No deseche el material de empaquetado hasta que haya inspeccionado cuidadosamente la
herramienta y la haya utilizado satisfactoriamente.
• Si hay piezas dañadas o faltantes, le suplicamos llamar al 1-888-909-6757, donde le
brindaremos asistencia.
LISTA DE EMPAQUETADO
• Podadora
• Clavija para compuesto orgánico
• Bolsa colectora de césped
ADVERTENCIA
En caso de que se dañe o falte alguna pieza, no utilice este producto hasta que se hayan
reemplazado las piezas. El uso de un producto al que le faltan piezas o cuyas piezas están
dañadas, puede producir lesiones personales graves.
ADVERTENCIA
No intente modi car este producto o crear accesorios que no fueron recomendados para usar
con este producto. Cualquier alteración o modi cación se considerará como mal uso y podrá
resultar en una condición peligrosa que conducirá a posibles lesiones personales serias.
ADVERTENCIA
No inserte la batería hasta que el montaje sea completo y la unidad esté lista para cortar.
Si la máquina está mal montada, podría arrancar accidentalmente y provocar graves daños
personales.
ADVERTENCIA
Para evitar un arranque accidental que podría causar lesiones corporales serias, retire siempre
la batería del producto al ensamblar las piezas.
ADVERTENCIA
No utilice nunca el cortacésped sin los dispositivos de seguridad adecuados en su lugar y en
perfectas condiciones. Nunca use el cortacésped con dispositivos de seguridad dañados. La
utilización de este producto con piezas dañadas o faltantes podrá causar lesiones personales serias.
• Manual
INSTRUCCIONES DE ENSAMBLADO
INSTRUCCIONES DE ENSAMBLADO
12
DESPLIEGUE Y AJUSTE DE LA EMPUÑADURA (Consulte la gura 2)
• Tire de la empuñadura superior hacia arriba y hacia atrás para elevar la empuñadura hasta
la posición de funcionamiento. Asegúrese de que los mangos encajen en su lugar de forma
segura.
• Apriete la empuñadura superior con los tornillos de liberación rápida a ambos lados.
• Apriete la empuñadura inferior con los tuerca a ambos lados.
Fig. 2
Tuerca
Perno del asa
Tornillos de liberación
rápida
13
INSTRUCCIONES DE ENSAMBLADO
COLOCACIÓN DEL COLECTOR DE CÉSPED (Consulte la gura 3)
• Levante la cubierta del ducto (1).
• Levante el receptor de hierba por su mango (2) y colóquelo debajo de la cubierta del ducto de
modo que los ganchos (3) del receptor de hierba encajen perfectamente en las ranuras de la
abrazadera del asa.
• Suelte la cubierta del ducto (1). Cuando estén correctamente instalados, los ganchos del
receptor de hierba saldrán por las aberturas de la cubierta del ducto.
Fig. 3
Ranuras
Ranuras
3
1
2

14
Fig. 4
INSTRUCCIONES DE ENSAMBLADO
INSTALACIÓN O RETIRO DE LA CLAVIJA PARA COMPUESTO ORGÁNICO
(Consulte la gura 4)
• Para quitar el tapón de la función para cubrimiento con hojarasca , levante la cubierta del
canal (1).
• Tome la manija (2) del tapón de la función para cubrimiento con hojarasca y sáquelo mediante
la manija.
• El tapón de la función para cubrimiento con hojarasca (3) se inserta angulado, por lo que es
necesario ejercer un poco de fuerza para quitarlo.
• Para instalar la bolsa para recolección de grama se debe quitar el tapón de la función para
cubrimiento con hojarasca.
• Al quitar la bolsa para recolección de grama se debe colocar de regreso el tapón de la
función para cubrimiento con hojarasca.
2
1
3
15
INSTRUCCIONES DE ENSAMBLADO
INSTALAR LA BATERÍA (Ver gura 5.)
• Levante y mantenga la cubierta de la batería abierta.
• Coloque la batería en la herramienta. Alinee las nervaduras salientes de la batería con los
surcos del puerto de la batería del producto.
• Asegúrese de que el cierre de la parte inferior de la batería encaja en su lugar y de que la
batería está bien asentada y segura en el producto antes de comenzar a trabajar con ella.
• Inserte la llave de seguridad.
• Si la máquina no se utilizará inmediatamente, no inserte la llave de seguridad.
• Cierre la puerta.
EXTRAER LA BATERÍA (Ver gura 5.)
• Suelte la palanca de arranque para detener el producto.
• Retire la llave de seguridad.
• Mantenga pulsado el botón de bloqueo de la batería situado en la parte inferior de la batería.
• Retire la batería del producto.
Fig. 5
Tapa de la
batería
Batería
Llave de seguridad
ARRANQUE Y DETENCIÓN DE LA PODADORA (Consulte las gura 6)
ARRANQUE DE LA PODADORA:
• Oprima y no suelte el botón de encendido (1).
• Tire el interruptor de agarre (2) hacia el mango y suelte el botón para arrancar la podadora.
DETENCIÓN DE LA PODADORA:
ARRANQUE SUAVE
Esta podadora LI-ION está equipada con una función de “arranque suave”. Al iniciar el arranque, la
podadora toma aproximadamente 3 segundos para llegar a su velocidad máxima. Si la podadora
no arranca: quite la batería y compruebe que debajo de la plataforma no hay algo que obstruya la
cuchilla y que ésta se puede hacer girar libremente con la mano. Aun una pequeña cantidad de
grama durante el arranque puede evitar que la función de “arranque suave” haga girar la podadora.
PRECAUCIÓN
No intente anular el funcionamiento de la botón de encendido o interruptor de agarre.
ADVERTENCIA
Una operadora en funcionamiento puede arrojar objetos extraños a los ojos del operador y, de
esta manera, ocasionar graves daños oculares. Siempre use gafas de seguridad cuando use la
podadora y realice ajustes o reparaciones.
16
INSTRUCCIONES DE USO
• Suelte el interruptor de agarre.
Fig. 6
1
2
17
INSTRUCCIONES DE USO
ADVERTENCIA
Cuando use la podadora, asegúrese de que las personas y mascotas se encuentren a al menos
100ft (30m) de distancia.
INSPECCIÓN DEL ÁREA DE CORTE. Retire piedras, palos, cables, juguetes y otros desechos que
la cuchilla giratoria pueda arrojar.
AJUSTE DE LA ALTURA DE CORTE (Consulte la gura 7)
Cuando se envían, las ruedas del cortacésped se ajustan a la posición de corte más baja. Antes
de usar el cortacésped por primera vez, ajuste la posición del corte a la altura más adecuada
para su cortacésped. El césped promedio debería medir entre 38 mm y 51 mm durante los
meses fríos y entre 51 mm y 70 mm durante los meses cálidos.
Para ajustar la altura de la hoja :
• Para subir la altura de la cuchilla, agarre la palanca de ajuste de altura (1) y muévala hacia
atrás del cortacésped.
• Para bajar la altura de la cuchilla, agarre la palanca de ajuste de altura (1) y muévala hacia
delante del cortacésped.
Fig. 7
1
18
INSTRUCCIONES DE USO
MANEJO EN PENDIENTES (Consulte la gura 8)
ADVERTENCIA
Las pendientes son una de las causas principales de accidentes por resbalones y caídas accidentales
que pueden provocar lesiones severas. El funcionamiento de la podadora en pendientes requiere
tomar precauciones extraordinarias. Si se siente inseguro en una pendiente, no use la podadora allí.
Para su seguridad, antes de hacer funcionar esta podadora en un área inclinada o con lomas, utilice el
registrador de pendientes que ha sido incluido como parte de este manual para medir pendientes.
• Pode atravesando las pendientes; no hacia arriba ni hacia abajo. Tenga mucha precaución al
cambiar de dirección en una pendiente.
• Tenga cuidado con los pozos, surcos, piedras, objetos ocultos o montículos que puedan
provocar que se resbale o tropiece. El césped alto puede ocultar obstáculos. Retire todos
los objetos como piedras, ramas de árboles, etc., que puedan provocar tropezones o ser
lanzados por la cuchilla.
• Siempre asegúrese de su postura. Un resbalón y caída puede provocar lesiones serias.
Si siente que está perdiendo el equilibrio, suelte el mango de control del motor/cuchilla
inmediatamente. La cuchilla para de girar en 3 segundos.
• No pode el pasto cerca de precipicios, zanjas o terraplenes; podría perder la rmeza de la
postura o el equilibrio.
• No pode el césped en pendientes con un ángulo mayor a 15°.
• No pode la grama húmeda o mojada. Un apoyo poco estable podría provocar resbalones.
ADVERTENCIA
No pode el césped en pendientes con un ángulo mayor a 15° (una elevación de
aproximadamente 2-1/2 pies [75 metros] cada 10 pies [3 metros]). Pode transversalmente en el
frente de unapendiente y nunca arriba abajo.
Observe y mantenga este nivel con un árbol vertical
Un poste de energía
La esquina de un edicio
O el poste de una cerca
DOBLE EN LA LÍNEA DE PUNTOS, REPRESENTANDO LA PENDIENTE DE 15°
Fig. 8

19
INSTRUCCIONES DE USO
CONSEJOS DE PODA
NOTA: el rendimiento de la podadora será mucho mayor con una cuchilla losa, especialmente si de corta
césped alto.Asegúrese de revisar la cuchilla y alarla al menos una vez al año, según se describe en la
sección Mantenimiento.
• Verique que no haya piedras, palos, cables ni otros objetos en el césped que puedan dañar
las cuchillas o el motor. Es posible que la podadora arroje estos objetos accidentalmente y
en cualquier dirección, algo que puede ocasionar lesiones personales graves al operador y a
otras personas.
• Para evitar descargas eléctricas, no use la podadora en condiciones húmedas.
• No pode el césped en círculos. Muévase hacia adelante y atrás del césped.
• Cuando corte césped grueso, pase la podadora más lentamente para lograr un mejor corte
y una adecuada descarga de recortes. Para tener un césped sano, siempre corte un tercio o
menos de su altura total. El césped promedio debe tener aproximadamente de 3,8 a 5 cm (1-
1/2 a 2 pulgadas) de altura en meses fríos y más de 5 cm (2 pulgadas) en meses cálidos.
CONSEJOS DE TRITURACIÓN DE COMPUESTO ORGÁNICO
NOTA: SIEMPRE INSPECCIONE EL ÁREA DONDE UTILIZARÁ LA PODADORA Y RETIRE PIEDRAS,
PALOS, CABLES, HUESOS Y OTROS DESECHOS QUE LA CUCHILLA GIRATORIA PUEDA ARROJAR.
• Suelte el interruptor para apagar la podadora si cruza un área con gravilla (la cuchilla podría
arrojar piedras).
• Coloque la podadora en la altura de corte más alta cuando pode suelos duros o malezas
altas.
• Para que la trituración sea efectiva, no corte césped húmedo ya que tiende a pegarse en
el lado inferior de la plataforma y, de esta manera, los recortes de césped no se trituran
correctamente. Es posible que el césped nuevo o espeso necesite un corte más angosto.
La velocidad en el suelo debe ajustarse según la condición del césped. Si no ha podado y el
césped ha crecido más de 10 cm, pódelo dos veces para reducir su altura a un máximo de 8,3
cm.
• Camine a un ritmo constante y adecuado. Superponga las las. No deje que el césped crezca
demasiado. En caso de que esto suceda, comience en la posición de corte más alta y luego
baje a la altura de corte deseada.
ADVERTENCIA
Si usted golpea un objeto extranjero, para el motor y quita la batería. Inspeccione minuciosamente
si la podadora se dañó. Repare los daños antes de usar la podadora. La vibración excesiva de la
podadora durante su funcionamiento advierte un daño. Inspeccione minuciosamente la podadora y
repare los daños antes de usarla.

20
INSTRUCCIONES DE USO
Fig. 9
VACIADO DEL RECEPTOR DE CÉSPED (Consulte la gura 9)
• Detenga el motor y retire la batería. Deje que la hoja se detenga por completo.
• Levante la puerta trasera.
• Levante la caja de la hierba por el mango para retirarla del cortacésped.
• Elimine los recortes de césped.
• Levante la puerta trasera y vuelva a colocar la caja de la hierba como se ha descrito
anteriormente en este manual.
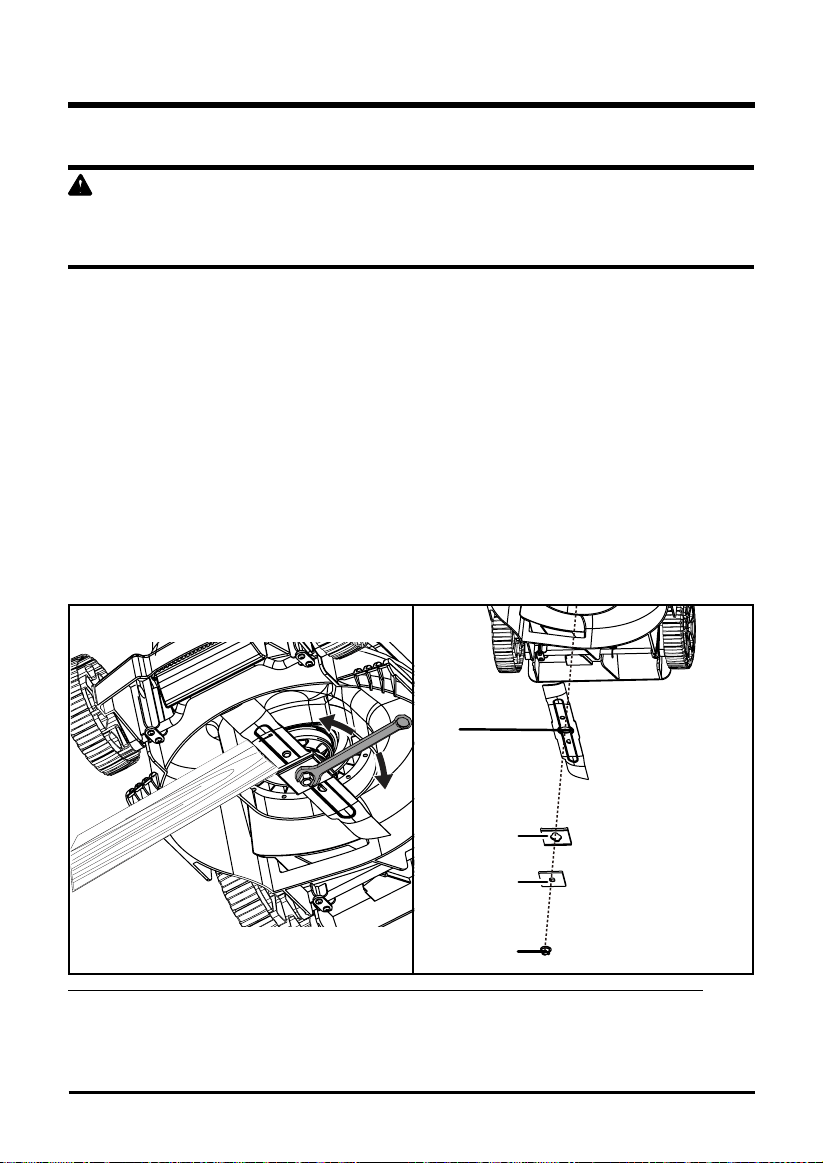
21
MANTENIMIENTO
CAMBIO DE LA CUCHILLA (Consulte las guras 10 y 11)
ADVERTENCIA
siempre use guantes para trabajo pesado y envuelva los bordes cortantes con harapos u otros
materiales para protegerse las manos cuando le haga cualquier mantenimiento a las cuchillas.
Al transportar o dar servicio a la unidad, quite siempre la batería.
Use solamente cuchillas de repuesto GREENWORKS .
• Retire la batería.
• Use guantes acolchados de cuero y calce un bloque de madera entre la cuchilla y la
plataforma de la podadora a n de evitar que la cuchilla gire cuando se retire la tuerca.
• Utilice un casquillo o una llave de 15 mm para aojar la tuerca de la cuchilla (1) y sacar la
cuchilla (4). Gire la tuerca “EN DIRECCIÓN CONTRARIA A LAS MANECILLAS DEL RELOJ”
para aojarla.
• Retire la tuerca de la cuchilla (1), la arandela cuadrada (2), la arandela de aislamiento (3) y la cuchilla.
• Para volver a colocar la cuchilla, póngala con los bordes cortantes en dirección a la tierra.
Ensamble la tuerca de la cuchilla, la arandela cuadrada y la arandela de aislamiento, como se
muestra a continuación.Con un casquillo o una llave de 15 mm, gire la tuerca de la cuchilla “EN
LA MISMA DIRECCIÓN QUE LAS MANECIL LAS DEL RELOJ” para asegurar la cuchilla.
NOTA: asegúrese de cambiar las partes en el mismo orden en el que se retiraron. Cuando coloque la
cuchilla, verique que los extremos curvos apunten a la plataforma de la podadora y no a la tierra. Consulte
el dibujoesquemático en la página 30 de este manual.
Fig. 11Fig. 10
2
1
4
3

22
MANTENIMIENTO
LIMPIEZA DE LA PODADORA
ADVERTENCIA
Para reducir el riesgo de descarga eléctrica, no exponga la podadora al agua. Se debe limpiar el
lado inferior de la plataforma de la podadora después de cada uso, ya que se acumulan recortes
de césped, hojas, suciedad y otros desechos, y producen óxido y corrosión.
• Retire toda acumulación de césped y hojas en y alrededor de la cubierta del motor (no use
agua). Limpie la podadora con un paño seco de vez en cuando.
• Si se acumulan desechos en el lado inferior de la unidad mientras la está usando, detenga el
motor desconéctelo del suministro de electricidad. Incline la podadora hacia adelante o hacia
un lado y raspe el lado inferior hasta limpiarlo con una herramienta apropiada.
ALMACENAJE DEL CORTACÉSPED
Debe seguir los pasos a continuación antes de guardar la podadora de césped.
• Limpie la podadora según las instrucciones anteriores.
• Inspeccione y cambie o afile la cuchilla de ser necesario. Consulte la sección de
mantenimiento.
• Lubricar la podadora.
• Almacene la podadora en un área seca y limpia. No la almacene cerca de materiales
corrosivos, como fertilizantes y cloruro sódico.
• Guarde la podadora en un lugar fresco y seco bajo techo, fuera del alcance de los niños. No
la cubra con una lámina de plástico sólido, ya que el plástico atrae humedad alrededor de la
podadora y produce corrosión.
La manija puede estar plegada por completo para el almacenamiento.
(Consulte las gura 2)
• Saque los tuerca que están en los lados de la manija superior para soltarla, y doble hacia
abajo la manija superior.
• Saque los tornillos de liberación rápida que están en los lados de la manija inferior para
soltarla, y tire hacia afuera cada lado de la manija inferior y levante sus lados más allá de los
bordes de los soportes para montaje. Doble la manija inferior hacia adelante. Asegúrese de
no doblar o retorcer el cordón eléctrico.
• Saque la batería y almacénela en un lugar fresco y seco, si es posible. Para aumentar la vida
útil de la batería cárguela cada dos semanas al no estar en uso.
• Quite la batería y guárdela en un lugar seguro fuera del alcance de los niños. Para
almacenarla no es necesario quitar la batería.
ADVERTENCIA
Para mantener la vida de funcionamiento se debe cargar la batería durante el almacenamiento.

23
ALMACENAMIENTO
• Cuando repare la podadora, utilice únicamente piezas de repuestos disponibles del
fabricante. Para obtener piezas de repuesto, llame a la línea de ayuda gratuita al 1-888-909-
6757. Si se utilizan piezas que no cumplen con las especicaciones del equipo original, es
posible que el rendimiento sea inadecuado y se vea comprometida la seguridad.
• Antes de limpiar, reparar o inspeccionar la podadora, verifique que la cuchilla y todas las
piezas con movimiento se hayan detenido por completo, y retire la batería. A fin de evitar
arranques accidentales, retire la llave cuando la podadora no está siendo usada. Retire
la batería cuando realice ajustes o cuando cualquiera de las cuatros ruedas tiene que
levantarse del piso.
• Mantenga las manijas secas, limpias y sin aceite ni grasa.
• Para reducir el riesgo de incendio, mantenga el motor libre de acumulaciones de césped,
hojas y desechos.
• A menudo, verique que los pernos de montaje del motor y la cuchilla estén bien ajustados.
Inspeccione visualmente si la cuchilla está dañada (es decir, si está doblada, agrietada o
desgastada).
• Mantenga la podadora con cuidado para el mejor y más seguro funcionamiento. Mantenga la
cuchilla alada y limpia. Las cuchillas están aladas y pueden cortar. Envuelva las cuchillas o
use guantes. Realice las reparaciones con extremo cuidado.
• Mantenga tuercas, pernos y tornillos ajustados para asegurarse de que el equipo se
encuentre en una condición de trabajo segura.
• No manipule los dispositivos de seguridad. Verifique su correcto funcionamiento
regularmente.
• Si choca un objeto extraño, detenga el motor y cambie el pasador de seguridad. Inspeccione
minuciosamente si la podadora se dañó. Repare los daños antes de usar la podadora.
• Los componentes de la podadora pueden desgastarse y dañarse, y esto a su vez puede
exponer las piezas en movimiento y permitir que se arrojen objetos. Como una precaución de
seguridad, revise frecuentemente los componentes y cambie aquéllos que muestren signos
de desgaste o daño.
• Cuando no esté en uso, guarde la podadora en un lugar seco bajo techo y fuera del alcance
de los niños.
ADVERTENCIA
AL DAR SERVICIO O TRANSPORTAR LA PODADORA QUITE SIEMPRE LA BATERÍA.

24
ELIMINACIÓN DE LA BATERÍA QUE NO DAÑA EL
MEDIO AMBIENTE
Las baterías que se utilizan en el paquete de baterías de esta podadora contienen los siguientes
materiales tóxicos y corrosivos: ION DE LITIO.
ADVERTENCIA
Se debe desechar los materiales tóxicos de la forma especicada para evitar contaminar el medio
ambiente. Antes de desechar los paquetes de baterías de ión de litio dañados o desgastados,
póngase en contacto con su agencia local para eliminación de desechos para obtener información
e instrucciones específicas. Lleve las baterías a un centro local para reciclaje o eliminación,
certicado para eliminación. Si el paquete de baterías se raja o se quiebra, ya sea que tenga fugas
o no, no lo vuelva a cargar y no lo use. Deséchelo y reemplácelo con un paquete de baterías
nuevo. ¡NO INTENTE REPARARLA!
Obedezca las siguientes instrucciones para evitar lesiones y riesgos de incendio, explosión o
choques eléctricos y para evitar daños al medio ambiente:
• Para evitar lesiones y riesgo de incendio, explosión y descarga eléctrica, así como daños al
medio ambiente: Cubra las terminales de la batería con cinta adhesiva para trabajo pesado.
• NO intente retirar ni destruir ninguno de los componentes del paquete de batería.
• NO intente abrir el paquete de batería.
• Si se produce una fuga, los electrolitos liberados son corrosivos y tóxicos. NO introduzca el
líquido enlos ojos, no lo coloque en la cara ni lo trague.
• NO coloque las baterías en la basura común de su casa.
• NO las incinere.
• NO las coloque en lugares en los formarán parte de cualquier basural o ujo municipal de
residuos sólidos.
• Colóquelas en un centro de reciclaje o eliminación certicado.

25
SOLUCIÓN DE PROBLEMAS
PROBLEMA CAUSA POSIBLE SOLUCIÓN
La podadora no
arranca.
La podadora corta
el césped de forma
despareja.
La podadora
no tritura
correctamente.
La podadora
es pesada para
empujar.
La podadora
produce ruido
y vibración
excesivos.
La batería no tiene carga.
El interruptor de control está
dañado.
Pasto pegado al lado de la
hoja.
La batería no es conectada al
motor.
La batería puede requerir
servicio o reemplazo.
El césped es escabroso o desparejo.
La altura de corte no se ajustó
correctamente.
Hay recortes de césped
húmedo pegados en el lado
inferior de la plataforma.
El tapón de la función para
cubrimiento con hojarasca no
está en su lugar.
La grama está muy larga o la
altura de corte está muy baja.
La parte trasera de la carcaza de
la podadora y la cuchilla se traban
debido a que la grama es muy densa.
El eje del motor está doblado.
La cuchilla no está equilibrada.
Cargue la batería.
Reemplace el interruptor de control.
(Llame a la línea telefónica gratis para
ayuda (1-888-909-6757))
Quite batería. Verique bajo plataforma
para asegurar que césped no sea
atascado luego a la hoja.
Revise la conexión entre el conector del
motor y la batería.
Llame a la línea telefónica gratis para ayuda
(1-888-909-6757) o reemplace la batería.
Revise el área a podar.
Mueva las ruedas a una posición más alta.
Espere a que el césped se seque antes
de podar.
Instalación de la clavija para compuesto
orgánico.
Aumente la altura de corte.
Vacíe la bolsa para recolección de grama.
Detenga el motor, retire la llave de
aislamiento y la batería, desconecte la
herramienta de la fuente de alimentación
y compruebe si hay daños. Haga que el
equipo se repare por un centro de servicio
autorizado antes de volverla a arrancar.
Repare lo necesario antes de arrancarla
de nuevo. Si la vibración continúa, llame
a la línea telefónica gratis para ayuda (1-
888-909-6757)

26
Por este medio y por un período de cuatro años GREENWORKS™ garantiza este producto
contra defectos en materiales, piezas o mano de obra al comprador original que cuente con
una prueba de compra. GREENWORKS™, a su sola discreción reparará o reemplazará, sin
costo alguno para el cliente, cualquier pieza defectuosa, siempre y cuando se haya hecho uso
normal de ella. Esta garantía es válida solamente para unidades utilizadas de manera personal
y que no hayan sido utilizadas o alquiladas para uso industrial o comercial, y que hayan recibido
mantenimiento de acuerdo a las instrucciones que aparecen en el manual del propietario que se
suministró con el producto nuevo.
ARTÍCULOS QUE NO CUBRE LA GARANTÍA:
1. Cualquier pieza que se haya vuelto inoperante debido a mal uso, uso comercial, abuso,
descuido, accidente, mantenimiento inapropiado o alteración.
2. La unidad, si no ha sido operada o si no se le ha dado mantenimiento de acuerdo al
manual del propietario.
3. Desgaste normal, excepto según se indica a continuación.
4. Artículos de mantenimiento rutinario tales como lubricantes, alado de cuchillas.
5. Deterioro normal del acabado exterior debido al uso y la exposición al entorno.
LÍNEA TELEFÓNICA PARA AYUDA DE GREENWORKS (1 888 90WORKS):
El servicio de garantía está disponible llamando a la línea de ayuda gratuita 1 888 909 6757 (1
888 90WORKS).
CARGOS DE TRANSPORTE:
Los cargos de transporte por el traslado de cualquier unidad de equipo o accesorio eléctrico son
responsabilidad del comprador. El comprador es responsable de pagar los cargos de transporte
de cualquier pieza presentada para reemplazo de acuerdo a esta garantía a menos que
GREENWORKS solicite por escrito tal retorno.
GARANTÍA LIMITADA DE 4 AÑOS

27
VISTA DESARROLLADA
42
41
51
54
22
4
38
44
39
23
35
21
31
15
13
17
56
8
55
53
24
20
49
50
52
26
30
11
28
32
12
33
29
10
18
37
36
5
48
46
19
43
47
3
1
2
7
6
9
45
27
25
16
14
40
34
58
59
60
61
62

28
LISTA DE PIEZAS
NO DE RÉF. NO DE PIÈCEDESCRIPTION QTÉ
1 311031558
Conjunto de la caja de seccionamiento
1
2 34901461A
Esponja
1
3
4
5
333031558
Asa superior
Baje el mango
Gancho de alambre
1
1
1
333041558
3411135-1
8 341211558
Arandela
2
9 322011558
Perno
2
7 34102466-1
Cierres de apertura rápida
2
6 32901466
Pasador
2
12 341191558
Soporte del eje de la rueda trasera
1
13 341051580
Cubierta trasera
1
14 341131558
Cubierta decorativa
2
11 311121558
Eje de la rueda trasera
1
15 341091558
Conector de triturado
1
16 341121558
Rueda de 7"
2
17 333071559
Muelle de tensión (cubierta trasera)
1
18 341081558
Barra de enlace de ajuste de altura
1
10 332031558
Muelle de tensión de ajuste de altura
1
19 3220505-
1
Tornillo
4
23 341201558
Arandela
1
20 3320238A-1
Manguito del eje
1
21 34117470
Soporte de la hoja
1
24 3331435A
Arandela
1
25 341111558
Cubierta decorativa
2
26 32200135
Tornillo
3
31 3410535
Aislante de la hoja
1
27 341101558
Rueda de 6"
2
28 322031558
Tornillo
1
29 341071558
Empuñadura de ajuste de altura
1
32 32204113
Tornillo
8
30 333011558
Eje de la rueda frontal
1
22 33304493
Cuchilla
1

29
LISTA DE PIEZAS
55 3410835AB
Tapa de rosca
2
56 322021558
Tornillo
2
57 3220518
Tornillo
2
58 3290305
Arandela plana
2
59 3221237
Tuerca
2
60 3330490-1
Gancho de alambre
2
61 34201493
Protector trasero de 14"
2
35 3221037
Tuerca
1
33 33306470
Placa para ajuste de la altura
4
34 3290135
Chaveta
4
36 34105493
Bloque de fijación
2
37 33310488
Arandela
4
38 341011580
Cubierta de 14"
1
39 341221558
Arandela
1
40 339011558
Peso del grupo
1
41 36101470A
Motor
1
42 36202487T1
placa de circuito impreso de 40V
1
43 322021527
Tornillo
9
44 341021558
Tapa
1
45 322042558
Tornillo
2
46 3220504
Tornillo
5
47 322041558
Clip de caña
1
48 32210302A
Tornillo
6
49 341141558
Bloque
1
50 341031558B
Tapa de la batería
1
51 311011337
Conjunto de la llave
1
52 341041558
Cubierta transparente
1
53 341061558
Mango
1
54 311061580 1Ensamblaje de la bolsa del recogedor de hierba
NO DE RÉF. NO DE PIÈCEDESCRIPTION QTÉ

LÍNEA DE AYUDA GRATUITA: 1-888-90WORKS
(888.909.6757)
Impreso en China en papel reciclado de 100%
Greenworks Tools
P.O. Box 1238
Mooresville, NC 28115
Rev: 01 (11-01-2016)