Preparing To Use Your Countertop Oven for the First Time
NOTE: During initial start up you may detect a slight smell and/or smoke. Turn the temperature to max and let run for approximately 5 minutes.
If you are using your Countertop oven for the first time, please be sure to:
• Remove any stickers from the surface of the oven.
• Open oven door and remove all printed documents and paper from inside the Countertop Oven.
• Clean the rack, pan and air fry basket with hot water, a small amount of dishwashing liquid and a non-abrasive cleaning pad.
CAUTION: DO NOT IMMERSE THE BODY OF THE UNIT IN WATER.
• Dry the unit thoroughly before using.
• Select a location for the Countertop Oven. The location should be in an open area on a flat counter where the plug will reach an outlet.
• Plug the Countertop Oven into a 120 Volt AC electrical outlet.
WARNING: When Countertop Oven is in use or cooling down, please be sure there is a 6-inch clearance between the Countertop Oven and any other surface including cords. Be sure the cord is not resting against the back of the Countertop Oven.
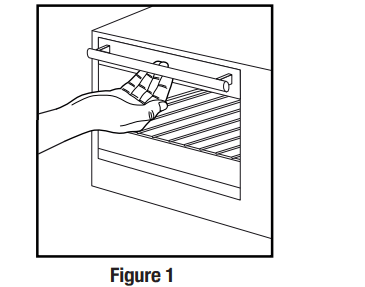
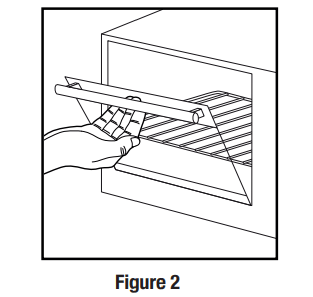
To Open the Oven Door:
Step 1: Grab the center of the handle underhanded with fingertips (See Figure 1).
Step 2: Pull down the oven door carefully (See Figure 2).
CAUTION: This appliance generates heat during use. Do not touch hot surfaces. Always use handles or knobs per above instructions.
GENERAL INFORMATION
Timer / Toast Shade Setting Tip
To set the timer for less than 20 minutes, ALWAYS turn the timer past the 20-minute mark to engage timer switch and then turn it back to desired time.
Heating Elements
The top and bottom heating elements will cycle ON and OFF to maintain the desired temperature. You may not see the heating elements glowing
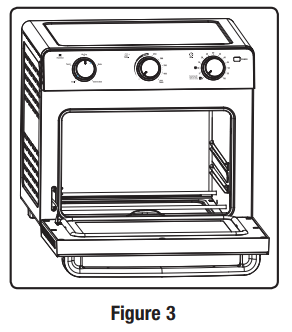
Positioning Rack
To accommodate a wide variety of foods the oven has two rack positions. (See Figure 3)
Positioning of the rack will depend on the size of the food and desired browning.
Before removing the rack allow the unit to cool.
The oven rack may tilt downward causing food to shift when the rack is pulled out, proceed with caution.
PLEASE NOTE:
For best air frying results, position the air fry basket on top of the baking pan in the top rack position.
For best broiling resuts, position the baking pan in the top rack position.
For best baking results, position the baking pan in the bottom rack position.
For best toast and pizza results, position the rack in the top rack position.
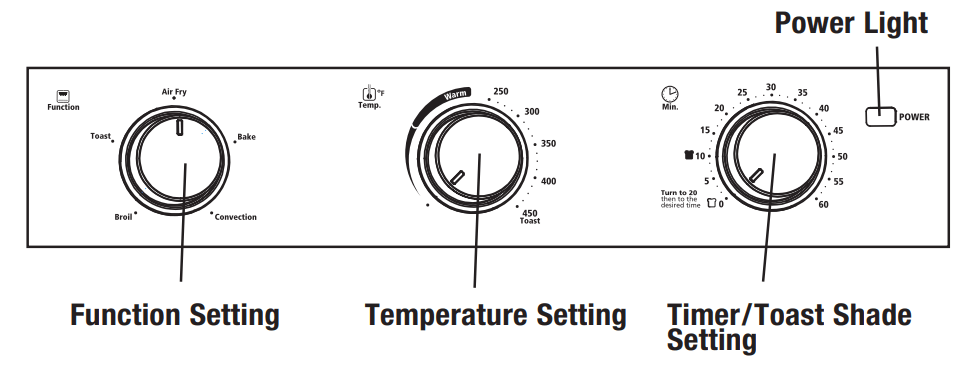
Preheating the Oven
• Set to the desired Function.
• Turn the Temperature Control Knob to the desired temperature.
• Set the Timer Knob to desired time and allow 5-6 minutes for the oven to preheat.
Removing Food
Always open door fully and remove food carefully with oven mitt.
To Use the Timer Dial
After rotating the Temperature Dial to your desired temperature, select from the following options on the Timer Dial.
• For cooking time longer than 20 minutes, rotate the Timer Dial clockwise to your desired time. After cooking completes at the sound of the bell, the oven will automatically turn “Off.”
• For cooking time less than 20 minutes, rotate the Timer Dial clockwise past the 20 minute mark to activate the timer, then rotate back counterclockwise to your desired cooking time.
Using Your Countertop Oven
To use the Air Fry Function (See fig. 4)
• Arrange food on the Air Fry Basket and position on top of the Baking Pan in the top rack position.
• Set function to AIR FRY. When in Air Fry mode, the top heating elements and air fry fan will operate once the timer has been set.
• Turn the Temperature Control Knob to the desired temperature.
• Turn the Timer Knob to the desired time.
NOTE: If cook time is less than 20 minutes, you must turn Timer past the 20 minutes mark to engage the timer then back to desired time.
NOTE: The top heating elements will cycle ON and OFF to maintain the desired temperature.
NOTE: Toss food evenly in oil if desired before placing food in oven.
WARNING: Cooked food, air fry basket, baking pan, and door can be very hot, handle with care. Do not leave the unit unattended.
FAQs about Air Frying
Should I toss my food in oil?
ANSWER: Not all foods will benefit from being tossed in oil prior to being air fried. Frozen foods and foods with a high fat content such as chicken wings or bacon do not require oil. To achieve crispy and browned results on foods such as hand-cut fries or vegetables, evenly coat food with about one tablespoon of oil.
Do I need to flip or toss my food halfway through the cooking cycle?
ANSWER: Large quantities of food can benefit from being tossed halfway through the cooking cycle to ensure even cooking and browning.
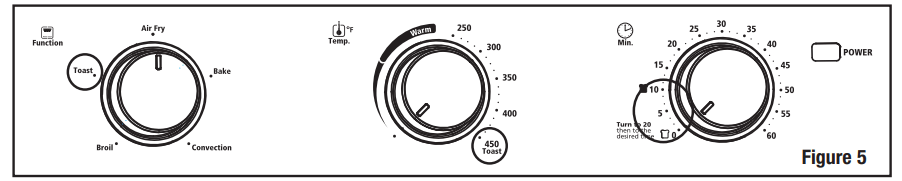
To Use the Toast Function (See fig. 5)
NOTE: Different types of bread require different settings. Lighter breads and waffles require a lighter setting. Darker breads, muffins, and English muffins require a darker setting.
• Arrange food on the wire rack.
• Set function to TOAST. When in Toast mode, both the top and bottom heating elements will operate once the timer has been set.
• Turn the Temperature Control Knob to the 450°F/TOAST setting.
• To set the timer, turn the timer past the 20 minute mark to engage timer switch and set back to desired toast “ ” between 0 and 10 minutes.
NOTE: The top and bottom heating elements will cycle ON and OFF to maintain the desired temperature.
WARNING: Cooked food, metal rack, and door can be very hot, handle with care. Do not leave the unit unattended.
To Use the Bake Function (See fig. 6)
• Arrange food on the wire rack or in the baking pan.
• Set function to BAKE. When in Bake mode, both the top and bottom heating elements will operate once the timer has been set.
• Turn the Temperature Control Knob to the desired temperature.
• Turn the Timer Knob to the desired time.
NOTE: The top and bottom heating elements will cycle ON and OFF to maintain the desired temperature.
NOTE: If cook time is less than 20 minutes, you must turn Timer past the 20 minutes mark to engage the timer back to desired time.
WARNING: Cooked food, metal rack, and door can be very hot, handle with care. Do not leave the unit unattended.
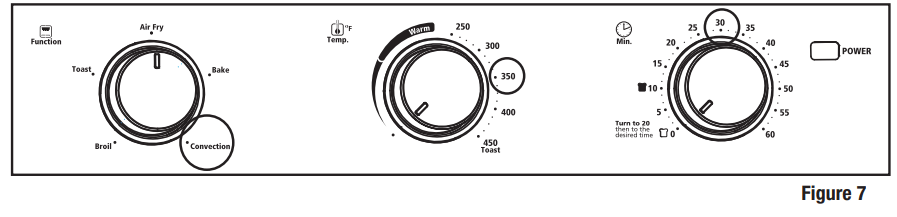
To Use The Convection Bake Function (See fig. 7)
• Arrange food on the wire rack or in the baking pan.
• Set function to Convection. When in Convection mode, both the top and bottom heating elements will operate once the timer has been set.
• Turn the Temperature Control Knob to the desired temperature.
• Turn the Timer Knob to the desired time.
NOTE: If cook time is less than 20 minutes, you must turn Timer past the 20 minutes mark to engage the timer back to desired time.
NOTE: The top and bottom heating elements will cycle ON and OFF to maintain the desired temperature.
WARNING: Cooked food, metal rack, and door can be very hot, handle with care. Do not leave the unit unattended.
FAQs About Convection Bake
What is Convection Bake?
Answer: In your Countertop Oven there is a built in fan that circulates the hot air in the oven chamber to better heat the food.
How do I adjust the time for Convection Bake?
Answer: On average, convection will shorten the cooking time by 30% but it varies by food. It is suggested to go with a shorter cooking time to start with and then add time if it is needed.
What are the best foods to use with Convection Bake?
Answer: While a shorter cook time is often desirable, baked goods in particular benefit from convection cooking as the circulating air keeps oven temperature consistent throughout.
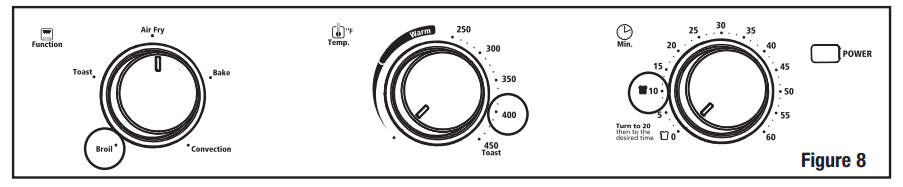
To Use the Adjustable Broil Function (See fig. 8)
• Arrange food on the baking pan.
• Close the door to the first notch, leaving a small gap at the top. This will ensure adequate airflow during broiling.
• Set function to BROIL. When in Broil mode, the top heating elements will operate once the timer has been set.
• Turn the Temperature Control Knob to the desired temperature.
• Turn the Timer Knob to the desired time. Turn food over about halfway through the broiling time.
NOTE: If cook time is less than 20 minutes, you must turn Timer past the 20 minutes mark to engage the timer back to desired time.
NOTE: The top heating elements will cycle ON and OFF to maintain the desired temperature.
WARNING: Cooked food, metal rack, and door can be very hot, handle with care. Do not leave the unit unattended.
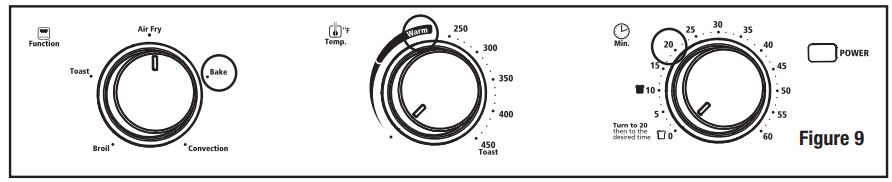
To Use the Warm Function (See fig. 9)
NOTE: The Warm Function is for warming and keeping food warm after heating.
• Arrange food on the wire rack, in the baking pan, or in the air fry basket.
• Set Function to BAKE.
• Turn the Temperature Control Knob to the desired WARM temperature setting.
• Turn the Timer Knob to the desired time.
NOTE: If cook time is less than 20 minutes, you must turn Timer past the 20 minutes mark to engage the timer back to desired time.
WARNING: Cooked food, metal rack, and door can be very hot, handle with care. Do not leave the unit unattended.
Cleaning Your Countertop Oven
Before cleaning your OSTER® countertop oven, unplug it and allow it to cool.
To clean, wipe with damp cloth.
CAUTION: DO NOT IMMERSE IN WATER.
Make sure to use only mild, soapy water. Abrasive cleaners, scrubbing brushes and chemical cleaners will damage the unit. Empty crumb tray frequently to avoid accumulation of crumbs. Air fry basket, wire rack, and baking pan are dishwasher safe. (top of dishwasher only).
This appliance has no user serviceable parts. Any servicing beyond that described in the Cleaning Section should be performed by an Authorized Service Representative only. See Warranty Section.
Storing Your Countertop Oven
Allow the appliance to cool completely before storing. If storing the countertop oven for long periods of time, make certain that the countertop oven is clean and free of food particles. Store the countertop oven in a dry location such as on a table or countertop or cupboard shelf. Other than the recommended cleaning, no further user maintenance should be necessary.
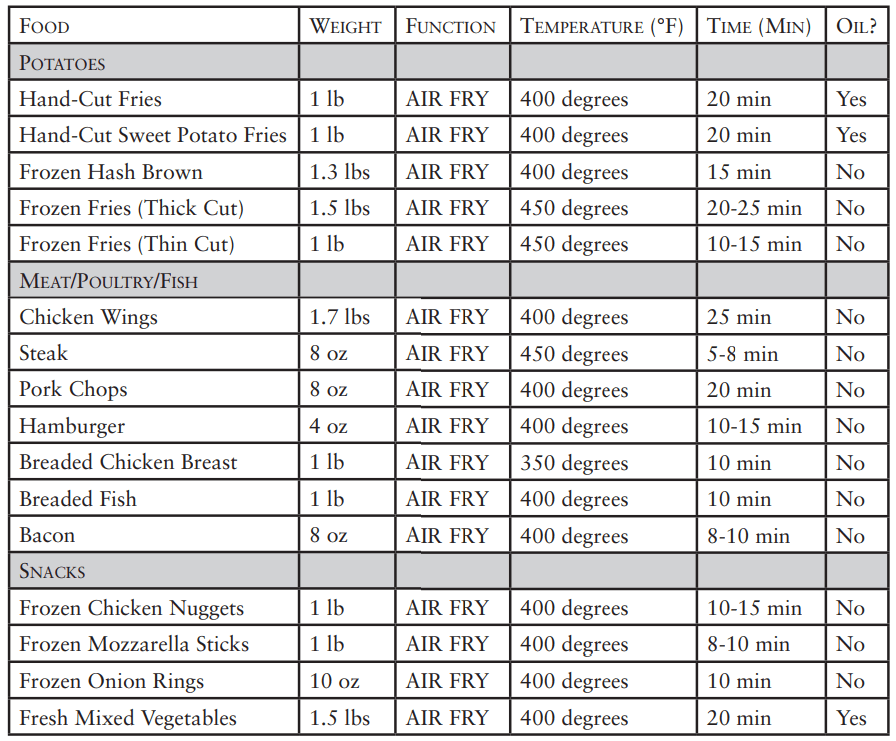
Air Fry Cooking Chart
Note: The oven does not need to be pre-heated for Air Frying.
Note: Cook times are estimates and may vary based on food type and preparation.
Helpful Tips / Troubleshooting
Problem
Potential Cause
Solution
Overcooked / Undercooked Foods
Incorrect temperature or time setting
You may have to adjust the time and temperature to desired taste. To set the timer for less than 20 minutes, turn the timer past the 20-minute mark to engage timer switch and then turn it back to desired time.
Because your countertop oven is smaller than your regular oven, it will heat up faster and generally cook in shorter periods of time.
Rack placement
Refer to “Positioning Rack” Section, Page English-4. Rack may need to be adjusted to accommodate food type.
Burnt Smell
First Use
It is recommended to heat countertop oven to 450º for approximately 15 minutes to eliminate any manufacturing residue that may remain after shipping.
Food build-up inside oven, on heating elements or in crumb tray.
Refer to “Cleaning Your Countertop Oven” Section, Page English-6.
Oven does not turn ON
Unit is unplugged
Plug the countertop oven into a 120- volt AC electrical outlet.
Timer was not turned past 20 minute mark.
Set timer knob and temperature knob to desired setting. Both must be turned on to operate the countertop oven.
Only one heating element is heating up
Function setting selection determines which heating element will operate.
When toasting, make sure the oven is not set to broil setting and temperature is set at 450º.
Heating elements do not stay ON
Heating elements will cycle ON and OFF to maintain proper heat.
Yes, the pan and rack of this Countertop Oven with Air Fryer are stainless steel.
#2 How long does it take to toast bread? I've seen reviews saying 10 mins which seems way too long.
With this Oster® countertop oven with air fryer, you must: • turn the Temperature Control Knob to the 450°F/TOAST setting. • To set the timer, turn the timer past the 20 minute mark to engage timer switch and setback to your desired toast, between 0 and 10 minutes.
#3 Can someone please give me the exact measurements of the wire rack that comes with this oven?
We appreciate your interest in our product. The exact measurement of the wire rack is 11 1/2" X 11 1/2".
#4 It looks great as an air fryer, but is it any good at toasting bread?
I had to play around with it a bit but figured it out - yes it toasts just fine. Baking and air frying also good - have not yet tried the other features.


 ” between 0 and 10 minutes.