User Manual
Digital Countertop
Oven
Manual de Instrucciones
Horno Digital para
Mostrador
P.N. 154625
Visit us at www.oster.com
MODEL/MODELO
TSSTTVDFL1
It’s what we’re made of.
For over 100 years, the Oster
®
brand has been defining innovation, power and durability.
Some say our line of uniquely designed and built appliances last forever. The Oster
®
Designed for Life Series is the next generation of innovative products that are
professionally designed, timelessly styled and backed by legendary performance.

English-2
IMPORTANT SAFEGUARDS
When using electrical appliances, basic safety precautions should always
be followed, including the following:
READ AND SAVE THESE
INSTRUCTIONS
• READALLINSTRUCTIONS,PRODUCTLABELSANDWARNINGS
BEFOREUSINGTHECOUNTERTOPOVEN.
• Donottouchhotsurfaces.Alwaysuseovenmittswhenhandlinghotmaterials
andallowmetalpartstocoolbeforecleaning.Alwaysusetheovenhandles
when moving the unit.
• Whentheunitisnotinuseandbeforecleaning,pressthe“Start/Cancel”
buttonandremovethecountertopovenfromthepoweroutlet.Allowtheunit
to cool thoroughly before putting in or taking off parts.
• Toprotectagainstriskofelectricalshock,donotimmersethecord,plug,or
appliance in water or any other liquids.
• Closesupervisionisalwaysnecessarywhenthisoranyapplianceisusednear
children. This appliance is not for use by children.
• Donotoperatethisoranyappliancewithafrayedordamagedcordorplug
or after the appliance malfunctions or is dropped or has been damaged in
anymanner.ReturnthecountertopoventothenearestAuthorizedSunbeam
ApplianceServiceCenterforexamination,repairorelectricalormechanical
adjustment.
• Donotuseattachmentsnotrecommendedbythemanufacturer;theymay
cause fire, electric shock or personal injury.
• Donotuseoutdoorsorforcommercialpurposes.
• Donotusethisapplianceforotherthanitsintendeduse.
• Donotletthecorddangleovertheedgeofatabletoporcountertoportouch
hot surfaces.
• Donotplacetheappliancenearahotgasorelectricburnerorinaheated
oven.
• Extremecautionshouldbeusedwhenusingcontainersconstructedofmaterial
other than metal or glass.
• Afiremayoccurifthecountertopoveniscoveredortouchingflammable
materials, including curtains, draperies, walls, etc., when in operation. Do not
store any items on top of the appliance when in operation.
• Whenusingcountertopoven,pulltheunitoutaminimumof6inchesaway
from the wall or other cords.

English-3
• Donotstoreanymaterials,otherthanmanufacturer’srecommended
accessories, in this unit when not in use.
• Donotplaceanyflammablematerialsinoven,suchaspaper,cardboard,
plastic or any materials that may catch fire or melt.
• Donotcovertheoventrayorrackwithmetalfoil.Thiswillcauseoverheating
of the appliance.
• Oversizedfoodsormetalutensilsmustnotbeinsertedintheapplianceasthey
may create a fire or risk of electrical shock.
• Donotcleanwithmetalscouringpads.Piecescanbreakoffthepadandtouch
electrical parts involving a risk of electrical shock.
• Useextremecautionwhenremovingpanordisposingofhotgreaseorother
hot liquids.
• Toturnthisapplianceoff,pressthe“Start/Cancel”buttonandremovecord
fromoutlet.TheLCDwillturnoffafter30secondsofinactivity.
This Unit Is for Household Use Only
Short Power Supply Cord Instructions
Ashortpower-supplycordisprovidedtoreducetheriskresultingfrom
becomingentangledinortrippingoveralongercord.Anextensioncord
maybeusedifcareisexercisedinitsuse.Ifanextensioncordisused,the
electrical rating of the cord must be at least as great as the electrical rating
of the appliance. The extension cord should be arranged so that it will not
drape over the countertop or tabletop where it can be pulled on by children
or tripped over unintentionally.
For Products Purchased in the United States and Canada Only
Toreducetheriskofelectricalshock,thisappliancehasapolarizedplug(one
bladeiswiderthantheother).Thisplugfitsapolarizedoutletonlyoneway;
iftheplugdoesnotfitfullyintotheoutlet,reversetheplug.Ifitstilldoesnot
fit, contact a qualified electrician.
Do not attempt to defeatthis safety feature.
SAVE THESE INSTRUCTIONS
English-4
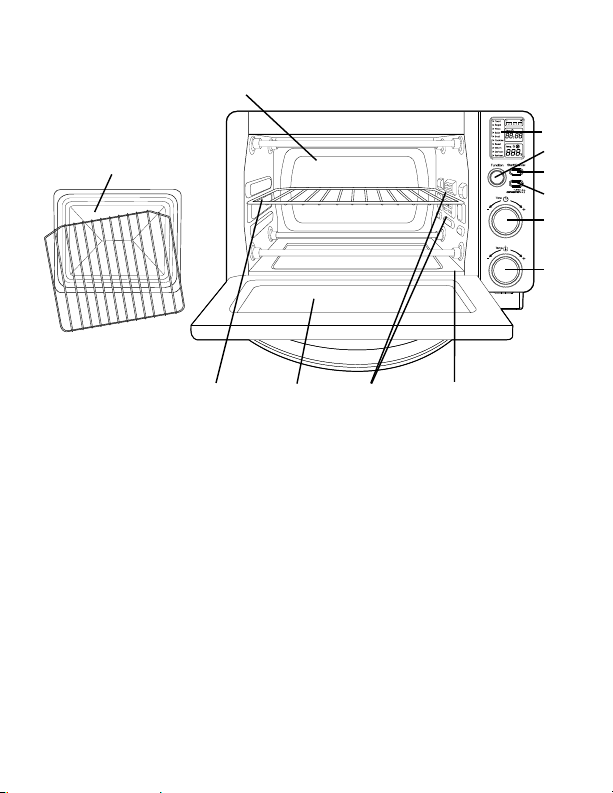
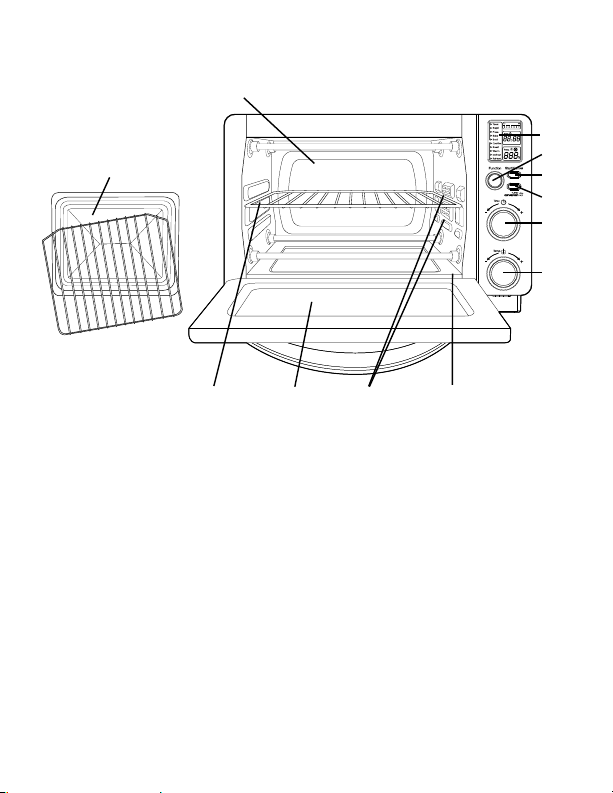
Product diagram
1. LCD Display
2. Function Selector Knob – Select cooking function by turning knob
to desired setting.
3. Start/Cancel Button – Press this button to turn the appliance off.
4. Turbo Convection Heat Button –Usetoactivateorcancel
turbo convection heat.
5. Time Control Knob –Adjustthedialtothedesiredtime
6. Temperature Control Knob –Adjustthedialthermostattodesiredtemperature.
7. Removable Wire Rack –See“PositioningRack”section.
8. Tempered Glass Door – For front viewing of food.
9. Two Rack Positions
10. Removable Crumb Tray – For crumb or fallen food particles collection.
Pulls out for easy cleaning.
11. Baking Pan/Cookie Sheet in One and Broil Rack –Useforallyourbaking
needs, broiling and grilling needs.
12. Easy Clean Interior Walls –Allowsfastcleanup.
1
9
11
5
6
2
4
10
7 8
12
3
English-5
a c
f
b
d
e
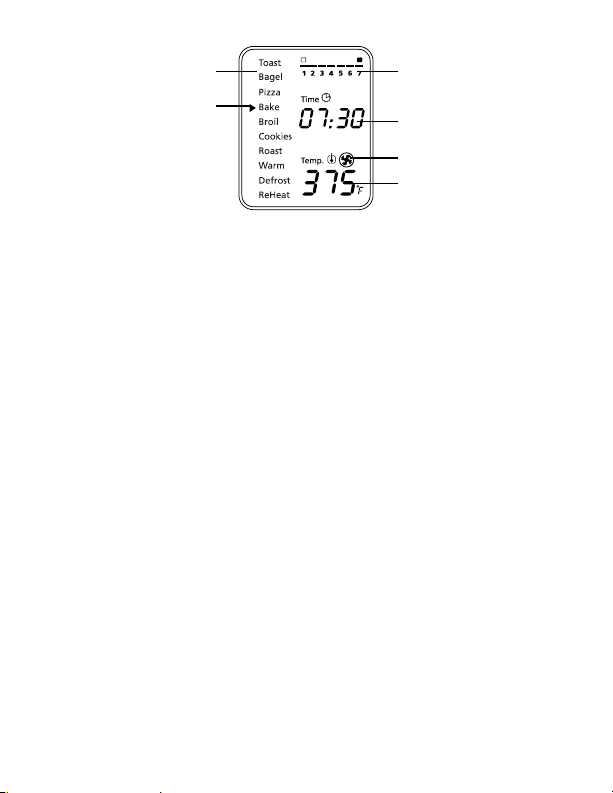
LCD Display
a. Functions Indicator –Toast,Bagel,Pizza,Bake,Broil,
Cookies,Roast,Warm,Defrost,Reheat
b. Function Indicator Arrow
c. 1-7 color shade setting indicator
d. Time Indicator
e. Turbo Convection Heat Icon
f. Temperature Indicator
Preparing Your Toaster Oven
Ifyouareusingyourtoasterovenforthefirsttime,please:
•Removeanystickersfromthesurfaceoftheoven.
•Openovendoorandremoveallprinteddocumentsandpaperfrom
inside the toaster oven.
•Cleantherackandpanwithhotwater,asmallamountofdishwashing
liquid and a nonabrasive sponge or cleaning pad.
DONOTIMMERSETHECORD,PLUGORBODYOFTHEUNIT
INWATER.
•Drytheunitthoroughlybeforeusing.
•Selectalocationforthetoasteroven.Thelocationshouldbeinanopen
area on a flat counter where the plug will reach an outlet.
•Plugthetoasterovenintoanelectricaloutlet.

English-6
using Your toaster oven (see Fig. 1)
Plug the unit in. The unit will emit two long
“beeps”andtheLCDscreenwillilluminate.The
function option will appear with an indicator on
thepresetTOASTfunction.TheLCDandthe
Start/Cancelbuttonlightwillbeilluminatedfor
30 seconds and then go out if no other buttons or
knobs are pressed or moved.
PLEASE NOTE: oncetheblueLCDdisplaygoes
out – you can press or move any button or knob to
“wakeup”thedisplayandoperateasnormal.
Step 1. Select Function
Turn the Function Knob to choose one of
thefollowing10optionsfromthemenu:
Toast,Bagel,Pizza,Bake,Broil,Cookies,
Roast,Warm,DefrostandReheat.The
indicator arrow will move from function to
function as the knob is turned.
NOTE:Ifthecookingprocessisnotstartedorno
further button is pressed or knob is turned
within 30 seconds the blue backlight and
theStart/CancelButtonLightwillturnoff.
Step 2. Time:
Turn the time knob to increase or decrease
the cooking time. The maximum time
setting is 60 minutes.
Step 3. Temperature:
Turn the temperature knob to increase or
decrease the temperature setting.
Figure 1
English-7
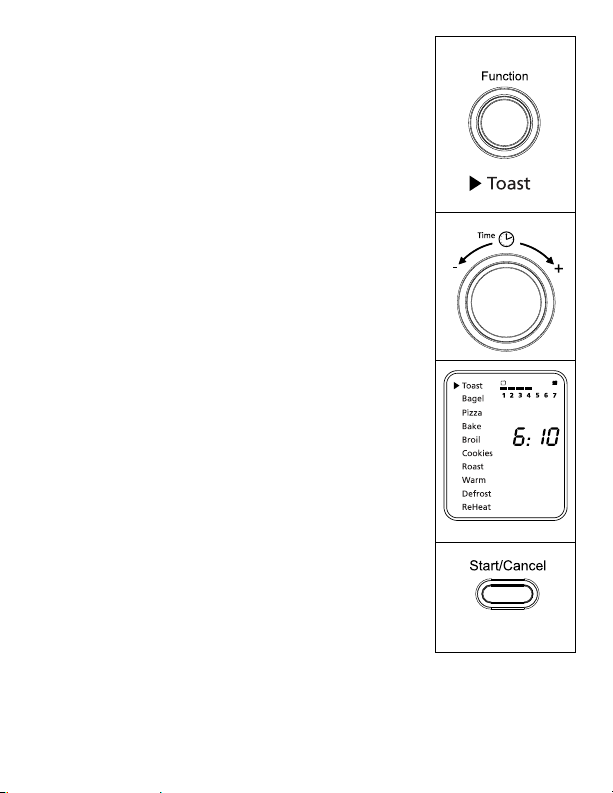
using the toast Function (see Fig. 2)
Step 1. Turn the Function Knob to the Toast
function.WhenyouselecttheToastfunction,
the 1-7 color shade setting indicator will
becomevisibleontheLCD.Bothupperand
lower heating elements will heat.
DefaultColorShadeSettingis4.Thiswill
be the default every time the Toaster Oven
isunpluggedandpluggedbackin.Ifthe
Toaster Oven remains plugged in since
the last time you have selected a different
shadefortheToastfunction(evenifnot
activated), the unit will remember the last
shade setting you selected.
NOTE: The top rack position is recommended for
toasting.
The temperature is not adjustable for
the Toast function. The time adjusts
automatically with shade adjustment.
The temperature or time is not adjustable
during the Toast function.
Step 2. To adjust the shade color:
Turn the Time Knob to adjust the shade color.
The color shade-setting indicator will show
your selection as you turn the knob.
Step 3. To Start:
PresstheStart/CancelButtontostartthe
toastingprocess.TheredStart/Cancel
Buttonlightwillilluminate.TheLCD
Display will show the Toast Function, the
shade color selection and the countdown
time. The unit will begin to operate and the
timer will start counting down.
WhentheToastingiscomplete,theunit
willemit3beeps.TheLCDandtheStart/
CancelButtonLightwillturnoffafter30
seconds.
Figure 2
NOTE:YoucancancelthetoastingcycleatanytimebypressingtheStart/Cancel
Buttononce.TheredStart/CancelButtonlightwillturnoffwhenevera
function has been completed or a function is manually cancelled.
English-8
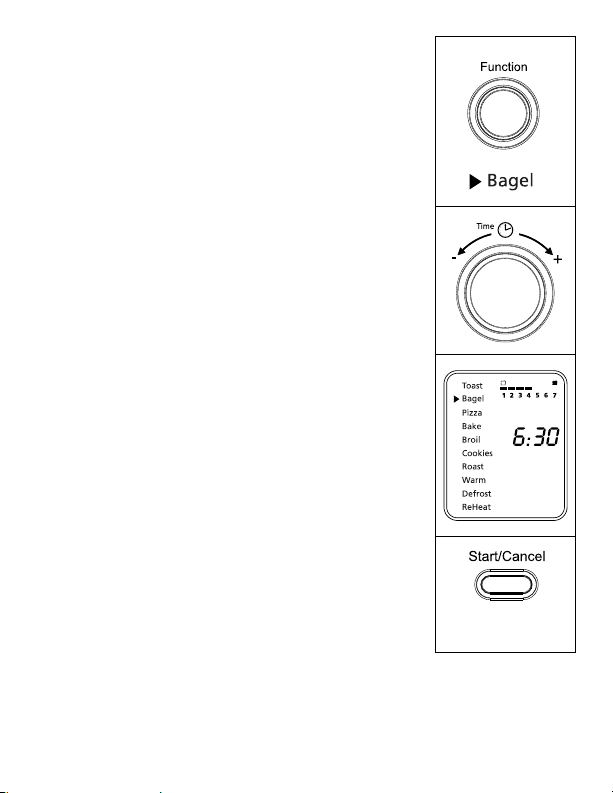
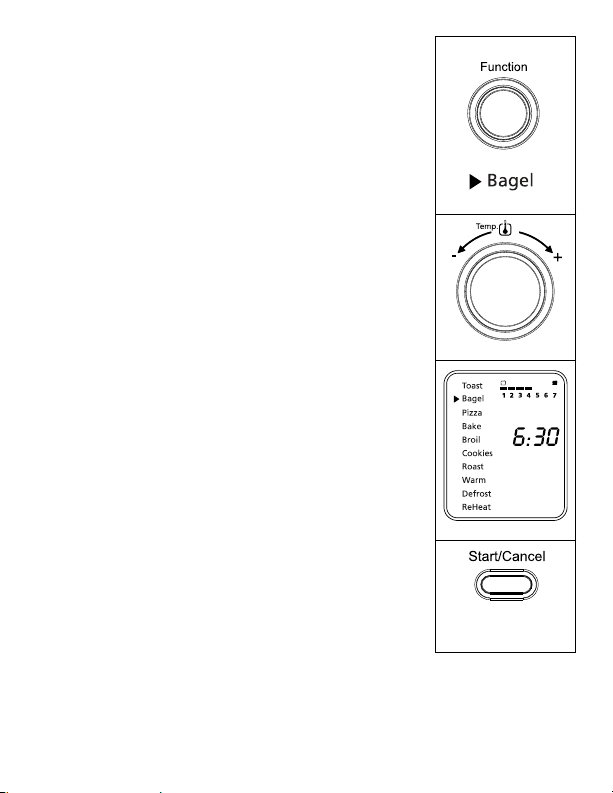
using the Bagel Function (see Fig. 3)
Step 1. TurntheFunctionKnobtotheBagelfunction.
WhenyouselecttheBagelfunction,the1-7
color shade setting indicator will become visible
ontheLCD.Theupperandlowerheating
elementswillheat.DefaultColorShadeSetting
is 4. This will be the default every time the
Toaster Oven is unplugged and plugged back
on.IftheToasterOvenremainsplugged-in
since the last time you have selected a
differentshadefortheBagelfunction(evenif
not activated), the unit will remember the last
shade setting you selected.
NOTE: The top rack position is recommended for bagel
toasting. For best results toast bagel with cut
side up.
The temperature is not adjustable for the
Bagelfunction.Thetimeadjustsautomatically
with shade adjustment. The temperature
ortimeisnotadjustableduringtheBagel
function.
Step 2. To adjust the shade color:
Turn the Time Knob to adjust the shade color.
The color shade-setting indicator will show your
selection as you turn the knob.
Step 3. To Start:
PresstheStart/CancelButtontostartthe
bageltoastingprocess.TheredStart/Cancel
Buttonlightwillilluminate.TheLCDDisplay
willshowtheBagelFunction,theshadecolor
selection and the countdown time. The unit
will begin to work and the timer will start
counting down.
WhentheBageltoastingiscomplete,theunit
willemit3beeps.TheLCDandtheStart/
CancelButtonLightwillturnoffafter30
seconds.
Figure 3
NOTE:Youcancancelthebageltoastingcycleatanytimebypressingthe
Start/CancelButtononce.TheredStart/CancelButtonlightwillturn
off whenever a function has been completed or a function is manually
cancelled.
English-9
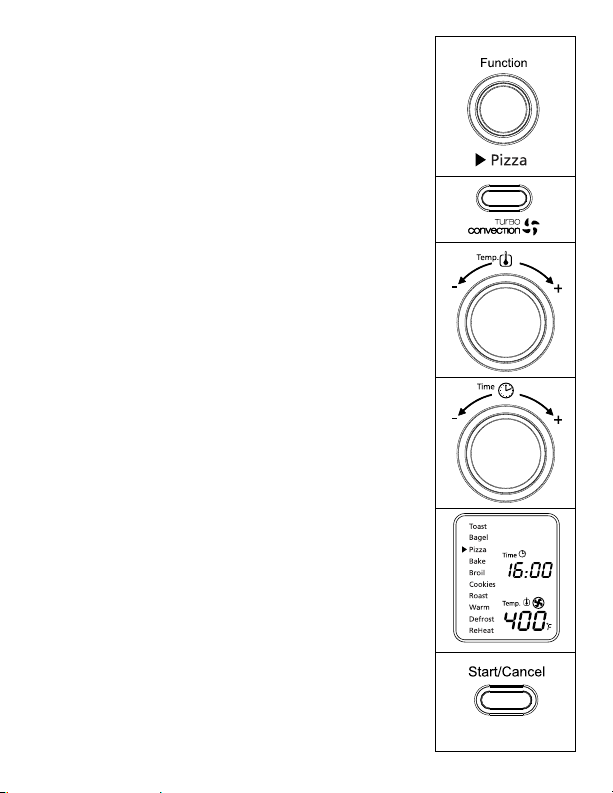
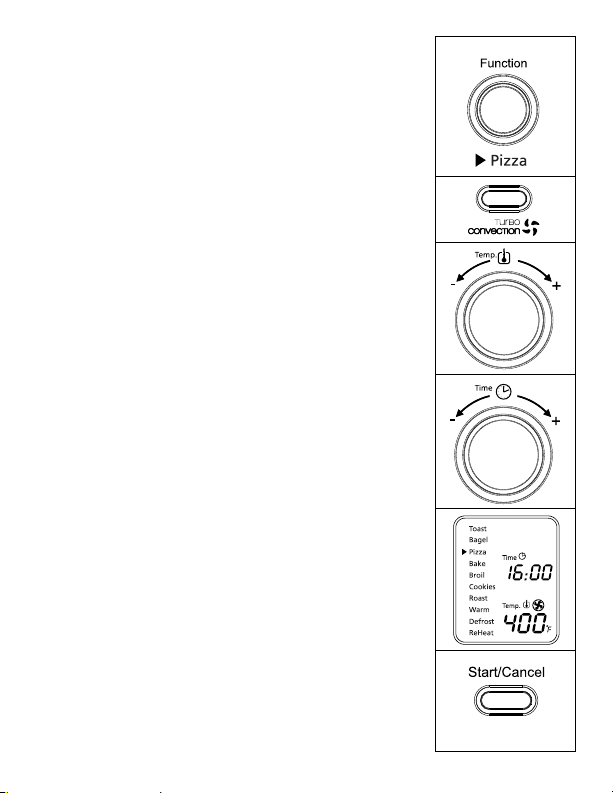
using the Pizza/ turBo convection heat
Function (see Fig. 4)
Step 1. TurntheFunctionKnobtothePizza
function.WhenyouselectthePizza
function,theTurboConvectionHeatwill
automatically activate.
Step 2. IfyouwishtoswitchtotheregularPizza
function, press the Turbo button once to
turnofftheTurboConvectionHeatdefault
selection. The blue light of the Turbo
ConvectionHeatbuttonwillturnoff.
TheTurboConvectionHeatFunctionturns
on a built-in fan that circulates hot air in
the oven chamber, cooking your food faster
and more evenly.
Default Temperature: 400ºF.
Default Time: 16 minutes.
Step 3. To set the temperature:
Turn the Temperature Knob if you wish to
increase or decrease the temperature setting.
ForthePizzaFunction,thetemperature
can be set from 350 to 450ºF in 25-degree
increments.
Step 4. To set the time:
Turn the Time Knob if you wish to
increase or decrease the cooking time.
ThemaximumtimesettingforPizzais60
minutes(1hour).Onceyouhaveselected
the desired cooking time, press the Start
button to initiate the cooking process.
Step 5. To Start:
PresstheStart/CancelButtontostartthe
cookingprocess.TheredStart/Cancel
Buttonlightwillilluminate.TheLCD
DisplaywillshowthePizzaFunction,
the countdown time and the selected
temperature. The unit will begin to work
and the timer will start counting down.
Figure 4

English-10English-10
WhenthePizzafunctioncycleiscomplete,
theunitwillemit3beeps.TheLCDandthe
Start/CancelButtonLightwillturnoffafter
30 seconds.
NOTE:Youcancancelthecookingcycleatany
timebypressingtheStart/CancelButton
once.TheredStart/CancelButtonlight
will turn off whenever a function has
been completed or a function is manually
cancelled.
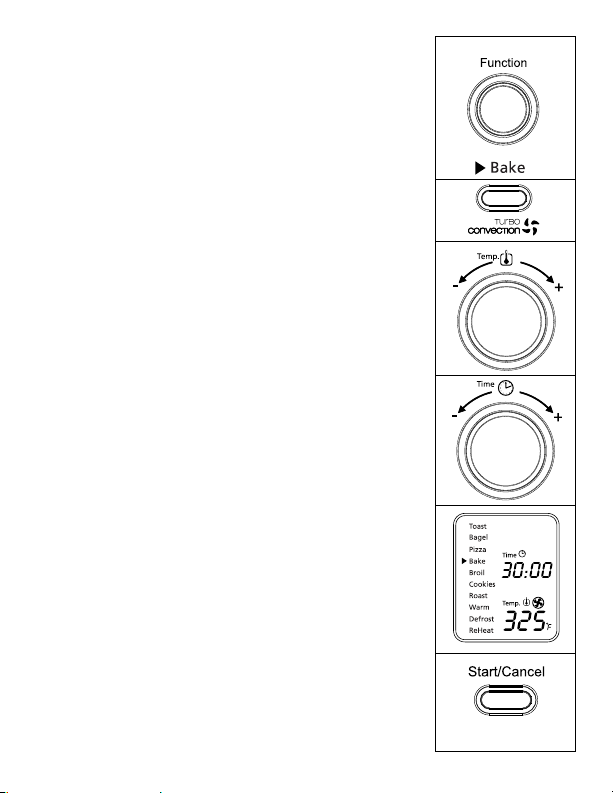
using the Bake/ turBo convection heat
Function (see Fig. 5)
Step 1. TurntheFunctionKnobtotheBake
function.WhenyouselecttheBake
function,theTurboConvectionHeatwill
automatically activate.
Step 2. IfyouwishtoswitchtotheregularBake
function, press the Turbo button once to
turnofftheTurboConvectionHeat.The
bluelightoftheTurboConvectionHeat
button will turn off.
TheTurboConvectionHeatFunctionturns
on a built-in fan that circulates hot air in
the oven chamber, cooking your food faster
and more evenly.
Default Temperature: 325ºF.
Default Time: 30 minutes.
Step 3. To set the temperature:
Turn the Temperature Knob if you wish to
increase or decrease the temperature setting.
FortheBakeFunction,thetemperature
can be set from 150 to 450ºF in 5-degree
increments.
Figure 5

English-11
Step 4. To set the time:
Turn the Time Knob if you wish to
increase or decrease the cooking time.
ThemaximumtimesettingforBakeis60
minutes(1hour).Onceyouhaveselected
the desired cooking time, press the Start
button to initiate the cooking process.
Step 5. To Start:
PresstheStart/CancelButtontostartthe
cookingprocess.TheredStart/Cancel
Buttonlightwillilluminate.TheLCD
DisplaywillshowtheBakeFunction,
the countdown time and the selected
temperature. The unit will begin to work
and the timer will start counting down.
WhentheBakingcycleiscomplete,theunit
willemit3beeps.TheLCDandtheStart/
CancelButtonLightwillturnoffafter30
seconds.
NOTE:Youcancancelthecookingcycleatany
timebypressingtheStart/CancelButton
once.TheredStart/CancelButtonlight
will turn off whenever a function has
been completed or a function is manually
cancelled.
Figure 5
English-12
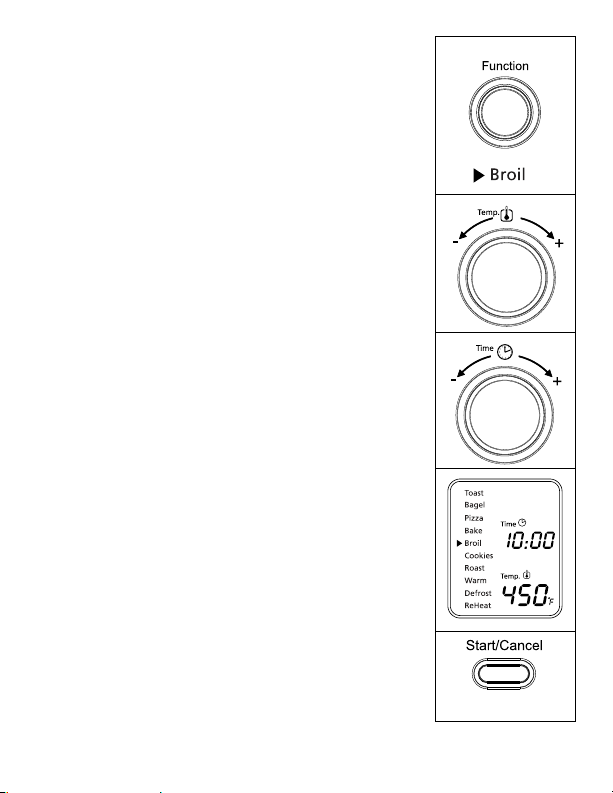
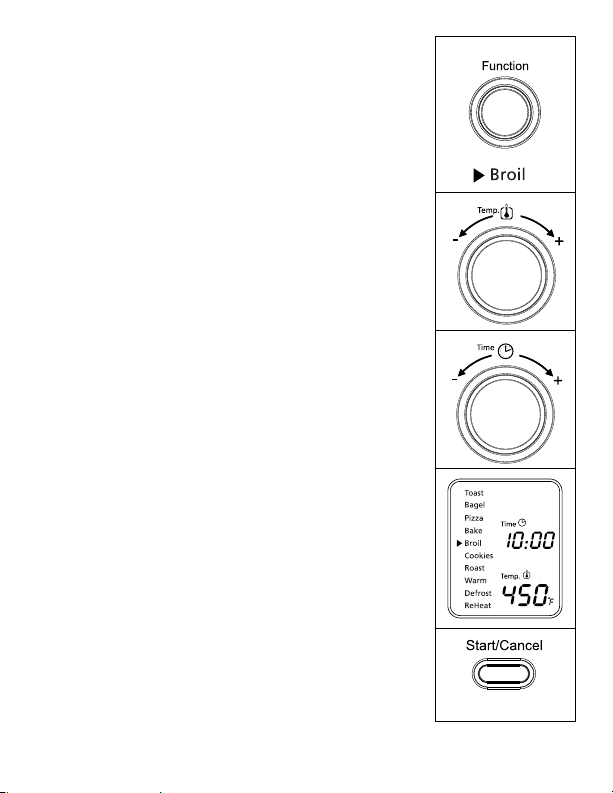
using the Broil Function (see Fig. 6)
Step 1. TurntheFunctionKnobtotheBroil
function.WhenyouselecttheBroilfunction,
the upper heating elements will heat.
Default Temperature: 450ºF.
Default Time: 10 minutes.
Step 2. To set the temperature:
Turn the Temperature Knob if you wish to
increase or decrease the temperature setting.
FortheBroilFunction,thetemperature
can be set from 400 to 450ºF in 25-degree
increments.
Step 3. To set the time:
Turn the Time Knob if you wish to
increase or decrease the cooking time.
ThemaximumtimesettingforBroilis60
minutes(1hour).Onceyouhaveselected
the desired cooking time, press the Start
button to initiate the cooking process.
Step 4. To Start:
PresstheStart/CancelButtontostartthe
broilingprocess.TheredStart/Cancel
Buttonlightwillilluminate.TheLCD
DisplaywillshowtheBroilFunction,
the countdown time and the selected
temperature. The unit will begin to work
and the timer will start counting down.
WhentheBroilingcycleiscomplete,the
unitwillemit3beeps.TheLCDandthe
Start/CancelButtonLightwillturnoffafter
30 seconds.
NOTE:Youcancancelthebroilingcycleatany
timebypressingtheStart/CancelButton
once.TheredStart/CancelButtonlight
will turn off whenever a function has
been completed or a function is manually
cancelled.
Figure 6
English-13
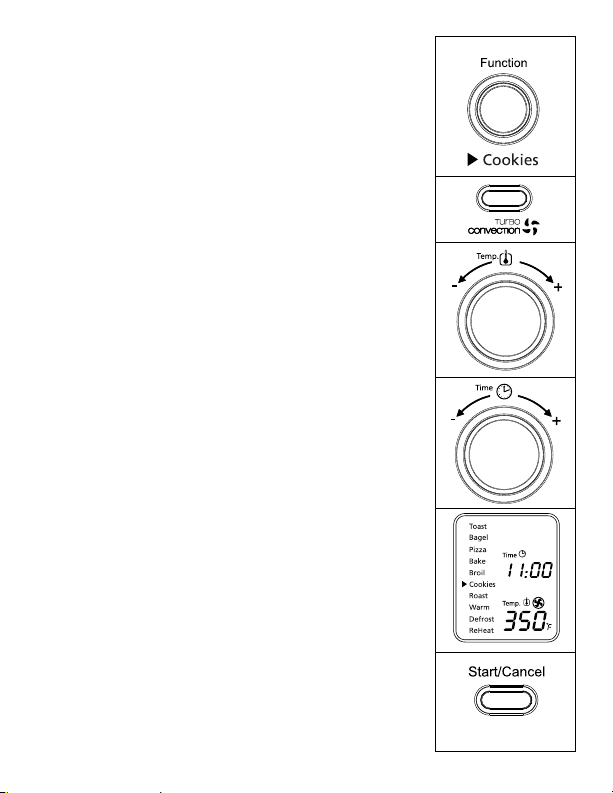
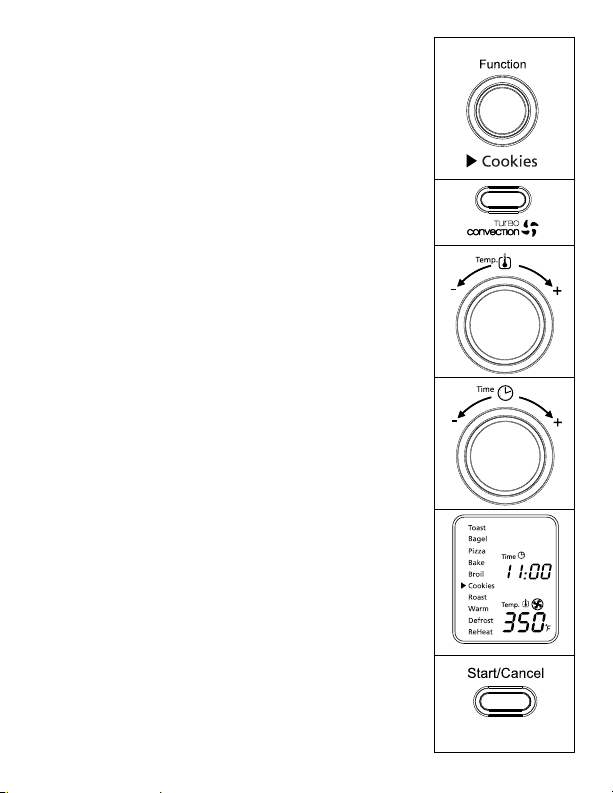
using the cookies/turBo convection heat
Function (see Fig. 7)
Step 1. TurntheFunctionKnobtotheCookies
function.WhenyouselecttheCookies
function,theTurboConvectionHeatwill
automatically activate.
Step 2. IfyouwishtousetheregularCookies
function, press Turbo button once to turn
offtheTurboConvectionHeat.Theblue
lightoftheTurboConvectionHeatbutton
will turn off.
TheTurboConvectionHeatFunctionturns
on a built-in fan that circulates hot air in
the oven chamber, cooking your food faster
and more evenly.
Default Temperature: 350ºF.
Default Time: 11 minutes.
Step 3. To set the temperature:
Turn the Temperature Knob if you wish to
increase or decrease the temperature setting.
FortheCookiesFunction,thetemperature
can be set from 150 to 450ºF in 5-degree
increments.
Step 4. To set the time:
Turn the Time Knob if you wish to
increase or decrease the cooking time. The
maximumtimesettingforCookiesis60
minutes(1hour).Onceyouhaveselected
the desired cooking time, press the Start
button to initiate the cooking process.
Figure 7
English-14
Step 5. To Start:
PresstheStart/CancelButtontostartthe
cookingprocess.TheredStart/Cancel
Buttonlightwillilluminate.TheLCD
DisplaywillshowtheCookiesFunction,
the countdown time and the selected
temperature. The unit will begin to work
and the timer will start counting down.
WhentheCookiesfunctioncycleis
complete, the unit will emit 3 beeps. The
LCDandtheStart/CancelButtonLightwill
turn off after 30 seconds.
NOTE:Youcancancelthecookingcycleatany
timebypressingtheStart/CancelButton
once.TheredStart/CancelButtonlight
will turn off whenever a function has
been completed or a function is manually
cancelled.
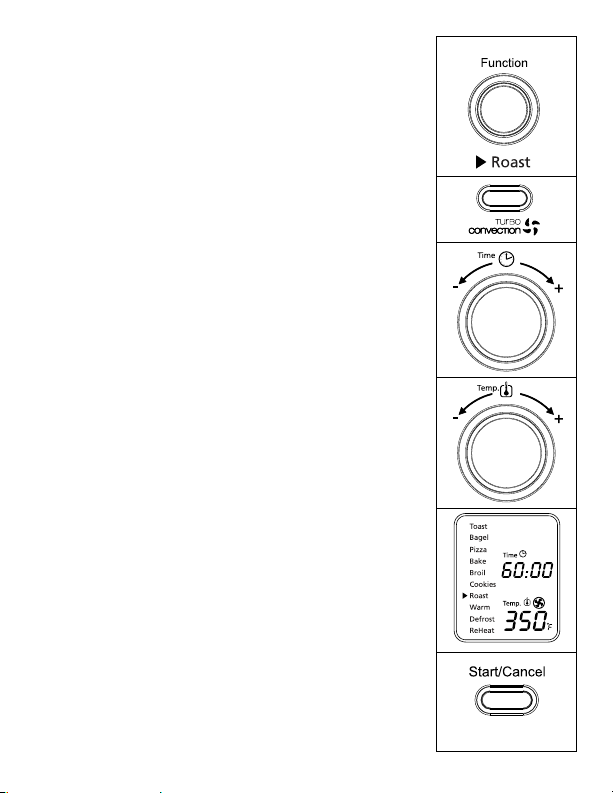
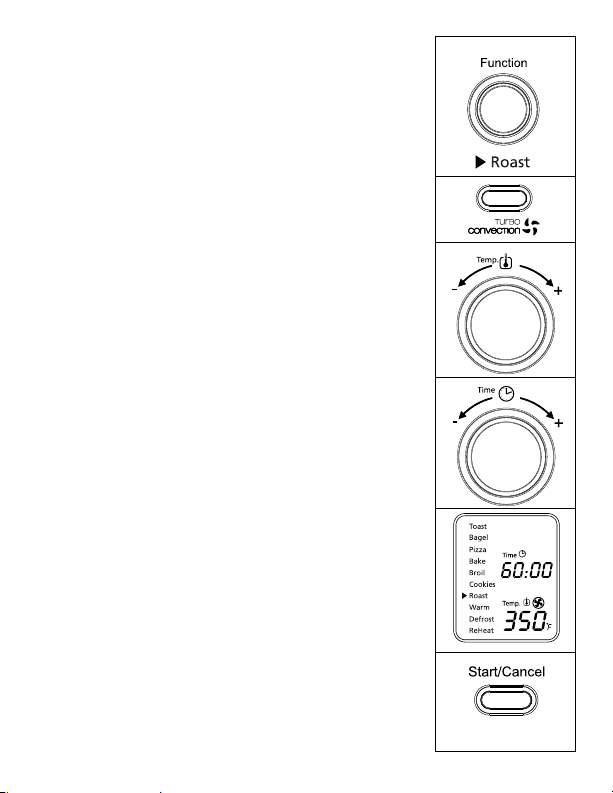
using the roast/turBo convection
Function (see Fig. 8)
Step 1. TurntheFunctionKnobtotheRoast
function.WhenyouselecttheRoast
function,theTurboConvectionHeatiswill
automatically activate.
Step 2. IfyouwishtousetheregularRoast
function, press the Turbo button once to
turnofftheTurboConvectionHeat.The
bluelightoftheTurboConvectionHeat
button will turn off.
TheTurboConvectionHeatFunctionturns
on a built-in fan that circulates hot air in
the oven chamber, cooking your food faster
and more evenly.
Default Temperature: 350ºF.
Default Time: 60 minutes.
Figure 8
English-15
Step 3. To set the temperature:
Turn the Temperature Knob if you wish to
increase or decrease the temperature setting.
FortheRoastFunction,thetemperature
can be set from 150 to 450ºF in 5-degree
increments.
Step 4. To set the time:
Turn the Time Knob if you wish to
increase or decrease the cooking time.
ThemaximumtimesettingforRoastis60
minutes(1hour).Onceyouhaveselected
the desired cooking time, press the Start
button to initiate the cooking process.
Step 5. To Start:
PresstheStart/CancelButtontostartthe
cookingprocess.TheredStart/Cancel
Buttonlightwillilluminate.TheLCD
DisplaywillshowtheRoastFunction,
the countdown time and the selected
temperature. The unit will begin to work
and the timer will start counting down.
WhentheRoastingcycleiscomplete,the
unitwillemit3beeps.TheLCDandthe
Start/CancelButtonLightwillturnoffafter
30 seconds.
NOTE:Youcancancelthecookingcycleatany
timebypressingtheStart/CancelButton
once.TheredStart/CancelButtonlight
will turn off whenever a function has
been completed or a function is manually
cancelled.
Figure 8
English-16
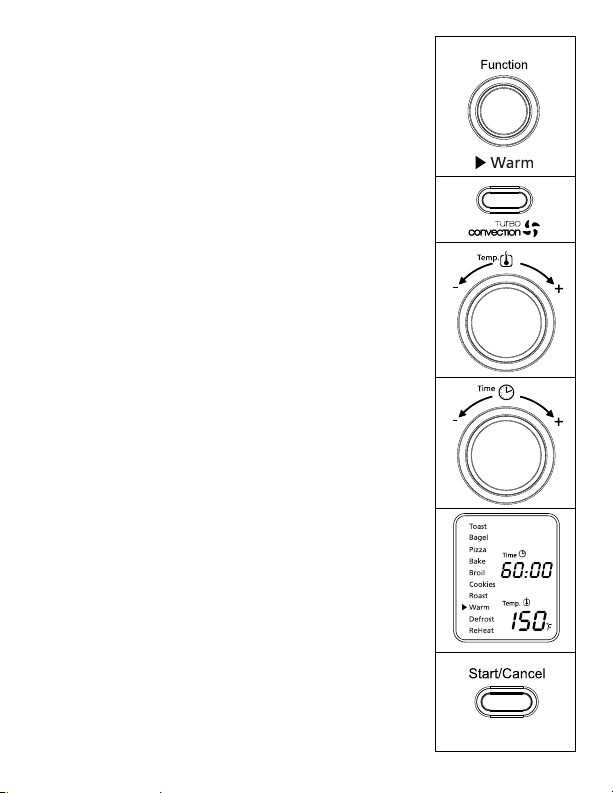
using the Warm Function (see Fig. 9)
Step 1. TurntheFunctionKnobtotheWarmfunction.
WhenyouselecttheWarmfunction,thelower
heating element will heat.
Default Temperature: 150ºF.
Default Time: 60 minutes.
YoumaymanuallyactivatetheTurbo
ConvectionHeatbypressingtheTurbo
button once to turn it on. The blue light of
the Turbo button will turn on.
Step 2. To set the temperature:
Turn the Temperature Knob if you wish to
increase or decrease the temperature setting.
FortheWarmFunction,thetemperature
can be set from 150 to 200ºF in 25-degree
increments.
Step 3. To set the time:
Turn the Time Knob if you wish to
increase or decrease the warming time.
ThemaximumtimesettingforWarmis60
minutes(1hour).Onceyouhaveselected
the desired warming time, press the Start
button to initiate the warming process.
Step 4. To Start:
PresstheStart/CancelButtontostartthe
warmingprocess.TheredStart/Cancel
Buttonlightwillilluminate.TheLCD
DisplaywillshowtheWarmFunction,
the countdown time and the selected
temperature. The unit will begin to work
and the timer will start counting down.
WhentheWarmingcycleiscomplete,the
unitwillemit3beeps.TheLCDandthe
Start/CancelButtonLightwillturnoffafter
30 seconds.
NOTE:Youcancancelthewarmingcycleatanytime
bypressingtheStart/CancelButtononce.The
redStart/CancelButtonlightwillturnoff
whenever a function has been completed or a
function is manually cancelled.
Figure 9
English-17
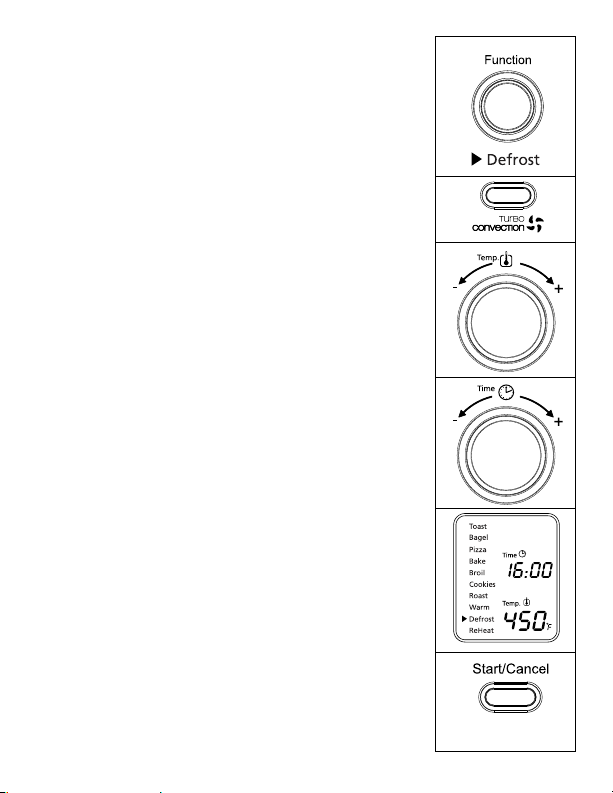
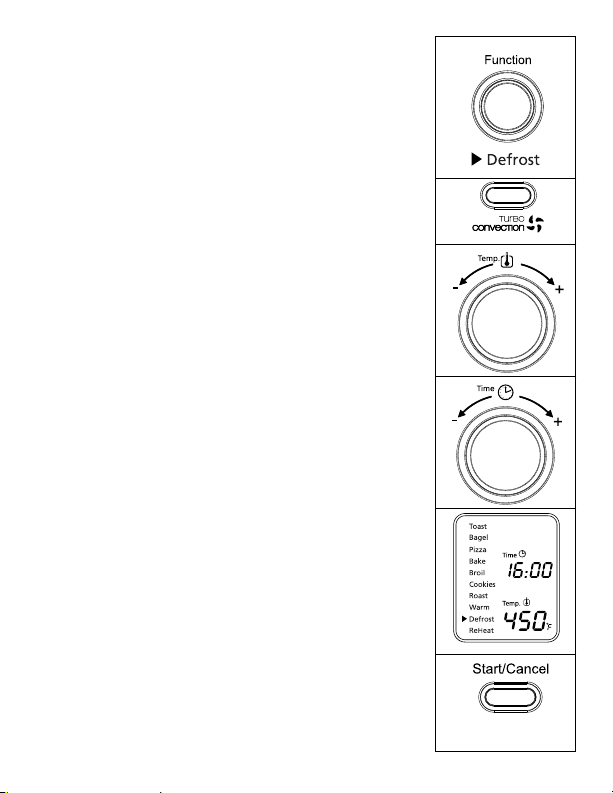
using the deFrost Function (see Fig. 10)
Step 1. Turn the Function Knob to the Defrost
function.
Default Temperature: 450ºF.
Default Time: 16 minutes.
YoumaymanuallyactivatetheTurbo
ConvectionHeatbypressingtheTurbo
button once to turn it on. The blue light of
the Turbo button will turn on.
Step 2. To set the temperature:
Turn the Temperature Knob if you wish to
increase or decrease the temperature setting.
For the Defrost function, the temperature
can be set from 150 to 450ºF in 5-degree
increments.
Step 3. To set the time:
Turn the Time Knob if you wish to increase
or decrease the defrosting time. The
maximum time setting for Defrost is 60
minutes(1hour).Onceyouhaveselected
the desired defrosting time, press the Start
button to initiate the cooking process.
Step 4. To Start:
PresstheStart/CancelButtontostartthe
defrostingprocess.TheredStart/Cancel
Buttonlightwillilluminate.TheLCD
Display will show the Defrosting function,
the countdown time and the selected
temperature. The unit will begin to work
and the timer will start counting down.
WhentheDefrostingcycleiscomplete,the
unitwillemit3beeps.TheLCDandthe
Start/CancelButtonLightwillturnoffafter
30 seconds.
NOTE:Youcancancelthedefrostingcycleatany
timebypressingtheStart/CancelButtononce.
TheredStart/CancelButtonlightwillturn
off whenever a function has been completed
or a function is manually cancelled.
Figure 10
English-18
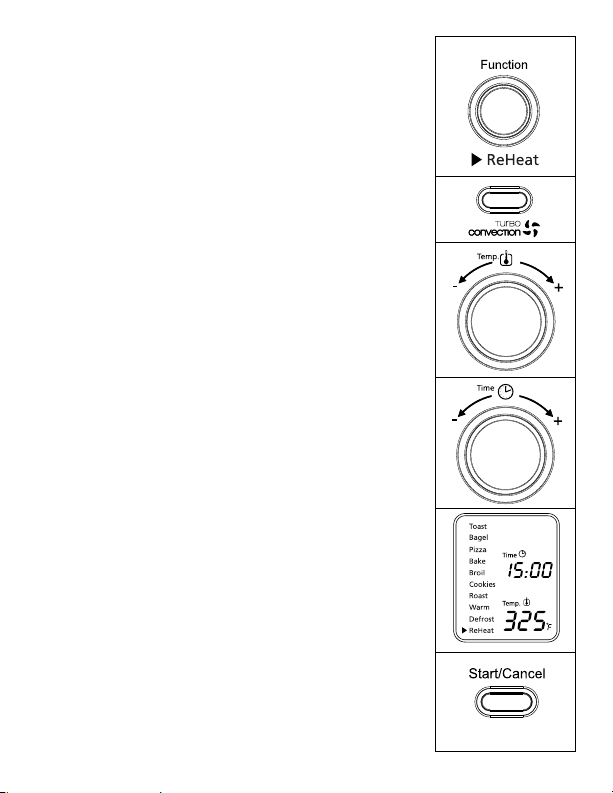
using the reheat Function (see Fig. 11)
Step 1. TurntheFunctionKnobtotheReheat
function.
Default Temperature: 325ºF.
Default Time: 15 minutes.
YoumaymanuallyactivatetheTurbo
ConvectionHeatbypressingtheTurbo
button once to turn it on. The blue light of
the Turbo button will turn on.
Step 2. To set the temperature:
Turn the Temperature Knob if you wish to
increase or decrease the temperature setting.
FortheReheatfunction,thetemperature
can be set from 150 to 450ºF in 5-degree
increments.
Step 3. To set the time:
Turn the Time Knob if you wish to increase
or decrease the reheating time. The maximum
timesettingforReheatis60minutes(1hour).
Once you have selected the desired reheating
time, press the Start button to initiate the
reheating process.
Step 4. To Start:
PresstheStart/CancelButtontostartthe
reheatingprocess.TheredStart/Cancel
Buttonlightwillilluminate.TheLCD
DisplaywillshowtheReheatFunction,
the countdown time and the selected
temperature. The unit will begin to work
and the timer will start counting down.
WhentheReheatingcycleiscomplete,the
unitwillemit3beeps.TheLCDandthe
Start/CancelButtonLightwillturnoffafter
30 seconds.
NOTE:Youcancancelthereheatingcycleatany
timebypressingtheStart/CancelButton
once.TheredStart/CancelButtonlight
will turn off whenever a function has
been completed or a function is manually
cancelled.
Figure 11
English-19
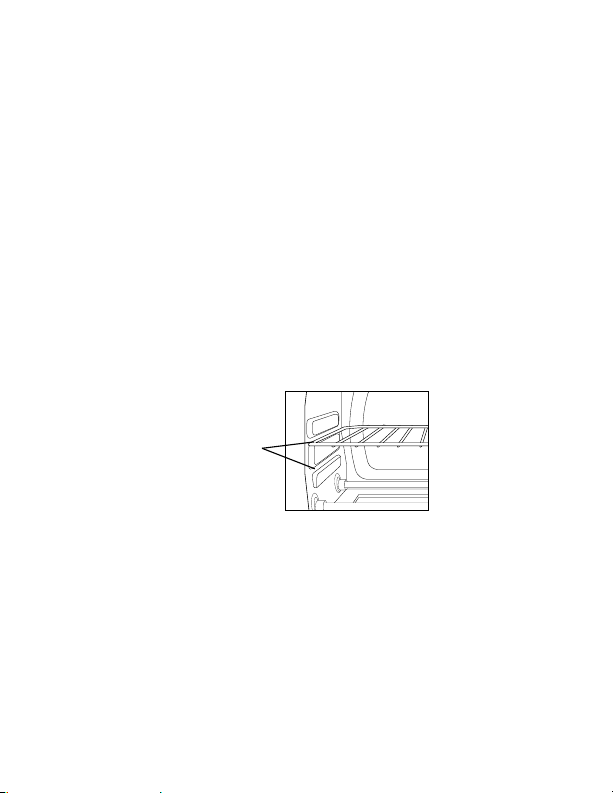
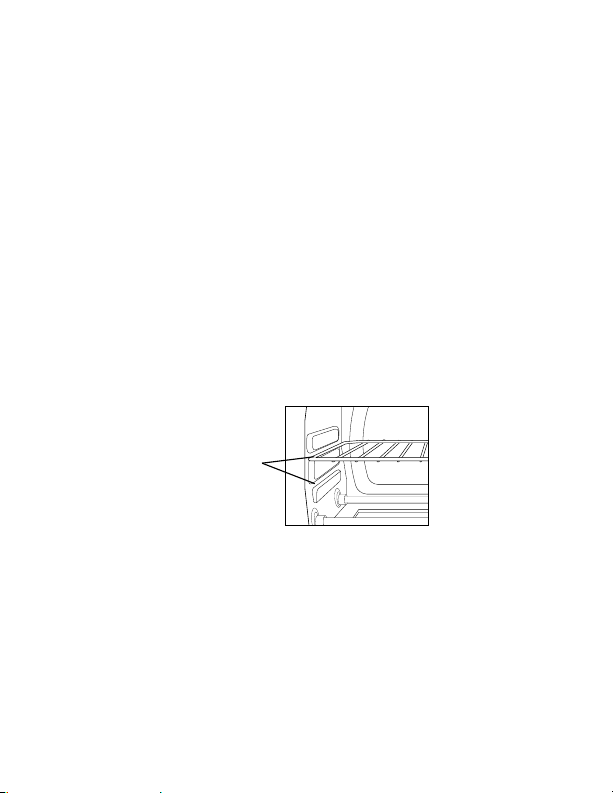
Positioning Pan
• To accommodate a wide variety of foods the oven has two rack positions.
The rack can be inserted in the oven in the upper or lower rack guides. The
rackwillfitintoeitheroftherackguidesinsideoftheCountertopOven.
(SeeFigureBelow)
• Beforeremovingtherackallowtheunittocool.
• To remove the rack, open the oven door and pull the rack towards the
front of the oven. The rack will slide on the rack guides on the inside of the
oven.
PLEASENOTE:theovenrackmaytiltdownwardcausingfoodtoshift
when the rack is pulled out, proceed with caution.
• Positioningoftheovenrackwilldependonthesizeofthefoodand
desiredbrowning.Movetheracktothelowerrackpositiontopreventtop
browning and move the rack to the upper rack position to prevent bottom
burning.
• Forbesttoastingresults,positiontherackintheupperrackguide.
rack guide
oPtions

English-20
cleaning Your countertoP oven
DONOTIMMERSEINLIQUIDS.
Step 1. PresstheStart/CancelButtonOFFandremoveplugfromelectrical
outlet.Allowtocool.
Step 2. Wipeunitdownwithdampcloth.DONOTIMMERSEINWATER.
Makesuretoonlyusemild,soapywater.Abrasivecleaners,scrubbing
brushes and chemical cleaners will damage the coating on this unit.
Step 3. RemovecrumbtraybypullingoutofCountertopOven.
Step 4. Shakeoffcrumbsfromcrumbtray.Cleaningthecrumbtrayoften
will avoid any accumulations.
Step 5. Removewirerackandcleanwithdampclothorplaceintoprackof
dishwasher.
storing Your countertoP oven
Allowtheappliancetocoolcompletelybeforestoring.Ifstoringthe
CountertopOvenforlongperiodsoftimemakecertainthattheCountertop
Oveniscleanandfreeoffoodparticles.StoretheCountertopOveninadry
location such as on a table or countertop or cupboard shelf. Other than the
recommended cleaning, no further user maintenance should be necessary.

English-21
5 Year satisFaction guarantee
SunbeamProducts,Inc.doingbusinessasJardenConsumerSolutionsor
ifinCanada,SunbeamCorporation(Canada)Limiteddoingbusinessas
JardenConsumerSolutions(collectively“JCS”)warrantsthatforaperiod
of five years from the date of purchase, this product will be free from defects
inmaterialandworkmanship.JCS,atitsoption,willrepairorreplacethis
product or any component of the product found to be defective during the
guaranteeperiod.Replacementwillbemadewithaneworremanufactured
productorcomponent.Iftheproductisnolongeravailable,replacement
may be made with a similar product of equal or greater value. This is your
exclusive guarantee. Do NOT attempt to repair or adjust any electrical or
mechanical functions on this product. Doing so will void this guarantee. This
guarantee is valid for the original retail purchaser from the date of initial
retail purchase and is not transferable. Keep the original sales receipt. Proof
ofpurchaseisrequiredtoobtainsatisfactionguaranteeperformance.JCS
dealers,servicecenters,orretailstoressellingJCSproductsdonothavethe
right to alter, modify or any way change the terms and conditions of this
guarantee.
Thisguaranteedoesnotcoverdamageresultingfromanyofthefollowing:
negligent use or misuse of the product, use on improper voltage or current,
use contrary to the operating instructions, disassembly, repair or alteration
byanyoneotherthanJCSoranauthorizedJCSservicecenter.Further,the
guaranteedoesnotcover:ActsofGod,suchasfire,flood,hurricanesand
tornadoes.
What are the limits on JCS’s Liability?
JCSshallnotbeliableforanyincidentalorconsequentialdamagescausedby
the breach of any express, implied or statutory guarantee or condition. Except
to the extent prohibited by applicable law, any implied guarantee or condition
of merchantability or fitness for a particular purpose is limited in duration
tothedurationoftheaboveguarantee.JCSdisclaimsallotherguarantees,
conditionsorrepresentations,express,implied,statutoryorotherwise.JCS
shall not be liable for any damages of any kind resulting from the purchase,
use or misuse of, or inability to use the product including incidental, special,
consequential or similar damages or loss of profits, or for any breach
of contract, fundamental or otherwise, or for any claim brought against
purchaser by any other party.

English-22
Some provinces, states or jurisdictions do not allow the exclusion or
limitation of incidental or consequential damages or limitations on how long
an implied guarantee lasts, so the above limitations or exclusion may not
apply to you. This guarantee gives you specific legal rights, and you may
also have other rights that vary from province to province, state to state or
jurisdiction to jurisdiction.
How to Obtain Satisfaction Guarantee Service
In the U.S.A.
Ifyouhaveanyquestionregardingthisguaranteeorwouldliketoobtain
guarantee service, please call 1-800-334-0759 and a convenient service center
address will be provided to you.
In Canada
Ifyouhaveanyquestionregardingthisguaranteeorwouldliketoobtain
guarantee service, please call 1-800-667-8623 and a convenient service center
address will be provided to you.
IntheU.S.A.,thisguaranteeisofferedbySunbeamProducts,Inc.doing
businessasJardenConsumerSolutionslocatedinBocaRaton,Florida33431.
InCanada,thisguaranteeisofferedbySunbeamCorporation(Canada)
Limited,locatedat20BHerefordStreet,Brampton,OntarioL6Y0M1.If
you have any other problem or claim in connection with this product, please
writetotheConsumerServiceDepartment.
PLEASE DO NOT RETURN THIS PRODUCT TO ANY OF THESE
ADDRESSES OR TO THE PLACE OF PURCHASE.

Español-1
PRECAUCIONES IMPORTANTES
Cuando se utilicen artefactos eléctricos deben seguirse siempre las
precauciones básicas de seguridad incluyendo las siguientes:
LEA Y GUARDE ESTAS
INSTRUCCIONES
• LEATODASLASINSTRUCCIONES,ETIQUETASDELPRODUCTO
YADVERTENCIASANTESDEUTILIZARELHORNOPARA
MOSTRADOR.
• Notoquelassuperficiescalientes.Utilicesiempreguantesparahornoscuando
manipulematerialescalientesydejequelaspiezasmetálicasseenfríenantesde
limpiarlas.Uselasasasdelhornoparamoverlodeunlugaraotro.
• Sielhornonoestáenusoyantesdelimpiarlo,presioneelbotónde“Iniciar/
Cancelar”ydesconecteelcabledeltomacorriente.Dejequelaunidadseenfríe
porcompletoantesdecolocaroquitarpiezas.
• Paraprotegersecontraelriesgodedescargaseléctricas,nosumerjaelcable,el
enchufeoelartefactoenaguanienotroslíquidos.
• Serequiereestrictasupervisióncuandoseutiliceesteocualquierotroartefacto
cercadelosniños.Esteartefactonodebeserutilizadoporniños.
• Noutiliceningúnelectrodomésticoquetengaunenchufeocabledañado
oraído,odespuésdequeelartefactohayapresentadofallas,sehaya
caídoohayasufridocualquierotrodaño.DevuelvaelhornoalCentrode
ServicioAutorizadodeArtefactosSunbeammáscercanoparasuinspección,
reparación,ajusteeléctricoomecánico.
• Noutiliceaditamentosnorecomendadosporelfabricanteyaqueestopuede
ocasionarincendios,descargaseléctricasolesionespersonales.
• Noutiliceenexterioresoparafinescomerciales.
• Noutiliceesteproductoparaotrosfinesdistintosalosrecomendados.
• Nodejequeelcableeléctricocuelguedelbordedelamesaolamesadanique
entre en contacto con superficies calientes.
• Nocoloqueelelectrodomésticocercaosobreunquemadorcaliente,yaseade
gasoeléctrico,nidentrodeunhornocaliente.
• Sedebeemplearextremaprecauciónalutilizarcontenedoresquenoseande
metal o vidrio.
• Sisecubreelhornoparamostradoroésteentraencontactoconmateriales
inflamables, incluyendo cortinas, tapices, paredes, etc., durante su
funcionamiento,podríaproducirseunincendio.Nocoloqueningúnartículo
sobreelelectrodomésticomientrasestéenfuncionamiento.

Español-2
• Alutilizarelhornodemesa,colóqueloaunadistanciamínimade15cm(6
pulgadas) de la pared o de otros cables.
• Noalmacenedentrodelaunidadningúnmaterial,distintoalosaccesorios
recomendadosporelfabricante,cuandonoestéenuso.
• Nointroduzcamaterialesinflamablesenelhorno,talescomopapel,cartón,
plástico,ocualquierotromaterialquepuedaincendiarseoderretirse.
• Noforrelabandejaolaparrilladelhornoconpapeldealuminio.Esto
ocasionaráqueelartefactosesobrecaliente.
• Nodebenintroducirsealimentosdemasiadograndesniutensiliosmetálicos
dentrodelartefacto,yaquepuedenproducirincendiosodescargaseléctricas.
• Nolimpieconestropajosmetálicos.Podríandesprendersepedazosdel
estropajoyentrarencontactoconlaspiezaseléctricas,locualgeneraríaun
riesgodedescargaseléctricas.
• Debeemplearseextremaprecauciónalsacarlabandejaodesechargrasasu
otroslíquidoscalientes.
•
Paraapagarelelectrodoméstico,presioneelbotónde“Iniciar/Cancelar”y
saqueelcabledeltomacorriente.Eldisplayseapagarádespuésde30segundos
de inactividad.
Esta unidad es sólo para uso doméstico
Instrucciones del cable de alimentación corto
Seproporcionauncabledealimentacióncortoparadisminuirlosriesgos
originadosporenredosotropiezosconcableslargos.Sepuedeutilizaruna
extensiónsiseempleanlasdebidasprecauciones.Siseusaunaextensión,la
capacidad nominal indicada de la misma debe ser por lo menos igual o mayor
aladelartefacto.Laextensióndebecolocarsedemaneraquenocuelguedel
mostradorodelamesa,dondelosniñospodríanhalarlaopodríaocasionar
tropiezosaccidentales.
Únicamente para productos comprados en Estados Unidos y Canadá
Paradisminuirelriesgodedescargaeléctricaesteartefactocuentaconun
enchufepolarizado(unaclavijaesmásanchaquelaotra).Esteenchufeentra
deunasolamaneraenuntomacorrientepolarizado;sielenchufenoentrapor
completoeneltomacorriente,inviértalo.Siaúnnoencaja,comuníquesecon
un electricista calificado.
No intente alterarestacaracterísticadeseguridad.
CONSERVE ESTAS
INSTRUCCIONES
Español-3
diagrama del Producto
1. Pantalla LCD
2. Perilla selectora de función:seleccionelafuncióndecoccióngirandola
perilla al ajuste deseado.
3. Botón para iniciar/cancelar: Presioneestebotónparaapagarelproducto.
4. Botón de calentamiento por convección turbo:Úseloparaactivarocancelarel
calentamientoporconvecciónturbo.
5. Perilla de control de tiempo: Ajustelaruedaalatemperaturadeseada.
6. Perilla de control de temperatura: Gradúelaruedadeltermostatoala
temperatura deseada.
7. Rejilla removible: Consultelasección“Posicionamientodelarejilla”
8. Puerta de vidrio templado: Para ver los alimentos desde el frente.
9. Dos posiciones para colocar la rejilla.
10. Bandeja recolectora removible: Para recolectar las migajas o restos de
comidaquecaigan.Sesacaparafacilitarsulimpieza.
11. Combinación de fuente para hornear, bandeja para galletas y parrilla para asar:
úselasparatodassustareasdehorneadoyasado.
1
9
11
5
6
2
4
10
7 8
12
3

Español-4
a c
f
b
d
e
11. Paredes interiores fáciles de limpiar: Permitenlalimpiezarápida.
Pantalla de LCD
a. Indicador de función:Tostar,Bagel,Pizza,Hornear,Dorar,Galletas,
Asado,Calentar,Descongelar,Recalentar
b. Flecha indicadora de función
c. Indicador de temperatura
d. Indicador de tiempo
e. Icono de calentamiento por convección turbo
f. Indicador del ajuste de intensidad de tostado del 1 al 7
PreParación del horno tostador
Alutilizarelhornotostadorporprimeravez,recuerde:
•Retirartodaslasetiquetasdelasuperficiedelhorno.
•Abrirlapuertadelhornotostadorysacartodoslosdocumentos
impresos y papeles que se encuentren dentro.
•Limpiarlarejillaylabandejaconaguacaliente,unapequeñacantidad
dedetergentelíquidoparalavarplatosyunaesponjanoabrasivaouna
almohadillalimpiadora.NOSUMERGIRELCABLE,ELENCHUFEO
ELCUERPODELAUNIDADENAGUA.
•Secarbienlaunidadantesdeutilizarla.
•Escogerunlugarparacolocarelhornotostador.Deberácolocarloen
un espacio abierto, sobre un mostrador plano, donde el enchufe pueda
llegar al tomacorriente.
•Enchufarelhornoenuntomacorriente.

Español-5
uso del horno tostador (Fig. 1)
Enchufelaunidad;éstaemitirádospitidoslargos
ylapantallaLCDseiluminará.Laopciónde
funciónapareceráconunindicadorenlafunción
predeterminadadeTOSTAR.LapantallaLCDyel
botóndeinicio/cancelarpermanecerániluminados
durante30segundosyposteriormenteseapagarán
si no se oprimen botones o se mueven perillas.
NOTA: DespuésdequelapantallaLCDseapague
puedeoprimircualquierbotónomovercualquier
perillapara“despertar”lapantallayhacer
funcionar el horno normalmente
Paso 1. Selección de la función
Girelaperilladefunciónparaelegirunade
lassiguientes10opcionesdelmenú:Tostar,
Bagel,Pizza,Hornear,Dorar,Galletas,
Asado,Calentar,Descongelar,Recalentar.
Laflechaindicadorasemoverádeuna
funciónaotraconformegirelaperilla.
NOTA:Sielprocesodecocciónnoempiezao
noseoprimeningúnotrobotónnise
giraningunaotraperillaenunplazode
30segundos,laluzdefondoazuldela
pantallaylaluzdelbotóndeiniciar/
cancelarseapagarán.
Paso 2. Tiempo:
Girelaperilladetiempoparaaumentaro
disminuireltiempodecocción.Eltiempo
decocciónmáximoesde60minutos.
Paso 3. Temperatura:
Girelaperilladetemperaturapara
aumentarodisminuirlagraduaciónde
temperatura.
Figura 1

Español-6
uso de la Función de tostar (Fig. 2)
Paso 1. GirelaperilladefunciónaTostar.Cuando
seleccionelafuncióndeTostar,elajustede
intensidaddetostadodel1al7apareceráen
lapantallaLCD.Tantoelelementotérmico
superiorcomoelinferiorsecalentarán.
El ajuste de intensidad de tostado
predeterminadoes4.Cadavezquese
desenchufe y vuelva a enchufarse el horno
tostador,elajustepredeterminadoserá4.Si
el horno tostador permanece enchufado desde
laúltimavezqueseleccionóunaintensidadde
tostadodistintaparadichafunción(aunqueno
seactive),launidadrecordaráelúltimoajuste
de intensidad seleccionado.
NOTA:Esrecomendadousarlaposiciónsuperiorde
larejillaparalafuncióndeTostar.
EnlafuncióndeTostarnosepuede
ajustar la temperatura. El tiempo se ajusta
automáticamenteconelajustedeintensidad
de tostado. La temperatura o el tiempo no son
ajustablesdurantelafuncióndeTostar.
Paso 2. Para ajustar la intensidad de tostado:
Girelaperilladetiempoparaajustar
la intensidad de tostado. El ajuste de la
intensidaddetostadomostrarásuselección
conforme gire la perilla.
Paso 3. Para comenzar:
oprimaelbotóndeiniciar/cancelarpara
comenzarelprocesodetostado.Laluzroja
delbotóndeiniciar/cancelarseiluminará.La
pantallaLCDmostrarálafuncióndeTostar,la
intensidad de tostado seleccionada y el tiempo
delcronómetrodecuentaregresiva.Launidad
comenzaráafuncionaryeltemporizador
empezarálacuentaregresiva.
Cuandotermineelciclodetostado,launidad
emitirátrespitidos.LapantallaLCDyel
botóndeiniciar/cancelarseapagarándespués
de 30 segundos.
Figura 2
NOTA: Puede cancelar el ciclo de tostado en cualquier momento
oprimiendounavezelbotóndeiniciar/cancelar.Laluzrojadel
botónparainiciar/cancelarseapagarácadavezqueunafunción
hayasidocompletadaosilafunciónesmanualmentecancelada.
Español-7
uso de la Función de Bagel
(rosquilla de Pan) (Fig. 3)
Paso 1. GirelaperilladefunciónaBagel.Cuandoseleccione
lafuncióndeBagel,elajustedeintensidadde
tostadodel1al7apareceráenlapantallaLCD.Los
elementostérmicossuperioreinferiorsecalentarán.
El ajuste de intensidad de tostado predeterminado
es4.Cadavezquesedesenchufeyvuelvaaenchufarse
elhornotostador,elajustepredeterminadoserá4.
Si el horno tostador permanece enchufado desde la
últimavezqueseleccionóunaintensidaddetostado
distintaparalafuncióndeBagel(aunquenoseactive),
launidadrecordaráelúltimoajustedeintensidad
seleccionado.
NOTA:Esrecomendadousarlaposiciónsuperiorde
larejillaparalafuncióndeBagel.Paramejores
resultados coloque la rosquilla de pan con la parte
cortada hacia arriba.
EnlafuncióndeBagelnosepuedeajustarla
temperatura.Eltiemposeajustaautomáticamente
con el ajuste de intensidad de tostado. La
temperatura o el tiempo no son ajustables durante
lafuncióndeBagel.
Paso 2. Para ajustar la intensidad de tostado:
Girelaperilladetiempoparaajustarlaintensidad
de tostado. El ajuste de la intensidad de tostado
mostrarásuselecciónconformegirelaperilla.
Paso 3. Para comenzar:
Oprimaelbotóndeiniciar/cancelarparacomenzar
el proceso de tostado de la rosquilla de pan. La
luzrojadelbotóndeiniciar/cancelarseiluminará.
LapantallaLCDmostrarálafuncióndeBagel,
la intensidad de tostado seleccionada y el tiempo
delcronómetrodecuentaregresiva.Launidad
comenzaráafuncionaryeltemporizadorempezará
la cuenta regresiva.
Cuandotermineelciclodetostadodelarosquilla
depan,launidademitirátrespitidos.Lapantalla
LCDyelbotóndeiniciar/cancelarseapagarán
despuésde30segundos.
Figura 3
NOTA: Puede cancelar el ciclo de tostado de la rosquilla de pan en cualquier
momentooprimiendounavezelbotóndeiniciar/cancelar.Laluzrojadel
botónparainiciar/cancelarseapagarácadavezqueunafunciónhaya
sidocompletadaosilafunciónesmanualmentecancelada.
Español-8
Figura 4
uso de la Función de Pizza/ calentamiento
P
or convección turBo (Fig. 4)
Paso 1. GirelaperilladefunciónaPizza.Alseleccionarla
funcióndePizza,elcalentamientoporconvección
turboseactivaráautomáticamente.
Paso 2. SideseacambiaralafunciónnormaldePizza,
oprimaelbotónTurbounavezparaapagar
laselecciónpredeterminadadecalentamiento
porconvecciónturbo.Laluzazuldelbotónde
calentamientoporconvecciónturboseapagará.
Lafuncióndecalentamientoporconvecciónturbo
enciende un ventilador incorporado que hace circular
airecalienteenlacámaradelhornoquepermite
cocinarlosalimentosmásrápidayuniformemente.
Temperatura predeterminada: 400 grados F.
Tiempo predeterminado: 16 minutos.
Paso 3. Para fijar la temperatura:
Girelaperilladetemperaturasideseaaumentar
odisminuirlagraduacióndetemperatura.Parala
funcióndePizzalatemperaturapuedegraduarsede
350 a 450 grados F, en incrementos de 25 grados.
Paso 4. Para fijar el tiempo:
Girelaperilladetiemposideseaaumentaro
disminuireltiempodecocción.Elajustedetiempo
máximoparahornearpizzases60minutos(1hora).
Unavezquehayaseleccionadoeltiempodecocción
deseado,oprimaelbotóndeiniciarparacomenzarel
procesodecocción.
Paso 5. Para comenzar:
Oprimaelbotóndeiniciar/cancelarparacomenzarel
procesodecocción.Laluzrojadelbotóndeiniciar/
cancelarseiluminará.LapantallaLCDmostrarála
funcióndePizza,eltiempodelcronómetrodecuenta
regresiva y la temperatura seleccionada. La unidad
comenzaráafuncionaryeltemporizadorempezará
lacuentaregresiva.Cuandotermineelciclodela
funcióndePizza,launidademitirátrespitidos.
LapantallaLCDyelbotóndeiniciar/cancelarse
apagarándespuésde30segundos.
NOTA: Puedecancelarelciclodecocciónencualquier
momentooprimiendounavezelbotóndeiniciar/
cancelar.Laluzrojadelbotónparainiciar/
cancelarseapagarácadavezqueunafunciónhaya
sidocompletadaosilafunciónesmanualmente
cancelada.
Español-9
uso de la Función de hornear/
calentamiento Por convección turBo (Fig. 5)
Paso 1. GirelaperilladefunciónaHornear.Al
seleccionarlafuncióndeHornear,el
calentamientoporconvecciónturbose
activaráautomáticamente.
Paso 2.Sideseacambiaralafunciónnormalde
Hornear,oprimaelbotónTurbounavez
paraapagarlafuncióndecalentamiento
porconvecciónturbo.Laluzazuldelbotón
decalentamientoporconvecciónturbose
apagará.
Lafuncióndecalentamientoporconvección
turbo enciende un ventilador incorporado que
hacecircularairecalienteenlacámaradel
hornoquepermitecocinarlosalimentosmás
rápidayuniformemente.
Temperatura predeterminada: 325 grados F.
Tiempo predeterminado: 30 minutos.
Paso 3. Para fijar la temperatura:
Girelaperilladetemperaturasidesea
aumentarodisminuirlagraduaciónde
temperatura.ParalafuncióndeHornearla
temperatura puede graduarse de 150 a 450
grados F, en incrementos de 5 grados.
Paso 4. Para fijar el tiempo:
Girelaperilladetiemposideseaaumentaro
disminuireltiempodecocción.Elajustede
tiempomáximoparalafuncióndeHornear
es60minutos(1hora).Unavezquehaya
seleccionadoeltiempodecoccióndeseado,
oprimaelbotóndeiniciarparacomenzarel
procesodecocción.Elmarcodelindicadorde
tiempodesaparecerá.
Paso 5. Para comenzar:
Oprimaelbotóndeiniciar/cancelarpara
comenzarelprocesodecocción.Laluzroja
delbotóndeiniciar/cancelarseiluminará.La
pantallaLCDmostrarálafuncióndeHornear,
eltiempodelcronómetrodecuentaregresiva
y la temperatura seleccionada. La unidad
comenzaráafuncionaryeltemporizador
empezarálacuentaregresiva.
Figura 5
Español-10
CuandotermineelciclodeHornear,launidad
emitirátrespitidos.LapantallaLCDyelbotón
deiniciar/cancelarseapagarándespuésde30
segundos.
NOTA:Puedecancelarelciclodecocciónencualquier
momentooprimiendounavezelbotónde
iniciar/cancelar.Laluzrojadelbotónpara
iniciar/cancelarseapagarácadavezqueuna
funciónhayasidocompletadaosilafunciónes
manualmente cancelada.
uso de la Función de dorar (Fig. 6)
Paso 1. GirelaperilladefunciónaDorar.Alseleccionar
lafunciónDorarloselementostérmicos
superioressecalentarán.
Temperatura predeterminada: 450 grados F.
Tiempo predeterminado: 10 minutos.
Paso 2. Para fijar la temperatura:
Girelaperilladetemperaturasideseaaumentar
odisminuirlagraduacióndetemperatura.
ParalafuncióndeDorarlatemperatura
puede graduarse de 400 a 450 grados F, en
incrementos de 25 grados. r.
Paso 3. Para fijar el tiempo:
Girelaperilladetiemposideseaaumentaro
disminuireltiempodecocción.Elajustede
tiempomáximoparaDorares60minutos(1
hora).Unavezquehayaseleccionadoeltiempo
decoccióndeseado,oprimaelbotóndeiniciar
paracomenzarelprocesodecocción.
Paso 4. Para comenzar:
Oprimaelbotóndeiniciar/cancelarpara
comenzarelprocesodedorado.Laluzroja
delbotóndeiniciar/cancelarseiluminará.La
pantallaLCDmostrarálafuncióndeDorar,el
tiempodelcronómetrodecuentaregresivayla
temperaturaseleccionada.Launidadcomenzará
afuncionaryeltemporizadorempezarála
cuenta regresiva.
CuandotermineelciclodeDorar,launidad
emitirátrespitidos.LapantallaLCDyelbotón
deiniciar/cancelarseapagarándespuésde30
segundos.
Figura 6

Español-11
NOTA: Puede cancelar el ciclo de dorado en cualquier
momentooprimiendounavezelbotónde
iniciar/cancelar.Laluzrojadelbotónpara
iniciar/cancelarseapagarácadavezqueuna
funciónhayasidocompletadaosilafunciónes
manualmente cancelada.
uso de la Función de galletas/
calentamiento Por convección turBo (Fig. 7)
Paso 1. GirelaperilladefunciónaGalletas.Al
seleccionarlafuncióndeGalletas,el
calentamientoporconvecciónturboseactivará
automáticamente.
Paso 2. Sideseacambiaralafunciónnormalde
Galletas,oprimaelbotónTurbounavez
paraapagarlafuncióndecalentamientopor
convecciónturbo.Laluzazuldelbotónde
calentamientoporconvecciónturboseapagará.
Lafuncióndecalentamientoporconvección
turbo enciende un ventilador incorporado que
hacecircularairecalienteenlacámaradel
hornoquepermitecocinarlosalimentosmás
rápidayuniformemente.
Temperatura predeterminada: 350 grados F.
Tiempo predeterminado: 11 minutos.
Paso 3. Para fijar la temperatura:
Girelaperilladetemperaturasideseaaumentar
odisminuirlagraduacióndetemperatura.
ParalafuncióndeGalletaslatemperatura
puede graduarse de 150 a 450 grados F, en
incrementos de 5 grados.
Paso 4. Para fijar el tiempo:
Girelaperilladetiemposideseaaumentaro
disminuireltiempodecocción.Elajustede
tiempomáximoparalafuncióndeGalletas
es60minutos(1hora).Unavezquehaya
seleccionadoeltiempodecoccióndeseado,
oprimaelbotóndeiniciarparacomenzarel
procesodecocción.
Figura 7
Español-12
Paso 5. Para comenzar:
Oprimaelbotóndeiniciar/cancelarpara
comenzarelprocesodecocción.Laluzroja
delbotóndeiniciar/cancelarseiluminará.La
pantallaLCDmostrarálafuncióndeGalletas,
eltiempodelcronómetrodecuentaregresiva
y la temperatura seleccionada. La unidad
comenzaráafuncionaryeltemporizador
empezarálacuentaregresiva.
Cuandotermineelciclodelafunciónde
Galletas,launidademitirátrespitidos.La
pantallaLCDyelbotóndeiniciar/cancelarse
apagarándespuésde30segundos.
NOTA:Puedecancelarelciclodecocciónencualquier
momentooprimiendounavezelbotónde
iniciar/cancelar.Laluzrojadelbotónpara
iniciar/cancelarseapagarácadavezqueuna
funciónhayasidocompletadaosilafunciónes
manualmente cancelada.
Figura 7

Español-13
uso de la Función de asar/ convección
t
urBo (Fig. 8)
Paso 1. GirelaperilladefunciónaAsar.Alseleccionarla
funcióndeAsar,elcalentamientoporconvección
turboseactivaráautomáticamente.
Paso 2. Sideseacambiaralafunciónnormalde
Asar,oprimaelbotónTurbounavez(Paso2)
paraapagarlafuncióndecalentamientopor
convecciónturbo.Laluzazuldelbotónde
calentamientoporconvecciónturboseapagará.
Lafuncióndecalentamientoporconvección
turbo enciende un ventilador incorporado que
hacecircularairecalienteenlacámaradelhorno
quepermitecocinarlosalimentosmásrápiday
uniformemente.
Temperatura predeterminada: 350 grados F.
Tiempo predeterminado: 60 minutos.
Paso 3. Para fijar la temperatura:
Girelaperilladetemperaturasideseaaumentar
odisminuirlagraduacióndetemperatura.Parala
funcióndeAsarlatemperaturapuedegraduarse
de 150 a 450 grados F, en incrementos de 5
grados.
Paso 4. Para fijar el tiempo:
Girelaperilladetiemposideseaaumentaro
disminuireltiempodecocción.Elajustede
tiempomáximoparalafuncióndeAsares60
minutos(1hora).Unavezquehayaseleccionado
eltiempodecoccióndeseado,oprimaelbotónde
iniciarparacomenzarelprocesodecocción.
Paso 5. Para comenzar:
Oprimaelbotóndeiniciar/cancelarpara
comenzarelprocesodecocción.Laluzrojadel
botóndeiniciar/cancelarseiluminará.Lapantalla
LCDmostrarálafuncióndeAsar,eltiempodel
cronómetrodecuentaregresivaylatemperatura
seleccionada.CuandotermineelciclodeAsar,la
unidademitirátrespitidos.LapantallaLCDyel
botóndeiniciar/cancelarseapagarándespuésde
30 segundos.
NOTA: Puedecancelarelciclodecocciónencualquier
momentooprimiendounavezelbotóndeiniciar/
cancelar.Laluzrojadelbotónparainiciar/
cancelarseapagarácadavezqueunafunción
hayasidocompletadaosilafunciónes
manualmente cancelada.
Figura 8

Español-14
uso de la Función de calentar (Fig. 9)
Paso 1. Gire la perilla de función a Calentar. Cuando seleccione
la función de Calentar, el elemento térmico inferior se
calentará.
Temperatura predeterminada: 150 grados F.
Tiempo predeterminado: 60 minutes.
Puedeactivarmanualmentelafunciónde
calentamientoporconvecciónturbooprimiendo
unavezelbotónTurboparaencenderla.Laluzazul
delbotónTurboseencenderá.
Paso 2. Para fijar la temperatura:
Girelaperilladetemperaturasideseaaumentar
odisminuirlagraduacióndetemperatura.Parala
funcióndeCalentarlatemperaturapuedegraduarse
de 150 a 200 grados F, en incrementos de 25
grados.Cuandohayaseleccionadolatemperatura
deseada,oprimalaperillaunavezparafijardicha
selección.Elmarcodelatemperaturadesaparecerá
yeldelajustedetiempocomenzaráaparpadear.
Paso3. Para fijar el tiempo:
Girelaperilladetiemposideseaaumentaro
disminuir el tiempo de calentamiento. El ajuste de
tiempomáximoparalafuncióndeCalentares60
minutos(1hora).Unavezquehayaseleccionadoel
tiempodecalentamientodeseado,oprimaelbotón
deiniciarparacomenzarelprocesodecalentar.
Paso 4. Para comenzar:
Oprimaelbotóndeiniciar/cancelarparacomenzar
elprocesodecalentamiento.Laluzrojadelbotón
deiniciar/cancelarseiluminará.LapantallaLCD
mostrarálafuncióndeCalentamiento,eltiempo
delcronómetrodecuentaregresivaylatemperatura
seleccionada.
Launidadcomenzaráafuncionaryeltemporizador
empezarálacuentaregresiva.
CuandotermineelciclodeCalentamiento,la
unidademitirátrespitidos.LapantallaLCDyel
botóndeiniciar/cancelarseapagarándespuésde30
segundos.
NOTA: Puede cancelar el ciclo de calentamiento en
cualquiermomentooprimiendounavezelbotón
deiniciar/cancelar.Laluzrojadelbotónpara
iniciar/cancelarseapagarácadavezqueuna
funciónhayasidocompletadaosilafunciónes
manualmente cancelada.
Figura 9
Español-15
uso de la Función de descongelar (Fig. 10)
Paso 1. GirelaperilladefunciónaDescongelar.
Temperatura predeterminada: 450 grados F.
Tiempo predeterminado 16 minutos.
Puedeactivarmanualmentelafunciónde
calentamientoporconvecciónturbooprimiendo
unavezelbotónTurboparaencenderla.Laluz
azuldelbotónTurboseencenderá.
Paso 2. Para fijar la temperatura:
Girelaperilladetemperaturasideseaaumentar
odisminuirlagraduacióndetemperatura.
ParalafuncióndeDescongelarlatemperatura
puede graduarse de 150 a 450 grados F, en
incrementos de 5 grados.
Paso 3. Para fijar el tiempo:
Girelaperilladetiemposideseaaumentar
o disminuir el tiempo de descongelado. El
ajustedetiempomáximoparalafunción
deDescongelares60minutos(1hora).
Unavezquehayaseleccionadoeltiempode
descongeladodeseado,oprimaelbotónde
iniciarparacomenzarelprocesodecocción.
Paso 4. Para comenzar:
Oprimaelbotóndeiniciar/cancelarpara
comenzarelprocesodedescongelado.Laluz
rojadelbotóndeiniciar/cancelarseiluminará.
LapantallaLCDmostrarálafunciónde
Descongelar,eltiempodelcronómetrode
cuenta regresiva y la temperatura seleccionada.
Launidadcomenzaráafuncionaryel
temporizadorempezarálacuentaregresiva.
CuandotermineelciclodeDescongelar,la
unidademitirátrespitidos.LapantallaLCDy
elbotóndeiniciar/cancelarseapagarándespués
de 30 segundos.
NOTA: Puede cancelar el ciclo de descongelado en
cualquiermomentooprimiendounavezel
botóndeiniciar/cancelar.Laluzrojadelbotón
parainiciar/cancelarseapagarácadavezqueuna
funciónhayasidocompletadaosilafunciónes
manualmente cancelada.
Figura 10

Español-16
uso de la Función de recalentar (Fig. 11)
Paso 1. GirelaperilladefunciónaRecalentar..
Temperatura predeterminada: 325 grados F.
Tiempo predeterminado: 15 minutos.
Puedeactivarmanualmentelafunción
decalentamientoporconvecciónturbo
oprimiendounavezelbotónTurbopara
encenderla.LaluzazuldelbotónTurbose
encenderá
Paso 2. Para fijar la temperatura:
Girelaperilladetemperaturasideseaaumentar
odisminuirlagraduacióndetemperatura.
ParalafuncióndeRecalentarlatemperatura
puede graduarse de 150 a 450 grados F, en
incrementos de 5 grados.
Paso 3. Para fijar el tiempo:
Girelaperilladetiemposideseaaumentaro
disminuir el tiempo de recalentado. El ajuste de
tiempomáximoparalafuncióndeRecalentar
es60minutos(1hora).Unavezquehaya
seleccionado el tiempo de recalentado deseado,
oprimaelbotóndeiniciarparacomenzarel
proceso de recalentar.
Paso 4. Para comenzar:
Oprimaelbotóndeiniciar/cancelarpara
comenzarelprocesoderecalentado.Laluz
rojadelbotóndeiniciar/cancelarseiluminará.
LapantallaLCDmostrarálafunciónde
Recalentar,eltiempodelcronómetrode
cuenta regresiva y la temperatura seleccionada.
Launidadcomenzaráafuncionaryel
temporizadorempezarálacuentaregresiva.
CuandotermineelciclodeRecalentar,la
unidademitirátrespitidos.LapantallaLCDy
elbotóndeiniciar/cancelarseapagarándespués
de 30 segundos.
NOTA: Puede cancelar el ciclo de recalentado en
cualquiermomentooprimiendounavezel
botóndeiniciar/cancelar.Laluzrojadelbotón
parainiciar/cancelarseapagarácadavezqueuna
funciónhayasidocompletadaosilafunciónes
manualmente cancelada.
Figure 11
Español-17
Posicionamiento de la rejilla
• Elhornoposeedosposicionesparacolocarlarejillaloquelepermite
adaptarse a una amplia variedad de alimentos. La rejilla puede introducirse
enelhornoenlasguíassuperioresoenlasinferiores.Larejillaencajará
encualquieradelasguíasqueseencuentranenelinteriordelhornopara
mostrador.(Verlafiguraabajo)
• Dejequelaunidadseenfríeantesdesacarlarejilla.
• Parasacarla,abralapuertadelhornoyhalelarejillahaciaadelante.La
rejillasedeslizaráporlasguíaslocalizadasenelinteriordelhorno.
NOTA:tengacuidadoalhalarlarejilladelhornohaciaafuerayaqueésta
podríainclinarsehaciaabajoyocasionarquelosalimentossedeslicen.
• Laposicióndelarejilladelhornodependerádeltamañodelosalimentos
ylaintensidaddedorado.Coloquelarejillaenlaposiciónmásbajapara
evitarquesetuestelapartesuperiorycolóquelaenlaposiciónmásalta
para evitar que se queme la parte inferior.
• Paraobtenerlosmejoresresultadosaltostar,coloquelarejillaenlaguía
superior
.
oPciones de
guías Para
rejillas

Español-18
limPieza del horno Para mostrador
NOSUMERJAENLÍQUIDOS.
Paso 1.Oprimaelbotóndeiniciar/cancelarparaapagarloysaqueelenchufe
deltomacorriente.Dejequeseenfríe.
Paso 2. Limpielaunidadconunpañohúmedo.NOSUMERJAENAGUA.
Asegúresedeusarúnicamenteaguayunjabónsuave.Loslimpiadores
abrasivos,cepillosparafrotarylimpiadoresquímicosdañaránel
recubrimiento de la unidad.
Paso 3. Saque la bandeja recolectora del horno para mostrador.
Paso 4. Sacudalasmigajasdelabandejarecolectora.Lalimpiezafrecuentede
labandejarecolectoraevitaráqueseproduzcanacumulaciones.
Paso 5. Saquelarejillaylímpielaconunpañohúmedoocolóquelaenel
anaquelsuperiordellavaplatosautomático
almacenamiento del horno Para mostrador
Dejequeelelectrodomésticoseenfríeporcompletoantesdeguardarlo.Sise
vaaalmacenarelhornoparamostradorporperíodosprolongadosdetiempo,
asegúresedequeestélimpioydesprovistodepartículasdealimentos.Guarde
el horno para mostrador en un lugar seco, como por ejemplo en una mesa,
mesadaoenelestantedeunaparador.Noesnecesarioningúnotrotipode
mantenimiento,salvolalimpiezarecomendadaenestemanual.

Español-19
5 años de garantía satisFactoria
SunbeamProducts,Inc.operandobajoelnombredeJardenConsumer
Solutions,oenCanadá,SunbeamCorporation(Canada)Limitedoperando
bajoelnombredeJardenConsumerSolutions,(enformaconjunta,“JCS”),
garantizaqueporunperíododecincoañosapartirdelafechadecompra,
esteproductoestarálibrededefectosdematerialesymanodeobra.JCS,asu
elección,repararáoreemplazaráesteproductoocualquiercomponentedel
mismoquepresentedefectosduranteelperíododegarantía.Elreemplazose
realizaráporunproductoocomponentenuevooreparado.Sielproductoya
noestuvieradisponible,seloreemplazaráporunproductosimilardevalor
igual o superior.
Éstaessugarantíaexclusiva.Nointenterepararoajustarningunafunción
eléctricaomecánicadeesteproducto.Alhacerloelimínaráéstagarantía.
Lagarantíaesválidaparaelcompradorminoristaoriginalapartirdelafecha
decomprainicialylamismanoestransferible.Conserveelrecibodecompra
original.Parasolicitarservicioengarantíasatisfactoriaserequierepresentar
unrecibodecompra.LosagentesycentrosdeserviciodeJCSolastiendas
minoristasquevendenproductosdeJCSnotienenderechoaalterar,modii
carnicambiardeningúnotromodolostérminosylascondicionesdeesta
garantía.
Estagarantíanocubrelosdañosqueseproduzcancomoresultadodeuso
negligente o mal uso del producto, uso de voltaje incorrecto o corriente
inapropiada, uso contrario a las instrucciones operativas, y desarme,
reparaciónoalteraciónporpartedeunterceroajenoaJCSoaunCentrode
ServicioAutorizadoporJCS.Asimismo,lagarantíanocubreactosfortuitos
tales como incendios, inundaciones, huracanes y tornados.
¿Cuál es el límite de responsabilidad de JCS?
JCSnoseráresponsablededañosincidentalesoemergentescausadosporel
incumplimientodealgunagarantíaocondiciónexpresa,implícitaolegal.
Exceptoenlamedidaenqueloprohíbalaleyaplicable,cualquiergarantíao
condiciónimplícitadecomerciabilidadoaptitudparaunindeterminadose
limita,encuantoasuduración,alplazodelagarantíaantesmencionada.
JCSquedaexentadetodaotragarantías,condicionesomanifestaciones,
expresa,implícita,legalodecualquierotranaturaleza.

Español-20
JCSnoseráresponsabledeningúntipodedañoqueresultedelacompra,
uso o mal uso del producto, o por la imposibilidad de usar el producto,
incluidos los daños incidentales, especiales, emergentes o similares, o la
pérdidadeganancias,nideningúnincumplimientocontractual,seadeuna
obligaciónesencialodeotranaturaleza,nideningúnreclamoiniciadocontra
el comprador por un tercero.
Algunasprovincias,estadosojurisdiccionesnopermitenlaexclusióno
limitacióndelosdañosincidentalesoemergentesnilaslimitacionesala
duracióndelasgarantíasimplícitas,demodoqueesposiblequelaexclusión
o las limitaciones antes mencionadas no se apliquen en su caso.
Estagarantíaleotorgaderechoslegalesespecíicosyesposiblequeusted
tengaotrosderechosquevaríandeunestado,provinciaojurisdicciónaotro.
Cómo solicitar el servicio en garantía satisfactoria
En los Estados Unido
Sitienealgunapreguntasobreestagarantíaodesearecibirserviciode
garantía,llameal1-800-334-0759ypodráobtenerladireccióndelcentrode
servicioqueleresultemásconveniente
En Canadá
Sitienealgunapreguntasobreestagarantíaodesearecibirserviciode
garantía,llameal1-800-667-8623ypodráobtenerladireccióndelcentrode
servicioqueleresultemásconveniente.
EnlosEstadosUnidos,estagarantíaesofrecidaporSunbeamProducts,Inc.
operandobajoelnombredeJardenConsumerSolutions,BocaRatón,Florida
33431.EnCanadá,estagarantíaesofrecidaporSunbeamCorporation
(Canada)LimitedoperandobajoelnombredeJardenConsumerSolutions,
20BHerefordStreet,Brampton,OntarioL6Y0M1.Siustedtieneotro
problemaoreclamoenconexiónconesteproducto,porfavorescribaal
DepartamentodeServicioalConsumidor.
POR FAVOR NO DEVUELVA ESTE PRODUCTO A NINGUNA
DE ESTAS DIRECCIONES NI AL LUGAR DE COMPRA.

Forproductquestionscontact:
JardenConsumerService
USA:1.800.334.0759
Canada:1.800.667.8623
www.oster.com
©2011SunbeamProducts,Inc.doingbusinessasJardenConsumer
Solutions.Allrightsreserved.DistributedbySunbeamProducts,Inc.doing
businessasJardenConsumerSolutions,BocaRaton,Florida33431.Jarden
ConsumerSolutionsisasubsidiaryofJardenCoporation(NYSE:JAH)
Parapreguntassobrelosproductosllame:
JardenConsumerService
EE.UU.:1.800.334.0759
Canadá:1.800.667.8623
www.oster.com
©2011SunbeamProducts,Inc.operandobajoelnombrede
JardenConsumerSolutions.
Todos los derechos reservados.
DistribuidoporSunbeamProducts,Inc.operandobajoelnombrede
JardenConsumerSolutions,BocaRaton,Florida33431.JardenConsumer
SolutionsesunasubsidiariadeJardenCoporation(NYSE:JAH)
CBA-021412
PrintedinChina ImpresoenChina