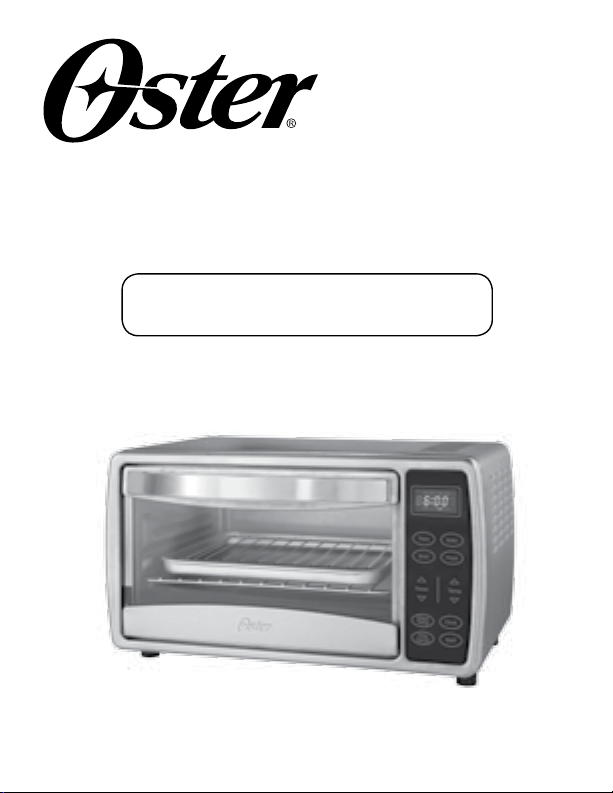
User Manual
Small Digital Oven
Manual de Instrucciones
Horno Digital Pequeño
P.N. 157149
Visit us at www.oster.com
MODEL/MODELO
TSSTTVDGSM

English-1
IMPORTANT SAFEGUARDS
When using electrical appliances, basic safety precautions should always
be followed, including the following:
READ AND SAVE THESE
INSTRUCTIONS
• READALLINSTRUCTIONS,PRODUCTLABELSANDWARNINGS
BEFOREUSINGTHECOUNTERTOPOVEN.
•Donottouchhotsurfaces.Alwaysuseovenmittswhenhandlinghot
materialsandallowmetalpartstocoolbeforecleaning.Allowtheunittocool
thoroughlybeforeputtinginortakingoffparts.Alwaysusetheovenhandles
whenmovingtheunit.
•Whentheunitisnotinuseandbeforecleaning,unplugthecountertop
ovenfromthewalloutlet.Note:Makesuretheovenisturnedoffbefore
unplugging.
•Toprotectagainstriskofelectricalshock,donotimmersetheappliancein
wateroranyotherliquids.
•Closesupervisionisalwaysnecessarywhenthisoranyapplianceisusednear
children.Thisapplianceisnotforusebychildren.
•Donotoperatethisappliancewithafrayedordamagedcordorplugorafter
theappliancemalfunctionsorisdroppedorhasbeendamagedinanymanner.
Returnappliancetothenearestauthorizedservicefacilityforexamination,
repair,oradjustment.
•Donotuseattachmentsnotrecommendedbythemanufacturer;theymay
causefire,electricshockorpersonalinjury.
•Donotuseoutdoorsorforcommercialpurposes.
•Donotusethisapplianceforotherthanitsintendeduse.
•Donotletthecorddangleovertheedgeofatabletoporcountertoportouch
hotsurfaces.
•Donotplacetheappliancenearahotgasorelectricburnerorinaheated
oven.
•Extremecautionshouldbeusedwhenusingcontainersconstructedofmaterial
otherthanmetalorglass.
•Afiremayoccurifthecountertopoveniscoveredortouchingflammable
materials,includingcurtains,draperies,walls,etc.,wheninoperation.Donot
storeanyitemsontopoftheappliancewheninoperation.
•Whenusingcountertopoven,pulltheunitoutaminimumof6inchesaway
fromwallsonallsides.Removecordsfromotherproductsfrombehind
countertopoven.

English-2
•Donotstoreanymaterials,otherthanmanufacturer’srecommended
accessories,inthisunitwhennotinuse.
•Donotplaceanyflammablematerialsinoven,suchaspaper,cardboard,
plasticoranymaterialsthatmaycatchfireormelt.
•Donotcovertheovenrackortrayswithmetalfoil.Thiswillcause
overheatingoftheappliance.
•Oversizedfoodsormetalutensilsmustnotbeinsertedintheapplianceasthey
maycreateafireorriskofelectricalshock.
•Donotcleanwithmetalscouringpads.Piecescanbreakoffthepadandtouch
electricalpartsinvolvingariskofelectricalshock.
•Useextremecautionwhenremovingtrayordisposingofhotgrease.
•Toturnthisapplianceoff,returnallcontrolstothe“OFF”position.
•Todisconnect,turnallcontrolsto“OFF”,thenremoveplugfromwalloutlet.
This Unit Is for Household Use Only
Short Power Supply Cord Instructions
Ashortpower-supplycordisprovidedtoreducetheriskresultingfrom
becomingentangledinortrippingoveralongercord.Anextensioncord
maybeusedifcareisexercisedinitsuse.Ifanextensioncordisused,the
electricalratingofthecordmustbeatleastasgreatastheelectricalrating
oftheappliance.Theextensioncordshouldbearrangedsothatitwillnot
drapeoverthecountertoportabletopwhereitcanbepulledonbychildren
ortrippedoverunintentionally.
For Products Purchased in the United States and Canada Only
Toreducetheriskofelectricalshock,thisappliancehasapolarizedplug(one
bladeiswiderthantheother).Thisplugfitsapolarizedoutletonlyoneway;
iftheplugdoesnotfitfullyintotheoutlet,reversetheplug.Ifitstilldoesnot
fit,contactaqualifiedelectrician.
Do not attempt to defeat thissafetyfeature.
SAVE THESE INSTRUCTIONS
English-3
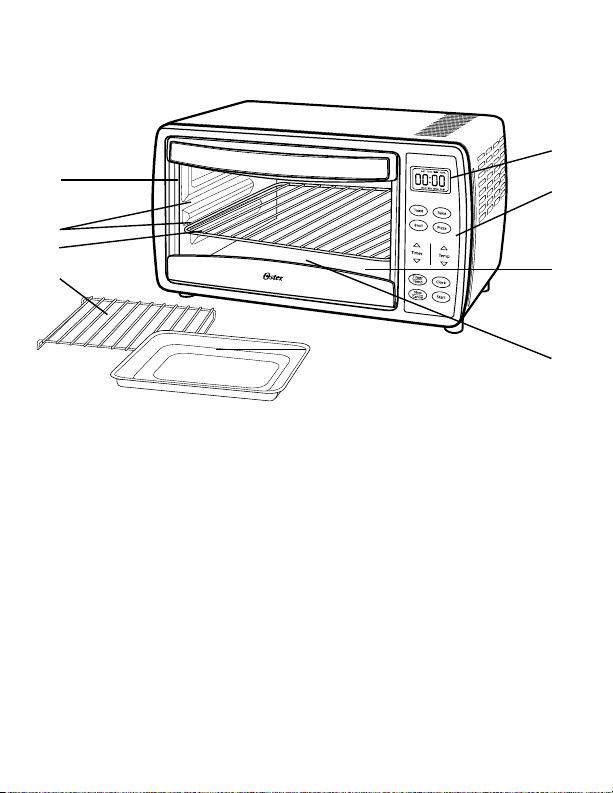
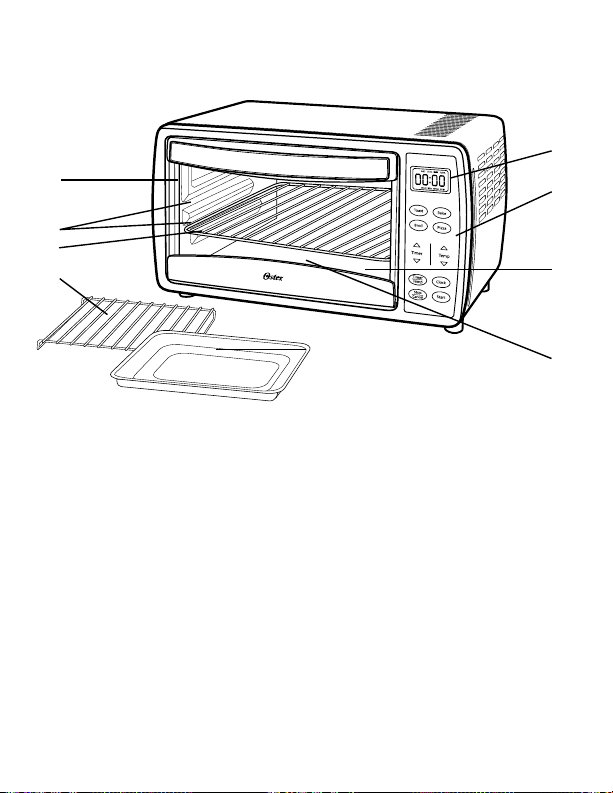
Product diagram
1. Removable Wire Rack –See“PositioningRack”section.
2. Broil Rack
3. Baking Pan
4. Time Display
5. Removable Crumb Tray –Forcrumborfallenfoodparticlescollection.
Pullsoutforeasycleaning.
6. Control Panel
7. Tempered Glass Door –Forfrontviewingoffood.
8. Easy Clean Interior Walls –Allowsfastcleanup.
9. Two Rack Positions
1
2
3
7
8
4
6
9
5
English-4
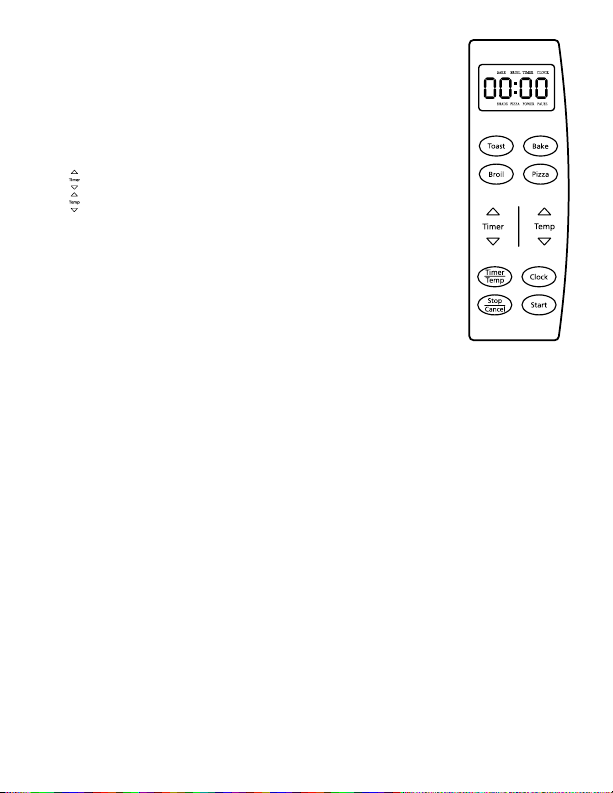
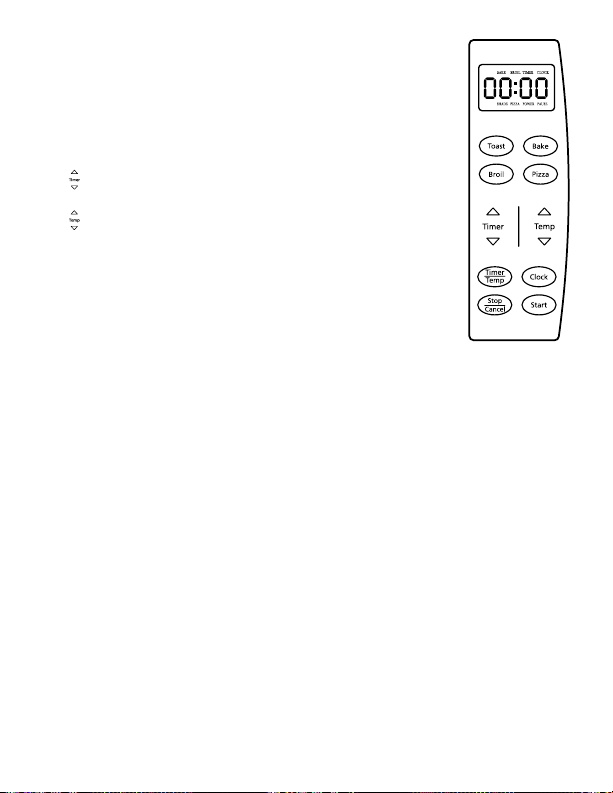
Control Panel
Function Buttons –
Toast – Selecttotoastbread,bagels,etc.
Bake – SelecttoBake.
Broil – SelecttoBroil.
Pizza – Selecttobakepizza.
(
) –Adjuststimeortoastshade.
(
) –Adjuststemperatureortoastshade.
Timer/Temp – Usethisbuttontochangebetweentimeand
temperaturewhenBake,BroilorPizzahavebeenselected.
Clock – AllowsyoutosettheOvenClock(see“Setting
theClock”section).
Stop/Cancel –Stopsheatingorcancelsfunction.
Start – Startsbaking/cookingprocess.
Preparing Your Toaster Oven
Ifyouareusingyourtoasterovenforthefirsttime,please:
•Removeanystickersfromthesurfaceoftheoven.
•Openovendoorandremoveallprinteddocumentsandpaperfrom
insidethetoasteroven.
•Cleantherackandpanwithhotwater,asmallamountofdishwashing
liquidandanonabrasivespongeorcleaningpad.
DONOTIMMERSETHECORD,PLUGORBODYOFTHEUNIT
INWATER.
•Drytheunitthoroughlybeforeusing.
•Selectalocationforthetoasteroven.Thelocationshouldbeinanopen
areaonaflatcounterwheretheplugwillreachanoutlet.
•Plugthetoasterovenintoanelectricaloutlet.

English-5
using Your toaster oven
setting the clock
PushtheClockbuttononcetosetthetime.Theclockwillflash.
Usethearrowkeystosetthehour.PushtheClockbuttonagain.
Usethearrowkeystosettheminutes.
PushtheClockbuttononcemoreandthetimewillbeset.
to use the toast Function
Placeovenrackintothedesiredpositionbeforeheatingtheoven.(See
“PositioningRack”Section)
NOTE:Differenttypesofbreadrequiredifferentsettings.Lighterbreadsand
wafflesrequirealightersetting.Darkerbreads,muffins,andEnglishmuffins
requireadarkersetting.
Arrangefoodonthewirerack.
PushtheToastbutton.Useeithersetofarrows(Timer/Temp)toselectToast
Shade.
PresstheStartbutton.
Whentoastingiscompleted,opendoorfullyandremovefoodcarefully.
to use the Bake Function
Placeovenrackintothedesiredpositionbeforeheatingtheoven.(See
“PositioningRack”Section)
Arrangefoodonthewirerackorinthebakingpan.
PushtheBakebuttononce.Usethetemperaturearrowkeystoselectdesired
temperature.
PushTimer/Tempbutton.Usethetimerarrowkeystoselectdesiredtime.
PushtheStartbutton.
NOTE:BothheatingelementswillcycleONandOFFtomaintainthedesired
temperature.Whenbakingiscompleted,opendoorfullyandremovefood
carefully.
English-6
to use the Broil Function
Placeovenrackintothedesiredpositionbeforeheatingtheoven.(See
“PositioningRack”Section)
Placebroilrackinsidethebakingpan.
Arrangefoodonbroilrack.
Placethepanontopofthewirerackinsideoven.
Closethedoortothefirstnotch,leavinga3-inchopengapatthetop.This
willensureadequateairflowduringbroiling.
PushtheBroilbuttononce.Usethetemperaturearrowkeystoselectdesired
temperature.
PushTimer/Tempbutton.Usethetimerarrowkeystoselectdesiredtime.
PushtheStartbutton.
NOTE:Thetop-heatingelementwillcycleONandOFFtomaintaindesired
temperature.
WARNING: DO NOT LEAVE OVEN UNATTENDED.
to use the Pizza Function
Placeovenrackintothedesiredpositionbeforeheatingtheoven.(See
“PositioningRack”Section)
Arrangepizzaonthewirerack.
PushthePizzabuttononce.Usethetemperaturearrowkeystoselectdesired
temperature.PushTimer/Tempbutton.Usethetimerarrowkeystoselect
desiredtime.
PushtheStartbutton.
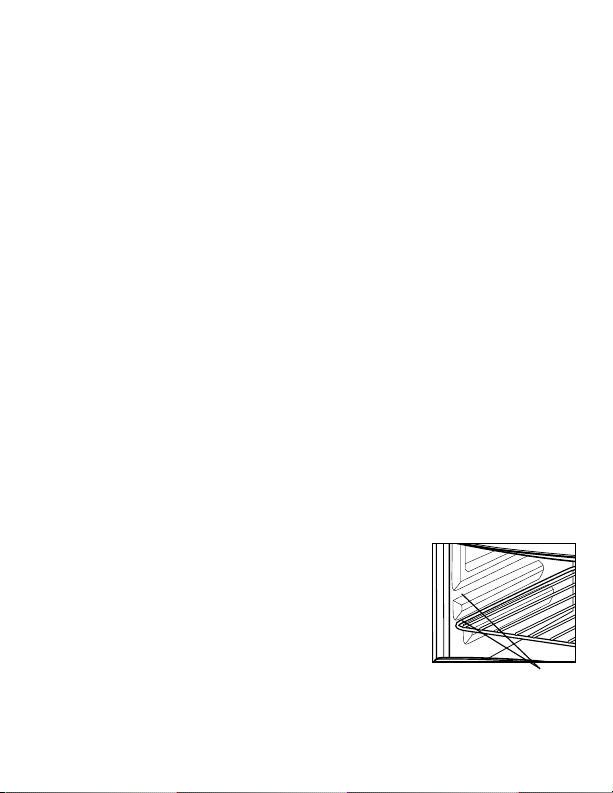
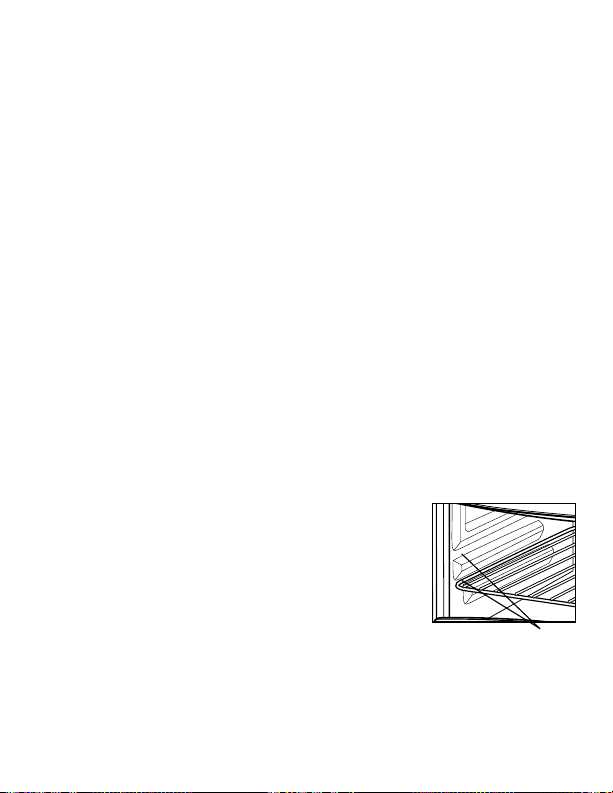
Positioning rack
Toaccommodateawidevarietyoffoodstheovenhas
tworackpositions.
Positioningoftherackwilldependonthesizeofthe
foodanddesiredbrowning.
Forbesttoastandpizzaresults,positiontherackinthe
upperrackposition.Beforeremovingtherackallowthe
unittocool.
PLEASE NOTE: Theovenrackmaytiltdownward
causingfoodtoshiftwhentherackispulledout.
Proceedwithcaution.
rack guide
oPtions
English-7
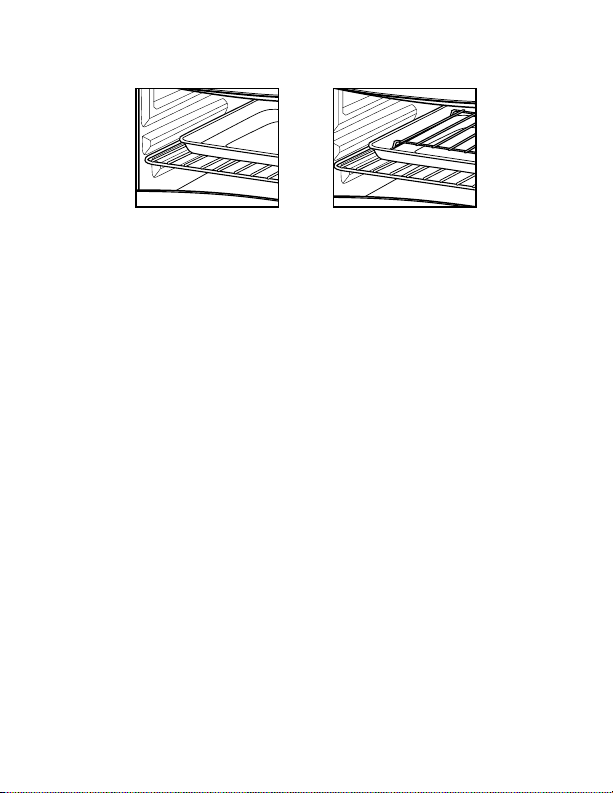
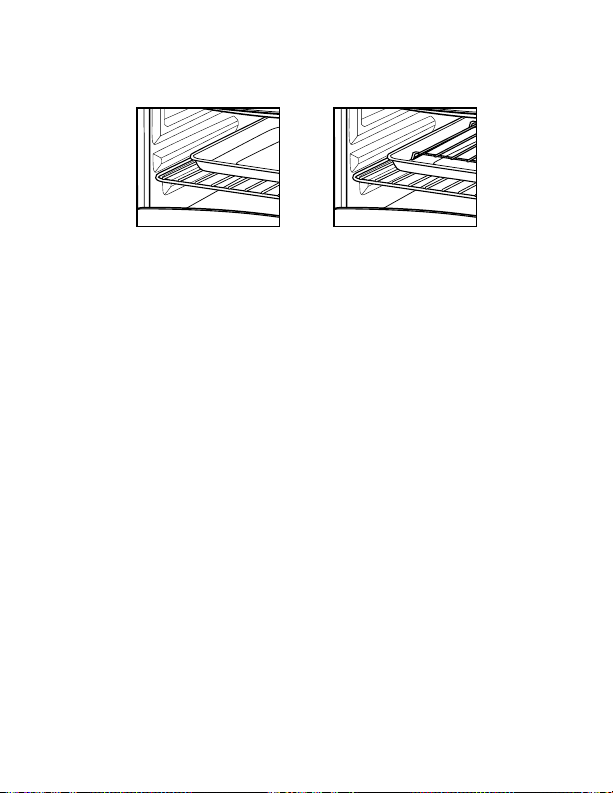
Positioning Pan
Placethebakingpanontopofthewirerackasindicatedinthefigurebellow.
For Baking For Grilling
or Broiling
cleaning Your small digital oven
BeforecleaningyourOster®SmallDigitalOven,unplugitandallowitto
cool.Toclean,wipewithdampcloth.DONOTIMMERSEINWATER!
Makesuretouseonlymild,soapywater.Abrasivecleaners,scrubbing
brushesandchemicalcleanerswilldamagethecoatingonthisunit.Empty
crumbtrayfrequentlytoavoidaccumulationofcrumbs.Toasterovenracks
aredishwashersafe(topofdishwasheronly).Otherthantherecommended
cleaning,nofurtherusermaintenanceshouldbenecessary.
storing Your small digital oven
Allowtheappliancetocoolcompletelybeforestoring.Ifstoringtheoven
forlongperiodsoftimemakecertainthattheoveniscleanandfreeoffood
particles.Storetheoveninadrylocationsuchasonatableorcountertopor
cupboardshelf.

English-8
helPFul tiPs / trouBleshooting
PROBLEM POTENTIAL CAUSE SOLUTION
•Overcooked/
undercookedfoods.
•Incorrect
temperature
ortimesetting.
•Rackplacement.
•Youmayhavetoadjust
thetimeandtemperature
tothedesiredtaste.
•Becauseyourovenis
smallerthanyourregular
oven,itwillheatupfaster
andgenerallycookin
shorterperiodsoftime.
•Referto“Positioning
Rack”Section.Rackmay
needtobeadjustedto
accommodatefoodtype.
•Burntsmell. •Foodbuild-up
insideoven,on
heatingelements
orincrumbtray.
• Referto“CleaningYour
SmallDigitalOven”
Section.
•Ovendoesnotturn
ON.
•Unitisunplugged.
• Didnotpress
Start.
•Plugthetoasteroveninto
appropriateelectrical
outlet.
•Settimer/temperatureto
thedesiredsetting.
•PressStart.
•Onlyoneheating
elementisheatingup.
•Function
settingselection
determineswhich
heatingelement
willoperate.
•Whentoasting,makesure
theovenisnotsettobroil
setting.
•Heatingelementsdo
notstayON.
•Heatingelements
willcycleONand
OFFtomaintain
properheat.
•Becertainthatfunctionis
asdesired.
•Cannotchange
functionbutton.
•Needtocancel
function.
•Presscancel.

English-9
1 Year limited WarrantY
SunbeamProducts,Inc.doingbusinessasJardenConsumerSolutionsor
ifinCanada,SunbeamCorporation(Canada)Limiteddoingbusinessas
JardenConsumerSolutions(collectively“JCS”)warrantsthatforaperiod
ofoneyearfromthedateofpurchase,thisproductwillbefreefromdefects
inmaterialandworkmanship.JCS,atitsoption,willrepairorreplacethis
productoranycomponentoftheproductfoundtobedefectiveduringthe
warrantyperiod.Replacementwillbemadewithaneworremanufactured
productorcomponent.Iftheproductisnolongeravailable,replacement
maybemadewithasimilarproductofequalorgreatervalue.Thisisyour
exclusivewarranty.DoNOTattempttorepairoradjustanyelectricalor
mechanicalfunctionsonthisproduct.Doingsowillvoidthiswarranty.
Thiswarrantyisvalidfortheoriginalretailpurchaserfromthedateofinitial
retailpurchaseandisnottransferable.Keeptheoriginalsalesreceipt.Proof
ofpurchaseisrequiredtoobtainwarrantyperformance.JCSdealers,service
centers,orretailstoressellingJCSproductsdonothavetherighttoalter,
modifyoranywaychangethetermsandconditionsofthiswarranty.
Thiswarrantydoesnotcovernormalwearofpartsordamageresultingfrom
anyofthefollowing:negligentuseormisuseoftheproduct,useonimproper
voltageorcurrent,usecontrarytotheoperatinginstructions,disassembly,
repairoralterationbyanyoneotherthanJCSoranauthorizedJCSservice
center.Further,thewarrantydoesnotcover:ActsofGod,suchasfire,flood,
hurricanesandtornadoes.
What are the limits on JCS’s Liability?
JCSshallnotbeliableforanyincidentalorconsequentialdamagescausedby
thebreachofanyexpress,impliedorstatutorywarrantyorcondition.
Excepttotheextentprohibitedbyapplicablelaw,anyimpliedwarrantyor
conditionofmerchantabilityorfitnessforaparticularpurposeislimitedin
durationtothedurationoftheabovewarranty.
JCSdisclaimsallotherwarranties,conditionsorrepresentations,express,
implied,statutoryorotherwise.
JCSshallnotbeliableforanydamagesofanykindresultingfromthe
purchase,useormisuseof,orinabilitytousetheproductincluding
incidental,special,consequentialorsimilardamagesorlossofprofits,orfor
anybreachofcontract,fundamentalorotherwise,orforanyclaimbrought
againstpurchaserbyanyotherparty.

English-10
Someprovinces,statesorjurisdictionsdonotallowtheexclusionor
limitationofincidentalorconsequentialdamagesorlimitationsonhowlong
animpliedwarrantylasts,sotheabovelimitationsorexclusionmaynot
applytoyou.
Thiswarrantygivesyouspecificlegalrights,andyoumayalsohaveother
rightsthatvaryfromprovincetoprovince,statetostateorjurisdictionto
jurisdiction.
How to Obtain Satisfaction Guarantee Service
In the U.S.A.
Ifyouhaveanyquestionregardingthiswarrantyorwouldliketoobtain
warrantyservice,pleasecall1.800.334.0759andaconvenientservicecenter
addresswillbeprovidedtoyou.
In Canada
Ifyouhaveanyquestionregardingthiswarrantyorwouldliketoobtain
warrantyservice,pleasecall1.800.667.8623andaconvenientservicecenter
addresswillbeprovidedtoyou.
IntheU.S.A.,thiswarrantyisofferedbySunbeamProducts,Inc.doing
businessasJardenConsumerSolutionslocatedinBocaRaton,Florida
33431.InCanada,thiswarrantyisofferedbySunbeamCorporation
(Canada)LimiteddoingbusinessasJardenConsumerSolutions,locatedat
20BHerefordStreet,Brampton,OntarioL6Y0M1.Ifyouhaveanyother
problemorclaiminconnectionwiththisproduct,pleasewriteourConsumer
ServiceDepartment.
PLEASE DO NOT RETURN THIS PRODUCT TO ANY OF THESE
ADDRESSES OR TO THE PLACE OF PURCHASE.

Español-1
PRECAUCIONES IMPORTANTES
Cuando se utilicen artefactos eléctricos deben seguirse siempre las
precauciones básicas de seguridad incluyendo las siguientes:
LEA Y GUARDE ESTAS
INSTRUCCIONES
• LEATODASLASINSTRUCCIONES,ETIQUETASDELPRODUCTO
YADVERTENCIASANTESDEUTILIZARELHORNOPARA
MOSTRADOR.
• Notoquelassuperficiescalientes.Siempreutiliceguantesdehornoal
manejarmaterialescalientesydejequelaspartesmetálicasseenfríenantesde
limpiarlas.Dejeenfriarbienelaparatoantesdeponeroquitarpiezas.Siempre
utilicelasasasdelhornocuandolomueva.
•Cuandonoseestéusandoelhornodemostradoryantesdelimpiarlo,
desenchúfelodeltomacorriente.
Nota:Verifiquequeelhornoestéapagadoantesdedesenchufarlo.
•Paraprotegersecontraelriesgodedescargaeléctrica,nosumerjaelaparatoen
aguanienningúnotrolíquido.
•Siempreesnecesariaunasupervisióndirectacuandoésteocualquieraparato
seusecercadeniños.Esteaparatonodebeserusadoporniños.
•Nouseésteniningúnotroaparatoconuncordónofichagastadosodañados,
nidespuésdequeelaparatonohayafuncionadobien,sehayacaídoosehaya
dañadodealgunaforma.Devuelvaelaparatoaltallerdeservicioautorizado
máscercano,parasuexamen,reparaciónoajuste.
•Noutiliceaccesoriosnorecomendadosporelfabricanteyaquepueden
provocarincendios,descargaeléctricaolesionespersonales.
•Nolousealairelibreniparafinescomerciales.
•Nouseesteaparatoparaningúnotrofinquenoseaelprevisto.
•Nopermitaqueelcordóncuelguedelbordedeunamesaodeunmostrador,
niquetoquesuperficiescalientes.
•Nocoloqueelaparatocercadeunquemadoreléctricoodegascalientenien
unhornocaliente.
•Sedebeemplearextremaprecauciónalusarrecipienteshechosdealgún
materialquenoseametalovidrio.
•Puedeproducirseunincendiosielhornodemostradorestácubiertooestá
tocandomaterialesinflamables,incluyendocortinas,colgaduras,paredes,etc.
cuandoestéenfuncionamiento.Noguardeningúnartículoencimadelaparato
cuandoestéenfuncionamiento.

Español-2
•Cuandouseelhornodemostrador,colóqueloaunmínimode6pulgadas
alejadodelaparedportodossuslados.Quiteloscordonesdeotrosartículos
quepuedanestardetrásdelhornodemostrador.
•Cuandonoseestéusando,noguardeningúnmaterialenesteaparato,aparte
delosaccesoriosrecomendadosporelfabricante.
•Nocoloqueningúnmaterialinflamableenelhorno,comopapel,cartón,
plásticonicualquiermaterialquepuedaprendersefuegooderretirse.
•Nocubraelhornoconpapeldealuminio.Estoprovocaráunrecalentamiento
delaparato.
•Nosedebenintroduciralimentosniutensiliosmetálicosdemasiadograndes
enelaparato,yaquepuedenprovocarunincendiooelriesgodedescarga
eléctrica.
•Nololimpieconestropajosdemetal.Puedenrompersetrozosdelestropajoy
tocarpiezaseléctricas,conelpeligrodequeprovoquenunadescargaeléctrica.
•Alasaralaparrilla,tengasumocuidadocuandoretirelabandejaosedeshaga
delagrasacaliente.
•Paraapagaresteaparato,coloquetodosloscontrolesenlaposiciónde
apagado“OFF”.
•Paradesconectar,giretodosloscontrolesalaposiciónapagada(“OFF”)y
luegosaquelafichadeltomacorriente.
Esta unidad es sólo para uso doméstico
Instrucciones del cable de alimentación corto
Seproporcionauncabledealimentacióncortoparadisminuirlosriesgos
originadosporenredosotropiezosconcableslargos.Sepuedeutilizaruna
extensiónsiseempleanlasdebidasprecauciones.Siseusaunaextensión,la
capacidadnominalindicadadelamismadebeserporlomenosigualomayor
aladelartefacto.Laextensióndebecolocarsedemaneraquenocuelguedel
mostradorodelamesa,dondelosniñospodríanhalarlaopodríaocasionar
tropiezosaccidentales.
Únicamente para productos comprados en Estados Unidos y Canadá
Paradisminuirelriesgodedescargaeléctricaesteartefactocuentaconun
enchufepolarizado(unaclavijaesmásanchaquelaotra).Esteenchufeentra
deunasolamaneraenuntomacorrientepolarizado;sielenchufenoentrapor
completoeneltomacorriente,inviértalo.Siaúnnoencaja,comuníquesecon
unelectricistacalificado.
No intente alterar estacaracterísticadeseguridad.
CONSERVE ESTAS INSTRUCCIONES
Español-3
diagrama del Producto
1. Rejilla removible: Consultelasección“Posicionamientodelarejilla”.
2. Rejilla para Asar
3. Bandeja para Hornear
4. Pantalla para el tiempo
5. Bandeja recolectora removible: Pararecolectarlasmigajasorestosde
comidaquecaigan.Sesacaparafacilitarsulimpieza.
6. Panel de control
7. Puerta de vidrio templado: Paraverlosalimentosdesdeelfrente.
8. Paredes interiores fáciles de limpiar –Permitenunafácilyrápidalimpieza.
9. Dos posiciones para colocar la rejilla
1
2
3
7
8
4
6
9
5
Español-4
Panel de Control
Function Buttons –
Tostar “Toast” – Seleccioneparatostarpan,bagels,etc.
Hornear “Bake” – SeleccioneparaHornear.
Asar “Broil” – SeleccioneparaAsar.
Pizza – Seleccioneparahornearunapizza.
(
) –Lepermiteajustareltiempoolaintensidadde
tostado.
(
) –Lepermitelatemperaturaolaintensidadde
tostado.
Contador de Tiempo/Temperatura “Timer/Temp” –Utilice
estebotónparacambiarentretiempoytemperaturauna
vezquehayaseleccionadolafuncióndeHornear“Bake”,
Asar“Broil”oPizza(vealasecciónde“Ajustandoel
Reloj”).
Reloj “Clock” – Lepermitefijarlahoradelrelojdelhorno.
Stop/Cancel –Interrumpeelcaloroanulalafunción.
Start – Iniciaelprocesodehornear/cocinar.
PreParación del horno tostador
Alutilizarelhornotostadorporprimeravez,recuerde:
•Retirartodaslasetiquetasdelasuperficiedelhorno.
•Abrirlapuertadelhornotostadorysacartodoslosdocumentos
impresosypapelesqueseencuentrendentro.
•Limpiarlarejillaylabandejaconaguacaliente,unapequeñacantidad
dedetergentelíquidoparalavarplatosyunaesponjanoabrasivaouna
almohadillalimpiadora.NOSUMERGIRELCABLE,ELENCHUFEO
ELCUERPODELAUNIDADENAGUA.
•Secarbienlaunidadantesdeutilizarla.
•Escogerunlugarparacolocarelhornotostador.Deberácolocarloen
unespacioabierto,sobreunmostradorplano,dondeelenchufepueda
llegaraltomacorriente.

Español-5
utilizando su horno tostador
ajustando el reloj
Oprimaelbotóndelreloj“Clock”unavezparafijarlahora.Elrelojse
pondráintermitente.
Uselosbotonesdelasflechasparaseleccionarlahora.Oprimadenuevoel
botóndelreloj“Clock”.
Uselosbotonesdelasflechasparaseleccionarlosminutos.
Oprimaunavezmáselbotóndelrelojylahoraquedaráfijada.
uso de la Función Para tostar
Coloquelarejillaenlaposicióndeseadaantesdecalentarelhorno.(Consulte
lasección“Colocandolarejilla”)
NOTA:Senecesitandistintasgraduacionesparadiferentestiposdepan.Los
panesmásblancosyloswaflesrequierenunagraduaciónmásbaja.Lospanes
másoscuros,losmuffinsylospanecillos,requierenunagraduaciónmásalta.
Coloquelosalimentosenlarejilla.
Presioneelbotóndetostar“Toast”.Usecualquieradelosbotonesdelasflechas
(Timer/Temp)paraseleccionarelgradodetostadodeseado.
Presioneelbotóndeiniciar“Start”.
Unavezquehayaterminadodetostar,abralapuertatotalmenteyretirelos
alimentosconcuidado.
uso de la Función Para hornear
Coloquelarejillaenlaposicióndeseadaantesdecalentarelhorno.(Consulte
lasección“Colocandolarejilla”)
Coloquelosalimentosenlarejillaoenlabandejaparahornear.
OprimaelbotónHornear“Bake”unavez.Uselosbotonesdelasflechasde
temperatura“Temp.”paraseleccionarlatemperaturadeseada.
Oprimaelbotóncontadordetiempo“Time”.Uselosbotonesdelasflechas
paraseleccionareltiempodeseado.
Oprimaelbotóndeiniciar“Start”.
NOTA:Amboselementoscalefactoresseencenderányseapagaránpara
mantenerlatemperaturadeseada.Cuandohayaterminadodehornear,abra
lapuertatotalmenteysaquelosalimentosconcuidado.
Español-6
uso de la Función Para asar
Coloquelarejillaenlaposicióndeseadaantesdecalentarelhorno.(Consultela
sección“Colocandolarejilla”)
ColoquelarejillaparaAsardentrodelabandejaparaHornear.
Coloquelosalimentosenelrejillaparaasaralaparrilla.
Coloquelabandejasobrelarejillaadentrodelhorno.
Cierrelapuertahastalaprimeramuesca,dejandoaproximadamenteunespacio
de3pulgadasenlapartesuperior.Estogarantizaráquehayaunacorrientedeaire
adecuadaduranteelasado.
PresioneelbotónparaAsar“Broil”unavez.Utilicelosbotonesdelasflechasde
temperatura“Temp.”paraseleccionarlatemperaturadeseada.
Presioneelbotóncontadordetiempo/temperatura“Timer/Temp”.Utilicelos
botonesdelasflechasdetiempo“Timer”paraseleccionareltiempodeseado.
Presioneelbotóndeiniciar“Start”.
NOTA:Elelementocalefactorsuperiorseencenderáyseapagaráparamantenerla
temperaturadeseada.
ADVERTENCIA: NO DEJE SU HORNO DESATENDIDO.
uso de la Función Para Pizza
Coloquelarejillaenlaposicióndeseadaantesdecalentarelhorno.(Consultela
sección“Colocandolarejilla”)
Coloquelapizzaenlarejilla.
PresioneelbotóndePizza.Utilicelosbotonesdelasflechasdetemperatura
“Temp.”paraajustarlatemperaturadeseada.Utilicelosbotonesdelasflechasde
tiempo“Timer”paraajustarparaajustareltiempodeseado.
Presioneelbotóndeiniciar“Start”.
cómo colocar de la rejilla
Paraqueelhornopuedaacomodarunagranvariedadde
alimentoslarejillapuedecolocarseentresposiciones.
Laposicióndelarejilladependerádeltamañodelos
alimentosydelgradodedoradoquedesee.
Paraobtenerlosmejoresresultadoscontostadasypizza,
coloquelarejillaenlaposiciónhaciaarriba,enlaguíade
rejilladelcentro.
Permitaqueelhornoseenfríeantesderetirarlarejilla.
IMPORTANTE: Larejilladelhornopuedeinclinarsehacia
adelantehaciendoquelosalimentossemuevancuandose
sacalarejilla;procedaconcuidado.
Posicionamiento
de la rejilla
Español-7
cómo colocar de la Bandeja
ColoquelabandejaparaHornearsobrelarejillacomoseindicaenlafiguraa
continuacción.
Para Hornear Para Asar
limPiando su horno Pequeño digital
AntesdelimpiarsuhornoOster®,desconécteloypermitaqueseenfríe.Limpie
conunpañosuaveyhúmedo.¡NOLOSUMERJAENAGUA!Asegúresedeusar
solamentejabónsuaveyagua.Loslimpiadoresabrasivos,cepillosylimpiadores
químicospuedendañarelrecubrimientodelimpiezacontinuadeestaunidad.
Vacíelabandejaparamigasfrecuentementeparaevitarlaacumulaciónde
residuos.Lasrejillasdelhornopuedenlavarseenlavadoradeplatos(laparte
superiordellavaplatosautomáticoexclusivamente).Noesnecesariootrotipode
mantenimientoquenosesealalimpiezarecomendadaenestemanual.
guardando su horno Pequeño digital
Permitaqueelaparatoseenfríecompletamenteantesdealmacenar.Sivaa
almacenarelhornoporperíodosprolongados,asegúresedequeelhornono
contengapartículasoresiduosdealimentos.Almaceneelhornoenunlugar
secocomoencimadeunamesaomostrador,osobreunarepisa.

Español-8
ProBlemas Y soluciones
PROBLEMA CAUSA POTENCIAL SOLUCIÓN
•Cocciónexcesivao
insuficientedelos
alimentos.
•Posiciónincorrectadela
temperaturaodeltiempo.
•Posicióndelarejilla.
•Puedequetengaqueajustarel
tiempoylatemperaturapara
conseguirelgustodeseado.
•Debidoaquesuhornoes
máspequeñoquesuhorno
normal,secalentarámás
rápidamenteyengeneral
cocinaráenperíodosde
tiempomáscortos.
•Consultelasección
“Colocandolarejilla”.Puede
quetengaqueajustarsela
rejilladependiendodeltipode
alimento.
•Oloraquemado. •Acumulacióndecomida
dentrodelhorno,enlos
elementoscalefactoreso
enlabandejarecolectora
demigas.
• Consultelasección
“Limpiandosuhorno”.
•Elhornono
enciende.
•Elartefactoestá
desenchufado.
•Noseseleccionóelbotón
deiniciar“Start”.
•Enchufeelhornoenun
tomacorrienteeléctrico.
•Seleccioneelbotóndel
contadordetiempo/
temperatura“Timer/Temp.”
hastalaposicióndeseada.
•Presioneelbotóndeiniciar
“Start”.
•Sólamenteun
elementocalefactor
secalienta.
•Laseleccióndelafunción
determinaqueelemento
calefactorestaráen
funcionamiento.
•Cuandotueste,compruebe
queelhornonoseencuentra
enlaposicióndeAsarala
parrilla.
•Loselementos
calefactoresno
semantienen
encendidos.
•Loselementos
calefactoresseencenderán
yapagaránparamantener
elcaloradecuado.
•Asegúresedetener
seleccionadalafunciónque
desea.
•Nosepuedecambiar
defunción.
•Esnecesariocancelarla
función.
•Presioneelbotóndecancelar.

Español-9
garantía limitada de 1 año
SunbeamProducts,Inc.operandobajoelnombredeJardenConsumer
Solutions,oenCanadá,SunbeamCorporation(Canada)Limitedoperando
bajoelnombredeJardenConsumerSolutions,(enformaconjunta,“JCS”),
garantizaqueporunperíododeunañoapartirdelafechadecompra,este
productoestarálibrededefectosdematerialesymanodeobra.JCS,asu
elección,repararáoreemplazaráesteproductoocualquiercomponentedel
mismoquepresentedefectosduranteelperíododegarantía.Elreemplazose
realizaráporunproductoocomponentenuevooreparado.Sielproductoya
noestuvieradisponible,seloreemplazaráporunproductosimilardevalor
igualosuperior.Éstaessugarantíaexclusiva.Nointenterepararoajustar
ningunafuncióneléctricaomecánicadeesteproducto.Alhacerloelimínará
éstagarantía.
Lagarantíaesválidaparaelcompradorminoristaoriginalapartirdelafecha
decomprainicialylamismanoestransferible.Conserveelrecibodecompra
original.Parasolicitarservicioengarantíaserequierepresentarunrecibode
compra.LosagentesycentrosdeserviciodeJCSolastiendasminoristasque
vendenproductosdeJCSnotienenderechoaalterar,modificarnicambiarde
ningúnotromodolostérminosylascondicionesdeestagarantía.
Estagarantíanocubreeldesgastenormaldelaspiezasnilosdañosquese
produzcancomoresultadodeusonegligenteomalusodelproducto,usode
voltajeincorrectoocorrienteinapropiada,usocontrarioalasinstrucciones
operativas,ydesarme,reparaciónoalteraciónporpartedeunterceroajeno
aJCSoaunCentrodeServicioautorizadoporJCS.Asimismo,lagarantía
nocubreactosfortuitostalescomoincendios,inundaciones,huracanesy
tornados.
¿Cuál es el límite de responsabilidad de JCS?
JCSnoseráresponsablededañosincidentalesoemergentescausadosporel
incumplimientodealgunagarantíaocondiciónexpresa,implícitaolegal.
Exceptoenlamedidaenqueloprohíbalaleyaplicable,cualquiergarantíao
condiciónimplícitadecomerciabilidadoaptitudparaunfindeterminadose
limita,encuantoasuduración,alplazodelagarantíaantesmencionada.
JCSquedaexentadetodaotragarantías,condicionesomanifestaciones,
expresa,implícita,legalodecualquierotranaturaleza.

Español-10
JCSnoseráresponsabledeningúntipodedañoqueresultedelacompra,
usoomalusodelproducto,oporlaimposibilidaddeusarelproducto,
incluidoslosdañosincidentales,especiales,emergentesosimilares,ola
pérdidadeganancias,nideningúnincumplimientocontractual,seadeuna
obligaciónesencialodeotranaturaleza,nideningúnreclamoiniciadocontra
elcompradorporuntercero.
Algunasprovincias,estadosojurisdiccionesnopermitenlaexclusióno
limitacióndelosdañosincidentalesoemergentesnilaslimitacionesala
duracióndelasgarantíasimplícitas,demodoqueesposiblequelaexclusión
olaslimitacionesantesmencionadasnoseapliquenensucaso.
Estagarantíaleotorgaderechoslegalesespecíficosyesposiblequeusted
tengaotrosderechosquevaríandeunestado,provinciaojurisdicciónaotro.
Cómo solicitar el servicio en garantía
En los Estados Unidos
Sitienealgunapreguntasobreestagarantíaodesearecibirserviciode
garantía,llameal1.800.334.0759ypodráobtenerladireccióndelcentrode
servicioqueleresultemásconveniente.
En Canadá
Sitienealgunapreguntasobreestagarantíaodesearecibirserviciode
garantía,llameal1.800.667.8623ypodráobtenerladireccióndelcentrode
servicioqueleresultemásconveniente.
EnlosEstadosUnidos,estagarantíaesofrecidaporSunbeamProducts,Inc.
operandobajoelnombredeJardenConsumerSolutions,BocaRatón,Florida
33431.EnCanadá,estagarantíaesofrecidaporSunbeamCorporation
(Canada)LimitedoperandobajoelnombredeJardenConsumerSolutions,
20BHerefordStreet,Brampton,OntarioL6Y0M1.Siustedtieneotro
problemaoreclamoenconexiónconesteproducto,porfavorescribaal
DepartamentodeServicioalConsumidor.
POR FAVOR NO DEVUELVA ESTE PRODUCTO A NINGUNA
DE ESTAS DIRECCIONES NI AL LUGAR DE COMPRA.

Forproductquestionscontact:
JardenConsumerService
USA:1.800.334.0759
Canada:1.800.667.8623
www.oster.com
©2012SunbeamProducts,Inc.doingbusinessasJardenConsumer
Solutions.Allrightsreserved.DistributedbySunbeamProducts,Inc.doing
businessasJardenConsumerSolutions,BocaRaton,Florida33431.Jarden
ConsumerSolutionsisasubsidiaryofJardenCoporation(NYSE:JAH)
Parapreguntassobrelosproductosllame:
JardenConsumerService
EE.UU.:1.800.334.0759
Canadá:1.800.667.8623
www.oster.com
©2012SunbeamProducts,Inc.operandobajoelnombrede
JardenConsumerSolutions.
Todoslosderechosreservados.
DistribuidoporSunbeamProducts,Inc.operandobajoelnombrede
JardenConsumerSolutions,BocaRaton,Florida33431.JardenConsumer
SolutionsesunasubsidiariadeJardenCoporation(NYSE:JAH)
CBA-051012
PrintedinChina ImpresoenChina