Setting up your cooker
Before using your cooker
DANGER OF SUFFOCATION: Packaging materials are not toys. Keep packaging materials, like plastic bags, foil, and foam, away from babies and children. Packaging materials can block airways and prevent breathing.
Note: Your cooker may produce an odor or emit smoke when you turn it on for the first time as it eliminates residues from the production process. This is normal and does not indicate a defect or hazard. Make sure that ventilation is ample.
- Remove the exterior and interior packaging.
- Make sure that the package contents are complete and in good condition. See Package contents on page 5.
Tips and hints for using your cooker
- Smaller food normally requires less cooking time than larger food.
- We recommend that you defrost frozen food before cooking to shorten the cook time.
- We recommend that you only use nylon, heat-proof plastic, or wooden cooking utensils. Metal utensils can damage the non-stick surface. Do not leave utensils in your cooker while you are using it.
- We recommend that you clean all used accessories after each use.
- To avoid scratching your cooker's surfaces, remove the shells from crustaceans or shellfish before cooking.
- Do not use the Delay timer or Warm programs for recipes which contain delicate foods or foods that can turn bad easily (for example, raw eggs or raw fish).
- Always make sure that you add at least one cup of liquid into the inner pot.
- Your cooker uses the liquid to create the steam needed to build up pressure.
- Do not use oil or oil-based liquids under pressure. Small amounts of oil added to the water do not cause a problem.
- When using wine, add an equivalent amount of water because the wine evaporates too quickly.
- The cook time countdown only starts when the internal pressure and temperature reach suitable levels.
- When cooking under pressure, the food continues to cook after the cook time has elapsed. If you are not sure how long the food needs to cook, reduce the cook time and use the quick release method to remove the lid. When the cooking program ends, open the lid and check for doneness. Cook longer, if needed.
- When cooking beans, add a teaspoon of oil to the water to reduce the amount of foam.
- Meat cuts of lesser quality are tougher, but they are better suited for cooking under pressure. The pressure breaks down fibers and makes the meat tender.
- You cannot adjust the cooking temperature.
Assembling your cooker
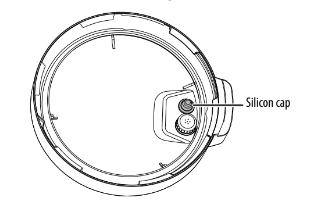
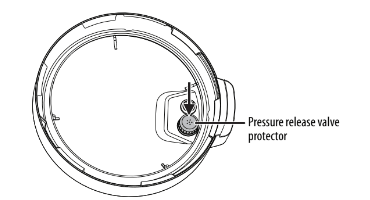
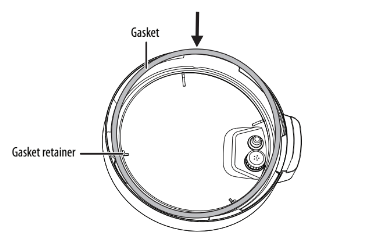
The floating valve, silicon cap, pressure release valve, pressure release valve protector, and gasket come pre-installed on your cooker. If for some reason these parts are not installed, follow the steps below.
1. Put the lid on a clean, flat, and stable surface.
2. Insert the floating valve into its opening.
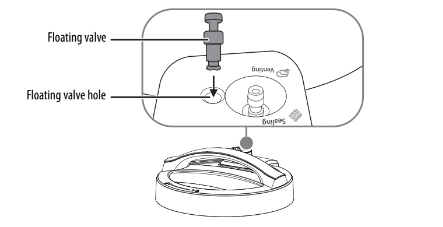
3. Put the pressure release valve into the vent on the lid.
4. Put a finger over the floating valve to keep it in position, then turn the lid upside down.
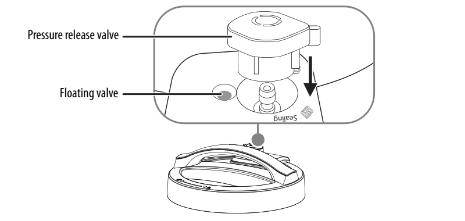
5. On the bottom side of the lid, attach the silicon cap on the floating valve with the other hand, then release the floating valve.
6. Put the valve protector on the inner side of the pressure release valve.
7. Install the gasket on the gasket retainer into the lid. Make sure that the gasket is correctly installed all around the retainer.
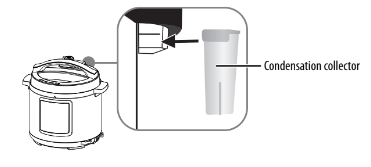
8. Slide the condensation collector in place on the back of your cooker.
Positioning your cooker
- Make sure that your cooker has at least six inches of open space on all sides.
- When using your cooker, make sure that you provide at least 12" (30 cm) of headroom above your cooker to protect surfaces from damage due to hot steam.
- Make sure that the air vents at the bottom of your cooker are free from obstruction.
Using your cooker
You can use your cooker to:
- Cook rice
- Prepare soups and stews
- Cook meats like chicken or stew
- Slow cook meals
- Warm food
- Sear or sauté food
- Bake cakes
WARNINGS:
- Do not put sealed products, like canned vegetables, in your cooker. They can expand or explode when they get hot and cause damage or injury.
- Your cooker has a power rating of 1,000W. Make sure that the electrical circuit you plug your cooker into is not overloaded with other appliances.
- Plug your cooker into a separate 120V, 60Hz power outlet. Do not plug anything else into the outlet.
- Do not use an extension cord.
- If you use your cooker on a wooden surface, put it on a heat-resistant mat to protect the wood.
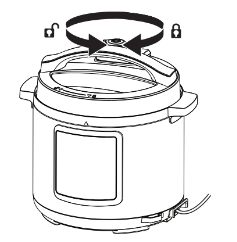
Closing the lid
1. Put the lid on top of your cooker. Make sure that no food residue is stuck between the lid and your cooker.

2. Align the

(unlock symbol) on the lid with the

on the top front of your cooker.
3. Rotate the lid clockwise until the

(lock symbol) on the lid aligns with the

on the top front of your cooker. Make sure that the pin on the back edge of the lid is fully retracted into the lid. If the pin is visible, the lid is not closed correctly.
Opening the lid
WARNINGS:
- Do not try to open the lid when the floating valve is popped up. Wait until your cooker has cooled and the valve has dropped down.
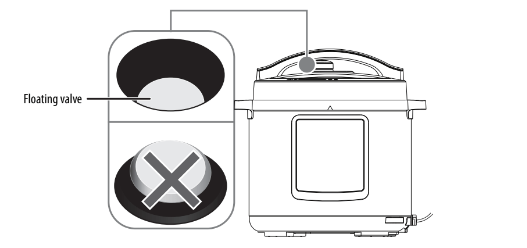
- We recommend that you wait a few minutes after the floating valve drops down. The internal pressure may still be higher than the outside pressure. Opening the lid too quickly can create a pressure differential and eject hot food and liquids towards the outside which can cause burns.
- If you cannot wait for the valve to drop, use the quick release method to open the lid. See Using the quick release method to open the lid on page 20.
- We recommend that you use oven mitts when handling your cooker or the lid. Escaping steam can burn.
- Rotate the lid counter-clockwise until the
 (unlock symbol) on the lid aligns with the
  on the top front of your cooker.
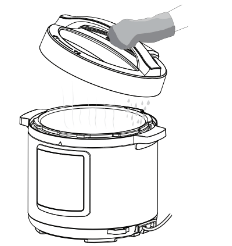
- As you open the lid, tilt it so that steam is diverted way from you.
Filling with food
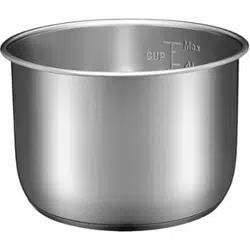
CAUTION: Do not put food directly into the inner housing. Always put food into the inner pot. If you do not use the inner pot or use another container instead, you can damage your cooker.
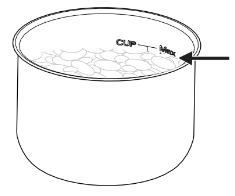
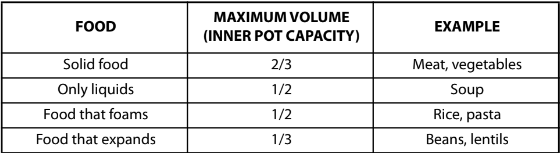
1. Fill the inner pot with your ingredients. Do not overfill the inner pot. Do not exceed the Max marking which applies to solids and liquids combined.
- When filling the inner pot, remember that some foods, like beans, rice, and pasta, expand during the cooking process. Plan accordingly.
- Overfilling can cause valves to clog and excess pressure to develop.
- Always make sure that you have filled the pot to at least the 2-cup marking inside the inner pot.
2. Fill the inner pot with at least one cup of liquid (like water, juice, stock, or broth). Your cooker needs liquid to build up internal pressure. Use the provided measuring cup for easy volume measurement.
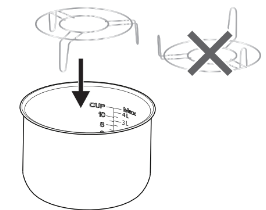
3. Make sure that the outside of the inner pot is dry and free of debris, then put it into your cooker. Liquids on the outside of the pot can damage the heating element.
4. Make sure that the inner pot is level with the cooker housing and that no objects remain between the inner pot and the inner housing.
5. Put the lid on your cooker, then lock the lid in place. See Closing the lid on page 14.
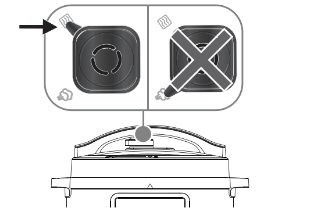
6. Make sure that the pressure release knob is in the sealing position

.
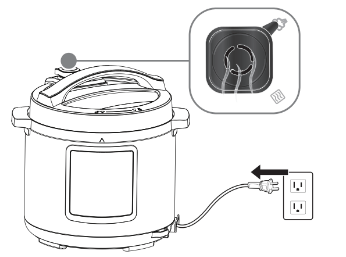
7. Plug the power cord into a power outlet. Your cooker turns on and goes into Standby mode.
8. Follow the instructions in Selecting a cooking program and cook time on page 18.
Selecting a cooking program and cook time
You can select from the following cooking programs. You can change the cooking time to suit your own tastes, different food quantities, and food manufacturer's instructions.
1. Put the inner pot, filled with ingredients, into your cooker.
2. Plug the power cord into a power outlet.
3. Put the lid on your cooker, then lock the lid in place. See Closing the lid on page 14.
4. Press a cooking program button. The default cooking time appears on the display.
5. If you want to change the default cooking time, press + or –. If you do not adjust the time within 10 seconds of pressing a program button, your cooker uses the default time.
Notes:
- You cannot adjust the default cooking time for the Rice program. Depending on the amount of food you are cooking, your cooker automatically sets the cooking time (from 14 to 18 minutes) once the correct pressure is reached.
- You can use the Warm program to reheat food or keep cooked food warm. Make sure that you add enough liquid to the inner pot to keep food from burning.
6. Press the Start button. When the internal pressure reaches the correct level, the countdown timer starts. The Warm and Slow Cook programs do not use pressure so the countdown timer starts immediately.
Setting the delay timer
You can prepare food for cooking, then set a delayed start time from 10 minutes to hours.
- Select a cooking program, then adjust the time if needed. See Selecting a cooking program and cook time on page 18.
- Press Delay once to turn on the delay timer. The default setting is two hours.
- Press + or – to adjust the hours (in 1-hour increments).
- Press Hours/Minutes to select minutes, then press + or – to adjust the minutes (in 10-hour increments).
- Press Start or wait 10 seconds to start the delay countdown timer. When the delay time elapses, your cooker starts heating. When the internal pressure reaches the correct level, the cook countdown timer starts.
Notes:
- You cannot use the Delay timer with the Warm or Sear/Sauté program.
- To adjust or cancel the delay time, press the Cancel button, then select a cooking program, cook time, and delay time. See Selecting a cooking program and cook time on page 18.
Cooking
WARNINGS:
- During use, your cooker may release steam to keep an appropriate pressure level. Keep your hands and face clear of escaping steam to avoid burns.
- When hot, always use oven mitts when handling your cooker and its accessories.
- To avoid excess pressure buildup and possible damage to your cooker, do not cover the lid, pressure release valve, floating valve, or air vents.
1. Put your ingredients into the inner pot, then put the pot into your cooker. See Filling with food on page 16. Make sure that the outside of the pot is dry and free of debris.
2. Close and lock the lid. See Closing the lid on page 14.
3. Press a cooking program button, then adjust the cook or delay time (if needed). See Selecting a cooking program and cook time on page 18 or Setting the delay timer on page 19.
4. Press the Start button or wait 10 seconds. Your cooker starts heating. When the internal pressure reaches the correct level, the countdown timer starts. When cooking is complete, the Warm program automatically starts. The default setting is 12 hours. You cannot adjust this time.
Note: To stop the Warm program, press Cancel, then unplug the power cord.
WARNING: We recommend that you wait a few minutes after the floating valve drops down. The internal pressure may still be higher than the outside pressure. Opening the lid too quickly can create a pressure differential and eject hot food and liquids towards the outside which can cause burns.
5. Press the Cancel button and unplug the power cord.
6. Let your cooker cool down before you open the lid. The floating valve on the lid drops down when the pressure has decreased.
7. Use oven mitts to open the lid. Follow the instructions and warnings in Opening the lid on page 15.
8. Carefully remove the food using suitable utensils and put it into a dish using the provided rice scoop, soup ladle, or other utensils.
9. Let your cooker cool down completely before cleaning it. See Cleaning your cooker on page 24.
10. Empty and clean the condensation reservoir after every use.
11. Inspect all protection features and clean after every use. See Protection features on page 10 and Cleaning your cooker on page 24.
12. Make sure that the gasket is intact and does not show any deformation.
Using the quick release method to open the lid
After the cook time has elapsed, the temperature and pressure inside your cooker slowly reduce. However, in the case of delicate food, you can release the pressure more quickly to keep the food from overcooking.
WARNINGS:
- Always use oven mitts because your cooker is hot and escaping steam can burn.
- Keep your face and hands clear of the pressure release valve before releasing the pressure contained inside your cooker. Do not stand in the steam venting trajectory.
- Do not use the quick release method when cooking only liquids or liquids with a small amount of solid food. Liquids can be ejected with the steam through the pressure release knob.
- Press Cancel and unplug the power cord.
- Rotate the pressure release knob on the top of the lid all the way to the venting position
 . The pressure release knob releases steam.
- Use oven mitts to open the lid. Follow the instructions and warnings in Opening the lid on page 15.
- Carefully remove the food using suitable utensils and put it into a dish using the provided rice scoop, soup ladle, or other utensils.
- Let your cooker cool down completely before cleaning it. See Cleaning your cooker on page 24.
- Empty and clean the condensation reservoir after every use.
Steaming vegetables or fish
WARNING: The cooking stand gets hot during use. Let it cool down before removing it or use suitable utensils to remove it.
- Pour about two cups of water into the inner pot.
- Put the cooking stand into the inner pot. Make sure that the outside of the cooking pot is dry and free of debris. Make sure that water does not reach the top of the stand.
- Put the vegetables or fish into a suitable heat-resistant dish, then put the dish on the cooking stand. Make sure that the food does not contact the water.
- Close and lock the lid. See Closing the lid on page 14.
- Press Steam Veggies , then adjust the cook or delay time (if needed). See Selecting a cooking program and cook time on page 18 or Setting the delay timer on page 19.
- Press Start or wait 10 seconds. Your cooker starts heating. When the internal pressure reaches the correct level, the countdown timer starts.
- When cooking is complete, press Cancel, then unplug your cooker.
- Use oven mitts to open the lid. Follow the instructions and warnings in Opening the lid on page 15.
- Carefully remove the food using suitable utensils and put it into a dish using the provided rice scoop, soup ladle, or other utensil.
- Let your cooker cool down completely before cleaning it. See Cleaning your cooker on page 24.
- Empty and clean the condensation reservoir after every use.
Searing or sautéing food
You can sear or sauté food with or without the lid. After 30 minutes, the Sear/Sauté program ends. You cannot adjust the cook or delay time.
WARNING: Do not leave your cooker unattended when using the Sear/Sauté program.
- Pour cooking oil into the inner pot, then put the inner pot into your cooker.
- Press Sear/Sauté , then press Start or wait 10 seconds.
- Let your cooker preheat for about one to two minutes.
- Put the food into the hot oil using suitable utensils, then let the food brown evenly. If you do not use the lid, check continuously to make sure that there is enough oil into the inner pot. Do not let the inner pot boil dry.
- If you use the lid, close and lock the lid. See Closing the lid on page 14.
- When cooking is complete, press Cancel, then unplug the power cord.
- If you used the lid, use oven mitts to open the lid. Follow the instructions and warnings in Opening the lid on page 15.
- If you want to add ingredients after you finish searing or sautéing, let your cooker cool for three to five minutes, then close the lid and select another cooking program.
- Carefully remove the food using suitable utensils and put it into a dish using the provided rice scoop, soup ladle, or other utensils.
- Let your cooker cool down completely before cleaning it. See Cleaning your cooker on page 24.
- Empty and clean the condensation reservoir after every use.
Making a cake
- Mix the cake ingredients ahead of time, stirring the cake into a paste.
- Put the cake mixture into the inner pot, then put the pot into your cooker. See Filling with food on page 16. Make sure that the outside of the pot is dry and free of debris.
- Close and lock the lid. See Closing the lid on page 14.
- Press Cake , then adjust the cook or delay time (if needed). See Selecting a cooking program and cook time on page 18 or Setting the delay timer on page 19.
- Press Start or wait 10 seconds. Your cooker starts heating. When the internal pressure reaches the correct level, the countdown timer starts.
- When cooking is complete, the Warm program automatically starts. The default setting is 12 hours. You cannot adjust this time.
- Press Cancel and unplug the power cord.
- Let your cooker cool down before you open the lid. The floating valve on the lid drops down when the pressure has decreased.
- Use oven mitts to open the lid. Follow the instructions and warnings in Opening the lid on page 15.
- Carefully remove the cake using suitable utensils and put it into a dish using the provided rice scoop, soup ladle, or other utensils.
- Let your cooker cool down completely before cleaning it. See Cleaning your cooker on page 24.
- Empty and clean the condensation reservoir after every use.
Cleaning your cooker
You should clean your cooker after every use.
WARNING: To avoid electric shocks or damage to your cooker, always press the Stop button and unplug the power cord before cleaning. Make sure that all parts of your cooker have cooled down completely.
CAUTIONS:
- Do not immerse the power cord or your cooker in water or any other liquids.
- Do not use abrasive cleaners, steel wool, or scouring pads.
- Dry all parts thoroughly after cleaning, before using, or before storing your cooker.
- Make sure that no water enters your cooker's housing or the control panel.
- The lid is not dishwasher safe.
- Clean the pressure release valve and pressure release valve protector only if you see a residue buildup.
- Make sure that all parts and surfaces are completely dry before connecting your cooker to a power outlet. Wet parts can cause an electric shock.
- Remove the inner pot and condensation collector from your cooker.
- Wash the inner pot, condensation collector, and any used accessories (like the measuring cup, rice scoop, soup ladle, and cooking stand) with hot soapy water. Rinse and dry carefully. You can also wash these items in a dishwasher.
- Turn the lid upside down and put it on a clean, flat, and stable surface.
- Remove the gasket by pulling it away from the lid.
- Check the pressure release valve protector, pressure release valve, and floating valve for residue. Only remove and clean these items if needed.
- If you need to clean the floating valve, put one hand under the lid and push up the floating valve. Remove the floating valve silicon cap with the other hand. Release and grab the floating valve with the hand under the lid.
- Wash the gasket, pressure release valve, pressure release valve protector, floating valve, and silicon cap with hot soapy water. Rinse and dry carefully. You can also wash these items in a dishwasher.
- Wipe the inner and outer housings, control panel, and lid with a damp cloth. Take extra care when cleaning near the heating element and control panel. Water can damage them. Dry these parts thoroughly after cleaning. Do not immerse them in water.
Storing your cooker
When storing your cooker:
- Make sure that your cooker and all parts are completely cool, clean, and dry.
- We recommend that you store your cooker in a dry place.
- Store your cooker on a stable shelf or in a cupboard to prevent it from falling.
- To avoid accidents, make sure that both your cooker and its power cord are beyond reach of children or pets.
Troubleshooting
My cooker is not working.
- Make sure that the power cord is plugged in and that the power outlet is working. If the outlet is not working, check the circuit breaker and reset if necessary.
- Your cooker may have overheated. Unplug the power cord from the power outlet, let your cooker cool, then try using it again.
I cannot close the lid.
- If the floating valve is out (popped up), check the valve for residue, then clean the valve if necessary.
- If the floating valve is damaged, take your cooker to a Best Buy authorized service center for repair.
My cooker heats up, but the display or the buttons do not light up.
- Press the Cancel button, then unplug the power cord from the power outlet. Take your cooker to a Best Buy authorized service center for repair.
The display and buttons light up, but my cooker does not heat.
- Press the Cancel button, then unplug the power cord from the power outlet. Take your cooker to a Best Buy authorized service center for repair.
The floating valve does not pop up.
- There may not be enough liquid to create sufficient pressure. Press the Cancel button, then unplug the power cord from the power outlet. Use the quick release method to release any built up pressure and let your cooker cool before opening it. See Using the quick release method to open the lid on page 20. Add liquid, then try again.
- Residue may be blocking the valve. Press the Cancel button, then unplug the power cord from the power outlet. Use the quick release method to release any built up pressure and let your cooker cool before opening it. See Using the quick release method to open the lid on page 20. Clean the valve, then try again.
Steam is continually released from the pressure release valve.
- The release valve may not be seated correctly. Press the Cancel button, then unplug the power cord from the power outlet. Wait until the steam flow stops, then use oven mitts to push the valve down.
- The release valve may be damaged. Press the Cancel button, then unplug the power cord from the power outlet. Take your cooker to a Best Buy authorized service center for repair.
- Your cooker may be building up too much pressure. Press the Cancel button, then unplug the power cord from the power outlet. Take your cooker to a Best Buy authorized service center for repair.
Steam leaks from the floating valve after it pops up.
- Residue may be blocking the valve. Press the Cancel button, then unplug the power cord from the power outlet. Use the quick release method to release any built up pressure and let your cooker cool before opening it. See Using the quick release method to open the lid on page 20. Clean the valve, then try again.
- The silicon cap on the floating valve may be damaged.
- Press the Cancel button, then unplug the power cord from the power outlet. Take your cooker to a Best Buy authorized service center for repair.
- Your cooker may be building up too much pressure. Press the Cancel button, then unplug the power cord from the power outlet. Take your cooker to a Best Buy authorized service center for repair.
Steam leaks from the sides of the lid.
- The lid may not be closed correctly. Press the Cancel button, then unplug the power cord from the power outlet. Wait until the steam flow stops, then use oven mitts to rotate the lid so that the (lock symbol) is aligned with the on the top front of your cooker.
- The sealing gasket may be missing. Press the Cancel button, then unplug the power cord from the power outlet. Use the quick release method to release any built up pressure and let your cooker cool before opening it. See Using the quick release method to open the lid on page 20. Install the sealing gasket, then try again.
- The sealing gasket may be damaged. Press the Cancel button, then unplug the power cord from the power outlet. Take your cooker to a Best Buy authorized service center for repair.
- Residue between the sealing gasket and lid may be preventing a good seal. Press the Cancel button, then unplug the power cord from the power outlet. Use the quick release method to release any built up pressure and let your cooker cool before opening it. See Using the quick release method to open the lid on page 20. Clean the residue from the gasket and lid, then try again.
I cannot open the lid.
- If the floating valve is popped up, wait until the valve drops down. You can use the quick release method with oven mitts to open the lid. See Using the quick release method to open the lid on page 20.
- The floating valve may be damaged. Press the Cancel button, then unplug the power cord from the power outlet. Use the quick release method to release any built up pressure and let your cooker cool before opening it. See Using the quick release method to open the lid on page 20. Take your cooker to a Best Buy authorized service center for repair.
My cooker is producing an odor or smoke.
- Your cooker may produce an odor or emit smoke when you turn it on for the first time as it eliminates residues from the production process. This is normal. Put the inner pot inside your cooker, then fill the pot with at least two cups of water. Let your cooker heat for at least 10 minutes without the lid or food until the odor and smoke are eliminated.
- If this is not the first time you turned on your cooker, it may be damaged. Press the Cancel button, then unplug the power cord from the power outlet. Use the quick release method to release any built up pressure and let your cooker cool before opening it. See Using the quick release method to open the lid on page 20. Take your cooker to a Best Buy authorized service center for repair.
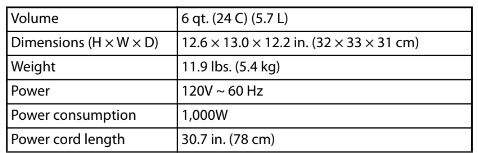
Specifications