In video playback mode, press to delete the current file.
In loop recording mode, press to take pictures.
3
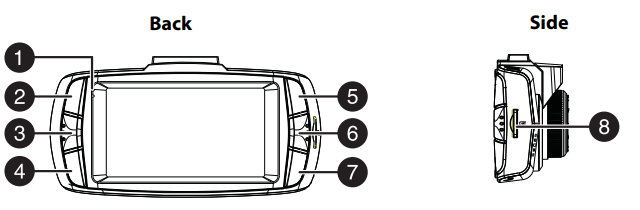
Menu button
Press to switch between the System Settings screen, Function Settings screen, and the video interface.
In replay mode, press to return to the previous page.
4
SOS video/file button
While recording, press to enter the emergency video interface. During playback, press to enable or close the video recording. When not recording, press to enter the playback file interface.
5
Up/WDR/OSD button
In loop recording mode, press to turn off the display.
In stop mode, press to turn WDR (Wide Dynamic Recording) on or off.
In OSD mode, press to go to the previous page.
#
ITEM
DESCRIPTION
6
Turn on/off video recording/OK button
While recording, press to stop recording. In stop mode, press to begin recording.
In OSD mode, press to confirm selection.
7
Turn on/off sound recording/ Down button
Press to turn the sound recording on or off. In OSD mode, press to go to the next page.
8
MicroSD card slot
Add a MicroSD memory card (8GB to 32GB) to this slot for additional on-board memory.
9
Speaker
Plays sound from the device.
10
Reset button
Press to reset your dash camera.
11
Suction cup mount
Attach the suction cup to this mount.
12
Mini USB jack
Connect a USB cable to this jack to charge the dash camera or to download files to a computer.
13
Power button
Press to turn on the dash camera. Press and hold for two seconds to turn off the dash camera.
14
Vents
Provide airflow for the dash camera.
15
Microphone
Allows you to record voice-over comments.
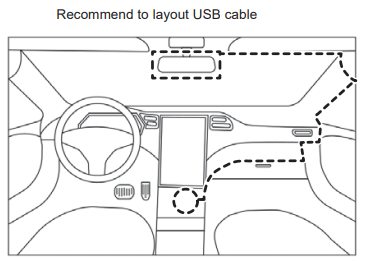
Installing your dash camera
Attach the dash camera to the suction mount (provided).
Install the suction mount onto your car’s front windshield, then adjust the dash camera to the proper angle for recording.
Plug the USB cable micro SD connector into the dash camera.
Plug the other end of the USB cable into the car charger (provided).
Plug the car charger into a 12V car socket.
Using your dash camera
Charging your dash camera
To charge your dash camera, plug the USB cable (provided) into the mini USB jack on the top of the dash camera.
Plug the other end of the USB cable into a car charger (provided).
Plug the car charger into the cigarette lighter. Your dash camera will begin charging when you turn on your car.
Turning on your dash camera
Press the power button to turn on your dash camera.
Press and hold the power button to turn off your dash camera.
Initially setting up your dash camera
When your dash camera is powered on for the first time, you will be prompted to enter basic setup information, such as Language, Year, Month, Day, Time Zone, Daylight Saving Time, and Time.
This information is required so that file names will be created correctly and time stamps will be accurate.
Subsequent startups will go directly to the video screen.
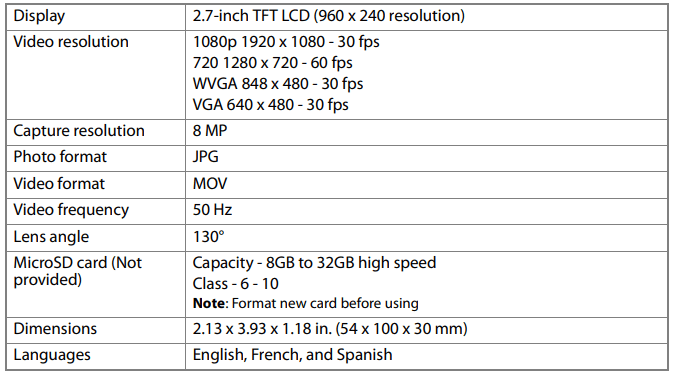
SETTING
OPTIONS
Resolution
1080p 1920 x 1080 - 30 fps
720p 1280 x 720 - 60 fps
WVGA 848 x 480 - 30 fps
VGA 640 x 480 - 30 fps
WDR
Wide Dynamic Range (automatically adjusts the exposure)
Recycle record
Sets the loop video duration. Settings include Off>1 min>3 mins> 5 mins. When the MicroSD memory card is full, the oldest unlocked video will be deleted automatically. The event will not be deleted.
Record audio
Turns the sound recording on or off.
Date stamp
Sets the current date and time.
Exposure
Sets the white balance value of the video recordings.
Language
Sets the language of the OSD screens.
Speaker volume
Sets the initial button sound feedback volume.
Beep sound
Turns the button sound feedback on or off.
Auto display off
Sets the automatic power-off timer. Settings include On>1 min>3 mins>5 mins.
Format
Formats a new SD memory card.
Note: Erases all your stored data. Back up your data before proceeding.
Default settings
Restores the dash camera to the factory settings.
Version information
Displays the current system version.
Time setup
Sets the system time setting.
Headlights on reminder
Press to turn the headlight reminder on or off.
Motion detection
When turned on, video recording is automatically initiated when a moving object is detected.
G-sensor
When the car is in a collision, the G-Sensor will automatically enter the Event Recording Mode to record and save the recorded images to the event video folder. The file is locked to ensure that files will not be overwritten by Recycle Record. The G-sensor setting allows you to adjust the sensitivity of the G-Sensor.
Recording video with your dash camera
Press the OK button to begin recording.
Press the OK button again to stop recording.
Taking still pictures with your dash camera
• Press the Camera button to take still pictures.
Understanding loop recording
When the MicroSD memory card in the dash camera is full, the camera continuously overwrites the oldest footage recorded. To protect a specific video clip against being overwritten, press the SOS Video button. The emergency record icon appears on the screen. Files can also be protected from the playback menu in Video Playback mode.
Using emergency recording
An emergency recording is initiated when the SOS Video button on the lower left of the Video screen is pressed or when the G-Sensor registers an impact. Emergency recordings create protected (locked) files that are not overwritten by continuous loop recording. In addition, to make sure that important footage isn’t lost surrounding an incident, adjacent video clips are locked if the incident happens within 30 seconds of the beginning or end of a clip.
Downloading files from your dash camera
To download files from your dash camera, remove the MicroSD memory card from your dash camera and insert it into a card reader on your computer. The memory card will appear as a mobile hard disk device in your list of files.
Download the files to your computer into a directory you can easily find.
Right click the device, then select Eject from the option list that appears.
Remove the memory card and replace it into your dash camera.
Using the OSD (On-screen Display)
Press the Menu button (the first button on the right) once and all of the screen icons are hidden, press it again and the LED screen turns off, press it a third time and the LED screen opens with the icons displayed.
Using the video screen
#
ICON
NAME
DESCRIPTION
1
Warning
Press the function key to lock the current video document. This prevents the file from being recorded over by a loop video.
2
Setting
Press to enter the Setup menu.
3
Camera
In camera and loop recording mode, press to take pictures.
In playback mode, press to delete the current file
4
Camera
Press start recording. When recording, press to stop.
5
99:99
Working time
Record work time duration of playback.
6
Camera
Press to change the current recording resolution.
7
Loop video time
Indicates the length of time a video file will be saved.
8
No SC card
Indicates that no SD card is present in the dash camera.
9
Microphone off
This icon is displayed to indicate that the DASH CAM is not currently recording sound.
10
Speaker off
Indicates that the speaker is turned off.
11
Motion detection
When enabled, automatically records video when motion is detected.
12
WDR (Wide
Dynamic
Recording)
Automatically adjusts the exposure.
13
OSD (On-screen display)
Press to turn on the display. Press again to turn off the display.
14
Stop
Press to stop recording.
15
Recording switch
Press to turn on the sound recording. Press again to turn off the sound recording.
16
Camera
In camera and loop recording mode, press to take pictures. In playback mode, press to delete the current file
17
Setting
Press to enter the Setup menu.
18
Playback files
Press to enter the playback menu.
19
WDR
Press to turn on WDR. Press again to turn it off.
20
Start video
Press to start a video recording. Press again to stop.
21
Recording switch
Press to turn on the sound recording. Press again to turn off the sound recording.
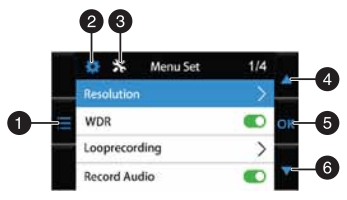
Using the Menu Set screen
#
ICON
NAME
DESCRIPTION
1
Setting
Press to enter the Settings menu.
2
Menu button
Press to enter the OSD menus.
In the System Settings menu, press to enter the Function Settings menu.
In the Function Settings menu, press to switch to the video interface.
In replay mode, press to return to the previous page.
3
Function setting button
Press to switch to the Function Settings menu.
4
Up button
In Loop Recording mode, press to turn off the screen.
In Playback mode, or in theSettingsscreen, press to return to the previous screen.
In non-video mode, turns the WDR function on or off.
5
OK
OK button
In Video mode, press to stop recording.
In Camera mode, press to start recording.
In the playback list, press to confirm a selection.
6
Down button
In Loop Recording mode, press to turn sound recording on or off.
In Playback mode, or in the Settings screen, press to go to the next screen.
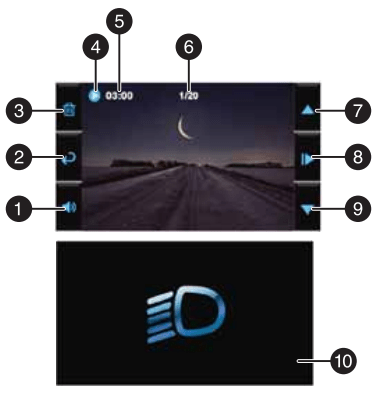
Using the Video screen
#
ICON
NAME
DESCRIPTION
1
Speaker volume switch
Press to cycle through the available speaker volumes.
2
Back to previous page
Press to return to the previous page.
3
Delete files
Press to delete the current file.
4
Video play button
Press to play video.
5
99:99
Time duration of playback
Time length of the selected file.
6
1/20
Current playback page
Indicates the currently displayed playback page.
7
Up button
In Loop Recording mode, press to turn off the screen. In Playback mode, or in the Settings screen, press to return to the previous screen.
In non-video mode, turns the WDR function on or off.
8
Play/pause button
Press to begin playback. Press again to pause playback.
9
Down button
In Loop Recording mode, press to turn sound recording on or off.
In Playback mode, or in the Settings screen, press to go to the next screen.
10
Headlight reminder screen
Press to turn the headlight reminder on or off.
Troubleshooting
Check the following guide for the possible causes and solutions for a problem before contacting the nearest service center or dealer for repairs.
PROBLEM
SOLUTION
My dash camera won’t turn on
Make sure that the power cord is properly connected.
Make sure that your vehicle’s cigarette lighter socket is clean and free of corrosion.
Make sure that the power cord’s cigarette lighter adapter is firmly seated in your cigarette lighter, and that the status LED is on.
My pictures and video are blurry
Clean the lens with a lens cloth.
The video quality is poor
You can set the resolution for recording video. As the resolution goes up, the image becomes clearer, sharper, more defined, and more detailed.
I do not want some videos overwritten
In recording mode, press "SOS video" to manually activate Event Recording. The recorded files are protected and will not be overwritten
The mounting bracket cannot be firmly mounted to the windshield
Please make sure the glass is not dirty or moist. Also, there is a protective film on the back of mounting bracket that must be removed.
There is no sound in the videos / I do not want sound in the videos
You can press the Microphone button to enable or disable the microphone function during recording.
I want to recycle the
film within five minutes
Enter Recycle Recording in Menu Configurations to adjust the length of time that a video is saved before being overwritten. You can select one minute, three minutes, or five minutes
I can’t transfer the films or the photos from the dash camera to a computer
Some USB cables are only for charging and cannot transfer films or photos. You can remove the SD card from the dash camera and put it in your computer card reader or a USB card reader to transfer data you want to store on the computer.
The screen suddenly goes black
When the unit remains idle for a certain period of time, it will save power and ensure safe driving by automatically turning off the backlight on the LCD screen. The recording is still working. If you want the LCD screen always turned on, refer to the Auto Display Off Setting in Menu Configurations.
Is the Recycle
Recording seamless or will any recorded time be missed?
It is seamless video recording without any time being missed.
#1 Does this camera have internal storage? If So How Much?
It does not have internal storage. Unit will not run without a MicroSD card.
#2 Does this camera have to have a power cord attached at all times? I notice one in the photo of the product but you never see a cord hanging down when viewing various videos.
Yes, the camera has to be connected through USB cable to your 12V port. It comes with 12V USB adapter. Camera has no internal battery.You can not view recorded videos on the camera. You have to upload them to your computer.
#3 Yesterday I brought two insignia Dash cameras from Best Buy can use 64GB micro Sd card ?
The highest GB to be used with this device is 32gb.