© 2022 PRUVEEO All Rights
Reserved.
1
PRUVEEO
USER MANUAL
If you have any questions, please contact us with no hesitation at
support@pruveeo.us for quick solutions.

© 2022 PRUVEEO All Rights
Reserved.
2
Safety information
To prevent injury to yourself or others, or damage to your device, read all safety
information before using.
Warning
Failure to comply with safety warnings and regulations can result in serious injury or
death.
PRUVEEO Dash Cam is not intended to be touched, modified, or calibrated while
operating a vehicle. PRUVEEO is not responsible for any damages resulting from the
user's misuse of the camera.
Do not use damaged power cords or plugs, or loose electrical sockets. Faulty connections
can cause electric shock or fire.
Do not touch the car charger with wet hands or disconnect the charger by pulling the
cord. Doing so may result in electrocution.
Do not use a bent or damaged car charger. Doing so may cause electric shock or fire.
Do not use your device while it is charging or touch your device with wet hands. Doing so
may cause electric shock.
Use only manufacturer-approved chargers, accessories, and supplies.
- Use only the manufacturer-approved charger specifically designed for your device. Using
an incompatible charger can cause serious personal injury or damage to your device.

© 2022 PRUVEEO All Rights
Reserved.
3
- PRUVEEO cannot be responsible for the user's safety when using accessories or supplies
that are not approved by PRUVEEO.
Do not drop the charger or device, or subject them to impact. Handle and dispose of the
charger and device with care.
- Never crush or puncture the device.
- Never dispose of the device in a fire.
- Never place the device in or on heating devices, such as microwave ovens, stoves, or
radiators. The device may explode if overheated. Follow all local regulations when
disposing of a used device.
- Avoid exposing the device to high external pressure, which can lead to an internal short
circuit and overheating.
Protect the device and charger from damage.
- Avoid exposing your device to excessive cold or heat. Extreme temperatures can damage
the device and reduce the charging capacity and life of your device.
- Do not allow children or animals to bite or chew the device. Doing so can result in fire or
explosion, and small parts can be a choking hazard. If children use the device, make sure
they use the device properly.
- Never use a damaged charger.

© 2022 PRUVEEO All Rights
Reserved.
4
Caution
Failure to comply with safety precautions and regulations can result in property damage,
serious injury or death.
Do not use your device near other electronic devices. Most electronic devices use radio
frequency signals. Your device may interfere with other nearby electronic devices.
Do not use your device near other devices that emit radio signals, such as sound systems
or radio towers. Radio signals from these may cause your device to malfunction.
Do not expose the device to heavy smoke or fumes. Doing so may damage the outside of
the device or cause it to malfunction.
If you notice strange smells or sounds coming from your device, or if you see smoke or
liquid leaking from the device, stop using the device immediately and take it to a
PRUVEEO Service Center. Failure to do so may result in fire or explosion.
For your own safety, do not operate the controls of this product while driving. The
window mount is needed when using the dash cam in a car. Make sure that you place the
dash cam in a location where it will not obstruct the driver's view.
Always keep the camera lens clean, and ensure that the lens is not blocked by any object
or placed near any reflective material. If the car's windshield is tinted with a dark coating,
recording quality may be affected.

© 2022 PRUVEEO All Rights
Reserved.
5
Your device is recommended for use and store within a temperature range of 15 degrees
Fahrenheit to 150 degrees Fahrenheit, and a humidity range of 10% to 80%.
If your device becomes overheated, allow it to cool down before use. Prolonged exposure
of skin to an overheated device may cause low-temperature burn symptoms, such as red
spots or areas of darker pigmentation.
Install mobile devices and equipment with caution.
- Ensure that any mobile devices or related equipment installed in your vehicle are
securely mounted.
- Avoid placing your device and accessories in or near an airbag deployment area.
Improperly installed wired equipment can cause serious injury in a situation where airbags
inflate rapidly.
Do not drop your device or subject your device to impact. If the device is bent, deformed
or damaged, malfunction may occur.
Do not attempt to disassemble, repair, or modify your device.
- Any changes or modifications to your device can void your manufacturer's warranty. If
your device needs servicing, take it to an authorized PRUVEEO Service Center.
Clean your device and charger by wiping with a towel or eraser. Do not use chemicals or
detergents. Doing so can discolor or corrode the outside of the device, and may result in
electric shock or fire.
Do not distribute copyright-protected material. Doing so without the permission of the
content owners may violate copyright laws. The manufacturer is not responsible or liable
for any legal issues that result from the user's illegal use of copyrighted material.

© 2022 PRUVEEO All Rights
Reserved.
6
Correct disposal of this product
(applicable in countries with separate waste collection systems)
Waste Electrical & Electronic Equipment
This symbol, found on the device, accessories or accompanying literature, indicates that
the product and its electronic accessories (e.g. charger, headset, USB cable) should not be
disposed of with other household waste.
To prevent possible harm to the environment or human health from uncontrolled waste
disposal, please separate these items from other types of waste and recycle them
responsibly to promote the sustainable reuse of material resources.
Household users should contact either the retailer where they purchased this product, or
their local government office, for information on where and how they can take these
items for environmentally safe recycling.
Business users should contact their supplier and check the terms and conditions of the
purchase contract. This product and its electronic accessories should not be mixed with
other commercial wastes for disposal.

© 2022 PRUVEEO All Rights
Reserved.
7
Disclaimer
Some content and services accessible through this device belong to third parties and are
protected by copyright, patent, trademark and/or other intellectual property laws. Such
content and services are provided solely for your personal non-commercial use.
You may not use any content or services in a manner that has not been authorized by the
content owner or service provider. Without limiting the foregoing, unless expressly
authorized by the applicable content owner or service provider, you may not modify, copy,
republish, upload, post, transmit, translate, sell, create derivative works, exploit, or
distribute in any manner or medium any content or services displayed through this device.
"THIRD PARTY CONTENT AND SERVICES ARE PROVIDED "AS IS." PRUVEEO DOES NOT
WARRANT CONTENT OR SERVICES SO PROVIDED, EITHER EXPRESSLY OR IMPLIEDLY,
FOR ANY PURPOSE. PRUVEEO EXPRESSLY DISCLAIMS ANY IMPLIED WARRANTIES,
INCLUDING BUT NOT LIMITED TO, WARRANTIES OF MERCHANTABILITY OR FITNESS
FOR A PARTICULAR PURPOSE. PRUVEEO DOES NOT GUARANTEE THE ACCURACY,
VALIDITY, TIMELINESS, LEGALITY, OR COMPLETENESS OF ANY CONTENT OR SERVICE
MADE AVAILABLE THROUGH THIS DEVICE AND UNDER NO CIRCUMSTANCES,
INCLUDING NEGLIGENCE, SHALL PRUVEEO BE LIABLE, WHETHER IN CONTRACT OR
TORT, FOR ANY DIRECT, INDIRECT, INCIDENTAL, SPECIAL OR CONSEQUENTIAL
DAMAGES, ATTORNEY FEES, EXPENSES, OR ANY OTHER DAMAGES ARISING OUT OF,
OR IN CONNECTION WITH, ANY INFORMATION CONTAINED IN, OR AS A RESULT OF
THE USE OF ANY CONTENT OR SERVICE BY YOU OR ANY THIRD PARTY, EVEN IF
ADVISED OF THE POSSIBILITY OF SUCH DAMAGES."

© 2022 PRUVEEO All Rights
Reserved.
8
Third party services may be terminated or interrupted at any time, and PRUVEEO makes
no representation or warranty that any content or service will remain available for any
period of time. Content and services are transmitted by third parties by means of
networks and transmission facilities over which PRUVEEO has no control. Without
limiting the generality of this disclaimer, PRUVEEO expressly disclaims any responsibility
or liability for any interruption or suspension of any content or service made available
through this device.
PRUVEEO is neither responsible nor liable for customer service related to the content and
services. Any question or request for service relating to the content or services should be
made directly to the respective content and service providers.
Warm Prompt
We recommend that you carefully read this manual before using the dash cam, then read
it again with the dash cam in your hands as this will help you to familiarize yourself with
its many features. The dash cam is constantly improved over time, so the specification of
the dash cam may change.
Please note that each button has multiple functions so please be careful which Buttons
you press in relation to each Mode / Function. There is no need to get frustrated because
you should only do this once in order to set it up in the way that you require.
1. Please ensure that the dash cam is SWITCHED OFF when you either insert or remove a
Micro SD Card, in order to avoid damage.
2. Please ensure that the Micro SD Card is inserted in the right way. If it is
inserted backwards, it might damage the dash cam and Card.

© 2022 PRUVEEO All Rights
Reserved.
9
3. If the Micro SD Card is not compatible with the dash cam, please DO
NOT insert it again, as you will damage the Card and the dash cam. Please
buy the correct card and then try again.
4. The dash cam supports the Micro SD card from 32GB to the highest 256GB.
5. Adjust the position of the lens to ensure that you correctly record what you want.
6. We recommend a 128 GB U3 or V30 speed Micro SD Card for this dash cam.
7. In video recording mode, if you want to press Menu / Mode button, please stop
recording videos first by pressing the Video Recording button.
8. We recommend using default factory settings, once the MENU has been set, then
connect the car charger to the unit and put into the card. Once the car is started, the
unit will automatically start recording. Once the car turns off, the unit will
automatically stop recording. Please note that your vehicle’s Cigarette Lighter Sockets
do not have any power when the ignition is switched OFF.
9. This dash cam must be continuously connected to a power supply via a 5V Charger
because there is no built-in battery.
10. If you turn the option of SCREEN SAVER ON, in video recording mode, when the
screen is switched Off, the dash cam is still recording. You can turn the screen on by
pressing the power button.

© 2022 PRUVEEO All Rights
Reserved.
10
11. If you want to playback the videos, we recommend unplugging your micro SD card
and plugging into your PC with card reader. We recommend using VLC Video player on
Windows OS, and Movist + VLC on MAC OS.
12. After several weeks of daily recording it may be necessary for you to format your
Micro SD Card - if that is the case, please note that you will lose all of your files, so
please back up a copy on your computer first in a unique dash cam Folder that you
have created.
13. When your dash cam crashes / screen goes black, the phenomenon may be caused by
improper operation, crash, please press the R = Reset button, hole by the top corner,
gently with a cocktail stick. Just like you would do for a computer, printer, phone, etc.
14. Dash cam only supports the micro SD card with the FAT32 file format. If you use the
64GB, 128GB, or 256GB card, you must format your micro SD card on the dash cam
before you can use it.
15. We recommend formatting your micro SD card once a month, and replace the micro
SD card every three months because the memory card has a certain number of reads
and writes, if it reaches the numbers, the micro SD card can't be used.
16. Please use Samsung EVO or SanDisk High Endurance Micro SD Card. Please don't use
SanDisk Ultra cards with our cameras.
17. At present, GPS technology struggles to obtain signals and accuracy in indoor
environments. There are two main reasons why GPS can’t be used indoors: low signal
strength and low accuracy.
© 2022 PRUVEEO All Rights
Reserved.
11
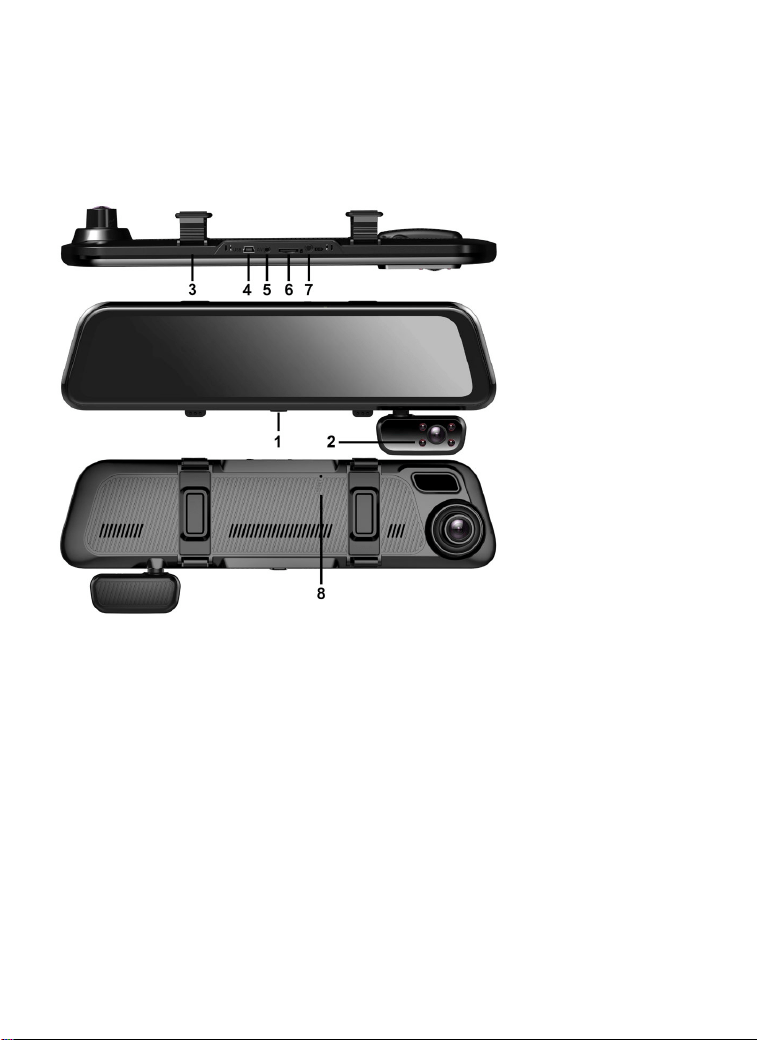
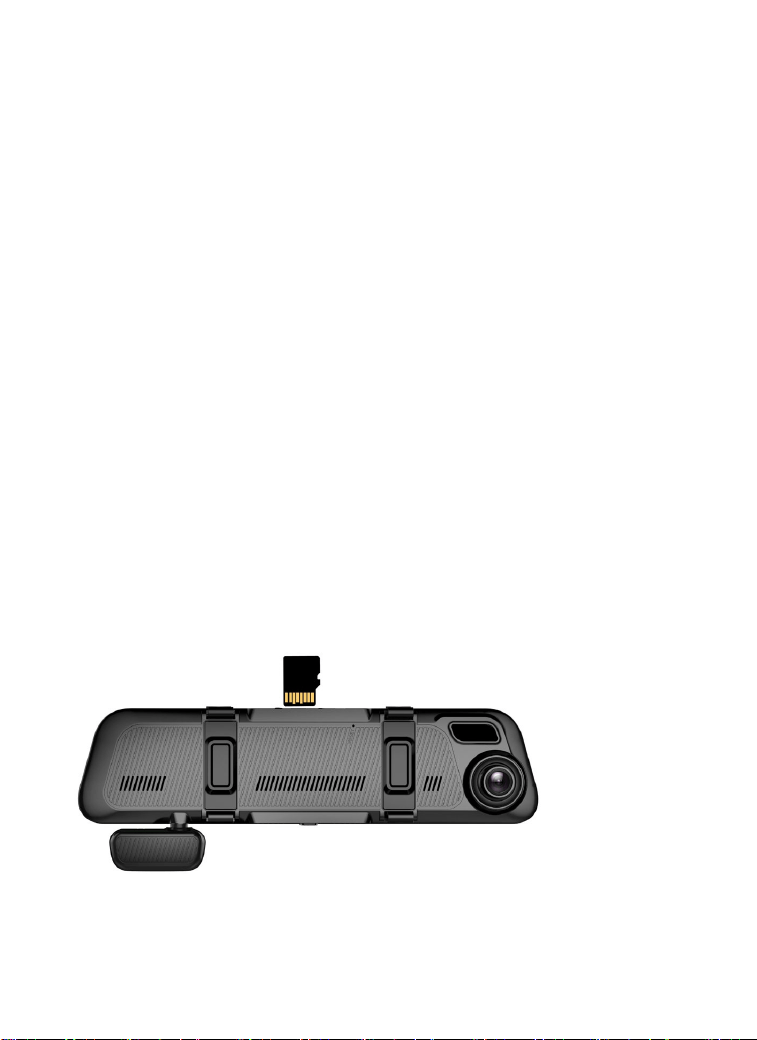
Device Layout
1. Power Button
2. Infrared Lights (Invisible to the eye, will automatically turn on
or off according to the brightness of light in the vehicle)
3. Rubber Mounting Strap
4. Mini USB Power Port
5. Rear Camera Port
6. Micro SD Card Slot
7. Without Function Port
8. Reset Button
© 2022 PRUVEEO All Rights
Reserved.
12
Button Functions
• There is no built-in battery, please connect to the
power cord to turn on this dash cam
• Press to turn on and off screen
• Press and hold 3 seconds to turn the device on or off
R
• Press and hold for 5 seconds to reset the device in the
event that it operates erratically, hangs up, or freezes
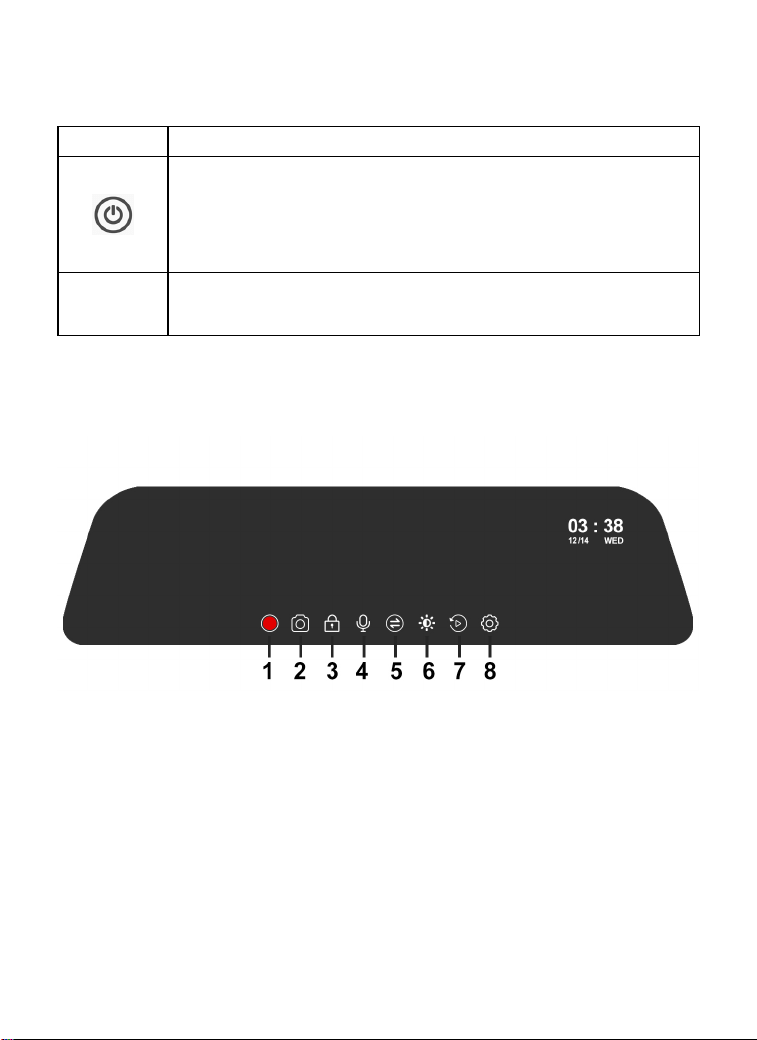
Introduction of icons
1. Video Recording
2. Take a Photo
3. Emergency Lock Video
4. Audio Recording
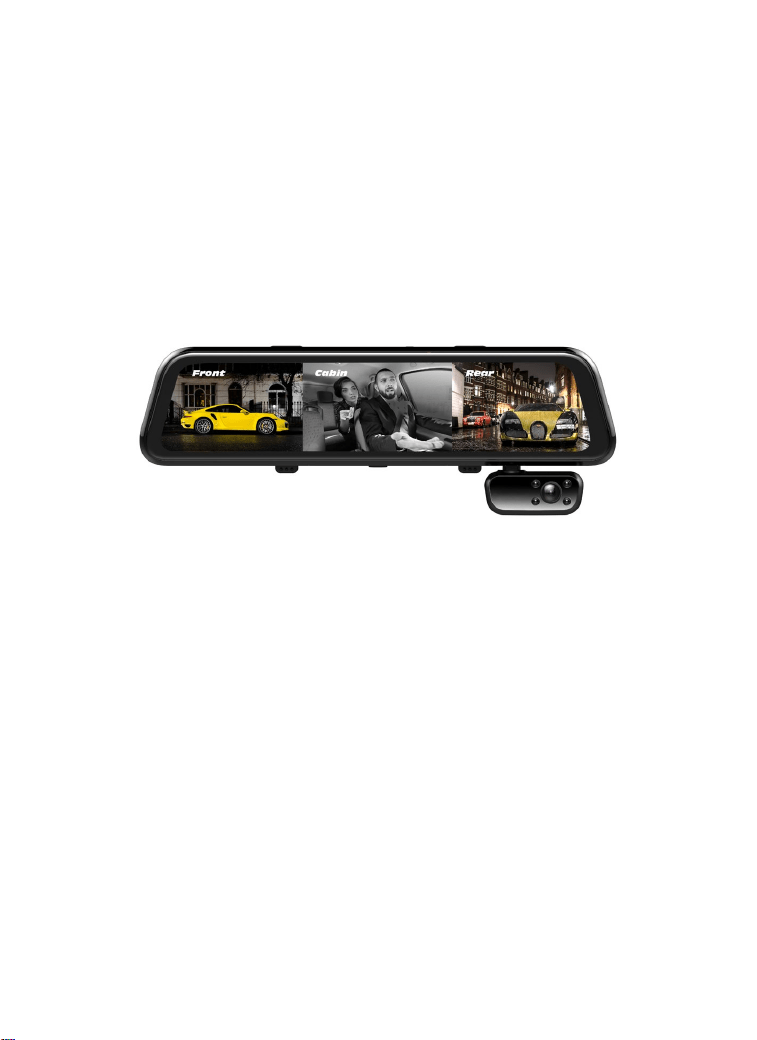
5. Screen Switch Between Front, Backup, Inside, All Cameras
6. Screen Brightness Adjustment
7. Playback Mode
8. Setting Menu

© 2022 PRUVEEO All Rights
Reserved.
13
Basic Gestures and Shortcuts
※ If the screen is off, tap the screen to turn on it.
※ If the icons on the screen are hidden, tap the screen to display the
icons.
※ Scroll left or right on the screen to switch the image between Front,
Rear, Cabin, All.
※ Scroll up or down to adjust the image of each camera.
Installation
1. Strap the dash cam to the rearview mirror of your vehicle with the
rubber mounting strap. Adjust the angle of the cameras to ensure that it
can shoot what you want.
2. Install the two rear cameras to the back or sides of your vehicle.
Carefully route the power cable around the windscreen and tuck in
under the trim.
3. The device is automatically powered on when plugged into a 12V
accessory socket or cigarette lighter and received a charge (i.e.: the
vehicle is started). To turn the device on manually, press and hold the
Power button until the welcome screen appears. The dash cam will
automatically start recording when power on.
4. The red wire of the rear camera provides 12 Volt power to your rear
camera. It is not necessary to connect the red wire to the power supply.
But if you want to use the parking assist function, it’s recommended to
connect to the power source of your reverse lights so the screen will

© 2022 PRUVEEO All Rights
Reserved.
14
display the image of the rear camera automatically when the vehicle is
in reverse. If you need more installation information, please search for a
“backup camera install” on YouTube.com.
5. Connecting the charger to the vehicle's 12V DC outlet. Be sure to
connect only the Pruveeo-approved at least a 2.5A charger designed
and supplied specifically for use with your device. Using an incompatible
charger can cause serious personal injury or damage to your device.
6. Inserting a memory card. You will need to insert a memory card
before you can begin recording. The dash cam supports Micro SD cards
with a capacity of up to 256GB. For reliable operation, use a U3, V30
memory card with a capacity of at least 32GB.
DO NOT insert or remove a memory card while the device is in
operation.
© 2022 PRUVEEO All Rights
Reserved.
15
Inserting the memory card
Your device accepts memory cards with a maximum capacity of 256GB.
Depending on the memory card manufacturer and type, some cards may
not be compatible with your device. Using an incompatible card may
damage the device or the memory card, or corrupt the data stored on it.
Please let the back of the dash cam face you.
• Insert the memory card with the gold-colored contacts facing you.
• Push the memory card into the slot until it locks in place.
It is recommended that you reformat a memory card after every time
that images are transferred from it to a computer, or at least once a
month.
Reformatting a memory card keeps important elements of data and file
structure clean, helping to prevent error messages and missing images.
Reformatting also restores the memory card, which can help prevent it
from becoming corrupted.

© 2022 PRUVEEO All Rights
Reserved.
16
Removing the memory card
Before removing a memory card from your dash cam, you must first
unmount it for safe removal.
Before removing a memory card from your device:
1. Tap the record video icon to stop the device from recording first
2. Press and hold the power button to switch off the device
3. Gently push the memory card in and let go until it unlocks
Do not remove the memory card while the device is transferring or
accessing information. Doing so can result in data loss or corruption, or
damage to the memory card or device. PRUVEEO is not responsible for
losses that result from the use of damaged memory cards, including the
loss of data.
Formatting the memory card
1. Tap the record video icon to stop the device from recording first
2. Tap the setting menu icon to access settings
3. Scroll up or down on the screen to navigate to "Format" option
4. Tap to view the current selection
5. Tap OK to format the card
6. Tap the
icon to exit
Please format the card on the dash cam before using it. Before
formatting a memory card, always remember to make backup copies of
all important data stored on the device. The manufacturer’s warranty
does not cover loss of data resulting from user actions.

© 2022 PRUVEEO All Rights
Reserved.
17
Resolution
Front Camera: QHD 2560 x 1440 (2K) / FHD 1920 x 1080
Inside Camera: FHD 1920 x 1080
Rear Camera: FHD 1920 x 1080
Loop Recording (Segment Length)
With Loop Recording Mode enabled, the device will continuously erase
older video as it records new video, keeping only the images captured
over a user-selected time range. All video older than this range will be
replaced with new video. (Note: any locked video files on the memory
card will remain protected, and will not be automatically deleted during
Loop Recording.)
It is recommended that you reformat a memory card after every time
that images are transferred from it to a computer, or at least once a
month. This keeps important elements of data and file structure clean,
helping to prevent error messages and missing images.
1. Tap the record video icon to stop the device from recording first
2. Tap the setting menu icon to access settings
3. Scroll up or down on the screen to navigate to "Loop Recording"
option
4. Tap to view the current selection
5. Tap to select your selection
6. Tap the
icon to exit
7. It is recommended to use the 1 minute option

© 2022 PRUVEEO All Rights
Reserved.
18
Exposure
Adjust the camera exposure value for brighter or darker recorded video,
according to your preference.
1. Tap the record video icon to stop the device from recording first
2. Tap the setting menu icon to access settings
3. Scroll up or down on the screen to navigate to "
Exposure "option
4. Tap to view the current selection
5. Tap to select your selection
6. Tap the
icon to exit
7. It is recommended to use the Low or Off option
G-sensor
If a change in gravitational forces is detected, such as in the event of a
vehicular accident, the g-sensor will signal to the camera, and an
automatic file lock will be placed on the current video, preserving your
most crucial footage. Locked videos can be found on the memory card
under “\event”.
Note: Locked video files won’t be erased by Loop Recording, they will
remain on the memory card until they are manually deleted, or when
the card is formatted.
1. Tap the record video icon to stop the device from recording first
2. Tap the setting menu icon to access settings
3. Scroll up or down on the screen to navigate to "G-sensor"
option
4. Tap to view the current selection
5. Tap to select your selection
6. Tap the
icon to exit
7. It is recommended to use the Low or Off option

© 2022 PRUVEEO All Rights
Reserved.
19
Parking Time
Use this option to set the duration of parking monitoring.
1. Tap the record video icon to stop the device from recording first
2. Tap the setting menu icon to access settings
3. Scroll up or down on the screen to navigate to "Parking Time"
option
4. Tap to view the current selection
5. Tap to select your selection
6. Tap the
icon to exit
7. It is recommended to use the Low or Off option
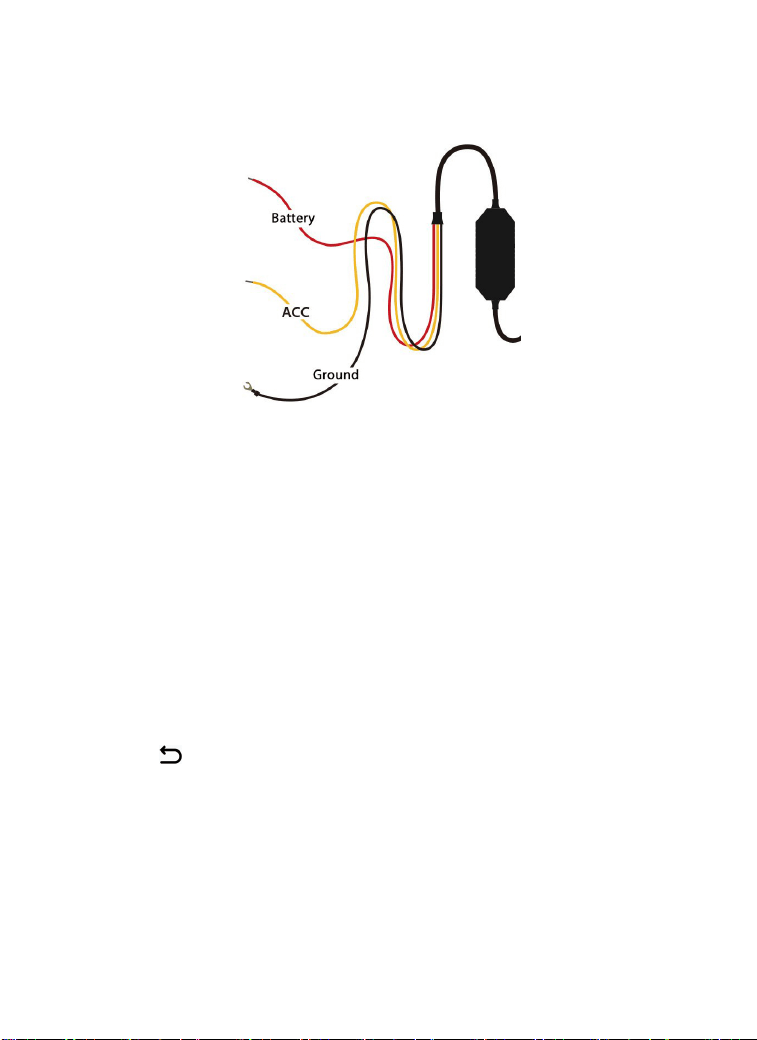
Parking (Parking Monitor)
Parking mode provides surveillance on your parked vehicle. When the
engine is off, Hardwire Kit is used to providing continuous power and
protect your car battery from discharge.
To use the Parking Mode feature, you need to use the ACC hardwire kit
at the same time. Please search for and purchase “Pruveeo ACC
Hardwire Kit” on Amazon.com.
© 2022 PRUVEEO All Rights
Reserved.
20
Automatic Parking Mode. The ACC (ignition-switched) detection feature
will allow the dash cam to switch to parking mode automatically if the
vehicle’s engine turns off and switch back to normal recording after the
vehicle’s engine turns on.
Regarding the installation of ACC hardwire kit, please search for”acc
hardwire kit parking mode” on YouTube.com.
1. Tap the record video icon to stop the device from recording first
2. Tap the setting menu icon to access settings
3. Scroll up or down on the screen to navigate to "Parking" option
4. Tap to view the current selection
5. Tap to select your selection
6. Tap the
icon to exit
7. It is recommended to use the “Time-Lapse” option

© 2022 PRUVEEO All Rights
Reserved.
21
There are 2 options under parking mode:
※ We recommend using the “Lapse Interval” option.
• Lapse Interval:
Record video in one frame per second to conserve memory and reduce
the time it takes to review video. With Time Lapse, the dash cam can
sustain a longer operational period while reducing video file size,
allowing a longer coverage in Parking Monitor Mode.
• G-sensor Trigger:
The G-sensor detects significant or sudden movement (such as an
impact or collision), it will trigger an event recording. We suggest
setting the “Gravity Sensing” to High sensitivity for parking mode
Recording. The dash cam will remain off until a movement is detected.
※ If you do not use the parking mode function, please change "Gravity
Sensing" to low sensitivity. Otherwise, the dash cam will easily lock the
video and cannot be deleted by the loop recording function. This will
cause the memory card to be full of locked videos and cause the
recorder to fail normal work.
Date Watermark
You have the option to display the date and time in your videos. Note
that the date and time stamp cannot be removed from videos if this
feature was enabled at the time of recording.
1. Tap the record video icon to stop the device from recording first
2. Tap the setting menu icon to access settings
3. Scroll up or down on the screen to navigate to "Date Watermark "
option

© 2022 PRUVEEO All Rights
Reserved.
22
4. Tap to view the current selection
5. Tap to select your selection
6. Tap the
icon to exit
Car OSD
Enable this feature to enter your vehicle plate number for video
recording. Your license plate number will be displayed at the bottom of
the video.
1. Tap the record video icon to stop the device from recording first
2. Tap the setting menu icon to access settings
3. Scroll up or down on the screen to navigate to "Car OSD"
option
4. Tap to view the current selection
5. Tap edit to enter your plate number
6. Tap the
icon to exit
Time Setting
Use the following procedure to change the device’s time and date.
1. Tap the record video icon to stop the device from recording first
2. Tap the setting menu icon to access settings
3. Scroll up or down on the screen to navigate to "Time Setting"
option
4. Tap the Year, Month, Day, Hour, Minute, Second to select
5. Tap the + or - to enter numbers
6. Tap the
icon to exit

© 2022 PRUVEEO All Rights
Reserved.
23
Daylight Saving Time
Enable / Disable Daylight Saving Time.
1. Tap the record video icon to stop the device from recording first
2. Tap the setting menu icon to access settings
3. Scroll up or down on the screen to navigate to "
Daylight Saving Time
"option
4. Tap to view the current selection
5. Tap to select your selection
6. Tap the
icon to exit
Screen Saver
Select a time duration for the screen to stay lit after recording starts.
1. Tap the record video icon to stop the device from recording first
2. Tap the setting menu icon to access settings
3. Scroll up or down on the screen to navigate to "Screen Saver"
option
4. Tap to view the current selection
5. Tap to select your selection
6. Tap the
icon to exit
Setting Guideline
Use this option to adjust the Parking assist lines, you need to connect
the red wire of the rear camera to the power supply of reverse lights.
1. Tap the record video icon to stop the device from recording first

© 2022 PRUVEEO All Rights
Reserved.
24
2. Tap the setting menu icon to access settings
3. Scroll up or down on the screen to navigate to "Setting Guideline"
option
4. Tap to view the current selection
5. Tap to select your selection
6. Tap the
icon to exit
Backup Camera Mirror
Use the following procedure to flip the image of the Backup camera
horizontally.
1. Tap the record video icon to stop the device from recording first
2. Tap the setting menu icon to access settings
3. Scroll up or down on the screen to navigate to "Backup Camera
Mirror" option
4. Tap to view the current selection
5. Tap to select your selection
6. Tap the
icon to exit
Backup Camera Flip
Use the following procedure to flip the image of the Backup camera
vertically.
1. Tap the record video icon to stop the device from recording first
2. Tap the setting menu icon to access settings
3. Scroll up or down on the screen to navigate to "Backup Camera Flip"
option
4. Tap to view the current selection

© 2022 PRUVEEO All Rights
Reserved.
25
5. Tap to select your selection
6. Tap the
icon to exit
In-car Camera Mirror
Use the following procedure to flip the image of the In-Car camera
horizontally.
1. Tap the record video icon to stop the device from recording first
2. Tap the setting menu icon to access settings
3. Scroll up or down on the screen to navigate to "In-car Camera Mirror"
option
4. Tap to view the current selection
5. Tap to select your selection
6. Tap the
icon to exit
In-car Camera Flip
Use the following procedure to flip the image of the In-Car camera
vertically.
1. Tap the record video icon to stop the device from recording first
2. Tap the setting menu icon to access settings
3. Scroll up or down on the screen to navigate to "In-car Camera Flip"
option
4. Tap to view the current selection
5. Tap to select your selection
6. Tap the
icon to exit

© 2022 PRUVEEO All Rights
Reserved.
26
Volume
Use this option to adjust the volume of the device's sound.
1. Tap the record video icon to stop the device from recording first
2. Tap the setting menu icon to access settings
3. Scroll up or down on the screen to navigate to "volume"
option
4. Tap to view the current selection
5. Tap to select your selection
6. Tap the
icon to exit
Recording Settings
You may choose to record audio with video, or turn off the microphone
so that all recorded videos will be muted.
1. Tap the record video icon to stop the device from recording first
2. Tap the setting menu icon to access settings
3. Scroll up or down on the screen to navigate to "Recording Settings"
option
4. Tap to view the current selection
5. Tap to select your selection
6. Tap the
icon to exit

© 2022 PRUVEEO All Rights
Reserved.
27
Language
Use this option to adjust the volume of the device's sound.
1. Tap the record video icon to stop the device from recording first
2. Tap the setting menu icon to access settings
3. Scroll up or down on the screen to navigate to "Language"
option
4. Tap to view the current selection
5. Tap to select your selection
6. Tap the
icon to exit
Time Format
Use the following procedure to switch the time format between 12
hours and 24 hours.
1. Tap the record video icon to stop the device from recording first
2. Tap the setting menu icon to access settings
3. Scroll up or down on the screen to navigate to "Time Format"
option
4. Tap to view the current selection
5. Tap to select your selection
6. Tap the
icon to exit

© 2022 PRUVEEO All Rights
Reserved.
28
Date Format
Use the following procedure to switch the date format between
YYYY/MM/DD, DD/MM/YYYY, MM/DD/YYYY.
1. Tap the record video icon to stop the device from recording first
2. Tap the setting menu icon to access settings
3. Scroll up or down on the screen to navigate to "Date Format"
option
4. Tap to view the current selection
5. Tap to select your selection
6. Tap the
icon to exit
Frequency
This option should be set according to the power supply specification
used in your country or geographical region (U.S. users should select the
"60Hz" option).
1. Tap the record video icon to stop the device from recording first
2. Tap the setting menu icon to access settings
3. Scroll up or down on the screen to navigate to "Light Frequency"
option
4. Tap to view the current selection
5. Tap to select your selection
6. Tap the
icon to exit
7. It is recommended to use the 60HZ option

© 2022 PRUVEEO All Rights
Reserved.
29
Key Volume
Allows you to turn the device's button sound effect on or off.
1. Tap the record video icon to stop the device from recording first
2. Tap the setting menu icon to access settings
3. Scroll up or down on the screen to navigate to "Key Volume"
option
4. Tap to view the current selection
5. Tap to select your selection
6. Tap the
icon to exit
Format SD
Performing this operation will format the memory card, clearing it of all
files.
1. Tap the record video icon to stop the device from recording first
2. Tap the setting menu icon to access settings
3. Scroll up or down on the screen to navigate to "Format" option
4. Tap to view the current selection
5. Tap OK to format the card
6. Tap the
icon to exit

© 2022 PRUVEEO All Rights
Reserved.
30
Reset Factory
Performing this operation will reset all of your device's settings to their
original values. Note: any user-customized settings will be lost.
1. Tap the record video icon to stop the device from recording first
2. Tap the setting menu icon to access settings
3. Scroll up or down on the screen to navigate to "Reset Factory" option
4. Tap to view the current selection
5. Tap OK to reset the dash cam to default settings
6. Tap the
icon to exit
Version
Displays the current device firmware information.
1. Tap the record video icon to stop the device from recording first
2. Tap the setting menu icon to access settings
3. Scroll up or down on the screen to navigate to "Version" option
4. Tap to view the the firmware version of your dash cam
Video Playback
Playback of videos can be done on the device or a computer. To
playback a video on the device, toggle to the Playback mode. Select the
desired video, tap theicon to play.
To playback a video on the computer either use an SD card adapter or
connect the device to the computer directly using the USB cable.

© 2022 PRUVEEO All Rights
Reserved.
31
To playback a video using an SD card adapter, remove the memory card
and insert it into an SD card adapter. Place the adapter in the computer.
To playback a video using USB cable, connect the USB Cable to the
device and the computer. After the device powers up, press the OK
Button to select Mass Storage. On the computer, navigate to device
drive. The videos are stored at: \Video. Select the video to playback.
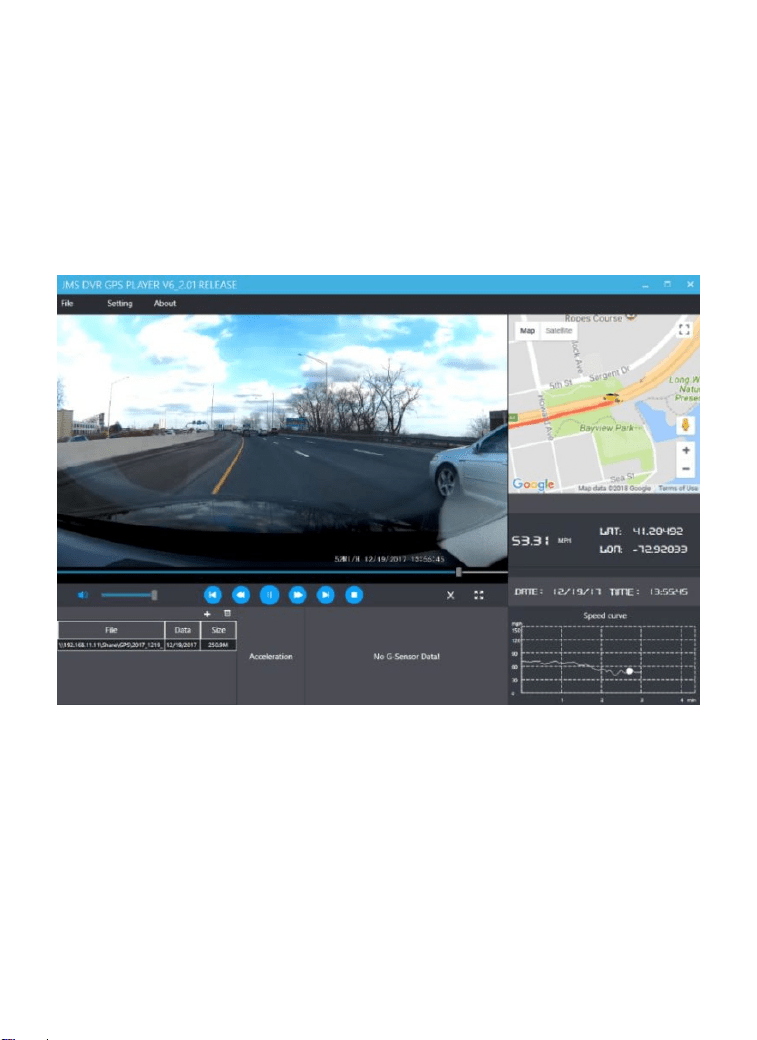
GPS Video Playback
You can play back your recordings in a specialized application that
allows you to view speed and location information alongside your
footage.
Windows:
Please download the software via our official website below.
https://pruveeo.us/pages/download
Mac OS:
Enter the Apple App Store™, search for ‘GXPlayer’, download, and
install.
Accessing Video Files:
Insert the micro SD card into your computer to access the video files.
Opening a GPS video file:
1. Once you've opened the application, navigate to the top menu bar and
click File > Open to browse through your files.
2. Navigate to the video file you want to add to the playback queue,
© 2022 PRUVEEO All Rights
Reserved.
32
select it and click “Open” to load it into the application. You may also
select multiple videos at once.
3. After a brief loading period, the (first) video should begin playing back
automatically, displaying speed and location information in real-time
along the right-side panels.
© 2022 PRUVEEO All Rights
Reserved.
33
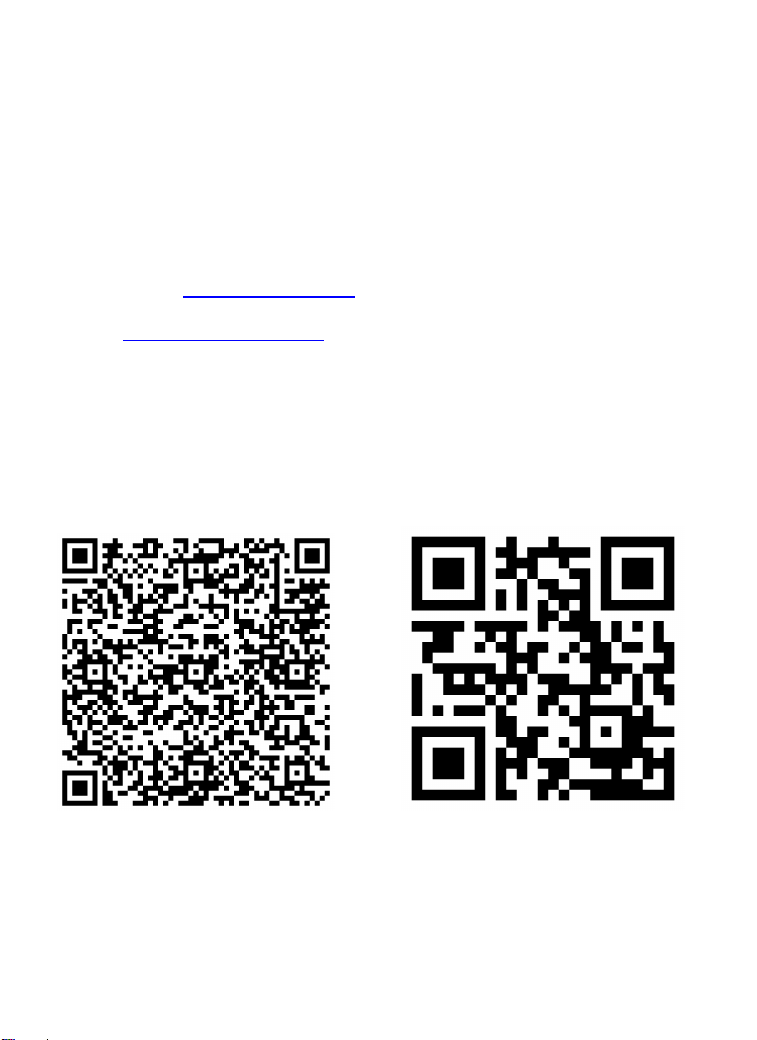
Contact us here, we have professional
customer service!
Official Site: http://pruveeo.us
Email: [email protected]
If you have any questions, please contact us with no hesitation at
support@pruveeo.us for quick solutions.
Every customer contact will be issued within12 hours.
Email Official Site
