User Guide for Pressure Cooker
Features
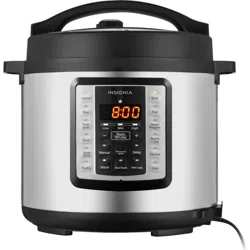
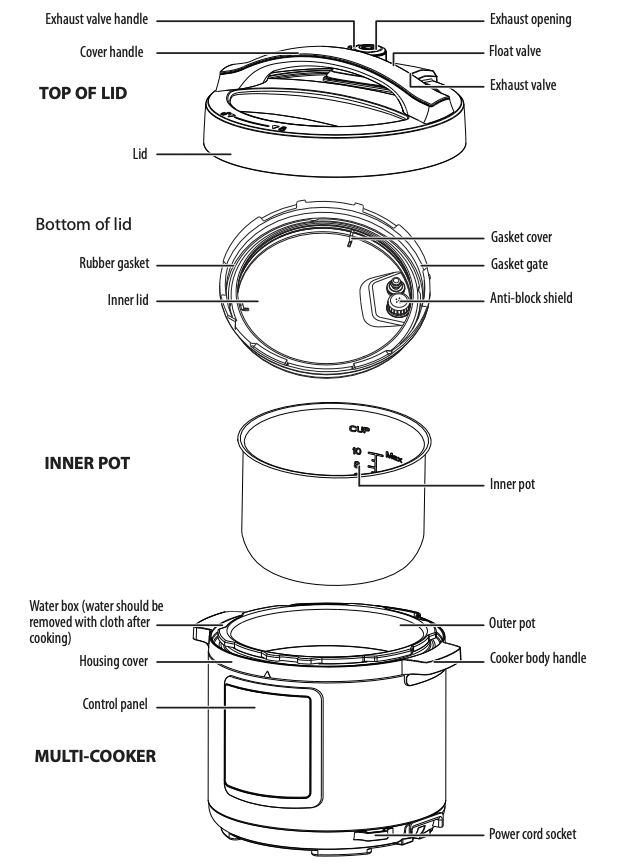
Main features
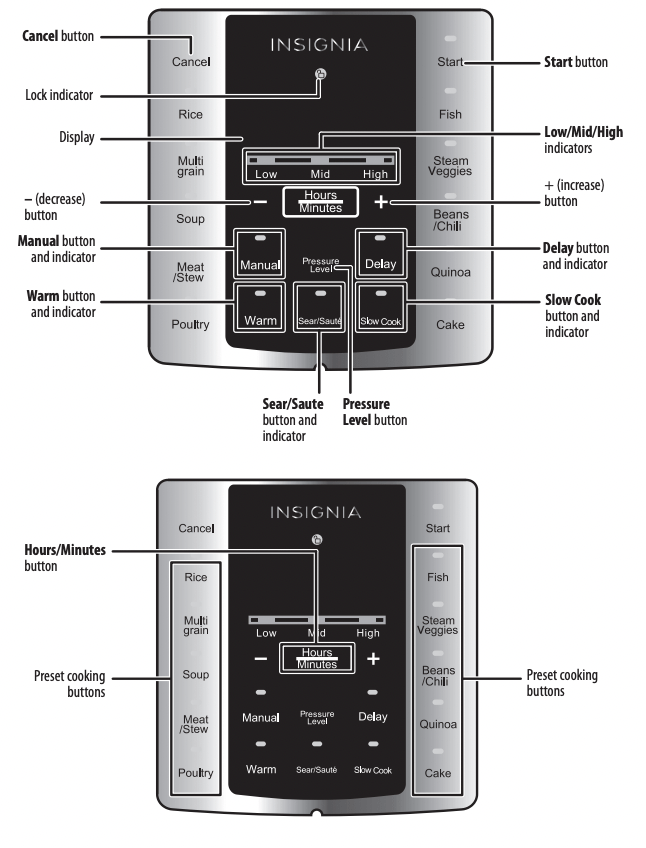
Control panel
| BUTTON |
EXPLANATION |
| CANCEL |
Press to cancel the current process and return to standby. |
| WARM |
In Standby, press to enter the Keep Warm state. The Warm indicator lights and the display shows the number of hours the Keep Warm state has been used (example: 0H, 1H, 2H). |
| SEAR/SAUTÉ |
In Standby, press to initiate the Sear function. The Sear indicator lights and the display shows “---”. Press the Start button (or wait 10 seconds) and the sear function begins. The multi-cooker returns to standby when the sear cycle is complete (30 minutes). |
| SLOW COOK |
In Standby, press to begin slow cooking. The Slow cook indicator lights and the display shows the default cooking time (four hours). Press the + or – and the Hours/Minutes buttons to adjust the cooking time. Press the Start button (or wait 10 seconds) and the Slow Cook function begins and the display shows a countdown of the time remaining. The multi-cooker returns to standby when the slow-cook cycle is complete. |
| MANUAL |
Manual – In Standby, press to cook using a manual setting. The Manual indicator light turns on and the digital screen shows default working time. Press the + or – button to adjust the cooking time. Press the Start button (or wait 10 seconds), the cooker automatically starts cooking.The digital screen starts countdown as soon as working pressure is present. The multi-cooker enters the Keep Warm state when it finishes cooking.
Preset cooking – Before a program starts, press the Delay button. The screen shows the preset start time. Press + or – to adjust the delay time, then press the Hours/Minutes button to change the hours or minutes delay. Press the Start button (or wait 10 seconds) and the cooker starts the delay time countdown. When the countdown ends the program begins.
Adjust – Before a program starts, you can press the Pressure Level button to change the pressure to Low, Mid, or High.
|
| Rice, Multigrain, Soup, Meat/Stew, Poultry, Fish, Steam Veggies, Beans/Chili, Quinoa, and Cake |
In Standby, press to cook with the preset. The indicator light turns on and the digital screen shows “----”. Press the Start button (or wait 10 seconds), the cooker automatically starts cooking. The digital screen starts a countdown as soon as working pressure is present. The multi-cooker enters the Keep Warm state when it finishes cooking.
Preset cooking – Before a program starts, press the Delay button. The screen shows the preset start time. Press + or – to adjust the delay time, then press the Hours/Minutes button to change the hours or minutes delay. Press the Start button (or wait 10 seconds) and the cooker starts the delay time countdown. When the countdown ends the program begins.
|
Using your multi-cooker
Preparing to cook
- Unplug the multi-cooker.
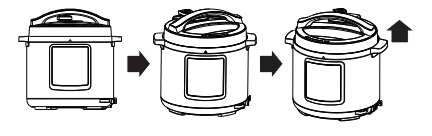
- Open the cover by holding the cover handle with one hand, then rotating the cover until the cover marking
 aligns with the “Open” mark
 on the housing, then open the cover.
3. Check the float valve and exhaust valve for obstructions and confirm that all parts are installed properly, especially the rubber gasket and anti-block shield.
4. Remove the stainless steel inner pot, then remove any foreign objects and water droplets from the outside of the inner pot and the inside of the housing.
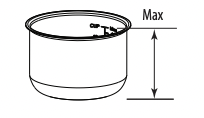
5. Add food and water to the inner pot. The total amount of food and water should not exceed the MAX level indicated in the inner pot.
6. Put the inner pot into the electric multi-cooker housing, then rotate the inner pot slightly left to right to ensure good contact between the inner pot and heating plate.
7. Close the cover completely by holding the cover handle with one hand and rotating the cover until the lock mark aligns with the “Close” mark on the housing.
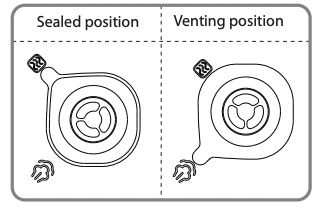
8. Turn the exhaust valve handle to the Sealing icon, indicating that the multi-cooker is in airtight condition.
Notes
- To manually exhaust the multi-cooker, turn the exhaust valve to the Venting icon.
- Make sure that the float valve has fallen.
9. Plug in the multi-cooker.
10. After each use, remove any foreign objects or materials from the rubber gasket and anti-block shield. Keep these items clean to avoid odor.
Cautions
- Never pull the rubber gasket. Pulling the gasket may deform it, affecting the sealing and pressure of your cooker.
- Never use your multi-cooker with a damaged gasket. If your cooker has a damaged gasket, it should be sent to the service center for replacement.
Opening the cover safely
Cautions
- Do not open the lid before the pressure in the pot has been completely released.
- Do not force the lid if it is difficult to open.
- Do not pull out the exhaust valve when turning it.
- After cooking a large amount of food, do not immediately open the vent. Allow it to cool for a short while before opening the lid.
- Unplug the multi-cooker.
- Make sure that the pressure is released.
You can either turn the exhaust valve to the “Venting” position until the float valve falls or put a wet towel on the cover to quicken cooling until the float valve falls.
Let the multi-cooker cool naturally, until the float valve falls on its own.
3. Open the cover by holding the cover handle with one hand, then rotating the cover until the cover marking aligns with the “Open” mark on the housing, then lift and open the cover.
Note When cooking a small quantity of food, the inner pot may stick to the cover when it is opened. In this case, shake the inner pot manually, then remove the cover after the inner pot falls into the cooker body
Cooking - general
After the initial preparations are complete and the multi-cooker is closed and ready, do the following:
- Turn on the multi-cooker by plugging it in. The display blinks and shows a red horizontal line “---”, indicating that the multi-cooker is ready.
- Press the desired preset button. The indicator next to the preset button turns red and 10 seconds later cooking begins. The display shows a bright red horizontal line “---”.
Notes
- If the buttons do not function, make sure that the lid is closed correctly.
- Cooking time varies with different preset selections. The greater the food amount, the longer the cooking time.
- You can cancel the current preset selection and return to standby by pressing the Cancel button.
- Within 10 seconds you can re-select preset time and function level. The electric multi-cooker starts working within 10 seconds after selection.
- While cooking, the cooker may sometimes generate a cluck” sound. This is not a malfunction.
3. After the selected cooking cycle is completed your cooker automatically enters the Keep Warm state, the selected function indicator goes out, and the Keep Warm indicator turns on. At this time the display screen shows “0.0”, and the cooker beeps 10 times.
Using the preset timer
You can adjust the cook times of the preset modes to fit a desired recipe.
- Select the preset you want. Note that you cannot select a preset time for Sear/Sauté, Slow Cook, or Cake modes.
- Within 10 seconds, press Preset. The time flashes on the display and the indicator next to Preset blinks.
- Press + or – to adjust the time (in half hour increments between 2 and 24 hours), then press Preset. The indicator next to Preset turns green and 10 seconds later cooking begins.
- The display shows the remaining time until cooking ends. To cancel the operation, press Cancel.
- After cooking, the multi-cooker enters the Keep Warm state automatically. This maintains your food at between 140° and 176° F(60° and 80° C).
- The Keep Warm feature can also be turned on by pressing the Warm button. Do not use the Keep Warm feature for more than eight hours.
Notes
- Cooking time varies with different preset selections. The greater the food amount, the longer the cooking time.
- You can cancel the current preset and return to standby by pressing the Keep Warm/Cancel button.
- Pressure build and release will add 8-20 min to the cook time (based on pressure setting [Low-Med-High]).
Cooking frozen meats
If you use meats that are 1” thick or less, the cooking time stated in the recipes section below can remain the same. It will just take longer for the multi-cooker to reach the pressure point. For example, if the recipe calls for the meat to be cooked for 15 minutes after pressure has been achieved, it will still be 15 minutes. It just takes longer for pressure to be achieved.
Larger cuts of meat will increase cooking times and they won’t cook as well as meats that were fully or partially thawed and browned first.
Recipes
We’ve provided a few recipes to get you started, but you'll find plenty of recipes online on such websites as Food52, Epicurious, CookEatShare, and the Food Network. Just search for multi-cooker recipes.
Cooking Rice
- Finish cooking preparation according to “Preparing to cook” on page 9.
- Measure the amount of rice you want to cook in a measuring cup level) and wash it.
- One measuring cup of rice is about 150 grams.
- Don’t wash rice in the inner pot.
3. Put the cleaned rice into the inner pot and fill it with water to the correct water level.
- The scale line inside the inner pot indicates how much water to add. For example, to cook two cups of rice, add water to line 2.
- Water quantity can vary with rice type and hardness, but never exceed the MAX level inside the inner pot.
4. Place the inner pot (wiped clean) into the cooker body, then rotate it slightly from left to right to ensure full contact between inner pot and heating plate.
5. Put the cover in place and turn on the multi-cooker.
6. Press the Rice button. The Rice preset function indicator lights and, after 10 seconds, the cooker begins cooking. Cooking time is around 35 minutes, but the time may slightly vary with rice amount or rice quality. After cooking, the multi-cooker switches to Keeping Warm automatically.
7. Open the cover (see “Opening the cover safely” on page 10). After cooking, the rice should be served after about one to three minutes on Keeping Warm.
Cooking Beef in red wine
• 4.4 lbs (2 kg) blade or chuck steak, cubed
• 1 cup (150 g) flour
• Salt and pepper, to taste
• 2 tablespoons (40 g) butter
• 2 tablespoons (40 ml) olive oil
• 2 onions, diced
• 1 leek, finely chopped
• 2 carrots, chopped
• 2 cloves garlic, minced
• 2 tablespoons parsley, chopped
• 2 tablespoons chives, chopped
• 1.6 pints (750 ml) red wine
- Finish cooking preparation according to “Preparing to cook” on page 9.
- In a plastic bag, toss the meat in flour and seasonings.
- Press the Sear/Sauté button. The Sear/Sauté preset function indicator turns on and, after 10 seconds, the cooker begins cooking.
- Melt the butter and oil, then place the meat into the inner pot in four batches, searing each for five minutes each.
- Add onions, leek, carrots, garlic, parsley, and chives.
- Pour the red wine over the top of the food and bring to the boil.
- Put the cover in place and turn on the multi-cooker.
- Press the Warm button, then press the Slow Cook preset button. The Slow Cook preset function indicator turns on and, after 10 seconds, the cooker begins cooking. After cooking, the multi-cooker switches to Keeping Warm automatically.
- Open the cover (see “Opening the cover safely” on page 10).
Cooking Butter Chicken
• 2 tablespoons olive oil
• 1 teaspoon ginger, minced
• 3 small onions, sliced thinly
• 2 teaspoons cayenne pepper, ground
• 2 teaspoons paprika, ground
• 1 teaspoon coriander seeds, ground
• 2 teaspoons turmeric, ground
• 2 teaspoons cumin, ground
• 2 x 14.2 oz. (420 ml) cans tomatoes, diced
• 4.4 lbs. (2 kg) chicken breast, diced
• 10 oz. (300 ml) pure cream
• Fresh coriander to taste
- Finish cooking preparation according to “Preparing to cook” on page 9.
- Press the Sear/Sauté button. The Sear/Sauté preset function indicator turns on and, after 10 seconds, the cooker begins cooking.
- Add the oil, garlic, and onions and saute until softened.
- Add the spices and stir until combined.Stir the tomatoes and chicken breast until everything is evenly coated.
- Pour the stock over the chicken, then securely place and seal the lid onto the multi-cooker.
- Press the Warm button.
- Press the Bean/Chili button. The Bean/Chili preset function indicator turns on and, after 10 seconds, the cooker begins cooking. After cooking, the multi-cooker switches to Keeping Warm automatically.
- Open the cover on according to “Opening the cover safely” on page 10.
Cleaning and maintaining your multi-cooker
Removing and installing the anti-block shield
|
Turn the anti-block shield counterclockwise until it comes off.
|
|
Insert and turn the anti-block shield clockwise until it seats firmly. |
|

|
Removing and installing the rubber gasket
| Gently grip the gasket and remove it from the groove. |
|
Press the gasket into the groove in the cover until it seats firmly. |
 |
- Prior to each use, make sure that the rubber gasket and anti-block shield are installed on the upper cover.
- After each use, remove any foreign objects or cooked food from the gasket and anti-block shield. Keep these items clean to avoid odors.
Never pull the gasket. Pulling the gasket could cause deformation which may affect sealing and pressure.
A damaged gasket should never be used. Send the damaged gasket to the service center for replacement.
Cleaning your multi-cooker
After each use, clean your multi-cooker thoroughly.
- Before cleaning, unplug the multi-cooker and wait until it cools down completely.
- Remove the cover and inner pot, then wash them with a detergent, rinse with fresh water, and wipe them dry with a soft cloth.
- Using clear water, clean the cover, including the rubber gasket, gasket gate, exhaust valve, anti-block shield, exhaust valve core, and float valve, then wipe them clean with a rag. After cleaning install them on the cover correctly.
- Clean the cooker body with a cloth. Do not immerse the cooker in water or wash with running water.
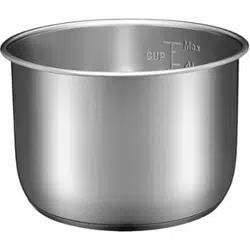
Maintaining the stainless steel inner pot
Note The inner pot comes with a smooth and polished surface. After being used for a long period, the surface will lose its luster. This is normal and won't influence the function of the product.
Do not empty
- It may cause yellowish and spotted inner pot or distorted bottom if it is empty with the unit on for a long time.
Do not use it to store acid, alkali, or preserved foods for a long period
- Although the inner pot has excellent anti-corrosion performance, it may cause a certain degree of corrosion. The suggested time of keep warm shall not exceed eight hours.
Keep it clean to prolong the service life
- Do not immerse it in water for long periods.
- Clean the inner pot with soap, weak detergent, or warm water to remove dust, oil, and dirt.
Do not scratch it with steel cooking implements
- Soften burnt foods on the bottom with water and then remove.
Troubleshooting
Caution Do not try to repair your multi-cooker yourself. Doing so invalidates the warranty.
| IF THIS OCCURS |
DO THIS |
| The power cord and plug suffer from expansion, deformation, discoloration, or are damaged. |
Stop using the multi-cooker immediately and send to an authorized service center for repair. |
| A portion of the power cord and the plug are hotter than usual. |
| When you plug it in, there is an unusual sound or shock. |
| There is dust or dirt on the plug or socket. |
Remove dust or dirt with a dry brush. |
| PROBLEM |
POSSIBLE CAUSE |
POSSIBLE SOLUTION |
| It’s difficult to close the cover. |
The rubber gasket is not positioned well. |
Reposition the rubber gasket. |
| The red push rod on the top of the lid is jammed by the float valve. |
Push the push rod gently by hand. |
| The float valve is in the up position. |
Press the float valve gently with a knife. |
| There is still pressure in the cooker. |
Wait for the pressure to completely release. |
| It’s difficult to open the cover. |
The float valve fails to fall after the steam has been released. |
Press the float valve gently with the rice spoon. |
| There is pressure inside the cooker. |
Wait until the pressure is lower |
| The cover is leaking. |
No rubber gasket. |
Install the rubber gasket correctly. |
| Food debris on the rubber gasket. |
Clean the rubber gasket. |
| Worn rubber gasket. |
Replace the rubber gasket. |
| The cover is not closed completely. |
Close the cover again. |
| The float valve is leaking |
Food debris on the float valve gasket. |
Clean the float valve gasket. |
| Float valve gasket ring worn. |
Replace the float valve gasket. |
| The float valve won’t rise. |
Too much or too little food and water in the cooker. |
Adjust food and water level in the cooker. |
| The cover or exhaust valve are leaking. |
Return to a Best Buy store near you for inspection or repair. |
| The exhaust valve does not seal. |
The exhaust valve is not in the SEALED position. |
Turn the exhaust valve to the SEALED position. |
| The pressure control is failing. |
Return to the service center for inspection or repair. |
| E1 or E2 appears on the display. |
Bottom sensor failure. |
Return to the service center for inspection or repair. |
| C1 appears on the display |
The temperature is too high because there is no water in the inner pot. |
Add water as required. |
| The temperature is too high because the inner pot is not positioned correctly. |
Reposition the inner pot correctly. |
| E8 appears on the display. |
The pressure switch has failed. |
Return to the service center for inspection or repair. |
| The rice is half cooked or too hard. |
There is not enough water in the inner pot. |
Add water. |
| The cover was closed prematurely |
When the cooking time expires, release the steam and open the cover in five minutes. |
| The rice is too soft. |
Too much water in the inner pot. |
Reduce the water level. |