
MODEL HPA2012US
Read before use & keep for future reference.
C 90 M 70 Y 0 K 0
Hex: #2a5caa
R 42 G 92 B 170
C 0 M 40 Y 100 K 0
Hex: #fca50b
R 252 G 165 B 11
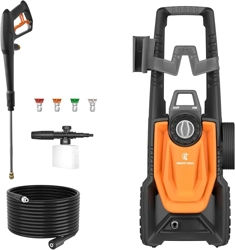
Electric Pressure
Washer
For more information visit giraffetools.com or contact our customer service by sending an email to service@giraffetools.

3
MANUAL CONTENTS
Introduction
Safeguards, Warnings And
Safety Tips
Save These Instructions
Technical Data
Unpacking
Preparation Of Operation
Operating
Maintenance
Recommended Products
03
03
05
06
07
08
13
16
18
---------------------------
------------------------------
-----------
------------------------
------------------------------------
--------------
------------------------------------
-------------------------------
--------------

3
INTRODUCTION
Congratulations on the purchase of your PRESSURE WASHER!
Your PRESSURE WASHER is a power tool in every sense of the word that may be used out-
and inside your house.
It is one of the finest most powerful household power washers on the market today.
Please familiarize yourself with the following assembly, operating and safety information.
Read this manual before using the power washer. Failure to follow these instructions could
cause personal injury, property damage, or both. Save this manual for other
users to read prior to using the power washer.
IMPORTANT SAFETY INSTRUCTIONS, SAVE THESE INSTRUCTIONS
WARNING ‒ When using this product basic precautions should always be followed,
including the following:
1. To avoid personal injury and/or damage to property and to maximize your power
washing experience, carefully follow all of the safety tips, instructions, warnings and
safeguards and become familiar with all of the controls. Be sure you know how to quickly
bleed off the pressure from all parts of your power washer, and how to turn off the power
Washer.
2. This power washer conforms to other safety and consumer standards. Do not modify or
rebuild any part of your power washer.
3. Do not use your power washer when you are under the influence of alcohol or drugs.
Use this power tool carefully and only when you are alert.
4. Watch your balance and footing while using your power washer. Surfaces become
slippery when wet and are extra slippery when using a detergent or cleaner.
5. Never operate the power washer in bare feet, sandals, or open-toed shoes.
6. When using the power washer near children make sure they are closely supervised by
an adult to avoid injury. Never let a child use the power washer.
7. When you press the power switch to turn off the power washer, water pressure may
SAFEGUARDS, WARNINGS AND SAFETY TIPS

4 5
remain in the system. To discharge the pressure, point the spray gun in a safe direction and
pull the trigger.
8. Never spray flammable liquids.
9. Never use the power washer in areas that contain combustible dust, liquids or vapors.
10. Keep operating area clear of all persons.
11. Do not overreach or stand on unstable support. Keep good footing and balance at all
times.
12. Follow the maintenance instructions specified in the manual.
13. Avoid contact of the pressure hose with sharp objects and examine the hose regularly.
Replace if damaged. Due to the high pressure involved, it cannot be repaired if cut of
damaged.
14. Only use detergent specifically formulated for power washers and follow instructions on
the detergent’s label.
15. Power washer detergents are available at your local hardware store.
16. Protect eyes, lungs, and skin from exposure to detergent. Dish or laundry soap is too
thick and will clog the nozzle of your detergent tank.
17. WARNING ‒ Risk of Injection or Injury‒ Do Not Direct Discharge Stream At Persons.
WARNING: If Connection Is Made To A Potable Water System, The System Shall Be
Protected Against Backflow.
18. Never use hot water with your power washer. It will overheat and damage the high
pressure pump.
19. IMPORTANT: Store the power washer indoors to prevent the water in the unit from
expanding under freezing conditions. When the water freezes and expands, your power
washer will be damaged and become inoperable. After disconnecting the water supply
And before disconnecting the high pressure hose Turn the pressure washer on for
2-3seconds, Turn the unit off immediately.
20. Never leave the power washer unattended while it is powered “on”.
21. Always turn the water supply “on ”before turning the power washer power to “on”.
Running the pump dry will cause damage to the internal components.
22. Never use a water supply to your power washer that exceeds 150 psi maximum.
23. Keep fingers, hands, feet and any part of your body clear of the stream of high pressure
water. The powerful spray can cause blindness or blast holes in the skin. It can break a
window if you are too close when you pull the trigger on the spray gun.
24. Always wear eye protection to prevent injury to eyes when operating the power washer.
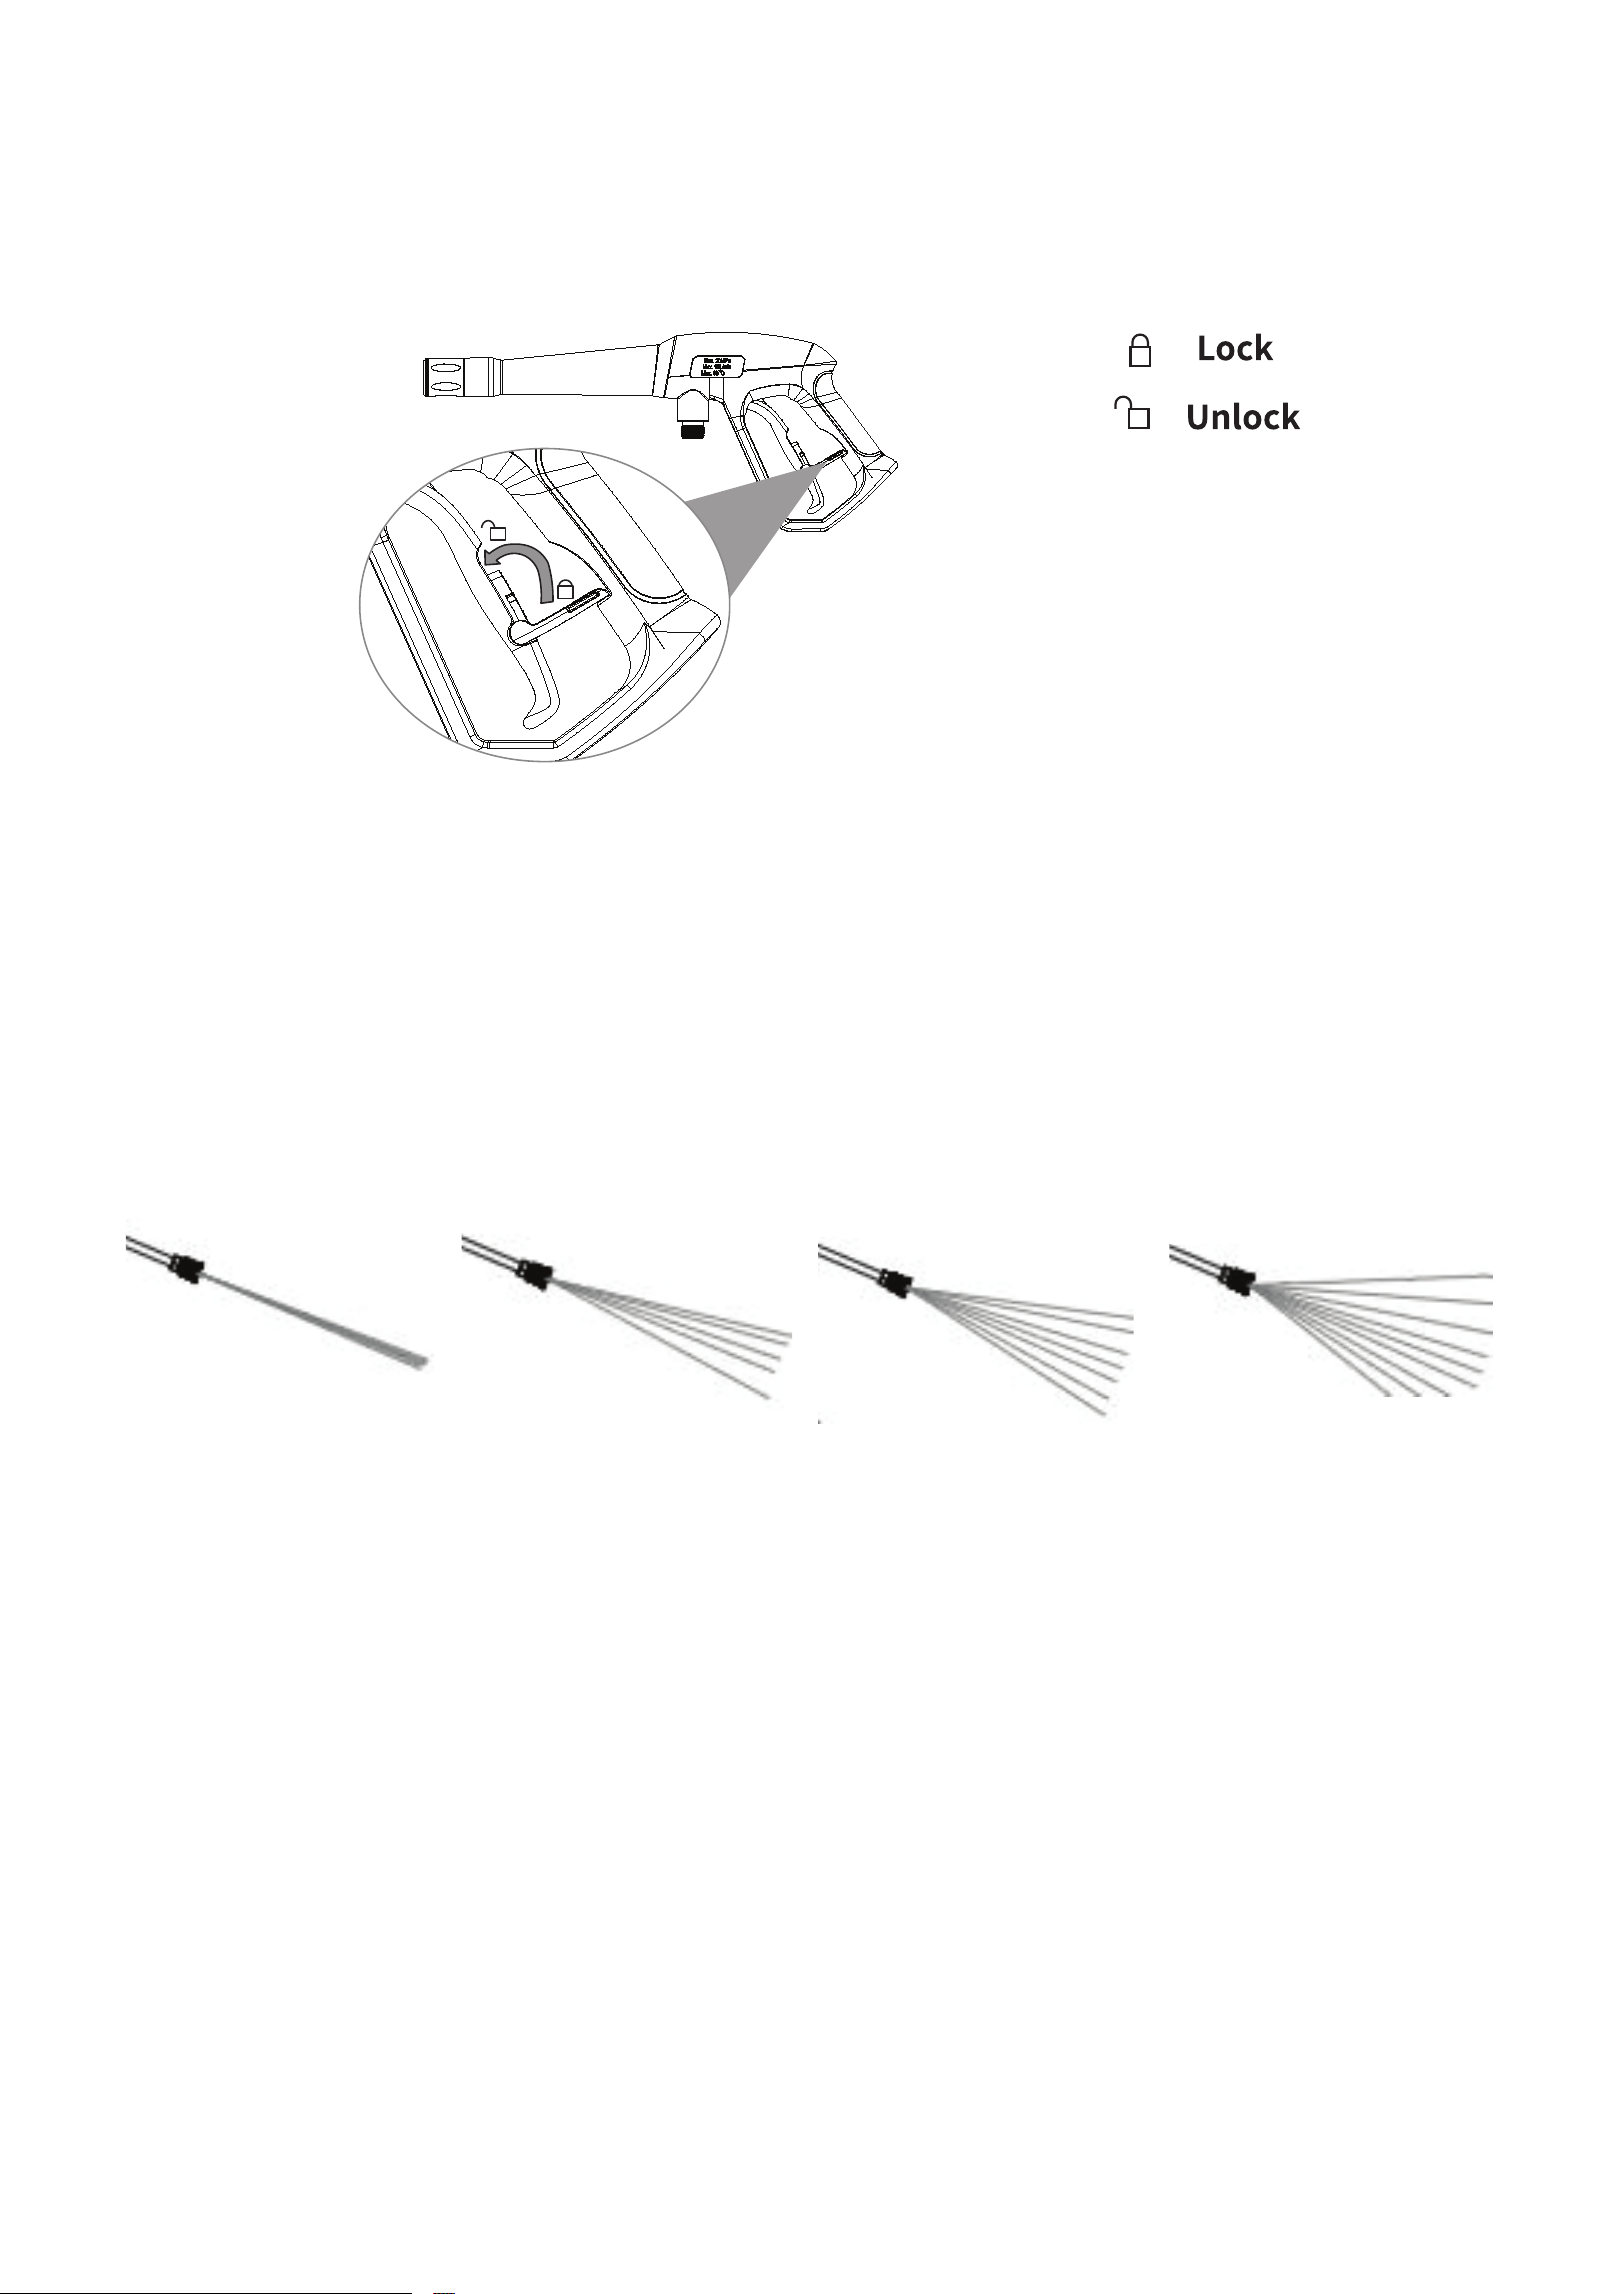
25. To avoid mishaps or injury, always use the trigger safety lock when not using the power
washer even if the spraying stops for a moment.
26. The power washer is equipped with a Ground Fault Circuit Interrupter Built Into The
5
Power Cord Plug which greatly reduces the chance of electric shock while the unit is in
use. If Replacement Of The Plug Or Cord Is Needed, Use Only Identical Replacement Parts.
27. Point the spray gun in a safe direction when beginning a power washing session.
28. When first using the spray gun, hold the spray gun and lance with two hands when
pulling the trigger until you get used to the“kick back”from the spray gun (one hand to
pull the trigger and the other to stabilize the gun assembly).
29. Never disconnect the high pressure hose from the power washer while the system is
pressurized.
30. Never permanently engage the trigger mechanisms on the spray gun.
31. Never operate the power washer unless all components are properly and securely
connected.
32. Never allow the power washer pump to Run for more than one minute, after you have
contain combustible dust, liquids or vapors. turned off the water supply.
This can cause the motor and pump to overheat and fail.
33. Never use lances or other parts that have not been supplied with your power washer.
34. Never use an extension power cord since it defeats the effectiveness of the GFCI and
increases the chance of electrocuting the operator.
35. Never spray any electrical outlet with your power washer.
36. Inspect the power cord before using. Do not use it if it is damaged.
SAVE THESE INSTRUCTIONS
GROUND FAULT CIRCUIT INTERRUPTER PROTECTION
This pressure washer is provided with a ground-fault circuit-
interrupter (GFCI) built into the plug of the power-supply cord. This
device provides additional protection from the risk of electric shock.
Should replacement of the plug or cord become
necessary, use only identical replacement parts that include GFCI
protection.

6 7
SERVICING OF A DOUBLE-INSULATED APPLIANCE
In a double-insulated product, two systems of insulation are provided instead of grounding.
Grounding means are not provided for a double- insulated product, nor should grounding
means be added to the product. Servicing a double-insulated product requires extreme
care and knowledge of the system, and should only be done by qualified service personnel.
Replacement parts for a double-insulated product must be identical to the original parts.
A double-insulated product is marked with the words “Double Insulation”or “Double
Insulated”.Product may also be marked with symbol shown below.by qualified service
personnel. Replacement parts for a double-insulated product must be identical to the
original parts. A double-insulated product is marked with the words “Double Insulation” or
“Double Insulated”. Product may also be marked with symbol shown below.
TECHNICAL DATA
MODEL HPA2012US
Power 1800W
Rated voltage 120V
Frequency 60Hz
Rated pressure 1800 PSI
Peak pressure 2400 PSI
Rated flow 1.3 GPM
Max flow 2.3 GPM
Hose Length 20FT
Max. water inlet temperature 140°F
G.W/N.W 21.60 LB / 19.40 LB
7
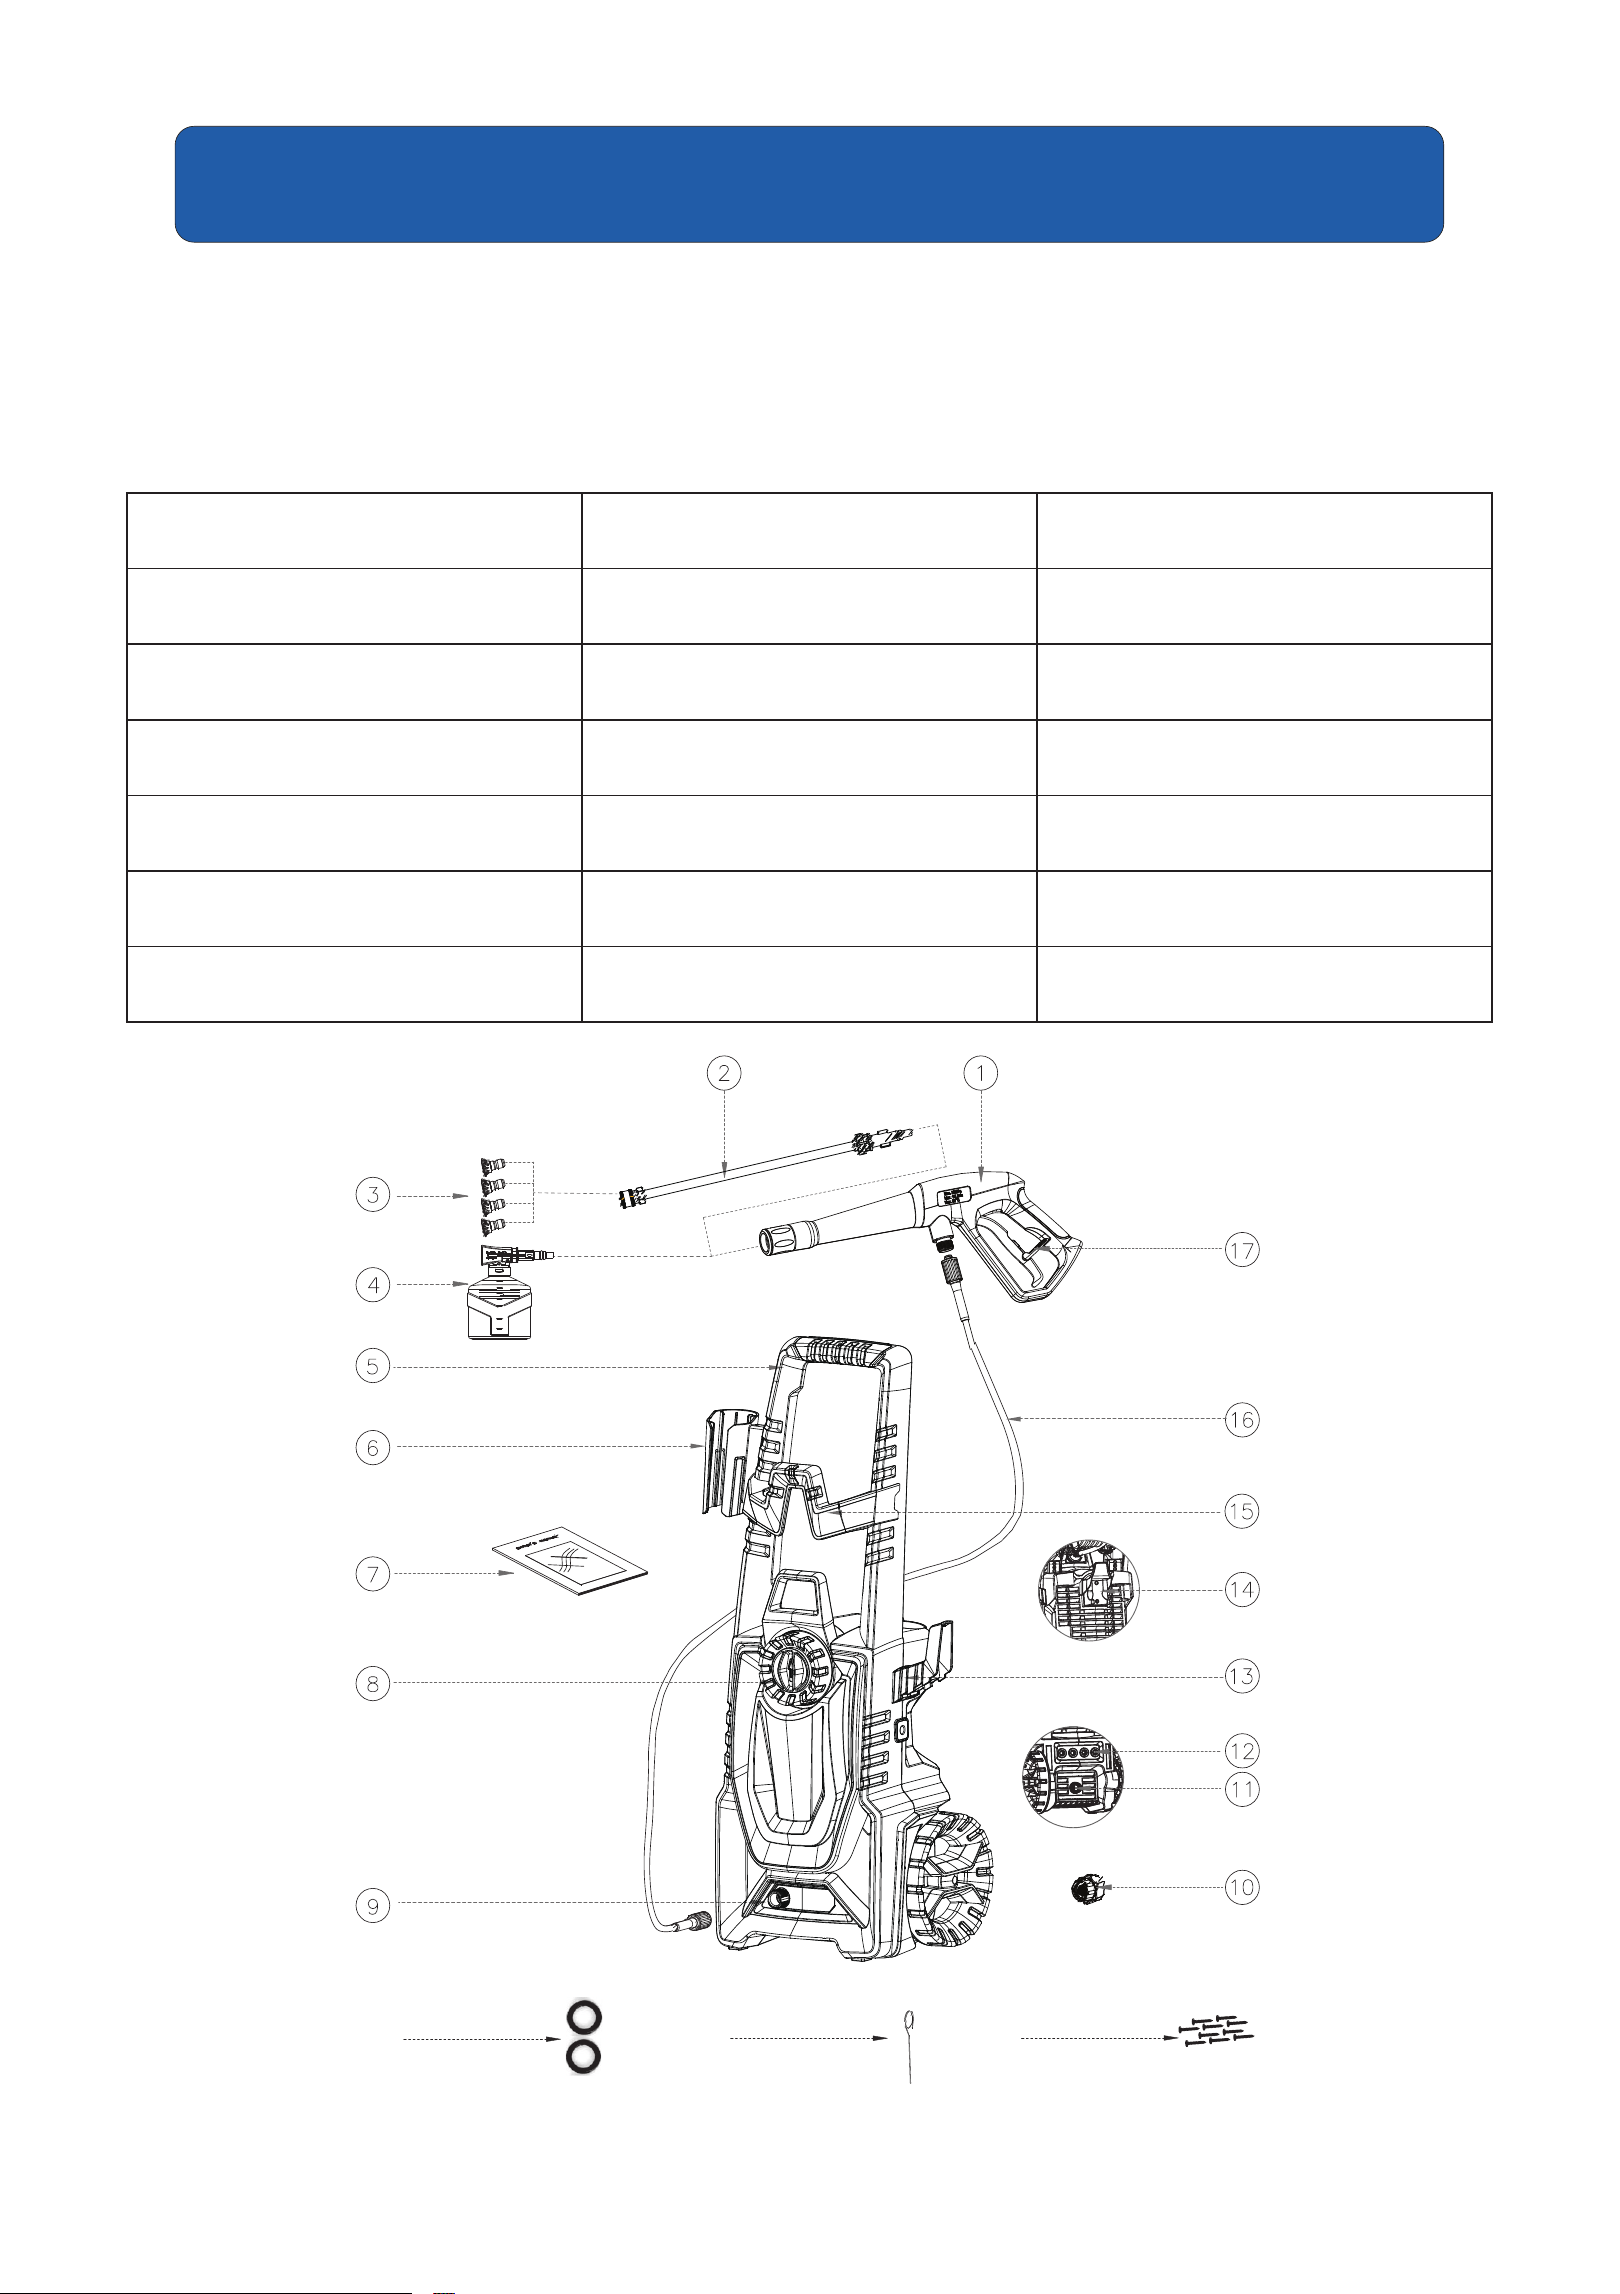
When unpacking this product, check to make sure parts listed below are included and
carefully inspect for any damage that may have occurred during transit. If any part is
missing and damaged, do not attempt to assemble or use the product.
UNPACKING
1. Gun 2. Quick lance
3. Metal nozzles
(0°/15°/25°/40°)
4. Detergent Bottle 5. Handle 6. Gun holder
7. Manual 8. ON/OFF 9. Water outlet
10. Water inlet connector 11. Water inlet 12. Nozzle storage
13. Power cord holder 14. Detergent Bottle hook 15. Hose hook
16. High pressure hose 17. Lock-off switch 18. 2 pcs seal ring(spare)
19. Hub pin
20. Screws package
(4*16mm 10pcs)
18
19
20
attached on the machine
*The machine is always with handle to transport.
8 9
PREPARATION OF OPERATION
HOW TO SET UP YOUR UNIT
(Ignore the installed accessories in the corresponding step)
Step 1 Mounting the soap bottle holder
Screw the hose holder tight to the main unit.
Note: All screws will be packed together with the manual, pls kindly check and find it when
unpacked.
Step 2 Mounting the handle and the hose hook
Slide the reel long handle to the machine, and fix four screws. Install the hose hook on the
long handle, and fix four screws.
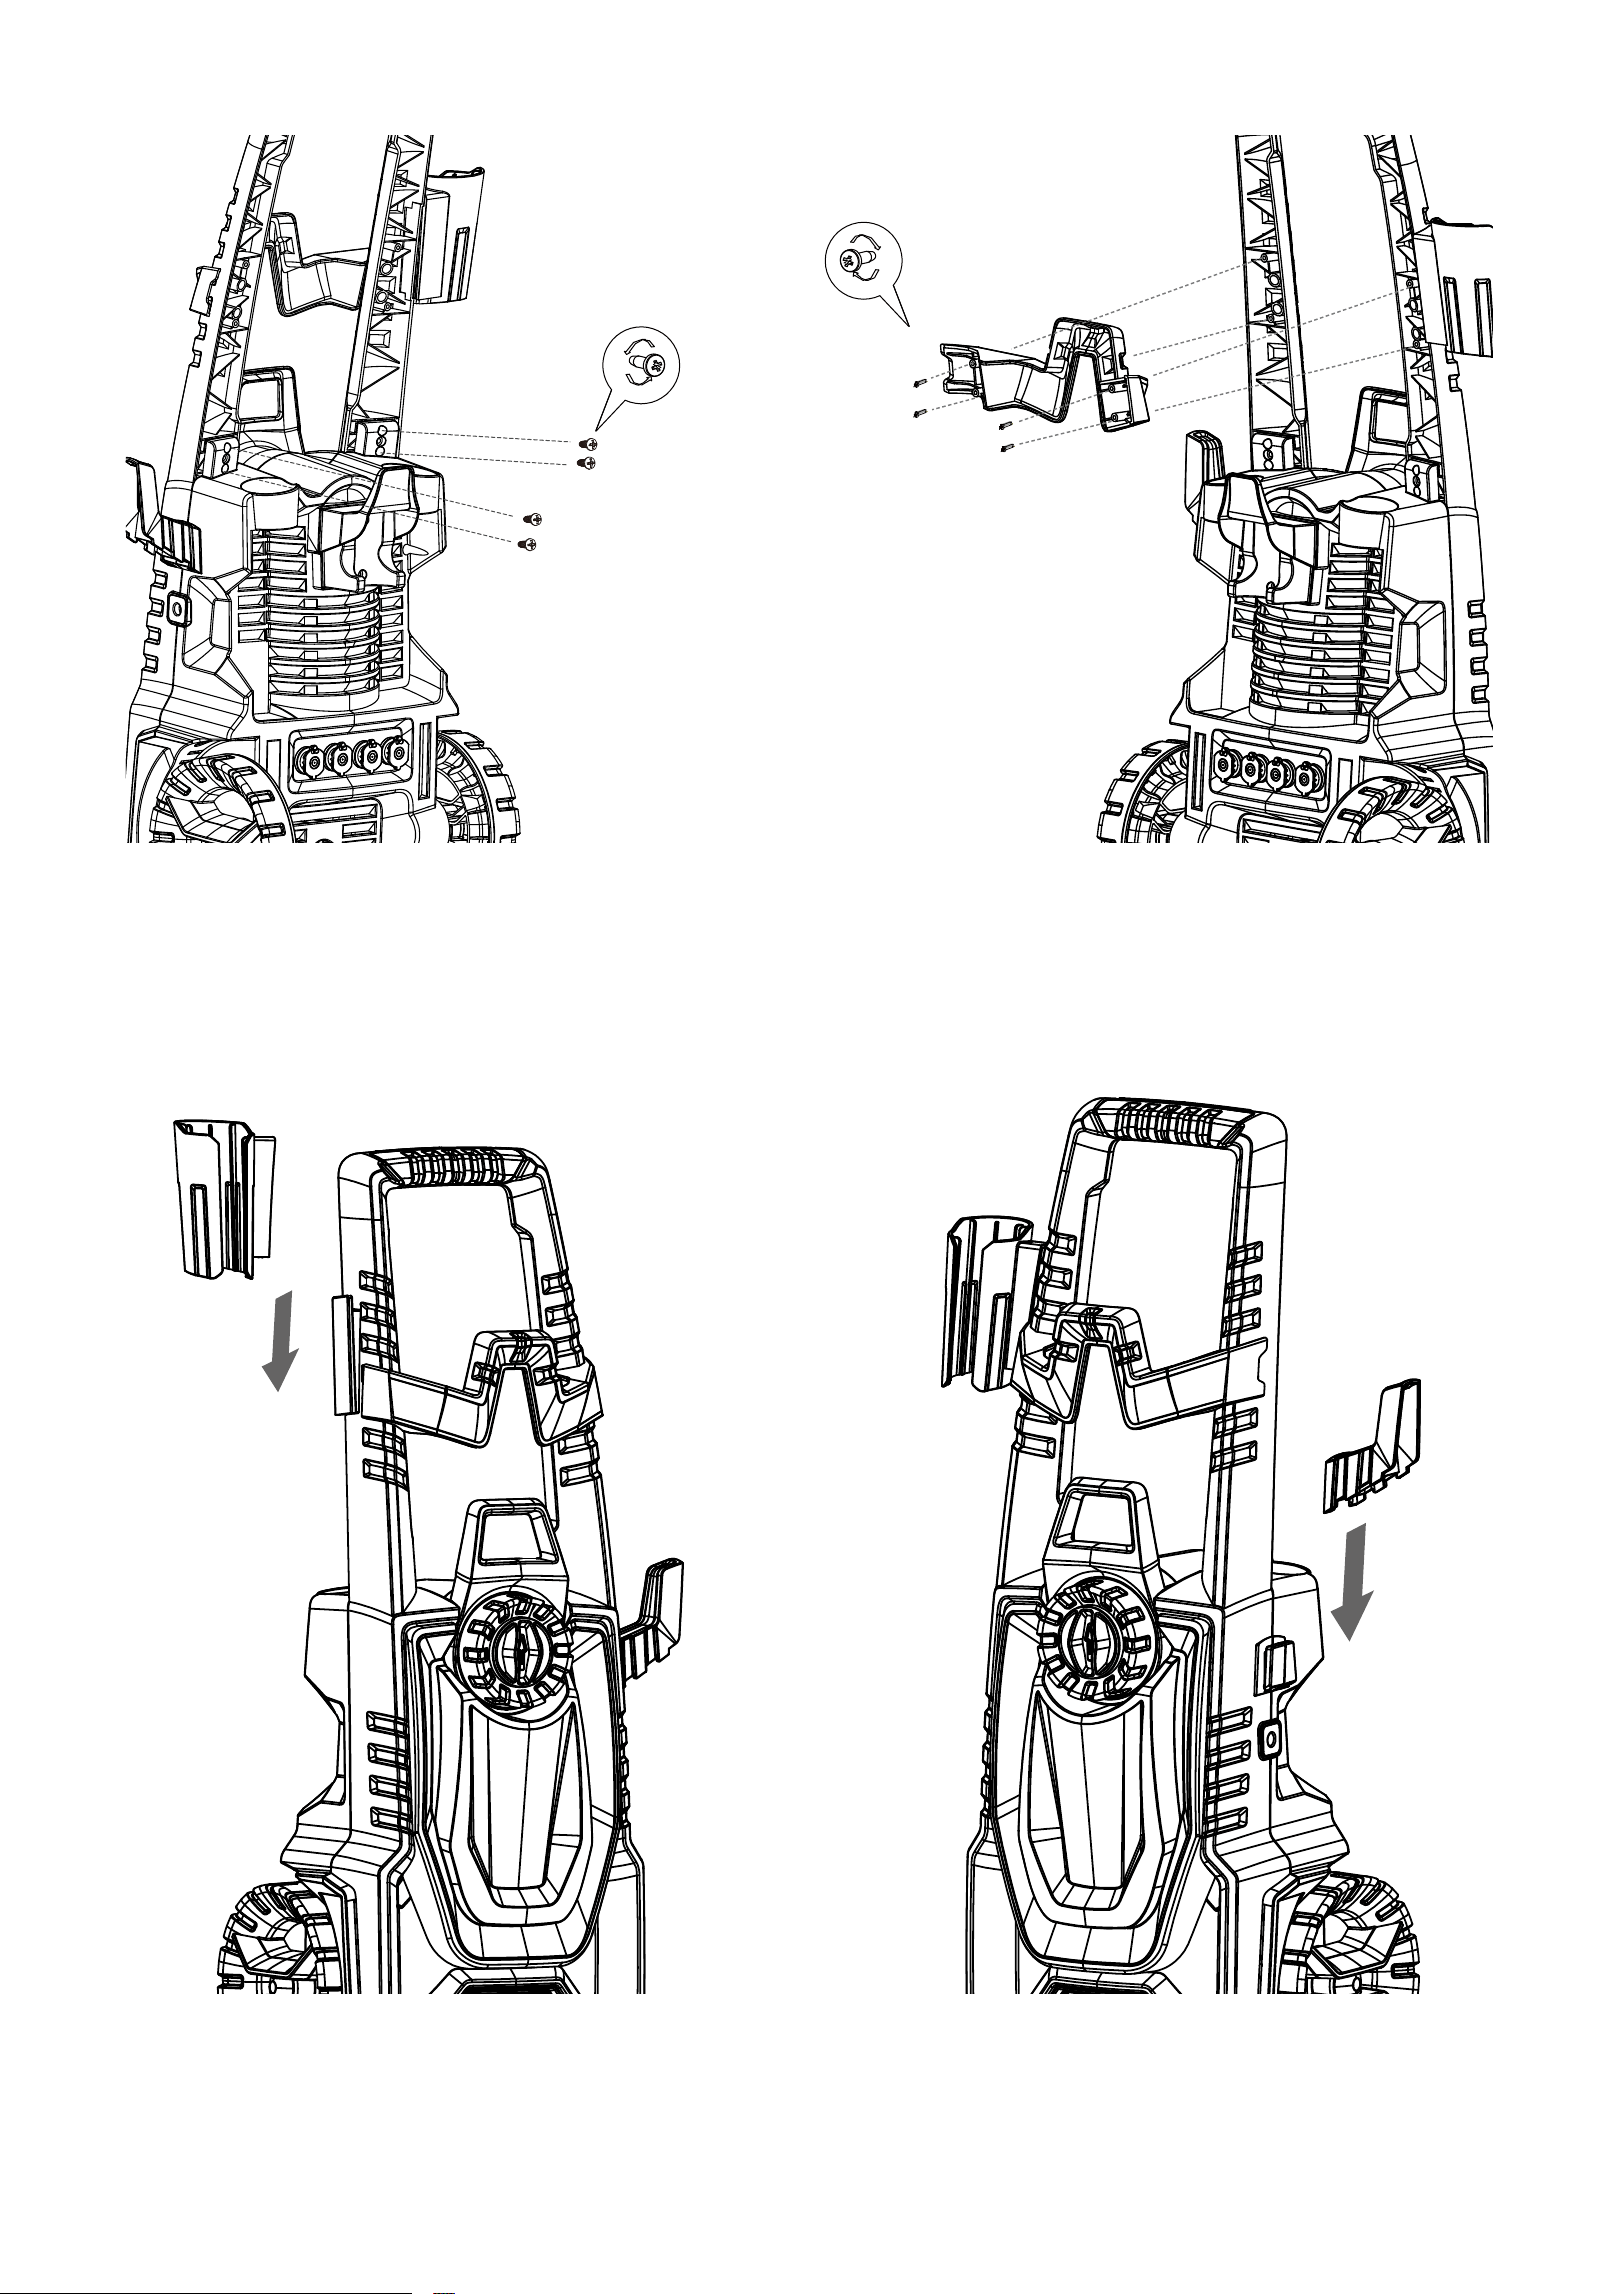
9
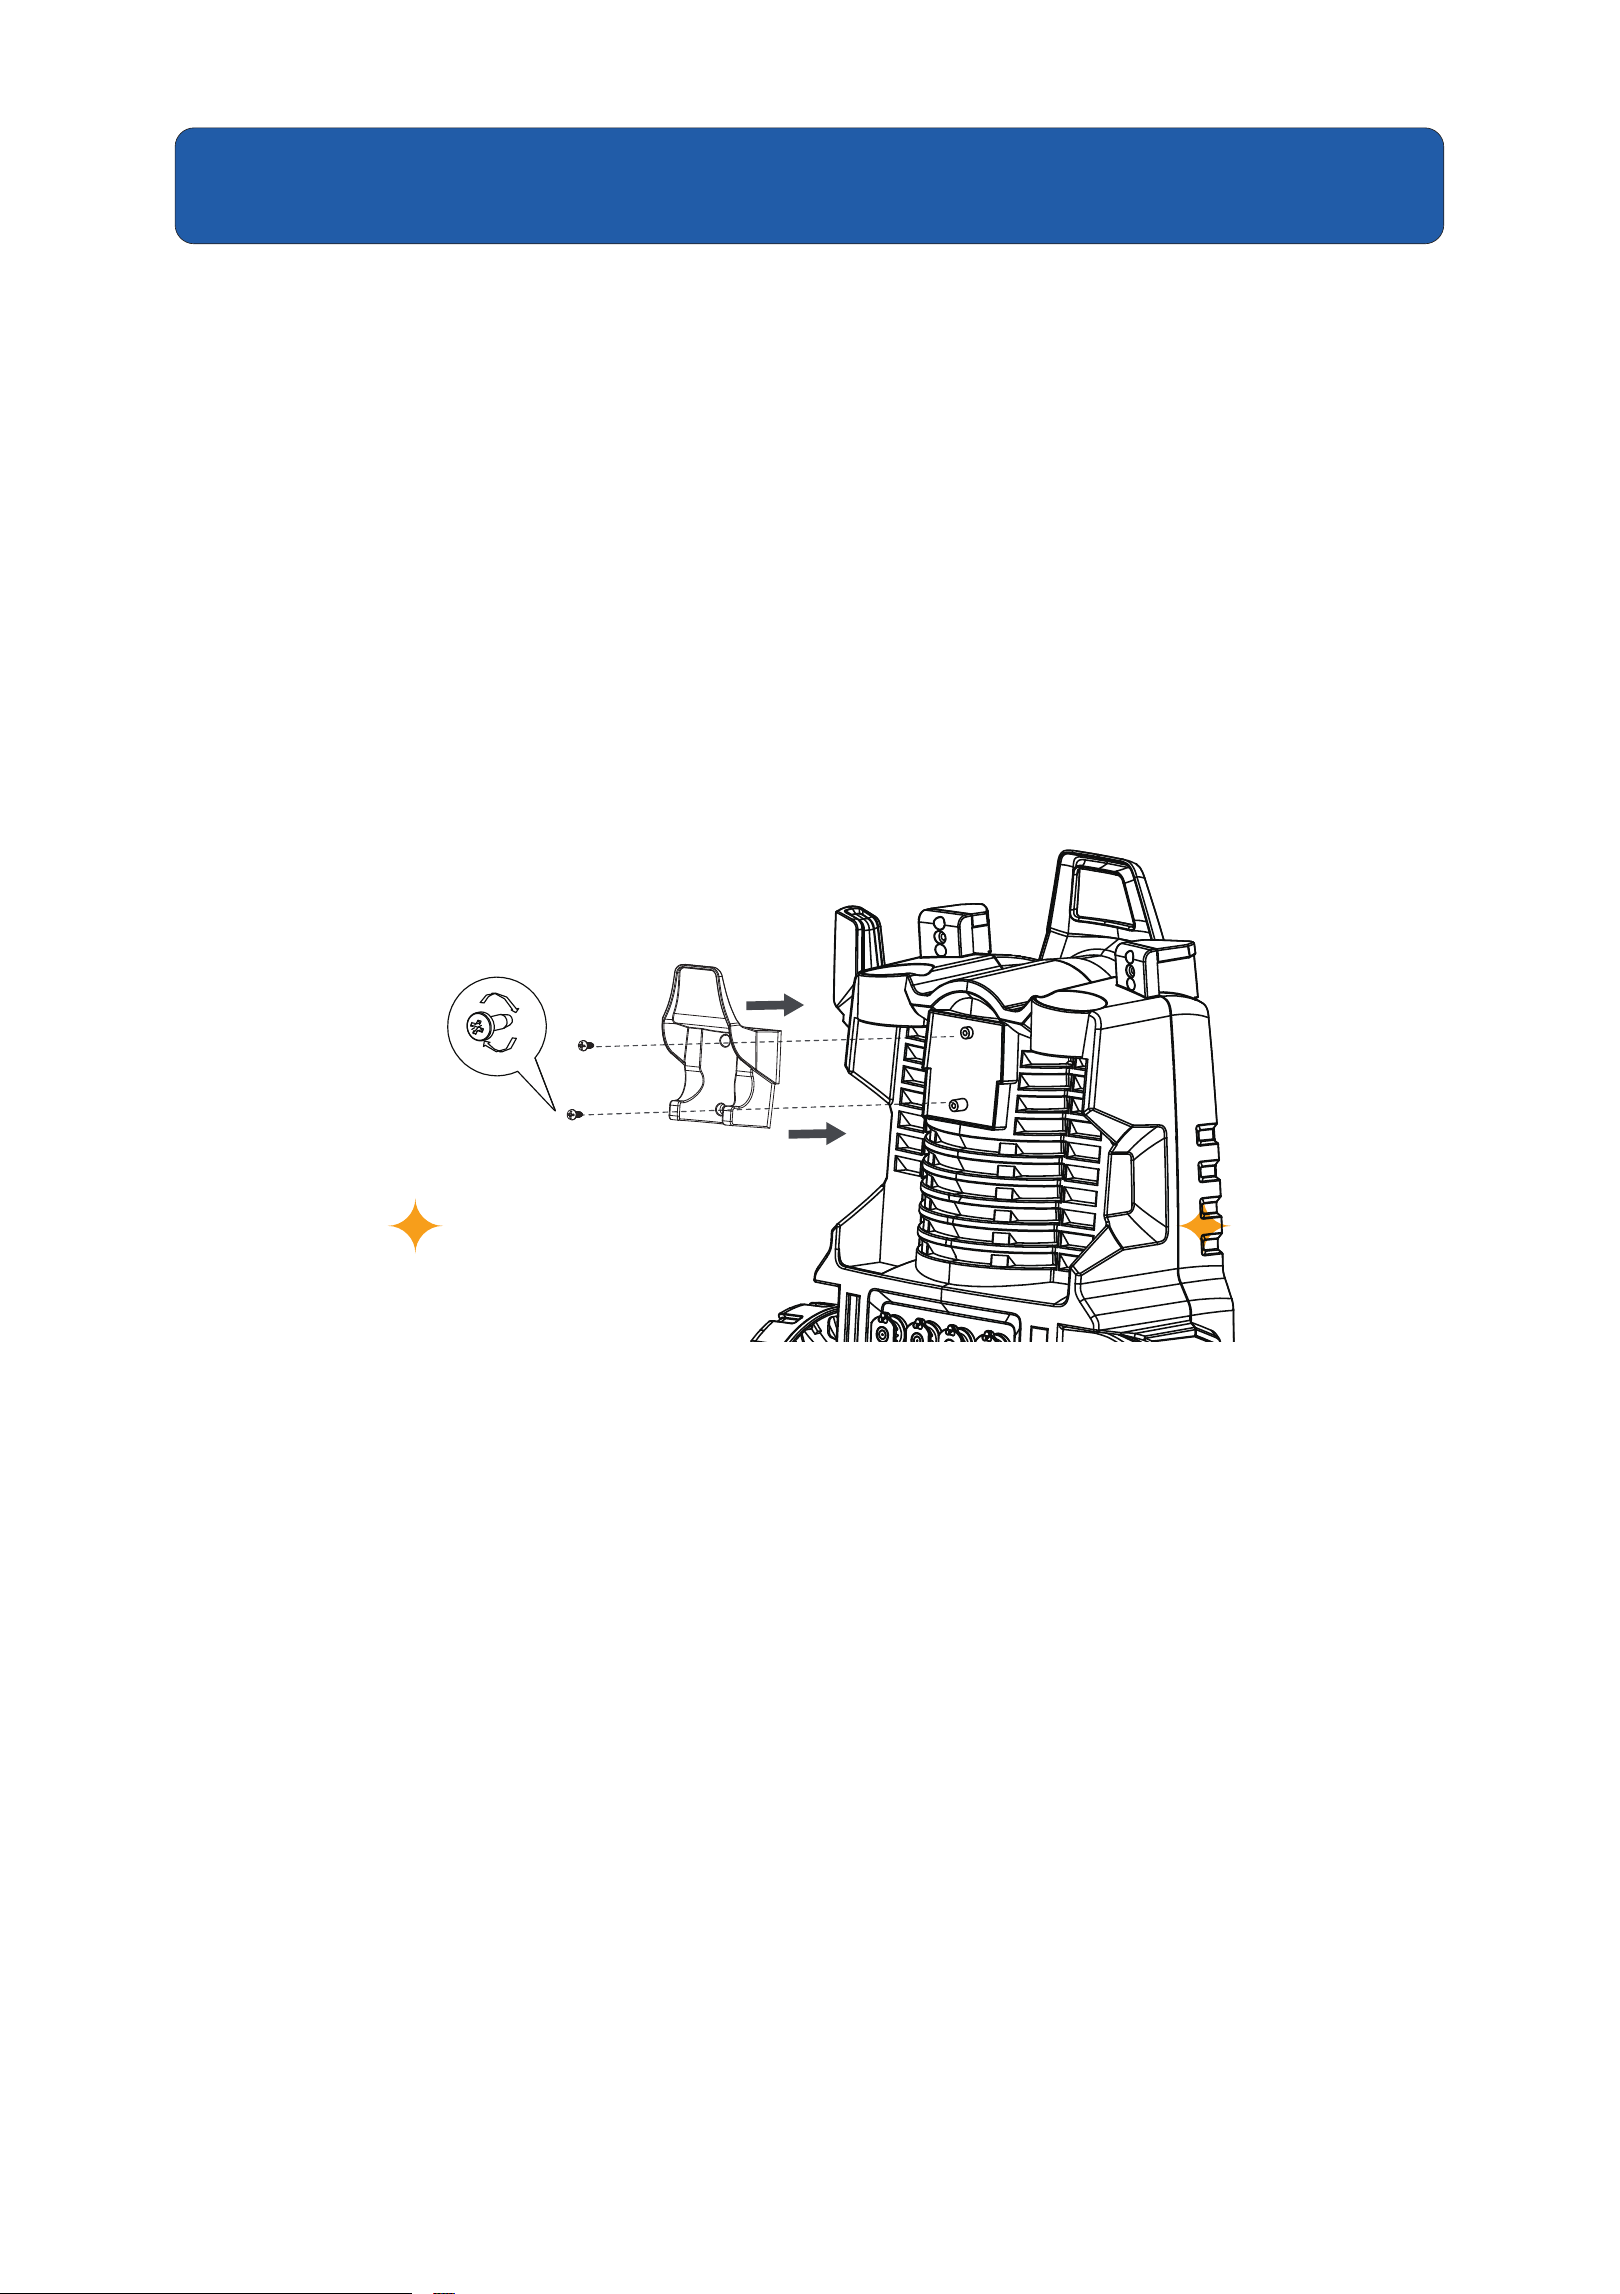
Step 3 Mounting the gun holder and power cord holder
Install gun holder and power cord holder to the main unit.
10 11
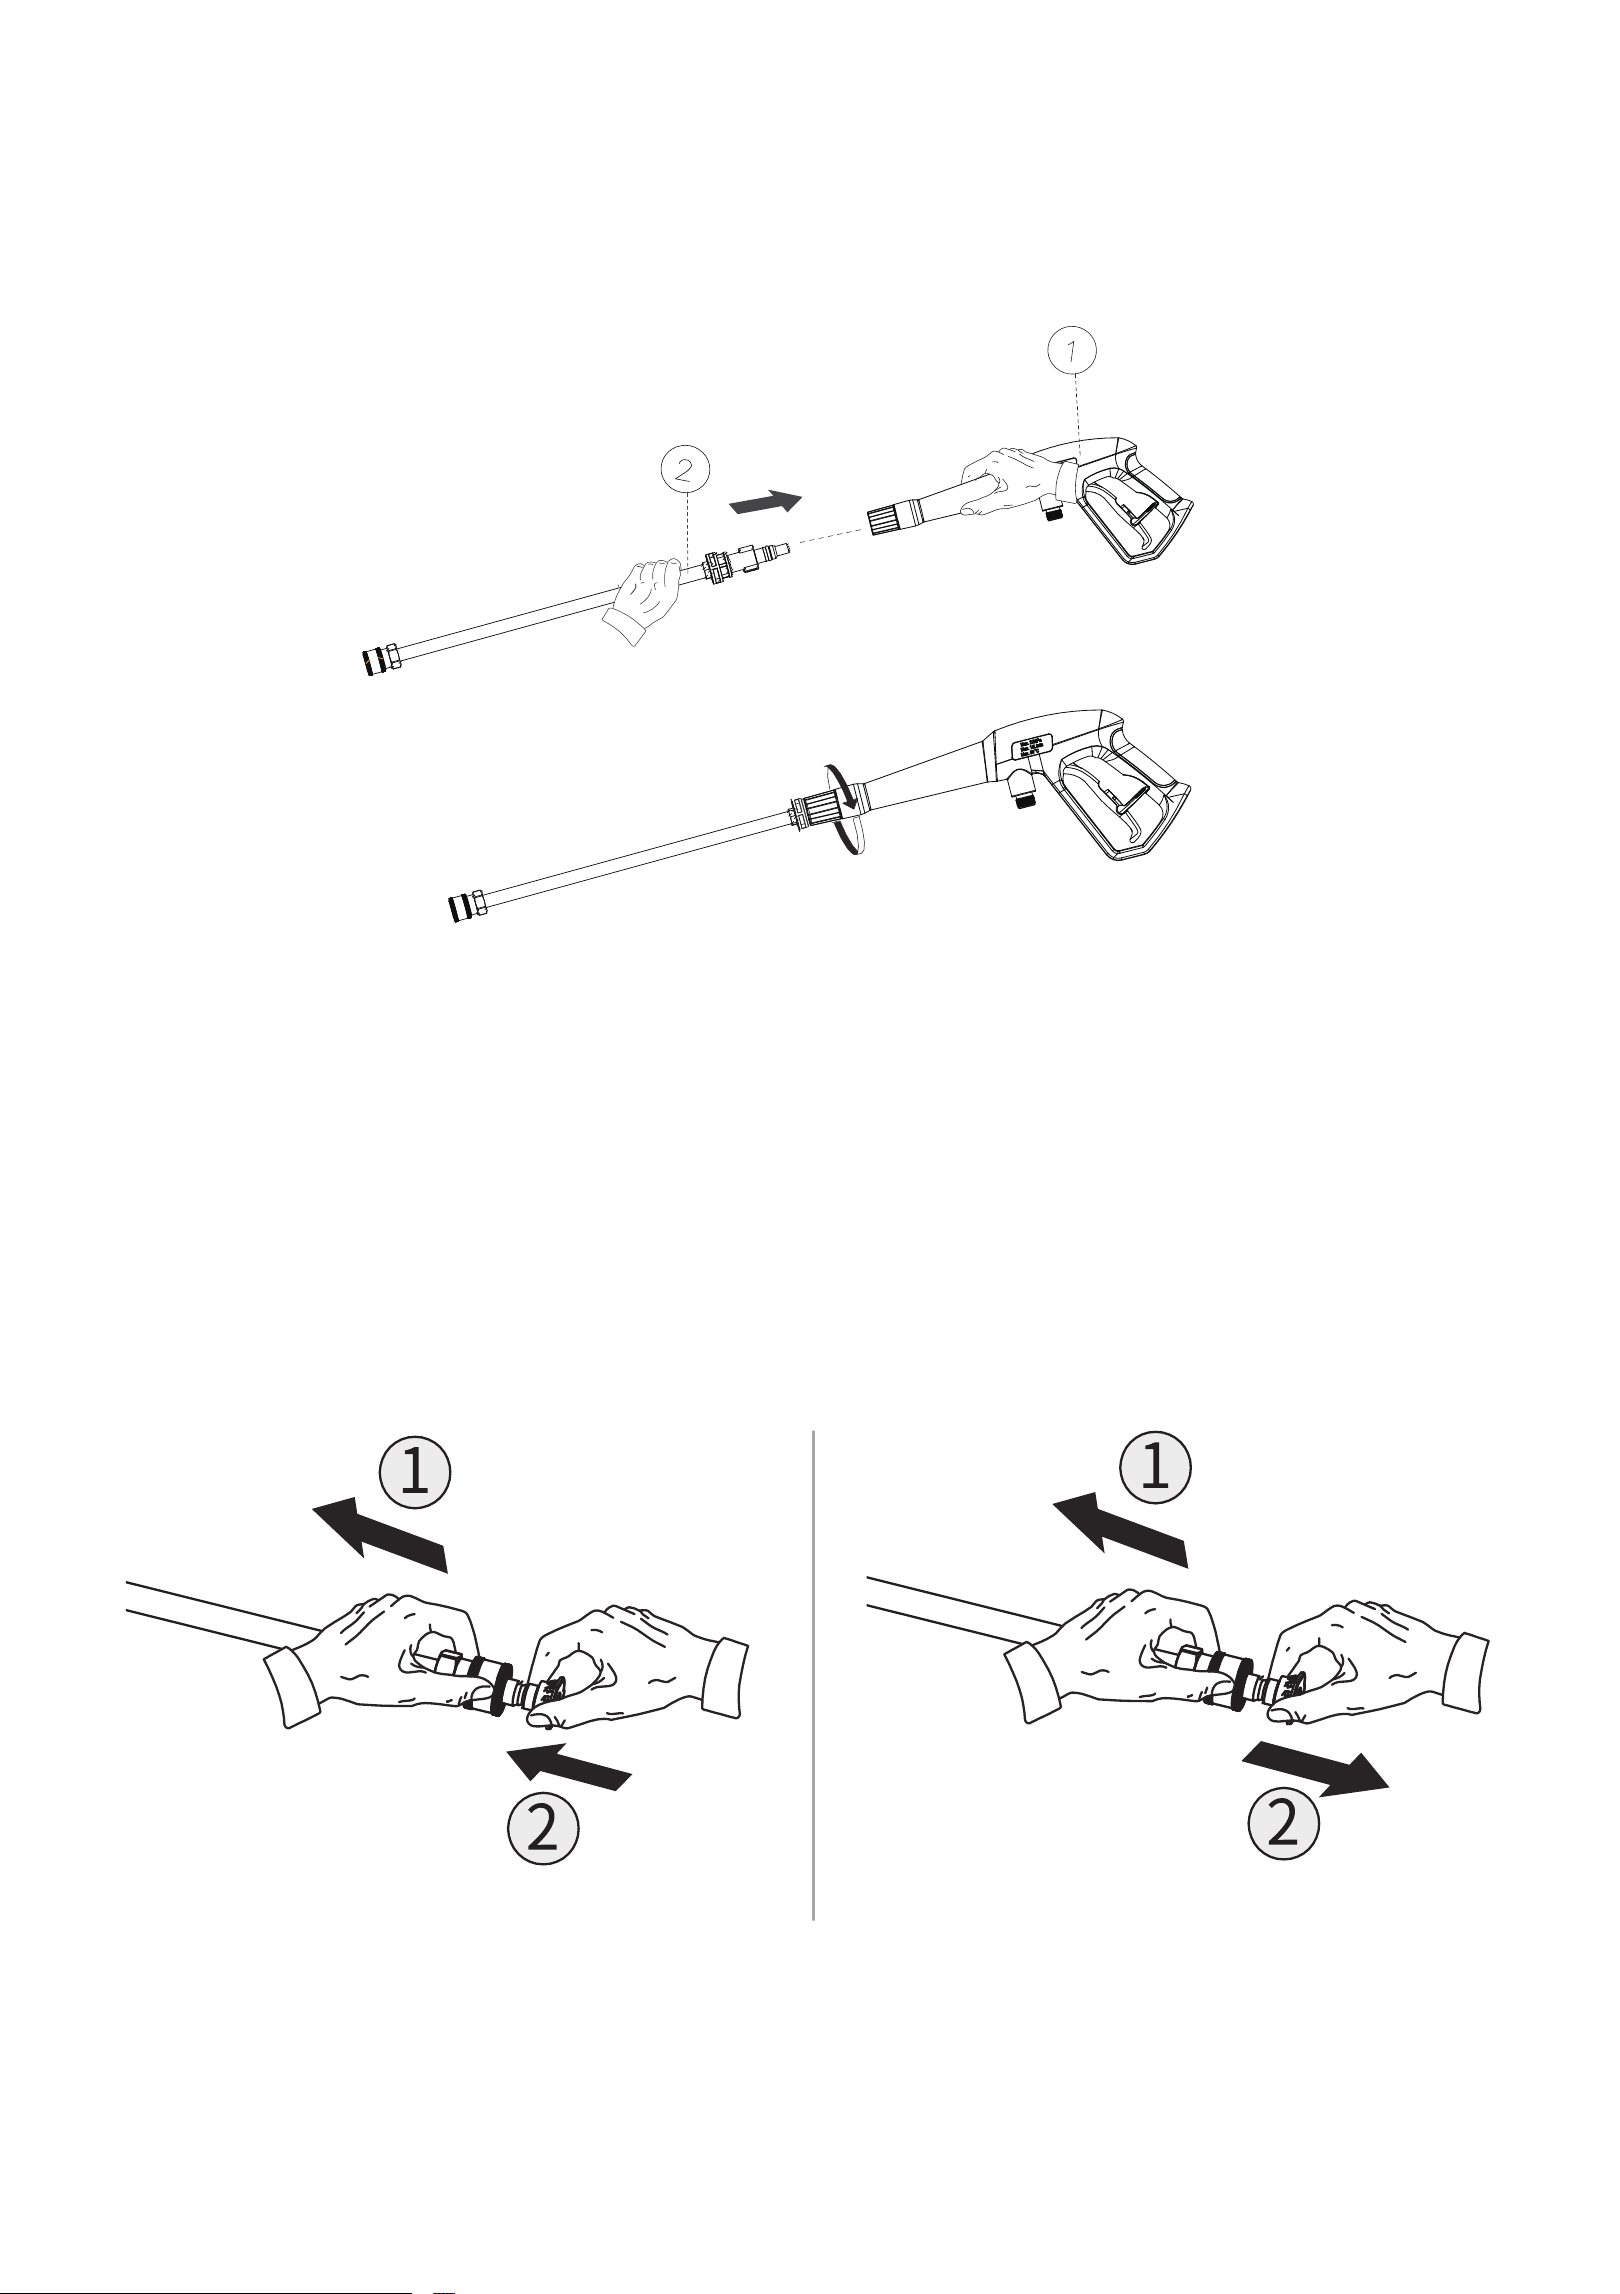
Step 4 Attach the quick lance to gun
Note: When the machine is not started, align the two projections on the lance with the
grooves on the gun when assembling.
Insert the nozzle:
Grasp the top metal ring with your left hand and pull it downwards without releasing it.
Insert the nozzle directly into the wand. Release the metal ring with your left hand to lock
it in place.
Pull out the nozzle:
Grasp the top metal ring of the wand with your left hand, squeeze it down, and without
releasing the ring, continue pulling the nozzle out of the wand with force.
Insert the nozzle Pull out the nozzle
11
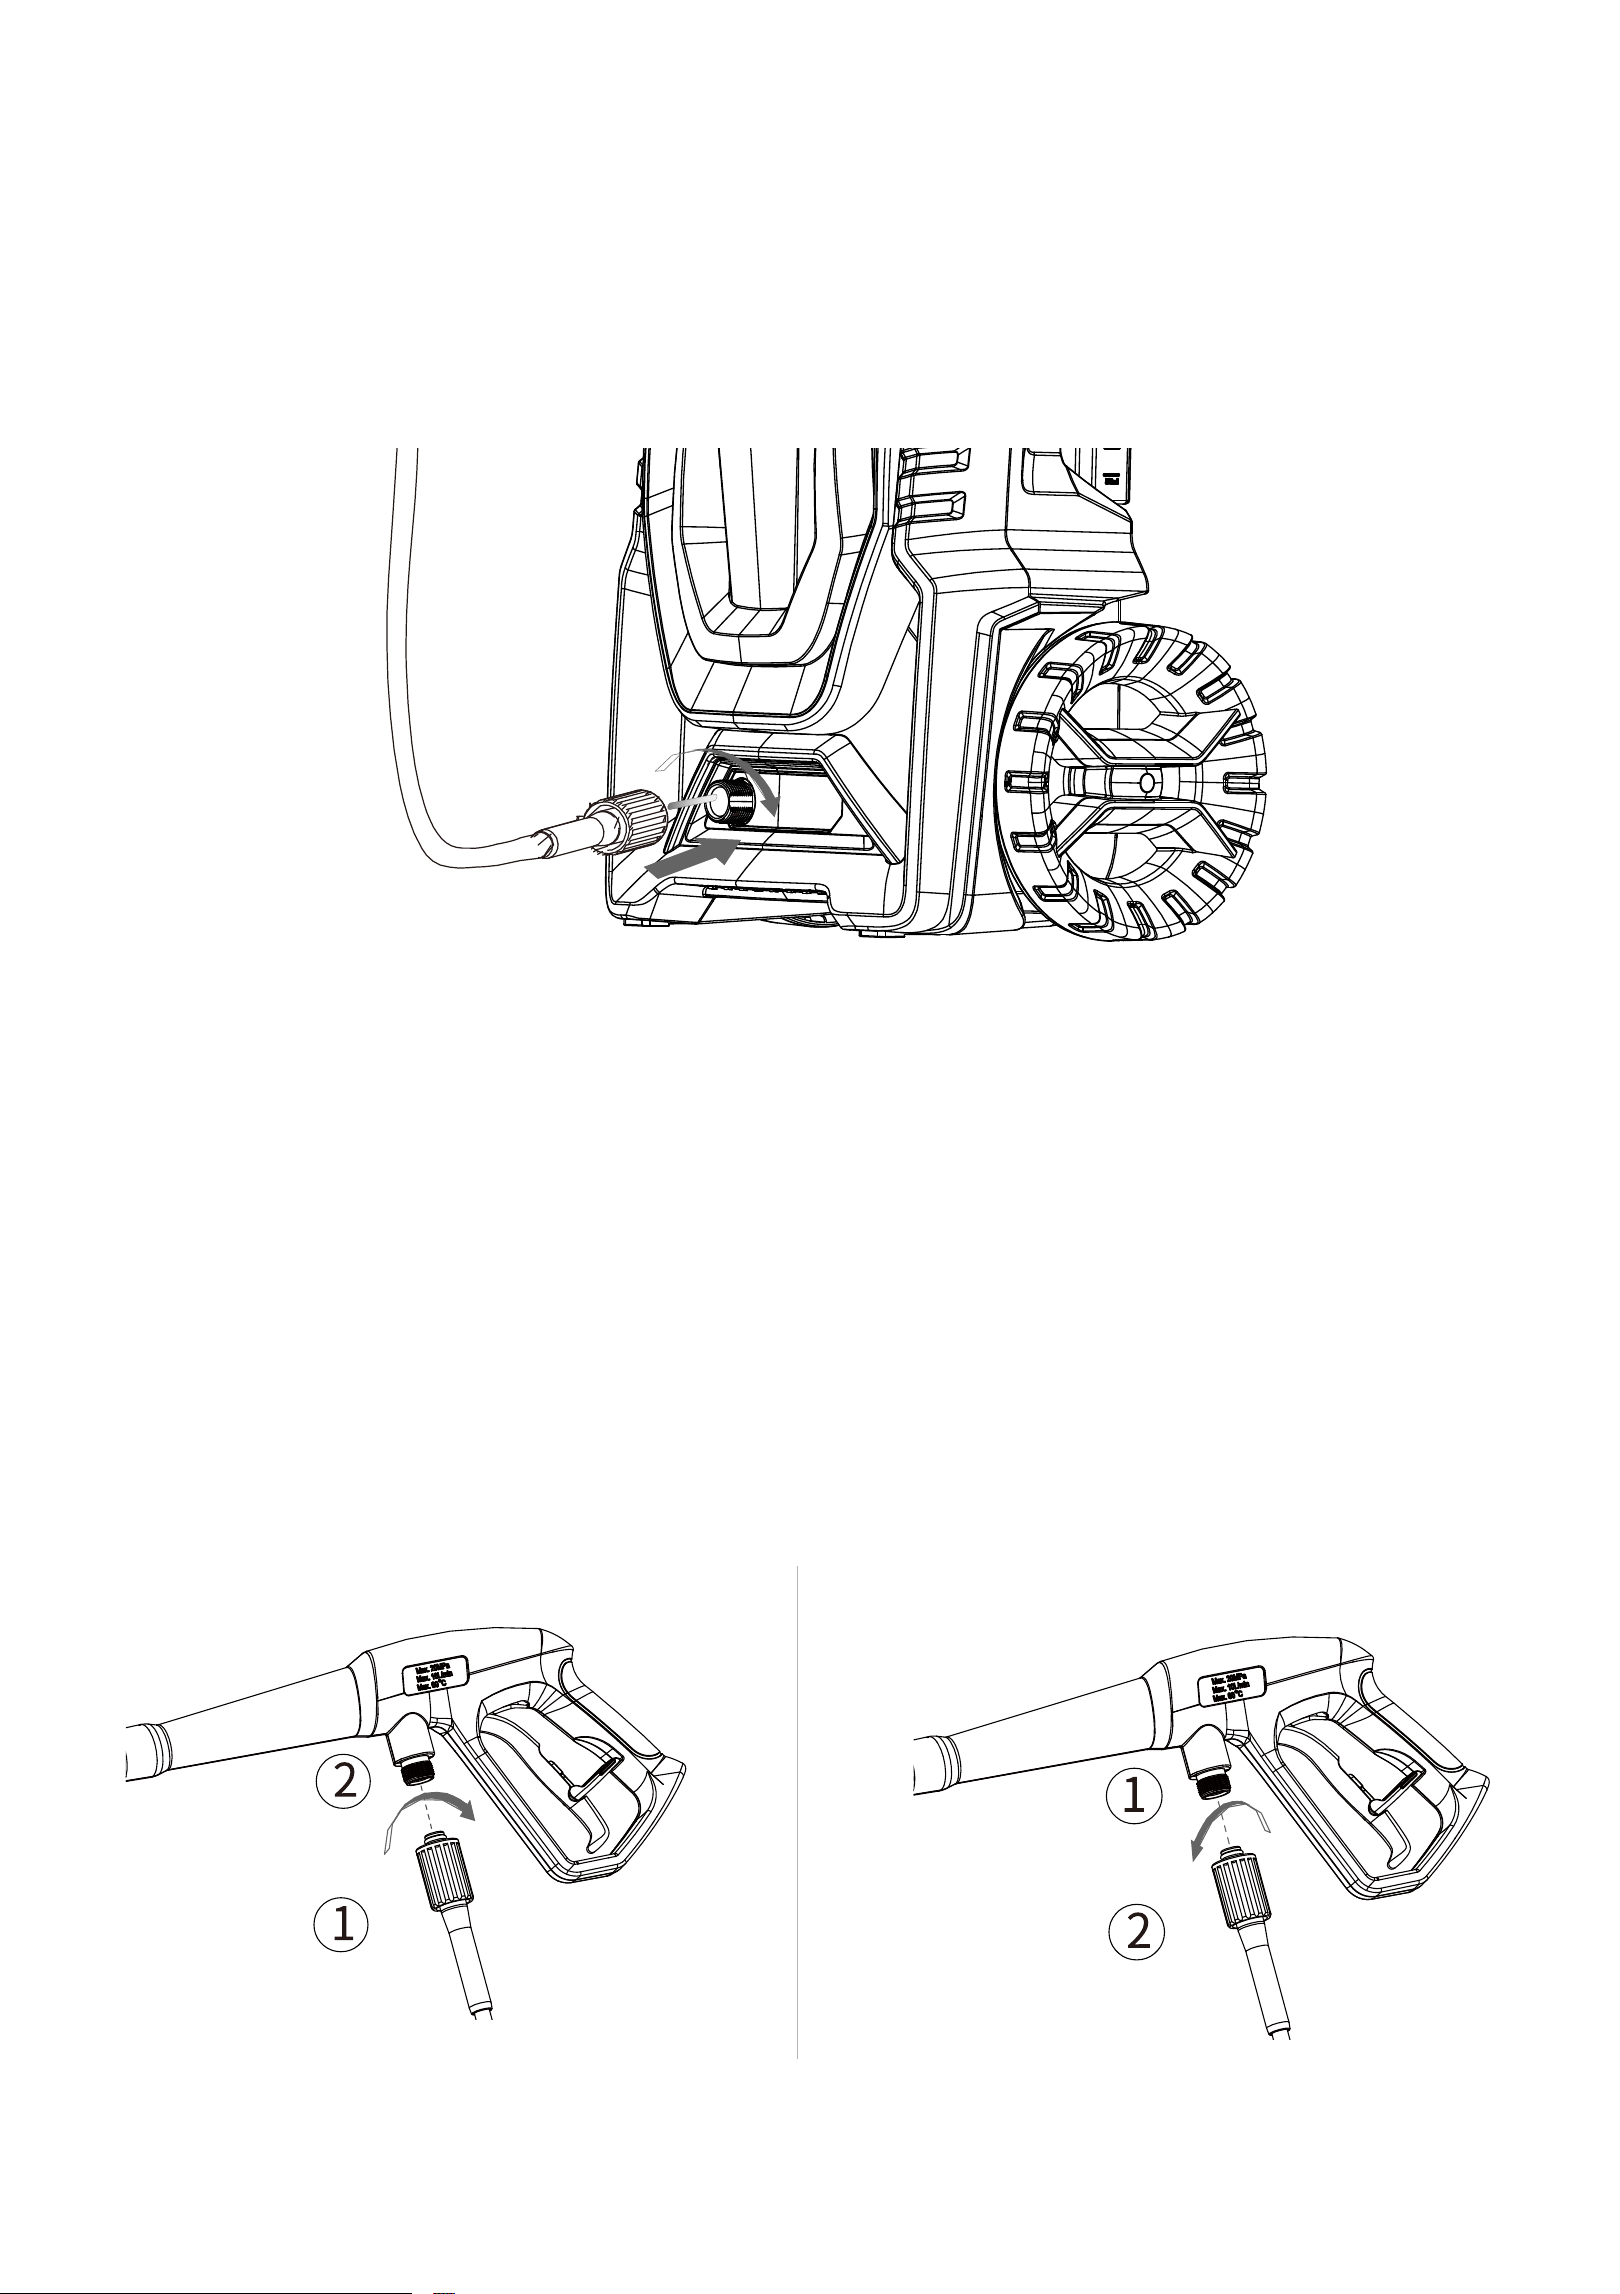
Step 5 Screw the high pressure hose onto the water outlet.
Connect one end of the hose to the water inlet.
CAUTION: Prior to operating the machine, please ensure that the high pressure hose has
been completely uncoiled.
Whilst the machine is in operation, the high pressure hose MUST NOT loop.
Step 6 Attach the other high pressure hose to the gun.
Connect the other end of the pressure hose to the gun.
Push the lock button and pull to detach the high pressure hose.
Note: After the high pressure hose is connected, check the connection by gently pulling
on the hose to ensure it stays connected. Push the lock button and pull to detach the high
pressure hose.
For detaching the hose easily, please pull the trigger to drain water from wand when
operation is completed and switch is in “ OFF/0 ” position.

12 13
Step 7 Attach the garden hose
Connect one end of the home garden hose (not supplied) to the adapter and another end
to water source.
WARNING: The appliance is INTENDED to be used at a temperature above 0 degree.
Step 8 Connect to the power supplier
(1) Plug the pressure washer into the power outlet.
(2) Press TEST button, power will be cut and indicator will
fade. Do not use if this test fails. We recommend you to
press the test button everytime before using pressure
washer to ensure the protector works.
(3) Press the RESET button the indicator will illuminates,
power on for use.
Step 9 Service parts: Seal ring replacement
Attention: If the leakage is happend, please check the seal ring. And change it with a
new one when the sealring is failed. Follow the picture, choose the correct seal ring for the
replacement.
9*2.55mm*1
10*2.65mm*1
Spray lance
High pressure hose
13
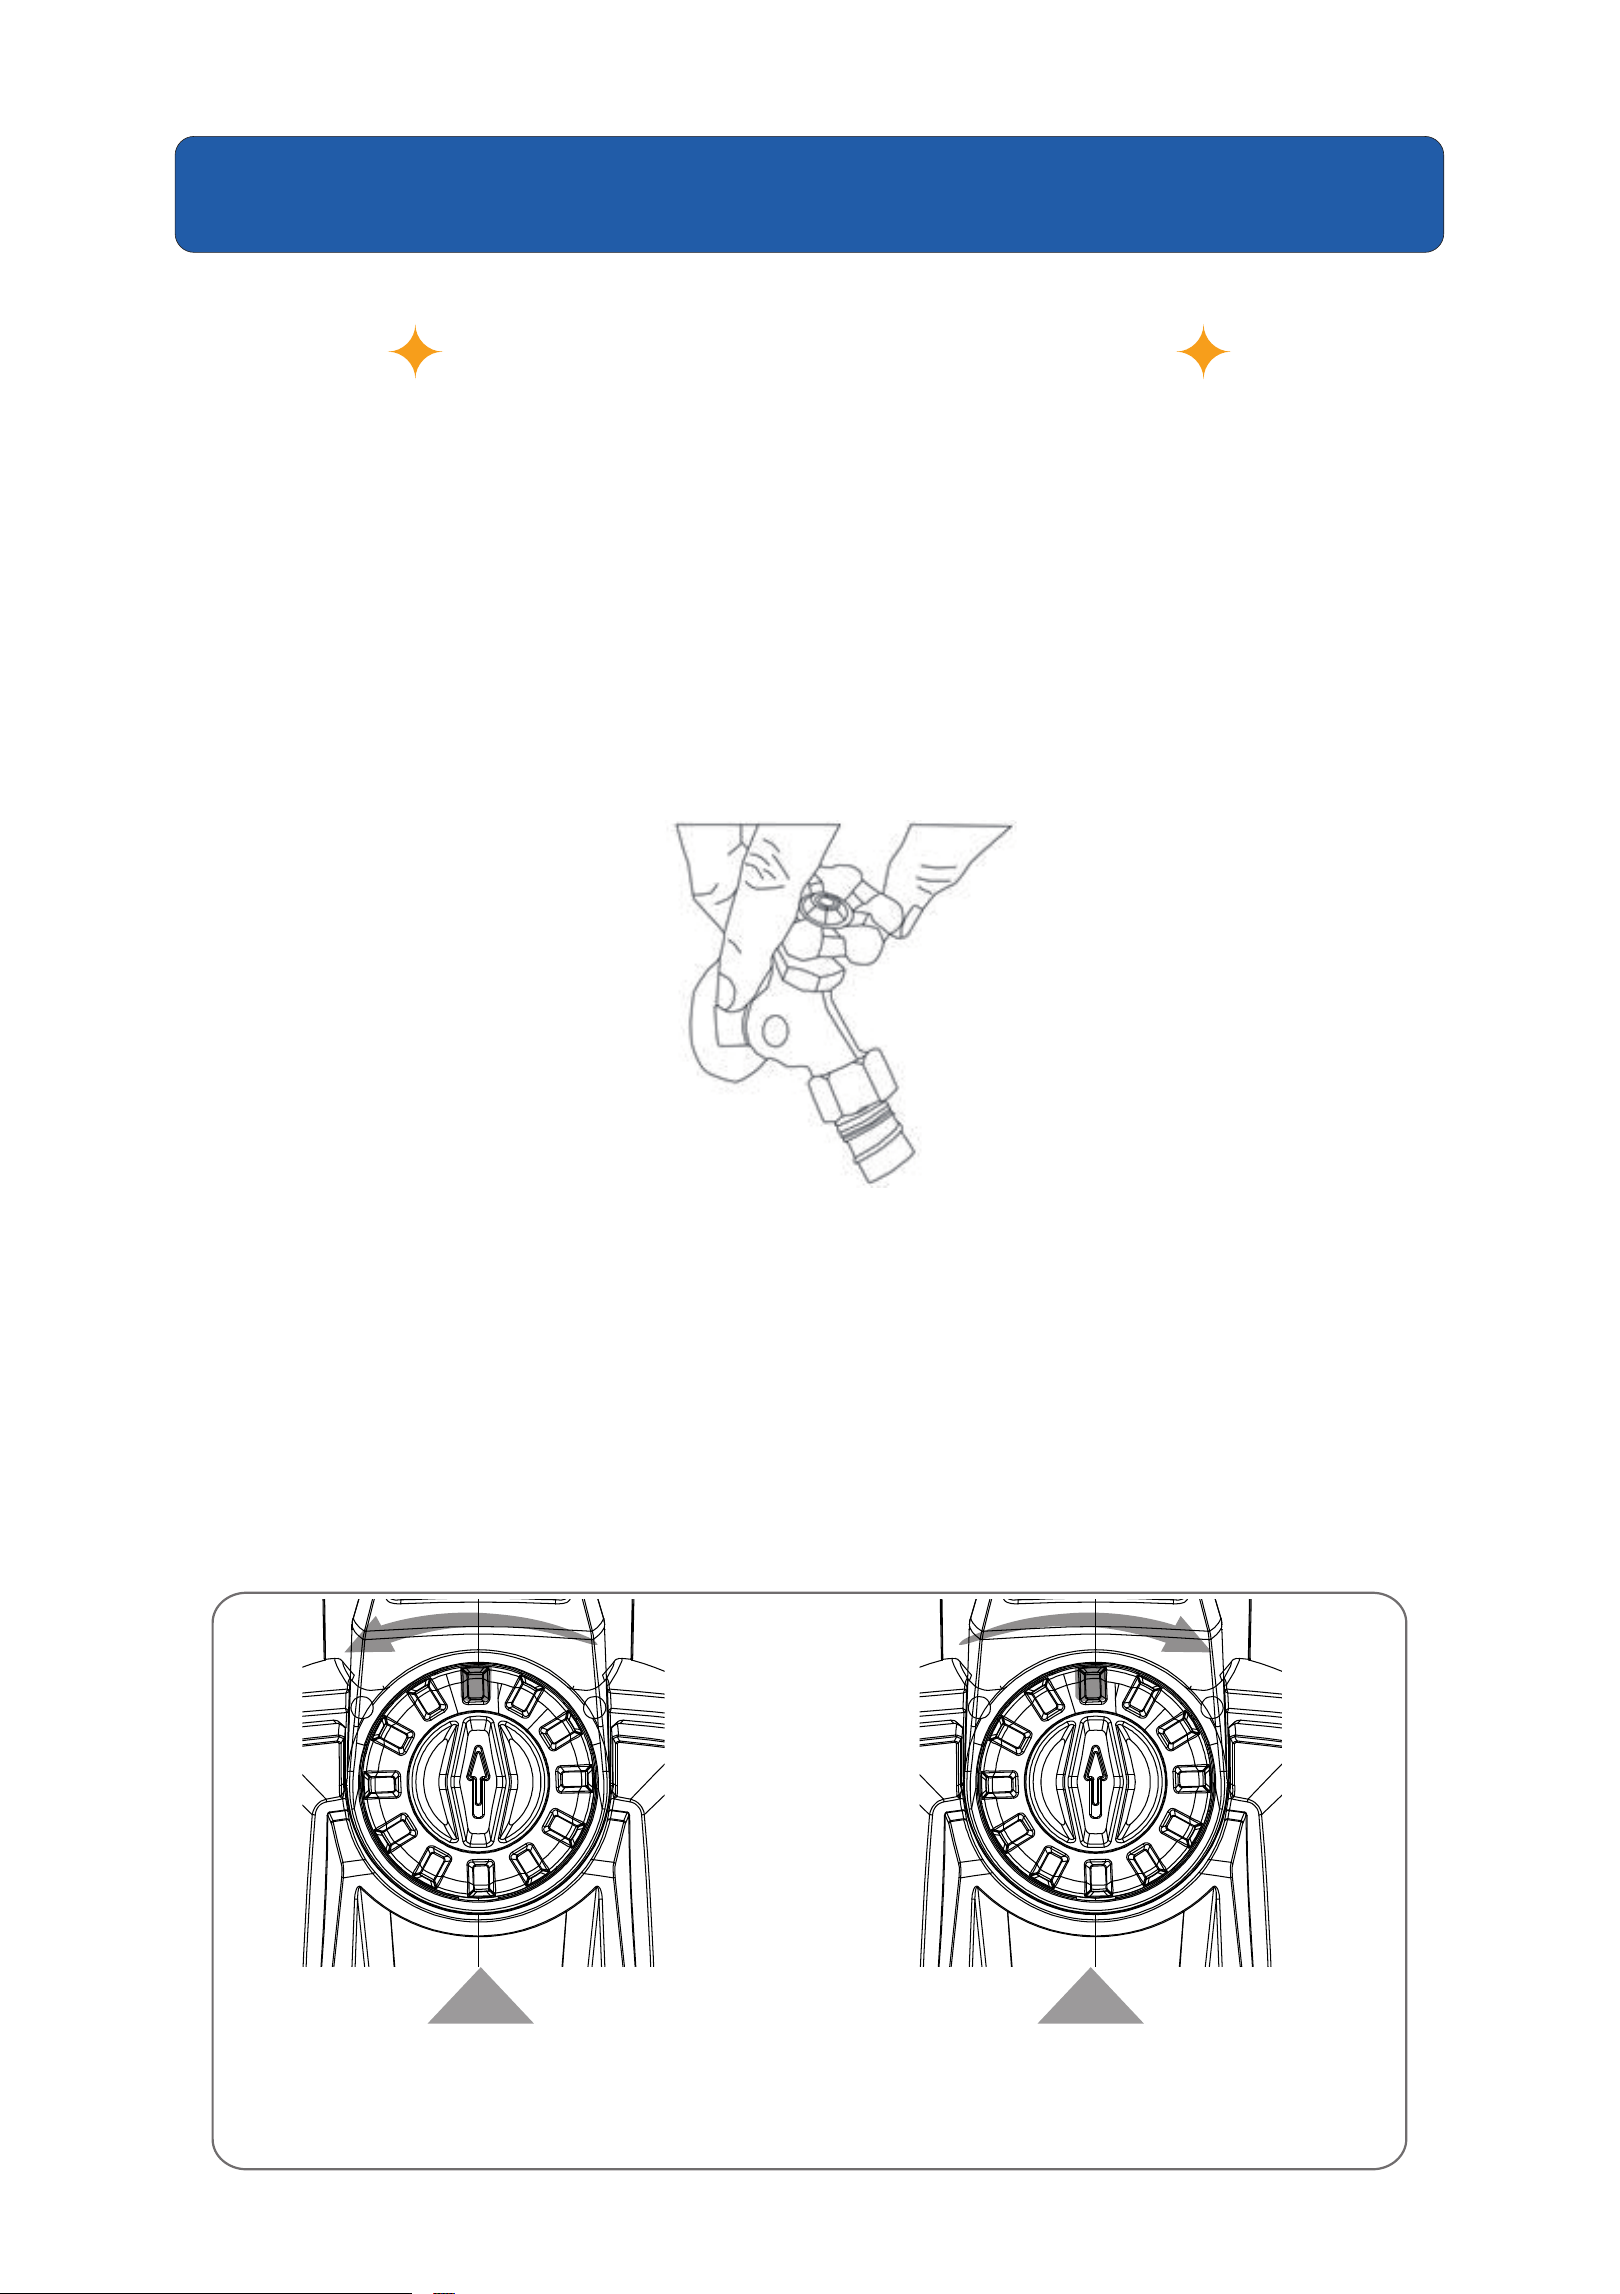
Step 1 Turn on the water supply tap
Connect the washer to the power supply and turn the switch to “ON/1”position. Then press
trigger.
Note: Before pressing trigger, make sure lock-off switch is in “unlock”position.
Warning: Do not start the machine without connecting and turning on the water
supply because it may cause damage to high pressure seals and reduce the service life
of pump.
Turn on Pressure Washer. Press the switch, the light light up, the machine start.
then pull the trigger till all the air is pushed out of machine and water flows from the gun.
Note: Before pressing trigger, make sure lock-off switch is in “unlock”position.
Warning: Do not start the machine without connecting and turning on the water
supply because it may cause damage to high pressure seals and reduce the service life of
pump.
Turn the switch on the
opposite direction.
Turn the switch
on clockwise.
OPERATING
TO WASH WITH WATER
14 15
Step 2 Release the trigger and turn the switch to “OFF/O” position
Turn off the water supply tap.
Note: When not in use, make sure Lock-off switch is in “Lock” position.
Step 3 Select the right nozzles
The gun is equipped with 4 kinds of quick connect nozzle(0°, 15°, 25°, 40°), 4 type of water
jet shape shown as follow. Pls turn off the gun when changing nozzle, Move the stop ring
of the quick connector seat on the spray gun by left hand, and install the quick connect
nozzle onto spray gun quickly, loose the stop ring, and push back to original position.
- Warning: High pressure jets can be dangerous if subject to misuse. The jet must not
be directed at persons, live electrical equipment or the appliance itself.
- Warning:Do not direct the jet against yourself or others in order to clean clothes or
foot-wear.
- Waring: Spray gun must be turned off when changing nozzles
Step 4 Cleaning
Begin with the nozzle 1-2ft away from the surface and approach with caution until it
reaches the desired position for overly close spray may do harm to surface.
Warning: Do not connect the machine to water supplies that are dirty, rusty, muddy, or
corrosive.( Including window cleaning luquids, plant foods, or fertilizers etc.)
0° nozzle(red)
15° nozzle(yellow)
25° nozzle(green) 40° nozzle(white)
15
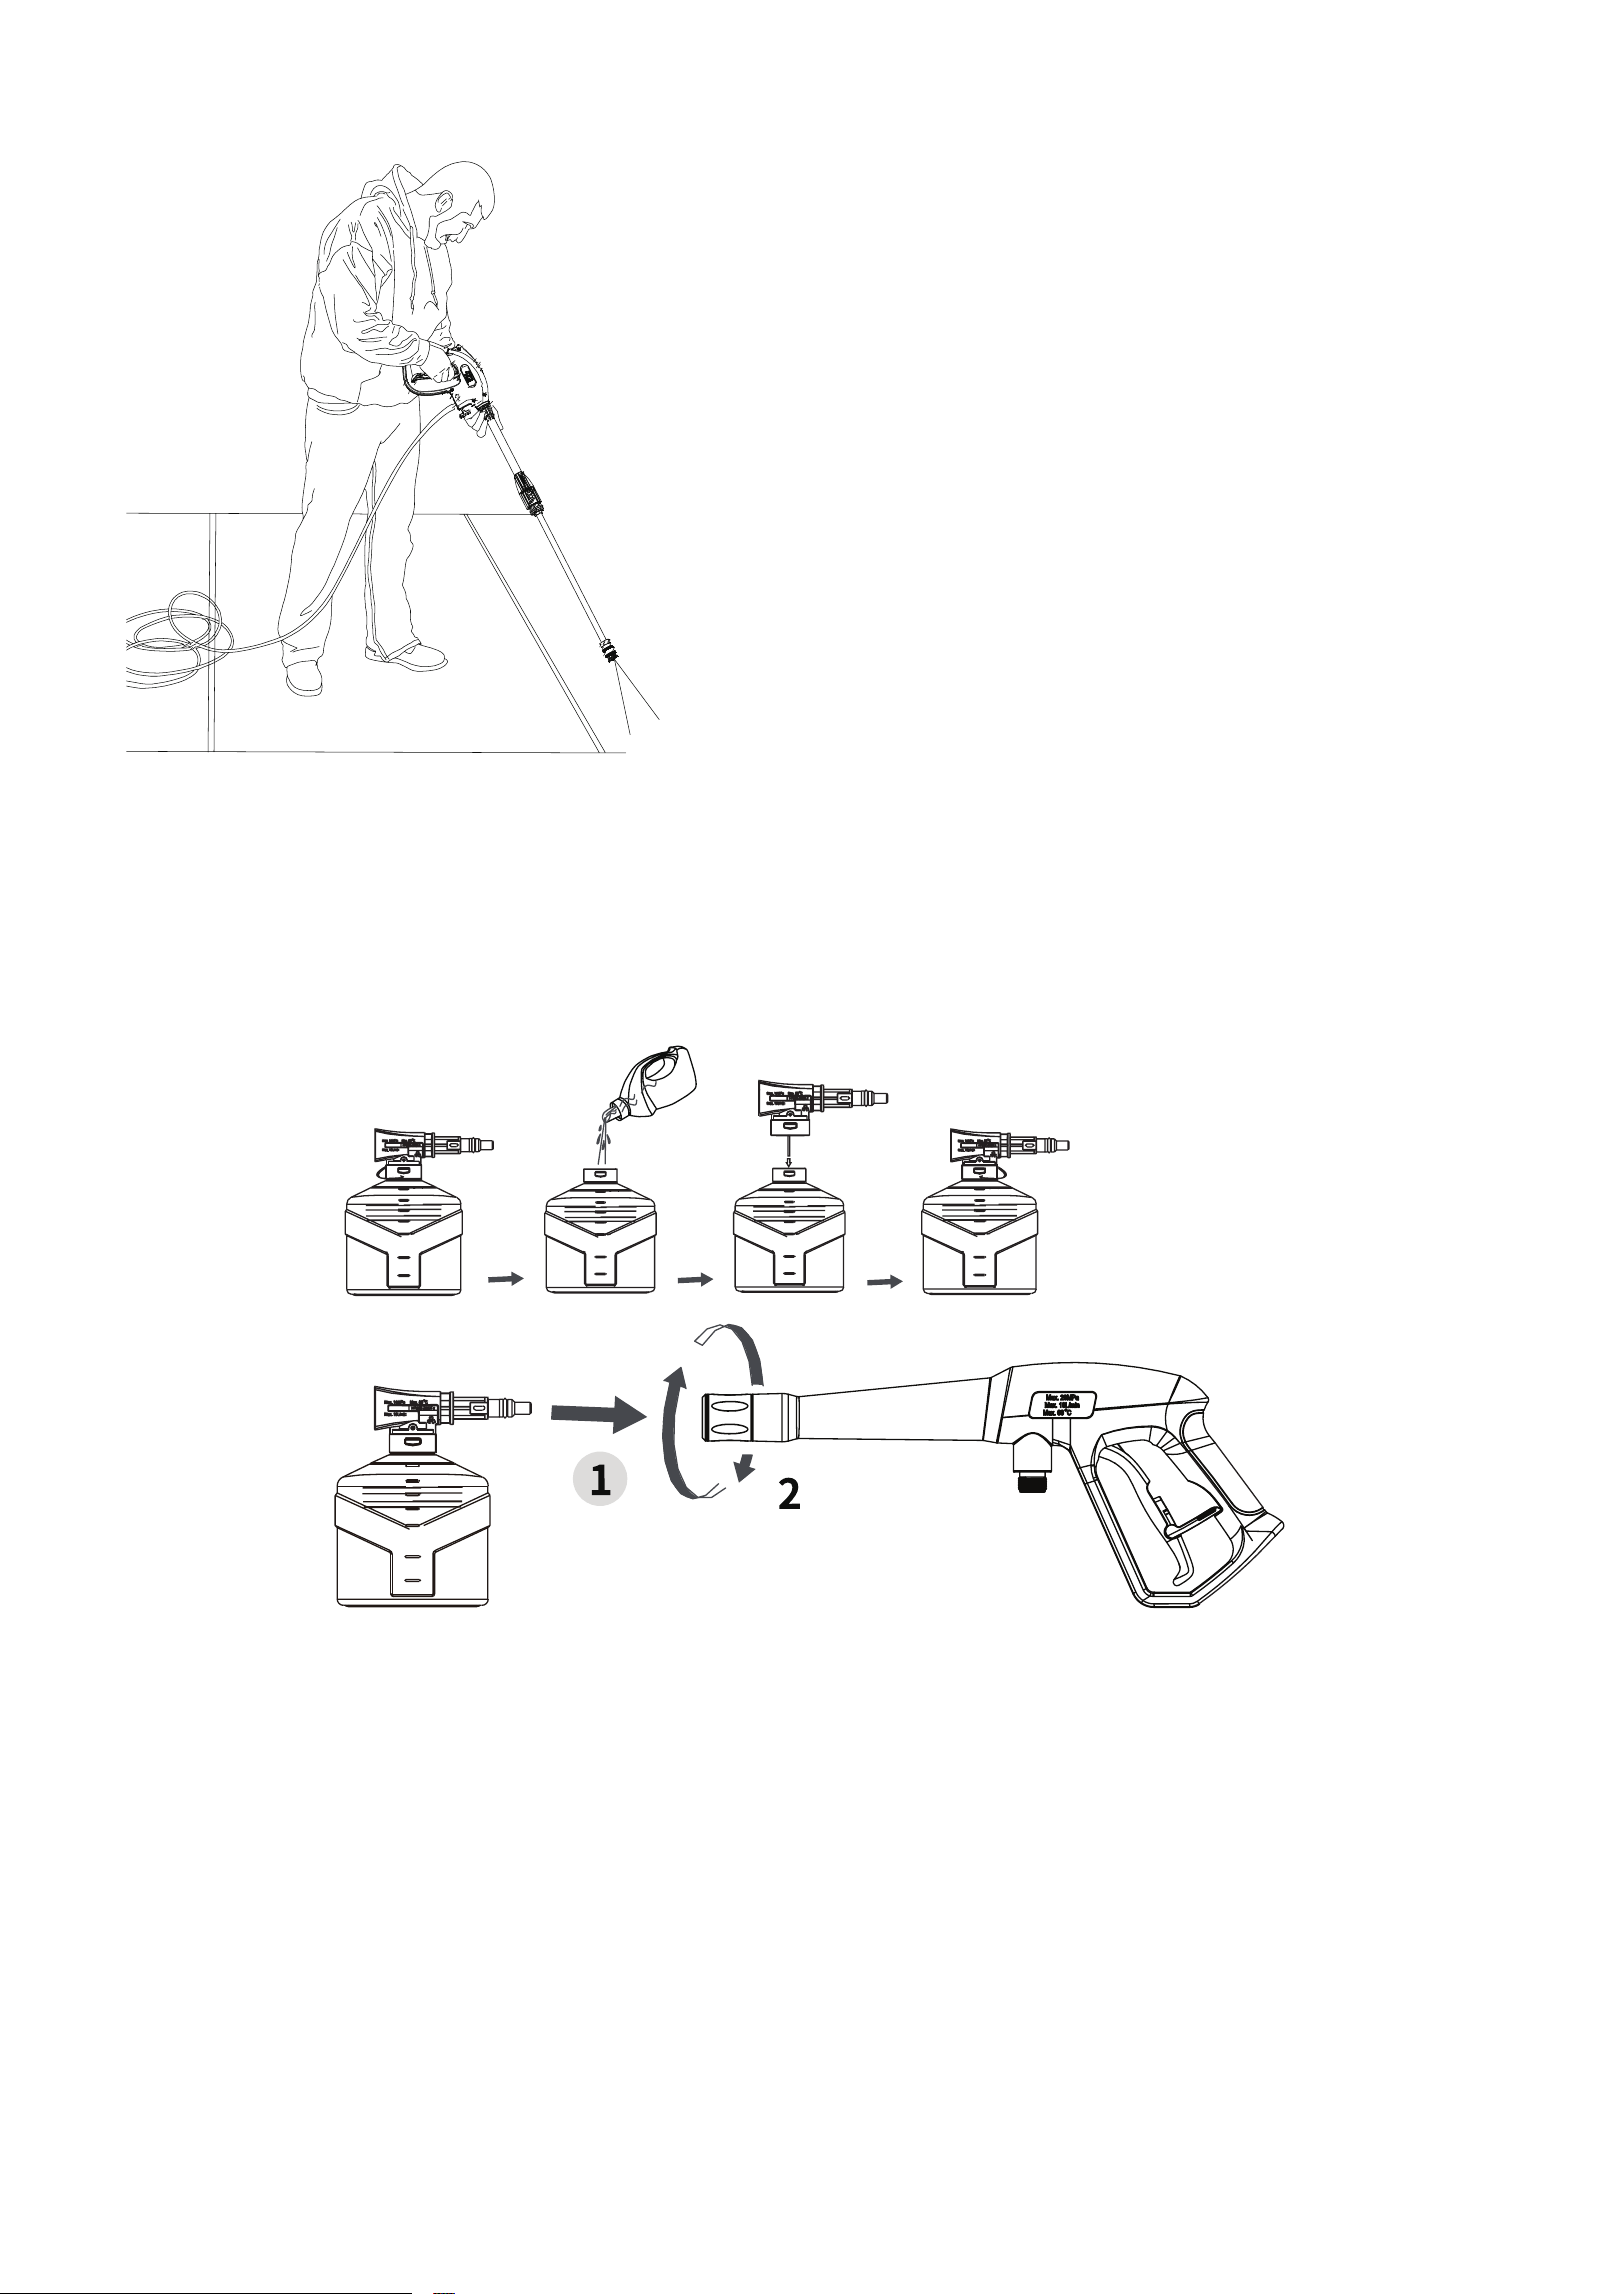
Step 5 Add and use detergent
a. Fill it with a properly formulated detergent or cleaner with a water ratio according to
instructions on the container. connect nozzle to wand.
b. Squeezel the wand trigger, detergent will come out through the nozzle.
c. Apply detergent so it thoroughly covers cleaning surface.
d. Allow detergent to remain on the surface for a few minutes. This is a good time to use a
brush to lightly scrub heavily soiled areas.
e. Change to spray nozzle, Rinse detergent from surface.
f. Cleaning up: Always draw fresh water through the detergent bottle when done to flush
any remaining detergents from the injection system. The bottle could be
detached if necessary in this process.
*This picture is for use only, please refer to the
actual machine you purchased.
16 17
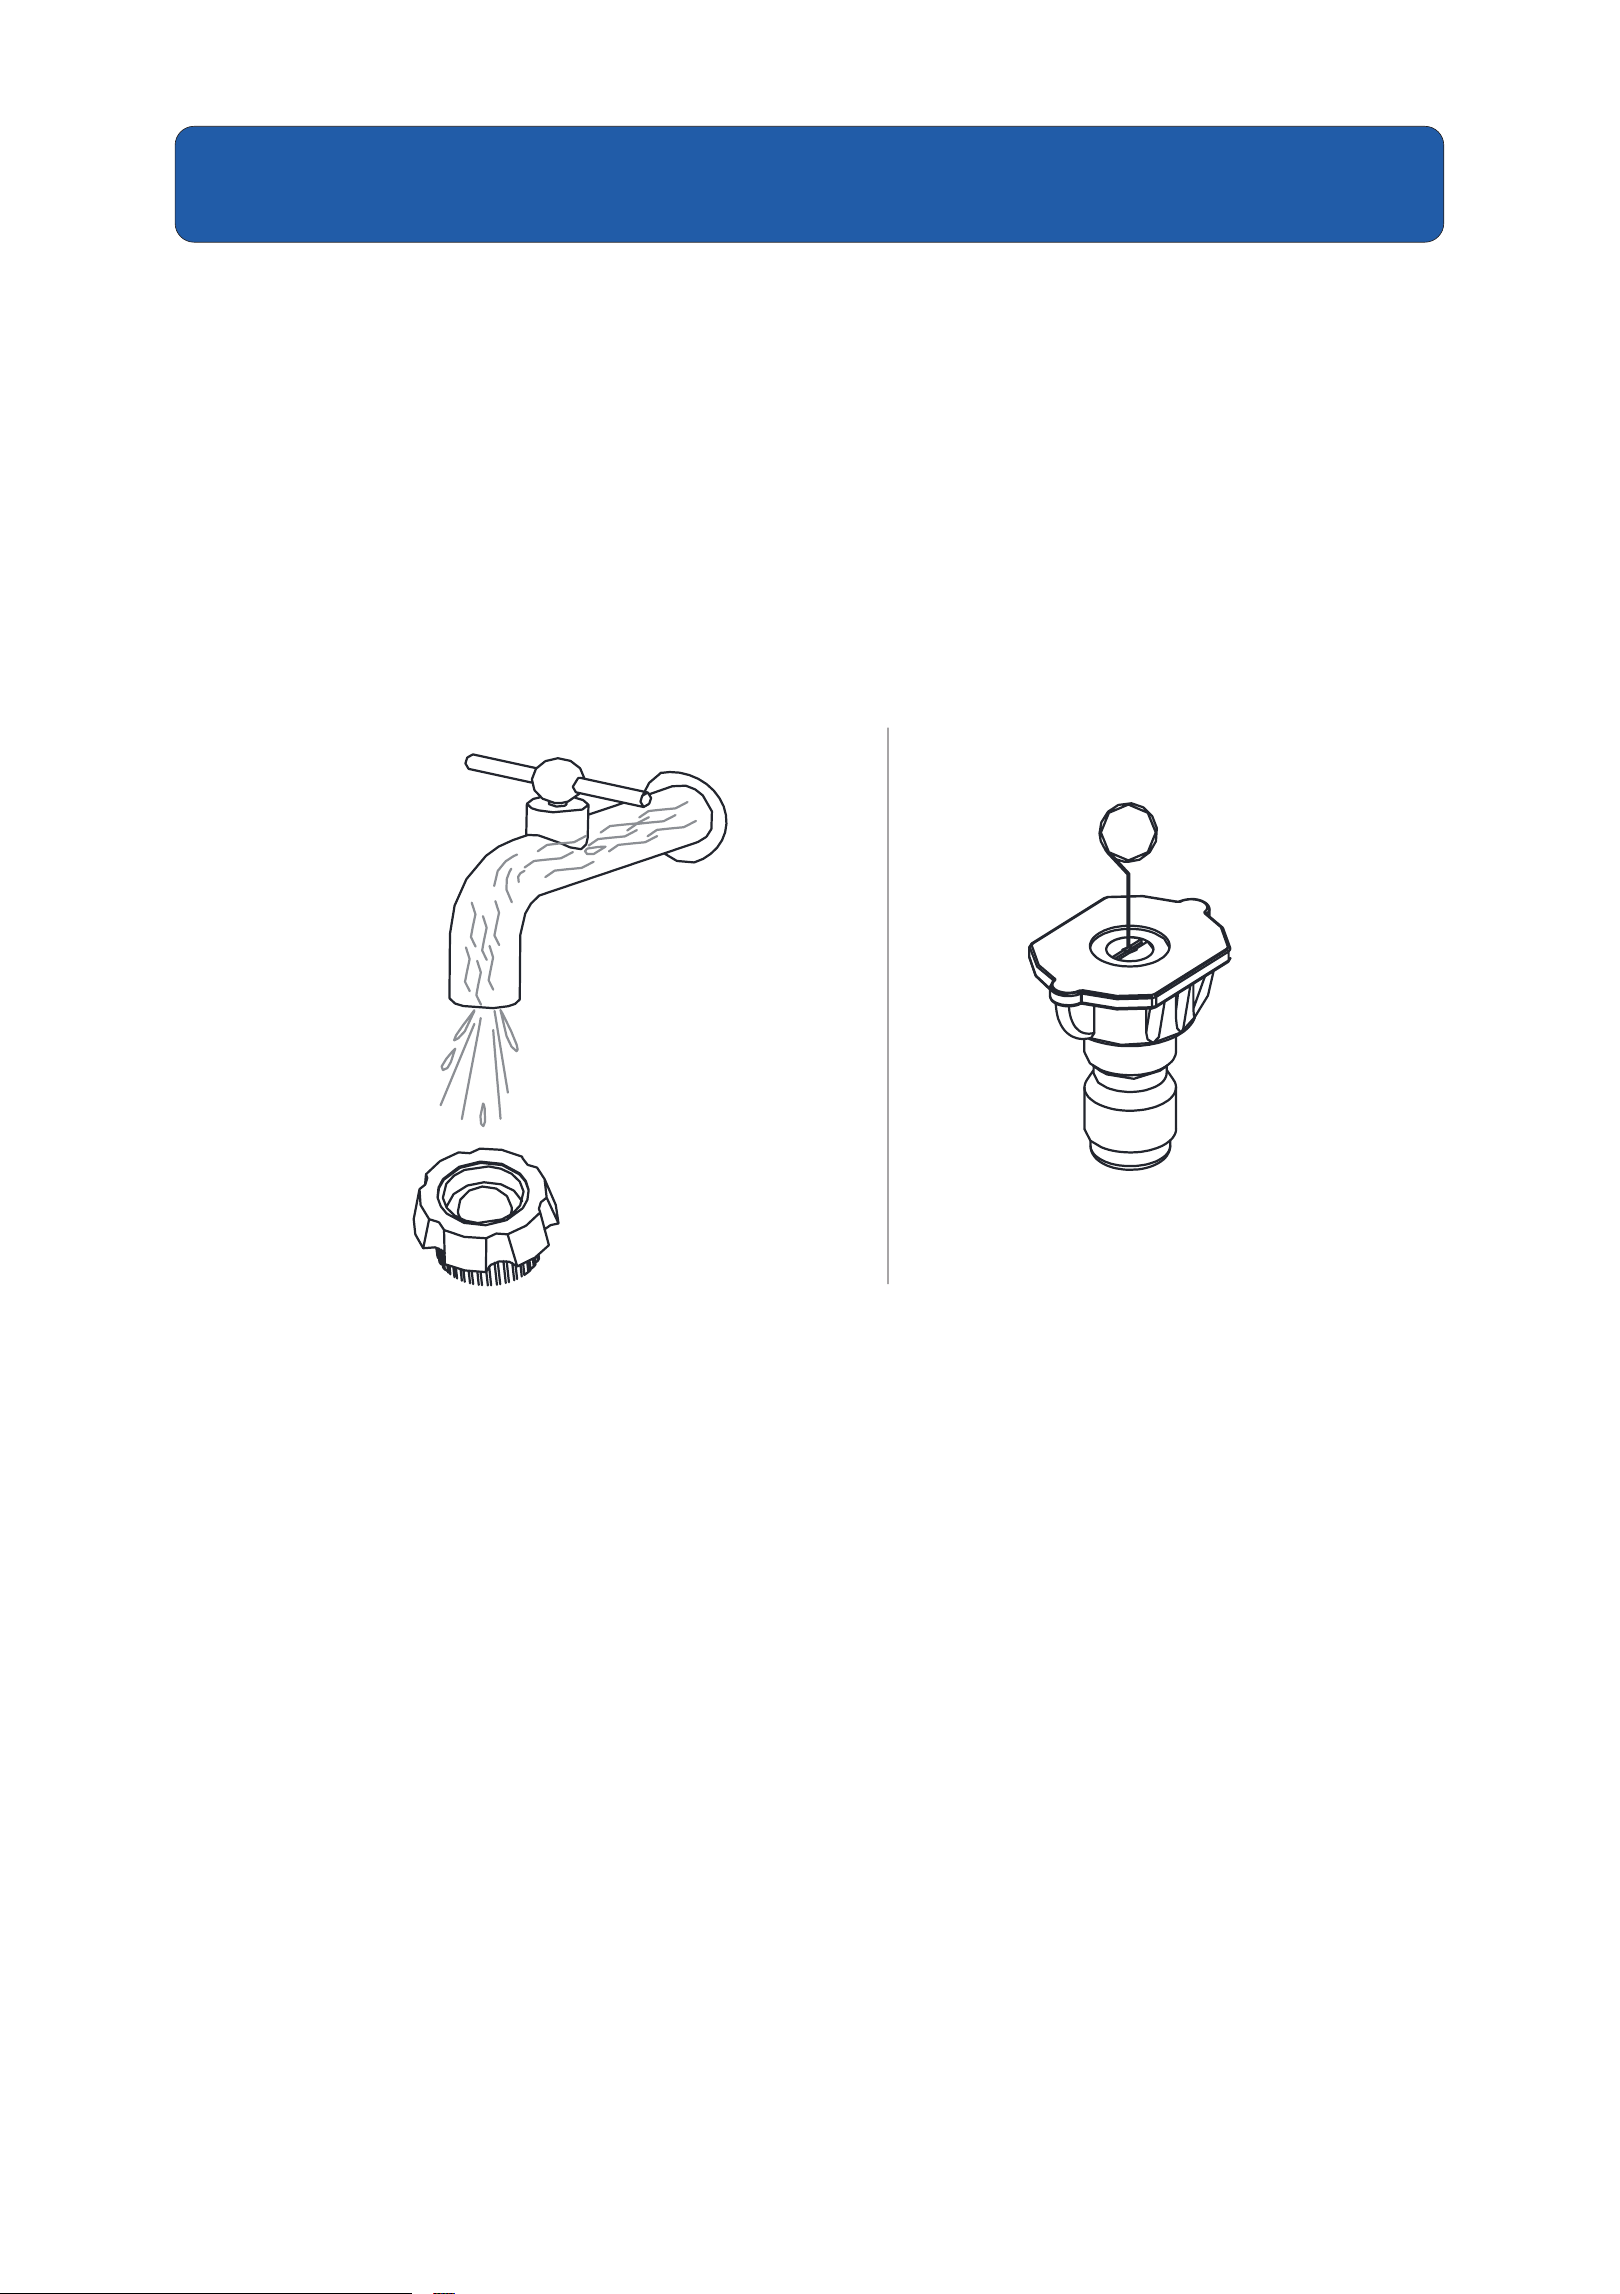
WATER FILTER AND NOZZLE CLEANING INSTRUCTIONS
Acloggedorparticallycloggedwaterfilterornozzlecancausesignificant reductionof
waterpressurecomingoutofthenozzleand/orcausetheunitto pulsatewhile spraying.
1.Thewaterfilterwasinstalledinsidethewaterinletquickconnector, shouldbe
cleanedperiodically. Rinseitwithcleantapwater,andthenplaceitbackintothe water
inlet quick connector.
2. Using the nozzle tip cleaner provided ( or an unfold paperclip), insert the wire into the
nozzle hole and move back and forth until debris is dislodged. Back flush water through
the nozzles using garden hose and highest pressure available (either standard water
nozzle or use your thumb over the nozzle to create water pressure for back flush ).
STORAGE
Do not store pressure washer outdoors.
Do not store pressure washer where it might freeze while there's water inside the
machine.
Serious damage will occur to the water system, pump and / or motor.
TIPS FOR EXTENDING THE LIFE OF YOUR PRESSURE WASHER
1. Never operate machine without water.
MAINTENANCE

17
2. Pressure washer is not meant to pump hot water.Never connect to hot water supply
this will significantly reduce life of the pump.
3. Using detergent other than those formulated for pressure washers may cause
damage to pump components (o-rings, etc.). This also applies to chemicals such as
bleach, dish soap, etc.
4. Never operate unit for more than one minute without spraying water. Resulting heat
buildup.
18 19
If you are interested in the above products, you can visit giraffetools.com or search for
Giraffe Tools on Amazon
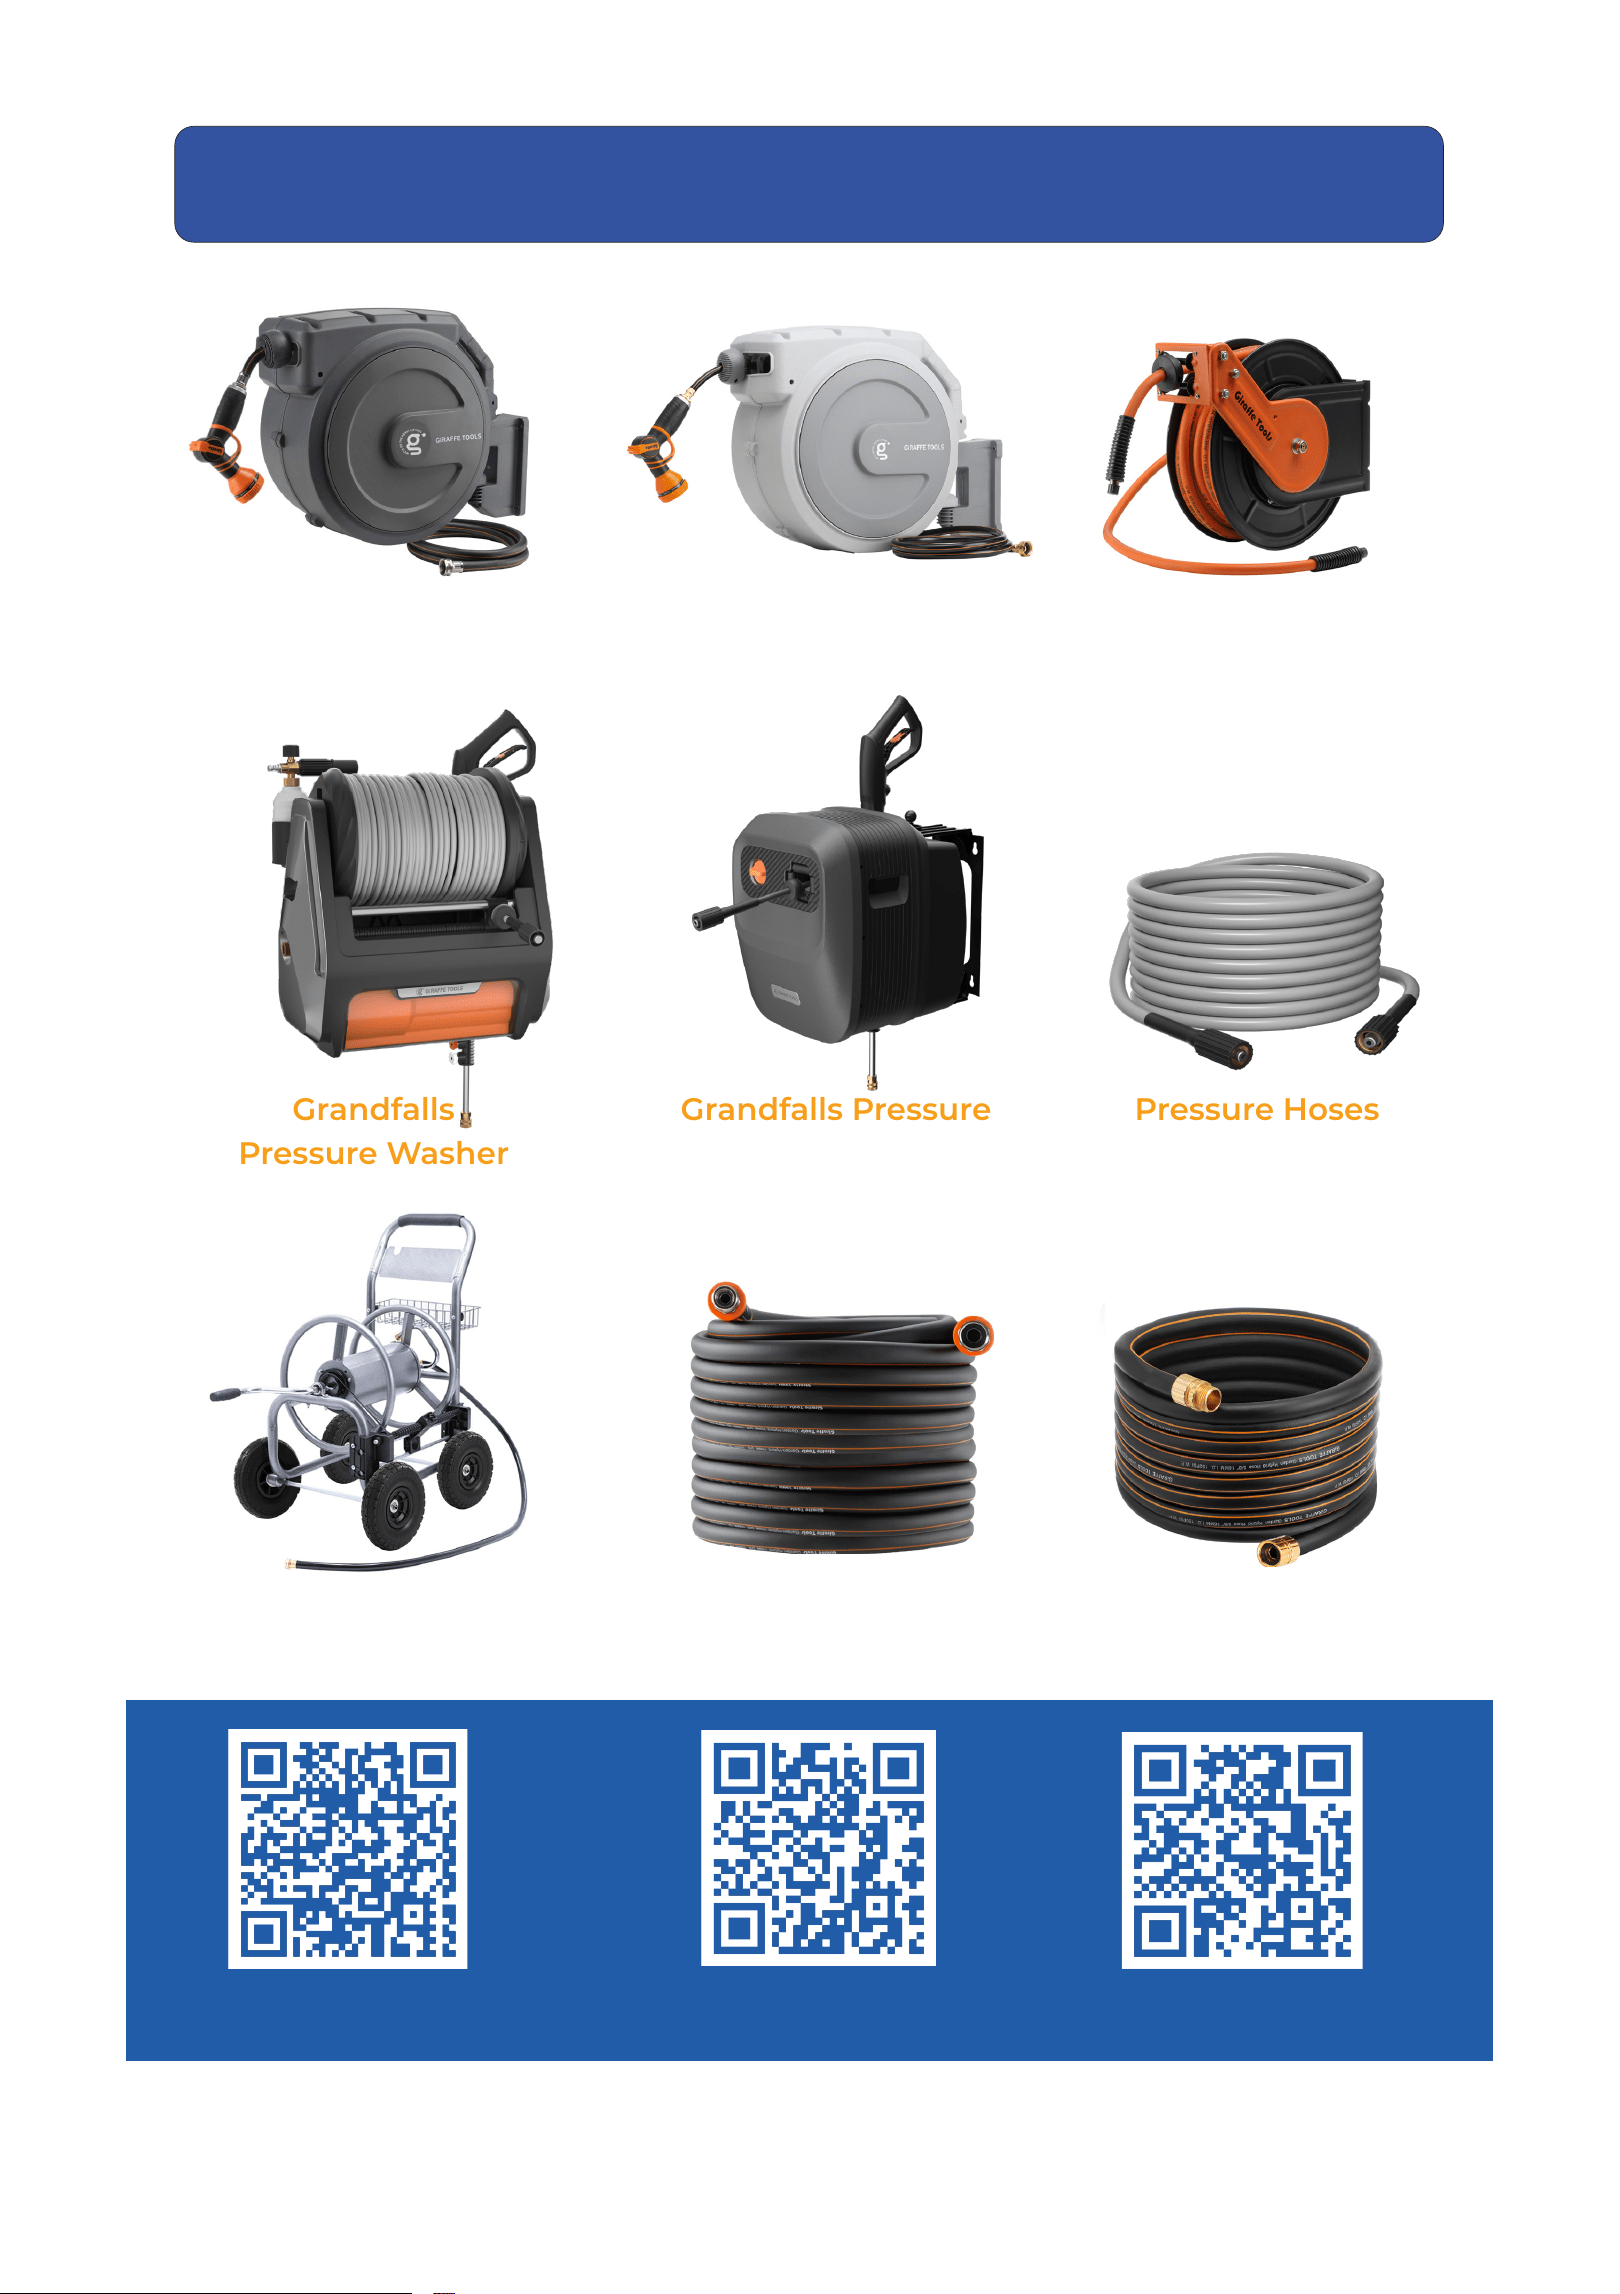
RECOMMENDED PRODUCTS
5/8" Retractable Hose
Reel, 60-115ft
1/2" Retractable Hose
Reel, 78-155ft
Retractable Air
Hose Reel
Grandfalls
Pressure Washer
Grandfalls Pressure
Washer, 65ft
Pressure Hoses
25-100ft
Hose Reel Cart
150-250ft
Hybrid Hose with
Swivel Grip 2.5-100ft
Customized Garden
Hose 6-100ft
Scan code to visit Giraffe Tools
store on Amazon.com
Scan code to visit giraffetools.com Scan code to join our
facebook group

19
WE WILL DO THE HEAVY LIFTING
giraffetools.com
service@giraffetools.com
To purchase Giraffe Tools products and more, visit giraffetools.com or
search for Giraffe Tools on Amazon.com.
+1 (833)583-0881
(9am - 5pm EST)
Complete your registration online for a
100 DAYS WARRANTY EXTENSION
