ISTRUZIONI PER L’USO
OPERATING INSTRUCTIONS
MODE D’EMPLOI
BEDIENUNGSANLEITUNG
INSTRUCCIONES DE USO
INSTRUÇÕES DE UTILIZAÇÃO
LEGGERE
ATTENTAMENTE
LE ISTRUZIONI
READ THE
INSTRUCTIONS
CAREFULLY
LIRE
ATTENTIVEMENT
LES INSTRUCTIONS
DIE
BEDIENUNGSANLEITUNG
AUFMERKSAM LESEN
LEER ATENTAMENTE
LAS INSTRUCCIONES
LER ATENTAMENTE
AS INSTRUÇÕES

45
E N
SAFETY
Intended use:
This appliance is intended to be used in household and similar applications such
as:
– staff kitchen areas in shops, offices and other working environments;
– farm houses;
– by clients in hotels, motels and other residential type environments;
– bed and breakfast type environments.
The improper use of the machine may cause possible injuries.
It is prohibited to make any technical changes to the machine.
The machine may not be used by children under 8 years of age or persons with
physical, sensory or mental impairment, or lacking the necessary experience, unless
supervised or after being instructed in the safe use of the machine and understanding
the potential dangers.
Do not let children play with the machine. Keep the machine and its mains lead
out of the reach of children under 8 years of age.
The necessary cleaning and maintenance meant to be performed by the user
must not be carried out by children if not under direct supervision and older than
8 years.
Installation site:
Place the coffee machine in a safe place, where nobody may overturn it or be
injured by it. Do not keep the machine at a temperature below 41°F (5°C) as
freezing may damage it. Do not use the coffee machine outdoors.
Do not place the machine on very hot surfaces or close to flames.
The coffee machine shall not be stored inside a cabinet when it’s in use.
Power supply:
The coffee machine shall be connected only to adequate power sockets equipped
with grounding means.
The voltage must match the one on the appliance identification plate.

46
I TE N
Power supply cable
:
Do not operate the coffee machine if the power cord is damaged. If the power
cord is damaged, it must be replaced by the manufacturer
(or the latter’s technical
service staff)
or, in any case, by a person duly qualified to do that, in order to
prevent any risk. Do not pass the power cable for angles and sharp edges, over
very hot objects, and protect it from oil. Do not carry or pull the coffee machine
holding it by the power cord. Do not remove the plug by pulling the power cord,
do not touch it with wet hands. Power cord should not hang loose from tables or
shelves
.
Danger of electrocution:
Live parts should never come into touch with water.
Do not immerse the machine
.
Protect children under 8 years of age
:
Prevent children from playing with the machine.
Children are not aware of the risks related to electric household appliances.
Do not leave the machine packaging materials within the reach of children
.
Danger of burns:
Do not touch the hot parts (cartridge holder group) of the machine immediately
after use.
While dispensing the drink, pay attention to any possible splashes of
hot liquid.
Cleaning:
Before cleaning, unplug the machine and let it cool down.
Do not immerse the machine in water! It is strictly forbidden to tamper with the
internal parts of the machine. Change the water in the tank if not used for 3 days.
To prevent damage to the appliance do not use alkaline cleaning agents when
cleaning, use a soft cloth and a mild detergent.
SAFETY
47
E N
SAFETY
Storing the machine:
If the machine remains inactive for a long time, unplug it and store it in a dry
place out of reach of children. Keep it protected from dust and dirt.
Servicing / Maintenance:
I
n case of failure, problems or a suspected fault resulting from falling of the machine,
immediately unplug the machine.
Do not attempt to operate a faulty machine.
Only the authorized Lavazza Service Centres can carry out the necessary ope-
rations and repairs. Lavazza will not be responsible for possible damage resulting
from repairs and operations not carried out by them.
Water tank:
Fill the tank only with fresh, non-sparkling, drinking water. Do not operate the
machine if the water is not at least above the minimum level indicated on the tank.
Capsule compartment:
Only Lavazza or compatible capsules must be introduced in the
capsule-holder; do not put in your fingers or any other object.
The capsules shall be used only once.
Machine disposal at the end of its operational life:
INFORMATION FOR THE USER: the symbol of the crossed-out wheeled bin
on the appliance or its packaging indicates that the product must be disposed of
separately from other waste at the end of its operational life.
The user must therefore take the appliance to be disposed of to an appropriate
separate collection centre for electrical and electronic equipment.
Appropriate separate waste collection, in view of the decommissioned equip-
ment’s recycling, processing and environment-friendly disposal, helps avoiding
possible adverse effects both on the environment and the public health and,
also, promotes the reuse and/or recycling of the materials the machine is made
up of. Specific administrative sanctions provided for by current regulations will
be applied for illicit disposal of the product by the user.
48
I TE N
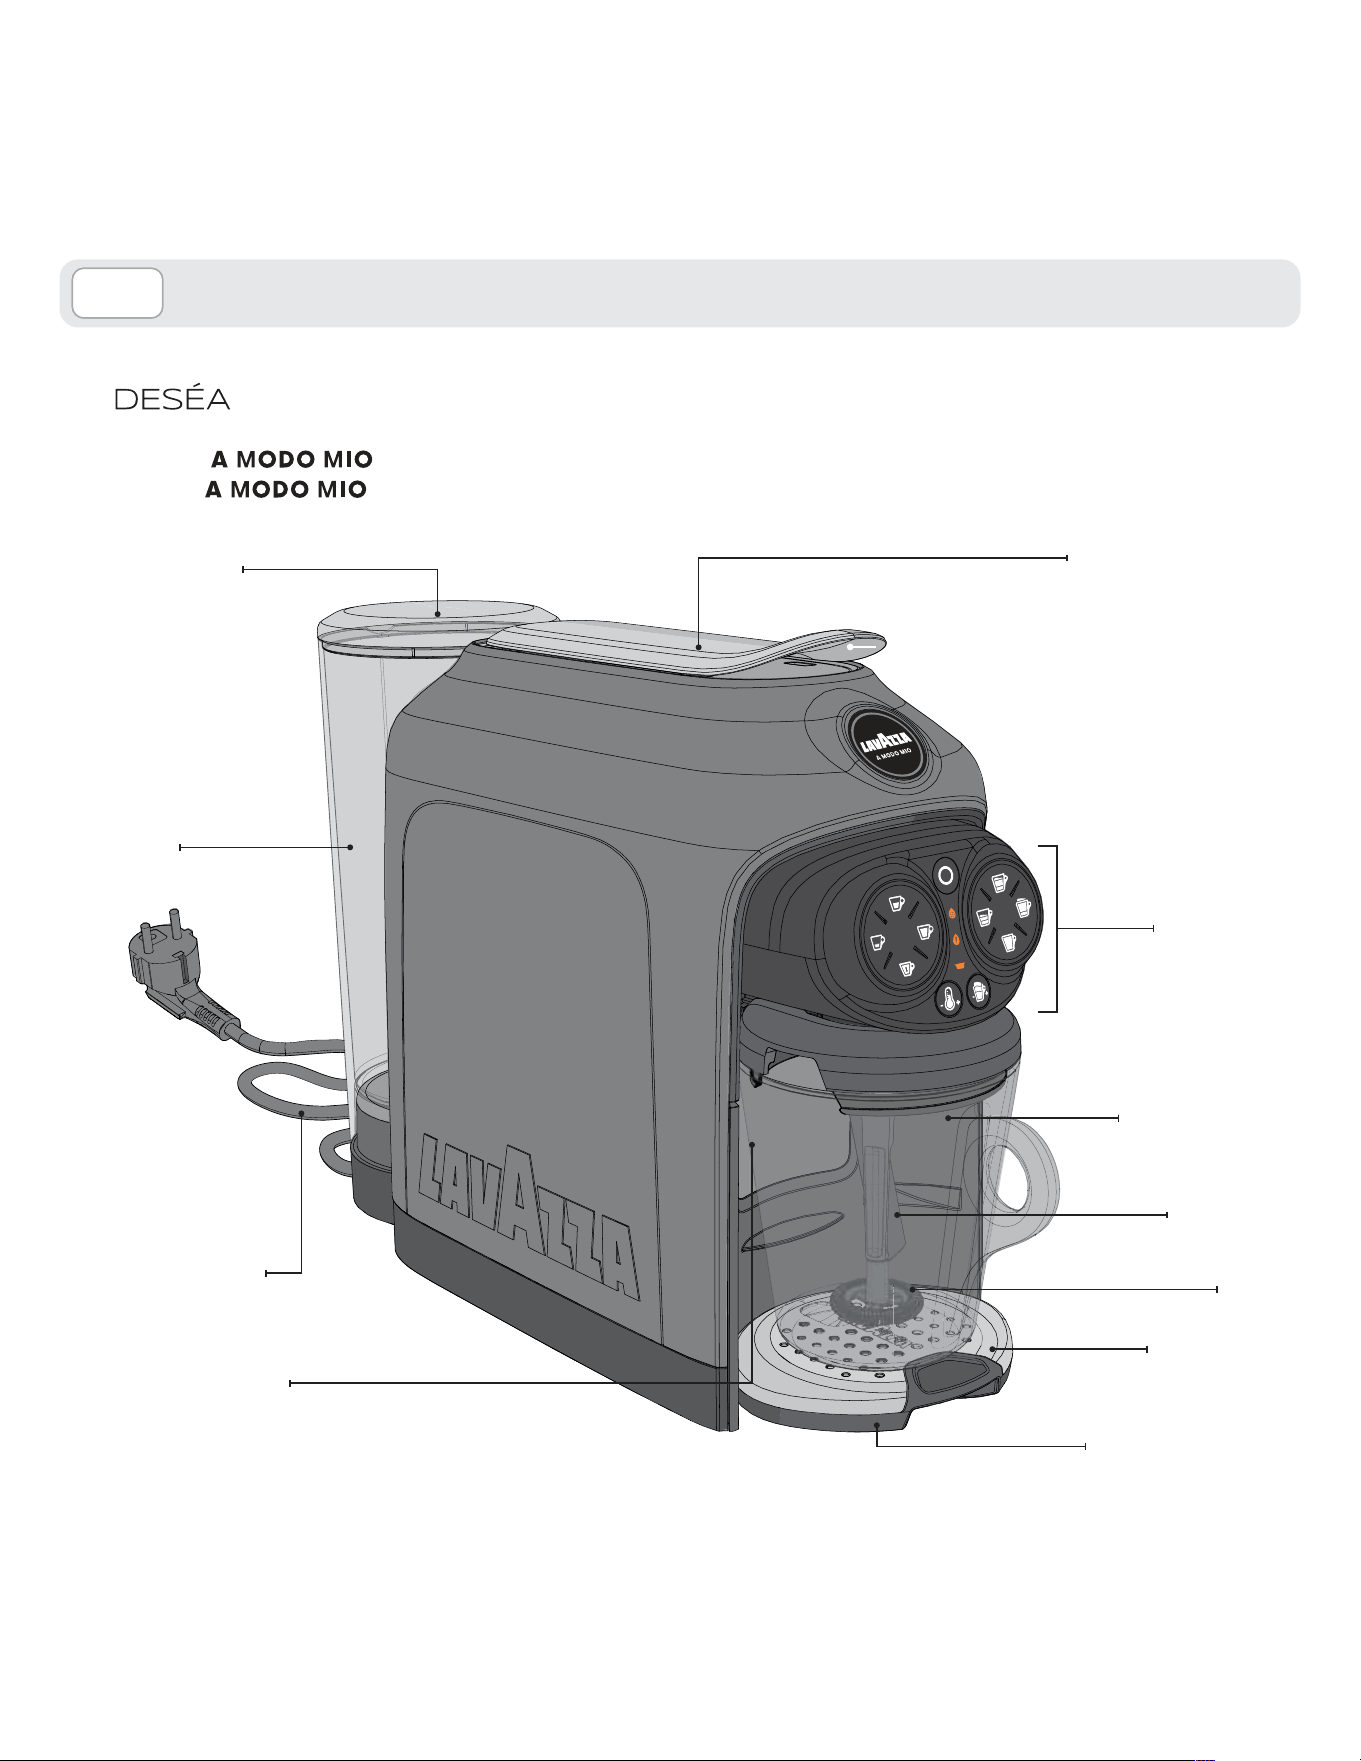
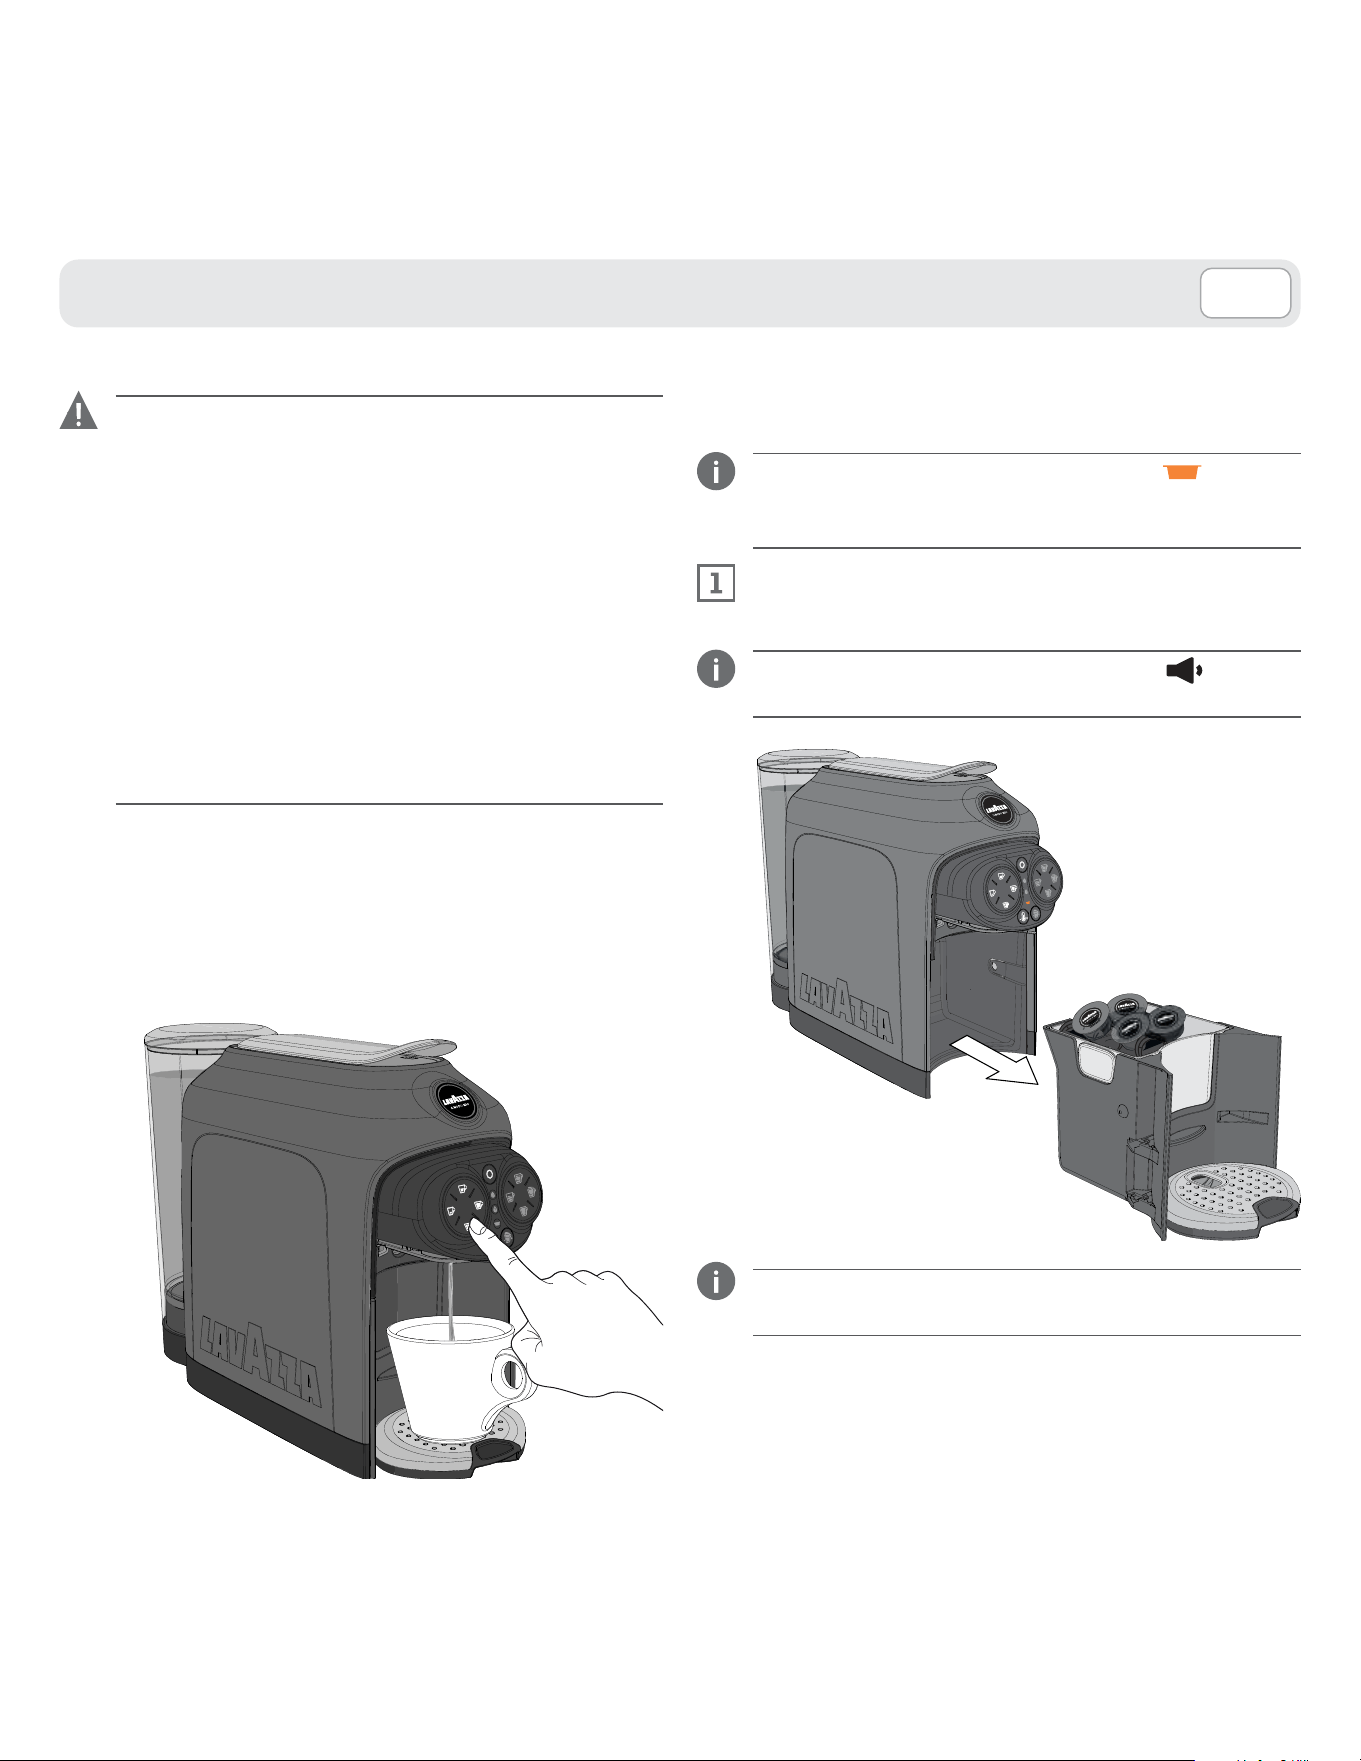
MACHINE COMPONENTS
•
machine
• Welcome kit consisting of 9 assorted
Lavazza capsules and a
Lavazza leaflet (included only
in some countries)
• Instruction booklet
• Quick guide
• Warranty sheet
PACKAGE CONTENT *
*�The characteristics and the package content can vary according to the target market.
Capsule loading lever
Touch control
interface
Water tank cover
Water tank
Plate with cup
support grid
Power supply cable
Used capsule drawers
Drop collection tray
Milk frothing jug
Steam wand
Beater
49
E N
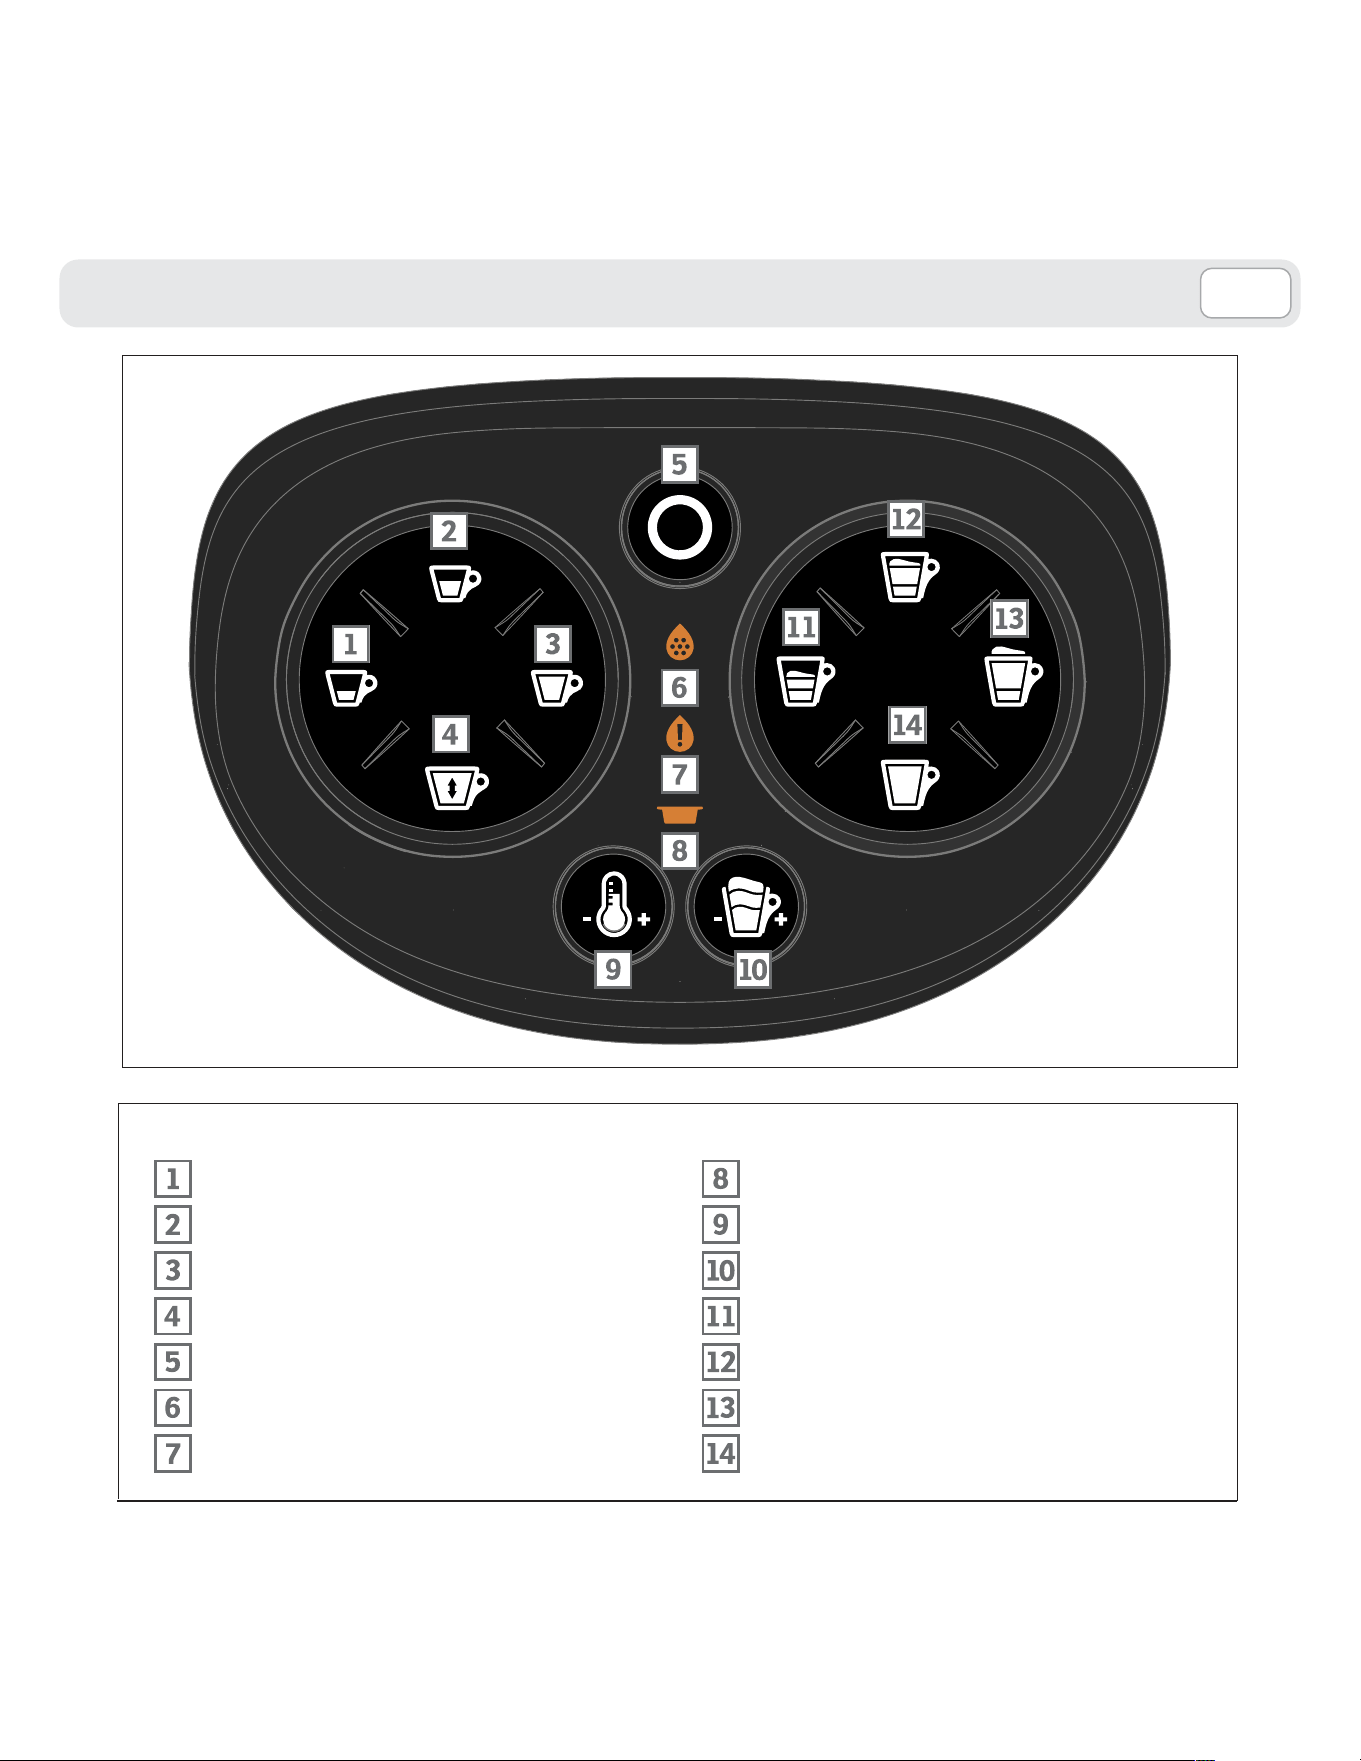
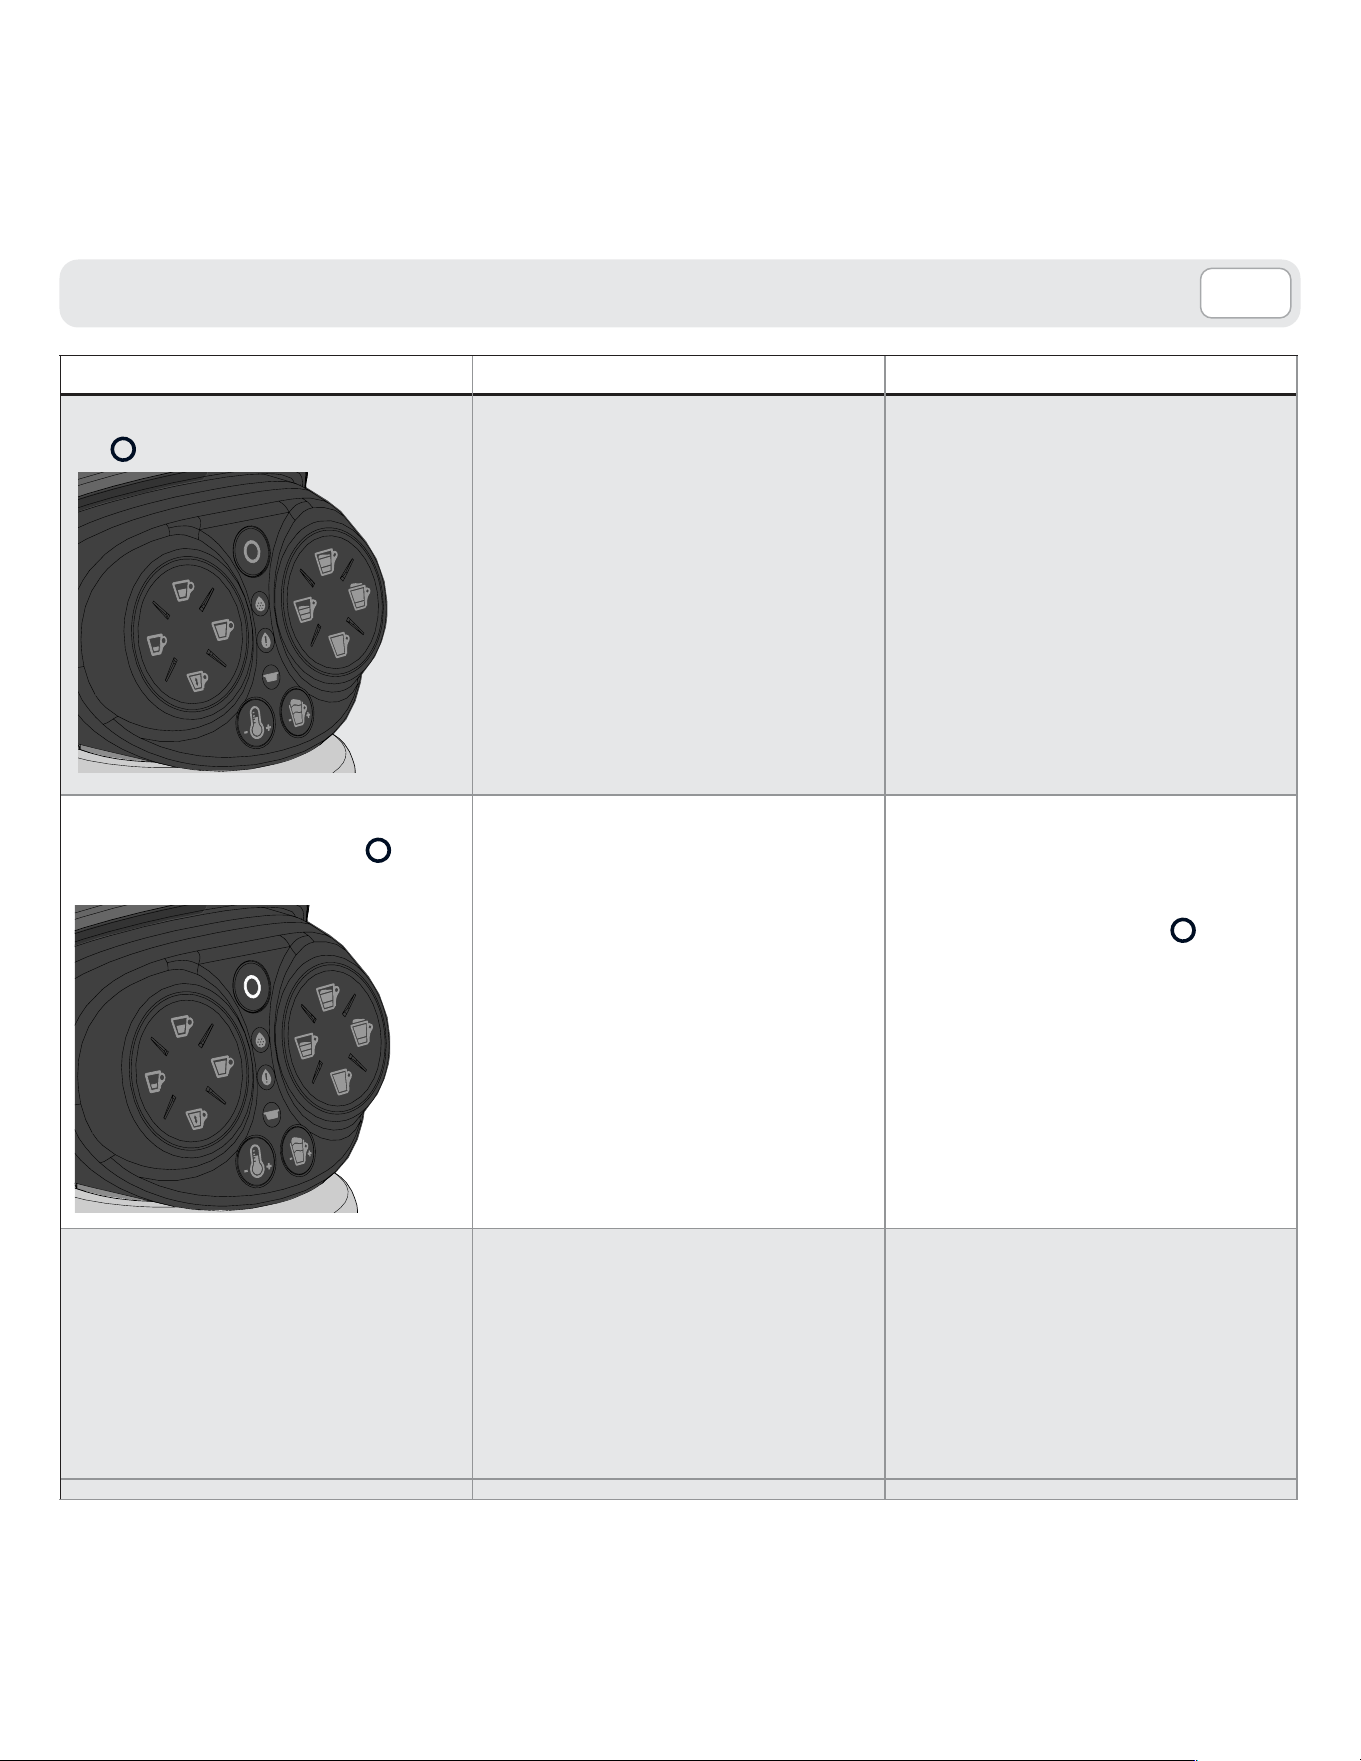
CONTROLS
TOUCH CONTROL INTERFACE
ESPRESSO supply button
LONG ESPRESSO supply button
LONG COFFEE supply button
FREE DOSE BEVERAGE supply button
On / Stand-by button
Warning light decalcification
Warning light no water
Warning light drip tray drawer
TEMPERATURE boost button
FOAM control button
CAPPUCCINO supply button
CAPPUCCINO LARGE supply button
MILK MACCHIATO supply button
HOT / COLD WHIPPED MILK
supply button
50
I TE N
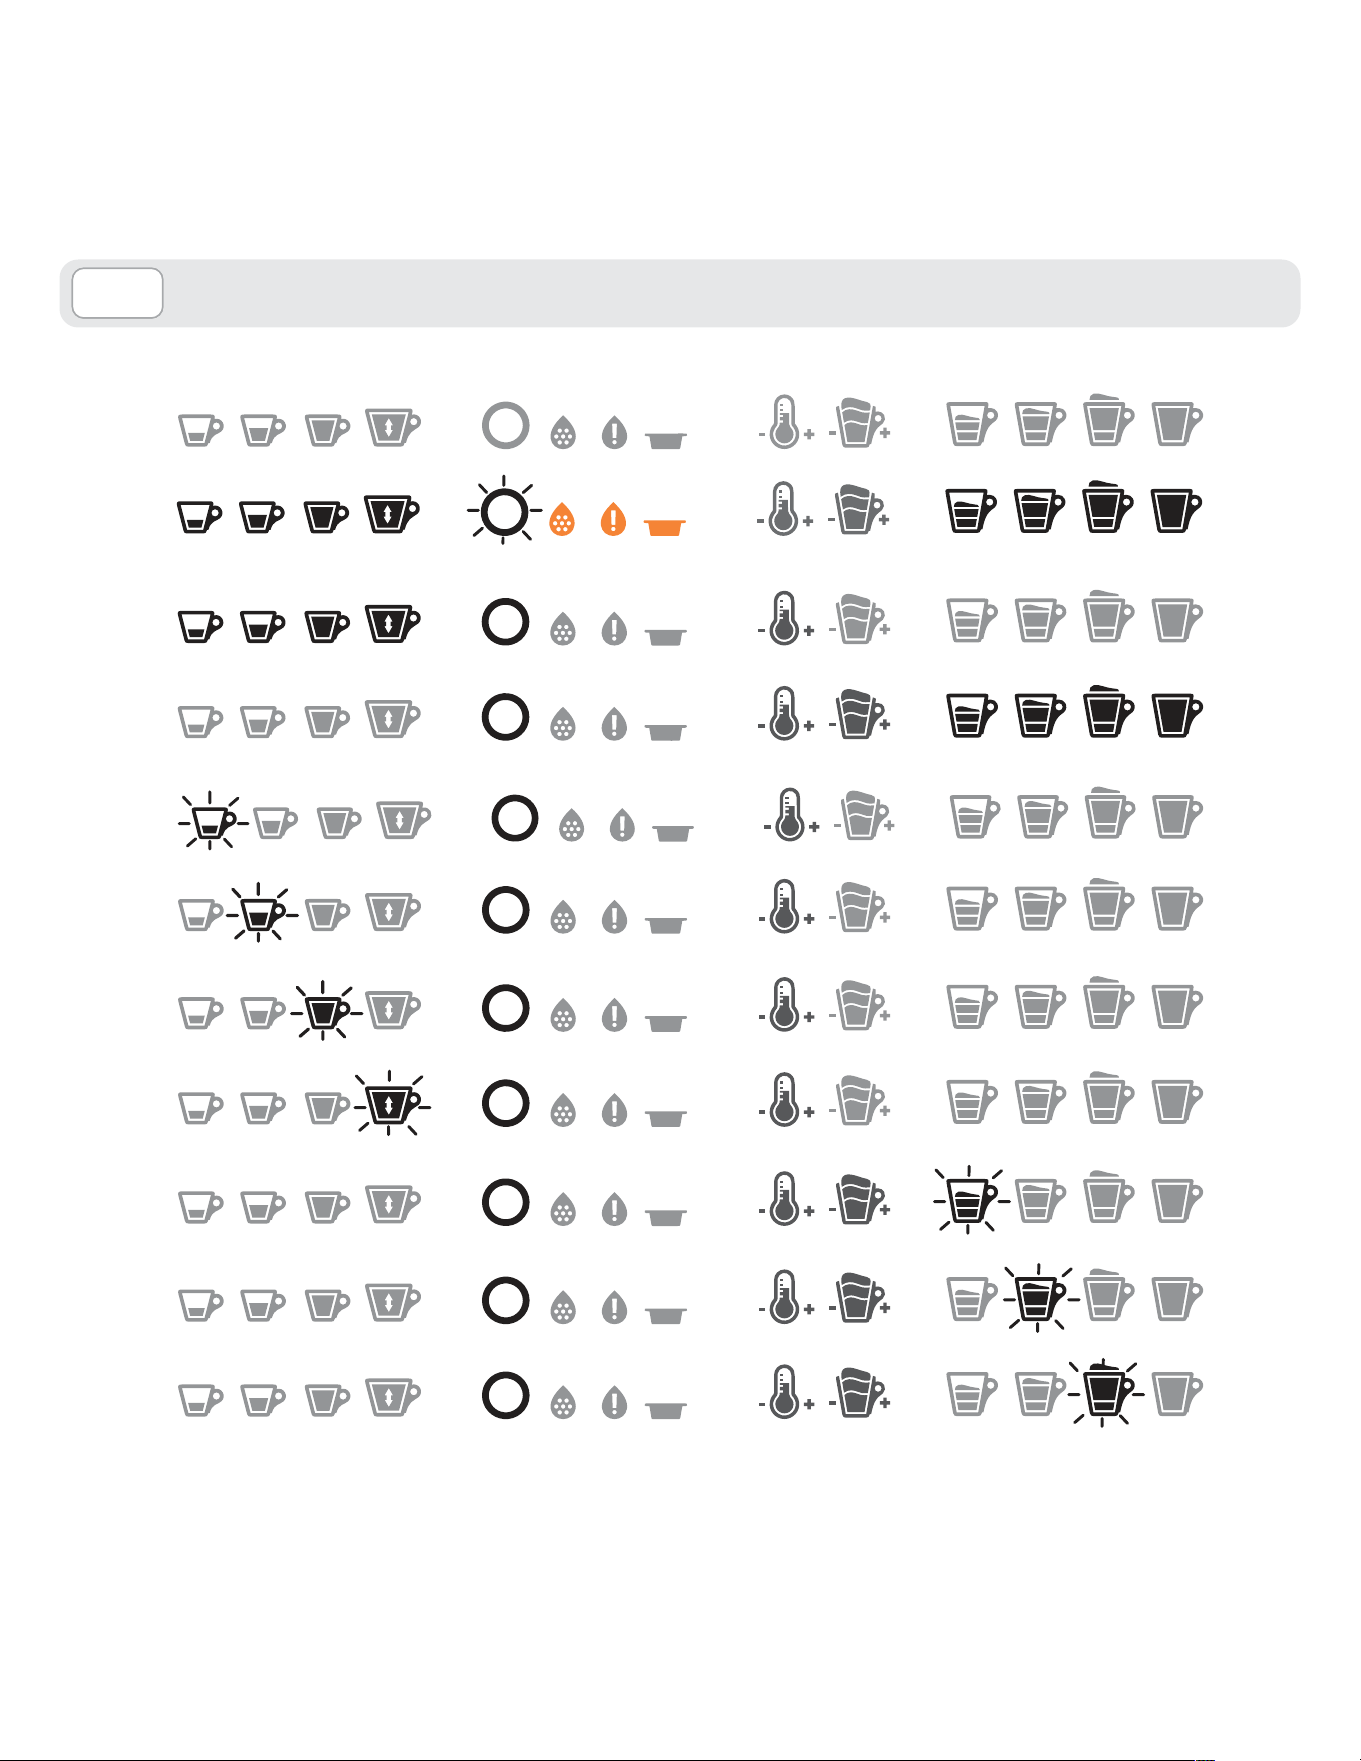
INDICATOR LIGHTS
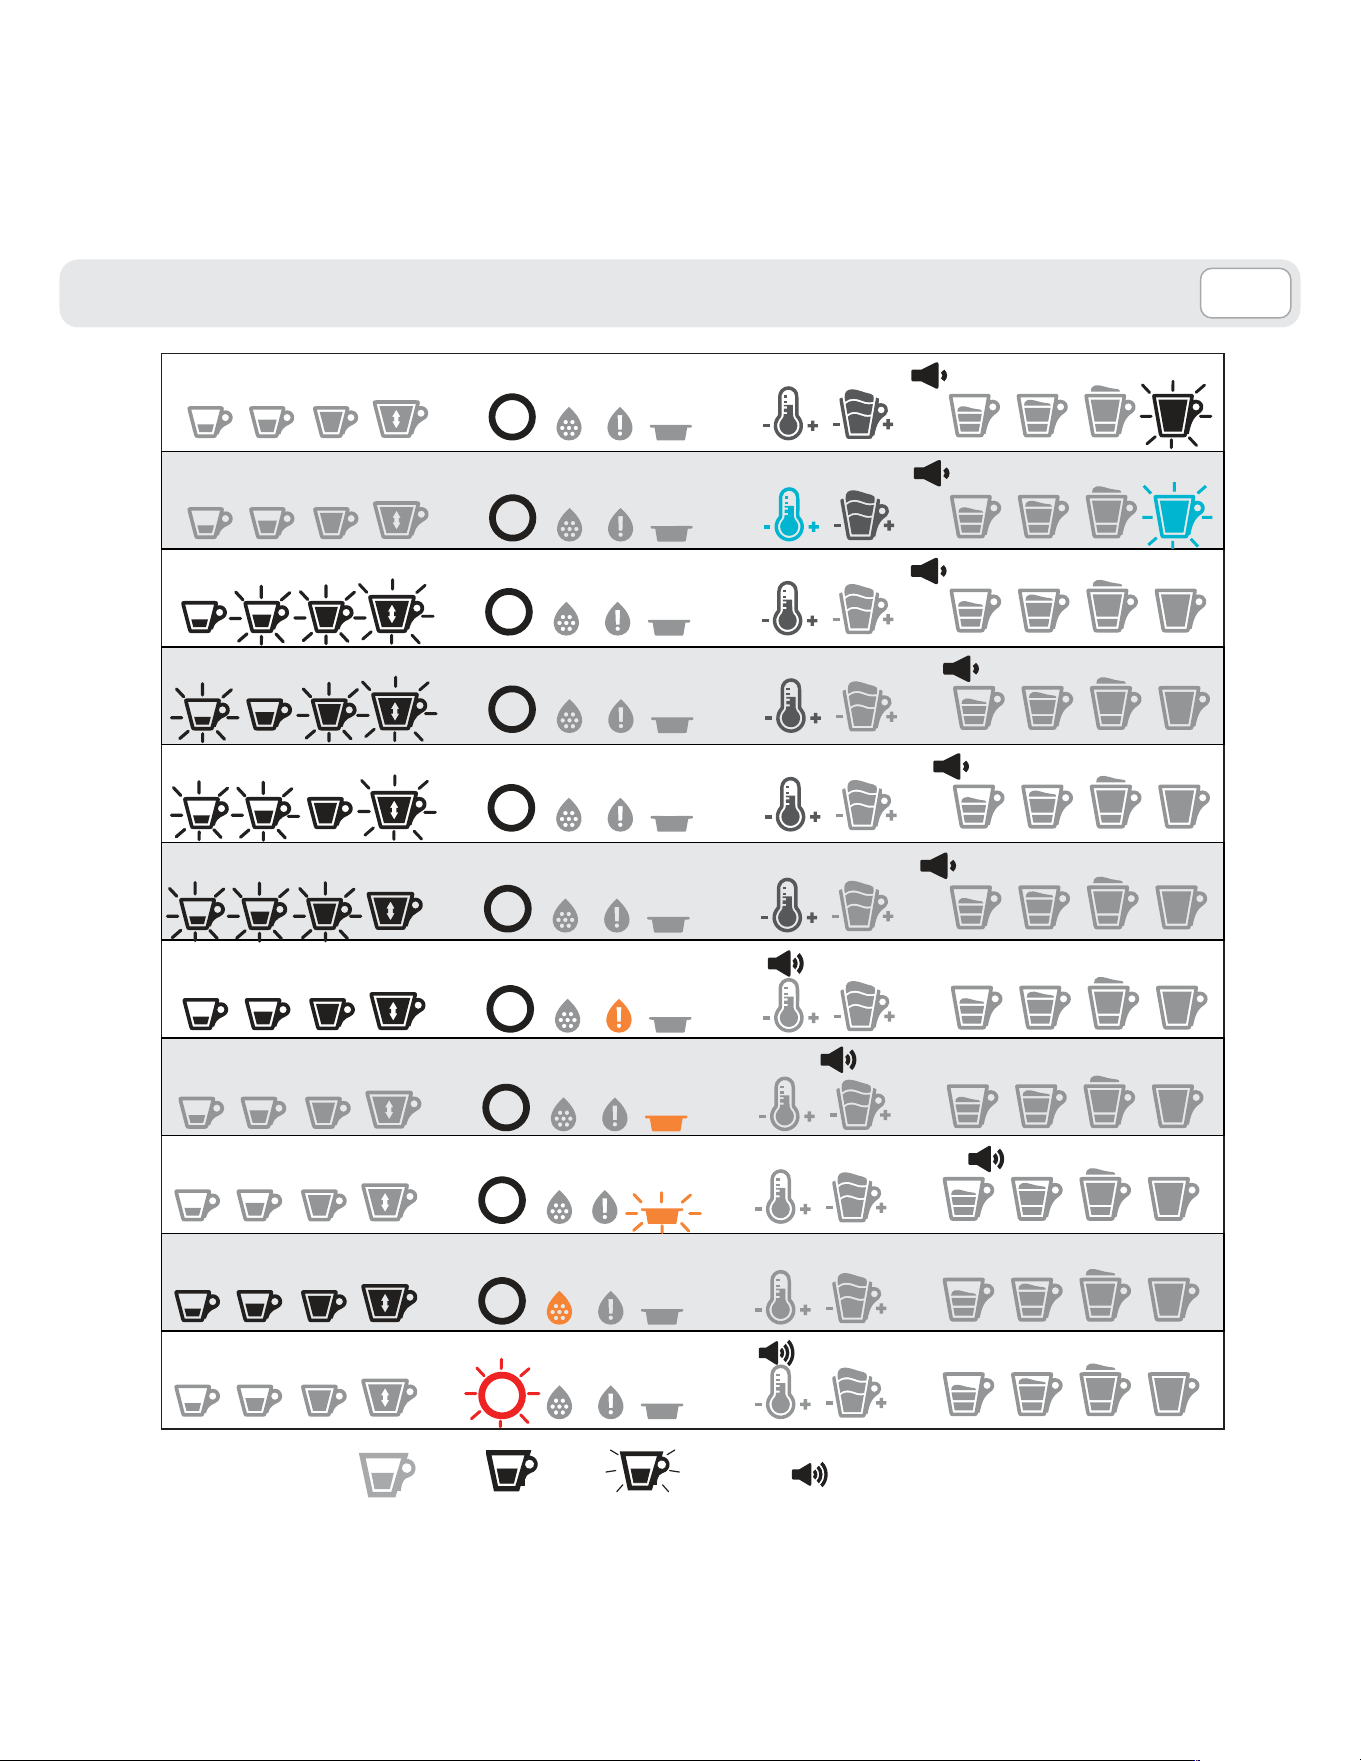
51
E N
INDICATOR LIGHTS
Delivering Hot Whipped Milk (button 14)
Delivering Cold Whipped Milk (button 14)
Programming Espresso measure (button 1)
Programming Long Espresso measure (button 2)
Programming Long Co�ee measure (button 3)
Programming Free Dose measure (button 4)
No water in tank
Used capsule drawer filled
Used capsule drawer positioned incorrectly or absent
Descaling required
Machine Block
= O�� = On� = Flashing� = Acoustic feedback
52
I TE N
We are not liable for any damages in case of:
• incorrect use and other uses than the intended
purposes;
• repairs not carried out at Lavazza authorized
service centers;
• tampering;
• use of spare parts and accessories which are not
original;
• failure to decalcify;
• storage in rooms below 39°F (4°C);
• use below 41°F (5°C);
• use over 104°F (40°C);
• use in places with relative humidity above 95%;
• using non-compatible capsules.
In any of these cases, the warranty is cancelled.
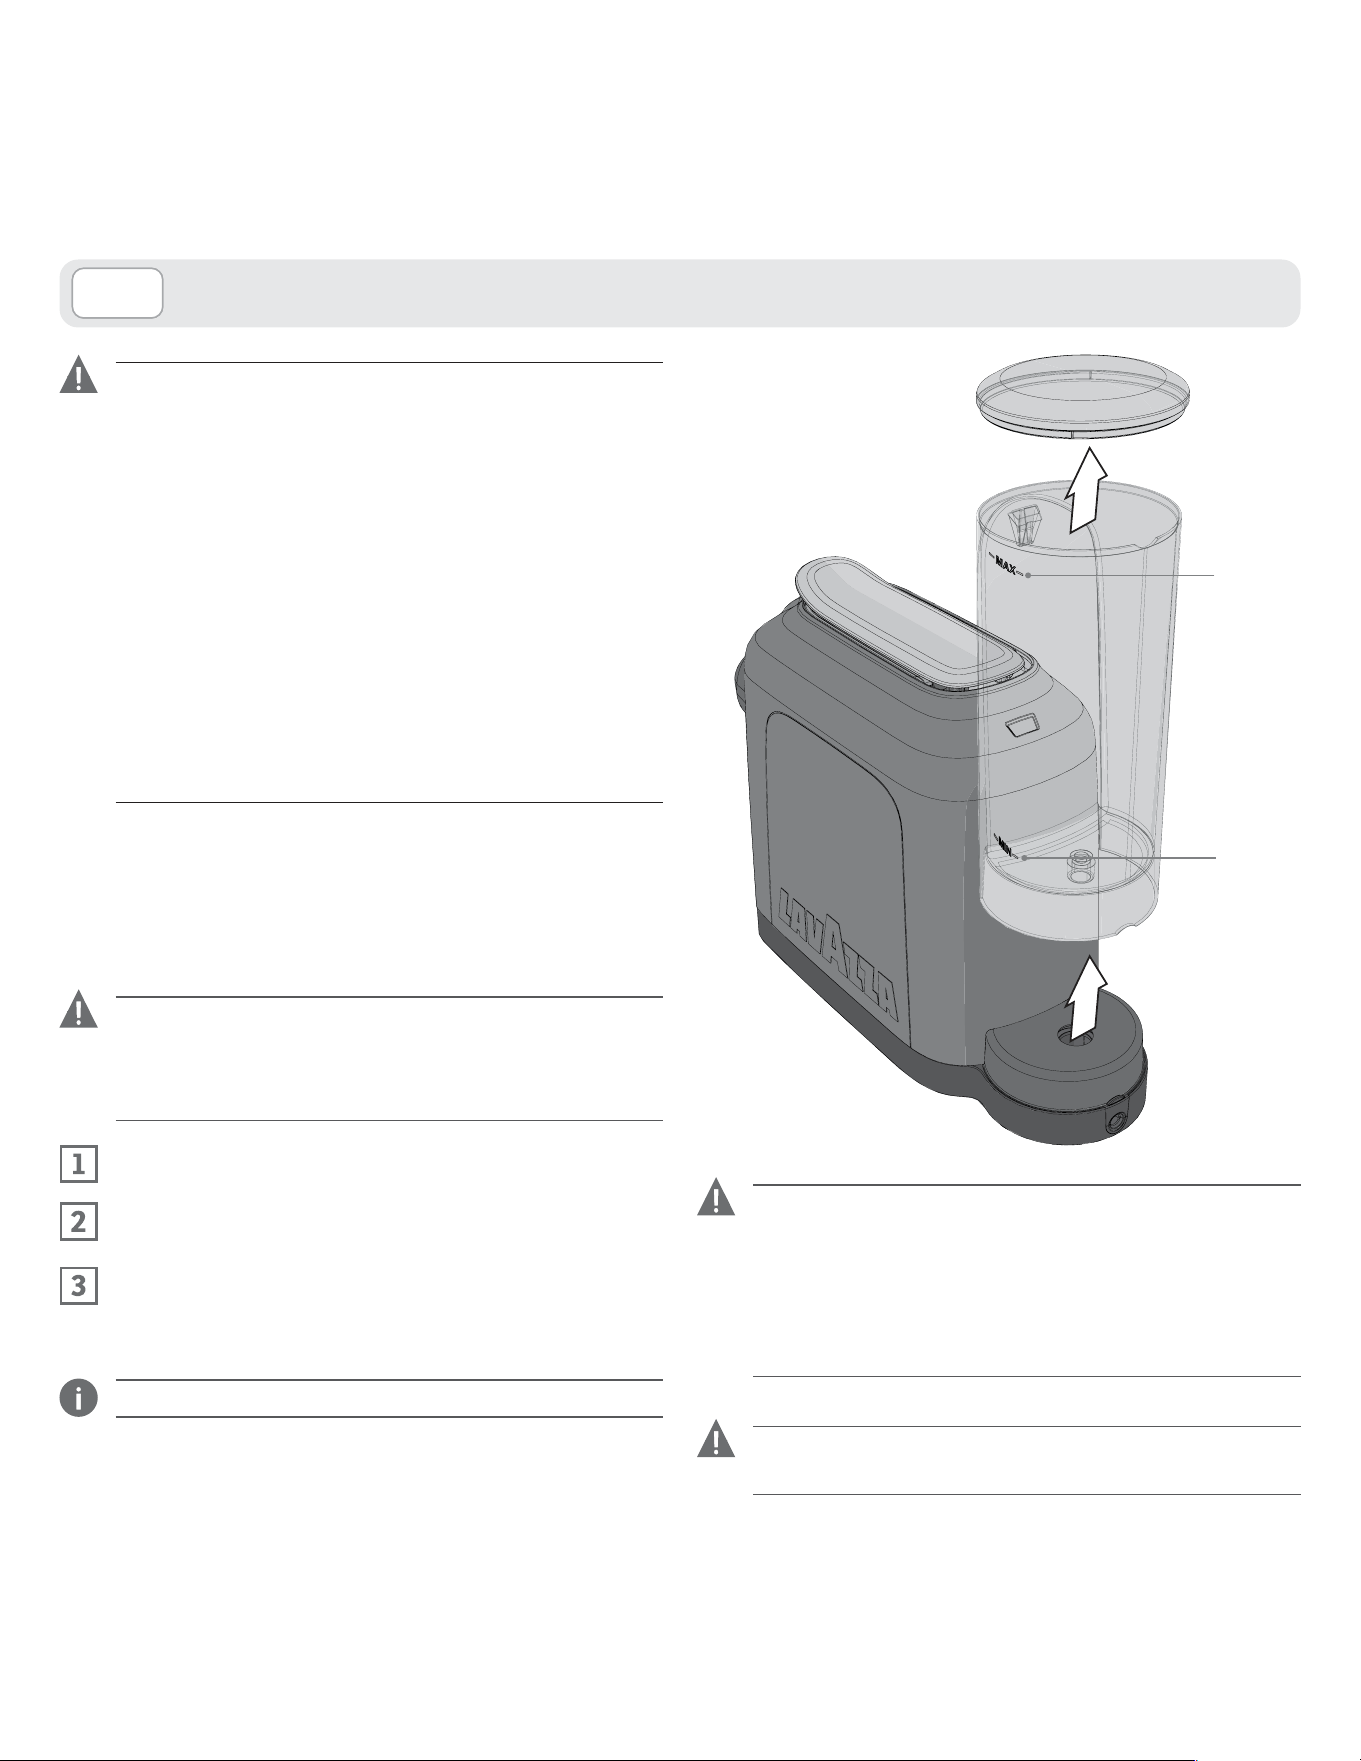
STARTING THE MACHINE
Place the coffee machine on a flat and stable surface,
far from water and heat sources. Machine damages
due to non-observance of these indications are not
covered by warranty.
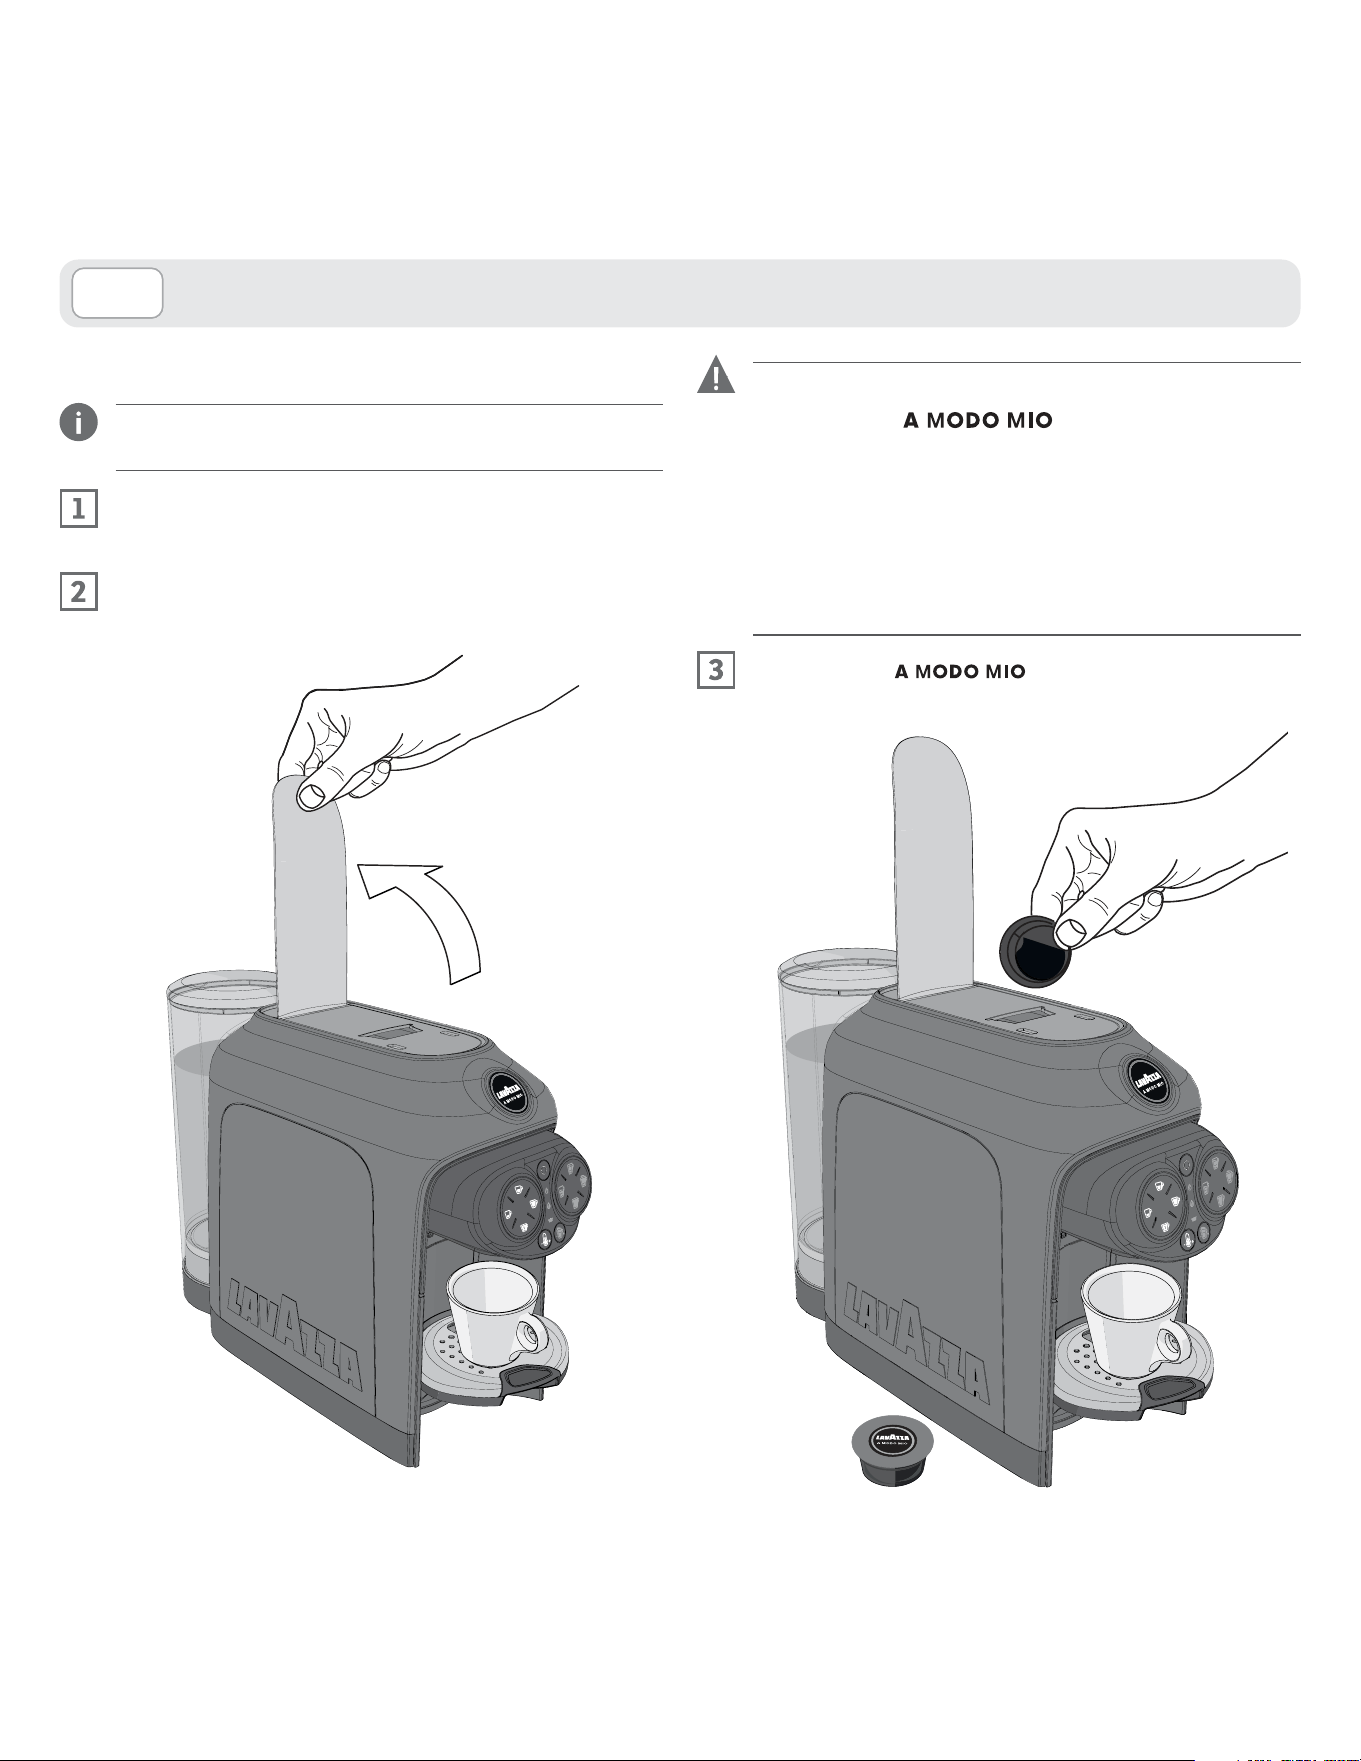
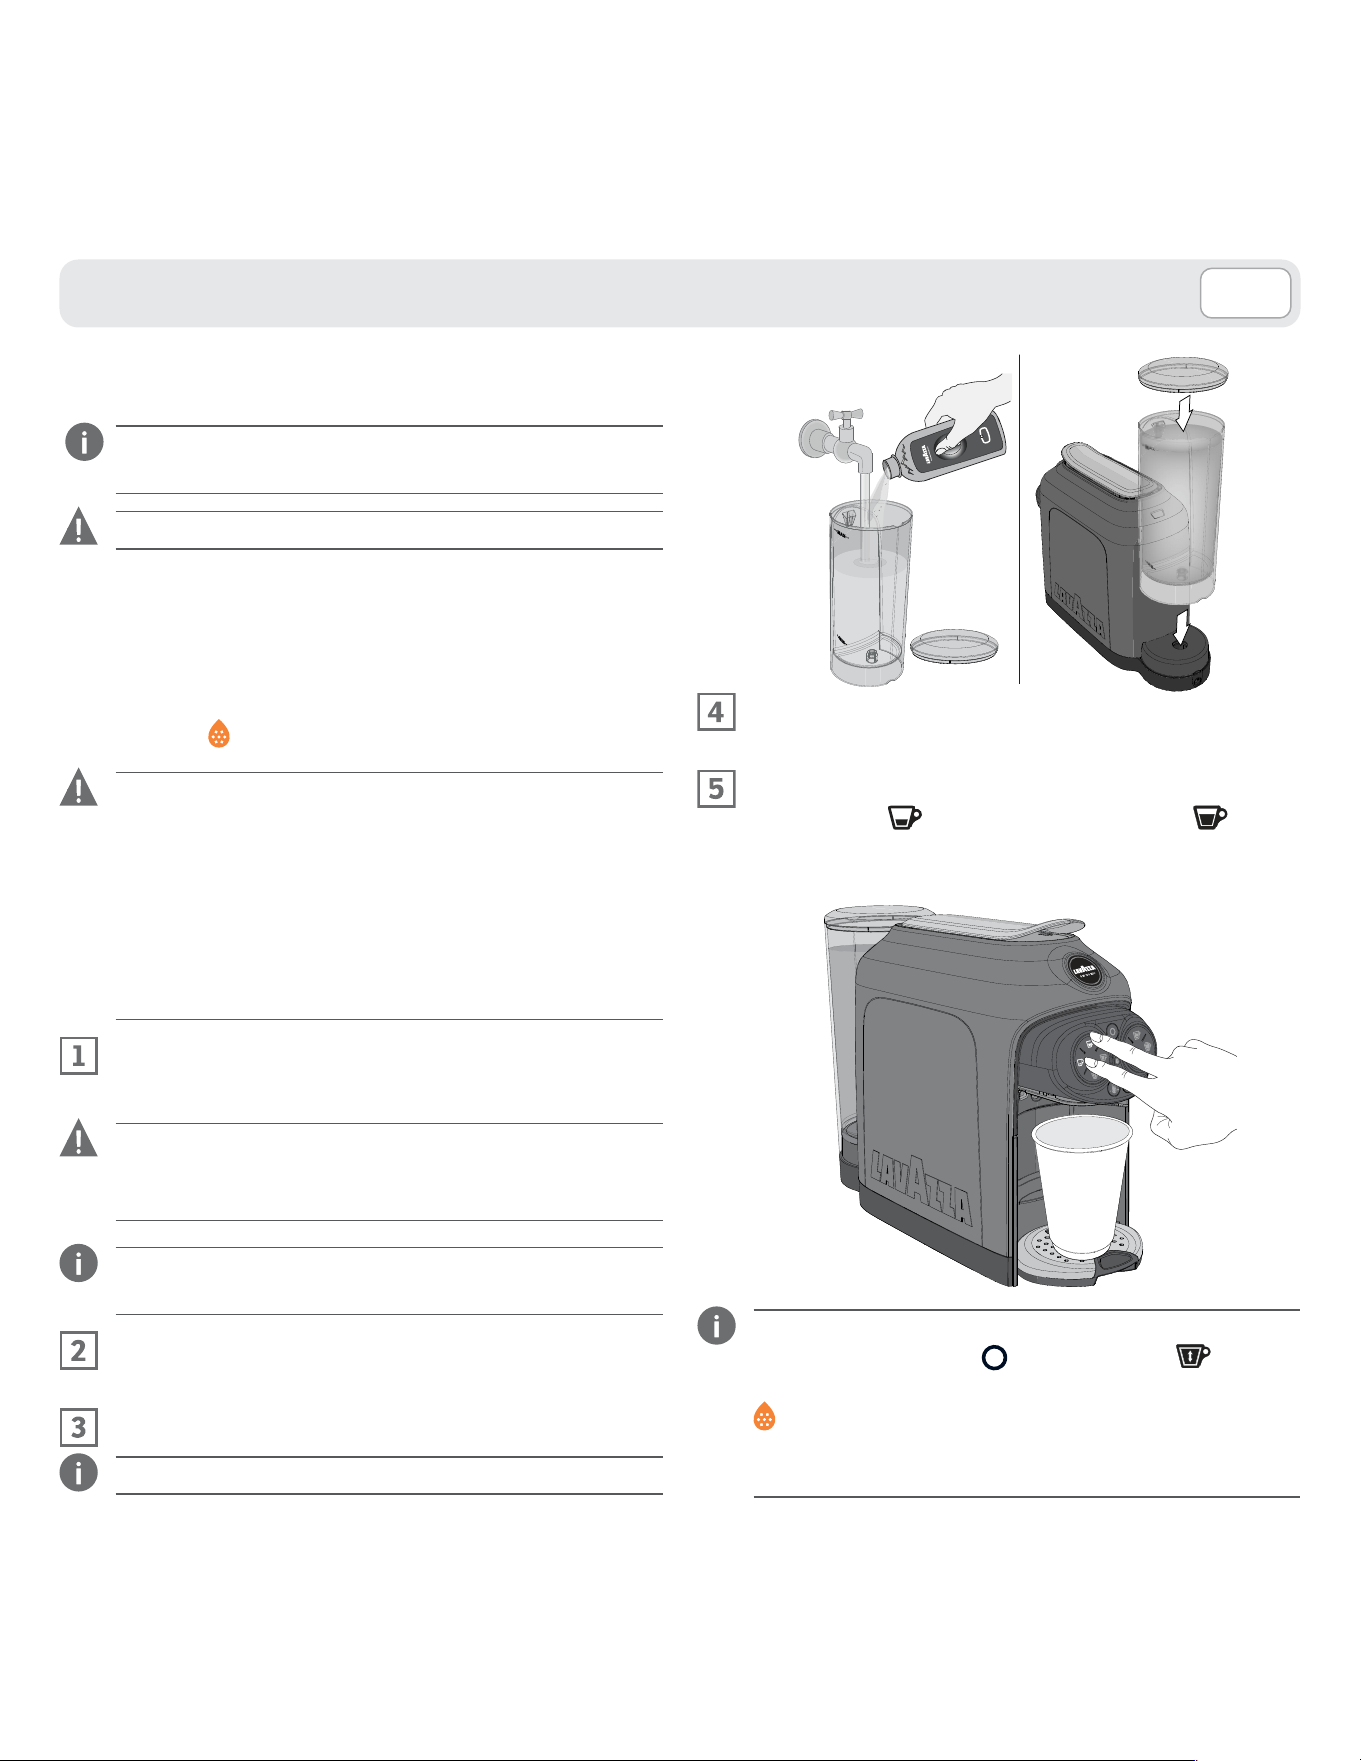
Lift and remove the cover, then the water tank itself.
Rinse the tank before using it.
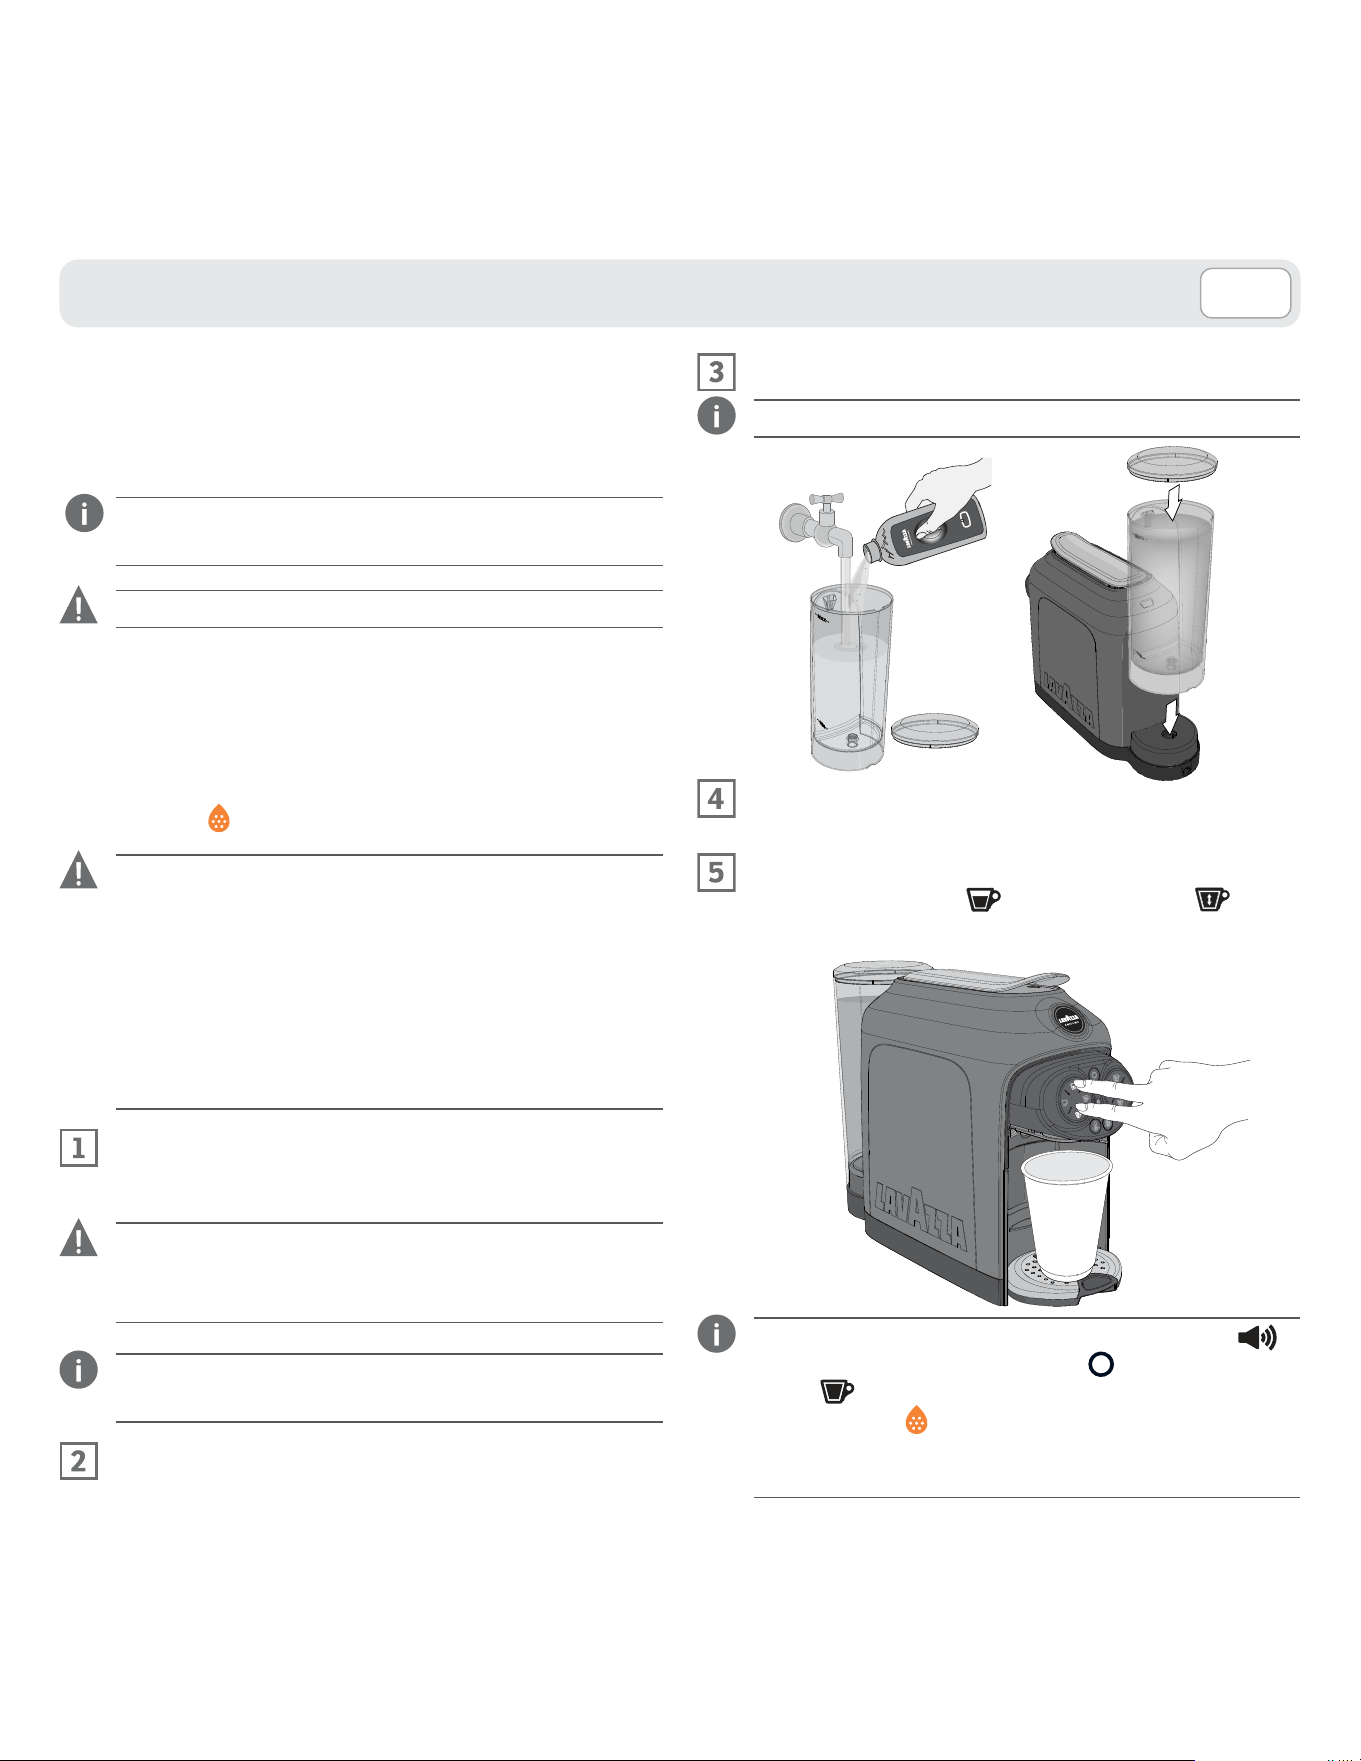
Fill the water tank up to the MAX level indicated, using
only fresh drinking water. Fit the tank back into place,
then close by using the cover.
The cover can be lifted to fill the tank directly.
Max
Min
MACHINE SETTING
The water level should never exceed the MAX indi-
cation.
Only use non-carbonated fresh water. Hot water and
other liquids can damage the tank and the machine.
Do not operate the machine without water: make
sure that there is enough water in the tank.
Make sure that the hands, the machine, the cord
and the support surface of the machine are not wet.
53
E N
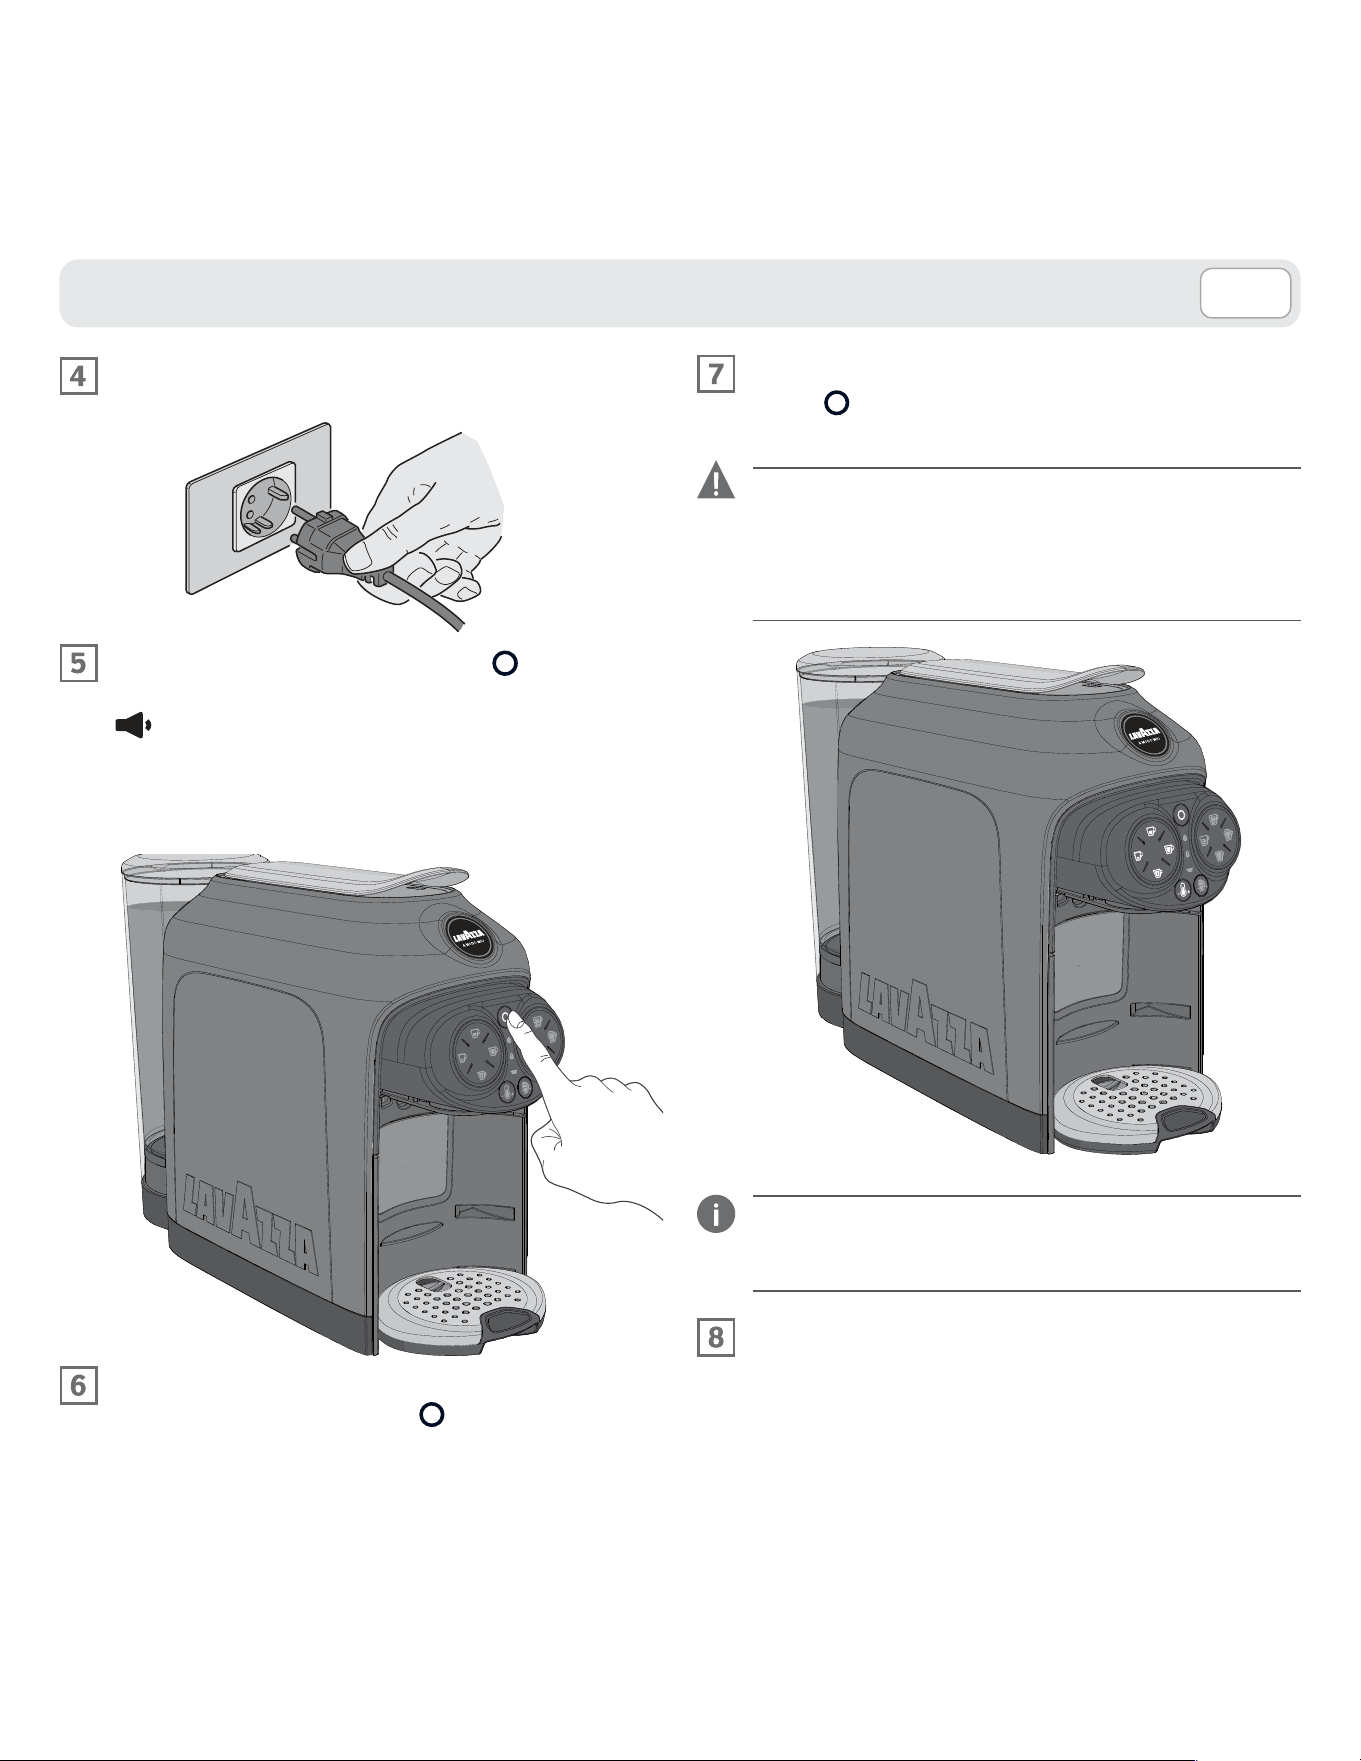
Fit the supply plug into the power outlet.
Press the ON�STAND�BY button to switch the
machine on. The machine will emit an acoustic signal
.
All buttons will come on to a steady white light, whereas
the alarm warning lamps will come on to a steady orange
light over an instant.
The coffee machine starts the heating cycle.
The ON�STAND�BY button will start blinking to a
light white.
MACHINE SETTING
The machine will be ready when the ON�STAND�BY
button stops blinking and the supply button lights are
steadily.
When the milk whipping jug is not inserted, the
machine will only turn on the coffee supply buttons
and the temperature selection button.
The milk beverage warning lights will be OFF and
the buttons will not work.
By pressing one of the supply buttons during the heating
cycle, you can reserve the beverage that will be supplied at
the end of the heating cycle
.
Upon the first machine start-up, you shall supply 16.9fl oz
(0.5 litres) of water, with no capsule inserted and keeping
the lever lowered.
54
I TE N
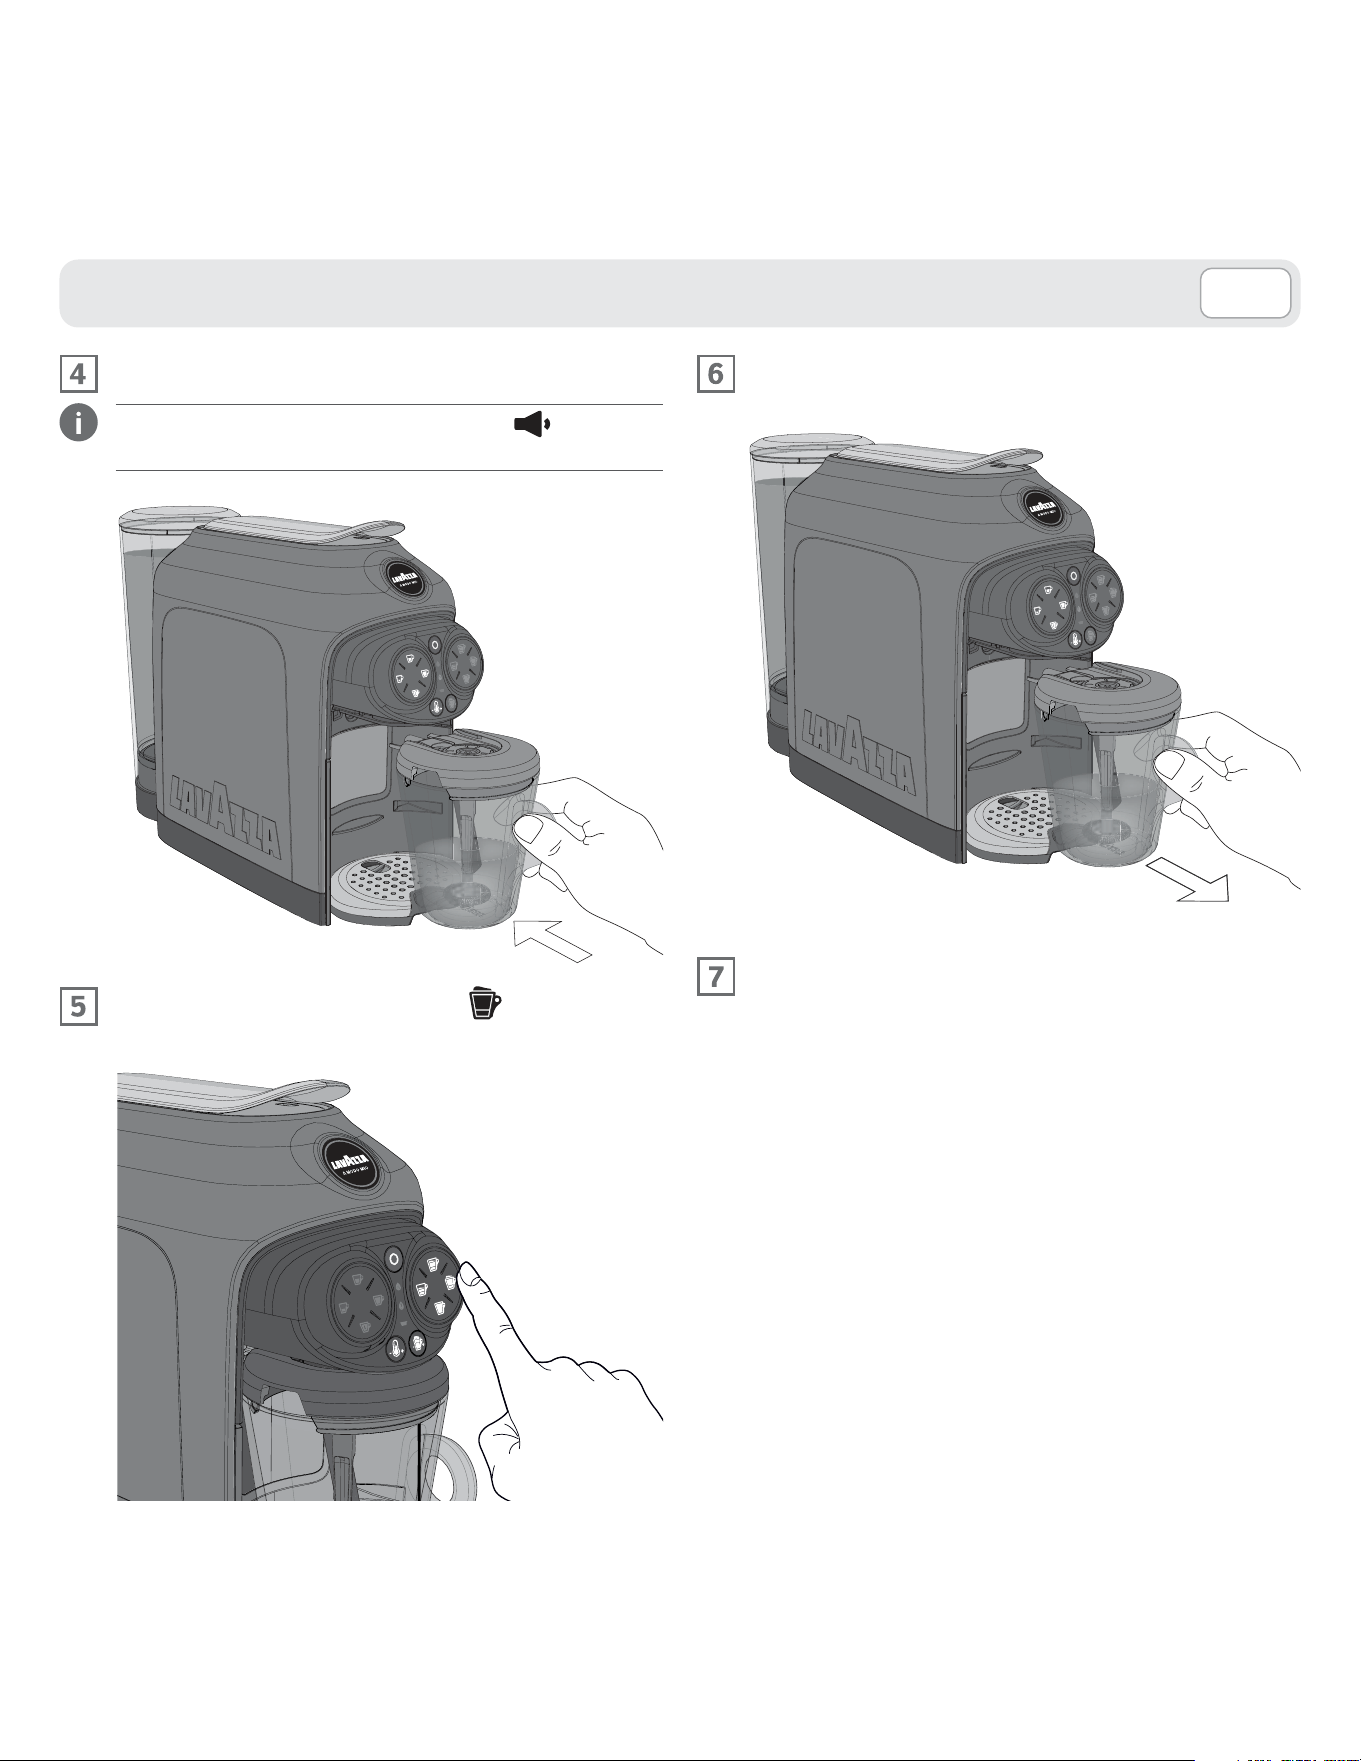
Place a cup under the supplying spout.
Press the FREE DOSE button and wait for the
supply to end.
Open and close the lever before removing and emptying
the cup.
Empty the cup and supply one more time, by pressing
the FREE DOSE
button again
.
When a supply is selected, the machine will activate
the electric water pump over 7 seconds.
If water is found inside the hydraulic circuit, the ma-
chine will normally supply.
If no water is found inside the hydraulic circuit, the
machine will stop supplying over 5 seconds and will
try to supply again up to a maximum of 5 time.
After 5 attempts have been made, the machine will
cause the “No water” warning lamp
to come on to
a steady orange light, to inform that water is missing,
and will also emit an acoustic signal.
MACHINE SETTING
ACOUSTIC SIGNAL ACTIVATION /
DEACTIVATION
Set the machine to the stand-by mode
.
Simultaneously keep the ESPRESSO /LONG
COFFEE buttons depressed over at least 5 seconds.
The machine will emit a prolonged acoustic signal
to
notify the acoustic signal deactivation, and two brief acous-
tic signals to notify the activation.
Once the procedure has been completed, the machine
will go back to the stand-by mode
.
STAND-BY FUNCTION
To ensure the energy conservation the machine auto-
matically passes to the STAND-BY mode after 9 min-
utes of not being used.
The machine can be manually set to the stand-by mode,
before a 9 minutes’ time, by pressing the ON/STAND-BY
, button: the machine will emit an acoustic signal .
In the “STAND-BY” mode, the buttons will be OFF,
and the ON/STAND-BY button will come on to a
less intense light. The machine can be activated again by
pressing the ON/STAND-BY button.
55
E N
MACHINE SETTING
PREPARATION FOR COFFEE BREWING
The coffee machine features two positions for preparing
the coffee: espresso cup/mug.
To use an espresso coffee cup, remove the cup support
plate.
Fit the cup support plate into the slot available at the top.
Place the cup onto the plate.
To use a big cup, place the cup (or glass) directly onto
the plate at the bottom.
56
I TE N
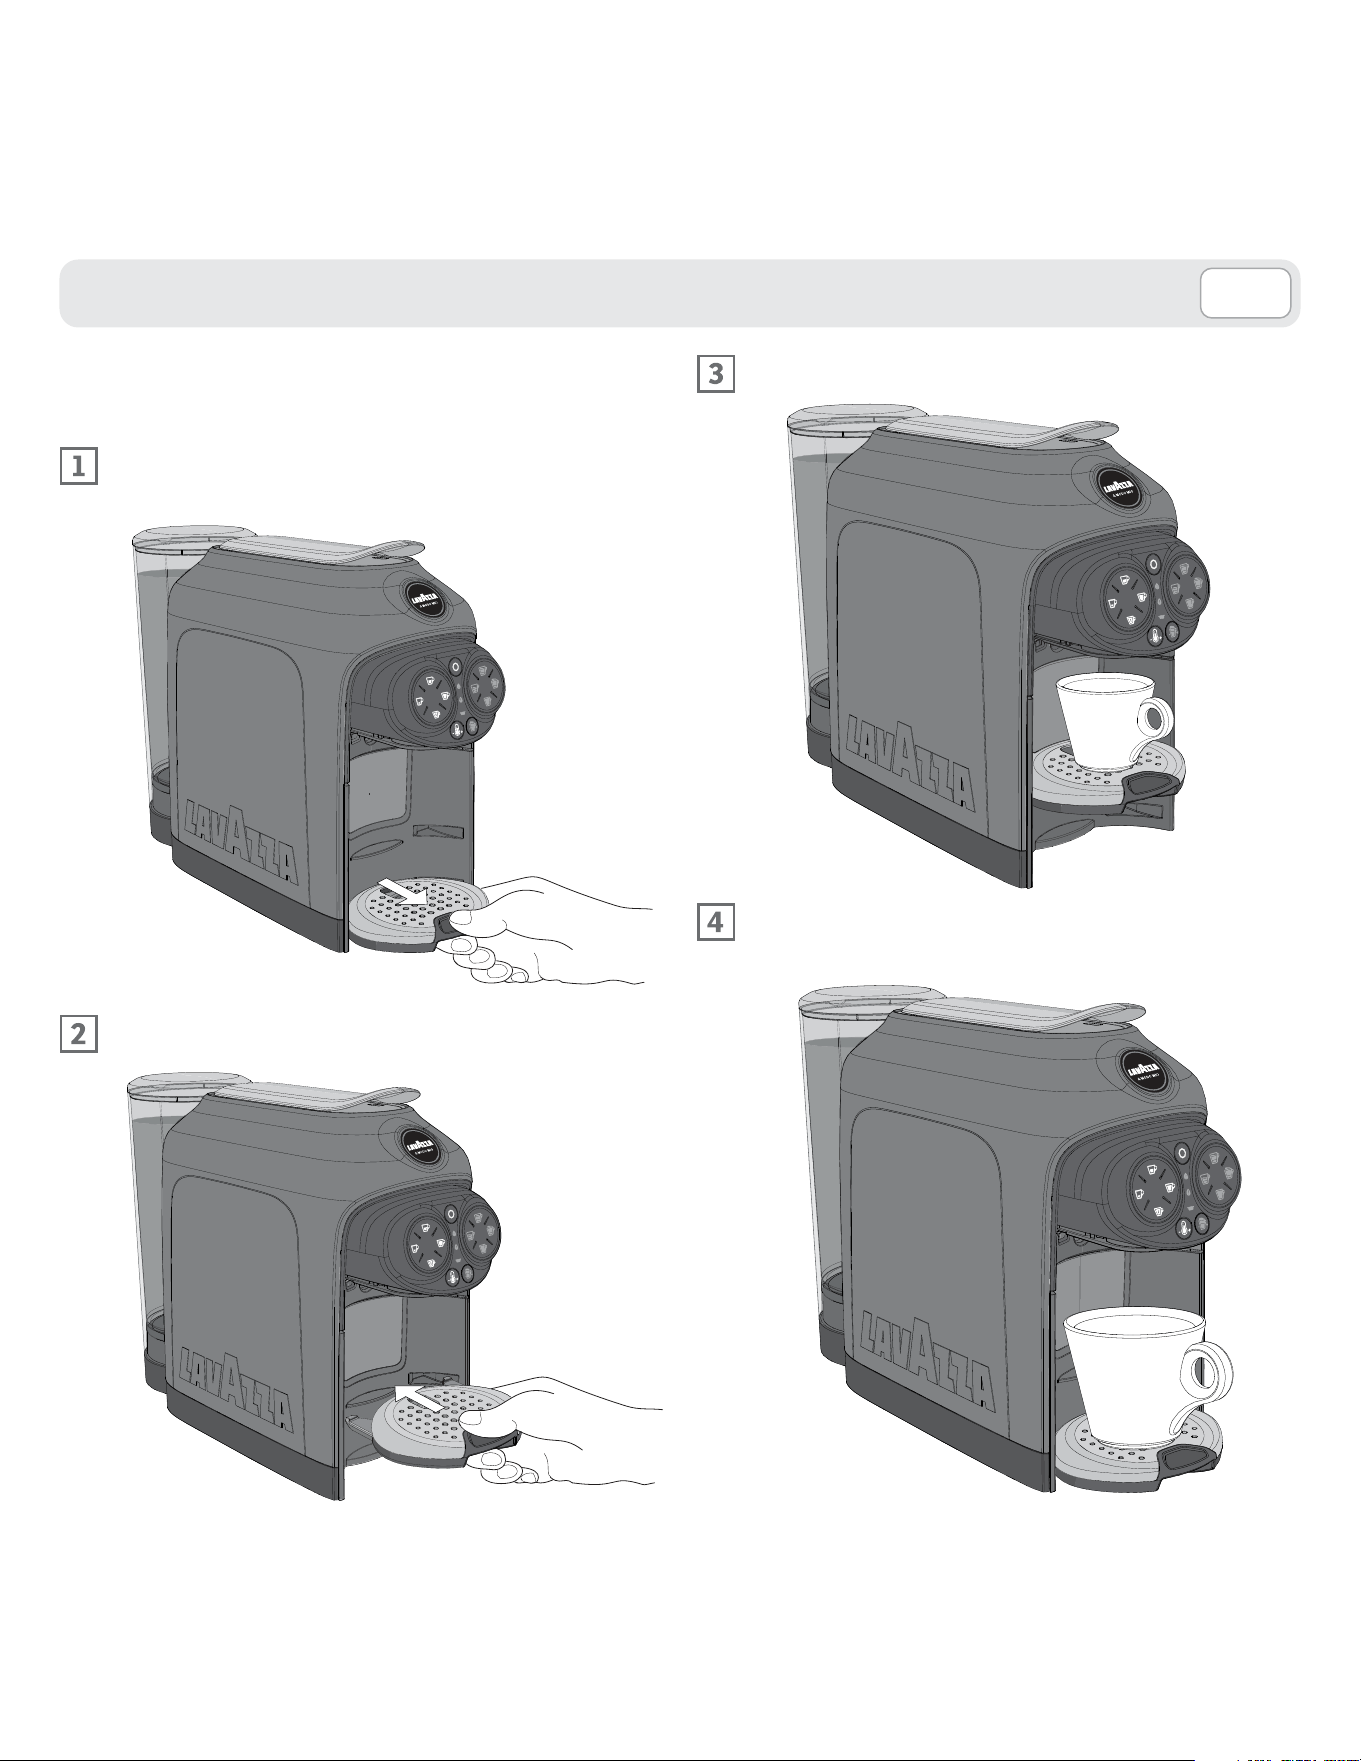
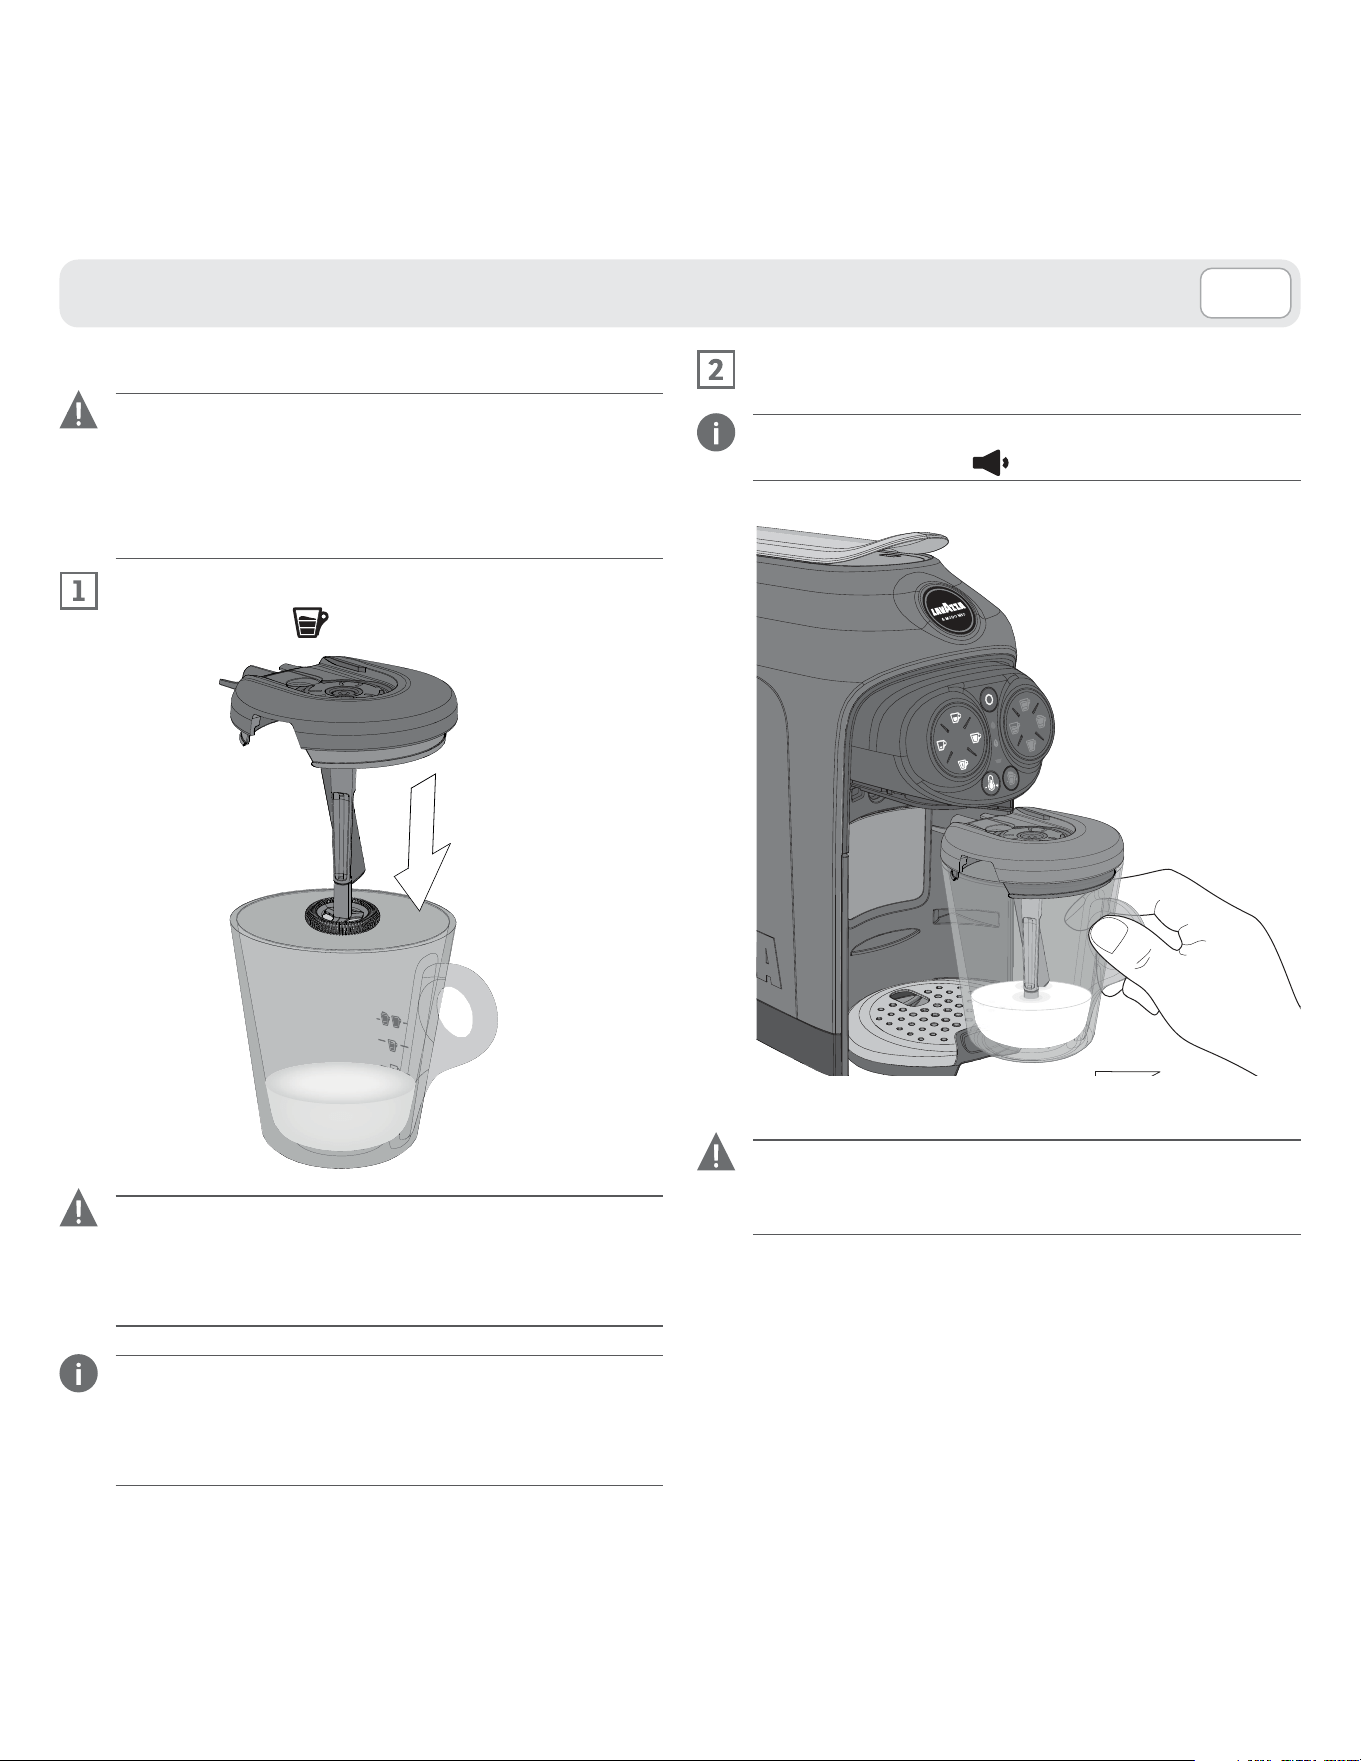
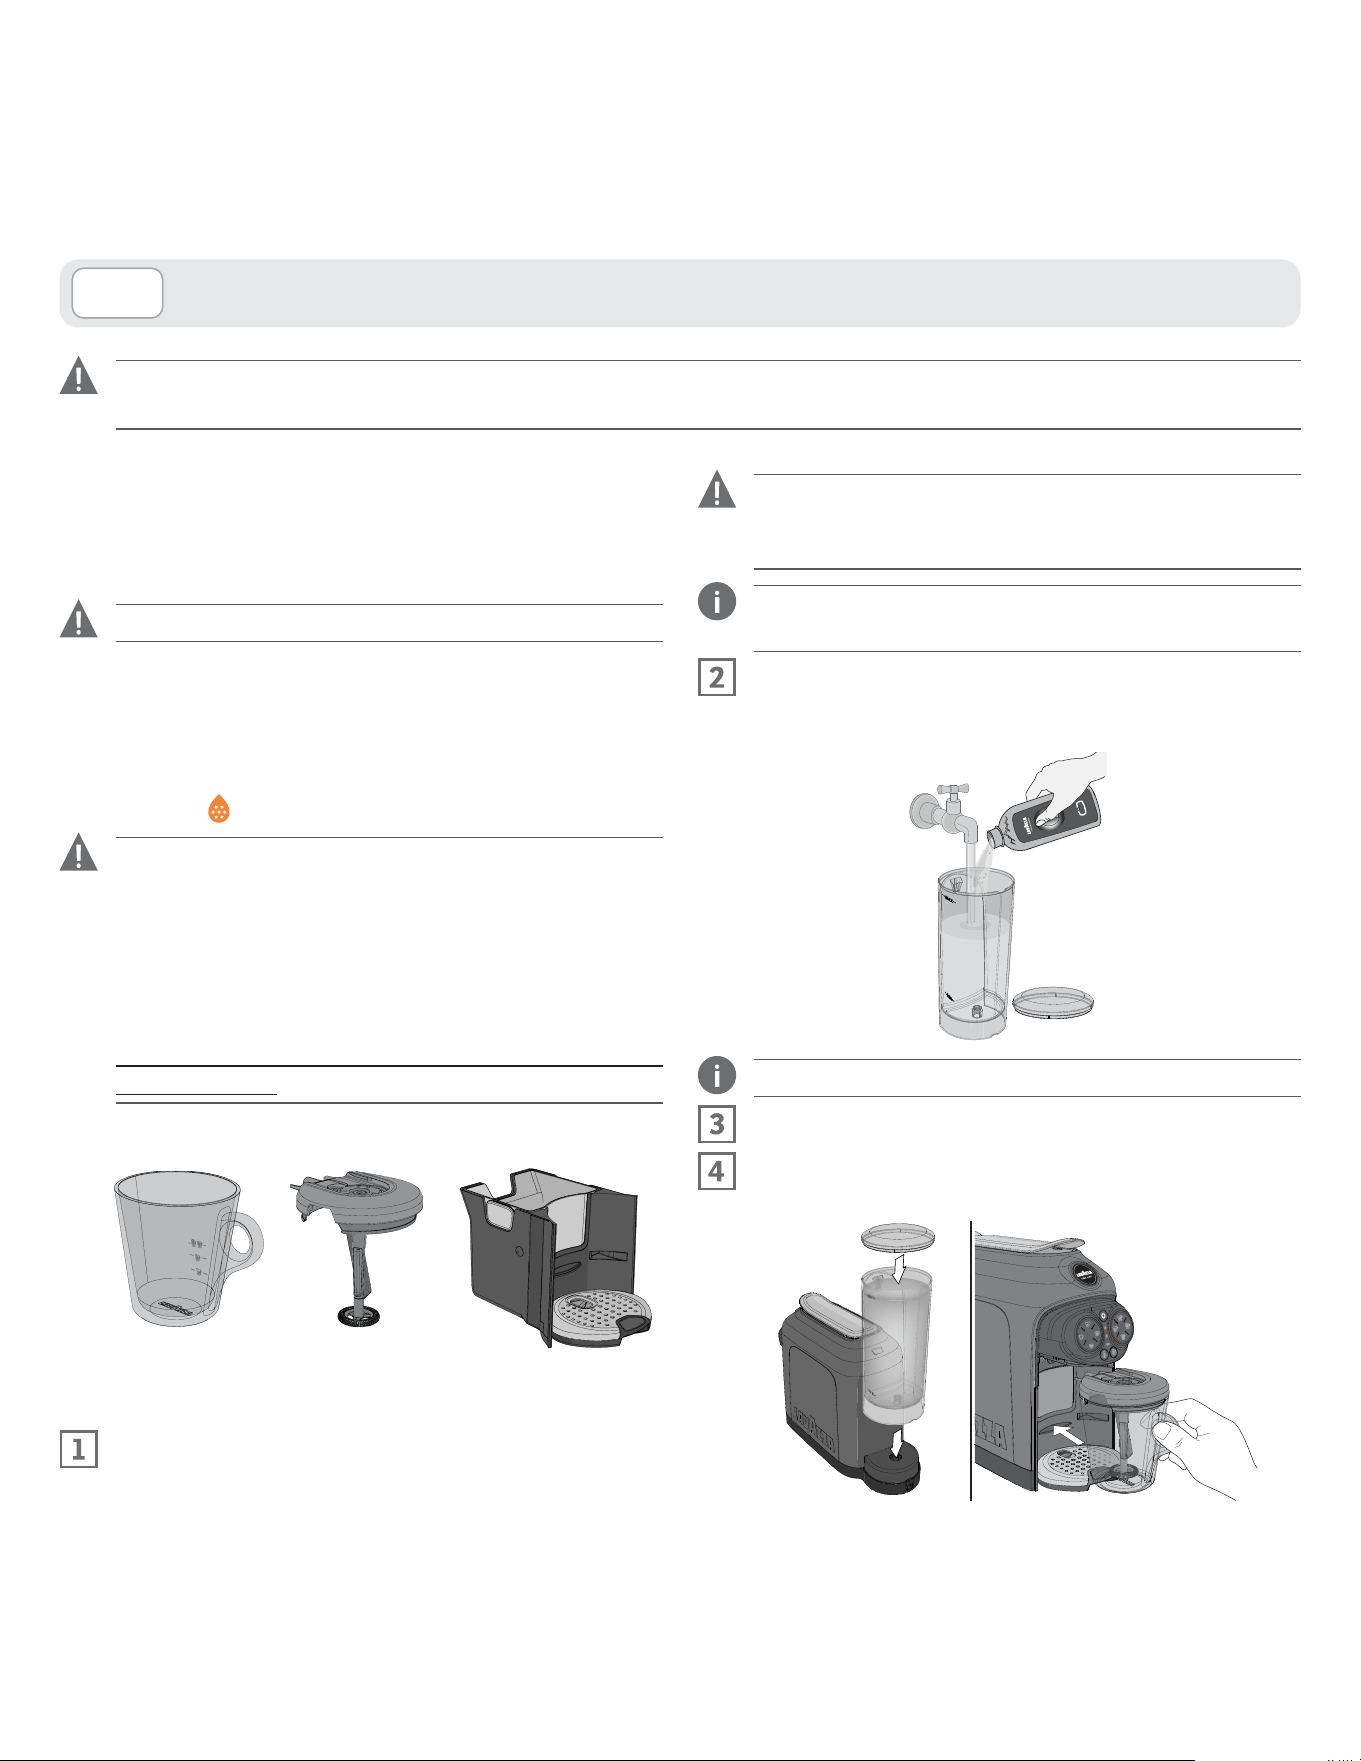
Open the milk whipping jug and fill it with fresh,
non-carbonated drinking water up to the MILK MAC-
CHIATO/ WHIPPED MILK level sign - .
Close the milk whipping jug with the cover and pay at-
tention to the correct position and direction of the cover.
PROVISION FOR PREPARING THE MILK-
BASED BEVERAGES
When the milk whipping jug is inserted, the machine
will only turn on the milk-based beverage supply but-
tons, the temperature selection button and the foam
control button. The Coffee beverage warning lights
will be OFF and the buttons will not work.
The milk whipping jug features three preparation levels:
CAPPUCCINO
CAPPUCCINO LARGE
-
MILK MACCHIATO
WHIPPED MILK
Always follow the levels indicated inside the milk
whipping jug.
When using for the first time, carry out a cleaning cy-
cle on the milk frothing jug.
MACHINE SETTING
57
E N
After cleaning remove the jug from the machine.
Wash all the components with cold or warm water, then
dry them up and fit them back into place correctly.
Insert the milk whipping jug into the machine.
The machine will emit an acoustic signal
to indicate
the correct insertion of the milk whipping jug.
Press the MILK MACCHIATO button to start
the cleaning cycle.
MACHINE SETTING
58
I TE N
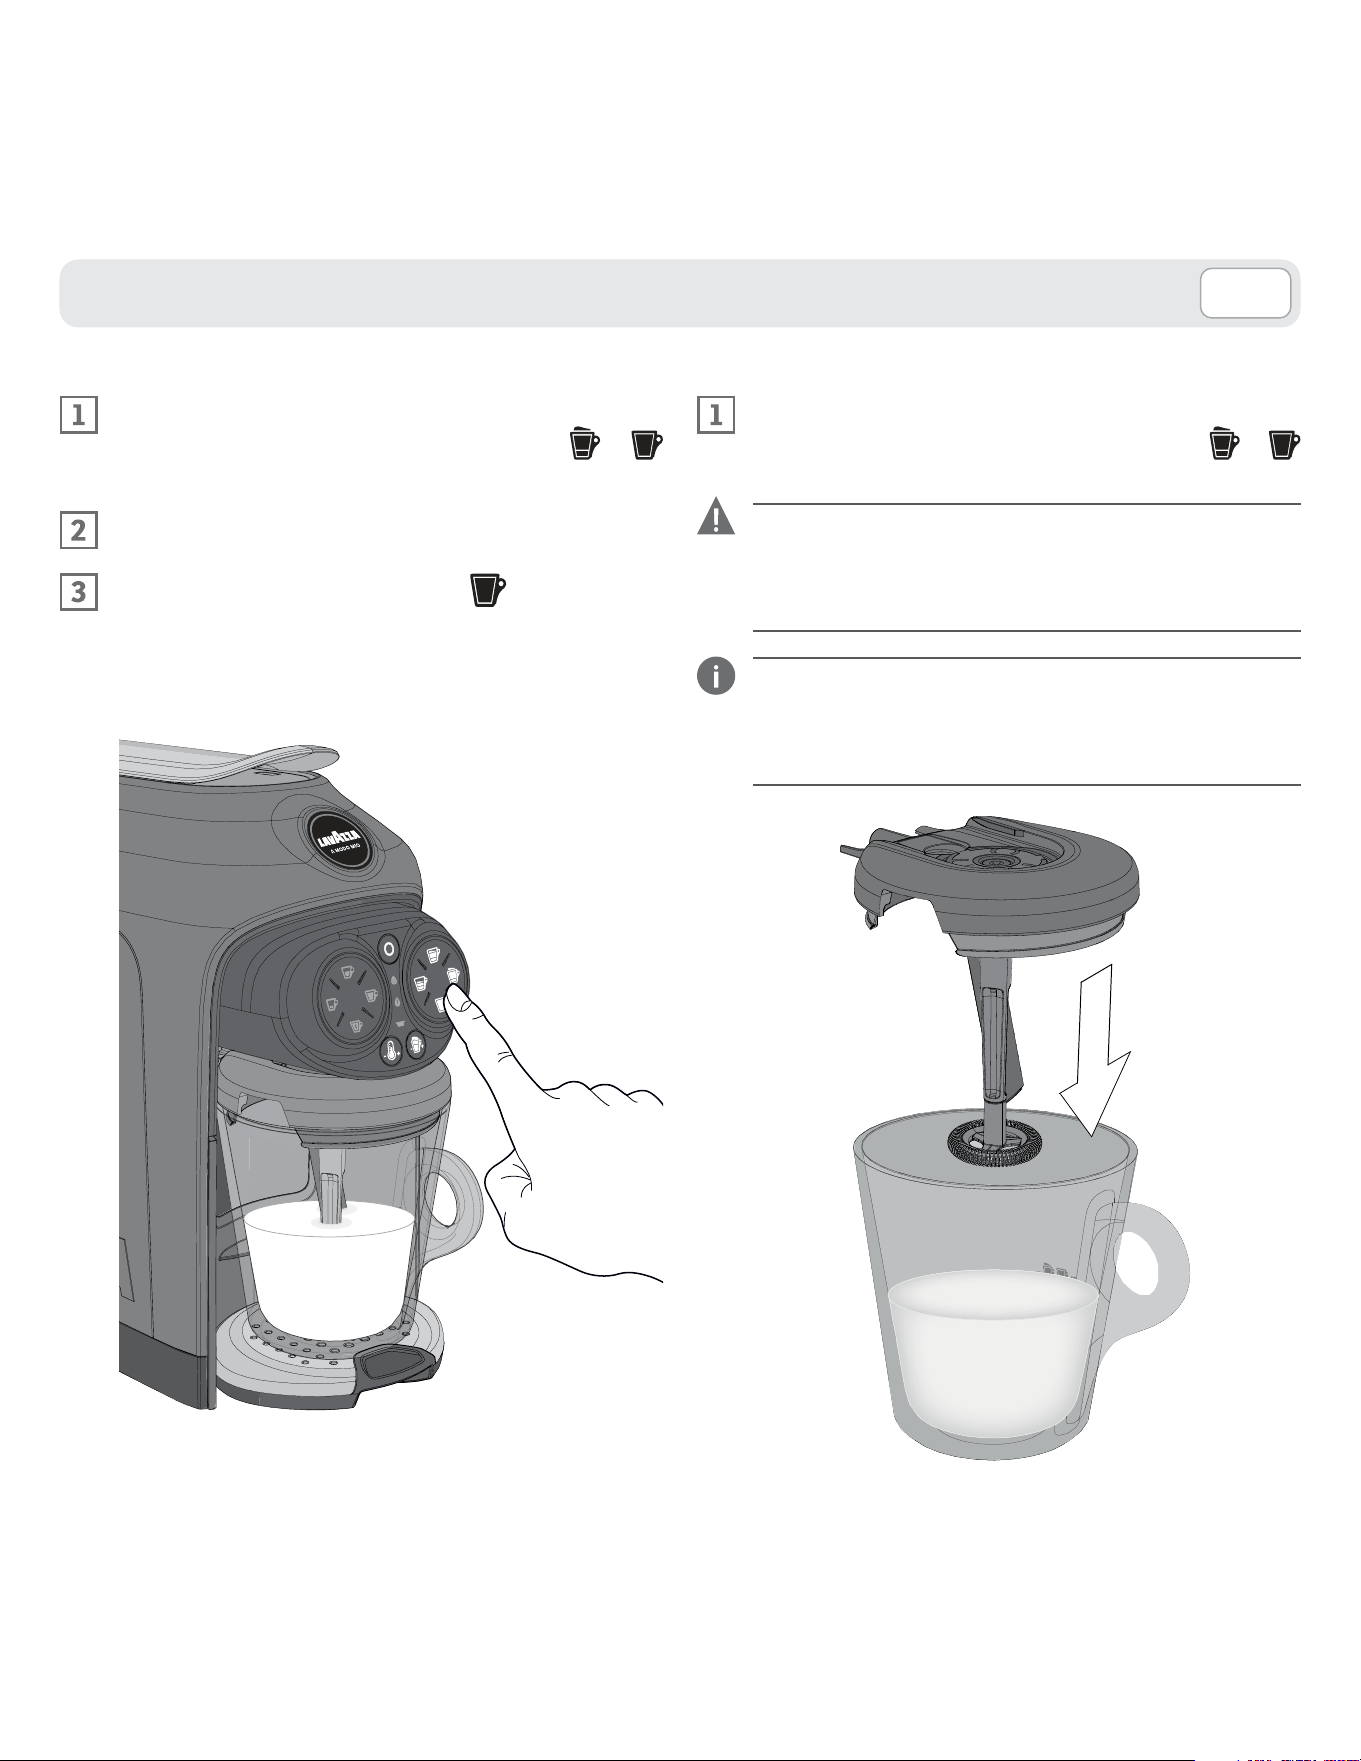
Never put fingers or objects in the capsule-holder
Only Lavazza
or compatible capsules
must be introduced in the capsule-holder.
Single-dose capsules are prepared to dispense one
coffee/product.
DO NOT use the capsules more than once.
Inserting two or more capsules can cause the ma-
chine to malfunction.
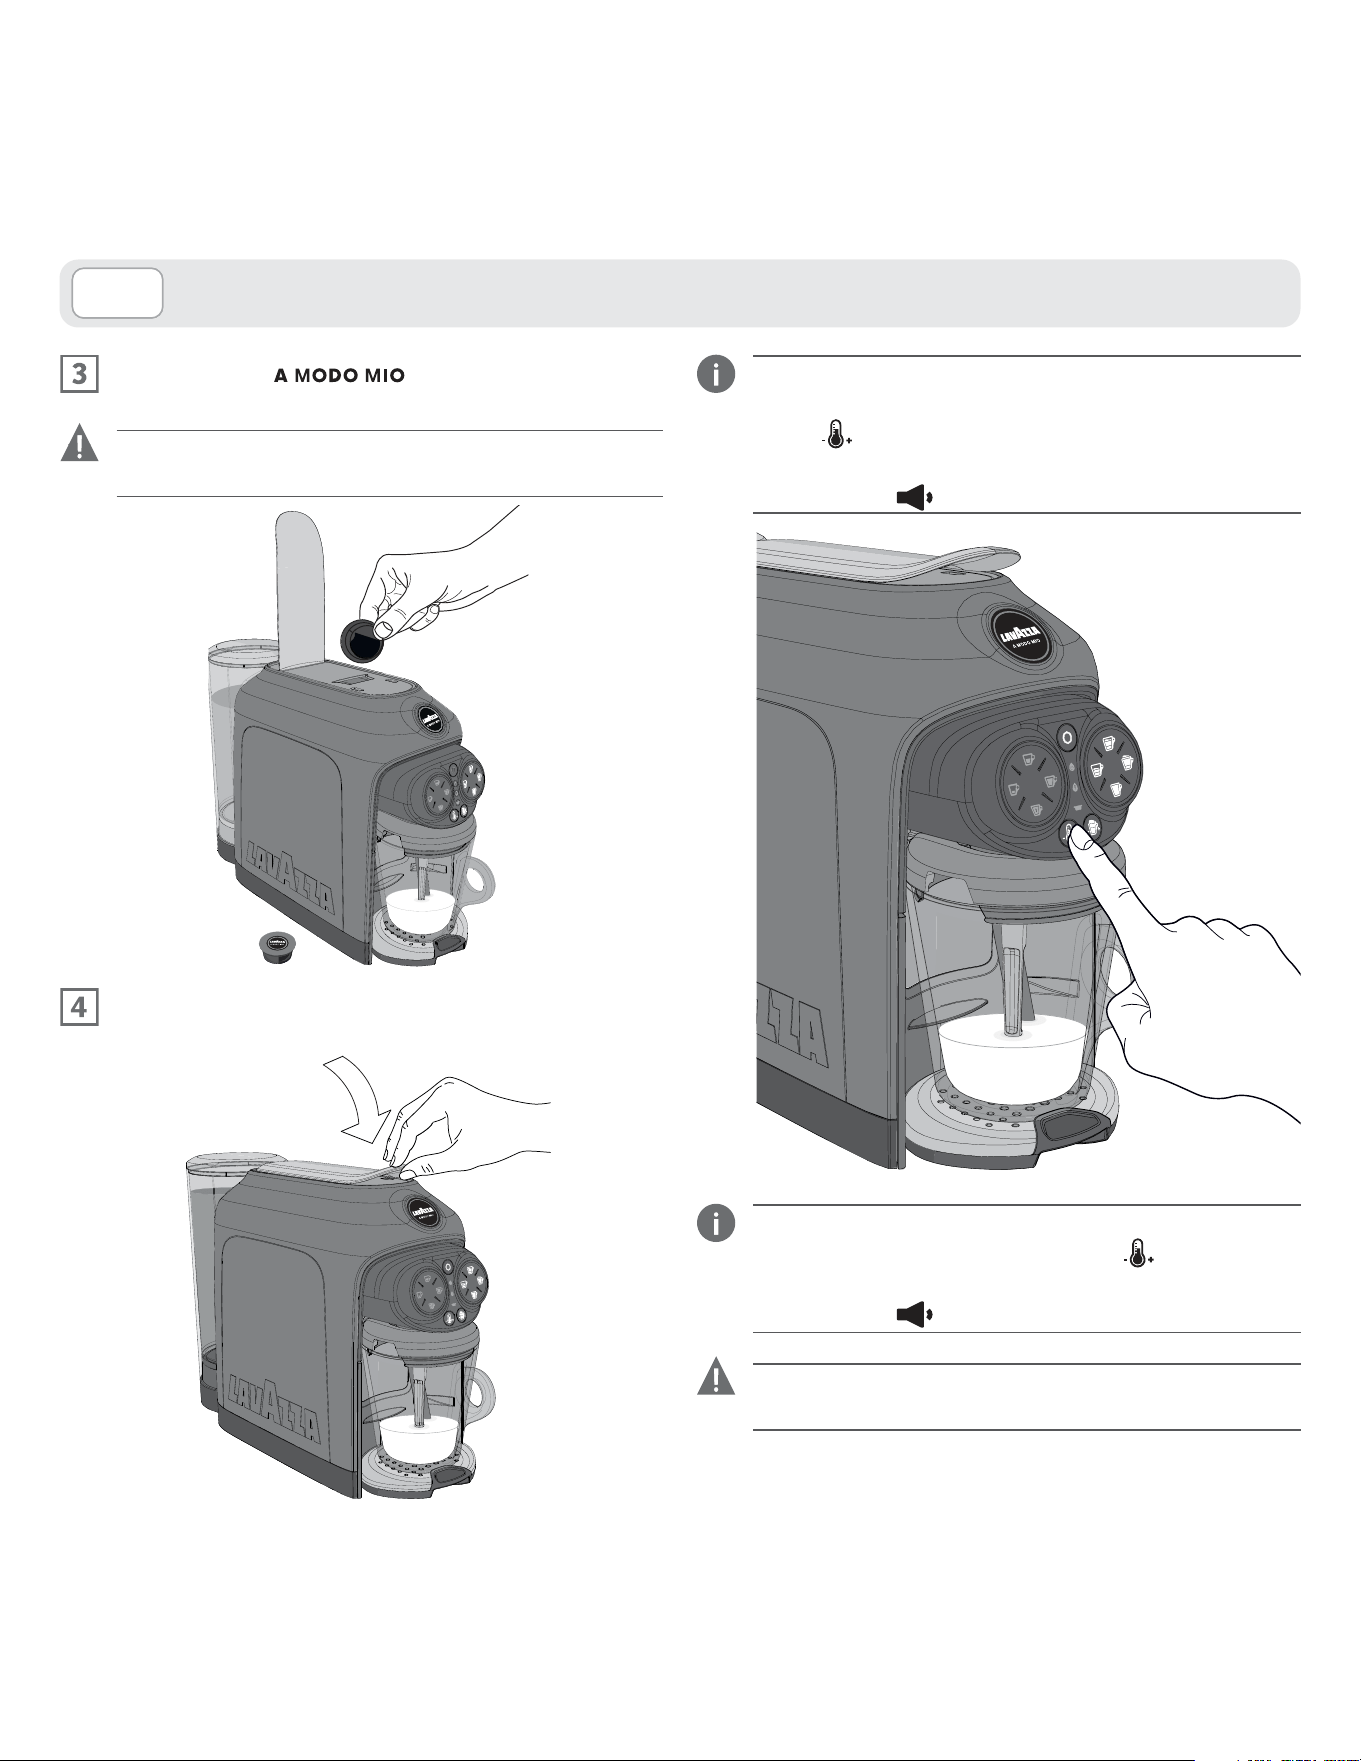
Put a Lavazza capsule into the capsule fit-
ting compartment.
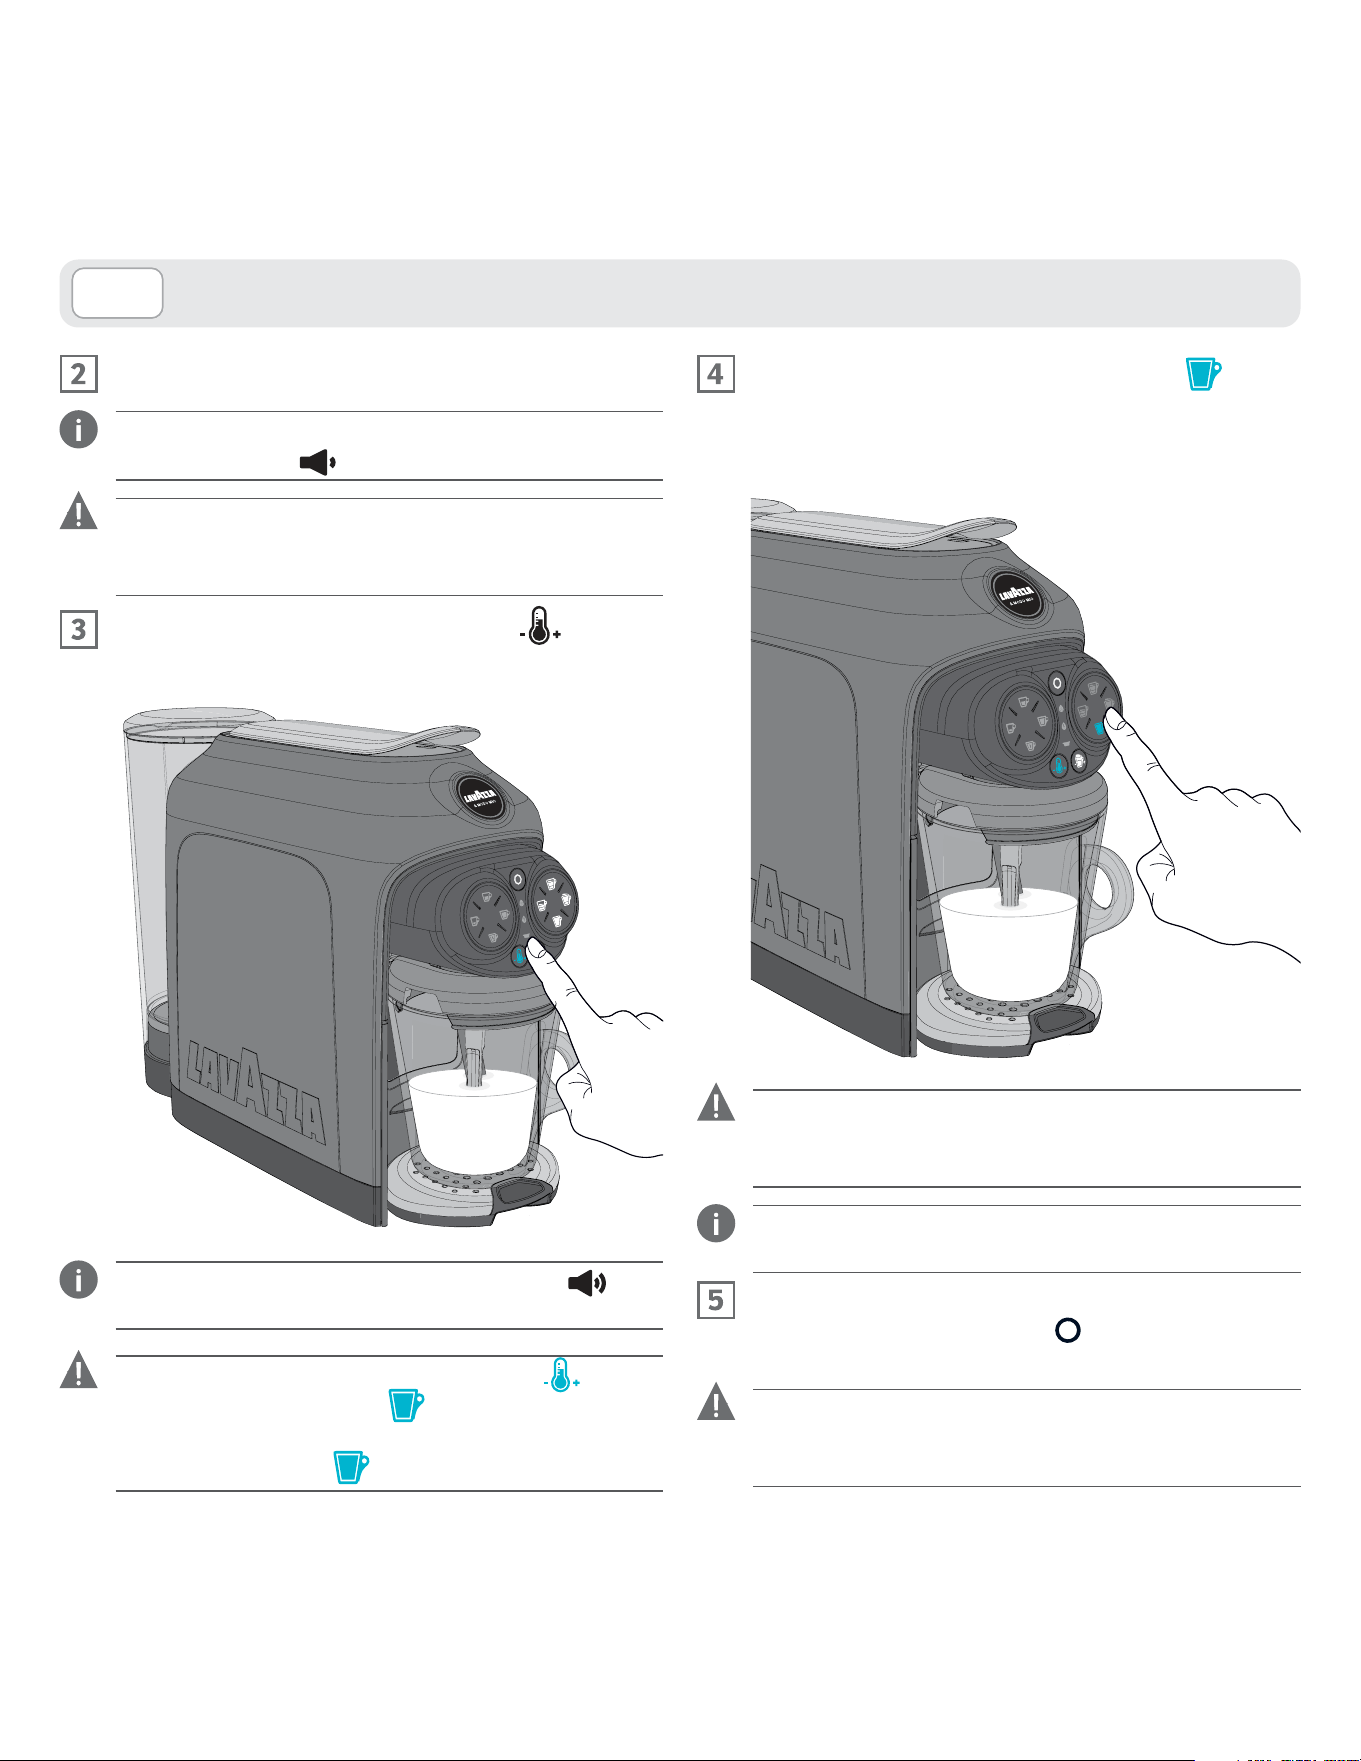
ESPRESSO / LONG ESPRESSO DELIVERY
Make sure that the coffee supply buttons have come on
to a steady white light.
Place the mug/cup as shown (see PREPARATION
FOR COFFEE BREWING).
Lift the capsule loading lever until it locks into position
to open the capsule fitting compartment.
PREPARING THE COFFEE
59
E N
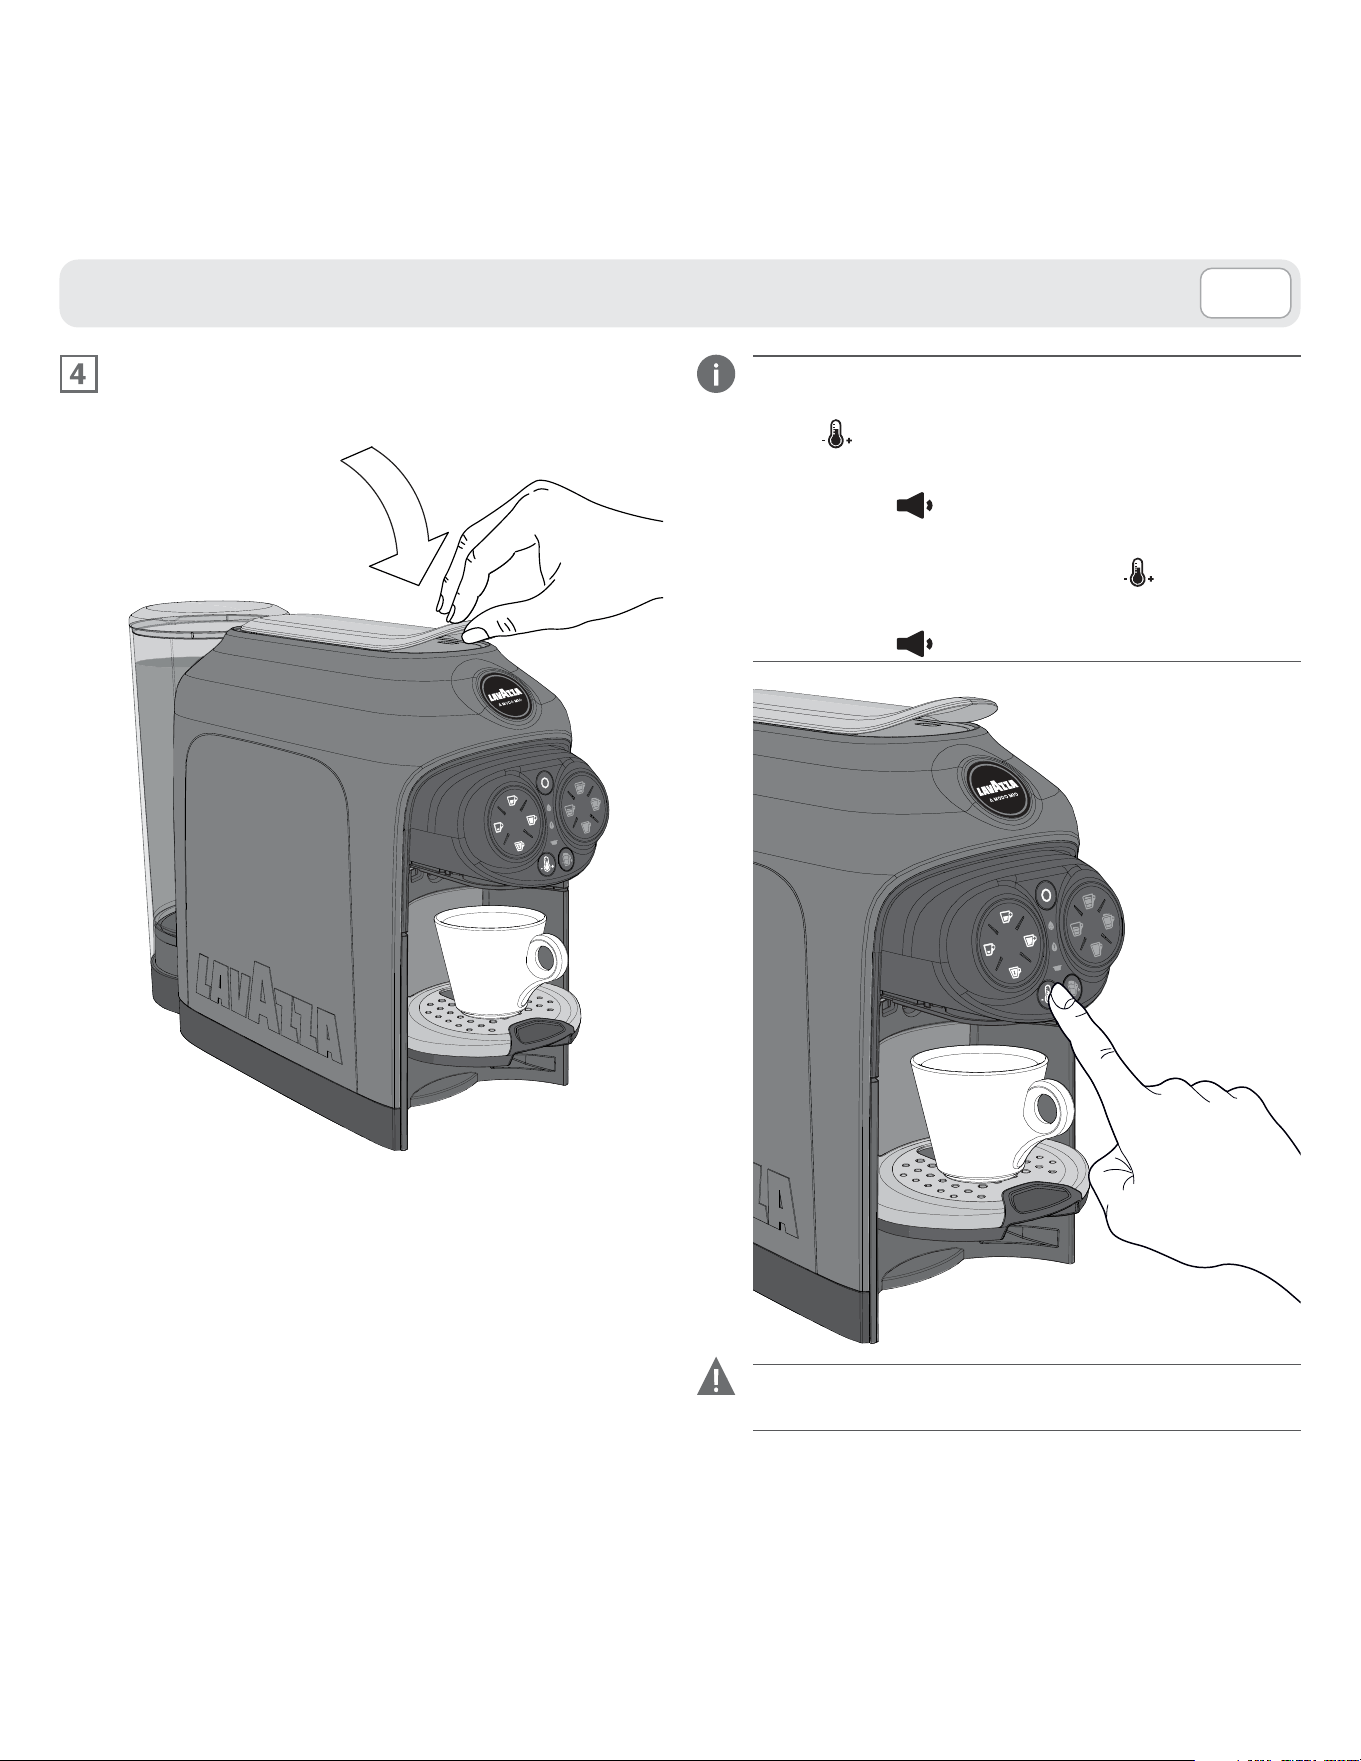
Lower the capsule loading lever to close the capsule
fitting compartment.
If you wish a hotter coffee, you can increase the beverage
temperature by pressing the “TEMPERATURE boost”
button .
The machine will, when the button is pressed, emit an
acoustic signal
and the button light will get brighter.
If you wish to go back to the standard temperature, press
the “TEMPERATURE boost” button
again.
The machine will, when the button is pressed, emit an
acoustic signal
and the button light will get dimmer.
The temperature cannot be changed during the sup-
ply phase.
PREPARING THE COFFEE
60
I TE N
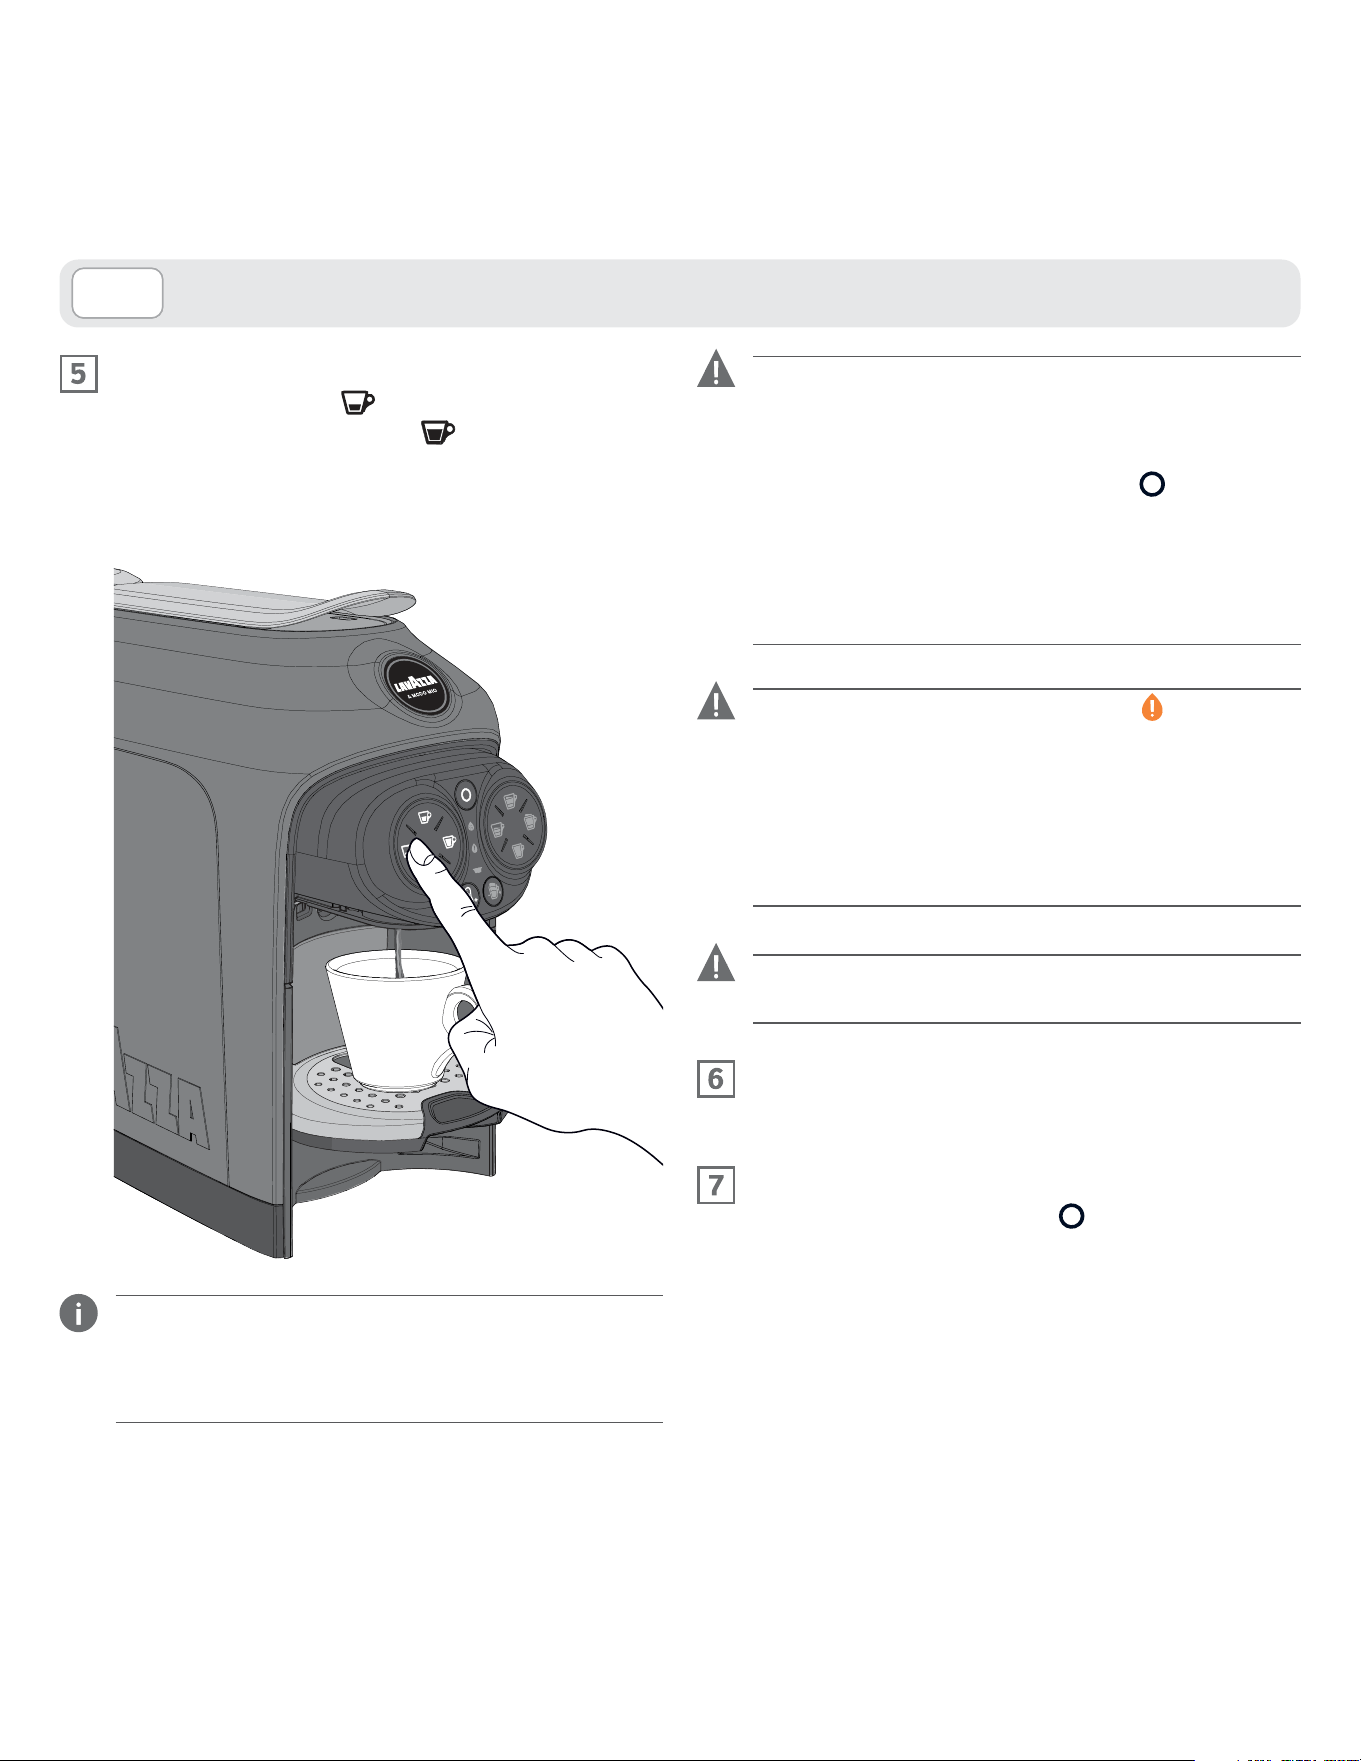
To start supplying:
press the ESPRESSO (1 fl oz /30 ml) or
press the LONG ESPRESSO (1.5 fl oz/45 ml).
The machine will stop delivery automatically when the
programmed measure is reached.
The supply button will light up to a blinking white light
when the product is being supplied.
You can stop supplying by pressing the supply button
again.
PREPARING THE COFFEE
If, during the dispensing cycle power supply is inter-
rupted proceed as follows:
- Restore the power supply.
- Press the ON�STAND�BY button
and wait for
the button to light up to a steady white light.
- Replace the capsule inside the capsule fitting com-
partment with a new one.
- Restart the coffee dispensing.
If, during the dispensing cycle water is exhausted
within the tank proceed as follows:
- Fill the water tank up to the indicated MAX level.
- Replace the capsule inside the capsule fitting com-
partment with a new one.
- Restart the coffee dispensing.
Supplying without a capsule the doses may not re-
spect the programmed quantity.
Once supply is over, lift and then lower the capsule
loading lever to unload the exhausted capsule.
To supply again, wait until both the supply button and
the ON�STAND�BY button
come on to a steady
white light.

61
E N
LONG COFFEE DELIVERY
Do steps: , , and in paragraph ESPRESSO
DELIVERY.
Press the LONG COFFEE (3 fl oz/90 ml) button
to start delivery. The machine will stop delivery auto-
matically when the programmed measure is reached.
The supply button will light up to a blinking white light
when the product is being supplied. You can stop supply-
ing by pressing the supply button again.
Once supply is over, lift and then lower the capsule load-
ing lever to unload the exhausted capsule.
To supply again, wait until both the supply button and
the ON�STAND�BY button come on to a steady
white light.
PREPARING THE COFFEE
FREE DOSE BEVERAGE DELIVERY
Do steps: , , and in paragraph ESPRESSO
DELIVERY.
In case of soluble capsules, it is recommended that a brief plain
(i.e. by using only water) supply should be dispensed before in-
serting the capsule, so that you can best enjoy the product.
Press the FREE DOSE BEVERAGE button to start
delivery. Once the desired amount of brewed coffee is
reached, press the button again to stop brewing.
The supply button will light up to a blinking white light
when the product is being supplied. You can stop supply-
ing by pressing the supply button again.
Once supply is over, lift and then lower the capsule load-
ing lever to unload the exhausted capsule.
To supply again, wait until both the supply button and the
ON�STAND�BY button come on to a steady white
light.

62
I TE N
Press down the button of the icon you wish to program.
The machine will start supplying and, after approximate-
ly 3 seconds, the other coffee buttons will start blinking
and the machine will beep , to indicate that the pro-
gramming mode has been accessed.
Keep the supply button depressed
Once the desired amount of coffee has been obtained,
stop supply by releasing the button.
The machine will stop and the dose will be programmed
If the programmed measure exceeds the maximum al-
lowed the machine will automatically stop delivery, the de-
livery button will blink and the last programmed measure
will be saved in the memory.
If there is a power failure during programming, the last
programmed value remains in the memory.
If during a dose programming, water lack
is indicated,
the machine stops the supply and the dose being pro-
grammed won’t be saved. Once filled the water tank, re-
peat the dose programming procedure.
PROGRAMMING
COFFEE DOSE PROGRAMMING
Measures are always programmed using the same but-
ton; any action by pressing other buttons will be ignored.
The programmed amount of brewed coffee can be
changed by repeating the programming.
It is not possible to program the coffee dose in milk-
based beverages.
Press the ON�STAND�BY button to switch the
machine on. The machine will be ready when the ON�
STAND�BY button stops blinking and the supply
button lights are steadily.
Lift the pod loading lever until it locks into position to
open the pod fitting compartment.
Put a Lavazza capsule into the capsule
fitting compartment.
Lower the pod loading lever to close the pod fitting
compartment. Place the cup onto the plate.
63
E N
PREPARING THE MILK-BASED BEVERAGES
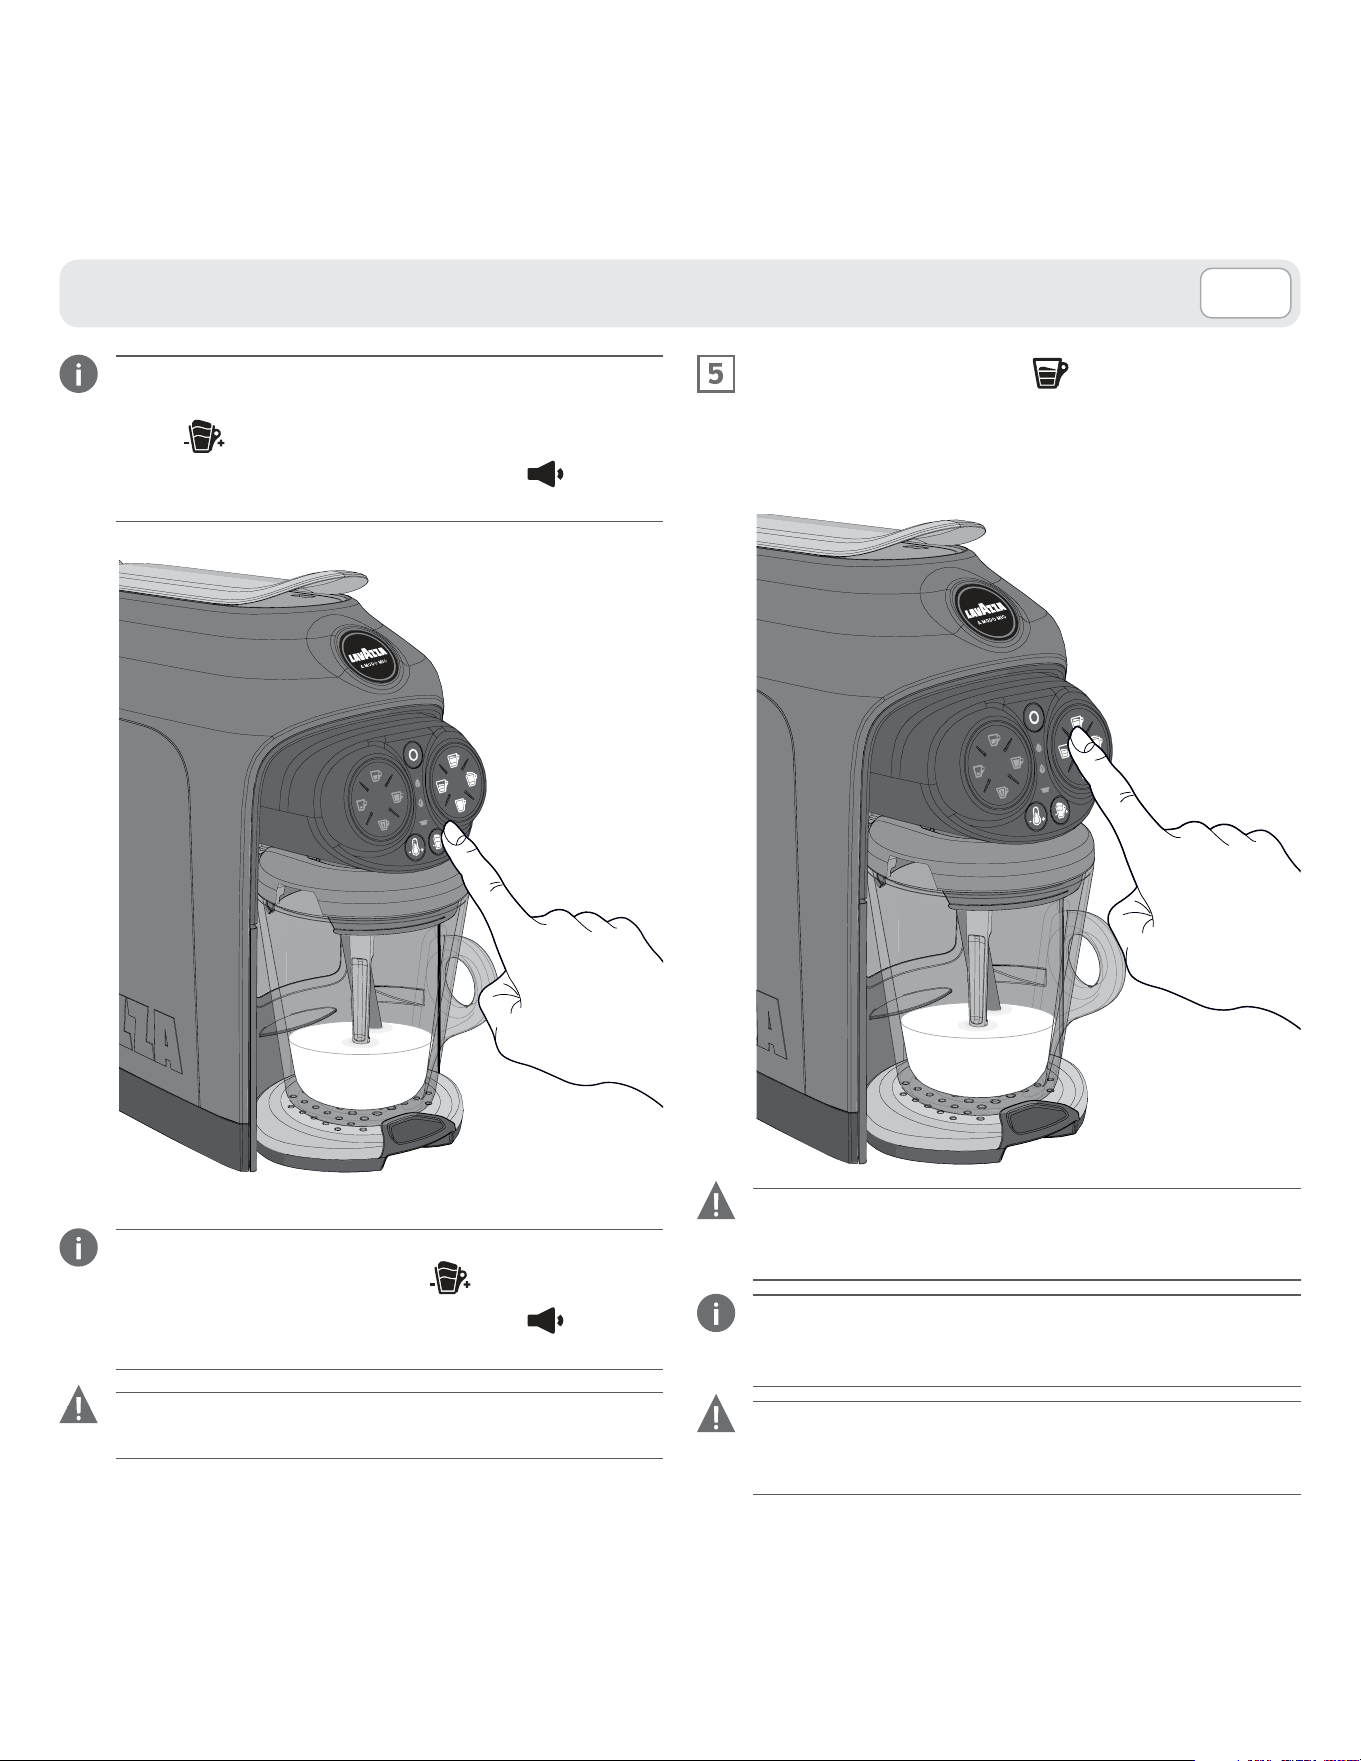
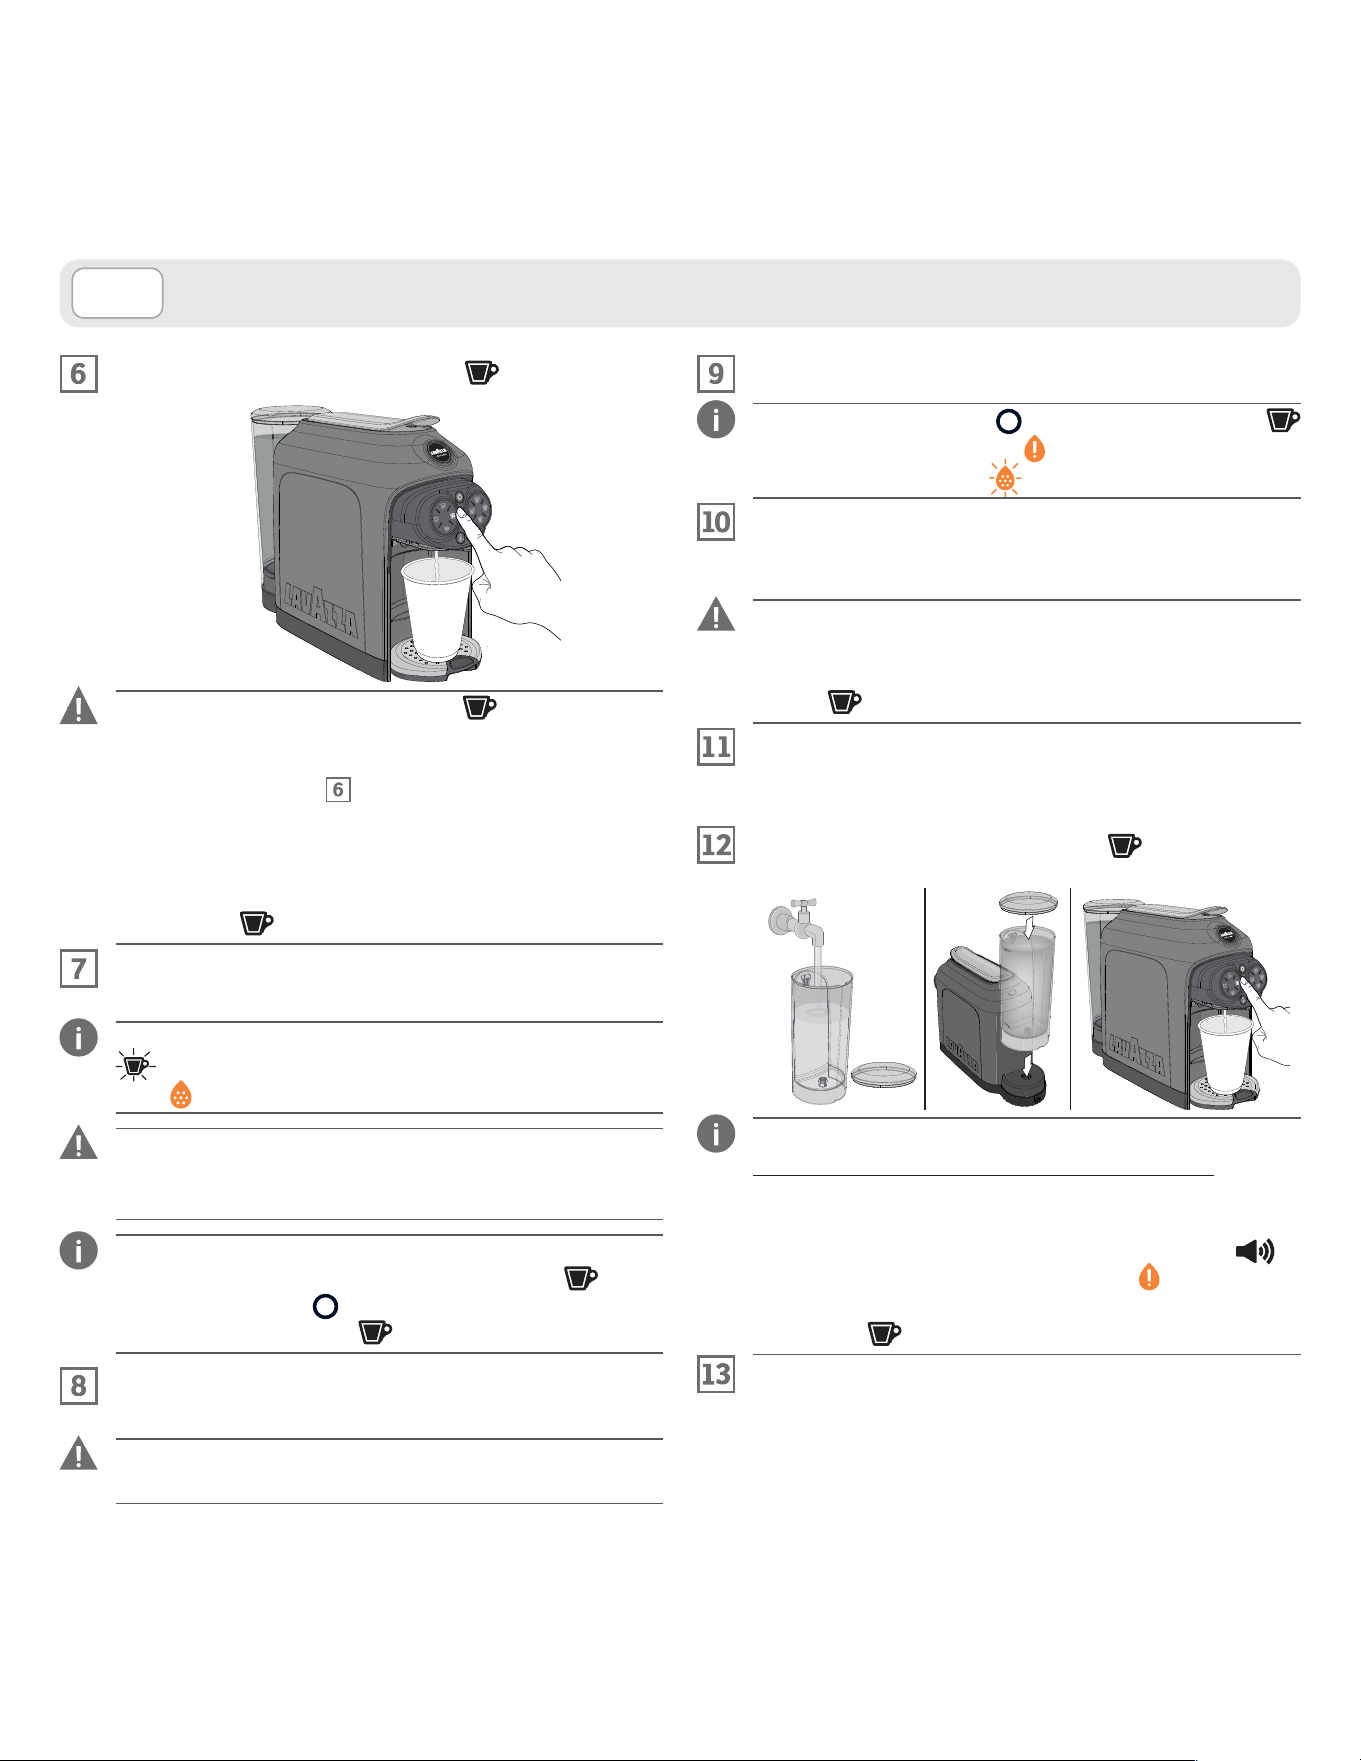
DELIVERING CAPPUCCINO
When the milk whipping jug is inserted, the machine
will only turn on the milk-based beverage supply but-
tons, the temperature selection button and the foam
control button. The coffee beverage warning lights
will be OFF and the buttons will not work.
Open the milk whipping jug and fill it with milk up to the
CAPPUCCINO
level sign.
Pour the exact amount of milk indicated on the jug.
Do not pour too much milk or too little milk.
Otherwise, hot milk may in both cases spill out of the
container.
Use only cold milk at the fridge temperature 39°F-46°F
(4-8°C).
Do not use milk at room temperature. Using soy milk will
not guarantee the best results.
Make sure that the milk whipping jug has been cor-
rectly put in place and, also, that the beverage supply
buttons are ON with a steady white light.
Close the milk whipping jug and fit it into the machine.
When the milk frothing jug is correctly positioned, the
machine emits a beep .
64
I TE N
PREPARING THE MILK-BASED BEVERAGES
If you wish a hotter coffee, you can increase the beverage
temperature by pressing the “TEMPERATURE boost”
button .
The machine will, when the button is pressed, emit an
acoustic signal and the button light will get brighter.
If you wish to go back to the standard temperature, press
the “TEMPERATURE boost” button
again .
The machine will, when the button is pressed, emit an
acoustic signal and the button light will get dimmer.
The temperature cannot be changed during the
supply phase.
Put a Lavazza capsule into the capsule
fitting compartment.
Check that a capsule has been inserted. If there is no
capsule, the machine will delivery water, not coffee
.
Lower the capsule loading lever to close the capsule
fitting compartment.
65
E N
If you wish more foam in the beverage, you can increase
the amount of the same by pressing the FOAM control
button .
The machine will emit an acoustic signal
when the
button is pressed.
If you wish to go back to the normal foam amount, press
the FOAM control button again .
The machine will emit an acoustic signal when the
button is pressed.
The foam amount cannot be changed when the
beverage is being supplied.
PREPARING THE MILK-BASED BEVERAGES
Press the CAPPUCCINO 2.8fl oz (80 ml) button
to start the machine. After a few seconds the machine
will start to warm and froth the milk.
When ready, the machine delivers the measure of coffee
in the jug and stops automatically.
Do not use the milk frothing jug to conserve
the beverages. Always clean the jug thoroughly
after each use.
The supply button will light up to a blinking white light
when the product is being supplied. You can stop supply-
ing by pressing the supply button again.
Do not make more than 5 consecutive beverages.
The machine will be ready to use again after about 10
minutes.
66
I TE N
PREPARING THE MILK-BASED BEVERAGES
DELIVERING CAPPUCCINO LARGE
Open the milk whipping jug and fill it with milk up to the
CAPPUCCINO LARGE level sign.
Do steps: , and in paragraph CAPPUCCINO
DELIVERY.
Press the CAPPUCCINO LARGE 4.5 fl oz (130 ml)
button to start the machine.
After a few seconds the machine will start to warm and
froth the milk.
When ready, the machine delivers the measure of coffee
in the jug and stops automatically.
DELIVERING MILK MACCHIATO
Open the milk whipping jug and fill it with milk up to the
MILK MACCHIATO level sign.
Do steps: , and in paragraph CAPPUCCINO
DELIVERY.
Press the MILK MACCHIATO 6.1 fl oz (175 ml)
button to start the machine.
After a few seconds the machine will start to warm and
froth the milk.
When ready, the machine delivers the measure of coffee
in the jug and stops automatically.
67
E N
DELIVERING HOT WHIPPED MILK
Open the milk whipping jug and fill it with milk up to the
MILK MACCHIATO / WHIPPED MILK -
level sign.
Close the milk whipping jug and fit it into the machine.
Press the HOT WHIPPED MILK button 6.1 fl oz
(175 ml) to start the preparation.
After a few seconds, the machine will start warming and
whipping the milk.
DELIVERING COLD WHIPPED MILK
Open the milk whipping jug and fill it with milk up to the
MILK MACCHIATO / WHIPPED MILK -
level sign.
Pour the exact amount of milk indicated on the jug.
Do not pour too much milk or too little milk.
Otherwise, hot milk may in both cases spill out of the
container.
Use only cold milk at the fridge temperature 39°F-46°F
(4-8°C).
Do not use milk at room temperature.
Using soy milk will not guarantee the best results.
PREPARING THE MILK-BASED BEVERAGES
68
I TE N
PREPARING THE MILK-BASED BEVERAGES
Do not use the milk frothing jug to conserve
the beverages. Always clean the jug thoroughly
after each use.
When the beverage is being supplied, the selected button
will be ON with a blinking blue light.
To supply again, wait until both the supply button and
the ON�STAND�BY button come on to a steady
white light.
Do not make more than 5 consecutive beverages.
The machine will be ready to use again after about 10
minutes.
Press the COLD WHIPPED MILK button 6.1 fl oz
(175 ml) to start the preparation.
After a few seconds, the machine will start whipping the
milk.
Close the milk whipping jug and fit it into the machine.
When the milk frothing jug is correctly positioned, the ma-
chine emits a beep .
Make sure that the milk whipping jug has been cor-
rectly put in place and, also, that the beverage supply
buttons are ON with a steady white light.
Keep the TEMPERATURE Boost button depressed
over at least 3 seconds.
The machine will emit a double acoustic signal to in-
dicate the shift to the cold beverage preparation.
Both the TEMPERATURE Boost button and the
COLD WHIPPED MILK icon will turn blue and
the machine will only enable the COLD WHIPPED
MILK supply button .
69
E N
CLEANING THE DROP COLLECTION TRAY
AND THE USED CAPSULE COLLECTION
TRAY
The capsule collection tray warning lamp will come
on when the used capsule tray is full and, therefore, has
to be emptied and fitted back into place again.
Remove the drop collection tray and the used capsule
collection tray.
The machine will emit an acoustic signal
to inform
that the capsule collection tray has been removed.
If the drawer is removed for more than 5 seconds, the
machine will zero the capsules inserted count.
MAINTENANCE AND CLEANING
CLEANING THE MACHINE
Never use solvents, alcohol or other aggressive
substances or ovens for drying the coffee machine
components.
Wash machine components (electric components
excluded) with cold/lukewarm water and non-abra-
sive clothes/sponges.
All removable components can be cleaned by using
a dishwasher.
Do not leave water in the tank and water circuit for
more than 3 days. If this is the case, drain the tank
and circuit, rinse it and refill it with fresh water, then
carry out a delivery without capsule before making
any coffee or other beverage.
COFFEE DISPENSER CLEANING
To clean the dispenser, perform a weekly COFFEE
BREWING procedure without inserting the capsule.
AROMATICO
100% ARABICA
70
I TE N
Remove the drop collection tray and the capsule col-
lection tray, then empty the used capsules and the flu-
ids found in the drop collection tray
.
Wash all the components with cold or warm water, or in
a dishwasher, then dry them up and fit them back into
place correctly
.
Regularly check that the drop collection tray is not full, so
as to prevent fluid leakage.
MAINTENANCE AND CLEANING
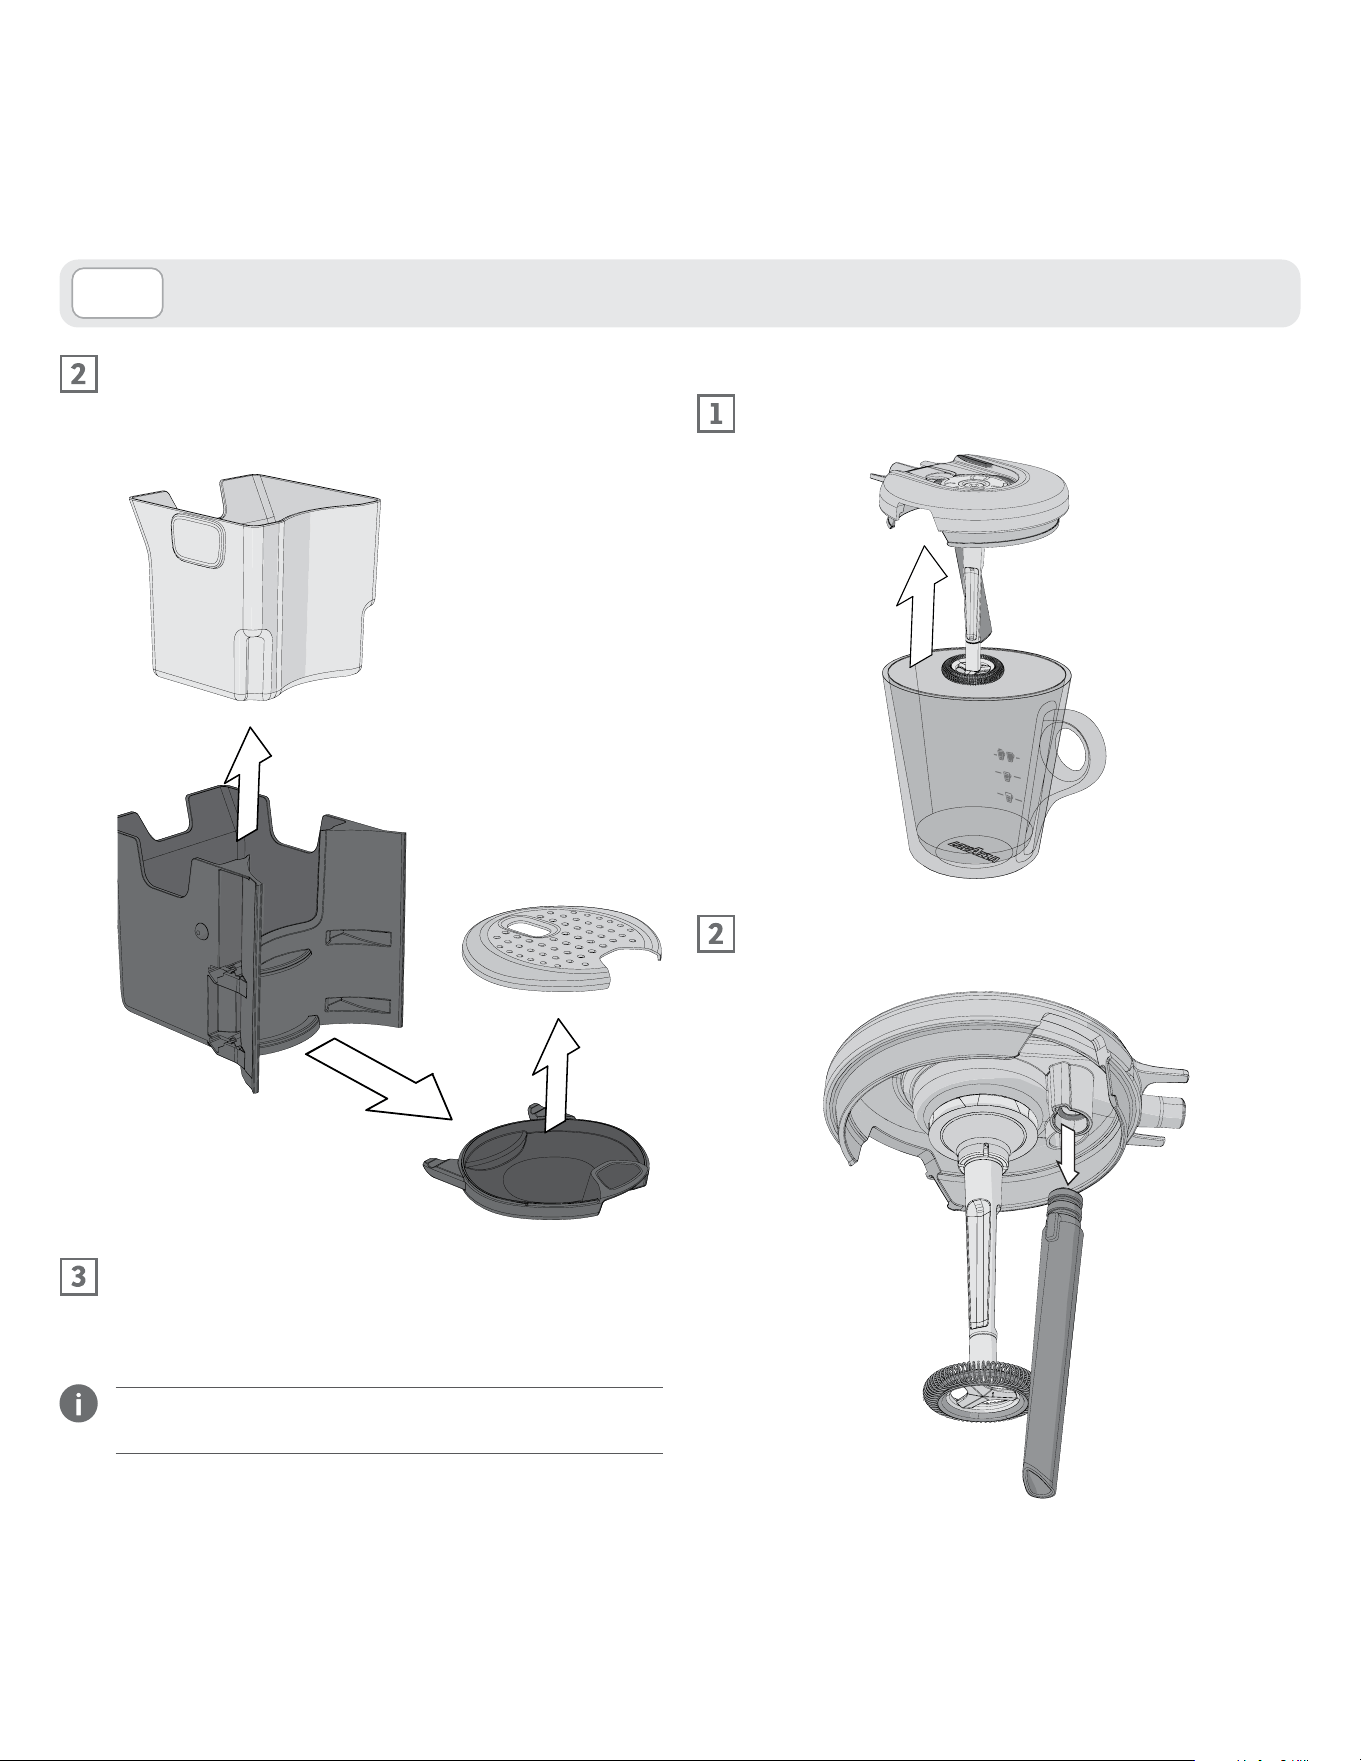
CLEANING MILK FROTHING JUG
Open the milk frothing jug and separate its components.
Remove the steam wand from the milk whipping jug
cover.

71
E N
MAINTENANCE AND CLEANING
Wash all the components with cold or warm water
.
Wash the jug, the whisk and the steam nozzle in cold wa-
ter or in a dishwasher at low temperature. Wash the com-
ponents separately.
Fit the steam wand onto the milk whipping jug cover.
Fit the cover onto the milk whipping jug.
Close the milk whipping jug with its cover and pay
attention to the correct position and direction of the
cover.
72
I TE N
DESCALING AS REGARDS MACHINES WITH
SERIAL NUMBER
FROM ����S�����6��6 TO ����S�����6���
FROM ����S��������6
Carefully read the descaling instructions.
Limescale normally builds up with extended use of the
appliance; the machine needs descaling every 2 months
and/or whenever a reduction in water flow is noticed.
The descaling cycle will be requested by the machine
through the switching-on of the special warning lamp
available .
Do not switch the machine off when the descaling
cycle is under way.
The machine must be monitored during the descal-
ing cycle. The cycle will have, once it has been start-
ed, to be performed completely.
Check there is no capsule inside the capsule contain-
ing compartment.
The milk frothing jug MUST be inserted during the
descaling cycle.
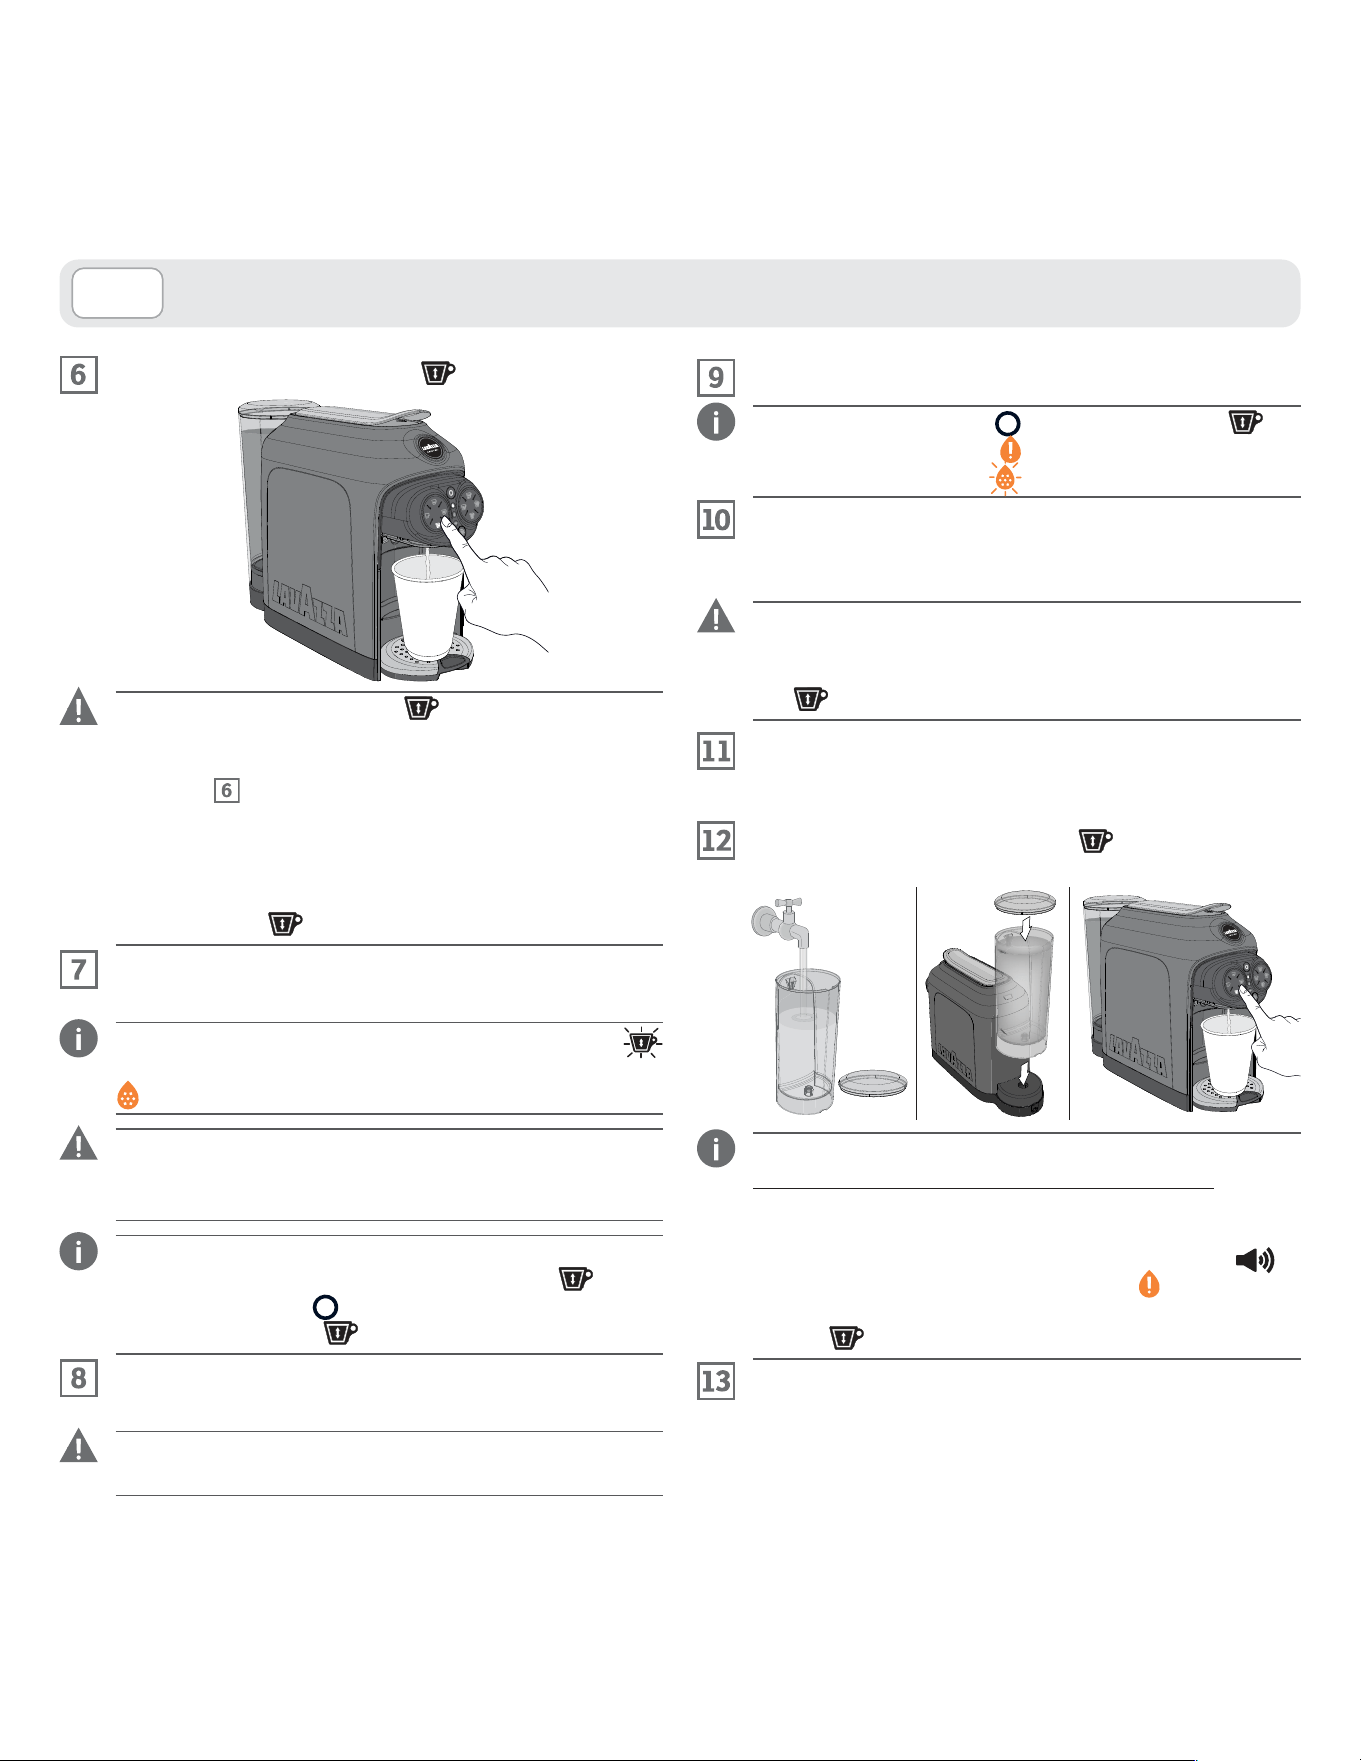
Items needed for descaling:
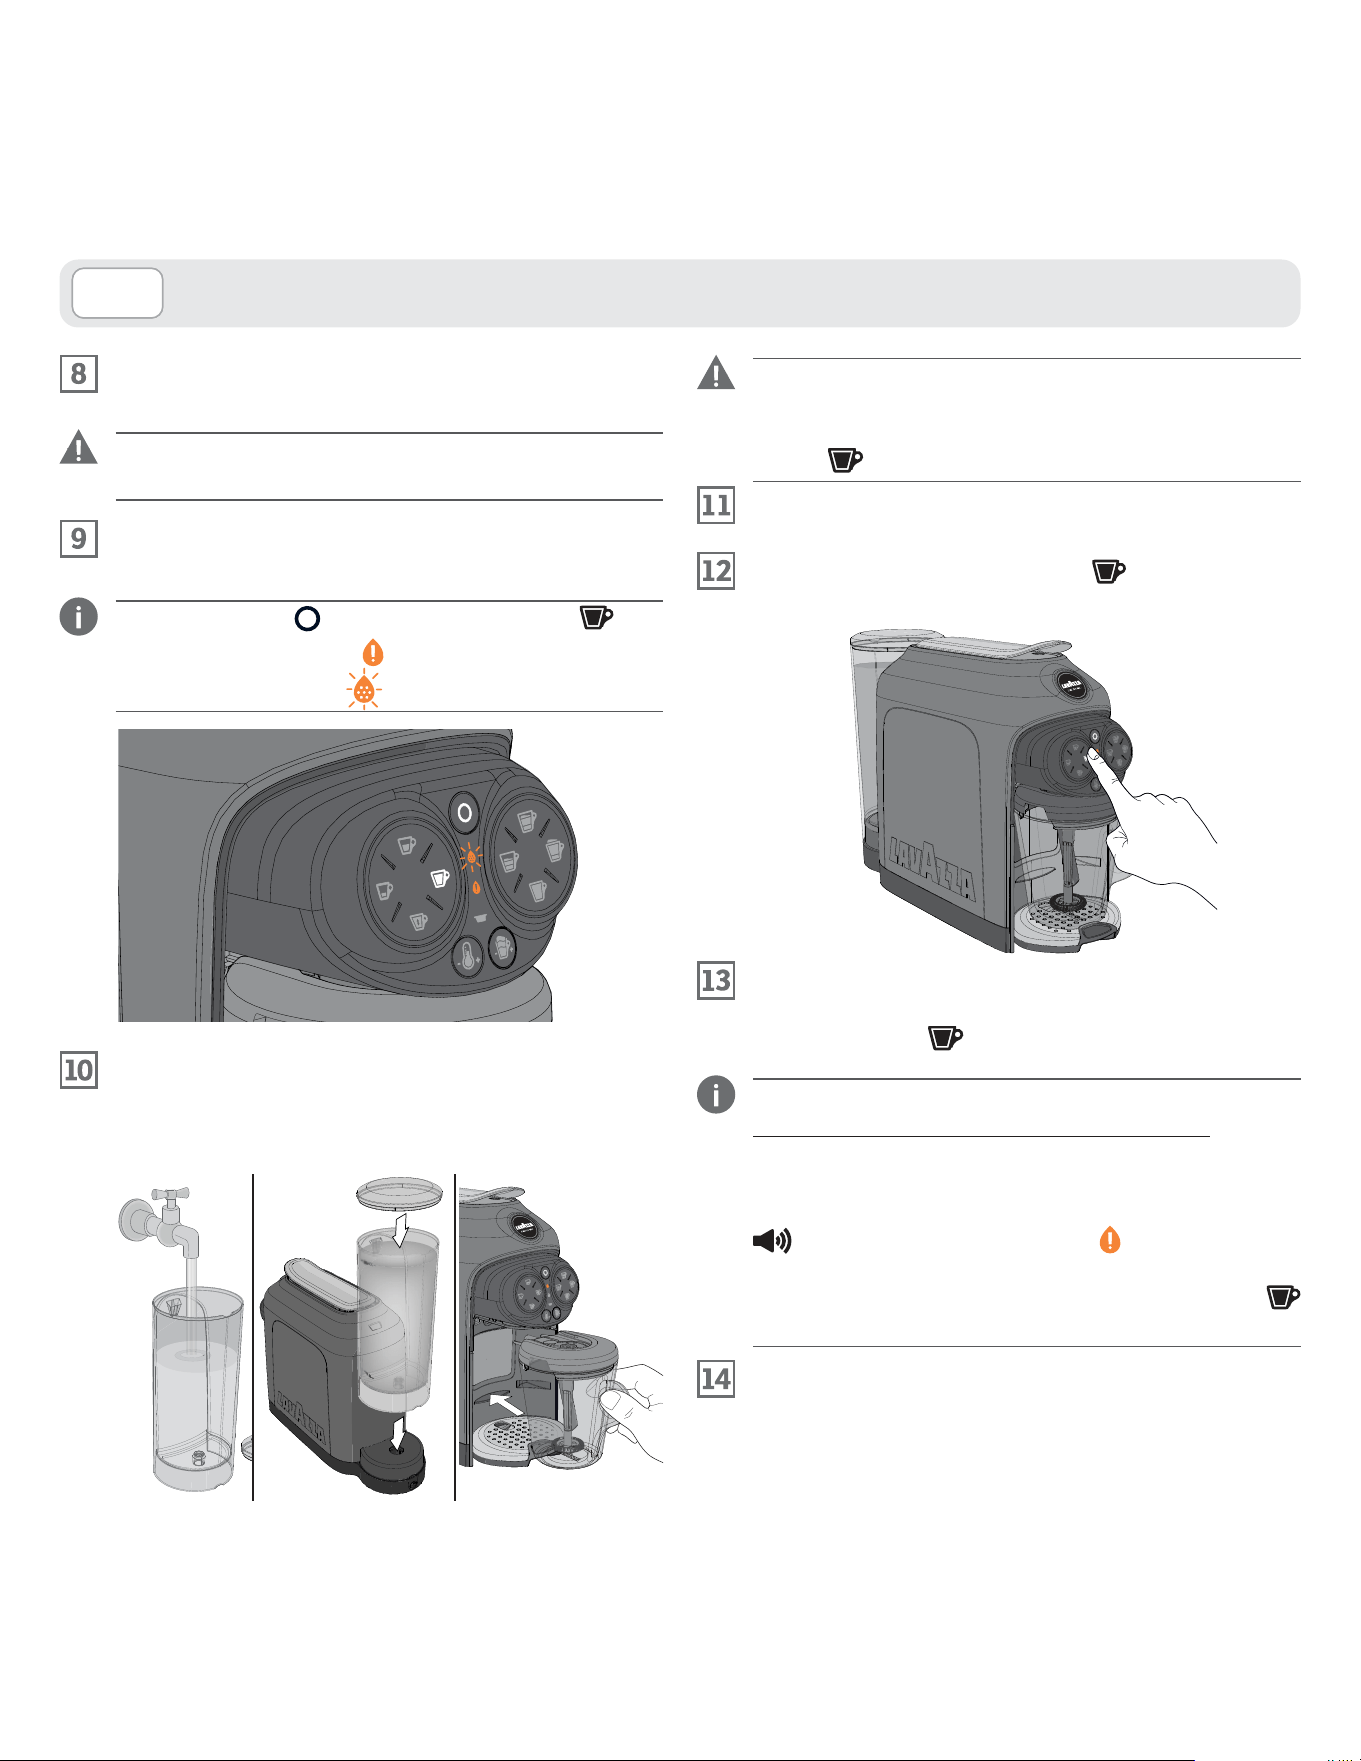
Remove and empty the water tank and remove the
milk whipping jug.
Do not drink the descaling solution and products
dispensed until the completion of the cycle.
Never use vinegar as a descaling solution.
To decalcify the machine, It Is recommended that the
LAVAZZA DESCALING agent should be used.
Fill the tank with the LAVAZZA DESCALING
agent 8.7fl oz (250 ml) and water 8.7fl oz (250 ml).
Fit the tank back into place on the machine
.
Use a moist cloth to wipe off the squirts or drops, if any.
Put the tank back in place on the machine.
Place the milk frothing jug (complete with its cover) into
position on the machine.
MAINTENANCE AND CLEANING
Milk frothing
jug
Milk frothing jug
cover
Capsule tray and
drop collection tray
DESCALING
DECALCIFICANTE
durgol
The Swiss Original
against Limescale
Prior to starting the machine, check the machine serial number that is printed under the Bar Code in the label un-
derneath the machine and find the operating instructions in the dedicated section.
73
E N
Keep, with the machine in the stand-by mode, the
LONG ESPRESSO and FREE DOSE supply
buttons simultaneously depressed over at least 3 seconds.
The machine will emit a prolonged acoustic signal *,
then the: ON/STAND-BY , and LONG COFFEE
button and the descaling warning lamp will all come
on to a steady light .
* The acoustic signals will not be emitted if they have
been turned OFF.
Press the LONG COFFEE button to start the
descaling cycle.
MAINTENANCE AND CLEANING
If the LONG COFFEE button is not pressed
within 9 minutes after the acoustic signal has been
emitted, the machine will go back to the “Stand-by”
mode and the step in the procedure shall be re-
peated, to start the cycle.
In case of power supply interruption, the machine
will, upon the first power-on, resume the descaling
procedure where it was interrupted: press the LONG
COFFEE
button to restart DESCALING.
The machine will automatically activate the descaling
process, after the heating cycle is over.
During the descaling cycle, the LONG COFFEE button
will be ON and blinking and the descaling warning
lamp will be ON to a steady light.
During the descaling cycle, the machine will auto-
matically perform intermittent supply cycles, to allow
the container to be emptied.
The descaling cycle can be temporarily interrupted by
pressing either the LONG COFFEE button ON/
STAND-BY button . To start the cycle again, press the
LONG COFFEE button .
74
I TE N
MAINTENANCE AND CLEANING
The cycle will be temporarily interrupted when the fluid
runs out in the machine tank.
DO NOT top up the tank during this phase.
You must allow the tank to empty completely.
Empty the milk frothing jug used to collect the descaling
solution.
ON/STAND-BY , LONG COFFEE button and
“No water” warning lamp
will be ON to a steady light.
Descaling warning lamp
will be ON and blinking.
Remove the water tank, rinse and wash it accurately.
Fill it with drinking fresh non-carbonated water up to the
MAX. level.
In case of power supply interruption, the machine will,
upon the first power-on, resume the rinse procedure
where it was interrupted: press the LONG COFFEE
button to restart RINSING.
Fit the tank with water. Place the milk frothing jug (com-
plete with its cover) back into position on the machine.
Press the LONG COFFEE button to start the rinsing
cycle.
At the end of the first rinse cycle, refill the water tank
and start the second rinse cycle by pressing the LONG
COFFEE button
.
To end the rinse cycle, a minimum amount of water of
67.62 fl oz (2 litres) (approximately 2 tanks) will have
to be supplied.
In case of lack of water, the cycle will be temporarily inter-
rupted, the machine will emit a prolonged acoustic signal
(if enabled) and the “No water ” warning lamp will
come on to a steady light.
Top up the tank and press the LONG COFFEE
button
again to restart the rinse cycle
At rinse end, the descaling warning lamp goes off, which
confirms that the procedure has come to an end.
Before using the machine, empty and thoroughly rinse
the milk frothing jug and its cover, clean it using a soft
moist cloth.
75
E N
DESCALING AS REGARDS MACHINES WITH
SERIAL NUMBER:
FROM
����S�������6�
TO
���S�����6���
FROM ����S�����6��� TO ����S���������
The machine serial number is shown below the barcode on
the label put under the machine.
Carefully read the descaling instructions.
Limescale normally builds up with extended use of the
appliance; the machine needs descaling every 2 months
and/or whenever a reduction in water flow is noticed.
The descaling cycle will be requested by the machine
through the switching-on of the special warning lamp
available
.
Do not switch the machine off when the descaling
cycle is under way.
The machine must be monitored during the descaling
cycle.
The cycle will have, once it has been started, to be
performed completely.
Check there is no capsule inside the capsule containing
compartment.
Remove and empty the water tank and remove the milk
whipping jug.
Do not drink the descaling solution and products dis-
pensed until the completion of the cycle.
Never use vinegar as a descaling solution.
To decalcify the machine, It Is recommended that the
LAVAZZA DESCALING agent should be used.
Fill the tank with the LAVAZZA DESCALING agent
8.7fl oz (250 ml) and water 8.7fl oz (250 ml).
Fit the tank back into place on the machine
.
Use a moist cloth to wipe off the squirts or drops, if any.
Place a container with a capacity of at least 16.9 fl oz (0.5 L)
under the supplying device.
Keep, with the machine in the STAND�BY mode, the
LONG ESPRESSO and FREE DOSE supply
buttons simultaneously depressed over at least 3 seconds.
The machine will emit a prolonged acoustic signal *,
then the ON/STAND-BY button , LONG COFFEE
button and the descaling warning lamp will all come on
to a steady light .
*The acoustic signals will not be emitted if they have
been turned OFF.
MAINTENANCE AND CLEANING
DESCALING
DECALCIFICANTE
durgol
The Swiss Original
against Limescale
76
I TE N
Press the LONG COFFEE button to start the des-
caling cycle.
If the LONG COFFEE button is not pressed
within 9 minutes after the acoustic signal has been
emitted, the machine will go back to the “Stand-by”
mode and the step
in the procedure shall be re-
peated, to start the cycle.
In case of power supply interruption, the machine will,
upon the first power-on, resume the descaling proce-
dure where it was interrupted: press the LONG COF-
FEE button
to restart DESCALING.
The machine will automatically activate the descaling
process, after the heating cycle is over.
During the descaling cycle, the LONG COFFEE button
will be ON and blinking and the descaling warning
lamp will be ON to a steady light
During the descaling cycle, the machine will auto-
matically perform intermittent supply cycles, to allow
the container to be emptied.
The descaling cycle can be temporarily interrupted by
pressing either the LONG COFFEE button , ON/
STAND-BY button . To start the cycle again, press the
LONG COFFEE button .
The cycle will be temporarily interrupted when the fluid
runs out in the machine tank.
DO NOT top up the tank during this phase.
You must allow the tank to empty completely.
MAINTENANCE AND CLEANING
Empty the container used to collect the solution.
ON/STAND-BY button , LONG COFFEE button
and “No water” warning lamp will be ON to a steady light.
Descaling warning lamp will be ON and blinking.
Remove the water tank, rinse and wash it accurately. Fill
it with drinking fresh non-carbonated water up to the
MAX. level.
In case of power supply interruption, the machine will,
upon the first power-on, resume the rinse procedure
where it was interrupted: press the LONG COFFEE
button to restart RINSING.
Fit the tank back into place on the machine
.
Place a con-
tainer with a capacity of at least 16.9 fl oz (0.5 L) under the
supplying device.
Press the
LONG COFFEE button
to start he rins-
ing cycle.
To end the rinse cycle, a minimum amount of water of
33.81 fl oz (1 litre) (approximately 1 full tank) will have
to be supplied.
I
n case of lack of water, the cycle will be temporarily interrupt-
ed, the machine will emit a prolonged acoustic signal (if
enabled) and the “No water” warning lamp
will come on to
a steady light.
Top up the tank and press the LONG COF-
FEE button
again to restart the rinse cycle.
At rinse end, the descaling warning lamp goes off, which
confirms that the procedure has come to an end.
Before using the machine, empty and thoroughly rinse
the milk frothing jug and its cover, clean it using a soft
moist cloth.
77
E N
DESCALING AS REGARDS MACHINES WITH
SERIAL NUMBER UNTIL ����S�������6�
The machine serial number is shown below the barcode on
the label put under the machine.
Carefully read the descaling instructions.
Limescale normally builds up with extended use of the
appliance; the machine needs descaling every 2 months
and/or whenever a reduction in water flow is noticed.
The descaling cycle will be requested by the machine
through the switching-on of the special warning lamp
available
.
Do not switch the machine off when the descaling
cycle is under way.
The machine must be monitored during the descal-
ing cycle.
The cycle will have, once it has been started, to be
performed completely.
Check there is no capsule inside the capsule contain-
ing compartment.
Remove and empty the water tank and remove the milk
whipping jug.
Do not drink the descaling solution and products dis-
pensed until the completion of the cycle.
Never use vinegar as a descaling solution.
To decalcify the machine, It Is recommended that the
LAVAZZA DESCALING agent should be used.
Fill the tank with the LAVAZZA DESCALING agent
8.7fl oz (250 ml) and water 8.7fl oz (250 ml).
Fit the tank back into place on the machine.
Use a moist cloth to wipe off the squirts or drops, if any.
Place a container with a capacity of at least 16.9 fl oz (0.5 L)
under the supplying device.
Keep, with the machine in the STAND�BY mode, the
ESPRESSO and LONG ESPRESSO supply
buttons simultaneously depressed over at least 3 sec-
onds.
The machine will emit a prolonged acoustic signal, then
the ON/STAND-BY , FREE DOSE and the
descaling warning lamp will all come on to a steady light
.
*The acoustic signals will not be emitted if they have
been turned OFF.
MAINTENANCE AND CLEANING
DESCALING
DECALCIFICANTE
durgol
The Swiss Original
against Limescale
78
I TE N
MAINTENANCE AND CLEANING
Empty the container used to collect the solution.
ON/STAND-BY button , FREE DOSE button and
“No water” warning lamp will be ON to a steady light.
Descaling warning lamp will be ON and blinking.
Remove the water tank, rinse and wash it accurately. Fill
it with drinking fresh non-carbonated water up to the
MAX. level.
In case of power supply interruption, the machine will,
upon the first power-on, resume the rinse procedure
where it was interrupted: press the FREE DOSE but-
ton
to restart RINSING.
Fit the tank back into place on the machine
.
Place a con-
tainer with a capacity of at least 16.9 fl oz (0.5 L) under the
supplying device.
Press the FREE DOSE button to start he rinsing
cycle.
To end the rinse cycle, a minimum amount of water of
33.81 fl oz (1 litre) (approximately 1 full tank) will have
to be supplied.
I
n case of lack of water, the cycle will be temporarily interrupt-
ed, the machine will emit a prolonged acoustic signal
(if
enabled) and the “No water” warning lamp
will come on to
a steady light.
Top up the tank and press the
FREE DOSE
button
again to restart the rinse cycle.
At rinse end, the descaling warning lamp goes off, which
confirms that the procedure has come to an end.
Before using the machine, empty and thoroughly rinse
the milk frothing jug and its cover, clean the machine
using a soft moist cloth.
Press the FREE DOSE button to start the descaling
cycle.
If the FREE DOSE button is not pressed within
9 minutes after the acoustic signal has been emitted,
the machine will go back to the “Stand-by” mode and
the step
in the procedure shall be repeated, to
start the cycle.
In case of power supply interruption, the machine
will, upon the first power-on, resume the descaling
procedure where it was interrupted: press the FREE
DOSE button
to restart DESCALING.
The machine will automatically activate the descaling
process, after the heating cycle is over.
During the descaling cycle, the FREE DOSE button
will be ON and blinking and the descaling warning lamp
will be ON to a steady light
During the descaling cycle, the machine will auto-
matically perform intermittent supply cycles, to allow
the container to be emptied.
The descaling cycle can be temporarily interrupted by
pressing either the FREE DOSE button , ON/
STAND-BY button . To start the cycle again, press the
FREE DOSE button .
The cycle will be temporarily interrupted when the fluid
runs out in the machine tank.
DO NOT top up the tank during this phase.
You must allow the tank to empty completely.
79
E N
TROUBLESHOOTING
Problem encountered Possible causes Solution
Machine does not turn ON�STAND�
BY
warning lamp OFF.
»�� Machine is not connected to the
power source.
»�� The machine is connect to power
strip not working.
»�� Power supply not available in the
electric/household mains.
»��Connected the machine to the power
source.
»��Connected the machine directly to
the power source.
»�� Connect another device to check the
power supply.
�� IF THE PROBLEM REMAIN
PLEASE CONTACT LAVAZZA
CUSTOMER SERVICE.
The machine will not switch on after
the ON�STAND�BY
button is
pressed.
»�� Touch interface fails to respond.
»�� Wrong simultaneous pressure of 2
buttons.
»�� Verify that the interface surface and
the user’s hands are clean and dry.
»�� Wait a few seconds, then press the
ON�STAND�BY button
only.
�� IF THE PROBLEM REMAIN
PLEASE CONTACT LAVAZZA
CUSTOMER SERVICE.
Excessive heating time perceived
(i.e. more than 40 seconds).
»�� Machine storage at low temperatures
(e.g.: cellar/garage).
»�� Keep the machine in a suitable place
over at least 1 hour.
Then, plug the machine into the
mains socket and try to switch it on.
�� IF THE PROBLEM REMAIN
PLEASE CONTACT LAVAZZA
CUSTOMER SERVICE.

80
I TE N
TROUBLESHOOTING
Problem encountered Possible causes Solution
The machine is very noisy. »�� Machine not is on a flat and stable
surface.
»�� Power supply cable incorrectly
positioned.
»�� Movable parts not fitted properly.
»��No water in the tank.
»��Capsule not present
»�� Check the surface.
»�� Check the correct position of the
cable into the base of the machine.
»��Fit the movable parts properly.
»�� Top up the tank with fresh drinking
water.
»�� Insert Lavazza A MODO MIO
capsule or compatible.
�� IF THE PROBLEM REMAIN
PLEASE CONTACT LAVAZZA
CUSTOMER SERVICE.
Unit ready for use and failing to
acknowledge the button press.
»�� Wrong button press/activation.
»�� Used capsule collection tray not
fitted.
» Water circuit clogged with scale
deposits.
»�� Press one of the illuminated buttons
with your fingertip, then check the
availability of the acoustic signal (if
activated) and the proper blinking of
the selected icon.
»�� Check the correct insertion of the
tray, with the resulting alarm warning
lamp switch-off. Check for correct
supplying.
� IF THE PROBLEM REMAIN
PLEASE CONTACT LAVAZZA
CUSTOMER SERVICE.
The lever remains closed after the
supply.
»�� Used capsule tray full. »�� Empty the tray and try to open the
lever.
� IF THE PROBLEM REMAIN
PLEASE CONTACT LAVAZZA
CUSTOMER SERVICE.
81
E N
TROUBLESHOOTING
Problem encountered Possible causes Solution
No supply (the machine is switched on,
yet it supplies no coffee or water).
»��No water in the tank.
»�� Tank not inserted correctly.
»�� Capsule loading lever lifted or not
lowered correctly.
»�� No water flow in the hydraulic circuit
(no activation).
»�� Capsule not compatible.
»�� Presence of limescale.
»�� Top the tank up with drinking fresh
water, then check for correct supplying.
»�� Correctly fit the tank in, then check
for correct supplying.
»�� Lower the capsule loading lever up to the
stop, then check for correct supplying.
»�� Disconnect the power cord, wait 10
seconds, then connect the power cord
again. Switch the machine on and wait
for the heating cycle to be over. Check
for correct supplying (the machine will
automatically make attempts at filling
the hydraulic circuit).
»�� Try again by using another capsule
from a different package.
»�� Perform the descaling procedure by
means of the Lavazza descaling agent.
� � IF THE PROBLEM REMAIN
PLEASE CONTACT LAVAZZA
CUSTOMER SERVICE.
Water leaks in the coffee machine. »�� Tank damaged.
»�� Spent capsule drawer filled.
»�� Capsule stuck.
»�� Capsule not compatible.
»�� Check for leaks in the tank keeping it
separate from the machine.
»�� Empty the spent capsule drawer.
»�� Open and close the lever to drop
the capsule. Remove and empty the
capsule collection tray.
»�� Use suitable capsules (i.e.
Lavazza
capsules or any
compatible capsule).
IF THE PROBLEM REMAIN
PLEASE CONTACT LAVAZZA
CUSTOMER SERVICE.
82
I TE N
Problem encountered Possible causes Solution
ON�STANDBY button blinking
red.
»�� Inadequate machine storing
conditions / Temporary lock.
»�� Unplug the machine from the power
socket and allow it to rest at room
temperature enough time (max. 1
hour). Plug the machine in again,
then press the switch-on button
(make one attempt only).
IF THE PROBLEM REMAIN
PLEASE CONTACT LAVAZZA
CUSTOMER SERVICE.
The loading lever does not reach the
supply position or requires an excessive
closing effort.
»��Spent capsule drawer filled.
»�� Capsule stuck.
»�� Empty the tray and make an attempt
at closing the lever.
»�� Open and close the lever to drop the
capsule.
IF THE PROBLEM REMAIN
PLEASE CONTACT LAVAZZA
CUSTOMER SERVICE.
Coffee is dispensed too fast and,
therefore, it is not so creamy.
»��A previously used capsule is used.
»��Capsule not present.
»��Capsule not compatible.
»�� Use a new capsule.
»�� Insert the capsule.
»�� Try again by using another capsule
from a different package.
IF THE PROBLEM REMAIN
PLEASE CONTACT LAVAZZA
CUSTOMER SERVICE.
The coffee is cold. »�� Slow supplying, hydraulic circuit
clogged with limescale.
»�� Perform the descaling procedure by
means of the Lavazza descaling agent.
IF THE PROBLEM REMAIN
PLEASE CONTACT LAVAZZA
CUSTOMER SERVICE.
TROUBLESHOOTING

83
E N
Problem encountered Possible causes Solution
The machine emits no sound »�� Acoustic signal OFF. »�� Set the machine to the stand-by
mode, then simultaneously keep the
“Espresso coffee” and “”Weak coffee”
buttons depressed over at least 5
seconds (refer to the “
GETTING
THE MACHINE READY” section)
IF THE PROBLEM REMAIN
PLEASE CONTACT LAVAZZA
CUSTOMER SERVICE.
Coffee flows out slowly drop by drop. »��Capsule not compatible.
»�� An inadequate pod has been used.
»�� Supplying device clogged.
»�� Hydraulic circuit clogged with
limescale.
»�� Try again by using another capsule
from a different package.
»�� Remove the used capsule and use a
new capsule.
»�� Clean the coffee dispensing spout
(see
MAINTENANCE AND
CLEANING).
»�� Perform the descaling procedure by
means of the Lavazza descaling agent.
IF THE PROBLEM REMAIN
PLEASE CONTACT LAVAZZA
CUSTOMER SERVICE.
The milk-based beverage warning
lights are OFF and the buttons won’t
work.
»�� Milk jug missing or inserted wrongly.
» Milk cover positioned with the
nozzles facing the handle.
» Insert the milk jug. The milk
preparation warning lights will be
turned on if the jug is inserted
correctly
» Turn the milk cover so that the nozzle
will face the direction opposite the
handle. The milk preparation warning
lights will be turned on if the jug is
inserted correctly.
IF THE PROBLEM REMAIN
PLEASE CONTACT LAVAZZA
CUSTOMER SERVICE.
TROUBLESHOOTING

84
I TE N
Problem encountered Possible causes Solution
Milk does not foam. » Milk unsuitable for use.
» Too hot milk temperature.
» Beater coil not fitted into place.
» Water circuit clogged with scale
deposits.
» It is recommended that whole milk
(pasteurized or UHT treated) and/
or cold skimmed milk from the fridge
39°F-46°F (4-8°C) should be used.
» Use milk at the fridge temperature
(i.e. ranging between 4°C and 8°C).
» Make sure that the beater coil has
been fitted into place correctly.
» Perform the descaling procedure by
means of the Lavazza descaling agent.
IF THE PROBLEM REMAIN
PLEASE CONTACT LAVAZZA
CUSTOMER SERVICE.
The milk-based beverage temperature
is too hot.
» Insufficient amount of milk fed with
respect to the selected / desired
amount.
» Add more milk by following the
indications of the icons on the milk
jug.
IF THE PROBLEM REMAIN
PLEASE CONTACT LAVAZZA
CUSTOMER SERVICE.
The milk-based beverage
temperature is too cold.
» Excessive amount of milk fed with
respect to the selected / desired
amount.
» Water circuit clogged with scale
deposits.
» Decrease the amount of milk by
following the indications of the icons
on the milk jug.
» Perform the descaling procedure by
means of the Lavazza descaling agent.
IF THE PROBLEM REMAIN
PLEASE CONTACT LAVAZZA
CUSTOMER SERVICE.
Noisy operation of the cappuccino
maker during the preparation with
milk.
» Milk shipping beater incorrectly fitted
into place.
» Fit the milk whipping beater into
the correct position, as shown in the
Manual (see page 71).
IF THE PROBLEM REMAIN
PLEASE CONTACT LAVAZZA
CUSTOMER SERVICE.
TROUBLESHOOTING

85
E N
Problem encountered Possible causes Solution
No coffee available for preparing the
cappuccinos and the milk with coffee
» Coffee capsule missing.
» Previous coffee capsule not
discharged.
» Early removal of the milk jug.
» Insert a coffee capsule and prepare
the new desired beverage by
eliminating the previous one.
» Discharge the used capsule, insert a
new one and prepare the new desired
beverage by eliminating the previous
one.
» Wait for the acoustic signal
at
the end of preparing the selected
beverage.
IF THE PROBLEM REMAIN
PLEASE CONTACT LAVAZZA
CUSTOMER SERVICE.
Milk spilling out of the jug » Milk jug broken.
» Excessive milk jug filling (above the
upper notch / icon).
» Insufficient milk jug filling (below the
selected notch / icon).
» Selection of the same beverage used
for the previous preparation.
» Check the integrity of the milk jug. In
case of breakage, CONTACT THE
LAVAZZA CUSTOMER SERVICE.
» Fill with the correct amount, as shown
by the icons on the jug.
» Fill with the correct amount, as shown
by the icons on the jug.
» Prepare the new desired beverage by
eliminating the previous one and by
applying one cycle ONLY.
IF THE PROBLEM REMAIN
PLEASE CONTACT LAVAZZA
CUSTOMER SERVICE.
TROUBLESHOOTING

86
I TE N
Contact Lavazza Customer Service for any problem or failure not included in the above list.
TECHNICAL SPECIFICATIONS
• Power supply: 220-240V / 50-60Hz
• Nominal power: 1500W
• Dimensions: Height Width Depth
280 mm 145 mm 380 mm
11.02 in 5.70 in 14.96 in
• Weight: 4,5 kg (8,81 lb)
• Water tank removable type: 1,1 L (38,71 oz)
• Housing materials: Thermoplastic
• Cable Length: 0,8 m (31.49 in)
Problem encountered Possible causes Solution
COLD WHIPPED MILK :
beverage preparation hot
» Wrong access procedure for the
COLD WHIPPED MILK
beverage.
» Repeat the access procedure by
keeping the “Temperature boost”
button depressed until the icon turns
BLUE
(as shown in page 67 of
the Manual).
IF THE PROBLEM REMAIN
PLEASE CONTACT LAVAZZA
CUSTOMER SERVICE.
ON�STANDBY button
red warning
light with acoustic signal emitted
when preparing a milk-based beverage.
» Products other than milk (e.g.
powders) have been used.
Use only milk to prepare the beverages
supplied by the machine.
IF THE PROBLEM REMAIN
PLEASE CONTACT LAVAZZA
CUSTOMER SERVICE.
TROUBLESHOOTING
