
High Pressure Washer
Model No.: AP001

READ BEFORE USE
By using this product, you signify that you have read, understand, and
accept the terms and conditions here.
It is recommended to watch all tutorial videos on the official Anykit
website and read the safety guidelines before use.
Prepare by reviewing the quick start guide and refer to this user manual
for more information.
Scan the QR code to watch
the AP001 tutorial videos,
which demonstrate how to
use the AP001 safely.
Video Tutorials
Scan this QR code to get the
manual in PDF, which can be
enlarged and viewed on your
mobile device.
ONLINE MANUAL
Read the following documents before using.
(1)Safety Guidelines
(2)Quick Start Guide
(3)User Manual

• Never touch the plug or the socket with wet hands.
• The appliance should not be used if the power cord or important parts
of the appliance, e.g. high-pressure hoses, trigger gun, or safety
devices are damaged.
• Check the power cord and plug for damage before every use. If the
power cord is damaged, please arrange for it to be replaced
immediately by an authorized repair agent or a skilled electrician.
• Check the high-pressure hose for damage before every use. Please
arrange for the immediate replacement of a damaged high-pressure
hose.
• The appliance may not be used in areas where a risk of explosion is
present.
• High-pressure jets can be dangerous if improperly used. The jet must
not be directed at persons, animals, live electrical equipment, or at the
appliance itself.
• The high-pressure jet must not be directed at other persons or
directed by the user at him/herself to clean clothing or footwear.
• Never use the appliance to clean objects containing hazardous
substances (e.g. asbestos).
• Vehicle tires or tire valves are susceptible to damage from the
high-pressure jet and may burst.
• Ensure that a distance of at least 30 cm is observed when cleaning
with the jet.
• Only use this device with water or aqueous detergents that are
supplied or recommended by the manufacturer. Do not use it with any
other liquids.
Danger
Safety Instructions

WARNING
Safety Instructions
• The plug and the coupling of an extension cable must be watertight
and must never lay in the water.
• Unsuitable extension cables can be hazardous. Only use extension
cables outdoors that have been approved for this purpose.
• Always fully unroll electrical cables from the cable drum.
• Only use high-pressure hoses, fixtures, and couplings recommended
by the manufacturer.
• This appliance is not intended for use by persons with reduced
physical, sensory, or mental capabilities.
• The appliance must not be operated by children or persons who have
not been instructed accordingly.
• Children should be supervised to prevent them from playing with the
appliance.
• This appliance was designed to be used with detergents that are
supplied or recommended by the manufacturer. The use of other
detergents or chemicals may compromise the safety of the appliance.
• When working with the appliance, the operator must consider the
local conditions and pay attention to other persons, in particular
children, who are nearby.
• Do not use the appliance when there are other persons around unless
they are also wearing safety equipment.
• Wear protective clothing and safety goggles to protect against
splashback containing water or dirt.

CAUTION
Safety Instructions
• In case of extended downtimes, switch the appliance off at the
switch/appliance switch or remove the plug.
• Do not operate the appliance at temperatures below 32 °F.
• Observe a distance of at least 30 cm
• When cleaning painted surfaces to avoid damage.
• Never leave the appliance unattended when it is in operation.
• Make sure that the power cable or extension cables are not damaged
by running over, pinching, dragging, or similar. Protect the power
cable from heat, oil, and sharp edges.
• Protect all electrical devices from the water jet.
• The appliance may only be connected to an electrical supply that has
been installed following IEC 60364.
• Cleaning operations that produce oily wastewater, e.g. engine washes,
and underbody washes, may only be carried out using washing
stations equipped with an oil separator.

TABLE OF CONTENTS
1. ABOUT ANYKIT-----------------------------------1
2. SPECIFICATIONS--------------------------------- 2
3. KNOW YOUR PRODUCT----------------------------3
4. PRESSURE WASHER INSTALLATION INSTRUCTIONS-----4
4.1. Handle Assembly----------------------------------4
4.2. High-pressure Hose Holder Assembly--------------------4
4.3. Trigger Gun Holder Assembly--------------------------4
4.4. Power Cord Holder Assembly--------------------------4
5. SPRAY GUN ASSEMBLY INSTRUCTIONS-------------5-8
5.1. Spray Wand Assembly-------------------------------5
5.2. Nozzles Assembly----------------------------------5
5.3 Installing High-Pressure Water Hose onto Spray Gun----------5
5.4 Connect The High-pressure Hose -----------------------5
5.5. Select The Right Nozzle For The Job!-----------------6-7
5.6. Install The Detergent Tank----------------------------8
6. CONNECT THE GARDEN HOSE ADAPTER--------------9

TABLE OF CONTENTS
7. ATTACH GARDEN HOSE TO WATER SUPPLY-----------10
8. OPERATION----------------------------------11-19
8.1 Before Operation-------------------------------11-12
8.2 Water Supply------------------------------------ 13
8.3 Using the Pressure Washer---------------------------14
8.4 Using Nozzles---------------------------------15-16
8.5 Working with Detergents--------------------------17-18
8.6 Interrupting Operation-------------------------------19
8.7 Finish Operation----------------------------------19
9. STORAGE---------------------------------------20
10. FROST PROTECTION--------------------------20-21
11. MAINTENANCE ------------------------------22-25
12. TROUBLESHOOTING
-------------------------26-27
13. WARRANTY
-----------------------------------28
14. CUSTOMER SUPPORT---------------------------29

- 1 -
ABOUT ANYKIT
ANYKIT is passionate about designing tools to solve problems and make
life easier. We focus on simplicity and ease of use, providing people with
convenience in their everyday lives. To enable DIY enthusiasts to embrace
creativity and convenience.
Follow Anykit on Amazon for More
- 2 -
SPECIFICATIONS
Voltage:
Maximum Pressure:
Flow Rate:
Load Power:
Load Current:
Charging Cable Length:
Noise Level:
Waterproof Rating: IPX5
Spray Bottle Capacity
Nozzle Types:
Nozzle Material:
High-Pressure Hose Length:
Metal
5 m
0°, 15°, 25°, 40° (4 nozzles)
400 ml
82 dB
120V
Model
AP001
2400 PSI
1.2 GPM
1600 W
14 A
5 m
Operating Environment:
In the Air:
32℉-104℉ (0℃-40℃)
- 3 -
KNOW YOUR PRODUCT
18
3
4
7
8
6
5
2
1
9
10
11
12
13
20
21
19
Front side
Back side
16
15
14
1. Handle
2. Front hook
3. Gun hook
4. Delivery port
6. Power cord hook
5. ON/OFF Switch
7. Power cord
8. Power cord plug
13. High-pressure hose
9. Nozzle
10. Metal extension pole
11. Water gun
12. Safety lock latch
14. Fixing screw
15. Rear hook
16. Machine inlet
18. Detergent tank
19. Needle
20. Garden hose adapter
21. Leakproof rubber ring
22. Tape
17. Detergent tank
storage area
17
22
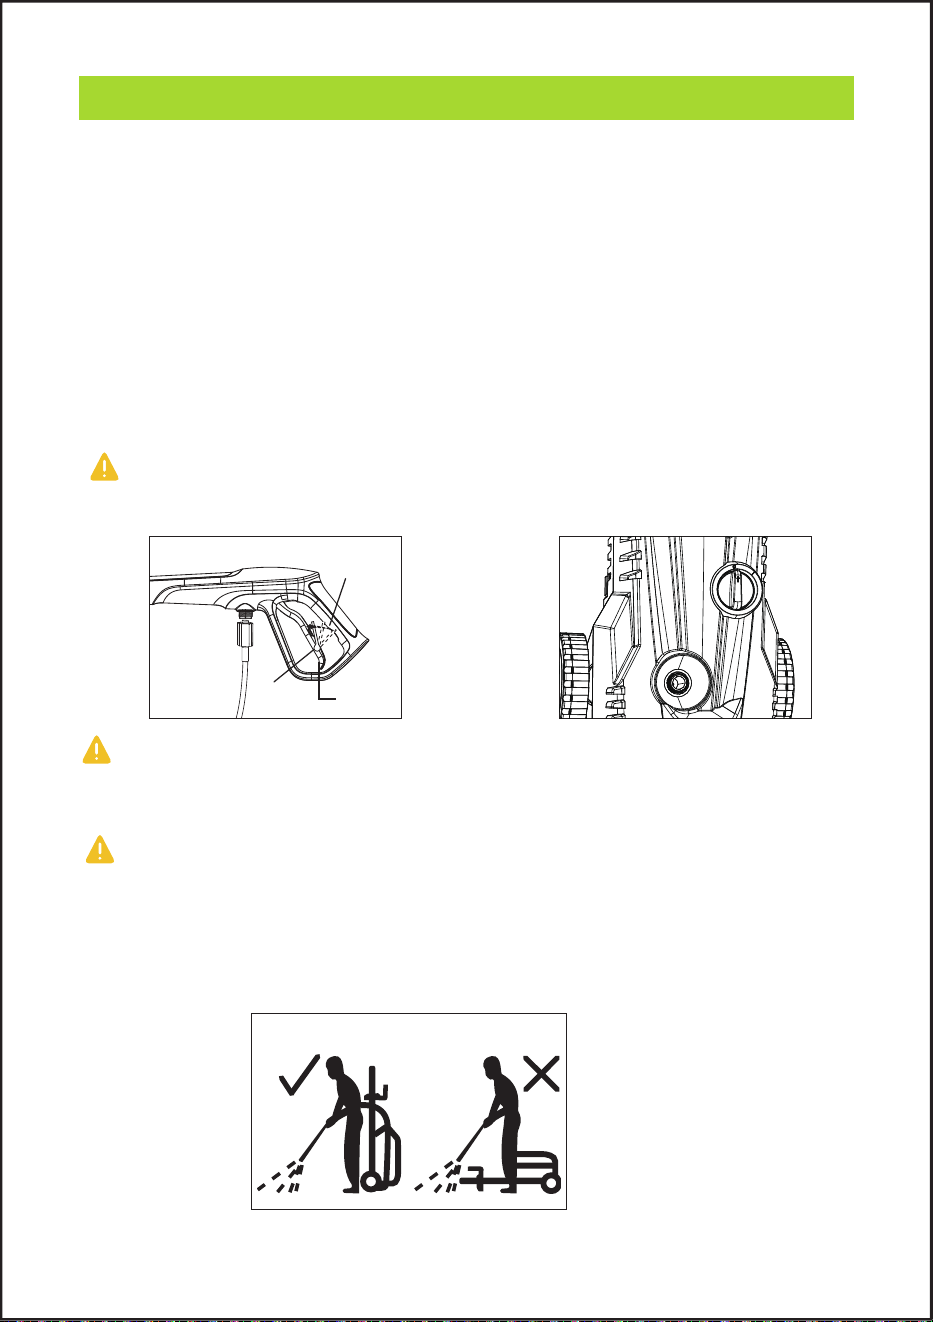
4.1. Handle Assembly
Attach the handle 1 to the designated position on the machine and
secure it with screw 13.
4.2. High-pressure Hose Holder Assembly
Step 2: Install the front hook 2 onto the handle (as shown in the
diagram).
4.3. Trigger Gun Holder Assembly
Step 3: Mount the water gun hook 3 on the left side of the machine
(as shown in the diagram).
4.4. Power Cord Holder Assembly
Step 4: Attach the power cord hook 5 to the right side of the
machine (as shown in the diagram).
- 4 -
PRESSURE WASHER INSTALLATION INSTRUCTIONS
3
4
6
7
5
2
1
15
14
13

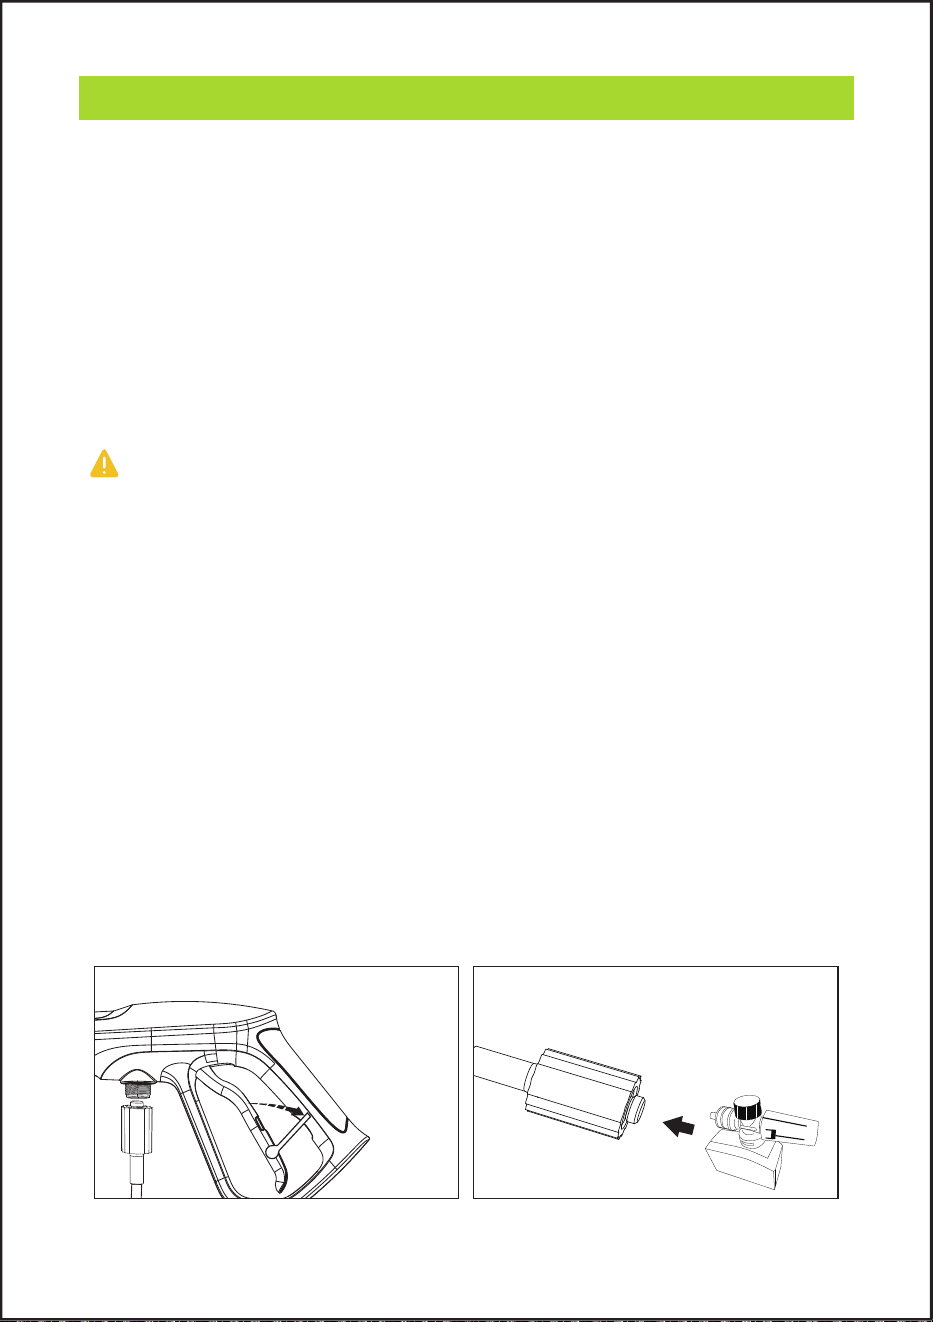
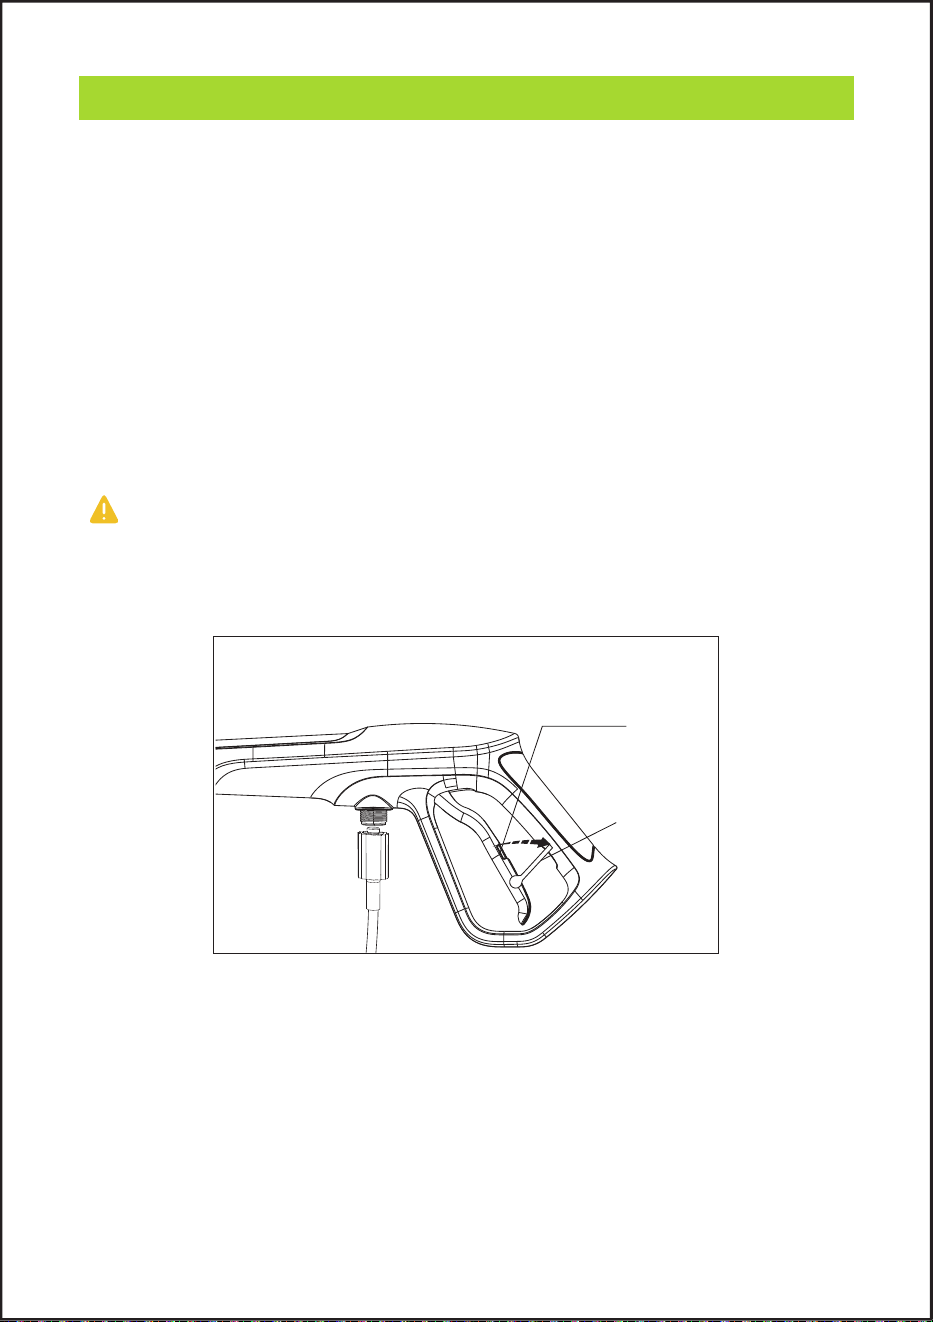
5.1. Spray Wand Assembly
Fit the spray wand into the trigger gun and rotate it until the two parts
are completely locked.
5.2. Nozzles Assembly
Fit the nozzle on the spray wand and press it until the two parts are
completely locked.
5.3 Installing High-Pressure Water Hose onto Spray Gun
Connect the high-pressure hose B to the trigger gun.
5.4 Connect The High-pressure Hose That Comes With The
Pressure Washer.
Connect the high-pressure hose A to the machine's water outlet.
Note: The different size nozzles of the water spray gun are all
stored on the gun itself, to avoid losing them, please put the used
nozzle back into the storage slot on the spray gun.
- 5 -
SPRAY GUN ASSEMBLY INSTRUCTIONS
Nozzle
Spray wand
Spray gun
High-pressure hose
Water inlet
B
A
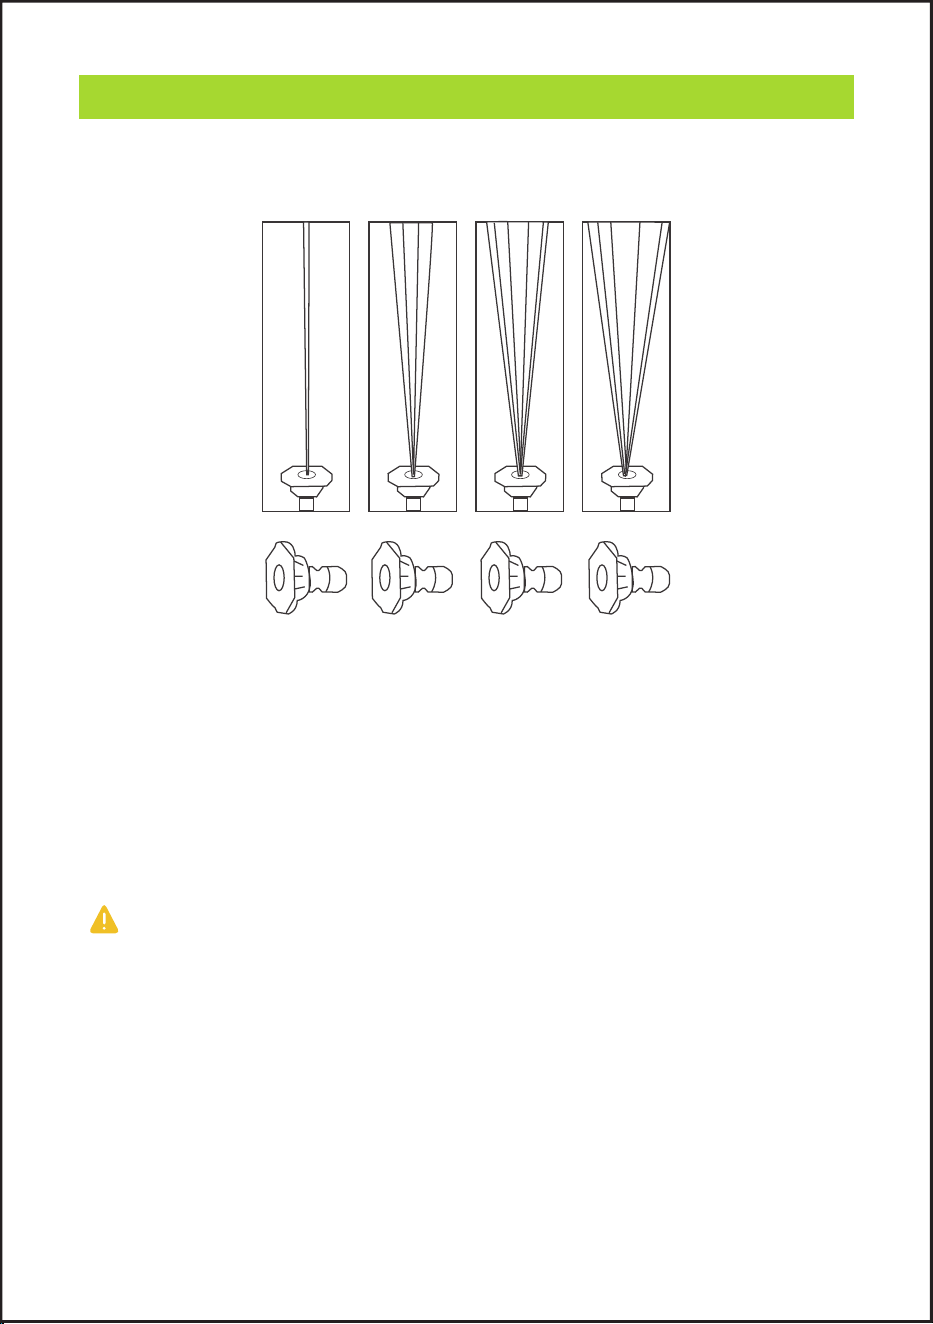
5.5. Select The Right Nozzle For The Job!
The 0º intense-jet nozzle (red) is a powerful nozzle that delivers a
high-pressure, pencil-point jet stream. It cuts heavy dirt deposits in a
small, concentrated area. It is ideal for dissolving stubborn substances,
like tar and grease spots on concrete, or for removing caked mud from
equipment. Use this nozzle to clean hard-to-reach areas including the
facades of 2-story buildings or the undersides of lawn mowers and
tractors.
NOTE: Care should be used when choosing the right nozzle to avoid
permanently gouging wood or damaging fragile surfaces.
- 6 -
SPRAY GUN ASSEMBLY INSTRUCTIONS
0° 15° 25° 40°

Use the 15º fan-tip nozzle (orange) for intense cleaning jobs on hard
surfaces. Applications include stripping paint and removing oil stains,
grease, heavy mildew stains, and rust from steel. This nozzle should
only be used in areas that can withstand the high pressure from this
nozzle.
Use the 25º fan-tip nozzle (green) to clean home siding, brick patios,
wood decks, driveways, or sidewalks. When using this nozzle, test a
small area first to avoid surface damage.
Use the 40º wide-spray tip nozzle (white) to clean items such as cars,
trucks, boats, patio furniture, or lawn equipment.
Use the Detergent tank for low-pressure detergent application to clean
equipment, remove mildew and oxidation stains from houses, clean
bricks, or degrease grimy surfaces.
NOTE: When using detergent, make sure to install the correct
detergent tank. All of the other colored nozzles will not work with the
detergent application.
- 7 -
SPRAY GUN ASSEMBLY INSTRUCTIONS
Use the Detergent tank for low-pressure detergent application to clean
equipment, remove mildew and oxidation stains from houses, clean
bricks, or degrease grimy surfaces.
NOTE: When using detergent, make sure to install the correct
detergent tank. All of the other colored nozzles will not work with the
detergent application.
- 8 -
SPRAY GUN ASSEMBLY INSTRUCTIONS
5.6. Install The Detergent Tank
Do not use household detergents, acids, alkalines, bleaches, solvents,
flammable material, or industrial grade solutions, in the detergent tank.
WARNING
If necessary, use a funnel to fill the detergent tank and avoid spilling.
① Put the detergent into the detergent tank.
② Install the detergent tank onto the gun.
③ Turn the gun clock wise to tighten.
NOTE
Follow the instruction on the solution bottle to prepare the detergent.
WARNING
To prevent streaking, don’t let the detergent dry on the surface.
NOTE
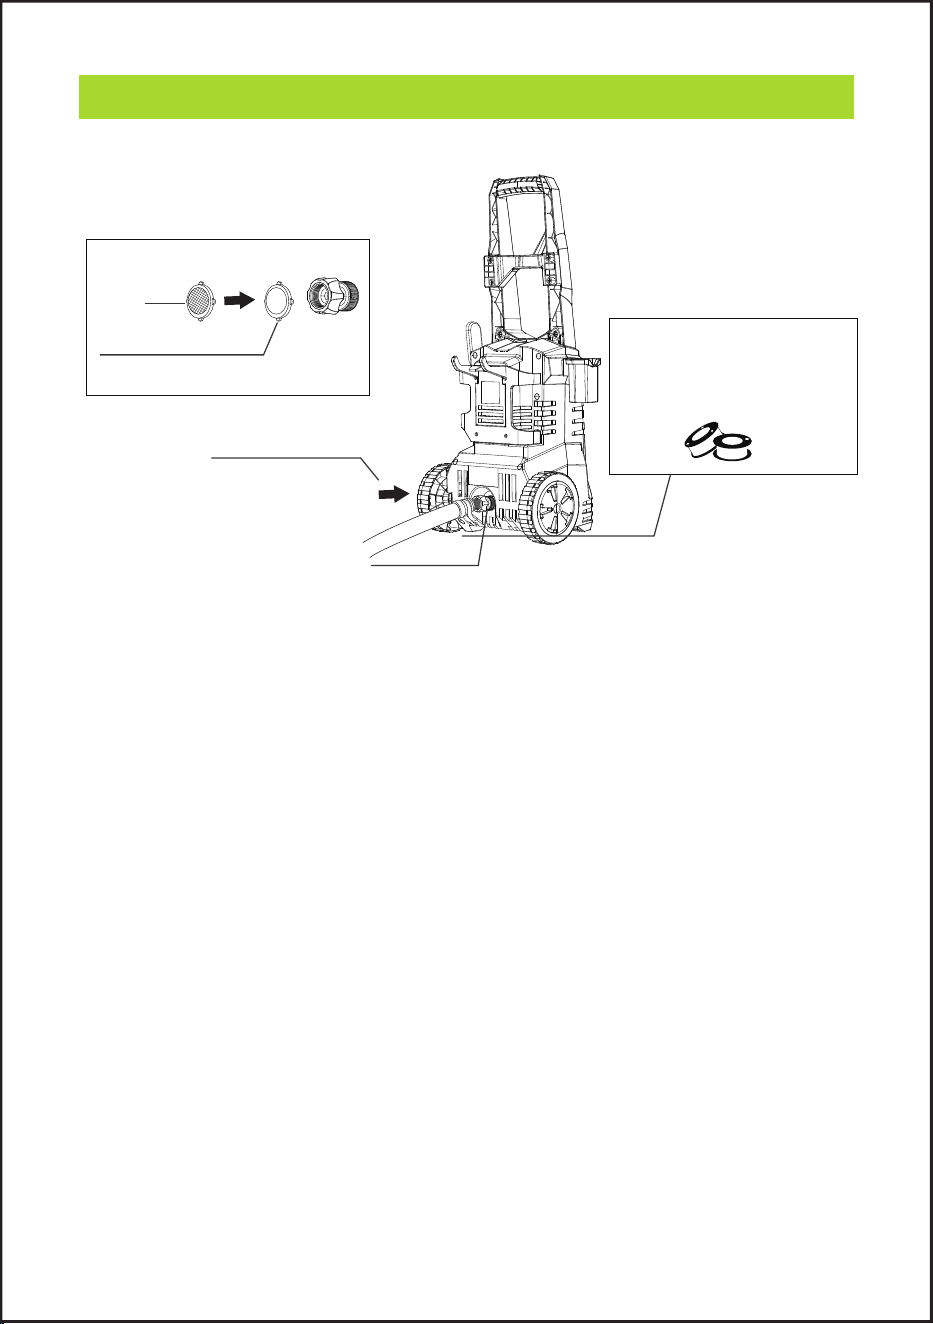
The waterproof rubber ring inside the water pipe adapter needs to be
replaced regularly. It is recommended to replace it every six months.
Please keep the replacement rubber ring that comes with the packaging
in a safe place. If you need to purchase accessories, you can contact
ANYKIT's customer service or visit anykit.com.
To prevent leakage, you can wrap
some tape (2 rolls included in the
package) around the connection
between the garden hose and the
high-pressure washer.
Regularly clean the filter screen in the water pipe adapter and replace
the garden hose adapter.
- 9 -
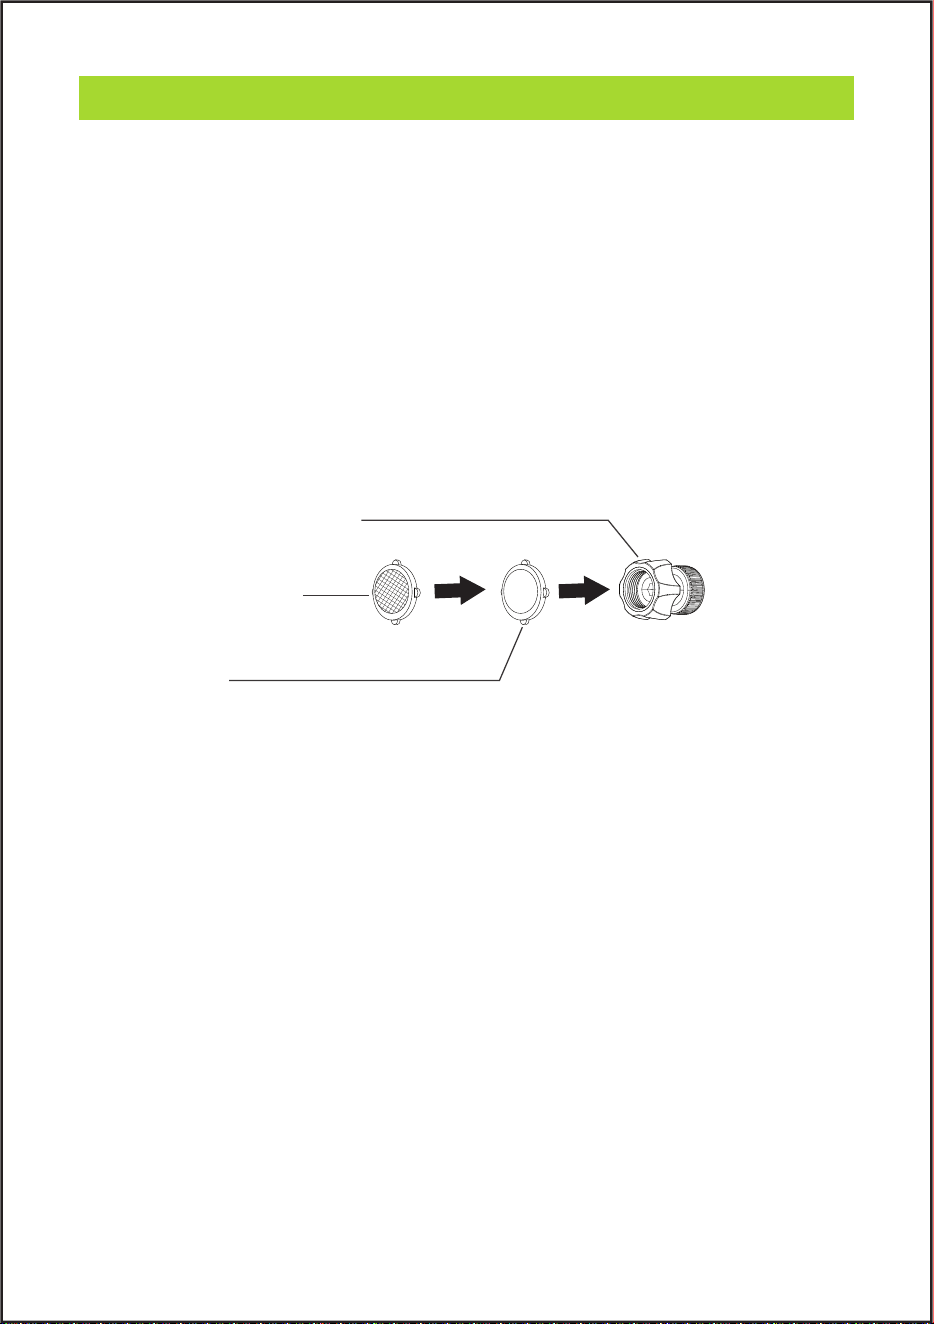
CONNECT THE GARDEN HOSE ADAPTER
Garden hose adapter
Water inlet
leakproof rubber ring
Filter
- 10 -
ATTACH GARDEN HOSE TO WATER SUPPLY
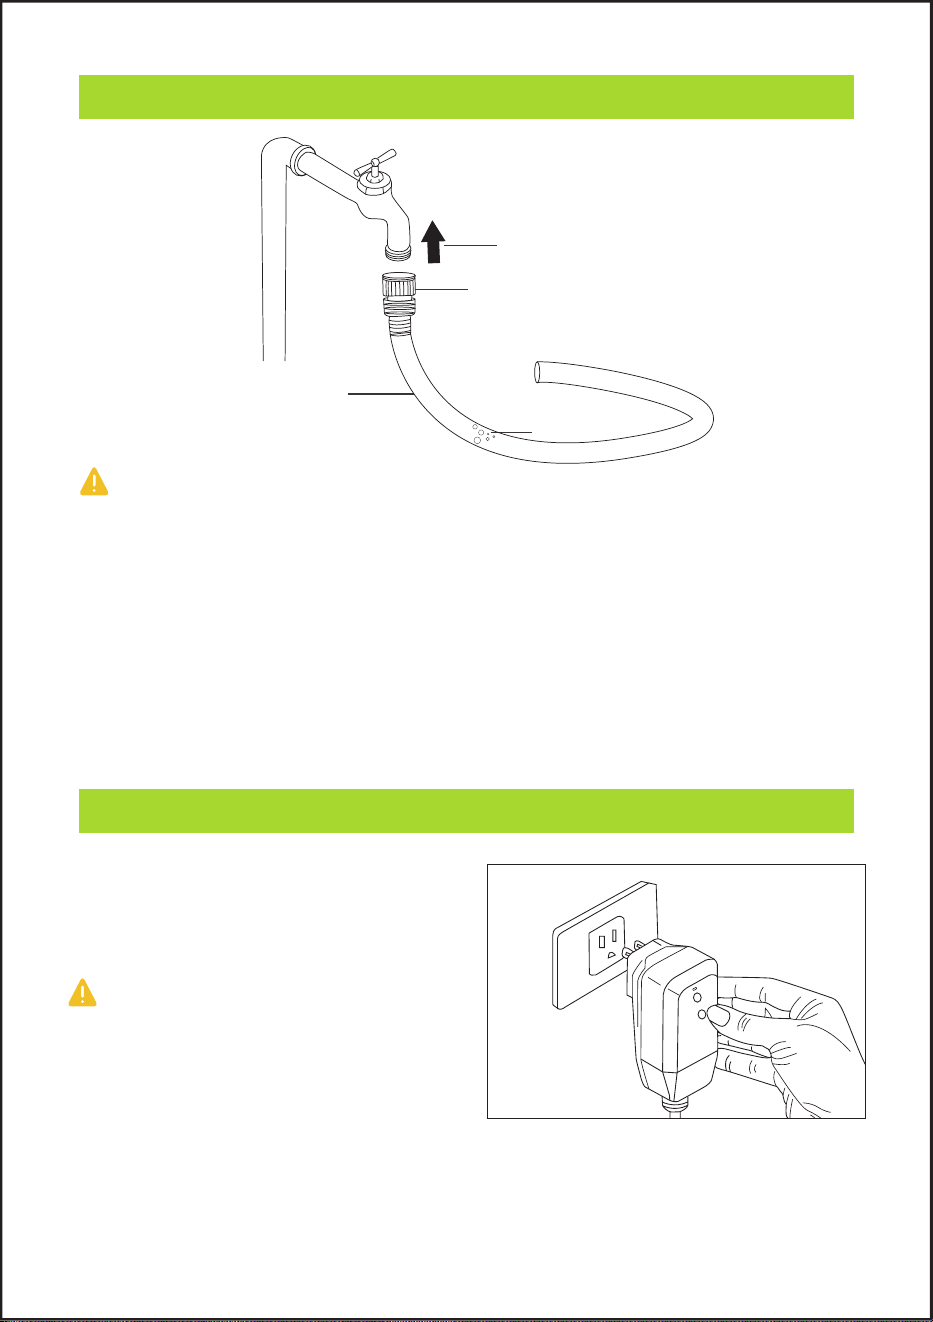
POWER ON THE DEVICE
NOTE: If the high-pressure water gun does not spray water or the
pressure is uneven when the machine starts, there may be air bubbles in
the water pipe, which can affect the water pressure. It is recommended
to follow the steps below:
1. Wait for the water to completely flow into the entire water pipe.
2. Start the high-pressure water gun to release the air in the
machine/high-pressure water pipe.
3. Wait for the water pressure of the high-pressure water gun to stabilize
before starting normal operation.
Connect to water supply
US standard 3/4 water
pipe joint(male end)
Garden hose
Air bubbles
Connect the power cord of the device
to the power outlet.
NOTE:
Ensure the machine power switch is
off (O position) before connecting.
RESET
TEST

- 11 -
1. Before starting up, check whether there is any looseness in the
screws and nuts of each part of the device.
2. Check whether there is any damage to the pipe joints or high-pres-
sure hoses. If there is any damage, it needs to be replaced immediately
to avoid the risk of explosion.
3. Connect the water inlet pipe to ensure a firm and airtight connection.
4. When connecting to the power socket, the switch of the cleaning
machine must be set to the "0" position. If using an extension cord, the
plug and socket must be waterproof.
5. When plugging in the power socket for the first time, the GFCI may
need to be reset. Press the "reset" button until the power indicator on
the GFCI lights up.
6. When performing cleaning operations, one hand should grip the
handle of the spray gun tightly, and the other hand should hold the
spray nozzle. Pay attention to concentration when operating, and be
aware that there will be a certain recoil force and rotational torque on
the handle when pulling the trigger and water sprays out.
7. The high-pressure water hose should not be twisted and should be
extended and straightened as much as possible.
8. When the spray gun is not in use, always set the trigger to the safety
lock position.
9. When the spraying stops, follow the pressure release procedure
before cleaning, inspecting, and maintaining the equipment. If the idle
time is too long (more than 10 minutes), turn off the power switch,
open the spray gun valve, and completely release the pressure.
Before Operation
OPERATION
- 12 -
The trigger gun is subjected to a recoil force when the water jet is
discharged. Make sure that you have a firm footing and are also holding
the trigger gun and sprayer firmly.
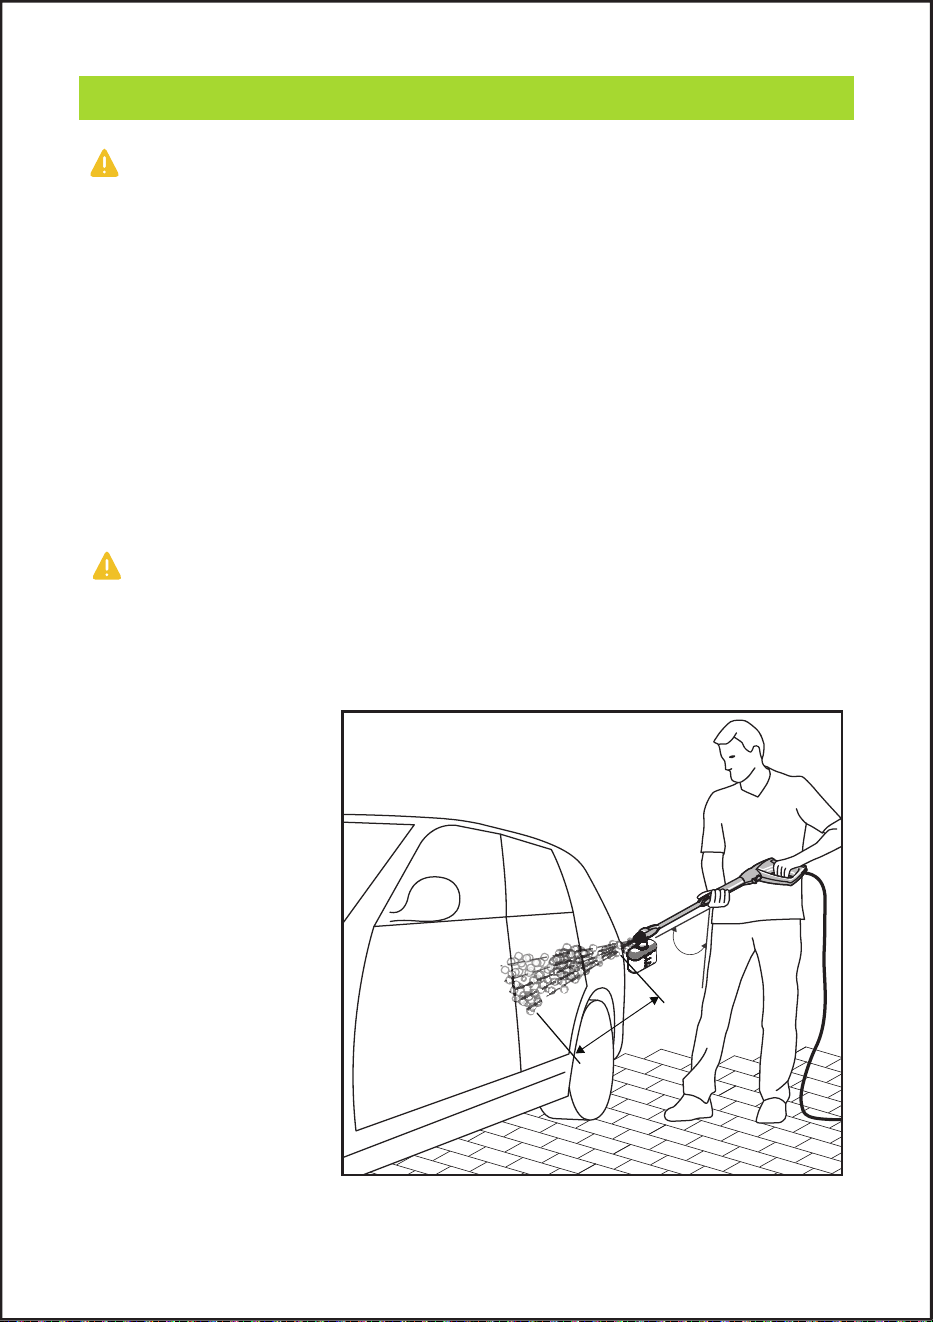
When using a spray gun for cleaning, please pay attention to the following:
1. Move the spray gun to spray and clean the object at a 45° angle to
avoid splashing back.
2. Keep the nozzle about 3.3 ft(1m) away from the surface being cleaned
to ensure that the water pressure can clean the dirt without damaging the
surface.
NOTE:
1. The high-pressure water gun should be at least 0.9 ft(30 cm) away
from the vehicle tire/valve stem when cleaning to avoid damage caused
by high-pressure spraying. Signs of damage include tire discoloration.
2. Always use both
hands to hold the spray
gun when working.
3. Do not use a 0°
nozzle to directly spray
the surface of the car.
Use a 40° nozzle to
clean the vehicle.
4. Do not spray the
pressure water onto
yourself or others to
clean clothes or shoes.
Danger
OPERATION
1m
45°

- 13 -
Water Supply
When it comes to selecting a water source for a high-pressure washer,
there are two main options. One is to connect it directly to a faucet or
a valve, where water automatically flows into the pump head. The other
option is to use a water bucket or a reservoir for suction.
It is recommended to use a faucet as the water source for several
reasons. Firstly, faucets provide an ample water supply, resulting in
higher pressure during machine operation. Secondly, the water quality
from faucets is generally better, reducing the chances of clogging the
pump head and nozzles.
Using a water bucket or reservoir for suction has its drawbacks. Firstly,
the water supply is usually not as abundant as from a faucet. Secondly,
the water quality cannot be guaranteed, as impurities from the bucket
or reservoir may be sucked in, leading to clogging of the pump head,
spray gun, and nozzles.
WARNING:
To ensure the performance of water suction from a bucket, please note
the following: Firstly, the suction hose should not exceed 2 meters in
length. Secondly, the height of the water bucket should not exceed
50cm. Lastly, ensure that the water bucket is positioned horizontally,
matching the orientation of the machine.
OPERATION
- 14 -
1. Turn the water supply tap on completely.
2. Make sure the safety lock is down and in its original position, then
press the trigger for a few seconds until the water flow is steady. This
will allow air to escape and discharge any residual pressure in the
hose(Fig. A).
3.Turn the ON/OFF switch to the ON (I) position to start the pressure
washer(Fig. B).
4. When re-starting the motor, always keep the trigger pressed.
NOTE: The motor only runs when the trigger is operated and shuts
off when the trigger is released.
IMPORTANT!
The pressure washer must be used on a secure and stable surface in a
standing, upright position(Fig. C).
Danger!
The trigger gun is subjected to a recoil force when the water jet is
discharged. Make sure that you have a firm footing and are also holding
the trigger gun and nozzle firmly.
Place the machine as close to the water source as possible.
Using the Pressure Washer
OPERATION
Fig. C
Fig.B
Fig.A
Slot
Trigger
Safety lock
- 15 -
Before beginning any cleaning task, determine the best nozzle for the job.
Each of the nozzles has a different spray pattern.
The nozzle patterns are 40˚ (for gentle cleaning), 25˚ (for all-purpose
cleaning), 15˚ (for tough jobs), 0˚ (for spot cleaning or hard-to-reach
areas), and the Soap nozzle (for detergent application).
CAUTION! NEVER change nozzles without locking the safety lock on the
trigger handle.
WARNING!
High-pressure jets can be dangerous if subject to misuse. The jet must
not be directed at persons, pets, live electrical equipment, or the
appliance itself.
This electric pressure washer is equipped with four Quick Connect noz-
zles that easily snap onto the Quick-Connect collar of the spray wand.
To connect a nozzle to the spray wand:
1. Turn off the pressure washer and shut off the water supply. Pull the
trigger to release water pressure.
2. Engage the safety lock on the trigger handle by pushing up on the
safety lock until it clicks into the slot (Fig. A).
3. Snap the desired nozzle onto the Quick-Connect collar until it clicks
into place (Fig. B).
Using Nozzles
OPERATION
Fig.B
Fig.A
- 16 -
To disconnect a nozzle from the spray wand once the cleaning
job is complete:
1. Turn off the pressure washer and shut off the water supply. Pull the
trigger to release water pressure.
2. Engage the safety lock on the trigger handle by pushing up on the
safety lock until it clicks into the slot.
3. Remove the nozzle by placing your hand over the nozzle while pulling
back on the Quick-Connect collar
WARNING!
Do not make changes to the nozzle while the trigger is engaged. Doing
so could result in damage to the pressure washer or injury to the user.
Using Nozzles
OPERATION
Fig.A
Slot
Safety Lock
- 17 -
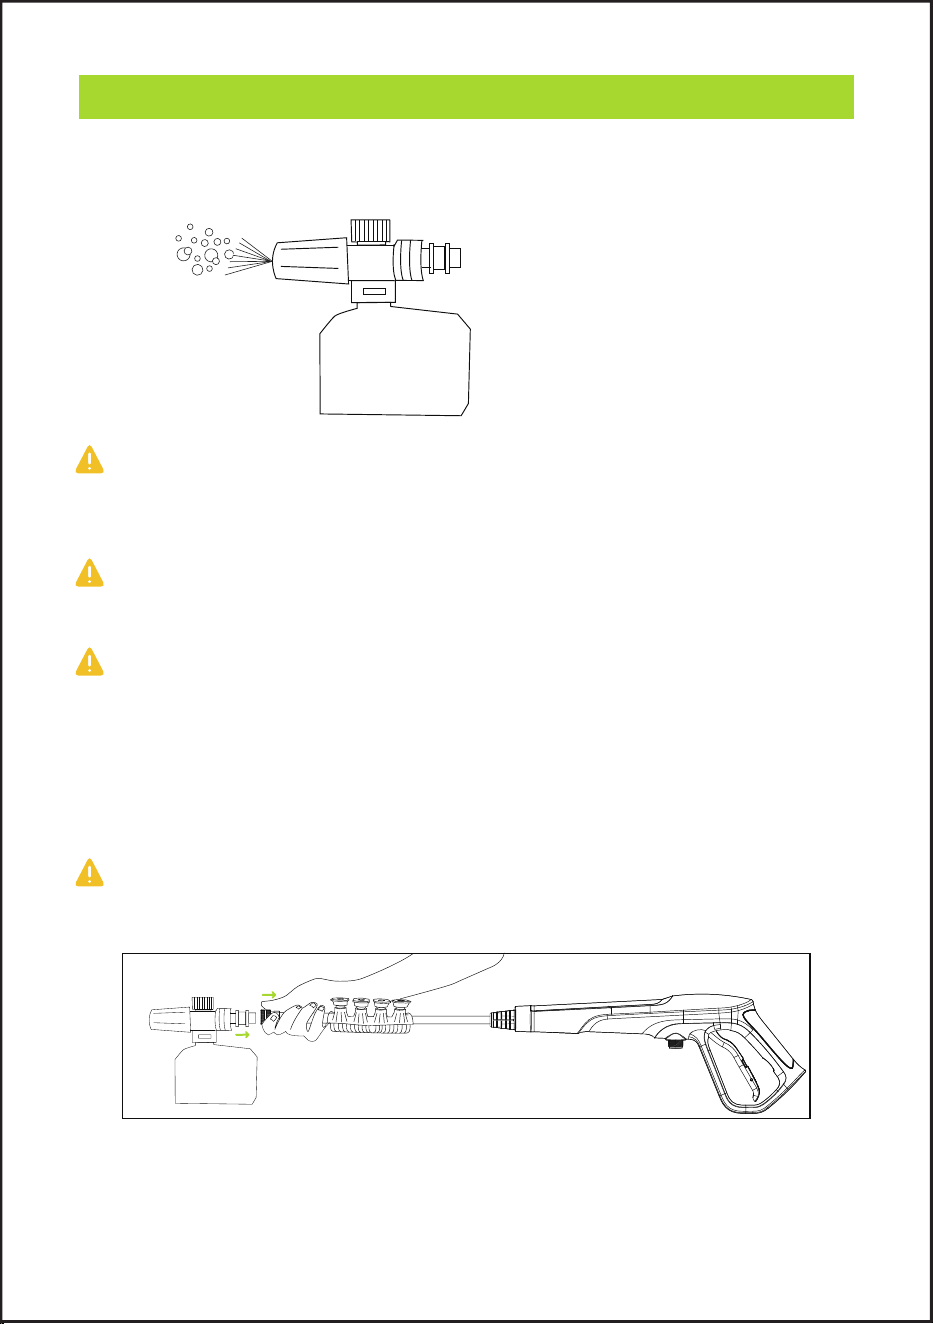
Adjust the detergent concentration by rotating the knob on top of the
product.
To rotate the nozzle of the product, you can adjust the angle of the
spray pattern (a vertical ellipse can be adjusted to a parallel ellipse).
CAUTION!
Always test the detergent in an inconspicuous area before use.
Recommended cleaning method
Spray the detergent sparingly on the dry surface and allow it to react,
but not to dry.
Spray off loosened dirt with the high pressure jet.
Working with Detergents
OPERATION

OPERATION
Recommended cleaning agents that can be used in the detergent tank:
For washing cars, we recommend using Meguiar's Super
Concentrated Car Wash. This specially formulated detergent is
designed to remove dirt and impurities from your car while restoring its
shine. It is also eco-friendly and protects against minor scratches. Mix
it with water in a ratio of 1:128 (detergent to water).
For cleaning decks, we recommend using Bona Cleaner. Mix the
cleaner with water in a ratio of 1:7 (cleaner to water) to effectively
remove stains and dirt without causing pollution.
For cleaning metal surfaces, we recommend using Brasso
Cleaner. It is generally recommended to mix pure water and Brasso
Cleaner in a 1:1 ratio (cleaner to water) to clean metal surfaces.
Please refer to the instructions on the selected cleaning agent before
use.
Note:
Consider the surface you will be cleaning, as different surfaces require
different cleaning agents. For example, you may need a different
detergent for cleaning a car than you would for cleaning a deck.
Look for cleaning agents that are eco-friendly and biodegradable.
These types of cleaning agents are better for the environment and
won't harm plants or animals.
Consider the concentration of the cleaning agent. Some cleaning
agents are highly concentrated and require dilution before use. Make
sure to follow the manufacturer's instructions for dilution ratios.
Test the cleaning agent on a small area before using it on a larger
surface. This will help you determine if the cleaning agent is effective
and won't damage the surface you are cleaning.
- 18 -
- 19 -
Release the lever on the trigger gun.
1. Lock the lever on the trigger gun.
2. During longer breaks (more than 10 minutes), also turn the appliance
off using the "0/OFF" switch.
3. Insert the trigger gun in its holder.
1. After operation with detergent: Run the machine for approximately 1
minute for a clear rinse.
2. Release the lever on the trigger gun.
3. Turn off the appliance "0/OFF".
4. Turn off the tap.
5. Press the lever on the trigger gun to release any remaining pressure
in the system.
6. Lock the lever on the trigger gun.
7. Detach the appliance from the water supply.
8. Pull out the plug.
Interrupting operation
CAUTION!
Only separate the high-pressure hose from the trigger gun or the
appliance while there is no pressure in the system.
Finish operation
OPERATION

- 20 -
In order to prevent accidents or injuries, keep in mind the weight of the
appliance when selecting a storage location for it (see Specifications).
The appliance and its accessories can become damaged from freezing
if there is any water residue in it. To avoid damage:
When not in use, store in a room with a temperature above 0℃.
CAUTION
Before extended storage periods, as during the winter, also observe the
instructions in the Care section.
• Park the machine on an even surface.
• Engage the spray gun in its compartment.
• Insert the trigger gun in its holder.
• Stow away the cable, the high-pressure hose, and accessories.
Storing the Appliance
STORAGE
Protect the appliance and its accessories from freezing.
FROST PROTECTION

- 21 -
If you must store your pressure washer in a location where the
temperature falls below 32ºF (0ºC), you can minimize the chance of
damage to your machine by utilizing the following procedure:
• 1. Disconnect all water connections.
• 2. Drain the water from the high-pressure washer to prevent water from
freezing in the machine and pipes. Turn it off immediately.
• 3. Do not allow the high-pressure hose to become kinked.
• 4. If the cleaning machine is found to be frozen, do not start the
high-pressure cleaning equipment or use methods such as pouring hot
water, or heating to thaw it. This is to prevent cracking of the equipment
due to a large temperature difference. The equipment can be placed at
room temperature to thaw naturally.
• 5. If the high-pressure cleaning equipment is frozen and forcibly started,
it will cause deformation and damage to the working parts such as the
spring and valve cover inside the high-pressure pump. In severe cases, it
will cause cracking of the high-pressure pump and bursting of water
pipes.
• 6. Freezing of the high-pressure cleaning equipment will damage the
seals in the high-pressure pump and reduce the sealing performance.
• 7. To prevent freezing damage to components that come into contact
with water, such as the pump head, high-pressure hose, and high-
pressure gun, antifreeze can be used.
FROST PROTECTION
WARNING!
Before reusing, completely flush the unit out with clear water.
Anti-freeze products can damage paintwork, so you must ensure there
is no anti-freeze left in the system before using it again.
Do not store near a furnace or other sources of heat that may dry out
the pump seals.

- 22 -
DANGER!
Turn off the appliance and remove the electrical plug before any care
and maintenance work.
WARNING!
When servicing, use only identical replacement parts. Use of any other
parts may create a hazard or cause product damage.
WARNING!
Before inspecting, cleaning, or servicing the machine, turn off the unit,
unplug from the outlet, pull the trigger to release water pressure, and
disconnect the high-pressure hose. Failure to follow these instructions
can result in serious personal injury or property damage.
GENERAL MAINTENANCE
Avoid using solvents when cleaning plastic parts. Most plastics are
susceptible to damage from various types of commercial solvents and
may be damaged by their use. Use clean cloths to remove dirt, dust, oil,
grease, etc.
WARNING!
Do not at any time let brake fluids, gasoline, petroleum-based products,
penetrating oils, etc., come in contact with plastic parts. Chemicals can
damage, weaken, or destroy plastic which may result in serious personal
injury.
All parts should be replaced at an authorized service center by Anykit.
To replace any accessories, please contact Anykit customer service at
MAINTENANCE
- 23 -
MAINTENANCE
Please replace any aging or damaged accessories promptly and always
use "ANYKIT" spare parts and accessories. Using any other accessories
or parts may be dangerous and could result in equipment damage or
personal injury.
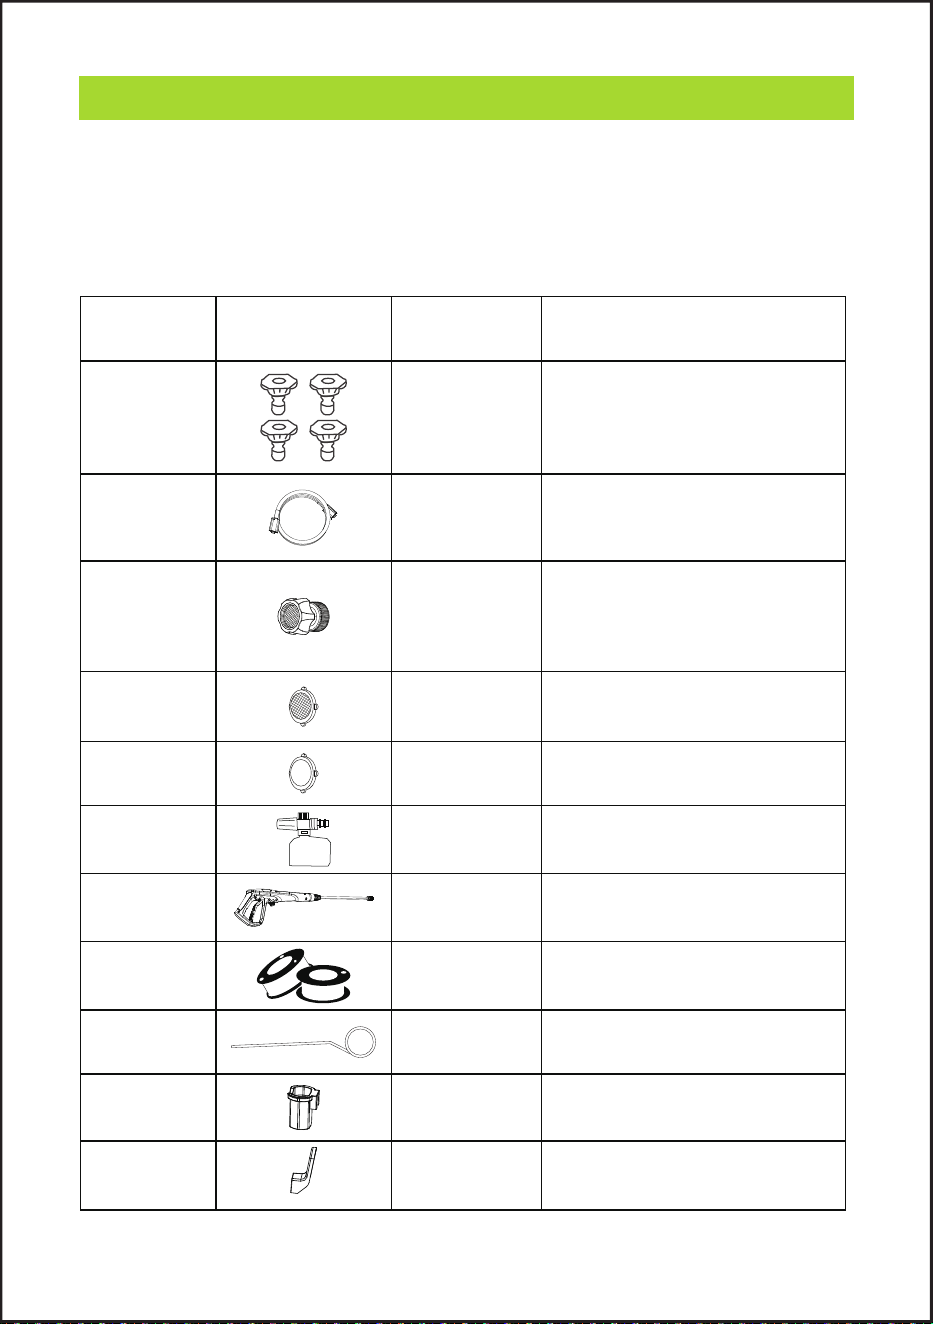
Accessory
part number
Accessories
pictures
Accessory
name
Nozzles
1
2
3
4
5
6
7
8
9
10
11
High-pressure
hose
Filter
Garden Hose
Adapter
Leakproof
rubber ring
Detergent tank
Water gun
Tape
Needle
Water gun
hook
Power cord
hook
Accessories description
Can be used to replace worn or
damaged nozzles, including four
nozzles with 0°, 15°, 25°, and 40°
angles.
Used to replace aging or damaged
high-pressure hoses, with a length
of 16.4 feet.
Used to replace damaged filter
screens.
Used to replace damaged or aging
leakproof rubber ring.
Used to replace damaged or aging
detergent tank.
Used to replace damaged or aging
water guns.
Used to prevent water pipe joints
from leaking.
Used to replace damaged cleaning
needles.
Used to replace damaged or aging
water gun hooks.
Used to replace damaged or aging
power cord hooks.
Used to replace broken or damaged
water inlet nut joints, with a
specification of 3/4 inch internal
thread.
- 24 -
High-pressure hose
The high-pressure hose is specially constructed with reinforced walls to
handle water pressure up to 34.5 MPa (5000 psi) - it can be damaged
if it isn’t stored appropriately.
• Do not kink.
• Do not drive vehicles over the hose.
• Do not expose the hose to sharp edges or corners.
Misuse will lead to ballooning or premature failure and will invalidate the
warranty.
NOZZLE MAINTENANCE
NOTE: After each use, please check if there is any foreign object
blocking the nozzle. You can use a cleaning needle to clear it.
Operating instructions:
Remove the nozzle from the spray gun.
Use a straight paper clip or cleaning tool to clean the spray tip.
Rinse it thoroughly.
Install the clean nozzle to the spray wand.
MAINTENANCE
- 25 -
Maintenance of Garden Hose Adapter
The sealing ring of the machine's water inlet should be replaced
regularly, and the sealing ring should be checked for signs of aging. If
the sealing ring is found to be aging, it should be replaced promptly to
maintain the good sealing performance of the equipment.
Replacement method: First, remove the "filter screen" and then remove
the "waterproof rubber ring" inside. Replace the old waterproof rubber
ring with a new one, and finally reinstall the "filter screen".
Garden hose adapter
leakproof rubber ring
Filter
MAINTENANCE
- 26 -
TROUBLESHOOTING
PROBLEM
Fluctuating
pressure
The machine will
not start
The machine stops
The machine is not
plugged-in
Faulty receptacle
Plug the machine in
Try another receptacle
Replace the fuse Unplug other appliances
Try without the extension cable
Contact your service centre
Check that hoses and connections are
airtight.
Increase water pressure, check for
blockages and / or change the large pipe.
Contact your nearest service centre
Replace the fuse
Unplug other appliances
Leave the machine to cool for 5 mins
Check that the mains voltage corresponds
to the specifications on the nameplate
Clean the jet with a needle and by spraying
water rearwardly through the jet
The fuse has blown
Faulty extension cable
The pump is drawing in
air
Valves dirty, worn or
sticking
The water supply is not
sufficient
Pump seals worn
The fuse has blown
Incorrect mains voltage
Partially blocked jet
Thermal sensor
activated
POSSIBLE CAUSE SOLUTION

- 27 -
TROUBLESHOOTING
Fuse blown
Fuse too small
Air in inlet
hose / pump
Partially blocked jet
Water filter blocked Clean the filter
Unfold the pipe
Contact your nearest service center
Clean the jet with a needle and by
spraying water rearwardly through the jet
Connect the inflow water
Clean the filter
Folded pipe
No water supply
Water filter blocked
Blocked jet
Pump fuse and/or
trigger out of order
Inadequate supply of
water generated
Increase in the
amperage
Replace it with a fuse with higher
amp consumption than the washer.
Allow machine to run with open trigger
until regular working pressure resumes.
Increase water pressure, check for
blockages and / or change the large pipe.
Try without the extension cable
Clean the jet with a needle and by
spraying water rearwardly through the jet
Pulsing machine
The machine turns on
and off by itself
The machine is on but
no water comes out

- 28 -- 28 -
WARRANTY
30-Day Guarantee
We will give you a full refund if you are not
satisfied with the product.
We offer a limited warranty that commences
from the date of purchase of the product.
One-Year Warranty
Visit anykit.com or scan the QR code for more details.

CUSTOMER SUPPORT
If you have any questions or concerns about your product,
please contact our Customer Support Team
ANYKIT AP001 C1226 V1.0
3.06.16.001400
Facebook Messenger
1-877-888-7979
Mon.-Fri. 8:00-5:00 PST(US)
www.anykit.com
@anykit
@anykit
- 29 -
READ BEFORE USE
By using this product, you signify that you have read, understand, and
accept the terms and conditions here.
It is recommended to watch all tutorial videos on the official Anykit
website and read the safety guidelines before use.
Prepare by reviewing the quick start guide and refer to this user manual
for more information.
4.1. Handle Assembly
Attach the handle 1 to the designated position on the machine and
secure it with screw 13.
5.5. Select The Right Nozzle For The Job!
5.1. Spray Wand Assembly
Fit the spray wand into the trigger gun and rotate it until the two parts
are completely locked.
5.2. Nozzles Assembly
Fit the nozzle on the spray wand and press it until the two parts are
completely locked.
5.3 Installing High-Pressure Water Hose onto Spray Gun
Connect the high-pressure hose B to the trigger gun.
5.4 Connect The High-pressure Hose That Comes With The
Pressure Washer.
Connect the high-pressure hose A to the machine's water outlet.
Note: The different size nozzles of the water spray gun are all
stored on the gun itself, to avoid losing them, please put the used
nozzle back into the storage slot on the spray gun.
4.2. High-pressure Hose Holder Assembly
Step 2: Install the front hook 2 onto the handle (as shown in the
diagram).
4.3. Trigger Gun Holder Assembly
Step 3: Mount the water gun hook 3 on the left side of the machine
(as shown in the diagram).
4.4. Power Cord Holder Assembly
Step 4: Attach the power cord hook 5 to the right side of the
machine (as shown in the diagram).
The 0º intense-jet nozzle (red) is a powerful nozzle that delivers a
high-pressure, pencil-point jet stream. It cuts heavy dirt deposits in a
small, concentrated area. It is ideal for dissolving stubborn substances,
like tar and grease spots on concrete, or for removing caked mud from
equipment. Use this nozzle to clean hard-to-reach areas including the
facades of 2-story buildings or the undersides of lawn mowers and
tractors.
NOTE: Care should be used when choosing the right nozzle to avoid
permanently gouging wood or damaging fragile surfaces.
Use the 15º fan-tip nozzle (orange) for intense cleaning jobs on hard
surfaces. Applications include stripping paint and removing oil stains,
grease, heavy mildew stains, and rust from steel. This nozzle should
only be used in areas that can withstand the high pressure from this
nozzle.
Use the 25º fan-tip nozzle (green) to clean home siding, brick patios,
wood decks, driveways, or sidewalks. When using this nozzle, test a
small area first to avoid surface damage.
Use the 40º wide-spray tip nozzle (white) to clean items such as cars,
trucks, boats, patio furniture, or lawn equipment.
Use the Detergent tank for low-pressure detergent application to clean
equipment, remove mildew and oxidation stains from houses, clean
bricks, or degrease grimy surfaces.
NOTE: When using detergent, make sure to install the correct
detergent tank. All of the other colored nozzles will not work with the
detergent application.
The waterproof rubber ring inside the water pipe adapter needs to be
replaced regularly. It is recommended to replace it every six months.
Please keep the replacement rubber ring that comes with the packaging
in a safe place. If you need to purchase accessories, you can contact
ANYKIT's customer service or visit anykit.com.
To prevent leakage, you can wrap
some tape (2 rolls included in the
package) around the connection
between the garden hose and the
high-pressure washer.
Regularly clean the filter screen in the water pipe adapter and replace
the garden hose adapter.
• Never touch the plug or the socket with wet hands.
• The appliance should not be used if the power cord or important parts
of the appliance, e.g. high-pressure hoses, trigger gun, or safety
devices are damaged.
• Check the power cord and plug for damage before every use. If the
power cord is damaged, please arrange for it to be replaced
immediately by an authorized repair agent or a skilled electrician.
• Check the high-pressure hose for damage before every use. Please
arrange for the immediate replacement of a damaged high-pressure
hose.
• The appliance may not be used in areas where a risk of explosion is
present.
• High-pressure jets can be dangerous if improperly used. The jet must
not be directed at persons, animals, live electrical equipment, or at the
appliance itself.
• The high-pressure jet must not be directed at other persons or
directed by the user at him/herself to clean clothing or footwear.
• Never use the appliance to clean objects containing hazardous
substances (e.g. asbestos).
• Vehicle tires or tire valves are susceptible to damage from the
high-pressure jet and may burst.
• Ensure that a distance of at least 30 cm is observed when cleaning
with the jet.
• Only use this device with water or aqueous detergents that are
supplied or recommended by the manufacturer. Do not use it with any
other liquids.
Scan the QR code to watch
the AP001 tutorial videos,
which demonstrate how to
use the AP001 safely.
Video Tutorials
Scan this QR code to get the
manual in PDF, which can be
enlarged and viewed on your
mobile device.
ONLINE MANUAL
Read the following documents before using.
Danger
WARNING
CAUTION
(1)Safety Guidelines
(2)Quick Start Guide
(3)User Manual
Safety Instructions Safety Instructions
- 1 -
ABOUT ANYKIT
ANYKIT is passionate about designing tools to solve problems and make
life easier. We focus on simplicity and ease of use, providing people with
convenience in their everyday lives. To enable DIY enthusiasts to embrace
creativity and convenience.
- 2 -
- 4 -
- 3 -
- 5 - - 6 -
KNOW YOUR PRODUCT
- 7 -
- 8 - - 9 -
- 12 -
- 11 -
- 13 -
- 14 -
- 15 -
- 16 - - 17 -
- 19 -
- 21 -
- 20 -
- 22 -
- 23 -
- 24 -
- 25 -
- 26 - - 27 - - 28 -- 28 -
CONNECT THE GARDEN HOSE ADAPTER
Garden hose adapter
Water inlet
leakproof rubber ring
Filter
SPRAY GUN ASSEMBLY INSTRUCTIONS SPRAY GUN ASSEMBLY INSTRUCTIONS SPRAY GUN ASSEMBLY INSTRUCTIONS SPRAY GUN ASSEMBLY INSTRUCTIONS
High Pressure Washer
Model No.: AP001
Safety Instructions
TABLE OF CONTENTS
1. ABOUT ANYKIT-----------------------------------1
2. SPECIFICATIONS--------------------------------- 2
3. KNOW YOUR PRODUCT----------------------------3
4. PRESSURE WASHER INSTALLATION INSTRUCTIONS-----4
4.1. Handle Assembly----------------------------------4
4.2. High-pressure Hose Holder Assembly--------------------4
4.3. Trigger Gun Holder Assembly--------------------------4
4.4. Power Cord Holder Assembly--------------------------4
5. SPRAY GUN ASSEMBLY INSTRUCTIONS-------------5-8
5.1. Spray Wand Assembly-------------------------------5
5.2. Nozzles Assembly----------------------------------5
5.3 Installing High-Pressure Water Hose onto Spray Gun----------5
5.4 Connect The High-pressure Hose -----------------------5
5.5. Select The Right Nozzle For The Job!-----------------6-7
5.6. Install The Detergent Tank----------------------------8
6. CONNECT THE GARDEN HOSE ADAPTER--------------9
TABLE OF CONTENTS
7. ATTACH GARDEN HOSE TO WATER SUPPLY-----------10
8. OPERATION----------------------------------11-19
8.1 Before Operation-------------------------------11-12
8.2 Water Supply------------------------------------ 13
8.3 Using the Pressure Washer---------------------------14
8.4 Using Nozzles---------------------------------15-16
8.5 Working with Detergents--------------------------17-18
8.6 Interrupting Operation-------------------------------19
8.7 Finish Operation----------------------------------19
9. STORAGE---------------------------------------20
10. FROST PROTECTION--------------------------20-21
11. MAINTENANCE ------------------------------22-25
12. TROUBLESHOOTING
-------------------------26-27
13. WARRANTY
-----------------------------------28
14. CUSTOMER SUPPORT---------------------------29
• The plug and the coupling of an extension cable must be watertight
and must never lay in the water.
• Unsuitable extension cables can be hazardous. Only use extension
cables outdoors that have been approved for this purpose.
• Always fully unroll electrical cables from the cable drum.
• Only use high-pressure hoses, fixtures, and couplings recommended
by the manufacturer.
• This appliance is not intended for use by persons with reduced
physical, sensory, or mental capabilities.
• The appliance must not be operated by children or persons who have
not been instructed accordingly.
• Children should be supervised to prevent them from playing with the
appliance.
• This appliance was designed to be used with detergents that are
supplied or recommended by the manufacturer. The use of other
detergents or chemicals may compromise the safety of the appliance.
• In case of extended downtimes, switch the appliance off at the
switch/appliance switch or remove the plug.
• Do not operate the appliance at temperatures below 32 °F.
• Observe a distance of at least 30 cm
• When cleaning painted surfaces to avoid damage.
• Never leave the appliance unattended when it is in operation.
• Make sure that the power cable or extension cables are not damaged
by running over, pinching, dragging, or similar. Protect the power
cable from heat, oil, and sharp edges.
• Protect all electrical devices from the water jet.
• The appliance may only be connected to an electrical supply that has
been installed following IEC 60364.
• Cleaning operations that produce oily wastewater, e.g. engine washes,
and underbody washes, may only be carried out using washing
stations equipped with an oil separator.
SPECIFICATIONS
18
PRESSURE WASHER INSTALLATION INSTRUCTIONS
• When working with the appliance, the operator must consider the
local conditions and pay attention to other persons, in particular
children, who are nearby.
• Do not use the appliance when there are other persons around unless
they are also wearing safety equipment.
• Wear protective clothing and safety goggles to protect against
splashback containing water or dirt.
3
4
7
8
6
5
2
1
9
10
11
12
13
20
21
19
Nozzle
Spray wand
Spray gun
High-pressure hose
Water inlet
B
A
5.6. Install The Detergent Tank
Do not use household detergents, acids, alkalines, bleaches, solvents,
flammable material, or industrial grade solutions, in the detergent tank.
WARNING
If necessary, use a funnel to fill the detergent tank and avoid spilling.
① Put the detergent into the detergent tank.
② Install the detergent tank onto the gun.
③ Turn the gun clock wise to tighten.
NOTE
Follow the instruction on the solution bottle to prepare the detergent.
WARNING
To prevent streaking, don’t let the detergent dry on the surface.
NOTE
Voltage:
Maximum Pressure:
Flow Rate:
Load Power:
Load Current:
Charging Cable Length:
Noise Level:
Waterproof Rating: IPX5
Spray Bottle Capacity
Nozzle Types:
Nozzle Material:
High-Pressure Hose Length:
Metal
5 m
0°, 15°, 25°, 40° (4 nozzles)
400 ml
82 dB
120V
Model
AP001
2400 PSI
1.2 GPM
1600 W
14 A
5 m
Operating Environment:
In the Air:
32℉-104℉ (0℃-40℃)
Front side
Back side
16
15
14
1. Handle
2. Front hook
3. Gun hook
4. Delivery port
6. Power cord hook
5. ON/OFF Switch
7. Power cord
8. Power cord plug
13. High-pressure hose
9. Nozzle
10. Metal extension pole
11. Water gun
12. Safety lock latch
14. Fixing screw
15. Rear hook
16. Machine inlet
18. Detergent tank
19. Needle
20. Garden hose adapter
21. Leakproof rubber ring
22. Tape
17. Detergent tank
storage area
17
22
0° 15° 25° 40°
1. Before starting up, check whether there is any looseness in the
screws and nuts of each part of the device.
2. Check whether there is any damage to the pipe joints or high-pres-
sure hoses. If there is any damage, it needs to be replaced immediately
to avoid the risk of explosion.
3. Connect the water inlet pipe to ensure a firm and airtight connection.
4. When connecting to the power socket, the switch of the cleaning
machine must be set to the "0" position. If using an extension cord, the
plug and socket must be waterproof.
5. When plugging in the power socket for the first time, the GFCI may
need to be reset. Press the "reset" button until the power indicator on
the GFCI lights up.
6. When performing cleaning operations, one hand should grip the
handle of the spray gun tightly, and the other hand should hold the
spray nozzle. Pay attention to concentration when operating, and be
aware that there will be a certain recoil force and rotational torque on
the handle when pulling the trigger and water sprays out.
7. The high-pressure water hose should not be twisted and should be
extended and straightened as much as possible.
8. When the spray gun is not in use, always set the trigger to the safety
lock position.
9. When the spraying stops, follow the pressure release procedure
before cleaning, inspecting, and maintaining the equipment. If the idle
time is too long (more than 10 minutes), turn off the power switch,
open the spray gun valve, and completely release the pressure.
Before Operation
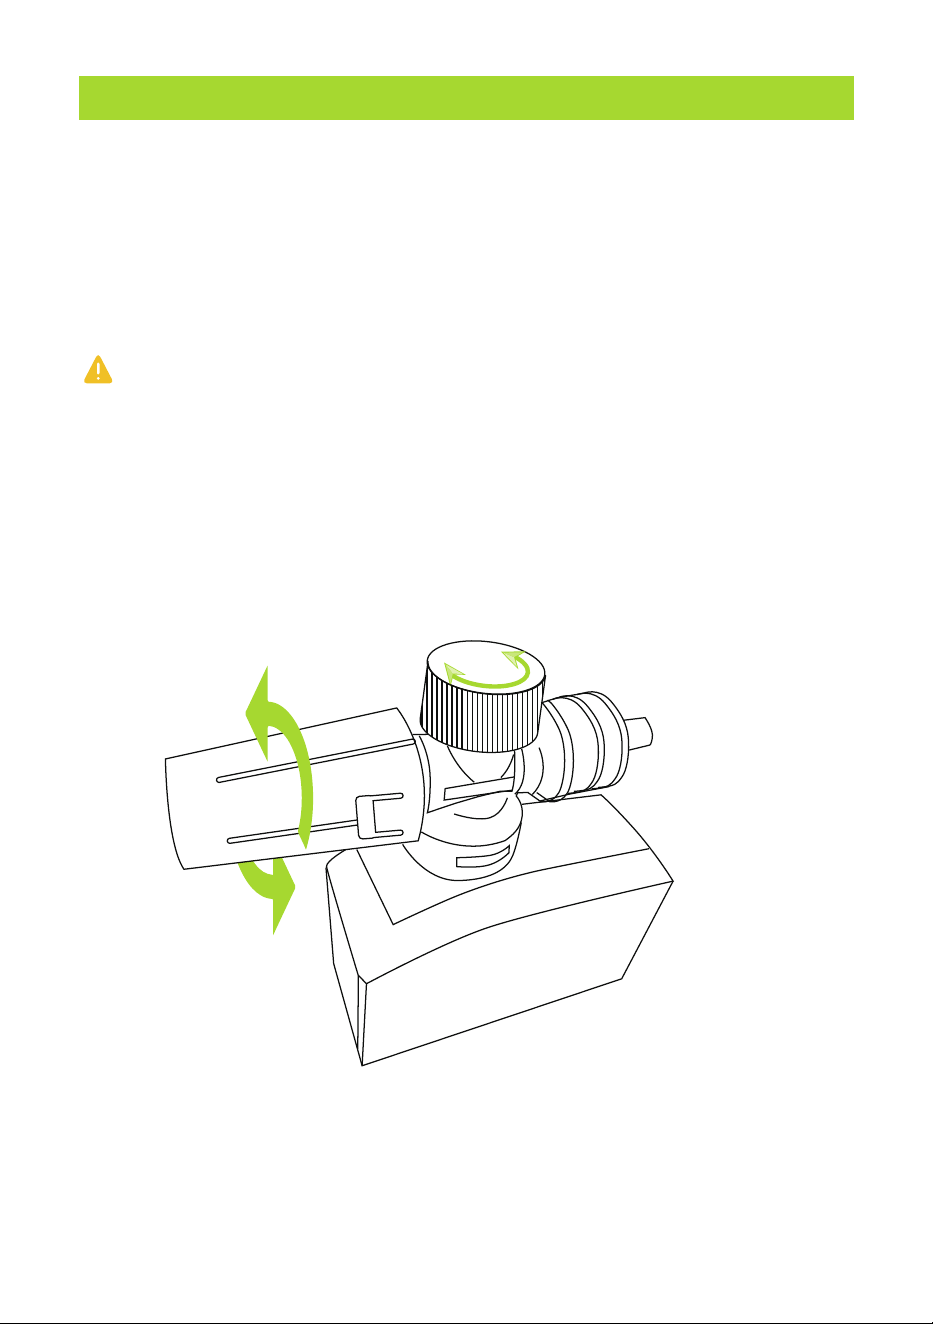
Adjust the detergent concentration by rotating the knob on top of the
product.
To rotate the nozzle of the product, you can adjust the angle of the
spray pattern (a vertical ellipse can be adjusted to a parallel ellipse).
CAUTION!
Always test the detergent in an inconspicuous area before use.
Recommended cleaning method
Spray the detergent sparingly on the dry surface and allow it to react,
but not to dry.
Spray off loosened dirt with the high pressure jet.
Working with Detergents
Follow Anykit on Amazon for More
3
4
6
7
5
2
1
15
14
13
OPERATION
Release the lever on the trigger gun.
1. Lock the lever on the trigger gun.
2. During longer breaks (more than 10 minutes), also turn the appliance
off using the "0/OFF" switch.
3. Insert the trigger gun in its holder.
1. After operation with detergent: Run the machine for approximately 1
minute for a clear rinse.
2. Release the lever on the trigger gun.
3. Turn off the appliance "0/OFF".
4. Turn off the tap.
5. Press the lever on the trigger gun to release any remaining pressure
in the system.
6. Lock the lever on the trigger gun.
7. Detach the appliance from the water supply.
8. Pull out the plug.
Interrupting operation
CAUTION!
Only separate the high-pressure hose from the trigger gun or the
appliance while there is no pressure in the system.
Finish operation
OPERATION
In order to prevent accidents or injuries, keep in mind the weight of the
appliance when selecting a storage location for it (see Specifications).
The appliance and its accessories can become damaged from freezing
if there is any water residue in it. To avoid damage:
When not in use, store in a room with a temperature above 0℃.
If you must store your pressure washer in a location where the
temperature falls below 32ºF (0ºC), you can minimize the chance of
damage to your machine by utilizing the following procedure:
• 1. Disconnect all water connections.
• 2. Drain the water from the high-pressure washer to prevent water from
freezing in the machine and pipes. Turn it off immediately.
• 3. Do not allow the high-pressure hose to become kinked.
• 4. If the cleaning machine is found to be frozen, do not start the
high-pressure cleaning equipment or use methods such as pouring hot
water, or heating to thaw it. This is to prevent cracking of the equipment
due to a large temperature difference. The equipment can be placed at
room temperature to thaw naturally.
• 5. If the high-pressure cleaning equipment is frozen and forcibly started,
it will cause deformation and damage to the working parts such as the
spring and valve cover inside the high-pressure pump. In severe cases, it
will cause cracking of the high-pressure pump and bursting of water
pipes.
• 6. Freezing of the high-pressure cleaning equipment will damage the
seals in the high-pressure pump and reduce the sealing performance.
• 7. To prevent freezing damage to components that come into contact
with water, such as the pump head, high-pressure hose, and high-
pressure gun, antifreeze can be used.
DANGER!
Turn off the appliance and remove the electrical plug before any care
and maintenance work.
WARNING!
When servicing, use only identical replacement parts. Use of any other
parts may create a hazard or cause product damage.
WARNING!
Before inspecting, cleaning, or servicing the machine, turn off the unit,
unplug from the outlet, pull the trigger to release water pressure, and
disconnect the high-pressure hose. Failure to follow these instructions
can result in serious personal injury or property damage.
GENERAL MAINTENANCE
Avoid using solvents when cleaning plastic parts. Most plastics are
susceptible to damage from various types of commercial solvents and
may be damaged by their use. Use clean cloths to remove dirt, dust, oil,
grease, etc.
WARNING!
Do not at any time let brake fluids, gasoline, petroleum-based products,
penetrating oils, etc., come in contact with plastic parts. Chemicals can
damage, weaken, or destroy plastic which may result in serious personal
injury.
All parts should be replaced at an authorized service center by Anykit.
To replace any accessories, please contact Anykit customer service at
CAUTION
Before extended storage periods, as during the winter, also observe the
instructions in the Care section.
• Park the machine on an even surface.
• Engage the spray gun in its compartment.
• Insert the trigger gun in its holder.
• Stow away the cable, the high-pressure hose, and accessories.
Storing the Appliance
STORAGE
Protect the appliance and its accessories from freezing.
FROST PROTECTION
FROST PROTECTION
WARNING!
Before reusing, completely flush the unit out with clear water.
Anti-freeze products can damage paintwork, so you must ensure there
is no anti-freeze left in the system before using it again.
Do not store near a furnace or other sources of heat that may dry out
the pump seals.
MAINTENANCE MAINTENANCE
Please replace any aging or damaged accessories promptly and always
use "ANYKIT" spare parts and accessories. Using any other accessories
or parts may be dangerous and could result in equipment damage or
personal injury.
1. Turn the water supply tap on completely.
2. Make sure the safety lock is down and in its original position, then
press the trigger for a few seconds until the water flow is steady. This
will allow air to escape and discharge any residual pressure in the
hose(Fig. A).
3.Turn the ON/OFF switch to the ON (I) position to start the pressure
washer(Fig. B).
4. When re-starting the motor, always keep the trigger pressed.
NOTE: The motor only runs when the trigger is operated and shuts
off when the trigger is released.
IMPORTANT!
The pressure washer must be used on a secure and stable surface in a
standing, upright position(Fig. C).
Danger!
The trigger gun is subjected to a recoil force when the water jet is
discharged. Make sure that you have a firm footing and are also holding
the trigger gun and nozzle firmly.
Place the machine as close to the water source as possible.
Using the Pressure Washer
OPERATION
The trigger gun is subjected to a recoil force when the water jet is
discharged. Make sure that you have a firm footing and are also holding
the trigger gun and sprayer firmly.
When using a spray gun for cleaning, please pay attention to the following:
1. Move the spray gun to spray and clean the object at a 45° angle to
avoid splashing back.
2. Keep the nozzle about 3.3 ft(1m) away from the surface being cleaned
to ensure that the water pressure can clean the dirt without damaging the
surface.
NOTE:
1. The high-pressure water gun should be at least 0.9 ft(30 cm) away
from the vehicle tire/valve stem when cleaning to avoid damage caused
by high-pressure spraying. Signs of damage include tire discoloration.
2. Always use both
hands to hold the spray
gun when working.
3. Do not use a 0°
nozzle to directly spray
the surface of the car.
Use a 40° nozzle to
clean the vehicle.
4. Do not spray the
pressure water onto
yourself or others to
clean clothes or shoes.
Water Supply
When it comes to selecting a water source for a high-pressure washer,
there are two main options. One is to connect it directly to a faucet or
a valve, where water automatically flows into the pump head. The other
option is to use a water bucket or a reservoir for suction.
It is recommended to use a faucet as the water source for several
reasons. Firstly, faucets provide an ample water supply, resulting in
higher pressure during machine operation. Secondly, the water quality
from faucets is generally better, reducing the chances of clogging the
pump head and nozzles.
Using a water bucket or reservoir for suction has its drawbacks. Firstly,
the water supply is usually not as abundant as from a faucet. Secondly,
the water quality cannot be guaranteed, as impurities from the bucket
or reservoir may be sucked in, leading to clogging of the pump head,
spray gun, and nozzles.
WARNING:
To ensure the performance of water suction from a bucket, please note
the following: Firstly, the suction hose should not exceed 2 meters in
length. Secondly, the height of the water bucket should not exceed
50cm. Lastly, ensure that the water bucket is positioned horizontally,
matching the orientation of the machine.
Danger
OPERATION OPERATION
Fig. C
Before beginning any cleaning task, determine the best nozzle for the job.
Each of the nozzles has a different spray pattern.
The nozzle patterns are 40˚ (for gentle cleaning), 25˚ (for all-purpose
cleaning), 15˚ (for tough jobs), 0˚ (for spot cleaning or hard-to-reach
areas), and the Soap nozzle (for detergent application).
CAUTION! NEVER change nozzles without locking the safety lock on the
trigger handle.
WARNING!
High-pressure jets can be dangerous if subject to misuse. The jet must
not be directed at persons, pets, live electrical equipment, or the
appliance itself.
This electric pressure washer is equipped with four Quick Connect noz-
zles that easily snap onto the Quick-Connect collar of the spray wand.
To connect a nozzle to the spray wand:
1. Turn off the pressure washer and shut off the water supply. Pull the
trigger to release water pressure.
2. Engage the safety lock on the trigger handle by pushing up on the
safety lock until it clicks into the slot (Fig. A).
3. Snap the desired nozzle onto the Quick-Connect collar until it clicks
into place (Fig. B).
Using Nozzles
OPERATION
To disconnect a nozzle from the spray wand once the cleaning
job is complete:
1. Turn off the pressure washer and shut off the water supply. Pull the
trigger to release water pressure.
2. Engage the safety lock on the trigger handle by pushing up on the
safety lock until it clicks into the slot.
3. Remove the nozzle by placing your hand over the nozzle while pulling
back on the Quick-Connect collar
WARNING!
Do not make changes to the nozzle while the trigger is engaged. Doing
so could result in damage to the pressure washer or injury to the user.
Using Nozzles
OPERATION OPERATION
Accessory
part number
Accessories
pictures
Accessory
name
Nozzles
1
2
3
4
5
6
7
8
9
10
11
High-pressure
hose
Filter
Garden Hose
Adapter
Leakproof
rubber ring
Detergent tank
Water gun
Tape
Needle
Water gun
hook
Power cord
hook
Accessories description
Can be used to replace worn or
damaged nozzles, including four
nozzles with 0°, 15°, 25°, and 40°
angles.
Used to replace aging or damaged
high-pressure hoses, with a length
of 16.4 feet.
Used to replace damaged filter
screens.
Used to replace damaged or aging
leakproof rubber ring.
Used to replace damaged or aging
detergent tank.
Used to replace damaged or aging
water guns.
Used to prevent water pipe joints
from leaking.
Used to replace damaged cleaning
needles.
Used to replace damaged or aging
water gun hooks.
Used to replace damaged or aging
power cord hooks.
Used to replace broken or damaged
water inlet nut joints, with a
specification of 3/4 inch internal
thread.
High-pressure hose
The high-pressure hose is specially constructed with reinforced walls to
handle water pressure up to 34.5 MPa (5000 psi) - it can be damaged
if it isn’t stored appropriately.
• Do not kink.
• Do not drive vehicles over the hose.
• Do not expose the hose to sharp edges or corners.
Misuse will lead to ballooning or premature failure and will invalidate the
warranty.
Maintenance of Garden Hose Adapter
The sealing ring of the machine's water inlet should be replaced
regularly, and the sealing ring should be checked for signs of aging. If
the sealing ring is found to be aging, it should be replaced promptly to
maintain the good sealing performance of the equipment.
Replacement method: First, remove the "filter screen" and then remove
the "waterproof rubber ring" inside. Replace the old waterproof rubber
ring with a new one, and finally reinstall the "filter screen".
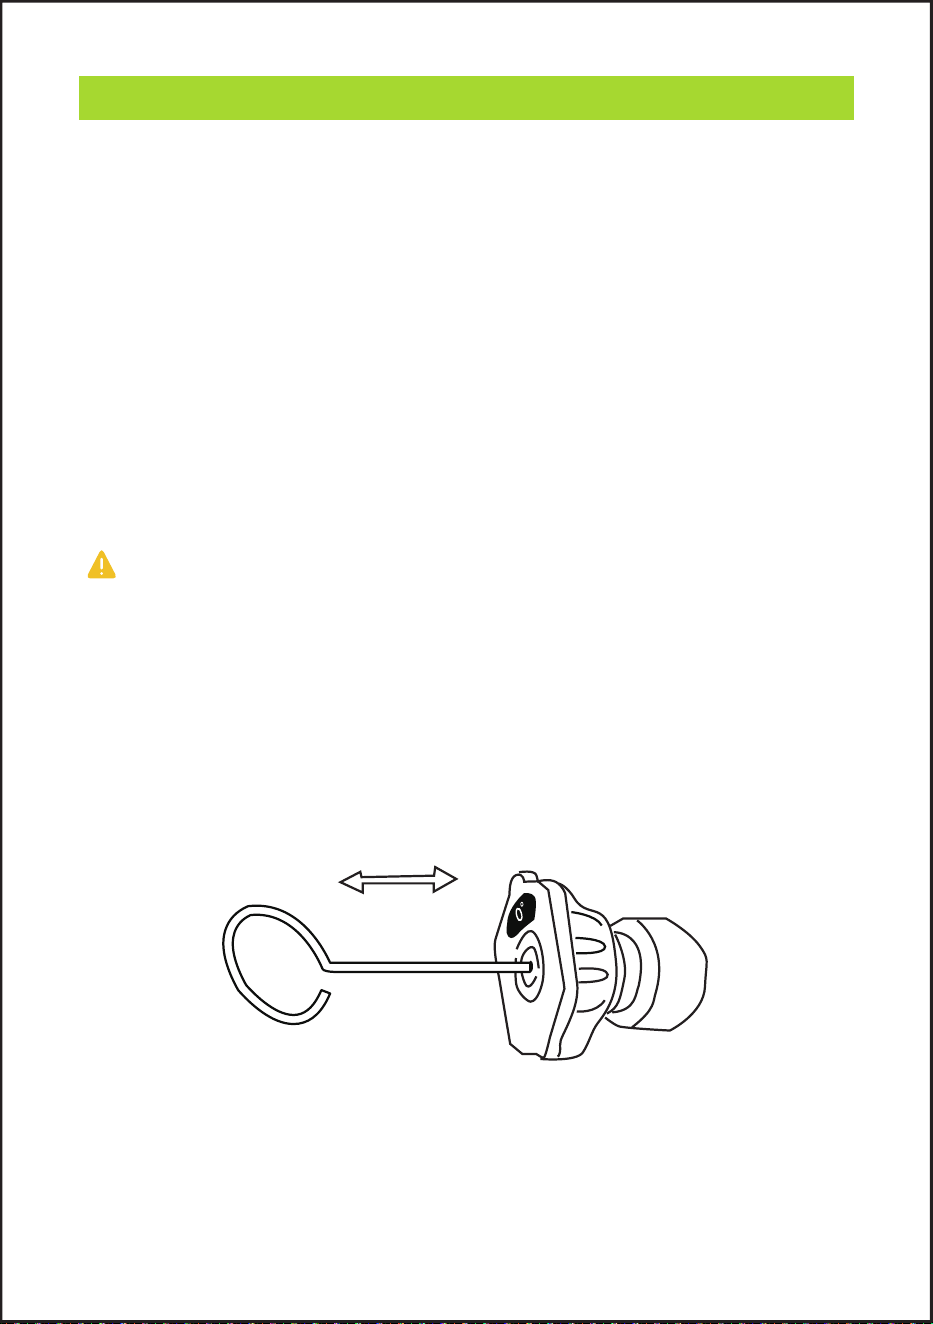
NOZZLE MAINTENANCE
NOTE: After each use, please check if there is any foreign object
blocking the nozzle. You can use a cleaning needle to clear it.
Operating instructions:
Remove the nozzle from the spray gun.
Use a straight paper clip or cleaning tool to clean the spray tip.
Rinse it thoroughly.
Install the clean nozzle to the spray wand.
TROUBLESHOOTING
PROBLEM
Fluctuating
pressure
The machine will
not start
The machine stops
The machine is not
plugged-in
Faulty receptacle
Plug the machine in
Try another receptacle
Replace the fuse Unplug other appliances
Try without the extension cable
Contact your service centre
Check that hoses and connections are
airtight.
Increase water pressure, check for
blockages and / or change the large pipe.
Contact your nearest service centre
Replace the fuse
Unplug other appliances
Leave the machine to cool for 5 mins
Check that the mains voltage corresponds
to the specifications on the nameplate
Clean the jet with a needle and by spraying
water rearwardly through the jet
The fuse has blown
Faulty extension cable
The pump is drawing in
air
Valves dirty, worn or
sticking
The water supply is not
sufficient
Pump seals worn
The fuse has blown
Incorrect mains voltage
Partially blocked jet
Thermal sensor
activated
POSSIBLE CAUSE SOLUTION
TROUBLESHOOTING
Fuse blown
Fuse too small
Air in inlet
hose / pump
Partially blocked jet
Water filter blocked Clean the filter
Unfold the pipe
Contact your nearest service center
Clean the jet with a needle and by
spraying water rearwardly through the jet
Connect the inflow water
Clean the filter
Folded pipe
No water supply
Water filter blocked
Blocked jet
Pump fuse and/or
trigger out of order
Inadequate supply of
water generated
Increase in the
amperage
Replace it with a fuse with higher
amp consumption than the washer.
Allow machine to run with open trigger
until regular working pressure resumes.
Increase water pressure, check for
blockages and / or change the large pipe.
Try without the extension cable
Clean the jet with a needle and by
spraying water rearwardly through the jet
Pulsing machine
The machine turns on
and off by itself
The machine is on but
no water comes out
WARRANTY
30-Day Guarantee
We will give you a full refund if you are not
satisfied with the product.
We offer a limited warranty that commences
from the date of purchase of the product.
One-Year Warranty
Visit anykit.com or scan the QR code for more details.
CUSTOMER SUPPORT
If you have any questions or concerns about your product,
please contact our Customer Support Team
ANYKIT AP001 C1226 V1.0
3.06.16.001400
Facebook Messenger
1-877-888-7979
Mon.-Fri. 8:00-5:00 PST(US)
www.anykit.com
@anykit
@anykit
Fig.B
Fig.A
Slot
Trigger
Safety lock
Fig.A
Slot
Safety Lock
1m
45°
Fig.B
Fig.A
Garden hose adapter
leakproof rubber ring
Filter
MAINTENANCE MAINTENANCE
OPERATION
Recommended cleaning agents that can be used in the detergent tank:
For washing cars, we recommend using Meguiar's Super
Concentrated Car Wash. This specially formulated detergent is
designed to remove dirt and impurities from your car while restoring its
shine. It is also eco-friendly and protects against minor scratches. Mix
it with water in a ratio of 1:128 (detergent to water).
For cleaning decks, we recommend using Bona Cleaner. Mix the
cleaner with water in a ratio of 1:7 (cleaner to water) to effectively
remove stains and dirt without causing pollution.
For cleaning metal surfaces, we recommend using Brasso
Cleaner. It is generally recommended to mix pure water and Brasso
Cleaner in a 1:1 ratio (cleaner to water) to clean metal surfaces.
Please refer to the instructions on the selected cleaning agent before
use.
Note:
Consider the surface you will be cleaning, as different surfaces require
different cleaning agents. For example, you may need a different
detergent for cleaning a car than you would for cleaning a deck.
Look for cleaning agents that are eco-friendly and biodegradable.
These types of cleaning agents are better for the environment and
won't harm plants or animals.
Consider the concentration of the cleaning agent. Some cleaning
agents are highly concentrated and require dilution before use. Make
sure to follow the manufacturer's instructions for dilution ratios.
Test the cleaning agent on a small area before using it on a larger
surface. This will help you determine if the cleaning agent is effective
and won't damage the surface you are cleaning.
- 18 -
- 29 -
- 10 -
ATTACH GARDEN HOSE TO WATER SUPPLY
POWER ON THE DEVICE
NOTE: If the high-pressure water gun does not spray water or the
pressure is uneven when the machine starts, there may be air bubbles in
the water pipe, which can affect the water pressure. It is recommended
to follow the steps below:
1. Wait for the water to completely flow into the entire water pipe.
2. Start the high-pressure water gun to release the air in the
machine/high-pressure water pipe.
3. Wait for the water pressure of the high-pressure water gun to stabilize
before starting normal operation.
Connect to water supply
US standard 3/4 water
pipe joint(male end)
Garden hose
Air bubbles
Connect the power cord of the device
to the power outlet.
NOTE:
Ensure the machine power switch is
off (O position) before connecting.
RESET
TEST
