Electric Leaf Blower
User Manual
Model No: STLB-2001

OVERVIEW
SAFETY INSTRUCTIONS
Features
APPLICATIONS
• Cordless
• Turbocharging
• Battery level display
• Super large air volume mode
• Blow debris or grass clippings off driveways, sidewalks, patios,
parks, parking lots, etc.
• Gather grass clippings, straws, or leaves into piles. Remove
debris from corners, around joints, and between bricks.
Warning! Please read safety warnings and instructions before
using this product. Failure to follow these warnings may result in
electric shock, fire, or serious injury.

READ BEFORE USE
Scan the QR code to watch
the STLB-2001 tutorial
videos, which demonstrates
how to use the STLB-2001
safely.
VIDEO TUTORIALS
Scan this QR code to get
the manual in PDF, which
can be enlarged and viewed
on your mobile device.
ONLINE MANUAL
By using this product, you signify that you have read, understand,
and accept the terms and conditions here.
It is recommended to watch all tutorial videos on the official Anykit
website and read the safety guidelines before using.
Prepare for your first use by reviewing the quick start guide and
refer to this user manual for more information.
Read the following documents before using.
(1)Safety Guidelines
(2)Quick Start Guide
(3)User Manual

TABLE OF CONTENTS
1. ABOUT ANYKIT------------------------------------1
2. SPECIFICATIONS----------------------------------2
3. KNOW YOUR PRODUCT-----------------------------3
4. ASSEMBLY---------------------------------------4
4.1. Preparing to Assemble the Blower
-----------------------4
4.2. Blower Tube Assembly
-----------------------------4-5
5. PREPARATIONS---------------------------------5-8
5.1. Check the Battery Pack Capacity
------------------------6
5.2. Charging the Battery
---------------------------------7
5.3 Battery Assembly
-----------------------------------8
6. OPERATION--------------------------------------9
7. MAINTENANCE-----------------------------------9
7.1. Cleaning
-----------------------------------------9
7.2. Battery Maintenance
--------------------------------10
7.3 Charger Maintenance
-------------------------------10
7.4 Storage
-----------------------------------------11
8. TROUBLESHOOTING------------------------------13
9. WARRANTY-------------------------------------15
10. CUSTOMER SUPPORT----------------------------16

01
Anykit is a trendy and practical tool brand. We focus on simplicity and
ease of use, providing people with convenience in their everyday lives.
Our products include leaf blowers, endoscopes, and various household
tools to enable DIY enthusiasts to embrace creativity and convenience.
ABOUT ANYKIT
Follow Anykit on Amazon for More

02
Model:
No load speed:
Max air volume:
Max air speed:
Capacity of battery:
Charger input:
Charger output:
Permitted charging temperature
range (for charger):
Run time:
Charging time:
Sound power level:
Product weight (without
battery pack):
Leaf blower recommended
operating temperature:
Battery pack recommended
storage temperature:
16 minutes(Low speed)
7 minutes(High speed)
Approx. 90min
(for one battery pack)
76 dB (Low speed)
92 dB(High speed)
4.54 lbs
32℉-104℉(0°C-40°C)
32℉-176℉(0°C-80°C)
Voltage:
STLB-2001
13000-16000r/min
331.25 CFM (9.38 m³/min)
88.4 MPH(39.5m/s)
3.0Ah(2 PACK)
100-240V 50/60Hz 1.5A
5V 2.0A
23℉-122℉ (-5°C~50°C)
20V
SPECIF ICATIONS
03
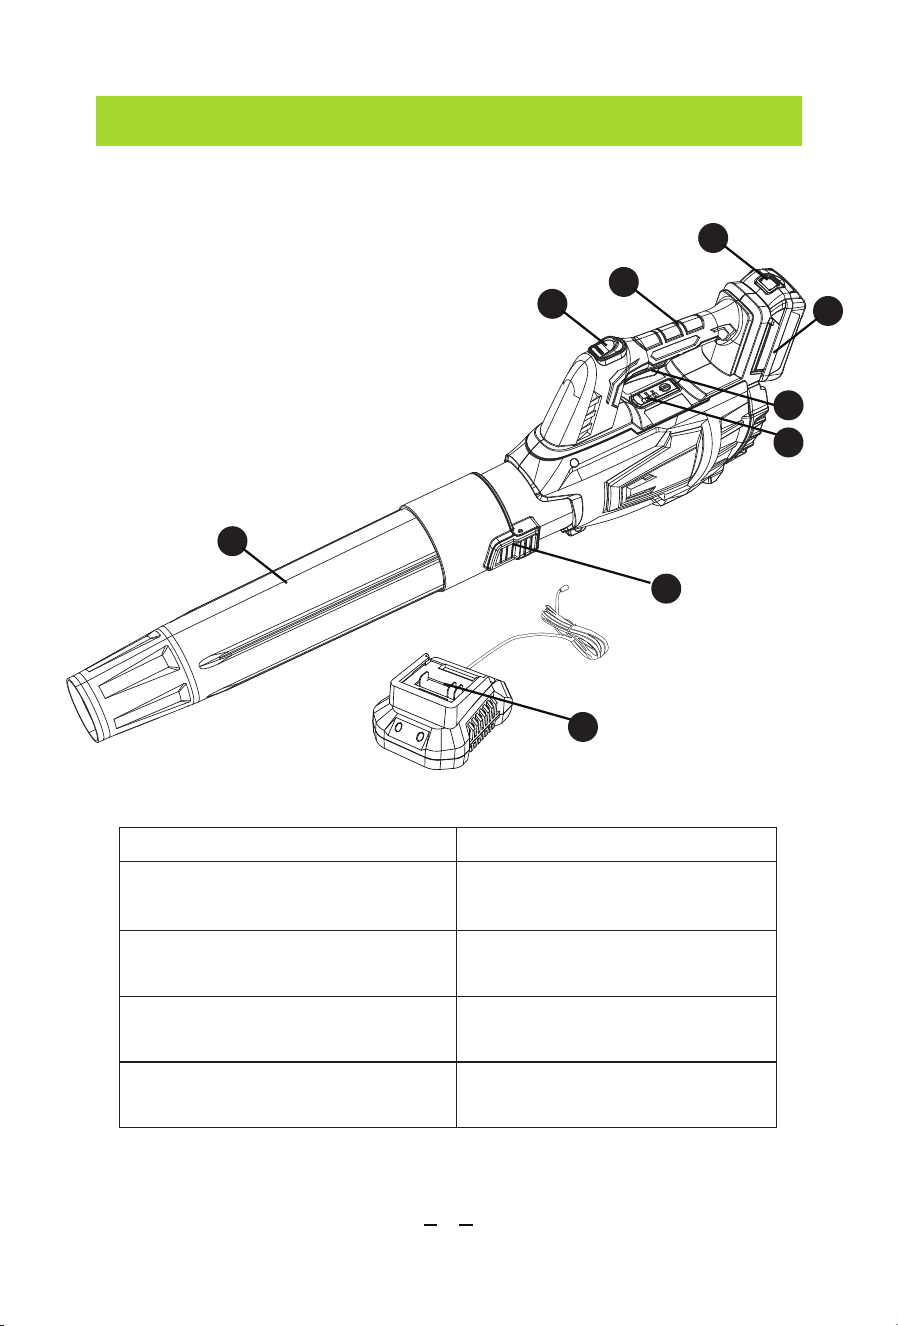
1. Blower Tube
2. Tube Release Button
3. Turbo
4. Handle
5. Battery Release Button
6. Batter Pack
7. On/Off Trigger
8. Battery LED indicators
9. Charger
On/Off Trigger
Turbo Button
Battery-Release Button
Battery LED indicators
Shows the battery level
at 40%, 70%, and 100%
Tube Release Button
Releases the tube from
the blower
Releases the battery pack
from the blower
Amplifies the air velocity
to the maximum
Starts or stops the blower
KNOW YOUR PRODUCT
1
3
4
6
5
2
8
9
7
04
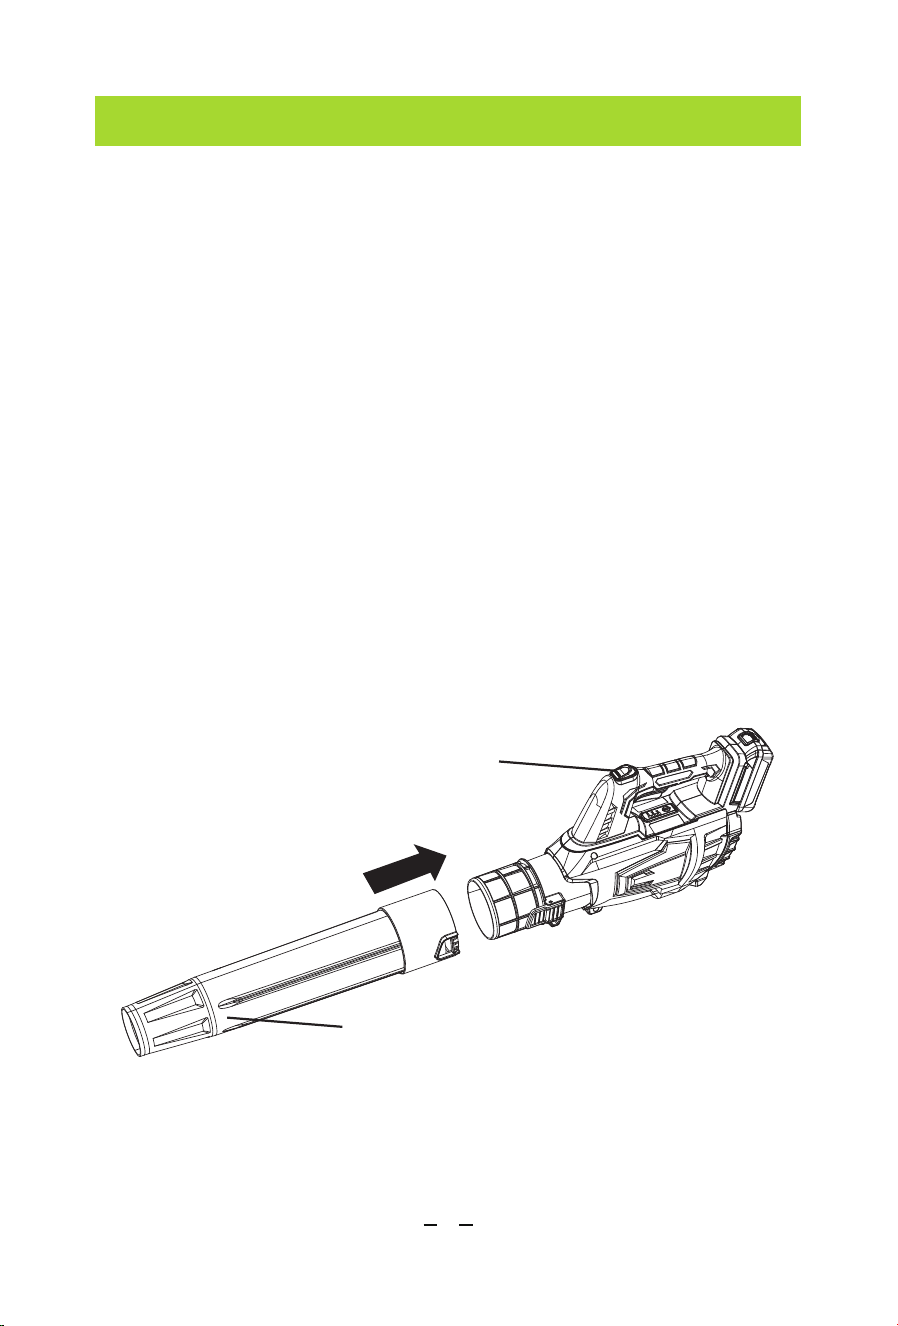
ASSEMBLY
Blower Tube Assembly
Take care not to lose any instructions. These provide important
information which will be required while attached the blower.
• Remove all parts of the cordless blower from the box and carefully
remove all packaging.
• Keep all packaging until the blower is fully assembled and has been
operated successfully.
• Always recycle the packaging in accordance with local recycling
regulation.
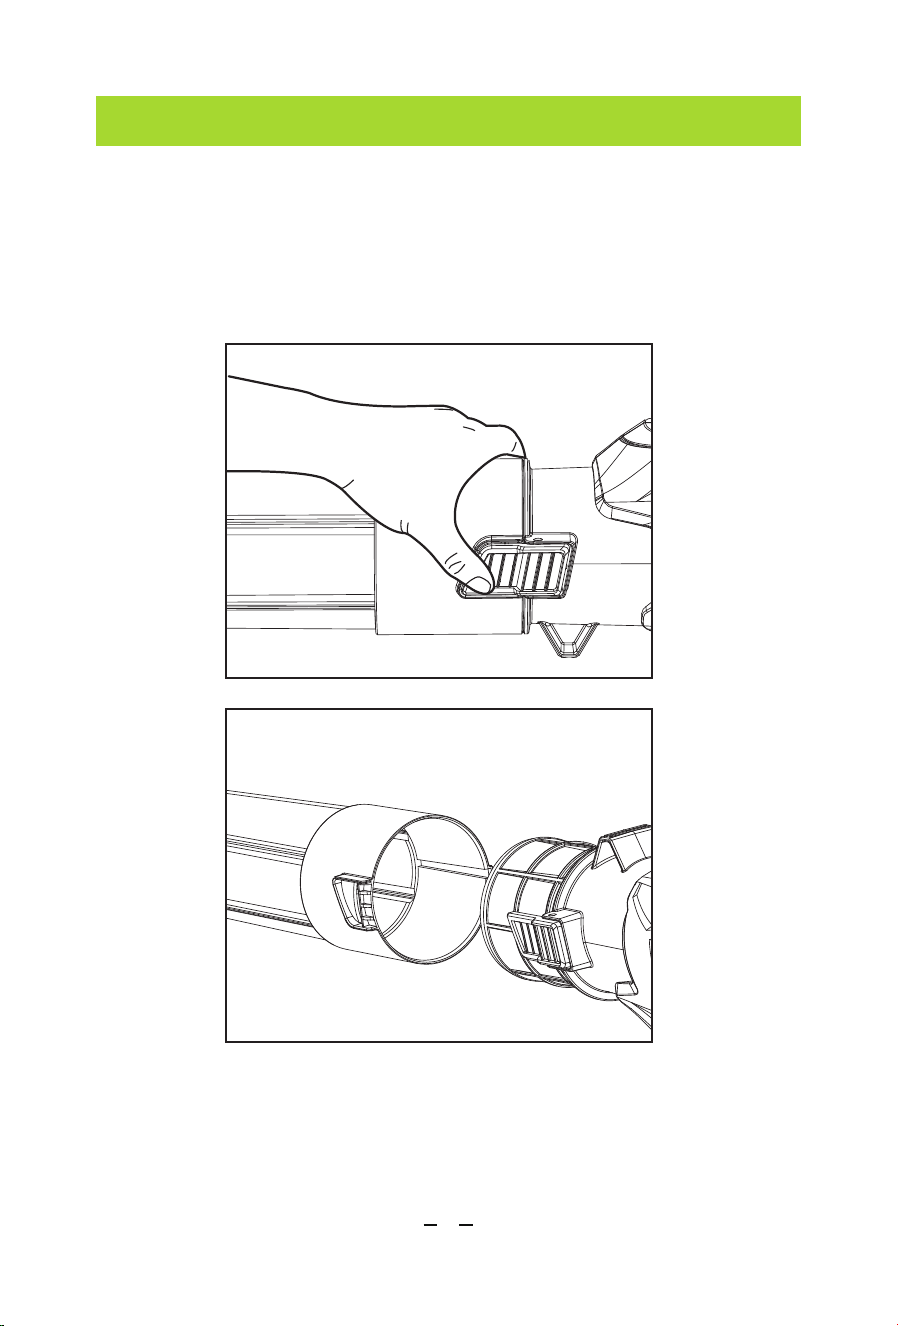
Align the groove in the tube with the knob on the blower housing.
Slide the nozzle over the blower outlet opening until the latch on the
blower is inserted into the opening on the nozzle and snaps into place.
Preparing to Assemble the Blower
Cordless Blower
Blower Tube
05
ASSEMBLY
To remove the tube, press and hold the tube-release button to
disengage the latch, then pull the tube straight from the blower.
Blower Tube Assembly
06
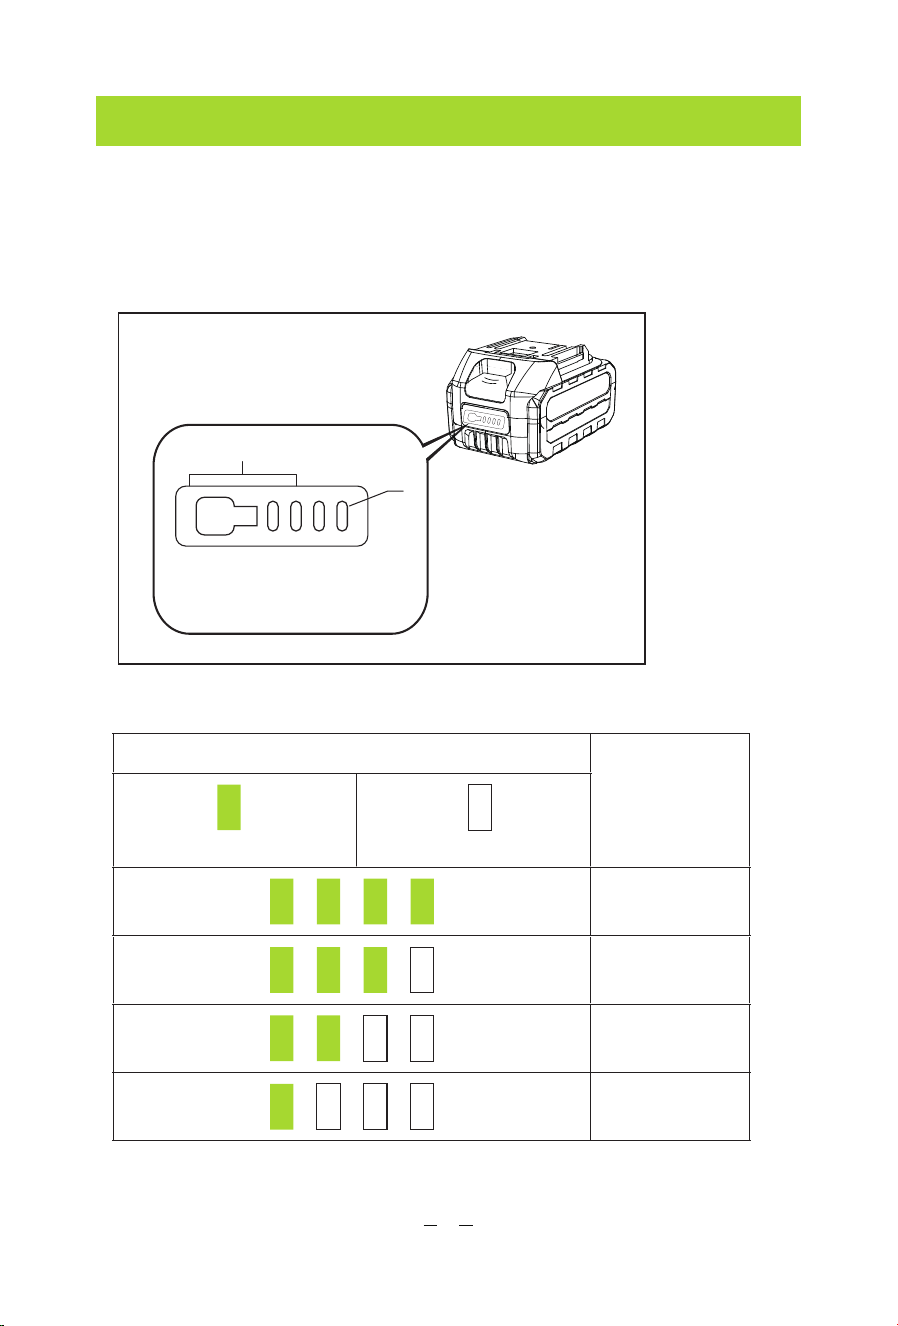
PREPARATIONS
Check the Battery Pack Capacity
1
2
1. Indicator lights 2. Button
►
Battery LED indicators
Check the battery pack capacity by pressing the button.
Indicator lamps
Remaining
capacity
On Off
75% to 100%
50% to 75%
25% to 50%
0% to 25%
07
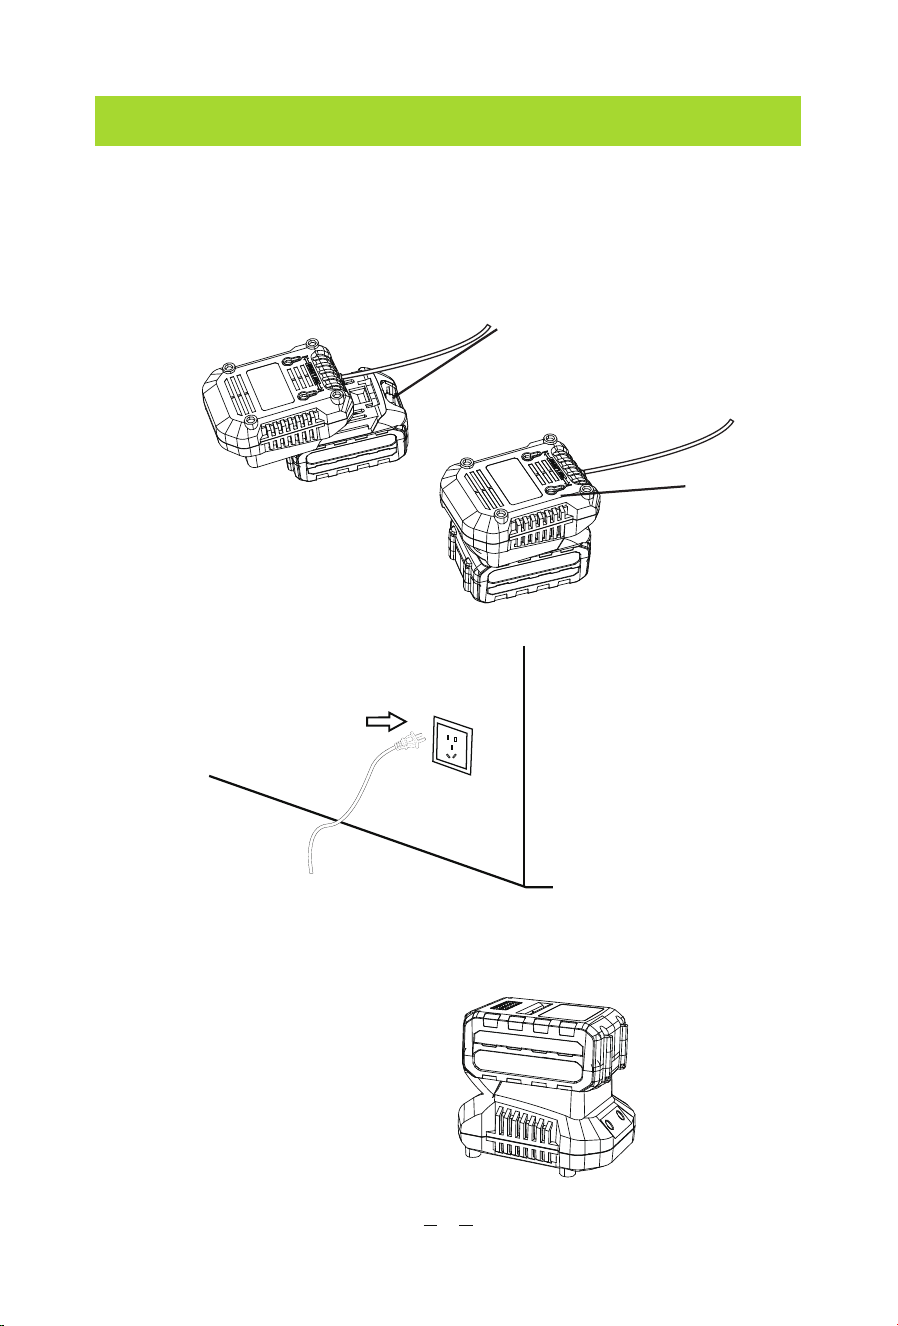
PREPARATIONS
Charging the Battery
1. Align the battery pack with the slots on the charger and slide it
until it locks in place.
2. Plug the charger cord into a suitable socket.
3. When the charging indicator turns green disconnect the charge
from the power supply.
Charger indicator lights
• Red light: charging
• Green light: fully charged
Release Button
Charger
08
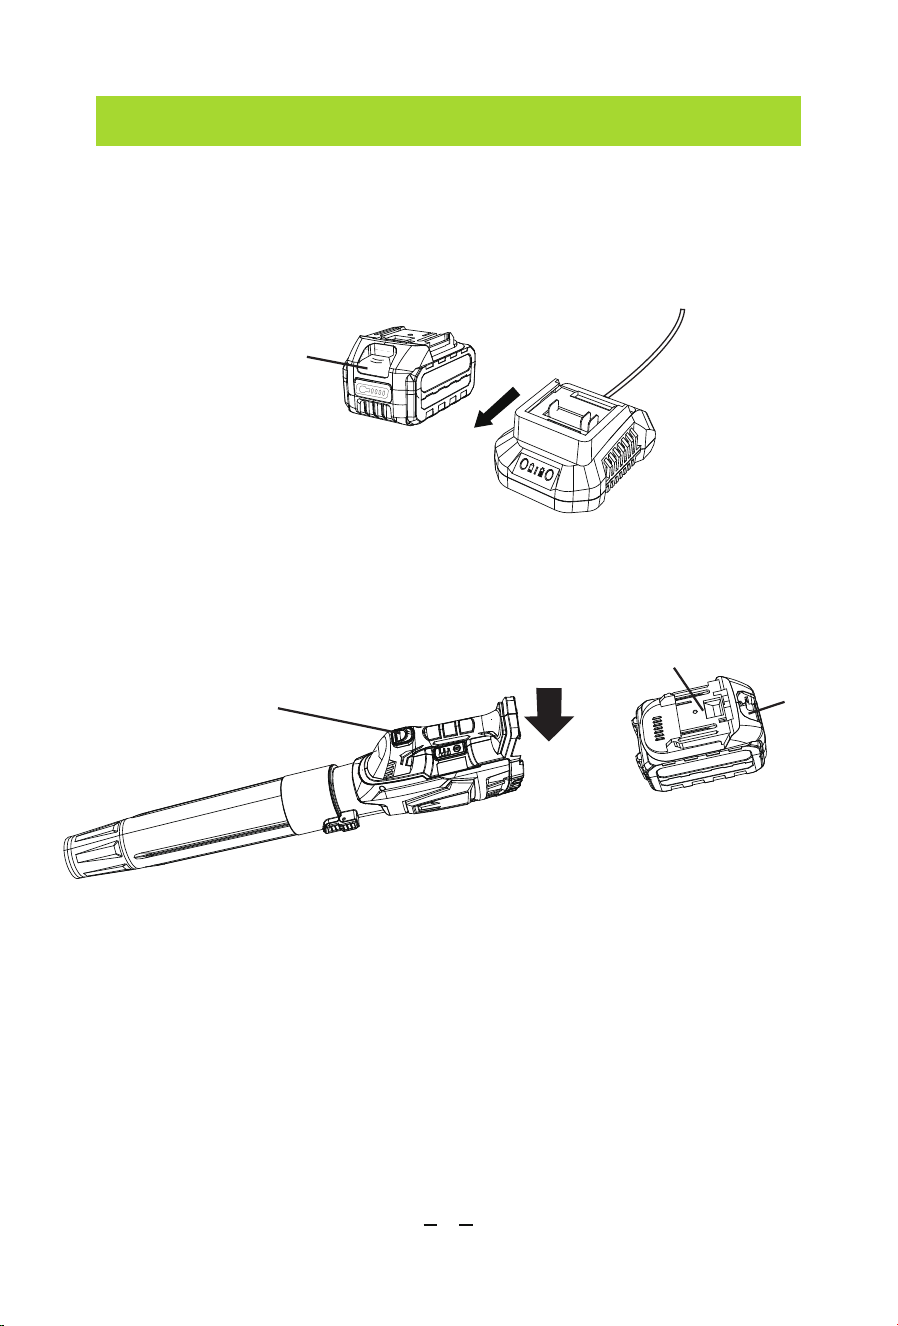
PREPARATIONS
Charging the Battery
Battery Assembly
4. Press the release button on the battery pack and remove the
battery from Charger.
Push the battery pack into the handle until the latch locks into place.
Cordless Blower
Tongue of
The Battery
Release
Button
Release
Button

09
OPERATION
Switching On/Off
1. Press the On/Off trigger to turn
on the blower.
2. Press and hold the On/Off Trigger
and Turbo button simultaneously for
high-speed operation.
3. Release the On/Off trigger to turn
off the blower.
USER TIPS:
Hold the blow tube approx 7”above the
ground when operating the blower. Use
a sweeping motion from side to side.
Advance slowly keeping the accumulated
debris/leaves in front of you.
After blowing the debris/leaves into a
pile, it is easy to dispose of the pile.
MAINTENANCE
Cleaning
• Remove the battery pack.
• Brush or blow dust and debris out of the air vents using
compressed air or a vacuum. Keep the air vents free of
obstructions, sawdust, and wood chips. Do not spray, wash, or
immerse the air vents in water.
• Wipe off the housing and the plastic components using a moist,
soft cloth. Do not use strong solvents or detergents on the plastic
housing or plastic components. Certain household cleaners may
cause damage or a shock hazard.
Approx 7"
Turbo
On/Off Trigger

10
MAINTENANCE
Battery Maintenance
Charger Maintenance
• Store the battery pack fully charged.
• Recharge the battery pack whenever there is a noticeable reduction
in the performance.
• Do not allow the battery pack to become completely discharged.
• Do not recharge a battery pack that is already fully charged.
Overcharging shortens battery life.
• Once the battery pack is fully charged, remove the battery from the
charger and disconnect the charger from the outlet.
• Do not store the battery pack on the tool or in the charger.
• Recharge the battery at a temperature between 5°C and 50°C.
If the battery pack is hot, allow it to cool down before recharging.
Keep the charger clean and clear of debris. Do not allow foreign
material into the recessed cavity or on the contacts. Wipe with a dry
cloth. Do not use solvents, or water, or place in wet conditions.
• Always unplug the charger when there is no battery pack in it.
• Give the batteries a full charge before placing them in storage. Do
not recharge a fully charged battery pack. Overcharging shortens the
battery life.
• Recharge the battery pack whenever there is a noticeable reduction
in the performance. Never let the batteries become completely
discharged.
• Keep the charger stored at normal room temperature. Do not store it
in excessive heat. Do not store in direct sunlight.
• Disconnect the charger from the AC power outlet when not in use
and once the battery has reached a full charge.

11
MAINTENANCE
Storage
• Store idle tools. When not in use, the unit should be stored in a dry,
high or locked-up place - out of reach of children.
• Keep the blower and its handle dry, clean and free from oil and
grease. Always use a clean cloth when cleaning. Never use brake
fluids, gasoline, petroleum-based products, or any strong solvents to
clean your blower. Following this rule will reduce the risk of loss of
control and deterioration of the enclosure plastic.
• Always remove the battery pack from the product when you are
assembling parts, making adjustments, cleaning, or when the product
is not in use.
• Shock Hazard. Do not pour or spray water on the blower in an
attempt to clean.
• To avoid serious personal injury, always turn off the unit, disconnect
the power supply and remove the battery pack from the product
when cleaning or performing any maintenance.
• Avoid using solvents when cleaning plastic parts. Most plastics are
susceptible to damage from various types of solvents and may be
damaged by their use.
• Do not at any time let brake fluids, gasoline, petroleum-based
products, penetrating oils, etc., come in contact with plastic parts.
Chemicals can damage, weaken or destroy plastic which may result
in serious personal injury.
• Please charge the battery pack,when not in use for over 3 months,
to save battery life.

12
MAINTENANCE
The recommended ambient temperature range:
Item Temperature
Blower storage
temperature range
Blower operation
temperature range
Battery charging
temperature range
Charger operation
tempera ture range
Battery storage
temperature
Battery discharging
tempera ture range
32°F (0°C) - 113°F (45°C)
32°F (0°C) - 113°F (45°C)
39°F (4°C) - 104°F (40°C)
39°F (4°C) - 104°F (40°C)
32°F (0°C) - 113°F (45°C)
32°F (0°C) - 113°F (45°C)

13
TROUBLESHOOTING
Problem Possible Reason Possible Solution
Battery pack is not installed
properly.
Install the battery
pack properly.
Fully charge the
battery pack.
Fully charge the
battery pack.
Cool down the battery
pack or blower
Turn the blower off and
stop the application that
caused the tool to become
overloaded. Then turn the
tool on to restart.
Battery is empty.
The battery pack is depleted.
The battery pack or blower
is too hot.
The battery is low. Fully charge the battery pack.
Contact Our
Customer Service Team.
Excessive wearing of motor fan.
The air intake is blocked by debris.
The power switch is defective.
The motor is defective.
The PCB board is defective.
No electricity supplied.
Using incorrect electric current
to charge.
Not pressing the on/off
trigger at the same time.
Press the on/off
trigger and the turbo
button at the same time.
The blower is operated in a
manner that causes it to draw
an abnormally high current.
The blower
doesn't work
when new.
The blower
doesn't work.
The air velocity
decreases.
The machine
does not start.
Turbo button
won't activate.
The indicator
does not light
red when charging
(The battery can
not be charged).
1. Change the outlet
2. Change the battery pack
3. Check if the charging
cord is broken or loose
Use correct electric current
as recommended in
"SPECIFICATIONS".

14
TROUBLESHOOTING
Problem Possible Reason Possible Solution
The battery pack is too hot.
The green light
indicator is always
on when charging.
The battery is out
of power less in
than 15 minutes.
Battery electrolyte
overflow.
Battery pack will
not charge.
Use in extreme temperatures,
both hot and cold, can negatively
impact battery performance.
Wait for the battery to cool
down.
Use the blower in our
recommended operating
temperature.
Maintain your battery pack
as we recommended in
"MAINTENANCE".
Intermittent use of the turbo
function is recommended
(Continuous use of the
turbo function lasts up to 7
minutes).
Stop using it and change to a
new battery pack. Dispose of
the used battery followed by
our recommendations in
"Environmentally Safe Battery
Disposal".
Stop using and change to a
new battery pack. Dispose of
the used battery following our
recommendations. Note: In
case of accidental contact
with electrolyte, please follow
our recommendations in
"Safety Warning and
Instructions for Battery Pack
Change to a new
battery pack.
The battery starts
bulging.
Physical damage or vibrations to
the battery can disrupt the
internal components, including the
seals that contain the electrolyte.
Battery pack not inserted into
charger.
Insert battery pack into
charger until LED appears.
Plug charger into a working
outlet. Refer notes“for more
details.
Move charger and battery to
a surrounding air temperature
of above 40°F(4.5℃)or below
105°F(+40.5℃).
Surrounding air temperature too
hot or too cold.
Charger not plugged in.
The battery may have been
damaged from being dropped.
Prolonged use of turbo function.
Battery loss.
Battery aging.
WARRANTY
15
30-Day Guarantee
One-Year Warranty
We will give you a full refund if you are not
satisfied with the product.
We offer a limited warranty that commences
from the date of purchase of the product.
Visit anykit.com or scan the QR code for more details.

CUSTOMER SUPPORT
If you have any questions or concerns about your product,
please contact our Customer Support Team
Facebook Messenger
1-877-888-7979
Mon.-Fri. 8:00-5:00 PST(US)
www.anykit.com
@anykit
@anykit
3.06.06.002100
ANYKIT STLB-2001 D0104 V1.0
16
