INSTRUCTION MANUAL
TN10/TN11
· Please check if the air inflator is fully charged before use.
· Do not allow children to use this air inflator! Keep it in a safe place out of
the reach of children! Never insert the air hose into the mouth, ears, or
eyes and do not use the pump as a toy!
· Please use the product in a dry and clean environment. It is forbidden to
use this air inflator near a flammable and explosive occasion, such as gas
station!
· Please cool down the unit 15 minutes after long time uses, to ensure
good work of the air inflator and extend life.
· If there is an unusual noise or the temperature becomes very high
during inflating, please turn off the inflator immediately. Be careful when
removing the air tube to avoid burns, don’t wash the product with water.
· Long-time storage of the product may decrease the effectiveness of the
battery. Charge the inflator at least once every three months to maintain
its performance.
EN
1. Please disconnect the external charger in
thunderstorms to avoid damage by lightning.
2. Keep away from heat sources and keep ventilation.
3. Do not place the device under high temperature
or throw it into the fire, as this may cause an explosion.
4. In storage, transport, and operating environment,
please pay attention to waterproofing.
WARNINGS
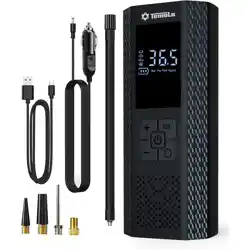
PORTABLE AIR
INFLATOR
尺寸:31x10x9(cm)尺寸:31x10x9(cm)
SAFETY GUIDELINES
2
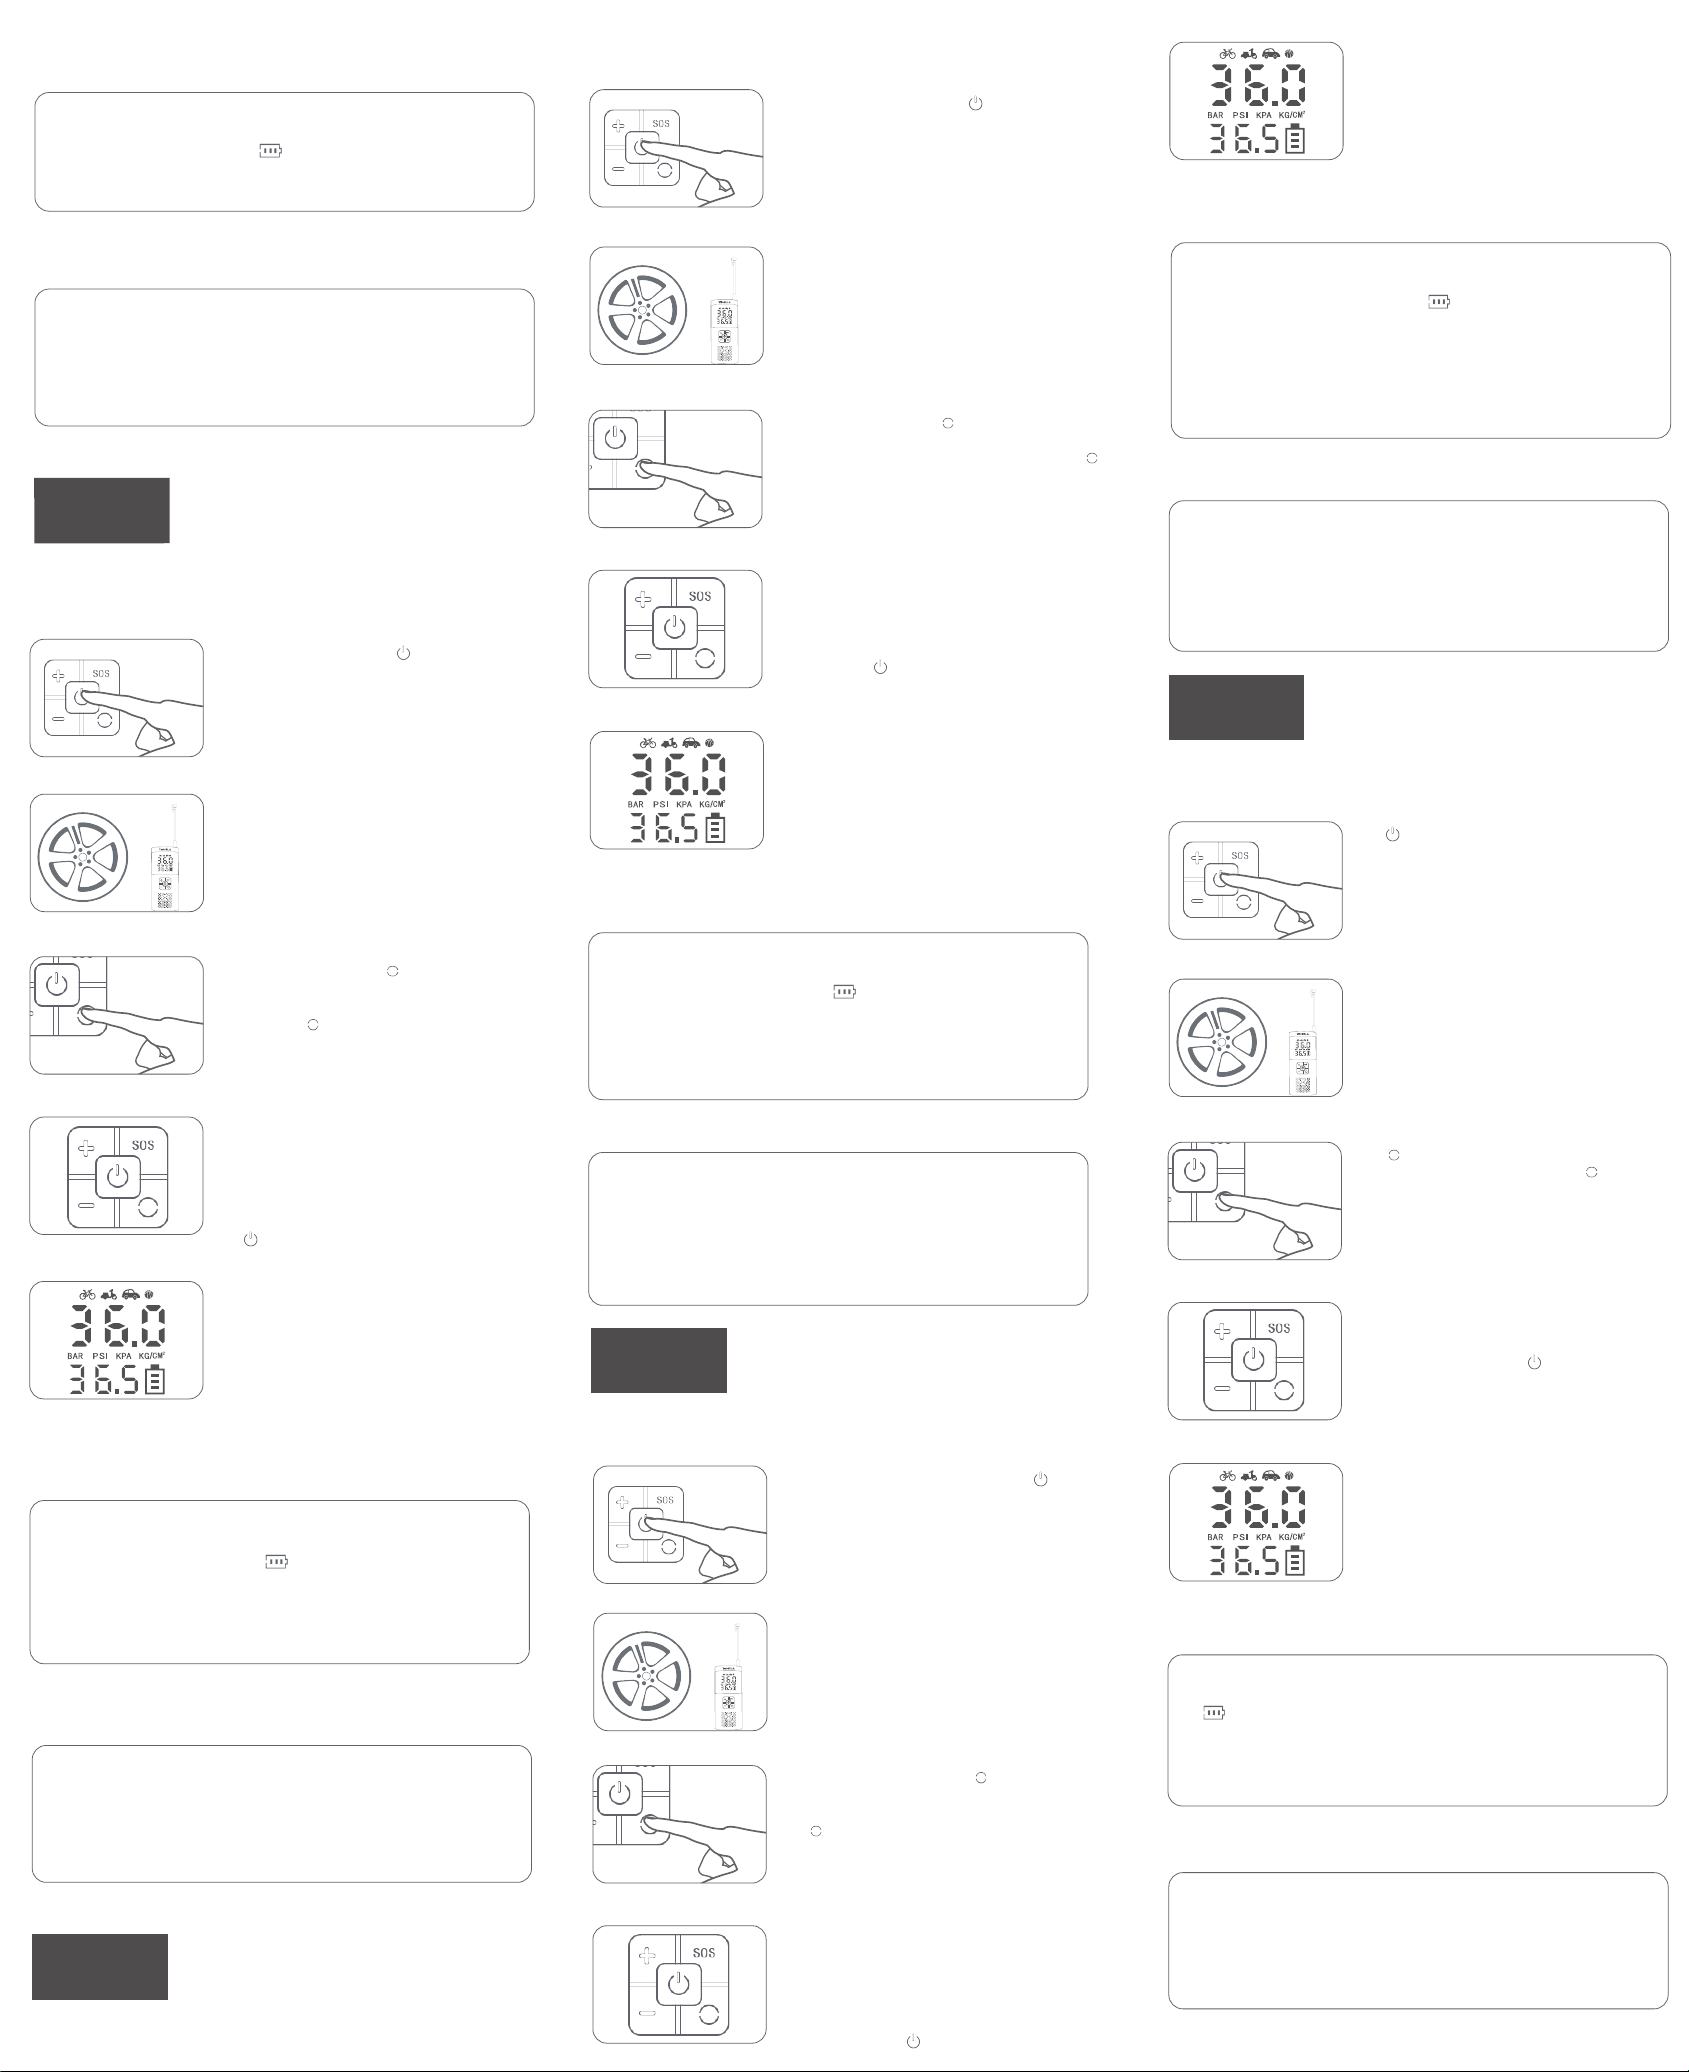
2. Connect one end of the air tube (with
screw thread) to the inflator before
inflating, and the other end is spun into
the tire valve core. In the case of french
valve cores, conversion fittings will need
to be added.
3. Press the " " button to switch the car,
motorcycle, bicycle, and ball mode.
Long press the " " button to switch
PSI、BAR、KPA、KG/cm² pressure units.
SPECIFICATIONS
Charge input voltage
Operating voltage
Max power consumption
Max current
Max filling flow
External air hose length
Operating temperature
Product dimensions
12V
7.4V/11.1V
60W
<6A
18L/min
300MM
-20℃~60℃
177*78*57mm
If there are still other problems, please contact us for help.
We will offer you a full refund or a replacement if the
appliance fails to work under regular service or due to
unintended damages.
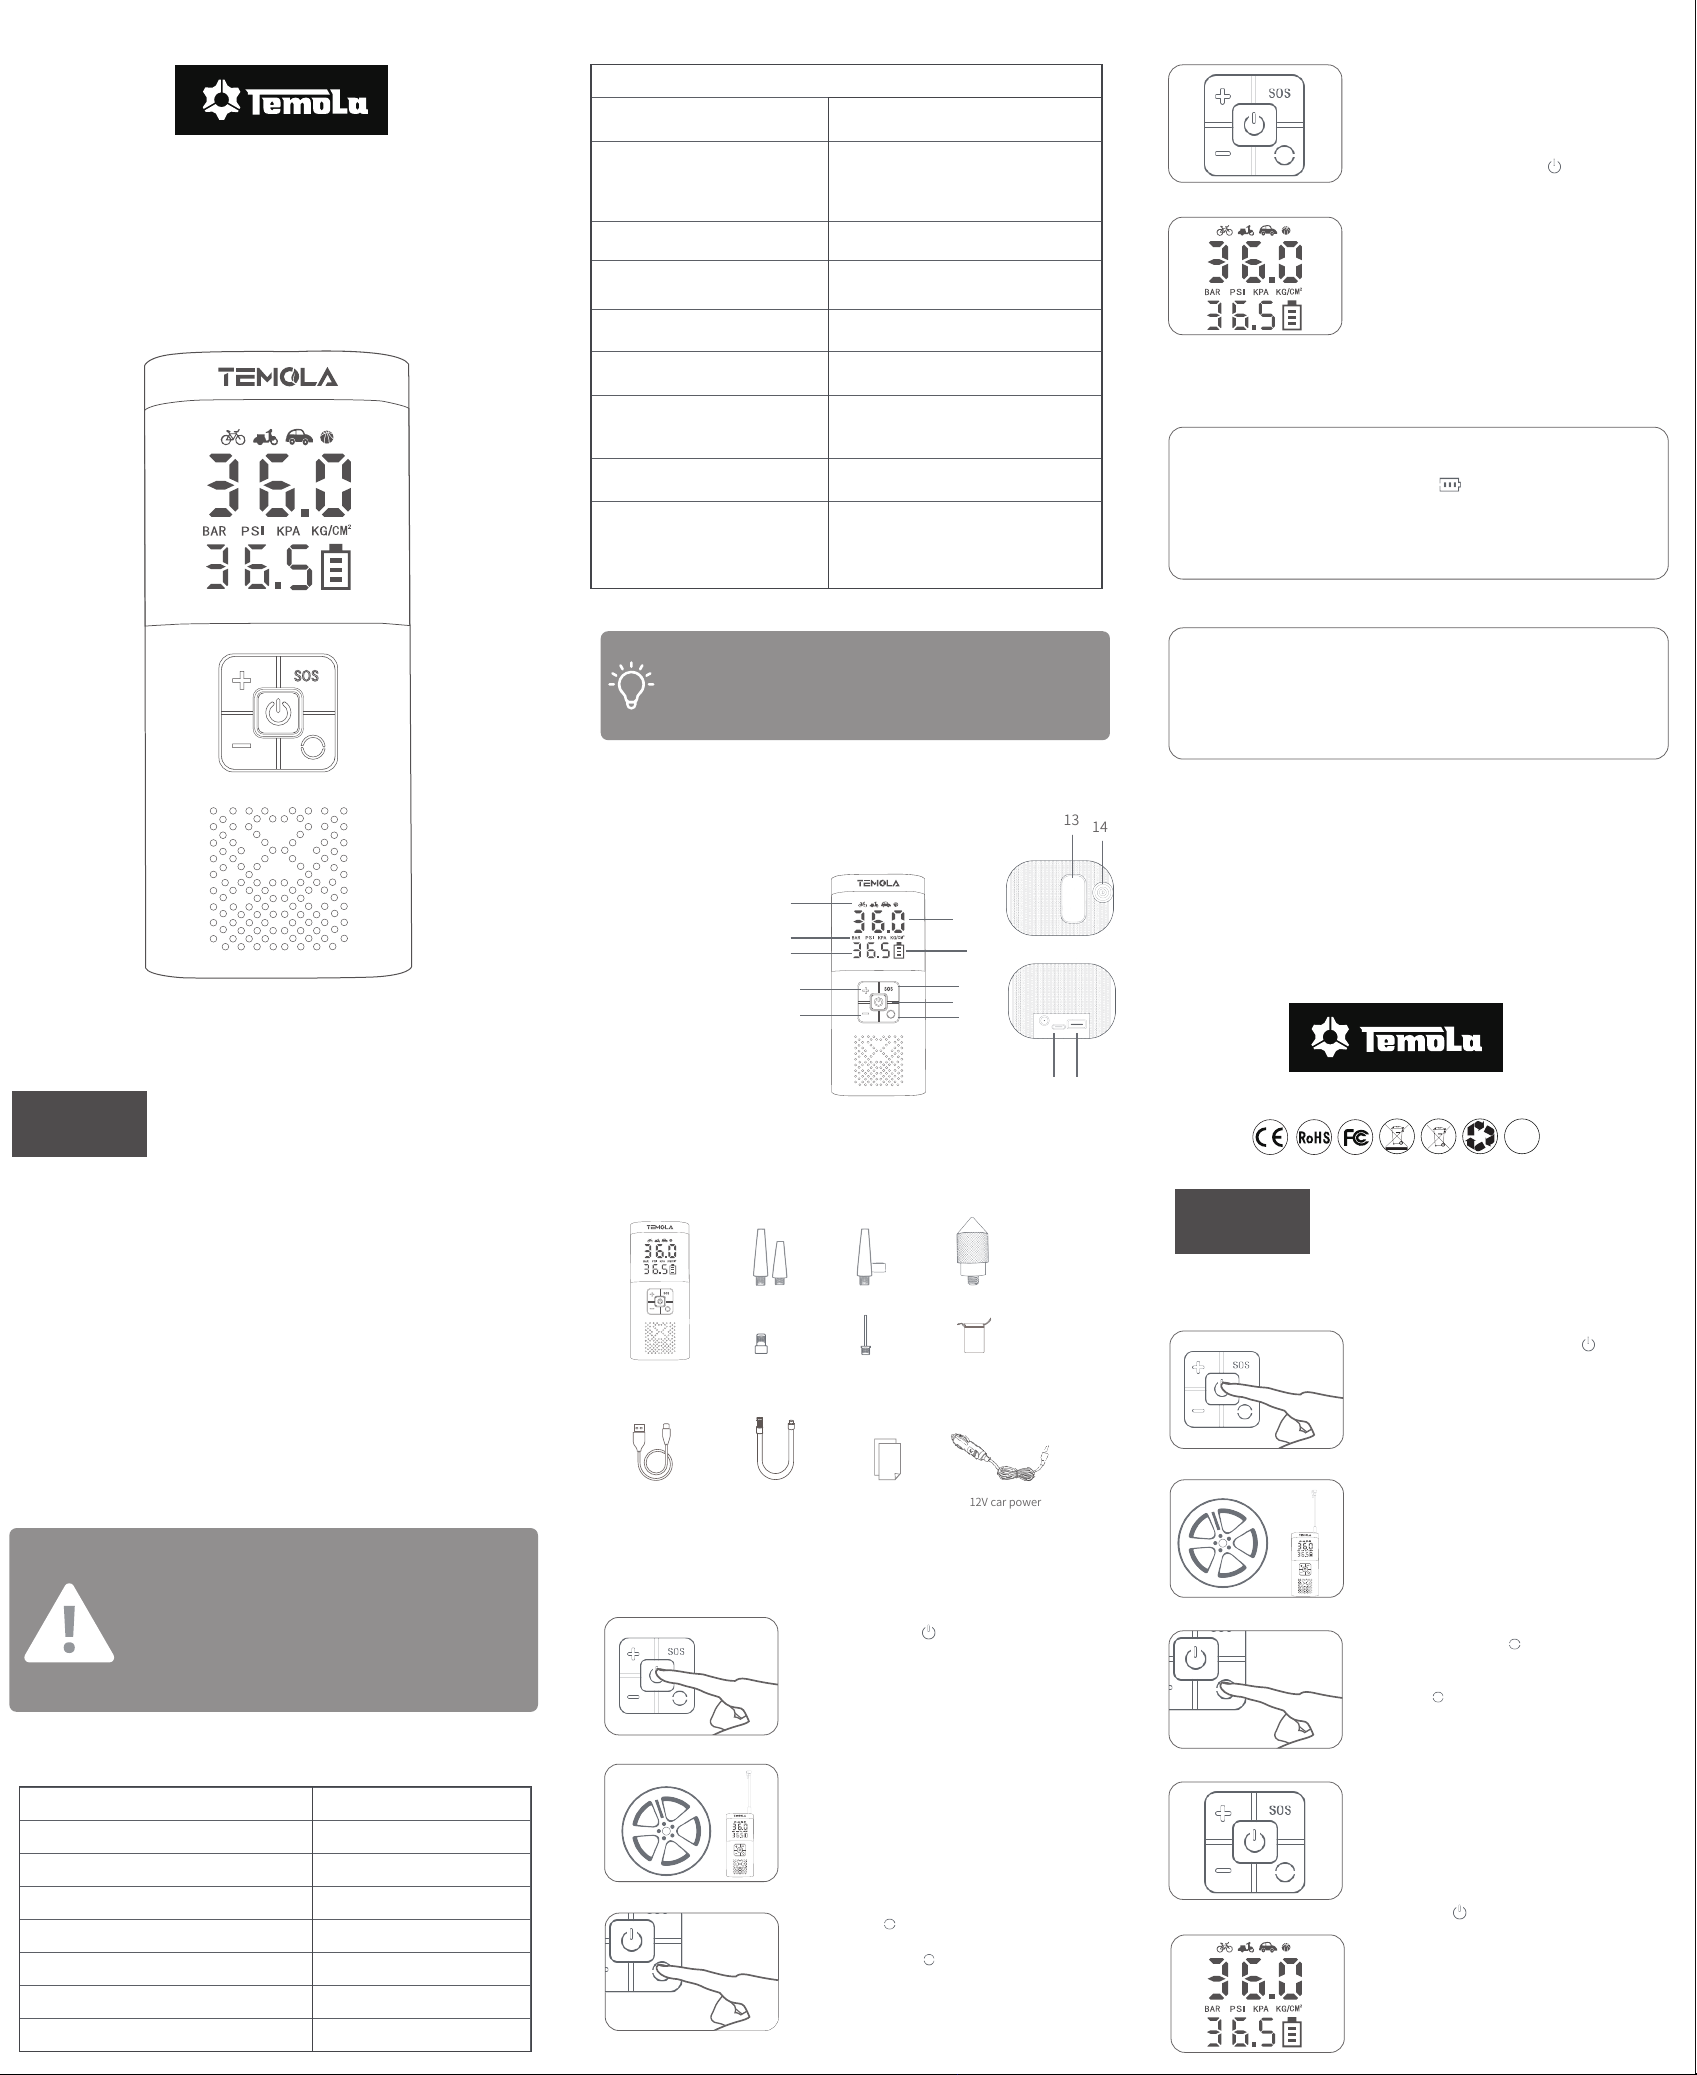
PRODUCT DESCRIPTION
1.Preset Mode
2.Real-Time Pressure Value
3.Pressure Unit
4.Preset Tire Pressure
5.Battery Level
6.Power Button
7.Mode Button
8.LED/SOS Button
9."+”Button
10."_"Button
11.TYPE-C Charging Port
12.USB Discharge Port
13.LED Light
14.Air Outlet
11 12
13
14
LIST OF ACCESSORIES
air inflator * 1
user manual * 1air tube * 1USB charging cable * 1 12V car power
supply cable * 1
HOW TO USE
1. Long press the " " button to activate
the power supply. The LCD screen will
automatically shut down after 60 seconds.
Malfunction
Slow inflation speed
The unit turns on but does not inflate
Unable to increase or decrease
the preset pressure
The unit inflates normally but the
displayed pressure is zero
Air leakage after connecting the air tube
The battery level indicator is different
when inflating compared to standby state
The battery level indicator doesn’t show
on the screen after charging
The unit cannot charge other devices
1. Check whether the unit's battery level is sufficient.
2. Check whether the air hose is leaking.
3. Check whether both ends of the air hose are
securely connected.
4. Check whether the item that is being inflated is
leaking
1. Check whether the unit's battery level is sufficient.
2. Check whether the pressure of the item being
inflated exceeds the preset pressure.
Make sure the unit is set to the correct mode. It
allows you to adjust the preset value within the
range of 5-150 psi.
The pressure of low-pressure inflatables including
balloons is too low to be measured.
Make sure the air hose is securely connected.
The lithium battery's voltage level significantly
drops when discharging power, causing the
battery level indicator to have a different display
when inflating compared to standby state.
Use a certified adapter and the included charging
cable, and try charging again.
1. Make sure the remaining battery level is sufficient.
2. The discharging output is 5V/2A. Make sure this
output meets the requirements of the charged
device.
3. The inflator can not charge other devices while
inflating.
Solution
TROUBLESHOOTING
DE
WIE BENUTZT MAN
1. Lang drücken Sie die Taste " ", um die
Netzteil zu aktivieren. Der LCD -Bildschirm
wird nach 60 Sekunden automatisch
heruntergefahren.
2. Konnennen Sie ein Ende des Luftrohrs
(mit Schraubengewinde) zum Inflator
vor dem Aufblasen, und das andere
Ende wird in den Reifventilkern gedreht.
Bei französischen Ventilkernen müssen
Umwandlungsnoten hinzugefügt werden.
3. Drücken Sie den " " -Taste, um das Auto,
das Motorrad, den Fahrrad und den
Ballmodus zu wechseln. Drücken Sie die
Taste " ", um die PSI -Balken 、 kpa 、
kg/cm² Druckeinheiten zu schalten.
4. "+" Und "-" sind Druckvorspannungstaste,
kurz drücken Sie für langsames Tuning,
lange drücken Sie für schnelles Tuning,
auf den entsprechenden Druckwert
eingestellt,dreimal blinken, um die
automatische Einstellung zu
vervollständigen, und drücken Sie dann
die Taste " " aufblasen.
5. Wenn die Inflation den festgelegten
Wert erreicht, stoppt das Gerät
automatisch die Inflation.
2
1. Inieren Sie das USB-Ladekabel an den Typ-C-Ladeanschluss am
Gerät (bitte verwenden Sie das ursprüngliche Ladekabel).
2.Die Batterie lädt, wenn der " " auf dem Luftinflator blinkt
3. 3-5 Stunden, um einen voll aufgeladenen Zustand zu erreichen.
HINWEIS: Das Gerät kann direkt verwendet werden
Ladung der Lithiumbatterie
2
1. Drücken Sie die Taste "SOS", um das Licht des Inflators
ein-/auszuschalten. Drücken Sie die Taste fort, um durch LED,
SOS, Blinker und auszugehen.
2. Nachdem Sie die Füllung auf die Temperatur des Luftrohrs
achten und das Ende des Luftrohrs schnell aus dem Ventilkern
und dem anderen Ende der Haupteinheit herausschrauben.
WEITERE HINWEISE
2
2
1. insert le câble de charge USB au port de charge de Type-C
sur l'unité (veuillez utiliser le câble de charge d'origine)
2. La batterie se charge lorsque le " " clignote sur le gonflement
de l'air
3. Présente 3 à 5 heures pour atteindre un état entièrement chargé.
Remarque: L'unité peut être utilisée directement lors
de la connexion du câble d'alimentation de la voiture,
mais pas lors de la charge régulière
CHARGEMENT DE LA
BATTERIE AU LITHIUM :
1. éteindre la lumière de l'inflator. Continuez à appuyer sur le
bouton pour parcourir la LED, SOS, les clignotements et
désactivés.
2. Après le remplissage, faites attention à la température du tube
d'air et vissez rapidement l'extrémité du tube d'air hors du
noyau de la soupape d'abord et l'autre extrémité de l'unité
principale.
AUTRES NOTES
5. Lorsque l'inflation atteint la valeur
définie, l'unité arrêtera
automatiquement l'inflation.
4. "+" et "-" Le bouton de préréglage de
pression, appuyez sur un réglage lent
pour le réglage lent, appuyez à longue
appuyer pour un réglage rapide, réglé
sur la valeur de pression appropriée,
flash pendant 3 fois pour terminer le
paramètre automatique, puis appuyez
sur le bouton " " pour commencer
à gonfler.
3. Appuyez sur le bouton " " pour changer
la voiture, la moto, le vélo et le mode de
balle. Appuyez longtemps sur le bouton
" " pour commuter Psi 、 Bar 、 KPA 、
Kg / cm² Unités de pression.
FR
COMMENT UTILISER
1. En long, appuyez sur le bouton " " pour
activer l'alimentation. L'écran LCD s'
arrêtera automatiquement après 60
secondes.
2. Connectez une extrémité du tube d'air
(avec filetage à vis) à l'inflator avant de
gonfler, et l'autre extrémité est tournée
dans le noyau de la soupape de pneu.
Dans le cas des noyaux de soupape
français, des raccords de conversion
devront être ajoutés.
1. serta el cable de carga USB en el puerto de carga tipo C en la
unidad (utilice el cable de carga original)
2. La batería se carga cuando el " " parpadea en el inflador de aire
3. Obtiene 3-5 horas para llegar a un estado completamente cargado.
Nota: La unidad se puede usar directamente al conectar
el cable de la fuente de alimentación del automóvil,
pero no mientras se carga regular
CARGA DE LA BATERÍA
DE LITIO:
2
1. Presione el botón "SOS" para encender/apagar la luz del inflador.
Continúe presionando el botón para recorrer el LED, SOS, Blinker
y Off.
2. Después de llenar, preste atención a la temperatura del tubo de
aire y atornille rápidamente el extremo del tubo de aire fuera del
núcleo de la válvula primero y el otro extremo fuera de la unidad
principal.
OTRAS NOTAS
CÓMO UTILIZAR
4. "+" Y "-" son el botón de presentación de
presión, presione corto para un ajuste
lento, presione largo para un ajuste rápido,
configure el valor de presión apropiado,
flash durante 3 veces para completar la
configuración automática, luego presione
el botón " " para comenzar a inflarse.
3. Presione el botón " " para cambiar el
modo de automóvil, motocicleta, bicicleta
y bola. Presione a largo plazo el botón " "
para cambiar PSI 、 Barra 、 KPA 、 Kg/cm²
Unidades de presión.
5. Cuando la inflación alcanza el valor
establecido, la unidad detendrá
automáticamente la inflación.
1. Gon Presione el botón " " para activar la
fuente de alimentación. La pantalla LCD
se apagará automáticamente después de
60 segundos.
2. Conecte un extremo del tubo de aire
(con rosca de tornillo) al inflador antes
de inflarse, y el otro extremo se gira en
el núcleo de la válvula del neumático.
En el caso de los núcleos de válvulas
franceses, se deberán agregar accesorios
de conversión.
4. "+" and " - "は圧力プリセットボタンであり、
ゆっくりしたチューニングのために短い押し、
長いプレスを押して高速調整を行い、適切な
圧力値に設定し、自動設定を完了するために3
回フラッシュしてから、「 」ボタンを押します
膨らみ始めるために。
3. 「 」ボタンを押して、車、オートバイ、自転車、
ボールモードを切り替えます。 「 」ボタンを
長く押して、psi、bar、kpa、kg/cm²圧力単位
を切り替えます。
5. インフレが設定値に達すると、ユニットはイン
フレを自動的に停止します。
1. USB充電ケーブルをユニットのType-C充電ポートに挿入します(
元の充電ケーブルを使用してください)
2. 「 」が空気インフレータでフラッシュすると、バッテリーが充電
されています
3. 完全に充電された状態に到達するために3~5時間を奪います。
注:ユニットは、車の電源ケーブルを接続するときに直接使用
できますが、定期的な充電中はそうではありません
リチウムバッテリーの充 電
2
1. 「SOS」ボタンを押して、インフレータのライトをオン/オフにします。ボ
タンを押し続けて、LED、SOS、ブリンカー、オフを介してサイクリングし
ます。
2. 充填後、エアチューブの温度に注意を払い、エアチューブの端を最
初にバルブコアからすぐにねじ込み、もう一方の端をメインユニットから
外します。
その他のメモ
JP
使い方
1. 「 」ボタンを押して、電源をアクティブに
します。 LCD画面は、60秒後に自動的にシャッ
トダウンされます。
2. 膨張する前にエアチューブ(ネジ糸で)の片
端(ネジ糸で)を接続し、もう一方の端がタ
イヤバルブのコアに紡がれます。 フレンチ
バルブコアの場合、変換継手を追加する
必要があります。
1. We provide complete after-sales services which cover a full
refund or a free replacement within 30 days since your purchase.
We promise our team always stands behind our product and we
will try our best to offer you a better user experience.
2. For any reason, if you are not satisfied with the TEMOLA brand
manufactured product, you can simply contact us for
REPLACEMENT or REFUND.
3. Additionally, if there are any problems with this product, please
always feel free to contact us at
SP
1. Premere il pulsante "SOS" per accendere/spegnere la luce del
gonfiore. Continua a premere il pulsante per scorrere tramite LED,
SOS, lampeggiatore e spegnimento.
2. Dopo il riempimento, presta attenzione alla temperatura del
tubo d'aria e avvita rapidamente l'estremità del tubo d'aria fuori
dal nucleo della valvola e l'altra estremità dall'unità principale.
ALTRE NOTE
IT
COME USARE
1. 1.Pangore il pulsante " " per attivare
l'alimentazione. La schermata LCD si
spegne automaticamente dopo 60
secondi.
2. Connetti un'estremità del tubo d'aria
(con filettatura della vite) al gonfiore
prima di gonfiarsi e l'altra estremità
viene girata nel nucleo della valvola del
pneumatico. Nel caso dei nuclei della
valvola francese, dovranno essere
aggiunti i raccordi di conversione.
3. Premere il pulsante " " per cambiare
la modalità di auto, motocicletta,
bicicletta e palla. Premere a lungo il
pulsante " " per cambiare psi 、 barra 、
kPa 、 kg/cm² unità di pressione.
1. Inserisci il cavo di ricarica USB sulla porta di ricarica di tipo C
sull'unità (utilizzare il cavo di ricarica originale)
2. La batteria si carica quando " " lampeggia sul gonfiore dell'aria
3. Portare 3-5 ore per raggiungere uno stato completamente carico.
Nota: l'unità può essere utilizzata direttamente quando
si collega il cavo di alimentazione dell'auto, ma non
durante la ricarica normale
CARICA DELLA
BATTERIA AL LITIO
5. Quando l'inflazione raggiunge il valore
impostato, l'unità fermerà
automaticamente l'inflazione.
4. "+" E "-" sono il pulsante di
presettamento della pressione, pressa
corta per una sintonia lenta, pressione
lunga per una sintonia rapida, impostata
sul valore di pressione appropriato, flash
per 3 volte per completare l'impostazione
automatica, quindi premere il pulsante
" " per iniziare a gonfiarsi.
1. Insert the USB charging cable to the type-c charging port on the
unit(please use the original charging cable)
2. The battery is charging when the " " flashes on the air inflator
3. Takes 3-5 hours to reach a fully charged state.
Note: The unit can be used directly when connecting
the car power supply cable, but not while regular
charging
CHARGING OF THE
LITHIUM BATTERY
1. Press the "SOS” button to turn the inflator's light on/off.
Continue to press the button to cycle through LED, SOS, blinker
and OFF.
2. After filling, pay attention to the temperature of the air tube
and quickly screw the end of the air tube out of the valve core
first and the other end out of the main unit.
OTHER NOTES
ABOUT WARRANTY
2
5. When the inflation reaches the set value,
the unit will automatically stop the
inflation.
4. "+" and "-" are pressure presetting
button, short press for slow tuning,
long press for fast tuning, set to the
appropriate pressure value, flash for 3
times to complete the automatic
setting, then press the " " button to
start inflating.
PS
E
JKS・プロジェクト株式会社
storage bag * 1
needle valve
adapter * 1
presta to schrader
adapter * 1
air nozzle cones * 2 air nozzle cones * 1
safety hammer * 1
6
7
10
9
8
2
1
3
5
4
INSTRUCTION MANUAL
TN10/TN11
· Please check if the air inflator is fully charged before use.
· Do not allow children to use this air inflator! Keep it in a safe place out of
the reach of children! Never insert the air hose into the mouth, ears, or
eyes and do not use the pump as a toy!
· Please use the product in a dry and clean environment. It is forbidden to
use this air inflator near a flammable and explosive occasion, such as gas
station!
· Please cool down the unit 15 minutes after long time uses, to ensure
good work of the air inflator and extend life.
· If there is an unusual noise or the temperature becomes very high
during inflating, please turn off the inflator immediately. Be careful when
removing the air tube to avoid burns, don’t wash the product with water.
· Long-time storage of the product may decrease the effectiveness of the
battery. Charge the inflator at least once every three months to maintain
its performance.
EN
1. Please disconnect the external charger in
thunderstorms to avoid damage by lightning.
2. Keep away from heat sources and keep ventilation.
3. Do not place the device under high temperature
or throw it into the fire, as this may cause an explosion.
4. In storage, transport, and operating environment,
please pay attention to waterproofing.
WARNINGS
PORTABLE AIR
INFLATOR
尺寸:31x10x9(cm)尺寸:31x10x9(cm)
SAFETY GUIDELINES
2
2. Connect one end of the air tube (with
screw thread) to the inflator before
inflating, and the other end is spun into
the tire valve core. In the case of french
valve cores, conversion fittings will need
to be added.
3. Press the " " button to switch the car,
motorcycle, bicycle, and ball mode.
Long press the " " button to switch
PSI、BAR、KPA、KG/cm² pressure units.
SPECIFICATIONS
Charge input voltage
Operating voltage
Max power consumption
Max current
Max filling flow
External air hose length
Operating temperature
Product dimensions
12V
7.4V/11.1V
60W
<6A
18L/min
300MM
-20℃~60℃
177*78*57mm
If there are still other problems, please contact us for help.
We will offer you a full refund or a replacement if the
appliance fails to work under regular service or due to
unintended damages.
Support@temola.net
PRODUCT DESCRIPTION
1.Preset Mode
2.Real-Time Pressure Value
3.Pressure Unit
4.Preset Tire Pressure
5.Battery Level
6.Power Button
7.Mode Button
8.LED/SOS Button
9."+”Button
10."_"Button
11.TYPE-C Charging Port
12.USB Discharge Port
13.LED Light
14.Air Outlet
11 12
13
14
LIST OF ACCESSORIES
air inflator * 1
user manual * 1air tube * 1USB charging cable * 1 12V car power
supply cable * 1
HOW TO USE
1. Long press the " " button to activate
the power supply. The LCD screen will
automatically shut down after 60 seconds.
Malfunction
Slow inflation speed
The unit turns on but does not inflate
Unable to increase or decrease
the preset pressure
The unit inflates normally but the
displayed pressure is zero
Air leakage after connecting the air tube
The battery level indicator is different
when inflating compared to standby state
The battery level indicator doesn’t show
on the screen after charging
The unit cannot charge other devices
1. Check whether the unit's battery level is sufficient.
2. Check whether the air hose is leaking.
3. Check whether both ends of the air hose are
securely connected.
4. Check whether the item that is being inflated is
leaking
1. Check whether the unit's battery level is sufficient.
2. Check whether the pressure of the item being
inflated exceeds the preset pressure.
Make sure the unit is set to the correct mode. It
allows you to adjust the preset value within the
range of 5-150 psi.
The pressure of low-pressure inflatables including
balloons is too low to be measured.
Make sure the air hose is securely connected.
The lithium battery's voltage level significantly
drops when discharging power, causing the
battery level indicator to have a different display
when inflating compared to standby state.
Use a certified adapter and the included charging
cable, and try charging again.
1. Make sure the remaining battery level is sufficient.
2. The discharging output is 5V/2A. Make sure this
output meets the requirements of the charged
device.
3. The inflator can not charge other devices while
inflating.
Solution
TROUBLESHOOTING
DE
WIE BENUTZT MAN
1. Lang drücken Sie die Taste " ", um die
Netzteil zu aktivieren. Der LCD -Bildschirm
wird nach 60 Sekunden automatisch
heruntergefahren.
2. Konnennen Sie ein Ende des Luftrohrs
(mit Schraubengewinde) zum Inflator
vor dem Aufblasen, und das andere
Ende wird in den Reifventilkern gedreht.
Bei französischen Ventilkernen müssen
Umwandlungsnoten hinzugefügt werden.
3. Drücken Sie den " " -Taste, um das Auto,
das Motorrad, den Fahrrad und den
Ballmodus zu wechseln. Drücken Sie die
Taste " ", um die PSI -Balken 、 kpa 、
kg/cm² Druckeinheiten zu schalten.
4. "+" Und "-" sind Druckvorspannungstaste,
kurz drücken Sie für langsames Tuning,
lange drücken Sie für schnelles Tuning,
auf den entsprechenden Druckwert
eingestellt,dreimal blinken, um die
automatische Einstellung zu
vervollständigen, und drücken Sie dann
die Taste " " aufblasen.
5. Wenn die Inflation den festgelegten
Wert erreicht, stoppt das Gerät
automatisch die Inflation.
2
1. Inieren Sie das USB-Ladekabel an den Typ-C-Ladeanschluss am
Gerät (bitte verwenden Sie das ursprüngliche Ladekabel).
2.Die Batterie lädt, wenn der " " auf dem Luftinflator blinkt
3. 3-5 Stunden, um einen voll aufgeladenen Zustand zu erreichen.
HINWEIS: Das Gerät kann direkt verwendet werden
Ladung der Lithiumbatterie
2
1. Drücken Sie die Taste "SOS", um das Licht des Inflators
ein-/auszuschalten. Drücken Sie die Taste fort, um durch LED,
SOS, Blinker und auszugehen.
2. Nachdem Sie die Füllung auf die Temperatur des Luftrohrs
achten und das Ende des Luftrohrs schnell aus dem Ventilkern
und dem anderen Ende der Haupteinheit herausschrauben.
WEITERE HINWEISE
2
2
1. insert le câble de charge USB au port de charge de Type-C
sur l'unité (veuillez utiliser le câble de charge d'origine)
2. La batterie se charge lorsque le " " clignote sur le gonflement
de l'air
3. Présente 3 à 5 heures pour atteindre un état entièrement chargé.
Remarque: L'unité peut être utilisée directement lors
de la connexion du câble d'alimentation de la voiture,
mais pas lors de la charge régulière
CHARGEMENT DE LA
BATTERIE AU LITHIUM :
1. éteindre la lumière de l'inflator. Continuez à appuyer sur le
bouton pour parcourir la LED, SOS, les clignotements et
désactivés.
2. Après le remplissage, faites attention à la température du tube
d'air et vissez rapidement l'extrémité du tube d'air hors du
noyau de la soupape d'abord et l'autre extrémité de l'unité
principale.
AUTRES NOTES
5. Lorsque l'inflation atteint la valeur
définie, l'unité arrêtera
automatiquement l'inflation.
4. "+" et "-" Le bouton de préréglage de
pression, appuyez sur un réglage lent
pour le réglage lent, appuyez à longue
appuyer pour un réglage rapide, réglé
sur la valeur de pression appropriée,
flash pendant 3 fois pour terminer le
paramètre automatique, puis appuyez
sur le bouton " " pour commencer
à gonfler.
3. Appuyez sur le bouton " " pour changer
la voiture, la moto, le vélo et le mode de
balle. Appuyez longtemps sur le bouton
" " pour commuter Psi 、 Bar 、 KPA 、
Kg / cm² Unités de pression.
FR
COMMENT UTILISER
1. En long, appuyez sur le bouton " " pour
activer l'alimentation. L'écran LCD s'
arrêtera automatiquement après 60
secondes.
2. Connectez une extrémité du tube d'air
(avec filetage à vis) à l'inflator avant de
gonfler, et l'autre extrémité est tournée
dans le noyau de la soupape de pneu.
Dans le cas des noyaux de soupape
français, des raccords de conversion
devront être ajoutés.
1. serta el cable de carga USB en el puerto de carga tipo C en la
unidad (utilice el cable de carga original)
2. La batería se carga cuando el " " parpadea en el inflador de aire
3. Obtiene 3-5 horas para llegar a un estado completamente cargado.
Nota: La unidad se puede usar directamente al conectar
el cable de la fuente de alimentación del automóvil,
pero no mientras se carga regular
CARGA DE LA BATERÍA
DE LITIO:
2
1. Presione el botón "SOS" para encender/apagar la luz del inflador.
Continúe presionando el botón para recorrer el LED, SOS, Blinker
y Off.
2. Después de llenar, preste atención a la temperatura del tubo de
aire y atornille rápidamente el extremo del tubo de aire fuera del
núcleo de la válvula primero y el otro extremo fuera de la unidad
principal.
OTRAS NOTAS
CÓMO UTILIZAR
4. "+" Y "-" son el botón de presentación de
presión, presione corto para un ajuste
lento, presione largo para un ajuste rápido,
configure el valor de presión apropiado,
flash durante 3 veces para completar la
configuración automática, luego presione
el botón " " para comenzar a inflarse.
3. Presione el botón " " para cambiar el
modo de automóvil, motocicleta, bicicleta
y bola. Presione a largo plazo el botón " "
para cambiar PSI 、 Barra 、 KPA 、 Kg/cm²
Unidades de presión.
5. Cuando la inflación alcanza el valor
establecido, la unidad detendrá
automáticamente la inflación.
1. Gon Presione el botón " " para activar la
fuente de alimentación. La pantalla LCD
se apagará automáticamente después de
60 segundos.
2. Conecte un extremo del tubo de aire
(con rosca de tornillo) al inflador antes
de inflarse, y el otro extremo se gira en
el núcleo de la válvula del neumático.
En el caso de los núcleos de válvulas
franceses, se deberán agregar accesorios
de conversión.
4. "+" and " - "は圧力プリセットボタンであり、
ゆっくりしたチューニングのために短い押し、
長いプレスを押して高速調整を行い、適切な
圧力値に設定し、自動設定を完了するために3
回フラッシュしてから、「 」ボタンを押します
膨らみ始めるために。
3. 「 」ボタンを押して、車、オートバイ、自転車、
ボールモードを切り替えます。 「 」ボタンを
長く押して、psi、bar、kpa、kg/cm²圧力単位
を切り替えます。
5. インフレが設定値に達すると、ユニットはイン
フレを自動的に停止します。
1. USB充電ケーブルをユニットのType-C充電ポートに挿入します(
元の充電ケーブルを使用してください)
2. 「 」が空気インフレータでフラッシュすると、バッテリーが充電
されています
3. 完全に充電された状態に到達するために3~5時間を奪います。
注:ユニットは、車の電源ケーブルを接続するときに直接使用
できますが、定期的な充電中はそうではありません
リチウムバッテリーの充 電
2
1. 「SOS」ボタンを押して、インフレータのライトをオン/オフにします。ボ
タンを押し続けて、LED、SOS、ブリンカー、オフを介してサイクリングし
ます。
2. 充填後、エアチューブの温度に注意を払い、エアチューブの端を最
初にバルブコアからすぐにねじ込み、もう一方の端をメインユニットから
外します。
その他のメモ
JP
使い方
1. 「 」ボタンを押して、電源をアクティブに
します。 LCD画面は、60秒後に自動的にシャッ
トダウンされます。
2. 膨張する前にエアチューブ(ネジ糸で)の片
端(ネジ糸で)を接続し、もう一方の端がタ
イヤバルブのコアに紡がれます。 フレンチ
バルブコアの場合、変換継手を追加する
必要があります。
Support@temola.net
1. We provide complete after-sales services which cover a full
refund or a free replacement within 30 days since your purchase.
We promise our team always stands behind our product and we
will try our best to offer you a better user experience.
2. For any reason, if you are not satisfied with the TEMOLA brand
manufactured product, you can simply contact us for
REPLACEMENT or REFUND.
3. Additionally, if there are any problems with this product, please
always feel free to contact us at
Support@temola.net.
SP
1. Premere il pulsante "SOS" per accendere/spegnere la luce del
gonfiore. Continua a premere il pulsante per scorrere tramite LED,
SOS, lampeggiatore e spegnimento.
2. Dopo il riempimento, presta attenzione alla temperatura del
tubo d'aria e avvita rapidamente l'estremità del tubo d'aria fuori
dal nucleo della valvola e l'altra estremità dall'unità principale.
ALTRE NOTE
IT
COME USARE
1. 1.Pangore il pulsante " " per attivare
l'alimentazione. La schermata LCD si
spegne automaticamente dopo 60
secondi.
2. Connetti un'estremità del tubo d'aria
(con filettatura della vite) al gonfiore
prima di gonfiarsi e l'altra estremità
viene girata nel nucleo della valvola del
pneumatico. Nel caso dei nuclei della
valvola francese, dovranno essere
aggiunti i raccordi di conversione.
3. Premere il pulsante " " per cambiare
la modalità di auto, motocicletta,
bicicletta e palla. Premere a lungo il
pulsante " " per cambiare psi 、 barra 、
kPa 、 kg/cm² unità di pressione.
1. Inserisci il cavo di ricarica USB sulla porta di ricarica di tipo C
sull'unità (utilizzare il cavo di ricarica originale)
2. La batteria si carica quando " " lampeggia sul gonfiore dell'aria
3. Portare 3-5 ore per raggiungere uno stato completamente carico.
Nota: l'unità può essere utilizzata direttamente quando
si collega il cavo di alimentazione dell'auto, ma non
durante la ricarica normale
CARICA DELLA
BATTERIA AL LITIO
5. Quando l'inflazione raggiunge il valore
impostato, l'unità fermerà
automaticamente l'inflazione.
4. "+" E "-" sono il pulsante di
presettamento della pressione, pressa
corta per una sintonia lenta, pressione
lunga per una sintonia rapida, impostata
sul valore di pressione appropriato, flash
per 3 volte per completare l'impostazione
automatica, quindi premere il pulsante
" " per iniziare a gonfiarsi.
1. Insert the USB charging cable to the type-c charging port on the
unit(please use the original charging cable)
2. The battery is charging when the " " flashes on the air inflator
3. Takes 3-5 hours to reach a fully charged state.
Note: The unit can be used directly when connecting
the car power supply cable, but not while regular
charging
CHARGING OF THE
LITHIUM BATTERY
1. Press the "SOS” button to turn the inflator's light on/off.
Continue to press the button to cycle through LED, SOS, blinker
and OFF.
2. After filling, pay attention to the temperature of the air tube
and quickly screw the end of the air tube out of the valve core
first and the other end out of the main unit.
OTHER NOTES
ABOUT WARRANTY
2
5. When the inflation reaches the set value,
the unit will automatically stop the
inflation.
4. "+" and "-" are pressure presetting
button, short press for slow tuning,
long press for fast tuning, set to the
appropriate pressure value, flash for 3
times to complete the automatic
setting, then press the " " button to
start inflating.
PS
E
JKS・プロジェクト株式会社
storage bag * 1
needle valve
adapter * 1
presta to schrader
adapter * 1
air nozzle cones * 2 air nozzle cones * 1
safety hammer * 1
6
7
10
9
8
2
1
3
5
4
