Model: P017
Color: Black
1. Overview

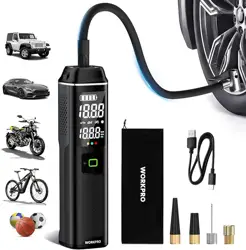
The GJOSYOI Portable Tire Inflator is a cordless, rechargeable air compressor designed for inflating tires and other inflatables. It features a digital pressure gauge, multiple inflation modes, an automatic shut-off function, and a built-in LED flashlight.
Primary uses include:
- Car, SUV, and light truck tires
- Motorcycle and bicycle tires
- Sports balls (basketball, football, soccer ball, etc.)
- Other inflatables (air mattresses, pool toys)
2. Package Contents
Before use, verify all components are present:
- Tire inflator main unit × 1
- Air hose × 1
- Atmospheric nozzle × 1
- Schrader valve mouthpiece (for tires) × 1
- French adapter (Presta valve adapter) × 1
- Ball needle × 1
- USB charging cable × 1
- Storage bag × 1
- User manual (this document) × 1
Note: Keep the original packaging and components for future storage and potential warranty claims.
3. Product Features and Components
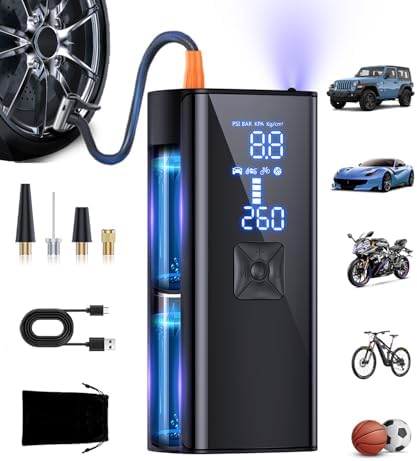
3.1 Main Unit
- Digital LCD Screens (2):
- Left Screen (Preset Value): Displays the target pressure you set.
- Right Screen (Real-time Value): Displays the current pressure as measured in the tire/inflatable.
- Control Buttons:
- Power Button: Turns the unit on/off. Press and hold to activate the LED flashlight.
- Mode Button (M): Cycles through the four preset inflation modes (Car, Motorcycle, Bicycle, Ball) and Manual mode.
- Unit Button (UNIT): Cycles through the four pressure measurement units: PSI, BAR, KPA, kg/cm².
- Plus (+) / Minus (-) Buttons: In Manual mode, used to increase or decrease the target pressure value.
- LED Flashlight: Located near the air outlet. Activated by pressing and holding the Power button.
- USB Output Port: Can be used to charge external electronic devices (e.g., smartphones) using the unit's internal battery.
- USB-C Charging Port: For recharging the inflator's internal battery using the provided cable.
- Air Outlet: Connects to the air hose.
3.2 Key Specifications
| Specification | Detail |
|---|---|
| Maximum Pressure | 150 PSI |
| Voltage | 12V DC (Internal Battery) |
| Power Source | Rechargeable Lithium Battery |
| Noise Level | ~40 Decibels |
| Air Flow | 36 Liters Per Minute |
| Dimensions (LxWxH) | 2.83" x 2.07" x 6.24" |
| Weight | 0.71 kg (1.57 lbs) |
| Material | ABS Plastic, Nylon-woven Hose |
4. Initial Setup and Charging
4.1 Initial Charge
- Connect the provided USB cable to the inflator's USB-C charging port.
- Connect the other end of the cable to a standard USB power adapter (5V, 2A recommended) or a computer USB port.
- The unit's screen may illuminate, indicating it is charging. A full charge typically takes several hours.
Note: It is recommended to fully charge the device before first use.
4.2 Battery Indicator
The battery level is typically indicated on the digital screen when the unit is powered on. A low battery icon will appear when power is insufficient for operation. Recharge promptly.
5. Operating Instructions
5.1 General Inflation Procedure
- Prepare the Inflator: Ensure the unit is charged. Attach the air hose to the inflator's air outlet by twisting it clockwise until secure.
- Select the Correct Nozzle/Adapter:
- For Car/Motorcycle Tires: Use the Schrader valve mouthpiece.
- For Bicycle Tires with Presta Valves: Screw the French adapter onto the valve stem first, then attach the Schrader mouthpiece.
- For Sports Balls: Use the ball needle. Moisten the needle slightly before insertion.
- For General Inflatables: Use the atmospheric nozzle.
- Connect to the Valve: Firmly press the appropriate nozzle onto the valve stem. For tire valves, you may need to press down to unlock the valve core and ensure a tight seal to prevent air leakage.
- Power On: Press the Power button. The digital screens will illuminate.
- Set Parameters:
- Press the UNIT button to select your preferred pressure unit (e.g., PSI).
- Press the MODE (M) button to select a preset mode (Car, Motorcycle, Bicycle, Ball) or Manual mode.
- In a Preset Mode, the target pressure is automatically set to a common value for that item.
- In Manual Mode, use the + and - buttons to set your desired target pressure. Refer to your vehicle's door jamb sticker or equipment manual for correct pressure.
- Start Inflation: Once the target pressure (on the left screen) is set, the inflator will automatically begin pumping. The right screen shows the real-time pressure increasing.
- Automatic Shut-Off: The inflator will automatically stop when the real-time pressure reaches the preset target pressure.
- Disconnect: After the unit stops, quickly remove the nozzle from the valve to prevent air from escaping back into the hose. Press the Power button to turn the unit off.
- Check Pressure: Use a separate tire gauge to verify pressure if desired. The inflator's gauge is accurate, but a secondary check is good practice.
5.2 Using the LED Flashlight
Press and hold the Power button for 2 seconds to turn the LED light on or off. The light operates independently of the inflation function.
5.3 Using the USB Output Port
You can use the inflator as a power bank. Use your own USB cable to connect a device (e.g., phone) to the inflator's USB output port. The inflator must have battery charge remaining.
Warning: Using the USB output function will drain the battery faster and may reduce available power for inflation.
6. Safety Instructions and Warnings
Read all instructions before use. Failure to follow warnings may result in injury or product damage.
- Intended Use: This inflator is designed for inflating tires and inflatable objects. Do not use it for breathing air, aerosol products, or any other purpose.
- Heat and Ventilation: The motor may become hot during extended use. Allow the unit to cool down between continuous inflation cycles. Operate in a well-ventilated area.
- Pressure Limits: Do not exceed the maximum pressure rating of 150 PSI or the maximum pressure rating of the item you are inflating. Over-inflation can cause tire or object failure, leading to explosion and serious injury.
- Battery Safety:
- Use only the provided USB cable or a certified equivalent for charging.
- Do not expose the unit to extreme heat, fire, or direct sunlight for prolonged periods.
- Do not attempt to disassemble the unit or replace the battery.
- If the battery is damaged, discontinue use immediately.
- Children: This is not a toy. Keep out of reach of children.
- Storage: Store in the provided bag in a cool, dry place away from sharp objects.
- Inspection: Regularly inspect the air hose and nozzles for cracks, wear, or damage before use. Do not use if any part is damaged.
7. Troubleshooting
| Problem | Possible Cause | Solution |
|---|---|---|
| Unit does not turn on. | Battery is depleted. | Recharge the unit fully. |
| Inflation is very slow or stops. | Battery is low. Air hose or connection is leaking. Valve is not properly engaged. | Recharge. Check all connections for tight seal. Ensure nozzle is firmly pressed onto valve. |
| Inflator does not stop automatically. | Target pressure not set correctly. Real-time pressure sensor issue. | Ensure you are in a mode with a set target pressure. Manually monitor pressure and stop the unit if necessary. |
| Screen is blank or unreadable. | Unit is off. Battery is completely dead. | Press Power button. Connect to charger. |
| Air leaks from connection. | Nozzle not fully seated on valve. Damaged hose or nozzle O-ring. | Press nozzle on firmly with a straight push. Inspect and replace accessory if damaged. |
| Unit becomes very hot. | Extended continuous use. | Turn off and allow to cool for 15-20 minutes before resuming. |
8. Care and Maintenance
- Cleaning: Wipe the exterior with a soft, dry cloth. Do not use liquids, solvents, or abrasive cleaners.
- Hose and Nozzles: Keep clean and free of debris. Store accessories in the storage bag.
- Battery: For long-term storage, charge the battery to approximately 50% and recharge every 3 months.
- General: Avoid dropping the unit or subjecting it to strong impacts.
9. Specifications Reference
| Feature | Description |
|---|---|
| Model Number | P017 |
| Brand | GJOSYOI |
| Included Components | As listed in Section 2. |
| UPC | 756709185424 |
| ASIN | B0FV7R1ZCQ |
10. Warranty and Support
This product is sold by GJOSYOI. For warranty service, defective items, or missing parts, contact the seller through your Amazon order details page or visit the GJOSYOI Store on Amazon.
Disclaimer: This manual is for instructional purposes based on product information available at the time of writing. Specifications and features are subject to change by the manufacturer. Always refer to the latest information provided with your product.