W125215A
Distributed by:
Hangzhou GreatStar Industrial Co., Ltd.
No.35 Jiuhuan Road, Jiubao Town,
Hangzhou 310019, China
www.greatstartools.com
Made in China
ORIGINAL OPERATING INSTRUCTIONS
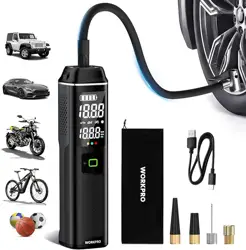
12V PORTABLE AIR INFLATOR
SYMBOLS
To reduce the risk of injury, user must
read instruction manual
Wear ear protection
Wear eye protection
Do not expose to rain
Wear protective gloves
Wear protective footwear
Do not burn
Batteries may enter water cycle if
disposed improperly, which can be
hazardous for ecosystem. Do not
dispose of waste batteries as unsorted
municipal waste.
2
Safety alert
Risk of bursting
WARNING! Do not direct air stream at
persons or pets.
Hot surface

3) Personal safety
Stay alert, watch what you are doing and use common
sense when operating a power tool. Do not use a power
tool while you are tired or under the influence of drugs,
alcohol or medication. A moment of inattention while
operating power tools may result in serious personal injury.
Use personal protective equipment. Always wear eye
protection. Protective equipment such as a mask, non-skid
safety shoes, hard hat or hearing protection used for
appropriate conditions will reduce personal injuries.
Prevent unintentional starting. Ensure the switch is in
the off-position before connecting to power source
and/or battery pack, picking up or carrying the tool.
Carrying power tools with your finger on the switch or
energising power tools that have the switch on invites
accidents.
Remove any adjusting key or wrench before turning the
power tool on. A wrench or a key left attached to a rotating
part of the power tool may result in personal injury.
Do not overreach. Keep proper footing and balance at all
times. This enables better control of the power tool in
unexpected situations.
Dress properly. Do not wear loose clothing or jewellery.
Keep your hair and clothing away from moving parts. Loose
clothes, jewellery or long hair can be caught in moving
parts.
Do not let familiarity gained from frequent use of tools
allow you to become complacent and ignore tool safety
principles. A careless action can cause severe injury within
a fraction of a second.
4) Power tool use and care
Do not force the power tool. Use the correct power tool for
your application. The correct power tool will do the job
better and safer at the rate for which it was designed.
Do not use the power tool if the switch does not turn it
on and off. Any power tool that cannot be controlled with
the switch is dangerous and must be repaired.
Disconnect the plug from the power source and/or remove
the battery pack, if detachable, from the power tool before
making any adjustments, changing accessories, or storing
power tools. Such preventive safety measures reduce the risk
of starting the power tool accidentall
y.
Store idle power tools out of the reach of children and
do not allow persons unfamiliar with the power tool or
these instructions to operate the power tool. Power
tools are dangerous in the hands of untrained users.
Maintain power tools and accessories. Check for
misalignment or binding of moving parts, breakage of
parts and any other condition that may affect the
power tool’s operation. If damaged, have the power tool
repaired before use. Many accidents are caused by poorly
maintained power tools.
Use the power tool, accessories. in accordance with
these instructions, taking into account the working
conditions and the work to be performed. Use of the power
tool for operations different from those intended could result
in a hazardous situation.
Danger!
When using the equipment, a few safety precautions must be
observed to avoid injuries and damage. Please read the
complete operating instructions and safety regulations with
due care. Keep this manual in a safe place, so that the
information is available at all times. If you give the equipment
to any other person, hand over these operating instructions
and safety regulations as well. We cannot accept any liability
for damage or accidents which arise due to a failure to follow
these instructions and the safety instructions.
1. GENERAL POWER TOOL SAFETY
WARNING
WARNING!
Read and understand all instructions. Failure to follow the
warnings and instructions may result in electric shock, fire
and/or serious injury.
Save all warnings and instructions for future reference.
The term "power tool" in the warnings refers to your
mains-operated (corded) power tool or battery-operated
(cordless) power tool.
1) Work area safety
Keep work area clean and well lit. Cluttered or dark areas
invite accidents.
Do not operate power tools in explosive atmospheres,
such as in the presence of flammable liquids, gases or
dust. Power tools create sparks which may ignite the dust
or fumes.
Keep children and bystanders away while operating a
power tool. Distractions can cause you to lose control.
2) Electrical safety
Power tool plugs must match the outlet. Never modify
the plug in any way. Do not use any adapter plugs with
earthed (grounded) power tools. Unmodified plugs and
matching outlets will reduce risk of electric shock.
Avoid body contact with earthed or grounded surfaces,
such as pipes, radiators, ranges and refrigerators.There
is an increased risk of electric shock if your body is earthed
or grounded.
Do not expose power tools to rain or wet conditions.
Water entering a power tool will increase the risk of electric
shock.
Do not abuse the cord. Never use the cord for carrying,
pulling or unplugging the power tool. Keep cord away
from heat, oil, sharp edges or moving parts. Damaged or
entangled cords increase the risk of electric shock.
When operating a power tool outdoors, use an extension
cord suitable for outdoor use. Use of a cord suitable for
outdoor use reduces the risk of electric shock.
If operating a power tool in a damp location is
unavoidable, use a residual current device (RCD)
protected supply. Use of an RCD reduces the risk of electric
shock.
3

Keep handles and grasping surfaces dry, clean and free
from oil and grease. Slippery handles and grasping
surfaces do not allow for safe handling and control of the
tool in unexpected situations.
5) Service
Have your power tool serviced by a qualified repair person
using only identical replacement parts. This will ensure that
the safety of the power tool is maintained.
6) Battery tool use and care
a. Recharge only with the charger specified by the
manufacturer. A charger that is suitable for one type of
battery pack may create a risk of fire when used with
another battery pack.
b. Use power tools only with specifically designated battery
packs. Use of any other battery packs may create a risk of
injury and fire.
c. When battery pack is not in use, keep it away from other
metal objects like paper clips, coins, keys, nails, screws, or
other small metal objects that can make a connection from
one terminal to another.
Shorting the battery terminals together may cause burns or
a fire.
d.Under abusive conditions, liquid may be ejected from the
battery; avoid contact. If contact accidentally occurs, flush
with water. If liquid contacts eyes, additionally seek
medical help. Liquid ejected from the battery may cause
irritation or burns.
ADDITIONAL SAFETY INSTRUCTIONS FOR BATTERY
CHARGING
Before charging, read the instructions.
Recharge only with USB power supply-5V DC.
Do not charge a leaking battery.
Do not use chargers for works other than those for which
they are specified.
The charging device must be protected from moisture.
Do not use the charging device in the open.
Do not short out the contacts of battery or power supply.
Do not open the unit and keep out of the reach of children.
Ensure that the connection between the battery charger
and battery is correctly positioned and is not obstructed by
foreign matter.
When charging batteries, ensure that the battery charger is
in a well-ventilated area and away from inflammable
materials. Batteries can get hot during charging. Do not
overcharge any batteries. Ensure that batteries and
chargers are not left unsupervised during charging.
Longer life and better performance can be obtained if the
battery is charged when the air temperature is between
18°C and 24°C. Do not charge the battery in air
temperatures below 4°C, or above 40°C. This is important
as it can prevent serious damage to the battery.
ADDITIONAL SAFETY INSTRUCTIONS RELATED TO BATTERY
SAFETY
Charge the tool only with 5V DC power supply, be sure to
charge strictly according to the instructions.
Do not charge the battery in a place where static electricity is
generated nor let the battery touch something that is statically
charged.
The battery can be stored at temperatures between 40°F(4°C)
and 104°F(40°C).
Never store or leave your lithium ion battery in temperatures
over that recommended otherwise fire may occur.
DO NOT store the Lithium Ion battery anywhere that the
temperature can easily reach higher temperatures than
recommended -this includes garden type sheds, and Vehicles
where the inside temperature can climb to dangerous levels in
the direct sunlight and on high temperature days. THINK
BEFORE LEAVING YOUR LITHIUM ION BATTERY PACK IN
STORAGE.
The battery can be charged or operated at temperatures
between 40°F(4°C) and 104°F(40°C). NEVER CHARGE YOU
LITHIUM ION BATTERY BELOW OR ABOVE TEMPERATURES
RECOMMENDED OTHERWISE FIRE OR SERIOUS DAMAGE TO
THE BATTERY PACK MAY OCCUR.
The most suitable temperatures to charge the battery pack are
between 68°F(20°C) -77°F(25°C).
Always allow the battery pack to cool down after charging, do
not place it in a hot environment such as a metal shed or open
trailer left in the sun.
Take care where the tool is stored. Do not store in areas of
corrosive fumes, or salt air or similar conditions. Try and store
the tool in the packaging supplied with the tool.
Do not dispose of the battery in a fire or put the battery into a
microwave oven, conventional oven, dryer, or high-pressure
container. Under these conditions, the battery may explode.
Never attempt to open the battery pack, puncture the battery
or subject the battery to strong physical shock.
If you detect leakage or a foul odour, it is especially important
to keep the battery away from fire. If battery liquid leaks onto
your skin or clothes, wash well with clean water immediately.
If liquid leaking from the battery gets into your eyes, do not
rub your eyes. Rinse your eyes well (for at least 10 minutes)
with clean water, and consult a doctor immediately.
Do not use a leaking battery.
Handle batteries with care to avoid shorting the battery with
conducting materials, such as nails, screws, metal watch
bands, rings, bracelets, and keys. The battery may overheat
and could burn you.
After the battery has reached the end of its useful life, we
recommend recycling the materials at your local municipal
council recycling centre. DO NOT attempt to replace the
battery cells in the battery pack, repair or modify any part of
the battery pack assembly.
WHEN TO CHARGE THE BATTERY
New batteries are shipped in a low charged condition and
should be fully charged before Use. The battery pack can be
4

Residual Risks
Additional residual risks may arise when using the tool which
may not be included in the enclosed safety warnings. These
risks can arise from misuse, prolonged use etc.
Even with the application of the relevant safety regulations
and the implementation of safety devices, certain residual
risks can not be avoided. These include:
Injuries caused by touching any rotating/moving parts.
Injuries caused when changing any parts or accessories.
Injuries caused by prolonged use of a tool. When using any
tool for prolonged periods ensure you take regular breaks.
Impairment of hearing.
2. LAYOUT AND UNPACKING
2.1 Layout (Fig. 1)
1. Air inflator
2. LED light
3. Air outlet
4. LED screen
5. Switch button
6. Pressure increase button
7. Pressure decrease button
8. Light button
9. Mode button
10. Air hose
11. USB-C charging cable
12. Presta to Schrader valve adaptor
13. Needle valve adaptor
14. Tapered valve adaptor
15. Short tapered valve adaptor
16. USB-C DC input port
17. USB-A DC output port
recharged at any time during use, provided the pack is not
overheated.
If the battery pack starts to cut out due to low voltage, or
previous tasks undertaken can no longer be performed, it is
suggested to stop using the tool and recharge the battery.
For storage, it is suggested to recharge the battery between
50% and 75% charge, and charge the device at least once in
3-6 months to preserve battery lifespan.
ADDITIONAL POWER TOOL SAFETY WARNINGS
Warning! Additional safety warnings for air inflator:
If there is an unusual noise or the temperature becomes
very high during inflating, please turn off the inflator
immediately.
The inflator metal parts can be hot after inflating for a
while. Do not touch the surface before they have cooled
down.
Before setting the inflation pressure value, make sure the
pressure unit is correctly selected. Mixing up psi and bar
could lead to dangerous over inflation.
Unit conversion:1 bar=14.5psi, 1 bar=100KPa
DO not leave the inflator unattended while it is in operation.
The intended use is described in this instruction manual.
The use of any accessory or attachment or performance of
any operation with this tool other than those recommended
in this instruction manual may present a risk of personal
injury and/or damage to property.
Safety of Others
Never allow children, persons with reduced physical,
sensory or mental capabilities or lack of experience and
knowledge or people unfamiliar with these instructions to
use the machine, local regulations may restrict the age of
the operator.
Never operate the machine while people, especially
children, or pets are nearby.
5
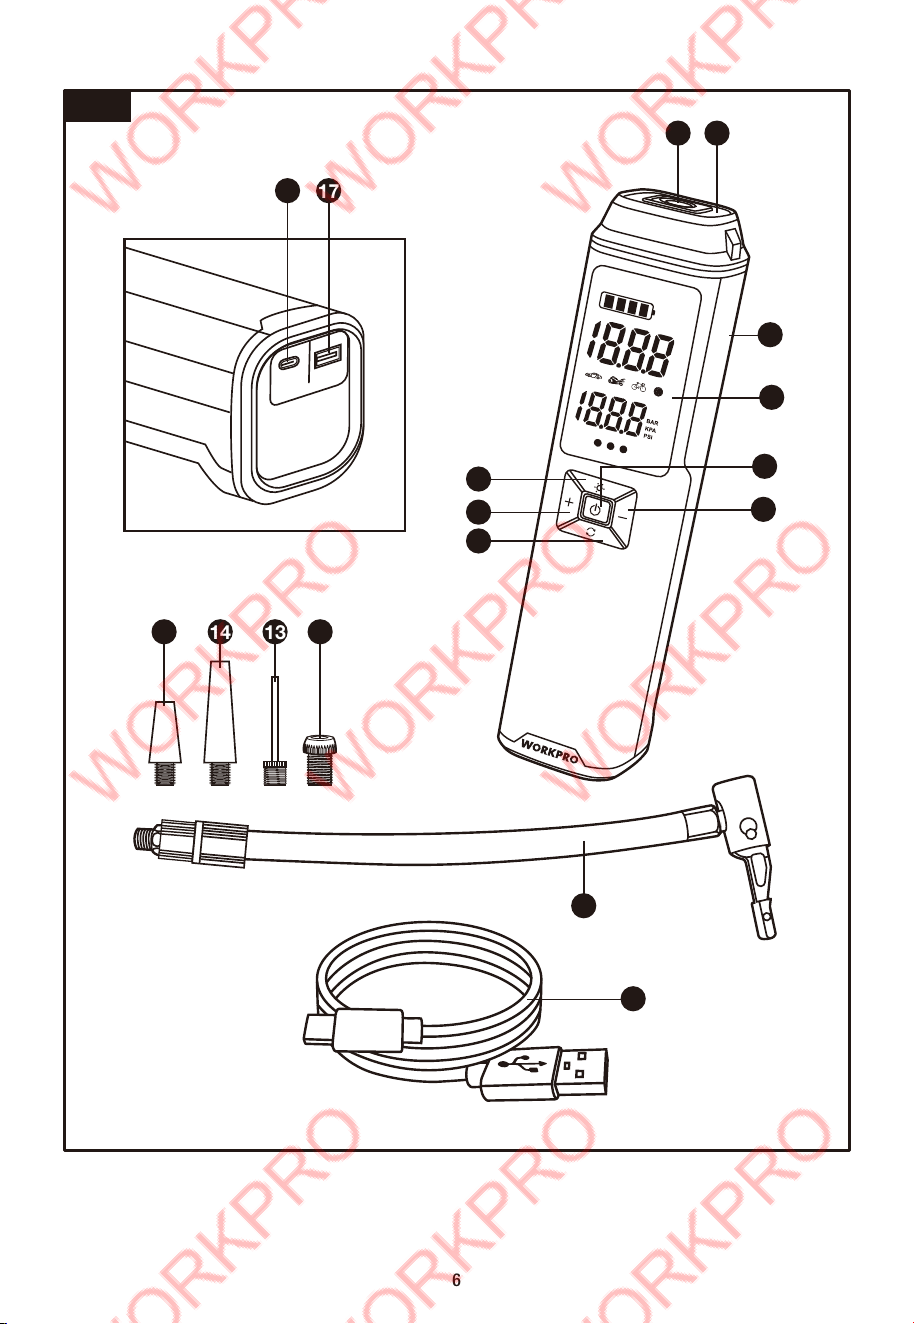
Fig. 1
6
4
1
7
5
11
8
6
9
15 14 13 12
10
5V INPUT
5V OUTPUT
16 17
3 2
Caution!
Residual risks
Even if you use this electric power tool in accordance with
instructions, certain residual risks cannot be rules out. The
following hazards may arise in connection with the
equipment’s construction and layout:
Damage to hearing if no suitable ear protection is used.
Health damage caused by hand-arm vibrations if the
equipment is used over a prolonged period or is not properly
guided and maintained.
5. ASSEMBLY
WARNING: Do not use this product if it is not completely
assembled or if any parts appear to be missing or damaged.
Use of a product that is not properly and completely
assembled or with damaged or missing parts could result in
serious personal injury.
5.1 Connecting the air hose and inflation adaptor(Fig.
2-3)
Insert air hose with black rubber protector end into air outlet
on the appliance and screw it up, then connecting air hose the
other end with inflation adaptor before inflating.
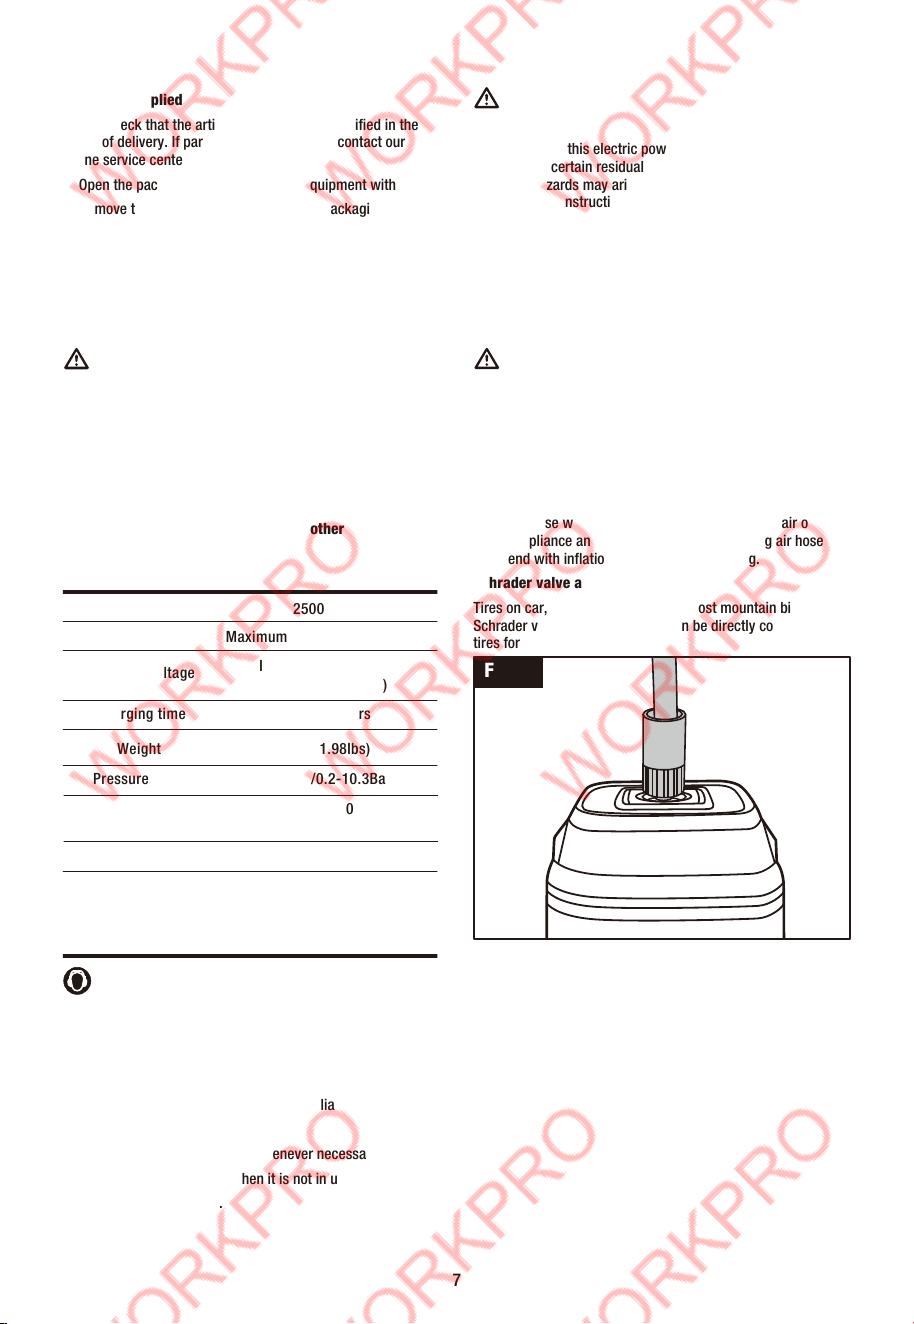
Schrader valve adaptor
Tires on car, motorbike, e-bike and most mountain bikes use a
Schrader valve. Inflator air hose can be directly connected to
tires for inflating.(Fig. 2)
Presta to Schrader, Needle and Tapered valve adaptor
To inflate road bicycles and certain mountain bicycles Presta
to Schrader valve adaptor will be used. Balls like basketball,
volleyball, football which requires the needle valve adaptor.
Air bed, swimming ring need tapered valve adaptor for
inflating. To screwing the inflation adaptor separately onto the
air hose without protector end before inflating.(Fig. 3)
2.2 Items supplied
Please check that the article is complete as specified in the
scope of delivery. If parts are missing, please contact our
online service center.
Open the packaging and take out the equipment with care.
Remove the packaging material and any packaging and/or
transportation braces (if available).
Check to see if all items are supplied.
Inspect the equipment and accessories for transport
damage.
If possible, please keep the packaging until the end of the
guarantee period
Danger!
The equipment and packaging material are not toys. Do
not let children play with plastic bags, foils or small
parts. There is a danger of swallowing or suffocating!
3. PROPER USE
With LED screen and easy-to-use interface, the portable
air inflator is ideal for inflating car, motorbike, bicycle,
ball and air bed. It cannot be used for other purposes.
7
Wear ear-muffs.
The impact of noise can cause damage to hearing.
Keep the noise emissions and vibrations to a minimum.
Only use appliances which are in perfect working order.
Service and clean the appliance regularly.
Adapt your working style to suit the appliance.
Do not overload the appliance.
Have the appliance serviced whenever necessary.
Switch the appliance off when it is not in use.
Wear protective gloves.
Fig. 2
Battery capacity
2500mAh
Battery voltage Maximum 12V, Nominal 10.8V
Charging time Approx. 5 hours
Weight 0.9kg (1.98Ibs)
Charging voltage
Input 5V/2A (USB-C)
Output 5V/2A (USB-A)
Pressure range 3-150psi/0.2-10.3Bar
Pressure accuracy
Air flow
Operating temperature
≤1.5psi (3-100psi)
≤ 2psi (100-150psi)
20L/min
Charging:
0~45°C (32°F~113°F)
Discharging:
-20~45°C (-4°F~113°F)
4.TECHNICAL DATA
LED Meaning
1 bar under 25%
2 bars 25%-50%
3 bars 50%-75%
4 bars 75%-100%
Note: The battery capacity indicator will flash when the power
is under 5%.
Charging
Battery capacity indicator also indicates the charging condition
of the battery.
LED Meaning
4 bars continuous flash under 25%
1 bar solid, 3 bars continuous flash 25%-50%
2 bars solid, 2 bars continuous flash 50%-75%
3 bars solid, 1 bar continuous flash 75%-100%
4 bars solid Fully charged
6.3 Power bank function
When the air inflator is not being charged or inflating other
devices, it can be used as a 5V/2A power bank. And he battery
should have a reasonable capacity of charging in order to
work.
USb will appear on the LED screen, when connect charging
cable and the USB-A port. After charging devices remove the
cable form the inflation in time. (Fig. 5)
WARNING:
It is not allowed to charge other devices when the inflator is
inflating or charged. Otherwise these two operation will
shorten the life of your devices and inflator.
6.4 Operation interface(Fig. 6)
Switch button
Long press for 2 seconds to switch on/off the inflator, press to
start/stop inflating.
If air pressure can't be detected at the inflation outlet for a long
time, the inflator will automatically stop in 30 seconds.
The air inflator will automatically shut down without operating
within 45 seconds.
5V INPUT
5V OUTPUT
6. BEFORE STARTING THE EQUIPMENT
6.1 Charging the battery
Connect to power supply (DC 5V), it can be any mobile phone
charger or USB port of the computer or power bank (output 5V
DC). (Fig. 4)
According to supply output current, the battery will take
approximately 5 hours to charge by USB-C DC input port
charging.
To ensure that the battery pack provides long service, you
should take care to recharge it promptly.
You must recharge the battery pack when you notice that
the power of the air inflator drops. Never fully discharge the
battery pack. This will cause it to develop a defect.
WARNING:
The switching devices installed on the tool by the manufactur-
er are not allowed to be removed or bypassed, e.g. by fitting a
switching button on the side of the inflator, as this may result
in risk of injury and the tool will no longer switch off
automatically.
6.2 Battery capacity indicator
Battery capacity indicator indicates the remaining
condition of the battery when using the inflator.
The battery capacity is shown by four bars, with each bar
representing 25%
8
Fig. 3
Fig. 4
5V INPUT
5V OUTPUT
Fig. 5
1
2
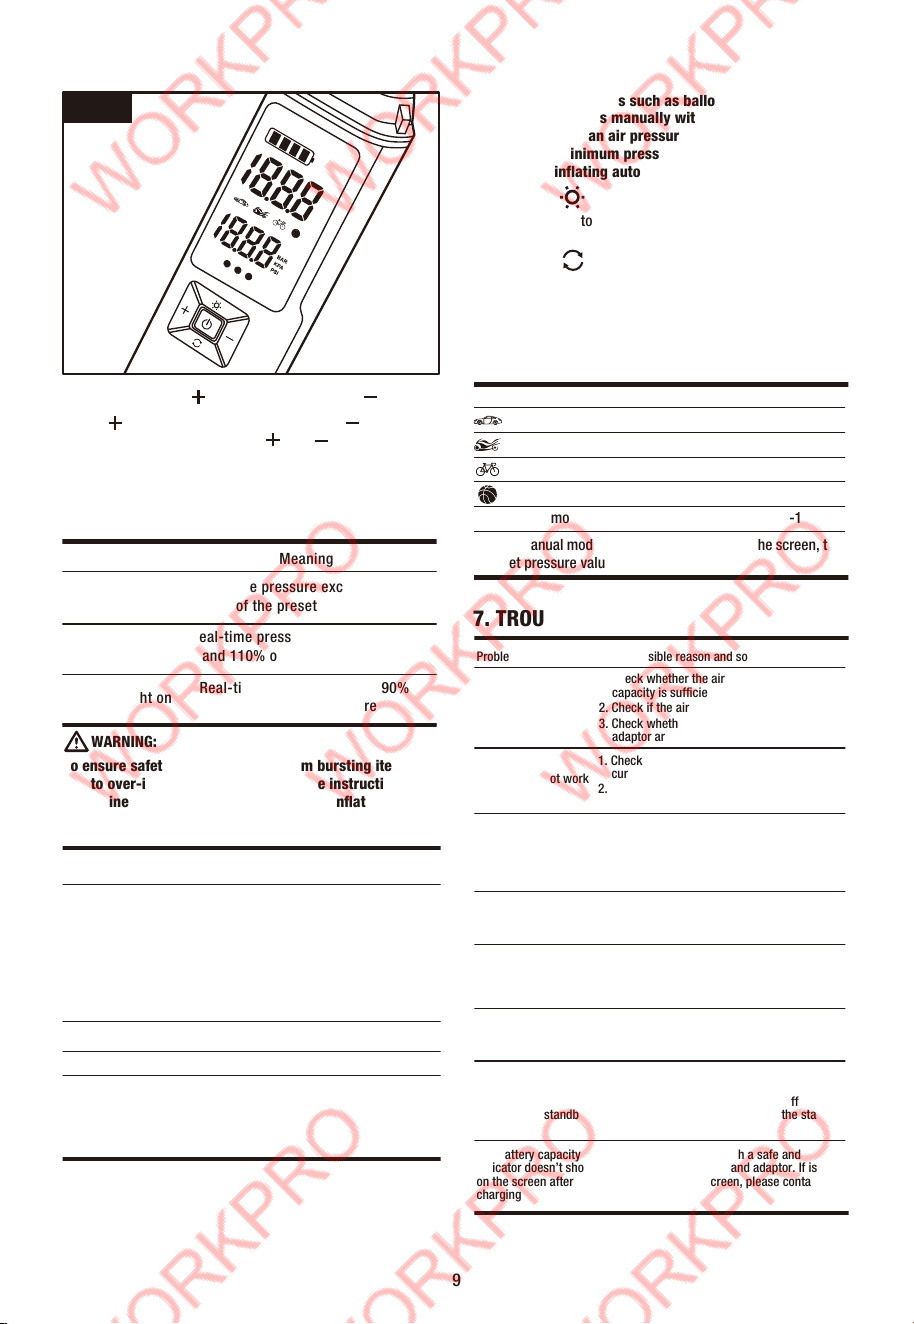
Pressure increase“ ”and decrease button“ ”
Press “ ” to increase preset pressure, press “ ” to decrease
preset pressure. Long press the “ ”or “ ” to quickly adjust.
The inflator will automatically stop inflating when reach the
preset pressure value.
Real-time pressure can be indicated by three indicator lights
after connecting inflator with the devices.
WARNING:
To ensure safety and avoid injury from bursting items
due to over-inflation, always refer to the instruction to
determine the proper air pressure before inflating.
Caution: Inflating Items such as balloons, beach balls,
and swimming rings manually with caution. Because
these items have an air pressure requirement below the
air inflator’s minimum pressure range. So the air inflator
cannot stop inflating automatically.
Light button
Press the light button to cycle through High light, Low light, SOS
light and OFF.
Mode button
Press the button to switch among Car mode, Motorcycle mode,
Bicycle mode, Ball mode and manual mode five inflation
modes.
Long press the button to switch the pressure unit among
PSI/BAR/KPA .
9
Fig. 6
LED Meaning
Red light on
Real-time pressure exceeds 110%
of the preset pressure
Green light on
Real-time pressure is between 90%
and 110% of the preset pressure
Yellow light on
Real-time pressure is under 90%
of the preset pressure
AIR PRESSURE REFERENCE TABLE
Category
Bicycles
Motorcycles
Cars
Balls
Type
Recommended
Pressure Range
Electric Folding Bike tires
12-, 14-, & 16-inch bicycle tires
20-, 22-, & 24-inch bicycle tires
26-, 27.5-, & 29-inch mountain bike tires
Electric Scooter tires
700c road bike clincher tires
700c road bike tubular tires
10 - 50psi
30 - 50psi
40 - 50psi
45 - 65psi
40 - 50psi
100 - 130psi
120 - 145psi
Scooter & street motorcycle tires
Car tires
1.8 - 3.0bar
2.2 - 2.8bar
Basketball
Soccer ball
Volleyball
Football
7 - 9psi
8 - 16psi
4 - 5psi
12 - 14psi
Problem Possible reason and solutions
Slow inflation speed
1. Check whether the air inflator battery
capacity is sufficient.
2. Check if the air hose/inflated items leaks.
3. Check whether the end of the air hose and
adaptor are tightly connected.
Inflator does not work
1. Check if the preset pressure is lower than the
current pressure.
2. Check whether the battery capacity is
sufficient.
The inflator works
normally, and the
current pressure
display zero
1.The inflated items pressure is lower than
inflator inflating range.
2.In the case of an empty tire, the tire pressure
value can be detected after a short period of
inflation.
The appliance shuts
off after connecting
with the valve
It will automatically shut down if there is no
operation for 45 seconds. Press and hold the
Switch button to turn it on again.
Unable to increase or
decrease the preset
pressure
Make sure the appliance is set under the
correct mode.The custom mode allows you to
adjust the preset value within the range of
3-150 psi.
Air leakage after
connecting with the
valve
Make sure the air chuck is securely connected
with the adaptor.
The battery capacity
indicator is different
when inflating
compared to standby
state
The lithium battery’s voltage level significantly
drops when discharging power, causing the
battery capacity indicator to have a different
display when inflating compared to the standby
state.This is normal.
The battery capacity
indicator doesn’t show
on the screen after
charging
Recharge the appliance with a safe and
compliant charging cable and adaptor. If is still
doesn’t show on the screen, please contact our
service team.
7. TROUBLE SHOOTING
Default Adjustable range
Car mode 2.5 Bar 1.8-3.5 Bar
Motorcycle mode 2.4 Bar 1.8-3.0 Bar
Bicycle mode 45 psi 30-145 psi
Ball mode 8 psi 4-16 psi
Manual mode 60 psi 3-150 psi /0.2-10.3 Bar
In the manual mode, no mode icon display on the screen, the
preset pressure value is adjustable.

10
Environmental protection
This product has been marked with a symbol
relating to removing electric and electronic waste.
This means that this product shall not be discarded
with household waste but that it shall be returned to
a collection system. It will then be recycled or
dismantled in order to reduce the impact on the
environment. Electric and electronic equipment can
be hazardous for the environment and for human
health since they contain hazardous substances.
Disposal of an exhausted battery
pack
To preserve natural resources, please recycle or
dispose of the battery pack properly. This battery
pack contains Li-ion batteries. Consult your local
waste authority for information regarding available
recycling and/or disposal options. Discharge your
battery pack by operating your tool, then remove the
battery pack from the tool housing and cover the
battery pack connections with heavy-duty adhesive
tape to prevent short circuit and energy discharge.
Do not attempt to open or remove any of the
components.
Li-ion
8. CLEANING, MAINTENANCE
8.1 Cleaning
Keep all safety devices, air vents and the motor housing
free of dirt and dust as far as possible. Wipe the equipment
with a clean cloth or blow it with compressed air at low
pressure.
We recommend that you clean the device immediately each
time you have finished using it.
Clean the equipment regularly with a moist cloth and some
soft soap. Do not use cleaning agents or solvents; these
could attack the plastic parts of the equipment. Ensure that
no water can seep into the device. The ingress of water into
an electric tool increases the risk of an electric shock.
8.2 Maintenance
There are no parts inside the equipment which require
additional maintenance.
9. STORAGE
Store the equipment and accessories in a dark and dry place
at above freezing temperature. The ideal storage temperature
is between 5°C(41°F )and 30°C(86°F). Store the electric tool in
its original packaging.
For storage, it is suggested to recharge the battery between
50% and 75% charge, and charge the device at least once in
3-6 months to preserve battery lifespan.
10. DISPOSAL AND RECYCLING
The equipment is supplied in packaging to prevent it from
being damaged in transit. The raw materials in this packaging
can be reused or recycled. The equipment and its accessories
are made of various types of material, such as metal and
plastic. Never place defective equipment in your household
refuse. The equipment should be taken to a suitable collection
center for proper disposal. If you do not know the
whereabouts of such a collection point, you should ask in your
local council offces.