PS
E
JKS・プロジェクト株式会社
DJ Precision Co., Ltd.
Made in China
FUNCIONAMIENTO DEL
PRODUCTO
1. Pulse prolongadamente el botón " " para
activar la alimentación. La pantalla LCD se
apagará automáticamente transcurridos
60 segundos.
2. Conecte un extremo del tubo de aire (con
rosca) al inflador antes de inflar, y el otro
extremo gírelo dentro del núcleo de la
válvula del neumático. En el caso de los
núcleos de válvula franceses, será
necesario añadir racores de conexión.
ES
1. Insérez le câble de charge USB dans le port de charge de type C de
l'appareil (utilisez le câble de charge d'origine).
2. La batterie est en cours de chargement lorsque le symbole " " clignote
sur le gonfleur d'air.
3. Il faut 3 à 5 heures pour atteindre un état de charge complet.
Remarque : L'appareil peut être utilisé directement lorsque le
câble d'alimentation de la voiture est branché, mais pas
pendant le chargement normal.
1. Veuillez débrancher le chargeur externe en cas
d'orage pour éviter les dommages causés par la
foudre.
2. Tenir à l'écart des sources de chaleur et maintenir
une ventilation.
3. Ne placez pas l'appareil à haute température et ne
le jetez pas au feu, car cela pourrait provoquer une
explosion.
4. Dans l'environnement de stockage, de transport et
d'exploitation, veuillez faire attention à
l'imperméabilisation.
AVERTISSEMENTS
SPECIFICATIONS
Product Model
Charge input voltage
Operating voltage
Max. power consumption
Max. current
Max. filling flow
External air hose length
Operating temperature
Product dimensions
TN09
5V2A
11.1V
60W
<6A
32L/min
300MM
-20℃~60℃
205x65x65mm
WARRANTY
1. We strictly abide by regulations which cover a full refund or
a free replacement within 30 days since your purchase.
We promise our team always stands behind our product and we
will try our best to offer you a better user experience.
2. For any reason, if you are not satisfied with the TEMOLA
brand manufactured product, you can simply contact us for
REPLACEMENT or REFUND.
3. Additionally, if there are any problems with this product, please
always feel free to contact us at [email protected]
TIRE INFLATOR
INSTRUCTION MANUAL
TN09
Thank you for choosing TEMOLA.
Please read this user manual carefully before use
and keep it for future reference. lf you have any
problems with our product, please feel free to
contact us.
CONTENTS
SAFETY INSTRUCTIONS 1
PRODUCT DESCRIPTION
1
LIST OF ACCESSORIES
2
TROUBLESHOOTING
2
PRODUCT OPERATION
3
CHARGING INSTRUCTIONS
3
SPECIFICATIONS
4
WARRANTY
4
GERMAN
5
ITALIAN
7
FRENCH
8
SPANISH
10
JAPANESE
12
31 4 5 62
PRODUCT OPERATION
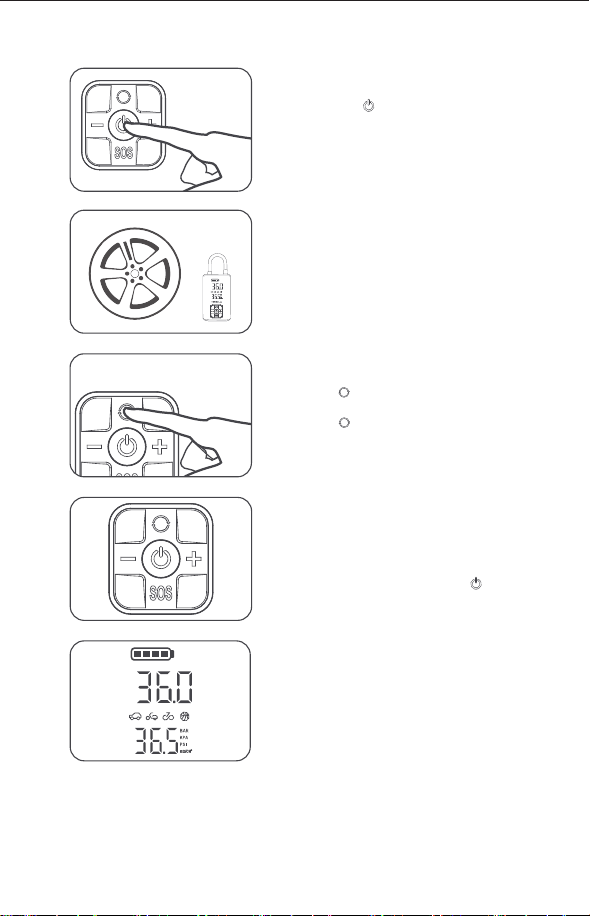
1. Long press the " " button to activate the
power supply. The LCD screen
will automatically shut down after 60
seconds.
Carefully check the package contents. If anything is missing or
damaged, please contact online customer service for support.
TROUBLESHOOTING
Malfunction
Slow inflation speed
The unit turns on but does not inflate
Unable to increase or decrease the preset
pressure
The unit inflates normally but the displayed
pressure is zero
Air leakage after connecting the air tube
The battery level indicator is different
when inflating compared to standby state
The battery level indicator doesn’t show
on the screen after charging
The unit cannot charge other devices
★ Check whether the unit's battery level is sufficient.
★ Check whether the air hose is leaking.
★ Check whether both ends of the air hose are
securely connected.
★ Check whether the item that is being inflated
is leaking.
★ Check whether the unit's battery level is sufficient.
★ Check whether the pressure of the item being
inflated exceeds the preset pressure.
★ Make sure the unit is set to the correct mode. It
allows you to adjust the preset value within the
range of 5-150 psi.
★ The pressure of low-pressure inflatables
including balloons is too low to be measured.
★ Make sure the air hose is securely connected.
★ The lithium battery's voltage level significantly
drops when discharging power, causing the
battery level indicator to have a different display
when inflating compared to standby state.
★ Use a certified adapter and the included
charging cable, and try charging again.
★ Make sure the remaining battery level is sufficient.
★ The discharging output is 5V/2A. Make sure this
output meets the requirements of the charged
device.
★ The inflator can not charge other devices while
inflating.
Solution
If you have any other problems, please feel free to contact our customer service team.
製品操作
1. " "ボタンを長押しして電源を入れます。液晶画面は
60秒後に自動的にシャットダウンします。
2. 空気入れをする前に、空気入れの一端(ネジ付
き)をインフレーターに接続し、もう一端をタ
イヤバルブコアにねじ込 みます。フレンチバル
ブ コ ア の 場 合 、コ ニ ュ ア レ ー シ ョ ン フ ィ ッ テ ィ
ングを追加する必要があります。
3. " "ボタンを押して、自動車、オートバイ、自転車、ボー
ルモ ードを切り替えます。" "ボタンを長 押しすると、
PSI、BAR、KPA、KG/cm² の圧力単位が切り替わ
ります。
JP
1. Desconecte el cargador externo en caso de
tormentas eléctricas para evitar daños por rayos.
2. Mantener alejado de fuentes de calor y mantener
ventilación.
3. No coloque el dispositivo a altas temperaturas ni
lo arroje al fuego, ya que esto podría provocar una
explosión.
4. En el entorno de almacenamiento, transporte y f
uncionamiento, preste atención a la
impermeabilización.
ADVERTENCIAS
CHARGING OF THE
LITHIUM BATTERY
2. Connect one end of the air tube (with
screwthread) to the inflator before
inflating, and the other end is spun into the
tire valve core. In the case of french valve
cores, conversion fittings will need to be
added.
3. Press the " " button to switch the car,
motorcycle, bicycle, and ball mode. Long
press the " " button to switch PSI、BAR、
KPA、KG/cm² pressure units.
4. "+" and "_"are pressure presetting button,
short press for slow tuning, long press for
fast tuning, set to the appropriate pressure
value, flash for 2 times to complete the
automatic setting, then press the " "
button to start inflating.
5. When the inflation reaches the set value,
the unit will automatically stop the inflation.
PRODUKTBETRIEB
1. Drücken Sie lange auf die Taste " ", um die
Stromversorgung zu aktivieren. Der
LCD-Bildschirm wird nach 60 Sekunden
automatisch abgeschaltet.
2. Schließen Sie ein Ende des Luftschlauchs
(mit Gewinde) vor dem Aufpumpen an
die Luftpumpe an, und das andere Ende
wird in den Ventileinsatz des Reifens
eingedreht. Bei französischen
Ventileinsätzen müssen
Konusverschraubungen hinzugefügt werden.
3. Drücken Sie die " "-Taste, um den Auto-,
Motorrad-, Fahrrad- und Ballmodus zu
wechseln. Drücken Sie lange die " "-Taste,
um PSI、BAR、KPA、KG/cm²
Druckeinheiten zu wechseln.
DE
4. ""+"" und ""_"" sind Druckvoreinstellungsknöpfe,
kurzes Drücken für langsame Einstellung,
langes Drücken für schnelle Einstellung,
stellen Sie den entsprechenden Druckwert
ein, blinken Sie 2 Mal, um die automatische
Einstellung abzuschließen, dann drücken
Sie die " " Taste, um das Aufpumpen zu s
tarten.
4. ""+"" e ""_"" sono pulsanti di preimpostazione
della pressione, premere brevemente per la
sintonizzazione lenta, premere a lungo per la
sintonizzazione veloce, impostare il valore di
pressione appropriato, lampeggiare per 2
volte per completare l'impostazione
automatica, quindi premere il pulsante " "
per iniziare il gonfiaggio.
5.Cuando el inflado alcance el valor ajustado,
la unidad detendrá automáticamente el i
nflado.
4. ""+"" et ""_"" sont des boutons de préréglage
de la pression, appuyez brièvement pour
un réglage lent, appuyez longuement pour
un réglage rapide, réglez sur la valeur de
pression appropriée, clignotez 2 fois pour
terminer le réglage automatique, puis
appuyez sur le bouton " " pour commencer
à gonfler.
2. L'une des extrémités du tuyau d'air (avec un
pas de vis) est connectée au gonfleur avant
le gonflage, et l'autre extrémité est introduite
dans le noyau de la valve du pneu. Dans le
cas d'un noyau de valve français, des
raccords de conduction devront être
ajoutés.
3. Appuyez sur le bouton " " pour passer du
mode voiture au mode moto, au mode vélo
et au mode ballon. Appuyez longuement
sur le bouton " " pour changer d'unité de
pression PSI、BAR、KPA、KG/cm².
5.Cuando el inflado alcance el valor ajustado,
la unidad detendrá automáticamente el i
nflado.
AUTRES NOTES
1. Appuyez sur le bouton "SOS" pour allumer/éteindre la lumière du gonfleur.
Continuez à appuyer sur le bouton pour passer de LED, SOS, clignotant
et OFF.
2. Après le remplissage, faites attention à la température du tube d'air et
vissez rapidement l'extrémité du tube d'air hors du noyau de la valve
d'abord et l'autre extrémité hors de l'unité principale.
4. ""+"" y ""_"" son botones de preajuste de
presión, pulsación corta para ajuste lento,
pulsación larga para ajuste rápido, ajuste
al valor de presión apropiado, parpadea 2
veces para completar el ajuste automático,
después pulse el botón " " para empezar
a inflar.
3. Pulse el botón " " para cambiar el modo
de coche, moto, bicicleta y pelota.
Mantenga pulsado el botón " " para
cambiar PSI、BAR、KPA、KG/cm²
unidades de presión.
CARGA DE LA BATERÍA DE LITIO
1. Inserte el cable de carga USB en el puerto de carga tipo-c de la unidad
(por favor, utilice el cable de carga original).
2. La batería se está cargando cuando parpadea " " en el inflador de aire
3. Tarda entre 3 y 5 horas en alcanzar el estado de carga completa.
Nota: La unidad se puede utilizar directamente cuando se
conecta el cable de alimentación del coche, pero no durante
la carga normal.
5.Cuando el inflado alcance el valor ajustado,
la unidad detendrá automáticamente el i
nflado.
OTRAS NOTAS
1. Pulse el botón "SOS" para encender/apagar la luz del inflador. Continúe
pulsando el botón para pasar por LED, SOS, intermitente y OFF.
2. Después del llenado, preste atención a la temperatura del tubo de aire y
enrosque rápidamente primero el extremo del tubo de aire fuera del
núcleo de la válvula y el otro extremo fuera de la unidad principal.
119 1210
7 8
SAFETY INSTRUCTIONS
1. Please check if the air inflator is fully charged before use.
2. Do not use this appliance in the rain, snow, or where there are liquids. Do not
use the appliance if it is damaged or the cable is broken, it might cause electric
shock. Check if the nozzle and preset pressure are suitable for the inflatable
before inflating, or it may impose hazard.
3. Do not allow children to use this air inflator! Keep it in a safe place out of the
reach of children! Never insert the air hose into the mouth, ears, or eyes and do
not use the pump as a toy!
4. Please use the product in a dry and clean environment. It is forbidden to use
this air inflator near a flammable and explosive occasion, such as gas station!
5. Please cool down the unit 15 minutes after long time uses, to ensure good work
of the air inflator and extend life.
6. If there is an unusual noise or the temperature becomes very high during
inflating, please turn off the inflator immediately. Be careful when removing the
air tube to avoid burns, don't wash the product with water.
7. Long-time storage of the product may decrease the effectiveness of the battery.
Charge the inflator at least once every three months to maintain its performance.
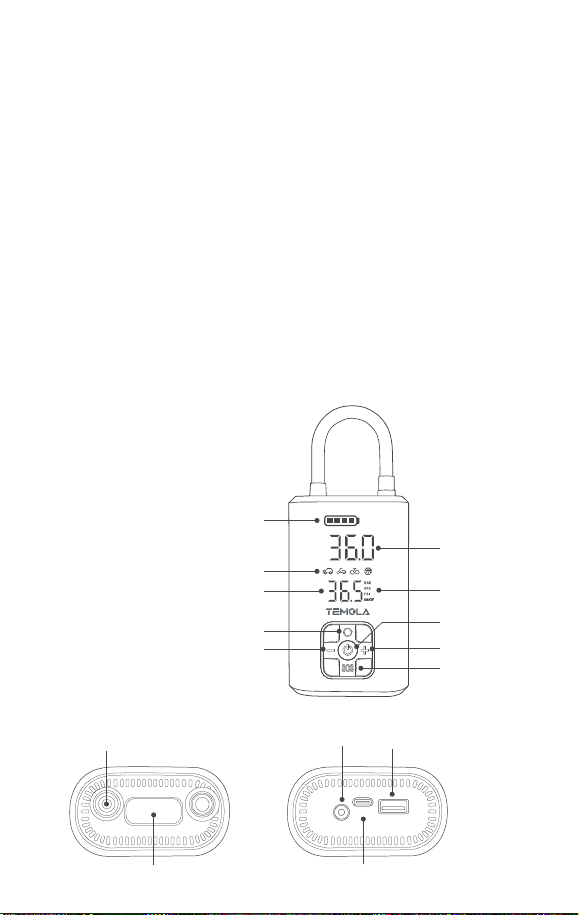
PRODUCT DESCRIPTION
1. Battery Indicator
2. Real-Time Pressure Value
3. Preset Mode
4. Pressure Unit
5. Preset Voltage Value
6. Power Button
7. Mode Button
8. " + " Button
9. " - " Button
10. LED/SOS Button
11. Air Outlet
12. LED Light
13. Car Input
14. Type-C Input
15. USB Output
1
3
7
9
10
2
4
8
6
5
15
14
13
12
11
CAR
INPUT
TYPE-C
INPUT
USB
OUTPUT
「リチウム電池の充電
1.USB充電ケーブルを本体のc型充電ポートに差し込みます(純正の充電ケーブル
をご使用ください)。
2. エアインフレーターの「 」が点滅したら充電中です。
3.満充電状態になるまで3~5時間かかります。
注:車載電源ケーブルが接続されている場合、本機は直接使用できますが、
通常の充電中は使用できません。
1. 落雷による損傷を避けるため、雷雨の場合は外部充電器
を取り外してください。
2. 熱源から遠ざけ、換気を心がけてください。
3. 爆発の危険がありますので、高温の場所に置いたり、
火の中に投げ込んだりしないでください。
4. 保管、輸送、使用環境においては、防水にご注意くださ
い。
警告
5.Cuando el inflado alcance el valor ajustado,
la unidad detendrá automáticamente el i
nflado.
その他の注意事項
1. SOS "ボタンを押して、インフレーターのライトをオン/オフします。ボタンを押し続け
ると、LED、SOS、ウ ィ ン カ ー 、OFFが 切り替 わります。
2. 充填後、エアチューブの温度に注意し、エアチューブの端をバルブコアから先に、もう
一方の端を本体から素早くねじ込みます。
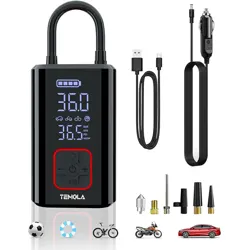
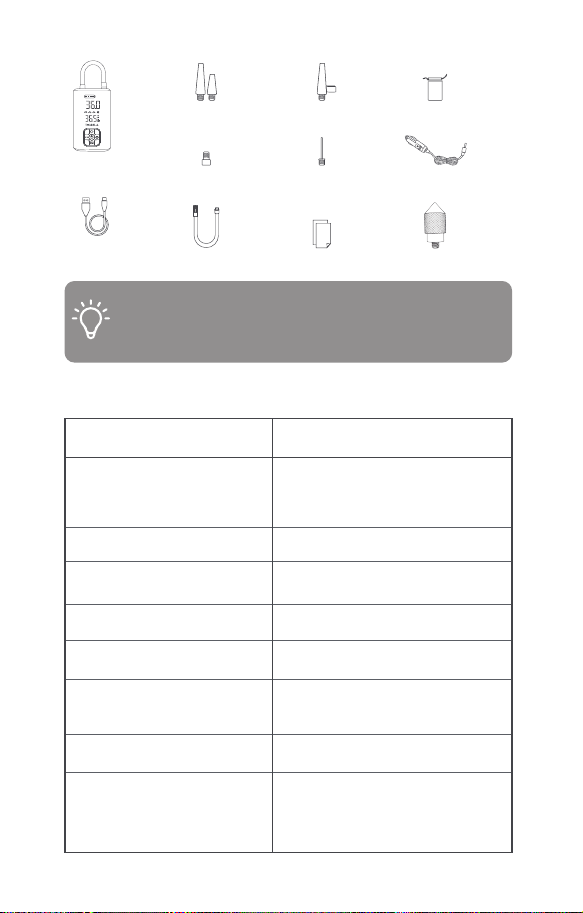
User Manual* 1Air Tube* 1
12V Car Power
Supply Cable* 1
Storage Bag* 1
Needle Valve
Adapter* 1
Presta To Schrader
Adapter* 1
Air Nozzle Cones* 2 Air Nozzle Cones* 1
Safety Hammer* 1
USB Charging
Cable* 1
Air Inflator* 1
LIST OF ACCESSORIES
OTHER NOTES
1. Insert the USB charging cable to the type-c charging port on the unit
(please use the original charging cable).
2. The battery is charging when the " " flashes on the air inflator.
3. Takes 3-5 hours to reach a fully charged state.
Note: The unit can be used directly when connecting the car
power supply cable, but not while regular charging.
1. Press the "SOS” button to turn the inflator's light on/off. Continue to press
the button to cycle through LED, SOS, blinker and OFF.
2. After filling, pay attention to the temperature of the air tube and quickly
screw the end of the air tube out of the valve core first and the other end
out of the main unit.
1. Please disconnect the external charger in
thunderstorms to avoid damage by lightning.
2. Keep away from heat sources and keep ventilation.
3. Do not place the device under high temperature or
throw it into the fire, as this may cause an explosion.
4. In storage, transport, and operating environment,
please pay attention to waterproofing.
WARNINGS
1. Bitte trennen Sie bei Gewitter das externe Ladegerät,
um Schäden durch Blitzschlag zu vermeiden.
2. Von Wärmequellen fernhalten und für Belüftung
sorgen.
3. Setzen Sie das Gerät keiner hohen Temperatur aus
und werfen Sie es nicht ins Feuer, da dies zu einer
Explosion führen kann.
4. Achten Sie bei Lagerung, Transport und
Betriebsumgebung bitte auf Wasserdichtigkeit.
WARNHINWEISE
AUFLADEN DER
LITHIUM-BATTERIE
1. Stecken Sie das USB-Ladekabel in den Typ-C-Ladeanschluss am Gerät
(bitte verwenden Sie das Original-Ladekabel).
2. Die Batterie wird aufgeladen, wenn das " " auf dem Luftaufblasgerät blinkt.
3. Es dauert 3-5 Stunden, bis der Akku vollständig aufgeladen ist.
Hinweis: Das Gerät kann direkt verwendet werden, wenn das
Stromversorgungskabel des Autos angeschlossen ist, aber
nicht während des regulären Ladevorgangs.
5.Cuando el inflado alcance el valor ajustado,
la unidad detendrá automáticamente el i
nflado.
SONSTIGE ANMERKUNGEN
1. Drücken Sie die "SOS"-Taste, um das Licht des Inflators ein-/auszuschalten.
Drücken Sie die Taste weiter, um zwischen LED, SOS, Blinker und AUS zu
wechseln.
2. Achten Sie nach dem Befüllen auf die Temperatur des Luftschlauchs und
schrauben Sie zuerst das Ende des Luftschlauchs aus dem Ventileinsatz
und dann das andere Ende aus dem Hauptgerät.
2. Collegare un'estremità del tubo dell'aria
(con filettatura a vite) al gonfiatore prima
del gonfiaggio, mentre l'altra estremità viene
inserita nel nucleo della valvola del
pneumatico. Nel caso di valvole francesi, è
necessario aggiungere i raccordi di
conuersione.
3. Premere il pulsante " " per passare alla
modalità auto, moto, bicicletta e palla.
Premere a lungo il pulsante " " per
commutare le unità di pressione PSI、BAR、
KPA、KG/cm² .
FUNZIONAMENTO DEI PRODOTTI
1. Premere a lungo il pulsante " " per attivare
l'alimentazione. Lo schermo LCD si spegnerà
automaticamente dopo 60 secondi.
IT
CARICA DELLA
BATTERIA AL LITIO
1. Inserire il cavo di ricarica USB nella porta di ricarica di tipo C dell'unità
(utilizzare il cavo di ricarica originale).
2. La batteria è in carica quando il simbolo " " lampeggia sul gonfiatore
d'aria.
3. Ci vogliono 3-5 ore per raggiungere lo stato di carica completa.
Nota: l'unità può essere utilizzata direttamente quando si
collega il cavo di alimentazione dell'auto, ma non durante la
normale ricarica.
1. Scollegare il caricabatterie esterno durante i
temporali per evitare danni causati dai fulmini.
2. Tenere lontano da fonti di calore e mantenere la
ventilazione.
3. Non posizionare il dispositivo ad alta temperatura
o gettarlo nel fuoco, poiché ciò potrebbe causare
un'esplosione.
4. Durante lo stoccaggio, il trasporto e l'ambiente
operativo, prestare attenzione all'impermeabilità.
AVVERTENZE
ALTRE NOTE
1. Premere il pulsante "SOS" per accendere/spegnere la luce del gonfiatore.
Continuare a premere il pulsante per passare da LED, SOS, lampeggiante
e OFF.
2. Dopo il riempimento, prestare attenzione alla temperatura del tubo
dell'aria e avvitare rapidamente l'estremità del tubo dell'aria fuori dal e
avvitare rapidamente l'estremità del tubo dell'aria dal nucleo della valvola
e l'altra estremità dall'unità principale. dall'unità principale.
FONCTIONNEMENT DU PRODUIT
1. Appuyez longuement sur le bouton " " pour
activer l'alimentation électrique. L'écran LCD
s'éteint automatiquement au bout de 60
secondes.
FR
CHARGEMENT DE LA
BATTERIE AU LITHIUM
4. ""+""と""_""は圧力プリセットボタンで、短く押すと
低 速チューニング、長く押すと高 速チューニングに
なり、適切な圧力値に設定し、2回点滅すると自動
設定が完了し、 " "ボタンを押して膨張を開始しま
す。
13

PS
E
JKS・プロジェクト株式会社
DJ Precision Co., Ltd.
Made in China
FUNCIONAMIENTO DEL
PRODUCTO
1. Pulse prolongadamente el botón " " para
activar la alimentación. La pantalla LCD se
apagará automáticamente transcurridos
60 segundos.
2. Conecte un extremo del tubo de aire (con
rosca) al inflador antes de inflar, y el otro
extremo gírelo dentro del núcleo de la
válvula del neumático. En el caso de los
núcleos de válvula franceses, será
necesario añadir racores de conexión.
ES
1. Insérez le câble de charge USB dans le port de charge de type C de
l'appareil (utilisez le câble de charge d'origine).
2. La batterie est en cours de chargement lorsque le symbole " " clignote
sur le gonfleur d'air.
3. Il faut 3 à 5 heures pour atteindre un état de charge complet.
Remarque : L'appareil peut être utilisé directement lorsque le
câble d'alimentation de la voiture est branché, mais pas
pendant le chargement normal.
1. Veuillez débrancher le chargeur externe en cas
d'orage pour éviter les dommages causés par la
foudre.
2. Tenir à l'écart des sources de chaleur et maintenir
une ventilation.
3. Ne placez pas l'appareil à haute température et ne
le jetez pas au feu, car cela pourrait provoquer une
explosion.
4. Dans l'environnement de stockage, de transport et
d'exploitation, veuillez faire attention à
l'imperméabilisation.
AVERTISSEMENTS
SPECIFICATIONS
Product Model
Charge input voltage
Operating voltage
Max. power consumption
Max. current
Max. filling flow
External air hose length
Operating temperature
Product dimensions
TN09
5V2A
11.1V
60W
<6A
32L/min
300MM
-20℃~60℃
205x65x65mm
WARRANTY
1. We strictly abide by regulations which cover a full refund or
a free replacement within 30 days since your purchase.
We promise our team always stands behind our product and we
will try our best to offer you a better user experience.
2. For any reason, if you are not satisfied with the TEMOLA
brand manufactured product, you can simply contact us for
REPLACEMENT or REFUND.
3. Additionally, if there are any problems with this product, please
always feel free to contact us at [email protected]
TIRE INFLATOR
INSTRUCTION MANUAL
TN09
Thank you for choosing TEMOLA.
Please read this user manual carefully before use
and keep it for future reference. lf you have any
problems with our product, please feel free to
contact us.
CONTENTS
SAFETY INSTRUCTIONS 1
PRODUCT DESCRIPTION
1
LIST OF ACCESSORIES
2
TROUBLESHOOTING
2
PRODUCT OPERATION
3
CHARGING INSTRUCTIONS
3
SPECIFICATIONS
4
WARRANTY
4
GERMAN
5
ITALIAN
7
FRENCH
8
SPANISH
10
JAPANESE
12
31 4 5 62
PRODUCT OPERATION
1. Long press the " " button to activate the
power supply. The LCD screen
will automatically shut down after 60
seconds.
Carefully check the package contents. If anything is missing or
damaged, please contact online customer service for support.
TROUBLESHOOTING
Malfunction
Slow inflation speed
The unit turns on but does not inflate
Unable to increase or decrease the preset
pressure
The unit inflates normally but the displayed
pressure is zero
Air leakage after connecting the air tube
The battery level indicator is different
when inflating compared to standby state
The battery level indicator doesn’t show
on the screen after charging
The unit cannot charge other devices
★ Check whether the unit's battery level is sufficient.
★ Check whether the air hose is leaking.
★ Check whether both ends of the air hose are
securely connected.
★ Check whether the item that is being inflated
is leaking.
★ Check whether the unit's battery level is sufficient.
★ Check whether the pressure of the item being
inflated exceeds the preset pressure.
★ Make sure the unit is set to the correct mode. It
allows you to adjust the preset value within the
range of 5-150 psi.
★ The pressure of low-pressure inflatables
including balloons is too low to be measured.
★ Make sure the air hose is securely connected.
★ The lithium battery's voltage level significantly
drops when discharging power, causing the
battery level indicator to have a different display
when inflating compared to standby state.
★ Use a certified adapter and the included
charging cable, and try charging again.
★ Make sure the remaining battery level is sufficient.
★ The discharging output is 5V/2A. Make sure this
output meets the requirements of the charged
device.
★ The inflator can not charge other devices while
inflating.
Solution
If you have any other problems, please feel free to contact our customer service team.
製品操作
1. " "ボタンを長押しして電源を入れます。液晶画面は
60秒後に自動的にシャットダウンします。
2. 空気入れをする前に、空気入れの一端(ネジ付
き)をインフレーターに接続し、もう一端をタ
イヤバルブコアにねじ込 みます。フレンチバル
ブ コ ア の 場 合 、コ ニ ュ ア レ ー シ ョ ン フ ィ ッ テ ィ
ングを追加する必要があります。
3. " "ボタンを押して、自動車、オートバイ、自転車、ボー
ルモ ードを切り替えます。" "ボタンを長 押しすると、
PSI、BAR、KPA、KG/cm² の圧力単位が切り替わ
ります。
JP
1. Desconecte el cargador externo en caso de
tormentas eléctricas para evitar daños por rayos.
2. Mantener alejado de fuentes de calor y mantener
ventilación.
3. No coloque el dispositivo a altas temperaturas ni
lo arroje al fuego, ya que esto podría provocar una
explosión.
4. En el entorno de almacenamiento, transporte y f
uncionamiento, preste atención a la
impermeabilización.
ADVERTENCIAS
CHARGING OF THE
LITHIUM BATTERY
2. Connect one end of the air tube (with
screwthread) to the inflator before
inflating, and the other end is spun into the
tire valve core. In the case of french valve
cores, conversion fittings will need to be
added.
3. Press the " " button to switch the car,
motorcycle, bicycle, and ball mode. Long
press the " " button to switch PSI、BAR、
KPA、KG/cm² pressure units.
4. "+" and "_"are pressure presetting button,
short press for slow tuning, long press for
fast tuning, set to the appropriate pressure
value, flash for 2 times to complete the
automatic setting, then press the " "
button to start inflating.
5. When the inflation reaches the set value,
the unit will automatically stop the inflation.
PRODUKTBETRIEB
1. Drücken Sie lange auf die Taste " ", um die
Stromversorgung zu aktivieren. Der
LCD-Bildschirm wird nach 60 Sekunden
automatisch abgeschaltet.
2. Schließen Sie ein Ende des Luftschlauchs
(mit Gewinde) vor dem Aufpumpen an
die Luftpumpe an, und das andere Ende
wird in den Ventileinsatz des Reifens
eingedreht. Bei französischen
Ventileinsätzen müssen
Konusverschraubungen hinzugefügt werden.
3. Drücken Sie die " "-Taste, um den Auto-,
Motorrad-, Fahrrad- und Ballmodus zu
wechseln. Drücken Sie lange die " "-Taste,
um PSI、BAR、KPA、KG/cm²
Druckeinheiten zu wechseln.
DE
4. ""+"" und ""_"" sind Druckvoreinstellungsknöpfe,
kurzes Drücken für langsame Einstellung,
langes Drücken für schnelle Einstellung,
stellen Sie den entsprechenden Druckwert
ein, blinken Sie 2 Mal, um die automatische
Einstellung abzuschließen, dann drücken
Sie die " " Taste, um das Aufpumpen zu s
tarten.
4. ""+"" e ""_"" sono pulsanti di preimpostazione
della pressione, premere brevemente per la
sintonizzazione lenta, premere a lungo per la
sintonizzazione veloce, impostare il valore di
pressione appropriato, lampeggiare per 2
volte per completare l'impostazione
automatica, quindi premere il pulsante " "
per iniziare il gonfiaggio.
5.Cuando el inflado alcance el valor ajustado,
la unidad detendrá automáticamente el i
nflado.
4. ""+"" et ""_"" sont des boutons de préréglage
de la pression, appuyez brièvement pour
un réglage lent, appuyez longuement pour
un réglage rapide, réglez sur la valeur de
pression appropriée, clignotez 2 fois pour
terminer le réglage automatique, puis
appuyez sur le bouton " " pour commencer
à gonfler.
2. L'une des extrémités du tuyau d'air (avec un
pas de vis) est connectée au gonfleur avant
le gonflage, et l'autre extrémité est introduite
dans le noyau de la valve du pneu. Dans le
cas d'un noyau de valve français, des
raccords de conduction devront être
ajoutés.
3. Appuyez sur le bouton " " pour passer du
mode voiture au mode moto, au mode vélo
et au mode ballon. Appuyez longuement
sur le bouton " " pour changer d'unité de
pression PSI、BAR、KPA、KG/cm².
5.Cuando el inflado alcance el valor ajustado,
la unidad detendrá automáticamente el i
nflado.
AUTRES NOTES
1. Appuyez sur le bouton "SOS" pour allumer/éteindre la lumière du gonfleur.
Continuez à appuyer sur le bouton pour passer de LED, SOS, clignotant
et OFF.
2. Après le remplissage, faites attention à la température du tube d'air et
vissez rapidement l'extrémité du tube d'air hors du noyau de la valve
d'abord et l'autre extrémité hors de l'unité principale.
4. ""+"" y ""_"" son botones de preajuste de
presión, pulsación corta para ajuste lento,
pulsación larga para ajuste rápido, ajuste
al valor de presión apropiado, parpadea 2
veces para completar el ajuste automático,
después pulse el botón " " para empezar
a inflar.
3. Pulse el botón " " para cambiar el modo
de coche, moto, bicicleta y pelota.
Mantenga pulsado el botón " " para
cambiar PSI、BAR、KPA、KG/cm²
unidades de presión.
CARGA DE LA BATERÍA DE LITIO
1. Inserte el cable de carga USB en el puerto de carga tipo-c de la unidad
(por favor, utilice el cable de carga original).
2. La batería se está cargando cuando parpadea " " en el inflador de aire
3. Tarda entre 3 y 5 horas en alcanzar el estado de carga completa.
Nota: La unidad se puede utilizar directamente cuando se
conecta el cable de alimentación del coche, pero no durante
la carga normal.
5.Cuando el inflado alcance el valor ajustado,
la unidad detendrá automáticamente el i
nflado.
OTRAS NOTAS
1. Pulse el botón "SOS" para encender/apagar la luz del inflador. Continúe
pulsando el botón para pasar por LED, SOS, intermitente y OFF.
2. Después del llenado, preste atención a la temperatura del tubo de aire y
enrosque rápidamente primero el extremo del tubo de aire fuera del
núcleo de la válvula y el otro extremo fuera de la unidad principal.
119 1210
7 8
SAFETY INSTRUCTIONS
1. Please check if the air inflator is fully charged before use.
2. Do not use this appliance in the rain, snow, or where there are liquids. Do not
use the appliance if it is damaged or the cable is broken, it might cause electric
shock. Check if the nozzle and preset pressure are suitable for the inflatable
before inflating, or it may impose hazard.
3. Do not allow children to use this air inflator! Keep it in a safe place out of the
reach of children! Never insert the air hose into the mouth, ears, or eyes and do
not use the pump as a toy!
4. Please use the product in a dry and clean environment. It is forbidden to use
this air inflator near a flammable and explosive occasion, such as gas station!
5. Please cool down the unit 15 minutes after long time uses, to ensure good work
of the air inflator and extend life.
6. If there is an unusual noise or the temperature becomes very high during
inflating, please turn off the inflator immediately. Be careful when removing the
air tube to avoid burns, don't wash the product with water.
7. Long-time storage of the product may decrease the effectiveness of the battery.
Charge the inflator at least once every three months to maintain its performance.
PRODUCT DESCRIPTION
1. Battery Indicator
2. Real-Time Pressure Value
3. Preset Mode
4. Pressure Unit
5. Preset Voltage Value
6. Power Button
7. Mode Button
8. " + " Button
9. " - " Button
10. LED/SOS Button
11. Air Outlet
12. LED Light
13. Car Input
14. Type-C Input
15. USB Output
1
3
7
9
10
2
4
8
6
5
15
14
13
12
11
CAR
INPUT
TYPE-C
INPUT
USB
OUTPUT
「リチウム電池の充電
1.USB充電ケーブルを本体のc型充電ポートに差し込みます(純正の充電ケーブル
をご使用ください)。
2. エアインフレーターの「 」が点滅したら充電中です。
3.満充電状態になるまで3~5時間かかります。
注:車載電源ケーブルが接続されている場合、本機は直接使用できますが、
通常の充電中は使用できません。
1. 落雷による損傷を避けるため、雷雨の場合は外部充電器
を取り外してください。
2. 熱源から遠ざけ、換気を心がけてください。
3. 爆発の危険がありますので、高温の場所に置いたり、
火の中に投げ込んだりしないでください。
4. 保管、輸送、使用環境においては、防水にご注意くださ
い。
警告
5.Cuando el inflado alcance el valor ajustado,
la unidad detendrá automáticamente el i
nflado.
その他の注意事項
1. SOS "ボタンを押して、インフレーターのライトをオン/オフします。ボタンを押し続け
ると、LED、SOS、ウ ィ ン カ ー 、OFFが 切り替 わります。
2. 充填後、エアチューブの温度に注意し、エアチューブの端をバルブコアから先に、もう
一方の端を本体から素早くねじ込みます。
User Manual* 1Air Tube* 1
12V Car Power
Supply Cable* 1
Storage Bag* 1
Needle Valve
Adapter* 1
Presta To Schrader
Adapter* 1
Air Nozzle Cones* 2 Air Nozzle Cones* 1
Safety Hammer* 1
USB Charging
Cable* 1
Air Inflator* 1
LIST OF ACCESSORIES
OTHER NOTES
1. Insert the USB charging cable to the type-c charging port on the unit
(please use the original charging cable).
2. The battery is charging when the " " flashes on the air inflator.
3. Takes 3-5 hours to reach a fully charged state.
Note: The unit can be used directly when connecting the car
power supply cable, but not while regular charging.
1. Press the "SOS” button to turn the inflator's light on/off. Continue to press
the button to cycle through LED, SOS, blinker and OFF.
2. After filling, pay attention to the temperature of the air tube and quickly
screw the end of the air tube out of the valve core first and the other end
out of the main unit.
1. Please disconnect the external charger in
thunderstorms to avoid damage by lightning.
2. Keep away from heat sources and keep ventilation.
3. Do not place the device under high temperature or
throw it into the fire, as this may cause an explosion.
4. In storage, transport, and operating environment,
please pay attention to waterproofing.
WARNINGS
1. Bitte trennen Sie bei Gewitter das externe Ladegerät,
um Schäden durch Blitzschlag zu vermeiden.
2. Von Wärmequellen fernhalten und für Belüftung
sorgen.
3. Setzen Sie das Gerät keiner hohen Temperatur aus
und werfen Sie es nicht ins Feuer, da dies zu einer
Explosion führen kann.
4. Achten Sie bei Lagerung, Transport und
Betriebsumgebung bitte auf Wasserdichtigkeit.
WARNHINWEISE
AUFLADEN DER
LITHIUM-BATTERIE
1. Stecken Sie das USB-Ladekabel in den Typ-C-Ladeanschluss am Gerät
(bitte verwenden Sie das Original-Ladekabel).
2. Die Batterie wird aufgeladen, wenn das " " auf dem Luftaufblasgerät blinkt.
3. Es dauert 3-5 Stunden, bis der Akku vollständig aufgeladen ist.
Hinweis: Das Gerät kann direkt verwendet werden, wenn das
Stromversorgungskabel des Autos angeschlossen ist, aber
nicht während des regulären Ladevorgangs.
5.Cuando el inflado alcance el valor ajustado,
la unidad detendrá automáticamente el i
nflado.
SONSTIGE ANMERKUNGEN
1. Drücken Sie die "SOS"-Taste, um das Licht des Inflators ein-/auszuschalten.
Drücken Sie die Taste weiter, um zwischen LED, SOS, Blinker und AUS zu
wechseln.
2. Achten Sie nach dem Befüllen auf die Temperatur des Luftschlauchs und
schrauben Sie zuerst das Ende des Luftschlauchs aus dem Ventileinsatz
und dann das andere Ende aus dem Hauptgerät.
2. Collegare un'estremità del tubo dell'aria
(con filettatura a vite) al gonfiatore prima
del gonfiaggio, mentre l'altra estremità viene
inserita nel nucleo della valvola del
pneumatico. Nel caso di valvole francesi, è
necessario aggiungere i raccordi di
conuersione.
3. Premere il pulsante " " per passare alla
modalità auto, moto, bicicletta e palla.
Premere a lungo il pulsante " " per
commutare le unità di pressione PSI、BAR、
KPA、KG/cm² .
FUNZIONAMENTO DEI PRODOTTI
1. Premere a lungo il pulsante " " per attivare
l'alimentazione. Lo schermo LCD si spegnerà
automaticamente dopo 60 secondi.
IT
CARICA DELLA
BATTERIA AL LITIO
1. Inserire il cavo di ricarica USB nella porta di ricarica di tipo C dell'unità
(utilizzare il cavo di ricarica originale).
2. La batteria è in carica quando il simbolo " " lampeggia sul gonfiatore
d'aria.
3. Ci vogliono 3-5 ore per raggiungere lo stato di carica completa.
Nota: l'unità può essere utilizzata direttamente quando si
collega il cavo di alimentazione dell'auto, ma non durante la
normale ricarica.
1. Scollegare il caricabatterie esterno durante i
temporali per evitare danni causati dai fulmini.
2. Tenere lontano da fonti di calore e mantenere la
ventilazione.
3. Non posizionare il dispositivo ad alta temperatura
o gettarlo nel fuoco, poiché ciò potrebbe causare
un'esplosione.
4. Durante lo stoccaggio, il trasporto e l'ambiente
operativo, prestare attenzione all'impermeabilità.
AVVERTENZE
ALTRE NOTE
1. Premere il pulsante "SOS" per accendere/spegnere la luce del gonfiatore.
Continuare a premere il pulsante per passare da LED, SOS, lampeggiante
e OFF.
2. Dopo il riempimento, prestare attenzione alla temperatura del tubo
dell'aria e avvitare rapidamente l'estremità del tubo dell'aria fuori dal e
avvitare rapidamente l'estremità del tubo dell'aria dal nucleo della valvola
e l'altra estremità dall'unità principale. dall'unità principale.
FONCTIONNEMENT DU PRODUIT
1. Appuyez longuement sur le bouton " " pour
activer l'alimentation électrique. L'écran LCD
s'éteint automatiquement au bout de 60
secondes.
FR
CHARGEMENT DE LA
BATTERIE AU LITHIUM
4. ""+""と""_""は圧力プリセットボタンで、短く押すと
低 速チューニング、長く押すと高 速チューニングに
なり、適切な圧力値に設定し、2回点滅すると自動
設定が完了し、 " "ボタンを押して膨張を開始しま
す。
13
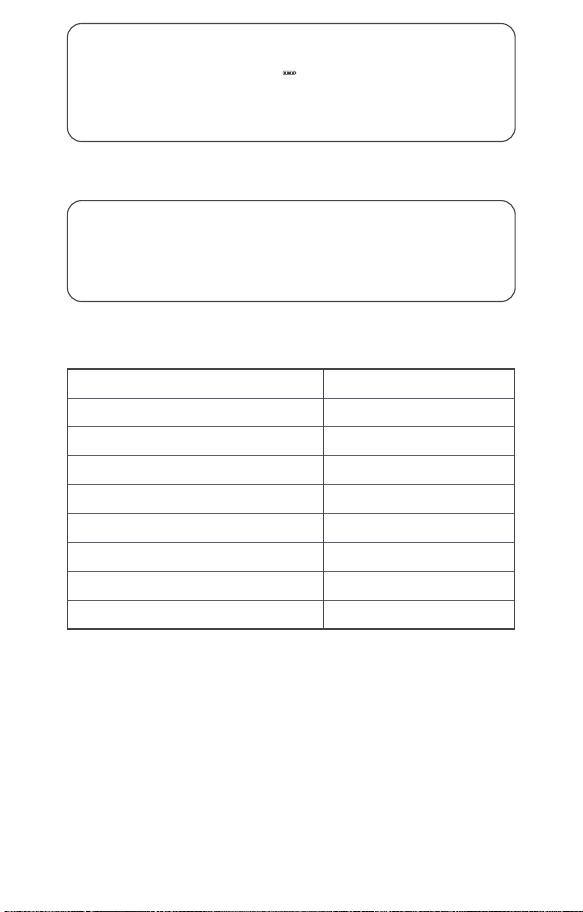
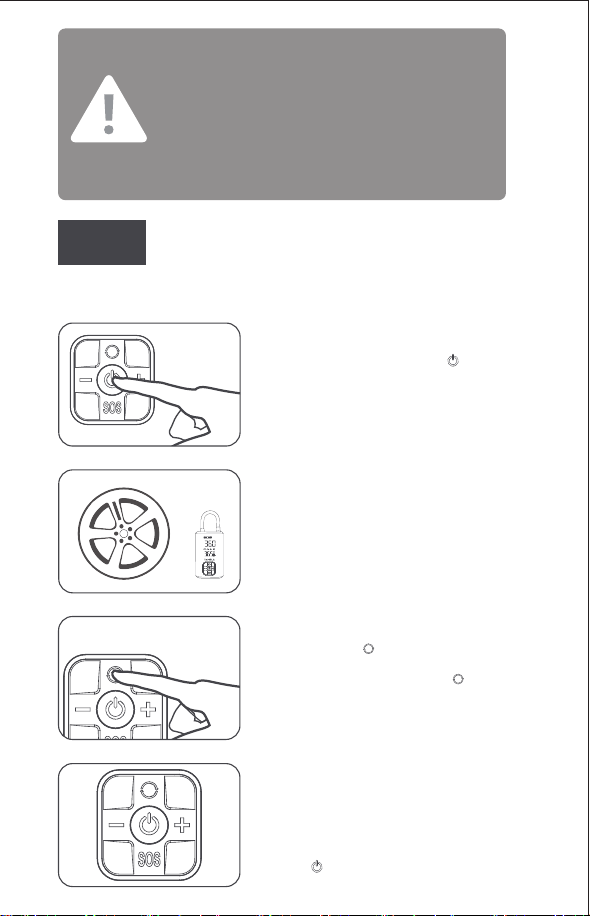
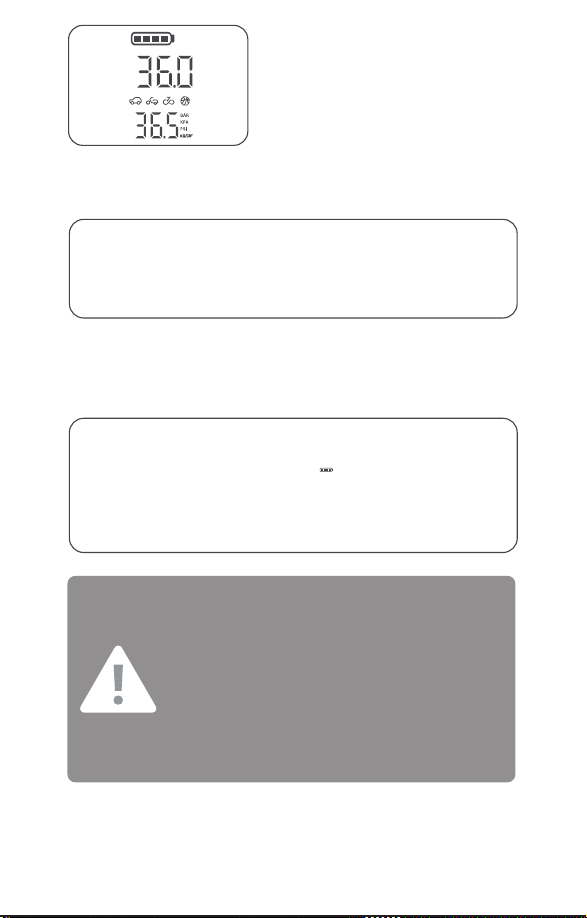
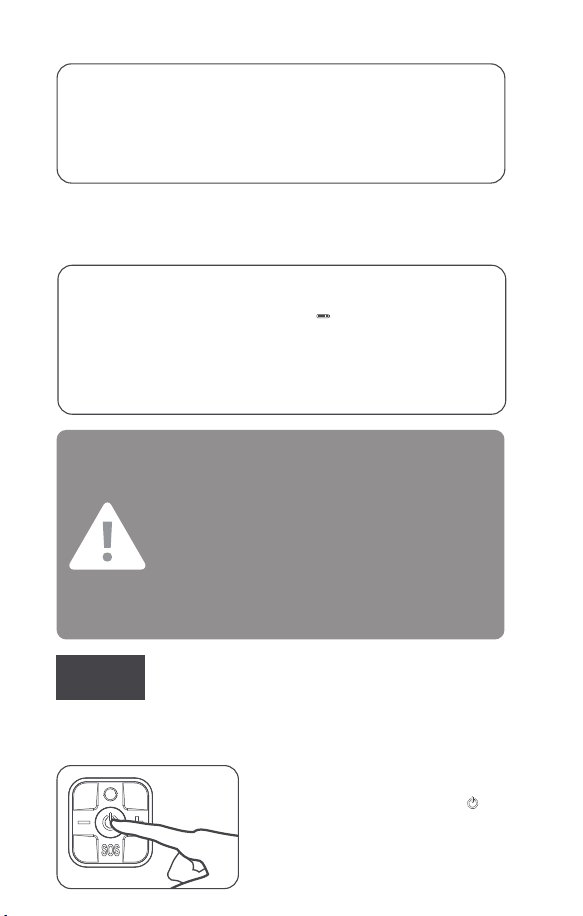
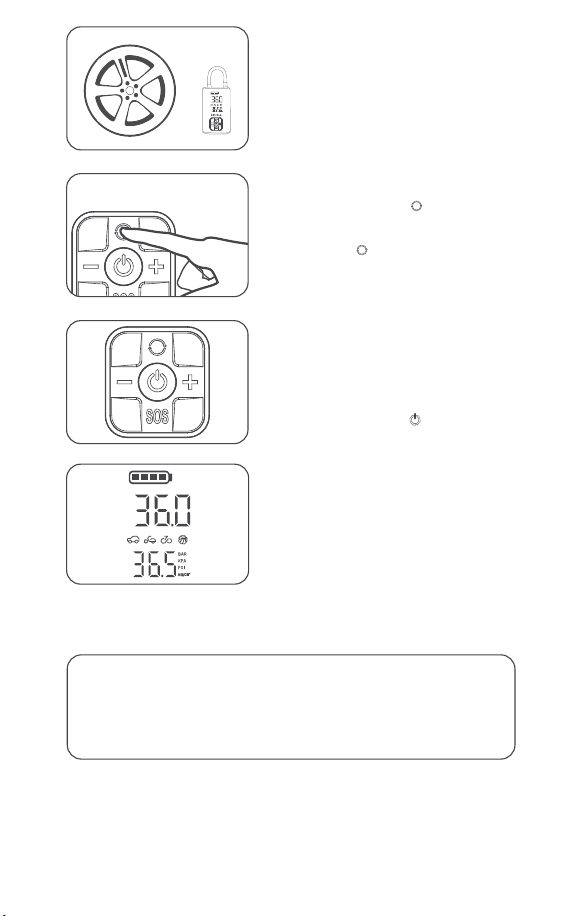
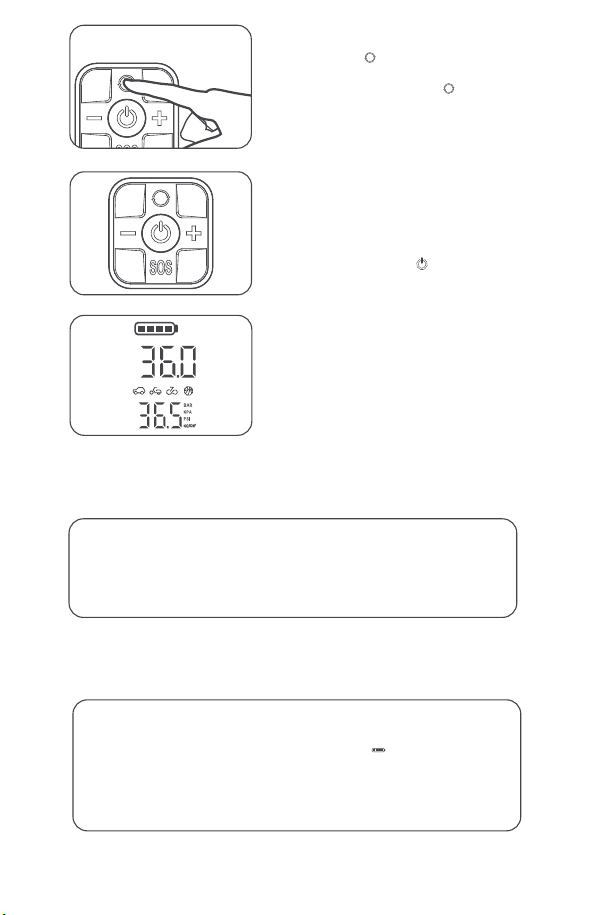
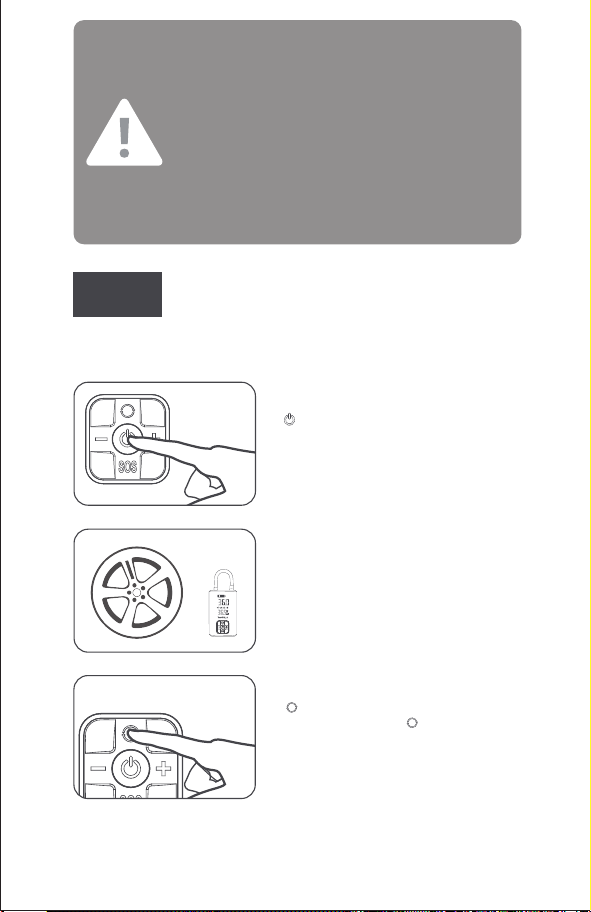
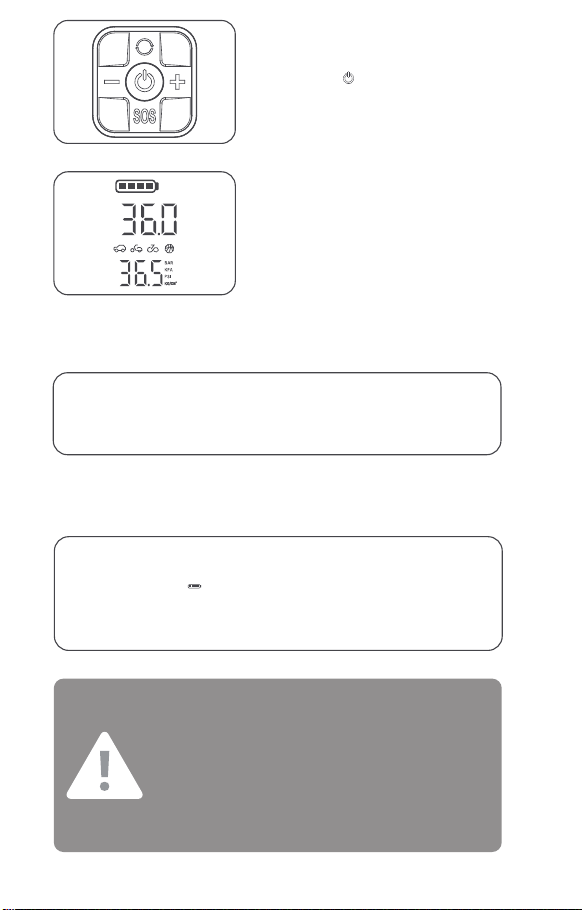
