Model: BAF-803 | Color: Black
1. Overview
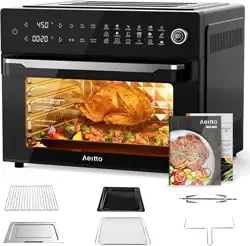
The Aeitto 32-Quart PRO is a multi-functional countertop appliance that combines an air fryer, toaster oven, rotisserie, dehydrator, and convection oven. It has a 30-liter (32-quart) capacity and is designed for family use.

Key Specifications:
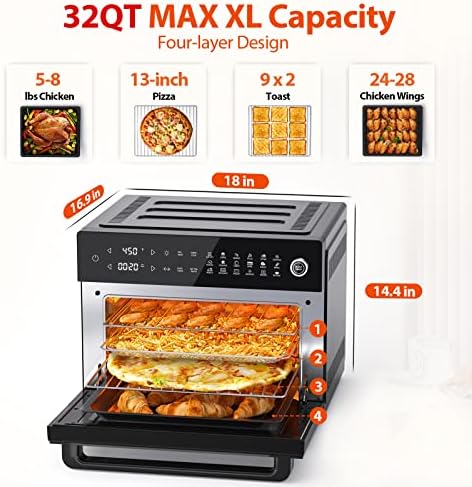
- Capacity: 30 Liters (32 Quarts)
- Power: 1800 Watts
- Temperature Range: 90°F to 450°F
- Dimensions: 16.9"D x 18"W x 14.4"H
- Weight: 24.2 Pounds
- Control Type: Digital with Knob Control
- Door Style: Dropdown Door with Double Tempered Glass
2. Package Contents
Before use, verify all parts are present.
- Aeitto 32-Quart Air Fryer Oven (Main Unit)
- Enamel Baking Pan
- Fry Basket
- Oven Rack
- Rotisserie Spit Fork
- Rotisserie Lift
- Crumb Tray
- Cookbook with Recipes
- User Manual
All accessories are detachable and dishwasher safe.
3. Control Panel and Features
The digital control panel allows you to select from multiple cooking functions.
3.1 Primary Functions (19-in-1)
- Air Fry
- Bake
- Roast
- Broil
- Toast
- Dehydrate
- Rotisserie
- Defrost
- Warm
- Proof (for dough)
- Pizza Grill
- Convection Oven
3.2 Dual Cook Function
You can combine any two preset functions to cook complex recipes. The control knob and digital display allow you to set time and temperature.
3.3 Interior Features
- 4-Level Cooking: Adjustable rack positions for even cooking.
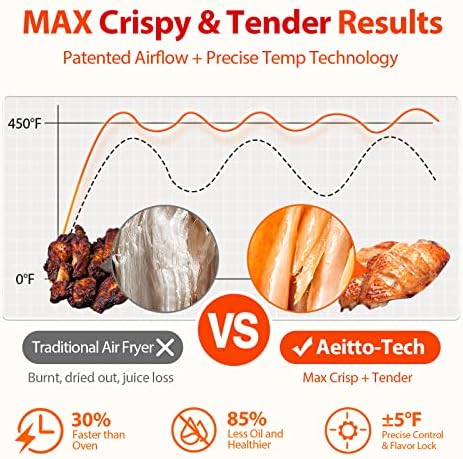
- 360° Hot Airflow: A convection fan circulates air for crispier results with less oil.
- Double Glass Door: Provides heat insulation and allows you to view food while cooking.
4. Use Guide
4.1 Initial Setup
- Remove all packaging materials and stickers.
- Wash all accessories (baking pan, fry basket, rack, etc.) with warm, soapy water. Dry thoroughly.
- Place the oven on a stable, heat-resistant countertop. Ensure at least 4 inches of clearance on all sides and above for ventilation.
- Plug the power cord into a standard 120V AC outlet.
4.2 Basic Operation
- Preheat: For best results, preheat the oven to the desired temperature before adding food. The double glass door reduces preheat time.
- Select Function: Turn the control knob to select the desired cooking function (e.g., Air Fry, Bake, Rotisserie).
- Set Temperature: Use the knob or buttons to adjust the temperature between 90°F and 450°F.
- Set Time: Set the cooking timer. The maximum time varies by function.
- Place Food: Use the appropriate accessory (rack, basket, or pan) and position it on one of the four levels.
- Start Cooking: Press the start button. The interior light and fan will turn on.
- Monitor: You can view food through the glass door. It is normal for steam to escape from the rear vent.
- Completion: An audible alert will sound when the timer ends. The oven will enter a keep-warm mode. Unplug the unit and use oven mitts to remove food and accessories.
4.3 Function-Specific Instructions
Air Frying
- Use the fry basket for best air circulation. Do not overfill.
- Lightly coat food with oil for crispier results.
- Shake or turn food halfway through cooking for even browning.
Rotisserie Cooking
- Attach the rotisserie spit fork securely through the food (e.g., whole chicken).
- Place the spit onto the rotisserie lift and position it inside the oven.
- Select the Rotisserie function. The spit will rotate automatically.

Dehydrating
- Use the oven rack(s) for dehydrating fruits, vegetables, or herbs.
- Set temperature to the lowest setting (90°F - 165°F).
- Dehydrating times are long (several hours). Ensure good ventilation in the room.
Baking & Toasting
- Use the enamel baking pan or oven rack.
- For toast, place slices directly on the oven rack or use the included pan.
- The oven can fit a 13-inch pizza or 9 slices of toast.
4.4 Capacity Guidelines
- 13-inch pizza
- 9 slices of toast
- 5 lb rotisserie chicken
- 10 lb roast turkey
- Fits most 13-inch pans, 12-cup muffin trays, and Dutch ovens up to 6QT.
5. Cleaning and Maintenance
Warning: Always unplug the oven and allow it to cool completely before cleaning.
5.1 Exterior
Wipe the outer casing and glass door with a soft, damp cloth. Do not use abrasive cleaners or scouring pads.
5.2 Interior
Wipe the interior walls and heating elements with a damp cloth. For stubborn residue, use a mild, non-abrasive cleaner.
5.3 Accessories
All accessories (baking pan, fry basket, rack, rotisserie parts, crumb tray) are dishwasher safe. Hand wash with warm, soapy water is also acceptable.
5.4 Crumb Tray
Pull out the crumb tray located at the bottom front of the oven regularly to empty and clean it.
6. Safety Information
- This appliance is for household use only.
- Do not immerse the main unit, power cord, or plug in water or any other liquid.
- Place the oven on a stable, level, heat-resistant surface away from edges.
- Maintain a minimum clearance of 4 inches on all sides and above for proper air circulation.
- Do not place anything on top of the oven.
- The exterior surfaces and the glass door become hot during use. Use oven mitts when handling hot accessories.
- Do not use the oven if the power cord or plug is damaged.
- Unplug the oven when not in use and before cleaning.
- Do not cover the air vents on the rear or top of the unit.
- Do not use metal scouring pads or sharp utensils on non-stick surfaces.
- This appliance is not intended for use by persons with reduced physical, sensory, or mental capabilities.
7. Troubleshooting
| Problem |
Possible Cause |
Solution |
| Oven does not turn on |
Not plugged in. Power outlet issue. |
Ensure the plug is firmly inserted into a working outlet. |
| Food is not cooking evenly |
Overcrowded basket/pan. Incorrect rack position. |
Do not overfill. Rearrange food midway. Use a higher rack position for more browning. |
| Smoke or excessive steam |
Excess oil or food debris in the bottom. |
Clean the interior and crumb tray. Avoid excessive oil. Ensure proper ventilation. |
| Rotisserie not turning |
Spit not properly seated. Motor issue. |
Ensure the spit forks are securely attached and the spit is correctly placed on the lift. Contact support if motor is faulty. |
| Error code on display |
Overheating or sensor fault. |
Unplug the oven, allow it to cool completely for 30 minutes, then plug it back in. If error persists, contact support. |
8. Warranty and Support
Aeitto offers a 1-year limited warranty from the date of purchase. The warranty covers defects in materials and workmanship under normal household use.
Lifetime Technical Consultation: Aeitto provides ongoing technical support.
Contact for Support:
- For any problems, contact Aeitto via your Amazon account where the purchase was made.
- Aeitto states that problems will be addressed within 24 working hours.
Safety Documents: For the complete User Guide and Manual, refer to the PDFs available on the product's Amazon page under "Safety and product resources."
Model Number: BAF-803 | ASIN: B0BR4ZYSRF
© Aeitto. Specifications are subject to change without notice.