
8168MTB
INSTRUCTION MANUAL
Read and save these instructions
www.Aeitto.com
PO1
PO2
PO3
P01=ICE CRUSH
P02=SMOOTHIE
P03=JUICE
SPEED TIME
1
2
3
4
5
6
7
Tips: When crushing ice, using ICE CRUSH / PULSE function intermittently will achieve a better result.
Note: "----" shows, appliance in standby.


NOW!
for an additional
As a special thank-you for registering your Aeitto unit, you'll auto-
matically receive an additional 12 months added to your limited
manufacturer's warranty!
All you need to do is send your Amazon order ID to our Email:
support@aeitto.com.
NOTE: Must register within 7 days after receiving your new product.
FREE upgrade to FULL Replacement Guarantee - no need to return.
Just send your Amazon Order ID to Email support@aeitto.com to activate the extended
warranty.
Once registered, you will be ensured that if anything goes wrong with your product, we will
either send you a brand new unit as a replacement (Absolutely FREE) or provide a FULL
refund of your order.
Send:
Amazon Order ID:
XXX-XXXXXXX-XXXXXXX
support@aeitto.com
Warranty
Subject:

CONTENTS
I. Important Safeguaids
II. Parts and Features
III. Control Panel
IV. Blending
V. How to Use the Tamper
VI. Care and Cleaning
VII. Safety Indexes
VIII. Maintenance
IX. Trouble Shooting
X. Warranty
...............................................................................................................................
...................................................................................................................................
............................................................................................................................................
...................................................................................................................................................
............................................................................................................................
.....................................................................................................................................
.......................................................................................................................................
.........................................................................................................................................
......................................................................................................................................
.....................................................................................................................................................
01
02
03
05
06
07
08
08
09
10

I. Important Safeguards
Please read this instruction before using.
Check that the voltage you use matches the rated voltage indicated by the appliance.
Do not immerse this appliance , power cord, plug into water or other liquid to avoid fire, leakage or
endanger personal safety.
It should be monitored when using this appliance, do not let children and people without self-care
close to blender.
Unplug when you do not use or clean the blender. When removing the jar, make sure the motor in
static state.
If the power cord, plug damaged, electrical failure or other causes of product damage, please do
not use it, but contact the manufacture's after-sales service (Email: support@aeitto.com).
If the power cord is damaged, it must be replaced by the manufacturer or authorized agent, or
qualified technical personnel to avoid harm.
The product should be placed on the table or flat place, do not hang the power cord on the edge
of the table or table.
Do not use the appliance or place it close to flammable gases and electric furnaces at high
temperatures.
Do not open the jar cover and contact the blade before the product stops running.
The blade is very sharp. Be careful when installing, removing and cleaning to avoid cutting by the
blade.
Do not use accessories recommended or sold by non-manufacturer, including jars, jar covers, etc.,
to avoid danger.
Do not soak in water or other liquids for cleaning jar with electrical components.
Please make sure the jar cover is installed in place before the appliance runs, otherwise the
appliance can not work properly.
This appliance is not suitable for children, disabled people, mental patients, people who are
allergic to motor noise or are not familiar with the appliance. Unless the guarantor gives full
supervision and guidance to the above personnel. Children are forbidden to play with this product.
Children under 8 years of age are not allowed to clean and maintain the appliance to avoid danger.
This appliance can not be used outdoors.
This appliance is suitable for household and similar purposes.
The appliance and power cord should be stored in a safe place to avoid children pulling power
cords.
Keep this manual for future inspection.
1.
2.
3.
4.
5.
6.
7.
8.
9.
10.
11.
12.
13.
14.
15.
16.
17.
18.
19.
01
II. Parts and Features
It is easy to put on and take off, and easy to clean. Always use the lid and the lid plug when the machine
is in operation.
Lift up on one lid flap while holding the container securely.
It is easy to put on and take off, and easy to clean. Always use the lid and the lid plug when the
machine is in operation.
Lids are not interchangeable between different container styles, types, and sizes.
Insert through the lid and secure by turning clockwise. Remove the lid plug to use the tamper or add
ingredients.
Push the lid onto the container until it locks in place.
The lid must always be secured when processing, especially hot liquids that may scald.
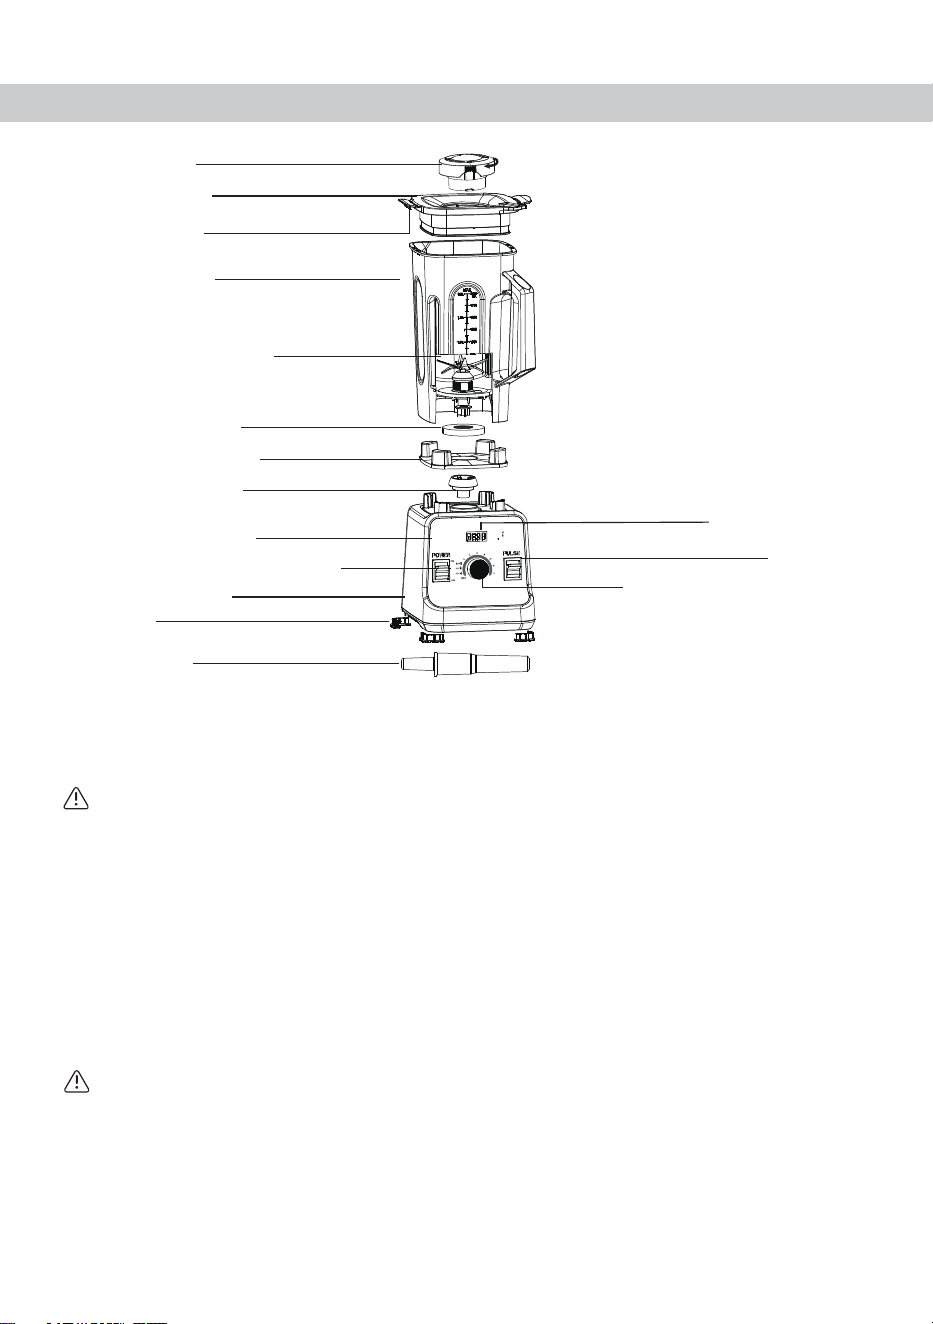
Lid Plug
2-Part Lid
Lip Flaps
Container
Blade Assembly
Retainer Nut
Centering Pad
Drive Socket
Control Panel
Led Screen
Variable Speed Knob
(or Programs Select)
Pulse
Power ON/OFF Switch
Feet
Motor Base
Tamper
2-Part Lid:
CAUTION:
Lid Plug:
To Lock the Lid in Place:
WARNING
To Remove the Lid:
1.
2.
02
P01=ICE CRUSH
P02=SMOOTHIE
P03=JUICE
Tips: When crushing ice, using ICE CRUSH / PULSE function intermittently will achieve a better result.
Note: "----" shows, appliance in standby.
SPEED
TIME

III. Control Panel
Rotate the lid plug counterclockwise from the “locked”to “unlocked” position and lift out.
Milliliters are clearly marked.
Designed for shock absorption.
Your Aeitto motor is designed to protect itself from overheating. If the motor shuts off, follow these
instructions:
Turn off the power switch for up to 45 minutes to reset. Reset time will be extended if high room
temperatures exist. To reduce the reset time, unplug the machine, remove the container, and blow air
into the center section of the bottom with a hair dryer on the cool setting.
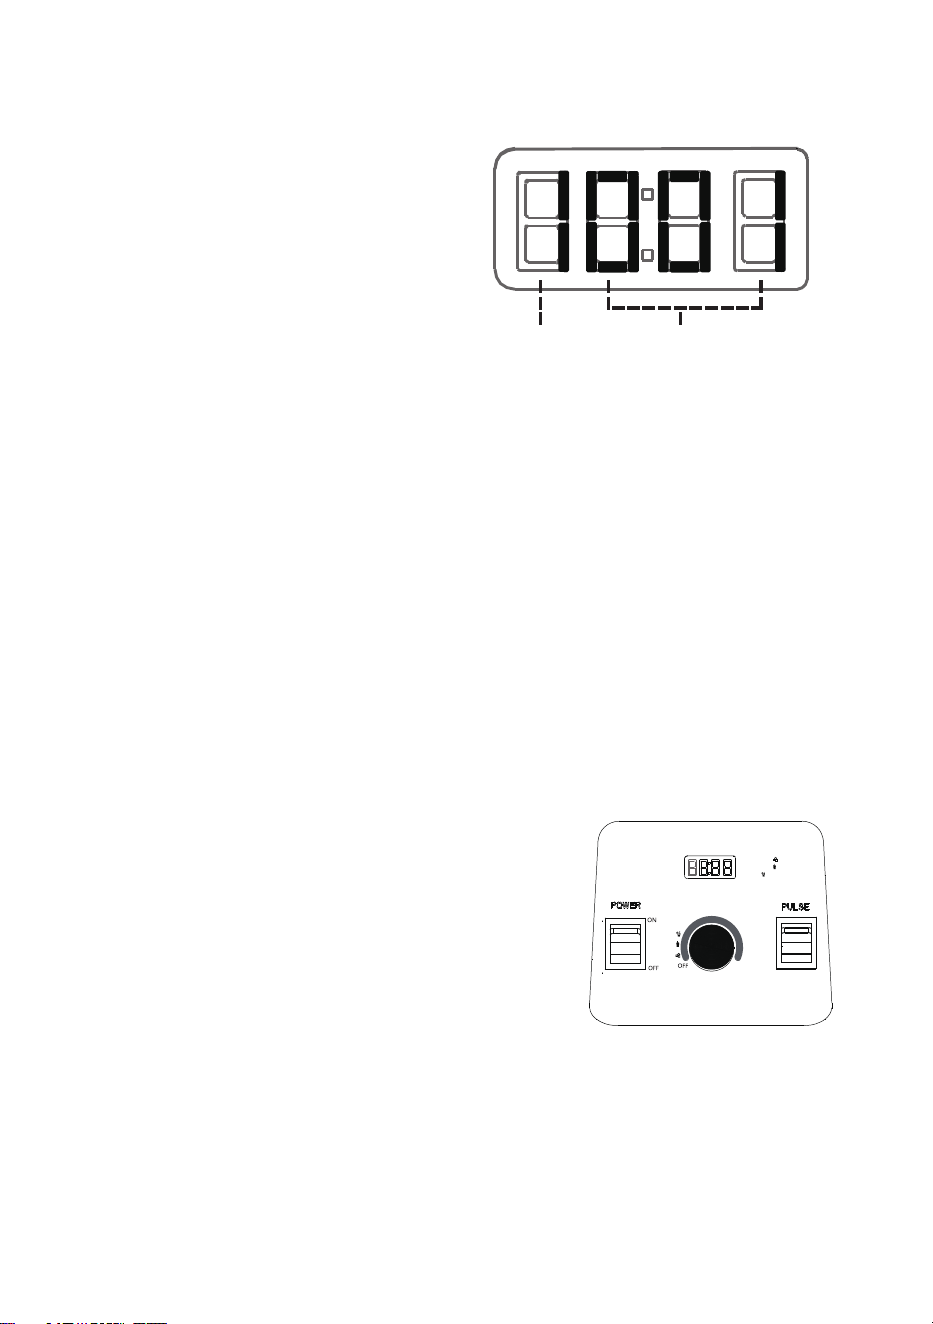
The ON/OFF switch controls power to the machine.
In standby mode, rotate the variable speed knob clockwise to select "P01", "P02" or "P03", blender
starts working after 2 flashes of "P01", "P02" or "P03" on screen.
Tips: Blender will stop at the end of the program automatically.
You can also stop programs by switching POWER button to OFF position or rotating the variable speed
knob anticlockwise to standby mode at any time.
ICE CRUSH =P01 SMOOTHIE =P02 JUICE =P03
To Remove the Lid Plug:
Container:
Centering Pad:
CAUTION:
Do not disassemble the Centering Pad. Before using Blender, please make sure the Centering Pad is
installed correctly ( the Driver Socket runs smoothly when rotating it by hand) to avoid appliance
damaged.
Automatic Overload Protection:
ON/OFF Switch
Variable Speed Knob
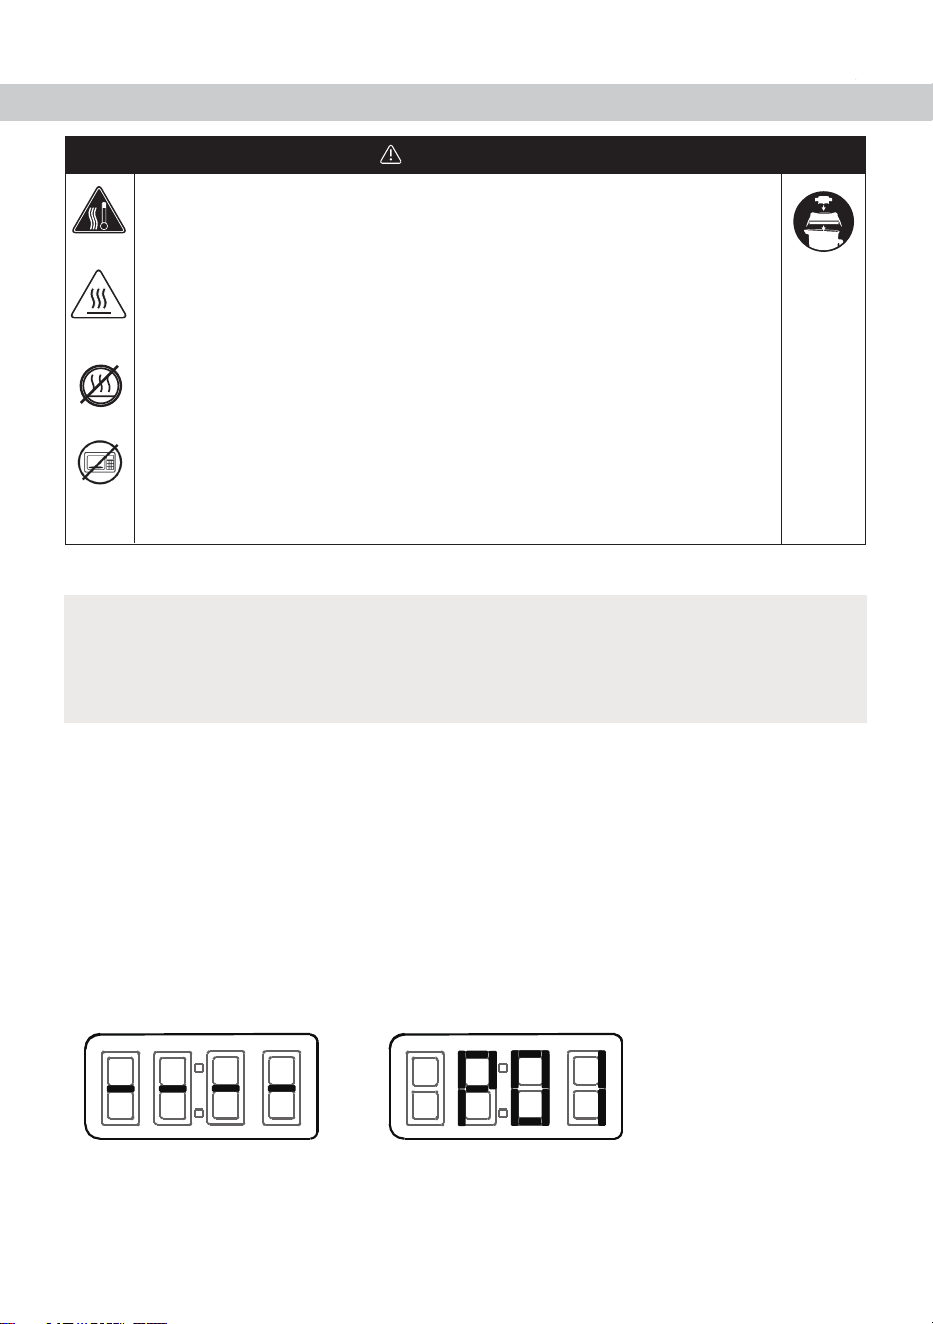
Standby Mode ICE CRUSH=P01
In standby mode:
Switch the Power Button to ON position, appliance in standby (Screen shows "----")
You can select your desired programs (ICE CRUSH=P01 SMOOTHIE=P02 JUICE=P03)
03
Tips: Blender can be stopped by switching POWER button to OFF position or rotating the variable
speed knob anticlockwise to standby mode after crossing P01, P02 and P03 at any time .
Switch the POWER button to ON position, blender is standby (LED screen shows "----").
Make sure the container put onto the motor base correctly.
The first number ( color orange) of screen shows a clockwise spinning flash.
The other 3 number shows left-time countdown.
The first number of screen shows current working speed when you choose variable speed from 1 to 7.
The other 3 number shows continuous working time.
The blades will rotate at the highest speed when pressed.
Under control of variable speed knob, pressing switch of
Pulse, the blades will rotate at the highest speed. When
release, blender will rotate at the speed set before.
In standby mode, pressing switch Pulse, the blades will rotate
at the highest speed. When release, blender will back to
standby mode.
You can also select desired speed from 1 to 7 .
In standby mode, rotate the variable speed knob
clockwise, you can choose your desired speed
after crossing P01, P02 and P03.
The first number of screen "color orange" shows
the current speed.
The other 3 numbers shows continous working
time.
LED Screen:
Pulse
When crushing ice, crushing no more than 500 grams will achieve a better result!
1. Selected program working mode:
2. Variable speed working mode:
Note:
04
P01=ICE CRUSH
P02=SMOOTHIE
P03=JUICE
PO1
PO2
PO3
1
2
3
4
5
6
7
Tips: When crushing ice, using ICE CRUSH / PULSE function intermittently will achieve a better result.
Note: "----" shows, appliance in standby.
SPEED TME
SPEED TIME
IV. Blending
To Avoid Possible Burns, Never Start on Speeds Above 1 when Processing Hot
Liquids.
Escaping steam, splashes or contents may burn. Always start on Variable 1,
then slowly increase the higher speed.
If a cup becomes warm to the touch of steams or vents, immediately stop
blending ingredients and turn off or unplug blender. Allow the cup and
ingredients to cool to room temperature before removing the blade base.
To avoid damage or personal injury, DO NOT use the cups (including the blade
base or lids) in the microwave.
Parts will become hot with extended use. DO NOT touch the drive
socket in the blender base or the drive socket.
Always use the lid and the lid plug when the machine is in operation. Never operate
the blender without checking to make sure that the lid and lid plug are securely
locked in place.
Load your container according to your recipe or the load order in the illustration here.
Push the lid down into place and lock both lid flaps onto the lip of the container by pressing. Insert
the lid plug. Turn the lid plug clockwise to lock.
Put the container onto the base correctly.
Switch POWER button to ON position to standby mode.
Switch the Power Button to ON position, appliance in standby (Screen shows "----").
In standby mode:
You can select your desired programs (ICE CRUSH=P01 SMOOTHIE=P02 JUICE=P03)
In standby mode, rotate the variable speed knob clockwise to select "P01", "P02" or "P03", blender
starts working after 2 flashes of "P01", "P02" or "P03" on screen.
Note:Considering safer blend, before rotating the variable speed knob, the blades will not rotate.
1.
2.
3.
4.
5.
WARNING
IMPORTANT!
05
Standby Mode ICE CRUSH=P01

V. How to Use the Tamper
At the end of the blend, rotate the variable speed knob counterclockwise to standby mode or shut
off by switching to OFF position.
If the mixture stops circulating, use the tamper to press mixture toward the blades. If this does not
work, press the power switch to OFF position to stop the motor. Remove the container from the
blender base and press the air bubble away from the blades. Add liquid if necessary. Secure the lid
and lid plug. Return the container to the blender base and continue blending.
After blending, wait until the blades completely stop before removing the lid or container from the
blender base.
Tips: Blender can be stopped by switching POWER button to OFF position or rotating the variable
speed knobanticlockwise to standby mode after crossing P01, P02 and P03 at any time .
Tips: Blender will stop at the end of the program automatically.
You can also stop programs by switching POWER button to OFF position or rotating the variable
speed knob anticlockwise to standby mode at any time.
You can also select desired speed from 1 to 7 .
Do not process recipes at lower or higher speeds than recommended.
Do not process recipes for longer than recommended.
Use your tamper to process thicker mixtures and keep ingredients moving around and through the
blades.
In standby mode, rotate the variable speed knob
clockwise, you can choose your desired speed
after crossing P01, P02 and P03.
The first number of screen "color orange" shows
the current speed.
The other 3 numbers shows lefttime countdown.
Tips to prevent overloading your blender:
Before use, please assemble the 2 pars of tamper as above.
6.
7.
06
SPEED TIME

VI. Care and Cleaning
IMPORTANT! The splash disk (near the top of the tamper) and lid prevent the tamper
from hitting the blades when the lid is secured properly in the locked position.
Wipe the base with a warm damp cloth and wipe clean with a dry, soft cloth. Wash the container,
lid, lid plug, and tamper with warm, soapy water. Rinse all parts. Wipe dry with a dry, soft cloth.
Choose a space on the counter that is level, dry and clean. Plug the blender into a grounded,
3-prong outlet.
Fill the container half full with warm water and add a couple of drops of dishwashing liquid.
Snap or push the complete 2-Part lid into the locked position.
Press the power switch to ON position. Slowly increase variable speed to 7 by rotating the variable
speed knob clockwise.
Run the machine for 30 to 60 seconds.
Rotate the variable speed knob counterclockwise to standby mode (Screen shows "----"), shut off
by switching to OFF position. You can also shut off by switching to OFF position.
Rinse and drain all pieces.
The container should not be more than two-thirds full when the tamper is used during blending.
To avoid overheating during blending, DO NOT use the tamper for more than 30 consecutive
seconds.
If food ingredients does not circulate, the blender may have trapped an air bubble. Carefully
remove the lid plug, while making sure the lid stays firmly in place. Release the air bubble by
inserting the tamper through the lid plug opening.
Holding the tamper straight down may not help the ingredients circulate. If necessary, point the
tamper towards the sides or corners of the container. DO NOT try to force the tamper deeper
into the container.
DO NOT use other objects (such as chopsticks, spoons�) to replace the Tamper to advoid
machine broken or even body hazard!
Note:The container is designed to be completely cleanable without removing the retainer nut and
blade assembly.
DO NOT attempt to remove the retainer nut or blade assembly from the container. Our Normal
Cleaning and Sanitizing procedures or a dishwasher cleaning cycle will ensure a complete and
thorough cleaning of your container and its components. If your container is damaged, please do
not use. Contact Aeitto Customer Service IMMEDIATELY for assistance (Email : support@aeitto.com).
BEFORE FIRST USE:
Follow these instructions if you prefer not to wash your container in the dishwasher.
1.
2.
1.
2.
3.
4.
5.
6.
07

Turn off and unplug the blender.
Wash the outside surface with a damp, soft cloth or sponge that has been rinsed in a mild solution
of liquid dish soap and warm water. Do not place the blender base in water.
Immediately dry all surfaces and polish with a soft cloth.
When making bubble-prone food, please considering the actual situation to decide running time
and speed.
To avoid inadvertent activation, turn off and unplug the blender before cleaning
Always unplug before cleaning the blender base or when not in use.
Do not put the blender base in water or other liquid.
Failure to follow instructions can cause death or electrical shock.
All parts listed above are dishwasher safe. If preferred, wash the parts in warm soapy water. Rinse
clean under running water, then dry.
Lids, Lid Plug, Tamper, and Container
Blender Base
To Avoid Injury and Damage.
Electrical Shock Hazard.
2.
3.
1.
1.
VII. Safety Indexes
VIII. Maintenance
WARNING
Product Name
Product Model
Rated Voltage
Frequency
Power
Capacity
Max Rotating Speed
Countertop Blender
8168MTB
120V
60Hz
1500W
2000ML
25000rpm
08

If the device does not work properly, check whether you are able to rectify the problem yourself. If
the problem cannot be solved with the steps below, contact the customer service department
IX. Trouble Shooting
Analysis of cause Fault resolution Fault Phenomenon
Machine not work.
Put the container onto the
base correctly.
Place container well, do not
shake ti, align with the driving
sheel and coupler.
Please follow the recipe to
operate the machine.
Container was not placed
in correctly position.
The POWER button was not
switched to ON position.
Switch the POWER button to
ON positon, blender is standby
(LED screen shows "----").
The base not stand well.
Place base on flat.
Check feets on the button of
base, contact our after-sales
service (support@aeitto.com)
if feets lost or broken.
The container not stand well
on base.
Too many food ingredients.
Too much water.
Too much or too little water.
Please adjust the water
quantity.
Please add water to the
correct levelquantity.
Over vibration.
Machine is not stable when
placed on flat.
There is a little gas bubble
overflow from transparent
lid.
Food not broken into
pieces.
(Email : support@aeitto.com).
When blending especially liquids, be sure to start slowly but not instantly to avoid impact, which
would cause spattering.
When blending immobile mixture, please use pulse function or tamper as assistant.
When making smoothies, to add adequate water will be helpful to operate and shorten the time.
Unplug the power cord before cleaning.
Clean the appliance and other parts immediately after use.
Please clean the container in time after use every time and when it is idle for more than ten
minutes.
Before storing the appliance, make sure it is clean and dry.
If you don’t use it for a long time, please unplug the power cord and pay attention to the dust and
insect.
Warning: The blade is very sharp, please handle it carefully.
2.
3.
4.
5.
6.
7.
8.
9.
08
09

If you have any questions about the device and about spare parts/accessories,
contact the customer service department via
We are delighted that you have chosen the Aeitto blender and hope you have a fun with it.
The manufacturer 's warranty covers the product for a period of 12 months from the date of purchase
against manufacturing faults.
X. Warranty
10