USER MANUAL
K12 Projector

LANGUAGE
English
Deutsch
Français
Italiano
Español
日 本 語
003-028
029-054
055-080
081-106
107-132
133-158

EN 03
TABLE OF CONTENTS
PUTRIMS LIFETIME PROFESSIONAL SUPPORT 04
INSTRUCTIONS FOR USE 04
PACKAGE LIST 06
PROJECTOR SPECIFICATIONS 07
PROJECTOR OVERVIEW 07
REMOTE CONTROL 09
INSTALLATION 10
1.Installation Method- - - - - - - - - - - - - - - - - - - - - - - - - - - - - - - - - - - - - - - - - - - - - - 10
2.Projection Distance and Size - - - - - - - - - - - - - - - - - - - - - - - - - - - - - - - - - - - - - - - - 11
3.Ceiling Installation - - - - - - - - - - - - - - - - - - - - - - - - - - - - - - - - - - - - - - - - - - - - - - 11
STARTING PROJECTOR 12
PROJECTION IMAGE SETTINGS 12
1.Keystone Correction - - - - - - - - - - - - - - - - - - - - - - - - - - - - - - - - - - - - - - - - - - - - - 12
1.1 Auto Keystone/Focus 12
1.2 Manual Keystone 13
2.Zoom Screen - - - - - - - - - - - - - - - - - - - - - - - - - - - - - - - - - - - - - - - - - - - - - - - - - 14
2.1 Zoom Screen 14
2.2 Screen Reset 14
ROJECTOR INPUT SIGNAL SWITCHING 15
1.Select The Signal Source- - - - - - - - - - - - - - - - - - - - - - - - - - - - - - - - - - - - - - - - - - - 15
1.1 Select The HDMI Input Signal Source 15
1.2 Select The GTV Signal Source 16
1.3 Voice Assistant in GTV 17
2.WIRELESS CONNECTION - - - - - - - - - - - - - - - - - - - - - - - - - - - - - - - - - - - - - - - - - - - 18
2.1 WiFi Settings 18
2.2 For iOS Devices (iOS Cast) 18
2.2 For Android Devices (Miracast) 19
3.Bluetooth Settings - - - - - - - - - - - - - - - - - - - - - - - - - - - - - - - - - - - - - - - - - - - - - - 20
OTHER PROJECTION SETTINGS 21
1.Video Mode - - - - - - - - - - - - - - - - - - - - - - - - - - - - - - - - - - - - - - - - - - - - - - - - - - 21
2.Sound Mode- - - - - - - - - - - - - - - - - - - - - - - - - - - - - - - - - - - - - - - - - - - - - - - - - - 21
3.System - - - - - - - - - - - - - - - - - - - - - - - - - - - - - - - - - - - - - - - - - - - - - - - - - - - - 22
4.General - - - - - - - - - - - - - - - - - - - - - - - - - - - - - - - - - - - - - - - - - - - - - - - - - - - - 23
SIGNAL LINES CONNECTION 24
1.USB Multimedia Connection- - - - - - - - - - - - - - - - - - - - - - - - - - - - - - - - - - - - - - - - - 24
1.1 USB Format 24
1.2 Video Play Interface 25
2.Connecting to Laptop&Computer via HDMI - - - - - - - - - - - - - - - - - - - - - - - - - - - - - - - - 26
3.Connecting to Speaker- - - - - - - - - - - - - - - - - - - - - - - - - - - - - - - - - - - - - - - - - - - - 27
FAQ & WARRANTY 27

EN 04
PUTRIMS LIFETIME PROFESSIONAL SUPPORT
Dear customer,
Thank you very much for supporting PUTRIMS!
Before you begin using the projector, please carefully read through this user manual. The features and
illustrations contained herein are provided as references and may slightly dier from the actual product due to
ongoing optimizations and updates. For precise details, please refer to the physical product.
If you have any questions, please include the following details in your email: country code, order number,
model, and a brief description of the problem (For example US+000-0000000-0000000+K12+No image) to
[email protected]om. We will provide a quick solution within 24 hours.
In fact, many problems can be easily solved through settings, such as no signal, no sound, Bluetooth
connection failure, WiFi connection failure, etc. We promise that all projectors are 100% carefully inspected and
packed before shipping.
If you have any questions, please contact us to solve the problem. And give us a chance to improve. We
promise to provide you with a satisfactory solution.
We are committed to providing excellent support 24H/7D to ensure your satisfaction as our valued customer.
Thank you for your understanding!
Sincerely,
PUTRIMS SUPPORT TEAM
INSTRUCTIONS FOR USE
1. Do not place the projector in a room that is too hot or too cold, because high temperature or low
temperature will affect the performance of the projector, shorten the service life of the equipment. The
working environment is preferably 5° C~35° C.
2. Equipped with a ventilation device to ensure the stable operation of the projector. Do not cover the vents
with cloths, blankets or other items. Do not insert objects of any kind into the slots of the projector, as this
may cause a short circuit or electric shock and damage the device.
3. The projector should be strictly protected from strong impact, extrusion and vibration. Do not attempt to
strongly impact, squeeze or shake it. Do not attempt to move the internal circuit to avoid malfunction.
4. As the core component of the projector, the lens is directly related to the clarity and eect of the picture.
Excessive wiping dust o the lens can aect image quality. Dirty lenses should be wiped with a soft cotton
cloth on the surface of the glass lens. Do not use hard cloths or abrasives.
5. Please control the ambient lighting in the room to enhance the visibility of the projected image. Dimming the
lights or using curtains can help reduce glare and improve image quality.
6. If you have any questions, please do not worry, please contact [email protected]om via email.


EN 06
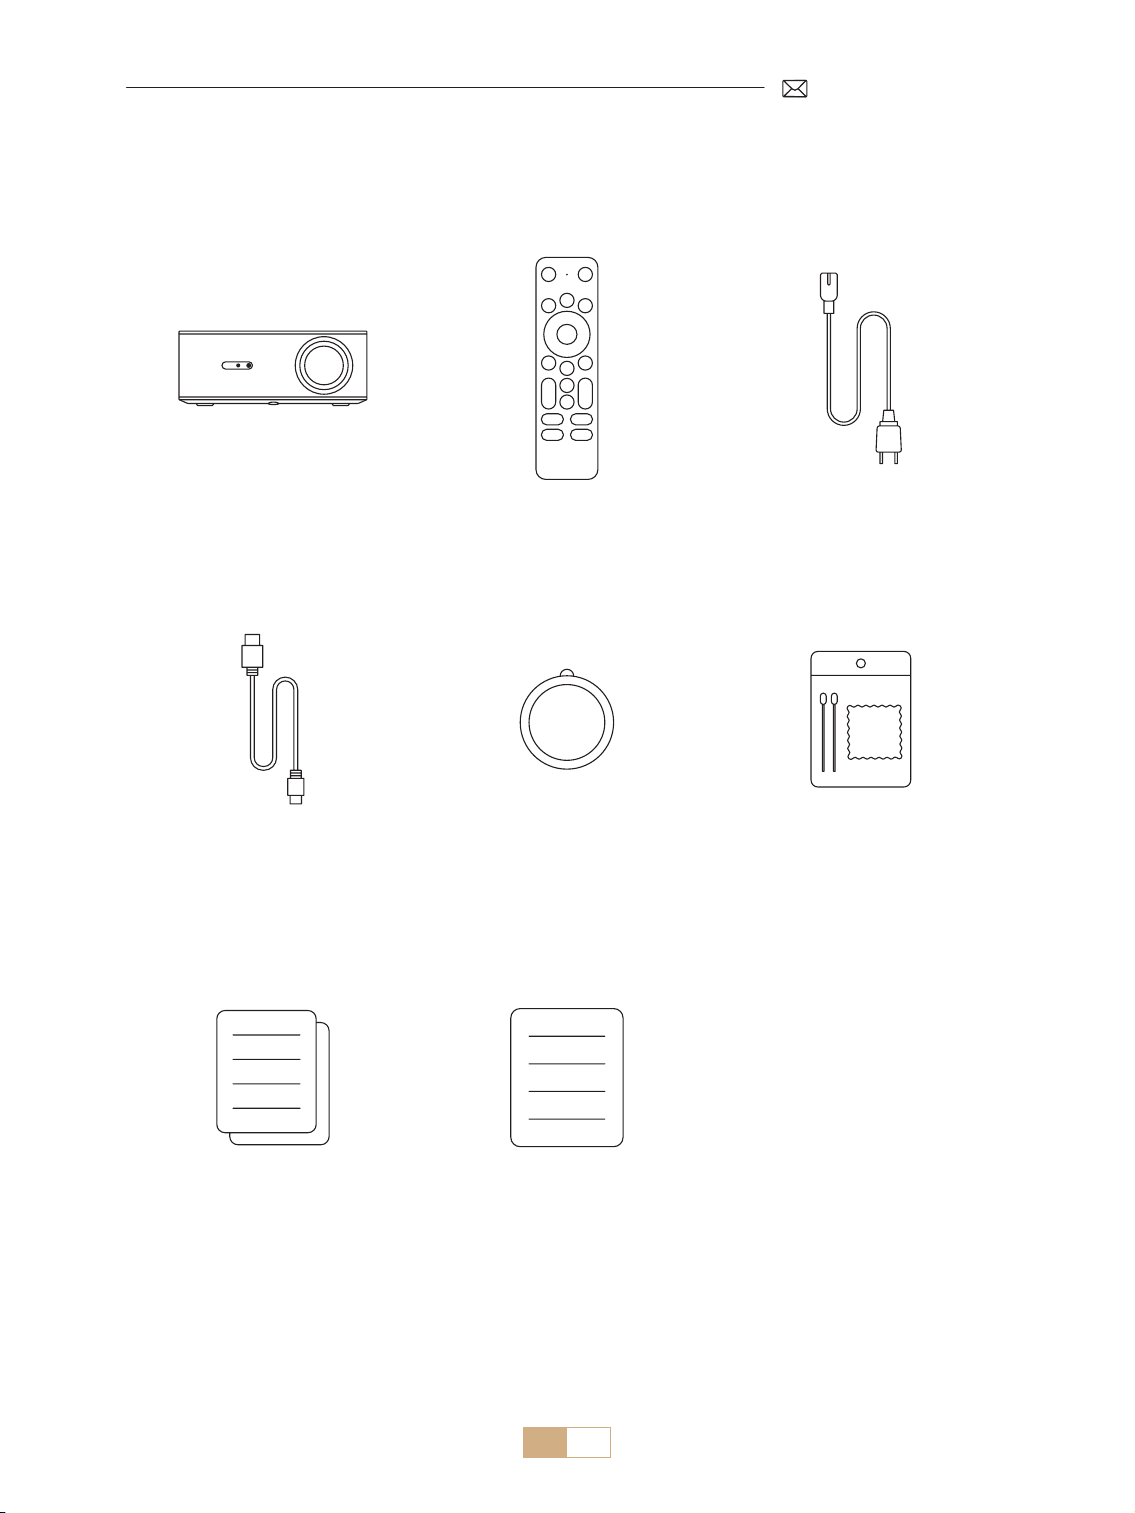
PACKAGE LIST
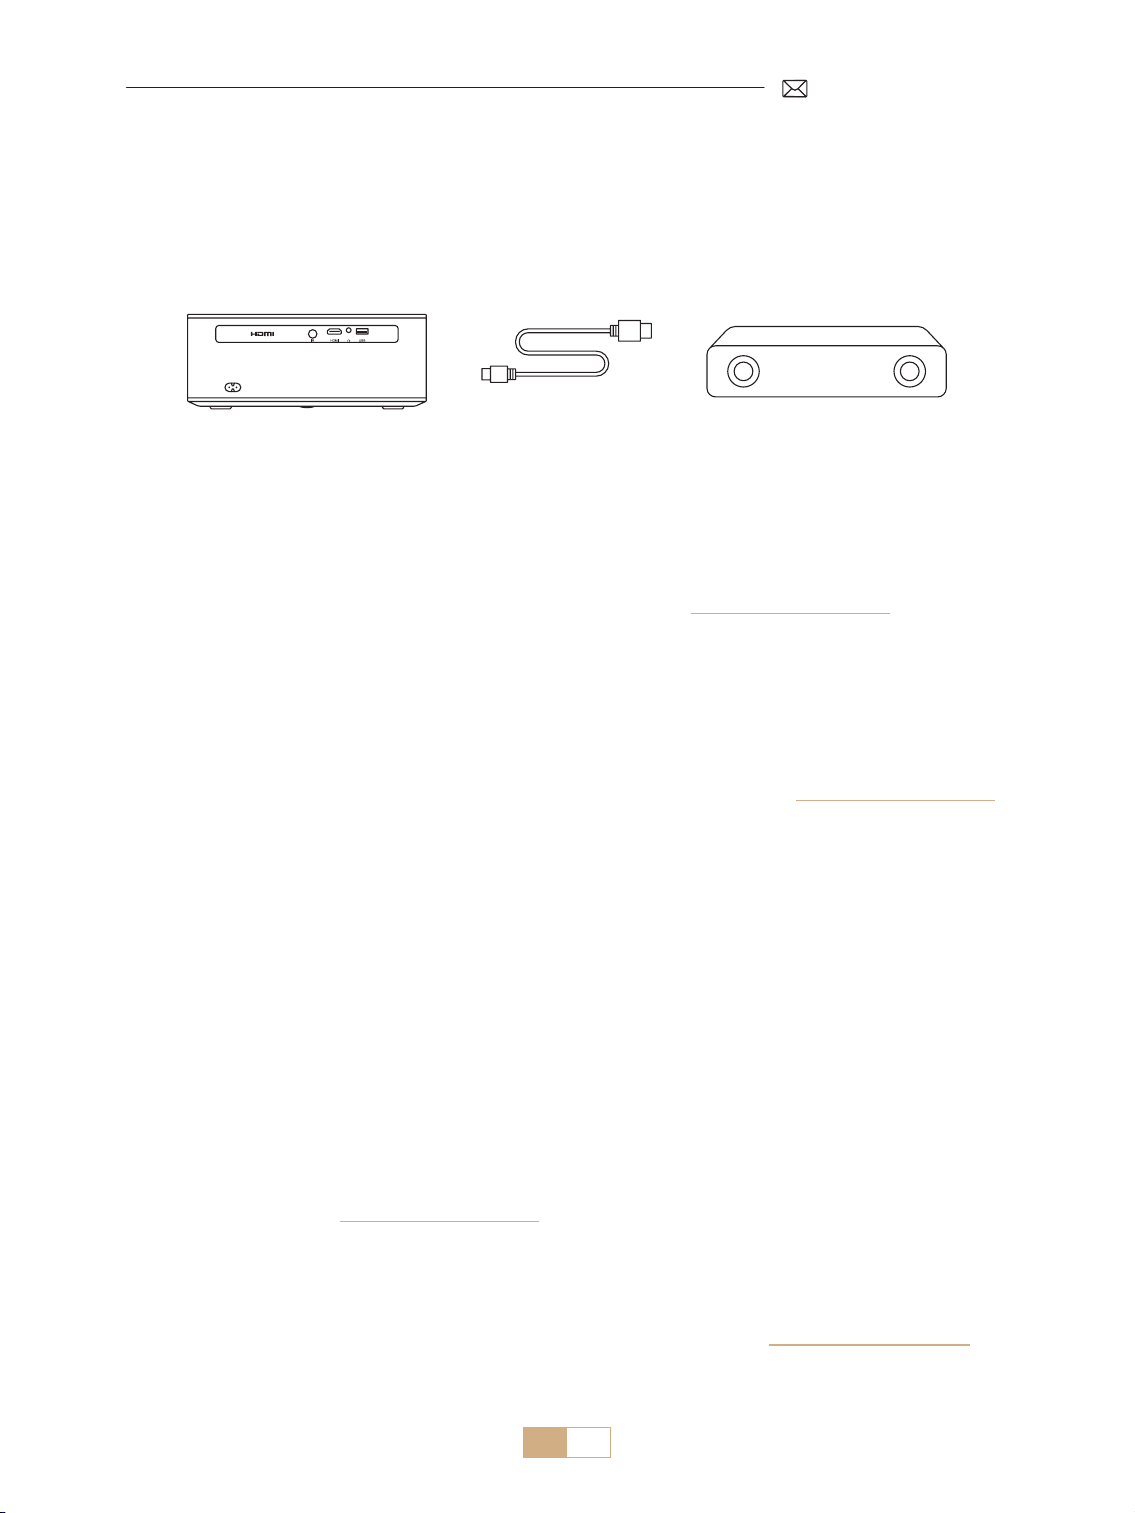
PUTRIMS K12 Projector *1 Dongle Remote Control *1 Power Cable *1
HDMI Cable *1 Lens Cover *1 Cleaning Kit *1
Quick Start Guide *1 FAQ *1

EN 07
PROJECTOR SPECIFICATIONS
Model No. K12
Native Resolution 1920*1080P Aspect Ratio
16:9/4:3
(Short press button
twice)
Display Tech LCD Light Source LED
Weight
2.5 kg
5.5 lbs
Size
(L*W*H)
28.0 x 24.2 x 10.7 cm
11'' x 9.5'' x 4.2''
Refresh Rate 60 Hz Power Voltage AC 100 240V~/50~60Hz2A
Focus Auto + Electric Keystone Auto + Manual
Output Port 3.5mm Audio Output Input Port HDMI*1/USB*1
Projection Ratio 1.3:1 Zoom 100% 50%
Operation Mode Remote Control
Installation Type Front/Rear on Desk, Front/ Rear on Ceiling
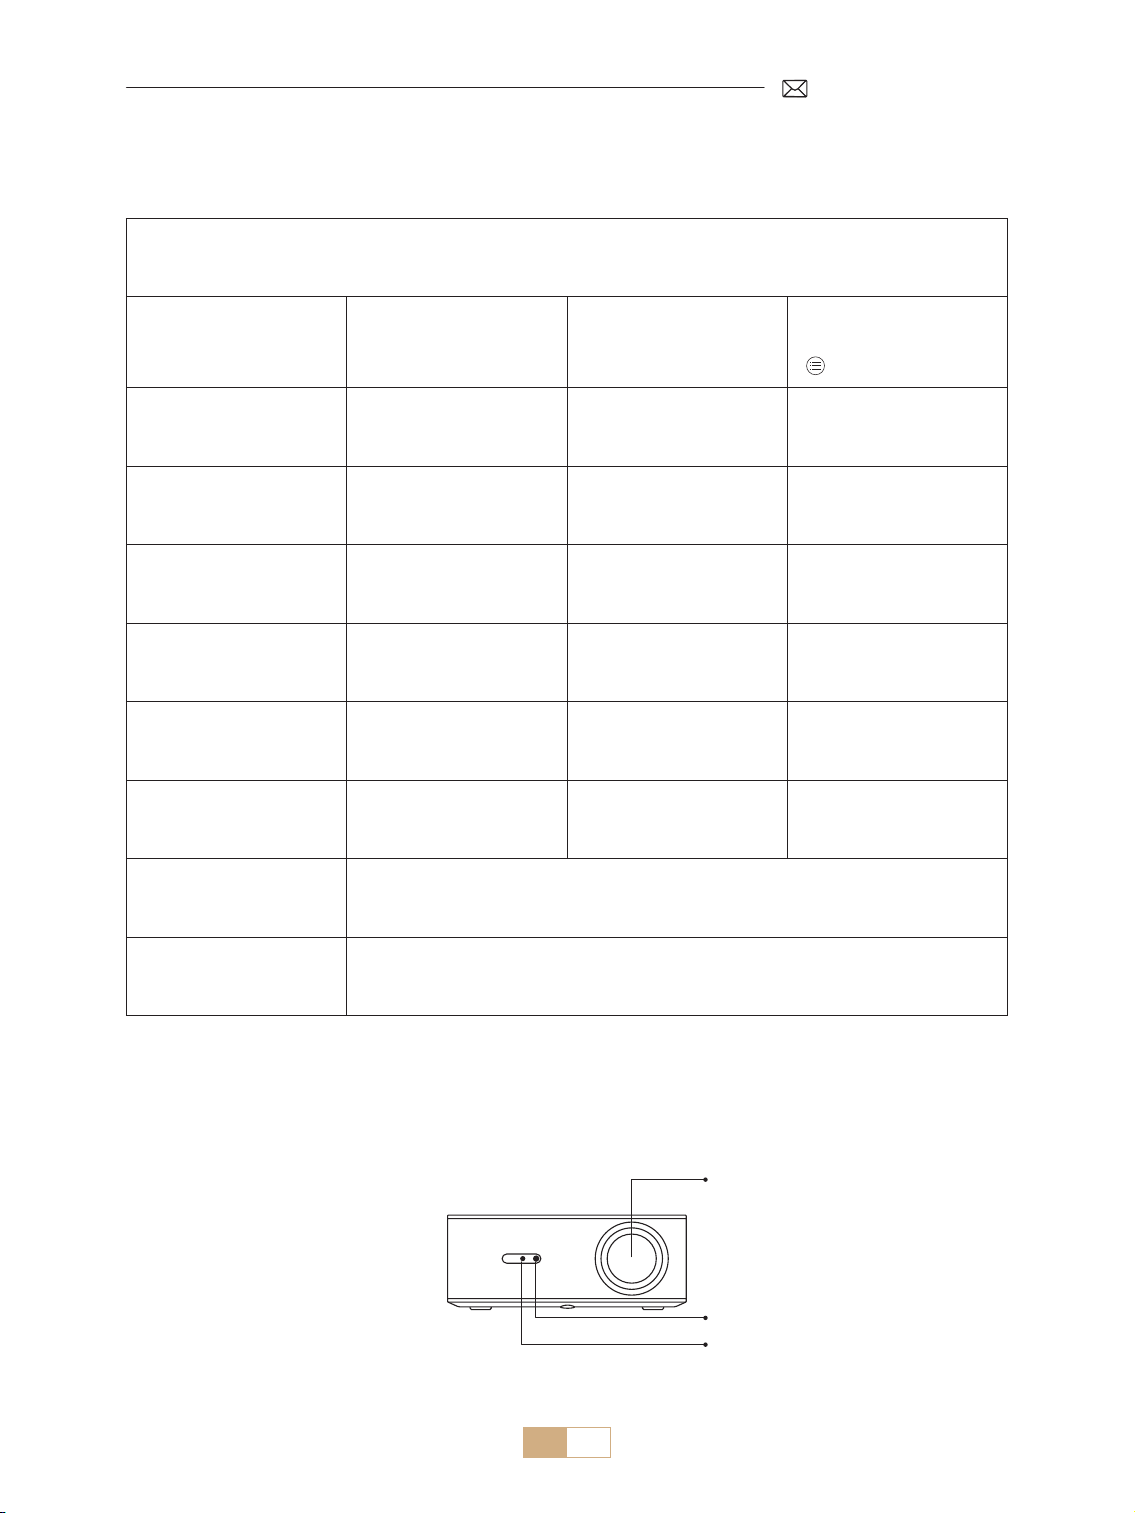
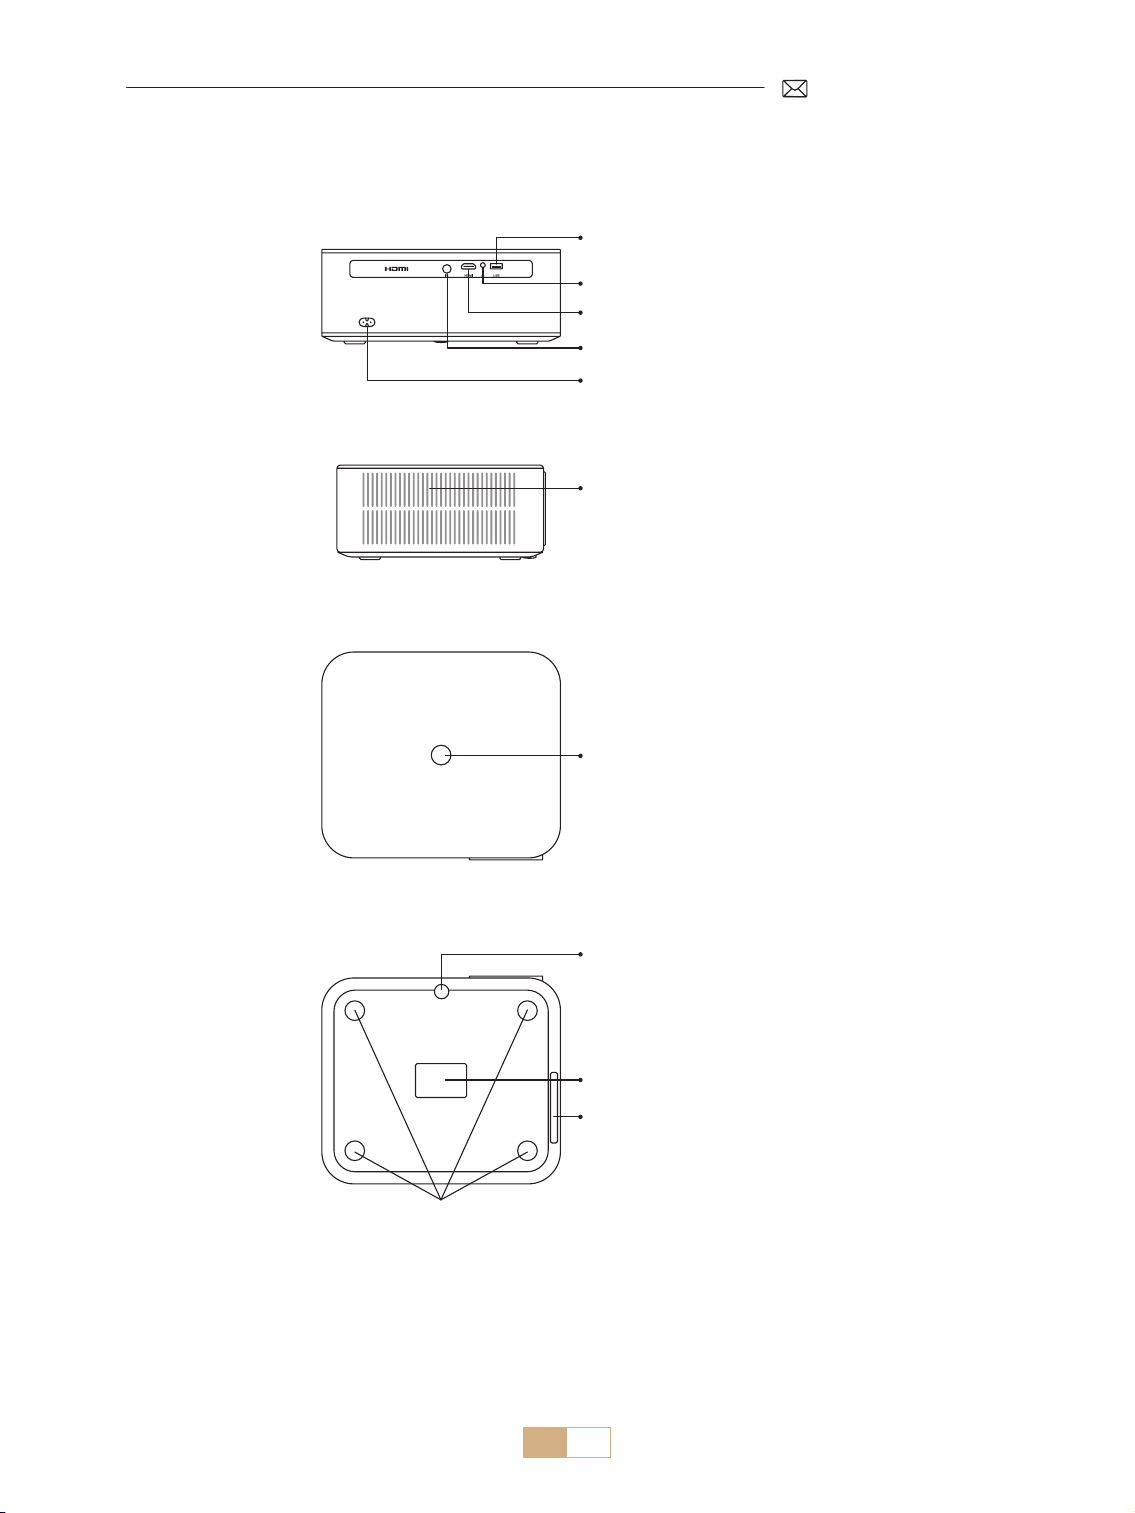
PROJECTOR OVERVIEW
Lens
IR Receiver
Focus Signal Receiver

EN 08
USB Port
3.5mm Audio Outport
HDMI Port
IR Receiver
Power Socket
Power Button
Dust Cleaning Port
Dust Filter
M5*12mm Mounting Hole
Projection Height
Adjustment
Air Outlet
* For ceiling mounting, locate the four holes at the bottom of the projector. Slowly remove the four rubber
blocks to reveal the mounting holes (M5*12mm) for ceiling installation.
To clean the lens, peel o the bottom product label and open the cover under it, carefully wiping the inner
screen with a clean cotton swab with alcohol. Exercise caution to avoid causing any damage. Please refer to the
cleaning video on the detail page or contact us.
EN 09
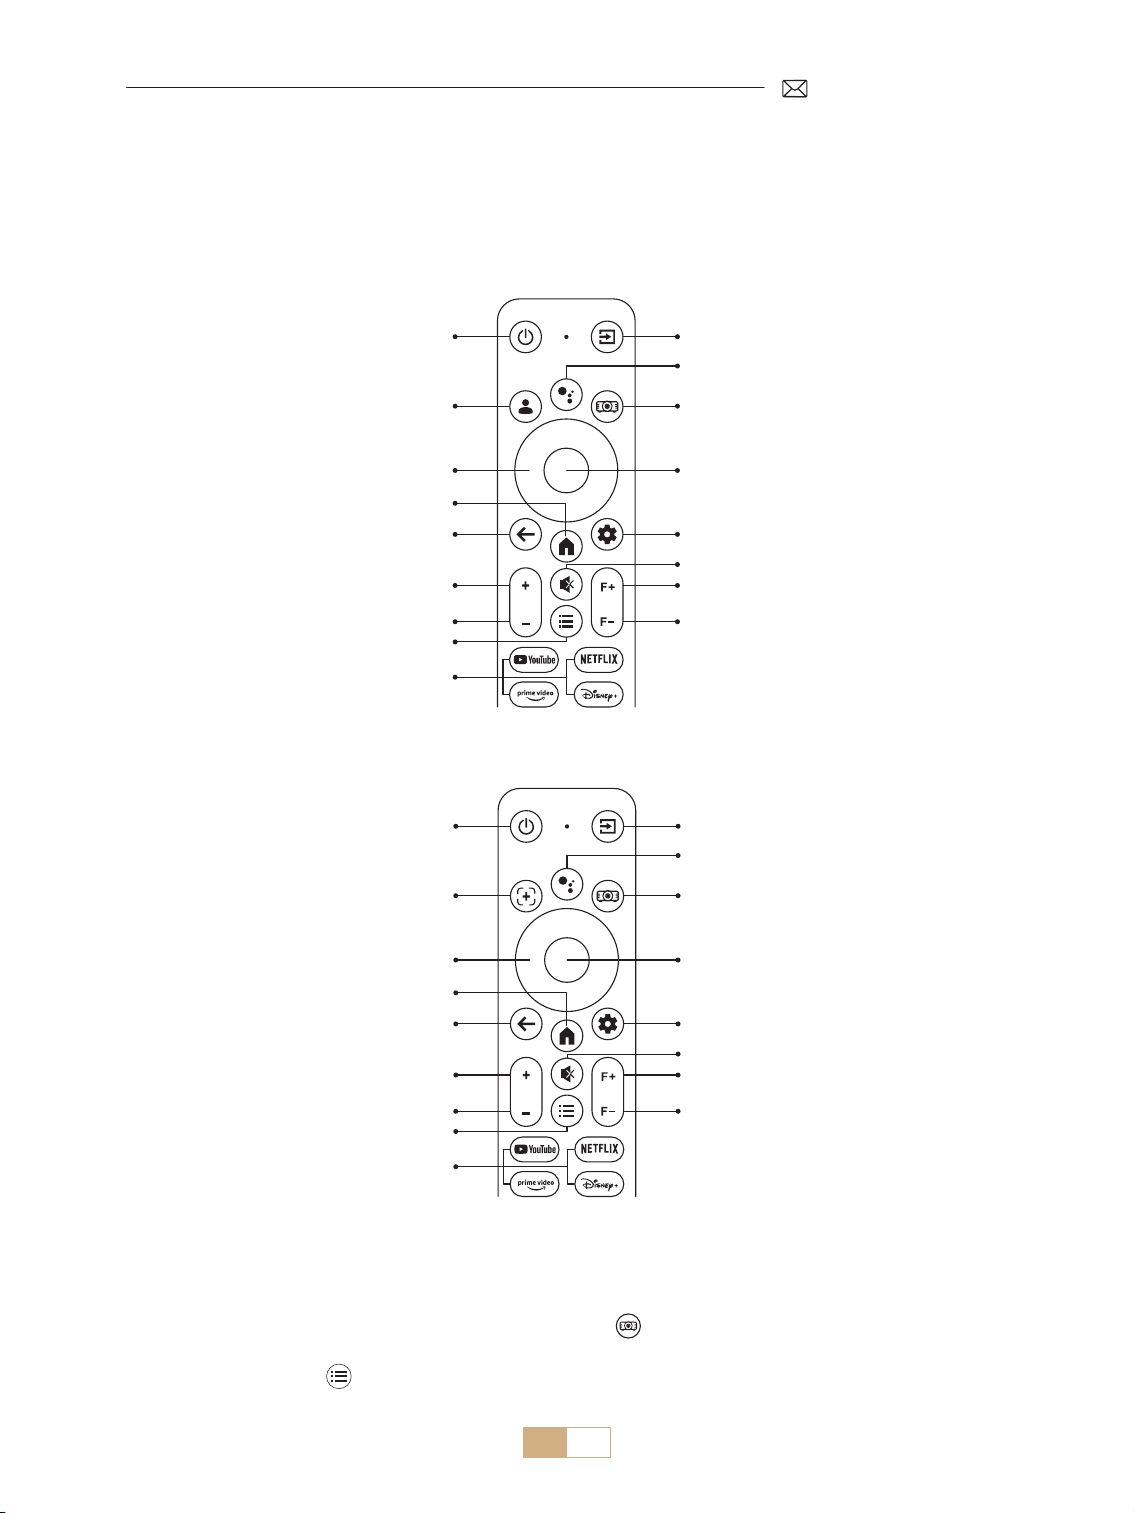
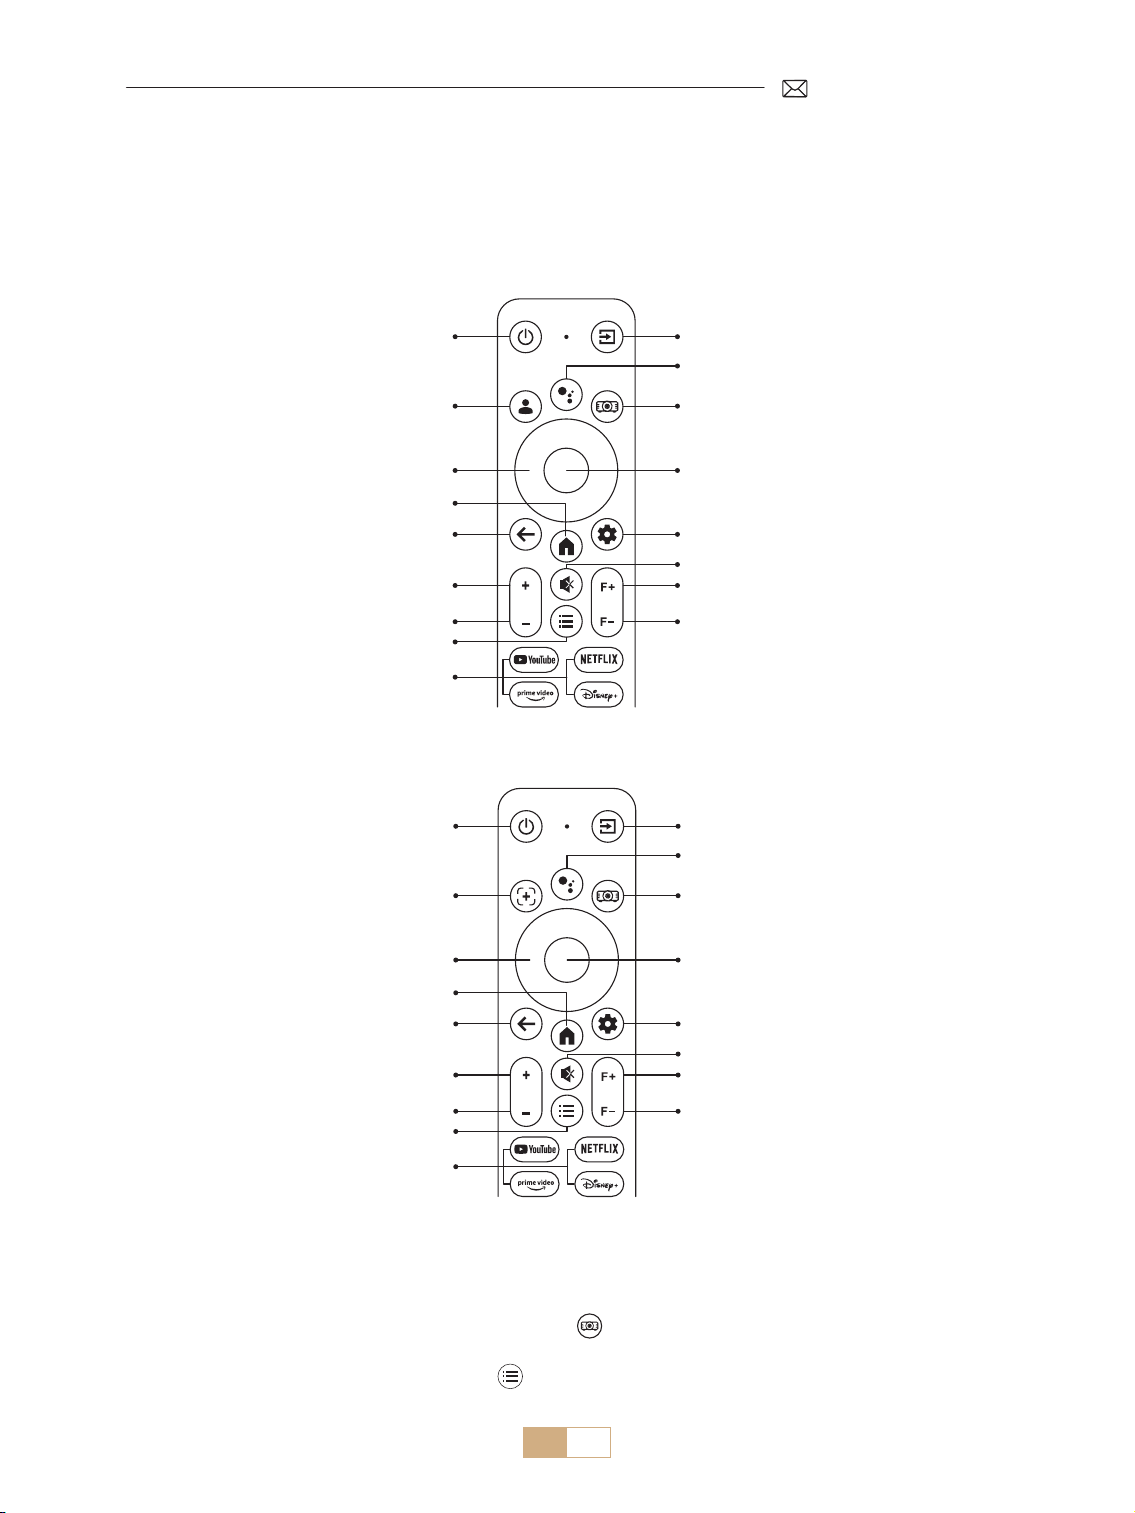
REMOTE CONTROL
Power Button Source Button
Dongle Voice
Projector Settings
OK
Dongle Settings
Mute
Focus +
Focus
Arrow Key
Home
Back
Volume +
Volume
Menu
APP
Google Account
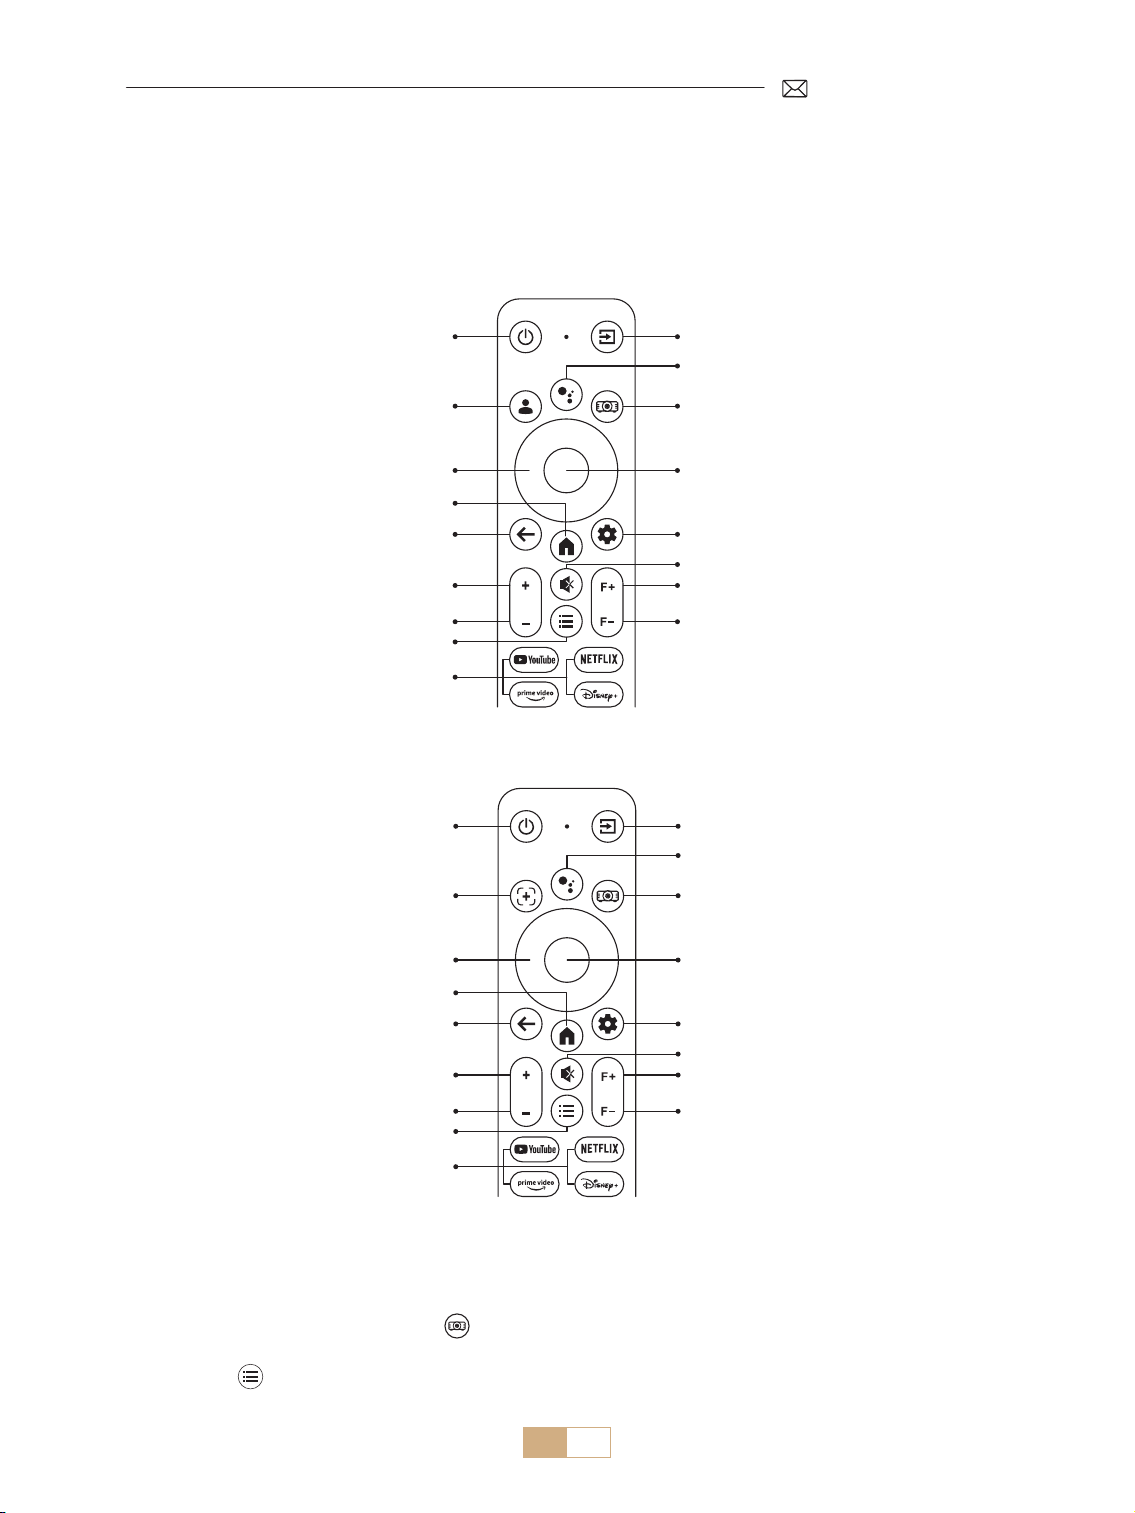
There are two versions of the remote control:
Version 1
Power Button Source Button
Dongle Voice
Projector Settings
OK
Dongle Settings
Mute
Focus +
Focus
Arrow Key
Home
Back
Volume +
Volume
Menu
APP
Auto Focus/
Keystone Correction
Version 2
Important:
1. Install 2 pieces of AAA batteries(not included)into the remote before using it.
2. If the signal source defaults to GTV mode,the Google TV page will automatically turn on when the projectoris
turned on.
3. In the USB or HDMI interface, press button to access system settings to adjust video/sound settings,
among other options.
4. Short press button twice to adjust aspect ratio 16:9 or 4:3.

EN 10
INSTALLATION
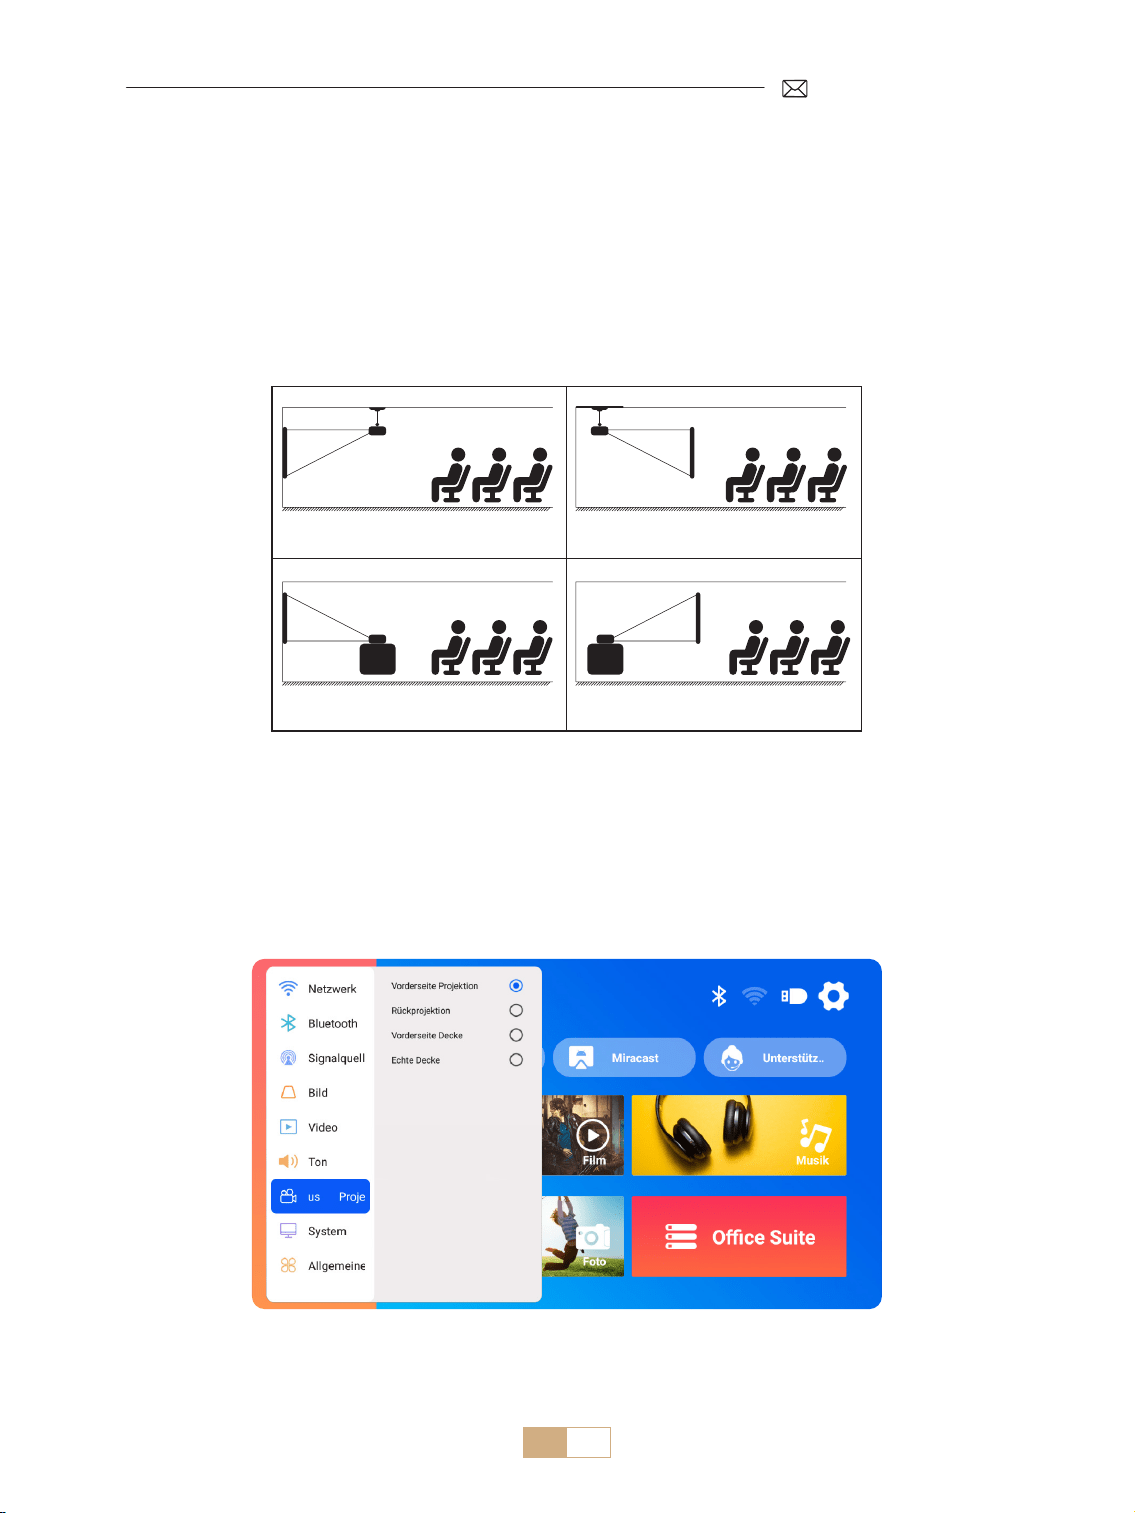
1.Installation Method
The projector can be mounted on the ceiling using ceiling mount or placed on a stable desk, depending on
the operating environment and requirements. Additionally, the projector can be installed using the following
methods
1. Front projection ceiling mount 2. Rear projection ceiling mount
3. Front projection desk mount 4. Rear projection desk mount
1) Select the [Settings] menu Select the [Projection Mode] option Select your Install Mode and press
"OK" to conrm the projection position(Front Projection/Rear Projection/Front Ceiling/Rear Ceiling).
2) It's recommended to position the projector with its lens symmetrically aligned with the screen. If you need to
adjust the angle, please keep it within 15° and use the keystone correction function to adjust the projection
image.

EN 11
2.Projection Distance and Size
The projector can be mounted on the ceiling using ceiling mount or placed on a stable desk, depending on
the operating environment and requirements. Additionally, the projector can be installed using the following
methods.
The recommended projection distance for this K12 projector is 2.5-3m. The image size depends on the
distance and the projector's throw ratio, which is 1.3:1. Additionally, the projector offers a 50% zoom out
feature.
Meter
Feet
0.8
2.6
30''
50''
80''
100''
120''
150''
1.4
4.5
2.3
7.5
2.8
9.1
3.4
11.1
4.3
14.1
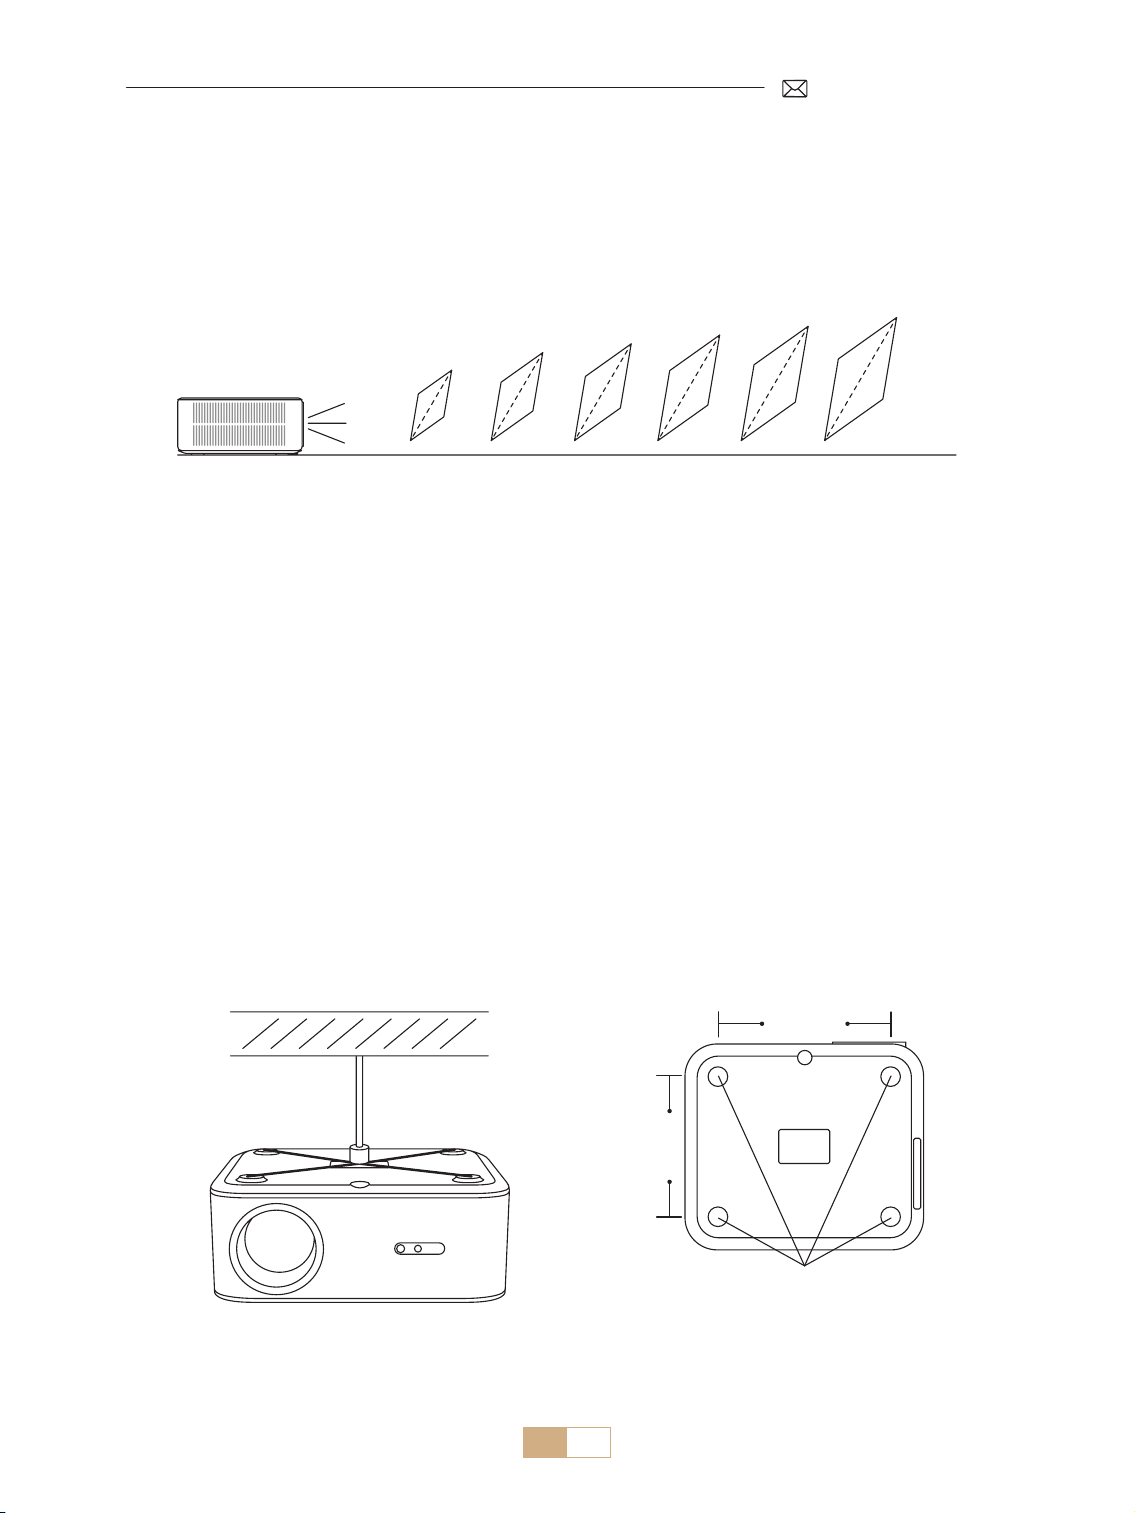
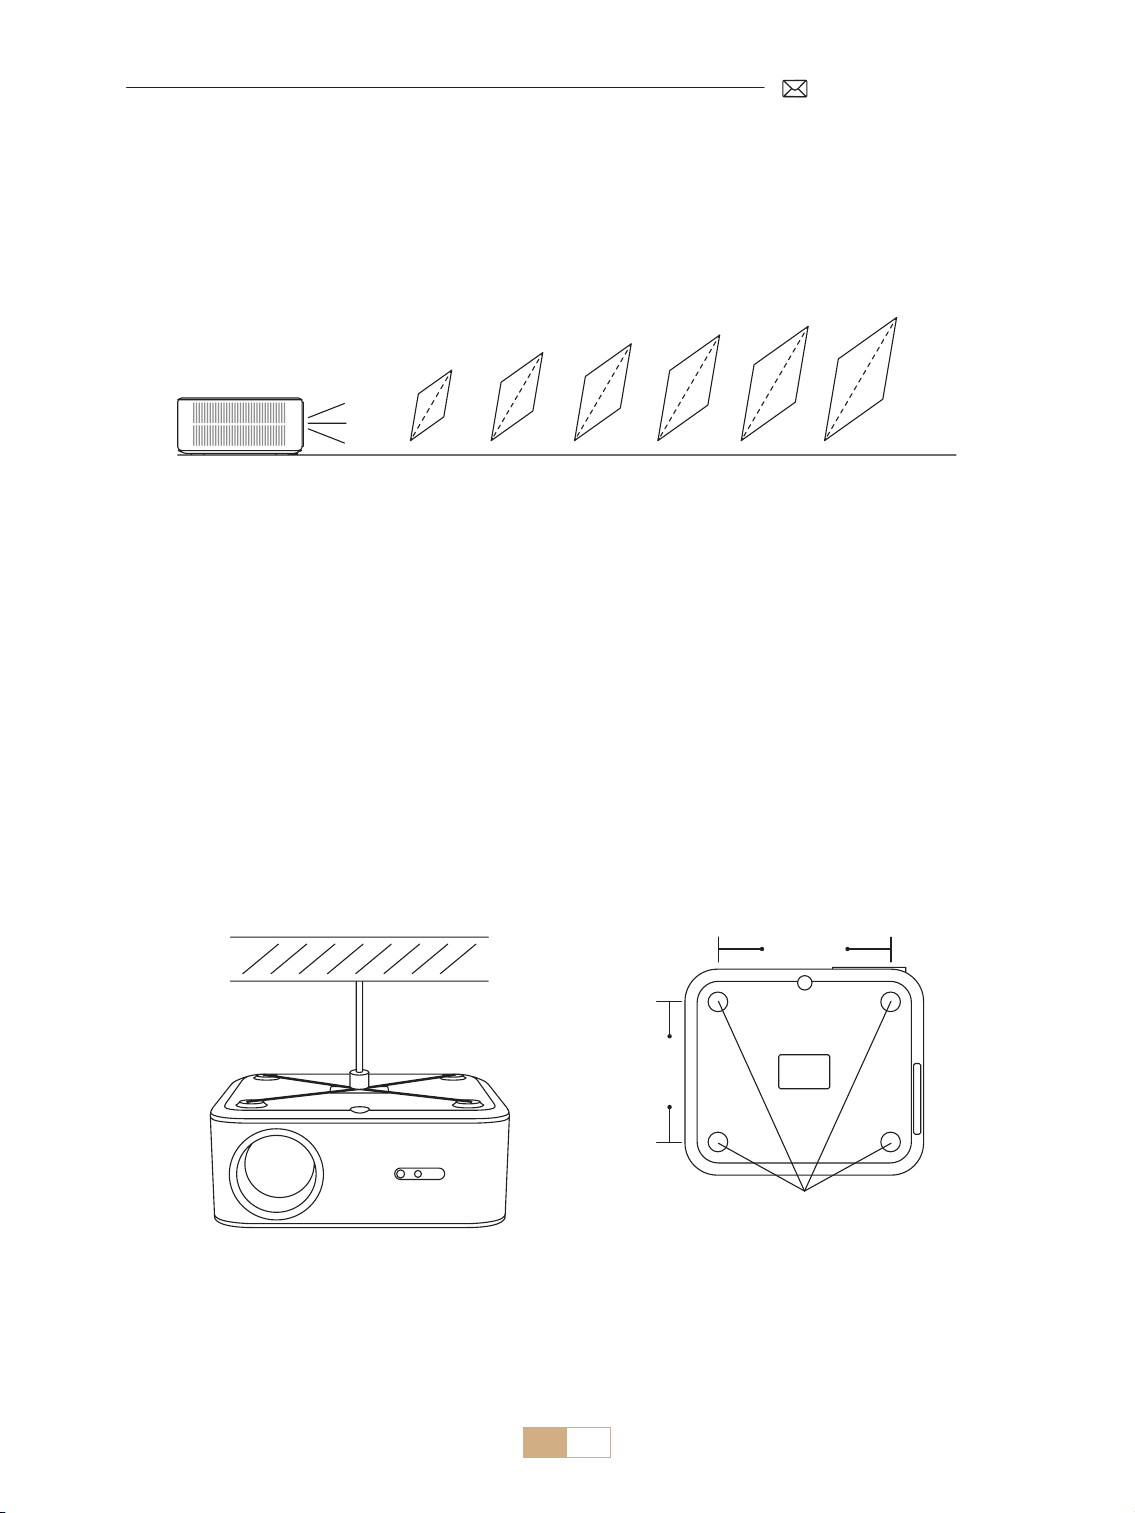
3.Ceiling Installation
1) Position the projector perpendicular to the ground and centered at the midpoint of the screen. This will help
achieve a at, properly aligned projection image.
2) To adjust the tilt base, unscrew the support rod at the bottom of the projector, For a visual guide, refer to the
gure provided below.
3) For the ceiling mount, there are 4 holes(M5*12mm) at the bottom of the projector. Please turn the projector
upside down, after removing the rubber pads you can nd the ceiling mount holes as shown in the picture
below.
NOTE: The hanging bracket or ceiling mount stand is not included
M5*12mm Mounting Hole
200mm
165mm

EN 12
Powering On:
• Begin by removing the lens cap and connecting the projector to the power source via the power cable.
• Once the red indicator light is illuminated, press the power button on the remote control or the power button
on the projector's control panel to initiate the startup sequence. The indicator light will change from red to
blue, signalling that the projector is now on.
• When the projector powers on, it will automatically enable the [Auto Keystone After Movement] and [Boot
Auto Focus] features. If the image is not a standard rectangle or appears out of focus, manually adjust the
keystone settings and use the 'F+' and 'F ' focus buttons on the remote control to rene the image clarity. If
the image remains blurry, consider adjusting the projection distance and angle.
Powering O:
• To shut down the projector, press the power button on the remote control or the power button on the
projector's control panel.
• The indicator light will transition from blue to red, indicating that the projector has been successfully turned
o.
PROJECTION IMAGE SETTINGS
STARTING PROJECTOR
1.Keystone Correction
1.1 Auto Keystone/Focus
Select the [Settings] menu Select the [Picture] option. Then select the [Auto Keystone/Focus] and click
"OK" button to activate the function. Then it will automatically focus the picture based on the projection
distance from the screen and adjust the picture to a rectangle when you change the projection angle.
If the picture is blurry, press the focus button ''F+'' ''F '' on the remote control to adjust the lens focus, until the
picture is clear. (*There is no need to press the OK button after the screen is clear)
NOTE:
1) If you have already set the projector's location, it is advisable to turn o the auto focus and auto keystone
correction features in the settings for a better viewing experience.
2) The side projection angle of the projector should not exceed 15° . Ensure there are no obstacles in front of
the projector, as they may interfere with the automatic keystone correction function.
EN 13
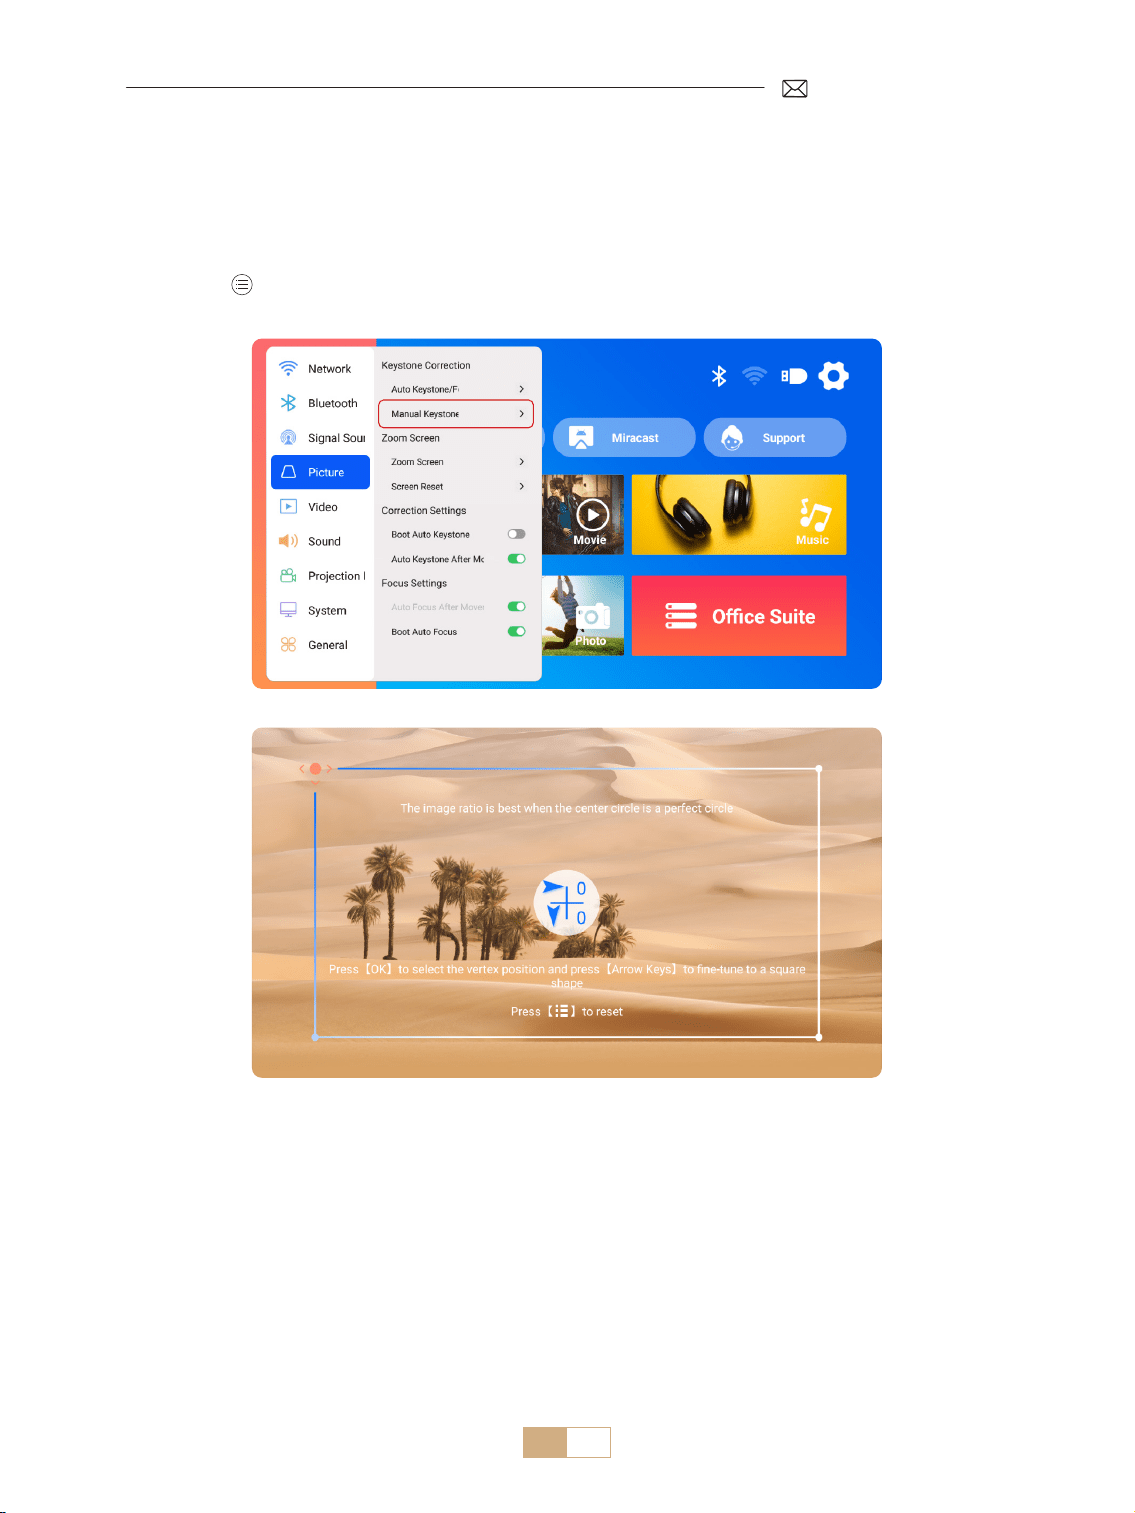
1.2 Manual Keystone
Select the [Settings] menu Select the [Picture] Option. Then select the [Manual Keystone] and click “OK”
button to pick the point you want to adjust at rst, and then press the arrow keys (“▼”“▶” “▲”“◀”) to set the
value needed as shown below.
Reset: Press to reset the image to the original keystone correction settings.
EN 14
2.Zoom Screen
2.1 Zoom Screen
2.2 Screen Reset
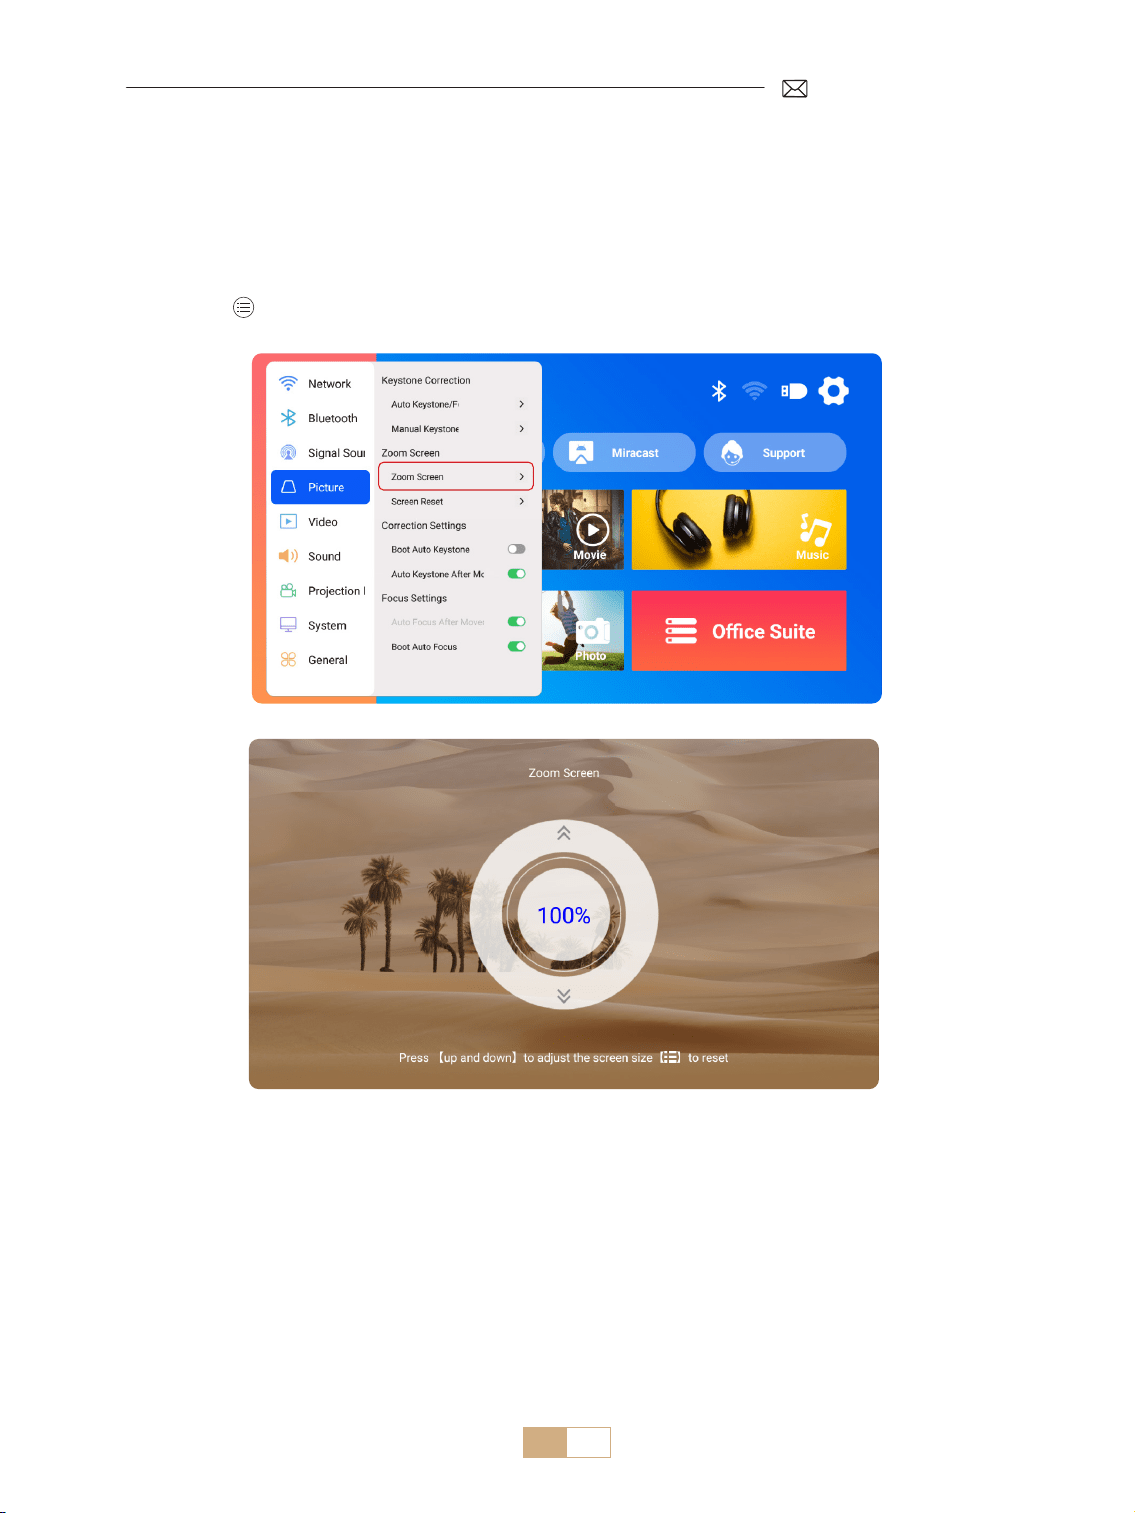
Select the [Settings] menu Select the [Picture] option. Then select the [Zoom Screen], press the button “▲”
“▼” to set the value needed as shown below, the projection screen can be zoomed from 100% to 50%.
Reset: Press and the image will restore to the original zoom settings.
This function clears any previously set zoom and keystone correction data, restoring the image to its original
size and shape.

EN 15
ROJECTOR INPUT SIGNAL SWITCHING
1.Select The Signal Source
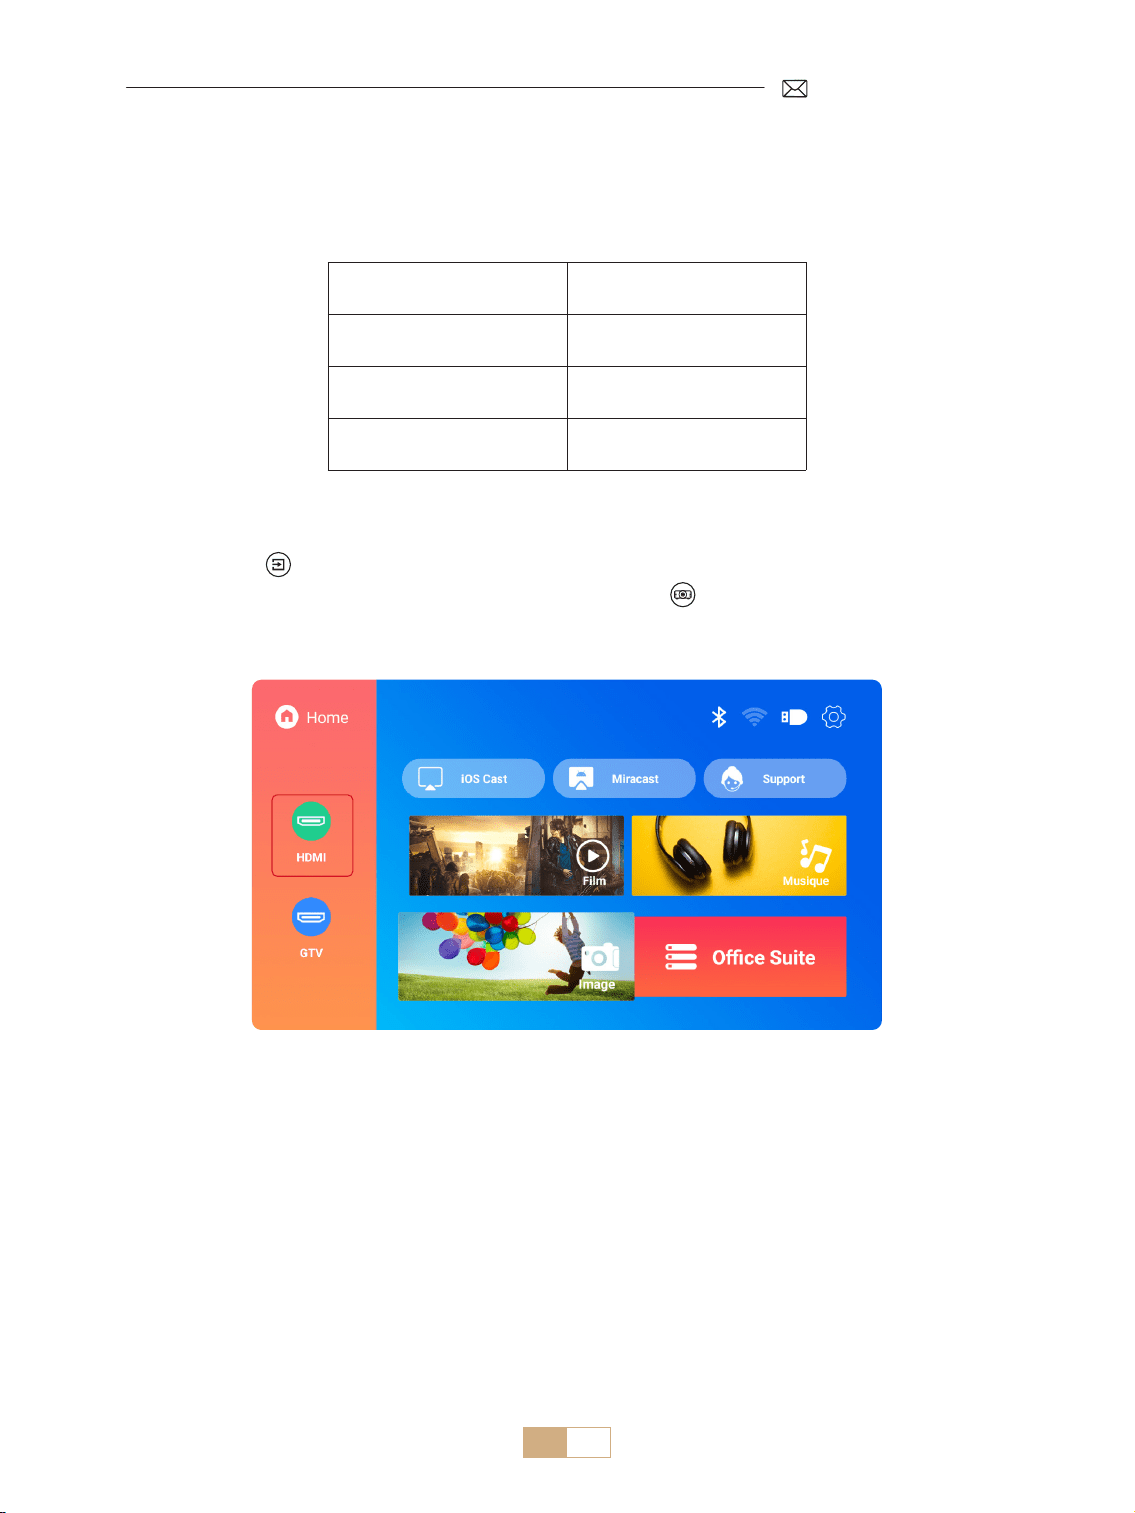
1.1 Select The HDMI Input Signal Source
1) Select the desired input signal source (eg.,HDMI) on the home page, or you can press the [ ] button on the
remote control to select the corresponding signal source.
2) When playing a video via HDMI, press button , select [Video] or [Sound] to adjust brightness, contrast,
and other settings as needed.
Menu Menu Included
Source HOME/HDMI/GTV
Boot Source Close/HDMI/GTV
HDMI Plug n play On/O

EN 16
When using the K12 projector's GTV for the rst time, please follow the steps below to set it up.
1) After selecting GTV as the signal source, press and hold the " " and " " on the remote control
simultaneously to pair them. (Note: Pair the remote control only during the rst use.)
2) Upon entering GTV, choose the appropriate language and country settings.
3) Log in to your Google account to access personalized content.
4) Prepare to load all the built in GTV apps. This process may take approximately 10 minutes, depending on
your network conditions.
5) After loading the APPs, you can enjoy the massive content in GTV.
1.2 Select The GTV Signal Source
The K12 projector features built in Google TV (officially licensed), enabling you to easily access and enjoy
your favorite apps and videos. With this projector, you can explore a vast library of lms and television shows
without needing an additional Fire TV stick.
EN 17
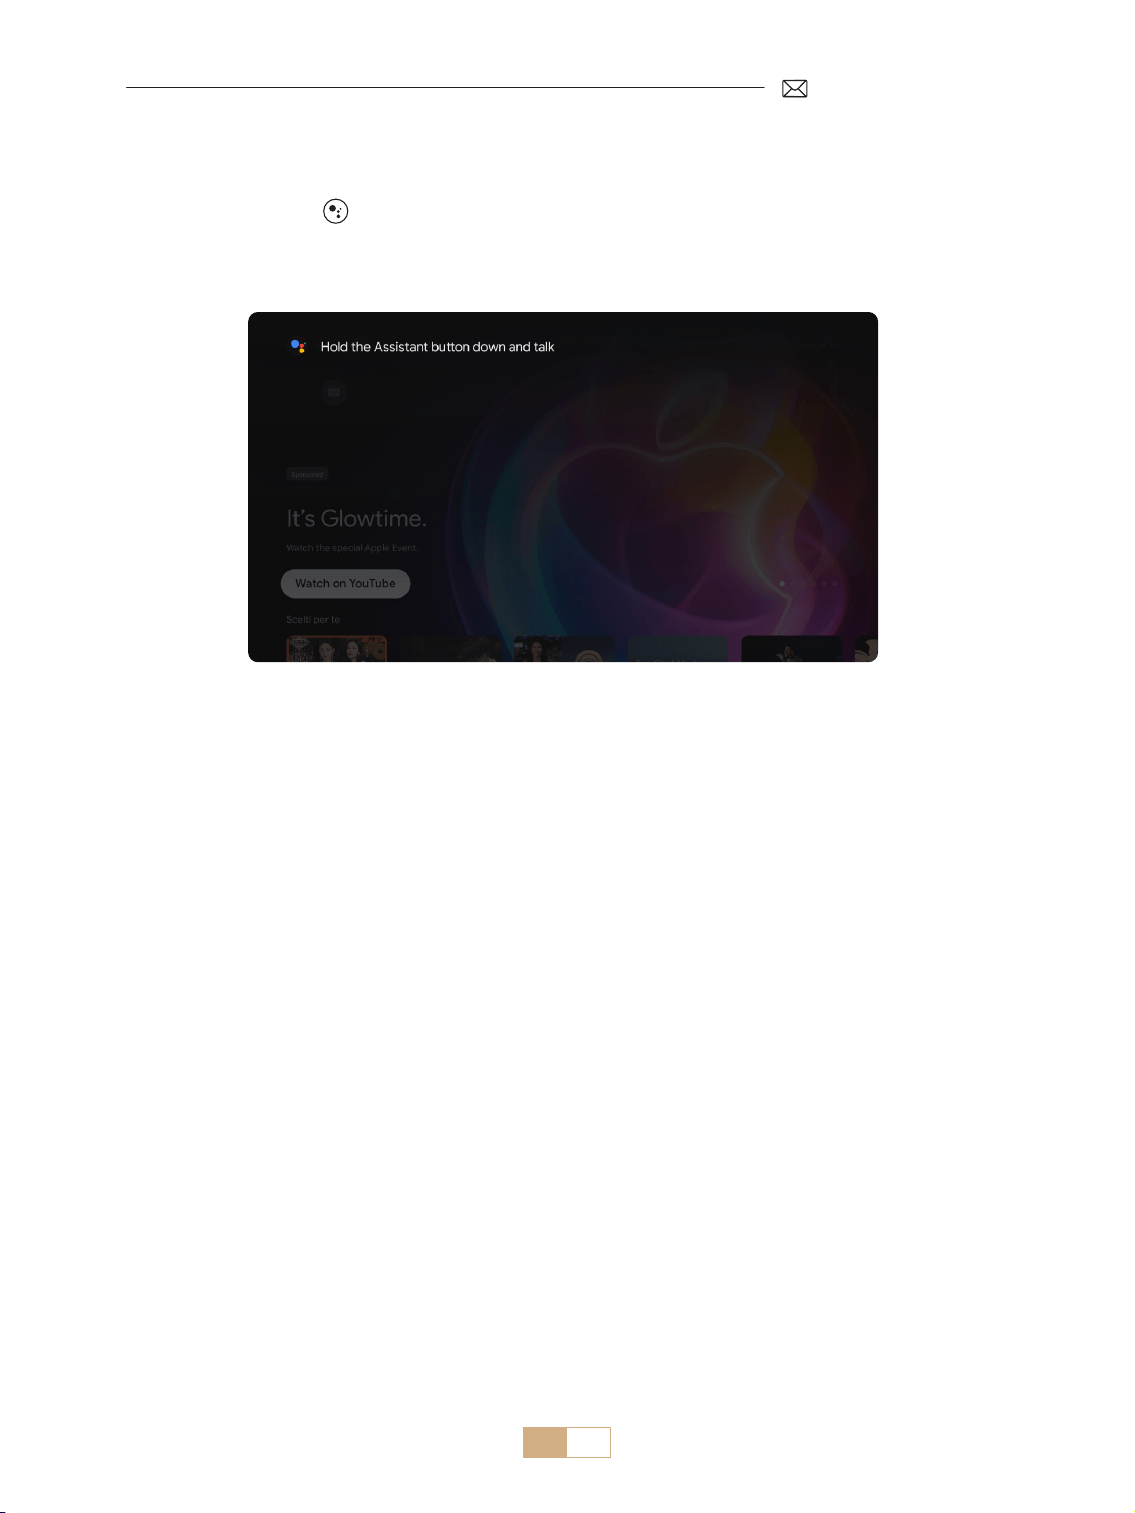
1.3 Voice Assistant in GTV
1) While speaking, hold [ ] on the remote control.
2) Voice Assistant can only be used within the Google TV (GTV) interface.
EN 18
2.1 WiFi Settings
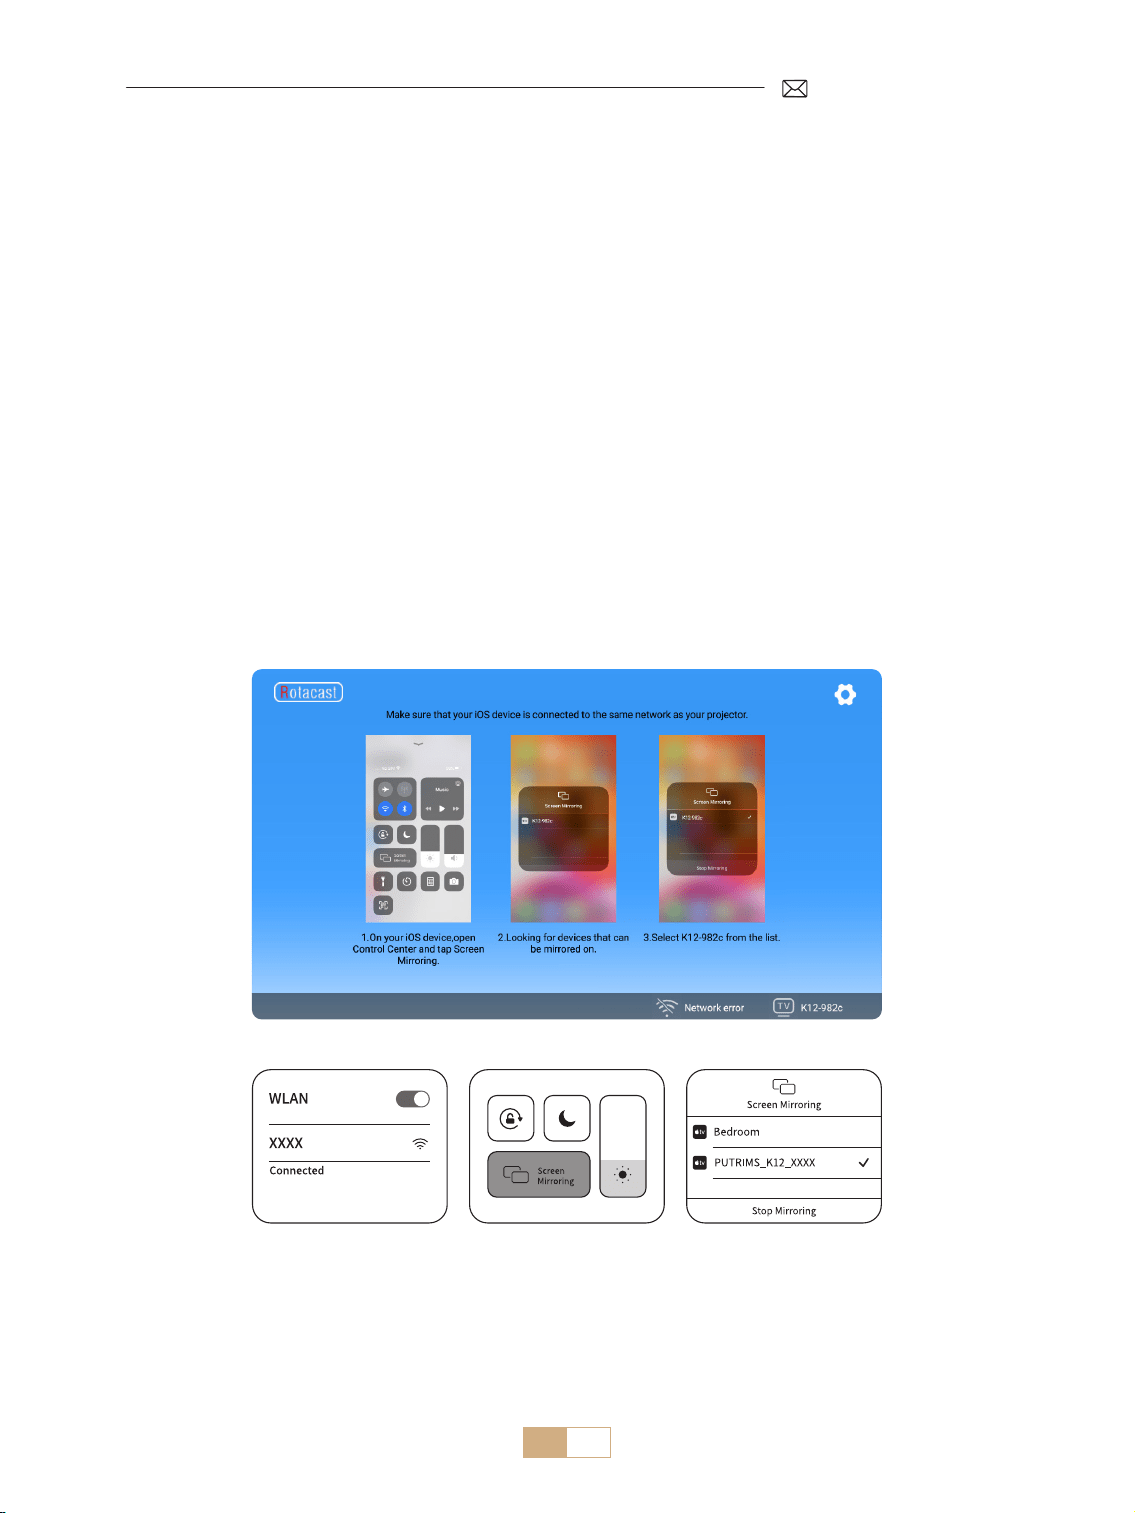
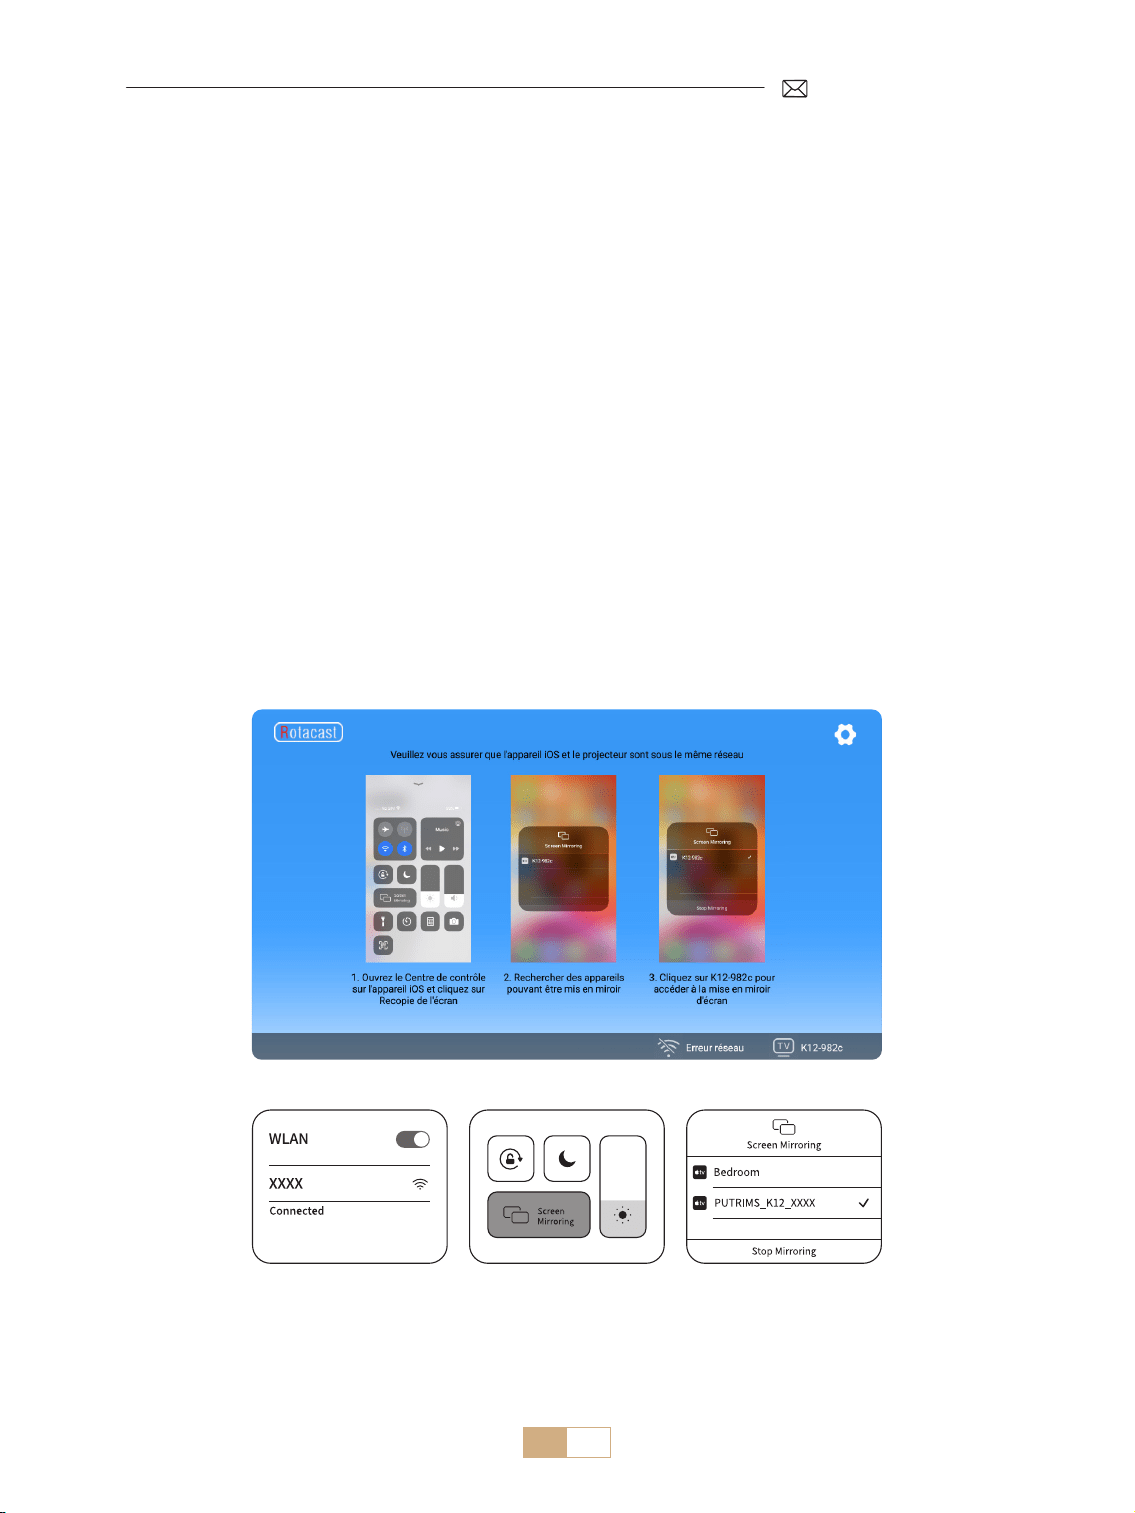
2.2 For iOS Devices (iOS Cast)
1) Select the [Settings] menu Select the [Network]>[WiFi Settings]
2) Screen mirroring requires a strong wireless WiFi signal, ensure that your home network is functioning well.
position your mobile device close to the projector. A distance of 3.28 feet (approximately 1 meter) is optimal.
The video resolution will dynamically adjust based on the strength of your Wi Fi signal.
3) Due to copyright restrictions, projectors do not support wireless mirroring of streaming apps such as Netix
or Disney directly from your phone. To watch streaming content, please select GTV signal source and
download the corresponding apps.
Attention: Ensure that your iOS device is connected to the same Wi Fi network as your projector.
1) Connect the projector to your home Wi Fi
2) Return to the projector's home page Select [iOS Cast] Stay on this interface
3) Access the [Control Center] on your iOS device Select the [Screen Mirroring] function Select and
connect the iOS Cast receiver named [K12-xxxx]
2.WIRELESS CONNECTION
EN 19
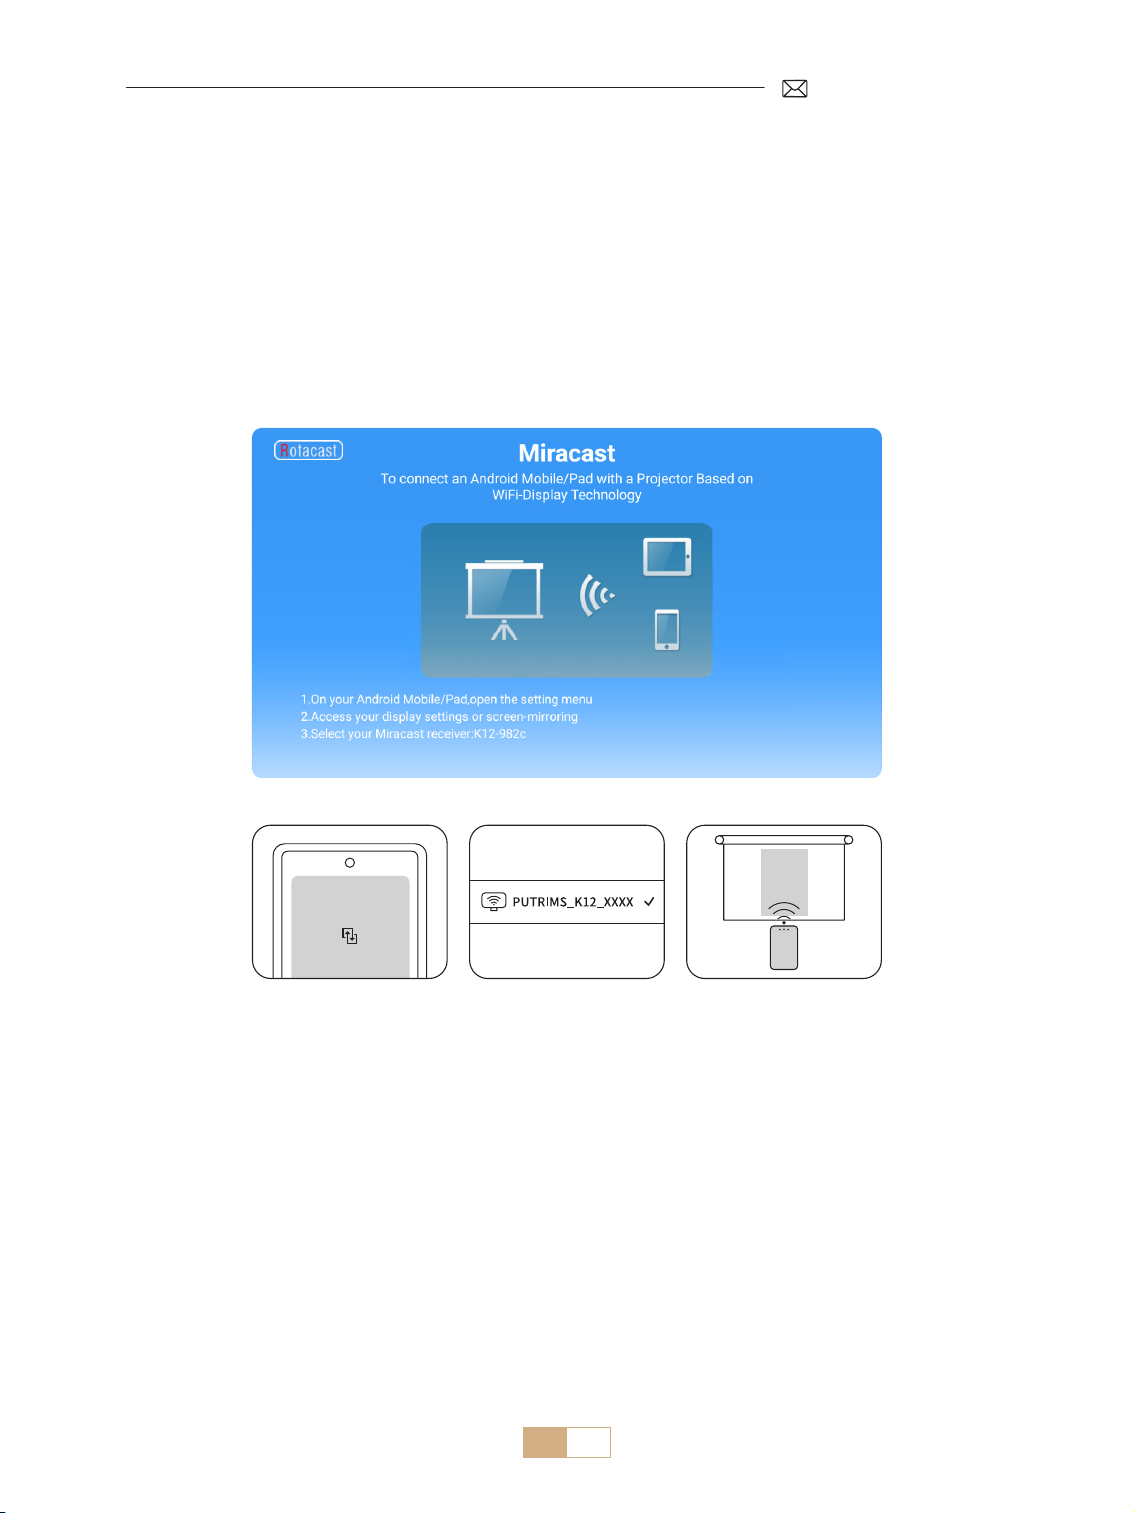
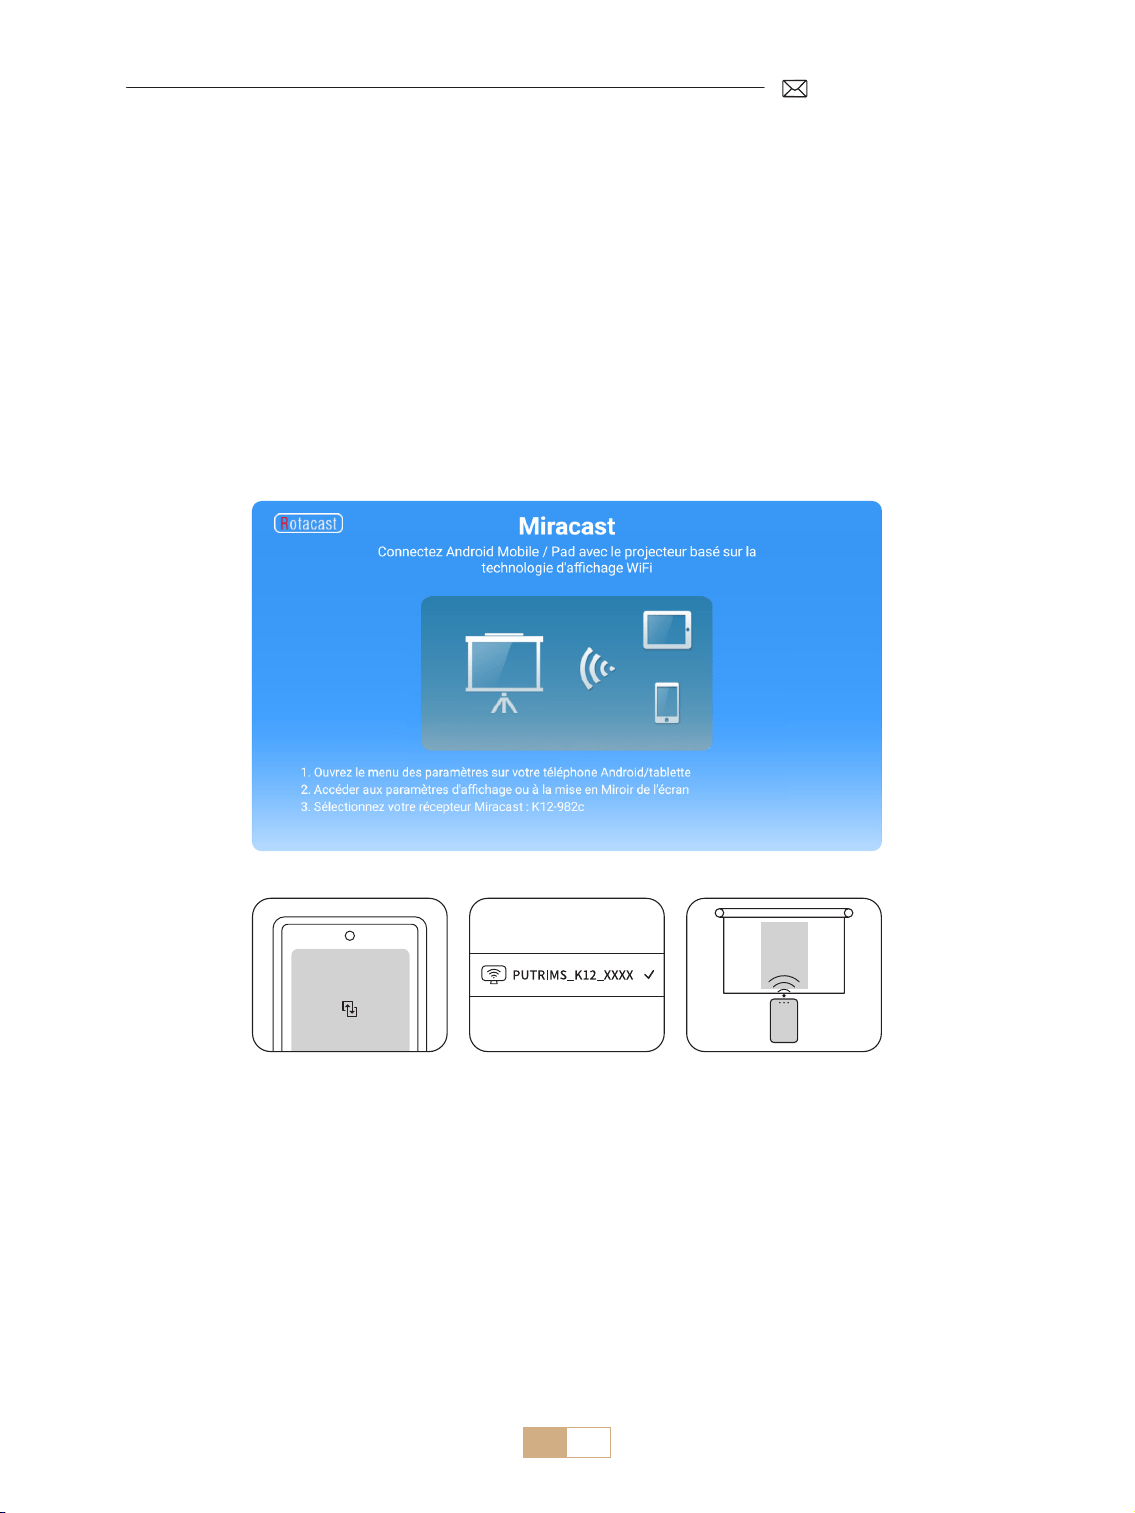
2.2 For Android Devices (Miracast)
Attention: To activate this function, please ensure your Android device supports Multi Screen/Wireless Display.
The name of “Multi Screen” may vary depending on various brands of Android device. Make sure to enable
the Wi Fi function on your Android device (It is not necessary to connect to any Wi Fi network ). Pixel series
mobiles use Google Chromecast, which requires a separate casting device (not included).
1) Select [Miracast] on the projector's home page Stay on this interface
2) Access the [Control Center] on your Android device, select [Screen Mirroring/Smart View]
3) Select the Miracast receiver named [K12-xxxx] and connect

EN 20
3.Bluetooth Settings
1) Turn on your Bluetooth Speaker.
2) Turn on the [Bluetooth Settings] of your projector.
3) Select your Bluetooth speaker to connect.
NOTE:
1) Ensure that any other devices previously paired with your Bluetooth speaker are disconnected rst.
2) This step only applies to connecting Bluetooth speakers, not mobile phones.
3) If you have any questions, please feel free to email PUTRIMS via: support@putrims.com

EN 21
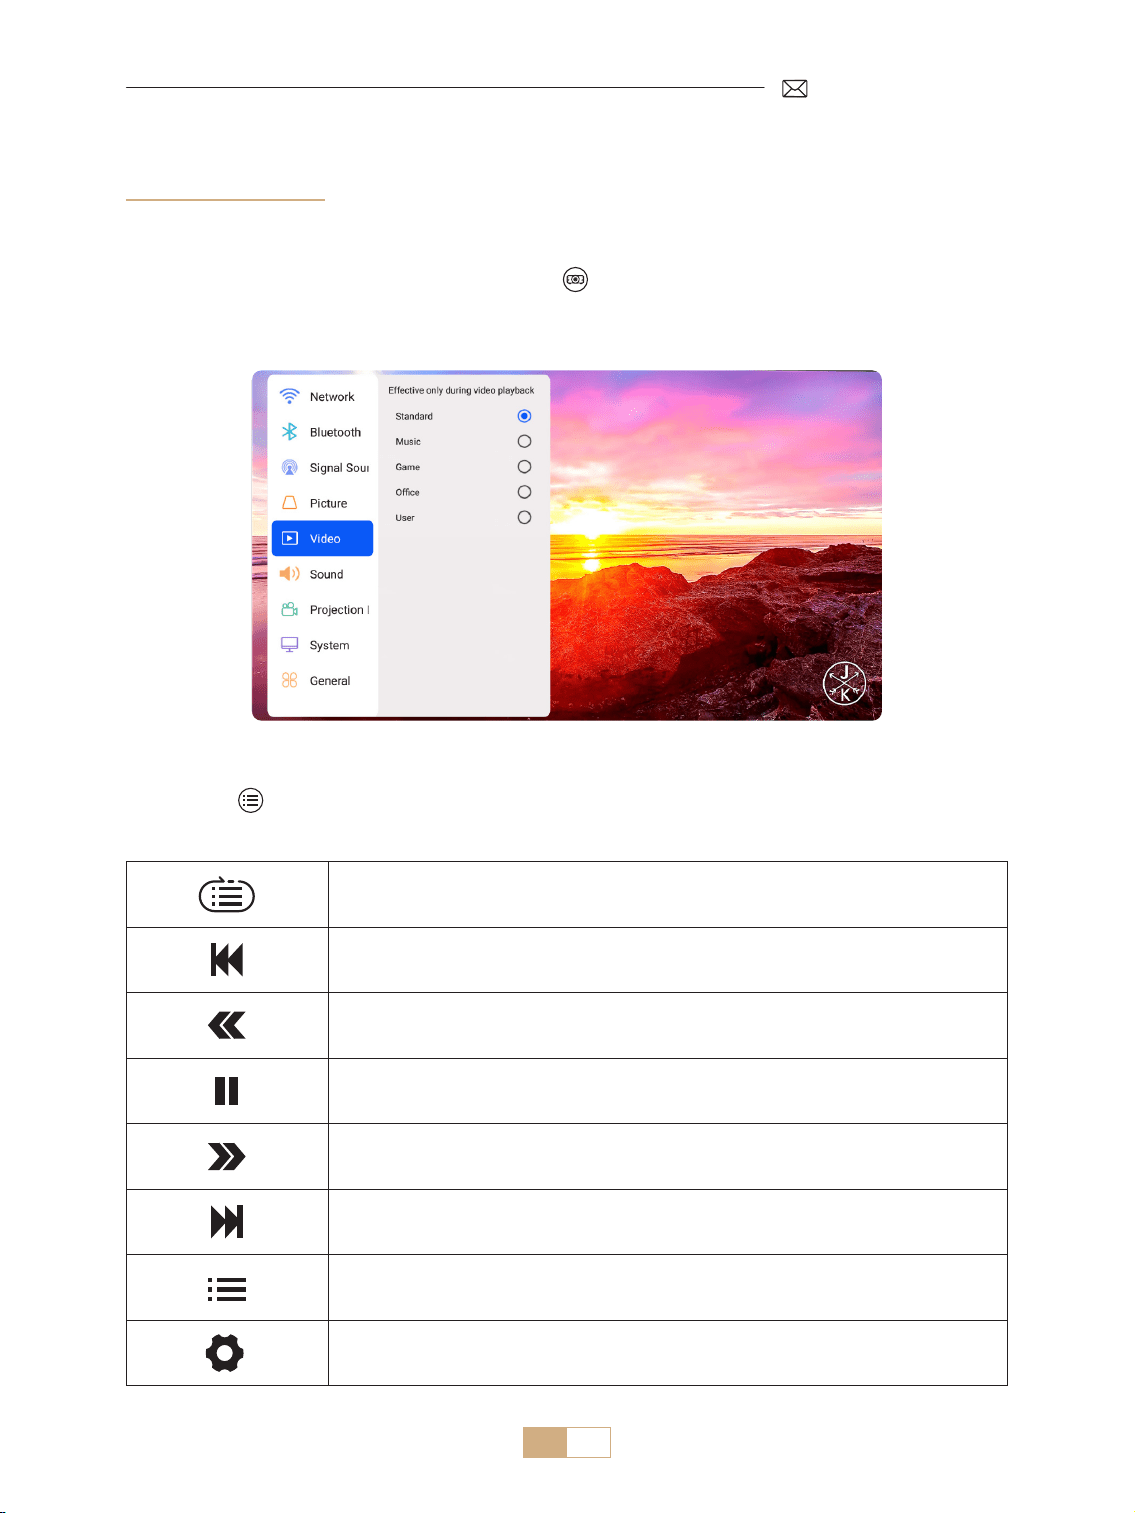
1) Go to the home page Select [Settings] Select the [Video]. You can choose the video mode as you need:
Standard/Music/Game/Oce/User.
2) When selecting the mode as "User", you can adjust the parameters of brightness, sharpness, contrast, and
saturation in a personalized way.
NOTE: The eect of the selected video mode will only take eect under video playback.
1) Go to the home page Select [Settings] Select the [Sound]. You can choose the video mode as you need:
Standard/News/Music/Movie/Sports/User.
2) When selected the mode as "User", you can adjust the sound frequency in a personalized way.
NOTE: The eect of the selected sound mode will only take eect under video playback
Key Tone: Enable or disable key tones.
OTHER PROJECTION SETTINGS
1.Video Mode
2.Sound Mode

EN 22
Note for USB File Upgrade:
1) Copy the upgrade package to the root directory of a USB drive.
2) Press and hold the power button on the device and the system will automatically detect the upgrade
package and begin the upgrade process.
NOTE: Before upgrading, please set the power on mode to standby.
Go to home page Select [Settings] Select the [System].
3.System
Menu Menu Included Function
About this machine
System version number/WiFi MAC
Address/Bluetooth MAC Address
Conrm the version info and
identify the device on network or
Bluetooth
System Upgrade
Online Upgrade(OTA)
USB Upgrade (USB)
Upgrade the software via USB local
le or online
Restore Factory Restore factory default settings

EN 23
Go to home page Select [Settings] Select the [General].
4.General
Menu Content Function
Language settings
English/Français/Italiano/
Espanol/Deutsche/ 日本語 and
other languages
Choose the preferred language
Power on Mode Power on Standby/Power on
Auto power on / stand by after
plug in
Sleep Timer
O/10min/20min/30min/60min/
90min/120min/180min/240min
Set the sleep time
Screensaver Timeout Never/1min/5min/10min
Set the projector screen saver
time
ARC O/On Connect speaker via HDMI cable

EN 24
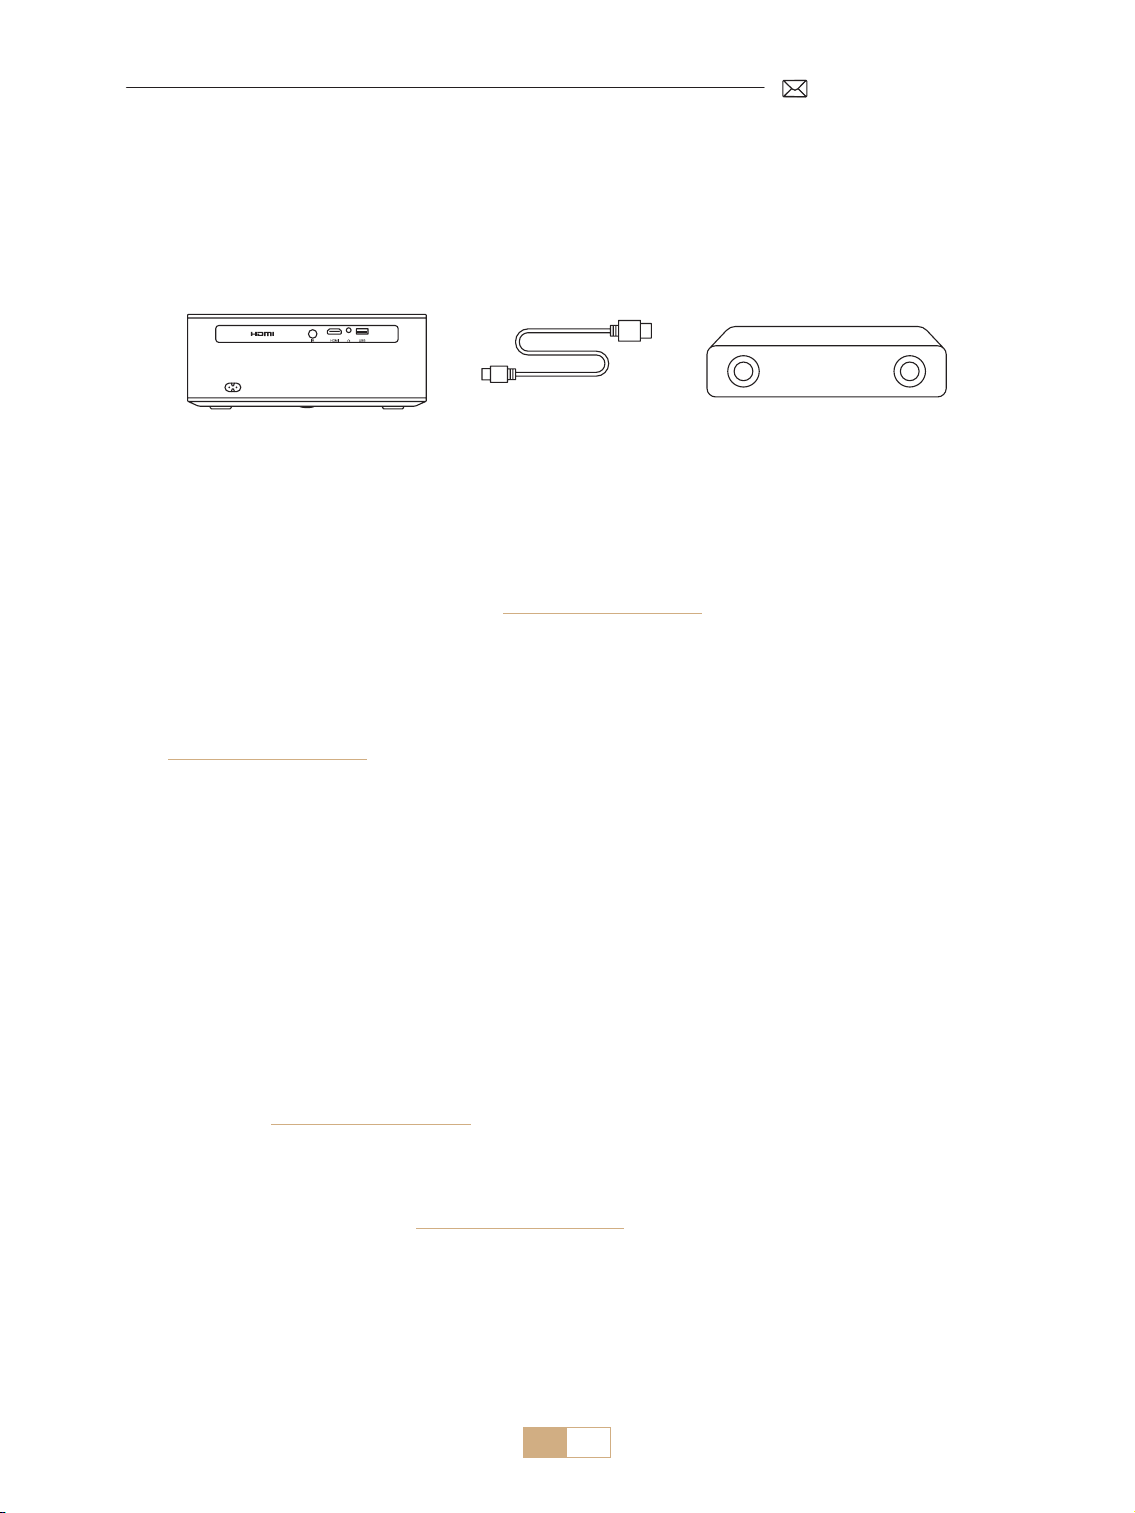
The PUTRIMS K12 oers HDMI, USB, and 3.5mm audio jack interfaces. Connect your device (e.g., PC, phone,
DVD player, soundbar, USB drive, PS4) to the suitable port.
SIGNAL LINES CONNECTION
1.USB Multimedia Connection
1.1 USB Format
1) Insert a USB drive into the projector’s port; it will be recognized automatically.
2) From the main interface, select a category (Movie, Music, Photo, Oce Suite) and press the "OK" button on
the remote control to access the les.
Note: Selecting the wrong le type will prevent you from viewing the corresponding les.
Warm Tips: If the projector cannot recognize the USB disk, please refer to the following methods to solve the
problem.
Please conrm whether your USB disk meets the following formats.
USB Format
FAT32: 8G/16G/32G
NTFS: 64G
Unsupported format: ExFAT
Attention: If the projector cannot recognize the contents of the USB flash drive,
please check whether your format of USB ash drive is correct.
Video Format
MP4/MKV/3GP/ASF/AVI/FLV/MPG/RMVB/TS/VOB, etc. (Support for video codecs may
vary; contact us for additional support)
Audio Format
AAC/FLAC/M4A/MP3/WAV, etc. (Support for audio codecs may vary; Dolby audio
codecs are not supported; contact us for additional support)
Image Format BMP/PNG/JPEG/JPG/JPE
Documente Format PPT/PDF/Word/Excel/TXT
EN 25
If the problem is still not solved, please send a detailed description of your issue to the following email address:
Single loop, list loop, and looping through the list only once
Switch to the previous video
Fast Backward the video 2X to 32X
Play or pause
Fast Forward the video 2X to 32X
Switch to the next video
Select the playlists in the current folder
Enter into projectot settings to adjust [Video] or [Sound] mode
1.2 Video Play Interface
1) In the USB interface, when playing a video, press [ ] button , then select [Video] or [Sound] to adjust
brightness, contrast, and other settings as needed.
2) Short press to access the video play settings as below.

EN 26
1. Use the included HDMI cable to connect your computer to the K12 projector.
2. Select HDMI source to project any le on your computer.
3. On your laptop, press and hold the "Win+P" keys to change the display mode.
NOTE:
1) If you encounter connection issues, it is likely because the display mode has not been selected correctly.
2) For MacBook, Use a Type C to HDMI adapter to connect your MacBook, or a Mini Display to HDMI adapter to
connect with your MacBook Air (adapter not included).
Computer only: Default setting for display on the main monitor only.
Duplicate: makes all the monitors display the same thing duplicating the desktop on each monitor.
Extend: makes all your monitors act like one big monitor extending the desktop across all of them.
Projector only: Displays only on the secondary monitor like a projector.
To change the screen resolution in Projector Only mode, follow these steps:
Step: Start > Control Panel > Appearance and Personalization > Adjust Screen Resolution
2.Connecting to Laptop&Computer via HDMI
EN 27
K12 supports HDMI ARC, turning on HDMI ARC in [General] settings rst, connect a soundbar via HDMI without
the need for additional audio cables.
3.Connecting to Speaker
(HDMI)
Thank you for selecting the PUTRIMS K12 projector. We provide 2 year warranty for K12 projector. If you have
any questions, please feel free to contact us via support@putrims.com.
We have compiled some frequently asked questions and their corresponding answers to assist you better.
Q1: The WiFi connection is unstable. How can I resolve this issue?
To address WiFi connectivity issues, rst, ensure that your home network is functioning well. Additionally, keep
the distance between your phone and the projector within 1 meter. If the problem persists, please reach out to
us at [email protected]om for further assistance.
Q2: The remote control and projector cannot communicate.
1. Is the power switch above the projector on or o?
2. Are the remote control batteries exhausted?
3. Are there obstacles blocking the infrared signal between the remote control and the projector?
Q3: What is the dongle GTV? Can I watch more popular movies and TV shows?
1. The projector has a built in, ocially authorized Google TV system, which includes pre loaded content from
Netix, YouTube, Prime Video, and more.
2. You can nd additional apps on the GTV homepage under "Apps" and search for the app you need.
Q4: The projector auto-os after working for a while.
1. The projector’s ventilation may be blocked, or the voltage might be unstable.
2. Send a video to [email protected]om, we will investigate the issue for you.
Q5: The projector is not compatible with my Bluetooth speaker.
1. The projector may not be compatible with certain versions of Bluetooth speakers.
2. Contact our after sales team at [email protected]om with the brand and model of your Bluetooth
speaker for further assistance.
Q6: Why is the image out of focus no matter how I adjust it?
1. Place the projector in line with the center of the screen. Or the projection angle should be within 15° ;
2. Use Auto or Manual Keystone to achieve a rectangular screen display; Use Auto Focus or Manual Focus to
adjust lens focus.
FAQ & WARRANTY

EN 28
Q7: Why can't I nd certain features?
Some functions may appear in sub menus or require a long press on certain buttons. Due to product upgrades,
functionalities may slightly dier from the manual. For accurate information, please refer to the actual product.
Q8: What if my order is past the platform return window? Why haven't I received a reply after 24
hours?
PUTRIMS support team will promptly assist with solutions, even if your order is past the platform return
window. If no reply within 24 hours, it could be due to time zone dierences or your email landing in the spam
folder. Please contact us again, we'll ensure your query is addressed promptly.

DE 29
INHALT
LEBENSLANGE PROFESSIONELLE UNTERSTÜTZUNG VON PUTRIMS 30
GEBRAUCHSANWEISUNG 30
PAKETLISTE 32
PROJEKTOR SPEZIFIKATIONEN 33
PRODUKTSTRUKTUR 33
FERNBEDIENUNG 35
INSTALLATION 36
1.Installationsmethode - - - - - - - - - - - - - - - - - - - - - - - - - - - - - - - - - - - - - - - - - - - - 36
2.Projektionsabstand und größe - - - - - - - - - - - - - - - - - - - - - - - - - - - - - - - - - - - - - - - 37
3.Montage an der Decke - - - - - - - - - - - - - - - - - - - - - - - - - - - - - - - - - - - - - - - - - - - - 37
PROJEKTOR STARTEN 38
PROJEKTIONSEINSTELLUNGEN 38
1.Trapezkorrektur- - - - - - - - - - - - - - - - - - - - - - - - - - - - - - - - - - - - - - - - - - - - - - - - 38
1.1 Auto Trapezkorrektur/Fokus 38
1.2 Manuelle Trapezkorrektur 39
2.Zoom-Bildschirm - - - - - - - - - - - - - - - - - - - - - - - - - - - - - - - - - - - - - - - - - - - - - - - 40
2.1 Zoom Bildschirm 40
2.2 Bildschirm zurücksetzen 40
PROJEKTOR EINGANGSSIGNALUMSCHALTUNG 41
1.Wählen Sie die Signalquelle - - - - - - - - - - - - - - - - - - - - - - - - - - - - - - - - - - - - - - - - - 41
1.1Wählen Sie die HDMI Eingangssignalquelle 41
1.2 Wählen Sie die GTV Signalquelle 42
1.3 Sprachassistent im GTV 43
2.Kabellose Verbindung - - - - - - - - - - - - - - - - - - - - - - - - - - - - - - - - - - - - - - - - - - - - 44
2.1 WiFi Einstellung 44
2.2 Für iOS Geräte (Airplay) 44
2.2 Für Android Geräte (Miracast) 45
3.Bluetooth-Einstellungen - - - - - - - - - - - - - - - - - - - - - - - - - - - - - - - - - - - - - - - - - - - 46
ANDERE PROJEKTIONSEINSTELLUNGEN 47
1.Videomodus - - - - - - - - - - - - - - - - - - - - - - - - - - - - - - - - - - - - - - - - - - - - - - - - - - 47
2.Tonmodus - - - - - - - - - - - - - - - - - - - - - - - - - - - - - - - - - - - - - - - - - - - - - - - - - - - 47
3.System - - - - - - - - - - - - - - - - - - - - - - - - - - - - - - - - - - - - - - - - - - - - - - - - - - - - 48
4.Universal - - - - - - - - - - - - - - - - - - - - - - - - - - - - - - - - - - - - - - - - - - - - - - - - - - - 49
SIGNALLEITUNGEN ANSCHLUSS 50
1.USB-Multimediaverbindung- - - - - - - - - - - - - - - - - - - - - - - - - - - - - - - - - - - - - - - - - 50
1.1 USB Format 50
1.2 Videowiedergabeeinstellungen 51
2.Mit Laptop/PC verbinden - - - - - - - - - - - - - - - - - - - - - - - - - - - - - - - - - - - - - - - - - - 52
3.Mit Lautsprecher verbinden - - - - - - - - - - - - - - - - - - - - - - - - - - - - - - - - - - - - - - - - - 53
FAQ & GARANTIE 53

DE 30
LEBENSLANGE PROFESSIONELLE UNTERSTÜTZUNG VON PUTRIMS
Sehr geehrter Kunde,
Vielen Dank für Ihre Unterstützung von PUTRIMS!
Bevor Sie den Beamer in Betrieb nehmen, bitten wir Sie, dieses Handbuch sorgfältig durchzulesen. Wenn
Sie Probleme haben, geben Sie in Ihrer E Mail bitte die folgenden Details an: Ländercode, Bestellnummer,
Modell und eine kurze Beschreibung des Problems (z. B. DE+000-0000000-0000000+K12+Kein Bild)
an [email protected]om. Seien Sie versichert, unser Team wird innerhalb von 24 Stunden mit einer
schnellen und eektiven Lösung antworten.
Es ist wichtig zu erwähnen, dass viele häuge Probleme durch einfache Anpassungen leicht behoben werden
können, z. B. Probleme mit Signal, Ton, Bluetooth oder WLAN Verbindungen oder abgehackte Animationen.
Um die größtmögliche Zufriedenheit zu gewährleisten, versichern wir Ihnen, dass alle unsere Projektoren vor
dem Versand einer strengen 100%igen Qualitätskontrolle und sorgfältigen Verpackung unterzogen werden.
Wenn Sie Fragen haben, kontaktieren Sie uns bitte, damit das Problem gelöst werden kann. Und geben Sie
uns die Möglichkeit, uns zu verbessern. Wir sind bestrebt, Ihnen für alle auftretenden Herausforderungen eine
zufriedenstellende Lösung zu bieten.
Mit freundlichen Grüßen,
PUTRIMS Serviceteam
GEBRAUCHSANWEISUNG
Temperaturüberlegungen:
Um die Langlebigkeit Ihres Projektors zu gewährleisten, vermeiden Sie es, ihn in übermäßig warmen oder
kalten Umgebungen aufzustellen. Extreme Temperaturen können die Lebensdauer des Geräts verkürzen. Für
eine optimale Leistung halten Sie eine Arbeitsumgebung zwischen 5 ° C und 35 ° C aufrecht.
Richtige Belüftung:
Der Beamer ist mit einem Belüftungssystem ausgestattet, um einen stabilen Betrieb zu gewährleisten. Decken
Sie die Lüftungsschlitze nicht mit Tüchern, Decken oder anderen Materialien ab. Stecken Sie außerdem keine
Gegenstände in die Schlitze des Projektors, da dies zu Kurzschlüssen oder Stromschlägen führen und Ihr Gerät
beschädigen kann.
Schutz vor Stößen und Vibrationen:
Gehen Sie vorsichtig mit Ihrem Beamer um und schützen Sie ihn vor starken Stößen, Stößen und Vibrationen.
Bewegen Sie den Beamer nicht, wenn interne Schaltkreisfehler vorliegen.
Linsenpege:
Das Projektorobjektiv ist eine entscheidende Komponente, die sich direkt auf die Bildauösung und qualität
auswirkt. Achten Sie darauf, dass das Objektiv frei von übermäßigem Staub ist. Verwenden Sie zum Reinigen
ein weiches Baumwolltuch, das für Glaslinsen geeignet ist. Vermeiden Sie die Verwendung von harten Tüchern
oder Scheuermitteln, da diese die Linsenoberäche beschädigen können. Wenden Sie sich für Hilfe und eine
Lösung bitte per E Mail an unser Supportteam unter [email protected]om.

DE 31
Scannen Sie den oziellen QR Code, um sich zu registrieren und die
Garantie zu aktivieren.
DE 32
PAKETLISTE
PUTRIMS K12 Beamer *1 Dongle Fernbedienung *1 Stromkabel *1
HDMI Kabel *1 Objektivabdeckung *1 Reinigungsset *1
Kurzanleitung *1 Kundendienstbrief *1
DE 33
PROJEKTOR SPEZIFIKATIONEN
Modell Nr.:K12
Native Auösung 1920*1080P Seitenverhältnis
16:9/4:3
(Drücken Sie die Taste
„ “ zweimal kurz)
Display Technologie LCD Lichtquelle LED
Produktgewicht
2,5 kg
5,5 lbs
Produktgröße
(L*W*H)
28.0 x 24.2 x 10.7 cm
11'' x 9.5'' x 4.2''
Bildwiederholrate 60 Hz Leistungsspannung AC 100 240V~/50~60Hz 2A
Fokus Auto + Elektro Trapezkorrektur Auto + Manuell
Ausgabeanschluss 3,5 mm Audioausgang Eingangsanschluss HDMI*1/USB*1
Projektionsverhältnis 1,3:1 Zoom 100% 50%
Betriebsart FERNBEDIENUNG
Installationstyp
Frontprojektion/Rückprojektions Deckenhalterung
Frontprojektion/Rückprojektions Tischhalterung
PRODUKTSTRUKTUR
Objektiv
IR Empfänger
Fokussignal Empfänger
DE 34
USB Anschluss
3,5 mm Audioausgang
HDMI Anschluss
IR Empfänger
Stromanschluss
Einschaltknopf
Staub Reinigungsanschluss
Staublter
M5*12mm Montageloch
Anpassung der
Projektionshöhe
Luftauslass
Hinweis: Suchen Sie für die Deckenmontage die vier Löcher an der Unterseite des Projektors. Entfernen Sie
langsam die vier Gummiblöcke, um die Montagelöcher (M5 x 12 mm) für die Deckenmontage freizulegen.
DE 35
FERNBEDIENUNG
Es gibt zwei Versionen der Fernbedienung:
Version 1
Einschalttaste
Einschalttaste
Quellentaste
Quellentaste
Dongle Stimme
Dongle Stimme
Projektoreinstellungen
Projektoreinstellungen
OK
OK
Dongle Einstellungen
Dongle Einstellungen
Stumm
Stumm
Fokus +
Fokus +
Fokus
Fokus
Pfeiltaste
Pfeiltaste
Home
Home
Zurück
Zurück
Lautstärke +
Lautstärke +
Lautstärke
Lautstärke
Menü
Menü
APP
APP
Autofokus/Trapezkorrektur
Google Konto
Version 2
Hinweis:
1. Legen Sie vor der Verwendung 2 AAA Batterien (nicht im Lieferumfang enthalten) in die Fernbedienung ein.
2. Wenn die Signalquelle standardmäßig auf den GTV Modus eingestellt ist, wird die Google TV Seite
automatisch eingeschaltet, wenn der Projektor eingeschaltet wird.
3. Drücken Sie in der USB oder HDMI Schnittstelle die Taste „ “, um auf die Systemeinstellungen zuzugreifen
und unter anderem die Video /Toneinstellungen anzupassen.
4. Drücken Sie die Taste „ “ zweimal kurz, um das Bildformat auf 16:9 oder 4:3 einzustellen.
DE 36
INSTALLATION
1.Installationsmethode
Der Projektor kann je nach Betriebsumgebung und Anforderungen mit einer Deckenhalterung an der Decke
montiert oder auf einem stabilen Schreibtisch aufgestellt werden. Darüber hinaus kann der Projektor mit den
folgenden Methoden installiert werden.
1.Frontprojektion Deckenhalterung 2.Rückprojektions Deckenhalterung
3.Frontprojektion Tischhalterung 4.Rückprojektions Tischhalterung
1) Wählen Sie das Menü [Einstellungen] Wählen Sie die Option [Projektionsmodus] Wählen Sie Ihren
Installationsmodus und drücken Sie „OK“, um die Projektionsposition zu bestätigen.
2) Es wird empfohlen, den Projektor so zu positionieren, dass sein Objektiv symmetrisch zur Leinwand
ausgerichtet ist. Wenn Sie den Winkel anpassen müssen, halten Sie ihn bitte innerhalb von 15° und
verwenden Sie die Trapezkorrekturfunktion, um das Projektionsbild anzupassen.
DE 37
2.Projektionsabstand und größe
Der Projektor kann je nach Betriebsumgebung und Anforderungen mit einer Deckenhalterung an der Decke
montiert oder auf einem stabilen Schreibtisch aufgestellt werden. Darüber hinaus kann der Projektor mit der
folgenden Methode installiert werden.
Der empfohlene Projektionsabstand für diesen K12 Beamer beträgt 2,5–3 m. Die Bildgröße hängt vom Abstand
und dem Projektionsverhältnis des Projektors ab, das 1,3:1 beträgt. Darüber hinaus bietet der Beamer eine 50%
Zoom Out Funktion.
Metro
Piedi
0.8
2.6
30''
50''
80''
100''
120''
150''
1.4
4.5
2.3
7.5
2.8
9.1
3.4
11.1
4.3
14.1
3.Montage an der Decke
1) Positionieren Sie den Projektor senkrecht zum Boden und zentriert auf der Mitte der Leinwand. So erzielen
Sie ein aches, richtig ausgerichtetes Projektionsbild.
2) Um die Neigungsbasis einzustellen, lösen Sie die Stützschraube an der Unterseite des Projektors. Eine
visuelle Anleitung nden Sie in der untenstehenden Abbildung.
3) Für die Deckenmontage gibt es an der Unterseite des Projektors 4 Löcher (M5 x 12 mm). Bitte drehen Sie den
Projektor um. Nach dem Entfernen der Gummipolster nden Sie die Löcher für die Deckenmontage, wie in
der Abbildung unten gezeigt.
HINWEIS: Die Aufhängevorrichtung oder der Deckenständer sind nicht im Lieferumfang enthalten
M5*12mm Montageloch
200mm
165mm

DE 38
Einschalten:
• Entfernen Sie zunächst die Objektivkappe und schließen Sie den Projektor über das Netzkabel an die
Stromquelle an.
• Sobald die rote Kontrollleuchte leuchtet, drücken Sie zum Starten die Einschalttaste auf der Fernbedienung
oder die Einschalttaste auf dem Bedienfeld des Projektors. Die Kontrollleuchte wechselt von Rot auf Blau und
zeigt damit an, dass der Projektor jetzt eingeschaltet ist.
• Wenn der Projektor eingeschaltet wird, aktiviert er automatisch die Funktionen [Auto Trapezkorrektur nach
Bewegung] und [Autofokus beim Start]. Wenn das Bild kein Standardrechteck ist oder unscharf erscheint,
passen Sie die Keystone Einstellungen manuell an und verwenden Sie die Fokustasten „F+“ und „F “ auf
der Fernbedienung, um die Bildschärfe zu verbessern. Wenn das Bild weiterhin unscharf ist, sollten Sie die
Projektionsentfernung und den Projektionswinkel anpassen.
Ausschalten:
• Um den Projektor auszuschalten, drücken Sie die Einschalttaste auf der Fernbedienung oder die
Einschalttaste auf dem Bedienfeld des Projektors.
• Die Kontrollleuchte wechselt von Blau auf Rot und zeigt damit an, dass der Projektor erfolgreich ausgeschaltet
wurde.
PROJEKTIONSEINSTELLUNGEN
PROJEKTOR STARTEN
1.Trapezkorrektur
1.1 Auto Trapezkorrektur/Fokus
Wählen Sie das Menü [Einstellungen] Wählen Sie die Option [Bild]. Wählen Sie dann [Auto-
Trapezkorrektur/Fokus] und klicken Sie auf „OK“, um die Funktion zu aktivieren. Anschließend wird das Bild
automatisch basierend auf dem Projektionsabstand vom Bildschirm fokussiert und das Bild in ein Rechteck
umgewandelt, wenn Sie den Projektionswinkel ändern.
Wenn das Bild unscharf ist, drücken Sie die Fokustaste „F+“ oder „F “ auf der Fernbedienung, um den
Objektivfokus anzupassen, bis das Bild klar ist. (*Nachdem der Bildschirm klar ist, müssen Sie die OK Taste
nicht mehr drücken.)
Hinweis:
1) Wenn Sie den Standort des Projektors bereits festgelegt haben, empehlt es sich, für ein besseres Seherlebnis
die Funktionen Autofokus und automatische Trapezkorrektur in den Einstellungen zu deaktivieren.
2) Der seitliche Projektionswinkel des Projektors sollte 15° nicht überschreiten. Stellen Sie sicher, dass
sich keine Hindernisse vor dem Projektor benden, da diese die automatische Trapezkorrekturfunktion
beeinträchtigen könnten.

DE 39
1.2 Manuelle Trapezkorrektur
Wählen Sie das Menü [Einstellungen] Wählen Sie die Option [Bild]. Wählen Sie dann [Manuelle
Trapezkorrektur] und klicken Sie auf „OK“, um den Punkt auszuwählen, den Sie zuerst anpassen möchten.
Drücken Sie dann die Pfeiltasten („ ▼“ „ ▶“ „ ▲“ „ ◀“), um den gewünschten Wert wie unten gezeigt einzustellen.
Zurücksetzen:Drücken Sie " ", um das Bild auf die ursprünglichen Trapezkorrektureinstellungen
zurückzusetzen.
DE 40
2.Zoom-Bildschirm
2.1 Zoom Bildschirm
2.2 Bildschirm zurücksetzen
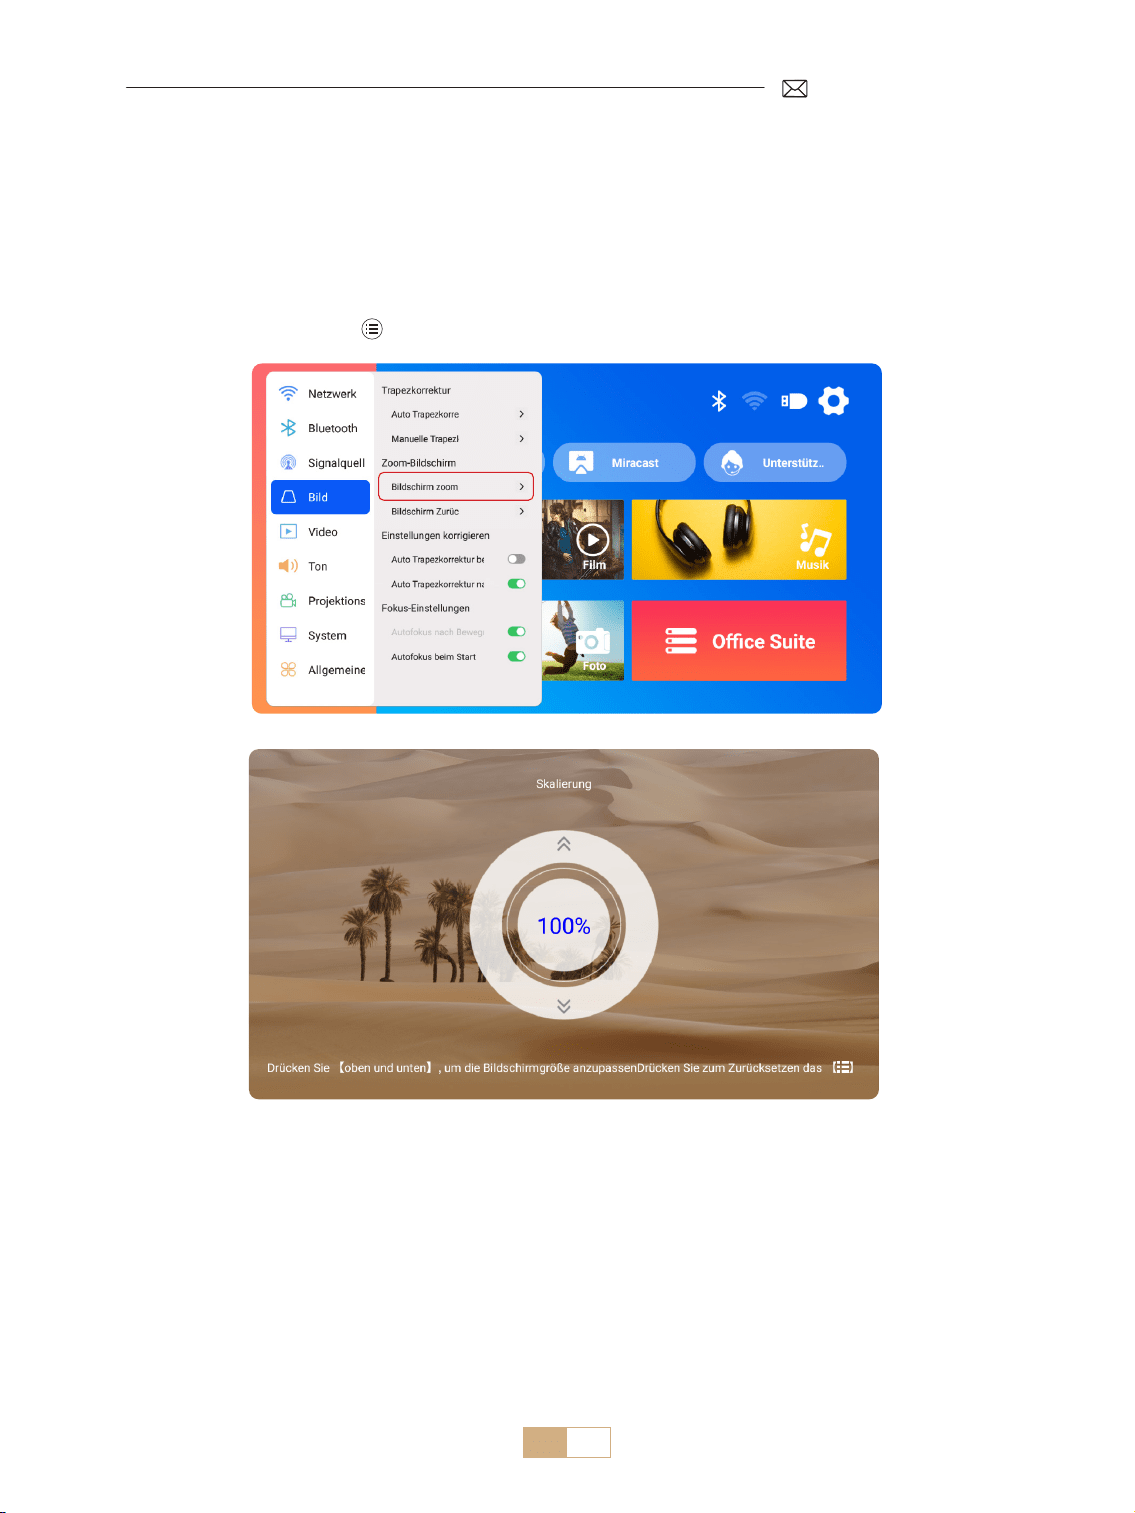
Wählen Sie das Menü [Einstellungen] Wählen Sie die Option [Bild]. Wählen Sie dann [Zoom-Bildschirm]
und drücken Sie die Taste „ ▲“ „ ▼“, um den gewünschten Wert wie unten gezeigt einzustellen. Der
Projektionsbildschirm kann von 100 % bis 50 % vergrößert werden.
Zurücksetzen: Drücken Sie " " und das Bild wird auf die ursprünglichen Zoomeinstellungen zurückgesetzt.
Diese Funktion löscht alle zuvor eingestellten Zoom und Trapezkorrekturdaten und stellt die ursprüngliche
Größe und Form des Bildes wieder her.

DE 41
PROJEKTOR-EINGANGSSIGNALUMSCHALTUNG
1.Wählen Sie die Signalquelle
1.1Wählen Sie die HDMI Eingangssignalquelle
1) Wählen Sie auf der Startseite die gewünschte Eingangssignalquelle (z. B. HDMI) aus, oder drücken Sie die
Taste „ “ auf der Fernbedienung, um die entsprechende Signalquelle auszuwählen.
2) Wenn Sie ein Video über HDMI wiedergeben, drücken Sie die Taste „ “ und wählen Sie [Video] oder [Ton],
um Helligkeit, Kontrast und andere Einstellungen nach Bedarf anzupassen.
Menü Inhalt
Signalquelle HOME/HDMI/GTV
Boot Standardsignal Schließen/HDMI/GTV
HDMI Plug n Play Ein/Aus
DE 42
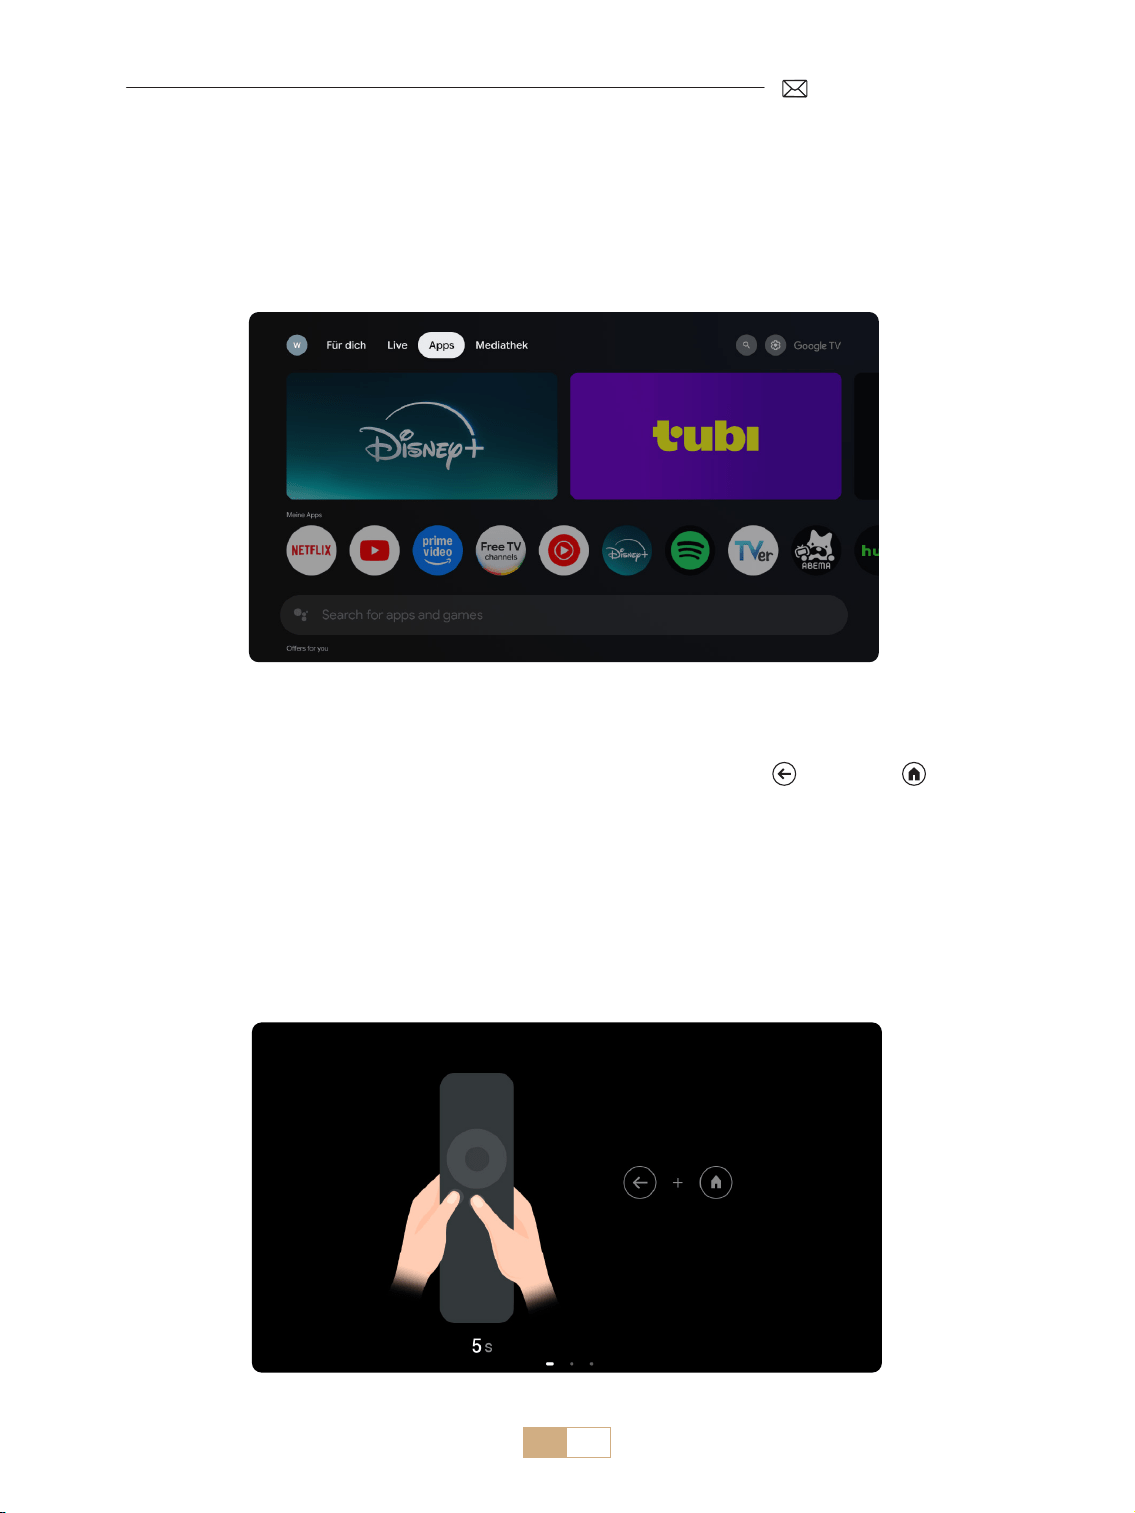
Wenn Sie das GTV des K12 Projektors zum ersten Mal verwenden, befolgen Sie bitte die nachstehenden
Schritte, um es einzurichten.
1) Nachdem Sie GTV als Signalquelle ausgewählt haben, halten Sie die „ “ und die „ “ auf der
Fernbedienung gleichzeitig gedrückt, um sie zu koppeln. (Hinweis: Koppeln Sie die Fernbedienung nur
beim ersten Gebrauch.)
2) Wählen Sie beim Aufrufen von GTV die entsprechenden Sprach und Ländereinstellungen.
3) Melden Sie sich bei Ihrem Google Konto an, um auf personalisierte Inhalte zuzugreifen.
4) Bereiten Sie das Laden aller integrierten GTV Apps vor. Dieser Vorgang kann je nach Netzwerkbedingungen
etwa 10 Minuten dauern.
5) Nachdem Sie die Apps geladen haben, können Sie die riesigen Inhalte von GTV genießen.
1.2 Wählen Sie die GTV Signalquelle
Der K12 Beamer verfügt über integriertes Google TV (oziell lizenziert), sodass Sie problemlos auf Ihre Lieblings
Apps und Videos zugreifen und diese genießen können. Mit diesem Projektor können Sie eine umfangreiche
Bibliothek an Filmen und Fernsehsendungen erkunden, ohne einen zusätzlichen Fire TV Stick zu benötigen.
DE 43
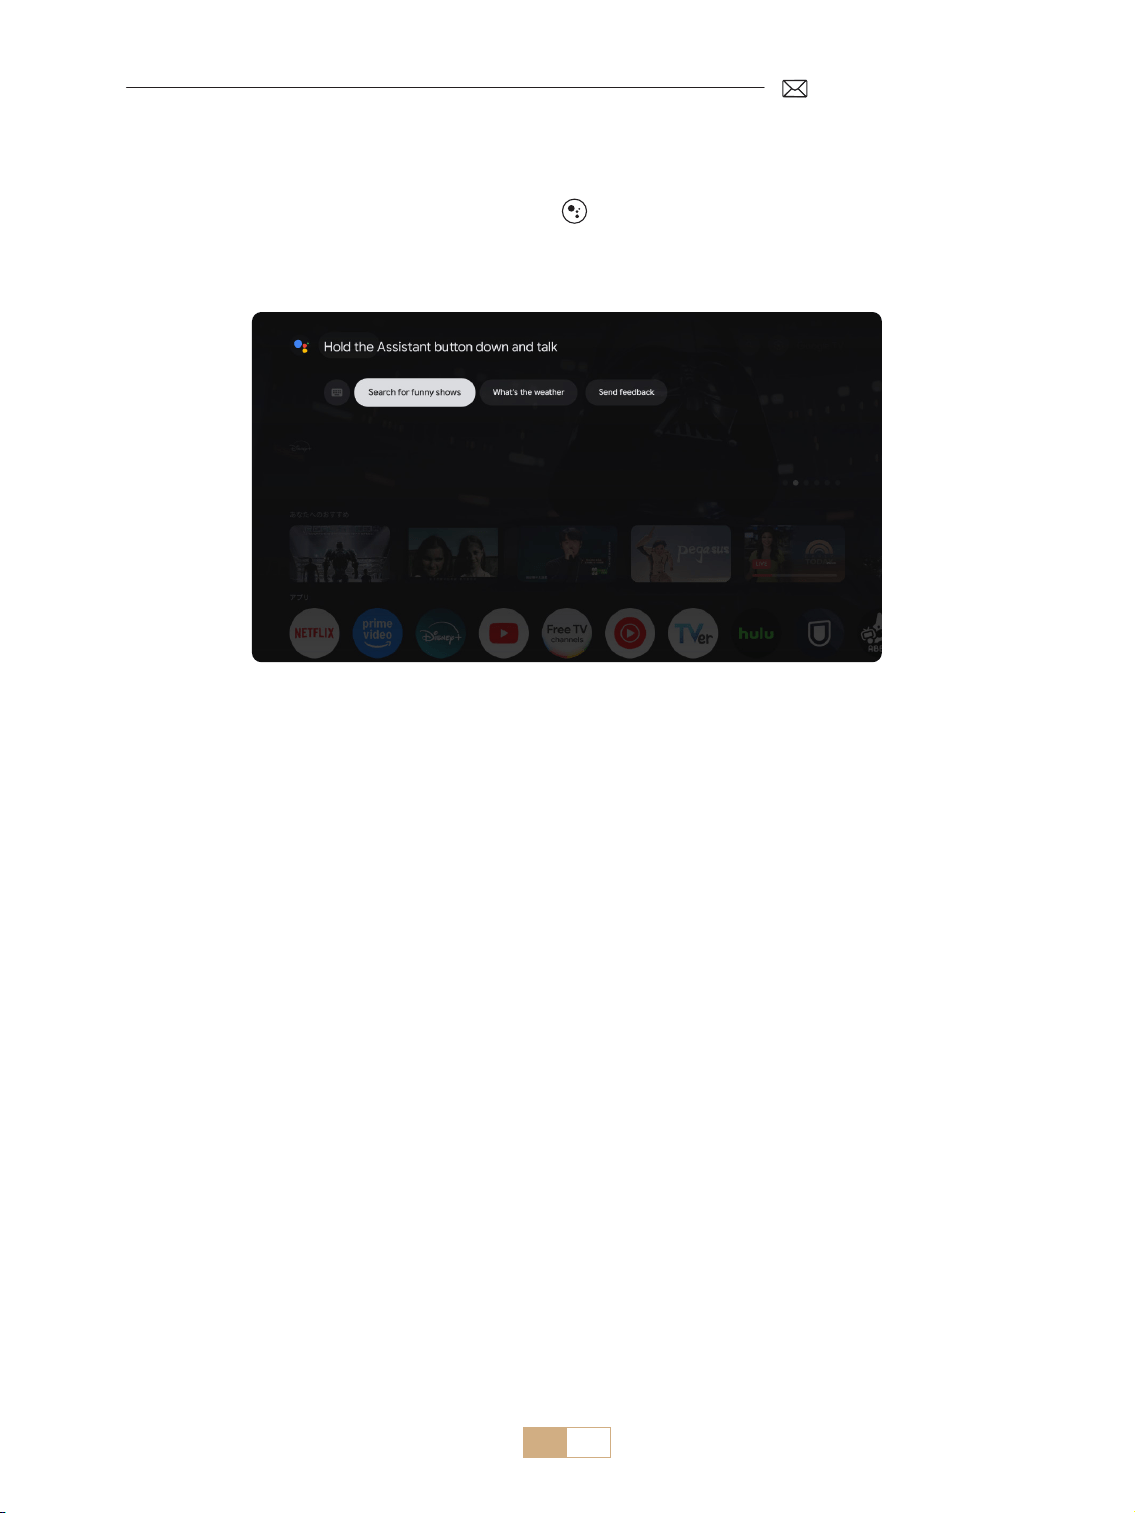
1.3 Sprachassistent im GTV
1) Halten Sie während des Sprechens die Sprachtaste „ “ auf der Fernbedienung gedrückt.
2) Der Sprachassistent kann nur innerhalb der Google TV Schnittstelle (GTV) verwendet werden.

DE 44
2.1 WiFi Einstellung
2.2 Für iOS Geräte (Airplay)
1) Wählen Sie das Menü [Einstellungen] Wählen Sie [Netzwerk]>[WiFi-Einstellungen]
2) Für die Bildschirmspiegelung ist ein starkes WLAN Signal erforderlich. Stellen Sie sicher, dass Ihr
Heimnetzwerk gut funktioniert. Positionieren Sie Ihr Mobilgerät in der Nähe des Projektors. Ein Abstand
von ungefähr 1 Meter ist optimal. Die Videoauflösung wird dynamisch an die Stärke Ihres WLAN Signals
angepasst.
3) Aus urheberrechtlichen Gründen unterstützen Projektoren keine drahtlose Spiegelung von Streaming Apps
wie Netix oder Disney direkt von Ihrem Telefon. Um Streaming Inhalte anzusehen, wählen Sie bitte die GTV
Signalquelle und laden Sie die entsprechenden Apps herunter.
Hinweis: Stellen Sie sicher, dass Ihr iOS Gerät mit demselben WLAN Netzwerk verbunden ist wie Ihr Projektor.
1) Verbinden Sie den Projektor mit Ihrem WLAN zu Hause
2) Kehren Sie zur Startseite des Projektors zurück Wählen Sie [iOS Cast] Bleiben Sie auf dieser Oberäche
3) Rufen Sie das [Kontrollzentrum] auf Ihrem iOS Gerät auf Wählen Sie die Funktion [Airplay] Wählen Sie
den iOS Cast Empfänger mit dem Namen [K12-xxxx] aus und verbinden Sie ihn
2.Kabellose Verbindung
DE 45
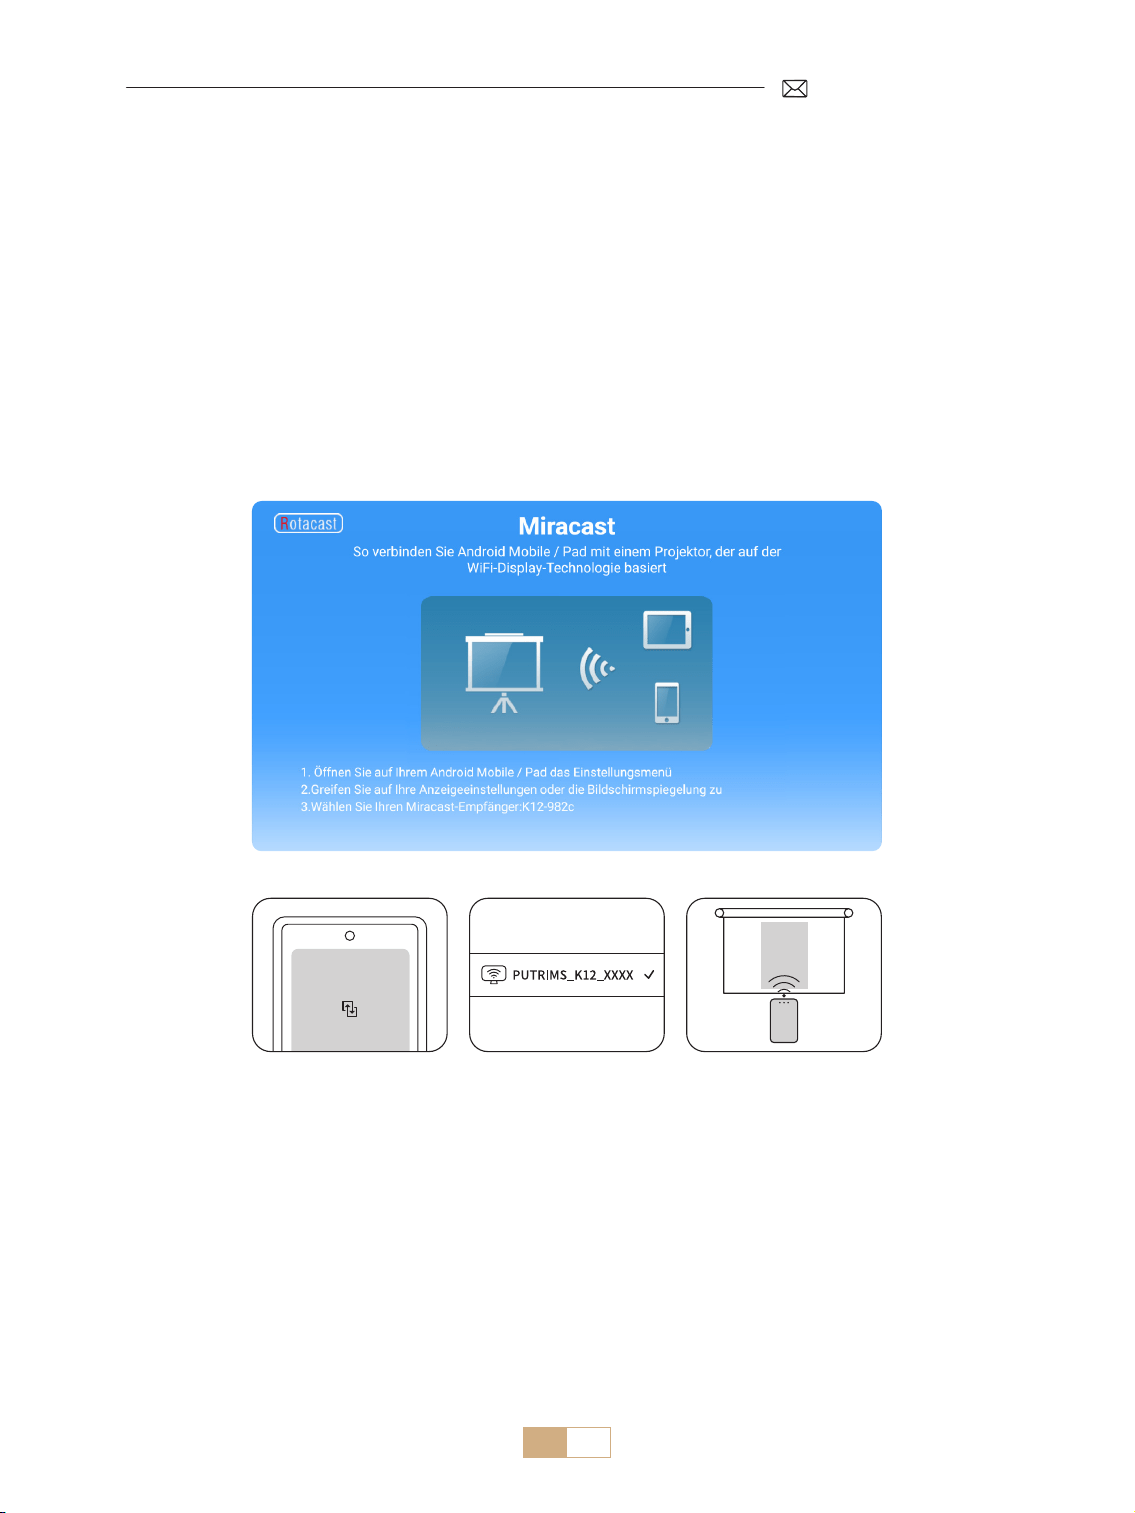
2.2 Für Android Geräte (Miracast)
Hinweis: Um diese Funktion zu aktivieren, stellen Sie bitte sicher, dass Ihr Android Gerät Multi-Screen/
Wireless Display unterstützt. Der Name „Multi Screen“ kann je nach Marke des Android Geräts unterschiedlich
sein. Stellen Sie sicher, dass die Wi Fi Funktion auf Ihrem Android Gerät aktiviert ist (es ist keine Verbindung
zu einem Wi-Fi-Netzwerk erforderlich). Mobiltelefone der Pixel Serie verwenden Google Chromecast, wofür
ein separates Casting Gerät erforderlich ist (nicht im Lieferumfang enthalten).
1) Wählen Sie [Miracast] auf der Startseite des Projektors – bleiben Sie auf dieser Oberäche
2) Rufen Sie das [Kontrollzentrum] auf Ihrem Android Gerät auf und wählen Sie [Screen Mirroring/Smart
View]
3) Wählen Sie den Miracast Empfänger mit dem Namen [K12-xxxx] und stellen Sie eine Verbindung her

DE 46
3.Bluetooth-Einstellungen
1) Schalten Sie Ihren Bluetooth Lautsprecher ein.
2) Aktivieren Sie die [Bluetooth Einstellungen] Ihres Projektors.
3) Wählen Sie Ihren Bluetooth Lautsprecher zum Verbinden aus.
Hinweis:
1) Stellen Sie sicher, dass alle anderen Geräte, die zuvor mit Ihrem Bluetooth Lautsprecher gekoppelt wurden,
zuerst getrennt werden.
2) Dieser Schritt gilt nur für die Verbindung von Bluetooth Lautsprechern, nicht für Mobiltelefone.
3) Wenn Sie Fragen haben, senden Sie bitte eine E Mail an PUTRIMS unter: [email protected]om
DE 47
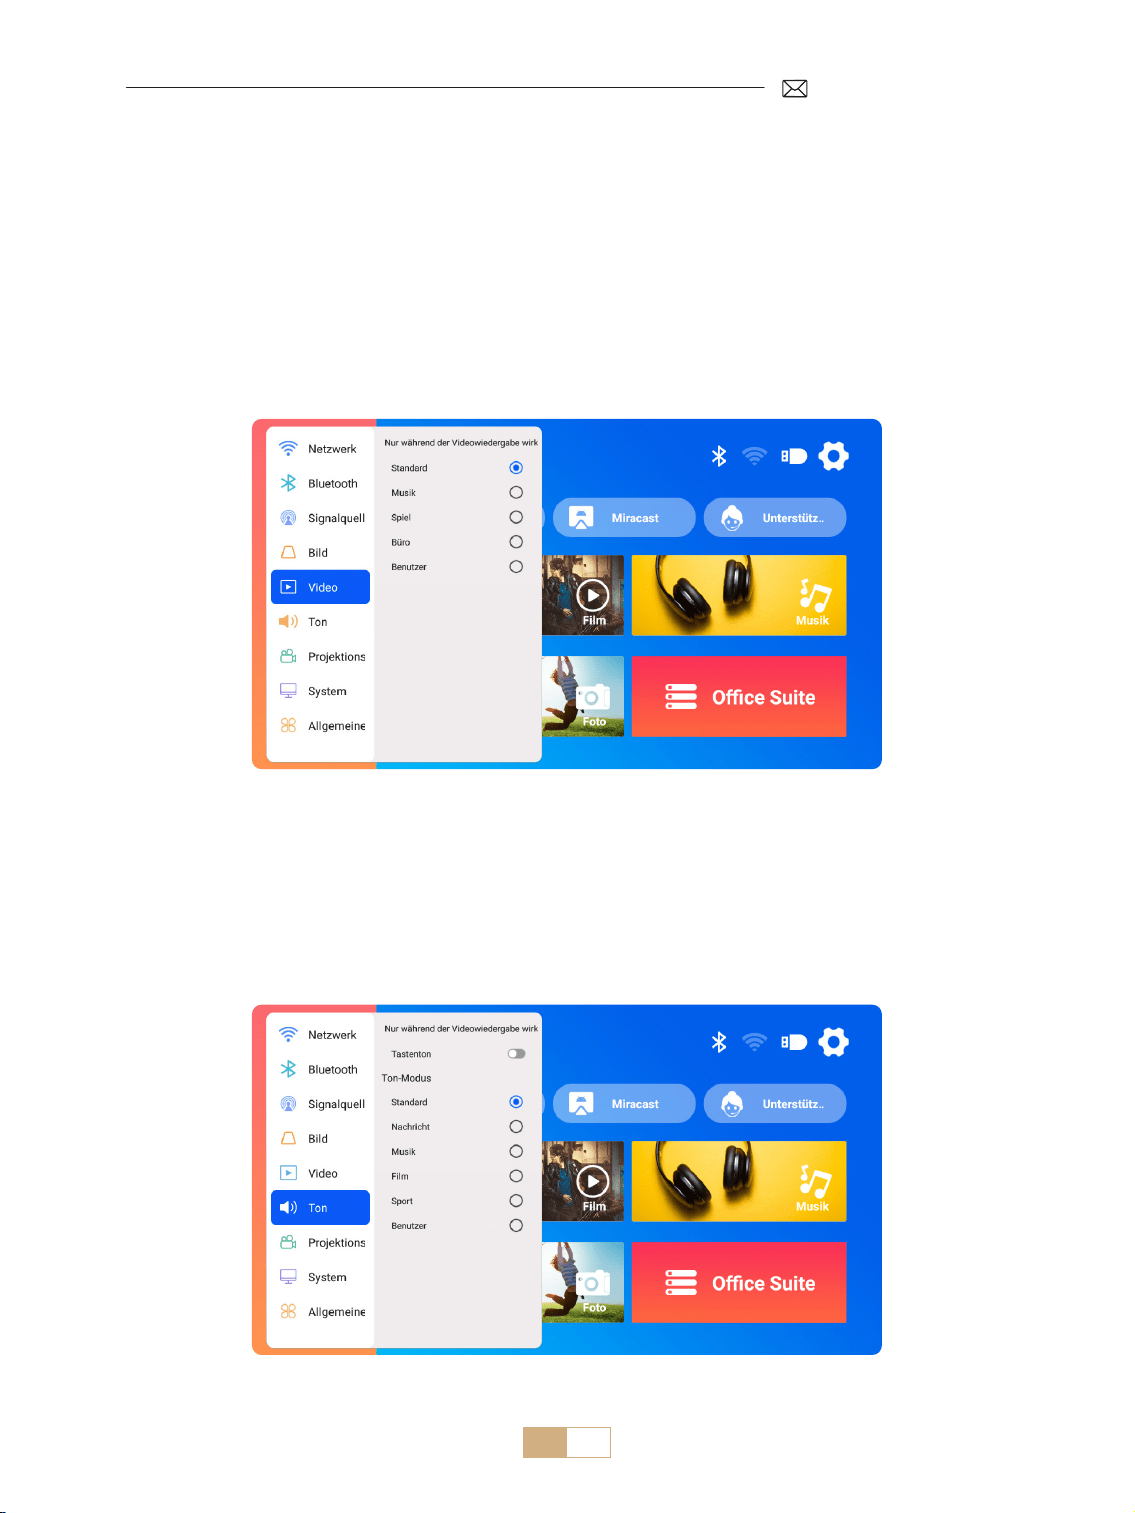
1) Gehen Sie zur Startseite Wählen Sie [Einstellungen] Wählen Sie [Video]. Sie können den Videomodus
nach Bedarf auswählen: Standard/Musik/Spiel/Büro/Benutzer.
2) Wenn Sie den Modus „Benutzer“ auswählen, können Sie die Parameter Helligkeit, Schärfe, Kontrast und
Sättigung individuell anpassen.
Hinweis: Der Eekt des ausgewählten Videomodus wird nur bei der Videowiedergabe wirksam
1) Gehen Sie zur Startseite – wählen Sie [Einstellungen] – wählen Sie [Ton]. Sie können den Videomodus nach
Bedarf auswählen: Standard/Nachrichten/Musik/Film/Sport/Benutzer.
2) Wenn Sie den Modus „Benutzer“ auswählen, können Sie die Tonfrequenz individuell anpassen.
Hinweis: Der Eekt des ausgewählten Tonmodus wird nur bei der Videowiedergabe wirksam
Tastenton: Tastentöne aktivieren oder deaktivieren.
ANDERE PROJEKTIONSEINSTELLUNGEN
1.Videomodus
2.Tonmodus
DE 48
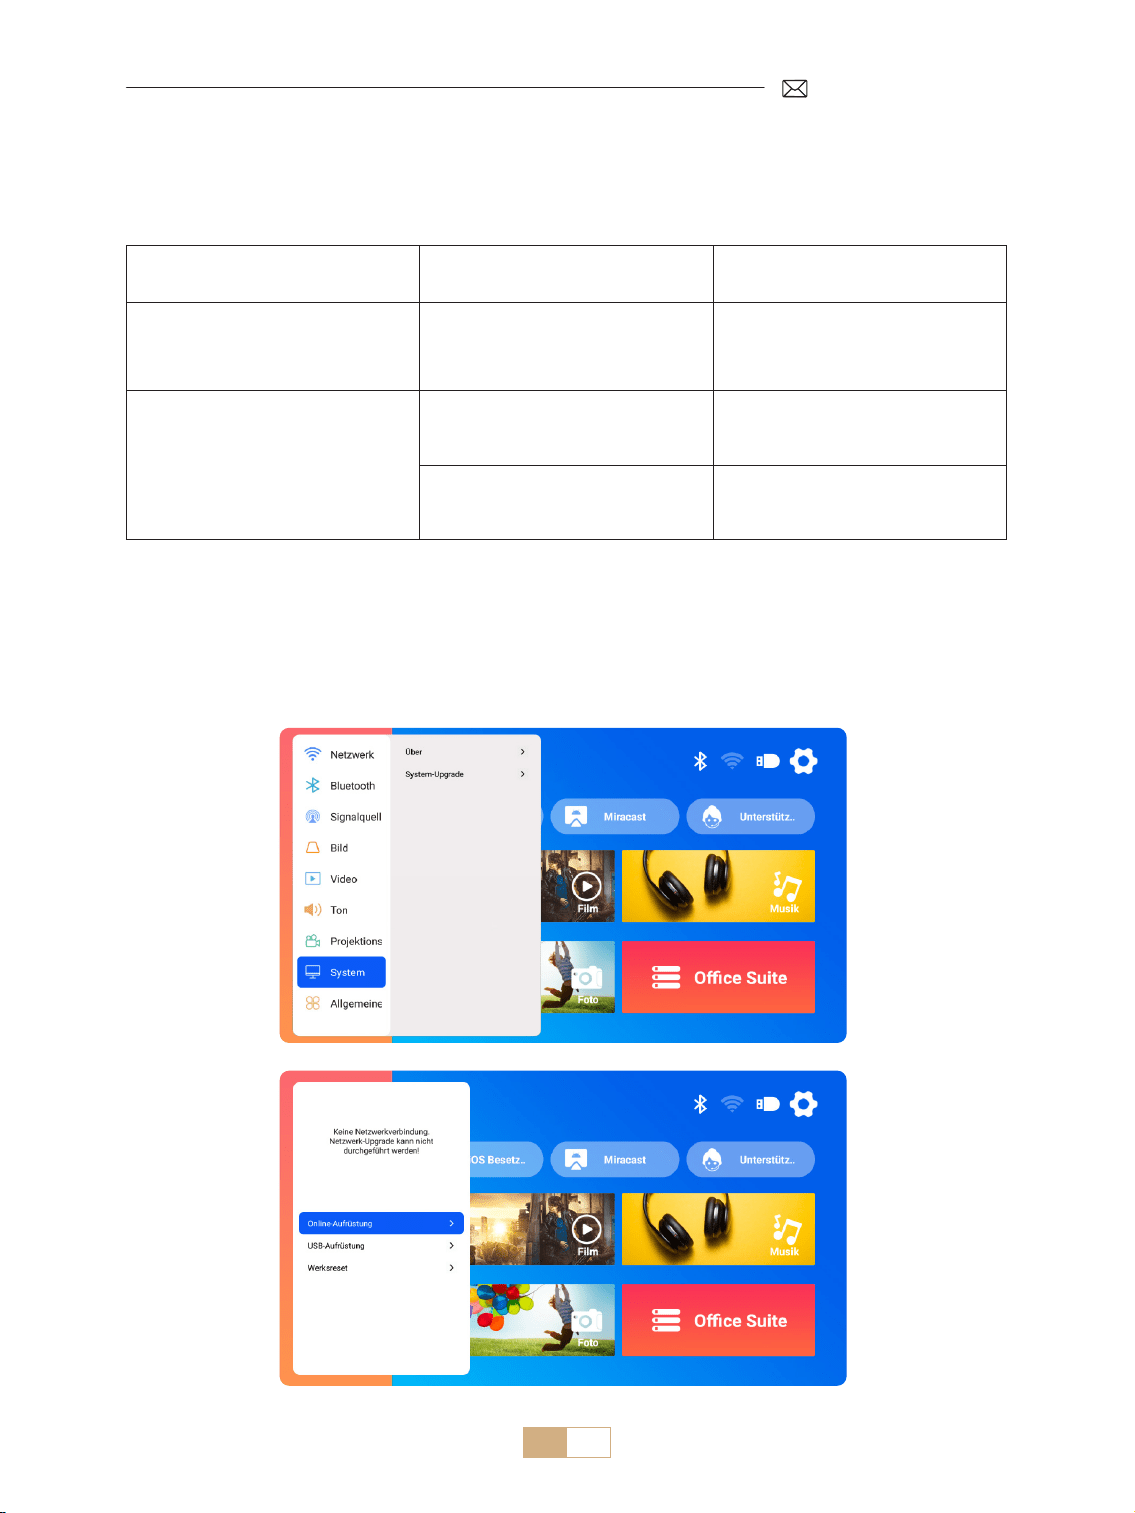
Hinweis zum Softwaredatei-Upgrade über USB:
1) Kopieren Sie das Upgrade Paket in das Stammverzeichnis eines USB Laufwerks.
2) Halten Sie die Einschalttaste am Gerät gedrückt. Das System erkennt das Upgrade Paket automatisch und
startet den Upgrade Vorgang.
Hinweis: Bitte schalten Sie vor dem Upgrade den Einschaltmodus auf Standby.
Gehen Sie zur Startseite Wählen Sie [Einstellungen] Wählen Sie [System].
3.System
Menü Inhalt Funktion
Über diese Maschine
Systemversionsnummer / WiFi
MAC Adresse / Bluetooth MAC
Adresse
Bestätigen Sie die
Versionsinformationen und
identizieren Sie das Gerät im
Netzwerk oder über Bluetooth
System Upgrade
Online Upgrade(OTA)
USB Upgrade (USB)
Aktualisieren Sie die Software über
eine lokale USB Datei oder online
Werkszustand wiederherstellen
Wiederherstellen der
Werkseinstellungen

DE 49
Gehen Sie zur Startseite Wählen Sie [Einstellungen] Wählen Sie [Universal].
4.Universal
Menü Inhalt Funktion
Spracheinstellungen
Englisch/Français/Italienisch/
Espanol/Deutsche/ 日本语 und
andere Sprachen
Wählen Sie die gewünschte
Sprache
Einschaltmodus Einschalten Standby/Einschalten
Automatisches Einschalten /
Standby nach dem Einstecken
Sleep Timer
Aus/10 Min./20 Min./30 Min./60
Min./90 Min./120 Min./180
Min./240 Min.
Stellen Sie die Ruhezeit ein
Bildschirmschoner Timeout Nie/1Min./5Min./10Min.
Stellen Sie die
Bildschirmschonerzeit des
Projektors ein
ARC Aus/Ein
Schließen Sie den Lautsprecher
über ein HDMI Kabel an

DE 50
Das PUTRIMS K12 bietet HDMI , USB und 3,5 mm Audiobuchsenschnittstellen. Schließen Sie Ihr Gerät (z. B.
PC, Telefon, DVD Player, Soundbar, USB Laufwerk, PS4) an den entsprechenden Anschluss an.
SIGNALLEITUNGEN ANSCHLUSS
1.USB-Multimediaverbindung
1.1 USB Format
1) Stecken Sie ein USB Laufwerk in den Anschluss des Projektors. Es wird automatisch erkannt.
2) Wählen Sie auf der Hauptoberäche eine Kategorie (Film, Musik, Foto, Oce Suite) aus und drücken Sie die
Taste „OK“ auf der Fernbedienung, um auf die Dateien zuzugreifen.
Hinweis: Wenn Sie den falschen Dateityp auswählen, können Sie die entsprechenden Dateien nicht anzeigen.
Hinweis: Wenn der Projektor den USB Datenträger nicht erkennt, befolgen Sie bitte die folgenden Methoden,
um das Problem zu lösen.
Bitte bestätigen Sie, ob Ihr USB Datenträger die folgenden Formate erfüllt.
Formato USB
FAT32: 8G/16G/32G
NTFS:64G
Nicht unterstütztes Format: ExFAT
Hinweis: Wenn der Projektor den Inhalt des USB Datenträger nicht erkennen kann,
überprüfen Sie bitte, ob das Format Ihres USB Datenträger korrekt ist.
Videoformat
MP4/MKV/3GP/ASF/AVI/FLV/MPG/RMVB/TS/VOB, etc. (Die Unterstützung für Video
Codecs kann variieren. Kontaktieren Sie uns für zusätzliche Unterstützung)
Audioformat
AAC/FLAC/M4A/MP3/WAV, etc. (Dolby Audiocodecs werden nicht unterstützt.
Kontaktieren Sie [email protected]om für weitere Unterstützung.)
Bildformat BMP/PNG/JPEG/JPG/JPE
Dokumentformat PPT/PDF/Word/Excel/TXT
DE 51
Wenn das Problem immer noch nicht gelöst ist, senden Sie bitte eine detaillierte Beschreibung Ihres Problems
an die folgende E Mail Adresse: [email protected]
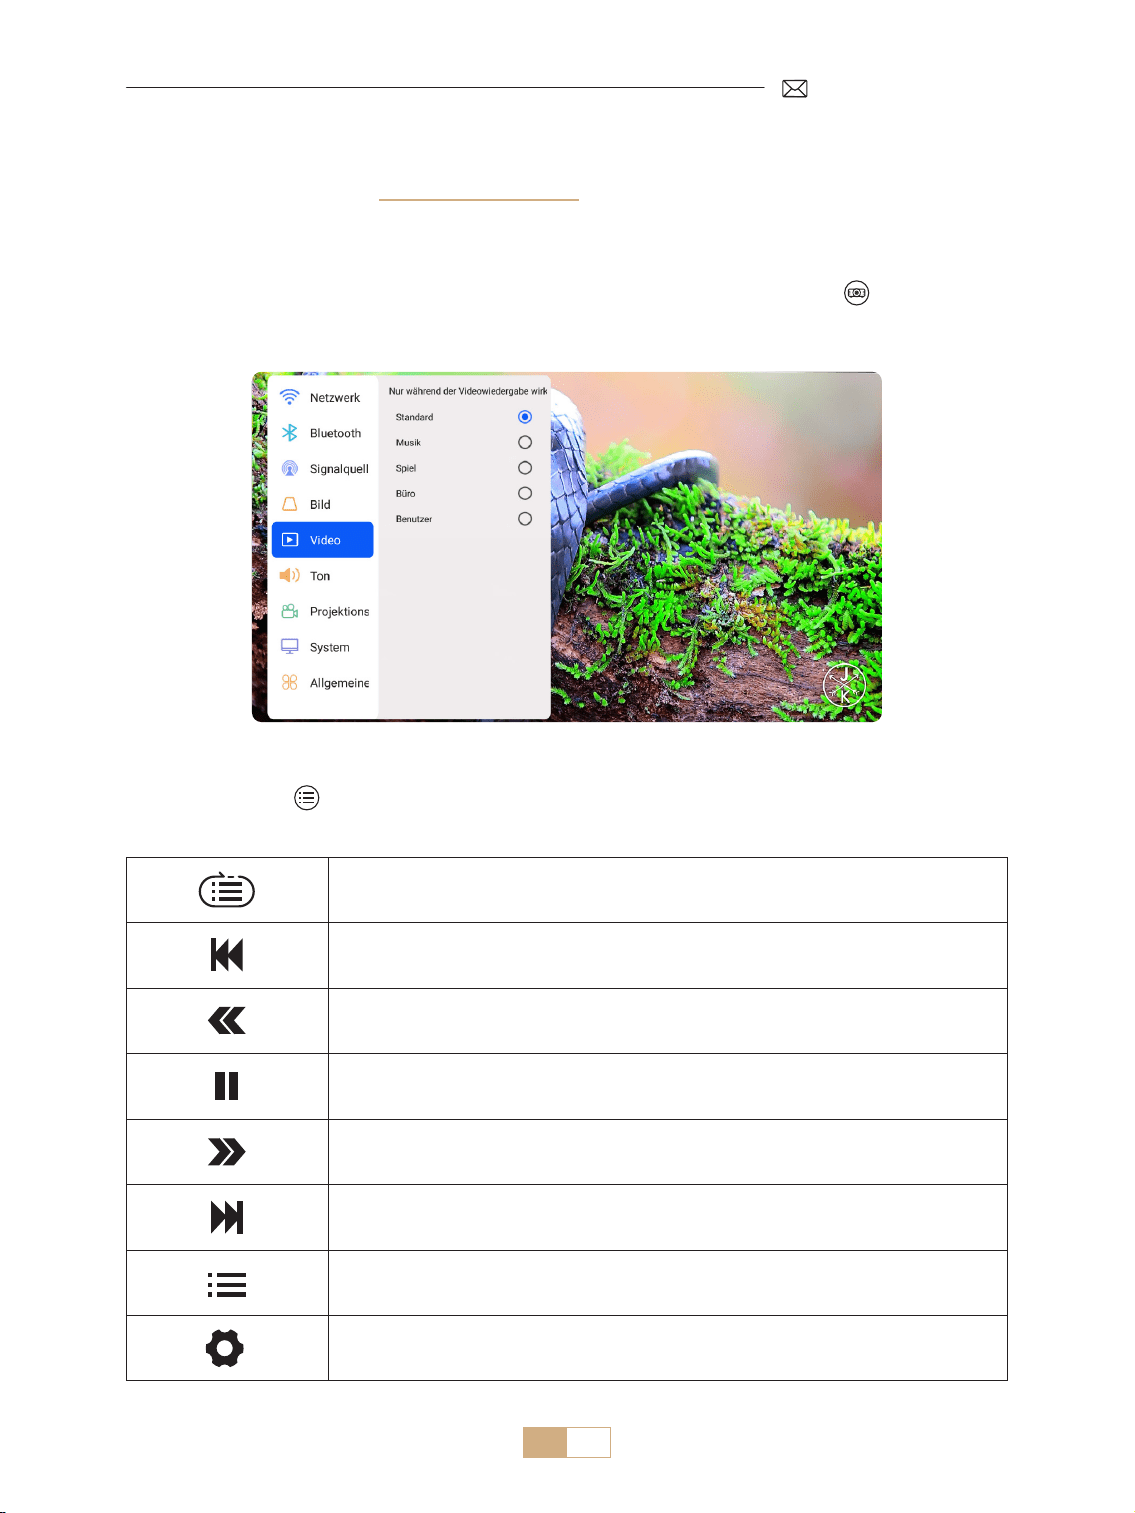
Zum vorherigen Video wechseln
Schneller Rücklauf des Videos 2 bis 32 fach
Abspielen oder pausieren
Das Video 2 bis 32 fach vorspulen
Zum nächsten Video wechseln
Wählen Sie die Wiedergabelisten im aktuellen Ordner aus
Rufen Sie die Projektoreinstellungen auf, um den Modus [Video] oder [Sound]
anzupassen
Entra nelle impostazioni del progetto per regolare la modalità [Video] o [Suono]
1.2 Videowiedergabeeinstellungen
1) Drücken Sie während der Wiedergabe eines Videos in der USB Schnittstelle die Taste „ “ und wählen Sie
dann [Video] oder [Ton], um Helligkeit, Kontrast und andere Einstellungen nach Bedarf anzupassen.
2) Drücken Sie kurz „ “, um wie unten beschrieben auf die Videowiedergabeeinstellungen zuzugreifen.
DE 52
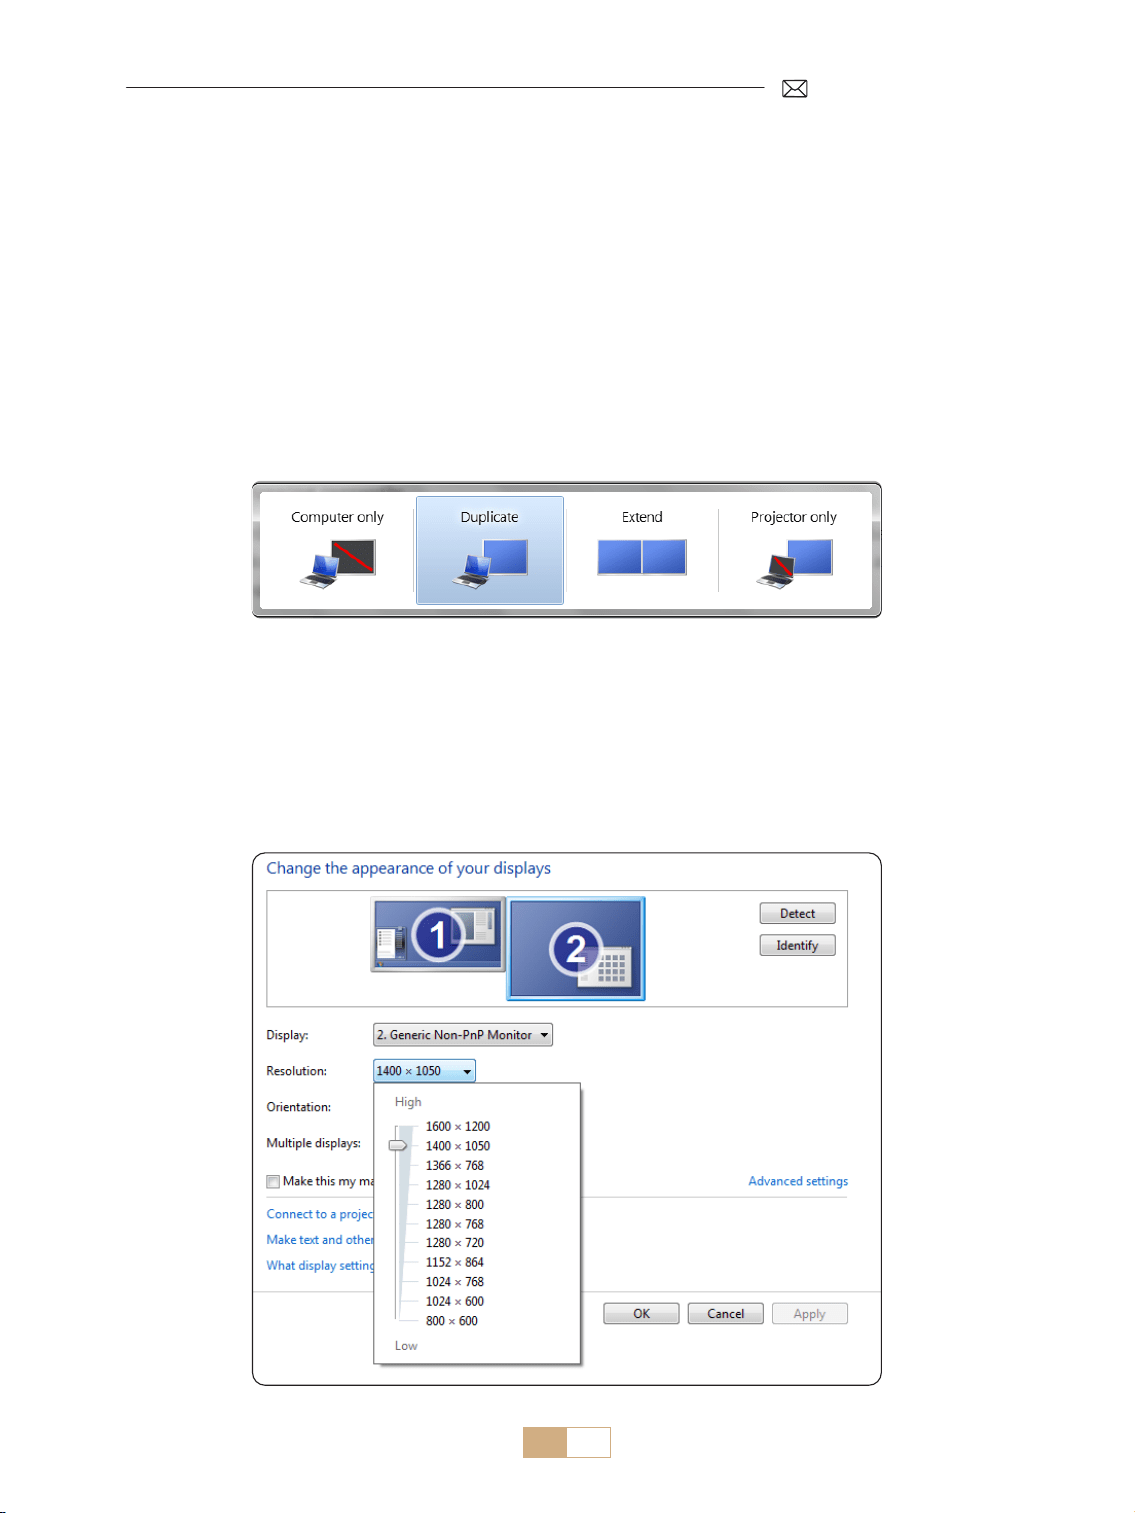
1. Verwenden Sie das mitgelieferte HDMI Kabel, um Ihren Computer mit dem K12 Projektor zu verbinden.
2. Wählen Sie die HDMI Quelle, um eine beliebige Datei auf Ihrem Computer zu projizieren.
3. Halten Sie auf Ihrem Laptop die Tasten „Win+P“ gedrückt, um den Anzeigemodus zu ändern.
Hinweis:
1) Wenn bei Ihnen Verbindungsprobleme auftreten, liegt dies wahrscheinlich daran, dass der Anzeigemodus
nicht richtig ausgewählt wurde.
2) Verwenden Sie für das MacBook einen Typ C auf HDMI Adapter zum Anschließen Ihres MacBook oder
einen Mini Display auf HDMI Adapter zum Anschließen an Ihr MacBook Air (Adapter nicht im Lieferumfang
enthalten).
Nur Computer: Dies ist die Standardoption und zeigt den Bildschirm nur auf dem Hauptmonitor an.
Duplizieren: Um Ihren Desktop auf allen angeschlossenen Monitoren zu duplizieren.
Erweitern: Um Ihren Desktop auf mehrere Monitore zu erweitern.
Nur Projektor: Verwenden Sie nur den sekundären Monitor (Projektor) und schalten Sie den Hauptmonitor aus.
Um die Bildschirmauösung im Nur Projektor Modus zu ändern, folgen Sie diesen Schritten:
Schritt: Start > Systemsteuerung > Darstellung und Anpassung > Bildschirmauösung anpassen
2.Mit Laptop/PC verbinden
DE 53
K12 unterstützt HDMI ARC. Aktivieren Sie zunächst HDMI ARC in den [Universal] Einstellungen und schließen
Sie eine Soundbar über HDMI an, ohne dass zusätzliche Audiokabel erforderlich sind.
3.Mit Lautsprecher verbinden
(HDMI)
Vielen Dank, dass Sie sich für den PUTRIMS K12 Projektor entschieden haben. Wir bieten 2 Jahre Garantie auf
den K12 Projektor. Wenn Sie Fragen haben, können Sie uns gerne über [email protected]om kontaktieren.
Um Ihnen besser helfen zu können, haben wir einige häufig gestellte Fragen und die entsprechenden
Antworten zusammengestellt.
F1: Die WLAN-Verbindung ist instabil. Wie kann ich dieses Problem lösen?
Um Probleme mit der WLAN Verbindung zu beheben, stellen Sie zunächst sicher, dass Ihr Heimnetzwerk gut
funktioniert. Halten Sie außerdem den Abstand zwischen Ihrem Telefon und dem Projektor unter 1 Meter.
Wenn das Problem weiterhin besteht, wenden Sie sich für weitere Hilfe an uns unter [email protected].
F2: Die Fernbedienung und der Projektor können nicht kommunizieren.
1. Ist der Netzschalter über dem Projektor ein oder ausgeschaltet?
2. Sind die Batterien der Fernbedienung leer?
3. Blockieren Hindernisse das Infrarotsignal zwischen der Fernbedienung und dem Projektor?
F3: Was ist der GTV-Dongle? Kann ich damit mehr beliebte Filme und Fernsehsendungen ansehen?
1. Der Projektor verfügt über ein integriertes, oziell autorisiertes Google TV System, das vorinstallierte Inhalte
von Netix, YouTube, Prime Video und mehr enthält.
2. Weitere Apps nden Sie auf der GTV Homepage unter „Apps“. Suchen Sie dort nach der gewünschten App.
F4: Der Projektor schaltet sich nach einer Weile automatisch ab.
1. Die Belüftung des Projektors ist möglicherweise blockiert oder die Spannung ist instabil.
2. Senden Sie ein Video an [email protected]om. Wir werden das Problem für Sie untersuchen.
F5: Der Projektor ist nicht mit meinem Bluetooth-Lautsprecher kompatibel.
1. Der Projektor ist möglicherweise nicht mit bestimmten Versionen von Bluetooth Lautsprechern kompatibel.
2. Wenden Sie sich für weitere Unterstützung an unser After Sales Team unter [email protected]om und
teilen Sie uns die Marke und das Modell Ihres Bluetooth Lautsprechers mit.
FAQ & GARANTIE

DE 54
F6: Warum ist das Bild unscharf, egal, welche Einstellungen ich vornehme?
1. Platzieren Sie den Projektor in einer Linie mit der Bildschirmmitte. Alternativ sollte der Projektionswinkel
innerhalb von 15° liegen;
2. Verwenden Sie die automatische oder manuelle Trapezkorrektur, um eine rechteckige Bildschirmanzeige zu
erzielen; Verwenden Sie den Autofokus oder den manuellen Fokus, um den Objektivfokus anzupassen.
F7: Warum nde ich bestimmte Funktionen nicht?
Manche Funktionen erscheinen möglicherweise in Untermenüs oder erfordern ein langes Drücken bestimmter
Tasten. Aufgrund von Produktaktualisierungen können die Funktionen geringfügig von der Anleitung
abweichen. Genauere Informationen nden Sie im tatsächlichen Produkt.
F8: Was passiert, wenn die Rückgabefrist für meine Bestellung abgelaufen ist? Warum habe ich nach
24 Stunden keine Antwort erhalten?
Das Supportteam von PUTRIMS hilft Ihnen umgehend mit Lösungen, auch wenn Ihre Bestellung bereits nach
Ablauf der Rückgabefrist der Plattform eingegangen ist. Wenn Sie innerhalb von 24 Stunden keine Antwort
erhalten, kann dies an Zeitzonenunterschieden liegen oder daran, dass Ihre E Mail im Spam Ordner gelandet
ist. Bitte kontaktieren Sie uns erneut. Wir sorgen dafür, dass Ihre Anfrage umgehend bearbeitet wird.

FR 55
TABLE DES MATIÈRES
ASSISTANCE PROFESSIONNELLE À VIE DE PUTRIMS 56
MODE D'EMPLOI 56
LISTE DES PAQUETS 58
CARACTÉRISTIQUES DU PROJECTEUR 59
STRUCTURE DU PROJECETEUR 59
TÉLÉCOMMANDE 61
INSTALLATION 62
1.Méthode d'Installation - - - - - - - - - - - - - - - - - - - - - - - - - - - - - - - - - - - - - - - - - - - - 62
2.Distance et Taille de Projection - - - - - - - - - - - - - - - - - - - - - - - - - - - - - - - - - - - - - - - 63
3.Installation Au Plafond- - - - - - - - - - - - - - - - - - - - - - - - - - - - - - - - - - - - - - - - - - - - 63
DÉMARRAGE DU PROJECTEUR 64
PARAMÈTRES DE L'IMAGE DE PROJECTION 64
1.Correction Trapézoïdale - - - - - - - - - - - - - - - - - - - - - - - - - - - - - - - - - - - - - - - - - - - 64
1.1 Correction Trapézoïdale/Mse au Point Automatique 64
1.2 Correction Trapézoïdale Manuelle 65
2.Écran Zoom - - - - - - - - - - - - - - - - - - - - - - - - - - - - - - - - - - - - - - - - - - - - - - - - - - 66
2.1 Écran zoom 66
2.2 Réinitialisation de l'Écran 66
COMMUTATION DU SIGNAL D'ENTRÉE DU PROJECTEUR 67
1.Sélectionnez la Source du Signal - - - - - - - - - - - - - - - - - - - - - - - - - - - - - - - - - - - - - - 67
1.1 Sélectionnez la Source du Signal d'Entrée HDMI 67
1.2 Sélectionnez la Source du Signal GTV 68
1.3 Assistant Vocal dans GTV 69
2.CONNEXION SANS FIL - - - - - - - - - - - - - - - - - - - - - - - - - - - - - - - - - - - - - - - - - - - - 70
2.1 Paramètres WiFi 70
2.2 Pour les Appareils iOS (iOS Cast) 70
2.2 Pour les Appareils Android (Miracast) 71
3.Paramètres Bluetooth - - - - - - - - - - - - - - - - - - - - - - - - - - - - - - - - - - - - - - - - - - - - 72
AUTRES PARAMÈTRES DE PROJECTION 73
1.Mode de Vidéo - - - - - - - - - - - - - - - - - - - - - - - - - - - - - - - - - - - - - - - - - - - - - - - - 73
2.Mode de Son - - - - - - - - - - - - - - - - - - - - - - - - - - - - - - - - - - - - - - - - - - - - - - - - - 73
3.Système - - - - - - - - - - - - - - - - - - - - - - - - - - - - - - - - - - - - - - - - - - - - - - - - - - - - 74
4.Général - - - - - - - - - - - - - - - - - - - - - - - - - - - - - - - - - - - - - - - - - - - - - - - - - - - - 75
CONNEXION DES LIGNES DE SIGNAL 76
1.Connexion Multimédia USB - - - - - - - - - - - - - - - - - - - - - - - - - - - - - - - - - - - - - - - - - 76
1.1 Format USB 76
1.2 Interface de Lecture Vidéo 77
2.Connexion à Un Ordinateur/Ordinateur Portable via HDMI - - - - - - - - - - - - - - - - - - - - - - - 78
3.Connexion aux Haut-Parleurs - - - - - - - - - - - - - - - - - - - - - - - - - - - - - - - - - - - - - - - - 79
FAQ & GARANTIE 79

FR 56
ASSISTANCE PROFESSIONNELLE À VIE DE PUTRIMS
Cher Client,
Merci beaucoup de soutenir PUTRIMS !
Avant de commencer à utiliser le projecteur, veuillez lire attentivement ce manuel d'utilisation. Les
fonctionnalités et illustrations contenues dans ce document sont fournies à titre de référence et peuvent
légèrement diérer du produit réel en raison des optimisations et des mises à jour en cours. Pour des détails
précis, veuillez vous référer au produit physique.
Si vous avez des questions, veuillez inclure les détails suivants dans votre e mail: Code du pays, numéro
de commande, modèle et une brève description du problème (Par exemple, FR+000-0000000-
heures.
En fait, de nombreux problèmes peuvent être facilement résolus grâce aux paramètres, tels que l'absence de
signal, l'absence de son, l'échec de la connexion Bluetooth, l'échec de la connexion WiFi, etc. Nous promettons
que tous les projecteurs sont soigneusement inspectés et emballés à 100 % avant l'expédition.
Si vous avez des questions, veuillez nous contacter pour résoudre le problème. Et donnez nous une chance de
nous améliorer. Nous nous engageons à vous fournir une solution satisfaisante.
Nous nous engageons à fournir Nous nous engageons à fournir un service après vente rapide et de qualité
pour garantir votre satisfaction en tant que client précieux.
Merci de votre compréhension !
Sincèrement,
ÉQUIPE DE SUPPORT PUTRIMS
MODE D'EMPLOI
1. Équipé d'un dispositif de ventilation pour assurer le fonctionnement stable du projecteur. Ne couvrez pas les
évents avec des chions, des couvertures ou d'autres objets. N'insérez aucun objet de quelque nature que
ce soit dans les fentes du projecteur, car cela pourrait provoquer un court circuit ou un choc électrique et
endommager l'appareil.
2. Le projecteur doit être strictement protégé des chocs violents, de l'extrusion et des vibrations. N'essayez
pas de le frapper fortement, de le presser ou de le secouer. N'essayez pas de déplacer le circuit interne pour
éviter tout dysfonctionnement.
3. En tant que composant principal du projecteur, l'objectif est directement lié à la clarté et à l'eet de l'image.
Un essuyage excessif de la poussière de l'objectif peut affecter la qualité de l'image. Les lentilles sales
doivent être essuyées avec un chion en coton doux sur la surface de la lentille en verre. N'utilisez pas de
chions durs ou abrasifs.
4. Veuillez contrôler l'éclairage ambiant de la pièce pour améliorer la visibilité de l'image projetée. L'atténuation
des lumières ou l'utilisation de rideaux peuvent aider à réduire l'éblouissement et à améliorer la qualité de
l'image.
5. Si vous avez des questions, ne vous inquiétez pas, veuillez contacter [email protected]om par e mail.


FR 58
LISTE DES PAQUETS
Projecteur PUTRIMS K12 *1 Projecteur PUTRIMS K12 *1 Câble d'Alimentation *1
Câble HDMI *1 Cache Objectif *1 Kit de Nettoyage *1
Guide de Démarrage Rapide *1 Questions Fréquemment Posées *1

FR 59
CARACTÉRISTIQUES DU PROJECTEUR
Modèle: K12
Résolution Native 1920*1080P Rapport Hauteur/Largeur
16:9/4:3
(Appuyez brièvement
deux fois sur le bouton )
Technologie D'achage LCD Source Lumière LED
Poids
2.5 kg
5.5 lbs
Taille
(L*W*H)
28.0 x 24.2 x 10.7 cm
11'' x 9.5'' x 4.2''
Taux Rafraîchissement 60 Hz Tension D'alimentation AC 100 240V~/50~60Hz 2A
Mise au Point Auto + Électrique Keystone Auto + Manuel
Port Sortie 3.5mm Sortie Audio Port d'Entrée HDMI*1/USB*1
Rapport de projection 1.3:1 Zoom 100% 50%
Mode Fonctionnement Télécommande
Type d'Installation Avant/Arrière sur bureau, Avant/Arrière au plafond
STRUCTURE DU PROJECETEUR
Lentille
Récepteur IR
Récepteur de signal de mise
au point

FR 60
Port USB
Sortie audio 3,5mm
Port HDMI
Récepteur IR
Prise de courant
Bouton d'alimentation
Port de Nettoyage de Poussière
Filet Anti Poussière
Trou de Montage M5*12mm
Réglage de la Hauteur de
Projection
Sortie d'air
* Pour le montage au plafond, localisez les quatre trous au bas du projecteur. Retirez lentement les quatre
blocs de caoutchouc pour révéler les trous de montage (M5*12 mm) pour l'installation au plafond.
FR 61
TÉLÉCOMMANDE
Il existe deux versions de la télécommande :
Version 1
Bouton d'alimentation
Bouton d'alimentation
Bouton de source
Bouton de source
Voix du dongle
Voix du dongle
Paramètres du projecteur
Paramètres du projecteur
OK
OK
Paramètres du dongle
Paramètres du dongle
Muet
Muet
Mise au point +
Mise au point +
Mise au point
Mise au point
Touche échée
Touche échée
Page d'accueil
Page d'accueil
Retour
Retour
Volume +
Volume +
Volume
Volume
Menu
Menu
APP
APP
Mise au Point/
Correction Trapézoïdale Auto
Compte Google
Version 2
REMARQUE:
1. Veuillez installez 2 piles AAA (non incluses) dans la télécommande avant de l'utiliser.
2. Si la source du signal est dénie par défaut sur le mode GTV, la page Google TV s'allumera automatiquement
lorsque le projecteur sera allumé.
3. Dans l'interface USB ou HDMI, appuyez sur le bouton pour accéder aux paramètres système pour régler
les paramètres de vidéo/son, entre autres options.
4. Appuyez brièvement deux fois sur le bouton pour régler le rapport hauteur/largeur 16:9 ou 4:3.

FR 62
INSTALLATION
1.Méthode d'Installation
Le projecteur peut être monté au plafond à l'aide d'un support de plafond ou placé sur un bureau stable, en
fonction de l'environnement d'utilisation et des exigences. De plus, le projecteur peut être installé à l'aide des
méthodes suivantes:
1. Support de plafond pour projection frontale 2. Support de plafond pour projection arrière
3. Support de bureau pour projection frontale 4. Support de bureau pour projection arrière
1) Sélectionnez le menu [Paramètres] Sélectionnez l'option [Mode de Projection] Sélectionnez votre
mode d'installation et appuyez sur "OK" pour conrmer la position de projection (Projection Avant/
Projection Arrière/Plafond Avant/Plafond Arrière).
2) Il est recommandé de placer l'objectif du projecteur symétriquement par rapport à l'écran. Si vous devez
ajuster l'angle, maintenez le à moins de 15° et utilisez la fonction de correction trapézoïdale pour ajuster
l'image projetée.
FR 63
2.Distance et Taille de Projection
Le projecteur peut être monté au plafond à l'aide d'un support de plafond ou placé sur un bureau stable, en
fonction de l'environnement d'utilisation et des exigences. De plus, le projecteur peut être installé à l'aide des
méthodes suivantes.
La distance de projection recommandée pour ce projecteur K12 est de 2,5 à 3m. La taille de l'image dépend de
la distance et du rapport de projection du projecteur, qui est de 1,3:1. De plus, De plus, le projecteur ore une
fonction de zoom arrière de 50%.
Mètre
Pieds
0.8
2.6
30''
50''
80''
100''
120''
150''
1.4
4.5
2.3
7.5
2.8
9.1
3.4
11.1
4.3
14.1
3.Installation Au Plafond
1) Positionnez le projecteur perpendiculairement au sol et centré au milieu de l'écran. Cela permettra d'obtenir
une image de projection plate et correctement alignée.
2) Pour régler la base d'inclinaison, dévissez la tige de support au bas du projecteur. Pour un guide visuel,
reportez vous à la gure ci dessous.
3) Pour le montage au plafond, il y a 4 trous (M5*12mm) au bas du projecteur. Veuillez retourner le projecteur,
après avoir retiré les coussinets en caoutchouc, vous pouvez trouver les trous de montage au plafond
comme indiqué sur l'image ci dessous.
REMARQUE: Le support de suspension ou le support de montage au plafond ne sont pas inclus.
Notes: S'il y a de la poussière ou des points noirs sur l'écran, vous pouvez essayer les méthodes suivantes pour
nettoyer l'objectif:
Décollez l'étiquette du dessous du produit et ouvrez le couvercle en dessous, en essuyant soigneusement
l'écran intérieur avec un coton tige propre imbibé d'alcool. Soyez prudent pour éviter de causer des
dommages. Veuillez vous référer à la vidéo de nettoyage sur la page de détails ou contactez nous.
Trou de Montage M5*12mm
200mm
165mm

FR 64
Mise Sous Tension:
• Commencez par retirer le capuchon de l'objectif et connectez le projecteur à la source d'alimentation via le
câble d'alimentation.
• Une fois le voyant rouge allumé, appuyez sur le bouton d'alimentation de la télécommande ou sur le bouton
d'alimentation du panneau de commande du projecteur pour lancer la séquence de démarrage. Le voyant
passe du rouge au bleu, indiquant que le projecteur est désormais allumé.
• Lorsque le projecteur s'allume, il active automatiquement les fonctions [Keystone automatique après
mouvement] et [Démarrage de la mise au point automatique]. Si l'image n'est pas un rectangle standard
ou semble oue, ajustez manuellement les paramètres de trapèze et utilisez les boutons de mise au point
« F+ » et « F » de la télécommande pour aner la clarté de l'image. Si l'image reste oue, pensez à ajuster la
distance et l'angle de projection.
Mise Hors Tension:
• Pour éteindre le projecteur, appuyez sur le bouton d'alimentation de la télécommande ou sur le bouton
d'alimentation du panneau de commande du projecteur.
• Le voyant passe du bleu au rouge, indiquant que le projecteur a été éteint avec succès.
PARAMÈTRES DE L'IMAGE DE PROJECTION
DÉMARRAGE DU PROJECTEUR
1.Correction Trapézoïdale
1.1 Correction Trapézoïdale/Mse au Point Automatique
Sélectionnez le menu [Paramètres] Sélectionnez l'option [Image]. Sélectionnez ensuite [Keystone/Focus
auto] et cliquez sur le bouton « OK » pour activer la fonction. L'image sera alors automatiquement mise au
point en fonction de la distance de projection par rapport à l'écran et ajustera l'image à un rectangle lorsque
vous modierez l'angle de projection.
Si l'image est oue, appuyez sur le bouton de mise au point « F+ » « F- » de la télécommande pour régler
la mise au point de l'objectif, jusqu'à ce que l'image soit claire. (*Il n'est pas nécessaire d'appuyer sur le bouton
OK une fois que l'écran est clair)
REMARQUE :
1) Si vous avez déjà déni l'emplacement du projecteur, il est conseillé de désactiver les fonctions de mise
au point automatique et de correction automatique du trapèze dans les paramètres pour une meilleure
expérience de visionnage.
2) L'angle de projection latéral du projecteur ne doit pas dépasser 15° . Assurez vous qu'il n'y a pas d'obstacles
devant le projecteur, car ils peuvent interférer avec la fonction de correction automatique du trapèze.

FR 65
1.2 Correction Trapézoïdale Manuelle
Sélectionnez le menu [Paramètres] Sélectionnez l'option [Image]. Sélectionnez ensuite [Keystone Manuel]
et cliquez sur le bouton « OK » pour sélectionner le point que vous souhaitez régler en premier, puis appuyez
sur les touches échées(« ▼ » « ▶ » « ▲ » « ◀ ») pour dénir la valeur requise comme indiqué ci dessous.
Réinitialiser: Appuyez sur le bouton pour réinitialiser l'image aux paramètres de correction trapézoïdale
d'origine.

FR 66
2.Écran Zoom
2.1 Écran zoom
2.2 Réinitialisation de l'Écran
Sélectionnez le menu [Paramètres] Sélectionnez l'option [Image]. Sélectionnez ensuite [Zoom Écran],
appuyez sur le bouton « ▲ » « ▼ » pour dénir la valeur souhaitée comme indiqué ci dessous, l'écran
deprojection peut être être ajustée de 100% à 50%.
Réinitialiser: Pressez le bouton et l'image reviendra aux paramètres de zoom d'origine.
Cette fonction eace toutes les données de zoom et de correction trapézoïdale précédemment dénies,
restaurant l'image à sa taille et sa forme d'origine.
FR 67
COMMUTATION DU SIGNAL D'ENTRÉE DU PROJECTEUR
1.Sélectionnez la Source du Signal
1.1 Sélectionnez la Source du Signal d'Entrée HDMI
1) Sélectionnez la source de signal d'entrée souhaitée (par exemple, HDMI) sur la page d'accueil ou appuyez
sur le bouton« » de la télécommande pour sélectionner la source de signal correspondante.
2) Lors de la lecture d'une vidéo via HDMI, appuyez sur le bouton , sélectionnez [Vidéo] ou [Son] pour
régler la luminosité, le contraste et d'autres paramètres selon vos besoins.
Menu Menu Inclus
Source HOME/HDMI/GTV
Démarrage de Source Fermer/HDMI/GTV
HDMI Plug n play On/O

FR 68
Lorsque vous utilisez le GTV du projecteur K12 pour la première fois, veuillez suivre les étapes ci dessous
pour le congurer.
1) Après avoir sélectionné GTV comme source de signal, appuyez simultanément sur le bouton " " et le
bouton " " de la télécommande pour les coupler. (Remarque : Couplez la télécommande uniquement
lors de la première utilisation.)
2) Une fois entré dans GTV, choisissez les paramètres de langue et de pays appropriés.
3) Connectez vous à votre compte Google pour accéder au contenu personnalisé.
4) Préparez vous à charger toutes les applications GTV intégrées. Ce processus peut prendre environ 10
minutes, selon les conditions de votre réseau.
5) Après avoir chargé les applications, vous pouvez proter du contenu massif de GTV.
1.2 Sélectionnez la Source du Signal GTV
Le projecteur K12 est doté de Google TV intégré (Sous Licence Ocielle), ce qui vous permet d'accéder facilement
à vos applications et vidéos préférées et d'en profiter. Avec ce projecteur, vous pouvez explorer une vaste
bibliothèque de lms et d'émissions de télévision sans avoir besoin d'un TV Stick supplémentaire.

FR 69
1.3 Assistant Vocal dans GTV
1) Tout en parlant, maintenez le bouton vocal enfoncé sur la télécommande.
2) L'assistant vocal ne peut être utilisé que dans l'interface Google TV (GTV).
FR 70
2.1 Paramètres WiFi
2.2 Pour les Appareils iOS (iOS Cast)
1) Sélectionnez le menu [Paramètres] Sélectionnez [Réseau] > [Paramètres WiFi]
2) La mise en miroir de l'écran nécessite un signal Wi Fi sans fil puissant. Assurez vous que votre réseau
domestique fonctionne correctement. Placez votre appareil mobile à proximité du projecteur. Une distance
d'environ 1 mètre est optimale. La résolution vidéo s'ajustera de manière dynamique en fonction de la
puissance de votre signal WiFi.
3) En raison de restrictions de droits d'auteur, les projecteurs ne prennent pas en charge la mise en miroir
sans fil d'applications de streaming telles que Netflix ou Disney directement depuis votre téléphone.
Pour regarder du contenu en streaming, veuillez sélectionner la source du signal GTV et télécharger les
applications correspondantes.
Attention: Assurez vous que votre appareil iOS est connecté au même réseau Wi Fi que votre projecteur.
1) Connectez le projecteur à votre WiFi domestique.
2) Retournez à la page d'accueil du projecteur Sélectionnez [iOS Cast] Restez sur cette interface.
3) Accédez au [Centre de Contrôle] sur votre appareil iOS Sélectionnez la fonction [Screen Mirroring]
Sélectionnez et connectez le récepteur iOS Cast nommé [K12-xxxx].
2.CONNEXION SANS FIL
FR 71
2.2 Pour les Appareils Android (Miracast)
Attention: Pour activer cette fonction, assurez vous que votre appareil Android prend en charge l'achage
multi écran/sans l. Le nom de « Multi-écran » peut varier selon les diérentes marques d'appareils Android.
Assurez vous d'activer la fonction Wi Fi sur votre appareil Android (il n'est pas nécessaire de se connecter à un
réseau WiFi). Les téléphones portables de la série Pixel utilisent Google Chromecast, qui nécessite un appareil
de diusion séparé (non inclus).
1) Sélectionnez [Miracast] sur la page d'accueil du projecteur Restez sur cette interface.
2) Accédez au [Centre de Contrôle] sur votre appareil Android, sélectionnez [Screen Mirroring/Smart
View].
3) Sélectionnez le récepteur Miracast nommé [K12-xxxx] et connectez vous.

FR 72
3.Paramètres Bluetooth
1) Allumez votre enceinte Bluetooth.
2) Activez les [Paramètres Bluetooth] de votre projecteur.
3) Sélectionnez votre enceinte Bluetooth pour vous connecter.
REMARQUE :
1) Assurez vous que tous les autres appareils précédemment couplés à votre enceinte Bluetooth sont d'abord
déconnectés.
2) Cette étape s'applique uniquement à la connexion d'enceintes Bluetooth, pas aux téléphones portables.
3) Si vous avez des questions, n'hésitez pas à envoyer un e mail à PUTRIMS via: [email protected].
FR 73
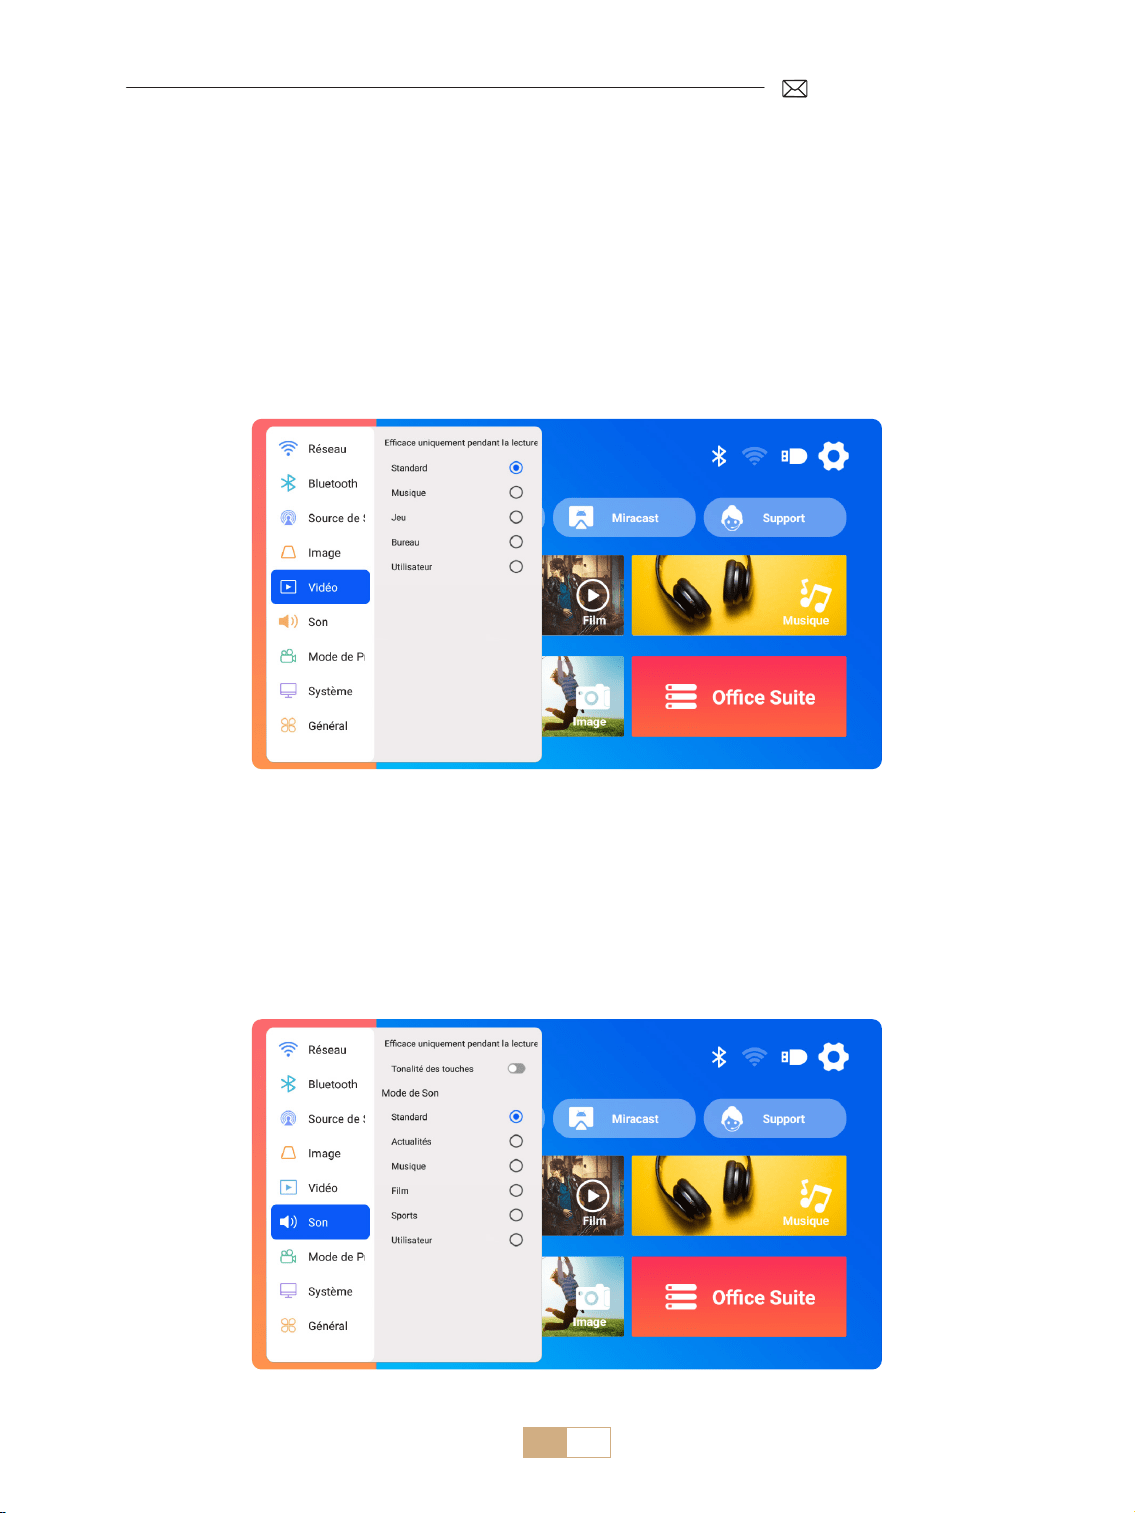
1) Allez sur la page d'accueil Sélectionnez [Paramètres] Sélectionnez [Vidéo]. Vous pouvez choisir le
mode vidéo selon vos besoins : Standard/Musique/Jeu/Bureau/Utilisateur.
2) Lorsque vous sélectionnez le mode « Utilisateur », vous pouvez régler les paramètres de luminosité, de
netteté, de contraste et de saturation de manière personnalisée.
REMARQUE : L'eet du mode vidéo sélectionné ne prendra eet que lors de la lecture vidéo.
1) Allez sur la page d'accueil Sélectionnez [Paramètres] Sélectionnez [Son]. Vous pouvez choisir le mode
vidéo selon vos besoins : Standard/Actualités/Musique/Film/Sports/Utilisateur.
2) Lorsque vous sélectionnez le mode « Utilisateur », vous pouvez régler la fréquence sonore de manière
personnalisée.
REMARQUE : L'eet du mode sonore sélectionné ne prendra eet que lors de la lecture vidéo
Tonalité des Touches: Activez ou désactivez les tonalités des touches.
AUTRES PARAMÈTRES DE PROJECTION
1.Mode de Vidéo
2.Mode de Son

FR 74
Remarque sur la Mise à Niveau du Fichier USB:
1) Copiez le package de mise à niveau dans le répertoire racine d'une clé USB.
2) Appuyez sur le bouton d'alimentation de l'appareil et maintenez le enfoncé. Le système détectera
automatiquement le package de mise à niveau et lancera le processus de mise à niveau.
REMARQUE : Avant la mise à niveau, veuillez régler le mode de mise sous tension sur veille.
Accédez à la page d'accueil Sélectionnez [Paramètres] Sélectionnez [Système].
3.Système
Menu Menu Inclus Fonction
À propos de cette machine
Numéro de version du système/
Adresse MAC WiFi/Adresse MAC
Bluetooth
Conrmez les informations de
version et identiez l'appareil sur
le réseau ou Bluetooth
Mise à niveau du système
Mise à jour en ligne (OTA)
Mise à jour USB (USB)
Mettre à jour le logiciel via un
chier local USB ou en ligne
Restaurer l'usine
Restaurer les paramètres d'usine
par défaut
FR 75
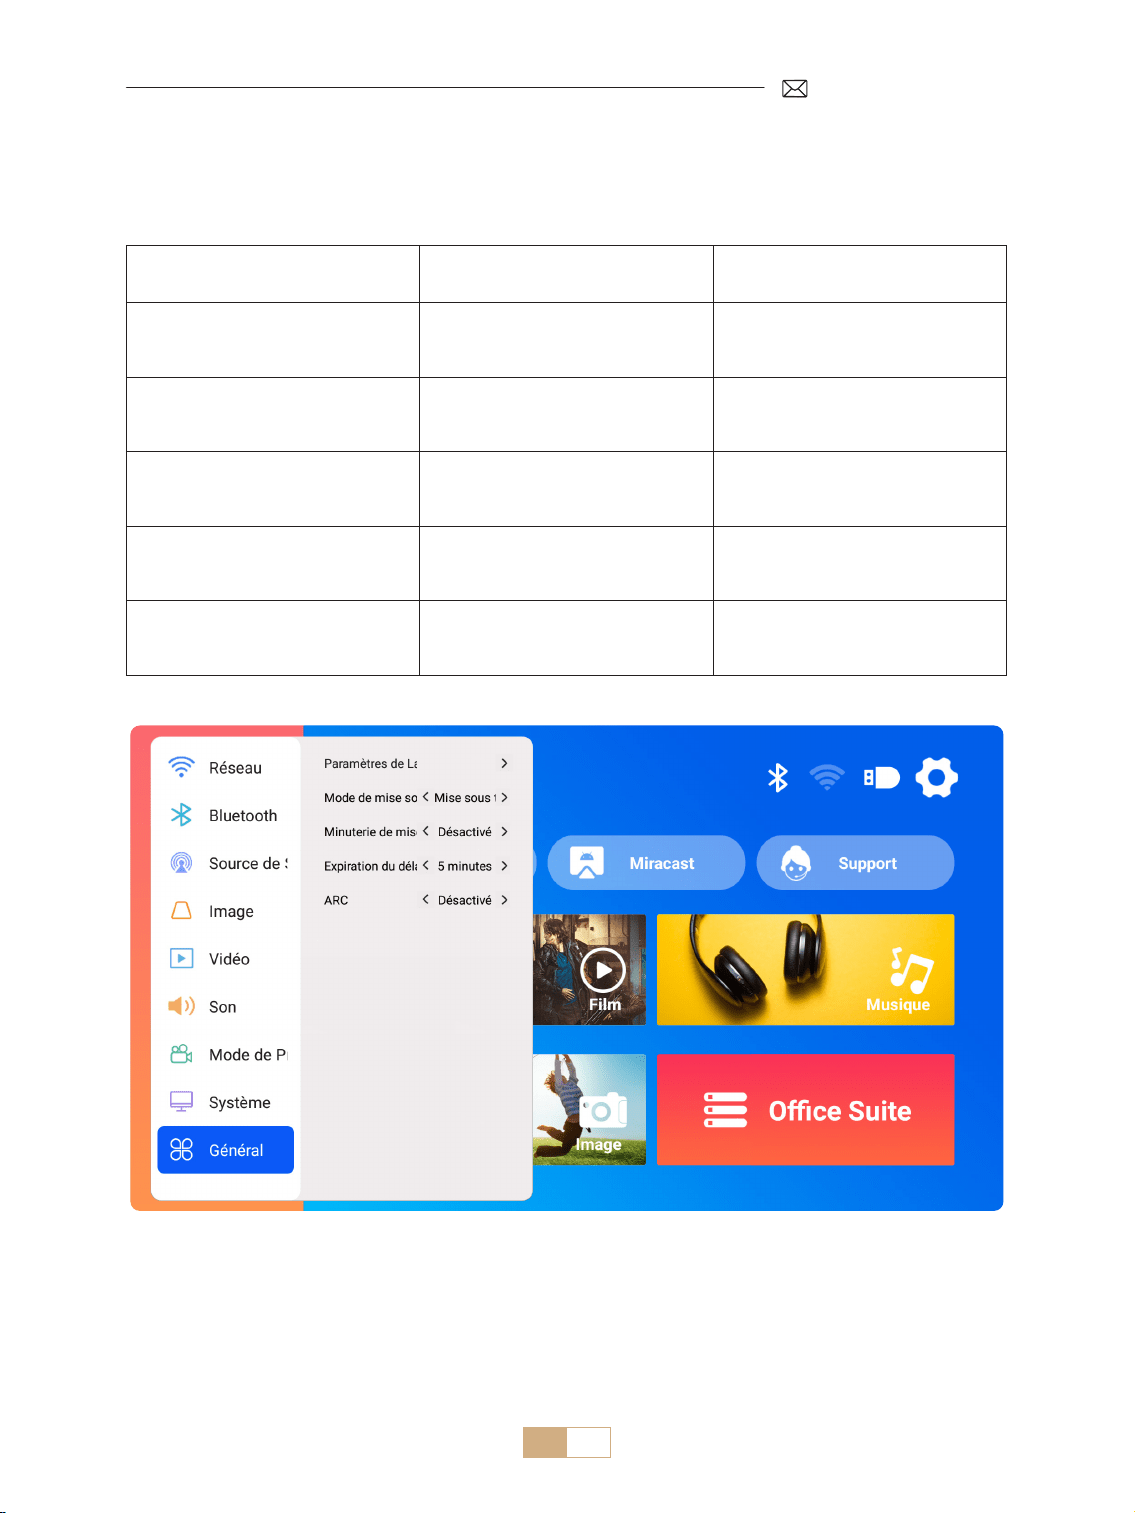
Accédez à la page d'accueil Sélectionnez [Paramètres] Sélectionnez [Général].
4.Général
Menu Contenu Fonction
Paramètres de Langue
Anglais/Français/Italien/
Espagnol/Allemand/Japonais et
autres langues
Choisissez la langue préférée
Mode de Démarrage Mise sous tension/veille
Mise sous tension/veille
automatique après avoir branché
l'alimentation
Minuterie de mise en veille
O/10min/20min/30min/60min/
90min/120min/180min/240min
Dénir l'heure sommeil
Délai d'expiration de l'économiseur
d'écran
Never/1min/5min/10min
Régler la durée de l'économiseur
d'écran du projecteur
ARC O/On
Connectez l'enceinte via un câble
HDMI
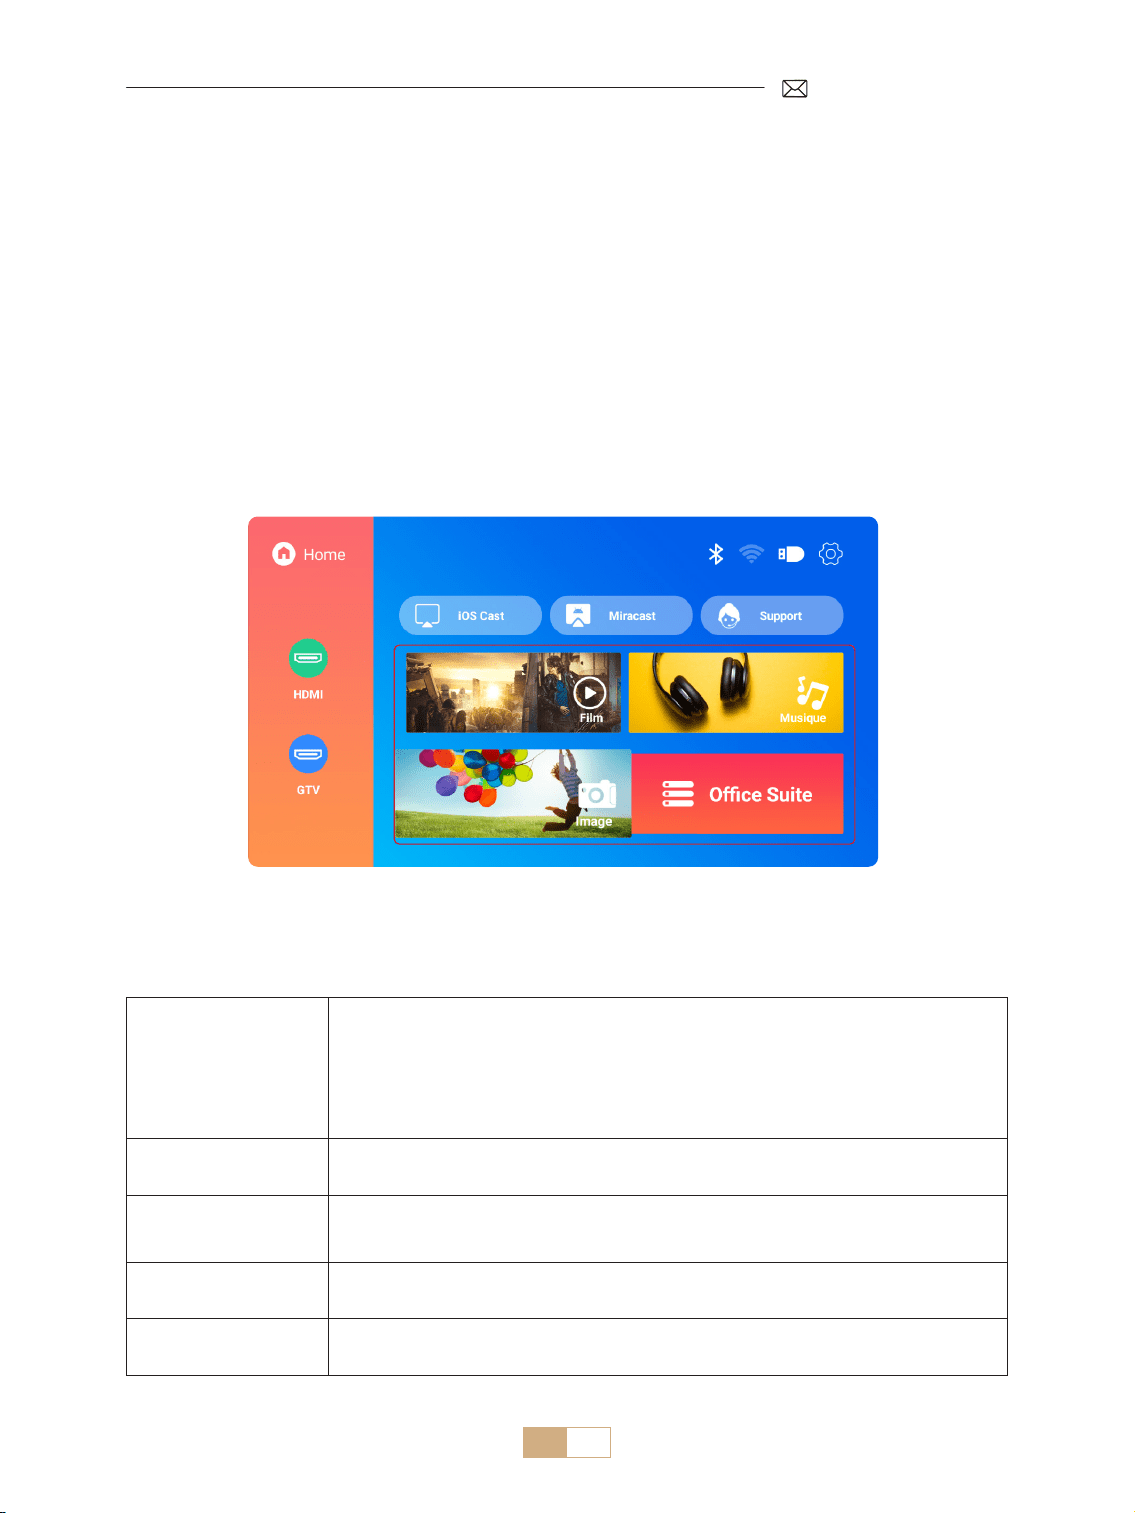
FR 76
Le PUTRIMS K12 propose des interfaces HDMI, USB et jack audio 3,5mm. Connectez votre appareil (par
exemple, PC, téléphone, lecteur DVD, barre de son, Clé USB, PS4) au port approprié.
CONNEXION DES LIGNES DE SIGNAL
1.Connexion Multimédia USB
1.1 Format USB
1) Insérez une clé USB dans le port du projecteur ; elle sera reconnue automatiquement.
2) Depuis l'interface principale, sélectionnez une catégorie (Film, Musique, Photo, Suite Oce) et appuyez sur
le bouton « OK » de la télécommande pour accéder aux chiers.
Remarque: La sélection d'un type de fichier incorrect vous empêchera de visualiser les fichiers
correspondants.
Conseils: Si le projecteur ne peut pas reconnaître le disque USB, veuillez vous référer aux méthodes suivantes
pour résoudre le problème.
Veuillez conrmer si votre Clé USB répond aux formats suivants:
Format USB
FAT32: 8G/16G/32G
NTFS: 64G
Format non pris en charge: ExFAT
Attention: Si le projecteur ne parvient pas à reconnaître le contenu de la Clé USB,
vériez si le format de votre clé USB est correct.
Format Vidéo
MP4/MKV/3GP/ASF/AVI/FLV/MPG/RMVB/TS/VOB, etc. (La prise en charge des codecs
vidéo peut varier ; contactez nous pour une assistance supplémentaire)
Format Audio
AAC/FLAC/M4A/MP3/WAV, etc. (La prise en charge des codecs audio peut varier;
Les codecs audio Dolby ne sont pas pris en charge; Contactez-nous pour une
assistance supplémentaire)
Format Image BMP/PNG/JPEG/JPG/JPE
Format Document PPT/PDF/Word/Excel/TXT
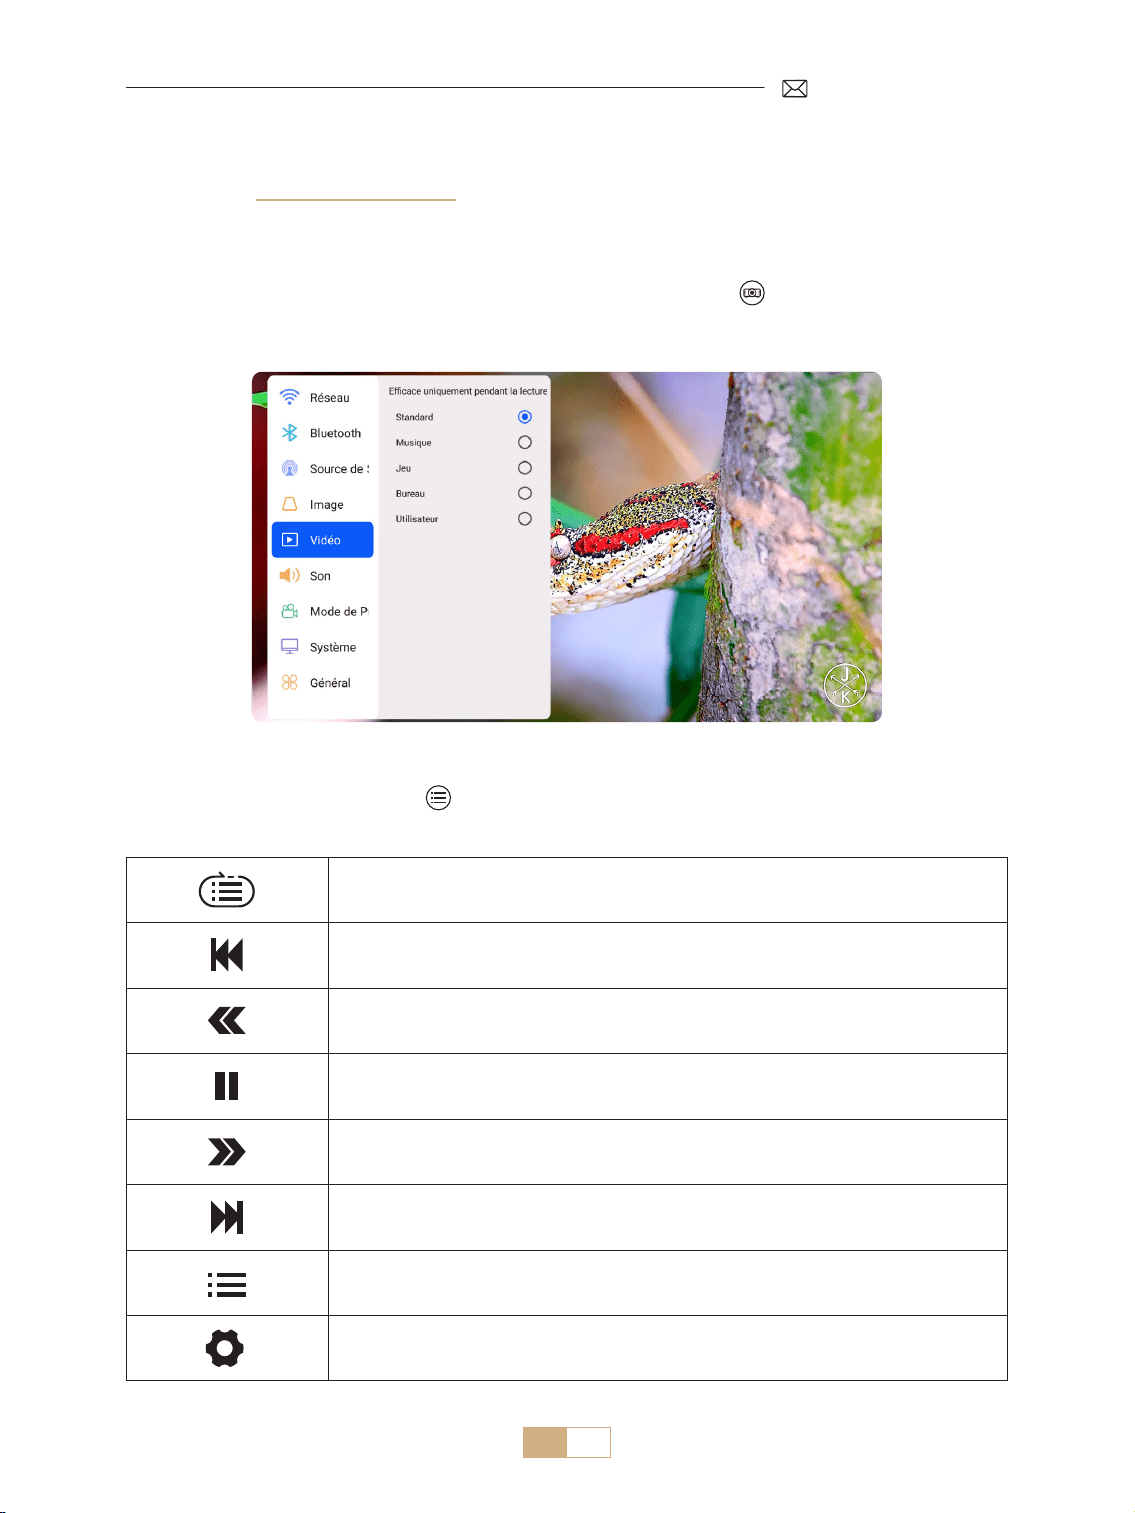
FR 77
Si le problème n'est toujours pas résolu, veuillez envoyer une description détaillée de votre problème à l'adresse
e mail suivante: support@putrims.com.
Boucle unique, boucle de liste et boucle dans la liste une seule fois.
Passer à la vidéo précédente.
Retour rapide de la vidéo 2X à 32X.
Lecture ou pause.
Avance rapide de la vidéo 2X à 32X.
Passer à la vidéo suivante.
Sélectionnez les listes de lecture dans le dossier actuel.
Accédez aux paramètres du projecteur pour régler le mode de [Vidéo] ou de [Son].
1.2 Interface de Lecture Vidéo
1) Dans l'interface USB, lors de la lecture d'une vidéo, appuyez sur le bouton , puis sélectionnez [Vidéo] ou
[Son] pour régler la luminosité, le contraste et d'autres paramètres selon vos besoins.
2) Appuyez brièvement sur le bouton pour accéder aux paramètres de lecture vidéo comme ci dessous.
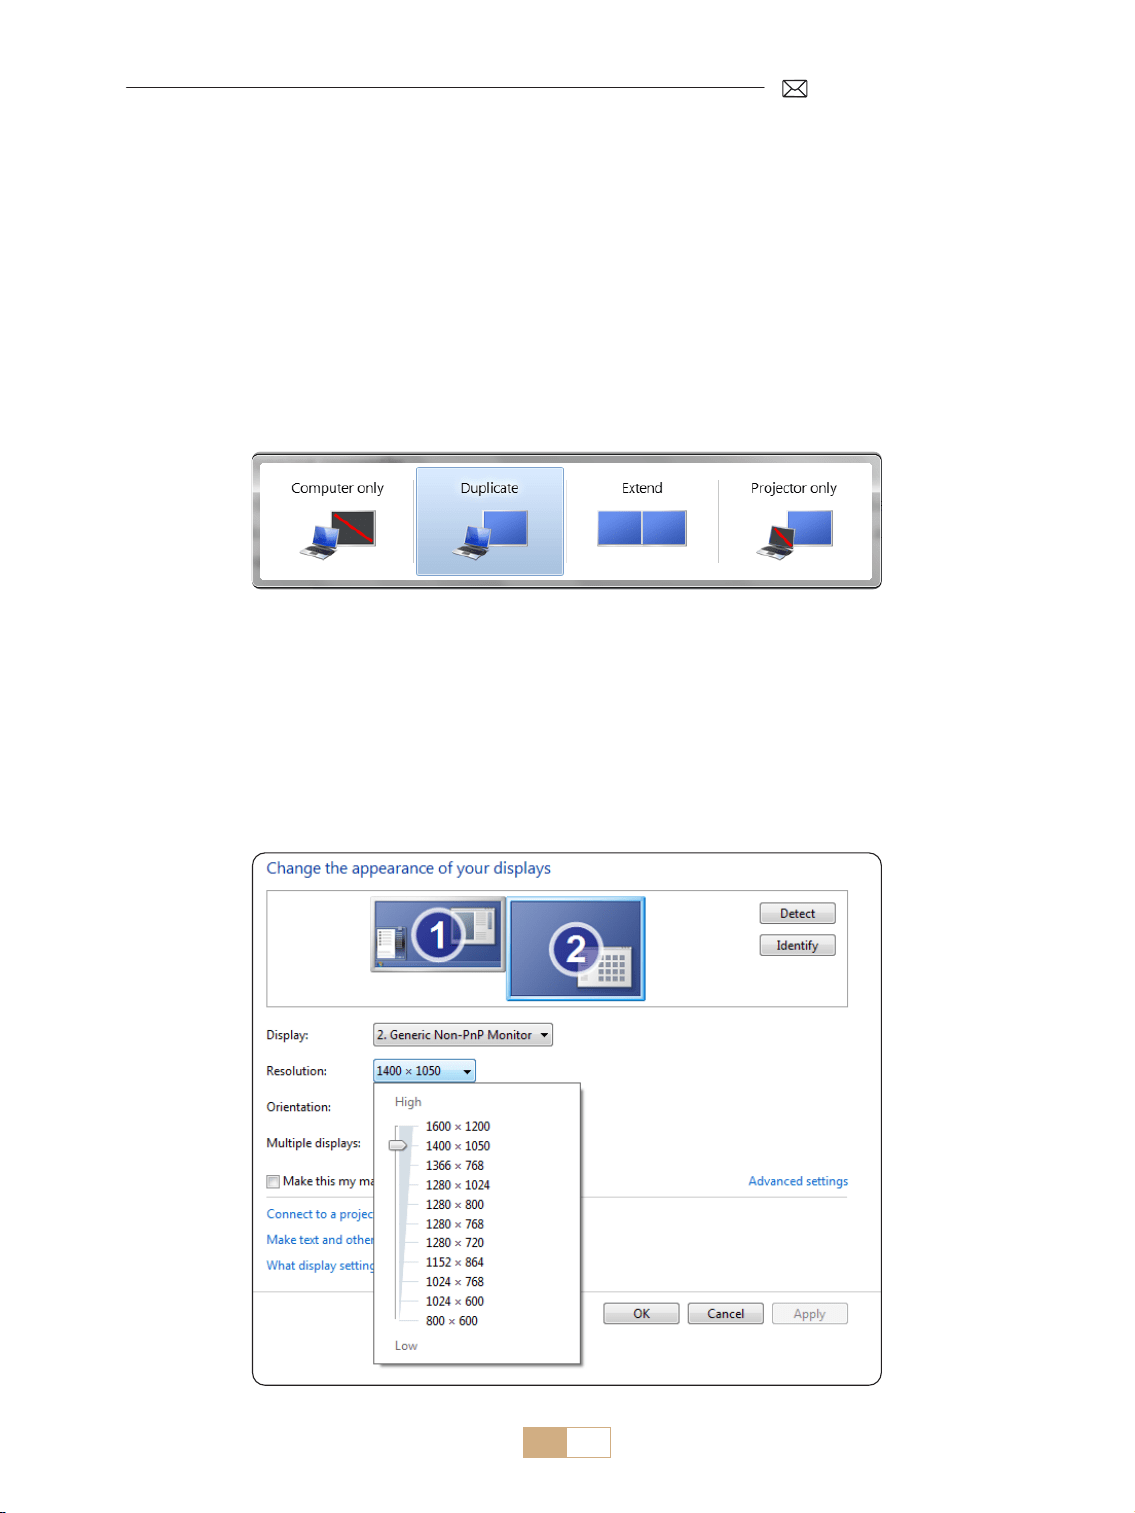
FR 78
1. Utilisez le câble HDMI fourni pour connecter votre ordinateur au projecteur K12.
2. Sélectionnez la source « HDMI » pour projeter n'importe quel chier sur votre ordinateur.
3. Sur votre ordinateur portable, maintenez enfoncées les touches " Win+P " pour changer le mode d'achage.
REMARQUE:
1) Si vous rencontrez des problèmes de connexion, c'est probablement parce que le mode d'achage n'a pas
été sélectionné correctement.
2) Pour MacBook, veuillez utiliser un adaptateur Type C vers HDMI pour connecter votre MacBook ou un
adaptateur Mini Display vers HDMI pour vous connecter à votre MacBook Air (Adaptateur non inclus).
Ordinateur uniquement: Paramètre par défaut pour l'achage sur le moniteur principal uniquement.
Dupliquer: Permet à tous les moniteurs d'afficher la même chose en dupliquant le bureau sur chaque
moniteur.
Étendre: Permet à tous vos moniteurs d'agir comme un seul grand moniteur en étendant le bureau sur tous
les moniteurs.
Projecteur uniquement: S'ache uniquement sur le moniteur secondaire comme un projecteur.
Pour modier la résolution de l'écran en mode Projecteur uniquement, procédez comme suit :
Étape: Démarrer > Panneau de Conguration > Apparence et Personnalisation > Régler la résolution de l'écran.
2.Connexion à Un Ordinateur/Ordinateur Portable via HDMI

FR 79
Le K12 prend en charge la fonction de HDMI ARC. En activant d'abord HDMI ARC dans les paramètres [Général],
connectez une barre de son via le câble HDMI sans avoir besoin de câbles audio supplémentaires.
3.Connexion aux Haut-Parleurs
(HDMI)
TMerci d'avoir choisi le projecteur PUTRIMS K12. Nous orons une garantie de 2 ans pour le projecteur K12. Si
vous avez des questions, n'hésitez pas à nous contacter via [email protected]om.
Nous avons compilé quelques questions fréquemment posées et leurs réponses correspondantes pour mieux
vous aider.
Q1: La connexion WiFi est instable. Comment puis-je résoudre ce problème ?
Pour résoudre les problèmes de connectivité WiFi, assurez vous d'abord que votre réseau domestique
fonctionne bien. De plus, maintenez la distance entre votre téléphone et le projecteur à moins d'un mètre. Si le
problème persiste, veuillez nous contacter à [email protected]om pour obtenir de l'aide.
Q2: La télécommande et le projecteur ne peuvent pas communiquer.
1. L'interrupteur d'alimentation au dessus du projecteur est il allumé ou éteint ?
2. Les piles de la télécommande sont elles épuisées ?
3. Y a t il des obstacles qui bloquent le signal infrarouge entre la télécommande et le projecteur ?
Q3: Qu'est-ce que le dongle GTV ? Puis-je regarder des lms et des émissions de télévision plus populaires ?
1. Le projecteur dispose d'un système Google TV intégré et ociellement autorisé, qui comprend du contenu
préchargé de Netix, YouTube, Prime Video, etc.
2. Vous pouvez trouver des applications supplémentaires sur la page d'accueil de GTV sous " Applications " et
rechercher l'application dont vous avez besoin.
Q4: Le projecteur s'éteint automatiquement après avoir fonctionné pendant un certain temps.
1. La ventilation du projecteur peut être bloquée ou la tension peut être instable.
2. Envoyez une vidéo à [email protected]om, nous étudierons le problème pour vous.
Q5: Le projecteur n'est pas compatible avec mon haut-parleur Bluetooth.
1. Le projecteur peut ne pas être compatible avec certaines versions de haut parleurs Bluetooth.
2. Contactez notre équipe après vente à [email protected]om avec la marque et le modèle de votre haut
parleur Bluetooth pour obtenir de l'aide.
FAQ & GARANTIE

FR 80
Q6 : Pourquoi l'image est-elle oue, peu importe comment je l'ajuste ?
1. Placez le projecteur en ligne avec le centre de l'écran. Ou l'angle de projection doit être dans les 15° ;
2. Utilisez la correction trapézoïdale automatique ou manuelle pour obtenir un achage d'écran rectangulaire;
Utilisez la mise au point automatique ou manuelle pour régler la mise au point de l'objectif.
Q7: Pourquoi ne puis-je pas trouver certaines fonctionnalités ?
Certaines fonctions peuvent apparaître dans des sous menus ou nécessiter une pression longue sur certains
boutons. En raison des mises à niveau du produit, les fonctionnalités peuvent légèrement diérer du manuel.
Pour des informations précises, veuillez vous référer au produit réel.
Q8: Que se passe-t-il si ma commande a dépassé la période de retour de la plateforme ? Pourquoi
n'ai-je pas reçu de réponse ?
Cela peut être dû à des différences de fuseau horaire ou à votre courrier électronique qui se retrouve
accidentellement dans un dossier spam. Veuillez nous recontacter et notre équipe après vente d'assistance de
PUTRIMS traitera votre problème dans les plus brefs délais.

ES 81
Tabla de Contenido
SOPORTE PROFESIONAL DE POR VIDA DE PUTRIMS 82
INSTRUCCIONES DE USO 82
LISTA DE PAQUETES 84
ESPECIFICACIONES DEL PROYECTOR 85
ESTRUCTURA DE APARIENCIA DEL PROYECTOR 85
CONTROL REMOTO 87
INSTALACIÓN 88
1.Método de Instalación - - - - - - - - - - - - - - - - - - - - - - - - - - - - - - - - - - - - - - - - - - - - 88
2.Distancia y Tamaño de Proyección - - - - - - - - - - - - - - - - - - - - - - - - - - - - - - - - - - - - - 89
3.Instalación en el Techo- - - - - - - - - - - - - - - - - - - - - - - - - - - - - - - - - - - - - - - - - - - - 89
INICIO DEL PROYECTOR 90
CONFIGURACIÓN DE LA IMAGEN DE PROYECCIÓN 90
1.Corrección Trapezoidal - - - - - - - - - - - - - - - - - - - - - - - - - - - - - - - - - - - - - - - - - - - 90
1.1 Corrección Trapezoidal/Enfoque Automáticas 90
1.2 Corrección Trapezoidal Manual 91
2.Zoom de Pantalla - - - - - - - - - - - - - - - - - - - - - - - - - - - - - - - - - - - - - - - - - - - - - - - 92
2.1 Zoom de Pantalla 92
2.2 Reinicio de Pantalla 92
CAMBIO DE SEÑAL DE ENTRADA DEL PROYECTOR 93
1.Seleccione la Fuente de Señal- - - - - - - - - - - - - - - - - - - - - - - - - - - - - - - - - - - - - - - - 93
1.1 Seleccione la Fuente de Señal de Entrada HDMI 93
1.2 Seleccione la Fuente de Señal GTV 94
1.3 Asistente de Voz en GTV 95
2.CONEXIÓN INALÁMBRICA - - - - - - - - - - - - - - - - - - - - - - - - - - - - - - - - - - - - - - - - - - 96
2.1 Conguración de WiFi 96
2.2 Para Dispositivos iOS (iOS Cast) 96
2.2 Para Dispositivos Android (Miracast) 97
3.Conguración de Bluetooth - - - - - - - - - - - - - - - - - - - - - - - - - - - - - - - - - - - - - - - - - 98
OTRAS CONFIGURACIONES DE PROYECCIÓN 99
1.Modo de Video - - - - - - - - - - - - - - - - - - - - - - - - - - - - - - - - - - - - - - - - - - - - - - - - 99
2.Modo de Sonido - - - - - - - - - - - - - - - - - - - - - - - - - - - - - - - - - - - - - - - - - - - - - - - 99
3.Sistema - - - - - - - - - - - - - - - - - - - - - - - - - - - - - - - - - - - - - - - - - - - - - - - - - - - -100
4.General - - - - - - - - - - - - - - - - - - - - - - - - - - - - - - - - - - - - - - - - - - - - - - - - - - - -101
CONEXIONES DE LÍNEAS DE SEÑAL 102
1.Conexión Multimedia USB - - - - - - - - - - - - - - - - - - - - - - - - - - - - - - - - - - - - - - - - - -102
1.1 Formato USB 102
1.2 Interfaz de Reproducción de Video 103
2.Conexión a la Computadora Portátil y al Ordenador - - - - - - - - - - - - - - - - - - - - - - - - - - -104
3.Conexión al Altavoz- - - - - - - - - - - - - - - - - - - - - - - - - - - - - - - - - - - - - - - - - - - - - -105
FAQ & GARANTÍA 105

ES 82
SOPORTE PROFESIONAL DE POR VIDA DE PUTRIMS
Estimado cliente,
¡Muchas gracias por apoyar a PUTRIMS!
Lea atentamente este manual de usuario antes de comenzar a utilizar el proyector. Las características e
ilustraciones contenidas aquí son solo como referencia y pueden diferir ligeramente del producto real debido
a optimizaciones y actualizaciones continuas. Consulte el producto real para obtener más detalles.
Si tiene alguna pregunta, incluya los siguientes detalles en su correo electrónico: código de país, número
de pedido, número de modelo y una breve descripción del problema (por ejemplo: ES+000-0000000-
0000000+K12+sin imagen) a support@putrims.com. Proporcionaremos una solución rápida en 24 horas.
De hecho, muchos problemas se pueden resolver fácilmente mediante la conguración, como falta de señal,
falta de sonido, falla de la conexión Bluetooth, falla de la conexión WiFi, etc. Prometemos que todos los
proyectores son 100% inspeccionados y empaquetados cuidadosamente antes del envío.
Si tiene alguna pregunta, comuníquese con nosotros para resolver el problema y danos la oportunidad de
mejorar. Nos comprometemos a brindarle soluciones satisfactorias.
Estamos comprometidos a brindar soporte de calidad 24 horas al día, 7 días a la semana para garantizar su
satisfacción como nuestro valioso cliente.
¡Gracias por su comprensión!
Atentamente,
Equipo de Soporte de PUTRIMS
INSTRUCCIONES DE USO
1. No coloque el proyector en una habitación demasiado caliente o demasiado fría, ya que las temperaturas
altas o bajas afectarán el rendimiento del proyector y acortarán la vida útil del equipo. El entorno de trabajo
es preferiblemente de 5 ° C a 35 ° C.
2. Equipado con un dispositivo de ventilación para garantizar el funcionamiento estable del proyector. No
cubra las rejillas de ventilación con paños, mantas u otros elementos. No inserte objetos de ningún tipo en
las ranuras del proyector, ya que esto puede provocar un cortocircuito o una descarga eléctrica y dañar el
dispositivo.
3. El proyector debe protegerse estrictamente de impactos fuertes, extrusiones y vibraciones. No intente
golpearlo, apretarlo ni sacudirlo con fuerza. No intente mover el circuito interno para evitar un mal
funcionamiento.
4. Como componente principal del proyector, la lente está directamente relacionada con la claridad y el efecto
de la imagen. Limpiar excesivamente el polvo de la lente puede afectar la calidad de la imagen. Las lentes
sucias deben limpiarse con un paño de algodón suave sobre la supercie de la lente de vidrio. No utilice
paños duros ni abrasivos.
5. Controle la iluminación ambiental de la habitación para mejorar la visibilidad de la imagen proyectada.
Atenuar las luces o usar cortinas puede ayudar a reducir el deslumbramiento y mejorar la calidad de la
imagen.
6. Si tiene alguna pregunta, no se preocupe, comuníquese con [email protected]om por correo electrónico.


ES 84
LISTA DE PAQUETES
Proyector PUTRIMS K12 *1 Control Remoto Dongle *1 Cable de Alimentación *1
Cable HDMI *1 Cubierta de Lente *1 Kit de Limpieza *1
Guía de Inicio Rápido *1 Preguntas Frecuentes *1

ES 85
ESPECIFICACIONES DEL PROYECTOR
Modelo no. K12
Resolución Nativa 1920*1080P Relación de Aspecto
16:9/4:3
(Pulse brevemente el
botón dos veces)
Tecnología de
Visualización
LCD Fuente de Luz LED
Peso Neto
2,5 kg
5,5 libras
Tamaño
(Largo*Ancho*Alto)
28.0 x 24.2 x 10.7 cm
11'' x 9.5'' x 4.2''
Frecuencia de
Actualización
60 Hz Voltaje de Potencia AC 100 240V~/50~60Hz 2A
Enfoque Automático + Eléctrico Corrección Trapezoidal Automático + Manual
Puerto de Salida Salida de audio de 3,5 mm Puerto de entrada HDMI*1/USB*1
Relación de proyección 1,3:1 Zoom 100% 50%
Modo de Operación Mando a distancia
Tipo de Instalación Delante/atrás en el escritorio, Delante/atrás en el techo
ESTRUCTURA DE APARIENCIA DEL PROYECTOR
Lente
Receptor IR
Receptor de Señal de Enfoque
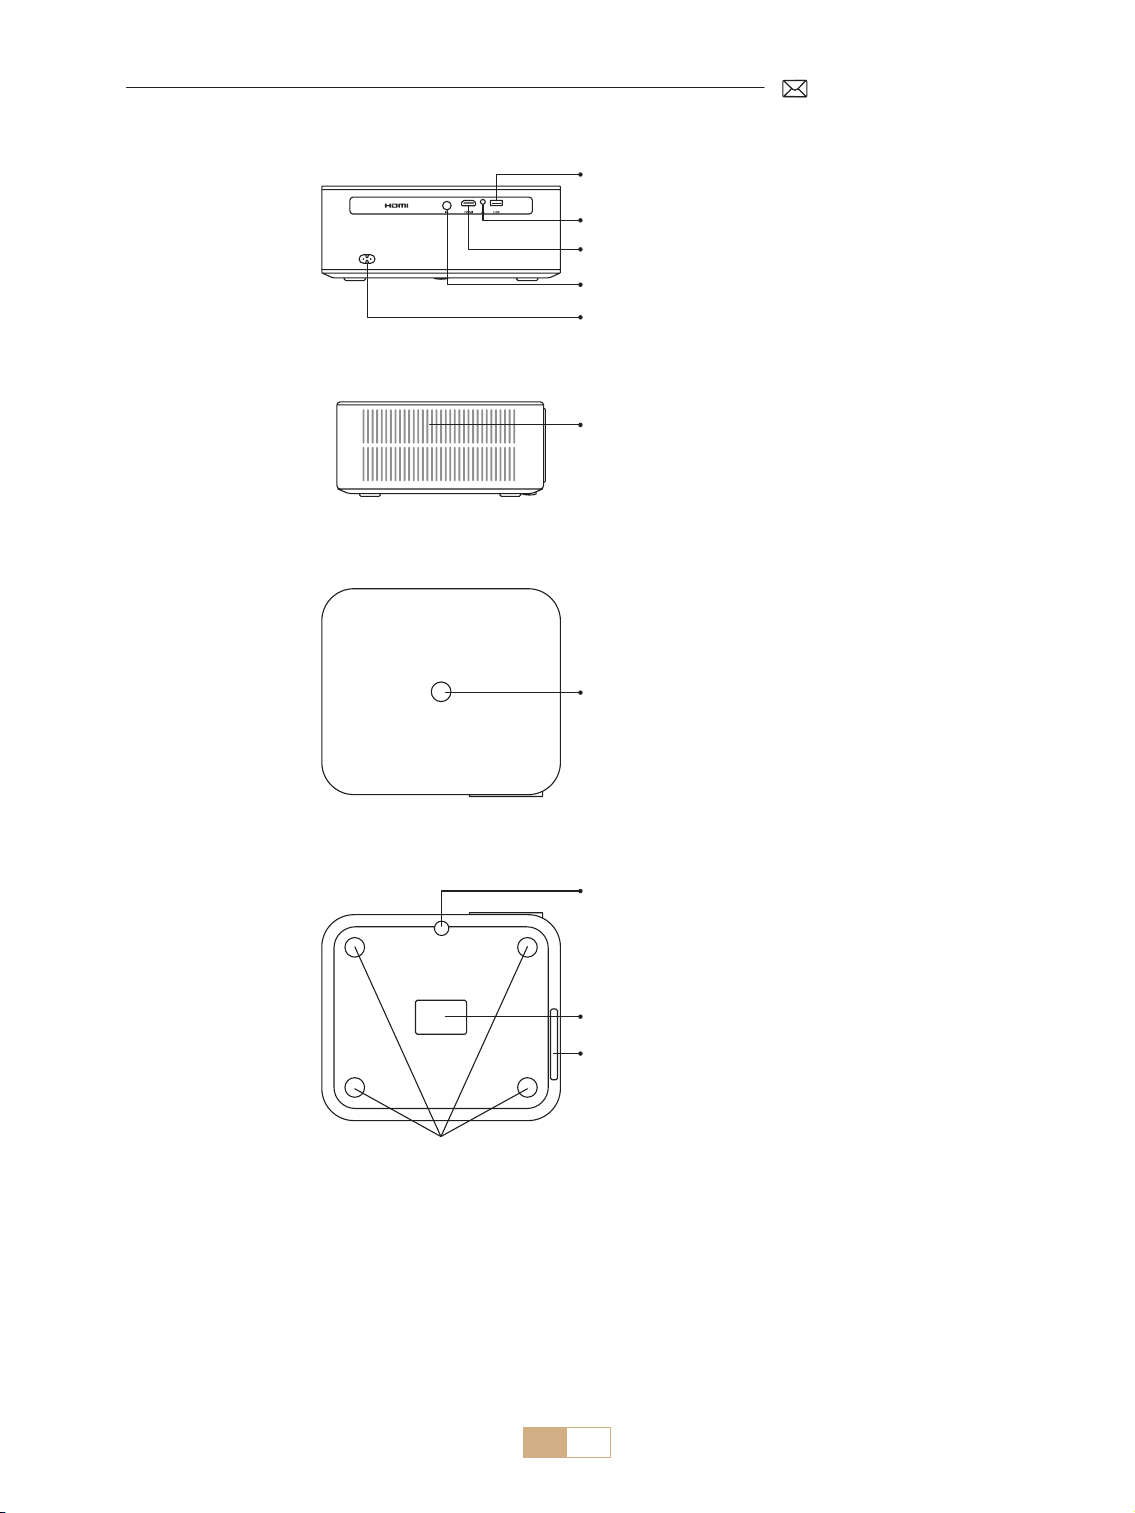
ES 86
Puerto USB
Puerto de Audio de 3,5mm
Puerto HDMI
Receptor IR
Toma de Corriente
Botón de Encendido
Puerto de Limpieza de Polvo
Filtro de Polvo
Oricio de Montaje M5*12mm
Ajuste de Altura de
Proyección
Salida de Aire
* Para montaje en techo, ubique los cuatro oricios en la parte inferior del proyector. Retire lentamente los
cuatro bloques de goma para revelar los oricios de montaje (M5*12 mm) para la instalación en el
techo.
Para limpiar la lente, retire la etiqueta inferior del producto y abra la tapa que se encuentra debajo, limpiando
con cuidado la pantalla interior con un hisopo de algodón limpio con alcohol. Tenga cuidado para evitar
causar daños. Consulte el video de limpieza en la página de detalles o contáctenos.
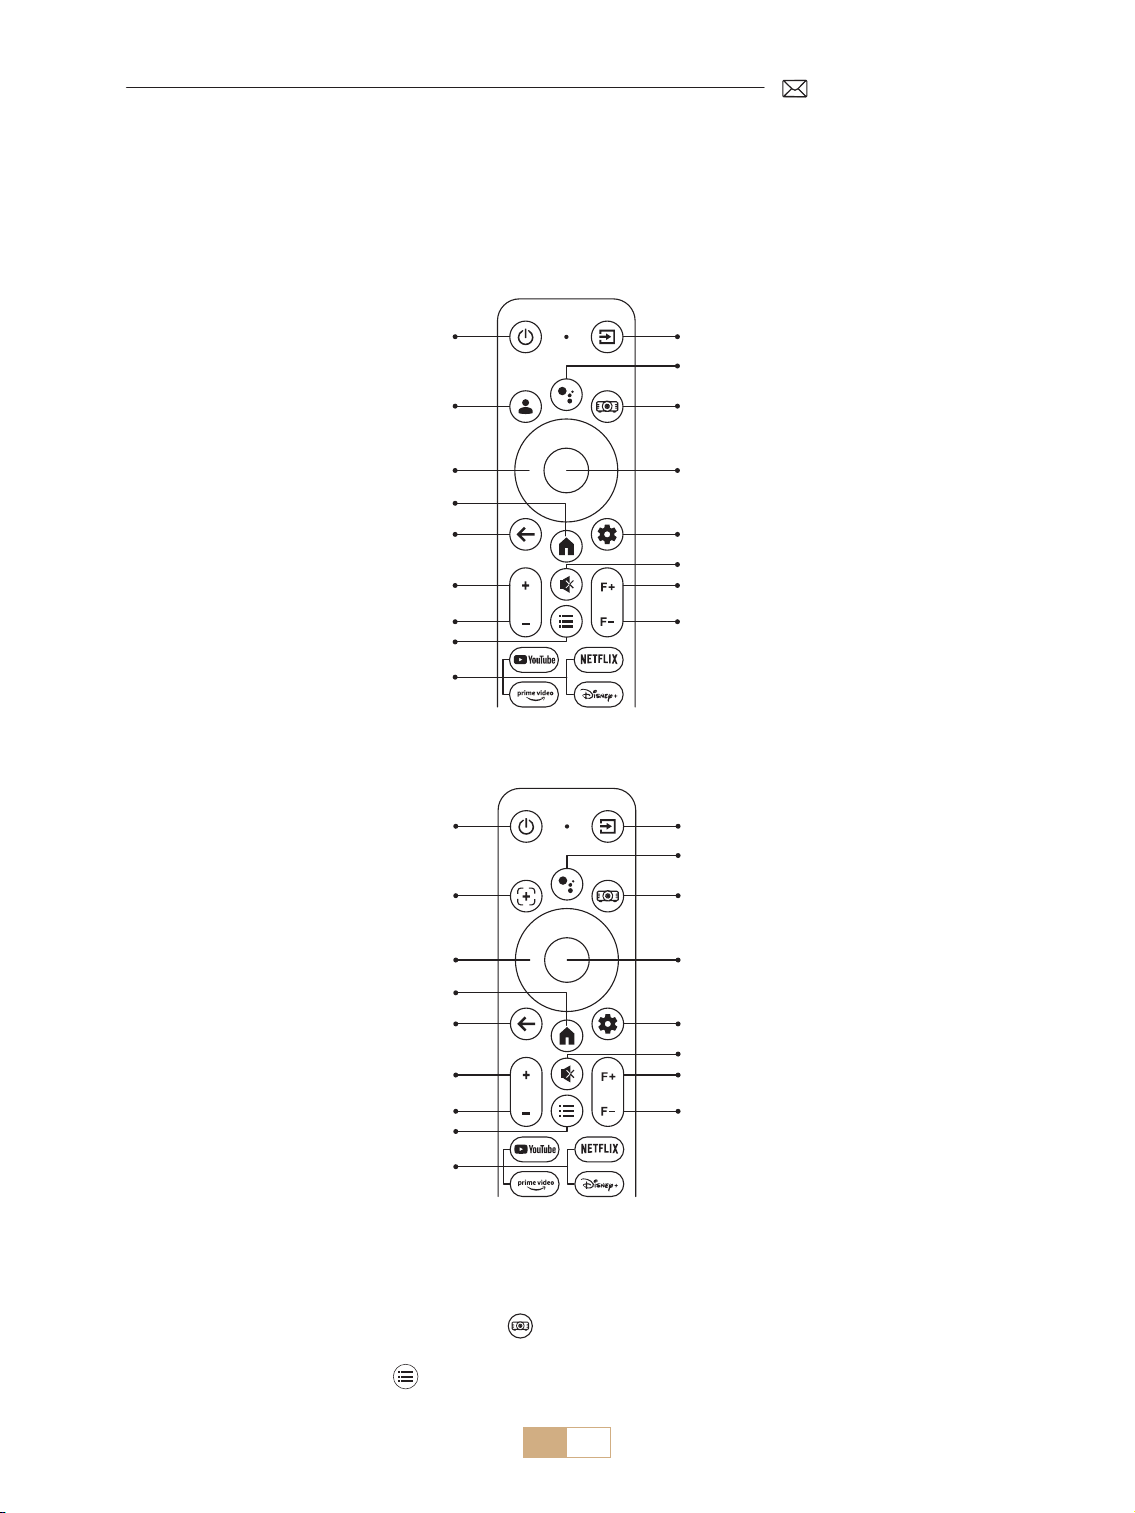
ES 87
CONTROL REMOTO
Existen dos versiones del mando a distancia:
Versión 1
Power Button
Power Button
Botón Fuente
Botón Fuente
Voz de Dongle
Voz de Dongle
Conguración del Proyector
Conguración del Proyector
OK
OK
Conguración de la Llave Electrónica
Conguración de la Llave Electrónica
Silenciar
Silenciar
Enfoque +
Enfoque +
Enfoque
Enfoque
Tecla de Flecha
Tecla de Flecha
Pagina de inicio
Pagina de inicio
Atrás
Atrás
Volumen +
Volumen +
Volumen
Volumen
Menú
Menú
APP
APP
Enfoque /
Corrección Trapezoidal Auto
Cuenta Google
Versión 2
Importante:
1. Instale 2 pilas AAA (no incluidas) en el control remoto antes de usarlo.
2. Si la fuente de señal predeterminada es el modo GTV, la página de Google TV se encenderá automáticamente
cuando se encienda el proyector.
3. En la interfaz USB o HDMI, presione el botón para acceder a la conguración del sistema para ajustar la
conguración de video/sonido, entre otras opciones.
4. Presione brevemente el botón dos veces para ajustar la relación de aspecto 16:9 o 4:3.
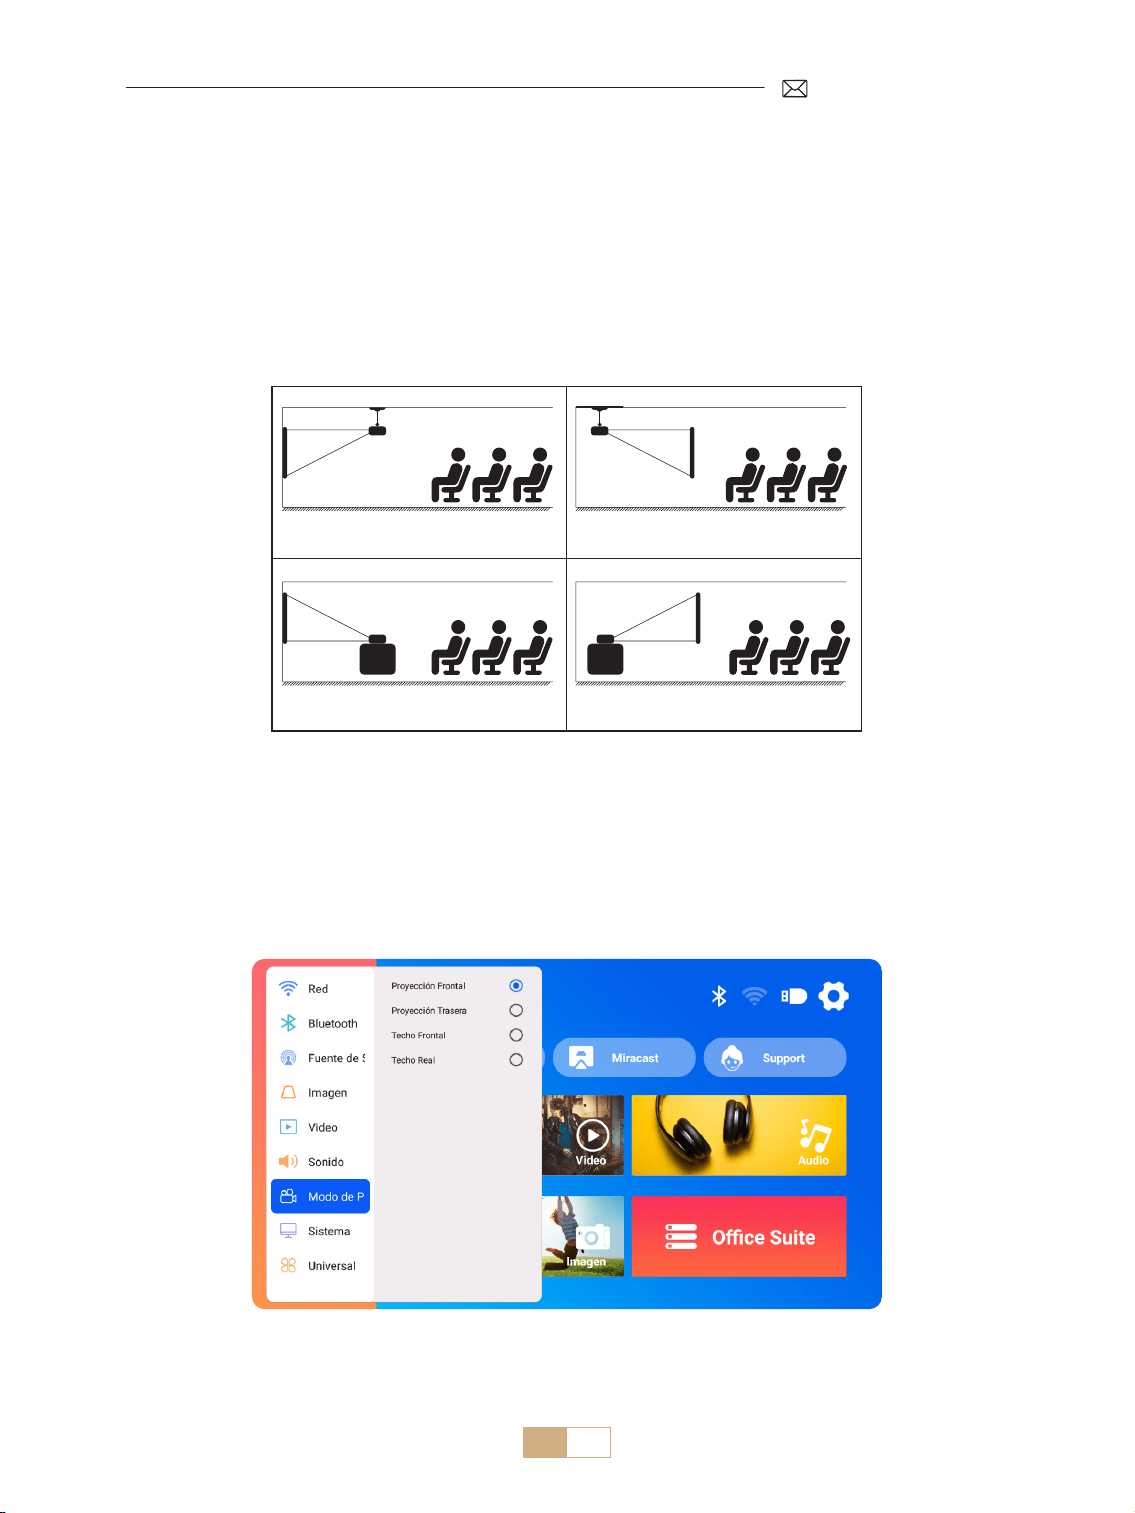
ES 88
INSTALACIÓN
1.Método de Instalación
El proyector se puede montar en el techo mediante un soporte de techo o se puede colocar sobre un escritorio
estable, según el entorno de funcionamiento y los requisitos. Además, el proyector se puede instalar mediante
los siguientes métodos.
1. Proyección frontal montaje en techo 2. Proyección trasera montaje en techo
3. Proyección frontal montaje en escritoriot 4. Proyección trasera montaje en escritorio
1) Seleccione el menú [Conguración] Seleccione la opción [Modo de Proyección] Seleccione el modo
de instalación y presione “OK” para confirmar la posición de proyección (Proyección frontal/Proyección
posterior/Techo frontal/Techo posterior).
2) Se recomienda colocar el proyector con su lente alineada simétricamente con la pantalla. Si necesita ajustar
el ángulo, manténgalo dentro de los 15° y utilice la función de corrección trapezoidal para ajustar la imagen
proyectada.

ES 89
2.Distancia y Tamaño de Proyección
El proyector se puede montar en el techo mediante un soporte de techo o se puede colocar sobre un escritorio
estable, según el entorno de funcionamiento y los requisitos. Además, el proyector se puede instalar mediante
los siguientes métodos.
La distancia de proyección recomendada para este proyector K12 es de 2,5 a 3m.
El tamaño de la imagen depende de la distancia y de la relación de proyección del proyector, que es 1,3:1.
Además, el proyector ofrece una función de alejamiento del 50%.
Metro
Pies
0,8
2,6
30''
50''
80''
100''
120''
150''
1,4
4,5
2,3
7,5
2,8
9,1
3,4
11,1
4,3
14,1
3.Instalación en el Techo
1) Coloque el proyector perpendicular al suelo y centrado en el punto medio de la pantalla. Esto ayudará a
lograr una imagen de proyección plana y correctamente alineada.
2) Para ajustar la base de inclinación, desatornille la varilla de soporte en la parte inferior del proyector. Para
obtener una guía visual, consulte la gura que se proporciona a continuación.
3) Para el montaje en el techo, hay 4 orificios (M5*12 mm) en la parte inferior del proyector. Dé vuelta el
proyector y, después de quitar las almohadillas de goma, podrá encontrar los orificios de montaje en el
techo, como se muestra en la imagen siguiente.
NOTA: El soporte para colgar o el soporte para montaje en el techo no están incluidos.
Oricio de Montaje M5*12mm
200mm
165mm

ES 90
Encendido:
• Comience quitando la tapa de la lente y conectando el proyector a la fuente de alimentación a través del
cable de alimentación.
• Una vez que la luz indicadora roja se ilumine, presione el botón de encendido en el control remoto o el
botón de encendido en el panel de control del proyector para iniciar la secuencia de inicio. La luz indicadora
cambiará de rojo a azul, lo que indica que el proyector ahora está encendido.
• Cuando el proyector se enciende, habilitará automáticamente las funciones [Auto Keystone After Movement]
y [Boot Auto Focus]. Si la imagen no es un rectángulo estándar o aparece desenfocada, ajuste manualmente
la conguración de la corrección trapezoidal y use los botones de enfoque "F+" y "F " en el control remoto
para refinar la claridad de la imagen. Si la imagen permanece borrosa, considere ajustar la distancia y el
ángulo de proyección.
Apagado:
• Para apagar el proyector, presione el botón de encendido en el control remoto o el botón de encendido en el
panel de control del proyector.
• La luz indicadora cambiará de azul a rojo, lo que indica que el proyector se ha apagado correctamente.
CONFIGURACIÓN DE LA IMAGEN DE PROYECCIÓN
INICIO DEL PROYECTOR
1.Corrección Trapezoidal
1.1 Corrección Trapezoidal/Enfoque Automáticas
Seleccione el menú [Conguración] Seleccione la opción [Imagen]. Luego seleccione [Auto Keystone/
Focus] y haga clic en el botón "OK" para activar la función. Luego, enfocará automáticamente la imagen
según la distancia de proyección desde la pantalla y ajustará la imagen a un rectángulo cuando cambie el
ángulo de proyección.
Si la imagen está borrosa, presione el botón de enfoque ''F+'' ''F '' en el control remoto para ajustar el enfoque
de la lente hasta que la imagen esté clara. (*No es necesario presionar el botón OK después de que la pantalla
esté clara)
NOTA:
1) Si ya ha congurado la ubicación del proyector, es recomendable desactivar las funciones de enfoque
automático y corrección trapezoidal automática en la conguración para una mejor experiencia de
visualización.
2) El ángulo de proyección lateral del proyector no debe superar los 15° . Asegúrese de que no haya obstáculos
frente al proyector, ya que pueden interferir con la función de corrección trapezoidal automática.
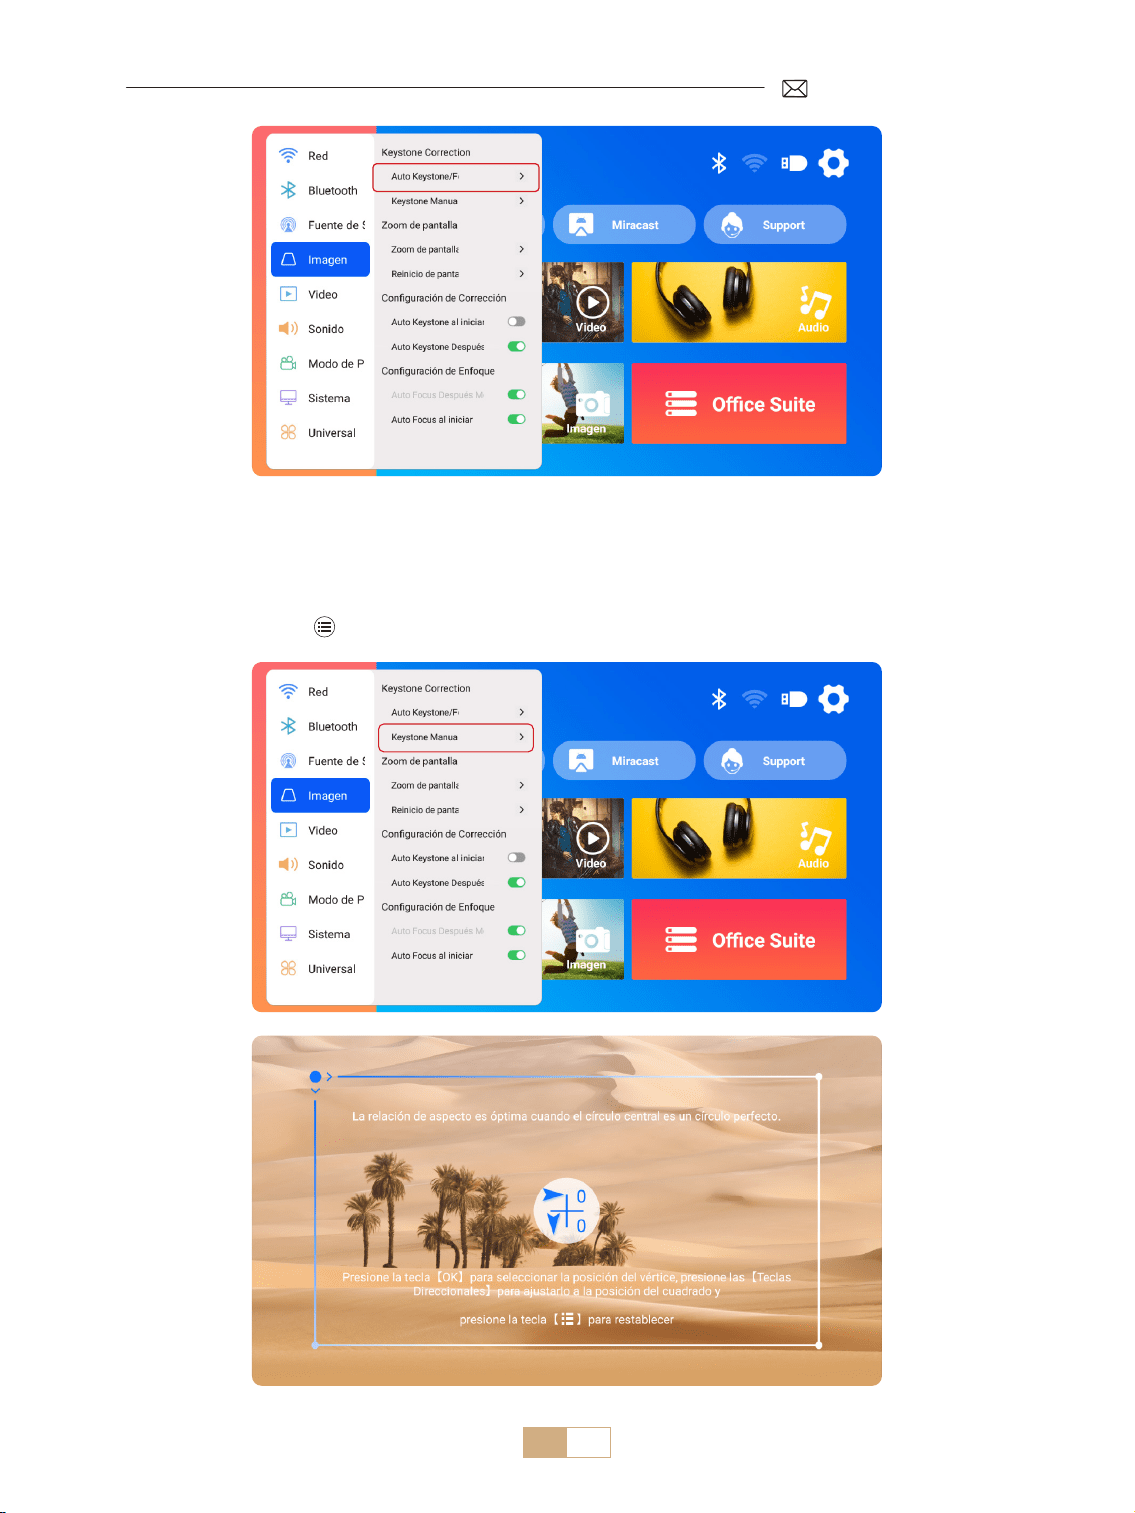
ES 91
1.2 Corrección Trapezoidal Manual
Seleccione el menú [Conguración] Seleccione la opción [Imagen]. Luego seleccione [Keystone Manual]
y haga clic en el botón "OK" para elegir el punto que desea ajustar primero y luego presione las teclas de echa
(" ▼ " " ▶ " " ▲ "" ◀ ") para establecer el valor necesario como se muestra a continuación.
Restablecer: presione para restablecer la imagen a la conguración de corrección trapezoidal original.
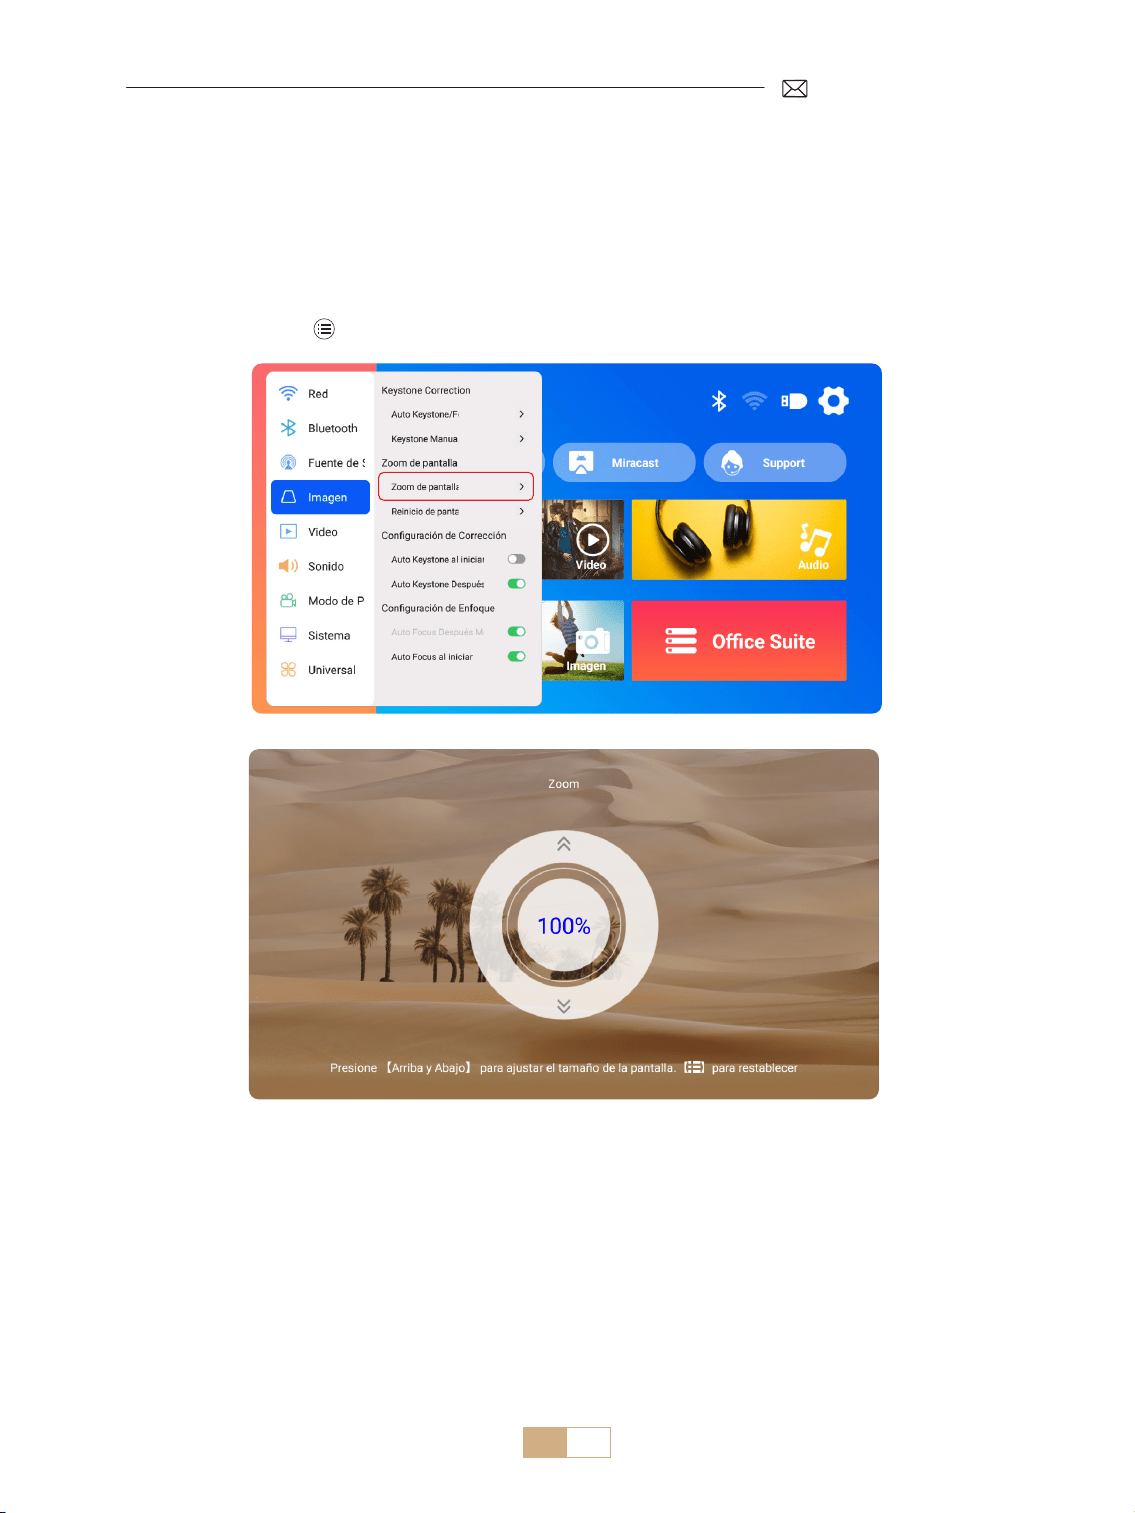
ES 92
2.Zoom de Pantalla
2.1 Zoom de Pantalla
2.2 Reinicio de Pantalla
Seleccione el menú [Conguración] Seleccione la opción [Imagen]. Luego seleccione [Zoom de pantalla],
presione el botón " ▲ "" ▼ " para establecer el valor necesario como se muestra a continuación, la pantalla de
proyección se puede ampliar del 100% al 50%.
Restablecer: Presione y la imagen se restaurará a la conguración de zoom original.
Esta función borra cualquier dato de corrección trapezoidal y de zoom previamente congurado, restaurando
la imagen a su tamaño y forma originales.

ES 93
CAMBIO DE SEÑAL DE ENTRADA DEL PROYECTOR
1.Seleccione la Fuente de Señal
1.1 Seleccione la Fuente de Señal de Entrada HDMI
1) Seleccione la fuente de señal de entrada deseada (por ejemplo, HDMI) en la página de inicio, o puede
presionar el botón [ ] en el control remoto para seleccionar la fuente de señal correspondiente.
2) Al reproducir un video a través de HDMI, presione el botón , seleccione [Video] o [Sonido] para ajustar el
brillo, el contraste y otras conguraciones según sea necesario.
Menú Menú Incluido
Fuente HOME/HDMI/GTV
Boot Fuente Desactiva/HDMI/GTV
HDMI Plug n play Encendido/Apagado

ES 94
Cuando utilice el GTV del proyector K12 por primera vez, siga los pasos a continuación para congurarlo.
1) Después de seleccionar GTV como fuente de señal, mantenga presionados simultáneamente el [ ] y el [ ]
en el control remoto para emparejarlos. (Nota: empareje el control remoto solo durante el primer uso).
2) Al ingresar a GTV, elija la conguración de idioma y país adecuada.
3) Inicie sesión en su cuenta de Google para acceder a contenido personalizado.
4) Prepárese para cargar todas las aplicaciones GTV integradas. Este proceso puede demorar aproximadamente
10 minutos, según las condiciones de su red.
5) Después de cargar las aplicaciones, puede disfrutar del contenido masivo en GTV.
1.2 Seleccione la Fuente de Señal GTV
El proyector K12 cuenta con Google TV integrado (licencia oficial), lo que te permite acceder y disfrutar
fácilmente de tus aplicaciones y videos favoritos. Con este proyector, puedes explorar una amplia biblioteca de
películas y programas de televisión sin necesidad de un Fire TV Stick adicional.
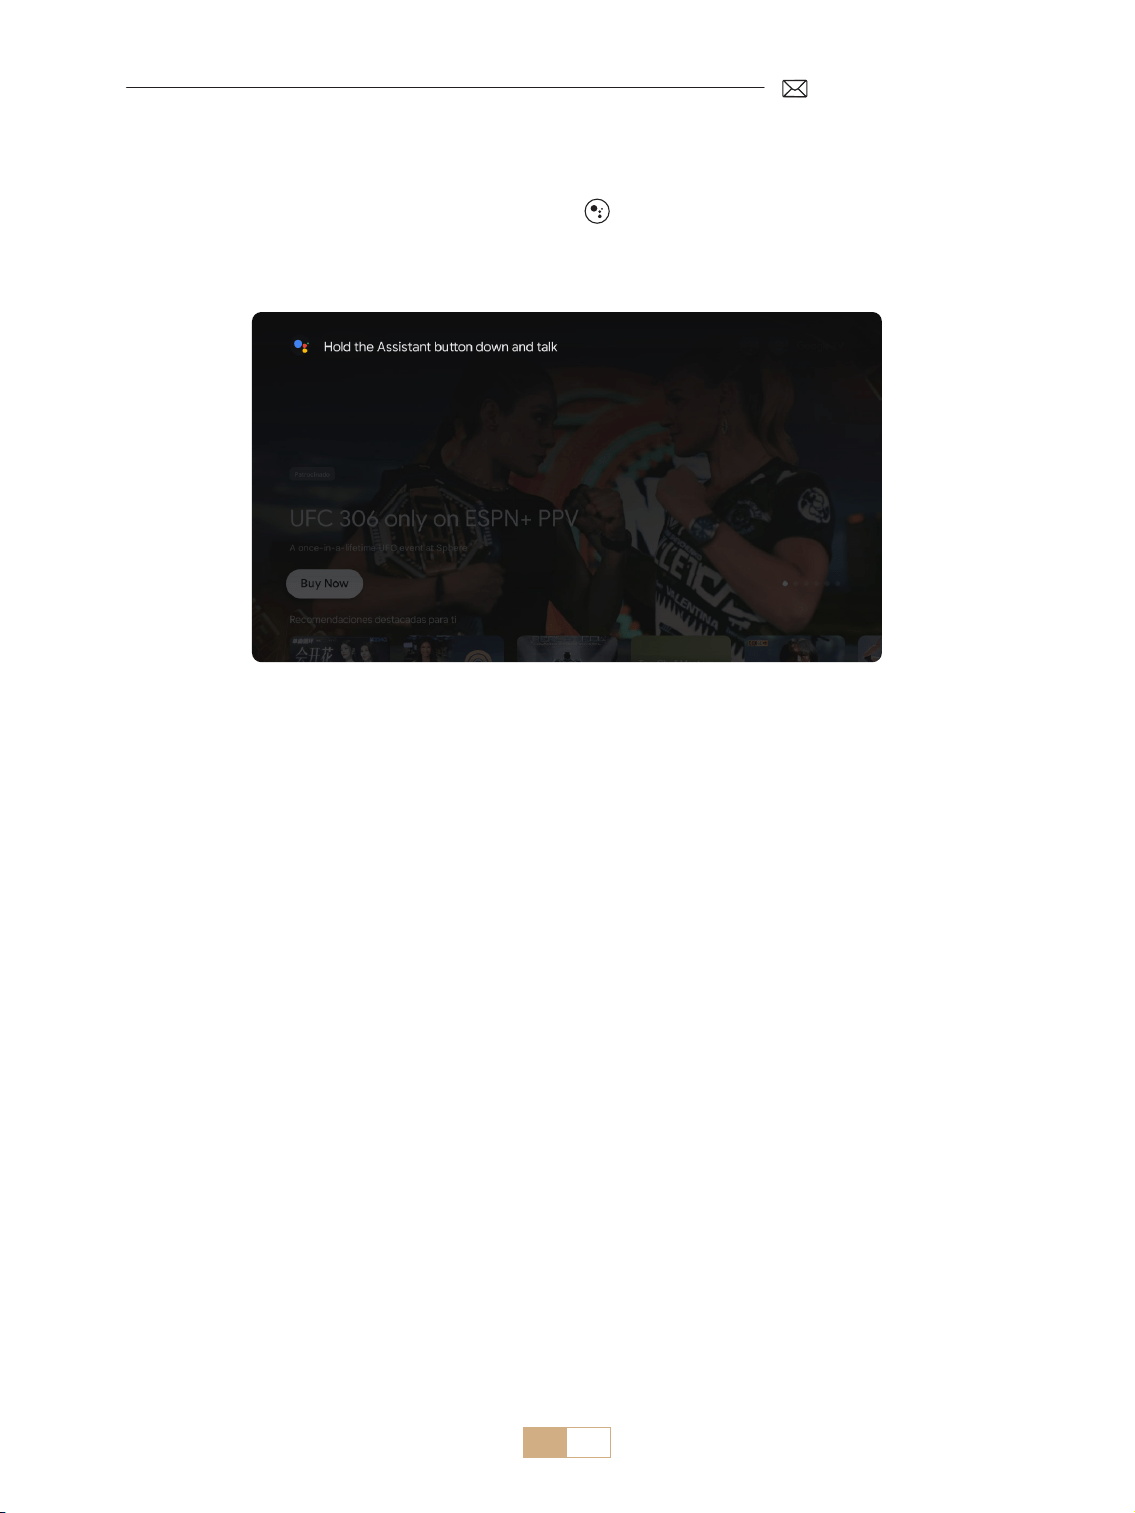
ES 95
1.3 Asistente de Voz en GTV
1) Mientras habla, mantenga presionado el botón de voz [ ] en el control remoto.
2) El Asistente de voz solo se puede usar dentro de la interfaz de Google TV (GTV).

ES 96
2.1 Conguración de WiFi
2.2 Para Dispositivos iOS (iOS Cast)
1) Seleccione el menú [Conguración] Seleccione [Red]>>[Conguración de WiFi]
2) La duplicación de pantalla requiere una señal WiFi inalámbrica potente. Asegúrese de que su red doméstica
esté funcionando bien. Coloque su dispositivo móvil cerca del proyector. Una distancia de 3,28 pies
(aproximadamente 1 metro) es óptima. La resolución del video se ajustará dinámicamente según la
intensidad de su señal WiFi.
3) Debido a restricciones de derechos de autor, los proyectores no admiten la duplicación inalámbrica de
aplicaciones de transmisión como Netix o Disney directamente desde su teléfono. Para ver contenido en
streaming, seleccione la fuente de señal GTV y descargue las aplicaciones correspondientes.
Atención: Asegúrese de que su dispositivo iOS esté conectado a la misma red Wi Fi que su proyector.
1) Conecte el proyector a su red Wi Fi doméstica
2) Regrese a la página de inicio del proyector Seleccione [iOS Cast] Permanezca en esta interfaz
3) Acceda al [Centro de control] en su dispositivo iOS Seleccione la función [Screen Mirroring] Seleccione
y conecte el receptor iOS Cast llamado [K12-xxxx]
2.CONEXIÓN INALÁMBRICA
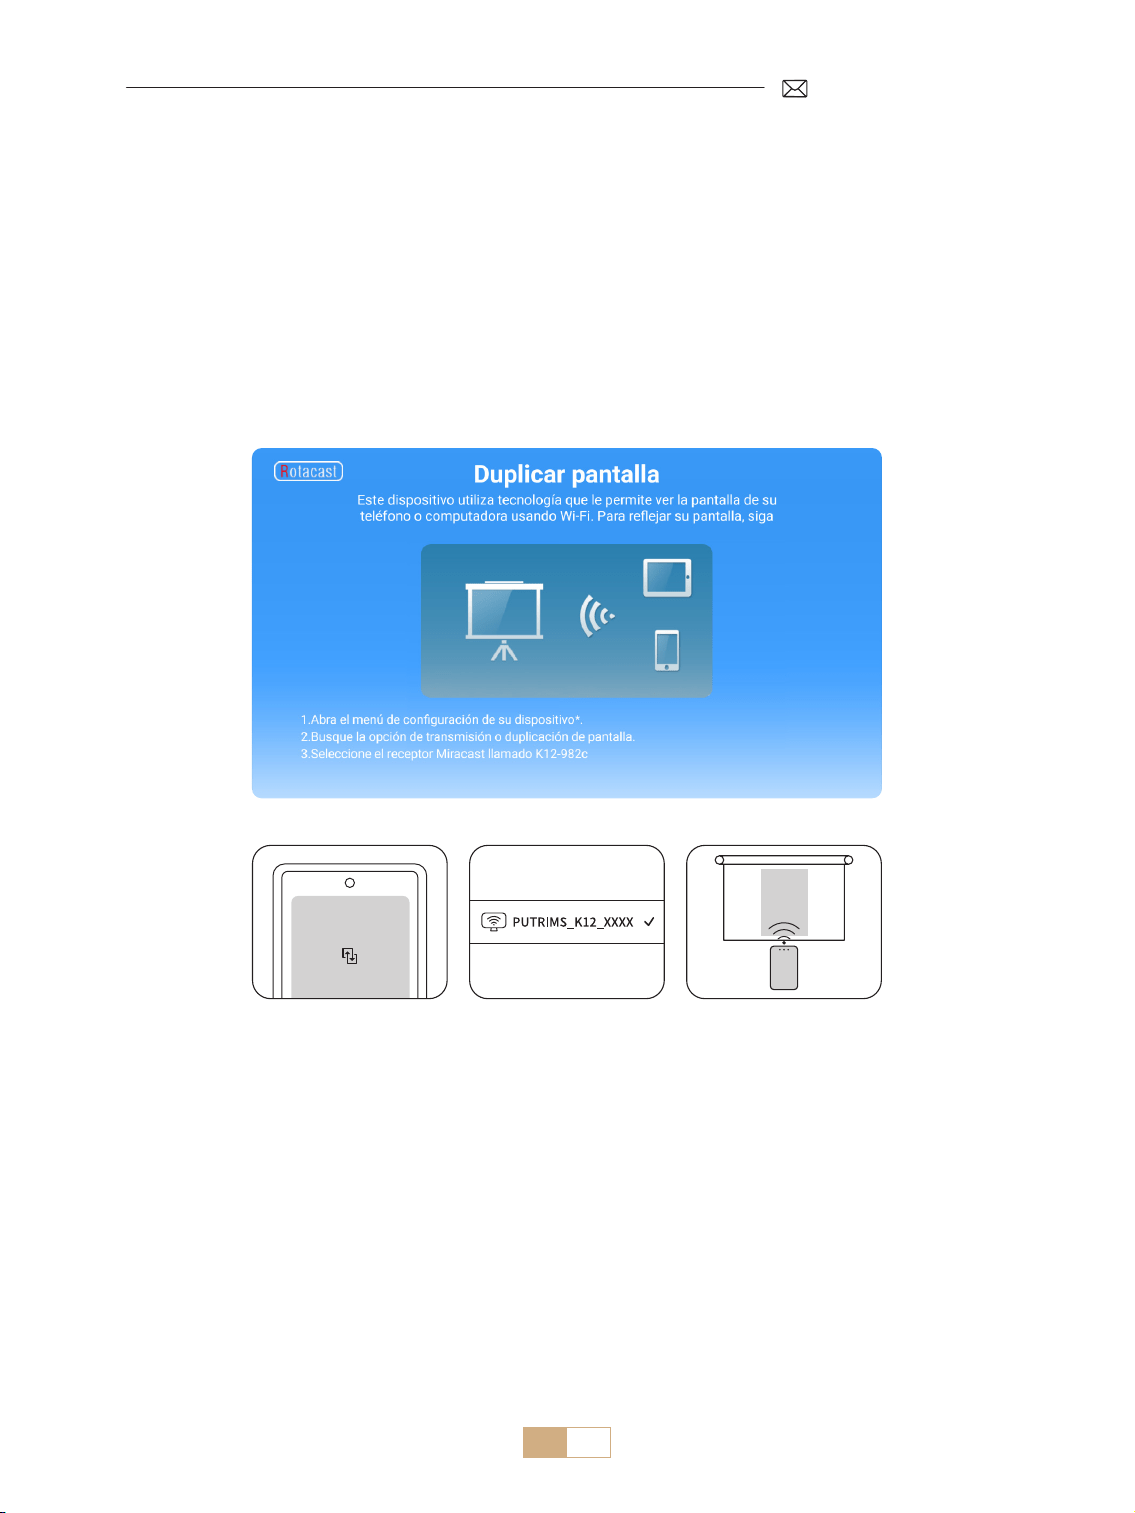
ES 97
2.2 Para Dispositivos Android (Miracast)
Atención: Para activar esta función, asegúrese de que su dispositivo Android sea compatible con Multi Screen/
Wireless Display. El nombre de "Multi Screen" puede variar según las distintas marcas de dispositivos Android.
Asegúrese de habilitar la función Wi Fi en su dispositivo Android (no es necesario conectarse a ninguna
red Wi Fi). Los teléfonos móviles de la serie Pixel utilizan Google Chromecast, que requiere un dispositivo de
transmisión independiente (no incluido).
1) Seleccione [Miracast] en la página de inicio del proyector. Permanezca en esta interfaz.
2) Acceda al [Centro de control] en su dispositivo Android, seleccione [Screen Mirroring/Smart View]
3) Seleccione el receptor Miracast llamado [K12-xxxx] y conéctese

ES 98
3.Conguración de Bluetooth
1) Encienda su altavoz Bluetooth.
2) Encienda la [Conguración de Bluetooth] de su proyector.
3) Seleccione el altavoz Bluetooth que desea conectar.
NOTA:
1) Asegúrese de desconectar primero cualquier otro dispositivo que haya emparejado previamente con su
altavoz Bluetooth.
2) Este paso solo se aplica a la conexión de altavoces Bluetooth, no de teléfonos móviles.
3) Si tiene alguna pregunta, no dude en enviar un correo electrónico a PUTRIMS a: [email protected]om

ES 99
1) Vaya a la página de inicio Seleccione [Conguración] Seleccione [Video]. Puede elegir el modo de
video que necesite: Estándar/Música/Juego/Ocina/Usuario.
2) Al seleccionar el modo como "Usuario", puede ajustar los parámetros de brillo, nitidez, contraste y
saturación de forma personalizada.
NOTA: El efecto del modo de video seleccionado solo tendrá efecto durante la reproducción de video.
1) Vaya a la página de inicio Seleccione [Conguración] Seleccione [Sonido]. Puede elegir el modo de
video que necesite: Estándar/Noticias/Música/Película/Deportes/Usuario.
2) Cuando seleccione el modo como "Usuario", puede ajustar la frecuencia del sonido de manera personalizada.
NOTA: El efecto del modo de sonido seleccionado solo tendrá efecto durante la reproducción de video
Tono de tecla: habilite o deshabilite los tonos de tecla.
OTRAS CONFIGURACIONES DE PROYECCIÓN
1.Modo de Video
2.Modo de Sonido

ES 100
Nota Para la Actualización de Archivos USB:
1) Copie el paquete de actualización al directorio raíz de una unidad USB.
2) Mantenga presionado el botón de encendido del dispositivo y el sistema detectará automáticamente el
paquete de actualización y comenzará el proceso de actualización.
NOTA: Antes de actualizar, congure el modo de encendido en modo de espera.
Vaya a la página de inicio Seleccione [Conguración] Seleccione [Sistema].
3.Sistema
Menú Menú Incluido Función
Acerca de Esta Máquina
Número de versión del sistema/
Dirección MAC de WiFi/Dirección
MAC de Bluetooth
Conrme la información de la
versión e identique el dispositivo
en la red o Bluetooth
Actualización del Sistema
Actualización en Línea (OTA)
Actualización USB (USB)
Actualice el software a través de
un archivo local USB o en línea
Restaurar Fábrica
Restaurar conguración
predeterminada de fábrica

ES 101
Vaya a la página de inicio Seleccione [Conguración] Seleccione [General].
4.General
Menú Contenido Función
Conguración de Idioma
English/Français/Italiano/
Espanol/Deutsche/ 日本語 y otros
idiomas
Elija el idioma preferido
Modo de Encendido
Encendido en modo de espera/
Encendido
Encendido automático/modo de
espera después de enchufar
Temporizador de Sueño
Apagado/10 min/20 min/30
min/60 min/90 min/120 min/180
min/240 min
Establecer el tiempo de reposo
Tiempo de Espera del Protector de
Pantalla
Nunca/1min/5min/10min
Establecer el tiempo del protector
de pantalla del proyector
ARC Apagado/Encendido
Conectar el altavoz mediante un
cable HDMI

ES 102
El PUTRIMS K12 ofrece interfaces HDMI, USB y conector de audio de 3,5 mm. Conecte su dispositivo (por
ejemplo, PC, teléfono, reproductor de DVD, barra de sonido, unidad USB, PS4) al puerto adecuado.
CONEXIONES DE LÍNEAS DE SEÑAL
1.Conexión Multimedia USB
1.1 Formato USB
1) Inserte un disco USB en el puerto del proyector; se reconocerá automáticamente.
2) Desde la interfaz principal, seleccione una categoría (Película, Música, Fotografía, Oce Suite) y presione el
botón "OK" en el control remoto para acceder a los archivos.
Nota: Si selecciona el tipo de archivo incorrecto, no podrá ver los archivos correspondientes.
Consejos útiles: Si el proyector no reconoce el disco USB, consulte los siguientes métodos para resolver el
problema.
Conrme si su disco USB cumple con los siguientes formatos.
Formato USB
FAT32: 8G/16G/32G
NTFS: 64G
Formato no compatible: ExFAT
Atención: si el proyector no puede reconocer el contenido de la unidad ash USB,
verique si el formato de la unidad ash USB es correcto.
Formato de Vídeo
MP4/MKV/3GP/ASF/AVI/FLV/MPG/RMVB/TS/VOB, etc. (La compatibilidad con códecs
de video puede variar; contáctenos para obtener asistencia adicional)
Formato de Audio
AAC/FLAC/M4A/MP3/WAV, etc. (La compatibilidad con códecs de audio puede
variar; los códecs de audio Dolby no son compatibles; contáctenos para obtener
asistencia adicional)
Formato de Imagen BMP/PNG/JPEG/JPG/JPE
Formato de
Documentos
PPT/PDF/Word/Excel/TXT
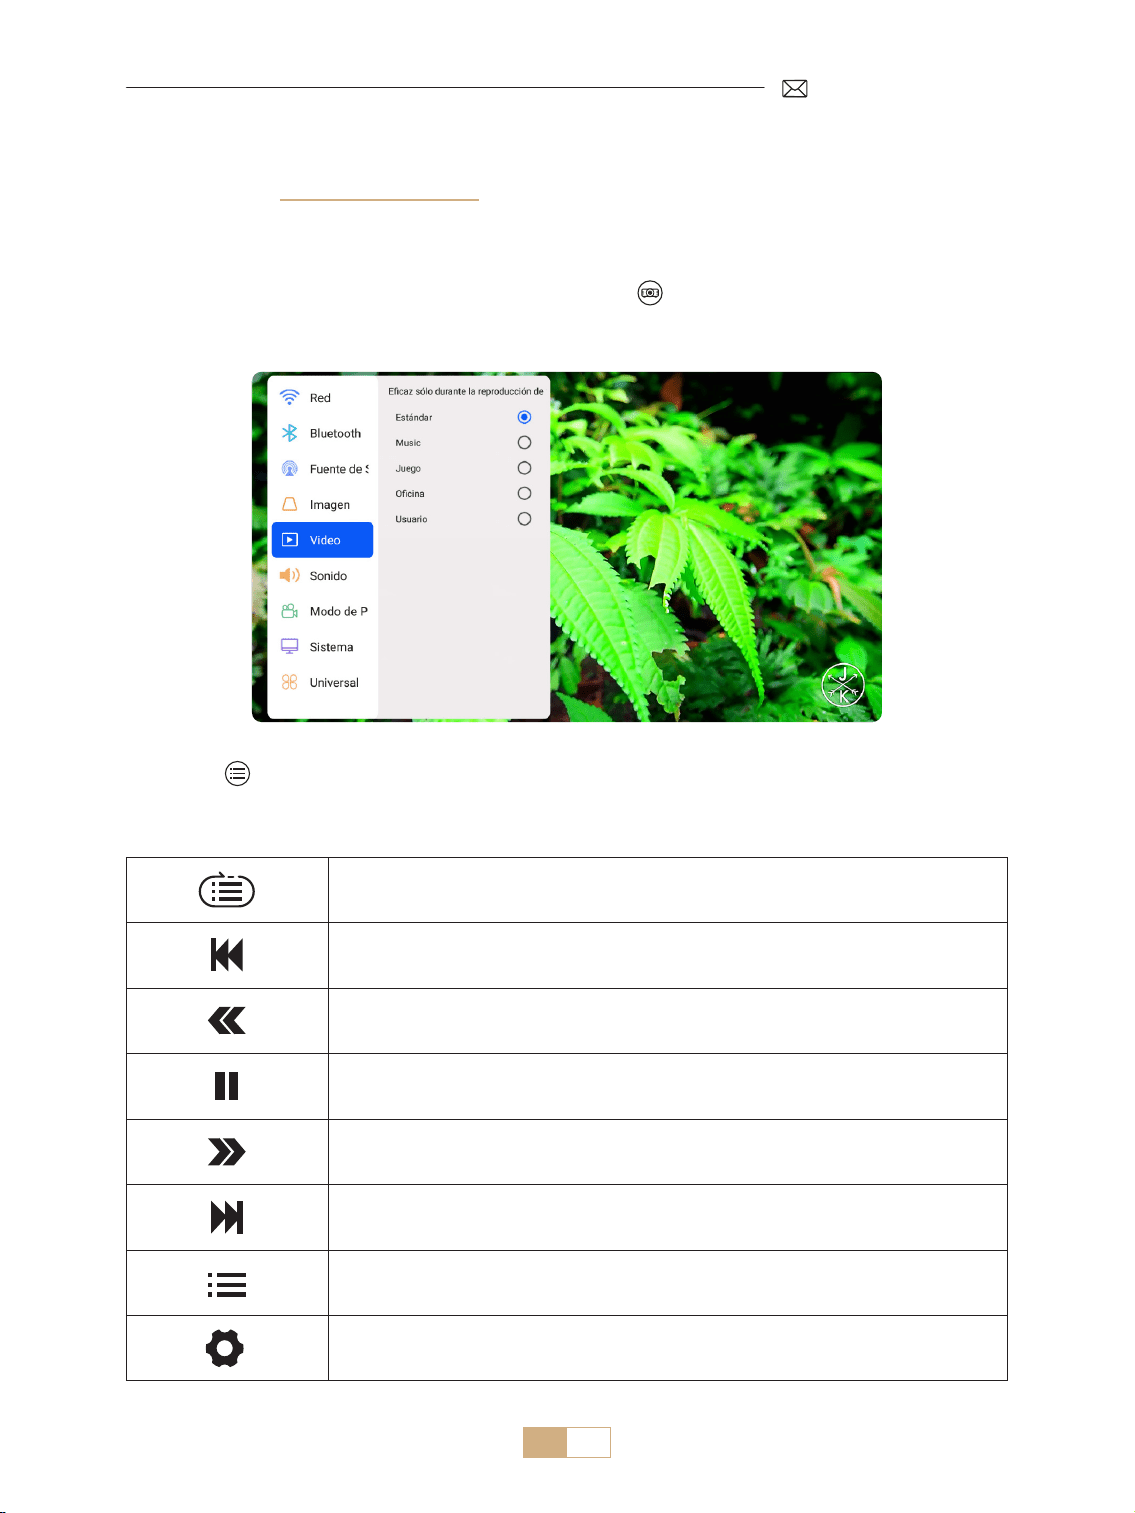
ES 103
Si el problema aún no se resuelve, envíe una descripción detallada de su problema a la siguiente dirección de
correo electrónico: support@putrims.com
Bucle único, bucle de lista y bucle a través de la lista solo una vez
Cambiar al video anterior
Retrocede rápidamente el vídeo de 2X a 32X
Reproducir o pausar
Adelanta el vídeo de 2X a 32X
Cambiar al siguiente video
Seleccionar las listas de reproducción en la carpeta actual
Ingrese a la conguración del proyecto para ajustar el modo [Video] o [Sonido]
1.2 Interfaz de Reproducción de Video
1) En la interfaz USB, al reproducir un video, presione el botón y luego seleccione [Video] o [Sonido] para
ajustar el brillo, el contraste y otras conguraciones según sea necesario.
2) Presione brevemente para acceder a la configuración de reproducción de video como se muestra a
continuación.

ES 104
1. Utilice el cable HDMI incluido para conectar su computadora al proyector K12.
2. Seleccione la fuente HDMI para proyectar cualquier archivo en su computadora.
3. En su computadora portátil, mantenga presionadas las teclas "Win+P" para cambiar el modo de visualización.
NOTA:
1) Si tiene problemas de conexión, es probable que se deba a que el modo de visualización no se ha
seleccionado correctamente.
2) Para MacBook, utilice un adaptador de tipo C a HDMI para conectar su MacBook, o un adaptador de Mini
Display a HDMI para conectarlo con su MacBook Air (adaptador no incluido).
Solo computadora: conguración predeterminada para mostrar solo en el monitor principal.
Duplicar: hace que todos los monitores muestren lo mismo duplicando el escritorio en cada monitor.
Extender: hace que todos los monitores actúen como un solo monitor grande que extiende el escritorio a
todos ellos.
Solo proyector: muestra solo en el monitor secundario como un proyector.
Para cambiar la resolución de pantalla en el modo Solo proyector, siga estos pasos:
Paso: Inicio > Panel de control > Apariencia y personalización > Ajustar resolución de pantalla
2.Conexión a la Computadora Portátil y al Ordenador
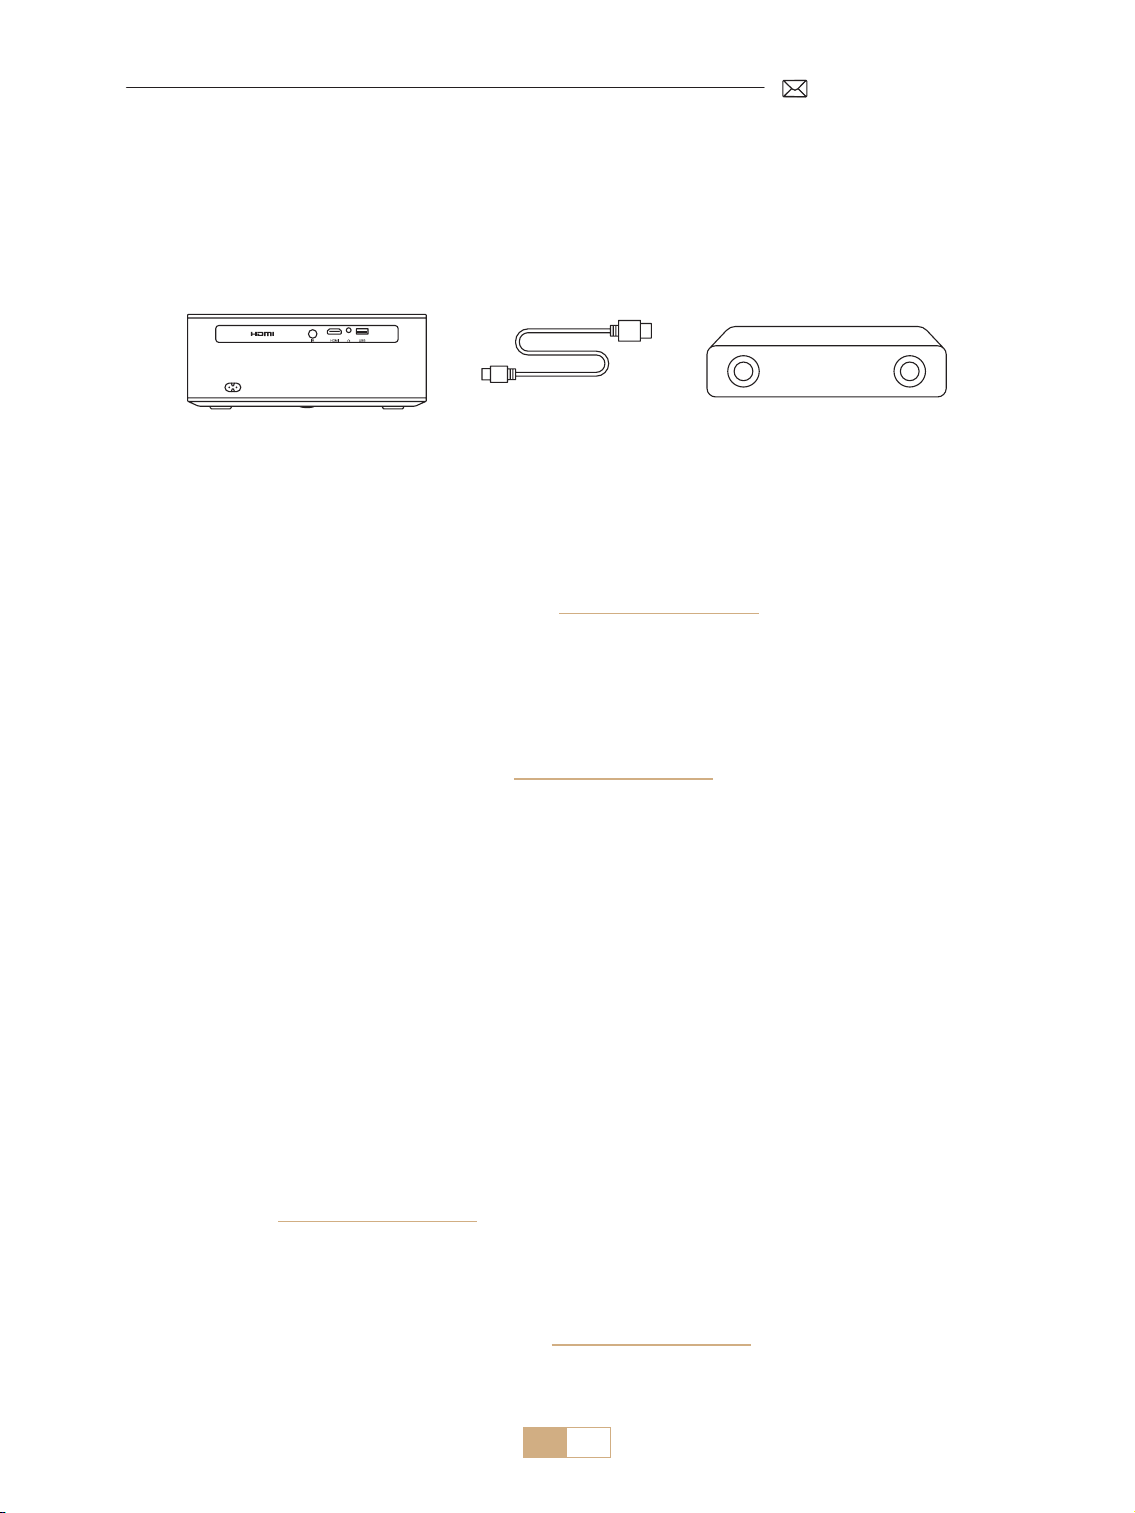
ES 105
K12 es compatible con HDMI ARC. Primero, active HDMI ARC en la conguración [General] y conecte una barra
de sonido a través de HDMI sin necesidad de cables de audio adicionales.
3.Conexión al Altavoz
(HDMI)
Gracias por elegir el proyector PUTRIMS K12. Ofrecemos una garantía de 2 años para el proyector K12. Si tiene
alguna pregunta, no dude en contactarnos a través de [email protected].
Hemos recopilado algunas preguntas frecuentes y sus respuestas correspondientes para ayudarlo mejor.
P1: La conexión WiFi es inestable. ¿Cómo puedo resolver este problema?
Para solucionar los problemas de conectividad WiFi, primero asegúrese de que su red doméstica esté
funcionando bien. Además, mantenga la distancia entre su teléfono y el proyector dentro de 1 metro. Si el
problema persiste, comuníquese con nosotros a [email protected]om para obtener más ayuda.
P2: El control remoto y el proyector no se pueden comunicar.
1. ¿El interruptor de encendido sobre el proyector está encendido o apagado?
2. ¿Las baterías del control remoto están agotadas?
3. ¿Hay obstáculos que bloqueen la señal infrarroja entre el control remoto y el proyector?
P3: ¿Qué es el adaptador GTV? ¿Puedo ver películas y programas de TV más populares?
1. El proyector tiene un sistema de Google TV incorporado y autorizado ocialmente, que incluye contenido
precargado de Netix, YouTube, Prime Video y más.
2. Puede encontrar aplicaciones adicionales en la página de inicio de GTV en "Aplicaciones" y buscar la
aplicación que necesita.
P4: El proyector se apaga automáticamente después de funcionar durante un tiempo.
1. La ventilación del proyector puede estar bloqueada o el voltaje puede ser inestable.
2. Envíe un video a [email protected]om, investigaremos el problema por usted.
P5: El proyector no es compatible con mi altavoz Bluetooth.
1. El proyector puede no ser compatible con ciertas versiones de altavoces Bluetooth.
2. Comuníquese con nuestro equipo de posventa en [email protected] con la marca y el modelo de su
altavoz Bluetooth para obtener más ayuda.
FAQ & GARANTÍA

ES 106
P6: ¿Por qué la imagen está desenfocada sin importar cómo la ajuste?
1. Coloque el proyector en línea con el centro de la pantalla. O el ángulo de proyección debe estar dentro de
los 15° ;
2. Utilice la corrección trapezoidal automática o manual para lograr una pantalla rectangular; utilice el enfoque
automático o el enfoque manual para ajustar el enfoque de la lente.
P7: ¿Por qué no puedo encontrar ciertas funciones?
Algunas funciones pueden aparecer en submenús o requerir una pulsación prolongada de determinados
botones. Debido a las actualizaciones del producto, las funcionalidades pueden diferir ligeramente del
manual. Para obtener información precisa, consulte el producto real.
P8: ¿Por qué no he recibido una respuesta después de 24 horas?
El equipo de soporte de PUTRIMS lo ayudará rápidamente a resolver los problemas. Si no hay respuesta dentro
de las 24 horas, puede deberse a diferencias de zona horaria o que su correo electrónico haya terminado en
la carpeta de spam. Comuníquese con nosotros nuevamente y nos aseguraremos de que sus consultas se
resuelvan rápidamente.

IT 107
INDICE DEI CONTENUTI
PUTRIMS SUPPORTO PROFESSIONALE A VITA 108
ISTRUZIONI PER L'USO 108
LISTA IMBALLAGGIO 110
SPECIFICHE DEL PROIETTORE 111
PANORAMICA DEL PROIETTORE 111
TELECOMANDO 113
INSTALLAZIONE 114
1.Metodo di Installazione - - - - - - - - - - - - - - - - - - - - - - - - - - - - - - - - - - - - - - - - - - -114
2.Distancia y Tamaño de Proyección - - - - - - - - - - - - - - - - - - - - - - - - - - - - - - - - - - - - -115
3.Installazione in Sotto- - - - - - - - - - - - - - - - - - - - - - - - - - - - - - - - - - - - - - - - - - - -115
AVVIO DEL PROIETTORE 116
IMPOSTAZIONI DELL'IMMAGINE PROIETTATA 116
1.Correzione di Keystone - - - - - - - - - - - - - - - - - - - - - - - - - - - - - - - - - - - - - - - - - - -116
1.1 Correzione Automatica/Messa a Fuoco Automatica 116
1.2 Correzione Trapezoidale Manuale 117
2.Schermo Zoom - - - - - - - - - - - - - - - - - - - - - - - - - - - - - - - - - - - - - - - - - - - - - - - -118
2.1 Schermo Zoom 118
2.2 Reset Schermo 118
SELEZIONE DELL'INPUT DEL PROIETTORE 119
1.Seleziona la Fonte del Segnale - - - - - - - - - - - - - - - - - - - - - - - - - - - - - - - - - - - - - - -119
1.1 Seleziona la Fonte del Segnale HDMI 119
1.2 Seleziona la Fonte del Segnale GTV 120
1.3 Assistente Vocale in GTV 121
2.Connessione Wireless - - - - - - - - - - - - - - - - - - - - - - - - - - - - - - - - - - - - - - - - - - - -122
2.1 Per dispositivi iOS (AirPlay) 122
2.2 Per dispositivi Android (Miracast) 122
2.2 Per dispositivi Android (Miracast) 123
3.Impostazioni Bluetooth - - - - - - - - - - - - - - - - - - - - - - - - - - - - - - - - - - - - - - - - - - -124
ALTRE IMPOSTAZIONI DI PROIEZIONE 125
1.Modalità Video - - - - - - - - - - - - - - - - - - - - - - - - - - - - - - - - - - - - - - - - - - - - - - - -125
2.Modalità Audio - - - - - - - - - - - - - - - - - - - - - - - - - - - - - - - - - - - - - - - - - - - - - - - -125
3.Sistema - - - - - - - - - - - - - - - - - - - - - - - - - - - - - - - - - - - - - - - - - - - - - - - - - - - -126
4.Generale- - - - - - - - - - - - - - - - - - - - - - - - - - - - - - - - - - - - - - - - - - - - - - - - - - - -127
CONNESSIONI DEI CABLE DI SEGNALE 128
1.Connessione Multimediale USB- - - - - - - - - - - - - - - - - - - - - - - - - - - - - - - - - - - - - - -128
1.1 Formato USB 128
1.2 Interfaccia di Riproduzione Video 129
2.Connessione a Laptop e Computer - - - - - - - - - - - - - - - - - - - - - - - - - - - - - - - - - - - - -130
3.Connessione ad Altoparlante - - - - - - - - - - - - - - - - - - - - - - - - - - - - - - - - - - - - - - - -131
FAQ & GARANZIA 131

IT 108
PUTRIMS SUPPORTO PROFESSIONALE A VITA
Gentile cliente,
grazie mille per il supporto a PUTRIMS!
Prima di iniziare a utilizzare il proiettore, ti preghiamo di leggere attentamente questo manuale utente. Le
caratteristiche e le illustrazioni contenute in questo documento sono fornite a titolo di riferimento e potrebbero
presentare lievi dierenze rispetto al prodotto eettivo a causa di continui aggiornamenti e ottimizzazioni. Per
dettagli precisi, si prega di fare riferimento al prodotto sico.
In caso di problemi, includi i seguenti dettagli nella tua e mail: codice Paese, numero d'ordine, modello e
una breve descrizione del problema (ad esempio IT+000-0000000-0000000+K12+Nessuna immagine) a
[email protected]om. Vi forniremo una soluzione rapida entro 24 ore.
In realtà, molti problemi possono essere facilmente risolti tramite le impostazioni, come mancanza di segnale,
mancanza di suono, fallimento della connessione Bluetooth, fallimento della connessione WiFi, ecc. Vi
promettiamo che tutti i proiettori sono ispezionati con estrema cura al 100% e imballati prima della spedizione.
Se hai domande, si prega di contattarci per risolvere il problema. E ci dia l'opportunità di migliorare. Vi
promettiamo di fornirti una soluzione soddisfacente.
Siamo impegnati a fornire un supporto eccellente 24H/7D al ne di garantire la tua completa soddisfazione
come nostro cliente stimato.
Grazie per la tua comprensione!
Cordiali saluti,
TEAM DI SUPPORTO PUTRIMS
ISTRUZIONI PER L'USO
1. Non posizionare il proiettore in una stanza troppo calda o troppo fredda, poiché alte temperature o
basse temperature possono influenzare le prestazioni del proiettore e ridurre la durata del servizio
dell'equipaggiamento. L'ambiente di lavoro ideale è compreso tra i 5° C e i 35° C.
2. È dotato di un dispositivo di ventilazione per garantire il funzionamento stabile del proiettore. Non coprire le
prese d'aria con stoe, coperte o altri oggetti. Non inserire oggetti di qualsiasi tipo negli slot del proiettore,
poiché ciò può causare corto circuito o scossa elettrica e danneggiare il dispositivo.
3. Il proiettore deve essere rigorosamente protetto da urti forti, pressioni e vibrazioni. Non tentare di
colpire forte, comprimere o scuotere il proiettore. Non tentare di spostare il circuito interno per evitare
malfunzionamenti.
4. Come componente principale del proiettore, l'obiettivo è direttamente correlato alla chiarezza e all'eetto
dell'immagine. Pulire espellendo troppo la polvere dall'obiettivo può inuenzare la qualità dell'immagine.
Le lenti sporche dovrebbero essere pulite con un morbido tessuto di cotone sulla supercie dell'obiettivo in
vetro. Non utilizzare stoe dure o abrasivi.
5. Controllare la luminosità ambientale nella stanza per migliorare la visibilità dell'immagine proiettata.
Abbassare le luci o utilizzare tende può contribuire a ridurre il riesso e migliorare la qualità dell'immagine.
6. Se hai domande, non preoccuparti, contatta [email protected] tramite email.


IT 110
LISTA IMBALLAGGIO
Proiettore PUTRIMS K12 *1 Telecomando Dongle *1 Cavo di Alimentazione *1
Cavo HDMI*1 Copriobiettivo *1 Kit di Pulizia *1
Guida Rapida *1 Domande Frequenti *1

IT 111
SPECIFICHE DEL PROIETTORE
Numero modello: K12
Risoluzione Nativa 1920*1080P Proporzioni
16:9/4:3(Premere
brevemente il pulsante
due volte)
Tecnologia di Display LCD Sorgente Luminosa LED
Peso del Prodotto
2,5 kg
5,5 lbs
Dimensioni del Prodotto
(L*W*H)
28,0 x 24,2 x 10,7 cm
11'' x 9,5'' x 4,2''
Frequenza di
Aggiornamento
60 Hz Tensione di Alimentazione AC 100 240V~/50~60Hz 2A
Messa a Fuoco Auto + Elettrico Correzione Trapezoidale Auto + Manuale
Porta di Uscita Uscita audio da 3,5 mm Porta di Ingresso HDMI*1/USB*1
Rapporto di proiezione 1,3:1 Zoom 100% 50%
Modalità di
funzionamento
Telecomando
Tipo di installazione Frontale/Posteriore su scrivania, Frontale/Posteriore su sotto
PANORAMICA DEL PROIETTORE
Lente
Ricevitore IR
Ricevitore del Segnale di Focus
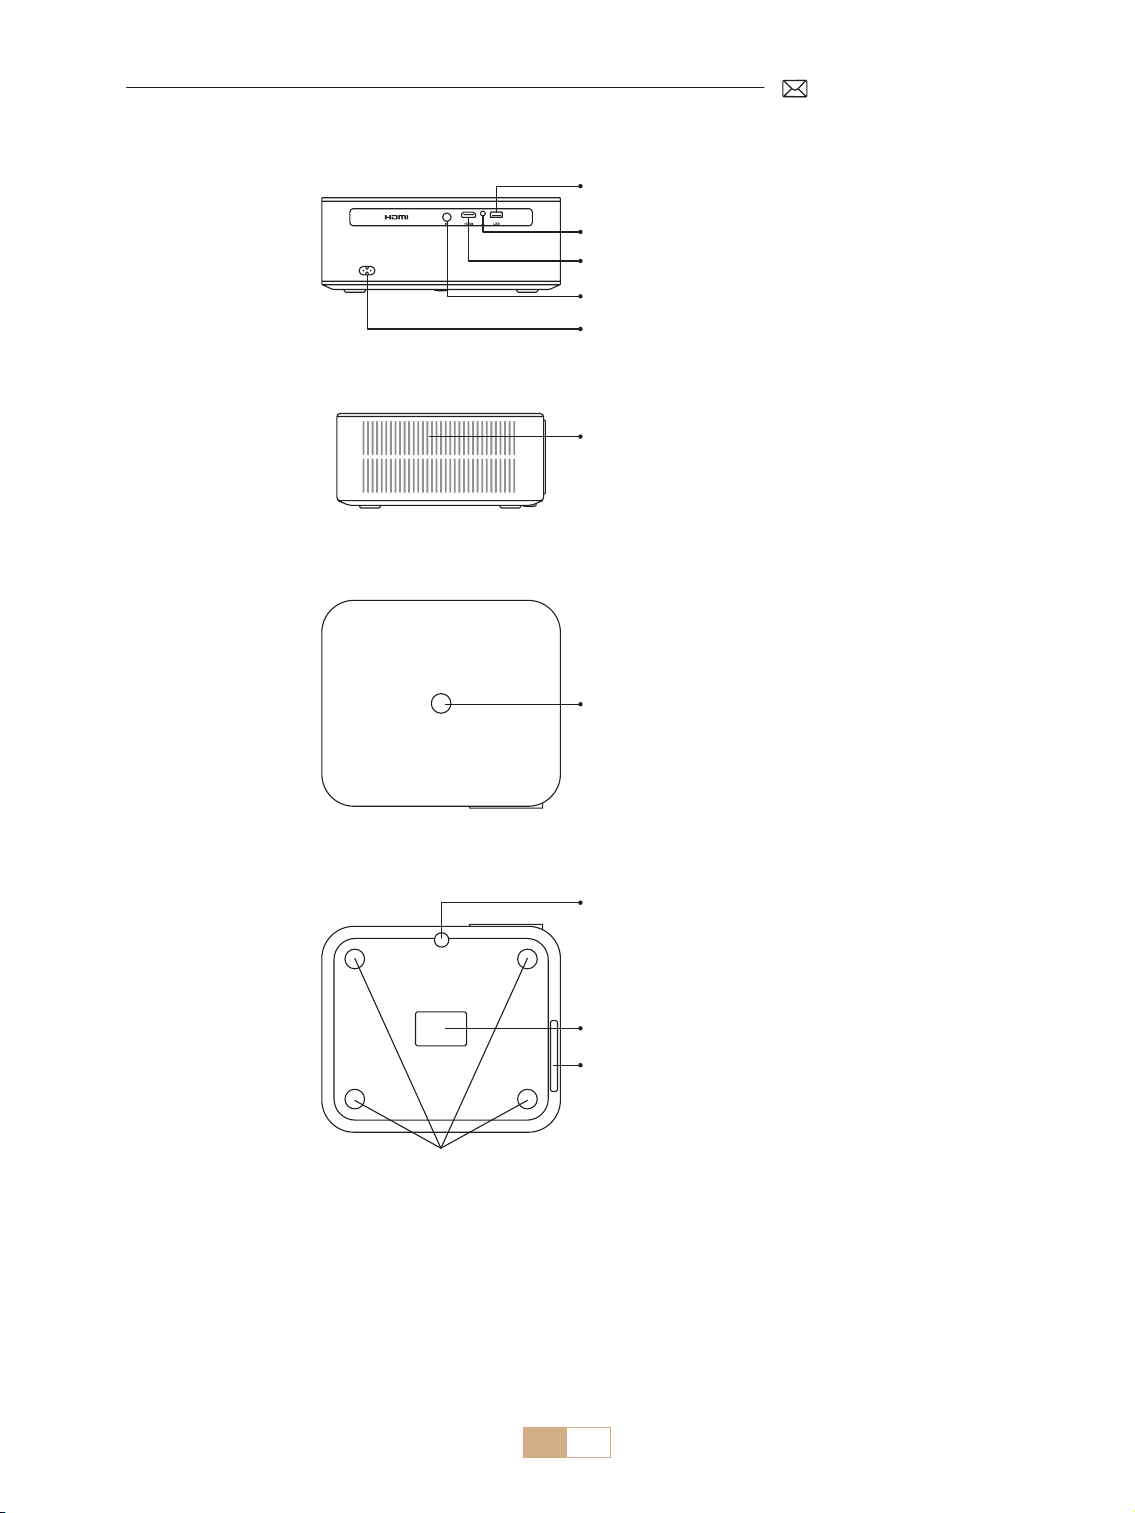
IT 112
Porta USB
Uscita Audio da 3,5 mm
Porta HDMI
Ricevitore IR
Interfaccia di Potenza
Pulsante di Accensione
Porta per la Pulizia della Polvere
Filtro Antipolvere
Foro di Montaggio M5 * 12 mm
Regolazione Altezza del
Proiettore
Uscita dell'Aria
* Per l'installazione a soffitto, sono presenti quattro fori di montaggio sul fondo del proiettore. Prima
dell'installazione, rimuovere i quattro piedini in gomma per esporre i fori di montaggio (M5*12mm) per
l'installazione a sotto.
Per pulire la lente, staccare l'etichetta inferiore del prodotto e aprire il coperchio sotto di essa, pulendo
accuratamente lo schermo interno con un bastoncino di cotone pulito con alcol. Prestare attenzione per
evitare di causare danni. Consultare il video sulla pulizia nella pagina dei dettagli o contattarci.
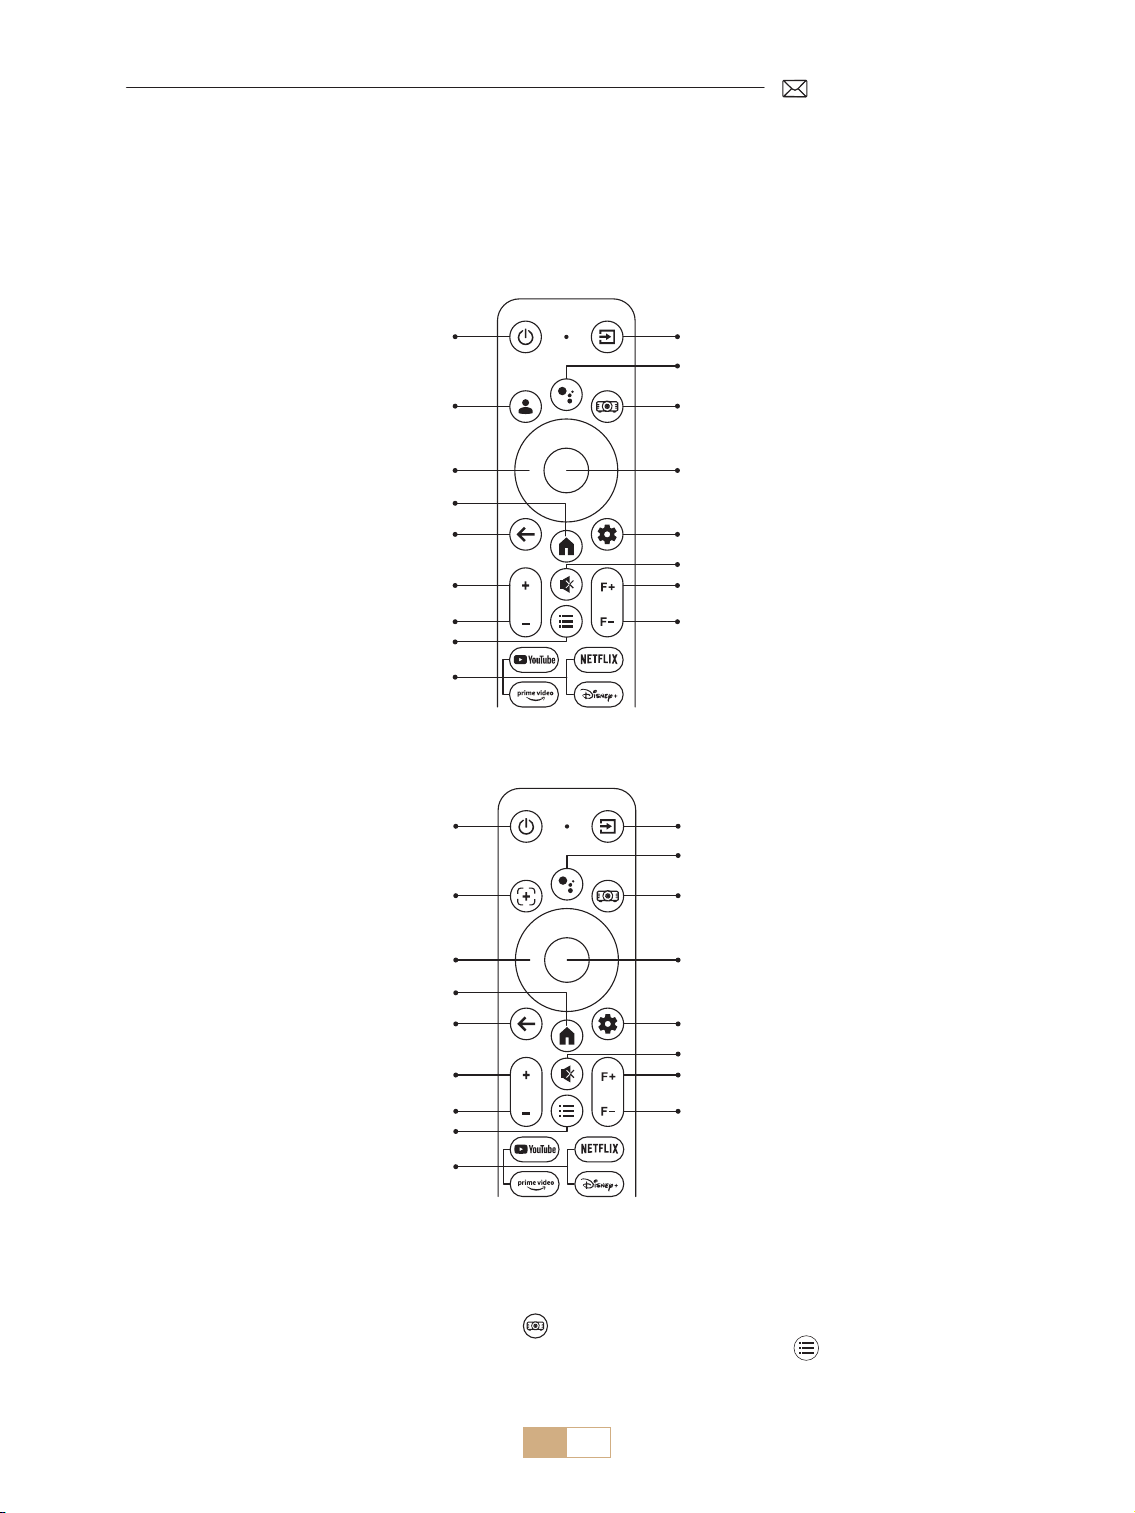
IT 113
TELECOMANDO
Esistono due versioni del telecomando:
Versione 1
Pulsante di Accensione
Pulsante di Accensione
Pulsante Sorgente
Pulsante Sorgente
Dongle Voce
Dongle Voce
Impostazioni del Proiettore
Impostazioni del Proiettore
OK
OK
Impostazioni del Dongle
Impostazioni del Dongle
Muto
Muto
Messa a fuoco +
Messa a fuoco +
Messa a fuoco
Messa a fuoco
Tasto freccia
Tasto freccia
Casa
Casa
Indietro
Indietro
Volume +
Volume +
Volume
Volume
Menù
Menù
APP
APP
Auto Focus/
Correzione Trapezoidale
Account Google
Versione 2
Importante:
1. Installare 2 batterie AAA (non incluse) nel telecomando prima di utilizzarlo.
2.Se la sorgente del segnale è impostata sulla modalità GTV, la pagina di Google TV si accenderà
automaticamente all'accensione del proiettore.
3. Nell'interfaccia USB o HDMI, premere il tasto per accedere alle impostazioni di sistema e regolare le
impostazioni video/suono e altre opzioni. Premere brevemente due volte il tasto per regolare il rapporto
d'aspetto 16:9 o 4:3.

IT 114
INSTALLAZIONE
1.Metodo di Installazione
A seconda dell'ambiente operativo e dei requisiti, il proiettore può essere montato a sotto con un supporto a
sotto o collocato su una scrivania stabile. Inoltre, il proiettore può essere installato con i seguenti metodi
1. Proiezione frontale Montaggio a sott 2. Retroproiezione Montaggio a sotto
3. Proiezione frontale Montaggio da tavolo 4. Proiezione posteriore Montaggio a tavolo
1) Seleziona il menu [Impostazioni] Seleziona l'opzione [Modalità Proiezione] Seleziona la tua Modalità
di Installazione e premi "OK" per confermare la posizione di proiezione (Proiezione Frontale/ Proiezione
Posteriore/ Proiezione Frontale al Sotto/ Proiezione Posteriore al Sotto).
2) Si consiglia di posizionare il proiettore con l'obiettivo simmetricamente allineato allo schermo. Se è
necessario regolare l'angolo, mantenerlo entro 15° e utilizzare la funzione di correzione trapezoidale per
regolare l'immagine di proiezione.

IT 115
2.Distancia y Tamaño de Proyección
A seconda dell'ambiente operativo e dei requisiti, il proiettore può essere montato a sotto con un apposito
supporto o collocato su una scrivania stabile. Inoltre, il proiettore può essere installato con i seguenti metodi.
La distanza di proiezione consigliata per il proiettore K12 è 2,5-3 m. La dimensione dell'immagine dipende
dalla distanza e dal rapporto di proiezione del proiettore (1,3:1). Inoltre, il proiettore offre una funzione di
zoom dal 100% al 50%.
Metro
Piedi
30''
50''
80''
100''
120''
150''
3.Installazione in Sotto
1) Posizionare il proiettore perpendicolarmente al terreno e al centro del punto centrale dello schermo. In
questo modo si otterrà un'immagine di proiezione piatta e correttamente allineata.
2) Per regolare la base di inclinazione, svitate l'asta di supporto alla base del proiettore, Per una guida visiva,
fate riferimento alla gura seguente.
3) Per il montaggio a sotto, sono presenti 4 fori (M5*12 mm) nella parte inferiore del proiettore. Capovolgendo
il proiettore, dopo aver rimosso i cuscinetti di gomma, è possibile trovare i fori per il montaggio a sotto
come mostrato nell'immagine sottostante.
NOTA: La staa di sospensione o il supporto per il montaggio a sotto non sono inclusi.
Foro di Montaggio M5 * 12 mm
200mm
165mm
0,8
2,6
1,4
4,5
2,3
7,5
2,8
9,1
3,4
11,1
4,3
14,1

IT 116
Accensione:
• Iniziare rimuovendo il copriobiettivo e collegando il proiettore alla fonte di alimentazione tramite il cavo di
alimentazione.
• Una volta accesa la spia rossa, premere il tasto di accensione sul telecomando o il tasto di accensione sul
pannello di controllo del proiettore per avviare la sequenza di avvio. L'indicatore luminoso passa da rosso a
blu, segnalando che il proiettore è ora acceso.
• All'accensione, il proiettore attiva automaticamente le funzioni [Correzione Automatica Dopo lo
Spostamento] e [Avvio Messa a Fuoco Automatica]. Se l'immagine non è un rettangolo standard o appare
sfocata, regolare manualmente le impostazioni della distorsione trapezoidale e utilizzare i tasti di messa a
fuoco “F+” e “F ” del telecomando per perfezionare la nitidezza dell'immagine. Se l'immagine rimane sfocata,
considerare la possibilità di regolare la distanza e l'angolo di proiezione.
Spegnimento:
• Per spegnere il proiettore, premere il tasto di accensione sul telecomando o il tasto di accensione sul pannello
di controllo del proiettore.
• L'indicatore luminoso passa dal blu al rosso, a indicare che il proiettore è stato spento correttamente.
IMPOSTAZIONI DELL'IMMAGINE PROIETTATA
AVVIO DEL PROIETTORE
1.Correzione di Keystone
1.1 Correzione Automatica/Messa a Fuoco Automatica
Selezionare il menu [Impostazioni] Selezionare l'opzione [Immagine]. Selezionare quindi [Correzione
Automatica/Messa a Fuoco Automatica] e fare clic sul pulsante "OK" per attivare la funzione. L'immagine
viene messa a fuoco automaticamente in base alla distanza di proiezione dallo schermo e viene regolata su un
rettangolo quando si cambia l'angolo di proiezione.
Se l'immagine è sfocata, premere il pulsante di messa a fuoco ''F+'' ''F '' sul telecomando per regolare la messa
a fuoco dell'obiettivo, fino a quando l'immagine non risulta chiara. (*Non è necessario premere il tasto OK
quando l'immagine è chiara).
NOTA:
1) Se avete già impostato la posizione del proiettore, è consigliabile disattivare le funzioni di autofocus e
correzione trapezoidale automatica nelle impostazioni per una migliore esperienza visiva.
2) L'angolo di proiezione laterale del proiettore non deve superare i 15° . Assicurarsi che non vi siano ostacoli
davanti al proiettore, poiché potrebbero interferire con la funzione di correzione trapezoidale automatica.
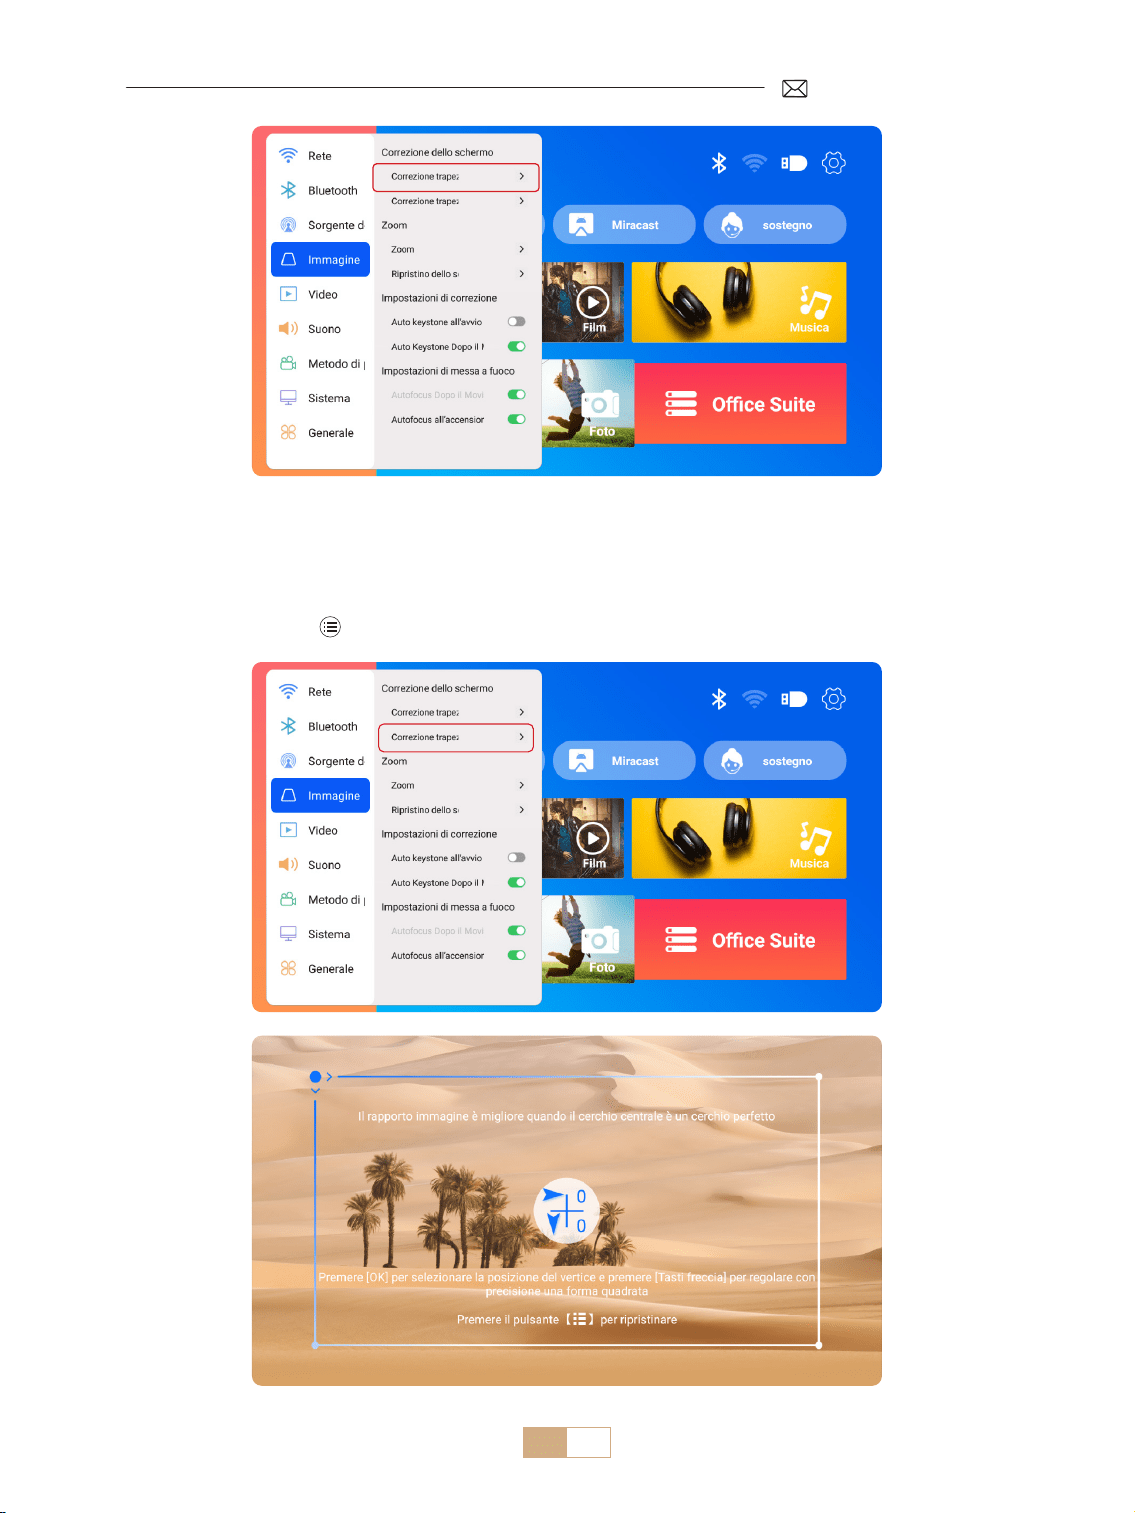
IT 117
1.2 Correzione Trapezoidale Manuale
Seleziona il menu [Impostazioni] Seleziona l'opzione [Immagine]. Quindi seleziona [Keystone Manuale]
e premi il pulsante "OK" per scegliere il punto che desideri regolare per primo, e poi premi i tasti freccia (" ▼ "
" ▶ " " ▲ "" ◀ ") per impostare il valore necessario come mostrato di seguito.
Azzeramento: Premere per riportare l'immagine alle impostazioni originali di correzione trapezoidale.

IT 118
2.Schermo Zoom
2.1 Schermo Zoom
2.2 Reset Schermo
Selezionare il menu [Impostazioni] Selezionare l'opzione [Immagine]. Selezionare quindi [Zoom
schermo], premere il pulsante " ▲ "" ▼ " per impostare il valore necessario, come mostrato di seguito; lo
schermo di proiezione può essere ingrandito dal 100% al 50%.
Azzeramento: Premere e l'immagine verrà ripristinata alle impostazioni originali dello zoom.
Questa funzione cancella i dati di correzione dello zoom e della distorsione trapezoidale precedentemente
impostati, riportando l'immagine alle dimensioni e alla forma originali.
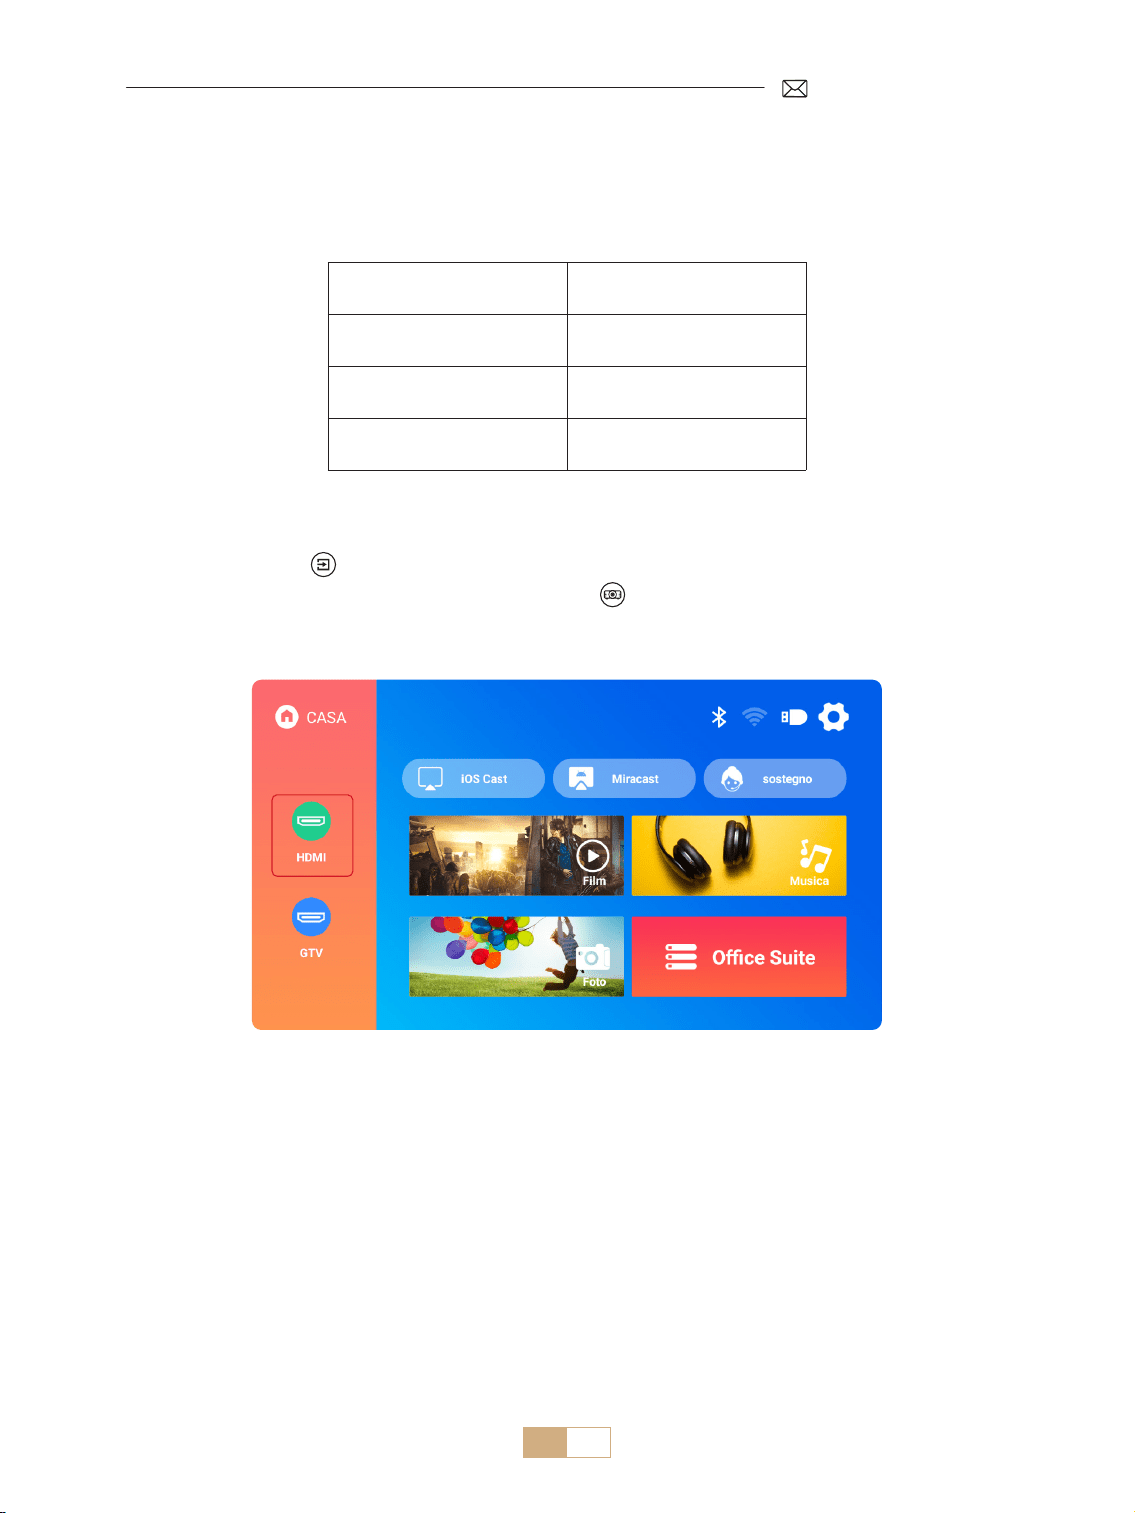
IT 119
SELEZIONE DELL'INPUT DEL PROIETTORE
1.Seleziona la Fonte del Segnale
1.1 Seleziona la Fonte del Segnale HDMI
1) Selezionare la sorgente di segnale di ingresso desiderata (ad esempio, HDMI) sulla pagina iniziale, oppure
premere il pulsante [ ] sul telecomando per selezionare la sorgente di segnale corrispondente.
2) Quando si riproduce un video via HDMI, premere il tasto e selezionare [Video] o [Audio] per regolare la
luminosità, il contrasto e altre impostazioni secondo le necessità.
Menu Menu incluso
Sorgente HOME/HDMI/GTV
Sorgente di avvio Chiudi/HDMI/GTV
HDMI Plug n play On/O
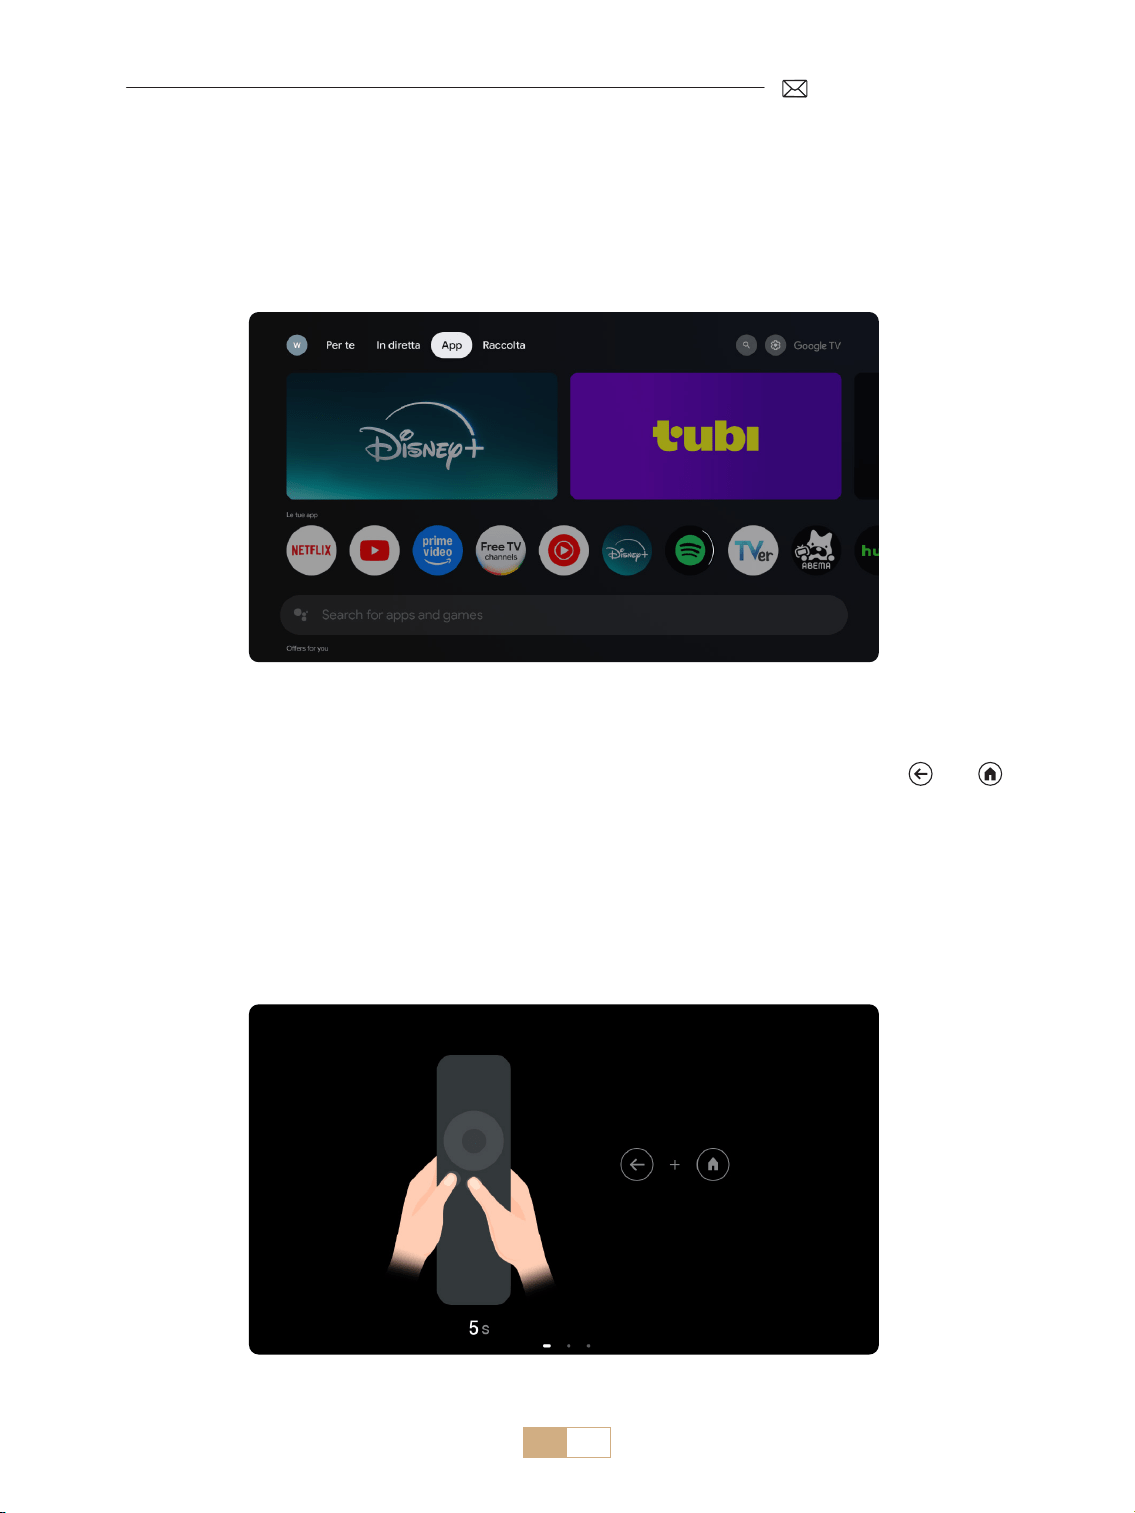
IT 120
Quando si utilizza il GTV del proiettore K12 per la prima volta, seguire la procedura seguente per
impostarlo.
1) Dopo aver selezionato GTV come sorgente di segnale, tenere premuto contemporaneamente il [ ] e il [ ]
del telecomando per accoppiarli. (Nota: accoppiare il telecomando solo durante il primo utilizzo).
2) Una volta entrati in GTV, scegliere le impostazioni della lingua e del paese appropriati.
3) Accedere al proprio account Google per accedere ai contenuti personalizzati.
4) Prepararsi a caricare tutte le applicazioni GTV integrate. Questo processo può richiedere circa 10 minuti, a
seconda delle condizioni della rete.
5) Dopo aver caricato le app, è possibile godersi l'enorme contenuto di GTV.
1.2 Seleziona la Fonte del Segnale GTV
Il proiettore K12 è dotato di Google TV integrata (con licenza uciale), che consente di accedere facilmente
alle applicazioni e ai video preferiti. Con questo proiettore è possibile esplorare una vasta libreria di film e
spettacoli televisivi senza bisogno di una chiavetta Fire TV aggiuntiva.
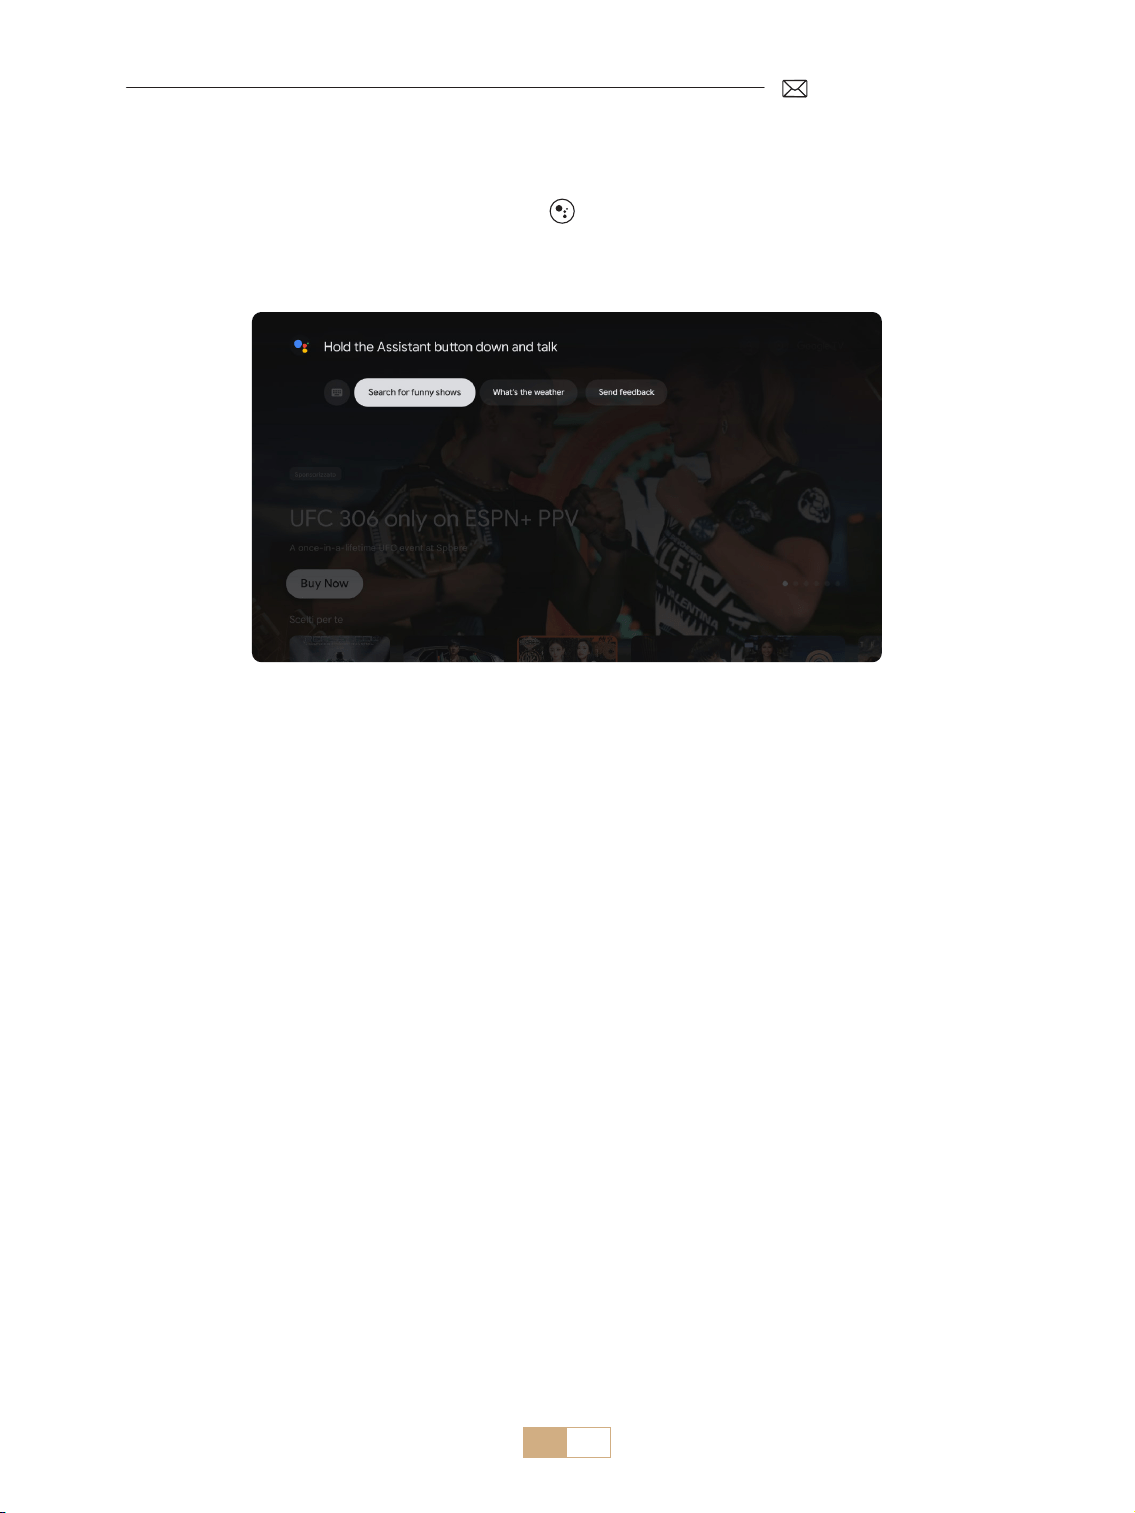
IT 121
1.3 Assistente Vocale in GTV
1) Mentre si parla, tenere premuto il pulsante vocale [ ] sul telecomando.
2) L'assistente vocale può essere utilizzato solo all'interno dell'interfaccia di Google TV (GTV).

IT 122
2.1 Per dispositivi iOS (AirPlay)
2.2 Per dispositivi Android (Miracast)
1) Selezionare il menu [Impostazioni] Selezionare [Rete] >[Impostazioni WiFi].
2) Il mirroring dello schermo richiede un forte segnale wireless WiFi, assicurati che la tua rete domestica
funzioni bene. Posiziona il tuo dispositivo mobile vicino al proiettore. Una distanza di 3,28 piedi (circa 1
metro) è ottimale. La risoluzione del video verrà regolata dinamicamente in base alla forza del tuo segnale
Wi Fi.
3) A causa delle restrizioni di copyright, i proiettori non supportano il mirroring wireless dei contenuti di app di
streaming come Netix o Disney direttamente dal tuo telefono. Per guardare contenuti di streaming, si prega
di selezionare la sorgente del segnale GTV e scaricare le app corrispondenti.
Attenzione: Assicurarsi che il tuo dispositivo iOS sia connesso alla stessa rete Wi Fi del tuo proiettore.
1) Connettere il proiettore alla rete Wi Fi di casa
2) Tornare alla homepage del proiettore Selezionare [iOS Cast] Restare su questa interfaccia
3) Accedere al [Centro di Controllo] sul tuo dispositivo iOS Selezionare la funzione [Mirroring dello
Schermo] Selezionare e connettersi al ricevitore iOS Cast chiamato [K12-xxx]
2.Connessione Wireless
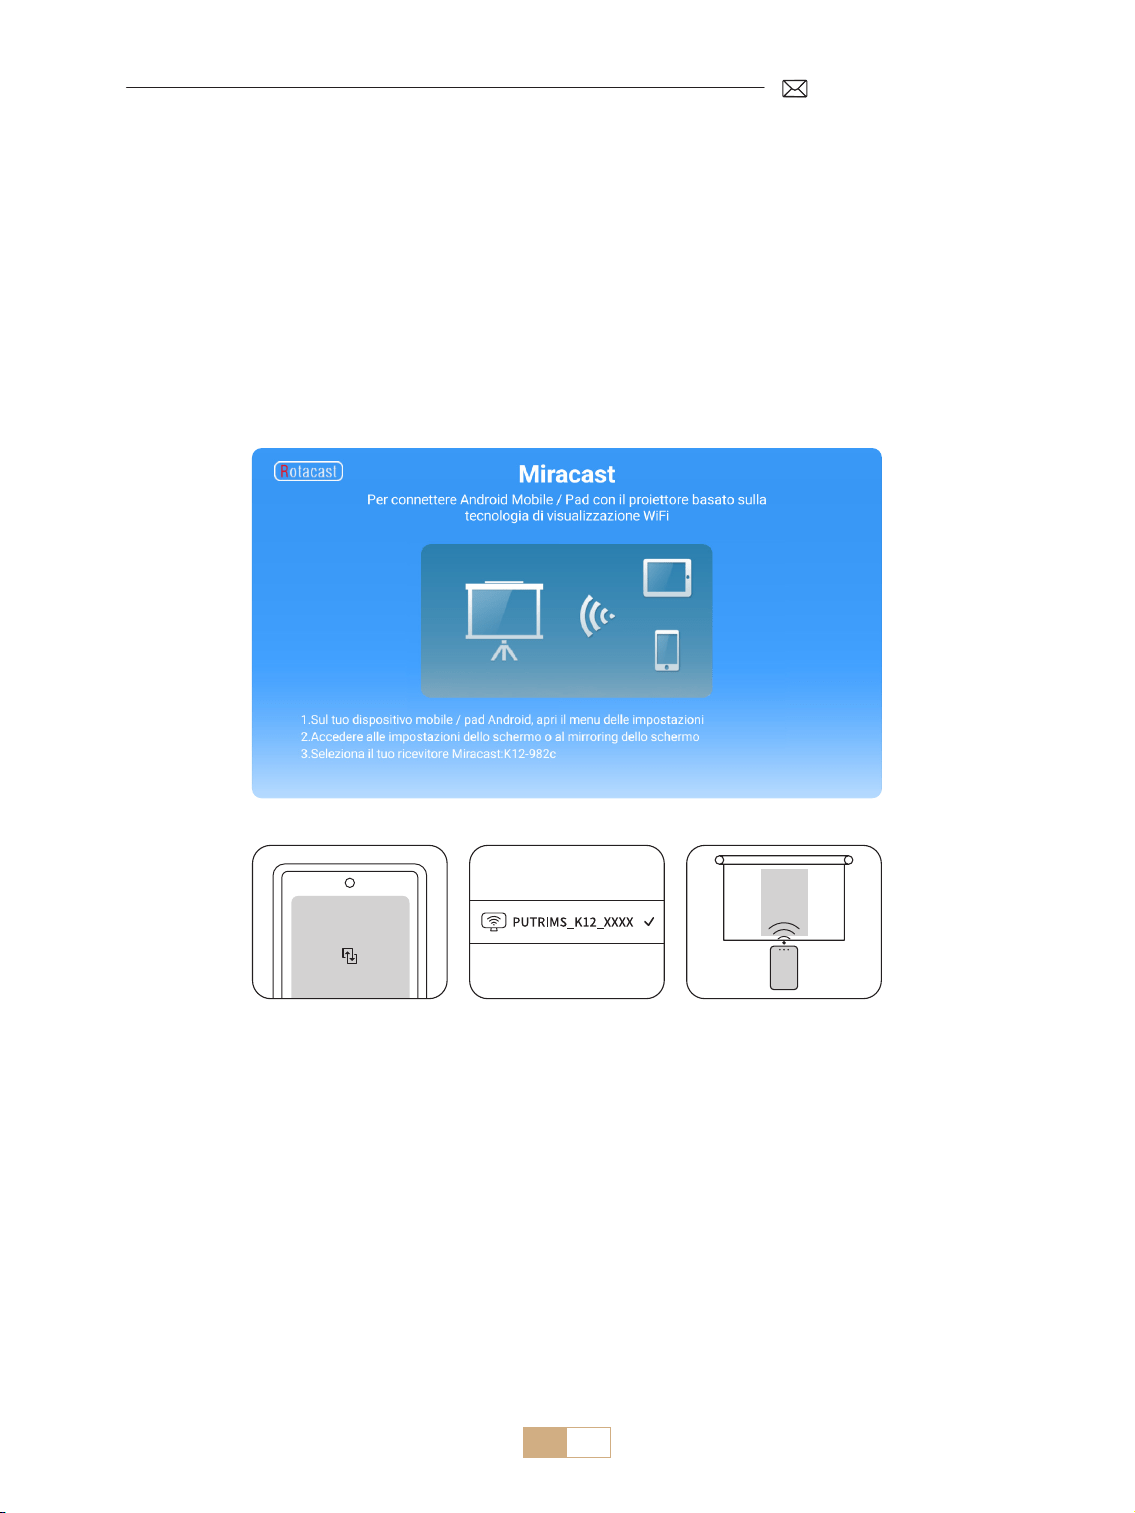
IT 123
2.2 Per dispositivi Android (Miracast)
Attenzione: Per attivare questa funzione, assicurarsi che il tuo dispositivo Android supporti Multi Screen/
Wireless Display. Il nome di "Multi Screen" può variare a seconda delle diverse marche di dispositivi Android.
Assicurati di abilitare la funzione Wi Fi sul tuo dispositivo Android (Non è necessario connettersi a una rete Wi
Fi). Le serie Pixel utilizzano Google Chromecast, che richiede un dispositivo di casting separato (non incluso).
1) Seleziona [Miracast] nella homepage del proiettore e rimani su questa interfaccia.
2) Accedi al [Centro di Controllo] sul tuo dispositivo Android e seleziona [Mirroring dello Schermo/Smart
View].
3) Seleziona il ricevitore Miracast chiamato [K12-xxxx] e connettiti.
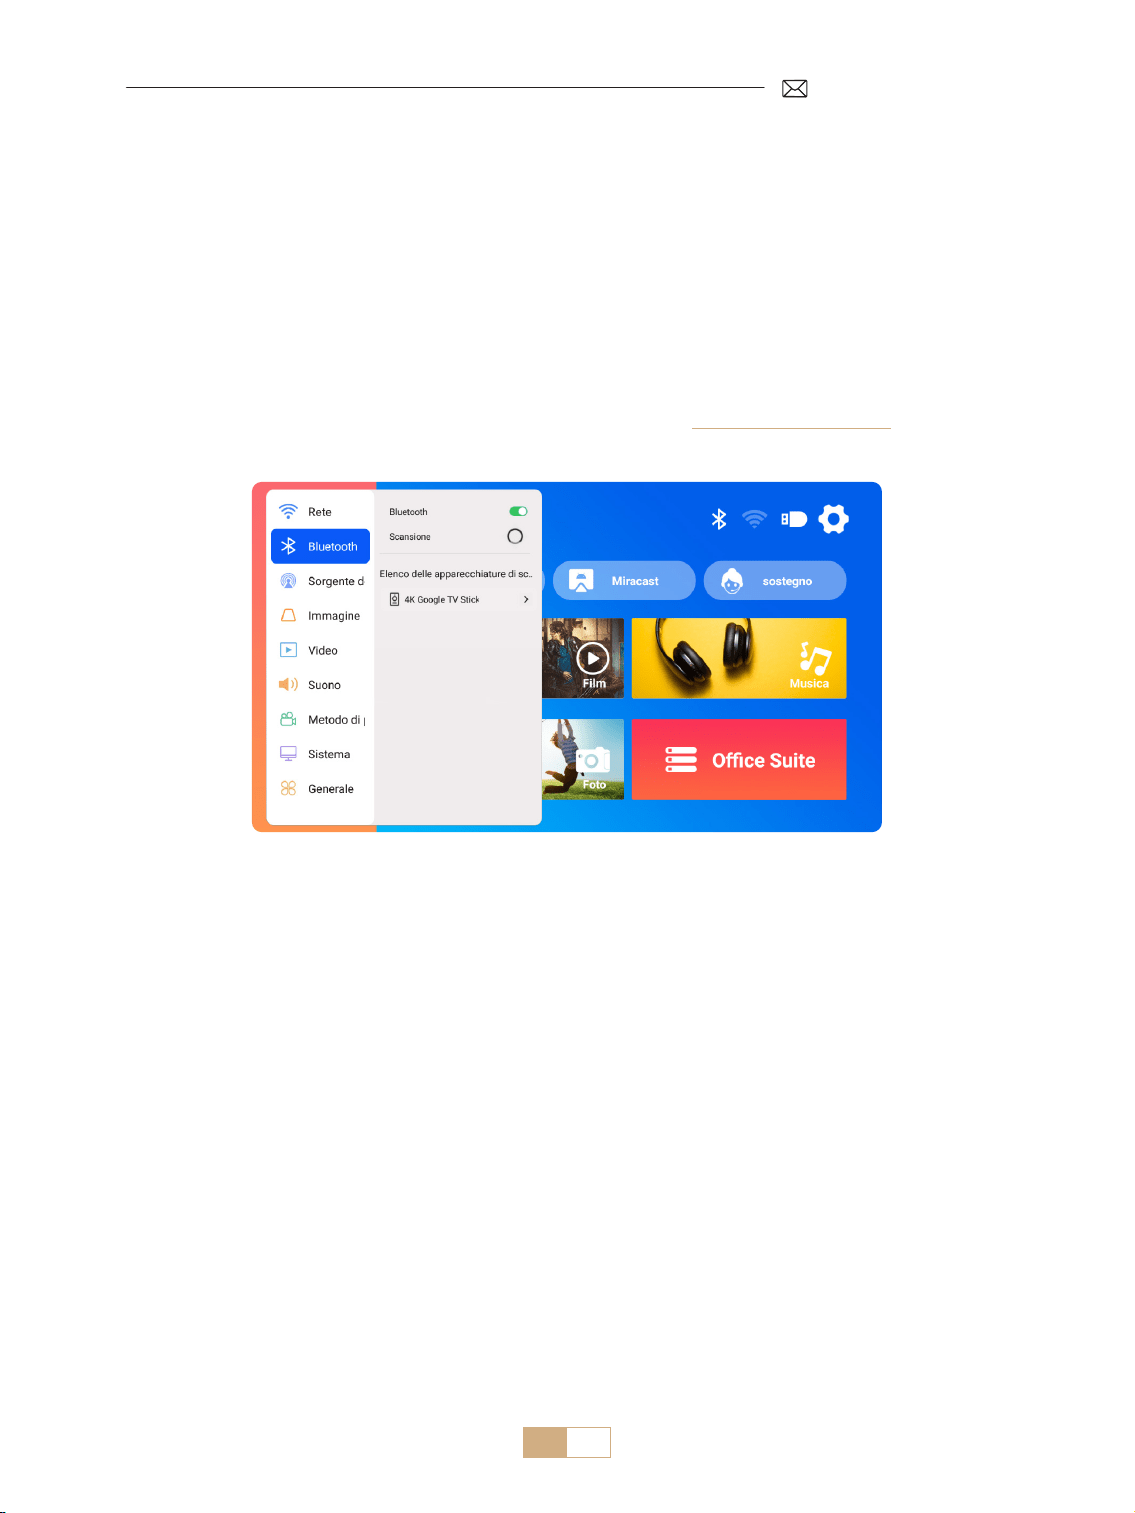
IT 124
3.Impostazioni Bluetooth
1) Accendi il tuo altoparlante Bluetooth.
2) Attiva le [Impostazioni Bluetooth] del tuo proiettore.
3) Seleziona il tuo altoparlante Bluetooth per connetterlo.
NOTA:
1) Assicurarsi che eventuali altri dispositivi precedentemente accoppiati al diffusore Bluetooth siano prima
scollegati.
2) Questa fase si applica solo al collegamento dei diusori Bluetooth, non dei telefoni cellulari.
3) In caso di domande, si prega di inviare un'e mail a PUTRIMS tramite: [email protected]

IT 125
1) Accedere alla pagina iniziale Selezionare [Impostazioni] Selezionare [Video]. È possibile scegliere la
modalità video desiderata: Standard/Musica/Gioco/Ucio/Utente.
2) Selezionando la modalità "Utente", è possibile regolare i parametri di luminosità, nitidezza, contrasto e
saturazione in modo personalizzato.
NOTA: L'eetto della modalità video selezionata sarà attivo solo durante la riproduzione video.
1) Accedere alla pagina iniziale Selezionare [Impostazioni] Selezionare [Audio]. È possibile scegliere la
modalità video desiderata: Standard/News/Musica/Movie/Sport/Utente.
2) Quando si seleziona la modalità "Utente", è possibile regolare la frequenza del suono in modo personalizzato.
NOTA: L'eetto della modalità audio selezionata sarà attivo solo durante la riproduzione video.
Tono tasti: Abilita o disabilita i toni dei tasti.
ALTRE IMPOSTAZIONI DI PROIEZIONE
1.Modalità Video
2.Modalità Audio
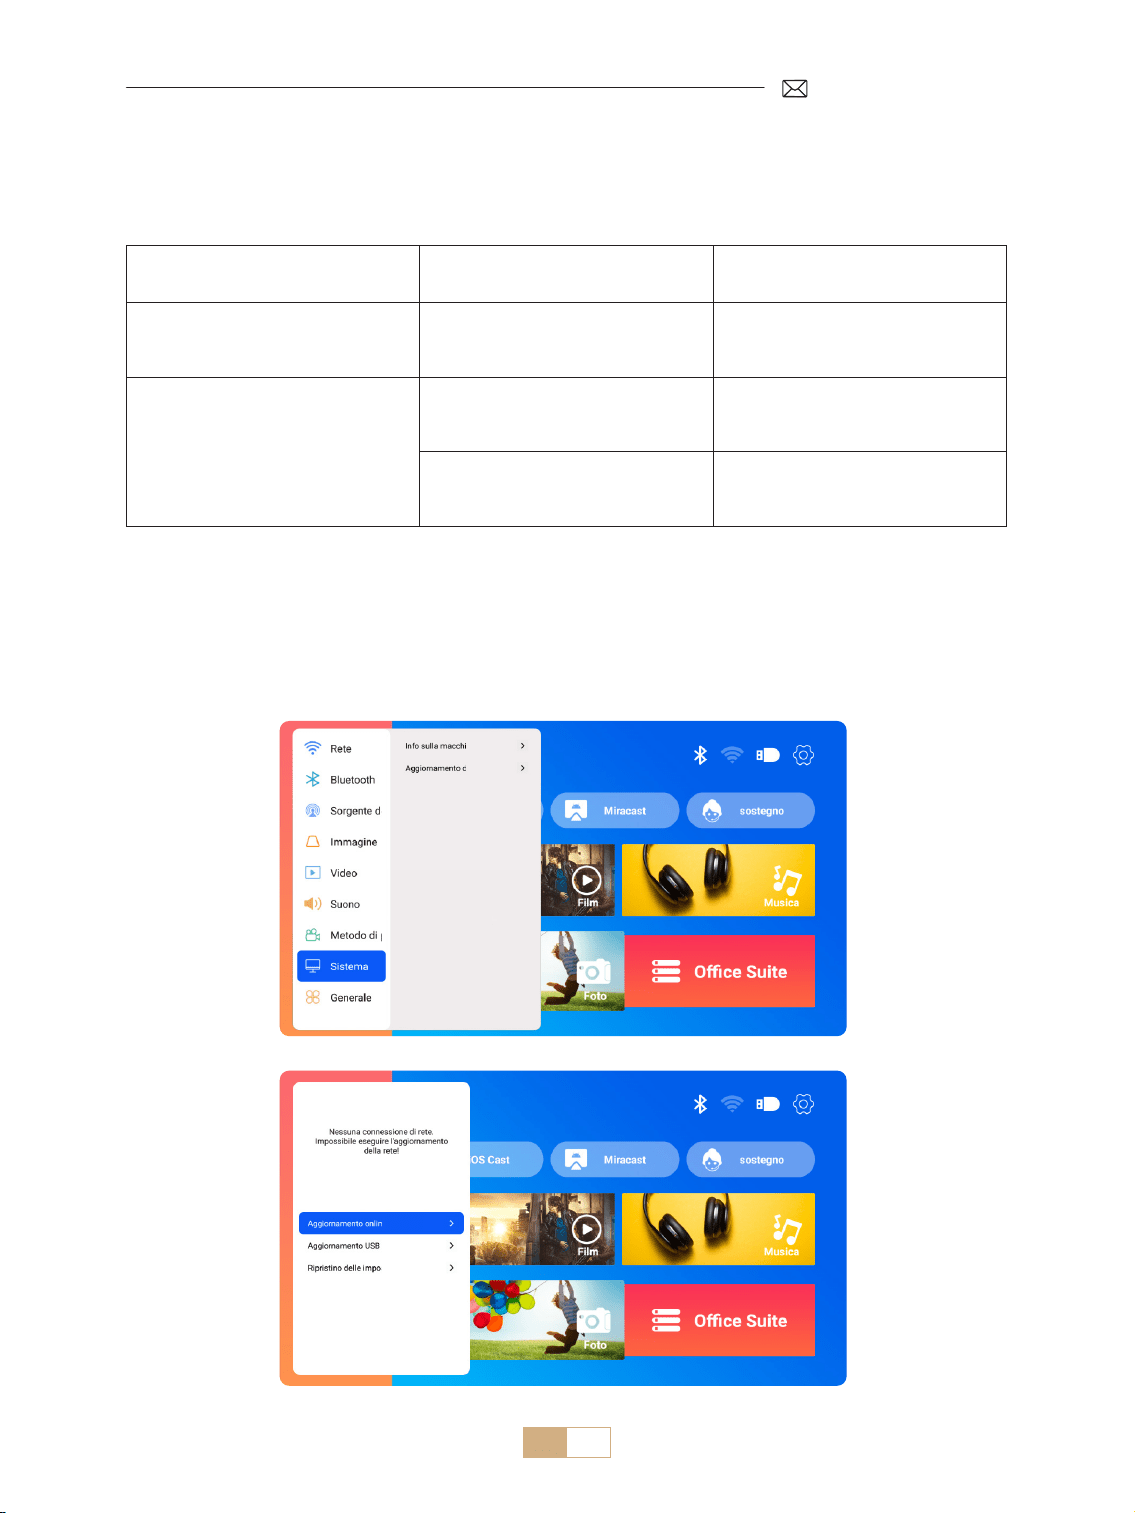
IT 126
Nota per l'aggiornamento dei le USB:
1) Copiare il pacchetto di aggiornamento nella directory principale di un'unità USB.
2) Tenere premuto il pulsante di accensione del dispositivo e il sistema rileverà automaticamente il pacchetto
di aggiornamento e inizierà il processo di aggiornamento.
NOTA: prima di eseguire l'aggiornamento, impostare la modalità di accensione in standby.
Andare alla pagina iniziale Selezionare [Impostazioni] Selezionare [Sistema].
3.Sistema
Menu Menu incluso Funzione
Informazioni su questa macchina
Numero di versione del sistema/
Indirizzo MAC Wi Fi/Indirizzo MAC
Bluetooth
Conferma le informazioni sulla
versione e identica il dispositivo
in rete o Bluetooth
Aggiornamento del sistema
Aggiornamento online (OTA)
Aggiornamento USB (USB)
Aggiornamento del software
tramite le locale USB o online
Ripristino Fabbrica
Ripristino delle impostazioni di
fabbrica
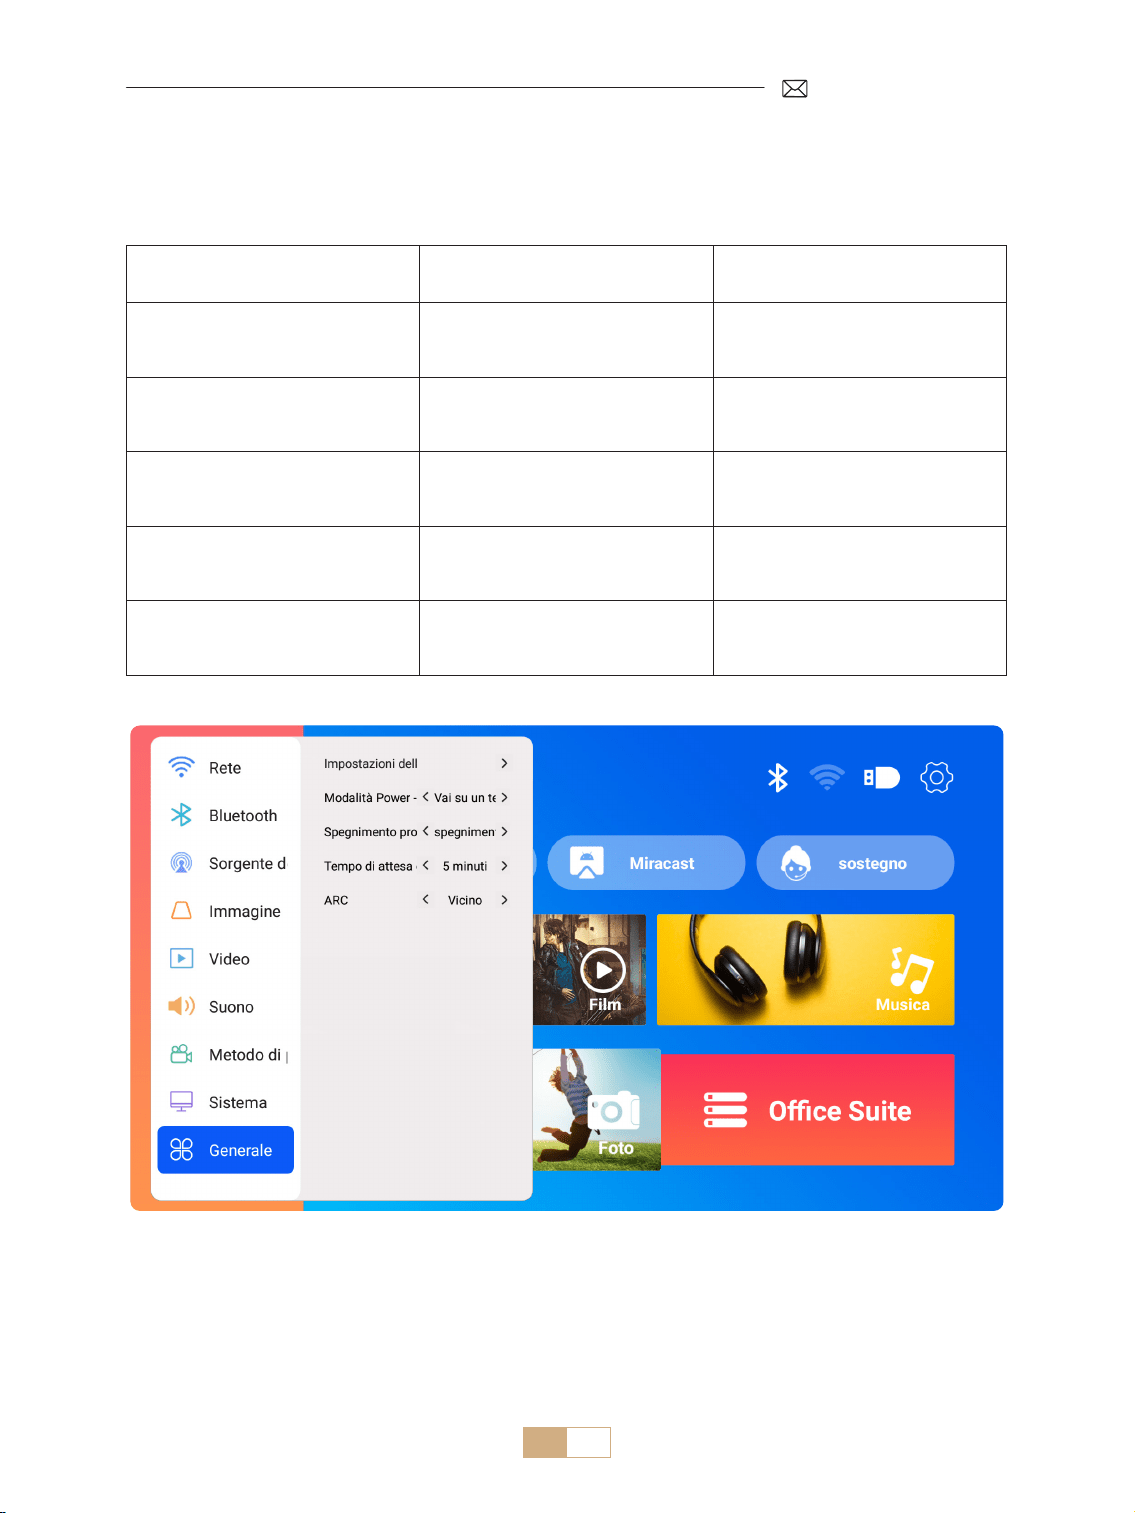
IT 127
Andare alla pagina iniziale Selezionare [Impostazioni] Selezionare [Generale].
4.Generale
Menu Contenuto Funzione
Impostazioni della lingua
English/Français/Italiano/
Espanol/Deutsche/ 日本語 e altre
lingue
Scegliere la lingua preferita
Modalità di accensione Accensione Standby/Accensione
Accensione automatica / stand by
dopo l'inserimento della spina
Timer di sospensione
O/10min/20min/30min/60min/
90min/120min/180min/240min
Impostare il tempo di
sospensione
Timeout screensaver Mai/1min/5min/10min
Impostare il tempo di
salvaschermo del proiettore
ARC Spento/Acceso
Collegare l'altoparlante tramite
cavo HDMI

IT 128
Il PUTRIMS K12 ore interfacce HDMI, USB e jack audio da 3,5 mm. Collegate il vostro dispositivo (ad esempio,
PC, telefono, lettore DVD, soundbar, unità USB, PS4) alla porta adatta.
CONNESSIONI DEI CABLE DI SEGNALE
1.Connessione Multimediale USB
1.1 Formato USB
1) Inserire un'unità USB nella porta del proiettore; verrà riconosciuta automaticamente.
2) Dall'interfaccia principale, selezionare una categoria (Film, Musica, Foto, Suite Oce) e premere il tasto "OK"
sul telecomando per accedere ai le.
Nota: la selezione del tipo di le sbagliato impedisce la visualizzazione dei le corrispondenti.
Suggerimenti utili: Se il proiettore non è in grado di riconoscere il disco USB, fare riferimento ai seguenti
metodi per risolvere il problema.
Vericare che il disco USB sia conforme ai seguenti formati.
Formato USB
FAT32: 8G/16G/32G
NTFS:64G
Formato non supportato: ExFAT
Attenzione: se il proiettore non riesce a riconoscere il contenuto dell'unità flash
USB, controlla se il formato dell'unità ash USB è corretto.
Formato video
MP4/MKV/3GP/ASF/AVI/FLV/MPG/RMVB/TS/VOB, etc. (Il supporto per i codec video
può variare; contattaci per ulteriore supporto)
Formato audio
AAC/FLAC/M4A/MP3/WAV, etc. (Il supporto per i codec audio può variare; i codec
audio Dolby non sono supportati; contattaci per ulteriore supporto )
Formato immagine BMP/PNG/JPEG/JPG/JPE
Documente Format PPT/PDF/Word/Excel/TXT
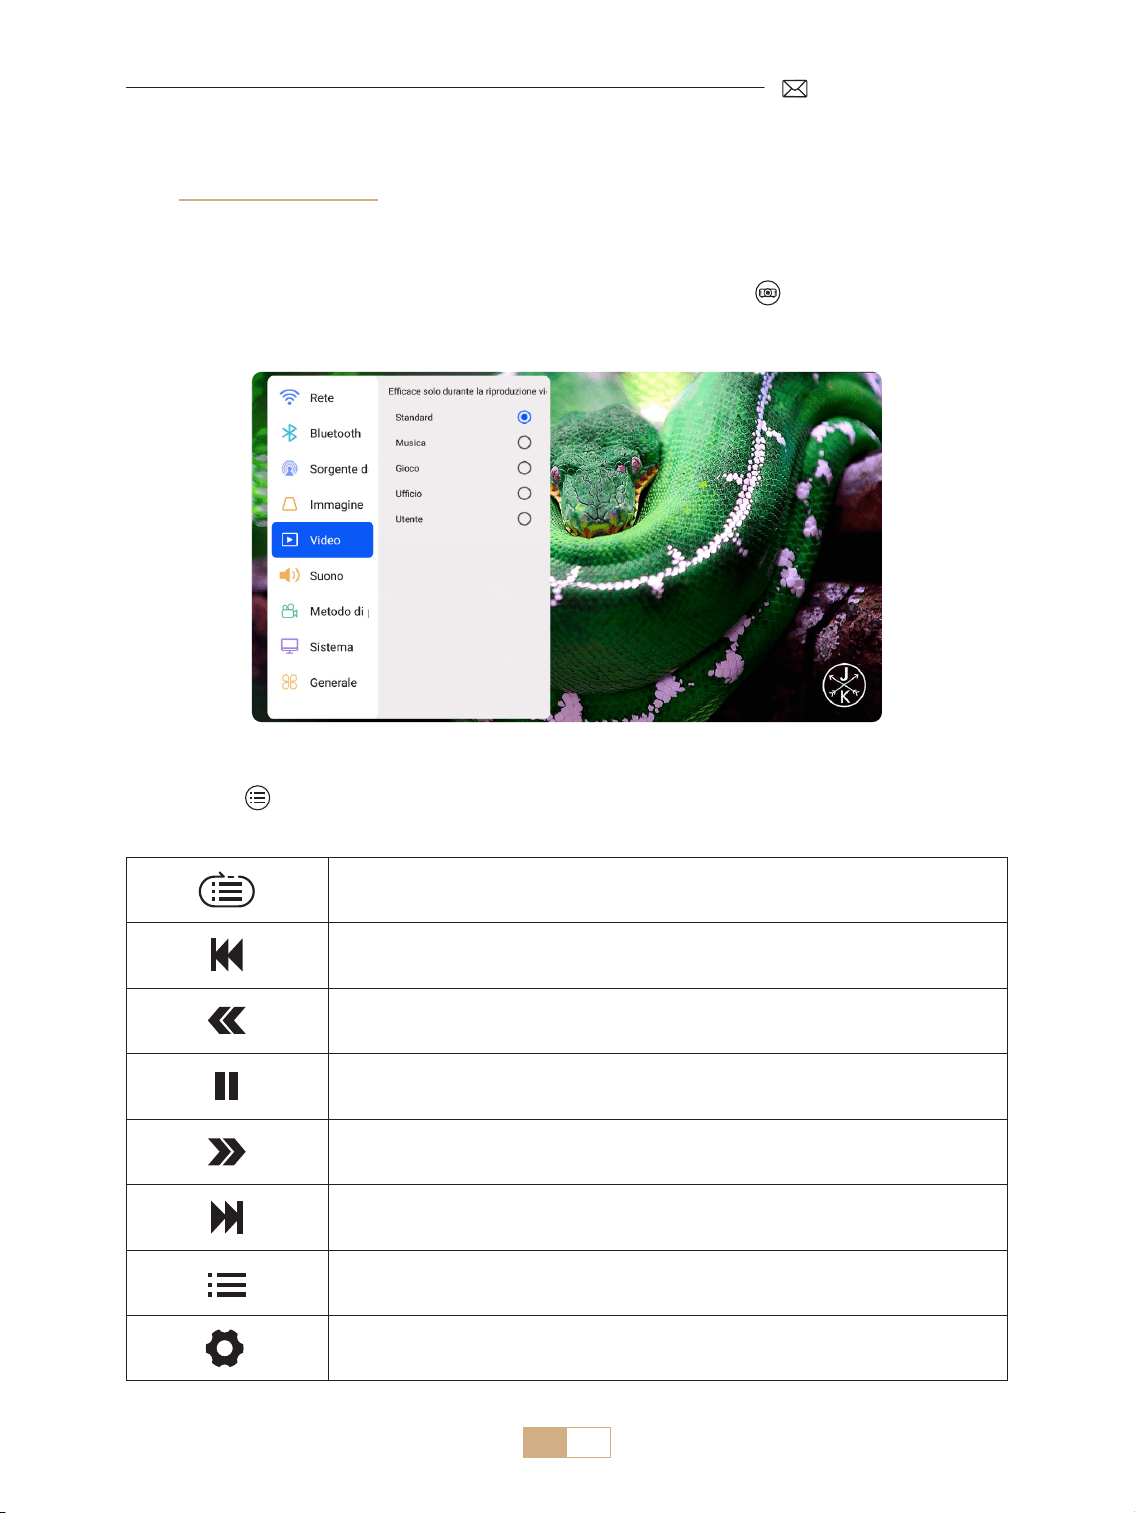
IT 129
Se il problema non è ancora risolto, invia una descrizione dettagliata del tuo problema al seguente indirizzo
email: [email protected]om
Ciclo singolo, ciclo di elenco e ciclo attraverso l'elenco solo una volta
Passa al video precedente
Veloce indietro il video 2X a 32X
Riproduci o metti in pausa
Avanti veloce del video da 2X a 32X
Passa al video successivo
Seleziona tutte le playlist nella cartella corrente
Entra nelle impostazioni del progetto per regolare la modalità [Video] o [Suono]
1.2 Interfaccia di Riproduzione Video
1) Nell'interfaccia USB, durante la riproduzione di un video, premi il pulsante , quindi seleziona [Video] o
[Suono] per regolare luminosità, contrasto e altre impostazioni secondo necessità.
2) Premi breve per accedere alle impostazioni di riproduzione video come di seguito
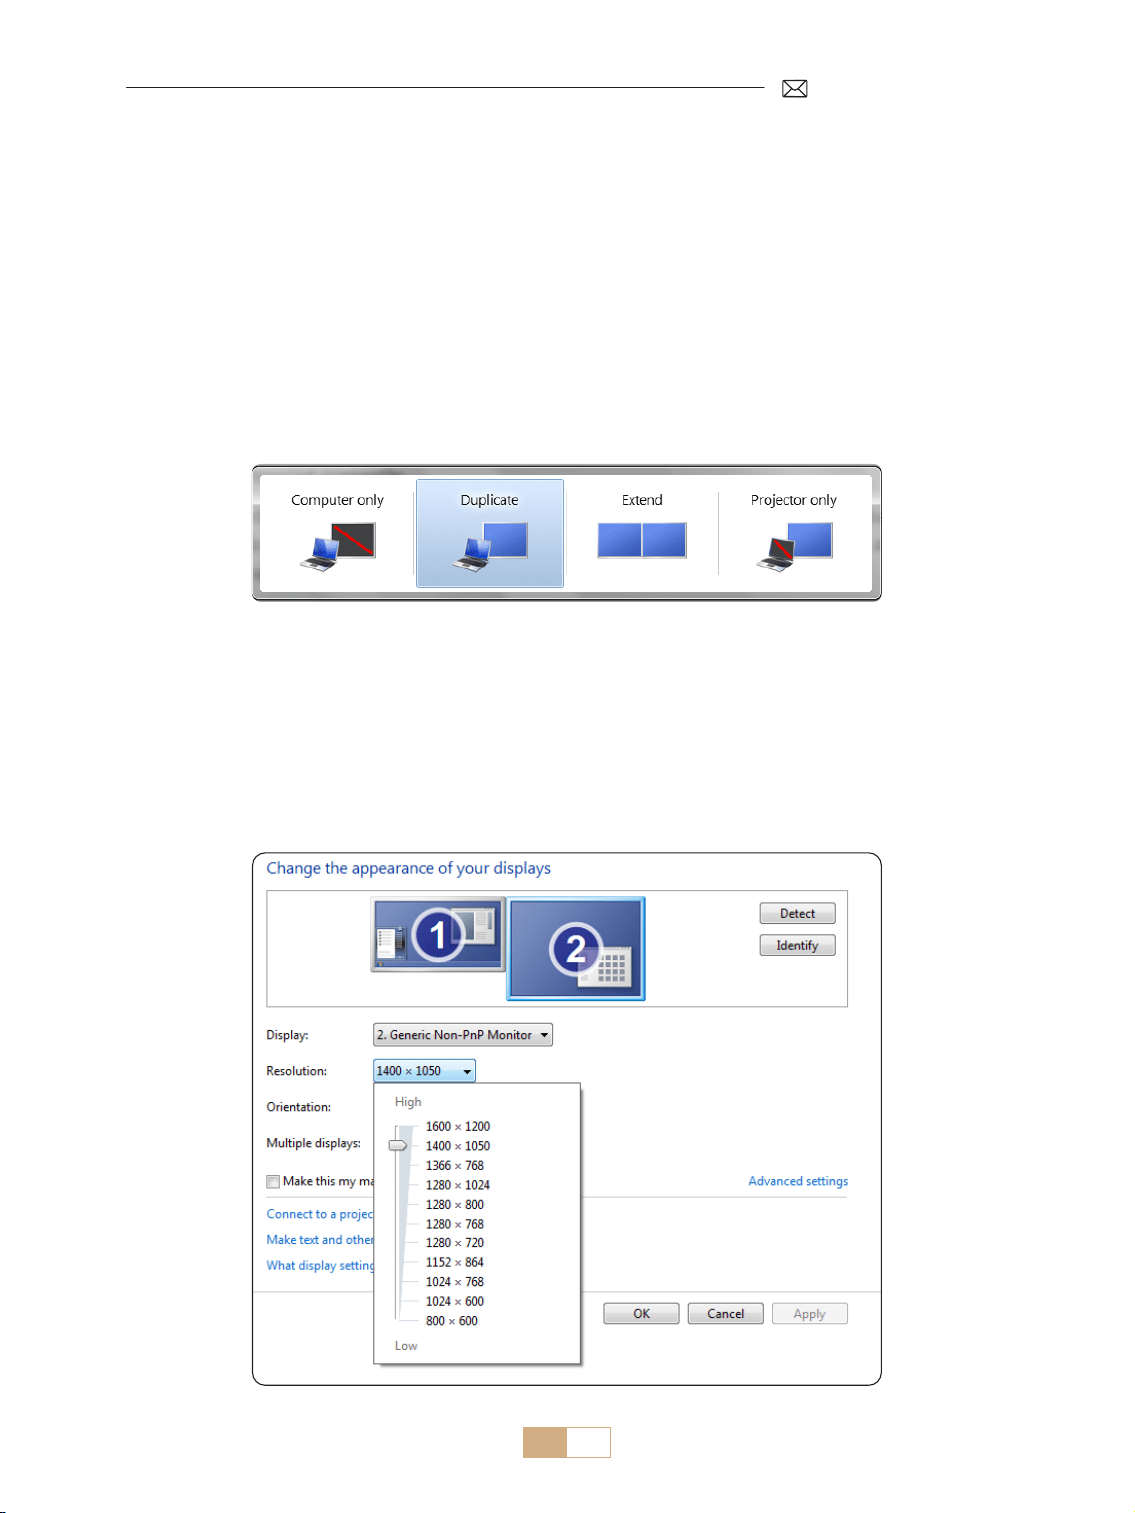
IT 130
1. Usa il cavo HDMI incluso per collegare il tuo computer al proiettore K12.
2. Seleziona la sorgente HDMI per proiettare qualsiasi le sul tuo computer.
3. Sul tuo laptop, tieni premuti i tasti "Win+P" per cambiare la modalità di visualizzazione.
NOTA:
1) Se riscontri problemi di connessione, è probabile che la modalità di visualizzazione non sia stata selezionata
correttamente.
2) Per MacBook, usa un adattatore da tipo C a HDMI per collegare il tuo MacBook o un adattatore da Mini
Display a HDMI per connetterti al tuo MacBook Air (adattatore non incluso).
Solo computer: Impostazione predenita per la visualizzazione solo sul monitor principale.
Duplicato: fa sì che tutti i monitor visualinino la stessa cosa duplicando il desktop su ciascun monitor.
Estendi: fa sì che tutti i tuoi monitor agissano come un grande monitor estendendo il desktop su tutti loro.
Solo proiettore: visualizza solo sul monitor secondario come un proiettore.
Per modicare la risoluzione dello schermo in modalità Solo proiettore, segui questi passaggi:
Passaggio: Start > Pannello di controllo > Aspetto e personalizzazione > Regola la risoluzione dello schermo
2.Connessione a Laptop e Computer

IT 131
K12 supporta HDMI ARC, attivando prima HDMI ARC nelle impostazioni [Generali], collega una soundbar
tramite HDMI senza la necessità di cavi audio aggiuntivi.
3.Connessione ad Altoparlante
(HDMI)
Grazie per aver scelto il proiettore PUTRIMS K12. Forniamo una garanzia di 2 anni per il proiettore K12. Se avete
domande, non esitate a contattarci via [email protected]om.
Abbiamo raccolto alcune domande frequenti e le relative risposte per aiutarvi meglio.
Q1: La connessione WiFi è instabile. Come posso risolvere questo problema?
Per risolvere i problemi di connettività WiFi, assicurarsi innanzitutto che la rete domestica funzioni bene.
Inoltre, mantenere la distanza tra il telefono e il proiettore entro 1 metro. Se il problema persiste, contattateci
all'indirizzo [email protected]om per ulteriore assistenza.
Q2: Il telecomando e il proiettore non riescono a comunicare.
1. L'interruttore di alimentazione sopra il proiettore è acceso o spento?
2. Le batterie del telecomando sono esaurite?
3. Ci sono ostacoli che bloccano il segnale a infrarossi tra il telecomando e il proiettore?
Q3: Che cos'è il dongle GTV? Posso guardare lm e programmi TV più popolari?
1. Il proiettore è dotato di un sistema Google TV integrato e ucialmente autorizzato, che include contenuti
precaricati di Netix, YouTube, Prime Video e altro ancora.
2. È possibile trovare altre app nella homepage di GTV alla voce "App" e cercare l'app desiderata.
Q4: Il proiettore si spegne automaticamente dopo aver lavorato per un po'.
1.La ventilazione del proiettore potrebbe essere bloccata o la tensione potrebbe essere instabile.
2. Inviate un video a support@putrims.com, indagheremo sul problema per voi.
Q5: Il proiettore non è compatibile con il mio altoparlante Bluetooth.
1. Il proiettore potrebbe non essere compatibile con alcune versioni di altoparlanti Bluetooth.
2. Contattare il nostro team post vendita all'indirizzo [email protected]om indicando marca e modello
dell'altoparlante Bluetooth per ulteriore assistenza.
FAQ & GARANZIA

IT 132
Q6: Perché l'immagine è sfocata, indipendentemente dalla regolazione?
1. Posizionare il proiettore in linea con il centro dello schermo. Oppure l'angolo di proiezione deve essere
compreso entro 15;
2. Utilizzare la funzione Auto o Manual Keystone per ottenere una visualizzazione rettangolare dello schermo;
utilizzare la funzione Auto Focus o Manual Focus per regolare la messa a fuoco dell'obiettivo.
Q7: Perché non riesco a trovare alcune funzioni?
Alcune funzioni possono essere visualizzate in sottomenu o richiedono una pressione prolungata su alcuni
pulsanti. A causa degli aggiornamenti del prodotto, le funzionalità possono dierire leggermente dal manuale.
Per informazioni precise, consultare il prodotto reale.
Q8: Cosa succede se il mio ordine ha superato la nestra di restituzione della piattaforma? Perché
non ho ricevuto una risposta dopo 24 ore?
Il team di supporto di PUTRIMS fornirà prontamente assistenza per trovare soluzioni, anche se l'ordine ha
superato la nestra di restituzione della piattaforma. Se non ricevete risposta entro 24 ore, ciò potrebbe essere
dovuto a differenze di fuso orario o al fatto che la vostra e mail è finita nella cartella spam. Contattateci di
nuovo e ci assicureremo che la vostra richiesta venga arontata tempestivamente.

JP 133
目次
PUTRIMS 年中無休のプロのサポート 134
使用上のご注意 134
パッケージリスト 136
プロジェクター仕様 137
プロジェクター紹介 137
リモコン 139
インストール 140
1. 取り付け方法 - - - - - - - - - - - - - - - - - - - - - - - - - - - - - - - - - - - - - - - - - - - - - - - - -140
2. 投影距離とサイズ- - - - - - - - - - - - - - - - - - - - - - - - - - - - - - - - - - - - - - - - - - - - - - -141
3. 天井への設置 - - - - - - - - - - - - - - - - - - - - - - - - - - - - - - - - - - - - - - - - - - - - - - - - -141
プロジェクター 起動 142
投影画像設定 142
1. 台形補正- - - - - - - - - - - - - - - - - - - - - - - - - - - - - - - - - - - - - - - - - - - - - - - - - - - -142
1.1 自動台形補正 / フォーカス 142
1.2 手動台形補正 143
2. ズーム画面 - - - - - - - - - - - - - - - - - - - - - - - - - - - - - - - - - - - - - - - - - - - - - - - - - -144
2.1 ズーム画面 144
2.2 画面リセット 144
プロジェクター入力信号の切り替え 145
1. 信号源の選択 - - - - - - - - - - - - - - - - - - - - - - - - - - - - - - - - - - - - - - - - - - - - - - - - -145
1.1 HDMI 入力信号源の選択 145
1.2 GTV 信号源の選択 146
1.3 GTV 音声アシスタント 147
2. 無線接続- - - - - - - - - - - - - - - - - - - - - - - - - - - - - - - - - - - - - - - - - - - - - - - - - - - -148
2.1 WiFi 設定 148
2.2 iOS デバイス用(iOS Cast) 148
2.2 Android デバイス用(Miracast) 149
3.Bluetooth 設定 - - - - - - - - - - - - - - - - - - - - - - - - - - - - - - - - - - - - - - - - - - - - - - - -150
他の投影設定 151
1. ビデオモード - - - - - - - - - - - - - - - - - - - - - - - - - - - - - - - - - - - - - - - - - - - - - - - - -151
2. 音声モード - - - - - - - - - - - - - - - - - - - - - - - - - - - - - - - - - - - - - - - - - - - - - - - - - -151
3. システム - - - - - - - - - - - - - - - - - - - - - - - - - - - - - - - - - - - - - - - - - - - - - - - - - - -152
4. 一般 - - - - - - - - - - - - - - - - - - - - - - - - - - - - - - - - - - - - - - - - - - - - - - - - - - - - - -153
信号線接続 154
1.USB マルチメディア接続 - - - - - - - - - - - - - - - - - - - - - - - - - - - - - - - - - - - - - - - - - - -154
1.1 USB フォーマット 154
1.2 ビデオ再生インターフェース 155
2.HDMI でノートパソコンとコンピュータと接続 - - - - - - - - - - - - - - - - - - - - - - - - - - - - - - -156
3. スピーカーの接続- - - - - - - - - - - - - - - - - - - - - - - - - - - - - - - - - - - - - - - - - - - - - - -157
よくある質問と保証 157

JP 134
PUTRIMS 年中無休のプロのサポート
お客様へ
平素は PUTRIMS をご愛用いただき、誠にありがとうございます!
プロジェクターを使用する前に、このクイックスタートガイドをお読みください。本書に記載されている機能
およびイラストは参考として提供されたものであり、継続的な最適化および更新により、実際の製品とは若干
異なる場合があります。正確な詳細については、実際の製品を参照してください。
ご質問がある場合は、次の詳細を電子メールに記載してください:国コード、注文番号、モデル、および問題
の簡単な説明(例:JP+000-0000000-0000000+K12+ 画像なし)で、[email protected] までお問い合
わせてください。弊社チームが 24 時間以内に迅速かつ効果的な解決策をご提案いたしますので、ご安心くださ
い。
実際、信号、音声、Bluetooth や WiFi 接続の問題、多くの問題は設定によって簡単に解決できます。ご満足い
ただけるよう、弊社のプロジェクターはすべて出荷前に 100%の品質チェックと徹底した梱包を行っております。
ご不明な点がございましたら、お気軽にお問い合わせください。そして、私たちに改善のチャンスを与えてく
ださい。私たちは、お客様に満足のいく解決策を提供することを約束します。弊社の大切な顧客としてお客様
の満足を保証するために 年中無休で優秀なサポートを提供することに努力しています。
よろしくお願いいたします。
PUTRIMS サービスチーム
使用上のご注意
1. プロジェクターを長持ちさせるために、過度に暖かい場所や寒い場所には置かないでください。極端な温度は、
デバイスの寿命を縮める可能性があります。最適なパフォーマンスを得るためには、5℃~ 35℃の作業環境
を維持してください。
2. プロジェクターには、安定した動作を保証するための換気システムが装備されています。通気口を布や毛布
などで覆わないようにしてください。さらに、プロジェクターのスリットに物を差し込まないでください。
ショートや感電の原因となり、機器に損傷を与える可能性があります。
3. プロジェクターを強い衝撃、押し出し、振動から保護し、慎重に取り扱ってください。プロジェクターに内
部回路の障害が発生している場合は、プロジェクターを移動しないでください。
4. プロジェクターのレンズは、画像の精細さと品質に直接影響する重要な部品です。レンズが汚れていないこ
とを確認してください。クリーニングの際は、ガラスレンズに適した柔らかい綿布を使用してください。硬
い布や研磨剤はレンズの表面を傷つける可能性があるため、使用しないでください。
5. 投影画像の視認性を高めるために、部屋の周囲の照明を調節してください。照明を暗くしたり、カーテンを
使用したりすることで、まぶしさを抑え、画質を向上させることができます。
6. ご不明な点がございましたら、[email protected] までご連絡ください。


JP 136
パッケージリスト
PUTRIMS K12 プロジェクター *1 Dongle リモコン *1 電源ケーブル *1
HDMI ケーブル *1 レンズカバー *1 クリーニングキット *1
クイックスタートガイド *1 FAQ *1

JP 137
プロジェクター仕様
モデル番号 K12
ネイティブ解像度 1920*1080P アスペクト比
16:9/4:3
( ボタンを 2 回短く押す)
ディスプレイ技術 LCD 光源 LED
重量 2.5 kg
サイズ
(L*W*H)
28.0 x 24.2 x 10.7 cm
リフレッシュ率 60 Hz 電源 AC 100 240V~/50~60Hz 2A
フォーカス 自動 + 電動 台形補正 自動 + 手動
出力ポート 3.5mm オーディオ出力 入力ポート HDMI*1/USB*1
投射比 1.3:1 ズーム 100% 50%
操作モード リモコン
取り付けタイプ 前面 / 背面:机上、前面 / 背面:天井
プロジェクター紹介
レンズ
IR レシーバー
フォーカス信号レシーバー

JP 138
USB ポート
3.5mm オーディオ出力
HDMI ポート
IR レシーバー
電源ソケット
電源ボタン
ホコリ掃除口
防塵フィルター
M5*12mm 取り付け穴
投影高さ調整
エアアウトレット
* ご注意:天井に取り付ける場合は、プロジェクターの底面にある 4 つの穴を探します。4 つのゴムブロックを
ゆっくりと外すと、天井取り付け用の取り付け穴(M5*12mm)が現れます。
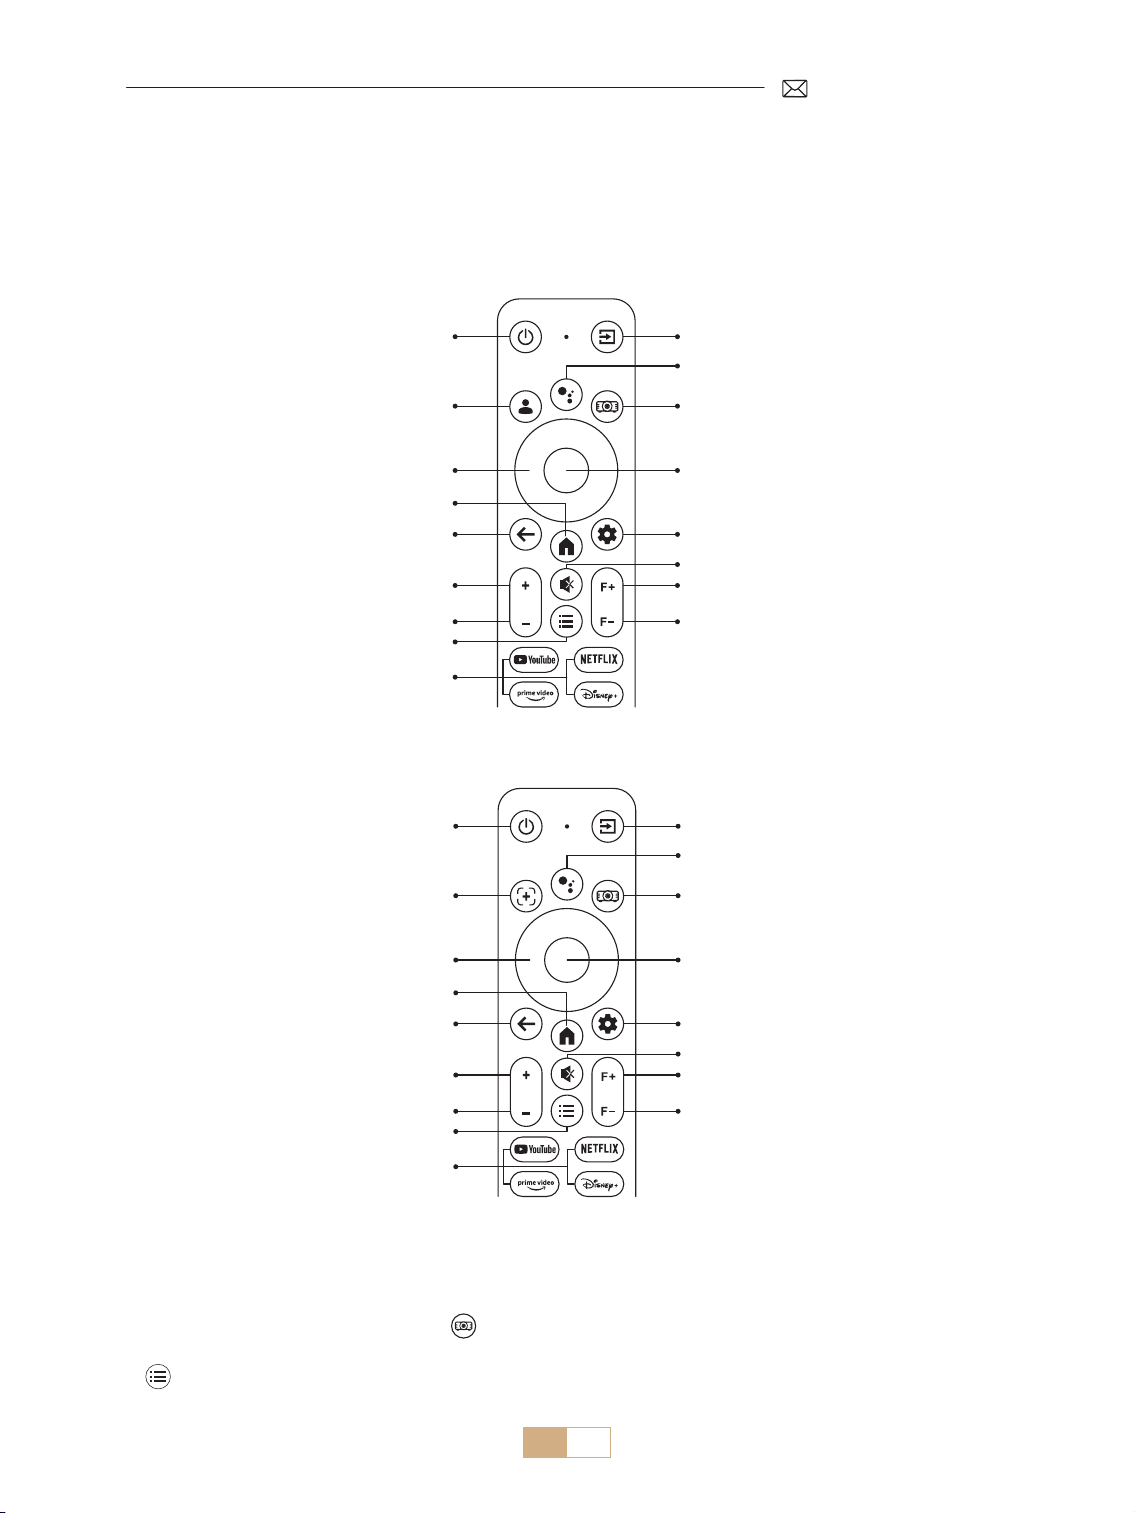
JP 139
リモコン
Google アカウント
リモコンには 2 つのバージョンがある:
バージョン 1
電源ボタン
電源ボタン
ソースボタン
ソースボタン
Dongle 音声
Dongle 音声
プロジェクター設定
プロジェクター設定
確認
確認
Dongle 設定
Dongle 設定
ミュート
ミュート
フォーカス +
フォーカス +
フォーカス
フォーカス
矢印キー
矢印キー
ホームページ
ホームページ
戻る
戻る
ボリューム +
ボリューム +
ボリューム
ボリューム
メニュー
メニュー
アプリ
アプリ
オートフォーカス /
台 形 補 正
バージョン 2
重要 :
1. リモコンに単 4 乾電池 2 本 ( 別売 ) を入れてからご使用ください。
2. 信号源が GTV モードにデフォルト設定されている場合、プロジェクターの電源がオンになると、Google TV
のページが自動的にオンになります。
3. USB または HDMI インターフェースで ボタンを押してシステム設定にアクセスし、ビデオ / 音声設定など
を調整します。
4. ボタンを 2 回短く押すと、アスペクト比を 16:9 または 4:3 に調整できます。

JP 140
インストール
1. 取り付け方法
プロジェクターは、天吊り用の金具で天吊りができ、ご使用環境やご要望に応じた机の上に置いて投影できます。
プロジェクターは以下の方法で設置することができます。
1. 天吊りと正面投影 2. 天吊りと背面投影
3. テーブル置きと正面投影 4. テーブル置きと背面投影
1) [設定]メニューを選択し、[ 投影モード ] オプションを選択します。取り付けモードを選択し、[OK] を押し
て投影位置を確定します ( 机の前 / 後、天井の前 / 後 )。
2) プロジェクターは、レンズが画面と対称になるように設置することをお勧めします。角度を調整する必要が
ある場合は、15°以内に保ち、台形補正機能を使って投影画像を調整してください。
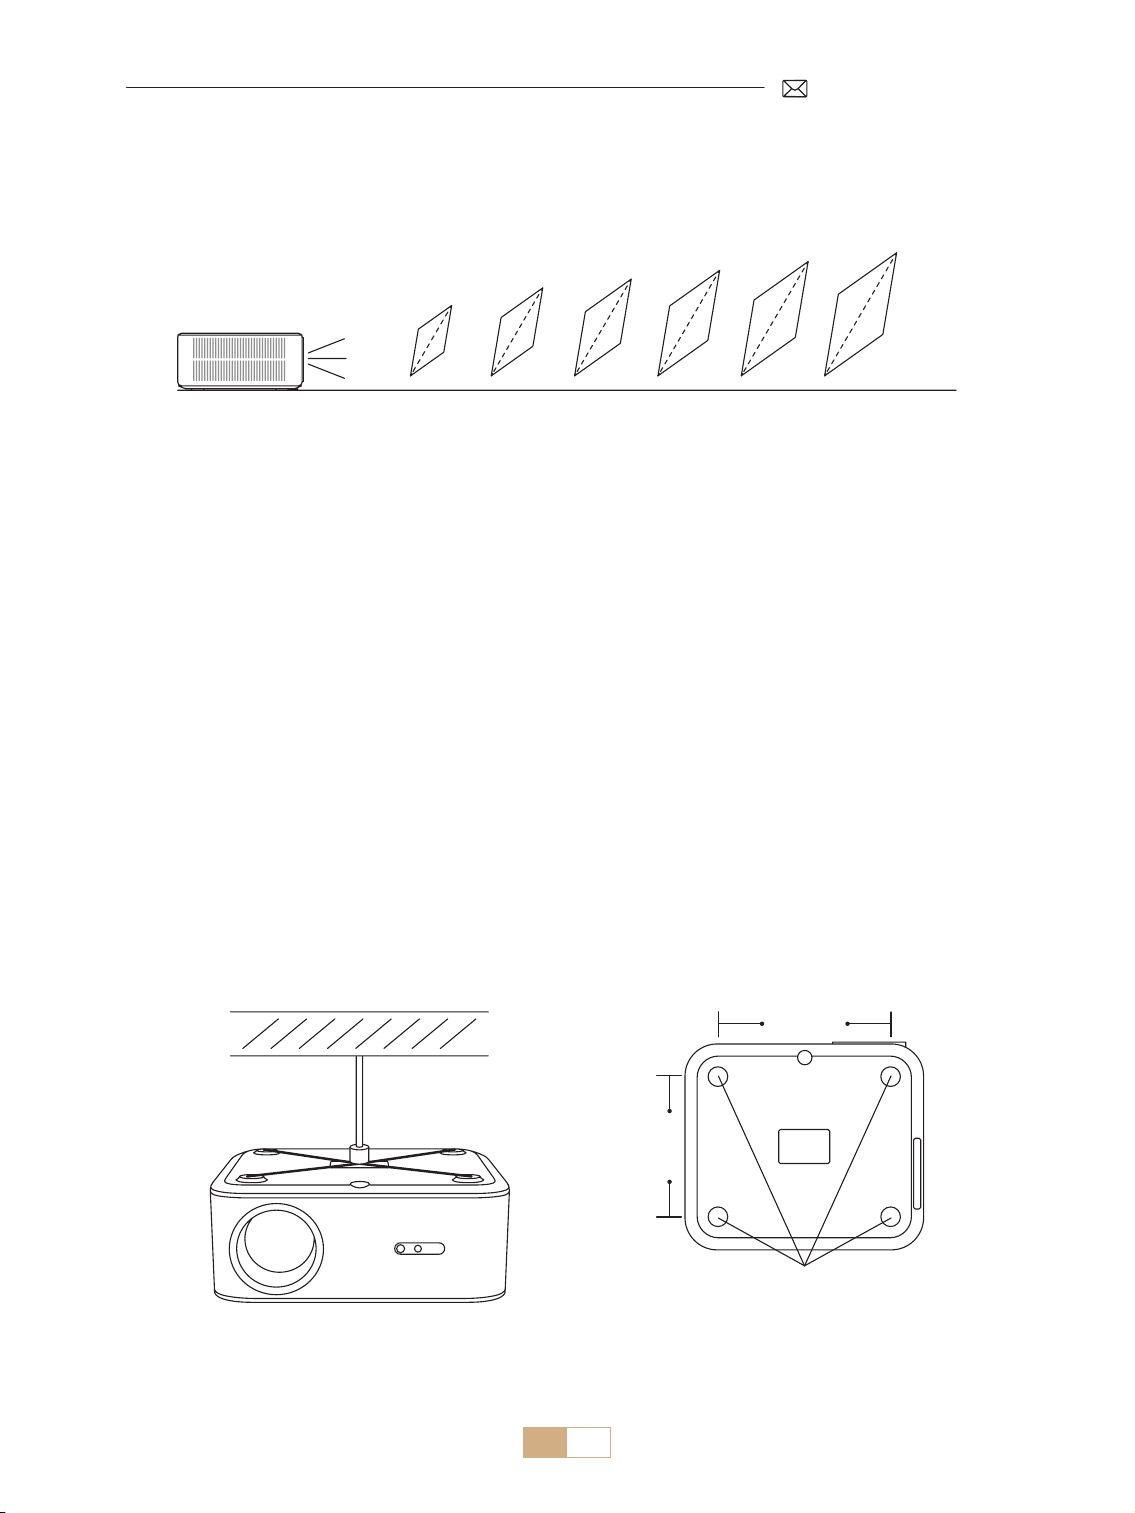
JP 141
2. 投影距離とサイズ
K12 プロジェクターの最適な投影距離は 2.5 ~3m です。画像サイズは、距離とプロジェクターの投写比(1.3:1)
によって異なります。さらに、このプロジェクターには 50%ズーム機能があります。
メートル
フィート
0.8
2.6
30''
50''
80''
100''
120''
150''
1.4
4.5
2.3
7.5
2.8
9.1
3.4
11.1
4.3
14.1
3. 天井への設置
1) プロジェクターは地面に対して垂直に置き、スクリーンの中央に置きます。こうすることで、平らで正しく
整列した投影画像を得ることができます。
2) チルトベースを調整するには、プロジェクター下部のサポートプレートを開きます。以下を参照してください。
3) 天吊り用には、プロジェクターの底に 4 つの穴があります(M5*12mm)。プロジェクターを逆さまにしてく
ださい。ゴムパッドを取り外した後、天井マウントの穴を見つけることができます。以下を参照してください。
ご注意:吊り下げ金具や天吊りスタンドはパッケージされていません。
M5*12mm 取り付け穴
200mm
165mm
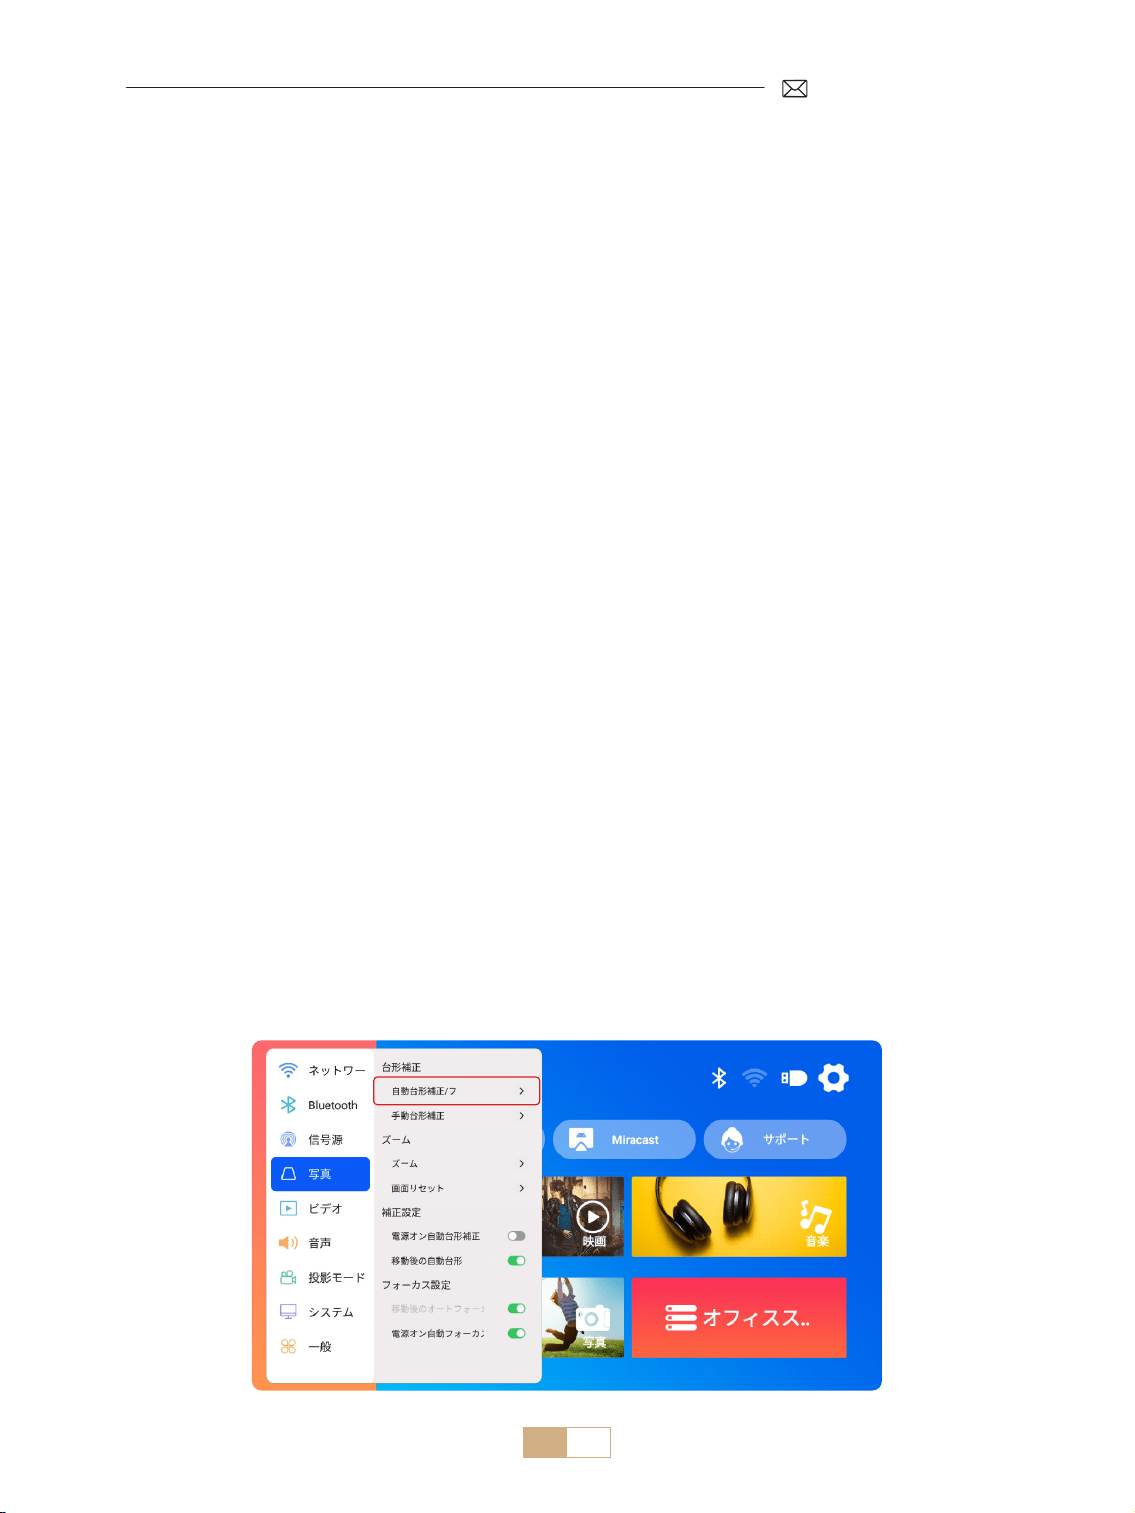
JP 142
電源オン :
• レンズカバーを外し、電源ケーブルでプロジェクターを電源に接続します。
• 赤いインジケーターランプが点灯したら、リモコンの電源ボタンまたはプロジェクターのパネルの電源ボタン
を押して、プロジェクターを起動します。インジケーターランプが赤から青に変わり、プロジェクターの電源
がオンになったことを示します。
• プロジェクターの電源が入ると、自動的に [ 移動後の自動台形補正 ] および [ オートフォーカス ] 機能が有効
になります。画像が標準的な長方形でなかったり、ピントが合っていないように見える場合は、手動で台形補
正を調整し、リモコンの 'F+' および 'F ' フォーカスボタンを押して画像の鮮明度を調整します。画像がぼやけ
たままの場合は、投影距離と角度の調整を検討してください。
電源オフ :
• プロジェクターをオフにするには、リモコンの電源ボタンまたはプロジェクターのパネルの電源ボタンを押し
ます。
• インジケーターランプが青色から赤色に変わり、プロジェクターの電源が正常にオフされたことを示します。
投影画像設定
プロジェクター 起動
1. 台形補正
1.1 自動台形補正 / フォーカス
[設定]メニューを選択し、[画像]オプションを選択します。次に [ 自動台形補正 / フォーカス ] を選択し、[OK]
ボタンをクリックして機能を有効にします。スクリーンからの投影距離に基づいて自動的にピントを合わせ、
投影角度を変えると画像を長方形に調整します。
画像がぼやけている場合は、リモコンのフォーカスボタン ''F+'' ''F '' を押して、画像がクリアになるまでレンズ
のフォーカスを調整します。( 画面がクリアになったら OK ボタンを押す必要はありません。)
ご注意 :
1) すでにプロジェクターの位置を設定している場合は、より良い視聴体験のために、設定でオートフォーカス
と自動台形補正機能をオフにすることをお勧めします。
2) プロジェクターの側面投影角度は 15°を超えないようにしてください。プロジェクターの前に障害物があると、
自動台形補正機能の妨げになることがあります。

JP 143
1.2 手動台形補正
[設定]メニューを選択し、[画像]オプションを選択します。次に [ 手動台形補正 ] を選択し、[OK] ボタンを
クリックして、調整したいポイントを選び、矢印キー「▼」 「▶」「▲」「◀」) を押して、下図のように必要
な値を設定します。
リセット : を押すと、画像が元の台形補正設定にリセットされます。
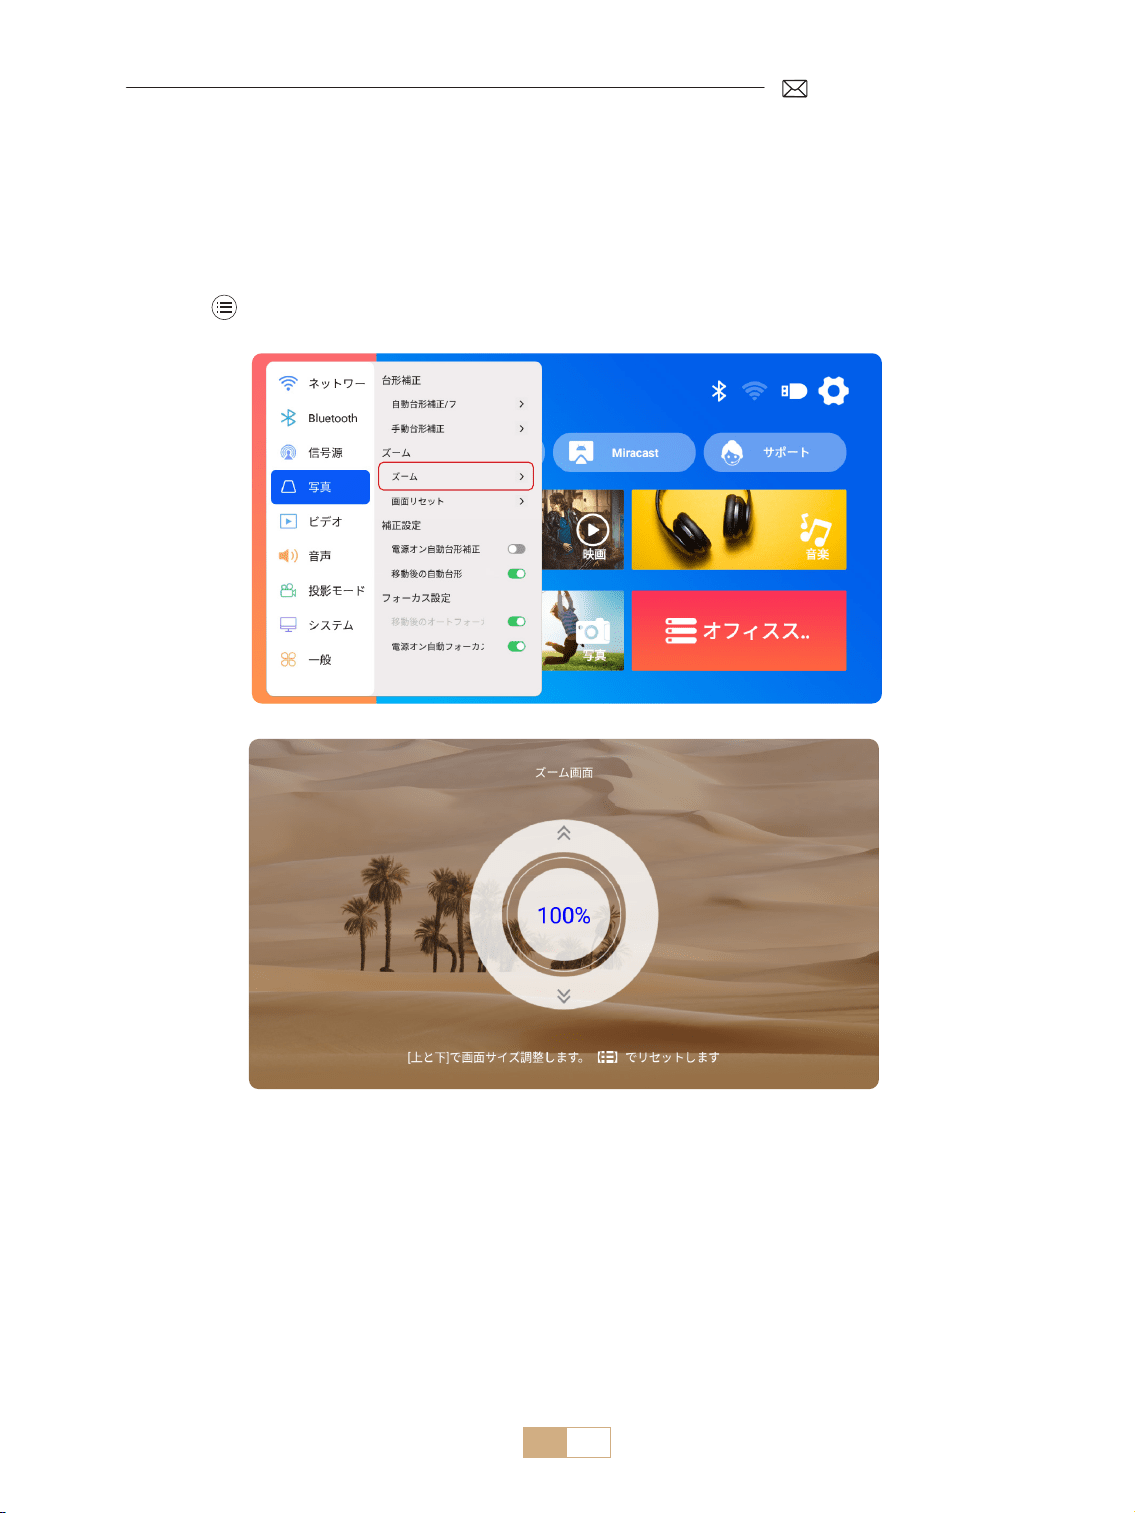
JP 144
2. ズーム画面
2.1 ズーム画面
2.2 画面リセット
[設定]メニューを選択し、[画像]オプションを選択します。次に、[ ズーム画面 ] を選択し、ボタン「▲」「▼」
を押して、以下のように必要な値を設定します。
リセット: を押すと、画像は元のズーム設定に戻ります。
この機能は、過去に設定されたズームと台形補正のデータをクリアし、画像を元のサイズと形状に戻します。

JP 145
プロジェクター入力信号の切り替え
1. 信号源の選択
1.1 HDMI 入力信号源の選択
1) ホーム画面で入力信号源(例:HDMI)を選択するか、リモコンの 「 」ボタンを押して対応する信号源を
選択します。
2) HDMI 経由でビデオを再生する場合、 ボタンを押して、[ ビデオ ] または [音声]を選択し、必要に応じて
明るさ、コントラスト、およびその他の設定を調整します。
メニュー コンテンツ
信号源 ホーム /HDMI/GTV
ブートソース 閉じる /HDMI/GTV
HDMI プラグアンドプレイ オン / オフ

JP 146
K12 プロジェクターの GTV を初めて使用する場合は、以下の手順に従って設定してください。
1) 信号源として GTV を選択した後、リモコンの 「 」と 「 」を同時に長押しします。リモコンの 「 」
を同時に長押ししてペアリングします。( 注:リモコンのペアリングは初回使用時のみ )。
2) GTV に入ったら、適切な言語と国の設定を選択してください。
3) パーソナライズされたコンテンツにアクセスするには、Google アカウントにログインしてください。
4) すべての内蔵 GTV アプリをロードする準備をします。このプロセスには、ネットワークの状況により、約 10
分かかる場合があります。
5) APP をロードした後、GTV の豊富なコンテンツを楽しむことができます。
1.2 GTV 信号源の選択
K12 プロジェクターは Google TV(公式ライセンス)を内蔵しており、お気に入りのアプリやビデオに簡単にア
クセスして楽しむことができます。このプロジェクターがあれば、Fire TV スティックを追加することなく、映
画やテレビ番組の豊富なライブラリを探索することができます。
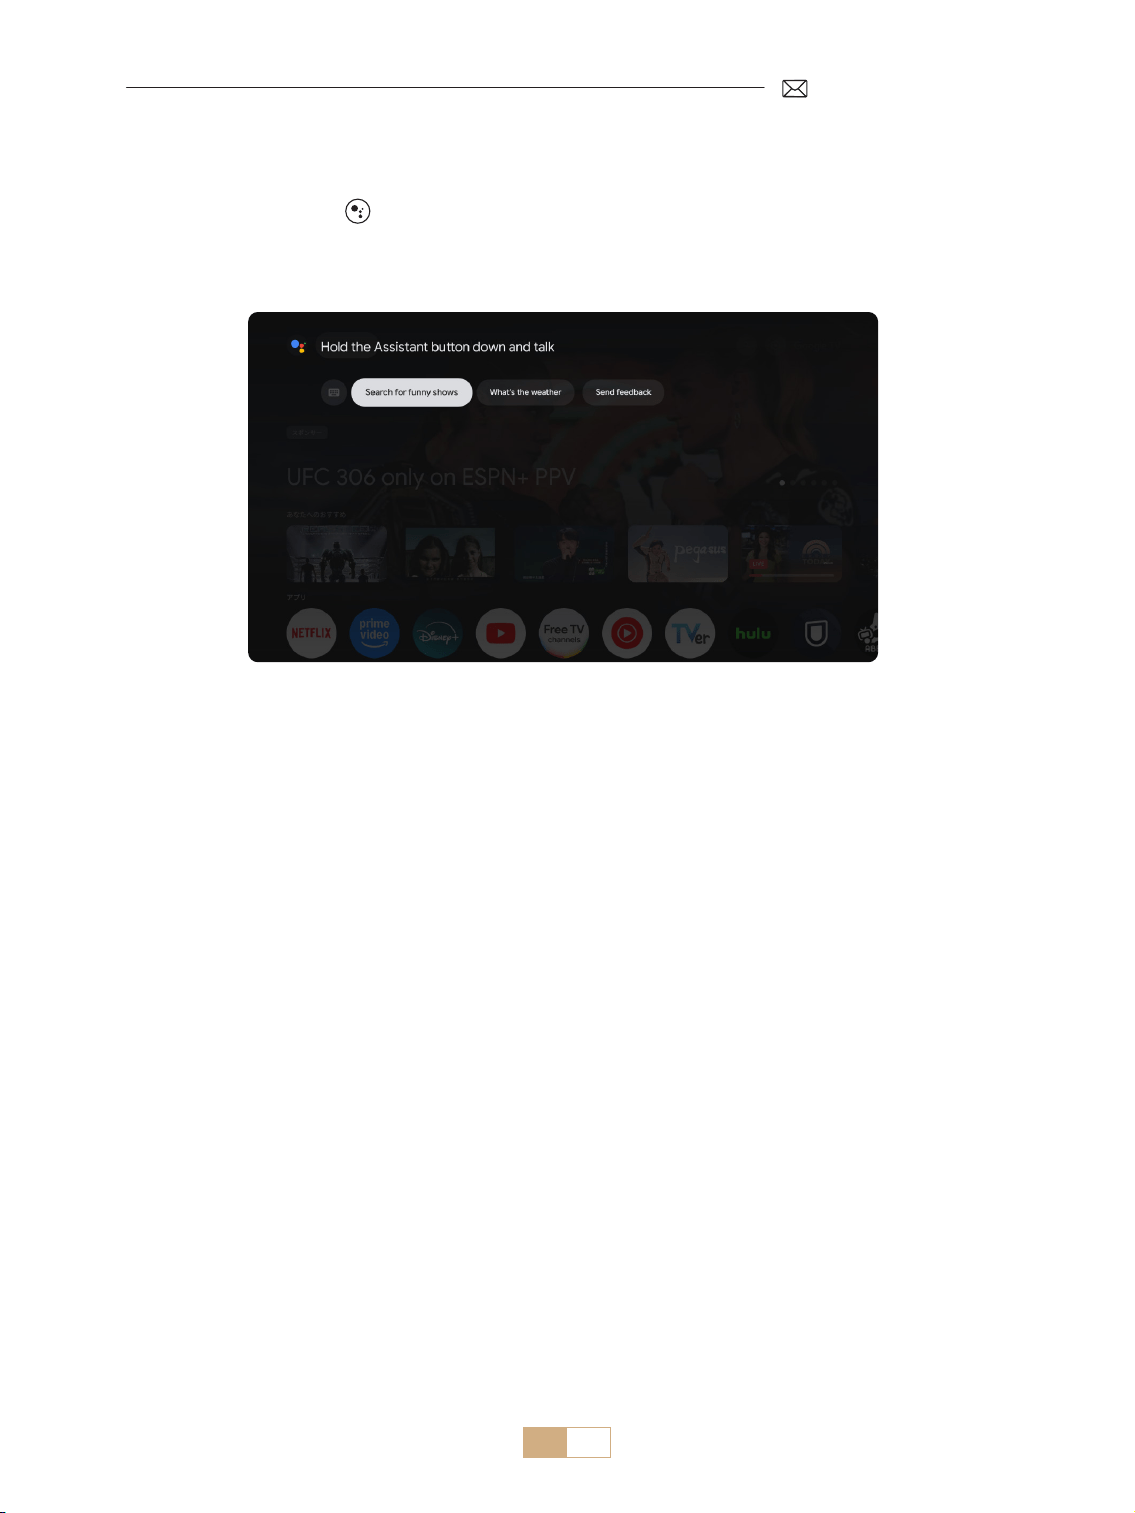
JP 147
1.3 GTV 音声アシスタント
1) 話すときは、リモコンの を押し続けます。
2) 音声アシスタントは、Google TV(GTV)のインターフェイス内でのみ使用できます。

JP 148
2.1 WiFi 設定
2.2 iOS デバイス用(iOS Cast)
1) [設定]メニューを選択 [ ネットワーク ]>[WiFi 設定 ] を選択
2) スクリーンミラーリングには強力なワイヤレス WiFi 信号が必要です。ホームネットワークが正常に機能して
いることを確認してください。モバイルデバイスをプロジェクターに近づけてください。約 1 メートルの距
離が最適です。ビデオ解像度は Wi Fi 信号の強さに応じて調整されます。
3) 著作権の制限により、プロジェクターは Netix や Disney などのストリーミングアプリのワイヤレスミラー
リングには対応していません。ストリーミングコンテンツを視聴するには、GTV 信号源を選択し、対応する
アプリをダウンロードしてください。
ご注意 : iOS デバイスがプロジェクターと同じ Wi Fi ネットワークに接続されていることを確認してください。
1) プロジェクターをご自宅の Wi Fi に接続します。
2) プロジェクターのホームページに戻り [iOS Cast] を選択 このインターフェイスにとどまります。
3) iOS デバイスの [ コントロールセンター ] にアクセスし、スクリーンミラーリング ] 機能を選択し、[K12-xxxx]
という iOS Cast を選択して接続します。
2. 無線接続
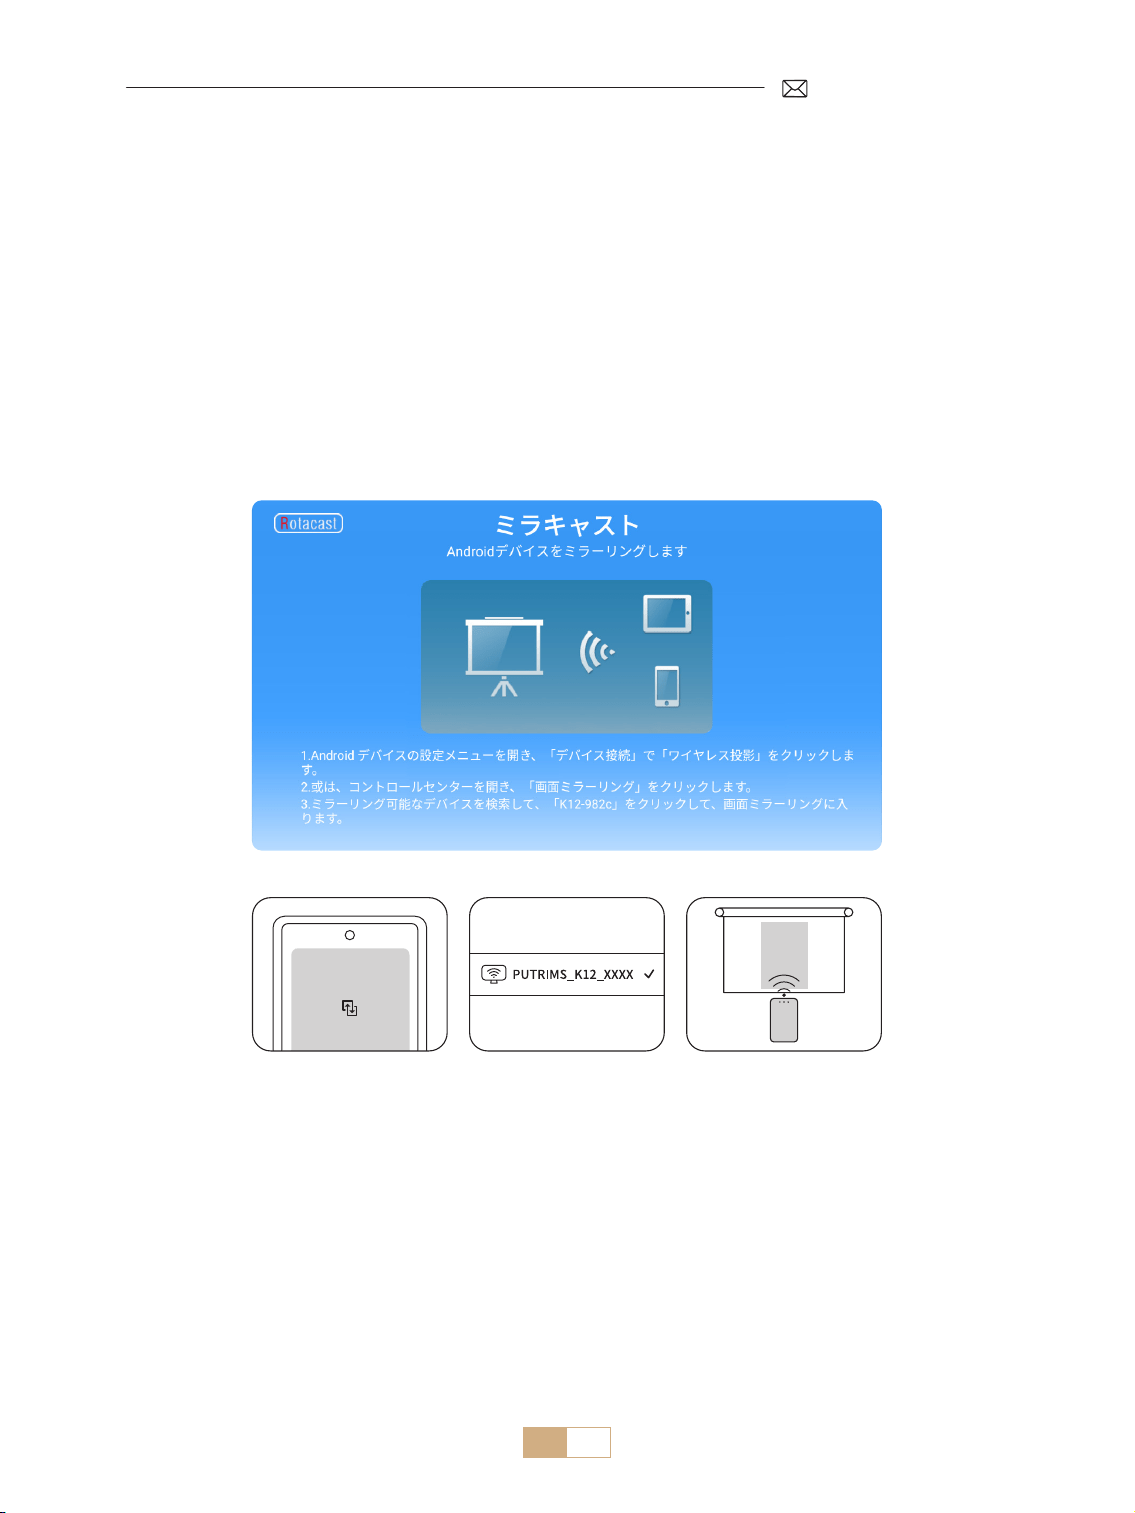
JP 149
2.2 Android デバイス用(Miracast)
ご注意 : この機能を有効にするには、お使いの Android デバイスがマルチスクリーン / ワイヤレスディスプレイ
に対応していることを確認してください。マルチスクリーン」の名称は、Android デバイスのブランドによって
異なる場合があります。Android デバイスの Wi Fi 機能を必ず有効にしてください(Wi Fi ネットワークに接続
する必要はありません)。 PixelシリーズはGoogle Chromecast を使用するため、別途キャスティングデバイス(別
売)が必要です。
1) プロジェクターのホーム画面で [Miracast] を選択 このインターフェイスにとどまります。
2) Android 端末の [ コントロールセンター ] にアクセスし、[ 画面ミラーリング / スマートビュー ] を選択します。
3) [K12-xxxx] という名前の Miracast レシーバーを選択し接続します。
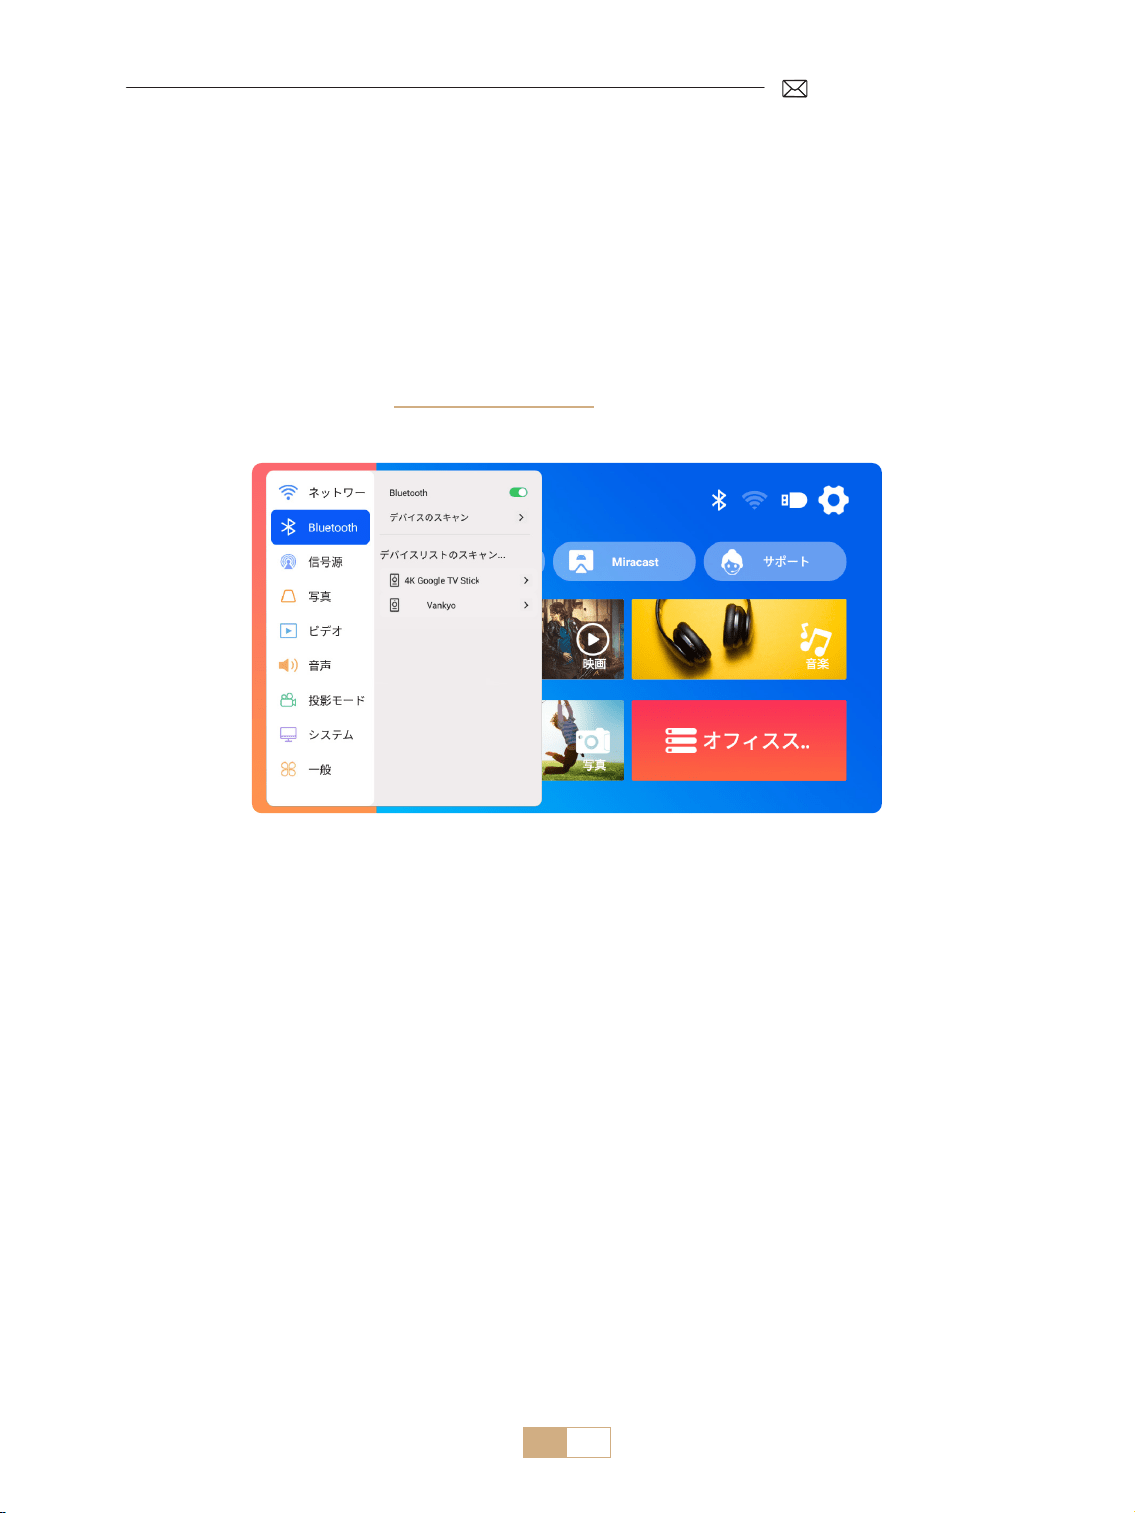
JP 150
3.Bluetooth 設定
1) Bluetooth スピーカーをオンにします。
2) プロジェクターの [Bluetooth 設定 ] をオンにします。
3) Bluetooth スピーカーを選択します。
ご注意 :
1) Bluetooth スピーカーと以前ペアリングしていた他のデバイスが切断されていることを確認してください。
2) この手順は、携帯電話ではなく、Bluetooth スピーカーを接続する場合にのみ適用されます。
3) ご不明な点がございましたら、[email protected] までお気軽にお問い合わせください。
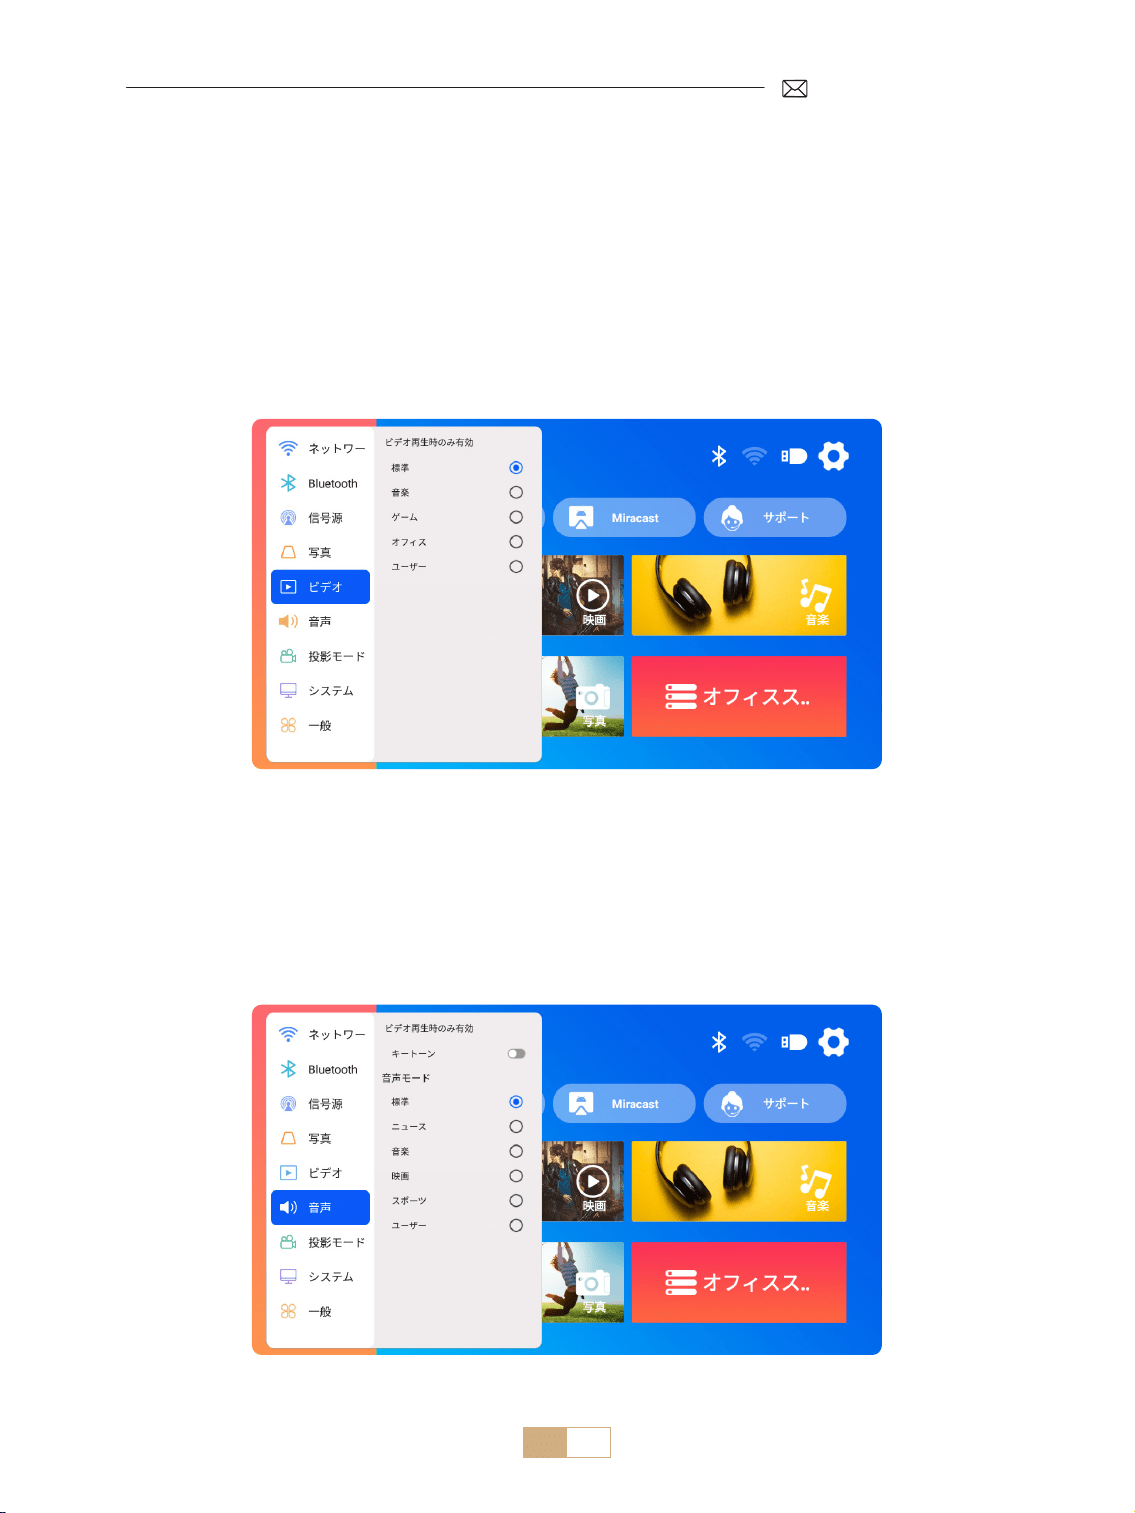
JP 151
1) ホームページに移動 [設定]を選択 [ ビデオ ] を選択。必要に応じてビデオモードを選択できます:標準
/音楽/ゲーム/オフィス/ユーザー。
2)「ユーザー」モードを選択すると、明るさ、シャープネス、コントラスト、彩度などのパラメーターを個別
に調整できます。
ご注意:選択したビデオモードの効果は、ビデオ再生時のみ有効です。
1) ホームページに移動 [設定]を選択 [音声]を選択。必要に応じてビデオモードを選択することができます:
標準/ニュース/音楽/映画/スポーツ/ユーザー。
2)「ユーザー」モードを選択すると、音の周波数を個人的に調整することができます。
ご注意:選択した音声モードの効果は、ビデオ再生時のみ有効です。
キートーン : キートーンを有効または無効にします。
他の投影設定
1. ビデオモード
2. 音声モード
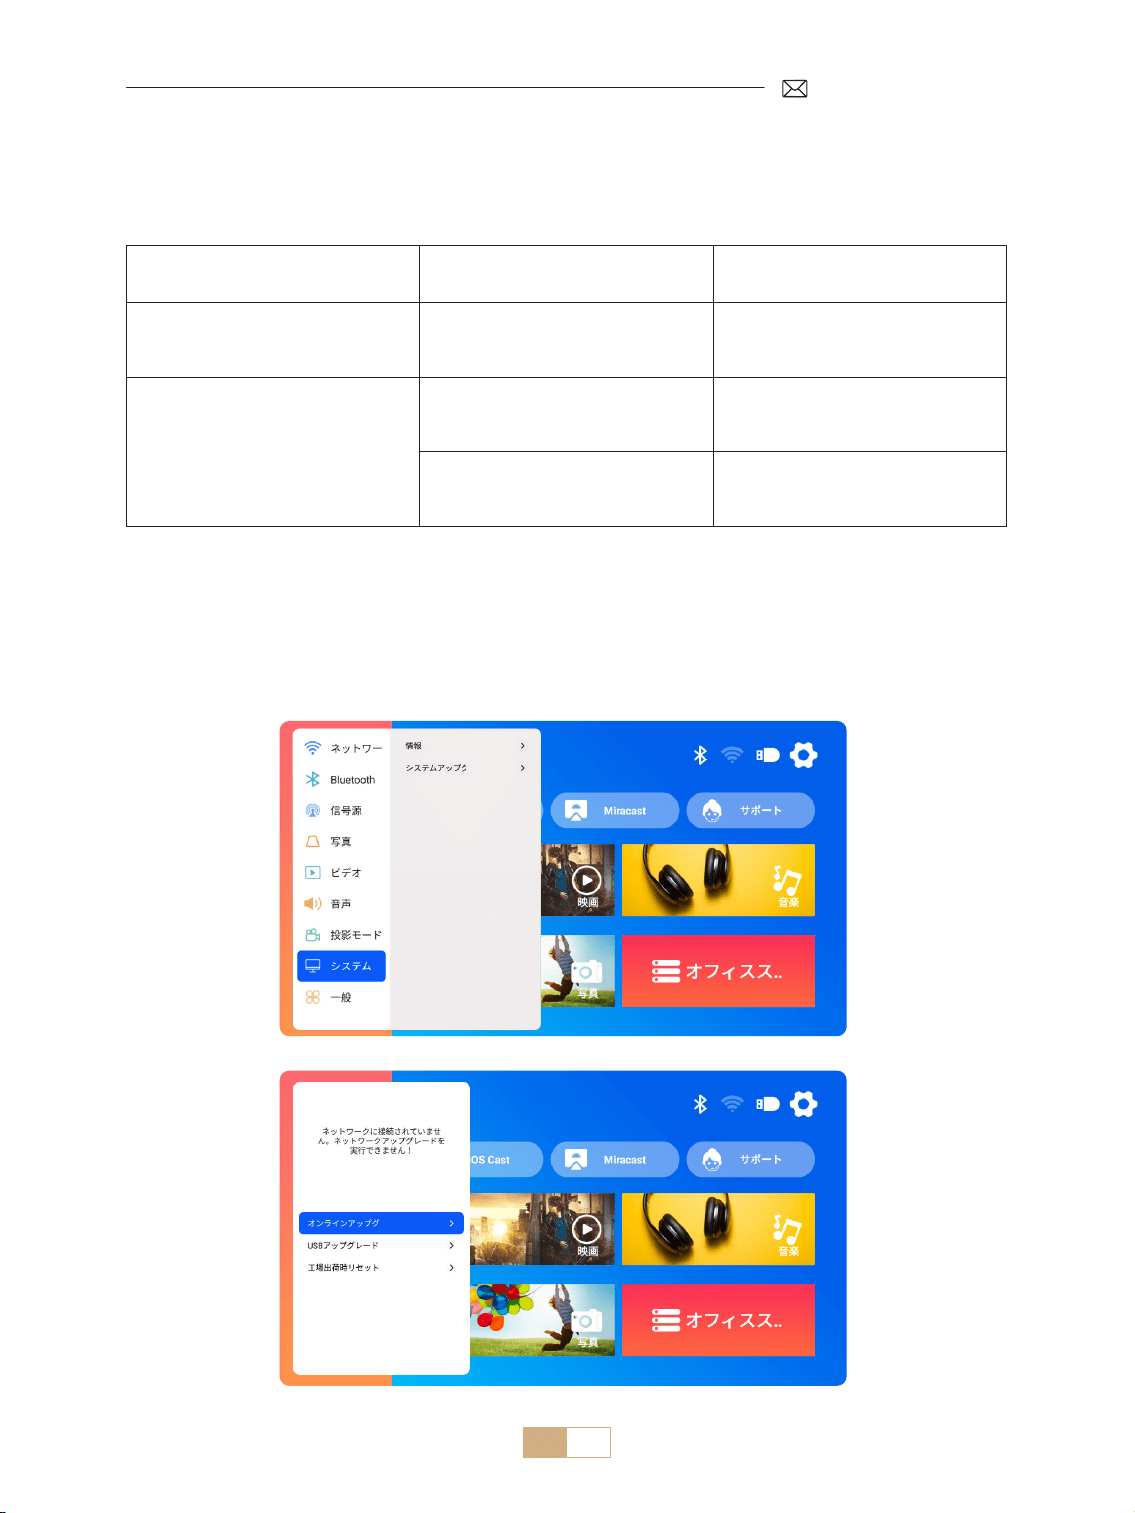
JP 152
USB ファイルアップグレードに関する注意事項 :
1) アップグレードパッケージを USB ドライブのルートディレクトリにコピーします。
2) デバイスの電源ボタンを長押しすると、システムが自動的にアップグレードパッケージを検出し、アップグ
レードプロセスを開始します。
ご注意 : アップグレードする前に、電源モードをスタンバイに設定してください。
ホームページに移動 [ 設定 ] を選択 [ システム ] を選択します。
3. システム
メニュー コンテンツ 機能
本機について
システムバージョン番号 /WiFi MAC
アドレス /Bluetooth MAC アドレス
バージョン情報を確認し、ネット
ワークまたは Bluetooth でデバイ
スを識別
システムのアップグレード
オンラインアップグレード(OTA)
USB アップグレード(USB)
USB ローカルファイルまたはオン
ライン経由でソフトウェアをアッ
プグレード
工場出荷時に戻す 工場出荷時の設定に戻す

JP 153
ホームページに移動 [ 設定 ] を選択 [ 一般 ] を選択します。
4. 一般
メニュー コンテンツ 機能
言語設定
英語 / フランス語 / イタリア語 /
スペイン語 / ドイツ語 / 日本語、
およびその他の言語
言語を選択
電源オンモード 電源オン スタンバイ / 電源オン 自動電源オン / 接続時スタンバイ
スリープタイマー
オフ /10min/20min/30min/60mi
n/90min/120min/180min/240min
睡眠時間の設定
スクリーンセーバーのタイムアウト 閉じる /1min/5min/10min
プロジェクターのスクリーンセー
バー時間の設定
ARC オフ / オン
HDMI ケーブルでスピーカーを接
続

JP 154
PUTRIMS K12 プロジェクターは、HDMI、USB、3.5mm オーディオインターフェースを備えています。お使いのデ
バイス(PC、電話、DVD プレーヤー、サウンドバー、USB ドライブ、PS4 など)を適切なポートに接続してください。
信号線接続
1.USB マルチメディア接続
1.1 USB フォーマット
1) USB ドライブをプロジェクターの USB ポートに挿入します。
2) メインインターフェースからカテゴリ(ムービー、ミュージック、フォト、オフィススイート)を選択し、
リモコンの「OK」ボタンを押してファイルにアクセスします。
注:間違ったファイルタイプを選択すると、対応するファイルを表示できなくなります。
ヒント : プロジェクターが USB ディスクを認識できない場合は、以下の方法で問題を解決してください。
USB ディスクが以下のフォーマットを満たしていることをご確認ください。
USB フォーマット
FAT32: 8G/16G/32G
NTFS:64G
サポートされていないフォーマット:: ExFAT
ご注意:プロジェクターが USB メモリーの内容を認識できない場合は、USB メモ
リーのフォーマットが正しいか確認してください。
ビデオフォーマット
MP4/MKV/3GP/ASF/AVI/FLV/MPG/RMVB/TS/VOB, etc. ( ビデオコードのサポートは異
なる場合があります。)
オーディオフォーマッ
ト
AAC/FLAC/M4A/MP3/WAV, etc. (音声コーデックのサポートは異なる場合がありま
す。ドルビーオーディオコードにには対応していません。)
画像フォーマット BMP/PNG/JPEG/JPG/JPE
文書フォーマット PPT/PDF/Word/Excel/TXT
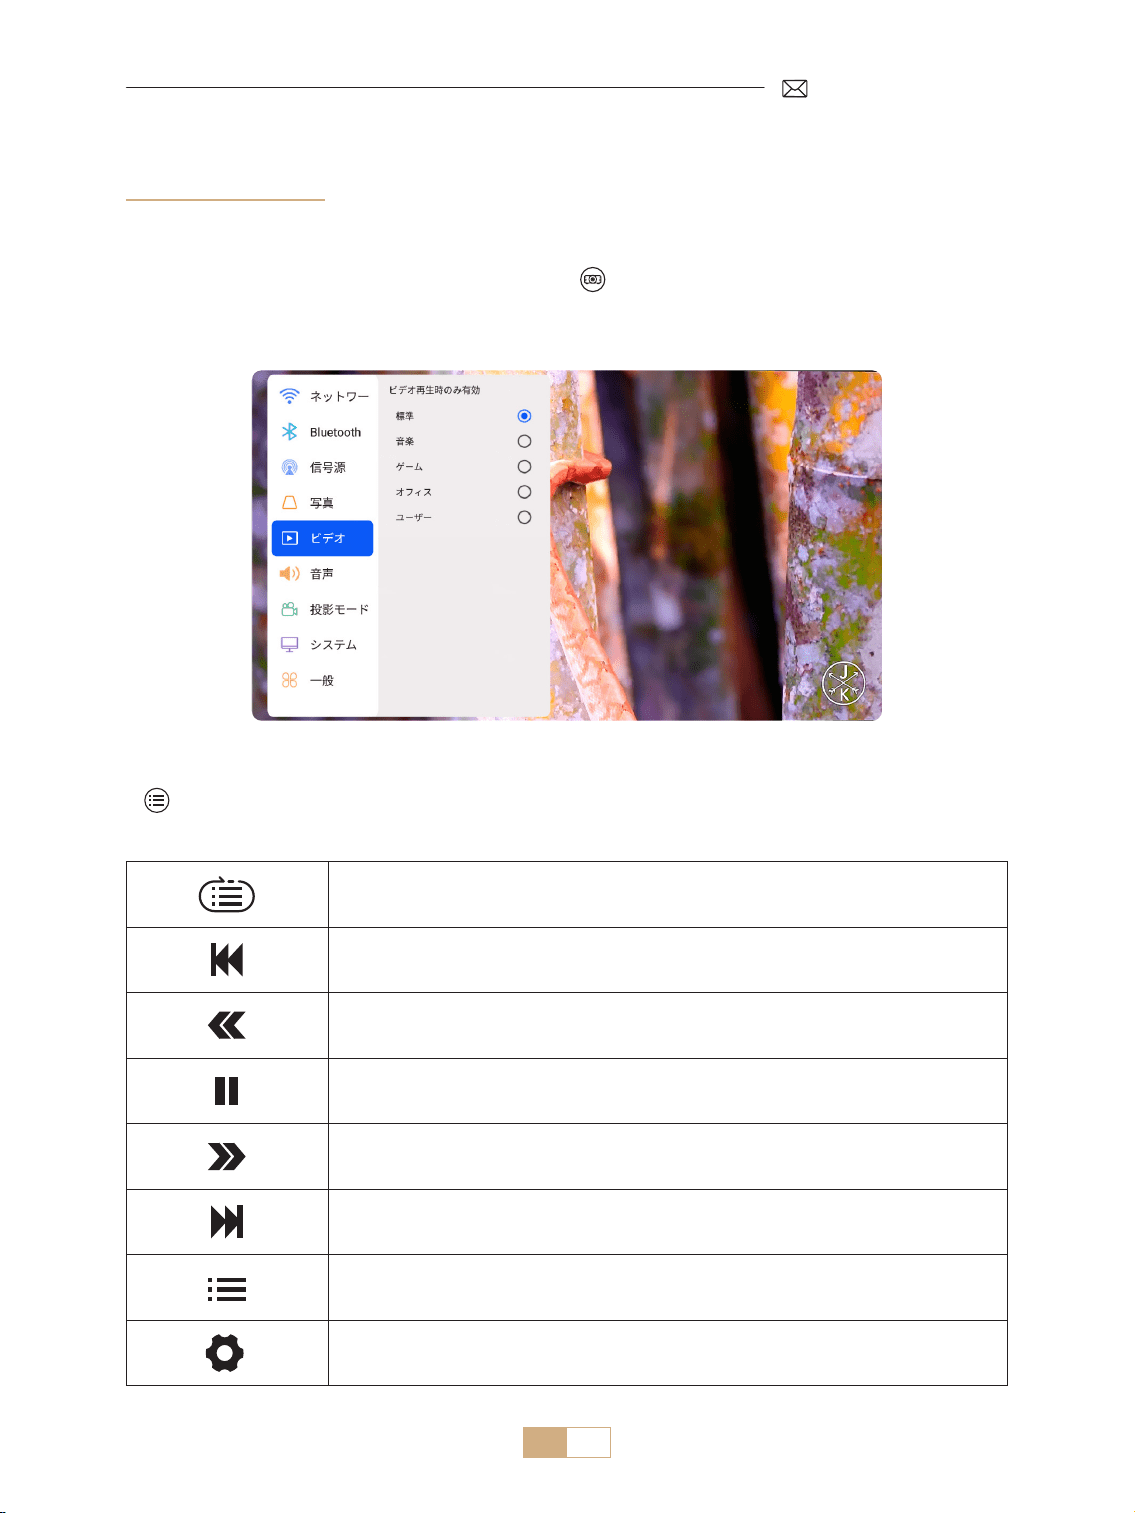
JP 155
それでも問題が解決しない場合は、問題の詳細を以下のメールアドレスにお送りください:
シングル・ループ、リスト・ループ、ループ・ワンス・オンリー・リスト
前のビデオに切り替え
ビデオを 2 倍から 32 倍に早戻し
再生 / 一時停止
ビデオを 2 倍から 32 倍に早送り
次のビデオに切り替え
現在のフォルダ内のプレイリストを選択
プロジェクター設定に入り、[ ビデオ ] または [ 音声 ] モードを調整
1.2 ビデオ再生インターフェース
1) USB インターフェースでは、ビデオを再生するときに、 ボタンを押し、[ ビデオ ] または [音声]を選択し、
必要に応じて明るさ、コントラスト、およびその他の設定を調整します。
2) を短く押すと、以下のようにビデオ再生設定にアクセスできます。

JP 156
1. 付属の HDMI ケーブルを使用して、コンピュータと K12 プロジェクターを接続します。
2. HDMI 信号源を選択し、コンピュータ上の任意のファイルを投影します。
3. ノートパソコンでは、「Win+P」キーを長押ししてディスプレイモードを変更します。
ご注意 :
1) 接続に問題がある場合、ディスプレイモードが正しく選択されていない可能性があります。
2) MacBook の場合、Type C から HDMI アダプタを使用して MacBook に接続するか、ミニディスプレイから
HDMI アダプタを使用して MacBook Air に接続します(アダプタは付属していません)。
パソコンのみ : これはデフォルトのオプションで、メインモニターにのみ画面を表示します。
複製 : 接続されているすべてのモニターにデスクトップを複製します。
拡張 : デスクトップを複数のモニターに拡張します。
プロジェクターのみ : セカンダリモニタ(プロジェクタ)のみを使用し、メインモニタはオフにします。
プロジェクター専用モードで画面解像度を変更するには、以下の手順に従います:
ステップ:スタート > コントロールパネル > 外観と個人設定 > 画面解像度の調整
2.HDMI でノートパソコンとコンピュータと接続
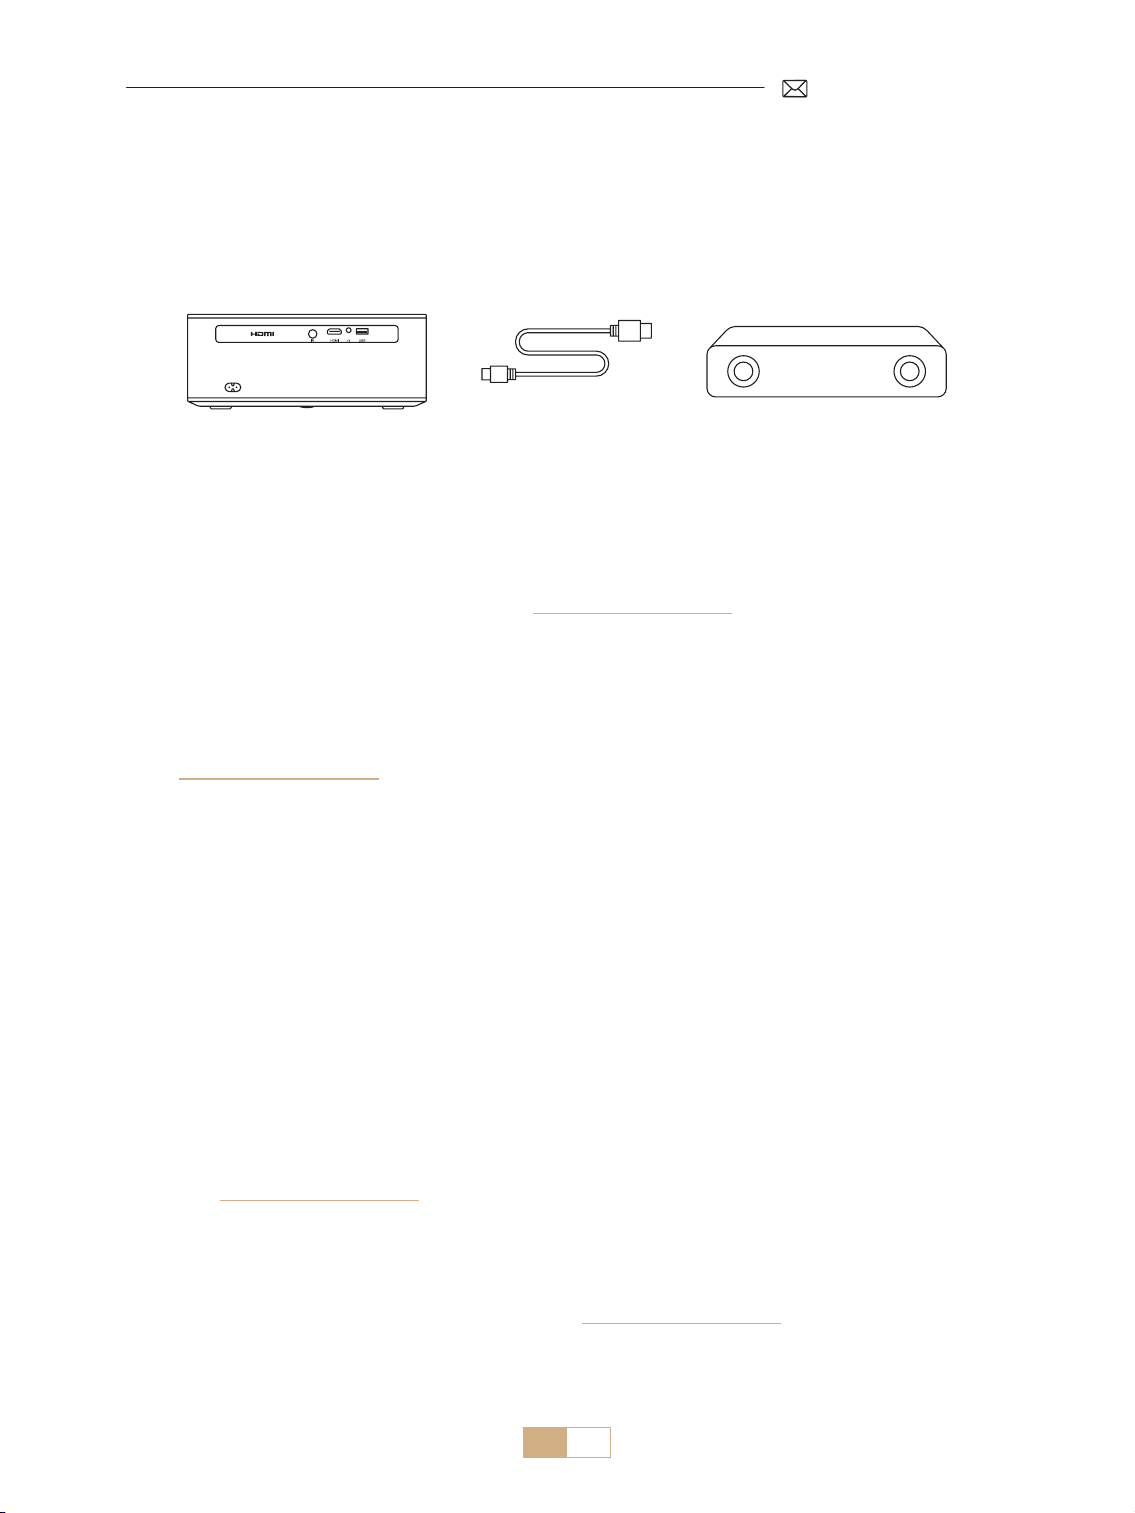
JP 157
K12 は HDMI ARC をサポートしており、最初に [一般]設定で HDMI ARC をオンにすると、追加のオーディオケ
ーブルなしで HDMI 経由でサウンドバーを接続できます。
3. スピーカーの接続
(HDMI)
PUTRIMS K12 プロジェクターをお買い上げいただき、誠にありがとうございます。K12 プロジェクターは 2 年
間保証いたします。ご不明な点がございましたら、[email protected] までお問い合わせください。
よくある質問とその回答をまとめましたが、ご参考ください。
Q1: WiFi 接続が不安定です。どうすれば解決できますか?
WiFi 接続の問題に対処するには、まず、ホームネットワークが正常に機能していることを確認してください。
さらに、携帯電話とプロジェクターの距離を 1 メートル以内に保ってください。それでも問題が解決しない場
合は、[email protected]om までお問い合わせください。
Q2: リモコンとプロジェクターが通信できない。
1. プロジェクター上部の電源スイッチはオンまたはオフになっていますか?
2. リモコンの電池は消耗していませんか?
3. リモコンとプロジェクターの間に赤外線信号を遮る障害物はありませんか?
Q3: Dongle GTV とは?もっと人気のある映画やテレビ番組を見ることはできますか?
1. このプロジェクターには、Netix、YouTube、Prime Video などのコンテンツがプリインストールされた、
Google TV 公式認定システムが内蔵されています。
2. GTV ホームページの 「Apps 」から必要なアプリを検索してください。
Q4: しばらく作業していると、プロジェクターが自動オフになりました。
1. プロジェクターの換気が妨げられているか、電圧が不安定になっている可能性があります。
Q5: プロジェクターは Bluetooth スピーカーと互換性がありません。
1. プロジェクターは、Bluetooth スピーカーのバージョンによっては使用できない場合があります。
2. Bluetooth スピーカーのブランドとモデルを明記の上、[email protected] までお問い合わせください。
よくある質問と保証

JP 158
Q6: どう調整してもピントが合わないのはなぜですか?
1. プロジェクターはスクリーンの中心に合わせて設置してください。 または、投影角度が 15 度以内になるよ
うにしてください。
2. 長方形の画面表示を達成するために、自動または手動台形補正を使用してください。レンズの焦点を調整す
るためにオートフォーカスまたは手動ォーカスを使用してください。
Q7: なぜ特定の機能が見つからないのですか?
一部の機能はサブメニューで表示されたり、特定のボタンを長押しする必要がある場合があります。製品のア
ップグレードにより、機能がマニュアルと若干異なる場合があります。正確な情報は実際の製品をご参照くだ
さい。
Q8: 私の注文がプラットフォームの返品期限を過ぎている場合はどうなりますか? 24 時間経っても返信がない
のはなぜですか?
PUTRIMS サポートチームは、お客様のご注文がプラットフォームの返品ウィンドウを過ぎている場合でも、迅
速に解決策をサポートします。24 時間以内に返信がない場合は、時差や迷惑メールフォルダに入っている可能
性があります。お手数ですが、再度お問い合わせください。