service@toptro.com
USER MANUAL
TR27

Language
English
Deutsche
Français
Espanol
Italian
日本语
04-21
22-41
42-61
62-81
82-101
102-121

CONTENTS
TOPTRO Lifetime Professional Support - - - - - - - - - - 4
TIPS- - - - - - - - - - - - - - - - - - - - - - - - - - - 4
PACKAGE LIST - - - - - - - - - - - - - - - - - - - - - - 5
PROJECTOR SPECIFICATIONS - - - - - - - - - - - - - - 5
PROJECTOR OVERVIEW - - - - - - - - - - - - - - - - - 6
REMOTE CONTROL - - - - - - - - - - - - - - - - - - - 7
INSTALLATION - - - - - - - - - - - - - - - - - - - - - - 8
1.Installation Method - - - - - - - - - - - - - - - - - - - - - 8
2.Projection Distance and Size - - - - - - - - - - - - - - - - 8
STARTING PROJECTOR- - - - - - - - - - - - - - - - - - 9
IMAGE FOCUS ADJUSTMENT - - - - - - - - - - - - - - - 9
SETTING UP THE PROJECTOR - - - - - - - - - - - - - - 10
1.WiFi Setting- - - - - - - - - - - - - - - - - - - - - - - - - 10
2.Wireless Connection - - - - - - - - - - - - - - - - - - - - 11
2.1 For iOS Cast (Airplay) 11
2.2 For Android System (Miracast) 12
3.Wired Screen Mirroring - - - - - - - - - - - - - - - - - - - 13
3.1 Android Connect by Cables 13
3.2 iOS Connect by Cables 13
4.Bluetooth - - - - - - - - - - - - - - - - - - - - - - - - - 13
5.Multimedia Play - - - - - - - - - - - - - - - - - - - - - - 14
5.1 USB Disk Input Mode 14
5.2 Video Play Interface 15
PROJECTOR SETTING - - - - - - - - - - - - - - - - - - 16
1.Display - - - - - - - - - - - - - - - - - - - - - - - - - - - 16
2.System settings - - - - - - - - - - - - - - - - - - - - - - 17
PROJECTOR SETTING - - - - - - - - - - - - - - - - - - 17
1.Connect via USB Disk - - - - - - - - - - - - - - - - - - - - 18
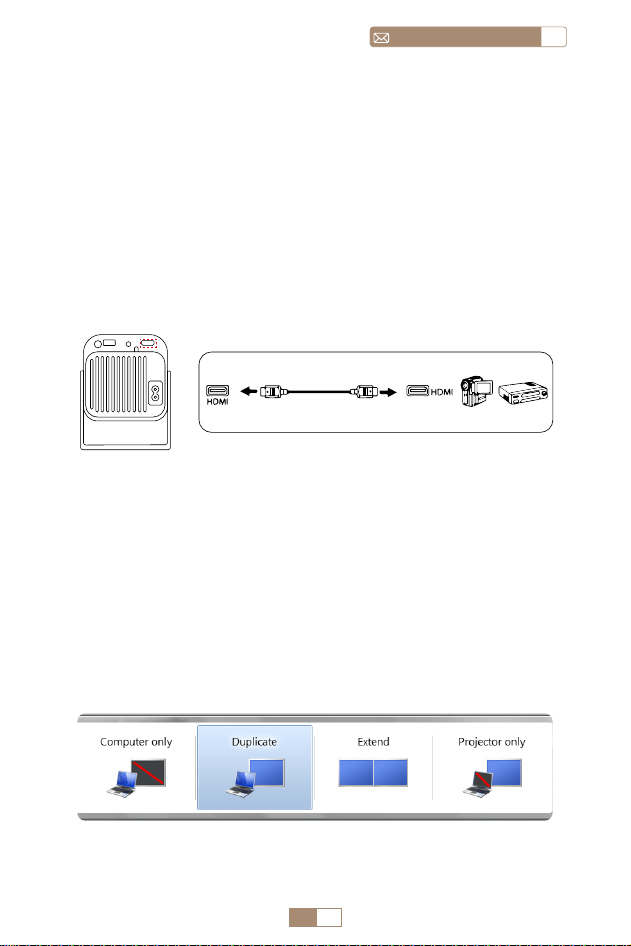
2.Connect to Devices via HDMI Port- - - - - - - - - - - - - - 18
3.Connect to Speaker - - - - - - - - - - - - - - - - - - - - 18
4.Connect to DVD Player - - - - - - - - - - - - - - - - - - - 19
5.Connect to Computer - - - - - - - - - - - - - - - - - - - 19
WARRANTY - - - - - - - - - - - - - - - - - - - - - - -20

EN 4
service@toptro.comEN
TOPTRO Lifetime Professional Support
TIPS
Dear customer,
Thank you very much for supporting TOPTRO.
Please read this manual thoroughly before using the projector. If
you have any issues, email your order number and the problem to
Service@toptro.com .We will provide a fast solution in 24 hours.
Many problems can be easily solved by setting, such as no signal, no
sound, Bluetooth connection failed, WiFi connection failed, choppy
animation, etc. We promise all the projectors have been 100% carefully
checked and packaged before shipping.
We also welcome you to follow our official website to keep abreast of
our latest developments.
If you have any questions, could you please contact us so that the
problem can be solved? And allow us to improve. We guarantee we will
provide you with a satisfactory solution.
Thanks for your understanding!
Best regards
TOPTRO Service Team
1. Do not place the projector in too warm or too cold a room, because
the high temperature or low temperature will shorten the lifespan of
the device. The working environment would be 5
℃
~35
℃
better.
2. The ventilation is equipped for the projector to work stably. Don't
cover the vent with cloth, blanket, or other things. Don't insert
anything into the slit of the projector, or it may produce a short circuit
or an electric shock to your device and cause damage.
3. The projector shall be strictly protected from strong impact, extrusion
and vibration. Do not try to move and on strong impact, extrusion
and vibration. Do not try to move and the internal circuit faults.
4. The lens, as the core component of the projector, is directly related
to the picture definition and effect. The excessive dust thereon will
affect image quality. The dirty lens shall be wiped with a soft cotton
cloth for the glass lens surface. Hard cloth or abrasives shall not be
used.
EN 5
ENservice@toptro.com
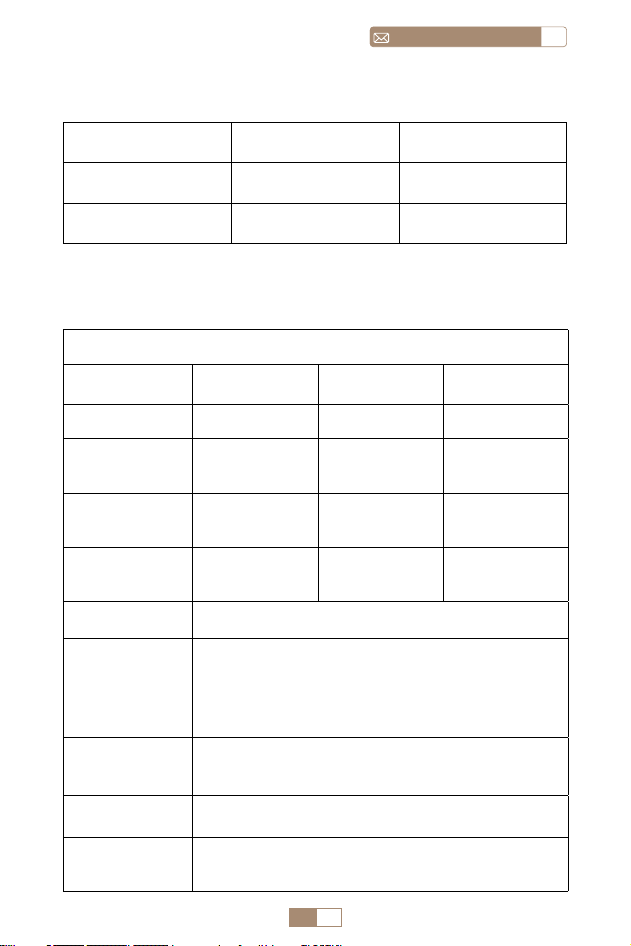
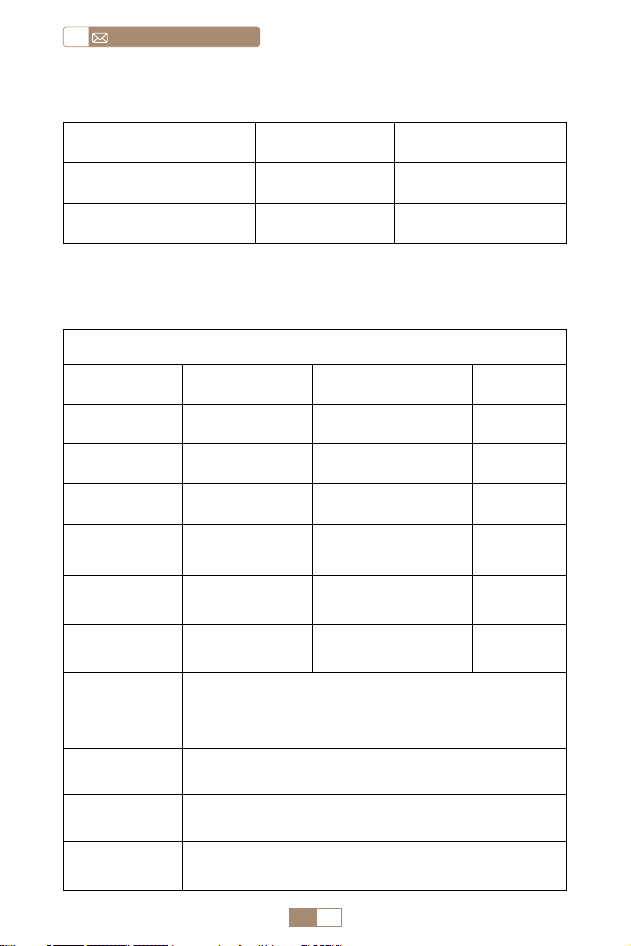
PROJECTOR SPECIFICATIONS
Model No TR27
Display Tech LCD Light Source LED
Size 4.1*4.2*8.7inch Weight 2lb
Native
Resolution
1920*1080P
Power
Voltage
AC90 260V
Keystone
Correction
Auto/Manual Focus Manual
Output Port
3.5mm Audio
Output
Aspect Ratio 4:3/16:9
Input Port HDMI*1/USB*1
Video Format
HEVC/VP9/AVS2/AVC 4K/MPEG1/MPEG2/
AV1 1080p/60fp(Support for video codecs
may vary depending on circumstances,
contact us for additional support)
Audio Format
MP3/OGG/FLAC/APE (Dolby audio codecs
are not supported )
Image Format JPG/BMP/PNG(support image scaling)
Document
Format
TXT/DOC/XLSX/PDF
PACKAGE LIST
TOPTRO TR27
Projector*1
Remote Control*1 Power Cord*1
HDMI Cable*1 Cleaning kit*1 User Manual*1
Lens Cover*1
EN 6
service@toptro.comEN
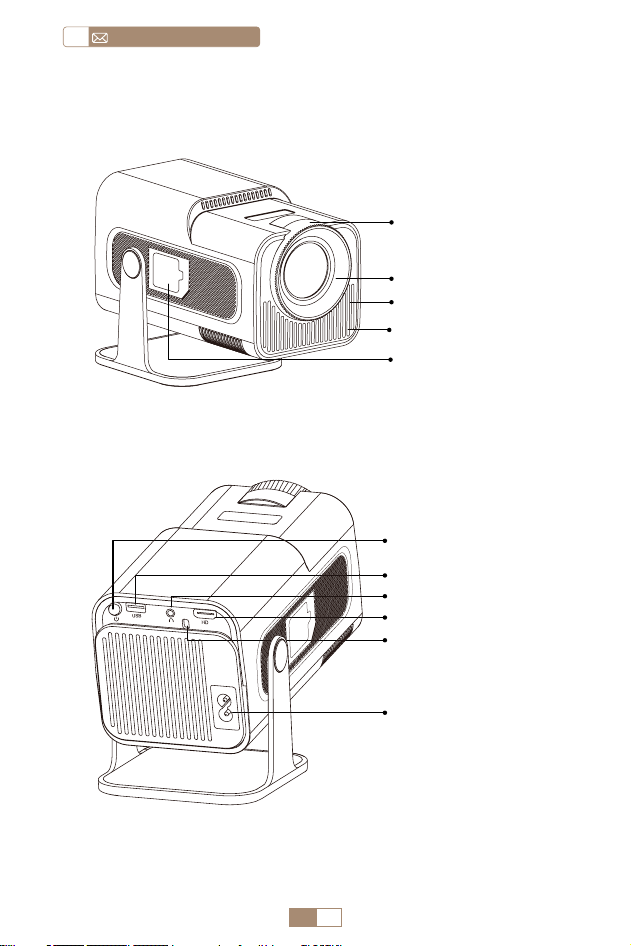
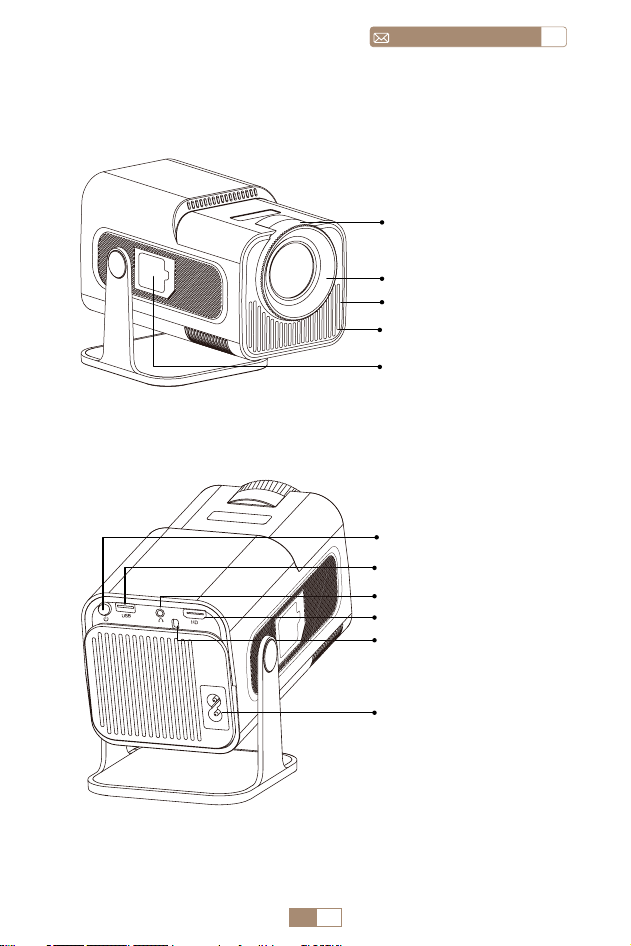
PROJECTOR OVERVIEW
Projector lens
Vents
Dust net
Dust removal port
Power Cord Port
HDMI Port
IR window
USB Port
Power button
Audio input/output
Manual Focus ±
EN 7
ENservice@toptro.com
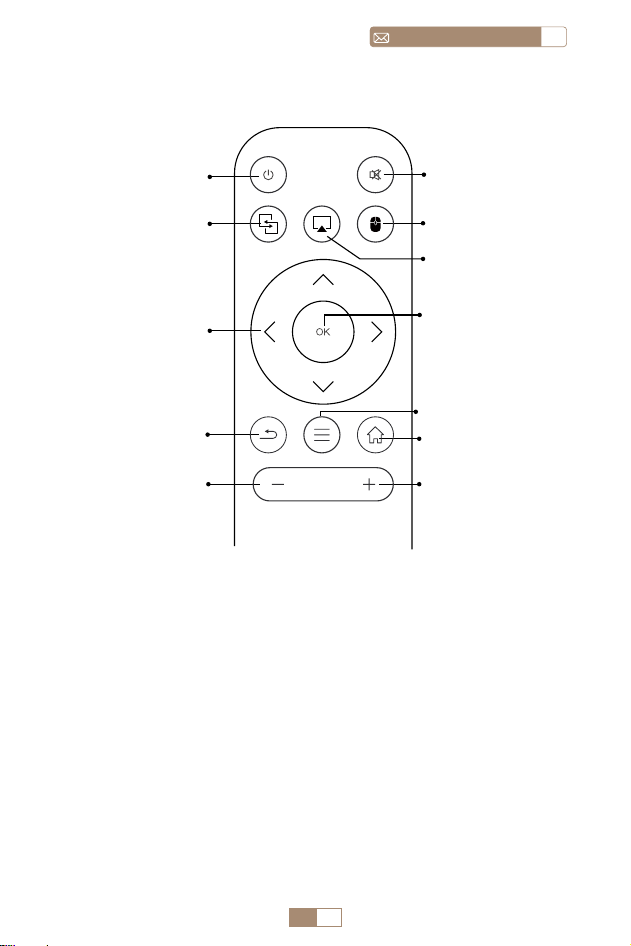
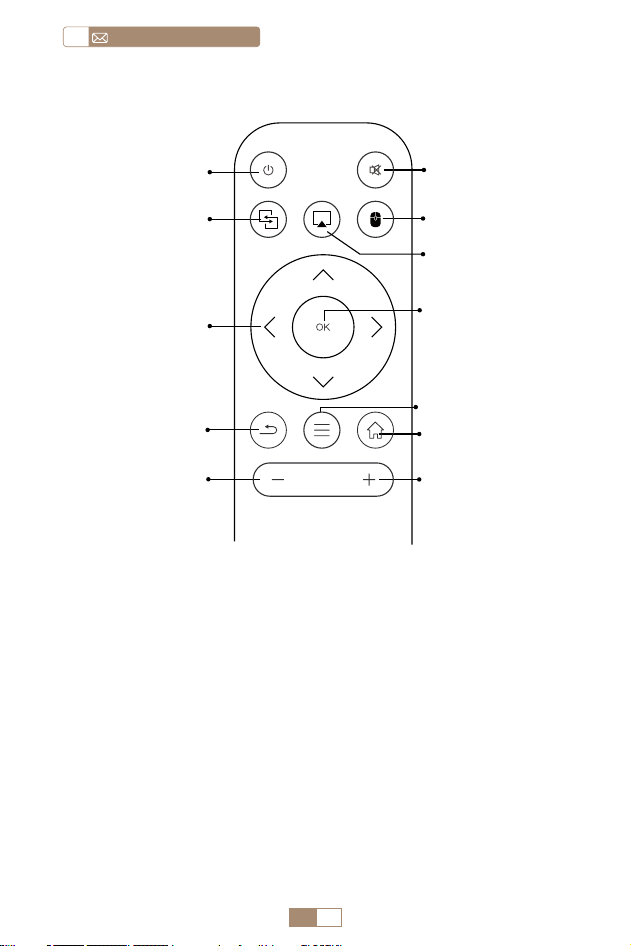
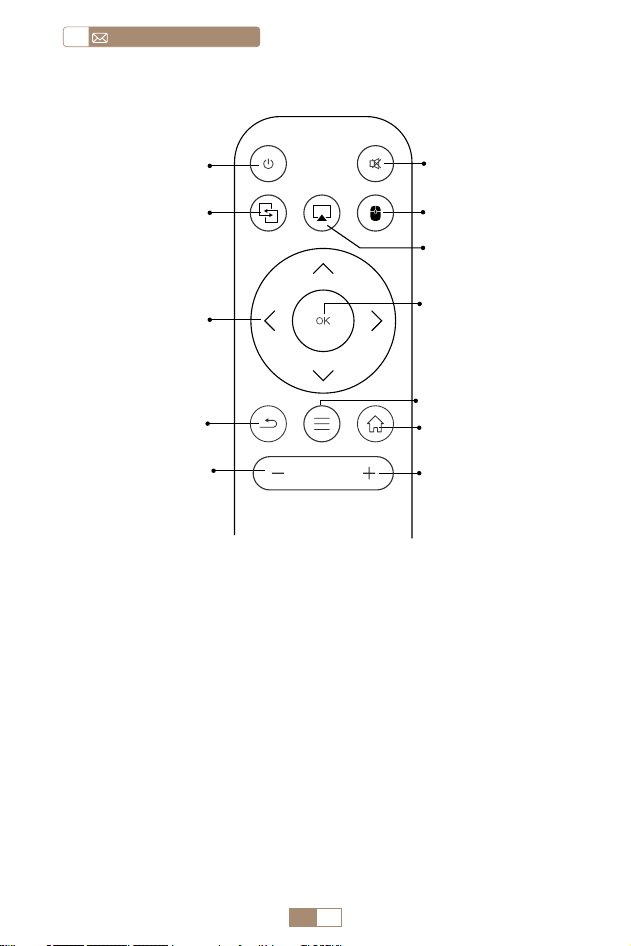
REMOTE CONTROL
Note:
1. Install 2 pieces of AAA batteries (not included) into the remote
before using it, do not combine new batteries with old ones
in the remote control, which can cause operation failure due to
insufficient power supply.
2. When using the remote control, ensure that you aim the signal
transmitter of the remote control at the infrared signal receiver
on the projector, or simply face the projection screen while
operating it.
3. When you are not using the remote control for a long period.
Please take out the batteries to prevent them from leakage.
Power on/o ①
② Mute
⑦ Conrm Key
⑨ Menu
④ Mouse Switching
⑩ Homepage
⑪ Volume+
⑤ Air Play
Miracast ③
Arrow Key ⑥
Back ⑧
Volume- ⑫

EN 8
service@toptro.comEN
1. According to the usage environment and requirements, the
projector can be placed on a stable desktop and the 270°
projected image can be adjusted.
2. Keep the projector at a height where its lens is symmetrical
to the screen axis. If this is not possible, use the keystone
correction function to adjust the projected image.
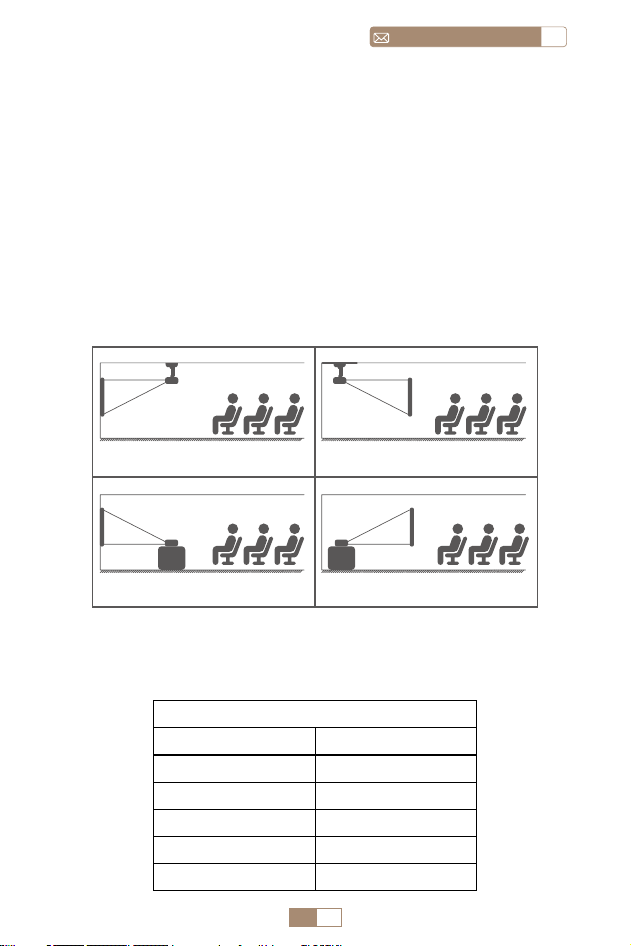
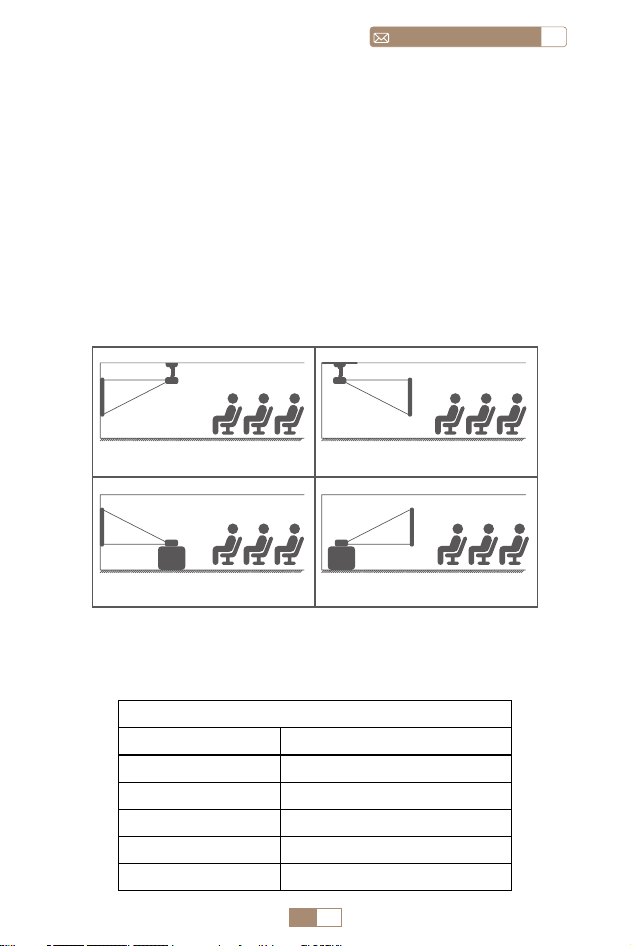
3. The projector can be adjusted to the following 4 modes.
INSTALLATION
1.Installation Method
2.Projection Distance and Size
Projector
Projector
Projector
Projector
screen
screen
screen
screen
1. Front Projection Ceiling mount
3. Front Projection Table mount
2. Rear projection Ceiling mount
4. Rear projection Table mount
Aspect Ratio: 16:9
Distance Screen Size
3.28ft 40"
6.56ft 80"
8.23ft 100"
9.88ft 120"
12.33ft 150"

EN 9
ENservice@toptro.com
*The image size of the projection depends on the distance
between the projector and the screen. There might be a slight
3% variation in measurements among the data listed above.
*The recommended projection distance is 6.56ft 9.88ft.
*A darker ambient environment will enhance the clarity of the
projected images.
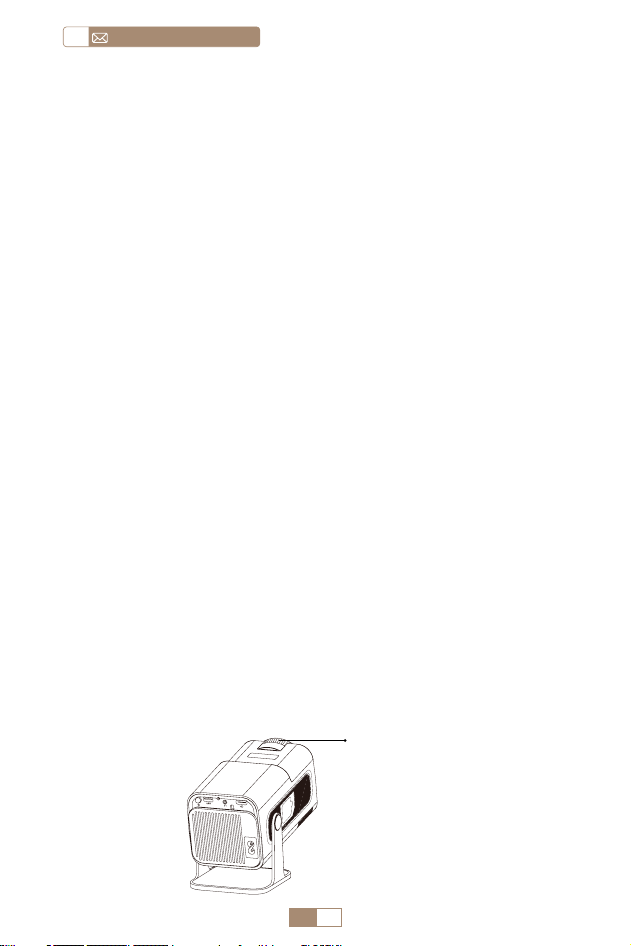
Place the projector lens perpendicularly to the projection
screen or curtain wall, and adjust the focus adjustment roller
until the image is clear.
Note: If it is still blurry, please try to adjust the projection
distance and projector placement.
Turn on the projector: Connect to the power cable, when the
red indicator light is on, press the power key on the remote
control or power button on the panel to start the projector,
the indicator turns from the red to blue, the projector is on.
Turn off the projector: Press the power key on the remote
control or power button on the panel to turn off the projector,
the indicator turns from the blue to red, the projector is in
shut down.
IMAGE FOCUS ADJUSTMENT
STARTING PROJECTOR
Focus ±
EN 10
service@toptro.comEN
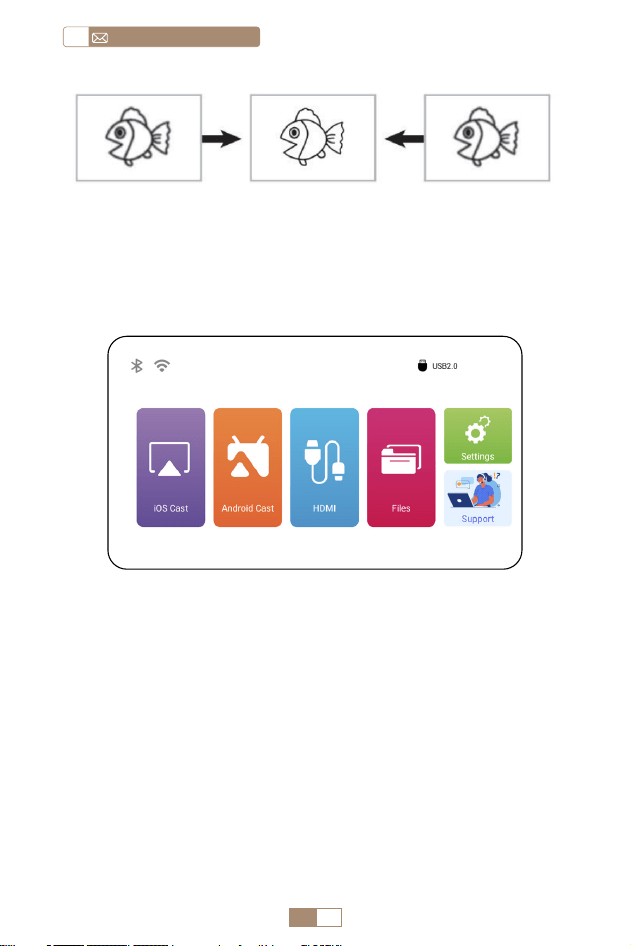
The projector's home page is as follow.
1. The fluency of screen mirroring with a wireless connection
will be affected by the network environment. A bandwidth
of 100 Mbit or more is recommended when using screen
mirroring.
2. Make sure your mobile device is close to the projector when
using wireless connection. A distance within 1 meter is
recom mended.
3. Some mobile devices may not support screen mirroring due
to the compatibility.
SETTING UP THE PROJECTOR
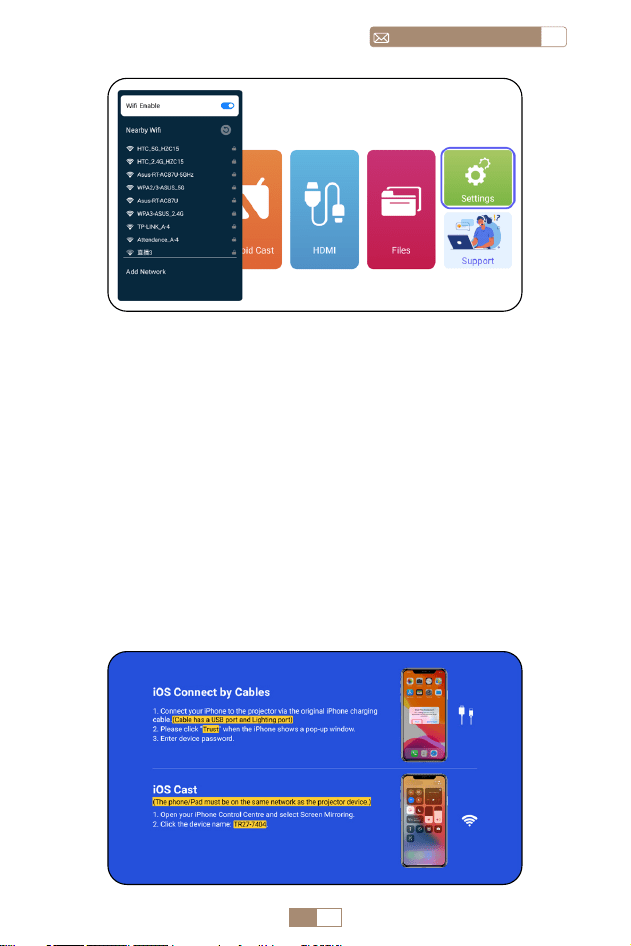
1.WiFi Setting
EN 11
ENservice@toptro.com
Attention: Ensure that your iOS device is connected to the
same Wi Fi network as your projector.
1. Connect the TR27 projector to your WiFi network.
2. Back to home page Select [ iOS Cast ] menu Stay on
this interface.
3. Access the [ Control Center ] on your iOS device Select
the [ Screen Mirroring ] function Select and connect the
iOS Cast receiver named [ TR27-7404 ] iOS device screen
will be mirrored and displayed on the projection screen.
2.Wireless Connection
2.1 For iOS Cast (Airplay)
EN 12
service@toptro.comEN
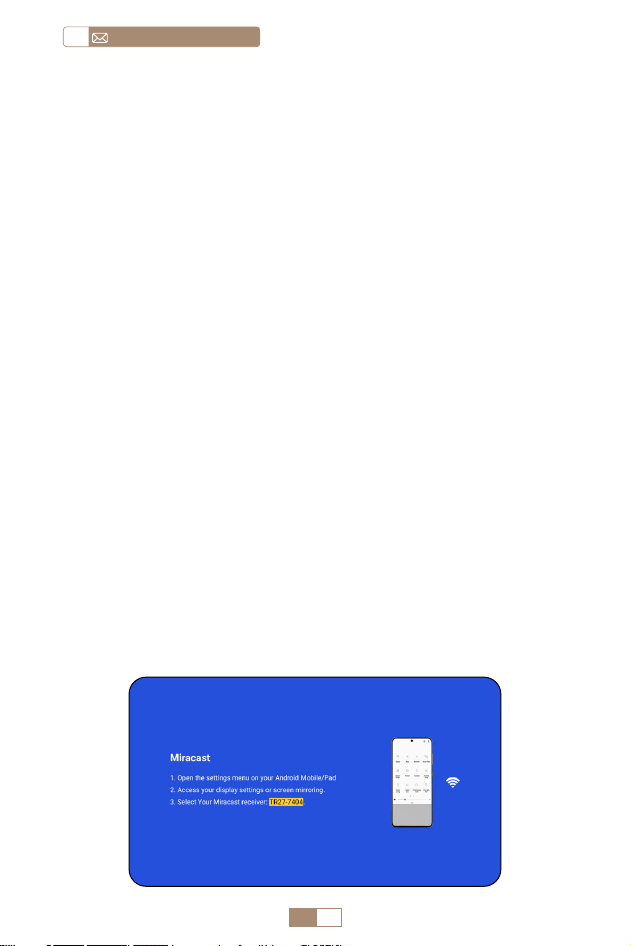
1. Make sure to enable the WLAN function on your Android
device. (Connecting to any Wi Fi network is not necessary.)
2. Back to home page Select [ Android Cast ] menu Stay
on this interface
3. Select the [ Settings ] menu on your Android device
Select the [ Screen mirroring ] function.
4. Select and connect the Miracast receiver named [ TR27-
7404 ]
5. Once connected successfully, your Android device screen
will be mirrored and displayed on the projection screen.
Note:
Screen Mirroring Methods: Android devices from different
brands may use various terms and methods to enable screen
mirroring. To find the exact steps for your device, please refer
to your device's manual. Common terms for screen mirroring
include Multi screen, Wireless Display, WLAN Display, Screen
Mirroring, and Smart View.
Device Compatibility: Please note that not all Android
phones support the screen mirroring function. Before
attempting to use screen mirroring, ensure that your Android
device supports this feature. You can check your device's
manual or look for the screen mirroring option in the settings
to verify compatibility.
2.2 For Android System (Miracast)
EN 13
ENservice@toptro.com
1. Confirm to open ElfCast in the pop up windowof your
phone.
2. lt can automatically be wired to the same screen.
Attention:
• Avoid Frequent Plugging & Unplugging for a stable connection.
• Certain Android models require selecting "Transfer File" for
screen mirroring.
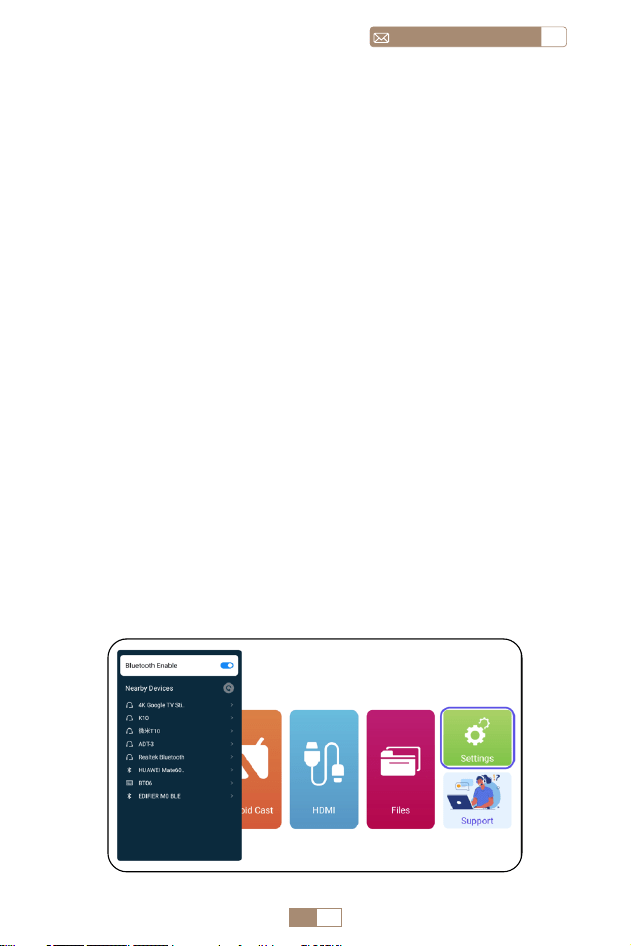
1. Turn on your Bluetooth Speaker.
2. Turn on the [ Bluetooth ] of your projector and select your
Bluetooth speaker to connect.
1. Connect your iPhone to the projector via a Lightning USB
cable.
2. Please click “Trust" when the iPhone shows a pop up window.
3. Enter device password.
3.Wired Screen Mirroring
4.Bluetooth
3.1 Android Connect by Cables
Connect Bluetooth Speakers
3.2 iOS Connect by Cables
EN 14
service@toptro.comEN
Note:
• The TR27 projector is compatible with most Bluetooth headsets,
Bluetooth speakers, and Airpods. However, please note that
it is not compatible with Bluetooth keyboards or Bluetooth
phones.
• If you encounter no sound while playing videos, we recommend
checking the Dolby sound settings on your connected
devices. Turning off Dolby sound can ensure better audio
compatibility with the projector.
• Some Bluetooth speakers may experience a significant
reduction in volume when connected to the projector. To
address this issue, try increasing the volume on all relevant
devices to achieve the desired sound level.
• If you have any questions or need further assistance, please
don't hesitate to contact TOPTRO support via email at
Service@toptro.com.
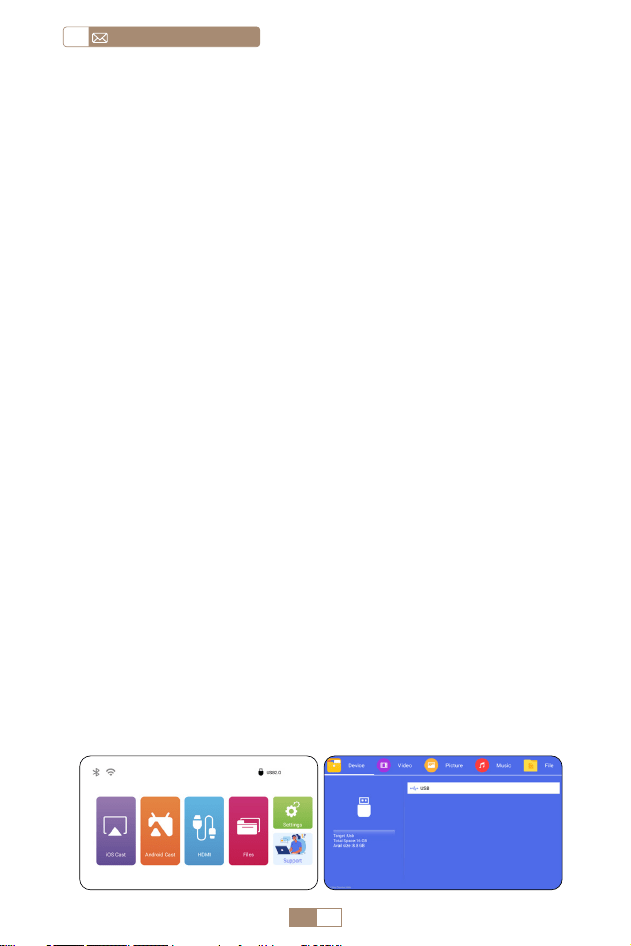
1. Insert the USB flash disk into the USB port of the projector.
2. Select “Files” and the press the "OK" key to enter.
3. Depending on the file type, select the option [ Device/
Vidoe/Picture/Music/Files ].
4. Select the desired file and then press the [ OK ] button to
play it.
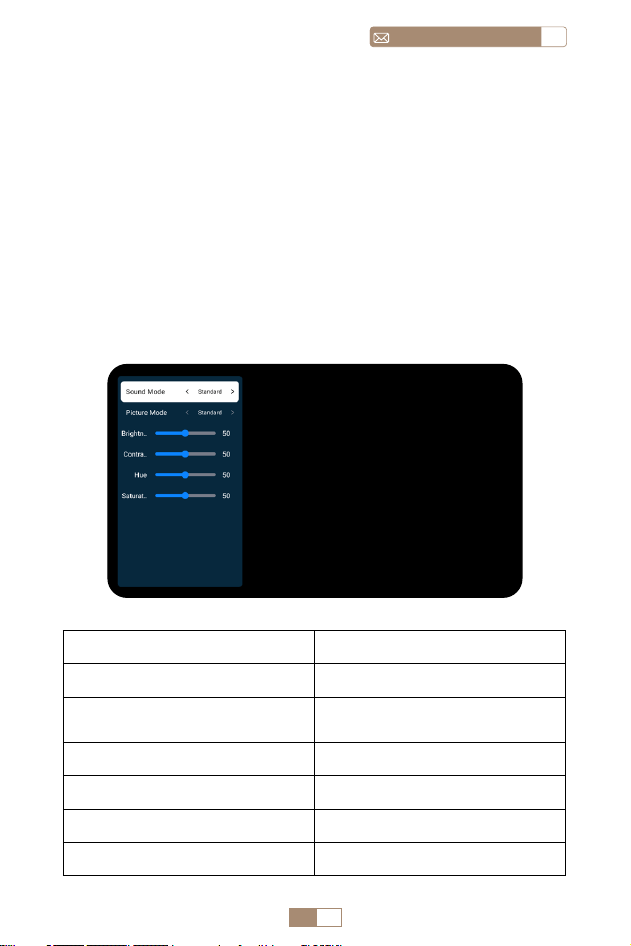
5. Click “MENU” button on the remote while playing video to
adjust the picture settings directly.
5.Multimedia Play
5.1 USB Disk Input Mode
EN 15
ENservice@toptro.com
Warm Tips: If your projector cannot recognize the USB disk,
please follow the methods below to resolve the issue. Please
ensure that your USB disk meets the following formats:
FAT32: 8GB/16GB/32GB
NTFS: 64GB 2TB
If it doesn't meet these criteria, you will need to change a
supported format USB disk.
If the problem persists, please send a detailed description of
your issue to the following email address: Service@toptro.com
5.2 Video Play Interface
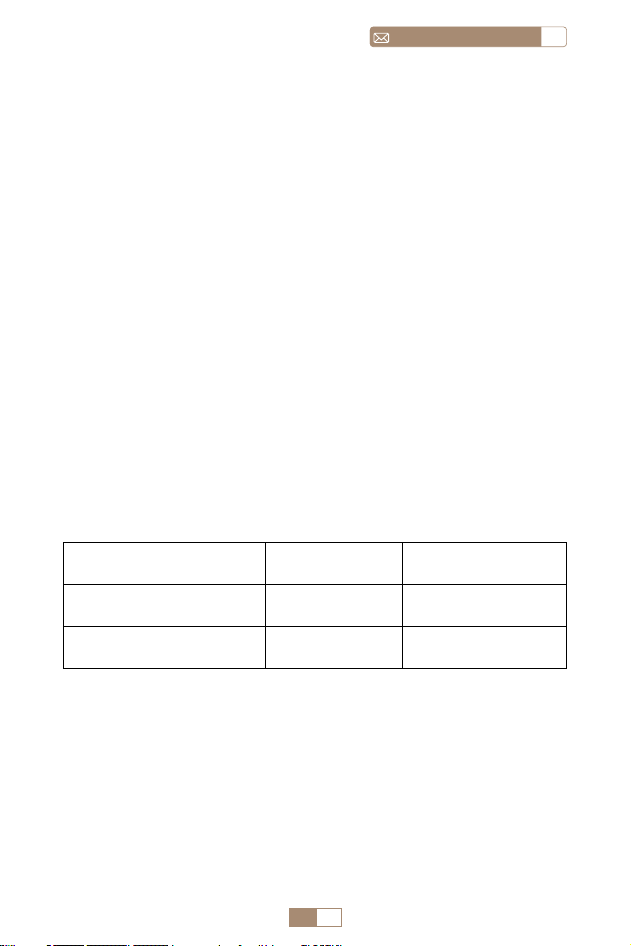
Manual Content
Sound Mode Standard/Music/Movie/News
Picture Mode
Standard/Cinema/Vivid/
Custom
Brightness 0~100
Contrast 0~100
Hue 0~100
Saturation 0~100
EN 16
service@toptro.comEN
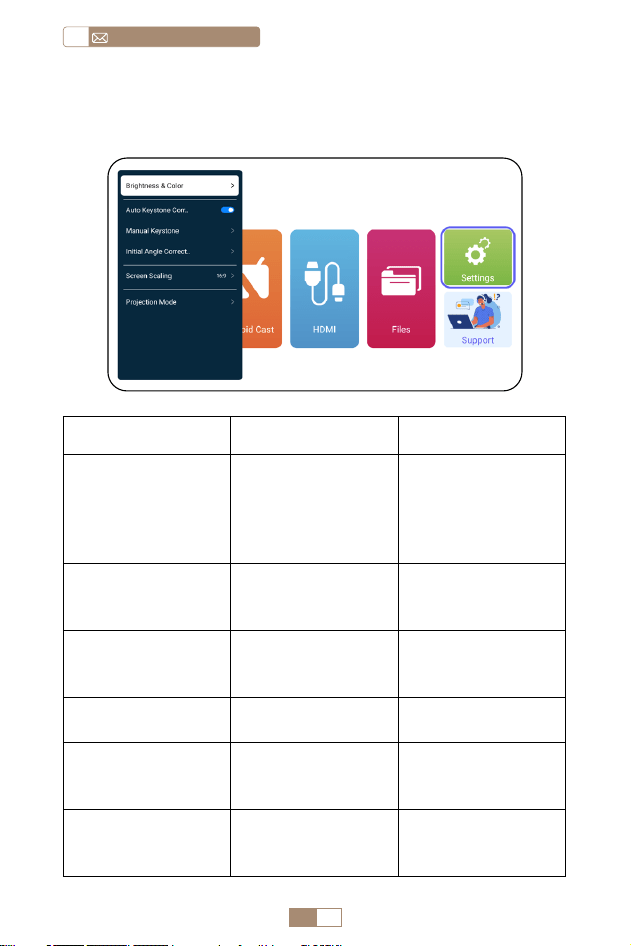
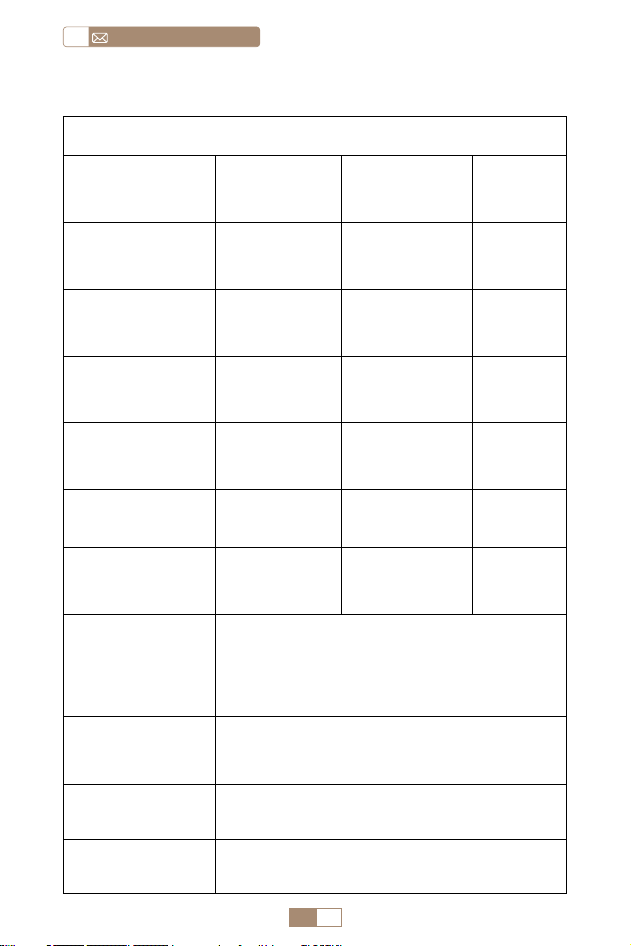
PROJECTOR SETTING
1.Display
Menu Content Function
Brightness & Color
Picture Mode/
Brightness/
Contrast/Hue/
Saturation/
Sharpness
Modify the picture
parameters in the
range 0 100
Auto Keystone
Correction
/
Adjust the screen
angle vertically
aumatically
Manual Keystone +/ /OK
Adjust the screen
angle vertically
manually
Initial Angle
Correction
/
Initial Angle
Correction
Screen Scaling
4:3/16:9/Original
Screen Ratio/
Screen Zoom
Adjust screen size
and zoom(100%
50%)
Projection Mode
Front/Rear front/
Front ceiling/Rear
ceiling Projection
Adjust the
projected image
position
EN 17
ENservice@toptro.com
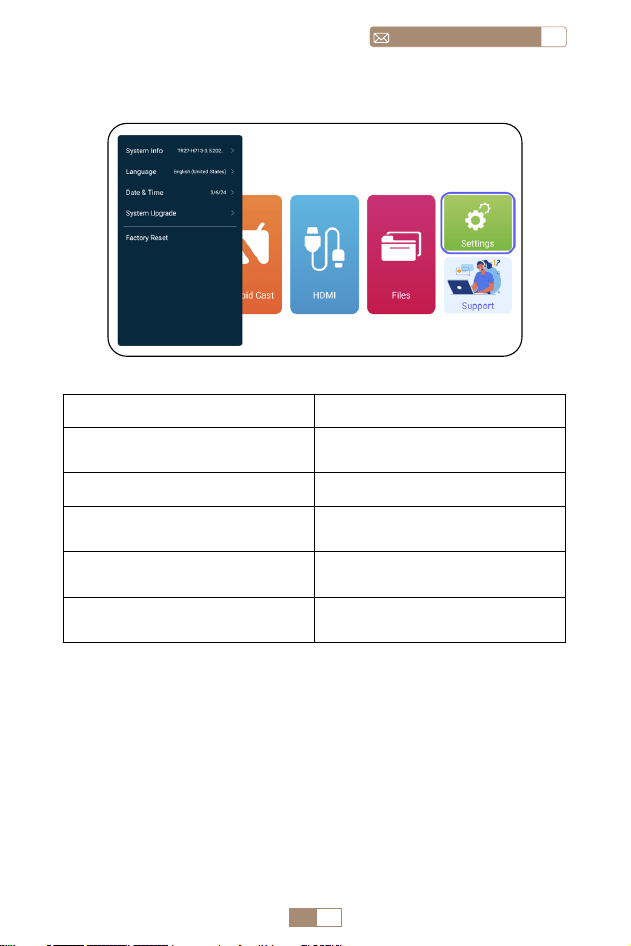
PROJECTOR SETTING
2.System settings
Menu Function
System Info
Introducing projector
information
Language Set up system language
Date &Time
Introducing projector
information
System Upgrade
Support the local upgrade or
online upgrade
Factory Reset
Restore factory default
settings
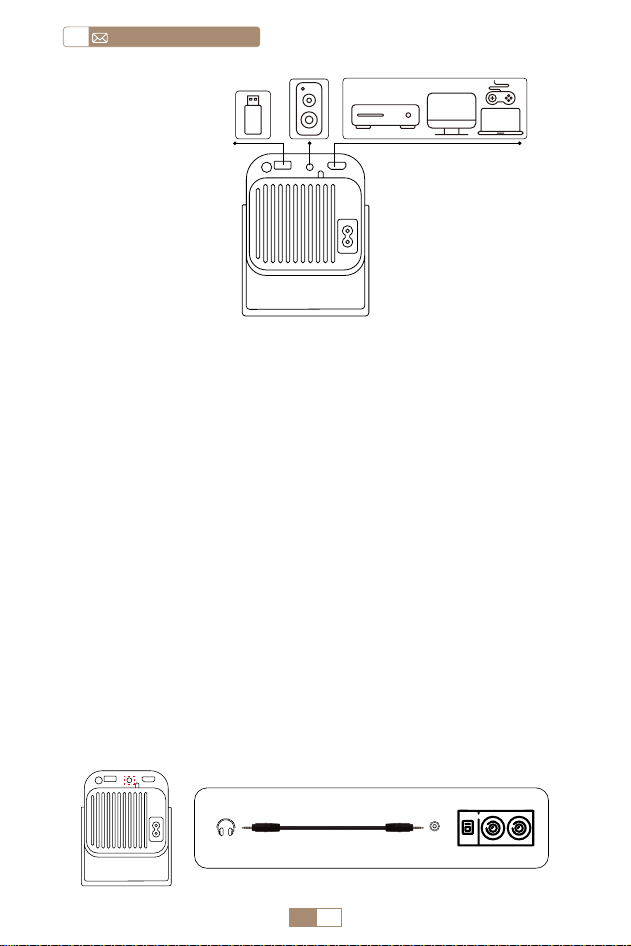
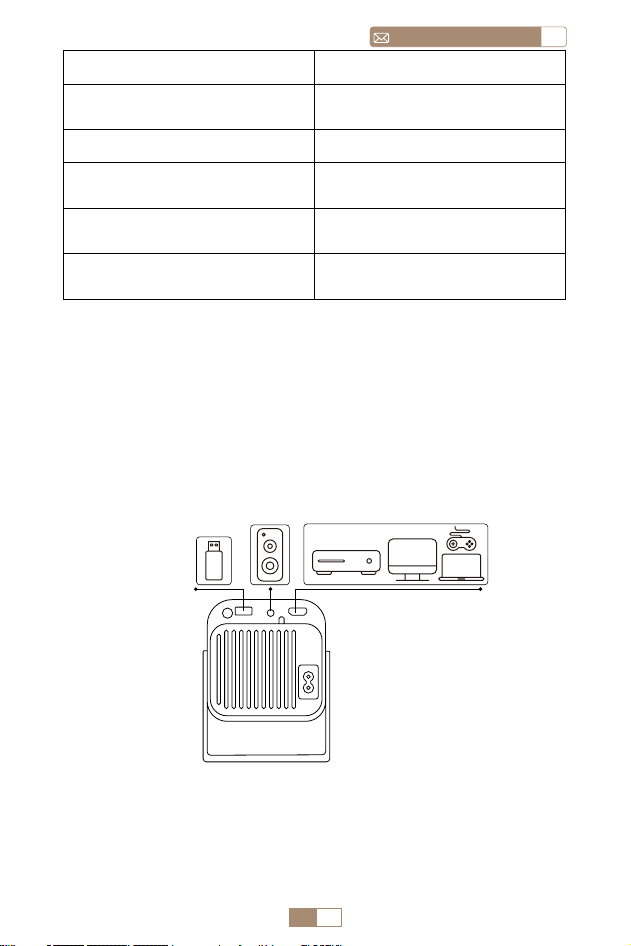
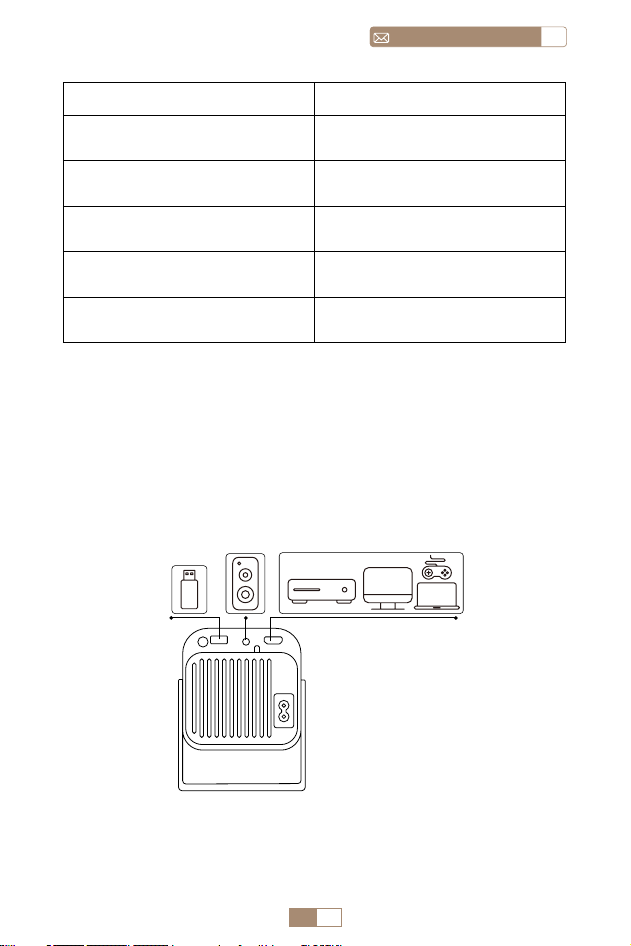
TOPTRO TR27 projector has 3 interfaces, HDMI port*1/USB
port*1/3.5mm headphone output*1. Please select the correct
connecting port to connect your device (PC, Phone, DVD
Player, USB, PS4, etc.)
EN 18
service@toptro.comEN
1.Connect via USB Disk
1. Insert the USB flash disk into the USB port of the projector.
2. Select “Media” and the press the "OK" key to enter.
3. Depending on the file type, select the option [ Device/
Vidoe/Picture/Music/Files ]
4. Select the desired file and then press the [ OK ] button to
play it.
2.Connect to Devices via HDMI Port
1. Connect your Fire TV stick (or PC, XBOX, PS4 etc.) to the
HDMI port of the projector.
2. Enter the home page to select the corresponding HDMI as
the signal source.
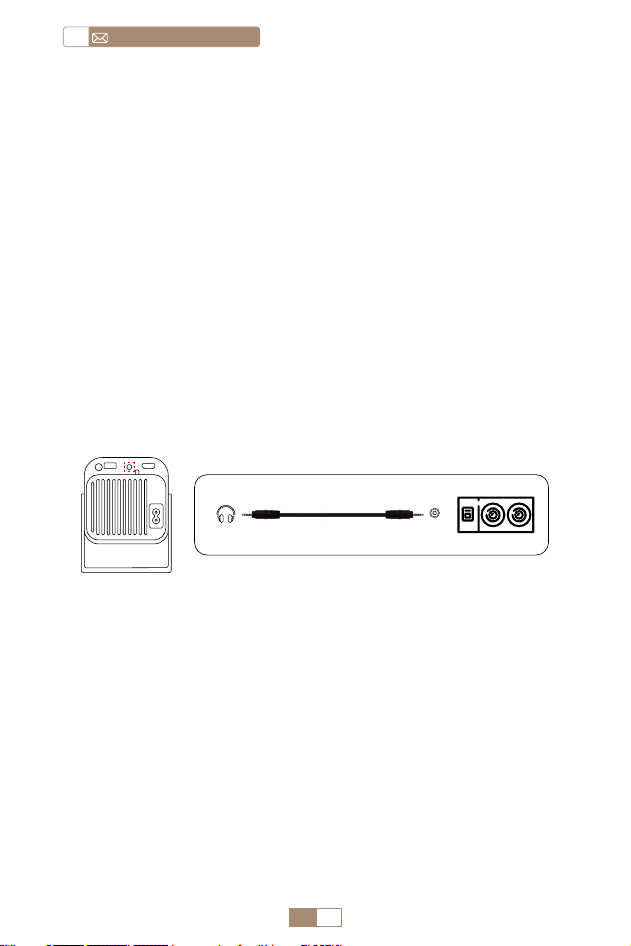
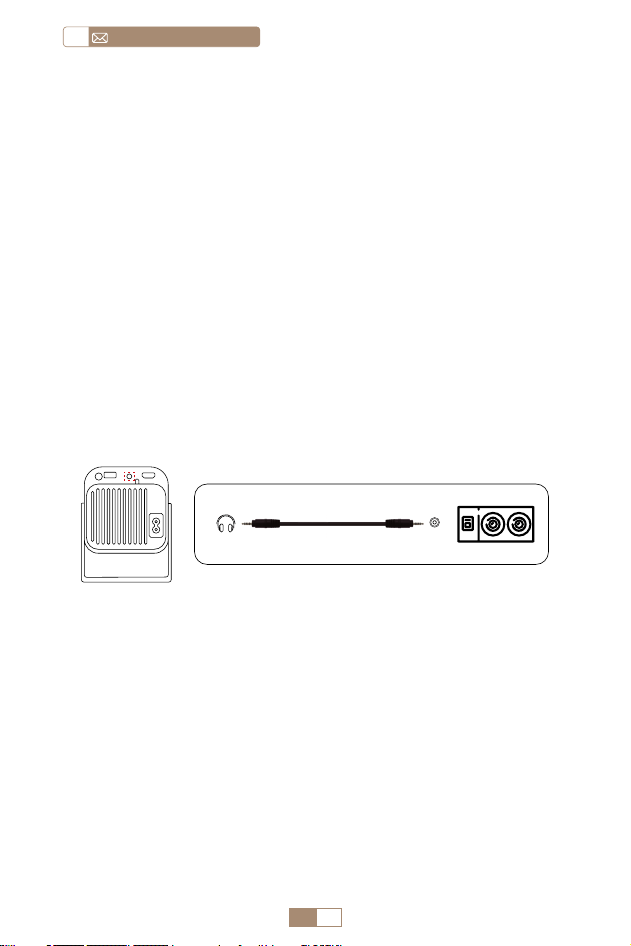
3.Connect to Speaker
• Use the 3.5mm audio cable to connect with speaker.
• Turn on the projector and the speaker(choose AUX mode).
DVD
Audio out
AUX port
EN 19
ENservice@toptro.com
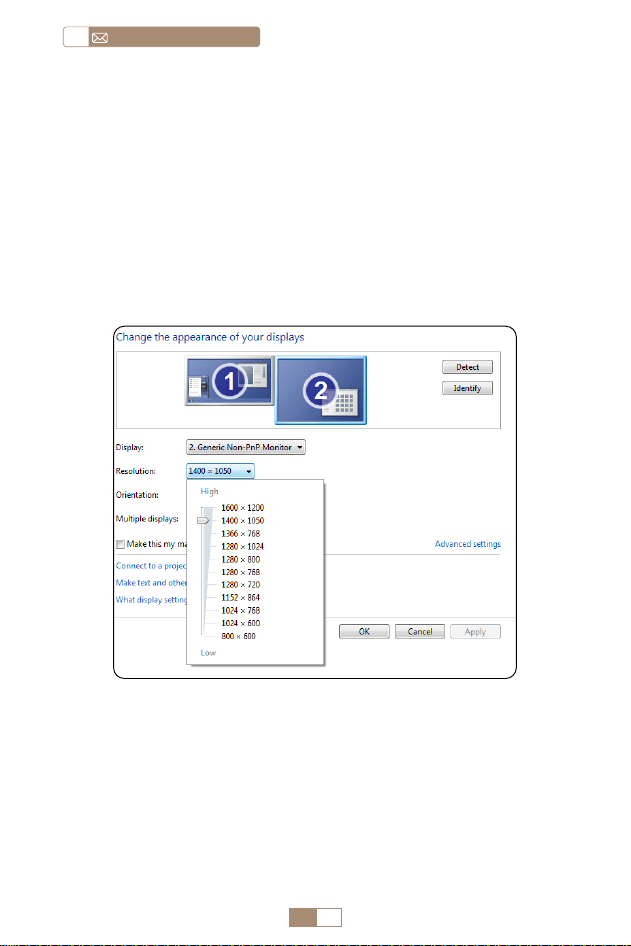
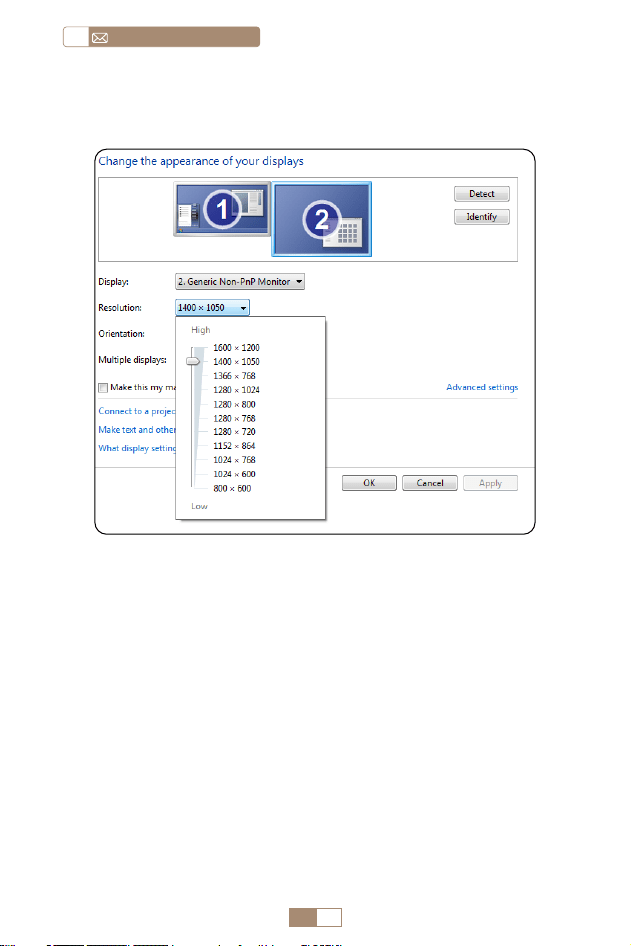
5.Connect to Computer
1. Connect to the computer and TR27 projector with the HDMI
cable.
2. Select the HDMI source to project any files on your computer.
3. On your laptop, hold down the key “Win+P” board keys to
change your display mode.
NOTE: For MacBook, Use a Type C to HDMI adapter to connect
your MacBook, or a Mini Display to HDMI adapter to connect
with your MacBook Air (adapter not included).
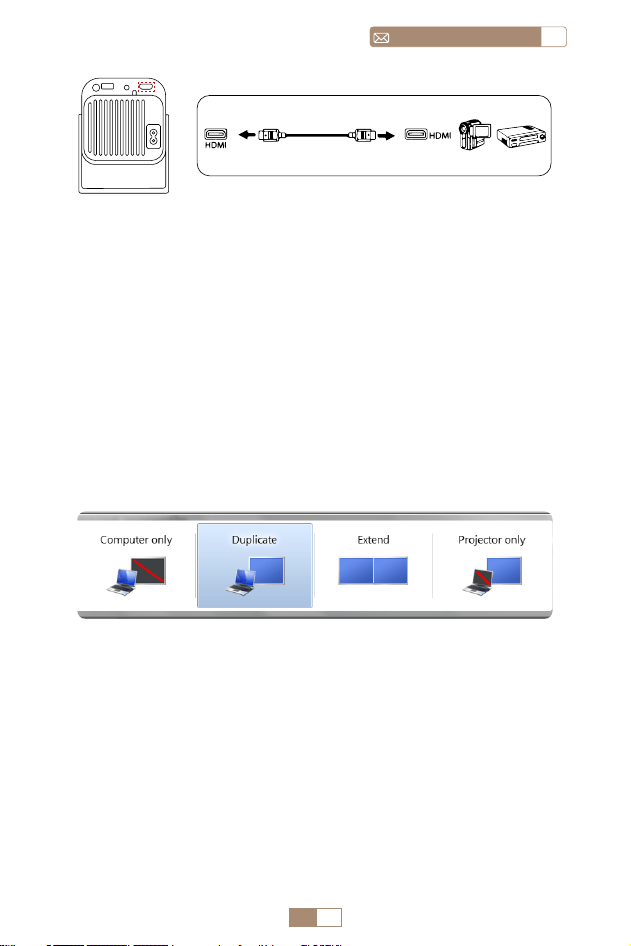
4.Connect to DVD Player
1. Turn on your DVD player and the projector.
2. Connect to the DVD Player and the projector with the HDMI
cable.
3. Enter the home page to select the corresponding HDMI as
the signal source.
Note: When the projector is connected to the DVD player via
the HDMI cable, if there is no sound, it may be that the output
signal of the HDMI port of the DVD player is not compatible
with HDCP, please try to connect your speaker.
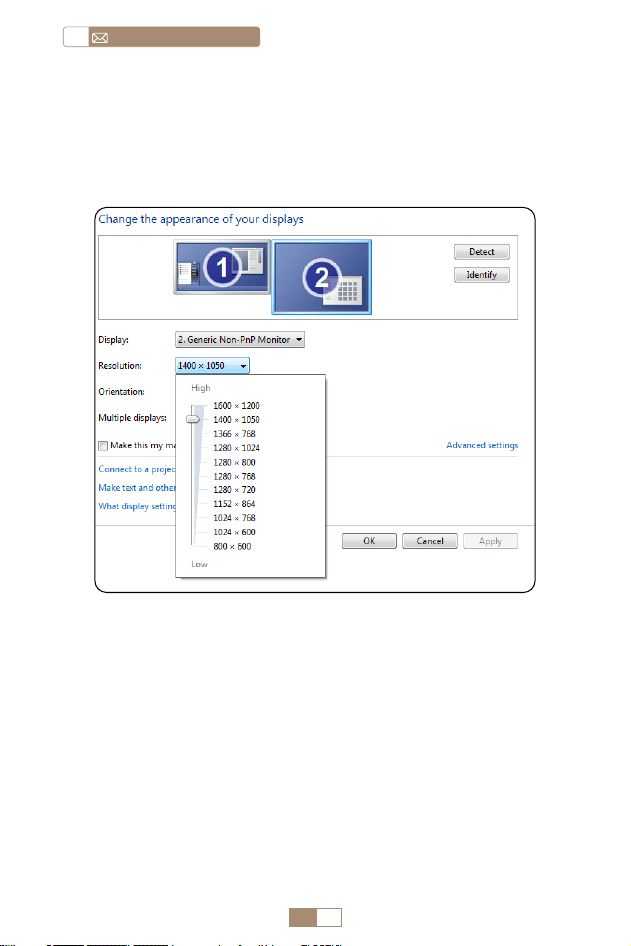
1. Computer only: This is the default option and will display
the screen only on the main monitor.
EN 20
service@toptro.comEN
WARRANTY
Thank you so much for your purchase and support. We provide
3 year warranty for TR27 projector. If you have any questions,
please feel free to contact us via [email protected]om
Note: We have prepared a gift for you. If you want it, please
contact us via [email protected]om.
2. Duplicate: To duplicate your desktop on all connected
monitors.
3. Extend: To extend your desktop across multiple monitors.
4. Projector only: Use the secondary monitor (projector)only
and keep the main monitor off.
To change the screen resolution in Projector Only mode, follow
these steps:
Step: Start > Control Panel > Appearance and Personalization
> Adjust Screen Resolution

CONTENTS
Lebenslanger professioneller Support von TOPTRO - - - -22
TIPPS - - - - - - - - - - - - - - - - - - - - - - - - - -22
PAKETLISTE - - - - - - - - - - - - - - - - - - - - - - -23
SPEZIFIKATIONEN DES PROJEKTORS - - - - - - - - - - -24
PROJEKTORÜBERSICHT - - - - - - - - - - - - - - - - -25
REMOTE CONTROL - - - - - - - - - - - - - - - - - - -26
INSTALLATION - - - - - - - - - - - - - - - - - - - - - -27
1.Installationsmethode - - - - - - - - - - - - - - - - - - - - 27
2.Projektionsabstand und -größe - - - - - - - - - - - - - - - 27
STARTEN DES PROJEKTORS - - - - - - - - - - - - - - -28
EINSTELLUNG DES BILDFOKUS - - - - - - - - - - - - - -28
EINRICHTEN DES PROJEKTORS- - - - - - - - - - - - - -29
1.WiFi-Einstellung - - - - - - - - - - - - - - - - - - - - - - 29
2.Drahtlose Verbindung - - - - - - - - - - - - - - - - - - - 30
2.1 Für iOS Cast (Airplay) 30
2.2 Für Android System (Miracast) 31
3.Kabelgebundener Bildschirm - - - - - - - - - - - - - - - - 32
3.1 Android Verbindung per Kabel 32
3.2 iOS Verbindung per Kabel 32
4.Bluetooth - - - - - - - - - - - - - - - - - - - - - - - - - 32
5.Multimedia Play - - - - - - - - - - - - - - - - - - - - - - 33
5.1 USB Disk Input Mode 33
5.2 Video Play Interfac 34
PROJEKTOREINSTELLUNG - - - - - - - - - - - - - - - -35
1.Anzeige - - - - - - - - - - - - - - - - - - - - - - - - - - 35
2.Die Systemeinstellungen - - - - - - - - - - - - - - - - - - 36
ANSCHLUSS DER SIGNALLEITUNGEN - - - - - - - - - - -37
1.Connect via USB disc - - - - - - - - - - - - - - - - - - - - 37
2.Verbinden mit Geräten über den HDMI-Anschluss - - - - - - 38
3.An den Lautsprecher anschließen - - - - - - - - - - - - - -38
4.An den DVD-Player anschließen - - - - - - - - - - - - - - 38
5.An den Computer anschließen - - - - - - - - - - - - - - - 39
GARANTIE- - - - - - - - - - - - - - - - - - - - - - - 40

DE 22
service@toptro.comDE
Lebenslanger professioneller Support von
TOPTRO
TIPPS
Lieber Kunde,
Vielen Dank für die Unterstützung von TOPTRO.
Bitte lesen Sie dieses Handbuch sorgfältig durch, bevor Sie den
Projektor verwenden. Wenn Sie Probleme haben, senden Sie
Ihre Bestellnummer und das Problem per E Mail an Service@
toptro.com. Wir bieten Ihnen innerhalb von 24 Stunden eine
schnelle Lösung.
Viele Probleme lassen sich leicht durch Einstellungen lösen, wie z.
B. kein Signal, kein Ton, Bluetooth Verbindung fehlgeschlagen,
WLAN Verbindung fehlgeschlagen, abgehackte Animation
usw. Wir versprechen, dass alle Projektoren vor dem Versand
zu 100 % sorgfältig geprüft und verpackt wurden.
Wir heißen Sie auch herzlich willkommen, unserer offiziellen
Website zu folgen, um über unsere neuesten Entwicklungen
auf dem Laufenden zu bleiben. (https://www.toptro.com/)
Wenn Sie Fragen haben, können Sie uns bitte kontaktieren,
damit das Problem gelöst werden kann? Und erlauben Sie uns, uns
zu verbessern. Wir garantieren Ihnen eine zufriedenstellende
Lösung.
Danke für dein Verständnis!
Beste Grüße
TOPTRO Serviceteam
1. Stellen Sie den Projektor nicht in einem zu warmen oder zu
kalten Raum auf, da hohe oder niedrige Temperaturen die
Lebensdauer des Geräts verkürzen. Die Arbeitsumgebung
wäre um 5
℃
~35
℃
besser.
2. Die Belüftung ist so ausgestattet, dass der Projektor stabil
DE 23
DEservice@toptro.com
PAKETLISTE
TOPTRO TR27 Projektor*1 Fernbedienung*1 Netzkabel*1
HDMI Kabel*1 Reinigungsset*1 Benutzerhandbuch*1
Objektivabdeckung*1
funktioniert. Decken Sie die Lüftungsöffnung nicht mit
Tüchern, Decken oder anderen Dingen ab. Führen Sie keine
Gegenstände in den Schlitz des Projektors ein, da dies zu
einem Kurzschluss oder Stromschlag an Ihrem Gerät führen
und Schäden verursachen kann.
3. Der Projektor muss streng vor starken Stößen, Stößen und
Vibrationen geschützt werden. Versuchen Sie nicht, sich
zu bewegen und starken Stößen, Stößen und Vibrationen
auszusetzen. Versuchen Sie nicht, sich zu bewegen, da sonst
die internen Schaltkreise gestört sind.
4. Das Objektiv als Kernkomponente des Projektors steht in
direktem Zusammenhang mit der Bildschärfe und wirkung.
Der übermäßige Staub darauf beeinträchtigt die Bildqualität.
Die verschmutzte Linse muss mit einem weichen
Baumwolltuch für die Glaslinsenoberfläche abgewischt
werden. Harte Tücher oder Scheuermittel dürfen nicht
verwendet werden.
DE 24
service@toptro.comDE
SPEZIFIKATIONEN DES PROJEKTORS
Model No TR27
Display
Technologie
LCD Lichtquelle LED
Produktgröße
10.58x10.7x
22.07cm
Gewicht 0.91kg
Aktualisierungsrate 60Hz Netzspannung
AC90
260V
Native Auflösung 1920*1080P
Maximal
unterstützte
Auflösung
4K
Trapezkorrektur
Automatisch/
manuell
Fokus Manual
Betriebsmodus Fernbedienung Seitenverhältnis 4:3/16:9
Ausgangsport
3,5 mm
Audioausgang
Eingangsport
HDMI*1/
USB*1
Videoformat
HEVC/VP9/AVS2/AVC 4K/MPEG1/MPEG2/AV1
1080p/60fp(Support for video codecs may vary
depending on circumstances, contact us for
additional support)
Audio Format
MP3/OGG/FLAC/APE (Dolby audio codecs are
not supported )
Bildformat JPG/BMP/PNG(support image scaling)
Dokumentformat TXT/DOC/XLSX/PDF

DE 25
DEservice@toptro.com
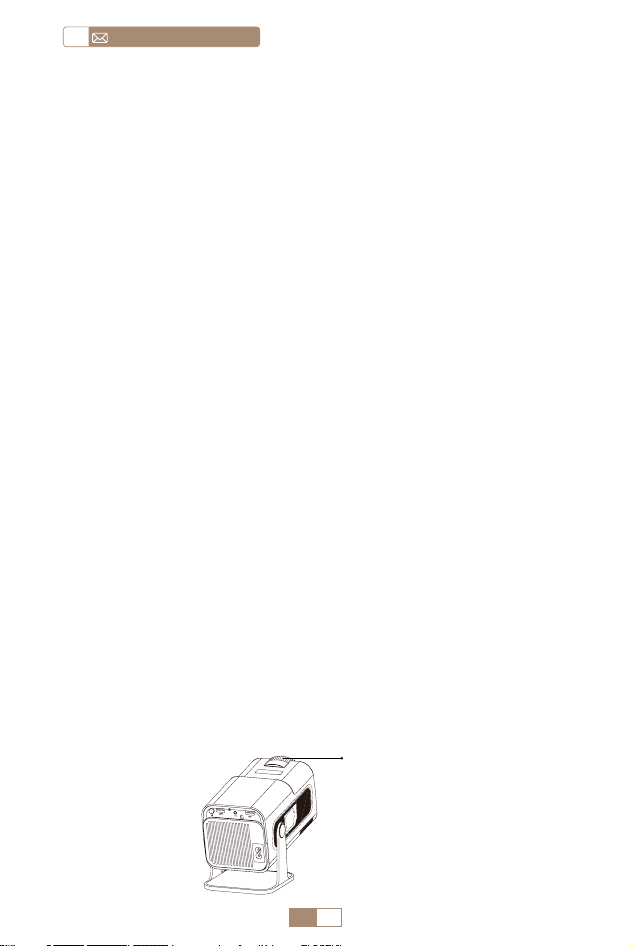
PROJEKTORÜBERSICHT
Projektorobjektiv
Lüftungsschlitze
Staubnetz
Staubentfernung
sanschluss
Netzkabelanschluss
HDMI Anschluss
IR Fenster
USB Anschluss
Power Taste
Audioeingang/
ausgang
Manueller Fokus ±

DE 26
service@toptro.comDE
REMOTE CONTROL
Notiz:
1. Legen Sie vorher 2 Stück AAA Batterien (nicht im Lieferumfang
enthalten) in die Fernbedienung ein Kombinieren Sie bei
der Verwendung keine neuen Batterien mit alten in der
Fernbedienung Steuerung, was zu Betriebsausfällen aufgrund
unzureichender Leistung führen kann liefern.
2. Achten Sie bei der Verwendung der Fernbedienung darauf,
dass Sie auf das Signal zielen Sender der Fernbedienung am
Infrarot Signalempfänger an Projektor an, oder blicken Sie
einfach zur Projektionsfläche, während Sie ihn bedienen.
3. Wenn Sie die Fernbedienung längere Zeit nicht verwenden.
Bitte Nehmen Sie die Batterien heraus, um ein Auslaufen zu
verhindern.
Ein-/Ausschalten ①
② Stumm
⑦ Schlüssel
bestätigen
⑨ Menü
④ Mausumschaltung
⑩ Homepage
⑪ Volume+
⑤ Luftspiel
Miracast ③
Pfeiltaste ⑥
Zurück ⑧
Volume- ⑫

DE 27
DEservice@toptro.com
1. Je nach Nutzungsumgebung und Anforderungen kann der
Projektor auf einem stabilen Schreibtisch aufgestellt und
das projizierte Bild auf 270° eingestellt werden.
2. Halten Sie den Projektor auf einer Höhe, in der sein Objektiv
symmetrisch zur Leinwandachse ist. Wenn dies nicht
möglich ist, verwenden Sie die Trapezkorrekturfunktion, um
das projizierte Bild anzupassen.
3. Der Projektor kann auf die folgenden 4 Modi eingestellt
werden.
INSTALLATION
1.Installationsmethode
2.Projektionsabstand und -größe
Aspect Ratio: 16:9
Distance Screen Size
1m 40"
2m 80"
2.51m 100"
3.01m 120"
3.76m 150"
Beamer
Beamer
Bildschirm
Beamer
Bildschirm
Bildschirm
screen
Bildschirm
1. Front Projection Ceiling mount
3. Front Projection Table mount
2. Rear projection Ceiling mount
4. Rear projection Table mount
DE 28
service@toptro.comDE
*Die Bildgröße der Projektion hängt vom Abstand zwischen
Projektor und Leinwand ab. Zwischen den oben aufgeführten
Daten kann es zu leichten Abweichungen von 3 % bei den
Messungen kommen.
*Der empfohlene Projektionsabstand beträgt 2~3m.
*Eine dunklere Umgebung verbessert die Klarheit der
projizierten Bilder.
Platzieren Sie das Projektorobjektiv senkrecht zur Projektionsfläche
oder Vorhangwand und stellen Sie die Fokuseinstellrolle ein,
bis das Bild klar ist.
Hinweis: Wenn es immer noch verschwommen ist, versuchen
Sie bitte, den Projektionsabstand und die Projektorposition
anzupassen.
Schalten Sie den Projektor ein: Schließen Sie das Netzkabel
an. Wenn die rote Anzeigeleuchte leuchtet, drücken Sie die
Ein /Aus Taste am Projektor Wenn Sie die Fernbedienung
oder den Netzschalter auf dem Bedienfeld drücken, um den
Projektor zu starten, wechselt die Anzeige von rot auf blau Der
Projektor ist eingeschaltet.
Schalten Sie den Projektor aus: Press the power key on
the remote control or power button on the panel to turn off
the projector, the indicator turns from the blue to red, the
projector is in shut down.
EINSTELLUNG DES BILDFOKUS
STARTEN DES PROJEKTORS
Focus ±

DE 29
DEservice@toptro.com
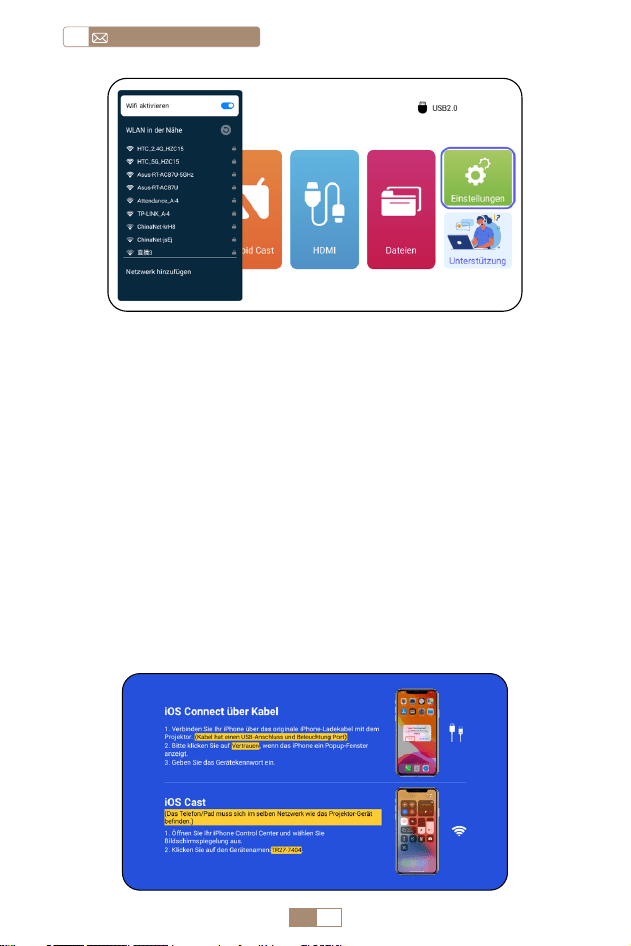
Die Homepage des Projektors sieht wie folgt aus.
1. Die reibungslose Bildschirmspiegelung bei einer drahtlosen
Verbindung wird von der Netzwerkumgebung beeinflusst. Bei
Verwendung der Bildschirmspiegelung wird eine Bandbreite
von 100 Mbit oder mehr empfohlen.
2. Stellen Sie sicher, dass sich Ihr Mobilgerät in der Nähe des
Projektors befindet, wenn Sie eine drahtlose Verbindung
verwenden. Ein Abstand von weniger als 1 Meter wird
empfohlen.
3. Einige Mobilgeräte unterstützen aus Kompatibilitätsgründen
möglicherweise keine Bildschirmspiegelung.
EINRICHTEN DES PROJEKTORS
1.WiFi-Einstellung
DE 30
service@toptro.comDE
Achtung: Stellen Sie sicher, dass Ihr iOS Gerät mit demselben
WLAN Netzwerk verbunden ist wie Ihr Projektor.
1. Verbinden Sie den TR27 Projektor mit Ihrem WLAN Netzwerk.
2. Zurück zur Startseite – Wählen Sie das Menü [ Wireless-
Bildschirm ] – Bleiben Sie auf dieser Oberfläche.
3. Greifen Sie auf das [ Kontrollzentrum ] auf Ihrem iOS
Gerät zu – Wählen Sie die Funktion [ Bildschirmspiegelung
] – Wählen Sie den iOS Cast Empfänger mit dem Namen [
TR27-7404 ] aus und verbinden Sie ihn – Der Bildschirm des
iOS Geräts wird gespiegelt und auf der Projektionsfläche
angezeigt.
2.Drahtlose Verbindung
2.1 Für iOS Cast (Airplay)

DE 31
DEservice@toptro.com
1. Stellen Sie sicher, dass die WLAN Funktion auf Ihrem Android
2. Gerät aktiviert ist. (Eine Verbindung zu einem Wi Fi Netzwerk
ist nicht erforderlich.)
3. Zurück zur Startseite – Wählen Sie das Menü [ Wireless-
Bildschirm ] – Bleiben Sie auf dieser Oberfläche Greifen Sie
auf Ihrem Android Gerät auf das [ Kontrollzentrum ] zu
und wählen Sie [ Bildschirmspiegelung/Smart View ]
4. Wählen Sie den Miracast Empfänger mit dem Namen [
TR27-7404 ] aus und schließen Sie ihn an.
5. Sobald die Verbindung erfolgreich hergestellt wurde, wird
der Bildschirm Ihres Android Geräts gespiegelt und auf der
Projektionsfläche angezeigt.
Notiz:
Bildschirmspiegelungsmethoden: AndroidGeräte verschi
edener Marken verwenden möglicherweise unterschiedliche
Begriffe und Methoden, um die Bildschirmspiegelung zu
aktivieren. Die genauen Schritte für Ihr Gerät finden Sie im
Handbuch Ihres Geräts. Zu den gebräuchlichen Begriffen für
die Bildschi rmspiegelung gehören „Multi Screen“, „Wireless
Display“, „WLAN Display“, „Screen Mirroring“ und „Smart View“.
Device Compatibility: Please note that not all Android
phones support the screen mirroring function. Before
attempting to use screen mirroring, ensure that your Android
device supports this feature. You can check your device's
manual or look for the screen mirroring option in the settings
to verify compatibility.
2.2 Für Android-System (Miracast)

DE 32
service@toptro.comDE
1. Bestätigen Sie, dass ElfCast im Popup Fenster Ihres Telefons
geöffnet wird.
2. lt kann automatisch mit demselben Bildschirm verbunden
werden.
Aufmerksamkeit:
• Vermeiden Sie häufiges Ein und Ausstecken, um eine
stabile Verbindung zu gewährleisten.
• Bei bestimmten Android Modellen muss für die Bildschirms
piegelung die Option „Datei übertragen“ ausgewählt werden
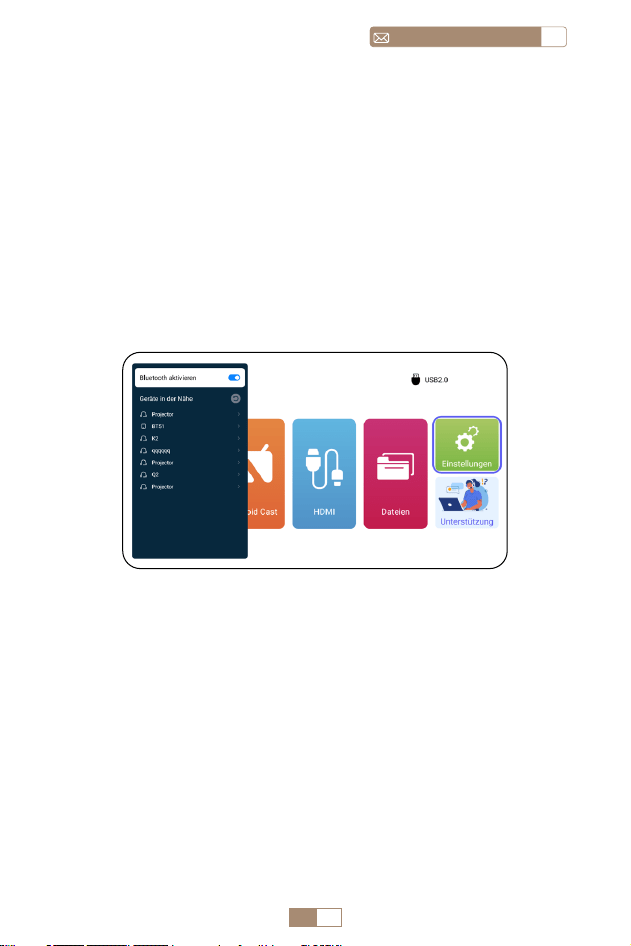
1. Schalten Sie Ihren Bluetooth Lautsprecher ein.
2. Schalten Sie [ Bluetooth ] Ihres Projektors ein und wählen
Sie Ihren Bluetooth Lautsprecher zum Verbinden aus.
1. Verbinden Sie Ihr iPhone über das Original iPhone mit dem
Projektor Ladekabel. Das Kabel verfügt über einen USB
Anschluss und einen Beleuchtungsanschluss.
2. Klicken Sie bitte auf „Vertrauen“, wenn auf dem iPhone ein
Popup Fenster angezeigt wird.
3. Geben Sie das Gerätepasswort ein.
3. Kabelgebundener Bildschirm
4.Bluetooth
3.1 Android-Verbindung per Kabel
Verbinden Sie Bluetooth-Lautsprecher
3.2 iOS-Verbindung per Kabel
Notiz:
• Der TR27 Projektor ist mit den meisten Bluetooth Headsets,
Bluetooth Lautsprechern und Airpods kompatibel. Bitte
beachten Sie jedoch, dass es nicht mit Bluetooth Tastaturen
oder Bluetooth Telefonen kompatibel ist.
• Wenn Sie beim Abspielen von Videos keinen Ton hören,
empfehlen wir, die Dolby Soundeinstellungen auf Ihren
DE 33
DEservice@toptro.com
1. Stecken Sie den USB Stick in den USB Anschluss des
Projektors.
2. Wählen Sie „Dateien“ und drücken Sie zum Aufrufen die
„OK“ Taste.
3. Wählen Sie je nach Dateityp die Option [ Gerät/Video/
Bild/Musik/Dateien ].
4. Wählen Sie die gewünschte Datei aus und drücken Sie dann
die Taste [ OK ], um sie abzuspielen.
5.Multimedia Play
5.1 USB Disk Input Mode
angeschlossenen Geräten zu überprüfen. Durch Ausschalten
des Dolby Sounds kann eine bessere Audiokompatibilität
mit dem Projektor gewährleistet werden.
• Bei einigen Bluetooth Lautsprechern kann es zu einer
erheblichen Lautstärkereduzierung kommen, wenn sie
mit dem Projektor verbunden sind. Um dieses Problem zu
beheben, erhöhen Sie die Lautstärke aller relevanten Geräte,
um den gewünschten Lautstärkepegel zu erreichen.
• Wenn Sie Fragen haben oder weitere Hilfe benötigen,
zögern Sie bitte nicht, den TOPTRO Support per E Mail unter
Service@toptro.com zu kontaktieren.

DE 34
service@toptro.comDE
5.2 Video Play Interfac
5. Klicken Sie während der Videowiedergabe auf die Taste
„MENU“ auf der Fernbedienung, um die Bildeinstellungen
direkt anzupassen.
Warme Tipps: Wenn Ihr Projektor die USB Festplatte nicht
erkennt, befolgen Sie bitte die folgenden Methoden, um das
Problem zu beheben. Bitte stellen Sie sicher, dass Ihr USB
Datenträger den folgenden Formaten entspricht:
FAT32: 8 GB/16 GB/32 GB
NTFS: 64 GB 2 TB
Wenn es diese Kriterien nicht erfüllt, müssen Sie ein USB
Laufwerk mit unterstütztem Format austauschen.
Wenn das Problem weiterhin besteht, senden Sie bitte eine
detaillierte Beschreibung Ihres Problems an die folgende
E Mail Adresse: Service@toptro.com.

DE 35
DEservice@toptro.com
Soundmodus Inhalt
Bildmodus
Standard/Musik/Film/
Nachrichten
Bildmodus
Standard/Kino/Lebendig/
Benutzerdefiniert
Helligkeit 0~100
Kontrast 0~100
Farbton 0~100
Sättigung 0~100
PROJEKTOREINSTELLUNG
1.Anzeige
DE 36
service@toptro.comDE
Menü Inhalt Funktion
Helligkeit und
Farbe
Bildmodus/
Helligkeit/
Kontrast/
Farbton/
Sättigung/
Schärfe
Ändern Sie die
Bildparameter im
Bereich von 0 100
Automatische
Trapezkorrektur
/
Vertikale Einstellung des
Bildwinkels aumatisch
Manuelle
Trapezkorrektur
+/ /OK
Manuelles Einstellen des
vertikalen Bildwinkels
Anfangswin
kelkorrektur
/ Anfangswinkelkorrektur
Bildschirm
skalierung
4:3/16:9/
ursprüngliches
Bildformat/
Bildschirmzoom
Einstellen von
Bildschirmgröße und
Zoom (100% 50%)
Projektionsmodus
Vorderseite/
Rückseite/
Vordere Decke/
Hintere Decke
Projektion
Einstellen der Position
des projizierten Bildes
2.Die Systemeinstellungen
DE 37
DEservice@toptro.com
ANSCHLUSS DER SIGNALLEITUNGEN
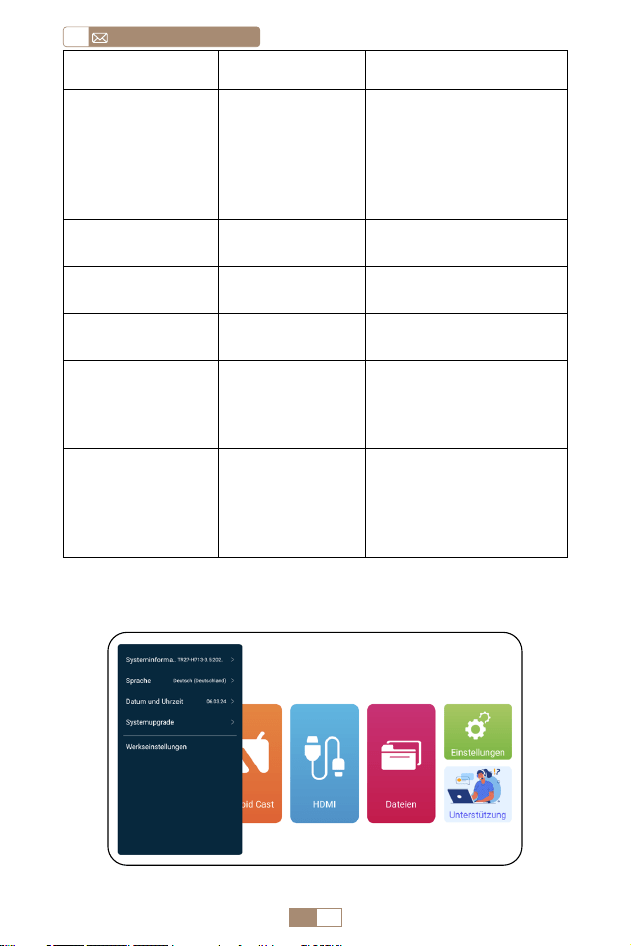
Menü Funktion
System Infos
Informationen zum Projektor
einführen
Sprache Einstellen der Systemsprache
Datum & Uhrzeit
Einführung in die
Projektorinformationen
System Upgrade
Aktualisieren der Software
über eine lokale Datei
Werksreset
Wiederherstellung der
Werkseinstellungen
Der TOPTRO TR27 Projektor verfügt über 3 Schnittstellen,
HDMI Anschluss*1/USB Anschluss*1/3,5mm Kopfhörerausg
ang*1. Bitte wählen Sie den richtigen Anschluss, um Ihr Gerät
anzuschließen (PC, Telefon, DVD Player, USB, PS4, etc.)
1.Connect via USB disc
1. Insert the USB flash disc into the USB port of the projector.
2. Select "Media" and press the "OK" button to access.
DVD
DE 38
service@toptro.comDE
2.Verbinden mit Geräten über den HDMI-Anschluss
1. Schließen Sie Ihren Fire TV Stick (oder PC, XBOX, PS4 usw.)
an den HDMI Anschluss des Projektors an.
2. Rufen Sie die Startseite auf, um den entsprechenden HDMI
Anschluss als Signalquelle auszuwählen.
3.An den Lautsprecher anschließen
• Verwenden Sie das 3,5 mm Audiokabel für die Verbindung
mit dem Lautsprecher.
• Schalten Sie den Projektor und den Lautsprecher ein (wählen
Sie den AUX Modus).
4.An den DVD-Player anschließen
1. Schalten Sie Ihren DVD Player und den Projektor ein.
2. Verbinden Sie den DVD Player und den Projektor mit dem
HDMI Kabel.
3. Rufen Sie die Startseite auf, um den entsprechenden HDMI
Anschluss als Signalquelle auszuwählen.
Hinweis: Wenn der Projektor über das HDMI Kabel an den
DVD Player angeschlossen ist und kein Ton zu hören ist, kann
es sein, dass das Ausgangssignal des HDMI Anschlusses des
DVD Players nicht HDCP kompatibel ist, versuchen Sie dann,
Ihren Lautsprecher anzuschließen.
3. Wählen Sie je nach Dateityp die Option [ Gerät/Video/
Bild/Musik/Dateien ].
4. Wählen Sie die gewünschte Datei und drücken Sie dann die
Taste [ OK ], um sie abzuspielen.
Audio out
AUX port
DE 39
DEservice@toptro.com
5.An den Computer anschließen
1. Verbinden Sie den Computer und den S27 Projektor mit dem
HDMI Kabel.
2. Wählen Sie die HDMI Quelle, um Dateien auf Ihrem Computer
zu projizieren.
3. Halten Sie auf Ihrem Laptop die Tasten "Win+P" gedrückt,
um den Anzeigemodus zu ändern.
HINWEIS: Für MacBook, verwenden Sie einen Typ C zu HDMI
Adapter, um Ihr MacBook zu verbinden, oder ein Mini Display
zu HDMI Adapter, um mit Ihrem MacBook Air zu verbinden
(Adapter nicht enthalten).
1. Nur Computer: Dies ist die Standardoption und zeigt den
Bildschirm nur auf dem Hauptmonitor an.
2. Duplizieren: Dupliziert Ihren Desktop auf allen angeschloss
enen Monitoren.
3. Erweitern: Erweitert Ihren Desktop auf mehrere Monitore.
4. Nur Projektor: Verwenden Sie nur den zweiten Monitor
(Projektor) und schalten Sie den Hauptmonitor aus.
Gehen Sie wie folgt vor, um die Bildschirmauflösung im Modus
"Nur Projektor" zu ändern:
DE 40
service@toptro.comDE
GARANTIE
Vielen Dank für Ihren Kauf und Ihre Unterstützung. Wir bieten
3 Jahre Garantie für TR27 Projektor. Wenn Sie Fragen haben,
kontaktieren Sie uns bitte über Service@toptro.com.
Hinweis: Wir haben ein Geschenk für Sie vorbereitet. Wenn Sie
es wünschen, kontaktieren Sie uns bitte über Service@toptro.
com.
Schritt: Start > Systemsteuerung > Darstellung und Personalisi
erung > Bildschirmauflösung anpassen

FR 41
FRservice@toptro.com
CONTENU
Support Professionnel à vie TOPTRO - - - - - - - - - - -42
CONSEILS - - - - - - - - - - - - - - - - - - - - - - - -42
PAKETLISTE - - - - - - - - - - - - - - - - - - - - - - -44
SPÉCIFICATIONS DU PROJECTEUR - - - - - - - - - - - -44
PRÉSENTATION DU PROJECTEUR- - - - - - - - - - - - -45
REMOTE CONTROL - - - - - - - - - - - - - - - - - - -46
INSTALLATION - - - - - - - - - - - - - - - - - - - - - -47
1.Méthode d'Installation - - - - - - - - - - - - - - - - - - - 47
2.Distance et Taille de Projection - - - - - - - - - - - - - - - 47
DÉMARRER LE PROJECTEUR - - - - - - - - - - - - - - -48
RÉGLAGE DE LA MISE AU POINT DE L'IMAGE- - - - - - - -48
CONFIGURATION DU PROJECTEUR- - - - - - - - - - - -49
1.Paramètre WiFi - - - - - - - - - - - - - - - - - - - - - - - 49
2. Connexion sans fil - - - - - - - - - - - - - - - - - - - - - 50
2.1 Pour iOS Cast (Airplay) 50
2.2 Pour le système Android (Miracast) 51
3. Connexion Filaire - - - - - - - - - - - - - - - - - - - - - 52
3.1 Connexion Android par Câbles 52
3.2 iOS Connexion par Câbles 52
4.Bluetooth - - - - - - - - - - - - - - - - - - - - - - - - - 52
5. Lecture Multimédia - - - - - - - - - - - - - - - - - - - - 53
5.1 Mode d'entrée sur disque USB 53
5.2 Interface de Lecture Vidéo 54
RÉGLAGE DU PROJECTEUR - - - - - - - - - - - - - - -55
1.Affichage- - - - - - - - - - - - - - - - - - - - - - - - - -55
2.Paramètres Système - - - - - - - - - - - - - - - - - - - - 56
CONNEXION DES LIGNES DE SIGNAL - - - - - - - - - - -57
1.Connectez-vous via un disque USB - - - - - - - - - - - - - 57
2. Connectez-vous aux appareils via le port HDMI - - - - - - - 58
3.Connectez-vous au haut-parleur - - - - - - - - - - - - - - 58
4.Connectez-vous au lecteur DVD - - - - - - - - - - - - - - 58
5.Connectez-vous à l'ordinateur - - - - - - - - - - - - - - - 59
GARANTIE- - - - - - - - - - - - - - - - - - - - - - - 60

FR 42
service@toptro.comFR
Support Professionnel à vie TOPTRO
CONSEILS
Cher client,
Merci beaucoup de soutenir TOPTRO.
Veuillez lire attentivement ce manuel avant d'utiliser le
projecteur. Si vous rencontrez des problèmes, envoyez votre
numéro de commande et le problème par e mail à Service@
toptro.com. Nous vous fournirons une solution rapide dans
les 24 heures.
De nombreux problèmes peuvent être facilement résolus
par réglage, tels que l'absence de signal, l'absence de son,
l'échec de la connexion Bluetooth, l'échec de la connexion
WiFi, l'animation saccadée, etc. Nous promettons que tous les
projecteurs ont été soigneusement vérifiés et emballés à 100
% avant l'expédition.
Nous vous invitons également à suivre notre site Web officiel
pour vous tenir au courant de nos derniers développements.
(https://www.toptro.com/)
Si vous avez des questions, pourriez vous nous contacter afin
que le problème puisse être résolu ? Et permettez nous de
nous améliorer. Nous garantissons que nous vous fournirons
une solution satisfaisante.
Merci pour votre compréhension.
Cordialement
Équipe de service TOPTRO
1. Ne placez pas le projecteur dans une pièce trop chaude ou
trop froide, car la température élevée ou basse réduira la
durée de vie de l'appareil. L'environnement de travail serait
meilleur de 5
℃
~ 35
℃
.
2. La ventilation est équipée pour que le projecteur fonctionne
de manière stable. Ne couvrez pas l'évent avec un chiffon,

FR 43
FRservice@toptro.com
une couverture ou autre chose. N'insérez rien dans la fente
du projecteur, sinon cela pourrait produire un court circuit
ou un choc électrique sur votre appareil et causer des
dommages.
3. Le projecteur doit être strictement protégé contre les
chocs violents, l'extrusion et les vibrations. N'essayez pas de
vous déplacer en cas d'impact, d'extrusion ou de vibration
violente. N'essayez pas de déplacer les défauts du circuit
interne.
4. L'objectif, en tant que composant principal du projecteur,
est directement lié à la définition et à l'effet de l'image. La
poussière excessive qui s’y trouve affectera la qualité de
l’image. La lentille sale doit être essuyée avec un chiffon
en coton doux pour la surface de la lentille en verre. Aucun
chiffon dur ou abrasif ne doit être utilisé.
FR 44
service@toptro.comFR
SPÉCIFICATIONS DU PROJECTEUR
Model No TR27
Technologie
d'affichage
LCD Source de lumière LED
Taille du produit 10.58x10.7x22.07cm Poids 0.91kg
Fréquence de
rafraîchissement
60Hz Tension d'alimentation AC90 260V
Résolution native 1920*1080P
Résolution maximale
prise en charge
4K
Correction
trapézoïdale
Automatique/
Manuel
Se concentrer Manuel
Mode de
fonctionnement
Télécom
mande
Ratio d'aspect 4:3/16:9
Port de sortie
Sortie audio 3,5
mm
Port d'entrée
HDMI*1/
USB*1
Format vidéo
HEVC/VP9/AVS2/AVC 4K/MPEG1/MPEG2/AV1 1080p/60fp
(la prise en charge des codecs vidéo peut varier selon
les circonstances, contactez nous pour une assistance
supplémentaire)
Format audio
MP3/OGG/FLAC/APE (les codecs audio Dolby ne sont pas
pris en charge)
Format d'image
JPG/BMP/PNG (prise en charge de la mise à l'échelle de
l'image)
Format des
documents
TXT/DOC/XLSX/PDF
PAKETLISTE
Projecteur TOPTRO TR27 * 1 Télécommande * 1 Cordon d'alimentation * 1
Câble HDMI * 1 Kit de nettoyage * 1 Manuel d'utilisation * 1
Cache objectif * 1

FR 45
FRservice@toptro.com
PRÉSENTATION DU PROJECTEUR
Objectif du projecteur
Évents
Filet anti poussière
Port de dépoussiérage
Mise au point
manuelle ±
Port du cordon
d'alimentation
Port HDMI
Fenêtre IR
Port USB
Bouton
d'alimentation
Entrée/sortie audio
FR 46
service@toptro.comFR
REMOTE CONTROL
Note:
1. Installez 2 piles AAA (non incluses) dans la télécommande
avant en l'utilisant, ne combinez pas des piles neuves avec
des anciennes dans la télécommande Contrôle, ce qui peut
provoquer un échec de fonctionnement en raison d'une
puissance insuffisante fournir.
2. Lorsque vous utilisez la télécommande, assurez vous de diriger
le signal émetteur de la télécommande sur le récepteur de
signal infrarouge sur le projecteur, ou faites simplement face à
l'écran de projection tout en l'utilisant.
3. Lorsque vous n'utilisez pas la télécommande pendant une
longue période. S'il te plaît retirez les piles pour éviter qu'elles
ne fuient.
Allumer/éteindre ①
② Muet
⑦ Conrmer la clé
⑨ Menu
④
Commutation de
la souris
⑩ Page d'accueil
⑪ Volume+
⑤ Lecture aérienne
Miracast ③
Touche échée ⑥
Retour ⑧
Volume- ⑫
FR 47
FRservice@toptro.com
1. Selon l'environnement d'utilisation et les exigences, le
projecteur peut être placé sur un bureau stable et l'image
projetée à 270° peut être ajustée.
2. Gardez le projecteur à une hauteur où son objectif est
symétrique par rapport à l'axe de l'écran. Si cela n’est pas
possible, utilisez la fonction de correction trapézoïdale pour
ajuster l’image projetée.
3. Le projecteur peut être réglé sur les 4 modes suivants.
INSTALLATION
1.Méthode d'Installation
2.Distance et Taille de Projection
Ratio d'aspect: 16:9
Distance Taille de l’écran
1m 40"
2m 80"
2.51m 100"
3.01m 120"
3.76m 150"
Projecteur
Projecteur
Projecteur
Projecteur
Écran
Écran
Écran
Écran
1. Support de plafond pour
projection frontale
3. Support de table de
projection avant
2. Support de plafond pour
rétroprojection
4. Support de table de
projection arrière
FR 48
service@toptro.comFR
*La taille de l'image de la projection dépend de la distance
entre le projecteur et l'écran. Il peut y avoir une légère variation
de 3 % dans les mesures parmi les données répertoriées ci
dessus.
*La distance de projection recommandée est de 2~3m.
*Un environnement ambiant plus sombre améliorera la clarté
des images projetées.
Placez l'objectif du projecteur perpendiculairement à l'écran de
projection ou au mur rideau et ajustez le rouleau de réglage de la
mise au point jusqu'à ce que l'image soit claire.
Remarque: Si l'image reste floue, essayez d'ajuster la distance de
projection et l'emplacement du projecteur.
Allumez le projecteur: Connectez le câble d'alimentation,
lorsque le voyant rouge est allumé, appuyez sur la touche
d'alimentation de la télécommande ou sur le bouton
d'alimentation du panneau pour démarrer le projecteur,
l'indicateur passe du rouge au bleu, le projecteur est allumé.
Éteignez le projecteur: Appuyez sur la touche d'alimentation
de la télécommande ou sur le bouton d'alimentation du
panneau pour éteindre le projecteur, l'indicateur passe du
bleu au rouge, le projecteur est éteint.
RÉGLAGE DE LA MISE AU POINT DE L'IMAGE
DÉMARRER LE PROJECTEUR
Focus ±

FR 49
FRservice@toptro.com
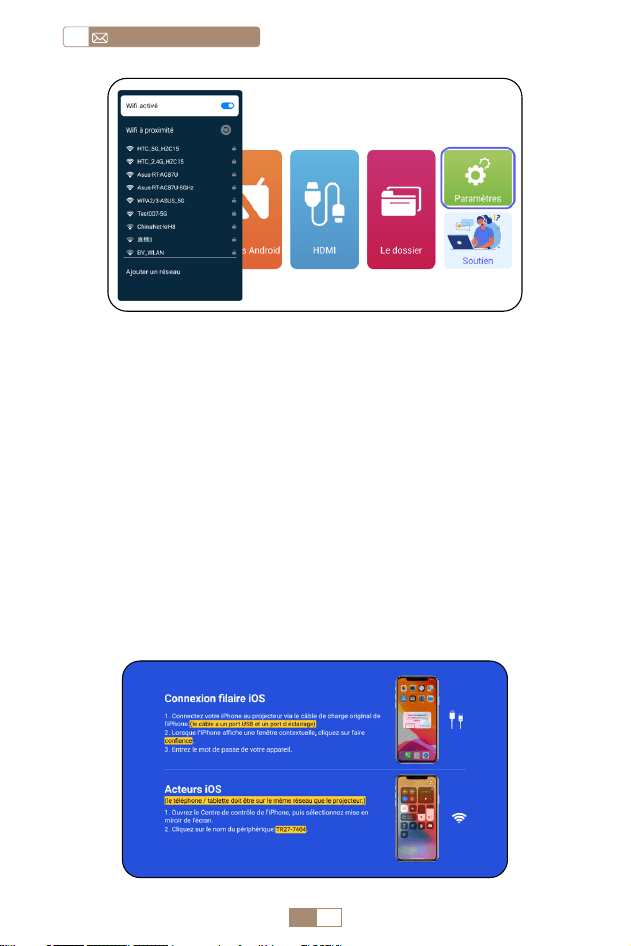
La page d'accueil du projecteur est la suivante.
1. La fluidité de la mise en miroir d'écran avec une connexion
sans fil sera affectée par l'environnement réseau. Une bande
passante de 100 Mbits ou plus est recommandée lors de
l'utilisation de la mise en miroir d'écran.
2. Assurez vous que votre appareil mobile est proche du
projecteur lorsque vous utilisez une connexion sans fil. Une
distance de 1 mètre est recommandée.
3. Certains appareils mobiles peuvent ne pas prendre en
charge la mise en miroir d'écran en raison de la compatibilité.
CONFIGURATION DU PROJECTEUR
1.Paramètre WiFi
FR 50
service@toptro.comFR
Attention : Assurez vous que votre appareil iOS est connecté
au même réseau Wi Fi que votre projecteur.
1. Connectez le projecteur TR27 à votre réseau WiFi.
2. Retour à la page d'accueil Sélectionnez le menu [ Acteurs
iOS ] Restez sur cette interface.
3. Accédez au [ Control Center ] sur votre appareil iOS
Sélectionnez la fonction [ Screen Mirroring ] Sélectionnez
et connectez le récepteur iOS Cast nommé [ TR27-7404 ]
L'écran de l'appareil iOS sera mis en miroir et affiché sur l'écran
de projection.
2. Connexion sans fil
2.1 Pour iOS Cast (Airplay)

FR 51
FRservice@toptro.com
1. Assurez vous d'activer la fonction WLAN sur votre appareil
Android. (La connexion à un réseau Wi Fi n'est pas nécessaire.)
2. Retour à la page d'accueil Sélectionnez le menu [ Acteurs
Android ] Restez sur cette interface.
3. Sélectionnez le menu [ Paramètres ] sur votre appareil Android
Sélectionnez la fonction [ Screen mirroring ]
4. Sélectionnez et connectez le récepteur Miracast nommé [
TR27-7404 ].
5. Une fois connecté avec succès, l'écran de votre appareil
Android sera mis en miroir et affiché sur l'écran de projection.
Note:
Méthodes de mise en miroir d'écran : les appareils Android
de différentes marques peuvent utiliser différents termes et
méthodes pour activer la mise en miroir d'écran. Pour conn
aître les étapes exactes pour votre appareil, veuillez vous référer
au manuel de votre appareil. Les termes courants pour la mise en
miroir d'écran incluent Multi écran, Affichage sans fil, Affichage
WLAN, Mise en miroir d'écran et Smart View.
Compatibilité des appareils : veuillez noter que tous les télé
phones Android ne prennent pas en charge la fonction de
mise en miroir d'écran. Avant d'essayer d'utiliser la mise en
miroir d'écran, assurez vous que votre appareil Android prend
en charge cette fonctionnalité. Vous pouvez consulter le manuel
de votre appareil ou rechercher l'option de mise en miroir d'écran
dans les paramètres pour vérifier la compatibilité.
2.2 Pour le système Android (Miracast)

FR 52
service@toptro.comFR
1. Confirmez pour ouvrir ElfCast dans la fenêtre contextuelle de
votre téléphone.
2. lt peut être automatiquement connecté au même écran.
Attention:
• Évitez les branchements et débranchements fréquents pour
une connexion stable.
• Certains modèles Android nécessitent de sélectionner "Tra
nsférer le fichier" pour la mise en miroir de l'écran.
1. Allumez votre haut parleur Bluetooth.
2. Allumez le [ Bluetooth ] de votre projecteur et sélectionnez
votre haut parleur Bluetooth à connecter.
1. Connectez votre iPhone au projecteur via un câble
Lightning USB.
2. Veuillez cliquer sur " Confiance " lorsque l'iPhone affiche une
fenêtre contextuelle.
3. Entrez le mot de passe de l'appareil.
3. Connexion Filaire
4.Bluetooth
3.1 Connexion Android par Câbles
Connecter des haut-parleurs Bluetooth
3.2 iOS Connexion par Câbles

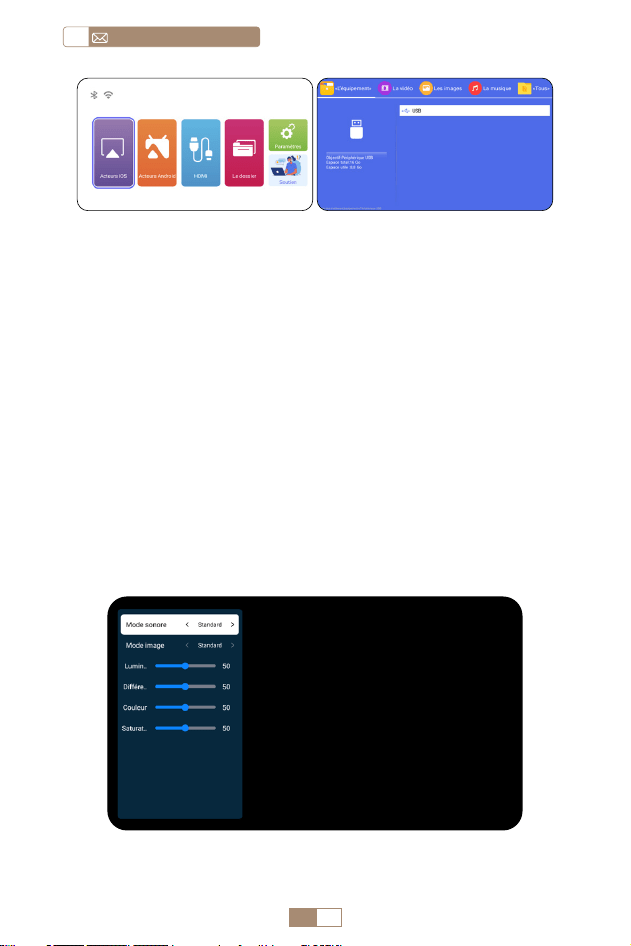
FR 53
FRservice@toptro.com
1. Insérez le disque flash USB dans le port USB du projecteur.
2. Sélectionnez "le dossier" puis appuyez sur la touche "OK "
pour entrer.
3. En fonction du type de fichier, sélectionnez l'option [
Appareil/Vidoe/Image/Musique/le dossier ].
4. Sélectionnez le fichier souhaité, puis appuyez sur le bouton [
OK ] pour le lire.
5. Cliquez sur le bouton "MENU" de la télécommande pendant la
lecture d'une vidéo pour régler directement les paramètres
d'image.
5. Lecture Multimédia
5.1 Mode d'entrée sur disque USB
Note:
1. Le projecteur TR27 est compatible avec la plupart des casques
Bluetooth, haut parleurs Bluetooth et Airpods. Veuillez to
utefois noter qu’il n’est pas compatible avec les claviers Bl
uetooth ou les téléphones Bluetooth.
2. Si vous n'entendez aucun son lors de la lecture de vidéos,
nous vous recommandons de vérifier les paramètres de
son Dolby sur vos appareils connectés. La désactivation
du Dolby Sound peut garantir une meilleure compatibilité
audio avec le projecteur.
3. Certaines enceintes Bluetooth peuvent subir une réduction
significative du volume lorsqu'elles sont connectées au
projecteur. Pour résoudre ce problème, essayez d'augmenter
le volume sur tous les appareils concernés pour atteindre le
niveau sonore souhaité.
4. Si vous avez des questions ou avez besoin d'aide supplémentaire,
n'hésitez pas à contacter le support TOPTRO par e mail à
Service@toptro.com.
FR 54
service@toptro.comFR
5.2 Interface de Lecture Vidéo
Conseils: Si votre projecteur ne reconnaît pas le disque USB,
veuillez suivre les méthodes ci dessous pour résoudre le
problème. Veuillez vous assurer que votre disque USB répond
aux formats suivants :
FAT32: 8 Go/16 Go/32 Go
NTFS: 64 Go 2 To
S'il ne répond pas à ces critères, vous devrez changer un disque
USB au format pris en charge.
Si le problème persiste, veuillez envoyer une description
détaillée de votre problème à l'adresse e mail suivante :
Service@toptro.com.
FR 55
FRservice@toptro.com
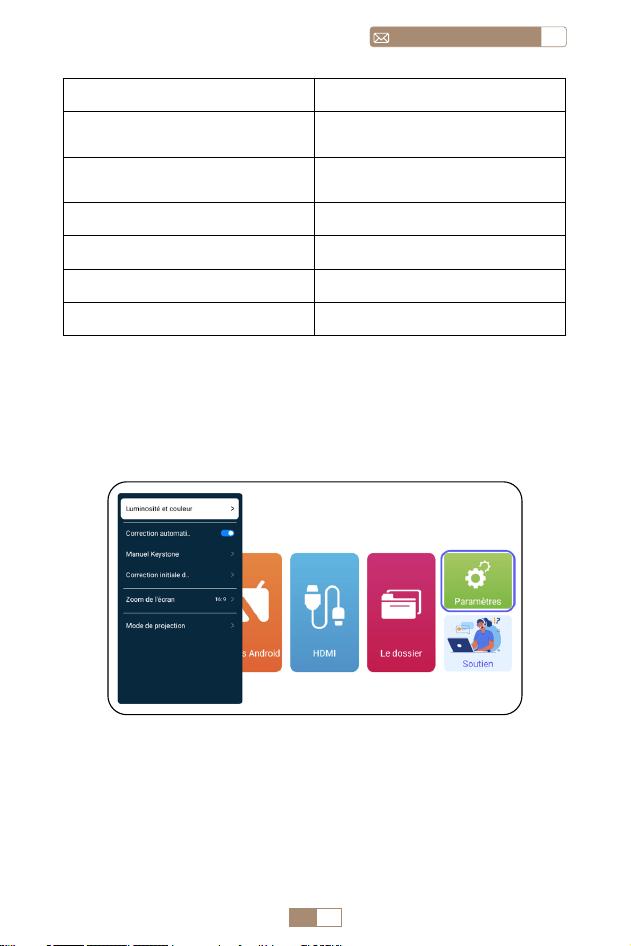
Manuel Contenu
Mode sonore
Standard/Musique/Film/
Actualités
Mode image
Standard/Cinéma/Vif/
Personnalisé
Luminosité 0~100
Contraste 0~100
Couleur 0~100
Saturation 0~100
RÉGLAGE DU PROJECTEUR
1.Affichage
FR 56
service@toptro.comFR
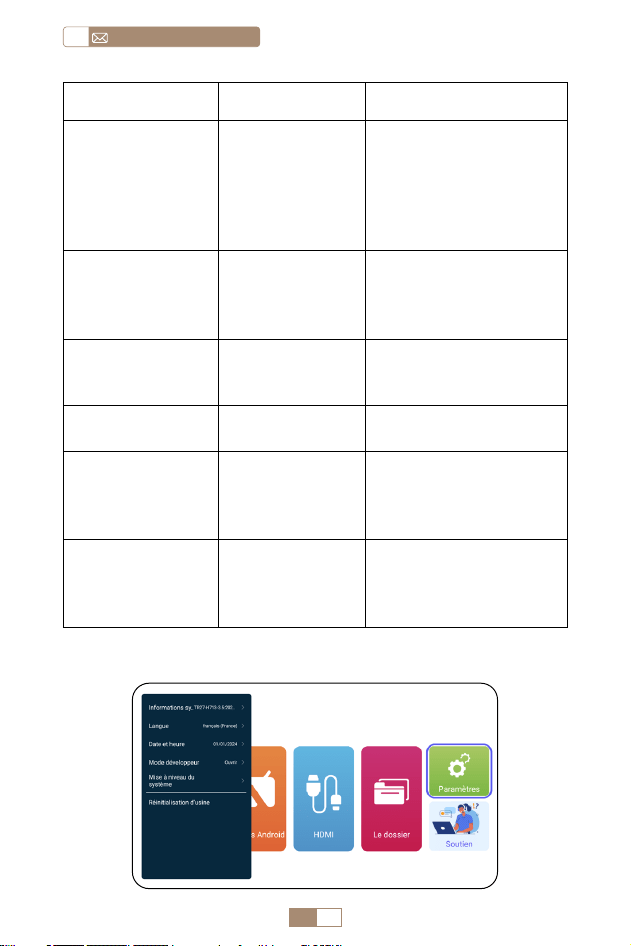
Menu Contenu Fonction
Luminosité et
couleur
Mode image/
Luminosité/
Contraste/
Teinte/
Saturation/
Netteté
Modifiez les paramètres
de l'image dans la plage
de 0 à 100
Correction
automatique du
trapèze
/
Ajustez
automatiquement
l’angle de l’écran
verticalement
Trapèze manuel +/ /OK
Ajustez manuellement
l’angle de l’écran
verticalement
Correction
d'angle initiale
/
Correction d'angle
initiale
Zoom de l'écran
4:3/16:9/
Rapport d'écran
d'origine/Zoom
de l'écran
Ajuster la taille de
l'écran et le zoom
Mode de
projection
Projection avant/
arrière/plafond
avant/plafond
arrière
Ajuster la position de
l'image projetée
2.Paramètres Système
FR 57
FRservice@toptro.com
CONNEXION DES LIGNES DE SIGNAL
Menu Fonction
Information système
Présentation des informations
sur le projecteur
Langue
Configurer la langue du
système
Date et heure
Présentation des informations
sur le projecteur
Mise à niveau du système
Mettre à jour le logiciel via le
fichier local
Retour aux paramètres d'usine
Restaurer les paramètres
d'usine par défaut
Le projecteur TOPTRO TR27 dispose de 3 interfaces, port HDMI*1/
port USB*1/sortie casque 3,5 mm*1. Veuillez sélectionner le
bon port de connexion pour connecter votre appareil (PC,
téléphone, lecteur DVD, USB, PS4, etc.)
1.Connectez-vous via un disque USB
1. Insérez le disque flash USB dans le port USB du projecteur.
2. Sélectionnez "Média", puis appuyez sur la touche "OK" pour
entrer.
DVD
FR 58
service@toptro.comFR
2. Connectez-vous aux appareils via le port HDMI
1. Connectez votre clé Fire TV (ou PC, XBOX, PS4, etc.) au port
HDMI du projecteur.
2. Entrez dans la page d'accueil pour sélectionner le HDMI
correspondant comme source de signal.
3.Connectez-vous au haut-parleur
• Utilisez le câble audio 3,5 mm pour vous connecter au haut
parleur.
• Allumez le projecteur et le haut parleur (choisissez le mode
AUX).
4.Connectez-vous au lecteur DVD
1. Allumez votre lecteur DVD et le projecteur.
2. Connectez vous au lecteur DVD et au projecteur avec le
câble HDMI.
3. Entrez dans la page d'accueil pour sélectionner le HDMI
correspondant comme source de signal.
Remarque: Lorsque le projecteur est connecté au lecteur DVD
via le câble HDMI, s'il n'y a pas de son, il se peut que le signal
de sortie du port HDMI du lecteur DVD ne soit pas compatible
avec HDCP, veuillez essayer de connecter votre haut parleur.
3. En fonction du type de fichier, sélectionnez l'option [
Appareil/Vidoe/Image/Musique/le dossier ].
4. Sélectionnez le fichier souhaité, puis appuyez sur le bouton [
OK ] pour le lire.
Audio out
AUX port

FR 59
FRservice@toptro.com
5.Connectez-vous à l'ordinateur
1. Connectez vous à l'ordinateur et au projecteur TR27 avec le
câble HDMI.
2. Sélectionnez la source HDMI pour projeter tous les fichiers
sur votre ordinateur.
3. Sur votre ordinateur portable, maintenez enfoncées les touches "
Win+P " du tableau pour changer votre mode d'affichage.
REMARQUE: Pour MacBook, utilisez un adaptateur Type C vers
HDMI pour connecter votre MacBook ou un adaptateur Mini
Display vers HDMI pour vous connecter à votre MacBook Air
(adaptateur non inclus).
1. Ordinateur uniquement: Il s’agit de l’option par défaut et
affichera l’écran uniquement sur le moniteur principal.
2. Dupliquer: Pour dupliquer votre bureau sur tous les moniteurs
connectés.
3. Étendre: Pour étendre votre bureau sur plusieurs moniteurs.
4. Projecteur uniquement: Utilisez uniquement le moniteur
secondaire (projecteur) et gardez le moniteur principal
éteint.
FR 60
service@toptro.comFR
GARANTIE
Merci beaucoup pour votre achat et votre soutien. Nous offrons
une garantie de 3 ans pour le projecteur TR27. Si vous avez des
questions, n'hésitez pas à nous contacter via Service@toptro.
com
Remarque: Si vous souhaitez un écran de projection gratuit,
veuillez nous contacter via Service@toptro.com
Pour modifier la résolution de l'écran en mode Projecteur
uniquement, procédez comme suit :
Étape : Démarrer > Panneau de configuration > Apparence et
personnalisation > Ajuster la résolution de l'écran

CONTENTS
Soporte Profesional de Por Vida de TOPTRO - - - - - - -62
CONSEJOS - - - - - - - - - - - - - - - - - - - - - - -62
LISTA DE PAQUETES - - - - - - - - - - - - - - - - - - -64
ESPECIFICACIONES DEL PROYECTOR- - - - - - - - - - -64
DESCRIPCIÓN GENERAL DEL PROYECTOR - - - - - - - -65
REMOTE CONTROL - - - - - - - - - - - - - - - - - - -66
INSTALACIÓN - - - - - - - - - - - - - - - - - - - - - - 67
1.Método de Instalación - - - - - - - - - - - - - - - - - - - 67
2.Distancia y Tamaño de Proyección - - - - - - - - - - - - - 67
PROYECTOR INICIAL - - - - - - - - - - - - - - - - - - -68
AJUSTE DEL ENFOQUE DE IMAGEN - - - - - - - - - - - -68
CONFIGURACIÓN DEL PROYECTOR- - - - - - - - - - - -69
1.Configuración de WiFi- - - - - - - - - - - - - - - - - - - -69
2.Conexión Inalámbrica - - - - - - - - - - - - - - - - - - - 70
2.1 Para iOS Cast (Airplay) 70
2.2 Para sistema Android (Miracast) 71
3.Duplicación de Pantalla con Cable - - - - - - - - - - - - - 72
3.1 Conexión Android por Cables 72
3.2 iOS se conecta por cables 72
4.Bluetooth - - - - - - - - - - - - - - - - - - - - - - - - - 72
5.Reproducción Multimedia - - - - - - - - - - - - - - - - - 73
5.1 Modo de entrada de disco USB 73
5.2 Interfaz de Reproducción de Vídeo 74
CONFIGURACIÓN DEL PROYECTOR- - - - - - - - - - - -75
1.Exhibición(Funciones de Corrección) - - - - - - - - - - - - 75
2.Ajustes del Sistema- - - - - - - - - - - - - - - - - - - - - 76
CONEXIÓN DE LÍNEAS DE SEÑAL - - - - - - - - - - - - - 77
1.Conéctese mediante un disco USB - - - - - - - - - - - - - 77
2.Conéctese a dispositivos a través del puerto HDMI- - - - - - 78
3.Conéctese al altavoz - - - - - - - - - - - - - - - - - - - - 78
4.Conéctese al reproductor de DVD - - - - - - - - - - - - - 78
5.Conéctese a la computadora - - - - - - - - - - - - - - - - 79
GARANTÍA- - - - - - - - - - - - - - - - - - - - - - - 80

ES 62
service@toptro.comES
Soporte Profesional de Por Vida de TOPTRO
CONSEJOS
Estimado cliente,
Muchas gracias por apoyar a TOPTRO.
Lea este manual detenidamente antes de utilizar el proyector.
Si tiene algún problema, envíe por correo electrónico su
número de pedido y el problema a Service@toptro.com. Le
proporcionaremos una solución rápida en 24 horas.
Muchos problemas se pueden resolver fácilmente mediante
la configuración, como falta de señal, falta de sonido, falla en
la conexión Bluetooth, falla en la conexión WiFi, animación
entrecortada, etc. Prometemos que todos los proyectores han
sido 100% revisados y empaquetados cuidadosamente antes
del envío.
También le invitamos a seguir nuestro sitio web oficial para
mantenerse al tanto de nuestros últimos desarrollos.(https://
www.toptro.com/)
Si tiene alguna pregunta, ¿podría ponerse en contacto con
nosotros para solucionar el problema? Y permítanos mejorar.
Le garantizamos que le proporcionaremos una solución
satisfactoria.
¡Gracias por su comprensión!
Atentamente
Equipo de servicio TOPTRO
1. No coloque el proyector en una habitación demasiado
cálida o demasiado fría, ya que la temperatura alta o baja
acortará la vida útil del dispositivo. El ambiente de trabajo
sería entre 5
℃
y 35
℃
mejor.
2. La ventilación está equipada para que el proyector funcione
de manera estable. No cubra el respiradero con tela, manta

ES 63
ESservice@toptro.com
u otras cosas. No inserte nada en la ranura del proyector,
ya que podría producir un cortocircuito o una descarga
eléctrica en su dispositivo y causar daños.
3. El proyector deberá estar estrictamente protegido contra
fuertes impactos, extrusiones y vibraciones. No intente
moverse ni en caso de fuertes impactos, extrusiones y
vibraciones. No intente moverse y el circuito interno falla.
4. La lente, como componente central del proyector, está
directamente relacionada con la definición y el efecto de la
imagen. El exceso de polvo afectará la calidad de la imagen.
La lente sucia se debe limpiar con un paño de algodón
suave para la superficie de la lente de vidrio. No se utilizarán
paños duros ni abrasivos.

ES 64
service@toptro.comES
ESPECIFICACIONES DEL PROYECTOR
Número de Modelo TR27
Tecnología de
visualización
LCD Fuente de luz LED
Tamaño del
producto
10.58x10.7x22.07cm Peso 0.91kg
Frecuencia de
actualización
60Hz Voltaje de potencia AC90 260V
Resolucion nativa 1920*1080P
Resolución máxima
admitida
4K
Corrección
trapezoidal
Automático/
manual
Focus Manual
Modo de
operación
Control remoto Relación de aspecto 4:3/16:9
Puerto de salida
Salida de audio de
3,5 mm
Puerto de entrada
HDMI*1/
USB*1
Formato de
video
HEVC/VP9/AVS2/AVC 4K/MPEG1/MPEG2/AV1 1080p/60fp(La
compatibilidad con códecs de vídeo puede variar según
las circunstancias; contáctenos para obtener asistencia
adicional)
Formato de
audio
MP3/OGG/FLAC/APE (Los códecs de audio Dolby no son
compatibles )
Formato de
imagen
JPG/BMP/PNG(Soporte de escala de imagen)
Formato del
documento
TXT/DOC/XLSX/PDF
LISTA DE PAQUETES
Proyector TOPTRO TR27 * 1 Control remoto * 1 Cable de alimentación * 1
Cable HDMI * 1 Kit de limpieza * 1 Manual de usuario * 1
Cubierta de lente * 1
ES 65
ESservice@toptro.com
DESCRIPCIÓN GENERAL DEL PROYECTOR
Lente del Proyector
Ventilaciones
Red Antipolvo
Puerto de
Eliminación de Polvo
Enfoque
Manual ±
Puerto del Cable
de Alimentación
Puerto HDMI
Ventana de Infrarrojos
Puerto USB
Botón de
Encendido
Entrada/Salida de
Audio
ES 66
service@toptro.comES
REMOTE CONTROL
Note:
1. Instale 2 pilas AAA (no incluidas) en el control remoto antes de
usarlo, no combine pilas nuevas con pilas viejas en el control
remoto, lo que puede provocar fallos de funcionamiento
debido a un suministro de energía insuficiente.
2. Cuando utilice el control remoto, asegúrese de apuntar el
transmisor de señal del control remoto al receptor de señal
infrarroja del proyector, o simplemente mire hacia la pantalla
de proyección mientras lo opera.
3. Cuando no utilice el control remoto durante un período
prolongado. Saque las baterías para evitar fugas.
①
Encendido/
Apagado
② Silencio
⑦ Conrmar clave
⑨ Menú
④ Cambio del mouse
⑩ Página de inicio
⑪ Volumen+
⑤ Juego aéreo
Miracast ③
Tecla de echa ⑥
Volver ⑧
Volumen- ⑫
ES 67
ESservice@toptro.com
④ Cambio del mouse
1. Según el entorno de uso y los requisitos, el proyector se
puede colocar en un escritorio estable y se puede ajustar la
imagen proyectada de 270°.
2. Mantenga el proyector a una altura en la que su lente sea
simétrica al eje de la pantalla. Si esto no es posible, utilice
la función de corrección trapezoidal para ajustar la imagen
proyectada.
3. El proyector se puede ajustar en los siguientes 4 modos.
INSTALACIÓN
1.Método de Instalación
2.Distancia y Tamaño de Proyección
Relación de aspecto: 16:9
Distancia Tamaño de Pantalla
1m 40"
2m 80"
2.51m 100"
3.01m 120"
3.76m 150"
Proyector
Proyector
Proyector
Proyector
Pantalla
Pantalla
Pantalla
Pantalla
1. Montaje de techo de proyección
frontal
3. Soporte de mesa de proyección
frontal
2. Proyección trasera Montaje en
techo
4. Soporte de mesa de proyección
trasera

ES 68
service@toptro.comES
*El tamaño de la imagen de la proyección depende de la
distancia entre el proyector y la pantalla. Puede haber una
ligera variación del 3 % en las mediciones entre los datos
enumerados anteriormente.
*La distancia de proyección recomendada es de 2~3m.
*Un ambiente más oscuro mejorará la claridad de las
imágenes proyectadas.
Coloque la lente del proyector perpendicularmente a la pantalla
de proyección o al muro cortina y ajuste el rodillo de ajuste de
enfoque hasta que la imagen sea clara.
Nota: Si aún está borroso, intente ajustar la distancia de proyección
y la ubicación del proyector.
Encienda el proyector: Conéctelo al cable de alimentación,
cuando la luz indicadora roja esté encendida, presione la tecla
de encendido en el control remoto o el botón de encendido
en el panel para iniciar el proyector, el indicador cambia de
rojo a azul, el proyector está en.
Apague el proyector: Presione la tecla de encendido en el
control remoto o el botón de encendido en el panel para
apagar el proyector, el indicador cambia de azul a rojo, el
proyector está apagado.
AJUSTE DEL ENFOQUE DE IMAGEN
PROYECTOR INICIAL
Focus ±

ES 69
ESservice@toptro.com
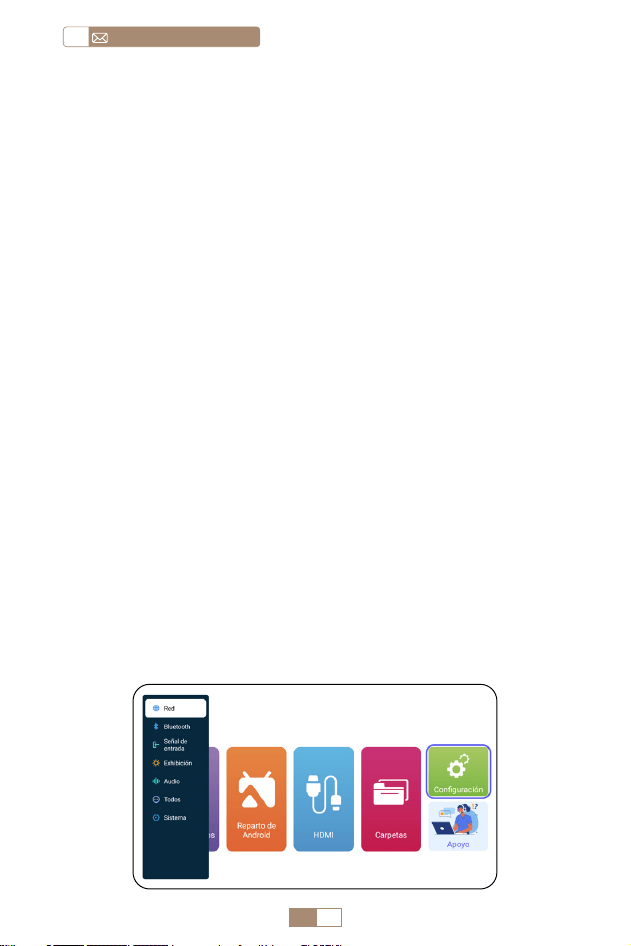
La página de inicio del proyector es la siguiente.
1. La fluidez de la duplicación de pantalla con una conexión
inalámbrica se verá afectada por el entorno de red. Se
recomienda un ancho de banda de 100 Mbit o más cuando
se utiliza la duplicación de pantalla.
2. Asegúrese de que su dispositivo móvil esté cerca del
proyector cuando utilice la conexión inalámbrica. Se
recomienda una distancia de 1 metro.
3. Es posible que algunos dispositivos móviles no admitan la
duplicación de pantalla debido a la compatibilidad.
CONFIGURACIÓN DEL PROYECTOR
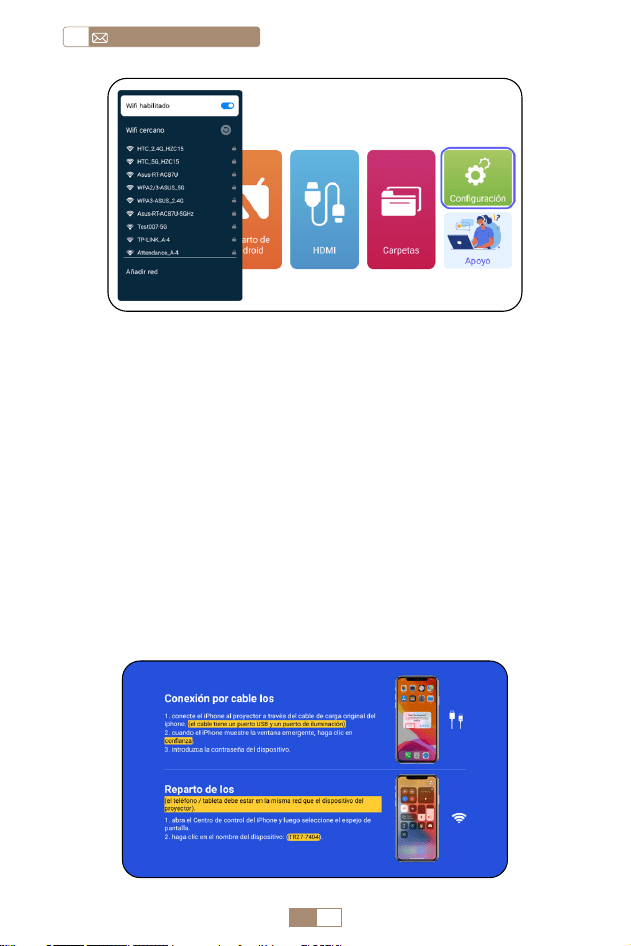
1.Configuración de WiFi
ES 70
service@toptro.comES
Atención: Asegúrese de que su dispositivo iOS esté conectado
a la misma red Wi Fi que su proyector.
1. Conecte el proyector TR27 a su red WiFi.
2. Volver a la página de inicio. Seleccione el menú [ Reparto
de iOS ]. Permanezca en esta interfaz.
3. Acceda al [ Centro de control ] en su dispositivo iOS
Seleccione la función [ Duplicar pantalla ] Seleccione y
conecte el receptor iOS Cast llamado [ TR27-7404 ] La
pantalla del dispositivo iOS se reflejará y se mostrará en la
pantalla de proyección .
2.Conexión Inalámbrica
2.1 Para iOS Cast (Airplay)
ES 71
ESservice@toptro.com
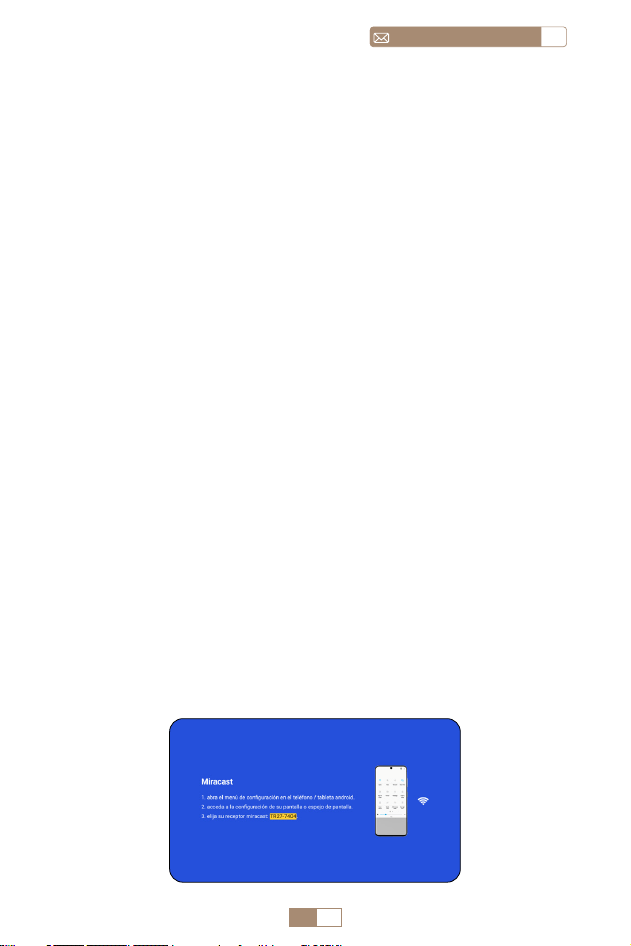
1. Asegúrese de habilitar la función WLAN en su dispositivo
Android. (No es necesario conectarse a ninguna red Wi Fi).
2. Volver a la página de inicio: seleccione el menú [ Reparto de
Android ] Permanezca en esta interfaz
3. Acceda al [ Centro de control ] en su dispositivo Android,
seleccione [ Duplicación de pantalla/Vista inteligente ]
4. Seleccione y conecte el receptor Miracast llamado [ TR27-7404 ]
5. Una vez conectado correctamente, la pantalla de su dispositivo
Android se reflejará y se mostrará en la pantalla de proyección.
Nota:
Métodos de duplicación de pantalla: Los dispositivos Android
de diferentes marcas pueden utilizar varios términos y
métodos para habilitar la duplicación de pantalla. Para
encontrar los pasos exactos para su dispositivo, consulte
el manual de su dispositivo. Los términos comunes para la
duplicación de pantalla incluyen pantalla múltiple, pantalla
inalámbrica, pantalla WLAN, duplicación de pantalla y vista
inteligente.
Compatibilidad del dispositivo: Tenga en cuenta que no todos
los teléfonos Android admiten la función de duplicación de
pantalla. Antes de intentar utilizar la duplicación de pantalla,
asegúrese de que su dispositivo Android admita esta función.
Puedes consultar el manual de tu dispositivo o buscar la opción
de duplicación de pantalla en la configuración para verificar la
compatibilidad.
2.2 Para sistema Android (Miracast)
ES 72
service@toptro.comES
1. Confirme para abrir ElfCast en la ventana emergente de su
teléfono.
2. lt se puede conectar automáticamente a la misma pantalla.
Atención:
• Evite enchufar y desenchufar con frecuencia para lograr una
conexión estable.
• Ciertos modelos de Android requieren seleccionar "Transferir
archivo" para duplicar la pantalla.
1. Encienda su altavoz Bluetooth.
2. Encienda el [ Bluetooth ] de su proyector y seleccione su
altavoz Bluetooth para conectarse.
1. Conecte su iPhone al proyector mediante un cable
Lightning USB.
2. Haga clic en "Confiar" cuando el iPhone muestre una ventana
emergente.
3. Ingrese la contraseña del dispositivo.
3.Duplicación de Pantalla con Cable
4.Bluetooth
3.1 Conexión Android por Cables
Conectar altavoces Bluetooth
3.2 iOS se conecta por cables

ES 73
ESservice@toptro.com
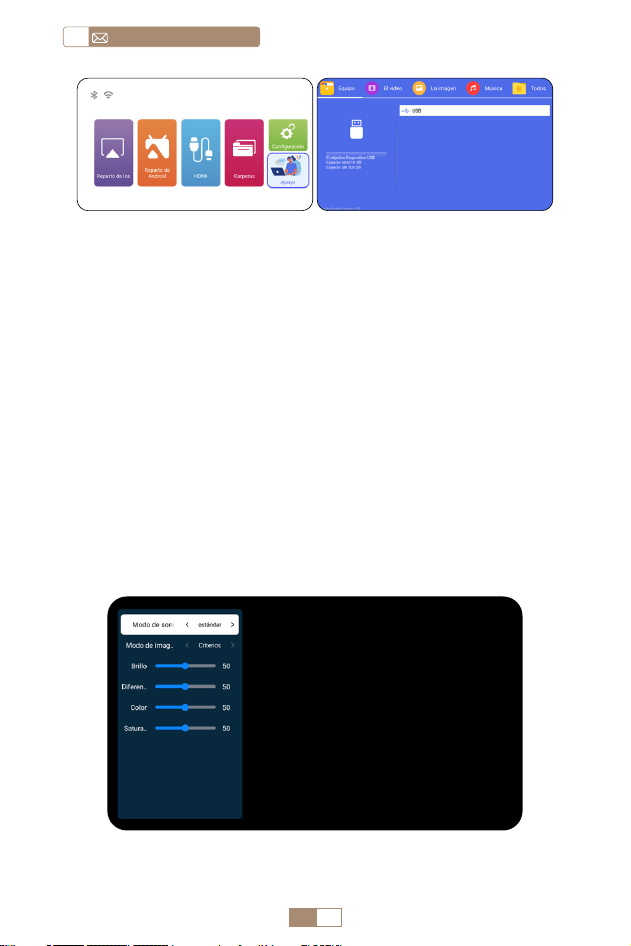
1. Inserte el disco flash USB en el puerto USB del proyector.
2. Seleccione [ Carpetas ] y presione la tecla [ OK ] para ingresar.
3. Dependiendo del tipo de archivo, seleccione la opción [
Equipo/El Video/La Imagen/Música/Todos ].
4. Seleccione el archivo deseado y luego presione el botón [
OK ] para reproducirlo.
5. Haga clic en el botón [ MENÚ ] en el control remoto mientras
reproduce video para ajustar la configuración de imagen
directamente.
5.Reproducción Multimedia
5.1 Modo de entrada de disco USB
Nota:
1. El proyector TR27 es compatible con la mayoría de los
auriculares Bluetooth, altavoces Bluetooth y Airpods. Sin
embargo, tenga en cuenta que no es compatible con teclados
Bluetooth ni teléfonos Bluetooth.
2. Si no encuentra sonido mientras reproduce videos, le
recomendamos verificar la configuración de sonido Dolby en
sus dispositivos conectados. Desactivar el sonido Dolby puede
garantizar una mejor compatibilidad de audio con el proyector.
3. Algunos altavoces Bluetooth pueden experimentar una
reducción significativa del volumen cuando se conectan al
proyector. Para solucionar este problema, intente aumentar
el volumen en todos los dispositivos relevantes para lograr el
nivel de sonido deseado.
4. Si tiene alguna pregunta o necesita más ayuda, no dude en
ponerse en contacto con el soporte de TOPTRO por correo
electrónico a Service@toptro.com.
ES 74
service@toptro.comES
5.2 Interfaz de Reproducción de Vídeo
Consejos cálidos:Si su proyector no puede reconocer el disco
USB, siga los métodos siguientes para resolver el problema.
Asegúrese de que su disco USB cumpla con los siguientes
formatos:
FAT32: 8GB/16GB/32GB
NTFS: 64GB 2TB
Si no cumple con estos criterios, deberá cambiar un disco
USB de formato compatible.
Si el problema persiste, envíe una descripción detallada de
su problema a la siguiente dirección de correo electrónico:
Service@toptro.com.
ES 75
ESservice@toptro.com
Manual Contenido
Modo de Sonido
Estándar/Música/Película/
Noticias
Modo de imagen
Estándar/Cine/Vívido/
Personalizado
Brillo 0~100
Contraste 0~100
Color 0~100
Saturación 0~100
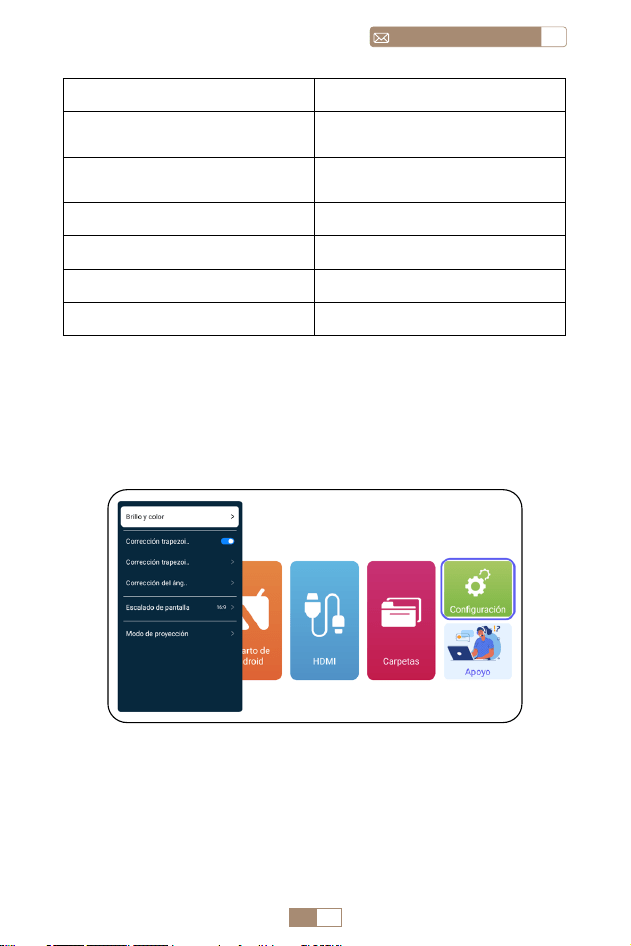
CONFIGURACIÓN DEL PROYECTOR
1.Exhibición(Funciones de Corrección)

ES 76
service@toptro.comES
Menú Contenido Función
Brillo y color
Modo de
imagen/Brillo/
Contraste/Tono/
Saturación/
Nitidez
Modifique los
parámetros de la
imagen en el rango
0 100
Corrección
Trapezoidal
Automática
/
Ajusta el ángulo de la
pantalla verticalmente
automáticamente
Corrección
Trapezoidal
Manual
+/ /OK
Ajuste el ángulo de la
pantalla verticalmente
manualmente
Corrección del
Ángulo inicial
/
Corrección del ángulo
inicial
Escala de Pantalla
4:3/16:9/Relación
de pantalla
original/Zoom
de pantalla
Ajustar el tamaño de la
pantalla y el zoom (100%
50%)
Modo de
proyección
Proyección
frontal/trasera
frontal/techo
frontal/techo
trasero
Ajustar la posición de la
imagen proyectada
2.Ajustes del Sistema
ES 77
ESservice@toptro.com
CONEXIÓN DE LÍNEAS DE SEÑAL
Menú Función
Información del Sistema
Presentación de información
sobre el proyector
Idioma
Configurar el idioma del
sistema
Fecha y hora
Presentación de información
sobre el proyector
Actualización de sistema
Actualice el software a través
de un archivo local
Restablecimiento de fábrica
Restaurar la configuración
predeterminada de fábrica
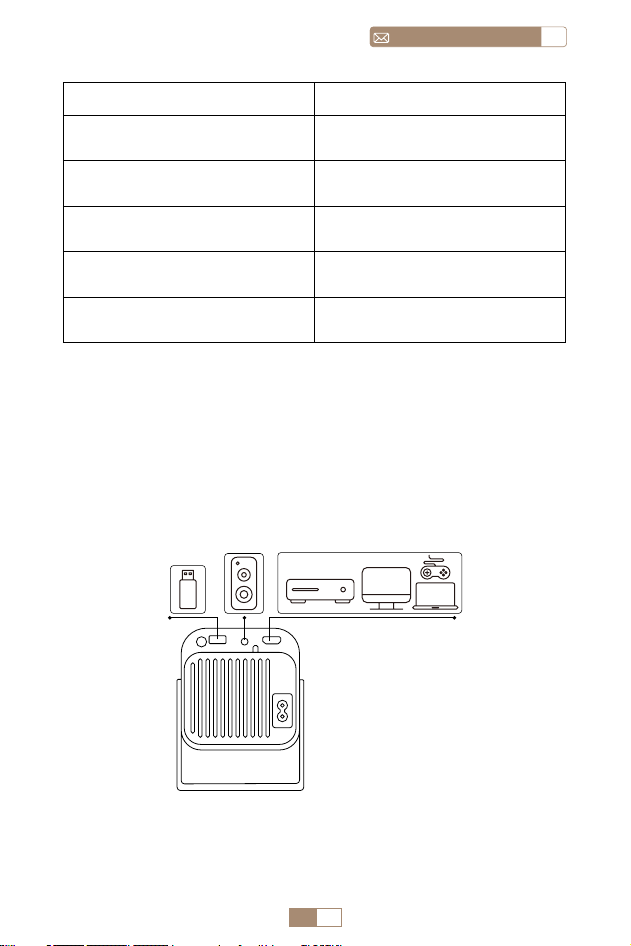
El proyector TOPTRO TR27 tiene 3 interfaces, puerto HDMI*1/
puerto USB*1/salida de auriculares de 3,5 mm*1. Seleccione el
puerto de conexión correcto para conectar su dispositivo (PC,
teléfono, reproductor de DVD, USB, PS4, etc.)
1.Conéctese mediante un disco USB
1. Inserte el disco flash USB en el puerto USB del proyector.
2. Seleccione "Medios" y presione la tecla "OK" para ingresar.
DVD

ES 78
service@toptro.comES
2.Conéctese a dispositivos a través del puerto HDMI
1. Conecte su dispositivo Fire TV (o PC, XBOX, PS4, etc.) al puerto
HDMI del proyector.
2. Ingrese a la página de inicio para seleccionar el HDMI corr
espondiente como fuente de señal.
3.Conéctese al altavoz
• Utilice el cable de audio de 3,5 mm para conectar con el altavoz.
• Encienda el proyector y el altavoz (elija el modo AUX).
4.Conéctese al reproductor de DVD
1. Encienda su reproductor de DVD y el proyector.
2. Conéctelo al reproductor de DVD y al proyector con el cable
HDMI.
3. Ingrese a la página de inicio para seleccionar el HDMI
correspondiente como fuente de señal.
Nota: Cuando el proyector está conectado al reproductor de
DVD a través del cable HDMI, si no hay sonido, puede ser que
la señal de salida del puerto HDMI del reproductor de DVD no
sea compatible con HDCP, intente conectar su altavoz.
3. Dependiendo del tipo de archivo, seleccione la opción [
Equipo/El Video/La Imagen/Música/Todos ].
4. Seleccione el archivo deseado y luego presione el botón [
OK ] para reproducirlo.
Audio out
AUX port
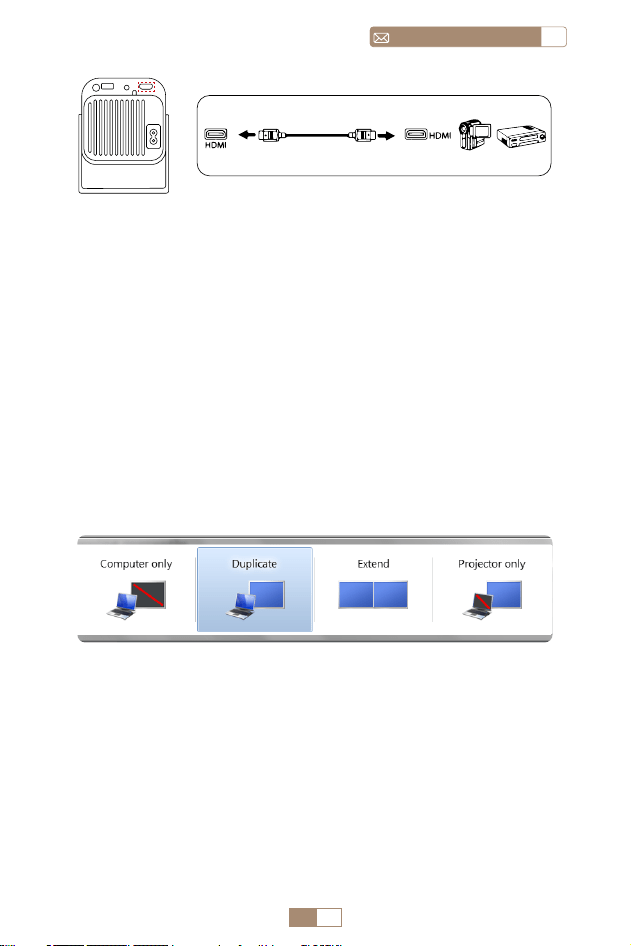
ES 79
ESservice@toptro.com
5.Conéctese a la computadora
1. Conéctelo a la computadora y al proyector TR27 con el
cable HDMI.
2. Seleccione la fuente HDMI para proyectar cualquier archivo
en su computadora.
3. En su computadora portátil, mantenga presionadas las
teclas del tablero "Win + P" para cambiar el modo de
visualización.
NOTA: Para MacBook, use un adaptador de tipo C a HDMI
para conectar su MacBook, o un adaptador Mini Display
a HDMI para conectar con su MacBook Air (adaptador no
incluido).
1. Solo computadora: Esta es la opción predeterminada y
mostrará la pantalla solo en el monitor principal.
2. Duplicar: Para duplicar su escritorio en todos los monitores
conectados.
3. Ampliar: Para ampliar su escritorio a varios monitores.
4. Sólo proyector: Utilice únicamente el monitor secundario
(proyector) y mantenga apagado el monitor principal.
Para cambiar la resolución de la pantalla en el modo Solo
proyector, siga estos pasos:
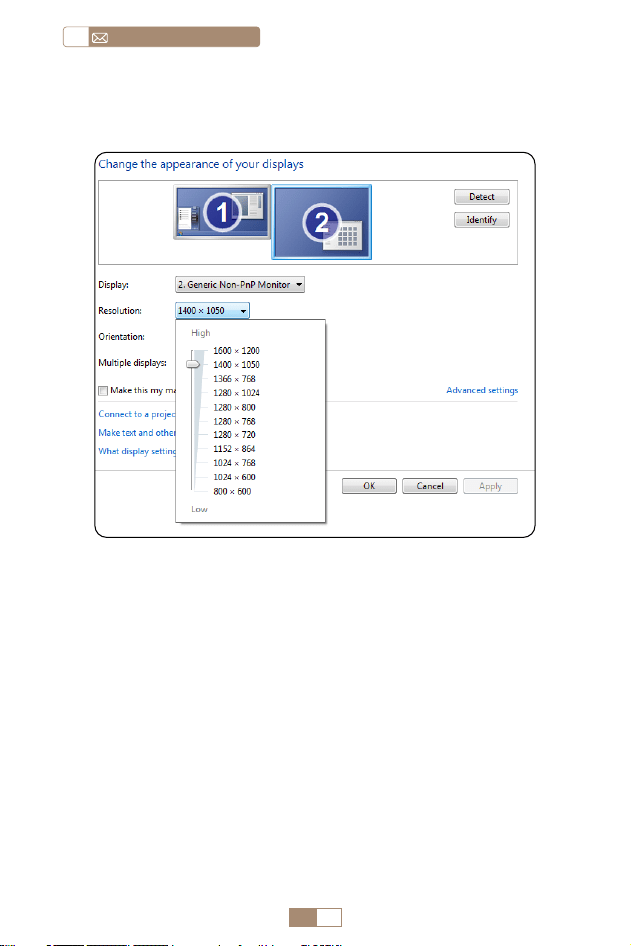
ES 80
service@toptro.comES
GARANTÍA
Muchas gracias por su compra y apoyo. Ofrecemos 3 años de
garantía para el proyector TR27. Si tiene alguna pregunta, no
dude en contactarnos a través de Service@toptro.com.
Nota: Hemos preparado un regalo para ti. Si lo desea, contáctenos
a través de Service@toptro.com.
Paso: Inicio > Panel de control > Apariencia y personalización >
Ajustar resolución de pantalla

CONTENTS
TOPTRO Supporto Professionale a Vita - - - - - - - - - -82
SUGGERIMENTI - - - - - - - - - - - - - - - - - - - - -82
ELENCO PACCHETTI - - - - - - - - - - - - - - - - - - -84
SPECIFICHE DEL PROIETTORE - - - - - - - - - - - - - -84
PANORAMICA DEL PROIETTORE - - - - - - - - - - - - -85
TELECOMANDO - - - - - - - - - - - - - - - - - - - - -86
INSTALLAZIONE - - - - - - - - - - - - - - - - - - - - - 87
1.Metodo di installazione - - - - - - - - - - - - - - - - - - - 87
2.Distanza e dimensioni di proiezione- - - - - - - - - - - - - 87
AVVIO DEL PROIETTORE - - - - - - - - - - - - - - - - -88
REGOLAZIONE DELLA MESSA A FUOCO DELL'IMMAGINE- -88
IMPOSTAZIONE DEL PROIETTORE - - - - - - - - - - - -89
1.Impostazione Wi-Fi - - - - - - - - - - - - - - - - - - - - - 89
2.Connessione senza fili - - - - - - - - - - - - - - - - - - - 90
2.1 Per iOS Cast (Airplay) 90
2.2 Per il sistema Android (Miracast) 91
3. Mirroring dello Schermo Cablato - - - - - - - - - - - - - - 92
3.1 Android Connect tramite cavi 92
3.2 Connessione iOS tramite cavi 92
4.Bluetooth - - - - - - - - - - - - - - - - - - - - - - - - - 92
5.Riproduzione multimediale - - - - - - - - - - - - - - - - - 93
5.1 Modalità di input del disco USB 93
5.2 Interfaccia di riproduzione video 94
IMPOSTAZIONE DEL PROIETTORE - - - - - - - - - - - -95
1.Mostra(Funzioni di Correzione) - - - - - - - - - - - - - - - 95
2.Impostazioni di sistema- - - - - - - - - - - - - - - - - - -96
COLLEGAMENTO LINEE DI SEGNALE - - - - - - - - - - - 97
1.Collegamento tramite disco USB - - - - - - - - - - - - - - 97
2.Collegarsi ai dispositivi tramite la porta HDMI - - - - - - - - 98
3.Collegarsi all'altoparlante - - - - - - - - - - - - - - - - - -98
4.Collegarsi al lettore DVD - - - - - - - - - - - - - - - - - - 98
5.Collegarsi al computer - - - - - - - - - - - - - - - - - - - 99
GARANZIA
- - - - - - - - - - - - - - - - - - - - - - - - - -
100

IT 82
service@toptro.comIT
TOPTRO Supporto Professionale a Vita
SUGGERIMENTI
Gentile Cliente,
Grazie mille per il supporto TOPTRO.
Si prega di leggere attentamente questo manuale prima
di utilizzare il proiettore. In caso di problemi, inviare tramite
e mail il numero dell'ordine e il problema a Service@toptro.
com. Forniremo una soluzione rapida entro 24 ore.
Molti problemi possono essere facilmente risolti impostando,
ad esempio assenza di segnale, assenza di audio, connessione
Bluetooth non riuscita, connessione WiFi non riuscita,
animazione discontinua, ecc. Promettiamo che tutti i
proiettori sono stati accuratamente controllati e imballati al
100% prima della spedizione.
Ti invitiamo inoltre a seguire il nostro sito Web ufficiale per
rimanere aggiornato sui nostri ultimi sviluppi. (https://www.
toptro.com/)
Se avete domande, potete contattarci per risolvere il
problema? E permetterci di migliorare. Ti garantiamo che ti
forniremo una soluzione soddisfacente.
Grazie per la tua comprensione!
Distinti saluti
Team di assistenza TOPTRO
1. Non posizionare il proiettore in una stanza troppo calda o
troppo fredda, perché la temperatura alta o bassa ridurrà la
durata del dispositivo. L'ambiente di lavoro sarebbe migliore
di 5
℃
~ 35
℃
.
2. La ventilazione è attrezzata per consentire al proiettore di
funzionare in modo stabile. Non coprire la presa d'aria con
panni, coperte o altro. Non inserire nulla nella fessura del

IT 83
ITservice@toptro.com
proiettore, altrimenti potrebbe produrre un cortocircuito o
una scossa elettrica al dispositivo e causare danni.
3. Il proiettore deve essere rigorosamente protetto da forti
impatti, estrusione e vibrazioni. Non tentare di muoversi in
caso di forti impatti, estrusioni e vibrazioni. Non tentare di
muoversi e il circuito interno si guasta.
4. L'obiettivo, in quanto componente principale del proiettore,
è direttamente correlato alla definizione e all'effetto
dell'immagine. L'eccessiva polvere influirà sulla qualità
dell'immagine. La lente sporca deve essere pulita con un
panno di cotone morbido per la superficie della lente in
vetro. Non devono essere utilizzati panni duri o abrasivi.

IT 84
service@toptro.comIT
SPECIFICHE DEL PROIETTORE
Modello n. TR27
Tecnologia di
Visualizzazione
LCD Fonte di Luce LED
Taglia del
Prodotto
10.58x10.7x22.07cm Peso 0.91kg
Frequenza di
Aggiornamento
60Hz
Tensione di
Alimentazione
AC90 260V
Risoluzione
Nativa
1920*1080P
Risoluzione Massima
Supportata
4K
Correzione
Trapezoidale
Automatico/
Manuale
Focus Manual
Modalità di
Funzionamento
Telecomando Proporzioni 4:3/16:9
Porta di Uscita
Uscita audio da 3,5
mm
Porta d'ingresso
HDMI*1/
USB*1
Formato Video
HEVC/VP9/AVS2/AVC 4K/MPEG1/MPEG2/AV1 1080p/60fp(Il
supporto per i codec video può variare a seconda delle
circostanze, contattaci per ulteriore supportot)
Formato Audio
MP3/OGG/FLAC/APE (I codec audio Dolby non sono
supportati )
Formato
Immagine
JPG/BMP/PNG(Supportare il ridimensionamento delle
immagini)
Formato del
Documento
TXT/DOC/XLSX/PDF
ELENCO PACCHETTI
Proiettore TOPTRO TR27*1 Telecomando*1 Cavo di alimentazione*1
Cavo HDMI*1 Kit di pulizia*1 Manuale dell'utente*1
Copriobiettivo*1

IT 85
ITservice@toptro.com
PANORAMICA DEL PROIETTORE
Obiettivo del Proiettore
Prese d'aria
Rete Antipolvere
Porta per la Rimozione
della Polvere
Messa a Fuoco
Manuale ±
Porta del Cavo di
Alimentazione
Porta HDMI
Finestra IR
Porta USB
Pulsante di
Accensione
Ingresso/Uscita
Audio
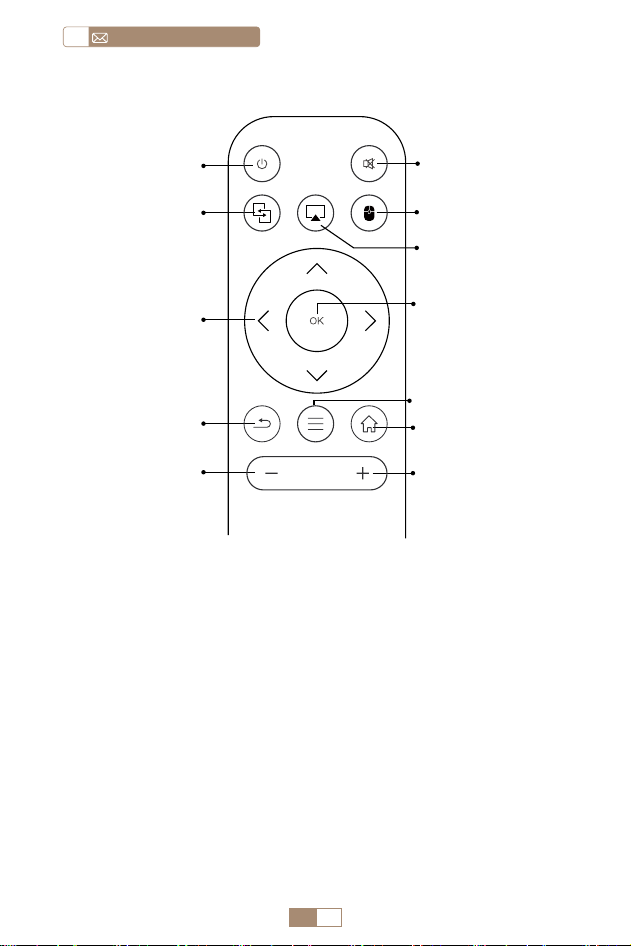
IT 86
service@toptro.comIT
TELECOMANDO
Nota:
1. Installare 2 batterie AAA (non incluse) nel telecomando prima
di utilizzarlo, non combinare batterie nuove con quelle vecchie
nel telecomando, poiché ciò potrebbe causare guasti dovuti a
potenza insufficiente fornitura.
2. Quando si utilizza il telecomando, assicurarsi di puntare il
trasmettitore del segnale del telecomando verso il ricevitore
del segnale a infrarossi sul proiettore o semplicemente di
fronte allo schermo di proiezione durante l'utilizzo.
3. Quando non si utilizza il telecomando per un lungo periodo. Si
prega di estrarre le batterie per evitare perdite.
①
Accensione/
Spegnimento
② Disattiva audio
⑦ Conferma chiave
⑨ Menù
④
Commutazione del
mouse
⑩ Pagina iniziale
⑪ Volume+
⑤ Gioco aereo
Miracast ③
Tasto freccia ⑥
Indietro ⑧
Volume- ⑫
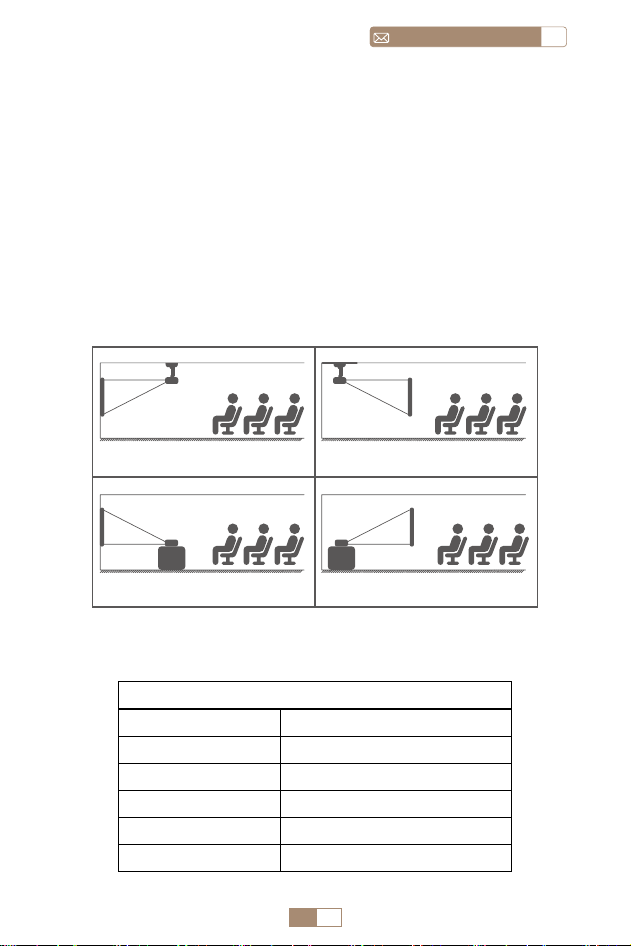
IT 87
ITservice@toptro.com
1. A seconda dell'ambiente e dei requisiti di utilizzo, il
proiettore può essere posizionato su una scrivania stabile e
l'immagine proiettata a 270° può essere regolata.
2. Mantenere il proiettore ad un'altezza in cui la lente sia
simmetrica rispetto all'asse dello schermo. Se ciò non è
possibile, utilizzare la funzione di correzione trapezoidale
per regolare l'immagine proiettata.
3. Il proiettore può essere regolato nelle 4 modalità seguenti.
INSTALLAZIONE
1.Metodo di installazione
2.Distanza e dimensioni di proiezione
Proporzioni: 16:9
Distanza Dimensione dello schermo
1m 40"
2m 80"
2.51m 100"
3.01m 120"
3.76m 150"
Proiettore
Proiettore
Proiettore
Proiettore
screen
screen
screen
screen
1. Montaggio a soffitto per
proiezione frontale
3. Supporto per tavolo per
proiezione frontale
2. Montaggio a soffitto a
retroproiezione
4. Supporto da tavolo per
retroproiezione
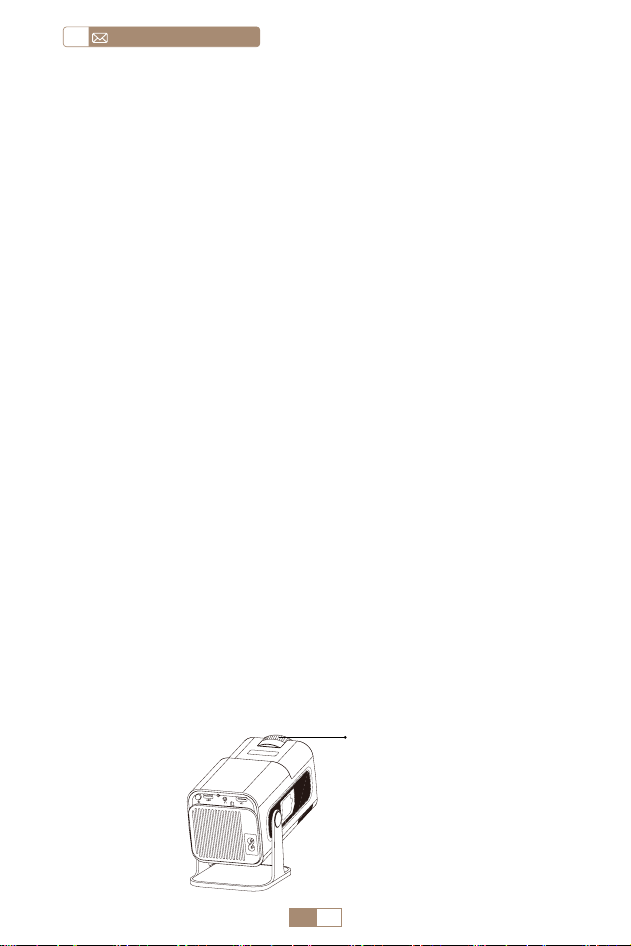
IT 88
service@toptro.comIT
*La dimensione dell'immagine proiettata dipende dalla
distanza tra il proiettore e lo schermo. Potrebbe esserci una
leggera variazione del 3% nelle misurazioni tra i dati sopra
elencati.
*La distanza di proiezione consigliata è 2~3m.
*Un ambiente più scuro migliorerà la chiarezza delle immagini
proiettate.
Posizionare l'obiettivo del proiettore perpendicolarmente allo
schermo di proiezione o alla facciata continua e regolare il rullo
di regolazione della messa a fuoco finché l'immagine non risulta
nitida.
Nota: se è ancora sfocato, provare a regolare la distanza di
proiezione e il posizionamento del proiettore.
Accendi il proiettore: Collegare al cavo di alimentazione,
quando la spia rossa è accesa, premere il tasto di accensione
sul telecomando o pulsante di accensione sul pannello
per avviare il proiettore, l'indicatore passa dal rosso al blu, il
proiettore è acceso.
Spegnere il proiettore: Premere il tasto di accensione sul
telecomando o il pulsante di accensione sul pannello per
spegnere proiettore, l'indicatore passa dal blu al rosso, il
proiettore è spento.
REGOLAZIONE DELLA MESSA A FUOCO
DELL'IMMAGINE
AVVIO DEL PROIETTORE
Focus ±
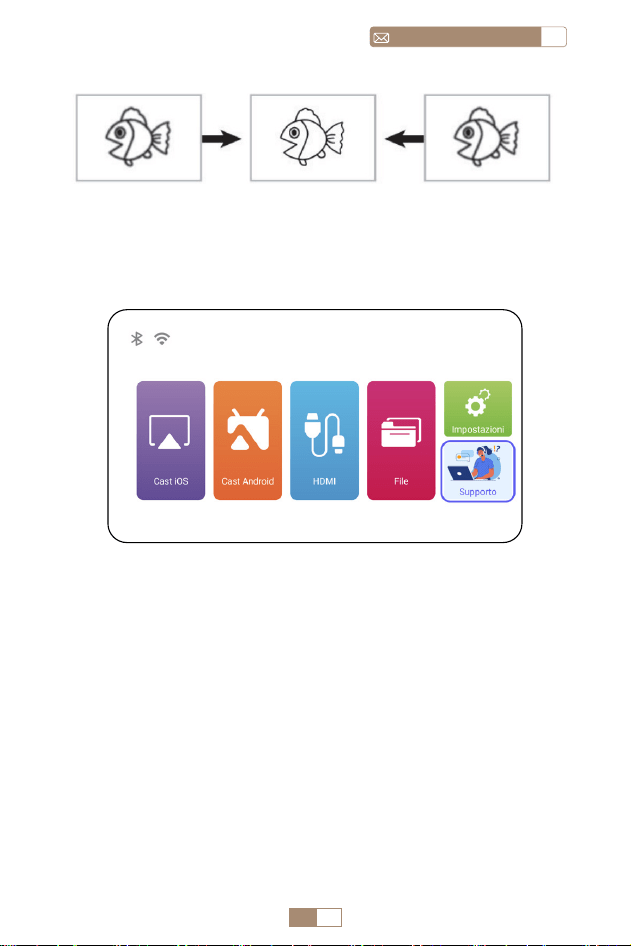
IT 89
ITservice@toptro.com
La home page del proiettore è la seguente.
1. La fluidità del mirroring dello schermo con una connessione
wireless sarà influenzata dall'ambiente di rete. Si consiglia
una larghezza di banda di 100 Mbit o più quando si utilizza il
mirroring dello schermo.
2. Assicurati che il tuo dispositivo mobile sia vicino al proiettore
quando usi la connessione wireless. Si consiglia una distanza
entro 1 metro.
3. Alcuni dispositivi mobili potrebbero non supportare il
mirroring dello schermo a causa della compatibilità.
IMPOSTAZIONE DEL PROIETTORE
1.Impostazione Wi-Fi
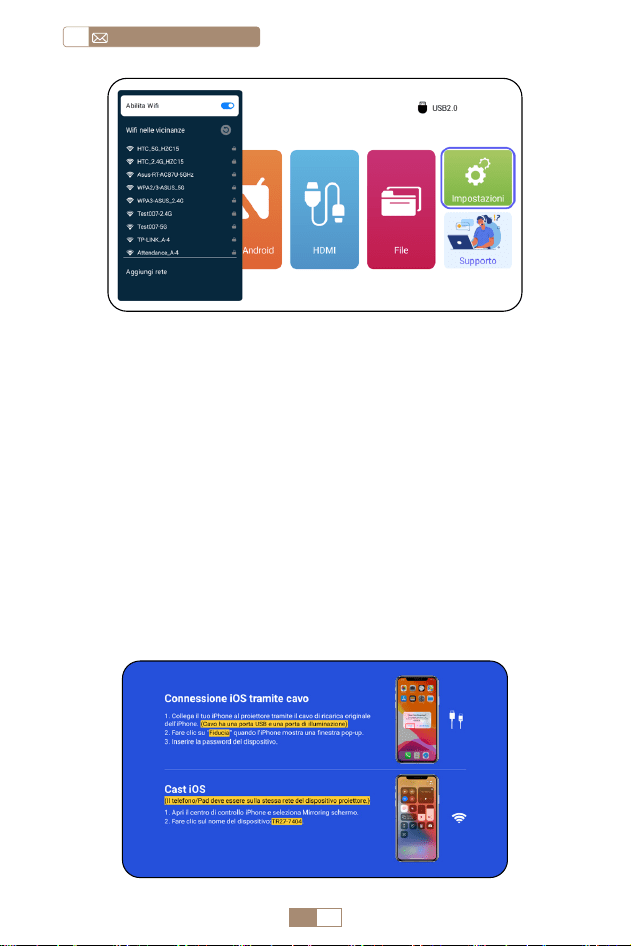
IT 90
service@toptro.comIT
Attenzione: Assicurati che il tuo dispositivo iOS sia connesso
alla stessa rete Wi Fi del proiettore.
1. Collega il proiettore TR27 alla tua rete WiFi.
2. Torna alla home page: seleziona il menu [ Cast iOS ] resta su
questa interfaccia.
3. Accedi al [ Centro di controllo ] sul tuo dispositivo iOS
Seleziona la funzione [ Clonazione schermo ] Seleziona e
collega il ricevitore iOS Cast denominato [ TR27-7404 ] Lo
schermo del dispositivo iOS verrà specchiato e visualizzato
sullo schermo di proiezione .
2.Connessione senza fili
2.1 Per iOS Cast (Airplay)

IT 91
ITservice@toptro.com
1. Assicurati di abilitare la funzione WLAN sul tuo dispositivo
Android. (Non è necessaria la connessione a qualsiasi rete
Wi Fi.)
2. Torna alla home page: seleziona il menu [ Cast Android ]
resta su questa interfaccia
3. Accedi al [ Centro di controllo ] sul tuo dispositivo Android
e seleziona [ Mirroring dello schermo/Visualizzazione
intelligente ].
4. Seleziona e collega il ricevitore Miracast denominato [
TR27-7404 ].
5. Una volta connesso con successo, lo schermo del tuo
dispositivo Android verrà specchiato e visualizzato sullo
schermo di proiezione.
Nota:
Metodi di mirroring dello schermo: I dispositivi Android di
diversi marchi possono utilizzare vari termini e metodi per
abilitare il mirroring dello schermo. Per trovare i passaggi
esatti per il tuo dispositivo, fai riferimento al manuale del
dispositivo. I termini comuni per il mirroring dello schermo
includono Multischermo, Display wireless, Display WLAN,
Mirroring schermo e Smart View.
Compatibilità del dispositivo: Tieni presente che non
tutti i telefoni Android supportano la funzione di mirroring
dello schermo. Prima di tentare di utilizzare il mirroring
dello schermo, assicurati che il tuo dispositivo Android
supporti questa funzione. Puoi controllare il manuale del tuo
dispositivo o cercare l'opzione di mirroring dello schermo
nelle impostazioni per verificare la compatibilità.
2.2 Per il sistema Android (Miracast)
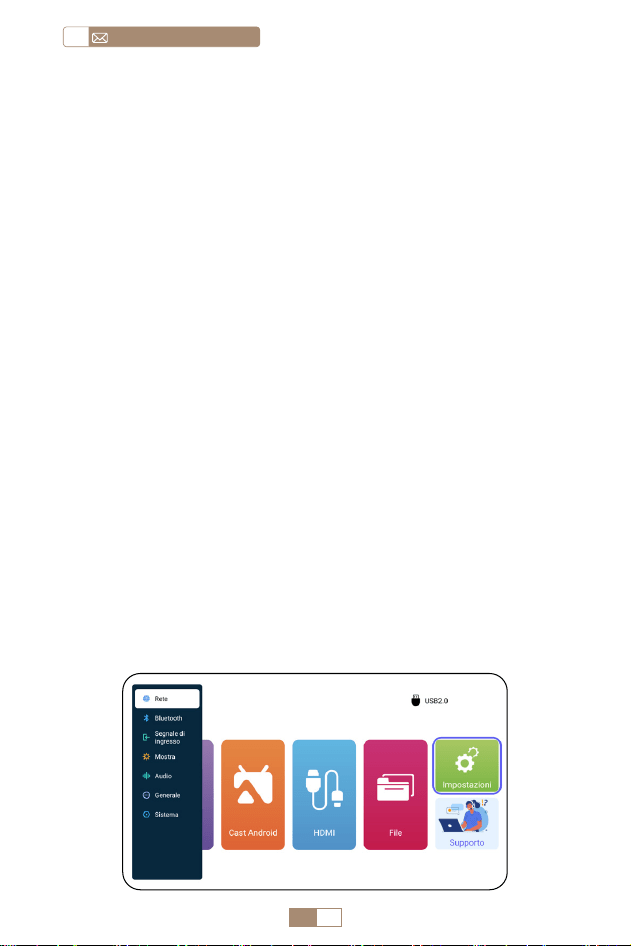
IT 92
service@toptro.comIT
1. Conferma di aprire ElfCast nella finestra pop up del tuo
telefono.
2. lt può essere collegato automaticamente allo stesso schermo.
Attenzione:
• Evitare collegamenti e scollegamenti frequenti per una
connessione stabile.
• Alcuni modelli Android richiedono la selezione di "Trasferisci
file" per il mirroring dello schermo.
1. Accendi l'altoparlante Bluetooth.
2. Accendi il [ Bluetooth ] del tuo proiettore e seleziona
l'altoparlante Bluetooth per connetterti.
1. Collega il tuo iPhone al proiettore tramite un cavo Lightning
USB.
2. Fare clic su "Affidabile" quando l'iPhone mostra una finestra
pop up.
3. Immettere la password del dispositivo.
3. Mirroring dello Schermo Cablato
4.Bluetooth
3.1 Android Connect tramite cavi
Collega gli altoparlanti Bluetooth
3.2 Connessione iOS tramite cavi

IT 93
ITservice@toptro.com
1. Inserire il disco flash USB nella porta USB del proiettore.
2. Selezionare [ File ] e premere il tasto [ OK ] per accedere
3. A seconda del tipo di file, selezionare l'opzione [
Attrezzature/Video/Immagine/Musica/Tutti ]
4. Selezionare il file desiderato e quindi premere il pulsante [
OK ] per riprodurlo.
5. Fare clic sul pulsante [ MENU ] sul telecomando durante
la riproduzione del video per regolare direttamente le
impostazioni dell'immagine.
5.Riproduzione multimediale
5.1 Modalità di input del disco USB
Nota:
1. Il proiettore TR27 è compatibile con la maggior parte degli
auricolari Bluetooth, altoparlanti Bluetooth e Airpod. Tuttavia,
tieni presente che non è compatibile con tastiere Bluetooth o
telefoni Bluetooth.
2. Se non si sente alcun suono durante la riproduzione dei video,
ti consigliamo di controllare le impostazioni audio Dolby sui
tuoi dispositivi collegati. La disattivazione dell'audio Dolby può
garantire una migliore compatibilità audio con il proiettore.
3. Alcuni altoparlanti Bluetooth potrebbero riscontrare una
significativa riduzione del volume quando collegati al
proiettore. Per risolvere questo problema, prova ad aumentare
il volume su tutti i dispositivi interessati per ottenere il livello
sonoro desiderato.
4. Se hai domande o hai bisogno di ulteriore assistenza, non
esitare a contattare il supporto TOPTRO via e mail all'indirizzo
Service@toptro.com.
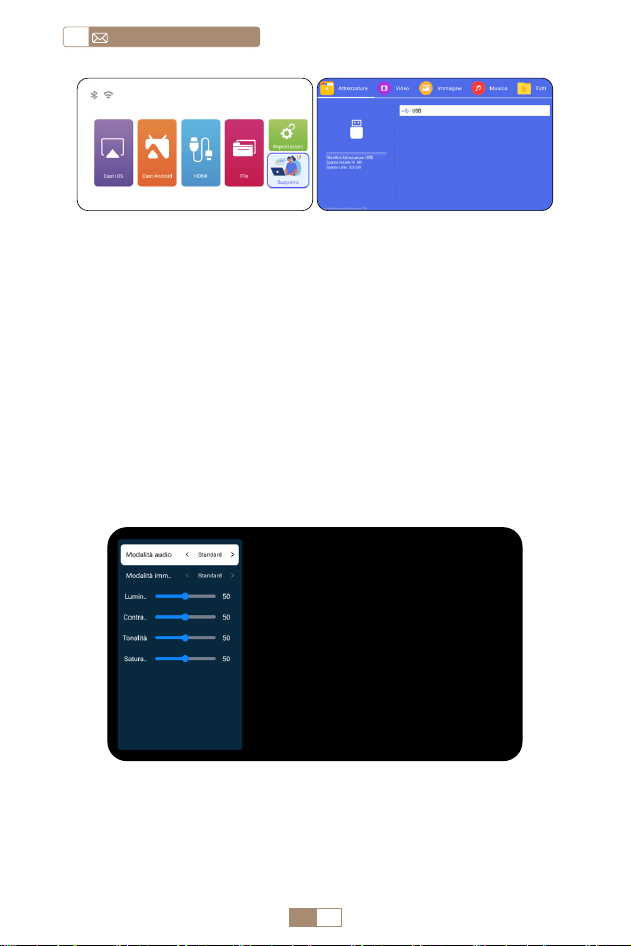
IT 94
service@toptro.comIT
5.2 Interfaccia di riproduzione video
Suggerimenti caldi: se il proiettore non riesce a riconoscere il
disco USB, seguire i metodi seguenti per risolvere il problema.
Assicurati che il tuo disco USB soddisfi i seguenti formati:
FAT32: 8GB/16GB/32GB
NTFS: 64 GB 2 TB
Se non soddisfa questi criteri, dovrai cambiare un disco USB
del formato supportato.
Se il problema persiste, invia una descrizione dettagliata del
problema al seguente indirizzo email: Service@toptro.com.

IT 95
ITservice@toptro.com
Manuale Contenuto
Modalità Audio
Standard/Musica/Film/
Notizie
Modalità Immagine
Standard/Cinema/Vivace/
Personalizzato
Luminosità 0~100
Contrasto 0~100
Tonalità 0~100
Saturazione 0~100
IMPOSTAZIONE DEL PROIETTORE
1.Mostra(Funzioni di Correzione)
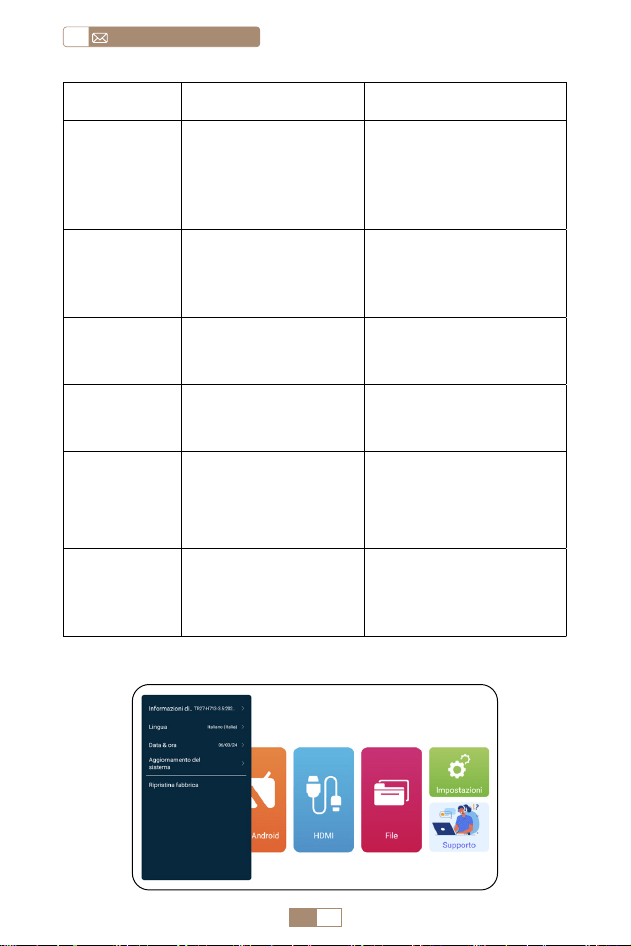
IT 96
service@toptro.comIT
Manuale Contenuto Funzione
Luminosità &
Colore
Modalità immagine/
Luminosità/
Contrasto/Tonalità/
Saturazione/
Nitidezza
Modificare i parametri
dell'immagine
nell'intervallo 0 100
Correzione
trapezoidale
automatica
/
Regola
automaticamente
l'angolazione dello
schermo verticalmente
Correzione
Trapezoidale
Manuale
+/ /OK
Regolare manualmente
l'angolazione dello
schermo verticalmente
Correzione
dell'angolo
Iniziale
/
Correzione dell'angolo
iniziale
Ridimensio
namento
dello
Schermo
4:3/16:9/Rapporto
schermo originale/
Zoom schermo
Regola le dimensioni
dello schermo e lo
zoom (100% 50%)
Modalità di
proiezione
Proiezione anteriore/
posteriore anteriore/
anteriore soffitto/
posteriore soffitto
Regolare la posizione
dell'immagine
proiettata
2.Impostazioni di sistema
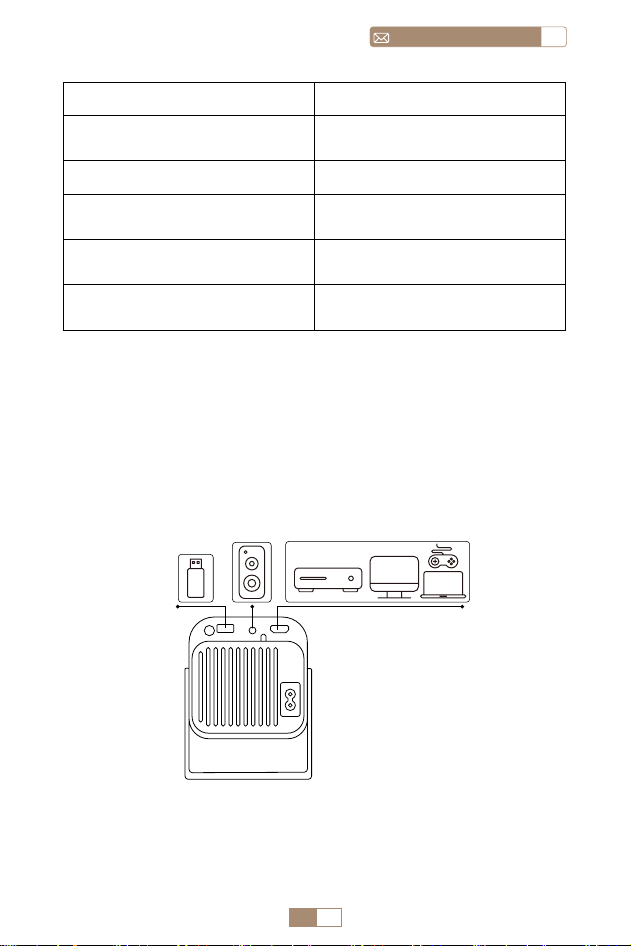
IT 97
ITservice@toptro.com
COLLEGAMENTO LINEE DI SEGNALE
Manuale Contenuto
Informazioni sul Sistema
Presentazione delle
informazioni sul proiettore
Lingua Imposta la lingua del sistema
Data & ora
Presentazione delle
informazioni sul proiettore
Aggiornamento del sistema
Aggiorna il software tramite
file locale
Ripristina fabbrica
Ripristina le impostazioni
predefinite di fabbrica
Il proiettore TOPTRO TR27 ha 3 interfacce, porta HDMI*1/
porta USB*1/uscita cuffie da 3,5 mm*1. Seleziona la porta di
connessione corretta per collegare il tuo dispositivo (PC, telefono,
lettore DVD, USB, PS4, ecc.)
1.Collegamento tramite disco USB
1. Inserire il disco flash USB nella porta USB del proiettore.
2. Selezionare "Media" e premere il tasto "OK" per accedere.
DVD
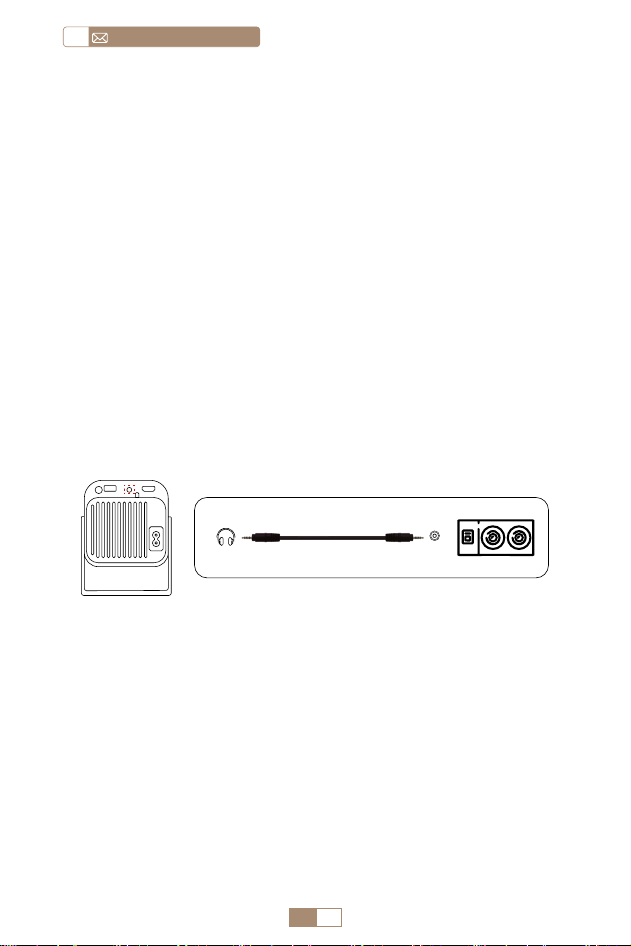
IT 98
service@toptro.comIT
2.Collegarsi ai dispositivi tramite la porta HDMI
1. Collega la tua chiavetta Fire TV (o PC, XBOX, PS4 ecc.) alla porta
HDMI del proiettore.
2. Accedere alla home page per selezionare l'HDMI corrisponde
nte come sorgente del segnale.
3.Collegarsi all'altoparlante
• Utilizzare il cavo audio da 3.5 mm per collegare l'altoparlante.
• Accendere il proiettore e l'altoparlante (scegliere la modalità
AUX).
4.Collegarsi al lettore DVD
1. Accendi il lettore DVD e il proiettore.
2. Collegare il lettore DVD e il proiettore con il cavo HDMI.
3. Accedere alla home page per selezionare l'HDMI corrispon
dente come sorgente del segnale.
Nota: quando il proiettore è collegato al lettore DVD tramite il
cavo HDMI, se non viene emesso alcun suono, è possibile che
il segnale di uscita della porta HDMI del lettore DVD non sia
compatibile con HDCP, provare a collegare l'altoparlante.
3. A seconda del tipo di file, selezionare l'opzione [
Attrezzature/Video/Immagine/Musica/Tutti ].
4. Selezionare il file desiderato e quindi premere il pulsante [
OK ] per riprodurlo.
Audio out
AUX port
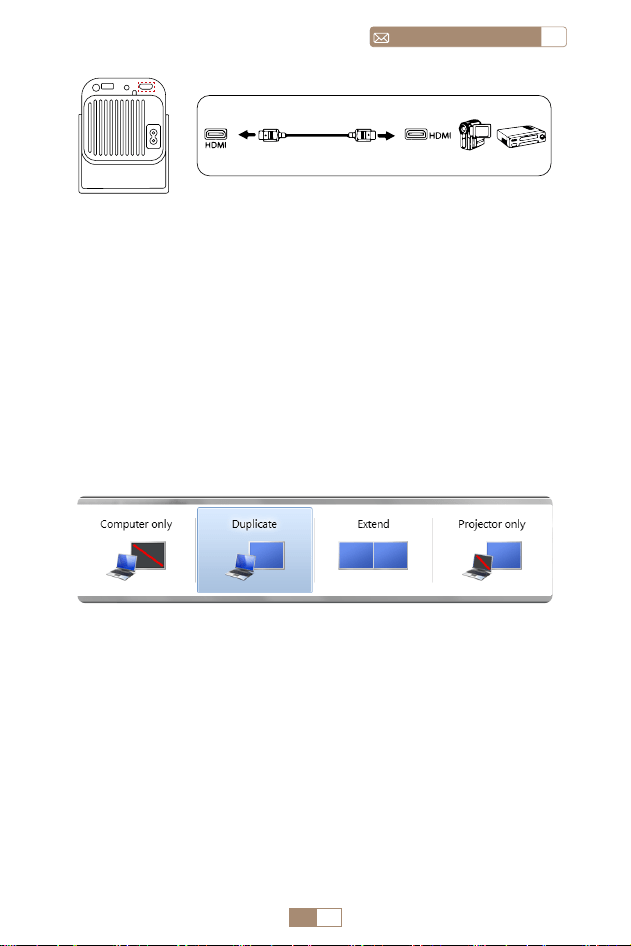
IT 99
ITservice@toptro.com
5.Collegarsi al computer
1. Collegare al computer e al proiettore TR27 con il cavo HDMI.
2. Seleziona la sorgente HDMI per proiettare qualsiasi file sul
tuo computer.
3. Sul tuo laptop, tieni premuti i tasti della scheda "Win+P" per
modificare la modalità di visualizzazione.
NOTA: per MacBook, utilizza un adattatore da tipo C a HDMI
per collegare il tuo MacBook o un adattatore da Mini Display
a HDMI per connetterti al tuo MacBook Air (adattatore non
incluso).
1. Solo computer: Questa è l'opzione predefinita e visualizzerà
la schermata solo sul monitor principale.
2. Duplica: Per duplicare il desktop su tutti i monitor collegati.
3. Estendi: Per estendere il desktop su più monitor.
4. Solo proiettore: Utilizzare solo il monitor secondario
(proiettore) e tenere spento il monitor principale.
Per modificare la risoluzione dello schermo in modalità Solo
proiettore, attenersi alla seguente procedura:
Passaggio: Start > Pannello di controllo > Aspetto e personaliz
zazione > Regola risoluzione dello schermo
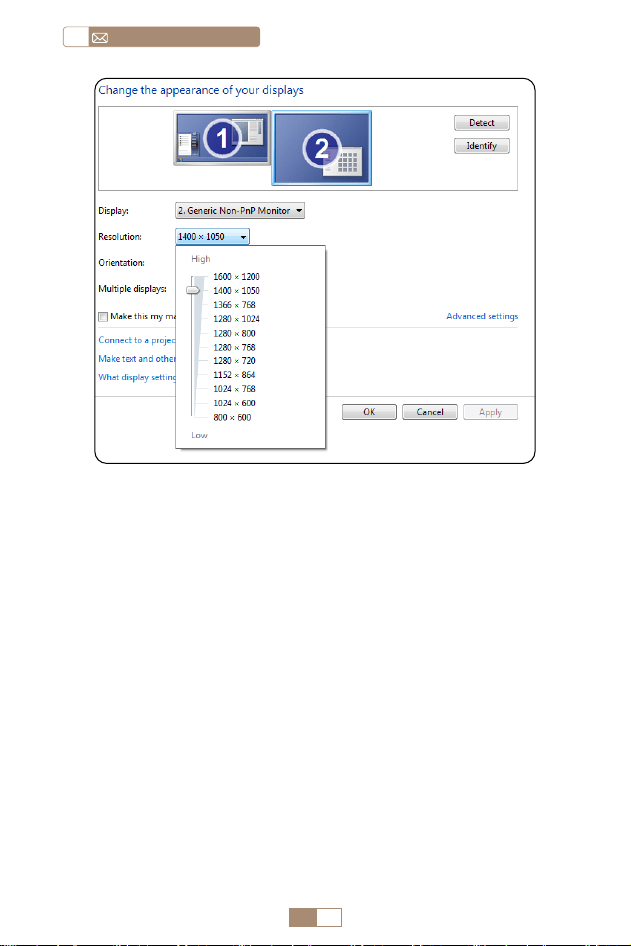
IT 100
service@toptro.comIT
GARANZIA
Grazie mille per il tuo acquisto e supporto. Forniamo una
garanzia di 3 anni per il proiettore TR27. In caso di domande,
non esitate a contattarci tramite Service@toptro.com.
Nota: Abbiamo preparato un regalo per te. Se lo desideri,
contattaci tramite Service@toptro.com.

ディレクトリ
TOPTRO アフターサービスを無料で提供 102
ご注意 102
パッケージリスト 104
商品仕様 104
プロジェクターの概要 105
リモコン 106
インストール 107
1. 投影方式 107
2. 投影距離と投影サイズ 107
プロジェクターの起動 108
フォーカス調整 108
プロジェクター設定 109
1.WiFi 設定 109
2. 無線接続 110
2.1 iOS デバイスの場合 (Airplay) - - - - - - - - - - - 110
2.2 Android デパイスの場合 (Miracast) - - - - - - - - -111
3. 有線スクリーン 112
3.1 Android デバイスをケーブルで接続 - - - - - - - - -112
3.2 iOS デバイスをケーブルで接続 - - - - - - - - - - 112
4.Bluetooth 112
Bluetooth スピーカーの接続 112
5. マルチメディア·プレー 113
5.1 USB 入力モード - - - - - - - - - - - - - - - - -113
5.2 ビデオ再生インターフェイス - - - - - - - - - - - 114
プ口ジェク夕ー設定 115
1. 画像設定 115
2. システム設定 116
信号線の接続 116
1.USB 接続 117
2.HDMI 接続 117
3. スピーカー / サウンドバーとの接続 117
4.DVD プレ—ャーとの接続 118
5.PC との接続 118
保証 120

JP 102
service@toptro.comJP
TOPTRO アフターサービスを無料で提供
ご注意
皆さまへ
TOPTRO をご愛顧いただき誠にありがとうございます。 プロ
ジェクターを使用する前に、この説明書をよくお読みください。
送信してください。24 時間以内に迅速な解決策を提供します。
また、最新の開発情報を入手するには、公式 Web サイトをフ
ォローしてください。(https://www.toptro.com/)
信号がない、音が出ない、Bluetooth 接続が失敗する、WiFi 接
続が失敗する、アニメーションが途切れるなど、設定すること
で多くの問題を簡単に解決できます。
すべてのプロジェクターは、出荷前に 100%慎重にチェックさ
れ、パッケージ化されていることをお約束します。
ご不明な点がございましたら、問題を解決するためにご連絡く
ださい。そして、私たちに改善の機会を与えてください。私た
ちはあなたに満足のいく解決策を提供することを保証します。
ご理解いただきありがとうございました。
TOTRO アフターサービスチーム
1. 高温または低温ではデバイスの寿命が短くなるため、プロジ
ェクターを 暖かくなりすぎたり寒すぎたりしない部屋に置
いてくだい。作業環境は 5℃ ~35℃良いでしょう。
2. プロジェクターが安定して動作するように換気装置が装備さ
れています。 通気口を布や毛布などで覆わないでください。
プロジェクタのスリットには 何も挿入しないでください。
短絡や感電を引き起こし、損傷を引き起こす可能性がありま

JP 103
JPservice@toptro.com
す。
3. プロジェクターは、強い衝撃、押し出し、振動から厳重に保
護する必要 があります。強い衝撃、押し出し、振動を加え
て動かそうとしないでく ださい。動かそうとしないでくだ
さい。内部回路に障害が発生します。
4. プロジェクターのコアコンポーネントとしてのレンズは、画
像の定義と 効果に直接関係しています。ほこりが多すぎると
画質に影響します。汚れたレンズは、ガラスレンズの表面を
柔らかい綿の布で拭きます。硬い布や研磨剤は使用しないで
ください。
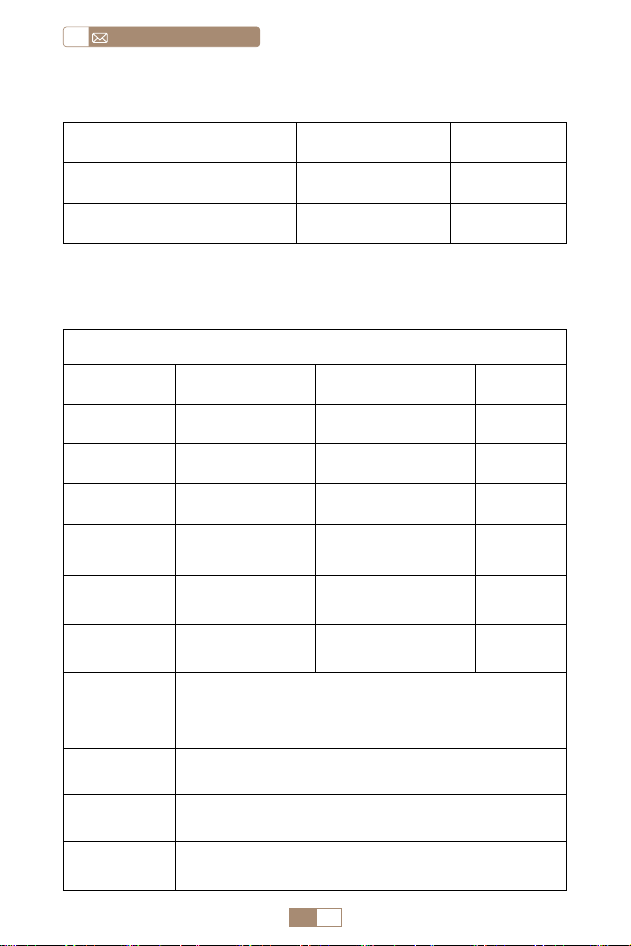
JP 104
service@toptro.comJP
商品仕様
Model No.: TR27
ディスプレイ技
術
LCD 光源 LED
サイズ 10.58x10.7x22.07cm 重量 0.91kg
リフレッシュ率 60HZ 電源 AC90 -260V
ネイティブ解像
度
1920*1080P 最高対応解像度 4K
インストール方
式
机の前 / 後 アスペクト 4:3/16:9
台形補正 フォーカス / 手動 フォーカス 手動
出力端子 3.5mm 音声端子 入力端子
HDMI*1/
USB*1
ビデオファイル
HEVC/VP9/AVS2/AVC 4K/MPEG1/MPEG2/AV1 1080p/60fp ( ビ
デオ コーデックのサポートは状況によって異なる場合がありま
す。追加のサポートについてはお問い合わせください )
オディオファイ
ル
MP3/OGG/FLAC/APE ( ドルビーオーディオコーデックはサポ
ートされていません )
写真ファイル JPG/BMP/PNG(画像スケーリングをサポート)
文書形式 TXT/DOC/XLSX/PDF
パッケージリスト
TOPTRO TR27 プロジェクター *1 リモコン *1 電源コード *1
HDMI ケーブル *1 クリーニングキット *1 説明書 *1
レンズカバー *1
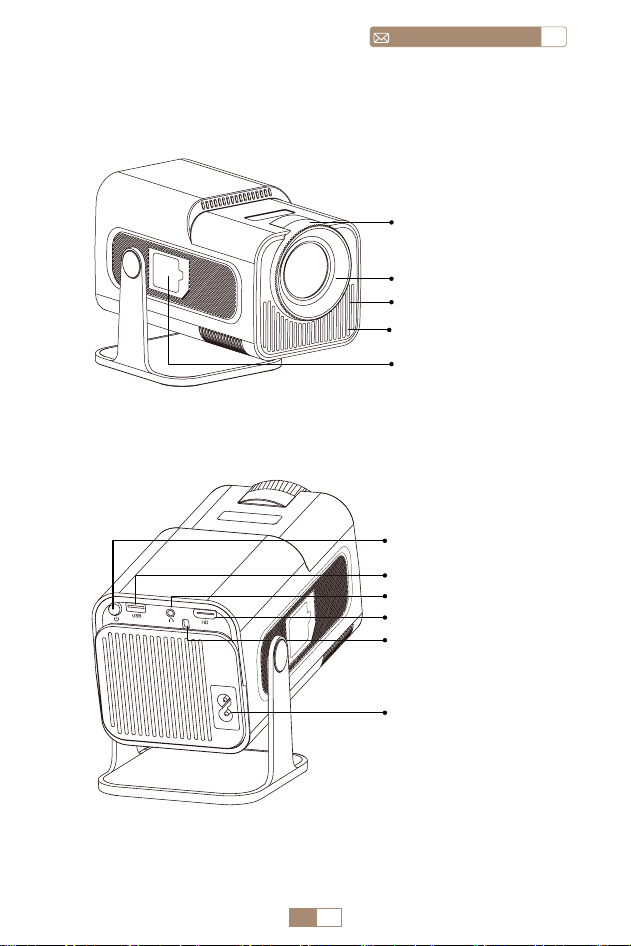
JP 105
JPservice@toptro.com
プロジェクターの概要
レンズ
通気口
ダストネット
塵埃除去口
电源输入孔
HDMI
赤外線受信機
USB
電源ボタン
音声入力穴
マニュアルフォー
カス
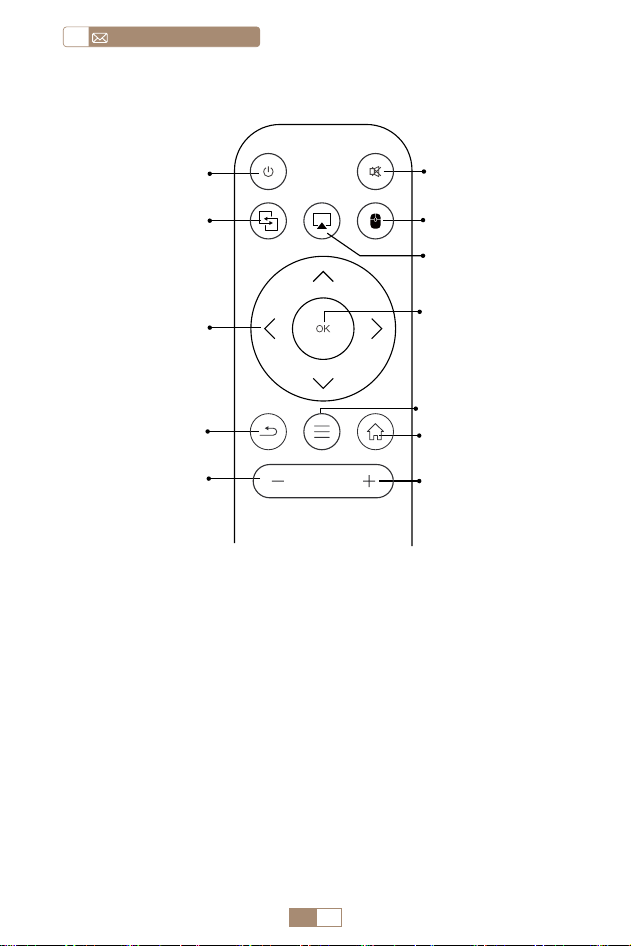
JP 106
service@toptro.comJP
リモコン
ご注意 :
1. バッテリーは同梱されていません。2*AAA バッテリーが必
要です。(別途購入)
2. リモコンを使用しながら、赤外線信号受信部に向ける必要で
す。
3. 液もれの原因にもなるので長期間使用しない場合は電池を取
り出しておい てください。
電源ボタン
①
②
消音
⑦
OK
⑨
メニュー
④
マウスキー
⑩
ホームページ
⑪
音量 +
⑤
エアプレイ
ミラキャスト
③
矢印キー
⑥
戻り
⑧
音量 -
⑫
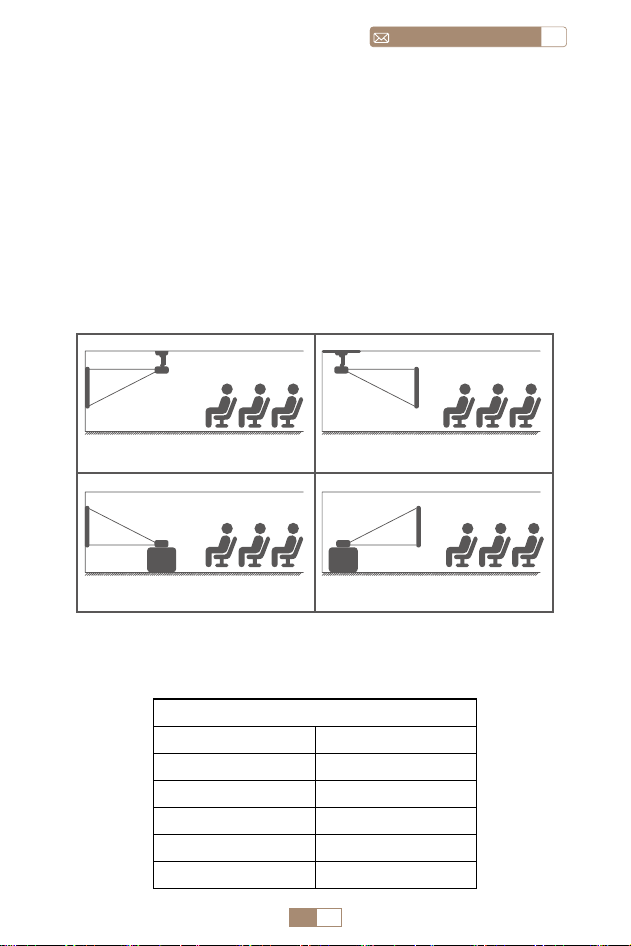
JP 107
JPservice@toptro.com
1. 使用環境や要件に応じて、プロジェクターを安定したデスク
トップに設置し、270°の投影画像を調整できます。
2. プロジェクターを、レンズがスクリーンの軸に対して対称に
なる高さに保ちます。 それができない場合は、台形補正機
能を使用して投写画像を調整してください。
3. プロジェクターは次の 4 つのモードに調整できます。
インストール
1. 投影方式
2. 投影距離と投影サイズ
プロジェクター
プロジェ
クター
プロジェ
クター
プロジェ
クター
スクリーン
スクリーン
スクリーン
スクリーン
1. 前面投影用天井取り付け
3. 前面投射用卓取り付け
2. 背面投影用天井取り付け
4. リア投影卓取り付け
アスペクト比:16:9
距離 スクリーンサイズ
1m 40"
2m 80"
2.51m 100"
3.01m 120"
3.76m 150"
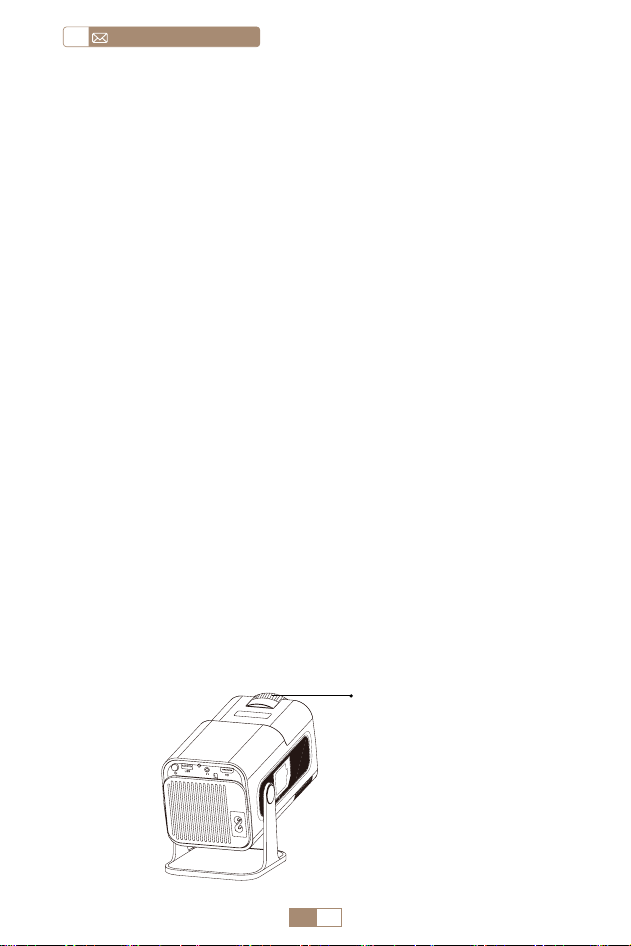
JP 108
service@toptro.comJP
* 投影の画像サイズはプロジェクターとスクリーンの距離に依
存します。上の表の画面サイズに参照して ±3% を考慮してく
だ さい。
* 推奨投影距離は 2~3m です。
* 周囲環境を暗くすると、投影画像の鮮明度が向上します。
プロジェクターのレンズを投影スクリーンまたはカーテンウォ
ールに対して垂直に置き、画像が鮮明になるまでフォーカス ホ
イールを調整します。
注:それでもまだぼやけている場合は、投射距離を調節してみ
てください。
投影機の起動 : 電源ケーブルを接続し、赤色のインジケーター
ランプが点灯したら、リモコンの電源ボタンまたはパネルの電
源ボタンを押してプロジェクターを起動します。ランプが赤色
から青色に変わり、プロジェクターが起動します。
投影機のシャットダウン : リモコンの電源ボタンまたはパネル
の電源ボタンを押して、プロジェクターをシャットダウンしま
す。ランプが青色から赤色に変わり、プロジェクターがオフに
なります。
フォーカス調整
プロジェクターの起動
フォーカス ±
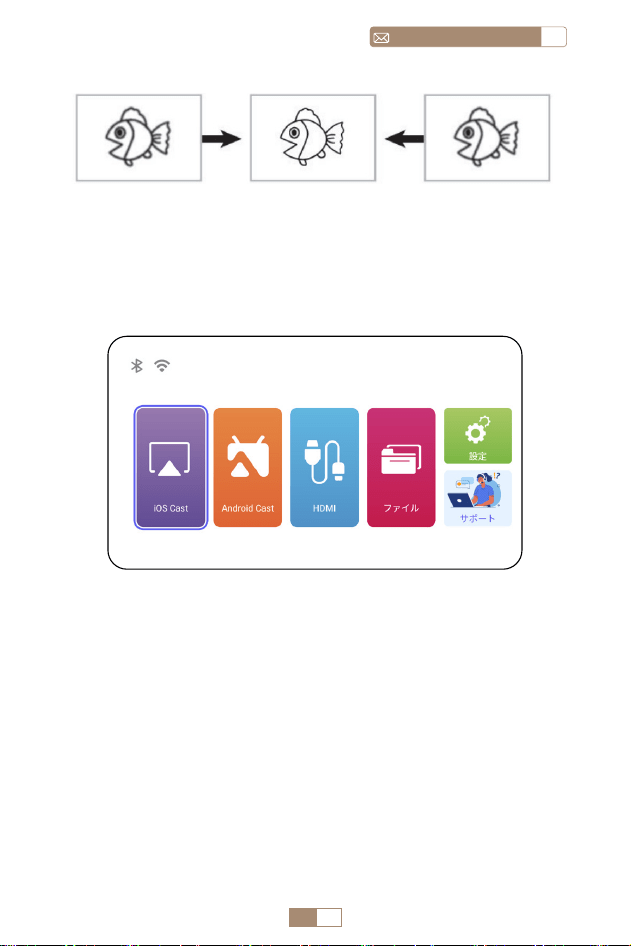
JP 109
JPservice@toptro.com
プロジェクターのホームページは以下の通り。
1. 無線接続での画面ミラーリングの流暢さは、ネットワーク環
境に影響されます。スクリーンミラーリングを使用する場合
は、100Mbit 以上の帯域幅を推奬します。
2. 無線接続を使用する場合、モバイルデバイスがプロジェクタ
ーの近くにあることを確認してください。1m 以内の距離を
推奬 します。
3. モバイルデバイスによっては、互換性によりスクリーンミラ
ーリングをサポートしない場合があります。
プロジェクター設定
1.WiFi 設定

JP 110
service@toptro.comJP
ご注意 : お使いのデバイスとプロジェクターが同じホーム WiFi
内にある必要があります。
1. TR27 プロジェクターをWiFiネットワークに接続してください。
2. プロジェクターでホームページに戻るー [ 無線スクリーン ]
メニューを選択するーこのインターフェイスに留まること。
3. iOS デバイスで [ コントロールセンター ] にアクセスする -[ 画
面のミラーリング ] 機能を選択する - [ 名称待定 ] という iOS
キャストレシーバーを選択して接続する --iOS デバイスの画
面がミラーリングされ、投影スクリーンに表示されます。
2. 無線接続
2.1 iOS デバイスの場合 (Airplay)
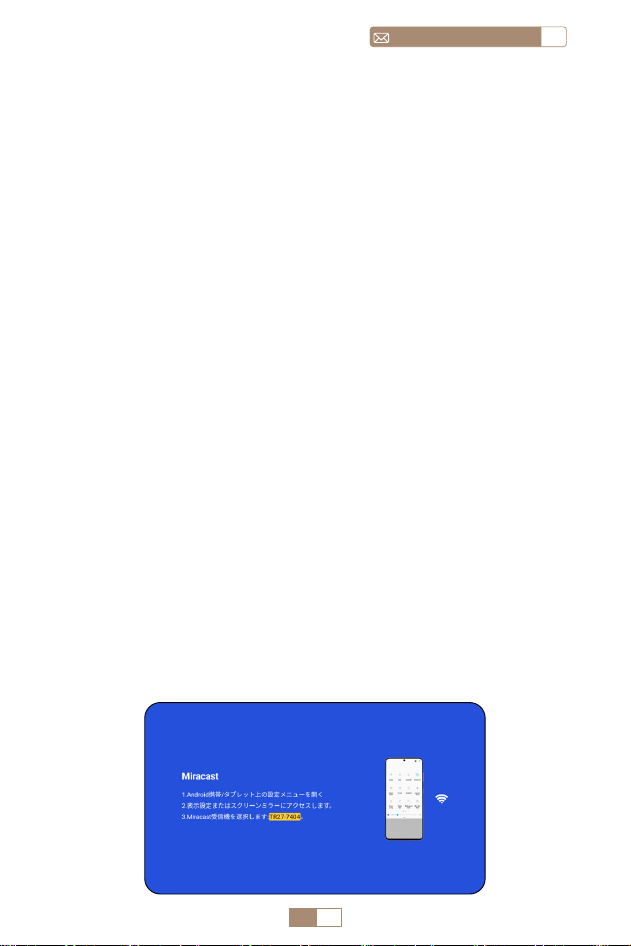
JP 111
JPservice@toptro.com
1. Android デバイスで WLAN 機能が有効になっていることを
確認 してください。(Wi-Fi ネットワークに接続する必要はあ
りません。)
2. ホームページに戻る -[ 無線スクリーン ] メニューを選択す
る -- このインターフェースに留まること。
3. Android デバイスで [ コントロールセンター ] にアクセスし、
[ 画面のミラーリング / スマート·ビュー ] を選択します。
4. [ TR27- プロジェクター ] というミラキャストレシーバー を
選択して接続します。
5. 接続が成功すると、Android デバイスの画面がミラーリング
さ れ、投影スクリーンに表示されます。
ご注意:
画面ミラーリングの方法 : 異なるブランドの Android デバイス
では、画面ミラーリングを有効にするために様々な用語や方法
が使用される場合があります。ご使用のデバイスの正確な手順
については、デバイスのマニュアルを参照してください。画面
ミ ラーリングの一般的な用語には、マルチスクリーン、ワイヤ
レスディスプレイ、WLAN デイスプレイ、画面ミラーリング、
スマ ート·ビューなどがあります。
デバイスの互換性 : すべての Android 電話が画面ミラーリン
グ機能をサポートしているわけではないことに注意してくださ
い。 画面ミラーリングを使用する前に、Android デバイスがこ
の機能をサポートしているかどうかを確認してください。デバ
イスの マニュアルを確認するか、設定で画面ミラーリングオプ
ションを検索して互換性を確認できます。
2.2 Android デパイスの場合 (Miracast)
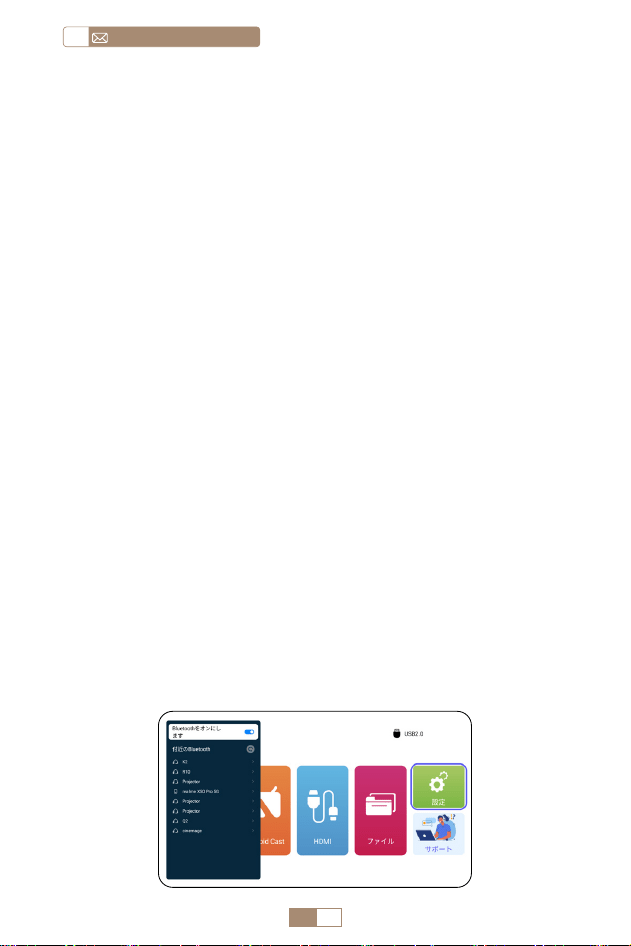
JP 112
service@toptro.comJP
1. 提供された QR コードをスキャンして Elfcast アプリをインス
トールします。
2. お使いのデバイスのポップアップウィンドウで Elfcast を開く
ことを確認します。
3. 指示に従ってデバイスのパスワードを入力して接続を確認し
てください。
4. お使いの Android デバイスが自動的に同じ画面に配線されま
す。
1. Bluetooth スピーカーの電源を ON にします。
2. プロジェクターの [ Bluetooth ] をオンにし、Bluetooth ス
ピーカーを選択して接続します。
1. iPhone 純正の充電ケーブルを使って iPhone をプロジェクタ
一に接続します。
2. お使いのデバイスに表示されるウィンドウで”信頼”をクリッ
クします。
3. 指示に従ってデバイスのパスワードを入力して接続を確認し
てください。
3. 有線スクリーン
4.Bluetooth
3.1 Android デバイスをケーブルで接続
Bluetooth スピーカーの接続
3.2 iOS デバイスをケーブルで接続
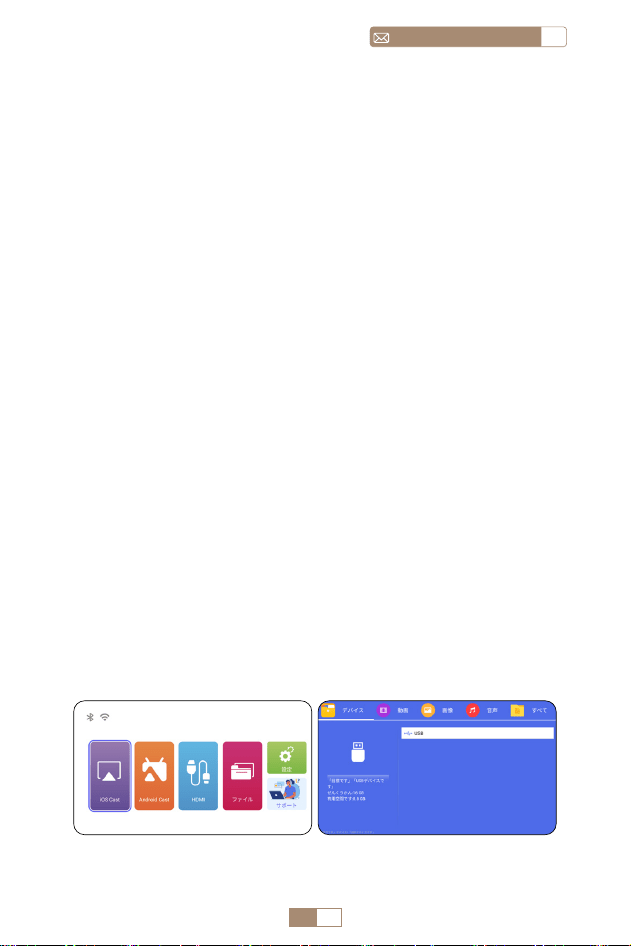
JP 113
JPservice@toptro.com
ご注意 :
1. TR27 プロジェクターは、ほとんどの Bluetooth ヘッドセッ
ト、Bluetooth スピーカー、Airpods と互換性がありますが、
Bluetooth キーボードは互換性がありません。
2. ビデ才再生中に音が出ない場合は、接続機器のドルビーサウ
ンド設定を確認することをお勧めします。ドルビーサウンド
をオフにすると、プロジェクターとの音声互換性が向上しま
す。
3. Bluetooth スピーカーの中には、プロジェクターに接続する
と音量が著しく低下するものがあります。この問題に対処す
るには、関連するすべてのデバイスの音量を上げて、希望の
サウンドレベルになるようにしてください。
4. 何か問題がある場合は遠慮なくて [email protected] へ
お問い合わせください !
1. USB メモリーをプロジェクターのUSB ポートに揮入します。
2. 「メディア」を選択し、「OK」キーを押して入りなさい。
3. ファイルの種類によつて、[ 動画/音楽/写真/書籍] を選択
します。
4. 希望のファイルを選択し、[ OK ] ボタンを押して再生する。
5. ビデ才再生中にリモコンの“MENU”ボタンをクリックすると、
画像設定を直接調整することができます。
5. マルチメディア·プレー
5.1 USB 入力モード
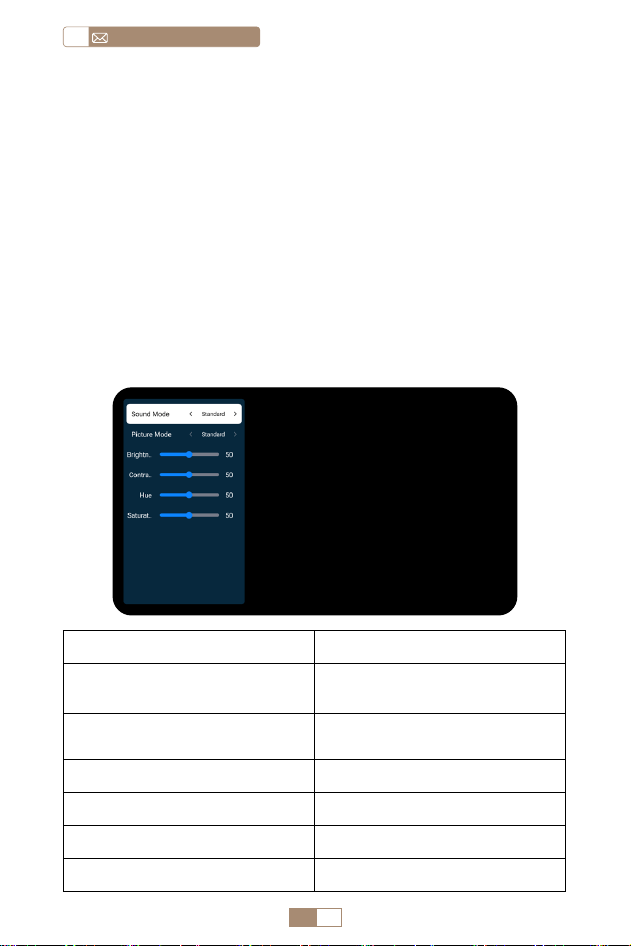
JP 114
service@toptro.comJP
こ注意:プロジェクターが USB メモリーを認識できない場合
は、以下の方法で問題を解決してください。
USB× モリ 一が以下のフォーマットを満たしていることをこ確
認ください :
FAT32:8GB/16GB/32GB
NTFS:64GB-2TB
これらの条件を満たさない場合は、サポートされているフォー
マットの USB メモリーに 変更する必要があります。
問题が解決しない場合は、問題の詳細を以下のメールアドレス
にお送りください : [email protected]
5.2 ビデオ再生インターフェイス
マニュアル 機能
サウンドモード
スタンダード / 音楽 / 映画 / ニ
ュース
ピクチャーモード
スタンダード / シネマ / ビビッ
ド / カスタム
輝度 0~100
対比 0~100
色相 0~100
色の彩度 0~100
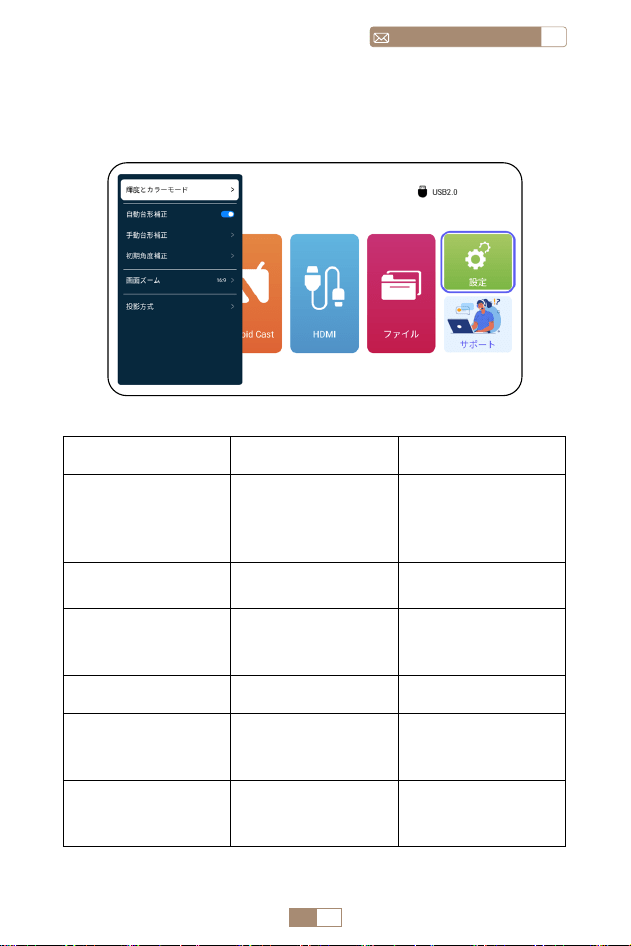
JP 115
JPservice@toptro.com
プ口ジェク夕ー設定
1. 画像設定
メニュー 内容 作用
明るさと色
画質モード / 明るさ
/ コントラスト / 色
相 / 彩度 / シャープ
ネス
画像パラメータを
0 ~ 100 の範囲で変
更します。
自動台形補正 /
画面の角度を垂直方
向に自動調整します
手動台形補正 +/-/OK
手動で画面の角度を
垂直方向に調整しま
す
初期角度補正 / 初期角度補正
画面ズーム
4:3/16:9/ オ リ ジ ナ
ル画面比 / 画面ズー
ム
画面サイズとズーム
を調整する
投影モード
フロント / リアフロ
ント / フロント天井
/ リア天井 投影
投影された画像の位
置を調整する
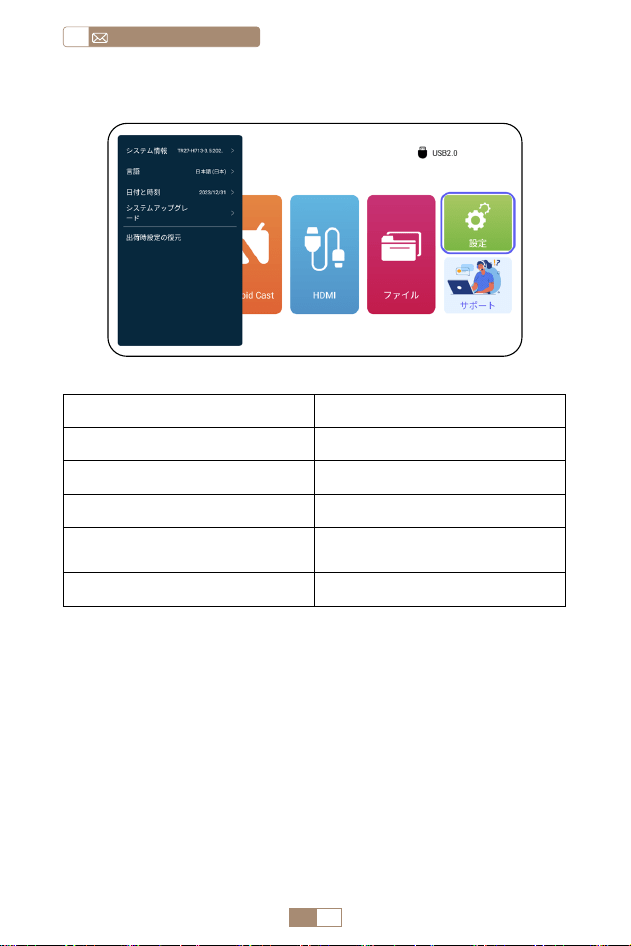
JP 116
service@toptro.comJP
信号線の接続
2. システム設定
メニュー 機能
システム情報 プロジェクター情報
言語 言語を選択する
日付と時刻 時間設定
システムアップグレード
ローカルファイル経由でソフ
トウェアをアップデートする
出荷時設定の復元 工場出荷時設定にリセット
TOPTRO TR27 プロジェクターは、HDMI ポート *1/USB ポー
ト *1/3.5mm ヘッドフォン出力 *1 の 3 つのインターフェース
を備えています。お使いのデバイス(PC、電話、DVD プレー
ヤー、USB、PS4 など ) を接続するために、正しい接続ポート
を選択してください。
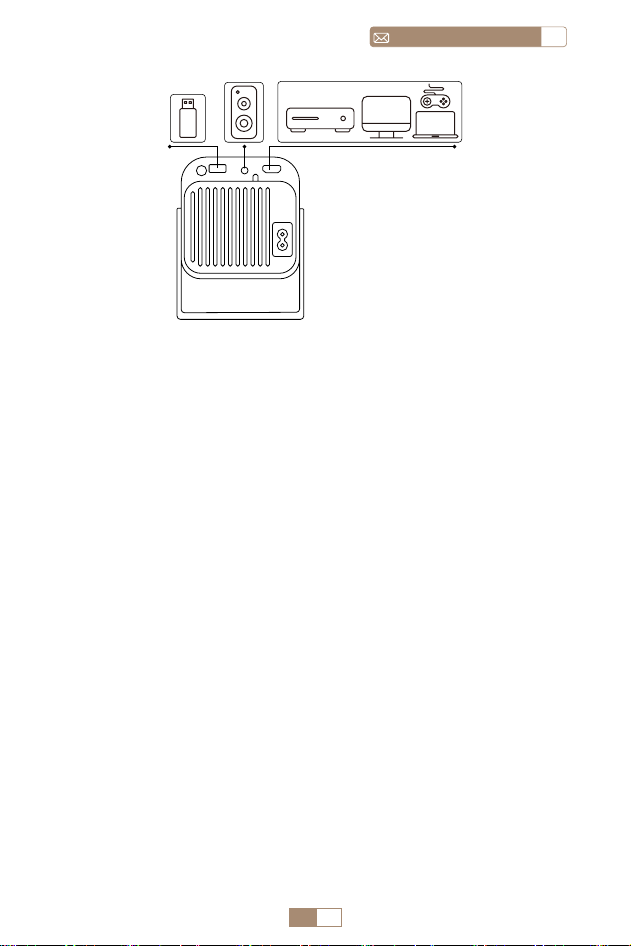
JP 117
JPservice@toptro.com
1.USB 接続
1. USB メモリーを USB 入力端子のいずれかに差し込む。
2. 「メディア」を選択し、「 OK」キーを押して入る。
3. ファイルの種類によって , [ ビデオ / 音楽 / 画像 / オフィス ]
オプション を選択する。
4. USB メモリーのファイルを選択し、[ OK ] ボタンを押して
再生する。
2.HDMI 接続
1. Fire TV スティック ( または PC、XBOX、PS4 など ) をプロ
ジェクターの HDMI ポートに接続します。
2. ホームページに入り、対応する HDMI を信号ソースとして選
択します。
3. スピーカー / サウンドバーとの接続
1. プロジェクターに付属の 3.5mm オーディオケーブルを使用
して、サウンドバーと接続します。
2. プロジェクターとサウンドバー(AUX モードを選択)をオ
ンにします。
DVD
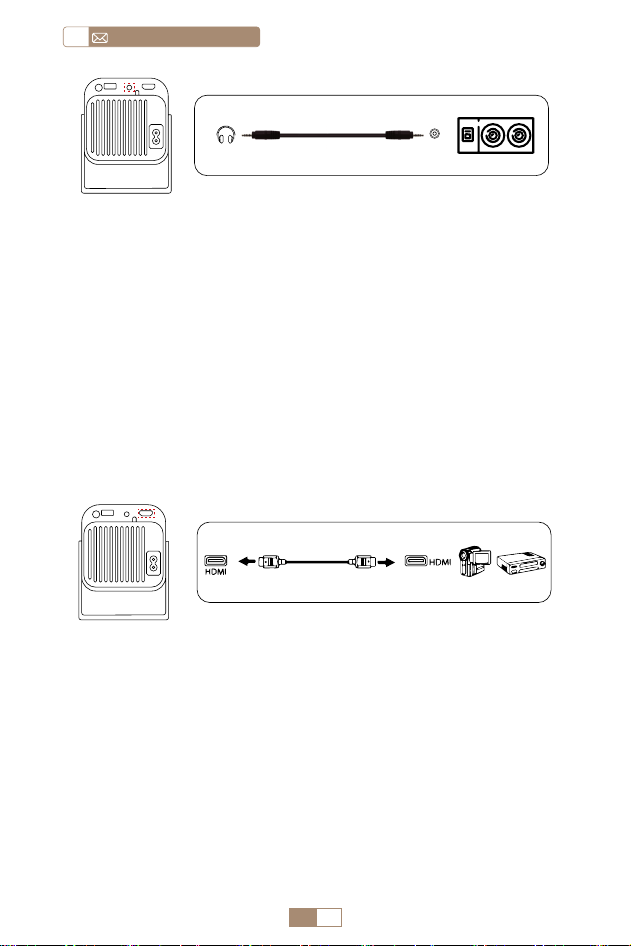
JP 118
service@toptro.comJP
4.DVD プレ—ャーとの接続
1. DVD プレーヤーとプロジェクターの電源をオンにます。
2. パッケージの 3 -in -1AV ケーブルで、DVD プレーヤーの
RCA ケーブルに接続ます。
3. 黒いコネクターをプロジェクターの AV 端子に接続し、ホー
ムページに入り、[ AV ] 信号源を選択してください。
注:プロジェクターと DVD プレーヤーを HDMI ケーブルで接
続した場合、音が出ない場合は、DVD プレーヤーの HDMI ポ
ートの出力信号が HDCP に対応していない可能性があります
ので、スピーカーを接続してみてください。
5.PC との接続
1. HDMI ケーブル ( 付属 ) でパソコンと TR27 プロジェクタを接
続します。
2. HDMI ソースを選択すると、パソコン上の任意のファイルを
投影することができます。
3. ノートパソコンで、「Win+P」ポードキーを押したままにし
ます。
ご注意 : Macbook と接続する場合は、外部 HDMI- タイプ C ケ
ーブルが 必要です。
Audio out
AUX port
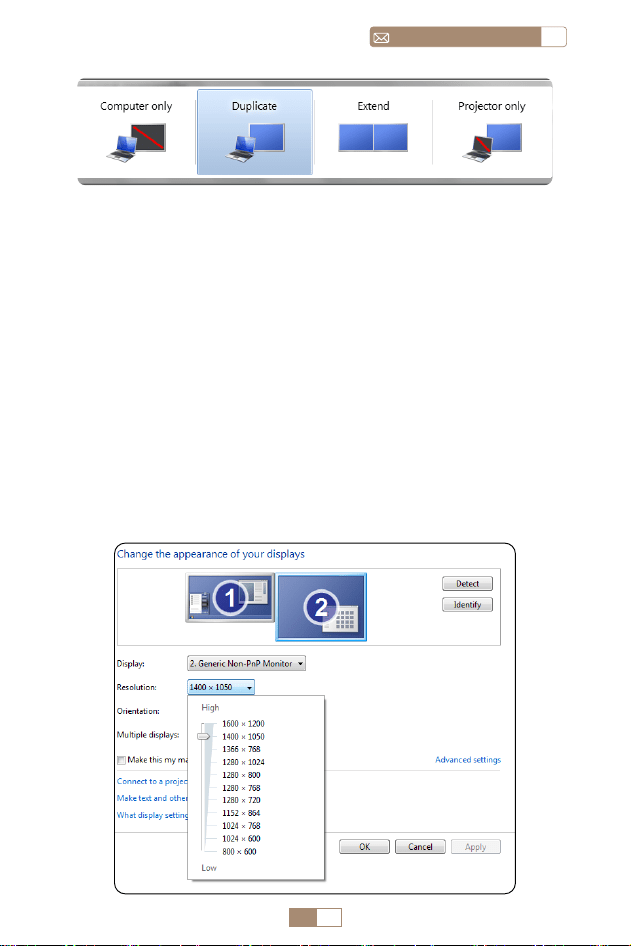
JP 119
JPservice@toptro.com
1. Computer only: フォルトのオプションです。メインモニタ
にのみ表示されます。
2. Duplicate: すべてのモニタに同じものを表示させ、各モニタ
のデストップを複製します。
3. Extend: すべてのモニタを 1 つの大きなモニタのように機能
させ、デスクトップをそれらすべてに拡張します。
4. Projector only: プロジェクターのようにセカンダりモニタ
にのみ表示せれます。
プロジェクター専用モードでは、画面の解像度を変更すること
ができます。
ステップ:スタート > コントロールパネル > 外観と個人設定 >
画面の解像度を調整する

JP 120
service@toptro.comJP
保証
ご購入ありがとうございました! TR27 プロジェクターに
は 3 年間の保証が付いています。ご不明な点がございました
[email protected]. までお気軽にお問い合わせください。
備考:プレゼントをご用意しました。プレゼントは下記の中
からおひとつお選びいただけます。ご希望の方は、service@
toptro.com までご連絡ください。
1. プロジェクタースクリーン :100 インチ。
2. ブルートゥーススピーカー。

Declaration of Conformity
We (EU based importer is responsible for this declaration)
Prolinx GmbH
(Company name)
Brehmstr.56, 40239 Duesseldorf, Germany
(Company address)
declare under our sole responsibility that the product
Trade name: TOPTRO
Equipment: Entertainment Projector
Model No. : TR27
to which this declaration relates is in conformity with the essential
requirement set out in the Council Directive on the Approximation
of the laws of the Member States relating to RED Directive(2014/53/
EU) & RoHS(2011/65/EU) product is responsible to affix CE marking, the
following standards were applied:
EN 62368 1:2014+A11:2017
EN IEC 62311:2020
ETSI EN 301 489 1 V2.2.3(2019 11)
ETSI EN 301 489 17 V3.2.4(2020 09)
ETSI EN 301 489 3 V2.1.1(2019 03)
EN 55032:2015+A11:2020
EN 55035:2017 +A11:2020
EN IEC 61000 3 2:2019
EN 61000 3 3:2013+A1:2019
ETSI EN 300 328 V2.2.2(2019 07)
ETSI EN 301 893 V2.1.1(2017 05)
ETSI EN 300 440 V2.2.1(2018 07)
IEC62321 3 1:2013
IEC62321 4:2013
IEC62321 5:2013
IEC62321 6:2015
IEC62321 7 1:2015
IEC62321 7 2:2017
IEC62321 8:2017
Full Name: George.wang Position: Approbation Manager
Signature: Place/Date: Shenzhen,China/Jan 2024

2024.3.20