
LANGUAGE
English
Deutsche
Français
Espanol
Italian
日 本 語
006-030
031-058
059-086
087-114
115-142
143-169

EN
3
Contens
TOPTRO 7D/24H PROFESSIONAL SUPPORT 6
INSTRUCTIONS FOR USE 7
PACKAGE LIST 8
PROJECTOR OVERVIEW 9
REMOTE CONTROL 10
INSTALLATION 11
1.Installation Method 11
2.Ceiling & Stand Mounting 12
3.Projection Distance and Size 12
REMOTE CONTROL 13
STARTING PROJECTOR 14
PROJECTION IMAGE SETTINGS 14
1.Projection Mode 14
2.Keystone Correction 15
3.Auto Focus 16
4.Zoom Setting 17
PROJECTOR SMART SETTINGS 18
1.Select The Signal Source 18
2.Wireless Connection 19
3.Bluetooth 22
4.Built in Smart Os System 22
OTHER BASIC PROJECTION SETTINGS 23
1.Option Menu 23
2.Picture Mode Menu 24
3.Audio Menu 25
4.About (System Information) 26
SIGNAL LINES CONNECTION 27
1.USB Multimedia Connecting 27
2.Connecting with PC 28
3.Connecting with MacBook or MacBook Air 29
4.Connecting with XBOX/PS5 29
FAQ 30

EN
4
Activate Your 3-year Warranty and
Exclusive Surprise
Ladies and Gentlemen
Thank you for purchasing the TP1 Projector.
Please take 1 minute to scan the code and activate your 3 year warranty.
lt is recommended to complete the process within 3 days.
Tips: If you find that you cannot activate your warranty by scanning
the code, you can contact us via the email below ,and we will help you
activate your warranty.
Scan to learn more
[email protected] www.youtube.com/@TOPTRO-R

EN
5
We are always working to improve and enhance our products. Please
note that the pictures and descriptions in the manual are for reference
only and may differ slightly from the actual product. For the most
accurate details, please refer to the product itself. You can also access the
latest updates through our online upgrade feature. We appreciate your
understanding!
Our product warranty and support are available for items purchased from
authorized sellers. To protect your rights, you’re welcome to email US at
[email protected] to verify the authenticity of your TP1 projector.
This is our official YouTube Link:www.youtube.com/@TOPTRO R,
where you can search for all the operation videos and troubleshooting
about the TP1 projector.
We love hearing how our projectors bring joy to your life! Share your
moments or feedback—we’re thrilled to be part of your experience.
The Fastest and Most Efcient Way to Contact Us:
Method 1: Email
Email: [email protected]
Tips:We recommend contacting via email rst since it lets you share
videos or other detailed information about your product, helping us
resolve your issue faster. If you don’t hear back from us by email,
it’s possible the message went to spam or got delayed. In that case,
please try the second method below.
Method 2: Orders
Go to Your Orders on Select The order has a problem
for the relevant item-Choose a topic from the displayed
list-Click Contact Seller to send us a message.
Thank you for your trust in TOPTRO! We’re here to make
sure you have the best experience possible.

EN
6
TOPTRO 7D/24H PROFESSIONAL SUPPORT
Dear valued customer,
Thank you very much for supporting TOPTRO! Before you begin using the
projector, please carefully read through this user manual. The features and
illustrations contained herein are provided as references and may slightly
differ from the actual product due to ongoing optimizations and updates. For
precise details, please refer to the physical product.
If you have any issues, please include the following details in your email:
country code, order number, model, and a brief description of the
problem (For example:US+000 0000000 0000000+TP1+No image),
please email us at [email protected] . Rest assured, our dedicated team
will respond promptly within 24 hours with effective solution to address your
concerns.
It's essential to mention that many common problems can be easily resolved
through simple adjustments. To ensure utmost satisfaction, we want to
assure you that all our projectors undergo a rigorous 100% quality check and
thorough packaging before shipping.
If you have any questions, please contact us so that the problem can be
solved. And give us an opportunity to improve. We are committed to providing
you with a satisfactory solution for any challenges you may encounter.
Best regards,
TOPTRO Service Team

EN
7
INSTRUCTIONS FOR USE
Temperature Considerations:
To ensure the longevity of your projector, avoid placing it in environments that
are excessively warm or cold. Extreme temperatures can shorten the device's
lifespan. For optimal performance, maintain a working environment between
5℃ and 35℃ .
Proper Ventilation:
The projector is equipped with a ventilation system to ensure stable operation.
Ensure that the projector is positioned in a well-ventilated area. Avoid
conning spaces like closets and ensure that there are no obstructions near
the air inlet and outlet. And excessive dust will affect the heat dissipation of
the projector. It is suggested to clean its dust lter every one or a half months
according to the actual environment.
Protection from Impact and Vibration:
Handle your projector with care, protecting it from strong impacts, extrusions,
and vibrations. Avoid moving the projector if it is experiencing internal circuit
faults.
Lens Maintenance:
The projector lens is a crucial component directly impacting picture denition
and quality. Ensure to keep the lens clean from excessive dust. When
cleaning, use a soft cotton cloth suitable for glass lenses.

EN
8
PACKAGE LIST
TOPTRO TP1 Projector*1 Remote Control*1 Power Cable*1
HDMI Cable*1 Lens Cover*1 Cleaning Kit*1
Quick Start Guide*1 FAQ*1
EN
9
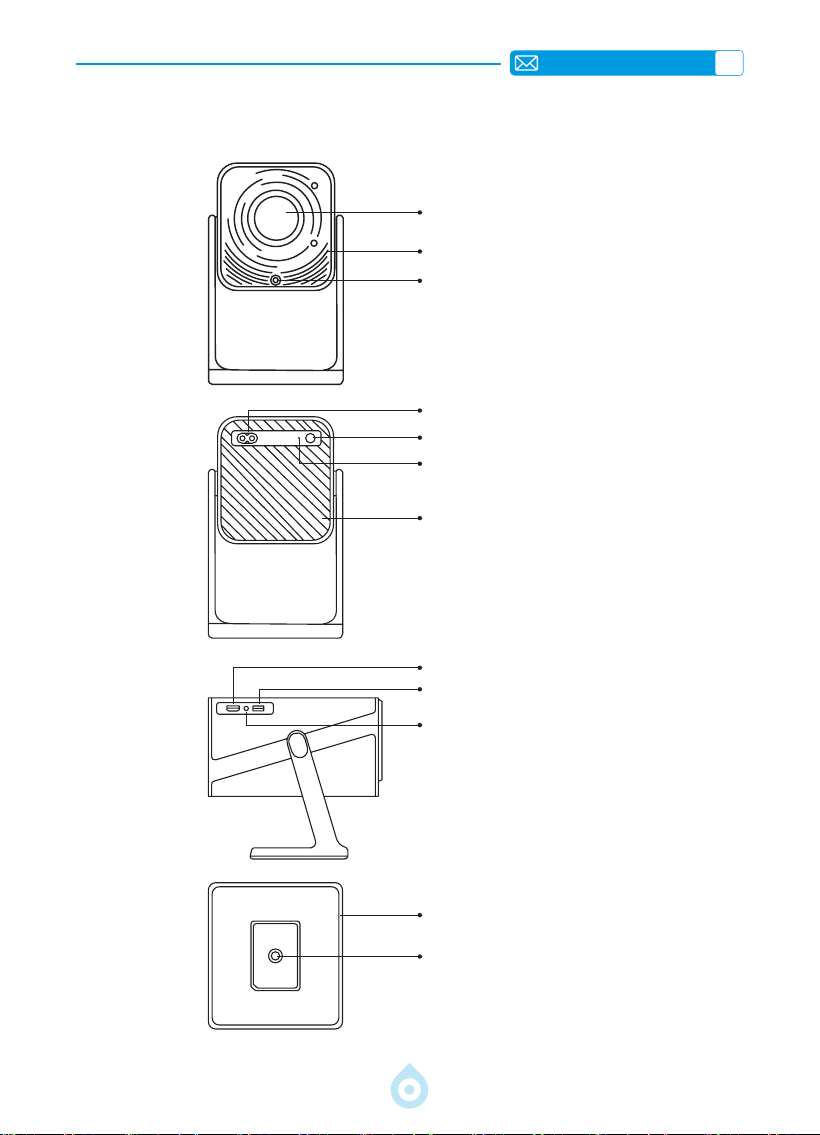
PROJECTOR OVERVIEW
Lens
Air Inlet
Focus Signal Receiver
Power Socket
Power ON/OFF
IR Receiver
Air Outlet
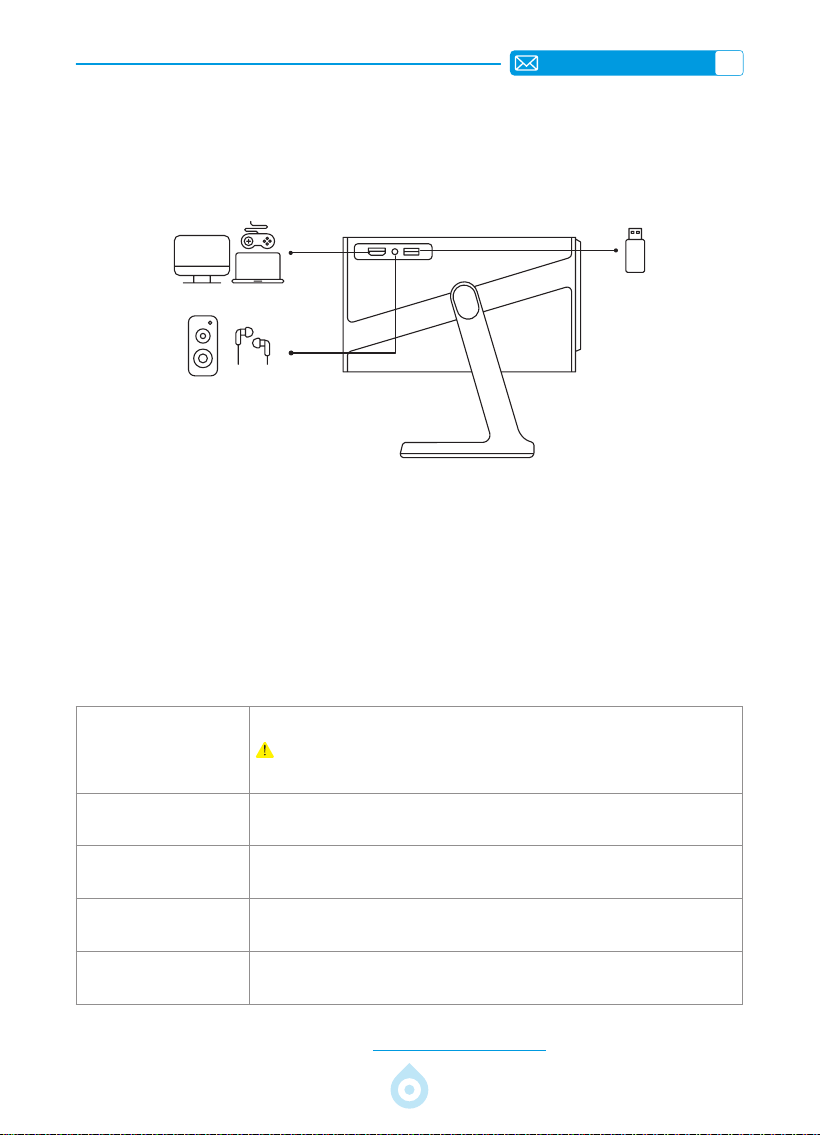
HDMI Port
USB Port
3.5mm Audio Jack
Flexible Stand
1/4 Inch Mounting Hole

EN
10
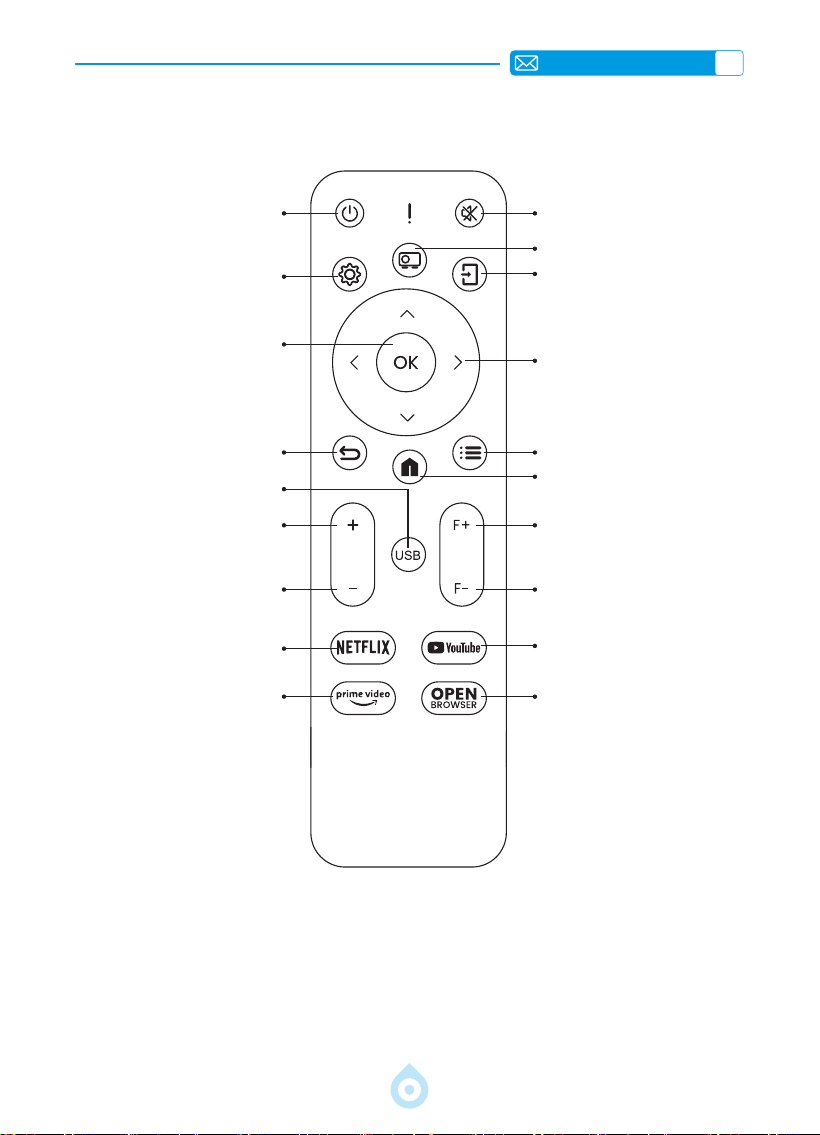
REMOTE CONTROL
Power Mute
Setting
Projection Mode
Conrm Key
Source
Back
Arrow Button
USB
Menu
Volume+
Homepage
Volume-
Focus+
NETFLIX
Focus-
Prime Video
YouTube
OPEN BROWSER
*Install 2 pieces of AAA batteries(Not Included) into the remote control before using it.
*When using the remote control, please make sure that the signal transmitter of the remote
control aims at the infrared signal receiver of the projector

EN
11
INSTALLATION
1.Installation Method
The projector can be mounted on the ceiling using a dedicated ceiling mount, or placed on a
stable desk for projection, depending on your environment and requirements. In addition, the
projector can be installed with the following methods:
Keep the projector at a height where its lens is axial symmetry to the screen. If this is not
possible, use the keystone correction function to adjust the projection image.
Front Projection Ceiling Mount
Front Projection Table Mount
Rear Projection Ceiling Mount
Rear Projection Table Mount

EN
12
3.Projection Distance and Size
40’’
60’’
84’’
100’’
120’’
Meter
Feet
1.0
3.2
1.46
4.8
2.05
6.71
2.44
7.99
2.92
9.59
The recommended projection distance for the TP1 projector is 1.8 2.9 meters. The image
size depends on the distance and the projector's throw ratio, which is 1.1 : 1. Additionally, the
projector offers 50% zoom-out feature, you can adjust screen size with this function.
*Actual projection size and distance may deviate slightly from laboratory data.
2.Ceiling & Stand Mounting
1) TP1 does not support four-corner mount installation. Use the stand with a 1/4" mount or a
stand tray to secure the projector.
2) Peel off the bottom product label to reveal the mounting hole.
Diameter:
Φ
1/4"
(6.35 mm)
Depth: 6.0 mm

EN
13
REMOTE CONTROL
Model No.: TP1
Product Size
(L*W*H)
4.57*4.80*9.45 inch
11.60*12.20*24.00cm
Product Weight
2.4 lbs
1.1KG
Native Resolution 1920*1080P Refresh Rate 60 Hz
Display Technology LCD Light Source LED
Keystone Correction Auto/Electric Power Voltage
AC100-240V
50-60Hz
Aspect Ratio 16:9 Focus Auto/Electric
Projection Ratio 1.1 : 1 (±0.5) Zoom 100%-50%
Projection Method Front/Rear on Desk Front/Rear on Ceiling
USB disk Support 1. FAT32: 8G/16G/32G 2. NTFS: 64G
Interfaces: HDMI*1/USB*1/3.5mm Audio Output x 1
Video Format
MP4/MPG/AVI/MPEG-4/TS/MOV/M4V/MKV/FLV/DAT/3GP (Support
for video codecs may vary depending on circumstances, contact
us for additional support)
Audio Format MP3/WMA/M4A/MP2/AAC/OGG/WAV/FLAC (Dolby SUPPORT)
Image Format JPG/JEPG/BMP/PNG

EN
14
STARTING PROJECTOR
PROJECTION IMAGE SETTINGS
1. Power On: Remove the lens cap and press the power key on either the remote control or
the projector itself. The indicator light will turn blue when the projector is powered on.
2. Language Setting: Select your preferred language in the settings.
3. Keystone Correction/Focus: Use the Auto Vertical Keystone Correction (or Four
Point Correction) and Focus function to achieve a rectangular and clear image. Ensure
that the area in front of the [Focus receiver] is unobstructed.
4. Fine tune Image Clarity: Adjust the "F+" and "F " focus buttons on the remote control
to rene image clarity. If the image is still blurry, adjust it again after pointing the projector
directly at the screen.
5. Connect External Devices: Connect your external device (e.g., smartphone, iPad, TV
stick, TV box, laptop, etc.) to the appropriate interfaces on the projector. Be sure to select
the correct source for your device; otherwise, the projector may not detect the signal.
1.Projection Mode
Select the [Settings] menu -- Select the [Projection] Option -- Select your Install Mode,
Press the arrow key to select and press “OK” to conrm the projection position.

EN
15
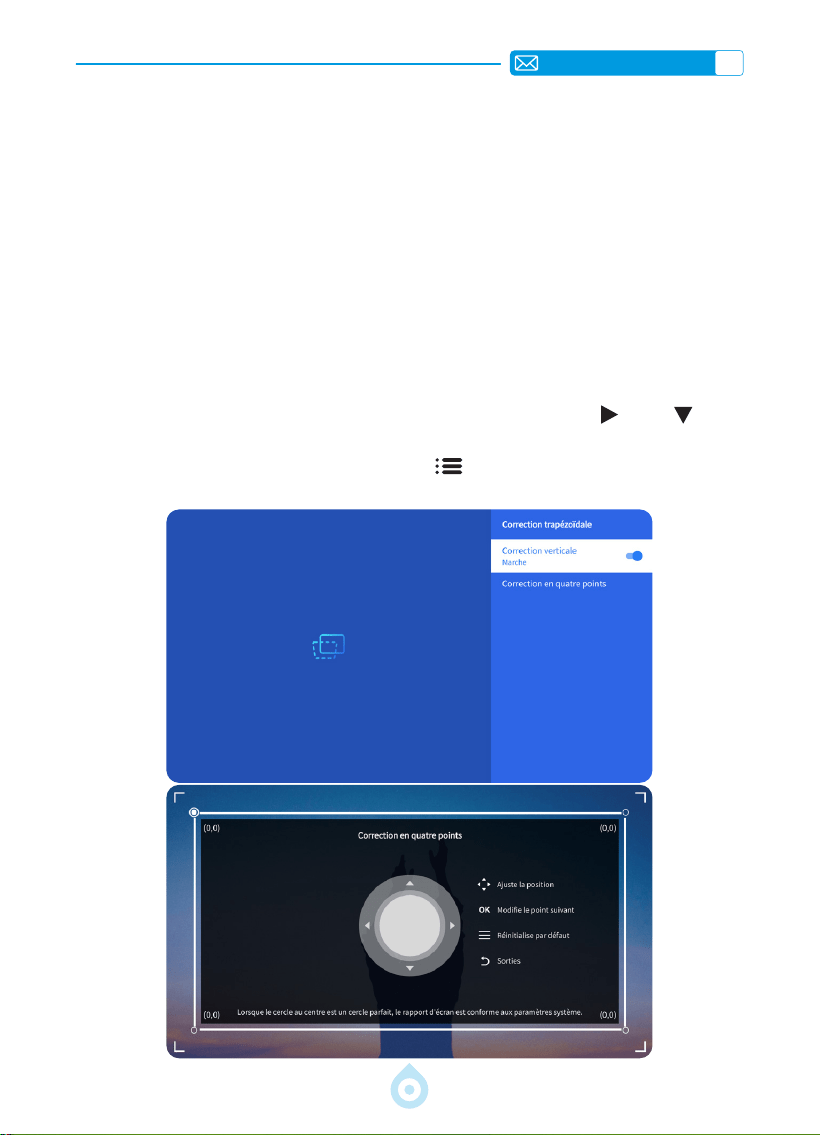
2.Keystone Correction
2.1 Auto Vertical Keystone Correction
2.2 Four Point Keystone
Select the [Settings] menu - turn on the [Keystone] option, then it will automatically adjust
the keystone as rectangle every time you move the projector or turn it on.
For optimal projection quality, it's recommended to position the projector centrally towards
the middle of the screen both vertically and horizontally. Or ensure that the offset angle of
the projector does not exceed 20° on vertical direction, otherwise the automatic keystone
correction function may not work properly.
Select the [Settings] menu -- Select the [Keystone] Option, Then select the [Four Point
Correction], Just click “OK” button to pick the point you want to adjust at rst, and then
press the button "
" or " " to set the value(Vertical 0-100) needed as shown below.
Reset: Press "Menu
" button, and the image will restore to the original keystone
correction settings.
EN
16
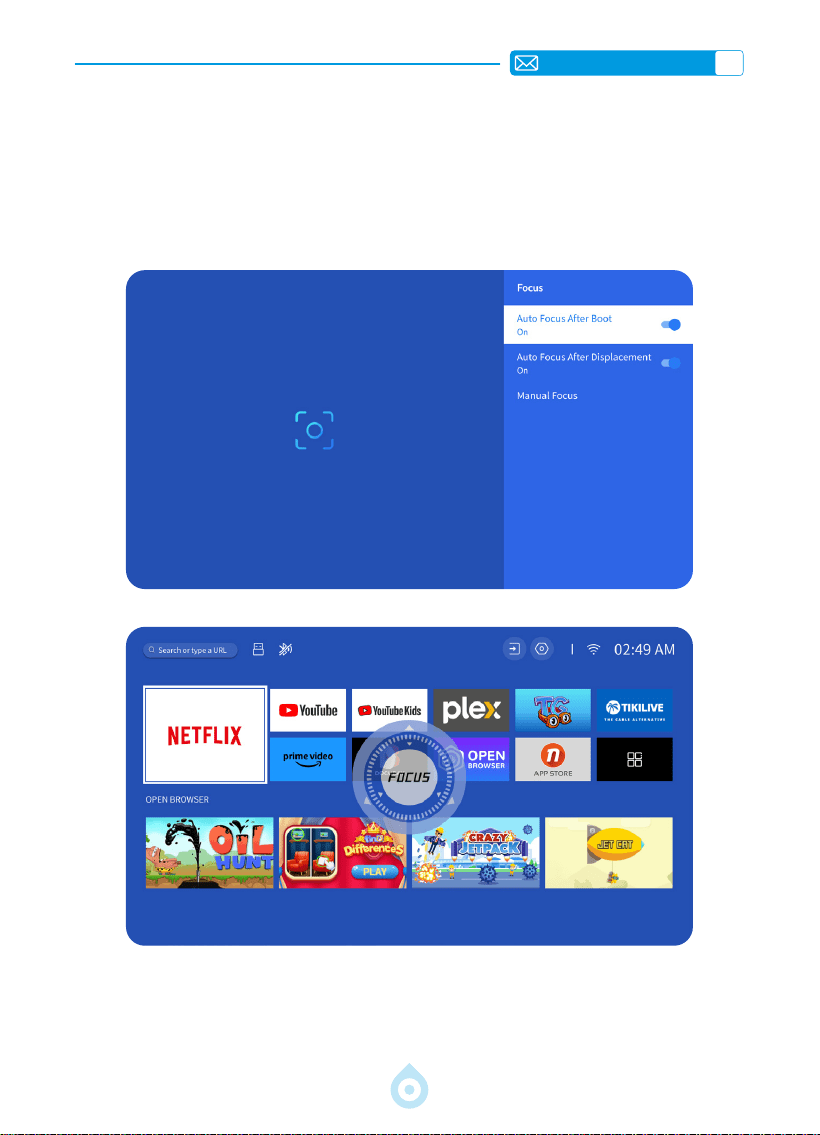
3.Auto Focus
Select the [Settings] menu - turn on the [Focus] option, then it will automatically focus and
adjust keystone every time you move the projector or turn it on.
If the image remains blurry, adjust the focus buttons "F+" and "F " on the projector remote
control to ne-tune the image clarity.
EN
17
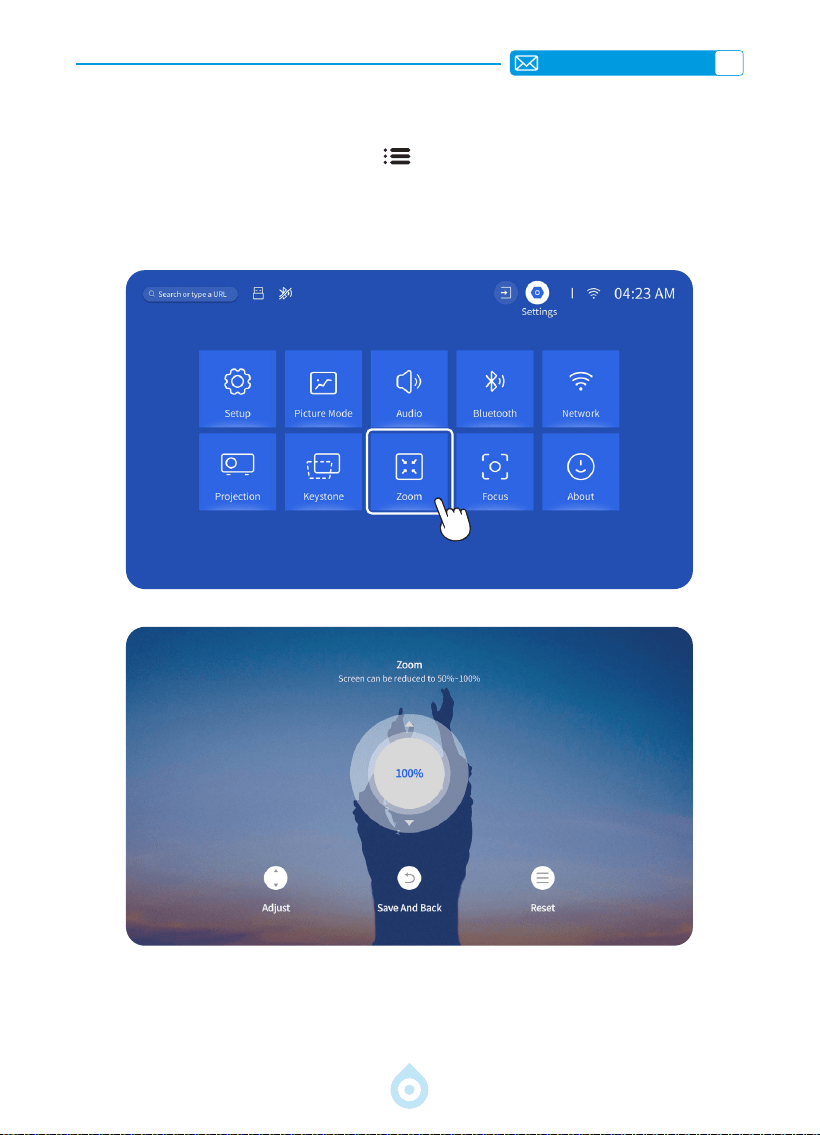
4.Zoom Setting
Go to the home page -- Select the "Menu " button -- Select the [Settings] -- Select the
[Zoom] option, the projection screen can be zoomed 50% - 100%. Press the button "
↑ ↓
" to
set the value needed as shown below.
EN
18
PROJECTOR SMART SETTINGS
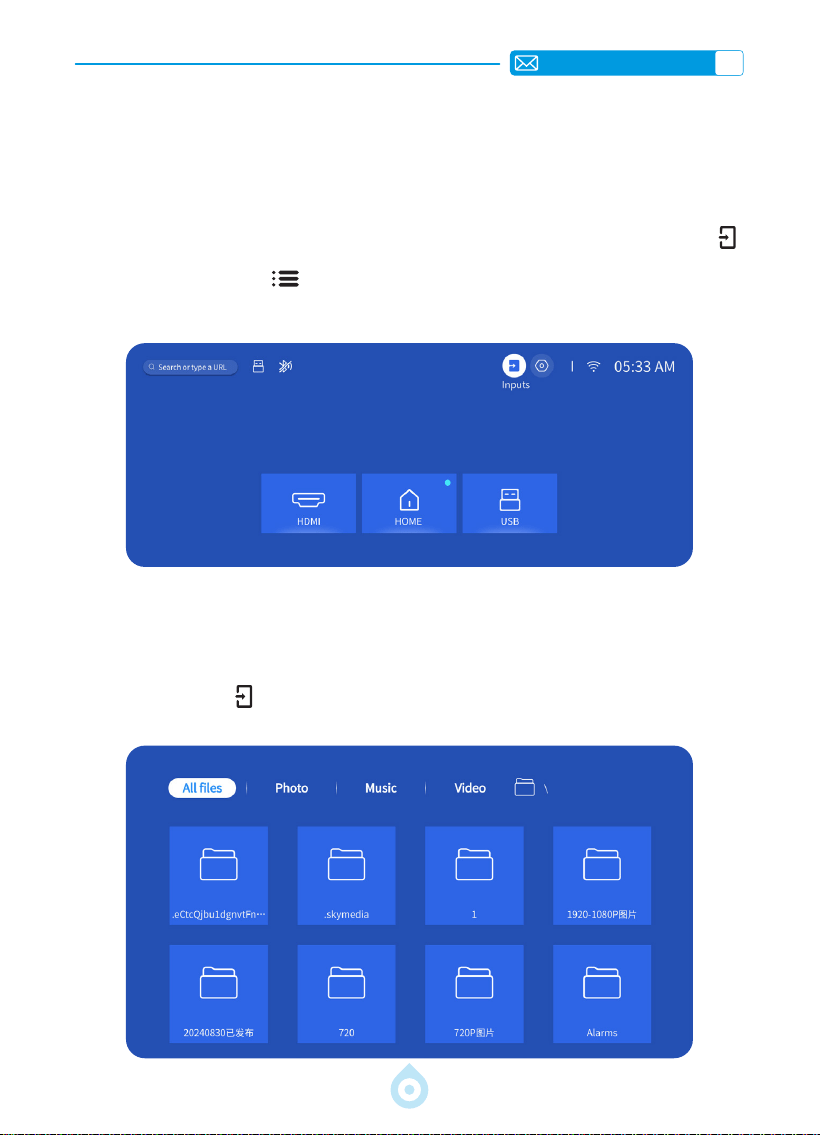
1.Select The Signal Source
Select the input signal source [HDMI] on the home page, or you can press the “Source ”
button on the remote control to select the corresponding signal source. When playing a video,
you can press the “Menu
” button, then select [Picture Mode]. You can freely adjust
the brightness and contrast of the image and other functions.
For USB devices, no need to choose the signal source. The machine will detect them
automatically. Press the "USB" button directly on the remote controller.
Or press the “Source
” button and Select the [USB] on the home page:
1.1 Select The HDMI Input Signal Source
1.2 Select the USB Input Signal Source
EN
19
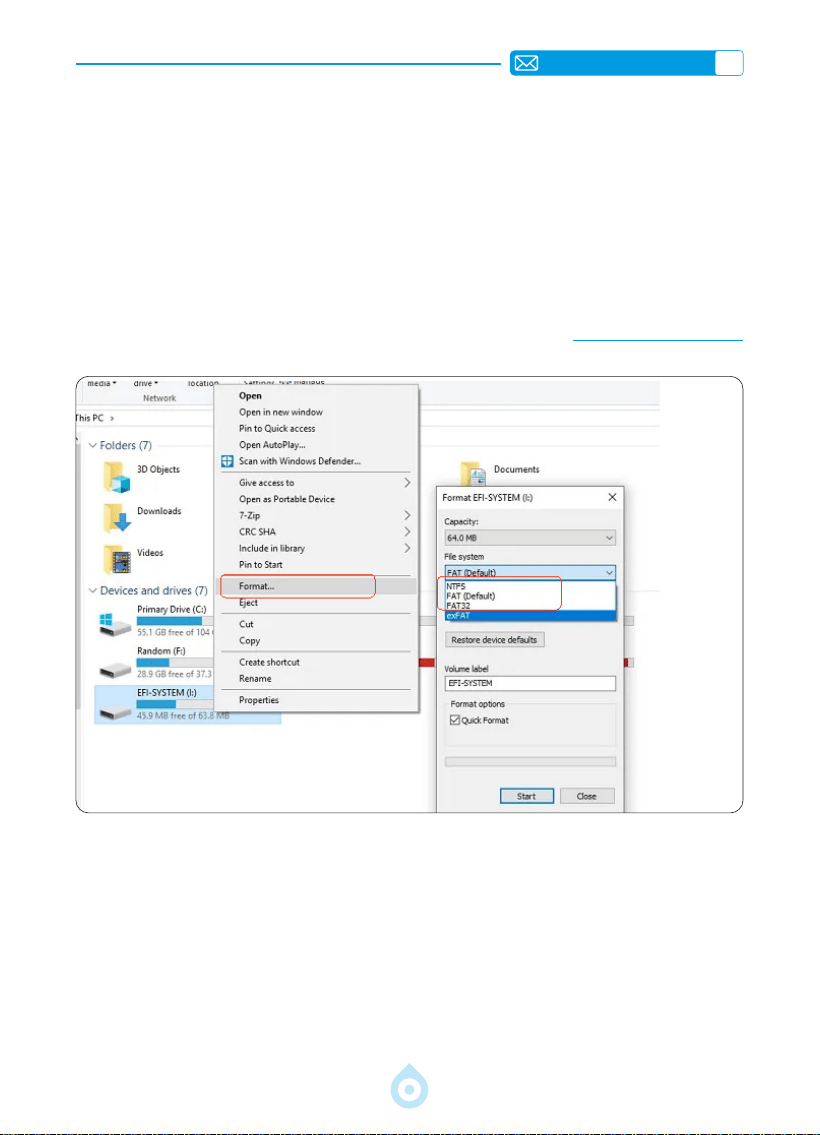
Warm Tips: If the projector cannot recognize the USB disk, please refer to the following
methods to solve the problem.
*Please conrm whether your USB disk meets the following formats.
*1. FAT32: 8G/16G/32G 2. NTFS: 64G
*If your USB disk is not belong to above formats, please change the USB disk format into
NTFS or FAT32 rstly according the below picture step.
Note: Before you change the USB disk format, please make sure to backup everything of
your USB Disk. Because doing these steps, everything will be lost forever.
If the problem is still not solved, please send your problem to this email: [email protected]
2.Wireless Connection
1) Screen mirroring requires a strong wireless WiFi signal, ensure that your home network
is functioning well. The video resolution will dynamically adjust based on the strength of
your Wi-Fi signal.
2) Select the [Settings] icon in the upper right corner of the projector main interface, then
press the "OK" key on the remote control to enter the settings interface and select
[Network]. Or Press the setting button on the remote control to enter the setting page
and select [Network].
2.1 WiFi Settings
EN
20
Attention: Ensure that your iOS device is connected to the same Wi-Fi network as your
projector.
1) Connect the projector to your home Wi-Fi.
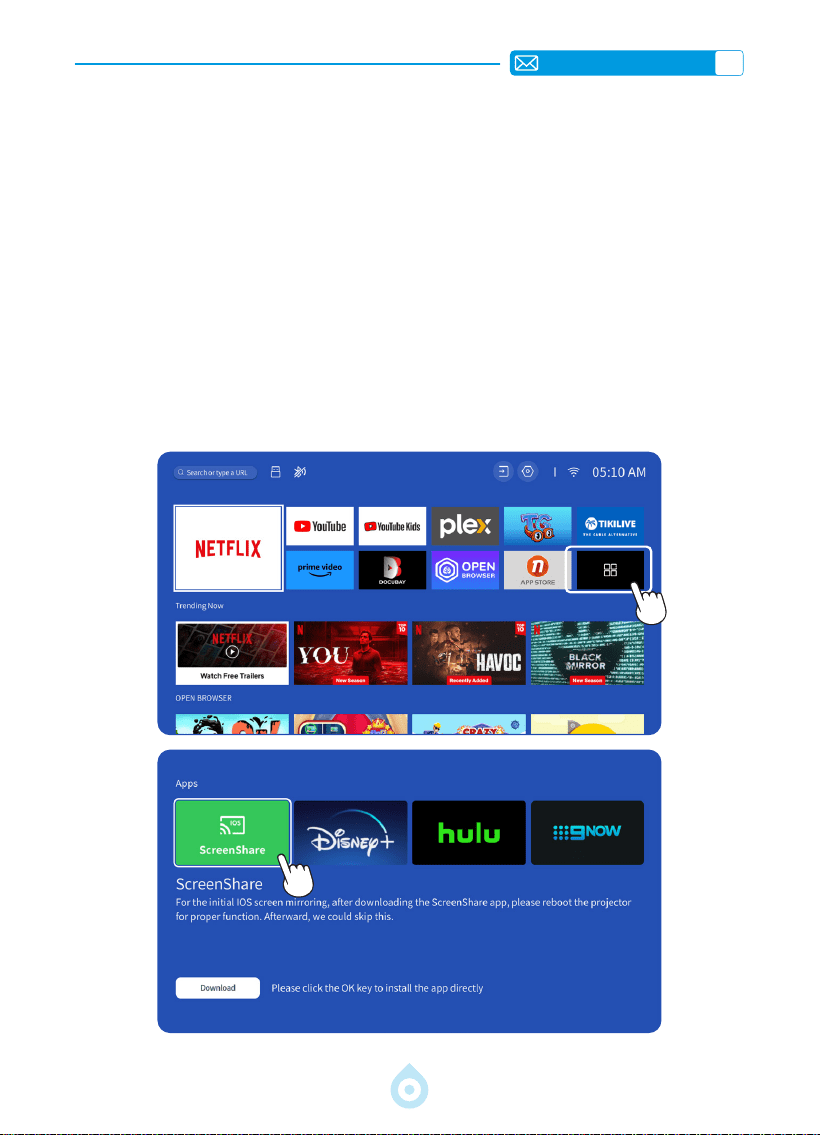
2) When using iOS device for the rst time, you need to download the APP "ScreenShare"
firstly in the Main Interface of the TP1 projector (Path: Main Interface - My
Applications - APP assistant - ScreenShare - Click "OK" - App download complete,
Please power off and restart - Find ScreenShare in My Applications).
3) Turn on the WiFi setting of your iOS device, ensure that your device and projector are
connected to the same Home WiFi.
4) Access the [Control Center] on your iOS device -- Select the [Screen Mirroring]
function -- Select and connect the iOS Cast receiver named [TOPTRO_TP1_XXXX]
5) Succeed
2.2 For iOS System (ScreenShare)

EN
21
Attention: Android devices may use various terms and methods to enable screen mirroring.
Make sure to enable the WLAN function on your Android device. (Connecting to any Wi-Fi
network is not necessary.)
1) Turn on the projector, and select "Screencast" as the lnput Source.
2) Turn on the "Multi Screen/Wireless Display" of your Android device.
3) Select "TOPTRO_TP1_XXXX" Projector from the search results to connect.
4) Succeed.
2.3 For Android System (Screencast)
EN
22
3.Bluetooth
4.Built in Smart Os System
1) Ensure that any devices previously paired with your Bluetooth speaker are disconnected
rst.
2) Turn on the [Bluetooth] of your projector and select your Bluetooth speaker to connect.
3) TP1 supports two-way transmission, In Bluetooth audio mode, it can be connected to mobile
devices and used as a Bluetooth speaker.
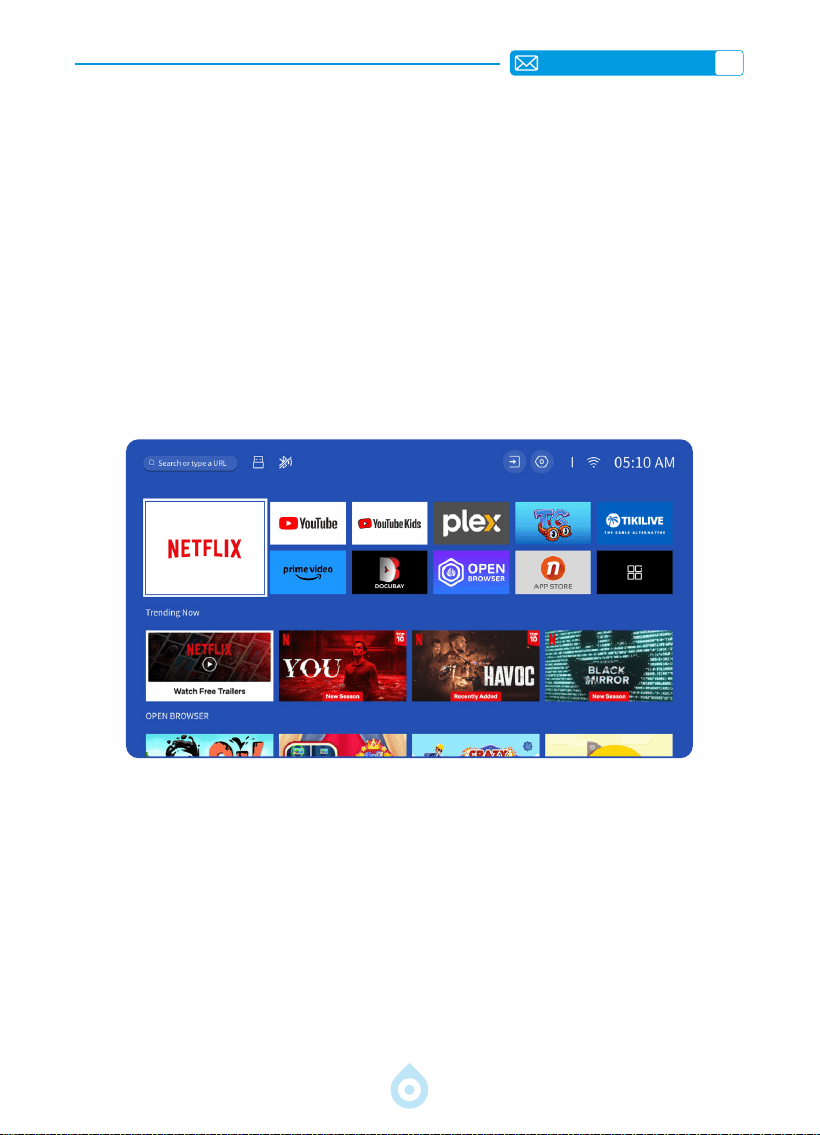
TP1 smart projector comes with built-in Smart Netix OS System, its Netix APP are licensed
ofcially. You can enjoy your favorite APP and video at will, and you can enjoy a large number
of wonderful lms and television works without using an extra TV stick. The Main interface of
TP1 projector is as below.

EN
23
OTHER BASIC PROJECTION SETTINGS
1.Option Menu
Go to home page -- Select [Settings] -- Select the [Setup]. Use the arrow keys on the
remote control to switch the menu, press the "OK" to conrm and set.
Menu Content
OSD Language English/French/Deutsch/Italian/Japanese etc
Time Setup Set Local Time
Screensaver Turn On/Off screen saver
Sleep Timer On/Off: Set the sleep time from 10 - 120 minutes
Auto Standby On/Off
USB Auto Upgrade Local Update
Internet Update Check Check Internet Environment
Reset Default Restore Factory Default

EN
24
2.Picture Mode Menu
Menu Content
Picture Mode Select the Picture Mode
Brightness Set the Screen Brightness Value
Contrast Set the Screen Contrast Value
Saturation Set the Screen Saturation Color
Hue Set the Screen Hue Color
Sharpness Set the Screen Sharpness Value
Gamma Correct the Gamma value
Color Temperature User/Cool/Standard/Warm
EN
25
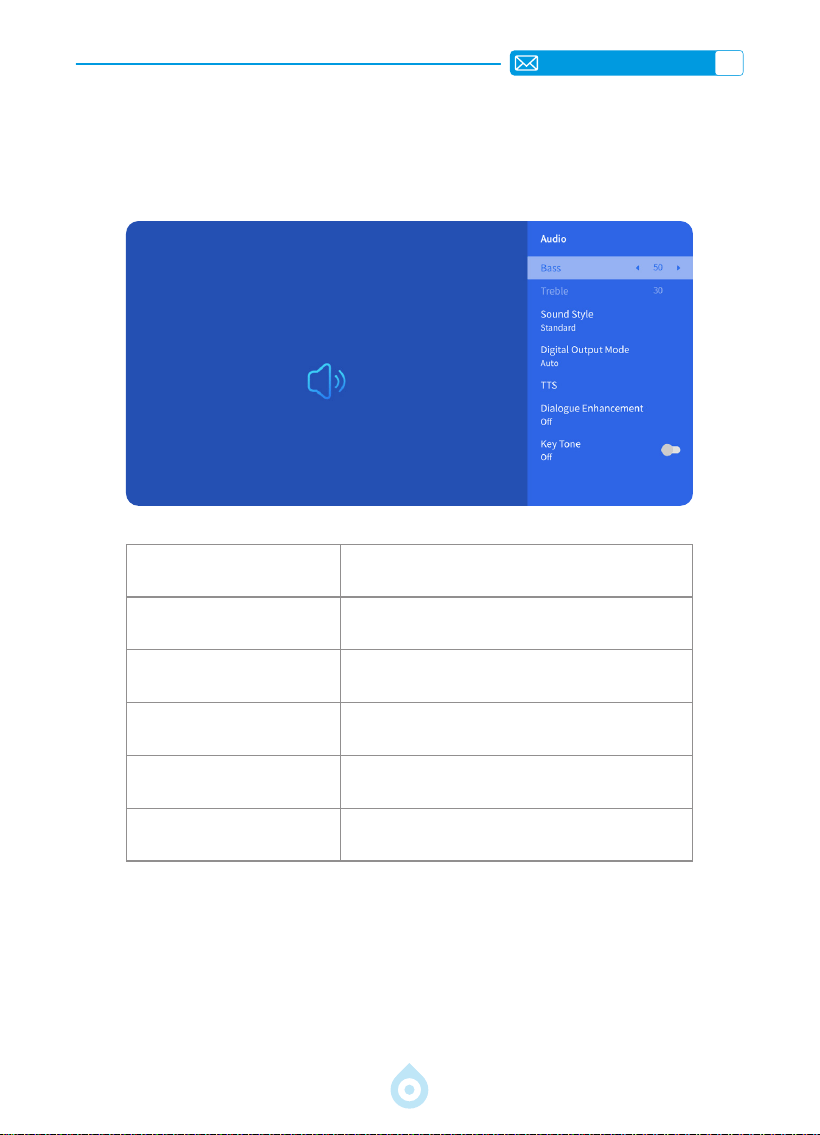
3.Audio Menu
Menu Content
Bass/Treble Set Preferred Values
Sound Style User/Standard/Movie/Music/Sports/Vivid
Digital Output Mode
Auto/PCM/Dolby Audio-Dolby Digital/Dolby
Audio-Dolby Digital Plus
Dialogue Enhancement Off/Low/Medium/High
Key Tone On/Off
Go to home page -- Select [Settings] -- Select the [Audio]. Use the arrow keys on the
remote control to switch the menu, press the "OK" to conrm and set.

EN
26
4.About (System Information)
Go to home page -- Select [Settings] -- Select the [About]. Use the arrow keys on the
remote control to switch the menu, press the “OK” to conrm and set.
Menu Content
Netix Netix Ofcially-Licensed
Version Info
View the Model number/version/OTA version/
Serial Number
License info License Information
Device Name Projector Model Name

EN
27
USB Format
FAT、FAT32: 8G/16G/32G
NTFS:64G
Unsupported format: exFAT
Attention: If the projector cannot recognize the contents of the USB ash drive,
please check whether your USB ash drive is formatted correctly.
Video Format
MP4, MKV, WMV, 3GP, MPG, VOB, TP, TS, DAT, MOV, FLV(Support for video
codecs may vary; contact us for additional support)
Audio Format
MP3, AAC, LPCM, APE, FLAC, OGG, AMR
(Support for audio codecs may vary; contact us for additional support)
Image Format
JPG, PNG, BMP, JPEG
Document Format
TXT, PDF, DOCX, XLSX, PPTX
SIGNAL LINES CONNECTION
1.USB Multimedia Connecting
Select the USB signal source, the machine will detect them automatically.
1) Select the required category “Photos” “Music” or “Video” in the main interface, and
press the“OK”key on the remote control to enter the corresponding category.
2) According to the programs to choose : “Photos” “Music” or “Video”.
3) Choose the le you want to play, and press the key “OK” to play or pause the le. (You
cannot enter the required category without connecting a USB disk.)
If the problem persists, please send a detailed description of your issue to the following email
address: [email protected]
TOPTRO TP1 Projector has 3 interfaces, HDMI Port*1/USB Port*1/3.5mm audio output*1. Please
select the correct connecting port to connect your device (USB, TV Stick, Speakers, PC, Laptop
, DVD Player,etc.)

EN
28
2.Connecting with PC
1) Connect to the computer and the projector with the HDMI cable (Included).
2) Select the HDMI source to project any les on your computer.
3) On your laptop, hold down the key "Win+P" board keys to change your display mode.
Computer only: it is the default option -only displays on the main monitor.
Duplicate: makes all the monitors display the same thing duplicating the desktop on each
monitor.
Extend: makes all your monitors act like one big monitor extending the desktop across all of
them.
Projector only: Displays only on the secondary monitor like a projector. You can change the
screen resolution on the Projector Only Mode.
Step: Start> Control Panel > Appearance and Personalization > Adjust Screen
Resolution

EN
29
3.Connecting with MacBook or MacBook Air
4.Connecting with XBOX/PS5
1) Choose the media signal channel: HDMI
2) Use a Type-C to HDMI adapter to connect your MacBook, or a Mini Display to HDMI adapter
to connect with your MacBook Air (adapter not included).Connecting with MacBook or Mac
Book Air. (Adapter not included)
1) Choose the media signal channel: HDMI
2) Use HDMI cable to connect to XBOX/PS5
3) Succeed

EN
30
FAQ
Thanks for selecting the TOPTRO TP1 Projector. We have compiled some frequently asked
questions and their corresponding answers to assist you better. If the problem persists, kindly
provide us the following details: country code, order number, model, and a brief description
of the problem (e.g., US+000 0000000 0000000+TP1+No image), please email us at
[email protected] . Rest assured, our dedicated team will respond promptly within 24
hours with effective solution to address your concerns.
Q1: The screen mirroring or WiFi connection is unstable. How can I resolve this
issue?
Screen mirroring requires a strong wireless WiFi signal, ensure that your home network is
functioning well. The video resolution will dynamically adjust based on the strength of your
Wi-Fi signal. Additionally, activate your phone’s Hotspot and try to connect with TP1 projector,
so as to identify if the issue is related to with the home network.
Q2: What is the most suitable projection distance? Can the screen size be
adjusted by scaling?
The recommended projection distance for the TP1 projector is 2-3 meters. The image size
depends on the distance and the projector's throw ratio, which is 1.1:1. In addition, TP1 projector
offers 50%-100% zoom out feature. For more detailed projection distance information, please
consult the manual or reach out to us directly.
Q3: Why is the image out of focus no matter how I adjust it?
Place the projector in line with the center of the screen. Or the offset angle should be within
15degree. Use Auto or Manual Keystone function to achieve a rectangular screen display; Use
Auto Focus or Manual Focus to adjust lens focus.
Q4:Whenscreenmirroring,theprojectorcannotplayNetix,YouTube,Hulu,or
Disney+, Why?
1. Due to copyright restrictions, including the TP1 model, the majority of projectors do not
support wireless mirroring of streaming services from your phone. Otherwise, the screen
will remain black with only sound playing. Even projectors with integrated systems may
have limitations with certain streaming services. To access these services, we suggest using
a TV Stick (not included) with our projector for a seamless and versatile experience.
2. Use the HomeShare function on TP1 Projector: 1)Turn on the HomeShare on the projector. 2)
Make sure your mobile phone and the projector be connected to the same WIFI. 3)Click the
projection Button on the APPS like Netix or Disney videos; 4) Select "TP1". However, due to
compatibility reasons, the Prime Video application does not support projection;
3. It is recommended that use the projector system's built-in APP for playback.

DE
31
Inhalt
TOPTRO 7D/24H PROFESSIONELLE UNTERSTÜTZUNG 34
GEBRAUCHSANWEISUNG 35
LIEFERUMFANG 36
PROJEKTORÜBERSICHT 37
FERNBEDIENUNG 38
INSTALLATION 39
1.Installationsmethode 39
2.Decken und Standmontage 40
3.Projektionsabstand und größe 40
FERNBEDIENUNG 41
PROJEKTOR STARTEN 42
Projektionsbildeinstellungen 42
1.Projektionsmodus 42
2.Trapezkorrektur 43
3.Autofokus 44
4.Zoom-Einstellungen 45
Projektor Smart Einstellungen 46
1.Signalquelle auswählen 46
2.Kabellose Verbindung 47
3.Bluetooth 50
4.Integriertes Smart OS System 50
WEITERE GRUNDLEGENDE PROJEKTIONSEINSTELLUNGEN 51
1.Optionsmenü 51
2.Bildmodus Menü 52
3.Audiomenü 53
4.Info (Systeminformationen) 54
SIGNALANSCHLUSS 55
1.USB Multimediaanschluss 55
2.Verbindung mit dem PC 56
3.Anschluss an MacBook oder MacBook Air 57
4.Anschluss an XBOX/PS5 57
FAQ 58

DE
32
Aktivieren Sie Ihre 3-Jahres-Garantie und
erhalten Sie eine exklusive Überraschung
Sehr geehrte Damen und Herren
Vielen Dank für den Kauf des TP1 Projektors.
Bitte nehmen Sie sich 1 Minute Zeit, um den Code zu scannen und Ihre
3 Jahres Garantie zu aktivieren.
Es wird empfohlen, den Vorgang innerhalb von 3 Tagen abzuschließen.
Tipps: Sollten Sie Ihre Garantie nicht durch Scannen des Codes
aktivieren können, kontaktieren Sie uns bitte über die unten stehende
E-Mail-Adresse. Wir helfen Ihnen gerne bei der Aktivierung.
Scannen, um mehr zu erfahren
[email protected] www.youtube.com/@TOPTRO-R
DE
33
Wir arbeiten ständig an der Verbesserung unserer Produkte. Bitte
beachten Sie, dass die Abbildungen und Beschreibungen im Handbuch
nur als Referenz dienen und geringfügig vom tatsächlichen Produkt
abweichen können. Genauere Informationen nden Sie im Produkt selbst.
Sie können die neuesten Updates auch über unsere Online-Upgrade-
Funktion abrufen. Vielen Dank für Ihr Verständnis!
Unsere Produktgarantie und unser Support gelten für Artikel, die bei
autorisierten Händlern erworben wurden. Um Ihre Rechte zu wahren,
können Sie uns gerne eine E-Mail an [email protected] senden, um
die Echtheit Ihres TP1-Projektors zu bestätigen.
Dies ist unser ofzieller YouTube-Link: www.youtube.com/@TOPTRO R.
Dort nden Sie alle Bedienungsvideos und Fehlerbehebungshinweise zum
TP1-Projektor.
Wir freuen uns, zu hören, wie unsere Projektoren Ihr Leben
bereichern! Teilen Sie uns Ihre Erlebnisse mit und geben Sie uns
Feedback – wir freuen uns, Teil Ihres Erlebnisses zu sein.
So erreichen Sie uns am schnellsten und efzientesten:
Methode 1: E Mail
E Mail: [email protected]
Tipps: Wir empfehlen Ihnen, uns zunächst per E-Mail zu kontaktieren,
da Sie so Videos oder andere detaillierte Informationen zu Ihrem
Produkt teilen und uns so helfen können, Ihr Problem schneller zu
lösen. Sollten Sie keine Antwort per E-Mail erhalten, ist die Nachricht
möglicherweise im Spam-Ordner gelandet oder wurde verspätet
bearbeitet. Versuchen Sie in diesem Fall bitte die zweite Methode
unten.
Methode 2: Bestellungen
Gehen Sie zu Ihren Bestellungen und wählen Sie
„Bei der Bestellung liegt ein Problem vor“ für den
entsprechenden Artikel. Wählen Sie ein Thema aus
der angezeigten Liste aus. Klicken Sie auf „Verkäufer
kontaktieren“, um uns eine Nachricht zu senden.
Vielen Dank für Ihr Vertrauen in TOPTRO! Wir möchten,
dass Sie das bestmögliche Erlebnis haben.

DE
34
TOPTRO 7D/24H PROFESSIONELLE UNTERSTÜTZUNG
Sehr geehrte Kundin, sehr geehrter Kunde,
Vielen Dank für Ihre Unterstützung bei TOPTRO! Bitte lesen Sie diese
Bedienungsanleitung sorgfältig durch, bevor Sie den Projektor in Betrieb
nehmen. Die Funktionen und Abbildungen dienen als Referenz und können
aufgrund laufender Optimierungen und Aktualisierungen leicht vom
tatsächlichen Produkt abweichen. Genauere Informationen entnehmen Sie
bitte dem Produkt.
Bei Problemen senden Sie uns bitte eine E-Mail an [email protected] und
geben Sie bitte folgende Informationen an: Ländercode, Bestellnummer,
Modell und eine kurze Beschreibung des Problems (z. B.: US+000
0000000 0000000+TP1+Kein Bild). Unser engagiertes Team antwortet
Ihnen innerhalb von 24 Stunden mit einer effektiven Lösung.
Viele häuge Probleme lassen sich durch einfache Anpassungen beheben. Um
Ihre Zufriedenheit zu gewährleisten, durchlaufen alle unsere Projektoren vor
dem Versand eine strenge 100%ige Qualitätskontrolle und werden sorgfältig
verpackt.
Bei Fragen kontaktieren Sie uns bitte, damit wir das Problem lösen können.
Geben Sie uns die Möglichkeit, uns zu verbessern. Wir sind bestrebt, Ihnen bei
allen auftretenden Problemen eine zufriedenstellende Lösung zu bieten.
Mit freundlichen Grüßen,
TOPTRO Service-Team

DE
35
GEBRAUCHSANWEISUNG
Temperaturhinweise:
Um die Langlebigkeit Ihres Projektors zu gewährleisten, vermeiden Sie
übermäßig warme oder kalte Umgebungen. Extreme Temperaturen können
die Lebensdauer des Geräts verkürzen. Für optimale Leistung sollten Sie eine
Umgebungstemperatur zwischen 5 ° C und 35 ° C einhalten.
Ausreichende Belüftung:
Der Projektor ist mit einem Belüftungssystem ausgestattet, um einen stabilen
Betrieb zu gewährleisten. Stellen Sie den Projektor an einem gut belüfteten
Ort auf. Vermeiden Sie beengte Räume wie Schränke und stellen Sie sicher,
dass sich keine Hindernisse in der Nähe der Luftein- und -auslässe benden.
Übermäßiger Staub beeinträchtigt die Wärmeableitung des Projektors. Wir
empfehlen, den Staubfilter je nach Umgebung alle ein bis zwei Monate zu
reinigen.
Schutz vor Stößen und Vibrationen:
Behandeln Sie Ihren Projektor sorgfältig und schützen Sie ihn vor starken
Stößen, Druckstellen und Vibrationen. Vermeiden Sie es, den Projektor zu
bewegen, wenn interne Schaltkreisfehler vorliegen.
Objektivpege:
Das Projektorobjektiv ist ein wichtiges Bauteil, das die Bildschärfe und
-qualität direkt beeinflusst. Halten Sie die Linse frei von übermäßigem
Staub. Verwenden Sie zum Reinigen ein weiches, für Glaslinsen geeignetes
Baumwolltuch.

DE
36
LIEFERUMFANG
TOPTRO TP1 Projektor*1 Fernbedienung*1 Stromkabel*1
HDMI-Kabel*1 Objektivabdeckung*1 Reinigungsset*1
Kurzanleitung*1 FAQ*1

DE
37
PROJEKTORÜBERSICHT
Objektiv
Lufteinlass
Fokussignalempfänger
Stromanschluss
Ein/Aus
IR-Empfänger
Luftauslass
HDMI-Anschluss
USB-Anschluss
3,5-mm-Audiobuchse
Flexibler Standfuß
1/4-Zoll-Montageloch

DE
38
FERNBEDIENUNG
Ein/Aus Stumm
Einstellungen
Projektionsmodus
Bestätigungstaste
Quelle
Zurück
Pfeiltaste
USB
Menü
Lautstärke+
Startseite
Lautstärke-
Fokus+
NETFLIX
Fokus-
Prime Video
YouTube
BROWSER ÖFFNEN
*Legen Sie vor der Verwendung zwei AAA-Batterien (nicht im Lieferumfang enthalten) in die
Fernbedienung ein.
*Achten Sie bei der Verwendung der Fernbedienung darauf, dass der Signalsender der
Fernbedienung auf den Infrarot-Signalempfänger des Projektors gerichtet ist.

DE
39
INSTALLATION
1.Installationsmethode
Der Projektor kann je nach Umgebung und Anforderungen mit einer speziellen
Deckenhalterung an der Decke montiert oder zur Projektion auf einem stabilen Schreibtisch
aufgestellt werden. Darüber hinaus sind folgende Installationsmethoden möglich:
Halten Sie den Projektor so hoch, dass sein Objektiv rotationssymmetrisch zur Leinwand
ist. Sollte dies nicht möglich sein, können Sie das Projektionsbild mit der Trapezkorrektur
korrigieren.
Frontprojektions Deckenmontage
Frontprojektions Tischmontage
Rückprojektions Deckenmontage
Rückprojektions Tischmontage

DE
40
3.Projektionsabstand und größe
40’’
60’’
84’’
100’’
120’’
Meter
Fuß
1,0
3.2
1,46
4.8
2,05
6.71
2,44
7.99
2,92
9.59
Der empfohlene Projektionsabstand für den TP1-Projektor beträgt 1,8 bis 2,9 Meter. Die
Bildgröße hängt vom Abstand und dem Projektionsverhältnis des Projektors (1,1:1) ab.
Zusätzlich bietet der Projektor eine 50%-Zoom-Funktion, mit der Sie die Bildschirmgröße
anpassen können.
*Die tatsächliche Projektionsgröße und der tatsächliche Abstand können
geringfügig von den Labordaten abweichen.
2.Decken und Standmontage
1) Der TP1 unterstützt keine Vier-Ecken-Montage. Verwenden Sie zur Befestigung des
Projektors einen Standfuß mit 1/4-Zoll-Halterung oder eine Standplatte.
2) Ziehen Sie das untere Produktetikett ab, um die Montageöffnung freizulegen.
Durchmesser:
Φ
1/4"
(6.35 mm)
Tiefe: 6,0 mm

DE
41
FERNBEDIENUNG
Modellnummer: TP1
Produktgröße
(L x B x H)
4,57 x 4,80 x 9,45 Zoll
11,60 x 12,20 x 24,00 cm
Produktgewicht
2,4 lbs
1,1 kg
Native Auösung
1920*1080P Bildwiederholfrequenz 60 Hz
Displaytechnologie
LCD Lichtquelle LED
Trapezkorrektur
Auto/Elektrisch Netzspannung
AC100-240V
50-60Hz
Bildformat
16:9 Fokus Auto/Elektrisch
Projektionsverhältnis
1.1 : 1 (±0.5) Zoom 100%-50%
Projektionsmethode
Vorne/Hinten am Tisch, vorne/Hinten an der Decke
USB-Festplatte-
nunterstützung
1. FAT32: 8 GB/16 GB/32 GB 2. NTFS: 64 GB
Schnittstellen
HDMI*1/USB*1/3,5-mm-Audioausgang x 1
Videoformat
MP4/MPG/AVI/MPEG-4/TS/MOV/M4V/MKV/FLV/DAT/3GP (Die
Unterstützung für Videocodecs kann je nach Umständen variieren.
Kontaktieren Sie uns für weitere Unterstützung.)
Audioformat
MP3/WMA/M4A/MP2/AAC/OGG/WAV/FLAC (Dolby-Unterstützung)
Bildformat
JPG/JEPG/BMP/PNG
DE
42
PROJEKTOR STARTEN
Projektionsbildeinstellungen
1. Einschalten: Entfernen Sie die Objektivkappe und drücken Sie die Einschalttaste auf der
Fernbedienung oder am Projektor. Die Kontrollleuchte leuchtet blau, sobald der Projektor
eingeschaltet ist.
2. Spracheinstellung: Wählen Sie Ihre gewünschte Sprache in den Einstellungen.
3. Trapezkorrektur/Fokus: Nutzen Sie die automatische vertikale Trapezkorrektur
(oder Vierpunktkorrektur) und die Fokusfunktion, um ein rechteckiges und klares Bild zu
erzielen. Stellen Sie sicher, dass der Bereich vor dem [Fokusempfänger] frei ist.
4. Bildschärfe optimieren: Passen Sie die Bildschärfe mit den Fokustasten „F+“ und „F “
auf der Fernbedienung an. Sollte das Bild weiterhin unscharf sein, richten Sie den Projektor
erneut auf die Leinwand.
5. Externe Geräte anschließen: Schließen Sie Ihr externes Gerät (z. B. Smartphone, iPad,
TV-Stick, TV-Box, Laptop usw.) an die entsprechenden Anschlüsse des Projektors an. Achten
Sie darauf, die richtige Quelle für Ihr Gerät auszuwählen, da der Projektor das Signal sonst
möglicherweise nicht erkennt.
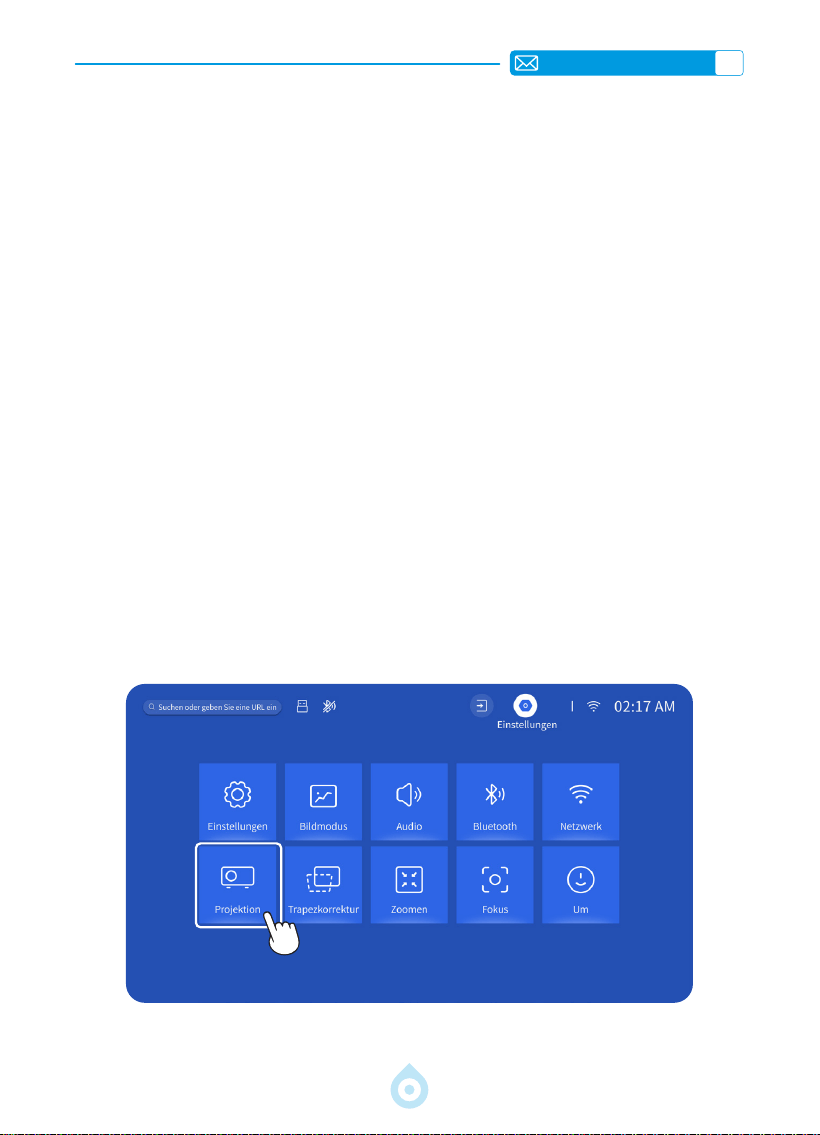
1.Projektionsmodus
Wählen Sie das Menü [Einstellungen] – wählen Sie die Option [Projektion] – wählen
Sie Ihren Installationsmodus, drücken Sie die Pfeiltaste zur Auswahl und bestätigen Sie die
Projektionsposition mit „OK“.
DE
43
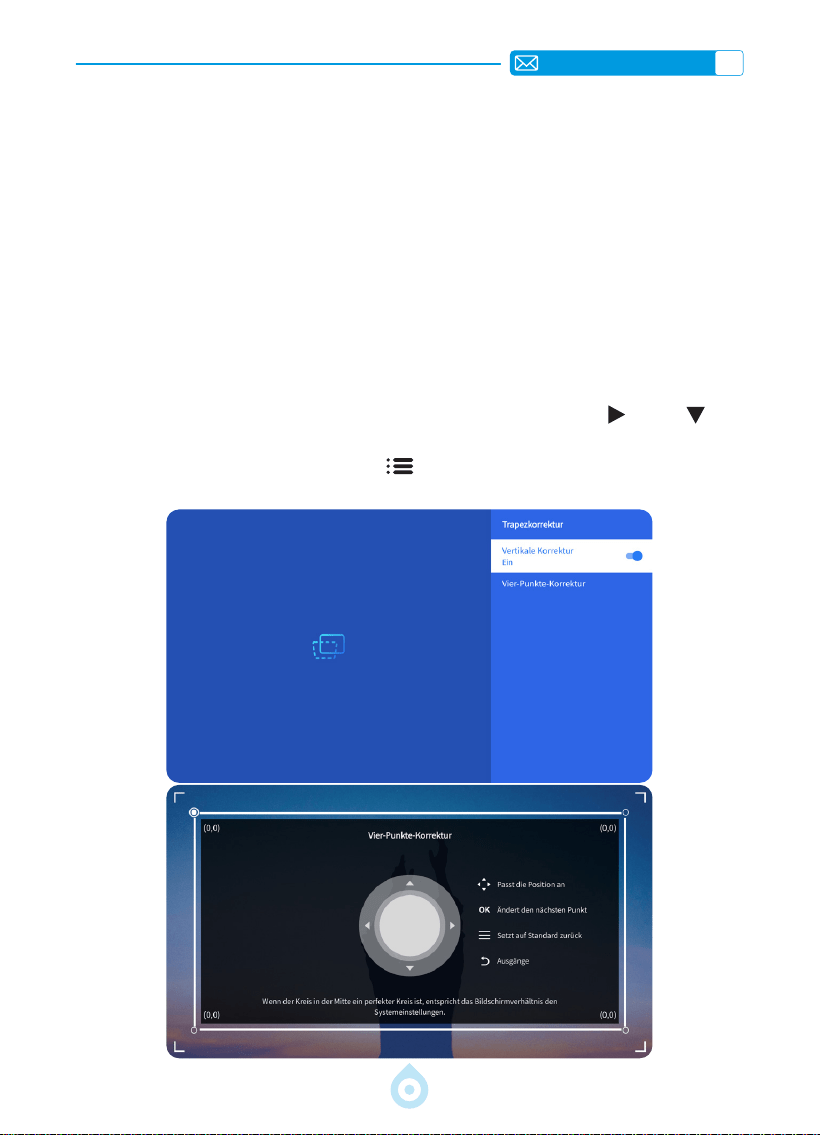
2.Trapezkorrektur
2.1 Automatische vertikale Trapezkorrektur
2.2 Vier Punkt Trapezkorrektur
Wählen Sie das Menü [Einstellungen] und aktivieren Sie die Option [Trapezkorrektur].
Die Trapezkorrektur wird dann automatisch rechteckig angepasst, sobald Sie den Projektor
bewegen oder einschalten.
Für eine optimale Projektionsqualität empfehlen wir, den Projektor vertikal und horizontal
mittig auf der Leinwand zu positionieren. Stellen Sie außerdem sicher, dass der vertikale
Versatzwinkel des Projektors 20
°
nicht überschreitet, da die automatische Trapezkorrektur
sonst möglicherweise nicht ordnungsgemäß funktioniert.
Wählen Sie das Menü [Einstellungen] und aktivieren Sie die Option [Trapezkorrektur].
Wählen Sie anschließend die Option [Vier Punkt Korrektur]. Klicken Sie auf „OK“, um den
gewünschten Punkt auszuwählen. Drücken Sie anschließend die Tasten „
“ oder „ “, um
den gewünschten Wert (vertikal 0–100) wie unten gezeigt einzustellen.
Zurücksetzen: Drücken Sie die Taste „Menü
“, um die ursprünglichen
Trapezkorrektureinstellungen wiederherzustellen.

DE
44
3.Autofokus
Wählen Sie im Menü [Einstellungen] die Option [Fokus]. Der Projektor fokussiert und
korrigiert die Trapezkorrektur automatisch, sobald Sie ihn bewegen oder einschalten.
Sollte das Bild weiterhin unscharf sein, können Sie die Bildschärfe mit den Fokustasten „F+“
und „F “ auf der Fernbedienung des Projektors optimieren.

DE
45
4.Zoom Einstellungen
Gehen Sie zur Startseite – wählen Sie „Menü “ – wählen Sie [Einstellungen] – wählen
Sie [Zoom]. Der Projektionsbildschirm kann um 50 % bis 100 % vergrößert werden. Drücken
Sie die Tasten „
↑ ↓
“, um den gewünschten Wert wie unten gezeigt einzustellen.
DE
46
Projektor Smart Einstellungen
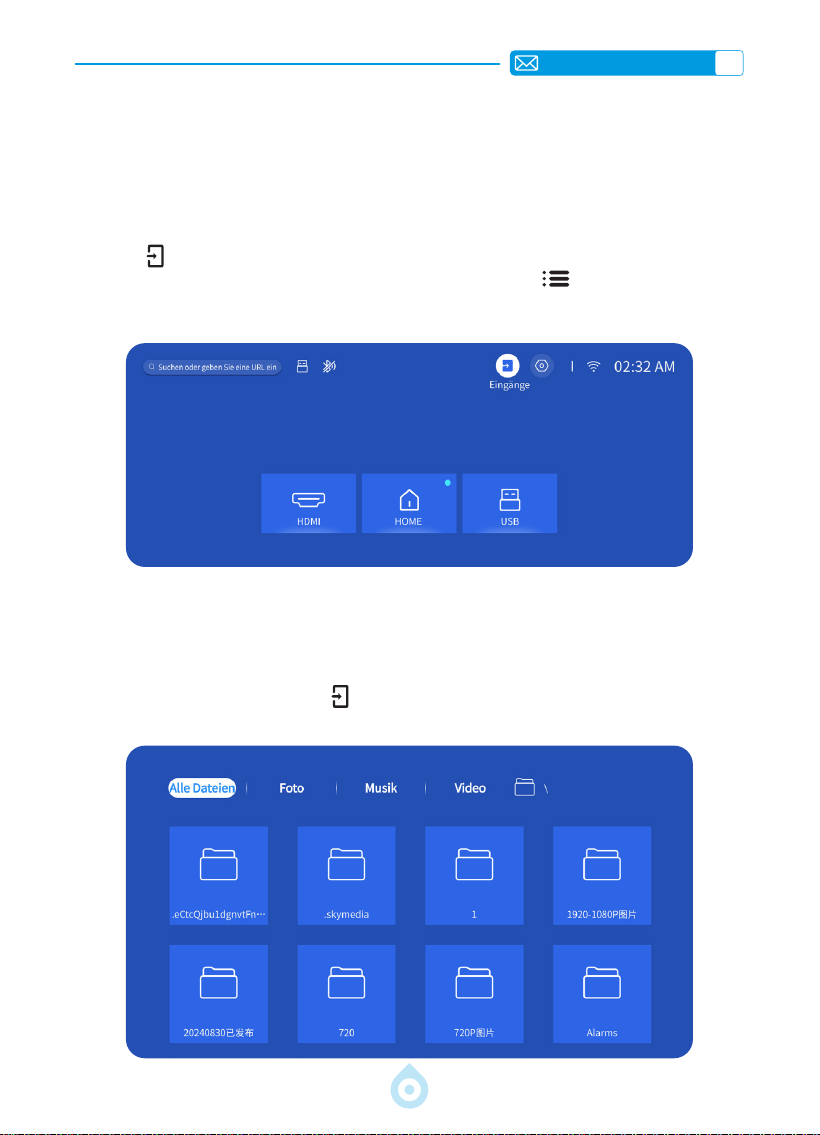
1.Signalquelle auswählen
Wählen Sie auf der Startseite die Eingangssignalquelle [HDMI] oder drücken Sie die Taste
„Quelle
“ auf der Fernbedienung, um die entsprechende Signalquelle auszuwählen.
Drücken Sie während der Videowiedergabe die Taste „Menü
“ und wählen Sie dann
[Bildmodus]. Sie können Helligkeit und Kontrast des Bildes sowie weitere Funktionen frei
einstellen.
Bei USB-Geräten müssen Sie keine Signalquelle auswählen. Das Gerät erkennt sie
automatisch. Drücken Sie die Taste „USB“ direkt auf der Fernbedienung.
Oder drücken Sie die Taste „Quelle
“ und wählen Sie auf der Startseite [USB] aus.
1.1 HDMI Eingangssignalquelle auswählen
1.2 USB Eingangssignalquelle auswählen
DE
47
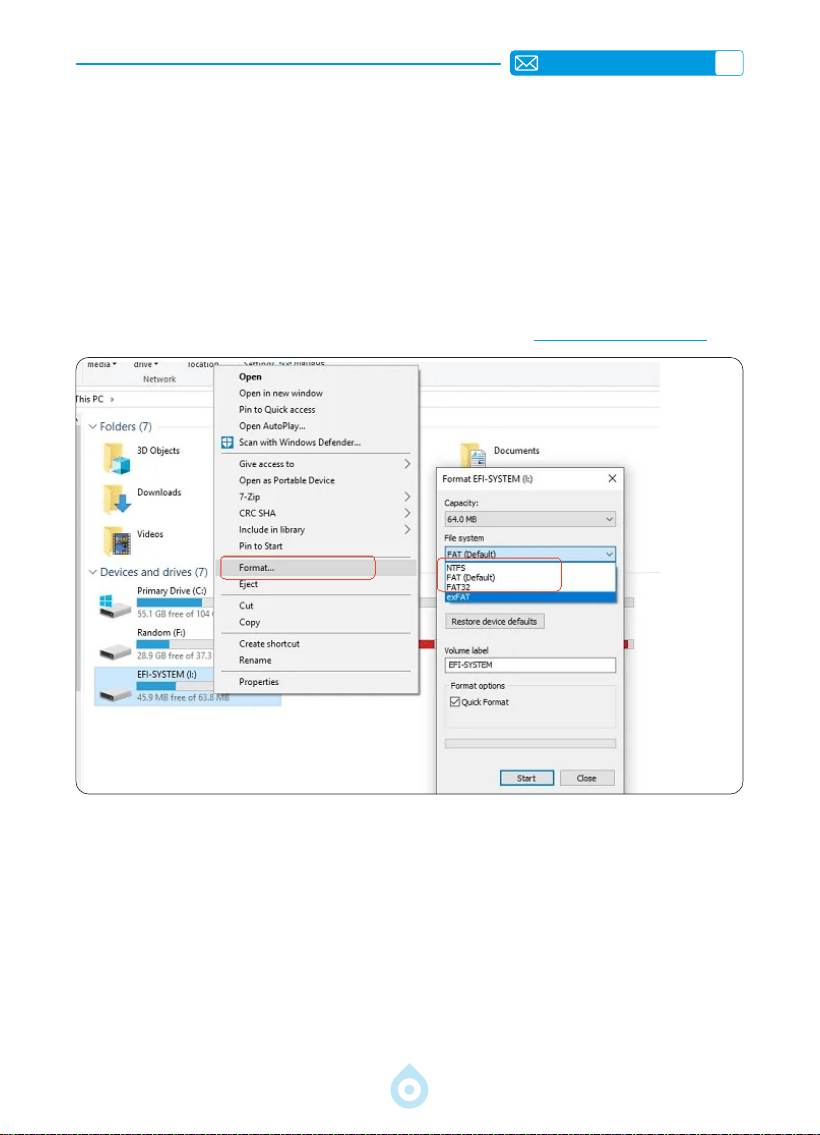
Tipps: Wenn der Projektor den USB-Stick nicht erkennt, befolgen Sie bitte die folgenden
Schritte, um das Problem zu beheben.
*Bitte überprüfen Sie, ob Ihr USB-Stick die folgenden Formate unterstützt:
*1. FAT32: 8 GB/16 GB/32 GB 2. NTFS: 64 GB
*Falls Ihr USB-Stick nicht die oben genannten Formate unterstützt, ändern Sie das Format
zunächst gemäß der folgenden Abbildung in NTFS oder FAT32.
Hinweis: Bevor Sie das Format ändern, sichern Sie bitte alle Daten auf Ihrem USB-Stick.
Andernfalls gehen alle Daten verloren.
Sollte das Problem weiterhin bestehen, wenden Sie sich bitte an [email protected].
2.Kabellose Verbindung
1) Für die Bildschirmspiegelung ist ein starkes WLAN-Signal erforderlich. Stellen Sie sicher,
dass Ihr Heimnetzwerk einwandfrei funktioniert. Die Videoauösung passt sich dynamisch
an die Stärke Ihres WLAN-Signals an.
2) Wählen Sie das Symbol [Einstellungen] in der oberen rechten Ecke der Projektor-
Hauptoberfläche und drücken Sie dann die Taste „OK“ auf der Fernbedienung, um die
Einstellungsoberfläche aufzurufen und [Netzwerk] auszuwählen. Oder drücken Sie
die Einstellungstaste auf der Fernbedienung, um die Einstellungsseite aufzurufen und
[Netzwerk] auszuwählen.
2.1 WLAN Einstellungen
DE
48
Achtung: Stellen Sie sicher, dass Ihr iOS-Gerät mit demselben WLAN wie Ihr Projektor
verbunden ist.
1) Verbinden Sie den Projektor mit Ihrem Heim-WLAN.
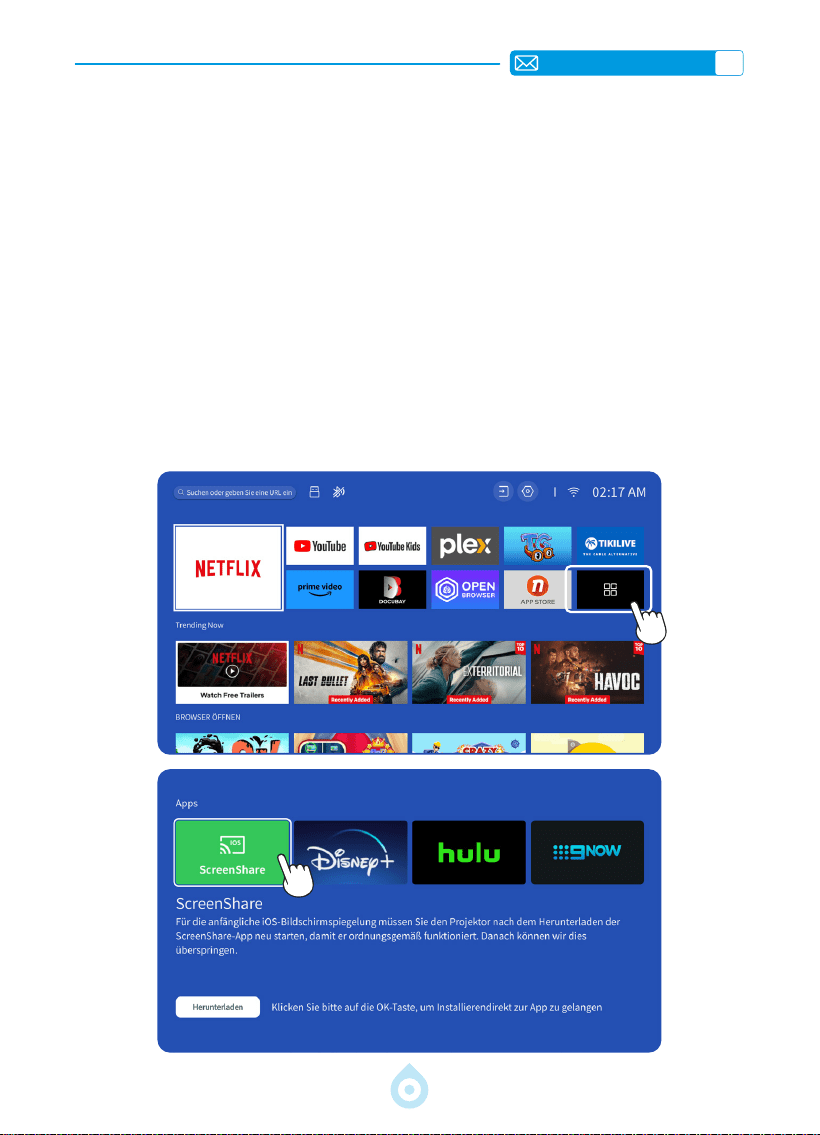
2) Wenn Sie Ihr iOS-Gerät zum ersten Mal verwenden, laden Sie zunächst die App
„ScreenShare“ im Hauptmenü des TP1 Projektors herunter (Pfad: Hauptmenü – Meine
Anwendungen – App-Assistent – ScreenShare – Klicken Sie auf „OK“. App-Download
abgeschlossen. Bitte ausschalten und neu starten. Suchen Sie ScreenShare in „Meine
Anwendungen“).
3) Aktivieren Sie die WLAN-Einstellungen Ihres iOS-Geräts und stellen Sie sicher, dass Ihr Gerät
und der Projektor mit demselben Heim-WLAN verbunden sind.
4) Rufen Sie das [Kontrollzentrum] auf Ihrem iOS-Gerät auf. Wählen Sie die Funktion
[Bildschirmspiegelung]. Wählen Sie den iOS Cast-Empfänger [TOPTRO_TP1_XXXX]
aus und verbinden Sie ihn.
5) Gelingen.
2.2 Für iOS Systeme (ScreenShare)

DE
49
Achtung: Android-Geräte verwenden möglicherweise unterschiedliche Begriffe und
Methoden zur Aktivierung der Bildschirmspiegelung. Aktivieren Sie die WLAN-Funktion Ihres
Android-Geräts. (Eine Verbindung zu einem WLAN-Netzwerk ist nicht erforderlich.)
1) Schalten Sie den Projektor ein und wählen Sie „Screencast“ als Eingangsquelle.
2) Aktivieren Sie die Funktion „Mehrfachbildschirm/Drahtlose Anzeige“ Ihres Android-Geräts.
3) Wählen Sie den Projektor „TOPTRO_TP1_XXXX“ aus den Suchergebnissen aus, um eine
Verbindung herzustellen.
4) Gelingen.
2.3 Für Android Systeme (Screencast)

DE
50
3.Bluetooth
4.Integriertes Smart OS System
1) Trennen Sie zunächst alle zuvor mit Ihrem Bluetooth-Lautsprecher gekoppelten Geräte.
2) Schalten Sie [Bluetooth] Ihres Projektors ein und wählen Sie den Bluetooth-Lautsprecher
aus, mit dem Sie eine Verbindung herstellen möchten.
3) Der TP1 unterstützt bidirektionale Übertragung. Im Bluetooth-Audiomodus kann er mit
Mobilgeräten verbunden und als Bluetooth-Lautsprecher verwendet werden.
Der TP1 Smart-Projektor verfügt über ein integriertes Smart-Netflix-OS-System. Die Netflix-
App ist ofziell lizenziert. Genießen Sie Ihre Lieblings-Apps und -Videos nach Belieben und
genießen Sie eine große Auswahl an Filmen und Fernsehsendungen ohne zusätzlichen TV-
Stick. Die Hauptoberäche des TP1-Projektors ist wie folgt.

DE
51
WEITERE GRUNDLEGENDE PROJEKTIONSEINSTELLUNGEN
1.Optionsmenü
Gehen Sie zur Startseite – wählen Sie [Einstellungen] – wählen Sie [Aufstellen]. Wechseln
Sie mit den Pfeiltasten auf der Fernbedienung zum Menü und drücken Sie zur Bestätigung
„OK“.
Menü Inhalt
OSD-Sprache
Englisch/Französisch/Deutsch/Italienisch/
Japanisch usw.
Zeiteinstellung Lokale Zeit einstellen
Bildschirmschoner Bildschirmschoner ein-/ausschalten
Sleep-Timer Ein/Aus: Ruhezeit von 10–120 Minuten einstellen
Automatischer Standby Ein/Aus
USB-Auto-Upgrade Lokales Update
Internet-Update-Prüfung Internetumgebung prüfen
Standardeinstellungen
wiederherstellen
Werkseinstellung wiederherstellen
DE
52
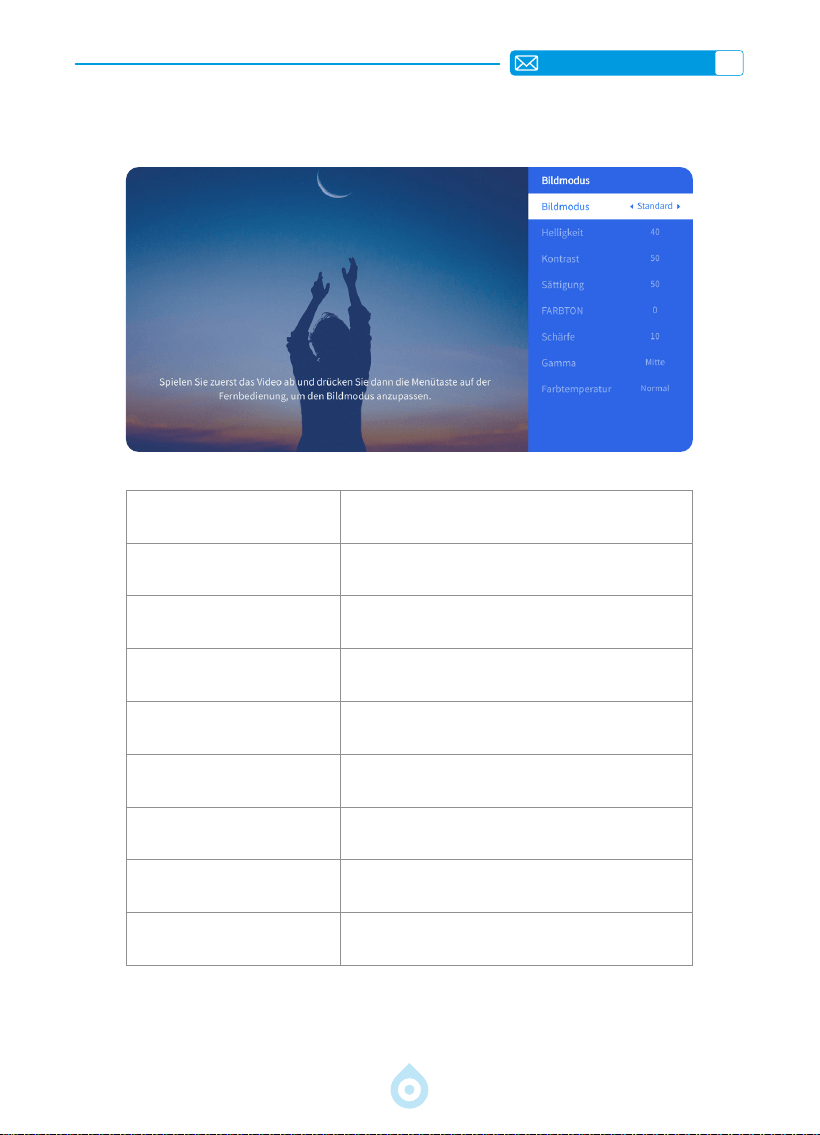
2.Bildmodus Menü
Menü Inhalt
Bildmodus Bildmodus auswählen
Helligkeit Bildschirmhelligkeit einstellen
Kontrast Bildschirmkontrast einstellen
Sättigung Bildschirmsättigungsfarbe einstellen
Farbton Bildschirmfarbton einstellen
Schärfe Bildschirmschärfe einstellen
Gamma Gammawert korrigieren
Farbtemperatur Benutzerdeniert/Kalt/Standard/Warm
DE
53
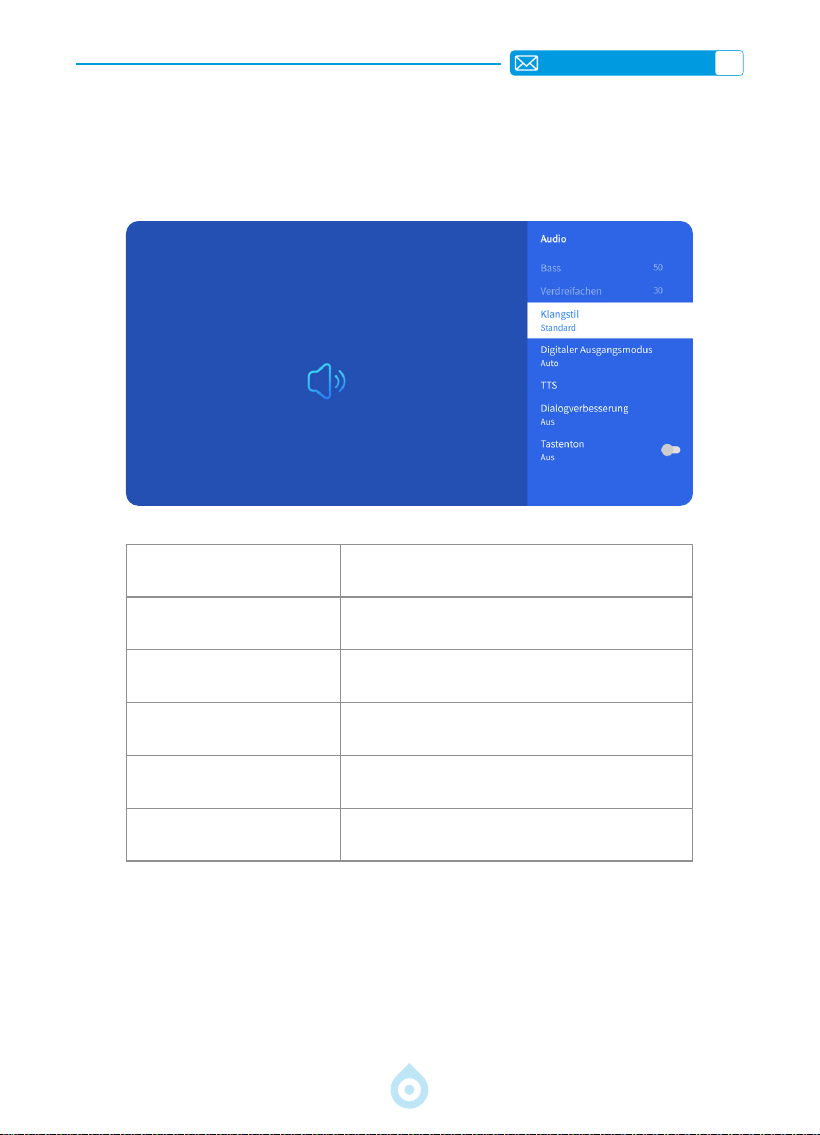
3.Audiomenü
Menü Inhalt
Bass/Höhen Bevorzugte Werte festlegen
Klangstil Benutzer/Standard/Film/Musik/Sport/Lebhaft
Digitaler Ausgabemodus
Auto/PCM/Dolby Audio-Dolby Digital/Dolby
Audio-Dolby Digital Plus
Dialogverbesserung Aus/Niedrig/Mittel/Hoch
Tastenton Ein/Aus
Zur Startseite gehen - [Einstellungen] auswählen - [Audio] auswählen. Mit den Pfeiltasten
auf der Fernbedienung das Menü wechseln und mit „OK“ bestätigen.
DE
54
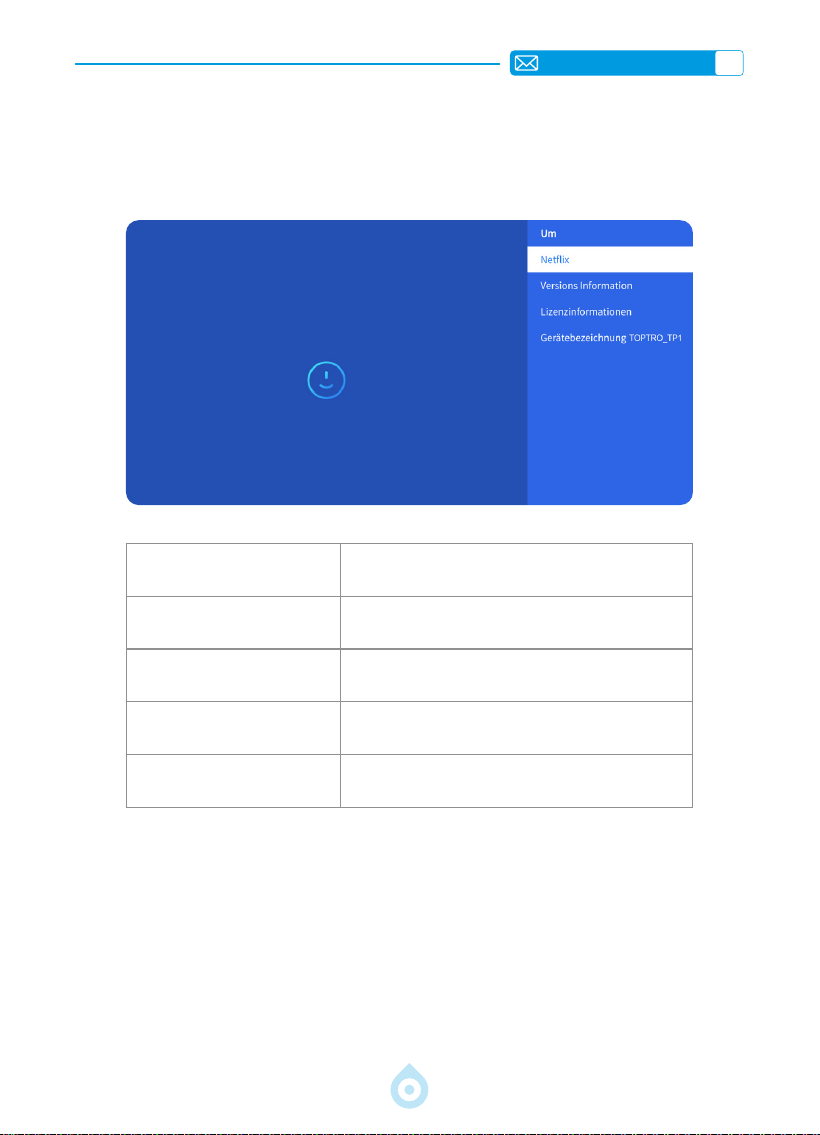
4.Info (Systeminformationen)
Zur Startseite gehen – [Einstellungen] auswählen – [Info] auswählen. Mit den Pfeiltasten
auf der Fernbedienung das Menü wechseln und mit „OK“ bestätigen.
Menü Inhalt
Netix Ofzielle Netix-Lizenz
Versionsinformationen
Modellnummer/Version/OTA-Version/
Seriennummer anzeigen
Lizenzinformationen Lizenzinformationen
Gerätename Projektormodell
DE
55
USB-Format
FAT、FAT32: 8G/16G/32G
NTFS:64G
Nicht unterstütztes Format: exFAT
Achtung: Wenn der Projektor den Inhalt des USB-Sticks nicht erkennt,
überprüfen Sie bitte, ob Ihr USB-Stick korrekt formatiert ist.
Videoformat
MP4, MKV, WMV, 3GP, MPG, VOB, TP, TS, DAT, MOV, FLV (Unterstützung
für Video-Codecs kann variieren; kontaktieren Sie uns für zusätzliche
Unterstützung)
Audioformat
MP3, AAC, LPCM, APE, FLAC, OGG, AMR
(Die Unterstützung für Audio-Codecs kann variieren. Kontaktieren Sie uns für
weitere Unterstützung.)
Bildformat
JPG, PNG, BMP, JPEG
Dokumentformat
TXT, PDF, DOCX, XLSX, PPTX
SIGNALANSCHLUSS
1.USB Multimediaanschluss
Wählen Sie die USB-Signalquelle. Das Gerät erkennt sie automatisch.
1) Wählen Sie im Hauptmenü die gewünschte Kategorie „Fotos“, „Musik“ oder „Video“
und drücken Sie die „OK“-Taste auf der Fernbedienung, um die entsprechende Kategorie
aufzurufen.
2) Wählen Sie je nach Programm: „Fotos“, „Musik“ oder „Video“.
3) Wählen Sie die abzuspielende Datei und drücken Sie die „OK“-Taste, um die Wiedergabe
zu starten oder zu pausieren. (Ohne Anschluss eines USB-Sticks ist die gewünschte
Kategorie nicht verfügbar.)
Wenn das Problem weiterhin besteht, senden Sie bitte eine detaillierte Beschreibung Ihres
Problems an die folgende E-Mail-Adresse: [email protected]
Der TOPTRO TP1 Projektor verfügt über drei Anschlüsse: HDMI*1, USB*1 und 3,5-mm-
Audioausgang*1. Wählen Sie den richtigen Anschluss für Ihr Gerät (USB, TV-Stick,
Lautsprecher, PC, Laptop, DVD-Player usw.).

DE
56
2.Verbindung mit dem PC
1) Verbinden Sie Computer und Projektor mit dem HDMI-Kabel (im Lieferumfang enthalten).
2) Wählen Sie die HDMI-Quelle, um Dateien auf Ihrem Computer zu projizieren.
3) Halten Sie auf Ihrem Laptop die Tastenkombination „Win+P“ gedrückt, um den
Anzeigemodus zu ändern.
Nur Computer: Standardmäßig wird nur der Hauptmonitor angezeigt.
Duplizieren: Alle Monitore zeigen dasselbe Bild an, wobei der Desktop auf jedem Monitor
dupliziert wird.
Erweitern: Alle Monitore fungieren als ein großer Monitor, der den Desktop auf alle Monitore
erweitert.
Nur Projektor: Die Anzeige erfolgt nur auf dem zweiten Monitor wie bei einem Projektor. Sie
können die Bildschirmauösung im Nur-Projektor-Modus ändern.
Schritt: Start > Systemsteuerung > Darstellung und Anpassung >
Bildschirmauösunganpassen

DE
57
3.Anschluss an MacBook oder MacBook Air
4.Anschluss an XBOX/PS5
1) Wählen Sie den Mediensignalkanal: HDMI
2) Verwenden Sie einen Typ-C-auf-HDMI-Adapter für den Anschluss Ihres MacBooks oder
einen Mini-Display-auf-HDMI-Adapter für den Anschluss an Ihr MacBook Air (Adapter nicht
im Lieferumfang enthalten). Anschluss an MacBook oder MacBook Air (Adapter nicht im
Lieferumfang enthalten).
1) Wählen Sie den Mediensignalkanal: HDMI
2) Verbinden Sie Ihr MacBook über ein HDMI-Kabel mit XBOX/PS5
3) Gelingen.

DE
58
FAQ
Vielen Dank, dass Sie sich für den TOPTRO TP1 Projektor entschieden haben. Wir haben einige
häug gestellte Fragen und die dazugehörigen Antworten zusammengestellt, um Ihnen besser
helfen zu können. Sollte das Problem weiterhin bestehen, senden Sie uns bitte eine E-Mail an
[email protected]: Ländercode, Bestellnummer, Modell und eine kurze Beschreibung
des Problems (z. B. US+000 0000000 0000000+TP1+Kein Bild). Unser Team wird sich
innerhalb von 24 Stunden mit einer effektiven Lösung für Ihr Anliegen bei Ihnen melden.
F1: Die Bildschirmspiegelung oder die WLAN Verbindung ist instabil. Wie kann ich
dieses Problem beheben?
Die Bildschirmspiegelung erfordert ein starkes WLAN-Signal. Stellen Sie sicher, dass Ihr
Heimnetzwerk einwandfrei funktioniert. Die Videoauflösung passt sich dynamisch an die
Stärke Ihres WLAN-Signals an. Aktivieren Sie außerdem den Hotspot Ihres Smartphones und
versuchen Sie, eine Verbindung zum TP1 Projektor herzustellen, um festzustellen, ob das
Problem mit dem Heimnetzwerk zusammenhängt.
F2: Welcher Projektionsabstand ist am besten geeignet? Kann die
Bildschirmgröße durch Skalierung angepasst werden?
Der empfohlene Projektionsabstand für den TP1-Projektor beträgt 2–3 Meter. Die Bildgröße
hängt vom Abstand und dem Projektionsverhältnis des Projektors (1,1:1) ab. Der TP1-
Projektor bietet zudem eine Zoomfunktion von 50–100 %. Detaillierte Informationen zum
Projektionsabstand nden Sie im Handbuch oder direkt bei uns.
F3: Warum ist das Bild unscharf, egal wie ich es einstelle?
Platzieren Sie den Projektor in der Mitte des Bildschirms. Der Versatzwinkel sollte maximal
15 Grad betragen. Verwenden Sie die automatische oder manuelle Trapezkorrektur, um eine
rechteckige Bildschirmanzeige zu erzielen. Passen Sie den Objektivfokus mit dem Autofokus
oder dem manuellen Fokus an.
F4:BeimBildschirmspiegelnkannderProjektorNetflix,YouTube,Huluoder
Disney+ nicht wiedergeben. Warum?
1. Aufgrund von Urheberrechtsbeschränkungen, einschließlich des TP1-Modells, unterstützen
die meisten Projektoren die drahtlose Spiegelung von Streaming-Diensten von Ihrem
Smartphone nicht. Andernfalls bleibt der Bildschirm schwarz, und es wird nur Ton
wiedergegeben. Selbst Projektoren mit integrierten Systemen können bei bestimmten
Streaming-Diensten Einschränkungen aufweisen. Für den Zugriff auf diese Dienste
empfehlen wir die Verwendung eines TV-Sticks (nicht im Lieferumfang enthalten) mit
unserem Projektor für ein nahtloses und vielseitiges Erlebnis.
2. Verwenden Sie die HomeShare-Funktion auf dem TP1-Projektor: 1) Schalten Sie HomeShare
auf dem Projektor ein. 2) Stellen Sie sicher, dass Ihr Mobiltelefon und der Projektor mit
demselben WLAN verbunden sind. 3) Klicken Sie in Apps wie Netix oder Disney Videos auf
die Projektionsschaltäche. 4) Wählen Sie „TP1“. Aus Kompatibilitätsgründen unterstützt die
Prime Video-App die Projektion jedoch nicht.
3. Es wird empfohlen, für die Wiedergabe die integrierte App des Projektors zu verwenden.

FR
59
CONTENU
ASSISTANCE PROFESSIONNELLE TOPTRO 7J/24H 62
MODE D'EMPLOI 63
LISTE DES COLIS 64
PRÉSENTATION DU PROJECTEUR 65
TÉLÉCOMMANDE 66
INSTALLATION 67
1.Méthode D'installation 67
2.Montage au Plafond et sur Pied 68
3.Distance et Taille de Projection 68
SPÉCIFICATIONS DU PROJECTEUR 69
DÉMARRAGE DU PROJECTEUR 70
RÉGLAGES DE L'IMAGE DE PROJECTION 70
1.Mode de Projection 70
2.Correction du Trapèze 71
3.Mise au Point Automatique 72
4.Réglage du Zoom 73
PARAMÈTRES INTELLIGENTS DU PROJECTEUR 74
1.Sélection de la Source du Signal 74
2.Connexion sans Fil 75
3.Bluetooth 78
4.Système D'exploitation Intelligent Intégré 78
AUTRES RÉGLAGES DE BASE DE LA PROJECTION 79
1.Menu Options 79
2.Menu Mode Image 80
3.Menu Audio 81
4.À Propos (Informations Système) 82
LIGNES DE SIGNAUX CONNEXION 83
1.Connexion Multimédia USB 83
2.Connexion avec le PC 84
3.Connexion au MacBook ou au MacBook Air 85
4.Connexion à la XBOX/PS5 85
FAQ 86

FR
60
Activez votre garantie de 3 ans et
bénéciez d'une surprise exclusive
Mesdames et Messieurs
Nous vous remercions d'avoir acheté le projecteur TP1.
Veuillez prendre 1 minute pour scanner le code et activer votre garantie
de 3 ans.
Il est recommandé d'achever le processus dans les trois jours.
Conseils : Si vous ne parvenez pas à activer votre garantie en scannant
le code, vous pouvez nous contacter via l'email ci-dessous et nous vous
aiderons à activer votre garantie.
Scannez pour en savoir plus
[email protected] www.youtube.com/@TOPTRO-R
FR
61
Nous travaillons constamment à l'amélioration de nos produits. Veuillez
noter que les images et descriptions du manuel sont données à titre
indicatif uniquement et peuvent différer légèrement du produit réel.
Pour des informations plus précises, veuillez vous référer au produit lui-
même. Vous pouvez également accéder aux dernières mises à jour grâce
à notre fonction de mise à jour en ligne. Nous vous remercions de votre
compréhension !
Notre garantie et notre assistance sont disponibles pour les articles
achetés auprès de revendeurs agréés. Pour protéger vos droits, n'hésitez
pas à nous contacter par e-mail à l'adresse [email protected] pour
vérier l'authenticité de votre projecteur TP1.
Voici notre lien YouTube officiel : www.youtube.com/@TOPTRO R,
où vous trouverez toutes les vidéos d'utilisation et de dépannage du
projecteur TP1.
Nous aimons savoir comment nos projecteurs apportent de la joie
dans votre vie ! Partager Nous sommes ravis de faire partie de votre
vie expérience.
Les moyens les plus rapides et les plus efcaces pour nous contacter:
Méthode 1 : Courriel
Courriel : [email protected]
Conseils:Nous vous recommandons de prendre contact par courrier
électronique dans un premier temps, car cela vous permet de
partager des vidéos ou d'autres informations détaillées sur votre
produit, nous aidant à résoudre votre problème plus rapidement.
Si vous ne recevez pas de réponse de notre part par courrier
électronique, il est possible que le message soit tombé dans les
spams ou qu'il ait été retardé. Dans ce cas, essayez la deuxième
méthode ci-dessous.
Méthode 2 : Commandes
Accédez à Vos commandes - Sélectionnez La ommande
a un problème pour l'article concerné-Choisir un sujet
à partir de la liste affichée-Cliquez sur Contacter le
vendeur pour nous envoyer une message.
Nous vous remercions de la confiance que vous
accordez à TOPTRO ! Nous sommes là pour s'assurer
que vous avez la meilleure expérience possible.

FR
62
ASSISTANCE PROFESSIONNELLE TOPTRO 7J/24H
Chère cliente,
Merci beaucoup de soutenir TOPTRO ! Avant de commencer à utiliser
le projecteur, veuillez lire attentivement ce manuel d'utilisation. Les
caractéristiques et illustrations contenues dans le présent document sont
fournies à titre de référence et peuvent différer légèrement du produit réel en
raison d'optimisations et de mises à jour permanentes. Pour des détails précis,
veuillez vous référer au produit physique.
Si vous avez des problèmes, veuillez inclure les détails suivants dans
votre courriel : code du pays, numéro de commande, modèle et
une brève description du problème (par exemple:FR+000 0000000
0000000+TP1+Pas d'image), veuillez nous envoyer un courriel à l'adresse
suivante : [email protected]. Soyez assuré que notre équipe dévouée
vous répondra rapidement dans les 24 heures avec une solution efcace pour
répondre à vos préoccupations.
Il est essentiel de mentionner que de nombreux problèmes courants peuvent
être facilement résolus par de simples ajustements. Pour garantir une
satisfaction maximale, nous tenons à vous assurer que tous nos projecteurs
font l'objet d'un contrôle de qualité rigoureux à 100 % et d'un emballage
minutieux avant d'être expédiés.
Si vous avez des questions, n'hésitez pas à nous contacter an de résoudre le
problème. Vous nous donnerez ainsi l'occasion de nous améliorer. Nous nous
engageons à vous fournir une solution satisfaisante pour tous les dés que
vous pouvez rencontrer.
Cordialement,
Équipe de Service TOPTRO

FR
63
MODE D'EMPLOI
Considérations Relatives à la Température :
Pour garantir la longévité de votre projecteur, évitez de le placer dans des
environnements excessivement chauds ou froids. Les températures extrêmes
peuvent réduire la durée de vie de l'appareil. Pour des performances
optimales, maintenez un environnement de travail entre 5℃ et 35℃ .
Ventilation Adéquate :
Le projecteur est équipé d'un système de ventilation pour assurer un
fonctionnement stable. Veillez à ce que le projecteur soit placé dans un
endroit bien ventilé. Évitez les espaces confinés tels que les placards et
assurez-vous qu'il n'y a pas d'obstructions près de l'entrée et de la sortie d'air.
L'excès de poussière affecte la dissipation de la chaleur du projecteur. Il est
conseillé de nettoyer le ltre à poussière tous les mois ou tous les six mois en
fonction de l'environnement réel.
Protection Contre les Chocs et les Vibrations :
Manipulez votre projecteur avec précaution, en le protégeant des chocs
violents, des extrusions et des vibrations. Évitez de déplacer le projecteur s'il
présente des défauts de circuit interne.
Entretien des Lentilles :
L'objectif du projecteur est un élément crucial qui a un impact direct sur la
définition et la qualité de l'image. Veillez à ce que l'objectif soit exempt de
poussière excessive. Pour le nettoyage, utilisez un chiffon doux en coton
adapté aux lentilles en verre.

FR
64
LISTE DES COLIS
Projecteur TOPTRO TP1*1 Télécommande*1 Câble D'alimentation*1
Câble HDMI*1 Cache-objectif*1 Kit de Nettoyage*1
Guide de Démarrage
Rapide*1
FAQ*1

FR
65
PRÉSENTATION DU PROJECTEUR
Lentille
Entrée d'air
Récepteur de Signal de Focus
Prise de courant
Bouton d'alimentation
Récepteur IR
Sortie d'air
Port HDMI
Port USB
Port de Sortie Audio 3,5 mm
Support Flexible à 360°
Trou de Montage de 1/4 de Pouce
FR
66
TÉLÉCOMMANDE
Alimentation Muet
Paramètres
Mode Projection
Touche de Conrmation
Source
Retour
Bouton Fléché
USB
Menu
Volume +
Page d'accueil
Volume-
Focus+
NETFLIX
Focus-
Prime Video
YouTube
OUVRIR LE NAVIGATEUR
*Installer 2 piles AAA (non incluses) dans la télécommande avant de l'utiliser.
*Lors de l'utilisation de la télécommande, assurez vous que l'émetteur de
signaux de la télécommande vise le récepteur de signaux infrarouges du
projecteur.

FR
67
INSTALLATION
1.Méthode D'installation
Le projecteur peut être monté au plafond à l'aide d'un support de plafond dédié, ou placé sur
un bureau stable pour la projection, en fonction de votre environnement et de vos besoins. En
outre, le projecteur peut être installé selon les méthodes suivantes :
Maintenez le projecteur à une hauteur permettant une symétrie axiale de l'objectif par
rapport à l'écran. Si cela n'est pas possible, utilisez la fonction de correction trapézoïdale pour
ajuster l'image projetée.
Montage au plafond de projection
frontale
Montage sur bureau de projection
frontale
Montage au plafond de projection
arrière
Montage sur bureau de projection
arrière

FR
68
3.Distance et Taille de Projection
40’’
60’’
84’’
100’’
120’’
Mètre
Pieds
1,0
3,2
1,46
4,8
2,05
6,71
2,44
7,99
2,92
9,59
La distance de projection recommandée pour le projecteur TP1 est de 1,8 à 2,9 mètres. La taille
de l'image dépend de la distance et du rapport de projection du projecteur, qui est de 1,1 : 1. En
outre, le projecteur offre une fonction de zoom arrière de 50 %, vous pouvez ajuster la taille de
l'écran grâce à cette fonction.
*La taille et la distance réelles de projection peuvent légèrement différer des
données de laboratoire.
2.Montage au Plafond et sur Pied
1) Le TP1 ne prend pas en charge l'installation à quatre angles. Utilisez le support avec un
support de 6,35 mm ou un plateau pour xer le projecteur.
2) Décollez l'étiquette inférieure du produit pour révéler le trou de montage.
Diamètre:
1/4 pouce
(6.35 mm)
Profondeur : 6,0 mm

FR
69
SPÉCIFICATIONS DU PROJECTEUR
Numéro de Modèle : TP1
Dimensions du
Produit (L*W*H)
4.57 * 4.80 * 9.45 pouces
11,60 * 12,20 * 24,00cm
Poids du Produit
2.4 lbs
1,1 kg
Résolution Native
1920*1080P
Taux de
Rafraîchissement
60 Hz
Technologie
D'afchage
LCD Source Lumineuse LED
Correction du
Trapèze
Auto/Electrique Tension D'alimentation
AC100-240V
50-60Hz
Rapport Hauteur/
Largeur
16:9 Focus Auto/Electrique
Ratio de Projection
1.1 : 1 (±0.5) Zoom 100%-50%
Méthode de
Projection
Avant/Arrière sur le Bureau
Avant/Arrière au Plafond
Prise en Charge des
clés USB
1. FAT32: 8 GB/16 GB/32 GB 2. NTFS: 64 GB
Interfaces :
HDMI*1/USB*1/Sortie Audio 3,5 mm x 1
Format Vidéo
MP4/MPG/AVI/MPEG-4/TS/MOV/M4V/MKV/FLV/DAT/3GP (La prise
en charge des codecs vidéo peut varier selon les circonstances,
contactez-nous pour une assistance supplémentaire)
Format Audio
MP3/WMA/M4A/MP2/AAC/OGG/WAV/FLAC (Dolby SUPPORT)
Format de L'image
JPG/JEPG/BMP/PNG

FR
70
DÉMARRAGE DU PROJECTEUR
RÉGLAGES DE L'IMAGE DE PROJECTION
1. Mise sous Tension: Retirez le capuchon de l'objectif et appuyez sur la touche
d'alimentation de la télécommande ou du projecteur lui-même. Le voyant devient bleu
lorsque le projecteur est sous tension.
2. Réglage de la Langue : Sélectionnez votre langue préférée dans les paramètres.
3. Correction Trapézoïdale/Focus : Utilisez la correction automatique de la
distorsion trapézoïdale verticale (ou la correction en quatre points) et la fonction
de mise au point pour obtenir une image rectangulaire et claire. Veillez à ce que la zone
située devant le [récepteur de mise au point] ne soit pas obstruée.
4. Ajustez la Clarté de L'image : Ajustez les boutons de mise au point « F+ » et « F » de
la télécommande pour afner la clarté de l’image. Si l’image est toujours oue, ajustez-la à
nouveau après avoir pointé le projecteur directement vers l’écran.
5. Connecter des Appareils Externes : Connectez votre appareil externe (par exemple,
smartphone, iPad, clé TV, boîtier TV, ordinateur portable, etc.) aux interfaces appropriées du
projecteur. Veillez à sélectionner la source correcte pour votre appareil ; sinon, le projecteur
risque de ne pas détecter le signal.
1.Mode de Projection
Sélectionnez le menu [Réglages] -- Sélectionnez l'option [Projection] -- Sélectionnez votre
Mode D'installation, appuyez sur la touche échée pour sélectionner et appuyez sur « OK »
pour conrmer la position de projection.
FR
71
2.Correction du Trapèze
2.1 Correction Trapézoïdale Verticale Automatique
2.2 Trapèze Quatre Points
Sélectionnez le menu [Réglages] - activez l'option [Keystone], puis le réglage s'effectuera
automatiquement. Le trapèze comme rectangle à chaque fois que vous déplacez le projecteur
ou que vous l'allumez.
Pour une qualité de projection optimale, il est recommandé de positionner le projecteur au
centre de l'écran, verticalement et horizontalement. Ou assurez-vous que l'angle de décalage
du projecteur ne dépasse pas 20
°
dans le sens vertical, sinon la fonction de correction
automatique de la distorsion trapézoïdale risque de ne pas fonctionner correctement.
Sélectionnez le menu [Réglages] -- Sélectionnez l'option [Keystone], puis sélectionnez
[Trapèze Quatre Points], cliquez simplement sur le bouton « OK » pour sélectionner le point
que vous souhaitez ajuster en premier lieu, puis appuyez sur le bouton «
» ou « » pour
dénir la valeur (Vertical 0-100) nécessaire, comme indiqué ci-dessous.
Réinitialiser : Appuyez sur le bouton "Menu
" et l'image sera restaurée avec les
paramètres de correction trapézoïdale d'origine.

FR
72
3.Mise au Point Automatique
Sélectionnez le menu [Réglages] et activez l'option [Mise au Point]. La mise au point et le
réglage trapézoïdal seront alors automatiques à chaque déplacement ou mise sous tension
du projecteur.
Si l'image reste floue, utilisez les boutons de mise au point « F+ » et « F » de la
télécommande du projecteur pour afner la netteté de l'image.
FR
73
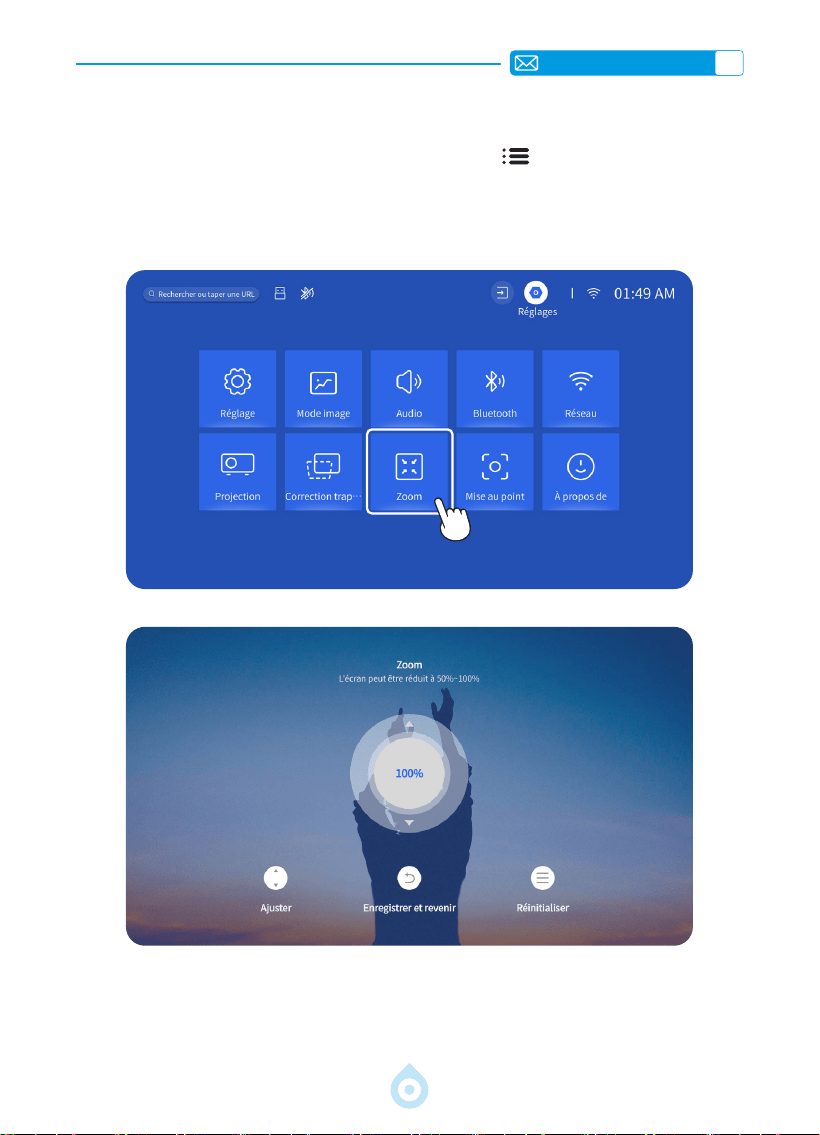
4.Réglage du Zoom
Allez sur la page d'accueil -- Sélectionnez le bouton «Menu » -- Sélectionnez [Réglages]
-- Sélectionnez l'option [Zoom], l'écran de projection peut être agrandi de 50% à 100%.
Appuyez sur le bouton «
↑↓
» pour régler la valeur nécessaire comme indiqué ci-dessous.
FR
74
PARAMÈTRES INTELLIGENTS DU PROJECTEUR
1.Sélection de la Source du Signal
Sélectionnez la source du signal d'entrée [HDMI] sur la page d'accueil ou appuyez sur le
bouton «Source
» de la télécommande pour sélectionner la source correspondante. Lors
de la lecture d'une vidéo, appuyez sur le bouton «Menu
», puis sélectionnez [Mode
Image]. Vous pouvez régler librement la luminosité et le contraste de l'image, ainsi que
d'autres fonctions.
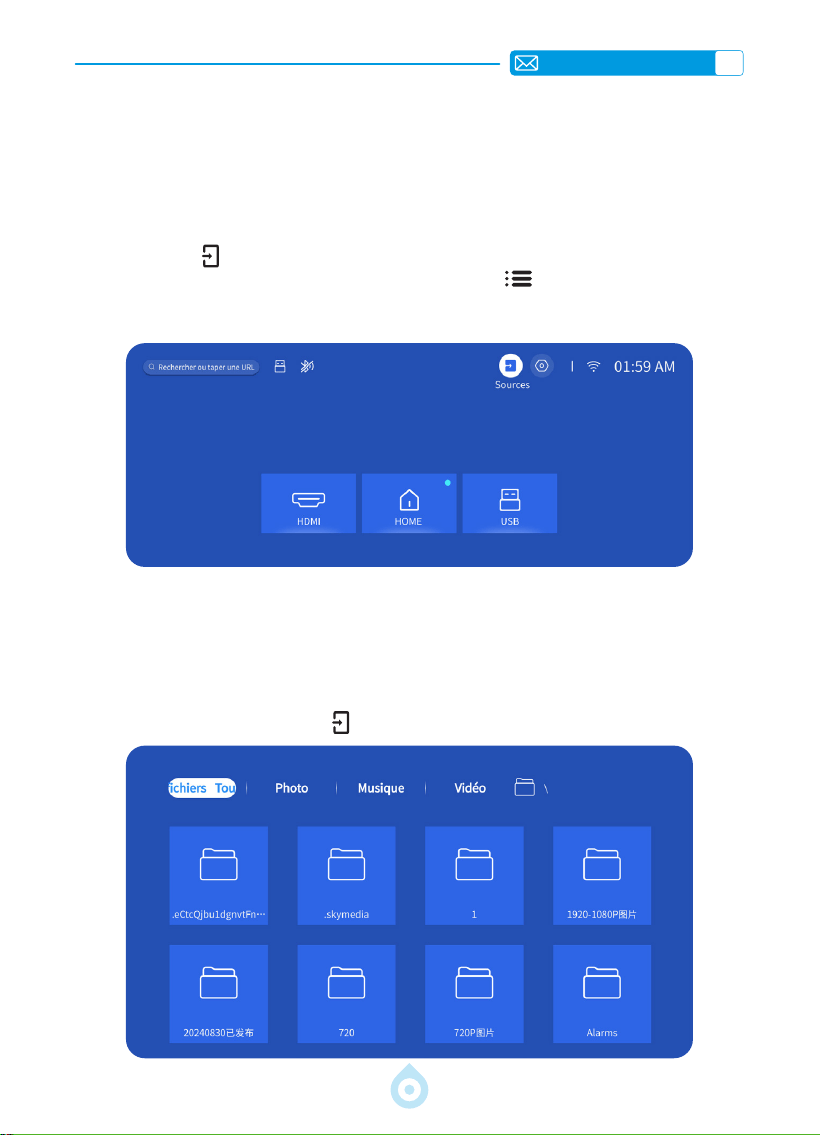
Pour les périphériques USB, il n'est pas nécessaire de choisir la source du signal. L'appareil les
détecte automatiquement.
Appuyez directement sur le bouton «USB» de la télécommande.
Ou appuyez sur le bouton "Source
" et sélectionnez [USB] sur la page d'accueil :
1.1 Sélection de la Source du Signal D'entrée HDMI
1.2 Sélection de la Source du Signal D'entrée USB

FR
75
Conseils: Si le projecteur ne peut pas reconnaître le disque USB, veuillez vous référer aux
méthodes suivantes pour résoudre le problème.
*Veuillez vérier si votre disque USB répond aux formats suivants.
*1. FAT32: 8 GB/16 GB/32 GB 2. NTFS: 64 GB
*Si votre disque USB n'appartient pas aux formats ci-dessus, veuillez d'abord changer le
format du disque USB en NTFS ou FAT32 selon l'étape de l'image ci-dessous.
Note: Avant de changer le format du disque USB, assurez-vous de sauvegarder tous les
éléments de votre disque USB. En effet, si vous procédez de la sorte, tout sera perdu à jamais.
Si le problème n'est toujours pas résolu, veuillez envoyer votre problème à l'adresse suivante :
2.Connexion sans Fil
1) La mise en miroir d'écran nécessite un signal WiFi sans l puissant, assurez-vous que votre
réseau domestique fonctionne correctement. La résolution vidéo s'ajuste dynamiquement
en fonction de la puissance du signal Wi-Fi.
2) Sélectionnez l'icône [Réglages] dans le coin supérieur droit de l'interface principale du
projecteur, puis appuyez sur la touche « OK » de la télécommande pour accéder à l'interface
des paramètres et sélectionnez [Réseau]. Ou appuyez sur le bouton de réglage de la
télécommande pour accéder à la page de réglage et sélectionnez [Réseau].
2.1 Paramètres WiFi

FR
76
Attention: Assurez-vous que votre appareil iOS est connecté au même réseau Wi-Fi que
votre projecteur.
1) Connectez le projecteur à votre réseau Wi-Fi domestique.
2) Lorsque vous utilisez un appareil iOS pour la première fois, vous devez d'abord télécharger
l'APP « ScreenShare » dans l'interface principale du projecteur TP1 (Chemin d'accès :
Interface Principale Mes Applications Assistant d'application ScreenShare -
Click « OK » - App download complete, Please power off and restart - Find ScreenShare in
My Applications).
3) Activez le paramètre WiFi de votre appareil iOS, assurez-vous que votre appareil et le
projecteur sont connectés au même WiFi domestique.
4) Accédez au [Centre de contrôle] sur votre appareil iOS -- Sélectionnez la fonction
[Screen Mirroring] -- Sélectionnez et connectez le récepteur Cast iOS nommé [TOPTRO_
TP1_XXXX]
5) Connexion réussie.
2.2 Pour iOS (ScreenShare)
FR
77
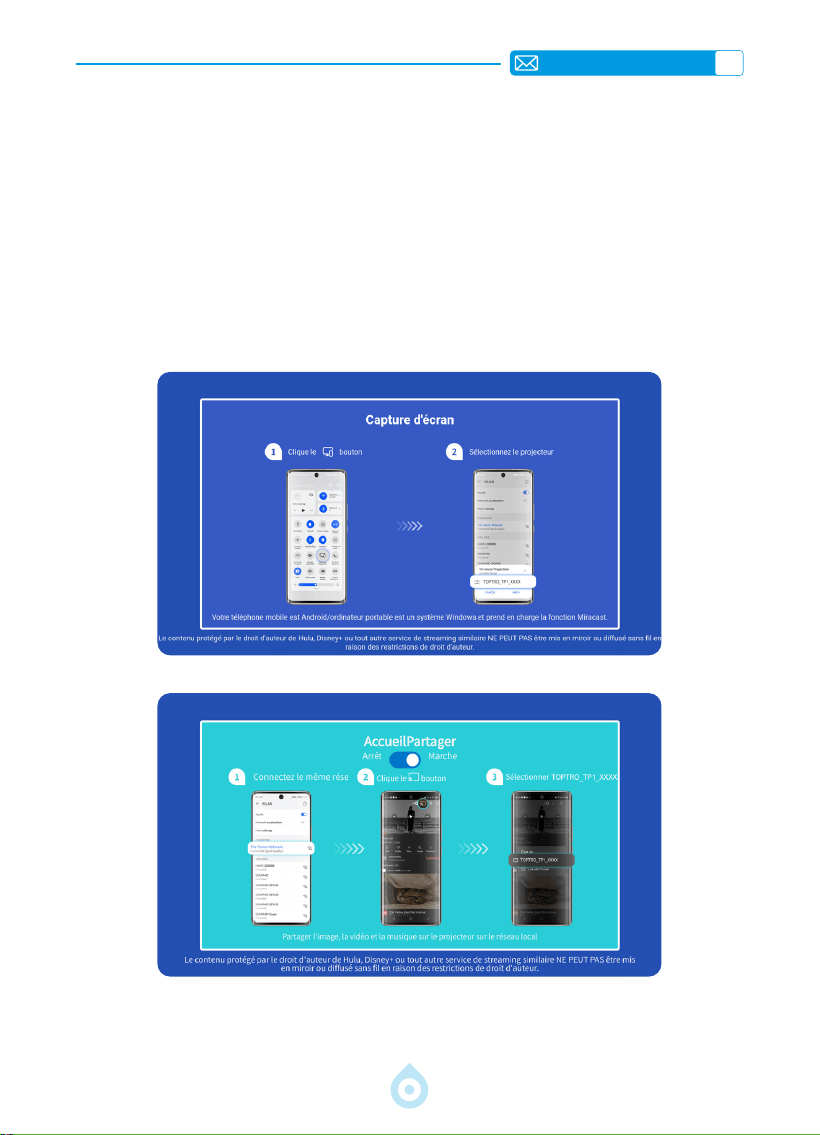
Attention: Les appareils Android peuvent utiliser différents termes et méthodes pour activer
la mise en miroir de l'écran. Assurez-vous d'activer la fonction WLAN sur votre appareil
Android. (Il n'est pas nécessaire de se connecter à un réseau Wi-Fi).
1) Allumez le projecteur et sélectionnez « Screencast » comme source d'entrée.
2) Activez l'afchage multi-écran/sans l de votre appareil Android.
3) Sélectionnez le projecteur « TOPTRO_TP1_XXXX » dans les résultats de la recherche pour
se connecter.
4) Connexion réussie.
2.3 Pour Android (Screencast)
FR
78
3.Bluetooth
4.Système D'exploitation Intelligent Intégré
1) Assurez-vous d'abord que tous les appareils précédemment associés à votre enceinte
Bluetooth sont déconnectés.
2) Activez le [Bluetooth] de votre projecteur et sélectionnez le haut-parleur Bluetooth à
connecter.
3) TP1 prend en charge la transmission bidirectionnelle. En mode audio Bluetooth, il peut être
connecté à des appareils mobiles et utilisé comme un haut-parleur Bluetooth.
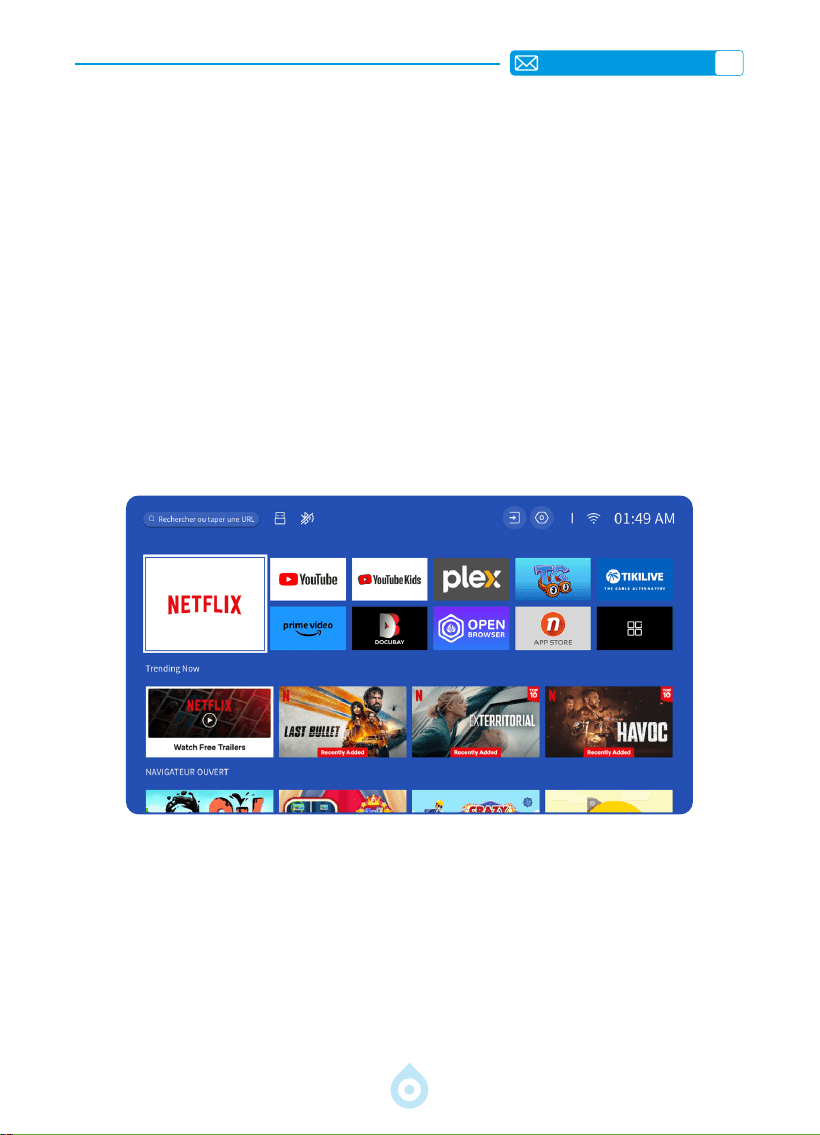
Le projecteur intelligent TP1 est doté d'un système d'exploitation Smart Netix intégré, dont
l'application Netflix est sous licence officielle. Vous pouvez profiter de vos applications et
vidéos préférées à volonté, et vous pouvez proter d'un grand nombre de lms et d'émissions
de télévision sans utiliser de clé TV supplémentaire. L'interface principale du projecteur TP1 est
la suivante.

FR
79
AUTRES RÉGLAGES DE BASE DE LA PROJECTION
1.Menu Options
Accédez à la page d'accueil, sélectionnez [Réglages], puis [Configuration]. Utilisez les
touches échées de la télécommande pour changer de menu, puis appuyez sur « OK » pour
conrmer et congurer.
Menu Contenu
Langue OSD Anglais/Français/Deutsch/Italien/Japonais etc.
Conguration de l'heure Régler L'heure Locale
Économiseur D'écran Activer/Désactiver L'économiseur D'écran
Minuterie de Sommeil
Activer/Désactiver : Régler la durée de veille
entre 10 et 120 minutes
Mode Veille Automatique Activer/Désactiver
Mise à jour USB Automatique Mise à jour Locale
Vérication des Mises à jour
Internet
Vérier L'environnement Internet
Réinitialisation par Défaut Rétablir les Paramètres D'usine
FR
80
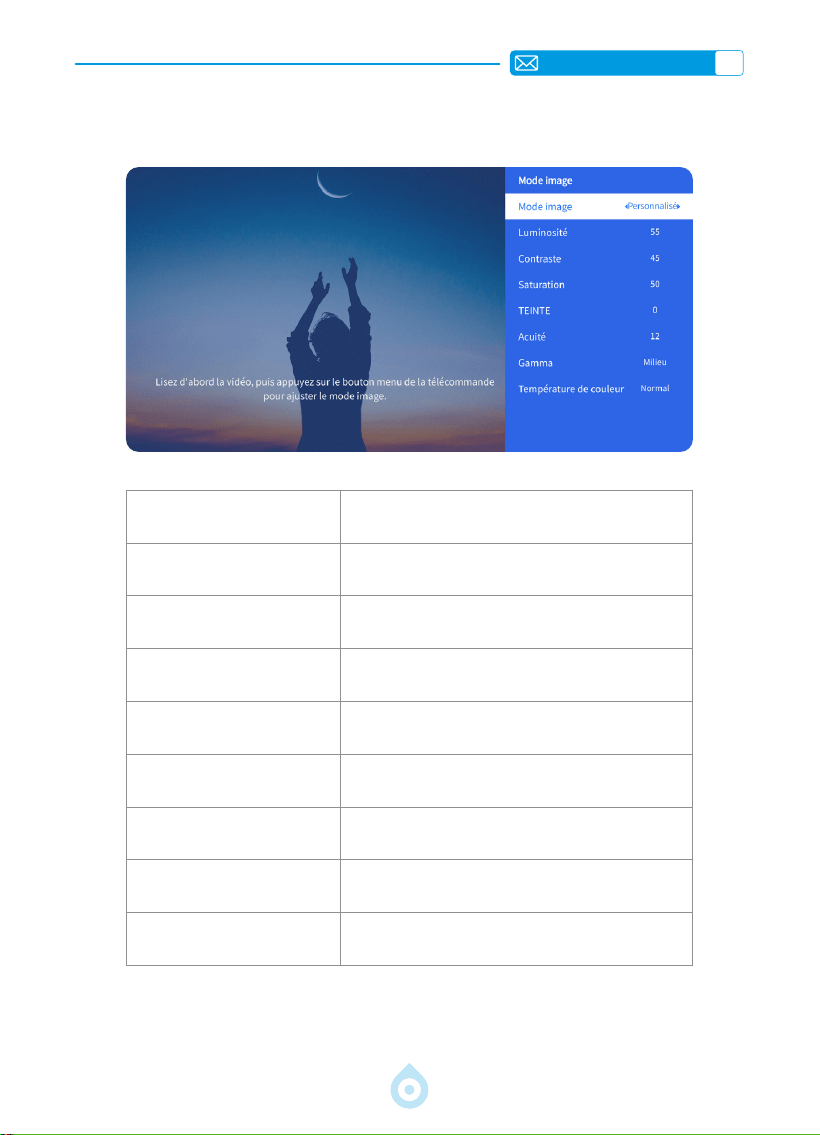
2.Menu Mode Image
Menu Contenu
Mode Image Sélectionner le Mode D'image
Luminosité Régler la Valeur de la Luminosité de L'écran
Contraste Régler la Valeur du contraste de L'écran
Saturation Dénir la Couleur de Saturation de L'écran
Teinte Dénir la Couleur de Teinte de L'écran
Acuité Régler la Valeur de la Netteté de L'écran
Gamma Corriger la Valeur Gamma
Température de Couleur Utilisateur/Froid/Standard/Chaud
FR
81
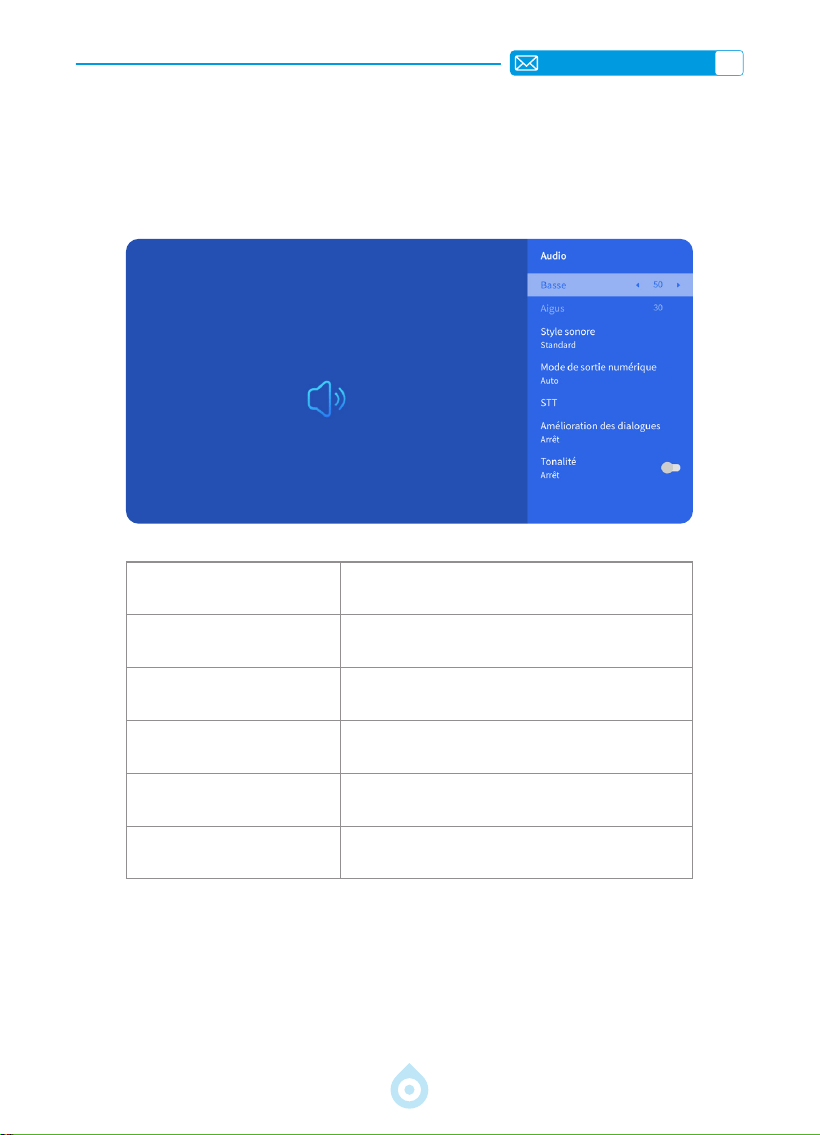
3.Menu Audio
Menu Contenu
Basses/Aigus Dénir les Valeurs Préférées
Style Sonore Utilisateur/Standard/Film/Musique/Sports/Vif
Mode de Sortie Numérique
Auto/PCM/Dolby Audio-Dolby Digital/Dolby
Audio-Dolby Digital Plus
Amélioration du Dialogue Désactivé/Faible/Moyen/Élevé
Tonalité Activé/Désactivé
Aller à la page d'accueil -- Sélectionner [Réglages] -- Sélectionner [Audio]. Utilisez les
touches échées de la télécommande pour passer d'un menu à l'autre, appuyez sur « OK »
pour conrmer et régler.

FR
82
4.À Propos (Informations Système)
Aller à la page d'accueil -- Sélectionner [Réglages] -- Sélectionner [A propos de]. Utilisez
les touches fléchées de la télécommande pour passer d'un menu à l'autre, appuyez sur
« OK » pour conrmer et régler.
Menu Contenu
Netix Licence ofcielle Netix
Informations sur la Version
Afcher le Numéro de Modèle/Version/Version
OTA/Numéro de Série
Informations sur la Licence Informations sur la Licence
Nom de L'appareil Nom du Modèle de Projecteur

FR
83
Format USB
FAT、FAT32: 8G/16G/32G
NTFS:64G
Format non pris en charge : exFAT
Attention : Si le projecteur ne peut pas reconnaître le contenu de la clé USB,
veuillez vérier si votre clé USB est correctement formatée.
Format Vidéo
MP4, MKV, WMV, 3GP, MPG, VOB, TP, TS, DAT, MOV, FLV (la prise en charge
des codecs vidéo peut varier ; contactez-nous pour une prise en charge
supplémentaire).
Format Audio
MP3, AAC, LPCM, APE, FLAC, OGG, AMR
(La prise en charge des codecs audio peut varier ; contactez-nous pour obtenir
une assistance supplémentaire)
Format Image
JPG, PNG, BMP, JPEG
Format Document
TXT, PDF, DOCX, XLSX, PPTX
LIGNES DE SIGNAUX CONNEXION
1.Connexion Multimédia USB
Sélectionnez la source de signal USB, l'appareil les détectera automatiquement.
1) Sélectionnez la catégorie souhaitée "Photos" "Musique" ou "Vidéo" dans l'interface
principale, et appuyez sur la touche "OK" de la télécommande pour accéder à la catégorie
correspondante.
2) Selon les programmes à choisir : "Photos" "Musique" ou "Vidéo".
3) Choisissez le chier que vous souhaitez lire et appuyez sur la touche "OK" pour lire ou
mettre en pause le fichier. (Vous ne pouvez pas entrer dans la catégorie requise sans
connecter un disque USB.)
Si le problème persiste, veuillez envoyer une description détaillée de votre problème à l'adresse
électronique suivante : [email protected]
Le projecteur TOPTRO TP1 dispose de 3 interfaces, Port HDMI*1/Port USB*1/Sortie audio de 3,5
mm*1. Veuillez sélectionner le port de connexion approprié pour connecter votre appareil (USB,
clé TV, Haut-parleurs, PC,Ordinateur Portable, Lecteur DVD, etc.)

FR
84
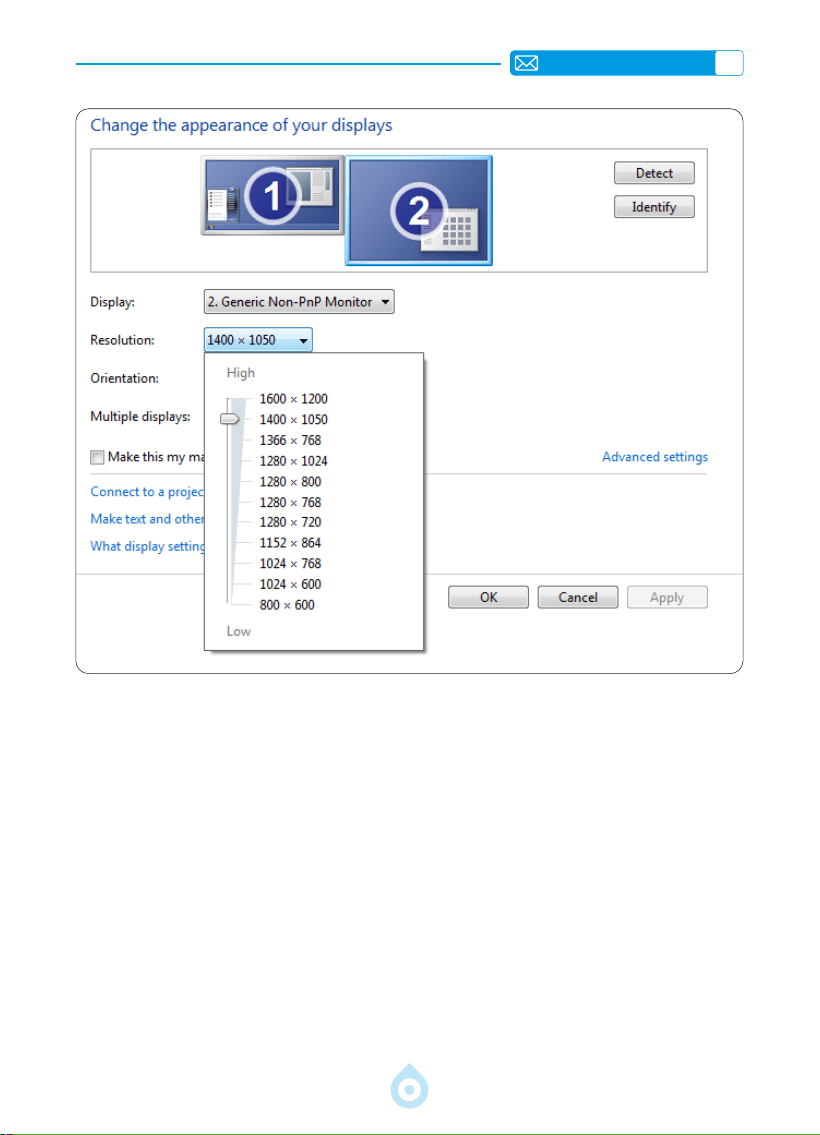
2.Connexion avec le PC
1) Connectez l'ordinateur et le projecteur à l'aide du câble HDMI (fourni).
2) Sélectionnez la source HDMI pour projeter des chiers sur votre ordinateur.
3) Sur votre ordinateur portable, maintenez les touches « Win+P » enfoncées pour modier
le mode d'afchage.
Ordinateur uniquement: option par défaut : afchage uniquement sur l'écran principal.
Duplicate : afchage identique sur tous les écrans, dupliquant ainsi le bureau.
Étendre : afchage identique sur tous les écrans, étendant le bureau.
Projecteur Uniquement : affichage uniquement sur l'écran secondaire, comme un
projecteur. Vous pouvez modier la résolution d'écran en mode Projecteur uniquement.
Étape:Démarrer>Panneaudeconguration>Apparenceetpersonnalisation>
Régler la résolution d'écran.
FR
85
3.Connexion au MacBook ou au MacBook Air
4.Connexion à la XBOX/PS5
1) Choisissez le canal du signal multimédia : HDMI
2) Utilisez un adaptateur Type-C vers HDMI pour connecter votre MacBook, ou un adaptateur
Mini Display vers HDMI pour connecter votre MacBook Air (adaptateur non inclus).
Connexion avec MacBook ou Mac Book Air. (Adaptateur non inclus)
1) Choisissez le canal du signal multimédia : HDMI
2) Utiliser le câble HDMI pour se connecter à la XBOX/PS5
3) Réussir

FR
86
FAQ
Merci d'avoir choisi le projecteur TOPTRO TP1. Nous avons rassemblé les questions les plus
fréquemment posées et les réponses correspondantes an de mieux vous aider. Si le problème
persiste, veuillez nous fournir les détails suivants : code du pays, numéro de commande, modèle
et une brève description du problème (par exemple, FR+000 0000000 0000000+TP1+Pas
D'image), veuillez nous envoyer un e-mail à [email protected] . Soyez assuré que notre
équipe dévouée vous répondra rapidement dans les 24 heures avec une solution efcace pour
répondre à vos préoccupations.
Q1 : La mise en miroir de l'écran ou la connexion WiFi est instable. Comment puis
je résoudre ce problème ?
La mise en miroir de l'écran nécessite un signal WiFi sans l puissant, assurez-vous que votre
réseau domestique fonctionne correctement. La résolution vidéo s'ajustera dynamiquement
en fonction de la force de votre signal Wi-Fi. De plus, activez le Hotspot de votre téléphone et
essayez de vous connecter au projecteur TP1, an d'identier si le problème est lié au réseau
domestique.
Q2 : Quelle est la distance de projection la plus appropriée ? La taille de l'écran
peut elle être ajustée par la mise à l'échelle ?
La distance de projection recommandée pour le projecteur TP1 est de 2 à 3 mètres. La
taille de l'image dépend de la distance et du rapport de projection du projecteur, qui est de
1,1:1. En outre, le projecteur TP1 offre une fonction de zoom arrière de 50 à 100 %. Pour des
informations plus détaillées sur la distance de projection, veuillez consulter le manuel ou nous
contacter directement.
Q3 : Pourquoi l'image n'est elle pas nette, quelle que soit la manière dont je
l'ajuste ?
Placez le projecteur en ligne avec le centre de l'écran. L'angle de décalage ne doit pas
dépasser 15 degrés. Utilisez la fonction Keystone automatique ou manuelle pour obtenir un
afchage rectangulaire de l'écran ; utilisez la mise au point automatique ou manuelle pour
régler la mise au point de l'objectif.
Q4:Lorsdelamiseenmiroirdel'écran,leprojecteurnepeutpaslireNetix,
YouTube,HuluouDisney+,pourquoi?
1. En raison de restrictions liées aux droits d'auteur, la majorité des projecteurs, y compris
le modèle TP1, ne prennent pas en charge la diffusion sans l de services de streaming
à partir de votre téléphone. Dans le cas contraire, l'écran restera noir et seul le son sera
diffusé. Même les projecteurs dotés de systèmes intégrés peuvent présenter des limitations
avec certains services de streaming. Pour accéder à ces services, nous suggérons d'utiliser
une clé TV (non incluse) avec notre projecteur pour une expérience transparente et
polyvalente.
2. Utiliser la fonction HomeShare sur le projecteur TP1 : 1) Activez HomeShare sur le projecteur.
2) Assurez-vous que votre téléphone portable et le projecteur sont connectés au même
WIFI. 3) Cliquez sur le bouton de projection sur les APPS comme Netix ou Disney videos ; 4)
Sélectionnez "TP1". Cependant, pour des raisons de compatibilité, l'application Prime Video
ne prend pas en charge la projection ;
3. Il est recommandé d'utiliser l'APP intégré au système de projection pour la lecture.

ES
87
CONTENIDO
SOPORTE PROFESIONAL TOPTRO 7D/24H 90
INSTRUCCIONES DE USO 91
LISTA DE PAQUETES 92
DESCRIPCIÓNGENERALDELPROYECTOR 93
REMOTE CONTROL 94
INSTALACIÓN 95
1.Método de Instalacióln 95
2.Montaje en Techo y Soporte 96
3.Distancia y Tamaño de Proyección 96
ESPECIFICACIONESDELPROYECTOR 97
INICIODELPROYECTOR 98
AJUSTESDEIMAGENDEPROYECCIÓN 98
1.Modo de Proyección 98
2.Corrección Trapezoidal 99
3.Enfoque Automático 100
4.Zoom SettingAjuste de Zoom 101
AJUSTESINTELIGENTESDELPROYECTOR 102
1.Seleccione la Fuente de Señal 102
2.Conexión Inalámbrica 103
3.Bluetooth 106
4.Sistema Operativo Inteligente Integrado 106
OTROSAJUSTESBÁSICOSDEPROYECCIÓN 107
1.Menú de Opciones 107
2.Menú de Modo de Imagen 108
3.Menú de Audio 109
4.Acerca de (Información del Sistema) 110
CONEXIÓN DE LÍNEAS DE SEÑAL 111
1.Conexión Multimedia USB 111
2.Conexión con PC 112
3.Conexión con MacBook o MacBook Air 113
4.Conexión con XBOX/PS5 113
Preguntas Frecuentes 114

ES
88
Active su Garantía de 3 Años y
una Sorpresa Exclusiva
Señoras y Señores
Gracias por comprar el proyector TP1.
Por favor, escanee el código y active su garantía de 3 años.
Se recomienda completar el proceso en un plazo de 3 días.
Consejos: Si no puede activar la garantía escaneando el código, puede
contactarnos a través del correo electrónico que aparece a continuación
y le ayudaremos a activarla.
Escanee para obtener más información
[email protected] www.youtube.com/@TOPTRO-R

ES
89
Trabajamos constantemente para mejorar nuestros productos.
Tenga en cuenta que las imágenes y descripciones del manual son solo
de referencia y pueden diferir ligeramente del producto real. Para obtener
información más precisa, consulte el producto. También puede acceder a
las últimas actualizaciones a través de nuestra función de actualización
en línea. ¡Agradecemos su comprensión! Nuestra garantía y soporte
técnico están disponibles para los artículos adquiridos a vendedores
autorizados. Para proteger sus derechos, puede enviarnos un correo
electrónico a [email protected] para vericar la autenticidad de su
proyector TP1.
Este es nuestro enlace oficial de YouTube: www.youtube.com/@
TOPTRO R, donde puede buscar todos los videos de funcionamiento y
solución de problemas del proyector TP1.
Nos encanta saber cómo nuestros proyectores alegran tu vida.
Comparte tus momentos o comentarios; nos encanta formar parte
de tu experiencia.
Las formas más rápidas y ecientes de contactarnos:
Método 1: Correo electrónico
Correo electrónico: [email protected]
Consejos: Te recomendamos contactarnos primero por correo
electrónico, ya que te permite compartir videos u otra información
detallada sobre tu producto, lo que nos ayuda a resolver tu problema
más rápidamente. Si no recibes respuesta por correo electrónico,
es posible que el mensaje haya ido a la carpeta de spam o se haya
retrasado. En ese caso, prueba el segundo método a continuación.
Método 2: Pedidos de Plataforma de Compras
Ve a "Tus pedidos en Plataforma de Compras" -
Selecciona "El pedido tiene un problema" para el
artículo en cuestión - Elige un tema de la lista que se
muestra - Haz clic en "Contactar con el vendedor" para
enviarnos un mensaje.
¡Gracias por tu confianza en TOPTRO! Estamos aquí
para asegurarnos de que tengas la mejor experiencia
posible.

ES
90
SOPORTE PROFESIONAL TOPTRO 7D/24H
Estimado cliente:
¡Muchas gracias por apoyar a TOPTRO! Antes de empezar a usar el proyector,
lea atentamente este manual de usuario. Las características e ilustraciones
que se incluyen aquí son solo una referencia y pueden diferir ligeramente del
producto real debido a las optimizaciones y actualizaciones continuas. Para
obtener información más precisa, consulte el producto físico.
Si tiene algún problema, incluya la siguiente información en su correo
electrónico: código de país, número de pedido, modelo y una
breve descripción del problema (por ejemplo: ES+000 0000000
0000000+TP1+Sin imagen). Envíenos un correo electrónico a service@
toptro.com. Nuestro equipo le responderá con prontitud en 24 horas con una
solución ecaz para sus inquietudes.
Es importante mencionar que muchos problemas comunes se pueden resolver
fácilmente con ajustes sencillos. Para garantizar su máxima satisfacción, le
aseguramos que todos nuestros proyectores se someten a un riguroso control
de calidad y a un embalaje completo antes del envío.
Si tiene alguna pregunta, contáctenos para que podamos resolver el problema
y brindarnos la oportunidad de mejorar. Nos comprometemos a brindarle una
solución satisfactoria ante cualquier problema que pueda encontrar.
Atentamente,
Equipo de Servicio TOPTRO

ES
91
INSTRUCCIONES DE USO
Consideraciones de Temperatura:
Para garantizar la larga duración del proyector, evite colocarlo en entornos
excesivamente cálidos o fríos. Las temperaturas extremas pueden acortar su
vida útil. Para un rendimiento óptimo, mantenga la temperatura de trabajo
entre 5 ° C y 35 ° C.
Ventilación Adecuada:
El proyector está equipado con un sistema de ventilación para garantizar un
funcionamiento estable. Asegúrese de colocarlo en un área bien ventilada.
Evite espacios reducidos como armarios y asegúrese de que no haya
obstrucciones cerca de la entrada y salida de aire. El exceso de polvo afectará
la disipación de calor del proyector. Se recomienda limpiar el ltro de polvo
cada mes o cada medio mes, según las condiciones ambientales.
Protección contra Impactos y Vibraciones:
Manipule el proyector con cuidado, protéjalo de impactos fuertes, extrusiones
y vibraciones. Evite moverlo si presenta fallas en los circuitos internos.
Mantenimiento de Lentes:
La lente del proyector es un componente crucial que afecta directamente la
denición y la calidad de la imagen. Asegúrese de mantenerla limpia y libre
de polvo. Para limpiarla, utilice un paño de algodón suave apto para lentes de
cristal.

ES
92
LISTA DE PAQUETES
Proyector TOPTRO TP1 ×1 Control Remoto ×1 Cable de Alimentación ×1
Cable HDMI ×1 Tapa de Lente ×1 Kit de Limpieza ×1
Guía de Inicio Rápido ×1 Preguntas Frecuentes ×1

ES
93
DESCRIPCIÓN GENERAL DEL PROYECTOR
Lente
Entrada de Aire
Receptor de Señal de Enfoque
Toma de Corriente
Botón de Encendido/Apagado
Receptor de Infrarrojos
Salida de Aire
Puerto HDMI
Puerto USB
Conector de Audio de 3.5 mm
Soporte Flexible de 360°
Oricio de Montaje de 6.35 mm

ES
94
REMOTE CONTROL
Encendido Silencio
Conguración
Modo de proyección
Conrmar tecla
Fuente
Atrás
Botón de echa
USB
Menú
Volumen +
Página de inicio
Volumen -
Focus+
NETFLIX
Focus-
Prime Video
YouTube
OPEN BROWSER
*Instale 2 pilas AAA (No Incluidas) en el control remoto antes de usarlo.
*Al utilizar el control remoto, asegúrese de que el transmisor de señal esté
orientado hacia el receptor de señal infrarroja del proyector.

ES
95
INSTALACIÓN
1.Método de Instalacióln
El proyector puede instalarse en el techo mediante un soporte especíco o colocarse sobre
un escritorio estable para proyectar, según el entorno y las necesidades. Además, puede
instalarse con los siguientes métodos:
Mantenga el proyector a una altura donde la lente tenga simetría axial con respecto a la
pantalla. Si esto no es posible, utilice la función de corrección trapezoidal para ajustar la
imagen proyectada.
Soporte de Techo para Proyección
Frontal
Soporte de Mesa para Proyección
Frontal
Soporte de Techo para Proyección
Trasera
Soporte de Mesa para Proyección
Trasera
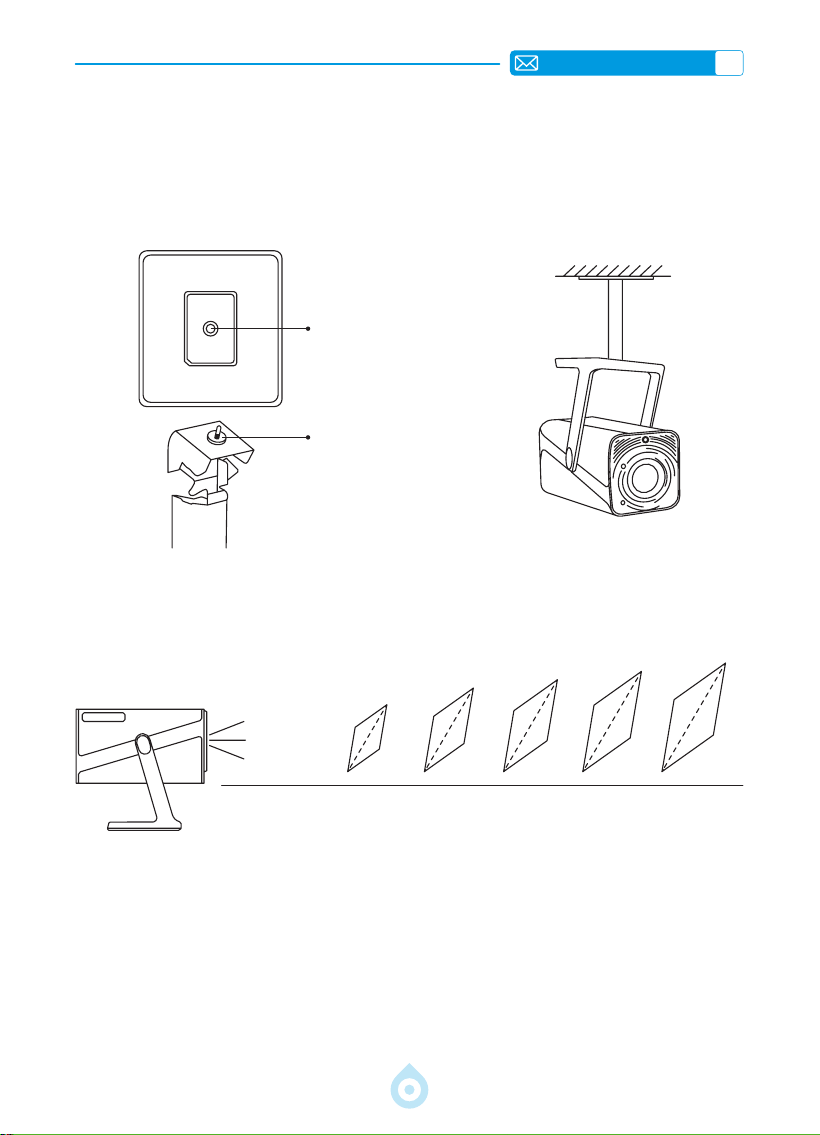
ES
96
3.Distancia y Tamaño de Proyección
40’’
60’’
84’’
100’’
120’’
Mètre
Pieds
1,0
3,2
1,46
4,8
2,05
6,71
2,44
7,99
2,92
9,59
La distancia de proyección recomendada para el proyector TP1 es de 1,8 a 2,9 metros. El
tamaño de la imagen depende de la distancia y del ratio de proyección del proyector, que es de
1,1:1. Además, el proyector ofrece una función de zoom de 50%, con la que puede ajustar el
tamaño de la pantalla.
*El tamaño y la distancia de proyección reales pueden variar ligeramente de los
datos de laboratorio.
2.Montaje en Techo y Soporte
1) El TP1 no admite la instalación en las cuatro esquinas. Utilice el soporte con un soporte de
6,35 mm o una bandeja para asegurar el proyector.
2) Retire la etiqueta inferior del producto para revelar el oricio de montaje.
Diámetro:
1/4 de pulgada
(6,35 mm)
Profundidad: 6,0 mm

ES
97
ESPECIFICACIONES DEL PROYECTOR
Número de Modelo: TP1
Tamaño del producto
(L*W*H)
11.60 * 12.20 * 24.00cm Peso del Producto 1.1KG
Resolución Nativa
1920*1080P
Frecuencia de
ctualización
60 Hz
Tecnología de
Visualización
LCD Fuente de Luz LED
Corrección
Trapezoidal
Automóvil/Eléctrico
Voltaje de
Alimentación
AC100-240V
50-60Hz
Relación de Aspecto
16:9 Enfoque Automático/Eléctrico
Relación de
Proyección
1.1 : 1 (±0.5) Zoom 100%-50%
Método de
Proyección
Delantero/Trasero en el Escritorio
Delantero/Trasero en el Techo
Compatibilidad con
Discos USB
1. FAT32: 8 GB/16 GB/32 GB 2. NTFS: 64 GB
Interfaces
HDMI*1/USB*1/Salida de Audio de 3,5 mm x 1
Formato de Vídeo
MP4/MPG/AVI/MPEG-4/TS/MOV/M4V/MKV/FLV/DAT/3GP(La
compatibilidad con códecs de video puede variar según las
circunstancias; contáctenos para obtener asistencia adicional)
Formato de Audio
MP3/WMA/M4A/MP2/AAC/OGG/WAV/FLAC (Dolby SUPPORT)
Formato de Imagen
JPG/JEPG/BMP/PNG

ES
98
INICIO DEL PROYECTOR
AJUSTES DE IMAGEN DE PROYECCIÓN
1. Encendido: Retire la tapa de la lente y presione el botón de encendido del control remoto
o del proyector. La luz indicadora se encenderá en azul al encender el proyector.
2. ConguracióndeIdioma: Seleccione su idioma preferido en la conguración.
3. Corrección Trapezoidal/Enfoque: Utilice la corrección trapezoidal vertical automática (o
corrección de cuatro puntos) y la función de enfoque para lograr una imagen rectangular y
nítida. Asegúrese de que el área frente al [receptor de enfoque] no esté obstruida.
4. Ajuste la Claridad de la Imagen: Ajuste los botones de enfoque "F+" y "F " del control
remoto para ajustar la claridad de la imagen. Si la imagen sigue borrosa, ajústela de nuevo
después de apuntar el proyector directamente a la pantalla.
5. Conexión de Dispositivos Externos: Conecte su dispositivo externo (por ejemplo,
teléfono inteligente, iPad, TV Stick, TV Box, computadora portátil, etc.) a las interfaces
correspondientes del proyector. Asegúrese de seleccionar la fuente correcta para su
dispositivo; de lo contrario, el proyector podría no detectar la señal.
1.Modo de Proyección
Seleccione el menú [Configuración] -- Seleccione la opción [Proyección] -- Seleccione
su modo de instalación, presione la tecla de echa para seleccionar y presione “OK” para
conrmar la posición de proyección.
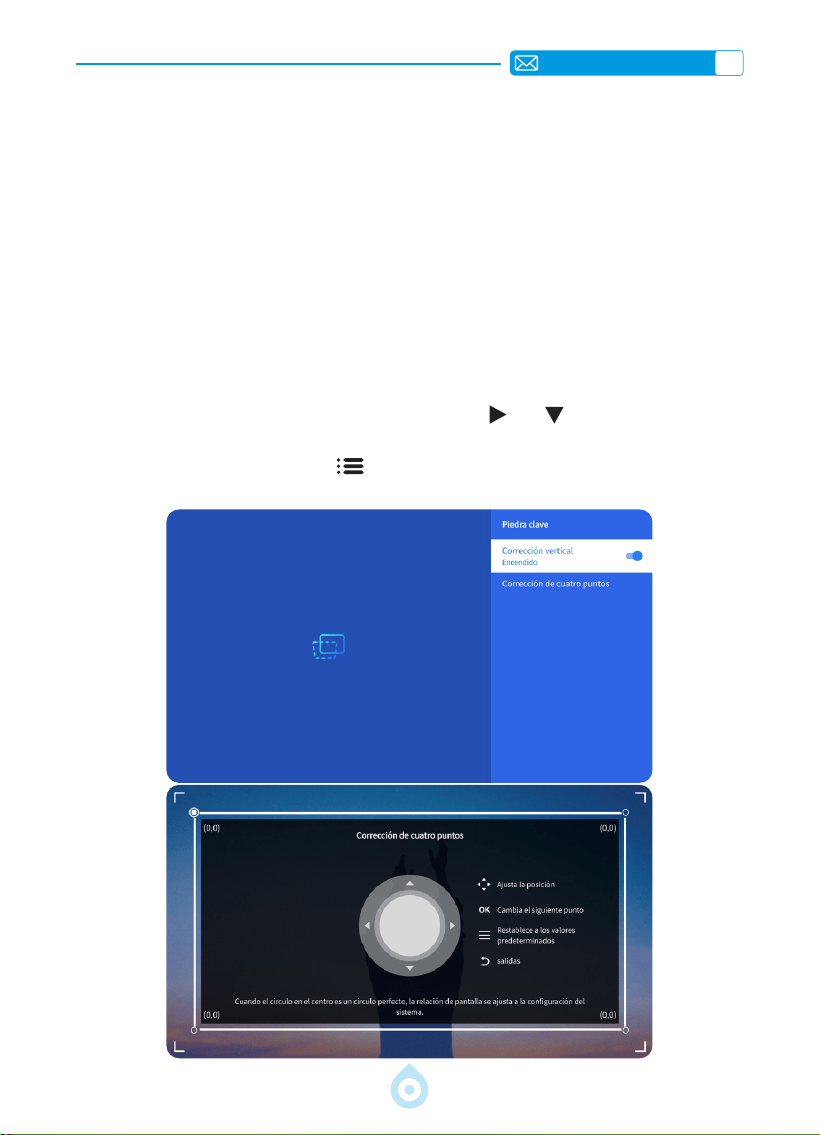
ES
99
2.Corrección Trapezoidal
2.1 Corrección Trapezoidal Vertical Automática
2.2 Corrección Trapezoidal de Cuatro Puntos
Seleccione el menú [Configuración] y active la opción [Corrección trapezoidal]. La
corrección trapezoidal se ajustará automáticamente como un rectángulo cada vez que mueva
el proyector o lo encienda.
Para una calidad de proyección óptima, se recomienda colocar el proyector en el centro de la
pantalla, tanto vertical como horizontalmente. Asegúrese de que el ángulo de desplazamiento
del proyector no supere los 20° en dirección vertical; de lo contrario, la corrección trapezoidal
automática podría no funcionar correctamente.
Seleccione el menú [Conguración] y la opción [Corrección trapezoidal]; a continuación,
seleccione [Corrección de cuatro puntos]. Haga clic en "Aceptar" para seleccionar el
punto que desea ajustar primero y, a continuación, pulse "
" o " " para establecer el valor
(Vertical 0-100), como se muestra a continuación.
Restablecer: Pulse el botón "Menú
" para restaurar la conguración original de corrección
trapezoidal.
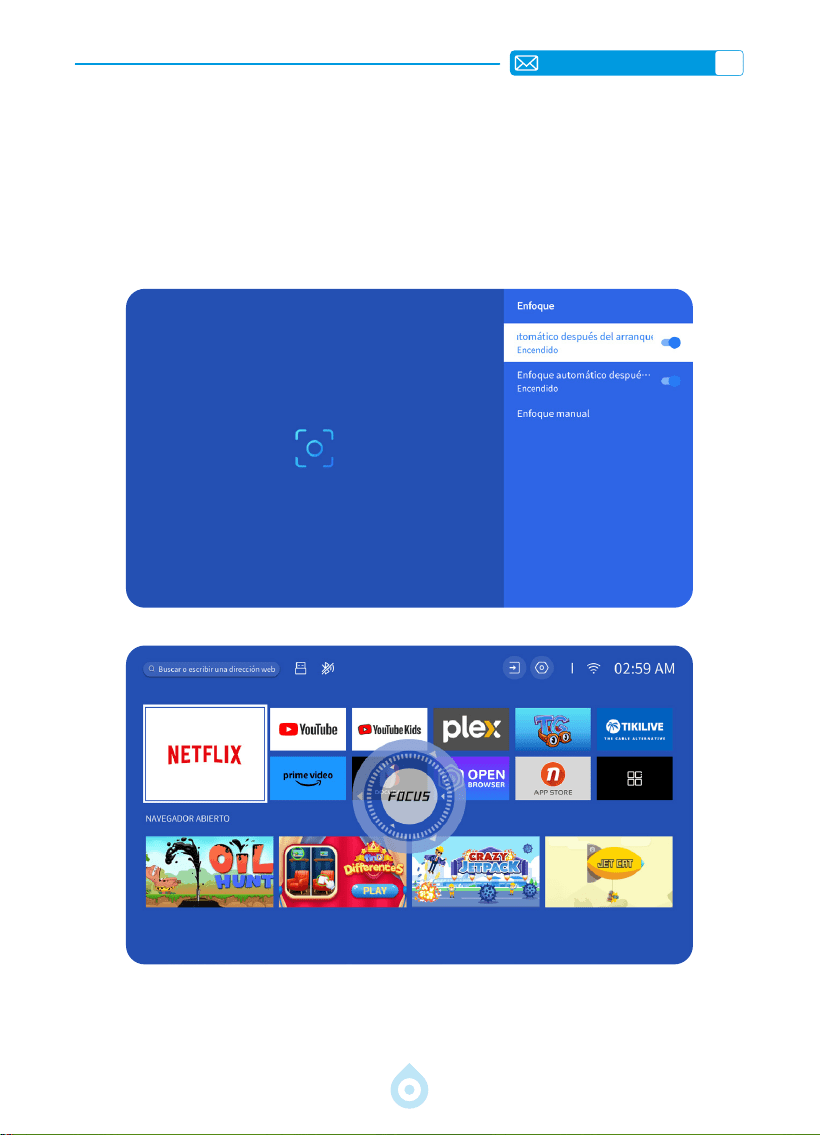
ES
100
3.Enfoque Automático
Seleccione el menú [Conguración] y active la opción [Enfoque]. El proyector enfocará
y ajustará la corrección trapezoidal automáticamente cada vez que mueva o encienda el
proyector.
Si la imagen sigue borrosa, ajuste los botones de enfoque "F+" y "F " del control remoto del
proyector para ajustar la nitidez de la imagen.
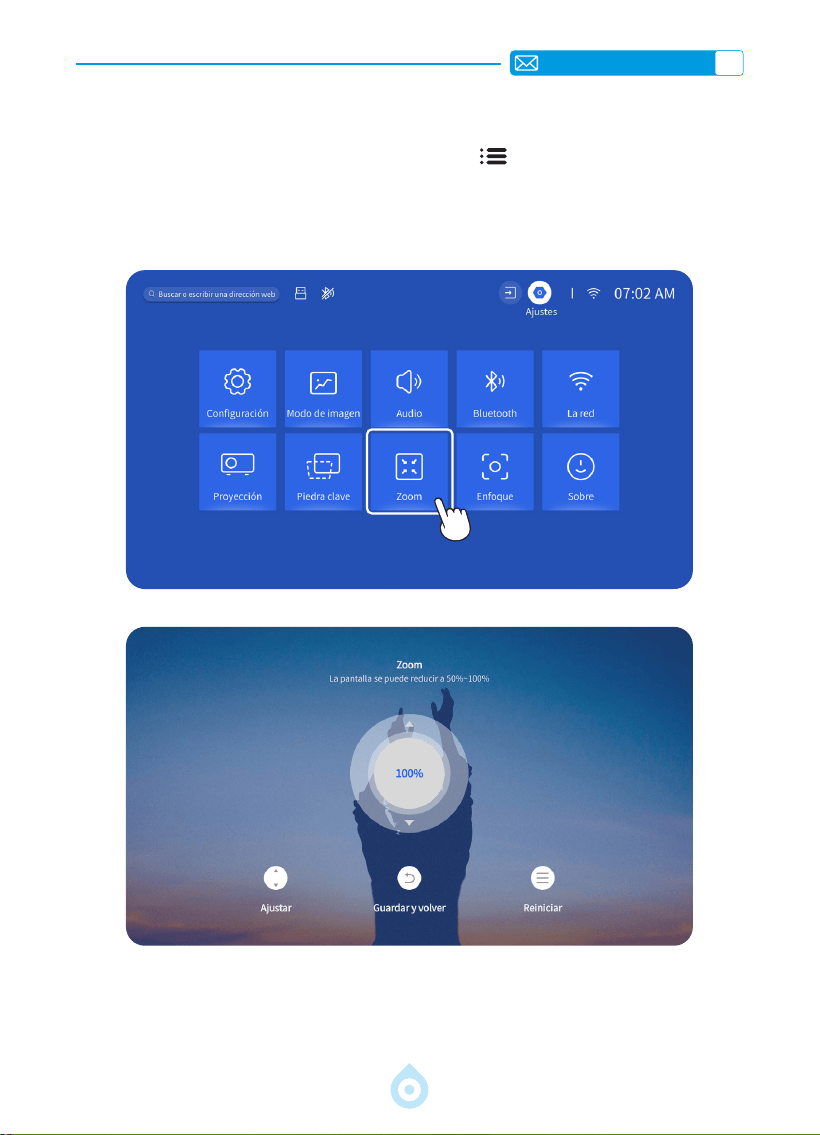
ES
101
4.Zoom SettingAjuste de Zoom
Vaya a la página de inicio. Seleccione el botón "Menú ". Seleccione [Conguración].
Seleccione la opción [Zoom]. La pantalla de proyección se puede ampliar entre el 50 % y
el 100 %. Presione el botón "
↑ ↓
" para congurar el valor deseado, como se muestra a
continuación.
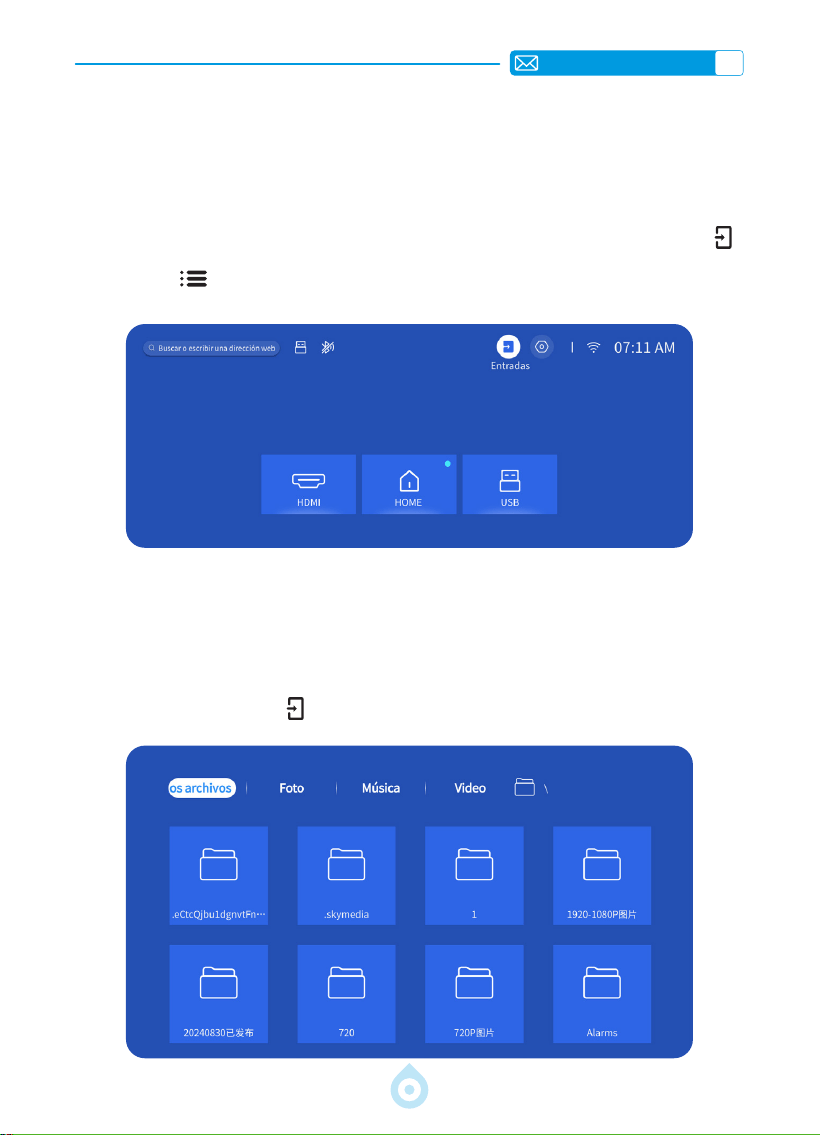
ES
102
AJUSTES INTELIGENTES DEL PROYECTOR
1.Seleccione la Fuente de Señal
Seleccione la fuente de entrada [HDMI] en la página de inicio o pulse el botón "Fuente "
del control remoto para seleccionar la fuente correspondiente. Al reproducir un vídeo, pulse el
botón "Menú
" y seleccione [Modo de imagen]. Puede ajustar libremente el brillo y el
contraste de la imagen, así como otras funciones.
Para dispositivos USB, no es necesario seleccionar la fuente de señal. El dispositivo los
detectará automáticamente.
Presione el botón "USB" directamente en el control remoto.
O presione el botón "Fuente
" y seleccione [USB] en la página de inicio.
1.1 Seleccionar la fuente de entrada HDMI
1.2 Seleccionar la fuente de señal de entrada USB
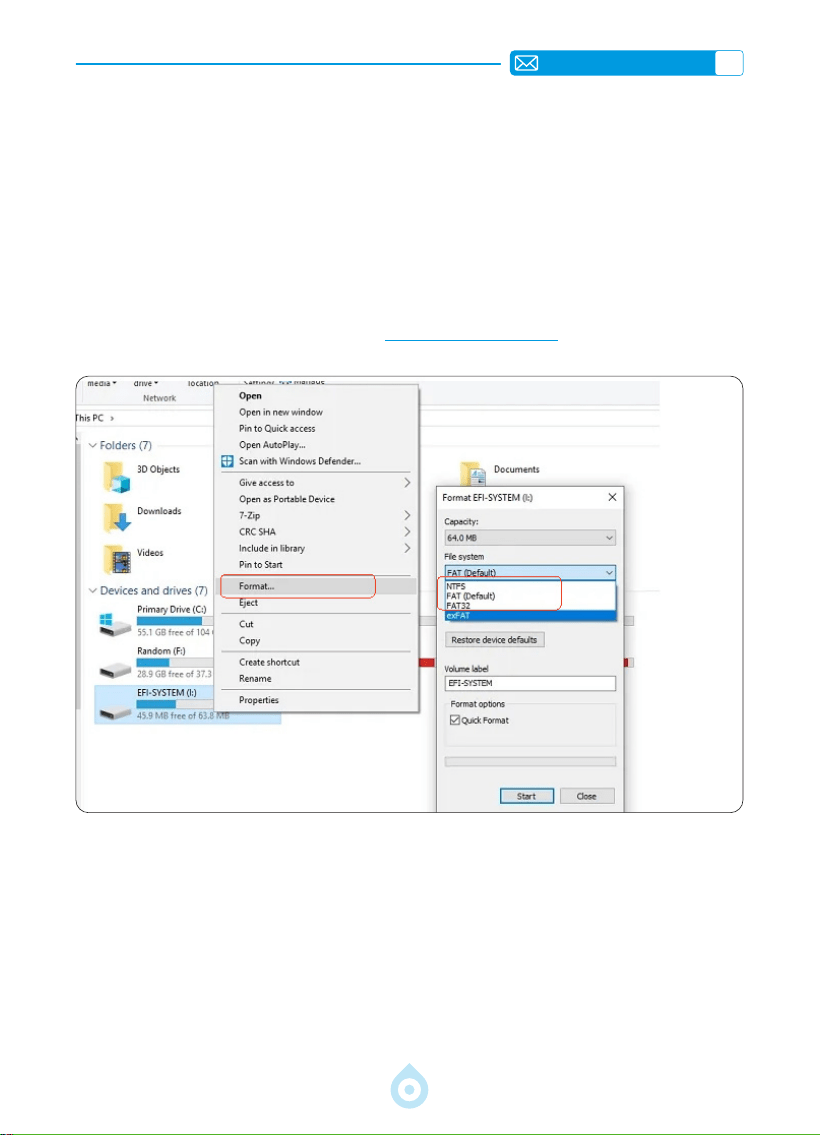
ES
103
Consejos: Si el proyector no reconoce el disco USB, siga estos pasos para solucionar el
problema.
*Conrme si su disco USB es compatible con los siguientes formatos:
*1. FAT32: 8 GB/16 GB/32 GB 2. NTFS: 64 GB
*Si su disco USB no es compatible con los formatos mencionados, primero cámbielo a NTFS
o FAT32 según la imagen a continuación.
Nota: Antes de cambiar el formato de la memoria USB, asegúrese de hacer una copia de
seguridad completa de su memoria USB. Si sigue estos pasos, se perderá todo para siempre.
Si el problema persiste, envíe su consulta a [email protected].
2.Conexión Inalámbrica
1) La duplicación de pantalla requiere una señal Wi Fi potente. Asegúrese de que su red
doméstica funcione correctamente. La resolución de video se ajustará dinámicamente
según la intensidad de la señal Wi-Fi.
2) Seleccione el ícono [Conguración] en la esquina superior derecha de la interfaz principal
del proyector y presione la tecla "OK" en el control remoto para acceder a la interfaz
de conguración y seleccionar [Red]. O presione el botón de conguración en el control
remoto para acceder a la página de conguración y seleccionar [Red].
2.1ConguracióndeWiFi
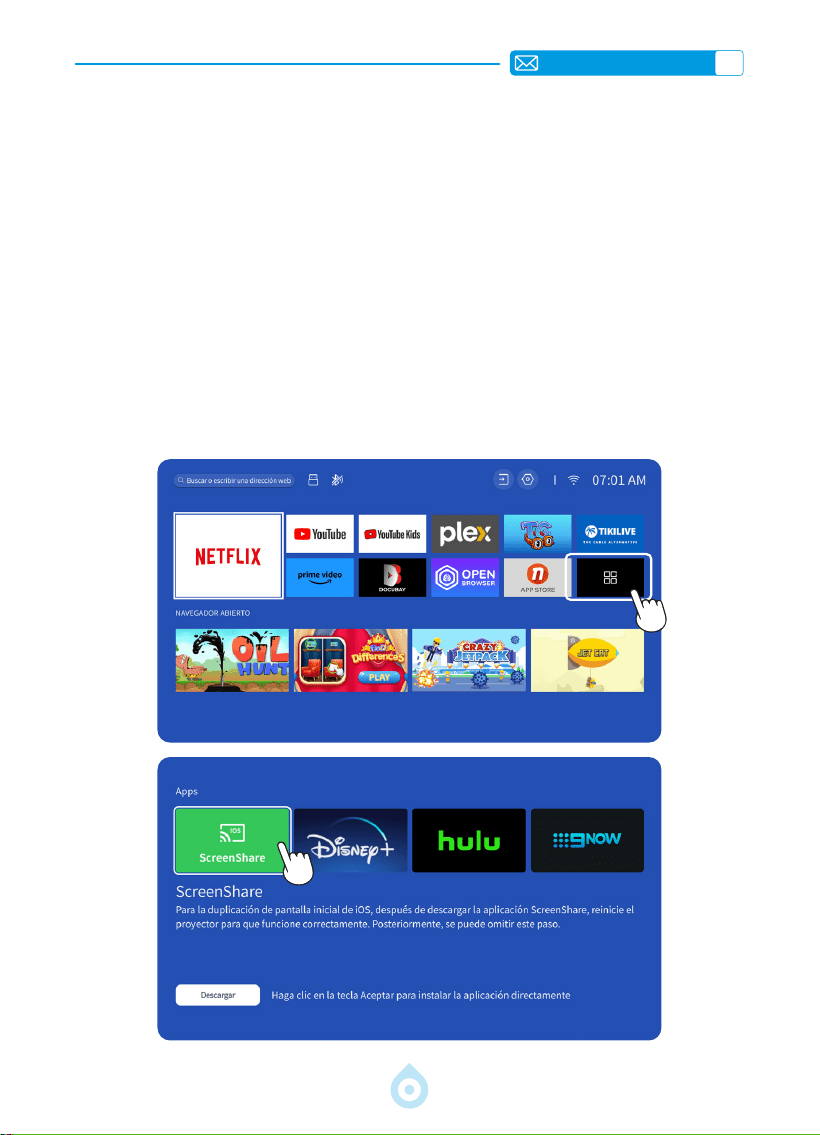
ES
104
Atención: Asegúrese de que su dispositivo iOS esté conectado a la misma red Wi-Fi que el
proyector.
1) Conecte el proyector a la red Wi-Fi de su casa.
2) Al usar su dispositivo iOS por primera vez, descargue la aplicación "ScreenShare" en la
interfaz principal del proyector TP1 (Ruta: Interfaz principal - Mis aplicaciones - Asistente
de aplicaciones - ScreenShare - Haga clic en "Aceptar" - Descarga completa. Apague y
reinicie el dispositivo - Busque ScreenShare en Mis aplicaciones).
3) Active la conguración Wi-Fi de su dispositivo iOS y asegúrese de que el dispositivo y el
proyector estén conectados a la misma red Wi-Fi.
4) Acceda al [Centro de control] en su dispositivo iOS. Seleccione la función [Duplicación
de pantalla]. Seleccione y conecte el receptor iOS Cast [TOPTRO_TP1_XXXX].
5) Listo.
2.2 Para el Sistema iOS (Compartir Pantalla)

ES
105
Atención: Los dispositivos Android pueden usar varios términos y métodos para habilitar la
duplicación de pantalla. Asegúrate de habilitar la función WLAN en tu dispositivo Android. (No
es necesario conectarse a ninguna red Wi-Fi).
1) Enciende el proyector y selecciona "Screencast" como fuente de entrada.
2) Activa la opción "Multipantalla/Visualización inalámbrica" en tu dispositivo Android.
3) Selecciona el proyector "TOPTRO_TP1_XXXX" en los resultados de búsqueda para
conectarte.
4) Listo.
2.3 Para el Sistema Android (Screencast)

ES
106
3.Bluetooth
4.Sistema Operativo Inteligente Integrado
1) Asegúrese de desconectar primero todos los dispositivos previamente emparejados con su
altavoz Bluetooth.
2) Active el [Bluetooth] del proyector y seleccione el altavoz Bluetooth que desea conectar.
3) El TP1 admite transmisión bidireccional. En el modo de audio Bluetooth, puede conectarse a
dispositivos móviles y usarse como altavoz Bluetooth.
El proyector inteligente TP1 incorpora el sistema operativo Smart Netix y su aplicación Netix
cuenta con licencia ocial. Disfruta de tus aplicaciones y vídeos favoritos a tu antojo, además
de una gran variedad de películas y series de televisión sin necesidad de un TV Stick adicional.
La interfaz principal del proyector TP1 es la siguiente.

ES
107
OTROS AJUSTES BÁSICOS DE PROYECCIÓN
1.Menú de Opciones
Vaya a la página de inicio - Seleccione [Conguración] - Seleccione [Conguración]. Utilice
las teclas de echa del control remoto para cambiar el menú, presione "OK" para conrmar y
congurar.
Menu Content
Idioma OSD English/French/Deutsch/Italian/Japanese etc
Conguración de Hora Establecer hora local
Protector de Pantalla Activar/Desactivar protector de pantalla
Temporizador de Apagado
Automático
Activado/Desactivado:Congurar tiempo (10-120
minutos)
Modo de Espera Automático Activado/Desactivado
Actualización automática
por USB
Actualización local
Comprobación de
actualizaciones de Internet
Comprobar el entorno de Internet
Restablecer valores
predeterminados
Restaurar valores predeterminados de fábrica
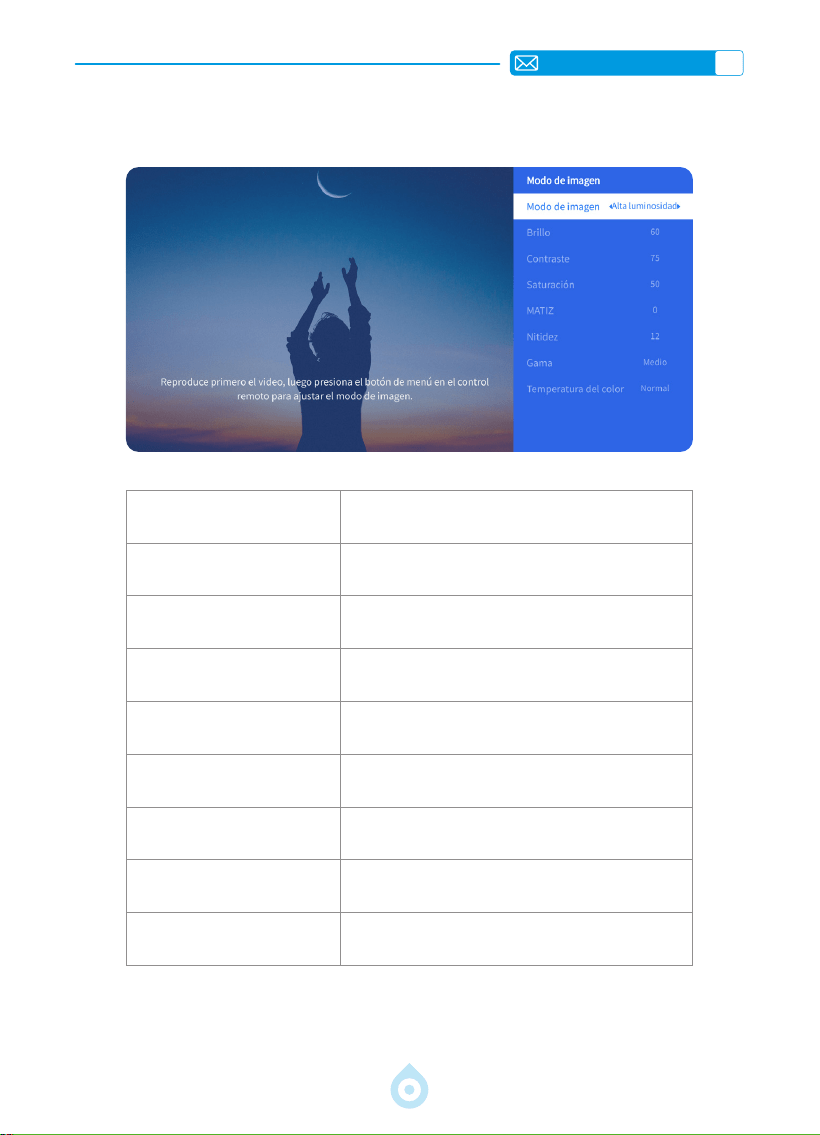
ES
108
2.Menú de Modo de Imagen
Menú Contenido
Modo de Imagen Seleccionar el modo de imagen
Brillo Congurar el brillo de la pantalla
Contraste Congurar el contraste de la pantalla
Saturación Congurar el color de saturación de la pantalla
Tono Congurar el tono de la pantalla
Nitidez Congurar la nitidez de la pantalla
Gamma Corregir el valor de gamma
Temperatura de Color Usuario / Frío / Estándar / Cálido

ES
109
3.Menú de Audio
Menú Contenido
Graves/Agudos Congurar Valores Preferidos
Estilo de Sonido
Usuario/Estándar/Película/Música/Deportes/
Vívido
Modo de Salida Digital
Automático/PCM/Dolby Audio-Dolby Digital/
Dolby Audio-Dolby Digital Plus
Mejora de Diálogos Desactivado/Bajo/Medio/Alto
Tono de Teclas Activado/Desactivado
Vaya a la página de inicio -- Seleccione [Configuración] -- Seleccione [Audio]. Use las
echas del control remoto para cambiar el menú y presione "OK" para conrmar y congurar.

ES
110
4.Acerca de (Información del Sistema)
Vaya a la página de inicio -- Seleccione [Conguración] -- Seleccione [Acerca de]. Use
las echas del control remoto para cambiar el menú y presione "Aceptar" para conrmar y
congurar.
Menú Contenido
Netix Netix Ofcially-Licensed
Version Info
View the Model number/version/OTA version/
Serial Number
License info License Information
Device Name Projector Model Name

ES
111
Formato USB
FAT、FAT32: 8G/16G/32G
NTFS:64G
Formato no compatible: exFAT
Atención: Si el proyector no puede reconocer el contenido de la unidad ash
USB, verique si su unidad ash USB está formateada correctamente.
Formato de vídeo
MP4, MKV, WMV, 3GP, MPG, VOB, TP, TS, DAT, MOV, FLV(La compatibilidad con
códecs de video puede variar; contáctenos para obtener asistencia adicional)
Formato de Audio
MP3, AAC, LPCM, APE, FLAC, OGG, AMR
(La compatibilidad con códecs de audio puede variar; contáctenos para obtener
asistencia adicional)
Formato de Imagen
JPG, PNG, BMP, JPEG
Formato del
Documento
TXT, PDF, DOCX, XLSX, PPTX
CONEXIÓN DE LÍNEAS DE SEÑAL
1.Conexión Multimedia USB
Seleccione la fuente de señal USB; el dispositivo la detectará automáticamente.
1) Seleccione la categoría deseada (fotos, música o vídeo) en la interfaz principal y pulse
"OK" en el control remoto para acceder a la categoría correspondiente.
2) Según el programa, seleccione "fotos, música o vídeo".
3) Seleccione el archivo que desee reproducir y pulse "OK" para reproducirlo o pausarlo. (No
es posible acceder a la categoría deseada sin conectar un dispositivo USB).
Si el problema persiste, envíe una descripción detallada del mismo a la siguiente dirección de
correo electrónico: [email protected]
El proyector TOPTRO TP1 cuenta con 3 interfaces: puerto HDMI*1, puerto USB*1 y salida de
audio de 3,5 mm*1. Seleccione el puerto correcto para conectar su dispositivo (USB, TV Stick,
altavoces, PC, portátil, reproductor de DVD, etc.).
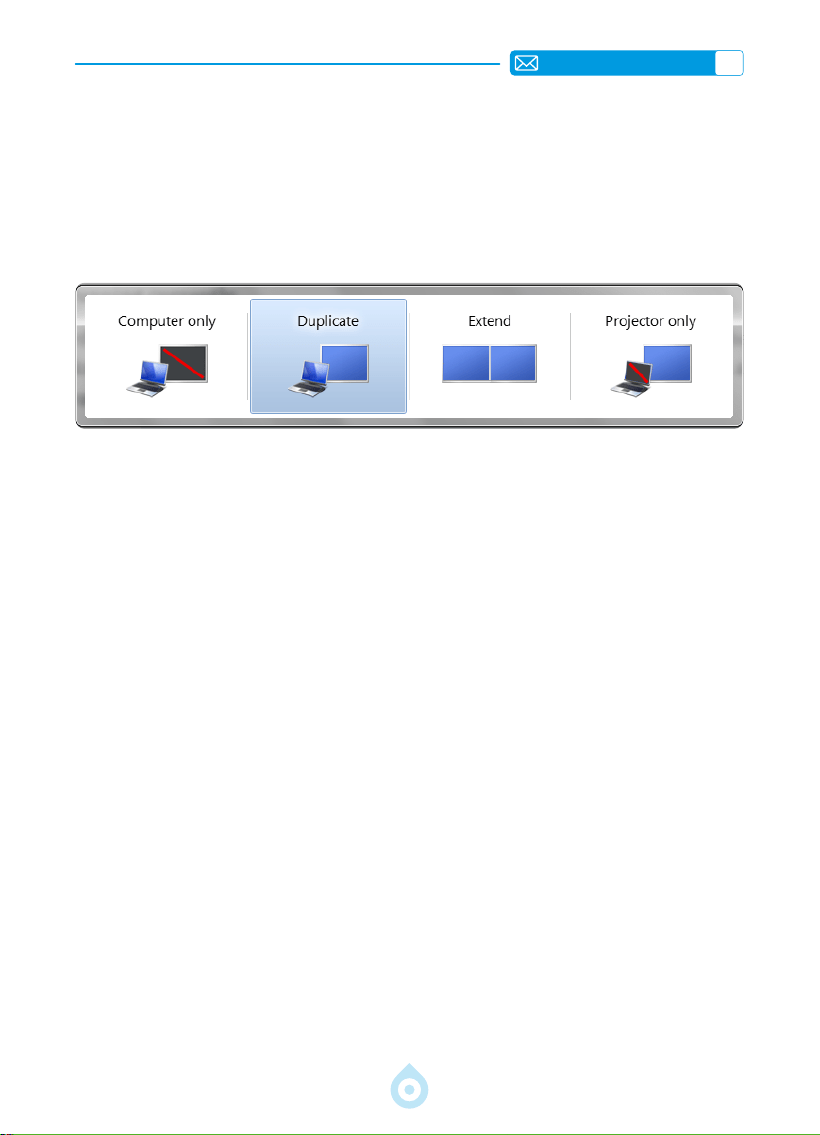
ES
112
2.Conexión con PC
1) Conecte la computadora y el proyector con el cable HDMI (incluido).
2) Seleccione la fuente HDMI para proyectar los archivos en su computadora.
3) En su portátil, mantenga presionadas las teclas "Win+P" para cambiar el modo de
visualización.
Solo computadora: es la opción predeterminada; solo se muestra en el monitor principal.
Duplicar: hace que todos los monitores muestren lo mismo, duplicando el escritorio en cada
uno.
Extender: hace que todos los monitores actúen como un solo monitor, extendiendo el
escritorio a todos ellos.
Solo proyector: Se muestra solo en el monitor secundario como un proyector. Puede
cambiar la resolución de pantalla en el modo Solo proyector.
Paso: Inicio > Panel de control > Apariencia y personalización > Ajustar resolución
de pantalla

ES
113
3.Conexión con MacBook o MacBook Air
4.Conexión con XBOX/PS5
1) Seleccione el canal de señal multimedia: HDMI
2) Utilice un adaptador Tipo-C a HDMI para conectar su MacBook, o un adaptador Mini Display
a HDMI para conectar su MacBook Air (adaptador no incluido). Conexión con MacBook o
MacBook Air. (Adaptador no incluido).
1) Seleccione el canal de señal multimedia: HDMI
2) Use el cable HDMI para conectar a XBOX/PS5
3) Listo

ES
114
Preguntas Frecuentes
Gracias por elegir el proyector TOPTRO TP1. Hemos recopilado algunas preguntas frecuentes
y sus respuestas para ayudarle mejor. Si el problema persiste, por favor, proporciónenos la
siguiente información: código de país, número de pedido, modelo y una breve descripción del
problema (por ejemplo, ES+000 0000000 0000000+TP1+Sin imagen), y escríbanos a
[email protected]. Nuestro equipo le responderá en 24 horas con una solución ecaz
para resolver sus inquietudes.
P1:Laduplicacióndepantallaolaconexiónwisoninestables.¿Cómopuedo
solucionar este problema?
La duplicación de pantalla requiere una señal wifi potente. Asegúrese de que su red
doméstica funcione correctamente. La resolución de video se ajustará dinámicamente
según la intensidad de su señal wifi. Además, active el punto de acceso de su teléfono e
intente conectarse al proyector TP1 para identicar si el problema está relacionado con la red
doméstica.
P2:¿Cuálesladistanciadeproyecciónmásadecuada?¿Sepuedeajustarel
tamaño de la pantalla mediante la escala?
La distancia de proyección recomendada para el proyector TP1 es de 2 a 3 metros. El tamaño
de la imagen depende de la distancia y de la relación de proyección del proyector, que es de
1,1:1. Además, el proyector TP1 ofrece una función de zoom de entre el 50 % y el 100 %. Para
obtener información más detallada sobre la distancia de proyección, consulte el manual o
contáctenos directamente.
P3:¿Porquélaimagenestádesenfocadaindependientementedecómola
ajuste?
Coloque el proyector alineado con el centro de la pantalla. El ángulo de desplazamiento debe
ser inferior a 15 grados. Utilice la función de corrección trapezoidal automática o manual
para lograr una pantalla rectangular; utilice el enfoque automático o manual para ajustar el
enfoque de la lente.
P4:Alduplicarlapantalla,elproyectornopuedereproducirNetflix,YouTube,
HuluniDisney+.¿Porqué?
1. Debido a restricciones de derechos de autor, incluido el modelo TP1, la mayoría de los
proyectores no admiten la duplicación inalámbrica de servicios de streaming desde el
teléfono. De lo contrario, la pantalla permanecerá negra y solo se reproducirá el sonido.
Incluso los proyectores con sistemas integrados pueden tener limitaciones con ciertos
servicios de streaming. Para acceder a estos servicios, sugerimos usar un TV Stick (no
incluido) con nuestro proyector para una experiencia uida y versátil.
2. Use la función HomeShare en el proyector TP1: 1) Active HomeShare en el proyector. 2)
Asegúrese de que su teléfono móvil y el proyector estén conectados a la misma red Wi-
Fi. 3) Haga clic en el botón de proyección en las aplicaciones como Netflix o Disney. 4)
Seleccione "TP1". Sin embargo, por razones de compatibilidad, la aplicación Prime Video no
es compatible con la proyección.
3. Se recomienda usar la aplicación integrada del proyector para la reproducción.

IT
115
CONTENUTO
ASSISTENZA PROFESSIONALE TOPTRO7D/24H 118
ISTRUZIONI PER L'USO 119
ELENCO DEI PACCHETTI 120
PANORAMICA DEL PROIETTORE 121
TELECOMANDO 122
INSTALLAZIONE 123
1.Metodo di Installazione 123
2.Montaggio a Softto e su Supporto 124
3.Distanza e Dimensione Della Proiezione 124
SPECIFICHE DEL PROIETTORE 125
AVVIO DEL PROIETTORE 126
IMPOSTAZIONI IMMAGINE PROIEZIONE 126
1.Modalità di Proiezione 126
2.Correzione Trapezoidale 127
3.Messa a Fuoco Automatica 128
4.Impostazione Dello Zoom 129
IMPOSTAZIONI INTELLIGENTI DEL PROIETTORE 130
1.SELEZIONARE LA SORGENTE DEL SEGNALE 130
2.CONNESSIONE WIRELESS 131
3.BLUETOOTH 134
4.SISTEMA SMART OS INTEGRATO 134
ALTRE IMPOSTAZIONI DI PROIEZIONE DI BASE 135
1.Menu Delle Opzioni 135
2.Modalità Immagine Menü 136
3.Menu Audio 137
4.Informazioni (Informazioni sul Sistema) 138
LINEE DI SEGNALE CONNESSIONE 139
1.Collegamento multimediale USB 139
2.Collegamento con il PC 140
3.Collegamento con MacBook o MacBook Air 141
4.Collegamento con XBOX/PS5 141
FAQ(Domande Frequenti) 142
IT
116
Attivazione della garanzia di 3 anni e
sorpresa esclusiva
Signore e signori
Grazie per aver acquistato il proiettore TP1.
Vi preghiamo di dedicare un minuto alla scansione del codice per attivare
la garanzia di 3 anni.
Si consiglia di completare il processo entro 3 giorni.
Suggerimenti: Se non riuscite ad attivare la garanzia tramite la
scansione del codice, potete contattarci tramite l'e-mail qui sotto e vi
aiuteremo ad attivare la garanzia.
Scansiona per saperne di più
[email protected] www.youtube.com/@TOPTRO-R

IT
117
Lavoriamo sempre per migliorare e potenziare i nostri prodotti.
Si prega di notare che le immagini e le descrizioni del manuale sono solo
di riferimento e possono differire leggermente dal prodotto reale. Per
i dettagli più accurati, consultare il prodotto stesso. È inoltre possibile
accedere agli ultimi aggiornamenti tramite la funzione di aggiornamento
online. Apprezziamo la vostra comprensione!
La nostra garanzia e assistenza sui prodotti sono disponibili per gli
articoli acquistati da venditori autorizzati. Per proteggere i vostri diritti,
siete invitati a inviarci un'e-mail a [email protected] per vericare
l'autenticità del vostro proiettore TP1.
Questo è il nostro link ufficiale a YouTube: www.youtube.com/@
TOPTRO R, dove è possibile cercare tutti i video operativi e la risoluzione
dei problemi del proiettore TP1.
Ci piace sapere come i nostri proiettori portano gioia nella vostra vita!
Condividete i vostri momenti o i vostri feedback: siamo entusiasti di
far parte della vostra esperienza.
I modi più rapidi ed efcienti per contattarci:
Metodo 1: Email
Email: [email protected]
Suggerimenti: consigliamo di contattare prima via email perché
consente di condividere video o altre informazioni dettagliate sul
prodotto, aiutandoci a risolvere il problema più velocemente. Se non
ricevete risposta da via e-mail, è possibile che il messaggio sia nito
nello spam o sia stato ritardato.
In questo caso, provare il secondo metodo qui sotto.
Metodo 2: Clicca sul Venditore
Vai alla pagina in cui hai acquistato il prodotto - clicca
su "Contatta il venditore" e inviaci un messaggio.
Grazie per la ducia riposta in TOPTRO! Siamo qui per
assicurarci che tu abbia la migliore esperienza possibile.

IT
118
ASSISTENZA PROFESSIONALE TOPTRO7D/24H
Gentile cliente,
La ringraziamo per aver sostenuto TOPTRO! Prima di iniziare a utilizzare il
proiettore, leggere attentamente il presente manuale d'uso. Le caratteristiche
e le illustrazioni contenute nel presente documento sono fornite come
riferimento e possono differire leggermente dal prodotto reale a causa di
ottimizzazioni e aggiornamenti continui. Per dettagli precisi, si prega di fare
riferimento al prodotto sico.
In caso di problemi, si prega di includere i seguenti dettagli nell'e-mail: codice
paese, numero d'ordine, modello e una breve descrizione del problema (ad
esempio: IT+000 0000000 0000000+TP1+Nessuna immagine), si prega di
inviare un'e-mail a [email protected] .Il nostro team dedicato risponderà
prontamente entro 24 ore con una soluzione efcace per risolvere il problema.
È essenziale ricordare che molti problemi comuni possono essere facilmente
risolti con semplici modifiche. Per garantire la massima soddisfazione,
vogliamo assicurarvi che tutti i nostri proiettori sono sottoposti a un rigoroso
controllo di qualità al 100% e a un accurato imballaggio prima della spedizione.
Se avete domande, contattateci per risolvere il problema. E dateci l'opportunità
di migliorare. Ci impegniamo a fornirvi una soluzione soddisfacente per
qualsiasi problema possiate incontrare.
Cordiali saluti,
Team di Assistenza TOPTRO

IT
119
ISTRUZIONI PER L'USO
Considerazioni sulla temperatura:
Per garantire la longevità del proiettore, evitare di posizionarlo in ambienti
eccessivamente caldi o freddi. Le temperature estreme possono ridurne la
durata. Per prestazioni ottimali, mantenere un ambiente di lavoro tra 5 ° C e
35° C.
Ventilazione adeguata:
Il proiettore è dotato di un sistema di ventilazione per garantire un
funzionamento stabile. Assicurarsi che il proiettore sia posizionato in un'area
ben ventilata. Evitare spazi angusti come armadi e assicurarsi che non vi
siano ostruzioni in prossimità delle prese d'aria. Un'eccessiva quantità di
polvere compromette la dissipazione del calore del proiettore. Si consiglia
di pulire il filtro antipolvere ogni mese o mese e mezzo, a seconda delle
condizioni ambientali.
Protezione da urti e vibrazioni:
Maneggiare il proiettore con cura, proteggendolo da forti urti, sporgenze e
vibrazioni. Evitare di spostare il proiettore in caso di guasti ai circuiti interni.
Manutenzione dell'obiettivo:
L'obiettivo del proiettore è un componente cruciale che inuisce direttamente
sulla denizione e sulla qualità dell'immagine. Assicurarsi di mantenerlo pulito
da polvere eccessiva. Per la pulizia, utilizzare un panno morbido di cotone
adatto alle lenti in vetro.
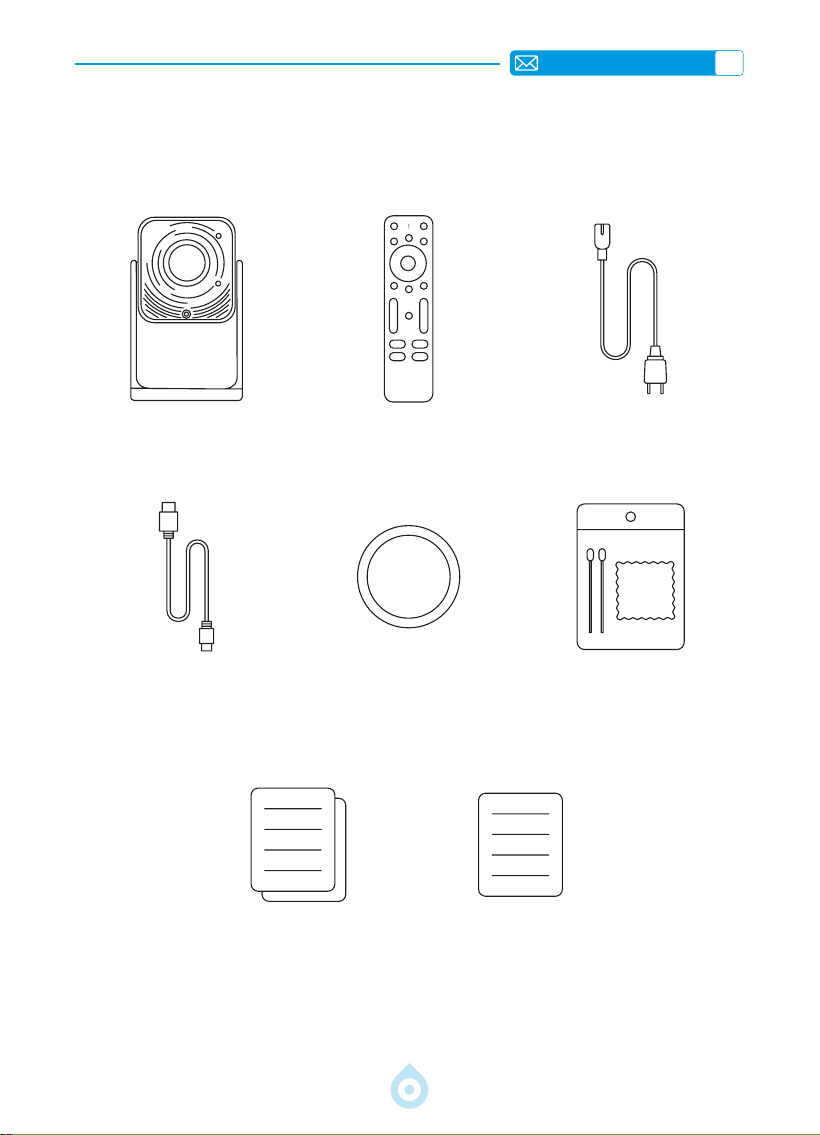
IT
120
ELENCO DEI PACCHETTI
Proiettore TOPTRO TP1*1 Telecomando*1 Cavo di alimentazione*1
Cavo HDMI*1 Copriobiettivo*1 Kit di pulizia*1
Guida rapida*1 Domande frequenti*1
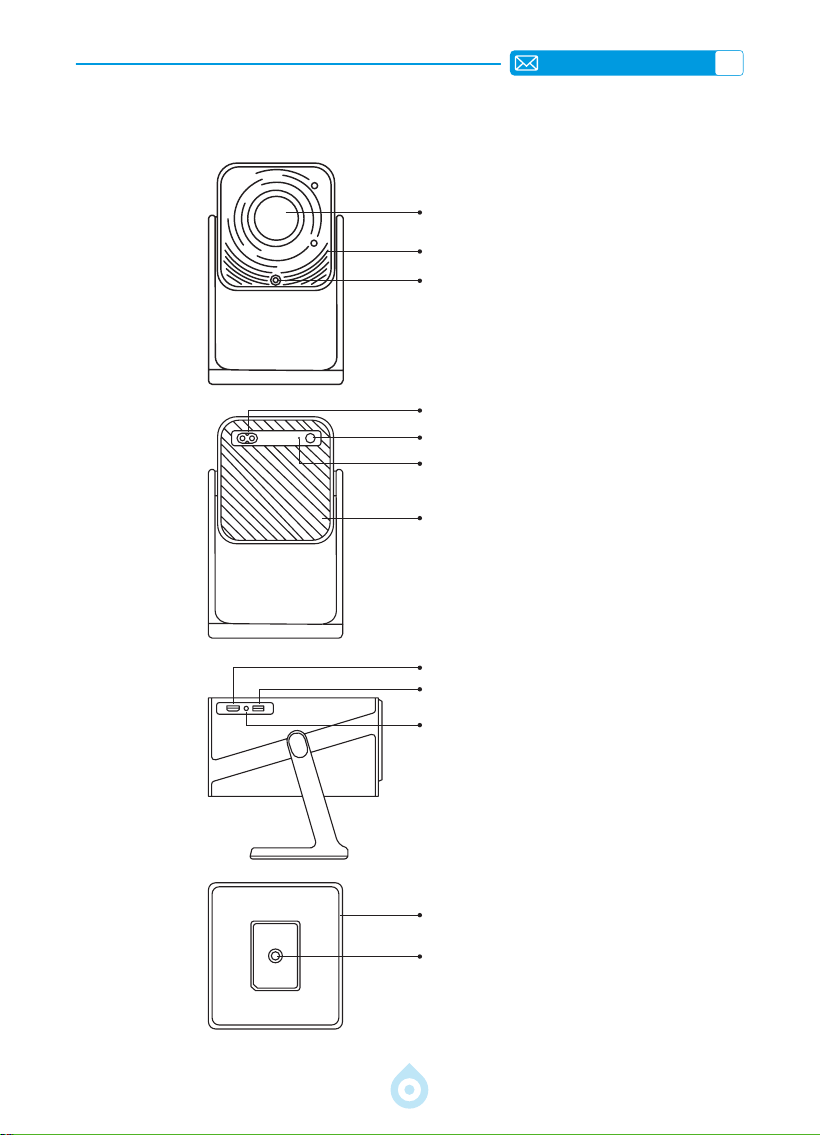
IT
121
PANORAMICA DEL PROIETTORE
Lente
Ingresso Aria
Ricevitore del Segnale di
Messa a Fuoco
Presa di Corrente
Accensione/Spegnimento
Ricevitore IR
Uscita Aria
Porta HDMI
Porta USB
Jack Audio da 3,5 mm
Supporto Flessibile a 360°
Foro di Montaggio da 1/4 di Pollice

IT
122
TELECOMANDO
Accensione Disattiva audio
Impostazioni
Modalità di proiezione
Tasto di conferma
Sorgente
Indietro
Pulsante freccia
USB
Menu
Volume+
Homepage
Volume-
Focus+
NETFLIX
Focus-
Prime Video
YouTube
APRI BROWSER
*Inserire 2 batterie AAA (non incluse) nel telecomando prima di utilizzarlo.
*Quando si utilizza il telecomando, assicurarsi che il trasmettitore del segnale
sia puntato verso il ricevitore a infrarossi del proiettore.

IT
123
INSTALLAZIONE
1.Metodo di Installazione
Il proiettore può essere montato a soffitto utilizzando un supporto dedicato, oppure
posizionato su una scrivania stabile per la proiezione, a seconda dell'ambiente e delle
esigenze. Inoltre, il proiettore può essere installato con i seguenti metodi:
Mantenere il proiettore a un'altezza che consenta all'obiettivo di essere assialmente
simmetrico rispetto allo schermo. Se ciò non è possibile, utilizzare la funzione di correzione
trapezoidale per regolare l'immagine proiettata.
Proiezione Frontale, Montaggio a
Softto
Proiezione Frontale, Montaggio a
Tavolo
Proiezione Posteriore, Montaggio a
Softto
Proiezione Posteriore, Montaggio a
Tavolo

IT
124
3.Distanza e Dimensione Della Proiezione
40’’
60’’
84’’
100’’
120’’
Mètre
Pieds
1,0
3,2
1,46
4,8
2,05
6,71
2,44
7,99
2,92
9,59
La distanza di proiezione consigliata per il proiettore TP1 è di 1,8 2,9 metri. Le dimensioni
dell'immagine dipendono dalla distanza e dal rapporto di proiezione del proiettore, che è
di 1,1:1. Inoltre, il proiettore offre una funzione di zoom out del 50%, per cui è possibile
regolare le dimensioni dello schermo con questa funzione.
*Le dimensioni e la distanza di proiezione effettive possono discostarsi
leggermente dai dati di laboratorio.
2.MontaggioaSofttoesuSupporto
1) Il TP1 non supporta l'installazione con montaggio a quattro angoli. Utilizzare il supporto con
attacco da 1/4" o un vassoio per ssare il proiettore.
2) Staccare l'etichetta inferiore del prodotto per scoprire il foro di montaggio.
Diametro:
1/4 di pollice
(6,35 mm)
Profondità: 6,0 mm

IT
125
SPECIFICHE DEL PROIETTORE
Numero di Modello: TP1
Dimensioni del
Prodotto (L*P*A)
4,57 * 4,80 * 9,45 pollici
11,60 * 12,20 * 24,00 cm
Peso del Prodotto
2,4 Libbre
1,1 KG
Risoluzione Nativa
1920*1080P
Frequenza di
Aggiornamento
60 Hz
Tecnologia di
Visualizzazione
LCD Fonte di Luce LED
Correzione
Trapezoidale
Auto/Elettrico
Tensione di
Alimentazione
AC100-240V
50-60Hz
Proporzioni
16:9 Messa a Fuoco Auto/Elettrico
Rapporto di
Proiezione
1.1 : 1 (±0.5) Zoom 100%-50%
Rapporto di
Proiezione
Fronte/Retro sulla Scrivania
Fronte/Retro a Softto
Supporto disco USB
1. FAT32: 8 GB/16 GB/32 GB 2. NTFS: 64 GB
Interfacce:
HDMI*1/USB*1/3.5mm Audio Output x 1
Formato Video
MP4/MPG/AVI/MPEG-4/TS/MOV/M4V/MKV/FLV/DAT/3GP (Il supporto
per i codec video può variare a seconda delle circostanze. Contattateci
per ulteriore supporto)
Formato Audio
MP3/WMA/M4A/MP2/AAC/OGG/WAV/FLAC (SUPPORTO Dolby)
Formato Immagine
JPG/JEPG/BMP/PNG
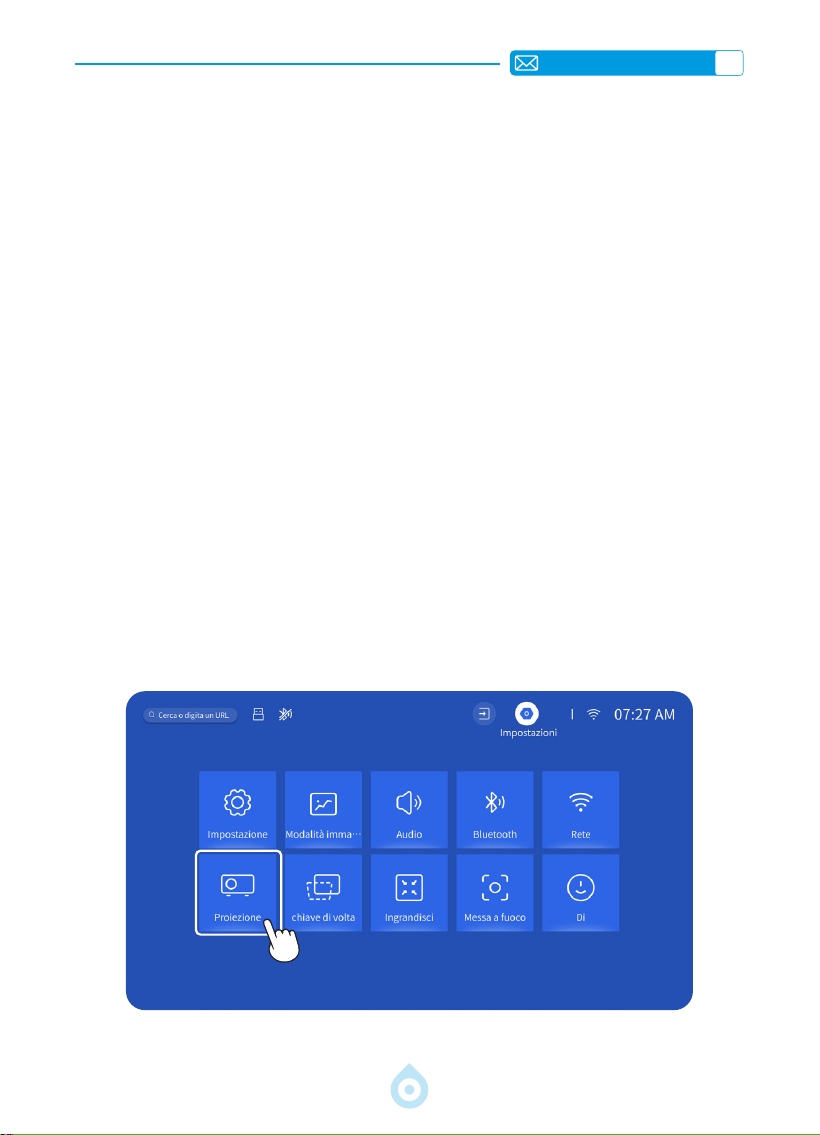
IT
126
AVVIO DEL PROIETTORE
IMPOSTAZIONI IMMAGINE PROIEZIONE
1. Accensione: rimuovere il copriobiettivo e premere il tasto di accensione sul telecomando o
sul proiettore stesso. La spia luminosa diventerà blu quando il proiettore è acceso.
2. Impostazione lingua: selezionare la lingua preferita nelle impostazioni.
3. Correzione trapezoidale/messa a fuoco: utilizzare la correzione trapezoidale
verticale automatica (o correzione a quattro punti) e la funzione di messa a fuoco
per ottenere un'immagine rettangolare e nitida. Assicurarsi che l'area davanti al [ricevitore
di messa a fuoco] non sia ostruita.
4. Regolazione della nitidezza dell'immagine: regolare i pulsanti di messa a fuoco
"F+" e "F " sul telecomando per migliorare la nitidezza dell'immagine. Se l'immagine è
ancora sfocata, regolarla nuovamente dopo aver puntato il proiettore direttamente verso lo
schermo.
5. Collegamento dispositivi esterni: collegare il dispositivo esterno (ad esempio,
smartphone, iPad, chiavetta TV, decoder, laptop, ecc.) alle interfacce appropriate sul
proiettore. Assicurarsi di selezionare la sorgente corretta per il dispositivo; in caso contrario,
il proiettore potrebbe non rilevare il segnale.
1.Modalità di Proiezione
Selezionare il menu [Impostazioni] -- Selezionare l'opzione [Proiezione] -- Selezionare
la modalità di installazione, premere il tasto freccia per selezionare e premere "OK" per
confermare la posizione di proiezione.

IT
127
2.Correzione Trapezoidale
2.1 Correzione trapezoidale verticale automatica
2.2 Correzione a quattro punti
Selezionate il menu [Impostazioni] - attivate l'opzione [Keystone], quindi regolerà
automaticamente il keystone come rettangolo ogni volta che spostate il proiettore o lo
accendete.
Per una qualità di proiezione ottimale, si consiglia di posizionare il proiettore al centro verso
il centro dello schermo sia in verticale che in orizzontale. Oppure assicurarsi che l'angolo di
sfalsamento del proiettore non superi i 20
°
in direzione verticale, altrimenti la funzione di
correzione automatica della distorsione trapezoidale potrebbe non funzionare correttamente.
Selezionare il menu [Impostazioni] -- Selezionare l'opzione [Chiave di volta], quindi
selezionare [Correzione trapezoidale in quattro punti], fare clic sul pulsante "OK" per
scegliere il punto che si desidera regolare, quindi premere il pulsante "
" " "per impostare il
valore (verticale 0-100) necessario, come mostrato di seguito.
Azzeramento: Premere il pulsante "Menu
" e l'immagine verrà ripristinata alle
impostazioni originali di correzione della distorsione trapezoidale.

IT
128
3.Messa a Fuoco Automatica
Selezionate il menu [Impostazioni] - attivate l'opzione [Messa a fuoco], quindi la messa a
fuoco e la regolazione della distorsione trapezoidale avverranno automaticamente ogni volta
che spostate il proiettore o lo accendete.
Se l'immagine rimane sfocata, regolare i tasti di messa a fuoco "F+" e "F " sul telecomando
del proiettore per regolare con precisione la nitidezza dell'immagine.

IT
129
4.Impostazione Dello Zoom
Accedere alla pagina iniziale -- Selezionare il tasto "Menu " -- Selezionare [Impostazioni]
-- Selezionare l'opzione [Zoom], lo schermo di proiezione può essere ingrandito del 50%
- 100%. Premere il pulsante "
↑ ↓
" per impostare il valore necessario, come mostrato di
seguito.
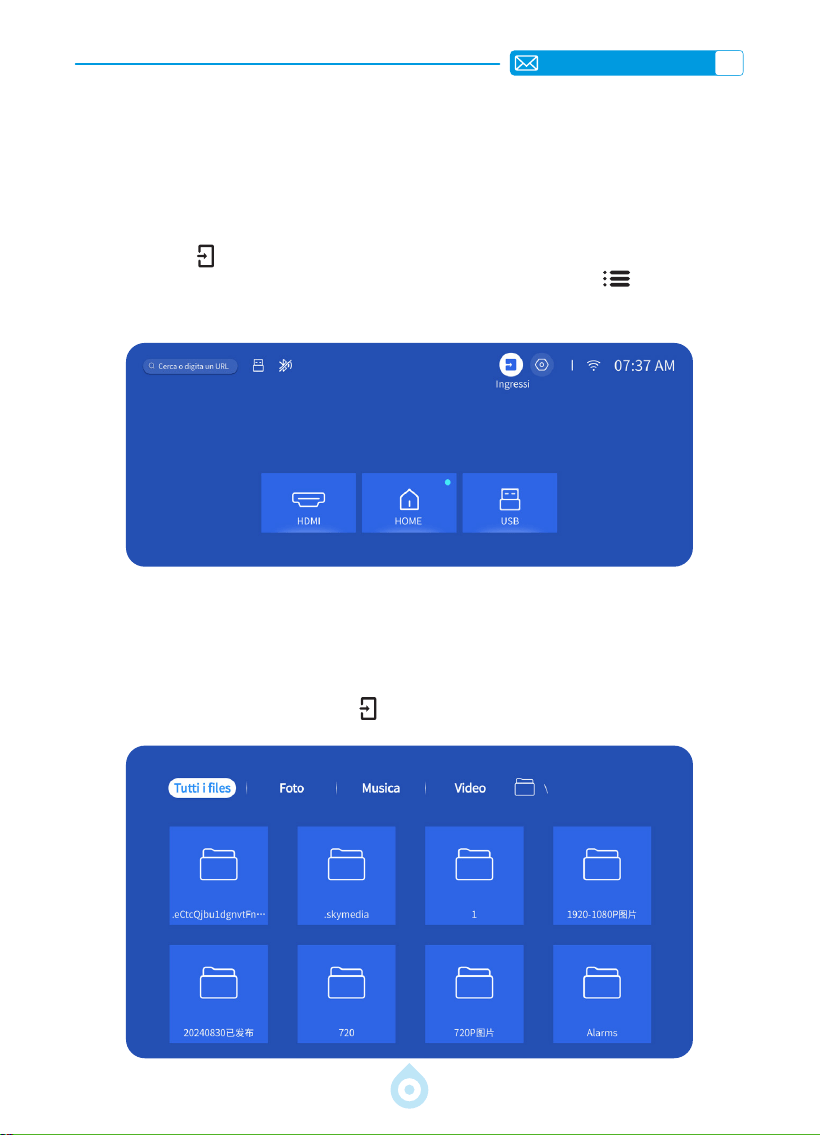
IT
130
IMPOSTAZIONI INTELLIGENTI DEL PROIETTORE
1.SELEZIONARE LA SORGENTE DEL SEGNALE
Selezionare la sorgente del segnale di ingresso [HDMI] nella pagina iniziale, oppure premere
il tasto “Source
” del telecomando per selezionare la sorgente del segnale corrispondente.
Durante la riproduzione di un video, è possibile premere il tasto “Menu
” e selezionare
[Modalità immagine]. È possibile regolare liberamente la luminosità e il contrasto
dell'immagine e altre funzioni.
Per i dispositivi USB, non è necessario scegliere la sorgente del segnale. L'apparecchio li
rileverà automaticamente.
Premere il tasto "USB" direttamente sul telecomando.
Oppure premere il pulsante “Sorgente
” e selezionare [USB] nella pagina iniziale:
1.1 Selezione della sorgente del segnale di ingresso HDMI
1.2 Selezione della sorgente del segnale di ingresso USB
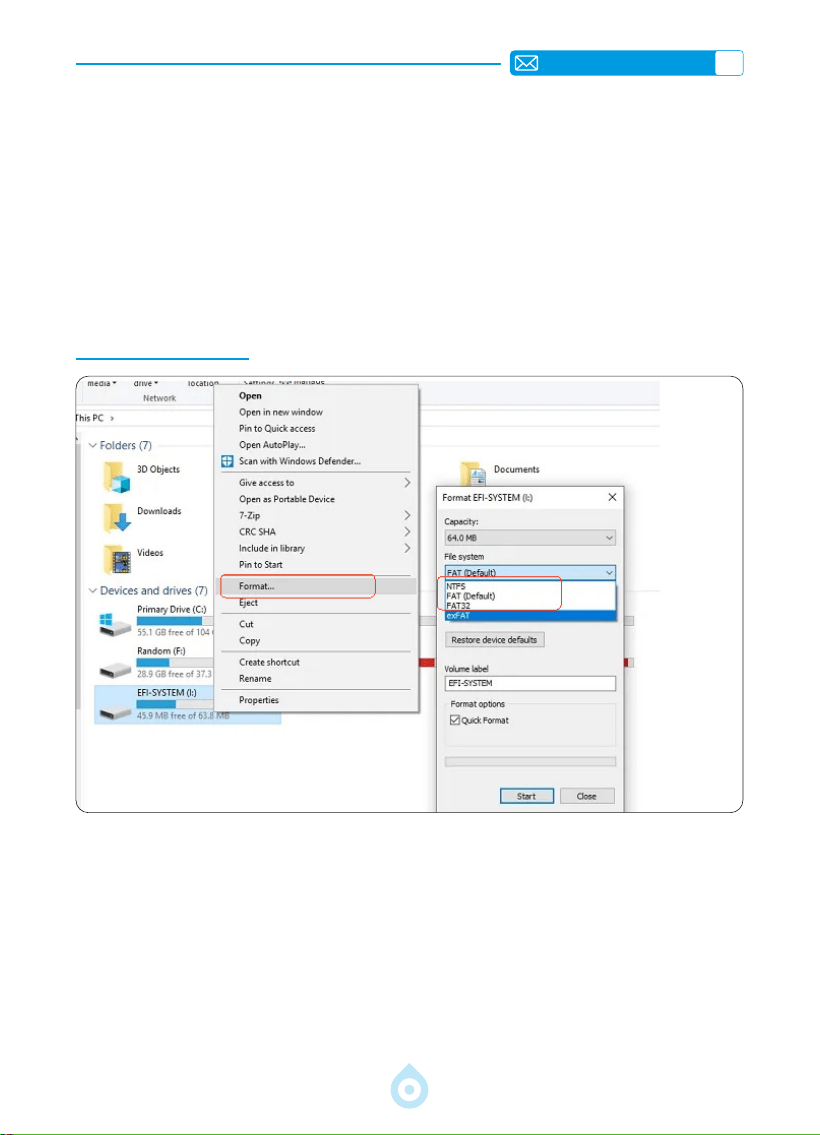
IT
131
Suggerimenti Utili: Se il proiettore non è in grado di riconoscere il disco USB, fare
riferimento ai seguenti metodi per risolvere il problema.
*Vericare che il disco USB sia conforme ai seguenti formati.
*1. FAT32: 8 GB/16 GB/32 GB 2. NTFS: 64 GB
*Se il disco USB non rientra nei formati sopra indicati, cambiare il formato del disco USB in
NTFS o FAT32 seguendo la procedura descritta nell'immagine sottostante.
Note: prima di cambiare il formato del disco USB, assicurarsi di eseguire un backup di tutto il
disco USB. Poiché eseguendo questi passaggi, tutto andrà perso per sempre.
Se il problema non è ancora stato risolto, si prega di inviare il problema a questo indirizzo e-mail:
2.CONNESSIONE WIRELESS
1) Il mirroring dello schermo richiede un forte segnale WiFi wireless; assicurarsi che la rete
domestica funzioni bene. La risoluzione video si regolerà dinamicamente in base alla
potenza del segnale Wi-Fi.
2) Selezionare l'icona [Impostazioni] nell'angolo superiore destro dell'interfaccia principale
del proiettore, quindi premere il tasto "OK" sul telecomando per accedere all'interfaccia
delle impostazioni e selezionare [Rete]. Oppure Premere il tasto di impostazione sul
telecomando per accedere alla pagina delle impostazioni e selezionare [Rete].
2.1 Impostazioni WiFi

IT
132
Attenzione: Assicurarsi che il dispositivo iOS sia collegato alla stessa rete Wi-Fi del proiettore.
1) Collegare il proiettore alla rete Wi-Fi domestica.
2) Quando si utilizza il dispositivo iOS per la prima volta, è necessario scaricare l'APP
"ScreenShare" nell'interfaccia principale del Proiettore TP1 (percorso: Interfaccia principale
- Le mie applicazioni - Assistente APP - ScreenShare - Fare clic su "OK" - Download dell'app
completato, spegnere e riavviare - Trovare ScreenShare in Le mie applicazioni).
3) Attivare l'impostazione WiFi del dispositivo iOS, assicurandosi che il dispositivo e il proiettore
siano collegati alla stessa rete WiFi domestica.
4) Accedere al [Centro di controllo] sul dispositivo iOS -- Selezionare la funzione [Screen
Mirroring] -- Selezionare e collegare il ricevitore iOS Cast denominato [TOPTRO_TP1_
XXXX].
5) Procedere
2.2 Per il Sistema iOS (ScreenShare)

IT
133
Attenzione: I dispositivi Android possono utilizzare termini e metodi diversi per abilitare il
mirroring dello schermo. Assicurarsi di abilitare la funzione WLAN sul dispositivo Android. (Non
è necessario collegarsi a una rete Wi-Fi).
1) Accendere il proiettore e selezionare "Screencast" come sorgente di ingresso.
2) Accendere il "Display multischermo/Wireless" del dispositivo Android.
3) Selezionare "TOPTRO_TP1_XXXX" dai risultati della ricerca per connettersi.
4) Procedere.
2.3 Per il Sistema Android (Screencast)
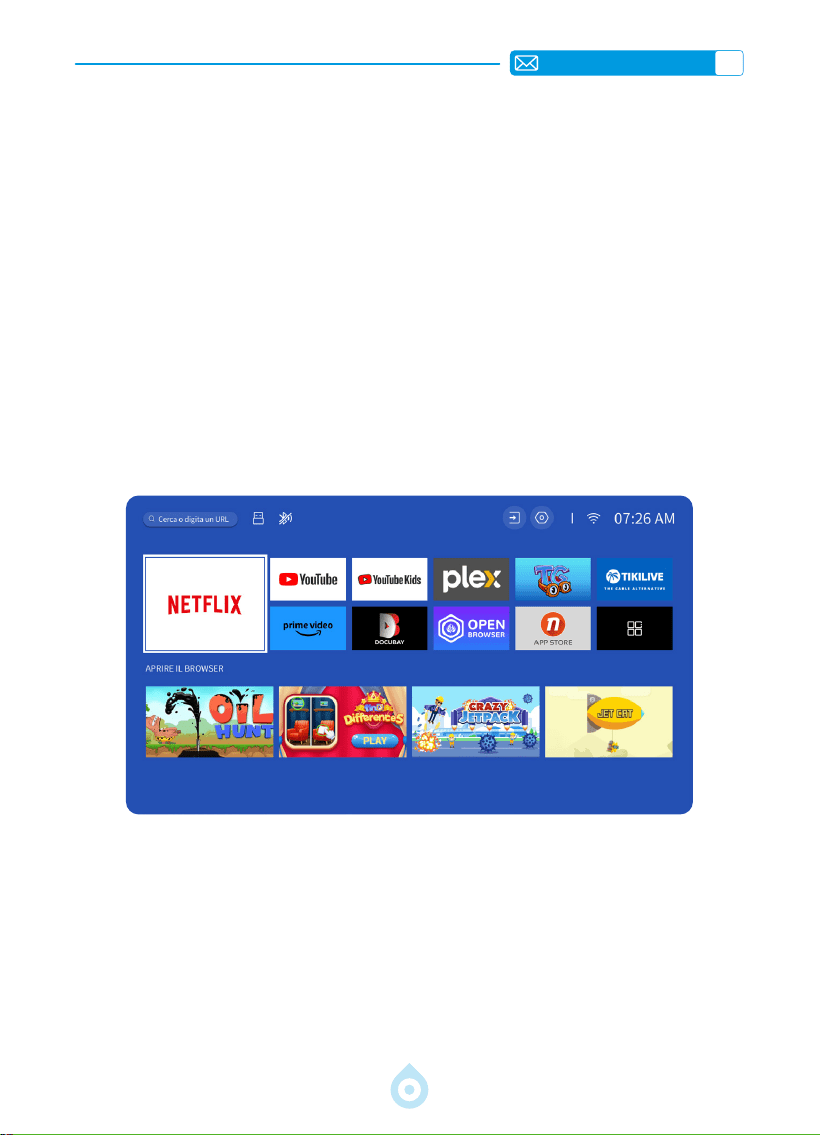
IT
134
3.BLUETOOTH
4.SISTEMA SMART OS INTEGRATO
1) Assicurarsi che tutti i dispositivi precedentemente accoppiati con il diffusore Bluetooth siano
prima scollegati.
2) Accendere il [Bluetooth] del proiettore e selezionare il diffusore Bluetooth da collegare.
3) TP1 supporta la trasmissione bidirezionale; in modalità audio Bluetooth, può essere collegato
a dispositivi mobili e utilizzato come altoparlante Bluetooth.
Il proiettore intelligente TP1 è dotato di un sistema Smart Netflix OS integrato, la cui APP
Netix è autorizzata ufcialmente. Potrete godervi le vostre APP e i vostri video preferiti a
piacimento, e potrete godervi un gran numero di lm e opere televisive meravigliose senza
dover utilizzare una chiavetta TV aggiuntiva. L'interfaccia principale del proiettore TP1 è la
seguente.

IT
135
ALTRE IMPOSTAZIONI DI PROIEZIONE DI BASE
1.Menu Delle Opzioni
Andare alla pagina iniziale -- Selezionare [Impostazioni] -- Selezionare [Impostazioni].
Utilizzare i tasti freccia del telecomando per cambiare il menu, premere "OK" per confermare
e impostare.
Menu Contenuto
Lingua OSD
Inglese/Francese/Deutsch/Italiano/Giapponese
ecc
Impostazione Dell'ora Impostare L'ora Locale
Salvaschermo Attivare/Disattivare lo Screen Saver
Timer di Sospensione
Attivare/Disattivare: Impostare il tempo di
sospensione da 10 a 120 minuti
Standby Automatico Attivare/Disattivare
Aggiornamento Automatico
USB
Aggiornamento Locale
Controllo Aggiornamento
Internet
Controllare l'ambiente Internet
Ripristino Delle Impostazioni
Predenite
Ripristino Delle Impostazioni di Fabbrica

IT
136
2.Modalità Immagine Menü
Menu Contenuto
Modalità Immagine Seleziona la Modalità Immagine
Luminosità Imposta il Valore di Luminosità Dello Schermo
Contrasto Imposta il Valore di Contrasto Dello Schermo
Saturazione Imposta il Colore di Saturazione Dello Schermo
Tinta Imposta il Colore Della Tonalità Dello Schermo
Nitidezza Imposta il Valore di Nitidezza Dello Schermo
Gamma Correggi il Valore Gamma
Temperatura del Colore Utente/Freddo/Standard/Caldo

IT
137
3.Menu Audio
Menu Contenuto
Bassi/Alti Impostare i Valori Preferiti
Stile Sonoro Utente/Standard/Movie/Music/Sport/Vivido
Modalità di Uscita Digitale
Auto/PCM/Dolby Audio-Dolby Digital/Dolby
Audio-Dolby Digital Plus
Miglioramento dei Dialoghi Off/Basso/Medio/Alto
Tono dei Tasti On/Off
Accedere alla pagina iniziale -- Selezionare [Impostazioni] -- Selezionare [Audio]. Utilizzare
i tasti freccia del telecomando per cambiare il menu, premere "OK" per confermare e
impostare.
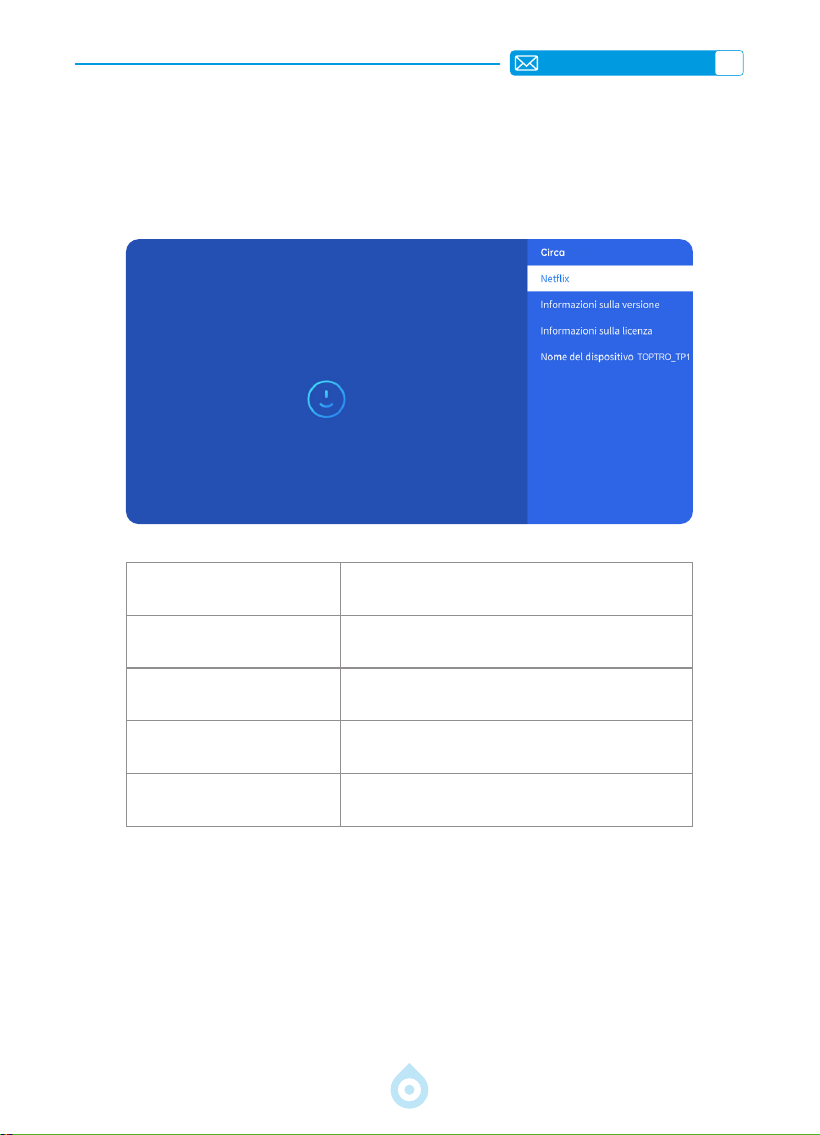
IT
138
4.Informazioni (Informazioni sul Sistema)
Accedere alla pagina iniziale -- Selezionare [Impostazioni] -- Selezionare [Circa]. Utilizzare
i tasti freccia del telecomando per cambiare il menu, premere “OK” per confermare e
impostare.
Menu Contenuto
Netix Netix in Licenza Ufciale
Informazioni Sulla Versione
Visualizzare il Numero di Modello/Versione/OTA/
Numero di Serie
Informazioni Sulla Licenza Informazioni Sulla Licenza
Nome del Dispositivo Nome del Modello di Proiettore

IT
139
Formato USB
FAT、FAT32: 8G/16G/32G
NTFS:64G
Formato non supportato: exFAT
Attenzione: Se il proiettore non è in grado di riconoscere il contenuto della
chiavetta USB, vericare che la chiavetta USB sia formattata correttamente.
Formato Video
MP4, MKV, WMV, 3GP, MPG, VOB, TP, TS, DAT, MOV, FLV(Il supporto per i codec
video può variare; contattateci per ulteriore supporto)
Formato Audio
MP3, AAC, LPCM, APE, FLAC, OGG, AMR
(Support for audio codecs may vary; contact us for additional support)
Formato Immagine
JPG, PNG, BMP, JPEG
Formato del
Documento
TXT, PDF, DOCX, XLSX, PPTX
LINEE DI SEGNALE CONNESSIONE
1.Collegamento multimediale USB
Selezionare la sorgente di segnale USB, l'apparecchio la rileverà automaticamente.
1) Selezionare la categoria desiderata “foto”, “musica” o "video" nell'interfaccia principale
e premere il tasto “OK” del telecomando per accedere alla categoria corrispondente.
2) In base ai programmi da scegliere: “foto”, "musica" o “video”.
3) Scegliere il le che si desidera riprodurre e premere il tasto “OK” per riprodurre o mettere in
pausa il le. (Non è possibile inserire la categoria desiderata senza collegare un disco USB).
Se il problema persiste, si prega di inviare una descrizione dettagliata del problema al
seguente indirizzo e-mail: [email protected]
Il Proiettore TOPTRO TP1 dispone di 3 interfacce, porta HDMI*1/porta USB*1 uscita audio
da 3,5 mm*1. Selezionare la porta di connessione corretta per collegare il dispositivo (USB, TV
Stick, Altoparlanti, PC, Laptop, Lettore DVD, ecc.).

IT
140
2.Collegamento con il PC
1) Collegare il computer e il proiettore con il cavo HDMI (in dotazione).
2) Selezionare la sorgente HDMI per proiettare i le sul computer.
3) Sul computer portatile, tenere premuto il tasto "Win+P" per cambiare la modalità di
visualizzazione.
Solo computer: è l'opzione predenita - visualizza solo il monitor principale.
Duplica: fa sì che tutti i monitor visualizzino la stessa cosa, duplicando il desktop di su ogni
monitor.
Estendi: fa sì che tutti i monitor si comportino come un unico grande monitor, estendendo il
desktop di a tutti i monitor.
Solo proiettore: Visualizza solo sul monitor secondario come un proiettore. È possibile
modicare la risoluzione dello schermo nella modalità Solo proiettore.
Passaggio: Start> Pannello di controllo > Aspetto e personalizzazione > Regola
risoluzione schermo

IT
141
3.Collegamento con MacBook o MacBook Air
4.Collegamento con XBOX/PS5
1) Scegliere il canale del segnale multimediale: HDMI
2) Utilizzare un adattatore da Type-C a HDMI per collegare il MacBook o un adattatore da
Mini Display a HDMI per collegare il MacBook Air (adattatore non incluso).Collegamento con
MacBook o Mac Book Air. (adattatore non incluso)
1) Scegliere il canale del segnale multimediale: HDMI
2) Utilizzare il cavo HDMI per collegarsi a XBOX/PS5
3) Riuscire

IT
142
FAQ(Domande Frequenti)
Grazie per aver scelto il Proiettore TOPTRO TP1. Abbiamo raccolto alcune domande frequenti
e le relative risposte per assisterti al meglio. Se il problema persiste, ti preghiamo di fornirci i
seguenti dettagli: prefisso internazionale, numero d'ordine, modello e una breve descrizione
del problema (ad esempio, IT+000 0000000 0000000+TP1+Nessuna immagine).
Inviaci un'e-mail all'indirizzo [email protected] . Il nostro team dedicato risponderà
tempestivamente entro 24 ore con una soluzione efcace per risolvere il tuo problema.
Q1: Lo screen mirroring o la connessione Wi Fi sono instabili. Come posso
risolvere questo problema?
Lo screen mirroring richiede un segnale Wi-Fi potente. Assicurati che la tua rete domestica
funzioni correttamente. La risoluzione video si regolerà dinamicamente in base alla potenza
del segnale Wi-Fi. Inoltre, attiva l'hotspot del tuo telefono e prova a connetterti al proiettore
TP1, in modo da identicare se il problema è correlato alla rete domestica.
Q2: Qual è la distanza di proiezione più adatta? È possibile regolare le dimensioni
dello schermo tramite ridimensionamento?
La distanza di proiezione consigliata per il proiettore TP1 è di 2-3 metri. Le dimensioni
dell'immagine dipendono dalla distanza e dal rapporto di proiezione del proiettore, che è di 1,1:1.
Inoltre, il proiettore TP1 offre una funzione di zoom out del 50%-100%. Per informazioni più
dettagliate sulla distanza di proiezione, consultare il manuale o contattarci direttamente.
Q3: Perché l'immagine risulta sfocata indipendentemente da come la regoli?
Posizionare il proiettore in linea con il centro dello schermo. In alternativa, l'angolo di offset
dovrebbe essere entro 15 gradi. Utilizzare la funzione Keystone automatica o manuale
per ottenere una visualizzazione rettangolare dello schermo; utilizzare la messa a fuoco
automatica o manuale per regolare la messa a fuoco dell'obiettivo.
Q4: Durante il mirroring dello schermo, il proiettore non riesce a riprodurre
Netix,YouTube,HuluoDisney+.Perché?
1. A causa delle restrizioni sul copyright, incluso il modello TP1, la maggior parte dei proiettori
non supporta il mirroring wireless dei servizi di streaming dal telefono. In caso contrario,
lo schermo rimarrà nero e verrà riprodotto solo l'audio. Anche i proiettori con sistemi
integrati potrebbero presentare limitazioni con alcuni servizi di streaming. Per accedere a
questi servizi, consigliamo di utilizzare un TV Stick (non incluso) con il nostro proiettore per
un'esperienza uida e versatile.
2. Utilizzare la funzione HomeShare sul proiettore TP1: 1) Attivare la funzione HomeShare sul
proiettore. 2) Assicurarsi che il telefono cellulare e il proiettore siano connessi alla stessa
rete Wi-Fi. 3) Fare clic sul pulsante di proiezione nelle app come Netix o Disney Video; 4)
Selezionare "TP1". Tuttavia, per motivi di compatibilità, l'app Prime Video non supporta la
proiezione;
3. Si consiglia di utilizzare l'app integrata nel sistema del proiettore per la riproduzione.

JP
143
コンテンツ
TOPTRO 7 日間 /24 時間プロフェッショナルサポート - - - - - - - - - - - - - - - - - 145
使用方法 146
パッケージ内容 147
プロジェクター概要 148
リモコン 149
インストール 150
1. インストール方法 150
2. 天井とスタンドへの取り付け 151
3. 投影距離とサイズ 151
プロジェクターの仕様 152
プロジェクターを起動する 153
投影画像設定 153
1. 投影モード 153
2. キーストーン補正 154
3. オートフォーカス 155
4. ズーム設定 156
プロジェクターのスマート設定 157
1. 信号源を選択 157
2. ワイヤレス接続 158
3.Bluetooth 161
4. 内蔵スマート OS システム 161
その他の基本的な投影設定 162
1. オプションメニュー 162
2. 画像モードメニュー 163
3. オーディオメニュー 164
4. バージョン情報(システム情報) 165
信号線接続 166
1.USB マルチメディア接続 166
2.PC との接続 167
3.MacBook または MacBook Air との接続 168
4.XBOX/PS4 との接続 168
FAQ 169
JP
144
当社は常に製品の改善と強化に取り組んでいます。
取扱説明書に掲載されている画像と説明は参考用であり、実際の製品とは多
少異なる場合がありますのでご了承ください。正確な情報については、製品
本体をご覧ください。また、オンラインアップグレード機能から最新のアッ
プデートにアクセスすることもできます。ご理解のほどよろしくお願いいた
します。
当社の製品保証とサポートは、正規販売店からご購入いただいた製品に適用
されます。お客様の権利を保護するため、TP1 プロジェクターの正規品であ
ることを確認するには、service@toptro.com までメールでお問い合わせく
ださい。
TOPTRO の 公 式 YouTube リ ン ク:www.youtube.com/@TOPTRO-R。TP1
プロジェクターの操作ビデオやトラブルシューティングなど、あらゆる情報
を検索できます。
当社のプロジェクターがお客様の生活に喜びをもたらしているというご意
見をお聞かせください。ぜひ、お客様の体験を共有してください。
最も迅速かつ効率的なお問い合わせ方法:
方法 1:メール
メールアドレス:service@toptro.com
ヒント:まずはメールでお問い合わせいただくことをお勧めします。動画
や製品に関する詳細情報を共有することで、問題の解決を迅速化できます。
メールで返信がない場合は、メッセージがスパムメールに分類されたか、
遅延している可能性があります。
その場合は、以下の 2 番目の方法をお試しください。
方法 2:注文
「注文」ページに移動し、「該当する商品に問題があります」
を選択します。表示されたリストからトピックを選択しま
す。「販売者に連絡」をクリックしてメッセージを送信し
てください。
TOPTRO をご利用いただき、ありがとうございます!お客
様に最高の体験をお届けできるよう尽力しております。
JP
145
TOPTRO 7 日間 /24 時間プロフェッショナルサポート
お客様へ
TOPTRO をご愛顧いただき誠にありがとうございます。
プロジェクターを使用する前に、この取扱説明書をよくお読みください。
問題がある場合は、注文番号と問題を service@toptro.com までメール
でお送りください。24 時間以内に迅速に解決いたします。信号なし、音なし、
Bluetooth 接続失敗、WiFi 接続失敗、途切れ途切れのアニメーションなど、
多くの問題は設定によって簡単に解決できます。すべてのプロジェクター
は出荷前に 100% 慎重に検査され、梱包されていることをお約束します。
また、当社の公式 Web サイトをフォローして、最新の開発状況を把握し
てください。(https://www.toptro.com/)
ご質問がある場合は、問題を解決できるようにご連絡ください。改善させ
ていただきます。ご満足いただける解決策を提供することをお約束します。
ご理解いただきありがとうございます !
よろしくお願いいたします
TOPTRO サービス チーム
3 年間の保証を有効にするには、数分ほどお時間をいただき、QR コード
をスキャンしてください。特別なサプライズがあお客様を待っています。
スキャンして詳細をご覧ください

JP
146
使用方法
温度に関する注意事項 :
プロジェクターの寿命を延ばすために、極端に暑いまたは寒い環境に置か
ないでください。極端な温度はデバイスの寿命を縮める可能性があります。
最適なパフォーマンスを得るには、動作環境を 5° C ~ 35° C に維持してく
ださい。
適切な換気 :
このプロジェクターには、安定した動作を確保するための換気システムが
装備されています。プロジェクターは換気の良い場所に設置してください。
クローゼットのような密閉された空間を避け、吸気口と排気口の近くに障
害物がないことを確認してください。また、ほこりが多すぎるとプロジェ
クターの放熱に影響します。実際の環境に応じて、1 か月に 1 回または 3
か月に 1 回、ダストフィルターを清掃することをお勧めします。
衝撃性と耐振動性 :
プロジェクターは、強い衝撃、押し出し、振動から保護するように注意し
て取り扱ってください。内部回路に障害が発生している場合は、プロジェ
クターを移動しないでください。
レンズのメンテナンス :
プロジェクター レンズは、画像の鮮明度と品質に直接影響を与える重要な
コンポーネントです。レンズを清潔に保ち、過度のほこりが付かないよう
にしてください。清掃するときは、ガラスレンズに適した柔らかい綿の布
を使用してください。

JP
147
パッケージ内容
TOPTROTP1プロジェクター
*1
リモコン *1 電源ケーブル *1
HDMI ケーブル *1 レンズカバー *1 クリーニングキット *1
クイックスタートガイド *1 FAQ*1

JP
148
プロジェクター概要
レンズ
空気入口
フォーカス信号受信機
電源コンセント
電源オン / オフ
IR レシーバー
排気口
HDMI ポート
USB ポート
3.5mm オーディオジャック
360°曲げられるスタンド
1/4 インチ取り付け穴

JP
149
リモコン
電源 消音
設定
投影モード
確認キー
ソース
戻る
矢印ボタン
USB
メニュー
音量 +
ホームページ
音量 -
フォーカス +
Netix
フォーカス -
プライムビデオ
YouTube
ブラウザを開く
*
使用する前に、リモコンに単 4 電池 2 本(別売)を取り付けてください。
*
リモコンを使用する際は、リモコンの信号送信機がプロジェクターの赤外線信号受信機に向
けられていることを確認してください。

JP
150
インストール
1. インストール方法
プロジェクターは、設置環境や要件に応じて、専用の天井マウントを使用して天井に取り付け
ることも、安定した机の上に置いて投影することもできます。また、以下の方法でも設置でき
ます :
プロジェクターは、レンズがスクリーンに対して軸対称になる高さに設置してください。それ
が難しい場合は、台形補正機能を使用して投影画像を調整してください。
前面投影天井マウント
前面投影デスクマウント
背面投影天井マウント
背面投影デスクマウント

JP
151
3. 投影距離とサイズ
40’’
60’’
84’’
100’’
120’’
メートル
フィート
1.0
3.2
1.46
4.8
2.05
6.71
2.44
7.99
2.92
9.59
TP1 プロジェクターの推奨投影距離は 1.8 ~ 2.9 メートルです。画面サイズは投影距離とプロジ
ェクターの投射比(1.1:1)によって異なります。さらに、プロジェクターには 50% のズーム
アウト機能があり、この機能を使って画面サイズを調整できます。
*
実際の投影サイズと距離は実験データと若干異なる場合があります。
2. 天井とスタンドへの取り付け
1) TP1 は四隅への取り付けには対応していません。プロジェクターを固定するには、1/4 インチ
マウント付きのスタンドまたはスタンドトレイをご使用ください。
2) 下部の製品ラベルを剥がすと、取り付け穴が現れます。
直径 :1/4 インチ
(6.35mm)
深さ :6.0mm
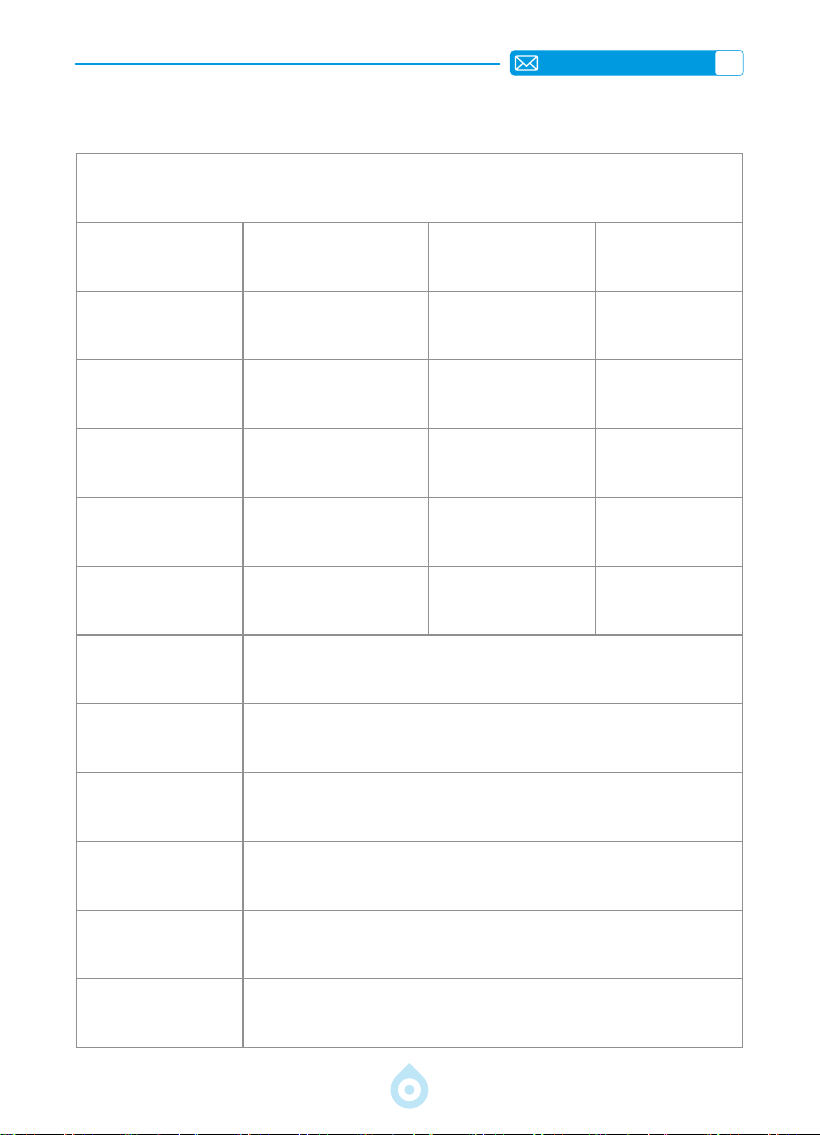
JP
152
プロジェクターの仕様
モデル No.: TP1
製品サイズ
(長さ*幅*高さ)
4.57*4.80*9.45インチ
11.60*12.20*24.00cm
製品重量
2.4lbs
1.1KG
ネイティブ解像度 1920*1080P リフレッシュレート 60Hz
ディスプレイ技術 LCD 光源 LED
台形補正 自動 / 電動 電源電圧
AC100-240V
50-60Hz
アスペクト比 16:9 フォーカス 自動 / 電動
投影比 1.1:1( ± 0.5) ズーム 100%-50%
投影方式 前/後面を机上に前/後面を天井に
USB ディスクのサポ
ート
1.FAT32:8G/16G/32G2.NTFS:64G
インターフェース HDMI*1/USB*1/3.5mmオーディオ出力x1
ビデオフォーマット
MP4/MPG/AVI/MPEG-4/TS/MOV/M4V/MKV/FLV/DAT/3GP(ビデオコー
デックのサポートは状況によって異なる場合がありますので、追加の
サポートについてはお問い合わせください)
オーディオフォーマッ
ト
MP3/WMA/M4A/MP2/AAC/OGG/WAV/FLAC(Dolbyサポート )
画像フォーマット JPG/JEPG/BMP/PNG
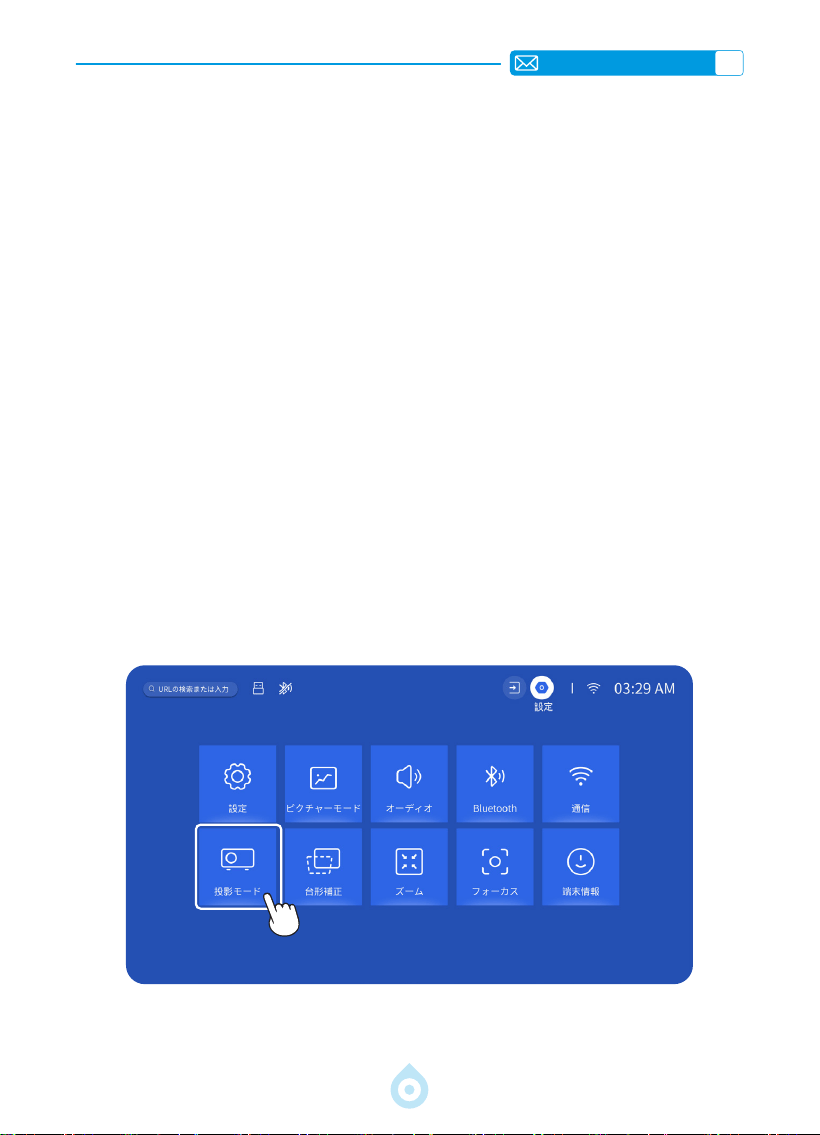
JP
153
プロジェクターを起動する
投影画像設定
1. 電源オン : レンズキャップを外し、リモコンまたはプロジェクター本体の電源ボタンを押し
ます。プロジェクターの電源がオンになると、インジケーターランプが青色に点灯します。
2. 言語設定 : 設定でご希望の言語を選択してください。
3. 台形補正 / フォーカス : 自動垂直台形補正(または 4 点補正)とフォーカス機能を使用して、
長方形で鮮明な画像を実現します。[ フォーカスレシーバー ] の前に障害物がないことを確認
してください。
4. 画像の鮮明度を微調整 : リモコンの「F+」および「F-」フォーカスボタンを調整して、画像
の鮮明度を調整します。それでも画像がぼやけている場合は、プロジェクターをスクリーン
に直接向けてから再度調整してください。
5. 外部デバイスの接続 : 外部デバイス(スマートフォン、iPad、TV スティック、TV ボックス、
ノートパソコンなど)をプロジェクターの適切なインターフェースに接続します。デバイス
の正しいソースを選択してください。そうしないと、プロジェクターが信号を検出できない
可能性があります。
1. 投影モード
[設定]メニューを選択し、[投影]オプションを選択して、インストールモードを選択し、矢印
キーを押して選択し、「OK」を押して投影位置を確定します。
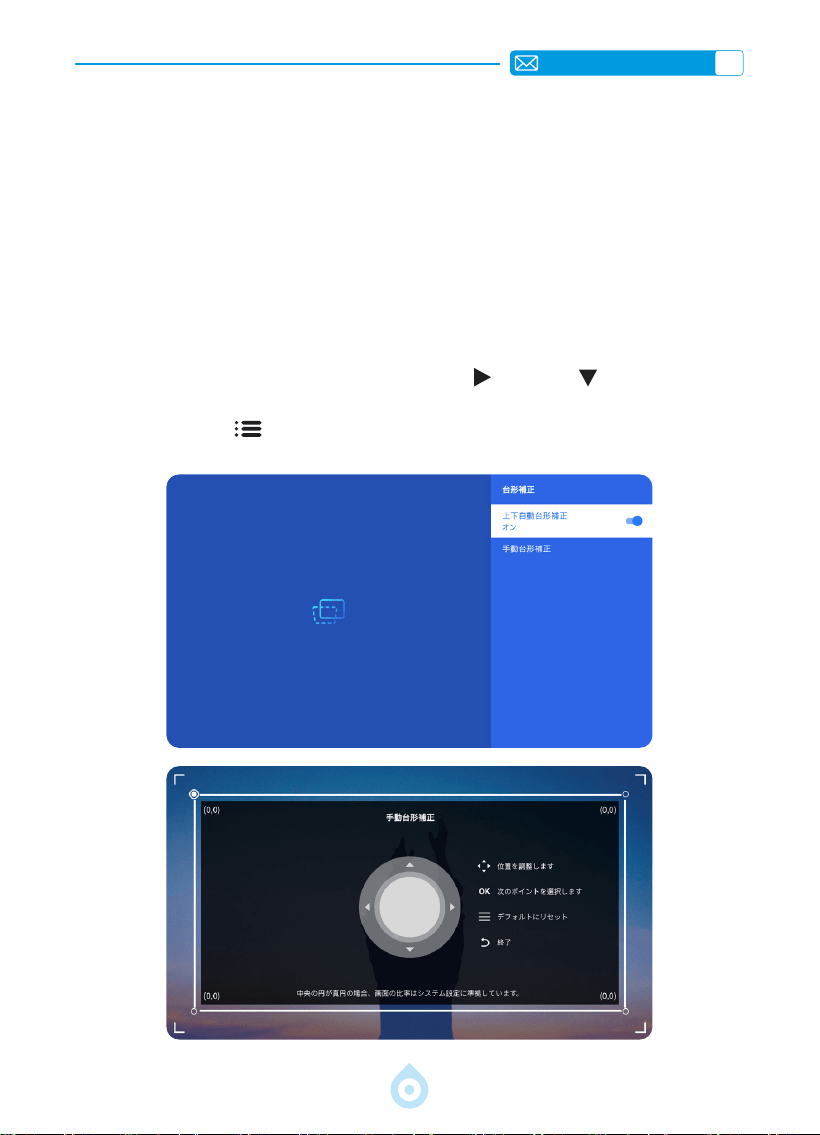
JP
154
2. キーストーン補正
2.1 自動垂直キーストーン補正
2.2 4 点キーストーン
[設定]
メニューを選択し、[ キーストーン ] オプションをオンにすると、プロジェクターを移
動したり電源を入れたりするたびに、キーストーンが長方形に自動的に調整されます。
最適な投影品質を得るには、プロジェクターを画面の中央(垂直方向と水平方向の両方)に配
置することをお勧めします。プロジェクターのオフセット角度が垂直方向で 20°を超えないよう
にしてください。そうしないと、自動キーストーン補正機能が正しく動作しない可能性があり
ます。
[設定]
メニューを選択し、[キーストーン ] オプションを選択し、[4 点補正 ]を選択します。「OK」
ボタンをクリックして調整したいポイントを選択し、「
」または「 」ボタンを押して、
下図のように必要な値(垂直方向 0 ~ 100)を設定します。
リセット:「メニュー
」ボタンを押すと、画像が元のキーストーン補正設定に戻ります。
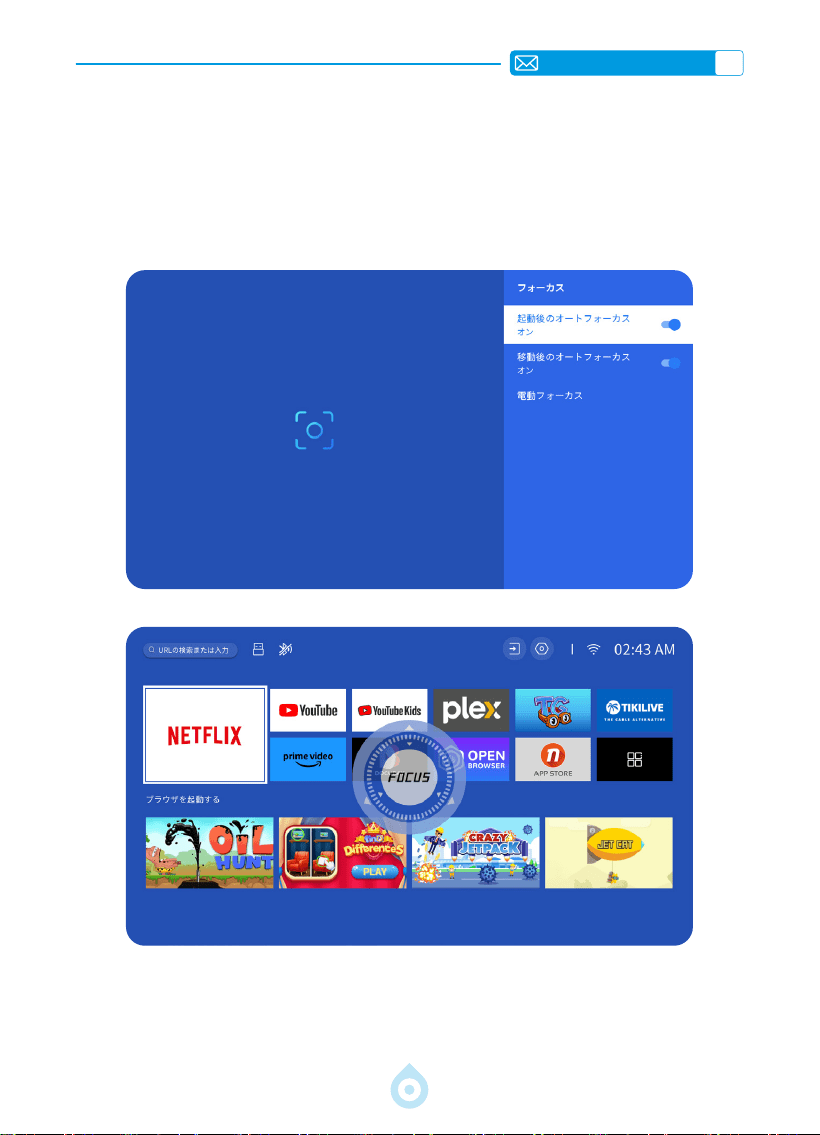
JP
155
3. オートフォーカス
[設定]
メニューを選択し、[ フォーカス ] オプションをオンにすると、プロジェクターを移動
したり電源を入れたりするたびに、自動的にフォーカスが調整され、台形補正が行われます。
画像がぼやけている場合は、プロジェクターのリモコンのフォーカスボタン「F+」と「F-」を調
整して、画像の鮮明さを微調整してください。
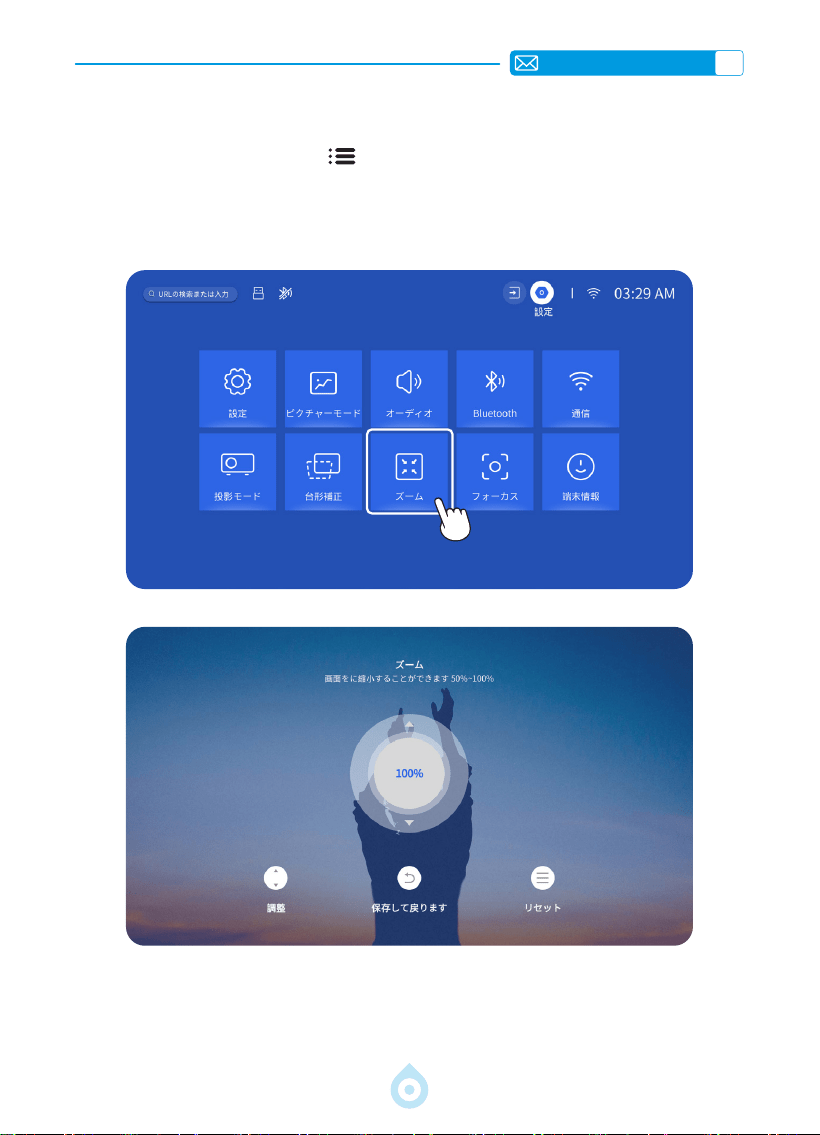
JP
156
4. ズーム設定
ホームページへ移動し、「メニュー 」ボタンを選択 - 「設定」を選択 - 「ズーム」オプショ
ンを選択すると、投影画面を 50% ~ 100% の範囲で拡大できます。「↑↓」ボタンを押して、
以下の値を設定します。
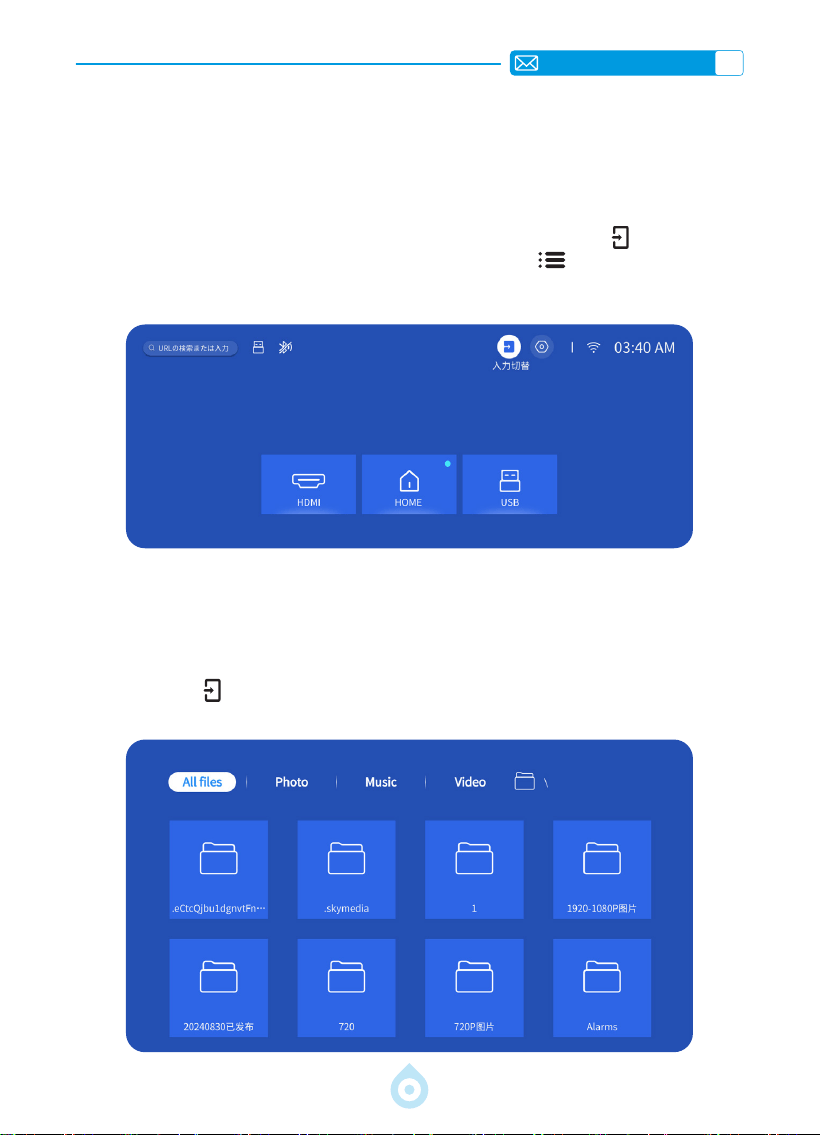
JP
157
プロジェクターのスマート設定
1. 信号源を選択
ホームページで入力信号ソース [HDMI] を選択するか、リモコンの「ソース 」ボタンを押し
て対応する信号ソースを選択します。動画再生中は、「メニュー
」ボタンを押し、「画像
モード」を選択します。画像の明るさやコントラストなどの機能を自由に調整できます。
USB デバイスの場合、信号源を選択する必要はありません。機器が自動的に検出します。
リモコンの「USB」ボタンを直接押してください。
または、「ソース
」ボタンを押し、ホームページで [USB] を選択してください。
1.1 HDMI 入力信号ソースの選択
1.2 USB 入力信号源の選択

JP
158
ヒント : プロジェクターが USB ディスクを認識しない場合は、以下の方法で問題を解決してく
ださい。
*
お使いの USB ディスクが以下のフォーマットに対応しているかどうかご確認ください。
*1. FAT32: 8G/16G/32G 2. NTFS: 64G
*
お使いの USB ディスクが上記のフォーマットに対応していない場合は、以下の手順に従って、
まず USB ディスクのフォーマットを NTFS または FAT32 に変更してください。
注意 :
USB ディスクのフォーマットを変更する前に、USB ディスク内のデータをすべてバック
アップしてください。これらの手順を実行すると、すべてのデータが永久に失われます。
それでも問題が解決しない場合は、service@toptro.com までお問い合わせください。
2. ワイヤレス接続
1) スクリーンミラーリングには強力な Wi-Fi 信号が必要です。ご自宅のネットワークが正常に機
能していることを確認してください。ビデオ解像度は Wi-Fi 信号の強度に応じて動的に調整さ
れます。
2) プロジェクターのメインインターフェースの右上にある [設定]アイコンを選択し、リモコン
の「OK」キーを押して設定インターフェースに入り、[ ネットワーク ] を選択します。または、
リモコンの設定ボタンを押して設定ページに入り、[ ネットワーク ] を選択します。
2.1 Wi-Fi 設定
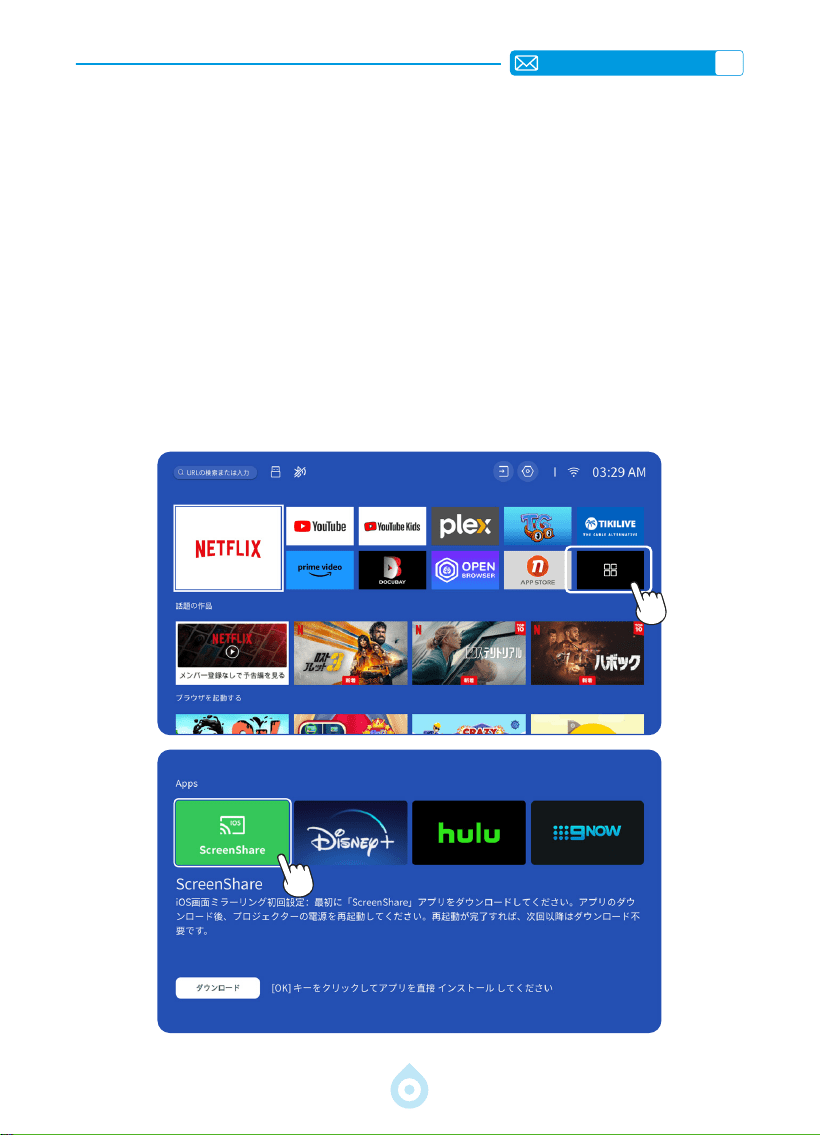
JP
159
注意 : iOS デバイスがプロジェクターと同じ Wi-Fi ネットワークに接続されていることを確認し
てください。
1) プロジェクターを自宅の Wi-Fi に接続します。
2) iOS デバイスを初めて使用する際は、まず TP1 プロジェクターのメインインターフェースで
アプリ「画面共有」をダウンロードする必要があります(パス:メインインターフェース -
マイアプリケーション - アプリアシスタント - 画面共有 - 「OK」をクリック - アプリのダウン
ロード完了、電源をオフにして再起動 - マイアプリケーションで画面共有を検索)。
3) iOS デバイスの Wi-Fi 設定をオンにし、デバイスとプロジェクターが同じ自宅の Wi-Fi に接続
されていることを確認します。
4) iOS デバイスの [ コントロールセンター ] にアクセス - [ スクリーンミラーリング ] 機能を選
択 - [TOPTRO_TP1_XXXX] という名前の iOS キャストレシーバーを選択して接続します。
5) 接続完了です。
2.2 iOS デバイスの場合(画面共有)
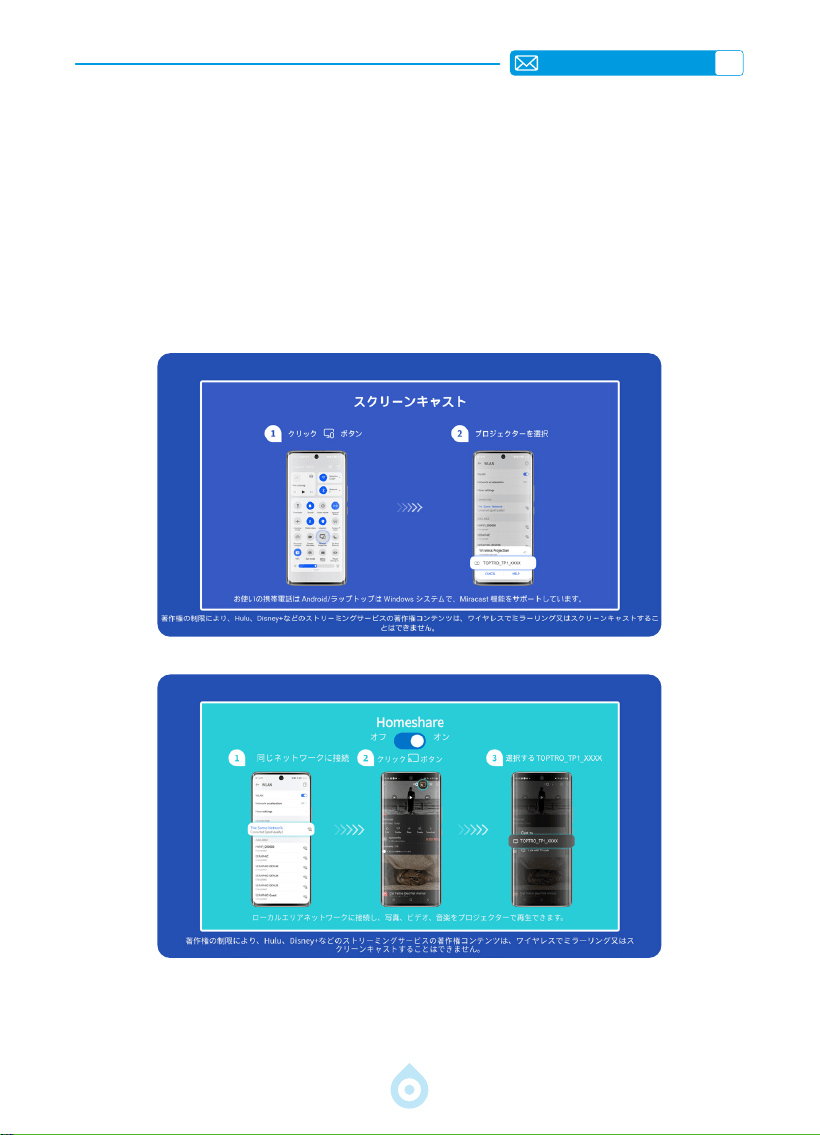
JP
160
注意 : Android デバイスによっては、スクリーンミラーリングを有効にするために様々な用語や
方法が使用される場合があります。Android デバイスの WLAN 機能が有効になっていることを
確認してください。(Wi-Fi ネットワークへの接続は必須ではありません。)
1) プロジェクターの電源を入れ、入力ソースとして「スクリーンキャスト」を選択します。
2) Android デバイスの「マルチスクリーン / ワイヤレスディスプレイ」をオンにします。
3) 検索結果から「TOPTRO_TP1_XXXX」プロジェクターを選択して接続します。
4) 接続完了です。
2.3 Android デバイス(スクリーンキャスト)

JP
161
3.Bluetooth
4. 内蔵スマート OS システム
1) Bluetooth スピーカーと以前ペアリングしたデバイスが切断されていることを確認してくださ
い。
2) プロジェクターの
[Bluetooth]
をオンにし、接続する Bluetooth スピーカーを選択します。
3) TP1 は双方向通信に対応しており、Bluetooth オーディオモードではモバイルデバイスに接続
して Bluetooth スピーカーとして使用できます。
TP1 スマートプロジェクターは、スマート Netix OS システムを内蔵し、Netix アプリは公式ラ
イセンスを取得しています。お気に入りのアプリや動画を自由に楽しむことができ、追加の TV
スティックを使わずに、数多くの素晴らしい映画やテレビ番組をお楽しみいただけます。TP1 プ
ロジェクターのメインインターフェースは以下の通りです。

JP
162
その他の基本的な投影設定
1. オプションメニュー
ホームページに移動し、[設定] を選択し、[ セットアップ ] を選択します。リモコンの矢印キー
を使用してメニューを切り替え、[OK] を押して確認および設定します。
メニュー コンテンツ
OSD 言語
英語 / フランス語 / ドイツ語 / イタリア語 / 日本
語など
時刻設定 現地時間の設定
スクリーンセーバー スクリーンセーバーのオン / オフ
スリープタイマー オン / オフ:スリープ時間を 10 ~ 120 分で設定
自動スタンバイ オン / オフ
USB 自動アップグレード ローカルアップデート
インターネット更新チェック インターネット環境の確認
デフォルトにリセット 工場出荷時設定への復元

JP
163
2. 画像モードメニュー
メニュー コンテンツ
画質モード 画質モードを選択
明るさ 画面の明るさを設定
コントラスト 画面のコントラストを設定
彩度 画面の彩度を設定
色相 画面の色相を設定
シャープネス 画面のシャープネスを設定
ガンマ ガンマ値を調整
色温度 ユーザー / クール / スタンダード / ウォーム

JP
164
3. オーディオメニュー
メニュー コンテンツ
低音 / 高音 好みの値を設定
サウンドスタイル ユーザー / 標準 / 映画 / 音楽 / スポーツ / 鮮明
デジタル出力モード
自動 /PCM/ ドルビーオーディオ - ドルビーデジタ
ル / ドルビーオーディオ - ドルビーデジタルプラス
ダイアログ強調 オフ/低/中/高
キートーン オン / オフ
ホーム画面へ移動し、「設定」を選択し、「オーディオ」を選択します。リモコンの矢印キー
でメニューを切り替え、「OK」を押して確定し、設定します。

JP
165
4. バージョン情報(システム情報)
ホーム画面へ移動し、[設定]を選択し、[ バージョン情報 ] を選択します。リモコンの矢印キー
でメニューを切り替え、「OK」を押して確定し、設定します。
メニュー コンテンツ
Netix Netix 公式ライセンス
バージョン情報
モデル番号 / バージョン /OTA バージョン / シリ
アル番号を表示
ライセンス情報 ライセンス情報
デバイス名 プロジェクターのモデル名

JP
166
USB フォーマット
FAT、FAT32: 8G/16G/32G
NTFS:64G
サポートされていない形式 : exFAT
注意 : プロジェクターが USB フラッシュ ドライブの内容を認識できない場合は、
USB フラッシュ ドライブが正しくフォーマットされているかどうかを確認して
ください。
ビデオフォーマット
MP4, MKV, WMV, 3GP, MPG, VOB, TP, TS, DAT, MOV, FLV( ビデオ コーデックのサポ
ートは異なる場合があります。追加のサポートについてはお問い合わせください )
オーディオフォーマッ
ト
MP3, AAC, LPCM, APE, FLAC, OGG, AMR
( オーディオ コーデックのサポートは異なる場合があります。追加のサポートに
ついてはお問い合わせください )
画像フォーマット
JPG, PNG, BMP, JPEG
ドキュメントフォーマ
ット
TXT, PDF, DOCX, XLSX, PPTX
信号線接続
1.USB マルチメディア接続
USB 信号源を選択すると、自動的に検出されます。
1) メインインターフェースで必要なカテゴリー「写真」「音楽」「ビデオ」を選択し、リモコ
ンの「OK」キーを押して該当するカテゴリーに進みます。
2) プログラムに応じて「写真」「音楽」「ビデオ」を選択します。
3) 再生したいファイルを選択し、「OK」キーを押して再生または一時停止します。(USB ディ
スクを接続していない場合は、必要なカテゴリーに進むことはできません。)
問題が解決しない場合は、問題の詳細な説明を次のメールアドレスに送信してください:
service@toptro.com
TOPTRO TP1 プロジェクターには、HDMI ポート *1、USB ポート *1、3.5mm オーディオ出力 *1
の 3 つのインターフェースが搭載されています。お使いのデバイス(USB、TV Stick、スピーカー、
PC、ノートパソコン、DVD プレーヤーなど)に合わせて、適切な接続ポートを選択してください。
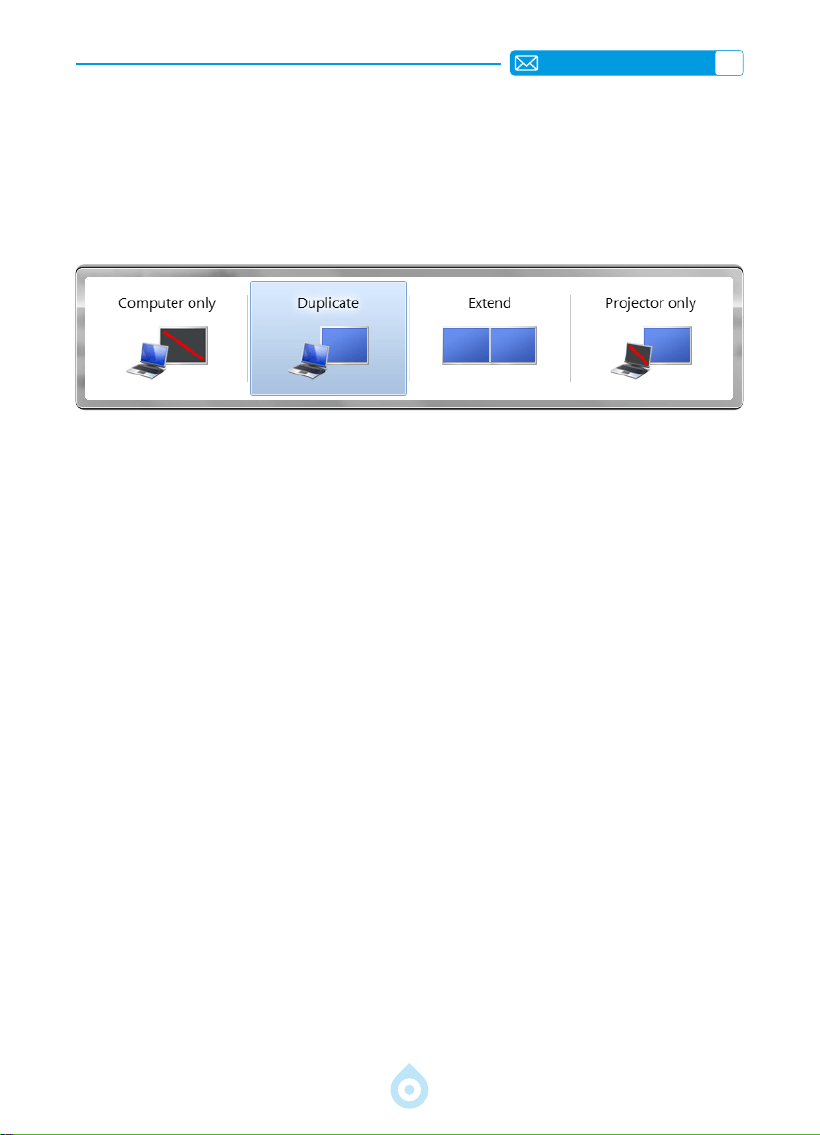
JP
167
2.PC との接続
1) HDMI ケーブル ( 付属 ) を使用してコンピューターと TP1 プロジェクターを接続 します。
2) HDMI ソースを選択して、コンピューター上のファイルを投影します。
3) ラップトップで、ボード キーの「Win+P」を押したままにして、表示モードを変更します。
コンピューターのみ : これはデフォルトのオプションです。プライマリ モニターにのみ表示さ
れます。
コピー : 各モニターのデスクトップを複製して、すべてのモニターに同じコンテンツを表示しま
す。
拡張 : すべてのモニターを 1 つの大きなモニターのように動作させ、デスクトップをすべてのモ
ニターに拡張します。
プロジェクターのみ : プロジェクターのように、セカンダリ ディスプレイにのみ表示します。
プロジェクターのみのモードでは画面解像度を変更できます。
手順 : スタート > コントロールパネル > デスクトップのカスタマイズ > 画面解像度の調整

JP
168
3.MacBook または MacBook Air との接続
4.XBOX/PS4 との接続
1) メディア信号チャンネルを選択します :「HDMI」。
2) Type-C から HDMI へ変換しましょう ! MacBook へのアダプタ、または MacBook Air への Mini
Display - HDMI アダプタ ( アダプタは付属していません )。MacBook または Mac Book Air を接
続します。 ( アダプターは付属しておりません )
1) メディア信号チャンネルを選択してください :「HDMI」。
2) HDMI ケーブルを使用して XBOX/PS4 に接続します。
3) 成功。

JP
169
FAQ
TOPTRO TP1 プロジェクターをお選びいただき、ありがとうございます。お客様により快適に
ご利用いただけるよう、よくある質問とその回答をまとめました。問題が解決しない場合は、
国コード、注文番号、型番、問題の簡単な説明(例:JP+000-0000000-0000000+TP1+ 故障画
像)を添えて、service@toptro.com までメールでご連絡ください。専任チームが 24 時間以内
に迅速に対応し、お客様の懸念事項に効果的な解決策をご提案いたしますので、ご安心ください。
Q1: スクリーンミラーリングまたは Wi-Fi 接続が不安定です。どうすれば解決できますか?
スクリーンミラーリングには強力な Wi-Fi 信号が必要です。ご自宅のネットワークが正常に機能
していることを確認してください。ビデオ解像度は Wi-Fi 信号の強度に応じて自動的に調整され
ます。また、スマートフォンのホットスポット機能を有効にして TP1 プロジェクターに接続し、
問題がご自宅のネットワークに関連しているかどうかを確認してください。
Q2: 最適な投影距離はどのくらいですか? スケーリングで画面サイズを調整できますか?
TP1 プロジェクターの推奨投影距離は 2 ~ 3 メートルです。画像サイズは投影距離とプロジェ
クターの投射比(1.1:1)によって異なります。また、TP1 プロジェクターは 50% ~ 100% のズ
ームアウト機能を備えています。投影距離に関する詳しい情報については、マニュアルをご覧
いただくか、直接お問い合わせください。
Q3: どのように調整しても画像の焦点が合わないのはなぜですか?
プロジェクターをスクリーンの中央に合わせて設置してください。または、オフセット角度を
15 度以内にしてください。自動または手動のキーストーン機能を使用して、画面を長方形に表
示してください。レンズの焦点を調整するには、自動フォーカスまたは手動フォーカスを使用
してください。.
Q4: スクリーンミラーリング時に、プロジェクターで Netix、YouTube、Hulu、Disney+ を再
生できないのはなぜですか?
1. 著作権制限のため、TP1 モデルを含むほとんどのプロジェクターは、スマートフォンからの
ストリーミングサービスのワイヤレスミラーリングをサポートしていません。サポートされ
ていない場合、画面は黒くなり、音声のみが再生されます。統合型プロジェクターであっても、
一部のストリーミングサービスでは制限がある場合があります。これらのサービスにアクセ
スするには、シームレスで多様な体験を実現するために、プロジェクターと TV Stick(別売)
の併用をお勧めします。
2. TP1 プロジェクターの HomeShare 機能を使用する:1) プロジェクターの HomeShare をオン
にします。2) スマートフォンとプロジェクターが同じ Wi-Fi に接続されていることを確認し
ます。3) Netix や Disney ビデオなどのアプリで投影ボタンをクリックします。4) 「TP1」を
選択します。ただし、互換性の問題により、Prime Videoアプリは投影をサポートしていません。
3. 再生には、プロジェクターシステムに内蔵されたアプリを使用することをお勧めします。
WARNING
High brightness lamp! Please don't look directly into the
lamp.When clean this projector, please pull out the power
cable.
ADVERTENCIA
¡Luces de alto brillo! Por favor, no mire directamente a la
lámpara. Al limpiar el proyector, desconecte el cable de
alimentación.
WARNUNG
Lampe mit hoher Helligkeit! Bitte schauen Sie nicht direkt
in die Lampe. Wenn Sie diesen Projektor reinigen, ziehen
Sie bitte das Netzkabel heraus.
AVVERTIMENTO
Lampada ad alta luminosità! Per favore, non guardare
direttamente nella lampada. Quando pulite questo
proiettore, estrarre il cavo di alimentazione.
AVERTISSEMENT
Lampe haute luminosité! Veuillez ne pas regarder
directement la lampe de table. Lorsque vous nettoyez le
projecteur, débranchez le cordon d'alimentation.
ご注意
高輝度ランプです。ランプを直接見ないでください。プロジ
ェクターを清掃するときは、電源ケーブルを抜いてください。

Ver.1.0