USER MANUAL
X2 PROJECTOR


LANGUAGE
日本語
Espanol
Italian
Français
English
01-19
20-38
39-57
58-76
77-95
Deutsche
96-114

01 02 03 04 05 06 07 08 09 10 11 12 13
14 15 16 17 18 19
20 21 22 23 24 25 26 27 28 29 30 31 32
33 34 35 36 37 38
39 40 41 42 43 44 45 46 47 48 49 50 51
52 53 54 55 56 57
58 59 60 61 62 63 64 65 66 67 68 69 70
71 72 73 74 75 76
77 78 79 80 81 82 83 84 85 86 87 88 89
90 91 92 93 94 95
96 97 98 99
111 112 113 114
100 101 102 103 104 105 106 107 108
109 110
ENEN
CONTENT
TOPTRO Lifetime Professional Support....................................................................................02
TIPS.............................................................................................................................................02
PACKAGE LIST..........................................................................................................................02
PROJECTOR SPECIFICATIONS..............................................................................................03
PROJECTOR OVERVIEW....................................................................................................03-04
REMOTE CONTOLLER.............................................................................................................05
INSTALLATION.....................................................................................................................06-07
1.Installation Method...............................................................................................................06
2.Projection Distance and Size.........................................................................................06-07
3.Install on the Ceiling.............................................................................................................07
STARTING PROJECTOR..........................................................................................................08
IMAGE ADJUSTMENT..........................................................................................................08-09
1.Focus Adjustment................................................................................................................08
2.Manual Keystone Correction (Maximum Adjustable: ±15°)...........................................08-09
SETTING UP THE PROJECTOR.........................................................................................09-12
1.Select The Input Signal Source...........................................................................................09
2.Menu Setting Method......................................................................................................09-12
2.1.OPTION.............................................................................................................09-10
2.2.PICTURE...........................................................................................................10-11
2.3.SOUND..............................................................................................................11-12
2.4.TIME........................................................................................................................12
SIGNAL LINES CONNECTION............................................................................................12-15
1.Connect USB Flash........................................................................................................12-13
2.Connect the Device with the HDMI out..........................................................................13-14
3.AV Connection................................................................................................................14-15
4.Audio Out Connection..........................................................................................................15
PLAY OPERATION................................................................................................................15-17
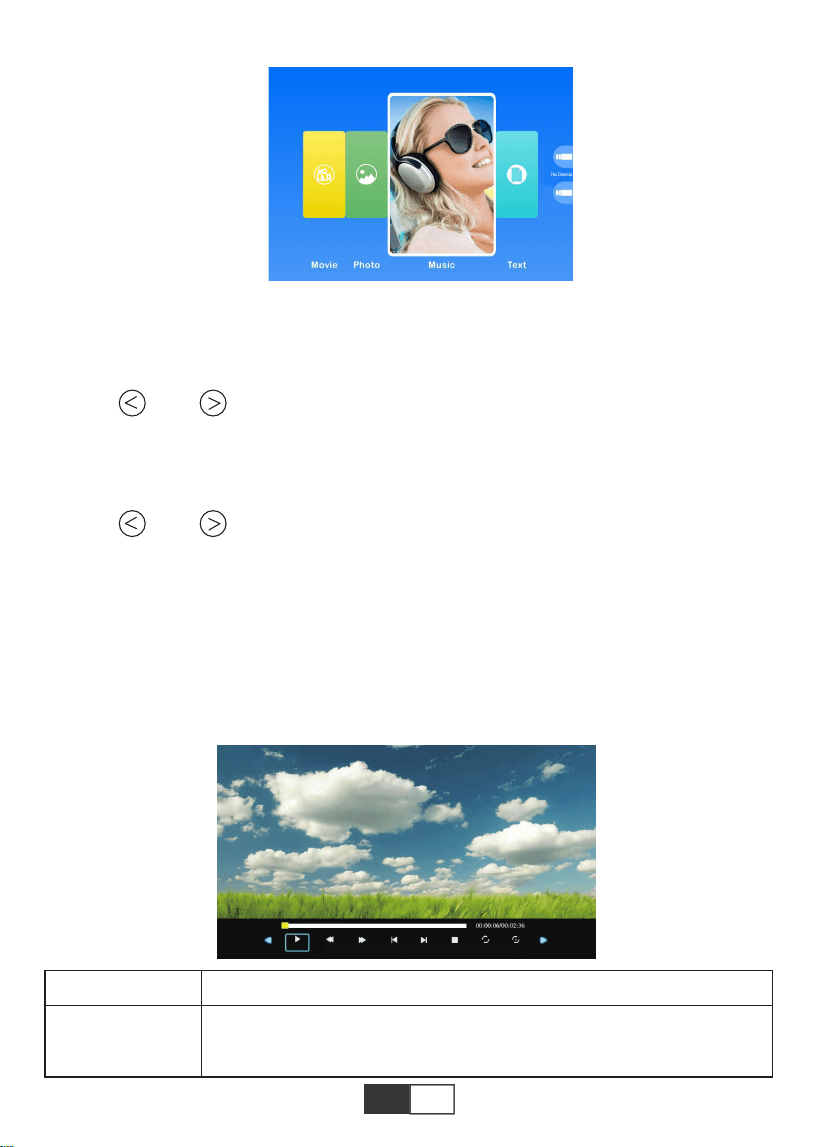
1.Play A Movie/ Photo/ Music/ Text (in USB input mode)..................................................15-16
2.Play interface...................................................................................................................16-17
Screen Mirroring.....................................................................................................................17-18
1.Android Screen(for android devices)...................................................................................18
2.IOS Screen(for ios devices).................................................................................................18
3.Wired connection (Only applicable to IOS devices)........................................................19
SAFE SHUTDOWN....................................................................................................................19
WARRANTY.....................................................................................................................19

01 02 03 04 05 06 07 08 09 10 11 12 13
14 15 16 17 18 19
20 21 22 23 24 25 26 27 28 29 30 31 32
33 34 35 36 37 38
39 40 41 42 43 44 45 46 47 48 49 50 51
52 53 54 55 56 57
58 59 60 61 62 63 64 65 66 67 68 69 70
71 72 73 74 75 76
77 78 79 80 81 82 83 84 85 86 87 88 89
90 91 92 93 94 95
96 97 98 99
111 112 113 114
100 101 102 103 104 105 106 107 108
109 110
EN
TIPS
PACKAGE LIST
TOPTRO Lifetime Professional Support
Dear customer,
Thank you very much for supporting TOPTRO!
Please read this manual thoroughly before using the projector. If you have any issues, email
your order number and the problem to [email protected]. We will provide a fast solution in
24 hours.
Actually, many problems can be easily solved by setting, such as no signal, no sound, bluetooth
connection failed, wifi connection failed, dark spots, choppy animation etc. We promise all the
projectors have been 100% carefully checked and packaged before shipping.
Really appreciate your support for TOPTRO. If you have any questions, could you please
contact us so that the problem can be solved. And give us an opportunity to improve. We
guarantee we will provide you a satisfactory solution.
Thanks for your understanding!
TOPTRO Service Team
1.Do not place projector in too warm or too cold room, because the high temperature or low
temperature will shorten lifespan of the device. The working environment would be 5℃~35
℃ better.
2.If there are black spots on the projection screen, plase don't worry, please contact
[email protected] via email, we can send you a video about how to remove the dust.
3.The ventilation is equipped for the projector to work stably. Don't cover the vent with cloth,
blanket or other things. Don't insert anything into the slit of the projector, or it may produce
a short circuit or an electric shock to your device and cause damage.
4.The projector shall be strictly protected from strong impact, extrusion and vibration. Do not
try to move and on strong impact, extrusion and vibration. Do not try to move and the
internal circuit faults.
5.Lens, as the core component of the projector, is directly related to the picture definition
and effect. The excessive dust thereon will affect image quality. The dirty lens shall be wiped
with soft cotton cloth for the glass lens surface. Hard cloth or abrasives shall not be used.
TOPTRO X2 Projector*1
HDMI Cable*1
Cloth*1
Power Cord*1
3 in 1 AV Signal Cable*1
User Manual*1
Remote Controller*1
Lens Cover*1
01 02 03 04 05 06 07 08 09 10 11 12 13
14 15 16 17 18 19
20 21 22 23 24 25 26 27 28 29 30 31 32
33 34 35 36 37 38
39 40 41 42 43 44 45 46 47 48 49 50 51
52 53 54 55 56 57
58 59 60 61 62 63 64 65 66 67 68 69 70
71 72 73 74 75 76
77 78 79 80 81 82 83 84 85 86 87 88 89
90 91 92 93 94 95
96 97 98 99
111 112 113 114
100 101 102 103 104 105 106 107 108
109 110
EN
PROJECTOR SPECIFICATIONS
PROJECTOR OVERVIEW
Native Resolution
Display Technology
Color Game
Projection Size
Power Voltage
Picture File
Projection Method
Video File
Audio File
1280*720P
LCD
16.7M Full
50-200inch
AC 100-240V
JPG/JPEG/BMP/PNG
Front/Rear on Desk, Front/ Rear on Ceiling
MPEG1/MPEG2/H.263/H.264/AVS/VC1/MJPEG/RV30/RV40/HEVC,etc.
MPEG1/MPEG2/LPCM/MP3,etc.
Keystone Correction
Light Source
Aspect Ratio
Projection Distance
Projector Weight
Interfeces
±15° manual
LED
Auto/4:3/16:9
1.59-3.67 Meters
1.2Kg
HDMI/USB*2/AV/3.5mm
Headphone Output
Model No. X2

01 02 03 04 05 06 07 08 09 10 11 12 13
14 15 16 17 18 19
20 21 22 23 24 25 26 27 28 29 30 31 32
33 34 35 36 37 38
39 40 41 42 43 44 45 46 47 48 49 50 51
52 53 54 55 56 57
58 59 60 61 62 63 64 65 66 67 68 69 70
71 72 73 74 75 76
77 78 79 80 81 82 83 84 85 86 87 88 89
90 91 92 93 94 95
96 97 98 99
111 112 113 114
100 101 102 103 104 105 106 107 108
109 110
EN
1
2
3
4
5
6
7
8
9/15
10
11
12
13
14
16
17
18
19
20
POWER
OK
M
S
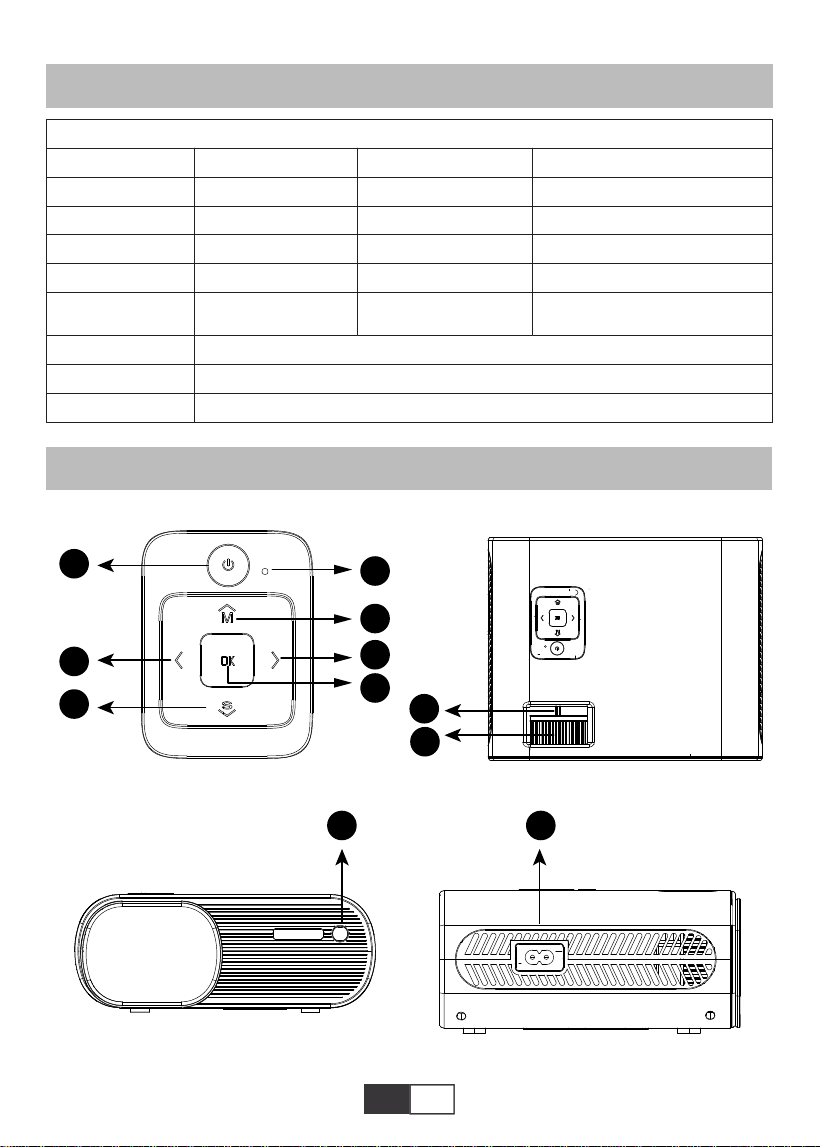
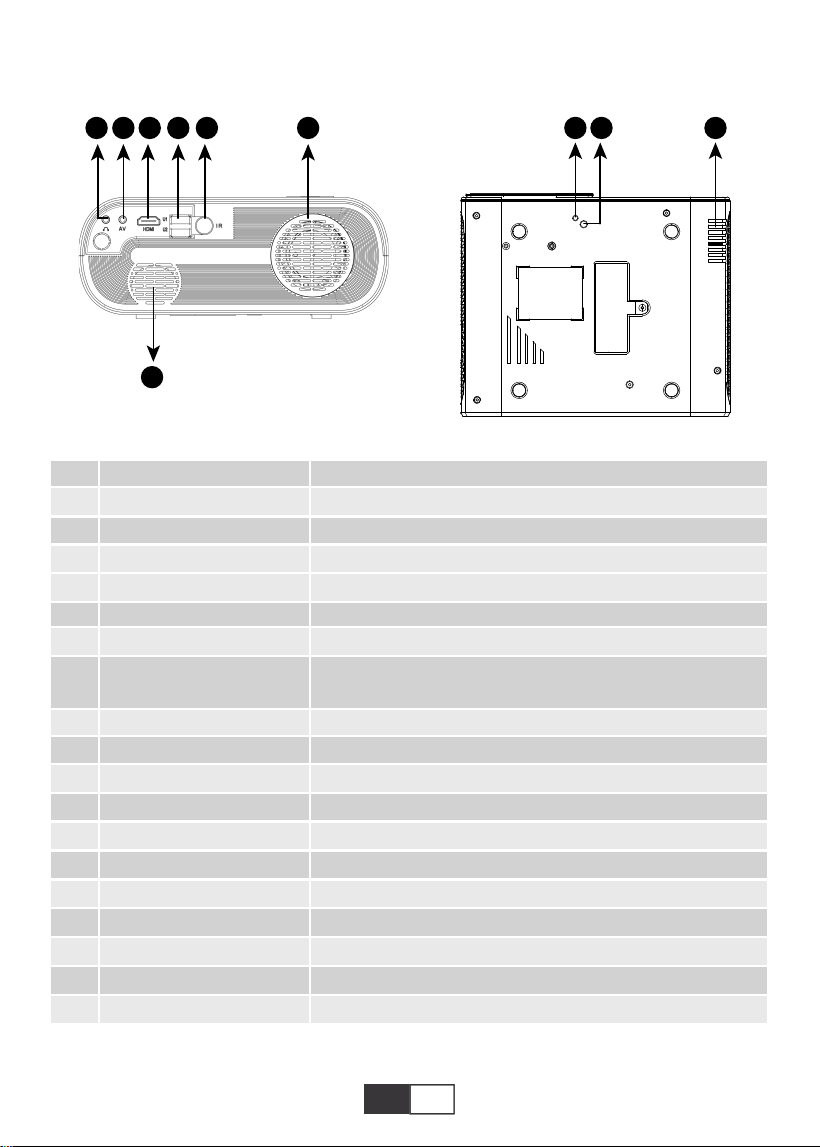
Indicator Light
Arrow Keys
Manual Focus
Keystone Correction knob
IR Receiver
Power Cable Socket
Headphone Jack
AV Port
HDMI Port
USB Port*2
Speaker
Ventilation Inlet
Height Adjustment Screw
Projector Mount Hole
Ventilation Outlet
Boot/Shut down the projector
Confirm the option
Open the menu
Switch the input signal source
Show the status of the power
Used to adjust the parameter of the projector in the menu mode
Adjust the focus ring to get the clearest image
Adjust the ±15° keystone correction to get the rectangle shape
projection screen
Infrared signal receiver
Plug the power cable
3.5mm Headphone Output
Audio output
HDMI input
USB input (OUT5V can be used to charge)
Projector speaker
Projector vent
Adjust the height of the projection screen
Fix the projector with a M6x10mm screw
Projector vent
01 02 03 04 05 06 07 08 09 10 11 12 13
14 15 16 17 18 19
20 21 22 23 24 25 26 27 28 29 30 31 32
33 34 35 36 37 38
39 40 41 42 43 44 45 46 47 48 49 50 51
52 53 54 55 56 57
58 59 60 61 62 63 64 65 66 67 68 69 70
71 72 73 74 75 76
77 78 79 80 81 82 83 84 85 86 87 88 89
90 91 92 93 94 95
96 97 98 99
111 112 113 114
100 101 102 103 104 105 106 107 108
109 110
EN
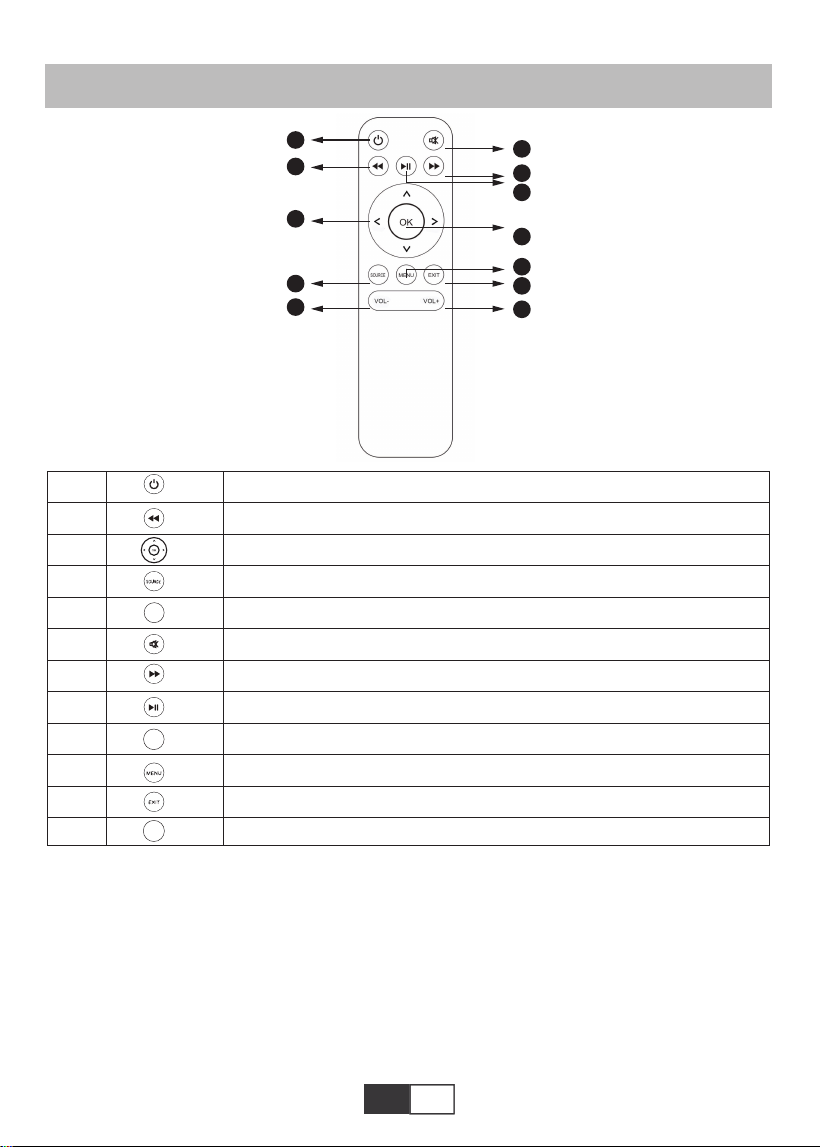
REMOTE CONTOLLER
1
2
3
4
5
6
7
8
9
10
11
12
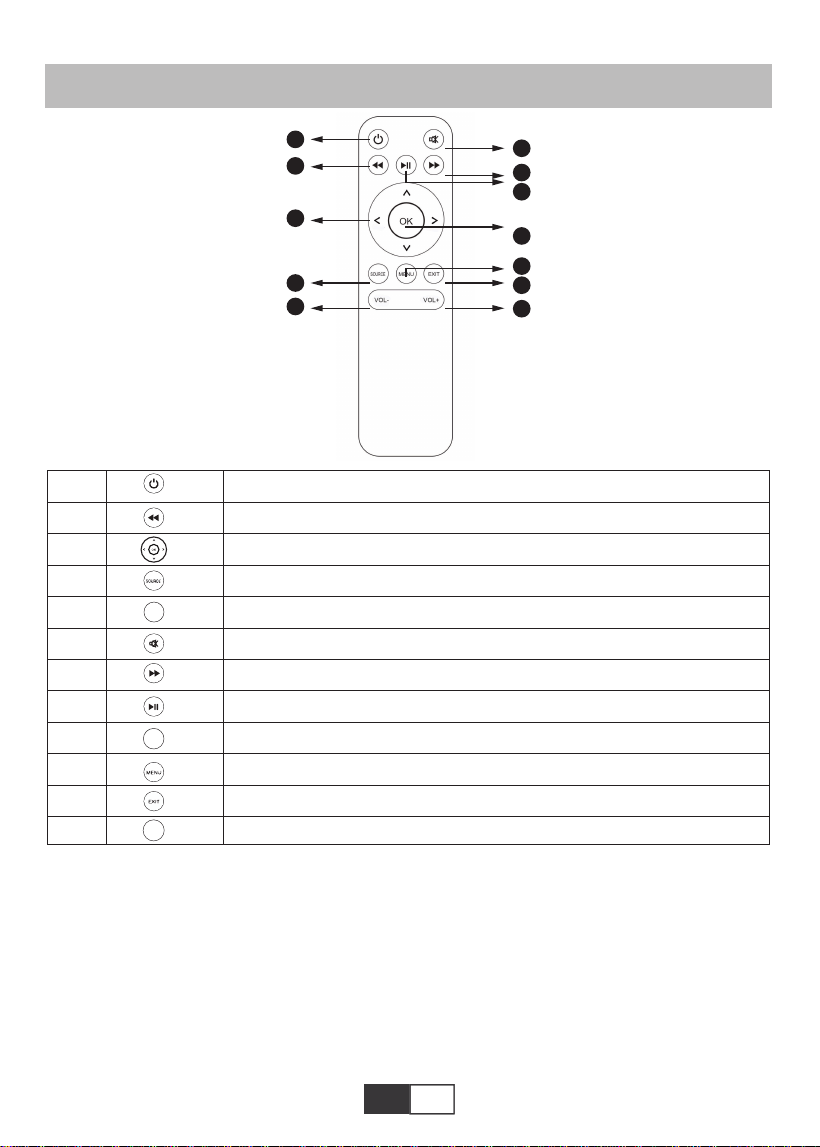
Turn on/off the projector
Return to the previous menu
Used to adjust the parameter of the projector in the menu mode
Signal source
Volume Down
Close the sound
Enter the next menu
Back to the home page/Play the video
Confirm the option
Pull up menus
Return to the previous menu
Volume up
OK
VOL-
VOL+
Note:
1).Install 2 pieces of AAA batteries into the remote before using it. Do not combine new
batteries with old ones in remote controller, which can cause operation failure due to insuffi-
cient power supply.
2).When using the remote controller, please make sure that the signal transmitter of the
remote controller aims at infrared signal receiver of the projector .
3).If you are not using the remote controller for an extended period, please take out batter-
ies to prevent batteries leakage.
01 02 03 04 05 06 07 08 09 10 11 12 13
14 15 16 17 18 19
20 21 22 23 24 25 26 27 28 29 30 31 32
33 34 35 36 37 38
39 40 41 42 43 44 45 46 47 48 49 50 51
52 53 54 55 56 57
58 59 60 61 62 63 64 65 66 67 68 69 70
71 72 73 74 75 76
77 78 79 80 81 82 83 84 85 86 87 88 89
90 91 92 93 94 95
96 97 98 99
111 112 113 114
100 101 102 103 104 105 106 107 108
109 110
EN
INSTALLATION
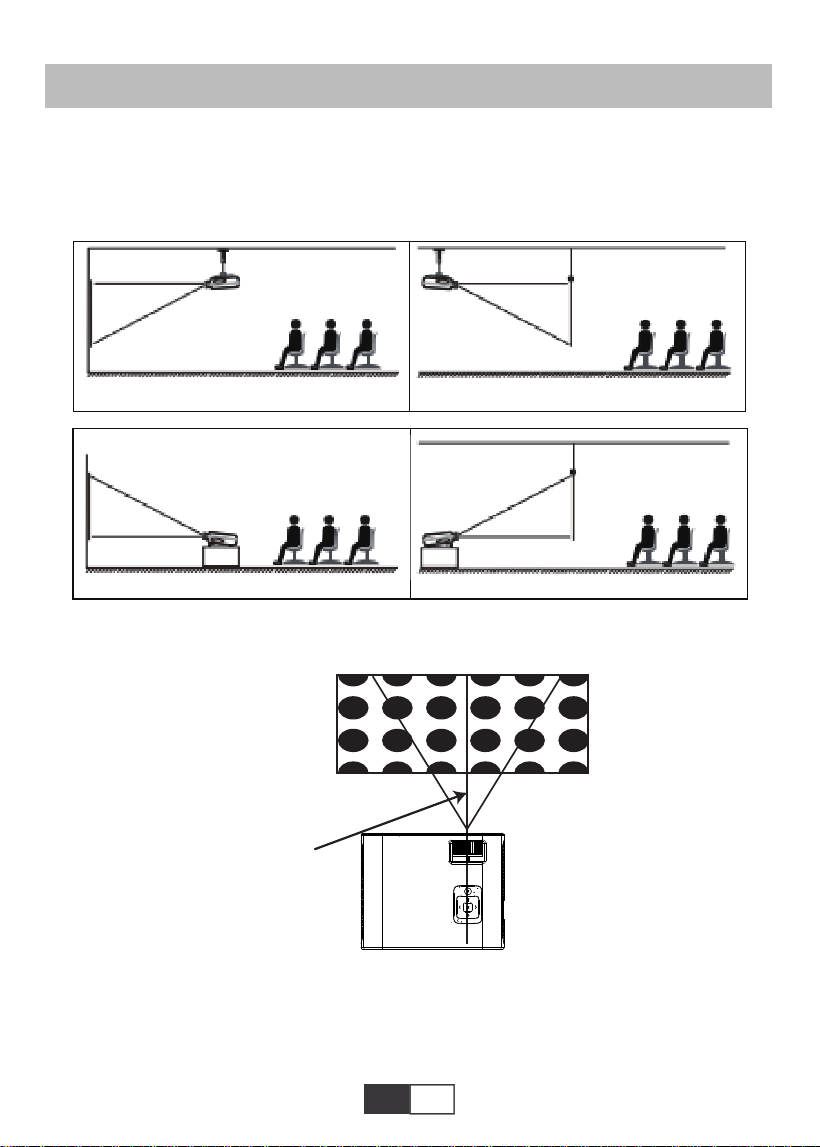
1.Installation Method
The projector can be hanged on the ceiling with special hanger frame, and placed on the
stable desk to project the image according to the operating environment and requirements.
In addition, the projector can be installed with following methods:
Keep the projector at a height where its lens is axial symmetry to the screen. If this is not
possible, use the keystone correction ring to adjust the image.
1.Front projection Ceiling mount 2.Rear projection Ceiling mount
Screen
Projector
Screen
Projector
3.Front projection Table mount 4.Rear projection Table mount
Screen
Projector
Screen
Projector
Rectangle Positive Image
The symmetry axis
of the screen
Screen
Projector
When you install the projector correctly, the image is rectangle.
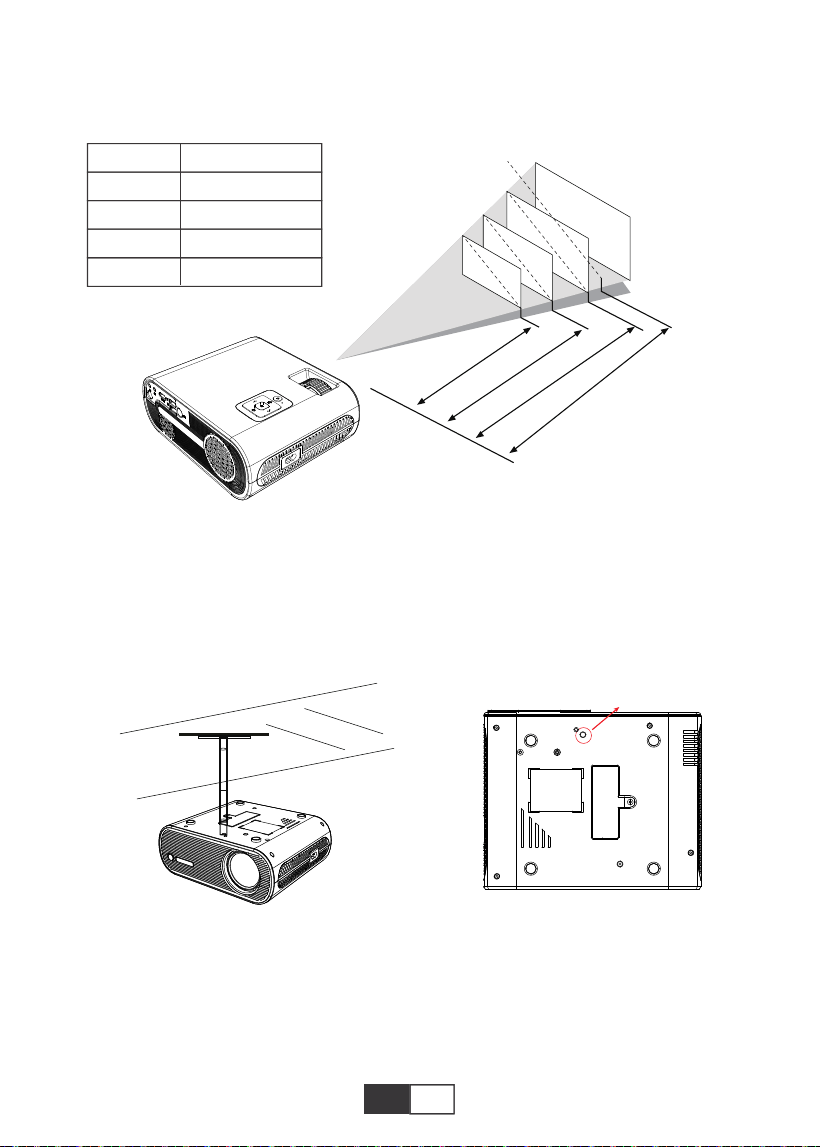
2.Projection Distance and Size
If you want to get a free projection screen,please contact us via [email protected]
01 02 03 04 05 06 07 08 09 10 11 12 13
14 15 16 17 18 19
20 21 22 23 24 25 26 27 28 29 30 31 32
33 34 35 36 37 38
39 40 41 42 43 44 45 46 47 48 49 50 51
52 53 54 55 56 57
58 59 60 61 62 63 64 65 66 67 68 69 70
71 72 73 74 75 76
77 78 79 80 81 82 83 84 85 86 87 88 89
90 91 92 93 94 95
96 97 98 99
111 112 113 114
100 101 102 103 104 105 106 107 108
109 110
EN
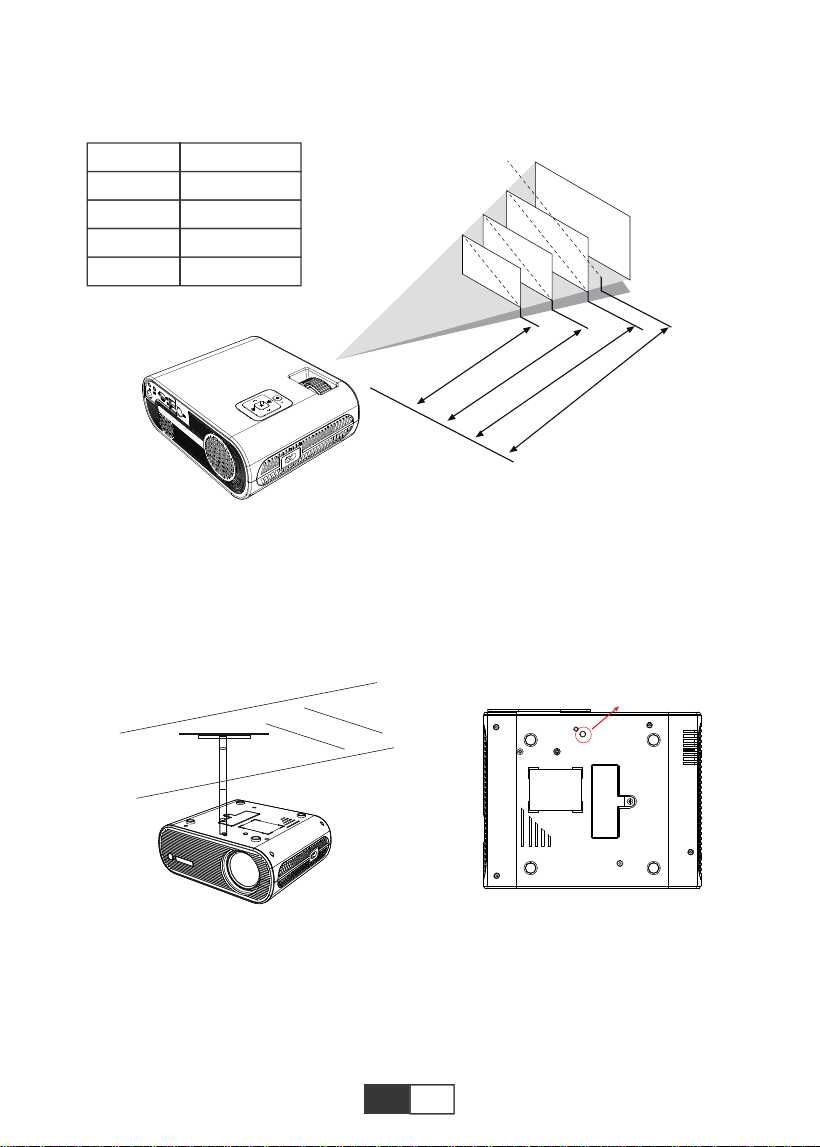
Please follow the data in chart below, to adjust the image size and the distance. (Aspect
Ratio: 16:9, Default)
The recommended projection distance is about 2.5m,the shortest projection distance
is 1.59m.
Remark:
The adjustable support base can assure the max projection angle by 15°, The best
display effect will be obtained by projection angle ranges of 0° - 8°.
50"
72"
100"
120"
367cm
307cm
224cm
159cm
3.Install on the Ceiling
A.Please purchase an universal single hole projector ceiling mount kit with M5 screw.
B.Connect the projector to the stand through the screw holes on the bottom of the projector.
M6*10MM
Distance
1.59m
2.24m
3.07m
3.67m
Screen Size
50 inch
72 inch
100 inch
120 inch

01 02 03 04 05 06 07 08 09 10 11 12 13
14 15 16 17 18 19
20 21 22 23 24 25 26 27 28 29 30 31 32
33 34 35 36 37 38
39 40 41 42 43 44 45 46 47 48 49 50 51
52 53 54 55 56 57
58 59 60 61 62 63 64 65 66 67 68 69 70
71 72 73 74 75 76
77 78 79 80 81 82 83 84 85 86 87 88 89
90 91 92 93 94 95
96 97 98 99
111 112 113 114
100 101 102 103 104 105 106 107 108
109 110
EN
STARTING PROJECTOR
A.Press the Power key on the remote or projector, the indicator light will turn blue.
B.Use the keystone on the top of the projector to get a rectangle projection screen.
C.Adjust the focus ring on the top of the projector to get the best image performance. (If it
is still blurry, please try to adjust the projection distance.)
D.Connect the external device (Smart phone, iPad, Amazon Fire TV, TV box, DVD player,
Computer, etc.) in the corresponding interfaces of the projector, please be sure to select the
corresponding source. If you do not select the correct source, the projector will not be able
to detect the signal.
E.Select the "Setup" button on the start-up screen to enter the “Advanced” submenu, and
then select the option “Language” to set your preferred language.
IMAGE ADJUSTMENT
1.Focus Adjustment
Rotate the focus ring slowly. At the same time, check the focus point carefully. The best
focus point for the lens would be where the image most clear.
Note: If it is still blurry, please try to adjust the projection distance.
2.Manual Keystone Correction (Maximum Adjustable: ±15°)
Slowly move the keystone correction ring on the top of the projector until the image change
to be rectangle. The keystone correction can be adjusted up to ±15° (vertical).
A. If the projected image is in a trapezoidal shape, it can be resolved by Keystone correc-
tion. ( Do Manual Keystone Correction )
Note: If the Keystone correction fail to resolve image shape, please reduce the vertical
height of the projector in relation to the center of the screen.
B. the projected image may be blurry or difficult to see, this is due to lack of Focus adjust-
ment with the lens, please follow the processes below to adjust the Focus. ( Do Manual

01 02 03 04 05 06 07 08 09 10 11 12 13
14 15 16 17 18 19
20 21 22 23 24 25 26 27 28 29 30 31 32
33 34 35 36 37 38
39 40 41 42 43 44 45 46 47 48 49 50 51
52 53 54 55 56 57
58 59 60 61 62 63 64 65 66 67 68 69 70
71 72 73 74 75 76
77 78 79 80 81 82 83 84 85 86 87 88 89
90 91 92 93 94 95
96 97 98 99
111 112 113 114
100 101 102 103 104 105 106 107 108
109 110
EN
1.Select The Input Signal Source
2.Menu Setting Method
2.1.OPTION
Select “OPTION” on the start-up screen,enter the “OPTION” menu
1).Select “Source” on the home-page, enter the “Source” menu.
2).Select the desired input signal source:HDMI/Screen Mirroring/AV/USB
Focus, find the most sharpness picture on the screen )
Note: It is normal when sharpness in the central, blur in the edge.
SETTING UP THE PROJECTOR
Menu
English/France/Italian/Japanese etc
Set up the language
displayed in the
operation interface
Restore all setting to
the original factory
setting
OSD Language
Restore Factory Default
Mode Function
01 02 03 04 05 06 07 08 09 10 11 12 13
14 15 16 17 18 19
20 21 22 23 24 25 26 27 28 29 30 31 32
33 34 35 36 37 38
39 40 41 42 43 44 45 46 47 48 49 50 51
52 53 54 55 56 57
58 59 60 61 62 63 64 65 66 67 68 69 70
71 72 73 74 75 76
77 78 79 80 81 82 83 84 85 86 87 88 89
90 91 92 93 94 95
96 97 98 99
111 112 113 114
100 101 102 103 104 105 106 107 108
109 110
EN
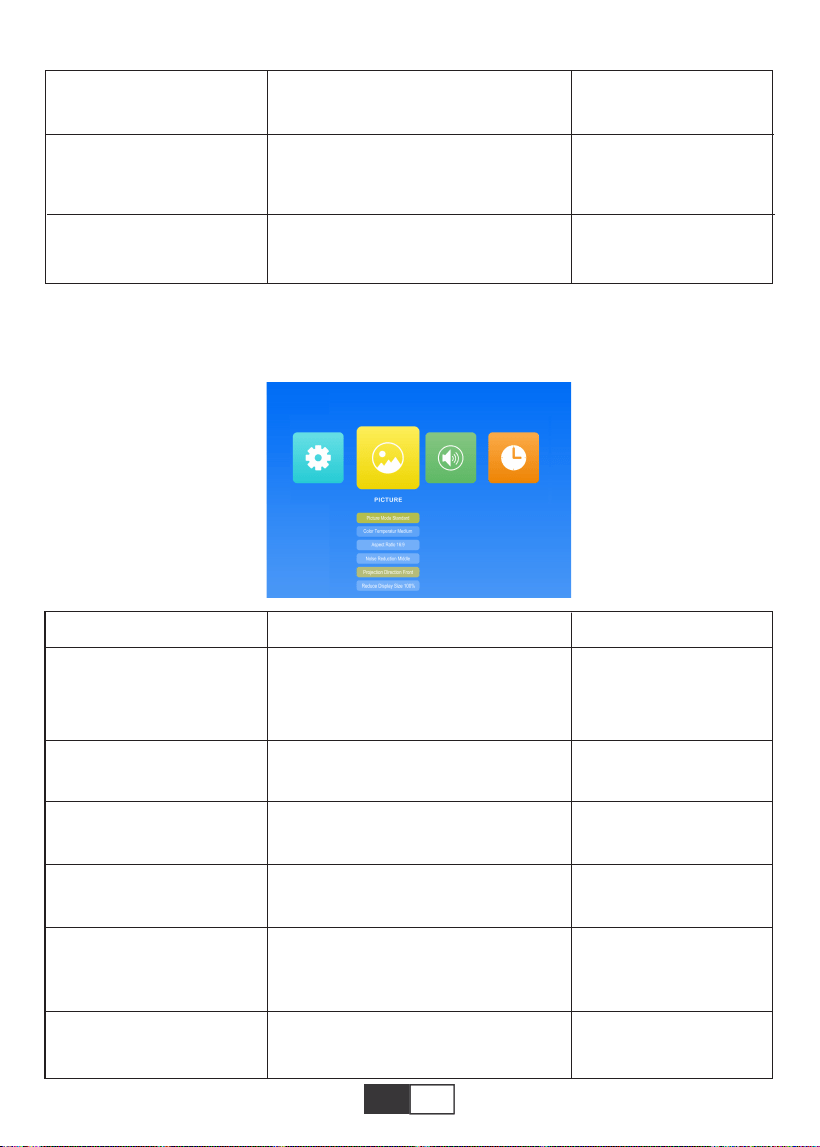
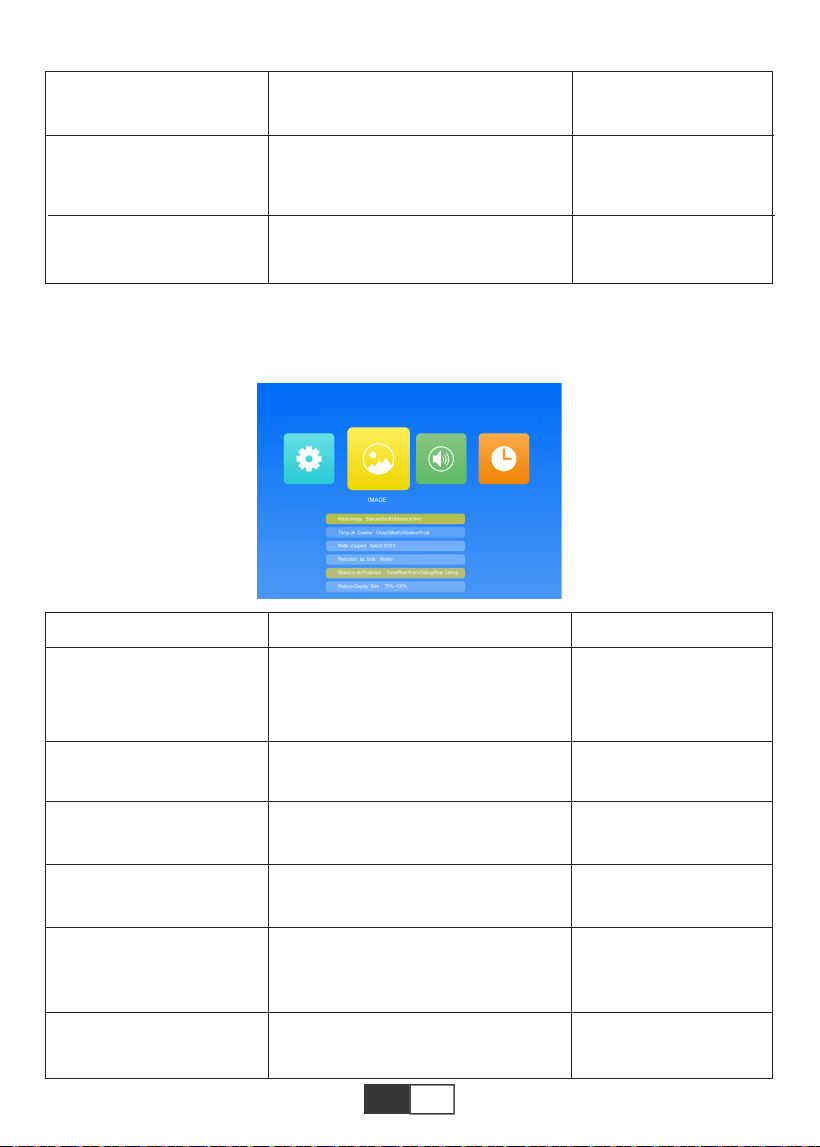
2.2.PICTURE
This menu can be opened directly by pressing the M button on the remote control or projec-
tor when playing text/picture/video/music.
Off/Low/Middle/High
Off/5 sec/10 sec/15 sec
Update software
Adjust the transparency
of menu interface
Adjust the duration of
keeping the menu
interface
Update the projector's
software version
Blending
OsdDuration
Software Update (USB)
Menu
Standard/Soft/User/Vivid
Medium/Warm/Cool
Auto/16:9/4:3
Off/Low/Middle/High/Default
Front/Rear/Front Ceiling/Rear
Ceiling
75%~100%
4 image mode to adjust
the "Contrast/Brightness
/Color/Sharpness/Tint"
of the image
Switch among the color
temperature mode
Set up the aspect ratio
of the image.
Set up the intensity of
noise reduction
Set up the projection
mode
Picture Mode
Color Temperature
Aspect Ratio
Noise Reduction
Projection Direct
Reduce Display Size
Mode Function
01 02 03 04 05 06 07 08 09 10 11 12 13
14 15 16 17 18 19
20 21 22 23 24 25 26 27 28 29 30 31 32
33 34 35 36 37 38
39 40 41 42 43 44 45 46 47 48 49 50 51
52 53 54 55 56 57
58 59 60 61 62 63 64 65 66 67 68 69 70
71 72 73 74 75 76
77 78 79 80 81 82 83 84 85 86 87 88 89
90 91 92 93 94 95
96 97 98 99
111 112 113 114
100 101 102 103 104 105 106 107 108
109 110
EN
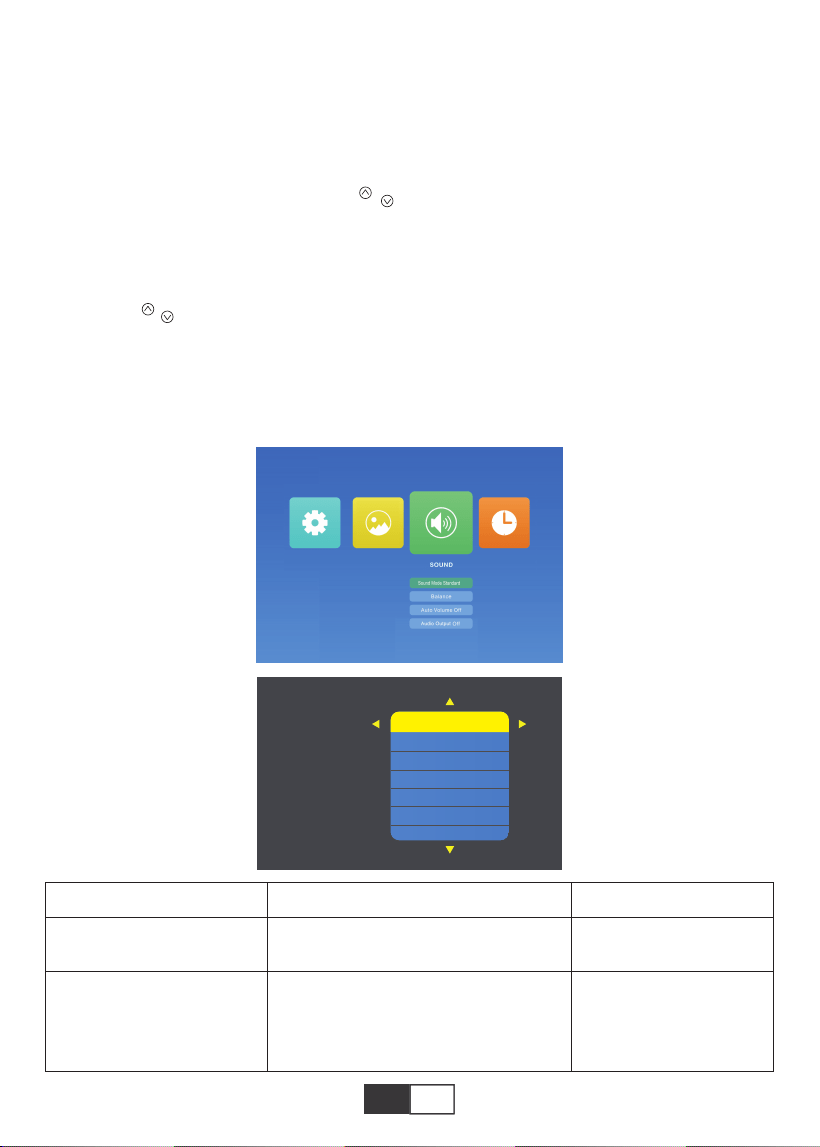
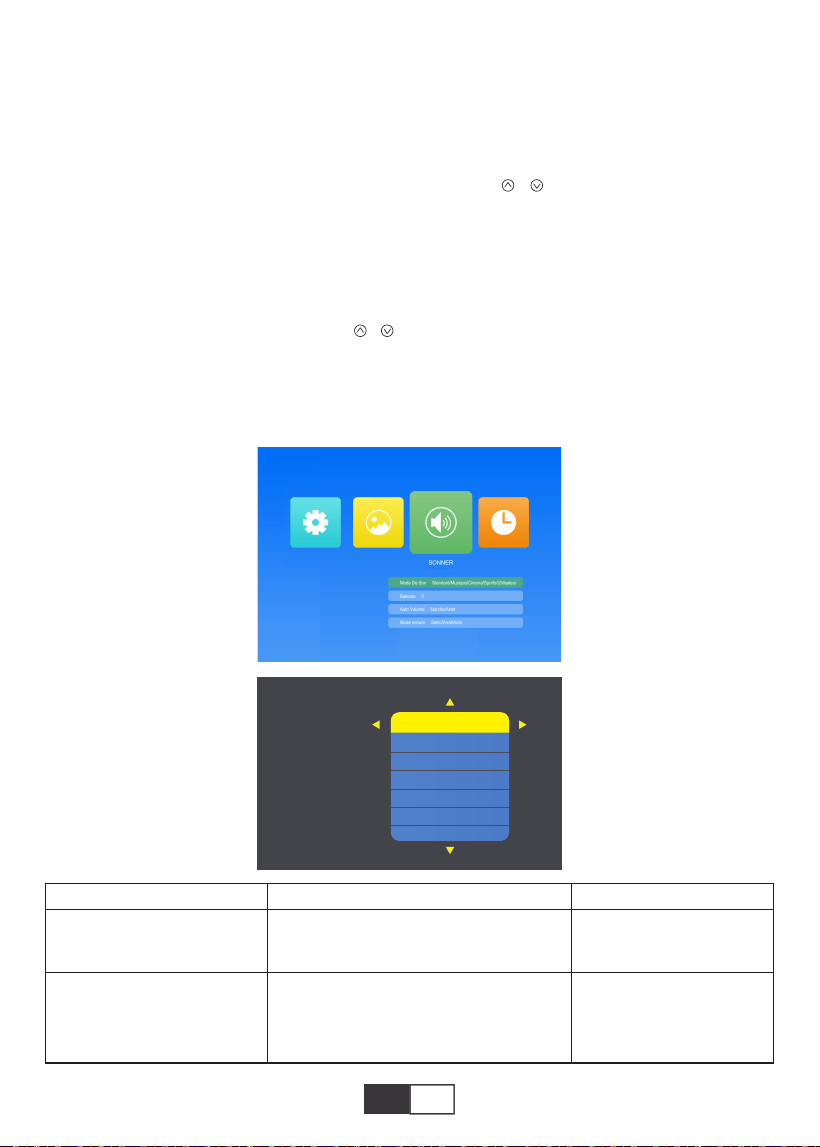
2.3.SOUND
This menu can be opened directly by pressing the M button on the remote control or projec-
tor when playing text/picture/video/music.
Menu
User/Standard/Music/Movie/Sports
-50 to +50
Set up the sound mode
Balance the sound of
the left and right
channel of the speaker
Sound Mode
Balance
Mode Function
Tips:
1). Picture Mode
In picture mode, you can choose the “Standard/Soft/User/Vivid” to adjust the
"Contrast/Brightness/Color/Sharpness/Tint" of the image.
In the picture Mode-User Option, you can adjust the “Contrast/Brightness/Col-
or/Sharpness/Tint” of the image by " / "button on the remote in " 0-100 "range.
2). Color Temperature
In Color Temperature, you can choose the different options, Medium/Warm/Cool.
In the Color Temperature-User Option, you can adjust the " Red/Green/Blue " of the
image by " / " button on the remote in " 0-100 " range.
01 02 03 04 05 06 07 08 09 10 11 12 13
14 15 16 17 18 19
20 21 22 23 24 25 26 27 28 29 30 31 32
33 34 35 36 37 38
39 40 41 42 43 44 45 46 47 48 49 50 51
52 53 54 55 56 57
58 59 60 61 62 63 64 65 66 67 68 69 70
71 72 73 74 75 76
77 78 79 80 81 82 83 84 85 86 87 88 89
90 91 92 93 94 95
96 97 98 99
111 112 113 114
100 101 102 103 104 105 106 107 108
109 110
EN
TOPTRO X2 projector has 6 signal sources, USB/ HDMI /AV / Audio Out Connec-
tion(3.5mm Headphone jack)/MHL Function/Use Lighting Digital AV Adapter. Support
iPhone, iPad, Choose Input Source “HDMI”. Please select the correct connecting port to
connect your device (PC, Phone, DVD Player, Sound bar, USB, PS4 etc.)
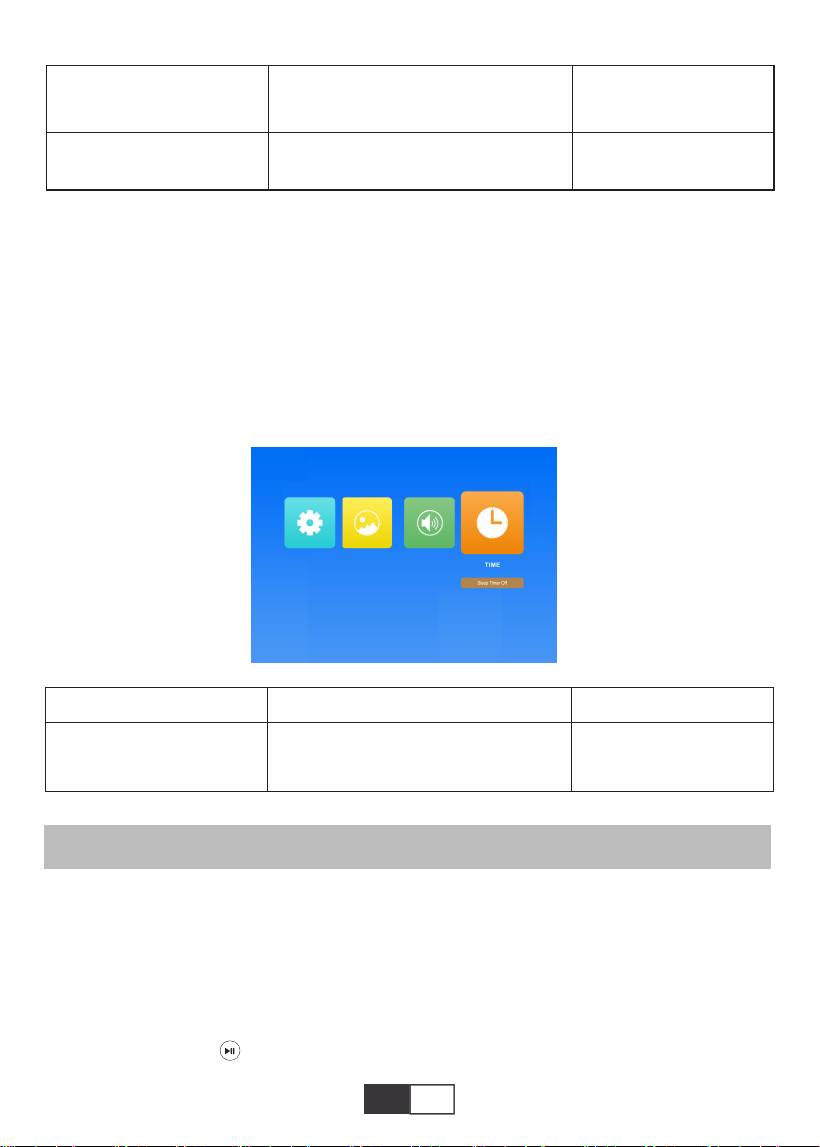
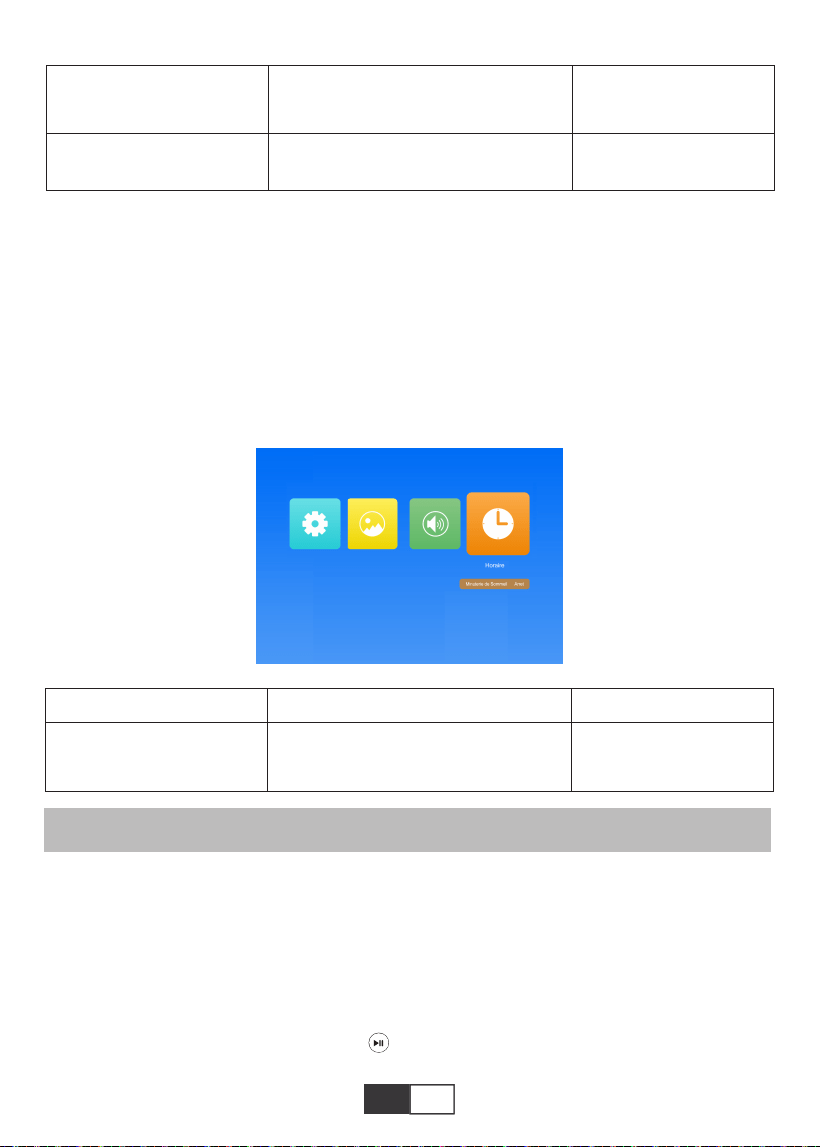
2.4.TIME
This menu can be opened directly by pressing the M button on the remote control or projec-
tor when playing text/picture/video/music.
1.Connect USB Flash
Insert the USB flash driver into the USB port and choose the right signal source, then press
Play / Pause button ( ) to display or stop.
Bluetooth connection steps:
Open the menu page → "SOUND" → "Audio Output" → Select "Static" mode by Right
button→ Search devices by button→Select the bluetooth device and press Right botton to
confirm the connection.(Press Right button to disconnect)→If it connect succesfully,the
status bar on the bottom row will show "Play".
SIGNAL LINES CONNECTION
Menu
Off/10 min/20 min/30 min/60 min/
90 min/120 min/180 min/240 min
Set the sleep time of
projector
Sleep Timer
Mode Function
Off/Auto/Static
Off/On
Intelligently adjust
volume
Auto Volume
Auto Output
01 02 03 04 05 06 07 08 09 10 11 12 13
14 15 16 17 18 19
20 21 22 23 24 25 26 27 28 29 30 31 32
33 34 35 36 37 38
39 40 41 42 43 44 45 46 47 48 49 50 51
52 53 54 55 56 57
58 59 60 61 62 63 64 65 66 67 68 69 70
71 72 73 74 75 76
77 78 79 80 81 82 83 84 85 86 87 88 89
90 91 92 93 94 95
96 97 98 99
111 112 113 114
100 101 102 103 104 105 106 107 108
109 110
EN
2.Connecting to the Computer
Using the HDMI cable (Included) to connect with the projector.
1).Connect the HDMI cable to your computer's HDMI port with the HDMI cable in
the package;
2).Select the HDMI source to project any files on your computer;
3).On your laptop, hold down the key “Win+P” board keys to change your display mode
( Press “ Source” on the remote control or “ S” on the control panel, then there is
“ Input Source” on the screen, choose “ USB “ )
Image Format
JEPG, PNG, BMP
.jpg / .png / .bmp
Support File Extension
Multimedia File Specification
Audio Format
Doesn’t Support : Dolby AC3 / AAC, DTS, WMA, DivX, VC1, RM, RMVB, FLV, etc
MPEG1, MPEG2, LPCM, MP3
.avi / .ts / .dat / .vob / .wmv / .mkv / .mp3
/ .mp4/ .m4a
Support File Extension
Video Format ( Bit Rate up to 30~40 Mbs )
Doesn’t support : MSVC / CRAM , MP42, GMC, IV32, RLE, cvid, RV20, DivX, RM,
RMVB, VC1, FLV , etc.
MPEG1, MPEG2, H.263, H.264, AVS,
VC1, MJPEG, RV30, RV40, HEVC
.dat / .ts / .mp4 / .mpg / .mpeg / .avi / .tp
/ .mkv / .mov / .asf / .flv / .3gp. / .3gpp
Support File Extension
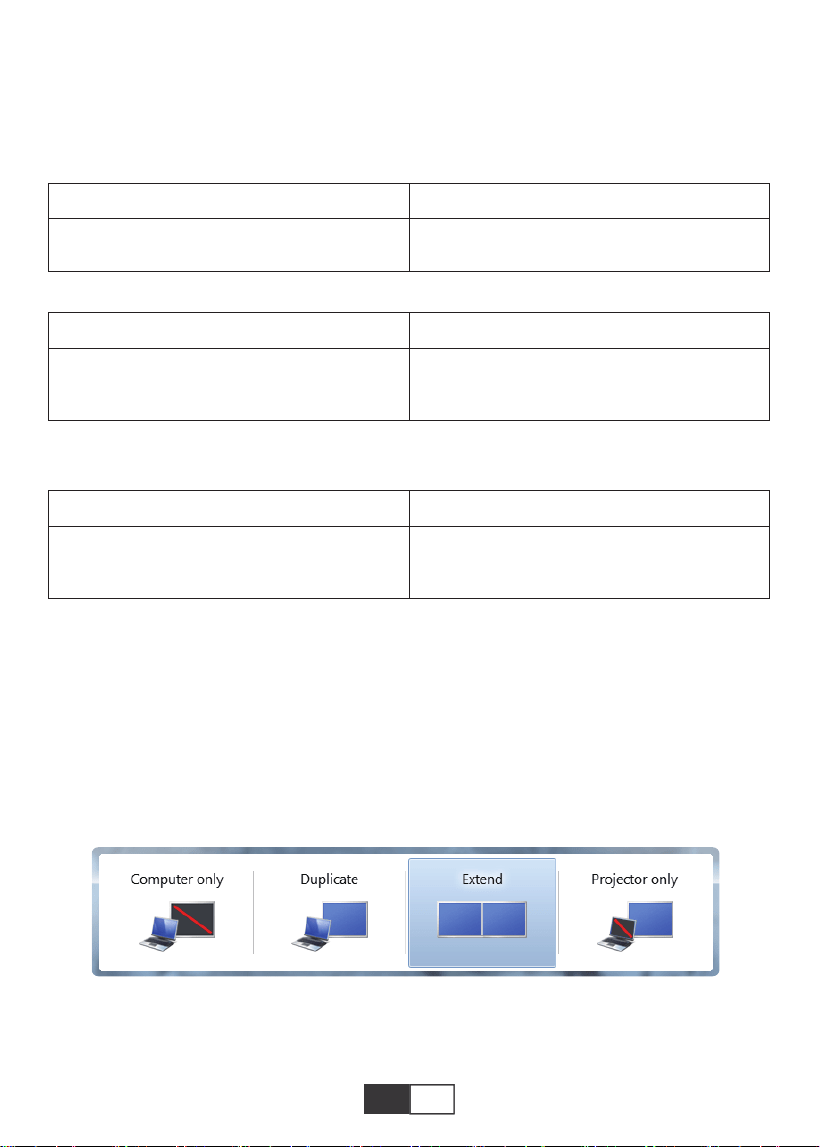
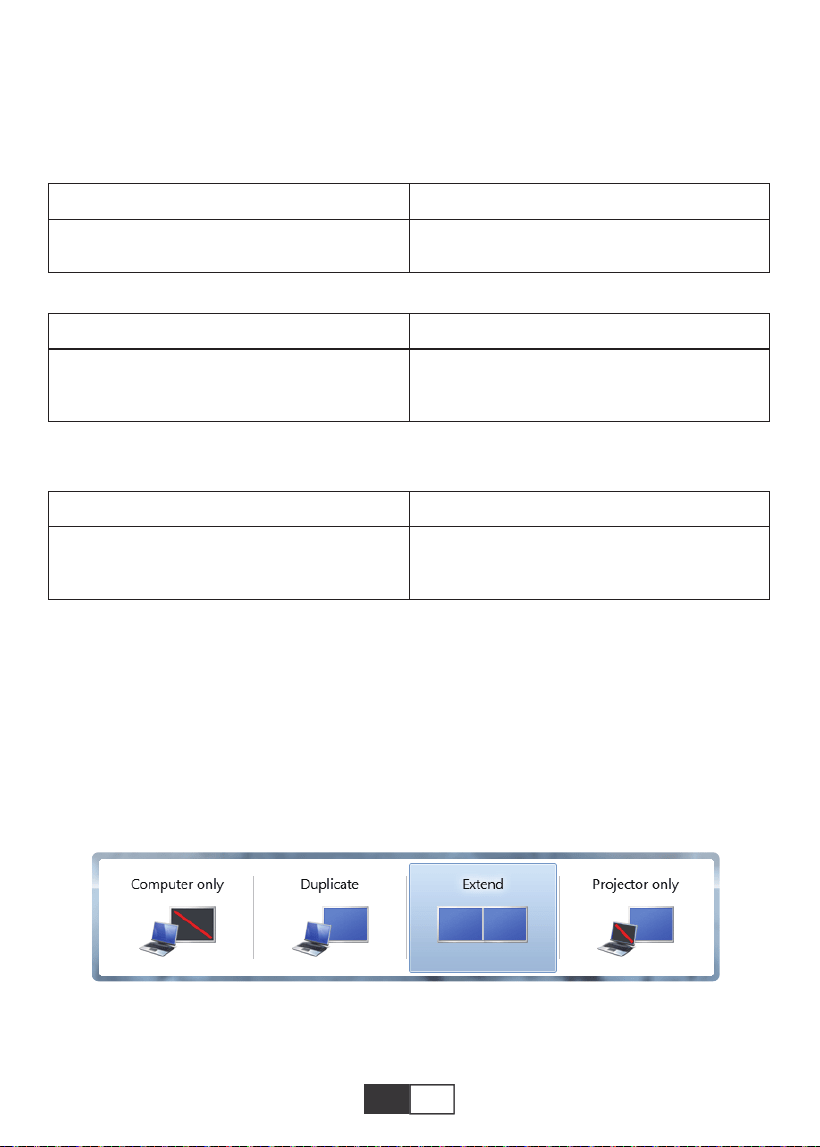
Computer only: is the default option – only displays on the main monitor.
Duplicate: makes all of the monitors display the same thing duplicating the desktop on
each monitor.
01 02 03 04 05 06 07 08 09 10 11 12 13
14 15 16 17 18 19
20 21 22 23 24 25 26 27 28 29 30 31 32
33 34 35 36 37 38
39 40 41 42 43 44 45 46 47 48 49 50 51
52 53 54 55 56 57
58 59 60 61 62 63 64 65 66 67 68 69 70
71 72 73 74 75 76
77 78 79 80 81 82 83 84 85 86 87 88 89
90 91 92 93 94 95
96 97 98 99
111 112 113 114
100 101 102 103 104 105 106 107 108
109 110
EN
Extend: makes all of your monitors act like one big monitor extending the desktop across
all of them.
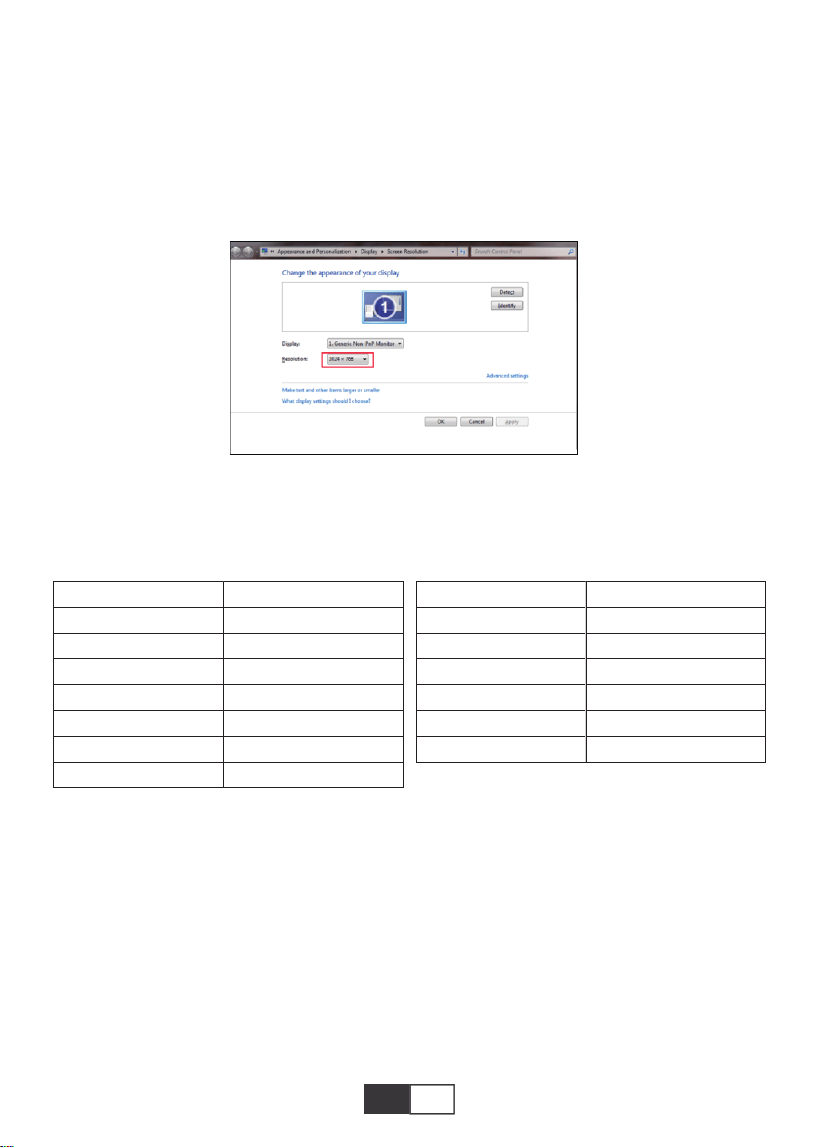
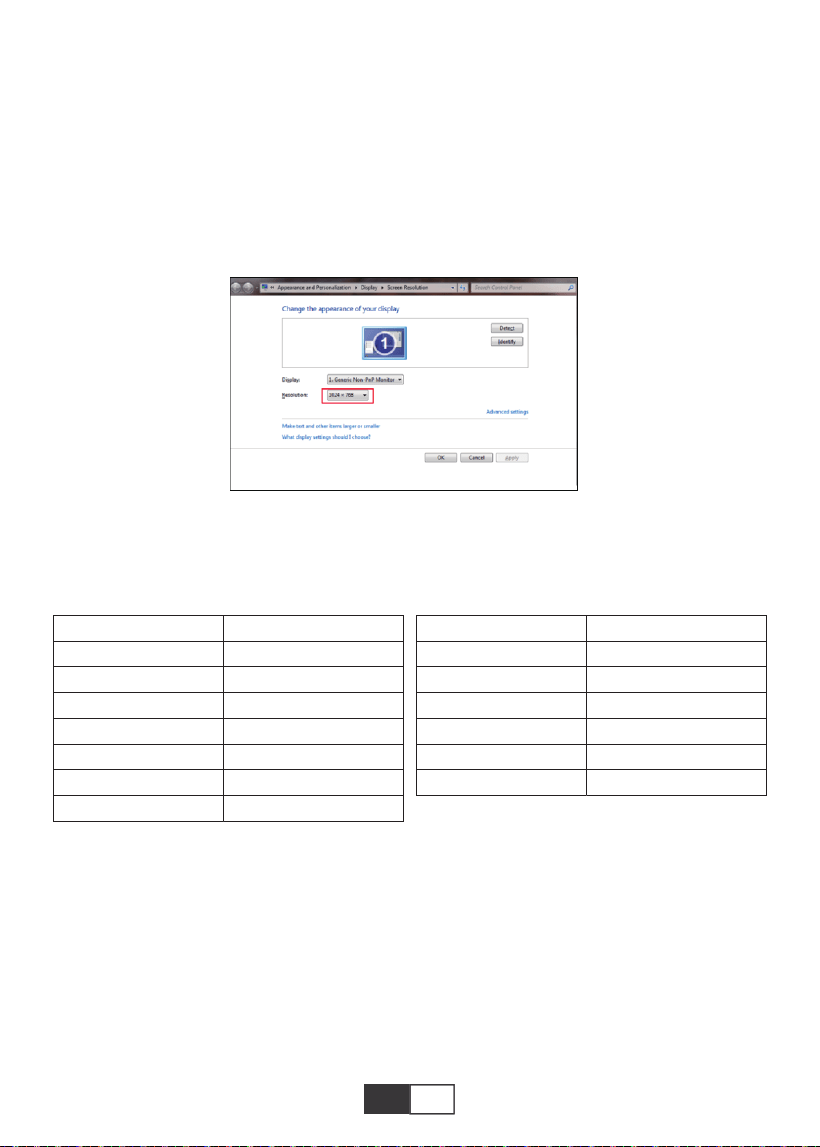
Projector only: Displays only on the secondary monitor like a projector.
You can change the screen resolution on the Projector Only Mode
Step: Start > Control Panel > Appearance and Personalization > Adjust Screen
Resolution
Note:
When connect the projector with the notebook, you may need to press Fn + F* (F1-F10 on
the keyboard) to change the output. Because of each brand of computer button function
difference, you can refer to the following table.
Manufacture
Acer
Dell
Epson
Fujitsu
IBM
Hewlett-packard
Lenovo
Keys
Fn+F5
Fn+F8
Fn+F8
Fn+F10
Fn+F7
Fn+F4
Fn+F10
Manufacture
NEC
Panasonic
Sharp
Sony
Toshiba
Zotac
Keys
Fn+F3
Fn+F3
Fn+F5
Fn+F7
Fn+F5
Fn+F3/F5
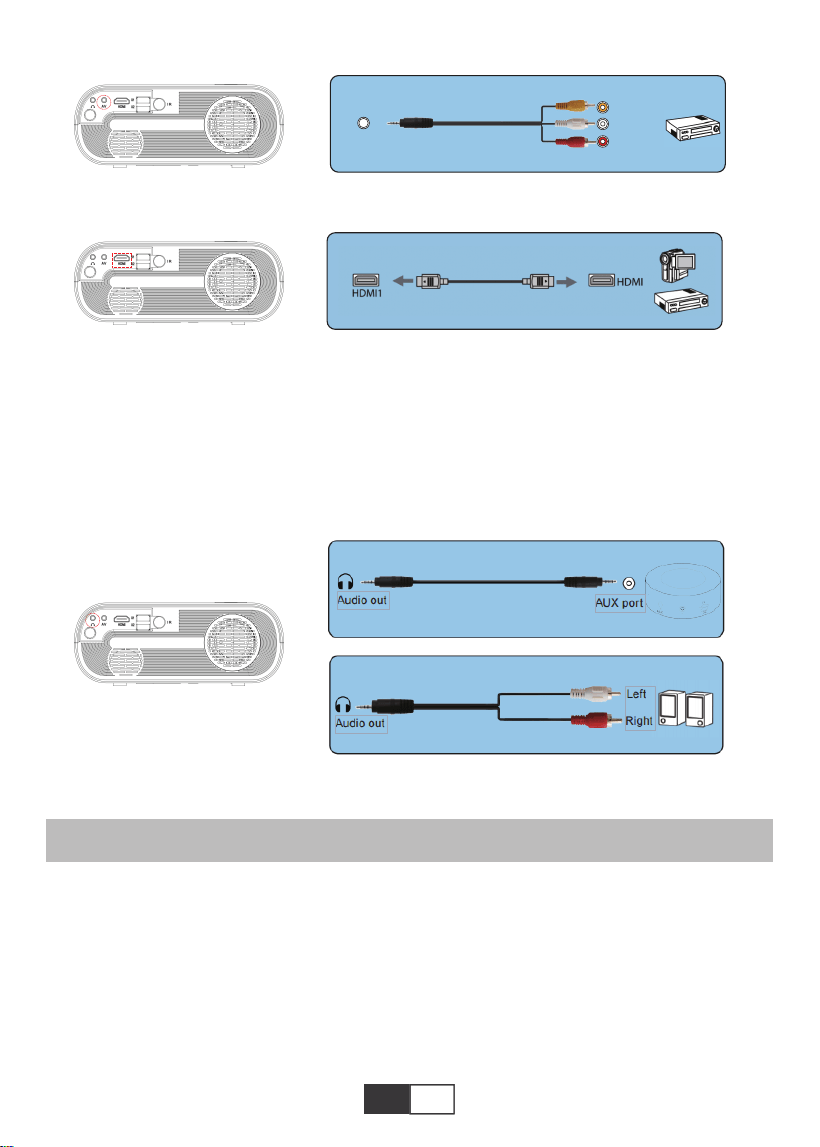
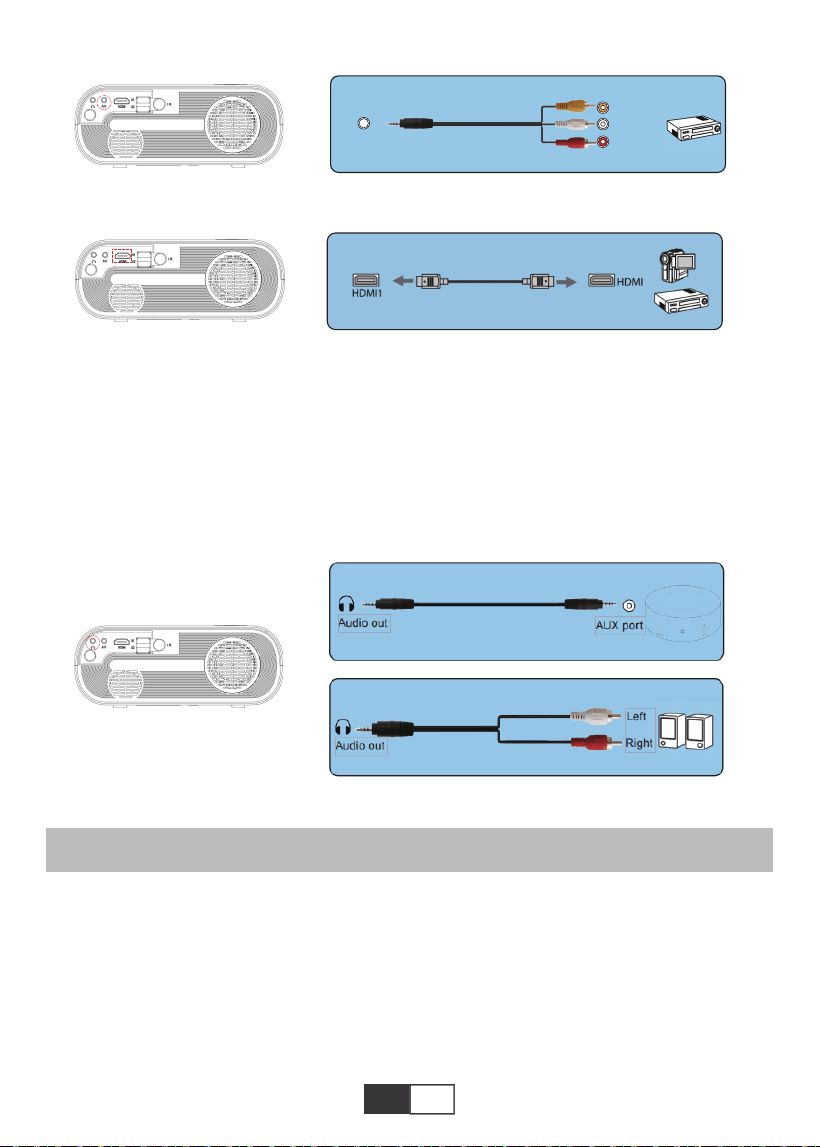
3.AV Connection
Use the AV cable in the package.
A. Turn on your DVD player and the projector;
B. Connect the colorful female connectors to your DVD player’s RCA cable;
C. Connect the black connector to the Audio-in port of the projector;
D. Connect the yellow connector of another side to the video port of the projector;
E. Select “AV” on the home page.
01 02 03 04 05 06 07 08 09 10 11 12 13
14
15 16 17 18 19
20 21 22 23 24 25 26 27 28 29 30 31 32
33 34 35 36 37 38
39 40 41 42 43 44 45 46 47 48 49 50 51
52 53 54 55 56 57
58 59 60 61 62 63 64 65 66 67 68 69 70
71 72 73 74 75 76
77 78 79 80 81 82 83 84 85 86 87 88 89
90 91 92 93 94 95
96 97 98 99
111 112 113 114
100 101 102 103 104 105 106 107 108
109 110
EN
PLAY OPERATION
4.Audio Out Connection
1.Play A Movie/ Photo/ Music/ Text (in USB input mode)
A.If your speaker has AUX port, please use your 3.5mm audio cable connect with the
Projector’s audio out port and your speaker’s AUX port.
B.If your speaker haven’t AUX port, please purchase a 2RCA cable,and then use it connect
with the Projector’s audio out port and your speaker’s Left and Right ports.
Frist Select “SOURCE” on the remote.
A.To play a video file, first select “Movie/ Music/ Photo/ Text” on the main screen, and then
press the “OK” key on the operation panel or remote. The selected box widens and the
surrounding white edges stand out.
Or connect to the DVD Player with the HDMI cable in the package.
AV
video
audio out
(L/R)
01 02 03 04 05 06 07 08 09 10 11 12 13
14 15
16 17 18 19
20 21 22 23 24 25 26 27 28 29 30 31 32
33 34 35 36 37 38
39 40 41 42 43 44 45 46 47 48 49 50 51
52 53 54 55 56 57
58 59 60 61 62 63 64 65 66 67 68 69 70
71 72 73 74 75 76
77 78 79 80 81 82 83 84 85 86 87 88 89
90 91 92 93 94 95
96 97 98 99
111 112 113 114
100 101 102 103 104 105 106 107 108
109 110
EN
FB
Mode Function
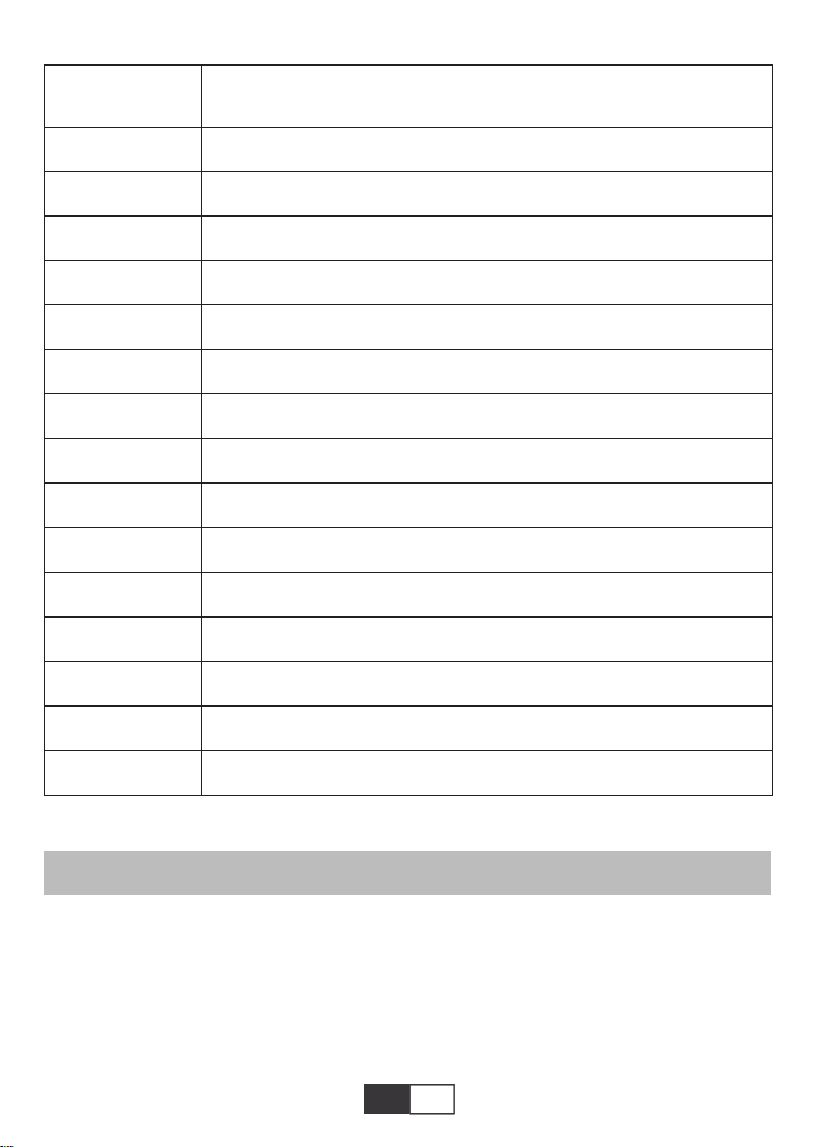
2.Play interface
Note: The video content can be viewed by staying the cursor on the selected video for over
3 seconds. Only MPEG1, MPEG2, H.263, H.264, AVS,
VC1, MJPEG, RV30, RV40 and HEVC are supported in video playing.
B.Press and on the operation panel or remote to select the equipment for File
storage. Press the “OK” key to enter the next step.
Note: If you have any question about the video Playing, just email to [email protected].
We will provide a fast solution in 24 hours.
C.Press and on the operation panel or remote to select the desired File (or folder
to enter the subfolder). Press the “OK” key to play it.
Suitable for basic business presentation, such as PowerPoint slides, Excel and Word
display.
Note: The image content can be viewed by staying the cursor on the selected image for
over 3 seconds. Only txt format is supported for image playing.
Fast Backward,rewinds the video back quickly while playing it. The
rewinding speed ranges from 2 X to 32X
01 02 03 04 05 06 07 08 09 10 11 12 13
14 15 16
17 18 19
20 21 22 23 24 25 26 27 28 29 30 31 32
33 34 35 36 37 38
39 40 41 42 43 44 45 46 47 48 49 50 51
52 53 54 55 56 57
58 59 60 61 62 63 64 65 66 67 68 69 70
71 72 73 74 75 76
77 78 79 80 81 82 83 84 85 86 87 88 89
90 91 92 93 94 95
96 97 98 99
111 112 113 114
100 101 102 103 104 105 106 107 108
109 110
EN
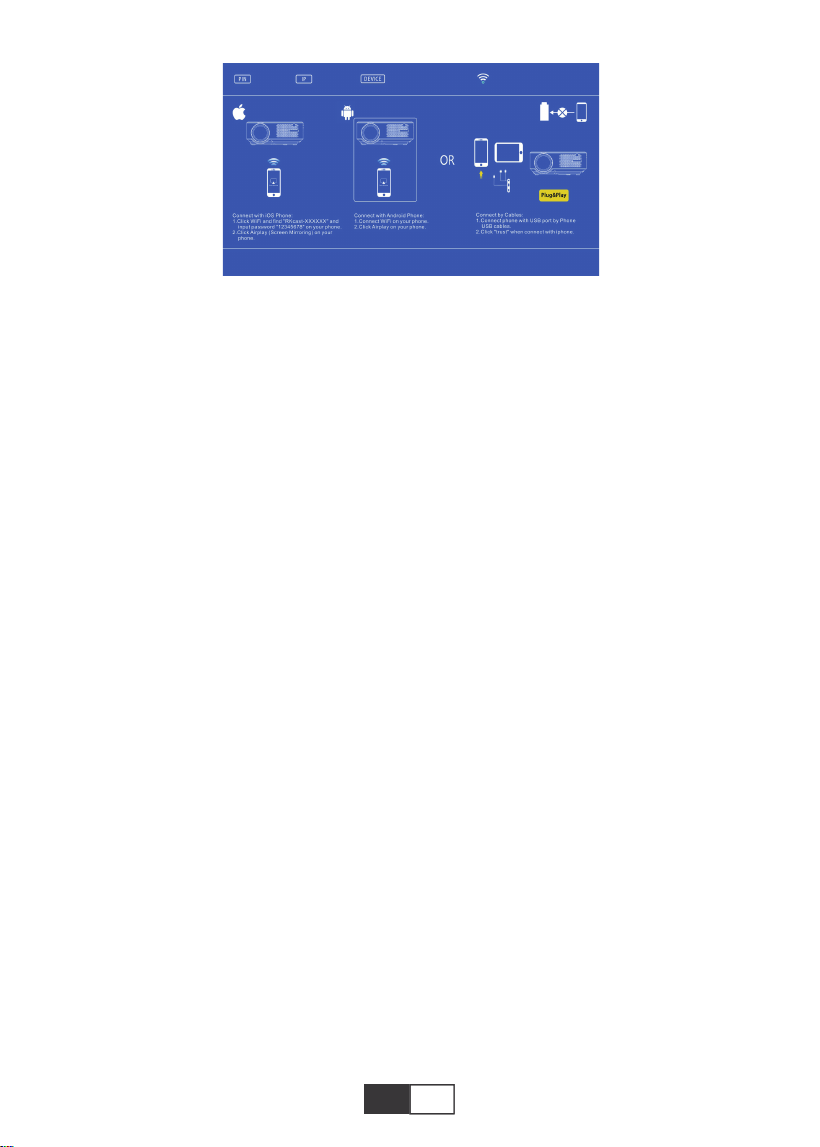
Screen Mirroring
Frist Select “SOURCE” on the remote.
Enter the “Screen Mirroring” menu,follow the prompts to select the corresponding connec-
tion method to connect your device to the projector.
FF
Prev.
Next
Stop
All
Random
Set A
Playlist
Info
Slow Forward
Step Forward
Goto Time
Zoom+
Zoom-
Aspect Ratio
Move
Fast Forward,pushes the video to move forward quickly while
playing it.The forward speed ranges from 2 X to 32X
Switch to the previous video
Switch to the next video
Stop playing and exit
Random On/Random Of
Set A/B(Set two nodes in the video to loop)/None
Select all playlists in the current folder
Video details
Slow Forward 1X to 16X
Set a time to jump directly
Zoom+ 1X to 8X
Zoom- 1X to 1/4X
Auto/4:3/16:9
01 02 03 04 05 06 07 08 09 10 11 12 13
14 15 16 17
18 19
20 21 22 23 24 25 26 27 28 29 30 31 32
33 34 35 36 37 38
39 40 41 42 43 44 45 46 47 48 49 50 51
52 53 54 55 56 57
58 59 60 61 62 63 64 65 66 67 68 69 70
71 72 73 74 75 76
77 78 79 80 81 82 83 84 85 86 87 88 89
90 91 92 93 94 95
96 97 98 99
111 112 113 114
100 101 102 103 104 105 106 107 108
109 110
EN
1. Android device
1). Connect home WiFi network on your mobile phone,
2). Activate the screen mirroring function of the mobile device. After the connection is
successful, the projection screen will display your mobile device.
Note:
1).Not all Android phones have screen mirroring function, and maybe different Android
phones display different names for the screen mirroring function. Please consult your
phone brand service provider to confirm whether your phone supports the screen mirroring
function and how to find this function.
2).When you use the screen mirroring function, make sure to the WiFi function of your
phone is active.
3).The smoothness of the projection screen depends on the quality of the network that your
phone is connected to, please make sure your phone is connected to a good quality
network, so that it can project a smooth video playback screen.
2. IOS device
2.1. Use the Screen Mirroring function of IOS device under the background of using home
WiFi network
1). Press the "OK" button on the remote control, and the projector connects to the home
WiFi network;
2). Turn on your IOS device and connect to the same home network;
3). Activate the screen mirroring function of the mobile device. After the connection is
successful, the projection screen will display your mobile device.
2.2. Use the Screen Mirroring function of IOS devices in the context of using cellular
network data
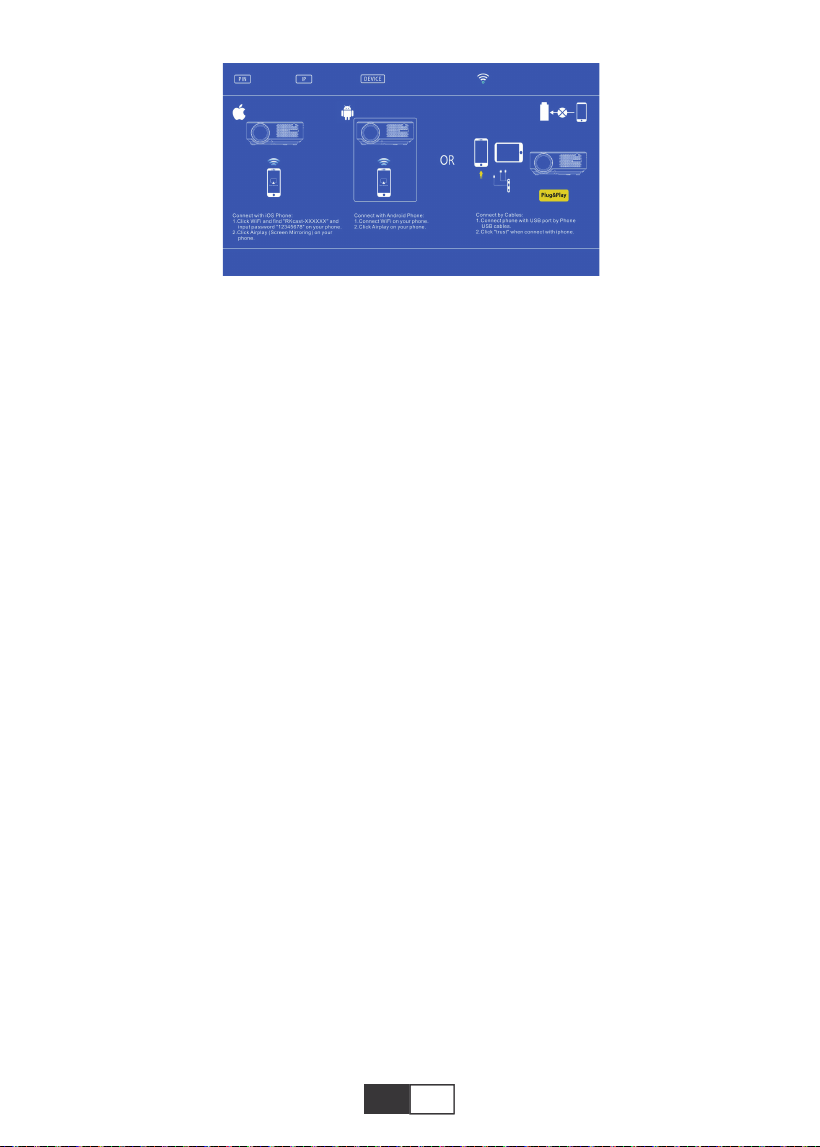
1). Open IOS device wifi settings, search and connect to "RKcast-XXXXXX" (password
12345678)
2). Turn on the IOS screen mirroring function and search.
3). Then select "RKcast-XXXXXX" from the list to connect to your IOS device. (If you can't
find it, please press “OK” button to enter the projector wifi menu and disconnect)
4). After the connection is successful, the projection screen shows that the connection with
your IOS device is successful.
First,press the remote control ‘ok’
button and connect with wifi.

01 02 03 04 05 06 07 08 09 10 11 12 13
14 15 16 17 18
19
20 21 22 23 24 25 26 27 28 29 30 31 32
33 34 35 36 37 38
39 40 41 42 43 44 45 46 47 48 49 50 51
52 53 54 55 56 57
58 59 60 61 62 63 64 65 66 67 68 69 70
71 72 73 74 75 76
77 78 79 80 81 82 83 84 85 86 87 88 89
90 91 92 93 94 95
96 97 98 99
111 112 113 114
100 101 102 103 104 105 106 107 108
109 110
EN
3. Wired connection (Only applicable to IOS devices)
You can also use a lightning cable to connect your ios devices to the projector,after insert
the cable via the USB port,please wait 5-10 seconds,there will be an alert asks whether you
trust the computer,please choose “Trust”,and the projection screen will display the same
content as your devices.
SAFE SHUTDOWN
1.Press the button on the projector or remote.
2.Press the OK button to confirm to shutdown.
3.Unplug the power cord of the projector.
4.Cover the lens and store the projector in a cool and dry place.
WARRANTY
Thank you so much for your purchase and support! We provide 3-year warranty for X2
projector. If you have any questions, please feel free to contact us via

01 02 03 04 05 06 07 08 09 10 11 12 13
14 15 16 17 18 19
20 21 22 23 24 25 26 27 28 29 30 31 32
33 34 35 36 37 38
39 40 41 42 43 44 45 46 47 48 49 50 51
52 53 54 55 56 57
58 59 60 61 62 63 64 65 66 67 68 69 70
71 72 73 74 75 76
77 78 79 80 81 82 83 84 85 86 87 88 89
90 91 92 93 94 95
96 97 98 99
111 112 113 114
100 101 102 103 104 105 106 107 108
109 110
FR
CONTENU
Assistance Professionnelle TOPTRO à vie ..............................................................................21
CONSEILS....................................................................................................................21
LISTE DES PAQUETS...............................................................................................................21
SPÉCIFICATIONS DU PROJECTEUR..................................................................................22
APERÇU DU PROJECTEUR............................................................................................22-23
TÉLÉCOMMANDE......................................................................................................24
INSTALLATION....................................................................................................................25-26
1.Méthode d'installation...........................................................................................................25
2.Distance et taille de projection........................................................................................25-26
3.Installer au plafond...............................................................................................................26
PROJECTEUR DE DÉMARRAGE..........................................................................................27
RÉGLAGE DE L'IMAGE.....................................................................................................27-28
1.Réglage de la mise au point.................................................................................................27
2.Correction manuelle de la distorsion trapézoïdale (réglable au maximum: ± 15 °)........27-28
CONFIGURATION DU PROJECTEUR.............................................................................28-31
1.Sélectionnez la source du signal d'entrée............................................................................28
2.Méthode de paramétrage du menu................................................................................28-31
2.1.OPTIONS...........................................................................................................28-29
2.2.IMAGE ...............................................................................................................29-30
2.3.SONNER............................................................................................................30-31
2.4.HORAIRE.................................................................................................................31
CONNEXION DES LIGNES DE SIGNAL............................................................................31-34
1.Connectez la clé USB.....................................................................................................31-32
2.Connexion à l'ordinateur................................................................................................32-33
3.Connexion AV.................................................................................................................33-34
4.Connexion de sortie audio...................................................................................................34
OPÉRATION DE JEU..........................................................................................................34-36
1.Lire un Cinema / Musiqn / Photo / Texte (en mode d'entrée USB).................................34-35
2.interface de lecture..........................................................................................................35-36
Screen Mirroring....................................................................................................................36-37
1.Mise en miroir de l'écran de l'appareil IOS..........................................................................37
2.Mise en miroir de l'écran de l'appareil Android.....................................................................37
3.Connexion filaire (uniquement pour les appareils IOS)........................................................38
ARRÊT SÉCURISÉ....................................................................................................................38
GARANTIE....................................................................................................................38

01 02 03 04 05 06 07 08 09 10 11 12 13
14 15 16 17 18 19
20
21 22 23 24 25 26 27 28 29 30 31 32
33 34 35 36 37 38
39 40 41 42 43 44 45 46 47 48 49 50 51
52 53 54 55 56 57
58 59 60 61 62 63 64 65 66 67 68 69 70
71 72 73 74 75 76
77 78 79 80 81 82 83 84 85 86 87 88 89
90 91 92 93 94 95
96 97 98 99
111 112 113 114
100 101 102 103 104 105 106 107 108
109 110
FR
CONSEILS
LISTE DES PAQUETS
Assistance professionnelle TOPTRO à vie
Cher client,
Merci beaucoup de soutenir TOPTRO!
Veuillez lire attentivement ce manuel avant d'utiliser le projecteur. Si vous rencontrez des
problèmes, envoyez votre numéro de commande et le problème à [email protected]. Nous
fournirons une solution rapide en 24 heures.
En fait, de nombreux problèmes peuvent être facilement résolus en réglant, tels que pas de
signal, pas de son, échec de la connexion Bluetooth, échec de la connexion WiFi, points
sombres, animation saccadée, etc. Nous promettons que tous les projecteurs ont été soigneu-
sement vérifiés et emballés à 100% avant l'expédition.
Si vous avez des questions, pourriez-vous s'il vous plaît nous contacter afin que le problème
puisse être résolu. Et donnez-nous l'occasion de nous améliorer. Nous garantissons que nous
vous fournirons une solution satisfaisante.
Merci pour votre compréhension!
Équipe de service TOPTRO
1.Ne placez pas le projecteur dans une pièce trop chaude ou trop froide, car la température
élevée ou la température basse réduiront la durée de vie de l'appareil. L'environnement de travail
serait 5 ℃ ~ 35 ℃ meilleur.
2.S'il y a des points noirs sur l'écran de projection, ne vous inquiétez pas, veuillez contacter
[email protected] par e-mail, nous pouvons vous envoyer une vidéo sur la façon d'éliminer
la poussière.
3.La ventilation est équipée pour que le projecteur fonctionne de manière stable. Ne couvrez pas
l'évent avec un chiffon, une couverture ou d'autres objets. N'insérez rien dans la fente du project-
eur, car cela pourrait produire un court-circuit ou une électrocution sur votre appareil et causer
des dommages.
4.Le projecteur doit être strictement protégé contre les chocs violents, l'extrusion et les vibrations.
N'essayez pas de bouger et en cas de fort impact, extrusion et vibration. N'essayez pas de
bouger et les défauts du circuit intern
5.Lentille, en tant que composant principal du projecteur, est directement liée à la définition et à
l'effet de l'image. La poussière excessive affectera la qualité de l'image. La lentille sale doit être
essuyée avec un chiffon en coton doux pour la surface de la lentille en verre. Aucun chiffon dur
ou abrasif ne doit être utilisé.
TOPTRO X2 Projecteur *1
Câble HDMI*1
Chiffon de nettoyage*1
Cordon d'alimentation*1
3-in-1 Câble AV
Manuel de l'Utilisateurl*1
Télécommande*1
Couvercle de l'objectif*1

01 02 03 04 05 06 07 08 09 10 11 12 13
14 15 16 17 18 19
20 21
22 23 24 25 26 27 28 29 30 31 32
33 34 35 36 37 38
39 40 41 42 43 44 45 46 47 48 49 50 51
52 53 54 55 56 57
58 59 60 61 62 63 64 65 66 67 68 69 70
71 72 73 74 75 76
77 78 79 80 81 82 83 84 85 86 87 88 89
90 91 92 93 94 95
96 97 98 99
111 112 113 114
100 101 102 103 104 105 106 107 108
109 110
FR
SPÉCIFICATIONS DU PROJECTEUR
APERÇU DU PROJECTEUR
Résolution native
Technologie d'affichage
Gamme de couleur
Taille de projection
Tension d'alimentation
Format d'image
compatible
Méthode de projection
Fichier vidéo
Fichier audio
1280*720P
LCD
16.7M Full
50-200 pouces
AC 100-240V
JPG/JPEG/BMP/PNG
Avant / arrière sur le bureau, avant / arrière au plafond
3GP/AVI/FLV/MP4/MPG/VOB/TS/M2TS/DAT/MKV
MP3/APE/AAC/FLAC/OGG/WAV/WMA/MID/DTS/M4A
Correction de trapézoïdale
Source de lumière
Ratio d'aspect
Distance de projection
Poids du projecteur
Interfeces
±15° manual
LED
Auto/4:3/16:9
1.59-3.67 mètres
1.2Kg
HDMI/USB*2/AV/3.5mm
Headphone Output
Modèle No. X2
01 02 03 04 05 06 07 08 09 10 11 12 13
14 15 16 17 18 19
20 21 22
23 24 25 26 27 28 29 30 31 32
33 34 35 36 37 38
39 40 41 42 43 44 45 46 47 48 49 50 51
52 53 54 55 56 57
58 59 60 61 62 63 64 65 66 67 68 69 70
71 72 73 74 75 76
77 78 79 80 81 82 83 84 85 86 87 88 89
90 91 92 93 94 95
96 97 98 99
111 112 113 114
100 101 102 103 104 105 106 107 108
109 110
FR
1
2
3
4
5
6
7
8
9/15
10
11
12
13
14
16
17
18
19
20
PUISSANCE
OK
M
S
Indicateur LED
Touches directionnelles
Mise au point manuelle
Bouton de correction
trapézoïdale
Récepteur IR
Prise de câble d'alimentation
Prise casque
Port AV
Port HDMI
Port USB * 2
Orateur
Entrée de ventilation
Vis de réglage de la hauteur
Trou de montage du projecteur
Sortie de ventilation
Démarrez / Arrêtez le projecteur
Confirmez l'option
Entrer / quitter le menu
Sélectionnez la source d'entrée (HDMI, VGA, AV)
Afficher l'état de l'alimentation
Utilisé pour ajuster le paramètre du projecteur en mode menu
Ajustez la bague de mise au point pour obtenir l'image la plus claire
Ajustez la correction trapézoïdale de ± 15 ° pour obtenir l'écran de
projection en forme de rectangle
Récepteur de signal infrarouge
Branchez le câble d'alimentation
Sortie casque 3,5 mm
Sortie audio
Entrée HDMI
Entrée USB (OUT5V peut être utilisé pour charger)
Haut-parleur de projecteur
Évent du projecteur
Ajuster la hauteur de l'écran de projection
Fixez le projecteur avec une vis M6x10mm
Évent du projecteur
01 02 03 04 05 06 07 08 09 10 11 12 13
14 15 16 17 18 19
20 21 22 23
24 25 26 27 28 29 30 31 32
33 34 35 36 37 38
39 40 41 42 43 44 45 46 47 48 49 50 51
52 53 54 55 56 57
58 59 60 61 62 63 64 65 66 67 68 69 70
71 72 73 74 75 76
77 78 79 80 81 82 83 84 85 86 87 88 89
90 91 92 93 94 95
96 97 98 99
111 112 113 114
100 101 102 103 104 105 106 107 108
109 110
FR
TÉLÉCOMMANDE.
1
2
3
4
5
6
7
8
9
10
11
12
Allumer / éteindre le projecteur
Retourner au menu précédent
Utilisé pour ajuster le paramètre du projecteur en mode menu
Source du signal
Baisser le volume
Fermer le son
Entrez dans le menu suivant
Retour à la page d'accueil / Lire la vidéo
Confirmez l'option
Afficher les menus
Retourner au menu précédent
Monter le son
OK
VOL-
VOL+
Remarque:
1).Installez 2 piles AAA dans la télécommande avant de l'utiliser. Ne combinez pas de
nouvelles piles avec d'anciennes dans la télécommande, car cela pourrait entraîner une
panne de fonctionnement en raison d'une alimentation électrique insuffisante.
2).Lorsque vous utilisez la télécommande, assurez-vous que l'émetteur de signal de la
télécommande vise le récepteur de signal infrarouge du projecteur.
3).Si vous n'utilisez pas la télécommande pendant une période prolongée, veuillez retirer
les piles pour éviter les fuites des piles.

01 02 03 04 05 06 07 08 09 10 11 12 13
14 15 16 17 18 19
20 21 22 23 24
25 26 27 28 29 30 31 32
33 34 35 36 37 38
39 40 41 42 43 44 45 46 47 48 49 50 51
52 53 54 55 56 57
58 59 60 61 62 63 64 65 66 67 68 69 70
71 72 73 74 75 76
77 78 79 80 81 82 83 84 85 86 87 88 89
90 91 92 93 94 95
96 97 98 99
111 112 113 114
100 101 102 103 104 105 106 107 108
109 110
FR
INSTALLATION
1.Méthode d'installation
Le projecteur peut être suspendu au plafond avec un cadre de suspension spécial, et placé
sur le bureau stable pour projeter l'image en fonction de l'environnement d'exploitation et
des exigences. De plus, le projecteur peut être installé avec les méthodes suivantes:
1.Front projection Ceiling mount 2.Rear projection Ceiling mount
Screen
Projector
Screen
Projector
Maintenez le projecteur à une hauteur où son objectif est symétrique axialement à l'écran.
Si cela n'est pas possible, utilisez la bague de correction trapézoïdale pour régler l'image.
3.Front projection Table mount 4.Rear projection Table mount
Screen
Projector
Screen
Projector
Rectangle Positive Image
The symmetry axis
of the screen
Screen
Projector
Lorsque vous installez correctement le projecteur, l'image est rectangulaire.
2.Distance et taille de projection
If Si vous souhaitez obtenir un écran de projection gratuit, veuillez nous contacter via
01 02 03 04 05 06 07 08 09 10 11 12 13
14 15 16 17 18 19
20 21 22 23 24 25
26 27 28 29 30 31 32
33 34 35 36 37 38
39 40 41 42 43 44 45 46 47 48 49 50 51
52 53 54 55 56 57
58 59 60 61 62 63 64 65 66 67 68 69 70
71 72 73 74 75 76
77 78 79 80 81 82 83 84 85 86 87 88 89
90 91 92 93 94 95
96 97 98 99
111 112 113 114
100 101 102 103 104 105 106 107 108
109 110
FR
Veuillez suivre les données du tableau ci-dessous pour ajuster la taille de l'image et la
distance. (Rapport hauteur / largeur: 16: 9, par défaut)
La distance de projection recommandée est d'environ 2,5 m, la distance de projec-
tion la plus courte est de 1,59 m.
Remarque:
La base de support réglable peut assurer l'angle de projection maximal de 15 °,
Le meilleur effet d'affichage sera obtenu par des plages d'angle de projection de 0 °
à 8 °.
50"
72"
100"
120"
367cm
307cm
224cm
159cm
3.Installer au plafond
A. Veuillez acheter un kit de montage au plafond universel pour projecteur monotrou avec
vis M6.
B.Connectez le projecteur au support à travers les trous de vis situés sous le projecteur.
M6*10MM
Distance
1.59m
2.24m
3.07m
3.67m
Taille de l'écran
50 pouces
72 pouces
100 pouces
120 pouces

01 02 03 04 05 06 07 08 09 10 11 12 13
14 15 16 17 18 19
20 21 22 23 24 25 26
27 28 29 30 31 32
33 34 35 36 37 38
39 40 41 42 43 44 45 46 47 48 49 50 51
52 53 54 55 56 57
58 59 60 61 62 63 64 65 66 67 68 69 70
71 72 73 74 75 76
77 78 79 80 81 82 83 84 85 86 87 88 89
90 91 92 93 94 95
96 97 98 99
111 112 113 114
100 101 102 103 104 105 106 107 108
109 110
FR
PROJECTEUR DE DÉMARRAGE
A.Allumez l'interrupteur à l'arrière du projecteur,puis appuyez sur la touche d'alimentation de la
télécommande ou du projecteur, le voyant deviendra bleu;
B.Utilisez la clé de voûte sur le dessus du projecteur pour obtenir un écran de projection rectan-
gle;
C.Ajustez la bague de mise au point sur le dessus du projecteur pour obtenir les meilleures
performances d'image; (S'il est toujours flou, essayez d'ajuster la distance de projection.)
D.Connectez l'appareil externe (Smart phone, iPad, Amazon Fire TV, boîtier TV, lecteur DVD,
ordinateur, etc.) dans les interfaces correspondantes du projecteur,assurez-vous de sélection-
ner la source correspondante. Si vous ne sélectionnez pas la bonne source, le projecteur ne
pourra pas détecter le signal ;
E.Sélectionnez le menu "Set", entrez dans "System Set", puis vous pouvez sélectionner l'option
"OSD Language" pour définir votre langue préférée.
RÉGLAGE DE L'IMAGE
1.Réglage de la mise au point
Tournez lentement la bague de mise au point. En même temps, vérifiez soigneusement le point
AF. Le meilleur point de mise au point pour l'objectif serait l'endroit où l'image est la plus claire.
Remarque: s'il est toujours flou, essayez d'ajuster la distance de projection.
2.Correction manuelle de la distorsion trapézoïdale (réglable au maximum: ± 15 °)
Déplacez lentement la bague de correction trapézoïdale sur le dessus du projecteur jusqu'à
ce que l'image se transforme en rectangle. La correction trapézoïdale peut être réglée
jusqu'à ± 15 ° (vertical).
A. Si l'image projetée est de forme trapézoïdale, elle peut être résolue par correction
Keystone. (Effectuer la correction manuelle de la distorsion trapézoïdale)
Remarque: Si la correction Keystone ne parvient pas à résoudre la forme de l'image,
veuillez réduire la hauteur verticale du projecteur par rapport au centre de l'écran.
B. l'image projetée peut être floue ou difficile à voir, cela est dû à un manque de réglage de
la mise au point avec l'objectif, veuillez suivre les processus ci-dessous pour ajuster le

01 02 03 04 05 06 07 08 09 10 11 12 13
14 15 16 17 18 19
20 21 22 23 24 25 26 27
28 29 30 31 32
33 34 35 36 37 38
39 40 41 42 43 44 45 46 47 48 49 50 51
52 53 54 55 56 57
58 59 60 61 62 63 64 65 66 67 68 69 70
71 72 73 74 75 76
77 78 79 80 81 82 83 84 85 86 87 88 89
90 91 92 93 94 95
96 97 98 99
111 112 113 114
100 101 102 103 104 105 106 107 108
109 110
FR
1.Sélectionnez la source du signal d'entrée
2.Méthode de paramétrage du menu
2.1.OPTIONS
Sélectionnez «OPTIONS» sur l'écran de démarrage, entrez dans le menu «OPTIONS».
1).Sélectionnez «Source» sur la page d'accueil, entrez dans le menu «Source».
2).Sélectionnez la source de signal d'entrée souhaitée: HDMI / Screen Mirroring / AV / USB
Concentrer. (Faites la mise au point manuelle, trouvez l'image la plus nette à l'écran)
Remarque: il est normal que la netteté au centre soit floue dans le bord.
CONFIGURATION DU PROJECTEUR
Menu
Anglais / France / italien / japonais
etc.
Reglages Langue
Restaurer les reglages
usine
Mode Function
Configurer la langue
affichée dans l'interface
de commande
Restaurez tous les
paramètres aux
paramètres d'usine
d'origine
01 02 03 04 05 06 07 08 09 10 11 12 13
14 15 16 17 18 19
20 21 22 23 24 25 26 27 28
29 30 31 32
33 34 35 36 37 38
39 40 41 42 43 44 45 46 47 48 49 50 51
52 53 54 55 56 57
58 59 60 61 62 63 64 65 66 67 68 69 70
71 72 73 74 75 76
77 78 79 80 81 82 83 84 85 86 87 88 89
90 91 92 93 94 95
96 97 98 99
111 112 113 114
100 101 102 103 104 105 106 107 108
109 110
FR
2.2.IMAGE
Ce menu peut être ouvert directement en appuyant sur le bouton M de la télécommande ou
du projecteur lors de la lecture de texte / image / vidéo / musique.
Arret/Bas/Middle/Haut
Arret / 5 sec / 10 sec / 15 sec
Mettre à jour le logiciel
Ajuster la transparence
de l'interface du menu
Ajuster la durée de
conservation de
l'interface du menu
Mettre à jour la version
du logiciel du projecteur
Blending
OsdDuration
Mise à jour logiciel(USB)
Menu
Standard/Soft/Utilisateur/Vivid/
Chaud/Med/Utilisateur/Froid
Auto/4:3/16:9
Middle
Front/Rear/Front Ceiling/Rear
Ceiling
75%~100%
4 modes d'image pour
régler le "Contraste /
Luminosité / Couleur /
Netteté / Teinte" de l'image
Basculer entre le mode
de température de
couleur
Configurez le rapport
hauteur / largeur de
l'image.
Configurer l'intensité de
la réduction du bruit
Configurer le mode de
projection
Mode Image
Temp.de Couleur
Ratio d‘aspect
Réduction de bruit
Direction de Projection
Reduce Display Size
Mode Fonction
01 02 03 04 05 06 07 08 09 10 11 12 13
14 15 16 17 18 19
20 21 22 23 24 25 26 27 28 29
30 31 32
33 34 35 36 37 38
39 40 41 42 43 44 45 46 47 48 49 50 51
52 53 54 55 56 57
58 59 60 61 62 63 64 65 66 67 68 69 70
71 72 73 74 75 76
77 78 79 80 81 82 83 84 85 86 87 88 89
90 91 92 93 94 95
96 97 98 99
111 112 113 114
100 101 102 103 104 105 106 107 108
109 110
FR
2.3.SONNER
Ce menu peut être ouvert directement en appuyant sur le bouton M de la télécommande ou
du projecteur lors de la lecture de texte / image / vidéo / musique.
Menu
Standard/Musique/Cinema/Sports/
Utilisateur
-50 à +50
Configurer le mode son
Équilibrez le son des
canaux gauche et droit
de l'enceinte
Mode De Son
Balance
Mode Function
Conseils:
1). Mode image
En mode image, vous pouvez choisir «Standard/Soft/Utilisateur/Vivid/» pour régler le
«Contraste / Luminosité / Couleur / Netteté / Teinte» de l'image.
Dans l'option utilisateur du mode image, vous pouvez régler le «contraste / luminosité /
couleur / netteté / teinte» de l'image à l'aide du bouton « / » de la télécommande dans
la plage «0-100».
2). Température de couleur
Dans Température de couleur, vous pouvez choisir les différentes options, Chaud/Med/Util-
isateur/Froid
Dans l'option utilisateur de la température de couleur, vous pouvez régler le "Rouge / Vert
/ Bleu" de l'image à l'aide du bouton « / » de la télécommande dans la plage "0-100".
01 02 03 04 05 06 07 08 09 10 11 12 13
14 15 16 17 18 19
20 21 22 23 24 25 26 27 28 29 30
31 32
33 34 35 36 37 38
39 40 41 42 43 44 45 46 47 48 49 50 51
52 53 54 55 56 57
58 59 60 61 62 63 64 65 66 67 68 69 70
71 72 73 74 75 76
77 78 79 80 81 82 83 84 85 86 87 88 89
90 91 92 93 94 95
96 97 98 99
111 112 113 114
100 101 102 103 104 105 106 107 108
109 110
FR
Le projecteur TOPTRO X2 dispose de 6 sources de signal, USB / HDMI / AV / Connexion
de sortie audio (prise casque 3,5 mm) / Fonction MHL / Utilisation de l'adaptateur AV
numérique d'éclairage. Soutenez l'iPhone, l'iPad, choisissez la source d'entrée «HDMI».
Veuillez sélectionner le port de connexion approprié pour connecter votre appareil (PC,
téléphone, lecteur DVD, barre de son, USB, PS4, etc.)
2.4.HORAIRE
Ce menu peut être ouvert directement en appuyant sur le bouton M de la télécommande ou
du projecteur lors de la lecture de texte / image / vidéo / musique.
1.Connectez la clé USB
Insérez le pilote flash USB dans le port USB et choisissez la bonne source de signal, puis
appuyez sur le bouton Lecture / Pause ( )pour afficher ou arrêter
Étapes de la connexion Bluetooth:
Ouvrez la page de menu → "SON" → "Sortie audio" → Sélectionnez le mode "Statique"
par le bouton droit → Rechercher des appareils par bouton → Sélectionnez l'appareil
Bluetooth et appuyez sur
Bouton droit pour confirmer la connexion (appuyez sur le bouton droit pour vous décon-
necter) → Si
connectez-vous avec succès, la barre d'état sur la rangée du bas affichera "Play".
CONNEXION DES LIGNES DE SIGNAL
Menu
Arrêt / 10 min / 20 min / 30 min /
60 min / 90 min/120 min/180 min/
240 min
Réglez la durée de
veille du projecteur
Minuterie de Sommeil
Mode Function
Marche/Arret
Static/Arret/Auto
Ajustez intelligemment
le volume
Auto Volume
Mode sonore
01 02 03 04 05 06 07 08 09 10 11 12 13
14 15 16 17 18 19
20 21 22 23 24 25 26 27 28 29 30 31
32
33 34 35 36 37 38
39 40 41 42 43 44 45 46 47 48 49 50 51
52 53 54 55 56 57
58 59 60 61 62 63 64 65 66 67 68 69 70
71 72 73 74 75 76
77 78 79 80 81 82 83 84 85 86 87 88 89
90 91 92 93 94 95
96 97 98 99
111 112 113 114
100 101 102 103 104 105 106 107 108
109 110
FR
2.Connexion à l'ordinateur
Utilisation du câble HDMI (inclus) pour se connecter au projecteur.
1) .Connectez le câble HDMI au port HDMI de votre ordinateur avec le câble HDMI en
le paquet;
2) .Sélectionnez la source HDMI pour projeter tous les fichiers sur votre ordinateur;
3) .Sur votre ordinateur portable, maintenez les touches de la carte "Win + P" enfoncées
pour changer de mode d'affichage
(Appuyez sur «Source» sur la télécommande ou sur «S» sur le panneau de commande,
puis «Source d'entrée» sur l'écran, choisissez «USB»)
Format d'image
JEPG, PNG, BMP
.jpg / .png / .bmp
Soutien Extension de fichier
Spécification du fichier multimédia
Audio Format
Ne prend pas en charge: Dolby AC3 / AAC, DTS, WMA, DivX, VC1, RM, RMVB, FLV, etc.
MPEG1, MPEG2, LPCM, MP3
.avi / .ts / .dat / .vob / .wmv / .mkv / .mp3
/ .mp4/ .m4a
Soutien Extension de fichier
Format vidéo (débit binaire jusqu'à 30 ~ 40 Mbs)
Ne prend pas en charge: MSVC / CRAM, MP42, GMC, IV32, RLE, cvid, RV20, DivX, RM,
RMVB, VC1, FLV, etc.
MPEG1, MPEG2, H.263, H.264, AVS,
VC1, MJPEG, RV30, RV40, HEVC
.dat / .ts / .mp4 / .mpg / .mpeg / .avi / .tp
/ .mkv / .mov / .asf / .flv / .3gp. / .3gpp
Soutien Extension de fichier
Ordinateur uniquement: c'est l'option par défaut - s'affiche uniquement sur le moniteur principal.
Dupliquer: fait que tous les moniteurs affichent la même chose en dupliquant le bureau sur
chaque moniteur.
01 02 03 04 05 06 07 08 09 10 11 12 13
14 15 16 17 18 19
20 21 22 23 24 25 26 27 28 29 30 31 32
33 34 35 36 37 38
39 40 41 42 43 44 45 46 47 48 49 50 51
52 53 54 55 56 57
58 59 60 61 62 63 64 65 66 67 68 69 70
71 72 73 74 75 76
77 78 79 80 81 82 83 84 85 86 87 88 89
90 91 92 93 94 95
96 97 98 99
111 112 113 114
100 101 102 103 104 105 106 107 108
109 110
FR FR
Étendre: fait que tous vos moniteurs agissent comme un seul grand moniteur étendant le
bureau sur tous.
Projecteur uniquement: s'affiche uniquement sur le moniteur secondaire comme un
projecteur.
Vous pouvez modifier la résolution de l'écran en mode projecteur uniquement
Étape: Démarrer> Panneau de configuration> Apparence et personnalisation> Ajust-
er l'écran Résolution
Remarque:
Lorsque vous connectez le projecteur au portable, vous devrez peut-être appuyer sur Fn +
F * (F1-F10 surclavier) pour modifier la sortie. En raison de chaque marque de fonction de
bouton d'ordinateur différence, vous pouvez vous référer au tableau suivant.
Fabrication
Acer
Dell
Epson
Fujitsu
IBM
Hewlett-packard
Lenovo
Clés
Fn+F5
Fn+F8
Fn+F8
Fn+F10
Fn+F7
Fn+F4
Fn+F10
Fabrication
NEC
Panasonic
Sharp
Sony
Toshiba
Zotac
Clés
Fn+F3
Fn+F3
Fn+F5
Fn+F7
Fn+F5
Fn+F3/F5
3.AV Connection
Utilisez le câble AV dans l'emballage.
A. Allumez votre lecteur DVD et le projecteur;
B. Connectez les connecteurs femelles colorés au câble RCA de votre lecteur DVD;
C. Connectez le connecteur noir au port d'entrée audio du projecteur;
D. Connectez le connecteur jaune d'un autre côté au port vidéo du projecteur;
E. Sélectionnez «AV» comme source de signal.
01 02 03 04 05 06 07 08 09 10 11 12 13
14 15 16 17 18 19
20 21 22 23 24 25 26 27 28 29 30 31 32
33
34 35 36 37 38
39 40 41 42 43 44 45 46 47 48 49 50 51
52 53 54 55 56 57
58 59 60 61 62 63 64 65 66 67 68 69 70
71 72 73 74 75 76
77 78 79 80 81 82 83 84 85 86 87 88 89
90 91 92 93 94 95
96 97 98 99
111 112 113 114
100 101 102 103 104 105 106 107 108
109 110
FR FR
OPÉRATION DE JEU
4.Connexion de sortie audio
1.Lire un Cinema / Musiqn / Photo / Texte (en mode d'entrée USB)
A.Si votre haut-parleur a un port AUX, veuillez utiliser votre câble audio 3,5 mm pour vous
connecter au Port de sortie audio du projecteur et port AUX de votre haut-parleur.
B.Si votre haut-parleur n’a pas de port AUX, veuillez acheter un câble 2RCA, puis utilisez-le
pour vous connecter au port de sortie audio du projecteur et aux ports gauche et droit de
votre haut-parleur.
Sélectionnez d'abord «SOURCE» sur la télécommande.
A. Pour lire un fichier vidéo, sélectionnez d'abord «Cinema / Musiqn / Photo / Texte» sur
l'écran principal, puis appuyez sur la touche «OK» du panneau de commande ou de la
télécommande. La boîte sélectionnée s'élargit et les bords blancs environnants ressortent.
Ou connectez-vous au lecteur DVD avec le câble HDMI dans l'emballage.
AV
video
audio out
(L/R)

01 02 03 04 05 06 07 08 09 10 11 12 13
14 15 16 17 18 19
20 21 22 23 24 25 26 27 28 29 30 31 32
33 34
35 36 37 38
39 40 41 42 43 44 45 46 47 48 49 50 51
52 53 54 55 56 57
58 59 60 61 62 63 64 65 66 67 68 69 70
71 72 73 74 75 76
77 78 79 80 81 82 83 84 85 86 87 88 89
90 91 92 93 94 95
96 97 98 99
111 112 113 114
100 101 102 103 104 105 106 107 108
109 110
FR
Pause
Mode Function
2.Interface de lecture
Remarque: Le contenu vidéo peut être visualisé en maintenant le curseur sur la vidéo
sélectionnée pendant plus de 3 secondes. Uniquement MPEG1, MPEG2, H.263, H.264,
AVS,VC1, MJPEG, RV30, RV40 et HEVC sont pris en charge dans la lecture vidéo.
B.presse " " et " " sur le panneau de commande ou à distance pour sélectionner
l'équipement pour le stockage de fichiers. Appuyez sur la touche «OK» pour accéder à
l'étape suivante.
Remarque: si vous avez des questions sur la lecture de la vidéo, envoyez un e-mail à
[email protected]. Nous fournirons une solution rapide en 24 heures.
C.presse " " et " " sur le panneau de commande ou la télécommande pour sélection-
ner le fichier souhaité (ou le dossier pour accéder au sous-dossier). Appuyez sur la touche
«OK» pour le lire.
Convient pour les présentations professionnelles de base, telles que les diapositives
PowerPoint, Excel et Word.
Remarque: Le contenu de l'image peut être visualisé en maintenant le curseur sur l'image
sélectionnée pendant plus de 3 secondes. Seul le format txt est pris en charge pour la
lecture d'images.

01 02 03 04 05 06 07 08 09 10 11 12 13
14 15 16 17 18 19
20 21 22 23 24 25 26 27 28 29 30 31 32
33 34 35
36 37 38
39 40 41 42 43 44 45 46 47 48 49 50 51
52 53 54 55 56 57
58 59 60 61 62 63 64 65 66 67 68 69 70
71 72 73 74 75 76
77 78 79 80 81 82 83 84 85 86 87 88 89
90 91 92 93 94 95
96 97 98 99
111 112 113 114
100 101 102 103 104 105 106 107 108
109 110
FR
Screen Mirroring
Sélectionnez d'abord «SOURCE» sur la télécommande.Entrez dans le menu «Screen
Mirroring».
FB
Retour rapide, rembobine rapidement la vidéo pendant la lecture. le
la vitesse de rembobinage varie de 2 X à 32X
FF
Prev.
Suivant
Stop
All
Random
Set A
Playlist
Info
Slow F
Step Fo
Goto Ti
Zoom+
Zoom-
Ratio d
Move
Avance rapide, pousse la vidéo à avancer rapidement pendant la
lecture.La vitesse d'avancement varie de 2 X à 32X
Passer à la vidéo précédente
Passer à la vidéo suivante
Arrêtez de jouer et quittez
Aléatoire activé / aléatoire de
Définir A / B (définir deux nœuds de la vidéo en boucle) / Aucun
Sélectionnez toutes les listes de lecture dans le dossier actuel
Détails de la vidéo
Avance lente 1X à 16X
Définir une heure pour sauter directement
Zoom + 1X à 8X
Zoom - 1X à 1 / 4X
Automatique / 4: 3/16: 9
01 02 03 04 05 06 07 08 09 10 11 12 13
14 15 16 17 18 19
20 21 22 23 24 25 26 27 28 29 30 31 32
33 34 35 36
37 38
39 40 41 42 43 44 45 46 47 48 49 50 51
52 53 54 55 56 57
58 59 60 61 62 63 64 65 66 67 68 69 70
71 72 73 74 75 76
77 78 79 80 81 82 83 84 85 86 87 88 89
90 91 92 93 94 95
96 97 98 99
111 112 113 114
100 101 102 103 104 105 106 107 108
109 110
FR
1.Mise en miroir de l'écran de l'appareil IOS.
1.1.Lorsqu'il est connecté à un réseau WiFi domestique, utilisez la fonction de mise en
miroir d'écran de l'appareil IOS
1) Appuyez sur le bouton OK de la télécommande pour connecter le projecteur au réseau
WiFi domestique;
2) Allumez votre appareil IOS et connectez-vous au même réseau WiFi domestique;
3)Activez la fonction de mise en miroir de l'écran de l'appareil IOS et l'écran de projection
affichera votre appareil mobile.
1.2.Lorsque vous êtes connecté à des données cellulaires, utilisez la fonction de mise en
miroir d'écran de l'appareil IOS
1).Ouvrez les paramètres wifi de l'appareil IOS, recherchez et connectez-vous à
"RKcast-XXXXXX" (mot de passe 12345678)
2).Activez la fonction de mise en miroir d'écran de l'appareil IOS et connectez-vous.
2. Mise en miroir de l'écran de l'appareil Android
1).Connectez-vous à votre réseau WiFi domestique ou à votre réseau de données mobiles
sur votre téléphone mobile;
2).Activez la fonction de mise en miroir de l'écran de l'appareil Android et l'écran de projec-
tion affichera votre appareil mobile.
Remarque:
1).Tous les téléphones mobiles n'ont pas une fonction de mise en miroir d'écran, et
peut-être différents mobiles les téléphones affichent des noms différents pour la fonction de
duplication d'écran.
Veuillez consulter votre fournisseur de services de marque de téléphone pour confirmer si
votre téléphone prend en charge l'écran fonction de mise en miroir et comment trouver
cette fonction.
2).Lorsque vous utilisez la fonction de mise en miroir de l'écran, assurez-vous de la fonction
WiFi de votre le téléphone est actif.
3).La fluidité de l'écran de projection dépend de la qualité du réseau qui
votre téléphone est connecté, veuillez vous assurer que votre téléphone est connecté à un
bon réseau de qualité, afin qu'il puisse projeter un écran de lecture vidéo fluide.
First,press the remote control ‘ok’
button and connect with wifi.

01 02 03 04 05 06 07 08 09 10 11 12 13
14 15 16 17 18 19
20 21 22 23 24 25 26 27 28 29 30 31 32
33 34 35 36 37
38
39 40 41 42 43 44 45 46 47 48 49 50 51
52 53 54 55 56 57
58 59 60 61 62 63 64 65 66 67 68 69 70
71 72 73 74 75 76
77 78 79 80 81 82 83 84 85 86 87 88 89
90 91 92 93 94 95
96 97 98 99
111 112 113 114
100 101 102 103 104 105 106 107 108
109 110
FR
3.Connexion filaire (uniquement pour les appareils IOS)
Vous pouvez également utiliser un câble pour connecter l'appareil ios au projecteur. Après
avoir inséré le câble dans le port USB, attendez 5 à 10 secondes. Un avertissement
apparaîtra vous demandant si vous faites confiance à l'ordinateur. Veuillez sélectionner
«Confiance» et l'écran de projection s'affichera. Le même contenu de l'appareil.
ARRÊT SÉCURISÉ
1.Appuie sur le sur le projecteur ou la télécommande.
2.Appuyez sur le bouton OK pour confirmer l'arrêt.
3.Débranchez le cordon d'alimentation du projecteur.
4.Couvrez l'objectif et rangez le projecteur dans un endroit frais et sec.
GARANTIE
Merci beaucoup pour votre achat et votre soutien! Nous offrons une garantie de 3 ans pour
le projecteur X2. Si vous avez des questions, n'hésitez pas à nous contacter via

01 02 03 04 05 06 07 08 09 10 11 12 13
14 15 16 17 18 19
20 21 22 23 24 25 26 27 28 29 30 31 32
33 34 35 36 37 38
39 40 41 42 43 44 45 46 47 48 49 50 51
52 53 54 55 56 57
58 59 60 61 62 63 64 65 66 67 68 69 70
71 72 73 74 75 76
77 78 79 80 81 82 83 84 85 86 87 88 89
90 91 92 93 94 95
96 97 98 99
111 112 113 114
100 101 102 103 104 105 106 107 108
109 110
IT
CONTENT
TOPTRO Supporto Professionale a Vita...................................................................................40
SUGGERIMENTI......................................................................................................40
LISTA PACCHETTI.....................................................................................................................40
SPECIFICHE DEL PROIETTORE.............................................................................................41
PANORAMICA DEL PROIETTORE....................................................................................41-42
Telecomando.......................................................................................................43
INSTALLAZIONE...........................................................................................................44-45
1.Metodo di installazione.........................................................................................................44
2.Distanza e dimensioni del proiettore...............................................................................44-45
3.Installare sul soffitto..............................................................................................................45
AVVIAMENTO DEL PROIETTORE...........................................................................................46
REGOLAZIONE DELL'IMMAGINE.......................................................................................46-47
1.Regolazione della messa a fuoco.........................................................................................46
2.Correzione trapezoidale manuale (massima regolabile: ± 15 °).....................................46-47
CONFIGURAZIONE DEL PROIETTORE............................................................................47-50
1.Selezionare la sorgente del segnale di ingresso...............................................................47
2.Metodo di impostazione del menu................................................................................47-49
2.1.OPZIONE..........................................................................................................47-48
2.2.IMMAGINE .......................................................................................................48-49
2.3.AUDIO ..............................................................................................................49-50
2.4.TEMPO ..................................................................................................................50
COLLEGAMENTO LINEE DI SEGNALESIGNAL LINES CONNECTION.......................50-53
1.Collegare USB Flash ......................................................................................................50-51
2.Collegamento al computer .............................................................................................51-52
3.Connessione AV. ............................................................................................................52-53
4.Collegamento uscita audio ..................................................................................................53
FUNZIONAMENTO DI GIOCO............................................................................................53-55
1.Riproduci un film / foto / musica / testo (in modalità di immissione USB)........................53-54
2.Play interfaccia ...............................................................................................................54-55
Clonazione schermo ............................................................................................................55-57
1.Dispositivo Android.........................................................................................................55-56
2.Dispositivo IOS. ...................................................................................................................56
3.Connessione cablata (applicabile solo ai dispositivi IOS) ..........................................56-57
ARRESTO SICURO...................................................................................................................57
GARANZIA........................................................................................................57

01 02 03 04 05 06 07 08 09 10 11 12 13
14 15 16 17 18 19
20 21 22 23 24 25 26 27 28 29 30 31 32
33 34 35 36 37 38
39
40 41 42 43 44 45 46 47 48 49 50 51
52 53 54 55 56 57
58 59 60 61 62 63 64 65 66 67 68 69 70
71 72 73 74 75 76
77 78 79 80 81 82 83 84 85 86 87 88 89
90 91 92 93 94 95
96 97 98 99
111 112 113 114
100 101 102 103 104 105 106 107 108
109 110
IT
SUGGERIMENTI
LISTA PACCHETTI
TOPTRO Supporto Professionale a Vita
Ciao amico,
Grazie mille per aver supportato TOPTRO!
Leggere attentamente questo manuale prima di utilizzare il proiettore. In caso di problemi,
inviare un'e-mail con il numero dell'ordine e il problema a [email protected]. Forniremo una
soluzione rapida in 24 ore.
EIn realtà, molti problemi possono essere facilmente risolti impostando, come nessun segnale,
nessun suono, connessione bluetooth fallita, connessione wifi fallita, macchie scure, animazi-
one discontinua ecc. Promettiamo che tutti i proiettori siano stati controllati attentamente al
100% e imballati prima della spedizione.
Apprezzo davvero il tuo supporto per TOPTRO. Se hai domande, puoi contattarci in modo che
il problema possa essere risolto. E dacci l'opportunità di migliorare. Garantiamo che ti forniremo
una soluzione soddisfacente.
Grazie per la tua comprensione!
TOPTRO Service Team
1.Non posizionare il proiettore in una stanza troppo calda o troppo fredda, poiché la temperatura
elevata o bassa ridurrà la durata del dispositivo. L'ambiente di lavoro sarebbe 5 ℃ ~ 35 ℃
migliore.
2.Se ci sono punti neri sullo schermo di proiezione, non preoccuparti, contatta service@top-
tro.com via e-mail, possiamo inviarti un video su come rimuovere la polvere.
3.La ventilazione è attrezzata per il funzionamento stabile del proiettore. Non coprire le prese
d'aria con panni, coperte o altre cose. Non inserire nulla nella fessura del proiettore, altrimenti si
potrebbe provocare un cortocircuito o una scossa elettrica al dispositivo e causare danni.
4.Il proiettore deve essere rigorosamente protetto da forti urti, estrusione e vibrazioni. Non
cercare di muoversi e in caso di forte impatto, estrusione e vibrazione. Non provare a muoversi e
il circuito interno fa male.
5.La lente, in quanto componente principale del proiettore, è direttamente correlata alla
definizione e all'effetto dell'immagine. La polvere eccessiva su di essa influirà sulla qualità dell'im-
magine. La lente sporca deve essere pulita con un panno di cotone morbido per la superficie
della lente di vetro. Non utilizzare panni duri o abrasivi.
Proiettore TOPTRO X2 * 1
Cavo HDMI * 1
Panno * 1
Cavo di alimentazione * 1
Cavo segnale AV 3 in 1 * 1
Manuale dell'utente * 1
Telecomando * 1
Copriobiettivo * 1
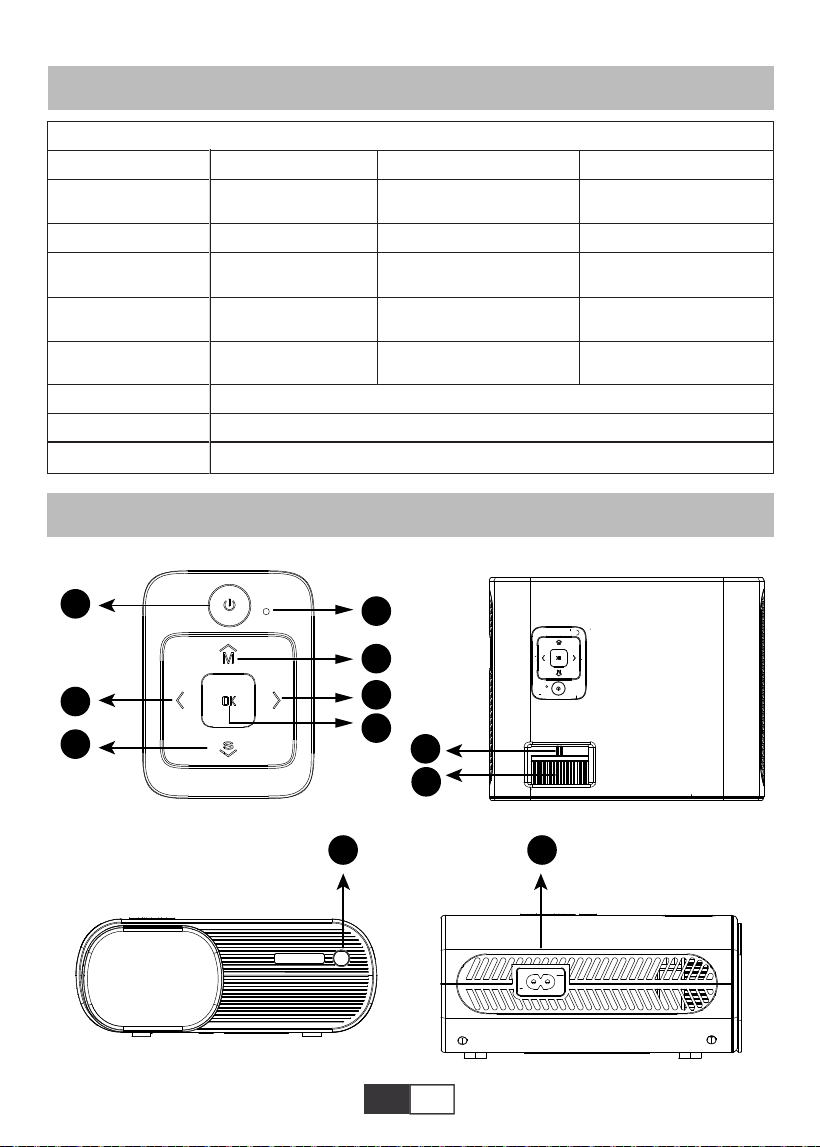
01 02 03 04 05 06 07 08 09 10 11 12 13
14 15 16 17 18 19
20 21 22 23 24 25 26 27 28 29 30 31 32
33 34 35 36 37 38
39 40
41 42 43 44 45 46 47 48 49 50 51
52 53 54 55 56 57
58 59 60 61 62 63 64 65 66 67 68 69 70
71 72 73 74 75 76
77 78 79 80 81 82 83 84 85 86 87 88 89
90 91 92 93 94 95
96 97 98 99
111 112 113 114
100 101 102 103 104 105 106 107 108
109 110
IT
SPECIFICHE DEL PROIETTORE
PANORAMICA DEL PROIETTORE
Risoluzione Nativa
Tecnologia di
Visualizzazione
Gioco a Colori
Dimensioni di
Proiezione
Tensione di
Alimentazione
Format d'image
compatible
Méthode de projection
Fichier vidéo
Fichier audio
1280*720P
LCD
16.7M Full
50-200 inch
AC 100-240V
JPG/JPEG/BMP/PNG
Anteriore / Posteriore sulla scrivania, Anteriore / Posteriore sul soffitto
MPEG1/MPEG2/H.263/H.264/AVS/VC1/MJPEG/RV30/RV40/HEVC,ecc.
MPEG1/MPEG2/LPCM/MP3,ecc.
Correzione Trapezoidale
Sorgente Luminosa
Aspect Ratio
Distanza di Proiezione
Peso del Proiettore
Interfeces
±15° Manuale
LED
Auto/4:3/16:9
1.59-3.67 Meters
1.2Kg
HDMI / USB * 2 / AV /
Uscita cuffie da 3,5 mm
Modello n. X2

01 02 03 04 05 06 07 08 09 10 11 12 13
14 15 16 17 18 19
20 21 22 23 24 25 26 27 28 29 30 31 32
33 34 35 36 37 38
39 40 41
42 43 44 45 46 47 48 49 50 51
52 53 54 55 56 57
58 59 60 61 62 63 64 65 66 67 68 69 70
71 72 73 74 75 76
77 78 79 80 81 82 83 84 85 86 87 88 89
90 91 92 93 94 95
96 97 98 99
111 112 113 114
100 101 102 103 104 105 106 107 108
109 110
IT
1
2
3
4
5
6
7
8
9/15
10
11
12
13
14
16
17
18
19
20
ENERGIA
OK
M
S
Spia
Tasti freccia
Messa a fuoco manuale
Manopola di correzione
trapezoidale
Ricevitore IR
Presa per cavo di
alimentazione
Jack per cuffie
Porta AV
Porta HDMI
Porta USB * 2
Altoparlante
Ingresso di ventilazione
Vite di regolazione dell'altezza
Foro di montaggio del proiettore
Uscita di ventilazione
Avvia / Spegni il proiettore
Conferma l'opzione
Apri il menu
Cambia la sorgente del segnale di ingresso
Mostra lo stato del potere
Utilizzato per regolare i parametri del proiettore nella modalità menu
Regola l'anello di messa a fuoco per ottenere l'immagine più nitida
Regolare la correzione trapezoidale di ± 15 ° per ottenere lo
schermo di proiezione a forma di rettangolo
Ricevitore di segnali a infrarossi
Collega il cavo di alimentazione
Uscita per cuffie da 3,5 mm
Uscita audio
Ingresso HDMI
Ingresso USB ((OUT5V può essere utilizzato per caricare)
Altoparlante del proiettore
Presa d'aria del proiettore
Regola l'altezza dello schermo di proiezione
Fissare il proiettore con una vite M6x10mm
Presa d'aria del proiettore

01 02 03 04 05 06 07 08 09 10 11 12 13
14 15 16 17 18 19
20 21 22 23 24 25 26 27 28 29 30 31 32
33 34 35 36 37 38
39 40 41 42
43 44 45 46 47 48 49 50 51
52 53 54 55 56 57
58 59 60 61 62 63 64 65 66 67 68 69 70
71 72 73 74 75 76
77 78 79 80 81 82 83 84 85 86 87 88 89
90 91 92 93 94 95
96 97 98 99
111 112 113 114
100 101 102 103 104 105 106 107 108
109 110
IT
Telecomando
1
2
3
4
5
6
7
8
9
10
11
12
Accende / spegne il proiettore
Ritorna al menù precedente
Utilizzato per regolare i parametri del proiettore nella modalità menu
Fonte del segnale
Volume basso
Chiudi il suono
Entra nel menu successivo
Torna alla home page / Riproduci il video
Conferma l'opzione
Apri i menu
Ritorna al menù precedente
Alza il volume
OK
VOL-
VOL+
Nota:
1) .Installare 2 batterie AAA nel telecomando prima di utilizzarlo. Non combinare batterie
nuove con quelle vecchie nel telecomando, che possono causare problemi di funzionamen-
to a causa di un'alimentazione insufficiente.
2) .Quando si utilizza il telecomando, assicurarsi che il trasmettitore del segnale del teleco-
mando punti al ricevitore del segnale a infrarossi del proiettore.
3) .Se non si utilizza il telecomando per un periodo prolungato, rimuovere le batterie per
evitare perdite dalle batterie.
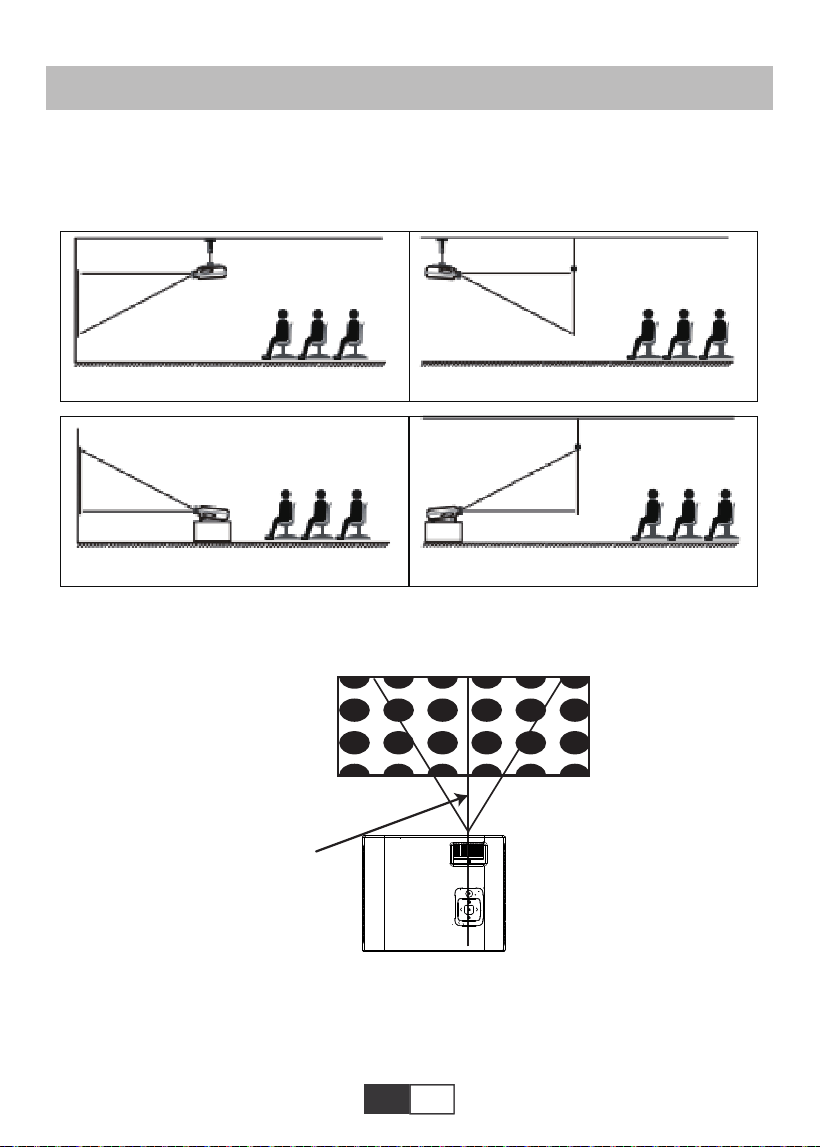
01 02 03 04 05 06 07 08 09 10 11 12 13
14 15 16 17 18 19
20 21 22 23 24 25 26 27 28 29 30 31 32
33 34 35 36 37 38
39 40 41 42 43
44 45 46 47 48 49 50 51
52 53 54 55 56 57
58 59 60 61 62 63 64 65 66 67 68 69 70
71 72 73 74 75 76
77 78 79 80 81 82 83 84 85 86 87 88 89
90 91 92 93 94 95
96 97 98 99
111 112 113 114
100 101 102 103 104 105 106 107 108
109 110
IT
INSTALLAZIONE
1.Metodo di installazione
Il proiettore può essere appeso al soffitto con apposito telaio appendiabiti, e posizionato
sulla stabile scrivania per proiettare l'immagine in base all'ambiente operativo e alle esigen-
ze. Inoltre, il proiettore può essere installato con i seguenti metodi:
Tenere il proiettore ad un'altezza in cui la sua lente sia a simmetria assiale rispetto allo
schermo. Se ciò non è possibile, utilizzare l'anello di correzione trapezoidale per regolare
l'immagine.
immagine positiva rettangolo
L'asse sistemetrico
dello schermo
Schermo
Proiettore
Quando si installa correttamente il proiettore, l'immagine è un rettangolo.
2.Distanza e dimensioni del proiettore
Se desideri avere uno schermo di proiezione gratuito, contattaci tramite service@top-
tro.com
1.Attacco a soffitto a proiezione frontale 2.Montaggio a soffitto a retroproiezione
Proiettore
3.Supporto da tavolo per proiezioni frontali 4.Supporto da tavolo per proiezioni posteriori
Schermo
Schermo
Proiettore
Proiettore

01 02 03 04 05 06 07 08 09 10 11 12 13
14 15 16 17 18 19
20 21 22 23 24 25 26 27 28 29 30 31 32
33 34 35 36 37 38
39 40 41 42 43 44
45 46 47 48 49 50 51
52 53 54 55 56 57
58 59 60 61 62 63 64 65 66 67 68 69 70
71 72 73 74 75 76
77 78 79 80 81 82 83 84 85 86 87 88 89
90 91 92 93 94 95
96 97 98 99
111 112 113 114
100 101 102 103 104 105 106 107 108
109 110
IT
Si prega di seguire i dati nella tabella sottostante, per regolare la dimensione dell'immagine
e la distanza. (Proporzioni: 16: 9, predefinito)
La distanza di proiezione consigliata è di circa 2,5 m, la distanza di proiezione più
breve è di 1,59 m.
Nota:
La base di appoggio regolabile può assicurare l'angolo di proiezione massimo di 15
°,Il miglior effetto di visualizzazione sarà ottenuto da intervalli di angoli di proiezione
di 0 ° - 8 °.
50"
72"
100"
120"
367cm
307cm
224cm
159cm
3.Installare sul soffitto
A. Acquistare un kit di montaggio a soffitto per proiettore a foro singolo universale con vite
M6.
B.Collegare il proiettore al supporto attraverso i fori delle viti nella parte inferiore del
proiettore.
M6*10MM
Distanza
1.59m
2.24m
3.07m
3.67m
Dimensione dello schermo
50 pollici
72 pollici
100 pollici
120 pollici
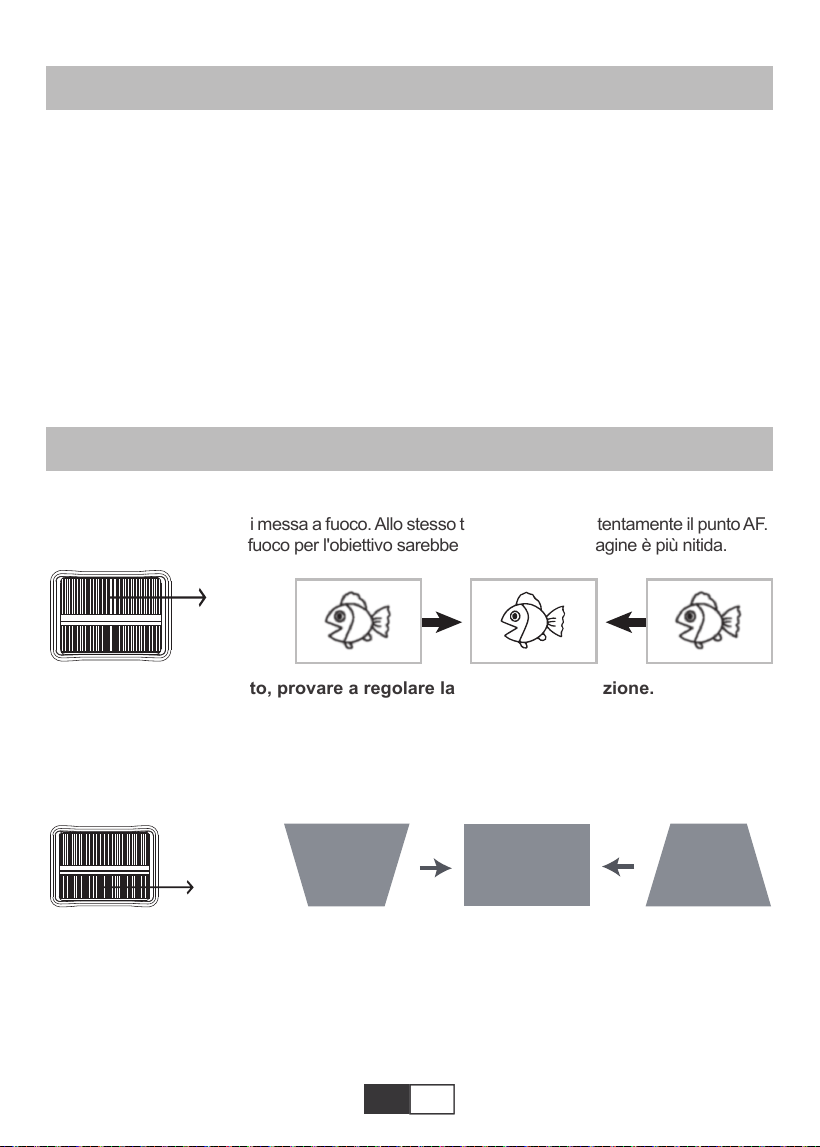
01 02 03 04 05 06 07 08 09 10 11 12 13
14 15 16 17 18 19
20 21 22 23 24 25 26 27 28 29 30 31 32
33 34 35 36 37 38
39 40 41 42 43 44 45
46 47 48 49 50 51
52 53 54 55 56 57
58 59 60 61 62 63 64 65 66 67 68 69 70
71 72 73 74 75 76
77 78 79 80 81 82 83 84 85 86 87 88 89
90 91 92 93 94 95
96 97 98 99
111 112 113 114
100 101 102 103 104 105 106 107 108
109 110
IT
AVVIAMENTO DEL PROIETTORE
A.Accendere l'interruttore sul retro del proiettore ,quindi premere il tasto di accensione sul
telecomando o sul proiettore, l'indicatore luminoso diventerà blu;
B.Utilizzare la distorsione trapezoidale sulla parte superiore del proiettore per ottenere uno
schermo di proiezione rettangolare;
C.Regolare l'anello di messa a fuoco sulla parte superiore del proiettore per ottenere le migliori
prestazioni di immagine; (Se è ancora sfocato, prova a regolare la distanza di proiezione.)
D.Collegare il dispositivo esterno (smartphone, iPad, Amazon Fire TV, TV box, lettore DVD,
computer, ecc.) Nelle interfacce corrispondenti del proiettore, assicurarsi di selezionare la
sorgente corrispondente. Se non si seleziona la sorgente corretta, il proiettore non sarà in grado
di rilevare il segnale ;.
E.Selezionare il menu "Set", entrare in "System Set", quindi è possibile selezionare l'opzione
"OSD Language" per impostare la lingua preferita.
REGOLAZIONE DELL'IMMAGINE
1.Regolazione della messa a fuoco
Ruota lentamente l'anello di messa a fuoco. Allo stesso tempo, controlla attentamente il punto AF.
Il miglior punto di messa a fuoco per l'obiettivo sarebbe quello in cui l'immagine è più nitida.
Nota: se è ancora sfocato, provare a regolare la distanza di proiezione.
2.Correzione trapezoidale manuale (massima regolabile: ± 15 °)
Spostare lentamente l'anello di correzione della distorsione trapezoidale sulla parte superi-
ore del proiettore finché l'immagine non diventa rettangolo. La correzione trapezoidale può
essere regolata fino a ± 15 ° (verticale).
A. Se l'immagine proiettata ha una forma trapezoidale, può essere risolta con Keystone
correzione. (Eseguire la correzione manuale della distorsione trapezoidale)
Nota: se la correzione trapezoidale non riesce a risolvere la forma dell'immagine, ridurre
l'estensione altezza verticale del proiettore rispetto al centro dello schermo.
B. l'immagine proiettata potrebbe essere sfocata o difficile da vedere, ciò è dovuto alla
mancanza di Regolazione della messa a fuoco con l'obiettivo, seguire i processi seguenti
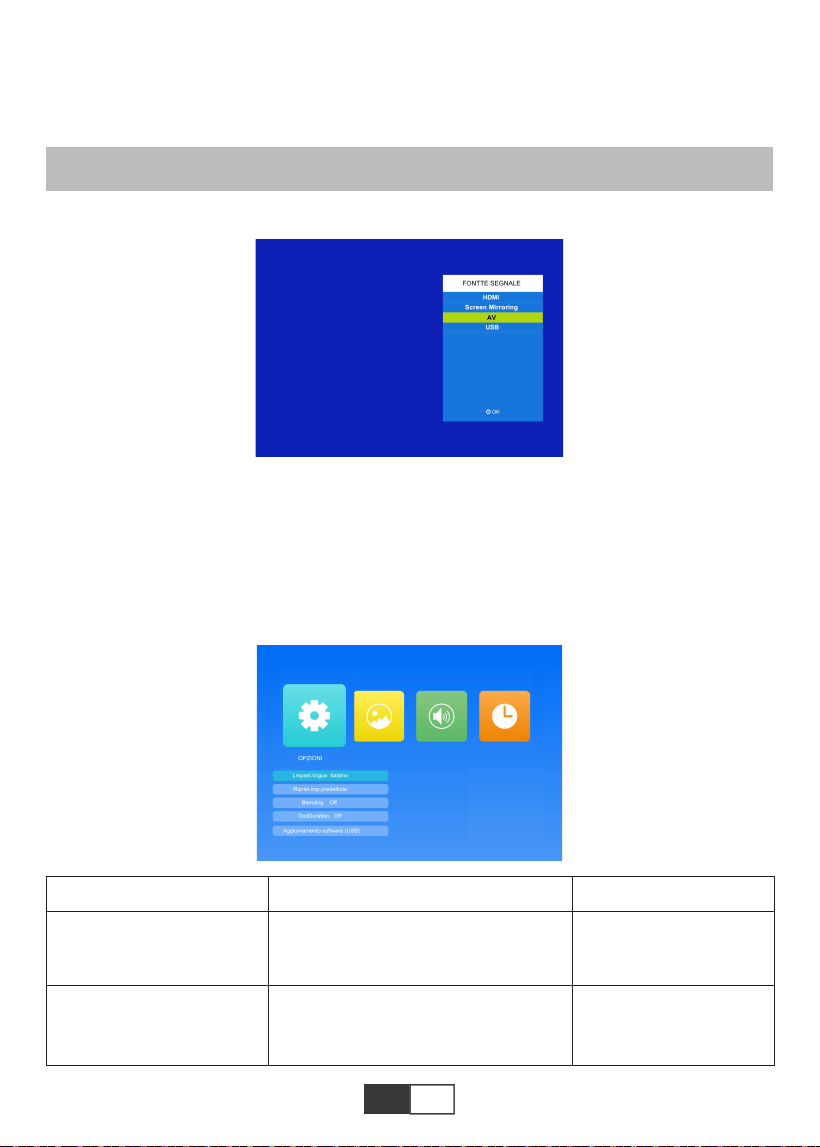
01 02 03 04 05 06 07 08 09 10 11 12 13
14 15 16 17 18 19
20 21 22 23 24 25 26 27 28 29 30 31 32
33 34 35 36 37 38
39 40 41 42 43 44 45 46
47 48 49 50 51
52 53 54 55 56 57
58 59 60 61 62 63 64 65 66 67 68 69 70
71 72 73 74 75 76
77 78 79 80 81 82 83 84 85 86 87 88 89
90 91 92 93 94 95
96 97 98 99
111 112 113 114
100 101 102 103 104 105 106 107 108
109 110
IT
1.Selezionare la sorgente del segnale di ingresso
2.Metodo di impostazione del menu
2.1.OPZIONE
Selezionare "OPZIONI" nella schermata di avvio, accedere al menu "OPZIONI".
1).Selezionare "FONTTE SEGNALE" nella home-page, accedere al menu "Sorgente".
2).Selezionare la sorgente del segnale di ingresso desiderata: HDMI / Screen Mirroring / AV / USB
per regolare il Messa a fuoco. (Esegui la messa a fuoco manuale, trova l'immagine più
nitida sullo schermo)
Nota: è normale quando la nitidezza al centro, sfocatura al bordo.
CONFIGURAZIONE DEL PROIETTORE
Menù
Inglese / Francia / italiano /
giapponese ecc
Lmpast.lingua
Riprist.imp.predefinite
Modalità Funzione
Imposta la lingua
visualizzata nell'interfac-
cia operativa
Ripristina tutte le
impostazioni alle
impostazioni di fabbrica
originali
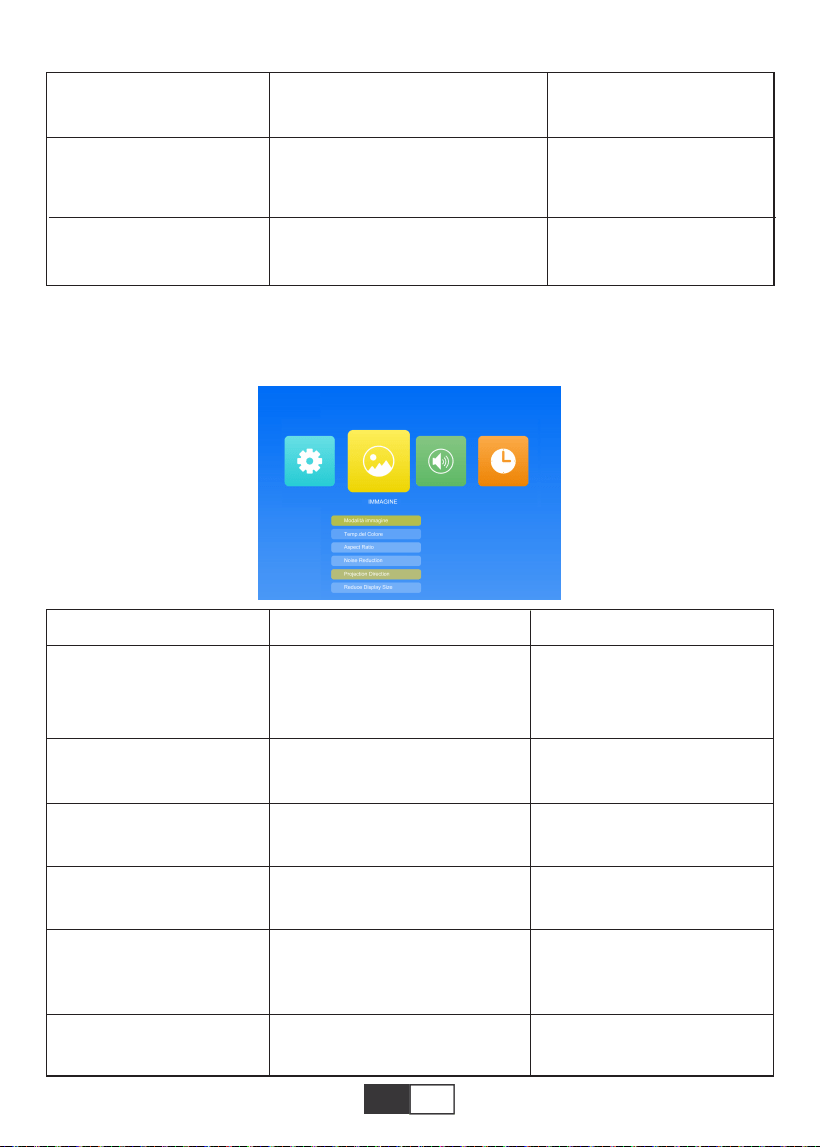
01 02 03 04 05 06 07 08 09 10 11 12 13
14 15 16 17 18 19
20 21 22 23 24 25 26 27 28 29 30 31 32
33 34 35 36 37 38
39 40 41 42 43 44 45 46 47
48 49 50 51
52 53 54 55 56 57
58 59 60 61 62 63 64 65 66 67 68 69 70
71 72 73 74 75 76
77 78 79 80 81 82 83 84 85 86 87 88 89
90 91 92 93 94 95
96 97 98 99
111 112 113 114
100 101 102 103 104 105 106 107 108
109 110
IT
2.2.IMMAGINE
Questo menu può essere aperto direttamente premendo il pulsante M sul telecomando o
sul proiettore durante la riproduzione di testo / immagine / video / musica.
Off / Basso / Middle / Alto
Off/ 5 Sec / 10 Sec / 15 Sec
Aggiorna il software
Regola la trasparenza
dell'interfaccia del menu
Regola la durata del
mantenimento
dell'interfaccia del menu
Aggiorna la versione
del software del proiettore
Blending
OsdDuration
Aggiornamento software
(USB)
Menù
Standard / Soft / Utente / Vivid
Medio / Caldo /Utente
Auto / 16: 9/4: 3
Off/Basso/Middle/Alto/Default
Front/Rear/Front Ceiling/Rear
Ceiling
75%~100%
Modalità immagine
Temp.del Colore
Aspect Ratio
Noise Reduction
Projection Direction
Reduce Display Size
Modalità Funzione
4 modalità immagine per
regolare "Contrasto /Luminosità
/ Colore / Nitidezza / Tinta"
dell'imm agine
Passa dalla modalità
temperatura colore
Imposta le proporzioni
dell'immagine.
Imposta l'intensità della
riduzione del rumore
Imposta la modalità di
proiezione
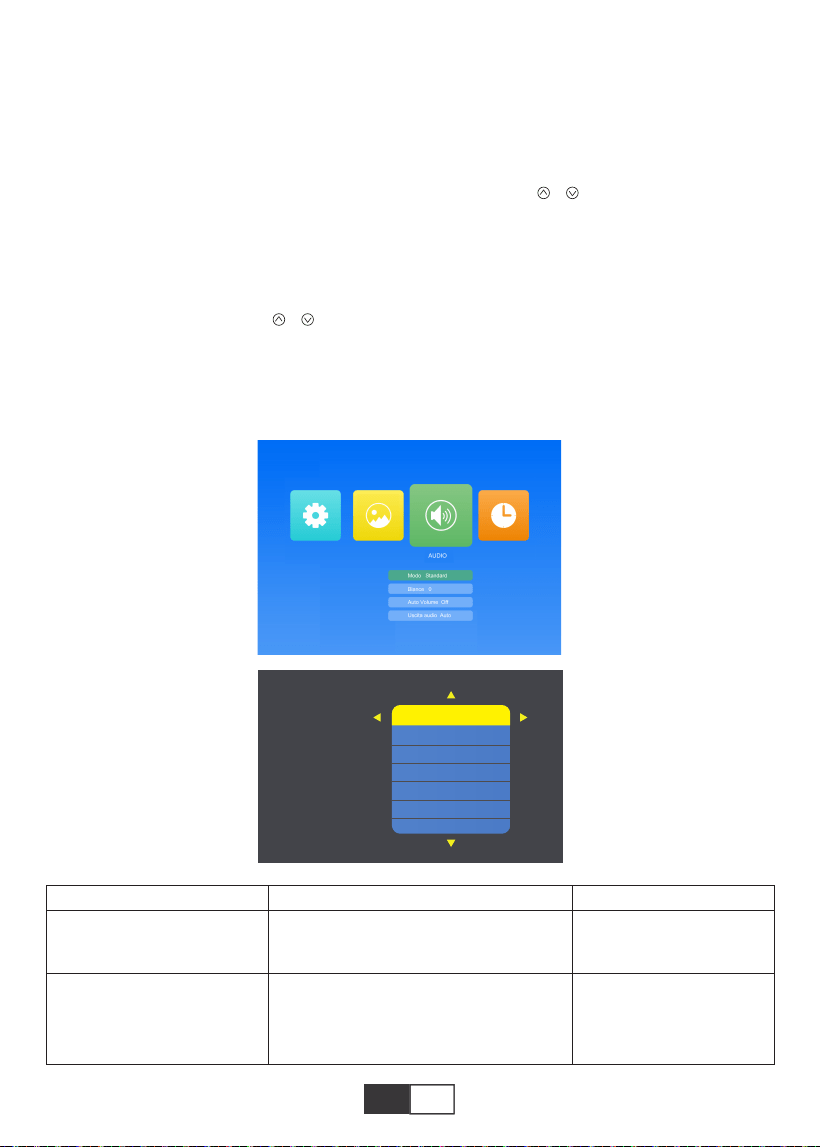
01 02 03 04 05 06 07 08 09 10 11 12 13
14 15 16 17 18 19
20 21 22 23 24 25 26 27 28 29 30 31 32
33 34 35 36 37 38
39 40 41 42 43 44 45 46 47 48
49 50 51
52 53 54 55 56 57
58 59 60 61 62 63 64 65 66 67 68 69 70
71 72 73 74 75 76
77 78 79 80 81 82 83 84 85 86 87 88 89
90 91 92 93 94 95
96 97 98 99
111 112 113 114
100 101 102 103 104 105 106 107 108
109 110
IT
2.3.AUDIO
Questo menu può essere aperto direttamente premendo il pulsante M sul telecomando o
sul proiettore durante la riproduzione di testo / immagine / video / musica.
Menù
Standard / Musica / Cinema /
Sport/Utente
Da -50 a +50
Imposta la modalità
audio
Bilancia il suono del
canale sinistro e destro
dell'altoparlante
Modo
Blance
Modalità Funzione
Suggerimenti:
1). Modalità immagine
In modalità immagine, è possibile scegliere "Standard / Soft / Utente / Vivid" per regolare
"Contrasto / Luminosità / Colore / Nitidezza / Tinta" dell'immagine.
Nell'opzione Modalità immagine-Utente, è possibile regolare "Contrasto / Luminosità /
Colore / Nitidezza / Tinta" dell'immagine tramite il pulsante " / " sul telecomando nella
gamma "0-100".
2). Temperatura di Colore
In Temperatura colore, puoi scegliere le diverse opzioni, Medio / Caldo / Freddo.
Nell'opzione Temperatura colore-utente, è possibile regolare il "Rosso / Verde / Blu" dell'im-
magine tramite il pulsante " / " sul telecomando nell'intervallo "0-100".
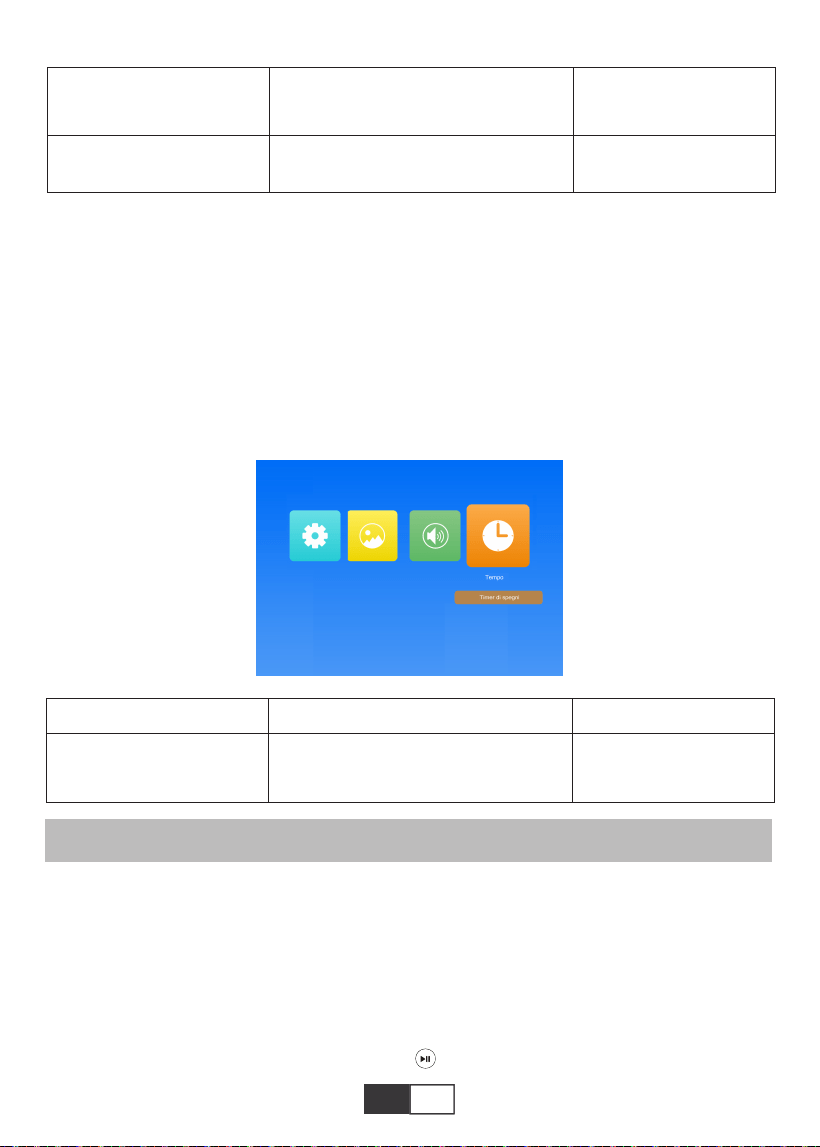
01 02 03 04 05 06 07 08 09 10 11 12 13
14 15 16 17 18 19
20 21 22 23 24 25 26 27 28 29 30 31 32
33 34 35 36 37 38
39 40 41 42 43 44 45 46 47 48 49
50 51
52 53 54 55 56 57
58 59 60 61 62 63 64 65 66 67 68 69 70
71 72 73 74 75 76
77 78 79 80 81 82 83 84 85 86 87 88 89
90 91 92 93 94 95
96 97 98 99
111 112 113 114
100 101 102 103 104 105 106 107 108
109 110
IT
Il proiettore TOPTRO X2 ha 6 sorgenti di segnale, connessione USB / HDMI / AV / uscita
audio (jack per cuffie da 3,5 mm) / Funzione MHL / Utilizza adattatore AV digitale per
illuminazione. Supporta iPhone, iPad, scegli la sorgente di ingresso "HDMI". Seleziona la
porta di connessione corretta per connettere il tuo dispositivo (PC, telefono, lettore DVD,
soundbar, USB, PS4 ecc.)
2.4.TEMPO
Questo menu può essere aperto direttamente premendo il pulsante M sul telecomando o
sul proiettore durante la riproduzione di testo / immagine / video / musica.
1.Collegare USB Flash
Inserire il driver flash USB nella porta USB e scegliere la sorgente del segnale corretta,
quindi premere il pulsante Riproduci / Pausa ( ) per visualizzare o interrompere.
Passaggi per la connessione Bluetooth:
Aprire la pagina del menu → "AUDIO" → "Uscita audio" → Selezionare la modalità "Statico"
Con il pulsante destro → Cerca dispositivi con il pulsante → Selezionare il dispositivo
Bluetooth e premere
Pulsante destro per confermare la connessione (premere il pulsante destro per disconnet-
tersi) → Se è presente connettersi con successo, la barra di stato nella riga inferiore
mostrerà "Play".
COLLEGAMENTO LINEE DI SEGNALE
Menù
Off / 10 min / 20 min / 30 min /
60 min / 90 min/120 min/180 min/
240 min
Imposta il tempo di
inattività del proiettore
Timer di spegni
Moda Funzione
Off / Auto / Static
Static/Off
Regola il volume in
modo intelligente
Auto Volume
Uscita audio
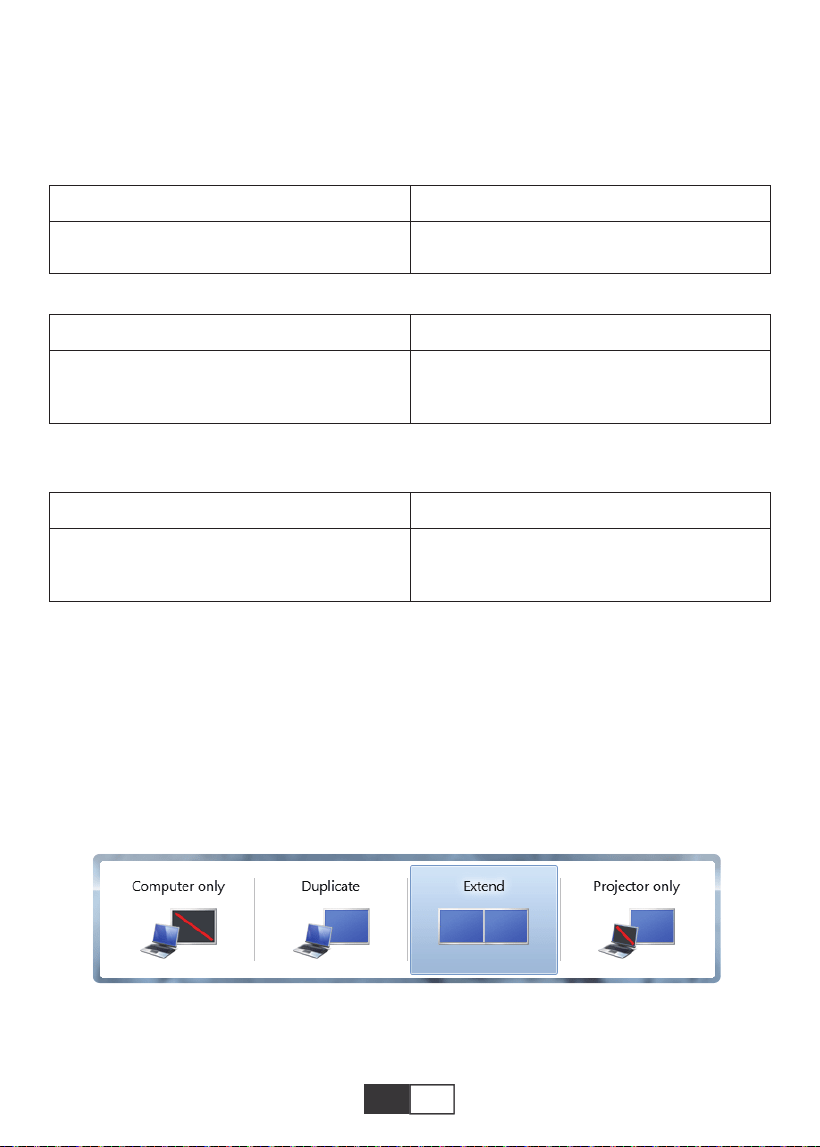
01 02 03 04 05 06 07 08 09 10 11 12 13
14 15 16 17 18 19
20 21 22 23 24 25 26 27 28 29 30 31 32
33 34 35 36 37 38
39 40 41 42 43 44 45 46 47 48 49 50
51
52 53 54 55 56 57
58 59 60 61 62 63 64 65 66 67 68 69 70
71 72 73 74 75 76
77 78 79 80 81 82 83 84 85 86 87 88 89
90 91 92 93 94 95
96 97 98 99
111 112 113 114
100 101 102 103 104 105 106 107 108
109 110
IT
2.Collegamento al computer
Utilizzando il cavo HDMI (in dotazione) per il collegamento al proiettore.
1) Collegare il cavo HDMI alla porta HDMI del computer con il cavo HDMI in
il pacchetto;
2). Seleziona la sorgente HDMI per proiettare qualsiasi file sul tuo computer;
3). Sul tuo laptop, tieni premuti i tasti della scheda "Win + P" per modificare la modalità di
visualizzazione
(Premere "Source" sul telecomando o "S" sul pannello di controllo, poi c'è "Input Source"
sullo schermo, scegliere "USB")
Formato immagine
JEPG, PNG, BMP
.jpg / .png / .bmp
Supporto Estensione del file
Specifica del file multimediale
Formato audio
Non supporta: Dolby AC3 / AAC, DTS, WMA, DivX, VC1, RM, RMVB, FLV, ecc.
MPEG1, MPEG2, LPCM, MP3
.avi / .ts / .dat / .vob / .wmv / .mkv / .mp3
/ .mp4/ .m4a
Supporto Estensione del file
Formato video (velocità in bit fino a 30 ~ 40 Mbs)
Non supporta: MSVC / CRAM, MP42, GMC, IV32, RLE, cvid, RV20, DivX, RM,RMVB, VC1,
FLV, ecc.
MPEG1, MPEG2, H.263, H.264, AVS,
VC1, MJPEG, RV30, RV40, HEVC
.dat / .ts / .mp4 / .mpg / .mpeg / .avi / .tp
/ .mkv / .mov / .asf / .flv / .3gp. / .3gpp
Supporto Estensione del file
Solo computer: è l'opzione predefinita - viene visualizzato solo sul monitor principale.
Duplica: fa in modo che tutti i monitor visualizzino la stessa cosa su cui duplica il desktop
ogni monitor.

01 02 03 04 05 06 07 08 09 10 11 12 13
14 15 16 17 18 19
20 21 22 23 24 25 26 27 28 29 30 31 32
33 34 35 36 37 38
39 40 41 42 43 44 45 46 47 48 49 50 51
52 53 54 55 56 57
58 59 60 61 62 63 64 65 66 67 68 69 70
71 72 73 74 75 76
77 78 79 80 81 82 83 84 85 86 87 88 89
90 91 92 93 94 95
96 97 98 99
111 112 113 114
100 101 102 103 104 105 106 107 108
109 110
IT IT
Estendi: fa sì che tutti i tuoi monitor si comportino come un grande monitor estendendo il
desktop su tutti loro.
Projector only: Displays only on the secondary monitor like a projector.
È possibile modificare la risoluzione dello schermo in modalità Solo proiettore
Passaggio: Start> Pannello di controllo> Aspetto e personalizzazione> Regola scher-
mo Risoluzione
Nota:
Quando si collega il proiettore al notebook, potrebbe essere necessario premere Fn + F*
(F1-F10 attivato tastiera) per modificare l'output. A causa di ogni marca di funzione del
pulsante del computer differenza, puoi fare riferimento alla seguente tabella.
Manufacture
Acer
Dell
Epson
Fujitsu
IBM
Hewlett-packard
Lenovo
Keys
Fn+F5
Fn+F8
Fn+F8
Fn+F10
Fn+F7
Fn+F4
Fn+F10
Manufacture
NEC
Panasonic
Sharp
Sony
Toshiba
Zotac
Keys
Fn+F3
Fn+F3
Fn+F5
Fn+F7
Fn+F5
Fn+F3/F5
3.Connessione AV
Usa il cavo AV nella confezione.
A. Accendi il lettore DVD e il proiettore;
B. Collega i connettori femmina colorati al cavo RCA del tuo lettore DVD;
C. Collegare il connettore nero alla porta di ingresso audio del proiettore;
D. Collegare il connettore giallo di un altro lato alla porta video del proiettore;
E. Selezionare "AV" come sorgente del segnale.

01 02 03 04 05 06 07 08 09 10 11 12 13
14 15 16 17 18 19
20 21 22 23 24 25 26 27 28 29 30 31 32
33 34 35 36 37 38
39 40 41 42 43 44 45 46 47 48 49 50 51
52
53 54 55 56 57
58 59 60 61 62 63 64 65 66 67 68 69 70
71 72 73 74 75 76
77 78 79 80 81 82 83 84 85 86 87 88 89
90 91 92 93 94 95
96 97 98 99
111 112 113 114
100 101 102 103 104 105 106 107 108
109 110
IT IT
FUNZIONAMENTO DI GIOCO
4.Collegamento uscita audio
1.Riproduci un film / foto / musica / testo (in modalità di immissione USB)
A.Se il tuo altoparlante ha una porta AUX, utilizza il cavo audio da 3,5 mm per connetterti
con il La porta di uscita audio del proiettore e la porta AUX dell'altoparlante.
B.Se il tuo altoparlante non ha una porta AUX, acquista un cavo 2RCA, quindi usalo per
collegarlo alla porta di uscita audio del proiettore e alle porte sinistra e destra dell'altopar-
lante.
Per prima cosa Selezionare "SOURCE" sul telecomando.
A.Per riprodurre un file video, selezionare prima "Cinema / Musica / Foto / Txt" nella
schermata principale, quindi premere il tasto "OK" sul pannello di controllo o sul telecoman-
do. La casella selezionata si allarga e risaltano i bordi bianchi circostanti.
Oppure connettiti al lettore DVD con il cavo HDMI nella confezione.
AV
video
audio out
(L/R)
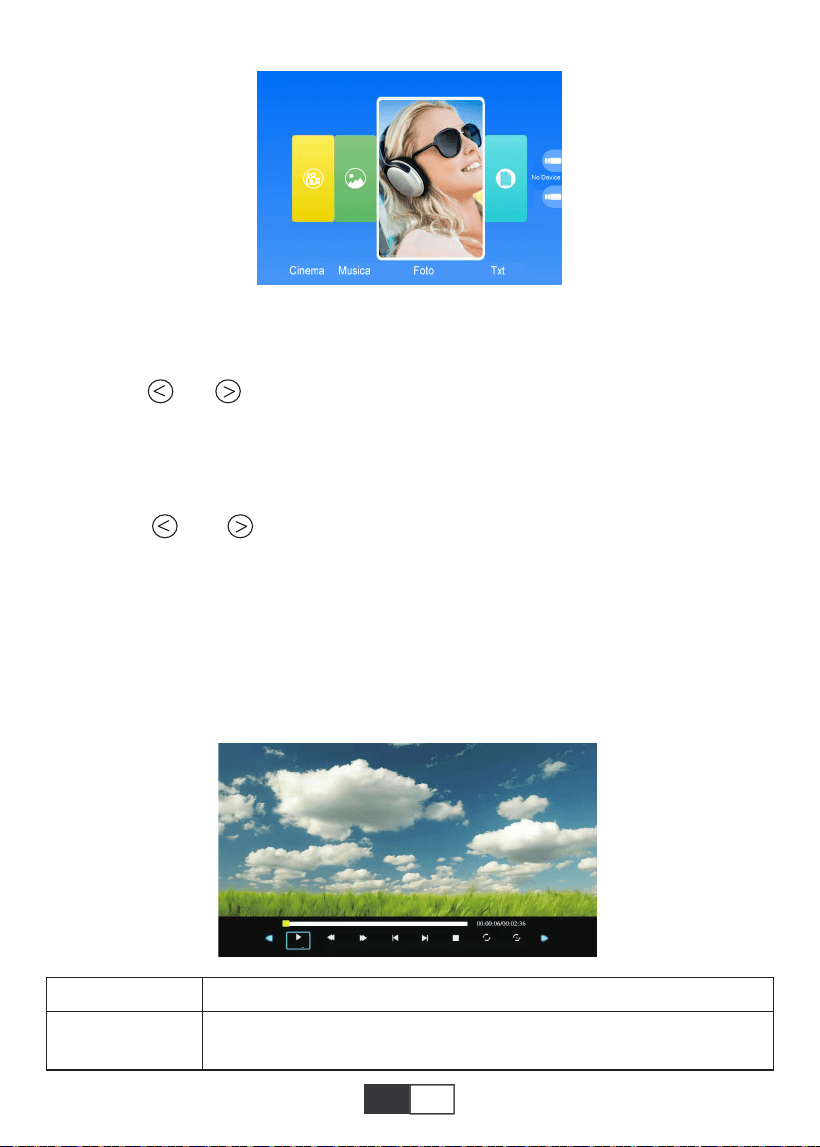
01 02 03 04 05 06 07 08 09 10 11 12 13
14 15 16 17 18 19
20 21 22 23 24 25 26 27 28 29 30 31 32
33 34 35 36 37 38
39 40 41 42 43 44 45 46 47 48 49 50 51
52 53
54 55 56 57
58 59 60 61 62 63 64 65 66 67 68 69 70
71 72 73 74 75 76
77 78 79 80 81 82 83 84 85 86 87 88 89
90 91 92 93 94 95
96 97 98 99
111 112 113 114
100 101 102 103 104 105 106 107 108
109 110
IT
MENÙ Funzione
2.Play interfaccia
Nota: il contenuto video può essere visualizzato mantenendo il cursore sul video selezion-
ato per più di 3 secondi. Solo MPEG1, MPEG2, H.263, H.264, AVS,VC1, MJPEG, RV30,
RV40 e HEVC sono supportati nella riproduzione video.
B.Premere “ ” e “ ” sul pannello operativo o sul telecomando per selezionare l'appar-
ecchiatura per la memorizzazione dei file. Premere il tasto "OK" per entrare nella fase
successiva.
Nota: in caso di domande sulla riproduzione del video, inviare un'e-mail a service@top-
tro.com. Forniremo una soluzione rapida in 24 ore.
C.Premere “ ” e “ ” sul pannello operativo o sul telecomando per selezionare il file
desiderato (o la cartella per entrare nella sottocartella). Premere il tasto “OK” per riprodurlo.
Adatto per presentazioni aziendali di base, come diapositive PowerPoint, visualizzazione di
Excel e Word.
Nota: il contenuto dell'immagine può essere visualizzato mantenendo il cursore sull'im-
magine selezionata per più di 3 secondi. Solo il formato txt è supportato per la riproduzione
di immagini.
FB
Indietro veloce, riavvolge rapidamente il video durante la riproduzi-
one. Il
01 02 03 04 05 06 07 08 09 10 11 12 13
14 15 16 17 18 19
20 21 22 23 24 25 26 27 28 29 30 31 32
33 34 35 36 37 38
39 40 41 42 43 44 45 46 47 48 49 50 51
52 53 54
55 56 57
58 59 60 61 62 63 64 65 66 67 68 69 70
71 72 73 74 75 76
77 78 79 80 81 82 83 84 85 86 87 88 89
90 91 92 93 94 95
96 97 98 99
111 112 113 114
100 101 102 103 104 105 106 107 108
109 110
IT
Clonazione schermo
Per prima cosa Selezionare "SOURCE" sul telecomando.
Accedere al menu "Screen Mirroring", seguire le istruzioni per selezionare il metodo di
connessione corrispondente per connettere il dispositivo al proiettore.
FF
Prec.
Il prossimo
Fermare
Tutti
Casuale
Imposta A
elenco di
riproduzione
Informazioni
Avanti lento
Passo in avanti
Goto Time
Zoom+
Ingrandisci-
Proporzioni
Mossa
La velocità di riavvolgimento varia da 2 X a 32X
Passa al video precedente
Passa al video successivo
Smetti di giocare ed esci
Casuale attivato / Casuale di
Imposta A / B (Imposta due nodi nel video in loop) / Nessuno
Seleziona tutte le playlist nella cartella corrente
Dettagli video
Avanzamento lento da 1X a 16X
Imposta un tempo per saltare direttamente
Zoom + 1X a 8X
Zoom: da 1X a 1 / 4X
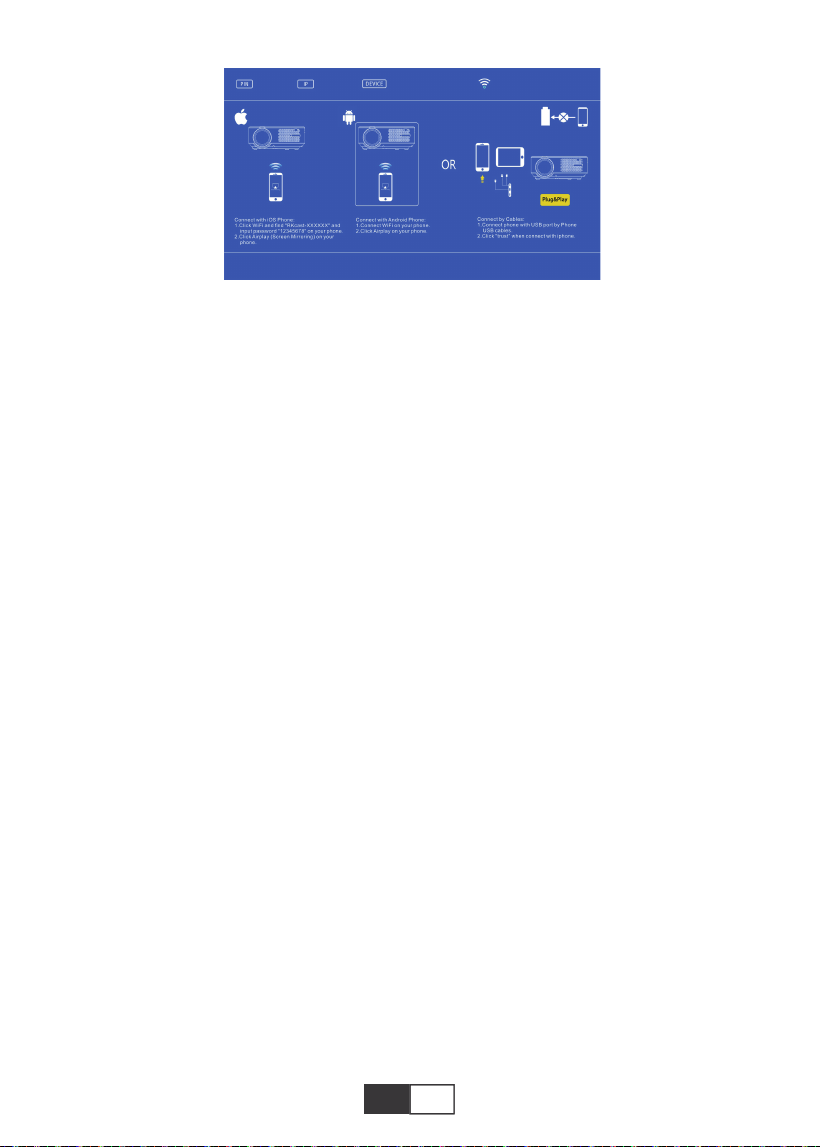
01 02 03 04 05 06 07 08 09 10 11 12 13
14 15 16 17 18 19
20 21 22 23 24 25 26 27 28 29 30 31 32
33 34 35 36 37 38
39 40 41 42 43 44 45 46 47 48 49 50 51
52 53 54 55
56 57
58 59 60 61 62 63 64 65 66 67 68 69 70
71 72 73 74 75 76
77 78 79 80 81 82 83 84 85 86 87 88 89
90 91 92 93 94 95
96 97 98 99
111 112 113 114
100 101 102 103 104 105 106 107 108
109 110
IT
1. Dispositivo Android
1). Collega la rete WiFi domestica sul tuo telefono cellulare,
2). Attivare la funzione di mirroring dello schermo del dispositivo mobile. Dopo che la
connessione è riuscita, lo schermo di proiezione mostrerà il tuo dispositivo mobile.
Nota:
1) Non tutti i telefoni Android hanno la funzione di mirroring dello schermo e forse diversi
telefoni Android visualizzano nomi diversi per la funzione di mirroring dello schermo. Si
prega di consultare il fornitore di servizi del marchio del telefono per verificare se il telefono
supporta la funzione di mirroring dello schermo e come trovare questa funzione.
2) .Quando si utilizza la funzione di mirroring dello schermo, assicurarsi che la funzione
WiFi del telefono sia attiva.
3) .L'uniformità dello schermo di proiezione dipende dalla qualità della rete a cui è connes-
so il telefono, assicurarsi che il telefono sia connesso a una rete di buona qualità, in modo
che possa proiettare una schermata di riproduzione video fluida.
2. Dispositivo IOS
2.1. Utilizzare la funzione Screen Mirroring del dispositivo IOS sullo sfondo dell'utilizzo della
rete WiFi domestica
1). Premere il pulsante "OK" sul telecomando e il proiettore si connette alla rete WiFi
domestica;
2). Accendi il tuo dispositivo IOS e connettiti alla stessa rete domestica;
3). Attivare la funzione di mirroring dello schermo del dispositivo mobile. Dopo che la
connessione è riuscita, lo schermo di proiezione mostrerà il tuo dispositivo mobile.
2.2. Utilizzare la funzione Screen Mirroring dei dispositivi IOS nel contesto dell'utilizzo dei
dati della rete cellulare
1). Apri le impostazioni Wi-Fi del dispositivo IOS, cerca e connettiti a "RKcast-XXXXXX"
(password 12345678)
2). Attiva la funzione di mirroring dello schermo IOS e cerca.
3). Quindi seleziona "RKcast-XXXXXX" dall'elenco per connetterti al tuo dispositivo IOS.
(Se non riesci a trovarlo, premere il pulsante "OK" per accedere al menu wifi del proiettore
e disconnettersi)
4). Dopo che la connessione è riuscita, lo schermo di proiezione mostra che la connessione
con il tuo dispositivo IOS è riuscita.
3. Connessione cablata (applicabile solo ai dispositivi IOS)
Puoi anche utilizzare un cavo Lightning per collegare i tuoi dispositivi iOS al proiettore,
First,press the remote control ‘ok’
button and connect with wifi.

01 02 03 04 05 06 07 08 09 10 11 12 13
14 15 16 17 18 19
20 21 22 23 24 25 26 27 28 29 30 31 32
33 34 35 36 37 38
39 40 41 42 43 44 45 46 47 48 49 50 51
52 53 54 55 56
57
58 59 60 61 62 63 64 65 66 67 68 69 70
71 72 73 74 75 76
77 78 79 80 81 82 83 84 85 86 87 88 89
90 91 92 93 94 95
96 97 98 99
111 112 113 114
100 101 102 103 104 105 106 107 108
109 110
IT
dopo aver inserito il cavo tramite la porta USB, attendi 5-10 secondi, ci sarà un avviso che
ti chiederà se ti fidi del computer, scegli "Trust", e lo schermo di proiezione mostrerà lo
stesso contenuto dei tuoi dispositivi.
ARRESTO SICURO
1.Premere il pulsante sul proiettore o sul telecomando.
2.Premere il pulsante OK per confermare lo spegnimento.
3.Scollegare il cavo di alimentazione del proiettore.
4.Coprire l'obiettivo e riporre il proiettore in un luogo fresco e asciutto.
GARANZIA
Grazie mille per il tuo acquisto e supporto! Forniamo 3 anni di garanzia per il proiettore X2.
In caso di domande, non esitare a contattarci tramite

01 02 03 04 05 06 07 08 09 10 11 12 13
14 15 16 17 18 19
20 21 22 23 24 25 26 27 28 29 30 31 32
33 34 35 36 37 38
39 40 41 42 43 44 45 46 47 48 49 50 51
52 53 54 55 56 57
58 59 60 61 62 63 64 65 66 67 68 69 70
71 72 73 74 75 76
77 78 79 80 81 82 83 84 85 86 87 88 89
90 91 92 93 94 95
96 97 98 99
111 112 113 114
100 101 102 103 104 105 106 107 108
109 110
ES
CONTENIDO
Soporte profesional de por vida TOPTRO ...............................................................................59
CONSEJOS.....................................................................................................................59
LISTA DE PAQUETES.............................................................................................................59
ESPECIFICACIONES DEL PROYECTOR.............................................................................60
RESUMEN DEL PROYECTOR...........................................................................................60-61
REMOTE CONTOLLER.............................................................................................................62
INSTALACIÓN...............................................................................................................63-64
1.Método de instalación..........................................................................................................63
2.Distancia de proyección y tamaño......................................................................................64
3.Instalar en el techo...............................................................................................................64
PROYECTOR DE ARRANQUE................................................................................................65
AJUSTE DE IMAGEN...........................................................................................................65-66
1.Ajuste de enfoque.................................................................................................................65
2.Corrección trapezoidal manual (máximo ajustable: ±15°)..............................................65-66
CONFIGURACIÓN DEL PROYECTOR..............................................................................66-69
1.Seleccione la fuente de la señal de entrada.......................................................................66
2.Método de configuración del menú.................................................................................66
2.1.OPCIONES............................................................................................................66-67
2.2.IMAGEN.................................................................................................................67-68
2.3.SONAR..................................................................................................................68-69
2.4.HORA..........................................................................................................................69
CONEXIÓN LÍNEAS DE SEÑAL........................................................................................69-72
1.Conecte el flash USB.....................................................................................................69-70
2.Conexión a la computadora...........................................................................................70-71
3.Conexión AV...................................................................................................................71-72
4.Conexión de salida de audio................................................................................................72
OPERACIÓN DE JUEGO.....................................................................................................72-75
1.Reproduzca Cine / Foto / Música / Texto (en modo de entrada USB)...............................73
2.Interfaz de juego.............................................................................................................73-74
Duplicar pantalla....................................................................................................................74-76
1.Dispositivo Android..............................................................................................................75
2.IOS device...........................................................................................................................75
2.1.IOS device(Uusing home WiFi network)....................................................66-67
2.1.IOS device(Uusing datos de red celular).................................................66-67
3.Conexión por cable (solo aplicable a dispositivos IOS).............................................75-76
APAGADO SEGURO.................................................................................................................76
GARANTÍA.................................................................................................................76

01 02 03 04 05 06 07 08 09 10 11 12 13
14 15 16 17 18 19
20 21 22 23 24 25 26 27 28 29 30 31 32
33 34 35 36 37 38
39 40 41 42 43 44 45 46 47 48 49 50 51
52 53 54 55 56 57
58
59 60 61 62 63 64 65 66 67 68 69 70
71 72 73 74 75 76
77 78 79 80 81 82 83 84 85 86 87 88 89
90 91 92 93 94 95
96 97 98 99
111 112 113 114
100 101 102 103 104 105 106 107 108
109 110
ES
CONSEJOS
LISTA DE EMPAQUE
Soporte profesional de por vida TOPTRO
Estimado cliente,
¡Muchas gracias por apoyar a TOPTRO!
Lea este manual detenidamente antes de utilizar el proyector. Si tiene algún problema, envíe su
número de pedido por correo electrónico y el problema a [email protected]. Proporcionare-
mos una solución rápida en 24 horas.
En realidad, muchos problemas se pueden resolver fácilmente mediante la configuración, como
no hay señal, no hay sonido, falla la conexión Bluetooth, falla la conexión WIF, puntos oscuros,
animación entrecortada, etc. Prometemos que todos los proyectores han sido 100%
cuidadosamente revisado y empaquetado antes del envío.
Realmente apreciamos su apoyo a TOPTRO. Si tiene alguna pregunta, podría ponerse en
contacto con nosotros para que el problema pueda ser resuelto? Y danos la oportunidad de
mejorar. Le garantizamos que le proporcionaremos una solución satisfactoria.
Gracias por su comprensión!
Equipo de servicio de TOPTRO
1.No coloque el proyector en una habitación demasiado cálida o demasiado fría, ya que la
temperatura alta o baja acortará la vida útil del dispositivo. El entorno de trabajo sería 5 ℃ ~ 35
℃ mejor.
2.Si hay puntos negros en la pantalla de proyección, no se preocupe, comuníquese con
[email protected] por correo electrónico, podemos enviarle un video sobre cómo eliminar el
polvo.
3. La ventilación está equipada para que el proyector funcione de manera estable. No cubra el
respiradero con tela, manta u otras cosas. No inserte nada en la ranura del proyector, ya que
podría producir un cortocircuito o una descarga eléctrica en su dispositivo y causar daños.
4. El proyector estará estrictamente protegido contra fuertes impactos, exprimidos y vibraciones.
No intente moverse bajo fuertes colisiones, apretones y vibraciones. No intente moverse, de lo
contrario el circuito interno no funcionará correctamente.
5. La lente, como componente central del proyector, está directamente relacionada con la
definición y el efecto de la imagen.El exceso de polvo afectará a la calidad de la imagen.La lente
sucia debe limpiarse con un paño de algodón suave para la superficie de la lente de vidrio. No se
deben utilizar paños duros ni abrasivos.
TOPTRO X2 Proyector*1
Cable HDMI*1
Paño*1
Cable de alimentación*1
3 en 1Cable AV*1
Manual de usuario*1
Control remoto*1
Cubierta de la lente*1
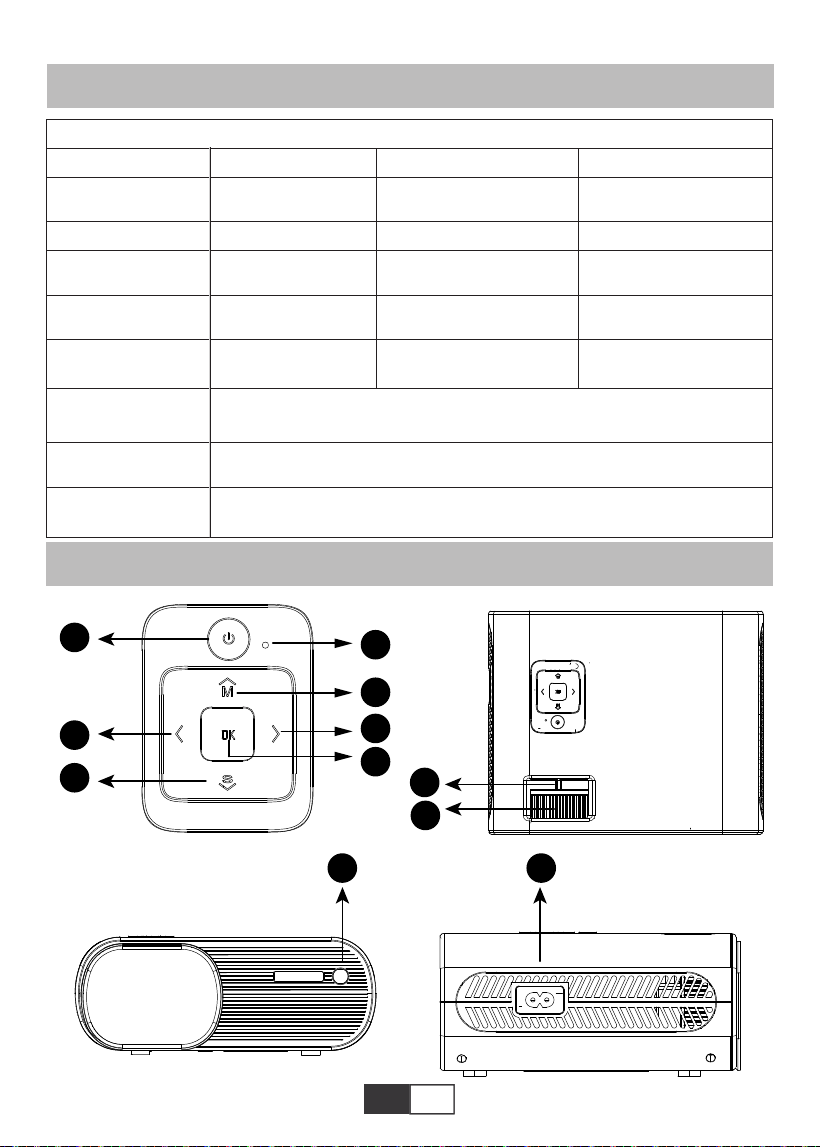
01 02 03 04 05 06 07 08 09 10 11 12 13
14 15 16 17 18 19
20 21 22 23 24 25 26 27 28 29 30 31 32
33 34 35 36 37 38
39 40 41 42 43 44 45 46 47 48 49 50 51
52 53 54 55 56 57
58 59
60 61 62 63 64 65 66 67 68 69 70
71 72 73 74 75 76
77 78 79 80 81 82 83 84 85 86 87 88 89
90 91 92 93 94 95
96 97 98 99
111 112 113 114
100 101 102 103 104 105 106 107 108
109 110
ES
Especificaciones del proyector
RESUMEN DEL PROYECTOR
Resolucion nativa
Tecnología de
pantalla
Gama de colores
Tamaño de la
imagen
Tension de
alimentacion
Formato de imagen
compatible
Método de proyección
Formato de video
compatible
Formato de audio
compatible
1280*720P
LCD
16.7M Full
50-200 inch
AC 100-240V
JPG/JPEG/BMP/PNG
Proyeccion frontal en el escritorio/ Proyeccion posterior e el escritorio/
Proyeccion frontal suspendida del techo/ Proyeccion posterior
MPEG1/MPEG2/H.263/H.264/AVS/VC1/MJPEG/RV30/RV40/HEVC,etc.
MPEG1/MPEG2/LPCM/MP3,etc.
Corrección trapezoidal
Fuente de luz
Ratio d'aspect
Distancia de proyeccidn
Peso del proyector
Interfaces
±15° Manual
LED
Auto/4:3/16:9
1.59-3.67 Meters
1.2Kg
puertos HDMI*1/ puertos
USB*2/salida de auriculares de
3,5 mm/salida AV
Modelo: X2

01 02 03 04 05 06 07 08 09 10 11 12 13
14 15 16 17 18 19
20 21 22 23 24 25 26 27 28 29 30 31 32
33 34 35 36 37 38
39 40 41 42 43 44 45 46 47 48 49 50 51
52 53 54 55 56 57
58 59 60
61 62 63 64 65 66 67 68 69 70
71 72 73 74 75 76
77 78 79 80 81 82 83 84 85 86 87 88 89
90 91 92 93 94 95
96 97 98 99
111 112 113 114
100 101 102 103 104 105 106 107 108
109 110
ES
1
2
3
4
5
6
7
8
9/15
10
11
12
13
14
16
17
18
19
20
Alimentación
OK
M
S
Indicador LED
Teclas de flecha
Enfoque manual
Perilla de corrección
trapezoidal
Receptor IR
Toma de cable de
alimentación
Toma de auriculares
Puerto AV
HDMI Port
Puerto USB * 2
Orador
Entrada de ventilación
Tornillo de ajuste de altura
Orificio de montaje del proyector
Salida de ventilación
Encender/apagar el proyector
Confirmar
Abre el menú
Seleccione la fuente de entrada (HDMI, VGA, AV)
Ver estado de energía
Se utiliza para ajustar el parámetro del proyector en el modo de menú
Ajuste el anillo de enfoque para obtener la imagen más clara
Ajuste la corrección trapezoidal de ± 15 ° para obtener la pantalla
de proyección con forma de rectángulo
Receptor de señales infrarrojas
Enchufe el cable de alimentación
Salida de auriculares de 3,5 mm
Salida de audio
Puerto HDMI
Entrada USB (se puede usar OUT5V para cargar)
Altavoz del proyector
Ventilación del proyector
Ajustar la altura de la pantalla de proyección
Fije el proyector con un tornillo M6x10mm
Ventilación del proyector

01 02 03 04 05 06 07 08 09 10 11 12 13
14 15 16 17 18 19
20 21 22 23 24 25 26 27 28 29 30 31 32
33 34 35 36 37 38
39 40 41 42 43 44 45 46 47 48 49 50 51
52 53 54 55 56 57
58 59 60 61
62 63 64 65 66 67 68 69 70
71 72 73 74 75 76
77 78 79 80 81 82 83 84 85 86 87 88 89
90 91 92 93 94 95
96 97 98 99
111 112 113 114
100 101 102 103 104 105 106 107 108
109 110
ES
REMOTE CONTOLLER
1
2
3
4
5
6
7
8
9
10
11
12
Enciende / apaga el proyector
Regresar al menú anterior
Se utiliza para ajustar el parámetro del proyector en el modo de menú
Fuente de señal
Bajar volumen
Cierra el sonido
Entrar en el siguiente menú
Volver a la página de inicio / Reproducir el video
Confirma la opción
Desplegar menús
Regresar al menú anterior
Sube el volumen
OK
VOL-
VOL+
Nota:
1) .Instale 2 pilas AAA en el control remoto antes de usarlo. No combine baterías nuevas
con viejas en el control remoto, lo que puede causar fallas en el funcionamiento debido a
una fuente de alimentación insuficiente.
2) .Al utilizar el mando a distancia, asegúrese de que el transmisor de señal del mando a
distancia apunte al receptor de señal de infrarrojos del proyector.
3). Si no va a utilizar el mando a distancia durante un período prolongado, saque las pilas
para evitar fugas.

01 02 03 04 05 06 07 08 09 10 11 12 13
14 15 16 17 18 19
20 21 22 23 24 25 26 27 28 29 30 31 32
33 34 35 36 37 38
39 40 41 42 43 44 45 46 47 48 49 50 51
52 53 54 55 56 57
58 59 60 61 62
63 64 65 66 67 68 69 70
71 72 73 74 75 76
77 78 79 80 81 82 83 84 85 86 87 88 89
90 91 92 93 94 95
96 97 98 99
111 112 113 114
100 101 102 103 104 105 106 107 108
109 110
ES
INSTALACIÓN
1.Método de instalación
El proyector se puede colgar en el techo con un marco de suspensión especial y colocarlo
en un escritorio estable para proyectar la imagen de acuerdo con el entorno operativo y los
requisitos. Además, el proyector se puede instalar con los siguientes métodos:
Mantenga el proyector a una altura donde su lente tenga simetría axial con la pantalla. Si
esto no es posible, utilice el anillo de corrección trapezoidal para ajustar la imagen.
Rectángulo de imagen positiva
El eje de simetría de
la pantalla
Pantalla
Proyector
Cuando instala el proyector correctamente, la imagen es rectangular.
2.Distancia y tamaño de proyección
Si desea obtener una pantalla de proyección gratuita, contáctenos a través de
1.Soporte de techo de proyección frontal 2.Soporte de techo de proyección trasera
Proyector
Proyector
Pantalla
3.Montaje en mesa de proyección frontal 4.Montaje en mesa de proyección trasera
Proyector Proyector
Pantalla
Pantalla
Pantalla
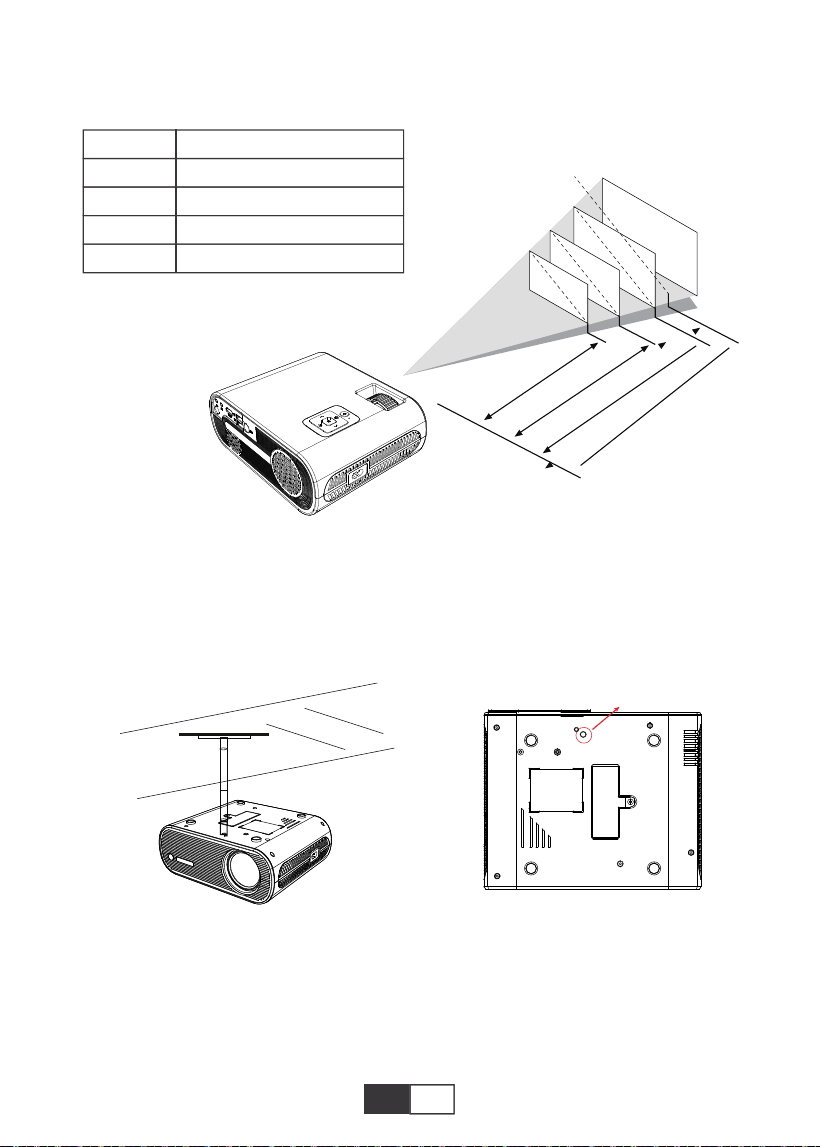
01 02 03 04 05 06 07 08 09 10 11 12 13
14 15 16 17 18 19
20 21 22 23 24 25 26 27 28 29 30 31 32
33 34 35 36 37 38
39 40 41 42 43 44 45 46 47 48 49 50 51
52 53 54 55 56 57
58 59 60 61 62 63
64 65 66 67 68 69 70
71 72 73 74 75 76
77 78 79 80 81 82 83 84 85 86 87 88 89
90 91 92 93 94 95
96 97 98 99
111 112 113 114
100 101 102 103 104 105 106 107 108
109 110
ES
Siga los datos del cuadro a continuación para ajustar el tamaño de la imagen y la distancia.
(Relación de aspecto: 16: 9, predeterminado)
La distancia de proyección recomendada es de aproximadamente 2,5 m, la distancia
de proyección más corta es de 1,59 m.
Observación:
La base de soporte ajustable puede asegurar el ángulo de proyección máximo en
15°,El mejor efecto de visualización se obtendrá mediante rangos de ángulos de
proyección de 0° - 8°.
50"
72"
100"
120"
367cm
307cm
224cm
159cm
3.Instalar en el techo
A. Adquiera un kit de montaje en techo para proyector de un solo orificio universal con
tornillo M6.
B. Conecte el proyector al soporte a través de los orificios para tornillos en la parte inferior
del proyector.
M6*10MM
Distancia
1.59m
2.24m
3.07m
3.67m
Tamaño de pantalla
50 pollici
72 pollici
100 pollici
120 pollici
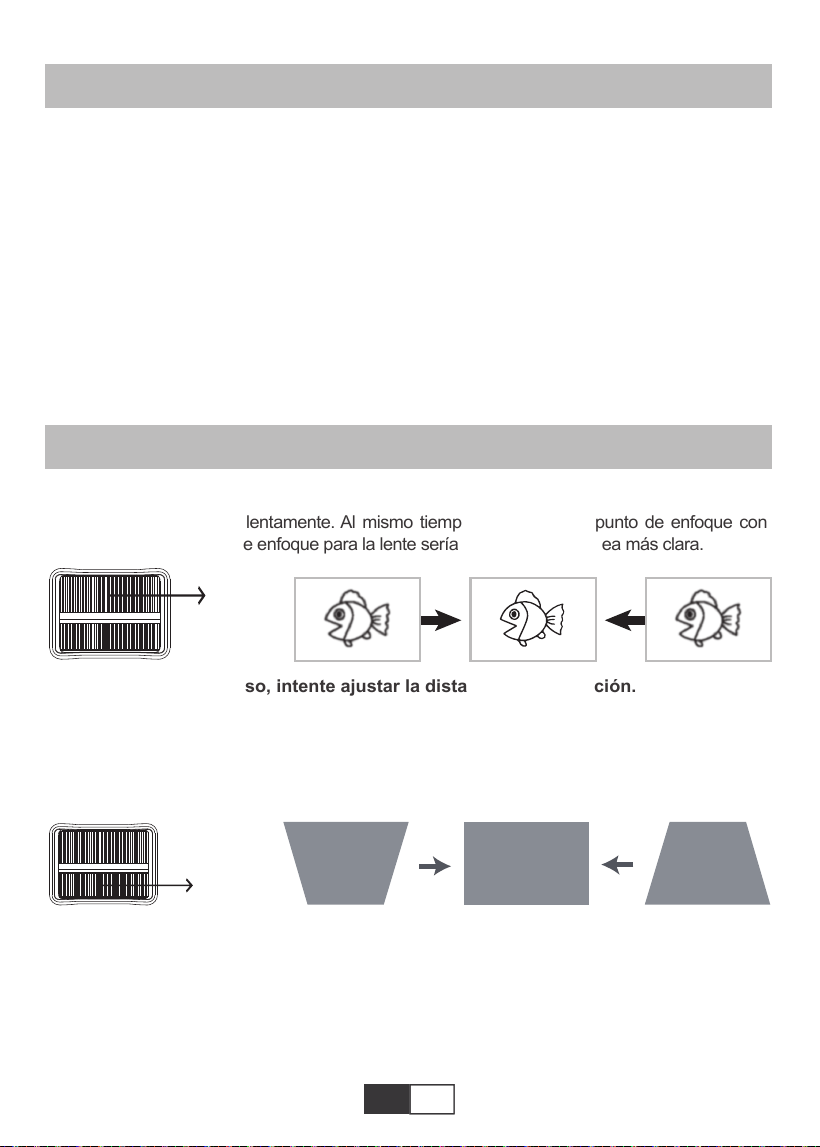
01 02 03 04 05 06 07 08 09 10 11 12 13
14 15 16 17 18 19
20 21 22 23 24 25 26 27 28 29 30 31 32
33 34 35 36 37 38
39 40 41 42 43 44 45 46 47 48 49 50 51
52 53 54 55 56 57
58 59 60 61 62 63 64
65 66 67 68 69 70
71 72 73 74 75 76
77 78 79 80 81 82 83 84 85 86 87 88 89
90 91 92 93 94 95
96 97 98 99
111 112 113 114
100 101 102 103 104 105 106 107 108
109 110
ES
PROYECTOR DE ARRANQUE
A. Encienda el interruptor en la parte trasera del proyector, luego presione la tecla de encendido
en el control remoto o proyector, la luz indicadora se volverá azul;
B. Utilice la piedra angular en la parte superior del proyector para obtener una pantalla de
proyección rectangular;
C.Ajuste el anillo de enfoque en la parte superior del proyector para obtener el mejor rendimien-
to de imagen; (Si todavía está borroso, intente ajustar la distancia de proyección).
D.Conecte el dispositivo externo (teléfono inteligente, iPad, Amazon Fire TV, caja de TV,
reproductor de DVD, computadora, etc.) en las interfaces correspondientes del proyector,
asegúrese de seleccionar la fuente correspondiente. Si no selecciona la fuente correcta, el
proyector no podrá detectar la señal ;.
E.Seleccione el menú "Establecer", ingrese el "Conjunto del sistema", luego puede seleccionar
la opción "Idioma OSD" para establecer su idioma preferido.
AJUSTE DE IMAGEN
1.Ajuste de enfoque
Gire el anillo de enfoque lentamente. Al mismo tiempo, compruebe el punto de enfoque con
atención. El mejor punto de enfoque para la lente sería donde la imagen sea más clara.
Nota: Si aún está borroso, intente ajustar la distancia de proyección.
2.Corrección trapezoidal manual (máximo ajustable: ±15°)
Mueva lentamente el anillo de corrección trapezoidal en la parte superior del proyector
hasta que la imagen cambie a un rectángulo. La corrección trapezoidal se puede ajustar
hasta ± 15 ° (vertical).
A. Si la imagen proyectada tiene forma trapezoidal, Keystone puede resolverlacorrección.
(Realizar corrección trapezoidal manual)
Nota: Si la corrección Keystone no resuelve la forma de la imagen, reduzca la altura
vertical del proyector en relación con el centro de la pantalla.
B. la imagen proyectada puede ser borrosa o difícil de ver, esto se debe a la falta de Ajuste
de enfoque con la lente, siga los procesos a continuación para ajustar el Atención.
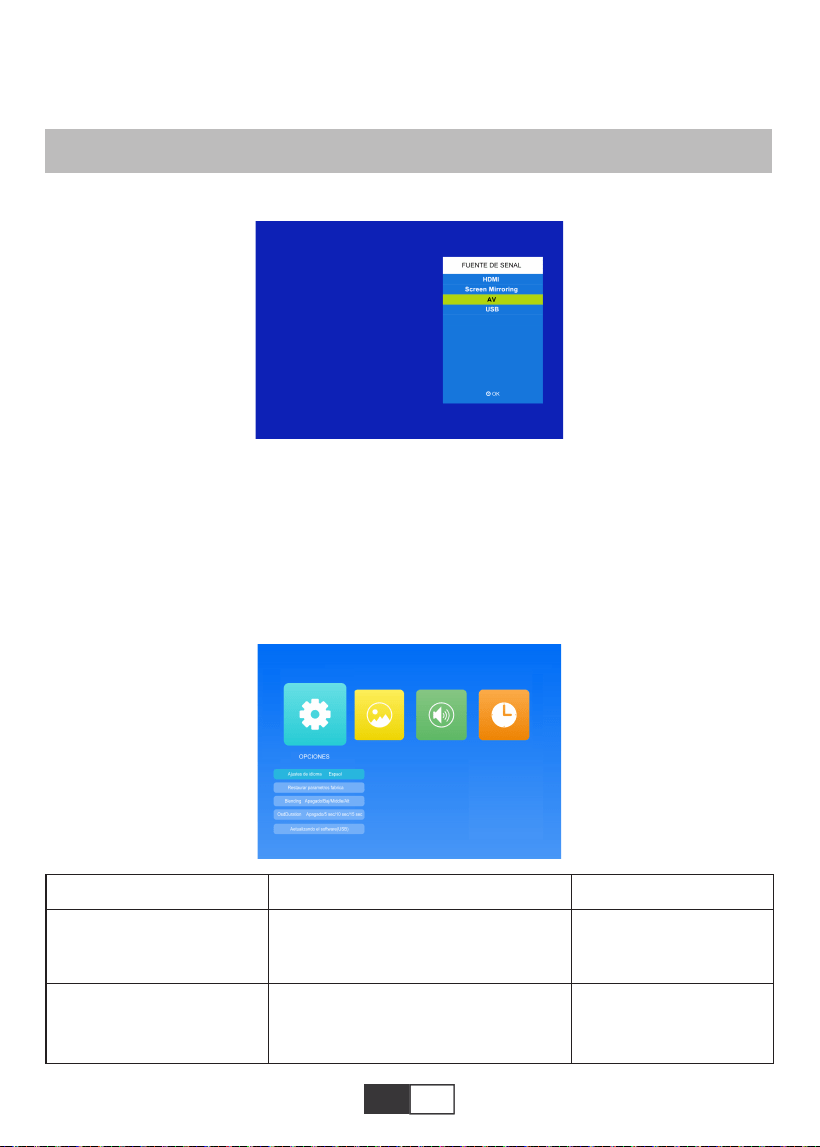
01 02 03 04 05 06 07 08 09 10 11 12 13
14 15 16 17 18 19
20 21 22 23 24 25 26 27 28 29 30 31 32
33 34 35 36 37 38
39 40 41 42 43 44 45 46 47 48 49 50 51
52 53 54 55 56 57
58 59 60 61 62 63 64 65
66 67 68 69 70
71 72 73 74 75 76
77 78 79 80 81 82 83 84 85 86 87 88 89
90 91 92 93 94 95
96 97 98 99
111 112 113 114
100 101 102 103 104 105 106 107 108
109 110
ES
1.Seleccione la fuente de la señal de entrada
2.Método de configuración del menú
2.1.OPCIONES
Seleccione “OPCIONES” en la pantalla de inicio, ingrese al menú “OPCIONES”.
1). Seleccione "FUENTE DE SENAL" en la página de inicio, ingrese al menú "FUENTE
DE SENAL".
2) Seleccione la fuente de señal de entrada deseada: HDMI / Screen Mirroring / AV / USB
(Enfoque manual, encuentre la imagen con mayor nitidez en la pantalla)
Nota: Es normal cuando la nitidez en el centro, el desenfoque en el borde.
CONFIGURACIÓN DEL PROYECTOR
Menú
Inglés / Espaol / Francia / Italiano /
Japonés, etc.
Ajustes de idioma
Restaurar parametros
fabrica
Modo Función
Configurar el idioma que
se muestra en la interfaz
de operación
Restaura toda la
configuración a la
configuración original de
fábrica
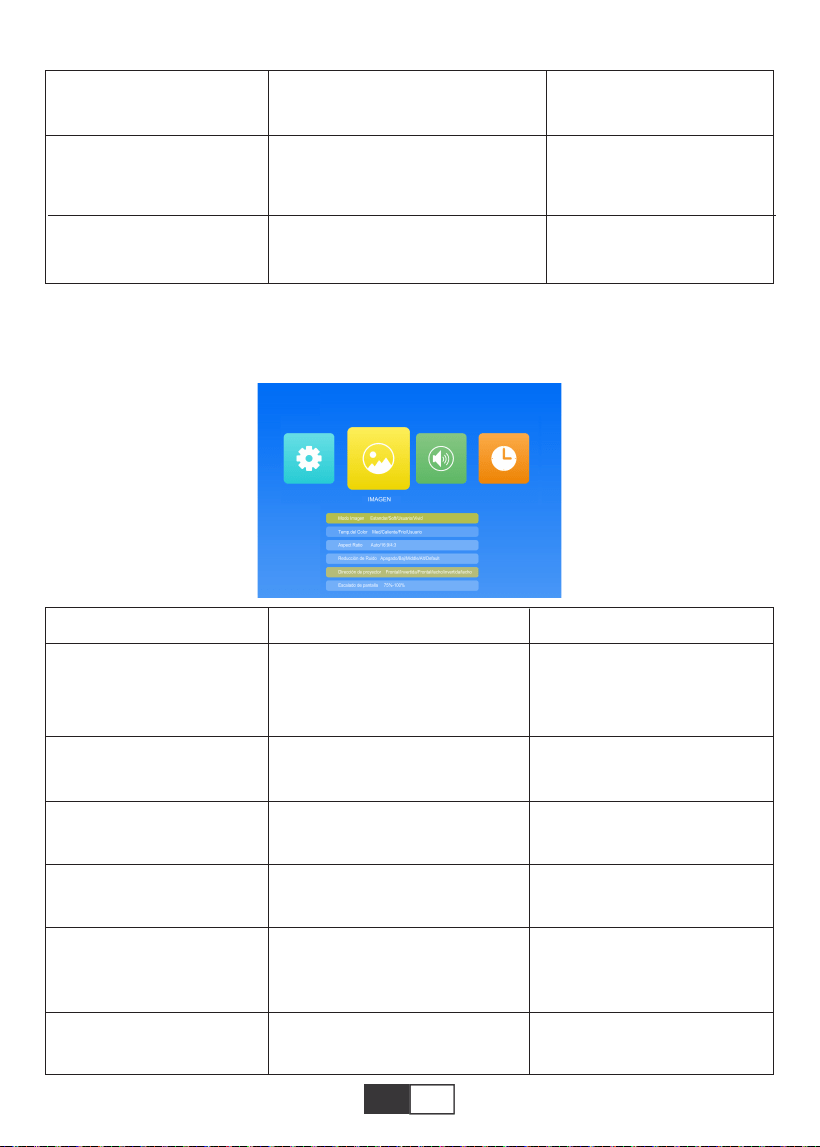
01 02 03 04 05 06 07 08 09 10 11 12 13
14 15 16 17 18 19
20 21 22 23 24 25 26 27 28 29 30 31 32
33 34 35 36 37 38
39 40 41 42 43 44 45 46 47 48 49 50 51
52 53 54 55 56 57
58 59 60 61 62 63 64 65 66
67 68 69 70
71 72 73 74 75 76
77 78 79 80 81 82 83 84 85 86 87 88 89
90 91 92 93 94 95
96 97 98 99
111 112 113 114
100 101 102 103 104 105 106 107 108
109 110
ES
2.2.IMAGEN
Este menú se puede abrir directamente presionando el botón M en el control remoto o el
proyector cuando se reproduce texto / imagen / video / música.
Apagado/Baj/Middle/Alt
Apagado/5 sec/10 sec/15 sec
Actualiza el software
Ajustar la transparencia
de la interfaz del menú
Ajustar la duración de
mantener la interfaz del
menú
Actualice la versión de
software del proyector
Blending
OsdDuration
Aetualizando el software
(USB)
Menù
Estandar/Soft/Usuario/Vivid
Med/Caliente/Frio/Usuario
Auto / 16: 9/4: 3
Apagado/Baj/Middle/Alt/Default
Frontal/Invertida/Frontal/techo/
invertida/techo
75%~100%
Modo Imagen
Temp.del Color
Aspect Ratio
Reducción de Ruido
Dirección de proyector
Escalado de pantalla
Modo Función
4 modos de imagen para
ajustar el "Contraste / Brillo /
Color / Agudeza / Tono" de la
imagen
Cambiar entre el modo de
temperatura de color
Configure la relación de
aspecto de la imagen.
Configurar la intensidad de
la reducción de ruido
Configurar el modo de
proyección
Escala de pantalla del 75%
al 100%
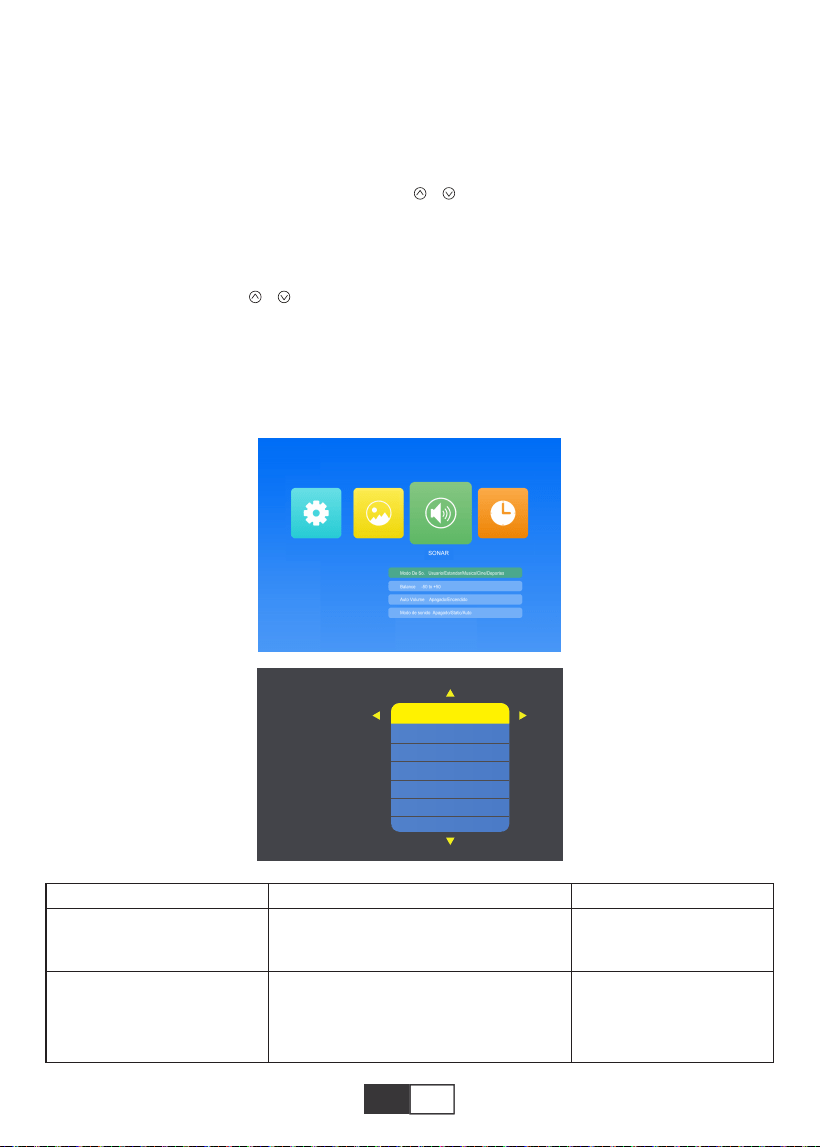
01 02 03 04 05 06 07 08 09 10 11 12 13
14 15 16 17 18 19
20 21 22 23 24 25 26 27 28 29 30 31 32
33 34 35 36 37 38
39 40 41 42 43 44 45 46 47 48 49 50 51
52 53 54 55 56 57
58 59 60 61 62 63 64 65 66 67
68 69 70
71 72 73 74 75 76
77 78 79 80 81 82 83 84 85 86 87 88 89
90 91 92 93 94 95
96 97 98 99
111 112 113 114
100 101 102 103 104 105 106 107 108
109 110
ES
2.3.SONAR
Este menú se puede abrir directamente presionando el botón M en el control remoto o el
proyector cuando se reproduce texto / imagen / video / música.
Menú
Usuario/Estandar/Musica/Cine/
Deportes
-50 to +50
Configurar el modo de
sonido
Equilibre el sonido de
los canales izquierdo y
derecho del altavoz
Modo De So.
Balance
Modo Function
Consejos:
1). Modo Imagen
En el modo de imagen, puede elegir “Estandar/Soft/Usuario/Vivid” para ajustar el
"Contraste / Brillo / Color / Agudeza / Tono" de la imagen.
En el modo de imagen-Opción de usuario, puede ajustar el "Contraste / Brillo / Color /
Agudeza / Tono" de la imagen con el botón " / " del control remoto en el rango "0-100".
2). Temp.del Color
En Temp.del Color, puede elegir las diferentes opciones, “Med/Caliente/Frio/Usuario”.
En la opción de usuario de temperatura de color, puede ajustar el "Rojo / Verde / Azul" de
la imagen con el botón " / " del control remoto en el rango "0-100".
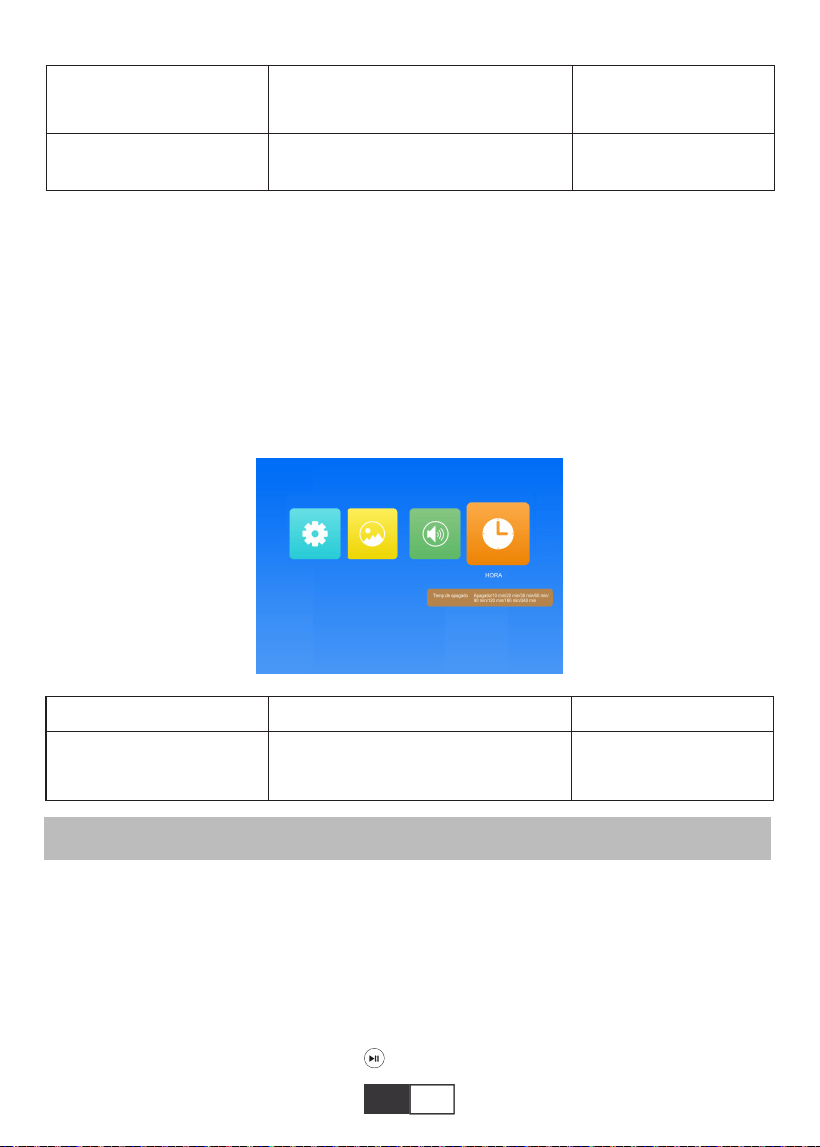
01 02 03 04 05 06 07 08 09 10 11 12 13
14 15 16 17 18 19
20 21 22 23 24 25 26 27 28 29 30 31 32
33 34 35 36 37 38
39 40 41 42 43 44 45 46 47 48 49 50 51
52 53 54 55 56 57
58 59 60 61 62 63 64 65 66 67 68
69 70
71 72 73 74 75 76
77 78 79 80 81 82 83 84 85 86 87 88 89
90 91 92 93 94 95
96 97 98 99
111 112 113 114
100 101 102 103 104 105 106 107 108
109 110
ES
El proyector TOPTRO X2 tiene 6 fuentes de señal, USB / HDMI / AV / Conexión de salida
de audio (conector de auriculares de 3,5 mm) / Función MHL / Uso del adaptador AV digital
de iluminación. Compatible con iPhone, iPad, elige la fuente de entrada "HDMI". Selecci-
one el puerto de conexión correcto para conectar su dispositivo (PC, teléfono, reproductor
de DVD, barra de sonido, USB, PS4, etc.)
2.4.HORA
Este menú se puede abrir directamente presionando el botón M en el control remoto o el
proyector cuando se reproduce texto / imagen / video / música.
1.Conecte el flash USB
Inserte el controlador flash USB en el puerto USB y elija la fuente de señal correcta, luego
presione el botón Reproducir / Pausa ( ) para mostrar o detener.
Pasos para la conexión Bluetooth:
Abra la página de menú → "SONAR" → "Modo de sonido" → Seleccione el modo "Static"
con el botón Derecha → Buscar dispositivos con el botón → Seleccione el dispositivo
Bluetooth y presione el botón Derecha para confirmar la conexión. (Presione el botón
Derecha para desconectar) → Si eso
conectarse correctamente, la barra de estado en la fila inferior mostrará "Reproducir"..
CONEXIÓN DE LÍNEAS DE SEÑAL
Menú
Apagado/10 min/20 min/30 min/
60 min/90 min/120 min/180 min/
240 min
Establecer el tiempo
de reposo del proyector
Temp.de apagado
Modo Función
Apagado/Encendido
Apagado/Static/Auto
Auto Volume
Modo de sonido
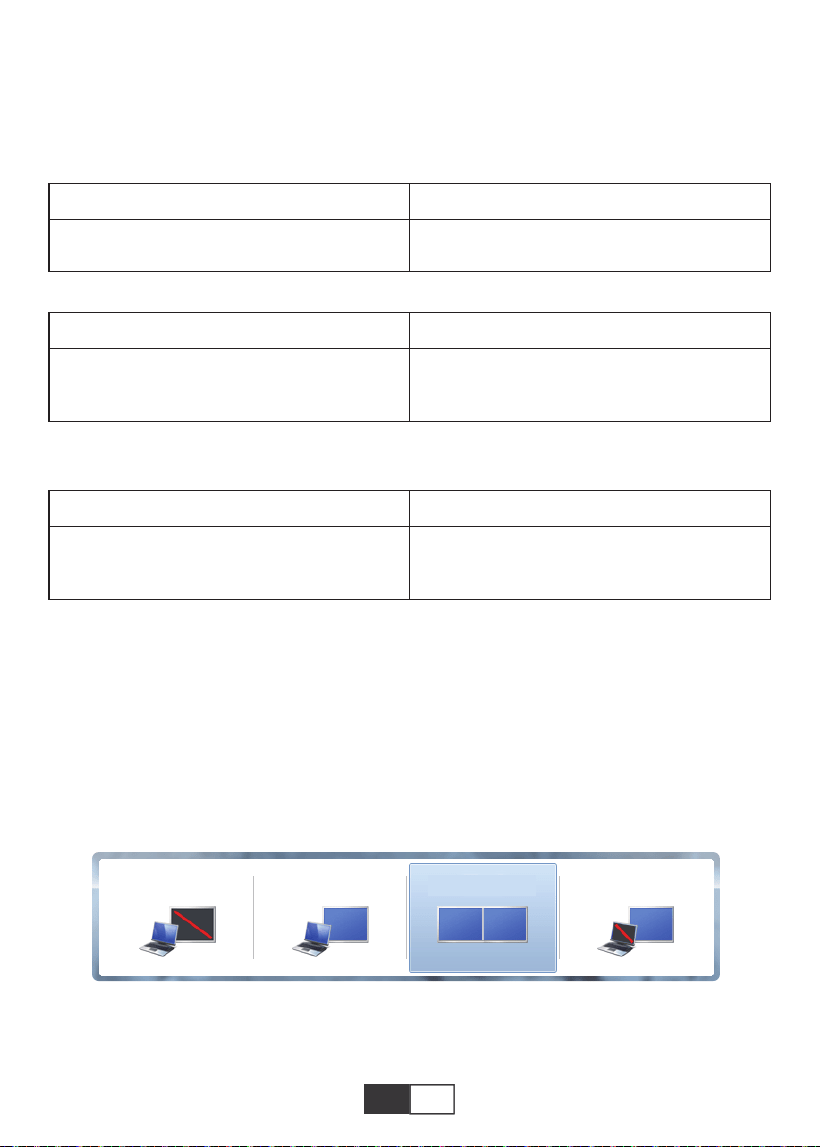
01 02 03 04 05 06 07 08 09 10 11 12 13
14 15 16 17 18 19
20 21 22 23 24 25 26 27 28 29 30 31 32
33 34 35 36 37 38
39 40 41 42 43 44 45 46 47 48 49 50 51
52 53 54 55 56 57
58 59 60 61 62 63 64 65 66 67 68 69
70
71 72 73 74 75 76
77 78 79 80 81 82 83 84 85 86 87 88 89
90 91 92 93 94 95
96 97 98 99
111 112 113 114
100 101 102 103 104 105 106 107 108
109 110
ES
2.Conexión a la computadora
Usando el cable HDMI (incluido) para conectar con el proyector.
1) .Conecte el cable HDMI al puerto HDMI de su computadora con el cable HDMI en
el paquete;
2) .Seleccione la fuente HDMI para proyectar cualquier archivo en su computadora;
3). En su computadora portátil, mantenga presionada la tecla "Win + P" teclas de la placa
para cambiar el modo de visualización
(Presione "SENAL" en el control remoto o "S" en el panel de control, luego "FUENTE DE
SENAL" en la pantalla, elija "USB")
Formato de imagen
JEPG, PNG, BMP
.jpg / .png / .bmp
Apoyo Extensión de archivo
Especificación de archivos multimedia
Formato de audio
No es compatible: Dolby AC3 / AAC, DTS, WMA, DivX, VC1, RM, RMVB, FLV, etc.
MPEG1, MPEG2, LPCM, MP3
.avi / .ts / .dat / .vob / .wmv / .mkv / .mp3
/ .mp4/ .m4a
Apoyo Extensión de archivo
Formato de video (tasa de bits de hasta 30 ~ 40 Mbs)
No es compatible con: MSVC / CRAM, MP42, GMC, IV32, RLE, cvid, RV20, DivX, RM,
RMVB, VC1, FLV, etc.
MPEG1, MPEG2, H.263, H.264, AVS,
VC1, MJPEG, RV30, RV40, HEVC
.dat / .ts / .mp4 / .mpg / .mpeg / .avi / .tp
/ .mkv / .mov / .asf / .flv / .3gp. / .3gpp
Apoyo Extensión de archivo
Solo computadora: es la opción predeterminada; solo se muestra en el monitor principal.
Duplicar: hace que todos los monitores muestren lo mismo duplicando el escritorio en
cada monitor.
Solo computadora Duplicar Ampliar Solo proyector

01 02 03 04 05 06 07 08 09 10 11 12 13
14 15 16 17 18 19
20 21 22 23 24 25 26 27 28 29 30 31 32
33 34 35 36 37 38
39 40 41 42 43 44 45 46 47 48 49 50 51
52 53 54 55 56 57
58 59 60 61 62 63 64 65 66 67 68 69 70
71 72 73 74 75 76
77 78 79 80 81 82 83 84 85 86 87 88 89
90 91 92 93 94 95
96 97 98 99
111 112 113 114
100 101 102 103 104 105 106 107 108
109 110
ES ES
Extender: hace que todos sus monitores actúen como un gran monitor que extiende el
escritorio a todos ellos.
Solo proyector: se muestra solo en el monitor secundario como un proyector.
Puede cambiar la resolución de la pantalla en el modo Solo proyector
Paso: Inicio> Panel de control> Apariencia y personalización> Ajustar pantalla
Resolución
Nota:
Cuando conecte el proyector con la computadora portátil, es posible que deba presionar Fn
+ F * (F1-F10 en el teclado) para cambiar la salida. Debido a cada marca de función de
botón de computadora diferencia, puede consultar la siguiente tabla.
Fabricar
Acer
Dell
Epson
Fujitsu
IBM
Hewlett-packard
Lenovo
Llaves
Fn+F5
Fn+F8
Fn+F8
Fn+F10
Fn+F7
Fn+F4
Fn+F10
Fabricar
NEC
Panasonic
Sharp
Sony
Toshiba
Zotac
Llaves
Fn+F3
Fn+F3
Fn+F5
Fn+F7
Fn+F5
Fn+F3/F5
3.Conexión AV
Utilice el cable AV en el paquete.
A. Encienda su reproductor de DVD y el proyector;
B. Conecte los conectores hembra de colores al cable RCA de su reproductor de DVD;
C. Conecte el conector negro al puerto de entrada de audio del proyector;
D. Conecte el conector amarillo de otro lado al puerto de video del proyector;
E. Seleccione “AV” como fuente de señal.
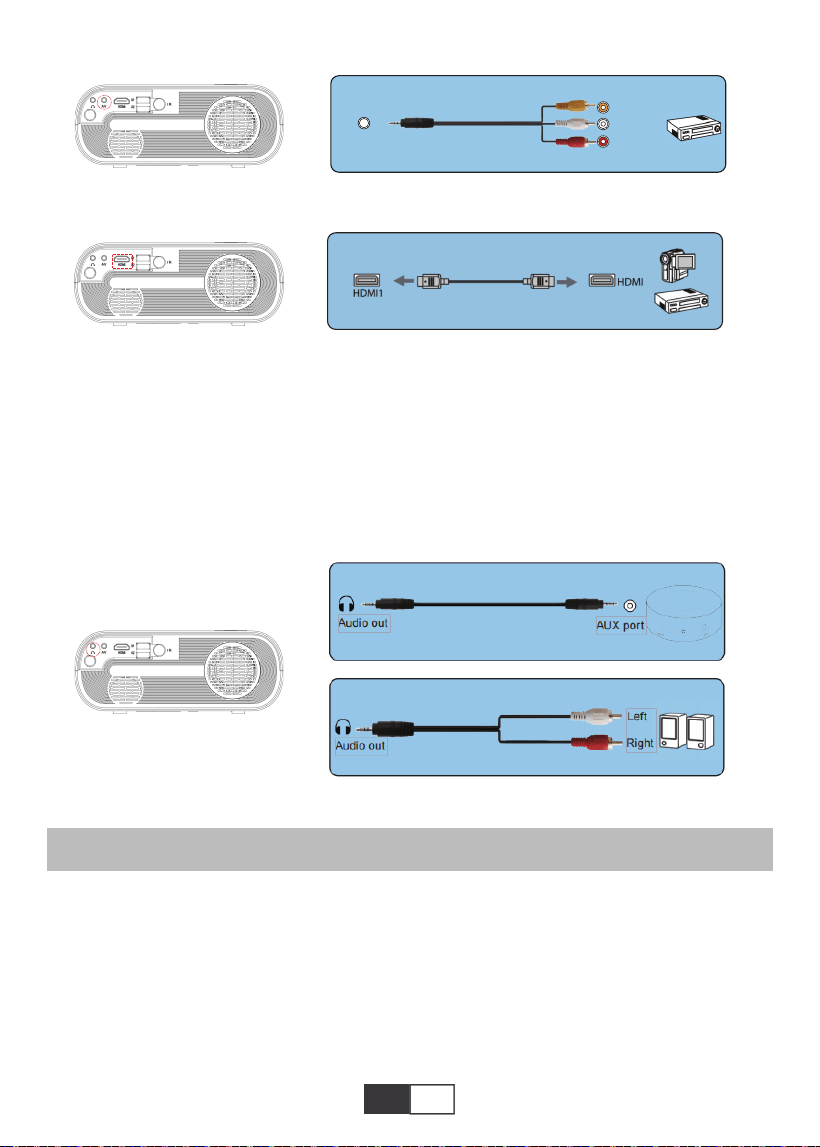
01 02 03 04 05 06 07 08 09 10 11 12 13
14 15 16 17 18 19
20 21 22 23 24 25 26 27 28 29 30 31 32
33 34 35 36 37 38
39 40 41 42 43 44 45 46 47 48 49 50 51
52 53 54 55 56 57
58 59 60 61 62 63 64 65 66 67 68 69 70
71
72 73 74 75 76
77 78 79 80 81 82 83 84 85 86 87 88 89
90 91 92 93 94 95
96 97 98 99
111 112 113 114
100 101 102 103 104 105 106 107 108
109 110
ES ES
OPERACIÓN DE JUEGO
4.Conexión de salida de audio
1.Reproduzca Cine / Foto / Música / Texto (en modo de entrada USB)
A.Si su altavoz tiene puerto AUX, utilice su cable de audio de 3,5 mm conéctelo al
El puerto de salida de audio del proyector y el puerto AUX de su altavoz.
B.Si su altavoz no tiene puerto AUX, compre un cable 2RCA y luego utilícelo con el puerto
de salida de audio del proyector y los puertos izquierdo y derecho de su altavoz.
Primero Seleccione “FUENTE DE SENAL” en el control remoto.
A. Para reproducir un archivo de video, primero seleccione “Cine / Foto / Música / Texto” en
la pantalla principal, y luego presione la tecla “OK” en el panel de operación o en el control
remoto. El cuadro seleccionado se ensancha y los bordes blancos circundantes se
destacan.
O conéctelo al reproductor de DVD con el cable HDMI incluido en el paquete.
AV
video
audio out
(L/R)
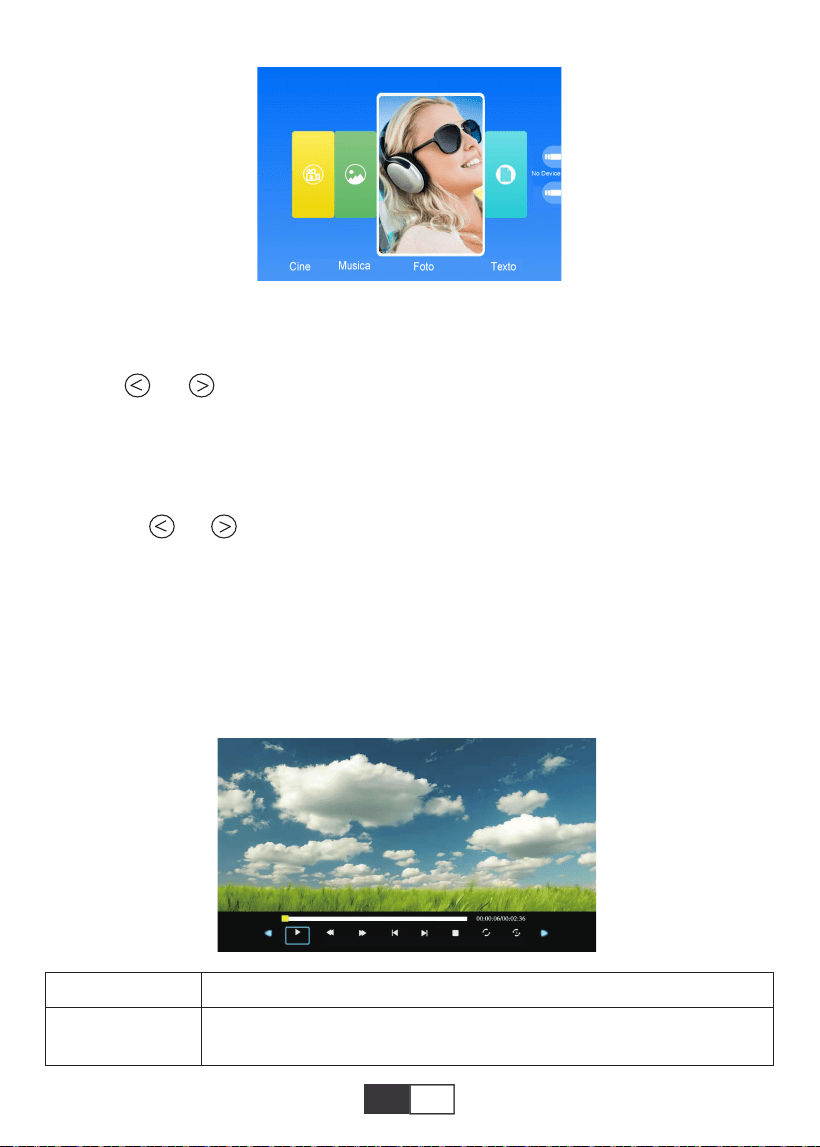
01 02 03 04 05 06 07 08 09 10 11 12 13
14 15 16 17 18 19
20 21 22 23 24 25 26 27 28 29 30 31 32
33 34 35 36 37 38
39 40 41 42 43 44 45 46 47 48 49 50 51
52 53 54 55 56 57
58 59 60 61 62 63 64 65 66 67 68 69 70
71 72
73 74 75 76
77 78 79 80 81 82 83 84 85 86 87 88 89
90 91 92 93 94 95
96 97 98 99
111 112 113 114
100 101 102 103 104 105 106 107 108
109 110
ES
MENÚ Función
2.Interfaz de juego
Nota: El contenido del video se puede ver manteniendo el cursor sobre el video seleccio-
nado durante más de 3 segundos. Solo MPEG1, MPEG2, H.263, H.264, AVS,VC1,
MJPEG, RV30, RV40 y HEVC son compatibles con la reproducción de video.
B.Pulse “ “ y “ ” en el panel de operación o en el control remoto para seleccionar el
equipo para el almacenamiento de archivos. Presione la tecla “OK” para ingresar al
siguiente paso.
Nota: Si tiene alguna pregunta sobre la reproducción del video, envíe un correo electrónico
a [email protected]. Brindaremos una solución rápida en 24 horas.
C.Presione “ ” y “ ” en el panel de operación o en el control remoto para seleccionar
el archivo deseado (o carpeta para ingresar a la subcarpeta) Presione la tecla “OK” para
reproducirlo.
Adecuado para presentaciones comerciales básicas, como diapositivas de PowerPoint,
Excel y Word.
Nota: El contenido de la imagen se puede ver manteniendo el cursor en la imagen
seleccionada durante más de 3 segundos. Solo se admite el formato txt para la reproduc-
ción de imágenes.
Pause
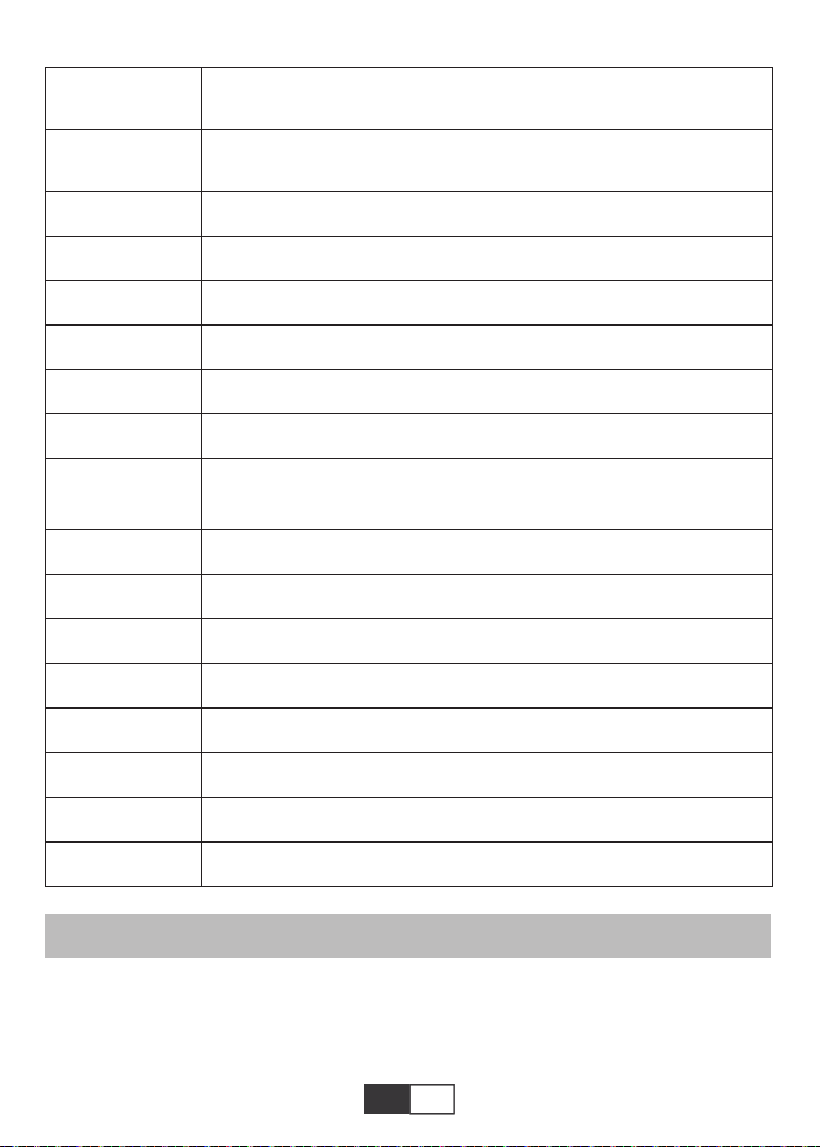
01 02 03 04 05 06 07 08 09 10 11 12 13
14 15 16 17 18 19
20 21 22 23 24 25 26 27 28 29 30 31 32
33 34 35 36 37 38
39 40 41 42 43 44 45 46 47 48 49 50 51
52 53 54 55 56 57
58 59 60 61 62 63 64 65 66 67 68 69 70
71 72 73
74 75 76
77 78 79 80 81 82 83 84 85 86 87 88 89
90 91 92 93 94 95
96 97 98 99
111 112 113 114
100 101 102 103 104 105 106 107 108
109 110
ES
Duplicar pantalla
Primero Seleccione “FUENTE” en el control remoto.
Ingrese al menú “Screen Mirroring”, siga las instrucciones para seleccionar el método de
conexión correspondiente para conectar su dispositivo al proyector.
FB
Fast Backward, rebobina el video rápidamente mientras lo
reproduce. Los la velocidad de rebobinado varía de 2 X a 32X
FF
Prev.
Siguien
Stop
All
Random
Set A
Playlist
Info
Slow Forward
Step Forward
Goto Time
Zoom+
Zoom-
Aspect Ratio
Move
Avance rápido, empuja el video para avanzar rápidamente mientras lo
reproduce.La velocidad de avance varía de 2 X a 32X
Cambiar al video anterior
Cambiar al siguiente video
Deja de jugar y sal
Aleatorio activado / Aleatorio de
Establecer A / B (Establecer dos nodos en el video en bucle) / Ninguno
Seleccionar todas las listas de reproducción en la carpeta actual
Detalles del video
Avance lento 1X a 16X
Establecer un tiempo para saltar directamente
Zoom+ 1X to 8X
Zoom- 1X to 1/4X
Auto/4:3/16:9
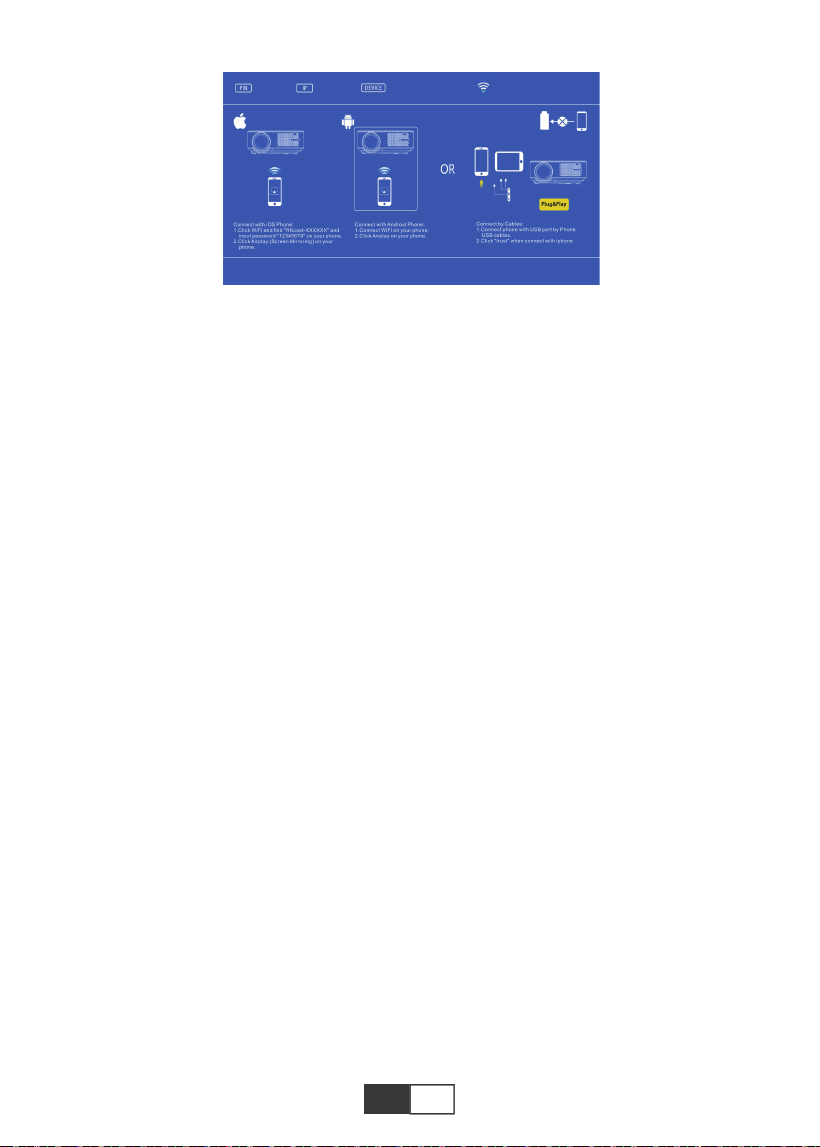
01 02 03 04 05 06 07 08 09 10 11 12 13
14 15 16 17 18 19
20 21 22 23 24 25 26 27 28 29 30 31 32
33 34 35 36 37 38
39 40 41 42 43 44 45 46 47 48 49 50 51
52 53 54 55 56 57
58 59 60 61 62 63 64 65 66 67 68 69 70
71 72 73 74
75 76
77 78 79 80 81 82 83 84 85 86 87 88 89
90 91 92 93 94 95
96 97 98 99
111 112 113 114
100 101 102 103 104 105 106 107 108
109 110
ES
1. Dispositivo Android
1). Conecte la red WiFi doméstica en su teléfono móvil,
2). Active la función de espejo de pantalla del dispositivo móvil. Una vez que la conexión
sea exitosa, la pantalla de proyección mostrará su dispositivo móvil.
Note:
1).Not all Android phones have screen mirroring function, and maybe different Android
phones display different names for the screen mirroring function. Please consult your
phone brand service provider to confirm whether your phone supports the screen mirroring
function and how to find this function.
2).When you use the screen mirroring function, make sure to the WiFi function of your
phone is active.
3).The smoothness of the projection screen depends on the quality of the network that your
phone is connected to, please make sure your phone is connected to a good quality
network, so that it can project a smooth video playback screen.
2. IOS device
2.1. Use the Screen Mirroring function of IOS device under the background of using home
WiFi network
1). Press the "OK" button on the remote control, and the projector connects to the home
WiFi network;
2). Turn on your IOS device and connect to the same home network;
3). Active la función de espejo de pantalla del dispositivo móvil. Una vez que la conexión
sea exitosa, la pantalla de proyección mostrará su dispositivo móvil.
2.2. Utilice la función Screen Mirroring de los dispositivos IOS en el contexto del uso de
datos de red celular
1). Abra la configuración wifi del dispositivo IOS, busque y conéctese a "RKcast-XXXXXX"
(contraseña 12345678)
2). Active la función de duplicación de pantalla de IOS y busque.
3). Luego seleccione "RKcast-XXXXXX" de la lista para conectarse a su dispositivo IOS.
(Si no puede encontrarlo, presione el botón "OK" para ingresar al menú wifi del proyector y
desconectar)
4). Una vez que la conexión es exitosa, la pantalla de proyección muestra que la conexión
con su dispositivo IOS fue exitosa.
3. Conexión por cable (solo aplicable a dispositivos IOS)
También puede usar un cable Lightning para conectar sus dispositivos ios al proyector,
First,press the remote control ‘ok’
button and connect with wifi.

01 02 03 04 05 06 07 08 09 10 11 12 13
14 15 16 17 18 19
20 21 22 23 24 25 26 27 28 29 30 31 32
33 34 35 36 37 38
39 40 41 42 43 44 45 46 47 48 49 50 51
52 53 54 55 56 57
58 59 60 61 62 63 64 65 66 67 68 69 70
71 72 73 74 75
76
77 78 79 80 81 82 83 84 85 86 87 88 89
90 91 92 93 94 95
96 97 98 99
111 112 113 114
100 101 102 103 104 105 106 107 108
109 110
ES
después de insertar el cable a través del puerto USB, espere de 5 a 10 segundos, habrá
una alerta que le preguntará si confía en la computadora, elija "Confiar", y la pantalla de
proyección mostrará el mismo contenido que sus dispositivos.
APAGADO SEGURO
1.Presione el botón del proyector o del control remoto.
2.Presione el botón OK para confirmar el apagado.
3. Desenchufe el cable de alimentación del proyector.
4. Cubra la lente y guarde el proyector en un lugar fresco y seco.
GARANTÍA
¡Muchas gracias por su compra y apoyo! Ofrecemos una garantía de 3 años para el
proyector X2. Si tiene alguna pregunta, no dude en contactarnos a través de

01 02 03 04 05 06 07 08 09 10 11 12 13
14 15 16 17 18 19
20 21 22 23 24 25 26 27 28 29 30 31 32
33 34 35 36 37 38
39 40 41 42 43 44 45 46 47 48 49 50 51
52 53 54 55 56 57
58 59 60 61 62 63 64 65 66 67 68 69 70
71 72 73 74 75 76
77 78 79 80 81 82 83 84 85 86 87 88 89
90 91 92 93 94 95
96 97 98 99
111 112 113 114
100 101 102 103 104 105 106 107 108
109 110
JP
目次
TOPTRO ライフタイム保証....................................................................................................................................78
ご注意事項..........................................................................................................................78
梱包.............................................................................................................................................78
商品仕様.........................................................................................................................................79
本体各部の名称....................................................................................................79-80
リモコン各部の名称........................................................................................................81
取付方法.....................................................................................................................82-83
1.I取付方法...................................................................................................................................................82
2.投写距離とスクリーンサイズ.................................................................................................82-83
3.天吊り方法...............................................................................................................................................83
本体の起動方法..........................................................................................................84
映像調整..........................................................................................................84
1.フォーカス調整.....................................................................................................................................84
2.手動で台形補正(最大調整可能:±15°).............................................................................84
本体の取り付け.......................................................................................................85
1.入力信号源を選択する.......................................................................................................................85
2.メニュー設定方法................................................................................................................................85
2.1.オプション..................................................................................................................85
2.2.映像.................................................................................................................................86
2.3.音声..........................................................................................................................87-88
2.4.時間.................................................................................................................................88
機器と接続する.......................................................................................................88
1.USBフラッシュと接続する........................................................................................................88-89
2.パソコンと接続する.....................................................................................................................89-90
3.AV と接続する..............................................................................................................................90-91
4.オーディオ出力接続............................................................................................................................91
再生方法................................................................................................................91-93
1.映画/写真/音楽/テキストを再生する(USD入力モード).......................................91-92
2.再生のインターフェース............................................................................................................92-93
スクリーンミラーリング.....................................................................................................................93-94
1.Android画面(Androidデバイス用).........................................................................................94
2.IOS 画面(iOSデバイス用)...................................................................................................94-95
安全に電源オフについて..............................................................................................................95
保証...................................................................................................................95

01 02 03 04 05 06 07 08 09 10 11 12 13
14 15 16 17 18 19
20 21 22 23 24 25 26 27 28 29 30 31 32
33 34 35 36 37 38
39 40 41 42 43 44 45 46 47 48 49 50 51
52 53 54 55 56 57
58 59 60 61 62 63 64 65 66 67 68 69 70
71 72 73 74 75 76
77
78 79 80 81 82 83 84 85 86 87 88 89
90 91 92 93 94 95
96 97 98 99
111 112 113 114
100 101 102 103 104 105 106 107 108
109 110
JP
ご注意事項
梱包
TOPTROライフタイム保証
この度はTOPTROをお買い上げいただきありがとうございます。
本体を使用する前に、この取扱説明書をよくお読みください。問題がある場合は注文番号とご
質問を[email protected]に電子メールを送信してください。 24時間以内に解決策を提供
します。
実際は信号、音、Bluetooth接続、wifi接続、ダークスポット、映画が途切れるなどの問題は設定
によって簡単に解決できます。出荷前に100%慎重にチェックされることをお約束します。
TOPTROへのご支援に心より感謝申し上げます。 ご不明な点がございましたら、お気軽にお問
い合わせください。 そして、私たちに改善の機会を与えてください。 私たちはあなたに満足さ
せる解決策を提供することを保証します。
TOPTROサービスチーム
1.湿気と暖房な場所で使用しないでください。火災と感電の原因となります。作業環境は5℃
〜35℃です。
2.黒点がある場合は[email protected]に連絡してください。解決策をお送りします。
3.本体を設置する場所は周囲から適当な空間開けてください。本体の通風口を塞がないでく
ださい。紙や布などの柔らかいものを置かないでください。
4.プロジェクターを強い衝撃、押し出し、振動で動かそうとしないでください。動かそうとしない
でください。内部回路に障害が発生します。
5.プロジェクターのコアコンポーネントとしてのレンズは、画像の定義と効果に直接関係して
います。ほこりが多すぎると画質に影響します。汚れたレンズは、ガラスレンズの表面を柔らか
い綿の布で拭きます。硬い布や研磨剤を使用しないでください。
TOPTROX2プロジェクター*1
HDMIケーブル*1
布*1
電源コード*1
3in1A信号ケーブル*1
取扱説明書*1
リモコン*1
レンズカバー*1

01 02 03 04 05 06 07 08 09 10 11 12 13
14 15 16 17 18 19
20 21 22 23 24 25 26 27 28 29 30 31 32
33 34 35 36 37 38
39 40 41 42 43 44 45 46 47 48 49 50 51
52 53 54 55 56 57
58 59 60 61 62 63 64 65 66 67 68 69 70
71 72 73 74 75 76
77 78
79 80 81 82 83 84 85 86 87 88 89
90 91 92 93 94 95
96 97 98 99
111 112 113 114
100 101 102 103 104 105 106 107 108
109 110
JP
商品仕様
本体各部の名称
解像度
ディスプレイ
技術
色域
投写サイズ
使用電源
画 像ファイル
設置方法
動 画ファイル
音 声ファイル
1280*720P
LCD
16.7MFull
1.59-5M
AC100-240V
JPG/JPEG/BMP/PNG
デ ス ク 置 き・天 吊 り
MPEG1/MPEG2/H.263/H.264/AVS/VC1/MJPEG/RV30/RV40/HEVC,など.
MPEG1/MPEG2/LPCM/MP3,など.
台形補正
光源
アスペクト比
投写距離
質量
接続端子
±15°手動
LED
自動/4:3/16:9
1.59-3.67M
1.2Kg
HDMI/USB*2/AV/3.5mm
ヘッド ホ ン
ModelNo.X2

01 02 03 04 05 06 07 08 09 10 11 12 13
14 15 16 17 18 19
20 21 22 23 24 25 26 27 28 29 30 31 32
33 34 35 36 37 38
39 40 41 42 43 44 45 46 47 48 49 50 51
52 53 54 55 56 57
58 59 60 61 62 63 64 65 66 67 68 69 70
71 72 73 74 75 76
77 78 79
80 81 82 83 84 85 86 87 88 89
90 91 92 93 94 95
96 97 98 99
111 112 113 114
100 101 102 103 104 105 106 107 108
109 110
JP
1
2
3
4
5
6
7
8
9/15
10
11
12
13
14
16
17
18
19
20
電源ボタン
OK
M
S
電源インジケーター
矢印キー
フォカスリング
台形補正ノブ
IRレシーバー
電源ケーブルソケット
ヘッドフォンジャック
AV ポート
HDMIポート
USBポート*2
スピーカー
換気口
高さ調整ネジ
プロジェクター マウントホ ー ル
換気口
電 源 オ ン・オ フ
確認ボタン
メニューボタン
入力ソースボタン
電源の状態を表示する
上/下/左/右
レンズ伸縮で投写画面のピントを調整する
±15°のキーストーン補正を調整して、長方形の投影スクリーンを
取得
赤外線信号受信機
電源ケーブルを差し込みます
3.5mmヘッドフォン出力
音声出力
HDMI出力
USBポート*2USB入力((OUT5Vで充電可能))
プロジェクタースピーカー
プロジェクター ベント
投影スクリーンの高さを調整する
M6x10mmネジでプロジェクターを固定する
プロジェクター ベント

01 02 03 04 05 06 07 08 09 10 11 12 13
14 15 16 17 18 19
20 21 22 23 24 25 26 27 28 29 30 31 32
33 34 35 36 37 38
39 40 41 42 43 44 45 46 47 48 49 50 51
52 53 54 55 56 57
58 59 60 61 62 63 64 65 66 67 68 69 70
71 72 73 74 75 76
77 78 79 80
81 82 83 84 85 86 87 88 89
90 91 92 93 94 95
96 97 98 99
111 112 113 114
100 101 102 103 104 105 106 107 108
109 110
JP
リモコン各部の名称
1
2
3
4
5
6
7
8
9
10
11
12
電 源 オ ン・オ フ
前のメーニュ戻し
メニューモードでプロジェクターのパラメーターを調整する
信号源
音量ー
静音
次のページへ
前のページへ/動画の再生
確認ボタン
メニューをプルアップ
前のメニューに戻る
音量+
OK
VOL-
VOL+
ご注意:
1)使用する前に、単4電池2本をリモコンに取り付けます。 新しい電池と古い電池を組み合わ
せないでください。電源不足により動作不良の原因となります。
2)リモコンを使用する場合は、リモコンの信号送信機がプロジェクターの赤外線信号受信機
に向けられていることを確認してください。
3)リモコンを長期間に使用しない場合は、電池の液漏れを防ぐために電池を取り出してくだ
さい。
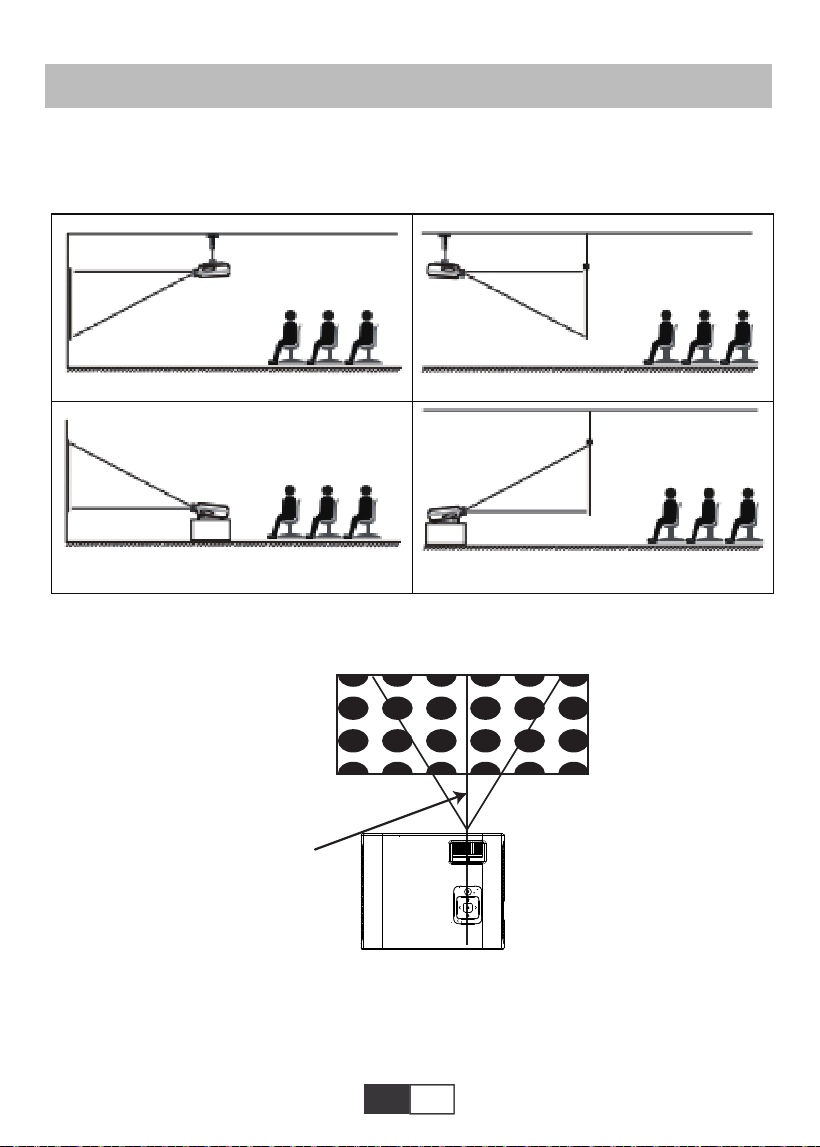
01 02 03 04 05 06 07 08 09 10 11 12 13
14 15 16 17 18 19
20 21 22 23 24 25 26 27 28 29 30 31 32
33 34 35 36 37 38
39 40 41 42 43 44 45 46 47 48 49 50 51
52 53 54 55 56 57
58 59 60 61 62 63 64 65 66 67 68 69 70
71 72 73 74 75 76
77 78 79 80 81
82 83 84 85 86 87 88 89
90 91 92 93 94 95
96 97 98 99
111 112 113 114
100 101 102 103 104 105 106 107 108
109 110
JP
取付方法
1.取付方法
プロジェクター は天井に吊るし、安定した机の上に置いて、動作環境や要件に応じて画像を投
影することができます。さらに、次の方法でインストールできます。
プロジェクターのレンズがスクリーンに対して軸対称になる高さに保ちます。もしできないな
ら、台形補正リングを使用して画像を調整してください。
2.投影距離とサイズ
無料のプロジェクションスクリーンをご希望の場合は、service @ toptro.comまでご連絡くだ
さい。
1.天井に設置してスクリーンの前面から投写
3.テーブルに設置してスクリーンの前面から投写
2.天井に設置してスクリーンの背面から投写
4.テーブルに設置してスクリーンの背面から投写
スクリーン
スクリーン
スクリーン
スクリーン
プ ロ ジェクター
プ ロ ジェクター プ ロ ジェクター
プ ロ ジェクター
正四辺形画像
画面の対象軸
投写位置
プ ロ ジェクター
正常な画像は正四辺形です。
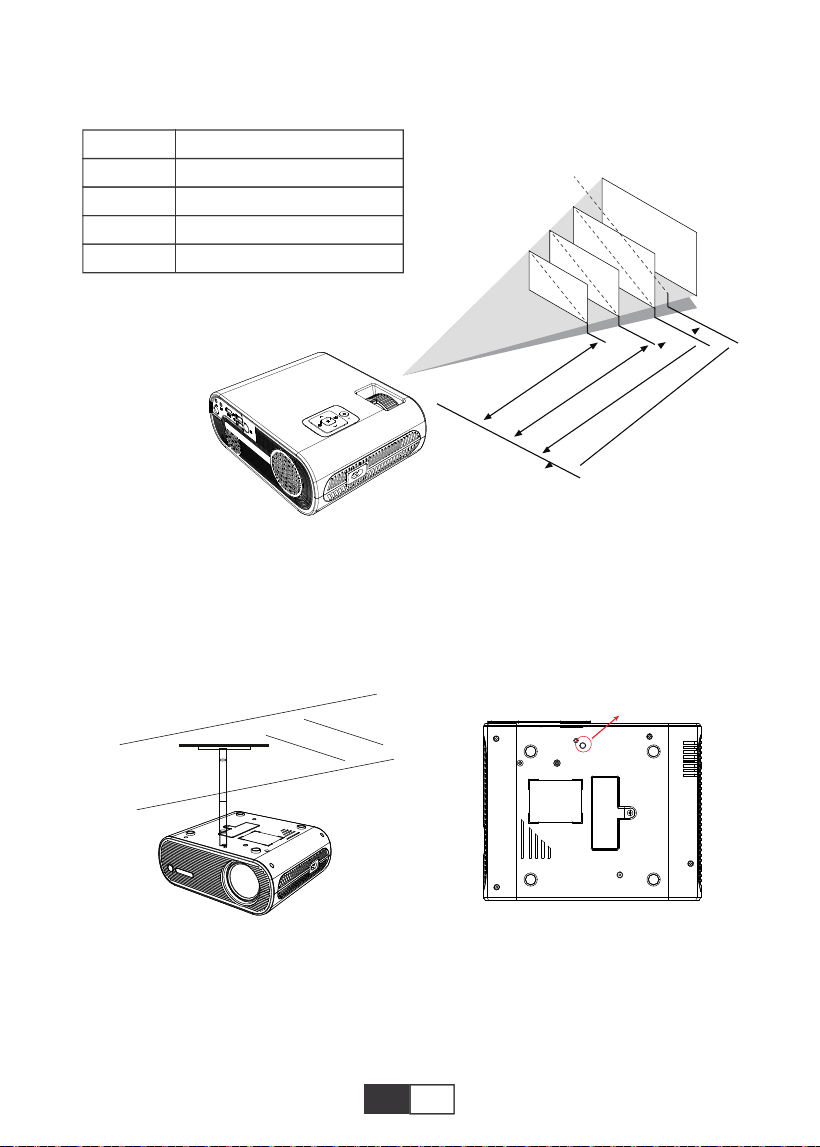
01 02 03 04 05 06 07 08 09 10 11 12 13
14 15 16 17 18 19
20 21 22 23 24 25 26 27 28 29 30 31 32
33 34 35 36 37 38
39 40 41 42 43 44 45 46 47 48 49 50 51
52 53 54 55 56 57
58 59 60 61 62 63 64 65 66 67 68 69 70
71 72 73 74 75 76
77 78 79 80 81 82
83 84 85 86 87 88 89
90 91 92 93 94 95
96 97 98 99
111 112 113 114
100 101 102 103 104 105 106 107 108
109 110
JP
下の表のデータに従って、画像サイズと距離を調整してください。(アスペクト比:16:9、デフォ
ルト)
推奨投影距離は約2.5m、最短投影距離は1.59mです。
リマーク:
調整可能なサポートベースは、最大投影角度を15°保証できます。
最高の表示効果は、0°〜8°の投影角度範囲で得られます。
50"
72"
100"
120"
367cm
307cm
224cm
159cm
3.天井吊り
A. M6ネジ付きのユニバーサルシングルホールプロジェクター天井マウントキットを購入して
ください。
B.プロジェクターの底にあるネジ穴を通してプロジェクターをスタンドに接続します。
M6*10MM
距離
1.59m
2.24m
3.07m
3.67m
スクリーンサイズ
50cm
72cm
100cm
120cm
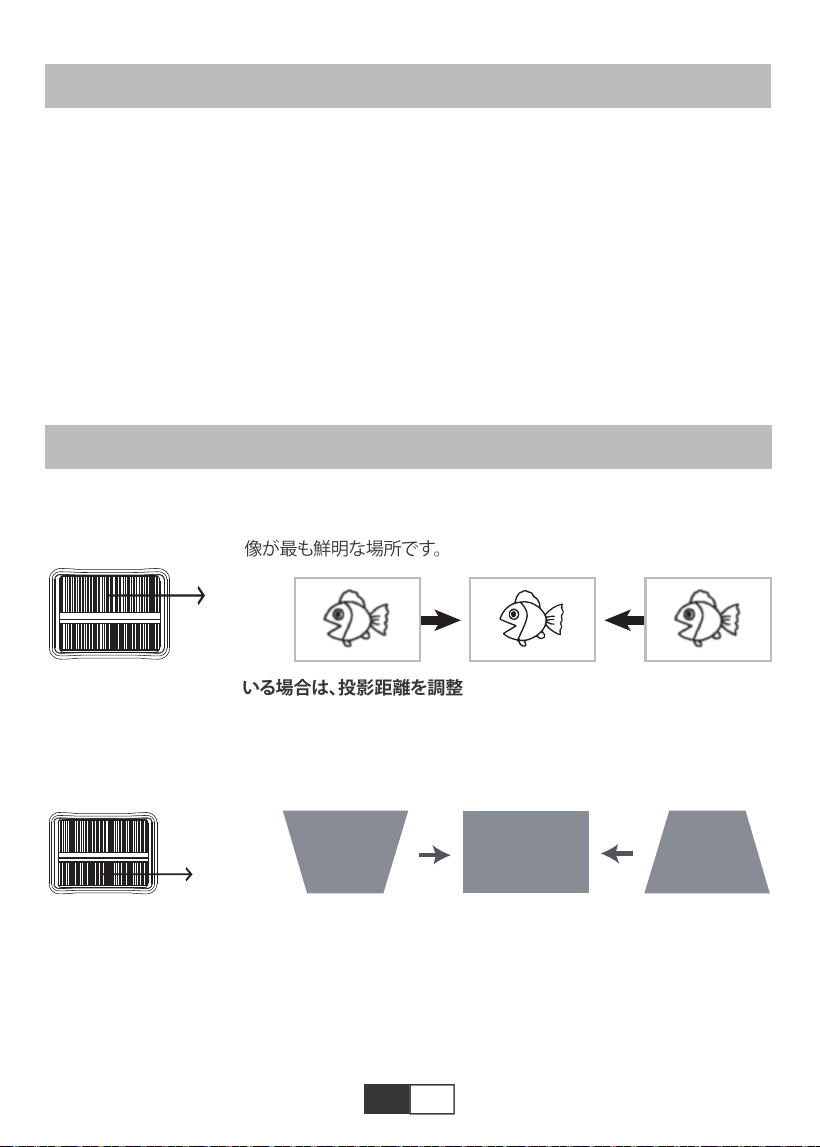
01 02 03 04 05 06 07 08 09 10 11 12 13
14 15 16 17 18 19
20 21 22 23 24 25 26 27 28 29 30 31 32
33 34 35 36 37 38
39 40 41 42 43 44 45 46 47 48 49 50 51
52 53 54 55 56 57
58 59 60 61 62 63 64 65 66 67 68 69 70
71 72 73 74 75 76
77 78 79 80 81 82 83
84 85 86 87 88 89
90 91 92 93 94 95
96 97 98 99
111 112 113 114
100 101 102 103 104 105 106 107 108
109 110
JP
本体の起動方法
A.プロジェクターの背面にあるスイッチをオンにしてから、リモコンまたはプロジェクターの電源
キーを押すと、インジケーターライトが青色に変わります。
B .プ ロジェクター の上部にあるキーストーンを使用して、長方形の投影スクリーンを取得します。
C.プロジェクター上部のフォーカスリングを調整して、最高の画像パフォーマンスを実現します。
(それでもぼやけている場合は、投影距離を調整してみてください。)
D.外部デバイス(スマートフォン、iPad、Amazon Fire TV、TVボックス、DVDプレーヤー、コンピュ
ーターなど)をプロジェクターの対応するインターフェイスに接続します。必ず、対応するソース
を選択してください。正しいソースを選択しないと、プロジェクタは信号を検出できません。
E. [設定]メニューを選択し、[システムセット]を入力します。次に、[OSD言語]オプションを選択し
て、希望の言語を設定できます。
映像調整
1.フォカス調整
フォーカスリングをゆっくり回します。 同時に、フォーカスポイントを注意深く確認してください。
レンズの最適な焦点は、画像が最も鮮明な場所です。
ご注意:それでもぼやけている場合は、投影距離を調整してみてください。
2.手動で台形補正(最大調整可能:±15°)
画像が長方形に変わるまで、プロジェクタの上部にあるキーストーン補正リングをゆっくりと
動かします。キーストーン補正は最大±15°(垂直)まで調整できます。
A.投影された画像が台形の場合、Keystoneで解決できます。補正。(手動キーストーン修正を
行います)
注:キーストーン補正で画像の形状を解決できない場合は、スクリーンの中心に対するプロジ
ェクターの垂直方向の高さ。
B.投影された画像がぼやけているか、見づらい場合があります。これは、レンズによるフォーカ
ス調整は、以下の手順で調整してください。フォーカス。(マニュアルフォーカスを実行し、画面
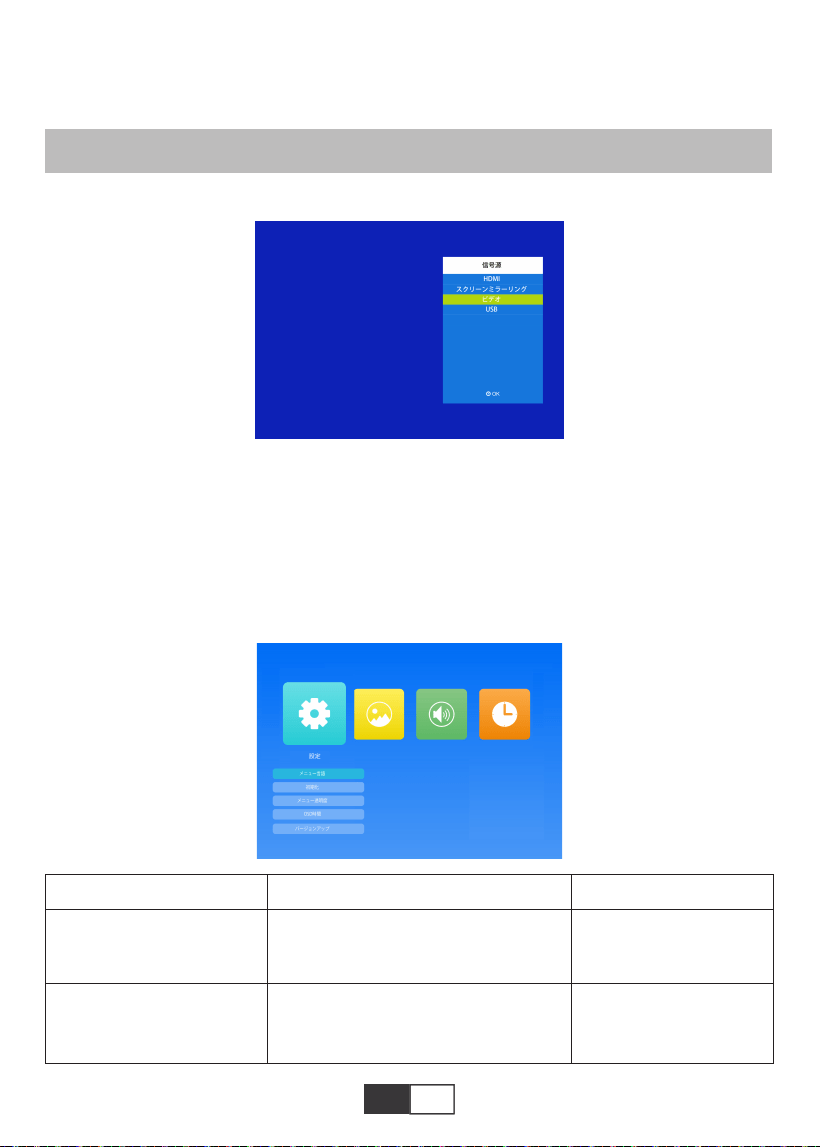
01 02 03 04 05 06 07 08 09 10 11 12 13
14 15 16 17 18 19
20 21 22 23 24 25 26 27 28 29 30 31 32
33 34 35 36 37 38
39 40 41 42 43 44 45 46 47 48 49 50 51
52 53 54 55 56 57
58 59 60 61 62 63 64 65 66 67 68 69 70
71 72 73 74 75 76
77 78 79 80 81 82 83 84
85 86 87 88 89
90 91 92 93 94 95
96 97 98 99
111 112 113 114
100 101 102 103 104 105 106 107 108
109 110
JP
1.入力信号源を選択する
2.メーニュ設定方法
2.1.オプション
起動画面で「オプション」を選択し、「オプション」メニューに入ります。
1)ホームページで「信号源」を選択し、「信号源」メニューに入ります。
2)目的の入力信号ソースを選択します:HDMI/スクリーンミラーリング/ビデオ(AV))/USB
上で最も鮮明な画像を見つけます)
注:中央がシャープで、エッジがぼやけている場合は正常です。
本体の取り付け
メーニュ
英語/フランス/イタリア語/日本語など
OSD言語
初期化
モード 機能
操作インターフェースに表示
される言語を設定する
すべての設定を工場出荷時
の設定に戻す
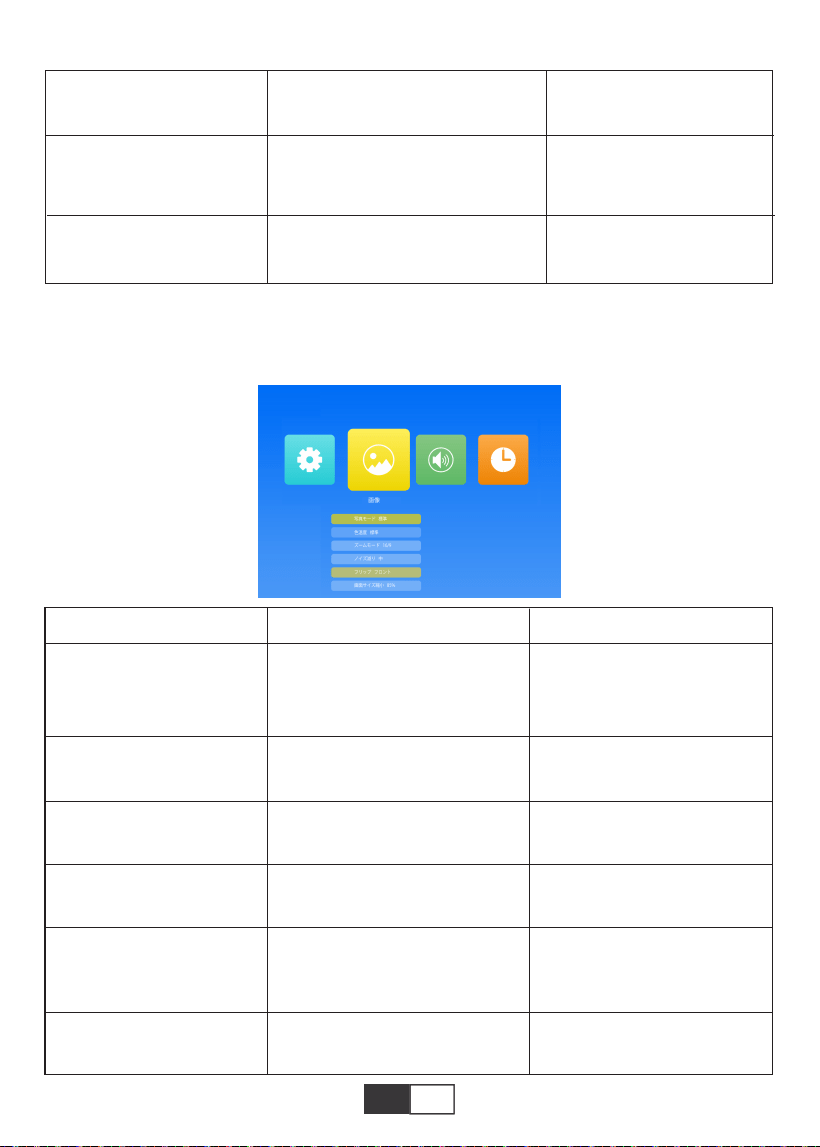
01 02 03 04 05 06 07 08 09 10 11 12 13
14 15 16 17 18 19
20 21 22 23 24 25 26 27 28 29 30 31 32
33 34 35 36 37 38
39 40 41 42 43 44 45 46 47 48 49 50 51
52 53 54 55 56 57
58 59 60 61 62 63 64 65 66 67 68 69 70
71 72 73 74 75 76
77 78 79 80 81 82 83 84 85
86 87 88 89
90 91 92 93 94 95
96 97 98 99
111 112 113 114
100 101 102 103 104 105 106 107 108
109 110
JP
2.2.映像
このメニューは、テキスト/画像/ビデオ/音楽を再生するときにリモコンまたはプロジェクター
のMボタンを押すと直接開くことができます。
画像モード
色温度
アスペクト比
ノイズ減り
スクリーン
プロジェクションダイレクト
標準/ソフト/ユーザー/ビビッド
中性/ウォーム/クール
自動/16:9/4:3
オフ/低/中/高/初期値
フロント/リア/フロント天井/リア天井
画像の「コントラスト/明るさ/
色/シャープネス/色合い」を調
整する4画像モード
色温度モードを切り替える
画像のアスペクト比を設定する
ノイズリダクションの強度を設
定する
リモートコントロールを介してVG
A接続デバイスを制御する
投影モードを設定する
メーニュ モード 機能
メニュー透明度
OSD時間
バージョンアップ(U S B
オフ/低/中/高
オフ/5秒/10秒/15秒
ソフトウェアアップデート
メニューインターフェイ
スの透明度を調整する
メニューインターフェイス
を維持するタイムを調整する
プロジェクター のソフトウェ
アバ ージョンを 更 新 する
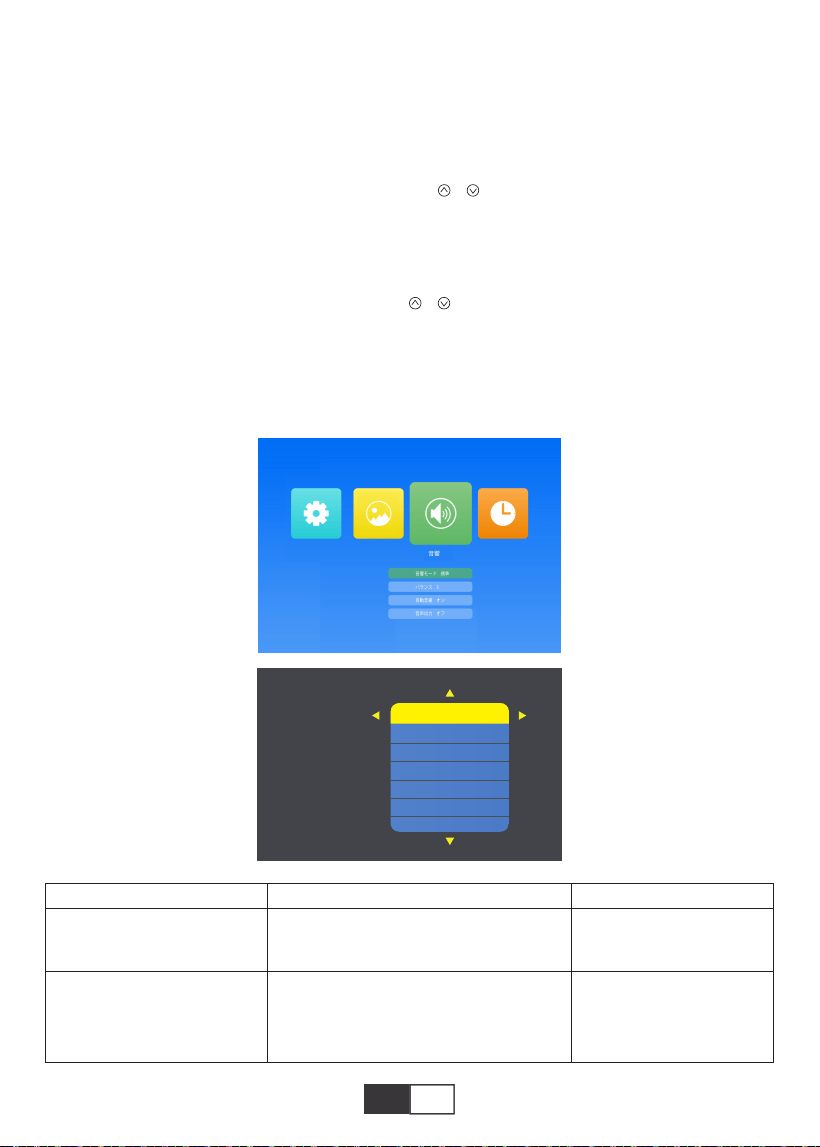
01 02 03 04 05 06 07 08 09 10 11 12 13
14 15 16 17 18 19
20 21 22 23 24 25 26 27 28 29 30 31 32
33 34 35 36 37 38
39 40 41 42 43 44 45 46 47 48 49 50 51
52 53 54 55 56 57
58 59 60 61 62 63 64 65 66 67 68 69 70
71 72 73 74 75 76
77 78 79 80 81 82 83 84 85 86
87 88 89
90 91 92 93 94 95
96 97 98 99
111 112 113 114
100 101 102 103 104 105 106 107 108
109 110
JP
2.3.音声
このメニューは、テキスト/画像/ビデオ/音楽を再生するときにリモコンまたはプロジェクター
のMボタンを押すと直接開くことができます。
音声モード
バランス
ユーザー/スタンダード/音楽/映画/
スポーツ
±50
音声モードを設定する
スピーカーの左右のチャ
ンネルの音のバランスを
とる
ご注意:
1).画像モード
画像モードでは、「標準/ソフト/ユーザー/ビビッド」を選択して、画像の「コントラスト/明るさ/
色/シャープネス/色合い」を調整できます。
画像モード-ユーザーオプションでは、リモコンの「/」ボタンで「0〜100」の範囲で画像の「
コントラスト/明るさ/色/シャープネス/色合い」を調整できます。
2).色温度
色温度では、さまざまなオプション、中/暖かい/涼しいを選択できます。
色温度-ユーザーオプションでは、リモコンの「/」ボタンで画像の「赤/緑/青」を「0〜100」
の範囲で調整できます。
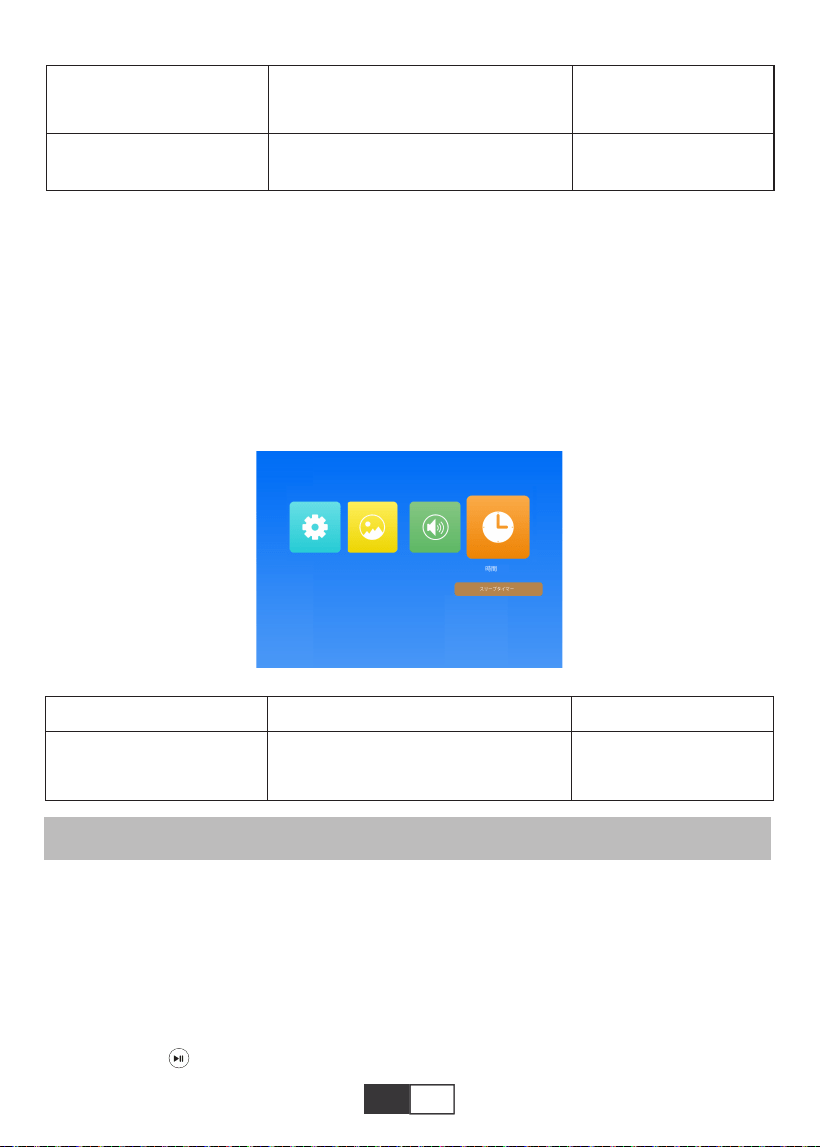
01 02 03 04 05 06 07 08 09 10 11 12 13
14 15 16 17 18 19
20 21 22 23 24 25 26 27 28 29 30 31 32
33 34 35 36 37 38
39 40 41 42 43 44 45 46 47 48 49 50 51
52 53 54 55 56 57
58 59 60 61 62 63 64 65 66 67 68 69 70
71 72 73 74 75 76
77 78 79 80 81 82 83 84 85 86 87
88 89
90 91 92 93 94 95
96 97 98 99
111 112 113 114
100 101 102 103 104 105 106 107 108
109 110
JP
TOPTROX2プロジェクターには、6つの信号源、USB/HDMI/AV/オーディオ出力接続(3.5mm
ヘッドフォンジャック)/ MHL機能/照明デジタルAVアダプターの使用があります。 iPhone、
iPadをサポートし、入力ソース「HDMI」を選択します。 デバイス(PC、電話、DVDプレーヤー、サ
ウンドバー、USB、PS4など)を接続するための正しい接続ポートを選択してください
2.4.時間
このメニューは、テキスト/画像/ビデオ/音楽を再生するときにリモコンまたはプロジェクター
のMボタンを押すと直接開くことができます。
1.USBフラシュと接続する
USBフラッシュドライバーをUSBポートに挿入し、適切な信号ソースを選択してから、再生/一
時停止ボタン()を押して表示または停止します。
Bluetooth接続手順:
メニューページを開く→「サウンド」→「オーディオ出力」→「静的」モードを選択右ボタンで→
ボタンでデバイスを検索→Bluetoothデバイスを選択してを押します。右ボタンで接続を確認
します(右ボタンを押して切断します)→接続に成功すると、下の行のステータスバーに「再生
」と表示されます。
機器と接続する
スリープタイマー
オフ/10分/20分/30分/60分/90分/
120分/180分/240分
プロジェクター のスリープ
時間を設定する
メーニュ モード 機能
オフ/自動/静的
オフ/オン
インテリジェントに 音 量
を調整する
自動音量
自動出力

01 02 03 04 05 06 07 08 09 10 11 12 13
14 15 16 17 18 19
20 21 22 23 24 25 26 27 28 29 30 31 32
33 34 35 36 37 38
39 40 41 42 43 44 45 46 47 48 49 50 51
52 53 54 55 56 57
58 59 60 61 62 63 64 65 66 67 68 69 70
71 72 73 74 75 76
77 78 79 80 81 82 83 84 85 86 87 88
89
90 91 92 93 94 95
96 97 98 99
111 112 113 114
100 101 102 103 104 105 106 107 108
109 110
JP
2.パソコンと接続する
HDMIケーブル(付属)を使用してプロジェクターに接続します。
1)HDMIケーブルをコンピューターのHDMIポートに接続します。
2)HDMIソースを選択して、コンピューター上のファイルを投影します。
3)ラップトップで、キー「Win+P」ボードキーを押したままにして表示モードを変更します
(リモコンの「ソース」またはコントロールパネルの「S」を押すと、画面の「入力ソース」で「USB」
を選択します)
画像形式
JEPG, PNG, BMP
.jpg / .png / .bmp
対応ファイル拡張子
対応ファイル拡張子
対応ファイル拡張子
マル チメディアファイル の 仕 様
音声形式
DolbyAC3/AAC、DTS、WMA、DivX、VC1、RM、RMVB、FLVなどにサポートされて
MPEG1, MPEG2, LPCM, MP3
.avi / .ts / .dat / .vob / .wmv / .mkv / .mp3
/ .mp4/ .m4a
いません。ビデオフォーマット(最大30〜40Mbsのビットレート)
MSVC/CRAM,MP42,GMC,IV32,RLE,cvid,RV20,DivX,RM,RMVB,VC1,FLVなどにサポート
されていません。
MPEG1, MPEG2, H.263, H.264, AVS,
VC1, MJPEG, RV30, RV40, HEVC
.dat / .ts / .mp4 / .mpg / .mpeg / .avi / .tp
/ .mkv / .mov / .asf / .flv / .3gp. / .3gpp
コンピューターのみ: デフォルトのオプションです‒メインモニターにのみ表示されます。
複製: すべてのモニターに同じものを表示させ、各モニターのデスクトップを複製します。
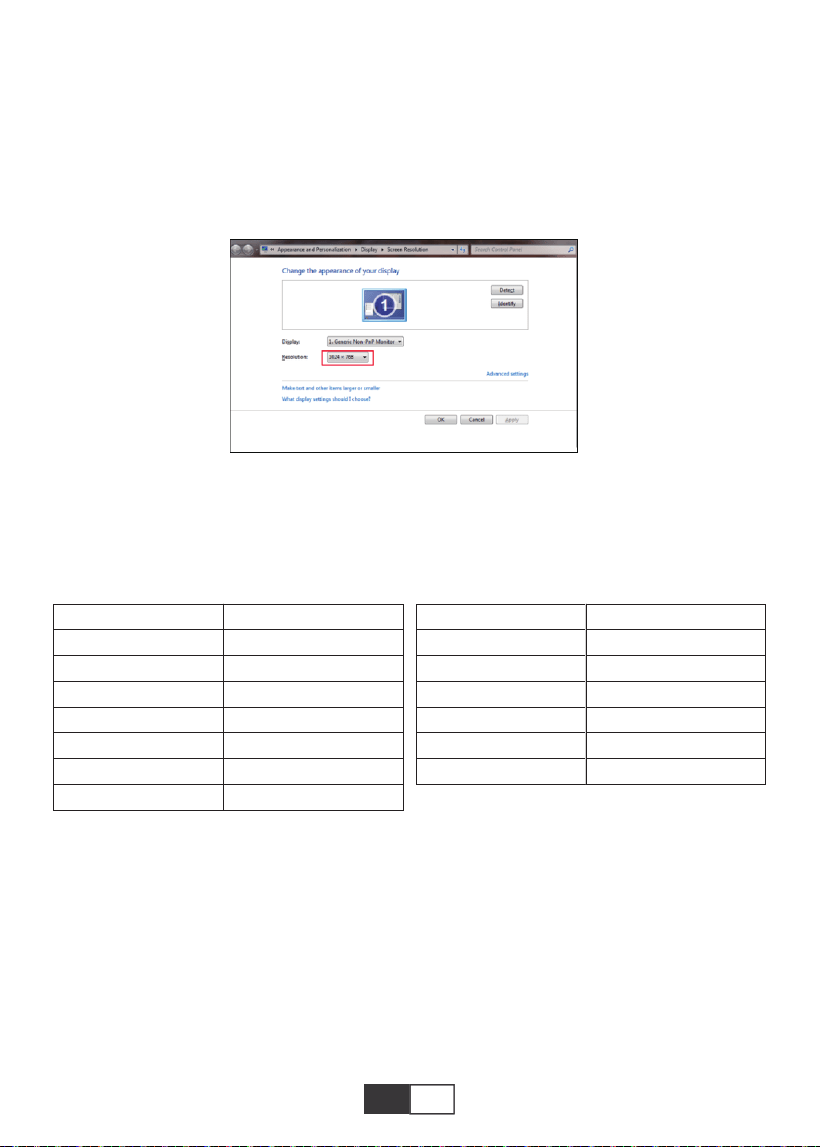
01 02 03 04 05 06 07 08 09 10 11 12 13
14 15 16 17 18 19
20 21 22 23 24 25 26 27 28 29 30 31 32
33 34 35 36 37 38
39 40 41 42 43 44 45 46 47 48 49 50 51
52 53 54 55 56 57
58 59 60 61 62 63 64 65 66 67 68 69 70
71 72 73 74 75 76
77 78 79 80 81 82 83 84 85 86 87 88 89
90 91 92 93 94 95
96 97 98 99
111 112 113 114
100 101 102 103 104 105 106 107 108
109 110
JP JP
拡張:すべてのモニターを1つの大きなモニターのように動作させ、デスクトップをすべてのモ
ニターに拡張します。
プロジェクター の み :プロジェクターのようにセカンダリモニターにのみ表示されます。
プロジェクター専用モードで画面解像度を変更できます
手順:[スタート]>[コントロールパネル]>[外観とカスタマイズ]>[画面の解像度を調整]
ご注意:
プロジェクターをノートブックに接続するとき、出力を変更するためにFn + F *(キーボードの
F1-F10)を押す必要がある場合があります。 コンピュータボタンの機能はブランドごとに異な
るため、次の表を参照してください。
Manufacture
Acer
Dell
Epson
Fujitsu
IBM
Hewlett-packard
Lenovo
Keys
Fn+F5
Fn+F8
Fn+F8
Fn+F10
Fn+F7
Fn+F4
Fn+F10
Manufacture
NEC
Panasonic
Sharp
Sony
Toshiba
Zotac
Keys
Fn+F3
Fn+F3
Fn+F5
Fn+F7
Fn+F5
Fn+F3/F5
3.AVと接続する
パッケージに含まれているAVケーブルを使用してください。
A.DVDプレーヤーとプロジェクターの電源を入れます。
B.カラフルなメスコネクタをDVDプレーヤーのRCAケーブルに接続します。
C.黒いコネクタをプロジェクターのオーディオ入力ポートに接続します。
D.反対側の黄色のコネクタをプロジェクターのビデオポートに接続します。
E.信号ソースとして「AV」を選択します。
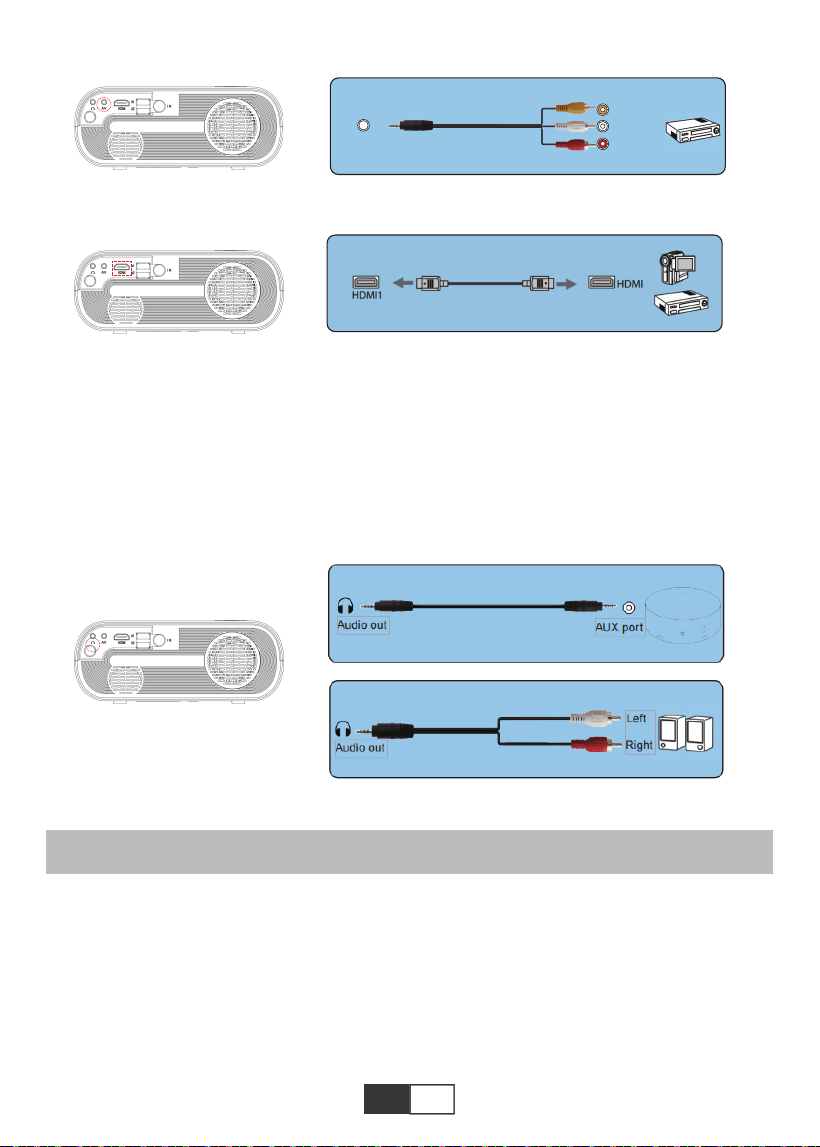
01 02 03 04 05 06 07 08 09 10 11 12 13
14 15 16 17 18 19
20 21 22 23 24 25 26 27 28 29 30 31 32
33 34 35 36 37 38
39 40 41 42 43 44 45 46 47 48 49 50 51
52 53 54 55 56 57
58 59 60 61 62 63 64 65 66 67 68 69 70
71 72 73 74 75 76
77 78 79 80 81 82 83 84 85 86 87 88 89
90
91 92 93 94 95
96 97 98 99
111 112 113 114
100 101 102 103 104 105 106 107 108
109 110
JP JP
再生方法
4.オーディオ出力接続
1.映画/写真/音楽/テキストを再生する(USB入力モード)
A.スピーカーにAUXポートがある場合は、3.5mmオーディオケーブルを使用して
プロジェクター のオーディオ出 力 ポ ートとスピ ーカー の A U X ポ ート。
B.スピーカーにAUXポートがない場合は、2RCAケーブルを購入して、プロジェクターのオーデ
ィオ出力ポートとスピーカーの左右のポートに接続して使用してください。
フリストリモコン の「ソース 」を選 択します。
A.動画ファイルを再生するには、メイン画面で「動画/音楽/写真/テキスト」を選択し、操作パネ
ルまたはリモコンの「OK」キーを押します。 選択したボックスが広がり、周囲の白いエッジが目
立ちます。
または、パッケージに含まれているHDMIケーブルでDVDプレーヤーに接続します。
AV
video
audio out
(L/R)
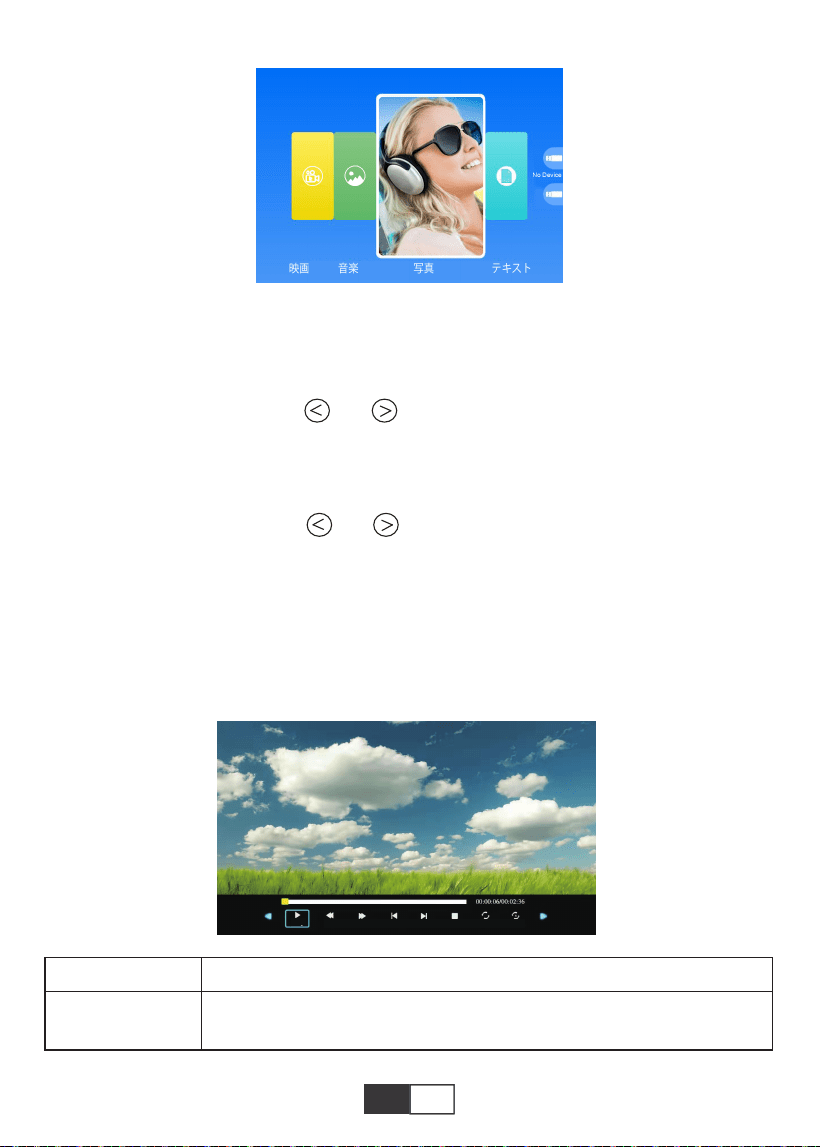
01 02 03 04 05 06 07 08 09 10 11 12 13
14 15 16 17 18 19
20 21 22 23 24 25 26 27 28 29 30 31 32
33 34 35 36 37 38
39 40 41 42 43 44 45 46 47 48 49 50 51
52 53 54 55 56 57
58 59 60 61 62 63 64 65 66 67 68 69 70
71 72 73 74 75 76
77 78 79 80 81 82 83 84 85 86 87 88 89
90 91
92 93 94 95
96 97 98 99
111 112 113 114
100 101 102 103 104 105 106 107 108
109 110
JP
メーニュ 機能
2.再生のインターフェース
ご 注 意:選択したビデオにカーソルを3秒以上置くと、ビデオコンテンツを表示できます。 ビデ
オ再生では、MPEG1、MPEG2、H.263、H.264、AVS、VC1、MJPEG、RV30、RV40、およびHEVCの
みがサポートされています。
B.操作パネルまたはリモコンの「」と「」を押して、ファイル保存する機器を選択します。
「OK」キーを押して、次のステップに入ります。注:ビデオの再生について質問がある場合は、
service@toptro.comに電子メールを送信してください。24時間以内に迅速なソリューション
を提供します。
C.操作パネルまたはリモコンの「」と「」を押して、目的のファイル(またはサブフォルダ
ーに入るフォルダー)を選択します。「OK」キーを押して再生します。PowerPointスライド、
Excel、Word表示などの基本的なビジネスプレゼンテーションに適しています。
ご 注 意:選択した画像にカーソルを3秒以上置くと、画像の内容を表示できます。 画像の再生
には、txt形式のみがサポートされています。
一時停止 FBFF前曲次曲停止ALLRandom
FB
再生中にビデオをすばやく巻き戻します。巻き戻し速度は2Xから32X
の範囲です
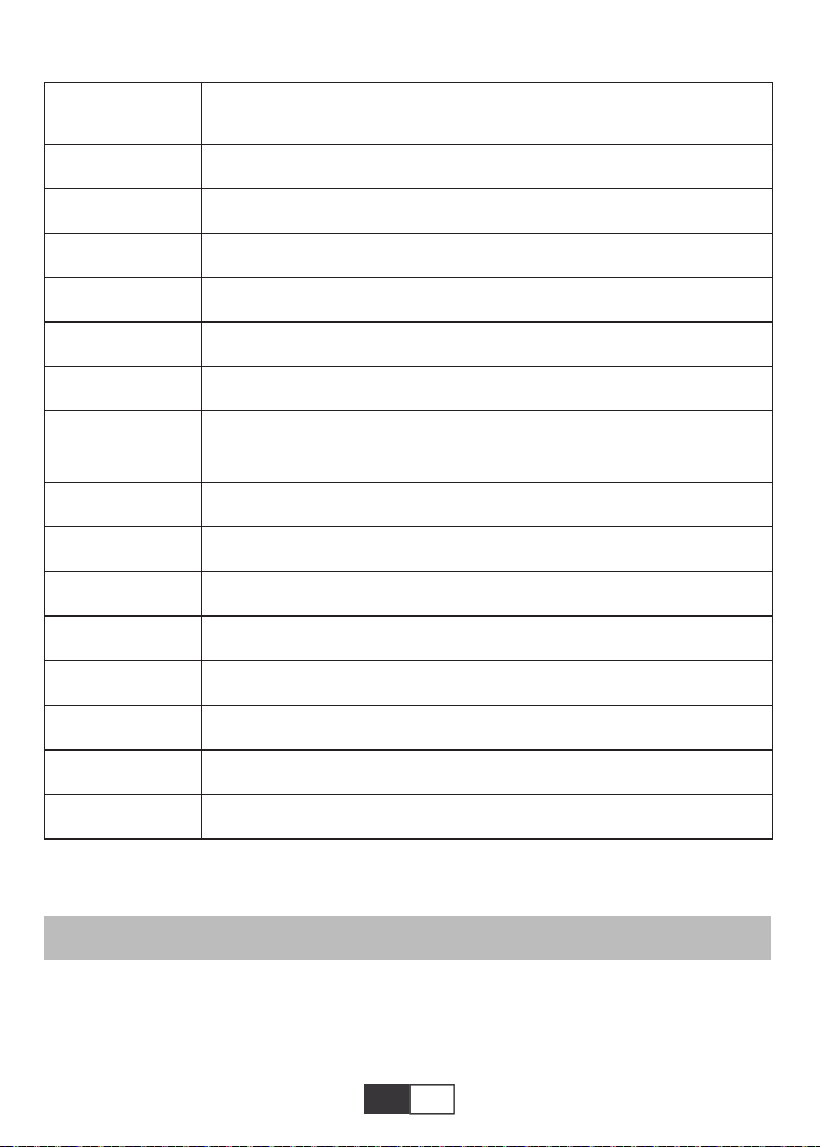
01 02 03 04 05 06 07 08 09 10 11 12 13
14 15 16 17 18 19
20 21 22 23 24 25 26 27 28 29 30 31 32
33 34 35 36 37 38
39 40 41 42 43 44 45 46 47 48 49 50 51
52 53 54 55 56 57
58 59 60 61 62 63 64 65 66 67 68 69 70
71 72 73 74 75 76
77 78 79 80 81 82 83 84 85 86 87 88 89
90 91 92
93 94 95
96 97 98 99
111 112 113 114
100 101 102 103 104 105 106 107 108
109 110
JP
スクリーンミラーリング
リモコンの「ソース」を選択します。
「スクリーンミラーリング」メニューに入り、プロンプトに従って、対応する接続方法を選択して、
デ バ イスをプロジェクター に 接 続します。
FF
前曲.
次曲
停止
All
Random
設置A
プレ イリスト
インフォ
スローフォワード
フォワード
時点に移動
ズーム+
ズーム-
アスペクト比
移動
早送り、ビデオをプッシュして、再生中にすばやく前進します。前進速度
は2Xから32Xの範囲です
前のビデオに切り替る
次のビデオに切り替える
再生を停止して終了します
ランダムオン/オフ
A/Bを設定(ビデオ内の2つのノードをループに設定)/なし
現在のフォルダ内のすべてのプレイリストを選択する
ビデオの詳細
スローフォワード1Xから16X
前進する1Xから16X
特定な時間を設定する
ズーム+1Xto8X
ズーム-1Xto1/4X
自動/4:3/16:9

01 02 03 04 05 06 07 08 09 10 11 12 13
14 15 16 17 18 19
20 21 22 23 24 25 26 27 28 29 30 31 32
33 34 35 36 37 38
39 40 41 42 43 44 45 46 47 48 49 50 51
52 53 54 55 56 57
58 59 60 61 62 63 64 65 66 67 68 69 70
71 72 73 74 75 76
77 78 79 80 81 82 83 84 85 86 87 88 89
90 91 92 93
94 95
96 97 98 99
111 112 113 114
100 101 102 103 104 105 106 107 108
109 110
JP
1.Androidデバイス
1).携帯電話で家庭用WiFiネットワークに接続し、
2).モバイルデバイスの画面ミラーリング機能をアクティブにします。 接続が成功すると、プロ
ジェクション画面にモバイルデバイスが表示されます。
注 意:
1).すべてのAndroidスマートフォンに画面ミラーリング機能があるわけではなく、Androidス
マートフォンごとに画面ミラーリング機能の名前が異なる場合があります。お使いの携帯電話
が画面ミラーリング機能をサポートしているかどうか、およびこの機能を見つける方法につい
ては、携帯電話のブランドサービスプロバイダーにご相談ください。
2).画面ミラーリング機能を使用する場合は、携帯電話のWiFi機能が有効になっていることを
確認してください。
3).投影画面の滑らかさは、電話が接続されているネットワークの品質によって異なります。ス
ムーズなビデオ再生画面を投影できるように、電話が高品質のネットワークに接続されてい
ることを確認してください。
2.IOSデバイス
2.1.ホームWiFiネットワークを使用するバックグラウンドでIOSデバイスの画面ミラーリング機
能を使用する
1).リモコンの「OK」ボタンを押すと、プロジェクターはホームWiFiネットワークに接続します。
2).IOSデバイスの電源を入れ、同じホームネットワークに接続します。
3). モバイルデバイスの画面ミラーリング機能をアクティブにします。 接続が成功すると、プロ
ジェクション画面にモバイルデバイスが表示されます。
2.2.セルラーネットワークデータを使用する状況で、IOSデバイスの画面ミラーリング機能を使
用する
1).IOSデバイスのwifi設定を開き、「RKcast-XXXXXX」(パスワード12345678)を検索して接続
します
2).IOS画面ミラーリング機能をオンにして検索します。
3).次に、リストから「RKcast-XXXXXX」を選択して、IOSデバイスに接続します。(見つからない
場合は、「OK」ボタンを押してプロジェクターのWi-Fiメニューに入り、切断してください)
First,press the remote control ‘ok’
button and connect with wifi.

01 02 03 04 05 06 07 08 09 10 11 12 13
14 15 16 17 18 19
20 21 22 23 24 25 26 27 28 29 30 31 32
33 34 35 36 37 38
39 40 41 42 43 44 45 46 47 48 49 50 51
52 53 54 55 56 57
58 59 60 61 62 63 64 65 66 67 68 69 70
71 72 73 74 75 76
77 78 79 80 81 82 83 84 85 86 87 88 89
90 91 92 93 94
95
96 97 98 99
111 112 113 114
100 101 102 103 104 105 106 107 108
109 110
JP
4)。接続が成功すると、投影画面にIOSデバイスとの接続が成功したことが示されます。
3.有線接続(IOSデバイスにのみ適用可能)
ライトニングケーブルを使用してiOSデバイスをプロジェクターに接続することもできます。
USBポートを介してケーブルを挿入した後、5〜10秒待ってください。コンピューターを信頼す
るかどうかを尋ねるアラートが表示されます。「信頼」を選択してください。投影画面には、デバ
イスと同じコンテンツが表示されます。
安全に電源オフについて
1.プロジェクターまたはリモコンのボタンを押します。
2.OKボタンを押して電源オフを確認します。
3.プロジェクターの電源コードを抜きます。
4.レンズを覆い、プロジェクタを涼しく乾燥した場所に保管します。
保証
X2プロジェクターをご購入いただいた本当にありがとうございます。ご購入日から3年間の保
証期間があり、ご不明な点がございましたら、[email protected].までお気軽にお問い合わ
せください。

01 02 03 04 05 06 07 08 09 10 11 12 13
14 15 16 17 18 19
20 21 22 23 24 25 26 27 28 29 30 31 32
33 34 35 36 37 38
39 40 41 42 43 44 45 46 47 48 49 50 51
52 53 54 55 56 57
58 59 60 61 62 63 64 65 66 67 68 69 70
71 72 73 74 75 76
77 78 79 80 81 82 83 84 85 86 87 88 89
90 91 92 93 94 95
96 97 98 99
111 112 113 114
100 101 102 103 104 105 106 107 108
109 110
DE
INHALT
TOPTRO Lebenslange professionelle Unterstützung...............................................................97
TIPPS..........................................................................................................................................97
PAKETLISTE..........................................................................................................................97
PROJEKTORSPEZIFIKATIONEN...............................................................................98
PROJEKTORÜBERSICHT.....................................................................................98-99
REMOTE CONTOLLER...........................................................................................................100
INSTALLATION........................................................................................101-102
1.Installationsmethode..........................................................................................................101
2.Projektionsabstand und Größe..................................................................................101-102
3.Installation der Decke.........................................................................................................102
PROJEKTOR STARTEN..........................................................................................................103
BILDANPASSUNG........................................................................................................103-104
1.Fokuseinstellung................................................................................................................103
2.Manuelle Trapezkorrektur (maximal einstellbar: ± 15 °)............................................103-104
PROJEKTOR EINRICHTEN.............................................................................................104-107
1.Wählen Sie die Eingangssignalquelle...............................................................................104
2.Menüeinstellungsmethode.........................................................................................104-106
2.1.OPTION.........................................................................................................104-105
2.2.BILD...............................................................................................................105-106
2.3.SOUND..........................................................................................................106-107
2.4.ZEIT.......................................................................................................................107
SIGNAL LINES ANSCHLUSS.........................................................................................107-110
1.Schließen Sie den USB-Flash an..............................................................................107-108
2.Verbindung zum Computer herstellen.......................................................................108-109
3.AV-Verbindung...........................................................................................................109-110
4.Audioausgang....................................................................................................................110
SPIELBETRIEB..............................................................................................................110-112
1.Spielen Sie einen Film / Foto / Musik / Text (im USB-Eingabemodus)....................1110-111
2.Schnittstelle spielen....................................................................................................111-112
Bildschirmspiegelung.....................................................................................................112-113
1.Android-Gerät....................................................................................................................113
2.IOS-Gerät...................................................................................................................113-114
3.Kabelverbindung (gilt nur für IOS-Geräte).......................................................................114
SICHERES AUSSCHALTEN...................................................................................................114
GARANTIE..........................................................................................................114

01 02 03 04 05 06 07 08 09 10 11 12 13
14 15 16 17 18 19
20 21 22 23 24 25 26 27 28 29 30 31 32
33 34 35 36 37 38
39 40 41 42 43 44 45 46 47 48 49 50 51
52 53 54 55 56 57
58 59 60 61 62 63 64 65 66 67 68 69 70
71 72 73 74 75 76
77 78 79 80 81 82 83 84 85 86 87 88 89
90 91 92 93 94 95
96
97 98 99
111 112 113 114
100 101 102 103 104 105 106 107 108
109 110
DE
TIPPS
PAKETLISTE
TOPTRO Lebenslange professionelle Unterstützung
Lieber Kunde,
vielen Dank, dass Sie TOPTRO unterstützen!
Bitte lesen Sie dieses Handbuch gründlich durch, bevor Sie den Projektor verwenden. Wenn Sie
irgendwelche Probleme haben, senden Sie eine E-Mail mit Ihrer Bestellnummer und dem
Problem an [email protected]. Wir werden innerhalb von 24 Stunden eine schnelle Lösung
anbieten.
Eigentlich können viele Probleme einfach durch die Einstellung gelöst werden, wie z.B. kein
Signal, kein Ton, Bluetooth-Verbindung fehlgeschlagen, WiFi-Verbindung fehlgeschlagen, dunkle
Flecken, abgehackte Animation usw. Wir versprechen, dass alle Projektoren vor dem Versand zu
100% sorgfältig geprüft und verpackt wurden.
Wir schätzen Ihre Unterstützung für TOPTRO sehr. Wenn Sie irgendwelche Fragen haben,
könnten Sie uns bitte kontaktieren, damit das Problem gelöst werden kann. Und geben Sie uns
die Möglichkeit, uns zu verbessern. Wir garantieren, dass wir Ihnen eine zufriedenstellende
Lösung anbieten werden.
Vielen Dank für Ihr Verständnis!
TOPTRO Service-Team
1. stellen Sie den Projektor nicht in einem zu warmen oder zu kalten Raum auf, da die hohe oder
niedrige Temperatur die Lebensdauer des Geräts verkürzen wird. Die Arbeitsumgebung wäre 5
℃~35℃ besser.
2. wenn es schwarze Flecken auf der Projektionsfläche gibt, machen Sie sich keine Sorgen, bitte
kontaktieren Sie [email protected] per E-Mail, wir können Ihnen ein Video schicken, wie Sie
den Staub entfernen können.
3. die Belüftung ist für den Projektor ausgestattet, um stabil zu arbeiten. Bedecken Sie die
Belüftung nicht mit Tüchern, Decken oder anderen Dingen. Stecken Sie keine Gegenstände in
den Schlitz des Projektors, da dies zu einem Kurzschluss oder einem elektrischen Schlag führen
und Ihr Gerät beschädigen kann.
4. der Projektor muss streng vor starken Stößen, Stößen und Vibrationen geschützt werden.
Versuchen Sie nicht, den Projektor zu bewegen und starken Stößen, Extrusionen und Vibrationen
auszusetzen. Versuchen Sie nicht, den Projektor zu bewegen und die interne Schaltung zu
beschädigen.
5. die Linse als Kernkomponente des Projektors steht in direktem Zusammenhang mit der
Bildschärfe und dem Bildeffekt. Übermäßiger Staub auf ihr beeinträchtigt die Bildqualität. Die
verschmutzte Linse sollte mit einem weichen Baumwolltuch für die Glaslinsenoberfläche
abgewischt werden. Harte Tücher oder Scheuermittel dürfen nicht verwendet werden.
TOPTRO X2 Projektor*1Cable
HDMI-Kabel*1
Tuch*1
Netzkabel*1
3 in 1 AV-Signalkabel*1
Benutzerhandbuch*1
Fernbedienung*1
Objektivabdeckung*1
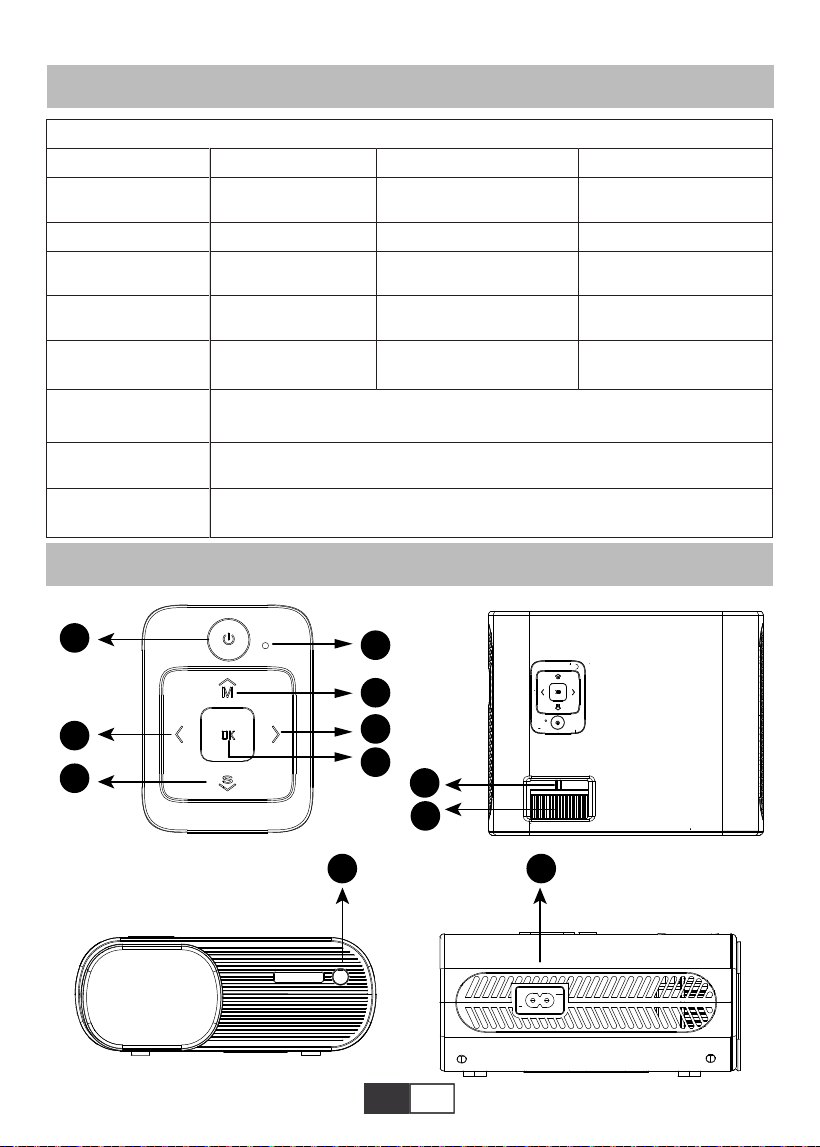
01 02 03 04 05 06 07 08 09 10 11 12 13
14 15 16 17 18 19
20 21 22 23 24 25 26 27 28 29 30 31 32
33 34 35 36 37 38
39 40 41 42 43 44 45 46 47 48 49 50 51
52 53 54 55 56 57
58 59 60 61 62 63 64 65 66 67 68 69 70
71 72 73 74 75 76
77 78 79 80 81 82 83 84 85 86 87 88 89
90 91 92 93 94 95
96 97
98 99
111 112 113 114
100 101 102 103 104 105 106 107 108
109 110
DE
PROJEKTORSPEZIFIKATIONEN
PROJEKTORÜBERSICHT
Native Auflösung
Display-
Technologie
Farbspiel
Projektions
größe
Netzspann
ung
Bilddatei
Projektions methode
Videodatei
Audiodatei
1280*720P
LCD
16.7M voll
50-200 Zoll
AC 100-240V
JPG/JPEG/BMP/PNG
Vorne / hinten am Schreibtisch, vorne / hinten an der Decke
MPEG1/MPEG2/H.263/H.264/AVS/VC1/MJPEG/RV30/RV40/HEVC,usw
MPEG1/MPEG2/LPCM/MP3,usw.
Trapezkorrektur
Lichtquelle
Seitenverhältnis
Projektionsabstand
Projektorgewicht
Schnittstellen
±15° Manuell
LED
Auto/4:3/16:9
1,59-3,67 Meter
1.2Kg
HDMI / USB * 2 / AV / 3,5
mm Kopfhörerausgang
Modell-Nr. X2

01 02 03 04 05 06 07 08 09 10 11 12 13
14 15 16 17 18 19
20 21 22 23 24 25 26 27 28 29 30 31 32
33 34 35 36 37 38
39 40 41 42 43 44 45 46 47 48 49 50 51
52 53 54 55 56 57
58 59 60 61 62 63 64 65 66 67 68 69 70
71 72 73 74 75 76
77 78 79 80 81 82 83 84 85 86 87 88 89
90 91 92 93 94 95
96 97 98
99
111 112 113 114
100 101 102 103 104 105 106 107 108
109 110
DE
1
2
3
4
5
6
7
8
9/15
10
11
12
13
14
16
17
18
19
20
POWER
OK
M
S
Kontrollleuchte
Pfeiltasten
Manueller Fokus
Trapezkorrekturknopf
IR-Empfänger
Netzkabelbuchse
Kopfhöreranschluss
AV-Anschluss
HDMI-Anschluss
USB-Anschluss * 2
Lautsprecher
Lüftungseinlass
Höhenverstellschraube
Projektorhalterung
Lüftungsauslass
Starten Sie den Projektor
Bestätigen Sie die Option
Rufen Sie das Menü auf
Schalten Sie die Eingangssignalquelle um
Zeigen Sie den Status der Stromversorgung an
Dient zum Einstellen der Parameter des Projektors im Menümodus
Passen Sie den Fokusring an, um das klarste Bild zu erhalten
Passen Sie die Trapezkorrektur um ± 15 ° an, um die rechteckige
Projektionsfläche zu erhalten
Infrarotsignalempfänger
Stecken Sie das Netzkabel ein
3,5 mm Kopfhörerausgang
Audioausgang
HDMI-Eingang
USB-Eingang (OUT5V kann zum Laden verwendet werden)
Projektorlautsprecher
Projektorentlüftung
Passen Sie die Höhe der Projektionsfläche an
Befestigen Sie den Projektor mit einer M6x10mm Schraube
Projektorentlüftung
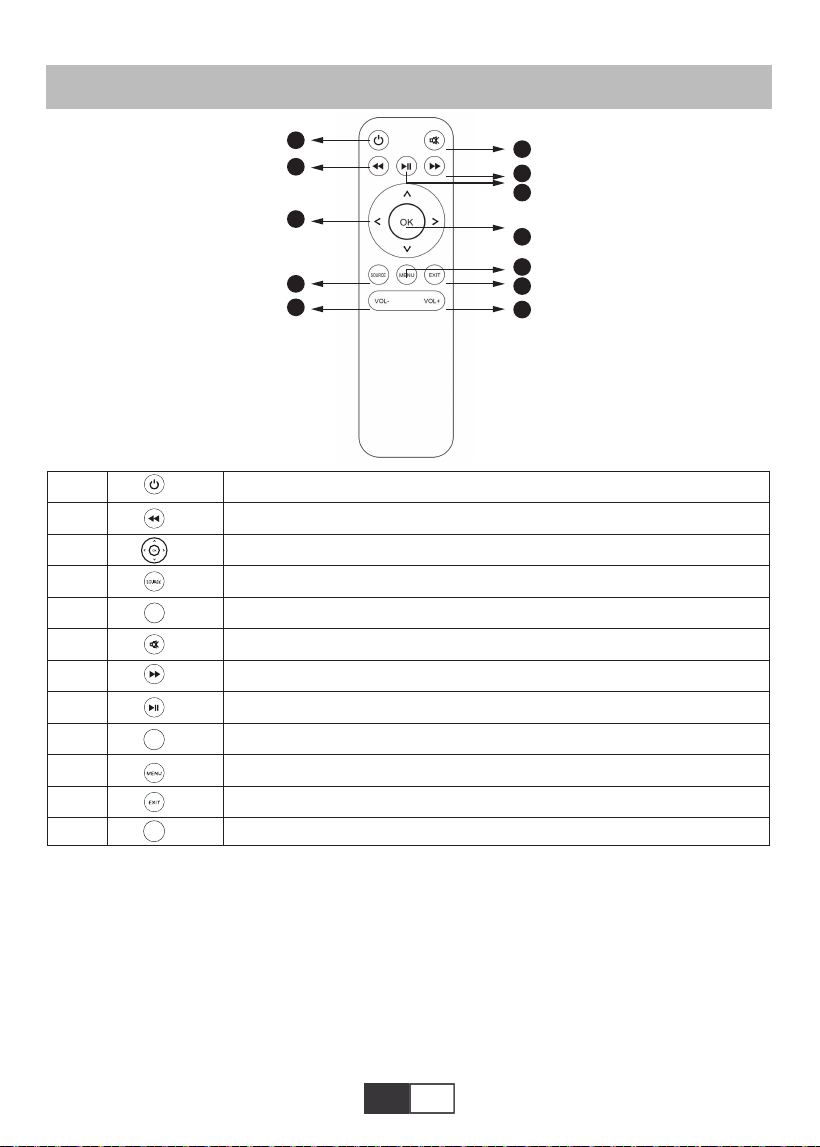
01 02 03 04 05 06 07 08 09 10 11 12 13
14 15 16 17 18 19
20 21 22 23 24 25 26 27 28 29 30 31 32
33 34 35 36 37 38
39 40 41 42 43 44 45 46 47 48 49 50 51
52 53 54 55 56 57
58 59 60 61 62 63 64 65 66 67 68 69 70
71 72 73 74 75 76
77 78 79 80 81 82 83 84 85 86 87 88 89
90 91 92 93 94 95
96 97 98 99
111 112 113 114
100 101 102 103 104 105 106 107 108
109 110
DE
REMOTE CONTOLLER
1
2
3
4
5
6
7
8
9
10
11
12
Schalten Sie den Projektor ein / aus
Kehren Sie zum vorherigen Menü zurück
Dient zum Einstellen der Parameter des Projektors im Menümodus
Signalquelle
Lautstärke runter
Schließen Sie den Ton
Rufen Sie das nächste Menü auf
Zurück zur Startseite / Video abspielen
Bestätigen Sie die Option
Menüs aufrufen
Kehren Sie zum vorherigen Menü zurück
Lautstärke erhöhen
OK
VOL-
VOL+
Hinweis:
1) .Installieren Sie 2 AAA-Batterien in die Fernbedienung, bevor Sie sie verwenden.
Kombinieren Sie keine neuen Batterien mit alten in der Fernbedienung, da dies aufgrund
unzureichender Stromversorgung zu Betriebsstörungen führen kann.
2) .Bei Verwendung der Fernbedienung stellen Sie bitte sicher, dass der Signalsender der
Fernbedienung auf den Infrarotsignalempfänger des Projektors ausgerichtet ist.
3) .Wenn Sie die Fernbedienung längere Zeit nicht benutzen, nehmen Sie bitte die Batter-
ien heraus, um ein Auslaufen der Batterien zu verhindern.
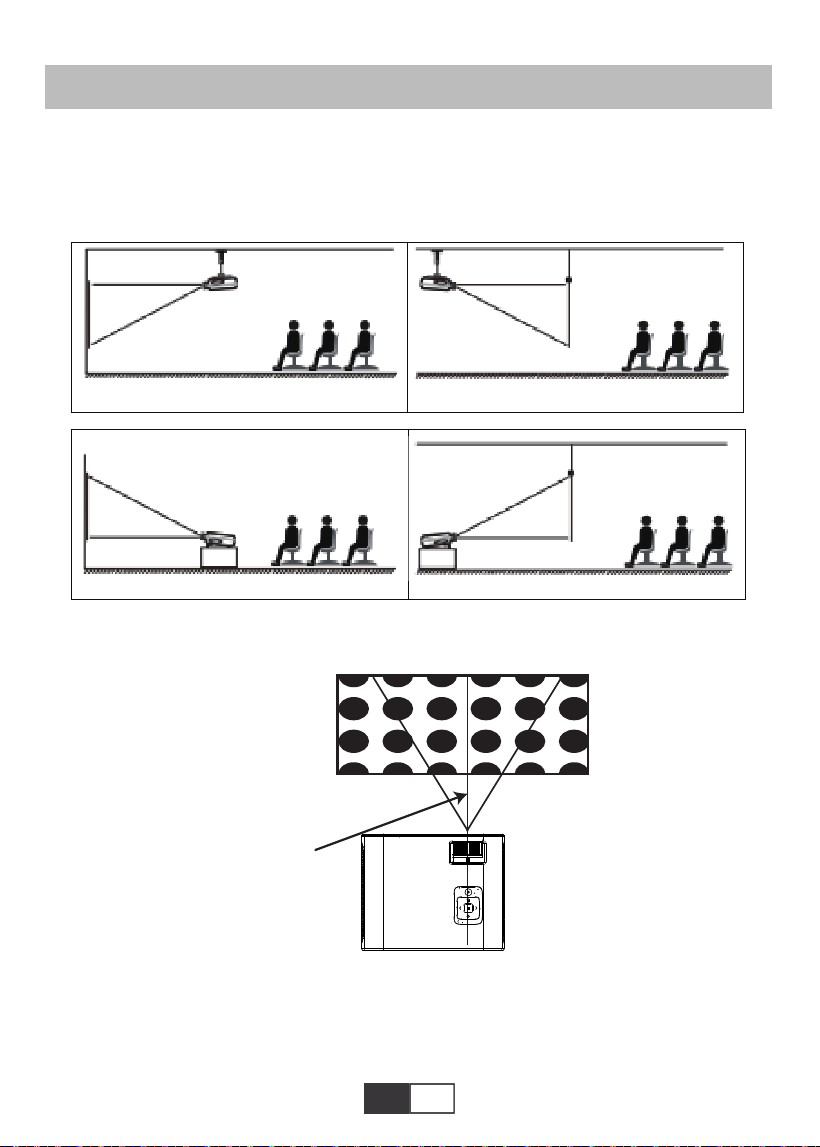
01 02 03 04 05 06 07 08 09 10 11 12 13
14 15 16 17 18 19
20 21 22 23 24 25 26 27 28 29 30 31 32
33 34 35 36 37 38
39 40 41 42 43 44 45 46 47 48 49 50 51
52 53 54 55 56 57
58 59 60 61 62 63 64 65 66 67 68 69 70
71 72 73 74 75 76
77 78 79 80 81 82 83 84 85 86 87 88 89
90 91 92 93 94 95
96 97 98 99
111 112 113 114
100
101 102 103 104 105 106 107 108
109 110
DE
1.Front projection Ceiling mount 2.Rear projection Ceiling mount
Screen
Projector
Screen
Projector
3.Front projection Table mount 4.Rear projection Table mount
Screen
Projector
Screen
Projector
INSTALLATION
1.Installationsmethode
Der Projektor kann mit einem speziellen Aufhängerahmen an die Decke gehängt und auf
den stabilen Schreibtisch gestellt werden, um das Bild entsprechend der Betriebsumge-
bung und den Anforderungen zu projizieren. Darüber hinaus kann der Projektor mit folgen-
den Methoden installiert werden:
Halten Sie den Projektor in einer Höhe, in der das Objektiv axialsymmetrisch zum Bildschirm
ist. Wenn dies nicht möglich ist, passen Sie das Bild mit dem Trapezkorrekturring an.
Rectangle positive Image
The symmetry axis of
the screen
Screen
Projector
Wenn Sie den Projektor korrekt installieren, ist das Bild rechteckig.
2.Projektionsabstand und Größe
Wenn Sie eine kostenlose Projektionsfläche erhalten möchten, kontaktieren Sie uns bitte
über [email protected]

01 02 03 04 05 06 07 08 09 10 11 12 13
14 15 16 17 18 19
20 21 22 23 24 25 26 27 28 29 30 31 32
33 34 35 36 37 38
39 40 41 42 43 44 45 46 47 48 49 50 51
52 53 54 55 56 57
58 59 60 61 62 63 64 65 66 67 68 69 70
71 72 73 74 75 76
77 78 79 80 81 82 83 84 85 86 87 88 89
90 91 92 93 94 95
96 97 98 99
111 112 113 114
100 101
102 103 104 105 106 107 108
109 110
DE
Bitte folgen Sie den Daten in der folgenden Tabelle, um die Bildgröße und den Abstand
anzupassen. (Seitenverhältnis: 16: 9, Standard)
Die empfohlene Projektionsentfernung beträgt ca. 2,5 m, die kürzeste Projektionsent-
fernung beträgt 1,59 m.
Anmerkung:
Die einstellbare Stützbasis kann den maximalen Projektionswinkel um 15 °
gewährleisten.
Der beste Anzeigeeffekt wird durch Projektionswinkelbereiche von 0 ° - 8 ° erzielt.
50"
72"
100"
120"
367cm
307cm
224cm
159cm
3.Installation der Decke
A. Bitte kaufen Sie ein universelles Einlochprojektor-Deckenmontageset mit M6-Schraube.
B. Verbinden Sie den Projektor durch die Schraubenlöcher an der Unterseite des Projektors
mit dem Ständer.
M6*10MM
Entfernung
1.59m
2.24m
3.07m
3.67m
Bildschirmgröße
50 Zoll
72 Zoll
100 Zoll
120 Zoll
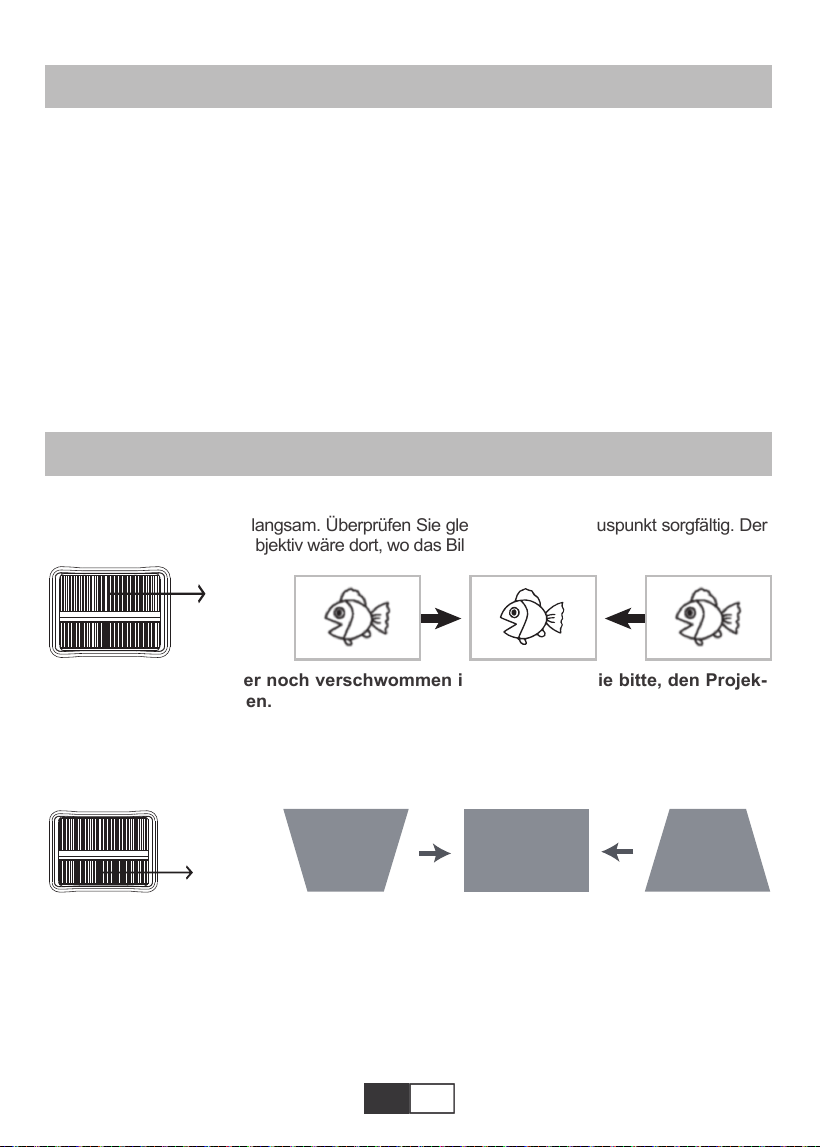
01 02 03 04 05 06 07 08 09 10 11 12 13
14 15 16 17 18 19
20 21 22 23 24 25 26 27 28 29 30 31 32
33 34 35 36 37 38
39 40 41 42 43 44 45 46 47 48 49 50 51
52 53 54 55 56 57
58 59 60 61 62 63 64 65 66 67 68 69 70
71 72 73 74 75 76
77 78 79 80 81 82 83 84 85 86 87 88 89
90 91 92 93 94 95
96 97 98 99
111 112 113 114
100 101 102
103 104 105 106 107 108
109 110
DE
PROJEKTOR STARTEN
A. Schalten Sie den Schalter an der Rückseite des Projektors ein. Drücken Sie dann die Ein- /
Aus-Taste auf der Fernbedienung oder dem Projektor. Die Anzeigelampe leuchtet blau.
B.Verwenden Sie den Schlussstein oben am Projektor, um eine rechteckige Projektionsfläche
zu erhalten.
C. Passen Sie den Fokusring oben am Projektor an, um die beste Bildleistung zu erzielen.
(Wenn es immer noch verschwommen ist, versuchen Sie bitte, den Projektionsabstand
anzupassen.)
D. Schließen Sie das externe Gerät (Smartphone, iPad, Amazon Fire TV, TV-Box, DVD-Player,
Computer usw.) an die entsprechenden Schnittstellen des Projektors an. Achten Sie darauf, die
entsprechende Quelle auszuwählen. Wenn Sie nicht die richtige Quelle auswählen, kann der
Projektor das Signal nicht erkennen.
E.Wählen Sie das Menü "Set", geben Sie das "System Set" ein und wählen Sie die Option
"OSD Language", um Ihre bevorzugte Sprache festzulegen.
BILDANPASSUNG
1.Fokuseinstellung
Drehen Sie den Fokusring langsam. Überprüfen Sie gleichzeitig den Fokuspunkt sorgfältig. Der
beste Fokuspunkt für das Objektiv wäre dort, wo das Bild am klarsten ist.
Hinweis: Wenn es immer noch verschwommen ist, versuchen Sie bitte, den Projek-
tionsabstand anzupassen.
2.Manuelle Trapezkorrektur (maximal einstellbar: ± 15 °)
Bewegen Sie den Trapezkorrekturring oben auf dem Projektor langsam, bis das Bild
rechteckig wird. Die Trapezkorrektur kann bis zu ± 15 ° (vertikal) eingestellt werden.
A. Wenn das projizierte Bild eine trapezförmige Form hat, kann es mit Keystone aufgelöst
werden Korrektur. (Manuelle Trapezkorrektur durchführen)
Hinweis: Wenn die Trapezkorrektur die Bildform nicht auflösen kann, reduzieren Sie bitte
die vertikale Höhe des Projektors in Bezug auf die Mitte des Bildschirms.
B. das projizierte Bild verschwommen oder schwer zu sehen sein kann, ist dies auf das
Fehlen von zurückzuführen.Fokuseinstellung mit dem Objektiv, folgen Sie bitte den
nachstehenden Schritten, um die Einstellung einzustellen Fokus.
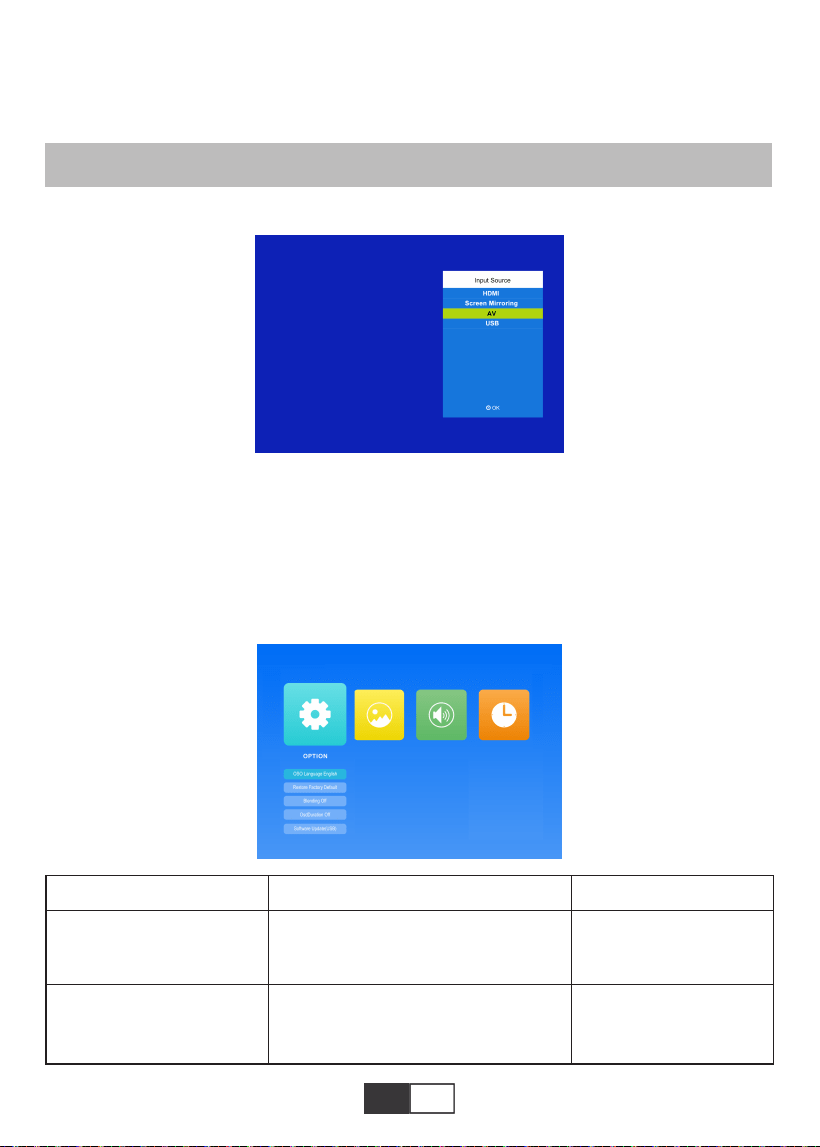
01 02 03 04 05 06 07 08 09 10 11 12 13
14 15 16 17 18 19
20 21 22 23 24 25 26 27 28 29 30 31 32
33 34 35 36 37 38
39 40 41 42 43 44 45 46 47 48 49 50 51
52 53 54 55 56 57
58 59 60 61 62 63 64 65 66 67 68 69 70
71 72 73 74 75 76
77 78 79 80 81 82 83 84 85 86 87 88 89
90 91 92 93 94 95
96 97 98 99
111 112 113 114
100 101 102 103
104 105 106 107 108
109 110
DE
1.Wählen Sie die Eingangssignalquelle
2.Menüeinstellungsmethode
2.1.OPTION
Wählen Sie im Startbildschirm „OPTION“ und rufen Sie das Menü „OPTION“ auf.
1) .Wählen Sie auf der Startseite „Quelle“ und rufen Sie das Menü „Quelle“ auf.
2) .Wählen Sie die gewünschte Eingangssignalquelle: HDMI / Bildschirmspiegelung / AV
/ USB
(Führen Sie den manuellen Fokus durch und finden Sie das schärfste Bild auf dem
Bildschirm.)
Hinweis: Es ist normal, wenn die Schärfe in der Mitte und die Kante unscharf sind.
PROJEKTOR EINRICHTEN
Menü
Englisch / Frankreich / Italienisch /
Japanisch usw.
OSD-Sprache
Werkseinstellung
wiederherstellen
Modus Funktion
Richten Sie die in der
Bedienoberfläche
angezeigte Sprache ein
Stellen Sie alle
Einstellungen auf die
ursprüngliche Werksein-
stellung zurück
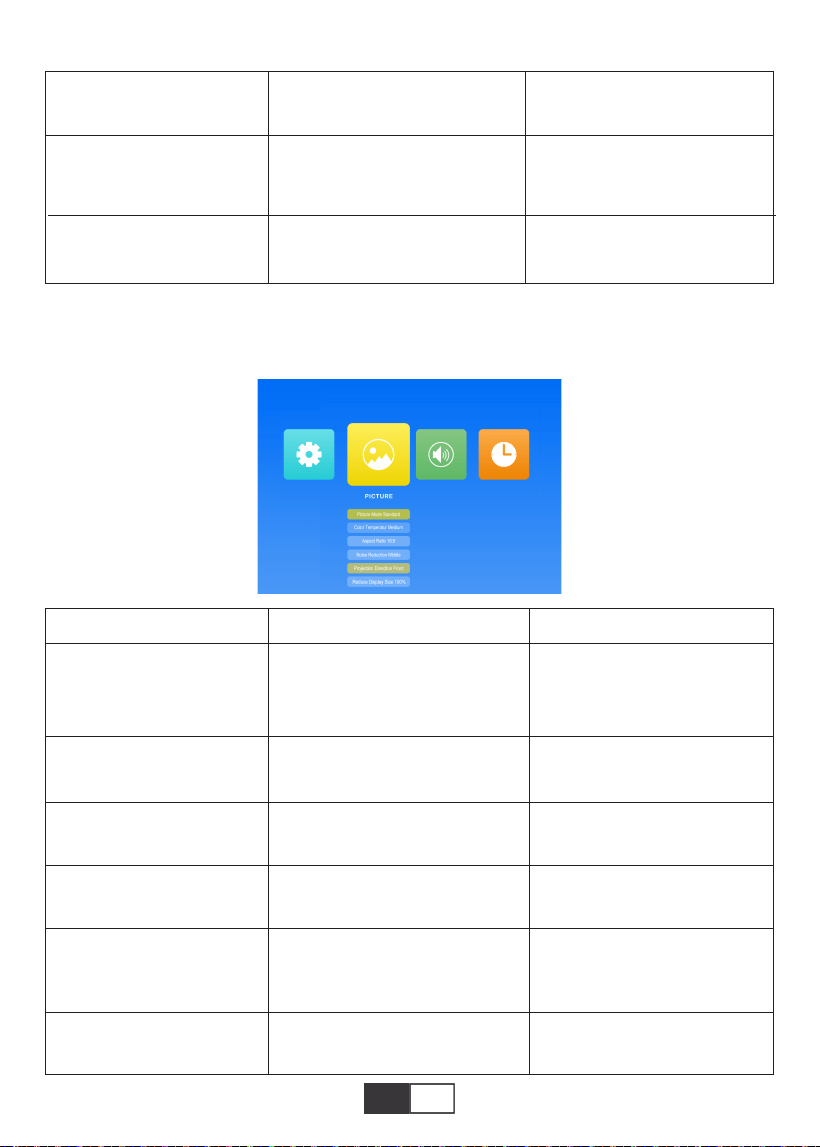
01 02 03 04 05 06 07 08 09 10 11 12 13
14 15 16 17 18 19
20 21 22 23 24 25 26 27 28 29 30 31 32
33 34 35 36 37 38
39 40 41 42 43 44 45 46 47 48 49 50 51
52 53 54 55 56 57
58 59 60 61 62 63 64 65 66 67 68 69 70
71 72 73 74 75 76
77 78 79 80 81 82 83 84 85 86 87 88 89
90 91 92 93 94 95
96 97 98 99
111 112 113 114
100 101 102 103 104
105 106 107 108
109 110
DE
2.2.BILD
Dieses Menü kann direkt durch Drücken der M-Taste auf der Fernbedienung oder dem
Projektor geöffnet werden, wenn Text / Bild / Video / Musik abgespielt wird.
Aus / Niedrig / Mittel / Hoch
Aus / 5 Sek/ 10 Sek/15 Sek
Software aktualisieren
Passen Sie die Transparenz
der Menüoberfläche an
Passen Sie die Dauer der
Beibehaltung der
Menüoberfläche an
Aktualisieren Sie die
Softwareversion des
Projektors
Mischen
OsdDuration
Software-Update (USB)
Menü
Standard / Soft / User / Vivid
Mittel / Warm / Kühl
Auto/16:9/4:3
Aus/Niedrig/Middle/Huch/Default
Vordere / Hintere / Vordere
Decke / Hintere Decke
75%~100%
Bildmodus
Farbtemperatur
Seitenverhältnis
Lärmreduzierung
Projektion direkt
Anzeigegröße reduzieren
Modus Funktion
4 Bildmodus zum Anpassen
von "Kontrast / Helligkeit /
Farbe / Schärfe / Farbton" des
Bildes
Wechseln Sie in den
Farbtemperaturmodus
Stellen Sie das Seitenver-
hältnis des Bildes ein.
Stellen Sie die Intensität der
Rauschunterdrückung ein
Richten Sie den Projektions-
modus ein
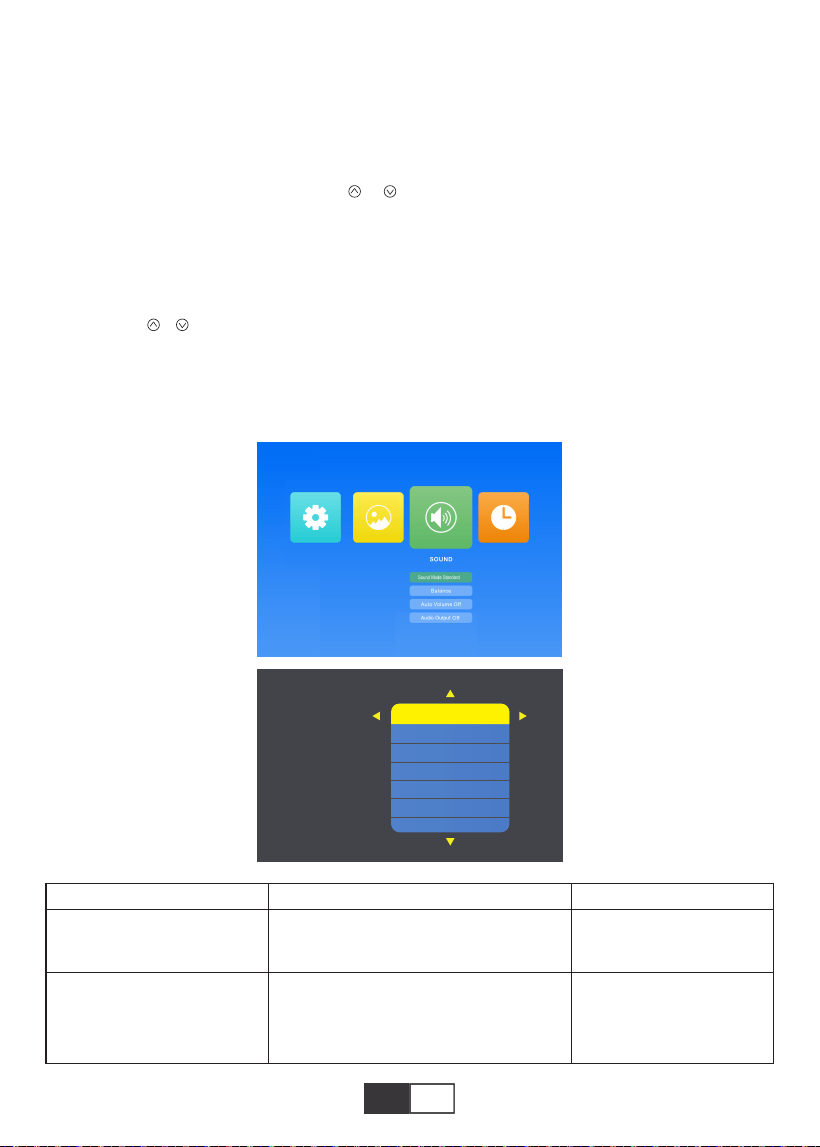
01 02 03 04 05 06 07 08 09 10 11 12 13
14 15 16 17 18 19
20 21 22 23 24 25 26 27 28 29 30 31 32
33 34 35 36 37 38
39 40 41 42 43 44 45 46 47 48 49 50 51
52 53 54 55 56 57
58 59 60 61 62 63 64 65 66 67 68 69 70
71 72 73 74 75 76
77 78 79 80 81 82 83 84 85 86 87 88 89
90 91 92 93 94 95
96 97 98 99
111 112 113 114
100 101 102 103 104 105
106 107 108
109 110
DE
2.3.SOUND
Dieses Menü kann direkt durch Drücken der M-Taste auf der Fernbedienung oder dem
Projektor geöffnet werden, wenn Text / Bild / Video / Musik abgespielt wird.
Benutzer / Standard / Musik / Film /
Sport
-50 bis +50
Richten Sie den
Soundmodus ein
Stimmen Sie den Klang
des linken und rechten
Kanals des Lautsprech-
ers ab
Klangmodus
Balance
Menü Modus Funktion
Tipps:
1). Bildmodus
Im Bildmodus können Sie „Standard / Weich / Benutzer / Lebendig“ auswählen, um den
„Kontrast / Helligkeit / Farbe / Schärfe / Farbton“ des Bildes anzupassen.
In der Bildmodus-Benutzeroption können Sie den „Kontrast / Helligkeit / Farbe / Schärfe /
Farbton“ des Bildes mit der Taste „ / “ auf der Fernbedienung im Bereich „0-100“
einstellen.
2). Farbtemperatur
Unter Farbtemperatur können Sie die verschiedenen Optionen Mittel / Warm / Kühl
auswählen.
In der Farbtemperatur-Benutzeroption können Sie das "Rot / Grün / Blau" des Bildes mit
der Taste " / " auf der Fernbedienung im Bereich "0-100" einstellen.
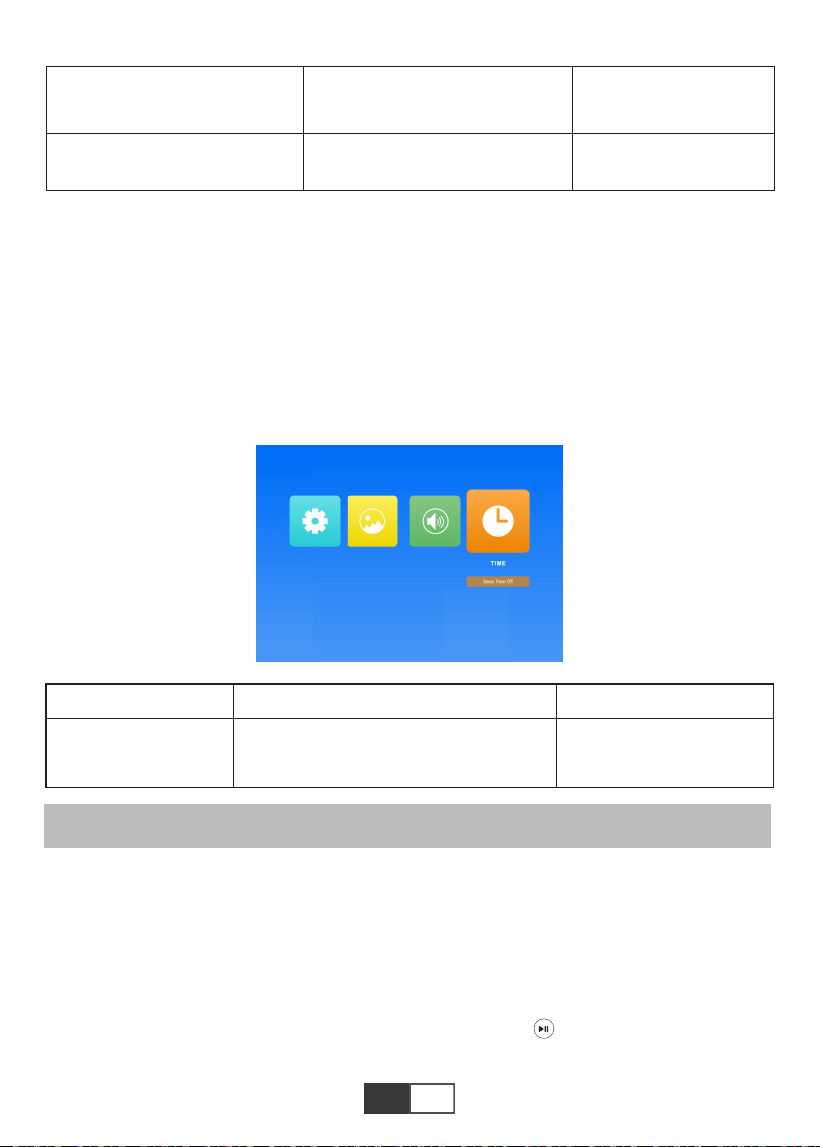
01 02 03 04 05 06 07 08 09 10 11 12 13
14 15 16 17 18 19
20 21 22 23 24 25 26 27 28 29 30 31 32
33 34 35 36 37 38
39 40 41 42 43 44 45 46 47 48 49 50 51
52 53 54 55 56 57
58 59 60 61 62 63 64 65 66 67 68 69 70
71 72 73 74 75 76
77 78 79 80 81 82 83 84 85 86 87 88 89
90 91 92 93 94 95
96 97 98 99
111 112 113 114
100 101 102 103 104 105 106
107 108
109 110
DE
Der TOPTRO X2-Projektor verfügt über 6 Signalquellen, USB- / HDMI- / AV- / Audioaus-
gang (3,5-mm-Kopfhörerbuchse) / MHL-Funktion / Verwendung eines digitalen Beleuch-
tungs-AV-Adapters. Unterstützt iPhone, iPad, wählen Sie die Eingangsquelle „HDMI“. Bitte
wählen Sie den richtigen Anschluss, um Ihr Gerät anzuschließen (PC, Telefon, DVD-Player,
Soundbar, USB, PS4 usw.).
2.4.ZEIT
Dieses Menü kann direkt durch Drücken der M-Taste auf der Fernbedienung oder dem
Projektor geöffnet werden, wenn Text / Bild / Video / Musik abgespielt wird.
1.Schließen Sie den USB-Flash an
Stecken Sie den USB-Flash-Treiber in den USB-Anschluss und wählen Sie die richtige
Signalquelle aus. Drücken Sie dann die Play / Pause-Taste , um anzuzeigen oder zu
stoppen.
Schritte zur Bluetooth-Verbindung:
Öffnen Sie die Menüseite → "SOUND" → "Audioausgang" → Wählen Sie den Modus
"Statisch"mit der rechten Taste → Geräte suchen mit der Taste → Wählen Sie das
Bluetooth-Gerät aus und drücken Sie rechts unten, um die Verbindung zu bestätigen.
(Drücken Sie die rechte Taste, um die Verbindung zu trennen.) → Wenn ja
Erfolgreich verbinden, in der Statusleiste in der unteren Reihe wird "Play" angezeigt.
SIGNAL LINES ANSCHLUSS
Aus/10 min/20 min/30 min/60 min/
90 min/120 min/180 min/240 min
Stellen Sie die Ruhezeit
des Projektors ein
Schlafzeit
Aus / Auto / Statisch
Aus/An
Lautstärke intelligent
einstellen
Automatische Lautstärke
Automatische Ausgabe
Menü Modus Funktion
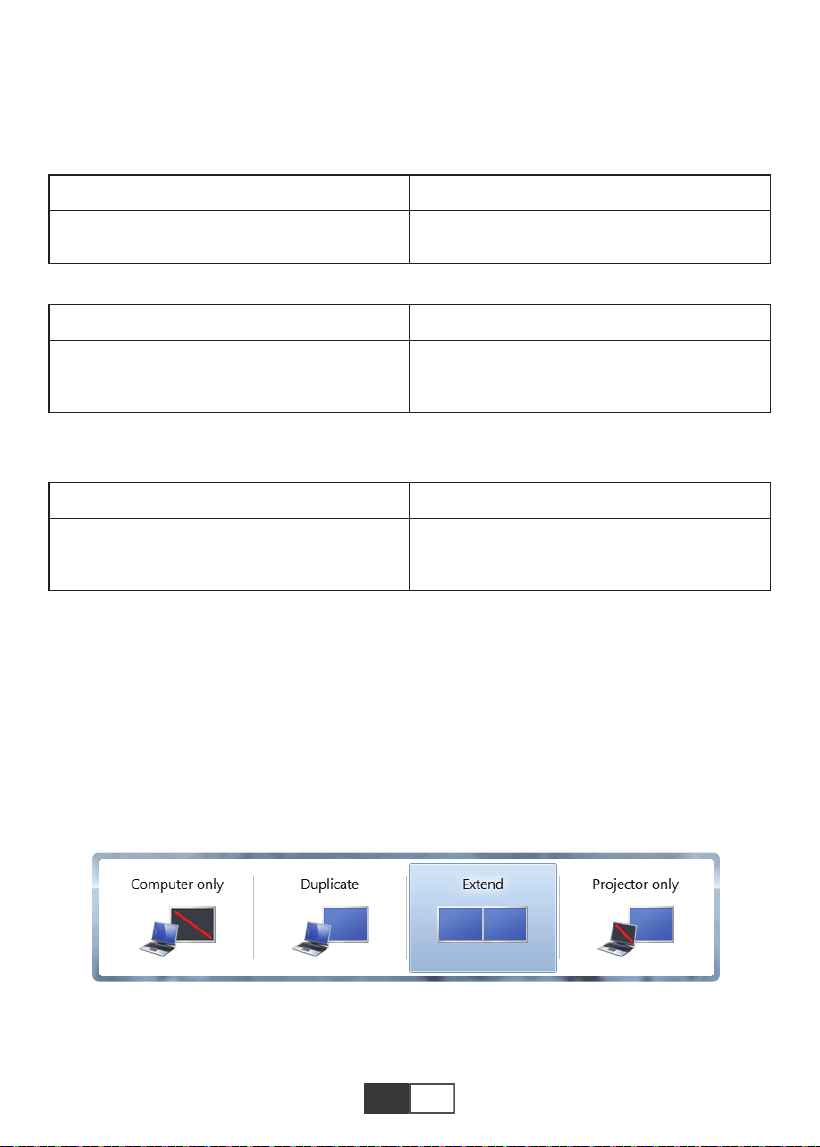
01 02 03 04 05 06 07 08 09 10 11 12 13
14 15 16 17 18 19
20 21 22 23 24 25 26 27 28 29 30 31 32
33 34 35 36 37 38
39 40 41 42 43 44 45 46 47 48 49 50 51
52 53 54 55 56 57
58 59 60 61 62 63 64 65 66 67 68 69 70
71 72 73 74 75 76
77 78 79 80 81 82 83 84 85 86 87 88 89
90 91 92 93 94 95
96 97 98 99
111 112 113 114
100 101 102 103 104 105 106 107
108
109 110
DE
2.Verbindung zum Computer herstellen
Verwenden Sie das HDMI-Kabel (im Lieferumfang enthalten), um eine Verbindung mit dem
Projektor herzustellen.
1) Schließen Sie das HDMI-Kabel mit dem HDMI-Kabel an den HDMI-Anschluss Ihres
Computers an das Paket;
2) .Wählen Sie die HDMI-Quelle aus, um alle Dateien auf Ihren Computer zu projizieren.
3) Halten Sie auf Ihrem Laptop die Tasten „Win + P“ gedrückt, um den Anzeigemodus zu
ändern
(Drücken Sie auf der Fernbedienung auf „Source“ oder auf dem Bedienfeld auf „S“
"Eingangsquelle" auf dem Bildschirm, wählen Sie "USB")
Bildformat
JEPG, PNG, BMP
.jpg / .png / .bmp
Unterstützung Dateierweiterung
Unterstützung Dateierweiterung
Unterstützung Dateierweiterung
Multimedia-Dateispezifikation
Audioformat
Unterstützt nicht: Dolby AC3 / AAC, DTS, WMA, DivX, VC1, RM, RMVB, FLV usw.
MPEG1, MPEG2, LPCM, MP3
.avi / .ts / .dat / .vob / .wmv / .mkv / .mp3
/ .mp4/ .m4a
Videoformat (Bitrate bis zu 30 ~ 40 Mbs)
Unterstützt nicht: MSVC / CRAM, MP42, GMC, IV32, RLE, CVID, RV20, DivX, RM,
RMVB, VC1, FLV usw.
MPEG1, MPEG2, H.263, H.264, AVS,
VC1, MJPEG, RV30, RV40, HEVC
.dat / .ts / .mp4 / .mpg / .mpeg / .avi / .tp
/ .mkv / .mov / .asf / .flv / .3gp. / .3gpp
Nur Computer: ist die Standardoption - wird nur auf dem Hauptmonitor angezeigt.
Duplizieren: Lässt alle Monitore dasselbe anzeigen, auf dem der Desktop dupliziert wird
jeder Monitor.

01 02 03 04 05 06 07 08 09 10 11 12 13
14 15 16 17 18 19
20 21 22 23 24 25 26 27 28 29 30 31 32
33 34 35 36 37 38
39 40 41 42 43 44 45 46 47 48 49 50 51
52 53 54 55 56 57
58 59 60 61 62 63 64 65 66 67 68 69 70
71 72 73 74 75 76
77 78 79 80 81 82 83 84 85 86 87 88 89
90 91 92 93 94 95
96 97 98 99
111 112 113 114
100 101 102 103 104 105 106 107 108
109 110
DE DE
Erweitern: Alle Ihre Monitore verhalten sich wie ein großer Monitor und erweitern den
Desktop über alle Monitore.
Nur Projektor: Wird wie ein Projektor nur auf dem sekundären Monitor angezeigt.
Sie können die Bildschirmauflösung im Nur-Projektor-Modus ändern
Schritt: Start> Systemsteuerung> Darstellung und Personalisierung>Bildschirm
anpassen
Auflösung
Hinweis:
Wenn Sie den Projektor mit dem Notebook verbinden, müssen Sie möglicherweise Fn + F
* (F1-F10 auf der Tastatur) drücken, um die Ausgabe zu ändern. Aufgrund der
Funktionsunterschiede der einzelnen Computertasten können Sie sich auf die folgende
Tabelle beziehen.
Herstellung
Acer
Dell
Epson
Fujitsu
IBM
Hewlett-packard
Lenovo
Schlüssel
Fn+F5
Fn+F8
Fn+F8
Fn+F10
Fn+F7
Fn+F4
Fn+F10
Herstellung
NEC
Panasonic
Sharp
Sony
Toshiba
Zotac
Schlüssel
Fn+F3
Fn+F3
Fn+F5
Fn+F7
Fn+F5
Fn+F3/F5
3.AV-Verbindung
Verwenden Sie das im Lieferumfang enthaltene AV-Kabel.
A. Schalten Sie Ihren DVD-Player und den Projektor ein.
B. Schließen Sie die bunten Buchsen an das Cinch-Kabel Ihres DVD-Players an.
C. Schließen Sie den schwarzen Anschluss an den Audioeingang des Projektors an.
D. Verbinden Sie den gelben Stecker einer anderen Seite mit dem Videoanschluss des
Projektors.
E. Wählen Sie "AV" als Signalquelle.
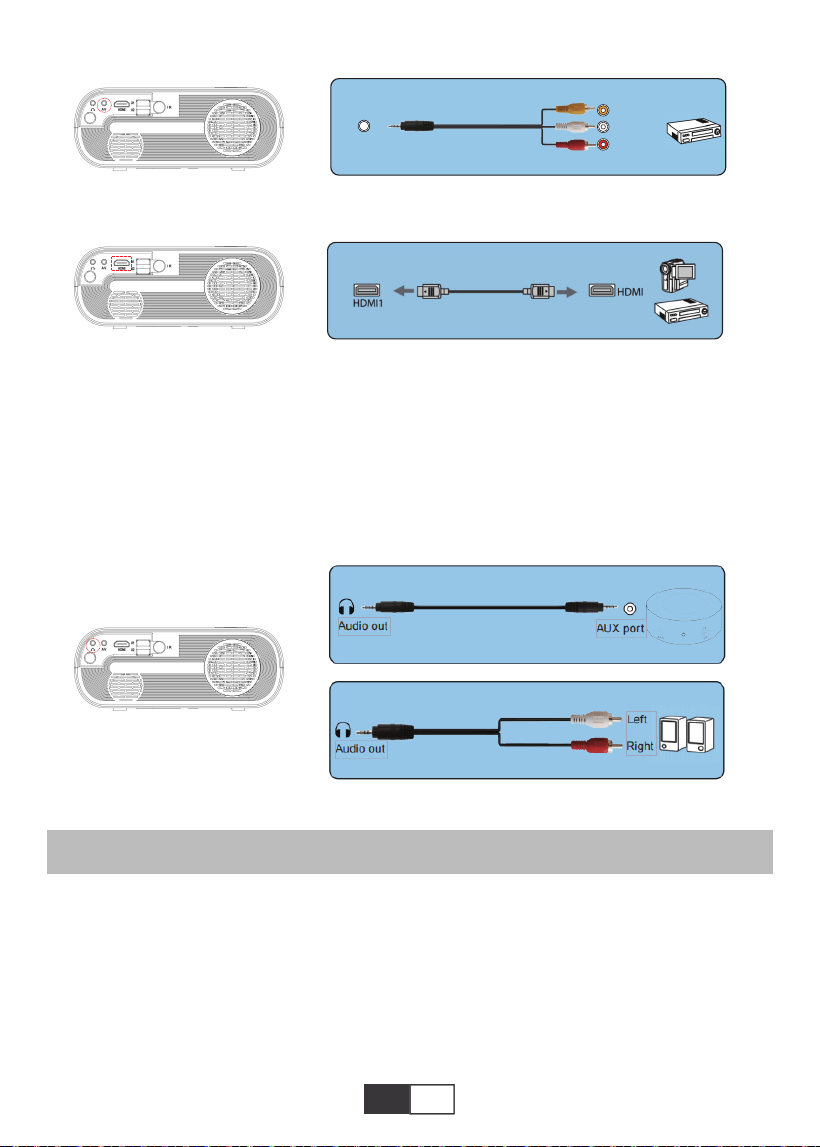
01 02 03 04 05 06 07 08 09 10 11 12 13
14 15 16 17 18 19
20 21 22 23 24 25 26 27 28 29 30 31 32
33 34 35 36 37 38
39 40 41 42 43 44 45 46 47 48 49 50 51
52 53 54 55 56 57
58 59 60 61 62 63 64 65 66 67 68 69 70
71 72 73 74 75 76
77 78 79 80 81 82 83 84 85 86 87 88 89
90 91 92 93 94 95
96 97 98 99
111 112 113 114
100 101 102 103 104 105 106 107 108
109
110
DE DE
SPIELBETRIEB
4.Audioausgang
1.Spielen Sie einen Film / Foto / Musik / Text (im USB Eingabemodus)
A.Wenn Ihr Lautsprecher über einen AUX-Anschluss verfügt, verwenden Sie bitte Ihr
3,5-mm-Audiokabel
Audioausgang des Projektors und AUX-Anschluss Ihres Lautsprechers.
B.Wenn Ihr Lautsprecher keinen AUX-Anschluss hat, kaufen Sie bitte ein 2-Cinch-Kabel
und verbinden Sie es mit dem Audioausgang des Projektors und dem linken und rechten
Anschluss Ihres Lautsprechers.
Frist Wählen Sie auf der Fernbedienung „QUELLE“.
A.Um eine Videodatei abzuspielen, wählen Sie zuerst „Film / Musik / Foto / Text“ auf dem
Hauptbildschirm und drücken Sie dann die Taste „OK“ auf dem Bedienfeld oder der Fernbe-
dienung. Das ausgewählte Feld wird breiter und die umgebenden weißen Ränder fallen
auf.
Oder schließen Sie den DVD-Player mit dem im Lieferumfang enthaltenen HDMI-Kabel an.
AV
video
audio out
(L/R)
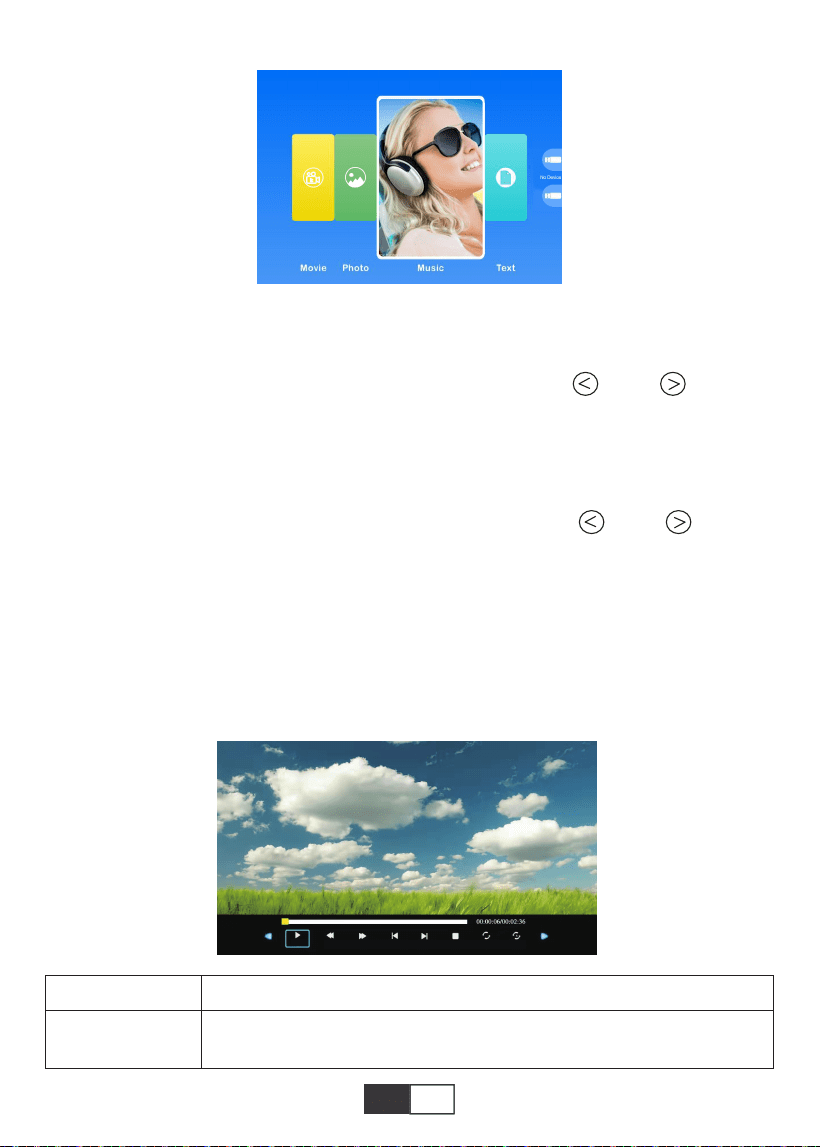
01 02 03 04 05 06 07 08 09 10 11 12 13
14 15 16 17 18 19
20 21 22 23 24 25 26 27 28 29 30 31 32
33 34 35 36 37 38
39 40 41 42 43 44 45 46 47 48 49 50 51
52 53 54 55 56 57
58 59 60 61 62 63 64 65 66 67 68 69 70
71 72 73 74 75 76
77 78 79 80 81 82 83 84 85 86 87 88 89
90 91 92 93 94 95
96 97 98 99
111 112 113 114
100 101 102 103 104 105 106 107 108
109 110
DE
MENÜ Funktion
2.Schnittstelle spielen
Hinweis: EDer Videoinhalt kann angezeigt werden, indem der Cursor länger als 3 Sekund-
en auf dem ausgewählten Video bleibt. Nur MPEG1, MPEG2, H.263, H.264, AVS, VC1,
MJPEG, RV30, RV40 und HEVC werden bei der Videowiedergabe unterstützt.
B.Drücken Sie auf dem Bedienfeld oder der Fernbedienung auf „ “ und „ “, um das
Gerät für die Dateispeicherung auszuwählen. Drücken Sie die Taste „OK“, um den
nächsten Schritt aufzurufen.
Hinweis: Wenn Sie Fragen zur Videowiedergabe haben, senden Sie einfach eine E-Mail
an [email protected]. Wir werden eine schnelle Lösung in 24 Stunden liefern.
C.Drücken Sie auf dem Bedienfeld oder der Fernbedienung auf „ “ und „ “, um die
gewünschte Datei (oder den gewünschten Ordner zum Aufrufen des Unterordners) auszu-
wählen. Drücken Sie die Taste „OK“, um sie abzuspielen.
Geeignet für grundlegende Geschäftspräsentationen wie PowerPoint-Folien, Excel und
Word-Anzeige.
Hinweis: Der Bildinhalt kann angezeigt werden, indem der Cursor länger als 3 Sekunden
auf dem ausgewählten Bild bleibt. Für die Bildwiedergabe wird nur das TXT-Format
unterstützt.
FB
Schneller Rücklauf, spult das Video während der Wiedergabe schnell
zurück. Das Die Rückspulgeschwindigkeit reicht von 2 x bis 32 x
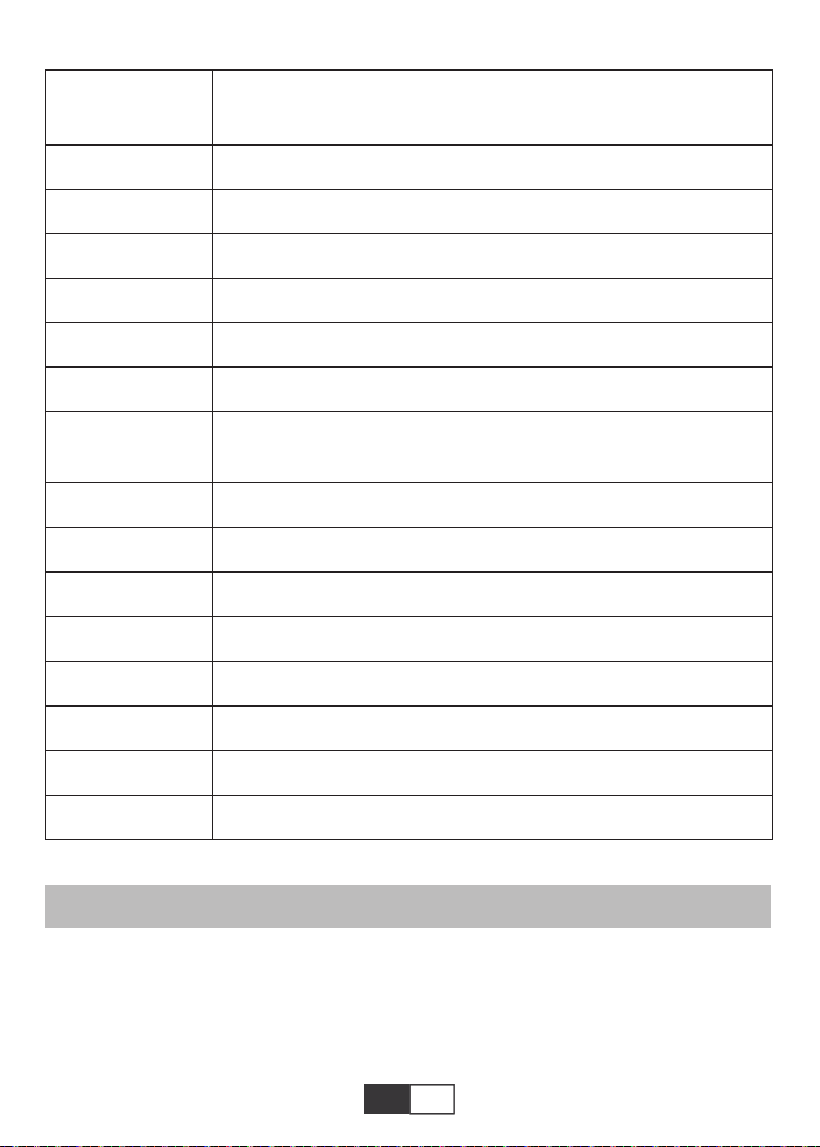
01 02 03 04 05 06 07 08 09 10 11 12 13
14 15 16 17 18 19
20 21 22 23 24 25 26 27 28 29 30 31 32
33 34 35 36 37 38
39 40 41 42 43 44 45 46 47 48 49 50 51
52 53 54 55 56 57
58 59 60 61 62 63 64 65 66 67 68 69 70
71 72 73 74 75 76
77 78 79 80 81 82 83 84 85 86 87 88 89
90 91 92 93 94 95
96 97 98 99
111
112 113 114
100 101 102 103 104 105 106 107 108
109 110
DE
Bildschirmspiegelung
Wählen Sie zuerst "SOURCE" auf der Fernbedienung.
Rufen Sie das Menü "Bildschirmspiegelung" auf und befolgen Sie die Anweisungen, um die
geeignete Verbindungsmethode zum Anschließen des Geräts an den Projektor auszu-
wählen.
FF
Zurück
Nächst
Stop
Alle
Zufällig
Stellen Sie A ein
Wiedergabeliste
Info
Langsam vorwärts
Schritt vorwärts
Goto Time
Zoom+
Zoom-
Seitenverhältnis
Bewegung
Schneller Vorlauf, drückt das Video, um sich während der Wiedergabe
schnell vorwärts zu bewegen.Die Vorwärtsgeschwindigkeit reicht von
2 X bis 32X
Wechseln Sie zum vorherigen Video
Wechseln Sie zum nächsten Video
Hör auf zu spielen und beende
Zufällig ein/Zufällig aus
Setze A / B (Setze zwei Knoten im Video auf Schleife) / Keine
Wählen Sie alle Wiedergabelisten im aktuellen Ordner aus
Videodetails
Langsamer Vorlauf 1X bis 16X
Stellen Sie eine Zeit ein, um direkt zu springen
Zoom+ 1X bis 8X
Zoom- 1X bis 1/4X
Auto/4:3/16:9

01 02 03 04 05 06 07 08 09 10 11 12 13
14 15 16 17 18 19
20 21 22 23 24 25 26 27 28 29 30 31 32
33 34 35 36 37 38
39 40 41 42 43 44 45 46 47 48 49 50 51
52 53 54 55 56 57
58 59 60 61 62 63 64 65 66 67 68 69 70
71 72 73 74 75 76
77 78 79 80 81 82 83 84 85 86 87 88 89
90 91 92 93 94 95
96 97 98 99
111 112
113 114
100 101 102 103 104 105 106 107 108
109 110
DE
1. Android-Gerät
1). Verbinden Sie Ihr WiFi-Heimnetzwerk mit Ihrem Mobiltelefon.
2). Aktivieren Sie die Bildschirmspiegelungsfunktion des Mobilgeräts. Nach erfolgreicher
Verbindung wird auf dem Projektionsbildschirm Ihr Mobilgerät angezeigt.
Hinweis:
1) .Nicht alle Android-Telefone verfügen über eine Bildschirmspiegelungsfunktion, und
möglicherweise zeigen verschiedene Android-Telefone unterschiedliche Namen für die
Bildschirmspiegelungsfunktion an. Wenden Sie sich an Ihren Telefondienstanbieter, um zu
bestätigen, ob Ihr Telefon die Bildschirmspiegelungsfunktion unterstützt und wie Sie diese
Funktion finden.
2) .Wenn Sie die Bildschirmspiegelungsfunktion verwenden, stellen Sie sicher, dass die
WLAN-Funktion Ihres Telefons aktiv ist.
3) .Die Glätte des Projektionsbildschirms hängt von der Qualität des Netzwerks ab, mit dem
Ihr Telefon verbunden ist. Stellen Sie sicher, dass Ihr Telefon mit einem Netzwerk guter
Qualität verbunden ist, damit ein reibungsloser Videowiedergabebildschirm projiziert
werden kann.
2. IOS-Gerät
2.1. Verwenden Sie die Bildschirmspiegelungsfunktion des iOS-Geräts vor dem Hintergr-
und der Verwendung eines WiFi-Heimnetzwerks
1). Drücken Sie die Taste "OK" auf der Fernbedienung, und der Projektor stellt eine
Verbindung zum WLAN-Heimnetzwerk her.
2). Schalten Sie Ihr IOS-Gerät ein und stellen Sie eine Verbindung zum selben Heimnetzw-
erk her.
3). Aktivieren Sie die Bildschirmspiegelungsfunktion des Mobilgeräts. Nach erfolgreicher
Verbindung wird auf dem Projektionsbildschirm Ihr Mobilgerät angezeigt.
2.2. Verwenden Sie die Bildschirmspiegelungsfunktion mit den Mobilfunknetzdaten des
iOS-Geräts
1). Öffnen Sie die WLAN-Einstellungen des IOS-Geräts, suchen Sie nach
"RKcast-XXXXXX" und stellen Sie eine Verbindung her (Passwort 12345678).
2). Aktivieren Sie die iOS-Bildschirmspiegelungsfunktion und suchen Sie.
3). Wählen Sie dann "RKcast-XXXXXX" aus der Liste, um eine Verbindung zu Ihrem
IOS-Gerät herzustellen. (Wenn Sie es nicht finden können, drücken Sie die OK-Taste, um
das WLAN-Menü des Projektors aufzurufen und die Verbindung zu trennen.)
First,press the remote control ‘ok’
button and connect with wifi.

01 02 03 04 05 06 07 08 09 10 11 12 13
14 15 16 17 18 19
20 21 22 23 24 25 26 27 28 29 30 31 32
33 34 35 36 37 38
39 40 41 42 43 44 45 46 47 48 49 50 51
52 53 54 55 56 57
58 59 60 61 62 63 64 65 66 67 68 69 70
71 72 73 74 75 76
77 78 79 80 81 82 83 84 85 86 87 88 89
90 91 92 93 94 95
96 97 98 99
111 112 113
114
100 101 102 103 104 105 106 107 108
109 110
DE
4). Nachdem die Verbindung erfolgreich hergestellt wurde, zeigt der Projektionsbildschirm
an, dass die Verbindung mit dem IOS-Gerät erfolgreich ist.
3. Kabelverbindung (gilt nur für IOS-Geräte)
Sie können auch ein Blitzkabel verwenden, um Ihre iOS-Geräte an den Projektor anzus-
chließen. Nachdem Sie das Kabel über den USB-Anschluss eingesteckt haben, warten Sie
bitte 5-10 Sekunden. Es wird eine Warnung angezeigt, ob Sie dem Computer vertrauen.
Wählen Sie "Vertrauen". Auf dem Projektionsbildschirm wird derselbe Inhalt wie auf Ihren
Geräten angezeigt.
SICHERES AUSSCHALTEN
1.Drücken Sie die Taste am Projektor oder an der Fernbedienung.
2.Drücken Sie die OK-Taste, um das Herunterfahren zu bestätigen.
3. Ziehen Sie das Netzkabel des Projektors ab.
4. Decken Sie das Objektiv ab und lagern Sie den Projektor an einem kühlen und trockenen
Ort.
GARANTIE
Vielen Dank für Ihren Kauf und Ihre Unterstützung! Wir gewähren 3 Jahre Garantie auf den
X2-Projektor. Bei Fragen wenden Sie sich bitte an