S28 Projector
USER MANUAL

Scan the ocial QR code to register your 3 year warrant

English
Deutsch
Français
Español
Italiano
日本語
04-22
23-41
42-60
61-79
80-98
99-117

EN 4
TABLE OF CONTENTS
PUTRIMS 7D/24H PROFESSIONAL SUPPORT 5
TIPS 5
PACKAGE LIST 6
PROJECTOR SPECIFICATIONS 7
PROJECTOR OVERVIEW 8
REMOTE CONTROL 9
INSTALLATION 9
1. Installation Method 9
2. Projection Distance and Size 10
STARTING PROJECTOR 10
PROJECTION SETTINGS 11
1. Electric Focus 11
2. Auto Vertical Keystone 11
3. Picture Settings 12
4. Option Settings 13
CONNECTING WITH SMART DEVICES 14
1. WiFi Setting 14
2. Wireless Connection 15
3. Wired Screen 16
4. Bluetooth 17
5. Multimedia Play 18
SIGNAL LINES CONNECTION 20
1. Connect via USB Disk 20
2. Connecting with Speaker 20
3. Connect to DVD Player 20
4. Connect to Computer 20
5. Connecting with MacBook or MacBook Air 21
6. Connecting with XBOX/ PS4/ PS5/ Nintendo/ Switch 21
7. Connecting with Fire TV Stick 21
FAQ 22

EN 5
PUTRIMS 7D/24H PROFESSIONAL SUPPORT
Dear valued customer,
Thank you very much for supporting PUTRIMS!
Before you begin using the projector, we kindly ask you to read through this manual carefully. If you have
any issues, please include the following details in your email: country code, order number, model, and a
brief description of the problem (For example US+000 0000000 0000000+S28+No image) to support@
putrims.com. Rest assured, our team will promptly respond within 24 hours with a fast and eective solution.
It's essential to mention that many common problems can be easily resolved through simple adjustments,
such as issues with signal, sound, Bluetooth or WiFi connections or choppy animations. To ensure the utmost
satisfaction, we assure you that all our projectors undergo a rigorous 100% quality check and thorough
packaging before shipping.
If you have any questions, please contact us so that the problem can be solved. And give us an opportunity to
improve. We are committed to providing you with a satisfactory solution for any challenges you may encounter.
Best regards,
PUTRIMS Service Team
TIPS
Temperature Considerations:
To ensure the longevity of your projector, avoid placing it in environments that are excessively warm or
cold. Extreme temperatures can shorten the device's lifespan. For optimal performance, maintain a working
environment between 5° C and 35° C.
Proper Ventilation:
The projector is equipped with a ventilation system to ensure stable operation. Avoid covering the vents with
cloth, blankets, or any other materials. Furthermore, refrain from inserting objects into the projector's slits, as
this may lead to short circuits or electric shocks, potentially causing damage to your device.
Protection from Impact and Vibration:
Handle your projector with care, protecting it from strong impacts, extrusions, and vibrations. Avoid moving the
projector if it is experiencing internal circuit faults.
Lens Maintenance:
The projector lens is a crucial component directly impacting picture denition and quality. Ensure to keep the
lens clean from excessive dust. When cleaning, use a soft cotton cloth suitable for glass lenses. Avoid using
hard cloth or abrasives, as they can damage the lens surface. Kindly reach out to our support team via email at
[email protected]om for assistance and resolution.

EN 6
PACKAGE LIST
Remote Control *1PUTRIMS S28 Projector *1
HDMI Cable *1
Quick Start Guide *1 Lens Cover *1
Power Cable *1

EN 7
Model No.: S28
Display Technology LCD Light Source LED
Product Size 8.07*6.06*6.45inch Product Weight 1.38kg
Refresh Rate 60HZ Power Voltage AC110-240V
Native Resolution 1280*720P Max Supported Resolution 1920*1080P decoding
Keystone Correction Auto/Electric Focus Electric
Operation Mode Remote Control Aspect Ratio 4:3/16:9
Output Port 3.5mm Audio Output Input Port HDMI*1/USB*1
Video Format
AVI/MP4/MKV/FLV/WMV/MOV/RMVB/MPEG1/MPEG2/MPEG-4/H.264/XVID/H.263
(Support for video codes may vary depending on circumstances, contact us for
additional support )
Audio Format AAC/MP2/MP3/PCM/FLAC/WMA (Dolby audio codes are not supported)
Image Format JPG/PNG/BMP/JPEG
Document Format TXT
PROJECTOR SPECIFICATIONS

EN 8
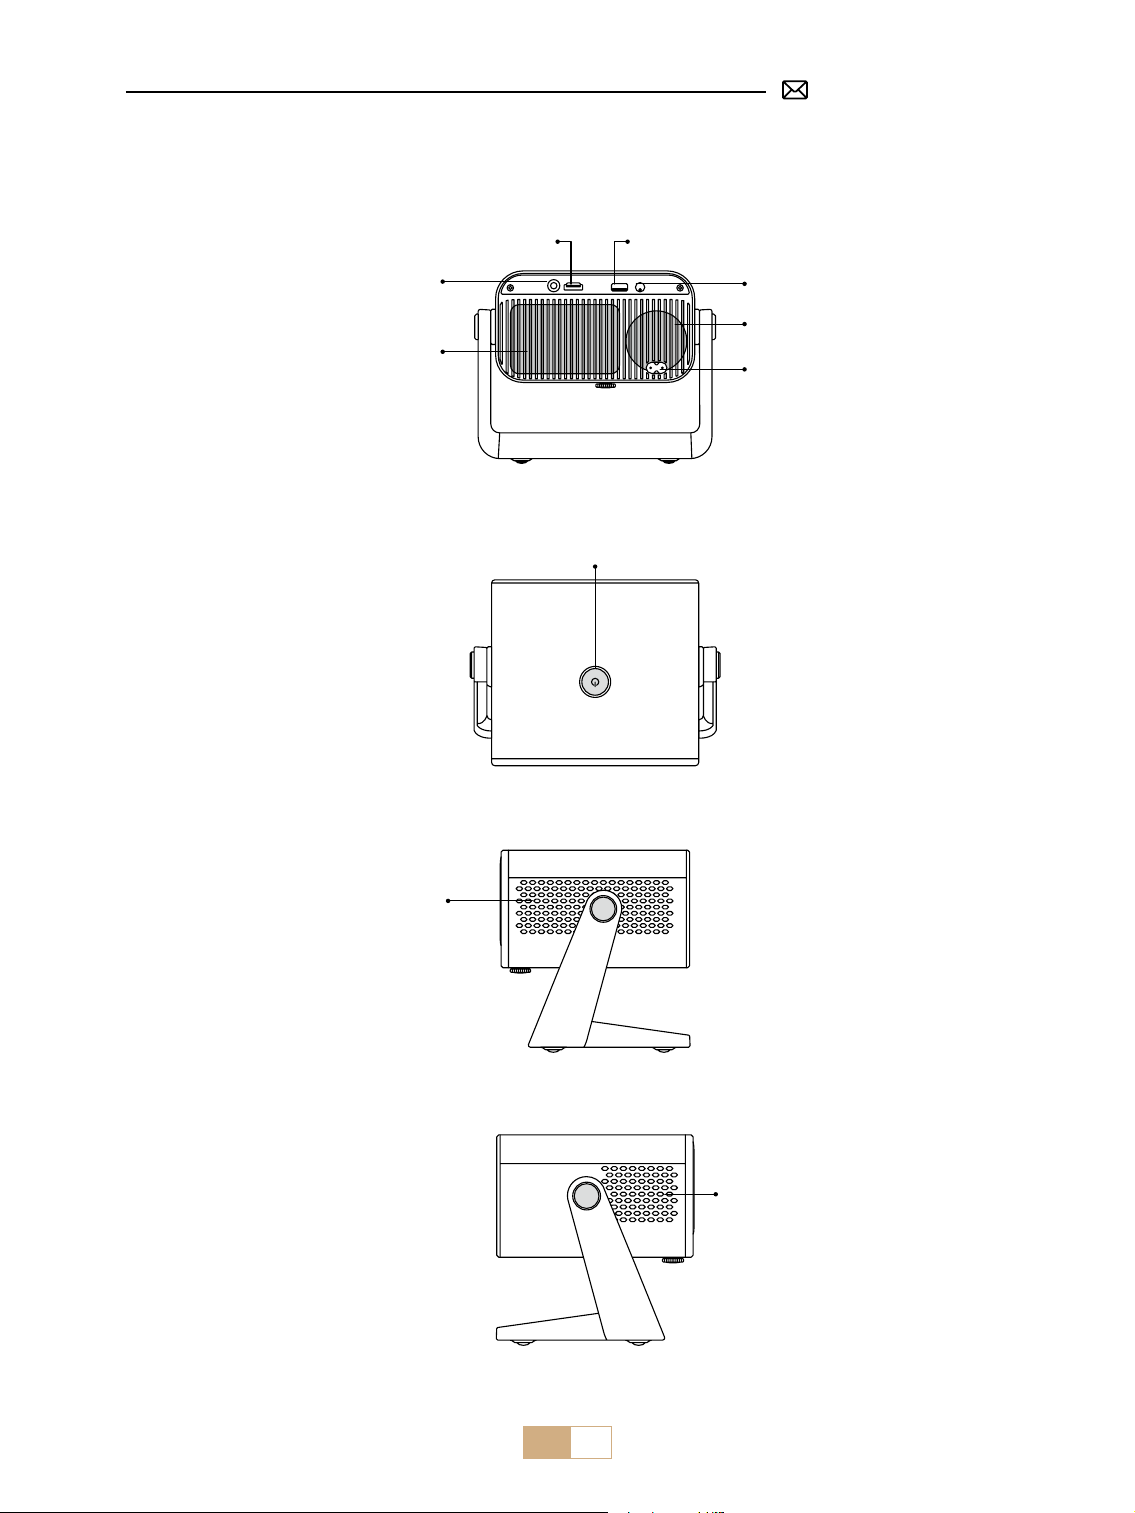
PROJECTOR OVERVIEW
3.5mm audio out port
HDMI port USB Port
IR
Power on/o
Speaker
Power input
Inlet
Dust net
Air outlet

EN 9
REMOTE CONTROL
Note:
1.Install 2 pieces of AAA batteries (not included) into the remote before using it, do not combine new batteries
with old ones in the remote control, which can cause operation failure due to insucient power supply.
2.When using the remote control, ensure that you aim the signal transmitter of the remote control at the
infrared signal receiver on the projector, or simply face the projection screen while operating it.
3.When you are not using the remote control for a long period. Please take out the batteries to prevent them
from leakage.
Source
Focus reduction
VOL-
Arrow button
Menu
Power
Conrm Key
Mute
VOL+
Focus Plus
Back
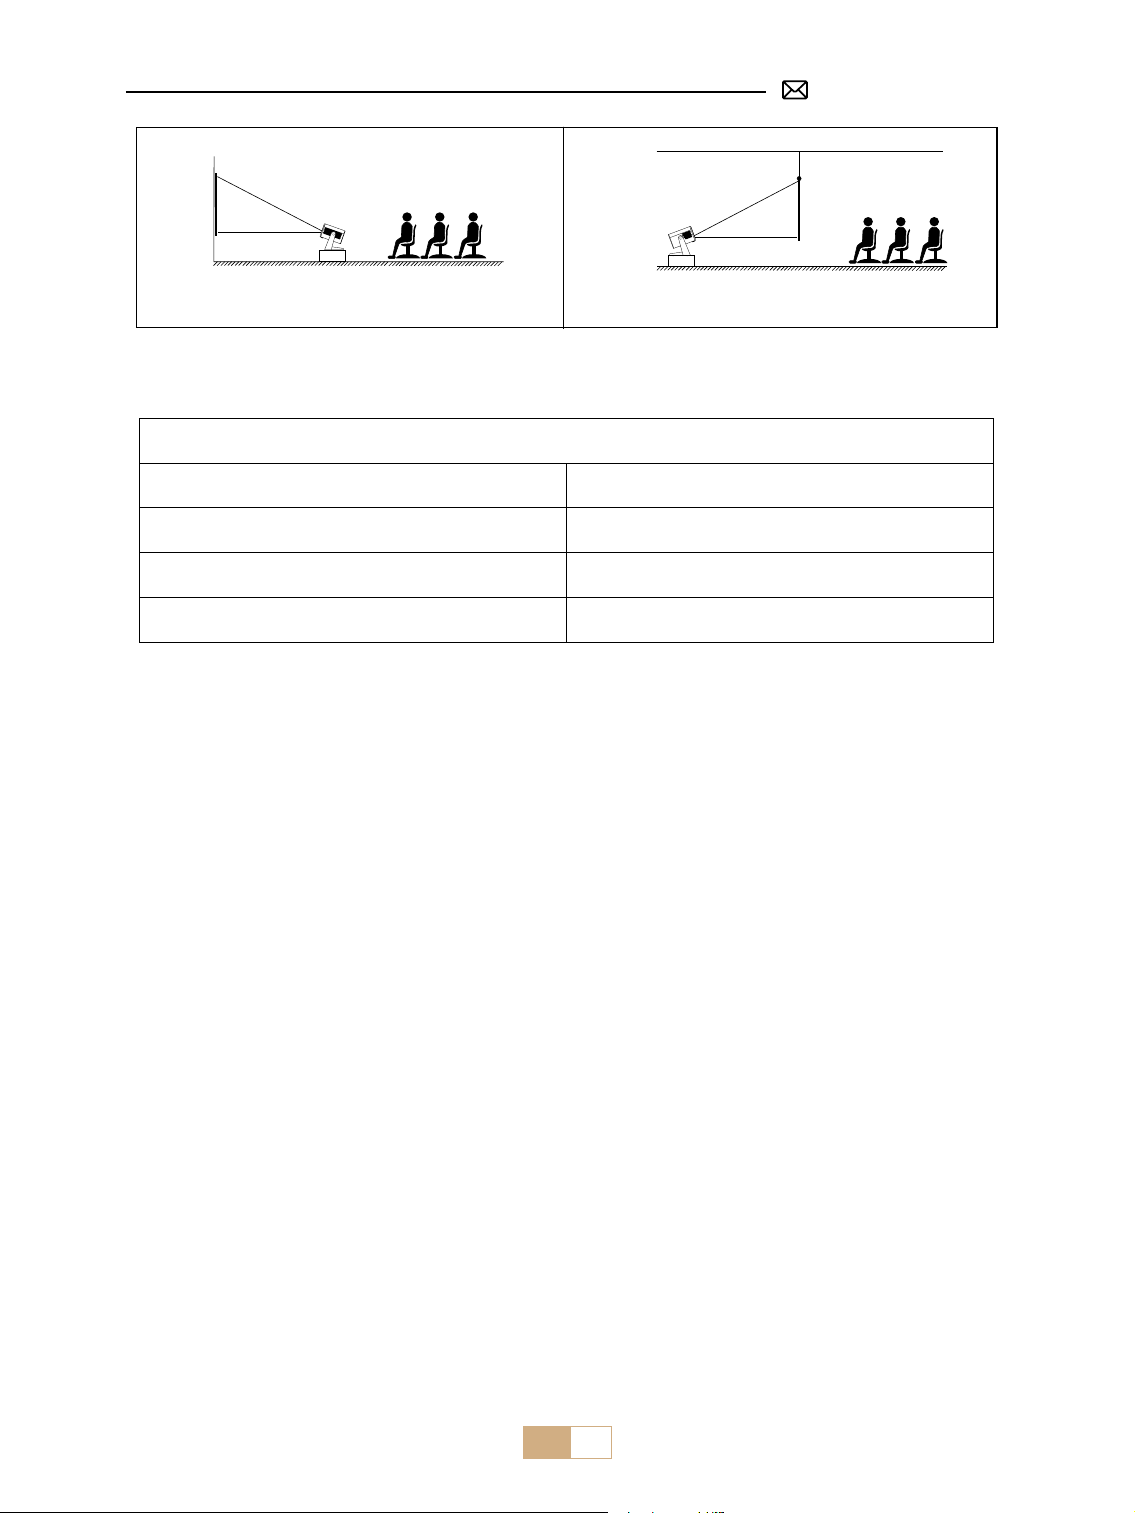
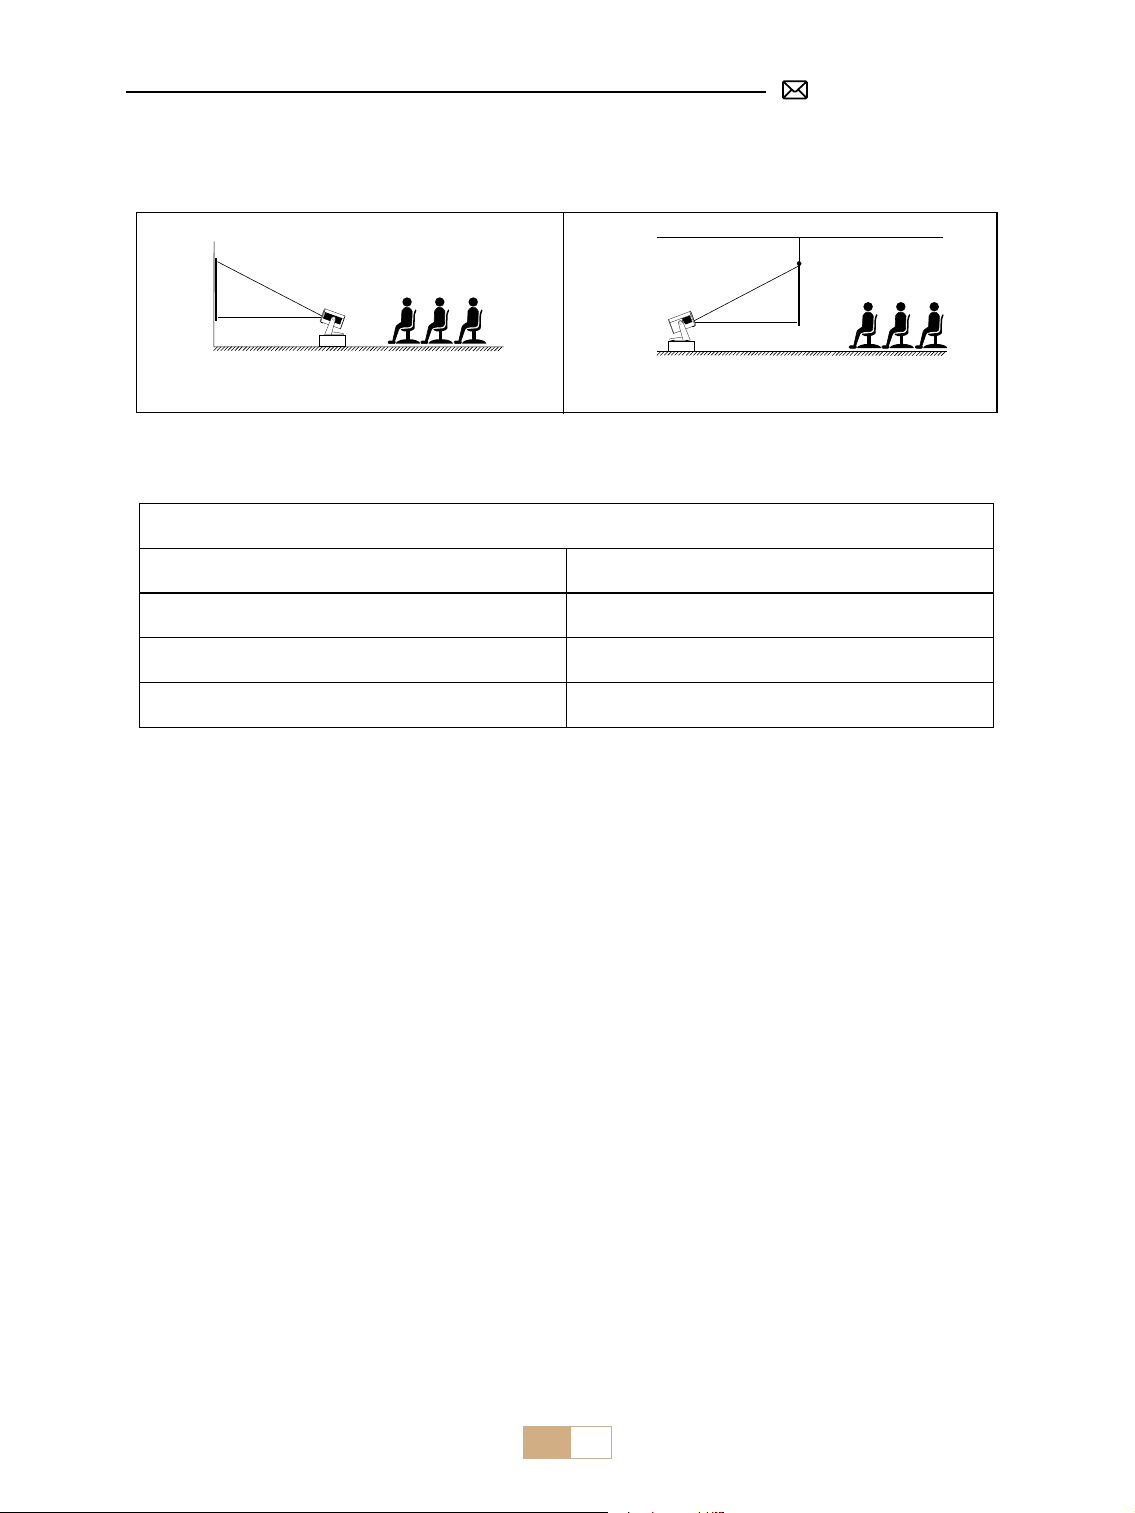
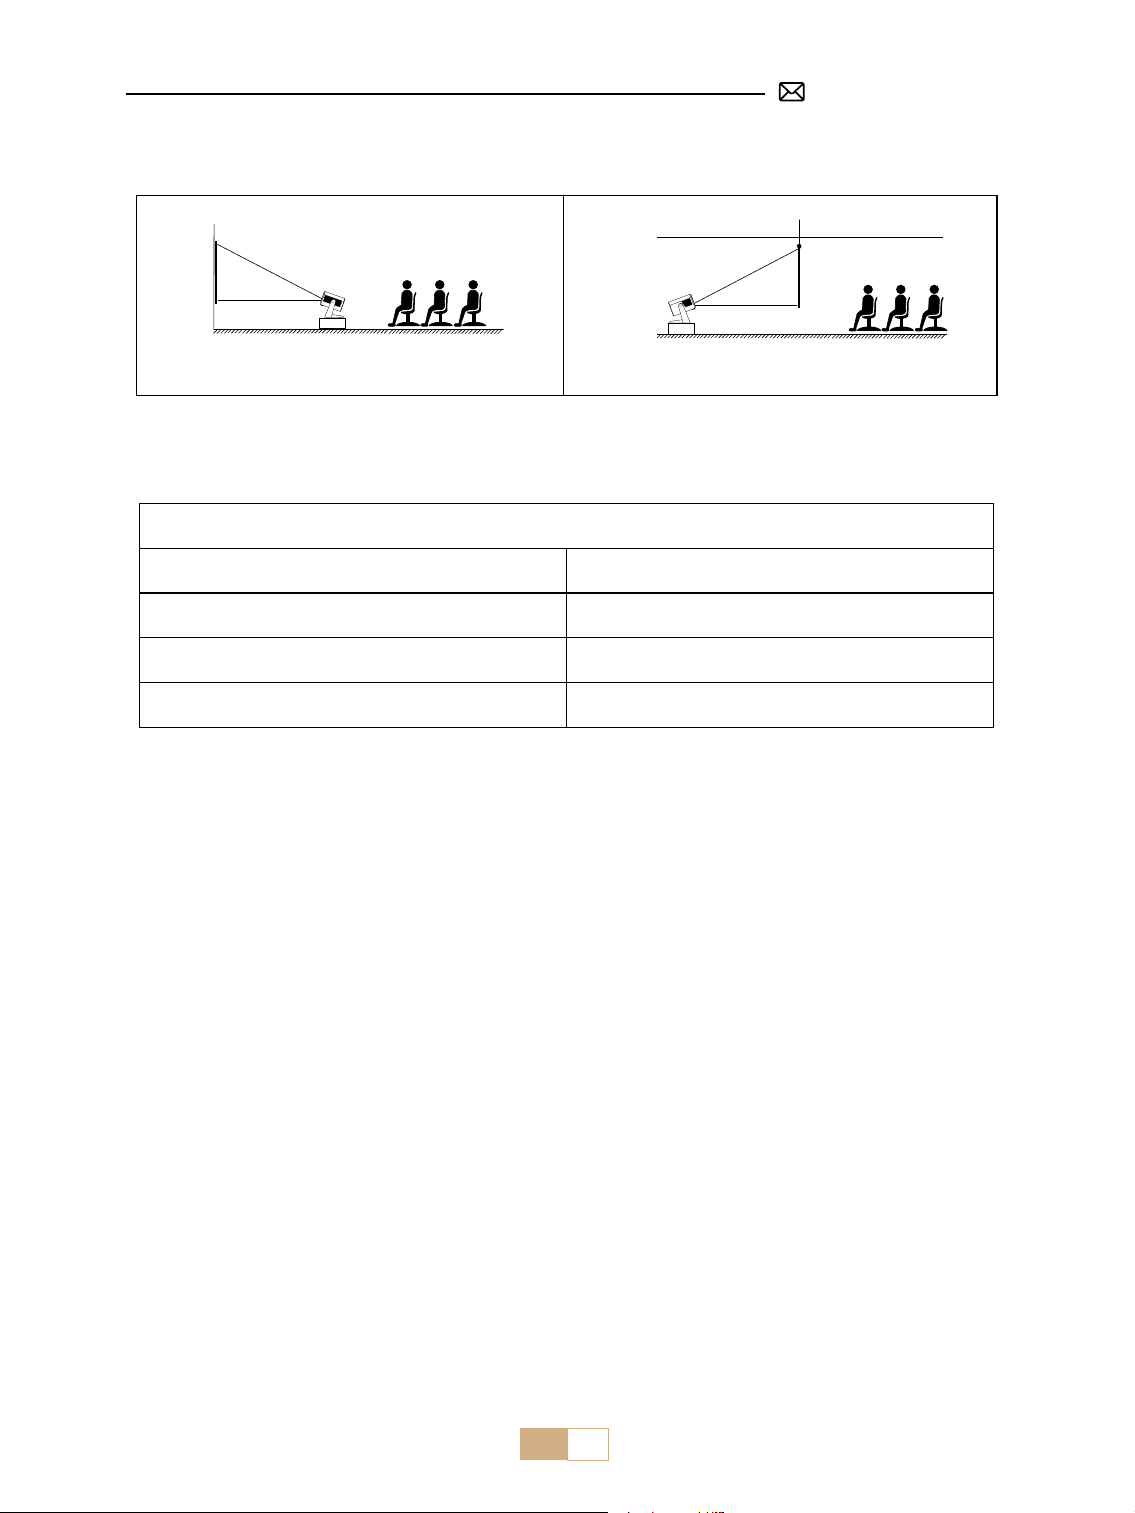
1. The projector can be placed on the stable desk or mounted on the ceiling to project the image according to
the operating environment and requirements.
2. Keep the projector at a height where its lens is axial symmetry to the screen. If this is not possible, use the
keystone correction function to adjust the projection image.
INSTALLATION
1. Installation Method
EN 10
Front Projection Table Mount Rear Projection Table Mount
2. Projection Distance and Size
Aspect Ratio: 16:9
Distance Screen Size
1.2m 40"
2.4m 80"
3.6m 120"
*The image size of the projection depends on the distance between the projector and the screen. There might
be a slight 3% variation in measurements among the data listed above.
*The recommended projection distance is 2-3m.
*A darker ambient environment will enhance the clarity of the projected images.
STARTING PROJECTOR
Turn on the projector
Remove the lens cap and connect to the power cable, when the red indicator light is on, press the power key
on the remote control or power button on the panel to start the projector, and the indicator turns from the red
to blue, the projector is on.
Turn o the projector
Press the power key on the remote control or power button on the panel to turn o the projector, the indicator
turns from blue to red, and the projector is shut down.
EN 11
PROJECTION SETTINGS
1. Electric Focus
Please place the projector horizontally face to the wall rst.
Press F+/F- on the remote control to adjust the focus.
Note: Since everyone's senses dier, please adjust the image to what you think is the clearest.
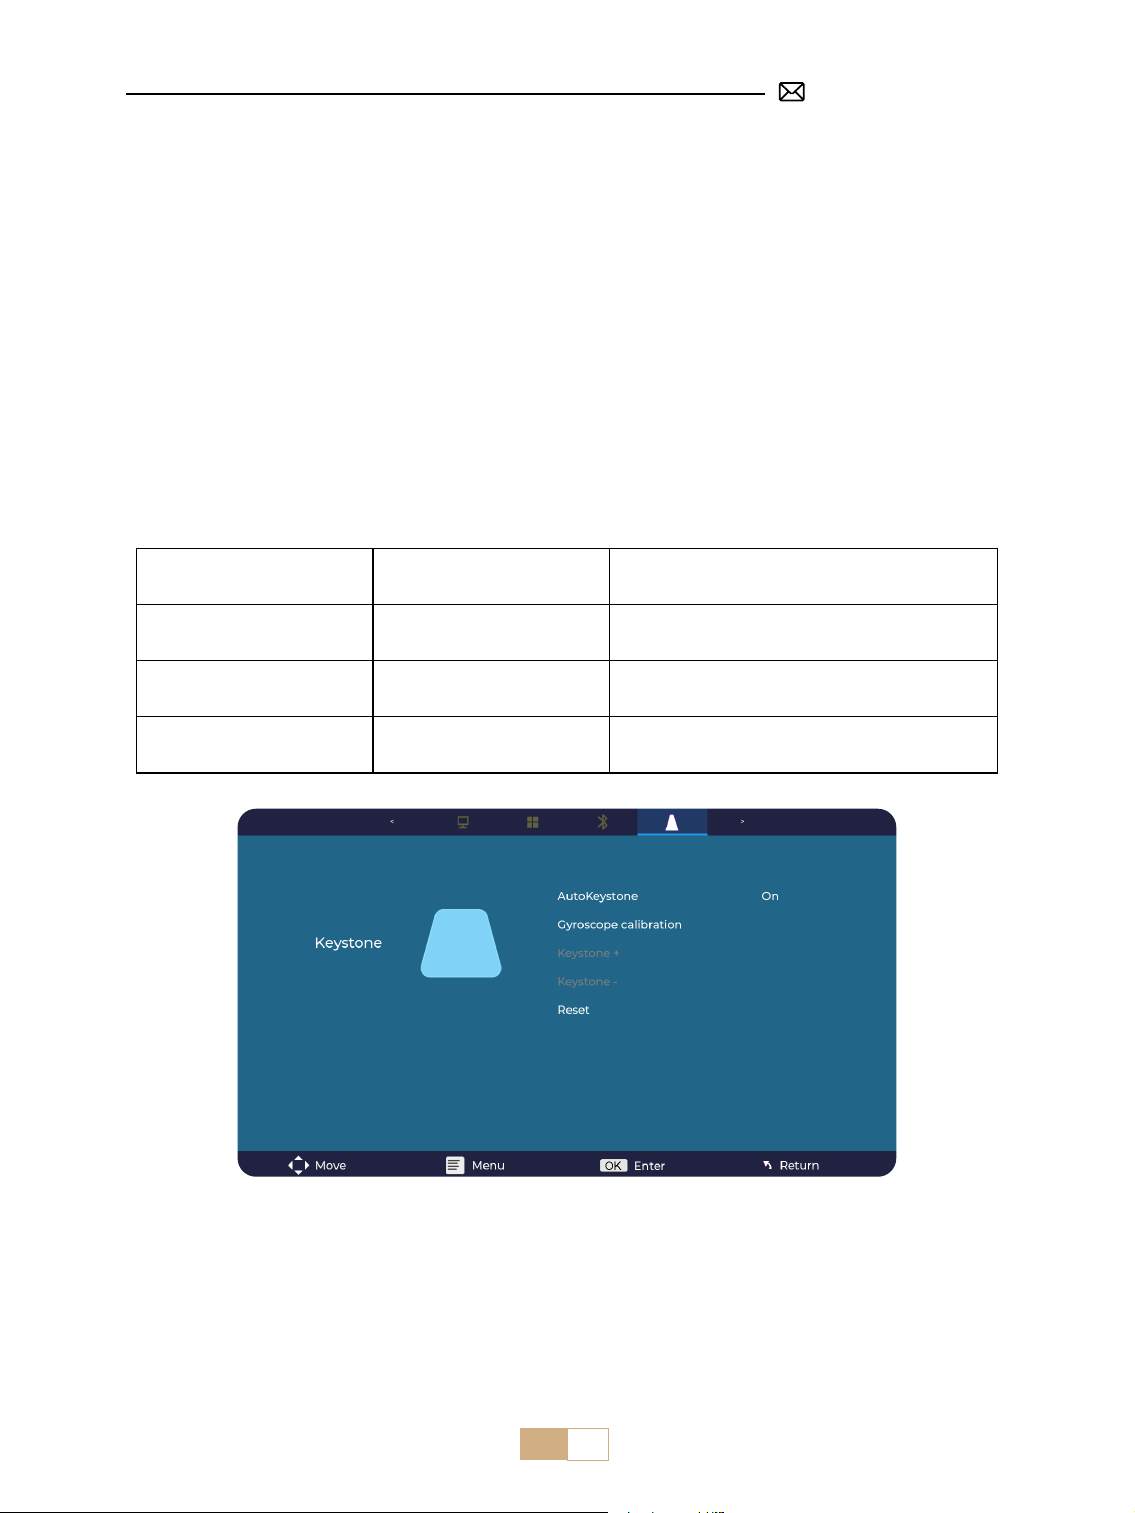
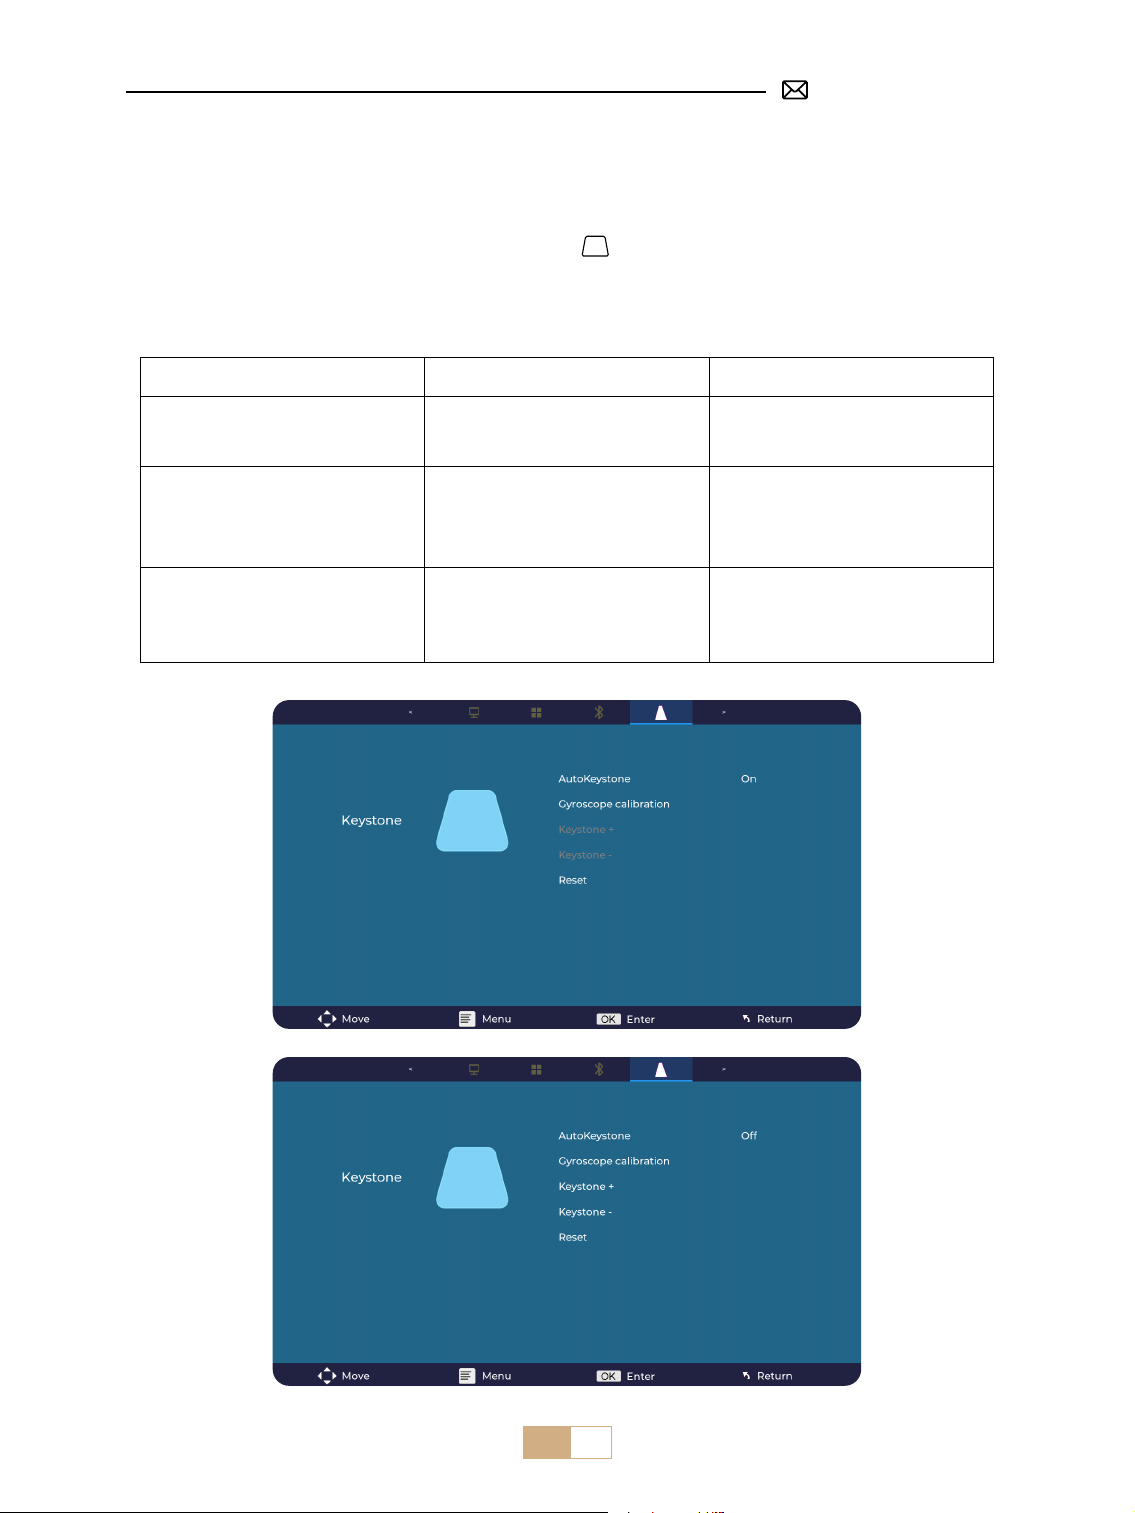
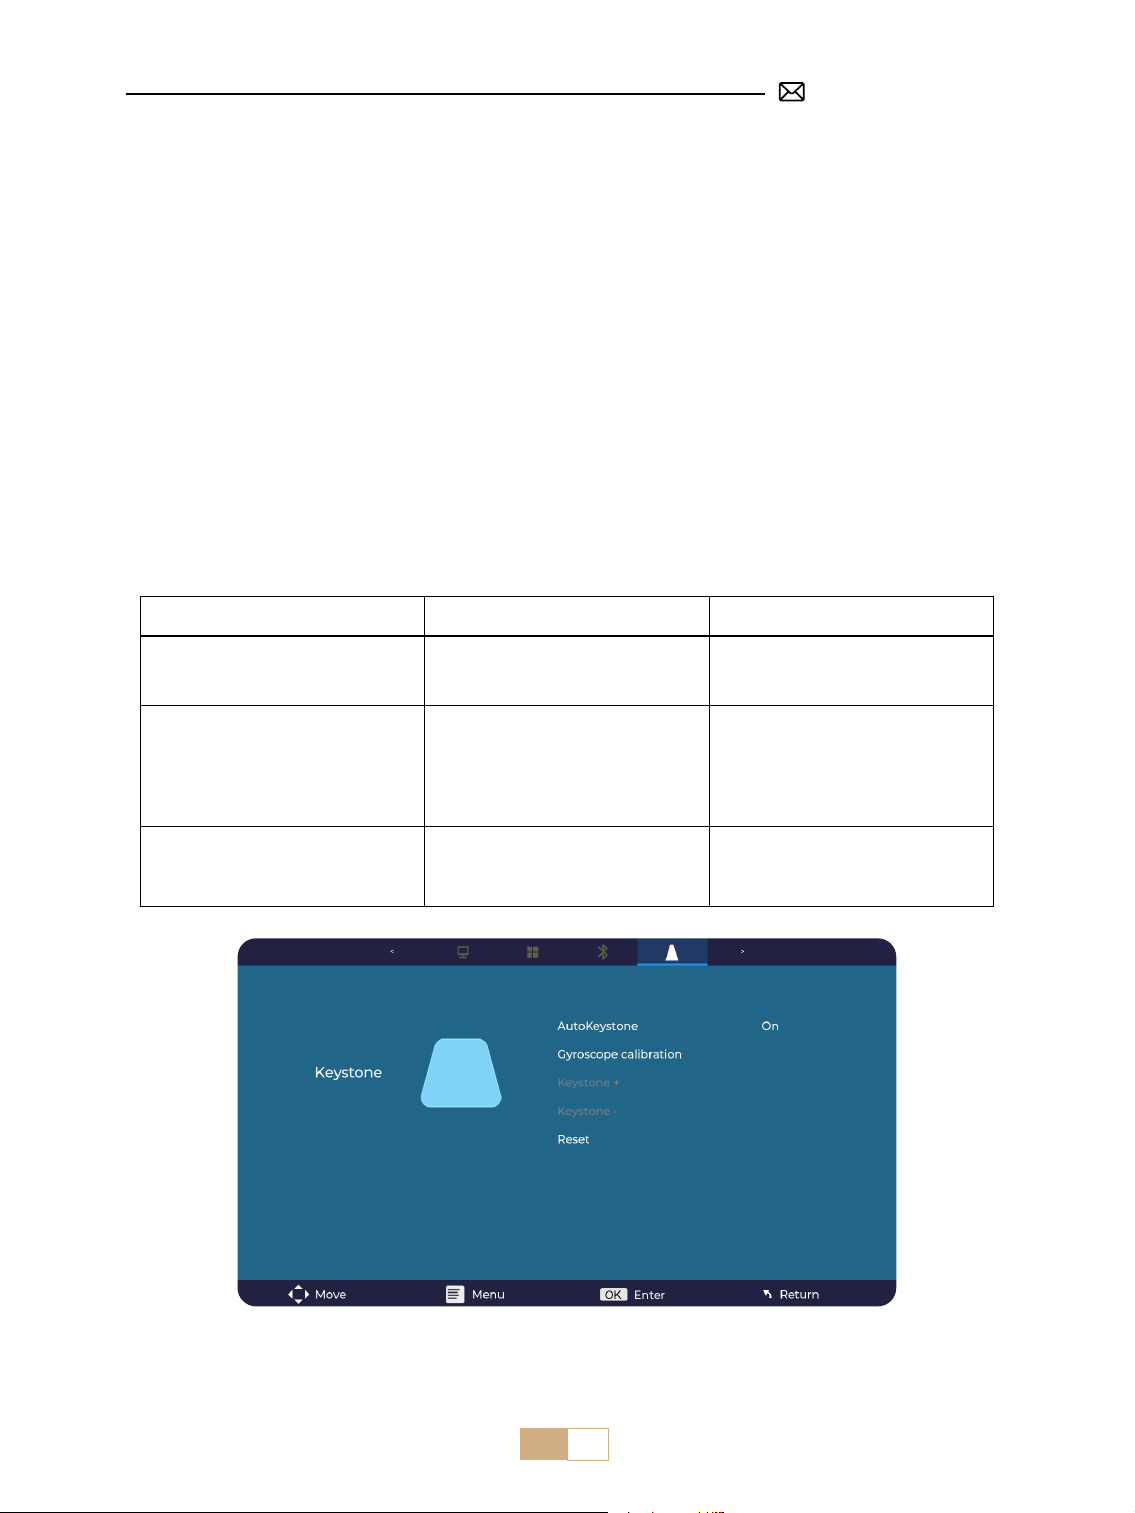
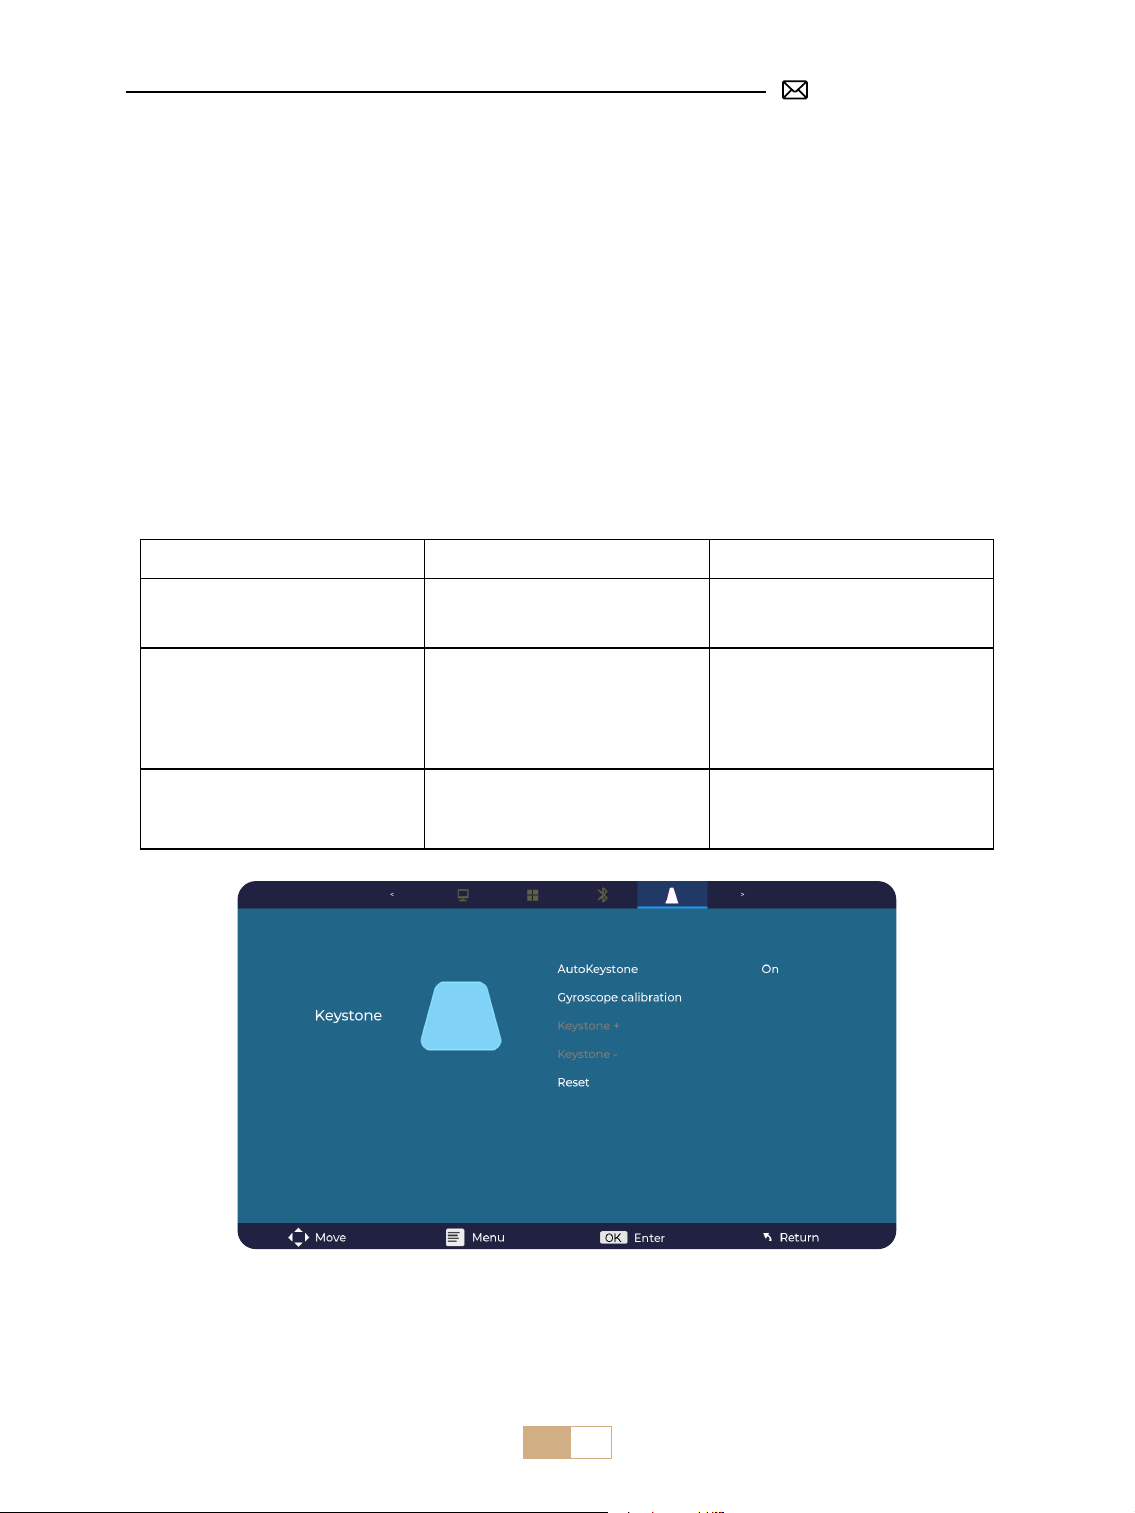
2. Auto Vertical Keystone
Tips: About the auto keystone function: When you receive the S28 Projector for the rst time, please click on
the Gyroscope Calibration function ( click on the show Calibration successful ) and then turn on the automatic
trapezoidal calibration function.
Select the [ Settings ] Menu-select the [ Keystone Icon ] in settings, turn on the [ Auto keystone ] option, and
then it will automatically adjust a rectangle. Or you can manually select [ +/- ], then press "OK" on the remote
to adjust the screen angle vertically ±30° until the guides are adjusted to a rectangle.
Menu Content Function
Auto Keystone On/O
Adjust the screen angle vertically automatically
±30°
Gyroscope Calibration Calibration successful
Please click this function rstly before rst use
the auto keystone function
Keystone + / - /Reset + / - /Reset
Adjust the screen angle vertically manually via
Remote control
EN 12
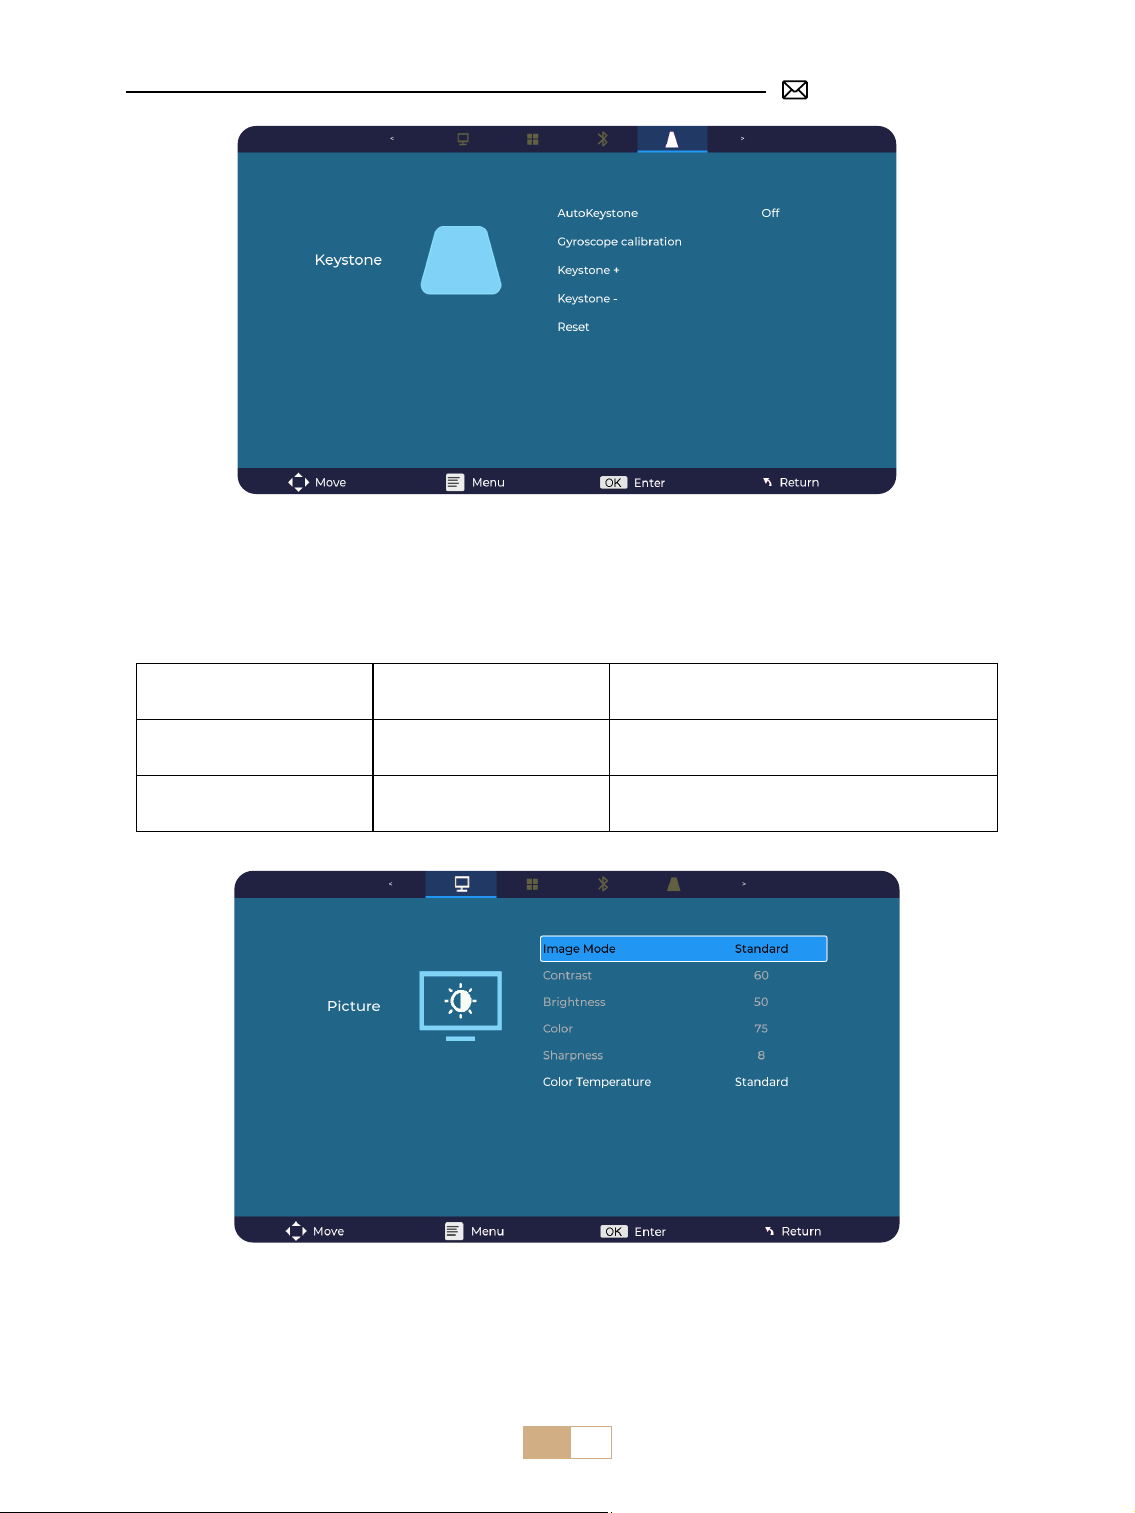
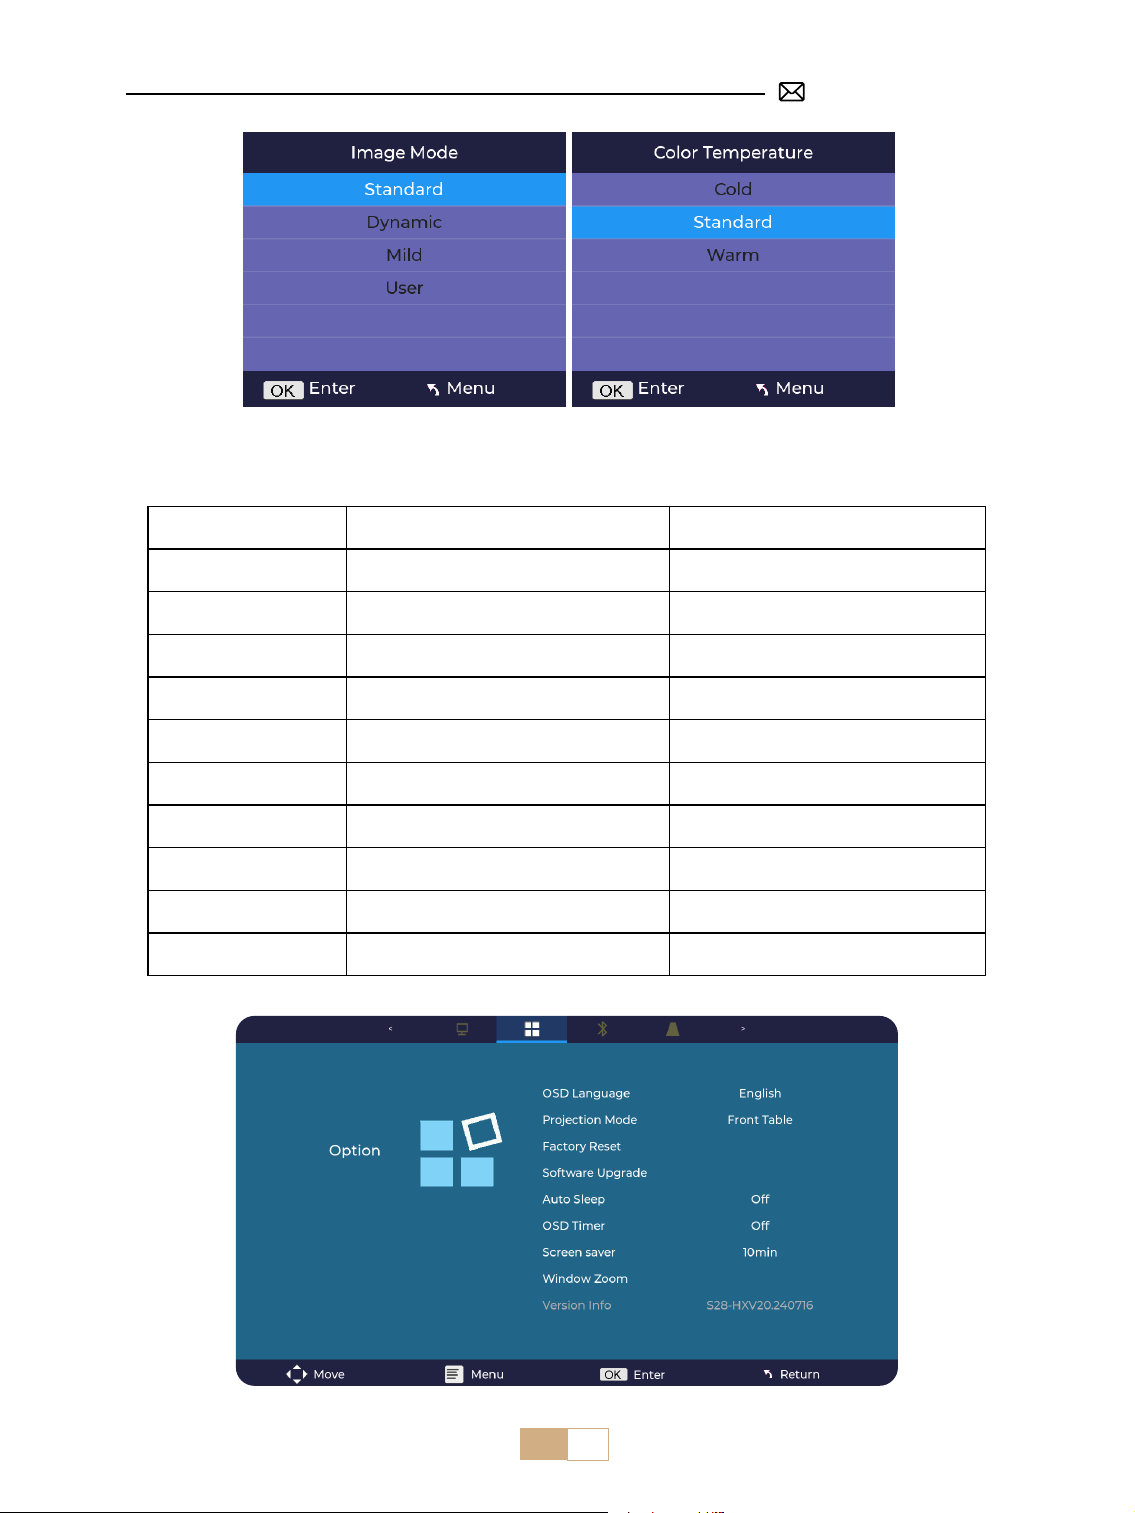
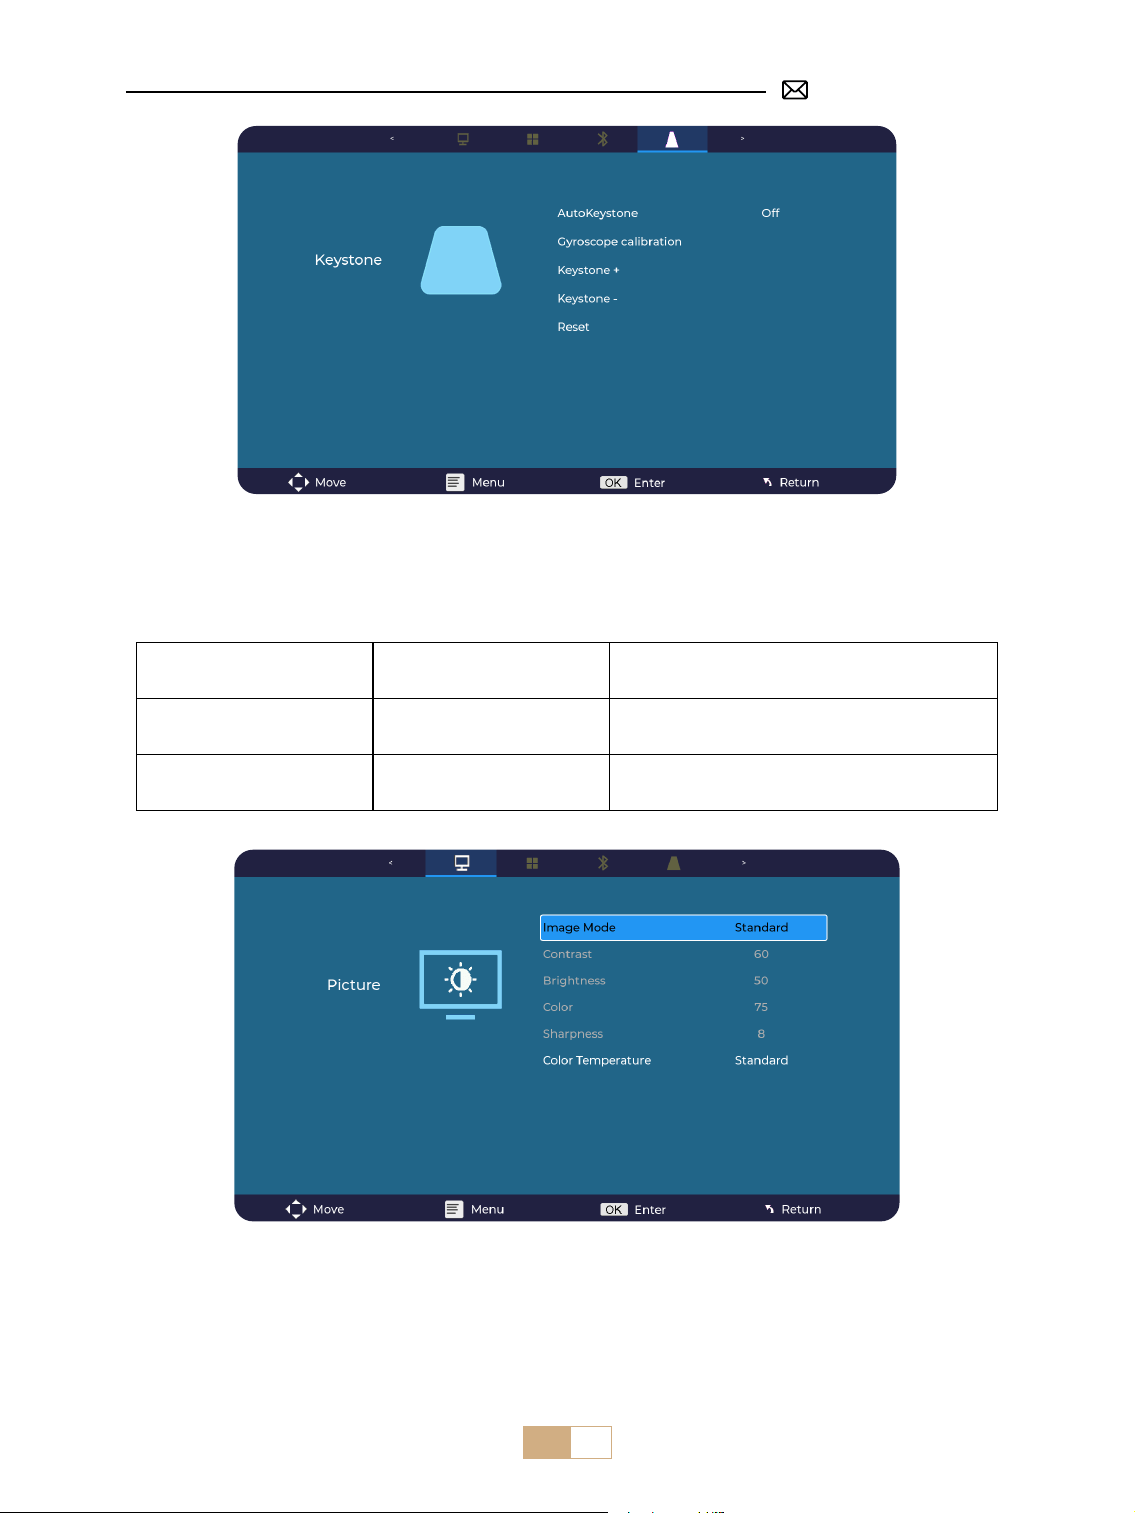
3. Picture Settings
①
Supports USB and HDMI parameter adjustments in User mode.
②
Click Menu button on the remote control- Picture Setting- Image Mode - User Mode.
Menu Content Function
Image Mode
Standard/Dynamic/Mild/
User
Adjust the contrast / brightness / color /
sharpness
Color Temperature Cold/Standard/Warm Adjust the color temperature
EN 13
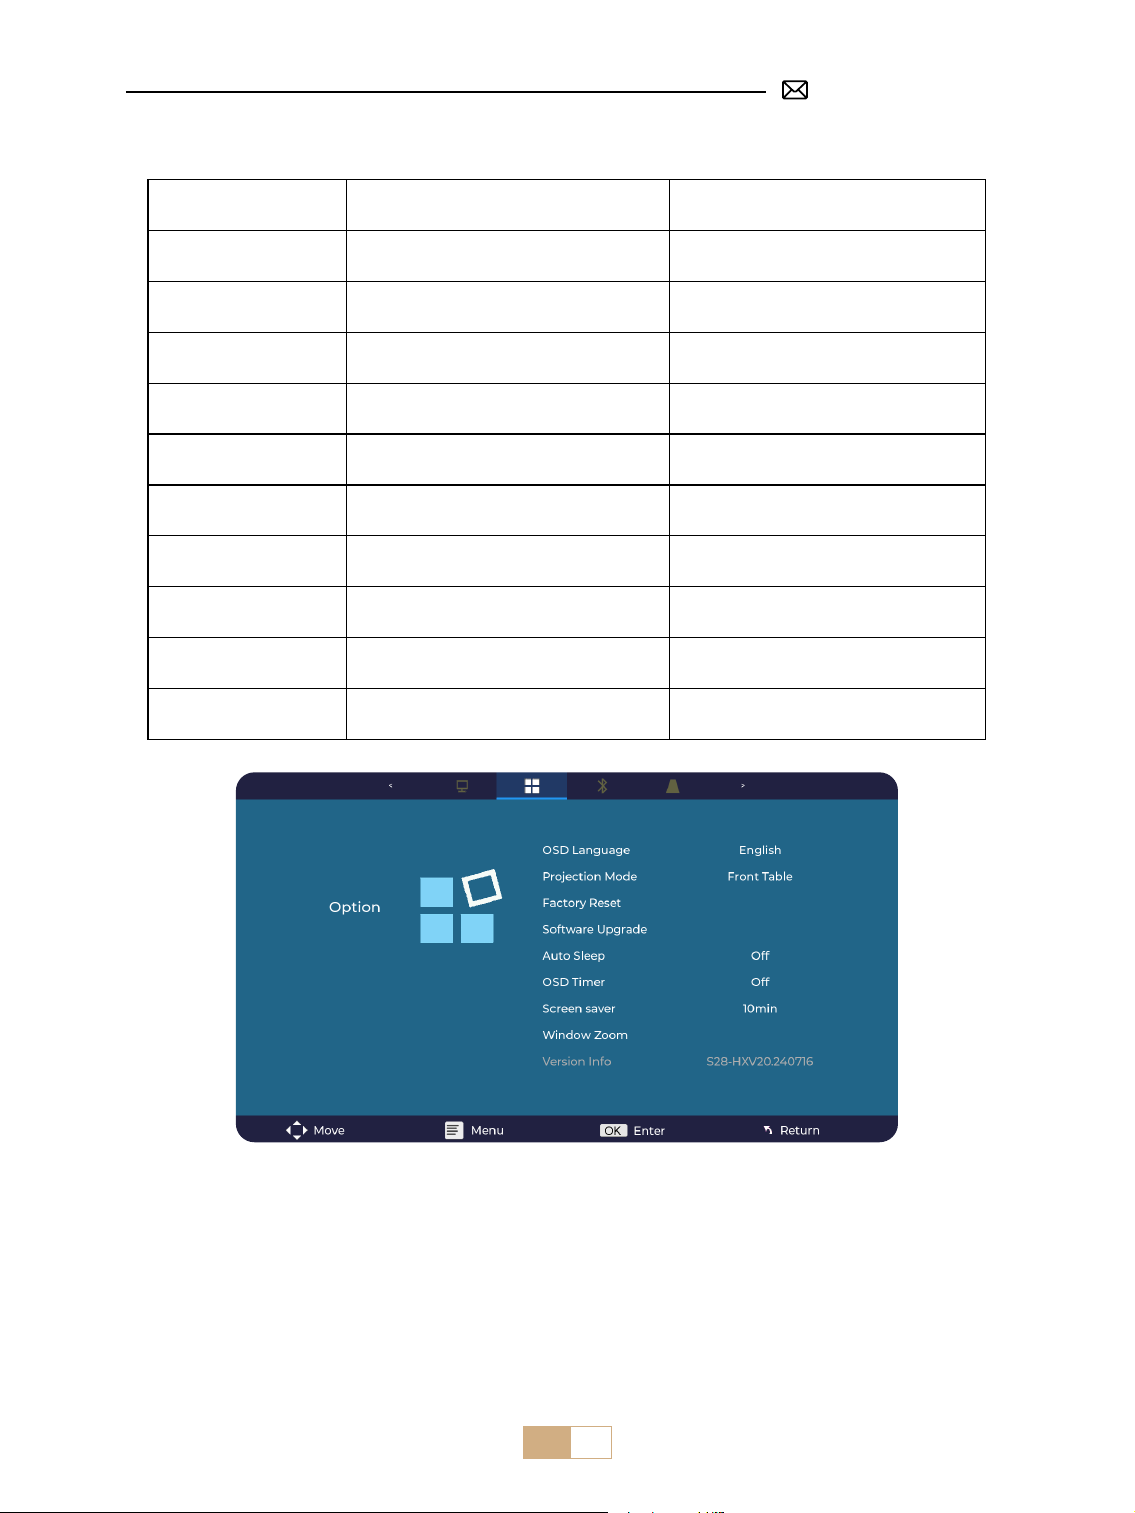
4. Option Settings
Menu Content Function
OSD Language
English/Français/Italian/Espanol/Deutsche/
日本語
Choose a language
Projection Mode Front/Back on Ceiling/Front/Back on Table Flip the projection image direction
Factory Reset Reset Restore factory default settings
Software Upgrade Local update(USB) Update the software via local le
Online Update Online update(OTA) Update the software via online
Auto Sleep O/60m/120m/180m Set the sleep time
OSD Timer O/5s/10s/15s/20s/25s/30s Set the time to return the homepage
Screen saver O/10min/15min/30min
Window Zoom Aspect Ratio 4:3/16:9, Zoom 100%-50%
Adjust the screen aspect ratio, Reduce the
image size
Version Info Software version Software version

EN 14
Tips:
①
The uency of screen mirroring with a wireless connection will be aected by the network environment. A
bandwidth of 100Mbit or more is recommended when using screen mirroring.
②
Make sure your mobile device is close to the projector when using the wireless connection. A distance within
1.6 meters is recommended.
③
Some mobile devices may not support screen mirroring due to the compatibility.
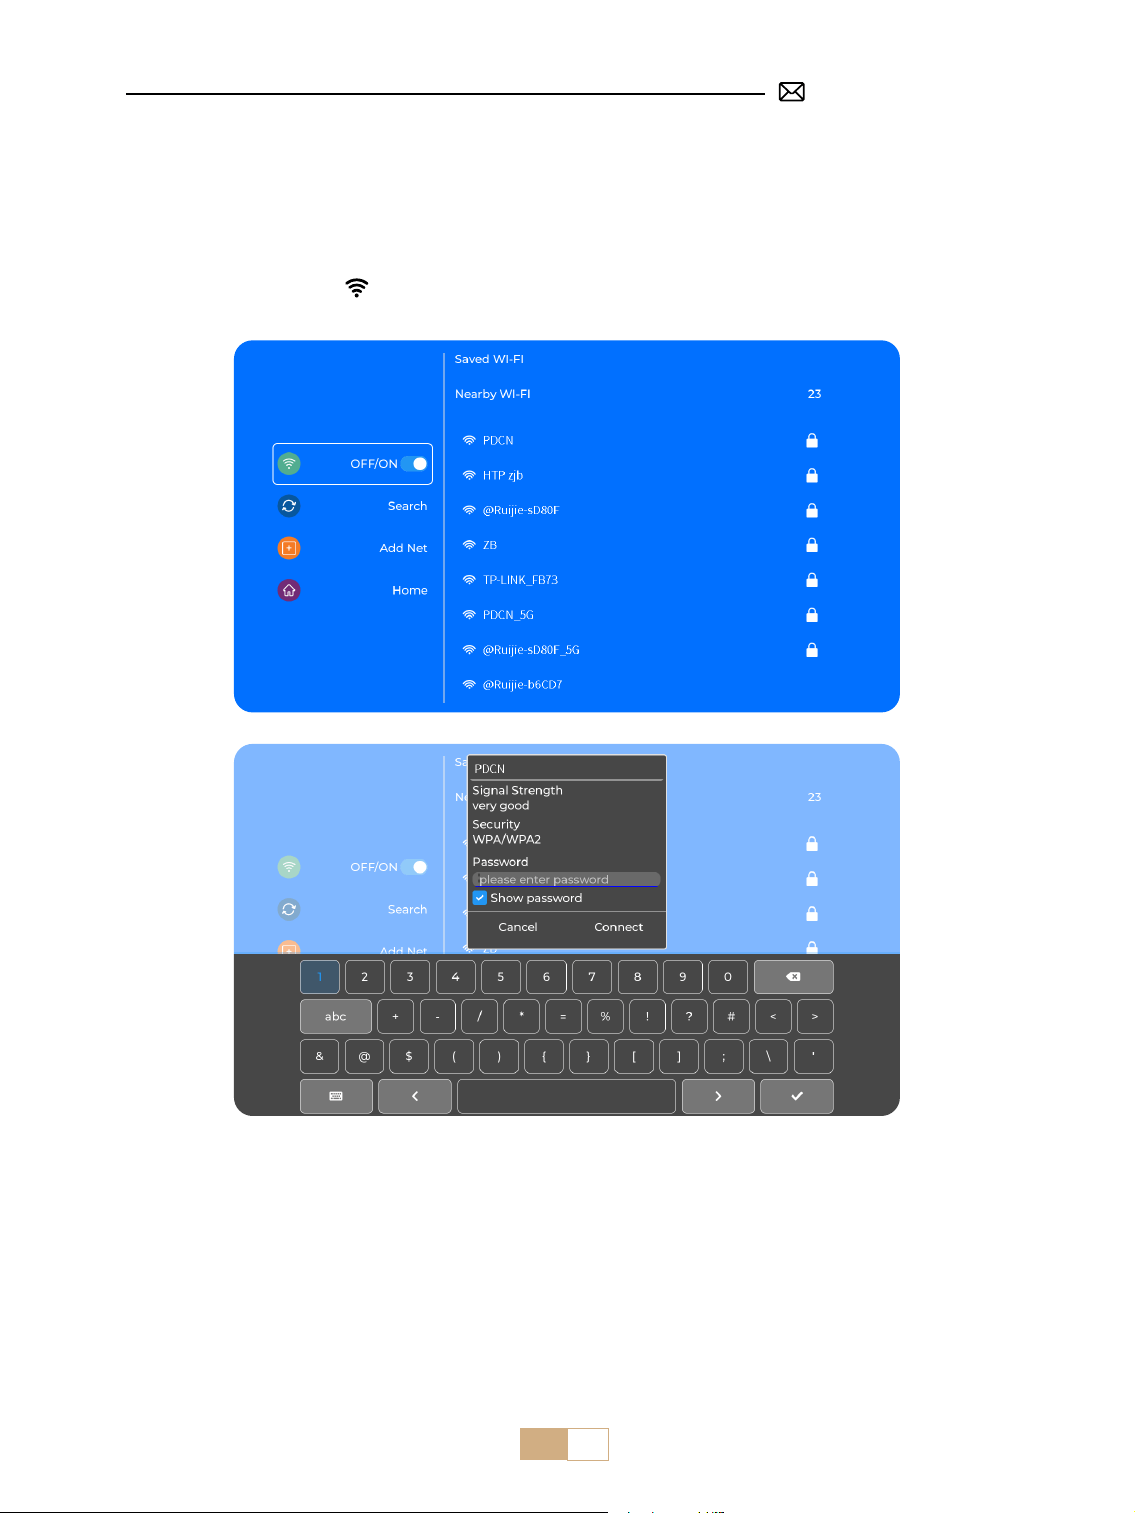
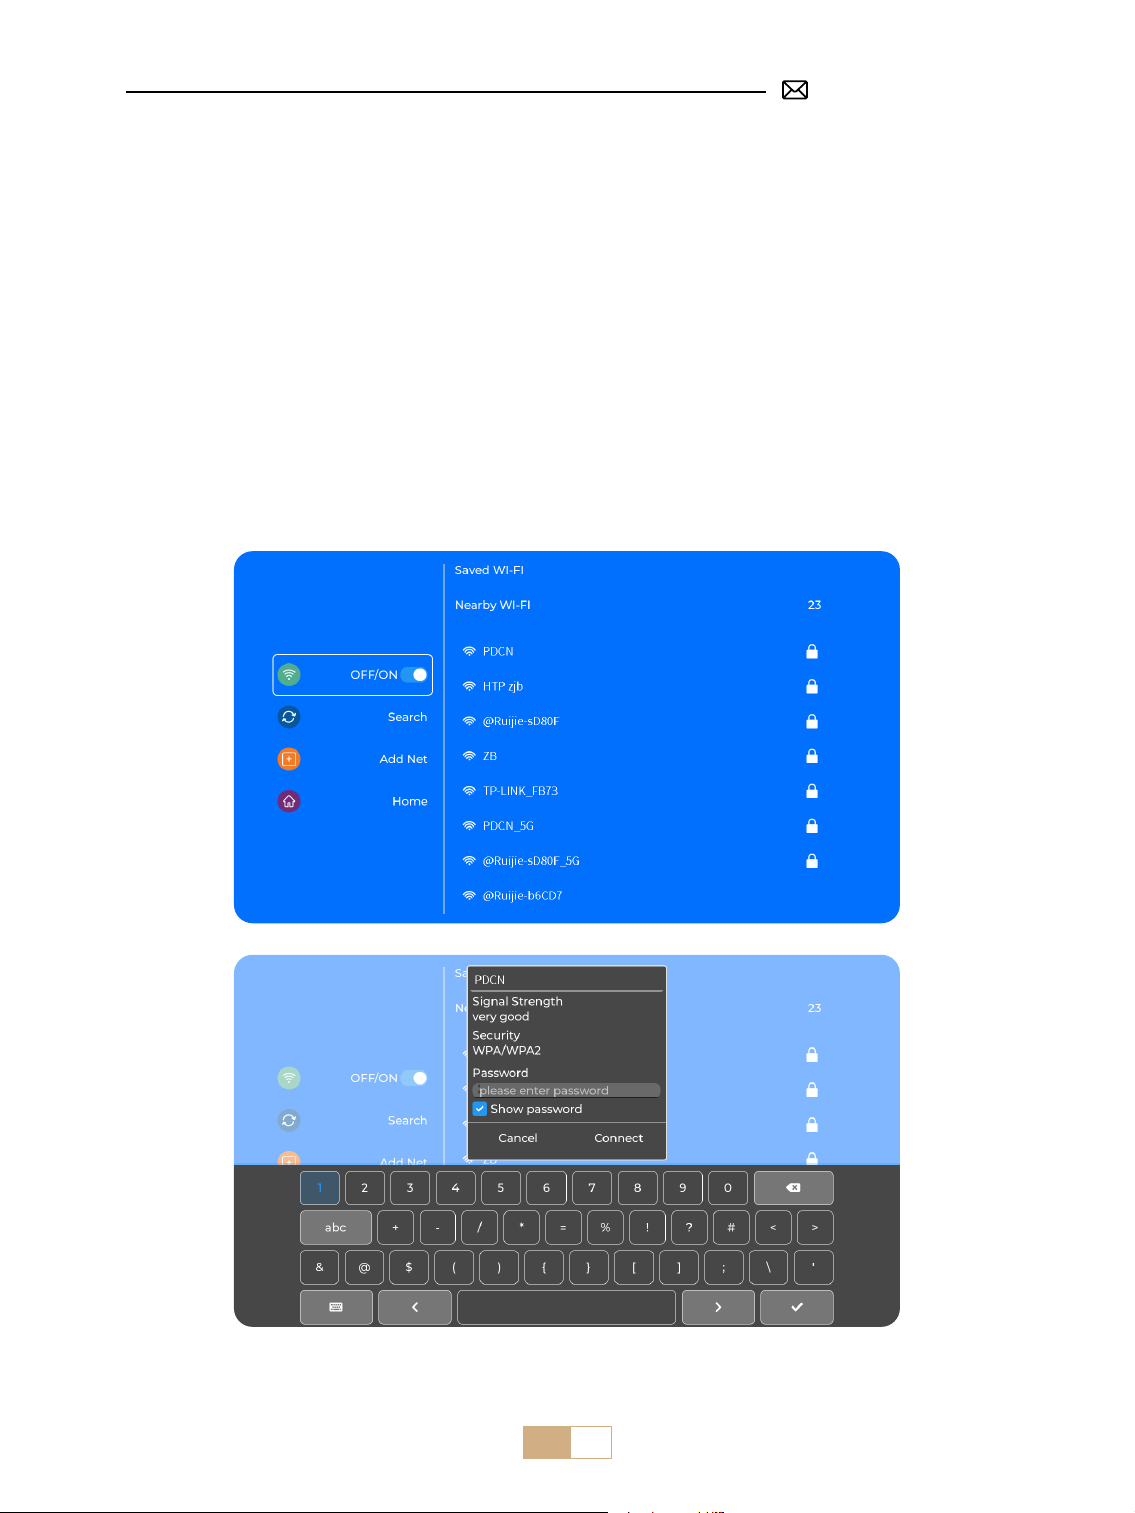
CONNECTING WITH SMART DEVICES
Select the [ Wi ] icon in the main interface, and then press the "OK" key on the remote control to enter the Wi
interface and select "Network Settings".
1. WiFi Setting
EN 15
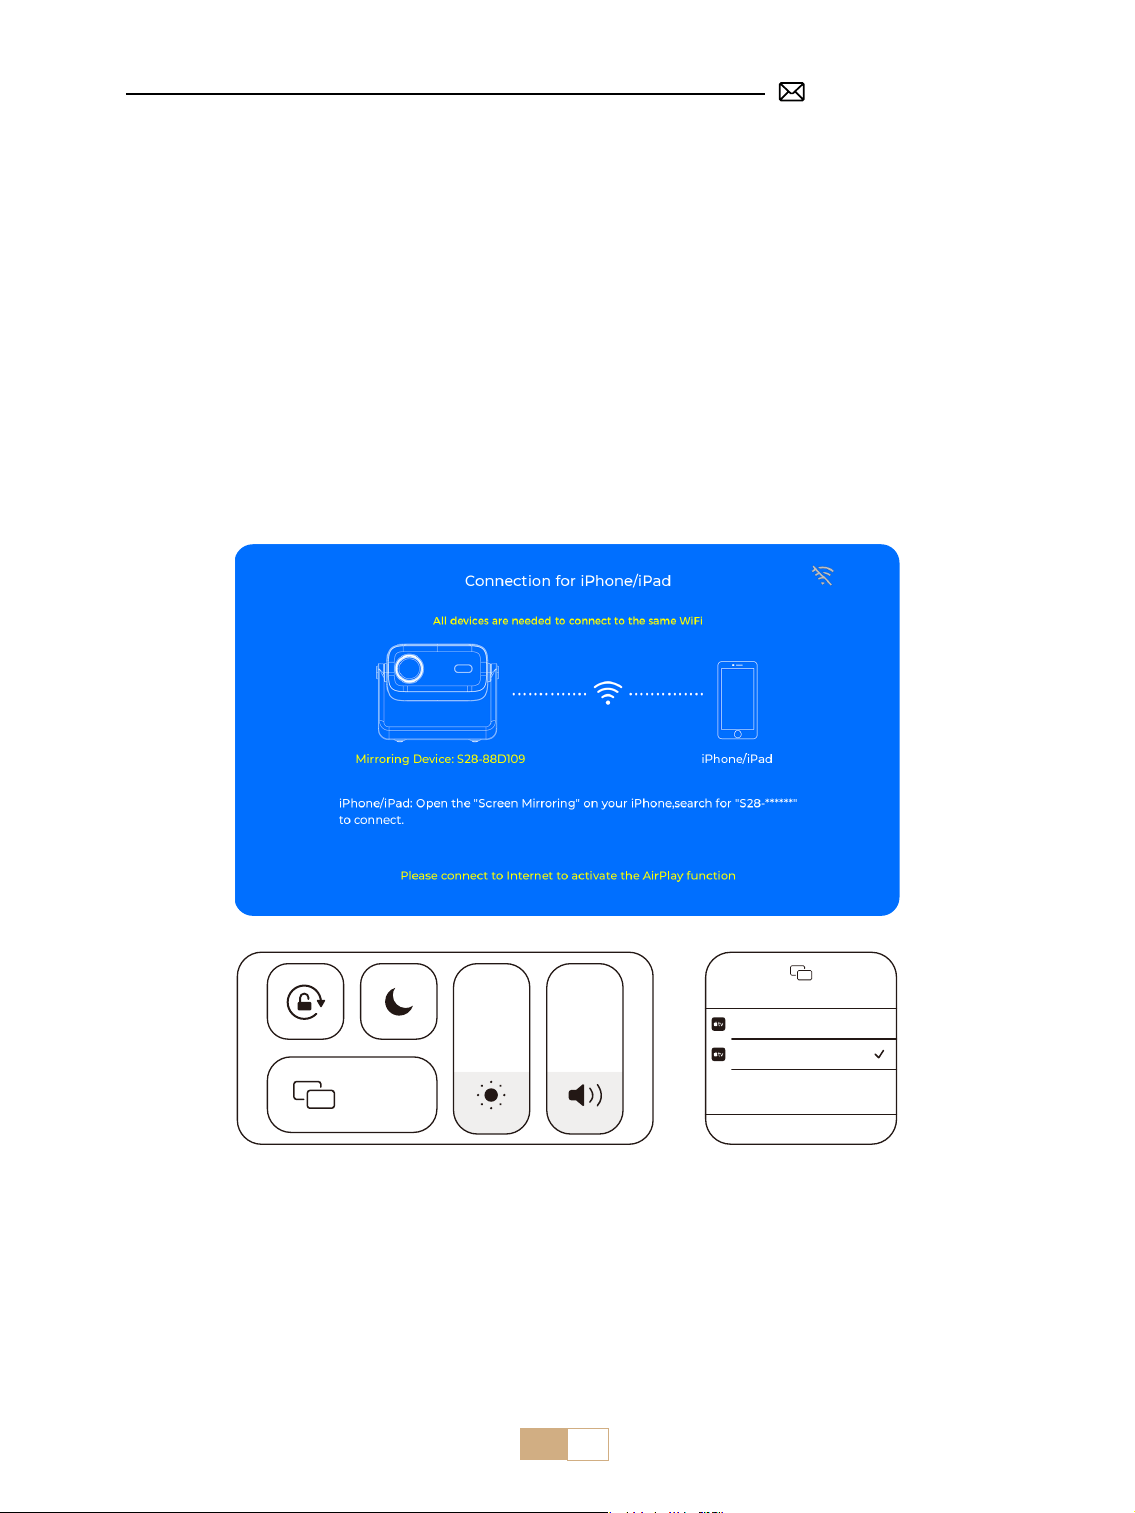
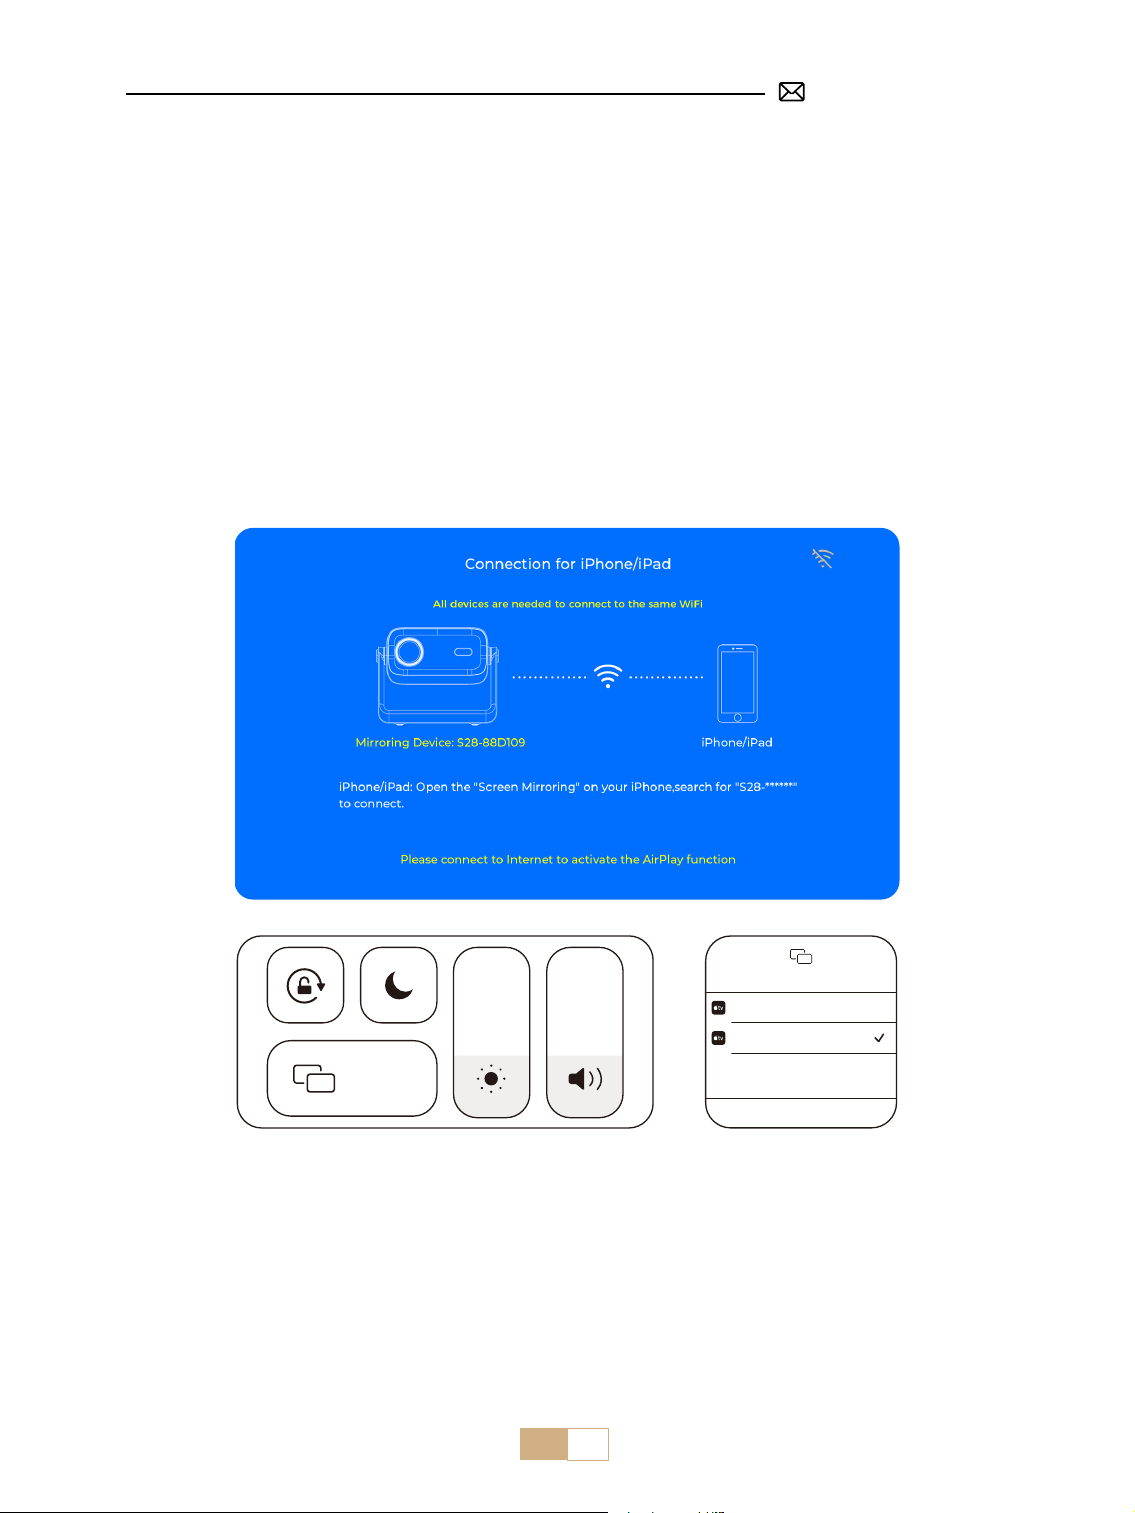
①
Enter [ WiFi Settings ] .
②
Connect the S28 projector to your WiFi network.
③
Select the [ iOS Wi-Fi Mirroring ] menu.
④
Stay on this interface.
⑤
Connect your iOS device to the same WiFi network.
⑥
Access the [ Control Center ] on your iOS device Select the [ Airplay ] function.
⑦
Select and connect the iOS named [ S28-XXXX ].
Attention: Ensure that your iOS device is connected to the same Wi-Fi network as your projector.
2. Wireless Connection
2.1 For iOS Cast (Airplay)
Note: Due to copyright restrictions, streaming services such as Netix, Hulu, Disney and YouTube require you to insert a TV
stick (not included) into the projector for normal playback.
Screen Mirroring
Stop Mirroring
Bedroom
Projector-S28-XXXX
Screen
Mirroring
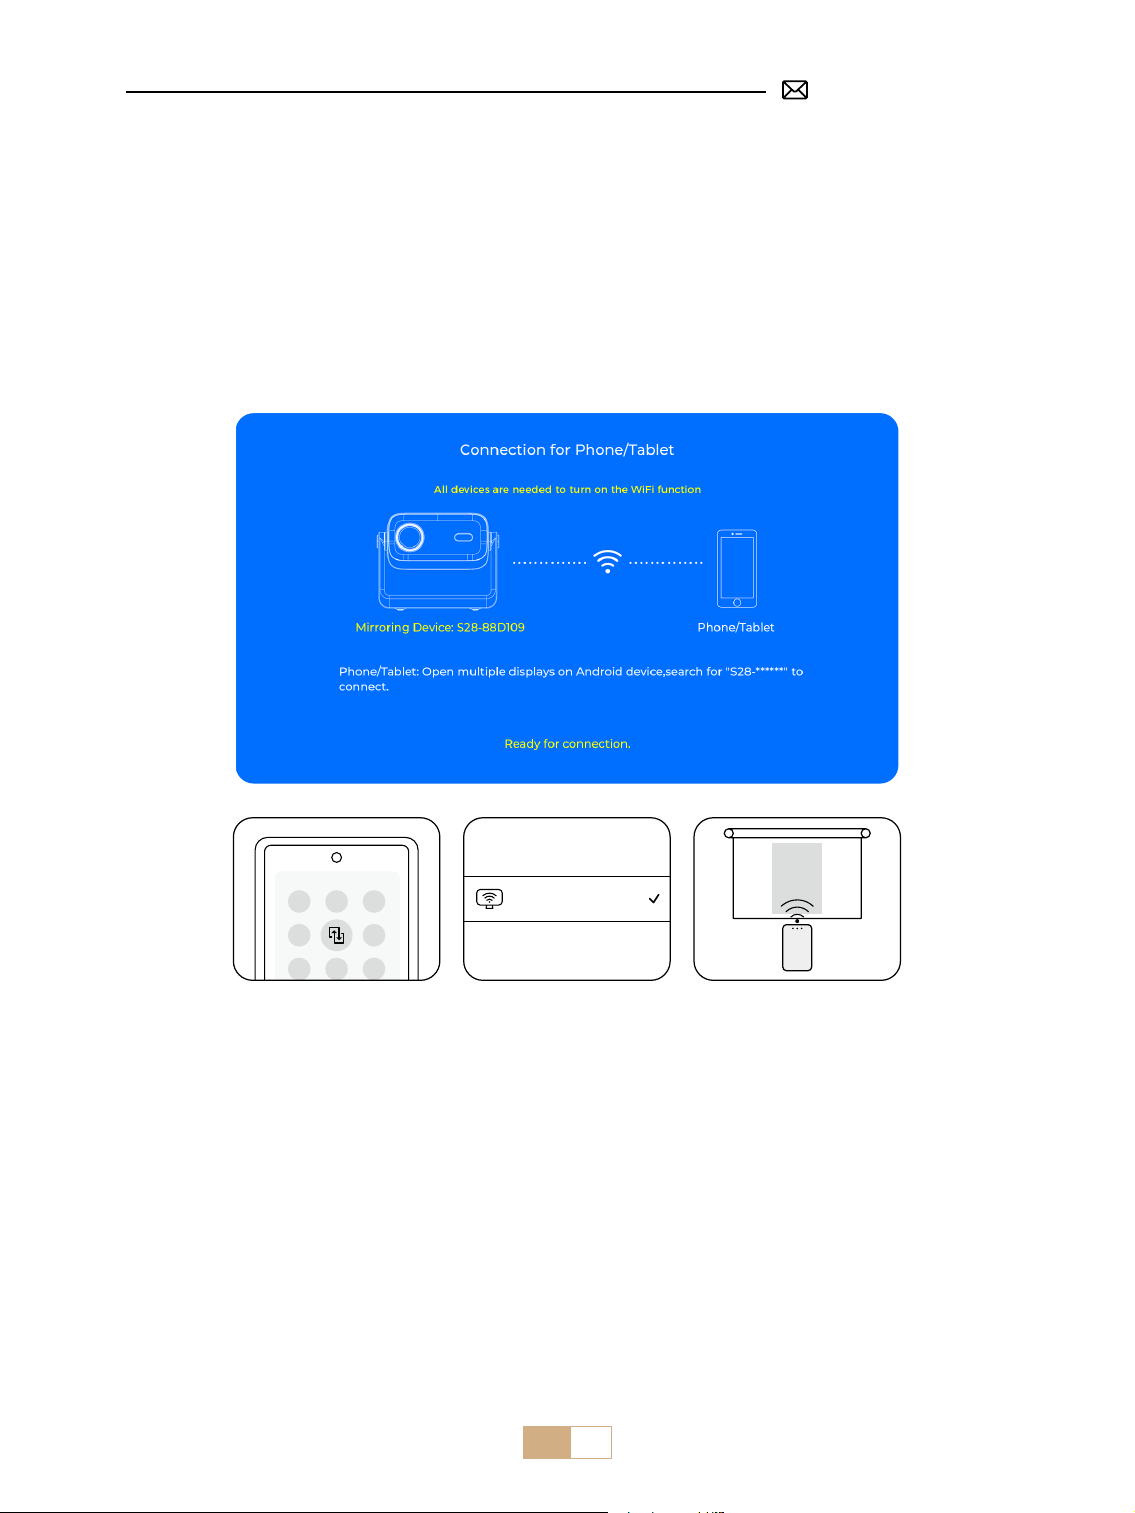
2.2 For Android System (Miracast)
Screen Mirroring Methods: Android devices from dierent brands may use various terms and methods to
enable screen mirroring. To nd the exact steps for your device, please refer to your device's manual. Common
terms for screen mirroring include Multi-screen, Wireless Display, WLAN Display, Screen Mirroring, and Smart
View.
Device Compatibility: Please note that not all Android phones support the screen mirroring function. Before
attempting to use screen mirroring, ensure that your Android device supports this feature. You can check your
device's manual or look for the screen mirroring option in the settings to verify compatibility.

EN 16
Note: Due to copyright restrictions, streaming services such as Netix, Hulu, Disney, and YouTube require you to insert a TV
stick (not included) into the projector for normal playback.
①
Enter [ WiFi Settings ] and turn on the WiFi function.
②
Select the [ Android Mirroring ] menu.
③
Stay on this interface.
④
Connect your Android device to the same WiFi network.
⑤
Access the [ Control Center ] on your Android device.
⑥
Select the [ Multi-Mirroring/Smart View ] function.
⑦
Select and connect the Miracast receiver named [ S28-XXXX ].
PUTRIMS_S28_XXXX
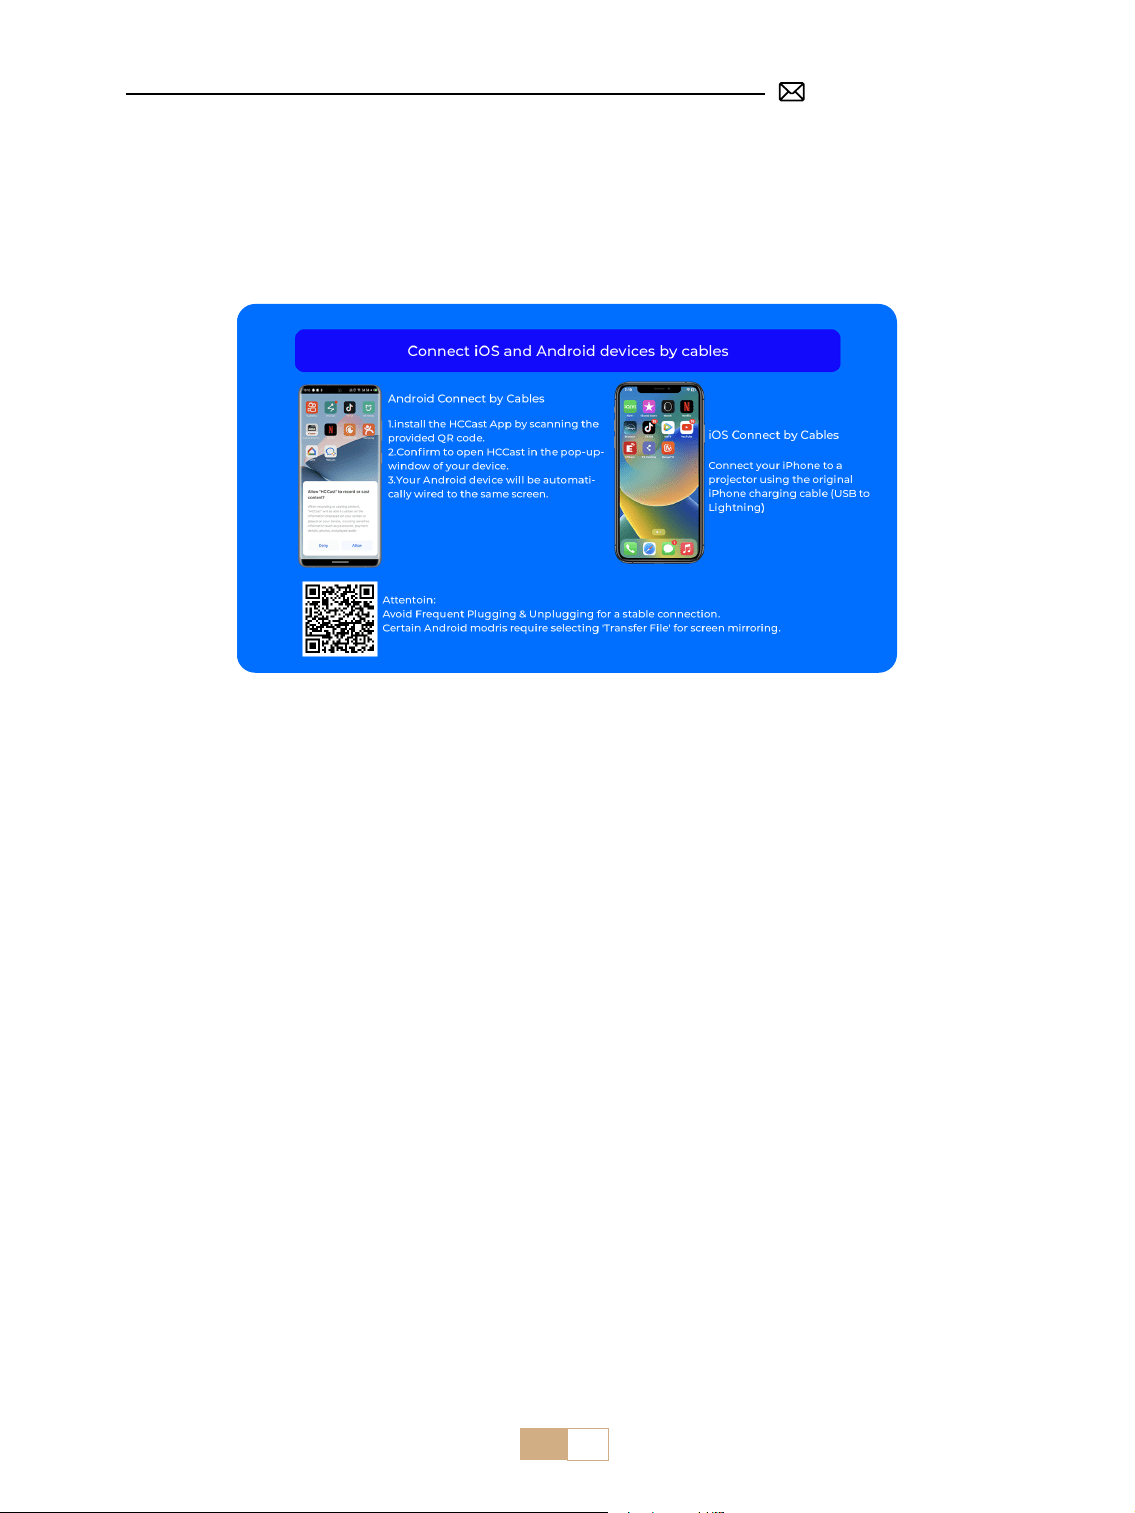
3. Wired Screen
3.1 Connect Android Device by Cable
①
Select the [ Wired Screen] menu.
②
Install the HCCast App rst by scanning the provided QR code.
③
Use a USB to Type-c cable to connect your Android device to the projector.
④
Conrm to open HCCast in the pop-up window of your device.
⑤
Enter your device password if prompted, to authenticate the connection.
⑥
Your Android device will be automatically wired to the same screen.
Notes:
Avoid frequent plugging and unplugging to get a stable connection. Some Android models require
selecting "Transfer Files" for screen mirroring.

EN 17
3.2 Connect iOS Device by Cable
①
Select the [ Wired Screen ] menu.
②
Connect your iPhone to a projector using the original iPhone charging cable. (USB to Lightning)
③
Success.
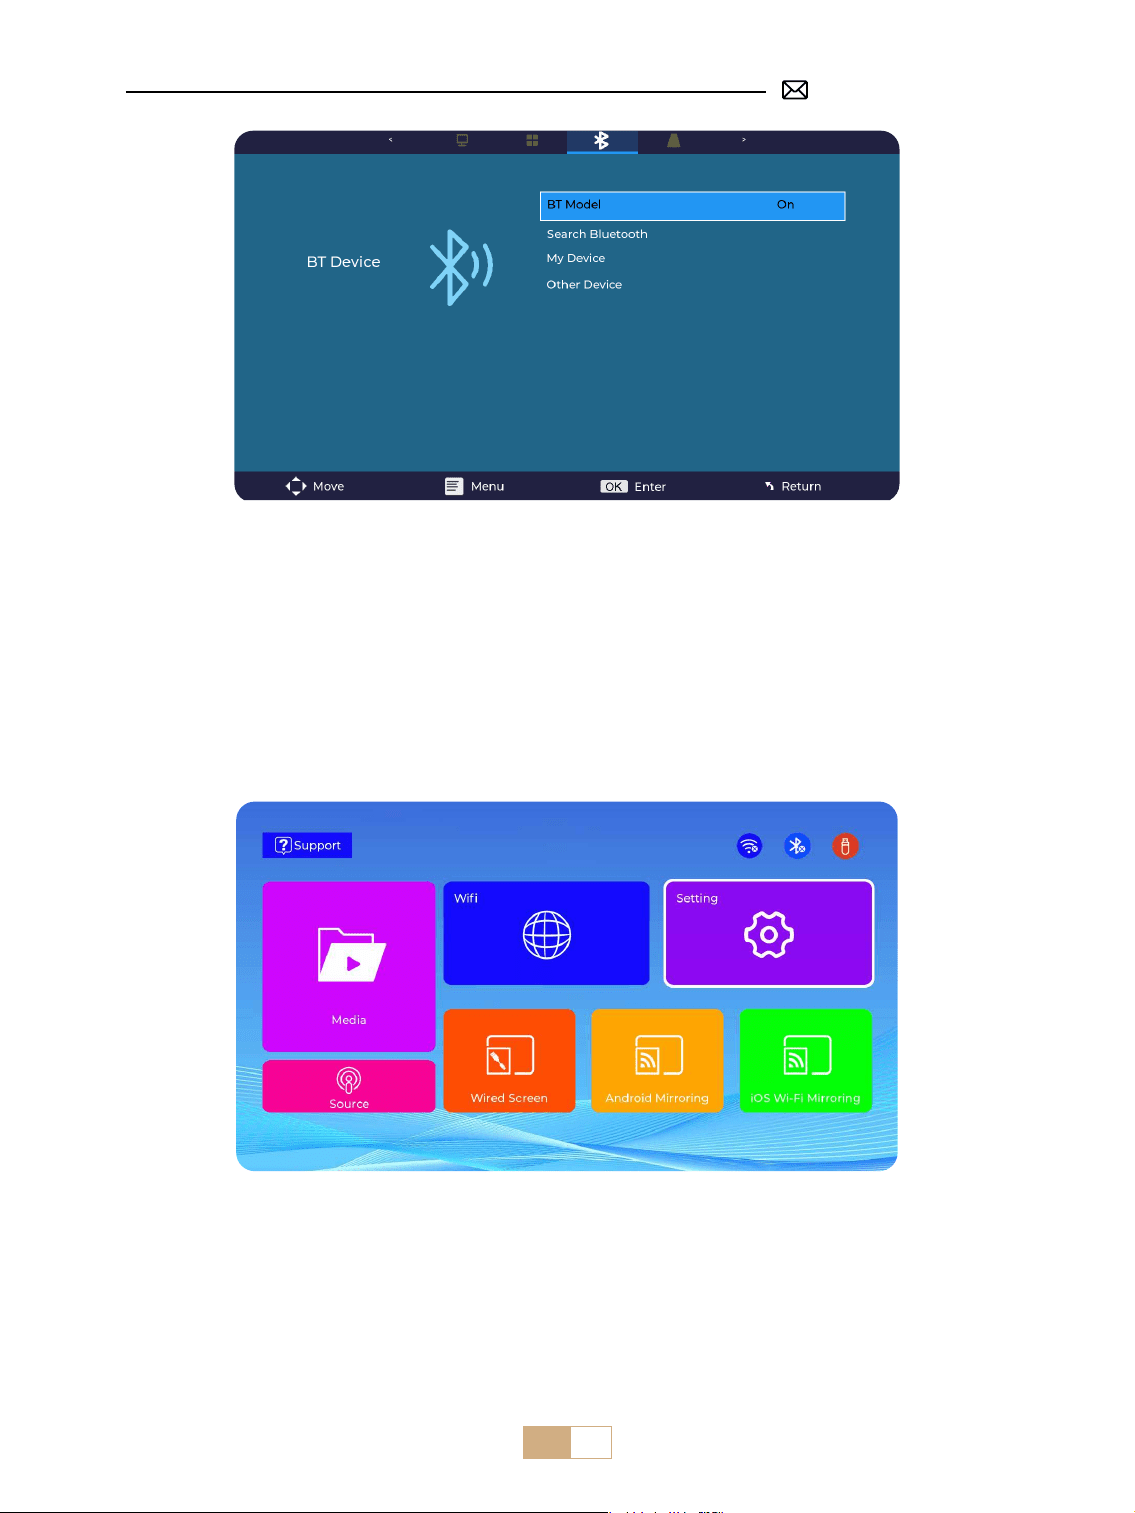
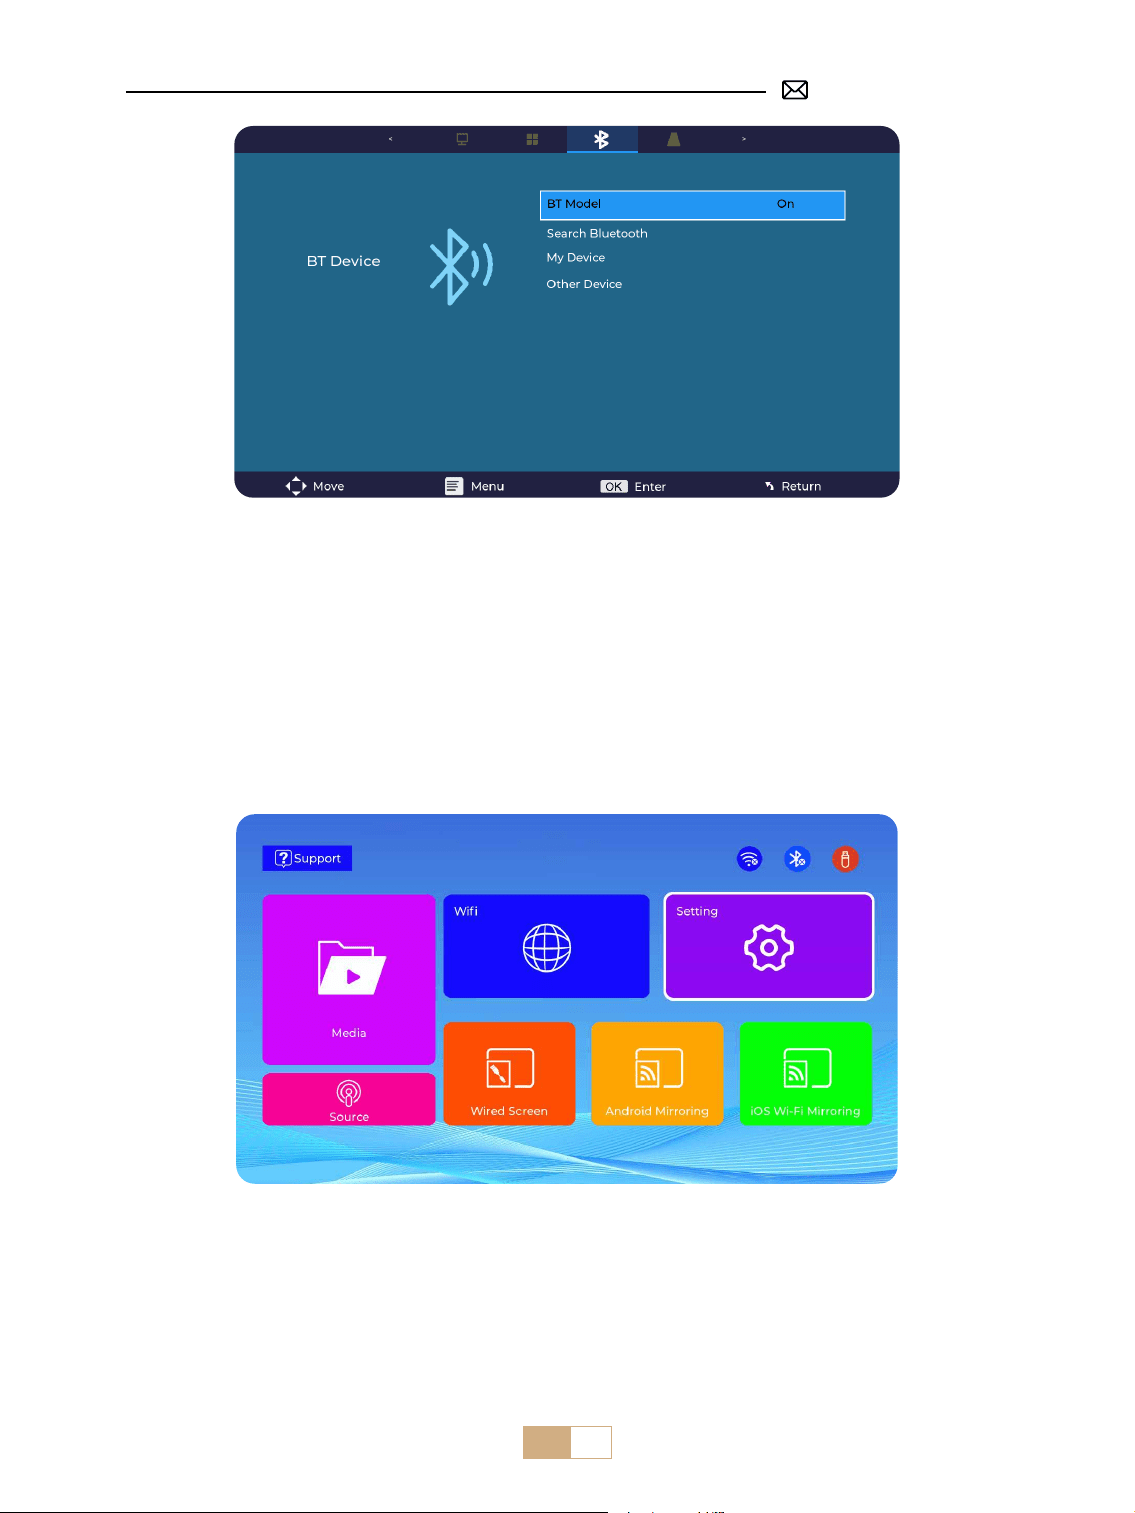
4. Bluetooth
Connect Bluetooth Speakers
①
Turn on your Bluetooth Speaker.
②
Turn on the [Bluetooth] of your projector and select your Bluetooth speaker to connect.
Note:
①
The S28 projector is compatible with most Bluetooth headsets, Bluetooth speakers, and Airpods. However,
please note that it is not compatible with Bluetooth keyboards or Bluetooth phones.
②
If you encounter no sound while playing videos, we recommend checking the Dolby Sound settings on your
connected devices. Turning o Dolby Sound can ensure better audio compatibility with the projector.
③
Some Bluetooth speakers may experience a significant reduction in volume when connected to the
projector. To address this issue, try increasing the volume on all relevant devices to achieve the desired Sound
level.
④
This step is only applicable to connect the Bluetooth Speaker but not to mobile phone Bluetooth
⑤
If you have any questions or need further assistance, please don't hesitate to contact PUTRMIS support via
email at [email protected]om.
EN 18
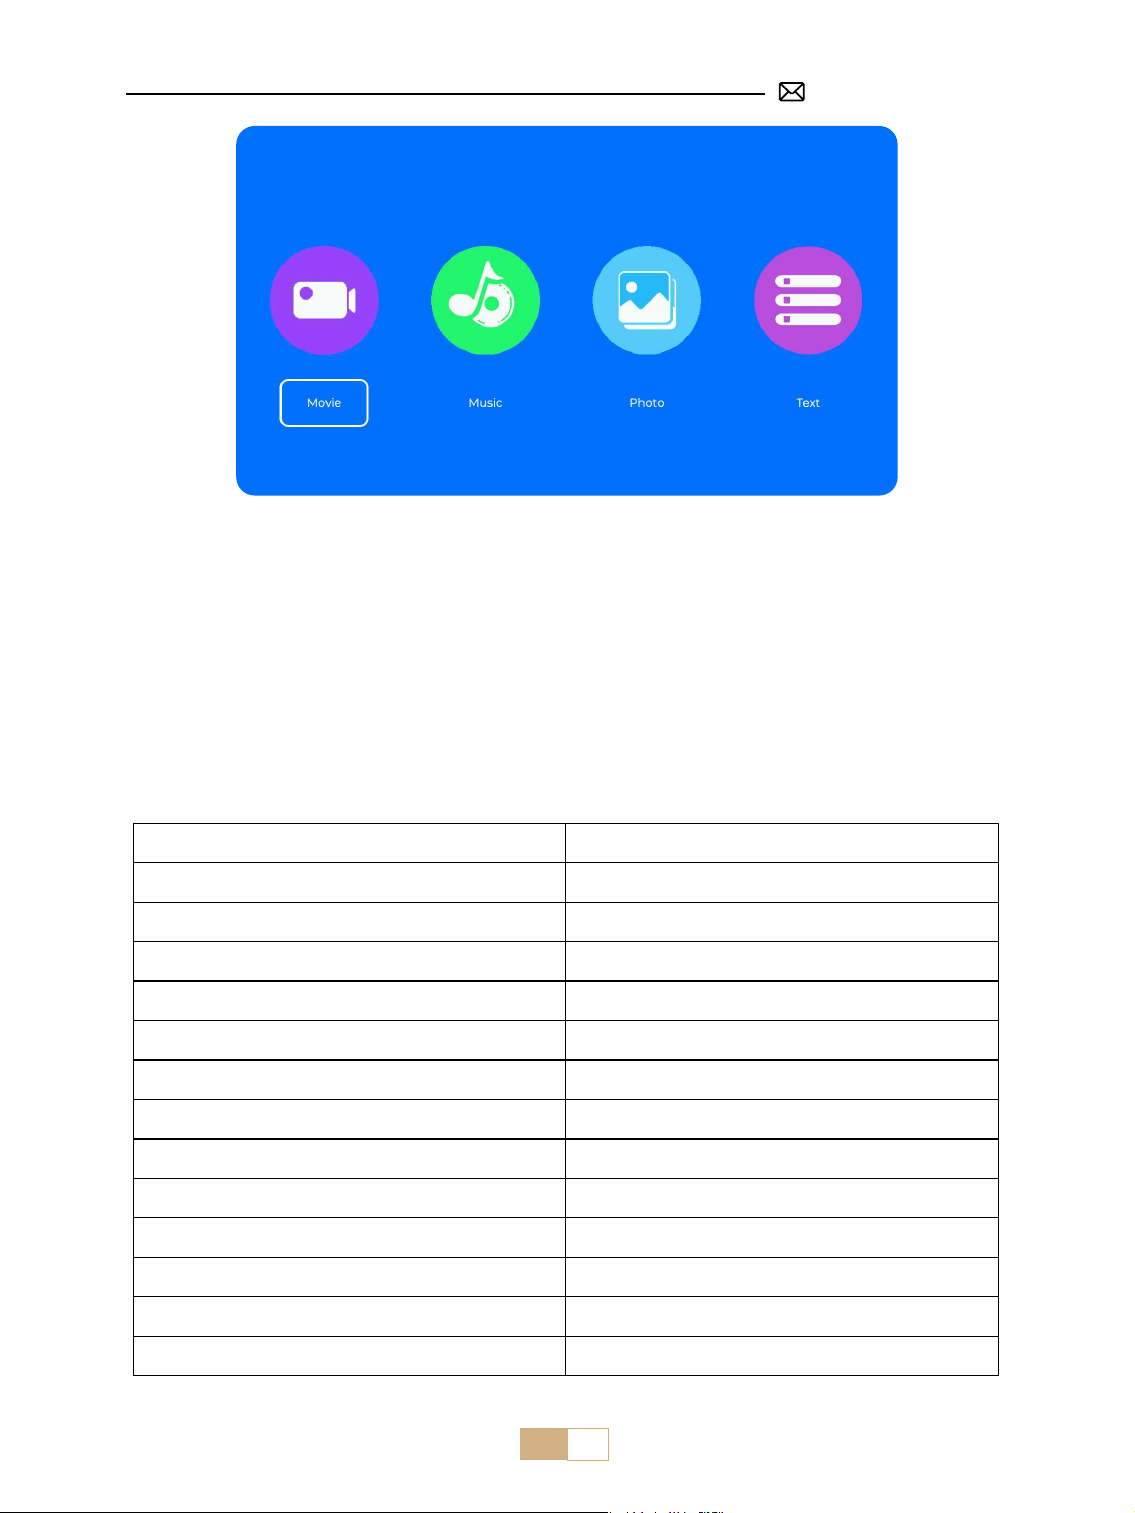
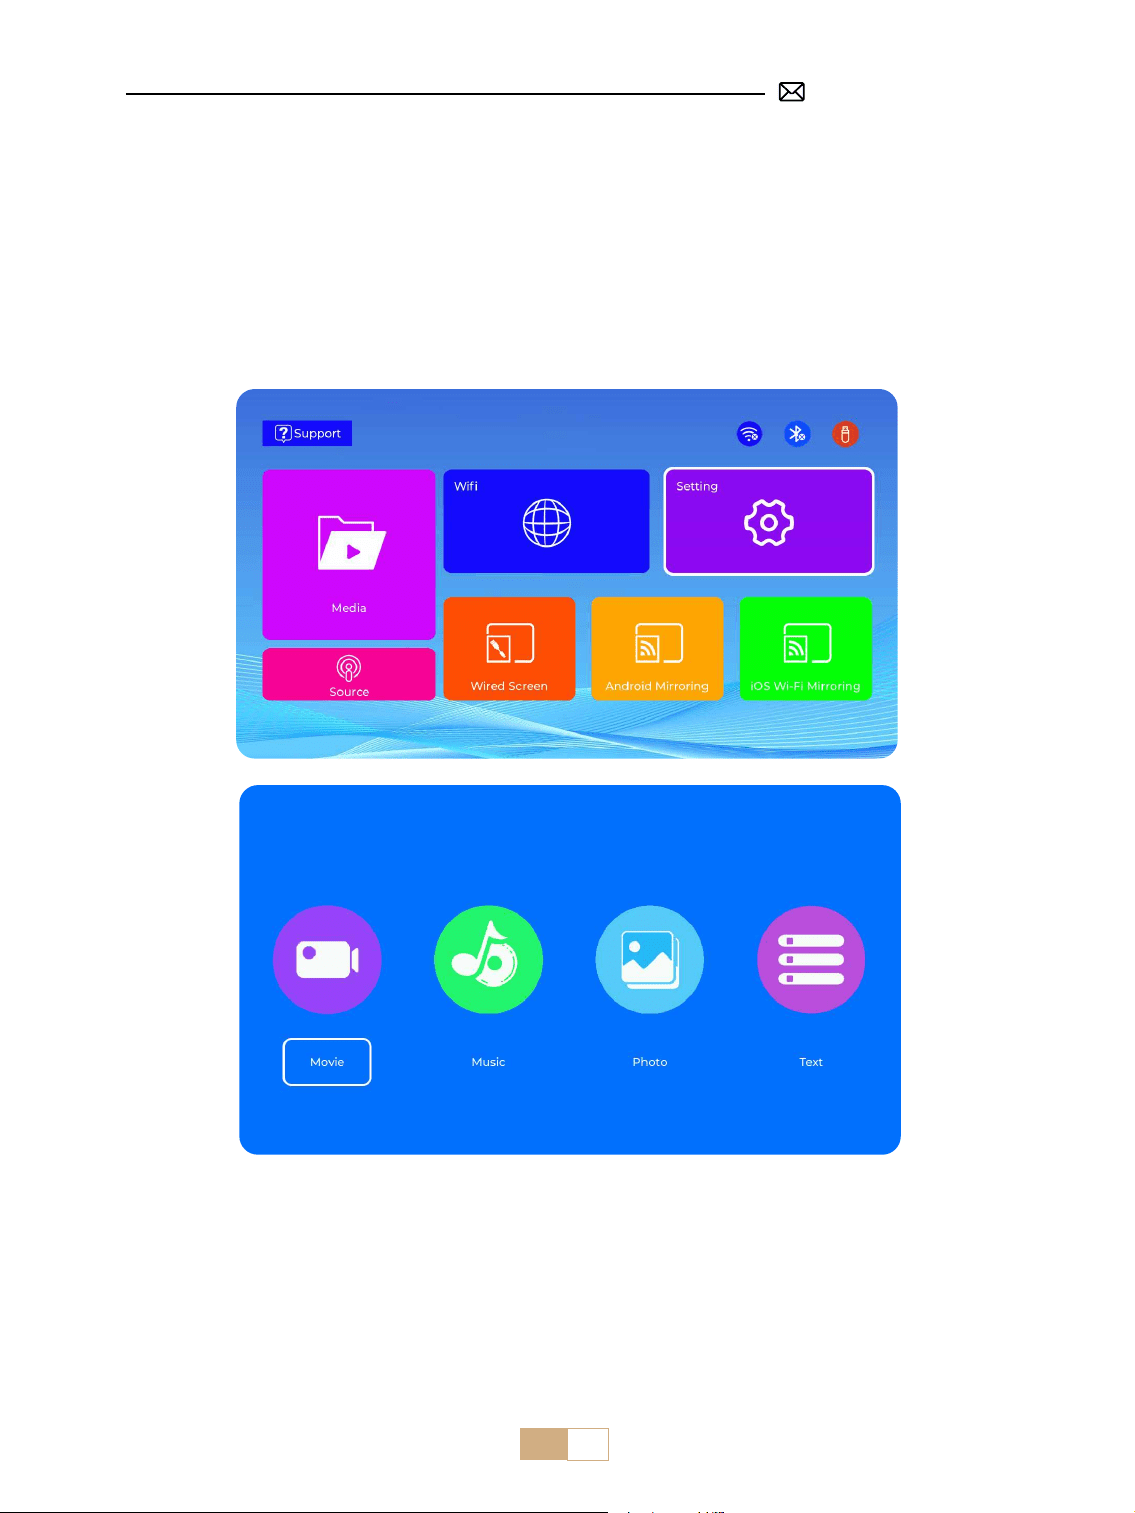
①
Insert the USB ash disk into the USB port of the projector.
②
Select "Media" and press the "OK" key to enter
③
Depending on the le type, select the option [ Movie/Music/Photo/Text ].
④
Select the desired le and then press the [ OK ] button to play it.
⑤
Click the "MENU" button on the remote while playing the video to adjust the picture settings directly.
5. Multimedia Play
5.1 USB Disk Input Mode
EN 19
Warm Tips: If your projector cannot recognize the USB disk, please follow the methods below to resolve the
issue.
Please ensure that your USB disk meets the following formats:
FAT, FAT32: 8GB/16GB/32GB NTFS: 64GB
If it doesn't meet these criteria, you will need to change a supported format USB disk.
If the problem persists, please send a detailed description of your issue to the following email address: support@
putrims.com.
5.2 Video Play Interface
Menu Function
FB Long press to Fast Backward the video
FF Long press to Fast Forward the video
Prev Switch to the previous video
Next Switch to the next video
Stop Stop playing and exit
Round List cycle or single cycle
Info Video details
List Select all playlists in the current folder
Zoom+ Zoom+ 2X to 8X
Zoom- Zoom- 1/2X to 1/8X
SF Slow Forward
STEP Step Forward
Auto Aspect Ratio: Auto/4:3/16:9
EN 20
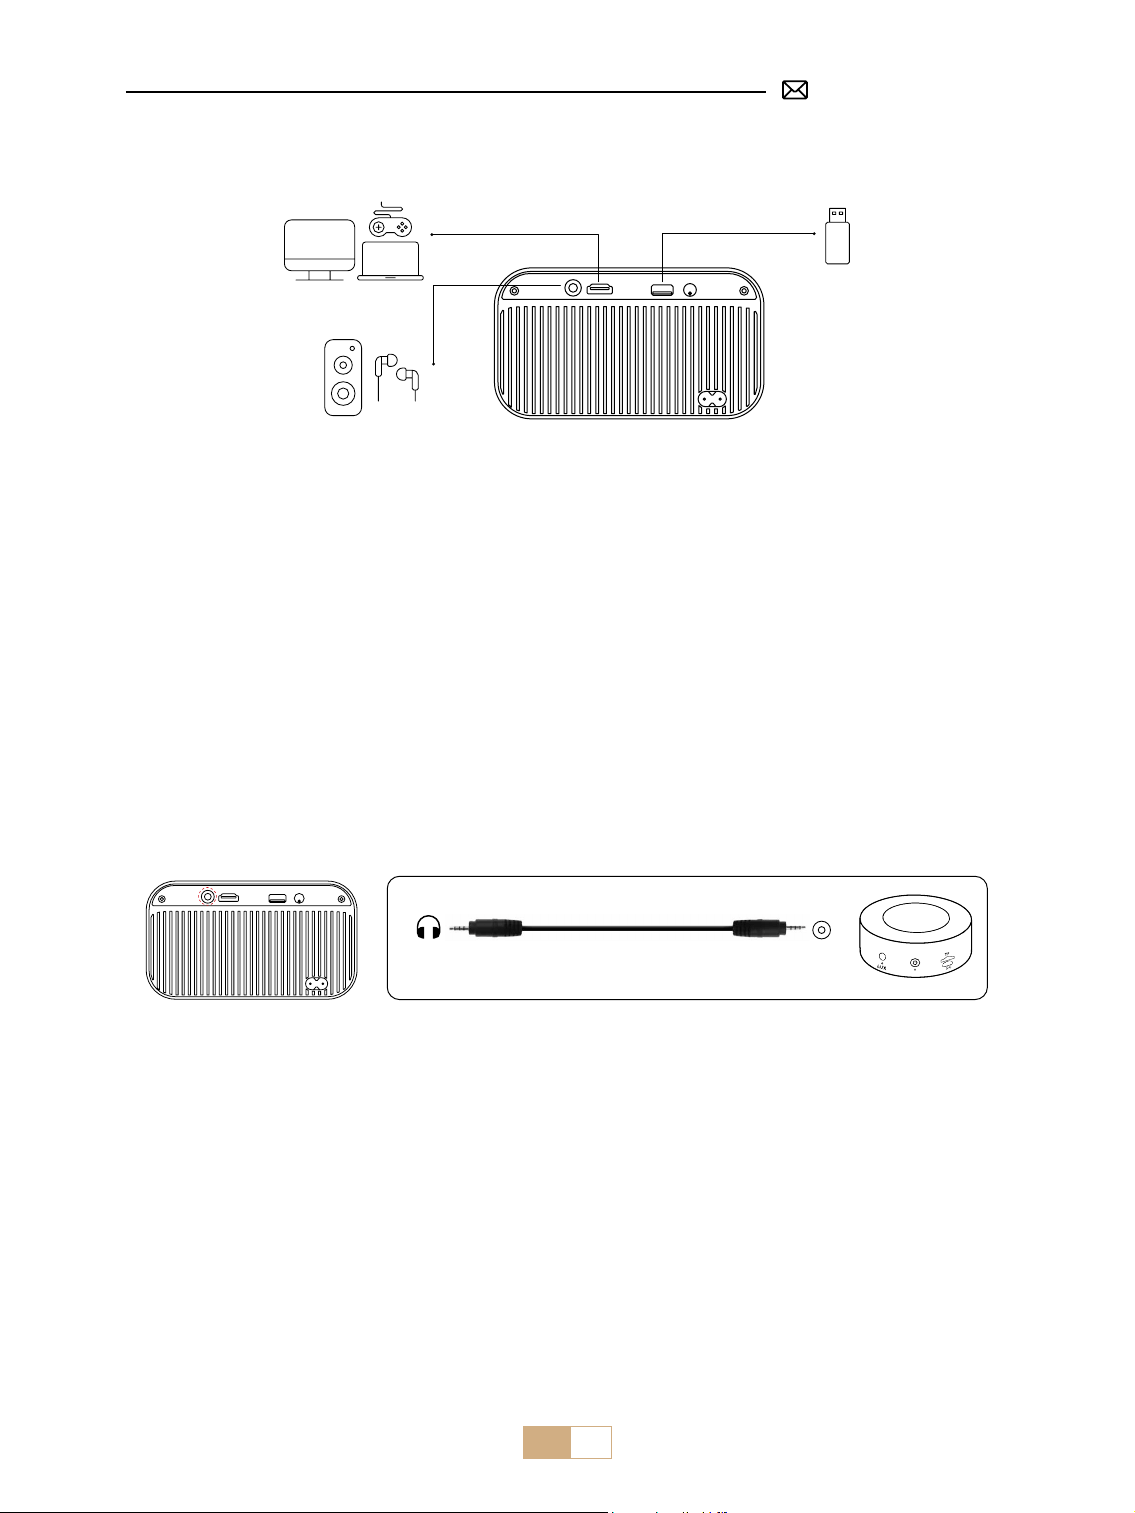
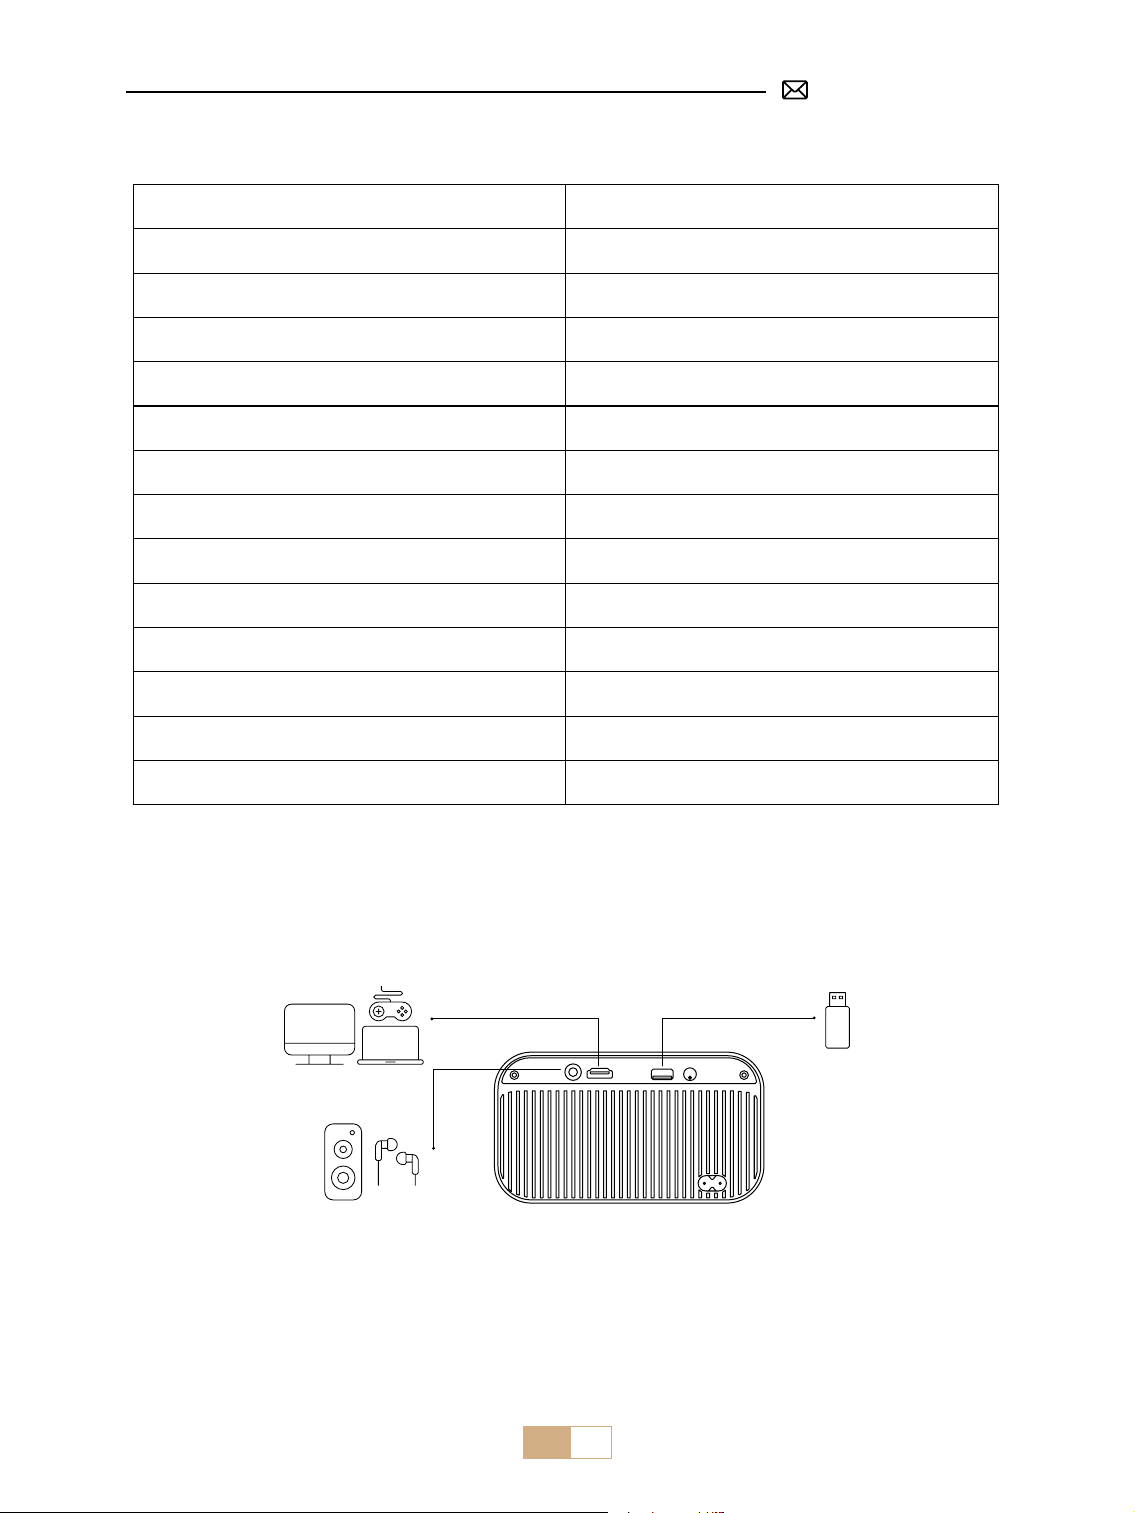
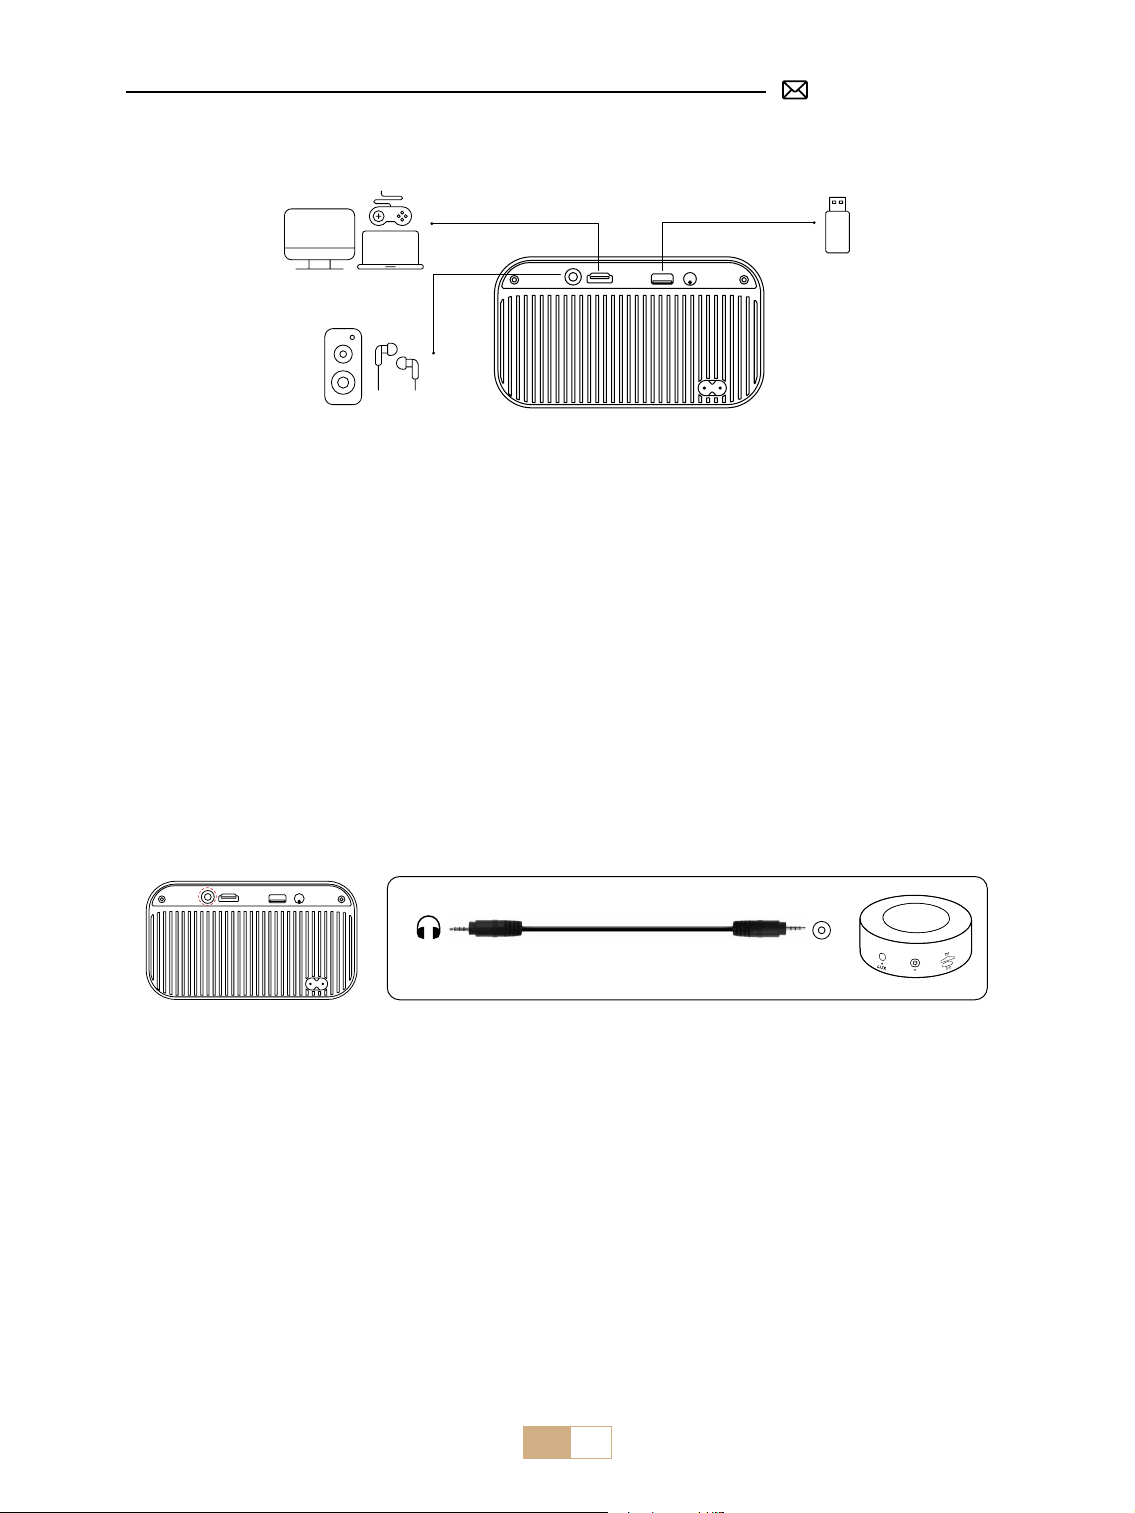
SIGNAL LINES CONNECTION
PUTRIMS S28 projector has 3 interfaces, HDMI port*1/USB port*1/3.5mm headphone output*1. Please select
the correct connecting port to connect your device (PC, Phone, TV Stick, Speaker, DVD Player, USB, PS4, etc.)
①
Insert the USB ash disk into the USB port of the projector.
②
Select "Media" and then press the "OK" key to enter.
③
Depending on the le type, select the option [Movie/Music/Photo/Text].
④
Select the desired le and then press the [OK] button to play it.
1. Connect via USB Disk
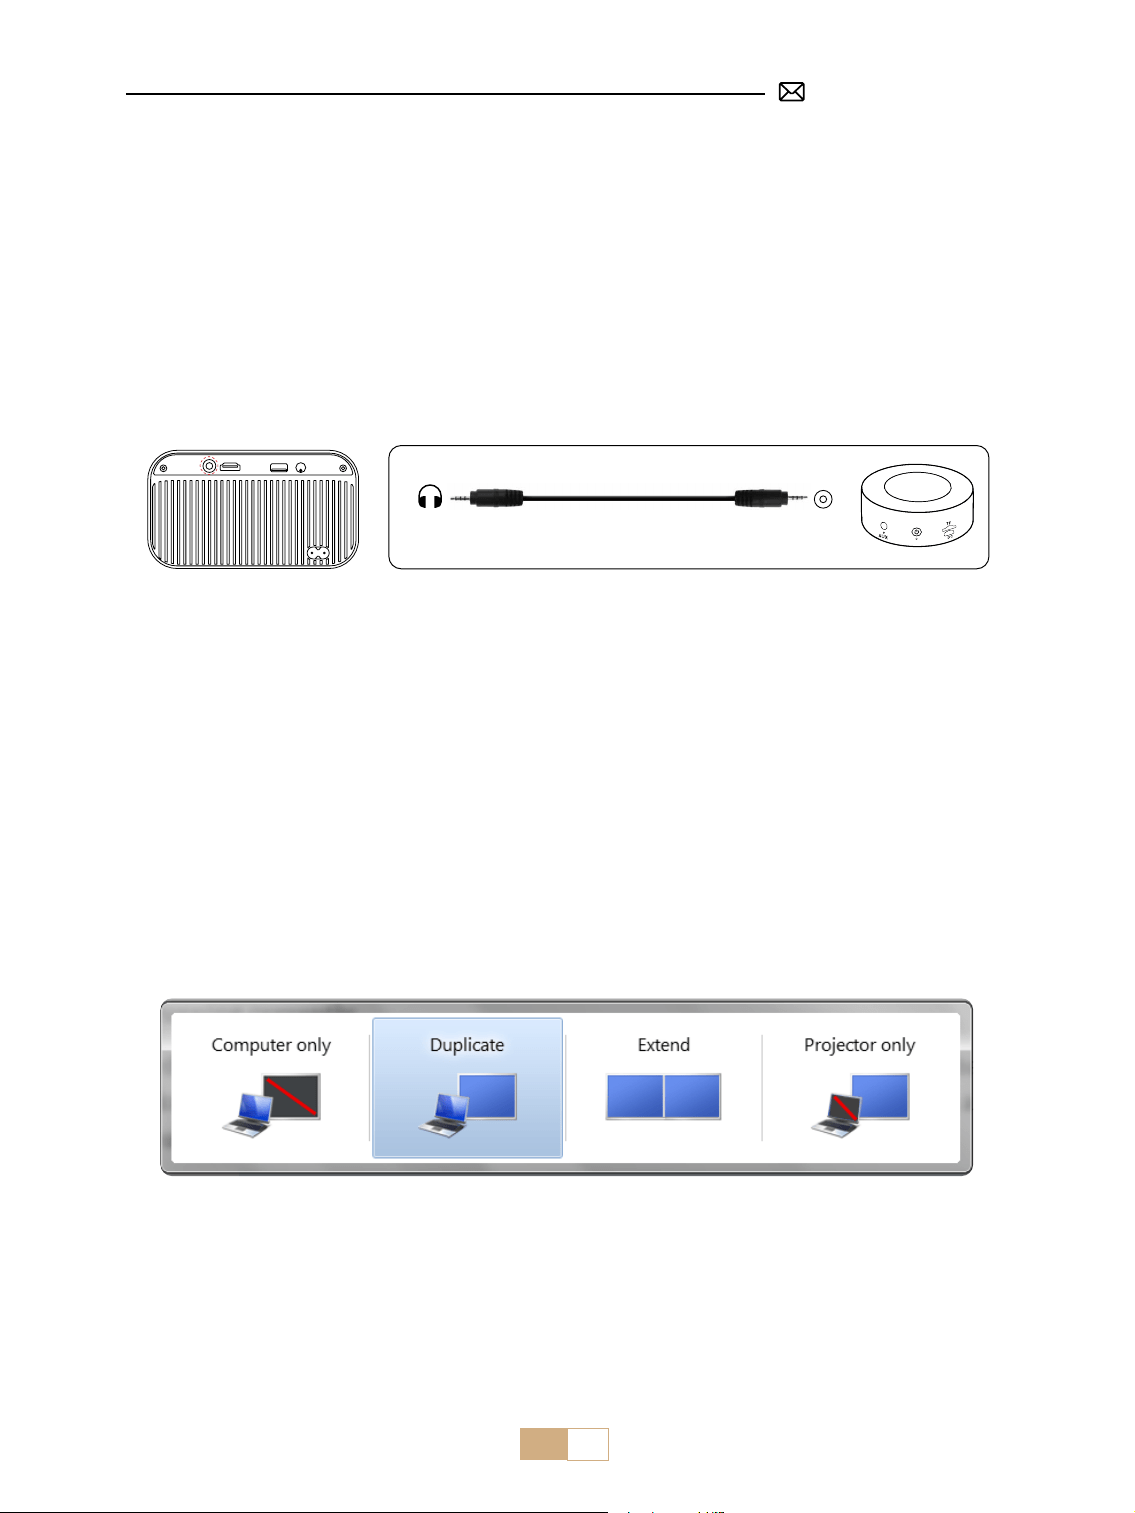
2. Connecting with Speaker
①
Use the 3.5mm audio cable to connect with the speaker.
②
Turn on the projector and the speaker.
Audio
out
AUX
port
①
Turn on your DVD player and the projector.
②
Connect to the DVD Player and the projector with the HDMI cable.
③
Enter the home page to select the corresponding HDMI as the signal source.
Note: When the projector is connected to the DVD player via the HDMI cable, if there is no sound, it may be that
the output signal of the HDMI port of the DVD player is not compatible with HDCP, please try to connect your
speaker.
3. Connect to DVD Player
①
Connect to the computer and S27 projector with the HDMI cable.
②
Select the HDMI source to project any les on your computer.
③
On your laptop, hold down the key "Win+P" board keys to change your display mode.
4. Connect to Computer
EN 21
NOTE: For MacBook, Use a Type-C to HDMI adapter to connect your MacBook, or a Mini Display to HDMI
adapter to connect with your MacBook Air (adapter not included).
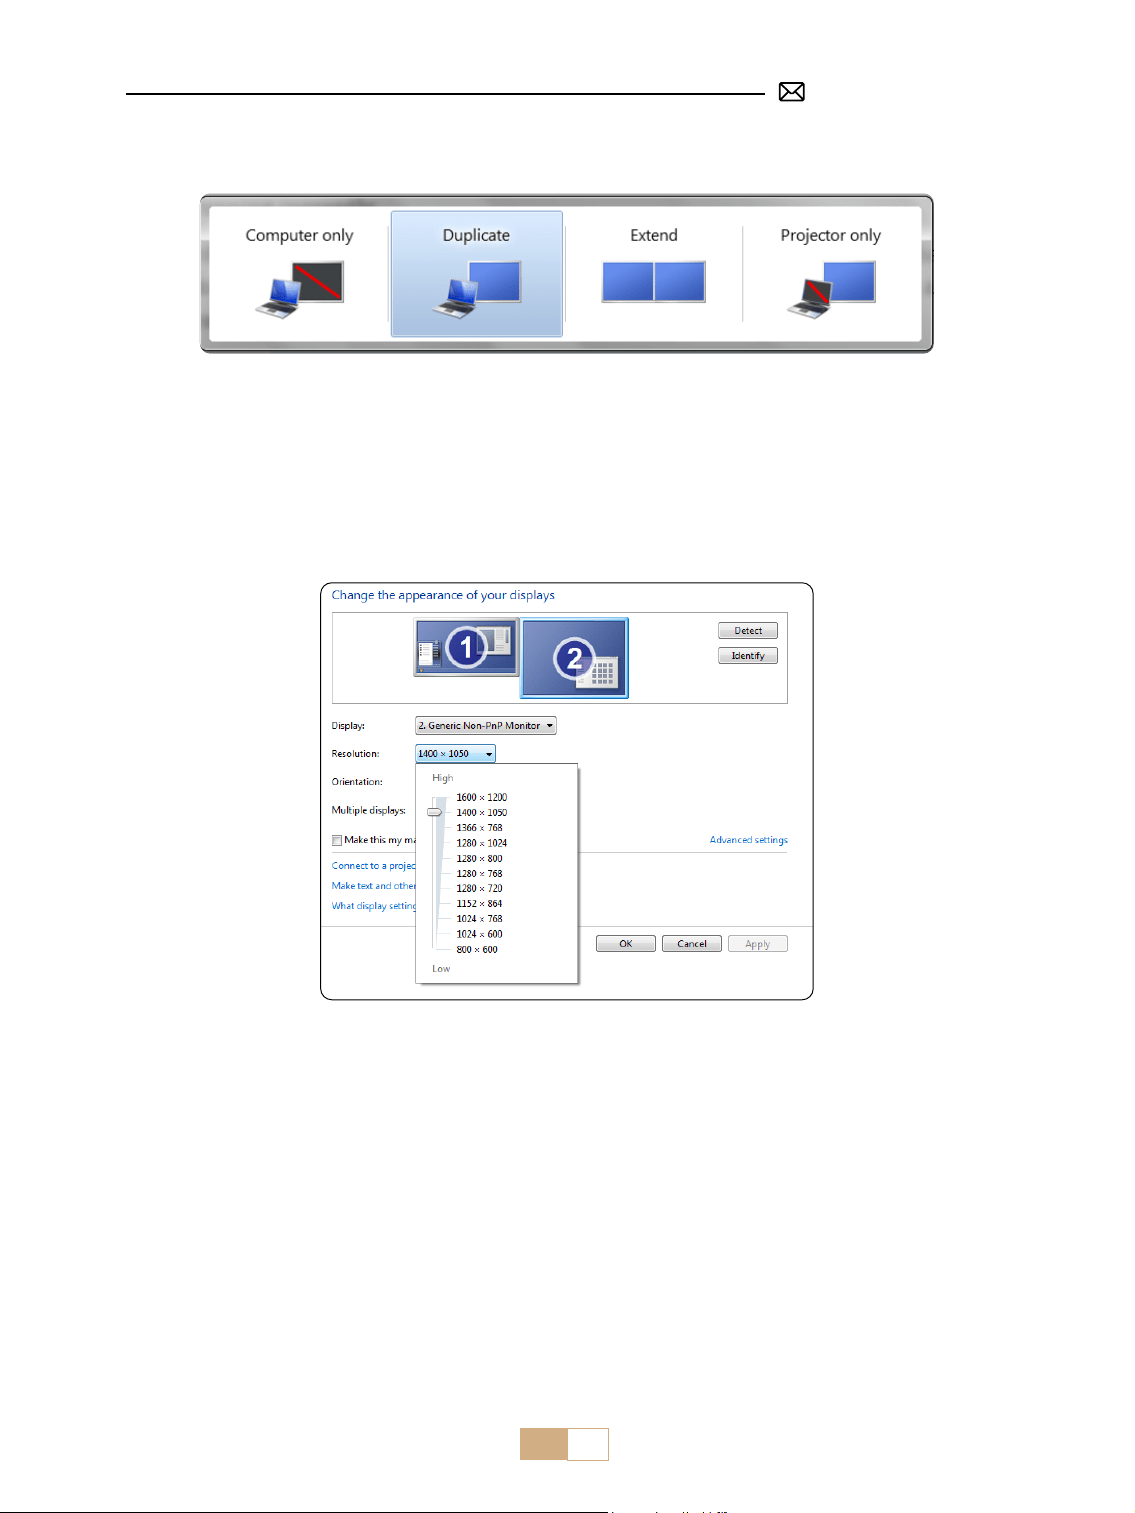
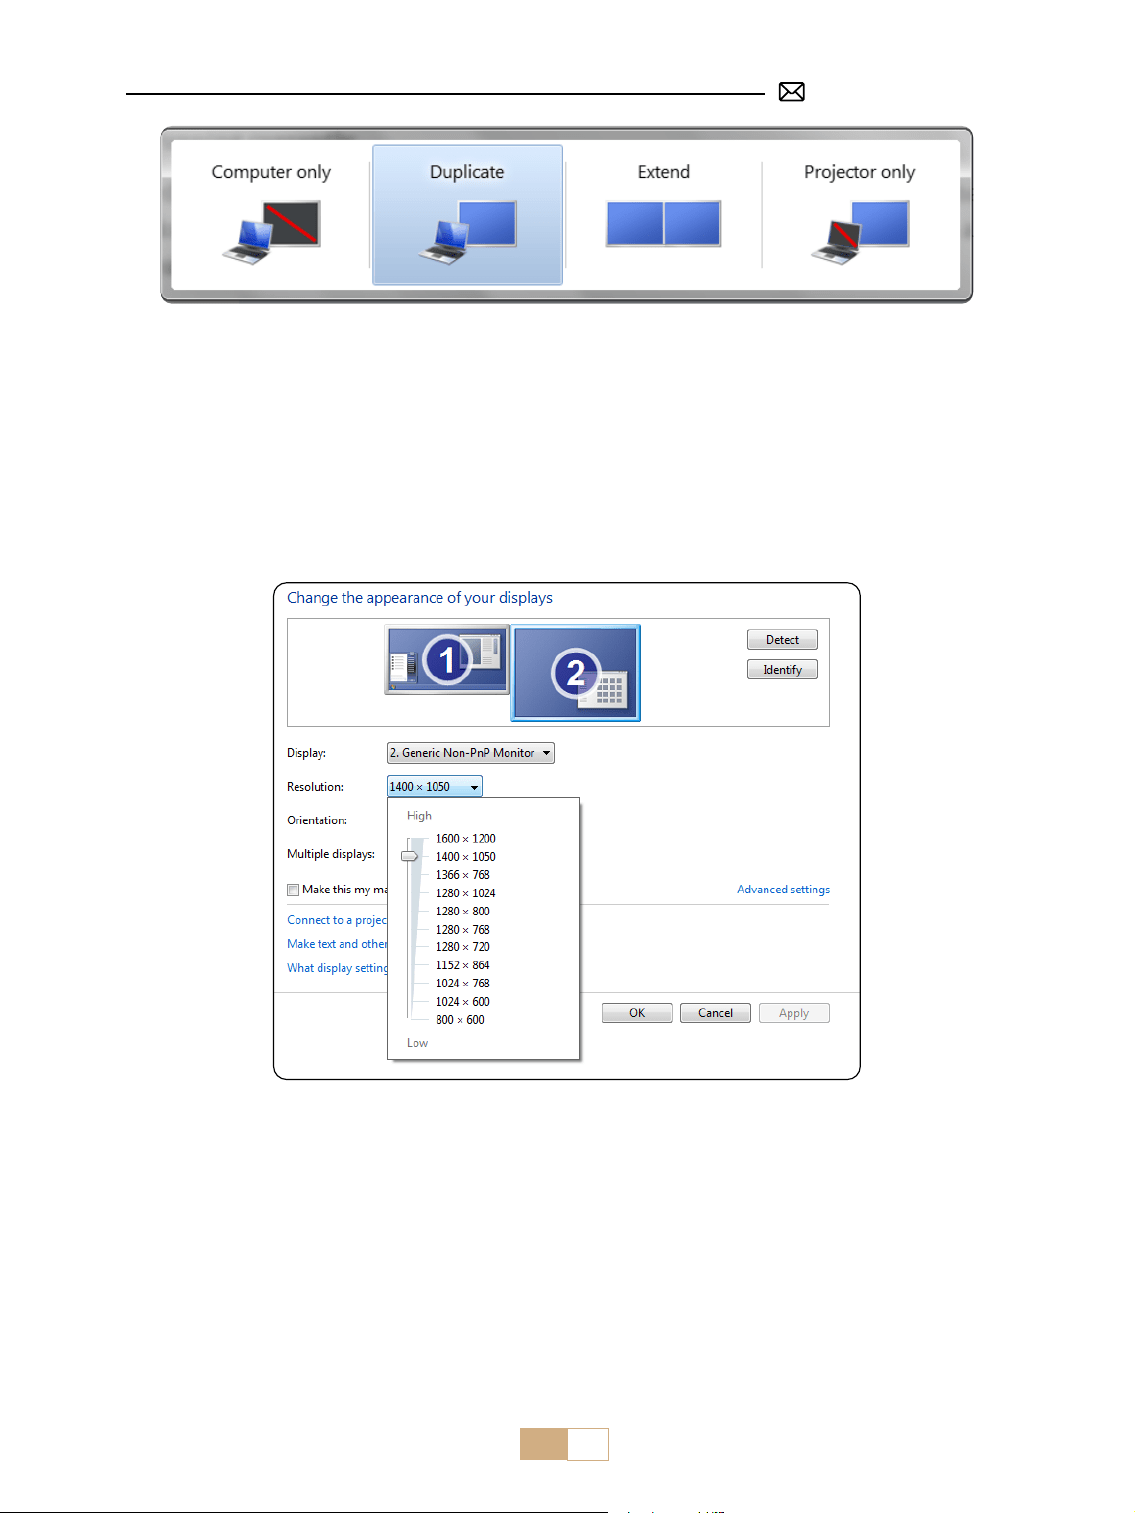
①
Computer only: This is the default option and will display the screen only on the main monitor.
②
Duplicate: To duplicate your desktop on all connected monitors.
③
Extend: To extend your desktop across multiple monitors.
④
Projector only: Use the secondary monitor (projector) only and keep the main monitor o
To change the screen resolution in Projector Only mode, follow these steps:
Step: Start > Control Panel > Appearance and Personalization > Adjust Screen Resolution
①
Use a Type-C to HDMI adapter to connect your MacBook, or a Mini Display to HDMI adapter to connect with
your MacBook Air (adapter not included).
②
Select the HDMI source to project any les on your MacBook or MacBook Air.
①
Use HDMI cable to connect to XBOX/ PS4/ PS5/ Nintendo/ Switch
②
Choose the media signal channel: "HDMI".
①
Plug the TV stick into the HDMI port of the projector.
②
Choose the media signal channel: "HDMI".
5. Connecting with MacBook or MacBook Air
6. Connecting with XBOX/ PS4/ PS5/ Nintendo/ Switch
7. Connecting with Fire TV Stick

EN 22
FAQ
Thank you for selecting the PUTRIMS S28 projector. We have compiled some frequently asked questions and
their corresponding answers to assist you better:
Q1: There is a black spot on the projected image. How can I remove it?
A: 1) Please use a hair dryer at low speed and aim it at the dust net to blow away the dust.
2) Or just tap the projector body to remove dust.
Q2: The projector cannot search for home WiFi, what should I do?
A: Please turn o the WiFi function of the projector, then shut down and restart it. Turn WiF back on, and your
home WiFi will be displayed in the list to be connected. Enter the correct password to connect.
Q3: The screen mirroring or WiFi connection is unstable. How can I resolve this issue?
A: Screen mirroring requires a strong wireless WiFi signal, to ensure that your home network is functioning well.
The video resolution will dynamically adjust based on the strength of your Wi-Fi signal. Additionally, activate
your phone's hotspot and connect to S28 to identify if the issue is with the home network. If the problem
persists, please reach out to us at [email protected]om for further assistance.
Q4: When screen mirroring, the projector cannot play Netflix, YouTube, Hulu, Disney videos, etc.
Why?
A: Due to copyright restrictions, most projectors do not support wireless mirroring of streaming services such
as Netix, Hulu, and Disney. To enjoy these services, we recommend using a TV Stick (not included) along with
our projector.
Q5: Why the screen is upside down and how can l adjust the projected image?
A: Please go to the Setting → Projection Mode → to flip the image direction. Place the projector
lens perpendicularly to the projection screen or curtain wall. Adjust the focus with the F-/F+key of the
remote until the image becomes clear. For picture rectangle adjustments, access the keystone settings
and select [+/-/reset ] to adjust it.
Q6: The projector displays the picture but has no sound. What could be the reason?
A: 1)The projector does not support Dolby Sound, DTS, 5.1-channel, HDMI CEC, or ARC. Make sure to turn
o any Dolby settings on your connected devices.
2) Verify that both the projectors volume and the volume on any external devices or Bluetooth speakers are set
to an adequate level.
3) Try playing dierent videos using other speakers. Certain versions of Bluetooth speakers may not work well
with the projector.
If you encounter any issues, kindly provide the following details in your email: country code, order number,
model, and a brief description of the problem (e.g, US+000-0000000-0000000+S28+No sound ) and email us at
[email protected]om. Rest assured, our dedicated team will respond promptly within 24 hours with a fast
and eective solution to address your concerns.

DE 23
INHALT
PUTRIMS PROFESSIONELLE UNTERSTÜTZUNG 7 TAGE/24 STUNDEN 24
Hinweis 24
PAKETLISTE 25
PROJEKTOR SPEZIFIKATIONEN 26
PRODUKTSTRUKTUR 27
FERNBEDIENUNG 28
INSTALLATION 28
1. Installationsmethode 28
2. Projektionsabstand und größe 29
PROJEKTOR STARTEN 29
PROJEKTIONSEINSTELLUNGEN 29
1. Elektrischer Fokus 29
2. Auto vertikale Trapezkorrektur 30
3. Bildeinstellungen 31
4. Optionseinstellungen 32
VERBINDUNG MIT SMART GERÄTEN HERSTELLEN 32
1. WiFiEinstellung 33
2. Kabellose Verbindung 33
3. Kabelgebundene Verbindung 35
4. Bluetooth 36
5. MultimediaWiedergabe 37
SIGNALLEITUNGEN ANSCHLUSS 38
1. Verbindung mit USBStick 39
2. Verbindung mit Lautsprecher 39
3. Verbindung mit DVD Player 39
4. Verbindung mit PC 39
5. Verbindung mit MacBook or MacBook Air 40
6. Verbindung mit XBOX/ PS4/ PS5/ Nintendo/ Switch 40
7. Verbindung mit Fire TV Stick 40
FAQ 41

DE 24
PUTRIMS PROFESSIONELLE UNTERSTÜTZUNG 7 TAGE/24 STUNDEN
Sehr geehrter Kunde,
Vielen Dank für Ihre Unterstützung von PUTRIMS!
Bevor Sie den Beamer in Betrieb nehmen, bitten wir Sie, dieses Handbuch sorgfältig durchzulesen. Wenn Sie
Probleme haben, geben Sie in Ihrer E-Mail bitte die folgenden Details an: Ländercode, Bestellnummer, Modell
und eine kurze Beschreibung des Problems (z. B. DE+000 0000000 0000000+S28+Kein Bild) an support@
putrims.com. Seien Sie versichert, unser Team wird innerhalb von 24 Stunden mit einer schnellen und
eektiven Lösung antworten.
Es ist wichtig zu erwähnen, dass viele häuge Probleme durch einfache Anpassungen leicht behoben werden
können, z. B. Probleme mit Signal, Ton, Bluetooth- oder WLAN-Verbindungen oder abgehackte Animationen.
Um die größtmögliche Zufriedenheit zu gewährleisten, versichern wir Ihnen, dass alle unsere Projektoren vor
dem Versand einer strengen 100%igen Qualitätskontrolle und sorgfältigen Verpackung unterzogen werden.
Wenn Sie Fragen haben, kontaktieren Sie uns bitte, damit das Problem gelöst werden kann. Und geben Sie
uns die Möglichkeit, uns zu verbessern. Wir sind bestrebt, Ihnen für alle auftretenden Herausforderungen eine
zufriedenstellende Lösung zu bieten.
Mit freundlichen Grüßen,
PUTRIMS-Serviceteam
Hinweis
Temperaturüberlegungen:
Um die Langlebigkeit Ihres Projektors zu gewährleisten, vermeiden Sie es, ihn in übermäßig warmen oder
kalten Umgebungen aufzustellen. Extreme Temperaturen können die Lebensdauer des Geräts verkürzen. Für
eine optimale Leistung halten Sie eine Arbeitsumgebung zwischen 5℃ und 35℃ aufrecht.
Richtige Belüftung:
Der Beamer ist mit einem Belüftungssystem ausgestattet, um einen stabilen Betrieb zu gewährleisten. Decken
Sie die Lüftungsschlitze nicht mit Tüchern, Decken oder anderen Materialien ab. Stecken Sie außerdem keine
Gegenstände in die Schlitze des Projektors, da dies zu Kurzschlüssen oder Stromschlägen führen und Ihr Gerät
beschädigen kann.
Schutz vor Stößen und Vibrationen:
Gehen Sie vorsichtig mit Ihrem Beamer um und schützen Sie ihn vor starken Stößen, Stößen und Vibrationen.
Bewegen Sie den Beamer nicht, wenn interne Schaltkreisfehler vorliegen.
Linsenpege:
Das Projektorobjektiv ist eine entscheidende Komponente, die sich direkt auf die Bildauösung und -qualität
auswirkt. Achten Sie darauf, dass das Objektiv frei von übermäßigem Staub ist. Verwenden Sie zum Reinigen
ein weiches Baumwolltuch, das für Glaslinsen geeignet ist. Vermeiden Sie die Verwendung von harten Tüchern
oder Scheuermitteln, da diese die Linsenoberäche beschädigen können. Wenden Sie sich für Hilfe und eine
Lösung bitte per E-Mail an unser Supportteam unter [email protected]om.

DE 25
PAKETLISTE
Fernbedienung*1PUTRIMS S28 Beamer*1
HDMI Kabel*1
Kurzanleitung*1 Objektivabdeckung*1
Stromkabel*1

DE 26
Modell Nr.: S28
Display-Technologie LCD Lichtquelle LED
Produktgröße 8.07*6.06*6.45inch Produktgewicht 1,38kg
Bildwiederholrate 60HZ Leistungsspannung AC110-240V
Native Auösung 1280*720P Max. unterstützte Auösung 1920*1080P Dekodierung
Trapezkorrektur Auto/Elektrisch Fokus Elektrisch
Betriebsmodus Fernbedienung Seitenverhältnis 4:3/16:9
Ausgabeanschluss 3,5 mm Audioausgang Eingangsanschluss HDMI*1/USB*1
Videoformat
AVI/MP4/MKV/FLV/WMV/MOV/RMVB/MPEG1/MPEG2/MPEG-4/H.264/XVID/H.263
(für weitere Unterstützung wenden Sie sich bitte an [email protected]om)
Audioformat AAC/MP2/MP3/PCM/FLAC/WMA (Dolby-Audio wird nicht unterstützt)
Bildformat JPG/PNG/BMP/JPEG
Dokumentformat TXT
PROJEKTOR SPEZIFIKATIONEN

DE 27
PRODUKTSTRUKTUR
3.5-mm Audioausgang
HDMI Anschluss USB Anschluss
IR Empfänger
Einschaltknopf
Lautsprecher
Stromschnittstelle
Einlass
Staubschutzgitter
Luftauslass

DE 28
FERNBEDIENUNG
Hinweis:
1. Legen Sie vor der Verwendung 2 AAA-Batterien ( nicht im Lieferumfang enthalten ) in die Fernbedienung ein.
2. Achten Sie bei Verwendung der Fernbedienung darauf, dass Sie auf den Infrarot-Signalempfänger des
Projektors zielen oder während der Bedienung einfach auf die Projektionsäche blicken.
3. Wenn Sie die Fernbedienung längere Zeit nicht verwenden, entnehmen Sie bitte die Batterie, um ein
Auslaufen zu verhindern.
Quellentaste
Fokus anpassen -
Lautstärke -
Pfeiltaste
Menü
Einschalttaste
OK
Stumm
Lautstärke +
Fokus anpassen +
Zurück
1. Der Beamer kann auf einem stabilen Schreibtisch platziert werden, um das Bild entsprechend der
Betriebsumgebung und den Anforderungen zu projizieren.
2. Platzieren Sie den Beamer in einer Höhe, in der seine Linse axialsymmetrisch zur Leinwand ist. Wenn dies
nicht möglich ist, verwenden Sie die Trapezkorrekturfunktion, um das Projektionsbild anzupassen.
INSTALLATION
1. Installationsmethode

DE 29
Frontprojektion Rückprojektion
2. Projektionsabstand und größe
Seitenverhältnis: 16:9
Distanz Bildschirmgröße
1,2m 40"
2,4m 80"
3,6m 120"
*Die Bildgröße der Projektion hängt vom Abstand zwischen Beamer und Leinwand ab. Die oben aufgeführten
Daten können geringfügig um 3 % abweichen.
*Der empfohlene Projektionsabstand beträgt 2–3 m.
*Eine dunklere Umgebung verbessert die Klarheit der projizierten Bilder.
PROJEKTOR STARTEN
Beamer einschalten:Entfernen Sie die Objektivkappe und schließen Sie das Netzkabel an. Wenn die rote
Kontrollleuchte leuchtet, drücken Sie die Einschalttaste auf der Fernbedienung oder den Einschaltknopf
auf dem Bedienfeld, um den Beamer zu starten. Die Anzeige wechselt von Rot auf Blau, der Beamer ist
eingeschaltet.
Beamer ausschalten: Drücken Sie die Einschalttaste auf der Fernbedienung oder den Einschaltknopf auf
dem Bedienfeld, um den Beamer auszuschalten. Die Anzeige wechselt von Blau auf Rot, und der Beamer ist
ausgeschaltet.
PROJEKTIONSEINSTELLUNGEN
1. Elektrischer Fokus
Bitte stellen Sie den Beamer zunächst horizontal mit der Vorderseite zur Wand auf.
Drücken Sie F+/F- auf der Fernbedienung, um den Fokus anzupassen.
Hinweis: Da jeder Mensch unterschiedliche Sinne hat, passen Sie das Bild bitte so an, wie es Ihrer Meinung
nach am klarsten ist.
DE 30
2. Auto vertikale Trapezkorrektur
Hinweis: Wenn Sie den S28 Beamer zum ersten Mal erhalten, klicken Sie bitte auf die Gyroskop-
Kalibrierungsfunktion ( klicken Sie auf die Anzeige „Kalibrierung erfolgreich“ ) und schalten Sie dann die
automatische Trapez-Kalibrierungsfunktion ein.
Wählen Sie das Menü [ Einstellungen ], wählen Sie das [ ] in den Einstellungen, aktivieren Sie die Option [
Auto-Trapez ] und es wird automatisch ein Rechteck angepasst. Sie können auch manuell [ +/- ] auswählen und
dann auf der Fernbedienung auf „OK“ drücken, um den Bildschirmwinkel vertikal um ±30° anzupassen, bis
das Bild ein Rechteck bildet.
Menü Inhalt Funktion
Auto Trapezkorrektur Ein / Aus
Passen Sie den Bildschirmwinkel
vertikal automatisch um ±30° an
Gyroskop Kalibrierung Kalibrierung erfolgreich
Bitte klicken Sie zuerst auf
diese Funktion, bevor Sie die
auto Trapezkorrekturfunktion
zum ersten Mal verwenden.
Trapezkorrektur/-/ Zurücksetzen + / - /Zurücksetzen
Passen Sie den Bildschirmwinkel
vertikal manuell über die
Fernbedienung an

DE 31
3. Bildeinstellungen
①
Unterstützt USB- und HDMI-Parameteranpassungen im Benutzermodus.
②
Klicken Sie auf der Fernbedienung auf die Schaltäche „Menü“ – „Bildeinstellungen“ – „Bildmodus“ –
„Benutzermodus“ .
Menü Inhalt Funktion
Bildmodus
Standard/Dynamisch/Mild/
Benutzer
Kontrast / Helligkeit / Farbe / Schärfe anpassen
Farbtemperatur Kalt/Standard/Warm Farbtemperatur anpassen
DE 32
4. Optionseinstellungen
Menü Inhalt Funktion
OSD-Sprache
Englisch/Français/Italienisch/Espanol/
Deutsche/ 日本语
Wählen Sie eine Sprache
Projektionsmodus
Vorder-/Rückseite an der Decke/Vorder-/
Rückseite auf dem Tisch
Drehen Sie die Projektionsbildrichtung
Werksreset Zurücksetzen
Stellen Sie die Werkseinstellungen wieder
her
Software-Upgrade Lokales Update (USB)
Aktualisieren Sie die Software über eine
lokale Datei
Online-Update Online-Update (OTA) Aktualisieren Sie die Software online
Automatischer
Ruhezustand
Aus/60 m/120 m/180 m Stellen Sie die Ruhezeit ein
OSD-Timer Aus/5 s/10 s/15 s/20 s/25 s/30 s
Stellen Sie die Zeit ein, zu der die Startseite
wieder aufgerufen werden soll
Bildschirmschoner Aus/10min/15min/30min
Zoom
Seitenverhältnis 4:3/16:9, Zoom 100 % - 50
%
Passen Sie das Bildschirm-Seitenverhältnis
an
Versionsinfo Softwareversion Reduzieren Sie die Bildgröße
Hinweis:
①
Die Leistung der Bildschirmspiegelung bei einer drahtlosen Verbindung wird durch die Netzwerkumgebung
beeinflusst. Bei Verwendung der Bildschirmspiegelung wird eine Bandbreite von 100 Mbit oder mehr
empfohlen.
VERBINDUNG MIT SMART GERÄTEN HERSTELLEN
DE 33
①
Rufen Sie die [ WLAN-Einstellungen ] auf.
②
Verbinden Sie den S28 Beamer mit Ihrem WLAN-Netzwerk.
③
Wählen Sie das Menü [ iOS Mirroring ] .
Hinweis: Stellen Sie sicher, dass Ihr iOS-Gerät mit demselben WLAN-Netzwerk verbunden ist wie Ihr Beamer.
2. Kabellose Verbindung
2.1 Für iOS Cast (Airplay)
Wählen Sie das Symbol [ ] auf der Hauptoberfläche und drücken Sie dann die Taste „OK“ auf der
Fernbedienung, um die WLAN-Oberäche aufzurufen. Wählen Sie dort „Netzwerkeinstellungen“.
1. WiFi Einstellung
②
Stellen Sie sicher, dass sich Ihr Mobilgerät bei Verwendung der drahtlosen Verbindung in der Nähe des
Projektors bendet. Ein Abstand von maximal 1.6 Metern wird empfohlen.
③
Einige Mobilgeräte unterstützen die Bildschirmspiegelung möglicherweise aufgrund der Kompatibilität
nicht.

DE 34
Screen Mirroring
Stop Mirroring
Bedroom
Projector-S28-XXXX
Screen
Mirroring
2.2 Für Android System (Miracast)
Hinweis: Bitte beachten Sie, dass nicht alle Android-Telefone die Bildschirmspiegelungsfunktion unterstützen.
Stellen Sie sicher, dass Ihr Android-Gerät diese Funktion unterstützt.
Android-Geräte verschiedener Marken verwenden möglicherweise unterschiedliche Begrie und Methoden,
um die Bildschirmspiegelung zu aktivieren. Die genauen Schritte für Ihr Gerät nden Sie im Handbuch Ihres
Geräts. Gängige Begrie für die Bildschirmspiegelung sind Multi-Screen, Wireless Display, WLAN Display, Screen
Mirroring und Smart View.
①
Rufen Sie die [ WLAN-Einstellungen ] auf und schalten Sie die WLAN-Funktion ein.
②
Wählen Sie das Menü [ Android Mirroring ] .
③
Bleiben Sie auf dieser Oberäche.
④
Verbinden Sie Ihr Android-Gerät mit demselben WLAN-Netzwerk.
⑤
Greifen Sie auf Ihrem Android-Gerät auf das [ Kontrollzentrum ] zu.
⑥
Wählen Sie die Funktion [ Multi-Mirroring/Smart View ] .
⑦
Wählen und verbinden Sie den Miracast-Empfänger mit dem Namen [ S28-XXXX ] .
④
Bleiben Sie auf dieser Oberäche.
⑤
Verbinden Sie Ihr iOS-Gerät mit demselben WLAN-Netzwerk.
⑥
Rufen Sie das [ Kontrollzentrum ] auf Ihrem iOS-Gerät auf. Wählen Sie die Funktion [ Airplay ] .
⑦
Wählen und verbinden Sie das iOS mit dem Namen [ S28-XXXX ] .
Hinweis: Aufgrund von Urheberrechtsbeschränkungen erfordern Streaming-Dienste wie Netix, Hulu, Disney
und YouTube, dass Sie für die normale Wiedergabe einen TV-Stick (nicht im Lieferumfang enthalten) in den
Beamer einstecken.

DE 35
Hinweis: Aufgrund von Urheberrechtsbeschränkungen erfordern Streaming-Dienste wie Netix, Hulu, Disney und YouTube,
dass Sie für die normale Wiedergabe einen TV-Stick (nicht im Lieferumfang enthalten) in den Beamer einstecken.
PUTRIMS_S28_XXXX
3. Kabelgebundene Verbindung
3.1 Android Gerät per Kabel verbinden
①
Wählen Sie das Menü [ Kabelgebundener Bildschirm ].
②
Installieren Sie zuerst die HCCast-App, indem Sie den bereitgestellten QR-Code scannen.
③
Verwenden Sie ein USB-zu-Typ-C-Kabel, um Ihr Android-Gerät mit dem Beamer zu verbinden.
④
Bestätigen Sie, um HCCast im Popup-Fenster Ihres Geräts zu önen.
⑤
Geben Sie bei entsprechender Auorderung Ihr Gerätekennwort ein, um die Verbindung zu authentizieren.
⑥
Ihr Android-Gerät wird automatisch mit demselben Bildschirm verbunden.
Hinweise:
Vermeiden Sie häuges Ein- und Ausstecken, um eine stabile Verbindung zu erhalten. Bei einigen
Android-Modellen müssen Sie für die Bildschirmspiegelung „Dateien übertragen“ auswählen.
3.2 iOS Gerät per Kabel verbinden
①
Wählen Sie das Menü [ Kabelgebundener Bildschirm ].
②
Verbinden Sie Ihr iPhone mit einem Beamer über das originale iPhone-Ladekabel .(USB auf Lightning)
③
Erfolg.

DE 36
4. Bluetooth
Bluetooth Lautsprecher verbinden
①
Schalten Sie Ihren Bluetooth-Lautsprecher ein.
②
Schalten Sie [Bluetooth] Ihres Projektors ein und wählen Sie Ihren Bluetooth-Lautsprecher zum Verbinden
aus.
Hinweise:
①
Der S28 Beamer ist mit den meisten Bluetooth-Headsets, Bluetooth-Lautsprechern und Airpods kompatibel.
Beachten Sie jedoch, dass er nicht mit Bluetooth-Tastaturen oder Bluetooth-Telefonen kompatibel ist.
②
Wenn beim Abspielen von Videos kein Ton zu hören ist, empfehlen wir Ihnen, die Dolby-Sound-
Einstellungen Ihrer verbundenen Geräte zu überprüfen. Durch Ausschalten von Dolby-Sound kann eine bessere
Audiokompatibilität mit dem Beamer gewährleistet werden.
③
Bei einigen Bluetooth-Lautsprechern kann die Lautstärke erheblich abnehmen, wenn sie mit dem Beamer
verbunden sind. Um dieses Problem zu beheben, versuchen Sie, die Lautstärke auf allen relevanten Geräten zu
erhöhen, um den gewünschten Tonpegel zu erreichen.
④
Die Bluetooth-Funktion unterstützt keine Datenübertragung per Smartphone. Bei Problemen senden Sie
uns einfach eine E-Mail an support@putrims.com.
DE 37
①
Stecken Sie den USB-Speicherstick in den USB-Anschluss des Projektors.
②
Wählen Sie „Medien“ und drücken Sie die „OK“-Taste, um die Option aufzurufen.
③
Wählen Sie je nach Dateityp die Option [Film/Musik/Foto/Text].
④
Wählen Sie die gewünschte Datei aus und drücken Sie dann die [OK]-Taste, um sie abzuspielen.
⑤
Klicken Sie während der Videowiedergabe auf die „MENU“-Taste auf der Fernbedienung, um die
Bildeinstellungen direkt anzupassen.
5. Multimedia Wiedergabe
5.1 USB Disk Eingabemodus
Hinweise: Bitte stellen Sie sicher, dass Ihr USB-Datenträger die folgenden Formate erfüllt:
FAT, FAT32: 8 GB/16 GB/32 GB
NTFS: 64 GB
Wenn er diese Kriterien nicht erfüllt, müssen Sie ihn durch einen USB-Datenträger mit unterstütztem Format
ersetzen.
DE 38
5.2 Videowiedergabeeinstellung
Menü Funktion
FB Lange drücken, um das Video schnell rückwärts abzuspielen
FF Lange drücken, um das Video schnell vorwärts abzuspielen
Zurück Zum vorherigen Video wechseln
Weiter Zum nächsten Video wechseln
Stopp Wiedergabe stoppen und beenden
Runde Listenzyklus oder Einzelzyklus
Info Videodetails
Liste Alle Wiedergabelisten im aktuellen Ordner auswählen
Zoom+ Zoom+ 2X bis 8X
Zoom- Zoom- 1/2X bis 1/8X
SF Langsam vorwärts
STEP Schritt vorwärts
Auto Seitenverhältnis: Auto/4:3/16:9
SIGNALLEITUNGEN ANSCHLUSS
Der PUTRIMS S28 Beamer verfügt über 3 Schnittstellen: HDMI-Anschluss*1/USB-Anschluss*1/3,5-mm-
Kopfhörerausgang*1. Bitte wählen Sie den richtigen Anschlussport zum Anschließen Ihres Geräts (PC, Telefon,
TV-Stick, Lautsprecher, DVD-Player, USB, PS4 usw.).
DE 39
①
Stecken Sie den USB-Speicherstick in den USB-Anschluss des Projektors.
②
Wählen Sie „Medien“ und drücken Sie dann die Taste „OK“, um zu önen.
③
Wählen Sie je nach Dateityp die Option [Film/Musik/Foto/Text]
④
Wählen Sie die gewünschte Datei aus und drücken Sie dann die Taste [OK], um sie abzuspielen.
1. Verbindung mit USBStick
2. Verbindung mit Lautsprecher
①
Verwenden Sie das 3,5-mm-Audiokabel, um eine Verbindung zum Lautsprecher herzustellen.
②
Schalten Sie den Beamer und den Lautsprecher ein.
Audio
out
AUX
port
①
Schalten Sie Ihren DVD-Player und den Beamer ein.
②
Verbinden Sie den DVD-Player und den Beamer mit dem HDMI-Kabel.
③
Rufen Sie [Quelle] auf der Startseite auf, um das entsprechende HDMI als Signalquelle auszuwählen.
Hinweise: Wenn kein Ton zu hören ist, liegt das möglicherweise daran, dass das Ausgangssignal des HDMI-
Anschlusses des DVD-Players nicht mit HDCP kompatibel ist. Versuchen Sie in diesem Fall, Ihren Lautsprecher
anzuschließen.
3. Verbindung mit DVD Player
①
Verbinden Sie den Computer und den S28 Beamer mit dem HDMI-Kabel.
②
Wählen Sie die HDMI-Quelle aus, um Dateien auf Ihrem Computer zu projizieren.
③
Halten Sie auf Ihrem Laptop die Tasten „Win+P“ gedrückt, um den Anzeigemodus zu ändern.
4. Verbindung mit PC
Nur Computer: Dies ist die Standardoption und zeigt den Bildschirm nur auf dem Hauptmonitor an.
Duplizieren: Um Ihren Desktop auf allen angeschlossenen Monitoren zu duplizieren.
Erweitern: Um Ihren Desktop auf mehrere Monitore zu erweitern.
Nur Projektor: Verwenden Sie nur den sekundären Monitor (Projektor) und schalten Sie den Hauptmonitor
aus.
Um die Bildschirmauösung im Nur-Projektor-Modus zu ändern, folgen Sie diesen Schritten:

DE 40
Schritt: Start > Systemsteuerung > Darstellung und Anpassung > Bildschirmauösung anpassen
①
Verwenden Sie einen Typ-C-auf-HDMI-Adapter zum Anschließen Ihres MacBook oder einen Mini-Display-auf-
HDMI-Adapter zum Anschließen an Ihr MacBook Air (Adapter nicht im Lieferumfang enthalten). Anschließen an
MacBook oder MacBook Air. (Adapter NICHT IM LIEFERUMFANG ENTHALTEN)
②
Wählen Sie die HDMI-Signalquelle zum Projizieren beliebiger Dateien auf Ihrem MacBook oder MacBook Air
5. Verbindung mit MacBook or MacBook Air
①
Verwenden Sie ein HDMI-Kabel, um eine Verbindung zu XBOX/ PS4/ PS5/ Nintendo/ Switch herzustellen.
②
Wählen Sie den Mediensignalkanal: „HDMI“
①
Stecken Sie den TV-Stick in den HDMI-Anschluss des Projektors.
②
Wählen Sie den Mediensignalkanal: „HDMI“.
6. Verbindung mit XBOX/ PS4/ PS5/ Nintendo/ Switch
7. Verbindung mit Fire TV Stick

DE 41
FAQ
Vielen Dank, dass Sie sich für den PUTRIMS S28 Beamer entschieden haben. Um Ihnen besser helfen zu
können, haben wir einige häug gestellte Fragen und die dazugehörigen Antworten zusammengestellt:
F1: Auf dem projizierten Bild ist ein schwarzer Fleck. Wie kann ich ihn entfernen?
A: 1) Verwenden Sie bitte einen Haartrockner bei niedriger Geschwindigkeit und richten Sie ihn auf das
Staubnetz, um den Staub wegzublasen.
2)Oder klopfen Sie einfach auf das Projektorgehäuse, um den Staub zu entfernen.
F2: Der Beamer kann nicht nach meinem Heim WLAN suchen. Was soll ich tun?
A: Bitte schalten Sie die WLAN-Funktion des Projektors aus, fahren Sie ihn dann herunter und starten Sie ihn
neu. Schalten Sie das WLAN wieder ein und Ihr Heim-WLAN wird in der Liste zur Verbindung angezeigt. Geben
Sie zum Verbinden das richtige Passwort ein.
F3: Die Bildschirmspiegelung oder WLAN Verbindung ist instabil. Wie kann ich dieses Problem lösen?
A: Für die Bildschirmspiegelung ist ein starkes drahtloses WLAN-Signal erforderlich, um sicherzustellen, dass
Ihr Heimnetzwerk gut funktioniert. Die Videoauflösung wird dynamisch an die Stärke Ihres WLAN-Signals
angepasst. Aktivieren Sie außerdem den Hotspot Ihres Telefons und stellen Sie eine Verbindung zu S28 her, um
festzustellen, ob das Problem am Heimnetzwerk liegt. Wenn das Problem weiterhin besteht, wenden Sie sich
für weitere Unterstützung an [email protected]om.
F4: Beim Bildschirmspiegeln kann der Beamer keine Netflix , YouTube , Hulu , Disney Videos usw.
abspielen. Warum?
A: Aufgrund von Urheberrechtsbeschränkungen unterstützen die meisten Projektoren kein drahtloses
Spiegeln von Streaming-Diensten wie Netix, Hulu und Disney. Um diese Dienste zu nutzen, empfehlen wir die
Verwendung eines TV-Sticks (nicht im Lieferumfang enthalten) zusammen mit unserem Beamer.
F5: Warum steht der Bildschirm auf dem Kopf und wie kann ich das projizierte Bild anpassen?
A: Gehen Sie bitte zu Einstellungen → Projektionsmodus → , um die Bildrichtung umzukehren. Platzieren
Sie das Projektorobjektiv senkrecht zur Projektionsäche oder Vorhangwand. Passen Sie den Fokus mit der
Taste F-/F+ auf der Fernbedienung an, bis das Bild klar wird. Rufen Sie für Bildrechteckanpassungen die
Trapezeinstellungen auf und wählen Sie [+/-/Zurücksetzen], um sie anzupassen.
F6: Der Beamer zeigt das Bild an, hat aber keinen Ton. Was könnte der Grund dafür sein?
A: 1) Der Beamer unterstützt kein Dolby-Sound, DTS, 5.1-Kanal, HDMI CEC oder ARC. Schalten Sie unbedingt
alle Dolby-Einstellungen auf Ihren angeschlossenen Geräten aus.
2) Überprüfen Sie, ob sowohl die Lautstärke des Projektors als auch die Lautstärke aller externen Geräte oder
Bluetooth-Lautsprecher ausreichend eingestellt sind.
3) Versuchen Sie, andere Videos mit anderen Lautsprechern abzuspielen. Bestimmte Versionen von Bluetooth-
Lautsprechern funktionieren möglicherweise nicht gut mit dem Beamer.
Wenn Sie auf Probleme stoßen, geben Sie in Ihrer E-Mail bitte die folgenden Details an: Ländercode,
Bestellnummer, Modell und eine kurze Beschreibung des Problems (z. B. DE+000-0000000-0000000+S28+Kein
Ton) und senden Sie uns eine E-Mail an [email protected]om. Seien Sie versichert, unser engagiertes Team
wird Ihnen innerhalb von 24 Stunden mit einer schnellen und eektiven Lösung für Ihr Anliegen antworten.

FR 42
CONTENU
PUTRIMS ASSISTANCE PROFESSIONNELLE 7J/24H 43
CONSEILS 43
LISTE DU PAQUET 44
SPÉCIFICATIONS DU PROJECTEUR 45
STRUCTURE DU PRODUIT 46
TÉLÉCOMMANDE 47
INSTALLATION 47
1. Méthode d'Installation 47
2. Distance et Taille de Projection 48
DÉMARRAGE DU PROJECTEUR 48
PARAMÈTRES DE PROJECTION 49
1. Mise Au Point Électrique 49
2. Auto Keystone Vertical 49
3. Paramètres d'Image 50
4. Paramètres des Options 51
CONNEXION AVEC DES APPAREILS INTELLIGENTS 52
1. Paramètres WiFi 52
2. Connexion Sans Fil 53
3. Écran Filaire 54
4. Bluetooth 55
5. Lecture Multimédia 56
CONNEXION DES LIGNES DE SIGNAL 58
1. Connexion via Disque USB 58
2. Connexion avec HautParleurs 58
3. Connexion avec Lecteur DVD 58
4. Connexion avec PC 58
5. Connexion avec MacBook ou MacBook Air 59
6. Connexion avec XBOX/PS4/PS5/Nintendo/Switch 59
7. Connexion avec Fire TV Stick 60
FAQ 60

FR 43
PUTRIMS ASSISTANCE PROFESSIONNELLE 7J/24H
Cher Client,
Merci beaucoup de soutenir PUTRIMS !
Avant de commencer à utiliser le projecteur, nous vous demandons de bien vouloir lire attentivement ce
manuel. Si vous rencontrez des problèmes, veuillez inclure les détails suivants dans votre e-mail: Code du
pays, numéro de commande, modèle et une brève description du problème (Par exemple FR+000 0000000
les plus brefs délais et vous proposera une solution rapide et ecace.
Il est essentiel de mentionner que de nombreux problèmes courants peuvent être facilement résolus par
de simples ajustements, tels que des problèmes de signal, de son, de connexions Bluetooth ou WiFi ou
d'animations saccadées. Pour garantir la plus grande satisfaction, nous vous assurons que tous nos projecteurs
subissent un contrôle qualité rigoureux à 100% et un emballage complet avant l'expédition.
Si vous avez des questions, veuillez nous contacter afin que le problème puisse être résolu. Et donnez-
nous l'occasion de nous améliorer. Nous nous engageons à vous fournir une solution satisfaisante à tous les
problèmes que vous pourriez rencontrer.
Cordialement,
L'équipe de service PUTRIMS
CONSEILS
Considérations relatives à la température:
Pour garantir la longévité de votre projecteur, évitez de le placer dans des environnements excessivement
chauds ou froids. Les températures extrêmes peuvent réduire la durée de vie de l'appareil. Pour des
performances optimales, maintenez un environnement de travail entre 5 ℃ et 35℃ .
Ventilation adéquate:
Le projecteur est équipé d'un système de ventilation pour assurer un fonctionnement stable. Évitez de couvrir
les orices d'aération avec du tissu, des couvertures ou tout autre matériau. De plus, évitez d'insérer des objets
dans les fentes du projecteur, car cela pourrait entraîner des courts-circuits ou des décharges électriques,
susceptibles d'endommager votre appareil.
Protection contre les chocs et les vibrations:
Manipulez votre projecteur avec précaution, en le protégeant des chocs violents, des extrusions et des
vibrations. Évitez de déplacer le projecteur s'il présente des défauts de circuit interne.
Entretien de l'objectif:
L'objectif du projecteur est un élément crucial qui a un impact direct sur la dénition et la qualité de l'image.
Veillez à garder l'objectif propre et à éviter toute poussière excessive. Lors du nettoyage, utilisez un chiffon
en coton doux adapté aux lentilles en verre. Évitez d'utiliser des chiffons durs ou abrasifs, car ils peuvent
endommager la surface de l'objectif. Veuillez contacter notre équipe d'assistance par e-mail à l'adresse
[email protected]om pour obtenir de l'aide et résoudre le problème.

FR 44
LISTE DU PAQUET
Télécommande *1Projecteur PUTRIMS S28*1
Câble HDMI *1
Guide de démarrage rapide *1 Cache-objectif *1
Câble d'alimentation *1

FR 45
Modèle: S28
Technologie
d'achage
LCD Source de lumière LED
Taille du produit 8.07*6.06*6.45inch Poids du produit 1.38kg
Taux de
rafraîchissement
60HZ Tension d'alimentation AC110-240V
Résolution native 1280*720P
Résolution maximale
supporté
Décodage 1920*1080P
Correction
trapézoïdale
Auto/Électrique Mise au point Électrique
Mode de
fonctionnement
Télécommande Ratio d'aspect 4:3/16:9
Port de sortie Sortie audio 3.5mm Port d'entrée HDMI*1/USB*1
Format vidéo
AVI/MP4/MKV/FLV/WMV/MOV/RMVB/MPEG1/MPEG2/MPEG-4/H.264/XVID/H.263(La
prise en charge des codes vidéo peut varier selon les circonstances, contactez-nous
pour une assistance supplémentaire)
Format audio AAC/MP2/MP3/PCM/FLAC/WMA(Les codes audio Dolby ne sont pas pris en charge)
Format d'Image JPG/PNG/BMP/JPEG
Format du
document
TXT
SPÉCIFICATIONS DU PROJECTEUR
FR 46
STRUCTURE DU PRODUIT
Port de sortie audio 3.5mm
Port HDMI Port USB
IR
Puissance ON/OFF
Haut-parleur
Entrée de puissance
Entrée d'air
Filet anti poussière
Sortie d'air

FR 47
TÉLÉCOMMANDE
Hinweis:
1. Installez 2 piles AAA (non fournies) dans la télécommande avant de l'utiliser. Ne combinez pas de piles
neuves avec des piles usagées dans la télécommande, car cela pourrait entraîner une défaillance du
fonctionnement en raison d'une alimentation électrique insusante.
2. Lorsque vous utilisez la télécommande, assurez-vous de diriger l'émetteur de signal de la télécommande
vers le récepteur de signal infrarouge du projecteur ou faites simplement face à l'écran de projection pendant
son fonctionnement.
3. Lorsque vous n'utilisez pas la télécommande pendant une longue période. Veuillez retirer la pile pour éviter
toute fuite.
Source
Mise au point +
VOL -
Bouton éché
Menu
Puissance
OK
Muet
VoL +
Mise au point -
Retour
1. Le projecteur peut être placé sur un bureau stable pour projeter l'image en fonction de l'environnement
d'exploitation et des exigences.
2. Maintenez le projecteur à une hauteur où son objectif est symétrique par rapport à l'écran. Si cela n'est pas
INSTALLATION
1. Méthode d'Installation
FR 48
Projection Avant sur le bureau Projection Arrière sur le bureau
2. Distance et Taille de Projection
Ratio d'Aspect : 16:9
Distance Taille de l'écran
1.2m 40”
2.4m 80”
3.6m 120”
*La taille de l'image projetée dépend de la distance entre le projecteur et l'écran. Il peut y avoir une légère
variation de 3 % dans les mesures parmi les données énumérées ci-dessus.
*La distance de projection recommandée est de 2 à 3 m.
*Un environnement ambiant plus sombre améliorera la clarté des images projetées.
DÉMARRAGE DU PROJECTEUR
Allumez le Projecteur:Retirez le capuchon de l'objectif et connectez le câble d'alimentation. Lorsque
le voyant rouge est allumé, appuyez sur la touche d'alimentation de la télécommande ou sur le bouton
d'alimentation du panneau pour démarrer le projecteur. Le voyant passe du rouge au bleu et le projecteur est
allumé.
Éteignez le Projecteur: Appuyez sur la touche d'alimentation de la télécommande ou sur le bouton
d'alimentation du panneau pour éteindre le projecteur. Le voyant passe du bleu au rouge et le projecteur est
éteint.
possible, utilisez la fonction de correction trapézoïdale pour ajuster l'image projetée.
FR 49
PARAMÈTRES DE PROJECTION
1. Mise Au Point Électrique
Veuillez d'abord placer le projecteur horizontalement face au mur.
Appuyez sur F+/F- sur la télécommande pour régler la mise au point. Remarque : les sens de chacun étant
diérents, veuillez ajuster l'image à ce qui vous semble le plus clair.
2. Auto Keystone Vertical
Conseils: À propos de la fonction de correction automatique de la distorsion trapézoïdale: lorsque
vous recevez le projecteur S28 pour la première fois, veuillez cliquer sur la fonction d'étalonnage du
gyroscope (cliquez sur Acher l'étalonnage réussi), puis vous pouvez activer la fonction d'étalonnage
trapézoïdal automatique.
Sélectionnez le menu [ Paramètres] - sélectionnez l' [ Icône Keystone ] dans les paramètres, activez
l'option [ Auto Keystone ], un rectangle sera alors automatiquement ajusté. Vous pouvez également
sélectionner manuellement [ +/- ], puis appuyer sur [ OK ] sur la télécommande pour régler l'angle de l'écran
verticalement ±30° jusqu'à ce que les guides soient ajustés à un rectangle.das Bild ein Rechteck bildet.
Menu Contenu Fonction
Auto Keystone On/O
Ajustez automatiquement l'angle
de l'écran verticalement ±30°
Étalonnage du Gyroscope Étalonnage réussi
Veuillez d'abord cliquer sur
cette fonction avant d'utiliser
pour la première fois la fonction
de correction automatique de
la distorsion trapézoïdale.
Keystone + / - /Réinitialiser + / - /Réinitialiser
Réglez l'angle de l'écran
verticalement manuellement via la
télécommande
FR 50
3. Paramètres d'Image
①
Prend en charge les réglages des paramètres USB et HDMI en mode utilisateur.
②
Cliquez sur le bouton Menu de la télécommande - Réglage de l'image - Mode image - Mode utilisateur.
Menu Contenu Fonction
Mode Image
Standard/Dynamique/Doux/
Utilisateur
Régler le contraste / la luminosité / la couleur /
la netteté
Température de Couleur Froid/Standard/Chaud Régler la température de couleur

FR 51
4. Paramètres des Options
Menu Contenu Fonction
Langue OSD
English/Français/Italian/Espanol/Deutsche/
japonais
Choisissez une langue
Mode de projection
Avant/Arrière sur Plafond/Avant/Arrière sur
Table
Inverser la direction de l'image de projection
Réinitialisation d'usine Réinitialiser Restaurer les paramètres d'usine par défaut
Mise à jour du logiciel Mise à jour locale(USB) Mettre à jour le logiciel via un chier local
Mise à jour en ligne Mise à jour en ligne(OTA) Mettre à jour le logiciel en ligne
Veille Automatique O/60m/120m/180m Régler l'heure de sommeil
Minuterie OSD O/5s/10s/15s/20s/25s/30s Dénir l'heure de retour à la page d'accueil
Économiseur d'écran O/10min/15min/30min Dénir le temps de l'économiseur d'écran
Window Zoom Ratio d'Aspect 4:3/16:9, Zoom 100%-50%
Ajuster le rapport hauteur/largeur de l'écran,
Réduire la taille de l'image
Info sur la version Version du logiciel Version du logiciel
FR 52
Conseils:
①
La uidité de la mise en miroir d'écran avec une connexion sans l sera aectée par l'environnement réseau.
Une bande passante de 100Mbit ou plus est recommandée lors de l'utilisation de la mise en miroir d'écran.
②
Assurez-vous que votre appareil mobile est proche du projecteur lorsque vous utilisez la connexion sans l.
Une distance de 1.6 mètre est recommandée.
③
Certains appareils mobiles peuvent ne pas prendre en charge la mise en miroir d'écran en raison de la
compatibilité.
CONNEXION AVEC DES APPAREILS INTELLIGENTS
Sélectionnez l'icône [ WiFi ] dans l'interface principale, puis appuyez sur la touche [ OK ] de la télécommande
pour accéder à l'interface Wi et sélectionnez [ Paramètres réseau ].
1. Paramètres WiFi
FR 53
①
Accédez à [ Paramètres WiFi ] .
②
Connectez le projecteur S28 à votre réseau Wi-Fi.
③
Sélectionnez le menu [ iOS WiFi Mirroring ] .
④
Restez sur cette interface.
⑤
Connectez votre appareil iOS au même réseau WiFi.
⑥
Accédez au [ Centre de Contrôle ] sur votre appareil iOS Sélectionnez la fonction [ Airplay ].
⑦
Sélectionnez et connectez l'iOS nommé [ S28-XXXX ].
Remarque: En raison de restrictions de droits d'auteur, les services de streaming tels que Netix, Hulu, Disney et YouTube
nécessitent que vous insériez une clé TV (non incluse) dans le projecteur pour une lecture normale.
Attention: Assurez-vous que votre appareil iOS est connecté au même réseau Wi-Fi que votre projecteur.
2. Connexion Sans Fil
2.1 Pour iOS Cast (Airplay)
Screen Mirroring
Stop Mirroring
Bedroom
Projector-S28-XXXX
Screen
Mirroring
2.2 Pour Système Android (Miracast)
Méthodes de mise en miroir d'écran: Les appareils Android de différentes marques peuvent utiliser
diérents termes et méthodes pour activer la mise en miroir d'écran. Pour trouver les étapes exactes pour votre
appareil, veuillez vous reporter au manuel de votre appareil. Les termes courants pour la mise en miroir d'écran
incluent Multi-écran, Achage sans l, Achage WLAN, Mise en miroir d'écran et Smart View.
Compatibilité des appareils: Veuillez noter que tous les téléphones Android ne prennent pas en charge la
fonction de mise en miroir d'écran. Avant d'essayer d'utiliser la mise en miroir d'écran, assurez-vous que votre
appareil Android prend en charge cette fonctionnalité. Vous pouvez consulter le manuel de votre appareil ou
rechercher l'option de mise en miroir d'écran dans les paramètres pour vérier la compatibilité.
FR 54
①
Accédez à [ Paramètres WiFi ] et activez la fonction WiFi.
②
Sélectionnez le menu [ Android Mirroring ] .
③
Restez sur cette interface.
④
Connectez votre appareil Android au même réseau WiFi.
⑤
Accédez au [ Centre de Contrôle ] sur votre appareil Android. Sélectionnez la fonction [ Multi-Mirroring/
Smart View ] .
⑥
Sélectionnez et connectez le récepteur Miracast nommé [ S28-XXXX ] .
Remarque: En raison de restrictions relatives aux droits d'auteur, les services de streaming tels que Netix, Hulu, Disney et
YouTube nécessitent l'insertion d'une clé TV (non incluse) dans le projecteur pour une lecture normale.
PUTRIMS_S28_XXXX
3. Écran Filaire
3.1 Connectez l'Appareil Android par Câble
①
Sélectionnez menu [ Écran Filaire ] .
②
Installez d'abord l'application HCCast en scannant code QR fourni.
③
Utilisez un câble USB vers Type-c pour connecter votre appareil Android au projecteur.
④
Conrmez l'ouverture HCCast dans fenêtre contextuelle votre appareil.
⑤
Saisissez mot passe votre appareil si vous y êtes invité, pour authentier connexion.
⑥
Votre appareil Android sera automatiquement connecté au même écran.
Remarques: Évitez brancher et débrancher fréquemment pour obtenir une connexion stable. Certains
modèles Android nécessitent de sélectionner "Transférer des Fichiers" pour mise en miroir de l'écran.
FR 55
3.2 Connectez l'Appareil iOS par Câble
①
Sélectionnez le menu [ Écran laire ] .
②
Connectez votre iPhone à un projecteur à l'aide du câble de chargement d'origine de l'iPhone (USB vers
Lightning).
③
Succès.
4. Bluetooth
Connecter des haut parleurs Bluetooth
①
Allumez votre Enceinte Bluetooth.
②
Activez le [Bluetooth] de votre projecteur et sélectionnez votre haut-parleur Bluetooth pour vous connecter.
Remarque:
①
Projecteur S28 est compatible avec la plupartdes casques Bluetooth, enceintes Bluetooth et Airpods.
Cependant, veuillez noter qu'il n'est pas compatible avec les claviers Bluetooth ou les téléphones Bluetooth.
②
S'il n'y a pas de son lors de la lecture de vidéos, nous vous recommandons de vérier les paramètres du son
Dolby sur vos appareils connectés. La désactivation du son Dolby peut garantir une meilleure compatibilité
audio avec le projecteur.
③
Certains haut-parleurs Bluetooth peuvent subir une réduction significative du volume lorsqu'ils sont
connectés au projecteur. Pour résoudre ce problème, essayez d'augmenter volume sur tous les appareils
concernés pour atteindre niveau sonore souhaité.
④
Cette étape s'applique uniquement à connexion haut-parleur Bluetooth, mais pas au Bluetooth du
téléphone portable.
⑤
Si vous avez des questions ou si vous avez besoin d'aide supplémentaire, n'hésitez pas à contacter support
PUTRMIS par e-mail à l'adresse [email protected]om.
FR 56
①
Insérez clé USB dans port USB du projecteur.
②
Sélectionnez "Média" et appuyez sur la touche "OK"pour entrer.
③
En fonction du type de chier, sélectionnez l'option [ Film/Musique/Photo/Texte ].
④
Sélectionnez chier souhaité, puis appuyez sur touche [ OK ] pour lire.
⑤
Cliquez sur touche "MENU" télécommande pendant lecture vidéo pour régler directement les paramètres
de l'image.
5. Lecture Multimédia
5.1 Mode D'Entrée Disque USB

FR 57
Conseils: Si votre projecteur ne reconnaît pas disque USB, veuillez suivre les méthodes ci-dessous pour
résoudre le problème.
Veuillez vous assurer que votre disque USB répond aux formats suivants :
FAT, FAT32: 8GB/16GB/32GB
NTFS: 64GB
S'il ne répond pas à ces critères, vous devrez changer de format disque USB pris en charge.
Si problème persiste, veuillez envoyer une description détaillée de votre problème à l'adresse e-mail suivante:
5.2 Paramètres de Lecture Vidéo
Menu Fonction
FB Appuyez longuement pour Retour Rapide vidéo
FF Appuyez longuement pour Avancer Rapidement vidéo
Prev Passer à vidéo précédente
Next Passer à vidéo suivante
Arrêt Arrêtez de jouer et quittez
Round Cycle liste ou cycle unique
Info Détails vidéo
List Sélectionner toutes les listes lecture dans dossier actuel
Zoom+ Zoom+ 2X à 8X
Zoom- Zoom- 1/2X à 1/8X
SF Avancer lentement
ÉTAPE Avancer
Auto Format D'image: Auto/4:3/16:9
FR 58
CONNEXION DES LIGNES DE SIGNAL
Projecteur PUTRIMS S28 dispose de 3 interfaces, HDMI port*1/USB port*1/Sortie audio 3,5mm*1. Veuillez
sélectionner port connexion approprié pour connecter votre appareil (PC, Phone, Clé TV, Haut-parleur, lecteur
DVD, USB, PS4, etc.)
①
Insérez clé USB dans le port USB du projecteur.
②
Sélectionnez "Média" puis appuyez sur touche "OK" pour entrer.
③
En fonction du type de chier, sélectionnez l'option [ Film/Musique/Photo/Texte ].
④
Sélectionnez chier souhaité puis appuyez sur touche [ OK ] pour lire.
1. Connexion via Disque USB
2. Connexion avec Haut Parleurs
①
Utilisez câble audio 3.5mm pour vous connecter au haut-parleur.
②
Allumez projecteur et haut-parleur (choisissez mode AUX).
Audio
out
AUX
port
①
Allumez votre lecteur DVD et projecteur.
②
Connectez lecteur DVD et projecteur avec câble HDMI.
③
Entrez [ source ] sur page d'accueil pour sélectionner HDMI correspondant comme source signal.
Remarque: Lorsque projecteur est connecté au lecteur DVD via câble HDMI s'il n'y a pas de son, il se peut que
signal sortie du port HDMI du lecteur DVD ne soit pas compatible avec HDCP, veuillez essayer connecter votre
haut-parleur.
3. Connexion avec Lecteur DVD
①
Connectez l'ordinateur et projecteur S28 avec câble HDMI.
②
Sélectionnez source HDMI pour projeter des chiers sur votre ordinateur.
③
Sur votre ordinateur portable, maintenez enfoncée la touche "Win+P" pour changer votre mode d'achage.
4. Connexion avec PC
FR 59
Ordinateur uniquement: ll s'agit l'option par défaut et elle affichera l'écran uniquement sur moniteur
principal.
Dupliquer: Pour dupliquer votre bureau sur tous les moniteurs connectés.
Étendre: Pour étendre votre bureau sur plusieurs moniteurs.
Projecteur uniquement: Utilisez uniquement moniteur secondaire (projecteur) et gardez moniteur principal
éteint.
Pour modier résolution l'écran en mode Projecteur Uniquement, procédez comme suit:
Étape: Démarrer > Panneau Conguration > Apparence et Personnalisation > Ajuster Résolution l'écran
①
Utilisez un adaptateur Type-C vers HDMI pour connecter votre MacBook, ou un adaptateur Mini Display
vers HDMI pour vous connecter à votre MacBook Air (adaptateur non inclus). Connexion avec MacBook ou Mac
Book Air(adaptateur non inclus).
②
Sélectionnez source HDMI pour projeter des chiers sur votre MacBook ou MacBook Air.
①
Utilisez un câble HDMI pour vous connecter à XBOX/ PS4/ PS5/ Nintendo/ Switch.
②
Choisissez canal signal multimédi: « HDMI ».
5. Connexion avec MacBook ou MacBook Air
6. Connexion avec XBOX/PS4/PS5/Nintendo/Switch

FR 60
①
Branchez le TV Stick sur le port HDMI du projecteur.
②
Choisissez le canal du signal multimédia: « HDMI ».
7. Connexion avec Fire TV Stick
FAQ
Merci d'avoir choisi projecteur PUTRIMS S28. Nous avons compilé quelques questions fréquemment posées et
leurs réponses correspondantes pour mieux vous aider :
Q1: Il y a une tache noire sur l'image projetée. Comment puis je l'enlever ?
R: 1) Veuillez utiliser un sèche-cheveux à faible vitesse et diriger vers filet anti-poussière pour souffler la
poussière.
2) Ou tapotez simplement corps du projecteur pour éliminer poussière.
Q2: Le projecteur ne peut pas rechercher WiFi domestique, que dois je faire ?
R: Veuillez désactiver fonction Wi-Fi du projecteur, puis l'éteindre et redémarrer. Réactivez Wi-Fi et votre Wi-Fi
domestique s'achera dans liste pour vous y connecter. Saisissez mot passe correct pour vous connecter.
Q3: Mise en miroir l'écran ou connexion WiFi est instable. Comment puis je résoudre ce problème ?
R: Mise en miroir l'écran nécessite un signal Wi-Fi sans fil puissant pour garantir bon fonctionnement votre
réseau domestique. Résolution vidéo s'ajustera manière dynamique en fonction puissance votre signal WiFi.
De plus, activez le point d'accès votre téléphone et connectez-vous au S28 pour déterminer si problème vient
du réseau domestique. Si problème persiste, veuillez nous contacter à l'adresse [email protected]om pour
obtenir l'aide.
Q4: Lors mise en miroir l'écran, le projecteur ne peut pas lire les vidéos Netflix, YouTube, Hulu,
Disney, etc. Pourquoi ?
R: En raison restrictions droits d'auteur HDCP, la plupart des projecteurs ne prennent pas en charge mise en
miroir sans l des services streaming tels que Netix, Hulu et Disney directement via les téléphones mobiles/
iPad. Pour profiter ces services, nous vous recommandons d'utiliser une clé TV (non incluse) avec notre
projecteur.
Q5: Pourquoi l'écran est il à l'envers et comment puis je régler l'image projetée ?
R: Accédez à Paramètres → Mode Projection → pour inverser la direction l'image. Placez l'objectif du projecteur
perpendiculairement à l'écran de projection ou au mur-rideau. Réglez mise au point avec touche F-/
F+ télécommande jusqu'à ce que l'image soit nette. Pour les réglages du rectangle l'image, accédez aux
paramètres trapèze et sélectionnez [ +/-/réinitialiser ] pour l'ajuster.
Q6: Le projecteur ache l'image, mais n'émet aucun son. Quelle peut en être raison ?
R: 1) Projecteur ne prend pas en charge son Dolby, DTS, 5.1 canaux, HDMI CEC ou ARC. Assurez-vous désactiver
tous les paramètres Dolby sur vos appareils connectés.
2) Vériez que volume du projecteur et celui des appareils externes ou des haut-parleurs Bluetooth sont réglés
à un niveau adéquat.
3) Essayez lire diérentes vidéos à l'aide d'autres haut-parleurs. Certaines versions haut-parleurs Bluetooth
peuvent ne pas fonctionner correctement avec projecteur.
Si vous rencontrez des problèmes, veuillez fournir les détails suivants dans votre e-mail: Code du pays, numéro
de commande, modèle et une brève description du problème (Par exemple, FR+000-0000000-0000000+S28+Pas
de son) et envoyez-nous un e-mail à [email protected]om. Soyez assuré que notre équipe vous répondra
dans les plus brefs délais et vous proposera une solution rapide et ecace.

ES 61
CONTENIDO
PUTRIMS SOPORTE POSTVENTA 24H RESPUESTA 62
CONSEJOS AMABLES 62
LISTA DE EMBALAJE 63
ESPECIFICACIONES DEL PROYECTOR 64
DESCRIPCIÓN GENERAL DEL PROYECTOR 65
MANDO A DISTANCIA 66
INSTALAR 66
1. Método de Instalación 66
2. Distancia y Tamaño de Proyección 67
ENCIENDE EL PROYECTOR 67
CONFIGURACIÓN DE IMAGEN PROYECCIÓN 68
1. Enfoque Eléctrico 68
2. Automática Vertical Trapezoidal Corrección 68
3. Conguración de Imagen 69
4. Conguración de Opciones 70
CONEXIÓN CON DISPOSITIVOS INTELIGENTES 71
1. WiFi Conguración 71
2. Conexión Inalámbrica 71
3. Duplicación de Pantalla con Cable 73
4. Bluetooth 74
5. Reproducción Multimedia 75
CONEXIÓN DE LÍNEA DE SEÑAL 76
1. Conectar a través de un Disco USB 77
2. Conexión con el Altavoz 77
3. Conexión con el Reproductor de DVD 77
4. Conexión con PC 77
5. Conexión con MacBook o MacBook Air 78
6. Conexión con XBOX/ PS4/ PS5/ Nintendo/ Switch 78
7. Conexión con Fire TV Stick 78
PREGUNTAS FRECUENTES (FAQ) 79

ES 62
PUTRIMS SOPORTE POSTVENTA 24H RESPUESTA
Estimado cliente,
¡Muchas gracias por apoyar a PUTRIMS!
Para garantizar la máxima satisfacción de nuestros clientes, todos nuestros proyectores se someten a rigurosas
pruebas de calidad del 100% y a un embalaje cuidadoso antes del envío. Antes de comenzar a utilizar el
proyector, puede leer la guía rápida o este manual.
Si necesita ayuda, puede enviarnos un correo electrónico a [email protected]om. Indique el problema
específico que encontró en el contenido del correo electrónico y también puede traer fotografías o videos.
Sería mejor si el asunto de su correo electrónico pudiera tener este formato: (por ejemplo, ES+S28+Número
de pedido)para que podamos identificar más rápidamente el modelo y el país del proyector que solicitó
para reducir las idas y venidas innecesarias. Le responderemos de inmediato dentro de las 24 horas con una
solución efectiva. Si no recibe respuesta en 24 horas, puede deberse a días festivos o a que se convirtió en
correo basura por accidente. Puede contactarnos nuevamente.
¡Esperamos que nuestro proyector le acompañe para que pase un momento maravilloso y feliz!
Atentamente
PUTRIMS
CONSEJOS AMABLES
Temperature Considerations:
Para garantizar la longevidad del proyector, evite colocarlo en entornos excesivamente cálidos o fríos. Las
temperaturas extremas pueden acortar la vida útil del dispositivo. Para un rendimiento óptimo, mantenga un
entorno de trabajo a una temperatura de entre 5 ℃ y 35 ℃ .
Buena Ventilación Refrigeración:
El proyector está equipado con un sistema de ventilación para garantizar un funcionamiento estable. Evite
cubrir las rejillas de ventilación con telas, mantas o cualquier otro material. Además, evite introducir objetos en
las ranuras del proyector, ya que esto puede provocar cortocircuitos o descargas eléctricas que podrían dañar
el dispositivo.
Protección contra Impactos y Vibraciones:
Maneje el proyector con cuidado, protéjalo de impactos fuertes, extrusiones y vibraciones. Evite mover el
proyector si presenta fallas en los circuitos internos.
Mantenimiento de Lentes:
La lente del proyector es un componente crucial que afecta directamente la definición y la calidad de la
imagen. Mantenga la lente limpia y libre de polvo. Para limpiarla, utilice un paño de algodón suave adecuado
para lentes de vidrio. Evite utilizar paños duros o abrasivos, ya que pueden dañar la superficie de la lente.
Comuníquese con nuestro equipo de soporte por correo electrónico a [email protected]om para obtener
ayuda y solución.

ES 63
LISTA DE EMBALAJE
Control Remoto*1Proyector PUTRIMS S28*1
Cable HDMI*1
Guía de Inicio Rápido*1 Cubierta de lente*1
Cable de Alimentación*1

ES 64
Modelo de Proyector: S28
Tecnología de
Visualización
LCD Fuente de Luz LED
Tamaño 8.07*6.06*6.45inch Peso 1.38kg
Frecuencia de
Actualización
60Hz Voltaje de Potencia AC110-240V
Resolución Nativa 1280*720P
Resolución Máxima
Admitida
Decodicación 1920*1080P
Corrección
Trapezoidal
Automático/Eléctrico Focus Eléctrico
Modo de Operación Mando a Distancia Relación de Aspecto 4:3/16:9
Output Puerto
Salida de audio de 3.5
mm
Input Puerto HDMI*1/USB*1
Video Formato
Compatible
AVI/MP4/MKV/FLV/WMV/MOV/RMVB/MPEG1/MPEG2/MPEG-4/H.264/XVID/H.263
(La compatibilidad con códigos de video puede variar según las circunstancias.
Contáctenos para obtener asistencia adicional)
Audio Formato
Compatible
AAC/MP2/MP3/PCM/FLAC/WMA
(Los códigos de audio Dolby no son compatibles)
Imagen Format
Compatible
JPG/PNG/BMP/JPEG
Format du
Document
TXT
ESPECIFICACIONES DEL PROYECTOR

ES 65
DESCRIPCIÓN GENERAL DEL PROYECTOR
Salida Audio 3.5mm puerto
Puerto HDMI
Puerto USB
IR
Encendido/Apagado
Trompeta
Entrada de alimentación
Entrada de aire
Red Antipolvo
Salida de aire

ES 66
MANDO A DISTANCIA
Consejos Amables:
1. Instale 2 pilas AAA ( No Incluidas ) en el control remoto antes de usarlo. No combine pilas nuevas con pilas
viejas en el control remoto, lo que puede provocar que el funcionamiento sea insensible debido a una fuente
de alimentación insuciente.
2. Cuando utilice el control remoto, asegúrese de apuntar el transmisor de señal del control remoto al receptor
de señal infrarroja del proyector o simplemente colóquese frente a la pantalla de proyección mientras lo opera.
3. Cuando no utilice el control remoto durante un período prolongado, retire la pila para evitar fugas.
Fuente de Señal
Enfoque -
Volumen -
Botón de Flecha
Menú
Tecla On/O
OK
Mute
Volumen +
Enfoque +
Botón Atrás
1. El proyector se puede colocar sobre una mesa para proyectar la imagen según el entorno de funcionamiento
y los requisitos.
2. Mantenga el proyector a una altura en la que su lente tenga simetría axial con respecto a la pantalla. Si esto
INSTALAR
1. Método de Instalación
ES 67
Proyección Frontal de Escritorio Proyección Trasera de Escritorio
2. Distancia y Tamaño de Proyección
Aspecto Relación: 16:9
Distancia Tamaño de Pantalla
1.2m 40"
2.4m 80"
3.6m 120"
*El tamaño de la imagen proyectada depende de la distancia entre el proyector y la pantalla. Puede haber una
ligera variación del 3% en las medidas entre los datos enumerados anteriormente.
*La distancia de proyección recomendada es de 2 a 3 m.
*Para obtener la mejor experiencia de visualización del proyector, se recomienda utilizar este proyector en un
entorno oscuro.
ENCIENDE EL PROYECTOR
Encienda el Proyector:Retire la tapa de la lente y conéctelo al cable de alimentación. Cuando la luz
indicadora roja esté encendida, presione la tecla de encendido en el control remoto o el botón de encendido
en el panel para iniciar el proyector. El indicador cambia de rojo a azul y el proyector está encendido.
Apague el Proyector: Presione la tecla de encendido en el control remoto o el botón de encendido en el
panel para apagar el proyector. El indicador cambia de azul a rojo y el proyector se apaga.
no es posible, utilice la función de corrección trapezoidal para ajustar la imagen proyectada.
ES 68
CONFIGURACIÓN DE IMAGEN PROYECCIÓN
1. Enfoque Eléctrico
Coloque el proyector horizontalmente frente a la pared y luego presione F+/F- en el control remoto para ajustar
la claridad de la imagen.
Nota: Dado que los sentidos de cada persona son diferentes, ajuste la imagen a lo que crea que es más claro.
Si aún cree que la imagen está borrosa, puede contactarnos para ayudarlo a juzgar.
2. Automática Vertical Trapezoidal Corrección
Consejos amables: Cuando reciba el proyector S28 por primera vez, primero haga clic en la función
de [Gyroscope Calibration] (haga clic en mostrar Calibración exitosa) antes de usar la función de
corrección trapezoidal automática.
Seleccione el menú [Conguración], seleccione el ícono de corrección trapezoidal en la conguración, active la
opción [Corrección trapezoidal automática] y luego se ajustará automáticamente un rectángulo.
Menú Contenido Función
Automática Trapezoidal
Corrección
Encendido/Apagado
La corrección trapezoidal
automática ajusta la imagen (±30°
en dirección vertical)
Gyroscope Calibration Calibración Exitosa
Haga clic en esta función
antes de utilizar la función
de corrección trapezoidal
automática por primera vez
Keystone + / - /Reset + / - /Reiniciar
Ajuste la corrección trapezoidal
de la imagen mediante el control
remoto

ES 69
3. Conguración de Imagen
①
Admite ajustes de parámetros USB y HDMI en modo de usuario.
②
Haga clic en el botón Menú del control remoto - Configuración de imagen - Modo de imagen - Modo de
usuario.
Menú Contenido Función
Modo de Imagen
Estándar/Dinámico/Leve/
Usuario
Ajustar el contraste/brillo/color/Nitidez
Temperatura de Color Frío/Estándar/Cálido Ajustar la temperatura del color
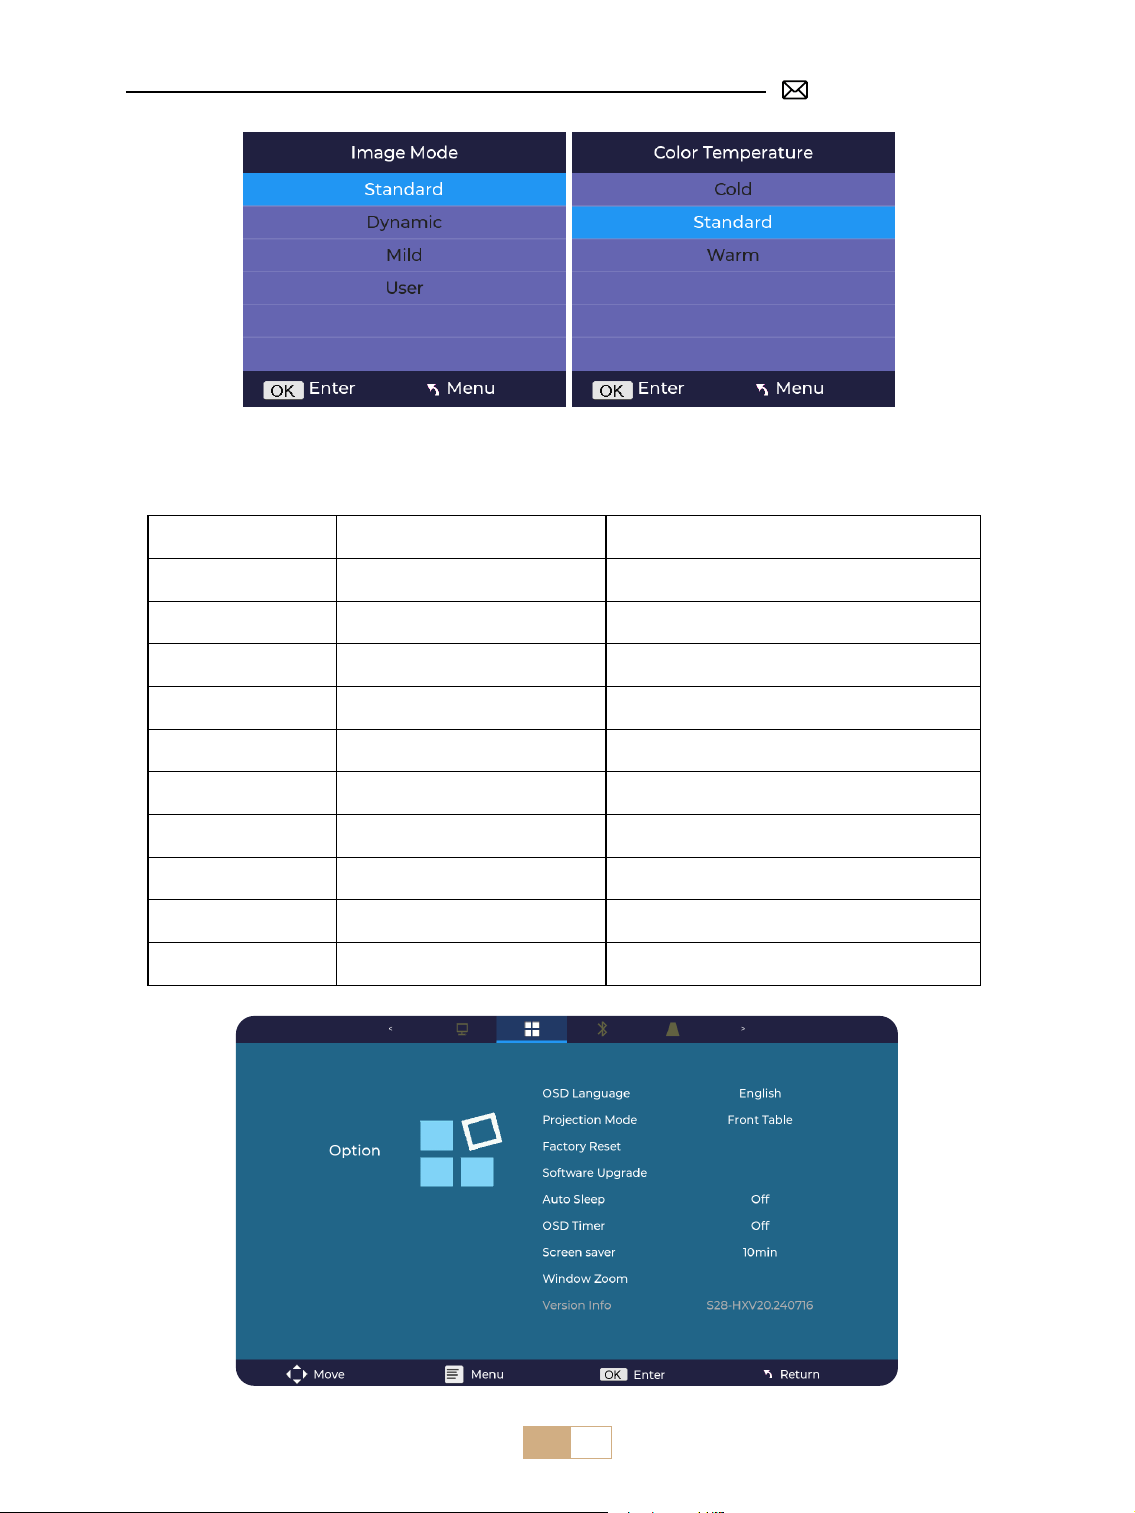
ES 70
4. Conguración de Opciones
Menú Contenido Función
Idioma del Menú OSD
Inglés/Francés/Italiano/Español/
Alemán/Japonés
Seleccionar un idioma
Modo de Proyección
Delantero/Reverso en el techo/
Delantero/Reverso en la mesa
Invertir la dirección de la imagen proyectada
Restablecimiento de
Fábrica
Reiniciar
Restaurar la conguración predeterminada de
fábrica
Actualización de Software Actualización Local (USB) Actualizar el software a través del archivo local
Actualización en Línea Actualización en Línea (OTA) Actualizar el software en línea
Suspensión Automática Apagado/60 m/120 m/180 m Establecer el tiempo de suspensión
Temporizador del Menú
OSD
Apagado/5 s/10 s/15 s/20 s/25 s/30 s Establecer el tiempo para volver a la página de inicio
Protector de Pantalla Apagado/10 min/15 min/30 min
Congurar el tiempo del protector de pantalla
Zoom de Ventana Relación de Aspecto 4:3/16:9 Ajustar la relación de aspecto de la pantalla;
Información de Versión Zoom 100%-50% Reducir el tamaño de la imagen
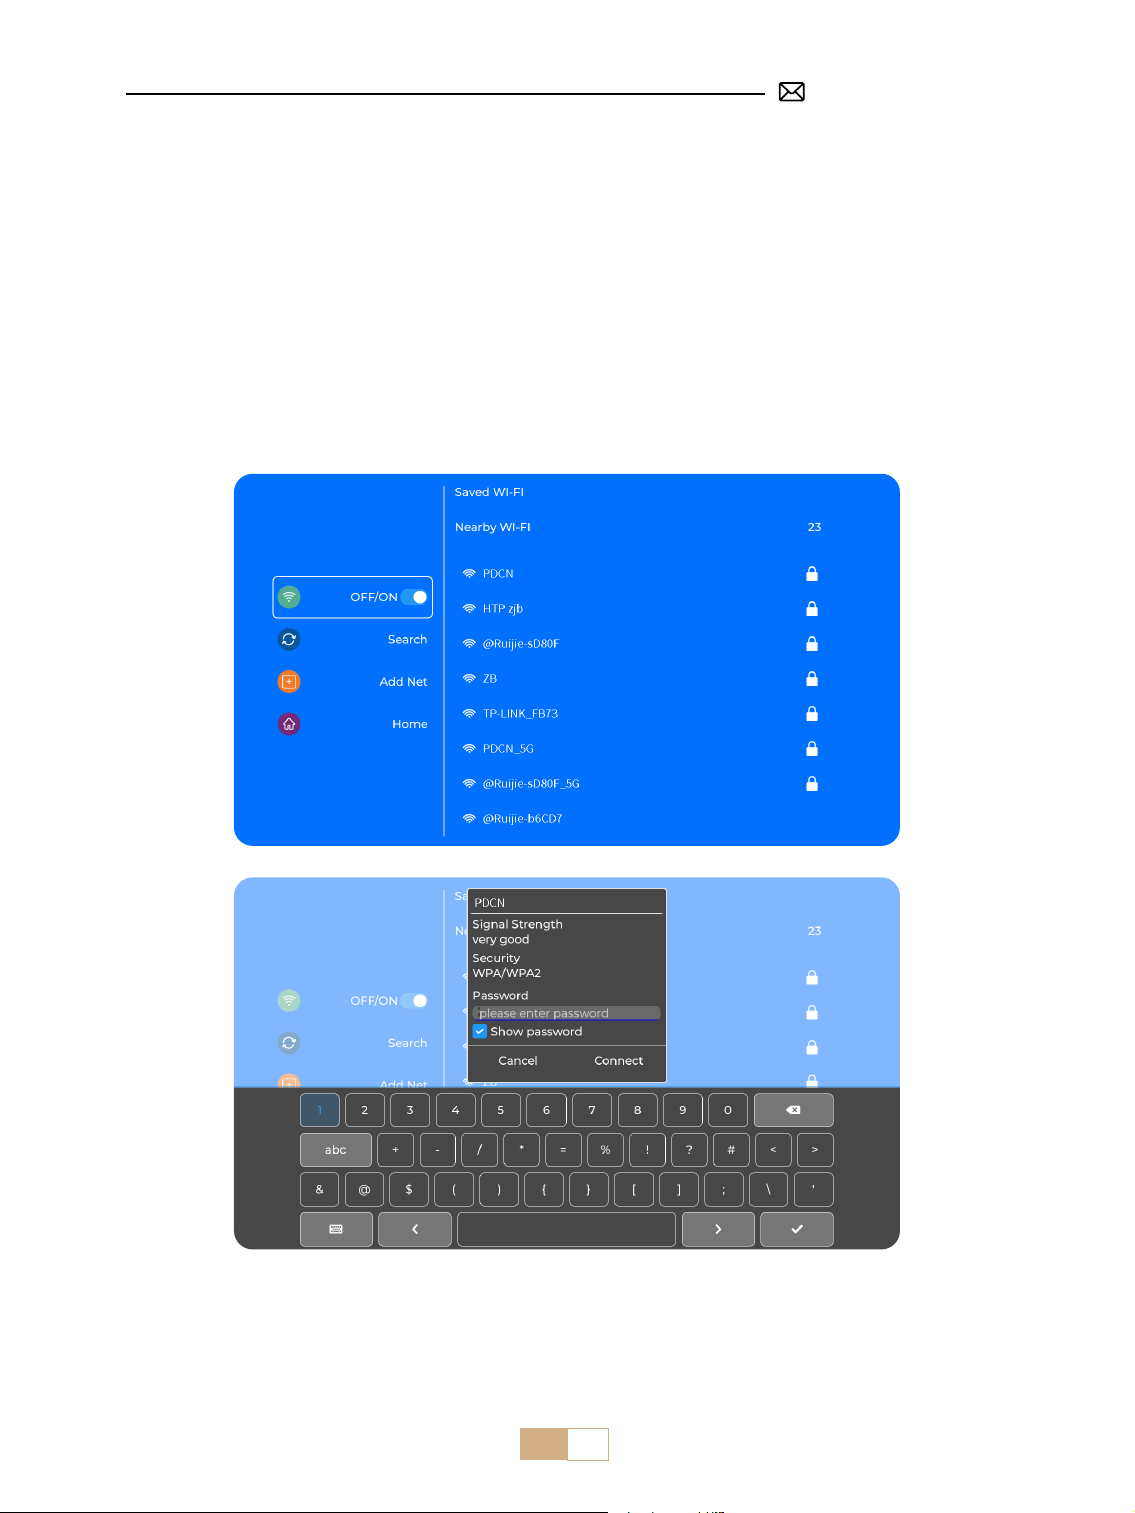
ES 71
Consejos Amables:
①
Primero conrme si su dispositivo móvil admite la duplicación de pantalla.
②
Asegúrese de que su dispositivo móvil esté cerca del proyector cuando utilice la conexión inalámbrica. Se
recomienda una distancia de 1-1.6 metros.
③
La uidez de la duplicación de pantalla con una conexión inalámbrica se verá afectada por el entorno de
red. Se recomienda un ancho de banda de 100 Mbit o más cuando se utiliza la duplicación de pantalla.
CONEXIÓN CON DISPOSITIVOS INTELIGENTES
Seleccione el ícono [Wifi] en la interfaz principal y luego presione la tecla "OK" en el control remoto para
ingresar a la interfaz Wi y seleccione "Conguración de red".
1. WiFi Conguración
Consejos Amables: Asegúrate de que tu dispositivo iOS esté conectado a la misma red Wi-Fi que tu proyector.
2. Conexión Inalámbrica
2.1 Para iOS Cast (Airplay)
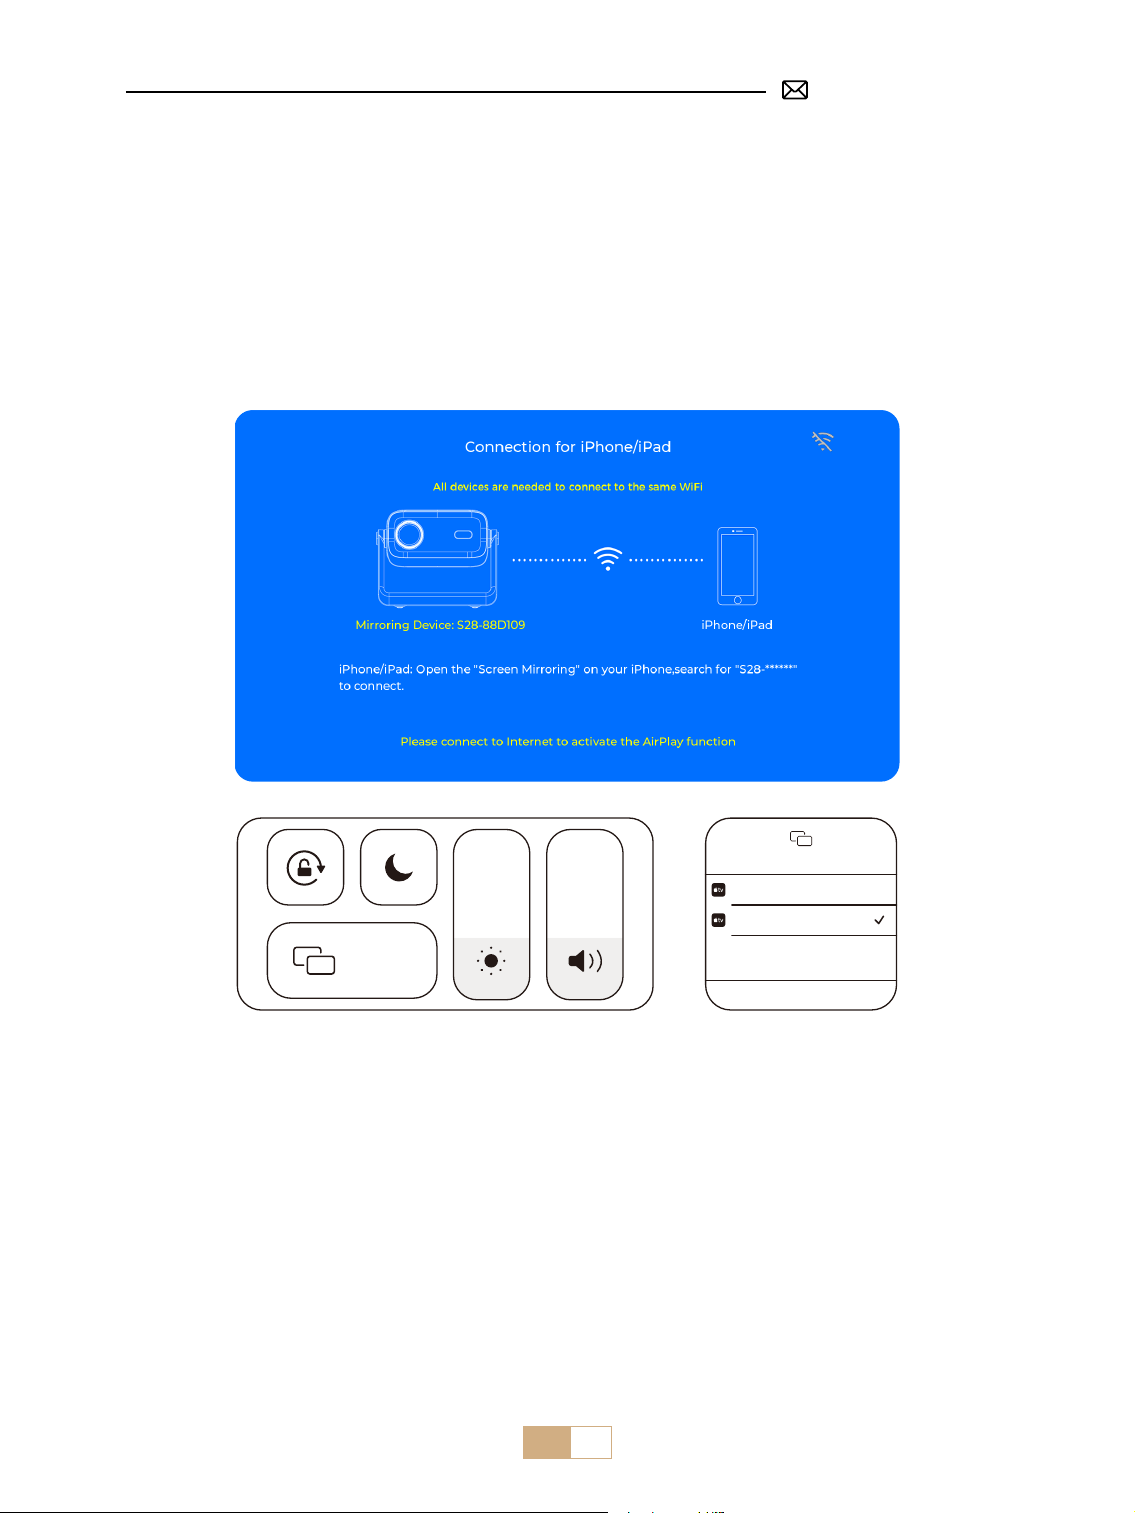
ES 72
①
Ingresa a [ Conguración Wi-Fi ].
②
Conecta el proyector S28 a tu red Wi-Fi
③
Selecciona el menú [ iOS Mirroring ].
④
Permanece en esta interfaz.
⑤
Conecta tu dispositivo iOS a la misma red Wi-Fi
⑥
Accede al [ Centro de control ]en tu dispositivo iOS Selecciona la función [ Airplay ].
⑦
Selecciona y conecta el dispositivo iOS llamado [ S28-XXXX ].
Nota: Debido a restricciones de derechos de autor, los servicios de transmisión como Netix, Hulu, Disney y YouTube requieren
que insertes un TV Stick (no incluido) en el proyector para la reproducción normal.
Screen Mirroring
Stop Mirroring
Bedroom
Projector-S28-XXXX
Screen
Mirroring
2.2 Para Android Sistema (Miracast)
Método de duplicación de pantalla: Los dispositivos Android de diferentes marcas pueden utilizar
distintos términos y métodos para habilitar la duplicación de pantalla. Para conocer los pasos exactos para
su dispositivo telefónico, consulte el manual de su teléfono. Los términos comunes para la duplicación de
pantalla incluyen Multi-screen, Wireless Display, WLAN Display, Screen Mirroring, and Smart View.
Compatibilidad del Dispositivo: Ten en cuenta que no todos los teléfonos Android admiten la función de
duplicación de pantalla. Antes de intentar usar la función de duplicación de pantalla, asegúrate de que tu
dispositivo Android admita esta función. Puedes consultar el manual de tu dispositivo o buscar la opción de
duplicación de pantalla en la conguración para vericar la compatibilidad.
①
Ingresa a [ Conguración de WiFi ] y activa la función WiFi.
②
Selecciona el menú [ Android Mirroring ] .
③
Permanece en esta interfaz
④
Conecta tu dispositivo Android a la misma red WiFi
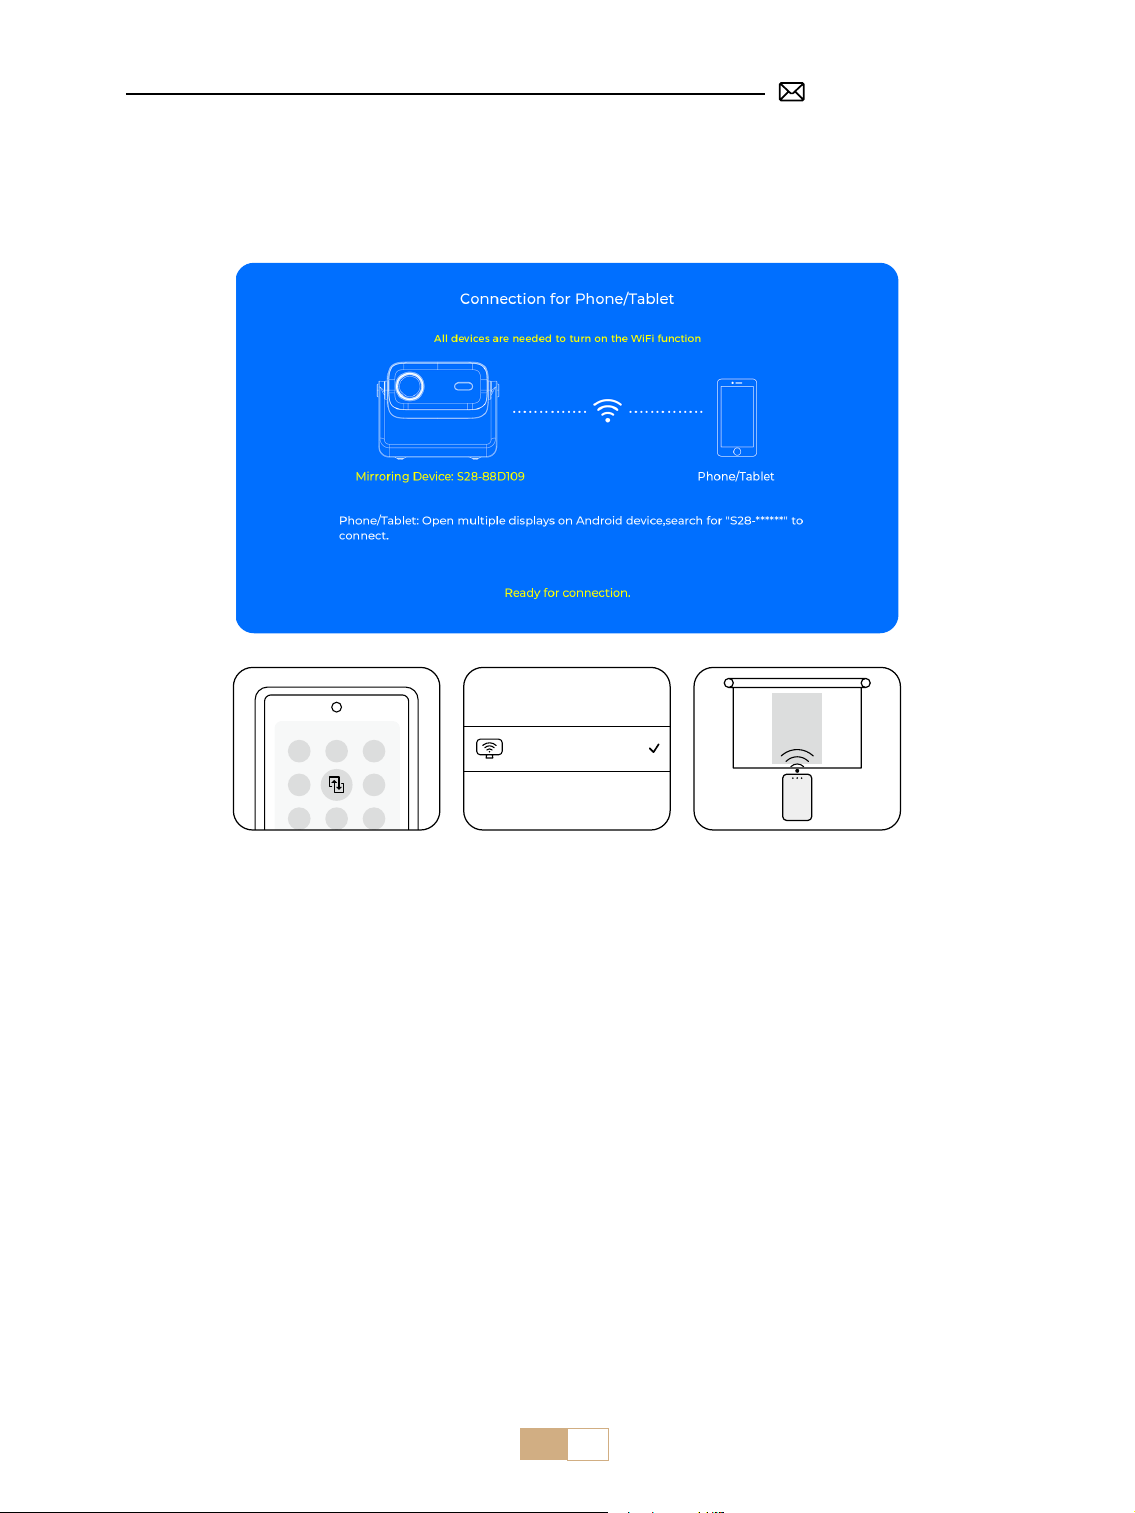
ES 73
PUTRIMS_S28_XXXX
3. Duplicación de Pantalla con Cable
3.1 Conexión por Cable Android
3.2 Conexión de cable iOS
①
Seleccione el menú [ Wired Screen ].
②
Instale la aplicación HCCast escaneando el código QR provisto.
③
Use un cable USB a TIPO C para conectar su dispositivo Android al proyector.
④
Conrme para abrir HCCast en la ventana emergente de su dispositivo.
⑤
Ingrese la contraseña de su dispositivo Android si se le solicita, para autenticar la conexión.
⑥
Su dispositivo Android se conectará automáticamente al proyector y mostrará la misma pantalla.
Notas: Evite enchufar y desenchufar con frecuencia para obtener una conexión estable. Algunos modelos de
Android requieren seleccionar "Transferir archivos" para la duplicación de pantalla.
①
Seleccione el menú [ Wired Screen ].
②
Conecte su iPhone a un proyector usando el cable de carga original del iPhone. (USB a Lightning)
③
Éxito.
⑤
Accede al [ Centro de control ] en tu dispositivo Android, Selecciona la función [ Multi-Mirroring/Smart View ] .
⑥
Selecciona y conecta el receptor Miracast llamado [ S28-XXXX ] .
Nota: Debido a restricciones de derechos de autor, los servicios de transmisión como Netix, Hulu, Disney y YouTube requieren
que insertes un TV Stick (no incluido) en el proyector para una reproducción normal.
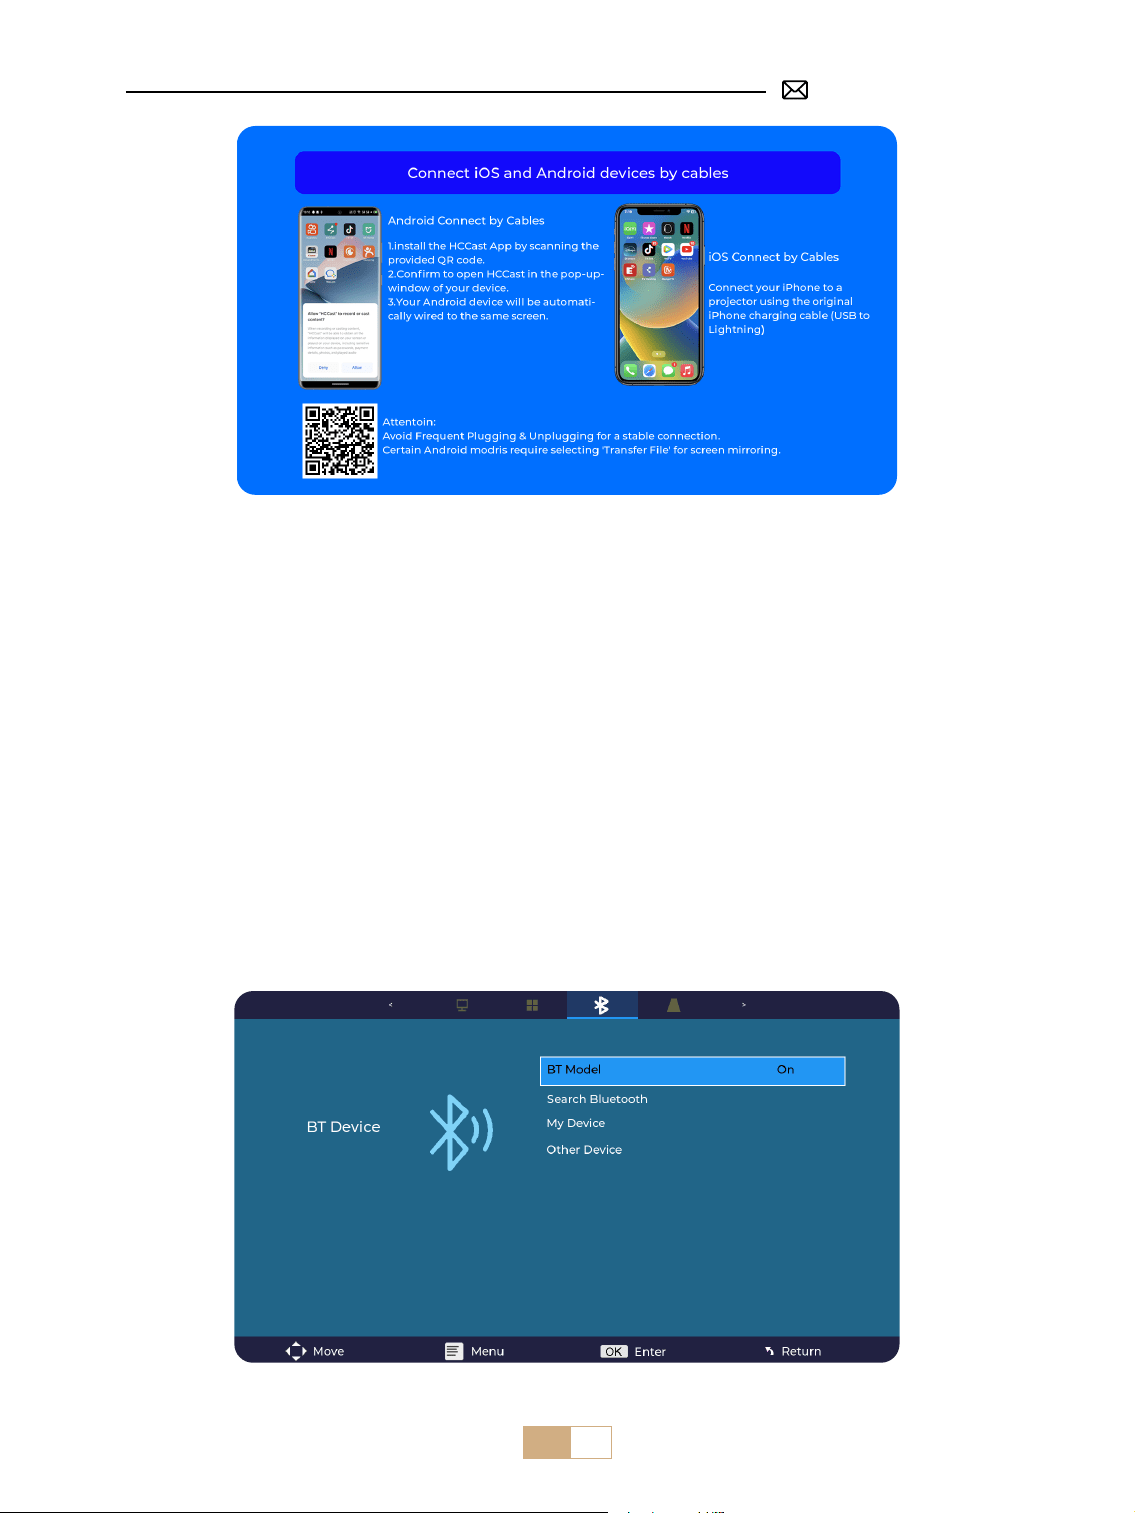
ES 74
4. Bluetooth
Conectar altavoces Bluetooth
①
Encienda el altavoz Bluetooth.
②
Encienda la función [Bluetooth] del proyector y busque el altavoz Bluetooth que desea conectar.
Consejos Amables:
①
La función Bluetooth de este proyector está limitada a dispositivos Bluetooth como auriculares/altavoces/
Airpods, y no se puede conectar a teclados/computadoras/teléfonos móviles a través de Bluetooth.
②
Si no hay sonido mientras se reproducen videos, verifique si el formato de audio es compatible y, en el
dispositivo externo conectado, desactive el sonido Dolby o cambie la salida de sonido a salida PCM.
③
Es posible que algunos altavoces Bluetooth experimenten una reducción signicativa del volumen cuando
se conectan al proyector. Puede intentar aumentar el volumen de su altavoz Bluetooth para lograr el nivel de
sonido deseado.
④
Este paso solo es aplicable para conectar el altavoz Bluetooth, pero no al teléfono móvil Bluetooth.
⑤
Si tiene más preguntas o necesita ayuda, puede ponerse en contacto con el soporte de PUTRMIS por correo
electrónico a [email protected]om.
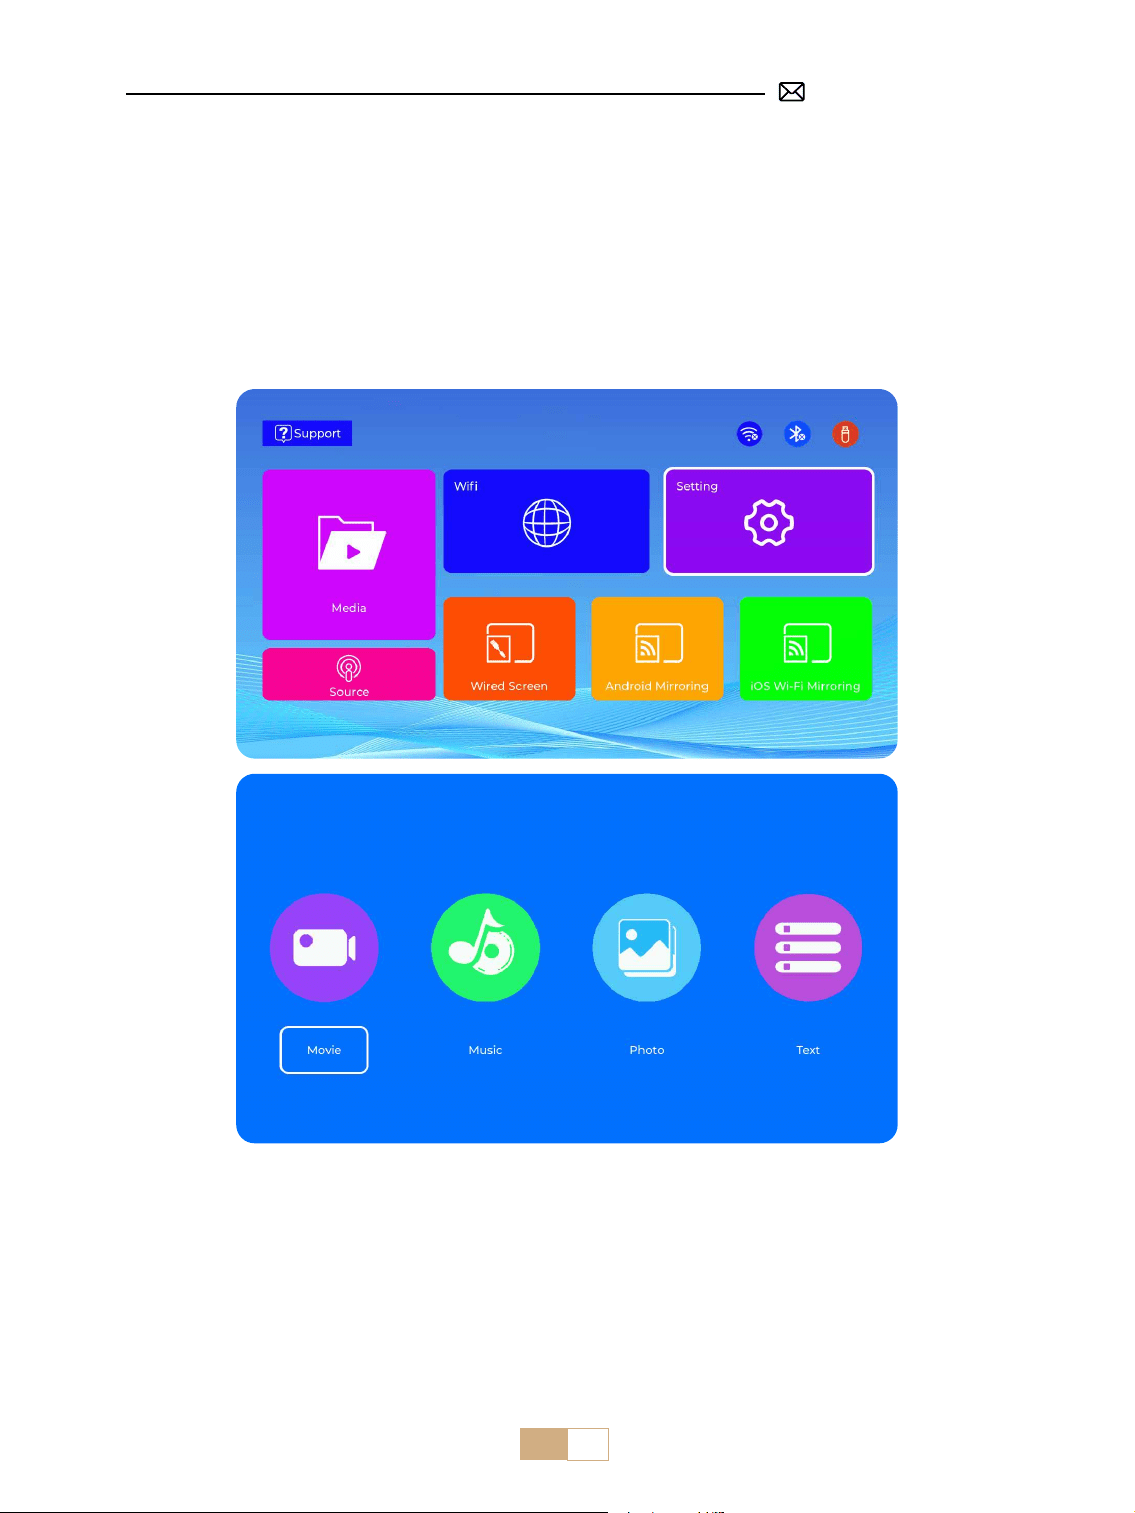
ES 75
①
Inserte el disco ash USB en el puerto USB del proyector.
②
Seleccione "Medios" y presione la tecla "OK" para ingresar.
③
Dependiendo del tipo de archivo, seleccione la opción [Película/Música/Foto/Texto].
④
Seleccione el archivo deseado y luego presione el botón [OK] para reproducirlo.
⑤
Haga clic en el botón "MENÚ" en el control remoto mientras reproduce el video para ajustar la conguración
de la imagen directamente.
5. Reproducción Multimedia
5.1 Conexión de Disco USB
Consejos Amables:
Asegúrese de que su Disco USB cumpla con los siguientes formatos:
FAT/FAT32: 8/16/32GB
NTFS: 64GB
Si no cumple con estos criterios, deberá cambiar a otro disco USB. Si el problema persiste, envíe una
descripción detallada del problema a la siguiente dirección de correo electrónico para recibir asistencia:
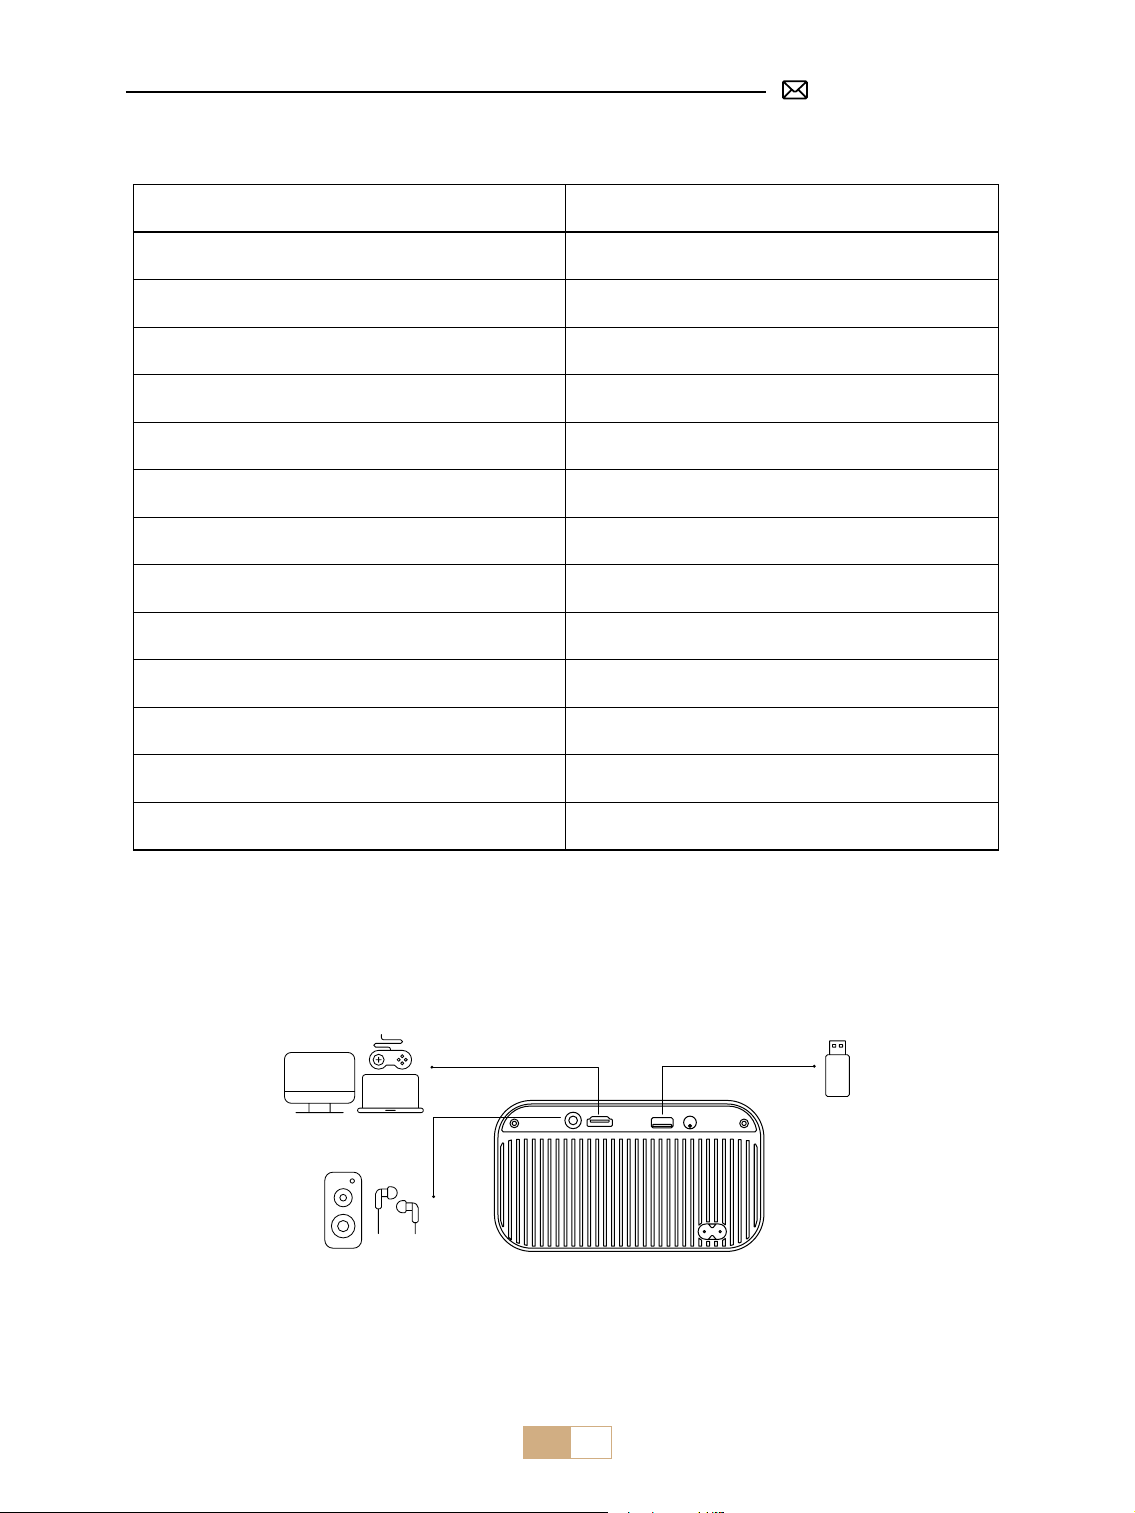
ES 76
5.2 Interfaz de Reproducción de Vídeo
Menú Función
FB Mantenga pulsado para retroceder rápidamente el video
FF Mantenga pulsado para avanzar rápidamente el video
Prev Pase al video anterior
Next Pase al siguiente video
Stop Detenga la reproducción y salga
Round Ciclo de lista o ciclo único
Info Detalles del video
List
Seleccione todas las listas de reproducción en la carpeta
actual
Zoom+ Zoom+ 2X a 8X
Zoom- Zoom-1/2X a 1/8X
SF Avance lento
STEP Avance gradual
Auto Relación de Aspecto: Automático/4:3/16:9
CONEXIÓN DE LÍNEA DE SEÑAL
El proyector PUTRIMS S28 tiene 3 interfaces: Puerto HDMI*1/Puerto USB*1/Salida de Auriculares de 3.5
mm*1. Seleccione el puerto de conexión correcto para conectar su dispositivo (PC, teléfono, TV Stick, altavoz,
reproductor de DVD, USB, PS4, etc.)
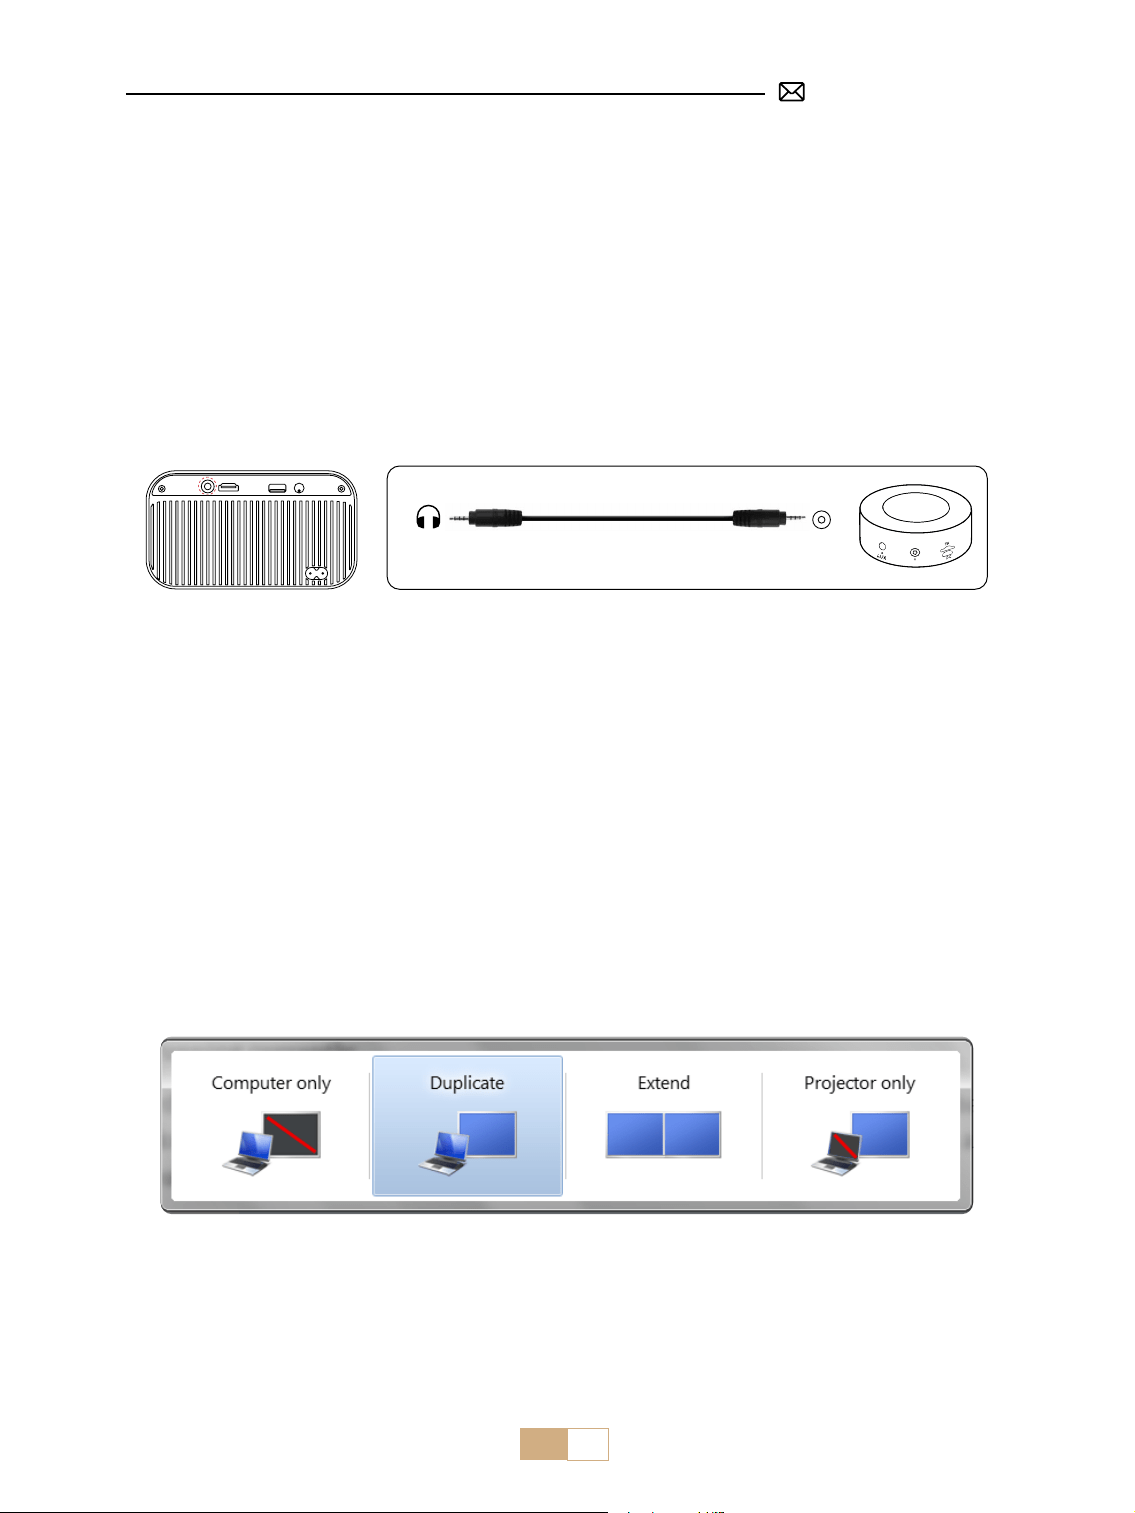
ES 77
①
Inserte el disco ash USB en el puerto USB del proyector.
②
Seleccione "Medios" y luego presione la tecla "OK" para ingresar.
③
Dependiendo del tipo de archivo, seleccione la opción [Película/Música/Foto/Texto].
④
Seleccione el archivo deseado y luego presione el botón [OK] para reproducirlo.
1. Conectar a través de un Disco USB
2. Conexión con el Altavoz
①
Utilice el cable de audio de 3.5 mm para conectarlo al altavoz.
②
Encienda el proyector y el altavoz.
Audio
out
AUX
port
①
Encienda el reproductor de DVD y el proyector.
②
Conecte el reproductor de DVD y el proyector con el cable HDMI.
③
Ingrese [fuente] en la página de inicio para seleccionar el HDMI correspondiente como fuente de señal.
Nota: Cuando el proyector está conectado al reproductor de DVD a través del cable HDMI, si no hay sonido, es
posible que la señal de salida del puerto HDMI del reproductor de DVD no sea compatible con HDCP. Intente
conectar el altavoz.
3. Conexión con el Reproductor de DVD
①
Conéctese a la computadora y al proyector S28 con el cable HDMI.
②
Seleccione la fuente HDMI para proyectar cualquier archivo en su computadora.
③
En su computadora portátil, mantenga presionada la tecla "Win+P" para cambiar el modo de visualización.
4. Conexión con PC
Computer Only: esta es la opción predeterminada y mostrará la pantalla solo en el monitor principal.
Duplicate: para duplicar su escritorio en todos los monitores conectados.
Extend: para extender su escritorio a varios monitores.
Proyector Only: use solo el monitor secundario (proyector) y mantenga el monitor principal apagado.

ES 78
Para cambiar la resolución de la pantalla en el modo Solo proyector, siga estos pasos:
Paso: Inicio > Panel de Control > Apariencia y Personalización > Ajustar Resolución de Pantalla
①
Utilice un adaptador de tipo C a HDMI para conectar su MacBook, o un adaptador de Mini Display a HDMI
para conectarlo con su MacBook Air (Adaptador No Incluido).
②
Seleccione la fuente HDMI para proyectar cualquier archivo en su MacBook o MacBook Air.
①
Utilice un cable HDMI para conectar a XBOX/PS4/PS5/Nintendo/Switch.
②
Elija el canal de señal multimedia: HDMI.
①
Conecte el TV Stick al puerto HDMI del proyector.
②
Seleccione el canal de señal multimedia: HDMI.
5. Conexión con MacBook o MacBook Air
6. Conexión con XBOX/ PS4/ PS5/ Nintendo/ Switch
7. Conexión con Fire TV Stick

ES 79
PREGUNTAS FRECUENTES (FAQ)
Gracias por elegir el Proyector PUTRIMS S28. Hemos recopilado algunas preguntas frecuentes y sus
respuestas correspondientes para ayudarle mejor:
P1: Hay una mancha negra en la imagen proyectada. ¿Cómo puedo quitarla?
R: 1) Utilice un secador de pelo a baja velocidad y apúntelo hacia la red antipolvo para quitar el polvo.
2) Simplemente golpee el cuerpo del proyector para quitar el polvo.
P2: El proyector no puede buscar la red WiFi de su hogar, ¿qué debo hacer?
R: Primero apague la función WiFi del proyector. Luego apague el proyector y reinícielo. Después de unos
minutos, encienda el proyector, vuelva a activar la red WiFi y busque la red WiFi de su hogar nuevamente.
P3: La duplicación de pantalla o la conexión WiFi son inestables. ¿Cómo puedo resolver este
problema?
R: La duplicación de pantalla requiere una señal WiFi inalámbrica potente para garantizar que tu red doméstica
funcione bien. La resolución del video se ajustará dinámicamente según la intensidad de tu señal WiFi.
Además, activa el punto de acceso de tu teléfono y conéctate a S28 para identicar si el problema está en la
red doméstica. Si el problema persiste, comunícate con nosotros a [email protected] para obtener más
ayuda.
P4: Al duplicar la pantalla, el proyector no puede reproducir Netix, YouTube, Hulu, videos de Disney,
etc. ¿Por qué?
R: Debido a restricciones de derechos de autor, la mayoría de los proyectores no admiten la duplicación
inalámbrica de servicios de transmisión como Netflix, Hulu y Disney. Para disfrutar de estos servicios,
recomendamos usar un TV Stick ( no incluido ) junto con nuestro proyector.
P5: ¿Por qué la pantalla está al revés y cómo puedo ajustar la imagen proyectada?
R: Vaya a Conguración → Modo de proyección → para invertir la dirección de la imagen. Coloque la lente del
proyector perpendicularmente a la pantalla de proyección o al muro cortina. Ajuste el enfoque con la tecla F-/
F+ del control remoto hasta que la imagen se aclare. Para los ajustes del rectángulo de la imagen, acceda a la
conguración de corrección trapezoidal y seleccione [ +/-/reset ] para ajustarlo.
P6: El proyector muestra la imagen pero no tiene sonido. ¿Cuál podría ser la razón?
R: 1) El proyector no es compatible con Dolby Sound, DTS, 5.1 canales, HDMI CEC o ARC. Asegúrese de
desactivar cualquier conguración de Dolby en los dispositivos conectados.
2) Verifique que tanto el volumen del proyector como el volumen de los dispositivos externos o altavoces
Bluetooth estén congurados en un nivel adecuado.
3) Intente reproducir diferentes videos con otros altavoces. Es posible que algunas versiones de altavoces
Bluetooth no funcionen bien con el proyector.
Si tiene algún problema, proporcione los siguientes detalles en su correo electrónico: código de país, número
de pedido, modelo y una breve descripción del problema ( Por ejemplo, ES+S28+número de Pedido
) y envíenos un correo electrónico a [email protected]. Tenga la seguridad de que nuestro equipo
dedicado le responderá con prontitud dentro de las 24 horas con una solución rápida y ecaz para abordar sus
inquietudes.

IT 80
CONTENUTI
PUTRIMS SUPPORTO PROFESSIONALE 7G/24H 81
SUGGERIMENTI 81
LISTA IMBALLAGGIO 82
SPECIFICHE DEL PROIETTORE 83
PANORAMICA DEL PROIETTORE 84
TELECOMANDO 85
INSTALLAZIONE 85
1. Metodo di Installazione 85
2. Distanza e Dimensione di Proiezione 86
AVVIO DEL PROIETTORE 86
IMPOSTAZIONI DELL'IMMAGINE PROIETTATA 87
1. Messa a Fuoco Elettrica 87
2. Keystone Verticale Automatico 87
3. Impostazioni Immagine 88
4. Impostazioni delle Opzioni 89
CONNESSIONE CON DISPOSITIVI INTELLIGENTI 90
1. Impostazione WiFi 90
2. Connessione Wireless 91
3. Wired Screen 92
4. Bluetooth 93
5. Riproduzione Multimediale 94
COLLEGAMENTO DELLE LINEE DI SEGNALE 96
1. Collegamento Tramite Chiavetta USB 96
2. Collegamento con l'Altoparlante 96
3. Collegamento con Lettore DVD 96
4. Collegamento con PC 96
5. Collegamento con MacBook o MacBook Air 97
6. Collegamento con XBOX/ PS4 97
7. Collegamento con Fire TV Stick 98
FAQ 98

IT 81
PUTRIMS SUPPORTO PROFESSIONALE 7G/24H
Gentile cliente,
grazie mille per il supporto a PUTRIMS!
Prima di iniziare a utilizzare il proiettore, ti chiediamo gentilmente di leggere attentamente questo manuale.
In caso di problemi, includi i seguenti dettagli nella tua e-mail: codice Paese, numero d'ordine, modello e
una breve descrizione del problema (ad esempio IT+000 0000000 0000000+S28+Nessuna immagine) a
[email protected]om. Ti assicuriamo che il nostro team risponderà rapidamente entro 24 ore per fornire
una soluzione rapida ed ecace.
Va detto che molti problemi comuni possono essere facilmente risolti con semplici regolazioni, come problemi
con segnale, audio, connessioni Bluetooth o WiFi o immagini a scatti. Ti assicuriamo che, per garantire la tua
massima soddisfazione, tutti i nostri proiettori sono sottoposti a un rigoroso controllo di qualità al 100% e a un
imballaggio accurato prima della spedizione.
In caso di domande, contattaci in modo che il problema possa essere risolto e darci la possibilità di migliorare.
Ci impegniamo a fornirti soluzioni soddisfacenti per qualsiasi problema che potresti incontrare.
Cordiali saluti,
Team di Assistenza PUTRIMS
SUGGERIMENTI
Considerazioni sulla Temperatura:
Per garantire la longevità del proiettore, evitare di posizionarlo in ambienti eccessivamente caldi o freddi.
Le temperature estreme possono ridurre la durata del dispositivo. Per prestazioni ottimali, mantenere un
ambiente di lavoro tra 5℃ e 35℃ .
Ventilazione Adeguata:
Il proiettore è dotato di un sistema di ventilazione per garantire un funzionamento stabile. Evitare di coprire le
prese d'aria con panni, coperte o altri materiali. Inoltre, non inserire oggetti nelle fessure del proiettore poiché
ciò potrebbe causare un cortocircuito o una scossa elettrica, che potrebbe danneggiare il dispositivo.
Protezione da Urti e Vibrazioni:
Maneggiare il proiettore con cura, proteggendolo da forti impatti, estrusioni e vibrazioni. Evitare di spostare il
proiettore se presenta guasti al circuito interno.
Manutenzione delle Lenti:
La lente del proiettore è un componente cruciale che ha un impatto diretto sulla denizione e sulla qualità
dell'immagine. Assicurati di tenere la lente pulita da polvere eccessiva. Durante la pulizia, usa un panno di
cotone morbido adatto alle lenti in vetro. Evita di usare panni ruvidi o abrasivi, poiché possono danneggiare la
supercie della lente. Contatta il nostro team di supporto via email all'indirizzo [email protected] per
assistenza e risoluzione.
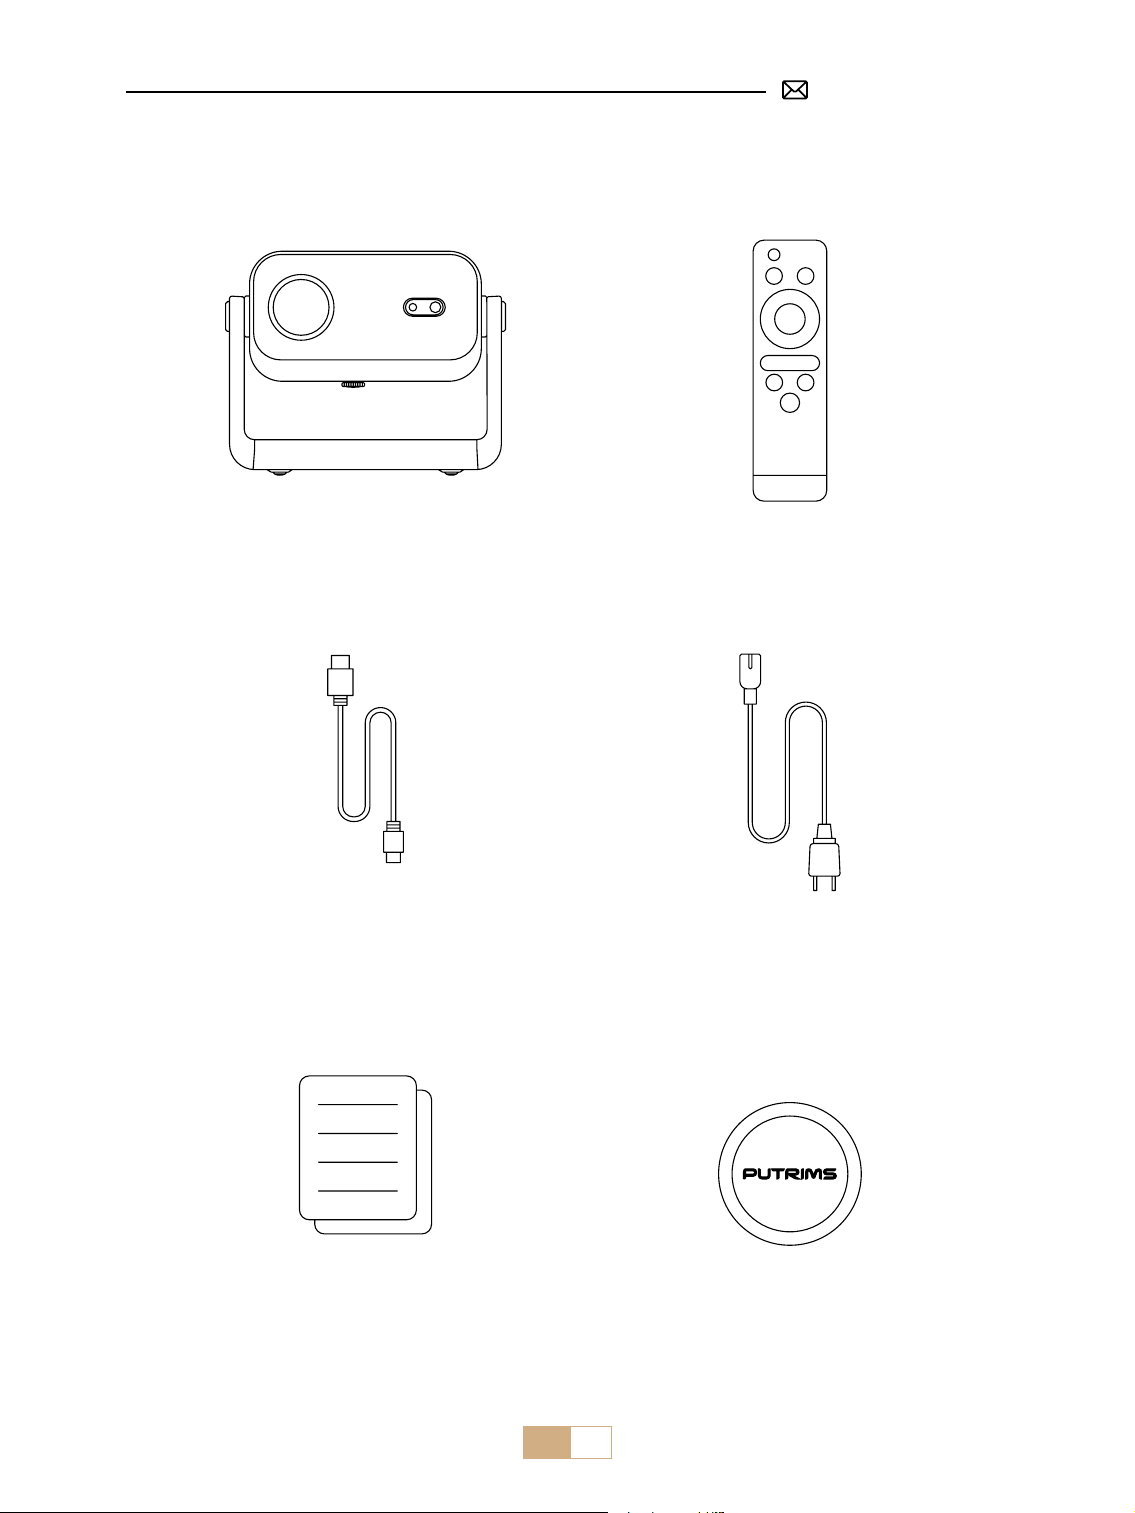
IT 82
LISTA IMBALLAGGIO
Telecomando*1Proiettore PUTRIMS S28*1
Cavo HDMI*1
Guida rapida*1 Copriobiettivo*1
Cavo di alimentazione*1

IT 83
Numero modello: S28
Tecnologia di
Display
LCD Sorgente Luminosa LED
Dimensioni del
Prodotto
20*18*20 cm Peso del Prodotto 1,38kg
Frequenza di
Aggiornamento
60Hz Tensione di Alimentazione CA 110-240 V
Risoluzione Nativa 1280*720P
Risoluzione Massima
Supportata
Decodica 1920*1080P
Correzione
Trapezoidale
Auto/Elettrico/Manuale Messa a Fuoco Elettrico/Manuale
Modalità di
Funzionamento
Telecomando Proporzioni 4:3/16:9
Porta di Uscita Uscita audio da 3,5 mm Porta di Ingresso HDMI*1/USB*1
Formato video
AVI/MP4/MKV/FLV/WMV/MOV/RMVB/MPEG1/MPEG2/MPEG-4/H.264/XVID/H.263(Il
supporto per i codici video può variare a seconda delle circostanze, contattateci per
ulteriore supporto)
Formato Audio AAC/MP2/MP3/PCM/FLAC/WMA(I codici audio Dolby non sono supportati)
Formato Immagine JPG/PNG/BMP/JPEG
Formato del
Documento
TXT
SPECIFICHE DEL PROIETTORE

IT 84
PANORAMICA DEL PROIETTORE
Porta di uscita audio da 3,5 mm
Porta HDMI
Porta USB
IR
Accensione/spegnimento
Altoparlante
Ingresso alimentazione
Ingresso dell'aria
Rete antipolvere
Uscita dell'aria

IT 85
TELECOMANDO
Nota:
1. Installare 2 batterie AAA (non incluse) nel telecomando prima di utilizzarlo, non combinare batterie nuove
con quelle vecchie nel telecomando, il che può causare guasti al funzionamento a causa di un'alimentazione
insuciente.
2. Quando si utilizza il telecomando, assicurarsi di puntare il trasmettitore del segnale del telecomando verso il
ricevitore del segnale a infrarossi sul proiettore o semplicemente di puntare lo schermo di proiezione durante il
funzionamento.
3. Quando non si utilizza il telecomando per un lungo periodo, rimuovere la batteria per evitare perdite.
Sorgente
Messa a fuoco -
VOL -
Tasto freccia
Menù
Interruttore
OK
Muto
VOL +
Messa a fuoco +
Indietro
1.Il proiettore può essere posizionato su una scrivania stabile per proiettare l'immagine in base all'ambiente
operativo e ai requisiti.
2.Mantenere il proiettore a un'altezza in cui la sua lente sia simmetrica assialmente allo schermo. Se ciò non è
INSTALLAZIONE
1. Metodo di Installazione

IT 86
Installazione Desktop con Proiezione Frontale Installazione Desktop con Retroproiezione
2. Distanza e Dimensione di Proiezione
Proporzioni: 16:9
Distanza Dimensione dello Schermo
1,2m 40"
2,4m 80"
3,6m 120"
*La dimensione dell'immagine della proiezione dipende dalla distanza tra il proiettore e lo schermo. Potrebbe
esserci una leggera variazione del 3% nelle misurazioni tra i dati elencati sopra.
*La distanza di proiezione consigliata è di 1,5-3 m.
*Un ambiente più buio migliorerà la nitidezza delle immagini proiettate.
AVVIO DEL PROIETTORE
Accendere il proiettore: rimuovere il tappo dell'obiettivo e collegare il cavo di alimentazione, quando la spia
rossa è accesa, premere il tasto di accensione sul telecomando o il pulsante di accensione sul pannello per
avviare il proiettore e l'indicatore passa dal rosso al blu, il proiettore è acceso.
Spegnere il proiettore: premere il tasto di accensione sul telecomando o il pulsante di accensione sul
pannello per spegnere il proiettore, l'indicatore passa dal blu al rosso e il proiettore si spegne.
possibile, utilizzare la funzione di correzione trapezoidale per regolare l'immagine di proiezione.
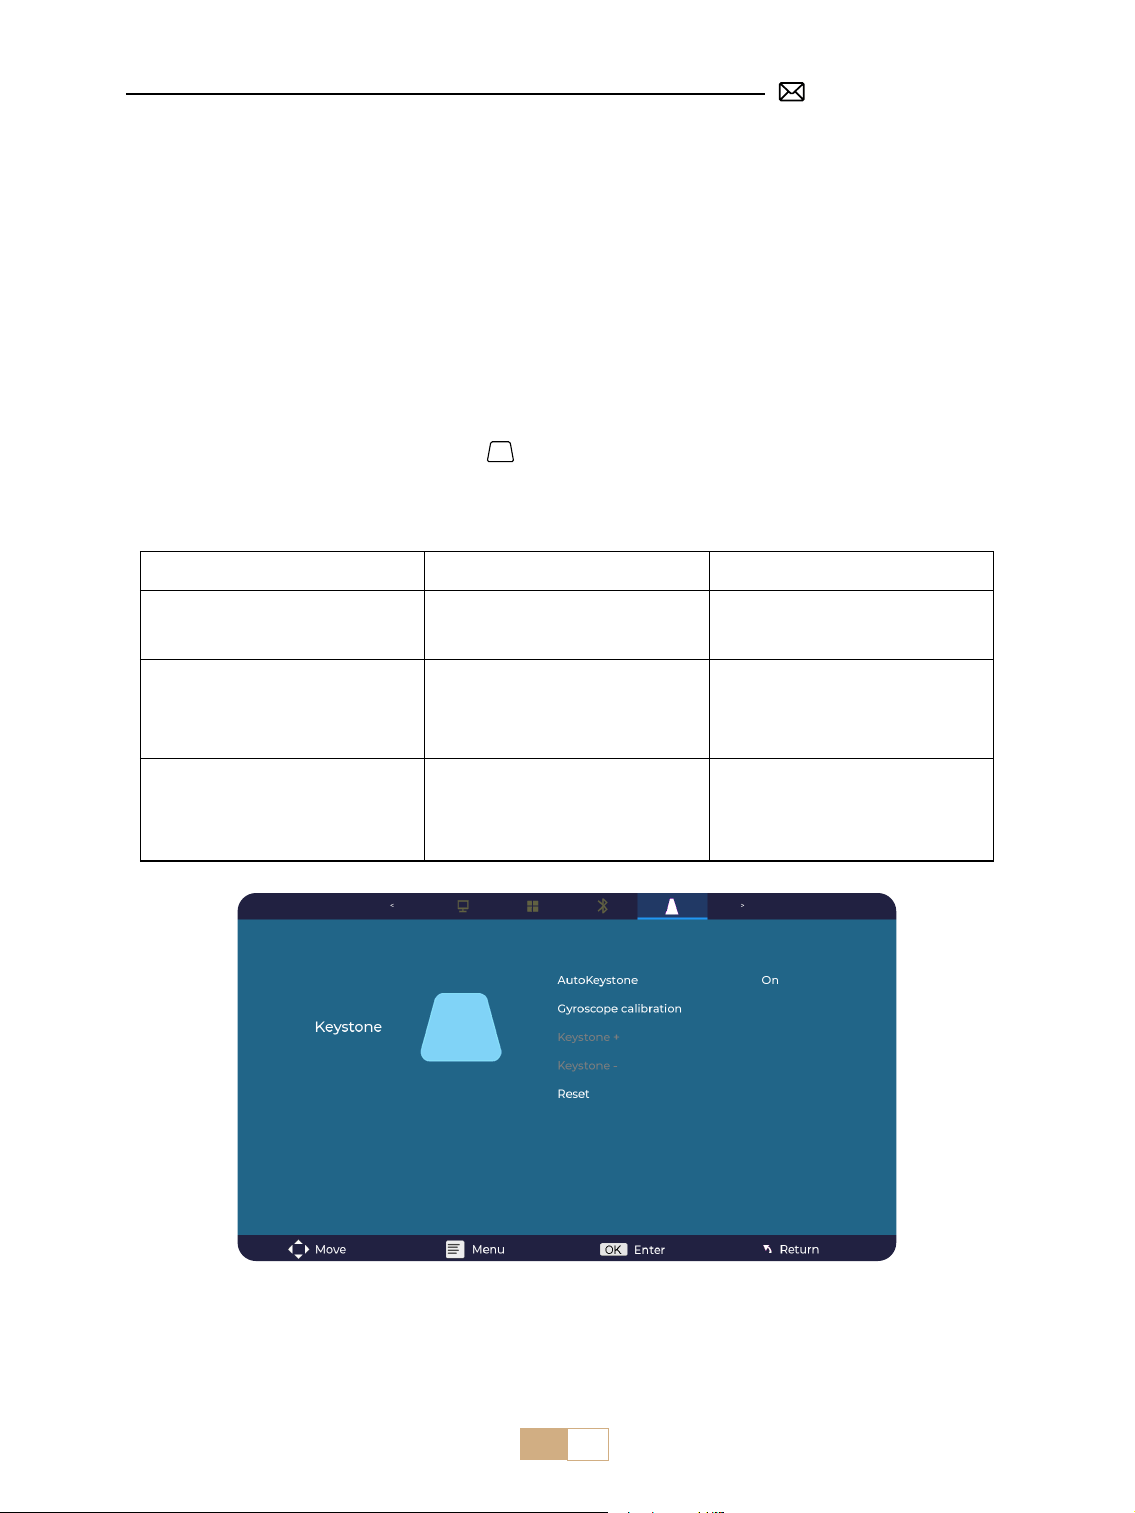
IT 87
IMPOSTAZIONI DELL'IMMAGINE PROIETTATA
1. Messa a Fuoco Elettrica
Per prima cosa, posizionare il proiettore orizzontalmente di fronte al muro.
Premere F+/F- sul telecomando per regolare la messa a fuoco. Nota: poiché i sensi di ognuno sono diversi,
regolare l'immagine su ciò che si ritiene più nitido.
2. Keystone Verticale Automatico
Suggerimenti: Informazioni sulla funzione keystone automatica: quando si riceve il proiettore S28 per la
prima volta, fare clic sulla funzione di Calibrazione del Giroscopio (dopo aver fatto clic, verrà visualizzato
che la Calibrazione è Riuscita) e quindi attivare la funzione di AtuoKeystone.
Seleziona il menu [Impostazioni], seleziona [ ] nelle impostazioni, attiva l'opzione [Auto Keystone], quindi
regolerà automaticamente un rettangolo. Oppure puoi selezionare manualmente [+/-], quindi premere "OK"
sul telecomando per regolare l'angolazione dello schermo verticalmente ±30° nché le guide non vengono
regolate su un rettangolo.
Menu Contenuto Funzione
Auto Keystone On/O
Regolare l'angolazione dello
schermo verticalmente
automaticamente ±30°
Calibrazione del Giroscopio Calibrazione riuscita
Si prega di fare clic su questa
funzione prima di utilizzare
l'AutoKeystone per la prima
volta
Keystone Manuale + / - /
Ripristino
+ / - /Ripristino
Regolare manualmente
l'angolazione dello schermo
verticalmente tramite
telecomando
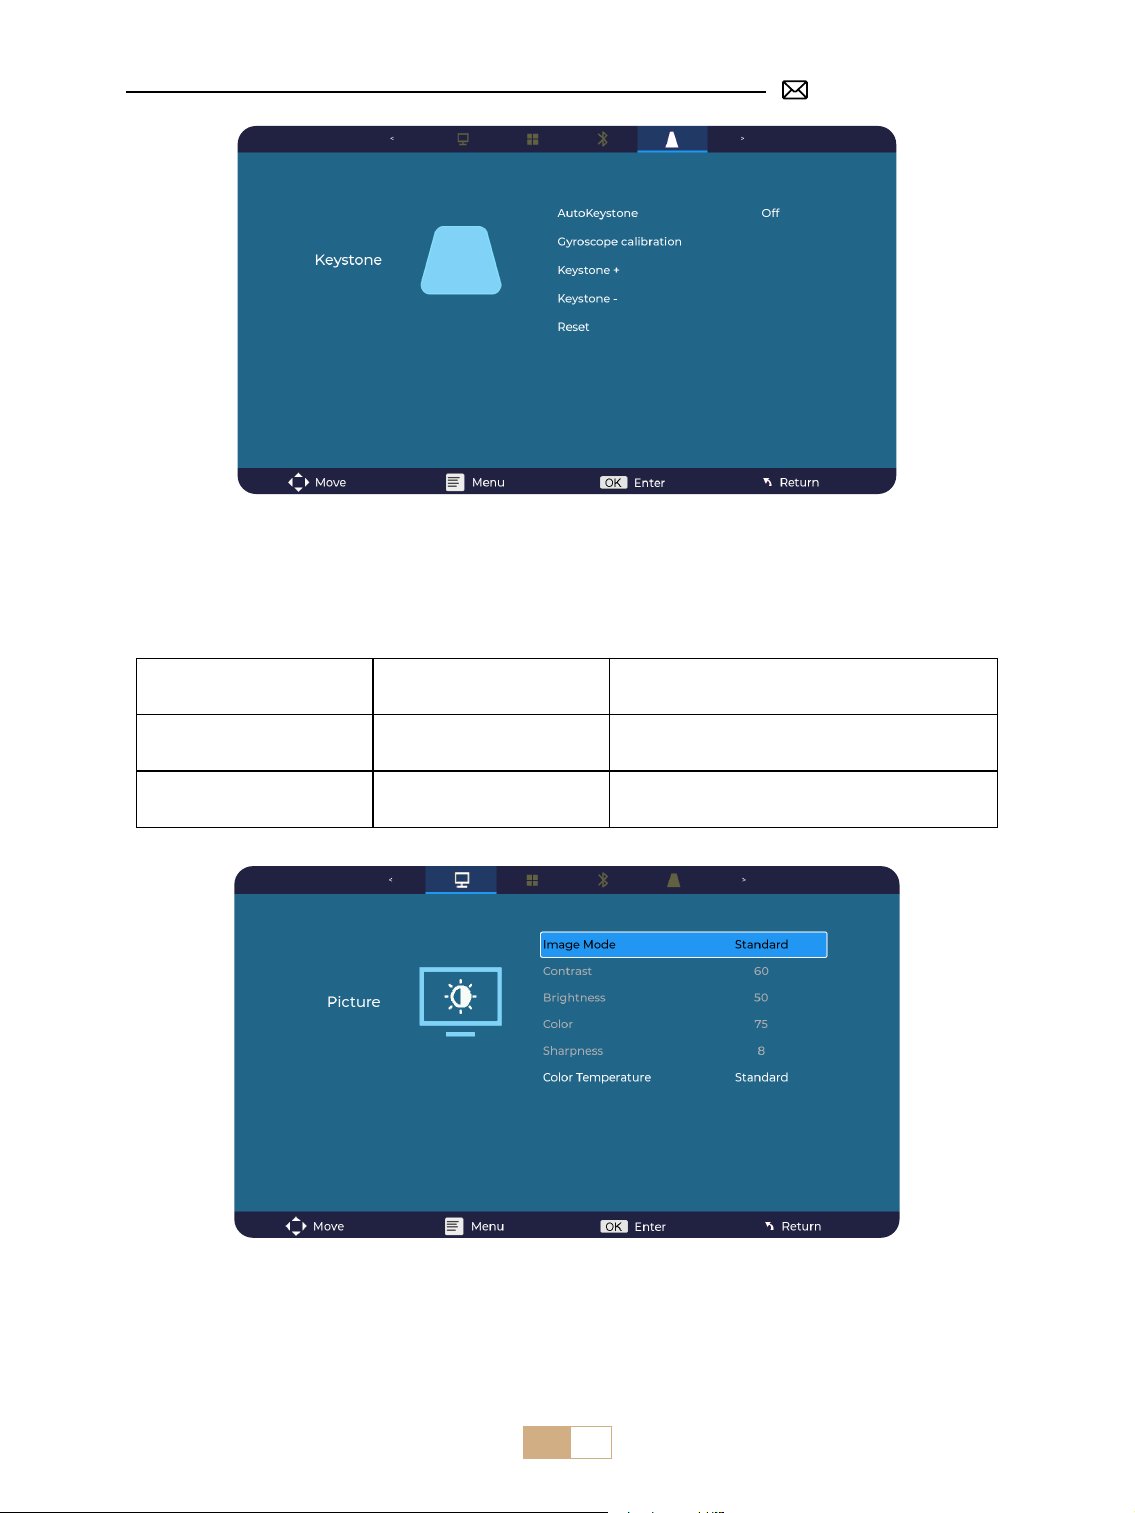
IT 88
3. Impostazioni Immagine
①
Supporta la regolazione dei parametri tramite la modalità Utente in sorgenti di segnale USB e HDMI.
②
Fare clic sul pulsante Menu sul telecomando - Impostazioni Immagine - Modalità Immagine - Modalità
Utente.
Menu Contenuto Funzione
Modalità Immagine
Standard/Dinamico/Mild/
Utente
Regola il contrasto / luminosità / colore /
nitidezza
Temperatura del Colore Freddo/Standard/Caldo Regola la temperatura del colore

IT 89
4. Impostazioni delle Opzioni
Menu Contenuto Funzione
Lingua OSD
English/Français/Italiano/Espanol/Deutsche/
日本語
Scegli una lingua
Modalità di Proiezione Fronte/retro sul tavolo
Capovolgere la direzione dell'immagine di
proiezione
Reset di Fabbrica Ripristino
Ripristinare le impostazioni predenite di
fabbrica
Aggiornamento software Aggiornamento locale (USB) Aggiornare il software tramite le locale
Aggiornamento Online Aggiornamento online (OTA) Aggiorna il software tramite online
Sospensione Automatica O/60min/120min/180min Imposta il tempo di sonno
OSD Timer O/5s/10s/15s/20s/25s/30s Imposta l'ora in cui tornare alla home page
Salvaschermo O/10min/15min/30min
Imposta l'ora in cui viene visualizzato il
salvaschermo
Window Zoom Proporzioni 4:3/16:9, Zoom 100%-50%
Regola il rapporto di aspetto dello schermo,
Riduci la dimensione dell'immagine
Informazioni sulla versione Versione software Informazioni sulla versione software
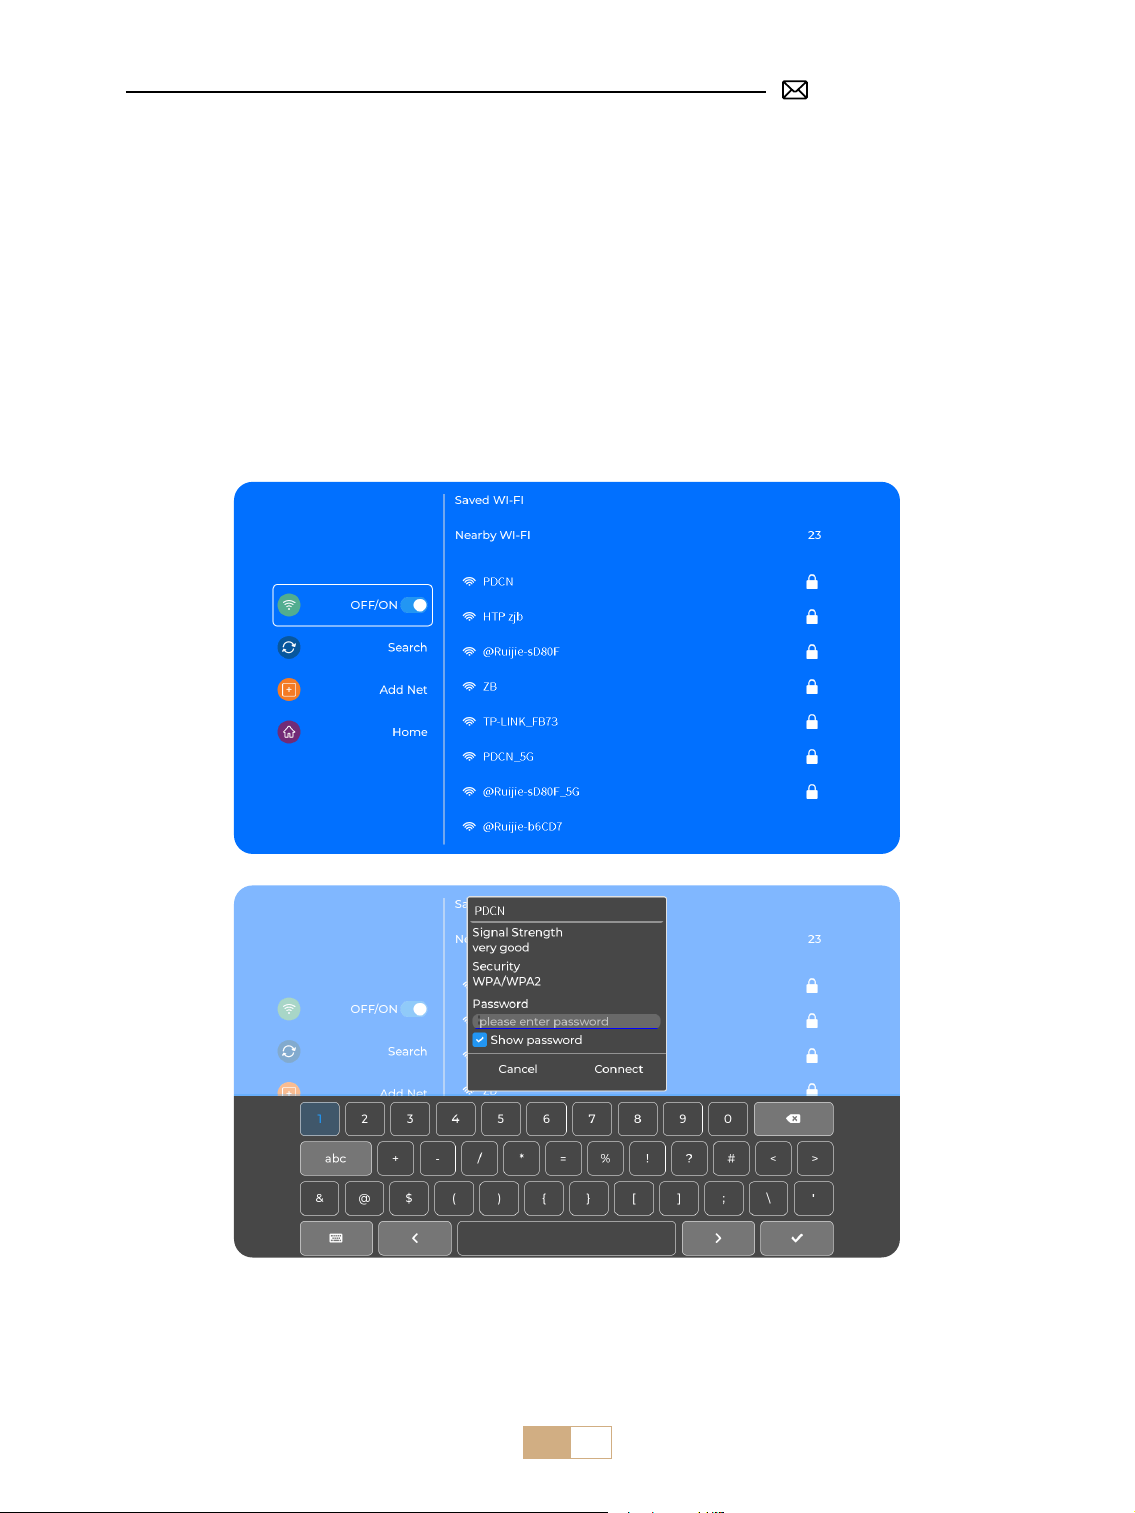
IT 90
Suggerimenti:
①
La uidità dello screen mirroring con una connessione wireless sarà inuenzata dall'ambiente di rete. Si
consiglia una larghezza di banda di 100 Mbit o superiore quando si utilizza lo screen mirroring.
②
Assicurarsi che il dispositivo mobile sia vicino al proiettore quando si utilizza la connessione wireless. Si
consiglia una distanza entro 1,6 metri.
③
Alcuni dispositivi mobili potrebbero non supportare lo screen mirroring a causa della compatibilità.
CONNESSIONE CON DISPOSITIVI INTELLIGENTI
Selezionare l'icona [ WiFi ] nell'interfaccia principale, quindi premere il tasto "OK" sul telecomando per
accedere all'interfaccia Wi-Fi e selezionare "Impostazioni di rete".
1. Impostazione WiFi

IT 91
Screen Mirroring
Stop Mirroring
Bedroom
Projector-S28-XXXX
Screen
Mirroring
2.2 Per Sistema Android (Miracast)
Metodi di Screen Mirroring: I dispositivi Android di marche diverse possono utilizzare vari termini e metodi
per abilitare lo screen mirroring. Per trovare i passaggi esatti per il tuo dispositivo, fai riferimento al manuale
del tuo dispositivo. I termini comuni per lo screen mirroring includono Multi-screen, Wireless Display, WLAN
Display, Screen Mirroring e Smart View.
Compatibilità del Dispositivo: Si prega di notare che non tutti i telefoni Android supportano la funzione di
mirroring dello schermo. Prima di provare a utilizzare lo screen mirroring, assicurarsi che il dispositivo Android
supporti questa funzione. È possibile controllare il manuale del dispositivo o cercare l'opzione di mirroring
dello schermo nelle impostazioni per vericare la compatibilità.
①
Accedi alle [ Impostazioni WiFi ] del proiettore.
②
Collega il proiettore S28 alla rete WiFi.
③
Seleziona il menu [ iOS Wi-Fi Mirroring ].
④
Rimani su questa interfaccia.
⑤
Collega il tuo dispositivo iOS alla stessa rete WiFi.
⑥
Accedi al [ Centro di controllo ] sul tuo dispositivo iOS. Seleziona la funzione [ Screen Mirroring ].
⑦
Seleziona e collega il dispositivo denominato [ S28-XXXX ].
Nota: a causa delle restrizioni sul copyright, i servizi di streaming come Netix, Hulu, Disney, ecc. richiedono di inserire una
restick TV (non inclusa) nel proiettore per la riproduzione normale.
Attenzione: Assicurati che il tuo dispositivo iOS sia connesso alla stessa rete Wi-Fi del proiettore.
2. Connessione Wireless
2.1 Per Sistema iOS (Airplay)

IT 92
①
Accedi alle [ Impostazioni WiFi ] del proiettore e collega il proiettore S28 alla rete WiFi.
②
Seleziona il menu [ Android Mirroring ].
③
Rimani su questa interfaccia.
④
Collega il tuo dispositivo Android alla stessa rete WiFi.
⑤
Attiva la funzione di mirroring dello schermo fornita con il dispositivo Android, come [Screen Share/Smart
View].
⑥
Seleziona e collega il proiettore denominato [ S28-XXXX ].
Nota: a causa delle restrizioni sul copyright, i servizi di streaming come Netix, Hulu, Disney, ecc. richiedono di inserire una
restick TV (non inclusa) nel proiettore per la riproduzione normale.
PUTRIMS_S28_XXXX
3. Wired Screen
3.1 Connessione Android Tramite Cavo
①
Seleziona il menu [ Wired Screen ].
②
Installa prima l'app HCCast scansionando il codice QR fornito.
③
Utilizza un cavo USB-Type-c per collegare il tuo dispositivo Android al proiettore.
④
Conferma di aprire HCCast nella nestra pop-up del tuo dispositivo.
⑤
Inserisci la password del tuo dispositivo se richiesto, per autenticare la connessione.
⑥
Il tuo dispositivo Android condividerà automaticamente lo schermo con il proiettore.
Nota: evita di collegare e scollegare frequentemente per ottenere una connessione stabile. Alcuni modelli
Android richiedono di selezionare "Trasferisci le" per il mirroring dello schermo.
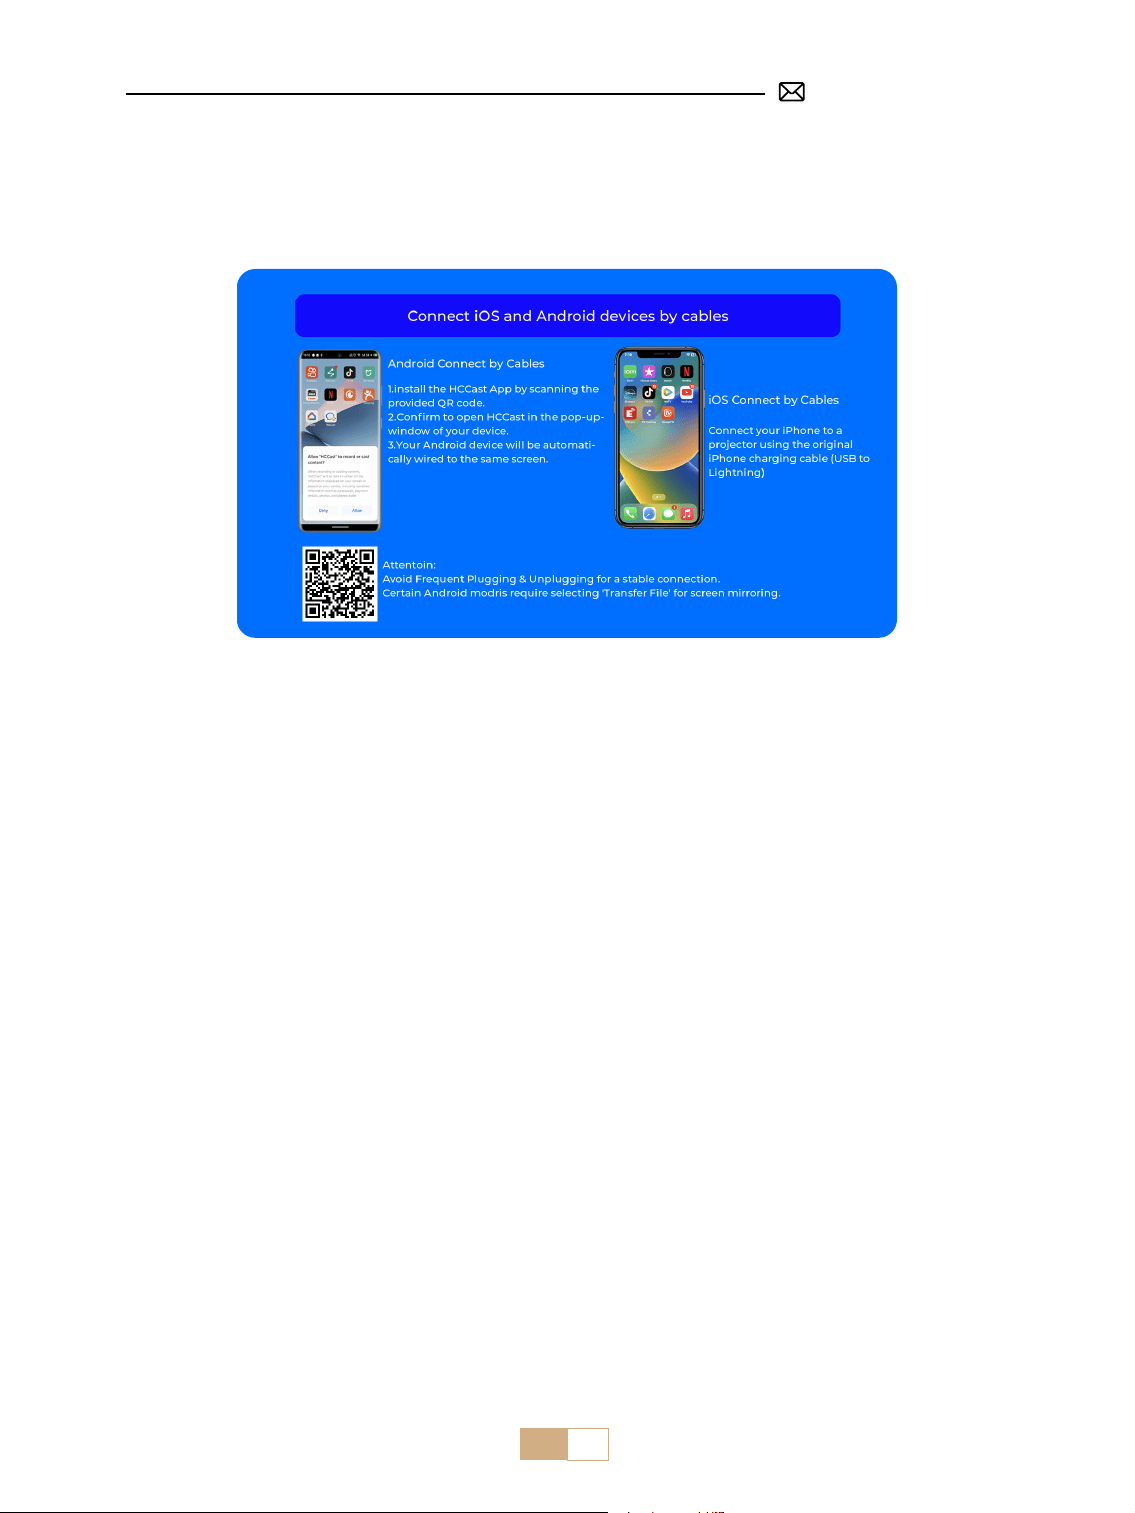
IT 93
4. Bluetooth
Collegare l’Altoparlante Bluetooth
①
Accendi l'altoparlante Bluetooth.
②
Accendi il [Bluetooth] del proiettore e selezionare l'altoparlante Bluetooth che si desidera connettere.
Nota:
①
Il proiettore S28 è compatibile con la maggior parte delle cue Bluetooth, degli altoparlanti Bluetooth e
degli Airpod. Tuttavia, tieni presente che non è compatibile con tastiere Bluetooth o telefoni/PC Bluetooth.
②
Se non senti alcun suono durante la riproduzione di video, ti consigliamo di controllare le impostazioni
Dolby Sound sui tuoi dispositivi collegati. Disattivare Dolby Sound può garantire una migliore compatibilità
audio con il proiettore.
③
Alcuni altoparlanti Bluetooth potrebbero subire una significativa riduzione del volume quando sono
collegati al proiettore. Per risolvere questo problema, prova ad aumentare il volume su tutti i dispositivi
interessati per ottenere il livello audio desiderato.
④
Questo passaggio è applicabile solo per collegare l'altoparlante Bluetooth ma non al Bluetooth del telefono
o del PC.
⑤
In caso di domande o per ulteriore assistenza, non esitate a contattare l'assistenza PUTRMIS via e-mail
all'indirizzo [email protected]om.
3.2 Connessione iOS Tramite Cavo
①
Seleziona il menu [ Wired Screen ].
②
Collega il tuo iPhone al proiettore utilizzando il cavo di ricarica originale per iPhone. (da USB a Lightning)
③
Riuscito.

IT 94
①
Inserire la chiavetta USB nella porta USB del proiettore.
②
Selezionare "Media" e premere il tasto "OK" per accedere.
③
A seconda del tipo di le, selezionare l'opzione [ Film/Musica/Foto/Testo ].
④
Selezionare il le desiderato e quindi premere il tasto [ OK ] per riprodurlo.
⑤
Fare clic sul tasto "MENU" sul telecomando durante la riproduzione del video per regolare direttamente le
impostazioni dell'immagine.
5. Riproduzione Multimediale
5.1 Modalità di Input della Chiavetta USB

IT 95
Suggerimenti caldi:
Se il proiettore non riesce a riconoscere la chiavetta USB, seguire i metodi indicati di seguito per risolvere il
problema.
Assicurati che la chiavetta USB soddis i seguenti formati:
FAT, FAT32: 8 GB/16 GB/32 GB NTFS: 64 GB
Se non soddisfa questi criteri, dovrai cambiare una chiavetta USB con un formato supportato.
Se il problema persiste, invia una descrizione dettagliata del problema al seguente indirizzo e-mail: support@
putrims.com.
5.2 Interfaccia di Riproduzione Video
Menu Funzione
FB Premere a lungo per tornare indietro velocemente nel video
FF Premere a lungo per far avanzare rapidamente il video
Prev Passa al video precedente
Next Passa al video successivo
Stop Interrompere la riproduzione ed uscire
Round Elenco ciclo o ciclo singolo
Info Dettagli video
List Seleziona tutte le playlist nella cartella corrente
Zoom+ Zoom+ 2X a 8X
Zoom- Zoom- 1/2X a 1/8X
SF Avanti lento
STEP Passo avanti
Auto Proporzioni: Auto/4:3/16:9

IT 96
COLLEGAMENTO DELLE LINEE DI SEGNALE
Il proiettore PUTRIMS S28 ha 3 interfacce, porta HDMI*1/porta USB*1/uscita cue da 3,5 mm*1. Selezionare la
porta di connessione corretta per collegare il dispositivo (PC, telefono, TV Stick, altoparlante, lettore DVD, USB,
PS4 , ecc.)
①
Inserire la chiavetta USB nella porta USB del proiettore.
②
Selezionare "Media" e quindi premere il tasto "OK" per accedere.
③
A seconda del tipo di le, selezionare l'opzione [ Film/Musica/Foto/Testo ].
④
Selezionare il le desiderato e quindi premere il tasto [ OK ] per riprodurlo.
1. Collegamento Tramite Chiavetta USB
2. Collegamento con l'Altoparlante
①
Utilizzare il cavo audio da 3,5 mm per connettersi all'altoparlante.
②
Accendi il proiettore e l'altoparlante.
Audio
out
AUX
port
①
Accendi il lettore DVD e il proiettore.
②
Collega il lettore DVD e il proiettore con il cavo HDMI.
③
Inserisci [Sorgente] nella home page per selezionare l'HDMI corrispondente come sorgente del segnale.
Nota: quando il proiettore è collegato al lettore DVD tramite il cavo HDMI, se non c'è audio, potrebbe essere
che il segnale di uscita della porta HDMI del lettore DVD non sia compatibile con HDCP.
3. Collegamento con Lettore DVD
①
Collegare il computer al proiettore S28 con il cavo HDMI.
②
Selezionare la sorgente HDMI per proiettare qualsiasi le sul computer.
③
Sul computer portatile, tenere premuti i tasti "Win+P" per cambiare la modalità di visualizzazione.
4. Collegamento con PC
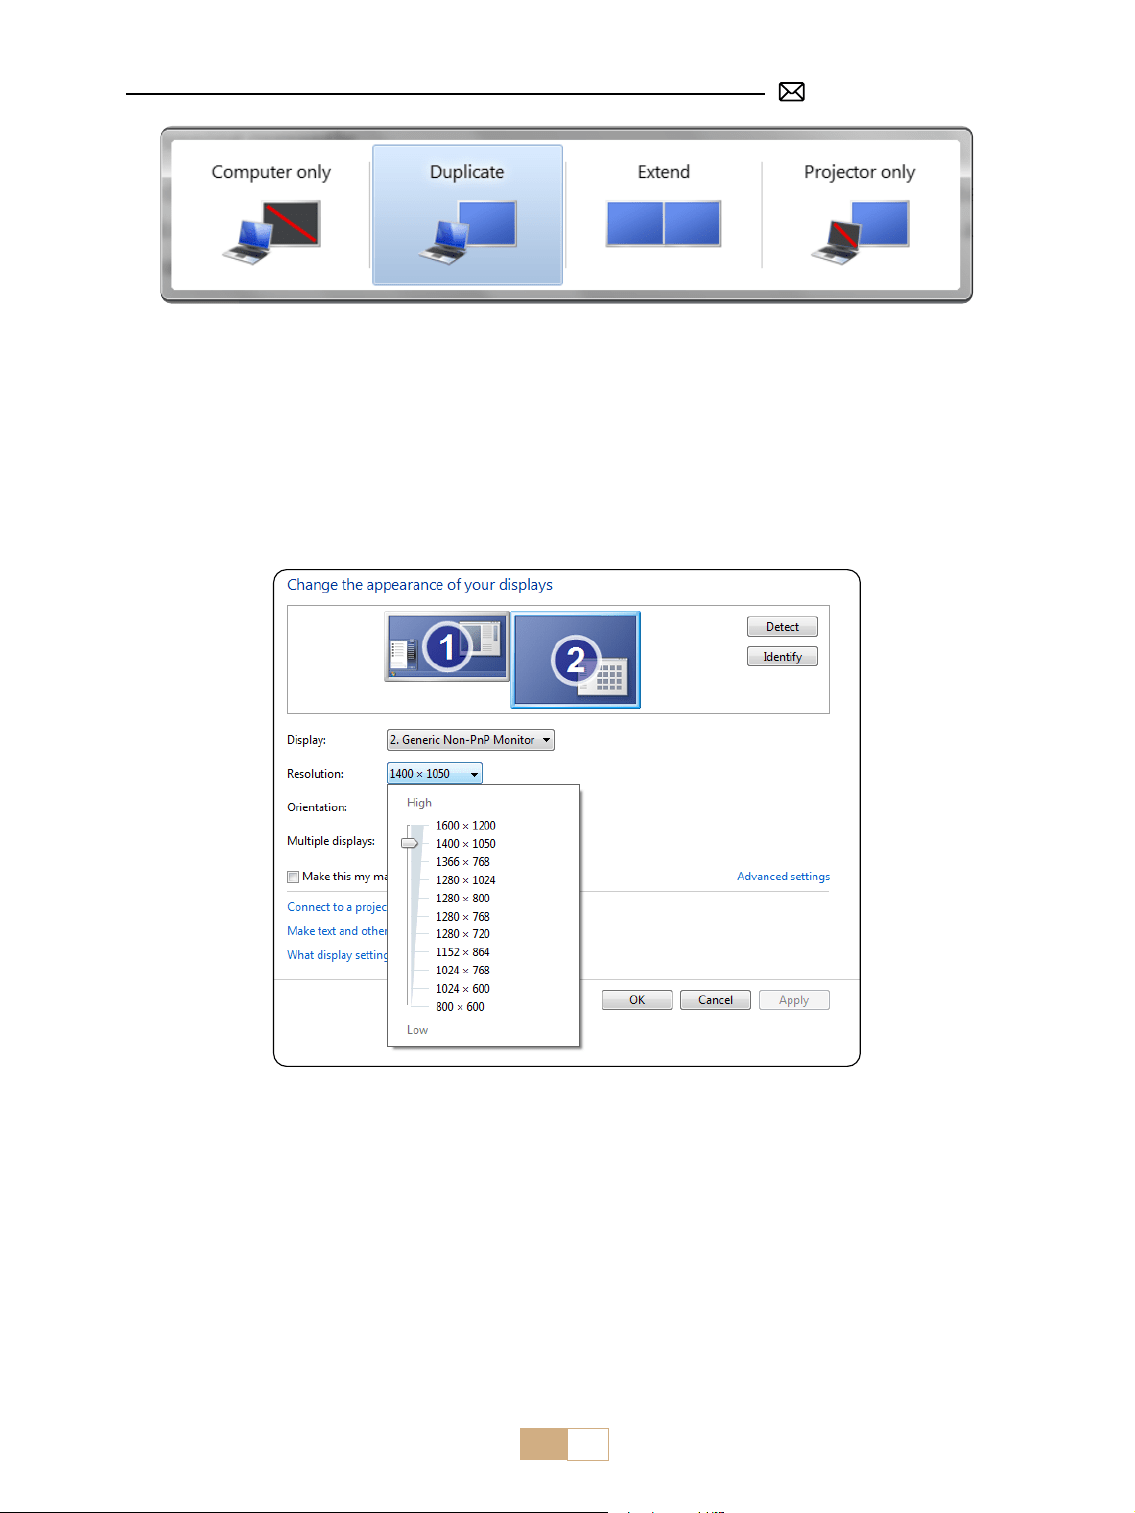
IT 97
Solo computer: Questa è l'opzione predenita e visualizzerà lo schermo solo sul monitor principale.
Duplica: per duplicare il desktop su tutti i monitor collegati.
Estendi: per estendere il desktop su più monitor.
Solo proiettore: utilizzare solo il monitor secondario (proiettore) e tenere spento il monitor principale.
Per modicare la risoluzione dello schermo in modalità Solo Proiettore, seguire questi passaggi:
Passaggio: Start > Pannello di controllo > Aspetto e personalizzazione > Regola risoluzione dello schermo.
①
Utilizza un adattatore Type-C a HDMI per collegare il tuo MacBook, o un adattatore Mini Display a HDMI per
collegare il tuo MacBook Air (adattatore non incluso).
②
Seleziona la sorgente HDMI per proiettare qualsiasi le sul tuo MacBook o MacBook Air.
①
Utilizzare il cavo HDMI per connettersi a XBOX/PS4.
②
Scegliere il canale del segnale multimediale: "HDMI".
5. Collegamento con MacBook o MacBook Air
6. Collegamento con XBOX/ PS4

IT 98
①
Collega la Firestick TV/Chromecast alla porta HDMI del proiettore.
②
Scegli il canale del segnale multimediale: "HDMI".
7. Collegamento con Fire TV Stick
FAQ
Grazie per aver scelto il proiettore PUTRIMS S28. Abbiamo raccolto alcune domande frequenti e le relative
risposte per assisterti al meglio:
D1: C'è un punto nero sull'immagine proiettata. Come posso rimuoverlo?
R: 1) Utilizzare un asciugacapelli a bassa velocità e puntarlo verso la rete antipolvere per soare via la polvere.
2) Oppure toccare semplicemente il corpo del proiettore per rimuovere la polvere.
D2: Il proiettore non riesce a cercare il WiFi domestico, cosa devo fare?
R: Disattivare la funzione WiFi del proiettore, quindi spegnerlo e riavviarlo. Riattivare il WiFi e il WiFi domestico
verrà visualizzato nell'elenco per la connessione. Immettere la password corretta per la connessione.
D3: Il mirroring dello schermo o la connessione WiFi sono instabili. Come posso risolvere questo
problema?
R: Lo screen mirroring richiede un segnale WiFi wireless potente, per garantire che la tua rete domestica
funzioni bene. La risoluzione video si adatterà dinamicamente in base alla potenza del segnale Wi-Fi. Inoltre,
attiva l'hotspot del tuo telefono e connettiti a S28 per identicare se il problema riguarda la rete domestica. Se
il problema persiste, contattaci all'indirizzo [email protected]om per ulteriore assistenza.
D4: Quando si esegue il mirroring dello schermo del telefono, il proiettore non riesce a riprodurre
video Netix, Hulu, Disney, ecc. Perché?
R: A causa delle restrizioni sul copyright, la maggior parte dei proiettori non supporta il mirroring wireless di
servizi di streaming come Netix, Hulu e Disney. Per usufruire di questi servizi, consigliamo di utilizzare un TV
Stick (non incluso) insieme al nostro proiettore.
D5: Perché lo schermo è capovolto e come posso regolare l'immagine proiettata?
R: Vai su Impostazioni → Modalità di proiezione → per capovolgere la direzione dell'immagine. Posiziona
l'obiettivo del proiettore perpendicolarmente allo schermo di proiezione o alla parete. Regola la messa a
fuoco con il tasto F-/F+ del telecomando nché l'immagine non diventa nitida. Per le regolazioni del rettangolo
dell'immagine, accedi alle impostazioni trapezoidali e seleziona [+/-/reset] per regolarlo.
D6: Il proiettore visualizza l'immagine ma non ha audio. Quale potrebbe essere il motivo?
R: 1) Il proiettore non supporta Dolby Sound, DTS, 5.1 canali, HDMI CEC o ARC. Assicurati di disattivare tutte le
impostazioni Dolby sui dispositivi collegati.
2) Verica che sia il volume del proiettore che il volume di eventuali dispositivi esterni o altoparlanti Bluetooth
siano impostati a un livello adeguato.
3) Prova a riprodurre video diversi utilizzando altri altoparlanti. Alcune versioni di altoparlanti Bluetooth
potrebbero non funzionare bene con il proiettore.
In caso di problemi, fornisci i seguenti dettagli nella tua e-mail: codice Paese, numero dell'ordine, modello
e una breve descrizione del problema (ad esempio, IT+000-0000000-0000000+S28+Nessun suono) e inviaci
un'e-mail all'indirizzo [email protected]. Ti assicuriamo che il nostro team di professionisti risponderà
rapidamente entro 24 ore per fornire soluzioni rapide ed ecaci per risolvere i tuoi problemi.

JP 99
目次
PUTRIMS 年中無休のプロのサポート 100
ヒント 100
パッケージリスト 101
プロジェクター 仕様 102
プロジェクター 紹介 103
リモコン 104
インストール 104
1. 取り付け方法 104
2. 投影距離とサイズ 105
プロジェクター 起動 105
投影設定 106
1. 電動フォーカス 106
2. オート垂直台形補正 106
3. 画像設定 107
4. オプション設定 108
スマートデバイスとの接続 109
1. WiFi 設定 109
2. 無線接続 110
3. 有線スクリーン 111
4. Bluetooth 112
5. マルチメディア再生 113
信号線の接続 115
1. USB ディスクで接続 115
2. スピーカーとの接続 115
3. DVD プレーヤーとの接続 115
4. PC との接続 115
5. MacBook または MacBook Air との接続 116
6. XBOX/ PS4/ PS5/ Nintendo/ Switch との接続 116
7. Fire TV Stick との接続 116
FAQ 117

JP 100
PUTRIMS 年中無休のプロのサポート
お客様へ
平素は PUTRIMS をご愛用いただき、誠にありがとうございます!
プロジェクターを使用する前に、このクイックスタートガイドをお読みくだ さい。
何か問題がございましたら、次の詳細を電子メールに記載してください:国コード、注文番号、モデル、問題
の簡単な説明(例:JP+000 0000000 0000000+S28+ 画像なし)で、[email protected]om までお問い合
わせてください。弊社チームが 24 時間以内に迅速かつ効果的な解決策をご提案いたしますので、ご安心くださ
い。
信号、音声、Bluetooth や WiFi 接続の問題、アニメーションが途切れるなど、多くの一般的な問題は簡単な調
整で解決できます。ご満足いただけるよう、弊社のプロジェクターはすべて出荷前に 100%の品質チェックと徹
底した梱包を行っております。
ご不明な点がございましたら、お気軽にお問い合わせください。そして、私たちに改善の機会を与えてください。
私たちは、お客様が遭遇する可能性のあるいかなる課題に対しても、満足のいく解決策を提供することをお約
束します。
よろしくお願いいたします。
PUTRIMS サービスチーム
ヒント
温度に関する注意事項:
プロジェクターを長持ちさせるために、過度に暖かい場所や寒い場所には置かないでください。極端な温度は、
デバイスの寿命を縮める可能性があります。最適なパフォーマンスを得るためには、5℃~ 35℃の作業環境を
維持してください。
適切な通風 :
プロジェクターには、安定した動作を保証するための換気システムが装備されています。通気口を布や毛布な
どで覆わないようにしてください。さらに、プロジェクターのスリットに物を差し込まないでください。ショ
ートや感電の原因となり、機器に損傷を与える可能性があります。
衝撃と振動からの保護 :
プロジェクターを強い衝撃、押し出し、振動から保護し、慎重に取り扱ってください。プロジェクターに内部
回路の障害が発生している場合は、プロジェクターを移動しないでください。
レンズのメンテナンス :
プロジェクターのレンズは、画像の精細さと品質に直接影響する重要な部品です。レンズが汚れていないこと
を確認してください。クリーニングの際は、ガラスレンズに適した柔らかい綿布を使用してください。硬い布
や研磨剤はレンズの表面を傷つける可能性があるため、使用しないでください。サポートと解決については、
[email protected]om まで電子メールでお問い合わせください。

JP 101
パッケージリスト
レンズカバー *1 PUTRIMS S28 プロジェクター *1
HDMI ケーブル *1
クイックスタートガイド *1 レンズカバー *1
電源ケーブル *1

JP 102
モデル番号 : S28
ディスプレイ技術 LCD 光源 LED
製品サイズ 8.07*6.06*6.45inch 重量 1.38kg
リフレッシュ率 60HZ 電源 AC110-240V
ネイティブ解像度 1280*720P 最大対応解像度 1920*1080P
台形補正 自動 / 電動 フォーカス 電動
操作モード リモコン アスペクト比 4:3/16:9
出力ポート 3.5mm 音声出力 入力ポート HDMI*1/USB*1
ビデオフォーマット
avi/mp4/mkv/v/wmv/mov/rmvb/mpeg1/mpeg2/mpeg-4/h.264/xvid/h.263( ビデオコ
ードのサポートは状況によって異なる場合があります。)
音声フォーマット AAC/MP2/MP3/PCM/FLAC/WMA( ドルビーオーディオコードには対応していません)
画像フォーマット JPG/PNG/BMP/JPEG
文書フォーマット TXT
プロジェクター 仕様

JP 103
プロジェクター 紹介
3.5mm オーディオ出力ポート
HDMI ポート
USB ポート
レシーバー
電源オン / オフ
スピーカー
電源入力
吸気口
防塵ネット
排気口
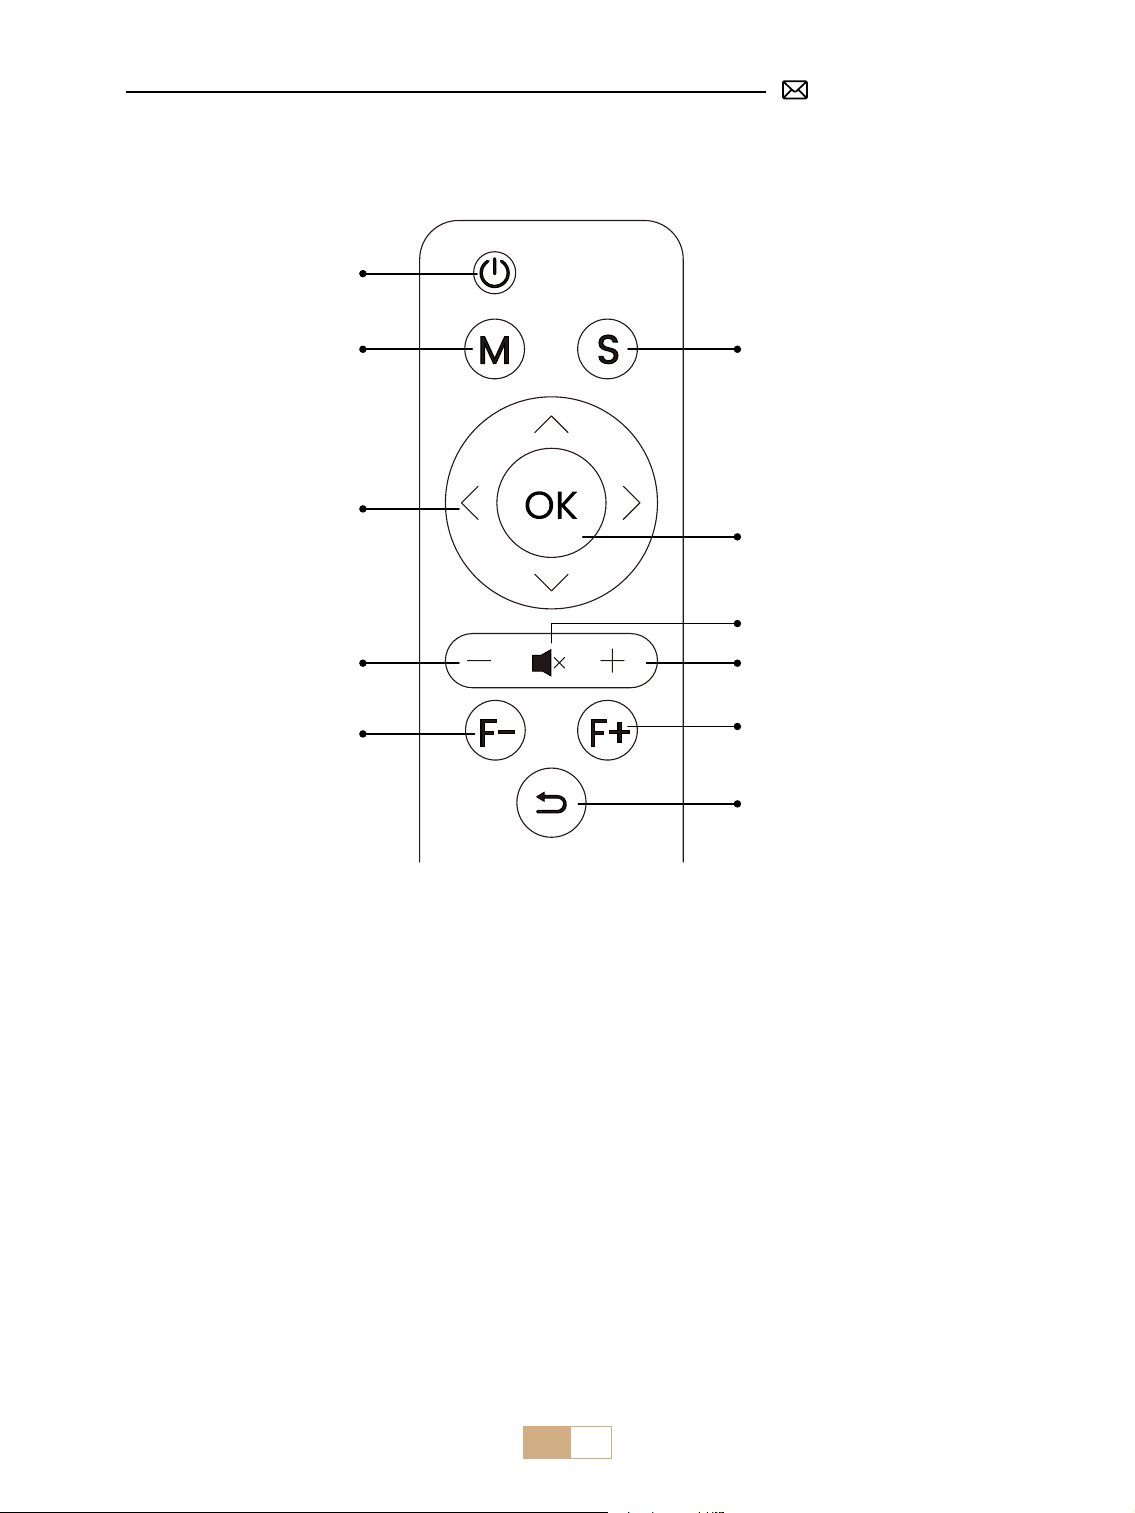
JP 104
リモコン
ご注意 :
1. リモコンを使用する前に、単 4 乾電池 2 本(別売)をリモコンに取り付けてください。新しい乾電池と古い
乾電池をリモコンに入れないでください。
2. リモコンを使用するとき、リモコンの信号送信機をプロジェクターの赤外線信号受信機に向けるか、または
単に投影スクリーンに向かって操作することを確認してください。
3. リモコンを長期間使用しない場合。液漏れを防ぐため、電池を取り外してください。
ソース
フォーカス -
音量 -
矢印ボタン
メニュー
電源
確認
ミュート
音量 +
フォーカス +
戻る
1. プロジェクターは安定した机の上に置くことができ、使用環境や要件に応じて画像を投影することができま
す。
2. プロジェクターは、レンズがスクリーンに対して軸対称になる高さに設置してください。これが不可能な場
合は、台形補正機能を使って投影画像を調整してください。
インストール
1. 取り付け方法
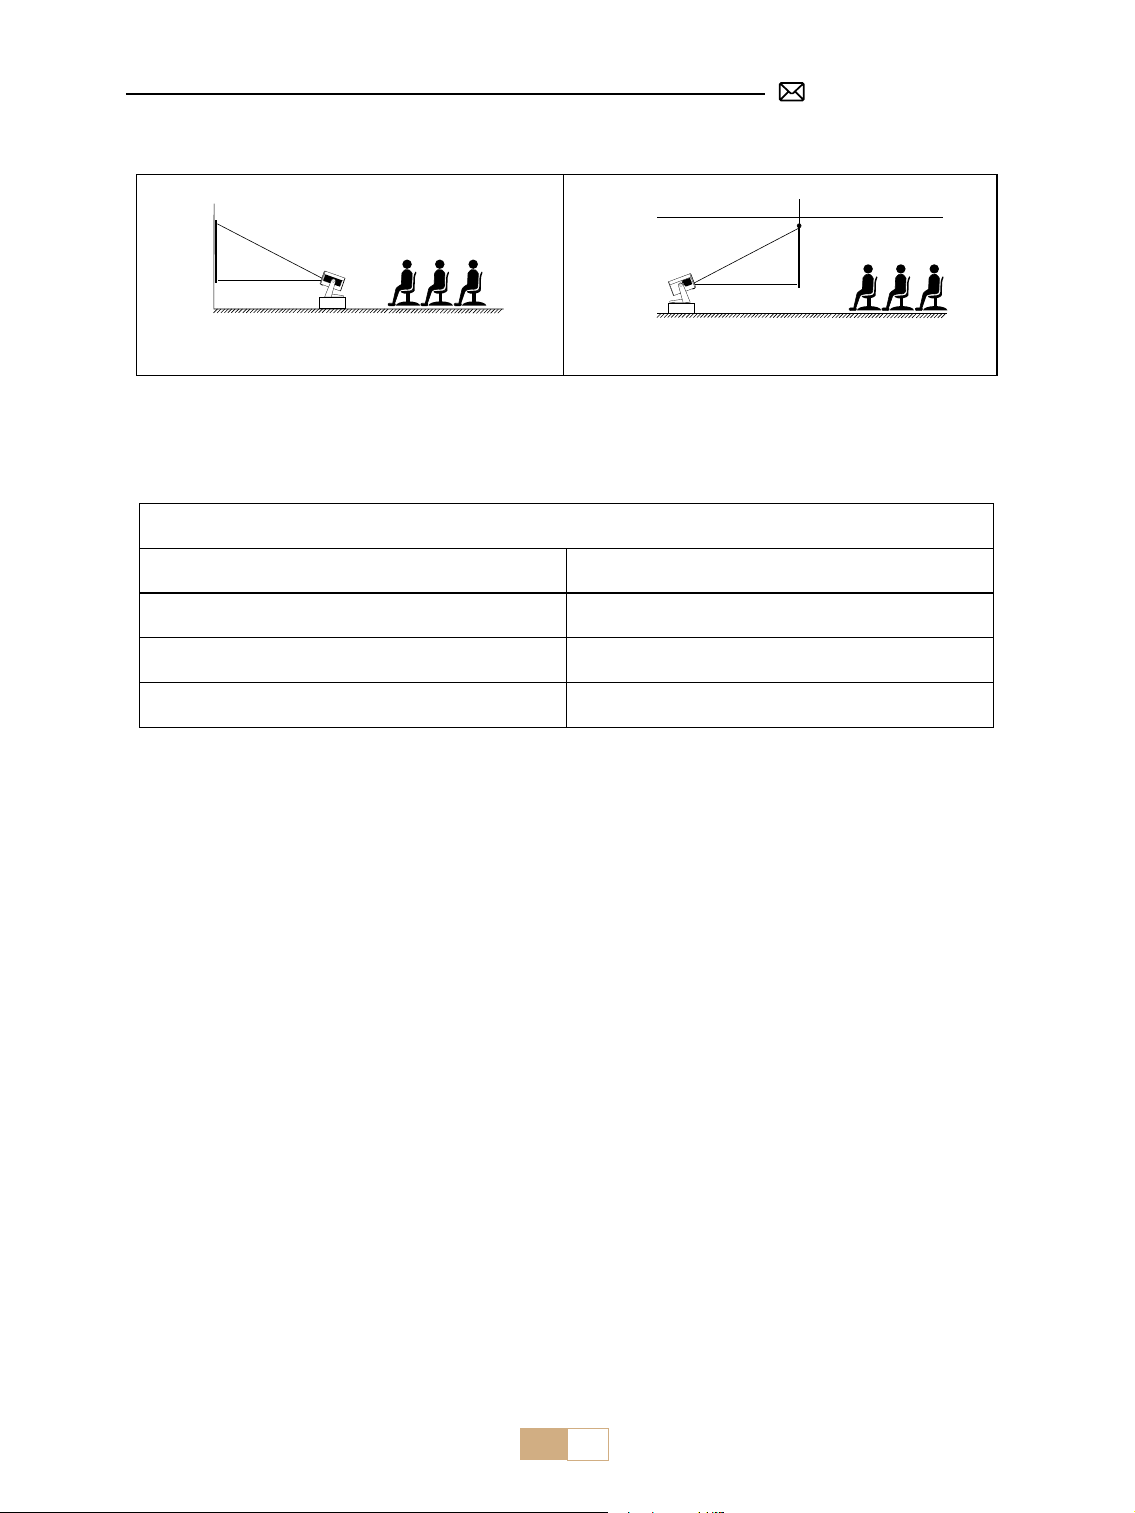
JP 105
テーブル置きと正面投影 テーブル置きと背面投影
2. 投影距離とサイズ
アスペクト比 : 16:9
距離 画面サイズ
1.2m 40"
2.4m 80"
3.6m 120"
* 投影の画像サイズは、プロジェクターとスクリーンの距離によって異なります。上記のデータには、3% の誤
差があります。
* 投影距離は 2 ~ 3m を推奨します。
* 周囲の環境を暗くすることで、投影映像の鮮明さが増します。
プロジェクター 起動
プロジェクターをオンにする
レンズカバーを外し、電源ケーブルに接続し、赤いインジケーターランプが点灯したら、リモコンの電源キー
またはパネルの電源ボタンを押してプロジェクターを起動し、インジケーターが赤から青に変わったら、プロ
ジェクターの電源が入っています。
プロジェクターをオフにする
リモコンの電源キーまたはパネルの電源ボタンを押すと、インジケーターが青色から赤色に変わり、プロジェ
クターの電源が切れます。

JP 106
投影設定
1. 電動フォーカス
プロジェクターを壁に水平に設置してください。
リモコンの F+/F- を押してピントを調整してください。注:感覚は人それぞれですので、一番鮮明と思われる画
像に調整してください。
2. オート垂直台形補正
ご注意 : 自動台形補正機能について、S28 プロジェクターが初めてお手元に届きましたら、ジャイロスコープ較
正機能をクリックしてください(較正成功の表示をクリックしてください)。
[ 設定 ] メニューを選択し、設定で [ 台形アイコン ] を選択し、[ 自動台形 ] オプションをオンにすると、自動的
に長方形に調整されます。または、手動で [+/-] を選択し、リモコンの [OK] を押して、ガイドが長方形に調整
されるまで、画面の角度を垂直方向に ±30°調整することができます。
メニュー コンテンツ 機能
自動台形補正 オン / オフ
スクリーンの角度を垂直方向に
±30°調整可能
ジャイロスコープ校正 校正成功
自動台形補正機能を使用する前に、
まずこの機能をクリックしてくだ
さい
台形補正+/ - /リセット +/-/リセット
リモコンで画面の角度を縦方向に
手動調整

JP 107
3. 画像設定
①
ユーザーモードで USB と HDMI パラメーター調整をサポートします。
②
リモコンのメニューボタンをクリック -- 画像設定 -- 画像モード -- ユーザーモード。
メニュー コンテンツ 機能
画像モード
標準 / ダイナミック / マイル
ド / ユーザー
コントラスト/明るさ/色/シャープネスを調
整
色温度 コールド / 標準 / ウォーム 色温度を調整
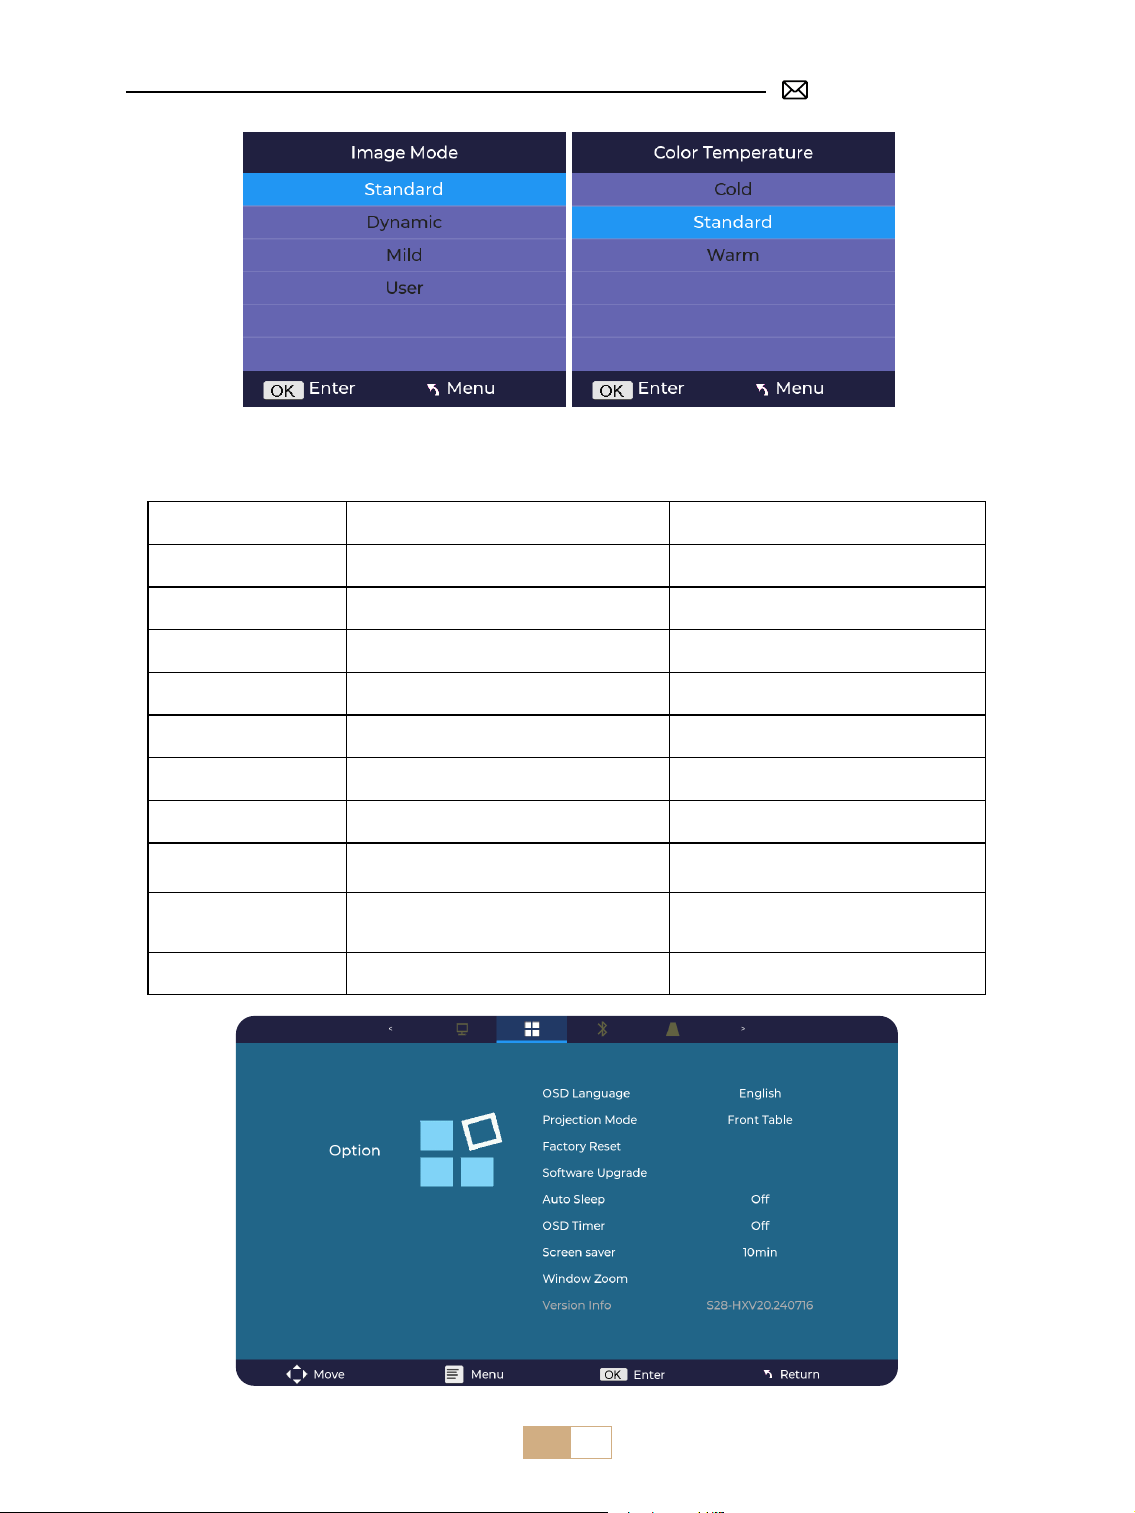
JP 108
4. オプション設定
メニュー コンテンツ 機能
OSD 言語
英語 / フランス語 / イタリア語 / スペイン語 /
ドイツ語 / 日本語
言語を選択
投影モード 正面 / 背面 / 天井に正面 / 天井に背面 投影画像の方向を反転
工場出荷時のリセット リセット 工場出荷時の設定に戻す
ソフトウェア更新 ローカル更新 (USB)
ローカルファイル経由でソフトウェアを更
新
オンライン更新 オンライン更新 (OTA) オンラインによるソフトウェアの更新
自動睡眠 オフ /60m/120m/180m 睡眠時間の設定
OSD タイマー オフ /5s/10s/15s/20s/25s/30s ホームページを返す時間を設定
スクリーンセーバー オフ /10min/15min/30min
ウィンドウズーム アスペクト比 4:3/16:9; ズーム 100%-50%
画面のアスペクト比を調整 画像サイズを調
整
バージョン情報 ソフトウェア・バージョン ソフトウェア・バージョン
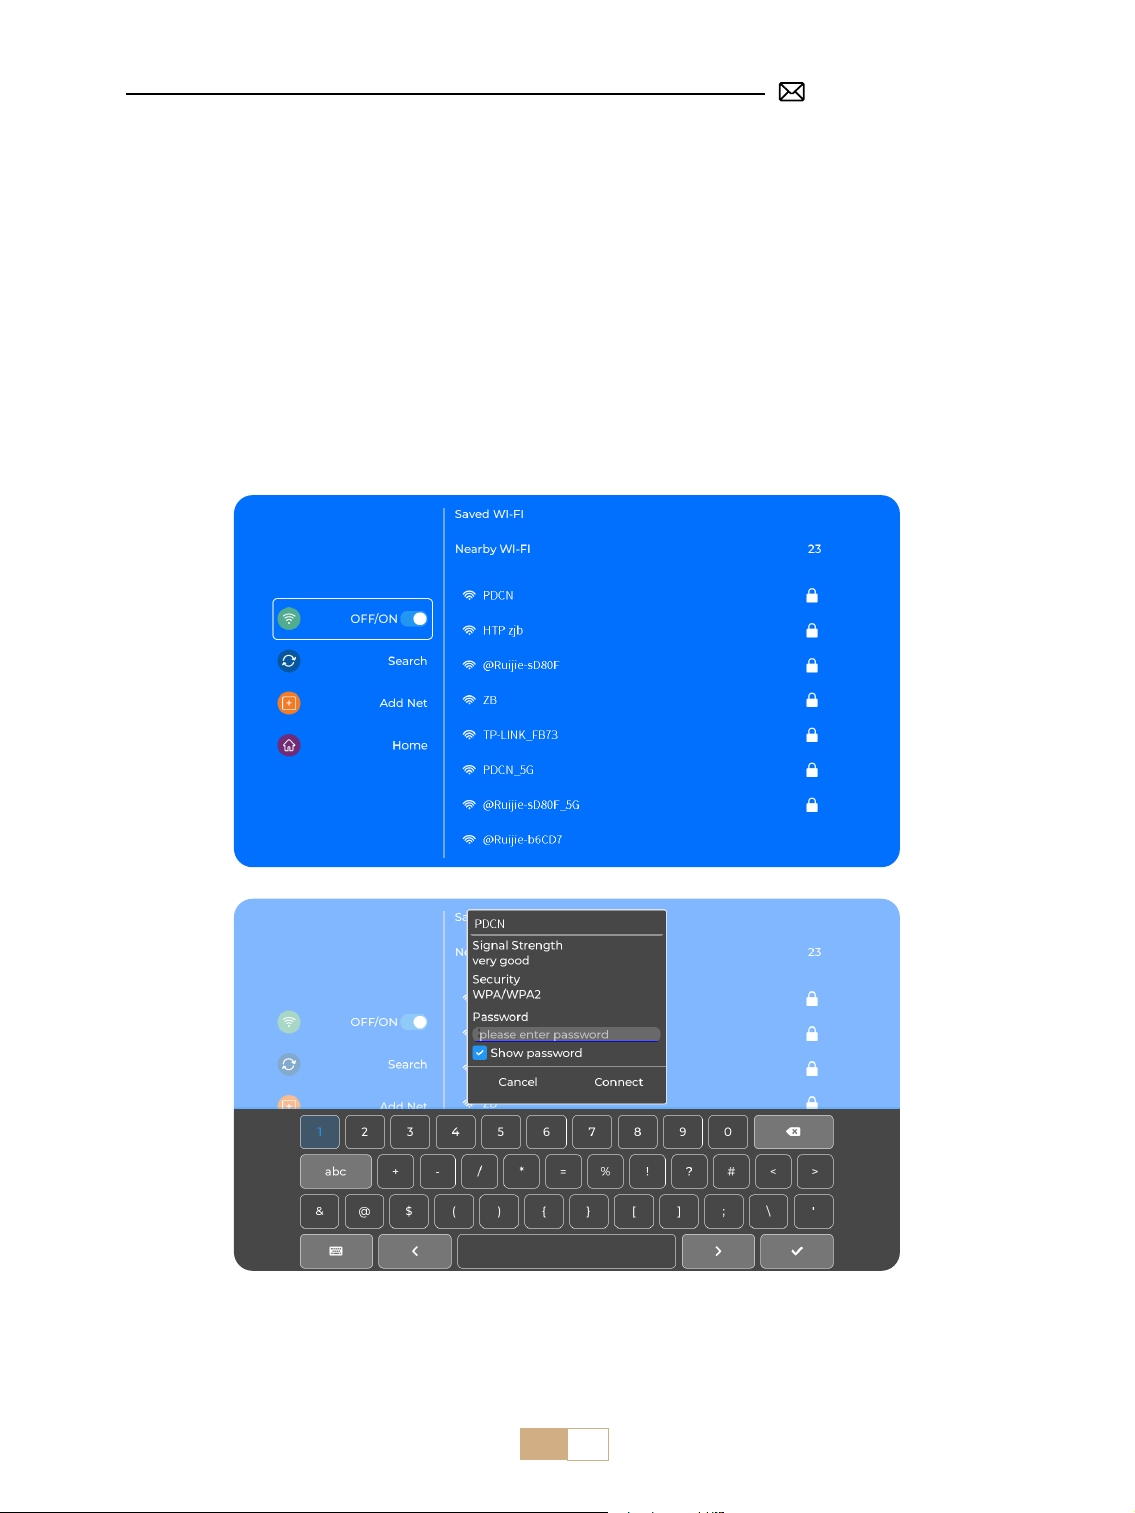
JP 109
ヒント:
①
ワイヤレス接続での画面ミラーリングの流暢さは、ネットワーク環境に影響されます。スクリーンミラーリ
ングを使用する場合は、100Mbit 以上のネットワークをお勧めします。
②
ワイヤレス接続を使用する際は、モバイルデバイスがプロジェクターの近くにあることを確認してください。
1.6m 以内の距離をお勧めします。
③
モバイル機器によっては、互換性の問題でスクリーンミラーリングに対応していない場合があります。
スマートデバイスとの接続
メインインタフェースの [ WiFi ] アイコンを選択し、リモコンの [OK] キーを押して、WiFi インタフェースに入り、
[ ネットワーク設定 ] を選択します。
1. WiFi 設定
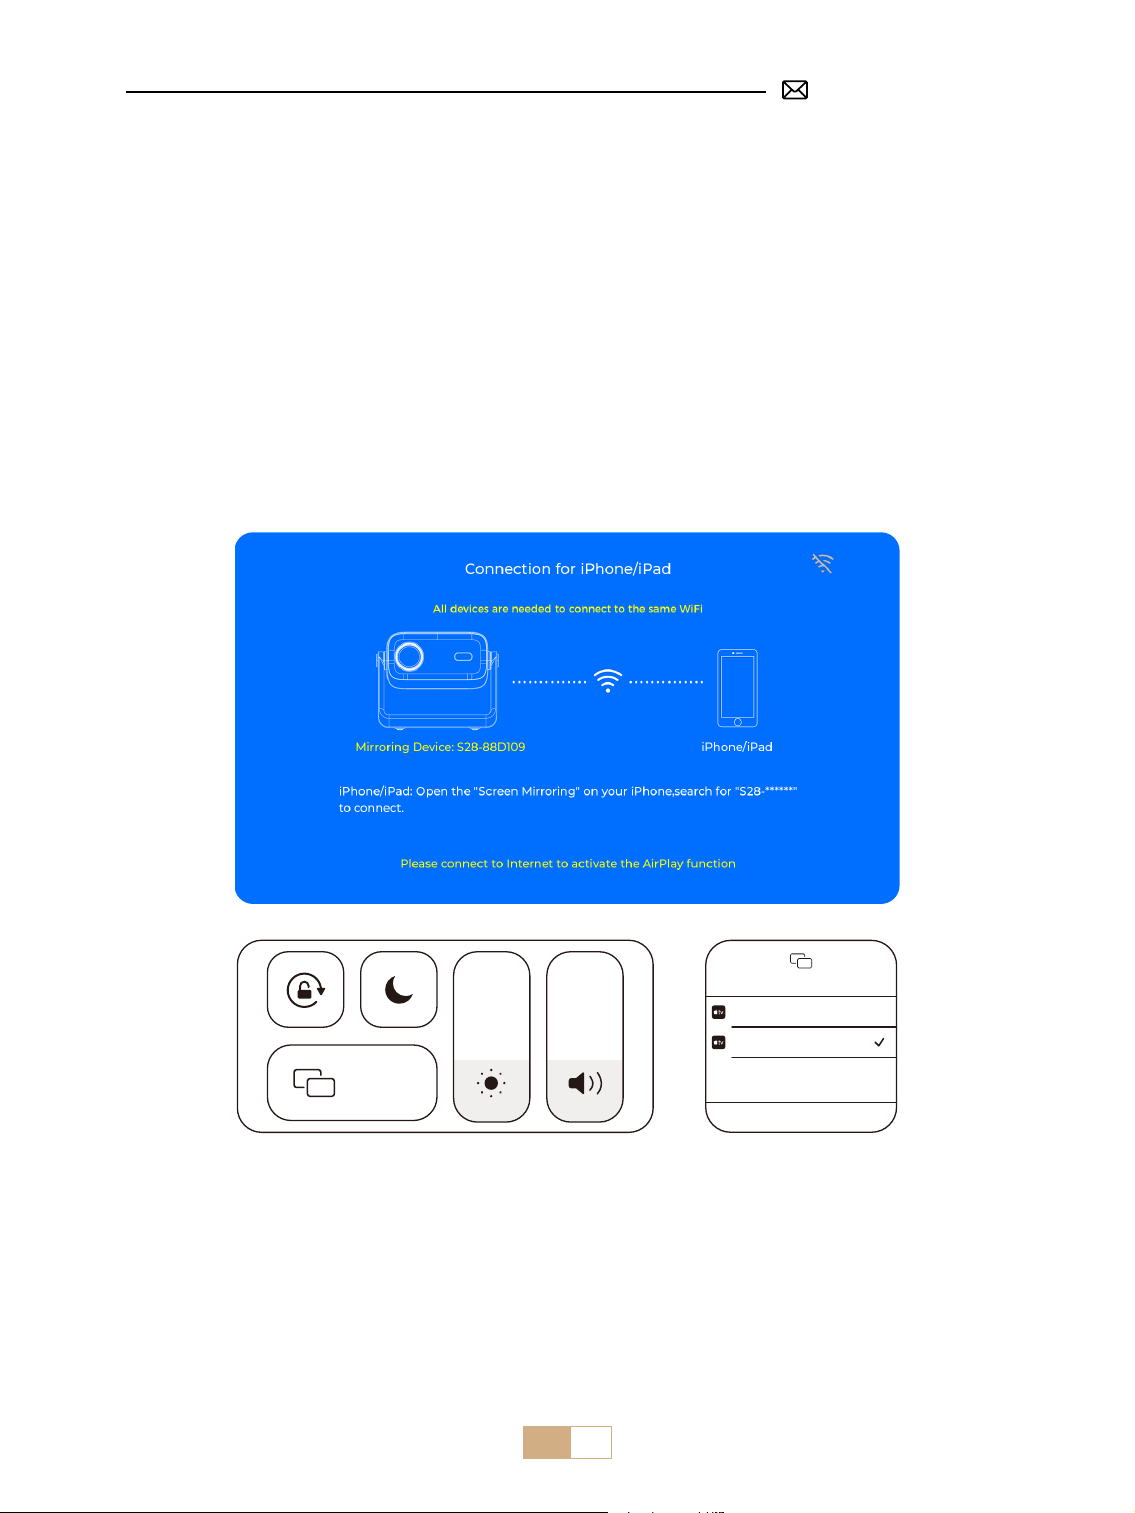
JP 110
①
[ WiFi 設定 ] に入ります。
②
S28 プロジェクターを WiFi ネットワークに接続します。
③
[ iOS ミラーリング ] メニューを選択します。
④
このインターフェイスに留まります。
⑤
iOS デバイスを同じ WiFi ネットワークに接続します。
⑥
iOS デバイスの [ コントロールセンター ] にアクセスし、[ Airplay] 機能を選択します。
⑦
[ S28-XXXX ] という iOS を選択して接続します。
ご注意 : 著作権の制限により、Netix、Hulu、Disney、YouTube などのストリーミングサービスでは、通常の再生には TV ステ
ィック(別売)をプロジェクターに挿入する必要があります。
ご注意 : iOS デバイスがプロジェクターと同じ Wi-Fi ネットワークに接続されていることを確認してください。
2. 無線接続
2.1 iOS キャスト用(Airplay)
Screen Mirroring
Stop Mirroring
Bedroom
Projector-S28-XXXX
Screen
Mirroring
2.2 Android システム用(Miracast)
スクリーンミラーリングの方法 : 異なるブランドの Android デバイスでは、スクリーンミラーリングを有効
にするためにさまざまな用語や方法が使用される場合があります。お使いのデバイスの正確な手順を確認す
るには、デバイスのマニュアルを参照してください。画面ミラーリングの一般的な用語には、Multi-screen、
Wireless Display、WLAN Display、Screen Mirroring、Smart View などがあります。
デバイスの互換性 : すべての Android 端末がスクリーンミラーリング機能をサポートしているわけではありま
せん。スクリーンミラーリングを使用する前に、お使いの Android 端末がこの機能をサポートしていることを
確認してください。デバイスのマニュアルを確認するか、設定でスクリーンミラーリングのオプションを探し、
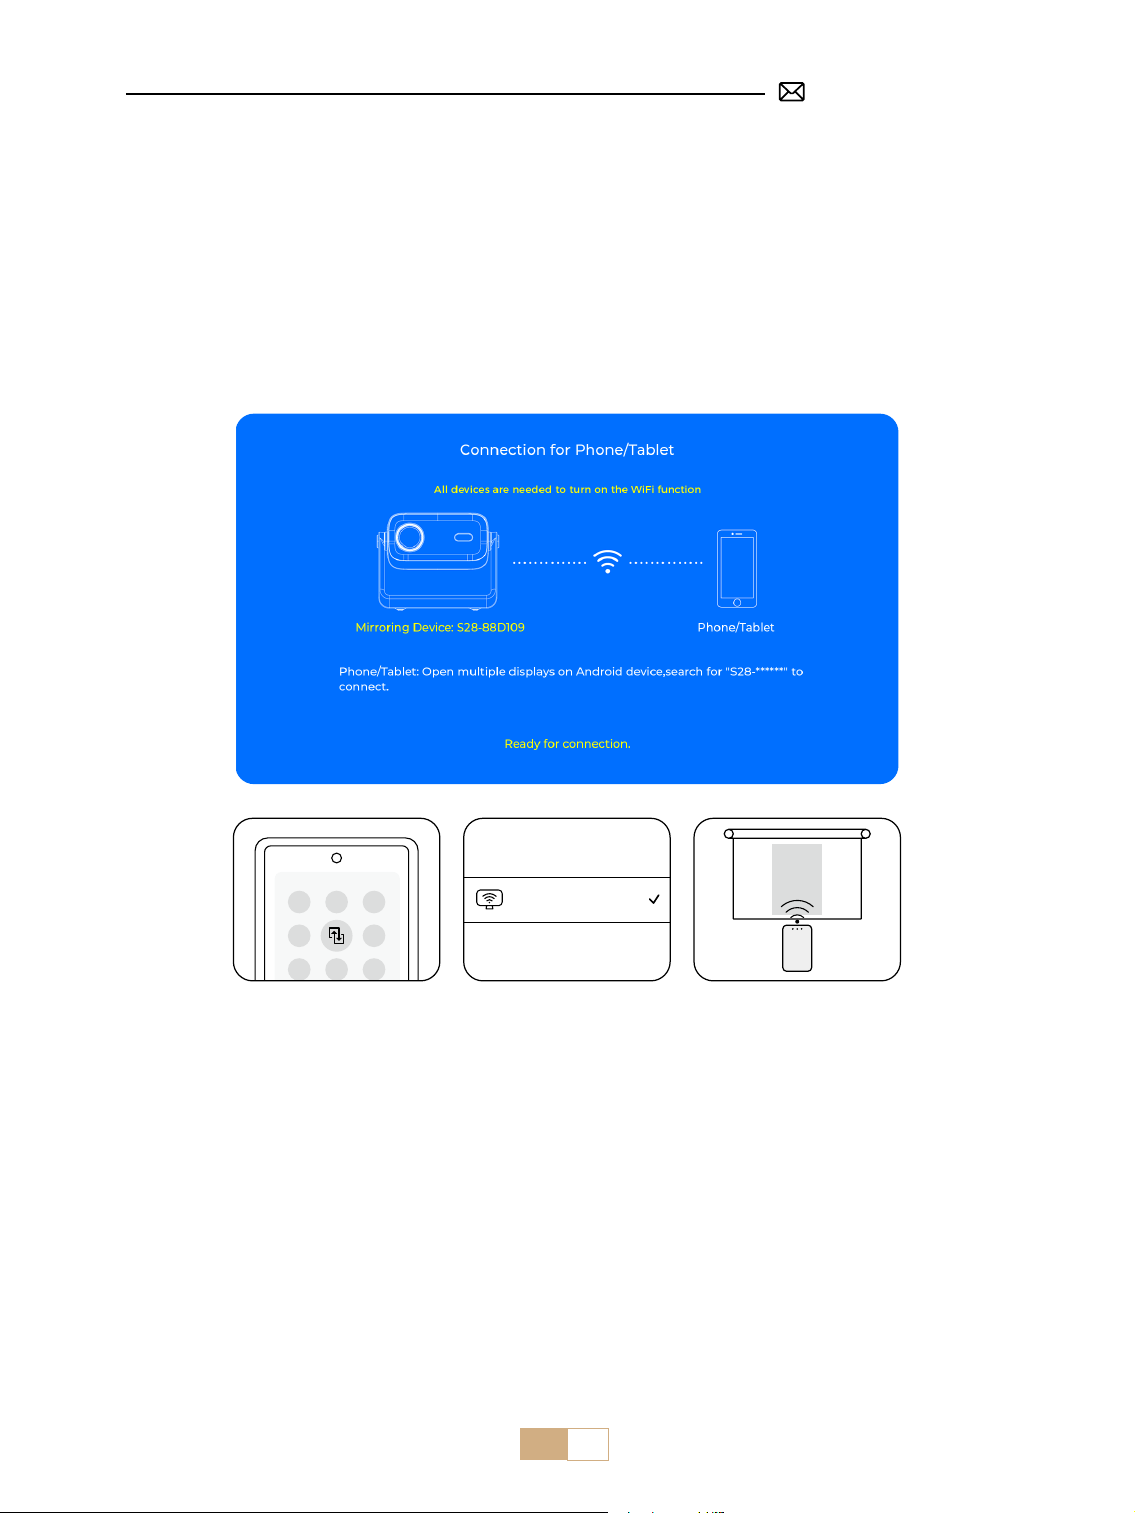
JP 111
PUTRIMS_S28_XXXX
3. 有線スクリーン
3.1 Android 接続ケーブル
①
[ 有線スクリーン ] メニューを選択します。
②
付属の QR コードをスキャンし、HCCast アプリをインストールします。
③
USB - Type-c ケーブルを使用して Android デバイスをプロジェクターに接続します。
④
デバイスのポップアップウィンドウで HCCast を開くことを確認します。
⑤
プロンプトが表示されたら、パスワードを入力し、接続を認証します。
⑥
Android デバイスは自動的に同じスクリーンに配線されます。
ご注意:安定した接続を得るために、頻繁な抜き差しは避けてください。Android の機種によっては、スクリー
ンミラーリングに [ ファイルの転送 ] を選択する必要があります。
互換性を確認することができます。
①
[ WiFi 設定 ] に入り、WiFi 機能をオンにします。
②
[ Android ミラーリング ] メニューを選択します。
③
このインターフェイスに留まります。
④
Android デバイスを同じ WiFi ネットワークに接続します。
⑤
Android 端末の [ コントロールセンター ] にアクセスし、[ マルチミラー / スマートビュー ] 機能を選択します。
⑥
[ S28-XXXX ] という Miracast レシーバーを選択し、接続します。
ご注意 : 著作権の制限により、Netix、Hulu、Disney、YouTube などのストリーミングサービスでは、通常の再生には TV ステ
ィック(別売)をプロジェクターに挿入する必要があります。
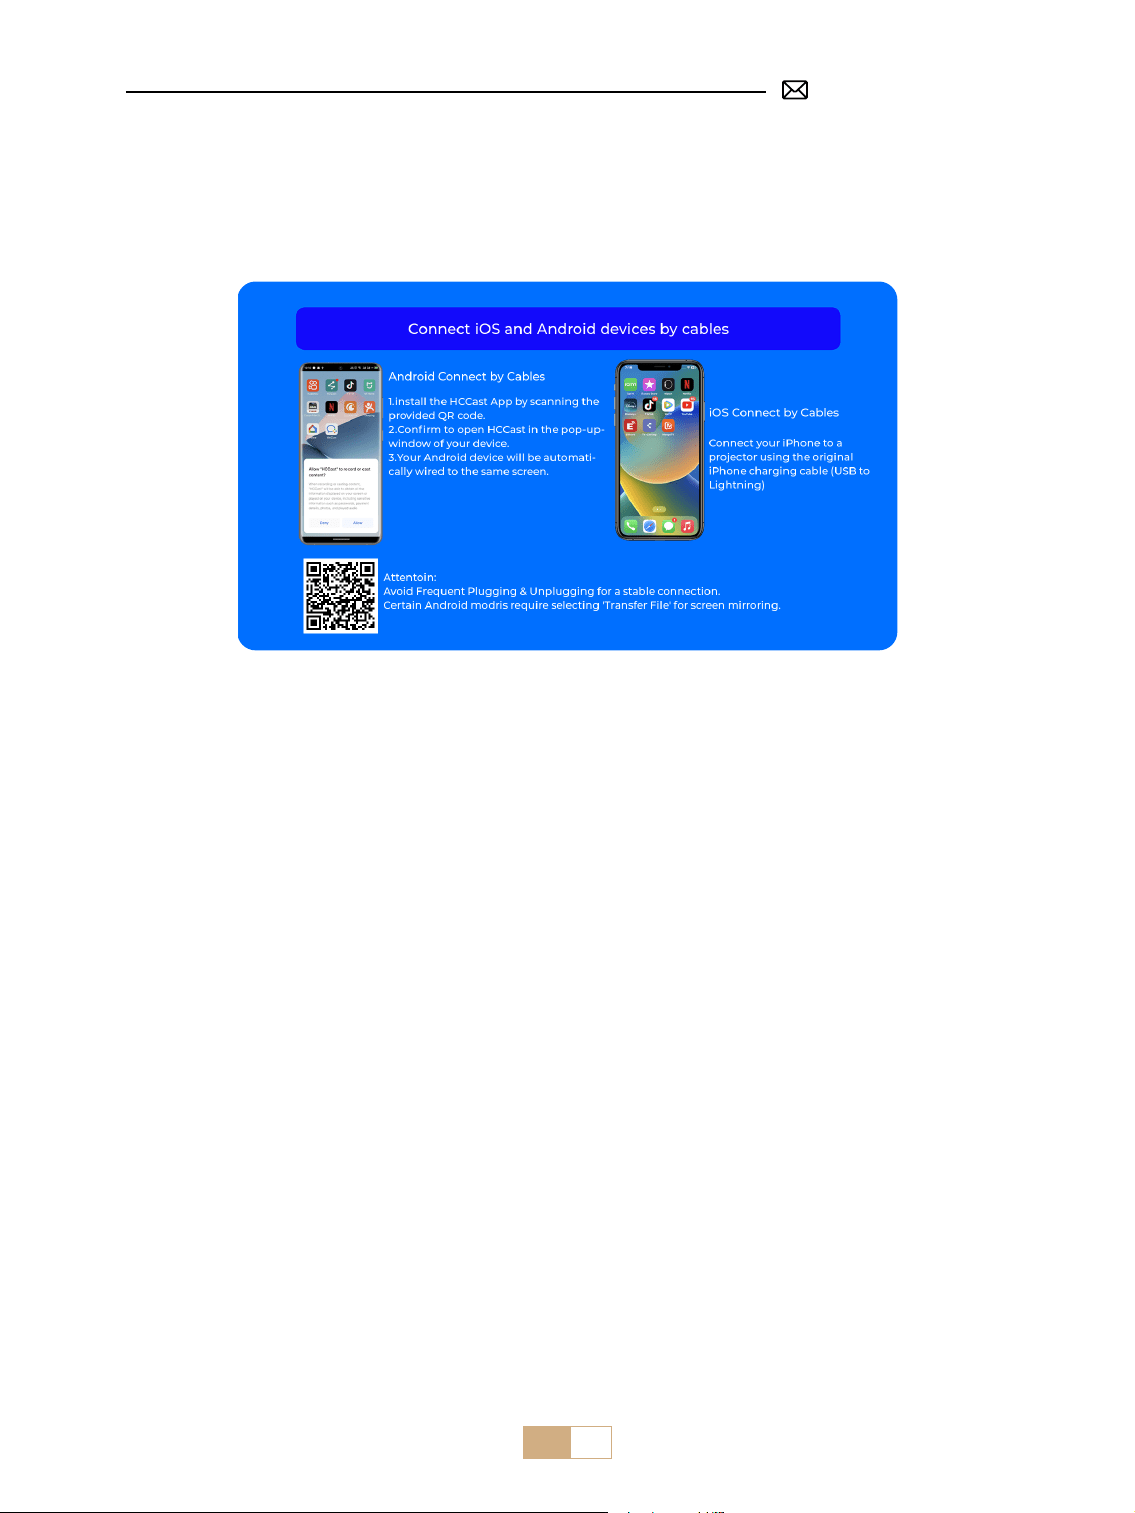
JP 112
3.2 iOS 接続ケーブル
①
[ 有線スクリーン ] メニューを選択します。
②
iPhone 純正充電ケーブル(USB-Lightning)を使用して iPhone をプロジェクターに接続します。
③
完了。
4. Bluetooth
Bluetooth スピーカーを接続
①
Bluetooth スピーカーをオンにします。
②
プロジェクターの [ Bluetooth ] をオンにし、Bluetooth スピーカーを選択して接続します。
ご注意:
①
S28 プロジェクターは、ほとんどの Bluetooth ヘッドセット、Bluetooth スピーカー、Airpods と互換性があ
ります。ただし、Bluetooth キーボードや Bluetooth 電話には対応していませんのでご注意ください。
②
ビデオ再生中に音が出ない場合は、接続機器のドルビーサウンド設定を確認することをお勧めします。ドル
ビーサウンドをオフにすると、プロジェクターとの音声互換性が向上します。
③
Bluetooth スピーカーによっては、プロジェクターに接続した際に音量が著しく低下する場合があります。
この問題に対処するには、関連するすべてのデバイスの音量を上げて、希望のサウンドレベルになるように
してください。
④
この手順は Bluetooth スピーカーとの接続にのみ適用され、携帯電話の Bluetooth との接続には適用されま
せん。
⑤
ご連絡ください。

JP 113
①
USB フラッシュディスクをプロジェクターの USB ポートに挿入します。
②
[ メディア ] を選択し、[ OK ] キーを押して入力します。
③
ファイルの種類によって、[ 動画 / 音楽 / 写真 / テキスト ] を選択します。
④
再生したいファイルを選択し、[ OK ] ボタンを押して再生します。
⑤
ビデオ再生中にリモコンの [ メニュー ] ボタンをクリックすると、画像設定を直接調整できます。
5. マルチメディア再生
5.1 USB 入力モード
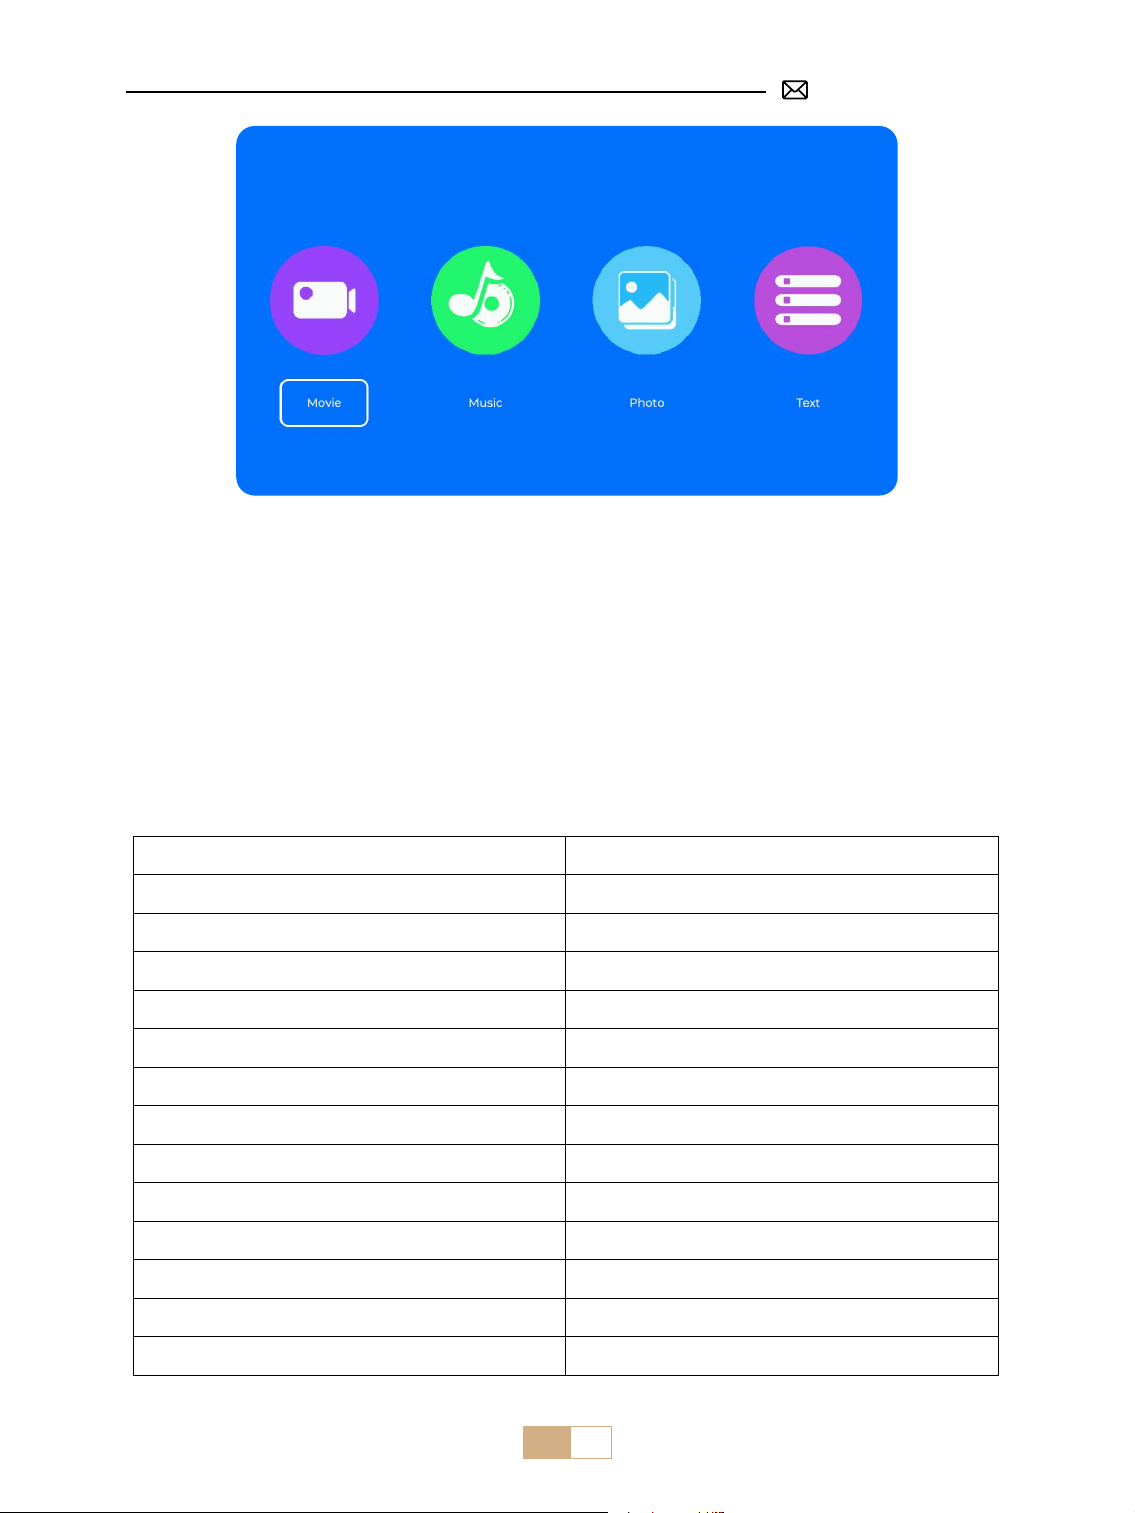
JP 114
ヒント :
プロジェクターが USB ディスクを認識できない場合は、USB ディスクが以下のフォーマットを満たしているこ
とをご確認ください :
FAT, FAT32: 8GB/16GB/32GB
NTFS: 64GB
これらの条件を満たさない場合は、サポートされているフォーマットの USB ディスクに変更する必要がありま
す。
問題が解決しない場合は、問題の詳細を以下のメールアドレスにお送りください: [email protected]om
5.2 ビデオ再生インターフェース
マニュアル 機能
早戻し 長押しでビデオを早戻し
早送り 長押しでビデオを早送り
前 前のビデオに切り替え
次 次のビデオに切り替え
停止 再生を停止して終了
サイクル リストサイクルまたはシングルサイクル
情報 ビデオ詳細
リスト 現在のフォルダ内のすべてのプレイリストを選択
ズーム + ズーム + 2X - 8X
ズーム - ズーム - 1/2X - 1/8X
スロー スロー・フォワード
ステップ ステップ・フォワード
オート アスペクト比 オート /4:3/16:9

JP 115
信号線の接続
PUTRIMS S28 プロジェクターは HDMI ポート *1/USB ポート *1/3.5mm ヘッドホン出力 *1 の 3 つのインターフ
ェイスを持っています。お使いのデバイス(PC、電話、TV スティック、スピーカー、DVD プレーヤー、USB、
PS4 など)を接続するために、正しい接続ポートを選択してください。
①
USB フラッシュディスクをプロジェクターの USB ポートに挿入します。
②
[ メディア ] を選択し、[ OK ] キーを押して入ります。
③
ファイルの種類に応じて、[ 動画 / 音楽 / 写真 / テキスト ] のオプションを選択します。
④
目的のファイルを選択し、[ OK ] ボタンを押して再生します。
1. USB ディスクで接続
2. スピーカーとの接続
①
3.5mm オーディオケーブルでスピーカーと接続します。
②
プロジェクターとスピーカーの電源を入れます(AUX モードを選択します)。
Audio
out
AUX
port
①
DVD プレーヤーとプロジェクターの電源を入れます。
②
DVD プレーヤーとプロジェクターを HDMI ケーブルで接続します。
③
ホーム画面で [ ソース ] を入力し、対応する HDMI を信号ソースとして選択します。
ご注意 : プロジェクターと DVD プレーヤーを HDMI ケーブルで接続した際に音が出ない場合は、DVD プレーヤ
ーの HDMI 端子の出力信号が HDCP に対応していない可能性がありますので、スピーカーを接続してみてくだ
さい。
3. DVD プレーヤーとの接続
①
パソコンと S28 プロジェクターを HDMI ケーブルで接続します。
②
HDMI ソースを選択し、コンピュータ上の任意のファイルを投影します。
③
パソコンで、[ Win+P ] ボードキーを押したまま、ディスプレイモードを変更できます。
4. PC との接続

JP 116
パソコンのみ : これはデフォルトのオプションで、メインモニターにのみ画面を表示します。
複製 : 接続されているすべてのモニターにデスクトップを複製します。
拡張 : デスクトップを複数のモニターに拡張します。
プロジェクターのみ : セカンダリモニタ(プロジェクタ)のみを使用し、メインモニタはオフにします。
プロジェクター専用モードで画面解像度を変更するには、以下の手順に従います:
ステップ:スタート > コントロールパネル > 外観と個人設定 > 画面解像度の調整
①
MacBook との接続には Type-C - HDMI アダプターを、MacBook Air との接続には Mini Display - HDMI アダ
プターをご使用ください(アダプターは付属していません)。MacBook または Mac Book Air との接続。( アダ
プターは付属していません。)
②
HDMI 信号源を選択し、MacBook または MacBook Air にあるファイルを投影します。
①
XBOX/ PS4/ PS5/ Nintendo/ Switch に接続するには、HDMI ケーブルを使用します。
②
メディア信号チャンネルを選択します:[ HDMI ]。
①
TV スティックをプロジェクターの HDMI ポートに接続します。
②
メディア信号チャンネルを選択します:[ HDMI ]。
5. MacBook または MacBook Air との接続
6. XBOX/ PS4/ PS5/ Nintendo/ Switch との接続
7. Fire TV Stick との接続

JP 117
FAQ
PUTRIMS S28 プロジェクターをお買い上げいただき、誠にありがとうございます。よくある質問とその回答を
まとめましたが、ご参考ください。
Q1:投影画像に黒い点があります。どうすれば除去できますか?
A: 1) ドライヤーを低速でダストネットに向けて当て、ホコリを吹き飛ばしてください。
2)または、プロジェクター本体を軽くたたいてください。
Q2: プロジェクターがホーム WiFi を検索できません。
A: プロジェクターの WiFi 機能をオフにしてから、電源をオフにして、再起動してください。WiF をオンにすると、
接続先リストにご自宅の WiFi が表示されます。正しいパスワードを入力して接続してください。
Q3: スクリーンミラーリングまたは WiFi 接続が不安定です。どうすればこの問題を解決できますか?
A: スクリーンミラーリングには、強力なワイヤレス WiFi 信号が必要です。ビデオ解像度は、Wi-Fi 信号の強度
に応じて動的に調整されます。さらに、携帯電話のホットスポットを有効にして S28 に接続し、問題がホーム
ネットワークにあるかどうかを確認してください。問題が解決しない場合は、[email protected]om までお
問い合わせください。
Q4: スクリーンミラーリング時、プロジェクターは Netix、YouTube、Hulu、ディズニービデオなどを再生
できません。なぜですか?
A: 著作権保護のため、ほとんどのプロジェクターは Netix、Hulu、Disney などのストリーミングサービスの
ワイヤレスミラーリングに対応していません。著作権の制限により、ほとんどのプロジェクターは Netix、
Hulu、Disney などのストリーミングサービスのワイヤレスミラーリングをサポートしていません。これらのサ
ービスを楽しむには、プロジェクターと一緒に TV Stick(別売)を使用することをお勧めします。
Q5: スクリーンが上下逆になっているのはなぜですか?
A: 設定→投影モード→映像の向きを反転してください。プロジェクターのレンズを投影スクリーンまたは壁掛
けスクリーンに対して垂直に置きます。画像が鮮明になるまで、リモコンの F-/F+ キーでフォーカスを調整しま
す。画像の矩形を調整するには、台形設定にアクセスし、【+/-/ リセット】を選択して調整します。
Q6: プロジェクターに映像は映るのですが、音が出ません。何が原因でしょうか?
A: 1) プロジェクターはドルビーサウンド、DTS、5.1ch、HDMI CEC、ARC をサポートしていません。接続機器
のドルビー設定を必ずオフにしてください。
2) プロジェクターの音量と外部機器または Bluetooth スピーカーの音量が適切なレベルに設定されていること
を確認します。
3) 他のスピーカーで別のビデオを再生してみてください。Bluetooth スピーカーのバージョンによっては、プロ
ジェクターとうまく動作しない場合があります。
また何か問題がございましたら、次の詳細を電子メールに記載してください:国コード、注文番号、モデル、
問題の簡単な説明(例:JP+000-0000000-0000000+S28+ 画像なし)で、support@putrims.com までお問い
合わせてください。弊社チームが 24 時間以内に迅速かつ効果的な解決策をご提案いたしますので、ご安心くだ
さい。

FCC Statement
FCC STATEMENT :
This device complies with Part 15 of the FCC Rules. Operation is subject to the following two conditions:
(1)This device may not cause harmful interference, and
(2)This device must accept any interference received, including interference that may cause undesired
operation.
Warning: Changes or modications not expressly approved by the party responsible for compliance could void
the user's authority to operate the equipment.
NOTE: This equipment has been tested and found to comply with the limits for a Class B digital device,
pursuant to Part 15 of the FCC Rules. These limits are designed to provide reasonable protection against
harmful interference in a residential installation. This equipment generates uses and can radiate radio
frequency energy and, if not installed and used in accordance with the instructions, may cause harmful
interference to radio communications. However, there is no guarantee that interference will not occur in a
particular installation. If this equipment does cause harmful interference to radio or television reception,
which can be determined by turning the equipment o and on, the user is encouraged to try to correct the
interference by one or more of the following measures:
Reorient or relocate the receiving antenna.
Increase the separation between the equipment and receiver.
Connect the equipment into an outlet on a circuit dierent from that to which the receiver is connected.
Consult the dealer or an experienced radio/TV technician for help.
FCC Radiation Exposure Statement:
This equipment complies with FCC radiation exposure limits set forth for an uncontrolled environment. This
equipment should be installed and operated with minimum distance 20cm between the radiator & your body.
This device contains licence-exempt transmitter(s)/receiver(s) that comply with Innovation, Science and
Economic Development Canada’s licence-exempt RSS(s). Operation is subject to the following two
conditions:
(1) This device may not cause interference.
(2) This device must accept any interference, including interference that may cause undesired operation of the
device.
L’émetteur/récepteur exempt de licence contenu dans le présent appareil est conforme aux CNR d’Innovation,
Sciences et Développement économique Canada applicables aux appareils radio exempts de licence.
L’exploitation est autorisée aux deux conditions suivantes :
(1) L' appareil ne doit pas produire de brouillage;
(2) L' appareil doit accepter tout brouillage radioélectrique subi, même si le brouillage est susceptible d' en
compromettre le fonctionnement.
This equipment complies with IC exposure limits set forth for an uncontrolled environment. This equipment
shall be installed and operated with minimum distance 20cm between the radiator & body.
Correct Disposal of this product
This marking indicates that this product should not be disposed with other household wastes
throughout the EU. To prevent possible harm to the environment or human health from
uncontrolled waste disposal, recycle it responsibly to promote the sustainable reuse of material
resources. To return your used device, please use the return and collection systems or contact
the retailer where the product was purchased. They can take this product for environmental safe
recycling.

Declaration of Conformity
We (Manufacturer is responsible for this declaration)
YABER TECHNOLOGIES CO., LIMITED
(Company name)
Room 406, 4 Floor, B Building, BanTian International Center, HuanCheng South Road, BanTian Street,
LongGang District, Shenzhen
(Company address)
declare under our sole responsibility that the product
Trade name: PUTRIMS
Equipment: Entertainment Projector
Model No. : S28
to which this declaration relates is in conformity with the essential requirement set out in the Council Directive
on the Approximation of the laws of the Member States relating to RED Directive(2014/53/EU) & RoHS(2011/65/
EU) product is responsible to ax CE marking, the following standards were applied:
EN 62368-1:2014+A11:2017
EN IEC 62311:2020
ETSI EN 301 489-1 V2.2.3(2019-11)
ETSI EN 301 489-17 V3.2.4(2020-09)
EN 55032:2015
EN 55035:2017
EN 61000-3-2:2019
EN 61000-3-3:2013+A1:2019
ETSI EN 300 328 V2.2.2(2019-07)IEC62321-3-1:2013
IEC62321-4:2013
IEC62321-5:2013
IEC62321-6:2015
IEC62321-7-1:2015
IEC62321-7-2:2017
IEC62321-8:2017
Full Name: George.wang Position: Approbation Manager
Signature: Place/Date: Shenzhen,China/Jul.10-2023
Declaration of Conformity