USER MANUAL
service@toptro.com
X7

LANGUAGE
English
Deutsche
Français
Espanol
Italian
日本语
02-25
26-49
50-73
74-97
98-121
122-142

service@toptro.com service@toptro.com
EN EN
2 3
CONTENTS
TOPTRO Lifetime Professional Support
TIPS
Dear customer,
Thank you very much for supporting TOPTRO.
Please read this manual thoroughly before using the projector. If you have
any issues, email your order number and the problem to
service@toptro.com. We will provide a fast solution in 24 hours.
Actually, many problems can be easily solved by setting, such as no signal,
no sound, Bluetooth connection failed, WiFi connection failed, choppy
animation etc. We promise all the projectors have been 100% carefully
checked and packaged before shipping.
If you have any questions, could you please contact us so that the
problem can been solved. And give us an opportunity to improve. We
guarantee we will provide you a satisfactory solution.
Thanks for your understanding!
Best regards
TOPTRO Service Team
1. Do not place projector in too warm or too cold room, because the high
temperature or low temperature will shorten lifespan of the device. The
working environment would be 5°C~35°C better.
2. The ventilation is equipped for the projector to work stably. Don't cover
the vent with cloth, blanket or other things. Don't insert anything into the
slit of the projector, or it may produce a short circuit or an electric shock
to your device and cause damage.
3. The projector shall be strictly protected from strong impact, extrusion
and vibration. Do not try to move and on strong impact, extrusion and
vibration. Do not try to move and the internal circuit faults.
4. Lens, as the core component of the projector, is directly related to the
picture definition and effect. The excessive dust thereon will affect image
quality. The dirty lens shall be wiped with soft cotton cloth for the glass
lens surface. Hard cloth or abrasives shall not be used.
TOPTRO Lifetime Professional Support - - - - - - - - - - - - - - 3
TIPS- - - - - - - - - - - - - - - - - - - - - - - - - - - - - - - 3
PACKAGE LIST - - - - - - - - - - - - - - - - - - - - - - - - - - 4
PROJECTOR SPECIFICATIONS - - - - - - - - - - - - - - - - - - 4
PROJECTOR OVERVIEW - - - - - - - - - - - - - - - - - - - - - 5
PACKAGE LIST - - - - - - - - - - - - - - - - - - - - - - - - - - 7
INSTALLATION - - - - - - - - - - - - - - - - - - - - - - - - - - 8
1.Installation Method - - - - - - - - - - - - - - - - - - - - - - - - - - 8
2.Projection Distance and Size- - - - - - - - - - - - - - - - - - - - - - 9
3.Install on the Ceiling- - - - - - - - - - - - - - - - - - - - - - - - - - 9
USE THE PROJECTOR - - - - - - - - - - - - - - - - - - - - - - 10
1.Turn on/off the projector- - - - - - - - - - - - - - - - - - - - - - - - 10
2.Focus Adjustment - - - - - - - - - - - - - - - - - - - - - - - - - - - 10
3.Keystone Correction Adjustment- - - - - - - - - - - - - - - - - - - - 11
SETTING UP THE PROJECTOR - - - - - - - - - - - - - - - - - - 11
1.Select the Insert Signal Source - - - - - - - - - - - - - - - - - - - - - 11
2.USB Disk Input Mode - - - - - - - - - - - - - - - - - - - - - - - - - 11
2.1 Play Video/Audio/Image/Office in the USB Disk Input Mode- - - - - -11
2.2 Play Interface - - - - - - - - - - - - - - - - - - - - - - - - - - - 13
2.3 Music Play Interface - - - - - - - - - - - - - - - - - - - - - - - - 14
2.4 Picture Play Interface- - - - - - - - - - - - - - - - - - - - - - - -15
3.WiFi Setting - - - - - - - - - - - - - - - - - - - - - - - - - - - - - - 16
3.1 iOS Cast ( for iOS Devices ) - - - - - - - - - - - - - - - - - - - - - 16
3.2 Miracast ( for Android Devices ) - - - - - - - - - - - - - - - - - - - 16
4.Bluetooth Setting - - - - - - - - - - - - - - - - - - - - - - - - - - - 18
5.Projector System Setting - - - - - - - - - - - - - - - - - - - - - - - 18
5.1 Projection Method - - - - - - - - - - - - - - - - - - - - - - - - - 19
5.2 Focus Menu - - - - - - - - - - - - - - - - - - - - - - - - - - - - 19
5.3 Keystone Correction Menu - - - - - - - - - - - - - - - - - - - - - 20
5.4 Zoom Menu - - - - - - - - - - - - - - - - - - - - - - - - - - - - 21
6.System Update - - - - - - - - - - - - - - - - - - - - - - - - - - - - 21
7.Common - - - - - - - - - - - - - - - - - - - - - - - - - - - - - - - 22
SIGNAL LINES CONNECTION - - - - - - - - - - - - - - - - - - - 22
1.Connect the Devices via the HDMI port - - - - - - - - - - - - - - - - - 23
2.Connect to the DVD Player- - - - - - - - - - - - - - - - - - - - - - - 23
3.Connect to the Sound bar/Speaker - - - - - - - - - - - - - - - - - - 24
4.Connect to the Computer - - - - - - - - - - - - - - - - - - - - - - - 24
WARRANTY - - - - - - - - - - - - - - - - - - - - - - - - - - - 25

service@toptro.com service@toptro.com
EN EN
4 5
PACKAGE LIST
PROJECTOR OVERVIEW
PROJECTOR SPECIFICATIONS
TOPTRO X7 Projector*1 Remote Control*1 Power Cord*1
HDMI Cable*1 AV Cable*1 User Manual*1
Lens Cover*1 Cleaning Cloth*1
Model No. X7
Native Resolution 1920*1080 Aspect Ratio 4:3/16:9
Display Tech LCD Light Source LED
Color Game 16.7M Full Size 8.3x7.2x6.3 inch
Weight 5.29 lb Power Voltage
AC100-240V ~
50/60Hz
Output Port Headphone Input Port
RJ45/HDMI/USB/
AV
Projection Method Front/Rear on Desk, Front/ Rear on Ceiling
Operation Mode Remote control
Video Format
MP4/MKV/WMV/3GP/MPG/VOB/TP/TS/DAT/MOV/FLV/4K
H.264/H.265(
≤
30fps)
Audio Format AAC_LC/HE_AAC/HE_AACV2/LPCM/MP3/APE/MP3
Image Format JPG/JPEG/BMP/PNG
Document Format TXT/WORD/EXCEL/PPTX
①
②③
④
⑤ ⑥
⑦ ⑧⑨ ⑩
⑪
⑫
⑬ ⑭
⑮
⑯ ⑰
⑱

service@toptro.com service@toptro.com
EN EN
6 7
1 Projector lens Optical coated glass lens
2/11 IR window Infrared signal receiver
3 Camera Auto-focus lens
4 Speakers Sound output
5 RJ45 Network port
6 USB Ports USB 1 port /USB 2 port
7/8 HDMI Ports HDMI Input
9 AV Interface
Separates audio and video
transmission
10 Headphone Jack 3.5mm Headphone Output
12 Power Cord Port Insert the power cord
13/14 Cooling outlet
Prevent the projector from
overheating
15 Power button Turn on/off power
16 Bottom Label
Nameplate on the bottom of the
projector
17 Machine Feet Height adjustment machine feet
18 Screw hole
Bracket screw hole (1/4 inch), also
supports hoisting
PACKAGE LIST
①
②
③
④
⑤
⑥
⑦
⑧
⑨
⑩
⑪
⑫
⑬
1 Turn on/off the power
2 Back to the main menu
3 Pull up the menu
4 Volume up
5 Volume down
6 Close the sound
7 Make system settings
8
Used to adjust the parameter of the projector in the
menu mode
9 Return to the previous menu
10 Adjust the auto focus and auto keystone correction
11 Manual focus+
12 Manual focus-
13 Select the input signal source
service@toptro.com service@toptro.com
EN EN
8 9
1.Install 2 pieces of AAA batteries into the remote before using it. Do not
combine new batteries with old ones in remote controller, which can
cause operation failure due to insufficient power supply.
2.When using the remote controller, please make sure that the signal
transmitter of the remote controller aims at infrared signal receiver of the
projector.
3.If you are not using the remote controller for an extended period, please
take out batteries to prevent batteries leakage.
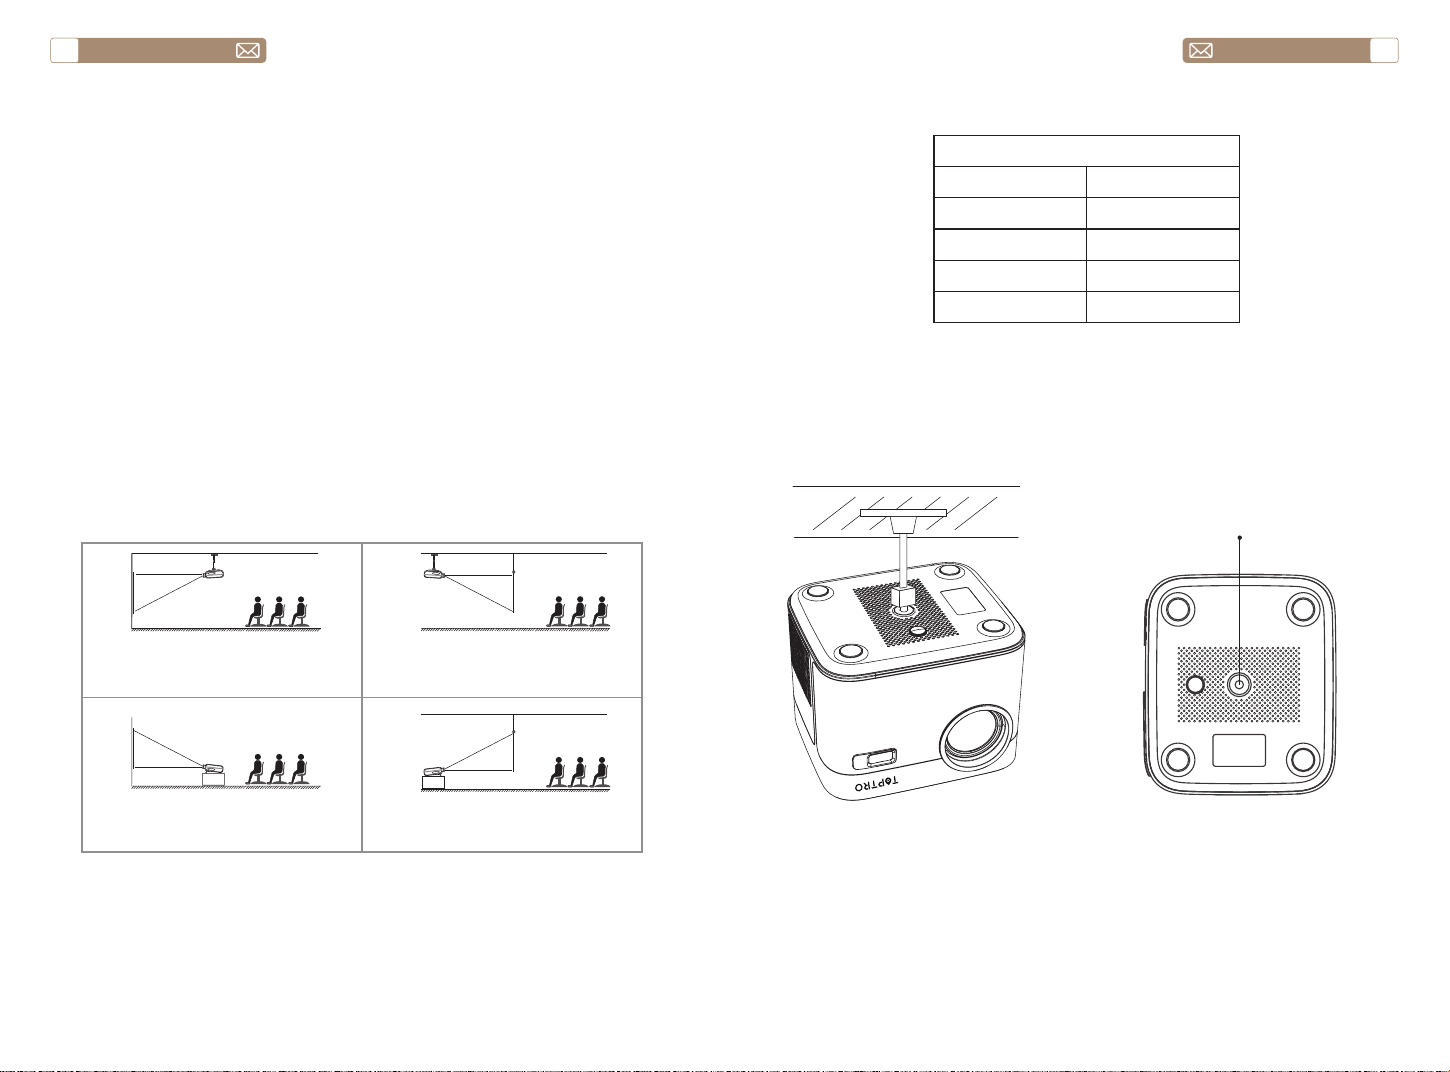
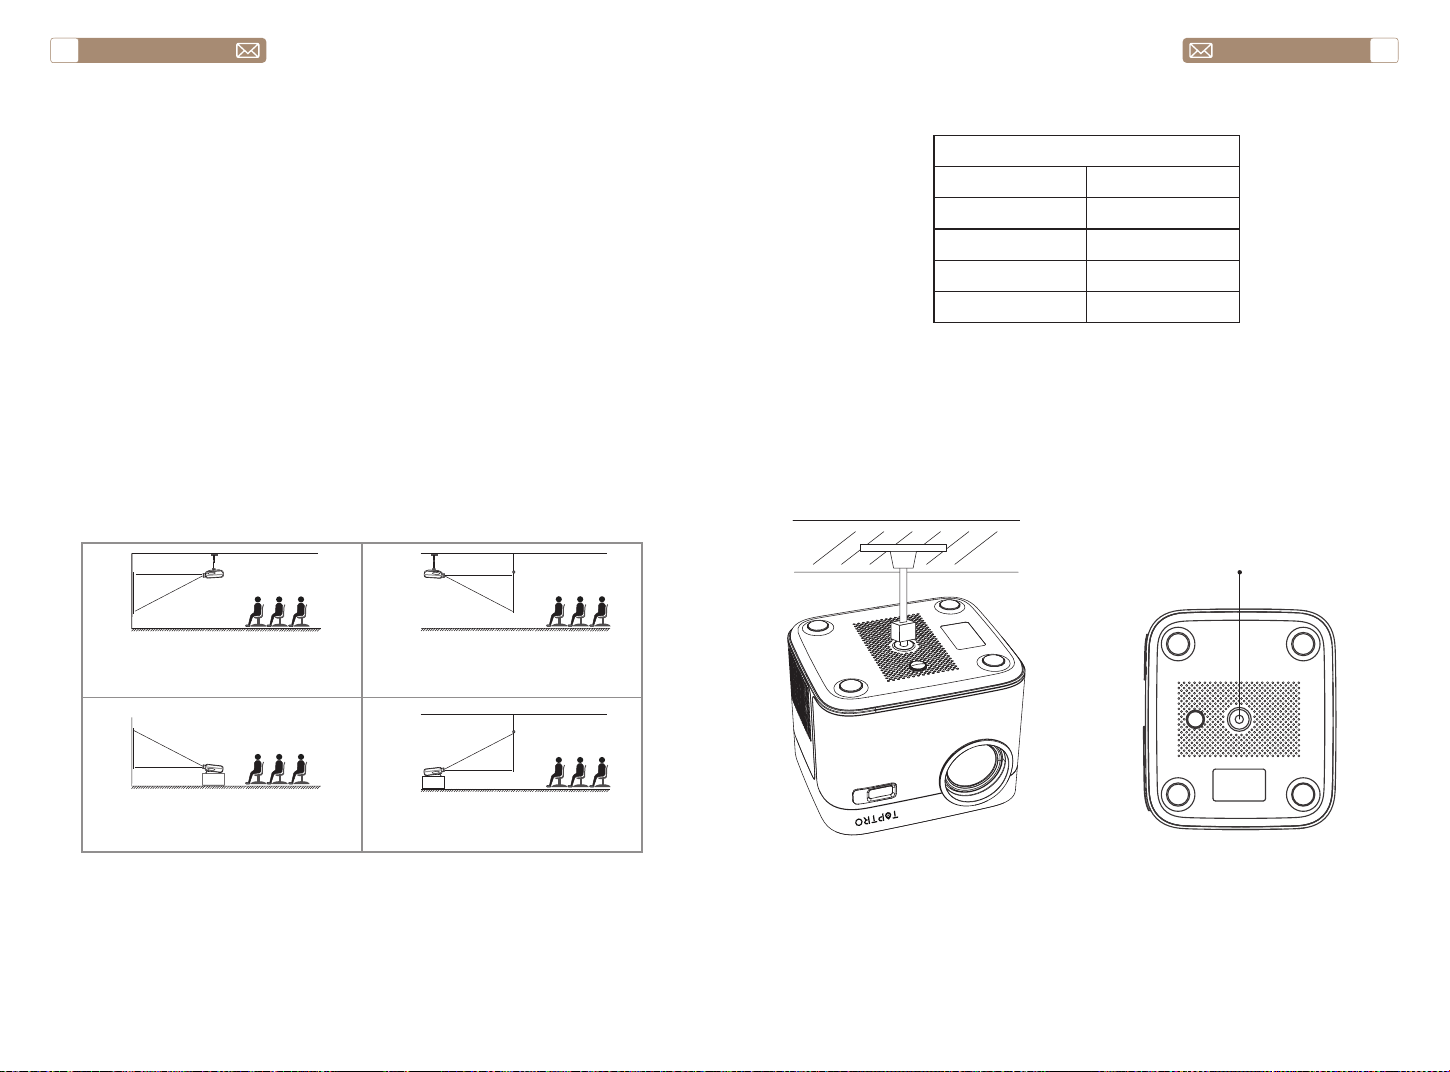
The projector can be hanged on the ceiling with special hanger frame,
and placed on the stable desk to project the image according to the
operating environment and requirements. The installation method is as
follows:
The recommended projection distance is about 8ft-10ft.
The image size depends on the distance between projector and screen,
there may be 3% deviation among above listed data. Different settings
cause various distances.
Note:
INSTALLATION
1.Installation Method
2.Projection Distance and Size
3.Install on the Ceiling
Projector
Projector
Projector
Projector
screen
screen
screen
screen
1. Front Projection Ceiling mount
3. Front Projection Table mount
2. Rear projection Ceiling mount
4. Rear projection Table mount
Aspect Ratio: 16:9
Distance (ft.) Screen Size
5 50"
8 80"
10 100"
12 120"
Bracket screw hole
Note: Please purchase an universal projector ceiling mount, attach the
projector with 1/4 inch screws.

service@toptro.com service@toptro.com
EN EN
10 11
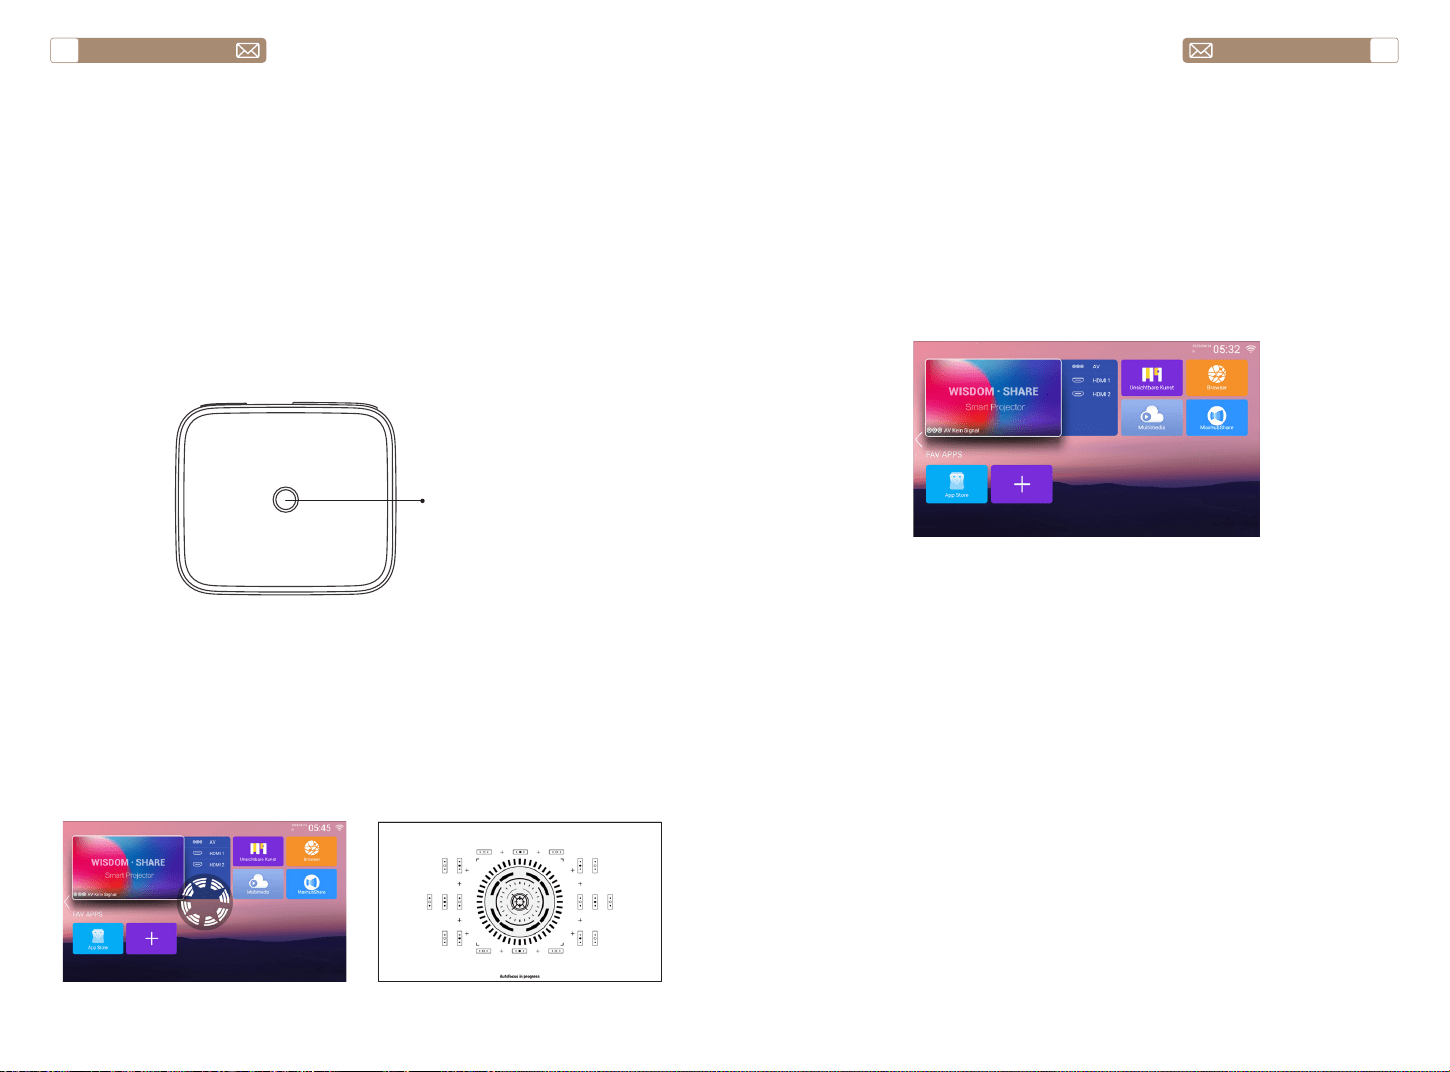
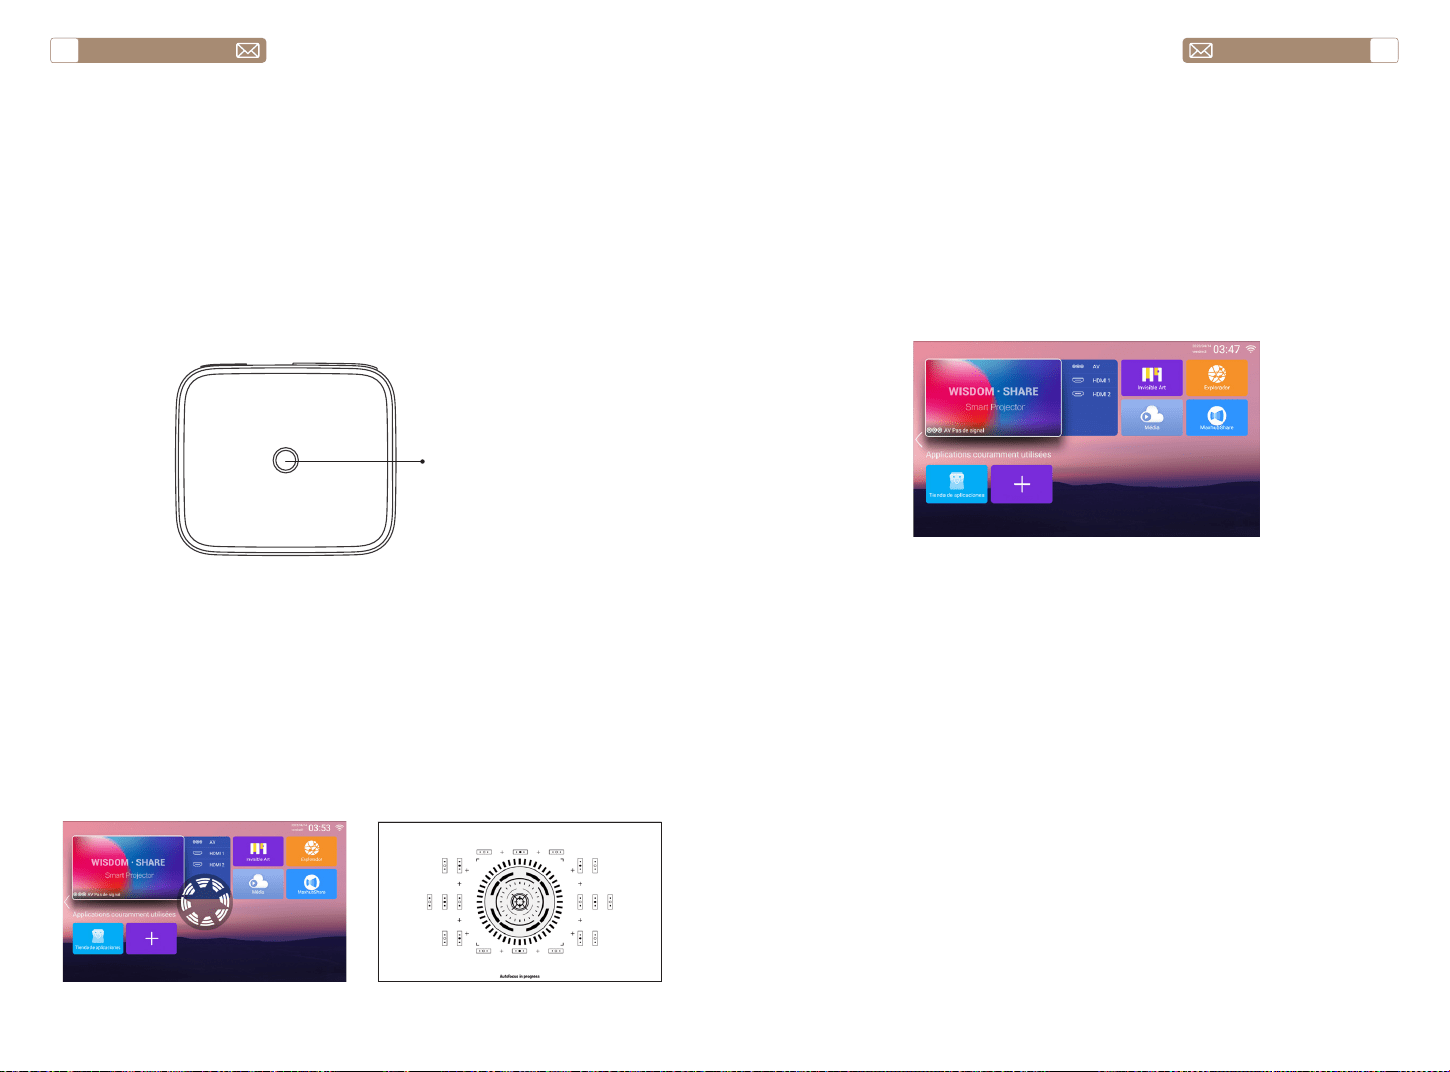
Connect the projector to the power supply, the projector will enter the
standby state, and the signal indicator light on the cover will be red.
Power on: Press the power button on the body, or the power button on
the remote control, and the indicator light turns blue to enter the working
state.
Shutdown: In the working state, press the power button on the body, or
the power button on the remote control, the indicator light will change
from blue to red, and the projector will be turned off.
* When starting the X7 projector for the first time, please wait patiently for
2-3 seconds, the projector will automatically adjust the focus. If the image
is not clear, you can press the focus button "F+", "F-" to adjust the focal
length of the lens, click or long press the focus button until the image is
clear.
Note: If it's still blurry, try adjusting the throw distance.
1. Insert the USB Disk, Select the icon [Media]
2. Select the option [All/Video/Audio/Image]
3. Select the desired file (or folder to enter the subfolder) in the USB disk,
then press the [OK] button to play it.
Notice: TOPTRO X7 projector supports USB disk to directly play PPT, Word,
Excel files.
* When the X7 projector is started for the first time, the projector will
automatically perform keystone correction. Or you can also use the
digital 4P keystone correction of the projector to change the image to be
rectangle (vertical and horizontal). Detail please refer the page 20 of this
manual.
USE THE PROJECTOR
1.Turn on/off the projector
2.Focus Adjustment
2.USB Disk Input Mode
2.1 Play Video/Audio/Image/Office in the USB Disk Input Mode
3.Keystone Correction Adjustment
Power button
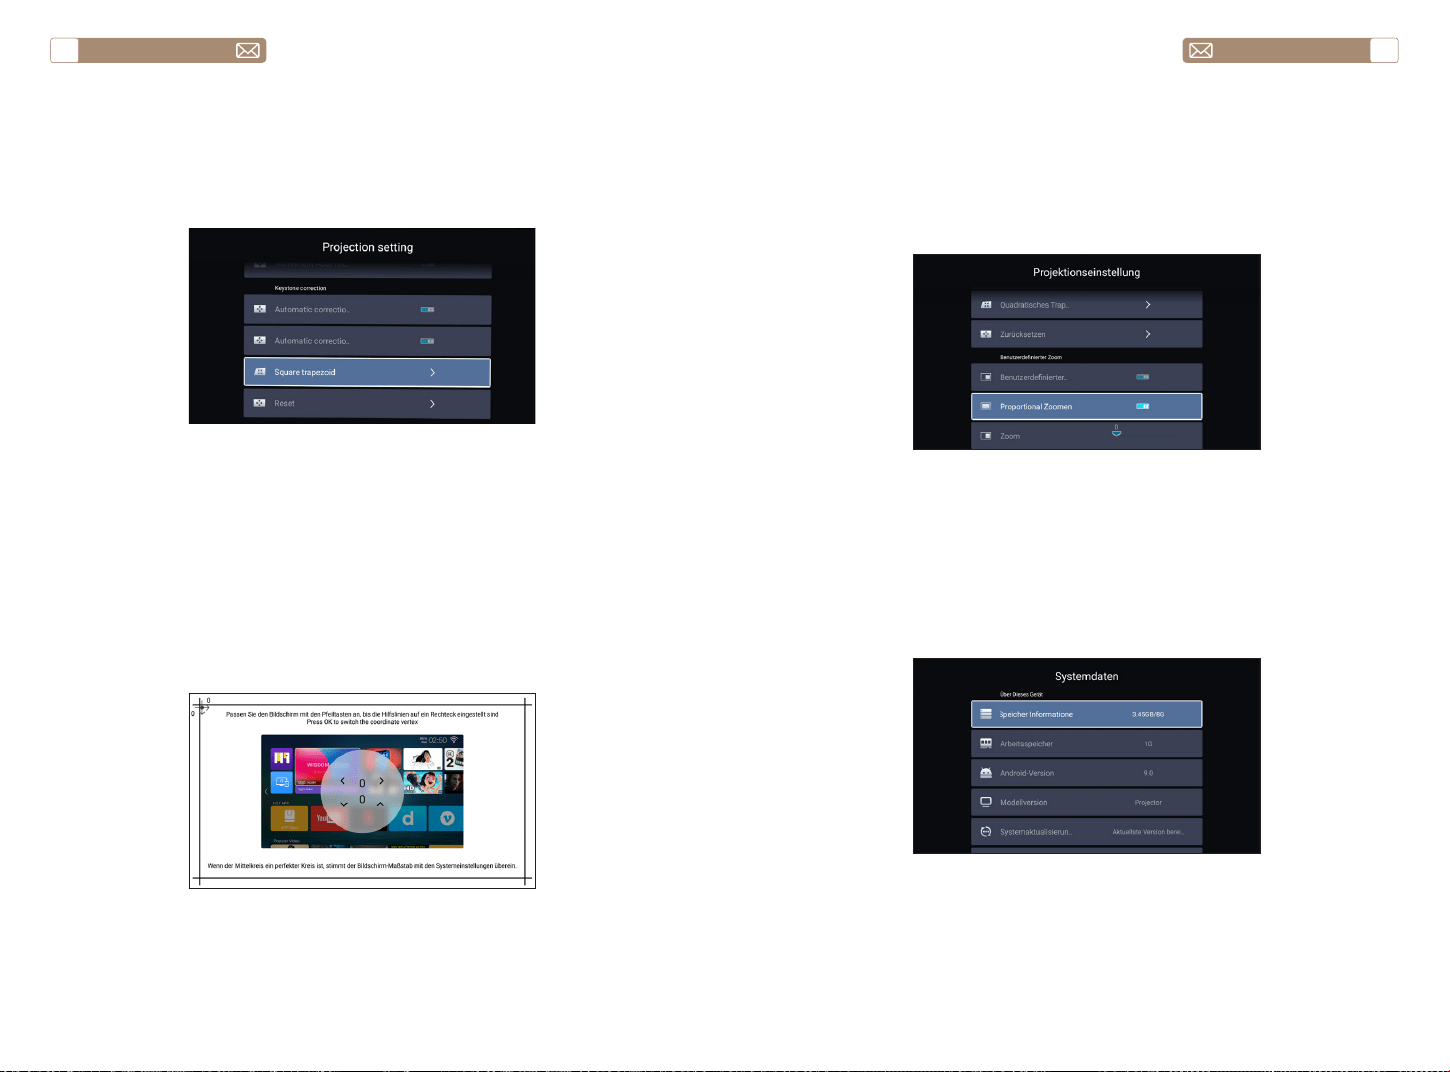
The projector's home page is as follow.
Select the desired insert signal source (AV/HDMI1/HDMI2) on the home
-page.
Note: If you connect the external device (Such as TV box, Fire TV Stick,
DVD Player, USB flash disk, Computer etc.), please must select the
corresponding signal source. If you choose wrong, the projector will show
no signal.
SETTING UP THE PROJECTOR
1.Select the Insert Signal Source

service@toptro.com service@toptro.com
EN EN
12 13
Warm Tips: If the projector cannot recognize the USB disk, please refer to
the following methods to solve the problem.
Please confirm whether your USB disk meets the following formats.
1. FAT32: 8G/16G/32G
2. NTFS: 64G
If it is not, please format the USB disk. Before you format the USB disk,
if you have anything on your USB disk, make sure to backup everything.
After these steps, everything will be lost forever.
1. Plug-in your usb disk into the computers USB port.
2. Open up File Explorer and right-click on the drive.
3. Choose Format.
4. In the File System dropdown, please choose the FAT32 format.
5. Click Start and close this window when finished.
If the problem is still not solved, please send your problem to this email:
service@toptro.com
How to convert USB disk format to FAT32 format?
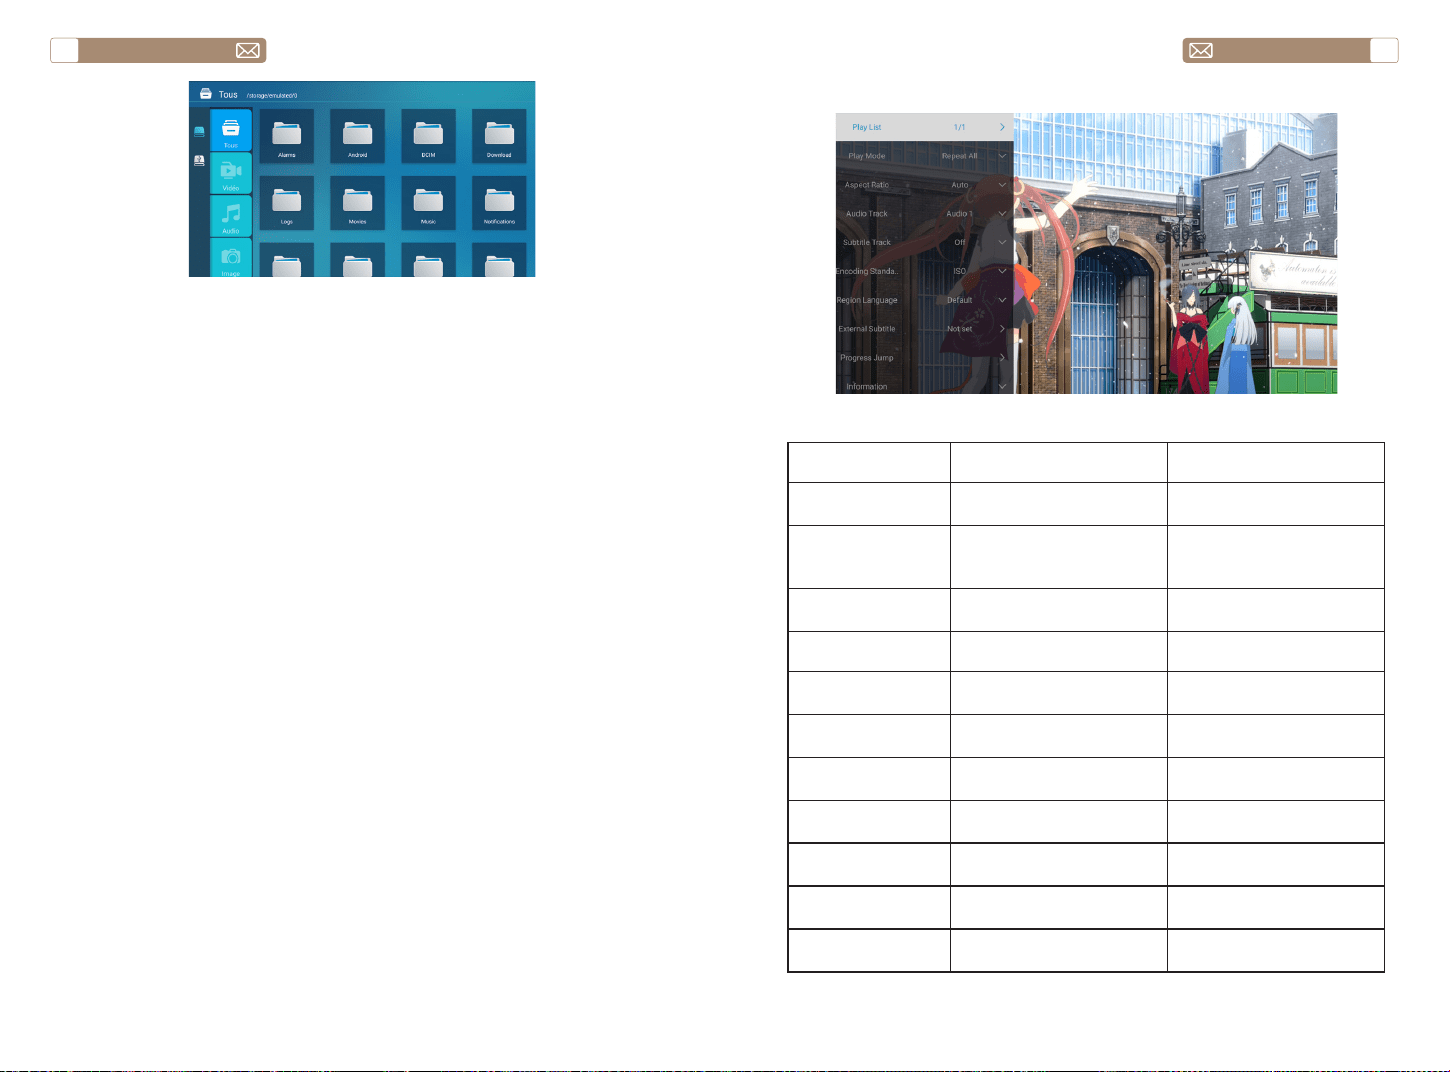
2.2 Play Interface
Playing setting Include Function
Play List the videos of current folder
change video from the
current folder
Play mode
repeat all, auto exit, repeat
one, random, play list
change play mode
Aspect Ratio auto, 16:9, 4:3, zoom1, zoom2 set video aspect ratio
Audio Track audio track set audio track
Subtitle Track subtitle track set subtitle track
Encoding Standard iso, windows set encoding standard
Region Language various language set region language
External Subtitle external subtitle
choose subtitle from other
folders
Progress Jump progress jump
fast forward video to specific
time
Information
resolution, size, duration,
bitrate
see the basic video
information
Picture & Sound picture and sound mode set picture and sound mode
service@toptro.com service@toptro.com
EN EN
14 15
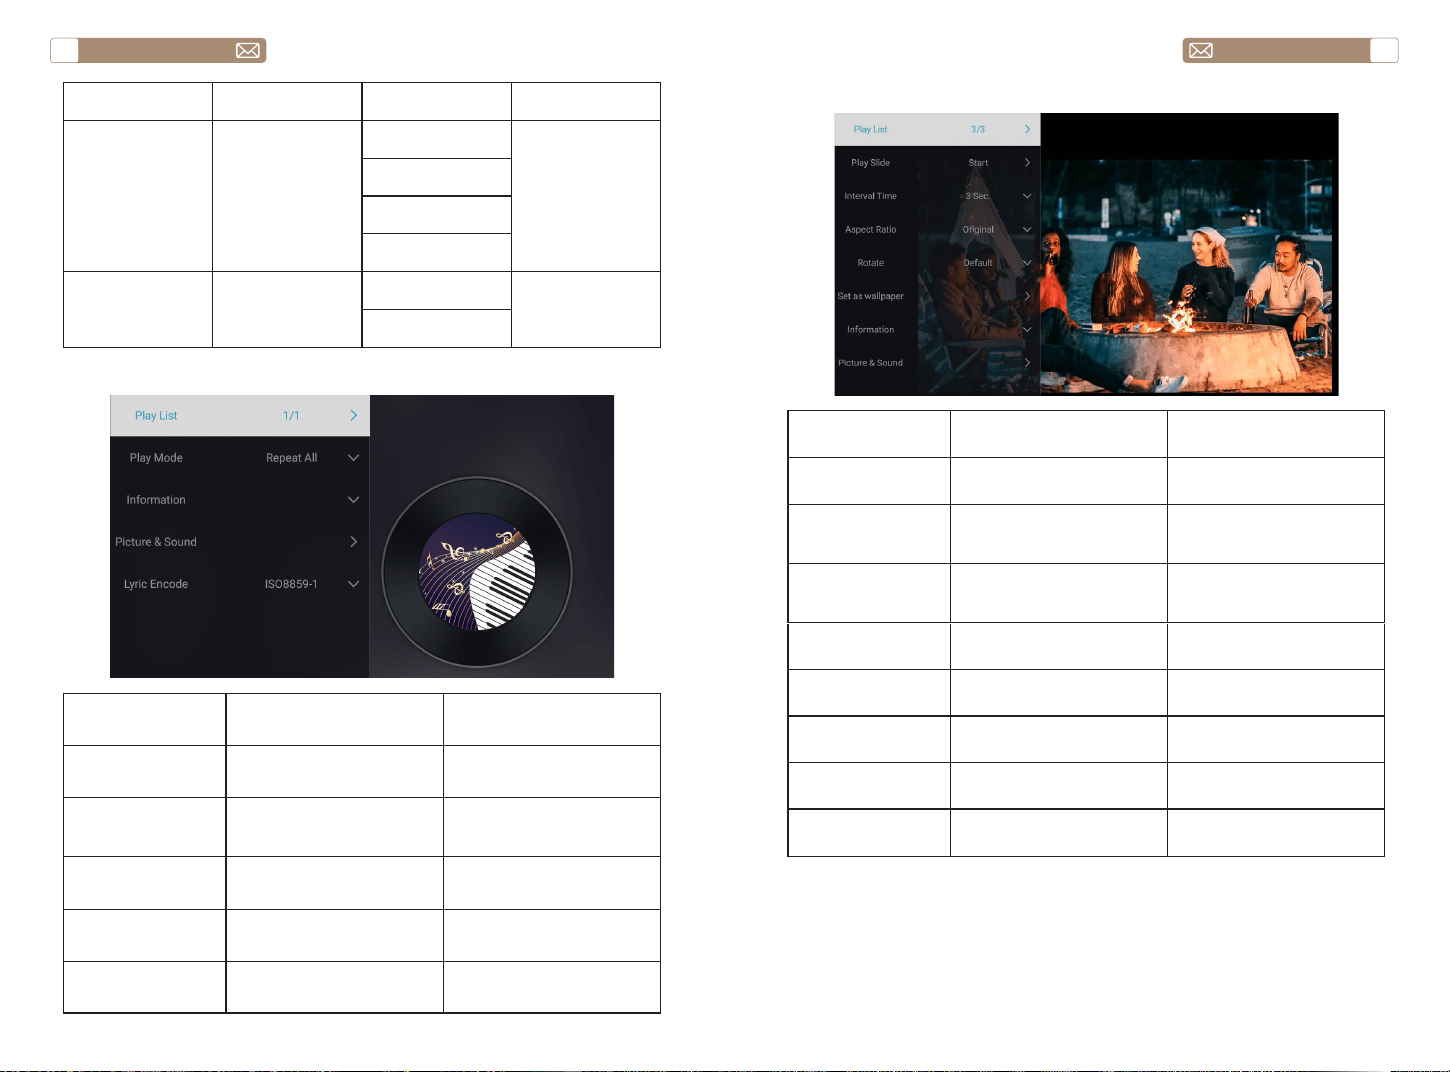
2.3 Music Play Interface
Playing setting Include Function
Play List the music of current folder
change music from the
current folder
Play mode
repeat all, auto exit, repeat
one, random, play list
change play mode
Information size, duration, bitrate
see the basic music
information
Picture&Sound picture and sound mode set picture and sound mode
Lyric Encode various encoding standard set encoding standard
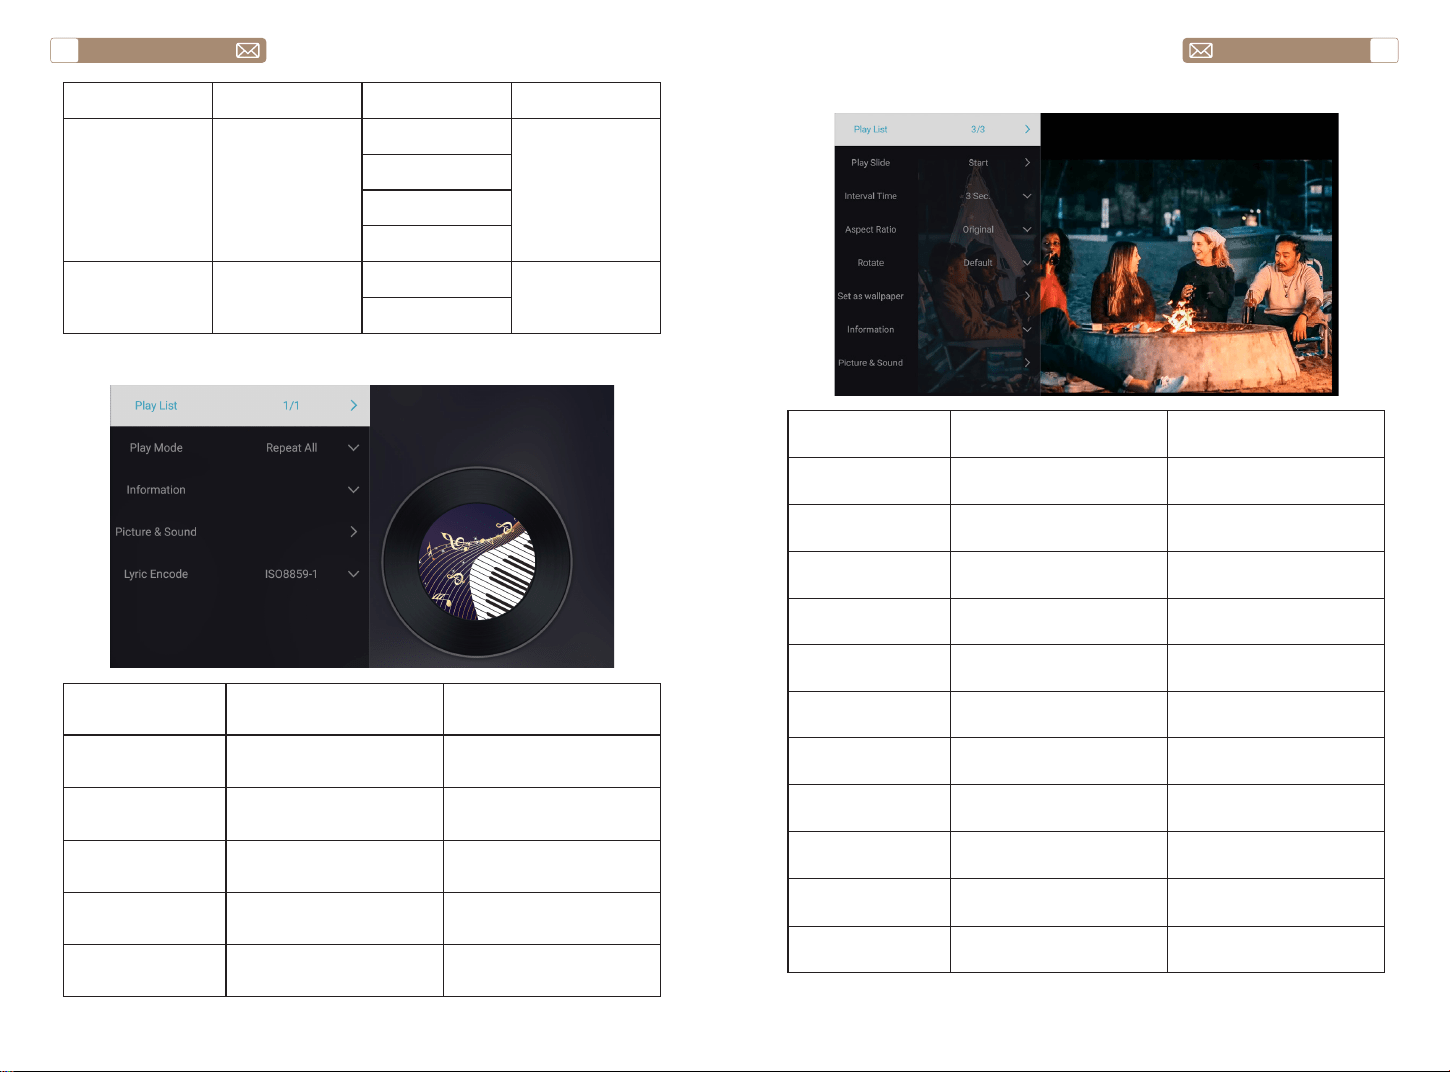
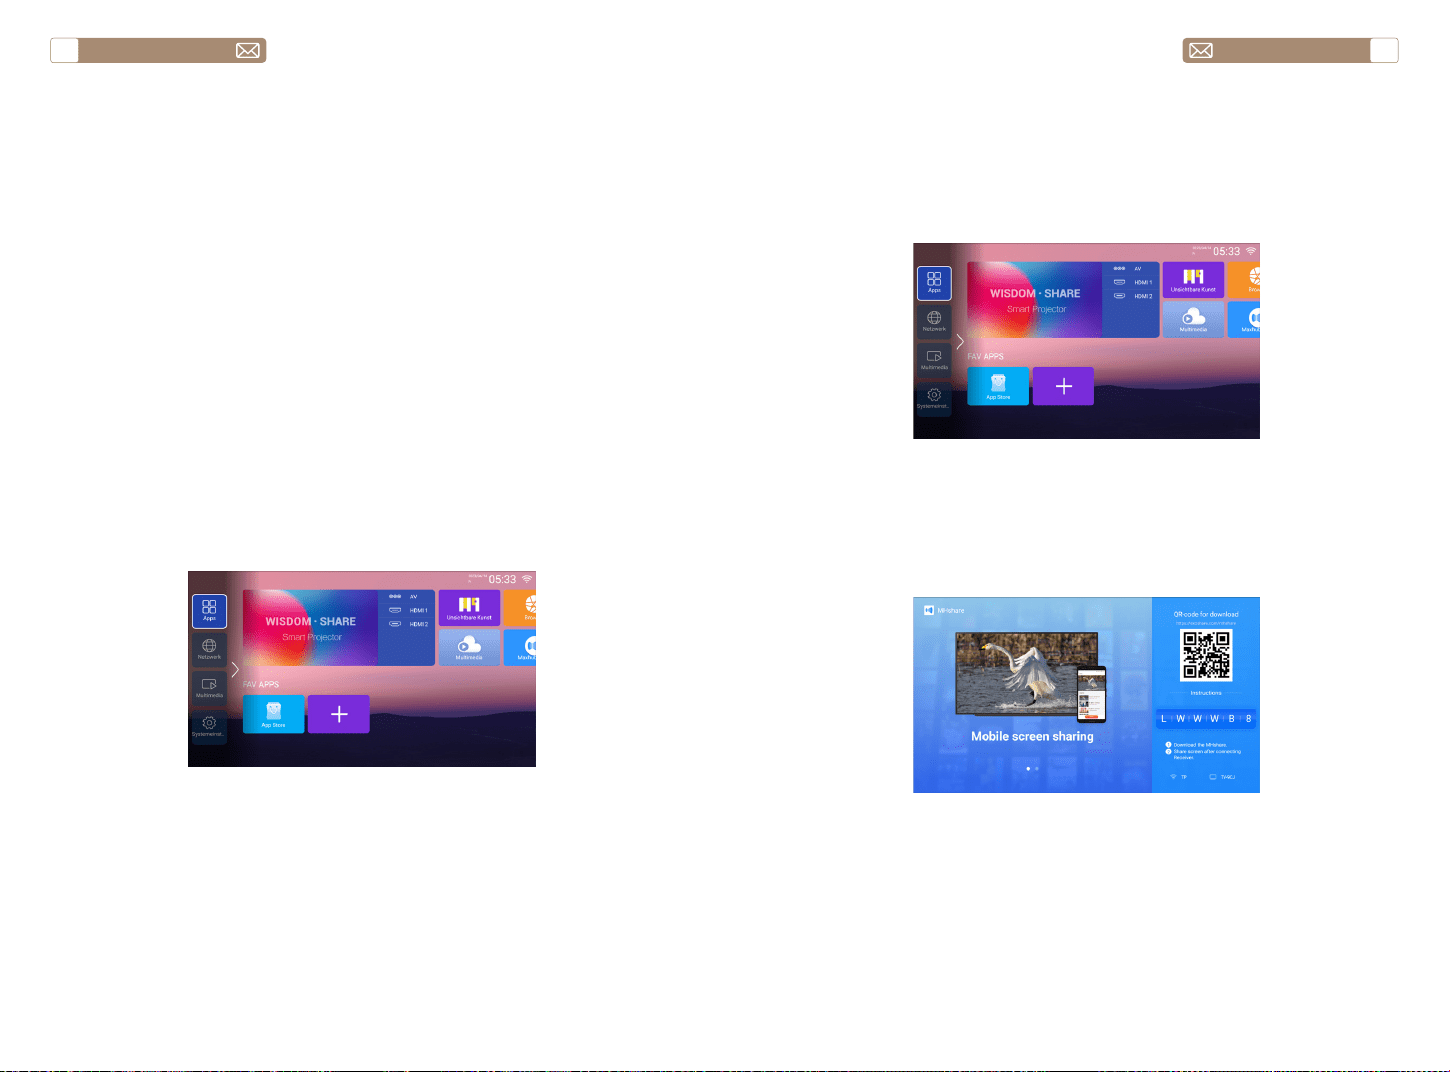
2.4 Picture Play Interface
Playing setting Include Function
Play List the videos of current folder
change video from the
current folder
Play mode
repeat all, auto exit, repeat
one, random, play list
change play mode
Aspect Ratio auto, 16:9, 4:3, zoom1, zoom2 set video aspect ratio
Audio Track audio track set audio track
Subtitle Track subtitle track set subtitle track
Encoding Standard iso, windows set encoding standard
Region Language various language set region language
External Subtitle external subtitle
choose subtitle from other
folders
Progress Jump progress jump
fast forward video to specific
time
Information
resolution, size, duration,
bitrate
see the basic video
information
Picture & Sound picture and sound mode set picture and sound mode
Menu Content Mode Function
Picture Mode
Standard/Soft/
Dynamic/Vivid/
User
Contrast
Modify the picture
parameters in the
range 0 -100
Brightness
Sharpness
Color
Sound Mode
Standard/Music/
Movie/News/Users
Bass
Modify the sound
parameters in the
range 0 -100
Treble
service@toptro.com service@toptro.com
EN EN
16 17
Wireless Connection
3.WiFi Setting
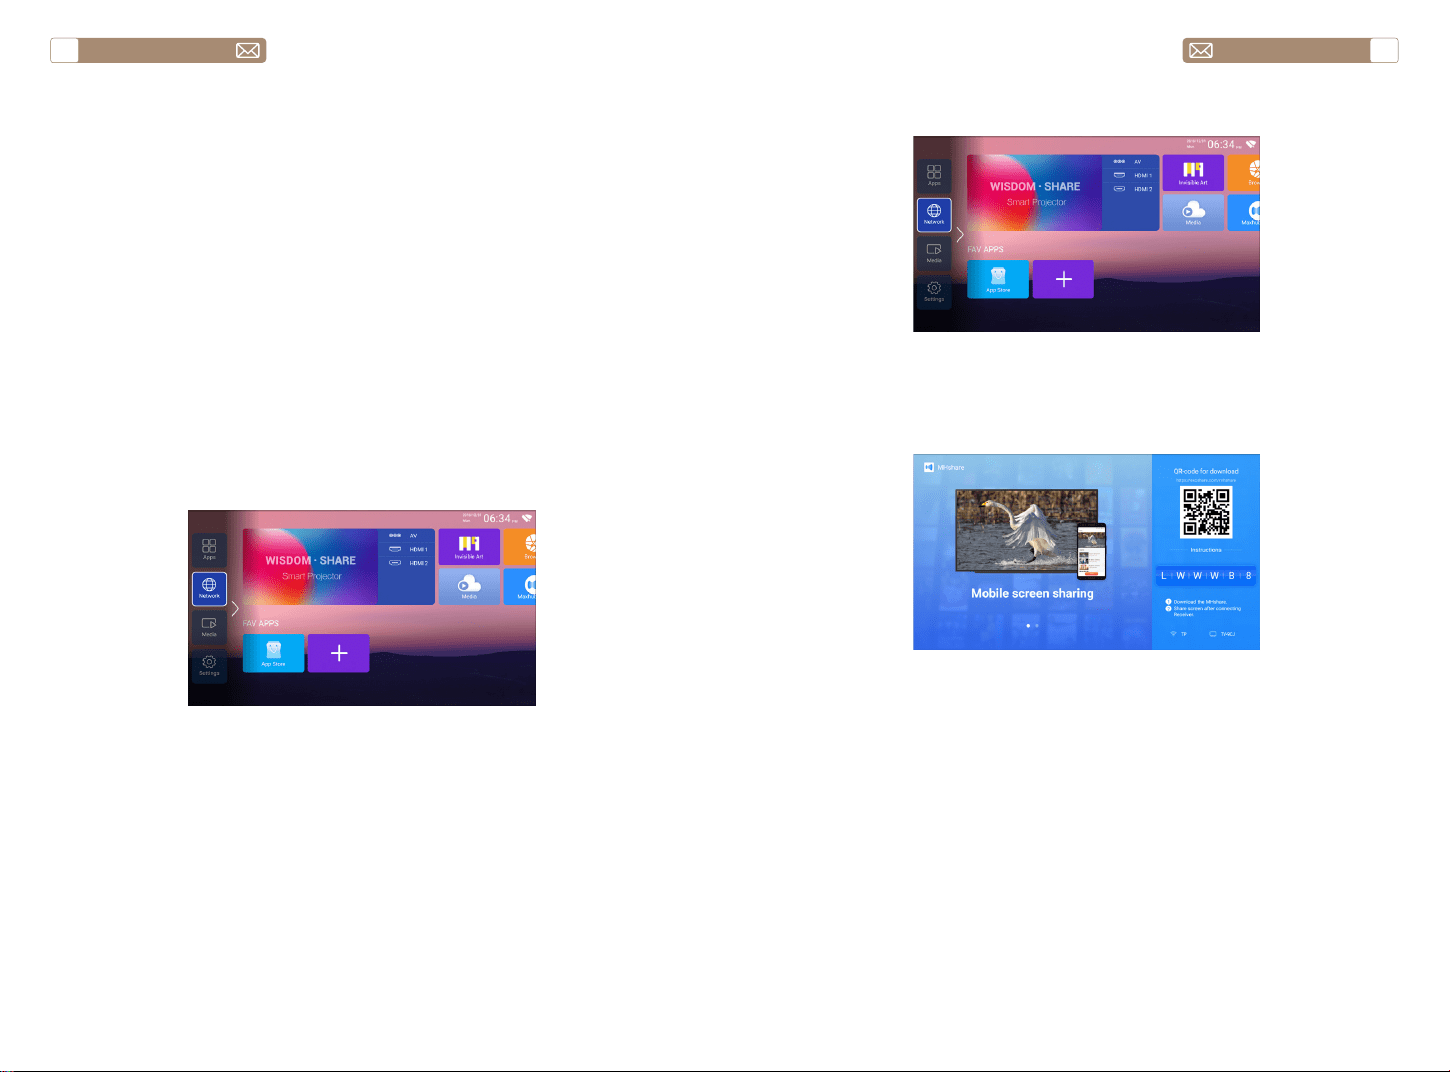
1. Go to home page -- Press the left button - Select the [ Network ] menu
- Select [ Wireless Net Mode ] - Select your home Wi-Fi from the list -
Connect the Toptro X7 projector to your home Wi-Fi.
2. Select the [ Settings ] menu on your iOS device - Turn on the [ Wi-Fi
] function - Connect your iOS device to the same home network as the
projector.
3. Open the [ Control Center ] on your iOS device - Select the [ Screen
Mirroring ] function Select and connect the iOS Cast receiver named
[Toptro X7-XXXX ] - your iOS device screen will be displayed on the
projection screen after 3 seconds.
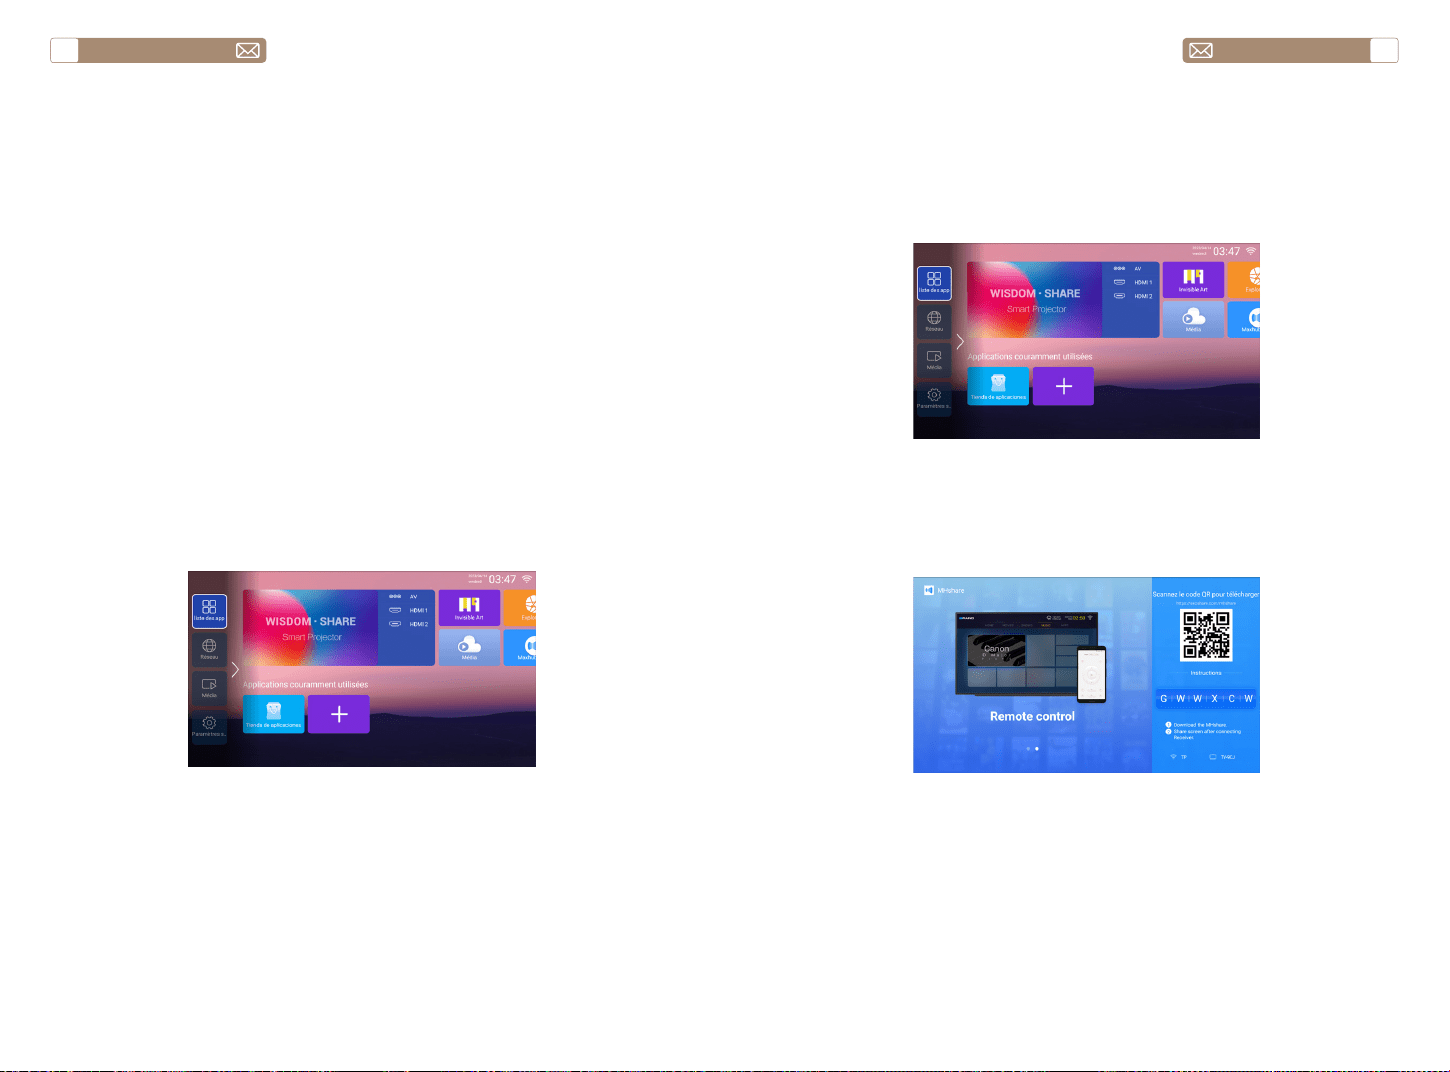
2. Go to home - Select the [Maxhub Share] app - Press the OK button to
enter the [Maxhub Share] app.
3. Scan the QR code and download the app on your Android device
4. Open [Maxhub Share] app on your Android device - Select TV named
[Toptro X7-XXXX] -Your Android device screen will be displaced on the
projection screen after 3 seconds.
Note:
1. Different brands of Android phones have different operations for
select Screen Mirroring Display, please refer to your phones manual. [
Multiscreen/Wireless display/WLAN display/Screen mirroring/Wireless
projection/Smart view etc. ]
2. Not all Android phones support this function. Please make sure it is
supported before use.
1. Make sure Toptro X7 projector and your Android device are connected
in the same Wi-Fi, operations refer to the [1] and [2] from iOS Cast (for iOS
Device).
Warming Tips:
1. The fluency of screen mirroring with wireless connection will be
affected by the network environment. A bandwidth of 100Mbit or more is
recommended when using screen mirroring.
2. Make sure your mobile device is close to the projector when using
wireless connection. A distance within 1 meter is recommended.
3. Some mobile devices may not support screen mirroring due to the
compatibility.
4. Any questions, please feel free to contact us via service@toptro.com
3.1 iOS Cast ( for iOS Devices )
3.2 Miracast ( for Android Devices )

service@toptro.com service@toptro.com
EN EN
18 19
4.Bluetooth Setting
5.Projector System Setting
Go to home page - - Select the [ Setting ] menu - - Select the
[ Bluetooth ] Option - - Open the Bluetooth function and your Bluetooth
device - - Scan the Bluetooth devices nearby automatically - - Choose
the Bluetooth device desired - - it will be paired and connected
automatically.
Note:
1. The Toptro X7 projector is compatible with the Bluetooth headsets,
Bluetooth speakers and Air Pods, but not the Bluetooth keyboards or
Bluetooth phones.
2. If you have any question, please feel free to contact us via
service@toptro.com
5.1 Projection Method
5.2 Focus Menu
Turn on this button, when you start the projector, please wait patiently for
2-3 seconds, the projector will automatically focus after powering on.
Turn on this button, the projector will automatically focus when changing
the position.
Notice:
1.Use autofocus when you’re setting up your projector or when you need
5.2.1 Automatic Focusing after boot
5.2.2 Movement Auto focus
service@toptro.com service@toptro.com
EN EN
20 21
5.4 Zoom Menu
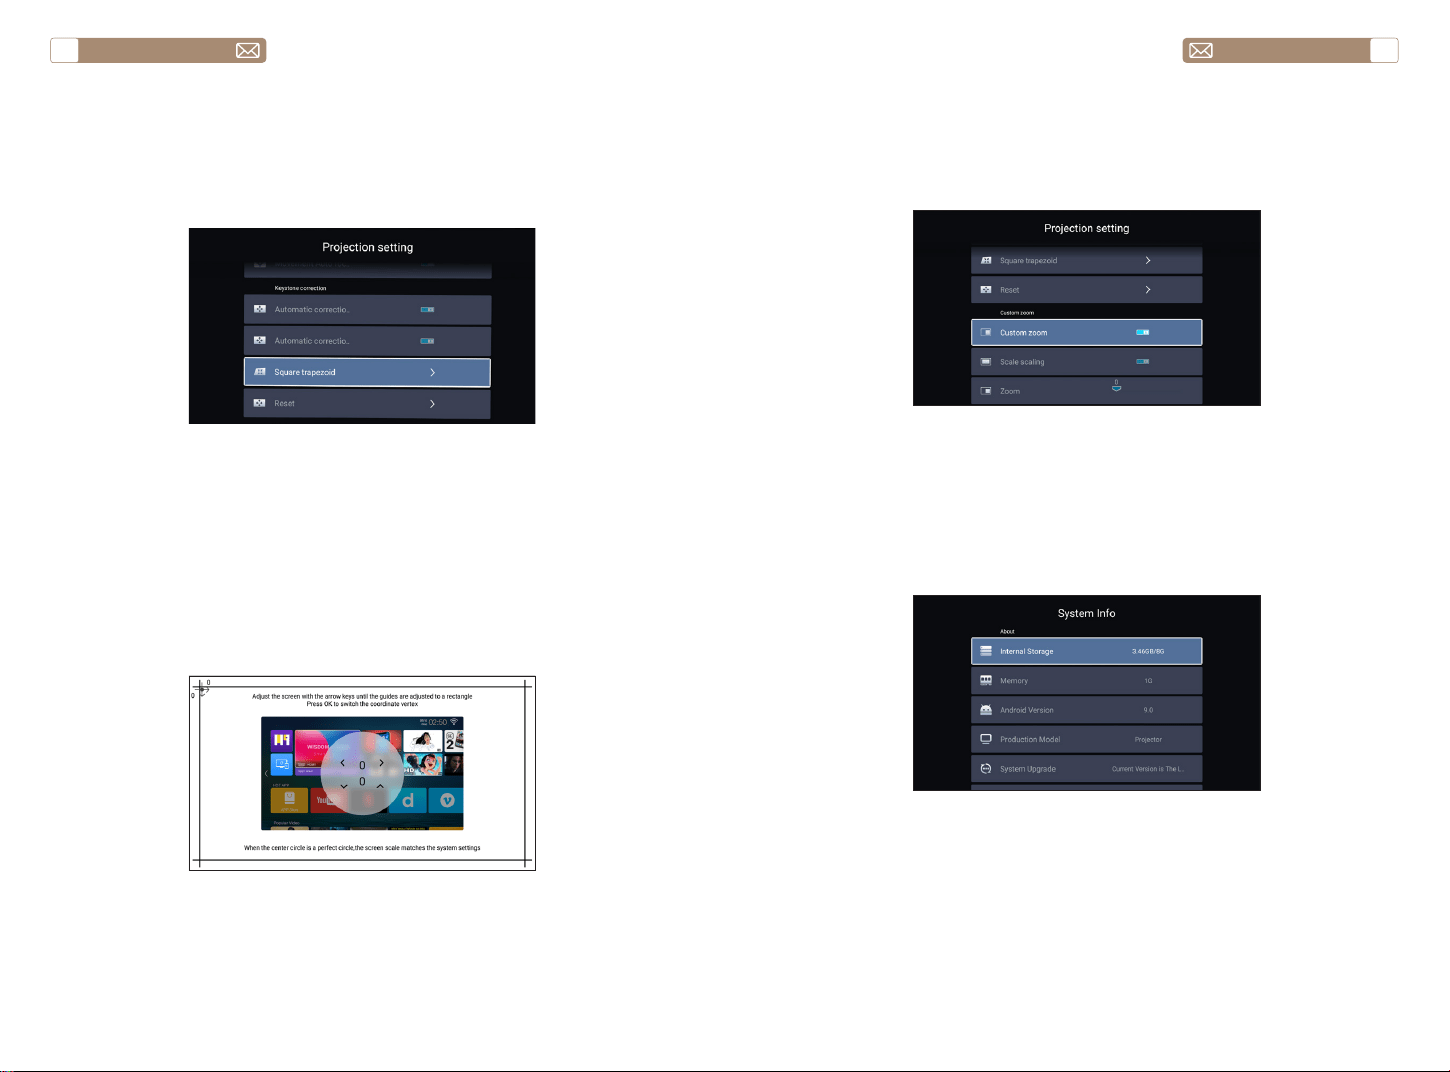
5.3 Keystone Correction Menu
* Select the [Custom Zoom] option, press the "OK" button on the remote
controller to enter the submenu [Scale scaling], press the "OK" key to
select this button to enter a three-level menu [Zoom], you can adjust the
projection size by adjusting the parameters, zoom range is 0—50.
Go to home page - - Select the [Setting] menu - - Select the [System
Info] Option - - Select the [System Upgrade]
Notice: If the software currently is the latest, you do not need to
upgrade the software. During the upgrade process, if you have any
question, please feel free to contact us via service@toptro.com
to quickly adjust the focus of your image.
2.Use manual focus mode when you need more precise control over
the focus of your image. Long press the focus button "F+" , "F-" until the
image is clear.
Turn on this button, when you start the projector, please wait patiently for
2-3 seconds, the projector will automatically focus after powering on.
Turn on this button, the projector will automatically keystone correction
when changing the position.
Notice: If you are not satisfied with the automatically corrected image,
the projection screen is not rectangular, you can adjust it by 4-point
keystone correction.
5.3.1 Automatic Correction after boot
5.3.2 Automatic Correction after displacement
6.System Update

service@toptro.com service@toptro.com
EN EN
22 23
7.Common
Menu Function
Language Set up system language
Input method Set current input method
Default source Set up default source: Off, AV, HDMI1, HDMI2
Power mode Set power mode: standby, on, last
System Recovery Recover the system and all data
The device name Change projector name
SIGNAL LINES CONNECTION
TOPTRO X7 projector has 7 interfaces, HDMI port*2/ USB port*2/ 3.5mm
headphone output*1/ Network port*1/ AV port*1, please select the correct
port to connect your device (PC, DVD Player, Fire TV stick, TV box, Sound
bar, USB disk, PS4 etc.).
1. Connect your Fire TV stick (or PC, TV box, PS4 etc.) to the HDMI port of
the projector;
2. Enter the home page to select the corresponding HDMI as the signal
source.
1. Turn on your DVD player and the projector;
2. Connect to the DVD Player and the projector with the HDMI cable
3. Enter the home page to select the corresponding HDMI as the signal
source.
Note: When the projector is connected to the DVD player via the HDMI
cable, if there is no sound, it may be that the output signal of the HDMI
port of the DVD player is not compatible with HDCP, please try to connect
your Sound bar/Speaker.
1.Connect the Devices via the HDMI port
2.Connect to the DVD Player
service@toptro.com service@toptro.com
EN EN
24 25
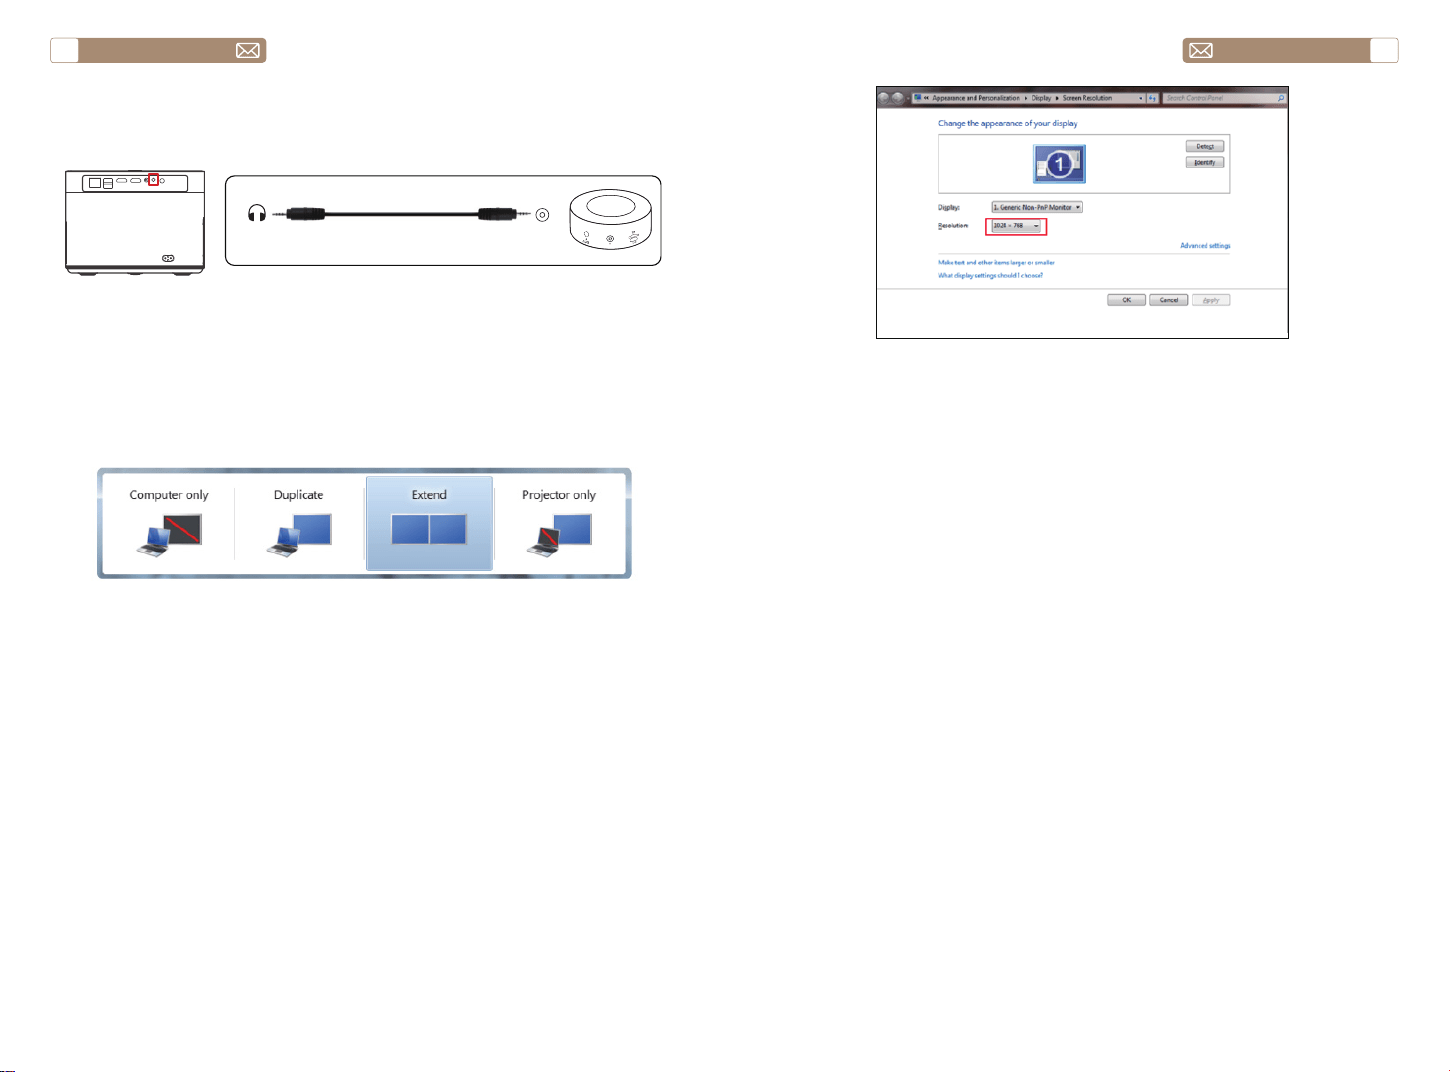
If your speaker has AUX port, please use your 3.5mm audio cable connect
the projector and your speaker as the picture shows.
1. Connect to the computer and X7 projector with the HDMI cable
(Included).
2. Select the HDMI source to project any files on your computer;
3. On your laptop, hold down the key “Win+P” board keys to change your
display mode.
Computer only: it is the default option – only displays on the main
monitor.
Duplicate: makes all the monitors display the same thing duplicating the
desktop on each monitor.
Extend: makes all your monitors act like one big monitor extending the
desktop across all of them.
Projector only: Displays only on the secondary monitor like a projector.
You can change the screen resolution on the Projector Only Mode
Step: Start > Control Panel > Appearance and Personalization > Adjust
Screen Resolution
3.Connect to the Sound bar/Speaker
4.Connect to the Computer
Audio
out
AUX
port
WARRANTY
Thank you so much for your purchase and support. We provide 3-year
warranty for X7 projector. If you have any questions, please feel free to
contact us via [email protected]om

service@toptro.com service@toptro.com
DE DE
26 27
CONTENTS
TOPTRO Lebenslanger Professioneller Support
TIPPS
Lieber Kunde,
Vielen Dank für die Unterstützung von TOPTRO.
Bitte lesen Sie dieses Handbuch sorgfältig durch, bevor Sie den Beamer
verwenden. Wenn Sie irgendwelche Probleme haben, senden Sie Ihre
Bestellnummer und das Problem per E-Mail an service@toptro.com. Wir
werden innerhalb von 24 Stunden eine schnelle Lösung anbieten.
Tatsächlich können viele Probleme einfach durch Einstellungen
gelöst werden, wie z. B. kein Signal, kein Ton, Bluetooth-Verbindung
fehlgeschlagen, WiFi-Verbindung fehlgeschlagen, abgehackte Animation
usw. Wir versprechen, dass alle Projektoren vor dem Versand zu 100 %
sorgfältig geprüft und verpackt wurden.
Wenn Sie Fragen haben, kontaktieren Sie uns bitte, damit das Problem
gelöst werden kann. Und geben Sie uns die Möglichkeit, uns zu
verbessern. Wir garantieren Ihnen eine zufriedenstellende Lösung.
Danke für dein Verständnis!
Mit freundlichen Grüßen
TOPTRO-Serviceteam
1.Stellen Sie den Projektor nicht in einem zu warmen oder zu kalten Raum
auf, da hohe oder niedrige Temperaturen die Lebensdauer des Geräts
verkürzen. Die Arbeitsumgebung wäre 5°C~35°C besser.
2. Die Belüftung ist so ausgestattet, dass der Projektor stabil funktioniert.
Decken Sie die Entlüftung nicht mit einem Tuch, einer Decke oder
anderen Dingen ab. Stecken Sie nichts in den Schlitz des Projektors, da
dies einen Kurzschluss oder Stromschlag an Ihrem Gerät verursachen und
Schäden verursachen kann.
3. Der Projektor muss streng vor starken Stößen, Extrusion und Vibration
geschützt werden. Versuchen Sie nicht, sich zu bewegen und bei starken
Stößen, Extrusionen und Vibrationen. Versuchen Sie nicht, sich zu
bewegen und die internen Schaltungsfehler.
4. Das Objektiv als Kernkomponente des Projektors steht in direktem
Zusammenhang mit der Bildschärfe und -wirkung. Der übermäßige Staub
darauf beeinträchtigt die Bildqualität. Die verschmutzte Linse muss mit
einem weichen Baumwolltuch für die Glaslinsenoberfläche abgewischt
werden. Hartes Tuch oder Scheuermittel dürfen nicht verwendet werden.
TOPTRO Lebenslanger Professioneller Support - - - - - - - - - - 27
TIPPS - - - - - - - - - - - - - - - - - - - - - - - - - - - - - - 27
PAKETLISTE - - - - - - - - - - - - - - - - - - - - - - - - - - - 28
TECHNISCHE DATEN DES BEAMERS - - - - - - - - - - - - - - - 28
PROJEKTORÜBERSICHT - - - - - - - - - - - - - - - - - - - - - 29
FERNBEDIENUNG - - - - - - - - - - - - - - - - - - - - - - - - 31
INSTALLATION - - - - - - - - - - - - - - - - - - - - - - - - - - 32
1.Installationsmethode - - - - - - - - - - - - - - - - - - - - - - - - - 32
2.Projektionsabstand und -größe - - - - - - - - - - - - - - - - - - - - 33
3.an der Decke installieren - - - - - - - - - - - - - - - - - - - - - - - 33
VERWENDEN SIE DEN PROJEKTOR - - - - - - - - - - - - - - - - 34
1.Schalten Sie den Projektor ein/aus - - - - - - - - - - - - - - - - - - - 34
2.Fokuseinstellung - - - - - - - - - - - - - - - - - - - - - - - - - - - 34
3.Anpassung der Trapezkorrektur - - - - - - - - - - - - - - - - - - - - 35
AUFSTELLEN DES PROJEKTORS - - - - - - - - - - - - - - - - - 35
1.Wählen Sie die Insert-Signalquelle aus - - - - - - - - - - - - - - - - - 35
2.USB Datenträger Eingabemodus - - - - - - - - - - - - - - - - - - - - 35
2.1 Spielen Sie Video/Audio/Bild/Office im USB Datenträger Eingabemodus ab- -35
2.2 Schnittstelle spielen - - - - - - - - - - - - - - - - - - - - - - - - 37
2.3 Musikwiedergabe-Schnittstelle - - - - - - - - - - - - - - - - - - - 38
2.4 Picture Play Schnittstelle - - - - - - - - - - - - - - - - - - - - - - 39
3.WiFi-Einstellung- - - - - - - - - - - - - - - - - - - - - - - - - - - - 40
3.1 iOS Cast (für iOS-Geräte) - - - - - - - - - - - - - - - - - - - - - - 40
3.2 Miracast (für Android-Geräte) - - - - - - - - - - - - - - - - - - - - 41
4.Bluetooth Einstellung - - - - - - - - - - - - - - - - - - - - - - - - - 42
5.Projektorsystemeinstellung - - - - - - - - - - - - - - - - - - - - - - 42
5.1 Projektionsmethode - - - - - - - - - - - - - - - - - - - - - - - - 43
5.2 Fokus - - - - - - - - - - - - - - - - - - - - - - - - - - - - - - - 43
5.3 Keystone Korrektur- - - - - - - - - - - - - - - - - - - - - - - - -44
5.4 Zoomen- - - - - - - - - - - - - - - - - - - - - - - - - - - - - -45
6.Systemaktualisierung - - - - - - - - - - - - - - - - - - - - - - - - - 45
7.Gemeinsam - - - - - - - - - - - - - - - - - - - - - - - - - - - - - - 46
ANSCHLUSS DER SIGNALLEITUNGEN - - - - - - - - - - - - - - - 46
1.Schließen Sie die Geräte über den HDMI-Anschluss an - - - - - - - - - 47
2.An den DVD-Player anschließen - - - - - - - - - - - - - - - - - - - - 47
3.Verbinden Sie sich mit der Soundbar/dem Lautsprecher - - - - - - - - 48
4.An den Computer anschließen- - - - - - - - - - - - - - - - - - - - - 48
WARRANTY - - - - - - - - - - - - - - - - - - - - - - - - - - - 49

service@toptro.com service@toptro.com
DE DE
28 29
PAKETLISTE
PROJEKTORÜBERSICHT
TECHNISCHE DATEN DES BEAMERS
TOPTRO X7 Beamer*1 Fernbedienung*1 Netzkabel*1
HDMI-Kabel*1 AV-Kabel*1 Benutzerhandbuch*1
Linsenabdeckung*1 Reinigungstuch*1
Modell Nr. X7
Native Auflösung 1920*1080 Seitenverhältnis 4:3/16:9
Display Tech LCD Lichtquelle LED
Farbspiel 16.7M Full Größe 8.3x7.2x6.3 inch
Gewicht 5.29 lb Netzspannung
AC100-240V ~
50/60Hz
Ausgangsport Kopfhörer Eingangsport
RJ45/HDMI/USB/
AV
Projektionsmethode
Vorn/hinten am Schreibtisch, vorne/hinten an der Decke
Betriebsmodus Fernbedienung
Videoformat
MP4 / MKV / WMV / 3GP / MPG / VOB / TP / TS / DAT / MOV /
FLV / 4K H.264/H.265(
≤
30fps)
Audio Format AAC_LC / HE_AAC / HE_AACV2 / LPCM / MP3 / APE / MP3
Bildformat JPG/JPEG/BMP/PNG
Dokumentenformat
TXT / WORD / EXCEL / PPTX
①
②③
④
⑤ ⑥
⑦ ⑧⑨ ⑩
⑪
⑫
⑬ ⑭
⑮
⑯ ⑰
⑱

service@toptro.com service@toptro.com
DE DE
30 31
1 Projektorlinse Optisch beschichtete Glaslinse
2/11 IR-Fenster Infrarot-Signalempfänger
3 Kamera Autofokus-Objektiv
4 Lautsprecher Tonausgabe
5 RJ45 Netzwerkport
6 USB-Anschlüsse USB 1-Anschluss /USB 2-Anschluss
7/8 HDMI-Anschlüsse HDMI-Eingang
9 AV-Schnittstelle Trennt Audio- und Videoübertragung
10 Kopfhöreranschluss 3,5-mm-Kopfhörerausgang
12 Netzkabelanschluss Stecken Sie das Netzkabel ein
13/14 Kühlauslass
Vermeiden Sie eine Überhitzung des
Projektors
15 Power-Taste Strom ein-/ausschalten
16 Unteres Etikett
Typenschild auf der Unterseite des
Projektors
17 Maschinenfüße Maschinenfüße zur Höhenverstellung
18 Schraubenloch
Halterungsschraubenloch (1/4 Zoll),
unterstützt auch das Heben
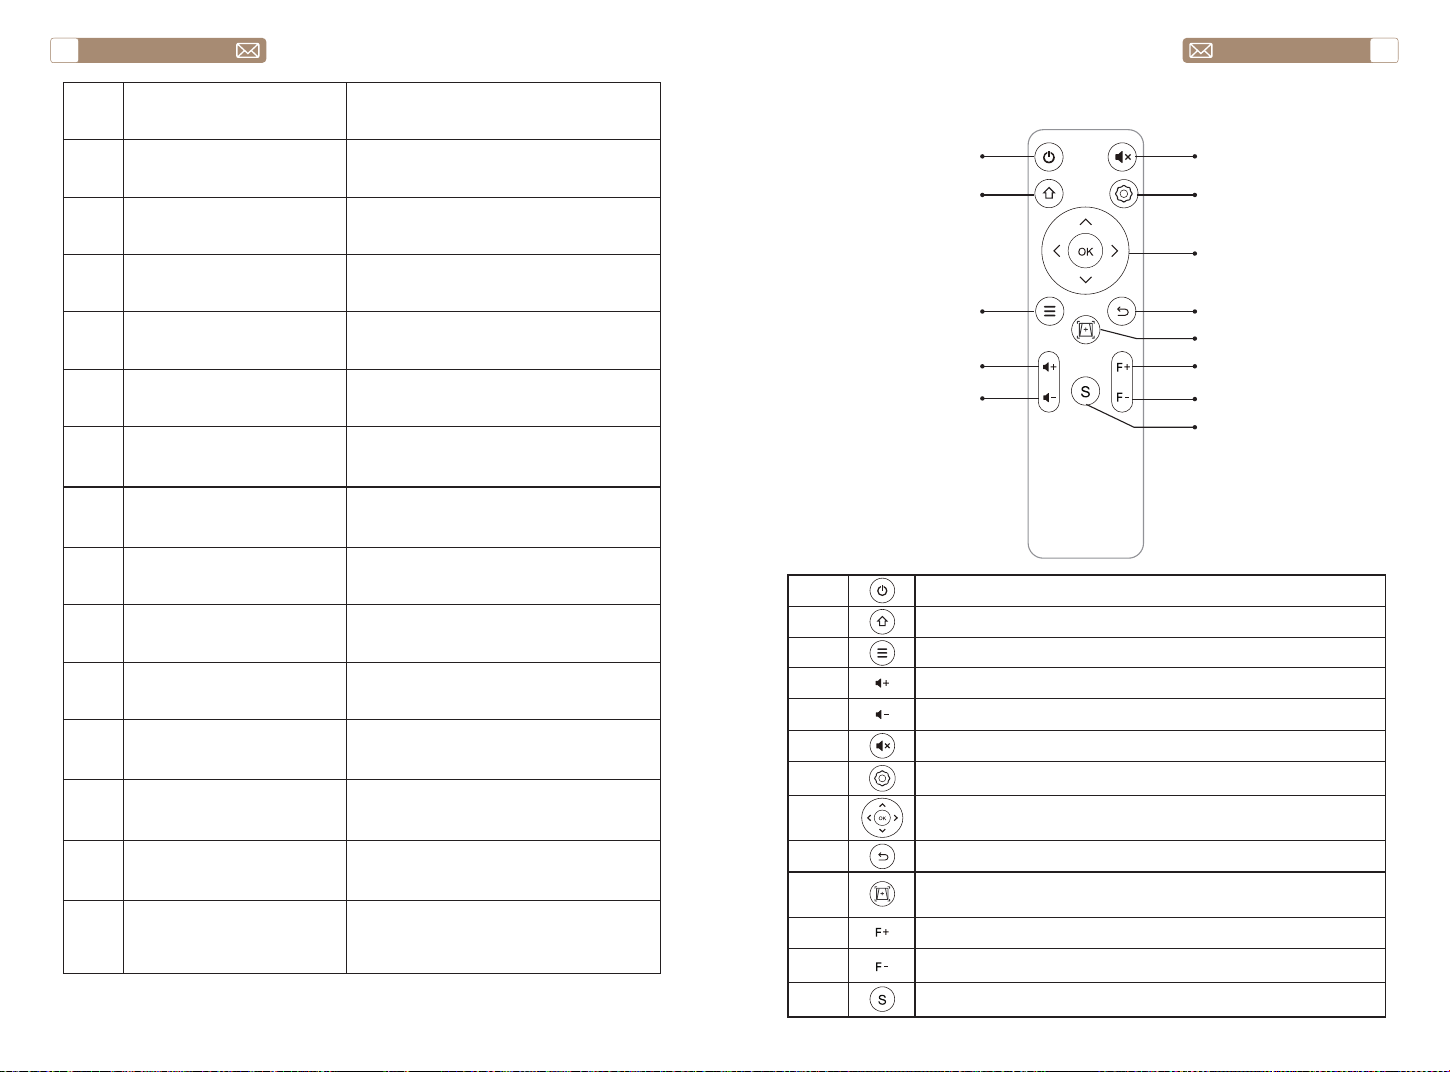
FERNBEDIENUNG
①
②
③
④
⑤
⑥
⑦
⑧
⑨
⑩
⑪
⑫
⑬
1 Schalten Sie den Strom ein/aus
2 Zurück zum Hauptmenü
3 Rufen Sie das Menü auf
4 Lautstärke erhöhen
5 Lautstärke runter
6 Schließen Sie den Ton
7 Systemeinstellungen vornehmen
8
Pfeiltasten
Bestätigen Sie die Option
9 Zurück zum vorherigen Menü
10 Autofokus und automatische Trapezverzerrung einstellen
11 Fokus+
12 Fokus-
13 Wählen Sie die Eingangssignalquelle

service@toptro.com service@toptro.com
DE DE
32 33
1.Installieren Sie 2 AAA-Batterien in die Fernbedienung, bevor Sie sie
verwenden. Kombinieren Sie keine neuen Batterien mit alten in der
Fernbedienung, da dies zu Betriebsausfällen aufgrund unzureichender
Stromversorgung führen kann.
2. Stellen Sie bei Verwendung der Fernbedienung sicher, dass der
Signalsender der Fernbedienung auf den Infrarotsignalempfänger des
Projektors gerichtet ist.
3.Wenn Sie die Fernbedienung längere Zeit nicht verwenden, nehmen Sie
bitte die Batterien heraus, um ein Auslaufen der Batterien zu verhindern.
Der Projektor kann mit einem speziellen Aufhängerahmen an der Decke
aufgehängt und auf dem stabilen Schreibtisch platziert werden, um das
Bild entsprechend der Betriebsumgebung und den Anforderungen zu
projizieren. Die Installationsmethode ist wie folgt:
Der empfohlene Projektionsabstand beträgt ca. 8ft-10ft.
Die Bildgröße hängt von der Entfernung zwischen Projektor und Leinwand
ab. Es kann eine Abweichung von 3% zwischen den oben aufgeführten
Daten geben. Unterschiedliche Einstellungen führen zu unterschiedlichen
Entfernungen.
Notiz:
INSTALLATION
1.Installationsmethode
2.Projektionsabstand und -größe
3.an der Decke installieren
Beamer
Beamer
Beamer
Beamer
Bildschirm
Bildschirm
Bildschirm
Bildschirm
1. Frontprojektions-Deckenhalterung
3. Frontprojektionstischhalterung
2. Rückprojektions-Deckenhalterung
4. Rückprojektionstischhalterung
Seitenverhältnis: 16:9
Entfernung (ft.) Bildschirmgröße
5 50"
8 80"
10 100"
12 120"
Schraubenloch der
Halterung
Notiz: Bitte kaufen Sie eine universelle Projektor Deckenhalterung und
befestigen Sie den Projektor mit 1/4 Zoll Schrauben.
service@toptro.com service@toptro.com
DE DE
34 35
Schließen Sie den Projektor an die Stromversorgung an, der Projektor
wechselt in den Standby-Modus und die Signalanzeige auf der
Abdeckung leuchtet rot.
Einschalten: Drücken Sie den Netzschalter am Gehäuse oder den
Netzschalter auf der Fernbedienung, und die Kontrollleuchte leuchtet
blau, um in den Betriebszustand zu wechseln.
Herunterfahren: Drücken Sie im Betriebszustand die Ein-/Aus-
Taste am Gehäuse oder die Ein-/Aus-Taste auf der Fernbedienung,
die Kontrollleuchte wechselt von blau zu rot und der Projektor wird
ausgeschaltet.
* Wenn Sie den X7 Beamer zum ersten Mal starten, warten Sie bitte 2-3
Sekunden geduldig, der Beamer passt den Fokus automatisch an. Wenn
das Bild nicht klar ist, können Sie die Fokustaste "F+", "F-" drücken, um
die Brennweite des Objektivs einzustellen, klicken oder lange auf die
Fokustaste drücken, bis das Bild klar ist.
Notiz: Wenn es immer noch verschwommen ist, versuchen Sie, die
Wurfweite anzupassen.
1. Legen Sie den USB Datenträger ein, wählen Sie das Symbol [Multimedia]
2. Wählen Sie die Option [Alle/Video/Audio/Bild]
3. Wählen Sie die gewünschte Datei (oder den Ordner zum Aufrufen des
Unterordners) auf dem USB-Laufwerk aus und drücken Sie dann die [OK]-
Taste, um sie abzuspielen.
Notiz: Der TOPTRO X7 Beamer unterstützt USB-Datenträger zur direkten
Wiedergabe von PPT-, Word- und Excel-Dateien.
* Wenn der X7 Beamer zum ersten Mal gestartet wird, führt der Projektor
automatisch eine Trapezkorrektur durch. Oder Sie können auch die
digitale 4P-Keystone-Korrektur des Projektors verwenden, um das Bild in
ein Rechteck (vertikal und horizontal) zu ändern. Einzelheiten entnehmen
Sie bitte der Seite 44 dieses Handbuchs.
VERWENDEN SIE DEN PROJEKTOR
1.Schalten Sie den Projektor ein/aus
2.Fokuseinstellung
2.USB Datenträger Eingabemodus
2.1 Spielen Sie Video/Audio/Bild/Office im USB Datenträger
Eingabemodus ab
3.Anpassung der Trapezkorrektur
Power Taste
Die Homepage des Projektors ist wie folgt.
Wählen Sie auf der Startseite die gewünschte Insert-Signalquelle (AV/
HDMI1/HDMI2).
Notiz: Wenn Sie das externe Gerät (z. B. TV-Box, Fire TV Stick, DVD-
Player, USB-Flash-Disk, Computer usw.) anschließen, müssen Sie die
entsprechende Signalquelle auswählen. Wenn Sie falsch wählen, zeigt der
Projektor kein Signal.
AUFSTELLEN DES PROJEKTORS
1.Wählen Sie die Insert-Signalquelle aus

service@toptro.com service@toptro.com
DE DE
36 37
Warme Tipps: Wenn der Projektor den USB-Datenträger nicht erkennen
kann, wenden Sie sich bitte an die folgenden Methoden, um das Problem
zu lösen.
Bitte bestätigen Sie, ob Ihr USB-Datenträger die folgenden Formate
erfüllt.
1. FAT32: 8G/16G/32G
2. NTFS: 64G
Wenn dies nicht der Fall ist, formatieren Sie den USB-Datenträger.
Stellen Sie sicher, dass Sie alles sichern, bevor Sie den USB-Datenträger
formatieren. Nach diesen Schritten ist alles für immer verloren.
Klicken Sie auf die Schaltfläche "OK", um die Wiedergabeoberfläche
aufzurufen.
1. Stecken Sie Ihre USB-Festplatte in den USB-Anschluss des Computers.
2. Öffnen Sie den Datei-Explorer und klicken Sie mit der rechten
Maustaste auf das Laufwerk.
3. Wählen Sie Format.
4. Wählen Sie im Dropdown-Menü Dateisystem bitte das Format FAT32
aus.
5. Klicken Sie auf Start und schließen Sie dieses Fenster, wenn Sie fertig
sind.
Wenn das Problem immer noch nicht gelöst ist, senden Sie Ihr Problem
bitte an diese E-Mail: service@toptro.com
Wie konvertiere ich das USB-Festplattenformat in das FAT32-Format?
2.2 Schnittstelle spielen
Spieleinstellung Enthalten Funktion
Wiedergabeliste
die Videos des aktuellen
Ordners
Video aus dem aktuellen
Ordner ändern
Wiedergabemodus
Alle wiederholen,Keine , 1 wie
derholen,Zufällig,Wiedergabe
liste
Spielmodus ändern
Bilds eitenformat AUTO, 16:9, 4:3, zoom1, zoom2
Video-Seitenverhältnis
einstellen
Audio-Track Audio-Track Audiospur einstellen
Untertitelspurc Untertitelspurc Untertitelspur einstellen
Codierungsstandard ISO, Windows
Kodierungsstandard
festlegen
Sprache der Region Verschiedene Sprachen Regionssprache einstellen
Externe Untertitel Externer Untertitel
Untertitel aus anderen
Ordnern auswählen
Zeit ist abgelaufen! Fortschrittssprung
schnelles Vorspulen des
Videos zu einer bestimmten
Zeit
INFORMATIONEN
Auflösung, Größe, Dauer,
Bitrate
Sehen Sie sich die
grundlegenden
Videoinformationen an
Bild & Töne Bild- und Tonmodus
Bild- und Tonmodus
einstellen
service@toptro.com service@toptro.com
DE DE
38 39
2.3 Musikwiedergabe-Schnittstelle
Spieleinstellung Enthalten Funktion
Wiedergabeliste
die Musik des aktuellen
Ordners
Musik aus dem aktuellen
Ordner ändern
Wiedergabemodus
Alle wiederholen,Keine , 1 wie
derholen,Zufällig,Wiedergabe
liste
Spielmodus ändern
INFORMATIONEN Größe, Dauer, Bitrate
siehe grundlegende
Musikinformationen
Bild & Töne Bild- und Tonmodus
Bild- und Tonmodus
einstellen
Musiktexte Code
verschiedene
Verschlüsselungsstandards
Kodierungsstandard
festlegen
2.4 Picture Play Schnittstelle
Spieleinstellung Enthalten Funktion
Wiedergabeliste
die Bilder des aktuellen
Ordners
Bild aus dem aktuellen
Ordner wechseln
Dia anzeigen Start stop
Beginnen Sie mit der
Wiedergabe von Folien aus
dem aktuellen Ordner
Intervallzeit 3 Sek., 5 Sek., 8 Sek., 12 Sek
Intervallzeit für die
Wiedergabe von Dias
einstellen
Bilds eitenformat
Auto, Vollbild, Verkleinern,
Original, Zoom1, Zoom2
Bildseitenverhältnis einstellen
Drehen
Standard, Nach rechts
drehen, Nach links drehen
Bild drehen
Als Hintergrundbild
einstellen
Als Hintergrundbild festlegen Als Hintergrundbild festlegen
INFORMATIONEN Auflösung, Größe
siehe grundlegende
Bildinformationen
Bild & Töne Bild- und Tonmodus
Bild- und Tonmodus
einstellen
Speisekarte Inhalt Modus Funktion
Bild
Standard/Weich/
Dynamisch/Vivid/
Benutzer
Kontrast
Verändere das Bild
Parameter in der
Bereich 0 -100
Helligkeit
Schärfe
Farbe
öne
Standard/Musik/
Film/Nachrichten/
Benutzer
Bässe
Ändern Sie den Ton
Parameter in der
Bereich 0 -100
Töne
service@toptro.com service@toptro.com
DE DE
40 41
Kabellose Verbindung
3.WiFi-Einstellung
1. Gehen Sie zur Startseite -- Drücken Sie die linke Taste - Wählen Sie das
Menü [ Netzwerk ] - Wählen Sie [ Netzwerk- Schnurlos ] - Wählen Sie
Ihr Heim-WLAN aus der Liste - Verbinden Sie den Toptro X7-Projektor mit
Ihrem Heim-WLAN
2.Wählen Sie auf Ihrem iOS-Gerät das Menü [ Systemeinstellungen ] -
Schalten Sie die Funktion [ Wi-Fi ] ein - Verbinden Sie Ihr iOS-Gerät mit
demselben Heimnetzwerk wie den Projektor.
3. Öffnen Sie das [ Kontrollzentrum ] auf Ihrem iOS-Gerät - Wählen
Sie die Funktion [ Bildschirm-Spiegelung ] Wählen Sie den iOS Cast-
Empfänger mit dem Namen [Toptro X7-XXXX ] aus und verbinden
Sie ihn - Ihr iOS-Gerätebildschirm wird nach 3 Sekunden auf der
Projektionsfläche angezeigt.
3. Scannen Sie den QR-Code und laden Sie die App auf Ihr Android-Gerät
herunter.
4. Öffnen Sie die App [Maxhub Share] auf Ihrem Android-Gerät - Wählen
Sie den Fernseher mit dem Namen [Toptro X7-XXXX] aus - Der Bildschirm
Ihres Android-Geräts wird nach 3 Sekunden auf der Projektionsfläche
verschoben.
Notiz:
1. Verschiedene Marken von Android-Telefonen haben unterschiedliche
Funktionen für ausgewählte Screen Mirroring-Anzeigen. Bitte lesen
Sie das Handbuch Ihres Telefons. [Multiscreen/Wireless Display/WLAN
Display/Screen Mirroring/Wireless Projection/Smart View etc.]
2. Nicht alle Android-Telefone unterstützen diese Funktion. Bitte stellen
Sie vor der Verwendung sicher, dass es unterstützt wird.
1. Stellen Sie sicher, dass der Toptro X7-Projektor und Ihr Android-Gerät
mit demselben Wi-Fi verbunden sind, die Vorgänge beziehen sich auf [1]
und [2] von iOS Cast (für iOS-Gerät).
2. Gehen Sie zur Startseite - Wählen Sie die App [Maxhub Share] aus -
Drücken Sie die OK-Taste, um die App [Maxhub Share] aufzurufen.
Erwärmungstipps:
1. Die Geschwindigkeit der Bildschirmspiegelung mit drahtloser
Verbindung wird von der Netzwerkumgebung beeinflusst. Bei der
Verwendung von Screen Mirroring wird eine Bandbreite von 100 Mbit oder
mehr empfohlen.
2. Stellen Sie sicher, dass sich Ihr Mobilgerät in der Nähe des Projektors
befindet, wenn Sie eine drahtlose Verbindung verwenden. Ein Abstand
von weniger als 1 Meter wird empfohlen.
3. Einige Mobilgeräte unterstützen aufgrund der Kompatibilität
möglicherweise keine Bildschirmspiegelung.
4. Bei Fragen wenden Sie sich bitte an service@toptro.com
3.1 iOS Cast (für iOS-Geräte)
3.2 Miracast (für Android-Geräte)

service@toptro.com service@toptro.com
DE DE
42 43
4.Bluetooth Einstellung
5.Projektorsystemeinstellung
Gehen Sie zur Startseite - - Wählen Sie das Menü [ Systemeinstellungen]
- - Wählen Sie die Option [ Bluetooth-Funktion ] - - Öffnen Sie die
Bluetooth-Funktion und Ihr Bluetooth-Gerät - - Scannen Sie automatisch
die Bluetooth-Geräte in der Nähe - - Wählen Sie das gewünschte
Bluetooth-Gerät - - es wird sein automatisch gekoppelt und verbunden.
Notiz:
1. Der Toptro X7 Projektor ist mit Bluetooth-Headsets, Bluetooth-
Lautsprechern und Air Pods kompatibel, jedoch nicht mit Bluetooth-
Tastaturen oder Bluetooth-Telefonen.
2. Wenn Sie Fragen haben, wenden Sie sich bitte per an uns
service@toptro.com
5.1 Projektionsmethode
5.2 Fokus
Schalten Sie diese Taste ein, wenn Sie den Projektor starten, warten
Sie bitte 2-3 Sekunden geduldig, der Projektor fokussiert nach dem
Einschalten automatisch.
Wenn Sie diese Taste einschalten, fokussiert der Projektor automatisch,
wenn die Position geändert wird.
Notiz:
1. Verwenden Sie den Autofokus, wenn Sie Ihren Projektor einrichten oder
5.2.1 Automatische Fokussierung nach dem Booten
5.2.2 Bewegung Autofokus
service@toptro.com service@toptro.com
DE DE
44 45
5.4 Zoomen
5.3 Keystone Korrektur
* Wählen Sie die Option [Benutzerdefinierter Zoom] , drücken Sie die
"OK"-Taste auf der Fernbedienung, um das Untermenü [Proportional
Zoomen] aufzurufen, drücken Sie die "OK"-Taste, um diese Taste
auszuwählen und ein dreistufiges Menü [Zoom] aufzurufen Sie können
die Projektionsgröße anpassen, indem Sie die Parameter anpassen, der
Zoombereich beträgt 50 % bis 100 %.
Gehen Sie zur Startseite - - Wählen Sie das Menü [Systemeinstellungen] -
- Wählen Sie die Option [Systemdaten] - - Wählen Sie die Option [Interner
Speicher Informationen]
Notiz: Wenn die Software derzeit die neueste ist, müssen Sie die Software
nicht aktualisieren. Wenn Sie während des Upgrade-Vorgangs Fragen
haben, können Sie uns gerne über service@toptro.com kontaktieren.
wenn Sie den Fokus Ihres Bildes schnell anpassen müssen.
2. Verwenden Sie den manuellen Fokusmodus, wenn Sie eine genauere
Kontrolle über den Fokus Ihres Bildes benötigen. Drücken Sie lange auf
die Fokustaste “F+”, “F-”, bis das Bild klar ist.
Schalten Sie diese Taste ein, wenn Sie den Projektor starten, warten Sie
bitte 2-3 Sekunden geduldig, der Projektor passt die Trapezkorrektur
automatisch an.
Schalten Sie diese Taste ein, der Projektor führt automatisch eine
Trapezkorrektur durch, wenn die Position geändert wird.
Notiz: Wenn Sie mit dem automatisch korrigierten Bild nicht zufrieden
sind, die Projektionswand nicht rechteckig ist, können Sie sie durch die
4-Punkt-Trapezkorrektur anpassen.
5.3.1 Automatische Korrektur nach dem Booten
5.3.2 Automatische Korrektur nach Verschiebung
6.Systemaktualisierung

service@toptro.com service@toptro.com
DE DE
46 47
7.Gemeinsam
Speisekarte Funktion
Sprache Systemsprache einrichten
Eingangsmodus Legen Sie die aktuelle Eingabemethode fest
Standard Eingabequelle Standardquelle einrichten: Aus, AV, HDMI1, HDMI2
Power Mode Energiemodus einstellen: Standby, Ein, Zuletzt
Systemrückstellung Stellen Sie das System und alle Daten wieder her
Gerätename Projektornamen ändern
ANSCHLUSS DER SIGNALLEITUNGEN
Der TOPTRO X7-Projektor verfügt über 7 Schnittstellen, HDMI-Anschluss * 2
/ USB-Anschluss * 2 / 3,5-mm-Kopfhörerausgang * 1 / Netzwerkanschluss
* 1 / AV-Anschluss * 1. Bitte wählen Sie den richtigen Anschluss aus, um
Ihr Gerät anzuschließen (PC, DVD-Player, Fire TV-Stick, TV-Box, Soundbar,
USB-Festplatte, PS4 etc.)
1. Schließen Sie Ihren Fire TV-Stick (oder PC, TV-Box, PS4 usw.) an den
HDMI Anschluss des Projektors an;
2. Rufen Sie die Startseite auf, um das entsprechende HDMI als
Signalquelle auszuwählen.
1. Schalten Sie Ihren DVD-Player und den Projektor ein;
2. Verbinden Sie den DVD-Player und den Projektor mit dem HDMI-Kabel
3. Rufen Sie die Startseite auf, um das entsprechende HDMI als
Signalquelle auszuwählen.
Notiz: Wenn der Projektor über das HDMI-Kabel mit dem DVD-
Player verbunden ist und kein Ton zu hören ist, kann es sein, dass das
Ausgangssignal des HDMI-Anschlusses des DVD-Players nicht mit HDCP
kompatibel ist. Bitte versuchen Sie, Ihre Soundbar anzuschließen /
Lautsprecher.
1.Schließen Sie die Geräte über den HDMI-Anschluss an
2.An den DVD-Player anschließen

service@toptro.com service@toptro.com
DE DE
48 49
Wenn Ihr Lautsprecher über einen AUX-Anschluss verfügt, verwenden Sie
bitte Ihr 3,5-mm-Audiokabel, um den Projektor und Ihren Lautsprecher
wie im Bild gezeigt anzuschließen.
1. Verbinden Sie den Computer und den X7-Projektor mit dem HDMI-
Kabel (im Lieferumfang enthalten).
2. Wählen Sie die HDMI-Quelle aus, um Dateien auf Ihrem Computer zu
projizieren;
3. Halten Sie auf Ihrem Laptop die Tasten „Win+P“ gedrückt, um den
Anzeigemodus zu ändern.
Nur Computer: Dies ist die Standardoption – wird nur auf dem
Hauptmonitor angezeigt.
Duplizieren: Lässt alle Monitore dasselbe anzeigen, indem der Desktop
auf jedem Monitor dupliziert wird.
Erweitern: Lässt alle Ihre Monitore wie einen großen Monitor wirken, der
den Desktop über alle erweitert.
Nur Projektor: Zeigt nur auf dem sekundären Monitor wie bei einem
Projektor an.
Sie können die Bildschirmauflösung im Nur-Projektor-Modus ändern
Schritt: Start > Systemsteuerung > Darstellung und Personalisierung >
Bildschirmauflösung anpassen
3.Verbinden Sie sich mit der Soundbar/dem Lautsprecher
4.An den Computer anschließen
Audio
out
AUX
port
WARRANTY
Vielen Dank für Ihren Einkauf und Ihre Unterstützung. Wir gewähren 3
Jahre Garantie auf den X7-Projektor. Bei Fragen können Sie uns gerne
über service@toptro.com kontaktieren.

service@toptro.com service@toptro.com
FR FR
50 51
CONTENTS
Support Professionnel à vie TOPTRO
CONSEILS
Cher Client,
Merci beaucoup de soutenir TOPTRO.
Veuillez lire attentivement ce manuel avant d’utiliser le projecteur. Si vous
rencontrez des problèmes, envoyez votre numéro de commande et le
problème à service@toptro.com. Nous fournirons une solution rapide en
24 heures.
En fait, de nombreux problèmes peuvent être facilement résolus par
le réglage, tels que l’absence de signal, l’absence de son, l’échec de la
connexion Bluetooth, l’échec de la connexion WiFi, l’animation saccadée,
etc. Nous promettons que tous les projecteurs ont été soigneusement
vérifiés à 100% et emballés avant expédition.
Si vous avez des questions, pourriez-vous s’il vous plaît nous contacter
afin que le problème puisse être résolu. Et donnez-nous l’occasion de
nous améliorer. Nous vous garantissons que nous vous fournirons une
solution satisfaisante.
Merci de votre compréhension!
Sinceres salutations
Équipe de service TOPTRO
1.Do placez pas le projecteur dans une pièce trop chaude ou trop froide,
car la température élevée ou basse réduira la durée de vie de l’appareil.
L’environnement de travail serait de 5 ° C ~ 35 ° C mieux.
2. La ventilation est équipée pour que le projecteur fonctionne de
manière stable. Ne couvrez pas l’évent avec un tissu, une couverture ou
d’autres choses. N’insérez rien dans la fente du projecteur, sinon cela
pourrait provoquer un court-circuit ou un choc électrique sur votre
appareil et causer des dommages.
3. Le projecteur doit être strictement protégé contre les chocs, les
extrusions et les vibrations. N’essayez pas de vous déplacer sur un impact
fort, une extrusion et une vibration. N’essayez pas de déplacer les défauts
du circuit interne.
4. L’objectif, en tant que composant central du projecteur, est directement
lié à la définition et à l’effet de l’image. La poussière excessive qui s’y
trouve affectera la qualité de l’image. La lentille sale doit être essuyée
avec un chiffon de coton doux pour la surface de la lentille en verre. Il ne
doit pas être utilisé de chiffon dur ou d’abrasifs.
Support Professionnel à vie TOPTRO - - - - - - - - - - - - - - - 51
CONSEILS - - - - - - - - - - - - - - - - - - - - - - - - - - - - 51
LISTE DES FORFAITS - - - - - - - - - - - - - - - - - - - - - - - 52
TECHNISCHE DATEN DES BEAMERS - - - - - - - - - - - - - - - 52
APERÇU DU PROJECTEUR - - - - - - - - - - - - - - - - - - - - 53
TÉLÉCOMMANDE - - - - - - - - - - - - - - - - - - - - - - - - 55
INSTALLATION - - - - - - - - - - - - - - - - - - - - - - - - - - 56
1.Méthode d'installation - - - - - - - - - - - - - - - - - - - - - - - - - 56
2.Distance et Taille de Projection - - - - - - - - - - - - - - - - - - - - 57
3.Installer au Plafond - - - - - - - - - - - - - - - - - - - - - - - - - - 57
UTILISER LE PROJECTEUR - - - - - - - - - - - - - - - - - - - - 58
1.Allumer/éteindre le projecteur - - - - - - - - - - - - - - - - - - - - - 58
2.Réglage de Focus - - - - - - - - - - - - - - - - - - - - - - - - - - - 58
3.Ajustement de la Correction Trapézoïdale - - - - - - - - - - - - - - - 59
CONFIGURATION DU PROJECTEUR- - - - - - - - - - - - - - - - 59
1.Sélectionnez la Source du Signal d'insertion - - - - - - - - - - - - - - 59
2.Mode d'entrée de Disque USB - - - - - - - - - - - - - - - - - - - - - 59
2.1 Lecture vidéo/audio/image/Office en mode d'entrée de disque USB - 59
2.2 Interface de Jeu - - - - - - - - - - - - - - - - - - - - - - - - - - 61
2.3 Interface de Lecture de Musique - - - - - - - - - - - - - - - - - - 62
2.4 Interface de Lecture d'image - - - - - - - - - - - - - - - - - - - - 63
3.Paramètre Wi-Fi- - - - - - - - - - - - - - - - - - - - - - - - - - - - 64
3.1 iOS Cast (pour les appareils iOS) - - - - - - - - - - - - - - - - - - - 64
3.2 Miracast (pour les appareils Android) - - - - - - - - - - - - - - - - 65
4.Paramètre Bluetooth - - - - - - - - - - - - - - - - - - - - - - - - - 66
5.Réglage du Système du Projecteur- - - - - - - - - - - - - - - - - - - 66
5.1 Méthode de Projection - - - - - - - - - - - - - - - - - - - - - - - 67
5.2 Focus - - - - - - - - - - - - - - - - - - - - - - - - - - - - - - - 67
5.3 Correction Trapézoïdale - - - - - - - - - - - - - - - - - - - - - - 68
5.4 Zoom - - - - - - - - - - - - - - - - - - - - - - - - - - - - - - - 69
6.Mise à jour du système - - - - - - - - - - - - - - - - - - - - - - - - 69
7.Common - - - - - - - - - - - - - - - - - - - - - - - - - - - - - - - 70
CONNEXION DES LIGNES DE SIGNAL - - - - - - - - - - - - - - - 70
1.Connectez les appareils via le port HDMI - - - - - - - - - - - - - - - - 71
2.Connectez-vous au lecteur DVD - - - - - - - - - - - - - - - - - - - - 71
3.Connectez-vous à la barre de son/haut-parleur - - - - - - - - - - - - 72
4.Connect to the Computer - - - - - - - - - - - - - - - - - - - - - - - 72
GARANTIE- - - - - - - - - - - - - - - - - - - - - - - - - - - - 73

service@toptro.com service@toptro.com
FR FR
52 53
LISTE DES FORFAITS
APERÇU DU PROJECTEUR
TECHNISCHE DATEN DES BEAMERS
Projecteur TOPTRO X7 * 1 Télécommande * 1 Cordon d'alimentation * 1
Câble HDMI*1 Câble AV*1 Manuel d'utilisation*1
Couvercle d'objectif*1 Chiffon de Nettoyage*1
Model No. X7
Résolution Native 1920*1080 Ratio d'aspect 4:3/16:9
Technologie
d'affichage
LCD Source de lumière LED
Jeu de Couleurs 16.7M Full Taille 8.3x7.2x6.3 pouces
Poids du
projecteur
5.29 lb
Tension
d'alimentation
AC100-240V ~
50/60Hz
Port de Sortie
Casque de
Musique
Port d'entrée
RJ45/HDMI/USB/
AV
Méthode de
Projection
Avant/arrière sur le bureau, avant/arrière au plafond
Mode de
Fonctionnement
Télécommande
Format Vidéo
MP4 / MKV / WMV / 3GP / MPG / VOB / TP / TS / DAT / MOV /
FLV / 4K H.264/H.265(
≤
30fps)
Format Audio AAC_LC / HE_AAC / HE_AACV2 / LPCM / MP3 / APE / MP3
Image Format JPG/JPEG/BMP/PNG
Format d'image
TXT / WORD / EXCEL / PPTX
①
②③
④
⑤ ⑥
⑦ ⑧⑨ ⑩
⑪
⑫
⑬ ⑭
⑮
⑯ ⑰
⑱
service@toptro.com service@toptro.com
FR FR
54 55
1 Lentille du projecteur
Lentille en verre à revêtement
optique
2/11 Fenêtre IR Récepteur de signal infrarouge
3 Caméra Objectif à mise au point automatique
4 Haut-parleurs Sortie audio
5 RJ45 Port réseau
6 Ports USB Port USB 1/Port USB 2
7/8 Ports HDMI Entrée HDMI
9 Interface Audiovisuelle
Sépare la transmission audio et
vidéo
10 Prise Casque Sortie casque 3,5 mm
12
Port du cordon
d'alimentation
Insérez le cordon d'alimentation
13/14 Sortie de Refroidissement
Empêcher le projecteur de
surchauffer
15 Bouton d'alimentation Allumer/éteindre l'alimentation
16 Étiquette Inférieure
Plaque signalétique au bas du
projecteur
17 Pieds de Machines
Pieds de machine à réglage en
hauteur
18 Trou de Vis
Trou de vis de support (1/4 pouce),
prend également en charge le
levage
TÉLÉCOMMANDE
①
②
③
④
⑤
⑥
⑦
⑧
⑨
⑩
⑪
⑫
⑬
1 Allumer/éteindre l'alimentation
2 Retour au menu principal
3 Tirez le menu
4 Monter le son
5 Baisser le volume
6 Fermez le son
7 Définir les paramètres du système
8
Touches directionnelles
Confirmez l'option
9 Retourner au menu précédent
10
Réglez la mise au point automatique et la correction
trapézoïdale automatique
11 Focus+
12 Focus-
13 Sélectionnez la source du signal d'entrée
service@toptro.com service@toptro.com
FR FR
56 57
1. Installez 2 piles AAA dans la télécommande avant de l’utiliser. Ne
combinez pas de piles neuves avec d’anciennes dans la télécommande,
ce qui peut entraîner une défaillance du fonctionnement en raison d’une
alimentation électrique insuffisante.
2. Lors de l’utilisation de la télécommande, assurez-vous que l’émetteur
de signal de la télécommande vise le récepteur de signal infrarouge du
projecteur.
3. Si vous n’utilisez pas la radiocommande pendant une période
prolongée, veuillez retirer les piles pour éviter toute fuite de pile.
Le projecteur peut être suspendu au plafond avec un cadre de cintre
spécial et placé sur le bureau stable pour projeter l’image en fonction
de l’environnement de fonctionnement et des exigences. La méthode
d’installation est la suivante:
La distance de projection recommandée est d’environ 8 pieds à 10 pieds.
La taille de l’image dépend de la distance entre le projecteur et l’écran,
il peut y avoir un écart de 3% entre les données énumérées ci-dessus.
Différents paramètres entraînent des distances différentes.
Note:
INSTALLATION
1.Méthode d'installation
2.Distance et Taille de Projection
3.Installer au Plafond
Projecteur
Projecteur
Projecteur
Projecteur
Filtrer
Filtrer
Filtrer
Filtrer
1. Support de plafond à projection avant
3. Support de table de projection avant
2. Projection arrière Montage au plafond
4. Support de table de projection arrière
Ratio d'aspect: 16:9
Distance (ft.) Taille de l’écran
5 50"
8 80"
10 100"
12 120"
Trou de vis
Note: Veuillez acheter un support de plafond de projecteur universel et
fixer le projecteur avec des vis de 1/4 de pouce.
service@toptro.com service@toptro.com
FR FR
58 59
Connectez le projecteur à l’alimentation, le projecteur passe en mode
veille et le voyant de signal sur le capot est rouge.
Mise sous tension: appuyez sur le bouton d’alimentation du boîtier ou sur
le bouton d’alimentation de la télécommande, et le voyant devient bleu
pour entrer dans l’état de fonctionnement.
Arrêt: à l’état de fonctionnement, appuyez sur le bouton d’alimentation
du boîtier ou sur le bouton d’alimentation de la télécommande, le voyant
passera du bleu au rouge et le projecteur s’éteindra.
*Lorsque vous démarrez le projecteur X7 pour la première fois, veuillez
patienter pendant 2-3 secondes, le projecteur ajustera automatiquement
la mise au point. Si l’image n’est pas claire, vous pouvez appuyer sur le
bouton de mise au point "F+" ou "F-" pour régler la distance focale de
l’objectif, cliquer ou appuyer longuement sur le bouton de mise au point
jusqu’à ce que l’image soit claire.
Remarque: si elle est encore floue, essayez d’ajuster la distance de
projection.
1. Insérez le disque USB, sélectionnez l’icône [Média]
2. Sélectionnez l’option [Tous/Vidéo/Audio/Image]
3. Sélectionnez le fichier souhaité (ou le dossier pour entrer dans le sous-
dossier) sur le disque USB, puis appuyez sur le bouton [OK] pour le lire.
Remarque: Le projecteur TOPTRO X7 prend en charge le disque USB pour
lire directement les fichiers PPT, Word et Excel.
* Lorsque le projecteur X7 est démarré pour la première fois, il effectue
automatiquement une correction trapézoïdale. Ou vous pouvez
également utiliser la correction trapézoïdale numérique 4P du projecteur
pour changer l’image en rectangle (vertical et horizontal). Détails Veuillez
vous référer à la page la page 68 de ce manuel.
UTILISER LE PROJECTEUR
1.Allumer/éteindre le projecteur
2.Réglage de Focus
2.Mode d'entrée de Disque USB
2.1 Lecture vidéo/audio/image/Office en mode d'entrée de disque USB
3.Ajustement de la Correction Trapézoïdale
Bouton
d'alimentation
La page d'accueil du projecteur est la suivante:
Sélectionnez la source de signal d’insertion souhaitée (AV/HDMI1/HDMI2)
sur la page d’accueil.
Remarque: Si vous connectez le périphérique externe (tel qu’un boîtier
TV, Fire TV Stick, lecteur DVD, disque flash USB, ordinateur, etc.), veuillez
sélectionner la source de signal correspondante. Si vous choisissez mal, le
projecteur n’affichera aucun signal.
CONFIGURATION DU PROJECTEUR
1.Sélectionnez la Source du Signal d'insertion
service@toptro.com service@toptro.com
FR FR
60 61
Conseils chaleureux: Si le projecteur ne peut pas reconnaître le disque
USB, veuillez vous référer aux méthodes suivantes pour résoudre le
problème.
Veuillez confirmer si votre disque USB respecte les formats suivants.
1. FAT32 : 8G/16G/32G
2. NTFS : 64G
Si ce n'est pas le cas, veuillez formater le disque USB. Avant de formater
le disque USB, si vous avez quelque chose sur votre disque USB, assurez-
vous de tout sauvegarder. Après ces étapes, tout sera perdu à jamais.
Cliquez sur le bouton "OK" pour accéder à l'interface de lecture.
1. Branchez votre disque USB dans le port USB de l'ordinateur.
2. Ouvrez l'Explorateur de fichiers et cliquez avec le bouton droit sur le
lecteur.
3. Choisissez Formater.
4. Dans la liste déroulante Système de fichiers, veuillez choisir le format
FAT32.
5. Cliquez sur Démarrer et fermez cette fenêtre lorsque vous avez
terminé.
Si le problème n'est toujours pas résolu, veuillez envoyer votre problème
à cet e-mail : service@toptro.com
How to convert USB disk format to FAT32 format?
2.2 Interface de Jeu
Réglage de jeu Inclure Fonction
Liste de lecture
les vidéos du dossier en
cours
changer la vidéo du dossier
actuel
Mode de lecture
Répéter tout, quitter
automatiquement, répéter
un, aléatoire, liste de lecture
changer de mode de
lecture
Format de limage
automatique, 16:9, 4:3,
zoom1, zoom2
définir le rapport hauteur/
largeur de la vidéo
Piste audio
piste audio définir la piste audio
Sous-titre DÉSACTIVÉ
définir la piste de sous-
titres
Norme d'encodage iso, windows
définir la norme
d'encodage
Région Langue diverses langues
définir la langue de la
région
Sous-titre externe sous-titre externe
choisir des sous-titres dans
d'autres dossiers
Le temps est hors
de l'intervalle
progrès saut
faire avancer rapidement la
vidéo à un moment précis
Informations
résolution,taille, durée,
débit binaire
voir les informations vidéo
de base
Image & Son mode image et son
régler le mode image et
son

service@toptro.com service@toptro.com
FR FR
62 63
2.3 Interface de Lecture de Musique
Réglage de jeu Inclure Fonction
Liste de lecture
la musique du dossier en
cours
changer la musique du
dossier actuel
Mode de lecture
répéter tout, quitter
automatiquement, répéter
un, aléatoire, liste de lecture
changer de mode de lecture
Informations taille, durée, débit binaire
voir les informations
musicales de base
Image & Son mode image et son régler le mode image et son
Encodage des
paroles
diverses normes d'encodage définir la norme d'encodage
2.4 Interface de Lecture d'image
Réglage de jeu Inclure Fonction
Liste de lecture
les images du dossier en
cours
changer l'image du dossier
actuel
Lecture de
diaporama
commencer arrêter
commencer à lire les
diapositives du dossier actuel
Temps d'intervall 3 s, 5 s, 8 s, 12 s
définir l'intervalle de lecture
des diapositives
Format de l'image
automatique, plein écran,
zoom arrière, original, zoom1,
zoom2
définir le rapport d'aspect de
l'image
Tourner
par défaut, rotation à droite,
Rotation à gauche
faire pivoter l'image
Définir comme fond
d'écran
Définir en tant que fond
d'écran
Définir en tant que fond
d'écran
Informations résolution, taille
voir les informations de base
sur l'image
Image & Son mode image et son régler le mode image et son
Menu Contenu Mode Fonction
Mode Image
La norme /Doux/
Dynamique/Vif/
Utilisateur
Contraste
Modifier l'image
paramètres dans le
plage 0 -100
Luminosité
Netteté
Couleur
Mode Son
la norme/Musique/
Film/Actualités/
Utilisateur
Graves
Modifier le son
paramètres dans le
plage 0 -100
Aigus
service@toptro.com service@toptro.com
FR FR
64 65
Connexion sans fil
3.Paramètre Wi-Fi
1. Allez à la page d'accueil -- Appuyez sur le bouton gauche -
Sélectionnez le menu [ Réseau ] - Sélectionnez [ Sans fil ] - Sélectionnez
votre Wi-Fi domestique dans la liste - Connectez le projecteur Toptro X7 à
votre Wi-Fi domestique.
2. Sélectionnez le menu [ Paramètres ] sur votre appareil iOS - Activez
la fonction [ Wi-Fi ] - Connectez votre appareil iOS au même réseau
domestique que le projecteur.
3. Ouvrez le [ Control Center ] sur votre appareil iOS - Sélectionnez la
fonction [ Screen Mirroring ] Sélectionnez et connectez le récepteur iOS
Cast nommé [ Toptro X7-XXXX ] - l'écran de votre appareil iOS s'affichera
sur l'écran de projection après 3 secondes.
3. Scannez le code QR et téléchargez l'application sur votre appareil
Android
4. Ouvrez l'application [Maxhub Share] sur votre appareil Android -
Sélectionnez un téléviseur nommé [Toptro X7-XXXX] - L'écran de votre
appareil Android s'affichera sur l'écran de projection après 3 secondes.
Note:
1. Différentes marques de téléphones Android ont des opérations
différentes pour certains écrans de mise en miroir d'écran, veuillez vous
référer au manuel de votre téléphone. [Affichage multi-écran/sans fil/
affichage WLAN/miroir d'écran/projection sans fil/affichage intelligent,
etc.]
2. Tous les téléphones Android ne prennent pas en charge cette fonction.
Veuillez vous assurer qu'il est pris en charge avant utilisation.
1. Assurez-vous que le projecteur Toptro X7 et votre appareil Android sont
connectés au même Wi-Fi, les opérations se réfèrent à [1] et [2] depuis iOS
Cast (pour appareil iOS)
2. Retour à la maison - Sélectionnez l'application [Maxhub Share] -
Appuyez sur le bouton OK pour accéder à l'application [Maxhub Share].
Conseils de réchauffement:
1. La fluidité de la duplication d'écran avec une connexion sans fil sera
affectée par l'environnement réseau. Une bande passante de 100 Mbit ou
plus est recommandée lors de l'utilisation de la duplication d'écran.
2. Assurez-vous que votre appareil mobile est proche du projecteur
lorsque vous utilisez une connexion sans fil. Une distance de 1 mètre est
recommandée.
3. Certains appareils mobiles peuvent ne pas prendre en charge la
duplication d'écran en raison de la compatibilité.
4. Pour toute question, n'hésitez pas à nous contacter via
service@toptro.com
3.1 iOS Cast (pour les appareils iOS)
3.2 Miracast (pour les appareils Android)

service@toptro.com service@toptro.com
FR FR
66 67
4.Paramètre Bluetooth
5.Réglage du Système du Projecteur
Allez à la page d'accueil - - Sélectionnez le menu [ Paramètres système ] -
- Sélectionnez l'option [ Fonction Bluetooth ] - - Ouvrez la fonction
Bluetooth et votre appareil Bluetooth - - Scannez automatiquement
les appareils Bluetooth à proximité - - Choisissez l'appareil Bluetooth
souhaité - - il être couplé et connecté automatiquement.
Note:
1. Le projecteur Toptro X7 est compatible avec les casques Bluetooth,
les haut-parleurs Bluetooth et les Air Pods, mais pas avec les claviers
Bluetooth ou les téléphones Bluetooth.
2. Si vous avez des questions, n'hésitez pas à nous contacter via
service@toptro.com
5.1 Méthode de Projection
5.2 Focus
Allumez ce bouton, lorsque vous démarrez le projecteur, veuillez attendre
patiemment pendant 2-3 secondes, le projecteur fera automatiquement
la mise au point après la mise sous tension.
Activez ce bouton, le projecteur fera automatiquement la mise au point
lors du changement de position.
Avis:
1. Utilisez la mise au point automatique lorsque vous configurez votre
5.2.1 Mise au point automatique après démarrage
5.2.2 Autofocus de mouvement

service@toptro.com service@toptro.com
FR FR
68 69
5.4 Zoom
5.3 Correction Trapézoïdale
* Sélectionnez l'option [Dimensionnement personnalisé] , appuyez
sur le bouton "OK" de la télécommande pour entrer dans le sous-menu
[Dimensionnement uniforme] , et appuyez sur la touche "OK" pour
sélectionner ce bouton pour entrer dans un menu à trois niveaux [Zoom]
, vous pouvez ajuster la taille de projection en ajustant les paramètres, la
plage de zoom est de 50 % à 100 %.
Allez à la page d'accueil - - Sélectionnez le menu [Paramètres système]
- - Sélectionnez l'option [Infos système] - - Sélectionnez [Mise à jour du
système]
Avis : Si le logiciel est actuellement le plus récent, vous n'avez pas besoin
de mettre à niveau le logiciel. Pendant le processus de mise à niveau, si
vous avez des questions, n'hésitez pas à nous contacter via
service@toptro.com
projecteur ou lorsque vous devez régler rapidement la mise au point de
votre image.
2. Utilisez le mode de mise au point manuelle lorsque vous avez besoin
d'un contrôle plus précis sur la mise au point de votre image. Appuyez
longuement sur le bouton de mise au point "F+" et "F-" jusqu'à ce que
l'image soit claire.
Allumez ce bouton, lorsque vous démarrez le projecteur, veuillez
attendre patiemment pendant 2-3 secondes, le projecteur ajustera
automatiquement la distorsion trapézoïdale.
Activez ce bouton, le projecteur corrigera automatiquement la distorsion
trapézoïdale lors du changement de position.
Avis: Si vous n'êtes pas satisfait de l'image corrigée automatiquement,
l'écran de projection n'est pas rectangulaire, vous pouvez l'ajuster par une
correction trapézoïdale à 4 points.
5.3.1 Correction automatique après démarrage
5.3.2 Correction automatique après déplacement
6.Mise à jour du système

service@toptro.com service@toptro.com
FR FR
70 71
7.Common
Menu Fonction
Langue Configurer la langue du système
Méthode de saisie Définir la méthode de saisie actuelle
Source prédéfinie
Configurer la source par défaut : Désactivé, AV, HDMI1,
HDMI2
Power Mode Définir le mode d'alimentation : veille, marche, dernier
Rétablissement du
système
Récupérer le système et toutes les données
Nom du périphérique Changer le nom du projecteur
CONNEXION DES LIGNES DE SIGNAL
Le projecteur TOPTRO X7 dispose de 7 interfaces, port HDMI*2/
port USB*2/sortie casque 3,5 mm*1/port réseau*1/port AV*1, veuillez
sélectionner le bon port pour connecter votre appareil (PC, lecteur DVD,
feu Clé TV, boîtier TV, barre de son, disque USB, PS4, etc.)
1. Connectez votre clé Fire TV (ou PC, boîtier TV, PS4, etc.) au port HDMI du
projecteur;
2. Accédez à la page d'accueil pour sélectionner le HDMI correspondant
comme source de signal ;
1. Allumez votre lecteur DVD et le projecteur;
2. Connectez-vous au lecteur DVD et au projecteur avec le câble HDMI
3. Accédez à la page d'accueil pour sélectionner le HDMI correspondant
comme source de signal.
Remarque : Lorsque le projecteur est connecté au lecteur DVD via le
câble HDMI s'il n'y a pas de son, il se peut que le signal de sortie du port
HDMI du lecteur DVD ne soit pas compatible avec HDCP, veuillez essayer
de connecter votre Soundbar/Speaker.
1.Connectez les appareils via le port HDMI
2.Connectez-vous au lecteur DVD

service@toptro.com service@toptro.com
FR FR
72 73
Si votre haut-parleur dispose d'un port AUX, veuillez utiliser votre câble
audio 3,5 mm pour connecter le projecteur et votre haut-parleur comme
le montre l'image.
1. Connect to the computer and X7 projector with the HDMI cable
(Included).
2. Select the HDMI source to project any files on your computer;
3. On your laptop, hold down the key “Win+P” board keys to change your
display mode.
Ordinateur uniquement: il s'agit de l'option par défaut – s'affiche
uniquement sur le moniteur principal.
Dupliquer: fait en sorte que tous les moniteurs affichent la même chose
en dupliquant le bureau sur chaque moniteur.
Étendre: fait en sorte que tous vos moniteurs agissent comme un seul
grand moniteur étendant le bureau sur chacun d'eux.
Projecteur uniquement: s'affiche uniquement sur le moniteur secondaire
comme un projecteur.
Vous pouvez modifier la résolution de l'écran en mode Projecteur
uniquement
Étape: Démarrer > Panneau de configuration > Apparence et
personnalisation > Ajuster la résolution de l'écran
3.Connectez-vous à la barre de son/haut-parleur
4.Connect to the Computer
Audio
out
AUX
port
GARANTIE
Merci beaucoup pour votre achat et votre soutien. Nous soutenons notre
projecteur X7 avec une garantie de 3 ans. Si vous avez des questions,
n'hésitez pas à nous contacter à service@toptro.com

service@toptro.com service@toptro.com
ES ES
74 75
CONTENTS
TOPTRO Soporte Profesional de Por Vida
CONSEJOS
Estimado cliente,
Muchas gracias por apoyar TOPTRO.
Lea detenidamente este manual antes de utilizar el proyector. Si tiene
algún problema, envíe un correo electrónico con su número de pedido y
el problema a service@toptro.com. Le proporcionaremos una solución
rápida en 24 horas.
En realidad, muchos problemas se pueden resolver fácilmente mediante
la configuración, como sin señal, sin sonido, falla en la conexión Bluetooth,
falla en la conexión WiFi, animación entrecortada, etc. Prometemos
que todos los proyectores han sido 100% revisados y empaquetados
cuidadosamente antes del envío.
Si tiene alguna pregunta, ¿podría ponerse en contacto con nosotros para
que podamos resolver el problema? Y danos la oportunidad de mejorar.
Le garantizamos que le proporcionaremos una solución satisfactoria.
¡Gracias por su comprensión!
Atentamente
Equipo de servicio TOPTRO
1. No coloque el proyector en una habitación demasiado cálida o
demasiado fría, ya que la temperatura alta o baja acortará la vida útil del
dispositivo. El entorno de trabajo sería 5 °C ~ 35 °C mejor.
2. La ventilación está equipada para que el proyector funcione de manera
estable. No cubra la rejilla de ventilación con telas, mantas u otras cosas.
No inserte nada en la ranura del proyector, ya que puede producir un
cortocircuito o una descarga eléctrica en su dispositivo y causar daños.
3. El proyector deberá estar estrictamente protegido contra fuertes
impactos, extrusiones y vibraciones. No intente mover y en caso de fuerte
impacto, extrusión y vibración. No intente moverse y el circuito interno
falla.
4. La lente, como componente central del proyector, está directamente
relacionada con la definición y el efecto de la imagen. El exceso de polvo
afectará la calidad de la imagen. La lente sucia debe limpiarse con un
paño de algodón suave para la superficie de la lente de vidrio. No se
utilizarán telas duras ni abrasivos.
TOPTRO Soporte Profesional de Por Vida - - - - - - - - - - - - - 75
CONSEJOS - - - - - - - - - - - - - - - - - - - - - - - - - - - 75
LISTA DE EMPAQUE - - - - - - - - - - - - - - - - - - - - - - - 76
ESPECIFICACIONES DEL PROYECTOR- - - - - - - - - - - - - - - 76
RESUMEN DEL PROYECTOR - - - - - - - - - - - - - - - - - - - 77
CONTROL REMOTO - - - - - - - - - - - - - - - - - - - - - - - 79
INSTALACIÓN - - - - - - - - - - - - - - - - - - - - - - - - - - 80
1.Método de Instalación - - - - - - - - - - - - - - - - - - - - - - - - - 80
2.Distancia y Tamaño de Proyección - - - - - - - - - - - - - - - - - - - 81
3.Instalar en el Techo - - - - - - - - - - - - - - - - - - - - - - - - - - 81
PROYECTOR DE INICIO- - - - - - - - - - - - - - - - - - - - - - 82
1.Encender/Apagar el Proyector - - - - - - - - - - - - - - - - - - - - - 82
2.Ajuste de Enfoque- - - - - - - - - - - - - - - - - - - - - - - - - - - 82
3.Ajuste de Corrección Trapezoidal - - - - - - - - - - - - - - - - - - - 83
CONFIGURACIÓN DEL PROYECTOR- - - - - - - - - - - - - - - - 83
1.Seleccione la Fuente de Señal de Inserción - - - - - - - - - - - - - - - 83
2. Modo de Entrada de Disco USB - - - - - - - - - - - - - - - - - - - - 83
2.1 Modo de Entrada de Disco USB - - - - - - - - - - - - - - - - - - - 83
2.2 Interfaz de Juego - - - - - - - - - - - - - - - - - - - - - - - - - 85
2.3 Interfaz de Reproducción de Música - - - - - - - - - - - - - - - - 86
2.4 Interfaz de Reproducción de Imágenes - - - - - - - - - - - - - - - 87
3.Configuración WiFi - - - - - - - - - - - - - - - - - - - - - - - - - - 88
3.1 iOS Cast (para Dispositivos iOS) - - - - - - - - - - - - - - - - - - - 88
3.2 Miracast (para Dispositivos Android) - - - - - - - - - - - - - - - - -89
4.Configuración de Bluetooth - - - - - - - - - - - - - - - - - - - - - - 90
5.Configuración del Sistema del Proyector - - - - - - - - - - - - - - - - 90
5.1 Ajuste de Proyección - - - - - - - - - - - - - - - - - - - - - - - - 91
5.2 Focus - - - - - - - - - - - - - - - - - - - - - - - - - - - - - - - 91
5.3 Keystone Correction - - - - - - - - - - - - - - - - - - - - - - - - 92
5.4 Zoom - - - - - - - - - - - - - - - - - - - - - - - - - - - - - - - 93
6.Actualización del Sistema - - - - - - - - - - - - - - - - - - - - - - - 93
7.Ajustes comunes - - - - - - - - - - - - - - - - - - - - - - - - - - - 94
CONEXIÓN DE LÍNEAS DE SEÑAL - - - - - - - - - - - - - - - - - 94
1.Conecte los dispositivos a través del puerto HDMI - - - - - - - - - - - 95
2.Conéctese al Reproductor de DVD - - - - - - - - - - - - - - - - - - - 95
3.Conéctese a la Barra de Sonido/Altavoz - - - - - - - - - - - - - - - - 96
4.Conectar a la Computadora - - - - - - - - - - - - - - - - - - - - - - 96
GARANTÍA- - - - - - - - - - - - - - - - - - - - - - - - - - - - 97

service@toptro.com service@toptro.com
ES ES
76 77
LISTA DE EMPAQUE
RESUMEN DEL PROYECTOR
ESPECIFICACIONES DEL PROYECTOR
TOPTRO X7 Proyector*1 Control Remoto*1 Cable de Alimentación*1
Cable HDMI*1 Cable AV*1 Manual de Usuario*1
Cubierta de la Lente*1 Paño de Limpieza*1
Model No. X7
Resolucion Nativa 1920*1080
Relación de
Aspecto
4:3/16:9
Tecnología de
Visualización
LCD Fuente de Luz LED
Juego de Colores 16.7M Full Tamaño 8.3x7.2x6.3 inch
Peso 5.29 lb
Voltaje de
Alimentación
AC100-240V ~
50/60Hz
Puerto de Salida Headphone Puerto de Entrada
RJ45/HDMI/USB/
AV
Método de
Proyección
Delantero / Trasero en el Escritorio, Delantero / Trasero en el
techo
Modo de
Operación
Control Remoto
Formato de Video
MP4 / MKV / WMV / 3GP / MPG / VOB / TP / TS / DAT / MOV /
FLV / 4K H.264/H.265(
≤
30fps)
Formato de Audio AAC_LC / HE_AAC / HE_AACV2 / LPCM / MP3 / APE / MP3
Formato de
Imagen
JPG/JPEG/BMP/PNG
Formato del
Documento
TXT / WORD / EXCEL / PPTX
①
②③
④
⑤ ⑥
⑦ ⑧⑨ ⑩
⑪
⑫
⑬ ⑭
⑮
⑯ ⑰
⑱
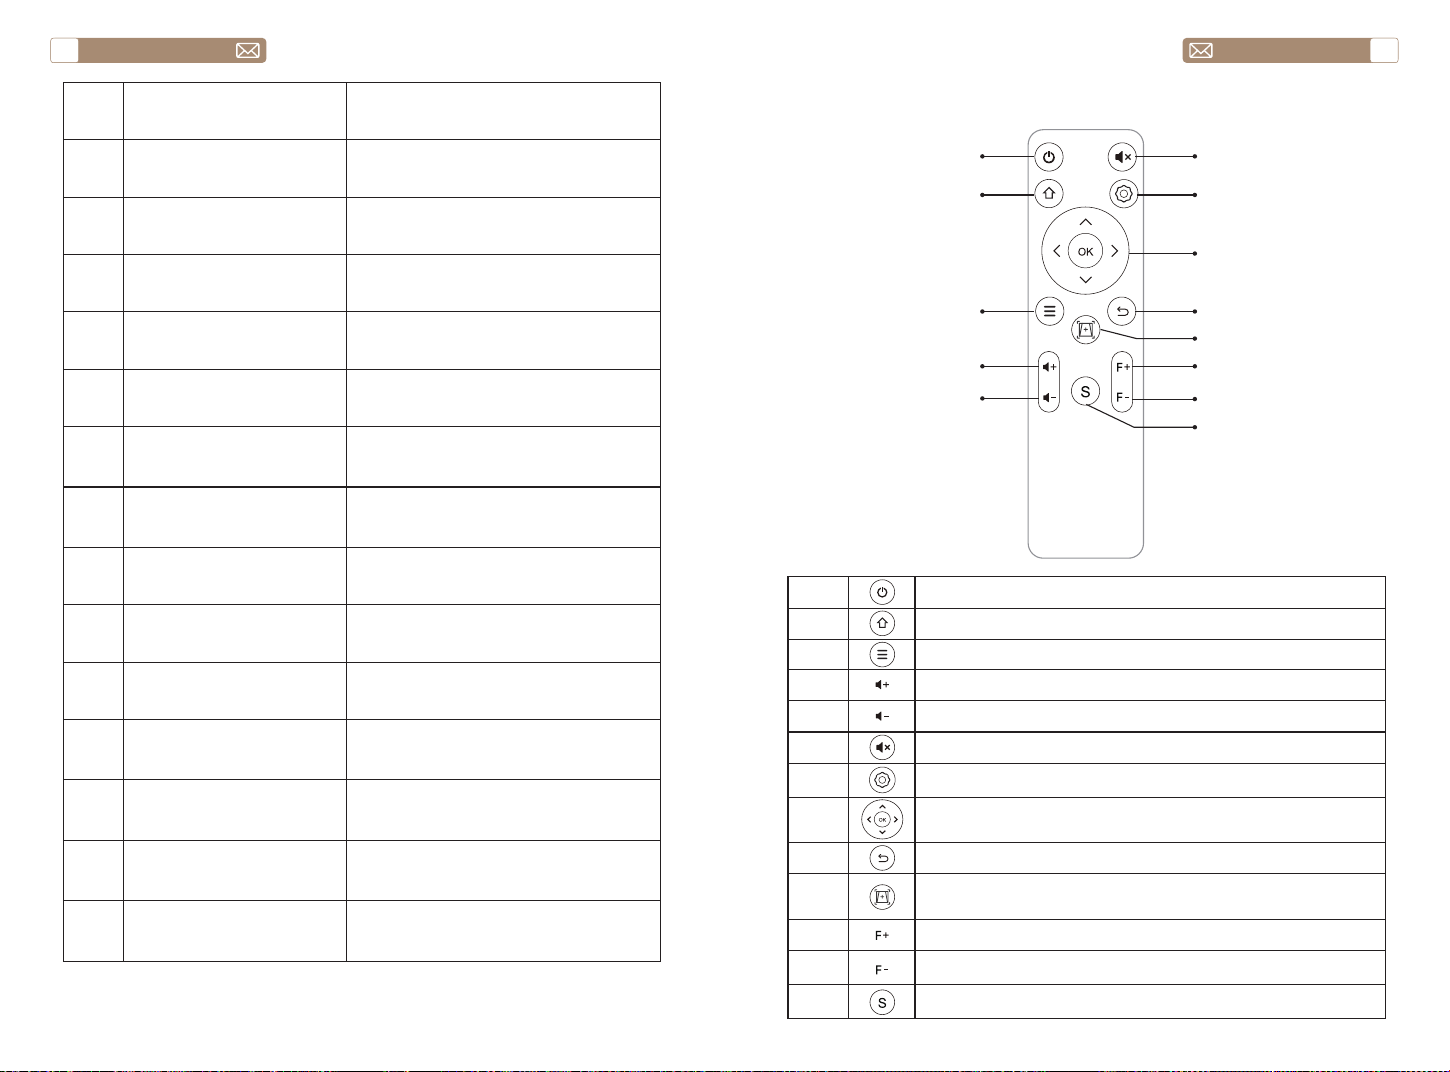
service@toptro.com service@toptro.com
ES ES
78 79
1 Lente Proyector
Lente de vidrio con revestimiento
óptico
2/11 Ventana de Infrarrojos Receptor de señal infrarroja
3 Cámara Lente de enfoque automático
4 Altavoces Salida de sonido
5 RJ45 puerto de red
6 Puertos USB Puerto USB 1/Puerto USB 2
7/8 Puertos HDMI Entrada HDMI
9 Interfaz AV
Separa la transmisión de audio y
video.
10 Toma de Auriculares Salida de auriculares de 3,5 mm
12
Cable de Alimentación
Puerto
Insertar el Cable de Alimentación
13/14 Salida de Refrigeración
Evite que el Proyector se
sobrecaliente
15 Botón de Encendido Encender/apagar energía
16 Etiqueta Inferior
Placa de identificación en la parte
inferior del Proyector
17 Pies de Máquina Pies de máquina de ajuste de altura
18 Orificio del Tornillo
Orificio de tornillo de soporte (1/4 de
pulgada), también admite elevación
CONTROL REMOTO
①
②
③
④
⑤
⑥
⑦
⑧
⑨
⑩
⑪
⑫
⑬
1 Encender/apagar la energía
2 Volver al menú principal
3 Sube el menú
4 Sube el volumen
5 Bajar volumen
6 Cierra el sonido
7 Realizar ajustes del sistema
8
Teclas de flecha
Confirmar la opción
9 Volver al menú anterior
10
Ajuste el enfoque automático y la corrección trapezoidal
automática
11 Enfoque+
12 Enfocar-
13 Seleccione la fuente de la señal de entrada

service@toptro.com service@toptro.com
ES ES
80 81
1). Instale 2 pilas AAA en el control remoto antes de usarlo. No combine
baterías nuevas con viejas en el control remoto, lo que puede causar
fallas en la operación debido a una fuente de alimentación insuficiente.
2). Cuando use el control remoto, asegúrese de que el transmisor de señal
del control remoto apunte al receptor de señal infrarroja del proyector.
3). Si no utiliza el mando a distancia durante un período prolongado,
saque las pilas para evitar fugas.
El proyector se puede colgar en el techo con un marco de suspensión
especial y colocarse en el escritorio estable para proyectar la imagen
de acuerdo con el entorno operativo y los requisitos. El método de
instalación es el siguiente:
La distancia de proyección recomendada es de aproximadamente 8 a 10
pies.
El tamaño de la imagen depende de la distancia entre el proyector y la
pantalla, puede haber una desviación del 3 % entre los datos enumerados
anteriormente. Diferentes configuraciones causan varias distancias.
Nota:
INSTALACIÓN
1.Método de Instalación
2.Distancia y Tamaño de Proyección
3.Instalar en el Techo
Proyector
Proyector
Proyector
Proyector
Pantalla
Pantalla
Pantalla
Pantalla
1. Montaje de techo de proyección frontal
3. Soporte de mesa de proyección frontal
2. Proyección trasera Montaje en techo
4. Soporte de mesa de proyección trasera
Relación de Aspecto: 16:9
Distancia (ft.) Tamaño de pantalla
5 50"
8 80"
10 100"
12 120"
Orificio del tornillo
Nota: Compre un soporte de techo universal para proyector, fije el
proyector con tornillos de 1/4 de pulgada.
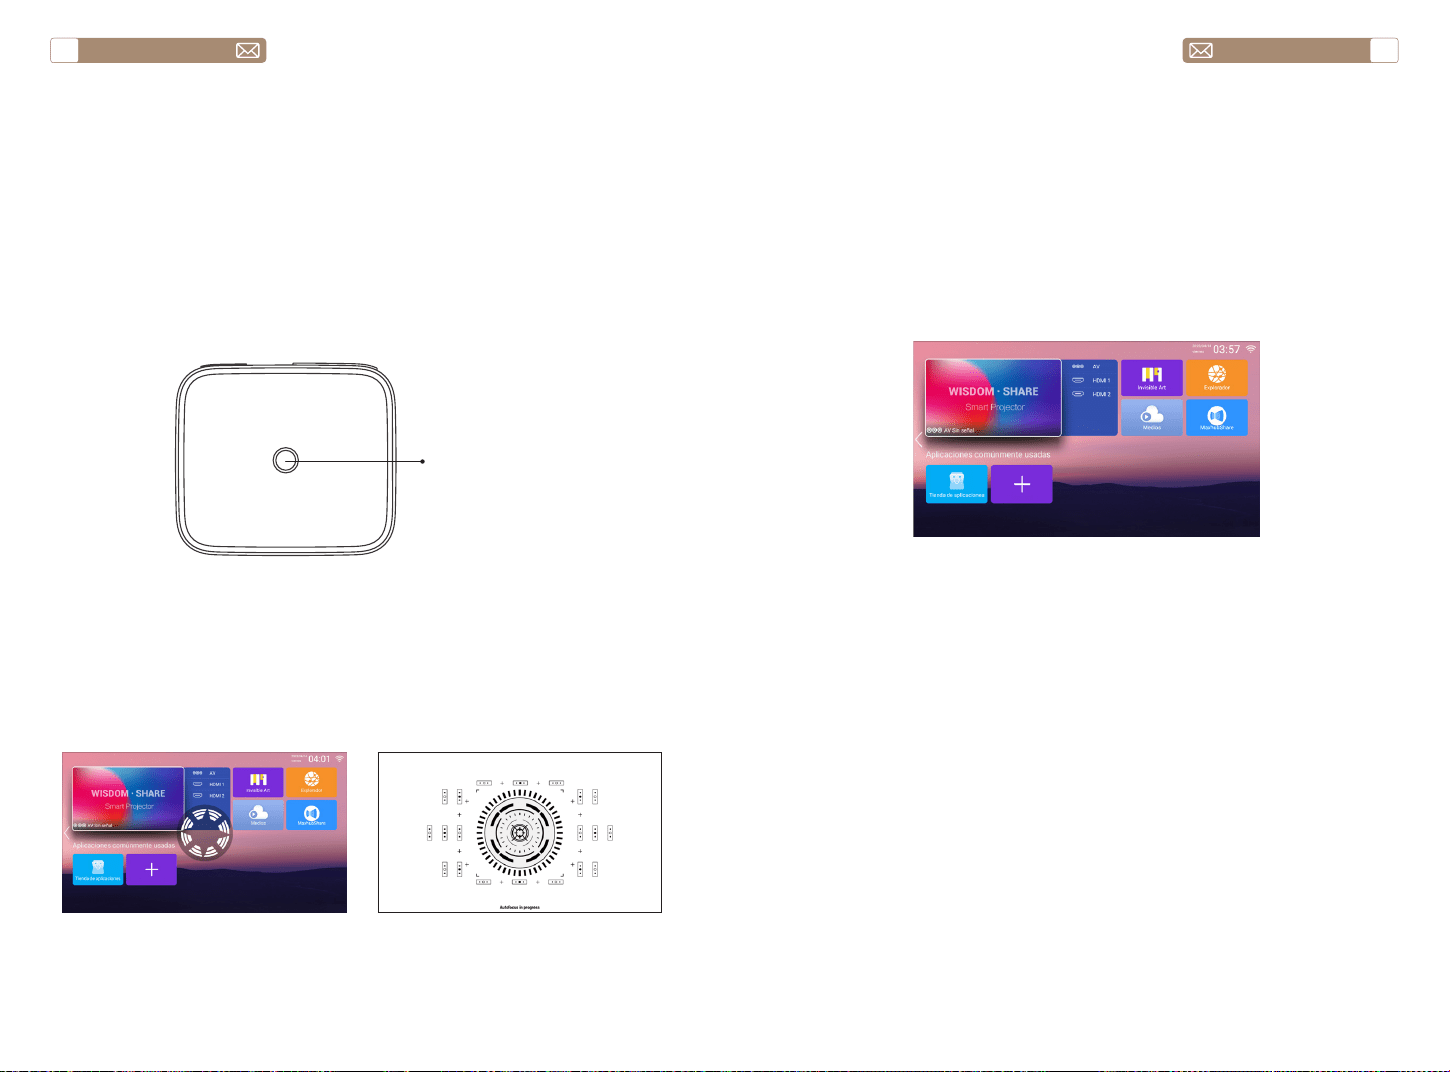
service@toptro.com service@toptro.com
ES ES
82 83
Conecte el proyector a la fuente de alimentación, el proyector entrará en
estado de espera y la luz indicadora de señal en la cubierta será roja.
Encendido: presione el botón de encendido en el cuerpo o el botón de
encendido en el control remoto, y la luz indicadora se vuelve azul para
ingresar al estado de funcionamiento.
Apagado: en el estado de funcionamiento, presione el botón de
encendido en el cuerpo o el botón de encendido en el control remoto, la
luz indicadora cambiará de azul a rojo y el proyector se apagará.
* Cuando inicie el proyector X7 por primera vez, espere pacientemente
durante 2-3 segundos, el proyector ajustará automáticamente el enfoque.
Si la imagen no es clara, puede presionar el botón de enfoque "F+",
"F-" para ajustar la distancia focal de la lente, hacer clic o mantener
presionado el botón de enfoque hasta que la imagen sea clara.
Nota: si todavía está borroso, intenta ajustar la distancia de proyección.
1. Inserte el disco USB, seleccione el icono [Medios]
2. Seleccione la opción [Todo/Vídeo/Audio/Imagen]
3. Seleccione el archivo deseado (o carpeta para ingresar a la subcarpeta)
en el disco USB, luego presione el botón [OK] para reproducirlo.
Nota: TOPTRO X7 Proyector admite disco USB para reproducir
directamente archivos PPT, Word, Excel.
* Cuando el Proyector X7 se inicia por primera vez, el Proyector realizará
automáticamente la corrección trapezoidal. O también puede usar la
corrección trapezoidal 4P digital del Proyector para cambiar la imagen
a un rectángulo (vertical y horizontal). Detalles, consulte la página 92 de
este manual.
PROYECTOR DE INICIO
1.Encender/Apagar el Proyector
2.Ajuste de Enfoque
2. Modo de Entrada de Disco USB
2.1 Modo de Entrada de Disco USB
3.Ajuste de Corrección Trapezoidal
Botón de
encendido
La página de inicio de Proyector es la siguiente.
Seleccione la fuente de señal de inserción deseada (AV/HDMI1/HDMI2) en
la página de inicio.
Nota: Si conecta el dispositivo externo (como TV box, Fire TV Stick,
reproductor de DVD, disco flash USB, computadora, etc.), debe
seleccionar la fuente de señal correspondiente. Si elige mal, el Proyector
no mostrará ninguna señal.
CONFIGURACIÓN DEL PROYECTOR
1.Seleccione la Fuente de Señal de Inserción

service@toptro.com service@toptro.com
ES ES
84 85
Sugerencias: Si el Proyector no puede reconocer el disco USB, consulte
los siguientes métodos para resolver el problema.
Confirme si su disco USB cumple con los siguientes formatos.
1.FAT32: 8G/16G/32G
2.NTFS: 64G
Si no es así, formatee el disco USB. Antes de formatear el disco USB, si
tiene algo en su disco USB, asegúrese de hacer una copia de seguridad
de todo. Después de estos pasos, todo estará perdido para siempre.
Haga clic en el botón "Aceptar" para obtener la interfaz de reproducción.
1. Conecte su disco USB al puerto USB de la computadora.
2. Abra el Explorador de archivos y haga clic derecho en la unidad.
3. Elija Formato.
4. En el menú desplegable Sistema de archivos, elija el formato FAT32.
5. Haga clic en Inicio y cierre esta ventana cuando termine.
Si el problema aún no se resuelve, envíe su problema a este correo
electrónico: service@toptro.com
¿Cómo convertir el formato de disco USB al formato FAT32?
2.2 Interfaz de Juego
Configuración de
reproducción
Incluir Función
Reproducir la lista
Los videos de la carpeta
actual
Cambiar video de la
carpeta actual
Modo reproducción
Repetir todo, Salida
automática, Repetir uno,
Aleatorio, Reproducir la lista
Cambiar el modo de
reproducción
Relación de aspecto
Automático, 16:9, 4:3,
Zoom1, Zoom2
Establecer la relación de
aspecto del video
Pista de audio Pista de audio Establecer pista de audio
Pista de subtítulos Pista de subtítulos
Establecer pista de
subtítulos
Codificación
estándar
ISO, WINDOWS
Establecer el estándar de
codificación
Idìoma de región Varios idiomas
Establecer el idioma de la
región
Subtítulo externo Subtítulo externo
Elegir subtítulos de otras
carpetas
La hora está fuera
rango
Salto de progreso
Avance rápido de video a
un tiempo específico
Información
Resolución, Tamaño,
Duración, Velocidad de bits
Ver la información básica
del video
Imagen & Sonido Modo de imagen y sonido
Establecer el modo de
imagen y sonido

service@toptro.com service@toptro.com
ES ES
86 87
2.3 Interfaz de Reproducción de Música
Configuración de
reproducción
Incluir Function
Reproducir la lista
La música de la carpeta
actual
Cambiar música de la carpeta
actual
Modo reproducción
Repetir todo, Salida
automática, Repetir uno,
Aleatorio, Reproducir la lista
Cambiar el modo de
reproducción
Información
Tamaño, Duración, Velocidad
de bits
Ver la información básica de
música
Imagen y sonido Modo de imagen y sonido
Establecer el modo de
imagen y sonido
Codificar letras
Varios estándares de
codificación
Establecer el estándar de
codificación
2.4 Interfaz de Reproducción de Imágenes
Configuración de
reproducción
Incluir Función
Reproducir la lista Las fotos de la carpeta actual
Cambiar imagen de la
carpeta actual
Reproducir
diapositiva
Empezar, Parar
Comenzar a reproducir
diapositivas desde la carpeta
actual
Tiempo de intervalo 3 Seg, 5 Seg, 8 Seg, 12 Seg
Establecer el tiempo de
intervalo de reproducción de
diapositivas
Relación de aspecto
AUTO, Pantalla completa,
Alejarse, original, zoom1,
zoom2
Establecer la relación de
aspecto de la imagen
Girar
Predeterminada, Rotar a la
derecha, Rotar a la izquierda
Rotar imagen
Establecer como
fondo de pantalla
Establecer como fondo de
pantalla
Establecer como fondo de
pantalla
Información Resolución, Tamaño
Ver la información básica de
la imagen
Imagen y sonido Modo de imagen y sonido
Establecer el modo de
imagen y sonido
Menú Contenido Modo Función
Modo de imagen
Estándar/Suave/
Dinámico/Vívido/
Usuario
Contraste
Modificar la imagen
parámetros en el
rango 0 -100
Brillo
Nitidez
Color
Modo de sonido
Estándar/Música/
Película/Noticias/
Usuarios
Graves
Modificar el sonido
parámetros en el
rango 0 -100
Agudos
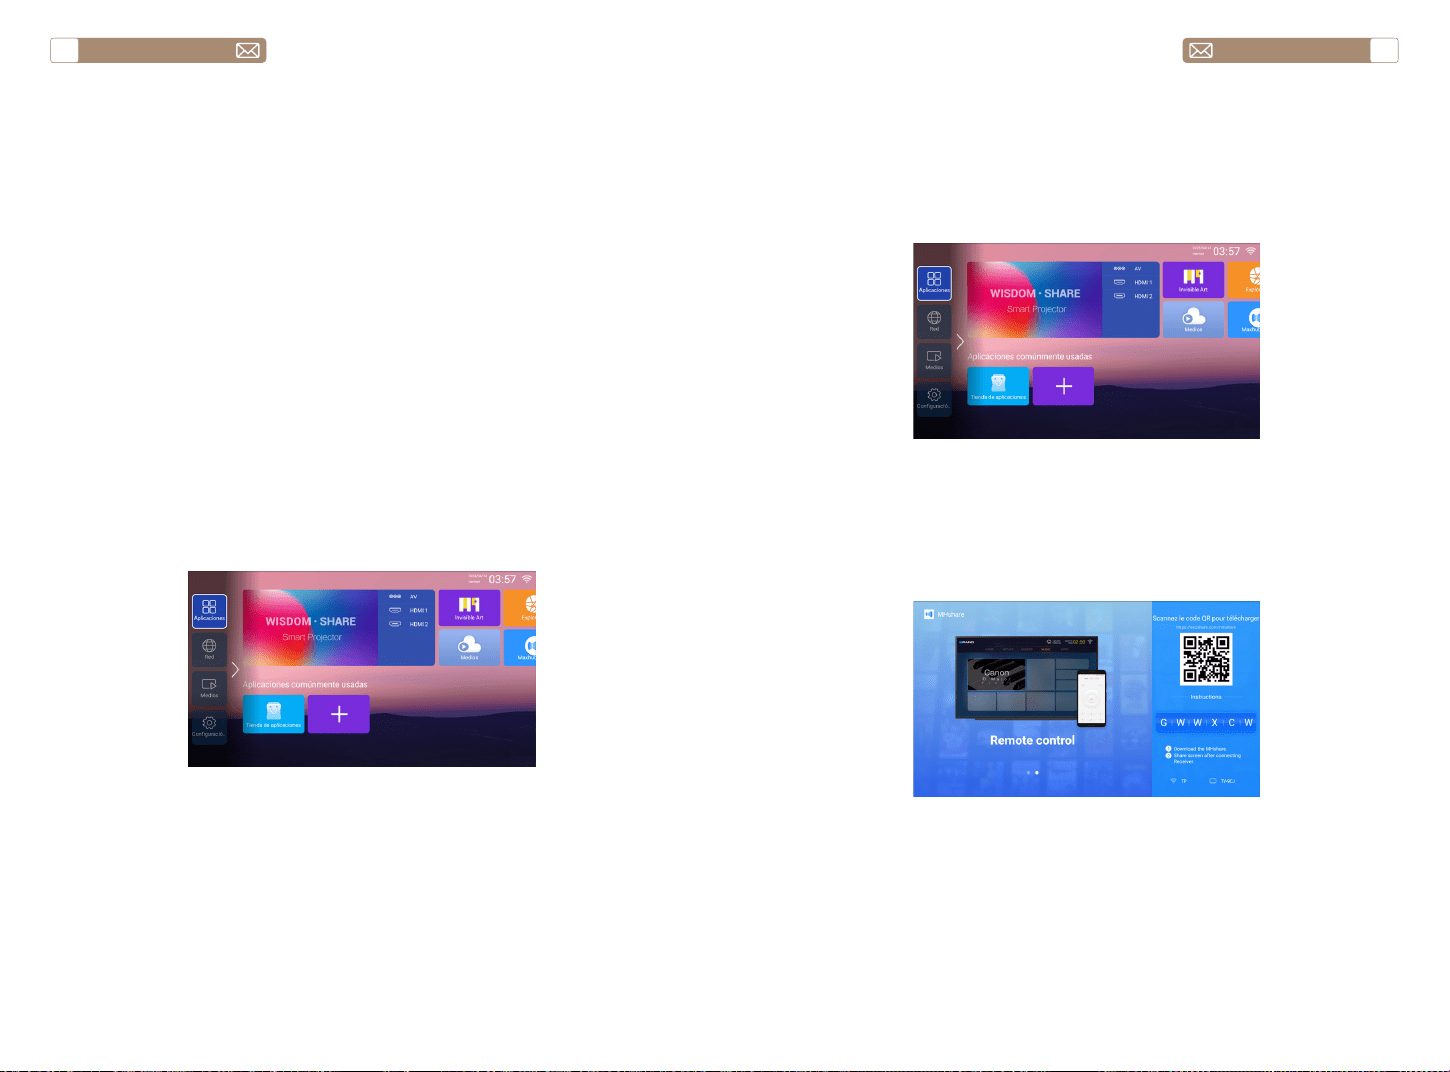
service@toptro.com service@toptro.com
ES ES
88 89
Conexión Inalámbrica
3.Configuración WiFi
1. Ir a la página de inicio - Presione el botón izquierdo - Seleccione
el menú [Red] - Seleccione [Red inalámbrica] - Seleccione su Wi-
Fi doméstico de la lista - Conecte el Proyector Toptro X7 a su Wi-Fi
doméstico
2. Seleccione el menú [Configuración] en su dispositivo iOS - Active la
función [Wi-Fi] - Conecte su dispositivo iOS a la misma red doméstica
que el Proyector.
3. Abra el [Centro de control] en su dispositivo iOS - Seleccione la
función [Duplicación de pantalla] Seleccione y conecte el receptor iOS
Cast llamado [Toptro X7-XXXX] - La pantalla de su dispositivo iOS se
mostrará en la pantalla de proyección después de 3 segundos.
3. Escanee el código QR y descargue la aplicación en su dispositivo
Android
4. Abra la aplicación [Maxhub Share] en su dispositivo Android -
Seleccione el televisor llamado [Toptro X7-XXXX] - La pantalla de su
dispositivo Android se desplazará en la pantalla de proyección después
de 3 segundos.
Nota:
1. Las diferentes marcas de teléfonos Android tienen diferentes
operaciones para seleccionar Screen Mirroring Display, consulte el manual
de su teléfono. [Pantalla múltiple/Pantalla inalámbrica/Pantalla WLAN/
Duplicación de pantalla/Proyección inalámbrica/Vista inteligente, etc.]
2. No todos los teléfonos Android admiten esta función. Por favor,
asegúrese de que sea compatible antes de su uso.
1. Asegúrese de que Toptro X7 Proyector y su dispositivo Android estén
conectados en el mismo Wi-Fi, las operaciones se refieren a [1] y [2] desde
iOS Cast (para dispositivo iOS)
2. Ir a la página de inicio - Seleccione la aplicación [Maxhub Share] -
Presione el botón OK para ingresar a la aplicación [Maxhub Share].
Consejos:
1. La fluidez de la duplicación de pantalla con conexión inalámbrica se
verá afectada por el entorno de la red. Se recomienda un ancho de
banda de 100 Mbit o más cuando se utiliza la duplicación de pantalla.
2. Asegúrese de que su dispositivo móvil esté cerca del Proyector cuando
utilice una conexión inalámbrica. Se recomienda una distancia de 1 metro.
3. Es posible que algunos dispositivos móviles no admitan la duplicación
de pantalla debido a la compatibilidad.
4. Cualquier pregunta, no dude en contactarnos a través de
service@toptro.com
3.1 iOS Cast (para Dispositivos iOS)
3.2 Miracast (para Dispositivos Android)

service@toptro.com service@toptro.com
ES ES
90 91
4.Configuración de Bluetooth
5.Configuración del Sistema del Proyector
Vaya a la página de inicio - - Seleccione el menú [Configuración del sistema]
- - Seleccione la opción [Función Bluetooth] - - Abra la función Bluetooth
y su dispositivo Bluetooth - - Escanee los dispositivos Bluetooth cercanos
automáticamente - - Elija el dispositivo Bluetooth deseado - - será emparejado y
conectado automáticamente.
Nota:
1. El proyector Toptro X7 es compatible con los auriculares Bluetooth, los
altavoces Bluetooth y los Air Pods, pero no con los teclados Bluetooth ni
los teléfonos Bluetooth.
2. Si tiene alguna pregunta, no dude en contactarnos a través de
service@toptro.com
5.1 Ajuste de Proyección
5.2 Focus
Encienda este botón, cuando inicie el Proyector, espere pacientemente
durante 2-3 segundos, el Proyector se enfocará automáticamente
después de encenderlo.
Encienda este botón, el Proyector enfocará automáticamente al cambiar
la posición.
Nota:
1.Utilice el enfoque automático cuando esté configurando su Proyector o
5.2.1 Automatic Focusing after boot
5.2.2 Autofocus de mouvement

service@toptro.com service@toptro.com
ES ES
92 93
5.4 Zoom
5.3 Keystone Correction
* Seleccione la opción [Personalizar Zoom] , presione el botón "OK" en
el Control Remotoler para ingresar al submenú [Zoom proporcional]
, presione la tecla "OK" para seleccionar este botón para ingresar a un
menú de tres niveles [Zoom] , puede ajuste el tamaño de proyección
ajustando los parámetros, el rango de zoom es 0—50.
Vaya a la página de inicio - - Seleccione el menú [Configuración del
sistema] - - Seleccione la opción [Ajustes comunes] - - Seleccione la
[Actualización del sistema]
Nota: Si el software actualmente es el más reciente, no necesita actualizar
el software. Durante el proceso de actualización, si tiene alguna pregunta,
no dude en contactarnos a través de service@toptro.com
cuando necesite ajustar rápidamente el enfoque de su imagen.
2.Utilice el modo de enfoque manual cuando necesite un control más
preciso sobre el enfoque de su imagen. Mantenga presionado el botón
de enfoque "F+", "F-" hasta que la imagen sea clara.
Encienda este botón, cuando inicie el Proyector, espere pacientemente
durante 2-3 segundos, el Proyector ajustará la distorsión trapezoidal
automáticamente.
Encienda este botón, el Proyector automáticamente corregirá la
distorsión trapezoidal al cambiar la posición.
Nota: Si no está satisfecho con la imagen corregida automáticamente,
la pantalla de proyección no es rectangular, puede ajustarla mediante la
corrección trapezoidal de 4 puntos.
5.3.1 Automatic Correction after boot
5.3.2 Automatic Correction after displacement
6.Actualización del Sistema
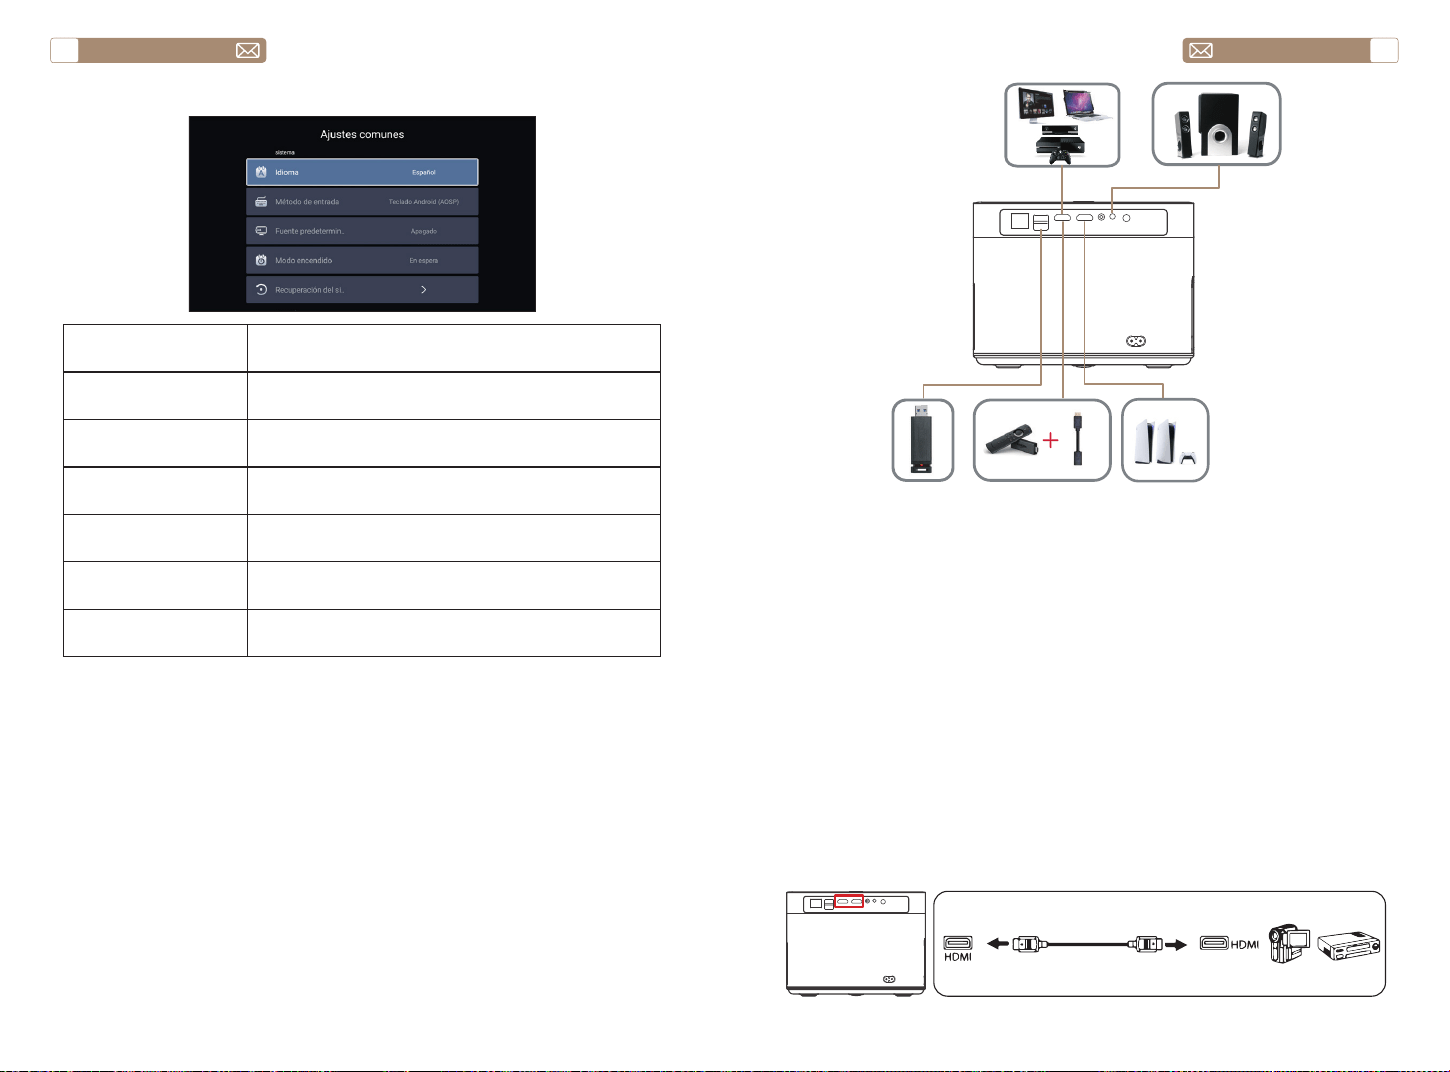
service@toptro.com service@toptro.com
ES ES
94 95
7.Ajustes comunes
Menú Function
Idioma Configurar el idioma del sistema
Método de entrada Establecer el método de entrada actual
Fuente predeterminada
Configurar fuente predeterminada: Apagado, AV, HDMI1,
HDMI2
Modo de potencia
Establecer el modo de energía: Colocarse, Encendido,
Last
Recuperación del
sistema
Recuperar el sistema y todos los datos
Nombre Del Dispositivo Cambiar el nombre del Proyector
CONEXIÓN DE LÍNEAS DE SEÑAL
TOPTRO X7 Proyector tiene 7 interfaces, puerto HDMI*2/puerto USB*2/
salida de auriculares de 3,5 mm*1/puerto de red*1/puerto AV*1, seleccione
el puerto correcto para conectar su dispositivo (PC, reproductor de DVD,
Fire Dispositivo de TV, caja de TV, barra de sonido, disco USB, PS4, etc.)
1. Conecte su dispositivo Fire TV (o PC, TV box, PS4, etc.) al puerto HDMI
del Proyector;
2. Ingrese a la página de inicio para seleccionar el HDMI correspondiente
como fuente de señal.
1. Encienda su reproductor de DVD y el Proyector;
2. Conéctese al reproductor de DVD y al proyector con el cable HDMI
3. Ingrese a la página de inicio para seleccionar el HDMI correspondiente
como fuente de señal.
Nota: Cuando el proyector está conectado al reproductor de DVD a
través del cable HDMI, si no hay sonido, es posible que la señal de salida
del puerto HDMI del reproductor de DVD no sea compatible con HDCP,
intente conectar su barra de sonido/altavoz.
1.Conecte los dispositivos a través del puerto HDMI
2.Conéctese al Reproductor de DVD
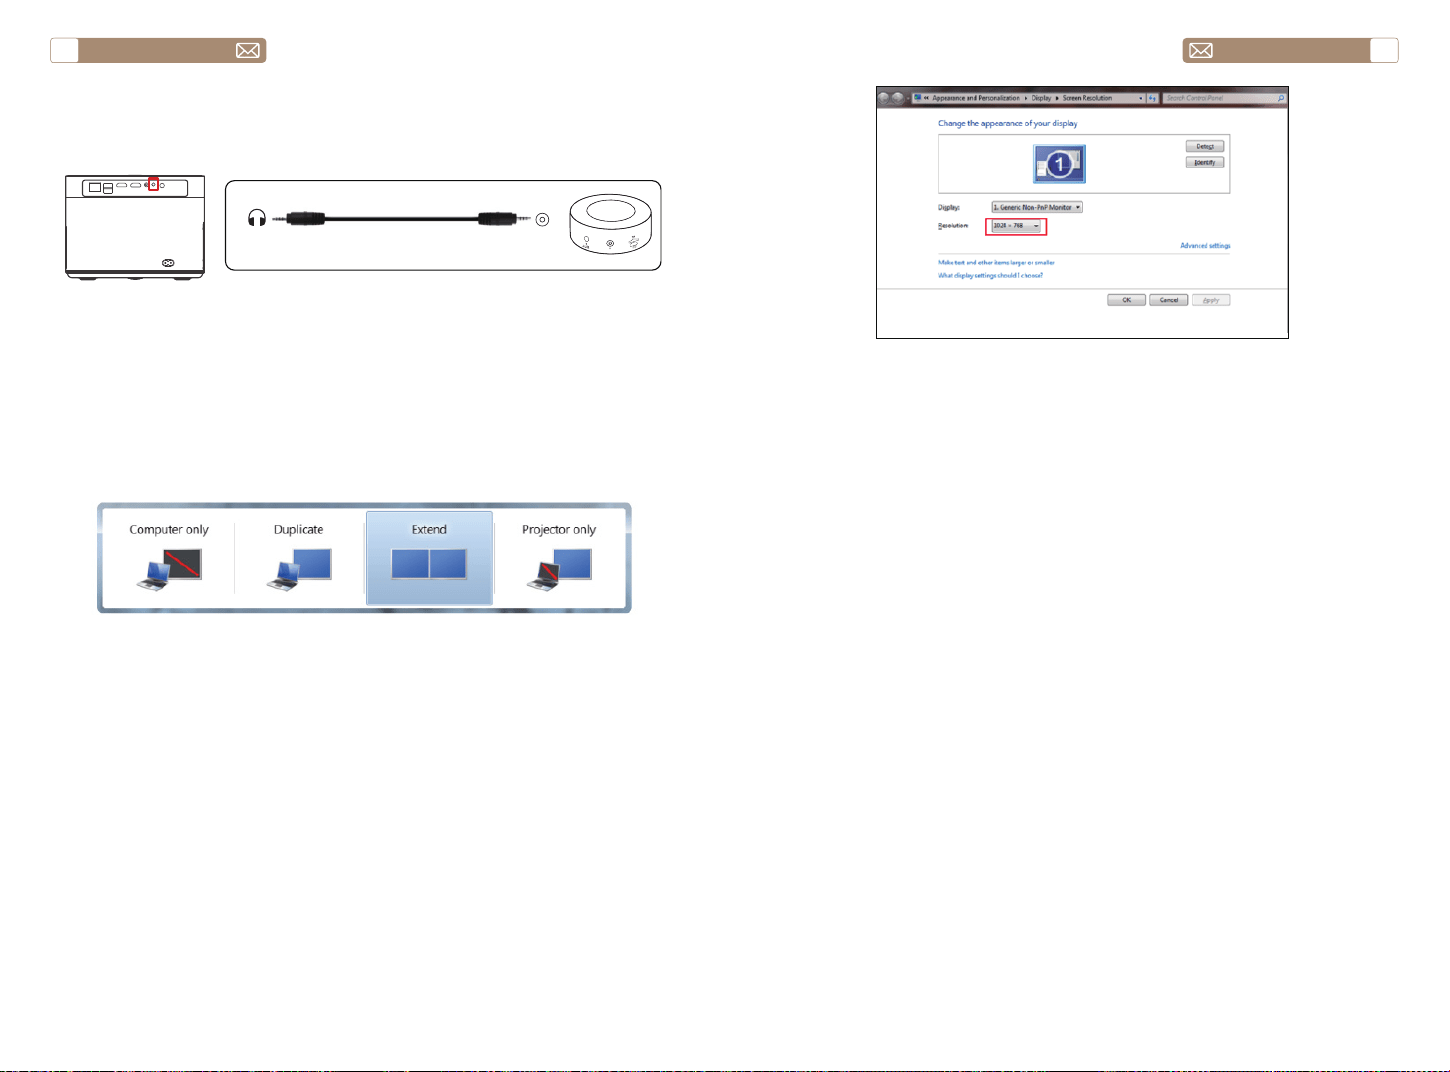
service@toptro.com service@toptro.com
ES ES
96 97
Si su altavoz tiene un puerto AUX, utilice su cable de audio de 3,5 mm
para conectar el Proyector y su altavoz como se muestra en la imagen.
1. Conéctese a la computadora y al Proyector X7 con el cable HDMI
(incluido).
2. Seleccione la fuente HDMI para proyectar cualquier archivo en su
computadora.
3. En su computadora portátil, mantenga presionadas las teclas de la
placa "Win+P" para cambiar el modo de visualización.
Solo computadora: es la opción predeterminada, solo se muestra en el
monitor principal.
Duplicar: hace que todos los monitores muestren lo mismo duplicando
el escritorio en cada monitor.
Extender: hace que todos sus monitores actúen como un gran monitor
extendiendo el escritorio a través de todos ellos.
Solo Proyector: se muestra solo en el monitor secundario como un
Proyector.
Puede cambiar la resolución de la pantalla en el Modo Solo Proyector
Paso: Inicio > Panel de control > Apariencia y personalización > Ajustar
resolución de pantalla
3.Conéctese a la Barra de Sonido/Altavoz
4.Conectar a la Computadora
Audio
out
AUX
port
GARANTÍA
Muchas gracias por su compra y apoyo. Ofrecemos 3 años de garantía
para X7 Proyector. Si tiene alguna pregunta, no dude en contactarnos a
través de service@toptro.com

service@toptro.com service@toptro.com
IT IT
98 99
CONTENTS
TOPTRO Supporto Professionale a Vita
CONSIGLI
Gentile Cliente,
Grazie mille per il supporto di TOPTRO.
Leggere attentamente questo manuale prima di utilizzare il proiettore. In
caso di problemi, inviare un'e-mail con il numero dell'ordine e il problema
a service@toptro.com. Forniremo una soluzione rapida in 24 ore.
In realtà, molti problemi possono essere risolti facilmente impostando,
come nessun segnale, nessun suono, connessione Bluetooth non riuscita,
connessione WiFi non riuscita, animazione instabile ecc. Promettiamo che
tutti i proiettori sono stati accuratamente controllati e imballati al 100%
prima della spedizione.
In caso di domande, potresti contattarci in modo che il problema possa
essere risolto. E dacci l'opportunità di migliorare. Ti garantiamo che ti
forniremo una soluzione soddisfacente.
Grazie per la tua comprensione!
Distinti saluti
Team di assistenza TOPTRO
1. Non posizionare il proiettore in una stanza troppo calda o troppo fredda,
poiché l'alta o la bassa temperatura ridurranno la durata del dispositivo.
L'ambiente di lavoro sarebbe 5°C~35°C migliore.
2. La ventilazione è predisposta per il funzionamento stabile del
proiettore. Non coprire lo sfiato con panni, coperte o altro. Non inserire
nulla nella fessura del proiettore, altrimenti potrebbe produrre un
cortocircuito o una scossa elettrica al dispositivo e causare danni.
3. Il proiettore deve essere rigorosamente protetto da forti urti, estrusioni
e vibrazioni. Non cercare di muoverti e in caso di forte impatto, estrusione
e vibrazione. Non cercare di muoverti e il circuito interno si guasta.
4. L'obiettivo, in quanto componente principale del proiettore, è
direttamente correlato alla definizione e all'effetto dell'immagine.
L'eccessiva polvere su di esso influirà sulla qualità dell'immagine. La
lente sporca deve essere pulita con un panno di cotone morbido per la
superficie della lente in vetro. Non utilizzare panni rigidi o abrasivi.
TOPTRO Supporto Professionale a Vita - - - - - - - - - - - - - - 99
CONSIGLI - - - - - - - - - - - - - - - - - - - - - - - - - - - - 99
ELENCO PACCHETTI - - - - - - - - - - - - - - - - - - - - - - - 100
SPECIFICHE DEL PROIETTORE - - - - - - - - - - - - - - - - - - 100
PANORAMICA DEL PROIETTORE - - - - - - - - - - - - - - - - - 101
CONTROL REMOTO - - - - - - - - - - - - - - - - - - - - - - - 103
INSTALLAZIONE - - - - - - - - - - - - - - - - - - - - - - - - - 104
1.Metodo di Installazione - - - - - - - - - - - - - - - - - - - - - - - - 104
2.Distanza e Dimensioni di Proiezione - - - - - - - - - - - - - - - - - - 105
3.Installa sul soffitto- - - - - - - - - - - - - - - - - - - - - - - - - - - 105
PROIETTORE DI INIZIO - - - - - - - - - - - - - - - - - - - - - - 106
1.Accende/Spegne il Proiettore - - - - - - - - - - - - - - - - - - - - - 106
2.Regolazione della Messa a Fuoco - - - - - - - - - - - - - - - - - - - 106
3.Regolazione della Correzione Trapezoidale- - - - - - - - - - - - - - - 107
IMPOSTAZIONE DEL PROIETTORE - - - - - - - - - - - - - - - - 107
1.Selezionare Inserisci Sorgente Segnale - - - - - - - - - - - - - - - - - 107
2. Modalità di Input del Disco USB - - - - - - - - - - - - - - - - - - - - 107
2.1 Modalità di Input del Disco USB - - - - - - - - - - - - - - - - - - - 107
2.2 Interfaccia di Gioco - - - - - - - - - - - - - - - - - - - - - - - - 109
2.3 Interfaccia di Riproduzione Musicale - - - - - - - - - - - - - - - - 110
2.4 Interfaccia di Riproduzione delle Immagini - - - - - - - - - - - - - 111
3.Impostazione Wi-Fi - - - - - - - - - - - - - - - - - - - - - - - - - - 112
3.1 iOS Cast (per Dispositivi iOS)- - - - - - - - - - - - - - - - - - - - -112
3.2 Miracast (per Dispositivi Android) - - - - - - - - - - - - - - - - - - 113
4.Impostazioni Bluetooth - - - - - - - - - - - - - - - - - - - - - - - - 114
5.Impostazione del Sistema del Proiettore - - - - - - - - - - - - - - - - 114
5.1 Impostazioni di proiezione - - - - - - - - - - - - - - - - - - - - - 115
5.2 Focus - - - - - - - - - - - - - - - - - - - - - - - - - - - - - - - 115
5.3 Keystone Correction - - - - - - - - - - - - - - - - - - - - - - - - 116
5.4 Zoom - - - - - - - - - - - - - - - - - - - - - - - - - - - - - - - 117
6.Aggiornamento del Sistema - - - - - - - - - - - - - - - - - - - - - - 117
7.Impostazioni comuni - - - - - - - - - - - - - - - - - - - - - - - - - 118
COLLEGAMENTO LINEE DI SEGNALE - - - - - - - - - - - - - - - 118
1.Collegare i Dispositivi Tramite la Porta HDMI - - - - - - - - - - - - - - 119
2.Collegati al Lettore DVD - - - - - - - - - - - - - - - - - - - - - - - - 119
3.Connettersi alla Soundbar/Altoparlante - - - - - - - - - - - - - - - - 120
4.Connettiti al Computer - - - - - - - - - - - - - - - - - - - - - - - - 120
GARANZIA- - - - - - - - - - - - - - - - - - - - - - - - - - - - 121

service@toptro.com service@toptro.com
IT IT
100 101
ELENCO PACCHETTI
PANORAMICA DEL PROIETTORE
SPECIFICHE DEL PROIETTORE
TOPTRO X7 Proiettore*1 Telecomando*1 Cavo di Alimentazione*1
Cavo HDMI*1 Cavo AV*1 Manuale Dell'utente*1
Copriobiettivo*1 Panno per la Pulizia*1
Model No. X7
Risoluzione Nativa 1920*1080 Proporzioni 4:3/16:9
Display Tech LCD Fonte di luce LED
Gioco del Colore 16.7M Full Misurare 8.3x7.2x6.3 inch
Il peso 5.29 lb
Tensione di
alimentazione
AC100-240V ~
50/60Hz
Porta di Uscita Headphone Porta d'ingresso
RJ45/HDMI/USB/
AV
Metodo di Proiezione
Fronte/Retro sulla Scrivania, Fronte/Retro sul Soffitto
Modalità di
Funzionamento
Telecomando
Formato Video
MP4 / MKV / WMV / 3GP / MPG / VOB / TP / TS / DAT / MOV /
FLV / 4K H.264/H.265(
≤
30fps)
Formato Audio AAC_LC / HE_AAC / HE_AACV2 / LPCM / MP3 / APE / MP3
Formato
Immagine
JPG/JPEG/BMP/PNG
Formato Documento
TXT / WORD / EXCEL / PPTX
①
②③
④
⑤ ⑥
⑦ ⑧⑨ ⑩
⑪
⑫
⑬ ⑭
⑮
⑯ ⑰
⑱
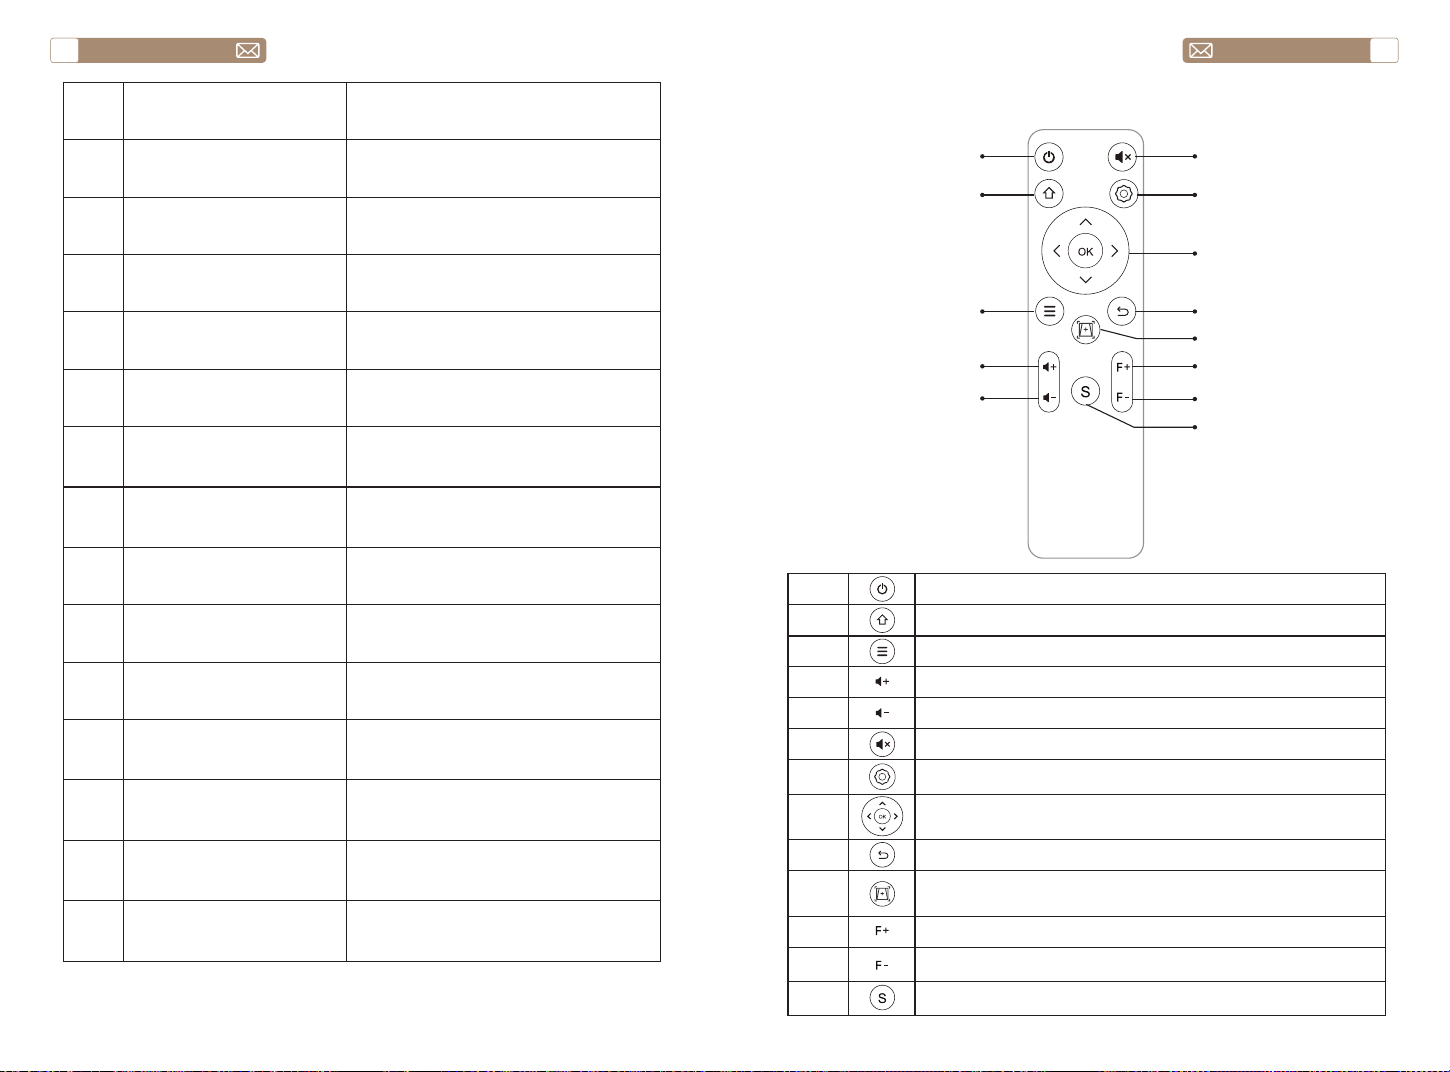
service@toptro.com service@toptro.com
IT IT
102 103
1 Obiettivo del proiettore
Lente in vetro con rivestimento
ottico
2/11 Finestra IR Ricevitore di segnali a infrarossi
3 Telecamera
Obiettivo con messa a fuoco
automatica
4 Altoparlanti Uscita audio
5 RJ45 Porta di rete
6 Porte USB Porta USB 1/porta USB 2
7/8 Porte HDMI Ingresso HDMI
9 Interfaccia AV Separa la trasmissione audio e video
10 Jack per cuffie Uscita cuffie da 3,5 mm
12
Porta del cavo di
alimentazione
Inserire il cavo di alimentazione
13/14 Uscita di raffreddamento
Prevenire il surriscaldamento del
proiettore
15 Pulsante di accensione Accendere/spegnere l'alimentazione
16 Etichetta inferiore Targhetta sul fondo del proiettore
17 Piedi della macchina
Piedi della macchina per la
regolazione dell'altezza
18 Foro per vite
Foro per vite staffa (1/4 di pollice),
supporta anche il sollevamento
CONTROL REMOTO
①
②
③
④
⑤
⑥
⑦
⑧
⑨
⑩
⑪
⑫
⑬
1 Accendere/spegnere l'alimentazione
2 Torna al menu principale
3 Apri il menu
4 Aumenta il volume
5 Volume basso
6 Chiudi il suono
7 Eseguire le impostazioni di sistema
8
Tasti freccia
Conferma l'opzione
9 Ritorna al menù precedente
10
Regola la messa a fuoco automatica e la correzione
trapezoidale automatica
11 Messa a fuoco+
12 Messa a fuoco-
13 Seleziona la sorgente del segnale di ingresso

service@toptro.com service@toptro.com
IT IT
104 105
1).Installare 2 batterie AAA nel telecomando prima di utilizzarlo. Non
combinare batterie nuove con quelle vecchie nel telecomando, che
possono causare problemi di funzionamento a causa di alimentazione
insufficiente.
2).Quando si utilizza il telecomando, assicurarsi che il trasmettitore del
segnale del telecomando punti al ricevitore del segnale a infrarossi del
proiettore.
3).Se non si utilizza il telecomando per un periodo prolungato, rimuovere
le batterie per evitare perdite di batterie.
Il proiettore può essere appeso al soffitto con uno speciale telaio di
sospensione e posizionato sulla scrivania stabile per proiettare l'immagine
in base all'ambiente operativo e ai requisiti. Il metodo di installazione è il
seguente:
La distanza di proiezione consigliata è di circa 8 piedi-10 piedi.
La dimensione dell'immagine dipende dalla distanza tra il proiettore e lo
schermo, potrebbe esserci una deviazione del 3% tra i dati sopra elencati.
Diverse impostazioni causano varie distanze.
Nota:
INSTALLAZIONE
1.Metodo di Installazione
2.Distanza e Dimensioni di Proiezione
3.Installa sul soffitto
Proiettore
Proiettore
Proiettore
Proiettore
Schermo
Schermo
Schermo
Schermo
1. Montaggio a soffitto per proiezione frontale
3. Supporto per tavolo per proiezione frontale
2. Montaggio a soffitto a retroproiezione
4. Supporto da tavolo per retroproiezione
Proporzioni: 16:9
Distanza (ft.) Dimensione dello schermo
5 50"
8 80"
10 100"
12 120"
Foro della vite
Nota: Si prega di acquistare un supporto da soffitto per proiettore
universale, fissare il proiettore con viti da 1/4 di pollice.

service@toptro.com service@toptro.com
IT IT
106 107
Collegare il proiettore all'alimentazione, il proiettore entrerà nello stato di
standby e la spia del segnale sul coperchio sarà rossa.
Accensione: premere il pulsante di accensione sul corpo o il pulsante
di accensione sul telecomando e l'indicatore luminoso diventa blu per
entrare nello stato di funzionamento.
Spegnimento: nello stato di funzionamento, premere il pulsante di
accensione sul corpo o il pulsante di accensione sul telecomando,
l'indicatore luminoso cambierà da blu a rosso e il proiettore si spegnerà.
* Quando si avvia il proiettore X7 per la prima volta, attendere
pazientemente per 2-3 secondi, il proiettore regolerà automaticamente
la messa a fuoco. Se l'immagine non è nitida, puoi premere il pulsante di
messa a fuoco "F+", "F-" per regolare la lunghezza focale dell'obiettivo,
fare clic o premere a lungo il pulsante di messa a fuoco finché l'immagine
non è nitida.
Nota: Se è ancora sfocato, prova a regolare la distanza di proiezione.
1. Inserire il disco USB, selezionare l'icona [Media]
2. Selezionare l'opzione [Tutte/Video/Audio/Immagine]
3. Selezionare il file desiderato (o la cartella per accedere alla sottocartella)
nel disco USB, quindi premere il pulsante [OK] per riprodurlo.
Nota: Il proiettore TOPTRO X7 supporta il disco USB per riprodurre
direttamente file PPT, Word, Excel.
* Quando il proiettore X7 viene avviato per la prima volta, il proiettore
eseguirà automaticamente la correzione trapezoidale. Oppure puoi
anche utilizzare la correzione trapezoidale digitale 4P del proiettore per
modificare l'immagine in un rettangolo (verticale e orizzontale). Per i
dettagli consultare la pagina 116 di questo manuale.
PROIETTORE DI INIZIO
1.Accende/Spegne il Proiettore
2.Regolazione della Messa a Fuoco
2. Modalità di Input del Disco USB
2.1 Modalità di Input del Disco USB
3.Regolazione della Correzione Trapezoidale
Pulsante di
accensione
La home page del proiettore è la seguente.
Selezionare la sorgente del segnale di inserimento desiderata (AV/HDMI1/
HDMI2) nella home page.
Nota: se si collega il dispositivo esterno (come TV box, Fire TV Stick, lettore
DVD, disco flash USB, computer ecc.), selezionare la sorgente del segnale
corrispondente. Se scegli male, il proiettore non mostrerà alcun segnale.
IMPOSTAZIONE DEL PROIETTORE
1.Selezionare Inserisci Sorgente Segnale
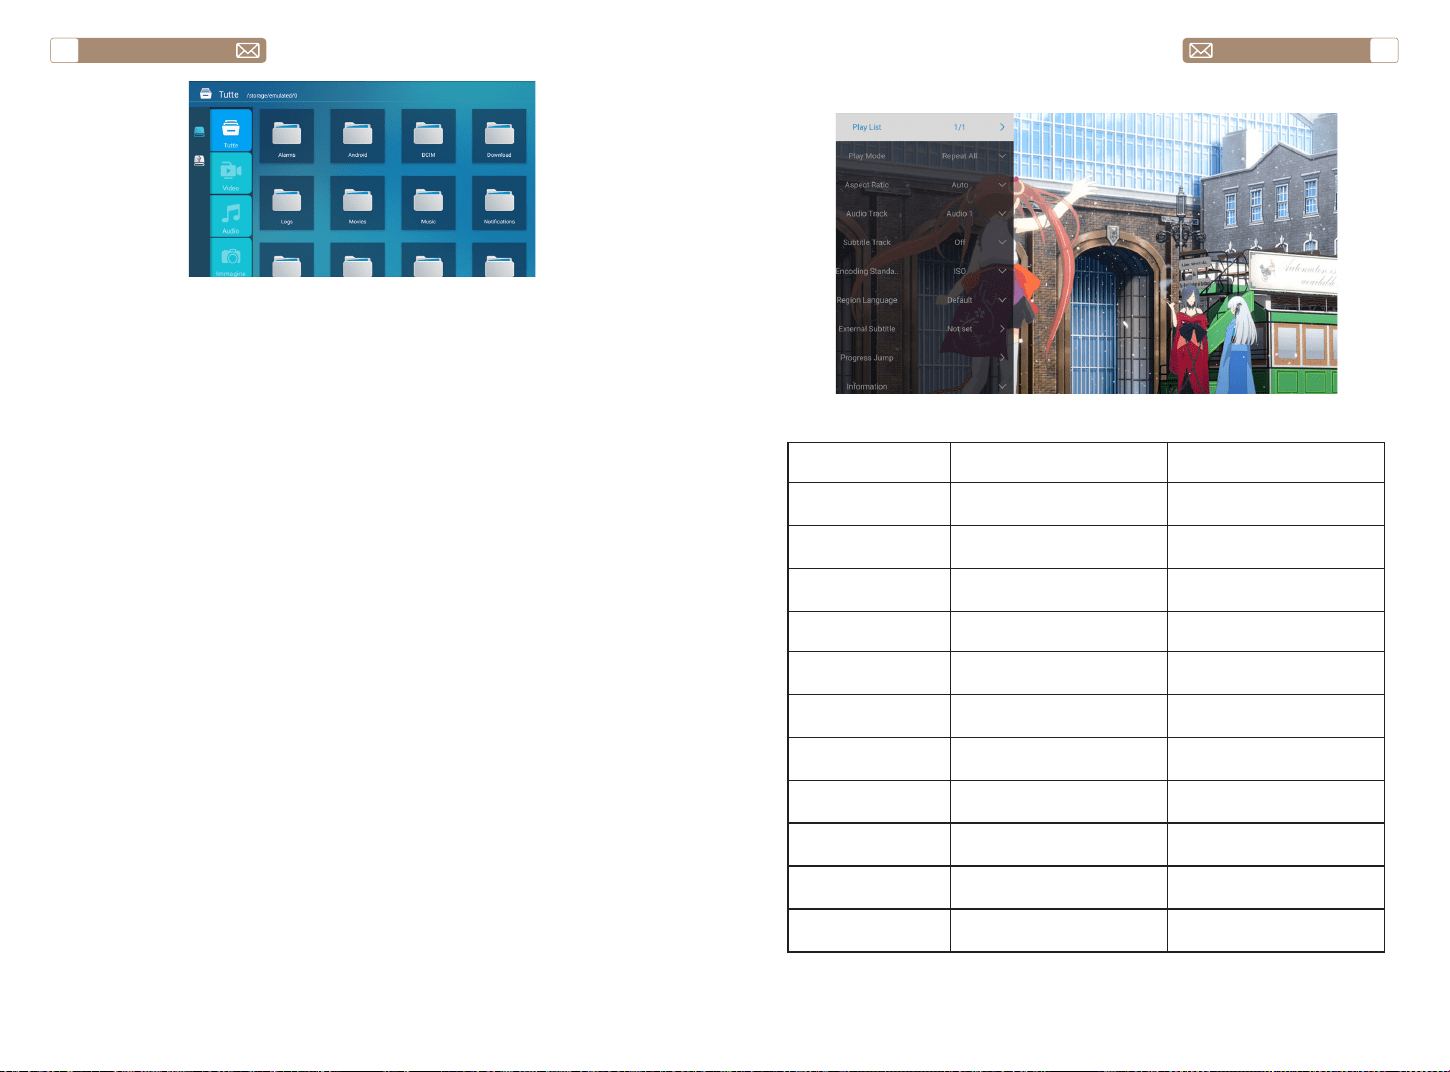
service@toptro.com service@toptro.com
IT IT
108 109
Nota: Se il proiettore non è in grado di riconoscere il disco USB, fare
riferimento ai seguenti metodi per risolvere il problema.
Conferma se il tuo disco USB soddisfa i seguenti formati.
1. FAT32: 8G/16G/32G
2.NTFS: 64G
In caso contrario, formattare il disco USB. Prima di formattare il disco USB,
se hai qualcosa sul tuo disco USB, assicurati di eseguire il backup di tutto.
Dopo questi passaggi, tutto sarà perso per sempre.
Fare clic sul pulsante "OK" per ottenere l'interfaccia di gioco.
1. Conecte su disco USB al puerto USB de la computadora.
2. Abra el Explorador de archivos y haga clic derecho en la unidad.
3. Elija Formato.
4. En el menú desplegable Sistema de archivos, elija el formato FAT32.
5. Haga clic en Inicio y cierre esta ventana cuando termine.
Si el problema aún no se resuelve, envíe su problema a este correo
electrónico: service@toptro.com
Come convertire il formato del disco USB nel formato FAT32?
2.2 Interfaccia di Gioco
Ambiente di gioco Includere Funzione
Play list
Video della cartella
corrente
Cambia video dalla cartella
corrente
Modalità
riproduzione
Ripeti tutto, Nessuno, Ripeti
uno, Random, Playlist
Cambia modalità di gioco
Proporzioni
Auto, 16:9, 4:3, zoom1,
zoom2
Imposta le proporzioni del
video
Traccia audio
Traccia audio Imposta traccia audio
Sottotitoli Traccia dei sottotitoli
Imposta la traccia dei
sottotitoli
Codifica standard ISO, WINDOWS
Imposta lo standard di
codifica
Lingua Regione Lingua varia
Imposta la lingua della
regione
Sottotitolo esterno Sottotitolo esterno
Scegli i sottotitoli da altre
cartelle
Tempo fuori
tagliando
Salto di progresso
Avanzamento rapido del
video a un'ora specifica
Informazioni
Risoluzione, Dimensioni,
Durata, Bitrate
Vedere le informazioni di
base sul video
Immagine & Audio Modalità immagine & audio
Impostare la modalità
immagine e audio

service@toptro.com service@toptro.com
IT IT
110 111
2.3 Interfaccia di Riproduzione Musicale
Ambiente di gioco Includere Funzione
Play list Musica della cartella corrente
Cambia musica dalla cartella
corrente
Modalità riproduzione
Ripeti tutto, Nessuno, Ripeti
uno, Random, Play list
Cambia modalità di gioco
Informazioni Dimensioni, Durata, Bitrate
Vedere le informazioni di
base sulla musica
Immagine & Audio Modalità immagine e audio
Impostare la modalità
immagine e audio
Codifica lyric Vari standard di codifica
Imposta lo standard di
codifica
2.4 Interfaccia di Riproduzione delle Immagini
Ambiente di gioco Includere Funzione
Play list
Immagini della cartella
corrente
Cambia immagine dalla
cartella corrente
Riproduzione
diapositive
Inizia, fermati
Inizia a riprodurre le
diapositive dalla cartella
corrente
Intervallo di tempo 3 Sec, 5 Sec, 8 Sec, 12 Sec
Imposta l'intervallo di
riproduzione delle diapositive
Proporzioni
Auto, Schermo intero, Zoom
indietro, Originale, Zoom1,
Zoom2
Imposta le proporzioni
dell'immagine
Ruotare
Predefinito, Ruota a destra,
Ruota a sinistra
Ruota l'immagine
Imposta come
sfondo
Imposta come sfondo Imposta come sfondo
Informazioni Risoluzione, Dimensione
Vedere le informazioni di
base sull'immagine
Immagine & Audio Modalità immagine e audio
Impostare la modalità
immagine e audio
Menu Contenuto Modalità Funzione
Modalità Immagine
Standard/
Dinamico/
Sfumato/Vivido/
Utente
Contrasto
Modifica
l'immagine
parametri nel
intervallo 0 -100
Luminosità
Nitidezza
Colore
Modalità Audio
Standard/Musica/
Film/Notizie/
Utente
Basso
Modifica il suono
parametri nel
intervallo 0 -100
Acuti
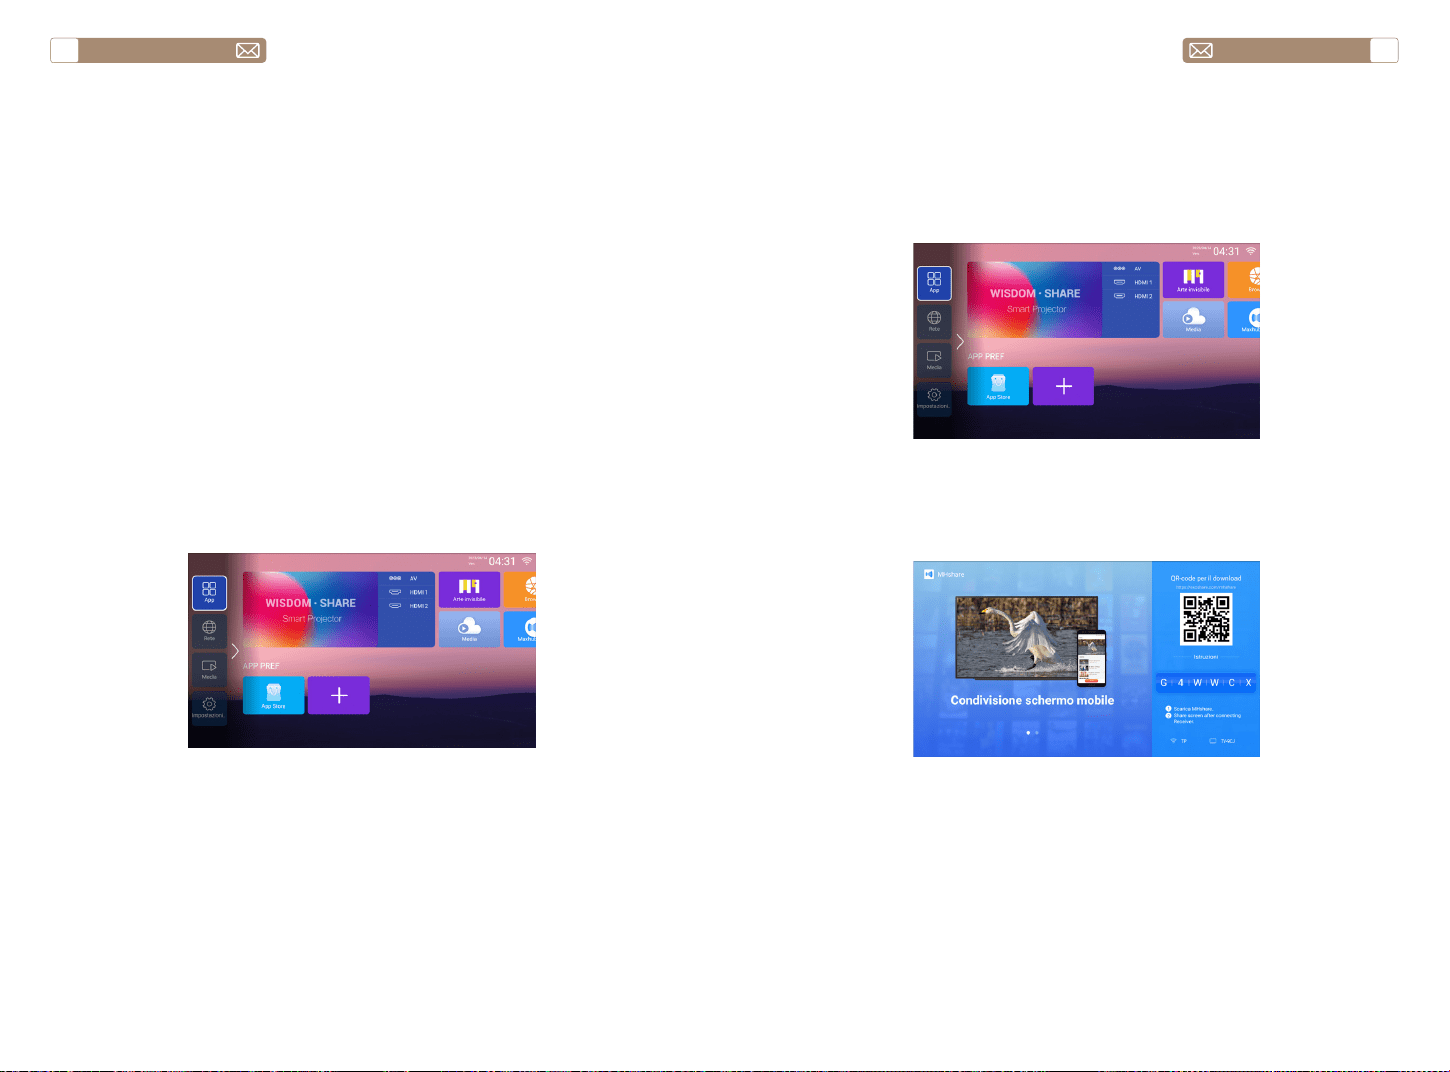
service@toptro.com service@toptro.com
IT IT
112 113
Connessione Senza Fili
3.Impostazione Wi-Fi
1. Vai alla home page -- Premi il pulsante sinistro - Seleziona il menu
[ Rete ] - Seleziona [ Wireless ] - Seleziona il tuo Wi-Fi domestico
dall'elenco - Connetti il proiettore Toptro X7 al tuo Wi-Fi domestico
2. Seleziona il menu [ Impostazioni ] sul tuo dispositivo iOS - Attiva
la funzione [ Wi-Fi ] - Connetti il tuo dispositivo iOS alla stessa rete
domestica del proiettore.
3. Apri il [ Centro di controllo ] sul tuo dispositivo iOS - Seleziona la
funzione [ Clonazione schermo ] Seleziona e collega il ricevitore Cast iOS
denominato [Toptro X7-XXXX ] - lo schermo del tuo dispositivo iOS verrà
visualizzato sullo schermo di proiezione dopo 3 secondi.
3. Scansiona il codice QR e scarica l'app sul tuo dispositivo Android
4. Apri l'app [Maxhub Share] sul tuo dispositivo Android - Seleziona la TV
denominata [Toptro X7-XXXX] - Lo schermo del tuo dispositivo Android
verrà spostato sullo schermo di proiezione dopo 3 secondi.
Nota:
1. Diverse marche di telefoni Android hanno operazioni diverse per
selezionare Screen Mirroring Display, fare riferimento al manuale del
telefono. [Multischermo/Display wireless/Display WLAN/Mirroring dello
schermo/Proiezione wireless/Smart view ecc.]
2. Non tutti i telefoni Android supportano questa funzione. Assicurati che
sia supportato prima dell'uso.
1. Assicurati che il proiettore Toptro X7 e il tuo dispositivo Android siano
connessi allo stesso Wi-Fi, le operazioni si riferiscono a [1] e [2] da iOS Cast
(per dispositivo iOS)
2. Vai alla home page - Seleziona l'app [Maxhub Share] - Premi il pulsante
OK per accedere all'app [Maxhub Share].
Nota:
1. La fluidità del mirroring dello schermo con la connessione wireless sarà
influenzata dall'ambiente di rete. Si consiglia una larghezza di banda di
almeno 100 Mbit quando si utilizza il mirroring dello schermo.
2. Assicurarsi che il dispositivo mobile sia vicino al proiettore quando si
utilizza la connessione wireless. Si consiglia una distanza entro 1 metro.
3. Alcuni dispositivi mobili potrebbero non supportare il mirroring dello
schermo a causa della compatibilità.
4. Per qualsiasi domanda, non esitate a contattarci tramite
service@toptro.com
3.1 iOS Cast (per Dispositivi iOS)
3.2 Miracast (per Dispositivi Android)
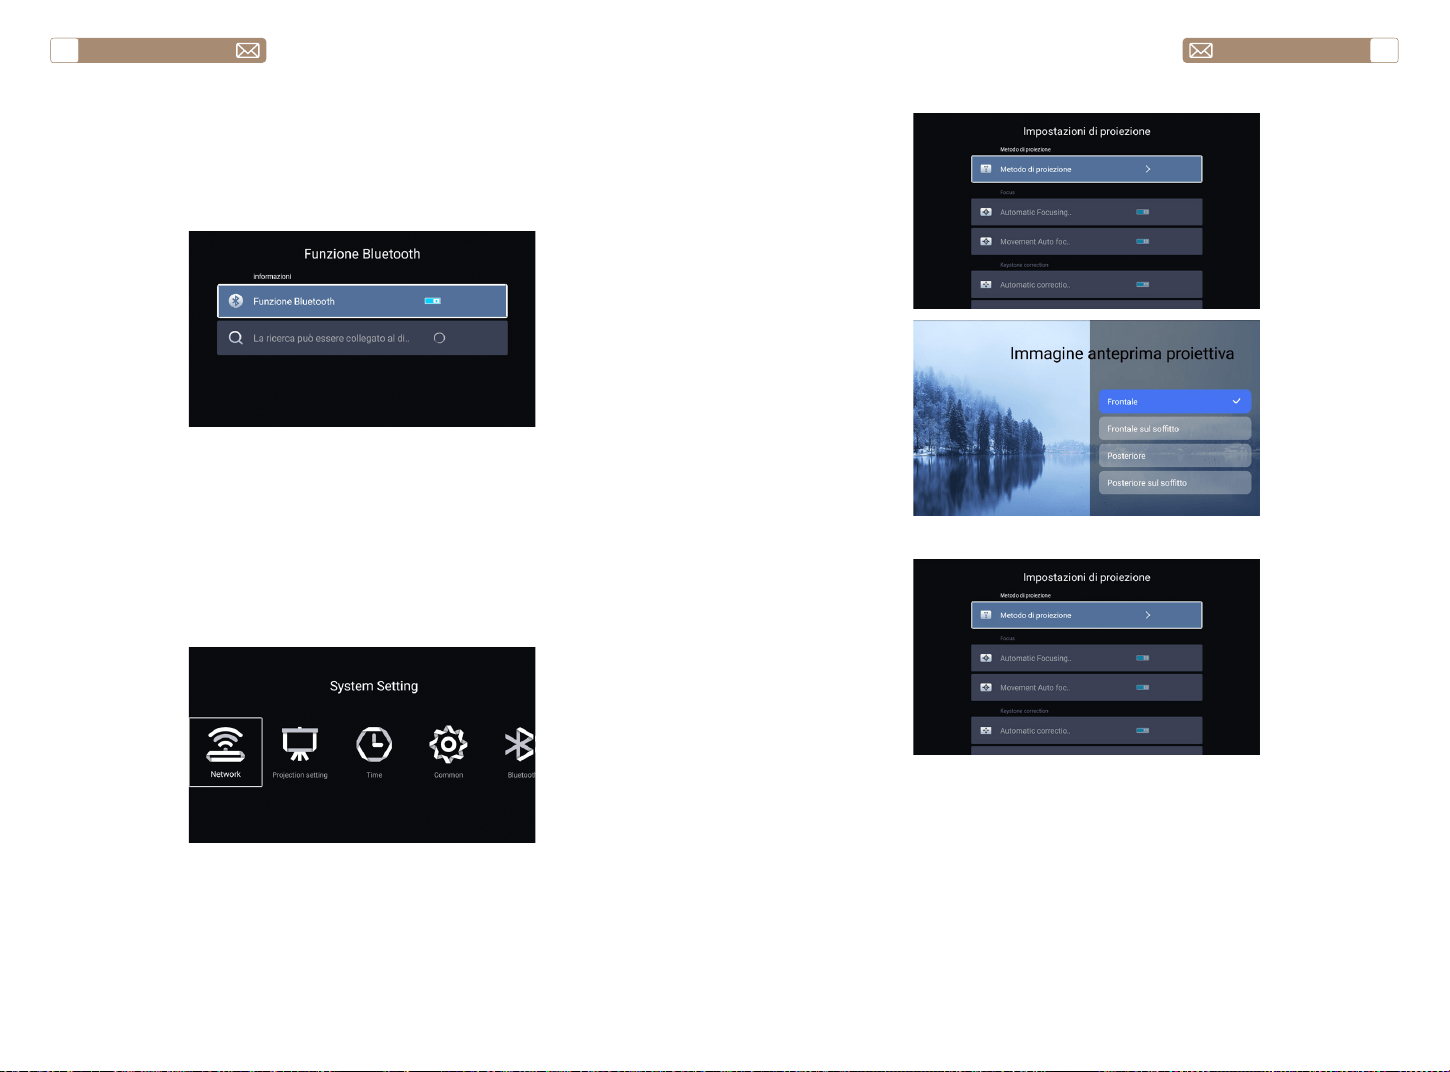
service@toptro.com service@toptro.com
IT IT
114 115
4.Impostazioni Bluetooth
5.Impostazione del Sistema del Proiettore
Vai alla home page - - Seleziona il menu [ Impostazioni di sistema ] - -
Seleziona l'opzione [ Bluetooth ] - - Apri la funzione Bluetooth e il tuo dispositivo
Bluetooth - - Scansiona automaticamente i dispositivi Bluetooth nelle vicinanze
- - Scegli il dispositivo Bluetooth desiderato - - sarà accoppiato e connesso
automaticamente.
Nota:
1. Il proiettore Toptro X7 è compatibile con le cuffie Bluetooth, gli
altoparlanti Bluetooth e gli Air Pod, ma non con le tastiere Bluetooth o i
telefoni Bluetooth.
2. In caso di domande, non esitate a contattarci tramite
service@toptro.com
5.1 Impostazioni di proiezione
5.2 Focus
Accendi questo pulsante, quando avvii il proiettore, attendi
pazientemente per 2-3 secondi, il proiettore si concentrerà
automaticamente dopo l'accensione.
Attivando questo pulsante, il proiettore metterà a fuoco automaticamente
quando si cambia posizione.
Nota:
1.Utilizzare la messa a fuoco automatica durante la configurazione del
5.2.1 Automatic Focusing after boot
5.2.2 Movement Auto focus
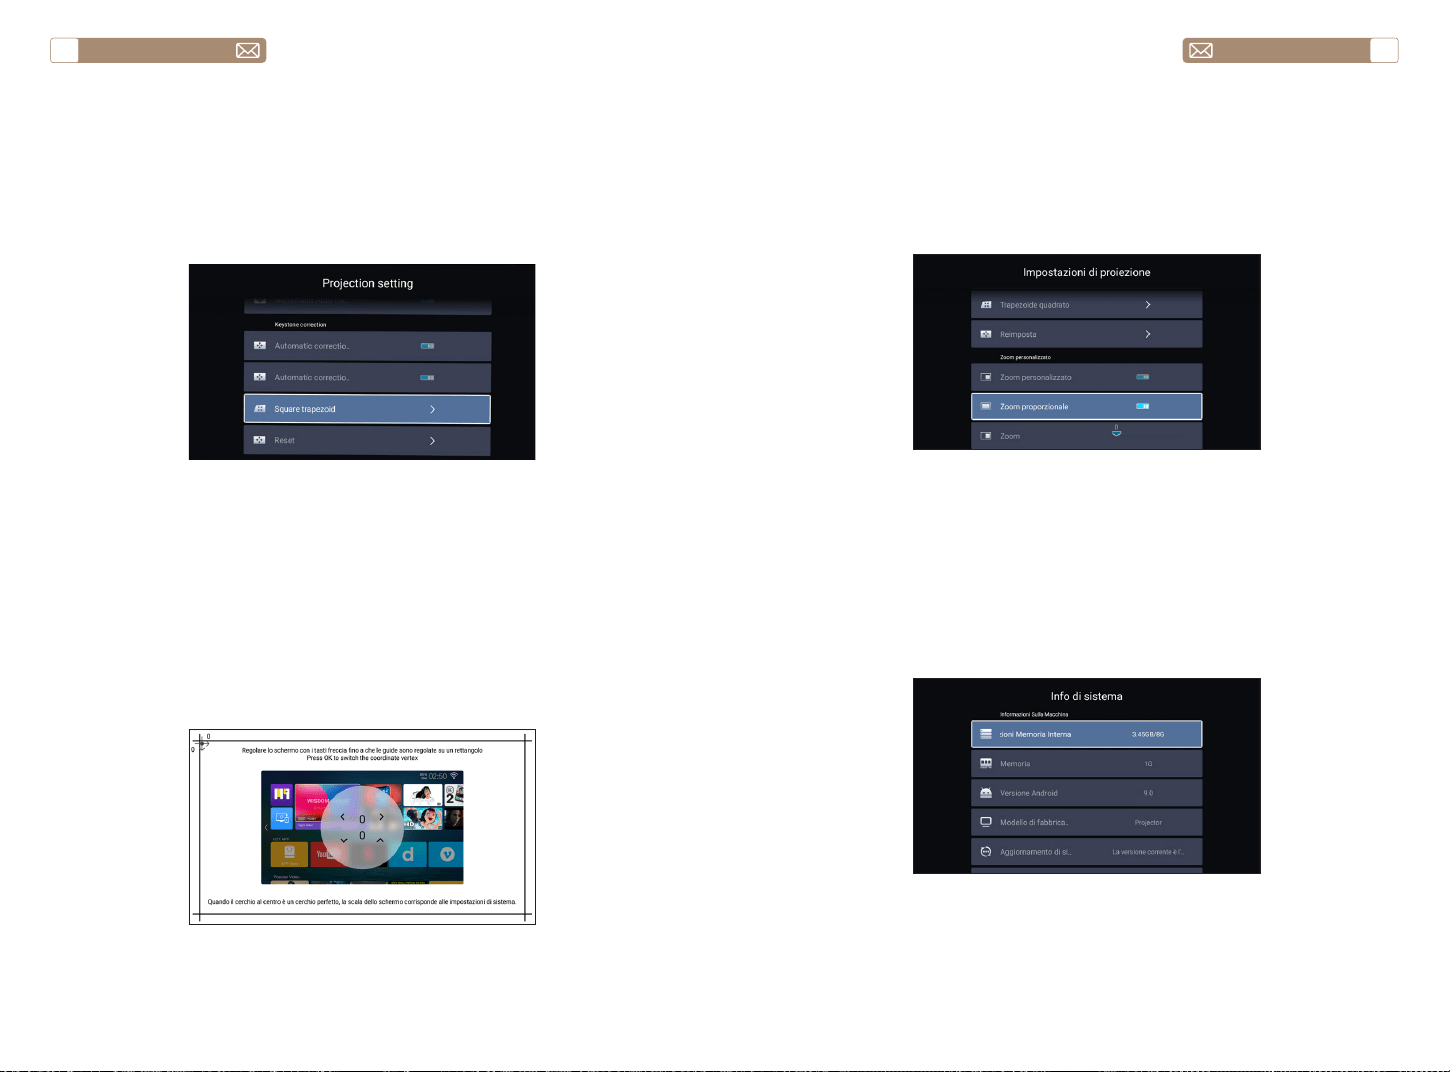
service@toptro.com service@toptro.com
IT IT
116 117
5.4 Zoom
5.3 Keystone Correction
* Selezionare l'opzione [Zoom personalizzato] , premere il pulsante "OK"
sul telecomando per accedere al sottomenu [Zoom proporzionale] ,
premere il tasto "OK" per selezionare questo pulsante per accedere a
un menu a tre livelli [Zoom] , è possibile regolare la dimensione della
proiezione regolando i parametri, l'intervallo di zoom è 0—50.
Vai alla home page - - Seleziona il menu [Impostazioni di sistema] - -
Seleziona l'opzione [Impostazioni comuni] - - Seleziona [Ripristino di
sistema]
Nota: Se il software attualmente è il più recente, non è necessario
aggiornare il software. Durante il processo di aggiornamento, se hai
qualche domanda, non esitare a contattarci tramite service@toptro.com
proiettore o quando è necessario regolare rapidamente la messa a fuoco
dell'immagine.
2.Utilizzare la modalità di messa a fuoco manuale quando è necessario un
controllo più preciso sulla messa a fuoco dell'immagine. Premere a lungo
il pulsante di messa a fuoco "F+", "F-" finché l'immagine non è nitida.
Attivare questo pulsante, quando si avvia il proiettore, attendere
pazientemente per 2-3 secondi, il proiettore regolerà automaticamente
la distorsione trapezoidale.
Attivando questo pulsante, il proiettore correggerà automaticamente la
distorsione trapezoidale quando si cambia la posizione.
Nota: se non sei soddisfatto dell'immagine corretta automaticamente,
lo schermo di proiezione non è rettangolare, puoi regolarlo con la
correzione trapezoidale a 4 punti.
5.3.1 Automatic Correction after boot
5.3.2 Automatic Correction after displacement
6.Aggiornamento del Sistema

service@toptro.com service@toptro.com
IT IT
118 119
7.Impostazioni comuni
Menù Funzione
Lingua Imposta la lingua del sistema
Metodo di inserimento Imposta il metodo di input corrente
Fonte predefinito Imposta la sorgente predefinita: Off, AV, HDMI1, HDMI2
Power Mode Imposta la modalità di alimentazione: standby, on, last
Ripristino del sistema Ripristina il sistema e tutti i dati
Nome Dispositivo Cambia il nome del proiettore
COLLEGAMENTO LINEE DI SEGNALE
Il proiettore TOPTRO X7 ha 7 interfacce, porta HDMI*2/porta USB*2/uscita
cuffie da 3,5 mm*1/porta di rete*1/porta AV*1, selezionare la porta corretta
per collegare il dispositivo (PC, lettore DVD, Fire chiavetta TV, box TV, barra
audio, disco USB, PS4 ecc.)
1. Collega la tua chiavetta Fire TV (o PC, TV box, PS4 ecc.) alla porta HDMI
del proiettore;
2. Accedere alla home page per selezionare l'HDMI corrispondente come
sorgente del segnale.
1. Accendi il tuo lettore DVD e il proiettore;
2. Collegare il lettore DVD e il proiettore con il cavo HDMI
3. Accedere alla home page per selezionare l'HDMI corrispondente come
sorgente del segnale.
Nota: quando il proiettore è collegato al lettore DVD tramite il cavo HDMI,
se non viene emesso alcun suono, è possibile che il segnale di uscita
della porta HDMI del lettore DVD non sia compatibile con HDCP, provare
a collegare la barra audio /Altoparlante.
1.Collegare i Dispositivi Tramite la Porta HDMI
2.Collegati al Lettore DVD

service@toptro.com service@toptro.com
IT IT
120 121
Se l'altoparlante dispone di una porta AUX, utilizzare il cavo audio
da 3,5 mm per collegare il proiettore e l'altoparlante come mostrato
nell'immagine.
1. Collegare al computer e al proiettore X7 con il cavo HDMI (incluso).
2. Seleziona la sorgente HDMI per proiettare qualsiasi file sul tuo
computer;
3. Sul tuo laptop, tieni premuti i tasti della scheda "Win + P" per cambiare
la modalità di visualizzazione.
Solo computer: è l'opzione predefinita – viene visualizzata solo sul
monitor principale.
Duplica: fa in modo che tutti i monitor visualizzino la stessa cosa
duplicando il desktop su ciascun monitor.
Estendi: fa in modo che tutti i tuoi monitor si comportino come un unico
grande monitor estendendo il desktop su tutti loro.
Solo proiettore: viene visualizzato solo sul monitor secondario come un
proiettore.
È possibile modificare la risoluzione dello schermo nella modalità Solo
proiettore
Passaggio: Start > Pannello di controllo > Aspetto e personalizzazione >
Regola la risoluzione dello schermo
3.Connettersi alla Soundbar/Altoparlante
4.Connettiti al Computer
Audio
out
AUX
port
GARANZIA
Grazie mille per l'acquisto e il supporto. Forniamo una garanzia di 3 anni
per il proiettore X7. In caso di domande, non esitate a contattarci tramite
service@toptro.com

service@toptro.com service@toptro.com
JP JP
122 123
目次
TOPTRO アフターサービスを無料で提供
ご注意
皆さまへ
TOPTRO をご愛顧いただき誠にありがとうございます。 プロジェクターを
使用する前に、この説明書をよくお読みください。問題がある場合は、注
文番号と問題 [email protected] へ送信してください。24 時間以内に迅
速な解決策を提供します。
信号がない、音が出ない、Bluetooth 接続が失敗する、WiFi 接続が失敗する、
アニメーションが途切れるなど、設定することで多くの問題を簡単に解決
できます。
すべてのプロジェクターは、出荷前に 100%慎重にチェックされ、パッケ
ージ化されていることをお約束します。
ご不明な点がございましたら、問題を解決するためにご連絡ください。そ
して、私たちに改善の機会を与えてください。私たちはあなたに満足のい
く解決策を提供することを保証します。
ご理解いただきありがとうございました。
TOTRO アフターサービスチーム
1、高温または低温ではデバイスの寿命が短くなるため、プロジェクターを
暖かくなりすぎたり寒すぎたりしない部屋に置いてくだい。作業環境は 5℃
~35℃良いでしょう。
2、プロジェクターが安定して動作するように換気装置が装備されています。
通気口を布や毛布などで覆わないでください。プロジェクタのスリットに
は 何も挿入しないでください。短絡や感電を引き起こし、損傷を引き起こ
す可能性があります。
3、プロジェクターは、強い衝撃、押し出し、振動から厳重に保護する必要
があります。強い衝撃、押し出し、振動を加えて動かそうとしないでく だ
さい。動かそうとしないでください。内部回路に障害が発生します。
4、、プロジェクターのコアコンポーネントとしてのレンズは、画像の定義
と 効果に直接関係しています。ほこりが多すぎると画質に影響します。汚
れたレンズは、ガラスレンズの表面を柔らかい綿の布で拭きます。硬い布
や研磨剤は使用しないでください。
TOPTRO アフターサービスを無料で提供 123
ご注意 123
パッケージリスト 124
商品仕様 124
プロジェクターの概要 125
リモートコントロール 127
インストール 128
1. 投影方式 128
2. 投影距離とサイズ 129
3. 天井取り付け 129
プロジェクターを使う 130
1. プロジェクター オン / オフ 130
2. フォーカス調整 130
3. 台形補正の調整 131
プロジェクターの設定 131
1. 入力信号源を選択 131
2. USB ディスク入力モード 131
3.WiFi 設定 133
3.1 iOS キャスト(iOS デバイス用) - - - - - - - - - - - - - - - -133
3.2 Miracast(Android デバイス用)- - - - - - - - - - - - - - - -134
4. Bluetooth 設定 135
5. プロジェクターのシステム設定 135
5.1 投影方法 - - - - - - - - - - - - - - - - - - - - - - - - - -136
5.2 フォーカス- - - - - - - - - - - - - - - - - - - - - - - - -136
5.3 台形補正 - - - - - - - - - - - - - - - - - - - - - - - - - 137
5.4 ズーム設定- - - - - - - - - - - - - - - - - - - - - - - - -138
6. システムアップデート 138
7. 一般設定 139
信号線の接続 139
1. HDMI ポートを介してデバイスを接続 140
2. DVD プレーヤーに接続 140
3. サウンドバー / スピーカーに接続 141
4. パソコンとの接続 141
保証 142

service@toptro.com service@toptro.com
JP JP
124 125
パッケージリスト
プロジェクターの概要
商品仕様
TOPTRO X7 プロジェク
ター *1
リモコン *1 電源コード *1
HDMI ケーブル *1 AV ケーブル *1 説明書 *1
レンズカバー *1 クリーニング布 *1
Model No. X7
解像度 1920*1080 アスペクト比 4:3/16:9
ディスプレイ技術 LCD 光源 LED
カラーゲーム 16.7M Full サイズ 8.3x7.2x6.3 inch
重量 5.29 lb 電圧
AC100-240V ~
50/60Hz
出力ポート ヘッドホン 入力ポート
RJ45/HDMI/USB/
AV
投影方法 フロント / リアプロ / ラック / マウント
操作モード リモコン
動画形式
MP4、MKV、WMV、3GP、MPG、VOB、TP、TS、DAT、
MOV、FLV、 4K H.264/H.265( ≤ 30fps)
音声形式 AAC_LC,HE_AAC,HE_AACV2, LPCM,MP3,APE,MP3
画像形式 JPG/JPEG/BMP/PNG
書類フォーマット TXT、WORD、EXCEL、PPTX
①
②③
④
⑤ ⑥
⑦ ⑧⑨ ⑩
⑪
⑫
⑬ ⑭
⑮
⑯ ⑰
⑱

service@toptro.com service@toptro.com
JP JP
126 127
1 プロジェクターレンズ 光学コーティングガラスレンズ
2/11 IR ウンドウ 赤外線信号受信機
3 レンズ オートフォーカスレンズ
4 スピーカー 音声出力
5 RJ45 ネットワーク ポート
6 USB ポート USB 1 ポート /USB 2 ポート
7/8 HDMI ポート HDMI 入力
9 AV インターフェース 音声と映像を分離して伝送する
10 ヘッドフォンジャック 3.5mm ヘッドホン出力
12 電源コードポート 電源コードを差し込む
13/14 冷却口 プロジェクターの過熱を防止する
15 電源ボタン 電源のオン/オフ
16 ボトムレーベル プロジェクター底面の銘板
17 マシーンフィート 高さ調整用機械脚
18 ネジ穴
ブラケットネジ穴(1/4 インチ)、吊
り下げにも対応
リモートコントロール
①
②
③
④
⑤
⑥
⑦
⑧
⑨
⑩
⑪
⑫
⑬
1
電源ボタン
2
ホーム
3
メニュー
4
音声 +
5
音声 -
6
消音
7
設置
8
矢印キー
OK ボタン
9
戻り
10
オートフォーカスと自動台形補正を調整
11
ソース
12
フォーカス +
13
フォーカス -
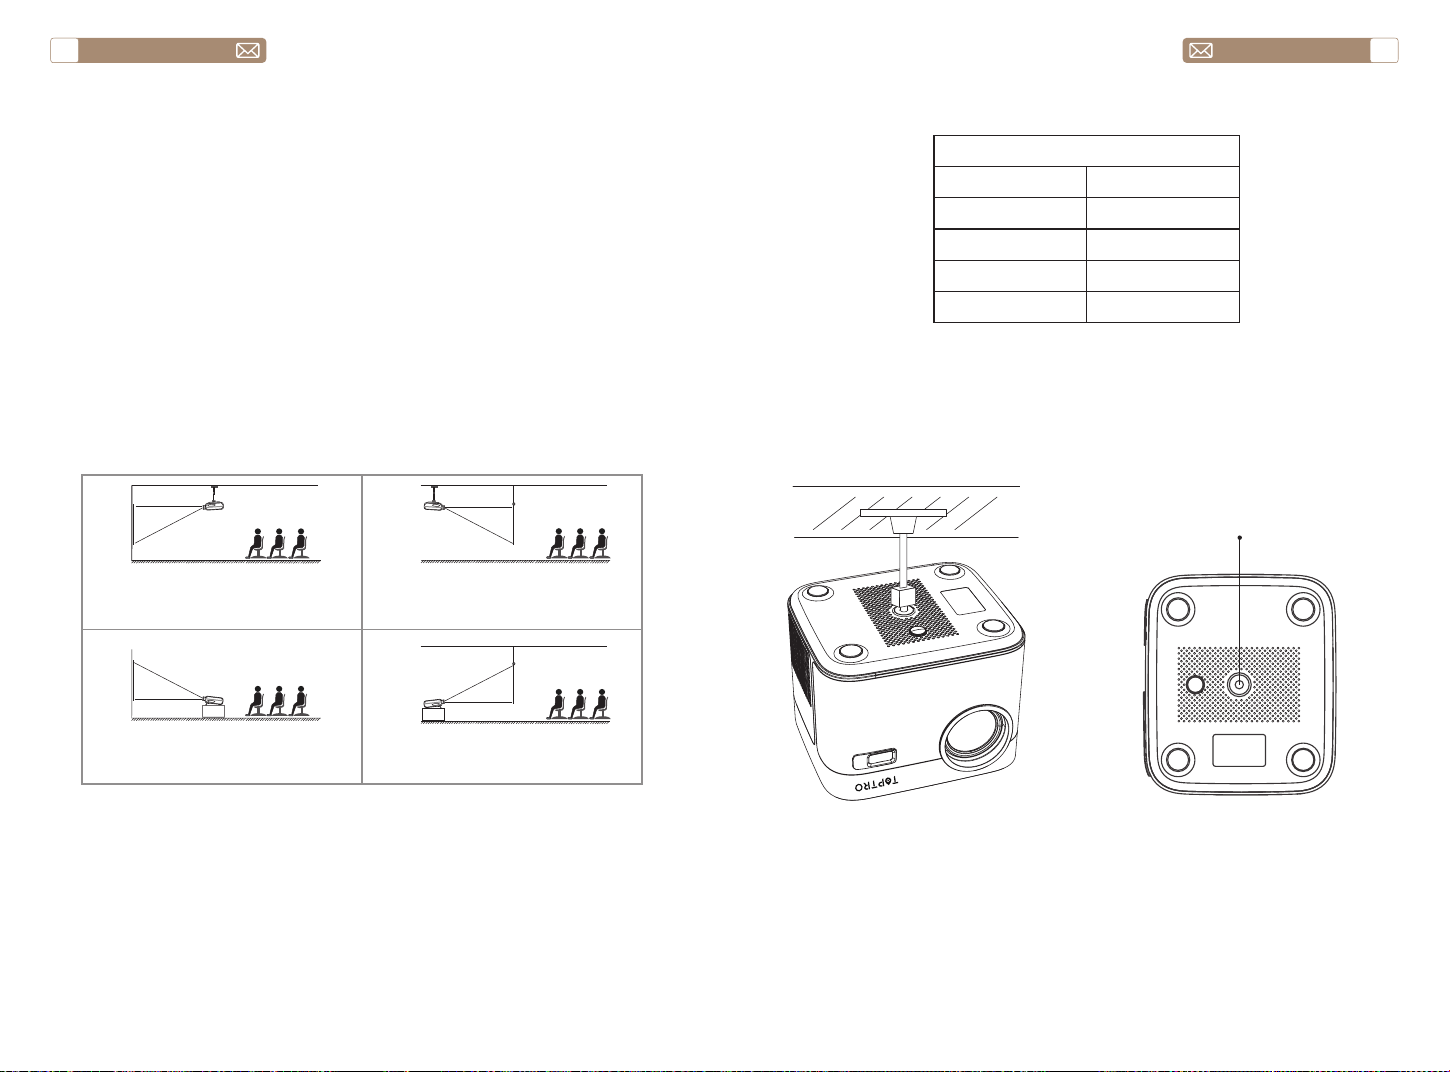
service@toptro.com service@toptro.com
JP JP
128 129
1)バッテリーは同梱されていません。2*AAA バッテリーが必要です。(別
途購入)
2)リモコンを使用しながら、赤外線信号受信部に向ける必要です。
3)液もれの原因にもなるので長期間使用しない場合は電池を取り出してお
いてください。
X7 プロジェクターは、天吊り用の金具で天吊りができ、安定した机の上に
置いても投影できます。ご使用環境によって下記の 4 つの投影方式があり
ます。
レンズがスクリーンに対して軸対称になる高さにプロジェクターを使用し
てください。 無理な場合は台形補正機能を使用して投影画像を調整してく
ださい。
最高な映像をご覧いただくためには 3.8ft ~ 10.9ft 以内で設置してくださ
い。
画面サイズは、プロジェクターのレンズからスクリーンまでの距離によっ
て決 まります。設定方式により 3%の誤差があります。
ご注意 :
インストール
1. 投影方式
2. 投影距離とサイズ
3. 天井取り付け
プロジェクター
プロジェクター
プロジェクター
プロジェクター
スクリーン
スクリーン
スクリーン
スクリーン
1. 天吊りと正面投影
3. テーブル置きと正面投影
2. 天吊りと背面投影
4. テーブル置きと背面投影
コントラスト : 16:9
投影距離 (ft) 投影サイズ
5 50"
8 80"
10 100"
12 120"
ブラケットのネジ穴
ご注意 :
ユニバーサル プロジェクター天井マウントを購入し、1/4 インチのネジで
プロジェクターを取り付けてください。
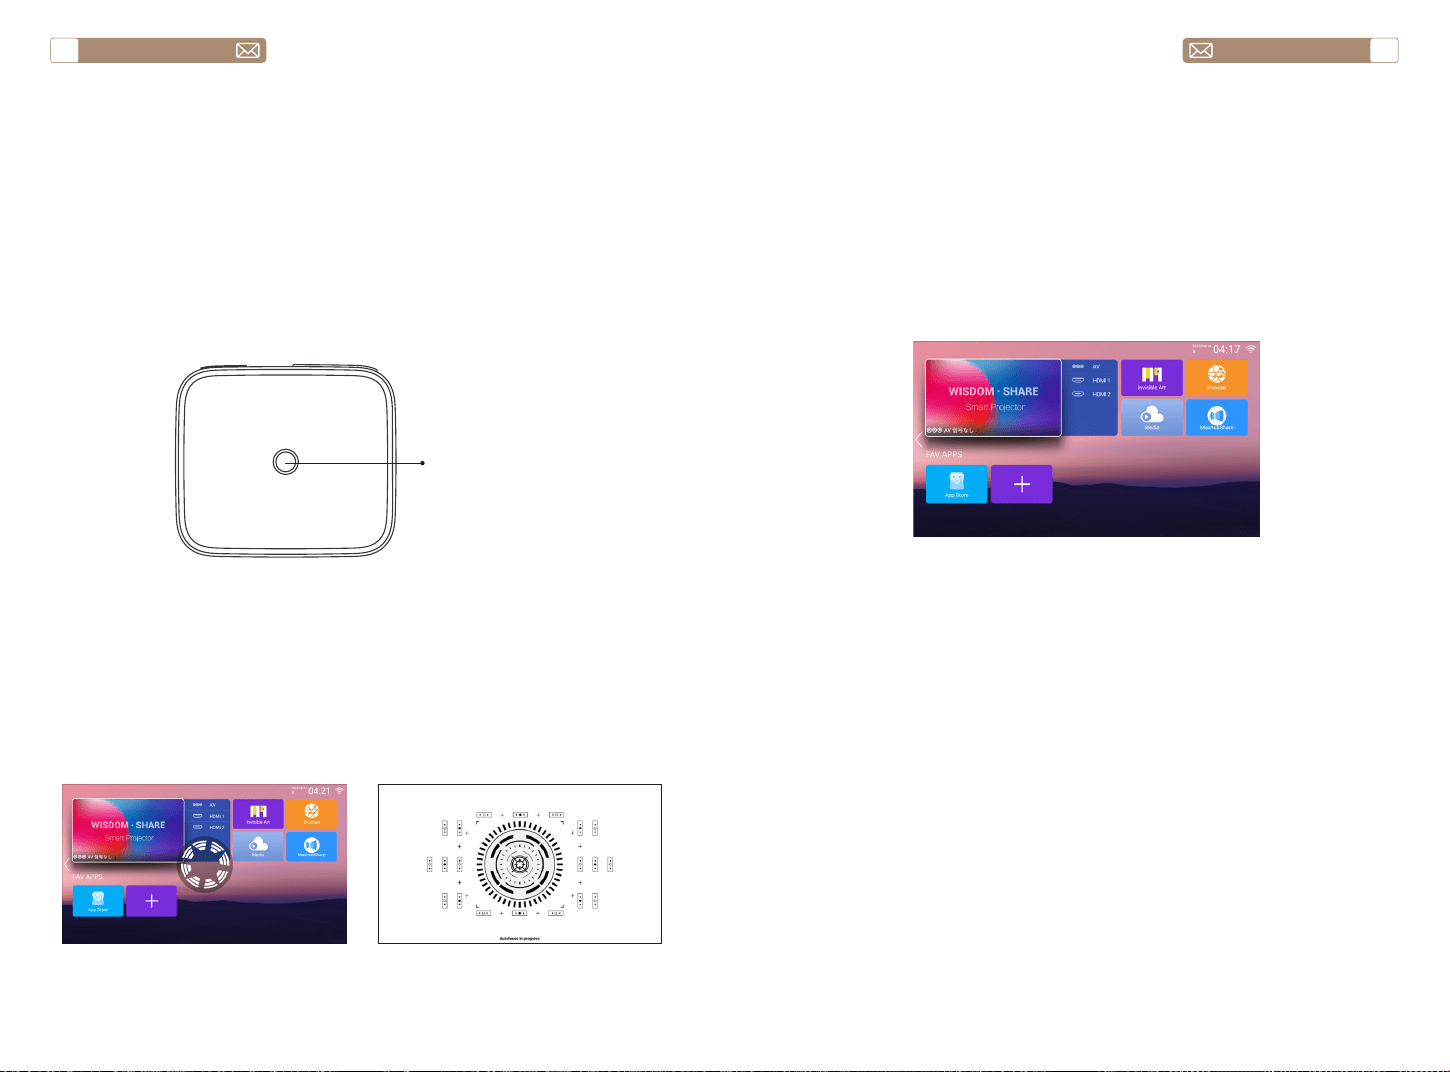
service@toptro.com service@toptro.com
JP JP
130 131
プロジェクターを電源に接続すると、プロジェクターはスタンバイ状態に
なり、カバーの信号表示灯が赤色になります。
電源を入れる:本体の電源ボタン、またはリモコンの電源ボタンを押すと、
インジケーターランプが青色に点灯し、動作状態になります。
シャットダウンします:動作状態で、本体の電源ボタン、またはリモコン
の電源ボタンを押すと、インジケーターランプが青色から赤色に変わり、
プロジェクターの電源がオフになります。
* X7プロジェクターを初めて起動するとき、2-3秒辛抱強く待ってください、
プロジェクターは自動的に焦点を調整します。画像が鮮明でない場合、フ
ォーカスボタン "F+"、"F-" を押して、レンズの焦点距離を調整し、画像が
鮮明になるまでフォーカスボタンをクリックまたは長押ししてください。
注:それでもまだぼやけている場合は、投射距離を調節してみてください。
1. USB ディスクを挿入し、アイコン[メディア]を選択します。
2.[すべて / ビデオ / オーディオ / 画像 ] を選択します。
3. USB ディスク内の目的のファイルを選択し(またはサブフォルダーに入
る)、[OK] ボタンを押して再生します。
注意 : TOPTROX7 プロジェクターは USB ディスクをサポートし、PPT、
Word、Excel ファイルを直接再生できます。
* X7 プロジェクターを初めて起動したとき、プロジェクターは自動的に台
形補正を行います。または、プロジェクターのデジタル 4P 台形補正を使用
して、画像を長方形(垂直および水平)に変更することもできます。詳細は、
本マニュアルの 137 ページを参照してください。
プロジェクターを使う
1. プロジェクター オン / オフ
2. フォーカス調整
2. USB ディスク入力モード
3. 台形補正の調整
電源ボタン
プロジェクターのホームページは以下の通りです。
ホームページで希望の入力信号源 (AV/HDMI1/HDMI2) を選択します。
注:外部機器 ( 例え TV ボックス、Fire TV Stick、DVD プレーヤー、USB
フラッシュディスク、パソコンなど ) を接続する場合、対応する信号ソー
スを選択する必要があります。間違った選択をすると、プロジェクターは
信号を表示しません。
プロジェクターの設定
1. 入力信号源を選択
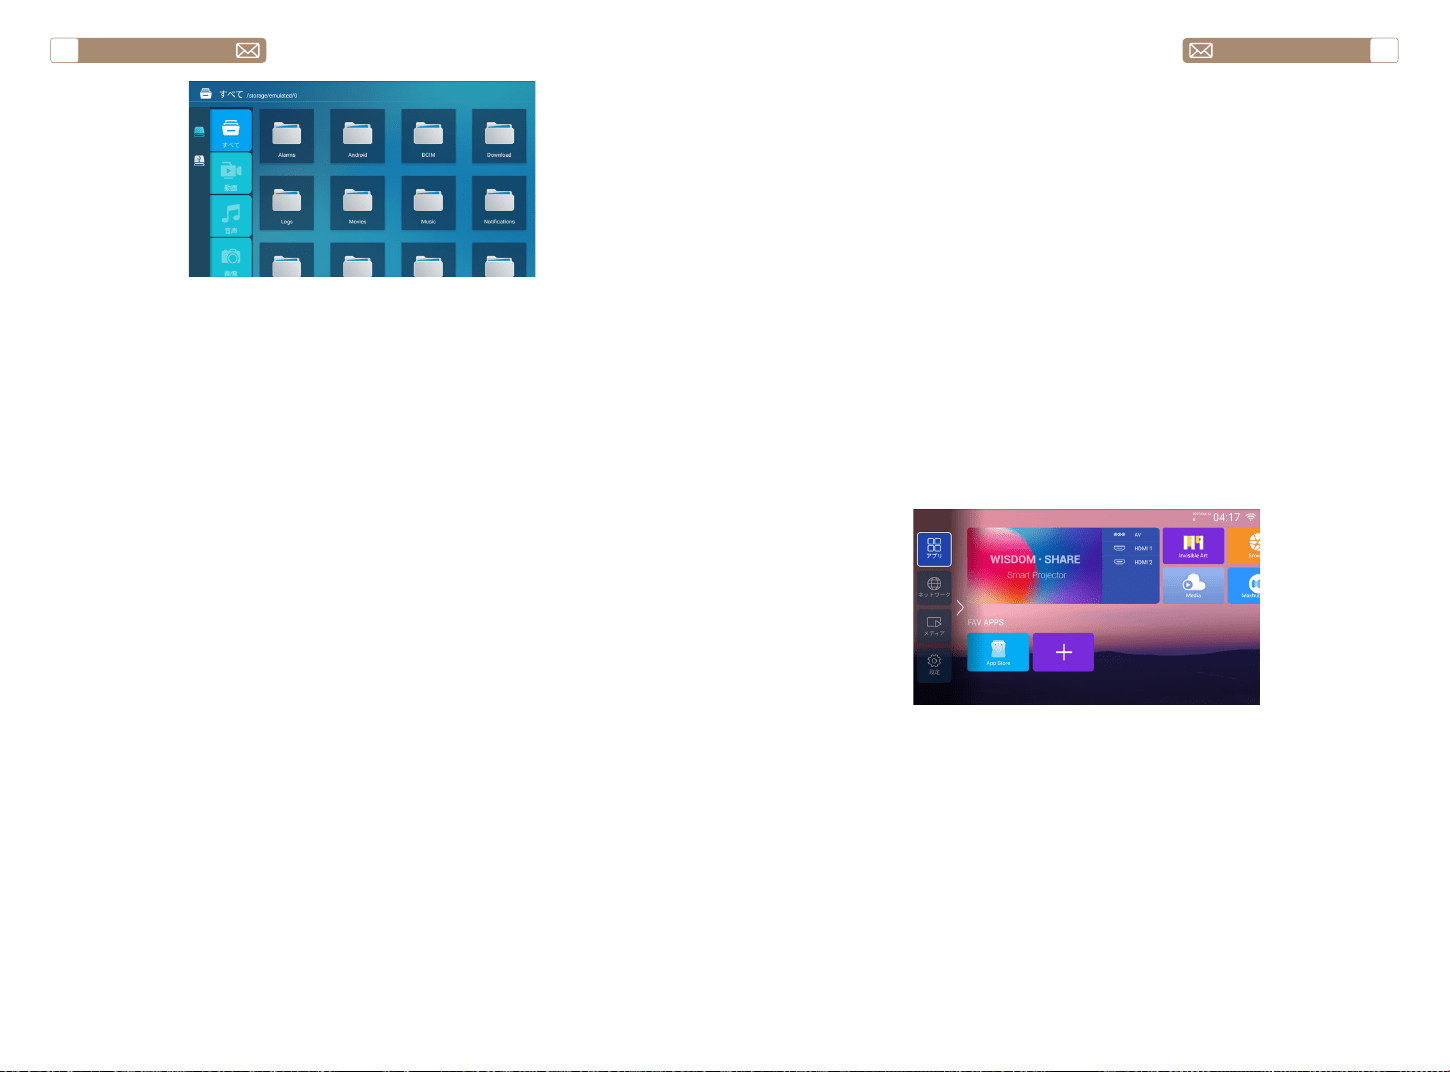
service@toptro.com service@toptro.com
JP JP
132 133
ヒント : プロジェクターが USB メモリを認識できない場合、以下の方法を
参照して問題を解決してください。
お手持ちの USB メモリが以下の形式であることをご確認ください。
1.Fat32:8G/16G/32G。
2.NTFS:64G
一致しない場合は、USB メモリをフォーマットしてください。 USB メモ
リをフォーマットする前に、USB メモリに何か入っている場合はすべてバ
ックアップしておいてください。 これらの手順の後、すべては永遠に失わ
れる。
USB メモリのフォーマットを FAT32 フォーマットに変換する方法は
1. パソコンの USB ポートに USB メモリーを挿入する
2. ファイルエクスプローラを開き、ドライブを右クリックします。
3. " フォーマット " を選択する。
無線接続
3.WiFi 設定
1. ホームページに移動 -[ 設定 ] メニュー -[ ネットワーク設定 ]-WiFi を選
択 -X7 プロジェクターをホーム WiFi に接続します。
2. ホームページに戻る -[iOSCast]-[OK] ボタンを押して [iOSCast] メニ
ューに入ります。
3. iOS デバイスの [ 設定 ]-[Wi-Fi] 機能をオンにします -iOS デバイスを
プロジェクターと同じホームネットワークに接続します。
4. iOS デバイスで [ コントロールセンター ] を開きます -[ スクリーンミラ
ーリング ] 機能を選択します -[X7-XXXX-(icast)] という名前の iOSCast
レシーバーを選択して接続します -3 秒後に iOS デバイスの画面がプロジ
ェクションに表示されます。
ヒント :
①無線接続による画面ミラーリングの流暢さは、ネットワーク環境の影響
を受けます。画面ミラーリングを使用する場合は、100M ビット以上の帯
域幅をお勧めします。
②無線接続を使用する場合は、モバイルデバイスがプロジェクターの近く
にあることを確認してください。1 メートル以内の距離をお勧めします。
③一部のモバイル機器は、互換性のために画面ミラーリングをサポートし
ていない場合があります。
④ご不明な点がございましたら、service@toptro.com へお気軽にお問い
合わせください。
3.1 iOS キャスト(iOS デバイス用)
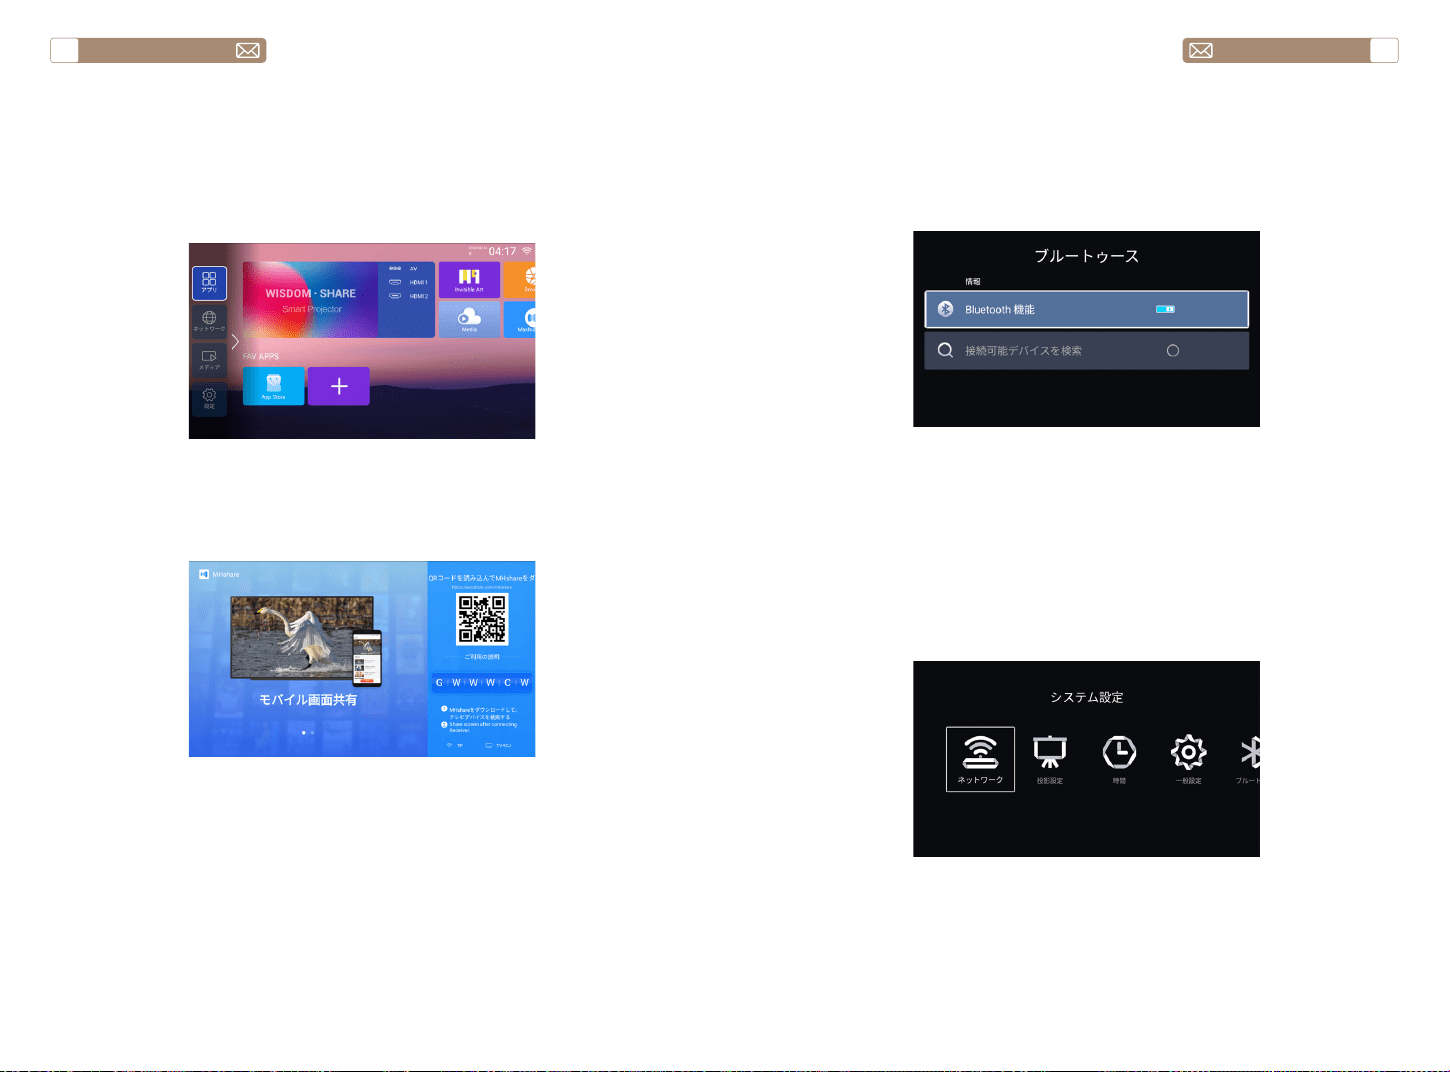
service@toptro.com service@toptro.com
JP JP
134 135
3.QR コードを読み取り、Android 端末でアプリをダウンロードする
4. Android 端末で「Maxhub Share」アプリを開く - 「Toptro X7-XXXX」
というテレビを選択 - 3 秒後に Android 端末の画面が投影画面にずれる。
注:
1. Android 携帯のブランドによって、スクリーンミラーリング表示を選択
するための操作が異なりますので、携帯のマニュアルを参照してください。
[ マルチスクリーン/ワイヤレスディスプレイ/ LAN ディスプレイ/スク
リーンミラーリング/ワイヤレスプロジェクション/スマートビューなど
] など。
2. すべての Android 端末が本機能に対応しているわけではありません。対
応機種であることをご確認の上、ご利用ください。
1. Android デバイスの [ 設定 ]-[Wi-Fi] 機能をオンにします -Android デバ
イスをプロジェクターと同じホームネットワークに接続します。
2. [Maxhub Share] アプリを選択する - OKボタンを押して [Maxhub
Share] アプリを入力します。
3.2 Miracast(Android デバイス用)
4. Bluetooth 設定
5. プロジェクターのシステム設定
ホームページに移動 -[ 設定 ]-[ システム設定 ]-[Bluetooth] を選択します。
Bluetooth 設定インターフェイスに入ります - 近くの Bluetooth デバイス
を自動的にスキャンします - あなたの Bluetooth デバイスを選択します -
自動的にペアリングされて接続されます。
ご注意 :
1、X7 プロジェクターは、Bluetooth ヘッドセット、Bluetooth スピーカー、
Airpod と互換性がありますが、Bluetooth キーボードや Bluetooth スマホ
とは互換性がありません。
2、ご不明な点がございましたら、service@toptro.com へお気軽にお問
い合わせください。
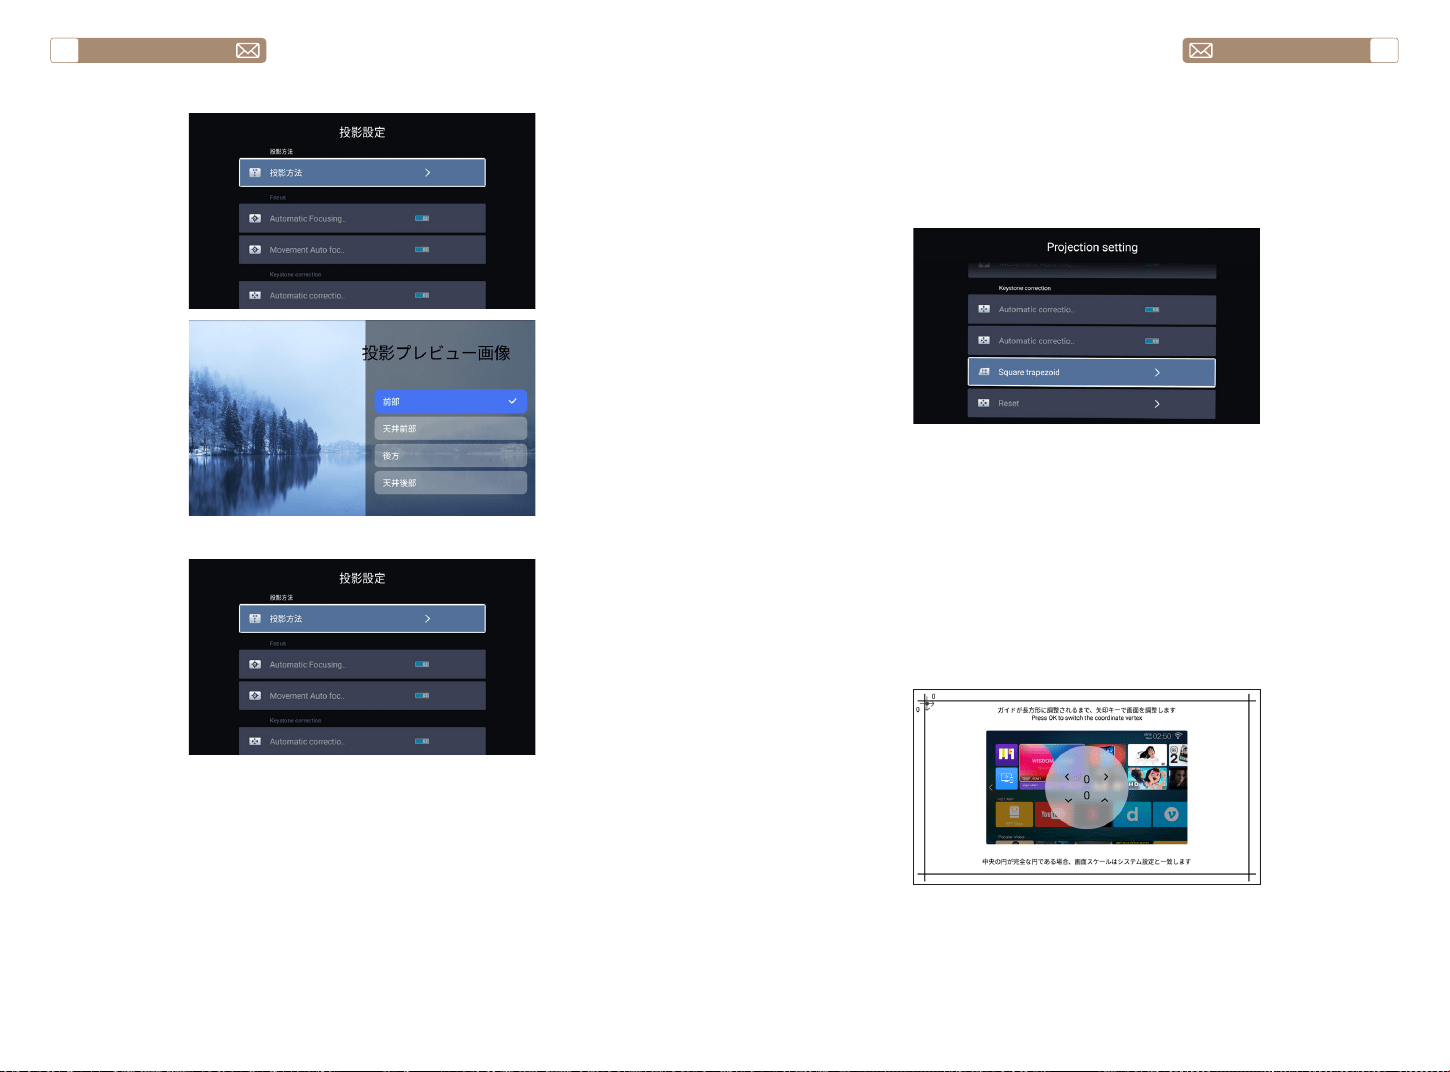
service@toptro.com service@toptro.com
JP JP
136 137
5.1 投影方法
5.2 フォーカス
このボタンをオンにすると、プロジェクターを起動すると、プロジェクタ
ーが自動的にフォーカスを調整するので、2-3 秒間辛抱強く待ってくださ
い。
このボタンをオンにすると、プロジェクターは位置を変更するときに自動
的に焦点を合わせます。
注意 :
1. オートフォーカスは、プロジェクターをセットアップするときや、画像
5.2.1 オートフォーカス
5.2.2 移動オートフォーカス
5.3 台形補正
のフォーカスを素早く調整する必要があるときに使用します。
2. 画像のフォーカスをより正確に制御する必要がある場合は、マニュアル
フォーカスモードを使用します。フォーカスボタン "F+"、"F-" を画像がク
リアになるまで長押しします。
このボタンをオンにすると、プロジェクターを起動したときに、2-3 秒間
辛抱強く待ってください、プロジェクターは自動的に台形補正します。
このボタンをオンにすると、プロジェクターは位置を変更するときに自動
的に台形補正を行います。
お知らせ
自動補正された画像に満足できない場合、プロジェクションスクリーンが
長方形でない場合、4 点台形補正で調整することができます。
5.3.1 自動台形補正
5.3.2 モバイル自動補正
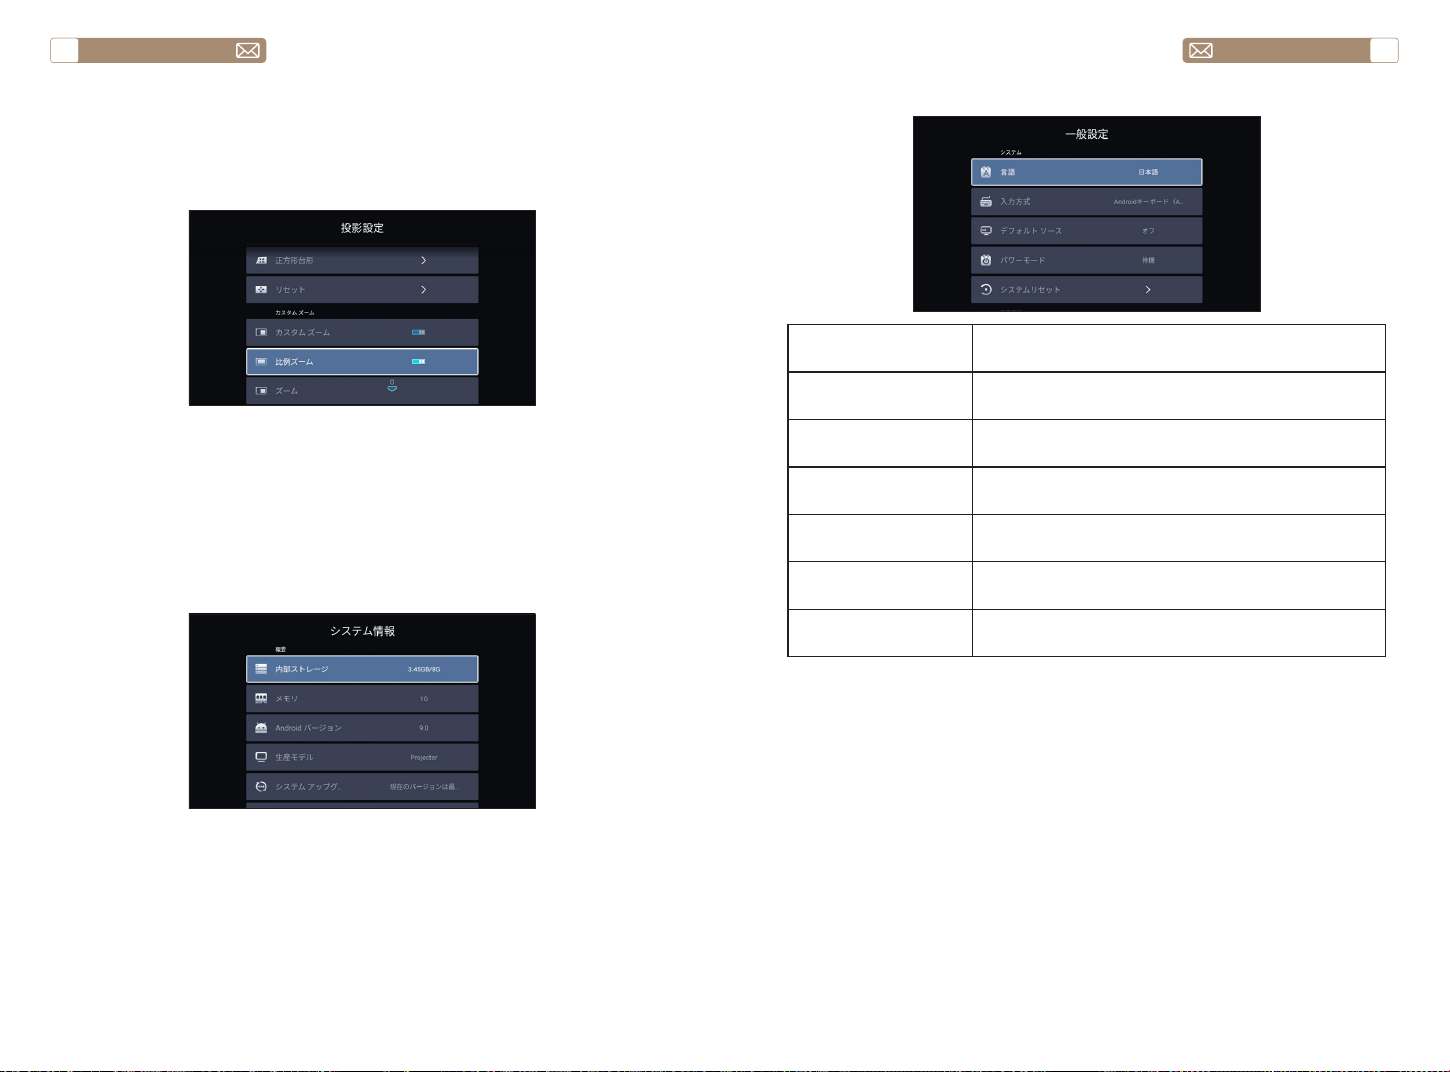
service@toptro.com service@toptro.com
JP JP
138 139
5.4 ズーム設定
ホームページに移動 -- [ 設定 ] メニューに入り -- [ カスタムズーム ] を選
択し、[ ズーム ] を選択し、投影画面が 50%~100% 拡大されます。ボタン
"
◀ ▶
" を押して、数値を調整できます。以下を参照してください。
ホームページに移動 - - [ 設定 ] メニューを選択 - - [ システム情報 ] オプ
ションを選択 - - [ システム アップグレード ] を選択
注意 : 現在のソフトウェアが最新の場合、ソフトウェアをアップグレード
する必要はありません。アップグレード プロセス中にご不明な点がござい
ましたら、[email protected] までお気軽にお問い合わせください。
6. システムアップデート
7. 一般設定
メニュー 内容
言語 英語 / フランス / イタリア語 / 日本語など
入力方式 入力方法を設定
デフォルトのソース
デフォルトソースの設定: オフ、AV、HDMI1、
HDMI2
パワーモード 電源モードの設定 : スタンバイ、電源オン、前回
工場出荷状態に戻す 工場出荷状態に戻す
デバイス名 プロジェクター名の変更
信号線の接続
TOPTRO X7 プ ロ ジ ェ ク タ ー は、(HDMI ポ ー ト * 2 / USB ポ ー ト * 2
/3.5mm ヘッドフォン *1/ ネットワークポート *1/ AV ポート *1) 出力の 7 つ
インターフェースを備えている。デバイスを接続するための正しい接続ポ
ートを選択してください(PC、DVD プレーヤー、Fire TV スティック、TV
ボックス、サウンドバー、USB ディスク、PS4 など)。
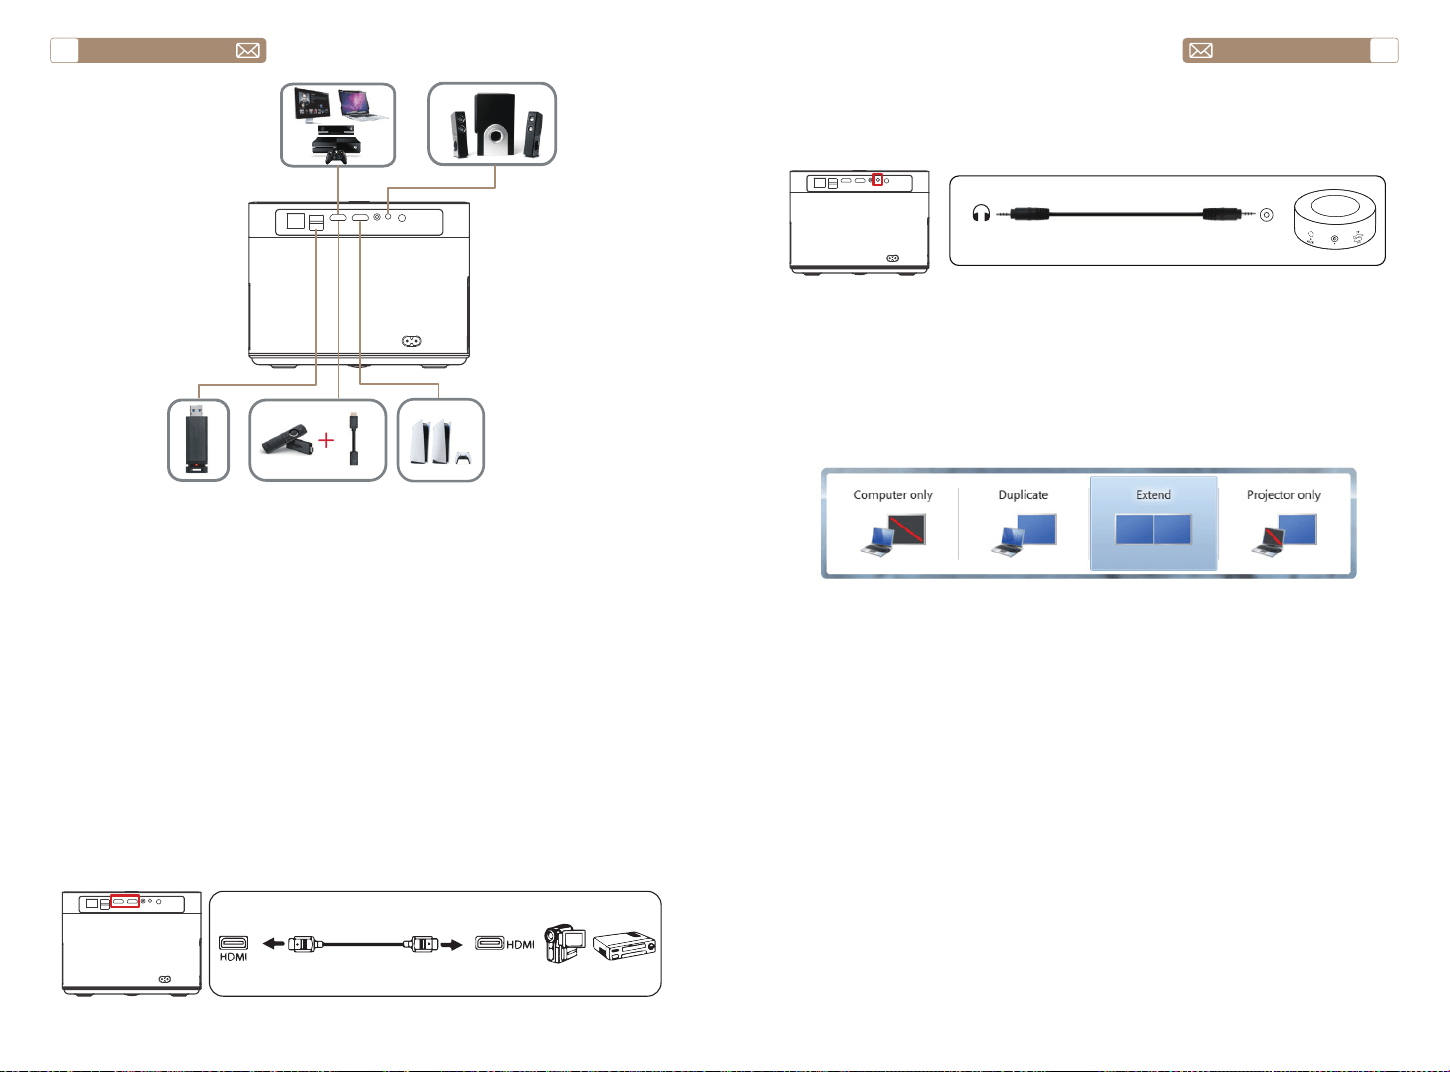
service@toptro.com service@toptro.com
JP JP
140 141
1. Fire TV スティック(または PC、TV ボックス、PS4 など)をプロジェ
クターの HDMI ポートに接続します。
2. ホームページに入り、対応する HDMI を信号源として選択します。
DVD プレーヤーに接続します。
1) DVD プレーヤーとプロジェクターの電源を入れる。
2) DVD プレーヤーとプロジェクターを HDMI ケーブルで接続する。
3) ホームページに入り、信号ソースとして対応する HDMI を選択する。
注 : プロジェクターと DVD プレーヤーを HDMI ケーブルで接続した場合、
音が出ない場合は、DVD プレーヤーの HDMI ポートの出力信号が HDCP
と互換性がない可能性がありますので、サウンドバー / スピーカーを接続
してみてください。
1. HDMI ポートを介してデバイスを接続
2. DVD プレーヤーに接続
スピーカーに AUX ポートがある場合は、写真のように 3.5mm オーディオ
ケーブルを使用してプロジェクターとスピーカーを接続してください。
1) HDMI ケーブル(付属)でパソコンと TR25 プロジェクタを接続します。
2)HDMI ソースを選択すると、パソコン上の任意のファイルを投影するこ
とができます。
3)ノートパソコンで、「Win + P」ボードキーを押したままにします。
Computer only: デフォルトのオプションです。メインモニタにのみ表示
されます。
Duplicate: すべてのモニタに同じものを表示させ、各モニタのデストップ
を複製します
Extend: すべてのモニタを1つの大きなモニタのように機能させ、デスク
トップをそれらすべてに拡張します。
Projector only: プロジェクターのようにセカンダりモニタにのみ表示せれ
ます。
プロジェクター専用モードでは、画面の解像度を変更することができます
ステップ スタート > コントロールパネル > 外観と個人設定 > 画面の解像度
を調整する
3. サウンドバー / スピーカーに接続
4. パソコンとの接続
Audio
out
AUX
port
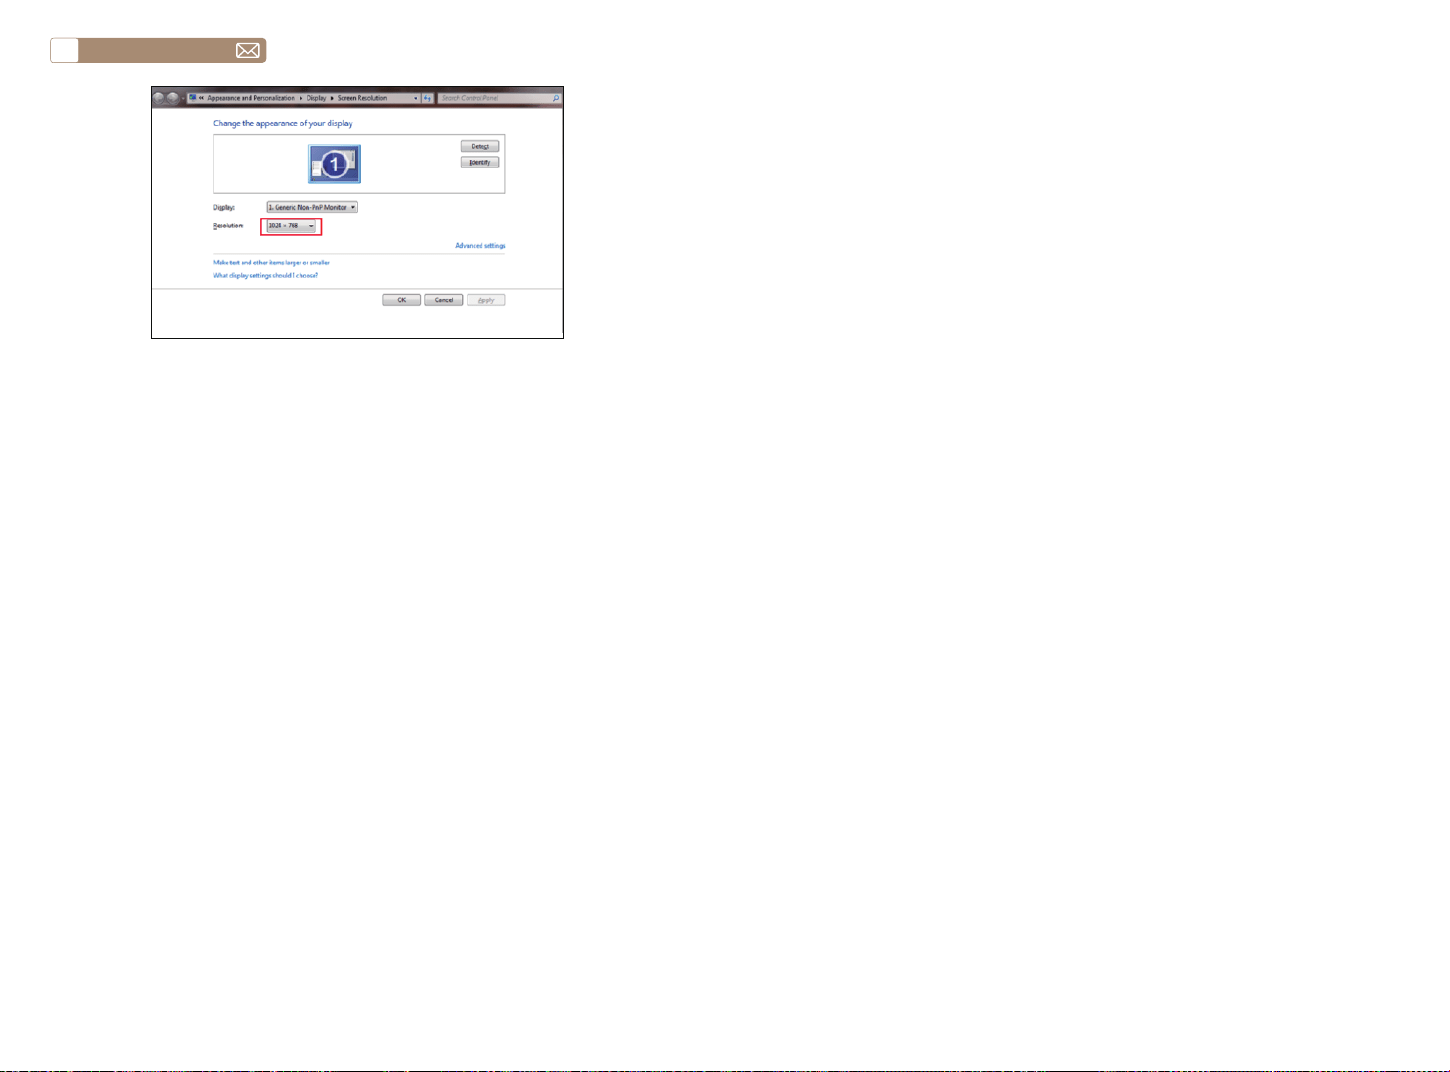
service@toptro.com
JP
142
保証
ご購入ありがとうございました! X7 プロジェクターには 3 年間の保証が
付いています。ご不明な点がございました [email protected]. までお
気軽にお問い合わせください。
FCC STATEMENT :
This device complies with Part 15 of the FCC Rules. Operation is subject
to the following two conditions:
This device may not cause harmful interference, and
This device must accept any interference received, including interference
that may cause undesired operation.
Warning: Changes or modifications not expressly approved by the party
responsible for compliance could void the user's authority to operate the
equipment.
NOTE: This equipment has been tested and found to comply with the
limits for a Class B digital device, pursuant to Part 15 of the FCC Rules.
These limits are designed to provide reasonable protection against
harmful interference in a residential installation. This equipment generates
uses and can radiate radio frequency energy and, if not installed and used
in accordance with the instructions, may cause harmful interference to
radio communications. However, there is no guarantee that interference
will not occur in a particular installation. If this equipment does cause
harmful interference to radio or television reception, which can be
determined by turning the equipment off and on, the user is encouraged
to try to correct the interference by one or more of the following
measures:
Reorient or relocate the receiving antenna.
Increase the separation between the equipment and receiver.
Connect the equipment into an outlet on a circuit different from that to
which the receiver is connected.
Consult the dealer or an experienced radio/TV technician for help.
FCC Radiation Exposure Statement:
This equipment complies with FCC radiation exposure limits set forth for
an uncontrolled environment. This equipment should be installed and
operated with minimum distance 20cm between the radiator & your
body.
This device contains licence-exempt transmitter(s)/receiver(s) that
comply with Innovation, Science and Economic Development Canada’s
licence-exempt RSS(s). Operation is subject to the following two
conditions:
(1) This device may not cause interference.
(2) This device must accept any interference, including interference that
may cause undesired operation of the device.

L’émetteur/récepteur exempt de licence contenu dans le présent
appareil est conforme aux CNR d’Innovation, Sciences et Développement
économique Canada applicables aux appareils radio exempts de licence.
L’exploitation est autorisée aux deux conditions suivantes :
(1) L' appareil ne doit pas produire de brouillage;
(2) L' appareil doit accepter tout brouillage radioélectrique subi, même si
le brouillage est susceptible d' en compromettre le fonctionnement.
This equipment complies with IC exposure limits set forth for an
uncontrolled environment. This equipment shall be installed and
operated with minimum distance 20cm between the radiator & body.
Cet équipement est conforme aux limites d'exposition IC définies pour un
environnement non contrôlé. Cet équipement doit être installé et utilisé
avec une distance minimale de 20 cm entre le radiateur et la carrosserie.
Correct Disposal of this product
This marking indicates that this product should not be
disposed with other household wastes throughout the
EU. To prevent possible harm to the environment or
human health from uncontrolled waste disposal, recycle it
responsibly to promote the sustainable reuse of material
resources. To return your used device, please use the return
and collection systems or contact the retailer where the
product was purchased. They can take this product for
environmental safe recycling.
Declaration of Conformity
We (EU based importer is responsible for this declaration)
Prolinx GmbH
(Company name)
Brehmstr.56, 40239 Duesseldorf, Germany
(Company address)
declare under our sole responsibility that the product
Trade name: TOPTRO
Equipment: Entertainment Projector
Model No. : X7
to which this declaration relates is in conformity with the essential
requirement set out in the Council Directive on the Approximation of
the laws of the Member States relating to RED Directive(2014/53/EU) &
RoHS(2011/65/EU) product is responsible to affix CE marking, the following
standards were applied:
EN 62368-1:2014+A11:2017
EN IEC 62311:2020
ETSI EN 301 489-1 V2.2.3(2019-11)
ETSI EN 301 489-17 V3.2.4(2020-09)
ETSI EN 301 489-3 V2.1.1(2019-03)
EN 55032:2015+A11:2020
EN 55035:2017 +A11:2020
EN IEC 61000-3-2:2019
EN 61000-3-3:2013+A1:2019
ETSI EN 300 328 V2.2.2(2019-07)
ETSI EN 301 893 V2.1.1(2017-05)
ETSI EN 300 440 V2.2.1(2018-07)
IEC62321-3-1:2013
IEC62321-4:2013
IEC62321-5:2013
IEC62321-6:2015
IEC62321-7-1:2015
IEC62321-7-2:2017
IEC62321-8:2017
Full Name: George.wang Position: Approbation Manager
Signature: Place/Date: Shenzhen,China/Apr.24-2023


X7.2023.04
