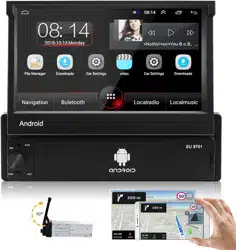
Android 7 Inch Flip Out Touch Screen Radio
Wires Diagram Instruction
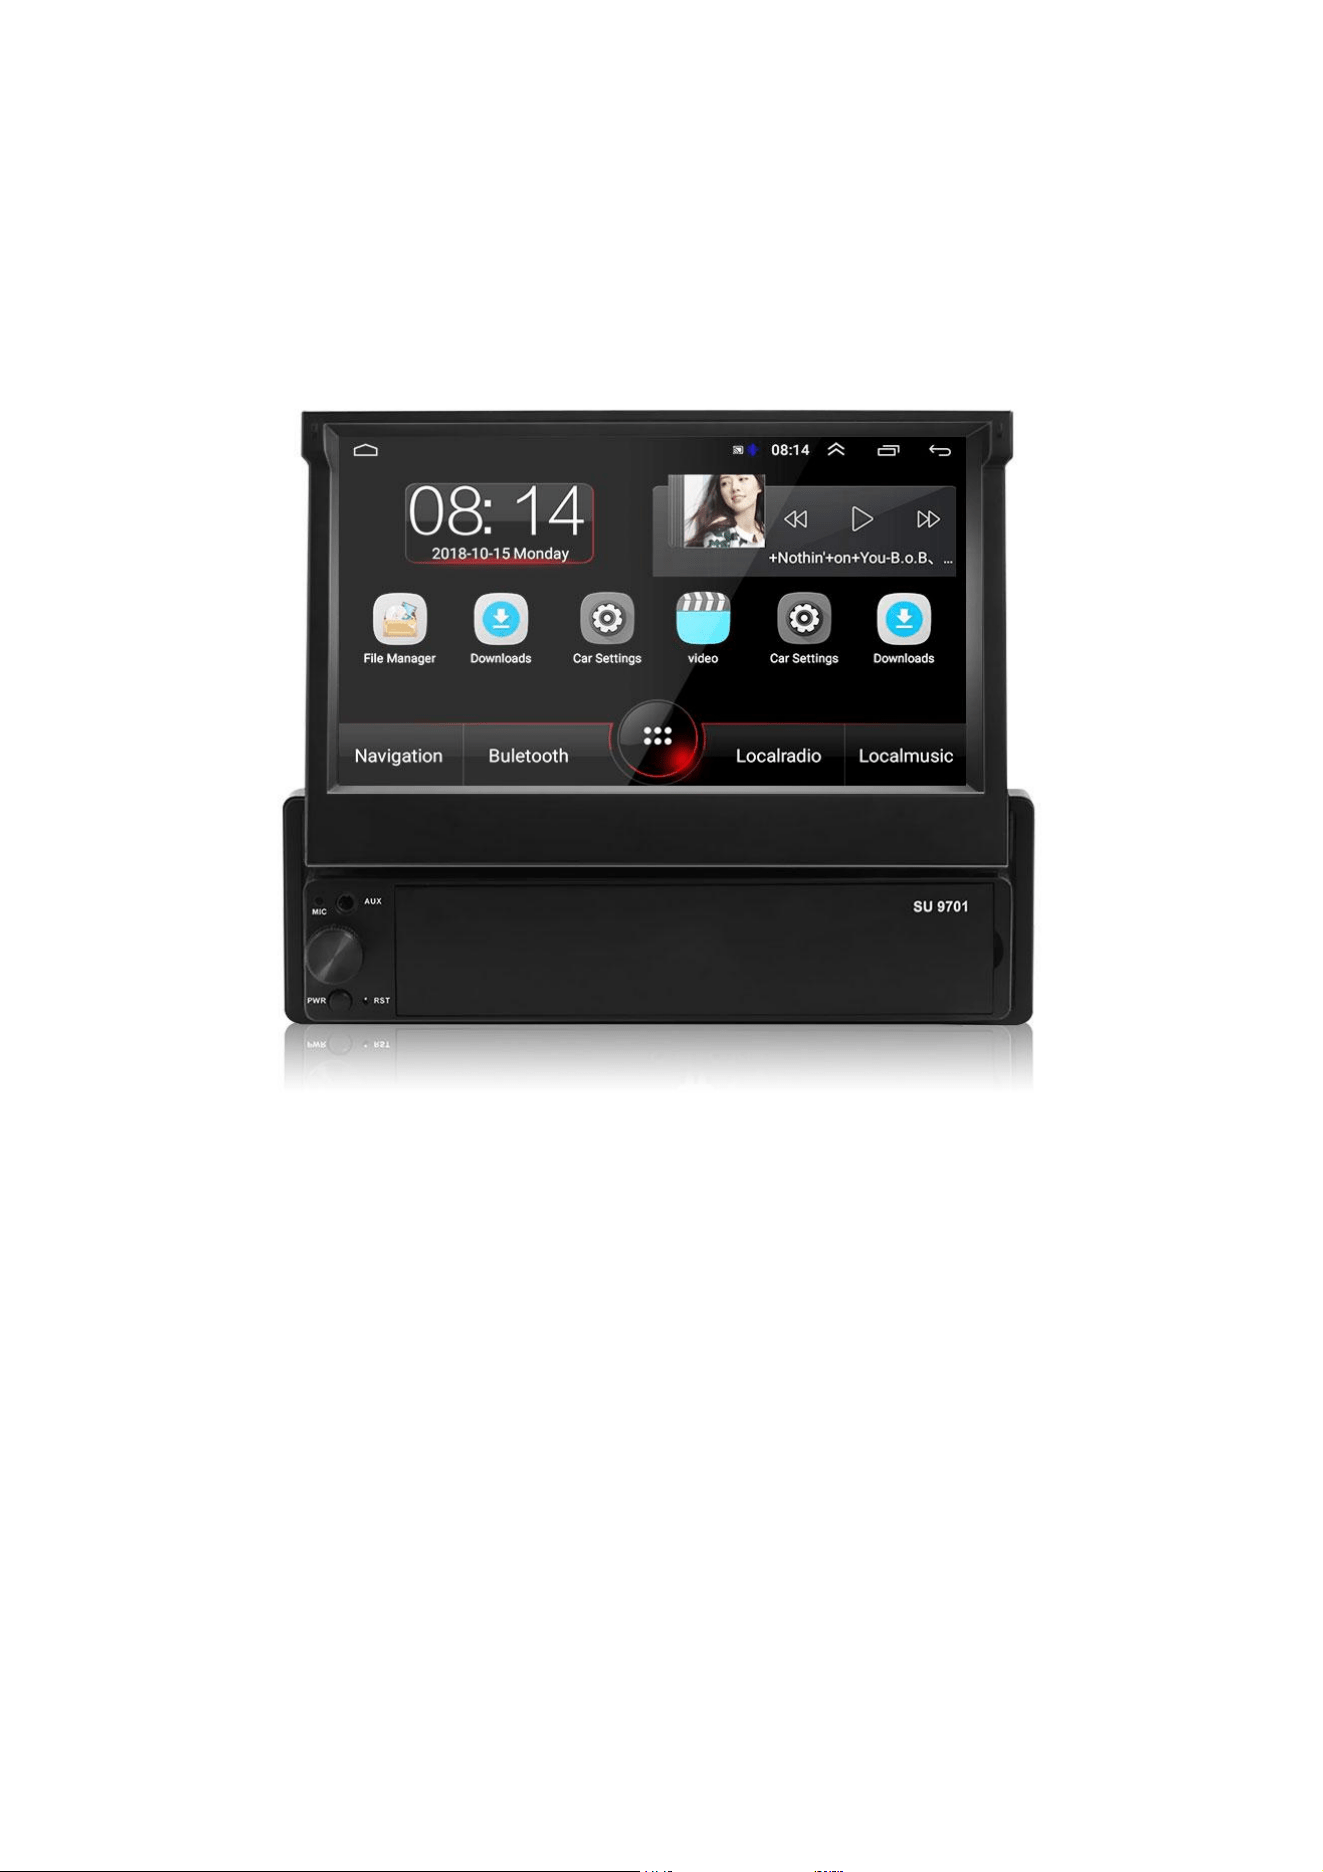
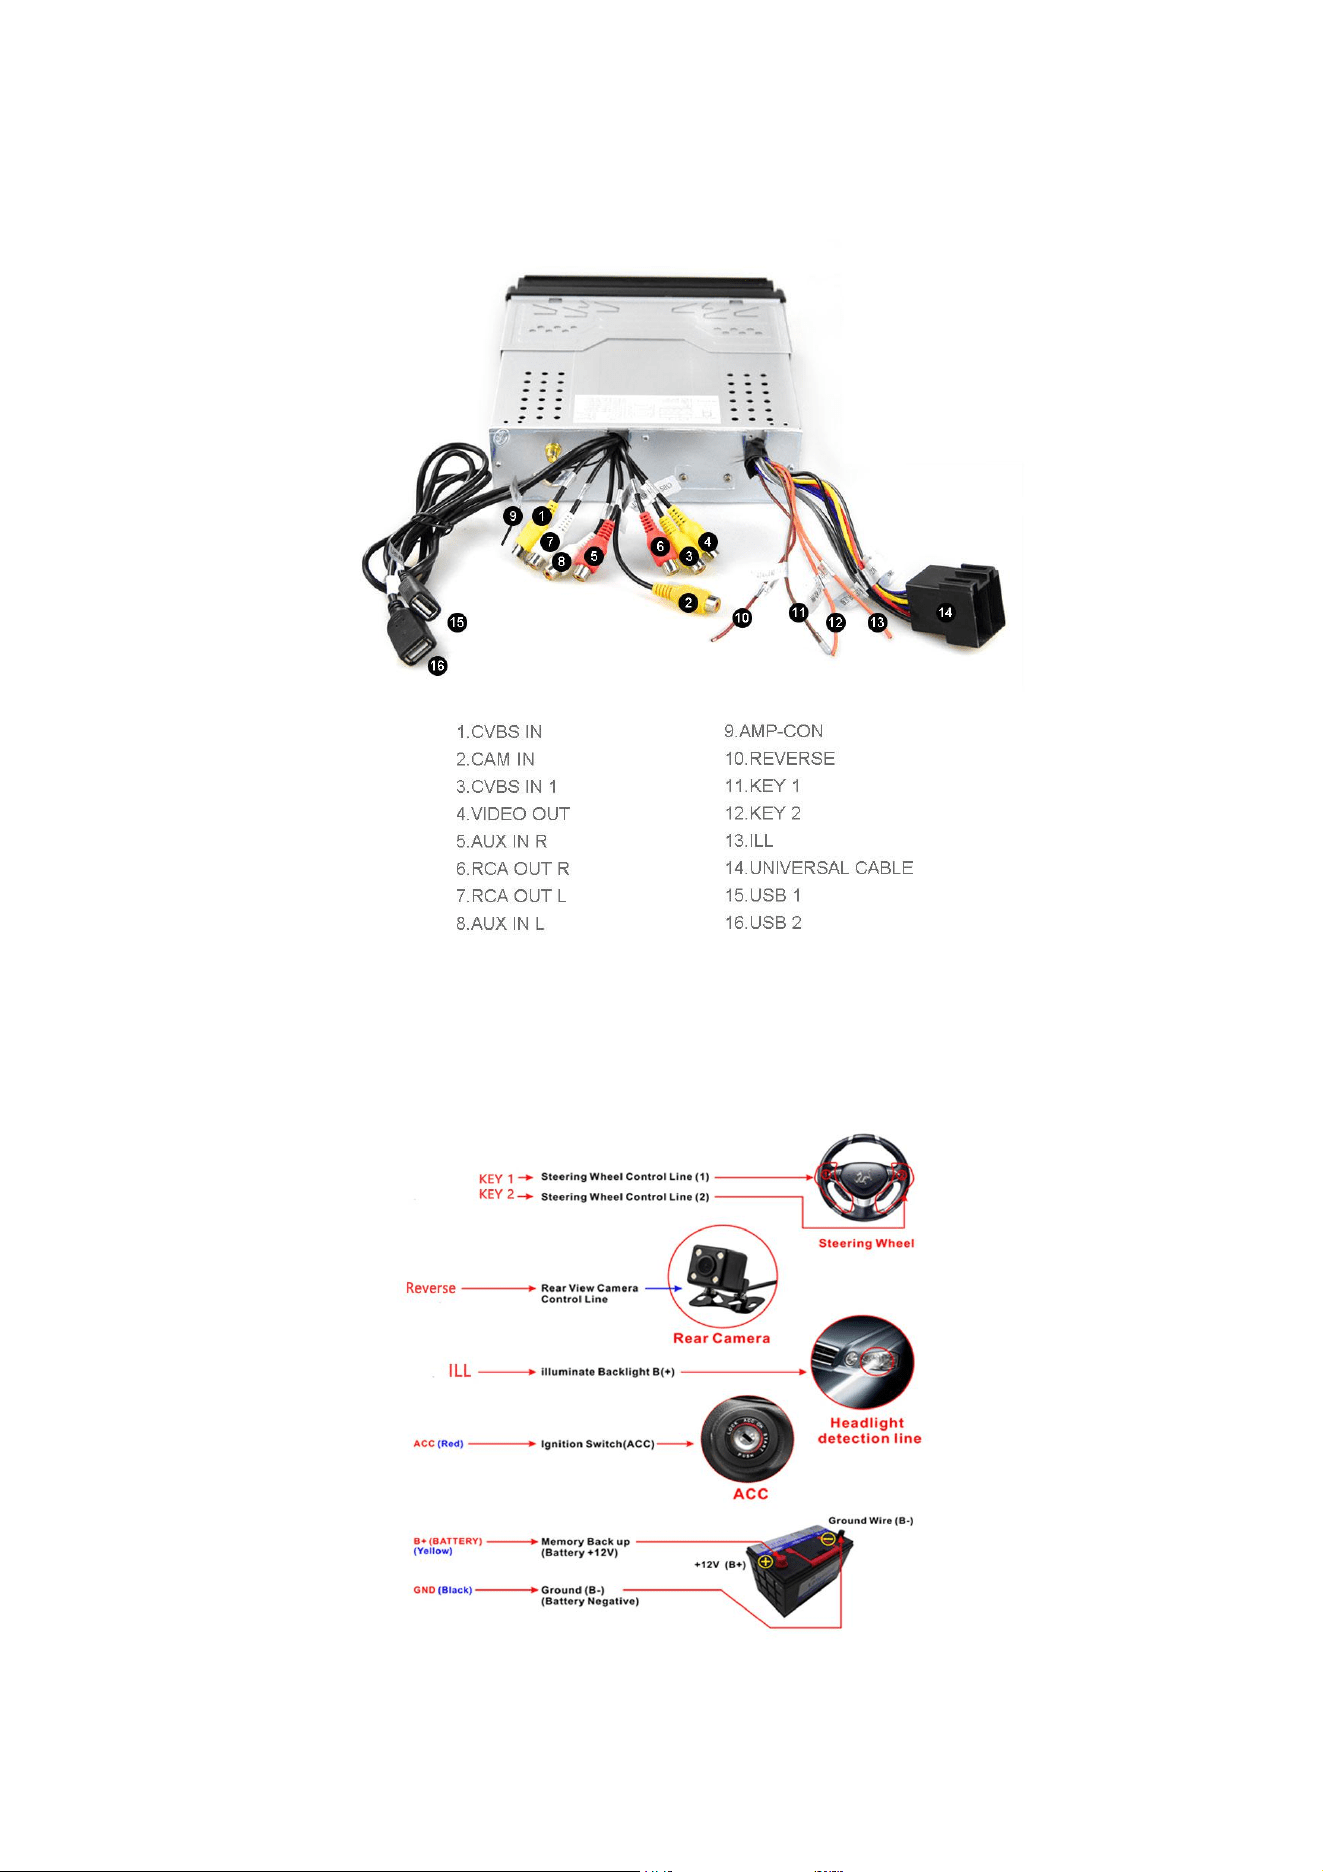
Camera Wiring (Optional):
1.
Power cable:
red and black.
Red - positive reversing light
Black - negative reversing light
2. RCA cable: yellow port. insert it into the port '' CAM-IN '' (yellow) of the radio
3. Make sure the ''Rear View Camera Control Line'' on the radio's power cord is connected to the reversing light
positive wire.
After connection, when you are parking, the device will display the rear view image automatically and when the
parking is over, you will return to the radio page.
Note 1: The short red wires next to the RCA port do not need to be connected to anything in this wiring.
Note 2: when the device is in parking mode, other functions will stop working temporarily.
How to confirm if the camera is good?
For 4 LED light rear camera, after connect the power cables of the camera, if the LED light is on, the camera is
good.
For 8/12 IR light rear camera, after connect the power cables of the camera, cover the lens by your hand and see
inside, if the red IR light is on, the camera is good.

User Operation Manual
Contents
Disclaimer
..........................................................
3
i) Basic Operation Setting..........................................
4
ii) Settings........................................................
5
1. Network & Internet............................................
5
2.
Car lnfotainment..............................................
6
2.1
General Settings.........................................
6
2.2
Display Setting..........................................
7
2.3
Volume Option............................................
8
2.4
Sound Effect.............................................
8
2.5
Video Option.............................................
8
2.6
Navigation Setting.......................................
9
2.7
Bluetooth Setting.......................................
10
2.8
Maneuver Control........................................
10
2.9
Version Information.....................................
11
iii) Application...................................................
11
1. Navigation..................................................
11
2.
Radio........................................................
12
3.
Video........................................................
13
4.
Music........................................................
14
5.
Bluetooth....................................................
14
6.
AVIN Input Support...........................................
16
7. Display Screen Instructions..................................
17
8.
Installation of Antenna......................................
17
iv) Troubleshooting Guide..........................................
18
1

Disclaimer
For your safety, it is advisable to not watch video or operate the machine when you are
driving. While driving, please adjust the volume to the optimum level. Before operating the
machine, you are advisable to read carefully and understand the safety instructions and
warning signals stated in the manual. Keep the manual in the reach for future reference.
1. Firstly, please ensure safety on the road.
2.In difficulty operating the machine, please stop the car safely before you
operate the machine.
3.Keep the machine out of reach from children to prevent unnecessary injury or
damage to the machine.
4.While using the GPS navigation, please adhere to the traffic rules.
5.Please do not operate the machine at restricted areas such as petrol station,
wine refinery, strong electromagnetic obstruction area to prevent danger.
6.Please do not install, maintain or repair the machine on your own with the
power on. It is very dangerous to install and repair the machine by personnel
without proper professional installation training and experience on electronic
device and automobile parts.
7.Please do not install or store the machine, especially LED display screen
directly under the sunlight or hazardous substances. During installation,
please ensure no direct contact with the air-conditioner's ventilation duct.
This will cause damage to the machine, the car or injury to the human body.
8.Please do not use sharp object to scratch or press the display screen
vigorously as this may damage the screen.
9.Please do not expose the machine under humid weather or direct contact with
liquid to prevent fire or lighting.
10.The machine can only support one 12mm CD at a time. Please do not insert 8mm
CD or other objects into the machine.
2
i) Basic Operation Setting
1. Power On / Off the machine
. When ACC is connected,press the power button on the front panel to switch
on the machine
. Press the power button on the front panel to switch on machine. Turnoff
the engine and unplug the car key to switch off.
2. Volume Adjustment
Press " ”on the front panel (some models with volume control
VOL+/VOL-button on the front panel) to adjust the volume of the machine.
3. Mute Control
Press the left volume button to display volume bar on the display screen.
Press the media volume to MUTE.
4. Backlight Control
Adjust the backlight at Display Setting under Car Settings.
5. Camera
The screen will be automatically switched to rear view sight when the car is
at reverse position.
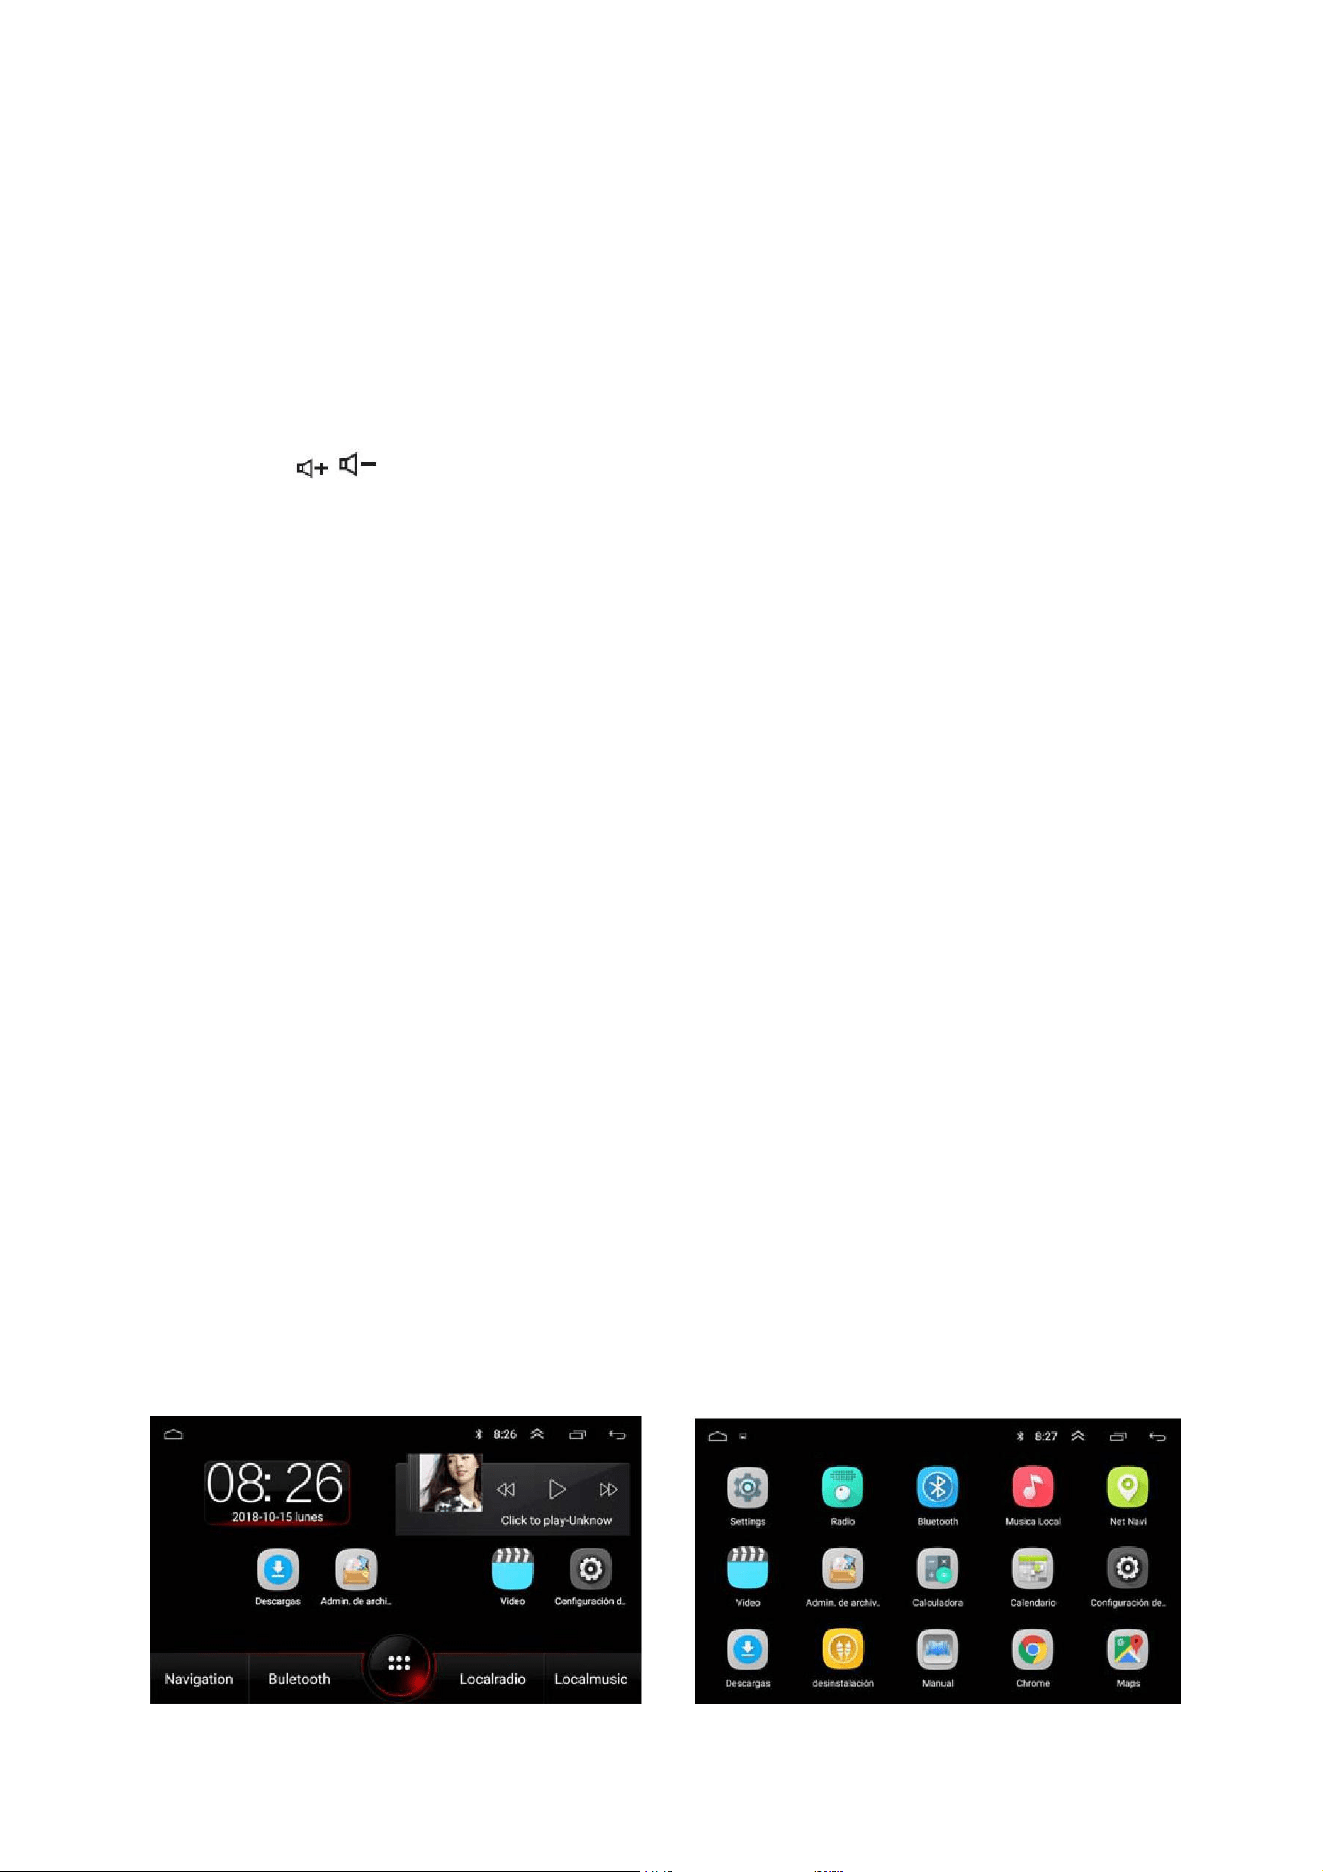
6. Playback Source Selection
At front panel, press Application to view Radio, Music, Video, USB play, TV
(optional) or AVIN mode and options.
At homepage, touch APP icon to enter application interface. Please view the
detailed operation manual of respective functions at the subsequent chapters.
Slide left or right to switch between different home pages.
3
7. Playback Mode and Position Memory
When you reboot the machine, the system will resume to the earlier mode prior
to shutdown.For radio, it will resume to the radio channel prior to shutdown.
For music or video, it will resume playing the last song or video prior to shutdown.
ii) Settings
Touch the icon “ ” on the front panelto enter Settings interface Select
the corresponding option to enter the corresponding settings option. Move the
o ptions bar up and down to find the desired settings.
. Note :
Direction of ON and OFF mode under setting interface .
[ ] ON mode
[ ] OFF mode
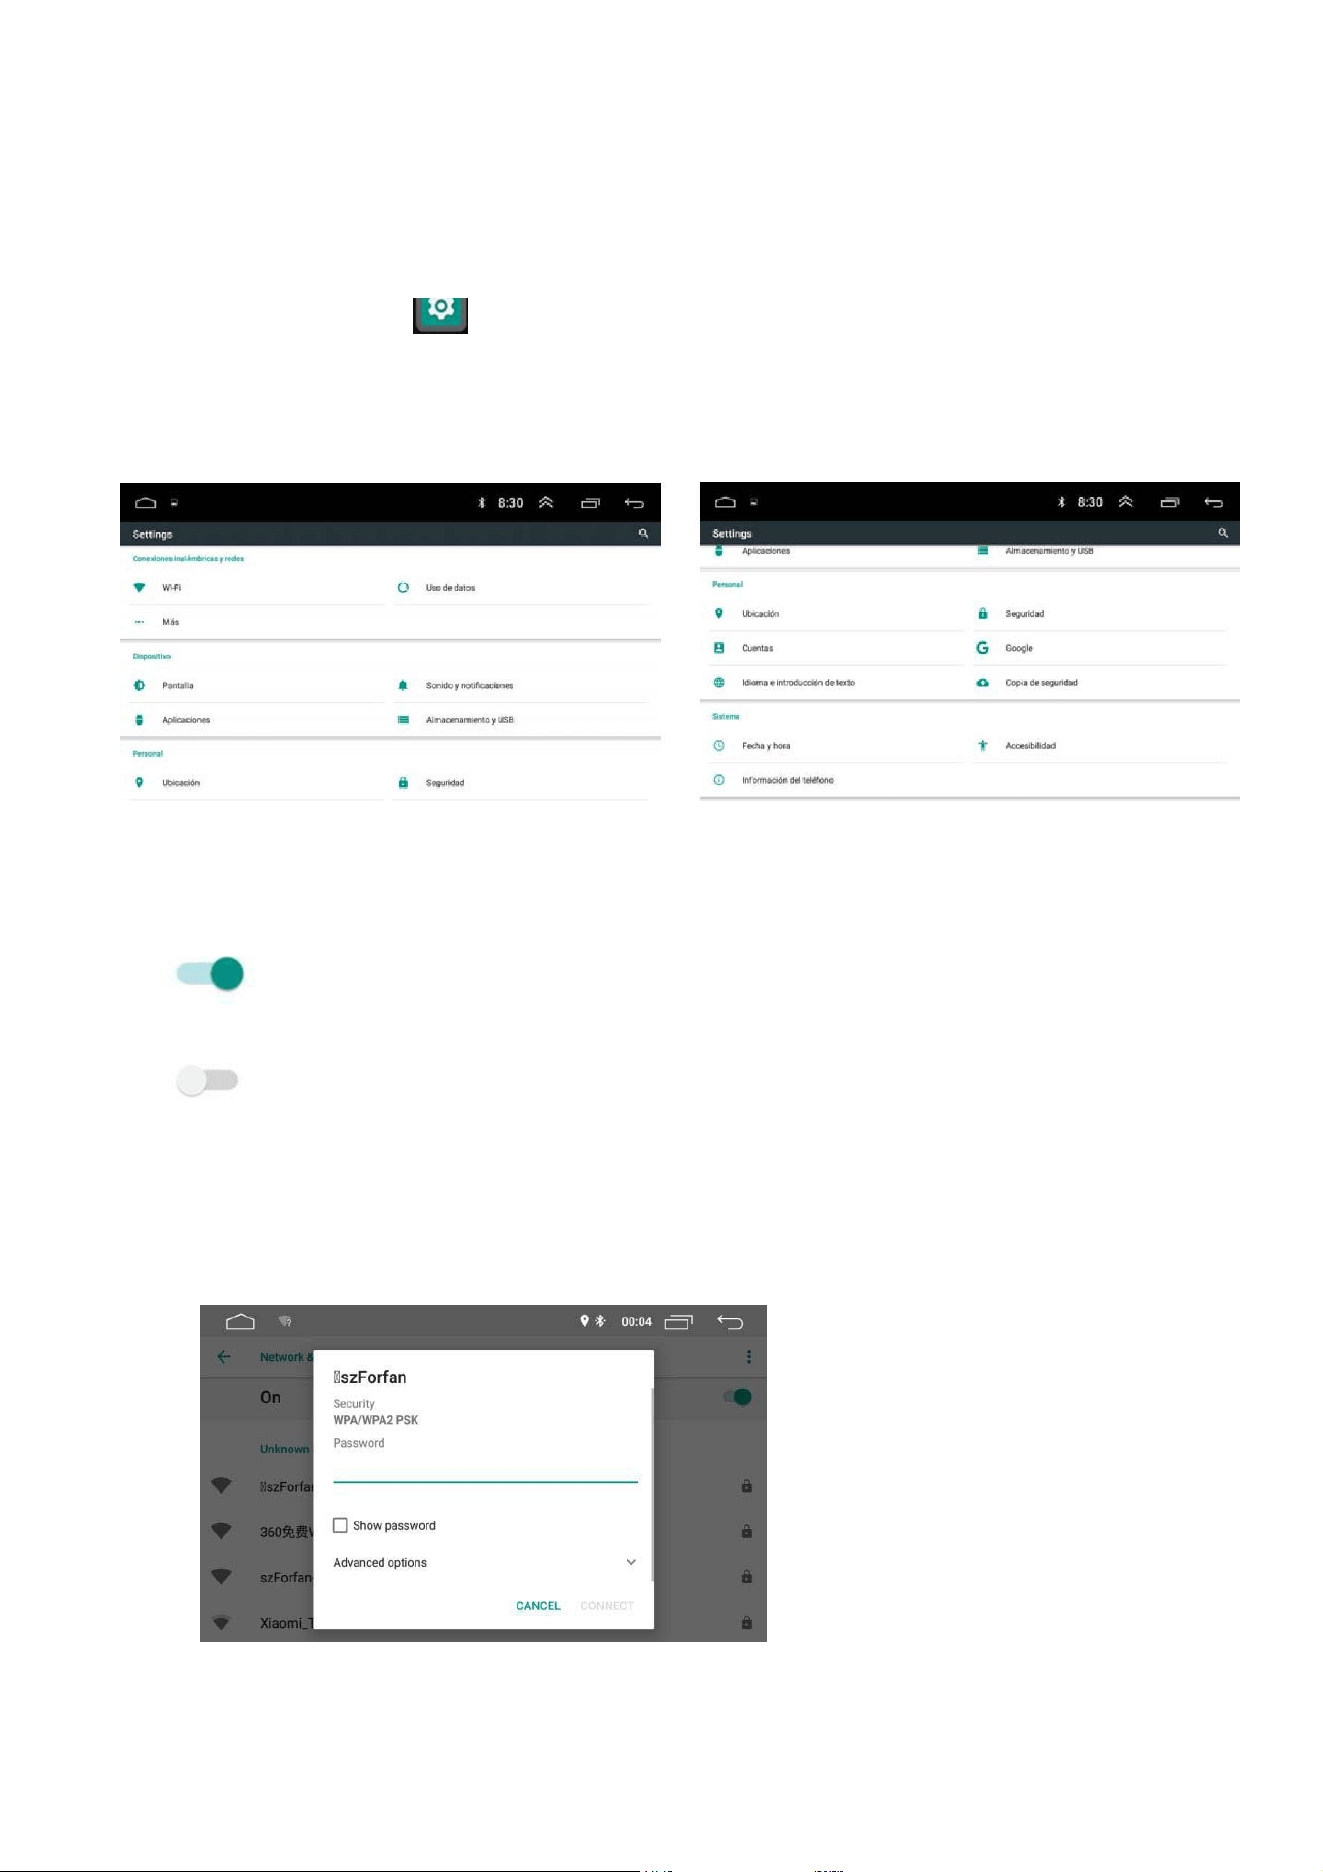
1. Network & Internet
1.1 Wi-Fi Connection
Go to settings then Wi-Fi to ensure Wi-Fi is switched on to connect to the internet.
As per the above picture,search for your desired Wi-Fi hotspot. Complete
the Wi-Fi connection by inserting the password and touch Connect.
4
You may change the language type, language input and type of keyboard in
this interface.
1.2 More
Setting of personal hotspot and VPN is allowed.
2. Car lnfotainment
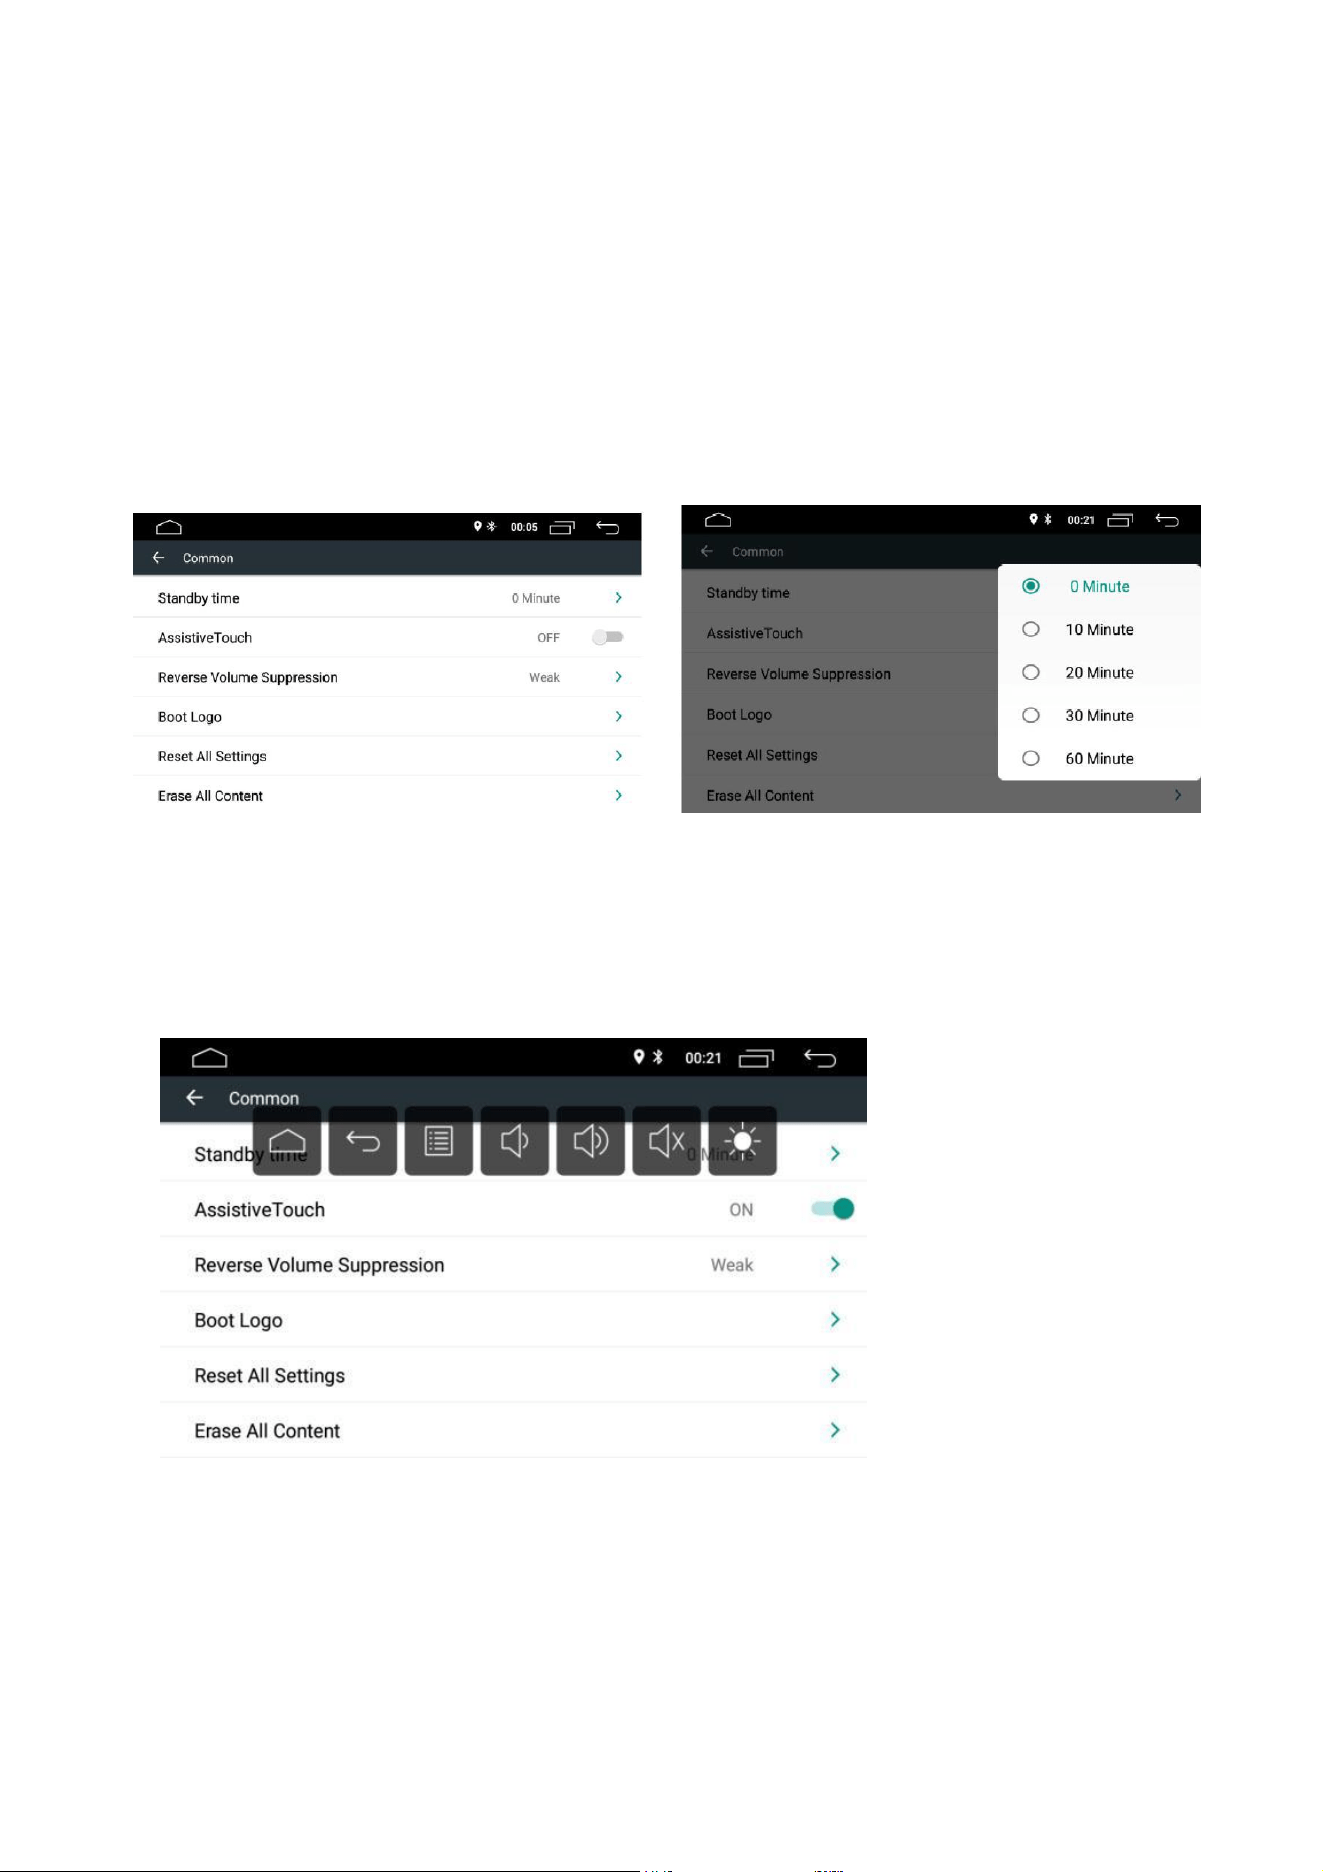
2.1 General Settings
Standby Time
The standby time are 0 minute, 0 minutes, 20 minutes, 30 minutes,
60 minutes respectively. Standby time can be adjusted in
accordance to desire.
Touch Assist
User can choose to on or off the touch assist. The touch assisthas 7 mo
st commonly used options and is displayed on top of the screen at the interface
where it provides the user easy maneuver of the machine.
Reverse Volume Control
To adjust the volume while at the reverse position, select Reverse Volume Suppression.
There are four options available namely None, Weak, Medium and Strong.
5
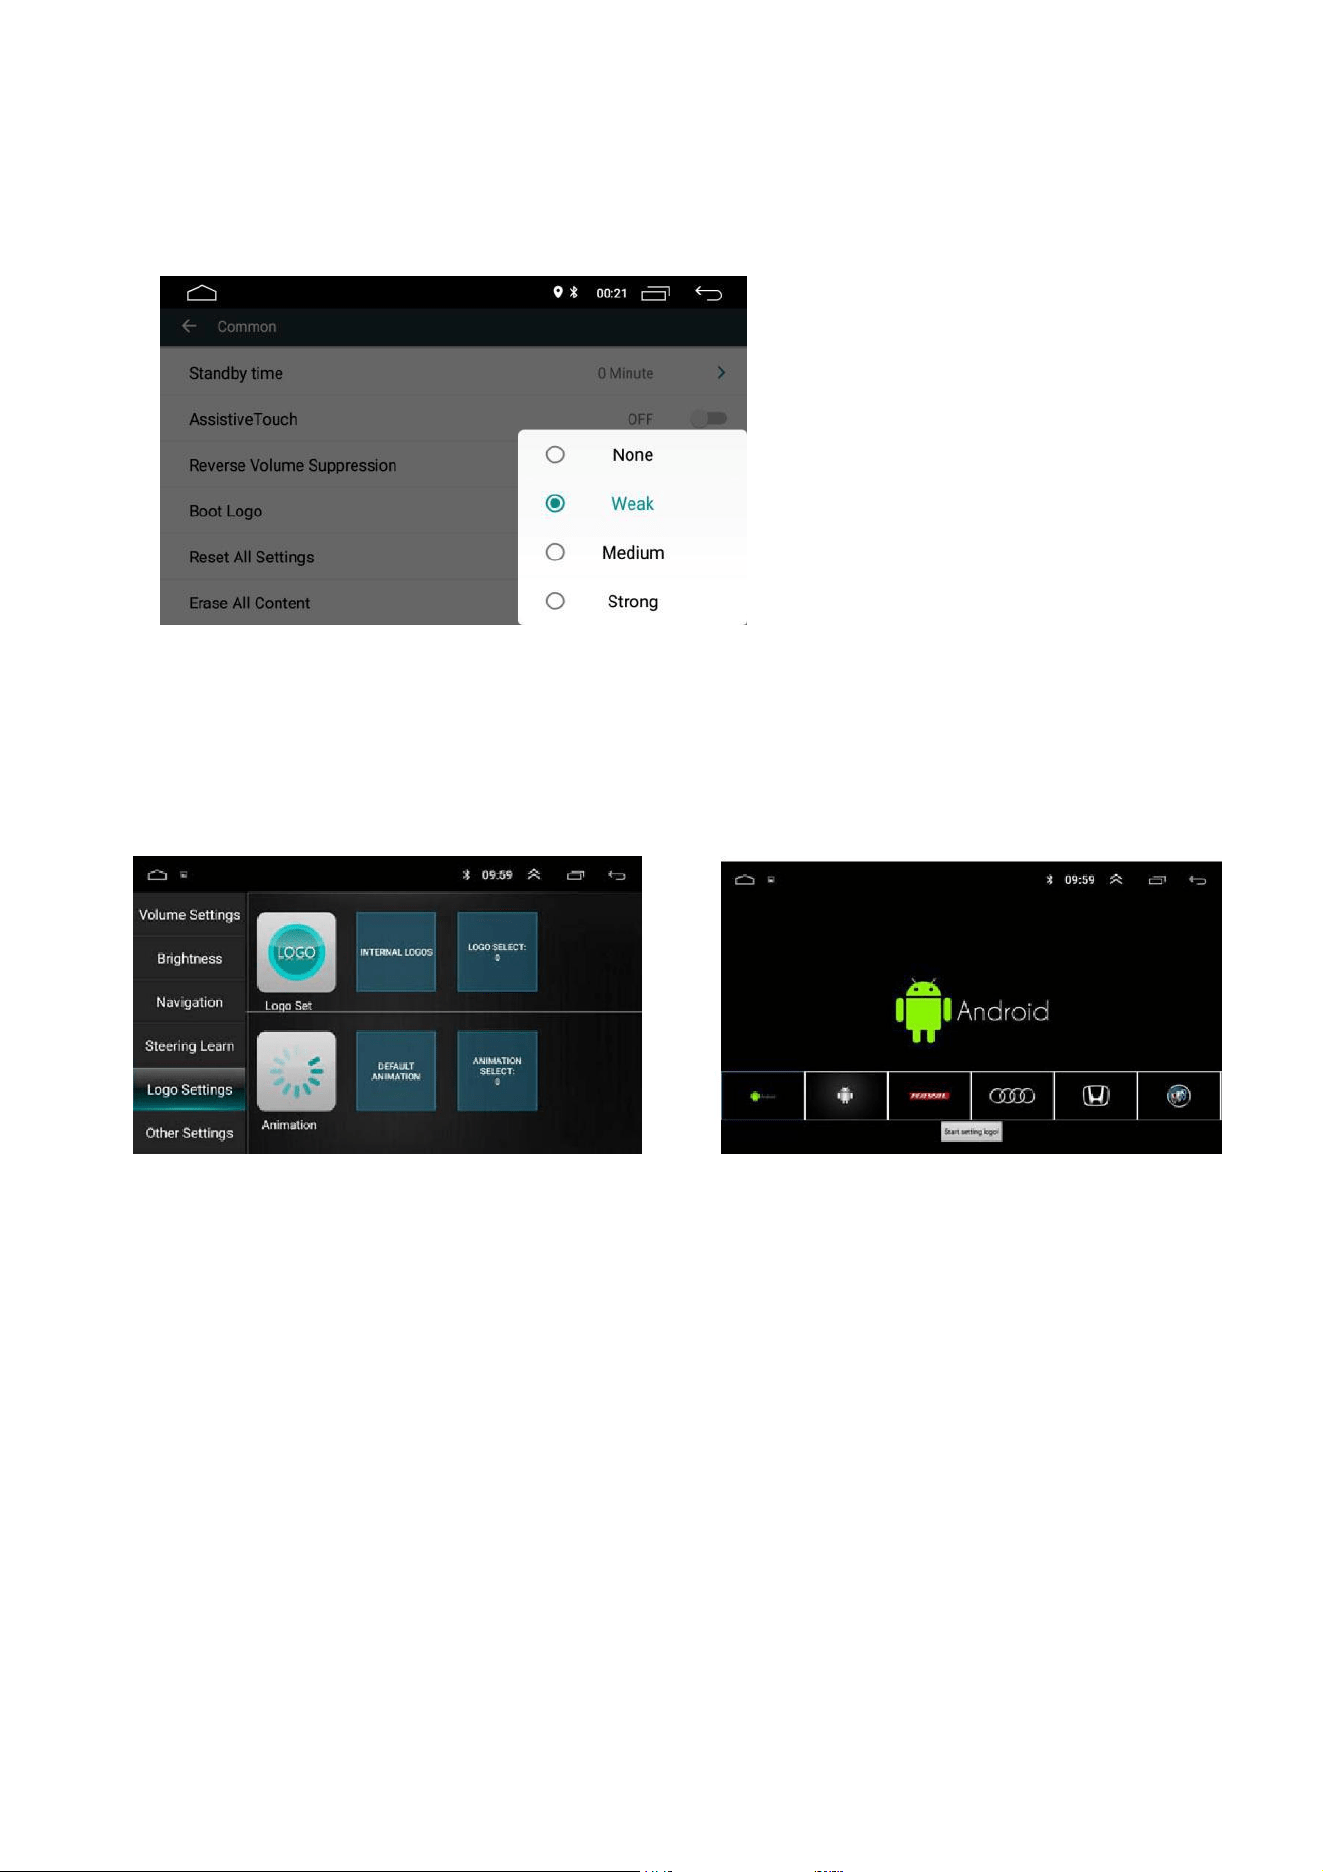
Selecting None means there will not be any changes to the current defaulted volume.
Selecting Strong means lowering down the reverse volume at most.
Boot Logo
Touch the boot logo, key in the password (5678)at the popup dialog to enter
boot menu.
Restore Factory Setting
Touch Restore FactorySetting,at the popup dialog, select confirm. When the machine
restarts, the system will restore to factory settings. All your settings will be removed.
System Restore
By selecting system restore, all applications installed by the user will be
remo ved and the system will restore to factory settings.
2.2 Display Setting
Adjust the display brightness of the background for different timing of daytime
and nighttime
2.3 Volume Option
6
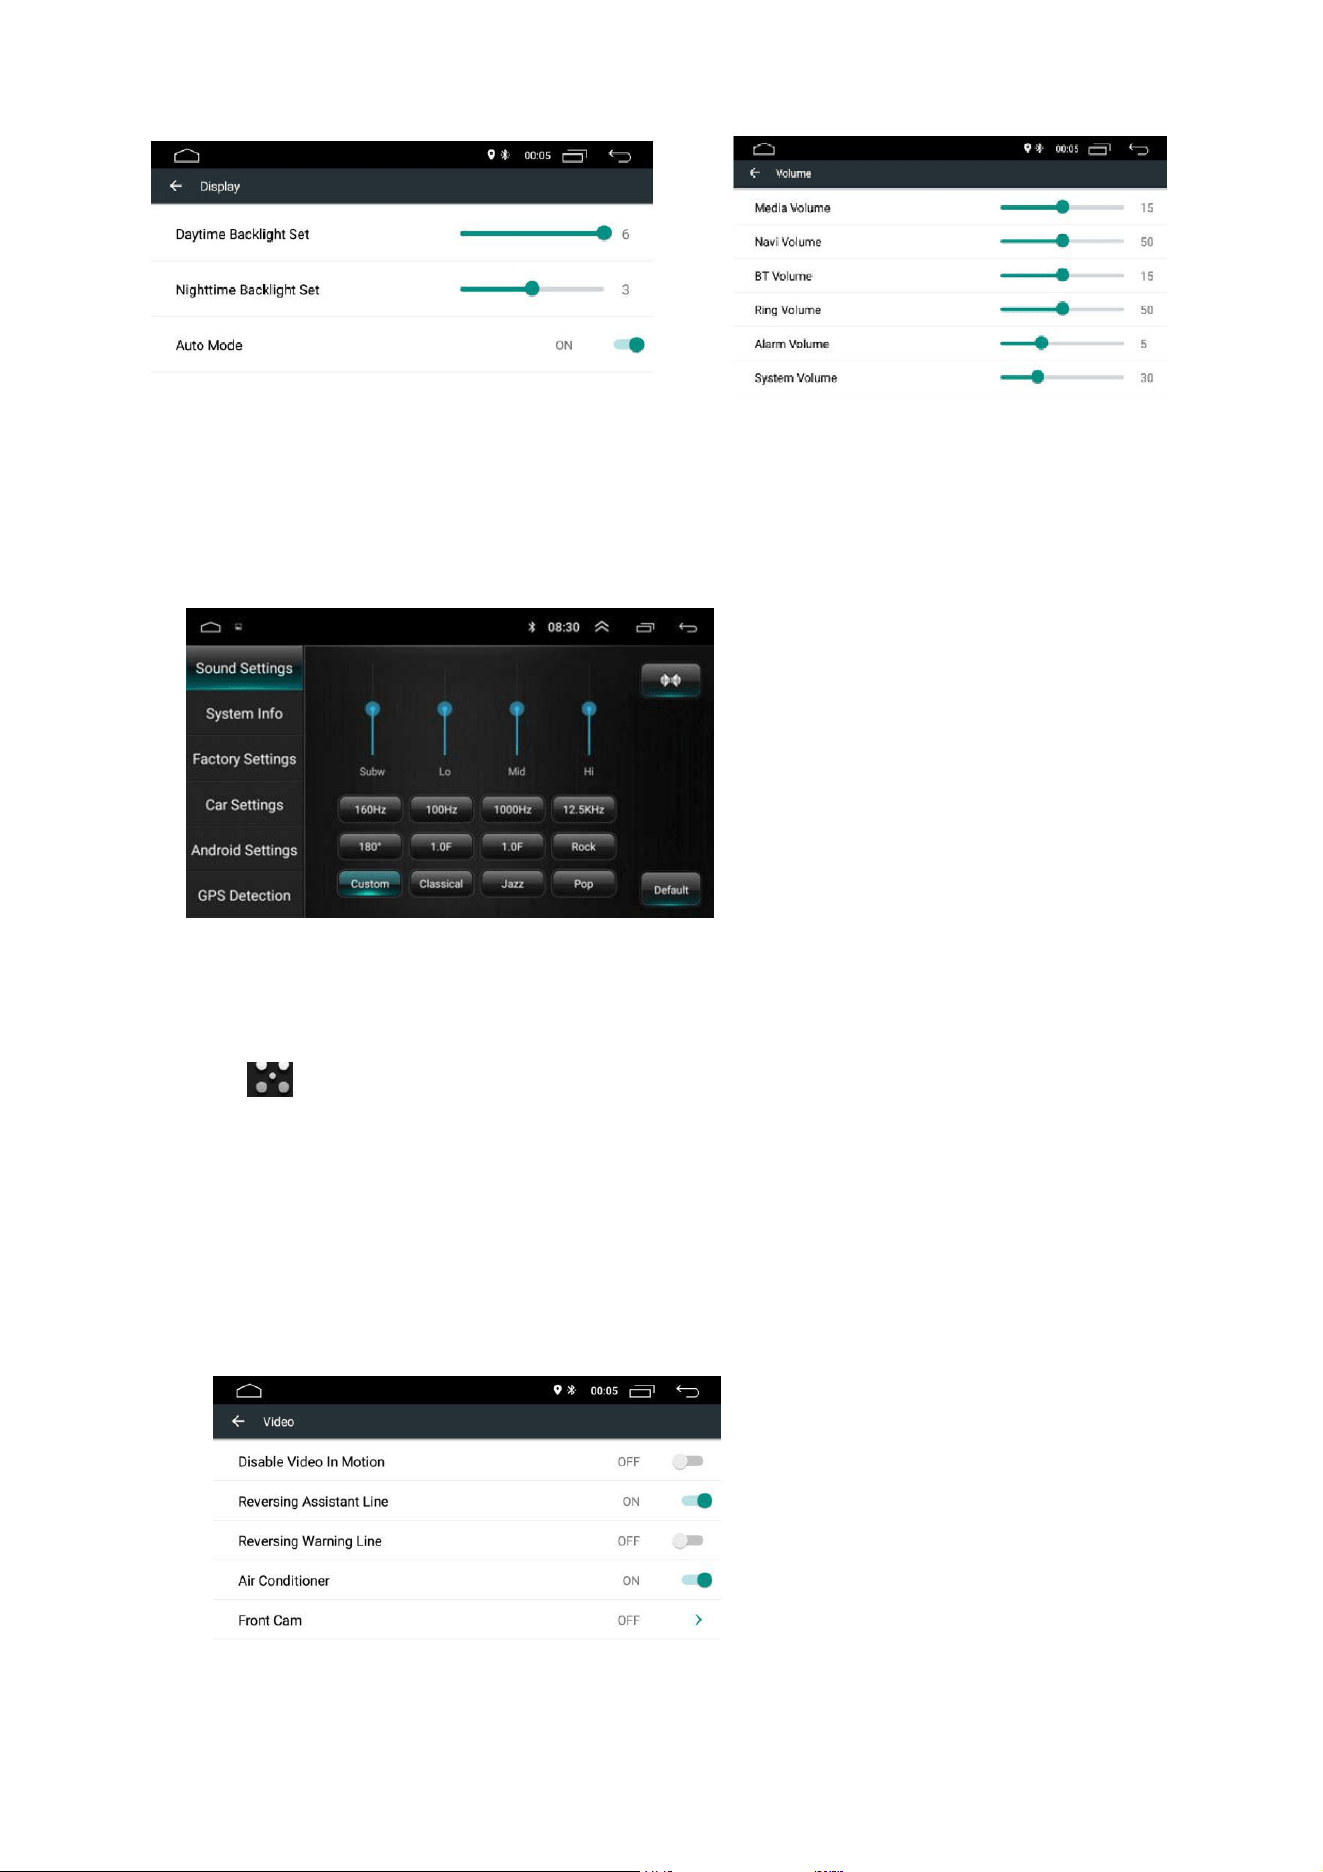
Volume options for respective systems can be adjusted in accordance to desire.
2.4 Sound Effect
Enter sound effect interface by touching "Sound Effect" to access
different sound effect modes. You can choose 6 defaulted sound effects or
customized in accordance to your preference.
Balance Setting
Touch four arrows to adjust the 4 speakers volume to control the sound effect. The 4
speakers volume is consistent when the black dot is right at the center. Touch the restore
icon “ ” at the bottom to restore the defaulted balance setting.
Loudness Setting
Sliding to the left or right to adjust the loudness. The higher the loudness, the
higher the low frequency value of the sound. Please adjust the loudness reasonably
to avoid loss of frequency signal.
2.5 Video Option
7
Video in Motion
Slide button to the right to enable or disable the video in motion option.
If video in motion is disabled, user cannot watch video and view picture while
the car is in motion.
Note:
Recommend to enable this option for your safety.
Reversing Assistant Line
This feature can only support certain car models. By enabling this option at
reverse position, the assistant line will be shown at the display by moving the
steering and aligned in accordance to the steering movement during reverse.
Reversal Warning Line
The camera of some car models may not have reversal-warning line. By enabling this option,
user is able to see the distance to warning line at the display during reverse.
Air Conditioner Display
This feature can only support certain car models. By enabling this option, the
air condition of the car will be displayed during adjustment.
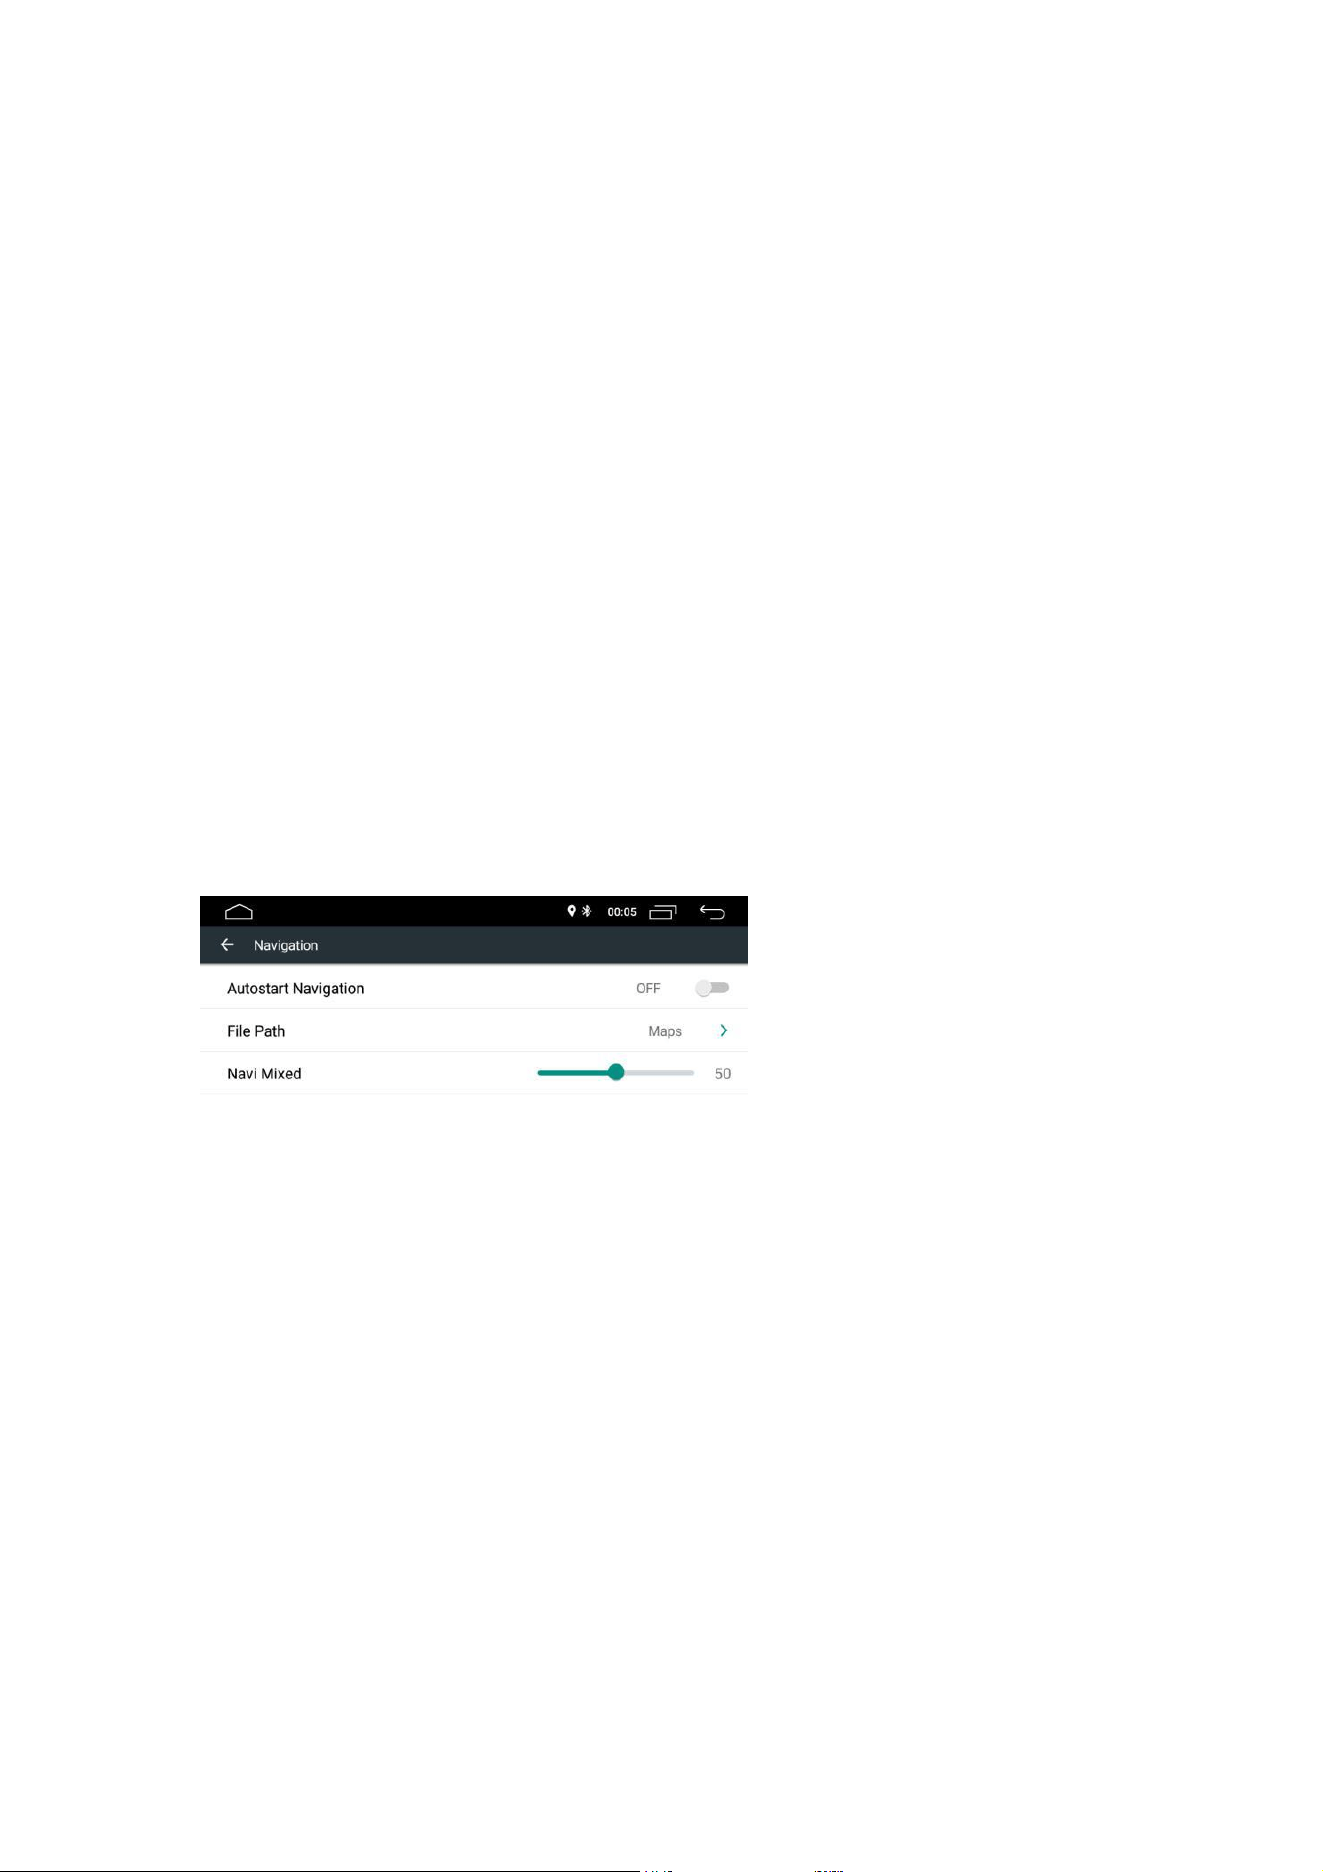
2.6 Navigation Setting
Autostart Navigation
User can set autostart of navigation upon booting.
Navigation Application Option
User may insert pre-installed navigation application to pair with the
navigation button. The system will automatically display all installed
applications and you may touch to select the application of your choice.
Navi Mixed
Slide to the left or right to adjust the Navi Mixed volume.
8
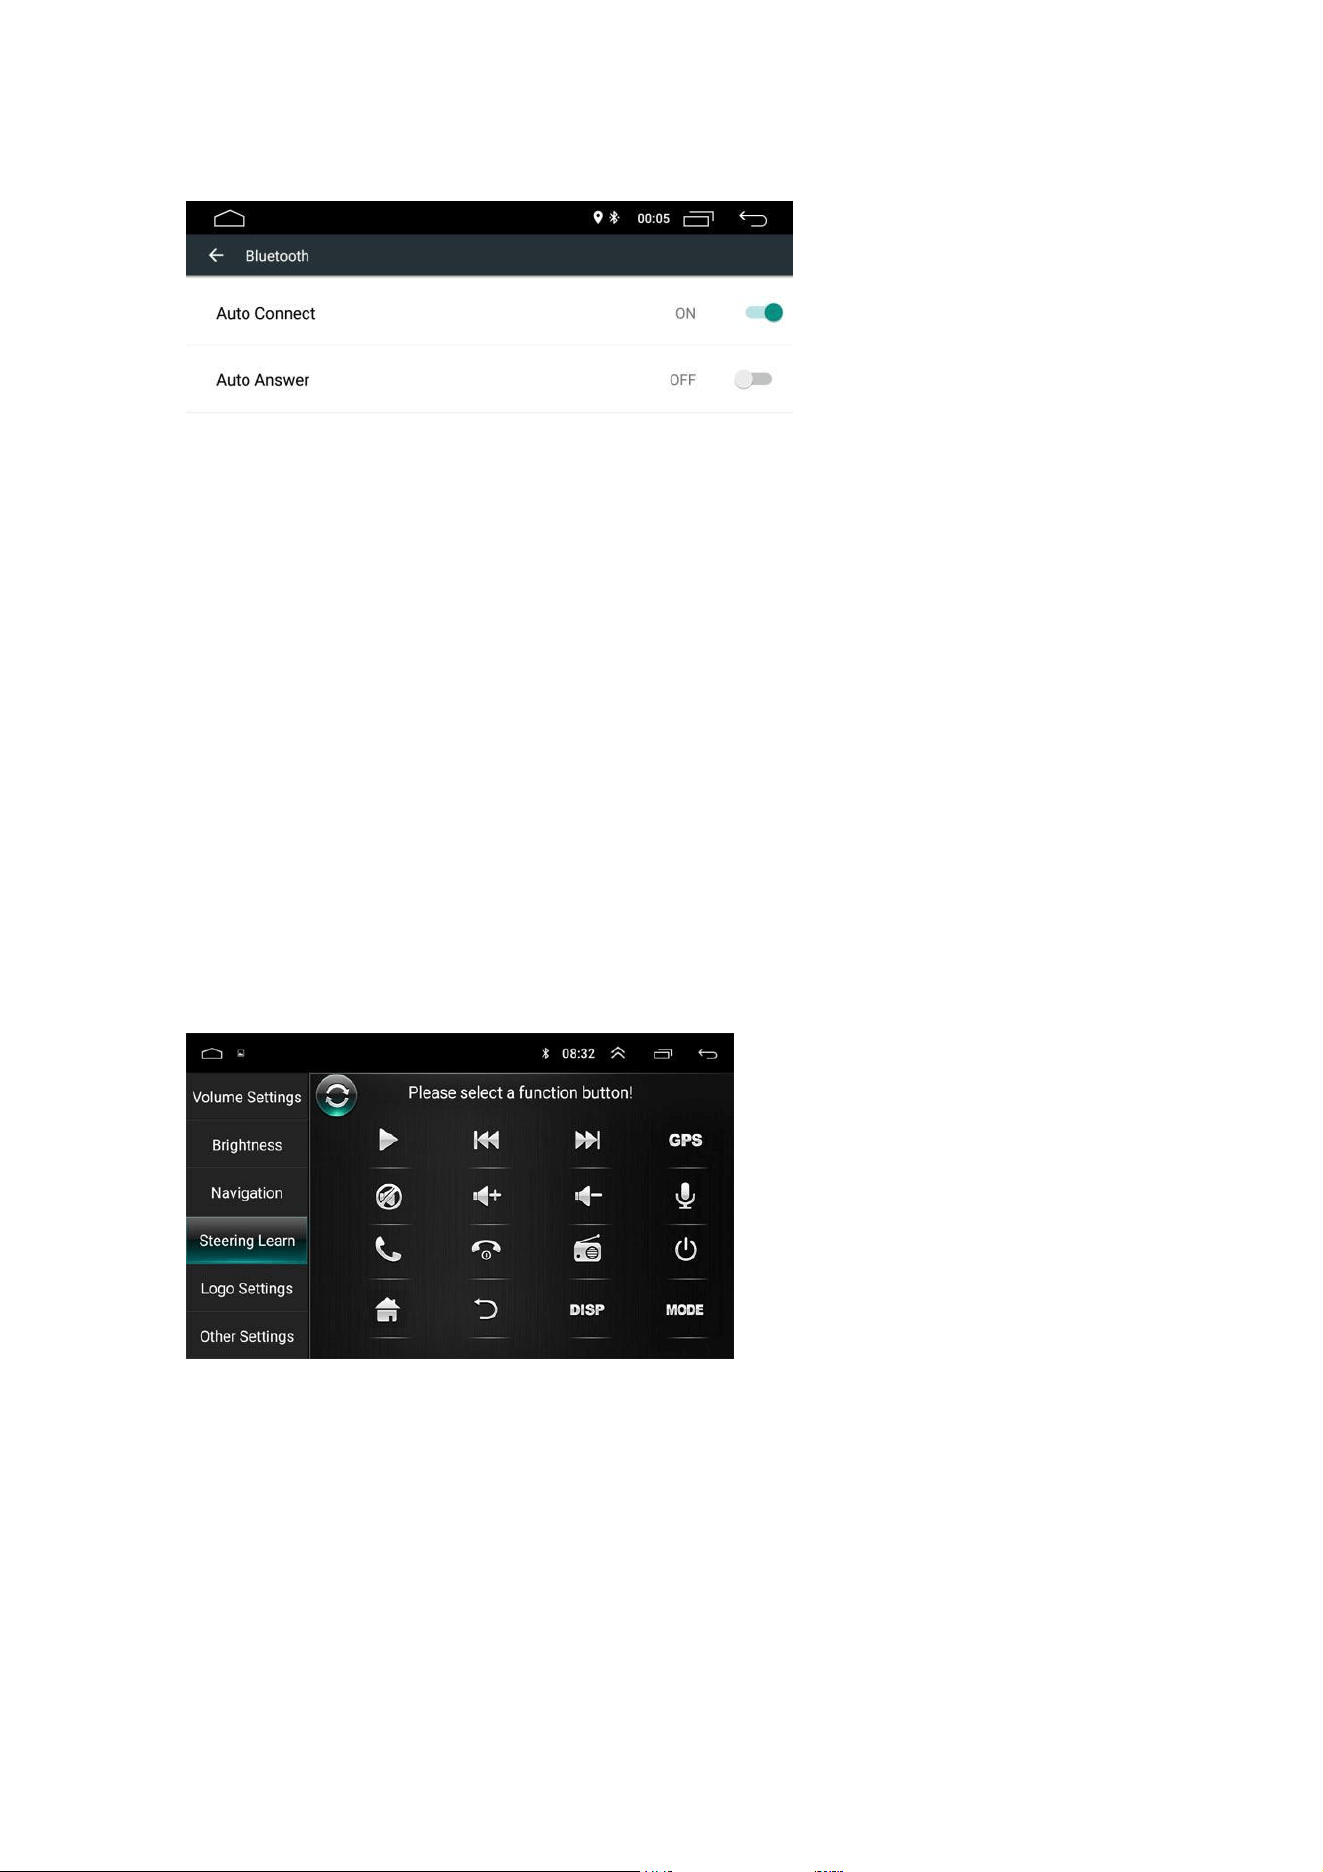
2.7 Bluetooth Setting
Name of Device
Display the Bluetooth name of the machine
Auto Connect
By enabling this option, the machine will auto search and auto connect
to the last connected device.
Auto Answer
By enabling this option, the machine will auto answer all
incoming calls using bluetooth.
2.8 Maneuver Control
Please follow the steps below to set the features of the control buttons on your
steering wheel.
To delete all, select“ ”.
Press the desired control button on your steering
Touch the corresponding feature of the control button on the touchscreen.
When the control button changes to blue colour that means the setting is successful.
Repeat step 2 -4 to complete all the control button setting.
9
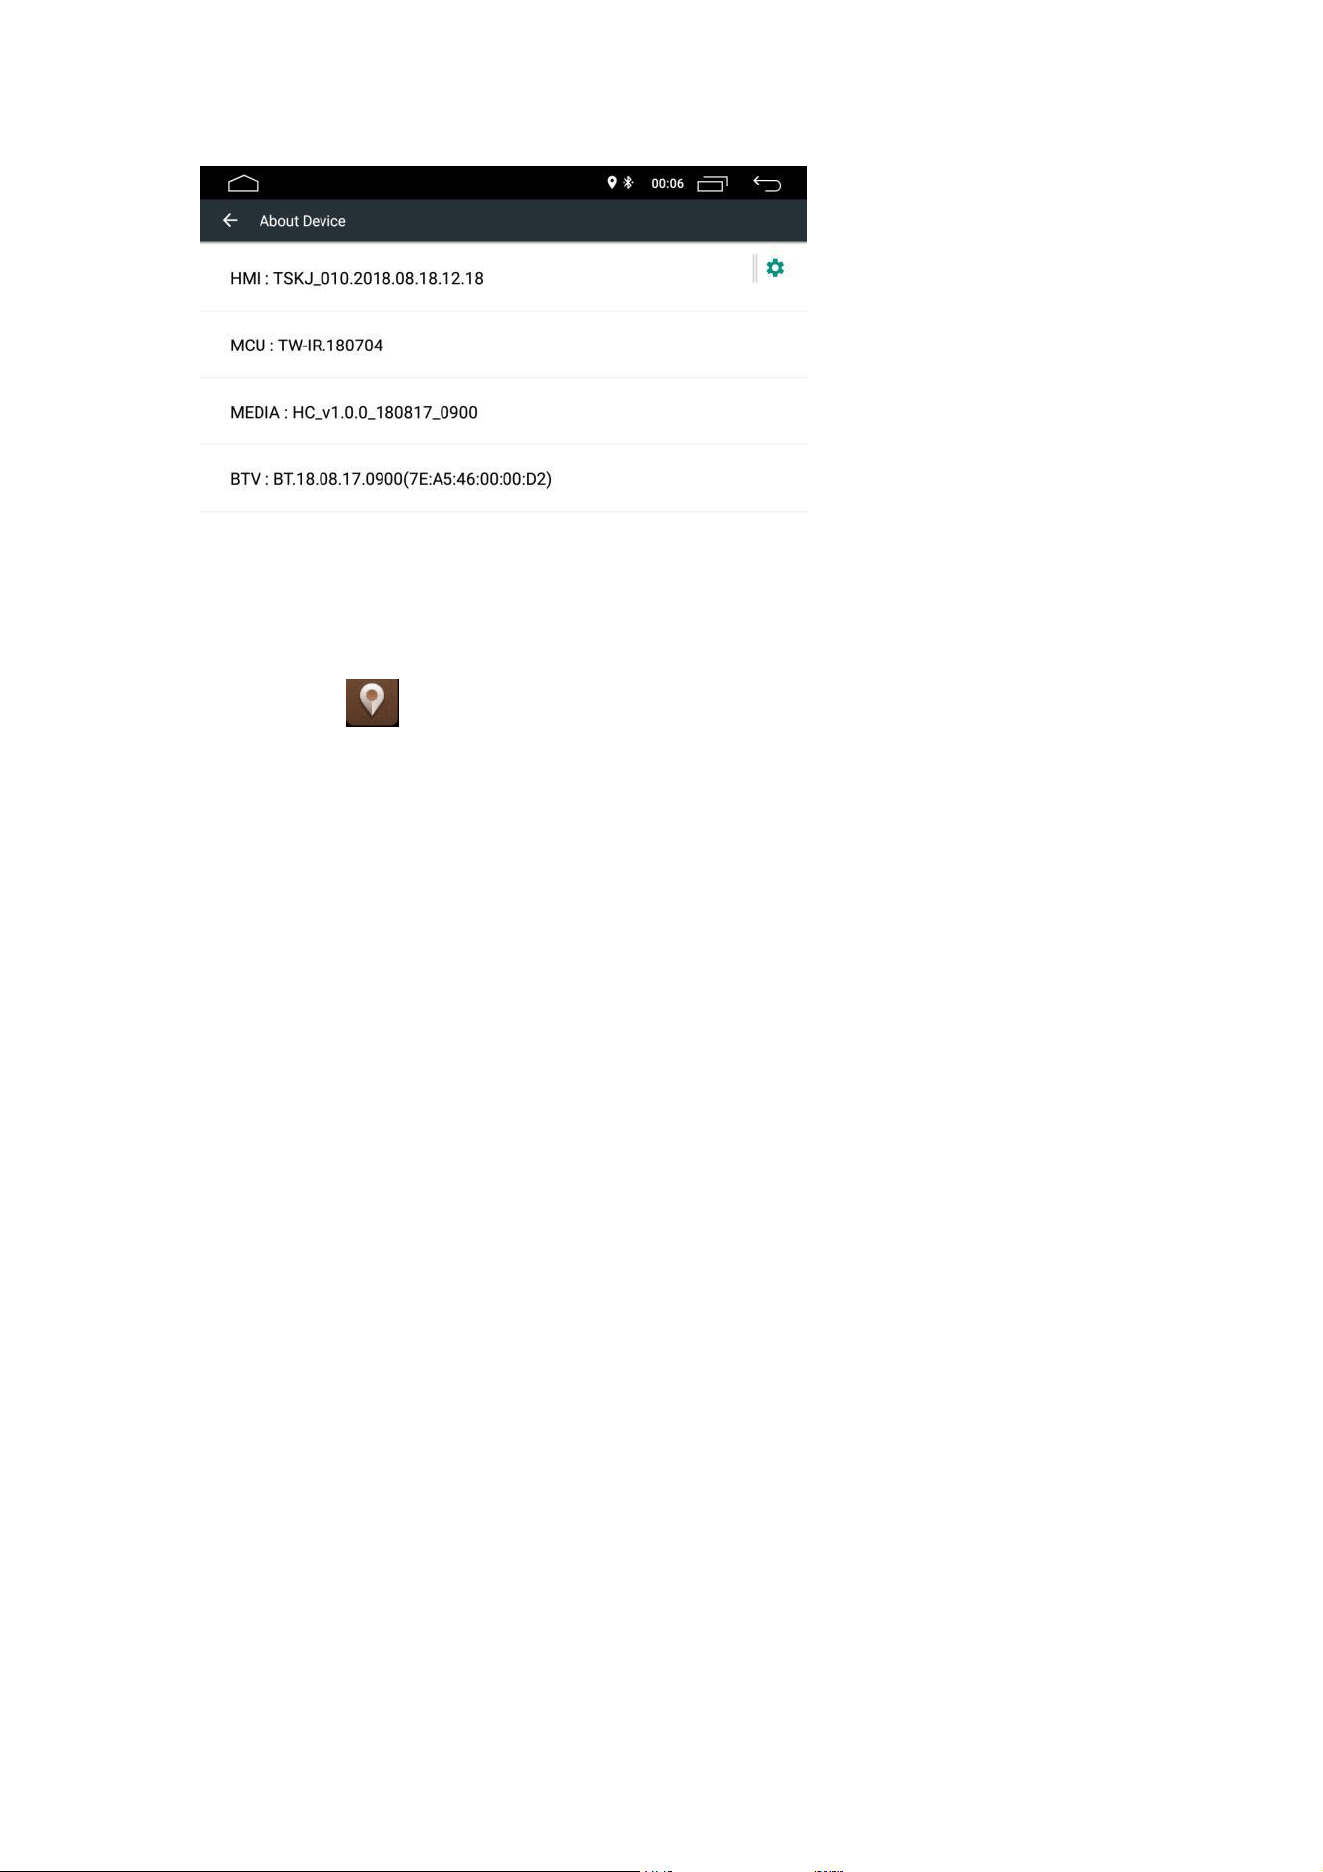
2.9 Version Information
iii) Application
1. Navigation
GPS Satellite Navigation Operation
The invention of GPS navigation has brought to the convenience of travelling
today. By using the GPS positioning and electronic navigation map, user can
reach the destination faster and more efficiently. To navigate accurately, both
the GPS positioning and navigation map are equally important. The GPS provides
precise positioning and fast calculating speed while the navigation map
provides huge information, data and route planning.
1.1 Navigation Map Data
User may copy the navigation map data intothe internal SD card. Before copying the data,
user is to ensure there is sufficient storage space in the internal SD card. If the
storage space is insufficient, please delete the unnecessary / unwanted data. The
copying and deleting of data can be done through defaulted ES File Explorer.
1.2 The data of some navigation applications can be stored externally in SD card
or USB drive.
Note
Some navigation application defaulted its route planning on the map and may not
support storage in external SD Card and USB Drive.
1.3 Installation of APK Navigation Application
Before navigation, please install APK Navigation Application and ensure
the APK navigation map is correctly installed.
1.4 Navigation Activation
Upon successful installation of APK Navigation Application, there will be a
corresponding icon on the homepage. Touch the icon to launch the application.
10
User can also go to "Car Setting" > "Navigation Setting">"Navigation Application
Option" to link the navigation button and application. Upon linkage, user may
press the Navigation Button" to start the navigation directly.
1.5 Navigation Application Operation
Please refer to the corresponding operation manual for details in navigation
application.
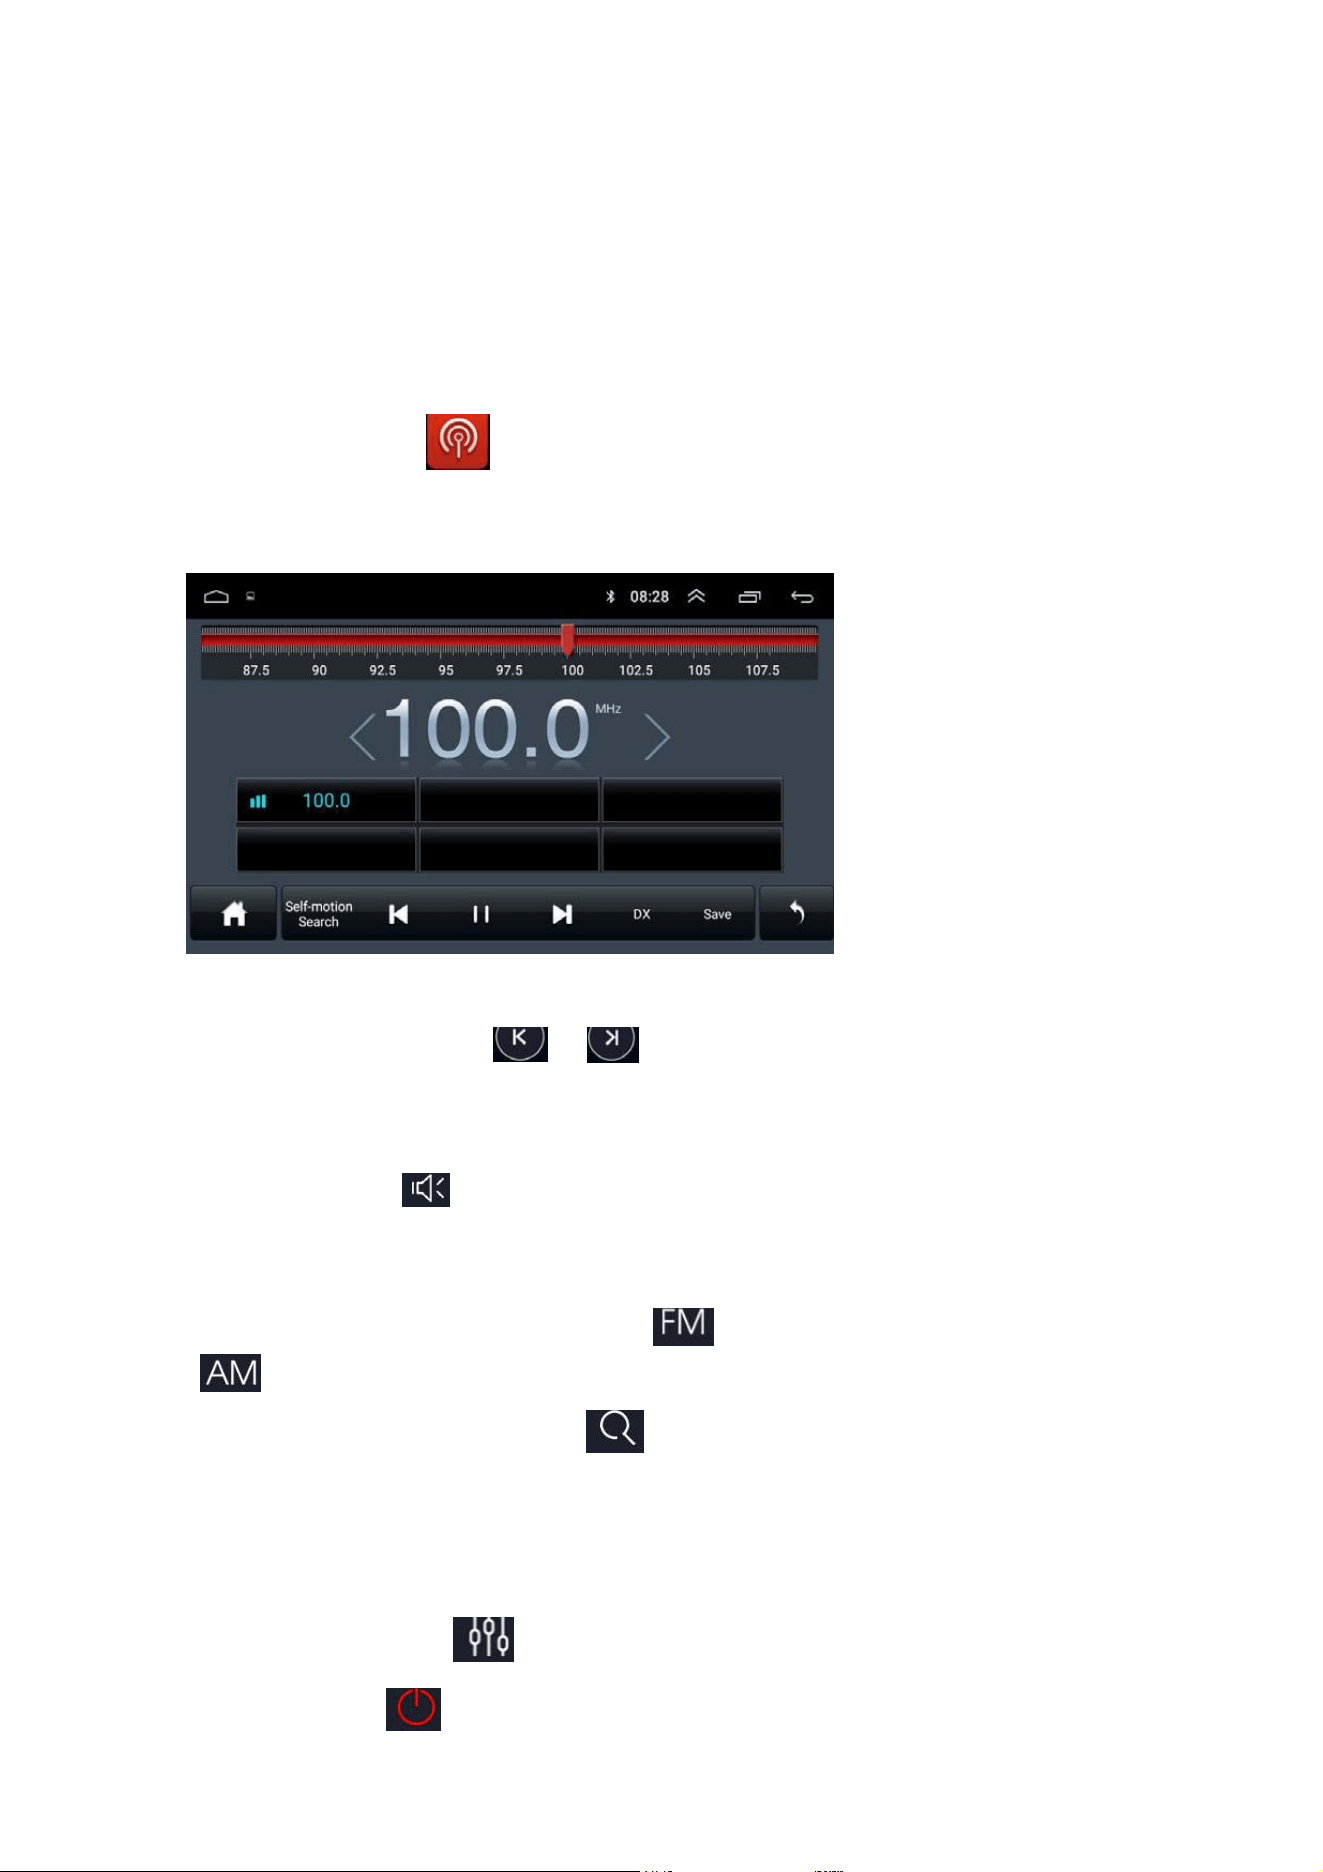
2. Radio
Touch the radio icon“ ” on the main interface to enter radio mode. You may also
touch the radio icon at the application page.
2.1 Radio Channel Search
Use the arrow icon “ , ” at the radio interface to search for band
channels. When a channel is found, the search will stop automatically and the
radio will start playing.
2.2 Media volume“ ” Slide to the left and right to adjust the media volume.
Touch media volume to mute.
2.3 Band Search
Touch band search to select :“ ”FM1,FM2,FM3;
“ ”AM1,AM2 2.4 Automatic Channel Search
When you touch this icon“ ” at the radio interface, the system will
automatically
search from low frequency to high frequency until it finds channel
with the strongest signal.
To stop the search, touch the icon again.
2.5 Sound settings“ ”
2.6 Off radio“ ”
11

2.7 Preset Radio Channel
Each band can store up to 6 radio channels. The system can store 24
radio channels(18 FM channels and 6 AM channels).
2.8 Preset Radio Channel Manually
Long press preset radio channel button (1-6) for about 2 seconds to
save the current radio channel.
3. Video
Touch the music video icon at the main interface. It supports flash internal
storage card, music and video stored in USB drive, ape, flac and other formats.
3.1 Video Player Interface
Screen playbacj ratio“ ,Loop piayback“ ”
Touch “ , ”to switch between video,Touch to playor pause the video.
Collection“ ”,File list“ ”
5.2 Folders and listing
To refresh video listing, touch video icon followed by the refresh button “ ”.
User can also access to the video folder by selecting other menu, thereafter
playing the video of selection.
Touch the “ ” button to search current video folder.
3.3 video display” ”,Favorite vidros” ”,History piay” ”.
4. Music
12
4.1 Cover Display
The machine supports MP3 cover display. If the song comes with cover data
and information, it will be shown on the cover display as per below.
4.2 Repeat and Shuffle
Touch“ ” to enable and disable shuffling of songs.Touch“ ”to switch
on the repeat mode. To repeat the current song →To repeat all songs.
4-3 Volume“ ,Sound“ ”,Touch “ , ”to switch between Music,
Touch
to playor pause the Music.Collection“ ”.
4.4 Folders and listing
To refresh video listing, touch video icon followed by the refresh button “
”. User can also access to the video folder by selecting other menu,
thereafter playing the video of selection.
Touch the “ ” button to search current video folder.
4.5 video display” ”,Favorite vidros” ”,History piay” ”.
5.Bluetooth
Bluetooth's hands-free function enables you to call safely while driving.
On the front panel, touch “ ”to enter bluetooth setting as shown below.
13
5.1 Pairing the machine with mobile phones
To activate the bluetooth hands-free function, pair your mobile
phone with the machine in the first place.
.Turn on bluetooth and bluetooth device search function on your mobile
phone .Search for the name of the machine. For example: BT5454
.You are required to key in the corresponding PIN number i.e. 0000 on your
mobile phone to connect to the machine.
.Once connected, a "CONNECTED" sign will appear on the screen.
If the mobile phone has been already paired with the machine, user can touch
“ ” directly
to connect to the bluetooth in the next connection. User may also touch “ ”
to disconnect.
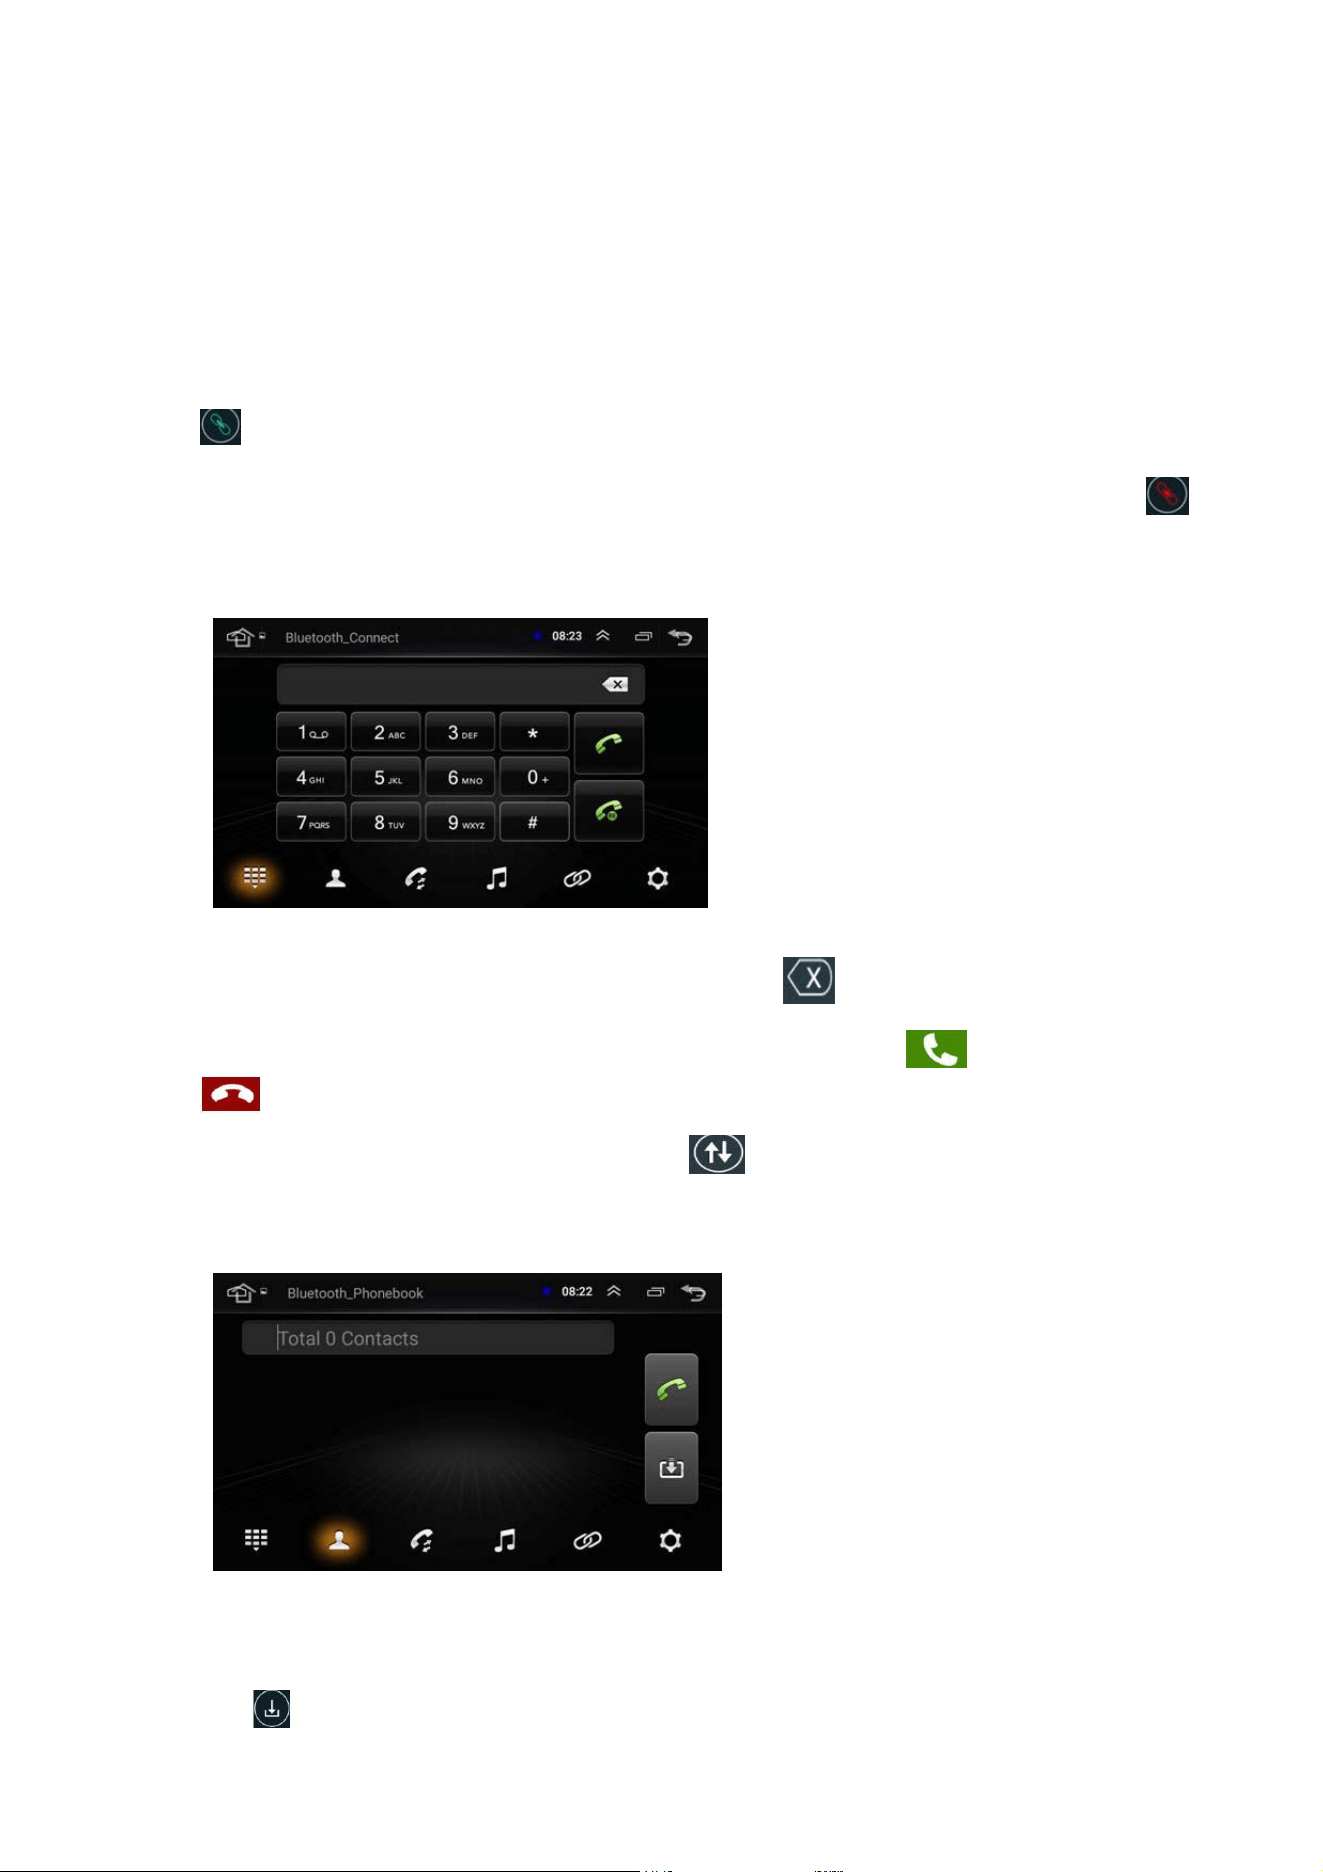
5.2 Making Phone Calls
Upon establishing the bluetooth connection, user can dial directly on the phone or
key in telephone numbers on the dial pad. Touch “ ”to delete the incorrect number
entered.When you entered the telephone number, press “ ” to call or
“ ” to hang off.
During conversation, user can touch “ ” on the screen to switch between
private mode and loud speaker.
5.3 Syncing Contacts
The machine supports syncing of contacts from mobile phone to the machine.
Once bluetooth is connected,
touch“ ” to download the contacts. Once download is completed,
14
name of the contact will be synced and shown on the display screen during phone
call. Forquick access to the contacts, the contact book supports name search
begins with first alphabet.
5.4 Call History
Call history shows outgoing call, incoming call and missed call. User can
perform call or delete in call history.
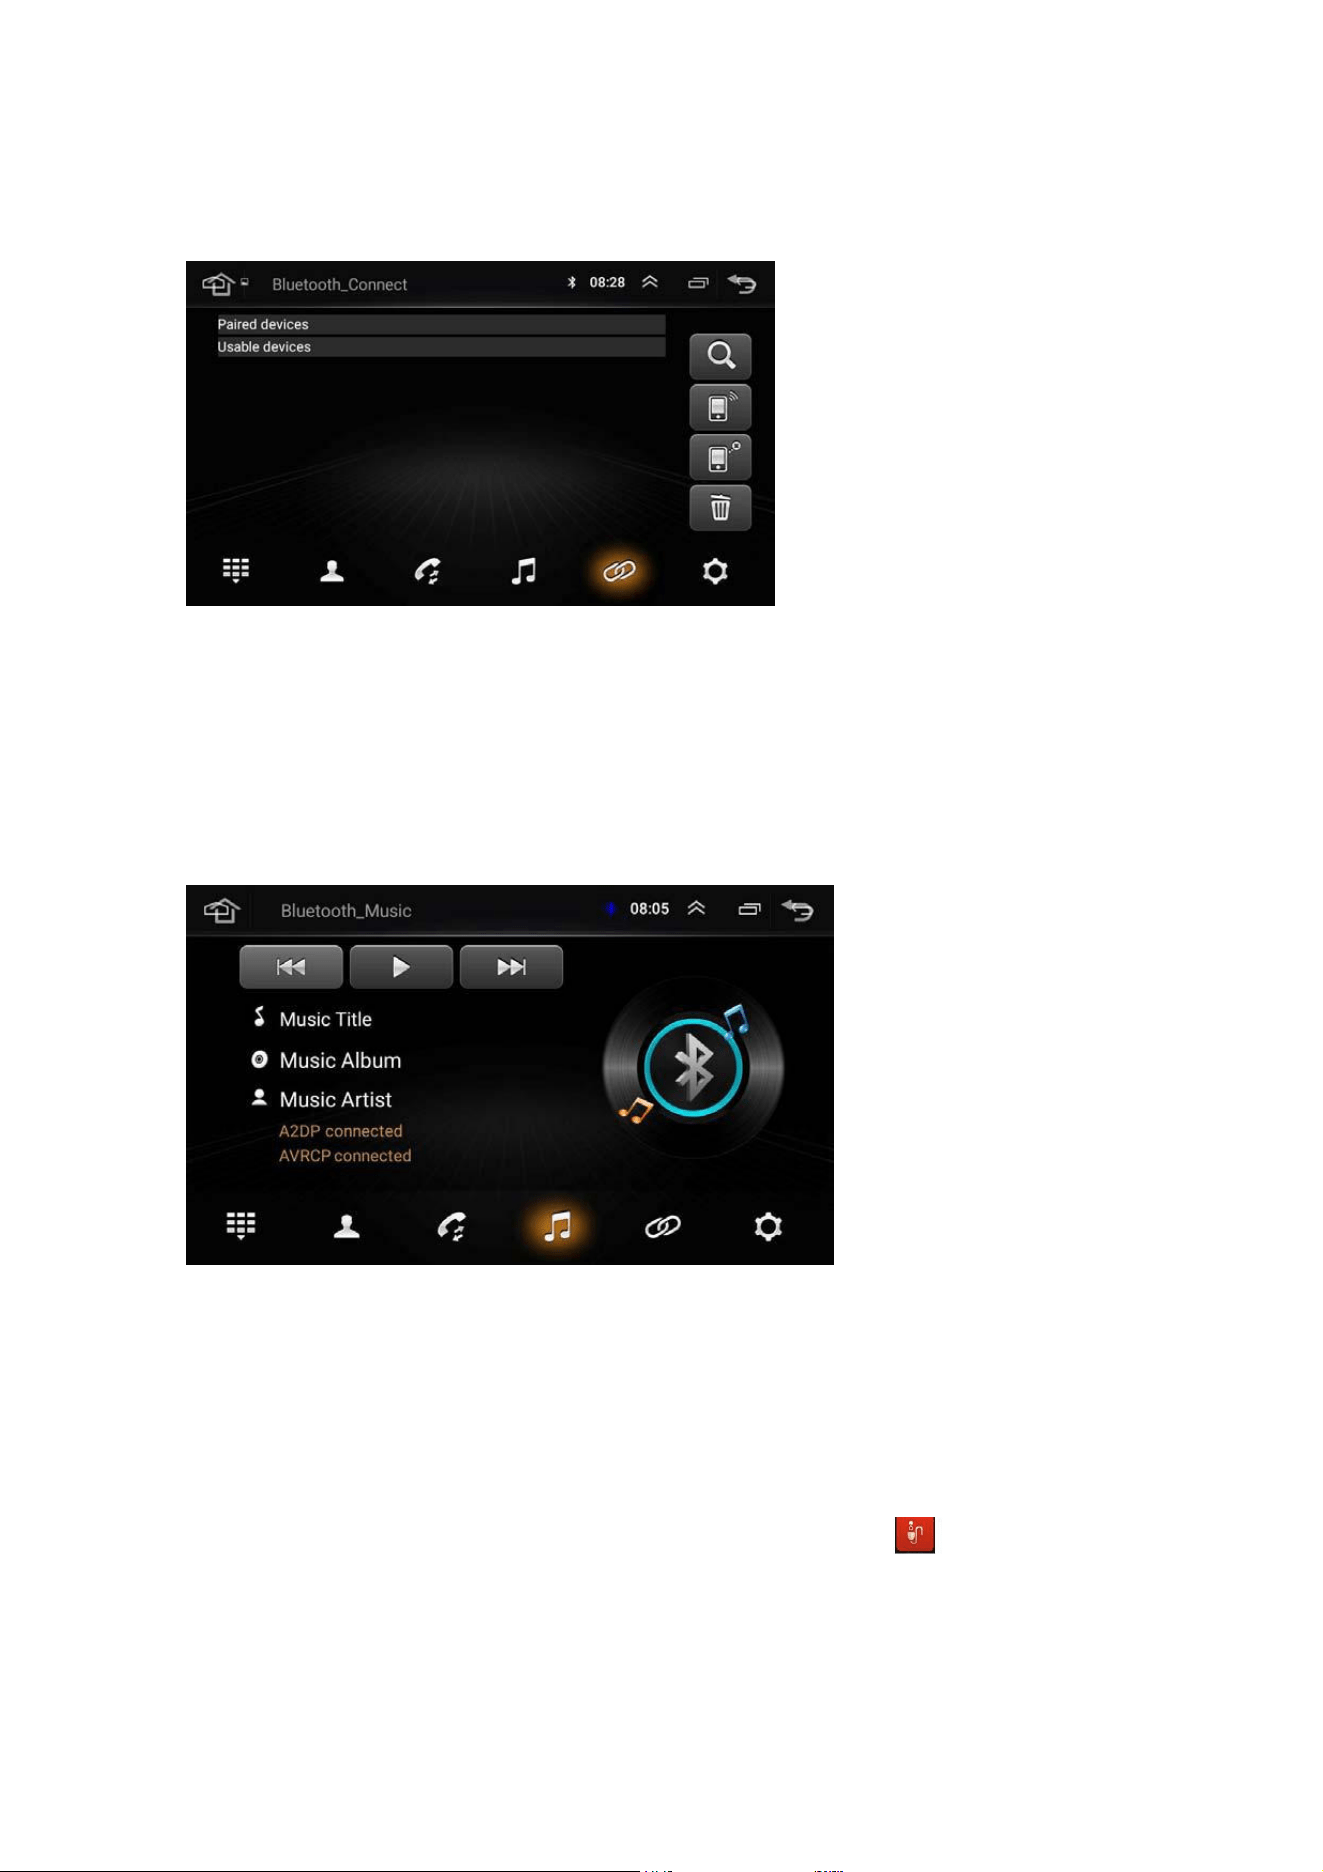
5.5 Bluetooth Music
This machine supports bluetooth music playing. User can play music on the mobile
phone and transfer it to the loud speaker of the machine via bluetooth. It also
supports simplified controls such as "Previous", "Next", "Pause" and "Play".
Due to bluetooth compatibility, the machine may not support all phone models.
Please contact us should you encounter problems connecting to the bluetooth.
6. AVIN Input Support
This machine supports AV (Line Audio / CVBS Audio) input. Connect external
AV systems to the machine via AV cable. Touch AVIN“ ” at the
main interfaceto switch to AV input mode.
15

7. Display Screen
Instructions 7.1 Notes
.Do not expose the display screen directly under the sunlight or heat for a
long period of time to prevent damage to the LCD screen.
.Do not expose the display screen directly under sunlight when it is not in use.
.The display screen should be used within the temperature ranges as per below:
a) Operating temperature range : -10℃~+50℃
b) Storage temperature range : -20℃~+80℃
The LCD screen is a full frontal display for better viewing experience in the car. Please
do not press the LCD screen vigorously to prevent damage. Except coordinating the touch
panel functions, please touch the LCD screen gently to prevent scratch or dust.
Shall not interfere with the installation of airbags and other safety
features or devices in the vehicles.
7.2 About LCD
.Small black dots or bright dots may appear on the LCD screen. This is not
a defect but merely the specification of LCD.
.If in use in cold areas, the LCD screen may be dimmer after power on but
the brightness will be adjusted to normal after a short while.
.If exposed directly under sunlight, user may be difficult to see the LCD
screen due to reflection.
7.3 Maintaining the LCD screen
.Please off the power before cleaning the LCD screen. Wipe the screen with soft
fabric to prevent scratch on the surface.
.Please do not use wet towel, benzene, and chemical related cleaners to clean
the LCD screen.
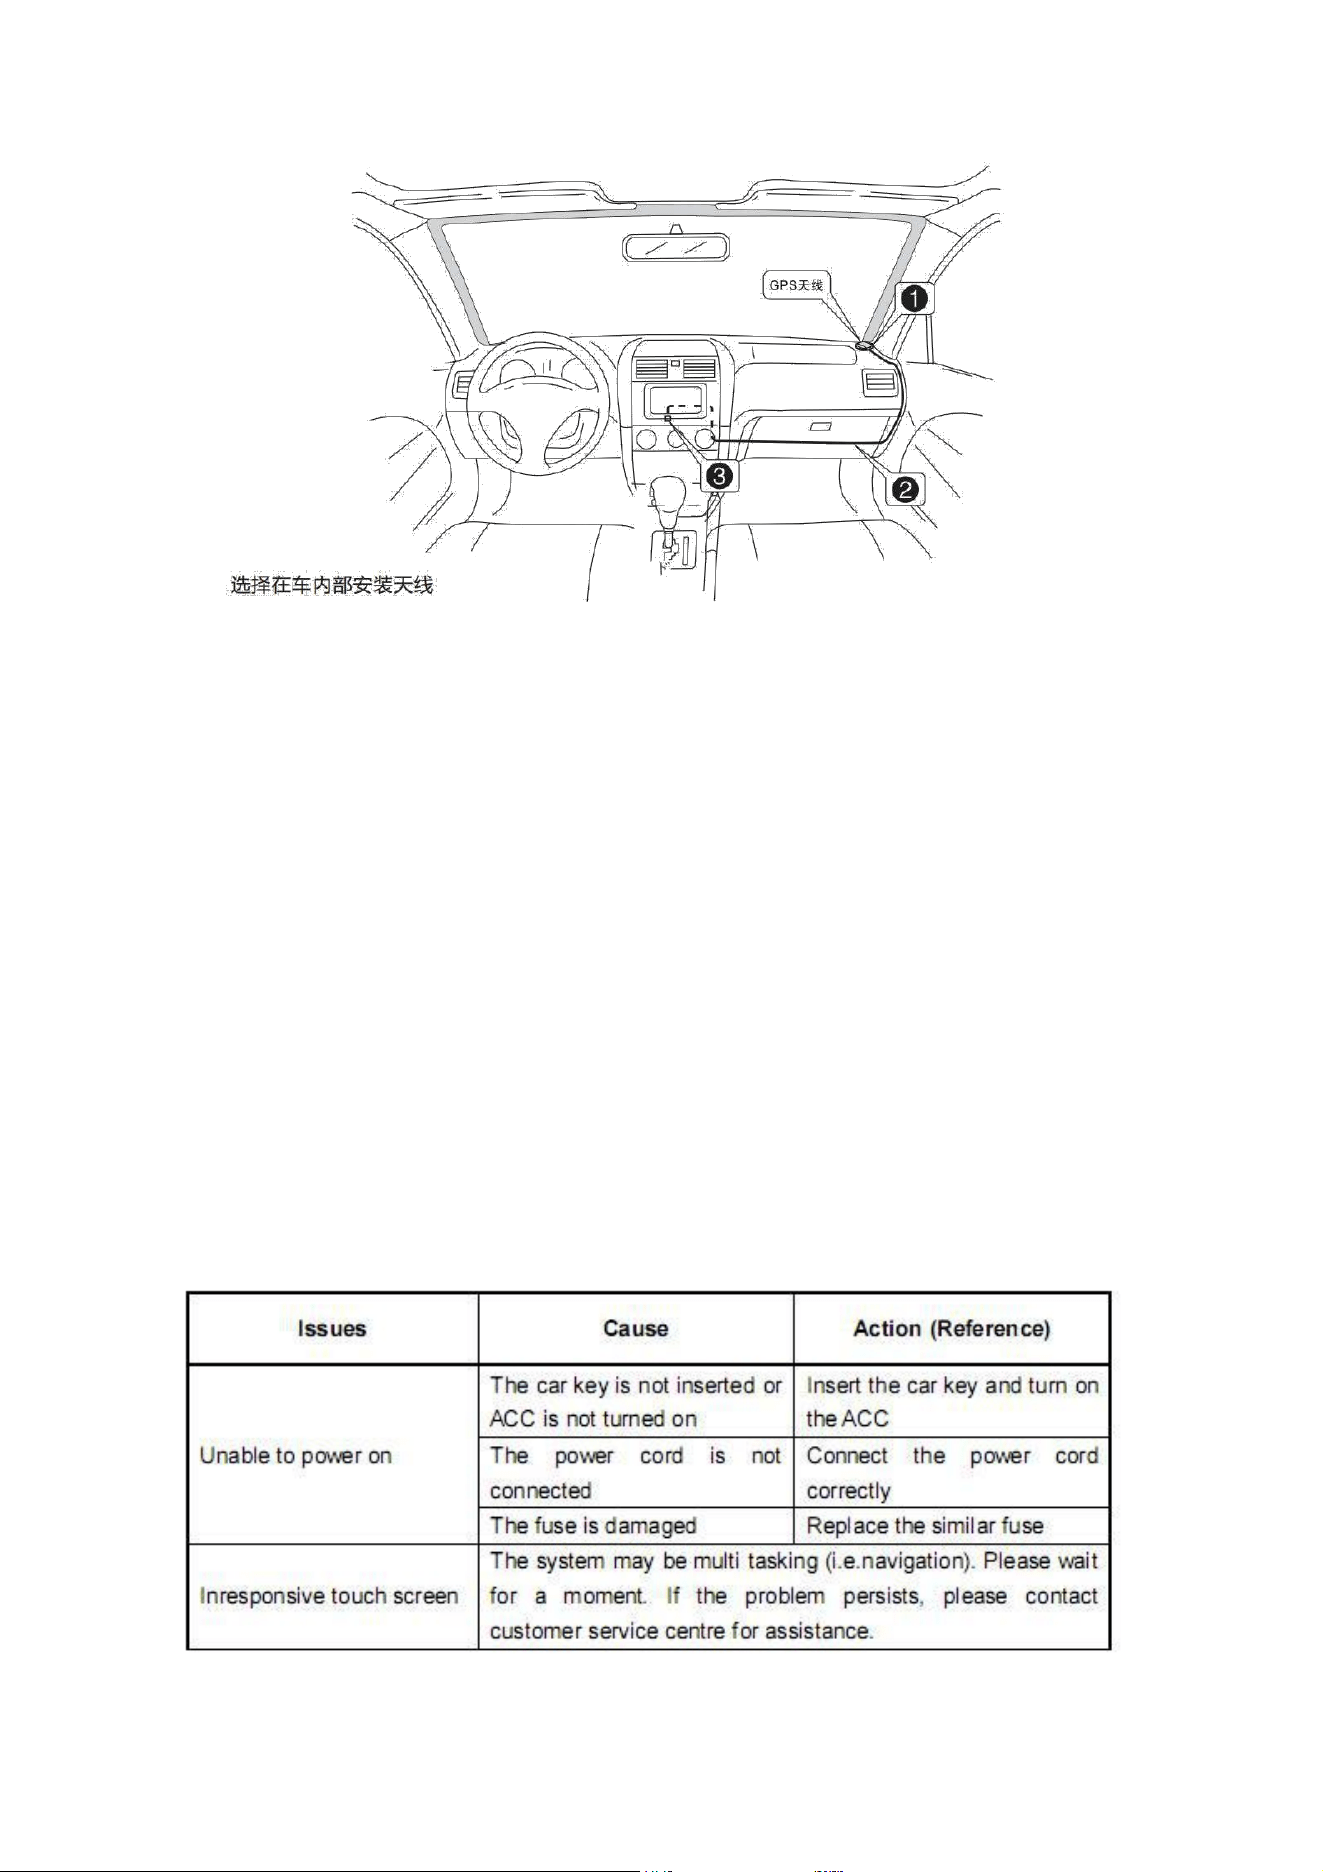
8.Installation of Antenna
Recommend installing the GPS antenna on dashboard or rear shelf. The
antenna should be installed on leveled surface facing the sky to prevent
blockage of radio waves as little as possible. Vehicle equipped with
tempered glass or tint may weaken the receiving signal of the GPS antenna.
Thus, recommend installing the antenna outside of the vehicle.
8.1 GPS Installation Guide
.Before affixing the GPS antenna, please ensure using the suitable cleaner to
clean the designated surface. After cleaning, tear off the back of the tape
and press to place the GPS antenna.
.Remove the side cover, move the cable through the storage box until it
reaches the control panel of the machine. The cable needs to be fixed with a
cable tie. Connect the GPS antenna's plug to the machine
16
Notes
.Please ensure the system power is off when connecting to the GPS antenna.
.Please do not shorten or extend the GPS cable. Altering the length of the cable
may result in short circuit or malfunction that may damage theproduct.
.The antenna should be installed on a leveled surface where radio waves will be
blocked as little as possible, otherwise it will affect the accuracy of navigation.
.Please do not interfere the GPS antenna with steering wheel or gear lever, as
it may be dangerous.
iv) Troubleshooting Guide
If you encounter the problems below, please refer to this troubleshooting
guide for quick solution. If the problems persist, it is advisable to contact
the professional or visiting the customer service centre for further
assistance. Please do not dismantle the machine withoutproper advice.
17
18
