
Technical Support and E-Warranty Certificate www.vevor.com/support
CHICKEN COOP DOOR OPENER
MODEL:JUMCC06B
We continue to be committed to provide you tools with competitive price.
"Save Half", "Half Price" or any other similar expressions used by us only represents an
estimate of savings you might benefit from buying certain tools with us compared to the major
top brands and does not necessarily mean to cover all categories of tools offered by us. You
are kindly reminded to verify carefully when you are placing an order with us if you are
actually saving half in comparison with the top major brands.
- 1 -
MODEL:JUMCC06B
Have product questions? Need technical support? Please feel free to
contact us:
Technical Support and E-Warranty Certificate
www.vevor.com/support
NEED HELP? CONTACT US!
This is the original instruction, please read all manual instructions
carefully before operating. VEVOR reserves a clear interpretation of our
user manual. The appearance of the product shall be subject to the
product you received. Please forgive us that we won't inform you again if
there are any technology or software updates on our product.
CHICKEN COOP DOOR OPENER

- 2 -
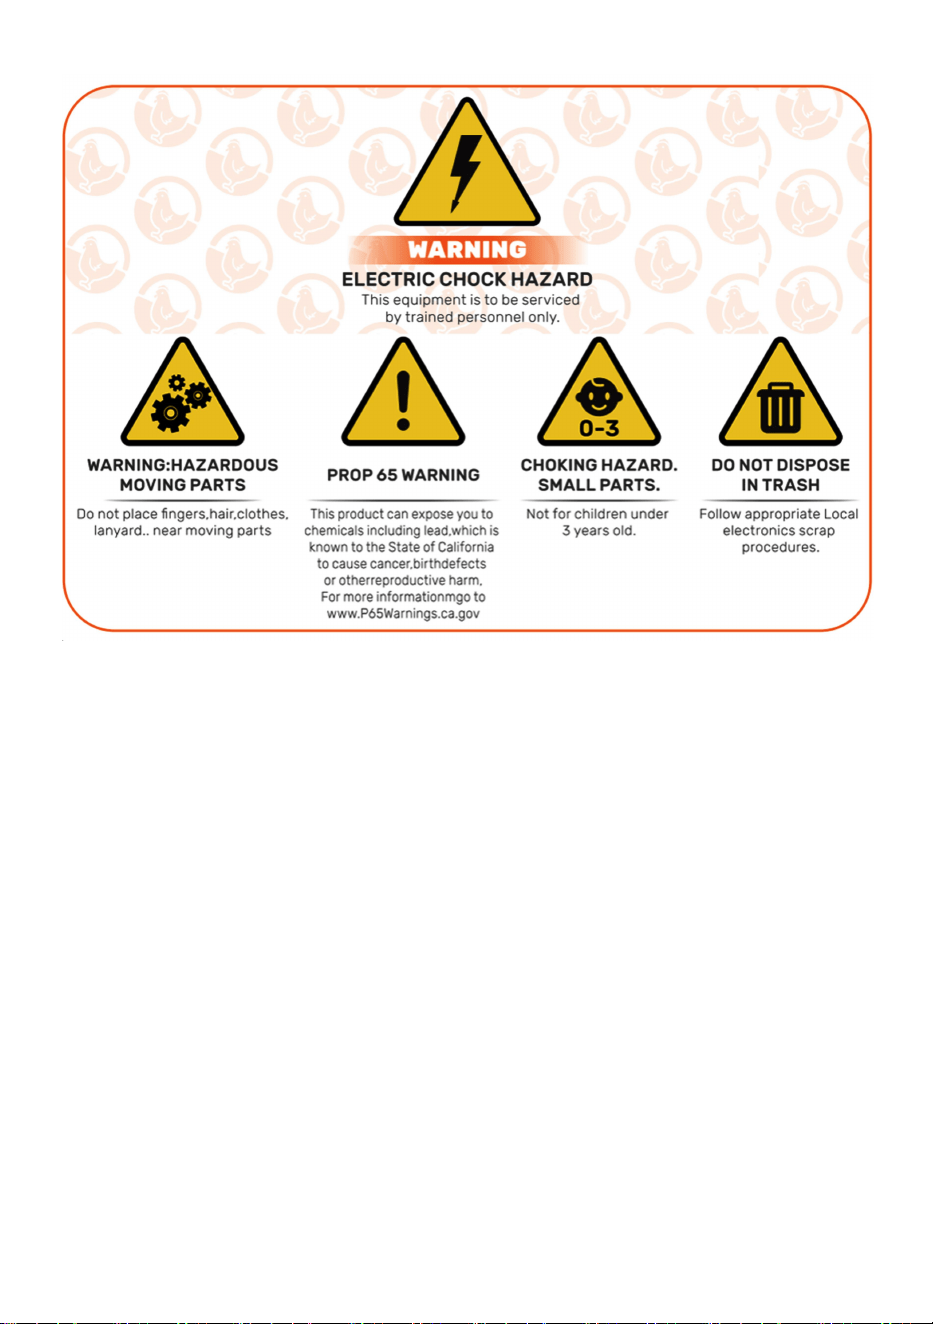
IMPORTANT SAFEGUARDS
Read all safety warnings, instructions, illustrations and
specifications provided with this electrical appliances. Failure to follow all
instructions listed below may result in electric shock, fire and/or serious injury.
Warnings & Cautions
●》To reduce risk of electric shock, do not disassemble this product.
●
》Use the AC/DC Power Adapter and cable provided with the unit. The use of
other cables
can result in shock, fire or cause damage to the unit.
●
》
If the supply cord(
AC/DC Power Adapter)
is damaged, it must be replaced by
the manufacturer, its service agent or similarly qualified persons in order to avoid
a hazard.
●》Ensure the unit is connected to the power source properly.
●
》Do not use the unit if power cord is damaged or if the plug socket contact is
loose.
Only use the AC/DC Power Adapter with a 100-240V AC power source.
●
》Run power supply to a protected area or build power supply housing in order
to protect
the power plug in from weather.(Run cord through hole in chicken
coop and plug in on the interior of the coop)
●
》
This appliance can be used by children aged from 8 years and above and
persons with reduced physical, sensory or mental capabilities or lack of
experience and knowledge if they have been given supervision or instruction
concerning use of the appliance in a safe way and understand the hazards
involved. Children shall not play with the appliance. Cleaning and user
maintenance shall not be made by children without supervision.
- 3 -
SAVE THESE INSTRUCTIONS
FCC Information
CAUTION: Changes or modifications not expressly approved by the party
responsible forcompliance could void the user's authority to operate the
equipment!
This device complies with Part 15 of the FCC Rules. Operation is
subject to the followingtwo conditions:
1) This product may cause harmful interference.
2)This product must accept any interference received, including
interference that maycause undesired operation.
WARNING: Changes or modifications to this product not expressly
approved by the party.responsible for compliance could void the user's
authority to operate the product.
Note: This product has been tested and found to comply with the limits for
a Class B digitaldevice pursuant to Part 15 of the FCC Rules, These limits

- 4 -
are designed to provide reasonableprotection against harmful interference
in a residential installation.
This product generates, uses and can radiate radio frequency energy, and
if not installedand used in accordance with the instructions, may cause
harmful interference to radiocommunications. However, there is no
guarantee that interference will not occur in a particular installation. If this
product does cause harmful interference to radio or television
reception,which can be determined by turning the product off and on, the
user is encouraged to tryto correct the interference by one or more of the
following measures.
· Reorient or relocate the receiving antenna.
· Increase the distance between the product and receiver.
· Connect the product to an outlet on a circuit different from that to which
the receiver isconnected.
· Consult the dealer or an experienced radio/TV technician for assistance.
- 6 -
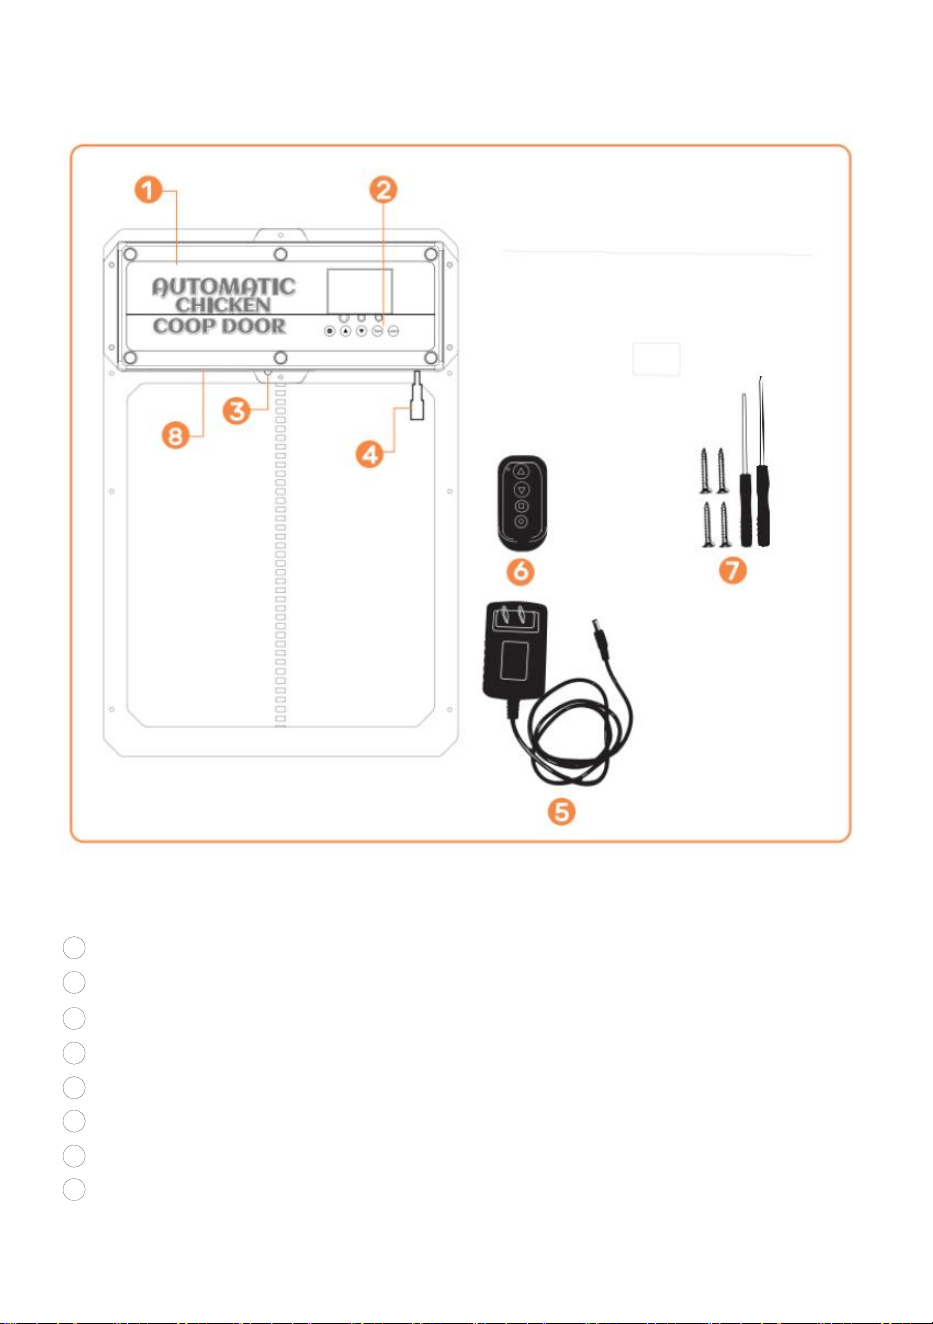
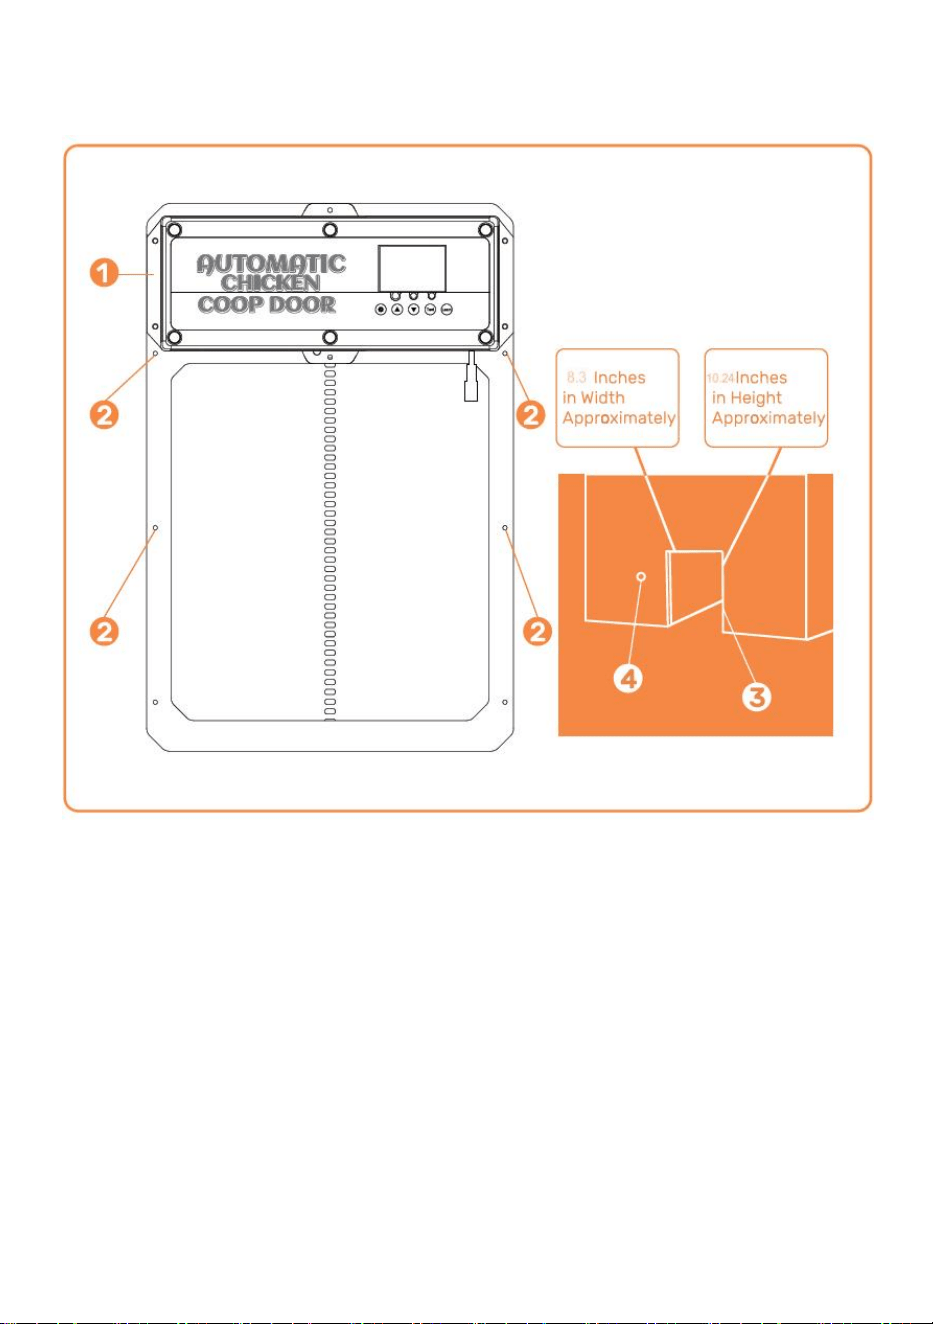
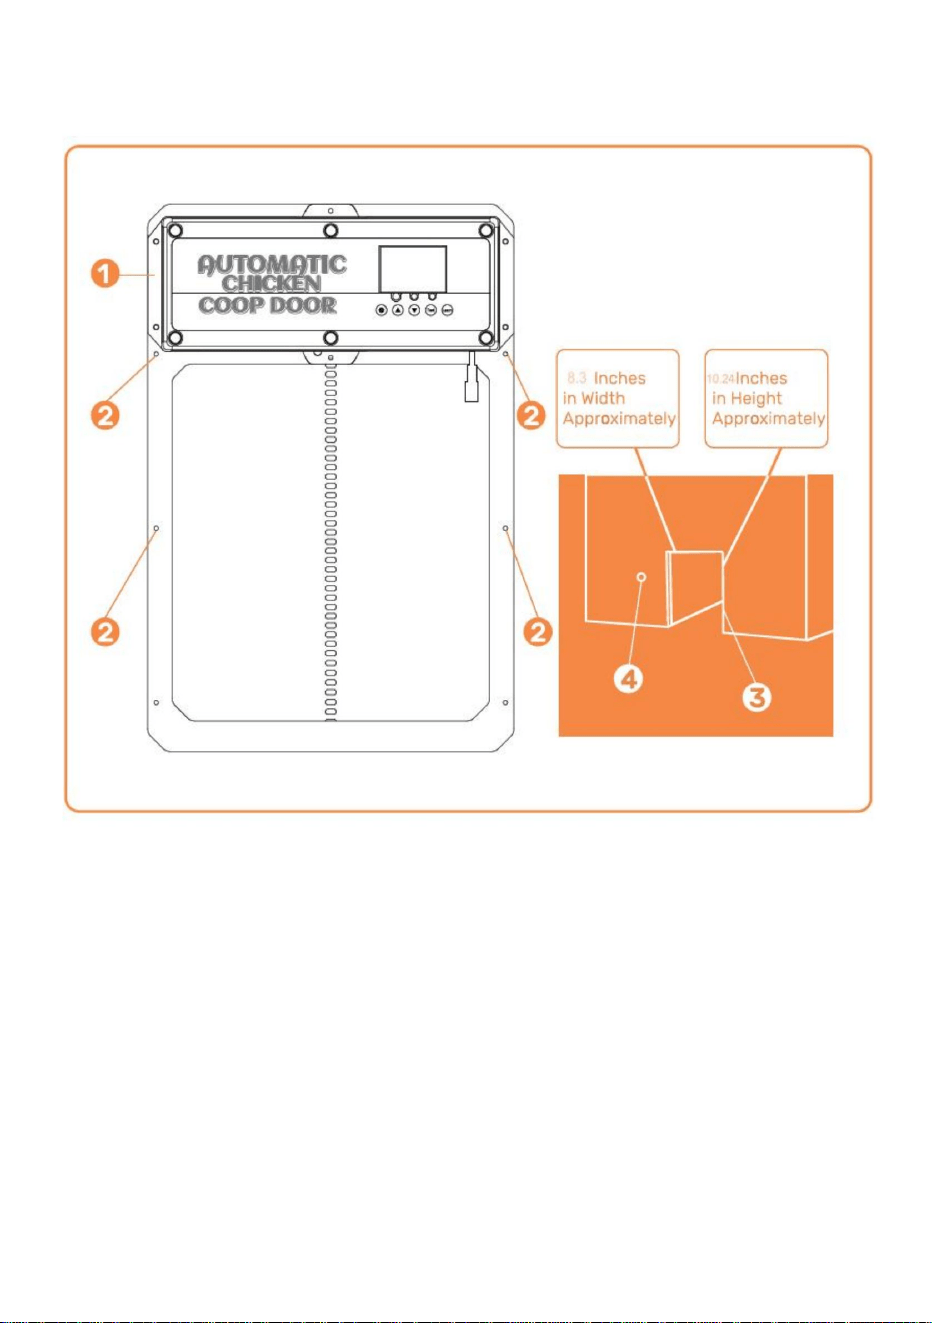
Installation Introduction
①Chicken Coop Door Frame
② Screw Installation Location
③ Chicken Coop Structure/Wall (with hole for the Chicken Coop Door Frame
Installation)
④ Hole for power supply to run through to ensure power is protected from
weather
- 7 -
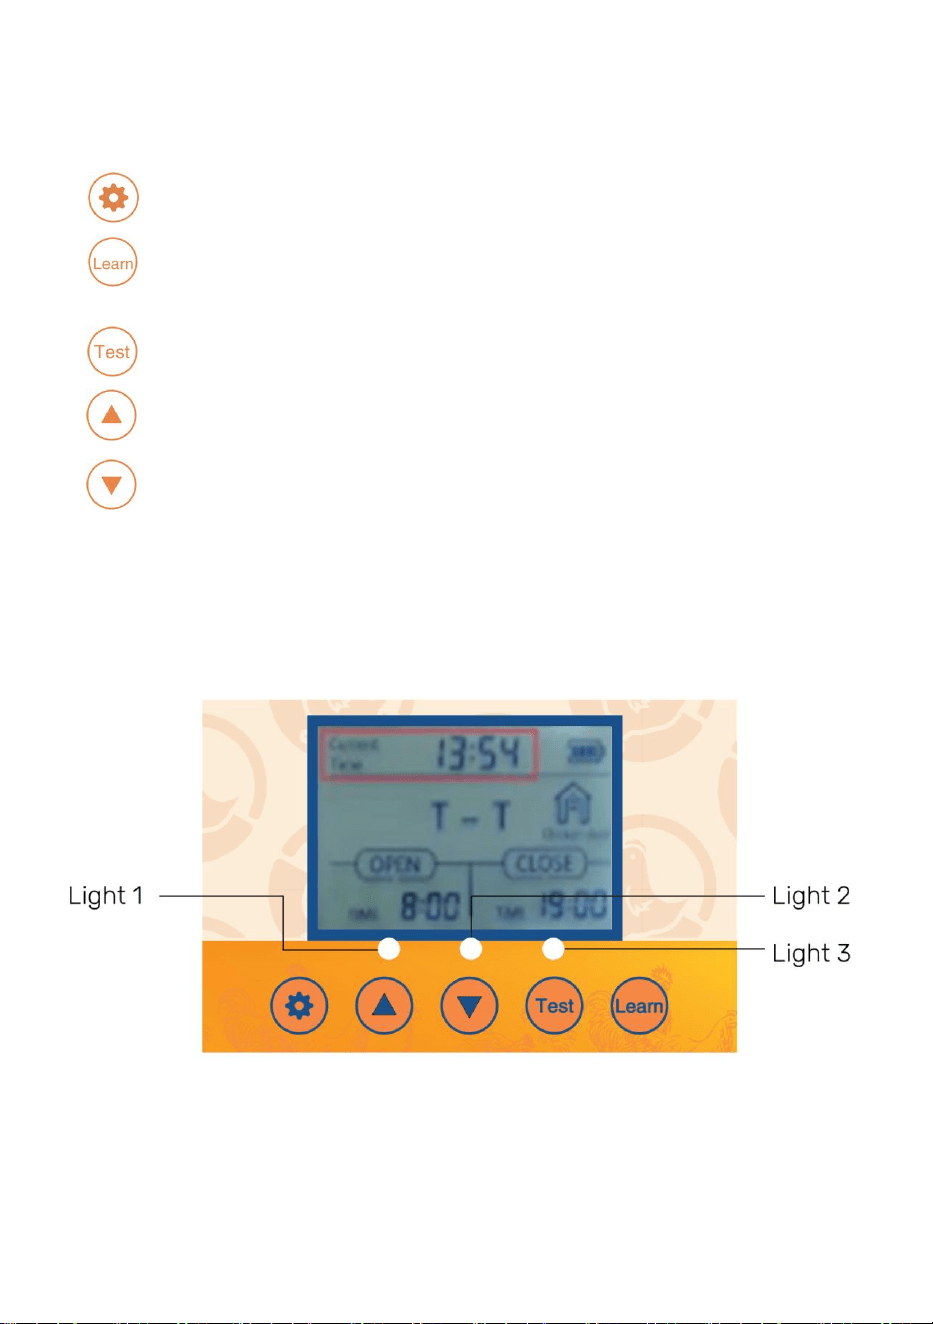
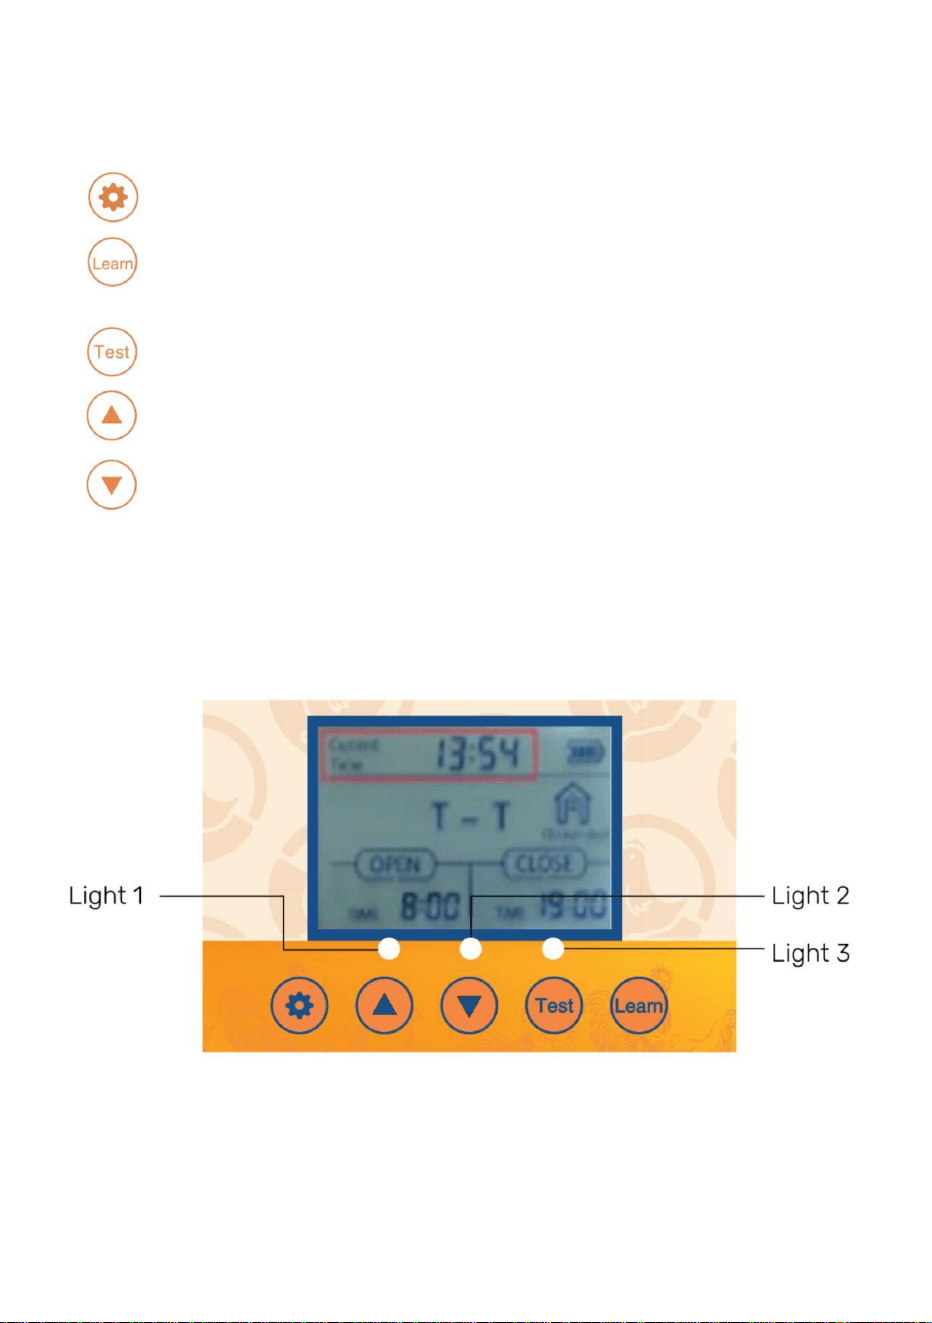
Control Panel Introduction
Digital Display
●
SET- Button used to switch between programming modes
● LEARN- Button used to add/remove the wireless remote control(s)
● Test- Button used to manually open/close the door
● (UP)- Button used to change program functions while in the program mode
● (DOWN)- Button used to change program functions while in the program
mode
● Light 1-Open door [green] and close door [red] indicator lights
● Light 2-Infrared sensor working indicator light
● Light 3-Light sensor working indicator light

- 8 -
Operations Manual
General Introduction
The Coop Door is the perfect solution for a more enjoyable Homesteading way of
life.We utilize modern technology and put that into a slim compact design to
provide our customers with the best Automatic Coop Door available.
Our product is made to support your homesteading goals and to help make
homesteading easier. We suggest to use the power cord or solar to power your
door,this door uses a lot of power due to it being a sturdier door so batteries
will die fast!
General Introduction
● 1. Verify/create an opening in the chicken door structure/wall such that the
chicken coop door frame can be installed and securely fastened with screws.
Width= 8.3 inch es.
Height=10.24 inches
● 2. Attach the chicken coop door frame to the chicken coop structure/wall with
the self-tapping screws(DO NOT OVERTIGHTEN OR DOOR WILL COMPRESS
AND NOT OPEN). Ensure the chicken coop door frame is flat [no gaps/warps]
against chicken coop structure/wall after the self-tapping screws are installed.
Use a power tool to install screws through door.
●3.Connect the DC Male Plug of the AC/DC Power Adapter to either one of the
DC Female Plugs on the chicken coop door.
● 4.Connect AC/DC Power Adapter to a power source and the chicken coop
door will turn
on as confirmed by the Digital Display being illuminated. Ensure
power source is protected from weather by plugging in on interior of coop or
building a simple power supply box to prevent water intrusion.
● 5. To utilize the light sensor or the timer see page 10-11.
● 6. Don't forget if the door isn't opening/closing all of the way try loosening the
screws on the door. The door can get pinched if the door is installed to tight.
● 7.If the door is not closing after programming. Please try turning off the power
again and try closing it again.
● 8. If you have exterior trim or anything that could make the door installed
uneven then use 2x4s or some flat pieces of wood to ensure flushness.
● 9.Use two 1" to !" wooden spacers and install them above door at the width of
the holes in the rain shield.

- 9 -
● 10.Install rain shield onto the two wooden spacers So door can go up and
behind the rain shield.
General Installation Continued l(Infrared Sensor)
● 11. The infrared sensor is built-in this door.
● 12. There is a red light on the sensor to indicate when something is blocking the
infrared ray. While the red light is illuminated the door will not close.
● 13. The animal sensing probe is shown in Figure . When the door descends (or is
descending) the probe senses an animal at the door (action+temperature, blue light
on), and the door
will return to rise. After 1 minute, it will continue to descend. After
power outage, restarting the probe requires preheating for about 15 seconds (blue
light goes out) to operate normally.
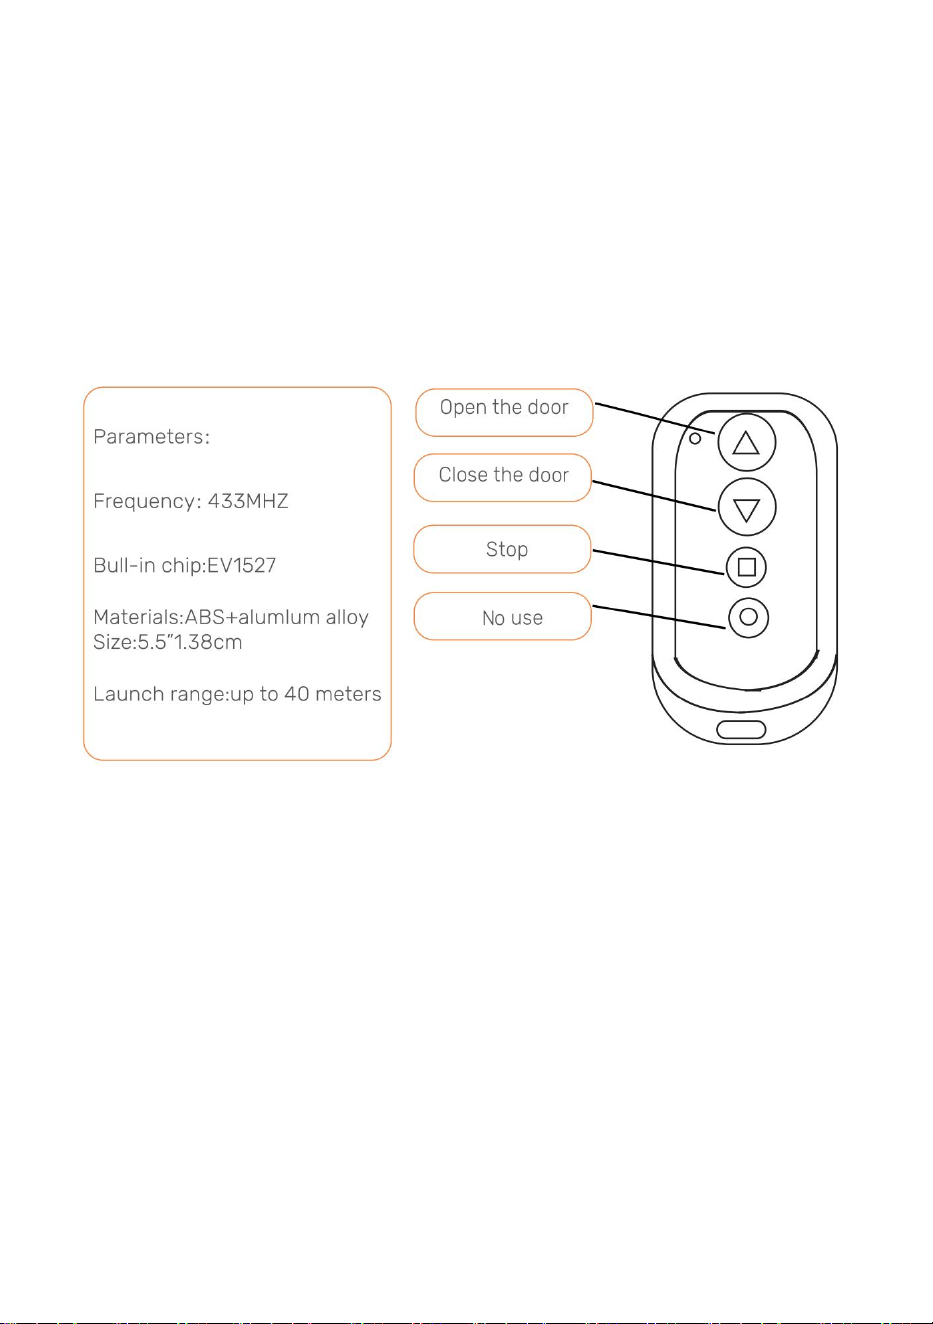
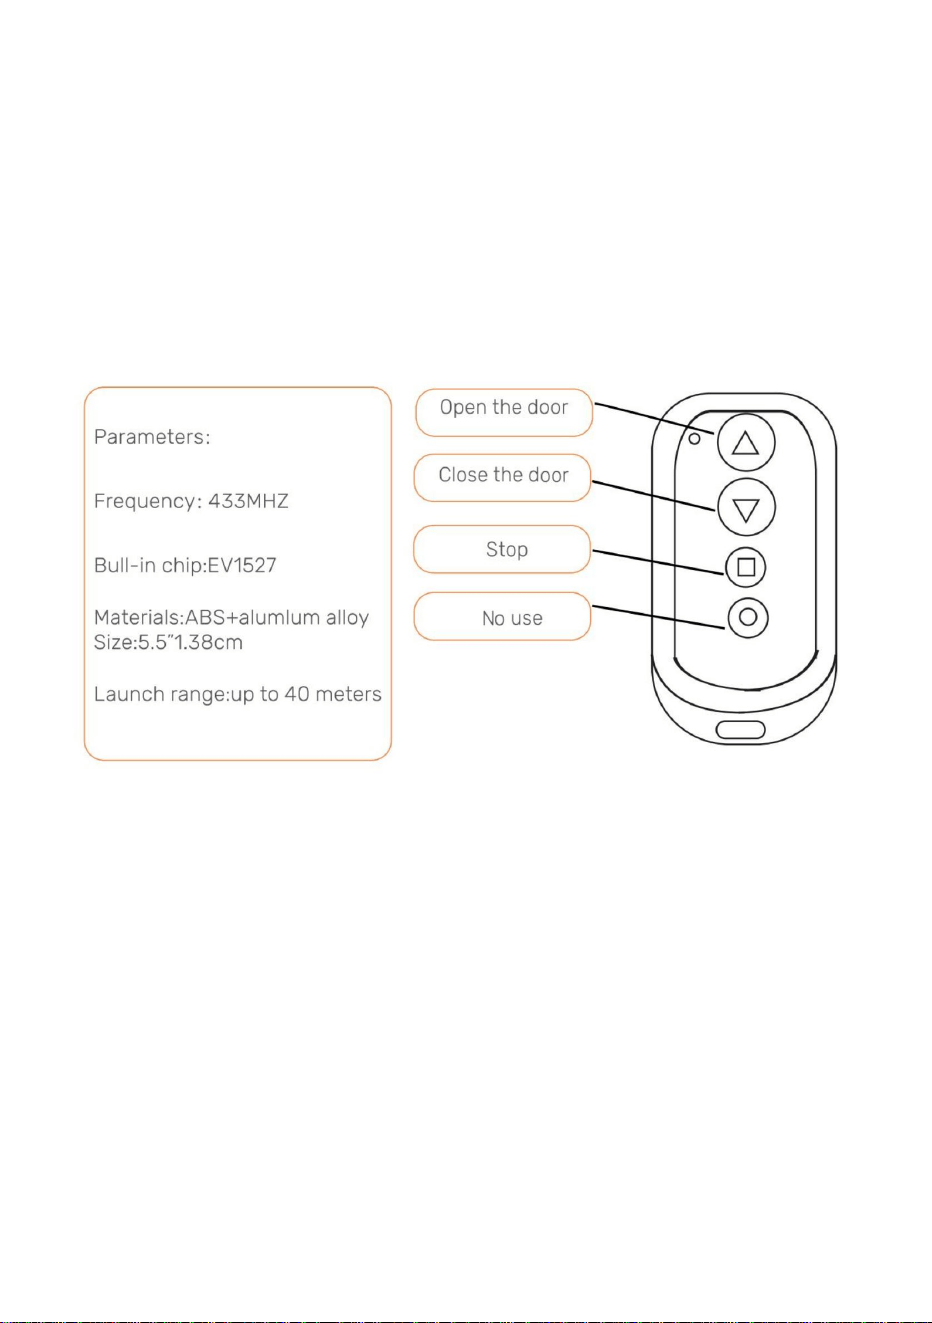
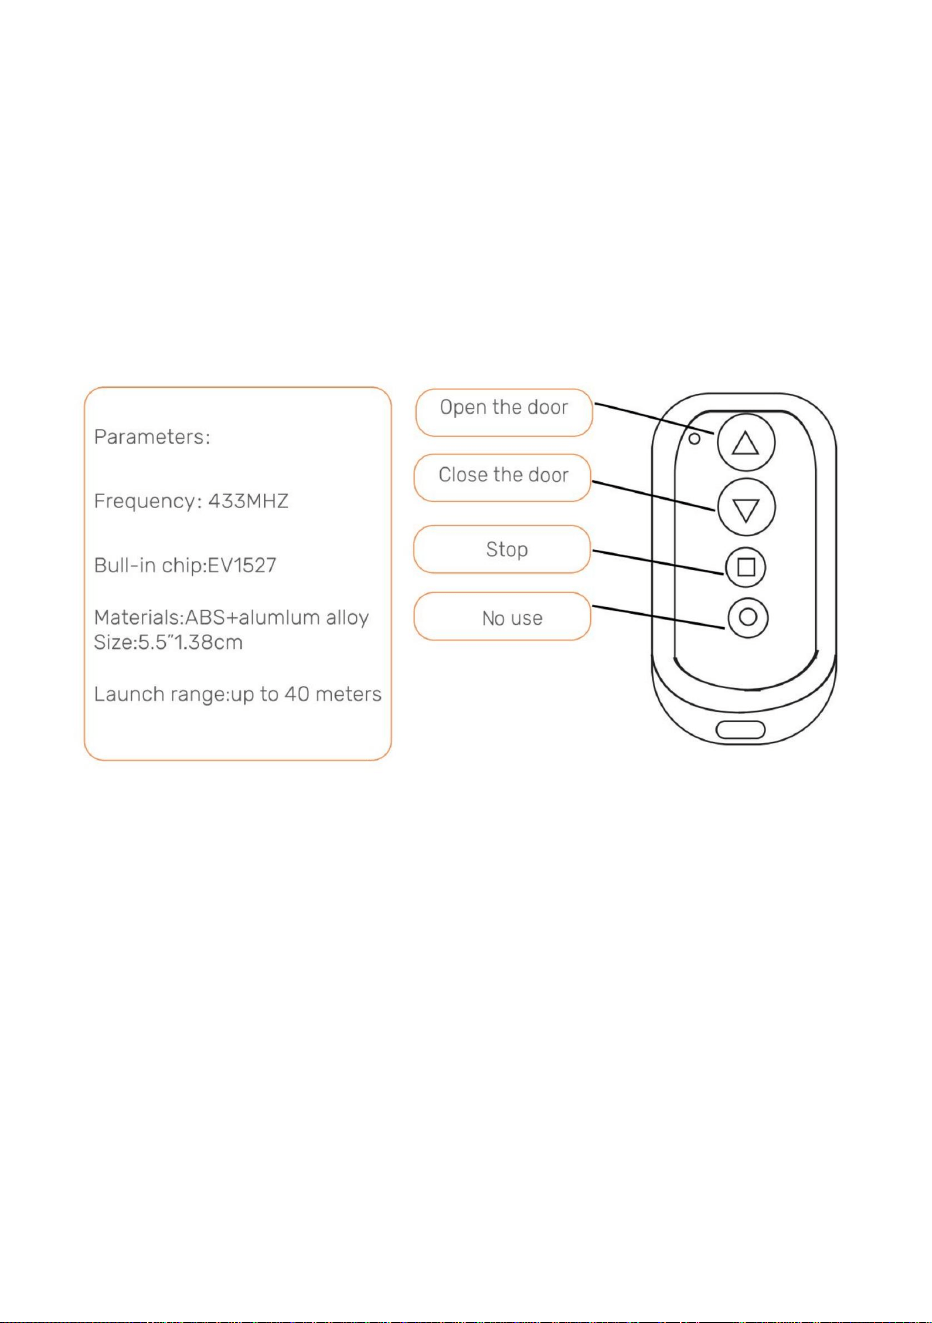
1.0 - Programming the Wireless Remote Control(s)
●1.Verify the remote control battery[s] are installed in the remote control(s)
(Battery(s): A27/12V sold separately).
●
2. To pair a remote control to the chicken coop door push and hold the LEARN
- 10 -
button on the control panel down for 2 seconds. Then press any button on the
remote control twice. The green LED flashes twice, indicating that the pairing is
complete.To pair the second remote control repeat this step.
●3. To un-pair all remote control[s] push and long hold the LEARN button, until the
green LED flashes twice, indicating that the cancellation is complete.
Note: If power is removed from the chicken coop door for a short period of time
and power is reapplied, the remote control[s] will still be paired to the chicken
coop door.
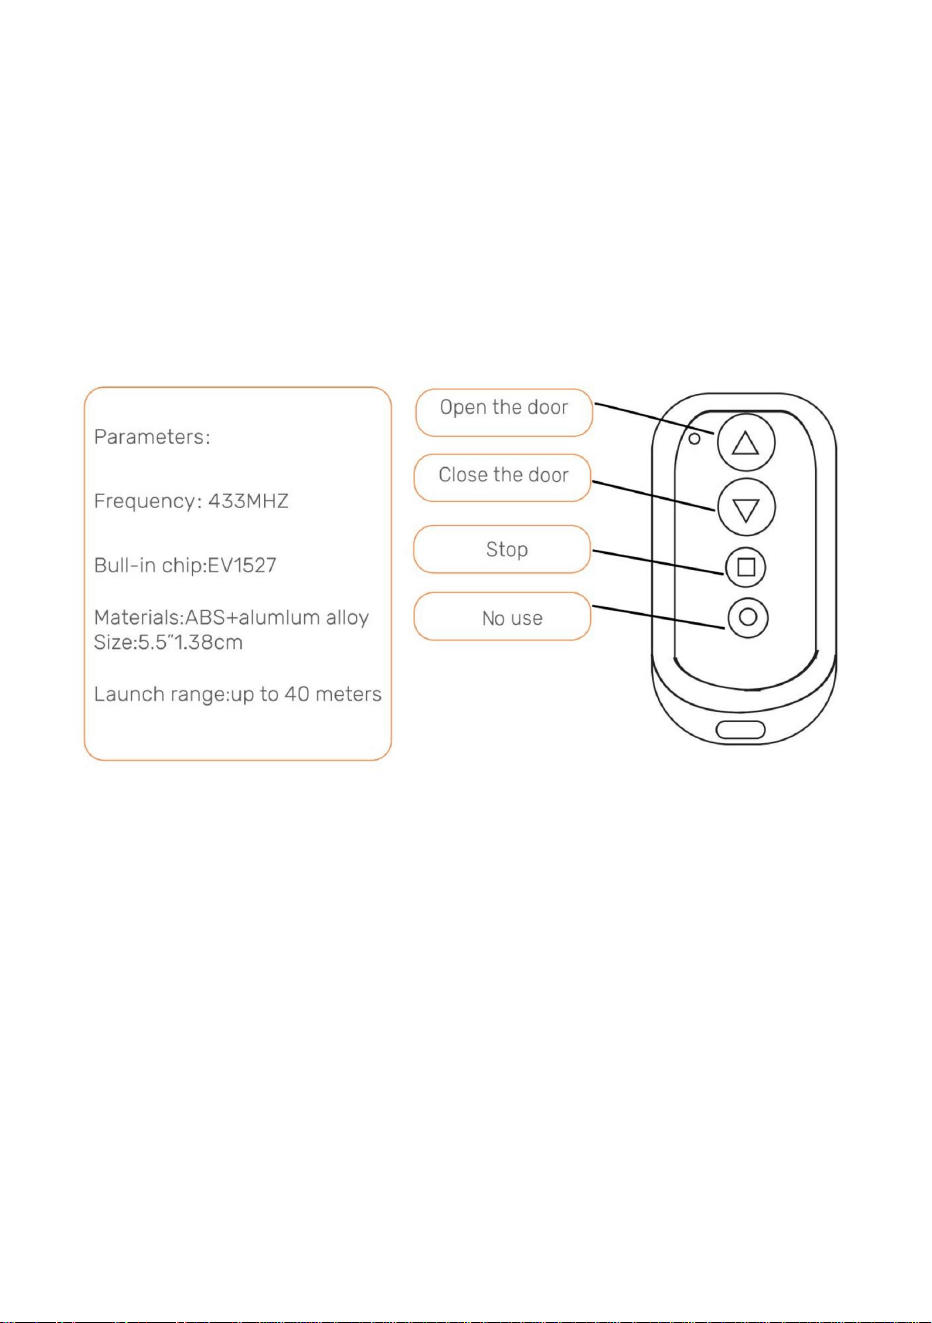
2.0- Open/Close Chicken Coop Door With Remote Control
● 1.Push the Up Arrow button to open the door.
●2. Push the Down Arrow button to close the door.
● 3. Push the Square butt to stop any movement of the door.
3.0- Open/Close Chicken Coop Door Without Remote Control
Sequentially pushing the Test button on the control panel will either open or close
the door.
● 1. Push the Test button on the control panel. The door will open.
●2.Push the Test button on the control panel. The door stop moving.
●3. Push the Test button on the control panel. The door will close.

- 11 -
4.0- Programming the Chicken Coop Door
1. Screen Wakeup
●1.1 Button wake-up:Press the SET or TEST button once to turn on the screen for
about 1 second.
●1.2 Remote control wake-up: Press and hold any key on the remote control for
about 5
seconds to light up the screen.
2. Setting manual door opening or closing
2.1 Connect the power supply, and the display screen will display as shown
2.2 Push the TEST button for one time for open the door.
2.3 Press the TEST button once to pause.
2.4 Press the
TEST button again to close the door.
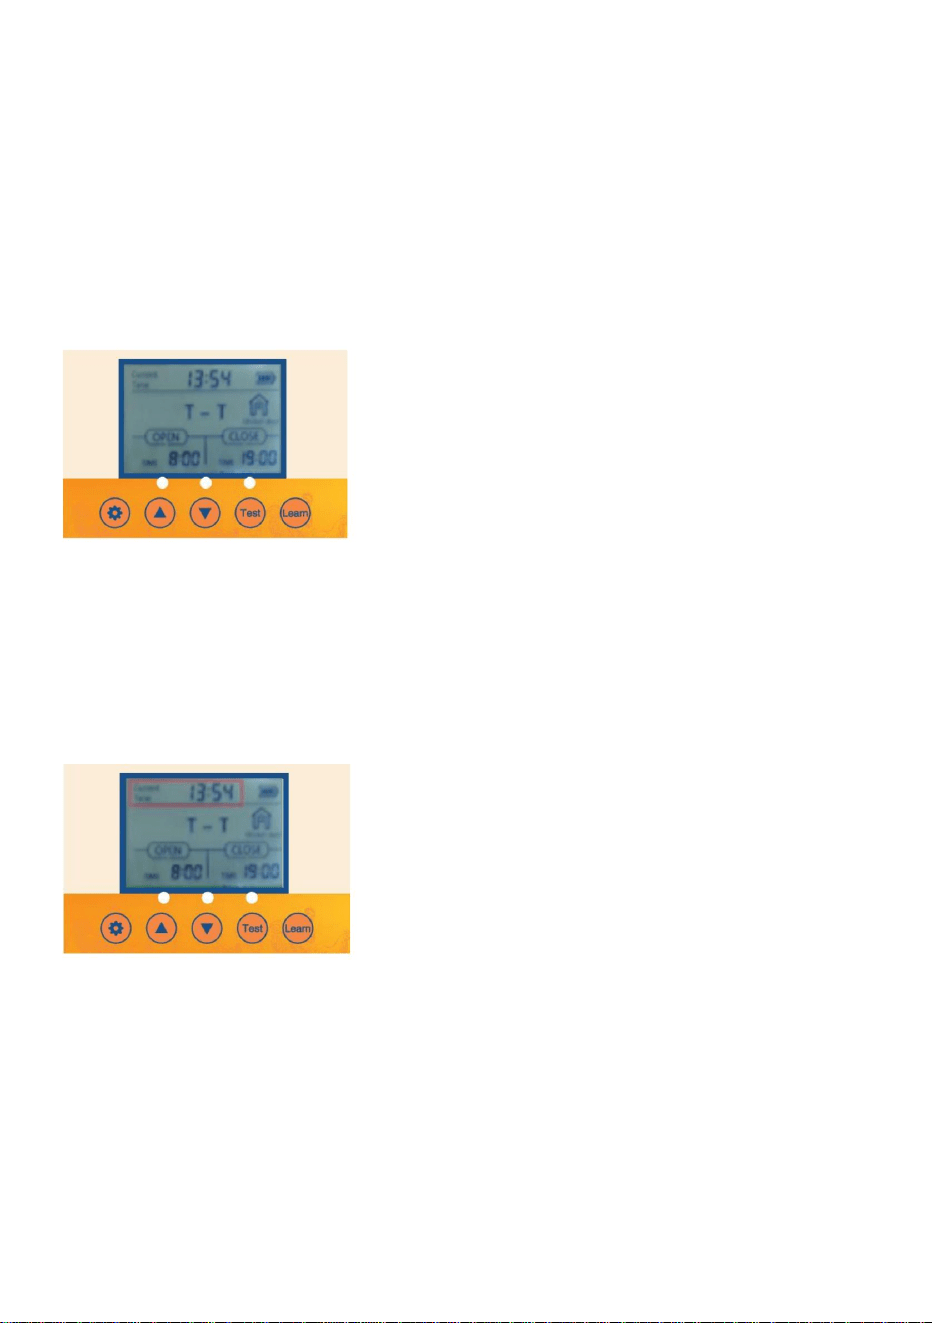
3. Setting the Local Time (24 Hour Time Format) for the Door
● 3.1Push the SET button on the control panel to display
● 3.2 The Hours time unit will flash. Adjust the Hours time unit by pushing the UP or
DOWN button.
● 3.3 Push the SET button to switch to the Minutes time unit. The Minutes time unit
will flash.
● 3.4 Adjust the Minutes time unit by pushing the UP or DOWN button.
● 3.5 Push the SET button to confirm the time setting and the nextsetting.
Sequentially pushing the SET button on the control panel will cycle through the

- 12 -
different settings to be programmed.
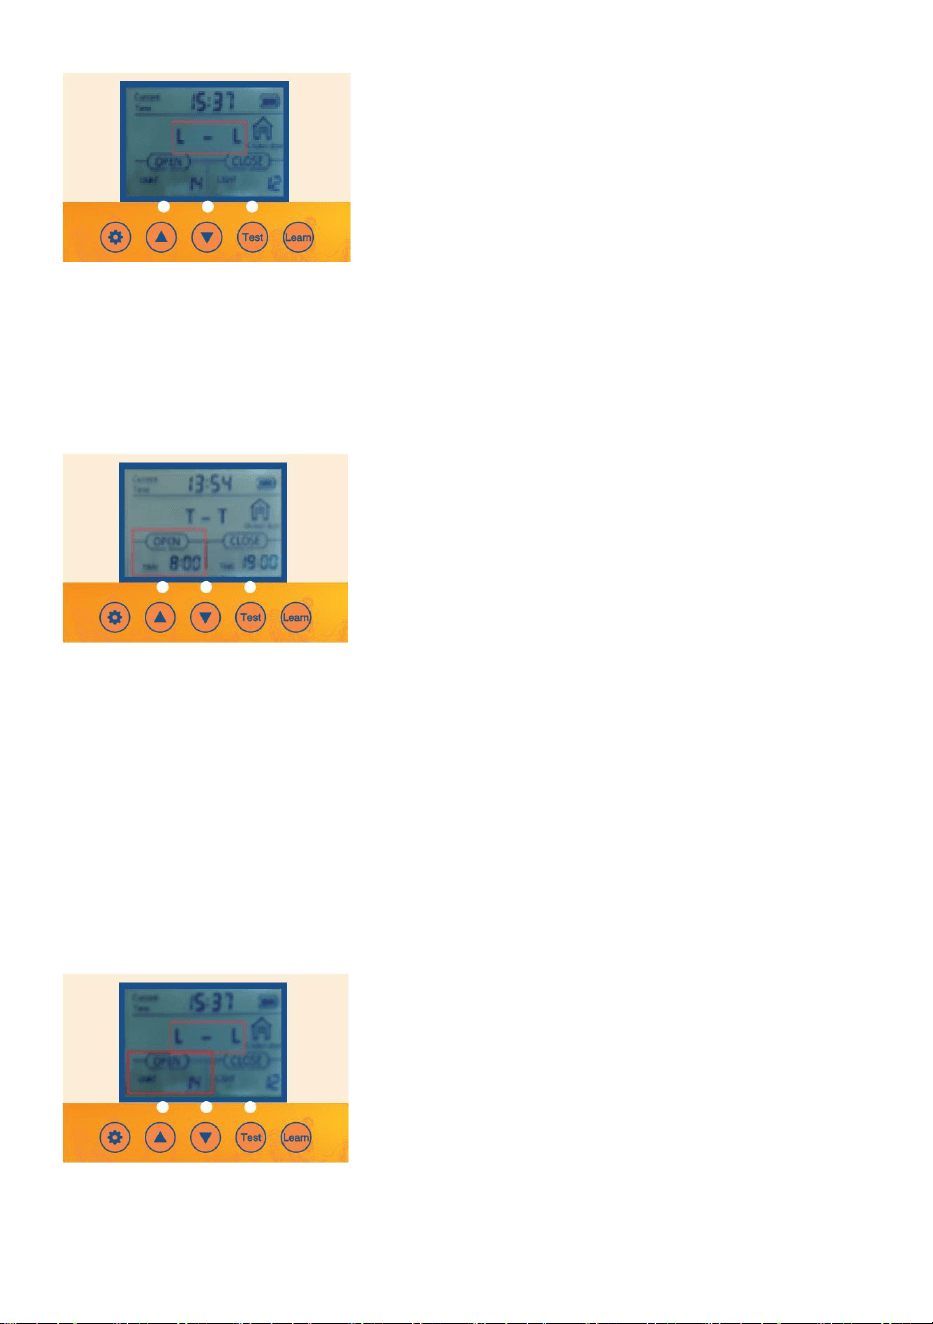
4. Set timing and light sensing mixed mode
4.1 Push the SET button for one second on the control
panel to display
4.2 T- T Indicates time to open the door - time to close the door.
4.3 Push the UP button for one second on the control panel to display
4.4 T- L Indicates time to open the door -light to close the door.
4.5 Push the UP button for one second on the control panel to display
4.6 L- T Indicates light to open the door - time to close the door
- 13 -
4.7 Push the UP button for one second on the control panel to display
4.8 L-L Indicates light to open the door -light to close
the door.
5. Turning option on so that the Door opens or closes automaticallywith the Local Time
Setting and Timer
● 5.1 Verify/Push the SET button on the control panel to display OPEN-T
● 5.2 The Hours time unit will flash. Adjust the Hours time unit by pushing the UP or
DOWN button.
● 5.3 Push the SET button to switch to the Minutes time unit. The Minutes time unit
will flash.
●
5.4 Adjust the Minutes time unit by pushing the UP or DOWN button
6.Turning option on so that the Door opens or closes automatically with the Ambient
Light Brightness Setting
● 6.1 Verify/Push the SET button on the control panel to display OPEN-L
●
6.2 The Lumen value unit will flash. Adjust the Lumen
value unit by pushing the UP or

- 14 -
DOWN button.
● 6.3 Adjust the Lumen value unit by pushing the UP or DOWN button.
Remember, For Open
23 = The most light for the door to open
0 = The least for the door to open
Remember, For Close
23= The least light for door to close
0= The most light for the door to close
● 6.4 It is recommended that the customer set it at around 15. If the sensitivity
value is too strong, the chicken coop door will open and close when it senses a
little light!
7. Close option on so that the Door opens or closes automatically with the
Local Time Setting and Timer
●
7.1 Verify/Push the SET button on the control panel to display CLOSE-T
●
7.2 The Hours time unit will flash. Adjust the Hours time unit by pushing the UP
or DOWN button.
●
7.3 Push the SET button to switch to the Minutes time unit. The Minutes time
unit will flash.
●
7.4 Adjust the Minutes time unit by pushing the UP or DOWN button.

- 15 -
8.Close option on so that the Door opens or closes automatically with the
Ambient Light Brightness Setting
● 8.1 Verify/Push the SET button on the control panel to display CLOSE-L
●
8.2 The Lumen value unit will flash. Adjust the Lumen value unit by pushing the UP or
DOWN button.
●
8.3 Adjust the Lumen value unit by pushing the UP or
DOWN button.
Remember, For Open
23 = The most light for the door to open
0 = The least for the door to open
Remember, For Close
23= The least light for door to close
0= The most light for the door to close
● 8.4 It is recommended that the customer set it at around 15. If the sensitivity value is too
strong, the chicken coop door will open and close when it senses a little light!
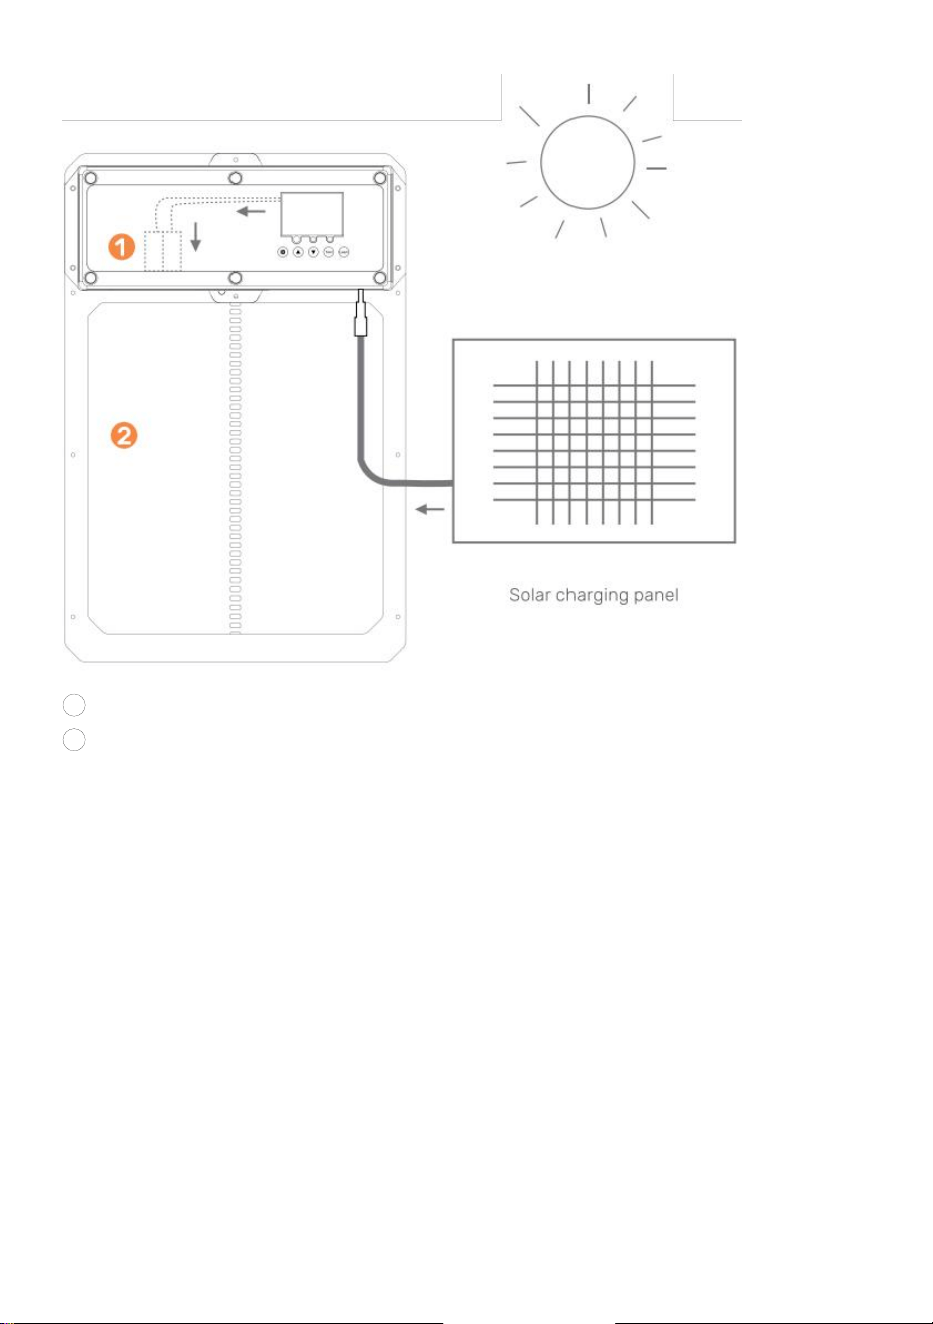
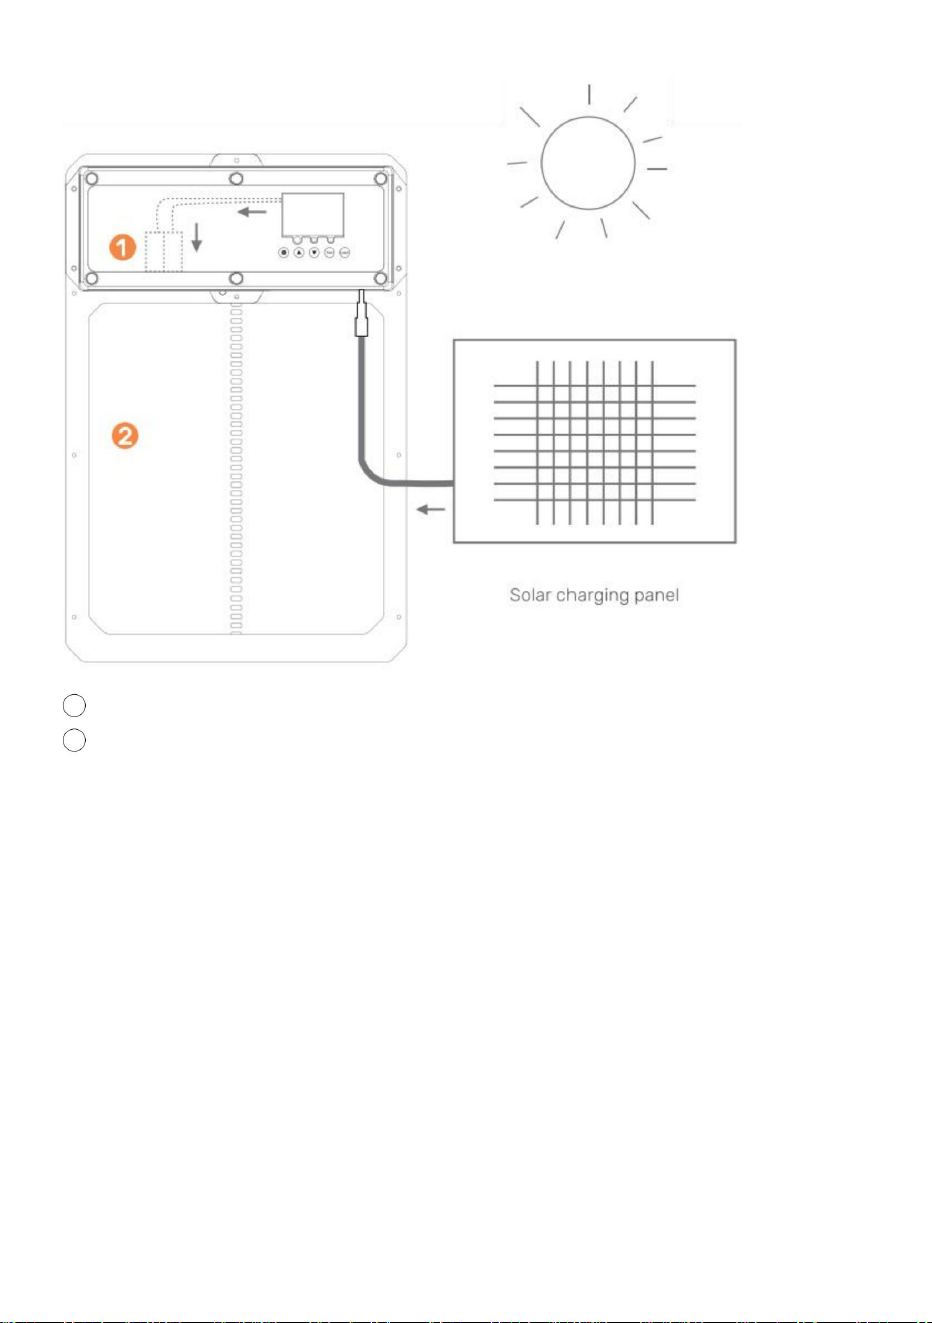
The chicken coop door is equipped with automatic charging function:
● 1.How to use the battery:
① No.5 1.2V nickel hydrogen rechargeable battery The 4PCS control board has a
voltage stabilizing function and automatically stops when the battery is fully
charged.
② 4PCS AA1.5V No.5 battery.
●
2.Solar charging panel charging: output 9V 10W solar charging panel as shown
in the figure
Note: If the solar power supply is used, AA batteries cannot be used, and
1.2V Ni-MH/Ni-Cr batteries are required
- 16 -
1
rechargeable battery
2
Chicken door coop
CAUTION: DO NOT TOUCH LEAD WIRES TOGETHER!
What you need:
10W-25W Solar Panel
9V 10Amp Solar Charge Controller
9V Battery 10AmpHour Battery
● 1. Install Solar Panel in direction to optimize for sunlight.
● 2. Connect solar panel to solar charge controller.
● 3. Connect battery to solar charge controller.
● 4. Connect auto chicken coop door to solar charge controller.
● 5.Protect solar charge controller and battery in enclosing to protect from
rain/weather.

- 17 -
See examples of products below
Solar Charge Controller and 25W Solar Panel
Maintenance &Troubleshooting
Remote Control(s) Not Working
● 》Check that the remote control battery(s)are installed in the correct direction and
the battery(s) are full of charge. Replace batteries if required.
●》Ensure the remote is programmed to the Chicken Coop Door correctly.
●》Check that the Chicken Coop Door is powered on.
Chicken Coop Door Does Not Power On
●》Ensure there is power going to the unit.
● 》Check the electrical connections powering the unit to ensure they are not dirty or
damaged.
Chicken Coop Door Does Not Open and/or Close Automatically with the Local
Time or Brightness Settings
●》Check to see if the settings used are programmed correctly and the features are
not turned off .
Timer isn't working properly
Follow these instructions to diagnose whether your timer is faulty or the door
settings were not set correctly.
● 1.Unplug the door from power.
● 2.Plug the door back in.

- 18 -
● 3. Do not change any other settings.
● 4.Reset the opening or closing time.
● 5.Wait until the door goes to specify the opening time 0805 to confirm if the
door opens.
● 6. If following these steps made your door work follow the same instructions to
program the door to your local time and your door open and close time. Ensure to
unplug the door again prior to doing so just to give it a hard reset.
Can a Solar Panel or Backup Battery be used with the unit?
Yes, it can be connected/installed with the supplied DC Male Plug
Does the Chicken Coop Door have to be installed on the inside or outside of the chicken
coop?
It depends on how you plan to use it. If it is installed on the inside of a closed off
coop then the light sensitivity settings will not operate properly.
What to do if the Door Jams when opening or closing the door?
Ensure the door frame is installed flat against the wall and that there are no
foreign debris found in the path of travel of the door.Also ensure the installation
screws are not installed too tight!
What to do if the Door does NOT open/close all of the way?
If the door is NOT closing try to reset your power supply.
Correct Disposal
This product is subject to the provision of European Directive 2012/19/EC.
The symbol showing a wheelie bin crossed through indicates that the product
requires separate refuse collection in the European Union. This applies to the
product and all accessories marked with this symbol. Products marked as such
may not be discarded with normal domestic waste, but must be taken to a
collection point for recycling electrical and electronic devices.
Made In China


MODELLO:JUMCC06B
"Risparmia la metà", "Metà prezzo" o qualsiasi altra espressione simile da noi utilizzata rappresenta
solo una stima del risparmio che potresti ottenere acquistando determinati utensili con noi rispetto ai
principali marchi principali e non significa necessariamente coprire tutte le categorie di utensili da noi
offerti. Ti ricordiamo gentilmente di verificare attentamente quando effettui un ordine con noi se
stai effettivamente risparmiando la metà rispetto ai principali marchi principali.
Continuiamo a impegnarci per fornirvi strumenti a prezzi competitivi.
APRIPORTA PER POLLAIO
Supporto tecnico e certificato di garanzia elettronica www.vevor.com/support
Machine Translated by Google

Questa è l'istruzione originale, si prega di leggere attentamente tutte le istruzioni del
manuale prima di utilizzare. VEVOR si riserva una chiara interpretazione del nostro manuale
utente. L'aspetto del prodotto sarà soggetto al prodotto ricevuto. Vi preghiamo di
perdonarci se non vi informeremo di nuovo se ci sono aggiornamenti tecnologici o software sul
nostro prodotto.
MODELLO:JUMCC06B
Hai domande sul prodotto? Hai bisogno di supporto tecnico? Non esitare a contattarci:
Supporto
tecnico e certificato di garanzia elettronica www.vevor.com/
support
- 1 -
APRIPORTA PER POLLAIO
HAI BISOGNO DI AIUTO? CONTATTACI!
Machine Translated by Google

coinvolti. I bambini non devono giocare con l'apparecchio. Pulizia e uso
Le istruzioni elencate di seguito possono causare scosse elettriche, incendi e/o lesioni gravi.
pollaio e collegarlo all'interno del pollaio)
per proteggere la spina di alimentazione dalle intemperie. (Fare passare il cavo attraverso il foro nel pollo
specifiche fornite con questo elettrodomestico. La mancata osservanza di tutte le
•ÿPer ridurre il rischio di scosse elettriche, non smontare questo prodotto. •ÿUtilizzare
l'adattatore di alimentazione CA/CC e il cavo forniti con l'unità. L'uso di
persone con ridotte capacità fisiche, sensoriali o mentali o prive di
•ÿQuesto apparecchio può essere utilizzato da bambini di età pari o superiore a 8 anni e
sull'uso sicuro dell'apparecchio e comprendere i pericoli
il produttore, il suo agente di assistenza o persone ugualmente qualificate al fine di evitare
altri cavi possono causare scosse, incendi o danni all'unità. •ÿSe il cavo di alimentazione
(adattatore di alimentazione CA/CC) è danneggiato, deve essere sostituito da
esperienza e conoscenza se hanno ricevuto supervisione o istruzione
la manutenzione non deve essere effettuata da bambini senza supervisione.
Leggere tutte le avvertenze di sicurezza, le istruzioni, le illustrazioni e
allentato. Utilizzare l'adattatore di alimentazione CA/CC solo con una fonte di alimentazione CA da
100-240 V. •ÿPortare l'alimentatore in un'area protetta o costruire un alloggiamento per l'alimentatore in modo da
un pericolo.
•ÿAssicurarsi che l'unità sia collegata correttamente alla fonte di alimentazione. •ÿ
Non utilizzare l'unità se il cavo di alimentazione è danneggiato o se il contatto della presa della spina è
Avvertenze e precauzioni
IMPORTANTIMISURE DI SICUREZZA
- 2 -
Machine Translated by Google

Questo dispositivo è conforme alla Parte 15 delle Norme FCC. Il funzionamento
è soggetto alle due condizioni seguenti: 1)
Questo prodotto può causare interferenze dannose.
ATTENZIONE: cambiamenti o modifiche al prodotto non espressamente approvati
dalla parte responsabile della conformità potrebbero invalidare l'autorizzazione
dell'utente a utilizzare il prodotto.
2) Questo prodotto deve accettare qualsiasi interferenza ricevuta, comprese le
interferenze che potrebbero causare un funzionamento indesiderato.
ATTENZIONE: cambiamenti o modifiche non espressamente approvati dalla parte
responsabile della conformità potrebbero invalidare il diritto dell'utente a utilizzare
l'apparecchiatura!
Nota: questo prodotto è stato testato e ritenuto conforme ai limiti per un dispositivo
digitale di Classe B ai sensi della Parte 15 delle Norme FCC. Tali limiti
Informazioni FCC
SALVARE QUESTE ISTRUZIONI
- 3 -
Machine Translated by Google

- 4 -
seguenti misure.
se non installato e utilizzato secondo le istruzioni, può causare
· Collegare il prodotto a una presa di corrente su un circuito diverso da quello a cui è collegato.
· Aumentare la distanza tra il prodotto e il ricevitore.
Questo prodotto genera, utilizza e può irradiare energia a radiofrequenza e
garantire che non si verifichino interferenze in una particolare installazione. Se questo
· Per assistenza, consultare il rivenditore o un tecnico radio/TV esperto.
interferenze dannose alle radiocomunicazioni. Tuttavia, non vi è alcuna
il ricevitore è connesso.
ricezione, che può essere determinata accendendo e spegnendo il prodotto, il
il prodotto provoca interferenze dannose alla radio o alla televisione
in un'installazione residenziale.
· Riorientare o riposizionare l'antenna ricevente.
l'utente è incoraggiato a provare a correggere l'interferenza con uno o più dei
sono progettati per fornire una protezione ragionevole contro interferenze dannose
Machine Translated by Google
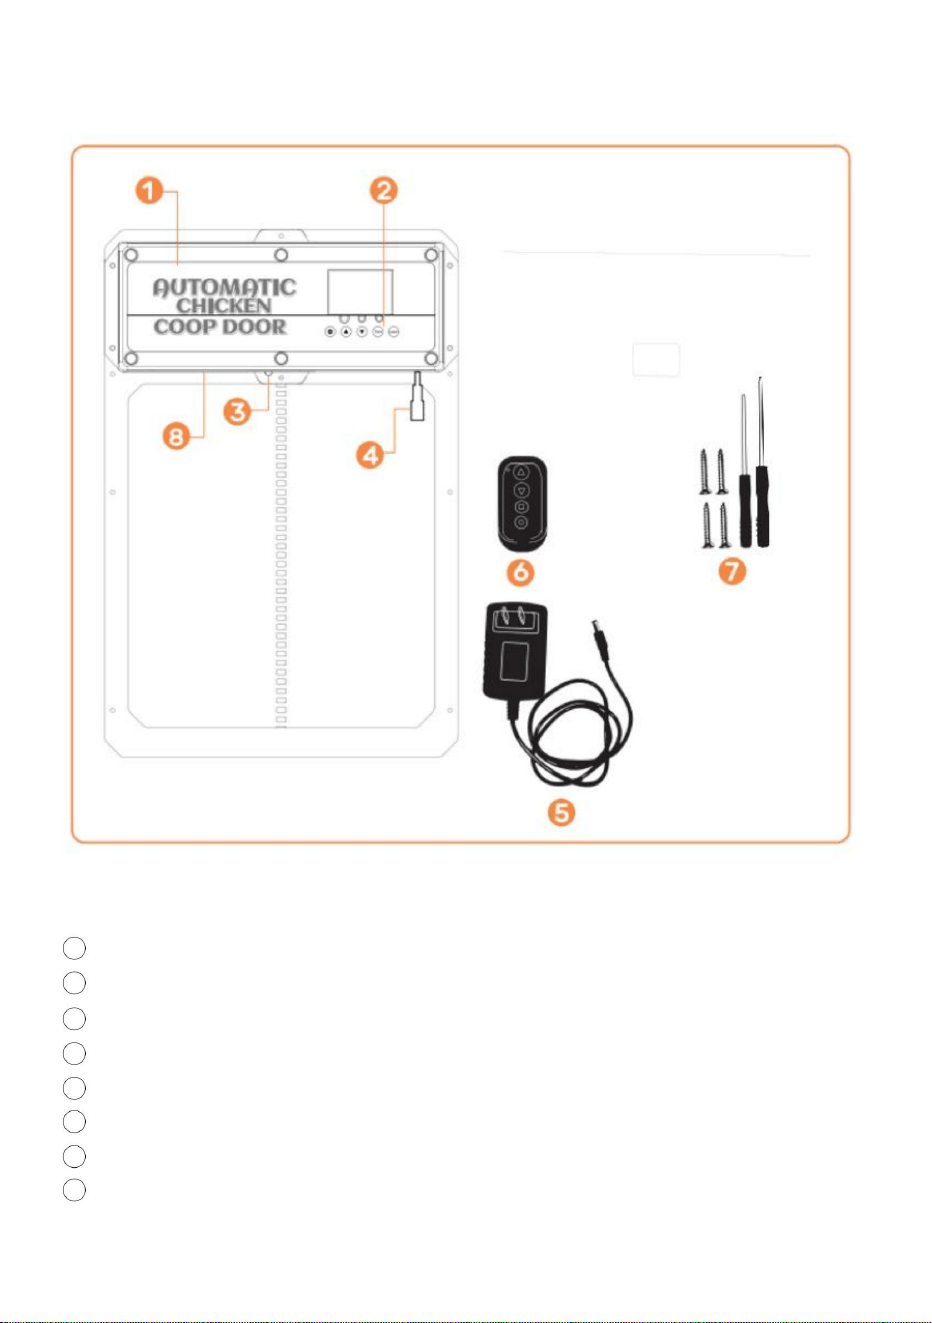
3 Sensore a infrarossi
5 Adattatore di alimentazione CA/CC con cavo e spina maschio CC
2 Pannello di controllo
1 Porta del Pollaio
8 Pacco batteria interno (ALIMENTAZIONE DI BACKUP)
4 Spina femmina CC/solare
6 Telecomando wireless (batterie non incluse, CARICA BATTERIE A27)
7 Viti autofilettanti e cacciavite
Introduzione al prodotto
- 5 -
Machine Translated by Google

Installazione)
ÿ Foro per il passaggio dell'alimentatore per garantire la protezione dell'alimentazione
ÿTelaio della porta del pollaio ÿ
Posizione di installazione delle viti ÿ
Struttura/parete del pollaio (con foro per il telaio della porta del pollaio
tempo atmosferico
Introduzione all'installazione
- 6 -
Machine Translated by Google

•
- 7 -
•
Test- Pulsante utilizzato per aprire/chiudere manualmente la porta
(UP) - Pulsante utilizzato per modificare le funzioni del programma mentre si è in modalità di programmazione
•
LEARN- Pulsante utilizzato per aggiungere/rimuovere il/i telecomando/i wireless
•
SET- Pulsante utilizzato per passare da una modalità di programmazione all'altra
Display digitale
(GIÙ) - Pulsante utilizzato per modificare le funzioni del programma mentre si è nel programma
•Luce 1-Spie luminose di apertura porta [verde] e chiusura porta [rossa] • Luce 2-
Spia luminosa di funzionamento del sensore a infrarossi •
Luce 3-Spia luminosa di funzionamento del sensore luminoso
modalità
•
Introduzione al pannello di controllo
Machine Translated by Google

Spine femmina CC sulla porta del pollaio. • 4. Collegare
l'adattatore di alimentazione CA/CC a una fonte di alimentazione e al pollaio
viti sulla porta. La porta può essere pizzicata se la porta è installata troppo stretta. • 7.Se la porta non si
chiude dopo la programmazione. Provare a spegnere l'alimentazione
vita. Utilizziamo la tecnologia moderna e la inseriamo in un design sottile e compatto per
Larghezza = 8,3 pollici es. Altezza = 10,24 pollici • 2.
Fissare il telaio della porta del pollaio alla struttura/parete del pollaio con
il telaio della porta del pollaio può essere installato e fissato saldamente con viti.
La porta Coop è la soluzione perfetta per un modo più piacevole di vivere in una fattoria
Il nostro prodotto è realizzato per supportare i tuoi obiettivi di homesteading e per aiutarti a realizzare
E NON APERTO). Assicurarsi che il telaio della porta del pollaio sia piatto [senza fessure/deformazioni]
costruire una semplice scatola di alimentazione per prevenire infiltrazioni d'acqua. • 5.
Per utilizzare il sensore di luce o il timer vedere pagina 10-11. • 6. Non
dimenticare che se la porta non si apre/chiude completamente, prova ad allentare la
irregolare quindi utilizzare 2x4 o alcuni pezzi piatti di legno per garantire il filo. • 9. Utilizzare due
distanziatori in legno da 1" a !" e installarli sopra la porta alla larghezza di
fornire ai nostri clienti la migliore porta automatica per pollai disponibile.
le viti autofilettanti (NON SERRARE ECCESSIVAMENTE O LA PORTA SI COMPRENDERÀ)
Utilizzare un elettroutensile per installare le viti attraverso la porta. •3.
Collegare la spina maschio CC dell'adattatore di alimentazione CA/CC a uno dei due
porta, questa porta consuma molta energia perché è una porta più robusta, quindi le batterie
di nuovo e prova a chiuderla di nuovo. •
8. Se hai delle finiture esterne o qualcosa che potrebbe rendere la porta installata
homesteading più facile. Ti consigliamo di usare il cavo di alimentazione o l'energia solare per alimentare il tuo
contro la struttura/parete del pollaio dopo l'installazione delle viti autofilettanti.
i fori nel parapioggia.
la porta si accenderà come confermato dall'illuminazione del display digitale. Assicurarsi
Introduzione generale
• 1. Verificare/creare un'apertura nella struttura/parete della porta del pollaio in modo che il
la fonte di alimentazione è protetta dalle intemperie collegandola all'interno del pollaio o
morirà velocemente!
Introduzione generale
Manuale operativo
- 8 -
Machine Translated by Google

- 9 -
discesa) la sonda rileva un animale alla porta (azione+temperatura, luce blu
raggio infrarosso. Mentre la luce rossa è accesa la porta non si chiude. • 13. La sonda di
rilevamento degli animali è mostrata nella Figura . Quando la porta scende (o è
acceso), e la porta tornerà a salire. Dopo 1 minuto, continuerà a scendere. Dopo
la luce si spegne) per funzionare normalmente.
dietro lo scudo antipioggia.
• 12. C'è una luce rossa sul sensore per indicare quando qualcosa sta bloccando il
Installazione generale (continua) (sensore a infrarossi) • 11.
Il sensore a infrarossi è integrato in questa porta.
• 10. Installare la protezione antipioggia sui due distanziatori in legno in modo che la porta possa salire e
1.0 - Programmazione del/i telecomando/i wireless •1.Verificare
che le batterie del telecomando siano installate nel/nei telecomando/i
(Batteria/e: A27/12V venduta separatamente). •2.
Per associare un telecomando alla porta del pollaio, tenere premuto il pulsante LEARN
interruzione di corrente, il riavvio della sonda richiede un preriscaldamento di circa 15 secondi (blu
Machine Translated by Google
e l'alimentazione viene ripristinata, il/i telecomando/i saranno ancora associati al pollo
Nota: se l'alimentazione viene rimossa dalla porta del pollaio per un breve periodo di tempo
porta del pollaio.
•2. Premere il pulsante Freccia giù per chiudere la porta.
telecomando due volte. Il LED verde lampeggia due volte, indicando che l'associazione è avvenuta.
il LED verde lampeggia due volte, indicando che l'annullamento è stato completato.
completo. Per associare il secondo telecomando, ripetere questo passaggio.
•3. Per disassociare tutti i telecomandi, premere e tenere premuto a lungo il pulsante LEARN , finché il
pulsante sul pannello di controllo per 2 secondi. Quindi premere un pulsante qualsiasi sul
•3. Spingere il pulsante quadrato per fermare qualsiasi movimento della porta.
3.0- Aprire/chiudere la porta del pollaio senza telecomando
Premendo in sequenza il pulsante Test sul pannello di controllo si aprirà o si chiuderà
• 1. Premere il pulsante Test sul pannello di controllo. La porta si aprirà. •2. Premere
il pulsante Test sul pannello di controllo. La porta smetterà di muoversi. •3. Premere il
pulsante Test sul pannello di controllo. La porta si chiuderà.
la porta.
2.0- Aprire/chiudere la porta del pollaio con il telecomando •1.Premere
il pulsante freccia su per aprire la porta.
- 10 -
Machine Translated by Google
2.3 Premere una volta il pulsante TEST per mettere in pausa.
Premendo in sequenza il pulsante SET sul pannello di controllo si passa attraverso
circa 1 secondo.
• 3.1Premere il pulsante SET sul pannello di controllo per visualizzare
•3.2 L'unità di tempo Ore lampeggerà. Regolare l'unità di tempo Ore premendo il pulsante UP o
3. Impostazione dell'ora locale (formato 24 ore) per la porta
•1.1 Pulsante di riattivazione: premere una volta il pulsante SET o TEST per accendere lo schermo per
circa 5 secondi per illuminare lo schermo.
• 3.3 Premere il pulsante SET per passare all'unità di tempo Minuti. L'unità di tempo Minuti
•1.2 Riattivazione del telecomando: tenere premuto un tasto qualsiasi del telecomando per
Pulsante GIÙ .
• 3.4 Regolare l'unità di tempo dei minuti premendo il pulsante SU o GIÙ . • 3.5 Premere il
pulsante SET per confermare l' impostazione dell'ora e l'impostazione successiva.
2.1 Collegare l'alimentatore e lo schermo del display apparirà come mostrato
2. Impostazione dell'apertura o chiusura manuale della porta
lampeggerà.
1. Riattivazione dello schermo
2.4 Premere nuovamente il pulsante TEST per chiudere la porta.
2.2 Premere una volta il pulsante TEST per aprire la porta.
4.0- Programmazione della porta del pollaio
- 11 -
Machine Translated by Google

- 12 -
4.1 Premere per un secondo il pulsante SET sul pannello di controllo per visualizzare 4.2 T- T Indica il
tempo di apertura della porta - tempo di chiusura della porta.
4.3 Premere per un secondo il pulsante SU sul pannello di controllo per visualizzare 4.4 T- L Indica il
tempo per aprire la porta - luce per chiudere la porta.
4. Modalità mista di impostazione e rilevamento della luce
diverse impostazioni da programmare.
4.5 Premere il pulsante SU per un secondo sul pannello di controllo per visualizzare 4.6 L- T Indica la
luce per aprire la porta - tempo per chiudere la porta
Machine Translated by Google

•5.4 Regolare l'unità di tempo dei minuti premendo il pulsante SU o GIÙ
lampeggerà.
6. Attivazione dell'opzione in modo che la porta si apra o si chiuda automaticamente con l'impostazione
della luminosità della luce ambientale
•6.1 Verificare/Premere il pulsante SET sul pannello di controllo per visualizzare OPEN-L •6.2
L'unità del valore Lumen lampeggerà. Regolare l'unità del valore Lumen premendo il pulsante UP o
•5.1 Verificare/Premere il pulsante SET sul pannello di controllo per visualizzare OPEN-T •5.2 L'unità di tempo
Ore lampeggerà. Regolare l'unità di tempo Ore premendo il pulsante SU o GIÙ .
•5.3 Premere il pulsante SET per passare all'unità di tempo Minuti. L'unità di tempo Minuti
5. Attivazione dell'opzione in modo che la porta si apra o si chiuda automaticamente con l'impostazione
dell'ora locale e del timer
4.7 Premere per un secondo il pulsante SU sul pannello di controllo per visualizzare 4.8 LL
Indica la luce per aprire la porta - luce per chiudere la porta.
- 13 -
Machine Translated by Google

Impostazione dell'ora locale e timer
7. Chiudi opzione in modo che la porta si apra o si chiuda automaticamente con l'
- 14 -
•
o il pulsante GIÙ .
l'unità lampeggerà.
• 7.2 L'unità di tempo Ore lampeggerà. Regolare l'unità di tempo Ore premendo il pulsante SU
• 7.1 Verificare/Premere il pulsante SET sul pannello di controllo per visualizzare CLOSE-T
7.4 Regolare l'unità di tempo dei minuti premendo il pulsante SU o GIÙ .
• 7.3 Premere il pulsante SET per passare all'unità di tempo Minuti. L'unità di tempo Minuti
Ricorda, per chiudere
0 = Il minimo per l'apertura della porta
23= La minima luce per chiudere la porta
0= La massima luce per la chiusura della porta • 6.4
Si consiglia al cliente di impostarla a circa 15. Se la sensibilità
Ricorda, per Open
23 = La massima luce per aprire la porta
• 6.3 Regolare l'unità del valore Lumen premendo il pulsante SU o GIÙ .
Pulsante GIÙ .
il valore è troppo forte, la porta del pollaio si aprirà e si chiuderà quando rileva un
poca luce!
Machine Translated by Google

funzione di stabilizzazione della tensione e si arresta automaticamente quando la batteria è completamente scarica
nella figura
ÿ Batteria ricaricabile al nichel-idrogeno da 1,2 V n. 5 La scheda di controllo 4PCS ha un
La porta del pollaio è dotata di funzione di ricarica automatica: • 1. Come
utilizzare la batteria:
caricato.
ÿ 4 batterie AA1.5V n. 5. • 2.
Pannello di ricarica solare: uscita pannello di ricarica solare 9V 10W come mostrato
Nota: se si utilizza l'alimentazione solare, non è possibile utilizzare batterie AA e
Sono necessarie batterie Ni-MH/Ni-Cr da 1,2 V
Impostazione della luminosità della luce ambientale
8.Chiudi opzione in modo che la porta si apra o si chiuda automaticamente con l'
Ricorda, per Open
• 8.3 Regolare l'unità del valore Lumen premendo il pulsante SU o GIÙ .
23 = La massima luce per aprire la porta
0 = Il minimo per l'apertura della porta
8.2 L'unità del valore Lumen lampeggerà. Regolare l'unità del valore Lumen premendo SU o
Pulsante GIÙ .
•
• 8.1 Verificare/Premere il pulsante SET sul pannello di controllo per visualizzare CLOSE-L
Ricorda, per chiudere
forte, la porta del pollaio si aprirà e si chiuderà quando rileverà un po' di luce!
- 15 -
23= La minima luce per chiudere la porta
0= La massima luce per la chiusura della porta
•8.4 Si consiglia al cliente di impostarlo a circa 15. Se il valore di sensibilità è troppo
Machine Translated by Google
- 16 -
2 Pollaio con porta
1 batteria ricaricabile
Pannello solare 10W-25W
Regolatore di carica solare 9V 10Amp
Cosa ti serve:
ATTENZIONE: NON TOCCARE INSIEME I FILI CONDUTTORI!
pioggia/tempo.
Batteria da 9 V Batteria da 10 Ampere
• 1. Installare il pannello solare nella direzione per ottimizzare la luce
solare. • 2. Collegare il pannello solare al regolatore di carica
solare. • 3. Collegare la batteria al regolatore di carica
solare. • 4. Collegare la porta automatica del pollaio al regolatore di carica
solare. • 5. Proteggere il regolatore di carica solare e la batteria in un involucro per proteggerli da
Machine Translated by Google

Manutenzione e risoluzione dei problemi
•ÿAssicurarsi che l'unità sia alimentata elettricamente.
• ÿControllare i collegamenti elettrici che alimentano l'unità per assicurarsi che non siano sporchi o
• ÿControllare che le batterie del telecomando siano installate nella direzione corretta e
La porta del pollaio non si accende
Impostazioni di ora o luminosità •ÿ
Controllare se le impostazioni utilizzate sono programmate correttamente e le funzioni sono
Il/I telecomando/i non funziona/no
la/le batteria/e è/sono completamente carica/e. Sostituisci le batterie se
necessario. •ÿAssicurati che il telecomando sia programmato correttamente per la porta del
pollaio. •ÿControlla che la porta del pollaio sia accesa.
Regolatore di carica solare e pannello solare da 25 W
Vedi esempi di prodotti qui sotto
danneggiato.
non spento.
Il timer non funziona correttamente
La porta del pollaio non si apre e/o si chiude automaticamente con il locale
Seguire queste istruzioni per diagnosticare se il timer è difettoso o se la porta
le impostazioni non sono state impostate
correttamente. • 1. Scollegare la porta
dall'alimentazione. • 2. Ricollegare la porta.
- 17 -
Machine Translated by Google

Smaltimento corretto
coop, le impostazioni di sensibilità alla luce non funzioneranno correttamente.
Questo prodotto è soggetto alle disposizioni della Direttiva Europea 2012/19/CE.
non possono essere smaltiti insieme ai normali rifiuti domestici, ma devono essere portati in un
prima di procedere, scollegare nuovamente la porta per effettuare un hard reset.
detriti estranei trovati nel percorso di movimento della porta. Assicurarsi inoltre che l'installazione
Assicurarsi che il telaio della porta sia installato piatto contro il muro e che non ci siano
programmare la porta in base all'ora locale e all'orario di apertura e chiusura della porta. Assicurarsi di
Sì, può essere collegato/installato con la spina maschio CC in dotazione
Cosa fare se la porta NON si apre/chiude completamente?
prodotto e tutti gli accessori contrassegnati con questo simbolo. I prodotti contrassegnati come tali
Made in China
È possibile utilizzare un pannello solare o una batteria di backup con l'unità?
le viti non sono troppo strette!
punto di raccolta per il riciclaggio di apparecchiature elettriche ed elettroniche.
cooperativa?
La porta del pollaio deve essere installata all'interno o all'esterno del pollaio?
Se la porta NON si chiude, provare a ripristinare l'alimentazione.
Il simbolo raffigurante un bidone della spazzatura barrato indica che il prodotto
la porta si apre.
• 6. Se seguendo questi passaggi la porta funziona, segui le stesse istruzioni per
Cosa fare se la porta si inceppa durante l'apertura o la chiusura?
richiede la raccolta differenziata dei rifiuti nell'Unione Europea. Ciò vale per
Dipende da come pensi di usarlo. Se è installato all'interno di un ambiente chiuso
• 3. Non modificare altre impostazioni. • 4. Reimpostare
l'orario di apertura o chiusura. • 5. Attendere che la
porta vada a specificare l'orario di apertura 0805 per confermare se il
- 18 -
Machine Translated by Google


MODEL:JUMCC06B
Nadal staramy się oferować Państwu narzędzia w konkurencyjnych cenach.
„Oszczędź połowę”, „Połowa ceny” lub inne podobne wyrażenia używane przez nas stanowią
jedynie szacunkowe oszczędności, jakie możesz uzyskać, kupując u nas określone narzędzia w
porównaniu z głównymi markami i niekoniecznie oznaczają one objęcie wszystkich kategorii narzędzi
oferowanych przez nas. Uprzejmie przypominamy, aby dokładnie sprawdzić, czy składając u nas
zamówienie faktycznie oszczędzasz połowę w porównaniu z głównymi markami.
OTWIERACZ DRZWI DO KURNIKA
Wsparcie techniczne i certyfikat gwarancji elektronicznej www.vevor.com/support
Machine Translated by Google

To jest oryginalna instrukcja, przed użyciem należy uważnie przeczytać wszystkie
instrukcje. VEVOR zastrzega sobie jasną interpretację naszej instrukcji obsługi. Wygląd
produktu będzie zależał od produktu, który otrzymałeś. Prosimy o wybaczenie, że nie
poinformujemy Cię ponownie, jeśli w naszym produkcie pojawią się jakiekolwiek aktualizacje
technologiczne lub oprogramowania.
MODEL:JUMCC06B
Masz pytania dotyczące produktu? Potrzebujesz wsparcia technicznego? Skontaktuj się z
nami: Wsparcie
techniczne i certyfikat E-Gwarancji www.vevor.com/support
- 1 -
OTWIERACZ DRZWI DO KURNIKA
POTRZEBUJESZ POMOCY? SKONTAKTUJ SIĘ Z NAMI!
Machine Translated by Google

•Urządzenie to może być używane przez dzieci w wieku od 8 lat i starsze.
•Aby zmniejszyć ryzyko porażenia prądem, nie rozmontowuj tego produktu. •Używaj zasilacza
AC/DC i kabla dostarczonego wraz z urządzeniem. Korzystanie z
osoby o ograniczonej sprawności fizycznej, sensorycznej lub umysłowej lub o braku
aby chronić wtyczkę zasilającą przed warunkami atmosferycznymi. (Przeprowadź kabel przez otwór w kurczaku)
specyfikacje dostarczone z tym urządzeniem elektrycznym. Nieprzestrzeganie wszystkich
kurnik i podłączyć do środka kurnika)
Nieprzestrzeganie poniższych instrukcji może skutkować porażeniem prądem, pożarem i/lub poważnymi obrażeniami.
zagrożenie.
•Upewnij się, że urządzenie jest prawidłowo podłączone do źródła zasilania. •Nie
używaj urządzenia, jeśli przewód zasilający jest uszkodzony lub jeśli styki gniazda wtykowego są uszkodzone.
zaangażowany. Dzieci nie mogą bawić się urządzeniem. Czyszczenie i użytkowanie
Dzieci nie mogą wykonywać żadnych prac konserwacyjnych bez nadzoru.
Przeczytaj wszystkie ostrzeżenia dotyczące bezpieczeństwa, instrukcje, ilustracje i
luźne. Zasilacza AC/DC należy używać wyłącznie ze źródłem zasilania AC 100–240 V. •Podłącz zasilacz do
chronionego obszaru lub zbuduj obudowę zasilacza, aby
Inne kable mogą spowodować porażenie prądem, pożar lub uszkodzenie urządzenia. •Jeśli
przewód zasilający (zasilacz AC/DC) jest uszkodzony, należy go wymienić
doświadczenie i wiedzę, jeżeli sprawowano nad nimi nadzór lub udzielano im instrukcji
dotyczące bezpiecznego korzystania z urządzenia i rozumienia zagrożeń
producenta, jego agenta serwisowego lub podobnie wykwalifikowaną osobę w celu uniknięcia
Ostrzeżenia i środki ostrożności
WAŻNEZABEZPIECZEŃSTWA
- 2 -
Machine Translated by Google

2) Produkt ten musi być odporny na wszelkie zakłócenia, w tym zakłócenia mogące powodować
niepożądane działanie.
OSTRZEŻENIE: Wszelkie zmiany lub modyfikacje tego produktu, które nie zostały wyraźnie
zatwierdzone przez stronę odpowiedzialną za zgodność, mogą spowodować unieważnienie
prawa użytkownika do korzystania z produktu.
To urządzenie jest zgodne z częścią 15 przepisów FCC. Eksploatacja podlega następującym
dwóm warunkom: 1) Ten produkt może powodować
szkodliwe zakłócenia.
UWAGA: Zmiany lub modyfikacje, które nie zostały wyraźnie zatwierdzone przez stronę
odpowiedzialną za zgodność, mogą spowodować unieważnienie prawa użytkownika do
korzystania ze sprzętu!
Uwaga: Ten produkt został przetestowany i uznany za zgodny z ograniczeniami dla urządzeń
cyfrowych klasy B zgodnie z częścią 15 przepisów FCC. Te ograniczenia
Informacje FCC
ZAPISZTEINSTRUKCJE
- 3 -
Machine Translated by Google

- 4 -
szkodliwe zakłócenia w komunikacji radiowej. Nie ma jednak
Odbiornik jest podłączony.
gwarantuje, że w konkretnej instalacji nie wystąpią żadne zakłócenia. Jeśli to
· Aby uzyskać pomoc, należy zwrócić się do sprzedawcy lub doświadczonego technika radiowo-telewizyjnego.
· Zwiększ odległość między produktem a odbiornikiem.
Ten produkt generuje, wykorzystuje i może emitować energię o częstotliwości radiowej,
jeśli nie zostanie zainstalowany i użyty zgodnie z instrukcją, może spowodować
· Podłączyć produkt do gniazdka w innym obwodzie niż ten, do którego jest podłączony.
Użytkownik jest zachęcany do próby skorygowania zakłóceń za pomocą jednego lub więcej z
są zaprojektowane tak, aby zapewnić rozsądną ochronę przed szkodliwymi zakłóceniami
następujące środki.
w instalacji mieszkaniowej.
· Zmiana orientacji lub położenia anteny odbiorczej.
produkt powoduje szkodliwe zakłócenia w odbiorze sygnału radiowego lub telewizyjnego
odbiór, który można ustalić poprzez wyłączenie i włączenie produktu,
Machine Translated by Google

3 Czujnik podczerwieni
4 wtyczki żeńskie DC/Solar
2 Panel sterowania
1 Drzwi do kurnika
5 Zasilacz AC/DC z przewodem i wtyczką męską DC
6 bezprzewodowych pilotów (baterie nie są dołączone, ZAŁADUJ BATERIE A27)
8 Wewnętrzny akumulator (ZASILANIE REZERWOWE)
Wprowadzenie do produktu
7 wkrętów samogwintujących i śrubokręt
- 5 -
Machine Translated by Google

Instalacja)
Otwór na zasilacz, który zapewni ochronę zasilania przed
Rama drzwi kurnika Miejsce
montażu śrub Konstrukcja/ściana
kurnika (z otworem na ramę drzwi kurnika)
pogoda
Wprowadzenie do instalacji
- 6 -
Machine Translated by Google

•
- 7 -
Test- Przycisk służący do ręcznego otwierania/zamykania drzwi
•
(W GÓRĘ) – Przycisk służący do zmiany funkcji programu w trybie programowania.
•
LEARN – przycisk służący do dodawania/usuwania bezprzewodowych pilotów zdalnego sterowania
•
SET- Przycisk służący do przełączania pomiędzy trybami programowania
Wyświetlacz cyfrowy
tryb
•
(DÓŁ) – Przycisk służący do zmiany funkcji programu w trakcie jego trwania.
• Kontrolka 1 - Otwórz drzwi [zielona] i zamknij drzwi [czerwona] •
Kontrolka 2 - Kontrolka działania czujnika
podczerwieni • Kontrolka 3 - Kontrolka działania czujnika światła
Wprowadzenie do panelu sterowania
Machine Translated by Google

zapewniamy naszym klientom najlepsze dostępne automatyczne drzwi do kurników.
wkręty samogwintujące (NIE DOKRĘCAJ ZBYT MOCNO, PONIEWAŻ DRZWI SIĘ ZMUSZĄ)
Nasz produkt został stworzony, aby wspierać Twoje cele związane z gospodarką domową i pomóc Ci w ich realizacji.
I NIE OTWIERAĆ). Upewnij się, że rama drzwi kurnika jest płaska [bez szczelin/odkształceń]
ponownie i spróbuj zamknąć drzwi. • 8.
Jeśli masz zewnętrzne listwy wykończeniowe lub cokolwiek, co mogłoby uniemożliwić montaż drzwi,
nierówne, użyj desek 2x4 lub płaskich kawałków drewna, aby zapewnić równą powierzchnię. • 9.
Użyj dwóch drewnianych przekładek o wymiarach 1" do !" i zamontuj je nad drzwiami na szerokości
Ramę drzwi kurnika można zamontować i solidnie przymocować za pomocą śrub.
Drzwi kurnikowe to idealne rozwiązanie, dzięki któremu życie w gospodarstwie domowym stanie się przyjemniejsze
zbudowanie prostej skrzynki zasilającej, aby zapobiec przedostawaniu się wody. • 5. Aby
skorzystać z czujnika światła lub timera, zobacz stronę 10-11. • 6. Nie zapomnij,
że jeśli drzwi nie otwierają się/zamykają całkowicie, spróbuj poluzować
śruby na drzwiach. Drzwi mogą zostać ściśnięte, jeśli drzwi są zamontowane zbyt ciasno. • 7. Jeśli drzwi nie
zamykają się po zaprogramowaniu. Spróbuj wyłączyć zasilanie
Szerokość = 8,3 cala. Wysokość = 10,24 cala • 2. Przymocuj
ramę drzwi kurnika do konstrukcji/ściany kurnika za pomocą
życie. Wykorzystujemy nowoczesną technologię i umieszczamy ją w smukłej, kompaktowej konstrukcji, aby
umrze szybko!
Wprowadzenie ogólne
Wtyczki DC żeńskie na drzwiach kurnika. • 4. Podłącz zasilacz
AC/DC do źródła zasilania i kurnika.
drzwi włączą się, co zostanie potwierdzone podświetleniem wyświetlacza cyfrowego. Upewnij się,
Wprowadzenie ogólne
• 1. Sprawdź/utwórz otwór w konstrukcji/ścianie drzwi dla kur, tak aby
łatwiejsze gospodarowanie. Sugerujemy korzystanie z przewodu zasilającego lub energii słonecznej do zasilania
do konstrukcji/ściany kurnika po zamontowaniu wkrętów samogwintujących.
źródło zasilania jest chronione przed warunkami atmosferycznymi poprzez podłączenie do wnętrza kurnika lub
otwory w osłonie przeciwdeszczowej.
Za pomocą elektronarzędzia wkręć śruby przez drzwi. •3. Podłącz wtyczkę
męską DC zasilacza AC/DC do jednego z następujących gniazd:
drzwi, te drzwi zużywają dużo energii, ponieważ są solidniejsze, więc baterie
Instrukcja obsługi
- 8 -
Machine Translated by Google

- 9 -
promienia podczerwieni. Gdy świeci się czerwone światło, drzwi nie zamkną się. • 13. Sonda
wykrywająca obecność zwierząt jest pokazana na rysunku. Gdy drzwi opadają (lub są
opadając) sonda wyczuwa zwierzę przy drzwiach (akcja + temperatura, niebieskie światło)
on), a drzwi wrócą do pozycji podniesionej. Po 1 minucie będą dalej opadać. Po
przerwa w dostawie prądu, ponowne uruchomienie sondy wymaga wstępnego nagrzania przez około 15 sekund (niebieski)
za osłoną przeciwdeszczową.
• 12. Na czujniku znajduje się czerwone światło, które sygnalizuje, gdy coś blokuje
Ciąg dalszy ogólnej instalacji (czujnik podczerwieni) • 11. Czujnik
podczerwieni jest wbudowany w te drzwi.
• 10. Zamontuj osłonę przeciwdeszczową na dwóch drewnianych przekładkach, aby drzwi mogły się podnieść i
1.0 - Programowanie bezprzewodowych pilotów zdalnego sterowania
•1. Sprawdź, czy w pilocie zdalnego sterowania znajdują się baterie.
(Bateria(y): A27/12V sprzedawane oddzielnie). •2. Aby
sparować pilota z drzwiami kurnika, naciśnij i przytrzymaj przycisk LEARN
(światło zgaśnie) aby działać normalnie.
Machine Translated by Google
- 10 -
Uwaga: Jeżeli zasilanie zostanie odłączone od drzwi kurnika na krótki okres czasu,
i po ponownym włączeniu zasilania pilot(y) nadal będą sparowane z kurczakiem
drzwi do kurnika.
2.0- Otwieranie/zamykanie drzwi kurnika za pomocą pilota •1. Naciśnij
przycisk ze strzałką w górę, aby otworzyć drzwi.
kompletne. Aby sparować drugi pilot, powtórz ten krok. •3. Aby rozparować
wszystkie piloty, naciśnij i przytrzymaj przycisk LEARN , aż
Zielona dioda LED mignie dwa razy, wskazując, że anulowanie zostało zakończone.
pilot zdalnego sterowania dwa razy. Zielona dioda LED miga dwa razy, wskazując, że parowanie jest zakończone
przycisk na panelu sterowania w dół przez 2 sekundy. Następnie naciśnij dowolny przycisk na
Kolejne naciśnięcia przycisku Test na panelu sterowania spowodują otwarcie lub zamknięcie
•3. Naciśnij kwadratowy ogranicznik, aby zatrzymać jakikolwiek ruch drzwi.
•2. Naciśnij przycisk strzałki w dół, aby zamknąć drzwi.
drzwi.
• 1. Naciśnij przycisk Test na panelu sterowania. Drzwi się otworzą. •2. Naciśnij
przycisk Test na panelu sterowania. Drzwi zatrzymają się. •3. Naciśnij przycisk Test
na panelu sterowania. Drzwi się zamkną.
3.0- Otwórz/zamknij drzwi kurnika bez pilota
Machine Translated by Google

- 11 -
•1.2 Wybudzanie pilota: Naciśnij i przytrzymaj dowolny przycisk na pilocie, aby włączyć pilota.
Przycisk W DÓŁ .
około 5 sekund, aby ekran się rozświetlił.
• 3.3 Naciśnij przycisk SET , aby przełączyć się na jednostkę czasu Minuty. Jednostka czasu Minuty
3. Ustawianie czasu lokalnego (format 24-godzinny) dla drzwi
•1.1 Wybudzanie za pomocą przycisku: Naciśnij raz przycisk SET lub TEST , aby włączyć ekran.
około 1 sekundy.
• 3.1 Naciśnij przycisk SET na panelu sterowania, aby wyświetlić •3.2
Jednostka czasu Godziny zacznie migać. Ustaw jednostkę czasu Godziny, naciskając przycisk UP lub
2.2 Naciśnij przycisk TEST jeden raz, aby otworzyć drzwi.
4.0- Programowanie drzwi kurnika
2.3 Naciśnij przycisk TEST jeden raz, aby wstrzymać.
Kolejne naciskanie przycisku SET na panelu sterowania spowoduje cykliczne przełączanie
1. EkranWakeup
2.4 Naciśnij ponownie przycisk TEST , aby zamknąć drzwi.
2. Ustawianie ręcznego otwierania lub zamykania drzwi
będzie migać.
• 3.4 Ustaw jednostkę czasu Minuty, naciskając przycisk W GÓRĘ lub W DÓŁ . • 3.5 Naciśnij
przycisk SET , aby potwierdzić ustawienie czasu i przejść do następnego ustawienia.
2.1 Podłącz zasilanie, a na ekranie wyświetlacza pojawi się pokazany obraz.
Machine Translated by Google

4. Tryb mieszany ustawiania czasu i wykrywania światła
4.3 Naciśnij przycisk UP na panelu sterowania przez jedną sekundę, aby wyświetlić 4.4 T-L .
Wskazuje czas otwarcia drzwi - kontrolka informuje o konieczności zamknięcia drzwi.
4.1 Naciśnij przycisk SET na panelu sterowania przez jedną sekundę, aby wyświetlić 4.2 T- T
Oznacza czas otwarcia drzwi - czas zamknięcia drzwi.
różne ustawienia do zaprogramowania.
4.5 Naciśnij przycisk UP na panelu sterowania przez jedną sekundę, aby wyświetlić 4.6 L-T
Wskazuje światło otwierające drzwi - czas zamknąć drzwi
- 12 -
Machine Translated by Google

- 13 -
będzie migać.
•5.4 Ustaw jednostkę czasu Minuty, naciskając przycisk W GÓRĘ lub W DÓŁ
6. Włączenie opcji automatycznego otwierania i zamykania drzwi przy ustawieniu jasności oświetlenia otoczenia
5. Włączenie opcji automatycznego otwierania i zamykania drzwi zgodnie z ustawieniem czasu lokalnego i timera
•5.3 Naciśnij przycisk SET , aby przełączyć się na jednostkę czasu Minuty. Jednostka czasu Minuty
•5.1 Sprawdź/naciśnij przycisk SET na panelu sterowania, aby wyświetlić OPEN-T •5.2 Jednostka czasu
godzinowego zacznie migać. Ustaw jednostkę czasu godzinowego, naciskając przycisk UP lub DOWN .
4.7 Naciśnij przycisk UP na panelu sterowania przez jedną sekundę, aby wyświetlić 4.8 LL Wskazuje,
że zaświeci się lampka kontrolna otwierania drzwi - zaświeci się lampka kontrolna zamykania drzwi.
•6.1 Sprawdź/naciśnij przycisk SET na panelu sterowania, aby wyświetlić OPEN-L •6.2 Jednostka wartości
lumenów zacznie migać. Ustaw jednostkę wartości lumenów, naciskając przycisk UP lub
Machine Translated by Google

lub przycisk W DÓŁ .
• 7.3 Naciśnij przycisk SET , aby przełączyć się na jednostkę czasu Minuty. Czas Minuty
• 7.2 Jednostka czasu Godziny zacznie migać. Dostosuj jednostkę czasu Godziny, naciskając przycisk UP.
• 7.1 Sprawdź/naciśnij przycisk SET na panelu sterowania, aby wyświetlić CLOSE-T
urządzenie zacznie migać.
7.4 Ustaw jednostkę czasu „Minuty” naciskając przycisk W GÓRĘ lub W DÓŁ .
- 14 -
•
Ustawienia czasu lokalnego i timera
7. Włącz opcję Zamknij, aby drzwi otwierały się lub zamykały automatycznie.
0 = Najmniej, aby otworzyć drzwi
Pamiętaj, dla bliskości
23= Najmniej światła potrzebnego do zamknięcia drzwi
Pamiętaj, dla otwartych
23 = Najwięcej światła do otwarcia drzwi
• 6.3 Ustaw jednostkę wartości lumenów, naciskając przycisk W GÓRĘ lub W DÓŁ .
Przycisk W DÓŁ .
0 = Najwięcej światła potrzebnego do zamknięcia
drzwi • 6,4 Zaleca się, aby klient ustawił wartość około 15. Jeśli czułość
wartość jest zbyt wysoka, drzwi kurnika otworzą się i zamkną, gdy wykryją
małe światło!
Machine Translated by Google

• 8.3 Ustaw jednostkę wartości lumenów, naciskając przycisk W GÓRĘ lub W DÓŁ .
Pamiętaj, dla otwartych
23 = Najwięcej światła do otwarcia drzwi
0 = Najmniej, aby otworzyć drzwi
8.2 Jednostka wartości lumenów zacznie migać. Ustaw jednostkę wartości lumenów, naciskając przycisk UP lub
Przycisk W DÓŁ .
•
• 8.1 Sprawdź/naciśnij przycisk SET na panelu sterowania, aby wyświetlić CLOSE-L
23= Najmniej światła potrzebnego do zamknięcia drzwi
0 = Najwięcej światła potrzebnego do zamknięcia
drzwi •8,4 Zaleca się, aby klient ustawił ją na około 15. Jeśli wartość czułości jest zbyt
- 15 -
Pamiętaj, dla bliskości
Mocne, drzwi kurnika otworzą się i zamkną, gdy wyczują odrobinę światła!
8. Włącz opcję Zamknij, aby drzwi otwierały się lub zamykały automatycznie
Ustawienie jasności światła otoczenia
funkcja stabilizacji napięcia i automatyczne zatrzymanie po pełnym naładowaniu akumulatora
Uwaga: W przypadku korzystania z zasilania słonecznego nie można używać baterii AA.
Akumulator niklowo-wodorkowy nr 5 1,2 V Płyta sterownicza 4PCS ma
Drzwi kurnika wyposażone są w funkcję automatycznego ładowania: • 1. Jak korzystać
z akumulatora:
na rysunku
Wymagane są akumulatory 1,2 V Ni-MH/Ni-Cr
naładowany.
4 baterie AA1,5 V nr 5. • 2. Ładowanie
panelu ładowania słonecznego: wyjście 9 V 10 W panelu ładowania słonecznego, jak pokazano
Machine Translated by Google

Panel słoneczny 10W-25W
Regulator ładowania słonecznego 9V 10A
Czego potrzebujesz:
UWAGA: NIE DOTYKAJ PRZEWODÓW ZE SOBĄ!
Bateria 9 V Bateria 10 amperogodzin • 1.
Zainstaluj panel słoneczny w kierunku optymalnym dla światła słonecznego.
• 2. Podłącz panel słoneczny do regulatora ładowania słonecznego.
• 3. Podłącz akumulator do regulatora ładowania słonecznego.
• 4. Podłącz drzwi automatycznego kurnika do regulatora ładowania słonecznego.
• 5. Chroń regulator ładowania słonecznego i akumulator w obudowie, aby zabezpieczyć przed
deszcz/pogoda.
Kurnik z 2 drzwiami
1 akumulator
- 16 -
Machine Translated by Google

Konserwacja i rozwiązywanie problemów
akumulator(y) są w pełni naładowane. W razie potrzeby wymień baterie. •
Upewnij się, że pilot jest prawidłowo zaprogramowany do drzwi kurnika. •Sprawdź, czy
drzwi kurnika są włączone.
Drzwi kurnika nie włączają się
•Upewnij się, że do urządzenia doprowadzone jest zasilanie.
• Sprawdź połączenia elektryczne zasilające urządzenie, aby upewnić się, że nie są zabrudzone lub uszkodzone.
uszkodzony.
Pilot(y) zdalnego sterowania nie działają
• Sprawdź, czy baterie pilota zdalnego sterowania są włożone we właściwym kierunku i
Regulator ładowania słonecznego i panel słoneczny 25 W
Zobacz przykłady produktów poniżej
Drzwi kurnika nie otwierają się i/lub nie zamykają automatycznie za pomocą lokalnego sterownika
Ustawienia czasu lub jasności •Sprawdź,
czy używane ustawienia są prawidłowo zaprogramowane i czy funkcje są aktywne.
Postępuj zgodnie z poniższymi instrukcjami, aby zdiagnozować, czy timer lub drzwi są uszkodzone.
Timer nie działa prawidłowo
ustawienia nie zostały wprowadzone
prawidłowo. • 1. Odłącz drzwi od zasilania.
• 2. Podłącz drzwi ponownie.
nie wyłączony.
- 17 -
Machine Translated by Google

Prawidłowa utylizacja
Czy w urządzeniu można stosować panel słoneczny lub akumulator zapasowy?
śruby nie są przykręcone zbyt mocno!
Tak, można go podłączyć/zainstalować za pomocą dołączonego męskiego wtyku DC
Co zrobić, jeśli drzwi NIE otwierają się/nie zamykają całkowicie?
punkt zbiórki sprzętu elektrycznego i elektronicznego przeznaczonego do recyklingu.
Wyprodukowano w Chinach
Upewnij się, że ościeżnica drzwi jest zamontowana płasko przy ścianie i nie ma żadnych
zaprogramuj drzwi na swój lokalny czas i czas otwarcia i zamknięcia drzwi. Upewnij się, że
produkt i wszystkie akcesoria oznaczone tym symbolem. Produkty oznaczone jako takie
nie wolno wyrzucać razem z normalnymi odpadami domowymi, lecz należy je oddać do punktu zbiórki odpadów.
Przed wykonaniem tej czynności odłącz drzwi ponownie od zasilania, aby wykonać twardy reset.
obce zanieczyszczenia znajdujące się na drodze ruchu drzwi. Należy również upewnić się, że montaż
Zależy to od tego, jak zamierzasz go używać. Jeśli jest zainstalowany wewnątrz zamkniętego
• 3. Nie zmieniaj żadnych innych ustawień. • 4. Zresetuj
czas otwierania lub zamykania. • 5. Poczekaj, aż drzwi
otworzą się, aby określić czas otwierania 0805, aby potwierdzić, czy
coop, wówczas ustawienia czułości na światło nie będą działać prawidłowo.
Niniejszy produkt podlega postanowieniom Dyrektywy Europejskiej 2012/19/WE.
Symbol przedstawiający przekreślony pojemnik na śmieci na kółkach oznacza, że produkt
Co zrobić, gdy drzwi zacinają się podczas otwierania lub zamykania?
drzwi się
otwierają. • 6. Jeśli po wykonaniu tych czynności drzwi zadziałały, postępuj zgodnie z tymi samymi instrukcjami.
Czy drzwi do kurnika muszą być zamontowane wewnątrz czy na zewnątrz kurnika?
Jeśli drzwi się NIE zamykają, spróbuj zresetować zasilanie.
wymaga oddzielnego zbierania odpadów w Unii Europejskiej. Dotyczy to
klatka?
- 18 -
Machine Translated by Google


MODELL:JUMCC06B
„Sparen Sie die Hälfte“, „Halber Preis“ oder andere ähnliche Ausdrücke, die wir verwenden, stellen nur eine
Schätzung der Ersparnis dar, die Sie beim Kauf bestimmter Werkzeuge bei uns im Vergleich zu den großen
Topmarken erzielen können, und decken nicht unbedingt alle von uns angebotenen Werkzeugkategorien ab. Wir
möchten Sie freundlich daran erinnern, bei Ihrer Bestellung bei uns sorgfältig zu prüfen, ob Sie im Vergleich
zu den großen Topmarken tatsächlich die Hälfte sparen.
Wir sind weiterhin bestrebt, Ihnen Werkzeuge zu wettbewerbsfähigen Preisen anzubieten.
HÜHNERSTALL-TÜRÖFFNER
Technischer Support und E-Garantie-Zertifikat www.vevor.com/support
Machine Translated by Google

Haben Sie Fragen zum Produkt? Benötigen Sie technischen Support? Bitte kontaktieren Sie
uns:
Technischer Support und E-Garantie-Zertifikat www.vevor.com/
support
MODELL:JUMCC06B
Dies ist die Originalanleitung. Bitte lesen Sie alle Anweisungen sorgfältig durch, bevor
Sie das Gerät in Betrieb nehmen. VEVOR behält sich eine klare Auslegung unserer
Bedienungsanleitung vor. Das Erscheinungsbild des Produkts richtet sich nach dem
Produkt, das Sie erhalten haben. Bitte verzeihen Sie uns, dass wir Sie nicht erneut informieren,
wenn es Technologie- oder Software-Updates für unser Produkt gibt.
- 1 -
HÜHNERSTALL-TÜRÖFFNER
Brauchen Sie Hilfe? Kontaktieren Sie uns!
Machine Translated by Google

lose. Verwenden Sie den AC/DC-Netzadapter nur mit einer 100-240-V-Wechselstromquelle. •ÿ Verlegen
Sie das Netzteil in einen geschützten Bereich oder bauen Sie ein Netzteilgehäuse auf, um
um den Netzstecker vor Witterungseinflüssen zu schützen. (Führen Sie das Kabel durch das Loch im
Spezifikationen, die mit diesem Elektrogerät geliefert werden. Die Nichtbeachtung aller
Die Nichtbeachtung der unten aufgeführten Anweisungen kann zu Stromschlag, Brand und/oder schweren Verletzungen führen.
Stall und Stecker im Inneren des Stalles)
•ÿDieses Gerät kann von Kindern ab 8 Jahren verwendet werden und
•ÿUm das Risiko eines Stromschlags zu verringern, zerlegen Sie dieses Produkt nicht. •ÿ
Verwenden Sie das mit dem Gerät mitgelieferte AC/DC-Netzteil und Kabel. Die Verwendung von
Personen mit eingeschränkten körperlichen, sensorischen oder geistigen Fähigkeiten oder Mangel an
Andere Kabel können zu Stromschlägen, Bränden oder Schäden am Gerät führen. •ÿWenn
das Netzkabel (AC/DC-Netzteil) beschädigt ist, muss es durch
Erfahrung und Wissen, wenn sie beaufsichtigt oder unterwiesen wurden
über den sicheren Gebrauch des Geräts informiert und verstehen die Gefahren
vom Hersteller, seinem Kundendienst oder ähnlich qualifizierten Personen, um zu vermeiden
eine Gefahr.
•ÿStellen Sie sicher, dass das Gerät ordnungsgemäß an die Stromquelle
angeschlossen ist. •ÿBenutzen Sie das Gerät nicht, wenn das Netzkabel beschädigt ist oder der Kontakt der Steckdose
Kinder dürfen nicht mit dem Gerät spielen. Reinigung und Benutzer
Wartungsarbeiten dürfen nicht von Kindern ohne Aufsicht durchgeführt werden.
Lesen Sie alle Sicherheitshinweise, Anweisungen, Abbildungen und
Warnungen und Vorsichtsmaßnahmen
WICHTIGE SICHERHEITSHINWEISE
- 2 -
Machine Translated by Google

- 3 -
FCC-Informationen
BEWAHREN SIE DIESE ANLEITUNG AUF
Dieses Gerät entspricht Teil 15 der FCC-Bestimmungen. Der Betrieb unterliegt den folgenden
zwei Bedingungen: 1) Dieses Produkt kann schädliche
Störungen verursachen.
WARNUNG: Änderungen oder Modifikationen an diesem Produkt, die nicht ausdrücklich von der für
die Konformität verantwortlichen Partei genehmigt wurden, können zum Erlöschen der Berechtigung
des Benutzers zum Betrieb des Produkts führen.
2) Dieses Produkt muss alle empfangenen Störungen tolerieren, einschließlich Störungen, die
einen unerwünschten Betrieb verursachen können.
ACHTUNG: Durch Änderungen oder Modifikationen, die nicht ausdrücklich von der für die Konformität
verantwortlichen Partei genehmigt wurden, kann die Berechtigung des Benutzers zum Betrieb des
Geräts erlöschen!
Hinweis: Dieses Produkt wurde getestet und entspricht den Grenzwerten für ein digitales Gerät der
Klasse B gemäß Teil 15 der FCC-Bestimmungen. Diese Grenzwerte
Machine Translated by Google

· Empfangsantenne neu ausrichten oder verlegen.
· Vergrößern Sie den Abstand zwischen Produkt und Empfänger.
Dieses Produkt erzeugt und verwendet Hochfrequenzenergie und kann diese auch ausstrahlen.
Wenn die Installation und Verwendung nicht gemäß den Anweisungen erfolgt, kann dies zu
schädliche Störungen des Funkverkehrs. Es gibt jedoch keine
· Schließen Sie das Produkt an eine Steckdose eines anderen Stromkreises an als den, an den
der Empfänger ist angeschlossen.
garantieren, dass bei einer bestimmten Installation keine Störungen auftreten. Wenn dies
· Wenden Sie sich an den Händler oder einen erfahrenen Radio-/Fernsehtechniker.
Das Produkt verursacht keine Störungen beim Radio- oder Fernsehempfang.
Empfang, der durch Aus- und Einschalten des Produkts überprüft werden kann,
Der Benutzer wird aufgefordert, die Störung durch eine oder mehrere der folgenden Maßnahmen zu beheben:
sind so konzipiert, dass sie einen angemessenen Schutz vor schädlichen Störungen bieten
Maßnahmen.
in einer Wohnanlage.
- 4 -
Machine Translated by Google

- 5 -
Produkteinführung
7 Blechschrauben und Schraubendreher
3 Infrarotsensor
5 AC/DC-Netzadapter mit Kabel und DC-Stecker
2 Bedienfeld
1 Hühnerstalltür
8 Interner Akku (Backup-Stromversorgung)
4 DC/Solar-Buchsenstecker
6 Kabellose Fernbedienungen (Batterien nicht im Lieferumfang enthalten, A27 BATTERIEN EINSETZEN)
Machine Translated by Google
- 6 -
Installationseinführung
Installation)
ÿ Loch für die Stromversorgung, um sicherzustellen, dass die Stromversorgung vor
ÿ Türrahmen des Hühnerstalls
ÿ Einbauort der Schraube ÿ
Struktur/Wand des Hühnerstalls (mit Loch für den Türrahmen des Hühnerstalls
Wetter
Machine Translated by Google
•
Test- Taste zum manuellen Öffnen/Schließen der Tür
(UP) - Taste zum Ändern der Programmfunktionen im Programmiermodus
•
LEARN- Taste zum Hinzufügen/Entfernen der drahtlosen Fernbedienung(en)
•
SET- Taste zum Umschalten zwischen den Programmiermodi
Digitalanzeige
Modus
•Leuchte 1 – Kontrollleuchten für Tür öffnen [grün] und Tür schließen [rot] •
Leuchte 2 – Kontrollleuchte für Infrarot-Sensor-Funktion
• Leuchte 3 – Kontrollleuchte für Lichtsensor-Funktion
(DOWN)- Taste zum Ändern der Programmfunktionen im Programm
•
- 7 -
•
Einführung in die Systemsteuerung
Machine Translated by Google

- 8 -
Bedienungsanleitung
• 1. Überprüfen/erstellen Sie eine Öffnung in der Hühnertürstruktur/-wand, so dass die
Die Stromquelle ist vor Witterungseinflüssen geschützt, indem sie im Inneren des Stalles eingesteckt wird oder
Der Türrahmen des Hühnerstalls kann montiert und mit Schrauben sicher befestigt werden.
Die Coop Door ist die perfekte Lösung für eine angenehmere Art des Homesteadings.
Bauen Sie eine einfache Stromversorgungsbox, um das Eindringen von Wasser zu
verhindern. • 5. Informationen zum Verwenden des Lichtsensors oder des Timers
finden Sie auf Seite 10-11. • 6. Vergessen Sie nicht, wenn sich die Tür nicht vollständig öffnet/schließt, versuchen Sie, die
Schrauben an der Tür. Die Tür kann eingeklemmt werden, wenn sie zu fest montiert ist. • 7.Wenn die Tür nach
dem Programmieren nicht schließt. Versuchen Sie bitte, den Strom auszuschalten.
Leben.Wir nutzen moderne Technologie und packen diese in ein schlankes, kompaktes Design, um
unseren Kunden die beste verfügbare automatische Hühnerstalltür bereitzustellen.
Breite = 8,3 Zoll. Höhe = 10,24 Zoll • 2. Befestigen Sie den
Hühnerstalltürrahmen an der Hühnerstallstruktur/Wand mit
die selbstschneidenden Schrauben (NICHT ZU FEST ANZIEHEN, SONST WIRD DIE TÜR KOMPRESSIERT
Unser Produkt ist dafür gedacht, Sie bei Ihren Zielen als Selbstversorger zu unterstützen und Ihnen zu helfen,
UND NICHT GEÖFFNET). Stellen Sie sicher, dass der Türrahmen des Hühnerstalls flach ist [keine Lücken/Verwerfungen]
erneut und versuchen Sie, sie erneut zu
schließen. • 8. Wenn Sie eine Außenverkleidung oder etwas haben, das die Tür verdecken könnte,
uneben, dann verwenden Sie 2x4 oder einige flache Holzstücke, um die Bündigkeit sicherzustellen. •
9.Verwenden Sie zwei 1" bis !" Holzabstandshalter und installieren Sie sie über der Tür in der Breite von
Homesteading einfacher. Wir empfehlen, das Netzkabel oder Solar zu verwenden, um Ihre
gegen die Hühnerstallkonstruktion/-wand, nachdem die selbstschneidenden Schrauben installiert wurden.
die Löcher im Regenschutz.
Verwenden Sie ein Elektrowerkzeug, um Schrauben durch die Tür zu
schrauben. •3. Schließen Sie den DC-Stecker des AC/DC-Netzteils an einen der
Tür, diese Tür verbraucht viel Strom, da sie eine stabilere Tür ist, also Batterien
wird schnell sterben!
Allgemeine Einführung
DC-Buchsenstecker an der Hühnerstalltür. • 4. Schließen Sie
den AC/DC-Netzadapter an eine Stromquelle und den Hühnerstall an
Tür wird eingeschaltet, was durch das Aufleuchten der Digitalanzeige bestätigt wird. Stellen Sie sicher,
Allgemeine Einführung
Machine Translated by Google

absteigend) die Sonde erkennt ein Tier an der Tür (Aktion+Temperatur, blaues Licht
Infrarotstrahl. Solange das rote Licht leuchtet, schließt die Tür nicht. • 13. Die
Tiererkennungssonde ist in Abbildung dargestellt. Wenn die Tür nach unten geht (oder
an), und die Tür geht wieder hoch. Nach 1 Minute fährt sie weiter runter. Nach
Licht erlischt), um normal zu funktionieren.
hinter dem Regenschutz.
• 12. Ein rotes Licht am Sensor zeigt an, wenn etwas den
Allgemeine Installation, Fortsetzung (Infrarotsensor) •
11. Der Infrarotsensor ist in diese Tür eingebaut.
• 10.Montieren Sie den Regenschutz auf den beiden hölzernen Abstandshaltern, damit die Tür nach oben und unten gehen kann.
1.0 - Programmieren der drahtlosen Fernbedienung(en)
•1.Überprüfen Sie, ob die Fernbedienungsbatterie(n) in der/den Fernbedienung(en) eingelegt sind.
(Batterie(n): A27/12V separat erhältlich). •2. Um
eine Fernbedienung mit der Hühnerstalltür zu koppeln, drücken und halten Sie die LEARN-Taste.
Stromausfall, Neustart der Sonde erfordert Vorheizen für ca. 15 Sekunden (blau
- 9 -
Machine Translated by Google
- 10 -
und die Stromversorgung wird wiederhergestellt, die Fernbedienung(en) werden immer noch mit dem Huhn gekoppelt
Hinweis: Wenn die Stromversorgung der Hühnerstalltür für kurze Zeit unterbrochen wird
Stalltür.
•2. Drücken Sie die Abwärtspfeiltaste, um die Tür zu schließen.
Um die zweite Fernbedienung zu koppeln, wiederholen Sie diesen Schritt.
•3. Um alle Fernbedienungen zu entkoppeln, drücken und halten Sie die LEARN -Taste, bis die
Die grüne LED blinkt zweimal und zeigt damit an, dass die Löschung abgeschlossen ist.
Fernbedienung zweimal. Die grüne LED blinkt zweimal und zeigt damit an, dass die Kopplung
Taste auf dem Bedienfeld 2 Sekunden lang gedrückt halten. Dann eine beliebige Taste auf dem
•3. Drücken Sie auf den quadratischen Knopf, um jede Bewegung der Tür zu stoppen.
3.0- Hühnerstalltür ohne Fernbedienung öffnen/schließen
Durch wiederholtes Drücken der Testtaste auf dem Bedienfeld wird entweder geöffnet oder geschlossen
die Tür.
• 1. Drücken Sie die Test-Taste auf dem Bedienfeld. Die Tür öffnet sich. • 2.
Drücken Sie die Test-Taste auf dem Bedienfeld. Die Tür bleibt stehen. • 3. Drücken Sie
die Test-Taste auf dem Bedienfeld. Die Tür schließt sich.
2.0 – Hühnerstalltür mit Fernbedienung öffnen/schließen •1. Drücken
Sie die Pfeiltaste nach oben, um die Tür zu öffnen.
Machine Translated by Google

- 11 -
2.4 Drücken Sie die TEST- Taste erneut, um die Tür zu schließen.
3. Einstellen der Ortszeit (24-Stunden-Zeitformat) für die Tür
•1.1 Aktivierung durch Knopfdruck:Drücken Sie einmal die Taste SET oder TEST, um den Bildschirm einzuschalten.
ca. 1 Sekunde.
•1.2 Aktivierung der Fernbedienung: Halten Sie eine beliebige Taste auf der Fernbedienung gedrückt,
• 3.1Drücken Sie die SET- Taste auf dem Bedienfeld, um •3.2 anzuzeigen. Die
Zeiteinheit „Stunden“ blinkt. Passen Sie die Zeiteinheit „Stunden“ an, indem Sie die UP- oder
DOWN- Taste.
etwa 5 Sekunden, um den Bildschirm zu beleuchten.
• 3.3 Drücken Sie die SET- Taste, um zur Zeiteinheit Minuten zu wechseln. Die Zeiteinheit Minuten
2. Manuelles Öffnen oder Schließen der Tür einstellen
wird blinken.
• 3.4 Passen Sie die Zeiteinheit „Minuten“ durch Drücken der AUF- oder AB -Taste an. • 3.5 Drücken
Sie die SET -Taste, um die Zeiteinstellung und die nächste Einstellung zu bestätigen.
2.1 Schließen Sie das Netzteil an. Auf dem Display erscheint die folgende Anzeige
2.2 Drücken Sie die TEST- Taste einmal, um die Tür zu öffnen.
4.0- Programmieren der Hühnerstalltür
2.3 Drücken Sie die TEST- Taste einmal, um anzuhalten.
Durch wiederholtes Drücken der SET- Taste auf dem Bedienfeld werden die
1. Bildschirmwecker
Machine Translated by Google

- 12 -
4.1 Drücken Sie die SET-Taste auf dem Bedienfeld eine Sekunde lang, um 4.2 T anzuzeigen. T zeigt
die Zeit zum Öffnen der Tür an – Zeit zum Schließen der Tür.
4.3 Drücken Sie die UP-Taste auf dem Bedienfeld eine Sekunde lang, um 4.4 T-L anzuzeigen. Gibt
die Zeit zum Öffnen der Tür an – Licht zum Schließen der Tür.
4. Mischmodus für Timing und Lichtsensor
verschiedene zu programmierende Einstellungen.
4.5 Drücken Sie die UP-Taste für eine Sekunde auf dem Bedienfeld, um 4.6 anzuzeigen. L- T Zeigt
an, dass Licht zum Öffnen der Tür vorhanden ist - Zeit zum Schließen der Tür
Machine Translated by Google

•5.4 Passen Sie die Zeiteinheit Minuten durch Drücken der UP- oder DOWN -Taste an
wird blinken.
6.Option aktivieren, damit die Tür automatisch mit der Einstellung der Umgebungslichthelligkeit
geöffnet oder geschlossen wird
•6.1 Überprüfen/Drücken Sie die SET- Taste auf dem Bedienfeld, um OPEN-L anzuzeigen. •6.2
Die Lumenwerteinheit blinkt. Passen Sie die Lumenwerteinheit an, indem Sie die UP- oder
•5.1 Überprüfen/Drücken Sie die SET -Taste auf dem Bedienfeld, um OPEN-T anzuzeigen . •5.2 Die
Zeiteinheit „Stunden“ blinkt. Passen Sie die Zeiteinheit „Stunden“ durch Drücken der UP- oder DOWN -Taste an.
•5.3 Drücken Sie die SET- Taste, um zur Zeiteinheit Minuten zu wechseln. Die Zeiteinheit Minuten
5.Option aktivieren, damit die Tür automatisch mit der Ortszeiteinstellung und dem Timer geöffnet oder
geschlossen wird
4.7 Drücken Sie die UP-Taste auf dem Bedienfeld eine Sekunde lang, um 4.8 LL anzuzeigen.
Zeigt Licht zum Öffnen der Tür an – Licht zum Schließen der Tür.
- 13 -
Machine Translated by Google

oder die AB -Taste.
Die Einheit blinkt.
• 7.2 Die Zeiteinheit „Stunden“ blinkt. Passen Sie die Zeiteinheit „Stunden“ an, indem Sie die UP-Taste drücken.
• 7.1 Überprüfen/Drücken Sie die SET- Taste auf dem Bedienfeld, um CLOSE-T anzuzeigen
7.4 Passen Sie die Zeiteinheit „Minuten“ durch Drücken der Taste „AUF“ oder „AB“ an .
• 7.3 Drücken Sie die SET- Taste, um zur Zeiteinheit Minuten zu wechseln. Die Zeiteinheit
•
- 14 -
Ortszeiteinstellung und Timer
7. Option Schließen einschalten, so dass die Tür automatisch öffnet oder schließt mit dem
Denken Sie daran, für Close
0 = Mindestwert zum Öffnen der Tür
23 = Mindestlichtstärke, damit die Tür schließt
0= Die meiste Helligkeit, damit die Tür schließt • 6.4 Es
wird empfohlen, dass der Kunde den Wert auf etwa 15 einstellt. Wenn die Empfindlichkeit
• 6.3 Passen Sie die Einheit des Lumenwerts durch Drücken der AUF- oder AB -Taste an.
23 = Das meiste Licht, damit die Tür geöffnet werden kann
Denken Sie daran, für Open
DOWN- Taste.
Wert zu hoch ist, öffnet und schließt sich die Hühnerstalltür, wenn sie einen
kleines Licht!
Machine Translated by Google

Spannungsstabilisierungsfunktion und stoppt automatisch, wenn die Batterie vollständig
in der Abbildung
ÿ Nr. 5 1,2 V Nickel-Wasserstoff-Akku Die 4PCS-Steuerplatine verfügt über eine
Die Hühnerstalltür ist mit einer automatischen Ladefunktion ausgestattet: • 1. Verwendung
der Batterie:
aufgeladen.
ÿ 4 Stück AA 1,5 V Nr. 5 Batterie. • 2.
Aufladen des Solarladepanels: Ausgang 9 V 10 W Solarladepanel wie abgebildet
Hinweis: Bei Verwendung der Solarstromversorgung können keine AA-Batterien verwendet werden.
Es sind 1,2 V Ni-MH/Ni-Cr-Akkus erforderlich
Einstellung der Umgebungslichthelligkeit
8.Option „Schließen“ einschalten, damit die Tür automatisch öffnet oder schließt.
Denken Sie daran, für Open
• 8.3 Passen Sie die Einheit des Lumenwerts durch Drücken der AUF- oder AB -Taste an.
23 = Das meiste Licht, damit die Tür geöffnet werden kann
0= Das meiste Licht, damit die Tür schließt •8.4 Es
wird empfohlen, dass der Kunde den Wert auf etwa 15 einstellt. Wenn der Empfindlichkeitswert zu
8.2 Die Lumenwerteinheit blinkt. Passen Sie die Lumenwerteinheit an, indem Sie die UP- oder
DOWN- Taste.
•
• 8.1 Überprüfen/Drücken Sie die SET- Taste auf dem Bedienfeld, um CLOSE-L anzuzeigen
Denken Sie daran, für Close
23 = Mindestlichtstärke, damit die Tür schließt
- 15 -
0 = Mindestwert zum Öffnen der Tür
stark, die Hühnerstalltür öffnet und schließt sich, wenn sie ein wenig Licht wahrnimmt!
Machine Translated by Google

- 16 -
2 Hühnertürstall
1 wiederaufladbarer Akku
10W-25W Solarmodul
9V 10A Solarladeregler
Was Sie benötigen:
ACHTUNG: DIE LEITUNGSKABEL NICHT ZUSAMMEN BERÜHREN!
Regen/Wetter.
9-V-Batterie, 10-Amperestunden-Batterie
• 1. Installieren Sie das Solarmodul in optimaler Richtung für das
Sonnenlicht. • 2. Schließen Sie das Solarmodul an den
Solarladeregler an. • 3. Schließen Sie die Batterie an den
Solarladeregler an. • 4. Schließen Sie die automatische Hühnerstalltür an den
Solarladeregler an. • 5. Schützen Sie den Solarladeregler und die Batterie in einem Gehäuse vor
Machine Translated by Google

- 17 -
•ÿStellen Sie sicher, dass das Gerät mit Strom versorgt wird. • ÿ
Überprüfen Sie die elektrischen Anschlüsse, die das Gerät mit Strom versorgen, um sicherzustellen, dass sie nicht verschmutzt sind oder
• ÿÜberprüfen Sie, ob die Fernbedienungsbatterie(n) richtig herum eingelegt sind und
Hühnerstalltür lässt sich nicht einschalten
nicht ausgeschaltet.
Solarladeregler und 25W Solarpanel
die Batterie(n) sind voll aufgeladen. Ersetzen Sie die Batterien bei Bedarf. •ÿStellen
Sie sicher, dass die Fernbedienung richtig auf die Hühnerstalltür programmiert ist. •ÿÜberprüfen
Sie, ob die Hühnerstalltür eingeschaltet ist.
Fernbedienung(en) funktionieren nicht
Produktbeispiele finden Sie weiter unten
Die Tür des Hühnerstalls öffnet und/oder schließt sich nicht automatisch mit dem lokalen
Der Timer funktioniert nicht richtig
Befolgen Sie diese Anweisungen, um festzustellen, ob Ihr Timer defekt ist oder die Tür
beschädigt.
Zeit- oder Helligkeitseinstellungen •ÿ
Überprüfen Sie, ob die verwendeten Einstellungen richtig programmiert sind und die Funktionen
Einstellungen wurden nicht richtig
vorgenommen. • 1.Trennen Sie die Tür vom
Strom. • 2.Schließen Sie die Tür wieder an.
Wartung und Fehlerbehebung
Machine Translated by Google

- 18 -
Tür öffnet sich. •
6. Wenn Ihre Tür nach diesen Schritten funktioniert, befolgen Sie die gleichen Anweisungen, um
erfordert in der Europäischen Union eine getrennte Müllentsorgung. Dies gilt für die
Stellen Sie sicher, dass der Türrahmen flach an der Wand anliegt und dass sich keine
Programmieren Sie die Tür auf Ihre Ortszeit und die Öffnungs- und Schließzeit Ihrer Tür. Stellen Sie sicher, dass
Produkt und alle mit diesem Symbol gekennzeichneten Zubehörteile. Als solche gekennzeichnete Produkte
dürfen nicht mit dem normalen Hausmüll entsorgt werden, sondern müssen in einer
Ziehen Sie vorher noch einmal den Stecker aus der Tür, um einen Kaltstart durchzuführen.
Kann mit dem Gerät ein Solarpanel oder eine Backup-Batterie verwendet werden?
Fremdkörper im Bewegungsbereich der Tür. Stellen Sie außerdem sicher, dass die Installation
Schrauben nicht zu fest anziehen!
Ja, es kann mit dem mitgelieferten DC-Stecker angeschlossen/installiert werden
Was tun, wenn sich die Tür NICHT vollständig öffnet/schließt?
Sammelstelle für das Recycling von elektrischen und elektronischen Geräten.
In China hergestellt
Muss die Hühnerstalltür innen oder außen am Hühnerstall angebracht werden?
Wenn die Tür NICHT schließt, versuchen Sie, Ihre Stromversorgung zurückzusetzen.
Genossenschaft?
Es hängt davon ab, wie Sie es verwenden möchten. Wenn es auf der Innenseite eines geschlossenen
• 3. Ändern Sie keine anderen Einstellungen. • 4. Setzen
Sie die Öffnungs- oder Schließzeit zurück. • 5. Warten
Sie, bis die Tür geht, um die Öffnungszeit 0805 festzulegen, um zu bestätigen, ob die
coop, dann funktionieren die Lichtempfindlichkeitseinstellungen nicht richtig.
Dieses Produkt unterliegt den Bestimmungen der europäischen Richtlinie 2012/19/EG.
Das Symbol einer durchgestrichenen Mülltonne weist darauf hin, dass das Produkt
Was tun, wenn die Tür beim Öffnen oder Schließen klemmt?
Richtige Entsorgung
Machine Translated by Google


MODÈLE:JUMCC06B
«Économisezlamoitié»,«Moitiéprix»outouteautreexpressionsimilaireutiliséeparnousnereprésente
qu'uneestimationdeséconomiesquevouspourriezréaliserenachetantcertainsoutilscheznousparrapport
auxgrandesmarquesetnecouvrepasnécessairementtouteslescatégoriesd'outilsquenousproposons.
Nousvousrappelonsdebienvouloirvérifiersoigneusementlorsquevouspassezunecommandechez
noussivouséconomisezréellementlamoitiéparrapportauxgrandesmarques.
Nouscontinuonsànousengageràvousfournirdesoutilsàdesprixcompétitifs.
OUVREPORTEDEPOULAILLER
Assistancetechniqueetcertificatdegarantieélectroniquewww.vevor.com/support
Machine Translated by Google
Ils'agitdelanoticed'utilisationd'origine.Veuillezlireattentivementtoutesles
instructionsdumanuelavantdel'utiliser.VEVORseréserveledroitd'interpréterclairement
notremanueld'utilisation.L'apparenceduproduitdépendduproduitquevousavez
reçu.Veuilleznousexcuser,nousnevousinformeronsplusencasdemiseàjourtechnologique
oulogicielledenotreproduit.
MODÈLE:JUMCC06B
Vousavezdesquestionssurnosproduits?Vousavezbesoind'assistancetechnique?
N'hésitezpas
ànouscontacter:Assistancetechniqueetcertificatdegarantie
électroniquewww.vevor.com/support
1
OUVREPORTEDEPOULAILLER
BESOIND'AIDE?CONTACTEZNOUS!
Machine Translated by Google

concernés.Lesenfantsnedoiventpasjoueravecl'appareil.Nettoyageetutilisation
lenonrespectdesinstructionscidessouspeutentraînerunchocélectrique,unincendieet/oudesblessuresgraves.
(coopérativeetpriseàl'intérieurdelacoopérative)
pourprotégerlaprised'alimentationdesintempéries.(Faitespasserlecordonàtraversletroudupoulet
spécificationsfourniesaveccesappareilsélectriques.Lenonrespectdetoutesles
•Pourréduirelerisquedechocélectrique,nedémontezpasceproduit.•Utilisezl'adaptateur
secteurCA/CCetlecâblefournisavecl'appareil.L'utilisationde
personnesayantdescapacitésphysiques,sensoriellesoumentalesréduitesoudépourvuesde
•Cetappareilpeutêtreutilisépardesenfantsâgésde8ansetpluset
concernantl'utilisationdel'appareilentoutesécuritéetcomprendrelesdangers
lefabricant,sonagentdeserviceoudespersonnesqualifiéesdemanièresimilaireafind'éviter
d'autrescâblespeuventprovoquerunchocélectrique,unincendieouendommagerl'appareil.
•Silecordond'alimentation(adaptateursecteurCA/CC)estendommagé,ildoitêtreremplacépar
expérienceetconnaissancess'ilsontreçuunesupervisionoudesinstructions
l'entretiennedoitpasêtreeffectuépardesenfantssanssurveillance.
Liseztouslesavertissementsdesécurité,instructions,illustrationset
•Faitespasserl'alimentationdansunezoneprotégéeouconstruisezunboîtierd'alimentationafindenepas
endommagerl'appareil.Utilisezuniquementl'adaptateursecteurCA/CCavecunesourced'alimentationCAde100à240V.
undanger.
•Assurezvousquel'appareilestcorrectementconnectéàlasourced'alimentation.•
N'utilisezpasl'appareilsilecordond'alimentationestendommagéousilecontactdelaprisedecourantest
Avertissementsetprécautions
MESURESDESÉCURITÉIMPORTANTES
2
Machine Translated by Google

3
CONSERVEZCESINSTRUCTIONS
InformationsdelaFCC
2)Ceproduitdoitacceptertouteinterférencereçue,ycompriscellesquipeuvent
provoquerunfonctionnementindésirable.
AVERTISSEMENT:Leschangementsoumodificationsapportésàceproduitnon
expressémentapprouvésparlapartieresponsabledelaconformitépourraientannuler
l'autoritédel'utilisateuràutiliserleproduit.
Cetappareilestconformeàlapartie15desrèglesdelaFCC.Sonfonctionnementest
soumisauxdeuxconditionssuivantes:1)Ce
produitpeutprovoquerdesinterférencesnuisibles.
ATTENTION:Leschangementsoumodificationsnonexpressémentapprouvésparla
partieresponsabledelaconformitépeuventannulerledroitdel'utilisateuràutiliser
l'équipement!
Remarque:ceproduitaététestéetjugéconformeauxlimitesd'unappareilnumérique
declasseBconformémentàlapartie15desrèglesdelaFCC.Ceslimites
Machine Translated by Google

mesuressuivantes.
s'iln'estpasinstalléetutiliséconformémentauxinstructions,peutprovoquer
∙Brancherleproduitsuruneprised'uncircuitdifférentdeceluiauquel
∙Augmenterladistanceentreleproduitetlerécepteur.
Ceproduitgénère,utiliseetpeutémettredel'énergieradiofréquence,et
garantirqu'aucuneinterférenceneseproduiradansuneinstallationparticulière.Sicela
∙Consultezlerevendeurouuntechnicienradio/TVexpérimentépourobtenirdel’aide.
interférencenuisibleauxradiocommunications.Cependant,iln'existeaucune
lerécepteurestconnecté.
réception,quipeutêtredéterminéeenéteignantetenrallumantleproduit,le
leproduitprovoquedesinterférencesnuisiblesaveclaradiooulatélévision
∙Réorienteroudéplacerl’antennederéception.
dansuneinstallationrésidentielle.
l'utilisateurestencouragéàessayerdecorrigerl'interférenceparuneouplusieursdes
sontconçuspourfourniruneprotectionraisonnablecontrelesinterférencesnuisibles
4
Machine Translated by Google

5
7visautotaraudeusesettournevis
Présentationduproduit
3Capteurinfrarouge
4prisesfemellesDC/Solar
2Panneaudecontrôle
1portedepoulailler
Adaptateursecteur5VAC/DCaveccordonetprisemâleDC
6Télécommandesansfil(pilesnonincluses,CHARGEZLESPILESA27)
8Packdebatteriesinternes(ALIMENTATIONDESECOURS)
Machine Translated by Google

6
Présentationdel'installation
Installation)
Troupourlepassagedel'alimentationélectriqueafindegarantirlaprotectiondel'alimentationcontre
Cadredeportedupoulailler
Emplacementd'installation
desvisStructure/murdupoulailler(avectroupourlecadredeportedupoulailler
météo
Machine Translated by Google

TestBoutonutilisépourouvrir/fermermanuellementlaporte
(UP)Boutonutilisépourmodifierlesfonctionsduprogrammeenmodeprogramme
•
(BAS)Boutonutilisépourmodifierlesfonctionsduprogrammependantquevousêtesdansleprogramme
LEARNBoutonutilisépourajouter/supprimerlaoulestélécommandessansfil
•
BoutonSETutilisépourbasculerentrelesmodesdeprogrammation
Affichagenumérique
mode
•
•Voyantslumineux1Ouvrirlaporte[vert]etfermerlaporte[rouge]•Voyantlumineux2
Voyantlumineuxdefonctionnementducapteurinfrarouge•Voyant
lumineux3Voyantlumineuxdefonctionnementducapteurdelumière
•
7
•
Présentationdupanneaudeconfiguration
Machine Translated by Google

FichesfemellesCCsurlaportedupoulailler.•4.Connectez
l'adaptateursecteurCA/CCàunesourced'alimentationetaupoulailler
vissurlaporte.Laportepeutêtrepincéesielleestinstalléetropserrée.•7.Silaportenesefermepasaprès
laprogrammation.Veuillezessayerdecouperl'alimentation
vie.Nousutilisonslatechnologiemoderneetlamettonsdansundesigncompactetmincepour
Largeur=8,3pouces.Hauteur=10,24pouces•2.Fixezle
cadredelaportedupoulailleràlastructure/aumurdupoulailleravec
Lecadredelaportedupoulaillerpeutêtreinstalléetsolidementfixéavecdesvis.
LaporteCoopestlasolutionparfaitepourunefaçonplusagréabledevivreenHomesteading
Notreproduitestconçupoursoutenirvosobjectifsd'autonomieetpourvousaideràfaire
ETNONOUVERT).Assurezvousquelecadredelaportedupoulaillerestplat[pasd'espaces/dedéformations]
construireunboîtierd'alimentationsimplepourempêcherl'infiltrationd'eau.•5.Pourutiliser
lecapteurdelumièreoulaminuterie,voirpage1011.•6.N'oubliezpasquesila
portenes'ouvre/nesefermepascomplètement,essayezdedesserrerle
inégale,utilisezalorsdes2x4oudesmorceauxdeboisplatspourassurerl'affleurement.•9.Utilisez
deuxentretoisesenboisde1"à!"etinstallezlesaudessusdelaporteàlalargeurde
fournirànosclientslameilleureportedepoulaillerautomatiquedisponible.
lesvisautotaraudeuses(NEPASTROPSERREROULAPORTESECOMPRIME
Utilisezunoutilélectriquepourinstallerlesvisàtraverslaporte.•3.Connectez
lafichemâleCCdel'adaptateursecteurCA/CCàl'undes
porte,cetteporteconsommebeaucoupd'énergiecarc'estuneporteplusrobuste,doncdespiles
etessayezdelafermerànouveau.•8.Si
vousavezunegarnitureextérieureoutoutcequipourraitrendrelaporteinstallée
l'autonomieestplusfacile.Nousvoussuggéronsd'utiliserlecordond'alimentationoul'énergiesolairepouralimentervotre
contrelastructure/lemurdupoulailleraprèsl'installationdesvisautotaraudeuses.
lestrousdansleparepluie.
laportes'allumeracommeconfirméparl'affichagenumériqueallumé.Assurezvous
Présentationgénérale
•1.Vérifiez/créezuneouverturedanslastructure/lemurdelaporteàpouletdetellesorteque
lasourced'alimentationestprotégéedesintempériesenlabranchantàl'intérieurdupoulaillerou
vamourirvite!
Présentationgénérale
Manueld'exploitation
8
Machine Translated by Google
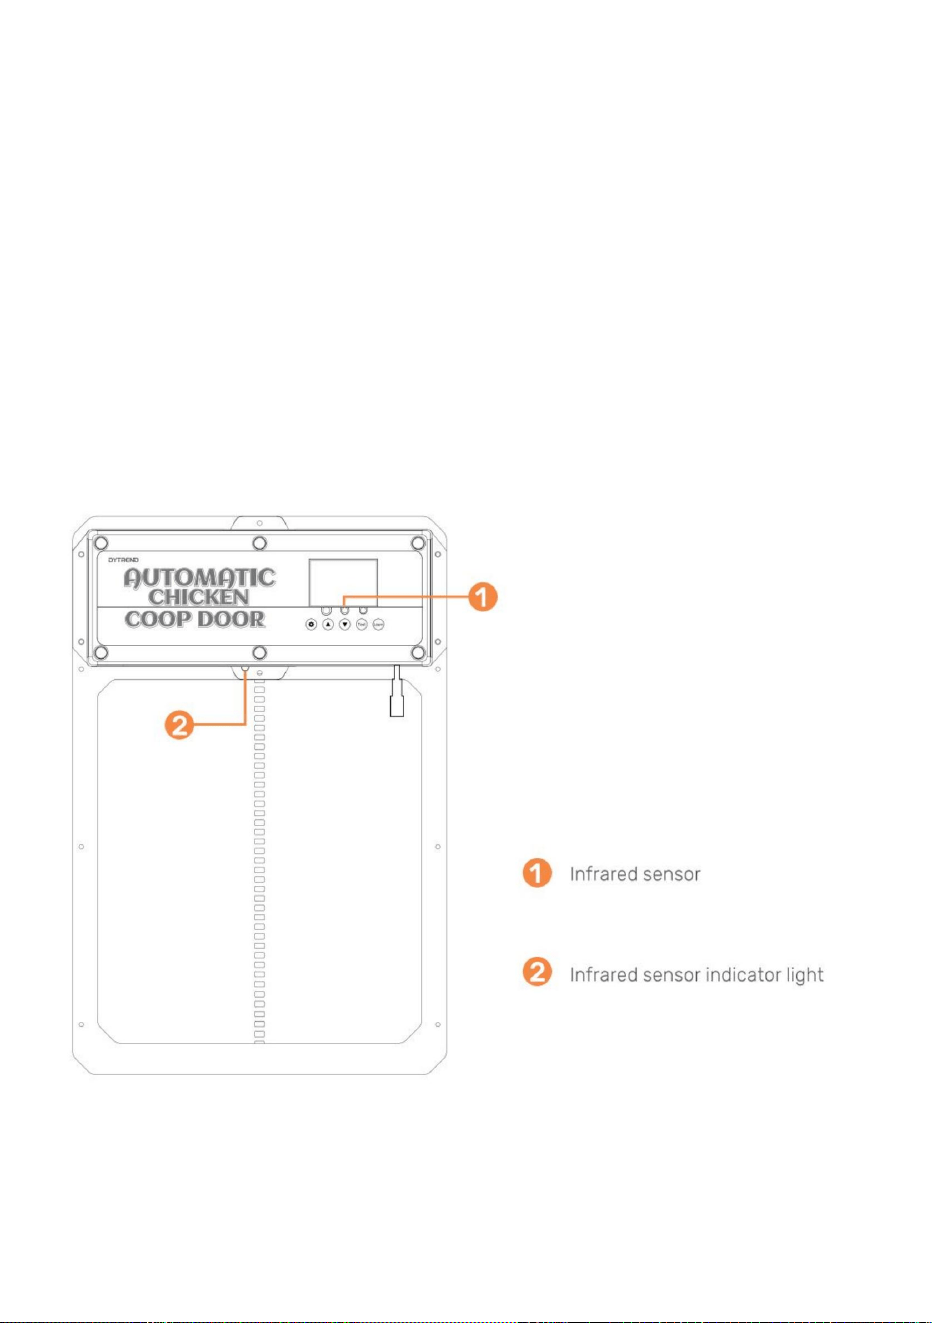
•12.Ilyaunelumièrerougesurlecapteurpourindiquerquandquelquechosebloquele
rayoninfrarouge.Tantquelalumièrerougeestallumée,laportenesefermepas.•13.
Lasondededétectiond'animauxestillustréeàlaFigure.Lorsquelaportedescend(ouest
sur),etlaporterecommenceraàmonter.Après1minute,ellecontinueraàdescendre.Après
coupuredecourant,leredémarragedelasondenécessiteunpréchauffaged'environ15secondes(bleu
Installationgénérale(suite)(Capteurinfrarouge)•11.Le
capteurinfrarougeestintégréàcetteporte.
(endescendant)lasondedétecteunanimalàlaporte(action+température,lumièrebleue
derrièreleparepluie.
•10.Installezleparepluiesurlesdeuxentretoisesenboisafinquelaportepuissemonteret
(lalumières'éteint)pourfonctionnernormalement.
(Pile(s):A27/12Vvendue(s)séparément).•2.Pour
couplerunetélécommandeàlaportedupoulailler,appuyezetmaintenezenfoncéleboutonLEARN
1.0Programmationdelaoudestélécommandessansfil
•1.Vérifiezquelaoulespilesdelatélécommandesontinstalléesdanslaoulestélécommandes
9
Machine Translated by Google
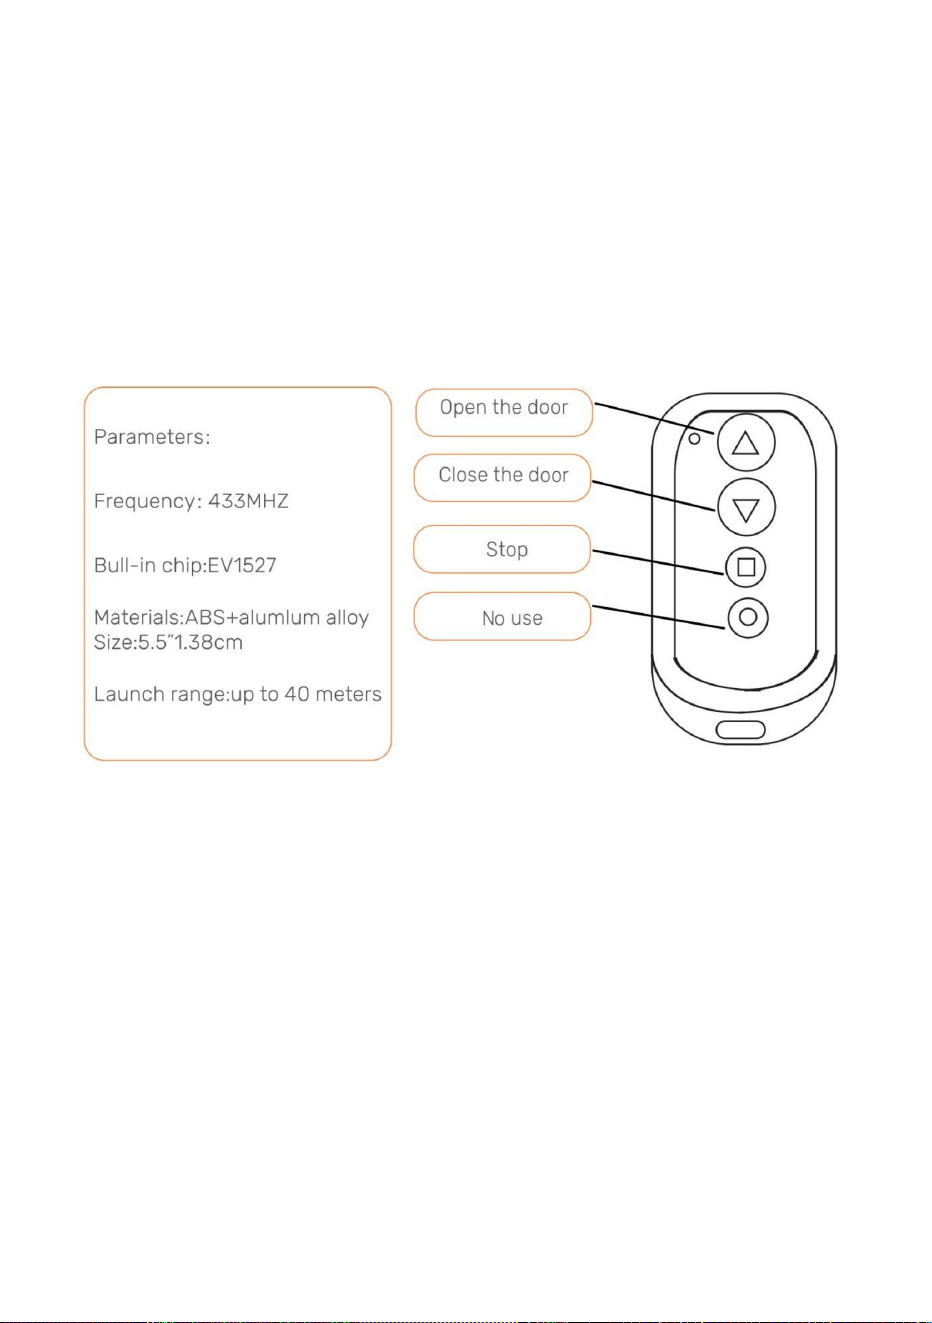
laLEDverteclignotedeuxfois,indiquantquel'annulationestterminée.
Remarque:sil'alimentationélectriquedelaportedupoulaillerestcoupéependantunecourtepériode
portedupoulailler.
2.0Ouvrir/fermerlaportedupoulailleravectélécommande•1.Appuyez
surleboutonfléchéverslehautpourouvrirlaporte.
télécommandedeuxfois.LaLEDverteclignotedeuxfois,indiquantquel'appairageestterminé
etl'alimentationestrétablie,laoulestélécommandesseronttoujourscoupléesaupoulet
terminé.Pourcouplerladeuxièmetélécommande,répétezcetteétape.•3.
Pourdissociertouteslestélécommandes,appuyezetmaintenezenfoncéleboutonLEARNjusqu'àcequele
surlepanneaudecommandependant2secondes.Appuyezensuitesurn'importequelboutondu
AppuyerséquentiellementsurleboutonTestdupanneaudecommandeouvriraoufermera
laporte.
3.0Ouvrir/fermerlaportedupoulaillersanstélécommande
•1.AppuyezsurleboutonTestdupanneaudecommande.Laportes'ouvre.•2.
AppuyezsurleboutonTestdupanneaudecommande.Laportes'arrêtedebouger.•3.
AppuyezsurleboutonTestdupanneaudecommande.Laporteseferme.
•2.Appuyezsurlaflècheverslebaspourfermerlaporte.
•3.Appuyezsurlabutéecarréepourarrêtertoutmouvementdelaporte.
10
Machine Translated by Google

2.3AppuyezunefoissurleboutonTESTpourfaireunepause.
EnappuyantséquentiellementsurleboutonSETdupanneaudecommande,vousparcourrezles
environ1seconde.
•3.1AppuyezsurleboutonSETdupanneaudecommandepourafficher•
3.2L'unitédetempsdesheuresclignote.Réglezl'unitédetempsdesheuresenappuyantsurleboutonUPou
3.Réglagedel'heurelocale(format24heures)pourlaporte
•1.1Boutonderéveil:appuyezunefoissurleboutonSETouTESTpourallumerl'écranpendant
environ5secondespourallumerl'écran.
•3.3AppuyezsurleboutonSETpourpasseràl'unitédetempsdesminutes.L'unitédetempsdesminutes
•1.2Réveilpartélécommande:Appuyezsurn'importequelletouchedelatélécommandeetmaintenezlaenfoncéependant
BoutonBAS.
•3.4Réglezl'unitédetempsdesminutesenappuyantsurleboutonHAUTouBAS.•3.5
AppuyezsurleboutonSETpourconfirmerleréglagedel'heureetleréglagesuivant.
2.1Connectezl'alimentationélectriqueetl'écrand'affichages'afficheracommeindiqué
2.Réglagedel'ouvertureoudelafermeturemanuelledelaporte
vaclignoter.
1.Réveilparécran
2.4AppuyezànouveausurleboutonTESTpourfermerlaporte.
2.2AppuyezunefoissurleboutonTESTpourouvrirlaporte.
4.0Programmationdelaportedupoulailler
11
Machine Translated by Google

4.1AppuyezsurleboutonSETpendantunesecondesurlepanneaudecommandepour
afficher4.2TTIndiquel'heured'ouverturedelaportel'heuredefermeturedelaporte.
4.Réglagedumodemixtedetemporisationetdedétectiondelumière
différentsréglagesàprogrammer.
4.3AppuyezsurleboutonUPpendantunesecondesurlepanneaudecommandepour
afficher4.4TLIndiqueletempsd'ouverturedelaportelumièrepourfermerlaporte.
4.5AppuyezsurleboutonUPpendantunesecondesurlepanneaudecommandepour
afficher4.6LTIndiquelalumièrepourouvrirlaporteilesttempsdefermerlaporte
12
Machine Translated by Google

•5.3AppuyezsurleboutonSETpourpasseràl'unitédetempsdesminutes.L'unitédetempsdesminutes
vaclignoter.
6.Activerl'optionpourquelaportes'ouvreousefermeautomatiquementavecleréglagedelaluminosité
delalumièreambiante
•5.1Vérifiez/appuyezsurleboutonSETdupanneaudecommandepourafficherOPENT•5.2
L'unitédetempsdesheuresclignote.Réglezl'unitédetempsdesheuresenappuyantsurleboutonUPou
DOWN.
•5.4Réglezl'unitédetempsdesminutesenappuyantsurleboutonHAUTouBAS
5.Activerl'optionpourquelaportes'ouvreousefermeautomatiquementavecleréglagedel'heurelocaleet
laminuterie
4.7AppuyezsurleboutonUPpendantunesecondesurlepanneaudecommandepour
afficher4.8LLIndiquelalumièrepourouvrirlaportelalumièrepourfermerlaporte.
•6.1Vérifiez/appuyezsurleboutonSETdupanneaudecommandepourafficherOPENL•6.2
L'unitédevaleurenlumensclignote.Réglezl'unitédevaleurenlumensenappuyantsurleboutonUPou
13
Machine Translated by Google
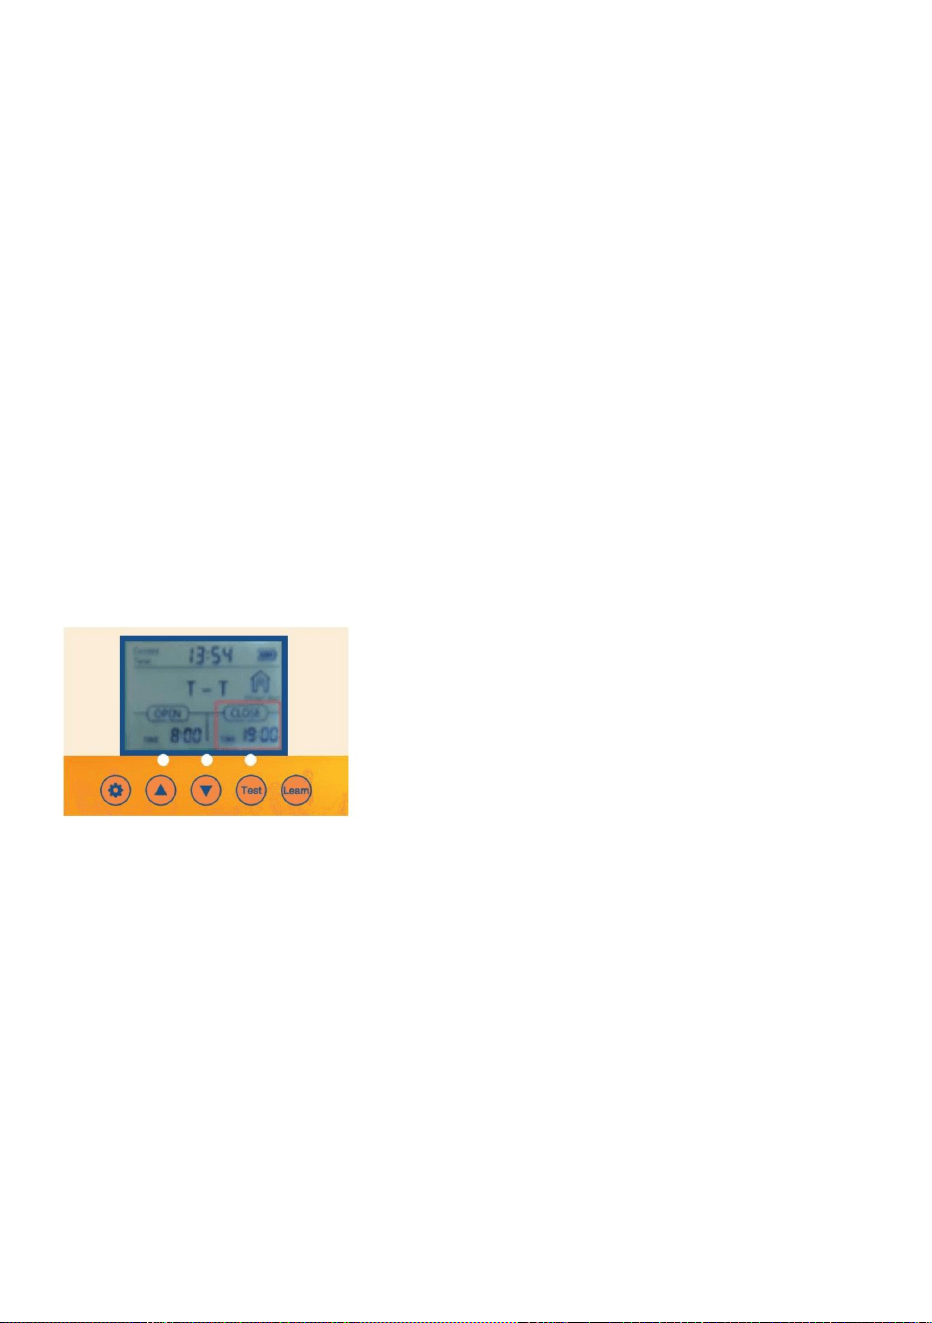
ouboutonBAS.
•7.3AppuyezsurleboutonSETpourpasseràl'unitédetempsdesminutes.L'heuredesminutes
•7.2L'unitédetempsdesheuresclignote.Réglezl'unitédetempsdesheuresenappuyantsurleboutonUP
•7.1Vérifiez/appuyezsurleboutonSETdupanneaudecommandepourafficherCLOSET
l'unitéclignotera.
7.4Réglezl'unitédetempsdesminutesenappuyantsurleboutonHAUTouBAS.
14
•
Réglagedel'heurelocaleetminuterie
7.OptionFermeractivéepourquelaportes'ouvreousefermeautomatiquementavecla
23=Lalumièrelaplusfortepourouvrirlaporte
0=Leminimumpourquelaportes'ouvre
23=Lamoindrelumièrepourfermerlaporte
0=Lalumièrelaplusfortepourquelaportese
ferme•6.4Ilestrecommandéauclientdelerégleràenviron15.Silasensibilité
N'oubliezpas,pourOpen
N'oubliezpas,pourfermer
•6.3Réglezl'unitédevaleurdulumenenappuyantsurleboutonHAUTouBAS.
BoutonBAS.
lavaleuresttropforte,laportedupoulaillers'ouvriraetsefermeralorsqu'elledétecteraune
petitelumière!
Machine Translated by Google

fonctiondestabilisationdelatensionets'arrêteautomatiquementlorsquelabatterieestcomplètementchargée
chargé.
4pilesAA1,5Vn°5.•2.
Chargementdupanneaudechargesolaire:sortiedupanneaudechargesolaire9V10Wcommeindiqué
Batterierechargeablenickelhydrogènen°51,2VLacartedecommande4PCSaun
Laportedupoulaillerestéquipéed'unefonctiondechargeautomatique:•
1.Commentutiliserlabatterie:
DespilesNiMH/NiCrde1,2Vsontnécessaires
Remarque:sil'alimentationsolaireestutilisée,lespilesAAnepeuventpasêtreutiliséeset
danslafigure
8.OptionFermeractivéepourquelaportes'ouvreousefermeautomatiquementavecla
Réglagedelaluminositédelalumièreambiante
•8.3Réglezl'unitédevaleurdulumenenappuyantsurleboutonHAUTouBAS.
23=Lalumièrelaplusfortepourouvrirlaporte
N'oubliezpas,pourOpen
0=Lalumièrelaplusfortepourquelaporteseferme
•8.4Ilestrecommandéauclientdelerégleràenviron15.Silavaleurdesensibilitéesttrop
•
BoutonBAS.
8.2L'unitédevaleurenlumensclignote.Réglezl'unitédevaleurenlumensenappuyantsurleboutonUPou
•8.1Vérifiez/appuyezsurleboutonSETdupanneaudecommandepourafficherCLOSEL
23=Lamoindrelumièrepourfermerlaporte
solide,laportedupoulaillers'ouvriraetsefermeralorsqu'elledétecteraunpeudelumière!
N'oubliezpas,pourfermer
15
0=Leminimumpourquelaportes'ouvre
Machine Translated by Google

16
2Poulailleràportes
1batterierechargeable
Panneausolaire10W25W
Contrôleurdechargesolaire9V10A
Cedontvousavezbesoin:
ATTENTION:NETOUCHEZPASLESFILSENSEMBLE!
Batterie9VBatterie10AmpHour•1.
Installezlepanneausolairedanslesensoptimalpourlalumièredusoleil.
•2.Connectezlepanneausolaireaucontrôleurdecharge
solaire.•3.Connectezlabatterieaucontrôleurdecharge
solaire.•4.Connectezlaporteautomatiquedupoulailleraucontrôleurde
chargesolaire.•5.Protégezlecontrôleurdechargesolaireetlabatteriedansunboîtierpourlesprotéger
pluie/météo.
Machine Translated by Google

17
lespilessontpleines.Remplacezlespilessinécessaire.•Assurezvousquela
télécommandeestcorrectementprogramméesurlaportedupoulailler.•Vérifiezquelaporte
dupoulaillerestsoustension.
Laportedupoulaillernes'allumepas
•Assurezvousquel'appareilestalimentéenélectricité.
•Vérifiezlesconnexionsélectriquesalimentantl'appareilpourvousassurerqu'ellesnesontpassalesou
Laminuterienefonctionnepascorrectement
Laoulestélécommandesnefonctionnentpas
•Vérifiezquelaoulespilesdelatélécommandesontinstalléesdanslebonsenset
Contrôleurdechargesolaireetpanneausolaire25W
Voirdesexemplesdeproduitscidessous
paséteint.
Paramètresdel'heureoudela
luminosité•Vérifiezsilesparamètresutiliséssontcorrectementprogrammésetsilesfonctionnalitéssont
lesparamètresn'ontpasétédéfinis
correctement.•1.Débranchezlaportede
l'alimentation.•2.Rebranchezlaporte.
Suivezcesinstructionspourdiagnostiquersivotreminuterieestdéfectueuseousilaporte
Laportedupoulaillernes'ouvrepaset/ounesefermepasautomatiquementaveclelocal
endommagé.
Maintenanceetdépannage
Machine Translated by Google

18
coop,lesparamètresdesensibilitéàlalumièrenefonctionnerontpascorrectement.
Ceproduitestsoumisauxdispositionsdeladirectiveeuropéenne2012/19/CE.
nepeutpasêtrejetéaveclesorduresménagèresnormales,maisdoitêtreapportédansun
débranchezànouveaulaporteavantdelefairejustepourluidonneruneréinitialisationmatérielle.
débrisétrangerstrouvéssurlechemindedéplacementdelaporte.Assurezvouségalementdel'installation
Assurezvousquelecadredelaporteestinstalléàplatcontrelemuretqu'iln'yapas
programmezlaporteàvotreheurelocaleetàvotreheured'ouvertureetdefermeturedelaporte.Assurezvousde
Oui,ilpeutêtreconnecté/installéaveclaprisemâleCCfournie
Quefairesilaportenes'ouvre/nesefermePAScomplètement?
produitettouslesaccessoiresmarquésdecesymbole.Produitsmarquéscommetels
FabriquéenChine
Unpanneausolaireouunebatteriedesecourspeutilêtreutiliséavecl'appareil?
lesvisnesontpastropserrées!
pointdecollectepourlerecyclagedesappareilsélectriquesetélectroniques.
coopérative?
Laportedupoulaillerdoitelleêtreinstalléeàl'intérieurouàl'extérieurdupoulailler?
SilaportenesefermePAS,essayezderéinitialiservotrealimentationélectrique.
Lesymbolereprésentantunepoubelleàroulettesbarréeindiquequeleproduit
laportes'ouvre.
•6.Sicesétapesontfaitfonctionnervotreporte,suivezlesmêmesinstructionspour
Quefairesilaportesebloquelorsdel'ouvertureoudelafermeturedelaporte?
exigeunecollecteséparéedesdéchetsdansl'Unioneuropéenne.Celas'appliqueà
Celadépenddel'utilisationquevouscomptezenfaire.S'ilestinstalléàl'intérieurd'unbâtimentfermé,
•3.Nemodifiezaucunautreparamètre.•4.Réinitialisez
l'heured'ouvertureoudefermeture.•5.Attendezquela
portes'ouvrepourspécifierl'heured'ouverture0805pourconfirmersila
Éliminationcorrecte
Machine Translated by Google


MODEL:JUMCC06B
"Save Half", "Half Price" of andere soortgelijke uitdrukkingen die wij gebruiken, geven alleen een schatting van de
besparingen die u kunt behalen door bepaalde gereedschappen bij ons te kopen in vergelijking met de grote topmerken
en betekent niet noodzakelijkerwijs dat alle categorieën gereedschappen die wij aanbieden, worden gedekt. Wij
herinneren u eraan om zorgvuldig te controleren of u daadwerkelijk de helft bespaart in vergelijking met de grote
topmerken wanneer u een bestelling bij ons plaatst.
Wij streven er voortdurend naar om u gereedschappen tegen concurrerende prijzen te leveren.
KIPPENKOOIDEUROPENER
Technische ondersteuning en e-garantiecertificaat www.vevor.com/support
Machine Translated by Google

Heeft u vragen over het product? Heeft u technische ondersteuning nodig? Neem dan gerust
contact met
ons op: Technische ondersteuning en E-garantiecertificaat
www.vevor.com/support
MODEL:JUMCC06B
Dit is de originele instructie, lees alle handleidingen zorgvuldig door voordat u het
product gebruikt. VEVOR behoudt zich een duidelijke interpretatie van onze gebruikershandleiding
voor. Het uiterlijk van het product is afhankelijk van het product dat u hebt ontvangen.
Vergeef ons dat we u niet opnieuw zullen informeren als er technologie- of software-updates
voor ons product zijn.
KIPPENKOOIDEUROPENER
- 1 -
HULP NODIG? NEEM CONTACT MET ONS OP!
Machine Translated by Google

een gevaar.
Het niet opvolgen van onderstaande instructies kan leiden tot een elektrische schok, brand en/of ernstig letsel.
hok en sluit het aan op de binnenkant van het hok)
betrokken. Kinderen mogen niet met het apparaat spelen. Reiniging en gebruik
om de stekker te beschermen tegen weersinvloeden. (Laat het snoer door het gat in de kip lopen)
specificaties die bij dit elektrische apparaat worden geleverd. Het niet naleven van alle
•ÿOm het risico op een elektrische schok te verminderen, mag u dit product niet demonteren.
•ÿGebruik de AC/DC-stroomadapter en -kabel die bij het apparaat zijn geleverd. Het gebruik van
personen met verminderde fysieke, sensorische of mentale vermogens of een gebrek aan
•ÿDit apparaat kan worden gebruikt door kinderen van 8 jaar en ouder en
over het veilig gebruiken van het apparaat en het begrijpen van de gevaren
de fabrikant, zijn serviceagent of soortgelijke gekwalificeerde personen om te voorkomen
andere kabels kunnen schokken, brand of schade aan het apparaat veroorzaken. •ÿAls
het netsnoer (AC/DC-stroomadapter) beschadigd is, moet het door een erkende vakman worden vervangen.
ervaring en kennis als zij toezicht of instructie hebben gekregen
Lees alle veiligheidswaarschuwingen, instructies, illustraties en
los. Gebruik de AC/DC-stroomadapter alleen met een 100-240V AC-voedingsbron. •ÿLeg de voeding
aan op een beschermd gebied of bouw de behuizing van de voeding zodanig dat
Onderhoud mag niet door kinderen zonder toezicht worden uitgevoerd.
•ÿZorg ervoor dat het apparaat correct op de stroombron is aangesloten. •ÿGebruik
het apparaat niet als het netsnoer beschadigd is of als het stopcontact niet goed is aangesloten.
Waarschuwingen en voorzorgsmaatregelen
BELANGRIJKE VEILIGHEIDSMAATREGELEN
- 2 -
Machine Translated by Google

- 3 -
BEWAAR DEZEINSTRUCTIES
FCC-informatie
Dit apparaat voldoet aan Deel 15 van de FCC-regels. De werking is onderworpen aan de
volgende twee voorwaarden: 1) Dit product kan
schadelijke interferentie veroorzaken.
WAARSCHUWING: Wijzigingen of aanpassingen aan dit product die niet uitdrukkelijk zijn goedgekeurd
door de partij die verantwoordelijk is voor de naleving, kunnen de bevoegdheid van de gebruiker om
het product te bedienen ongeldig maken.
2) Dit product moet alle ontvangen interferentie accepteren, inclusief interferentie die
ongewenste werking kan veroorzaken.
LET OP: Wijzigingen of aanpassingen die niet uitdrukkelijk zijn goedgekeurd door de partij die
verantwoordelijk is voor de naleving, kunnen de bevoegdheid van de gebruiker om het apparaat te
bedienen ongeldig maken!
Let op: Dit product is getest en voldoet aan de limieten voor een digitaal apparaat van klasse B,
overeenkomstig deel 15 van de FCC-regels. Deze limieten
Machine Translated by Google

De gebruiker wordt aangemoedigd om te proberen de interferentie door een of meer van de
indien niet geïnstalleerd en gebruikt in overeenstemming met de instructies, kan dit leiden tot
· Sluit het product aan op een stopcontact op een ander circuit dan dat waarop het apparaat is aangesloten.
· Vergroot de afstand tussen het product en de ontvanger.
Dit product genereert, gebruikt en kan radiofrequentie-energie uitstralen, en
garanderen dat er geen interferentie zal optreden in een bepaalde installatie. Als dit
· Raadpleeg de dealer of een ervaren radio-/tv-technicus voor hulp.
De ontvanger is aangesloten.
schadelijke interferentie met radiocommunicatie. Er is echter geen
ontvangst, die kan worden bepaald door het product uit en aan te zetten, de
product veroorzaakt schadelijke interferentie met radio of televisie
in een residentiële installatie.
· Heroriënteer of verplaats de ontvangstantenne.
zijn ontworpen om redelijke bescherming te bieden tegen schadelijke interferentie
volgende maatregelen.
- 4 -
Machine Translated by Google

- 5 -
7 Zelftappende schroeven en schroevendraaier
Productintroductie
3 Infraroodsensor
5 AC/DC-stroomadapter met snoer en DC-stekker
2 Bedieningspaneel
1 Kippenhokdeur
8 Interne batterij (BACKUP-VOEDING)
4 DC/zonne-vrouwelijke stekker
6 draadloze afstandsbedieningen (batterijen niet inbegrepen, LAAD A27 BATTERIJEN)
Machine Translated by Google
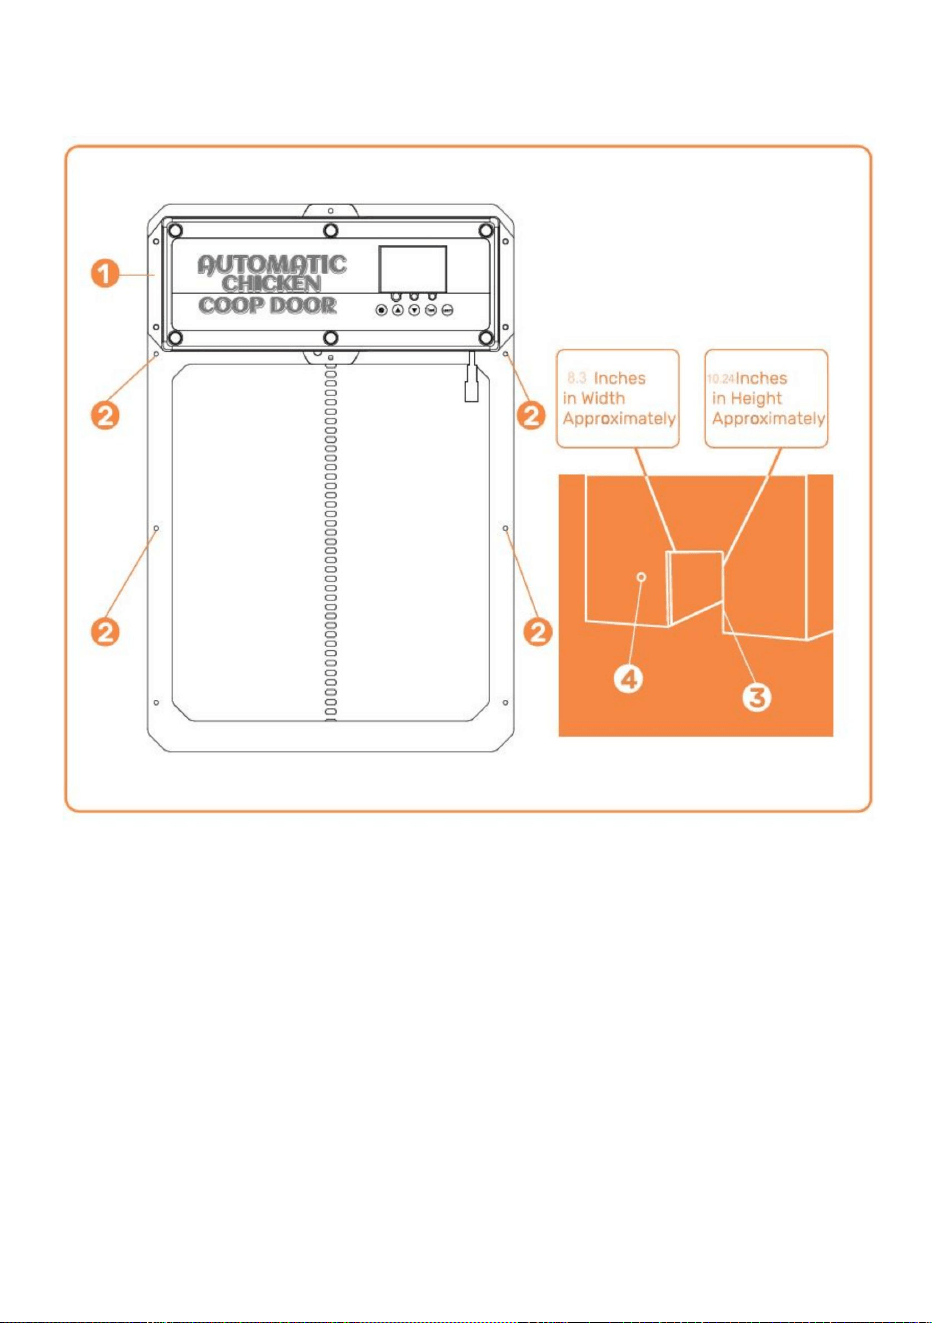
- 6 -
Installatie Inleiding
weer
ÿKoor van de deur van het
kippenhok ÿ Plaats van de
schroefinstallatie ÿ Structuur/muur van het kippenhok (met gat voor het deurkozijn van het kippenhok)
Installatie) ÿ
Gat waar de stroomtoevoer doorheen kan lopen om ervoor te zorgen dat de stroom beschermd is tegen
Machine Translated by Google

•
Test- knop waarmee u de deur handmatig kunt openen/sluiten
(UP)- Knop die wordt gebruikt om programmafuncties te wijzigen terwijl u zich in de programmamodus bevindt
modus
SET- knop waarmee u kunt schakelen tussen programmeermodi
•
LEARN- Knop die wordt gebruikt om de draadloze afstandsbediening(en) toe te voegen/te verwijderen
Digitaal display
•
•
•Lampje 1-Open deur [groen] en sluit deur [rood] indicatielampjes • Lampje
2-Infraroodsensor werkt indicatielampje • Lampje 3-
Lichtsensor werkt indicatielampje
(OMLAAG) - Knop die wordt gebruikt om programmafuncties te wijzigen terwijl u zich in het programma bevindt
- 7 -
•
Inleiding tot het Configuratiescherm
Machine Translated by Google

- 8 -
Bedieningshandleiding
zal snel sterven!
leven. We maken gebruik van moderne technologie en stoppen die in een slank en compact ontwerp om
Breedte = 8,3 inch es. Hoogte = 10,24 inch • 2. Bevestig het
deurkozijn van het kippenhok aan de structuur/muur van het kippenhok met
DC-vrouwelijke stekkers op de deur van het kippenhok. • 4.
Sluit de AC/DC-stroomadapter aan op een stroombron en het kippenhok
Het deurkozijn van het kippenhok kan worden geïnstalleerd en stevig worden vastgezet met schroeven.
De Coop Door is de perfecte oplossing voor een aangenamere manier van Homesteading
een eenvoudige voedingskast bouwen om binnendringen van water te voorkomen. • 5. Zie
pagina 10-11 voor het gebruik van de lichtsensor of de timer. • 6. Vergeet niet als
de deur niet helemaal open/dicht gaat, probeer dan de
schroeven op de deur. De deur kan bekneld raken als de deur te strak is geïnstalleerd. • 7. Als de deur niet
sluit na het programmeren. Probeer de stroom uit te schakelen
ongelijkmatig, gebruik dan 2x4's of wat platte stukken hout om een egale afwerking te garanderen. •
9. Gebruik twee houten afstandhouders van 1" tot !" en installeer deze boven de deur op de breedte van
Ons product is gemaakt om uw doelen op het gebied van zelfvoorzienendheid te ondersteunen en u te helpen
EN NIET OPEN). Zorg ervoor dat het deurkozijn van het kippenhok vlak is [geen openingen/krommingen]
de zelftappende schroeven (NIET TE DRAAI AAN, ANDERS WORDT DE DEUR SAMENGEPERST)
Wij bieden onze klanten de beste automatische kippenhokdeur die er is.
en probeer het opnieuw te sluiten. • 8. Als
u buitenbekleding of iets anders hebt waardoor de deur niet goed kan worden geïnstalleerd,
Gebruik een elektrisch gereedschap om schroeven door de deur te draaien.
•3. Sluit de DC-stekker van de AC/DC-stroomadapter aan op een van de
deur, deze deur verbruikt veel stroom omdat het een stevigere deur is, dus batterijen
homesteading gemakkelijker. Wij raden aan om het netsnoer of de zonne-energie te gebruiken om uw
tegen de structuur/muur van het kippenhok nadat de zelftappende schroeven zijn geïnstalleerd.
Algemene introductie
• 1. Controleer/maak een opening in de structuur/muur van de kippendeur, zodat de
De stroombron is beschermd tegen weersinvloeden door deze aan te sluiten op de binnenkant van het hok of
deur zal aangaan zoals bevestigd door het oplichten van het digitale display. Zorg ervoor
Algemene introductie
de gaten in het regenscherm.
Machine Translated by Google

aflopend) de sonde detecteert een dier bij de deur (actie + temperatuur, blauw licht
infraroodstraal. Zolang het rode lampje brandt, zal de deur niet sluiten. • 13. De dierensensorsonde
wordt weergegeven in Afbeelding . Wanneer de deur naar beneden gaat (of
aan), en de deur zal weer omhoog gaan. Na 1 minuut zal hij verder dalen. Na
stroomuitval, het opnieuw opstarten van de sonde vereist voorverwarmen gedurende ongeveer 15 seconden (blauw
Algemene installatie vervolg (infraroodsensor) • 11. De
infraroodsensor is ingebouwd in deze deur.
• 12. Er zit een rood lampje op de sensor om aan te geven dat er iets de sensor blokkeert.
achter het regenscherm.
• 10. Plaats het regenscherm op de twee houten afstandhouders, zodat de deur omhoog kan en
(als het lampje uitgaat) om normaal te kunnen functioneren.
1.0 - Programmeren van de draadloze afstandsbediening(en) •1.
Controleer of de batterij(en) van de afstandsbediening in de afstandsbediening(en) zijn geplaatst.
(Batterij(en): A27/12V apart verkrijgbaar). •2. Om een
afstandsbediening te koppelen aan de deur van het kippenhok, houdt u de LEARN-knop ingedrukt
- 9 -
Machine Translated by Google
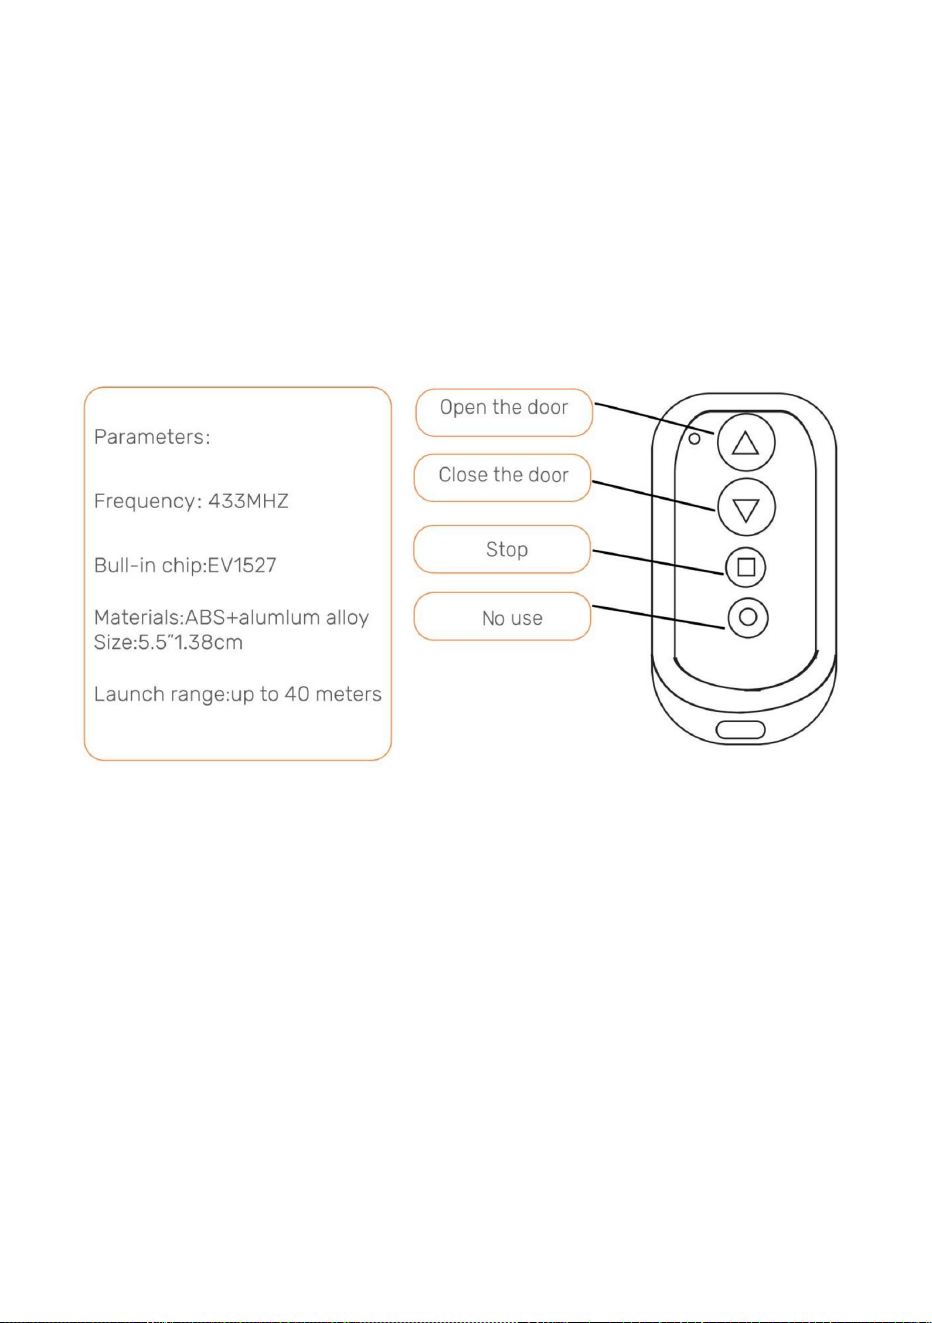
- 10 -
en de stroom wordt weer ingeschakeld, de afstandsbediening(en) blijven nog steeds gekoppeld aan de kip
Let op: Als de stroomvoorziening van de deur van het kippenhok voor een korte periode wordt onderbroken,
kippenhok deur.
3.0- Open/sluit de deur van het kippenhok zonder afstandsbediening
voltooid. Herhaal deze stap om de tweede afstandsbediening te koppelen. •3. Om alle
afstandsbedieningen te ontkoppelen, houdt u de LEARN- knop ingedrukt totdat de
De groene LED knippert twee keer, wat aangeeft dat de annulering voltooid is.
afstandsbediening twee keer. De groene LED knippert twee keer, wat aangeeft dat de koppeling is
knop op het bedieningspaneel 2 seconden ingedrukt. Druk vervolgens op een willekeurige knop op het
•2. Druk op de pijl-omlaagknop om de deur te sluiten.
2.0 - Open/sluit de deur van het kippenhok met de afstandsbediening •1. Druk
op de pijl-omhoogknop om de deur te openen.
•3. Druk op de vierkante knop om de beweging van de deur te stoppen.
de deur.
• 1. Druk op de testknop op het bedieningspaneel. De deur gaat open. •2. Druk op de testknop
op het bedieningspaneel. De deur stopt met bewegen. •3. Druk op de testknop op het
bedieningspaneel. De deur gaat dicht.
Door achtereenvolgens op de testknop op het bedieningspaneel te drukken, wordt het apparaat geopend of gesloten.
Machine Translated by Google

- 11 -
2.2 Druk één keer op de TEST- knop om de deur te openen.
ongeveer 1 seconde.
• 3.1 Druk op de SET- knop op het bedieningspaneel om weer te geven •3.2 De
tijdseenheid Uren knippert. Pas de tijdseenheid Uren aan door op de UP- of
Door achtereenvolgens op de SET- knop op het bedieningspaneel te drukken, doorloopt u de volgende stappen:
3. De lokale tijd (24-uurs tijdnotatie) voor de deur instellen
•1.1 Knop wekken: Druk eenmaal op de SET- of TEST- knop om het scherm voor
ongeveer 5 seconden om het scherm te laten oplichten.
• 3.3 Druk op de SET- knop om naar de Minuten-tijdseenheid te gaan. De Minuten-tijdseenheid
OMLAAG- knop.
•1.2 Wekken via afstandsbediening: Houd een willekeurige toets op de afstandsbediening ingedrukt gedurende
• 3.4 Pas de tijdseenheid Minuten aan door op de UP- of DOWN -knop te drukken. • 3.5 Druk op de
SET -knop om de tijdsinstelling en de volgende instelling te bevestigen.
2.1 Sluit de voeding aan en het display zal het volgende weergeven
2. Instellen van handmatig openen of sluiten van de deur
zal knipperen.
1. SchermWakeup
2.4 Druk nogmaals op de TEST- knop om de deur te sluiten.
4.0- Programmeren van de kippenhokdeur
2.3 Druk eenmaal op de TEST- knop om te pauzeren.
Machine Translated by Google

- 12 -
4.1 Druk gedurende één seconde op de SET-knop op het bedieningspaneel om het volgende weer te
geven: 4.2 T- T Geeft de tijd aan om de deur te openen - tijd om de deur te sluiten.
4.3 Druk gedurende één seconde op de OMHOOG-knop op het bedieningspaneel om het volgende weer
te geven: 4.4 T- L Geeft aan dat het tijd is om de deur te openen, licht op om de deur te sluiten.
4. Instelling en lichtdetectie gemengde modus
verschillende instellingen die geprogrammeerd moeten worden.
4.5 Druk gedurende één seconde op de OMHOOG-knop op het bedieningspaneel om het volgende weer
te geven: 4.6 L- T Geeft aan dat het lampje brandt om de deur te openen - tijd om de deur te sluiten
Machine Translated by Google
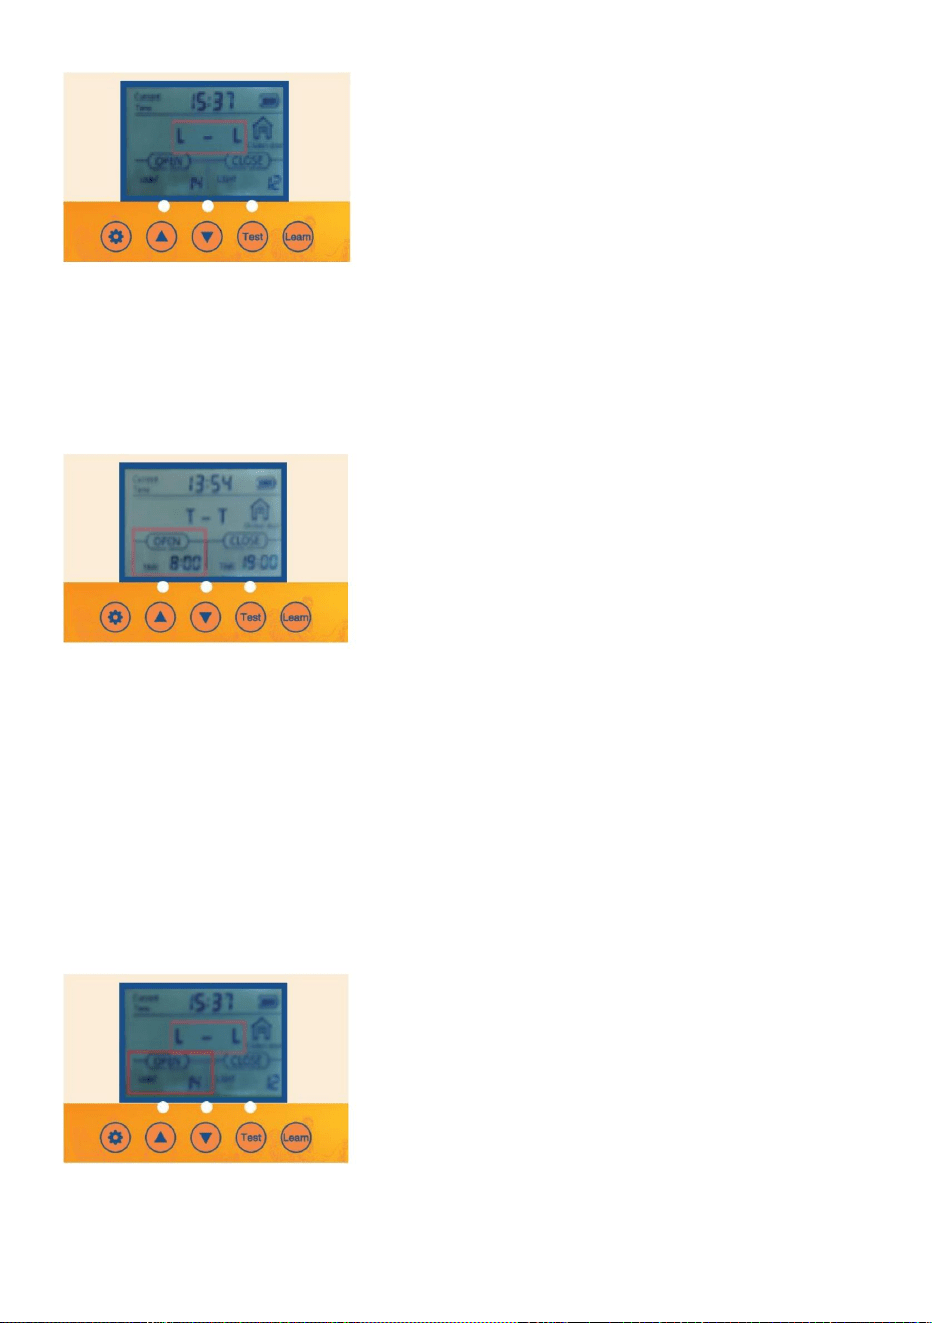
•5.4 Pas de tijdseenheid Minuten aan door op de UP- of DOWN -knop te drukken
zal knipperen.
6. Optie inschakelen zodat de deur automatisch open of dicht gaat met de instelling voor de
helderheid van het omgevingslicht
•6.1 Controleer/Druk op de SET- knop op het bedieningspaneel om OPEN-L weer te geven .
•6.2 De Lumen-waarde-eenheid knippert. Pas de Lumen-waarde-eenheid aan door op de UP- of
•5.1 Controleer/Druk op de SET -knop op het bedieningspaneel om OPEN-T weer te geven .
•5.2 De uren-tijdseenheid knippert. Pas de uren-tijdseenheid aan door op de UP- of DOWN -knop te drukken.
•5.3 Druk op de SET- knop om naar de Minuten-tijdseenheid te gaan. De Minuten-tijdseenheid
5. Optie inschakelen zodat de deur automatisch opent of sluit met de lokale tijdinstelling en timer
4.7 Druk gedurende één seconde op de OMHOOG-knop op het bedieningspaneel tot 4.8 LL
op het display verschijnt . Licht op om de deur te openen en licht op om de deur te sluiten.
- 13 -
Machine Translated by Google

7. Optie Sluiten aan zodat de deur automatisch opent of sluit met de
Lokale tijdinstelling en timer
of OMLAAG- knop.
eenheid zal knipperen.
• 7.2 De uren-tijdseenheid knippert. Pas de uren-tijdseenheid aan door op de UP-knop te drukken.
• 7.1 Controleer/Druk op de SET- knop op het bedieningspaneel om CLOSE-T weer te geven
7.4 Pas de tijdseenheid Minuten aan door op de knop OMHOOG of OMLAAG te drukken .
• 7.3 Druk op de SET- knop om naar de Minuten-tijdseenheid te gaan. De Minuten-tijdseenheid
Onthoud, voor dichtbij
0 = Het minste voor de deur om te openen
23= Het minste licht voor de deur om te sluiten
waarde is te sterk, de deur van het kippenhok zal open en dicht gaan wanneer het een
Onthoud, voor Open
23 = Het meest licht voor de deur om te openen
• 6.3 Pas de lumenwaarde aan door op de knop OMHOOG of OMLAAG te drukken .
OMLAAG- knop.
klein lichtje!
0 = Het lichtste voor de deur om te sluiten • 6.4 Het
wordt aanbevolen dat de klant deze op ongeveer 15 instelt. Als de gevoeligheid
- 14 -
•
Machine Translated by Google
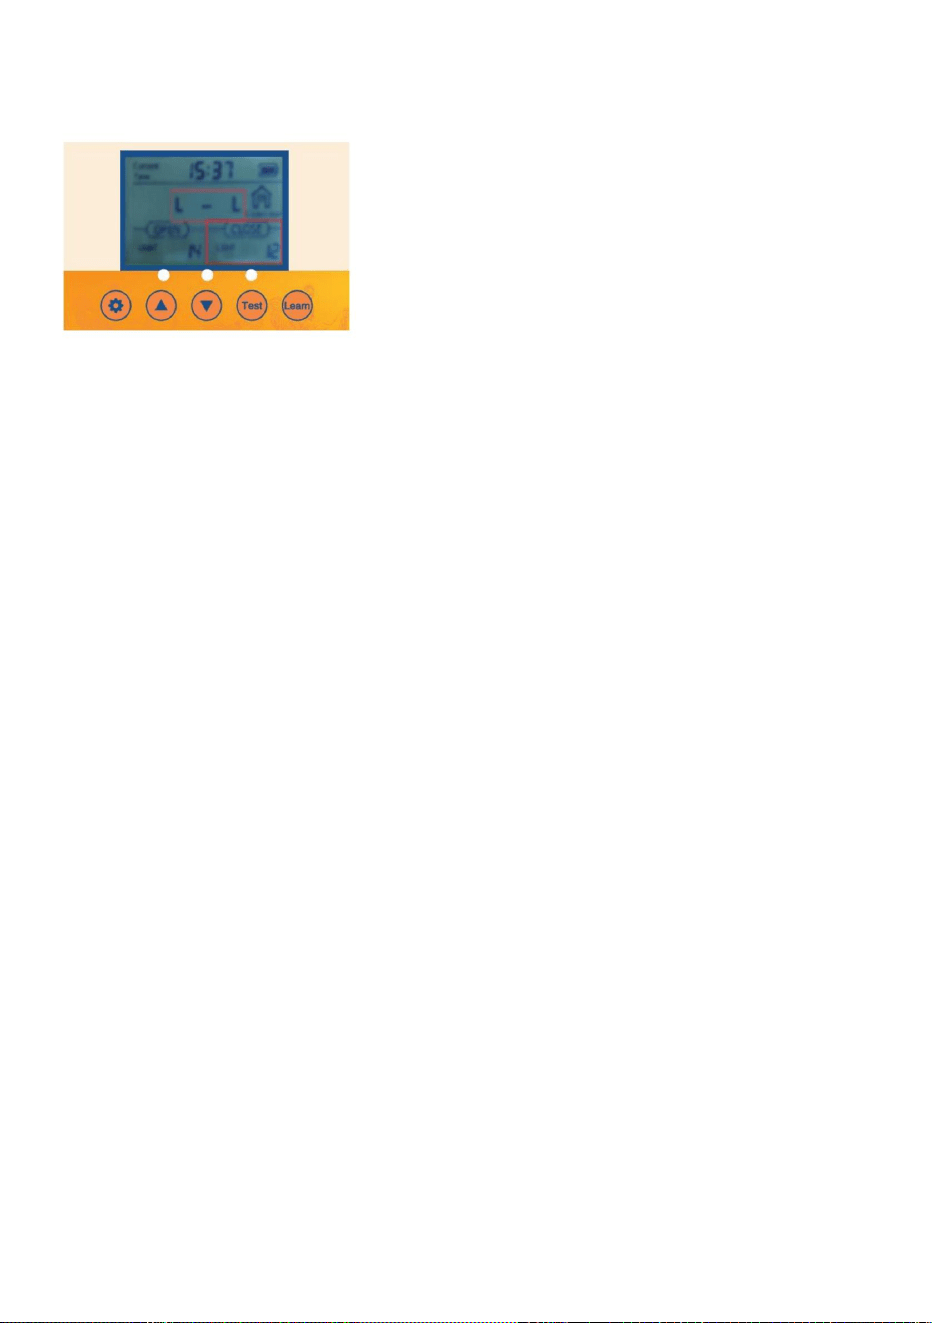
spanningsstabilisatiefunctie en stopt automatisch wanneer de batterij volledig is opgeladen
in de figuur
ÿ Nr. 5 1,2V nikkelwaterstof oplaadbare batterij Het 4PCS-controlebord heeft een
Het kippenhokdeurtje is uitgerust met een automatische oplaadfunctie: • 1. Hoe de
batterij te gebruiken:
opgeladen.
ÿ 4PCS AA1.5V No.5 batterij. • 2.
Zonnepaneel opladen: uitgang 9V 10W zonnepaneel zoals afgebeeld
Let op: Als de zonne-energievoorziening wordt gebruikt, kunnen er geen AA-batterijen worden gebruikt en
Er zijn 1,2 V Ni-MH/Ni-Cr-batterijen vereist
Instelling helderheid omgevingslicht
8. Optie Sluiten aan zodat de deur automatisch opent of sluit met de
Onthoud, voor Open
• 8.3 Pas de Lumen-waarde aan door op de UP- of DOWN -knop te drukken.
23 = Het meest licht voor de deur om te openen
0 = Het minste voor de deur om te openen
8.2 De Lumen-waarde-eenheid knippert. Pas de Lumen-waarde-eenheid aan door op de UP- of
OMLAAG- knop.
•
• 8.1 Controleer/Druk op de SET- knop op het bedieningspaneel om CLOSE-L weer te geven
Onthoud, voor dichtbij
sterk, de deur van het kippenhok gaat open en dicht als er een beetje licht is!
- 15 -
23= Het minste licht voor de deur om te sluiten
0 = Het lichtst mogelijke moment om de deur te
sluiten •8.4 Het wordt aanbevolen dat de klant deze op ongeveer 15 instelt. Als de gevoeligheidswaarde te laag is,
Machine Translated by Google

- 16 -
2 Kippenhok met deur
1 oplaadbare batterij
10W-25W zonnepaneel
9V 10Amp Zonne-laadregelaar
Wat heb je nodig:
LET OP: RAAK DE DRADEN NIET SAMEN AAN!
regen/weer.
9V-batterij 10AmpHour-batterij • 1.
Installeer het zonnepaneel in een richting die optimaal is voor zonlicht. •
2. Sluit het zonnepaneel aan op de zonnelaadregelaar. • 3. Sluit
de batterij aan op de zonnelaadregelaar. • 4. Sluit de deur
van het automatische kippenhok aan op de zonnelaadregelaar. • 5. Bescherm
de zonnelaadregelaar en de batterij in de behuizing om ze te beschermen tegen
Machine Translated by Google

- 17 -
•ÿZorg ervoor dat er stroom naar het apparaat gaat. • ÿ
Controleer de elektrische aansluitingen die het apparaat van stroom voorzien om er zeker van te zijn dat ze niet vuil of
• ÿControleer of de batterij(en) van de afstandsbediening in de juiste richting zijn geplaatst en
Kippenhokdeur gaat niet aan
Tijd- of helderheidsinstellingen •ÿ
Controleer of de gebruikte instellingen correct zijn geprogrammeerd en of de functies werken.
Afstandsbediening(en) werken niet
de batterij(en) vol zijn. Vervang de batterijen indien nodig. •ÿZorg ervoor dat de
afstandsbediening correct is geprogrammeerd voor de kippenhokdeur. •ÿControleer of de
kippenhokdeur is ingeschakeld.
Zonnelaadregelaar en 25W zonnepaneel
Bekijk hieronder voorbeelden van producten
beschadigd.
niet uitgeschakeld.
Timer werkt niet goed
De deur van het kippenhok gaat niet automatisch open en/of dicht met de lokale
Volg deze instructies om te diagnosticeren of uw timer defect is of de deur
instellingen zijn niet correct ingesteld. • 1.
Haal de stekker van de deur uit het stopcontact.
• 2. Steek de stekker van de deur er weer in.
Onderhoud en probleemoplossing
Machine Translated by Google

- 18 -
Het hangt ervan af hoe u het wilt gebruiken. Als het aan de binnenkant van een afgesloten ruimte is geïnstalleerd
Trek eerst de stekker uit het stopcontact om de deur een harde reset te geven.
vreemd vuil dat zich op de looproute van de deur bevindt. Zorg er ook voor dat de installatie
Dit product valt onder de bepalingen van de Europese richtlijn 2012/19/EG.
Zorg ervoor dat het deurkozijn vlak tegen de muur is geïnstalleerd en dat er geen
programmeer de deur naar uw lokale tijd en uw deur open en dicht tijd. Zorg ervoor dat
product en alle accessoires die met dit symbool zijn gemarkeerd. Producten die als zodanig zijn gemarkeerd
mag niet bij het normale huisvuil worden gegooid, maar moet naar een afvalverwerkingsbedrijf worden gebracht.
Gemaakt in China
Ja, het kan worden aangesloten/geïnstalleerd met de meegeleverde DC-mannelijke stekker
Wat moet ik doen als de deur NIET helemaal open/dicht gaat?
schroeven niet te vast aangedraaid!
Kan ik een zonnepaneel of een reservebatterij gebruiken met het apparaat?
inzamelpunt voor het recyclen van elektrische en elektronische apparaten.
kippenhok?
Moet de deur van het kippenhok aan de binnen- of buitenkant van het kippenhok worden geïnstalleerd?
Als de deur NIET sluit, probeer dan de stroomvoorziening te resetten.
deur gaat open.
• 6. Als uw deur na het volgen van deze stappen werkt, volgt u dezelfde instructies om
Wat moet ik doen als de deur klemt bij het openen of sluiten?
vereist gescheiden afvalinzameling in de Europese Unie. Dit geldt voor de
Het symbool met een doorgestreepte afvalbak geeft aan dat het product
• 3. Wijzig geen andere instellingen. • 4. Stel de
openings- of sluitingstijd opnieuw in. • 5. Wacht tot
de deur de openingstijd 0805 opgeeft om te bevestigen of de
coop, dan werken de lichtgevoeligheidsinstellingen niet goed.
Correcte verwijdering
Machine Translated by Google


MODELL: JUMCC06B
"Spara hälften", "halva priset" eller andra liknande uttryck som används av oss representerar
bara en uppskattning av besparingar du kan dra nytta av att köpa vissa verktyg hos oss jämfört med
de stora toppmärkena och betyder inte nödvändigtvis att täcka alla kategorier av verktyg som erbjuds
av oss. Du påminns vänligen om att noggrant kontrollera när du gör en beställning hos oss om
du faktiskt sparar hälften i jämförelse med de främsta stora varumärkena.
Vi fortsätter att vara engagerade i att ge dig verktyg till konkurrenskraftiga priser.
KYCKLINGSKÅL DÖRRÖPPNARE
Teknisk support och e-garanticertifikat www.vevor.com/support
Machine Translated by Google

BEHÖVER HJÄLP? KONTAKTA OSS!
KYCKLINGSKÅL DÖRRÖPPNARE
- 1 -
Har du produktfrågor? Behöver du teknisk support? Kontakta oss gärna: Teknisk support och
e-
garanticertifikat www.vevor.com/support
MODELL: JUMCC06B
Detta är den ursprungliga instruktionen, läs alla instruktioner noggrant innan du
använder den. VEVOR reserverar sig för en tydlig tolkning av vår användarmanual. Utseendet
på produkten är beroende av den produkt du fått. Ursäkta oss att vi inte kommer att
informera dig igen om det finns någon teknik eller mjukvaruuppdateringar på vår produkt.
Machine Translated by Google

- 2 -
VIKTIGA SÄKERHETSÅTGÄRDER
Varningar och försiktighetsåtgärder
en fara.
instruktionerna nedan kan leda till elektriska stötar, brand och/eller allvarliga skador.
coop och koppla in på insidan av coop)
inblandade. Barn får inte leka med apparaten. Rengöring och användare
för att skydda nätkontakten från väder.(Kör sladden genom hålet i kycklingen
specifikationer som medföljer denna elektriska apparat. Underlåtenhet att följa alla
•ÿFör att minska risken för elektriska stötar, ta inte isär denna produkt. •ÿ
Använd AC/DC-strömadaptern och kabeln som medföljer enheten. Användningen av
personer med nedsatt fysisk, sensorisk eller mental förmåga eller brist på
•ÿDenna apparat kan användas av barn från 8 år och uppåt och
angående användning av apparaten på ett säkert sätt och förstå farorna
tillverkaren, dess serviceombud eller liknande kvalificerade personer för att undvika
andra kablar kan resultera i stötar, brand eller orsaka skada på enheten. •ÿ
Om nätsladden (AC/DC-strömadapter) är skadad måste den bytas ut av
erfarenhet och kunskap om de har fått handledning eller instruktion
Läs alla säkerhetsvarningar, instruktioner, illustrationer och
lös. Använd endast AC/DC-strömadaptern med en 100-240V AC-strömkälla. •ÿKör
strömförsörjning till ett skyddat område eller bygg strömförsörjningshus i ordning
underhåll får inte utföras av barn utan tillsyn.
•ÿSe till att enheten är korrekt ansluten till strömkällan. •ÿAnvänd inte
enheten om nätsladden är skadad eller om stickkontakten är den
Machine Translated by Google
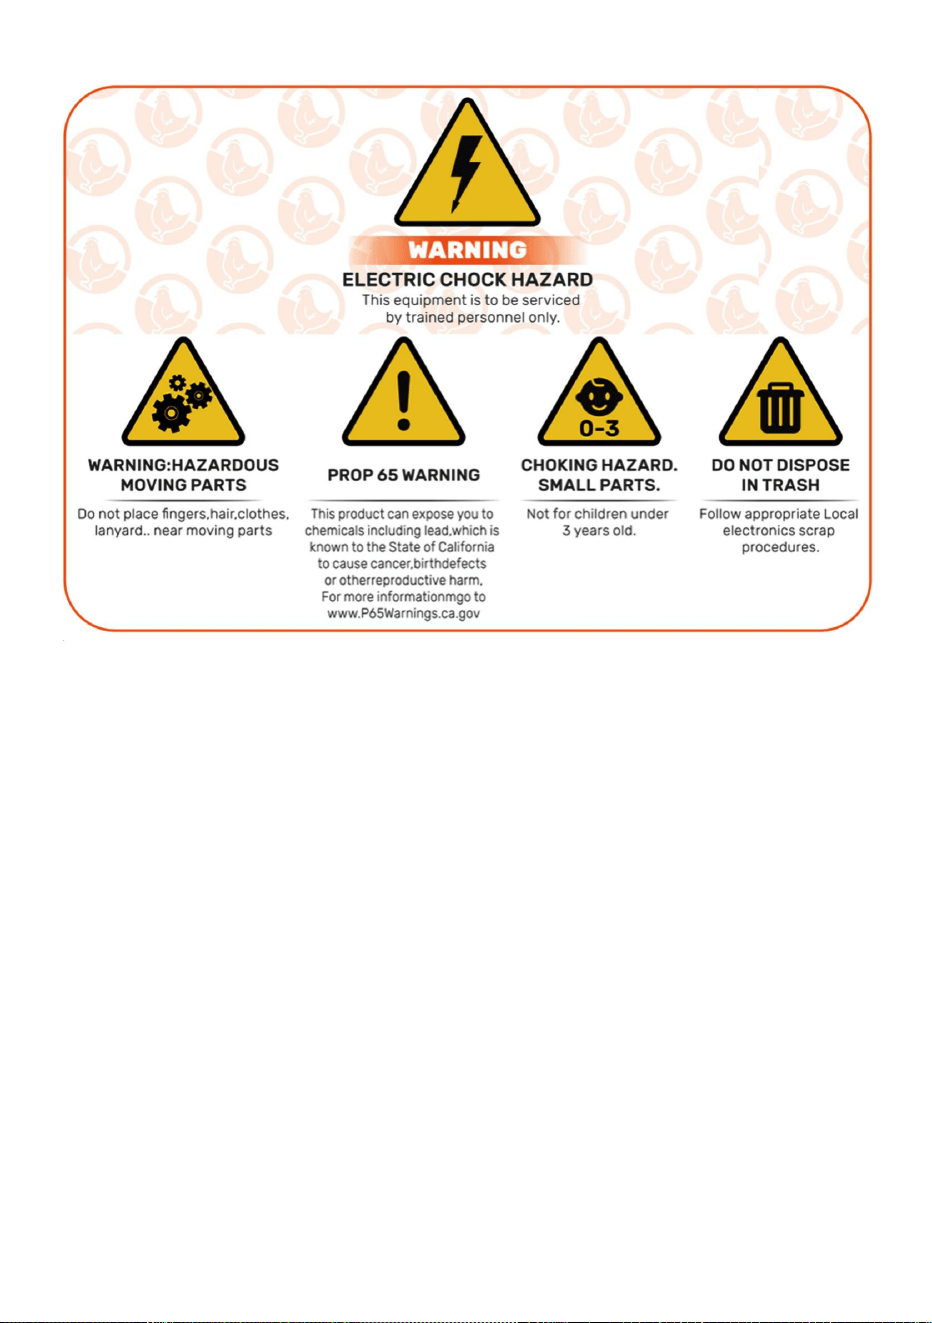
2) Denna produkt måste acceptera alla mottagna störningar, inklusive störningar
som kan orsaka oönskad funktion.
VARNING: Ändringar eller modifieringar av denna produkt som inte uttryckligen godkänts
av den part som är ansvarig för efterlevnaden kan upphäva användarens behörighet att
använda produkten.
Denna enhet uppfyller del 15 av FCC-reglerna. Driften är föremål för följande två
villkor: 1) Denna produkt kan orsaka skadliga
störningar.
FÖRSIKTIGHET: Ändringar eller modifieringar som inte uttryckligen godkänts av den part
som ansvarar för efterlevnaden kan upphäva användarens behörighet att använda
utrustningen!
Obs: Denna produkt har testats och befunnits överensstämma med gränserna för en
klass B digital enhet i enlighet med del 15 av FCC-reglerna, dessa gränser
FCC-information
SPARA DENNA INSTRUKTIONER
- 3 -
Machine Translated by Google

- 4 -
användaren uppmuntras att försöka korrigera störningen av en eller flera av de
om den inte installeras och används i enlighet med instruktionerna, kan orsaka
· Anslut produkten till ett uttag på en annan krets än den till vilken
· Öka avståndet mellan produkten och mottagaren.
Denna produkt genererar, använder och kan utstråla radiofrekvensenergi, och
garantera att störningar inte kommer att inträffa i en viss installation. Om detta
· Kontakta återförsäljaren eller en erfaren radio/TV-tekniker för hjälp.
mottagaren är ansluten.
skadliga störningar på radiokommunikation. Det finns dock ingen
mottagning, vilket kan bestämmas genom att stänga av och på produkten
produkten orsakar skadliga störningar på radio eller TV
i en bostadsanläggning.
· Rikta om eller flytta mottagningsantennen.
är utformade för att ge rimligt skydd mot skadlig störning
följande åtgärder.
Machine Translated by Google

3 Infraröd sensor
4 DC/solar honkontakt
2 Kontrollpanel
1 hönshusdörr
5 AC/DC-nätadapter med sladd och DC-hankontakt
6 Trådlös fjärrkontroll (batterier ingår ej, LADDA A27 BATTERIER)
8 internt batteripaket (BACKUP STRÖMFÖRSÖRJNING)
Produktintroduktion
7 Självgängande skruvar och skruvmejsel
- 5 -
Machine Translated by Google

Installation)
ÿ Hål för strömförsörjningen att gå igenom för att säkerställa att strömmen skyddas från
ÿHönshusets dörrram ÿ
Skruvinstallationsplats ÿ
Hönshusets struktur/vägg (med hål för hönshusets dörrram
väder
Installationsintroduktion
- 6 -
Machine Translated by Google

•
- 7 -
Test- knapp som används för att manuellt öppna/stänga dörren
(UPP)- Knapp som används för att ändra programfunktioner i programläge
•
•
SET- knapp används för att växla mellan programmeringslägen
•
LEARN- knapp som används för att lägga till/ta bort trådlösa fjärrkontroller
Digital display
läge
(NER)- Knapp som används för att ändra programfunktioner under programmets gång
•Ljus 1-Öppna dörr [grön] och stäng dörr [röd] indikatorlampor • Ljus 2-
Infraröd sensor funktionsindikatorlampa • Ljus 3-Ljus
sensor funktionsindikatorlampa
•
Introduktion till kontrollpanelen
Machine Translated by Google

kommer dö snabbt!
Vi använder modern teknik och lägger in den i en slimmad kompakt design för att
Bredd = 8,3 tum es. Höjd=10,24 tum • 2. Fäst
hönshusets dörrkarm på hönshusets struktur/vägg med
DC-hona pluggar på hönshusets dörr. • 4. Anslut AC/
DC-strömadaptern till en strömkälla och hönshuset
hönshusets dörrkarm kan installeras och fästas säkert med skruvar.
Coop-dörren är den perfekta lösningen för ett roligare Homesteading-sätt
bygga en enkel strömförsörjningsbox för att förhindra vattenintrång. • 5. Se
sidan 10-11 för att använda ljussensorn eller timern. • 6. Glöm inte
om dörren inte öppnar/stängs hela vägen försök att lossa
skruvar på dörren. Dörren kan klämmas om dörren monteras för tätt. • 7.Om dörren inte
stängs efter programmering. Försök att stänga av strömmen
ojämnt, använd sedan 2x4 eller några platta träbitar för att säkerställa att den är jämn.
• 9.Använd två 1" till !" trä distanser och installera dem ovanför dörren på bredden av
Vår produkt är gjord för att stödja dina hembygdsmål och för att hjälpa till att göra
OCH INTE ÖPPEN). Se till att hönshusets dörrkarm är platt [inga luckor/varpor]
de självgängande skruvarna (DRÄCK INTE ÖVER ELLER KOMPRESSAR DÖRREN
förse våra kunder med den bästa automatiska Coop-dörren som finns.
igen och försök att stänga den igen.
• 8. Om du har yttre klädsel eller något som kan göra att dörren är installerad
Använd ett elverktyg för att montera skruvar genom dörren.
•3.Anslut DC-hankontakten på AC/DC-strömadaptern till någon av de
dörr, den här dörren använder mycket ström på grund av att den är en robustare dörr så batterier
hushållning lättare. Vi föreslår att du använder nätsladden eller solenergi för att driva din
mot hönshusstruktur/vägg efter att de självgängande skruvarna monterats.
Allmän introduktion
• 1. Verifiera/skapa en öppning i kycklingdörrens struktur/vägg så att
strömkällan skyddas från väder genom att koppla in på insidan av coop eller
dörren kommer att slås på, vilket bekräftas av att den digitala displayen är upplyst. Säkerställa
Allmän introduktion
hålen i regnskyddet.
Driftshandbok
- 8 -
Machine Translated by Google

- 9 -
• 12. Det finns en röd lampa på sensorn för att indikera när något blockerar
infraröd stråle. När den röda lampan lyser kommer dörren inte att stängas. • 13.
Djuravkänningssonden visas i figur . När dörren går ned (eller är
på), och dörren kommer att gå upp igen. Efter 1 minut fortsätter den att sjunka. Efter
strömavbrott, omstart av sonden kräver förvärmning i cirka 15 sekunder (blå
Allmän installation forts.l(Infraröd sensor) • 11. Den
infraröda sensorn är inbyggd i denna dörr.
sjunkande) känner sonden av ett djur vid dörren (action+temperatur, blått ljus
bakom regnskyddet.
• 10. Montera regnskydd på de två trädistanserna så att dörren kan gå upp och
(Batterier: A27/12V säljs separat). •2. För att
para ihop en fjärrkontroll till hönshusets dörr tryck och håll ner LEARN
1.0 - Programmering av trådlösa fjärrkontroller •1.Kontrollera
att fjärrkontrollens batterier är installerade i fjärrkontrollen(erna)
lampan slocknar) för att fungera normalt.
Machine Translated by Google
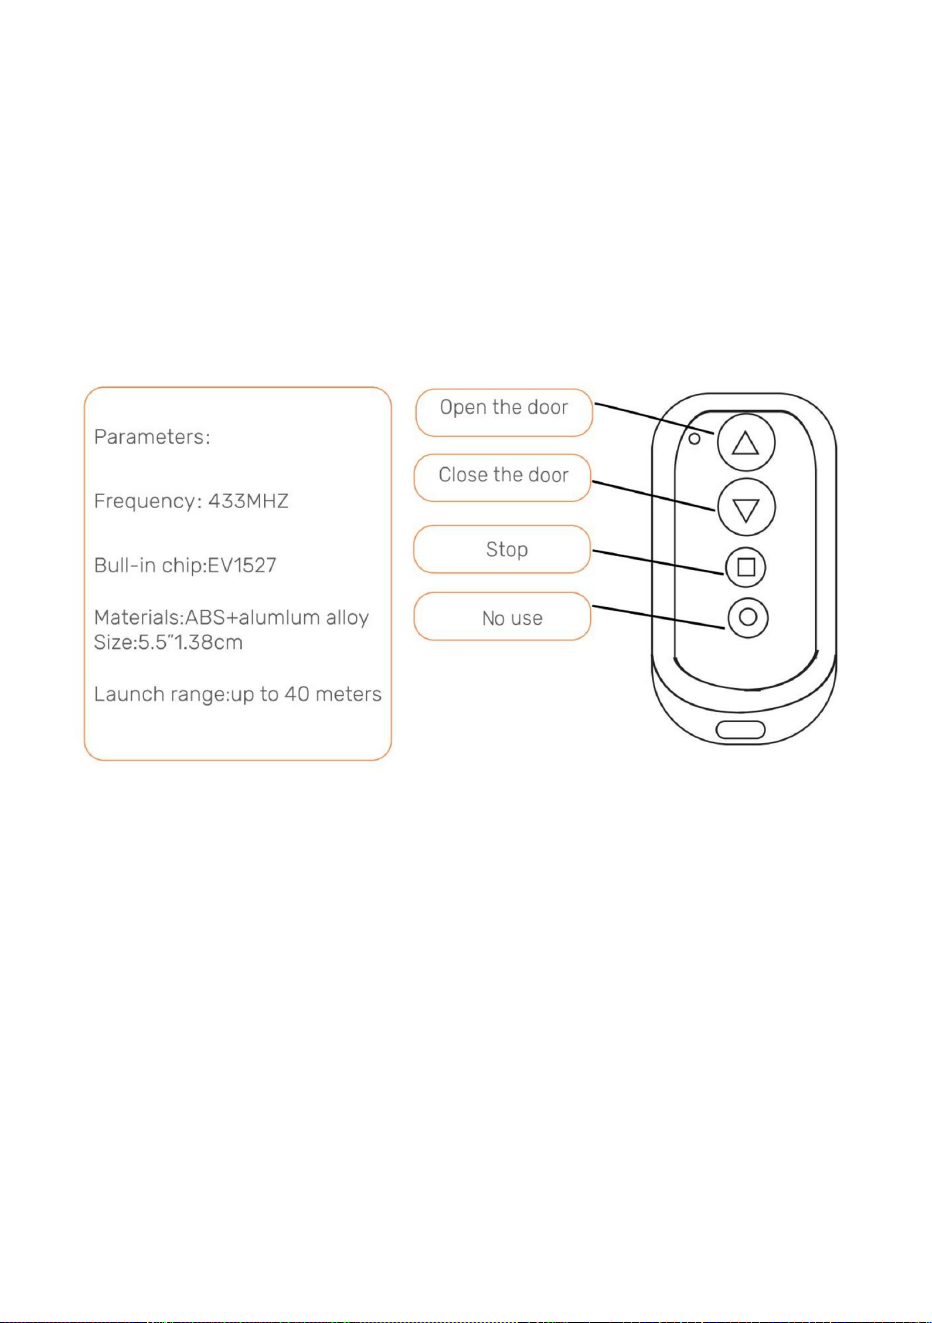
- 10 -
grön lysdiod blinkar två gånger, vilket indikerar att annulleringen är klar.
Obs: Om strömmen tas bort från hönshusets lucka under en kort tid
coop dörr.
2.0- Öppna/stäng hönshusdörren med fjärrkontroll •1. Tryck på
uppåtpilen för att öppna luckan.
komplett. Upprepa detta steg för att para ihop den andra fjärrkontrollen.
•3. För att koppla bort alla fjärrkontroller håller du LEARN -knappen intryckt tills
och strömmen sätts på igen, kommer fjärrkontrollerna fortfarande att kopplas ihop med kycklingen
fjärrkontroll två gånger. Den gröna lysdioden blinkar två gånger, vilket indikerar att parningen är
knappen på kontrollpanelen nedtryckt i 2 sekunder. Tryck sedan på valfri knapp på
Om du sekventiellt trycker på testknappen på kontrollpanelen öppnas eller stängs den
3.0- Öppna/stäng hönshusdörren utan fjärrkontroll
dörren.
• 1. Tryck på testknappen på kontrollpanelen. Dörren öppnas. •2.Tryck på
testknappen på kontrollpanelen. Dörren slutar röra sig. •3. Tryck på testknappen
på kontrollpanelen. Dörren kommer att stängas.
•3. Tryck på den fyrkantiga kolven för att stoppa alla rörelser av dörren.
•2. Tryck på nedåtpilen för att stänga dörren.
Machine Translated by Google
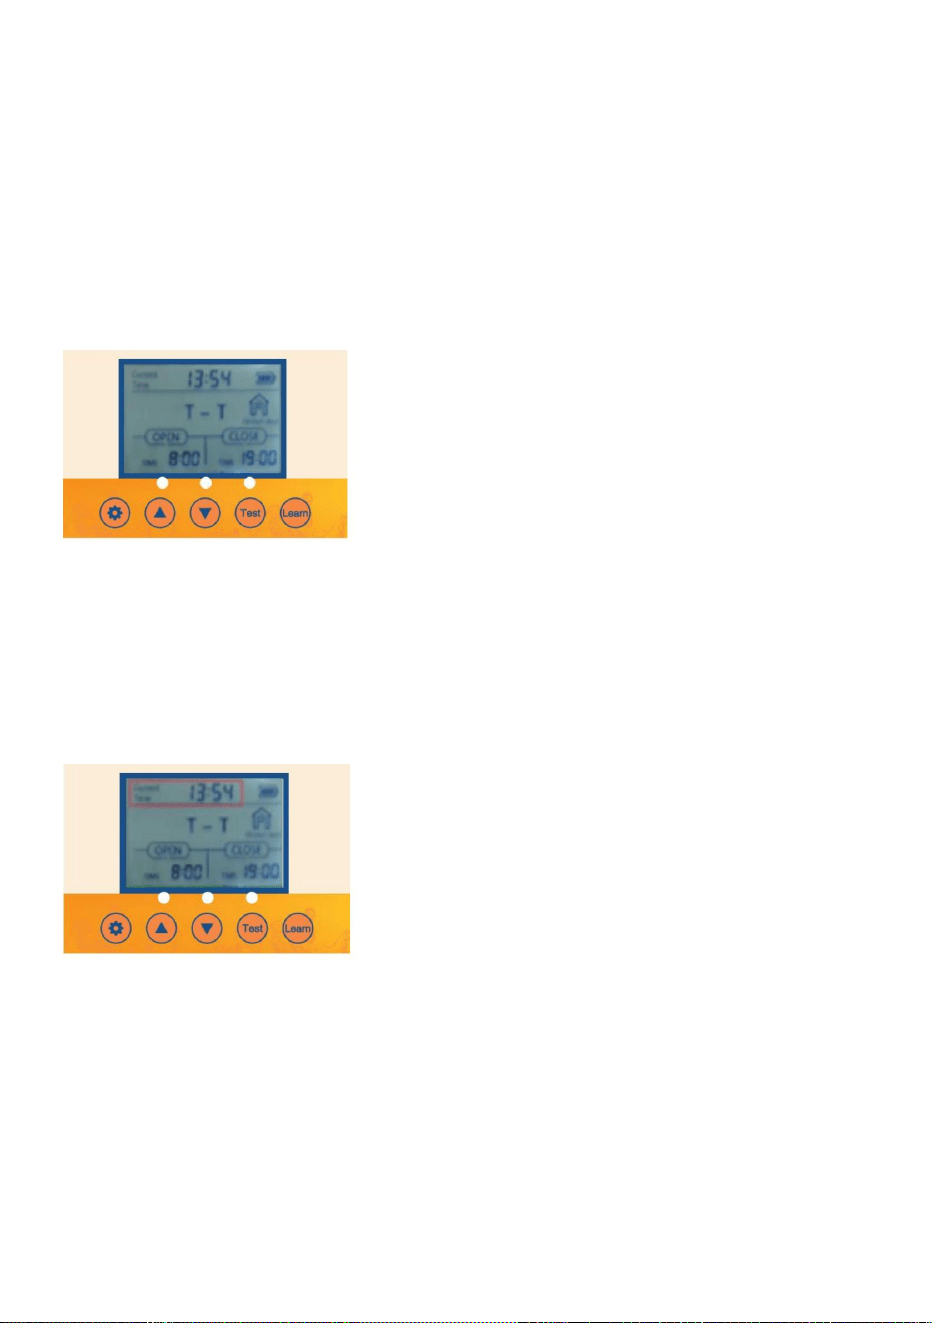
- 11 -
2.2 Tryck på TEST -knappen en gång för att öppna dörren.
ca 1 sekund.
• 3.1 Tryck på knappen SET på kontrollpanelen för att visa •3.2
Tidsenheten för timmar blinkar. Justera tidsenheten för timmar genom att trycka UPP eller
Om du trycker på SET -knappen i tur och ordning på kontrollpanelen går du igenom
3. Ställa in lokal tid (24 timmars tidsformat) för dörren
•1.1 Väckning av knapp: Tryck på knappen SET eller TEST en gång för att slå på skärmen för
ca 5 sekunder för att lysa upp skärmen.
• 3.3 Tryck på knappen SET för att växla till tidsenheten för minuter. Tidsenheten minuter
DOWN- knappen.
•1.2 Väckning av fjärrkontrollen: Tryck och håll ned valfri knapp på fjärrkontrollen för
• 3.4 Justera tidsenheten för minuter genom att trycka på UPP- eller NED -knappen. • 3.5
Tryck på SET -knappen för att bekräfta tidsinställningen och nästa inställning.
2.1 Anslut strömförsörjningen så visas skärmen som visas
2. Ställa in manuell dörröppning eller stängning
kommer att blinka.
1. ScreenWakeup
2.4 Tryck på TEST -knappen igen för att stänga luckan.
4.0- Programmering av hönshusets dörr
2.3 Tryck på TEST -knappen en gång för att pausa.
Machine Translated by Google

- 12 -
4.1 Tryck på SET-knappen i en sekund på kontrollpanelen för att visa 4.2 T-T Indikerar
tid för att öppna dörren - tid att stänga dörren.
4. Inställning och ljusavkännande blandat läge
olika inställningar som ska programmeras.
4.3 Tryck på UPP-knappen i en sekund på kontrollpanelen för att visa 4.4 T-L Indikerar
tid för att öppna dörren -lampa för att stänga dörren.
4.5 Tryck på UPP-knappen i en sekund på kontrollpanelen för att visa 4.6 L-T Indikerar
ljus för att öppna dörren - dags att stänga dörren
Machine Translated by Google

- 13 -
•5.3 Tryck på knappen SET för att växla till tidsenheten för minuter. Tidsenheten minuter
kommer att blinka.
6. Slå på alternativet så att dörren öppnas eller stängs automatiskt med inställningen för
ljusstyrka för omgivande ljus
•6.1 Verifiera/tryck på SET -knappen på kontrollpanelen för att visa OPEN-L •6.2
Lumenvärdesenheten blinkar. Justera Lumenvärdesenheten genom att trycka UPP eller
•5.1 Verifiera/tryck på knappen SET på kontrollpanelen för att visa OPEN-T •5.2 Tidsenheten
för timmar blinkar. Justera tidsenheten för timmar genom att trycka på UPP- eller NER -knappen.
•5.4 Justera tidsenheten för minuter genom att trycka på UPP- eller NER -knappen
5. Slå på alternativet så att dörren öppnas eller stängs automatiskt med lokal tidsinställning och
timer
4.7 Tryck på UPP-knappen i en sekund på kontrollpanelen för att visa 4.8 LL Indikerar ljus
för att öppna dörren -ljus för att stänga dörren.
Machine Translated by Google

Lokal tidsinställning och timer
7. Stäng alternativ på så att dörren öppnas eller stängs automatiskt med
• 7.2 Tidsenheten för timmar blinkar. Justera tidsenheten för timmar genom att trycka UPP
• 7.3 Tryck på knappen SET för att växla till tidsenheten för minuter. Minuternas tid
eller NER -knappen.
• 7.1 Verifiera/tryck på SET- knappen på kontrollpanelen för att visa CLOSE-T
enheten blinkar.
7.4 Justera tidsenheten för minuter genom att trycka på UPP- eller NER -knappen.
23 = Det mest ljusa för dörren att öppna
0 = Det minsta för dörren att öppna
23= Minst ljus för att dörren ska stängas
0= Mest ljus för att dörren ska stänga • 6.4
Det rekommenderas att kunden ställer in den på cirka 15. Om känsligheten
Kom ihåg, For Open
Kom ihåg, för nära
• 6.3 Justera enheten för lumenvärde genom att trycka på UPP- eller NER -knappen.
DOWN- knappen.
lite ljus!
värdet är för starkt öppnas och stängs hönshusets dörr när den känner av en
- 14 -
•
Machine Translated by Google

• 8.3Justera enheten för lumenvärde genom att trycka på UPP- eller NED -knappen.
23 = Det mest ljusa för dörren att öppna
Kom ihåg, For Open
0 = Det minsta för dörren att öppna
•
DOWN- knappen.
8.2 Lumenvärdesenheten blinkar. Justera lumenvärdesenheten genom att trycka UPP eller
• 8.1 Verifiera/tryck på SET- knappen på kontrollpanelen för att visa CLOSE-L
Kom ihåg, för nära
0= Mest ljus för att dörren ska stänga •8.4 Det
rekommenderas att kunden ställer in den på cirka 15. Om känslighetsvärdet är för mycket
23= Minst ljus för att dörren ska stängas
stark, hönshusets dörr öppnas och stängs när den känner av lite ljus!
- 15 -
Inställning för ljusstyrka för omgivande ljus
8.Close alternativet på så att dörren öppnas eller stängs automatiskt med
spänningsstabiliserande funktion och stoppar automatiskt när batteriet är fullt
laddad.
ÿ 4st AA1.5V nr 5 batteri. • 2.
Laddning av solcellspanel: utgång 9V 10W solladdningspanel enligt bilden
ÿ No.5 1,2V nickelväte uppladdningsbart batteri 4PCS-kontrollkortet har en
Hönshusets dörr är utrustad med automatisk laddningsfunktion: • 1.Hur
man använder batteriet:
1,2V Ni-MH/Ni-Cr-batterier krävs
Obs: Om solenergiförsörjningen används kan AA-batterier inte användas, och
i figuren
Machine Translated by Google

10W-25W solpanel
9V 10Amp Solar Charge Controller
Vad du behöver:
FÖRSIKTIGHET: RÖR INTE LEDNINGSKABLAR SAMMANS!
9V batteri 10AmpHour batteri • 1.
Installera solpanelen i riktning för att optimera för solljus. • 2. Anslut
solpanelen till solcellsladdningsregulatorn. • 3. Anslut batteriet
till solcellsladdningsregulatorn. • 4. Anslut den automatiska
hönshusets dörr till solenergiladdningsregulatorn. • 5. Skydda
solenergiladdningsregulator och batteri i höljet för att skydda från
regn/väder.
2 hönslucka
1 laddningsbart batteri
- 16 -
Machine Translated by Google

Underhåll & Felsökning
batteriet/batterierna är fulla av laddning. Byt ut batterierna vid behov. •ÿSe
till att fjärrkontrollen är korrekt programmerad till hönshusets dörr. •ÿKontrollera att
hönshusets dörr är påslagen.
Kycklinghusets dörr slår inte på
•ÿSe till att det går ström till enheten. • ÿKontrollera
de elektriska anslutningarna som driver enheten för att säkerställa att de inte är smutsiga eller
Timern fungerar inte som den ska
Fjärrkontroll(er) fungerar inte
• ÿKontrollera att fjärrkontrollens batteri(er) är installerade i rätt riktning och
Solar Charge Controller och 25W solpanel
Se exempel på produkter nedan
inte avstängd.
Inställningar för tid eller ljusstyrka
•ÿKontrollera om de använda inställningarna är korrekt programmerade och om funktionerna är det
inställningarna var inte korrekt
inställda. • 1. Koppla bort dörren från
strömmen. • 2. Sätt tillbaka dörren.
Följ dessa instruktioner för att diagnostisera om din timer är felaktig eller dörren
Chicken Coop-dörren öppnas och/eller stängs inte automatiskt med lokalen
skadad.
- 17 -
Machine Translated by Google

Korrekt avfallshantering
Det beror på hur du planerar att använda den. Om den är installerad på insidan av en avstängd
koppla ur dörren igen innan du gör det bara för att ge den en hård återställning.
främmande skräp hittats i dörrens färdväg. Se även till installationen
Denna produkt omfattas av bestämmelserna i det europeiska direktivet 2012/19/EC.
Se till att dörrkarmen är installerad plant mot väggen och att det inte finns några
programmera dörren till din lokala tid och din dörröppning och stängningstid. Se till att
produkten och alla tillbehör märkta med denna symbol. Produkter märkta som sådana
får inte slängas tillsammans med vanligt hushållsavfall utan måste tas till en
Tillverkad i Kina
Ja, den kan anslutas/installeras med den medföljande DC-hankontakten
Vad ska man göra om dörren INTE öppnas/stänger hela vägen?
skruvarna är inte monterade för hårt!
Kan en solpanel eller reservbatteri användas med enheten?
insamlingsställe för återvinning av elektriska och elektroniska apparater.
coop?
Måste hönshusets dörr installeras på insidan eller utsidan av kycklingen
Om dörren INTE stängs försök att återställa strömförsörjningen.
dörren öppnas.
• 6. Om du följer dessa steg får din dörr att fungera, följ samma instruktioner för att
Vad ska man göra om dörren fastnar när man öppnar eller stänger dörren?
kräver separat sophämtning i Europeiska unionen. Detta gäller för
Symbolen som visar en soptunna på hjul korsad anger att produkten
• 3. Ändra inga andra inställningar. • 4. Återställ
öppnings- eller stängningstiden. • 5.Vänta tills
dörren går för att ange öppningstiden 0805 för att bekräfta om
coop kommer inte ljuskänslighetsinställningarna att fungera korrekt.
- 18 -
Machine Translated by Google


MODELO:JUMCC06B
Seguimoscomprometidosabrindarleherramientasaprecioscompetitivos.
"Ahorrelamitad","mitaddeprecio"ocualquierotraexpresiónsimilarqueutilicemossolorepresenta
unaestimacióndelahorroquepodríaobteneralcomprarciertasherramientasconnosotrosencomparación
conlasprincipalesmarcasynonecesariamentesignificaquecubratodaslascategoríasdeherramientas
queofrecemos.Lerecordamosque,alrealizarunpedidoconnosotros,verifiquecuidadosamentesi
realmenteestáahorrandolamitadencomparaciónconlasprincipalesmarcas.
ABRIDORDEPUERTADEGALLINERO
Soportetécnicoycertificadodegarantíaelectrónicawww.vevor.com/support
Machine Translated by Google

¿Tienepreguntassobreelproducto?¿Necesitaasistenciatécnica?Nodudeenponerseen
contactocon
nosotros:Asistenciatécnicaycertificadodegarantíaelectrónica
www.vevor.com/support
MODELO:JUMCC06B
Estassonlasinstruccionesoriginales,leaatentamentetodaslasinstruccionesdel
manualantesdeutilizarelproducto.VEVORsereservaunainterpretaciónclaradenuestro
manualdeusuario.Laaparienciadelproductoestarásujetaalproductoquerecibió.
Perdónenospornoinformarlenuevamentesihayactualizacionesdetecnologíaosoftwareen
nuestroproducto.
1
ABRIDORDEPUERTADEGALLINERO
¿NECESITAAYUDA?¡CONTÁCTENOS!
Machine Translated by Google

Losniñosnodebenjugarconelaparato.Limpiezayuso
Lasinstruccionesqueseenumeranacontinuaciónpuedenprovocardescargaseléctricas,incendiosy/olesionesgraves.
gallineroyenchufeenelinteriordelgallinero)
paraprotegerelenchufedealimentacióndelclima.(Paseelcableatravésdelorificioenelgallinero)
especificacionesproporcionadasconesteaparatoeléctrico.Elincumplimientodetodaslas
•Parareducirelriesgodedescargaeléctrica,nodesarmeesteproducto.•Useel
adaptadordecorrienteCA/CCyelcablequeseincluyenconlaunidad.
personasconcapacidadesfísicas,sensorialesomentalesreducidasoconfaltade
•Esteaparatopuedeserutilizadoporniñosmayoresde8añosy
sobreelusodelaparatodeformaseguraycomprenderlospeligros
elfabricante,suagentedeservicioopersonasigualmentecalificadasparaevitar
Otroscablespuedenprovocardescargaseléctricas,incendiosodañosalaunidad.•Si
elcabledealimentación(adaptadordecorrienteCA/CC)estádañado,debeserreemplazadopor
Experienciayconocimientossihanrecibidosupervisiónoinstrucción
Elmantenimientonodeberáserrealizadoporniñossinsupervisión.
Leatodaslasadvertenciasdeseguridad,instrucciones,ilustracionesy
suelto.UtiliceeladaptadordecorrienteCA/CCúnicamenteconunafuentedealimentacióndeCAde100240V.
•Conduzcalafuentedealimentaciónaunáreaprotegidaoconstruyaunacarcasaparalafuentedealimentación
unpeligro.
•Asegúresedequelaunidadestéconectadaalafuentedealimentacióncorrectamente.
•Noutilicelaunidadsielcabledealimentaciónestádañadoosielcontactodelenchufeestádañado.
MEDIDASDESEGURIDADIMPORTANTES
Advertenciasyprecauciones
2
Machine Translated by Google
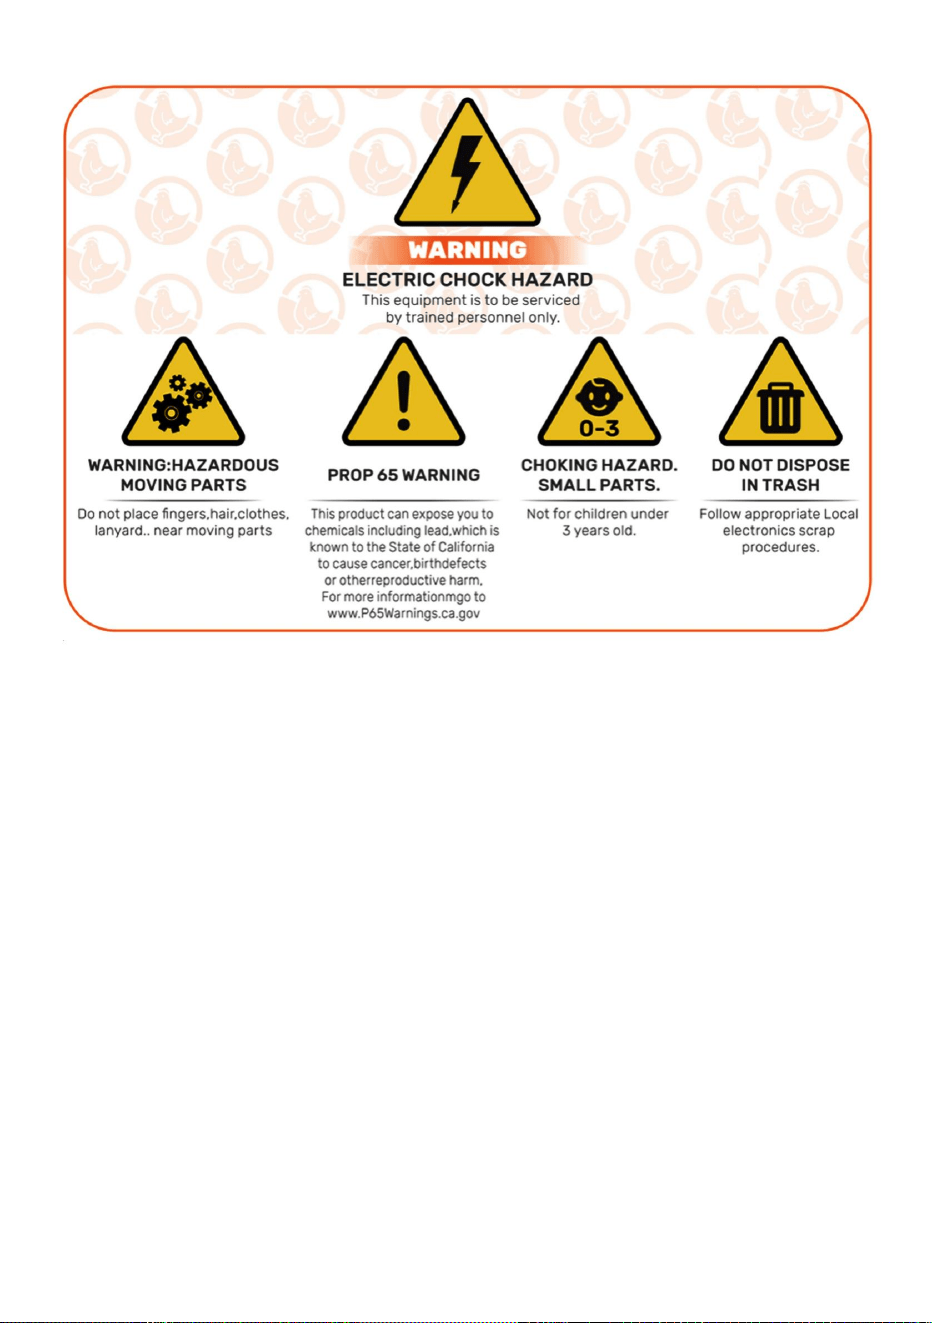
2)Esteproductodebeaceptarcualquierinterferenciarecibida,incluidaaquellaquepuedaprovocar
unfuncionamientonodeseado.
ADVERTENCIA:Loscambiosomodificacionesaesteproductonoaprobadosexpresamentepor
laparteresponsabledelcumplimientopodríananularlaautoridaddelusuarioparaoperarel
producto.
EstedispositivocumpleconlaParte15delasNormasdelaFCC.Sufuncionamientoestásujeto
alasdoscondicionessiguientes:1)Esteproducto
puedecausarinterferenciasperjudiciales.
PRECAUCIÓN:¡Loscambiosomodificacionesnoaprobadosexpresamenteporlaparte
responsabledelcumplimientopodríananularlaautoridaddelusuarioparaoperarelequipo!
Nota:Esteproductohasidoprobadoysehadeterminadoquecumpleconloslímitesparaun
dispositivodigitaldeClaseBdeconformidadconlaParte15delasNormasdelaFCC.Estoslímites
InformacióndelaFCC
GUARDEESTASINSTRUCCIONES
3
Machine Translated by Google

4
siguientesmedidas.
Sinoseinstalayutilizadeacuerdoconlasinstrucciones,puedecausar
∙Conecteelproductoaunatomadecorrientedeuncircuitodiferentedeaquelalqueestáconectado.
∙Aumentarladistanciaentreelproductoyelreceptor.
Esteproductogenera,utilizaypuedeirradiarenergíaderadiofrecuenciay
garantizarquenoseproduzcaninterferenciasenunainstalacióndeterminada.Siesto
∙Consultealdistribuidoroauntécnicoderadio/TVexperimentadoparaobtenerayuda.
interferenciasperjudicialesalasradiocomunicaciones.Sinembargo,noexiste
Elreceptorestáconectado.
recepción,quesepuededeterminarencendiendoyapagandoelproducto,la
Elproductocausainterferenciasdañinasalaradiootelevisión.
enunainstalaciónresidencial.
∙Reorientaroreubicarlaantenareceptora.
Serecomiendaalusuarioqueintentecorregirlainterferenciamedianteunoomásdelossiguientesmétodos:
Estándiseñadosparaproporcionarunaprotecciónrazonablecontrainterferenciasdañinas.
Machine Translated by Google
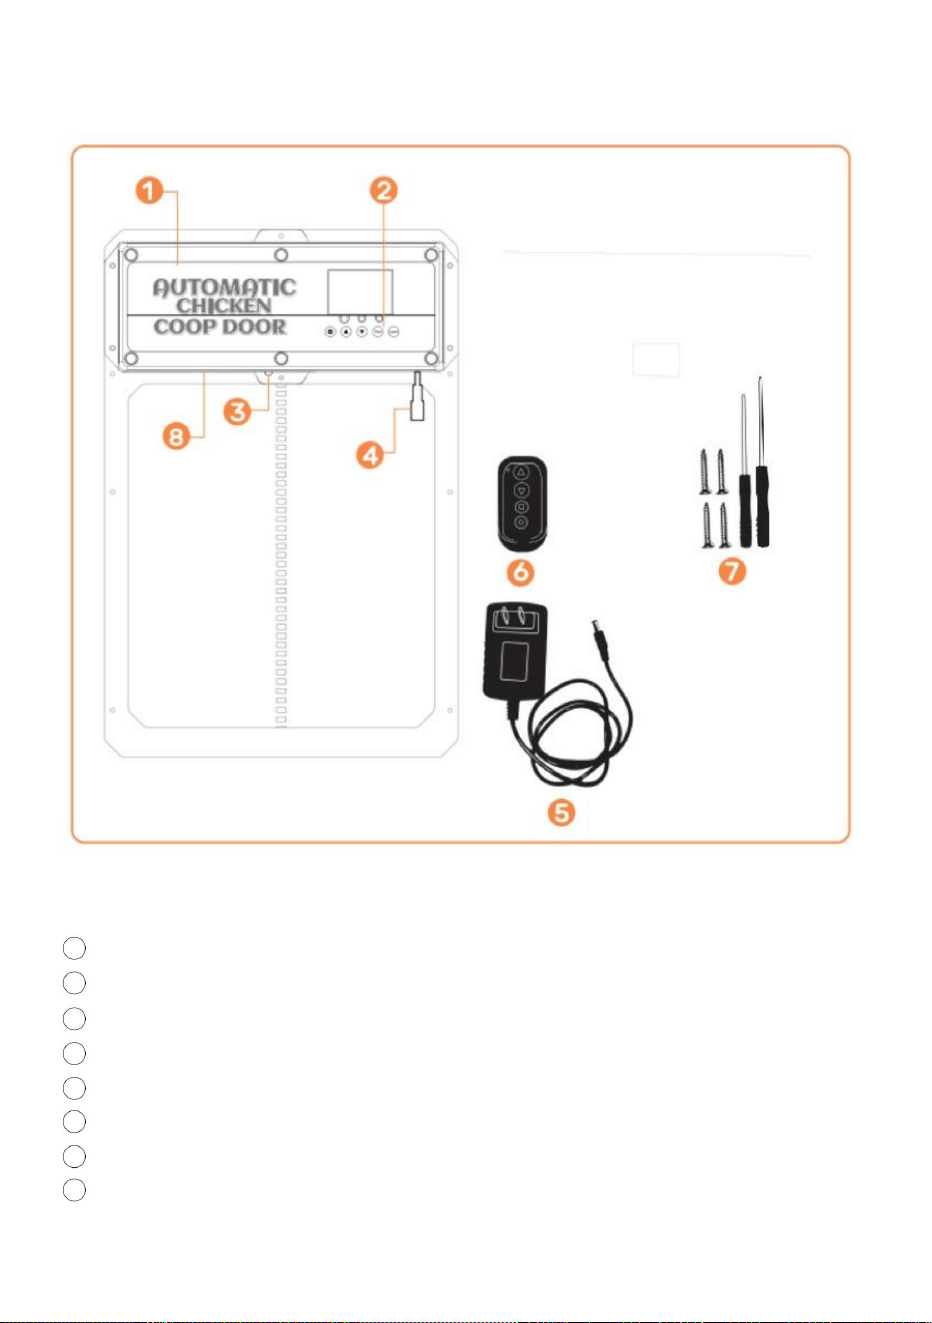
3Sensordeinfrarrojos
AdaptadordecorrienteCA/CCde5VconcableyenchufemachodeCC
2Paneldecontrol
1puertadegallinero
8Bateríainterna(FUENTEDEALIMENTACIÓNDERESPALDO)
4enchufeshembraCC/solar
6Controlremotoinalámbrico(bateríasnoincluidas,CARGUEBATERÍASA27)
7tornillosautorroscantesydestornillador
Introduccióndelproducto
5
Machine Translated by Google
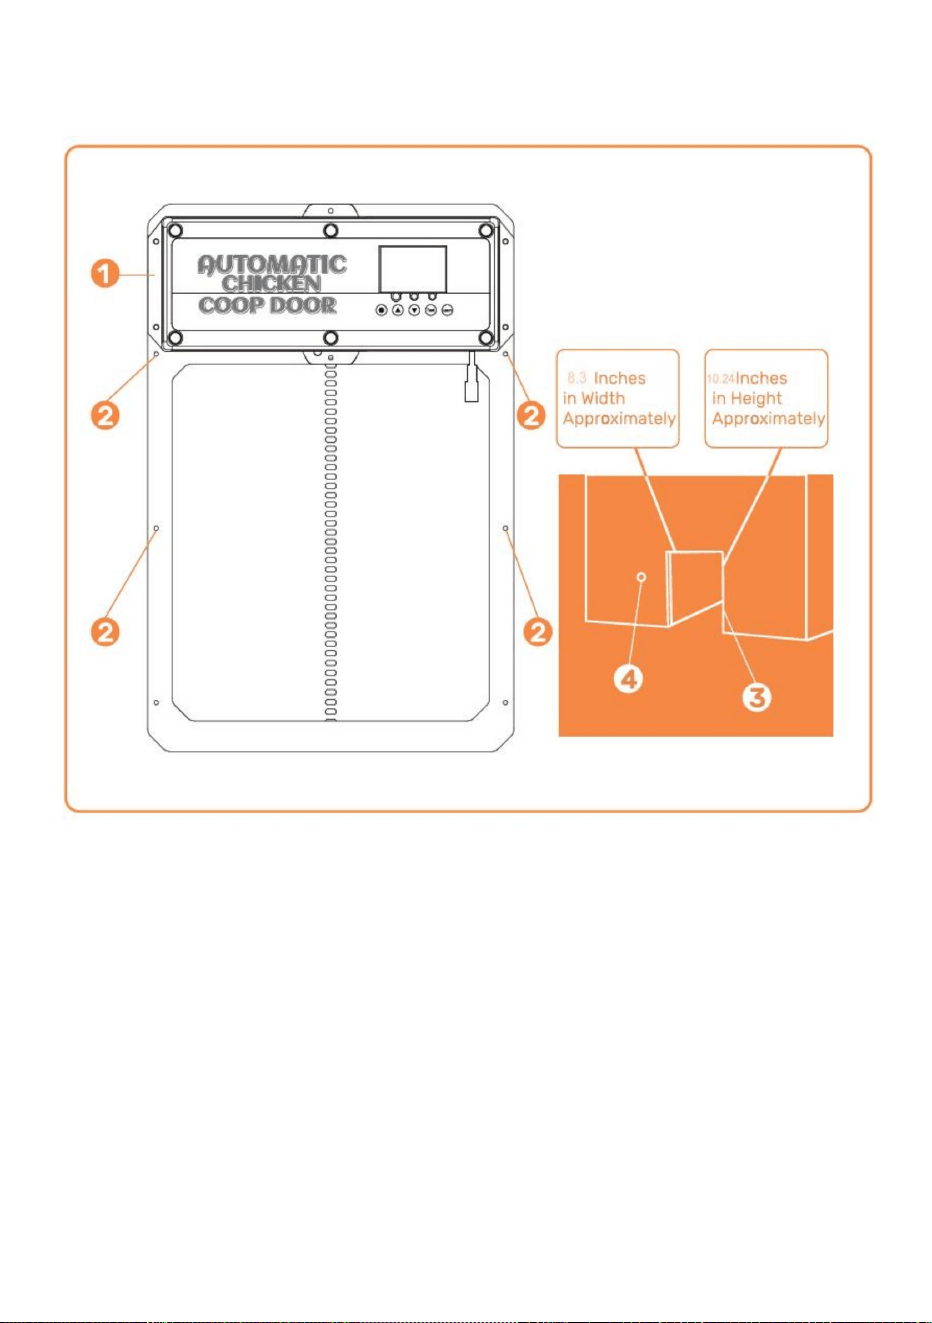
Instalación)
Orificioparaquepaselafuentedealimentaciónparagarantizarquelaenergíaestéprotegida
Marcodelapuertadelgallinero
Ubicacióndeinstalacióndelos
tornillosEstructura/pareddelgallinero(conorificioparaelmarcodelapuertadelgallinero)
clima
Introducciónalainstalación
6
Machine Translated by Google

•
7
•
Botóndepruebautilizadoparaabrir/cerrarlapuertamanualmente
(ARRIBA)Botónutilizadoparacambiarlasfuncionesdelprogramamientrasestáenelmododeprograma
modo
APRENDER:Botónutilizadoparaagregaroquitarel/loscontrol(es)remoto(s)inalámbrico(s)
•
SETBotónutilizadoparacambiarentremodosdeprogramación
Pantalladigital
•
•
•Luz1:lucesindicadorasdepuertaabierta[verde]ypuertacerrada[roja]•Luz
2:luzindicadoradefuncionamientodelsensordeinfrarrojos
•Luz3:luzindicadoradefuncionamientodelsensordeluz
(ABAJO)Botónutilizadoparacambiarlasfuncionesdelprogramamientrasseestáenelprograma.
Introducciónalpaneldecontrol
Machine Translated by Google

EnchufeshembradeCCenlapuertadelgallinero.•4.Conecteel
adaptadordecorrienteCA/CCaunafuentedealimentaciónyalgallinero.
tornillosenlapuerta.Lapuertapuedequedaratrapadasiseinstalademasiadoapretada.•7.Silapuertanose
cierradespuésdelaprogramación,intenteapagarlaalimentación.
vida.Utilizamostecnologíamodernaylaponemosenundiseñodelgadoycompactopara
Ancho=8,3pulgadasaproximadamente.Alto=10,24pulgadas
•2.Fijeelmarcodelapuertadelgallineroalaestructura/pareddelgallinerocon
Elmarcodelapuertadelgallinerosepuedeinstalaryfijardeformaseguracontornillos.
Lapuertadelgallineroeslasoluciónperfectaparaunaformadevidaruralmásagradable.
Nuestroproductoestádiseñadopararespaldarsusobjetivosdeagriculturafamiliaryayudarloalograrlos.
YNOABIERTO).Asegúresedequeelmarcodelapuertadelgallineroestéplano[sinhuecosnideformaciones]
Construirunacajadesuministrodeenergíasimpleparaevitarlaentradadeagua.•5.Para
utilizarelsensordeluzoeltemporizador,consultelaspáginas1011.•6.Noolvide
quesilapuertanoseabreocierraporcompleto,intenteaflojarel
Siesirregular,utilicetablonesde2x4pulgadasoalgunaspiezasplanasdemaderaparagarantizarque
quedenalras.•9.Utilicedosespaciadoresdemaderade1pulgadaa2,5cmeinstálelossobrelapuertaalanchode
Proporcionaranuestrosclienteslamejorpuertaautomáticaparagallinerodisponible.
lostornillosautorroscantes(NOAPRIETEDEMASIADOOLAPUERTASECOMPRIMIRÁ)
Utiliceunaherramientaeléctricaparainstalarlostornillosatravésdelapuerta.
•3.ConecteelenchufemachodeCCdeladaptadordealimentacióndeCA/CCacualquieradelos
puerta,estapuertaconsumemuchaenergíadebidoaqueesunapuertamásresistente,porloquesenecesitanbaterías.
nuevamenteeintentecerrarlanuevamente.
•8.Sitienemoldurasexterioresocualquiercosaquepuedahacerquelapuertaseinstale
Lavidaenelcampoesmásfácil.Lesugerimosqueutiliceelcabledealimentaciónolaenergíasolarparaalimentarsuhogar.
contralaestructura/pareddelgallinerodespuésdeinstalarlostornillosautorroscantes.
losagujerosenelprotectordelluvia.
Lapuertaseencenderá,comoloconfirmalailuminacióndelapantalladigital.Asegúrese
Introduccióngeneral
•1.Verifique/creeunaaberturaenlaestructura/pareddelapuertadelgallinerodemaneraque
Lafuentedealimentaciónestáprotegidadelclimaalenchufarlaenelinteriordelgallineroo
¡Morirárápido!
Introduccióngeneral
Manualdeoperaciones
8
Machine Translated by Google

9
descendente)lasondadetectaunanimalenlapuerta(acción+temperatura,luzazul
rayoinfrarrojo.Mientraslaluzrojaestéencendida,lapuertanosecerrará.•13.Lasondade
deteccióndeanimalessemuestraenlaFigura.Cuandolapuertadesciende(osecierra)
encendido)ylapuertavolveráasubir.Despuésde1minuto,continuarábajando.Después
cortedeenergía,reiniciarlasondarequiereprecalentamientoduranteunos15segundos(azul
Instalacióngeneral(continuación)(sensordeinfrarrojos)•11.El
sensordeinfrarrojosestáintegradoenestapuerta.
•12.Hayunaluzrojaenelsensorparaindicarcuandoalgoestábloqueandoel
Detrásdelprotectordelluvia.
•10.Instaleelprotectorcontralalluviaenlosdosespaciadoresdemaderaparaquelapuertapuedasubiry
1.0Programacióndeloscontrolesremotosinalámbricos•1.Verifique
quelasbateríasdelcontrolremotoesténinstaladasenloscontrolesremotos.
laluzseapaga)parafuncionarnormalmente.
(Batería(s):A27/12Vsevendeporseparado).•2.Para
emparejaruncontrolremotoconlapuertadelgallinero,mantengapresionadoelbotónLEARN
Machine Translated by Google

ysevuelveaaplicarenergía,elcontrolremotoseguiráemparejadoconelpollo.
Nota:Sisecortalaenergíadelapuertadelgallineroporunperíodocortodetiempo
puertadelgallinero.
2.0Abrir/Cerrarlapuertadelgallineroconcontrolremoto•1.Presioneelbotón
deflechahaciaarribaparaabrirlapuerta.
Completar.Paraemparejarelsegundocontrolremoto,repitaestepaso.•3.Para
desemparejartodosloscontrolesremotos,mantengapresionadoelbotónLEARNhastaqueaparezcaelmensaje
ElLEDverdeparpadeadosveces,indicandoquelacancelaciónsehacompletado.
Elcontrolremotoparpadeadosveces.ElLEDverdeparpadeadosveces,loqueindicaqueelemparejamientoestá
delpaneldecontroldurante2segundos.Luegopresionecualquierbotóndel
•3.Empujeeltopecuadradoparadetenercualquiermovimientodelapuerta.
Alpresionarsecuencialmenteelbotóndepruebaenelpaneldecontrol,seabriráocerrará
Lapuerta.
3.0Abrir/CerrarPuertadeGallineroSinControlRemoto
•2.Presioneelbotóndeflechahaciaabajoparacerrarlapuerta.
•1.Pulseelbotóndepruebaenelpaneldecontrol.Lapuertaseabrirá.•2.Pulseel
botóndepruebaenelpaneldecontrol.Lapuertadejarádemoverse.•3.Pulseelbotónde
pruebaenelpaneldecontrol.Lapuertasecerrará.
10
Machine Translated by Google

11
2.3PresioneelbotónTESTunavezparapausar.
AlpresionarsecuencialmenteelbotónSETenelpaneldecontrol,serecorreránlasopciones
alrededorde1segundo.
•3.1PresioneelbotónSETenelpaneldecontrolparavisualizar•3.2Launidadde
tiempoHorasparpadeará.AjustelaunidaddetiempoHoraspresionandoelbotónUPo
3.Configuracióndelahoralocal(formatode24horas)paralapuerta
•1.1Botóndeactivación:PresioneelbotónSEToTESTunavezparaencenderlapantalla
unos5segundosparailuminarlapantalla.
•3.3PulseelbotónSETparacambiaralaunidaddetiempoenminutos.Launidaddetiempoenminutos
•1.2Activacióndelcontrolremoto:Mantengapresionadacualquiertecladelcontrolremoto
BotónABAJO.
•3.4AjustelaunidaddetiempoenminutospresionandoelbotónARRIBAoABAJO.•3.5Presioneel
botónSETparaconfirmarlaconfiguracióndelahoraylasiguienteconfiguración.
2.1Conectelafuentedealimentaciónylapantallamostraráloquesemuestra
2.Configuracióndeaperturaocierremanualdelapuerta
parpadeará.
2.4PresionenuevamenteelbotónTESTparacerrarlapuerta.
1.Activacióndepantalla
2.2PresioneelbotónTESTunavezparaabrirlapuerta.
4.0Programacióndelapuertadelgallinero
Machine Translated by Google

12
4.1PresioneelbotónSETduranteunsegundoenelpaneldecontrolparamostrar
4.2TTIndicaeltiempoparaabrirlapuertatiempoparacerrarlapuerta.
4.3PresioneelbotónARRIBAduranteunsegundoenelpaneldecontrolparamostrar
4.4TLIndicaeltiempoparaabrirlapuertaluzparacerrarlapuerta.
4.Ajustedelmodomixtodedeteccióndeluzytemporización
Diferentesconfiguracionesaprogramar.
4.5PresioneelbotónARRIBAduranteunsegundoenelpaneldecontrolpara
mostrar4.6LTIndicaluzparaabrirlapuertatiempoparacerrarlapuerta
Machine Translated by Google
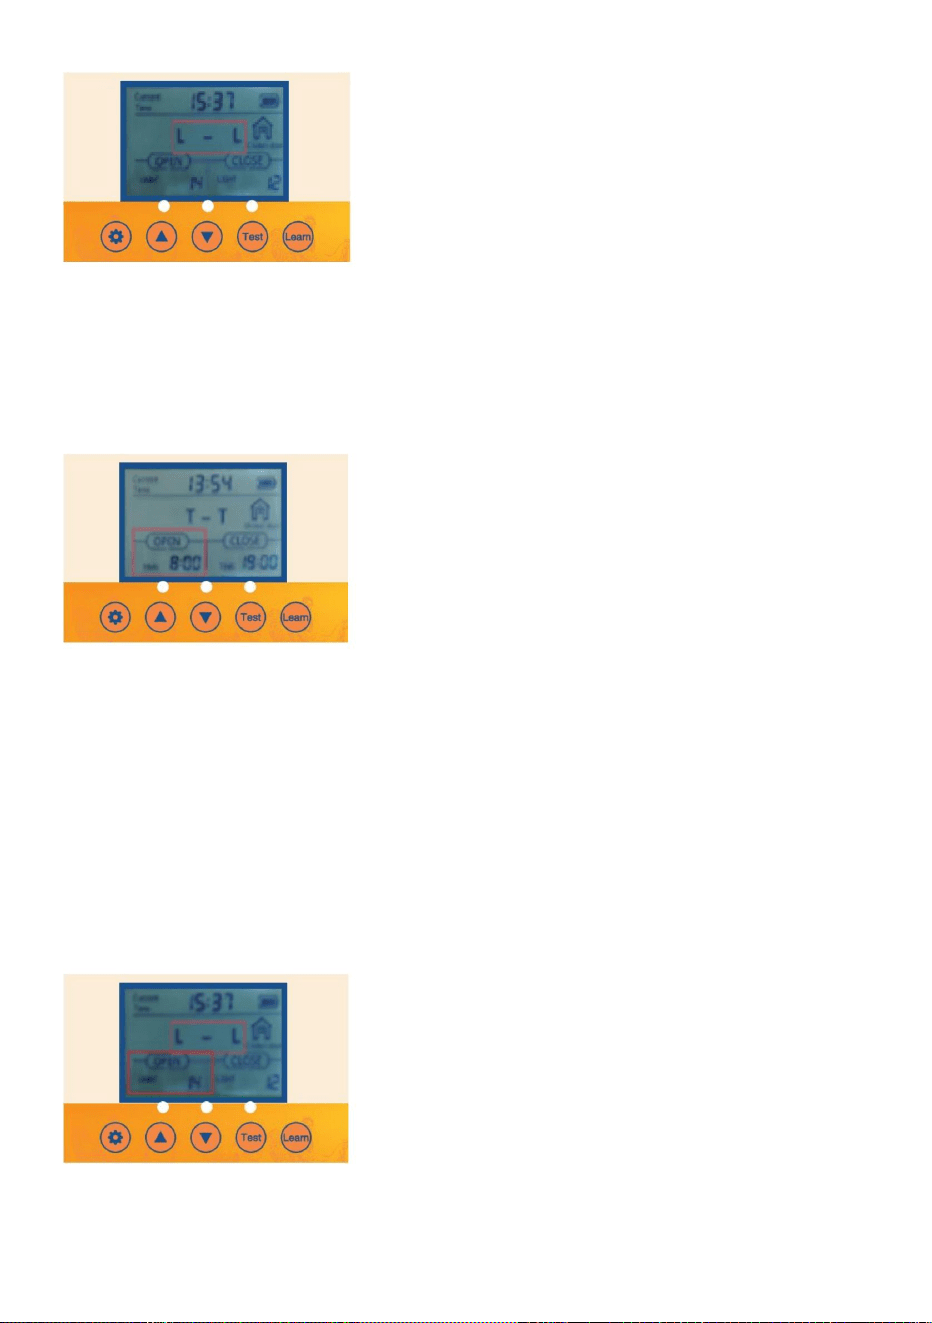
13
•5.4AjustelaunidaddetiempoenminutospresionandoelbotónARRIBAoABAJO
parpadeará.
6.Activarlaopciónparaquelapuertaseabraosecierreautomáticamenteconlaconfiguracióndebrillo
delaluzambiental.
•5.1Verifique/presioneelbotónSETenelpaneldecontrolparamostrarOPENT•5.2Launidad
detiempoenhorasparpadeará.AjustelaunidaddetiempoenhoraspresionandoelbotónUPoDOWN.
•5.3PulseelbotónSETparacambiaralaunidaddetiempoenminutos.Launidaddetiempoenminutos
5.Activarlaopciónparaquelapuertaseabraosecierreautomáticamenteconlaconfiguracióndehoralocal
yeltemporizador.
4.7PresioneelbotónARRIBAduranteunsegundoenelpaneldecontrolparamostrar4.8
LLIndicaluzparaabrirlapuertaluzparacerrarlapuerta.
•6.1Verifique/PresioneelbotónSETenelpaneldecontrolparamostrarOPENL•6.2La
unidaddevalordeLumenparpadeará.AjustelaunidaddevalordeLumenpresionandoelbotónUPo
Machine Translated by Google

oelbotónABAJO.
Launidadparpadeará.
•7.2LaunidaddetiempoHorasparpadeará.AjustelaunidaddetiempoHoraspresionandoelbotónARRIBA
•7.1Verifique/PresioneelbotónSETenelpaneldecontrolparamostrarCLOSET
7.4AjustelaunidaddetiempoenminutospresionandoelbotónARRIBAoABAJO.
•7.3PulseelbotónSETparacambiaralaunidaddetiempoenminutos.Launidaddetiempoenminutos
14
•
7.OpciónCerraractivadaparaquelaPuertaseabraocierreautomáticamenteconla
Configuracióndehoralocalytemporizador
Recuerde,paracerrar
0=Lomínimoparaquelapuertaseabra
23=Lamenorluzparacerrarlapuerta
0=Lamayorcantidaddeluzparaquelapuertase
cierre•6.4Serecomiendaqueelclienteloconfigurealrededorde15.Silasensibilidad
Recuerde,paraabrir
23=Lamayorcantidaddeluzparaquelapuertaseabra.
•6.3AjustelaunidaddelvalordeLumenpresionandoelbotónARRIBAoABAJO.
BotónABAJO.
¡Pequeñaluz!
Sielvaloresdemasiadofuerte,lapuertadelgallineroseabriráysecerrarácuandodetecteun
Machine Translated by Google

Recuerde,paraabrir
•8.3AjustelaunidaddelvalordeLumenpresionandoelbotónARRIBAoABAJO.
23=Lamayorcantidaddeluzparaquelapuertaseabra.
0=Laluzmásintensaparaquelapuertasecierre
•8.4Serecomiendaqueelclienteloconfigureenalrededorde15.Sielvalordesensibilidadesdemasiado
•
BotónABAJO.
8.2LaunidaddevalordeLumenparpadeará.AjustelaunidaddevalordeLumenpresionandolosbotonesARRIBAo
•8.1Verifique/PresioneelbotónSETenelpaneldecontrolparamostrarCLOSEL
23=Lamenorluzparacerrarlapuerta
Recuerde,paracerrar
15
¡Fuerte,lapuertadelgallineroseabriráycerrarácuandodetecteunpocodeluz!
0=Lomínimoparaquelapuertaseabra
Ajustedelbrillodelaluzambiental
8.OpciónCerraractivadaparaquelaPuertaseabraosecierreautomáticamenteconla
Funcióndeestabilizacióndevoltajeysedetieneautomáticamentecuandolabateríaestácompletamentecargada.
Enlafigura
Bateríarecargabledeníquelhidrógenon.º5de1,2VLaplacadecontrol4PCStieneuna
Lapuertadelgallineroestáequipadaconunafuncióndecargaautomática:•
1.Cómoutilizarlabatería:
Cargado.
4pilasAA1,5Vn.º5.•2.Carga
delpaneldecargasolar:salidadelpaneldecargasolarde9Vy10Wcomosemuestra
Nota:Siseutilizalafuentedealimentaciónsolar,nosepuedenutilizarpilasAAy
SerequierenbateríasNiMH/NiCrde1,2V.
Machine Translated by Google

Loquenecesitas:
Controladordecargasolarde9Vy10A
Panelsolarde10Wa25W
PRECAUCIÓN:¡NOTOQUELOSCABLESENTRESÍ!
lluvia/clima.
Bateríade9V,bateríade10amperios
porhora•1.Instaleelpanelsolarenladirecciónqueoptimicelaluz
solar.•2.Conecteelpanelsolaralcontroladordecargasolar.
•3.Conectelabateríaalcontroladordecargasolar.•4.
Conectelapuertadelgallineroautomáticoalcontroladordecargasolar.•5.
Protejaelcontroladordecargasolarylabateríaenungabineteparaprotegerlosde
2gallineroconpuerta
1bateríarecargable
16
Machine Translated by Google
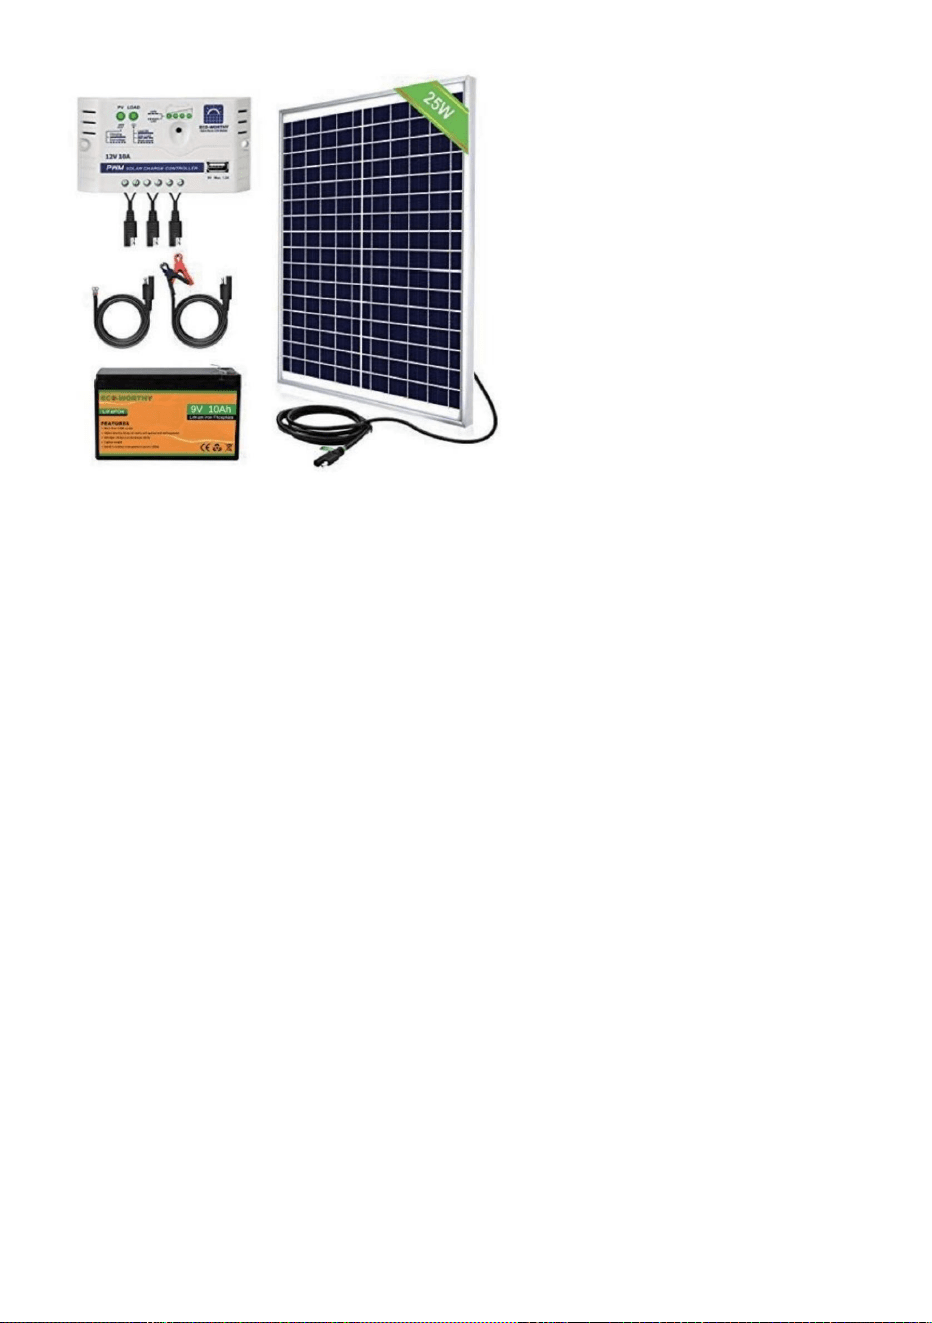
Mantenimientoysolucióndeproblemas
•Asegúresedequehayaenergíallegandoalaunidad.•
Verifiquelasconexioneseléctricasquealimentanlaunidadparaasegurarsedequenoesténsuciaso
•Verifiquequelaspilasdelcontrolremotoesténinstaladasenladireccióncorrectay
Lapuertadelgallineronoseenciende
dañado.
Loscontrolesremotosnofuncionan
Lasbateríasestáncompletamentecargadas.Reemplacelasbateríassies
necesario.•Asegúresedequeelcontrolremotoestéprogramadocorrectamenteparalapuerta
delgallinero.•Verifiquequelapuertadelgallineroestéencendida.
Controladordecargasolarypanelsolarde25W
Veaejemplosdeproductosacontinuación
Lapuertadelgallineronoseabrey/osecierraautomáticamenteconelcontrollocal
Configuracióndetiempoobrillo•
Verifiquesilasconfiguracionesutilizadasestánprogramadascorrectamenteylasfuncionesestán
Eltemporizadornofuncionacorrectamente
Sigaestasinstruccionesparadiagnosticarsisutemporizadorestádefectuosoolapuerta
Losajustesnoseestablecieron
correctamente.•1.Desconectelapuertade
lacorriente.•2.Vuelvaaenchufarlapuerta.
Noapagado.
17
Machine Translated by Google

Eliminacióncorrecta
coopentonceslaconfiguracióndesensibilidadalaluznofuncionarácorrectamente.
EsteproductoestásujetoalasdisposicionesdelaDirectivaEuropea2012/19/CE.
Nosepuedendesecharconlabasuradomésticanormal,sinoquedebenllevarseaun
Desenchufelapuertanuevamenteantesdehacerlosoloparadarleunreiniciocompleto.
residuosextrañosencontradosenelcaminoderecorridodelapuerta.Asegúresetambiéndelainstalación
Asegúresedequeelmarcodelapuertaestéinstaladodemaneraplanacontralaparedyquenohaya
Programelapuertasegúnsuhoralocalylahoradeaperturaycierredelapuerta.Asegúresede
Sí,sepuedeconectar/instalarconelenchufemachoCCsuministrado.
¿QuéhacersilapuertaNOabre/cierracompletamente?
productoytodoslosaccesoriosmarcadosconestesímbolo.Losproductosmarcadoscomotales
Hechoenchina
¿Sepuedeutilizarunpanelsolarounabateríaderespaldoconlaunidad?
¡Lostornillosnoestándemasiadoapretados!
Puntoderecogidaparaelreciclajedeaparatoseléctricosyelectrónicos.
¿cooperativa?
¿Lapuertadelgallinerodebeinstalarseenelinterioroenelexteriordelgallinero?
SilapuertaNOsecierra,intenterestablecerlafuentedealimentación.
Elsímboloquemuestrauncontenedordebasuratachadoindicaqueelproducto
Lapuertase
abre.•6.Siseguirestospasoshizoquesupuertafuncionara,sigalasmismasinstruccionespara
¿Quéhacersilapuertaseatascaalabrirlaocerrarla?
exigelarecogidaselectivaderesiduosenlaUniónEuropea.Estoseaplicaalos
Dependedecómoplaneesusarlo.Siseinstalaenelinteriordeunespaciocerrado,
•3.Nocambieningunaotraconfiguración.•4.
Restablezcalahoradeaperturaocierre.•5.Espere
hastaquelapuertaespecifiquelahoradeapertura0805paraconfirmarsilapuertaestáabierta.
18
Machine Translated by Google

