USER MANUAL
Convection Microwave
Model: KM-MOTC-15SS
KoolMore
Over the Range Convection
Microwave Oven

Stay informed with the latest information
for your KoolMore Appliance.
If you need any assistance or have questions, our customer
support team is here to help.

Safety
Setup
Operation
Troubleshooting
10
24
25
Warranty
8
3
20
Maintenance
CONTENT

When using electrical appliances basic safety precautions should be followed, including the following:
WARNING - To reduce the risk of burns, electric shock, fire, injury to persons or exposure to excessive
microwave energy:
1. Read all instructions before using the appliance.
2. Read and follow the specific: "PRECAUTIONS TO AVOID POSSIBLE EXPOSURE TO EXCESSIVE
MICROWAVE ENERGY" found on page 2.
3. This appliance must be grounded. Connect only to properly grounded outlet. See "GROUNDING
INSTRUCTIONS" found on page 4.
4. Install or locate this appliance only in accordance with the provided installation instructions.
5. Some products such as whole eggs and sealed containers - for example, closed glass jars - are
able to explode and should not be heated in this oven.
6. Use this appliance only for its intended use as described in the manual. Do not use corrosive chem-
icals or vapors in this appliance. This type of oven is specifically designed to heat, cook or dry food.
It is not designed for industrial or laboratory use.
7. As with any appliance, close supervision is necessary when used by children.
8. Do not operate this appliance if it has a damaged cord or plug, if it is not working properly, or if it
has been damaged or dropped.
9. This appliance should be serviced only by qualified service personnel. Contact nearest authorized
service facility for examination, repair, or adjustment.
10.Do not cover or block any openings on the appliance.
11.Do not store this appliance outdoors. Do not use this product near water - for example, near a
kitchen sink, in a wet basement, near a swimming pool, or similar location.
12.Do not immerse cord or plug in water.
13.Keep cord away from heated surface.
14.Do not let cord hang over edge of table or counter.
15.When cleaning surfaces of door and oven that comes together on closing the door, use only mild,
nonabrasive soaps, or detergent applied with a sponge or soft cloth.
16.To reduce the risk of fire in the oven cavity:
• Do not overcook food. Carefully attend appliance when paper, plastic, or other combustible materi-
als are placed inside the oven to facilitate cooking.
• Remove wire twist-ties from paper or plastic bag before placing bag in oven.
• If material inside of the oven ignite, keep oven door closed, turn oven off, and disconnect the power
cord, or shut off power at the fuse or circuit breaker panel.
• Do not use the cavity for storage purposes. Do not leave paper products, cooking utensils, or food
in the cavity when not in use.
17. Liquids, such as water, coffee, or tea are able to overheat beyond the boiling point without appear-
ing to be boiling. Visible bubbling or boiling when the container is removed from the microwave oven is
not always present.
SAFETY
3

THIS COULD RESULT IN VERY HOT LIQUID SUDDENLY BOILING OVER WHEN THE CONTAINER IS
DISTURBED OR A UTENSIL IS INSERTED INTO THE LIQUID.
To reduce the risk of injury to persons:
1. Do not overheat the liquid.
2. Stir the liquid both before and halfway through heating it.
3. Do not use straight-sided containers with narrow necks.
4. After heating, allow the container to stand in the microwave oven for a short time before removing
the container.
5. Use extreme care when inserting a spoon or other utensil into the container.
As with any appliance, close supervision is necessary when the microwave oven is used by children.
18. If material inside of the oven should ignite, the oven door should be kept closed, the appliance
turned off, the power cord disconnected, or the power shut off at the fuse or circuit breaker panel.
1. Do not operate any heating or cooking appliance beneath the appliance.
2. Do not mount unit over or near any portion of heating or cooking appliance.
3. Do not mount over sink.
4. Do not store anything directly on top of the appliance surface when the appliance is in operation.
5. Do not mount or oversized metal utensils should not be inserted in a microwave/ toaster oven as
they may create a fire or risk of electric shock.
6. Do not clean with metal scouring pads. Pieces can come off the pad and touch electrical parts
involving a risk of electric shock.
7. Do not use paper products when appliance is operated in the toaster mode.
8. Do not store any materials, other than manufacturer's recommended accessories, in the oven when
not in use.
9. Do not cover racks or any other part of the oven with metal foil. This will cause overheating of the
oven.
10.Clean Ventilation Hoods Frequently - Grease should not be allowed to accumulate on hood or filter.
11.When hot foods are under the hood, turn the fan on.
12.Use care when cleaning the vent-hood filter. Corrosive cleaning agents, such as lye-based oven
cleaners, may damage the filter
13.Suitable for use above both gas and electric cooking equipment.
GROUNDING INSTRUCTIONS
This appliance must be grounded. In the event of an electrical short circuit, grounding reduces the risk
of electric shock by providing an escape wire for the electric current. This appliance is equipped with a
cord having a grounding wire with a grounding plug. The plug must be plugged into an outlet that is
properly installed and grounded.
WARNING - Improper use of the grounding can result in a risk of electric shock.
Consult a qualified electrician or serviceman if the grounding instructions are not completely
understood, or if doubt exists as to whether the appliance is properly grounded. If it is necessary to
use an extension cord, use only a 3-wire extension cord that has a 3-bladed grounding plug, and 3-slot
receptacle that will accept the plug on the appliance. The marked rating of the extension cord shall be
equal to or greater than the electrical rating of the appliance.
DANGER - Electric Shock Hazard
Touching some of the internal components can cause serious personal injury or death. Do not
disassemble this appliance.
WARNING - Electric Shock Hazard
Improper use of the grounding can result in electric shock. Do not plug into an outlet until appliance is
properly installed and grounded.
1. A short power-supply cord is provided to reduce the risks resulting from becoming entangled in or
tripping over a longer cord.
2. Longer cord sets or extension cords are available and may be used if care is exercised in their use.
3. If a long cord or extension cord is used:
I. The marked electrical rating of the cord set or extension cord should be at least as great as the
electrical rating of the appliance.
II. The extension cord must be a grounding-type 3-wire cord.
III. The longer cord should be arranged so that it will not drape over the counter top or tabletop
where it can be pulled on by children or tripped over unintentionally.
Radio Interference
1. Operation of the microwave oven may cause interference to your radio, TV or similar equipment.
2. When there is interference, it may be reduced or eliminated by taking the following measures:
I. Clean door and sealing surface of the oven
II. Change the receiving antenna of radio or television.
III. Relocate the microwave oven with respect to the receiver.
IV. Move the microwave oven away from the receiver.
V. Plug the microwave oven into a different outlet so that microwave oven and receiver are on
different branch circuits.
Utensils
CAUTION - Personal Injury Hazard
Tightly-closed utensils could explode. Closed containers should be opened and plastic pouches
should be pierced before cooking.
See the instructions on "Materials you can use in microwave oven or to be avoided in microwave
oven."
There may be certain non-metallic utensils that are not safe to use for microwaving. If in doubt, you
can test the utensil in question following the procedure below.
Utensil Test:
1. Fill a microwave-safe container with 1 cup of cold water (250ml) along with the utensil in
question.
2. Cook on maximum power for 1 minute.
3. Carefully feel the utensil. If the empty utensil is warm, do not use it for microwave cooking.
4. Do not exceed 1 minute cooking time.
4

THIS COULD RESULT IN VERY HOT LIQUID SUDDENLY BOILING OVER WHEN THE CONTAINER IS
DISTURBED OR A UTENSIL IS INSERTED INTO THE LIQUID.
To reduce the risk of injury to persons:
1. Do not overheat the liquid.
2. Stir the liquid both before and halfway through heating it.
3. Do not use straight-sided containers with narrow necks.
4. After heating, allow the container to stand in the microwave oven for a short time before removing
the container.
5. Use extreme care when inserting a spoon or other utensil into the container.
As with any appliance, close supervision is necessary when the microwave oven is used by children.
18. If material inside of the oven should ignite, the oven door should be kept closed, the appliance
turned off, the power cord disconnected, or the power shut off at the fuse or circuit breaker panel.
1. Do not operate any heating or cooking appliance beneath the appliance.
2. Do not mount unit over or near any portion of heating or cooking appliance.
3. Do not mount over sink.
4. Do not store anything directly on top of the appliance surface when the appliance is in operation.
5. Do not mount or oversized metal utensils should not be inserted in a microwave/ toaster oven as
they may create a fire or risk of electric shock.
6. Do not clean with metal scouring pads. Pieces can come off the pad and touch electrical parts
involving a risk of electric shock.
7. Do not use paper products when appliance is operated in the toaster mode.
8. Do not store any materials, other than manufacturer's recommended accessories, in the oven when
not in use.
9. Do not cover racks or any other part of the oven with metal foil. This will cause overheating of the
oven.
10.Clean Ventilation Hoods Frequently - Grease should not be allowed to accumulate on hood or filter.
11.When hot foods are under the hood, turn the fan on.
12.Use care when cleaning the vent-hood filter. Corrosive cleaning agents, such as lye-based oven
cleaners, may damage the filter
13.Suitable for use above both gas and electric cooking equipment.
GROUNDING INSTRUCTIONS
This appliance must be grounded. In the event of an electrical short circuit, grounding reduces the risk
of electric shock by providing an escape wire for the electric current. This appliance is equipped with a
cord having a grounding wire with a grounding plug. The plug must be plugged into an outlet that is
properly installed and grounded.
WARNING - Improper use of the grounding can result in a risk of electric shock.
Consult a qualified electrician or serviceman if the grounding instructions are not completely
understood, or if doubt exists as to whether the appliance is properly grounded. If it is necessary to
use an extension cord, use only a 3-wire extension cord that has a 3-bladed grounding plug, and 3-slot
receptacle that will accept the plug on the appliance. The marked rating of the extension cord shall be
equal to or greater than the electrical rating of the appliance.
DANGER - Electric Shock Hazard
Touching some of the internal components can cause serious personal injury or death. Do not
disassemble this appliance.
WARNING - Electric Shock Hazard
Improper use of the grounding can result in electric shock. Do not plug into an outlet until appliance is
properly installed and grounded.
1. A short power-supply cord is provided to reduce the risks resulting from becoming entangled in or
tripping over a longer cord.
2. Longer cord sets or extension cords are available and may be used if care is exercised in their use.
3. If a long cord or extension cord is used:
I. The marked electrical rating of the cord set or extension cord should be at least as great as the
electrical rating of the appliance.
II. The extension cord must be a grounding-type 3-wire cord.
III. The longer cord should be arranged so that it will not drape over the counter top or tabletop
where it can be pulled on by children or tripped over unintentionally.
Radio Interference
1. Operation of the microwave oven may cause interference to your radio, TV or similar equipment.
2. When there is interference, it may be reduced or eliminated by taking the following measures:
I. Clean door and sealing surface of the oven
II. Change the receiving antenna of radio or television.
III. Relocate the microwave oven with respect to the receiver.
IV. Move the microwave oven away from the receiver.
V. Plug the microwave oven into a different outlet so that microwave oven and receiver are on
different branch circuits.
Utensils
CAUTION - Personal Injury Hazard
Tightly-closed utensils could explode. Closed containers should be opened and plastic pouches
should be pierced before cooking.
See the instructions on "Materials you can use in microwave oven or to be avoided in microwave
oven."
There may be certain non-metallic utensils that are not safe to use for microwaving. If in doubt, you
can test the utensil in question following the procedure below.
Utensil Test:
1. Fill a microwave-safe container with 1 cup of cold water (250ml) along with the utensil in
question.
2. Cook on maximum power for 1 minute.
3. Carefully feel the utensil. If the empty utensil is warm, do not use it for microwave cooking.
4. Do not exceed 1 minute cooking time.
5

THIS COULD RESULT IN VERY HOT LIQUID SUDDENLY BOILING OVER WHEN THE CONTAINER IS
DISTURBED OR A UTENSIL IS INSERTED INTO THE LIQUID.
To reduce the risk of injury to persons:
1. Do not overheat the liquid.
2. Stir the liquid both before and halfway through heating it.
3. Do not use straight-sided containers with narrow necks.
4. After heating, allow the container to stand in the microwave oven for a short time before removing
the container.
5. Use extreme care when inserting a spoon or other utensil into the container.
As with any appliance, close supervision is necessary when the microwave oven is used by children.
18. If material inside of the oven should ignite, the oven door should be kept closed, the appliance
turned off, the power cord disconnected, or the power shut off at the fuse or circuit breaker panel.
1. Do not operate any heating or cooking appliance beneath the appliance.
2. Do not mount unit over or near any portion of heating or cooking appliance.
3. Do not mount over sink.
4. Do not store anything directly on top of the appliance surface when the appliance is in operation.
5. Do not mount or oversized metal utensils should not be inserted in a microwave/ toaster oven as
they may create a fire or risk of electric shock.
6. Do not clean with metal scouring pads. Pieces can come off the pad and touch electrical parts
involving a risk of electric shock.
7. Do not use paper products when appliance is operated in the toaster mode.
8. Do not store any materials, other than manufacturer's recommended accessories, in the oven when
not in use.
9. Do not cover racks or any other part of the oven with metal foil. This will cause overheating of the
oven.
10.Clean Ventilation Hoods Frequently - Grease should not be allowed to accumulate on hood or filter.
11.When hot foods are under the hood, turn the fan on.
12.Use care when cleaning the vent-hood filter. Corrosive cleaning agents, such as lye-based oven
cleaners, may damage the filter
13.Suitable for use above both gas and electric cooking equipment.
GROUNDING INSTRUCTIONS
This appliance must be grounded. In the event of an electrical short circuit, grounding reduces the risk
of electric shock by providing an escape wire for the electric current. This appliance is equipped with a
cord having a grounding wire with a grounding plug. The plug must be plugged into an outlet that is
properly installed and grounded.
WARNING - Improper use of the grounding can result in a risk of electric shock.
Consult a qualified electrician or serviceman if the grounding instructions are not completely
understood, or if doubt exists as to whether the appliance is properly grounded. If it is necessary to
use an extension cord, use only a 3-wire extension cord that has a 3-bladed grounding plug, and 3-slot
receptacle that will accept the plug on the appliance. The marked rating of the extension cord shall be
equal to or greater than the electrical rating of the appliance.
DANGER - Electric Shock Hazard
Touching some of the internal components can cause serious personal injury or death. Do not
disassemble this appliance.
WARNING - Electric Shock Hazard
Improper use of the grounding can result in electric shock. Do not plug into an outlet until appliance is
properly installed and grounded.
1. A short power-supply cord is provided to reduce the risks resulting from becoming entangled in or
tripping over a longer cord.
2. Longer cord sets or extension cords are available and may be used if care is exercised in their use.
3. If a long cord or extension cord is used:
I. The marked electrical rating of the cord set or extension cord should be at least as great as the
electrical rating of the appliance.
II. The extension cord must be a grounding-type 3-wire cord.
III. The longer cord should be arranged so that it will not drape over the counter top or tabletop
where it can be pulled on by children or tripped over unintentionally.
Radio Interference
1. Operation of the microwave oven may cause interference to your radio, TV or similar equipment.
2. When there is interference, it may be reduced or eliminated by taking the following measures:
I. Clean door and sealing surface of the oven
II. Change the receiving antenna of radio or television.
III. Relocate the microwave oven with respect to the receiver.
IV. Move the microwave oven away from the receiver.
V. Plug the microwave oven into a different outlet so that microwave oven and receiver are on
different branch circuits.
Utensils
CAUTION - Personal Injury Hazard
Tightly-closed utensils could explode. Closed containers should be opened and plastic pouches
should be pierced before cooking.
See the instructions on "Materials you can use in microwave oven or to be avoided in microwave
oven."
There may be certain non-metallic utensils that are not safe to use for microwaving. If in doubt, you
can test the utensil in question following the procedure below.
Utensil Test:
1. Fill a microwave-safe container with 1 cup of cold water (250ml) along with the utensil in
question.
2. Cook on maximum power for 1 minute.
3. Carefully feel the utensil. If the empty utensil is warm, do not use it for microwave cooking.
4. Do not exceed 1 minute cooking time.
6
Utensils Remarks
Browning dish
Follow manufacturer's instructions. The bottom of browning dish
must be at least 3/16 inch (5mm) above the turntable. Incorrect
usage may cause the turntable to break.
Dinnerware
Microwave-safe only. Follow manufacturer's instructions. Do not use
cracked or chipped dishes.
Glass jars
Always remove lid. Use only to heat food until just warm. Most glass
jars are not heat resistant and may break.
Glassware
Heat-resistant oven glassware only. Make sure there is no metallic
trim. Do not use cracked or chipped dishes.
Oven cooking
bags
Follow manufacturer's instructions. Do not close with metal tie. Make
slits to allow steam to escape.
Paper plates and
cups
Use for short term cooking/warming only. Do not leave oven
unattended while cooking.
Paper towels
Use to cover food for reheating and absorbing fat. Use with
supervision for a short-term cooking only.
Parchment paper Use as a cover to prevent splattering or a wrap for steaming.
Plastic
Microwave-safe only. Follow the manufacturer's instructions. Should
be labeled "Microwave Safe". Some plastic containers soften, as the
food inside gets hot. "Boiling bags" and tightly closed plastic bags
should be slit, pierced or vented as directed by packaging.
Plastic wrap
Microwave-safe only. Use to cover food during cooking to retain
moisture. Do not allow plastic wrap to touch food.
Thermometers Microwave-safe only (meat and candy thermometers).
Wax paper Use as a cover to prevent splattering and retain moisture.
Utensils Remarks
Aluminum tray May cause arcing. Transfer food into microwave-safe dish.
Food carton with
metal handle
May cause arcing. Transfer food into microwave-safe dish.
Metal or metal-
trimmed utensils
Metal shields the food from microwave energy. Metal trim may
cause arcing.
Metal twist ties May cause arcing and could cause a fire in the oven.
Paper bags May cause a fire in the oven.
Plastic foam
Plastic foam may melt or contaminate the liquid inside when exposed
to high temperature.
Wood
Wood will dry out when used in the microwave oven and may split or
crack.
MATERIALS TO BE AVOIDED IN MICROWAVE OVEN
UTENSILS YOU CAN USE IN MICROWAVE OVEN
7
1
2
4
5
6
7
9
10
3
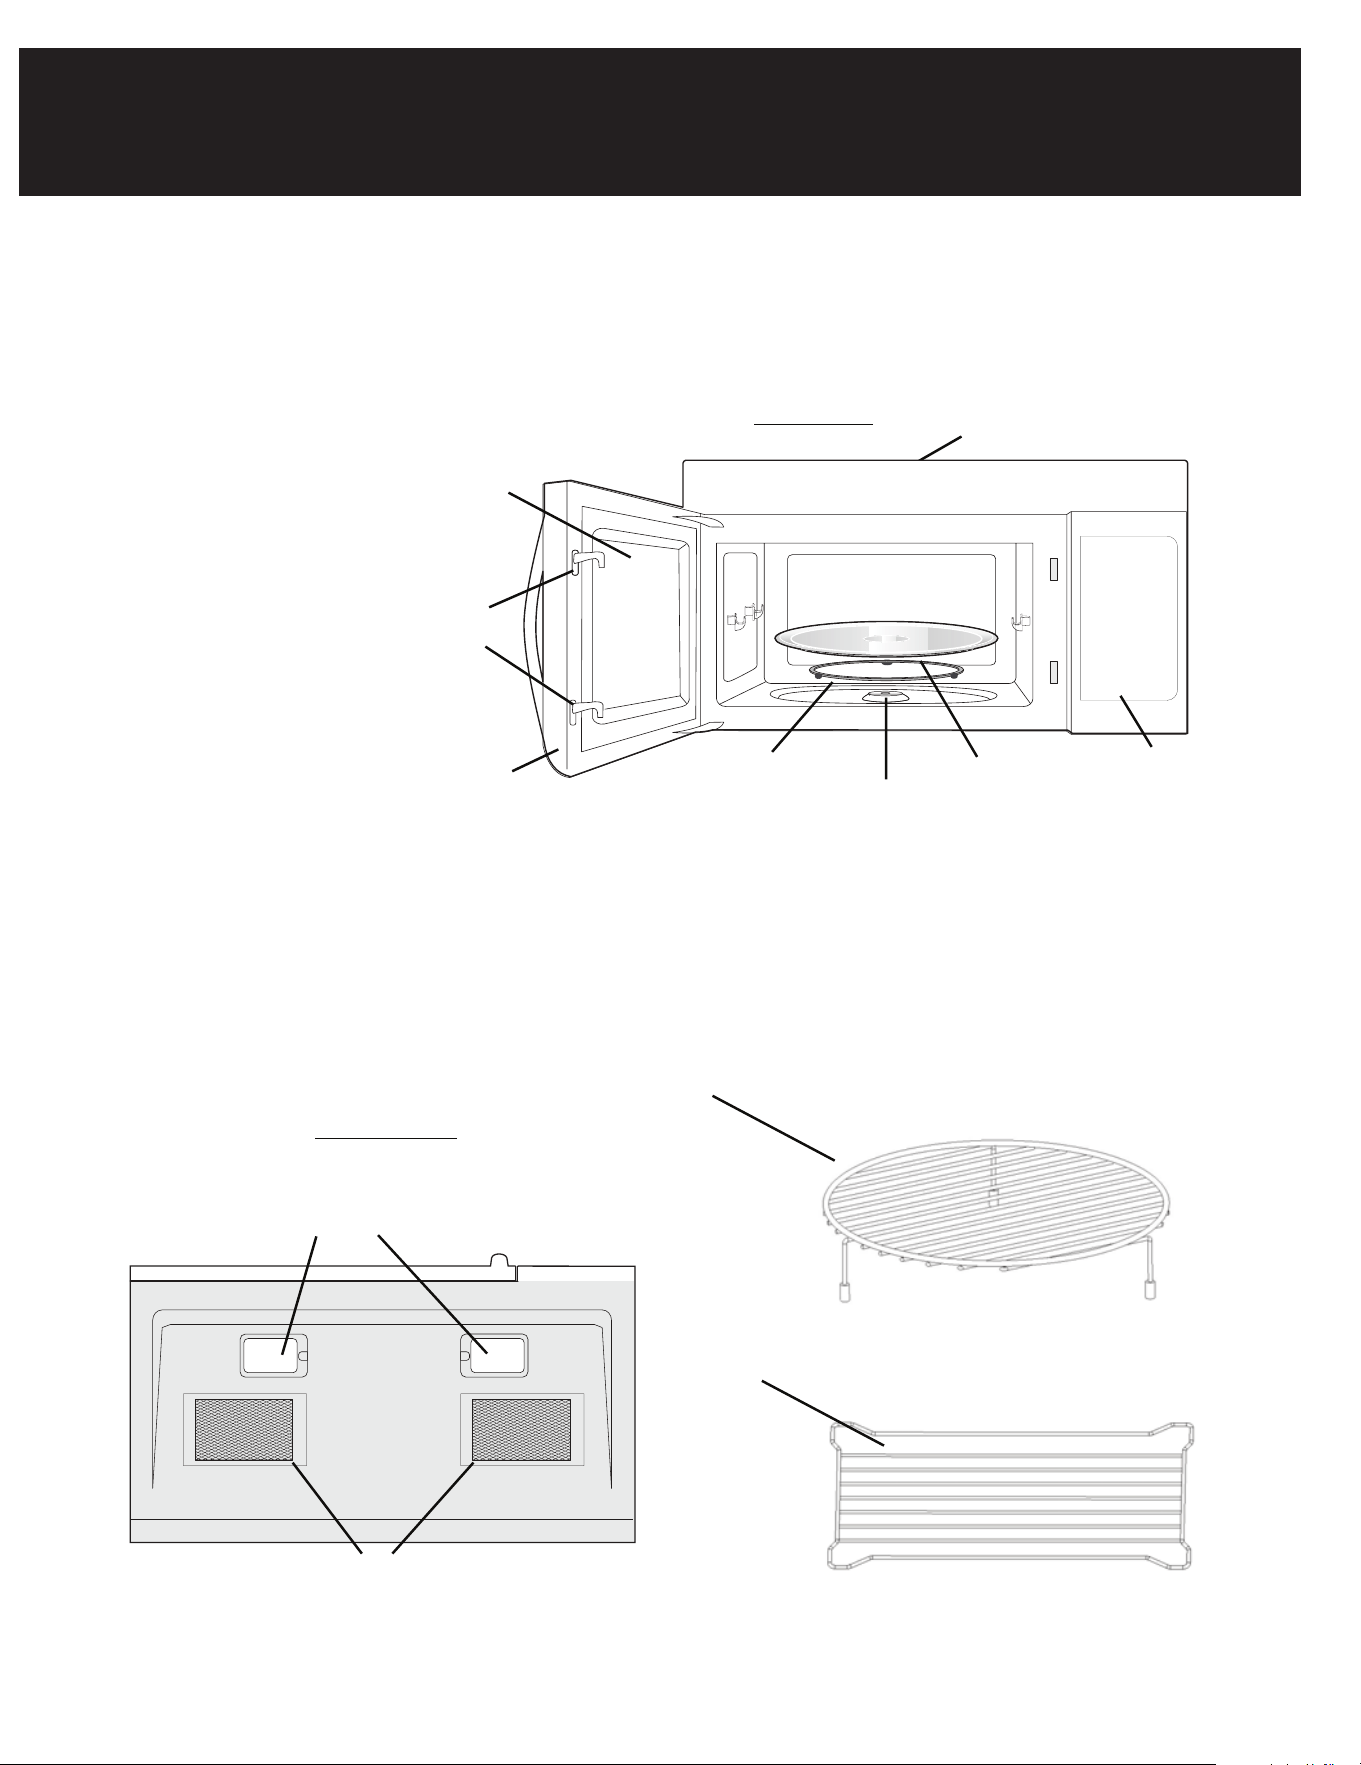
Microwave features
Turntable
Shaft
Turntable
ring
assembly
Turntable
glass
tray
Control
panel
Door
assembly
Window
Interlock
system
Front View
Surface lights
Ventilation
filters
Ventilation openings (on top)
8
8
1
2
3
4
5
6
7
11
12
Wire rack
Shelf
(use in convection and
cooking on the removable turntable )
combination
(use in microwave cooking)
Bottom View
Front
Rear
9
10
12
11
SETUP
8
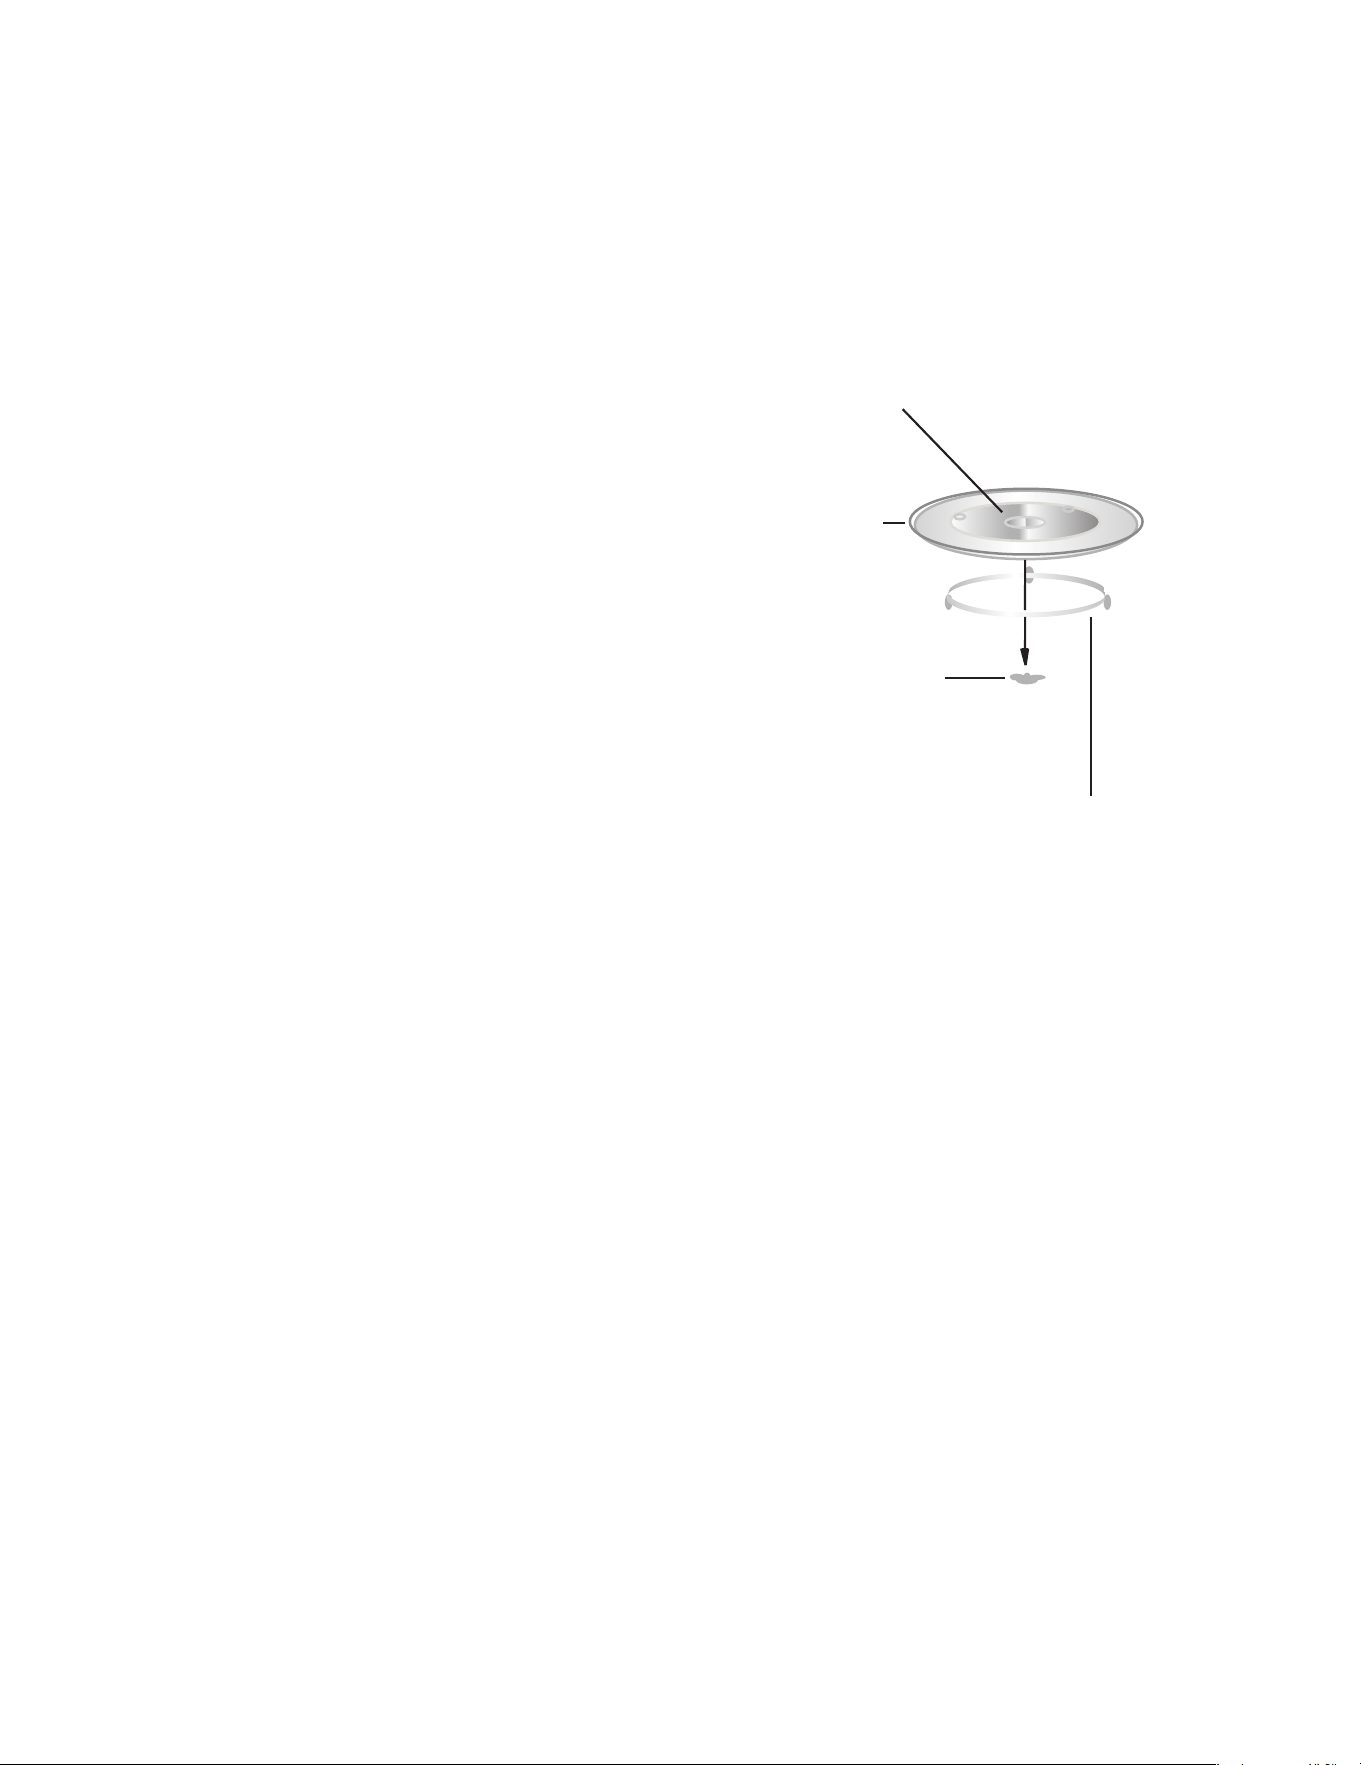
Hub (underside)
Glass tray
Turntable ring assembly
Turntable shaft
TURNTABLE INSTALLATION
• Never place the glass tray upside down.
The glass tray should never be restrict-
ed.
• Both glass tray and turntable ring
assembly must always be used during
cooking.
• All food and containers of food are
always placed on the glass tray for
cooking.
• If glass tray or turntable ring assembly
cracks or breaks, contact your nearest
authorized service center.
Countertop Installation
Remove all packing material and accesso-
ries. Examine the oven for any damage such
as dents or broken door. Do not install if
oven is damaged.
Cabinet: Remove any protective film found on
the microwave oven cabinet surface. Do not
remove the light brown Mica cover that is
attached to the oven cavity to protect the
magnetron.
9
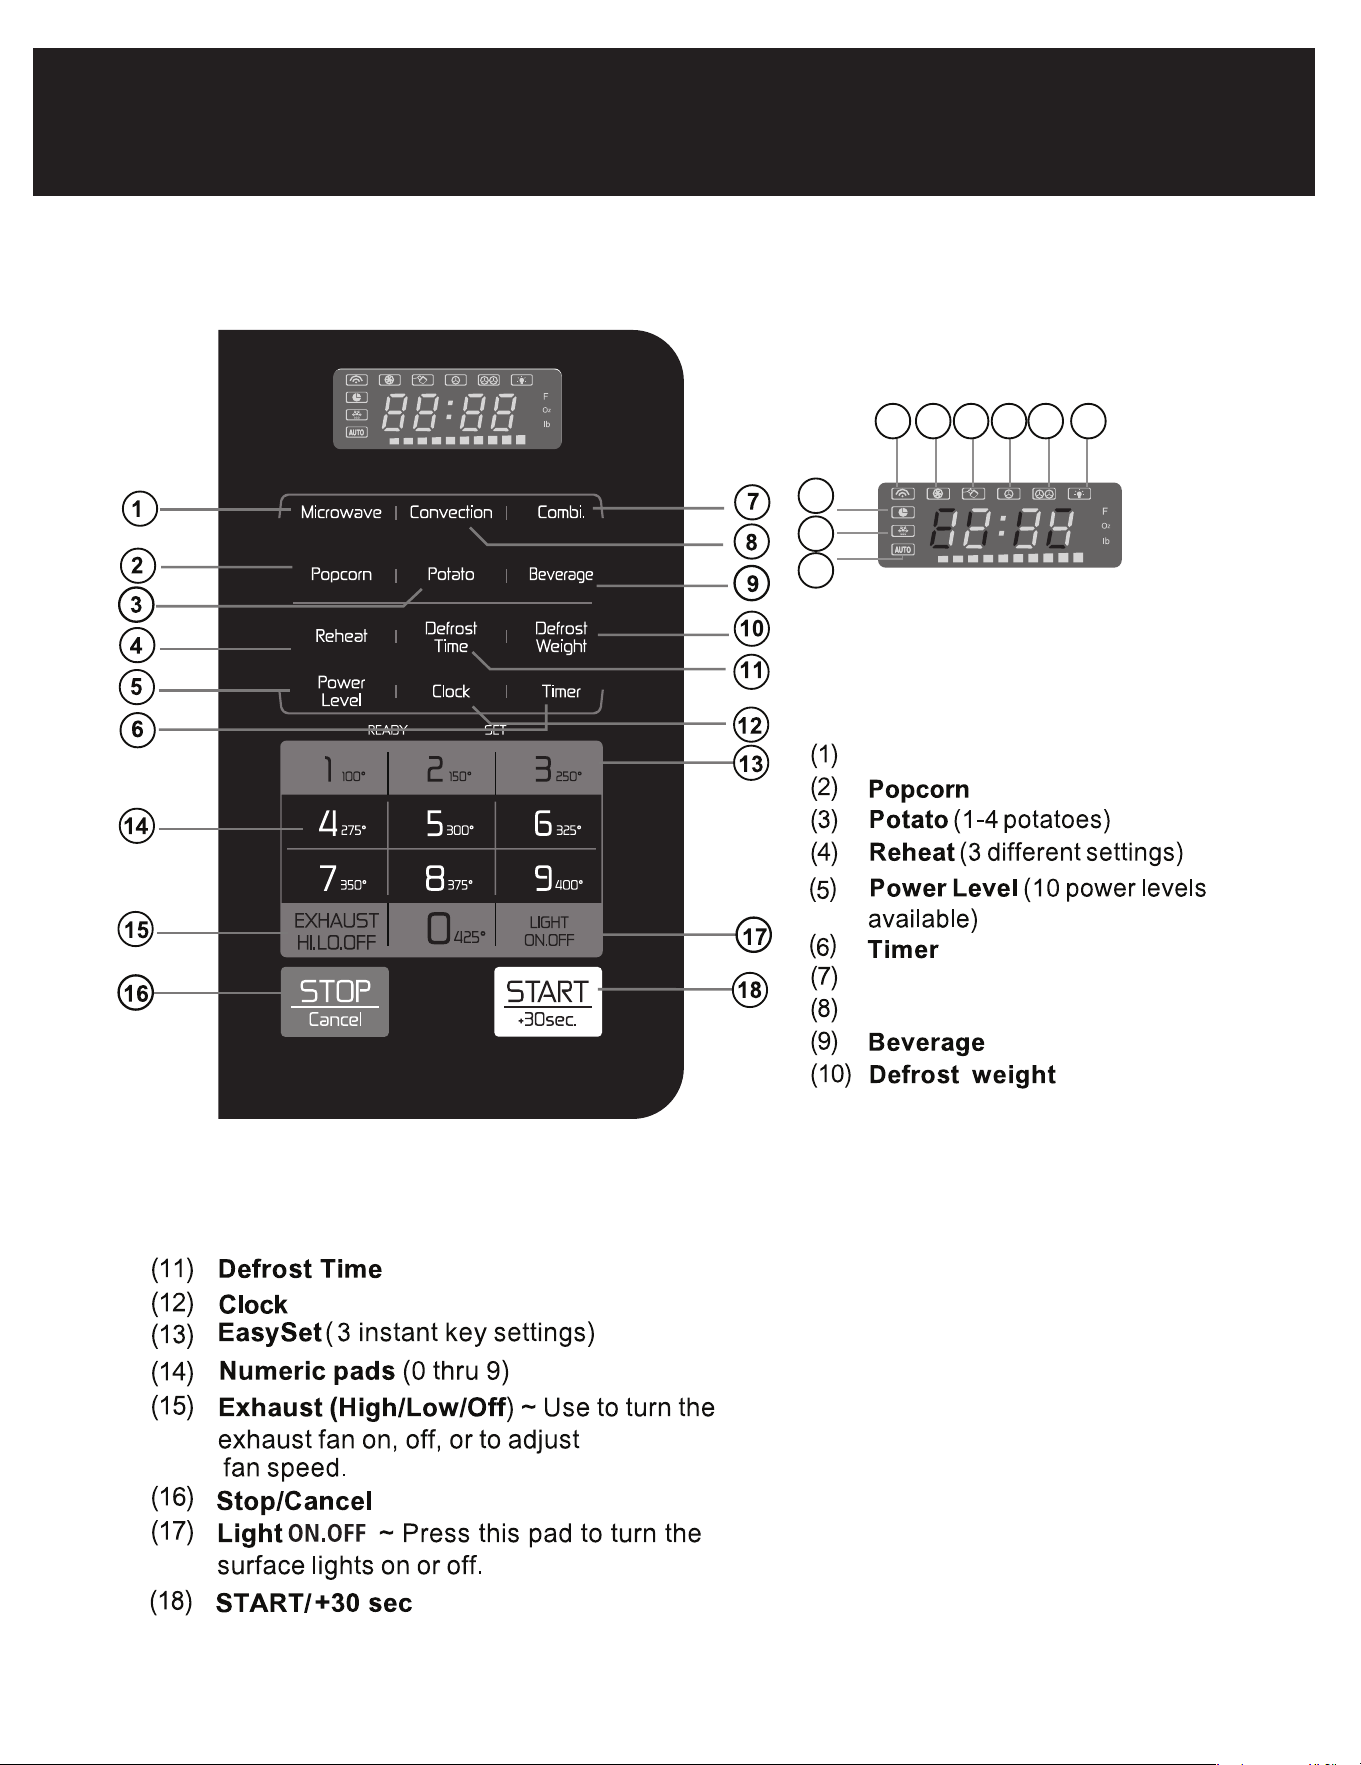
Timer
Defrost
Auto Cook
(19)
(20)
(21)
(22)
(23)
(24)
(25)
(26)
(27)
Microwave
Convection
Combination
Microwave
indicator
Convection
indicator
Lock
indicator
Vent Fan Of Low-Speed
Vent Fan Of High-S peed
indicator
indicator
indicator
indicator
indicator
indicator
stove Lamp
19
20 21 22 23 24
25
26
27
CONTROL PANEL
OPERATION
10

MANUAL COOKING
Setting the clock
Example: setting clock display for 9:00:
1. Touch Clock pad once for AM, touch twice
for PM.
2. Enter time using number pads.
3. Touch Clock pad again.
Setting the timer
Example: setting timer for 5 minutes:
1. Touch Timer pad once.
2. Enter desired time using number pads.
3. Touch Timer pad.
4. When the timer has reached the end of set
time, you will hear beep alerts indicating
the timer has run out.
Control Lock
You may lock the control panel to prevent the
microwave from being accidentally started or
used by children.
The control lock feature is very useful when
cleaning the control panel. The lock will
prevent accidental programming when wiping
the control panel clean.
Example: to set the control lock ON:
Touch and hold the Stop/Cancel pad for more
than 3 seconds. The Lock icon will appear in
the display window along with 2 beeps.
Example: to change the control lock from ON
to OFF:
Touch and hold the Stop/Cancel pad for more
than 3 seconds. The Lock icon will disappear
in the display window.
Using the Stop/Cancel key
This feature will let you quickly stop or cancel
the cooking process.
Touch the Stop/Cancel pad to:
1. Erase if you have entered wrong informa-
tion.
2. Cancel timer.
3. Press pad once to pause the oven tempo-
rarily during cooking. (Touch START/+30
sec pad again to resume cooking.)
4. Return the time of day (clock) to the display
after cooking cycle is completed.
5. Cancel a program during cooking, touch
twice.
Using the Start/+ 30 sec. key
This feature will let you quickly start or add 30
seconds
Touch the START/+30sec. pad to:
1. Start programmed cooking.
2. Start cooking for 30 seconds at 100%
power level.
3. Extend cooking time in multiples of 30
seconds each time this pad is touched
during microwave cooking.
Example: to add 1 minute of cook time during
80% microwave cooking:
Press START/+30 sec pad twice.
Note: The cooking time cannot be added in
defrost, auto menu and multi-stage cooking.
11

Heating with high power level
Example: to heat for 5 minutes at 100%
power:
1. Press Microwave pad.
2. Use the number pads to enter desired
heating time (cook time may be set up
to 99 minutes and 99 seconds).
3. Touch Start/+30SEC. pad.
When heating has finished you will hear
beeps.
Heating with lower power levels
Using the highest power level to heat foods
does not always give the best results when
some types of food need slower cooking,
such as roasts, baked goods or custards.
Your oven has nine other power levels you
may choose.
Example: to heat for 4 minutes at 70%
power:
1. Press Microwave pad.
2. Use the number pads to enter desired
heating time (cook time may be set up
to 99 minutes and 99 seconds).
3. Press Power Level pad once for power
level 10 (100% power).
4. Use the number key to change the
power level to 7. PL7 appears in the
display (70% power).
5. Press Start/+30SEC. pad.
When heating has finished you will hear
beeps.
Suggested power levels for
cooking
The 10 power levels available with this
microwave will help you to adjust to the
power output best suited for the food type
you are preparing. As with any food
preparation in the microwave, it is best to
follow the microwave instructions that are
printed on food packaging.
The table below provides suggested power
levels for various types of food that you
can prepare in the microwave.
Power
level
Microwave
output
Use to prepare when:
10 100%
Boiling water. Cooking
ground beef. Making candy.
Cooking fresh fruits &
vegetables. Cooking fish &
poultry. Preheating browning
dish. Reheating beverages.
Cooking bacon slices.
9 90%
Reheating meat slices quickly.
Saute onions, celery & green
peppers.
8 80%
All reheating. Cooking
scrambled eggs.
7 70%
Cooking breads & cereal
products. Cooking cheese
dishes & veal. Cakes, muffins,
brownies & cupcakes.
6 60% Cooking pasta.
5 50%
Cooking meats & whole
poultry. Cooking custard.
Cooking spare ribs, rib roast
& sirloin roast.
4 40%
Cooking less tender cuts of
meat. Reheating frozen
packaged foods.
3 30%
Thawing meat, poultry &
seafood. Cooking small
quantities of food. Finish
cooking casseroles, stew &
some sauces.
2 20%
Softening butter & cream
cheese. Heating small
amounts of food.
1 10%
Softening ice cream. Raise
yeast dough.
12

Heating with multiple cooking stages
For best results, some microwave recipes call for
different power levels or different lengths of time
for cooking. Your microwave may be set to
change from one stage to another automatically
(2 stages maximum).
Example: to cook food for 3 minutes at 80%
power and then 50% power for 6 minutes 30
seconds:
1. Press Microwave.
2. Use the number pads to enter heating time
for the 1st stage (cook time may be set up to
99 minutes and 99 seconds).
3. Press Power Level pad once.
4. Use the number keys to enter power level for
the 1st stage. PL8 appears in the display (80
% power).
5. Press Microwave pad for 2nd stage.
6. Use the number pads to enter heating time
for the 2nd stage (cook time may be set up to
99 minutes and 99 seconds).
7. Press Power Level pad for 2nd stage.
8. Use the number key to enter power level for
the 2nd stage. PL5 appears in the display (50
% power).
9. Press Start/+30SEC. pad.
When heating has finished you will hear beeps.
Note:
Power level must always be programmed for first
stage - 100% =10.
Suggestions for getting the best
results
To help you achieve the best possible results
from your microwave oven, read the following
suggestions below;
Storage temperature
Foods taken from the freezer or refrigerator take
longer to cook than the same foods would at
room temperature.
Size
Small pieces of food cook faster than large ones.
Pieces similar in size and shape will cook more
evenly when cooked together. For more even
results, reduce the power levels when cooking
large pieces of food.
Natural moisture
Very moist foods cook more evenly because
microwave energy heats water molecules very
efficiently.
Stirring
Stir foods such as casseroles and vegetables
from the outside to the center to distribute the
heat more evenly. This will allow the food to cook
faster. Constant stirring is not necessary.
Turn over items
Turn over foods such as pork chops, roasts or
whole cauliflower halfway through the cook time.
This will help to expose all sides equally to
microwave energy.
Food placement
Place delicate areas of food items, such as
asparagus tips, toward the center of the
turntable tray.
Food arrangement
Arrange unevenly shaped foods, such as chicken
pieces or salmon, with the thicker or meatier
parts toward the outside of the turntable tray.
Let the food stand
After removing the food from the microwave,
cover the food with foil or a casserole lid and let
it stand to finish cooking. This will help the food
finish in the center and avoids overcooking the
edges. The length of stand time depends on the
density and surface area of the food items.
Wrapping in paper towels or waxed paper
Sandwiches and many other food types
containing pre-baked bread should be wrapped
prior to placing in the microwave to help prevent
the food items from drying out while heating.
13

Using Ready Set
Microwave heating or cooking may be quickly set
at 100% power level for 1, 2 or 3 minutes. Use the
number keys 1, 2 or 3 to choose the desired
minutes of cook time (this option will only work
using the 1, 2 or 3 numeric pads):
Example: to quickly heat for 2 minutes at 100%
power:
Touch number pads 1, 2 or 3 for desired minutes
of cook time.
Exhaust High / Low / Off
The exhaust ventilation moves steam and other
cooking vapors from the cooking surface of the
range below the microwave oven.
To operate the exhaust vent, Touch the Exhaust
HI.LO.OFF pad once for the highest speed
setting. Touch the pad again to choose the Low
speed setting and a 3rd time to turn the exhaust
ventilation off.
Note: If the temperature gets too hot around the
microwave oven, the fan in the exhaust vent
hood will automatically turn on at the LOW
setting to cool the oven. The will automatically
turn off when the internal parts are cool. When
this occurs, the vent cannot be turned off.
Surface Light / On / Off
Touch the Light/On/Off pad once for a cooking
surface light. Press the pad again to turn the
light off.
Setting Defrost by Weight
Example: to defrost 1lb. of food with the default
power level and cook time determined automati-
cally:
Press Defrost Weight pad once.
0.0 will appear in the display.
Use the numeric pads to input weight of food to
defrost in pounds (10 = 1lb).
You may enter any weight from 0.1 to 6.0lbs.
Press START/+30sec. pad.
When defrosting has finished you will hear
beeps.
Note: The weight amount must be a valid entry
for this feature to start. A valid weight entry is
0.1 to 6.0 pounds.
Setting Defrost by Time
Example: to defrost food with the default 30%
power level for 5 minutes:
Press Defrost Time pad once.
0:00 will appear in the display.
Use the number pads to enter desired defrost
time (defrost time may be set up to 99 minutes
and 99 seconds).
Press Start/+30SEC. pad.
When heating has finished you will hear beeps.
Note: Power levels cannot be changed for both
defrost (by weight) or defrost (by time) because
the defrost performance will be adversely affect-
ed.
Special notes for defrosting by time
After pressing Start/+30SEC. key, the display will
count down remaining defrost time. The oven
will beep twice during the defrost cycle. At this
time open the door and turn the food if needed
and remove any portions that have already
thawed. Touch the Start/+30SEC. key to resume
the defrost cycle.
When heating has finished you will hear beeps.
14

Defrosting tips
• When using the defrost by weight feature, the
weight entered should always be pounds
(valid entries are from 0.1 to 6.0 pounds).
• Use both defrost weight and defrost time
features for raw food items only. Defrosting
gives best results when food to be thawed is
a minimum of 0°F (taken directly from a true
freezer). If the food has been stored in a
refrigerator-freezer that does not maintain a
temperature of 5°F or below, always program
a lower food weight or lower cook time to
prevent cooking the food.
• If the frozen food is stored outside the freezer
for up to 20 minutes, enter a reduced cook
time or weight.
• The shape of the package will alter the
defrosting time. Shallow rectangular food
packets defrost more quickly than a deep
frozen block of food.
• Separate pieces as they begin to defrost.
Separated frozen pieces of food defrost
better.
• Shield warm areas of food with small pieces
of foil if they start to become warm.
• You may use small pieces of aluminum foil to
shield food items like chicken wings, leg tips
and fish tails, but do not allow the foil to
touch the oven cavity walls when defrosting.
Defrosting suggestions for meats
For best results, please read these suggestions when defrosting meats.
Meat Normal amount Suggestions
Roast beef or
pork
2.5 to 6 lbs. (40 to 96
oz.)
Start with the food placed fat side down. After each stage, turn the food
over and shield any warm portions with narrow strips of aluminum foil.
Let stand, covered for 15-30 minutes.
Steaks, chops
or fish
0.5 to 3 lbs. (8 to 48 oz.)
After each stage, rearrange the food. If there are any warm or thawed
portions of food, shield them with narrow flat pieces of aluminum foil.
Remove any pieces of food that are nearly defrosted. Let stand, covered
for about 5 to 10 minutes.
Ground meat 0.5 to 3 lbs. (8 to 48 oz.)
After each stage, remove any pieces of food that are nearly defrosted.
Let stand, covered with foil for 5 to 10 minutes.
Whole chicken
2.5 to 6 lbs. (40 to 96
oz.)
Remove giblets before freezing poultry. Start defrosting with the breast
side down. After the 1st stage, turn the chicken over and shield any warm
portions with narrow strips of aluminum foil. After the 2nd stage, again
shield any warm portions with narrow strips of aluminum foil. Let stand,
covered, for 30 to 60 minutes in the refrigerator.
Chicken pieces 0.5 to 3 lbs. (8 to 48 oz.)
After each stage, rearrange or remove any pieces of food that are nearly
defrosted. Let stand for 10-20 minutes.
15
Reheat Directions Amount
Use only pre-cooked, refrigerated foods. Cover plate with vented
plastic wrap or waxed paper, tucked under plate. If food is not as
hot as you prefer after heating with Reheat, continue heating using
manual time and power level settings.
Contents:
- 3-4 oz. meat, poultry or fish (up to 6 oz. with bone)
- ½ cup starch (potatoes, pasta, rice, etc.)
- ½ cup of vegetables (about 3-4 oz.)
Casserole
Cover plate with lid or vented plastic wrap. If food is not as hot as
you prefer after heating with Reheat, continue heating using manual
time and power level settings.
Stir foods once before serving.
Contents:
- Casserole-refrigerated foods (for example beef stew or lasagna)
- Pasta-Canned spaghetti and ravioli, refrigerated foods.
Dinner plate 1 serving (1 plate)
1 to 4 servings
Pasta
Reheat
The reheat feature provides 3 quick preset
settings based on serving size to reheat
food for your cooking convenience.
Example: to reheat 24 ounces of food.
1. Press Reheat pad 3 times to reheat 24oz.
of food. 24.00oz will appear in the
display (see reheat category table).
2. Press Start/+30SEC. pad.
Reheat Category Press Display
8 ounces of food once 8.00 oz
16 ounces of food twice 16.00 oz
24 ounces of food 3 times 24.00 oz
REHEAT COOKING SUGGESTIONS
16

CONVECTION Cooking
There are ten temperatures of convection; 100°F, 150°F,
250°F, 275°F, 300°F, 325°F, 350°F, 375°F, 400°F, 425°F.
Convection cooking uses a heating element to raise the
temperature of the air inside the oven. Any oven
temperature from 100°F to 425°F may be set. A fan gently
circulates this heated air throughout the oven. Air and
around the food, producing golden brown exteriors and rich,
moist interiors. Because the heated air is constantly
moving, not permitting a layer of cooler air to develop
around the food, some foods cook faster than in regular
oven cooking.
For Best Results...
Always use the shelf when convection cooking.
Reduce package/recipe temperature 25°F for
baked goods.
The shelf is required for good air circulation and
even browning.
Using CONVECTION With preheating
Example: to cook food for 5 minutes at 250°F
using Convection with preheating
1. Press Convection pad once.
2. Press the temperature key to select the
temperature you need. Do not enter cook time
now. (The cook time will be entered after the
oven is preheated.)
3. Press Start/+30SEC. (When the oven is
preheated, it will signal.)
4. Place the food in the oven. Press the number
key(s) to cook timing (If you do not enter the
cooking time within 2 minutes the oven will
turn off automatically)
5. Press "Start/+30SEC. " to start cooking. when
cooking is complete, the oven will signal and
turn off.
Using CONVECTION Without preheating
Example: to cook food for 5 minutes at 250°F
using Convection without preheating
1. If your recipe does not require preheating,
press the Convection pad once.
2. Press the temperature key to select the
temperature you need.
3. Press Convection to confirm the temperature.
4. Press the number keys to set cooking time.
5. Press the "Start/+30SEC. "pad to start the
oven.
COMBINATION COOKING
Combination Cooking offers the best features of
microwave energy and convection cooking. Microwaves
cook food fast and convection circulation of heated air
browns foods beautifully. Any oven temperature from
100°F to 425°F may be set.
For Best Results...
Always use the shelf when combination cooking.
The shelf is required for good air circulation and
even browning.
Microwave +convection Combination Cooking
Example: to cook food for 5 minutes using
combination cooking.
1. Press COMBI. pad once.
2. Press the number keys to set cooking time.
3. Press Start/+30SEC. pad to start cooking.
Notes:
• Check the Cookware Tips section for correct
cookware when Combination Cooking
• Do not use metal cookware when
Combination Cooking
• Place meat on a trivet in a glass dish to
collect juices and prevent spattering.
• For best cooking and browning results, whole
roasts should be roasted in a glass dish
placed directly on the oven shelf.
• For foods that are too tall to fit in the oven,
you can take out the trivet. If necessary, you
may take out the shelf and place the dish
directly on the turntable.
17
POPCORN
CAUTION
DO NOT leave microwave oven unattended while
popping corn.
The popcorn feature lets you pop 3 different
uncommercially packaged microwave popcorn sized
bags. Use the table below to determine the setting to
use.
Example: to pop a 3.0 oz. bag of popcorn
automatically.
1. Press Popcorn pad (1, 2 or 3 times - refer to table
above to change for bag size).
2. Press Start/+30SEC. pad.
The microwave will beep when finished.
POTATO
The potato feature cooks 1, 2, 3 or 4 (cooking times
based on 8 to 32 oz.) potatoes automatically. Use the
table below to determine the setting to use.
Example: to cook 1 potato automatically.
1. Press Potato pad (1, 2, 3 or 4 times - refer to table
above to change quantity).
2. Press Start/+30SEC. pad.
The microwave will beep when finished.
Notes:
Before cooking, pierce potatoes with fork several times.
After cooking, let potatoes stand for 5 minutes.
BEVERAGE
The beverage feature heats 1, 2 or 3 cups of beverage.
Use the table below to determine the setting to use.
Example: to heat 1 cup of a beverage.
1. Press Beverage pad (1, 2 or 3 times - refer to table
above to change number of servings).
2. Press Start/+30SEC. pad.
The microwave will beep when finished.
Amount Press popcorn pad
1.75 oz. (default
setting)
once
3.00 oz. 2 times
3.50 oz. 3 times
Amount Press potato pad
1 potato (default
setting)
once
2 potatoes 2 times
3 potatoes 3 times
4 potatoes 4 times
Amount Press beverage pad
1 cup (about 8 oz.) once (default setting)
2 cups (about 16 oz.) 2 times
3 cups (about 24 oz.) 3 times
18

Convenience
category
Amount Suggestions
Popcorn 1.75, 3.0, 3.5 oz., 1 pkg.
Cook a single “microwave-only” bag of popcorn at a time. Use caution when
removing and opening the hot popcorn bag from the oven. Let microwave
oven cool down at least 5 minutes before using again.
Potato
1,2,3,4 potatoes
8,16,24 32 oz.
Pierce each potato several times using a fork. Place on turntable in spoke-
like fashion. After cooking, let stand for 3-5 minutes. Let oven cool for at
least 5 minutes before using again. Use the start/+30sec pad to increase
cook time for larger potatoes.
Beverage
1,2,3 cups (8 oz,16 oz,
24 oz.)
Use a microwave-safe measuring cup or mug; do not cover. Place the
beverage in the microwave. After heating, stir well. Let oven cool for at least
5 minutes before using again. Beverages heated with the beverage category
may be very hot. Remove the container with care.
AUTO COOKING
Convenience cooking suggestions
19
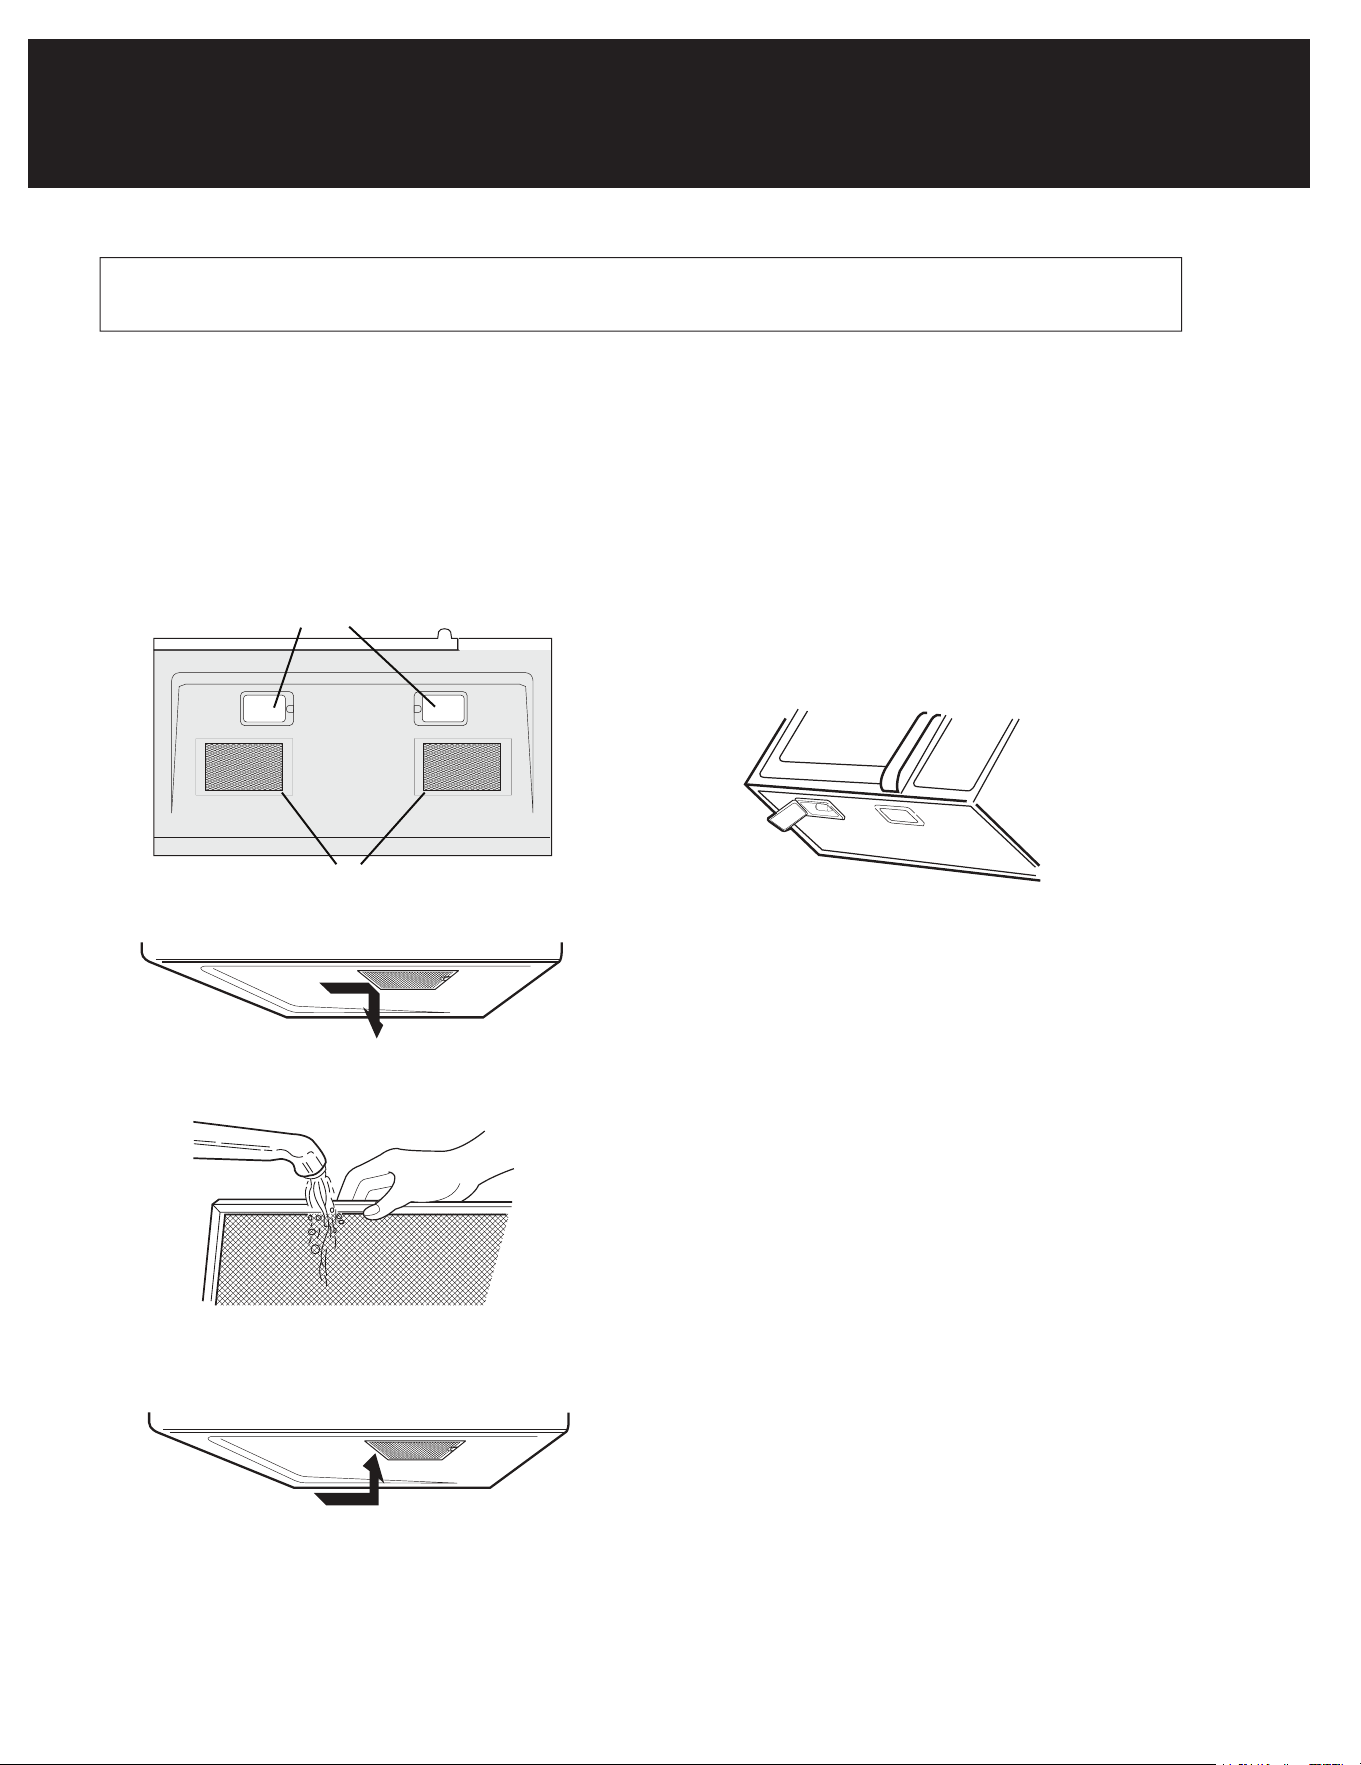
CAUTION
To avoid risk of personal injury or property damage, do
not operate oven hood without filters properly in place.
Cleaning the exhaust filters
The oven ventilation exhaust filters should be removed and
cleaned often; generally at least once every month.
1. To remove the exhaust ventilation filters, slide the filter to
the rear. Then pull filter downward and push to the other
side. The filter will drop out. Repeat for the 2nd filter.
2. Soak the ventilation filters in hot water using a mild
detergent. Rinse well and shake to dry
Do not use
ammonia. The aluminum
on the filter will corrode and darken.
3. To reinstall the exhaust ventilation filter, slide it into the
side slot, then push up and toward oven to lock.
Reinstall the 2nd filter using the same procedure.
Front
Rear
Surface lights
Ventilation
filters
Surface light replacement
CAUTION
To avoid risk of personal injury or property damage, wear
gloves when replacing the light bulbs.
1. Unplug the microwave oven or turn off power at the main
circuit breaker.
2. Remove the bulb cover mounting screws at both light
positions under the microwave.
3.
Replace bulb with 30 watt appliance bulb.
4.
5. Plug the microwave back into the power supply or turn
the power back on at the main circuit breaker.
Re-install bulb cover and mounting screw.
Disconnect the power cord before cleaning or
leave the door open to deactivate the oven during cleaning.
or wash in
a dishwasher.
MAINTENANCE
20
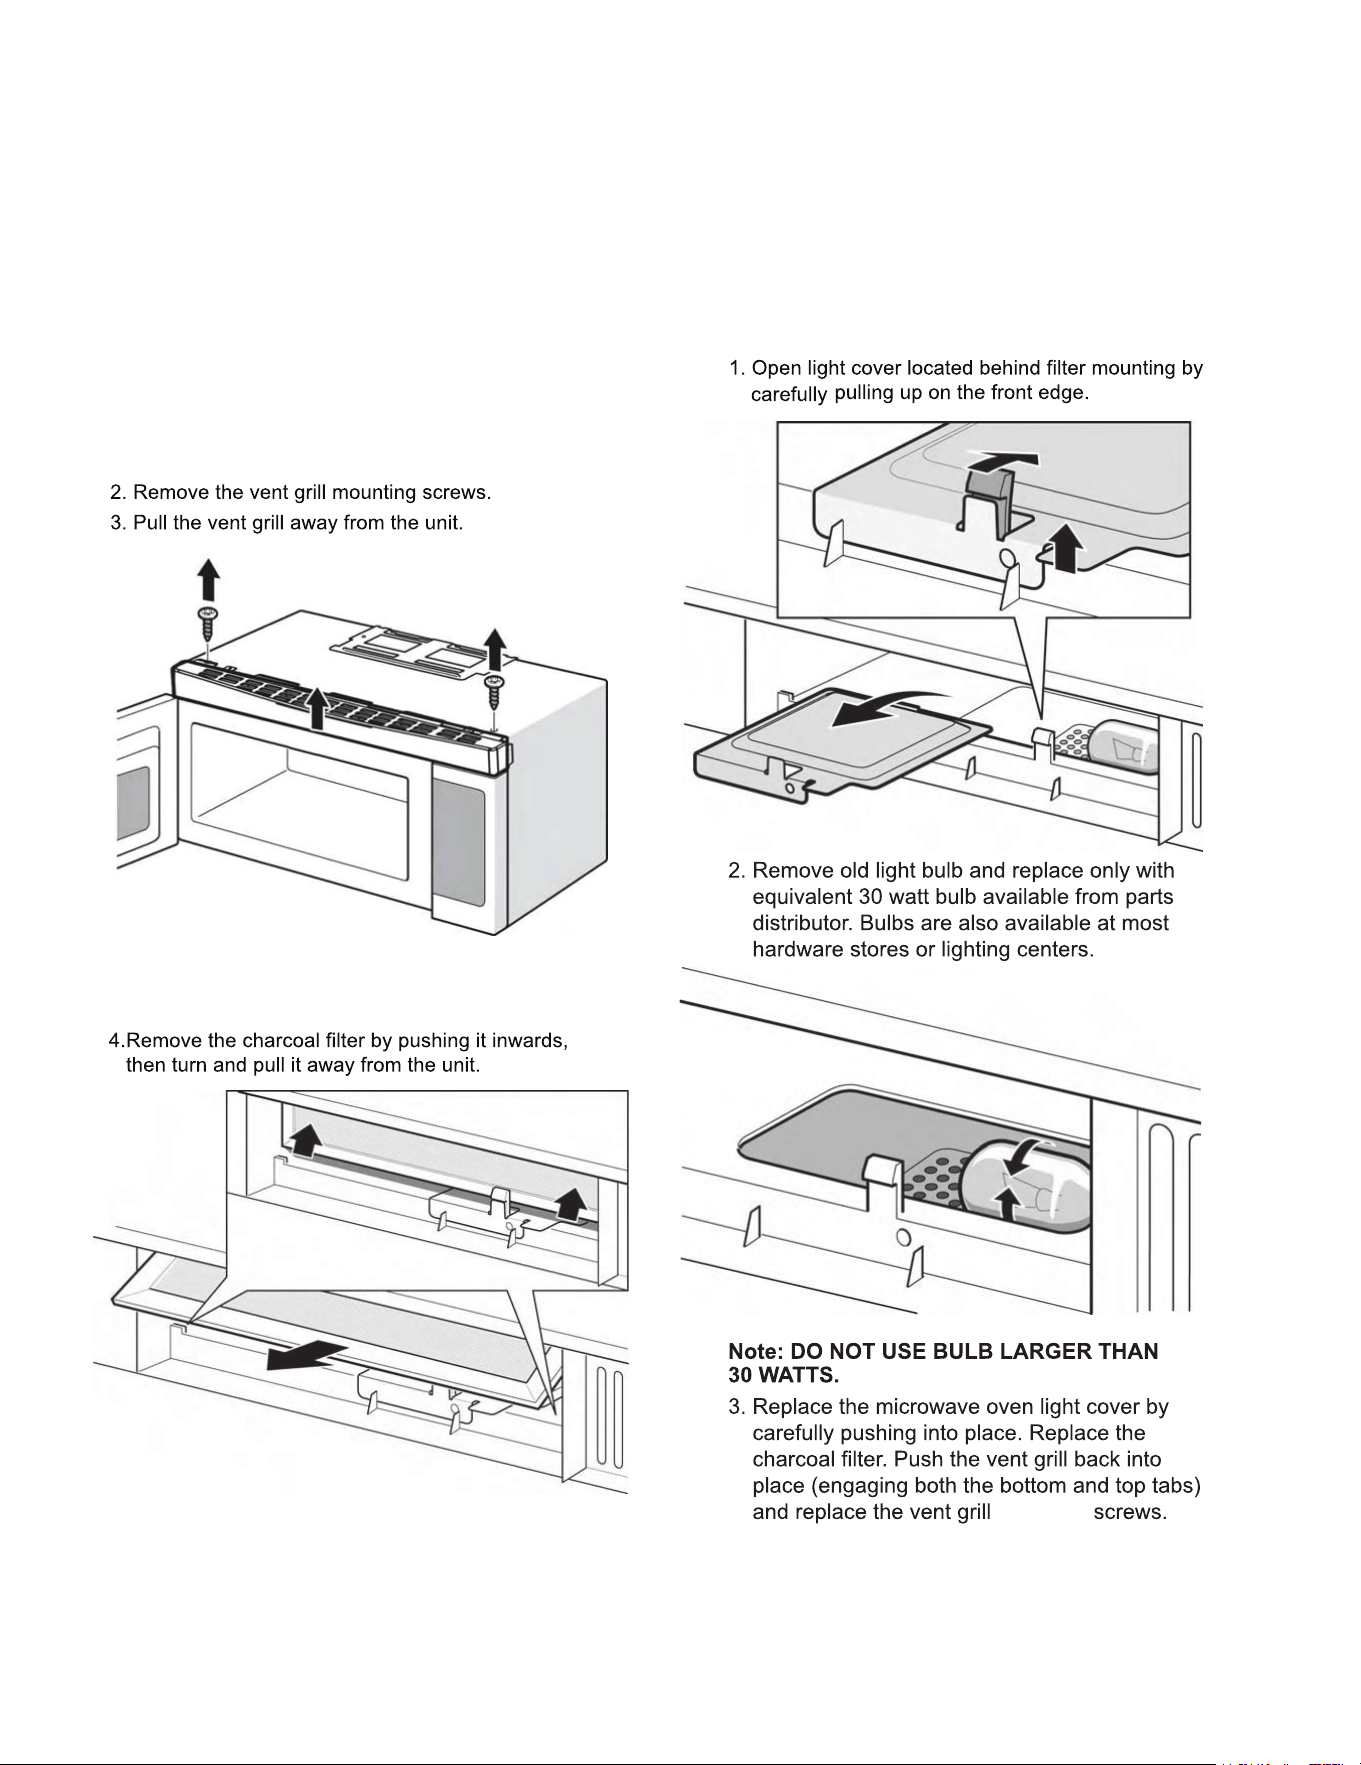
Charcoal Filter installed in your microwave oven, is used
for nonvented, recirculated installation. The filter should
be changed every 6 to 12 months depending on use.
1. Disconnect power to the microwave oven at the circuit
breaker panel or by unplugging.
Remove the per instructions 1-4 above and
charcoal filter, if used.
vent grill
Charcoal filter replacement
Oven light replacement
mounting
(For some models)
21

CLEANING SUGGESTIONS
For best performance and for safety reasons,
keep the oven interior and outside clean. Take
special care to keep the door window and oven
frame free of food and grease build-up.
Never use rough scouring powder or pads on the
microwave. Wipe the microwave oven inside and
out with a soft cloth and warm (not hot) mild
detergent solution. Then rinse and wipe dry
immediately.
Wipes spatters immediately with a wet paper
towel, especially after cooking greasy foods like
chicken or bacon.
Cleaning microwave vents
Follow these instructions to clean and care for
your microwave oven:
• Keep the inside (cavity) of the oven clean.
Food particles and spilt liquids can stick to
the oven walls, causing the oven to work less
efficiently.
• Wipe spills immediately. Use a damp, clean
cloth and mild soap. DO NOT use harsh
detergent or abrasive cleaners.
• To help loosen baked-on food particles or
liquids, heat 2 cups of water (add the juice of
1 lemon if you desire) to boiling on high for
2-5 minutes in a 4-cup measuring glass kept
the coverless enabling it on boiling. Let it
stand in the oven for a few minutes.
• Removing greasy buildup: To prevent the
oven from turning the oven cavity orange,
wipe the oven right after cleaning the items in
turkeys, fatty food or do the process in warm
immediately after cooking. Wash the turnta-
ble tray in warm sudsy water or in the dish-
washer.
• Clean the outside surface with the micro-
wave with soap and a damp cloth to dry. Dry
with a clean soft cloth. To prevent damage to
the operating parts of the oven, do not let
water seep into the vents or openings.
• Wash the oven door window with mild soapy
suds and water. Be sure to use a soft clean
cloth to avoid scratching.
• If steam accumulates inside or outside the
oven door, wipe with a soft cloth. Steam can
accumulate when operating the oven in high
humidity and in no way indicates microwave
leakage.
• Never operate the microwave food or grease
cavity. This can damage the oven without
filter cloths in tow. You may wish to leave a
cup of water standing inside the oven when it
is not in use to prevent damage if the oven is
accidentally turned on.
How to Clean the Inside
Walls, Floor, Inside Window, Metal and Plastic
Parts on the Door
Some deposits can be removed with a paper
towel; others may require a damp cloth. Warm
greasy spots with a sudsy cloth, then rinse with
a damp cloth. Do not use abrasive cleaners or
sharp utensils on the walls of the oven. To clean
the surface of the door and the surface of the
oven that comes together on closing, use only
mild, non-abrasive soaps or detergents using a
sponge or soft cloth. Rinse with a damp cloth
and dry. Never use a commercial oven cleaner
on any part of your microwave.
Turntable and Turntable Support
To prevent breakage, do not place the turntable
in water just after cooking. Wash it carefully in
warm, sudsy water. If the dishwasher, The turnta-
ble and support can be too fragile. Remember,
do not operate the oven without the turntable
and support in place.
How to Clean the Outside
Do not use cleaners containing ammonia or
alcohol on the microwave oven. Ammonia or
alcohol can damage the appearance of the
microwave.
Clean the outside of the oven with a sudsy cloth.
Rinse with a damp cloth and then dry. Wipe the
window clean with a damp cloth.
22

Control Panel and Door
Wipe with a damp cloth. Dry thoroughly. Do not use
cleaning sprays, large amounts of soap and water,
abrasives or sharp objects on the panel—they can
damage it. Some paper towels can also scratch the
control panel.
Door Surface
It is important to keep the area clean where the
door seals against the microwave. Use only mild,
non-abrasive detergents applied with a clean
sponge or soft cloth. Rinse well.
Power Cord
If the cord becomes soiled, unplug and wash with a
damp cloth. For stubborn spots, sudsy water may
be used, but be certain to rinse with a damp cloth
and dry thoroughly before plugging cord into
outlet.
Stainless Steel
Do not use a steel-wool pad; it will scratch the
surface.
To clean stainless steel surfaces, use a hot, damp
cloth with a mild detergent suitable for stainless
steel surfaces. Use a clean, hot, damp cloth to
remove soap. Dry with a dry, clean cloth.
23
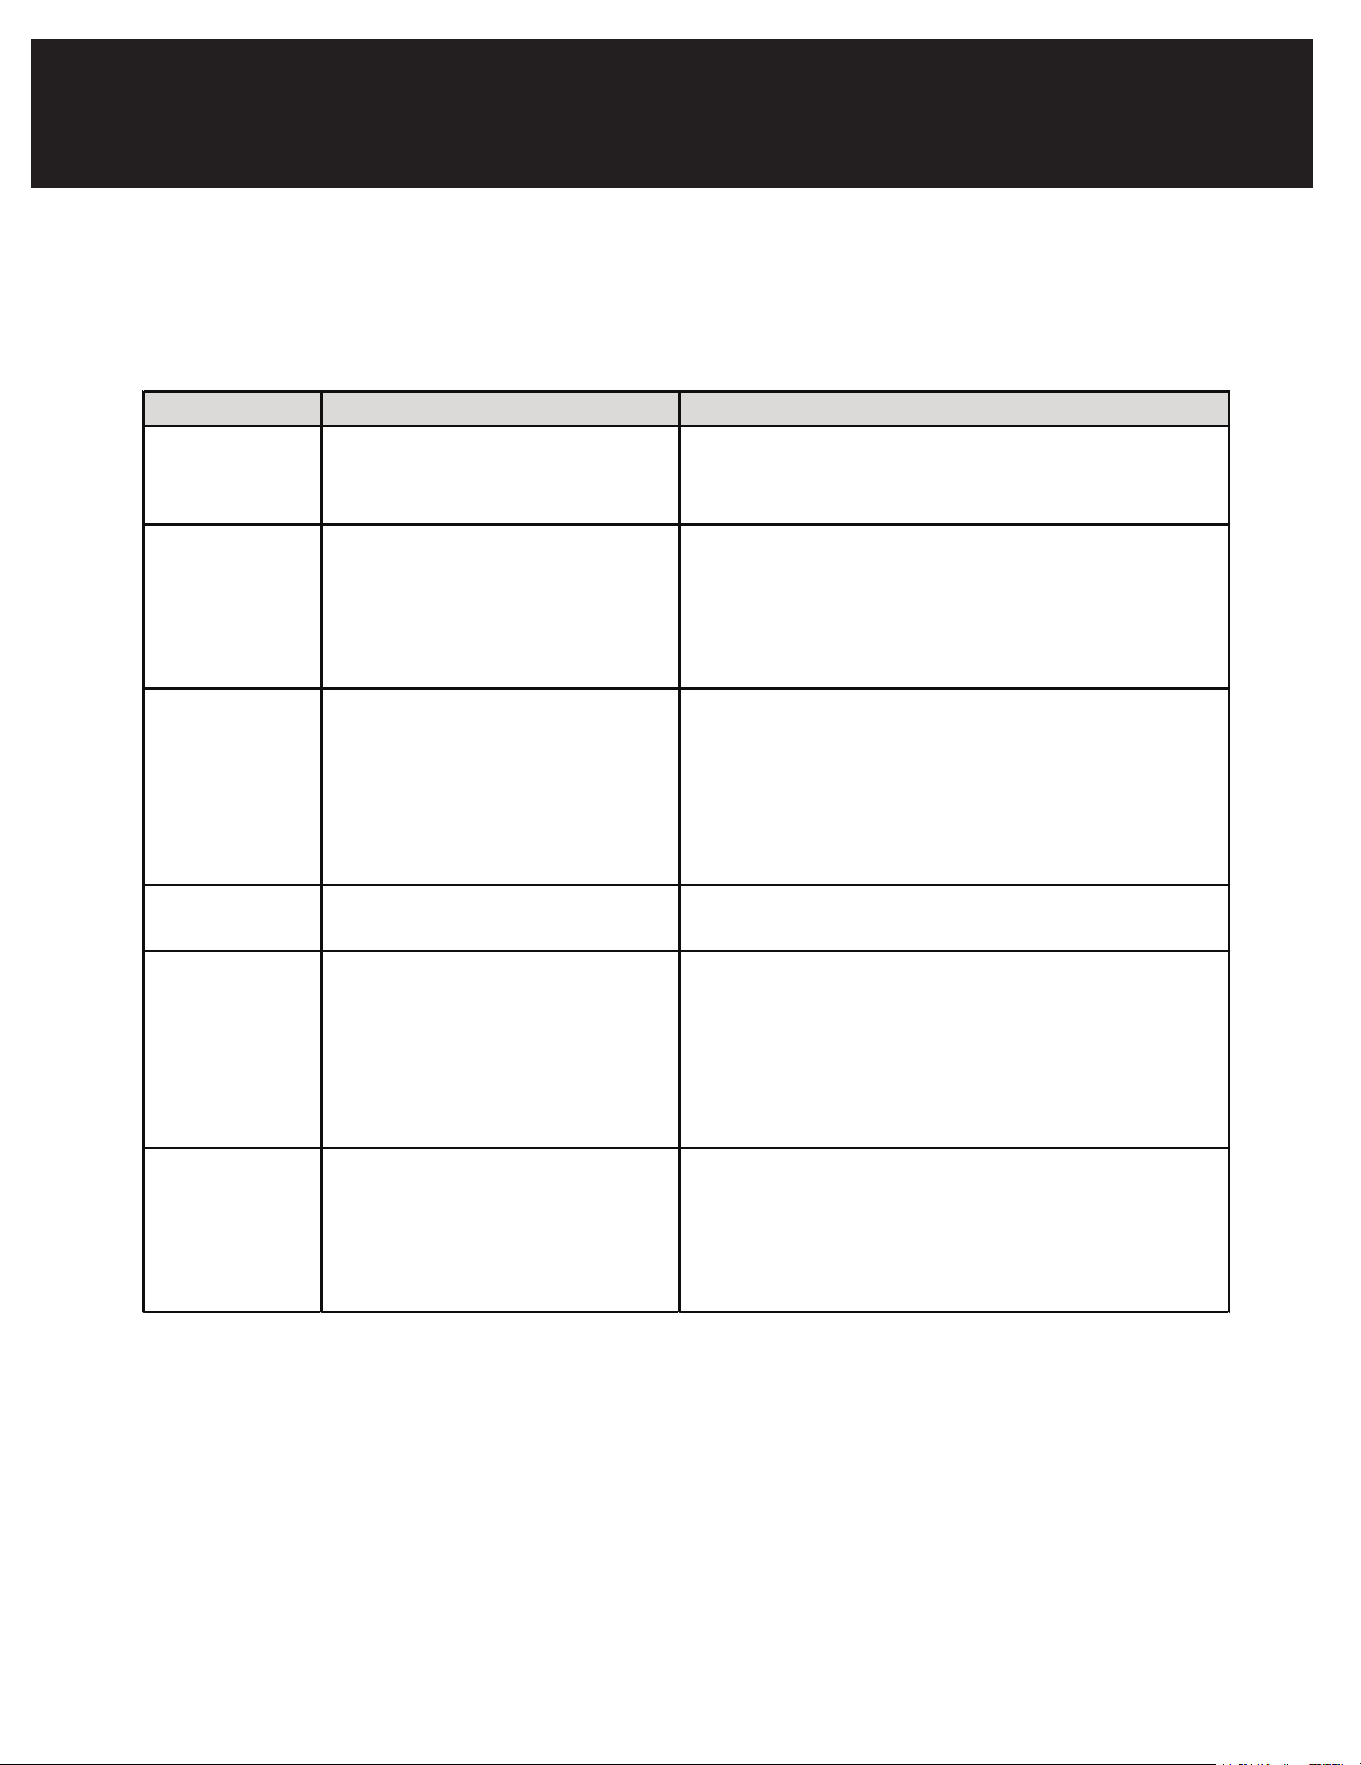
TROUBLESHOOTING
TROUBLE POSSIBLE CAUSE POSSIBLE REMEDY
Oven will not
start
a. Electrical cord for oven is not
plugged in. b. Door is open. c.
Wrong operation is set.
a. Plug into the outlet. b. Close the door and try
again. c. Check instructions.
Arcing or
sparking
a. Materials to be avoided in
microwave oven were used. b. The
oven is operated when empty. c.
Spilled food remains in the cavity.
a. Use microwave-safe cookware only. b. Do not
operate with oven empty. c. Clean cavity with wet
towel.
Unevenly
cooked foods
a. Materials to be avoided in
microwave oven were used. b.
Food is not defrosted completely.
c. Cooking time, power level is not
suitable. d. Food is not turned or
stirred.
a. Use microwave-safe cookware only. b. Completely
defrost food. c. Use correct cooking time, power
level. d. Turn or stir food.
Overcooked
foods
Cooking time, power level is not
suitable.
Use correct cooking time, power level.
Undercooked
foods
a. Materials to be avoided in
microwave oven were used. b.
Food is not defrosted completely.
c. Oven ventilation ports are
restricted. d. Cooking time, power
level is not suitable.
a. Use microwave-safe cookware only. b. Completely
defrost food. c. Check to see that oven ventilation
ports are not restricted. d. Use correct cooking time,
power level.
Improper
defrosting
a. Materials to be avoided in
microwave oven were used. b.
Cooking time, power level is not
suitable. c. Food is not turned or
stirred.
a. Use microwave-safe cookware only. b. Use correct
cooking time, power level. c. Turn or stir food.
Check your problem by using the chart below and try the solutions for each problem. If the
microwave oven still does not work properly, contact the nearest authorized service center.
24

Koolmore Supply, Inc. extends a limited warranty to the original purchaser, guaranteeing that this
Koolmore
product is free from manufacturing defects in material or workmanship for one year from the date of
purchase.
Should you discover any such defect within the warranty period, Koolmore Supply, Inc., reserves the
right to
repair or replace the product without charge, or to cover the cost of replacement parts and repair labor
needed
to correct defects present at the time of purchase or resulting from regular usage, when the appliance
has been
installed, operated, and maintained as per the instructions provided.
At its sole discretion, Koolmore Supply Inc. may decide to replace the product. In such an event, your
replacement
appliance will carry the warranty for the remaining term of the original unit's warranty period.
This warranty is valid exclusively to the original purchaser of the product and only applicable within the
United
States. The warranty commences from the date of original consumer purchase. Proof of the original
purchase
date will be required to obtain service under this warranty.
Under this limited warranty, your sole and exclusive remedy will be product repair, as outlined above. All
services must be provided by a Koolmore-designated service company.
To claim warranty or request repair service:
Email support@koolmore.com. Please include your name, address, phone number, warranty repair
request,
and a copy of your proof of purchase receipt. Alternatively, visit koolmore.com and use the contact us
page. A
Koolmore customer service representative will promptly arrange service for your appliance.
We thank you for choosing Koolmore.
This limited warranty will not cover:
1. Failure of the product to perform during power failures or interruptions,
or due to inadequate electrical service.
2. Damage incurred during transportation or handling.
3. Damage caused by accidents, vermin, lightning, winds, re, oods, or acts of God.
4. Damage resulting from accidents, alterations, misuse, abuse, improper installation, repair, or mainte-
nance.
This includes using any external device that alters or converts the voltage or frequency of
electricity.
5. Unauthorized product modications, repairs by unauthorized centers, or use of non-approved
replacement parts.
6. Abnormal cleaning and maintenance not aligned with the user's manual.
7. Use of incompatible accessories or components.
8. Any costs associated with repairs or replacements under these excluded circumstances shall be the
responsibility of the consumer.