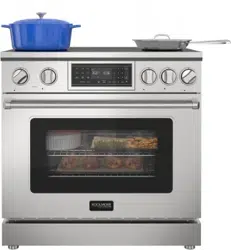
Professional Induction Oven Range
With Polished Glass Ceramic Cooktop,
True Convection Oven
Models: KM-IPR-36TP-SS


Contents
Safety .................................................................................. 4
Setup ..................................................................................... 8
Cooking Recommendations ................................................ 10
Installation ............................................................................. 13
Operation .............................................................................. 17
Setting Surface Controls .............................................................. 20
Operating the Oven ...................................................................... 22
Buttons Functions ......................................................................... 23
Broiler Operation .......................................................................... 25
Cleaning And Maintenance .................................................. 28
Remove The Oven Door ....................................................... 31
Troubleshooting ................................................................... 33
Error Codes ......................................................................... 36
Warranty ................................................................................ 37
4
Read all safety instructions before using the product. Failure to follow these instructions may result
in re, electrical shock, serious injury or death.
ANTI-TIP DEVICE
Tip-Over Hazard
• A child or adult can tip the range and be killed.
• Install the anti-tip bracket to the wall or oor.
• Engage the range to the anti-tip bracket by sliding the range back such that the
foot is engaged.
• Re-engage the anti-tip bracket if the range is moved.
• Failure to do so can result in death or serious burns to children or adults.
To reduce the risk of tipping the range, the range must be secured by a properly
installed anti-tip bracket. See installation instructions shipped with the bracket
for complete details before attempting to install.
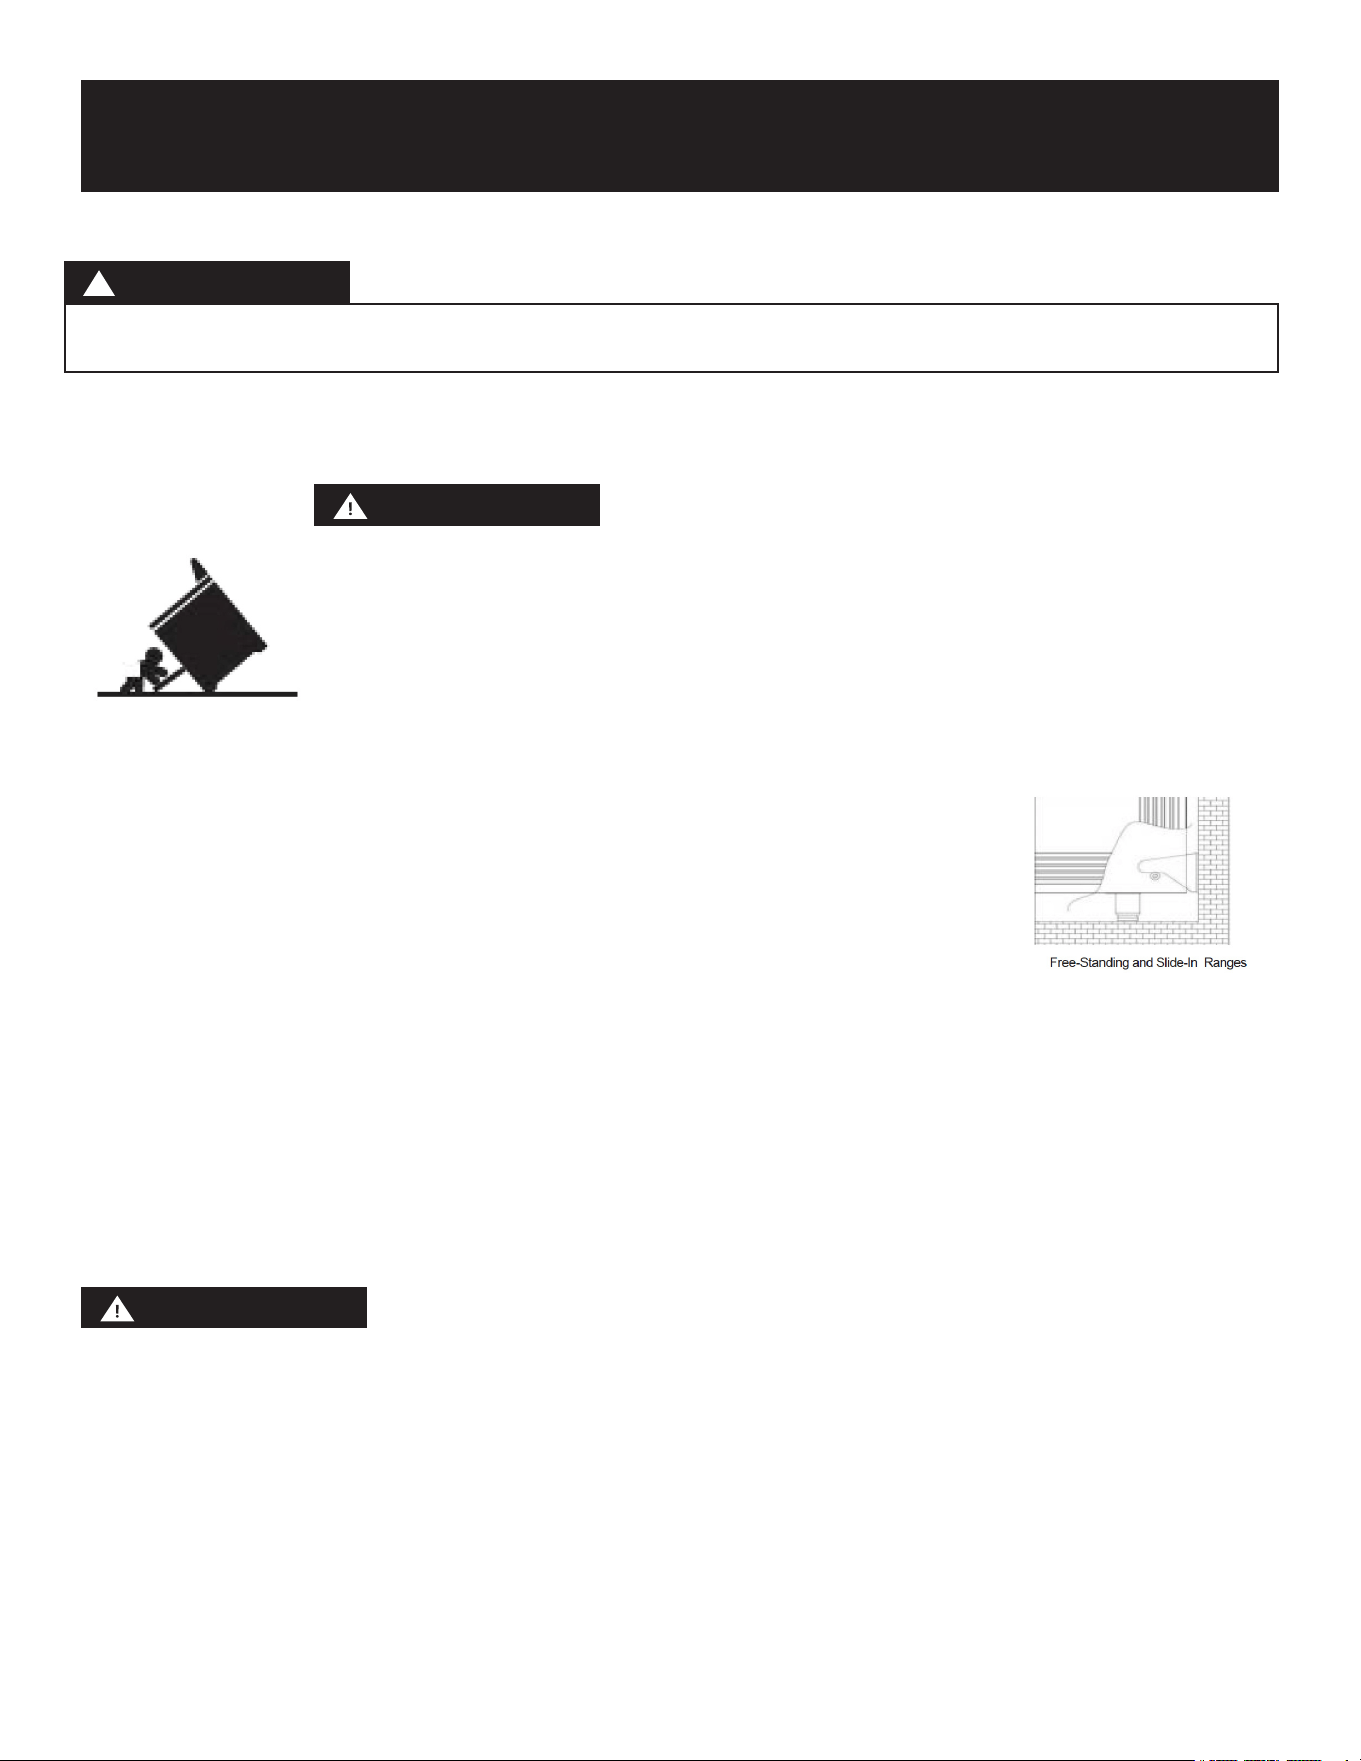
For Free-Standing and Slide-In Ranges
To check if the bracket is installed and engaged properly, look underneath the
range to see that the rear leveling leg is engaged in the bracket.
GENERAL SAFETY INSTRUCTIONS
• Before performing any service, unplug the range or disconnect the power supply at the household
distribution panel by removing the fuse or switching off the circuit breaker.
• Do not leave children alone—children should not be left alone or unattended in an area where an
appliance is in use. They should never be allowed to climb, sit or stand on any part of the appli-
ance.
• Do not store items of interest to children above or on the backguard of a range—children climbing
on the range to reach items could be seriously injured.
• Use only dry pot holders—moist or damp pot holders on hot surfaces may result in burns from
steam. Do not let pot holders touch hot heating elements. Do not use a towel or other bulky cloth
in place of pot holders.
• Never use your appliance for warming or heating the room.
• Do not touch the surface units, the heating elements or the interior surface of the oven. These
surfaces may be hot enough to burn even though they are dark in color. During and after use, do
not touch, or let clothing or other ammable materials contact the surface units, areas nearby the
surface units or the interior area of the oven, allow sucient time for cooling rst. Other surfac-
es of the appliance may become hot enough to cause burns. Potentially hot surfaces include the
Safety
WARNING
!
WARNING
CAUTION:
5
cooktop, areas facing the cooktop, oven vent opening, surfaces near the opening and crevices
around the oven door.
• Do not heat unopened food containers. Pressure could build up and the container could burst,
causing an injury.
• Do not use any type of foil or liner to cover the oven bottom or anywhere in the oven, except as
described in this manual. Oven liners can trap heat or melt, resulting in damage to the product and
risk of shock, smoke or re.
• Avoid scratching or impacting glass doors, cook tops or control panels. Doing so may lead to
glass breakage.
• Cook meat and poultry thoroughly—meat to at least an internal temperature of 160°F and poul-
try to at least an internal temperature of 180°F. Cooking to these temperatures usually protects
against foodborne illness.
KEEP FLAMMABLE MATERIALS AWAY FROM THE RANGE
Do not store or use gasoline or any other ammable vapors and liquids in the vicinity of this or any
other appliance. They can cause explosions, res, or personal injury or death.
Do not store ammable materials in an oven, a range drawer, a warming drawer, or near a cooktop.
Do not let cooking grease or other ammable materials accumulate on the range.
Clean the venting hood frequently. Grease should not be allowed to accumulate on the hood or lter.
IN THE EVENT OF A FIRE, TAKE THE FOLLOWING STEPS TO PREVENT INJURY AND FIRE
SPREADING
• Do not use water on grease res. Turn off the burner to eliminate the fuel source. Smother the re
with a lid, baking sheet, or use a dry chemical or foam-type re extinguisher.
• Should a re occur in the oven, keep the oven door closed. Turn the oven off and wait for the re to
burn out. Do not try to open the oven door if there is a re inside. You could be burned or injured. If
the re does not go out by itself, use a dry chemical re extinguisher to put out the re.
COOKTOP SAFETY INSTRUCTIONS
• Never leave surface units unattended at high heat settings. Boilovers cause smoking and greasy
spillovers that may catch on re. You may also be burned if you are not careful when handling hot
grease.
• Do not use aluminum foil to line the drip pans or anywhere in the oven, except as described in this
manual. Improper use of aluminum foil can result in a risk of electric shock, re, or damage to the
appliance.
• Use proper pan size - Select utensils with at bottoms large enough to cover the surface unit heat-
ing element. The use of undersized utensils will expose a portion of the heating element to direct
contact and may result in ignition of clothing or other ammable materials.
• Do not use water on grease res. Never pick up a aming pan. Turn the controls off. Smother the
re with a tight-tting lid, cookie sheet, or at tray, or use a dry chemical or foam-type re extin-
guisher.
• In the event of an electrical power outage, use caution if cooking or baking. Do not use the cook-
top if there is a power outage unless it is specically designed for use with an external power
source. If the power fails during cooking, turn the control to off and remove the pan from the burn-
er.
WARNING
WARNING
WARNING

6
WARNING
WARNING
• Use care when opening oven door - Let hot air or steam escape before removing or replacing food.
Stand to the side of the oven when opening the door to avoid burns caused by escaping hot air or
steam.
• Do not heat unopened food containers. Build-up of pressure may cause the container to burst and
result in injury.
• Keep the oven vent ducts unobstructed. The oven vent is located at the back of the cooktop and
the vent at the bottom of the backguard. Touching the surfaces in this area when the oven is
operating may cause severe burns. Also, do not place plastic or heat-sensitive items on or near the
oven vent. These items could melt or ignite.
• Placement of oven racks. Always place oven racks in the desired location while the oven is cool.
If the rack must be moved while the oven is hot, use pot holders and avoid the hot oven frame and
the oven itself.
• Do not allow children to climb or play around the range. The weight of a child on or in the door
could cause the range to tip over, burn the child, or cause other injury.
• Be sure all control knobs are turned to off and the appliance is cool before using any type of
aerosol cleaner on or around the appliance. The chemical that produces the spraying action could,
in the presence of heat, ignite or cause metal parts to corrode.
• Clean the range regularly to keep all parts free of grease that could catch re. Pay particular
attention to the area around each surface element. Exhaust fan vents and air intakes should be
cleaned regularly, especially if they appear to be clogged with grease.
• Use only dry pot holders - Moist or damp pot holders on hot surfaces may result in burns from
steam. Do not let pot holders touch hot heating elements. Do not use a towel or other bulky cloth
in place of pot holders.
GLASS COOKTOP SAFETY INSTRUCTIONS
• Use care when touching the cooktop. The glass surface of the cooktop will retain heat after the
controls have been turned off.
• Do not cook on a broken cooktop. If the cooktop should break, cleaning solutions and spillovers
may penetrate the broken cooktop and create a risk of electric shock. Contact a qualied
technician immediately.
• Avoid scratching the glass cooktop. The cooktop can be scratched with items such as knives,
sharp instruments, rings or other jewelry, and rivets on clothing.
• Use suitable pans. Use only at-bottomed pans to ensure proper cooking results and to prevent
damage to the cooktop. Pans should have the same diameter as the cooking zone or slightly
larger.
• Clean the cooktop with caution. If a wet sponge or cloth is used to wipe spills on a hot cooking
area, be careful to avoid steam burn; some cleaners can produce noxious fumes if applied to a hot
surface.
NOTE: Sugar spills are an exception. They should be scraped off the hot surface immediately to avoid
permanent damage.
• Read and follow all instructions and warnings on the cleaning cream for ceramic or glass
cooktops.
OVEN SAFETY INSTRUCTIONS
• Stand away from the range when opening the oven door. Hot air or steam which escapes can

7
cause burns to hands, face, and/or eyes.
• Do not use oven for storage. Stored items, especially ammable materials, may ignite, causing
damage, re, or burns.
• Keep oven vent ducts unobstructed. The oven vent is located at the back of the cooktop and the
vent at the bottom of the backguard. Touching the surfaces in this area when the oven is operating
may cause burns.
• Place oven racks in desired locations while oven is cool. If rack must be moved while oven is hot,
use pot holders and avoid the hot oven frame and the oven itself.
• Use care when opening oven door. Let hot air or steam escape before removing or replacing food.
• Never leave jars or cans of fat or drippings in or near your oven. They could ignite and cause a re.
• Do not store or use combustible materials near the oven, such as curtains, papers, etc.
• When using cooking or roasting bags in oven, follow the manufacturer’s directions. Do not use an
oven thermometer with cooking or roasting bags.
• Use the self-cleaning feature of the oven with care. Do not use oven cleaners or oven liner
protective coating of any kind on or around any part of the oven. Remove the broiler pan and other
utensils, and all excess grease and other soils from the oven before self-cleaning.
• Do not leave items such as paper, cooking utensils, foil, or oven liners in the oven during the self-
clean cycle. These items can ignite or melt.
• Do not clean the door gasket. The door gasket is essential for a good seal. Care should be taken
not to rub, damage, or move the gasket.
• Do not use oven cleaners. No commercial oven cleaner or oven liner protective coating of any kind
should be used in or around any part of the oven.
• Clean only parts listed in this manual. Before cleaning any part of the oven, be sure all controls are
turned off and the oven is cool. Remove broiler pan, oven racks, and other utensils, and wipe out
excessive spillovers to prevent excessive smoke or are-ups.
SELF-CLEANING OVEN SAFETY INSTRUCTIONS
• The self-cleaning feature operates the oven at temperatures high enough to burn away food soils
in the oven. Follow these instructions for safe operation.
• Do not touch oven surfaces during self-clean operation. Keep children away from the oven during
self-cleaning. Failure to follow these instructions may cause burns.
• Before operating the self-clean cycle, remove pans, shiny metal oven racks and other utensils from
the oven. Only gray porcelain-coated oven racks may be left in the oven. Do not use self-clean to
clean other parts, such as the drip pans or bowls.
• Before operating, do not use self-clean with an excessive amount of grease. Wipe out excess
grease to avoid ignition. Excessive amount of food soils from the oven may ignite leading to
smoke damage to your home.
• If the self-cleaning mode malfunctions, turn the oven off and disconnect the power supply. Have it
serviced by a qualied technician.
• Do not clean the door gasket. The door gasket is essential for a good seal. Care should be taken
not to rub, damage, or move the gasket.
• Do not use oven cleaners. No commercial oven cleaner or oven liner protective coating of any kind
should be used in or around any part of the oven.
WARNING

8
IMPORTANT INSTRUCTIONS FOR UNPACKING AND INSTALLATION
IMPORTANT
Read and follow the below instructions and precautions for unpacking, installing, and servicing your
appliance.
Remove all tape and packaging before using the appliance. Destroy the carton and plastic bags
after unpacking the appliance. Never allow children to play with packaging material. Do not remove
the wiring label and other literature attached to the appliance. Do not remove model/serial number
plate.
Cold temperatures can damage the electronic control. When using this appliance for the rst time,
or when the appliance has not been used for an extended period of time, be sure the appliance has
been in temperatures above 32°F (0°C) for at least 3 hours before turning on the power to the appli-
ance.
Make sure wall covering, countertop, and cabinets around the range can withstand the heat (up to
194°F) generated by the range. Discoloration, delamination, or melting may occur. This range has
been designed to comply with the maximum allowable wood cabinet temperature of 194°F.
Before installing the range in an area covered with linoleum or other synthetic oor covering, make
sure the oor covering can withstand temperatures of at least 200°F (93°C). Use an insulated pad or
1/4 in. (0.64 cm) plywood under the range if installing the range over carpet.
Do not modify or alter the construction of the appliance by removing the leveling legs, panels, wire
covers, anti-tip brackets/screws, or any other part of the appliance.
Be sure to have an appropriate foam type re extinguisher available, visible, and easily accessible
located near the appliance.
GROUNDING INSTRUCTIONS
Avoid re hazard or electrical shock. Failure to follow this warning may cause serious injury, re, or
death.
Avoid re hazard or electrical shock. Do not use an adapter plug, use an extension cord, or remove
grounding prong from the power cord. Failure to follow this warning may cause serious injury, re, or
death.
Proper Installation - Be sure your appliance is properly installed and grounded by a qualied techni-
cian. In the United States, installation must be in accordance with the National Fuel Gas Code ANSI
Z223.1/NFPA 54 - latest edition and National Electrical Code NFPA 70 - latest edition, and local
electrical code requirements. In Canada, installation must be in accordance with the Natural Gas
Installation Code CSA B149.1 - latest edition and Canadian Electrical Code Part 1 - latest edition, and
local electrical code requirements. Install only per installation instructions provided in the literature
package for this appliance.
Set-up
WARNING
!

9
For personal safety, this appliance must be properly grounded. For maximum safety, the power
cord must be plugged into an electrical outlet that is correctly polarized and properly grounded. If a
two-prong wall receptacle is encountered, contact a qualied electrician and have it replaced with a
properly grounded three-prong wall receptacle in accordance with the National Electrical Code. Do
not remove the grounding prong from the power cord. If it is not possible to avoid use of an exten-
sion cord, use an extension cord that is properly grounded. The electrical plug and extension cord
must be checked for proper polarization and grounding, and if not found to be correct, they must
be corrected by a qualied electrician. It is the responsibility of the consumer to contact a qualied
installer to ensure that the electrical installation is adequate and conforms with all local codes and
ordinances.
See the installation instructions packaged with this appliance for complete installation and ground-
ing instructions.
IMPORTANT INSTRUCTIONS FOR SERVICE AND MAINTENANCE
Do not repair or replace any part of the appliance unless specically recommended in the manuals.
All other servicing should be done only by a qualied technician. This reduces the risk of personal
injury and damage to the appliance.
Always contact your dealer, distributor, service agent, or manufacturer about problems or conditions
you do not understand.
Ask your dealer to recommend a qualied technician and an authorized repair service. Know how to
disconnect the power to the appliance at the circuit breaker or fuse box in case of an emergency.
Remove the oven door from any unused oven if it is to be stored or discarded. Do not touch a hot
oven light bulb with a damp cloth. Doing so could cause the bulb to break. Handle halogen light(s)
(if equipped) with paper towels or soft gloves. Disconnect the appliance or shut off the power to the
appliance before removing and replacing the bulb.
WARNING
California Residents: for cancer and reproductive harm information, visit www.P65Warnings.ca.gov
Important: This appliance has been tested and found to comply with the limits for a Class B digital
device, pursuant to Part 18 of the FCC rules (United States) and ICES-001 (Canada). These limits are
designed to provide reasonable protection against harmful interference in a residential installation.
This appliance generates, uses, and can radiate radio frequency energy and, if not installed and used
in accordance with the instructions, may cause harmful interference to radio communications. How-
ever, there is no guarantee that interference will not occur in a particular installation. If this unit does
cause harmful interference to radio or television reception, which can be determined by turning the
unit off and on, the user is encouraged to correct the interference by one or more of the following
measures:
Reorient or relocate the receiving antenna.
Increase the separation between the unit and receiver.
Connect the unit into an outlet on a circuit different from that to which the receiver is connected.
PROPER DISPOSAL OF YOUR APPLIANCE
WARNING
!
10
Dispose of or recycle your appliance in accordance with Federal and Local Regulations. Contact
your local authorities for the environmentally safe disposal of your appliance.
COOKING RECOMMENDATIONS
Bakeware
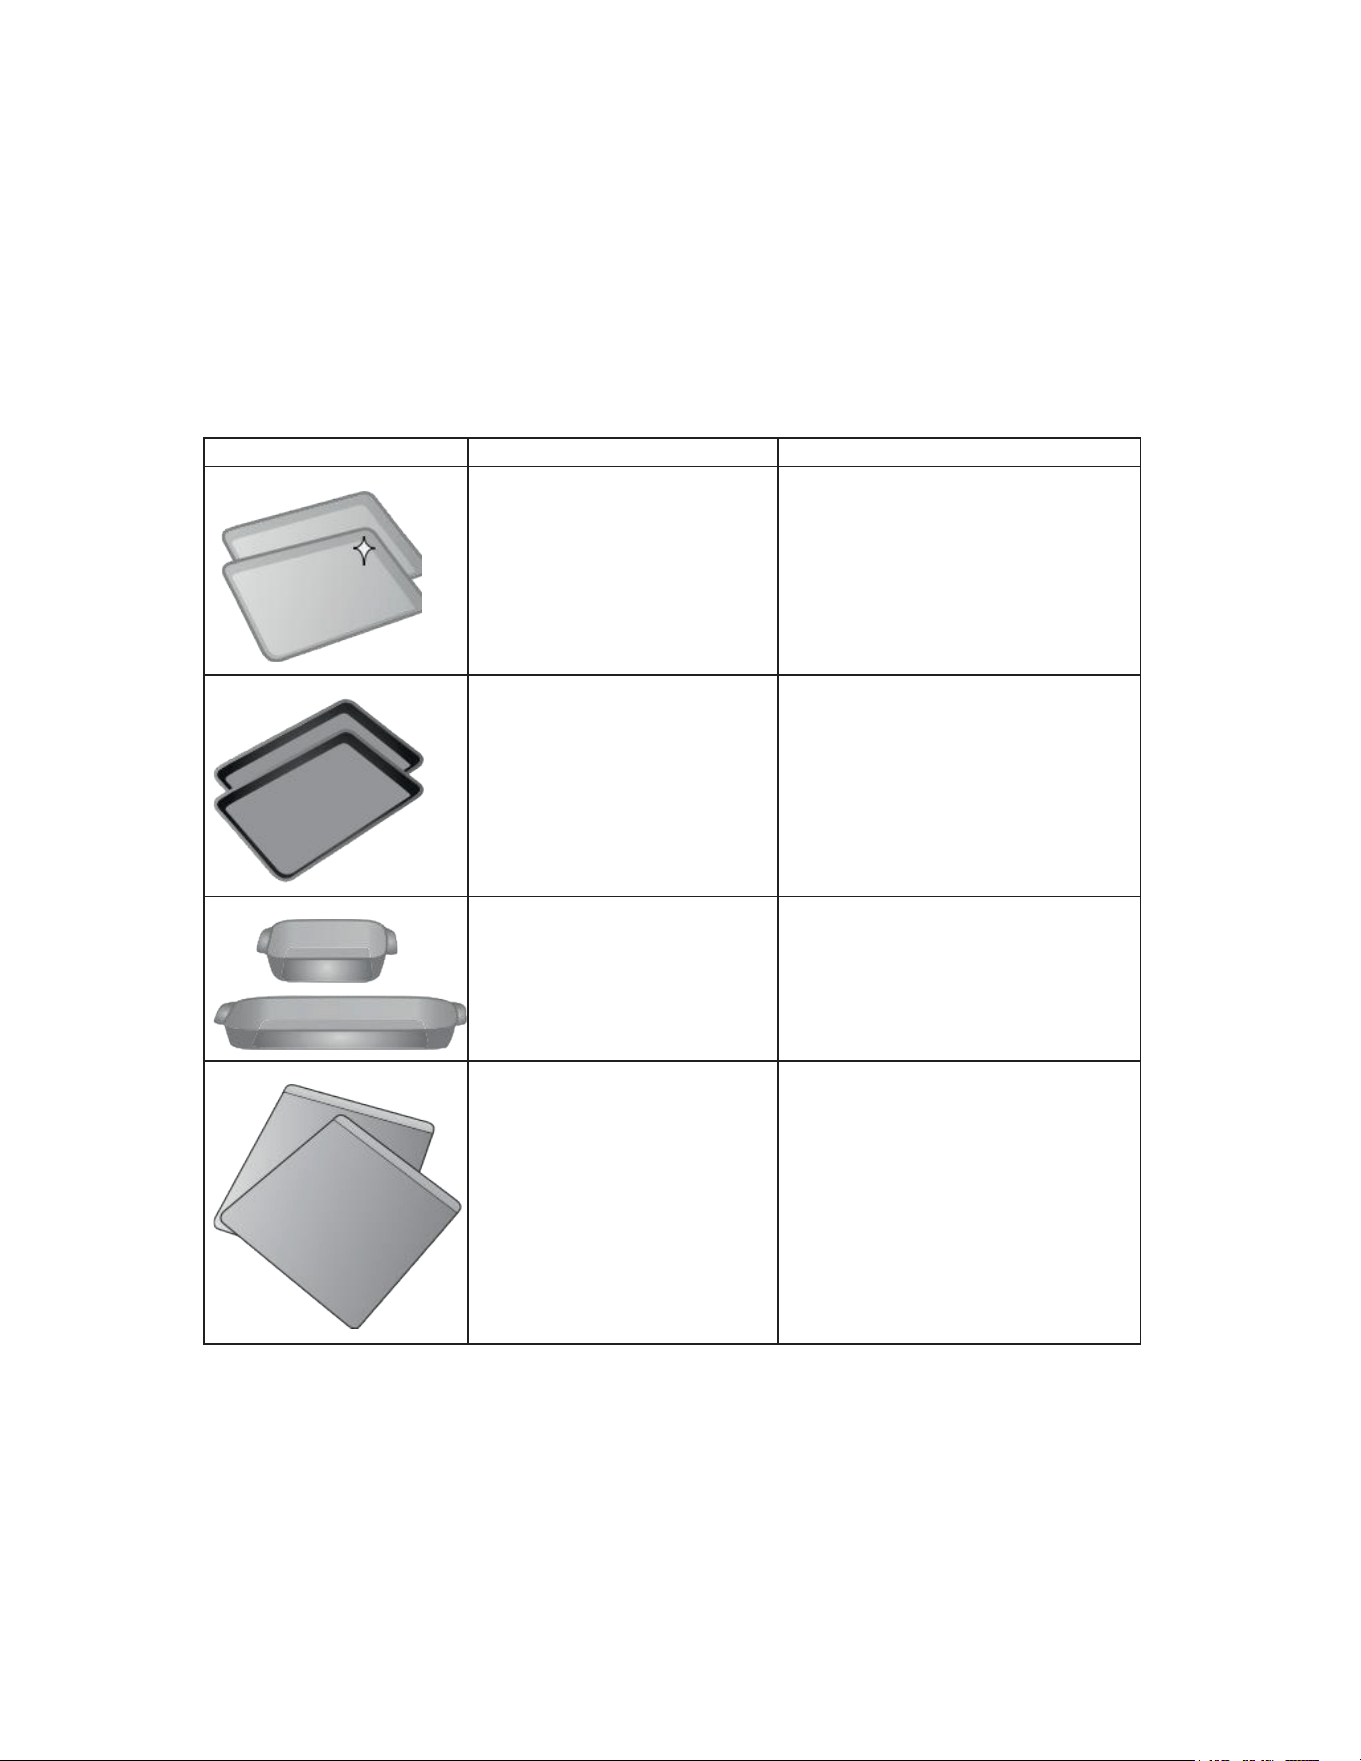
The material of bakeware affects how evenly and quickly it transfers heat from the pan to the food.
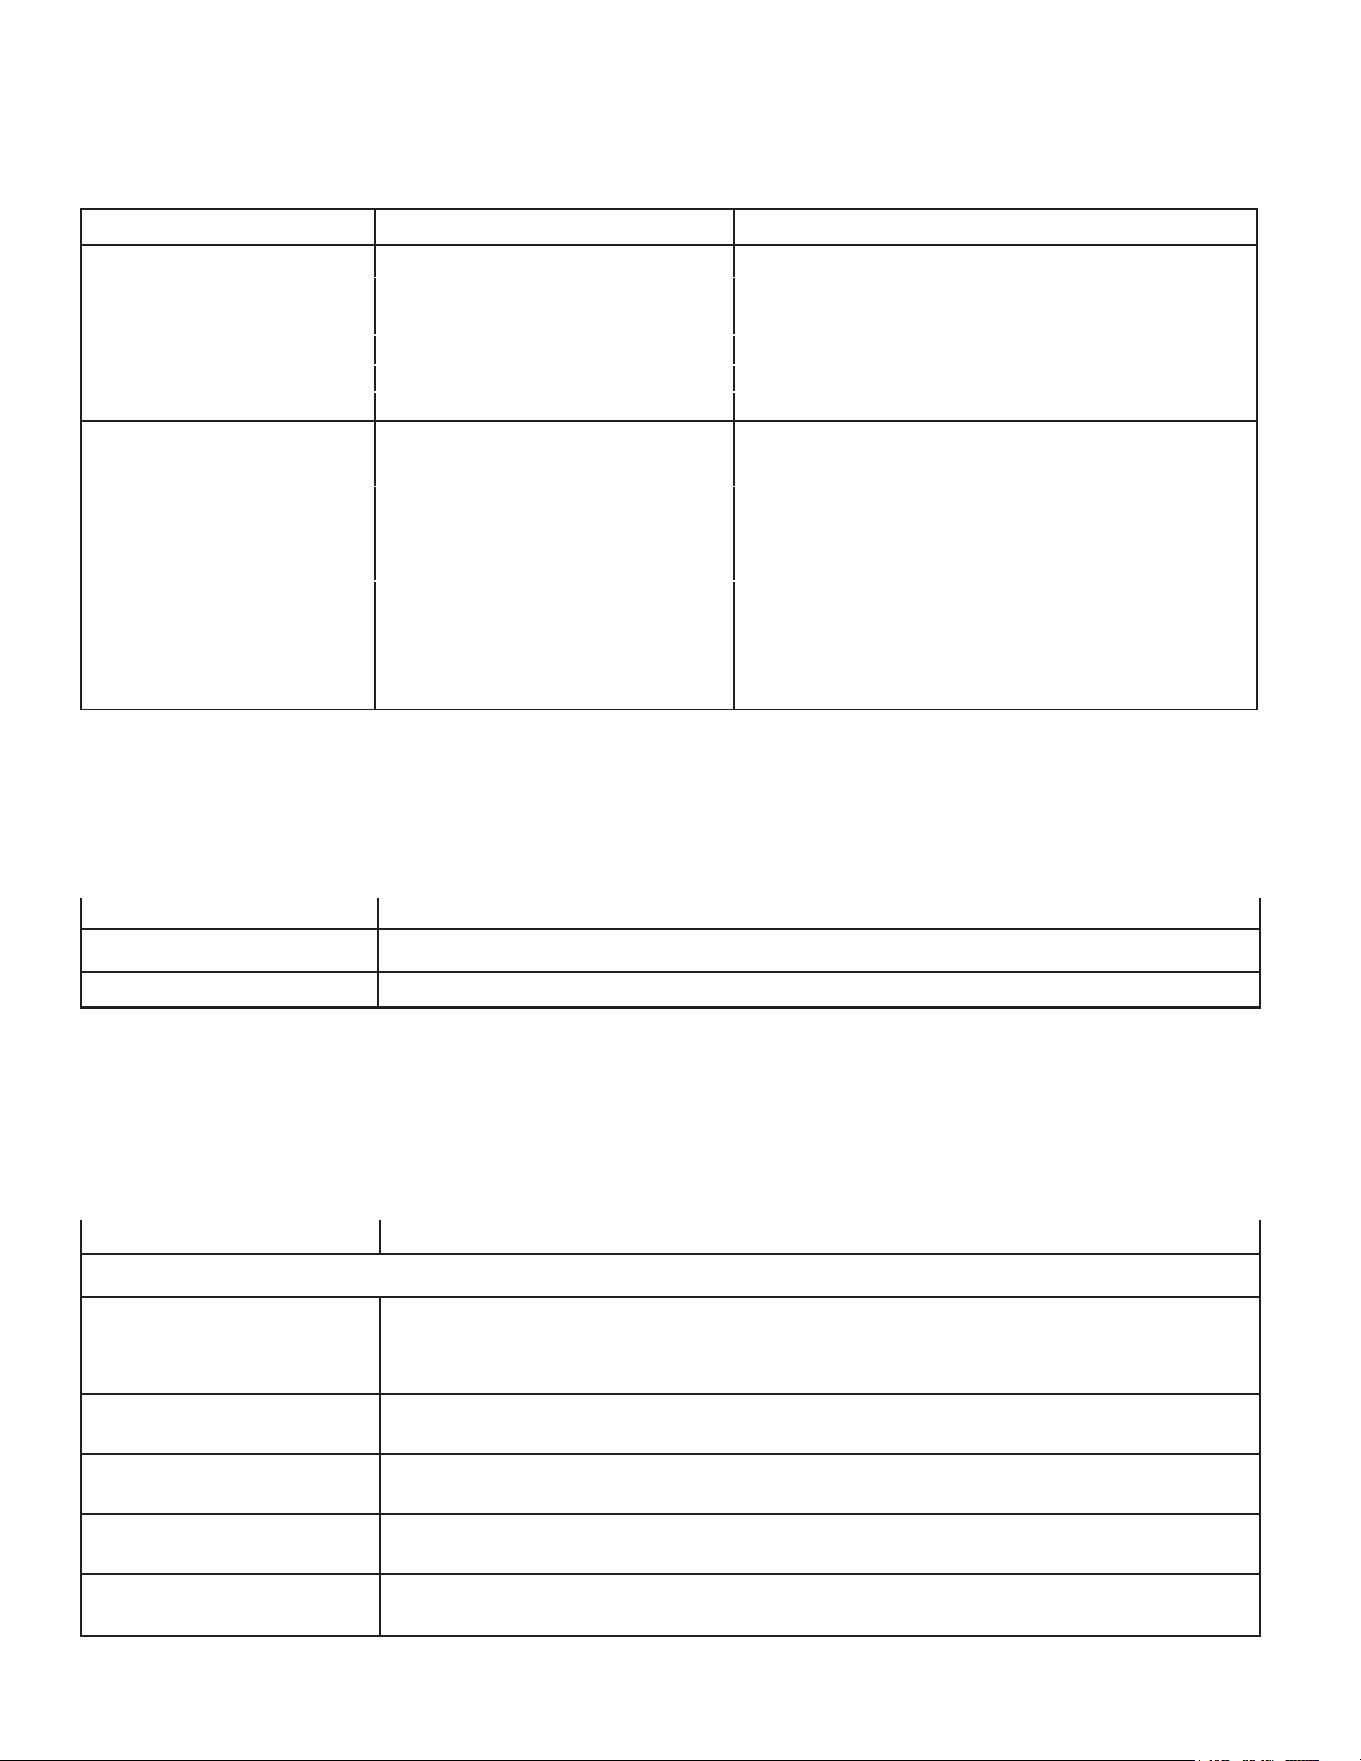
Material Attributes Recommendation
Shiny metal bakeware Shiny , aluminum , and non-
coat- ed bakeware is the best for even
heating. It is suitable for all baked
goods .
Recommended cooking temperatures
and times are based on shiny metal
bakeware .
Dark metal bakeware Dark bakeware cooks hotter than
shiny bakeware .
Reduce the cooking temperature by
25 ° F ( 13- 14 ° C ) when using dark bake-
ware .
Glass bakeware Glass bakeware cooks hotter
than shiny bakeware .
Glass is convenient , as the same
piece of bakeware can be used
for cooking , serving , and storing
food.
Reduce the cooking temperature by
25 ° F ( 13-14 ° C ) when using glass bake-
ware .
Insulated bakeware Insulated bakeware cooks cooler
than shiny bakeware .
Insulated bakeware is designed
for baking in gas ovens .
Reduce the cooking temperature by
25 ° F ( 13-14 ° C ) when using glass bake-
ware .
11
Condition Attributes Recommendation
Aging cookware As pans age and become If food is too dark or overcooked , use the
discolored , cooking times may
need to be reduced slightly.
minimum cook time in the recipe or packag-
ing.
If food is too light or undercooked , use the
middle to maximum cook time in the recipe
or packaging.
High altitude Air is drier and air pressure is
lower.
Adjust cooking temperature , cooking time , or
recipes as needed.
Water boils at a lower tem-
perature , and liquids evapo-
rate faster.
Increase amount of liquid in baking recipes .
Increase cook time on cooktop. Cover dishes
to reduce evaporation .
Foods may take longer to
bake.
Doughs may rise faster.
Increase bake time or oven temperature .
Reduce amount of baking soda or baking
powder in recipe . Reduce rising time or
punch down dough and allow it to rise twice .
Result Recommendation
Food too light Use the middle to maximum cook t ime recommended on packaging or recipe .
Food too dark Use the minimum cook t ime recommended on packaging or recipe .
Situation Recommendation
Baking
Rack placement Follow the instructions in “ Operating the oven ” starting on page 26 .
When using only one rack , place the rack so the food is in the center of the
oven .
Preheat Fully preheat the oven before baking items like cookies , cakes , biscuits and breads
. Insert food immediately after the beep.
Checking food Use the window and oven l ight when checking food. Opening the door may
reduce baking performance .
Bake or Convection Bake Convection bake is the best function to use for baking on multiple racks . For
best performance , see “ Convection Bake ” on page 35 .
Food placement Allow at least 2 inches ( 5 cm) of space between bakeware for proper aircir-
culation .
Cooking Conditions
Conditions in your kitchen can affect the performance of your appliance when cooking food.
Cooking Results
Small adjustments may x a problem with food not being as done as you like or more done than
you like .
Cooking Tips
Use these additional tips to get the best results from your appliance .

12
Material Recommendation
Broiling / Roasting
Broiling pan For best results when broiling , use a broil pan with a broil pan insert de-
signed to drain the fat from the food , help avoid spatter , and reduce smok-
ing. The broiler pan will catch grease spills , and the insert helps prevent
grease splatters .
If a broiler pan and insert are not supplied with this appliance , they may be
purchased from thorkitchen.com.
Convection Cooking
Convection attributes Convection cooking uses a fan to circulate hot air around the oven and
food. It browns food more evenly and reduces hot spots in the oven .
Convection saves time when using multiple racks or cooking several food items
at once .
Convection bake Reduce cooking temperature by 2 5 ° F ( 13 - 14 ° C ) from the recipe unless the
recipe is written for convection baking.
Preheat the oven for best results .
13
CHECKING THE INSTALLATION SITE
Clearance and dimensions
To install the range, refer to the following gure:
For installation in CANADA - A freestanding range is not to be installed closer than 12 mm from any
adjacent surface.
Minimum dimensions
IMPORTANT
To eliminate the risk of burns or re caused by reaching over heated surface units, cabinet storage
space located above the surface units should be avoided. If cabinet storage is to be provided, the
risk can be reduced by installing a range hood that projects horizontally a minimum of 5” beyond the
bottom of the cabinets.
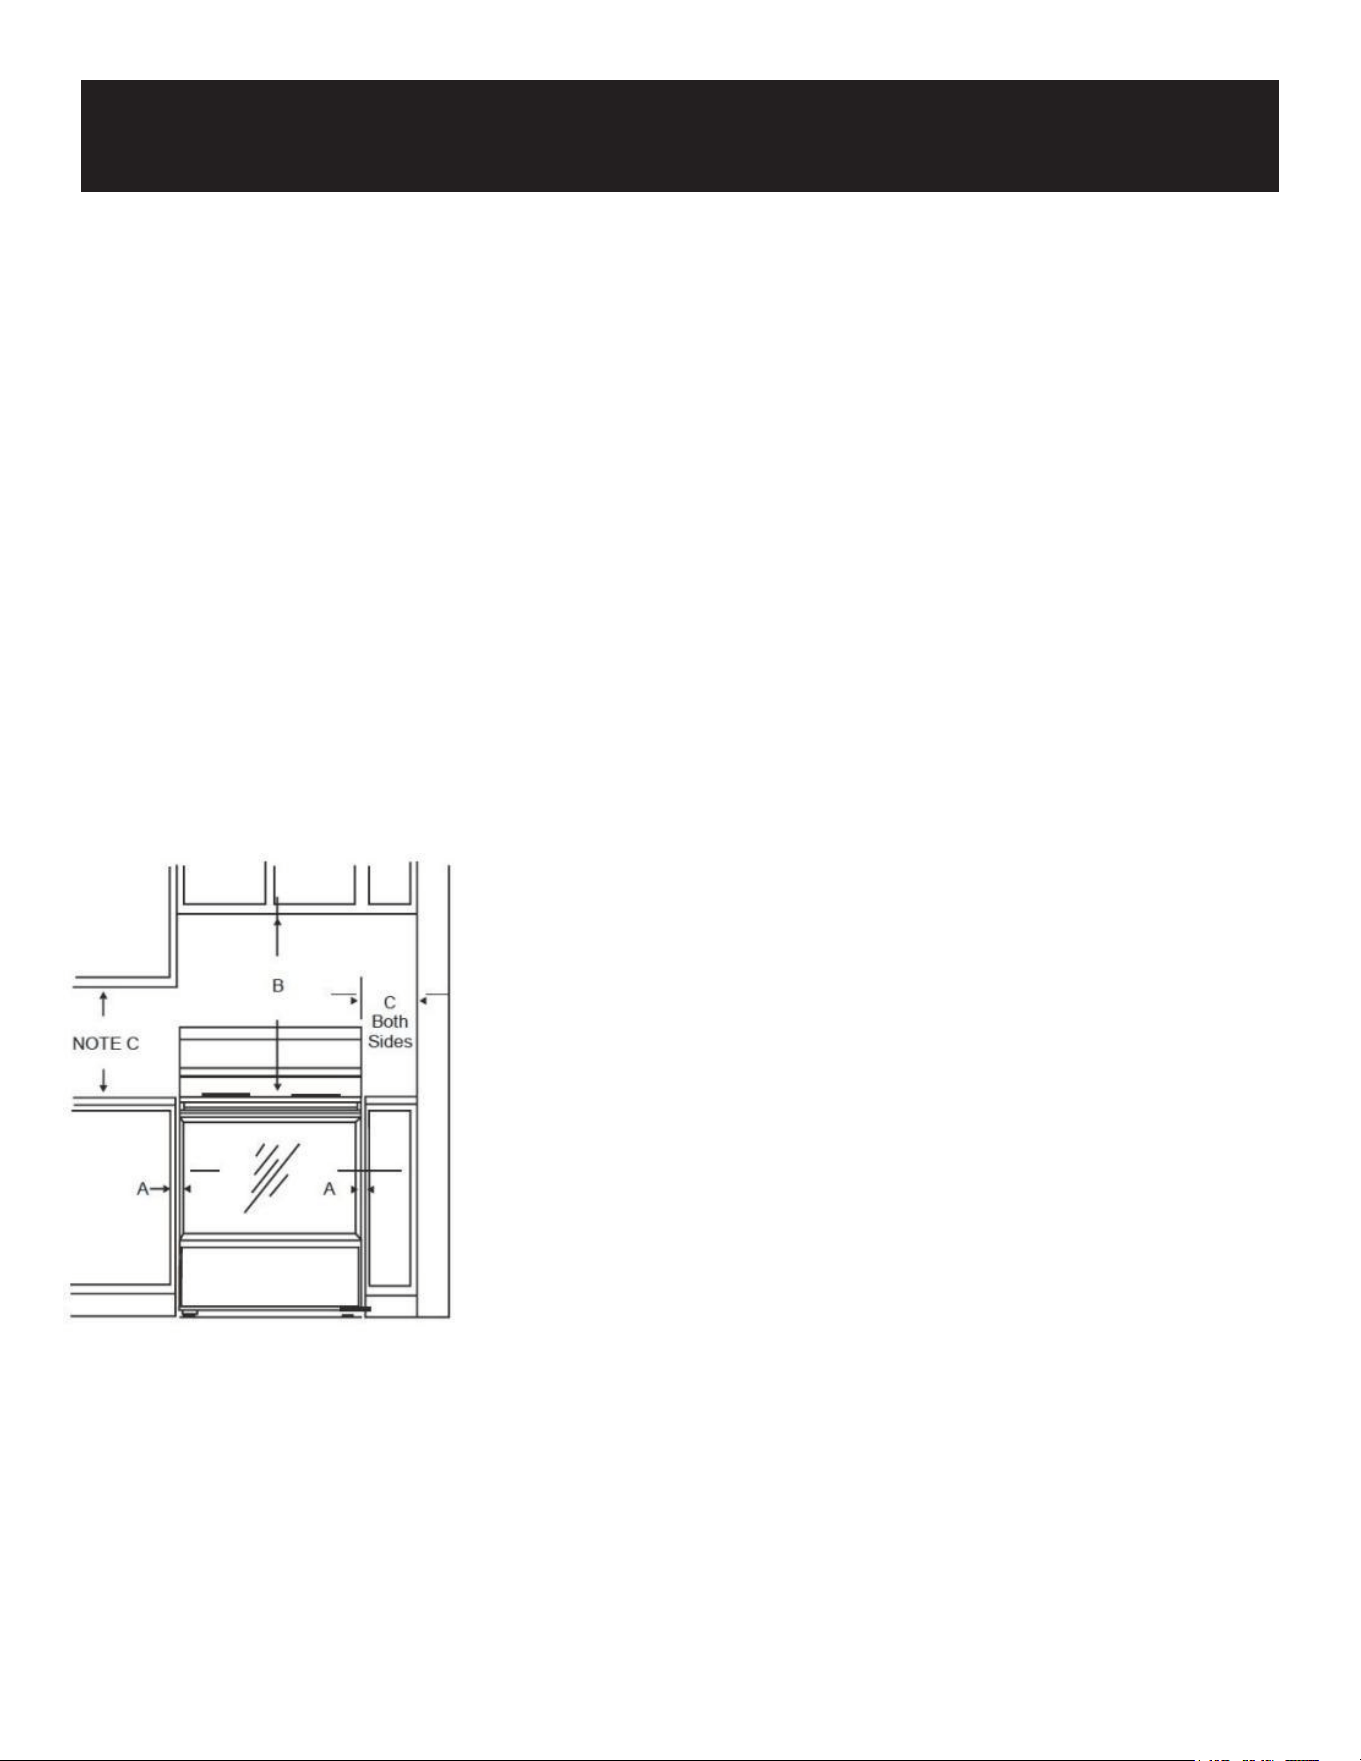
MINIMUM DIMENSIONS BETWEEN COOKTOP, WALLS AND ABOVE
THE COOKTOP:
A: Make sure the wall covering, countertop, ooring, and cabinets
around the range can withstand the heat (up to 200°F) generated by
the range.
B: Allow 30" minimum clearance between surface units and the
bottom of unprotected wood or metal cabinet, or allow a 24" mini-
mum when the bottom of wood or metal cabinet is protected by no
less than 1/4" thick ame retardant mill board covered with not less
than No 28MSG sheet metal, (.015"), .015" thick stainless steel, .024"
aluminum or .020" copper.
C: This appliance has been approved for 0" spacing to adjacent
surfaces above the cooktop. However, a 6" minimum spacing to sur-
faces less than 15" above the cooktop and adjacent cabinet is recommended to reduce exposure to
steam, grease splatter and heat.
To reduce the risk of burns or re when reaching over hot surface elements, cabinet storage space
above the cooktop should be avoided. If cabinet storage space is to be provided above the cooktop,
the risk can be reduced by installing a range hood that projects at least 5" beyond the front of the cab-
inets. Cabinets installed above the cooktop must be no deeper than 16".
D: Allow 30"/36" (depending on your range width) minimum clearance between right and left cabinets.
Installation
14
STEP 1: MEETING ELECTRICAL CONNECTION REQUIREMENTS
CAUTION:
For personal safety, do not use an extension cord with this appliance. Remove the house fuse or open the circuit
breaker before beginning installation.
This appliance must be supplied with the proper voltage and frequency, and connected to an individual, properly
grounded branch circuit, protected by a circuit breaker or fuse with the amperage specied on the rating plate. The
rating plate is located on the right side of the oven door.
We recommend that you have a qualied electrician handle the electrical wiring and hookup of your range. After instal-
lation, ask the electrician to show you where your main range disconnect is located.
Check with your local utilities for electrical codes applicable in your area. Failure to wire your oven according to gov-
erning codes could result in a hazardous condition. If there are no local codes, your range must be wired and fused in
accordance with the requirements of the National Electrical Code, ANSI/NFPA No. 70—Latest Edition.
Effective January 1, 1996, the National Electrical Code requires that new construction (not existing) utilize a 4-conduc-
tor connection to an electric range. When installing an electric range in new construction, follow the steps for a 4-wire
connection.
You must use a 3-wire or 4-wire, single-phase A.C. 208Y/120 Volt or 240/120 Volt, 60 Hertz electrical system. If the
electrical service provided does not meet these specications, have a licensed electrician install an approved outlet.
Use only a 3-conductor or a 4-conductor UL-listed range cord. These cords may be provided with ring terminals on wire
and a strain relief device.
A range cord rated at 40 amps with a minimum voltage range of 125/250 volts is required. A 50 amp range cord is
not recommended but if used, it should be marked for use with a nominal 1 3/8" diameter connection opening. Care
should be taken to center the cable and strain relief within the knock-out hole to prevent damage to the cable.
NOTE: This appliance is manufactured to be installed with a 4-wire cord set.
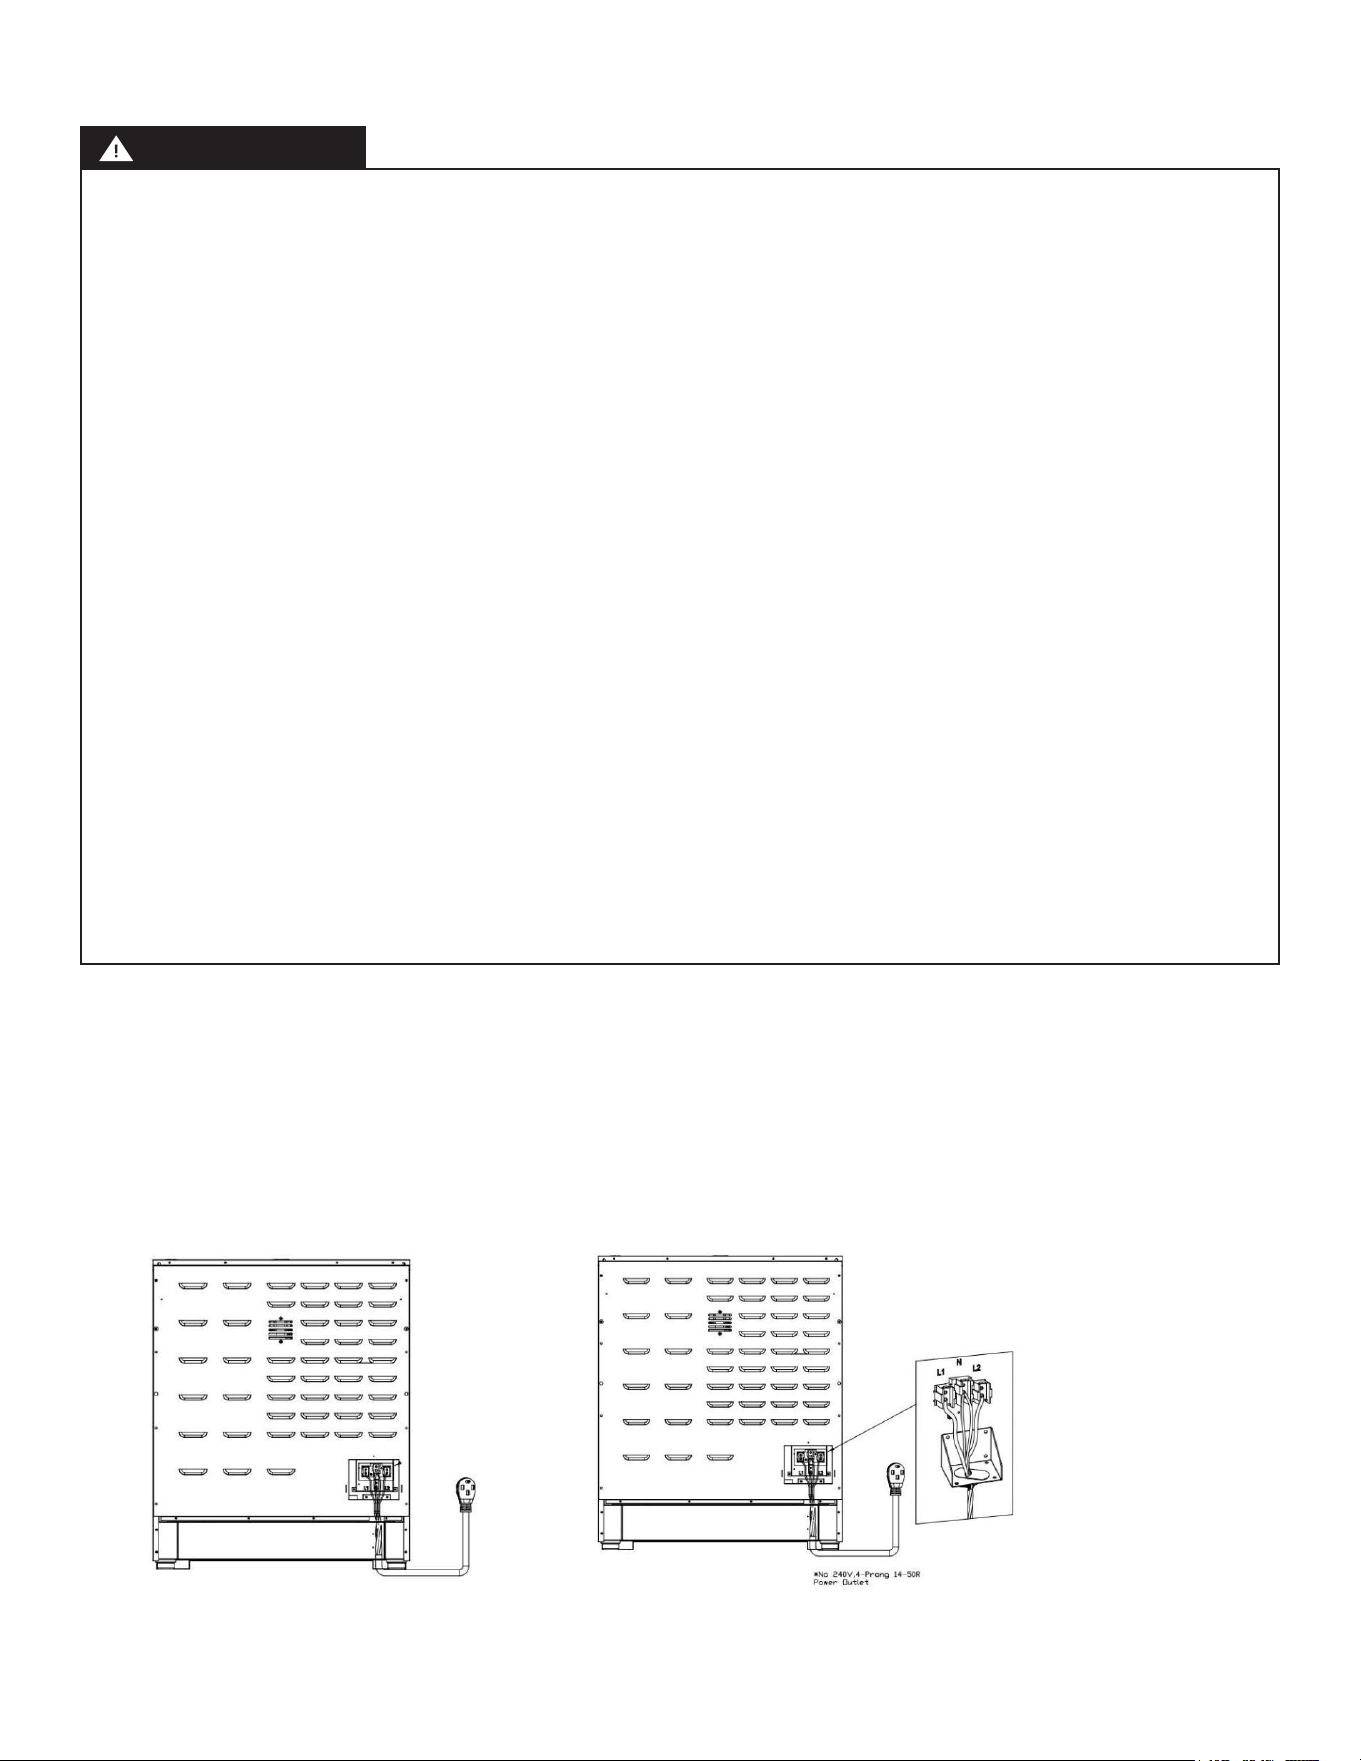
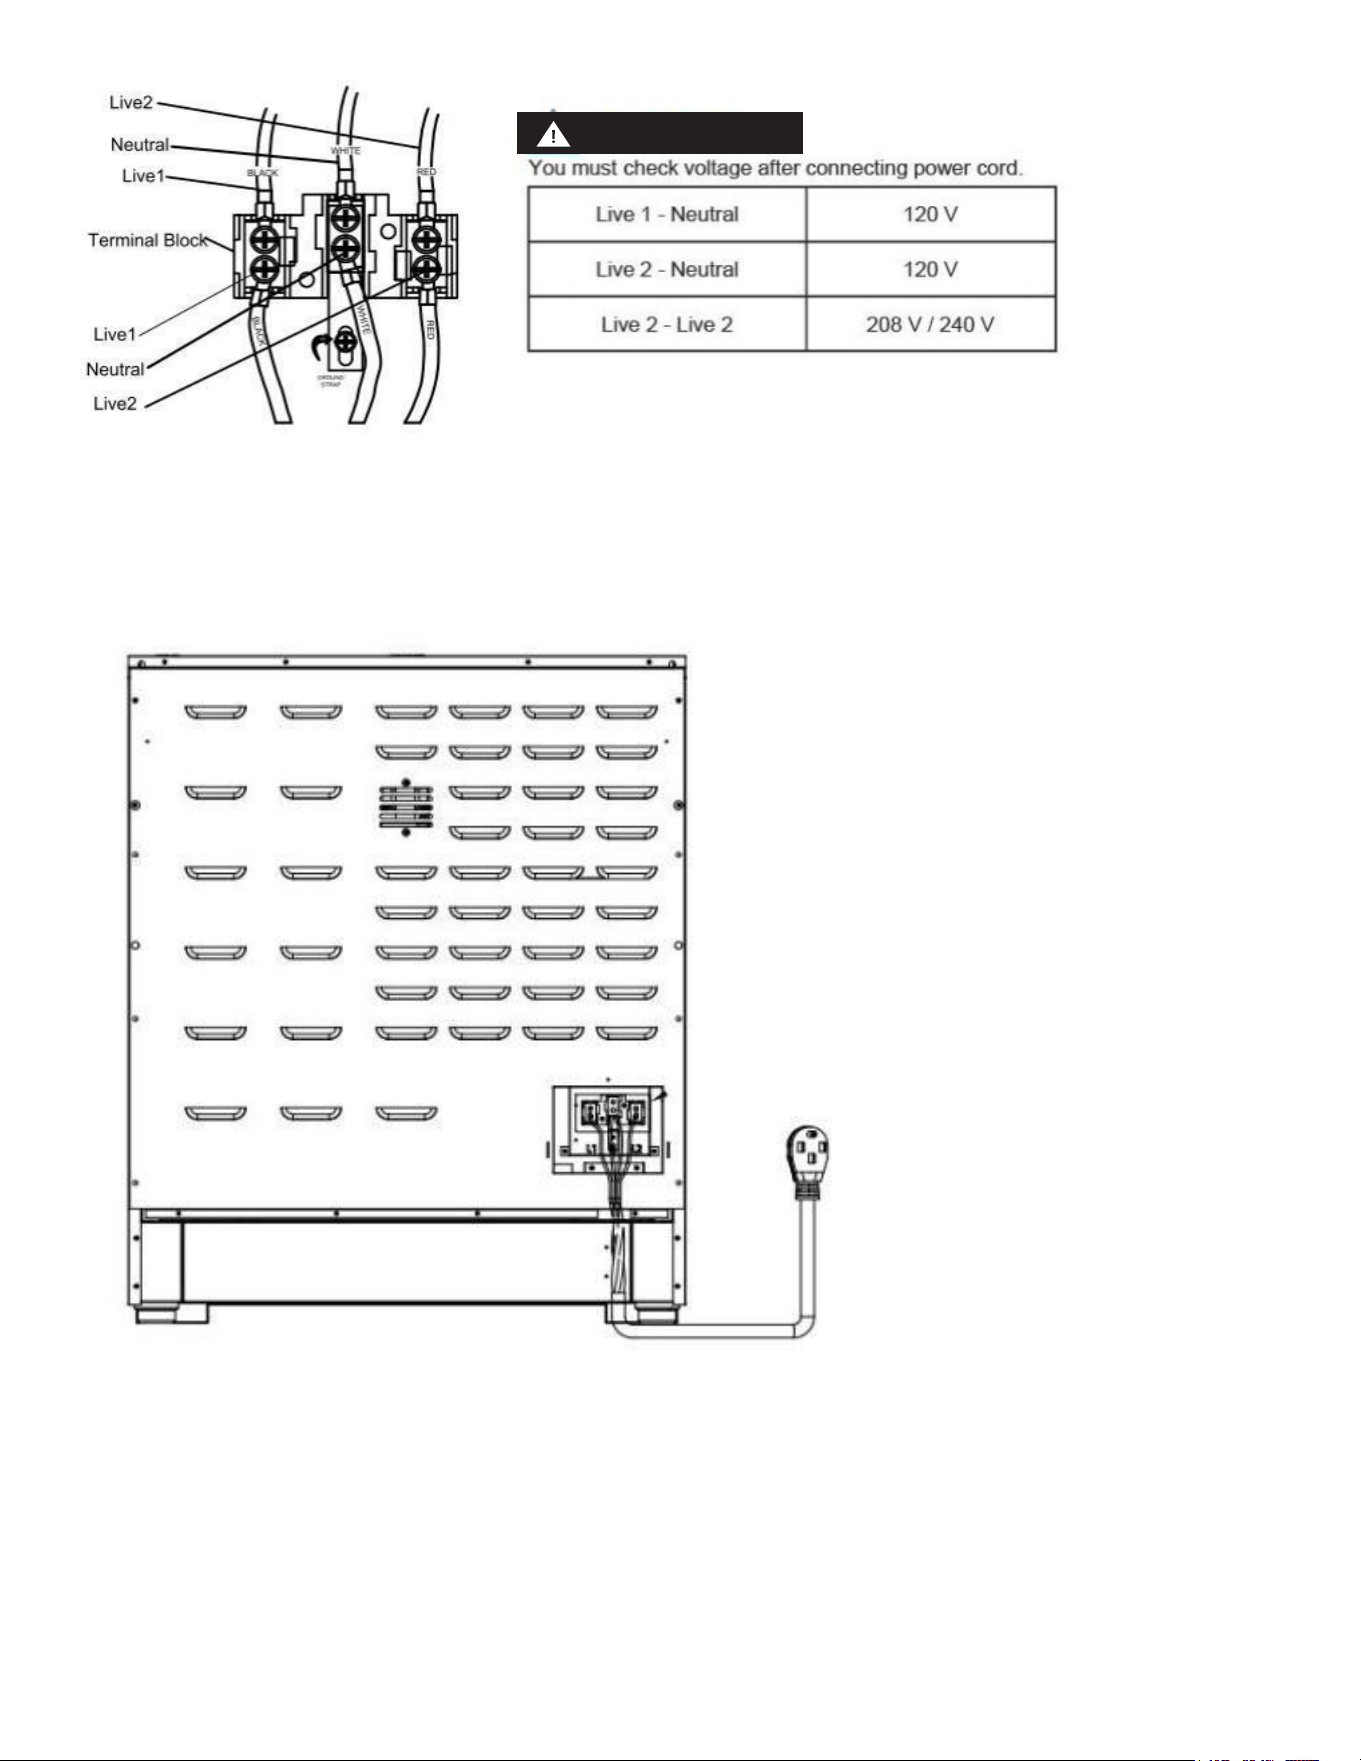
STEP 2: POWER CORD
1. Remove the rear terminal block cover and loosen the 6 screws with a screwdriver. The terminal
block will then be accessible. Do not discard these screws.
2. For power cord installations only, hook the strain relief over the power cord hole located below the
rear of the drawer body.
Insert the power cord through the strain relief and tighten the device
• You must install the power cord with a strain relief.
• Attach the strain relief to the opening in conduit connection plate.
CAUTION!
15
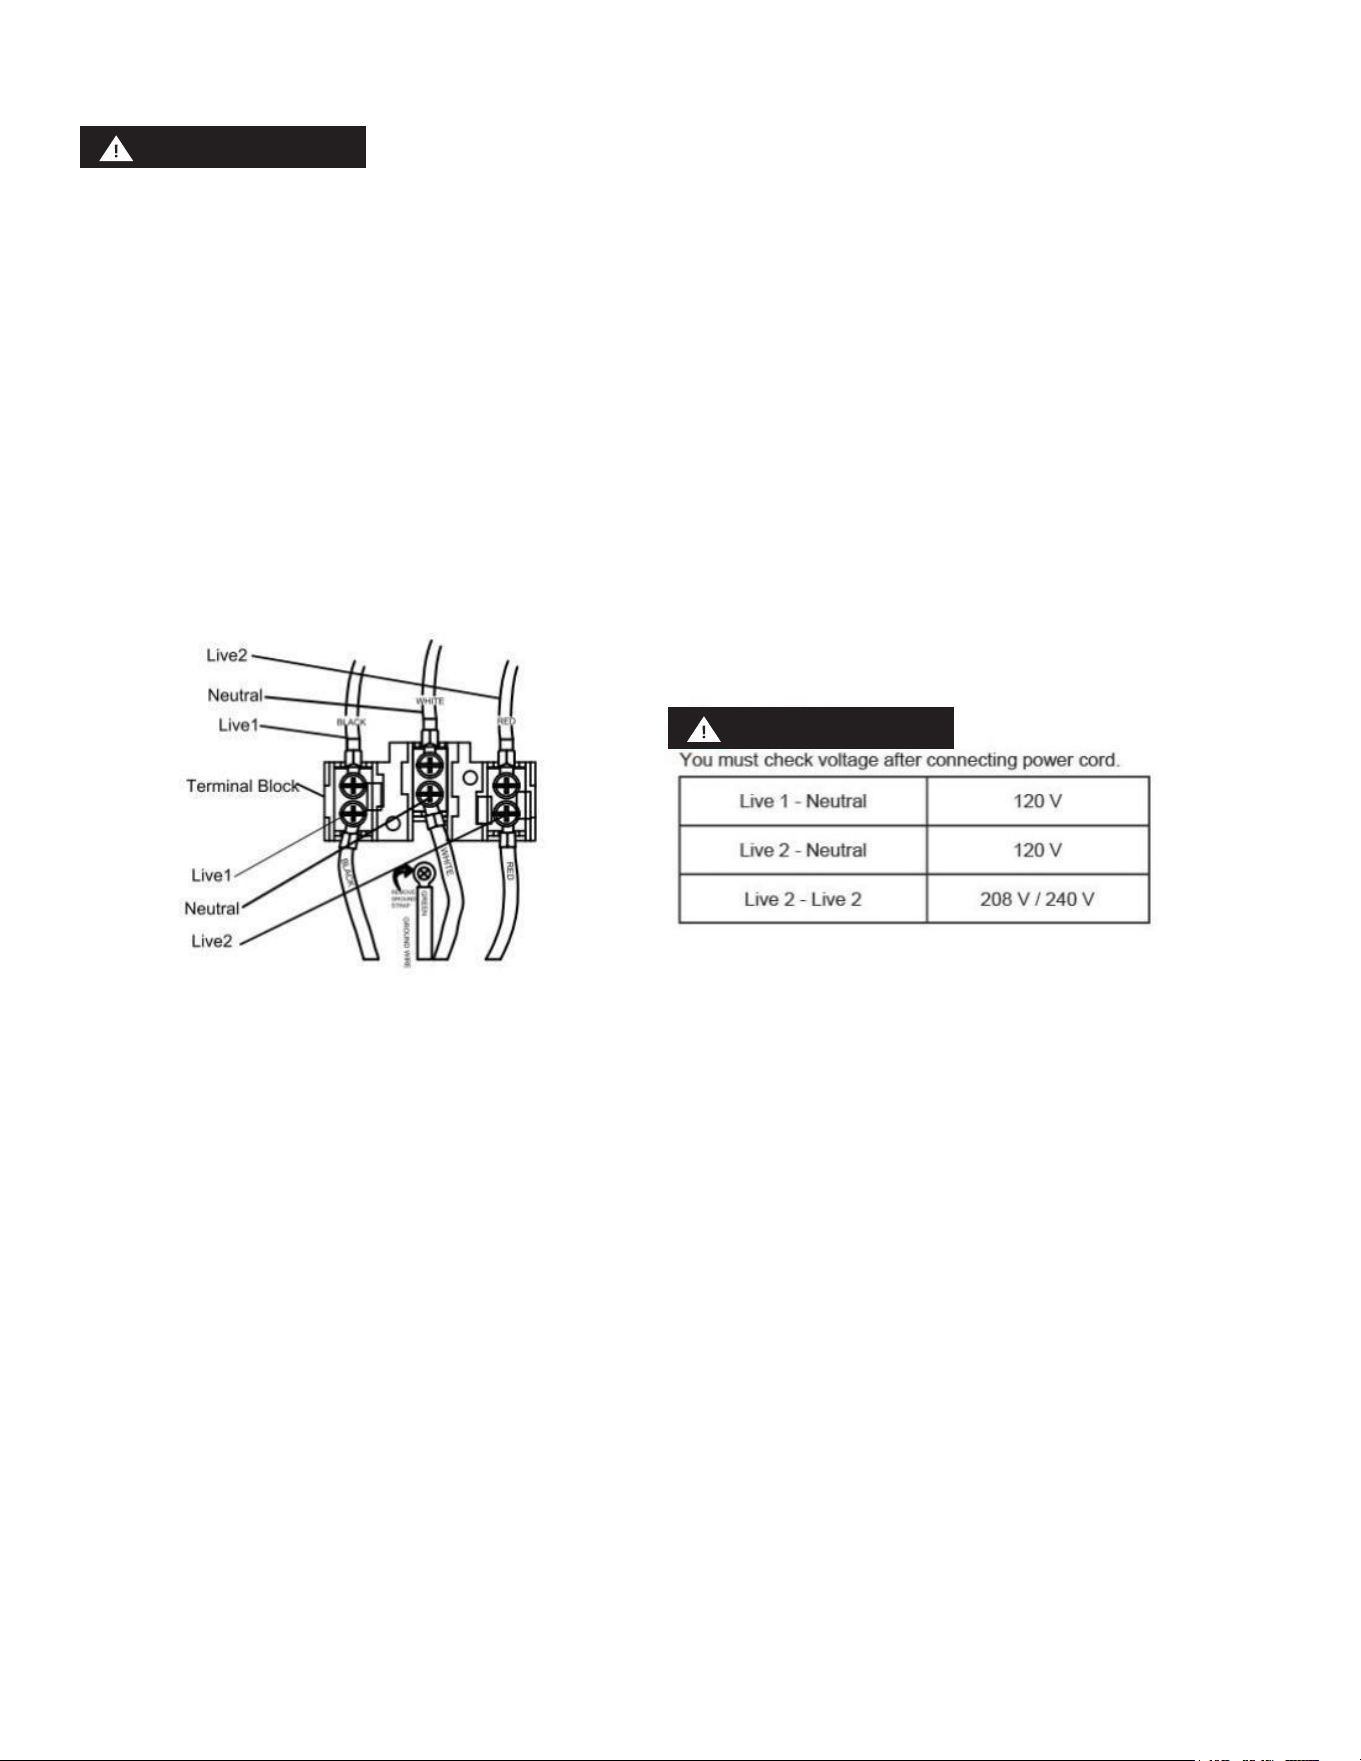
STEP 3: 4-WIRE POWER CORD INSTALLATION
WARNING:
Electrical Shock Hazard
Electrical supply required on this appliance must be permanently grounded.
Do not connect to the circuit breaker or fuse box before making the ground connection.
This appliance must be connected to a grounded, metallic, permanent wiring system. A ground wire
must be connected to the appliance's ground connector in the terminal block. Failure to do so may
result in a re, electrical shock, or personal injury. See below for more information on proper ground-
ing methods.
1. Remove the 4 lower terminal screws from the terminal block.
2. Insert the terminal screws through each power cord terminal and into the lower terminals of the
terminal block, ensuring that screws and terminals are color-coded.
3. Tighten screws securely into the terminal block.
STEP 4: 3-Wire Power Cord
WARNING
Electrical ground is required on this appliance.
Do not connect to the electrical supply until the appliance is permanently grounded.
Disconnect power to the circuit breaker or fuse box before making the electrical connection.
This appliance must be connected to a grounded, metallic, permanent wiring system, or a grounding
connector should be connected to the grounding terminal or wire lead on the appliance. Failure to do
any of the above could result in re, personal injury, or electrical shock. See below for more informa-
tion on electrical grounding.
A. Remove the 4 lower terminal screws from the terminal block.
B. Insert the green ground terminals together with the white one.
C. Insert the 3 terminal screws through each power cord terminal and into the lower terminals of the
terminal block. Be certain that the wires and terminals match by color.
D. Tighten screws securely into the terminal block.
WARNING
CAUTION!
16
STEP 5. REPLACING THE TERMINAL BLOCK COVER
Replace the terminal block cover on the range back and tighten the screw.
CAUTION!
17
How Does Induction Work?
Most cooking uses radiant heat that must pass through the cookware to get food hot. Induction is a
process that induces heat with an energy reaction. When each cooking zone is turned on, power goes
to a coil under the cooktop. The powered coil creates an electromagnetic eld. The electromagnetic
eld reacts with compatible materials in cookware, creating heat in the cookware itself. The power
level controls the heating level, delivering precise results.
Induction Benets
Cleaner Cooking: Because induction works by heating the cookware and not the cooktop, spills don’t
cook or stick to the surface.
Cooler Cooktop: An induction cooktop will be cooler when you remove cookware compared to a con-
ventional cooktop. The only radiant heat produced in induction is from the cookware itself, keeping
the kitchen cooler.
Fast Heating: Cookware heats up faster than on a conventional electric cooktop. Pay close attention
to avoid scorching food when starting to cook. You may need to use a lower setting than usual.
Precise Control: The heat going into the cookware changes immediately when you adjust the setting
of the cooking zone.
Even Heating: Cookware typically heats more evenly on an induction cooktop, reducing hot or cool
spots.
Energy Eciency: Because induction creates heat directly in the pan, it uses less electricity than a
conventional cooktop.
Before Using Your Cooktop
Before using your cooktop for the rst time, apply a ceramic cooktop cleaning cream (available in
most hardware, grocery, and department stores) to the ceramic surface. Clean and buff with a clean
paper towel. Cooktop cleaning creams leave a protective nish on the glass, making cleaning easier
when the cooktop is soiled from cooking and helping to prevent scratches and abrasions.
Although induction cooking zones do not produce heat, they can become hot from contact with hot
cookware. Burns may occur if a cooking zone or the surrounding area is touched before it has cooled
to a safe temperature.
Sounds
The magnetic eld over the induction cooking zone may cause cookware to vibrate, creating a buzz-
ing or humming noise. These sounds are not unusual, especially at high settings.
• Cookware that is not perfectly at on the bottom may vibrate slightly against the cooktop.
• A loose handle may vibrate in its socket.
• Multi-material cookware may allow small vibrations in its structure.
Figure 1: Induction Sounds
Operation
WARNING
18
Sounds are less likely to occur with heavier, higher-quality cookware.
An induction cooktop may also produce faint clicking sounds from the electronic switches that main-
tain the desired cooking temperature. You may also hear a fan that cools the electronics inside the
cooktop.
NOTE Be sure to read detailed instructions for induction cooktop cleaning in the “Care and Cleaning”
section and the “Before You Call” checklist section of this Use and Care Manual.
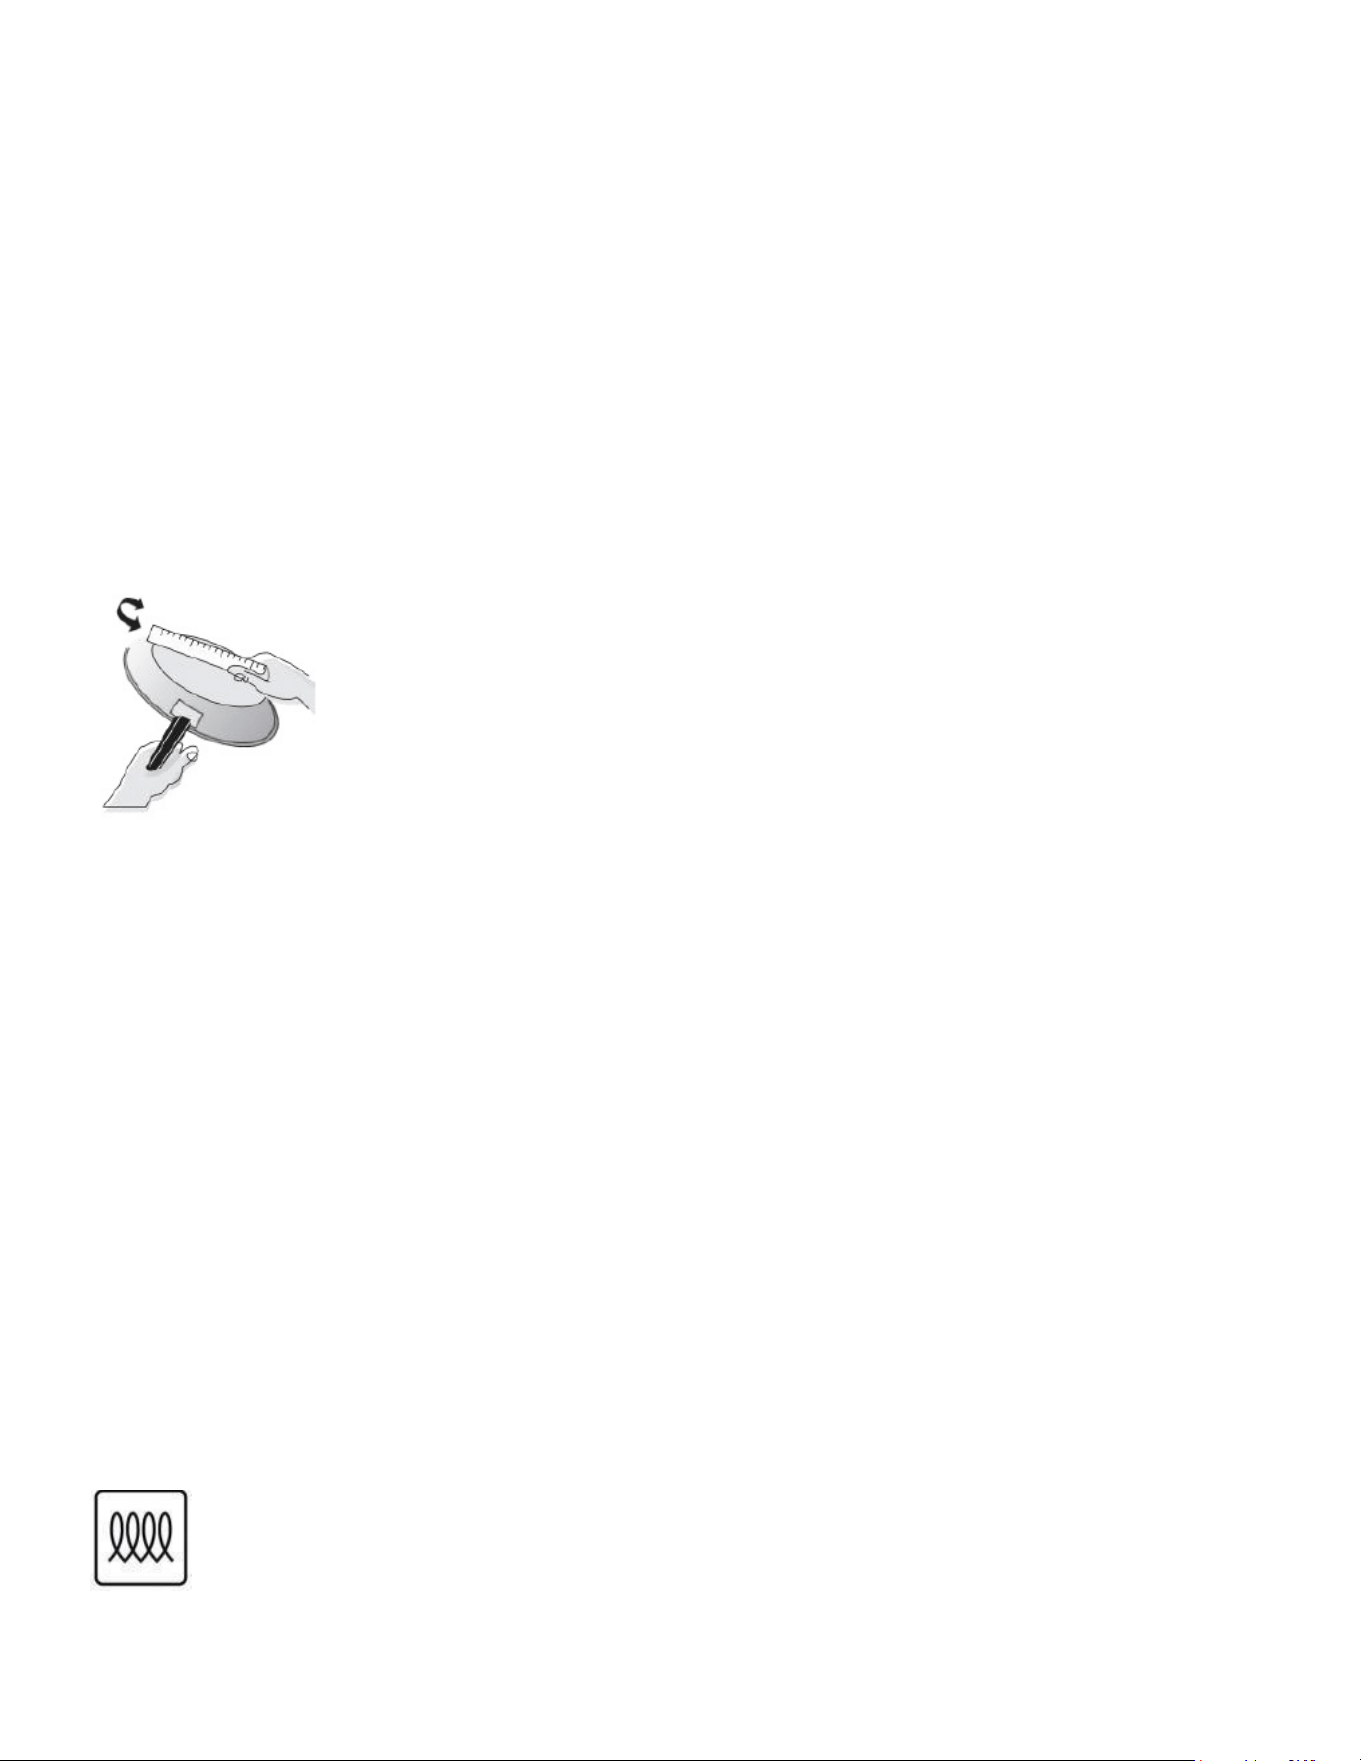
Using Proper Cookware
The size and type of cookware used will inuence the heat setting needed for the best cooking re-
sults. Be sure to follow the recommendations for using proper cookware as illustrated in Figure 2.
Check for atness by rotating a ruler across the bottom of the cookware (see Figure 2).
Cookware should have at bottoms that make good contact with the entire surface of the heating
element (see Figure 3).
Figure 2: Testing Cookware
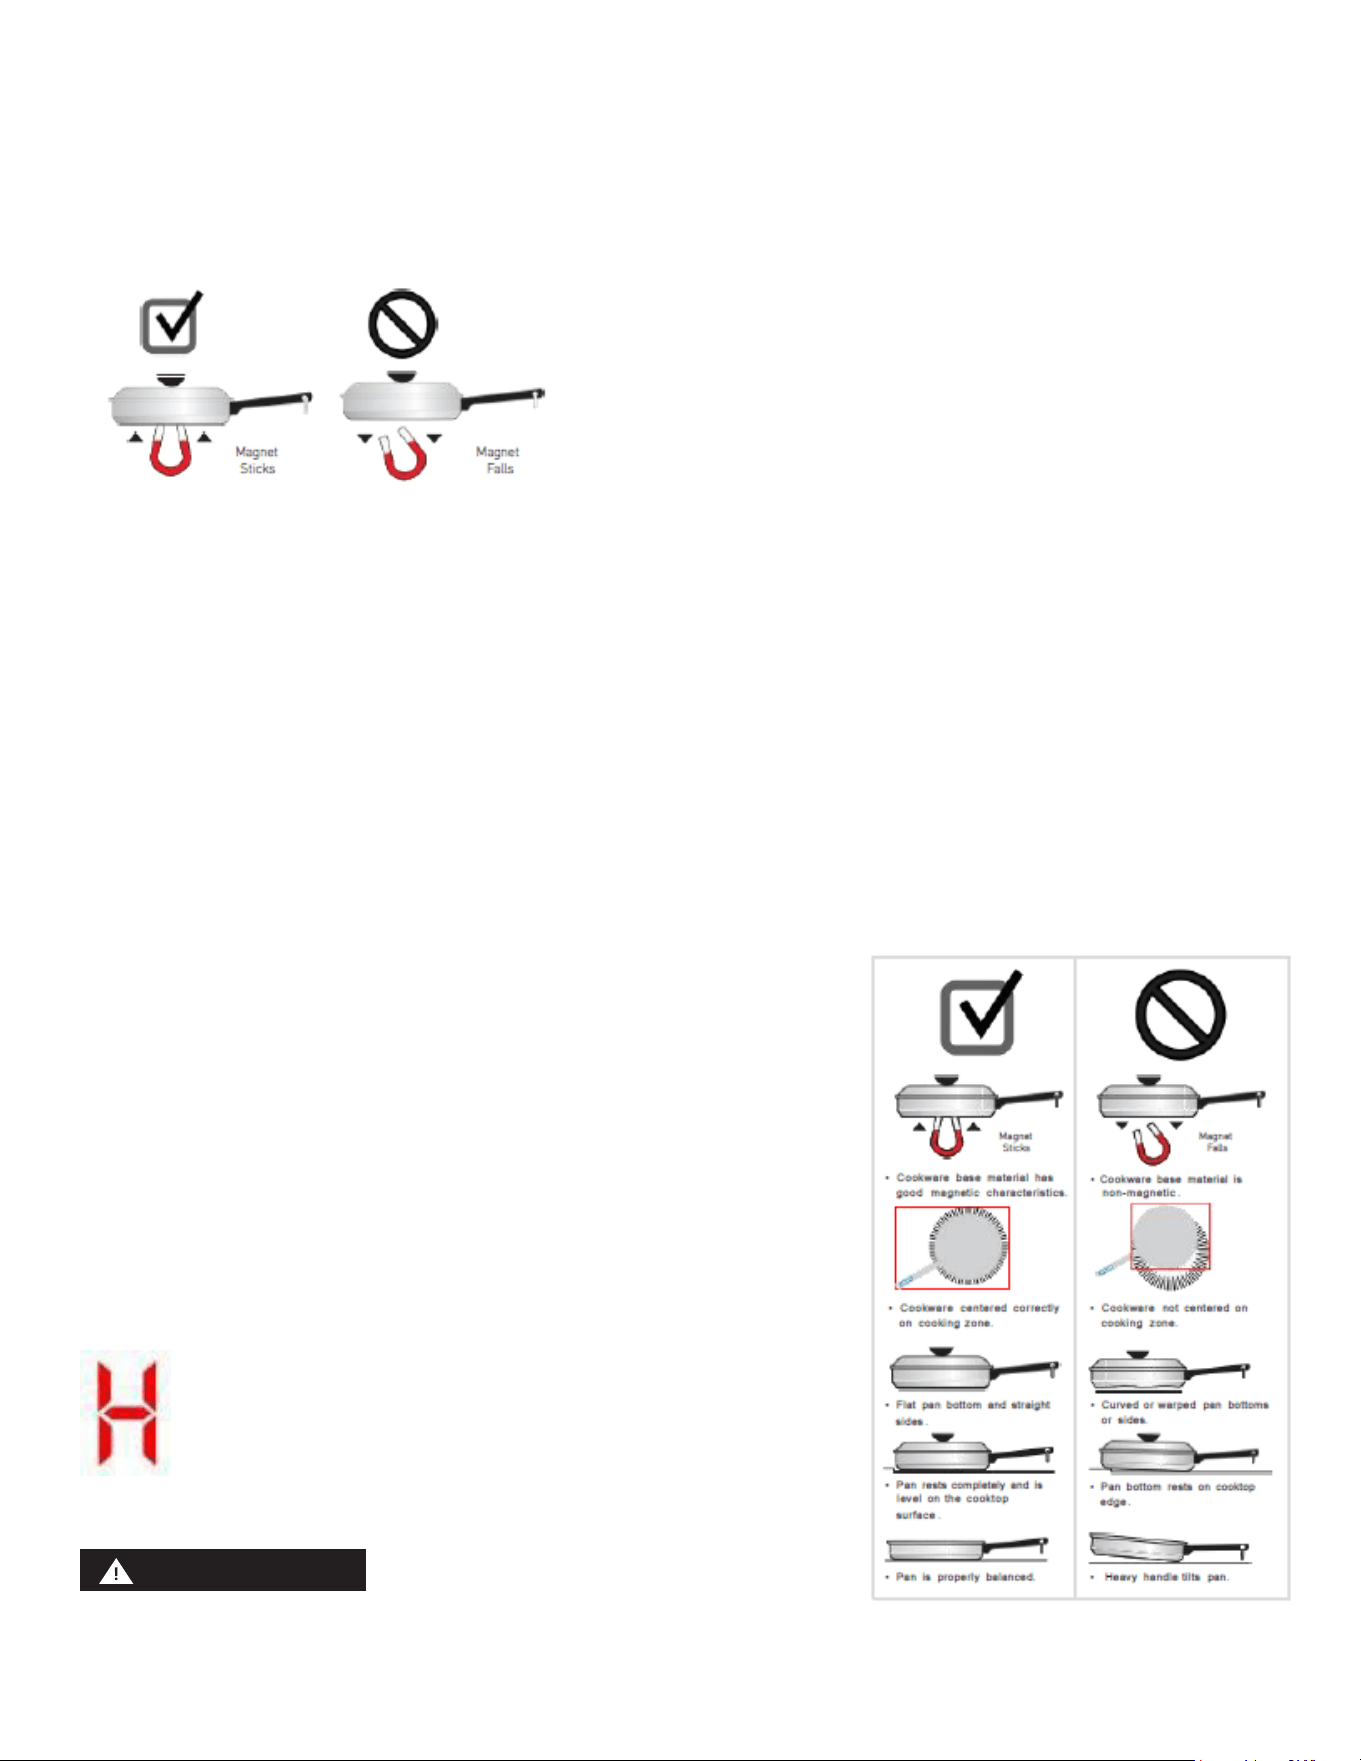
Cookware Material Types
Cookware material is especially important when using an induction cooktop. The cookware must con-
tain magnetic iron or steel to work on an induction cooktop. Common materials for induction cook-
ware include the following:
• Stainless Steel: Slow heat conductor.
Durable, easy to clean, and resists staining.
Some types of stainless steel will not work on an induction cooktop. Use the magnet test (see
Figure 4: Magnet Test) to check stainless steel cookware.
• Cast Iron: A slow heat conductor that retains heat very well. Cooks evenly once the cooking tem-
perature is reached.
• Porcelain-Enamel on Metal: Heating characteristics will vary depending on the base material.
Porcelain-enamel on compatible metal will work on an induction cooktop. Use the magnet test to
check porcelain-enamel cookware.
To determine if a piece of cookware will work on your induction cooktop, try to stick a magnet to it.
If the magnet clings rmly to the bottom of the cookware, it is compatible with induction cooking.
Cookware sold as induction-ready often has a symbol printed on the bottom by the manufacturer.
Induction Symbol
19
The Magnet Test
To check if a piece of cookware works on your induction cooktop:
Stick a magnet to the cookware (refer to Figure 4: Magnet Test).
If the magnet clings rmly to the bottom of the cookware, it will work.
If the magnet clings weakly or not at all, the cookware is not compatible with induction cooking.
Magnet Test
CAUTION
Proper cookware on an operating induction cooking zone will heat up very quickly. If an empty piece
of cookware is left on an operating zone, the rapid change in temperature may warp or damage the
cookware.
Pan Sensing
When the cooktop is on, the cooking zones automatically detect when cookware is placed on a zone.
The control for that zone will light up, making it easy to identify the correct section of the control to
use.
Error Message: Displayed if the cookware is unsuitable, too small, or if no cookware has been placed
on the cooking zone.
Figure 5 shows conditions that can prevent pan detection .
If you remove a pan from an active cooking zone , the zone will
turn off after 30 seconds . If the cooktop
does not detect cookware in any zone for 30 seconds , the whole
cooktop will turn off.
Hot Surface Indicator
When a cooking zone is turned off, it may remain hot due to con-
tact with hot cookware. The Hot Surface Indicator will come on
and remain.
Figure 6: Hot Surface Indicator
Although induction cooking zones do not directly generate heat,
they can become hot from contact with hot cookware. Burns may occur if a cooking zone or the sur-
CAUTION!
20
rounding area is touched before it has cooled to a safe temperature.
Do not place ammable items such as plastic salt and pepper shakers, spoon holders, or plastic
wrapping on top of the range when it is in use. Heat radiating from cookware could cause these items
to melt or ignite. Potholders, towels, or wooden spoons could catch re if placed too close to hot
cookware.
Do not use aluminum foil to line any part of the cooktop. Improper installation of these liners may
result in the risk of electric shock or re. If these items melt on the cooktop, they will damage the
cooktop.
Home Canning
Be sure to read and observe all the following points when home canning with your appliance. Check
with the USDA (United States Department of Agriculture) website and be sure to read all the informa-
tion they have available as well as follow their recommendations for home canning procedures:
Use only a completely at-bottom canner with no ridges that radiate from the bottom center when
home canning. Heat is spread more evenly when the bottom surface is at. Use a straight-edge to
check the canner bottom.
Ensure the diameter of the canner does not exceed 1 inch beyond the surface element markings or
burner.
It is recommended to use smaller-diameter canners on electric coil and ceramic glass cooktops and
to center canners on the burner grates.
Start with hot tap water to bring water to boil more quickly.
Use the highest heat setting when rst bringing the water to a boil. Once boiling is achieved, reduce
the heat to the lowest possible setting to maintain the boil.
Use tested recipes and follow instructions carefully. Check with your local Cooperative Agricultural
Extension Service or a manufacturer of glass jars for the latest canning information.
It is best to can small amounts and light loads. Do not leave water bath or pressure canners on high
heat for an extended amount of time.
SETTING SURFACE CONTROLS
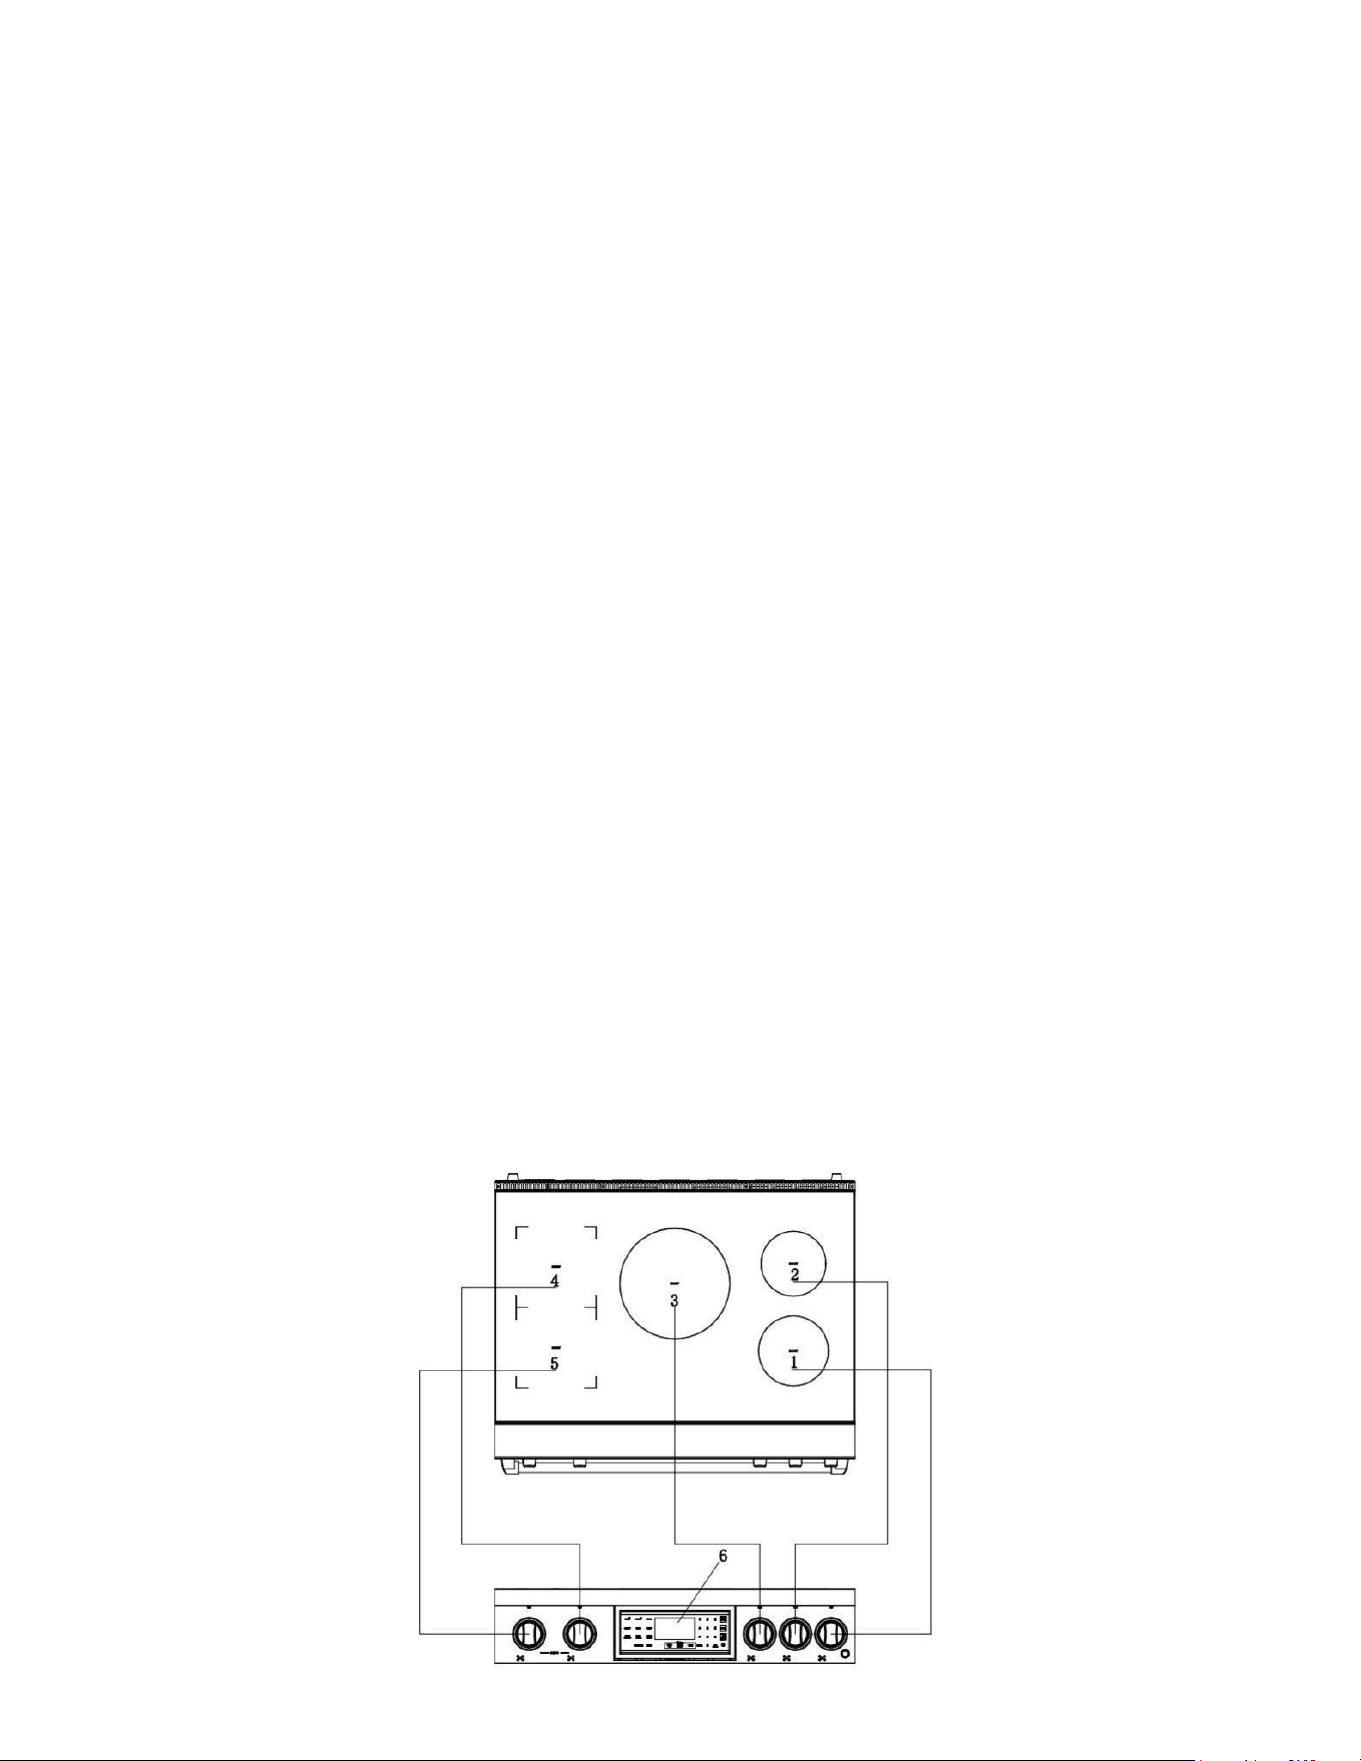
Control Panel Overview
1.Right Front Burner
2.Middle Burner
3.Left Rear Burner
4.Left Front Burner
5.Control Panel
21
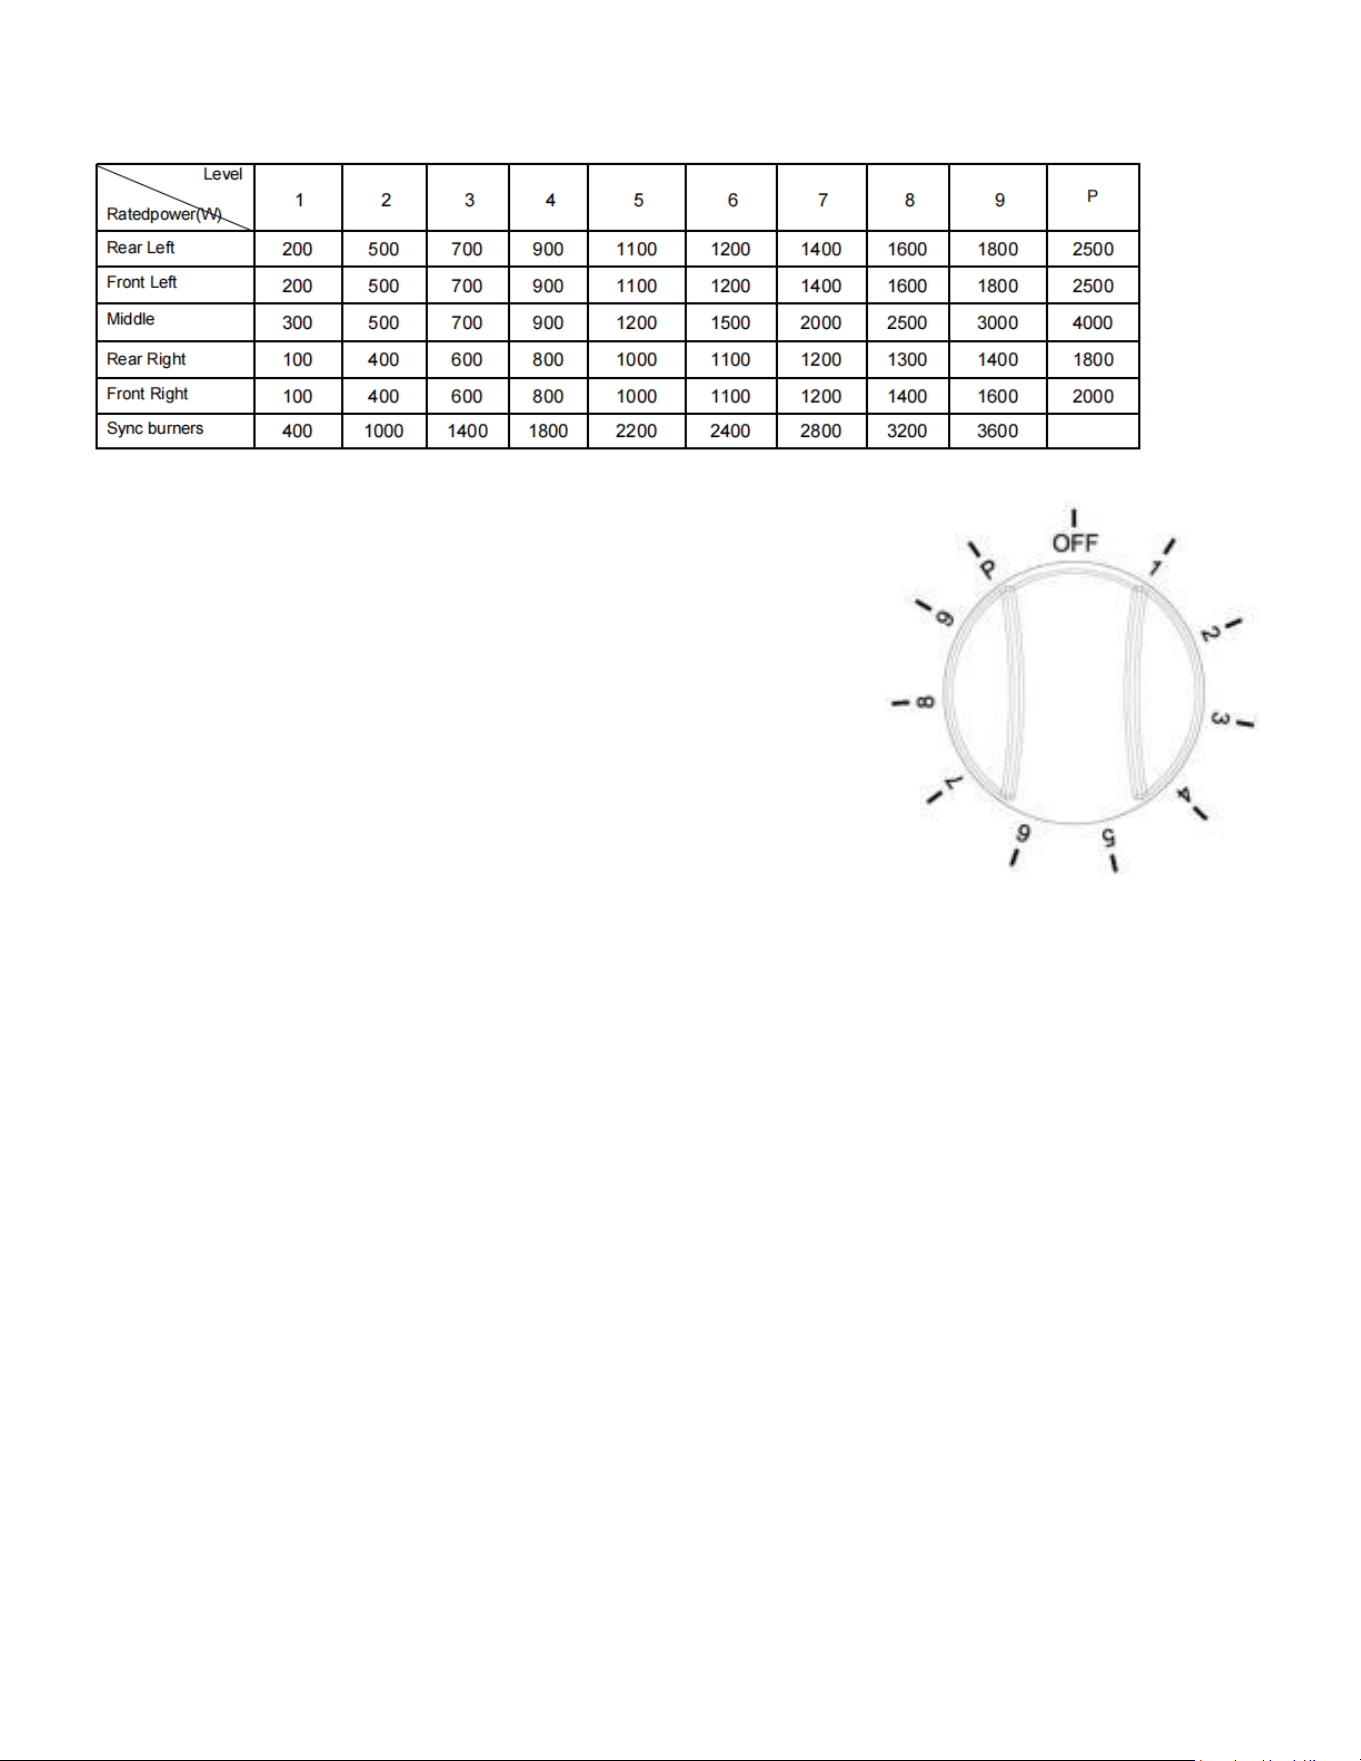
Heating Power Of Cooking Zone
USING THE RANGETOP
How to operate the control knobs:
Push the knob and turn clockwise to your desired cooking level;
there are 9 temperature levels for each element.
NOTE: When heating on level “P” (boost mode), after 5 minutes, the
output power will automatically switch to level 9.
Sync Burners
The two left cooking zones have the Bridge feature. The Bridge
indicator is available on the front-left cooking zone if both left cook-
ing zones detect cookware. The Bridge function makes the two left
cooking zones work together to heat a long piece of cookware, like a griddle.
How to Use:
Activate:
Press the Sync burners key. The burners’ display will both blink and show a “0”.
Set Power Level:
Press the number keys to select the power level. For example, press the number key “9,” and the burn-
ers’ display will both show a “9”.
The cooking zone will automatically enter readiness mode if no key is pressed within 30 seconds.
Boost Function:
Press the Boost key; it will show “P” on the display, boosting the heating power to the highest level.
Boost mode is designed for quickly heating or boiling larger quantities and operates for a maximum
of 10 minutes. After 10 minutes, it will automatically revert to power level 9.
Turn Off:
Option A:
Press the desired cooking zone power key, then press the number key “0”. The cooking zone will shut
off automatically if no key is pressed within 5 seconds, and the unit will enter readiness mode.
22
Option B:
Press the Power key. It will make a “beep” sound once, and the unit will turn off, entering standby
mode.
Note: Please do not pull the power plug until the cooling fan has stopped.
Operating the Oven
Oven Cooking Safety Guidelines
Do not block the ducts on the rear of the range when cooking in the oven. It is important that the ow
of moist warm air from the oven and fresh air into the oven burner is never interrupted. Avoid touch-
ing the vent opening or nearby surfaces during oven or broiler operation because they are hot. Do not
place plastics, paper, or other items that could melt or burn near the oven vent.
Use all the oven modes with the oven door closed.
Do not use aluminum foil to cover the oven shelves or line the oor of the oven. The trapped heat can
irreversibly damage the enamel and may even cause a re.
Do not place water, ice, or any dish or tray directly on the oven oor, as this will irreversibly damage
the enamel.
Do not cover the slotted grid of the broil/roast pan with aluminum foil. This will catch grease and
could cause a re.
Do not use plastic wrap or wax paper in the oven.
For food safety reasons, do not leave food in the oven for longer than two hours before or after cook-
ing or defrosting. This is to avoid contamination by organisms that may cause food poisoning. Take
care during warmer weather.
According to the United States Department of Agriculture (USDA): DO NOT hold foods at tempera-
tures between 40°F to 140°F for more than 2 hours. Cooking raw foods below 275°F is not recom-
mended.
Never cover any slots, holes, or passages in the oven bottom or cover an entire rack with materials
such as aluminum foil. Doing so blocks airow through the oven and may cause carbon monoxide
poisoning. Aluminum foil lining may also trap heat, causing a re hazard.
WARNING!

23
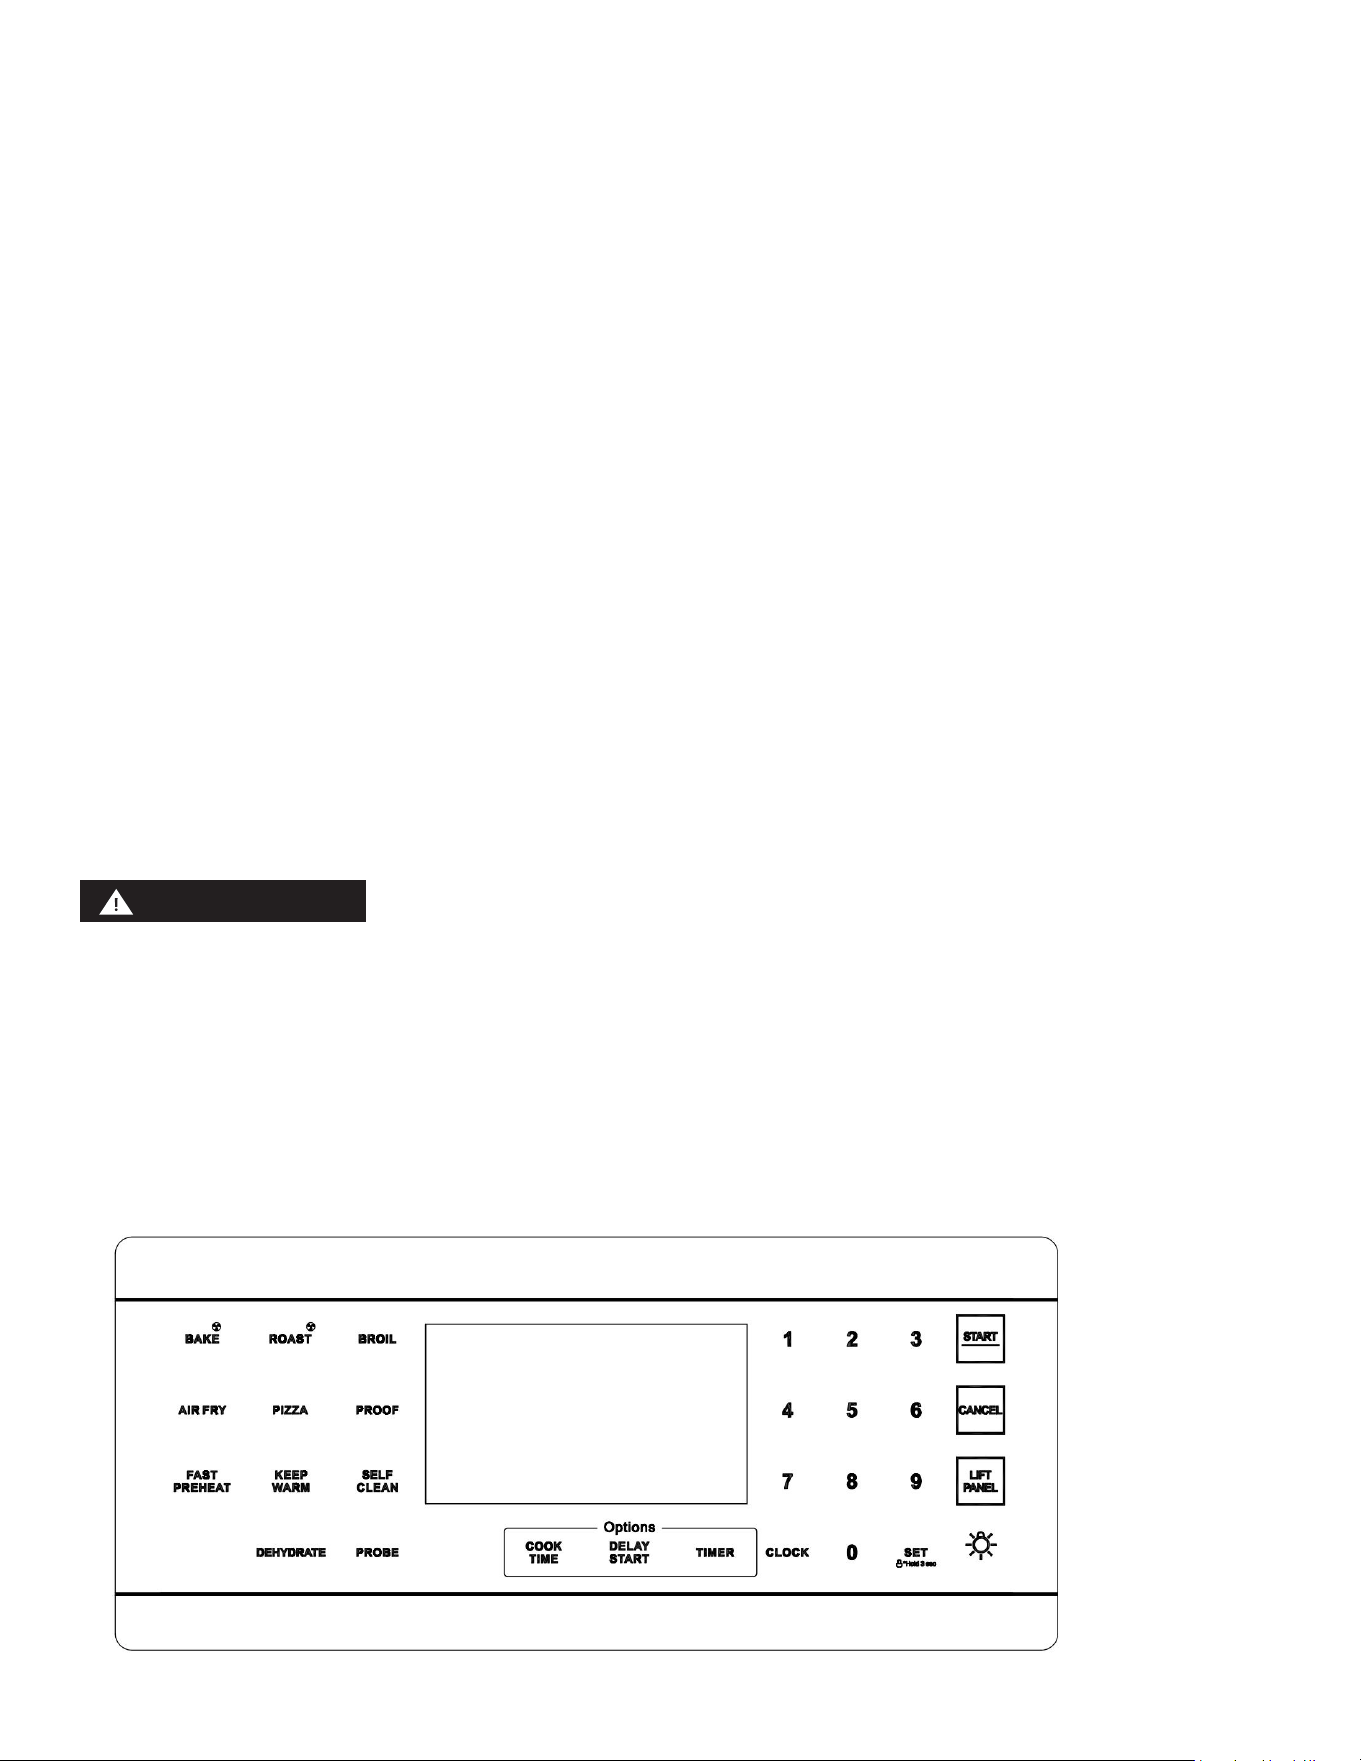
BUTTONS FUNCTIONS
BAKE Key:
This touch key is used to enter the Bake and Convection Bake settings.
In standby mode, touch it to enter the Bake function setting mode. Touch it again to enter the Convec-
tion Bake setting mode. Touching it a third time will re-enter the Bake function setting mode.
Bake:
Turns on the fan while roasting. Provides consistent heat by circulating air inside the oven during bak-
ing. Ideal for cooking large cuts of meat.
Broil:
Activates the broil function, using the top oven element only.
Select between Broil High or Broil Low modes:
Press once for High heat mode.
Press twice for Low heat mode.
Air Fry:
Turns the Air Fry mode on and off.
Pizza:
Use to select the Pizza function of the oven.
Proof:
Use to select the bread-proong function.
Fast Preheat:
Use to select the Fast Preheat function for quick heating.
Keep Warm:
Keeps the oven warm after cooking by maintaining the temperature at 150°F (65°C) for up to three
hours.
Clean:
Activates the oven's cleaning mode. Options include Steam Clean and Self-Clean.
The cleaning duration is adjustable based on pollution depth:
3 gears: 5 hours
2 gears (default): 3 hours
1 gear: 2 hours
Dehydrate:
Use to activate the dehydrate function of the oven.
Probe:
Sets the working temperature for the food probe.
Warming Zone:
Turns the 100 W warming center on the cooktop on or off.
Adjust the warming level using numeric keys (1, 2, or 3).

24
Cook Time:
Sets the cooking time.
The oven automatically shuts off when the set time elapses.
Delay Start:
Sets the oven to start and stop automatically.
Compatible with Bake, Convection Bake, Convection Roast, or Cook Time functions.
Timer:
Activates the kitchen timer for the desired duration.
Clock:
Press to set the clock and current time.
Set/Child Lock:
Locks the oven control panel to prevent accidental operation.
Press and hold for three seconds to enable or disable.
Lift Panel:
Used for lifting or lowering the oven control panel.
Cancel:
Cancels all oven operations except the clock and timer.
Start:
Starts oven cooking, cleaning, or timing functions.
Oven Light:
Turns the oven light on or off.
Numbers:
Use to set times, temperatures, and preset oven functions.
Oven Operation
Preheat the oven to the temperature stated in the recipe. Depending on the temperature and the size
of the oven, preheating will vary. For better cooking performance and exact oven cavity temperature,
preheating time will be 10 mins per 100 Degrees.
Arrange pans and food items evenly on the shelves. Make sure pans do not touch each other or the
sides of the oven. When baking a single item, always center the item on the oven shelf. If baking 2 or
multiple shelves, make sure you stagger items so the shelves so that one is not directly above anoth-
er.
When baking using convection, either reduce the temperature stated in the recipe and leave the bak-
ing time unchanged or reduce the baking time by several minutes and leave the temperature un-
changed. For foods with a baking time of over an hour, reducing both the temperature and time slight-
ly may give the best results.

25
Dark metal baking pans or those with a dull nish absorb heat faster than shiny pans, and are excel-
lent for pies and breads, or anything that needs browning or a crisper crust.
A shiny nish may work best for foods that require light, delicate browning e.g. cakes and cookies, as
it reects some heat and gives a less intense baking surface.
Avoid opening the oven door frequently during baking.
* For best results use the broiler pan. The pan is used to catch grease spills and has a cover to pre-
vent grease splatter.
* The convection fan circulates heated air over and around the food being roasted, sealing juices
quickly for a moist and tender product while, at the same time, creating a rich golden-brown exterior.
* Use the broiler pan and slotted grid supplied with the range when roasting to elevate the meat on a
metal roasting rack. This allows hot air to circulate around the meat, browning it more evenly like a
rotisserie. (A suitable roasting rack can be purchased through your HRG distributor or by calling cus-
tomer care.)
* When roasting larger items like a whole turkey, use only the pan and grid for greater stability.
Convection defrost
With temperature control off, a motorized fan in the rear of the oven circulates air. The fan accelerates
natural defrosting of the food without heat. To avoid illness and food waste, do not allow defrost food
to remain in the oven for more than two hours without being cooked.
Defrosting
To thaw uncooked frozen food, set the oven temperature to 100-150°F; once thawed, cook the food
immediately and do not re freeze. To prevent liquid from thawing food dripping on the oven oor, be
sure any uncooked food is tightly wrapped in foil and/or placed in a heat proof container.
Convection Dehydration
With the temperature control on 175°F, warm air is radiated from the bake burners on the bottom of
the oven cavity and is circulated by a motorized fan in the rear of the oven. The food dries by evapora-
tion. Drying foods inhibits microbial growth and retains certain enzymes.
Broiler operation
Door must be closed during broiler operation. Broiling is a method of cooking tender cuts of meat
directly under the infrared broiler in the oven. Broiling in the oven is accomplished with the oven door
closed. It is normal and necessary for some smoke to be present to give the food a broiled avor.
If you open the oven door to check the food, have it open for as short a time as possible. This is to
prevent the control panel from overheating and prevents melted knobs. Use both the broil/roast pan
and slotted grid supplied. The grid helps to reduce smoking and spatter by letting grease drip into the
bottom of the pan, away from intense heat. To prevent food sticking, spray the grid with a light coat-
ing of non-stick cooking spray.
Preheating
CAUTION!

26
Preheating is suggested when searing rare steaks (Remove the broiler pan before preheating with the
infrared broiler. Foods will stick to hot metal. To preheat, turn the oven selector knob to the Broil posi-
tion, wait for the burner to become hot, approximately 2 minutes - preheating is not necessary when
broiling meat well-done).
To Broil
Broil one side until the food is browned; turn and cook on the second side, season and serve. Always
pull the rack out to the stop position before turning or removing food.
Setting Broil
The Broil selector knob controls the Broil feature; heat radiates downward from the oven broiler for
even coverage. The Broil feature temperature is 500°F (260°C).
Use the broil pan and insert (not supplied). The broil pan should be kept away from the oven walls,
bottom, and door. The insert should not be covered with foil, this traps grease and may cause a re.
To broil:
1. Place the broiler pan insert on the broiler pan. Place the food on the broiler pan insert.
2. Arrange the interior oven rack and place the broiler pan on the rack. Be sure to center the broiler
pan and position it directly under the broil burner. If preheating, preheat the broil burner rst, then po-
sition the broiler pan after the broil burner is preheated.
3. Turn the oven selector to Broil.
The oven indicator light will remain on until the selector knob is turned to the off position or the tem-
perature control cycles off.
Broiling guidelines
Choose a suitable shelf position. To ensure that meat is cooked through rather than just browned on
the outside, broil thick pieces of meat and poultry on shelf positions 2 or 3. Use shelf position 4 for
thinner foods that need less cooking time like steaks, chops, or hamburgers. Because most meats are
broiled in the top position, the heat from the broiler can cause the top of the broiler to brown. Do not
use heatproof glass or earthenware, as these do not withstand the intense heat of the broiler. Center
the food in the oven, so it is directly under the broiler.
Temp adjust
The temperature in the oven has been calibrated at the factory. When rst using the oven, be sure to
follow recipe times and temperatures. If you think the oven is too hot or too cool, you can correct the
temperature in the oven.
Before correcting, test a recipe by using a temperature setting that is higher or lower than the recom-
mended temperature. The baking results should help you decide how much of an adjustment is need-
ed.
The oven temperature can be adjusted ±35°F (±19°C).
How to correct the oven temperature
* In the standby state, touch the “Set” key and the number “5” key for three seconds at the same time,
the temperature calibration will be set.
NOTE
This adjustment will not affect the broiling or the self-cleaning temperatures. The adjustment will be
retained in memory after a power failure.
Temp unit (Fahrenheit or Celsius temperature selection)
You can program the oven control to display the temperature in Fahrenheit or Celsius.

27
The oven has been preset at the factory to display in Fahrenheit.
How to change the display from Fahrenheit to Celsius or Celsius to Fahrenheit.
* Touch the “Set” key and the number “4” key for three seconds to switch between °F/°C.
Time of day (12hr/24hr)
The oven can be programmed to display time of day in the 12 hour or 24 hour mode.
The oven has been preset at the factory to display in the 12 hour mode.
How to change between the 12 and 24 hour time of day display
* Touch the “Set” button and the number “2” button for three seconds to switch the 12/24 hour clock
mode.
Sound on/off
Using Sound On/OFF, you can set the oven controls to operate silently.
How to turn the sound on or off.
* Touch the “Set” key and the number
Control lockout
This feature lets you lock the buttons on the touch pad so they cannot be activated accidentally. After
the lock, only “Cancel” and “SETTING/LOCK/Hold 3 sec” can operate.
How to activate the control lockout feature
a. Press SETTING/LOCK/Hold 3 sec) for 3 seconds.
LOC and the lock icon appear in the display as well as the current time.
b. After activating the lockout in the non-cleaning function, the oven will lock the door and the
screen will display the lock icon. Only Cancel and SETTING/LOCK/Hold 3 sec) can be operated, and
other buttons are invalid. If the oven is currently heating, press Cancel to stop the oven.
Press SETTING/LOCK/Hold 3 sec) to cancel the lockout function and the oven lock will automati-
cally unlock.
c. After the lockout is activated in the self-cleaning function, the lock icon will be displayed on the
screen. Only Cancel and SETTING/LOCK/Hold 3 sec) can be operated, and other buttons are invalid.
You can press Cancel to cancel self-cleaning, and if the temperature in the oven is below 212°F, the
lock icon will automatically unlock. Otherwise the door will remain locked.
How to unlock the controls
a. Press SETTING/LOCK/Hold 3 sec) for 3 seconds.
LOC and the lock icon will disappear from the display.
12-hour energy saving
If you accidentally leave the oven on, this feature will automatically turn off the oven after 12-hours
during baking functions or after 3 hours during a broil function.
Touch the “Set” button and the number “1” button for three seconds to switch the 12-hour energy
saving mode.

28
- Always make sure that the controls are off and all surfaces are cool before removing or cleaning any
of the range parts. This will prevent you from getting burned.
- If your range is pulled out from the wall for any reason, make sure that the anti-tip device is re-en-
gaged after your range has been pushed back into place. Failure to take this precaution could result in
your range tipping and personal injury.
cleaning stainless steel surfaces
Do not use a steel-wool pad or abrasive cleaners on stainless steel surfaces. Abrasive pads and
cleaners will scratch the surface and damage the nish.
NOTE
To prevent any discolorations or grease stains, we recommend that you clean and remove any spills,
spots, and grease from your range after each use.
1. Place a small amount of a stainless steel appliance cleaner or polish on a damp cloth or damp
paper towel.
2. Clean a small area, rubbing with the grain of the stainless steel, if applicable.
3. Dry and buff with a clean, dry paper towel or soft cloth.
4. Repeat as necessary.
- Do not use a steel-wool pad or abrasive cleaners on stainless steel surfaces. Abrasive pads and
cleaners will scratch the surface and damage the nish.
- If you previously used a mineral oil-based stainless steel appliance cleaner, wash the surface with
dish washing liquid and water before using the stainless steel cleaner or polish.
Cleaning The Oven Racks
Clean by hand in hot, soapy water with a plastic or soap-lled scouring pad, then dry with a soft cloth.
If the rack becomes dicult to slide, rub the siderails with wax paper or a cloth containing a small
amount of cooking oil. This helps the rack slide more easily in the tracks.
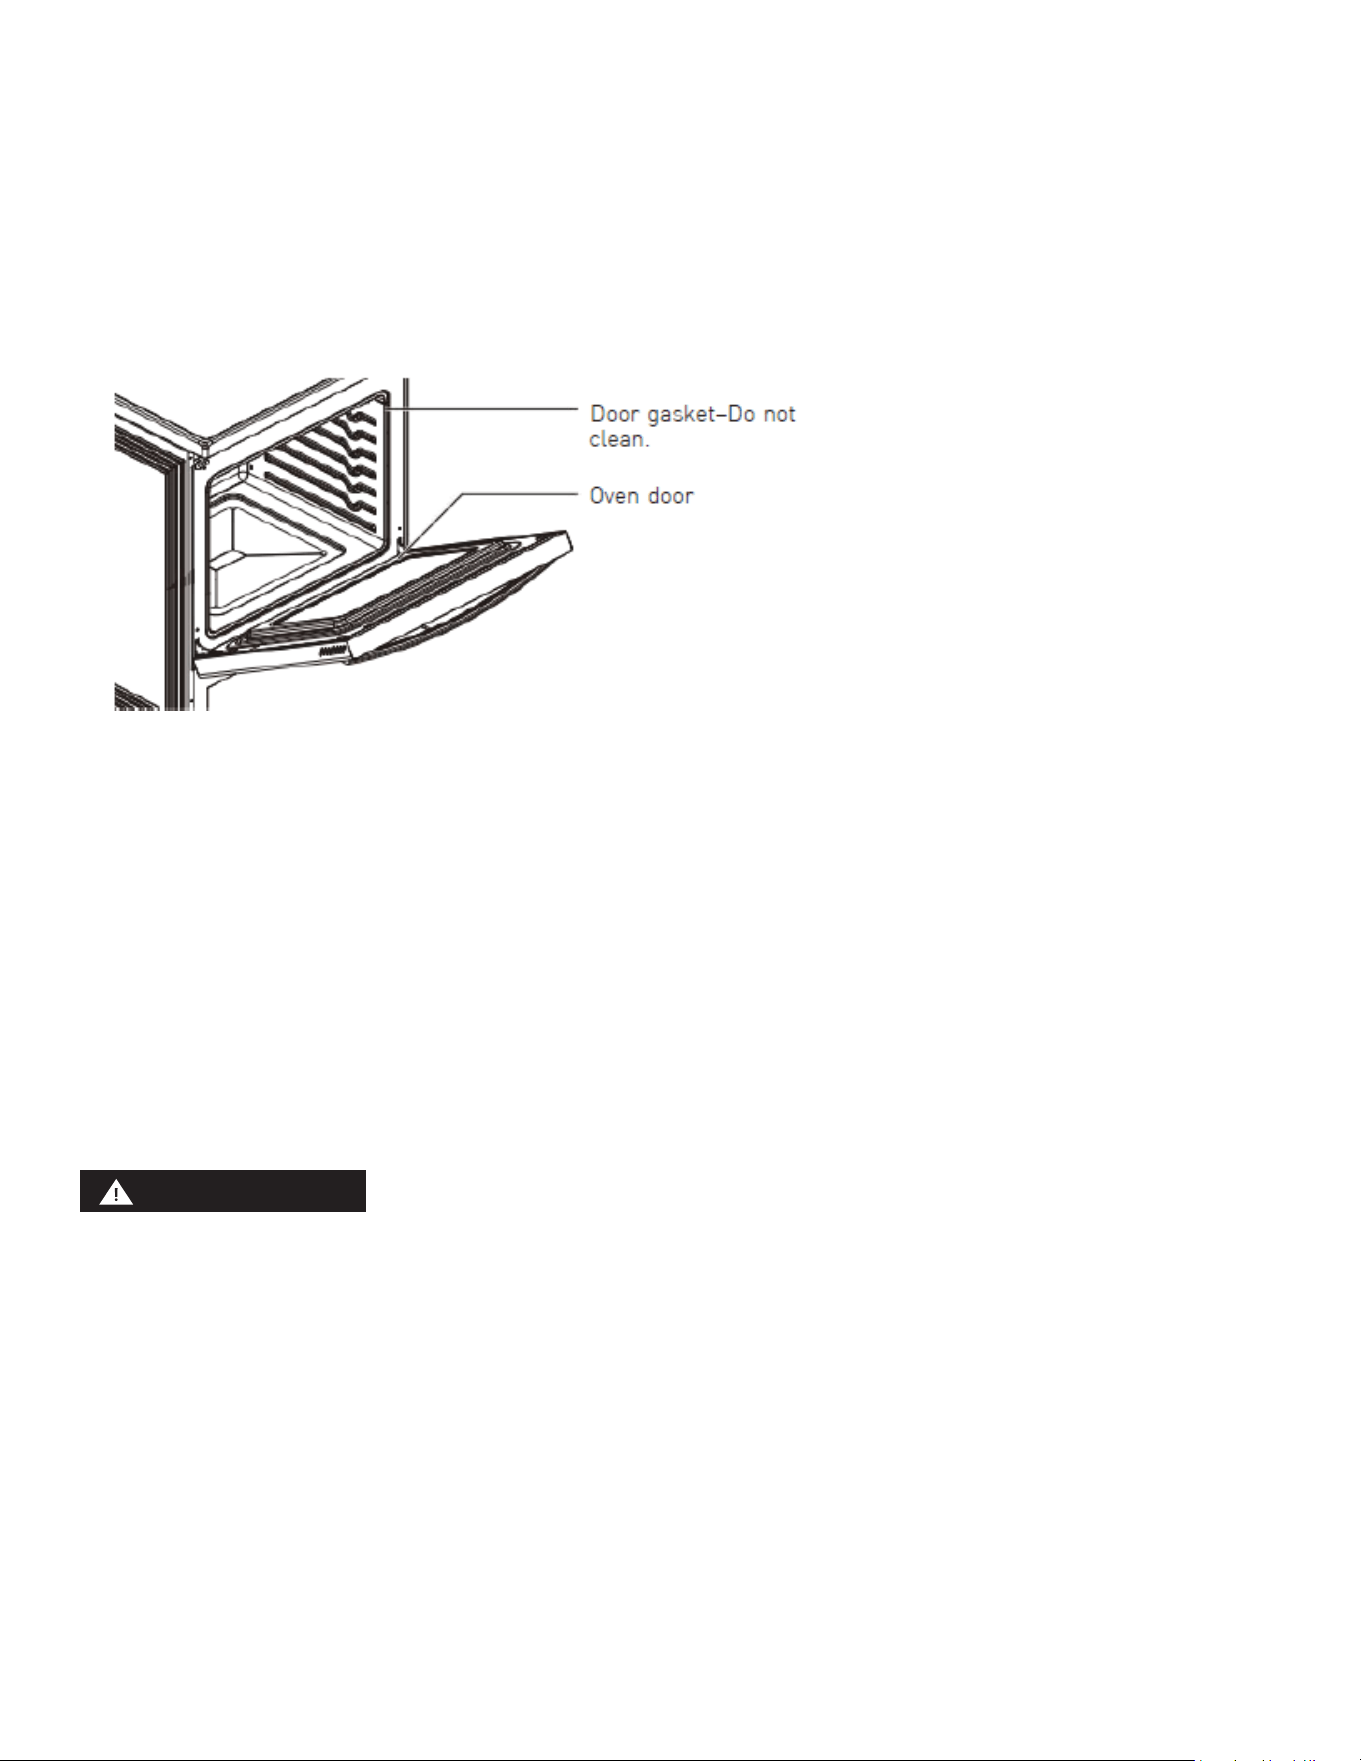
Cleaning the oven door
- DO NOT clean the oven door gasket. The oven door gasket is made of a woven material which is
essential for a good seal. Care should be taken not to rub, damage, or move this gasket.
- DO NOT immerse the door in water.
- DO NOT spray or allow water or the cleaning solution to enter the door vents.
- DO NOT use oven cleaners, cleaning powders, or any harsh abrasive cleaning materials on the out-
CLEANING AND MAINTENANCE
WARNING!
CAUTION!
CAUTION!
CAUTION!
29
WARNING!
side of the oven door.
The oven door has multiple surfaces that require different cleaning techniques.
The gasket on the oven door frame should never be cleaned or moved to clean other surfaces. The
gasket is made of a woven material which is essential for a good heat seal.
1. Clean the inside door surface by hand with hot, soapy water and a soapy plastic scouring pad. Do
not let moisture get inside the door assembly.
2. Rinse thoroughly with a clean, soft cloth.
3. Dry thoroughly with a clean, soft cloth.
Note: See the instructions for cleaning stainless steel surfaces on page 33.
4. Clean the outside door stainless steel surfaces by following the instructions in Cleaning stainless
steel surfaces on page 33.
5. Clean the glass window with glass cleaner or warm, soapy water with a thorough rinse. Do not let
moisture get inside the door assembly.
Cleaning The Surface Burner Control Knobs
Do not use spray cleaners on the surface burner control panel. Spray entering the valve holes could
contact electrical components resulting in death, personal injury, or product damage.
1. Make sure that all surface burner knobs are in the OFF position.
2. Pull the control knobs straight off the surface burner control valve stems. Do not clean the control
knobs in a dishwasher. They are not dishwasher-safe.
3. Clean the knobs in warm, soapy water. Rinse and completely dry all surface including back and
stem hole.
4. Clean stainless steel surfaces with a stainless steel cleaner on a damp, soft cloth.
5. Replace the control knobs in the OFF position by pushing them straight onto the control valve
stems.
Cleaning The Cook Top
The cook top surface is a porcelain-enamel surface. To prevent this surface from becoming dull, wipe

30
up and clean spills as they happen. Foods with a lot of acid (for example, tomatoes, sauerkraut, and
fruit juices) or foods with high sugar content can cause dull spots if allowed to set.
CAUTION
- Do not use a steel-wool pad or abrasive cleaners on stainless steel surfaces. Abrasive pads and
cleaners will scratch the surface and damage the nish.
- Carefully check the bottoms of pans for roughness that may scratch the cook top.
Normal daily use cleaning
NOTE
Daily use of a ceramic cook top cleaner helps keep the cook top looking new.
Use only a ceramic cook top cleaner. Other creams may not be as effective. By following these steps,
you can maintain and protect the surface of the glass cook top.
Before using the cook top for the rst time, clean it with a ceramic cook top cleaner. This helps pro-
tect the top and makes cleanup easier.
1. Shake the cleaning cream well, then apply a few drops of cleaner directly on the cook top.
2. Use a paper towel or a cleaning pad for ceramic cook tops to clean the entire cook top surface.
3. Use a dry cloth or paper towel to remove all cleaning residue. You do not need to rinse.
Cleaning Sugary Spills And Melted Plastics
NOTE
If pitting or indentations in the glass surface have already occurred, they can’t be repaired. The cook
top glass will have to be replaced.
Sugary spillovers (such jellies, fudge, candy, and syrups) or melted plastics can cause pitting of the
cook top surface. This is not covered under the warranty.
You should clean the spill while it is still hot. Take special care when removing hot substances.
When using a scraper, make sure that it is new and the razor blade is still sharp. Do not use a dull or
nicked blade.
1. Turn off all surface burners. Remove hot pans.
2. Wearing an oven mitt, use a single-edge, razor-blade scraper to move the spill to a cool area of the
cook top. Remove the spill with paper towels.
3. Wait until the cook top has cooled, then remove any remaining spillover. Don’t use the surface burn-
ers again until all of the residue has been completely removed.
Removing burned-on residue
1. Make sure that all surface burners are turned off, then let the cook top cool.
2. Spread a few drops of ceramic cook top cleaner on the entire burned residue area.
3. Using a cleaning pad for ceramic cook tops, rub the residue area. Apply pressure as needed.
4. If any residue remains, repeat the steps listed above as needed.
5. For additional protection, after all residue has been removed, polish the entire surface with a ce-
ramic cook top cleaner and a paper towel.
Removing heavy, burned-on residue
31
1. Make sure that all surface burners are turned off, then let the cook top cool.
2. Use a single-edge, razor-blade scraper at approximately a 45 angle against the glass surface and
scrape the residue, you need to apply remove the residue. Do not scrape the seal.
3. After scraping with the scraper, spread a few drops of ceramic cook top cleaner on the entire
burned residue area, use the cleaning pad to remove any remaining residue.
4. For additional protection, after all residue has been removed, polish the entire surface with a ce-
ramic cook top cleaner and a paper towel.
cleaning the cook top seal
- Lay a wet cloth on the seal for a few minutes, then wipe clean with a nonabrasive cleaner.
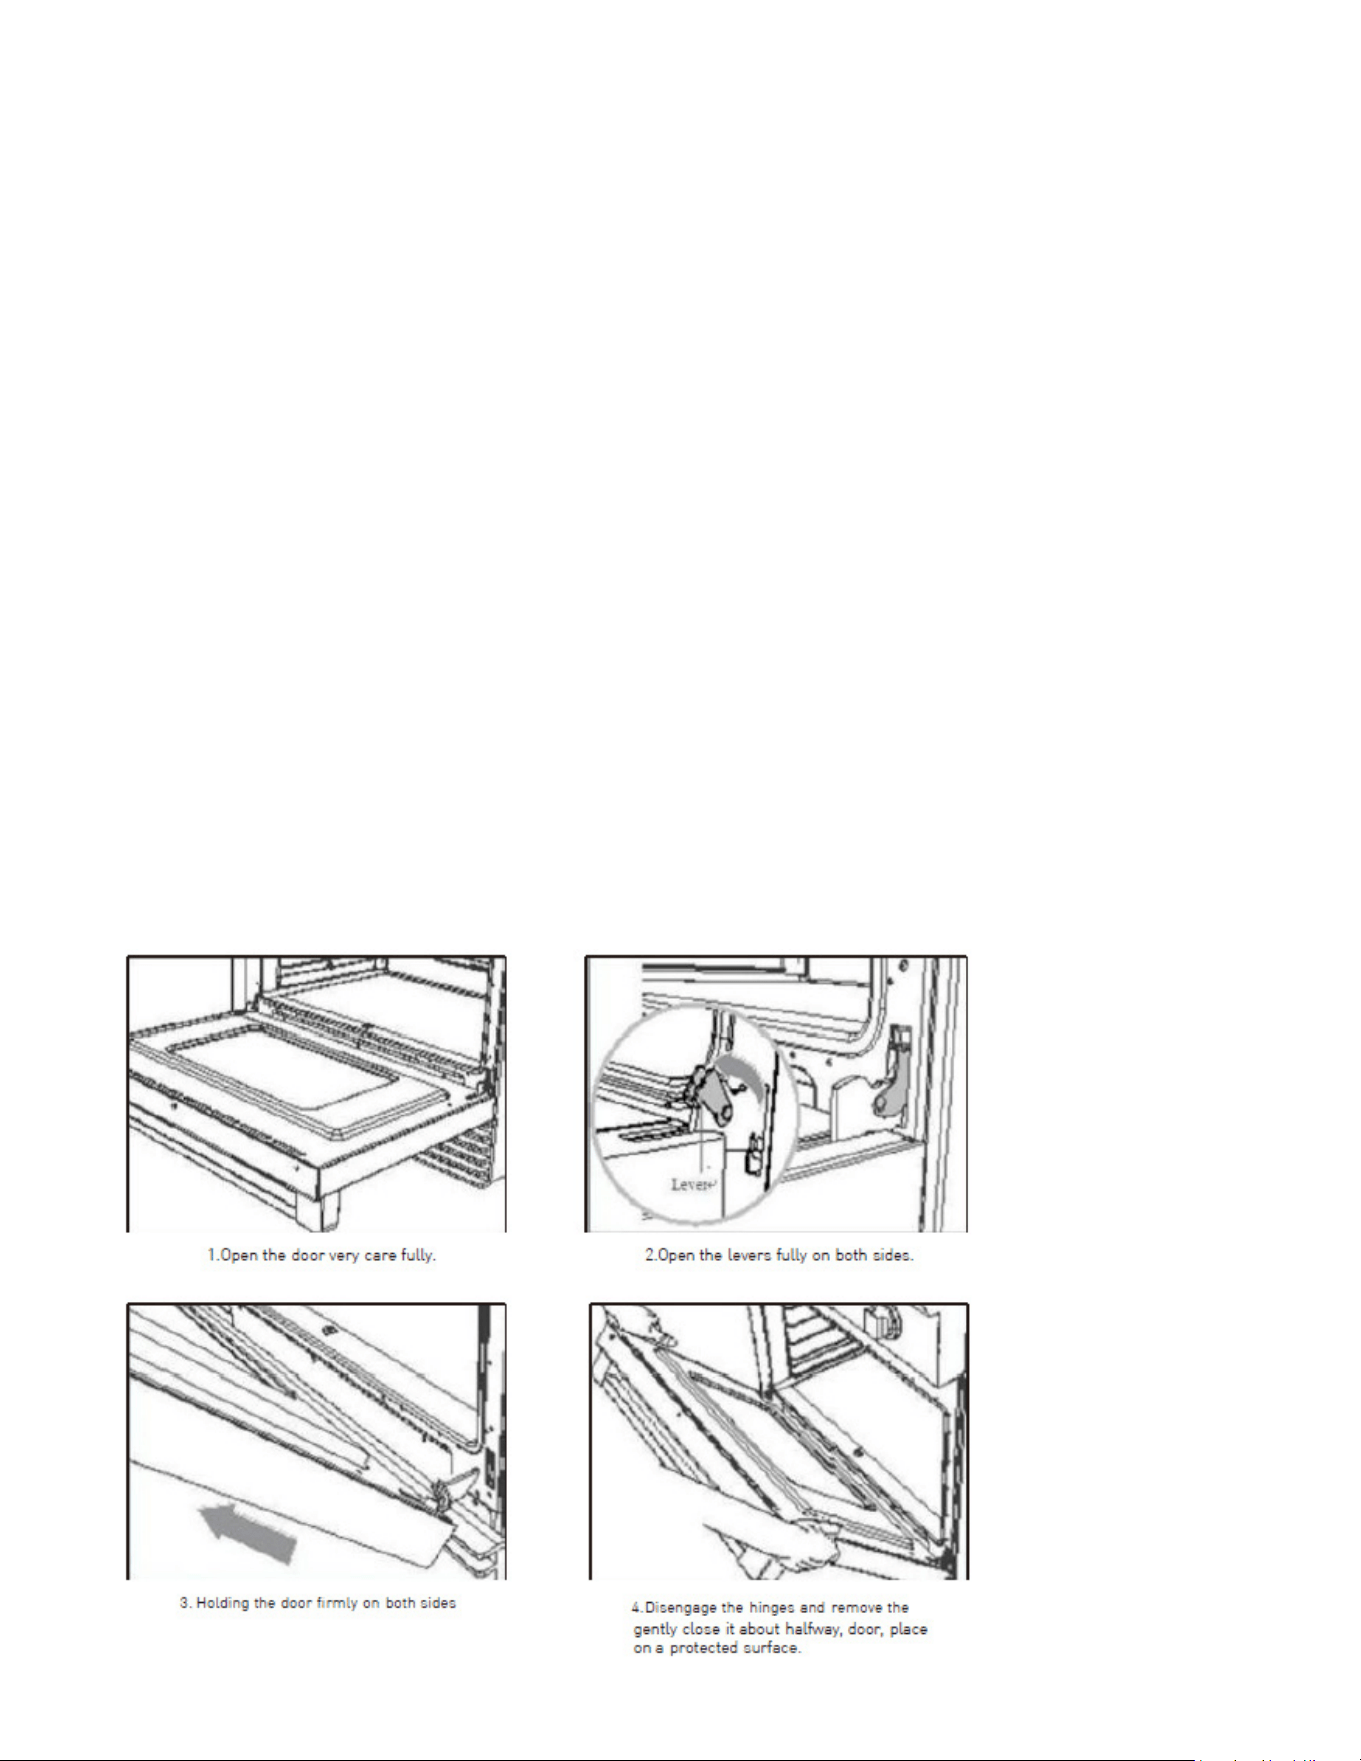
REMOVE THE OVEN DOOR
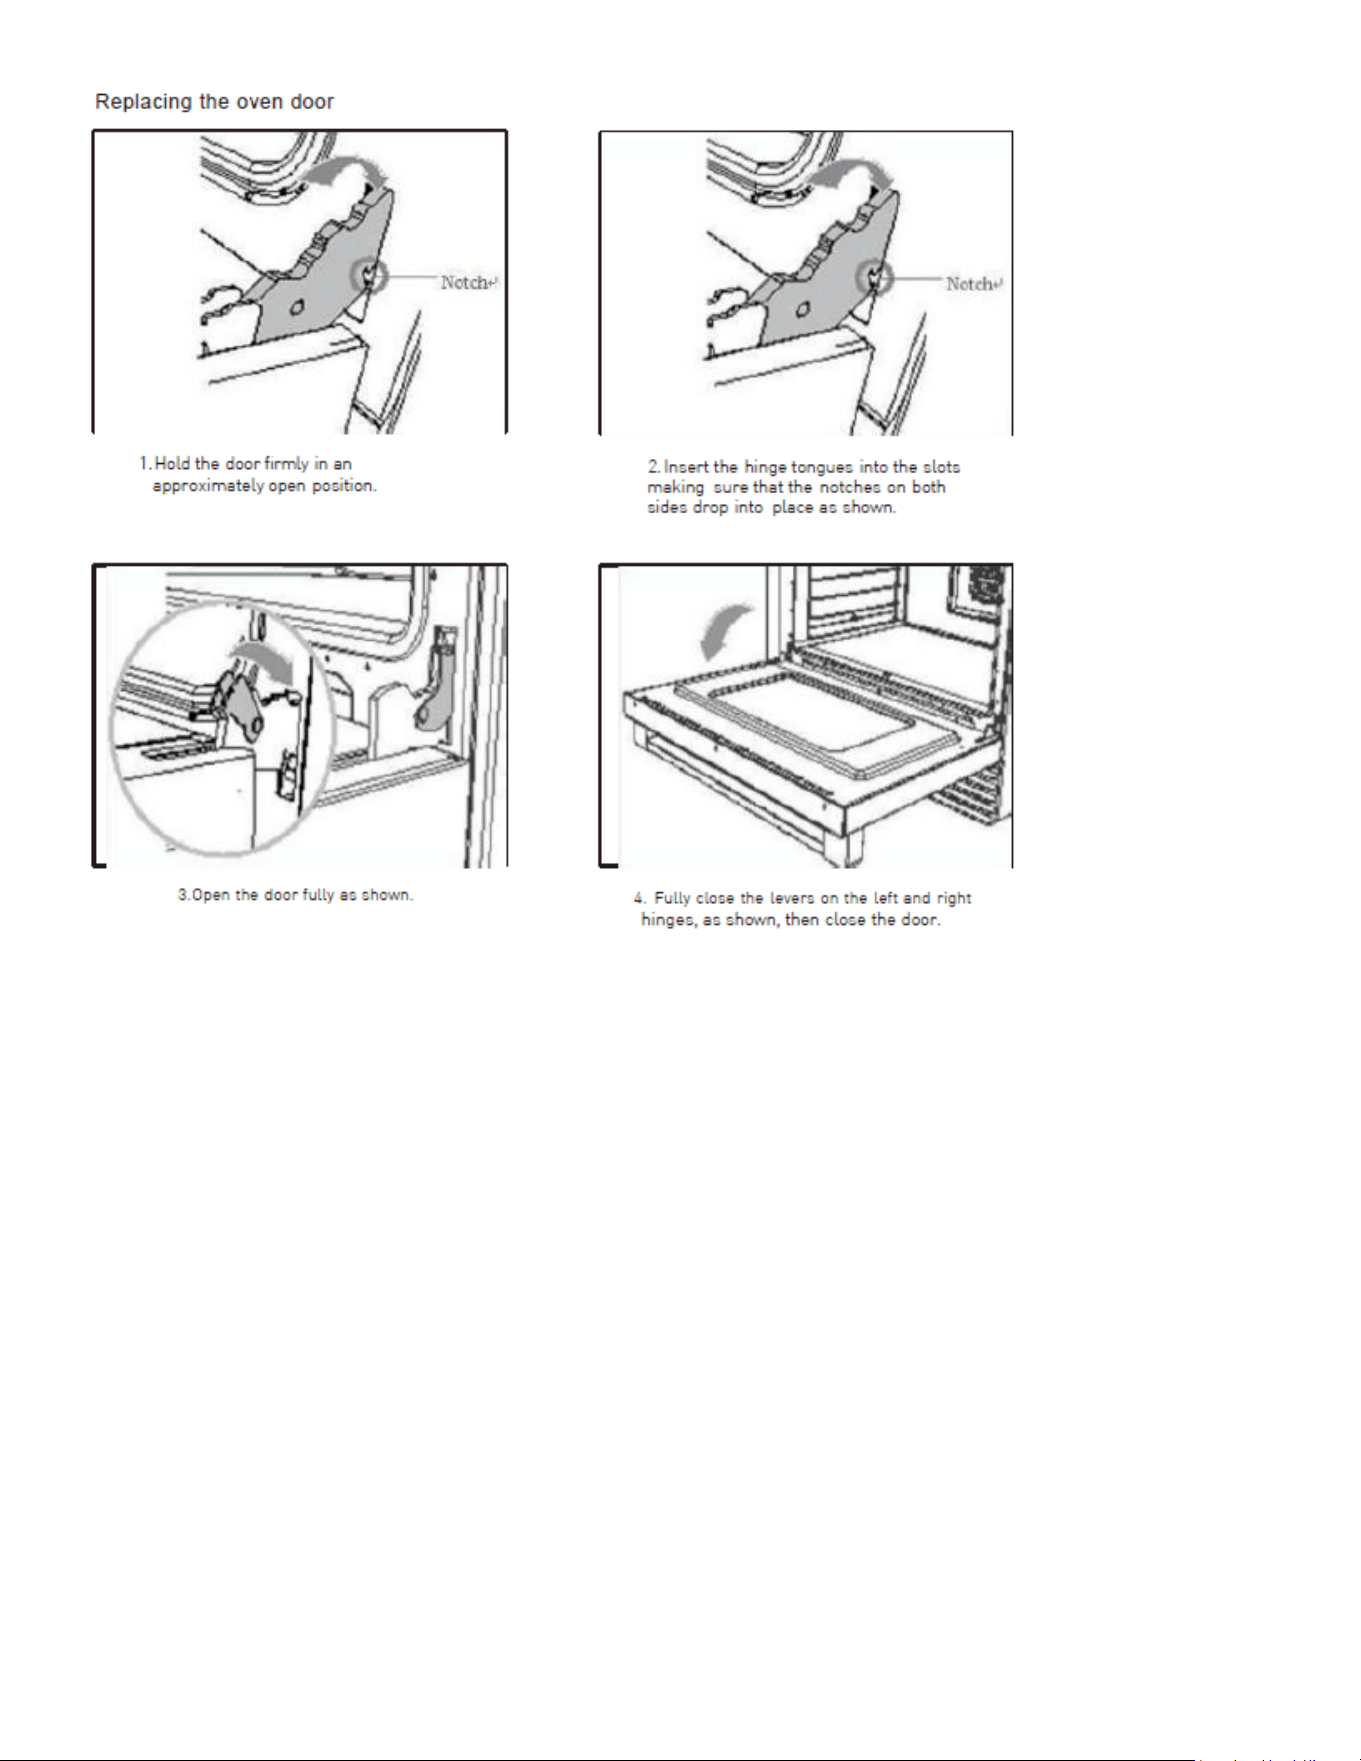
Removing and replacing the oven door
Do not lift the oven door by its handle. Doing so may damage the door. Make sure the oven and the
door are cool before you begin to remove the door.
IMPORTANT
Before removing the door, make sure there is a large enough clear, protected surface in the kitchen to
rest the door on.
The oven door is heavy
Removing the oven door
32
33
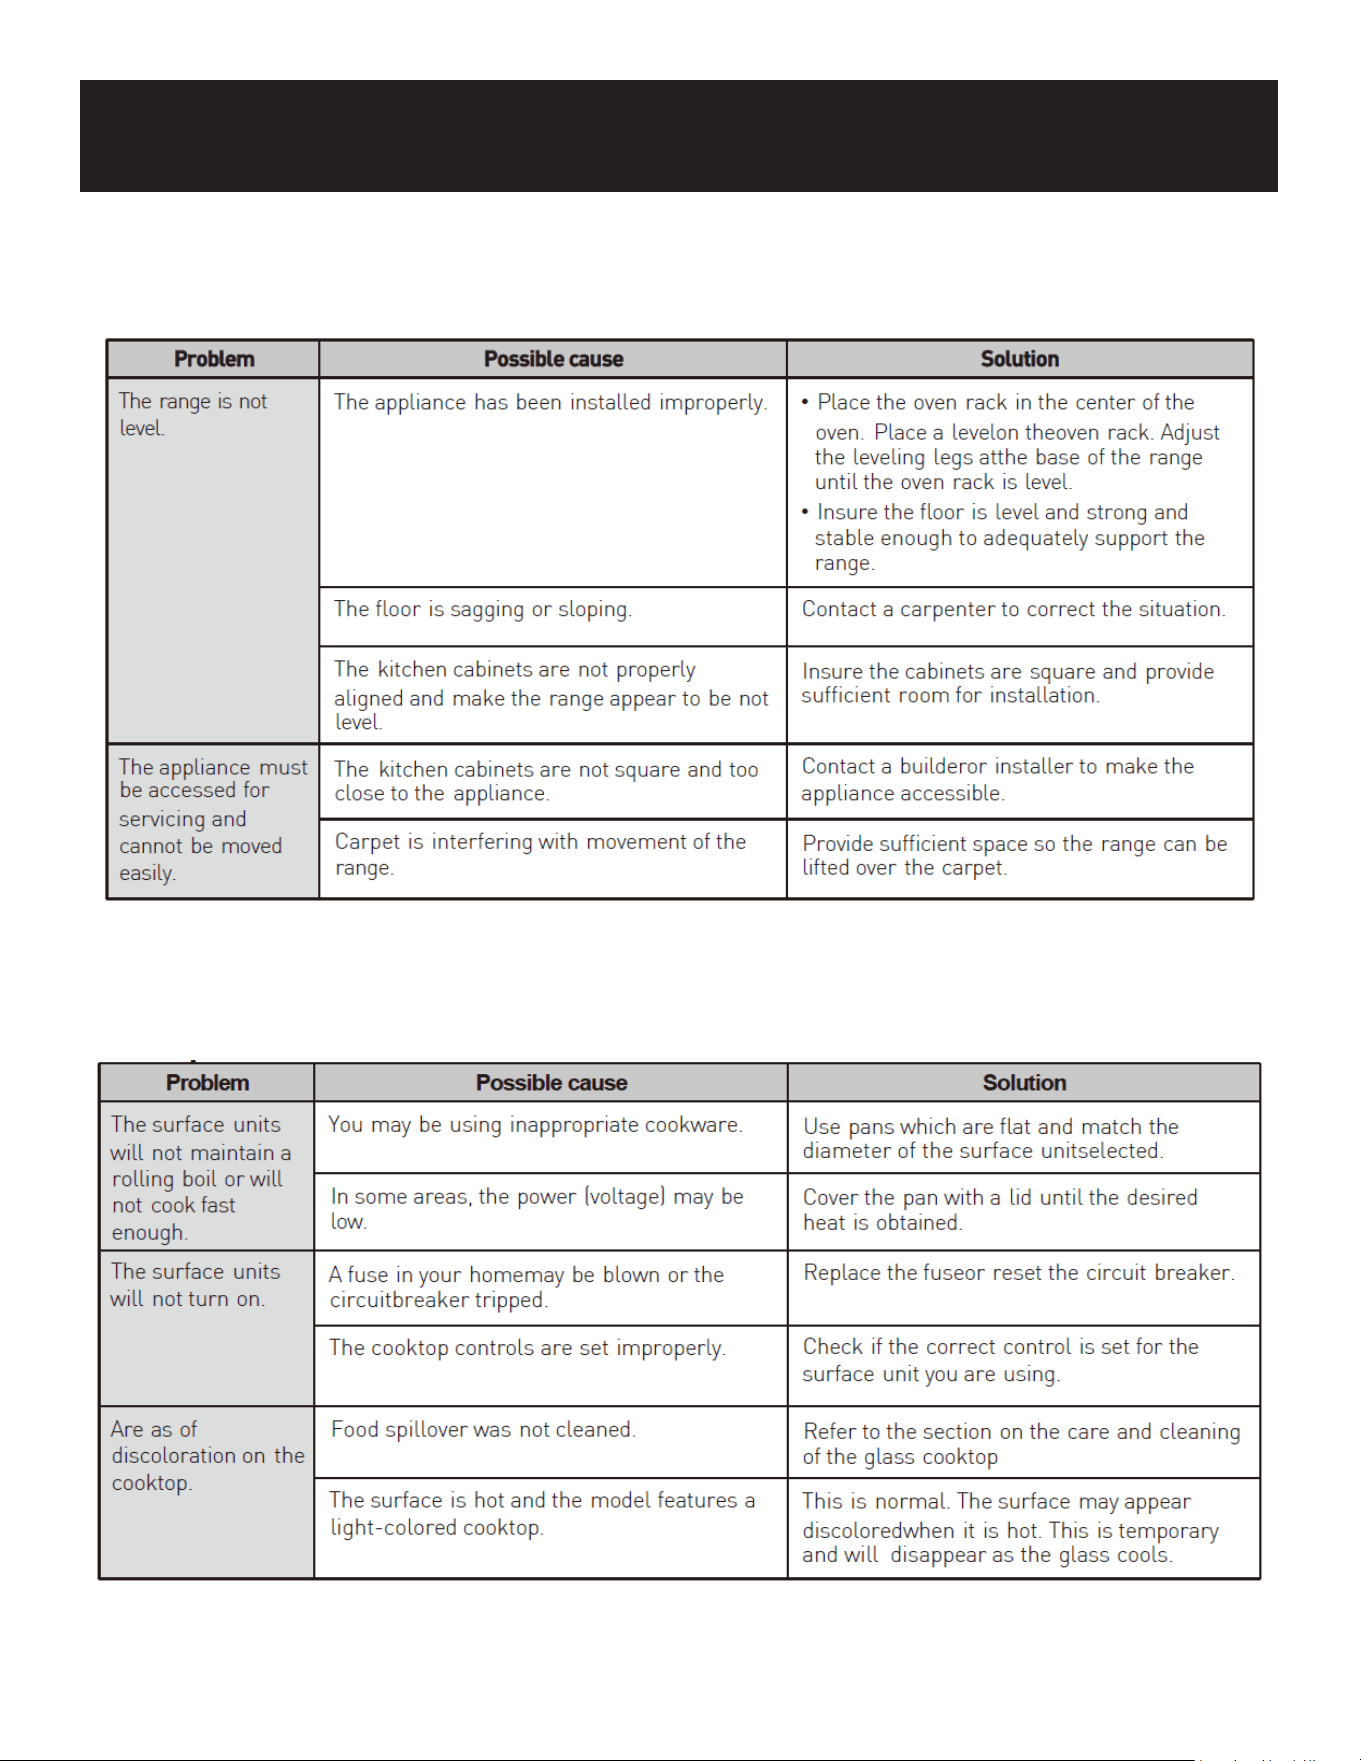
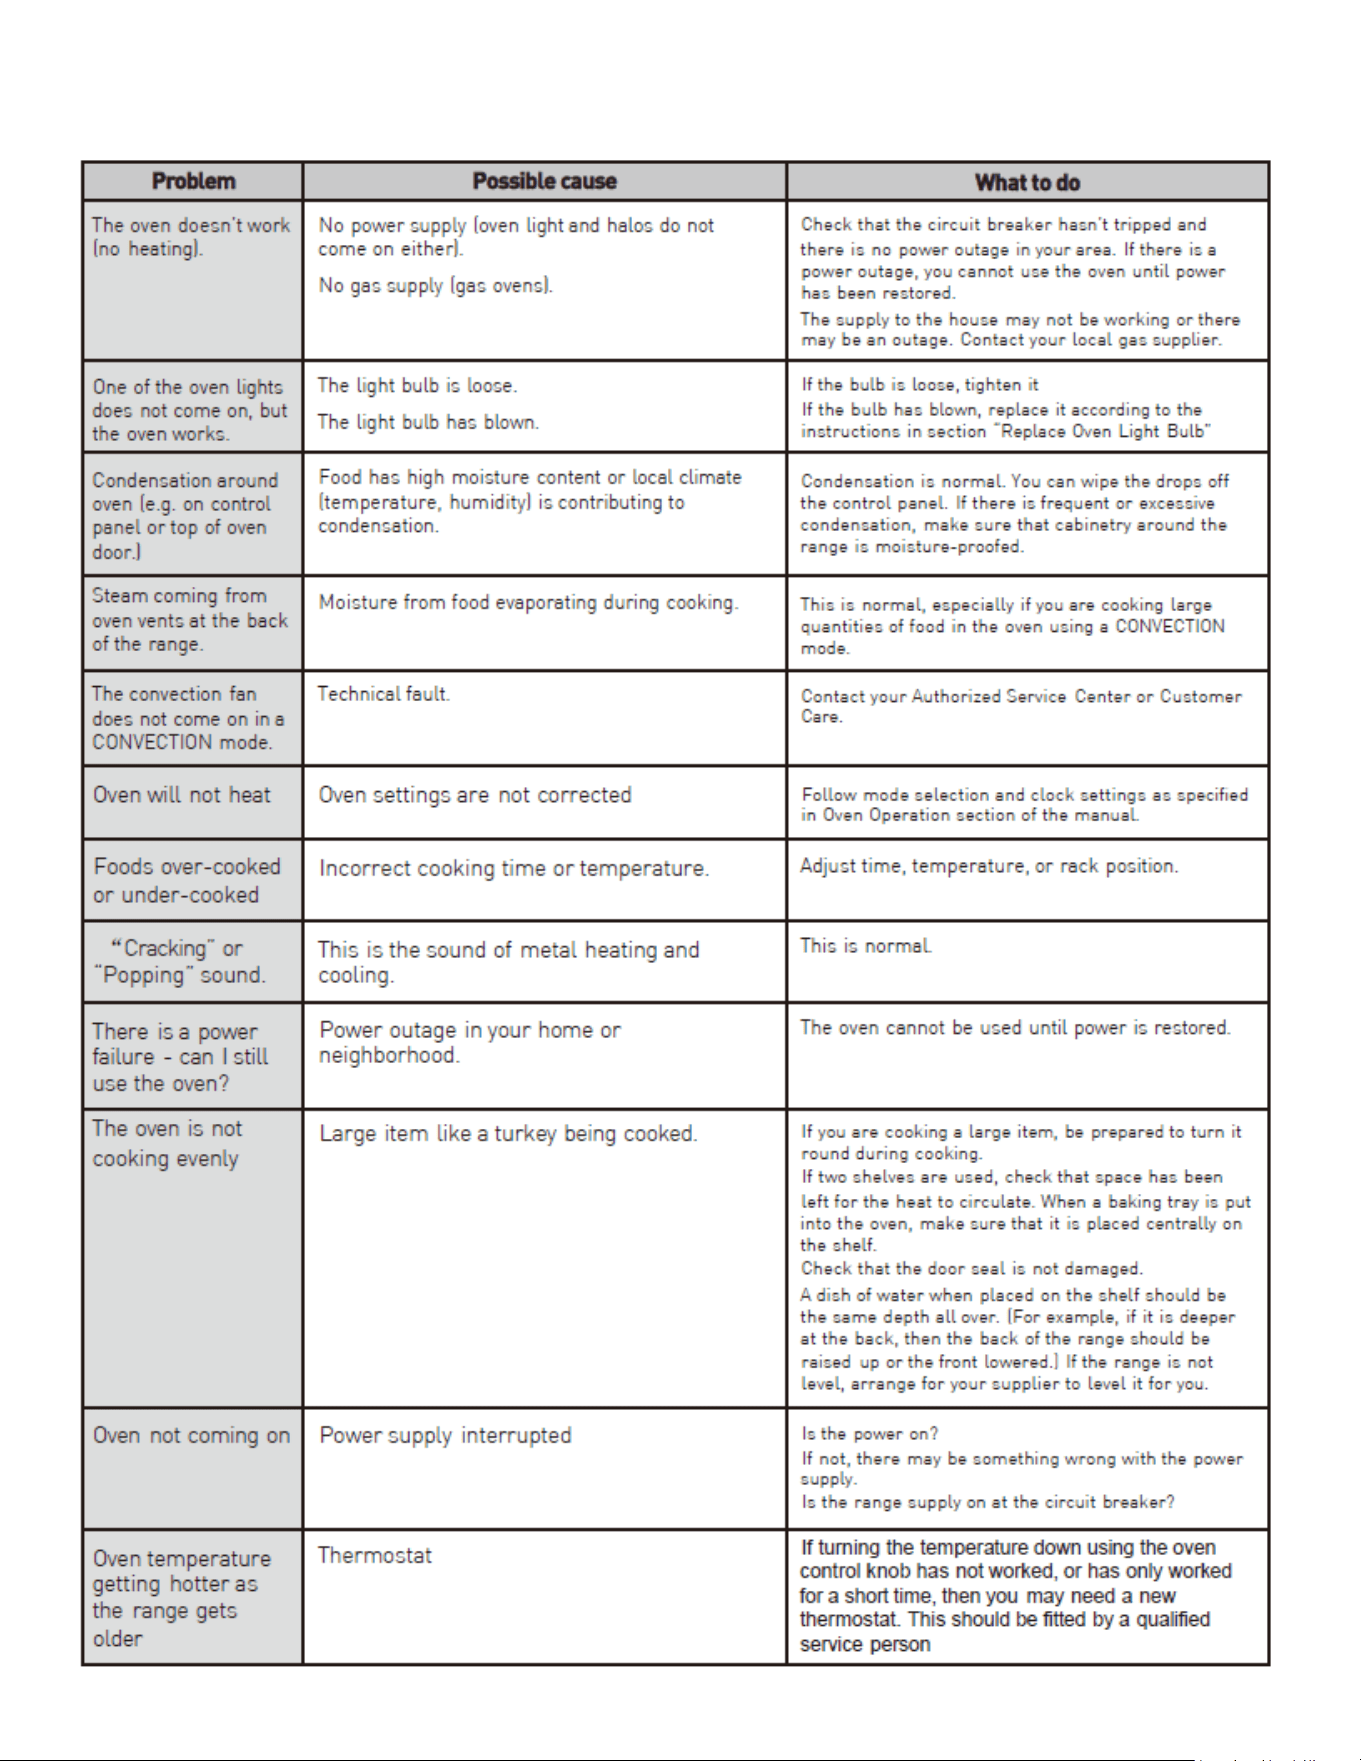
TROUBLESHOOTING
INSTALLATION
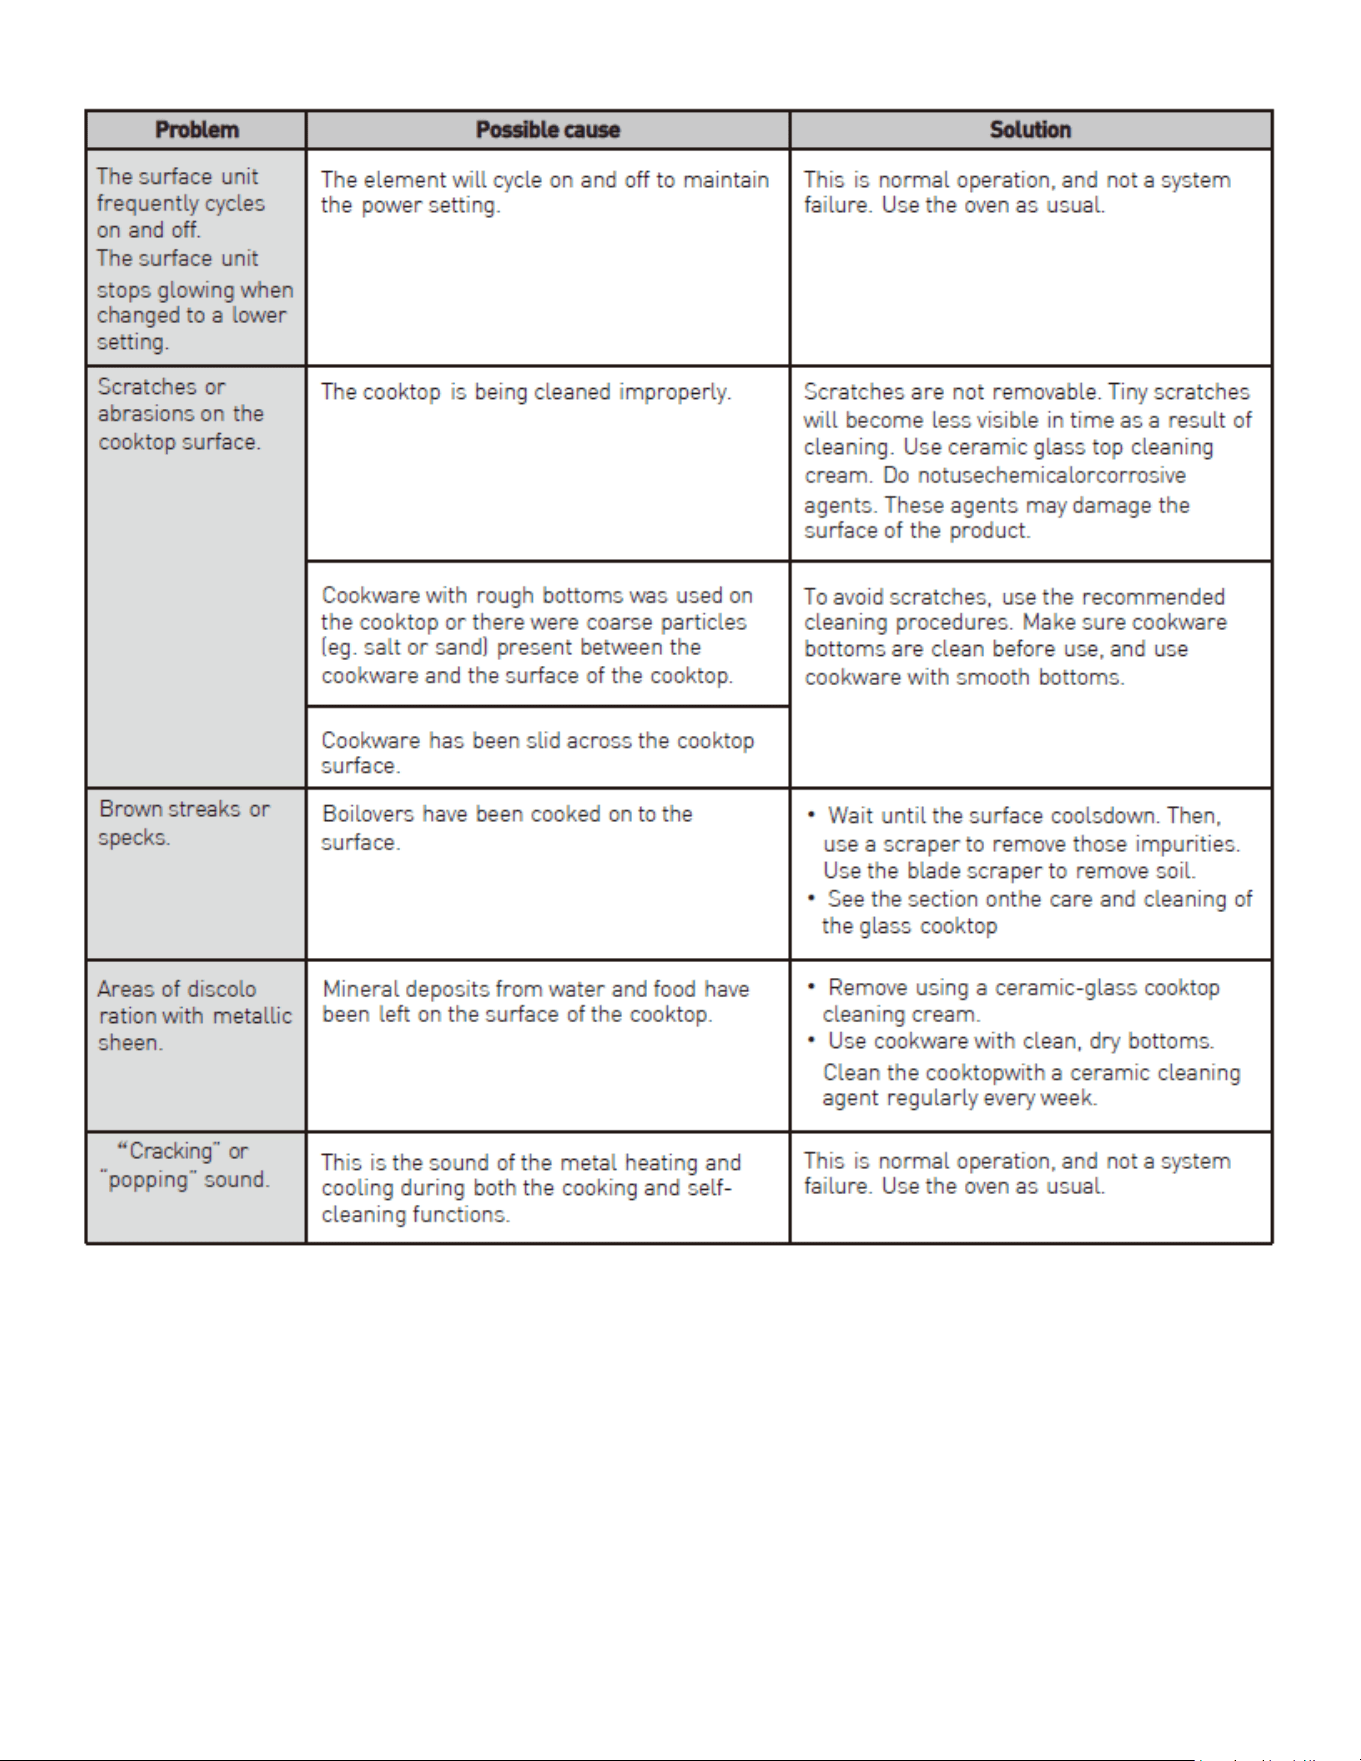
COOKTOP
34
35
OVEN
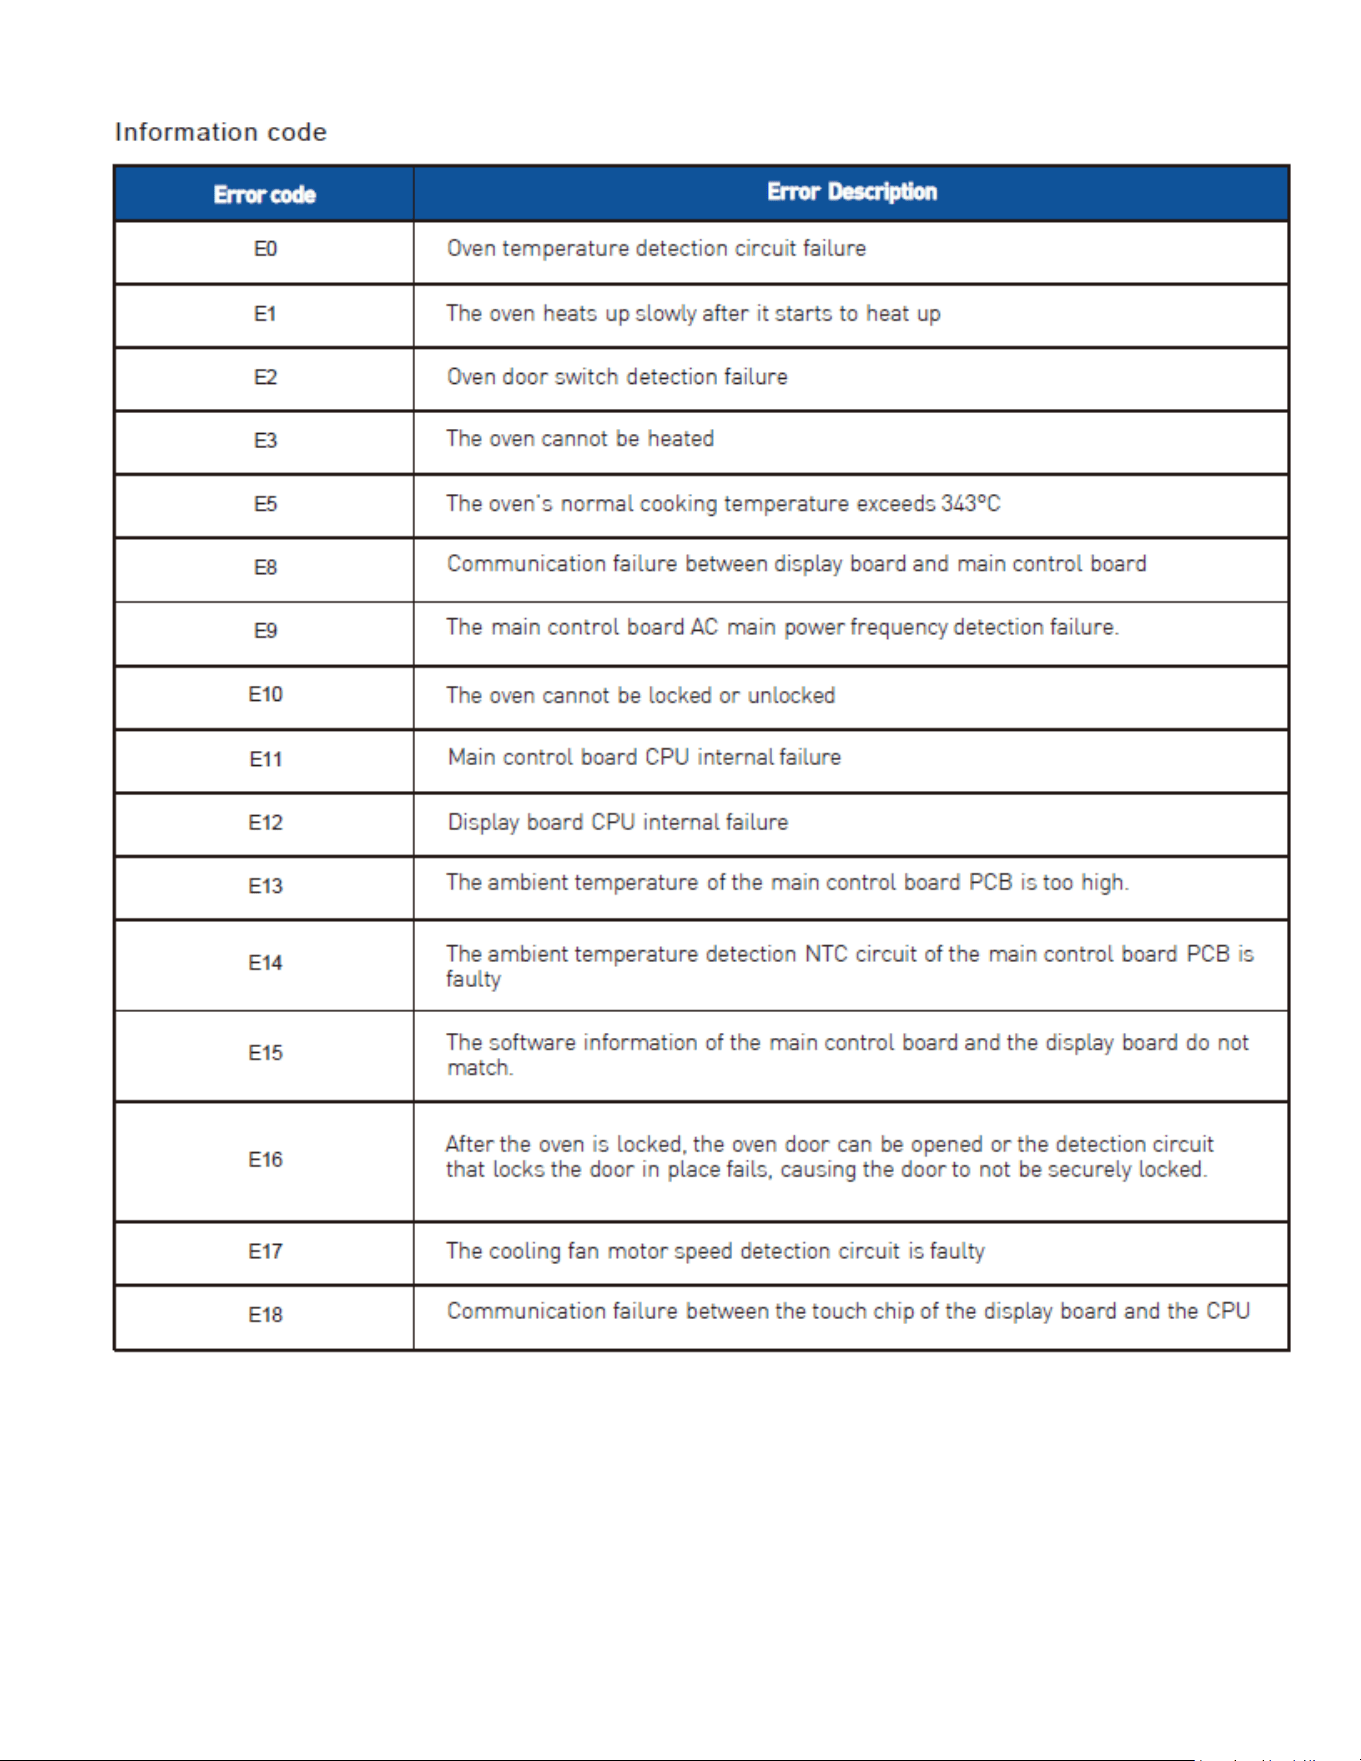
36

37