
23624
EN
Original Instructions
Version 1
12V DIGITAL
AIR COMPRESSOR
1.1 Product Reference
User Manual for: 12V Digital Air Compressor
Stock No: 23624
Part No: AC12VD
1.2 Revisions
Version 1: February 2024
First release
As our manuals are continually updated, always ensure
that the latest version is used.
Please visit drapertools.com/manuals for the latest
version of this manual and the associated parts list, if
applicable.
1.3 Understanding the Safety Content of
This Manual
WARNING!
– Situations or actions that may result
in personal injury or death.
CAUTION! – Situations or actions that may result
in damage to the product or surroundings.
Important: – Information or instructions of particular
importance.
1.4 Copyright © Notice
Copyright © Draper Tools Limited.
Permission is granted to reproduce this manual for
personal and educational use ONLY. Commercial
copying, redistribution, hiring or lending is strictly
prohibited.
No part of this manual may be stored in a retrieval system
or transmitted in any other form or means without written
permission from Draper Tools Limited.
In all cases, this copyright notice must remain intact.
1. Preface
– 2 –
These are the original product instructions. This
document is part of the product; retain it for the life
of the product, passing it on to subsequent holders.
Read this manual in full before attempting to
assemble, operate or maintain this product.
This Draper Tools manual describes the purpose
of the product and contains all the necessary
information to ensure its correct and safe use.
Following all the instructions and guidance in
this manual will ensure the safety of both the
product and the operator and increase the
lifespan of the product.
All photographs and drawings within this manual are
supplied by Draper Tools to help illustrate correct
operation of the product.
Every eort has been made to ensure the
information contained in this manual is accurate.
However, Draper Tools reserves the right to amend
this document without prior warning. Always use the
latest version of the product manual.
EN

2. Contents
– 3 –
EN
1. Preface 2
1.1 Product Reference 2
1.2 Revisions 2
1.3 Understanding the Safety Content of This
Manual 2
1.4 Copyright © Notice 2
2. Contents 3
3. Product Introduction 4
3.1 Intended Use 4
3.2 Specication 4
4. Health and Safety Information 5
4.1 General Safety Instructions for Compressors 5
4.2 Residual Risk 5
5. Identication and Unpacking 6-7
5.1 Product Overview 6
5.2 What’s in the Box? 7
5.3 Packaging 7
6. Operating Instructions 8-9
6.1 Connecting The Compressor 8
6.2 Using the Compressor 8-9
6.3 Auto Stop 9
6.4 Using the Ination Adaptors 9
6.5 Using the Torch 9
7. Maintenance and Troubleshooting 10
7.1 General Maintenance 10
7.2 Fuse Replacement 10
7.3 Troubleshooting 10
8. Spares, Returns and Disposal 11
9. Warranty 11
10. Explanation of Symbols 11

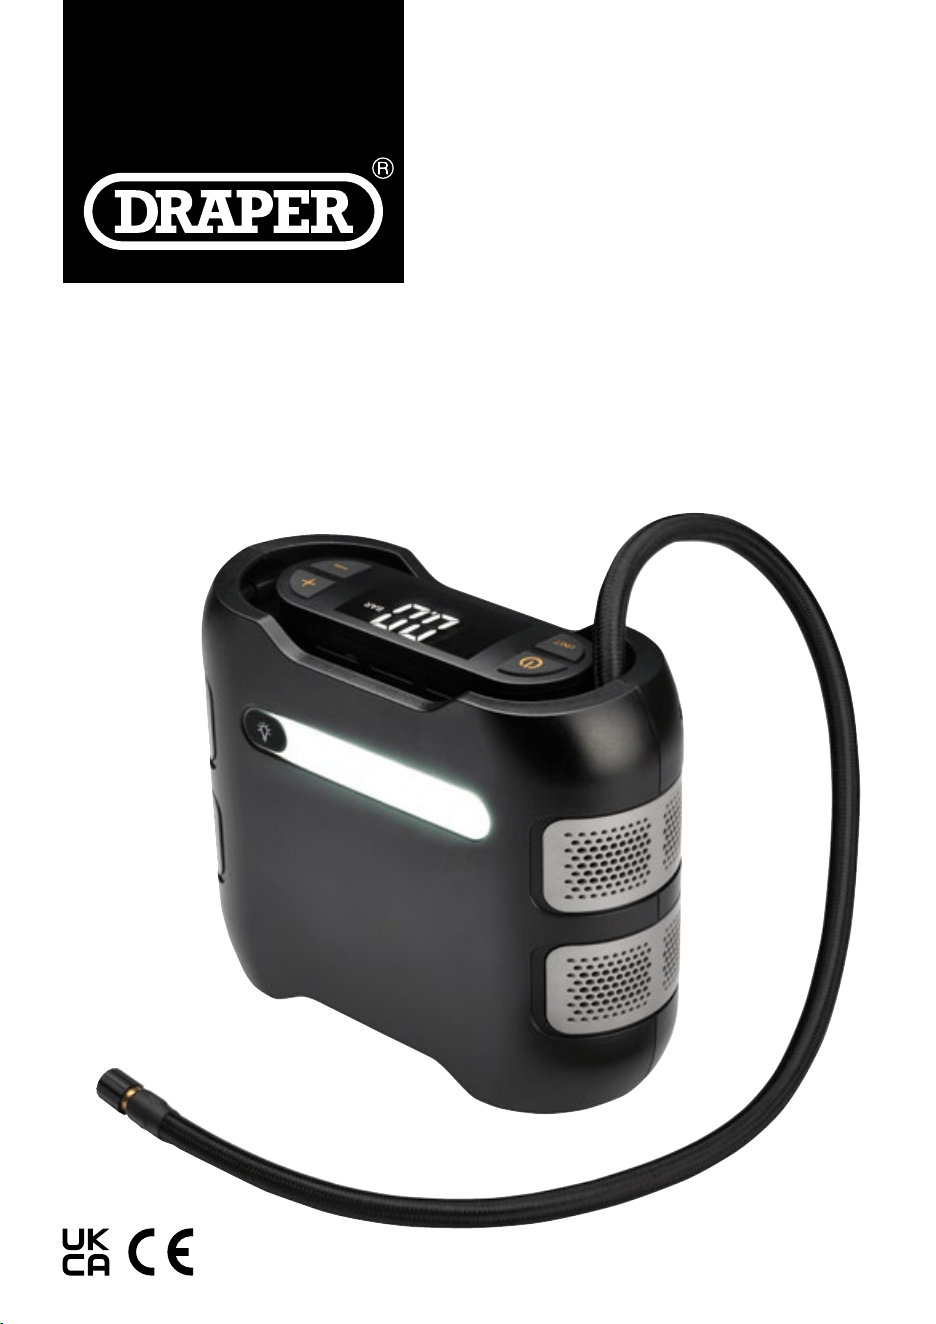
3. Product Introduction
Stock No. 23624
Part No. AC12VD
Net Weight: 930g
Dimensions: 200mm x 80mm x 166mm
Rated Voltage: 12V DC
Maximum Current: 10A
Maximum Pressure: 150psi (10 Bars/1035kPa)
Pressure Range: 3 – 150psi (0.2 – 10Bars/20 – 1030kPa)
Gauge Pressure Accuracy: +/- 1.50psi
Recommended Cycle Time: 10mins on/10mins o
Flow Rate: 30L/pm
Air Hose Length: 600mm
Noise Level: 84db
LED Torch Power: 5W
Power Supply/Adaptor: 12V DC
Power Cord Length: 3.0m
Operating/Storage Temperature: -30°C to 60°C
– 4 –
EN
3.2 Specication
3.1 Intended Use
This 12V air compressor is designed to inate tyres on
cars, motorbikes, bicycles and light commercial vehicles.
It includes an accessory kit for inating air beds,
inatable toys, footballs, paddling pools and beach
balls. There is also an integrated LED torch and a
charging adaptor compatible with most vehicle 12V
power sockets.
This product is intended for domestic and infrequent
light use. Any other application beyond the conditions
established for use will be considered misuse. Draper
Tools accepts no responsibility for improper use of this
product.
Read this manual in full before attempting to assemble,
operate or maintain the product and retain it for later use.
4. Health and Safety Information
Important: Read all the Health and Safety instructions
before attempting to operate, maintain or repair this
product. Failure to follow these instructions may result in
injury or damage to the user, the product or the item
being inated.
General Health and Safety Precautions
4.1 General Safety Instructions for
Compressors
WARNING! This compressor is capable of
supplying air at high pressure.
• NEVER point this product at any person or any object
for which its use is not intended.
• Observe and adhere to all standard safety precautions
and good practices when working in a workshop
environment.
• Keep the work environment clear and well-lit, with
bystanders at a safe distance.
• The product is not a toy and should not be used by
children. Keep children and non-essential persons
away from the ination area.
• Before use, inspect the product carefully for signs of
damage.
WARNING! DO NOT use this product if any
damage or defects are present; take it out of
service until it has been repaired or replaced.
Contact Draper Tools for repair and
replacement options.
• Do not use this product for purposes other than its
intended use.
• ALWAYS ensure that the air hose and valve
connections are tight and secure, and rmly hold the
item to be inated during operation.
• Do not use the compressor while the vehicle is moving.
• Always unplug the adaptor from the vehicle’s 12V
power outlet after use.
• ONLY use accessories recommended and supplied by
Draper Tools.
• To avoid damage to the compressor and adaptor only
a 12V DC (10 – 15A) cord should be used.
• DO NOT use this product in wet conditions or expose
it to rain.
• DO NOT use this product near ammable or
combustible materials or in dangerous or explosive
environments.
• Keep away from heat sources and do not leave for
long periods of time in a hot car.
• Ensure the cord does not come into contact with
sharp edges and is not exposed to hot objects or oil.
• DO NOT attempt to open or modify this product in
any way.
• DO NOT use the product if the casing is open or cord
is damaged in any way.
• NEVER leave the compressor running unattended and
switch it o before moving away.
• Use this product ONLY for the recommended cycle
time and allow at least 30 minutes for it to cool before
the next use.
WARNING! The compressor is designed for
occasionally use only. Extended continual use of
the product may cause it to overheat and harm
both the product and the operator.
• After use, ALWAYS check the tyre pressure using a
tyre pressure gauge that complies with BS EN
12645:2014.
CAUTION! NEVER exceed the maximum
pressure recommended by the manufacturer
of the item to be inated. Check the
manufacturer’s information before every use
and continually monitor the item during
ination. Over ination could result in the
item bursting or personal injury.
• NEVER carry the compressor by the hose.
4.2 Residual Risk
The safety instructions in this manual cannot account for
all possible conditions and situations that may occur.
Exercise common sense and caution when using this
product and protect against any additional conceivable
risks.
– 5 –
EN

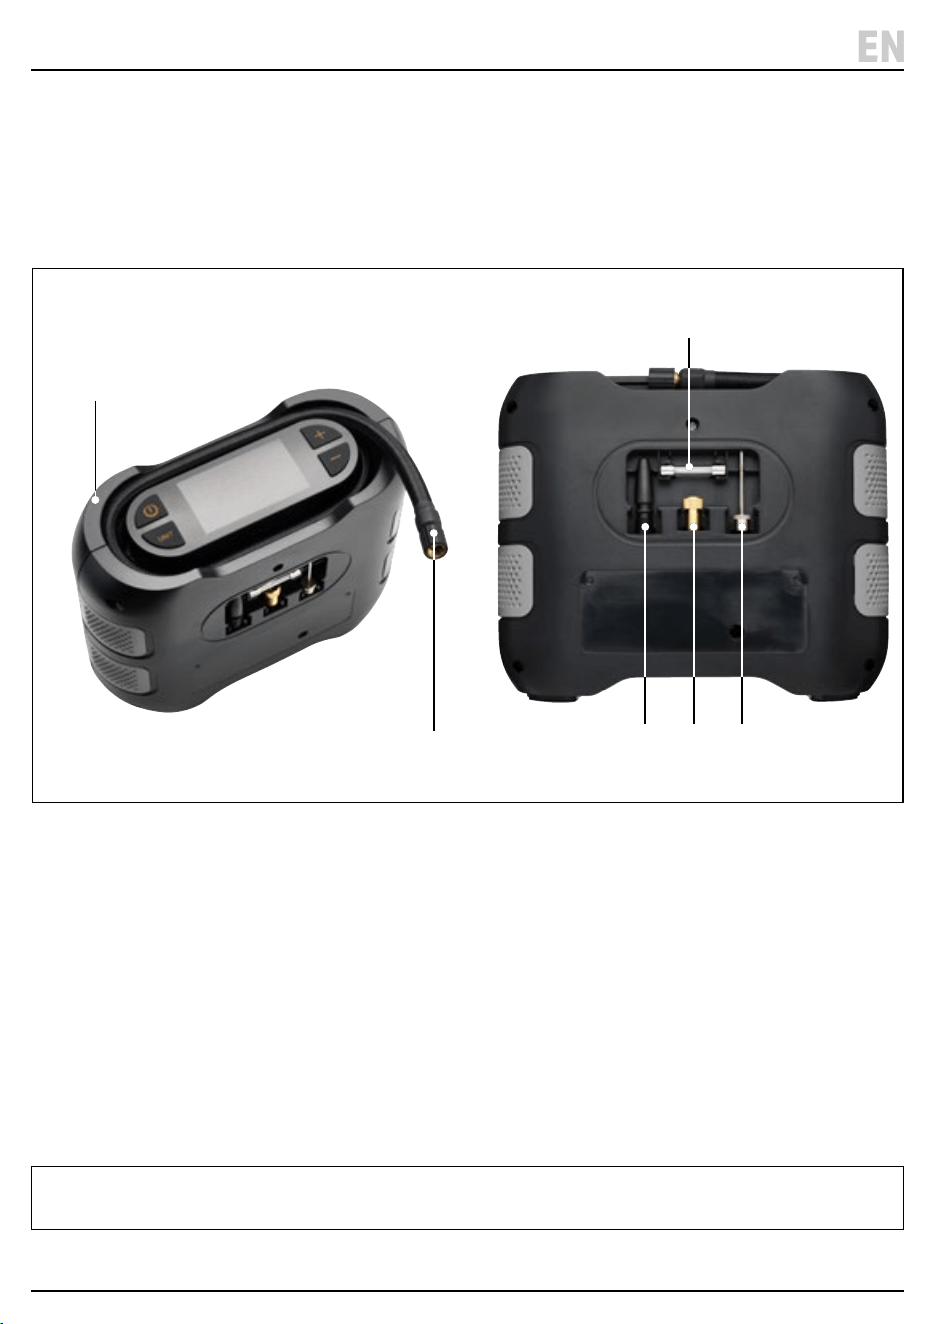
5. Identication and Unpacking
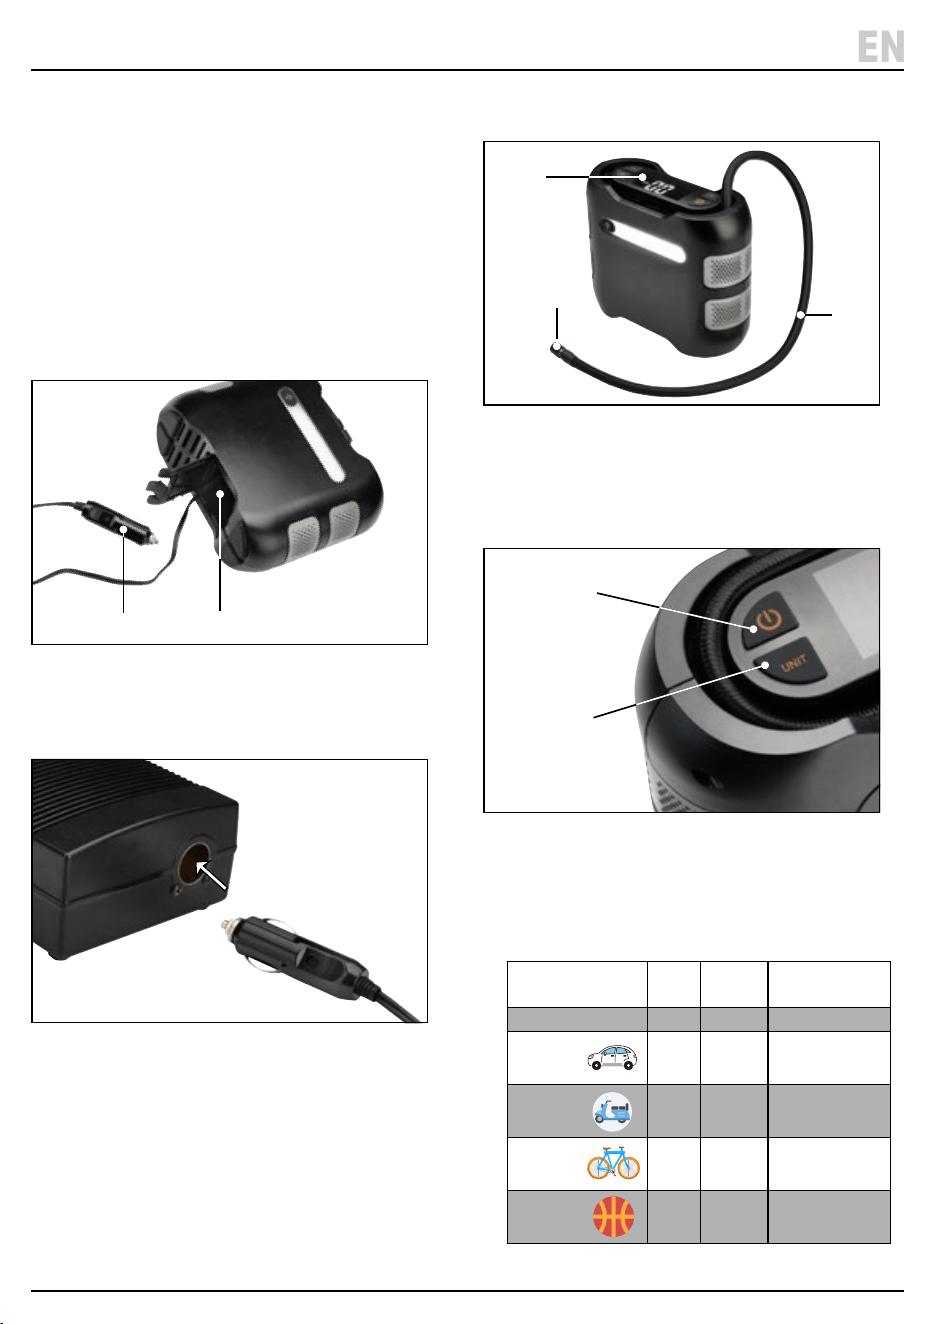
5.1 Product Overview
(1) Air compressor
(2) Power button
(3) LED display screen
(4) (+) Increase pressure button
(5) (-) Decrease pressure button
(6) Air hose
(7) Accessory kit storage compartment
(8) Unit/Mode button
(9) Torch button
(10) LED torch
(11) 12V DC adaptor & cable
(12) Adaptor & cord storage compartment
Screen
(13) Selected pressure value
(14) Selected Pressure unit (PSI/Bar/kPa)
(15) Selected preset mode
– 6 –
EN
(9)
(11)
(12)
(3)
(4)
(5)
(7)
(1)
(8)
(2)
(6)
(10)
(15)
(14)
(13)
(12)
5. Identication and Unpacking
5.3 Packaging
Keep the product packaging for the duration of the
warranty period for reference should the product need to
be returned for repair.
WARNING! Keep packaging materials out of reach of
children. Dispose of packaging correctly and
responsibly and in accordance with local regulations.
(A) 1 x Air compressor with air hose
(B) 1 x Threaded hose connector
(C) 1 x Black plastic adaptor
(D) 1 x Brass adaptor
(E) 1 x Metal needle valve adaptor
(F) 1 x 10Amp replacement fuse
Please visit drapertools.com for our full range of accessories and consumables.
– 7 –
EN
5.2 What’s in the Box?
Carefully remove the product from the packaging and
examine it for any signs of damage that may have
occurred during shipment.
Before assembling the product, lay the contents out and
check them against the parts shown below. If any part is
damaged or missing, do not attempt to use the product.
Please contact the Draper Helpline; contact details can
be found at the back of this manual.
(A)
(B) (C) (D) (E)
(F)
6. Operating Instructions
Important: Before operating this product, read and
understand all the safety instructions listed in this
manual.
Important: Always follow the manufacturer’s
recommendations for the pressure levels. For vehicles
this is often located on the inside of the door. For bikes
check the marking on the tyres. After ination, vehicle
tyres should be double-checked using a purpose-built
tyre pressure gauge complying with BSEN 12645:2014.
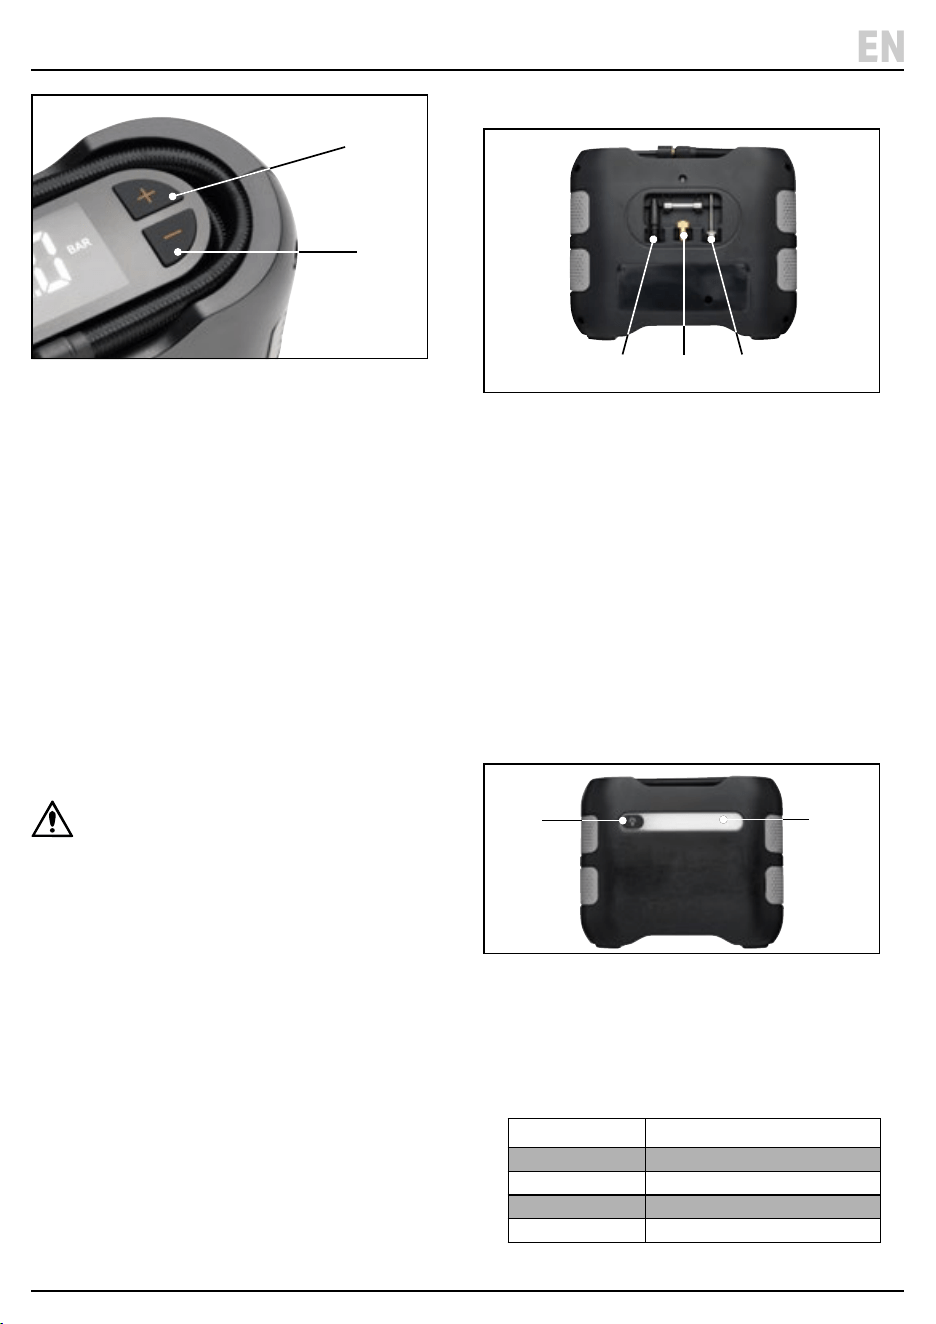
6.1 Connecting The Compressor
1 Fig.
1. Open the cord compartment (12) and take out the
adaptor and cord (11). Feed the cord through the hole
in the compartment door and close.
2 Fig.
2. Plug into the vehicle’s 12V DC power socket.
3. Turn on the vehicle’s engine while the compressor
is being used. Unplug from the power socket as soon
as the ination process is completed.
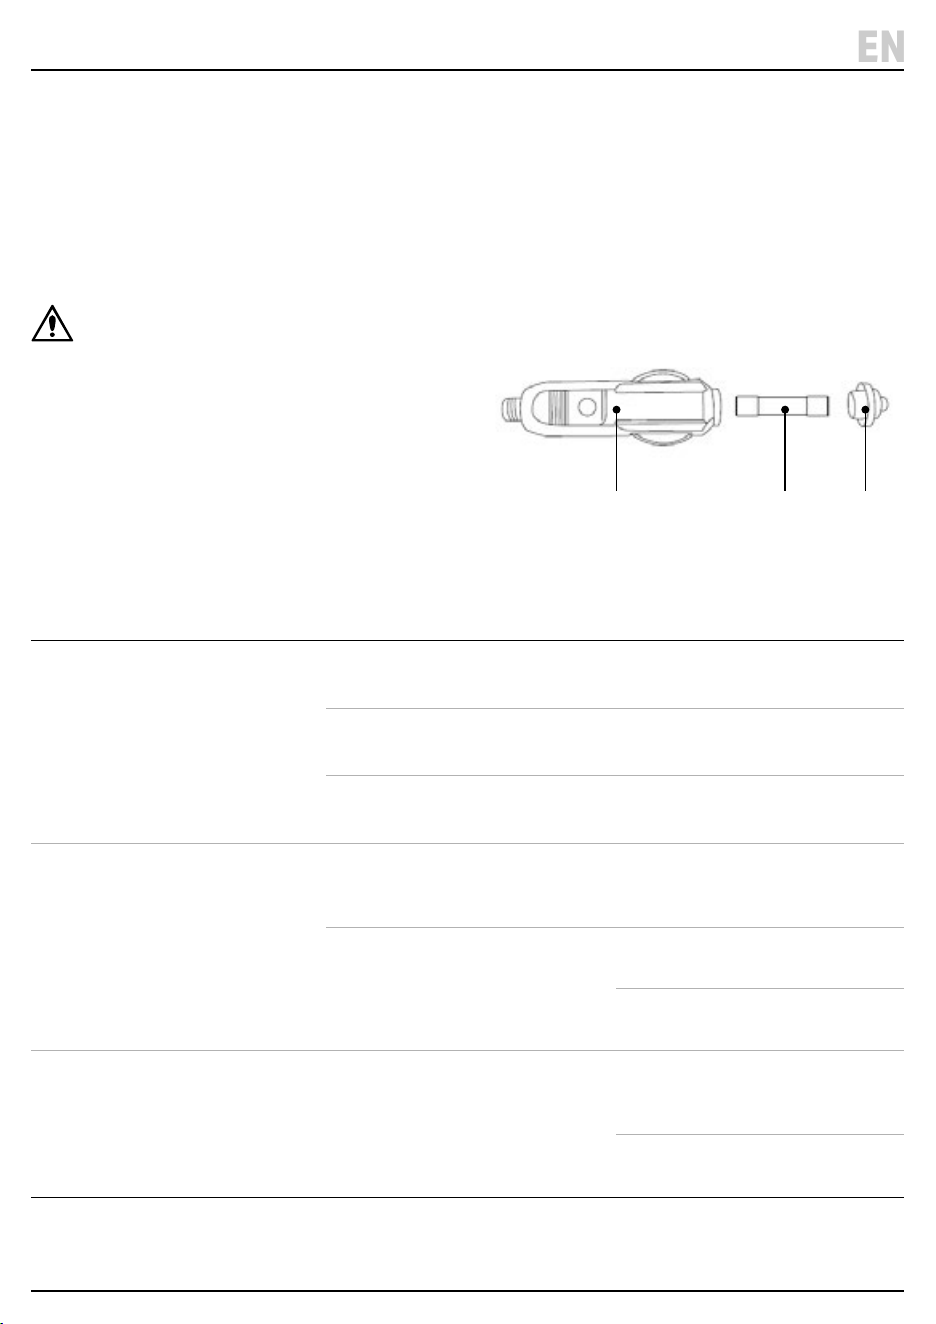
6.2 Using the Compressor
3 Fig.
1. Unwrap the air hose (6) from around the display
screen (3).
2. Screw the threaded hose connector (B) onto the
tyre valve to be inated.
4 Fig.
3. Press the POWER button (2) for 1-2 seconds to turn
on the air compressor.
4. Then press the UNIT button (8) and cycle through the
pressure level modes available.
– 8 –
EN
(11) (12)
(3)
(B)
(6)
(2)
(8)
Mode Press Default
Setting
Adjustable
Range
Manual Mode X1 30 PSI 3 – 150psi
Car X2 2.5 Bar 0.2 – 10.3 Bar
Scooter/
Motorcycle
X3 2.4 Bar 0.2 – 10.3 Bar
Bike X4 45 PSI 3 – 150 PSI
Ball X 5 8 PSI 3 – 150 PSI
(4)
(5)
6. Operating Instructions
5 Fig.
5. Use the (+) (4) and (-) (5) buttons to select the required
pressure level.
Note: On ‘manual’ mode to switch between Bar,
PSI and KPA ,press and hold the MODE button down
for 1 - 2 seconds.
6. To start inating press the POWER button. To pause
the inating process, press the POWER button again.
7. When the air pressure reaches the preset value the
compressor will automatically stop. To stop inating
before the preset pressure is reached press and hold
down the POWER button.
8. Once complete, press and hold the POWER button
until the screen switches o.
9. Disconnect the air hose from the tyre valve and
replace the valve seal or cap, if required.
WARNING! The hose connector may be hot after
use, take care when detaching it from the valve.
10. Unplug the adaptor from the vehicle’s 12V power
outlet after use and turn o the vehicle’s engine.
6.3 Auto Stop
During the inating process the compressor will
automatically stop during the following:
• 3 minute operation with pressure valve above 120PSI.
• 5 minute operation with pressure value below 5PSI.
• Operation time over 30 minutes.
Allow to cool and then press the POWER button to
restart the compressor.
6.4 Using the Ination Adaptors
6 Fig.
Use the adaptors for inating footballs, beach balls, air
beds and inatable toys.
Important: Always follow the manufacturer’s
recommendations for the pressure levels required to
inate the item.
1. Attach either the plastic (C), brass (D) or needle (E)
ination adaptor to the threaded hose connector (B),
turn until secure.
2. Operate the compressor as described in section
6.2 Using the Compressor.
6.5 Using the Torch
7 Fig.
1. Press the POWER button (2) and the LED screen will
come on.
2. Press the TORCH button (9) and the light (10) will
come on, then press to cycle through the options.
– 9 –
EN
(C)
(D)
(E)
(9)
(10)
Press Function
X1 On/Constant Beam
X 2 Slow Flashing/S.O.S
X 3 Fast Flashing/Strobe
X 4 OFF
7. Maintenance and Troubleshooting
Important: Any maintenance and repairs should be
carried out only by authorised and suitably qualied
personnel.
7.1 General Maintenance
• Keep the air hose and adaptors clean and free from
any obstructions.
• Clean the product regularly using a damp cloth.
Caution! DO NOT use aggressive chemicals to
clean the product as they may damage the
product housing.
• Store the product in a clean and dry location, out of
the reach of children.
7.2 Fuse Replacement
• A spare fuse for the adaptor is supplied with the
compressor.
1. To replace the fuse, unscrew the cap on the head of
the adaptor (11).
2. Take out the old fuse and insert the new fuse (F).
3. Ret the cap.
Problem Possible Cause Remedy
Compressor will not switch on.
Adaptor cord not plugged into
power supply.
Plug into a 12V DC socket.
Adaptor fuse has blown. Replace fuse (Refer to section 7.2).
Target pressure below actual
pressure of item to inate.
Adjust and set the correct pressure.
Compressor does not inate item.
Connection to the item’s valve is
not airtight.
Reattach the threaded hose
connector (B) and ensure it is tted
securely.
Air is escaping from the
inated item.
Check that item does not have a
puncture or any air leakage.
Check all connections are airtight
and no leaking.
The Compressor inates items
slowly.
Compressor is overheating or.
cycle time exceeding 10minutes.
Recommended cycle time is 10mins
on and 10minutes o.
Follow recommendation.
Switch o and allow to cool for
approximately 30 minutes.
– 10 –
EN
7.3 Troubleshooting
(F)(11) (Cap)
For spare parts, servicing, and repair and replacement
options, please contact the Draper Tools Product
Helpline for details of your nearest authorised agent.
Draper Tools will endeavour to hold any spare parts, if
applicable, for seven years from the date that it sells the
nal matching stock item.
Any servicing or repairs carried out by unauthorised
personnel or installation of spare parts not supplied by
Draper Tools will invalidate your warranty.
At the end of its working life, dispose of the product
responsibly and in line with local regulations. Recycle
where possible.
DO NOT dispose of this product with domestic waste;
most local authorities provide appropriate recycling
facilities.
12 months
This product is guaranteed for 12 months to be free from
defective materials and workmanship. Full details of the
warranty period can be found on the Draper Tools
Website.
Should the tool develop a fault within the warranty
period, return the complete tool to the place of purchase
or contact Draper Tools directly. Proof of purchase must
be provided.
This warranty does not apply to any consumable parts,
batteries or normal wear and tear.
It also does not cover any damage caused by misuse,
careless or unsafe handling, modications, or repairs
carried out by any personnel other than an authorised
Draper Tools repair agent.
Please note that this guarantee is in addition to and does
not aect your statutory rights.
8. Spares, Returns and Disposal
9. Warranty
10. Explanation of Symbols
– 11 –
EN
Read the instruction manual
Warning!
Keep out of the reach of children
Operating air pressure
Operating air pressure
WEEE –
Waste Electrical & Electronic Equipment
Do not dispose of Waste Electrical & Electronic Equipment
in with domestic rubbish
BAR
PSI

© Published by Draper Tools Limited© Published by Draper Tools Limited
Delta International
Delta International BV
Oude Graaf 8
6002 NL
Weert
Netherlands
Contact Details
Draper Tools
Draper Tools Limited
Hursley Road
Chandler’s Ford
Eastleigh
Hampshire
SO53 1YF
UK
Website: drapertools.com
Email: [email protected]
Product Helpline: +44 (0) 23 8049 4344
Telephone Sales Desk: +44 (0) 23 8049 4333
General Enquiries: +44 (0) 23 8026 6355
General Fax: +44 (0) 23 8026 0784
Please contact the Draper Tools Product Helpline for repair and servicing enquiries.
