
D40
DC-DC Battery Charger
User Manual V2.0
Please read this manual carefully before use and keep it for future reference.


Franch
Germany
Netherlands
Thank You!
ShenzhenPowerOakNewenerCo., Ltd.
F19, BLD No.1, Kaidaer, Tongsha RD No.168, Xili street, Nanshan, Shenzhen,
China
Web: https://www.bluettipower.com
Thank You!
Thank you for making BLUETTI a part of your family.
From the very beginning, BLUETTI has tried to stay true to a sustainable future
through green energy storage solutions while delivering an exceptional eco-friendly
experience for our homes and our world.
That's why BLUETTI makes its presence in 100+ countries and is trusted by millions
of customers across the globe.

Notice
BLUETTI's products, services, and features are subject to the agreed-upon terms and
conditions during purchase. Please note that some products, services, or features
described in this manual may not be available under your purchase contract. Unless
otherwise specified in the contract, BLUETTI makes no representations or warranties
of any kind, express or implied, with respect to the contents of this manual.
The contents of this manual are subject to change without notice. Please get the
latest version from: https://www.bluettipower.com/pages/user-guides
If you have any questions or concerns about this manual, please contact BLUETTI
support for further assistance.
About the Manual
Introduction
This manual provides information on the functionality, basic operation and safety
instructions of the D40 DC-DC Battery Charger ((hereinafter referred to as D40). Please
read and understand all instructions in this manual before use.
Symbol Conventions
This manual uses the following symbols to highlight important information:
Copyright © ShenzhenPowerOakNewenerCo., Ltd. All rights reserved.
No part of this document may be reproduced or transmitted in any form or by any
means without the prior written consent of ShenzhenPowerOakNewenerCo., Ltd.
Symbol Category
Danger / Attention
Notice
Description
It indicates a hazardous situation which, if not avoided, could
result in death or serious injury.
It indicates a potentially hazardous situation which, if not
avoided, could cause substantial damage to property and
the environment.

Contents
Safety Instructions
Packing List
Product Introduction
Product Overview
Mounting
Location Requirements
Mount the D40
Applications
Supported House Batteries
Charge the House Batteries (Battery Mode)
Charge via BLUETTI Portable Power Station
Charge via Solar Panels
Charge via Starter Battery
Replace the House Battery
Preparation
Replacement
Pause / Resume Charging
Power RV Appliances (Load Mode)
Specifications
Indicator Instructions
Troubleshooting
1
2
3
4
5
5.1
5.2
6
6.1
6.2
6.2.1
6.2.2
6.2.3
6.3
6.3.1
6.3.2
6.4
6.5
7
8
9
Appx. 1 FAQ
Appx. 2 Abbreviations
Appx. 3 FCC Statement
Appx. 4 IC Caution
06
08
09
10
11
11
11
12
12
12
12
13
15
16
16
16
16
17
19
20
20
23
23
24
24

1. Safety Instructions
This manual contains important safety and operating instructions for D40 battery
charger. Before using battery charger, read all instructions and cautionary markings on
battery charger, battery, and product using battery.
1.1. Statement
To ensure a safe operation, it's crucial to observe and adhere to the following conditions:
• Always operate or store the product in the conditions specified in this manual.
• The installation and ambient conditions must comply with all applicable codes and
regulations.
• Avoid unauthorized disassembly, component replacement, or modification of software codes.
BLUETTI shall not be liable for damages resulting from the following circumstances:
• Force majeure events such as earthquakes, fires, storms, floods, or mudslides.
• Damage caused by the customer's own transportation.
• Damage resulting from inadequate storage conditions as specified in the manual.
• Damage caused by customer negligence, improper operation, or intentional actions.
• System or hardware damage caused by third parties or customers, including but not
limited to improper handling and installation not in accordance with the instructions in
this manual.
• Damage caused by adjustments, changes, or removal of identification labels not in
compliance with this manual.
• The product doesn't fulfill power supply needs for power-reliant equipment in critical
sectors like atomic energy, aviation, medical, and other domains where safety is
paramount. BLUETTI assumes no liability for incidents involving personal safety, fire,
equipment malfunction, data loss, or any adverse aftermath resulting from using this
product with such equipment.
1.2 General Requirements
• The battery charger is intended to recharge batteries. The battery that is connected to
this product is only suitable if it complies with the given battery standard for that
battery type and is provided with a battery management system that will monitor and
control the electrical and thermal health of the battery during charging. When installing
this battery charger, the battery is to be verified as in compliance with the applicable
battery standard.
• Always turn off the power source before starting any electrical work.
• Do not clean the product with water.
• Do not disassemble the product on your own.
• Regularly inspect the product and its accessories for damage or deterioration.
EN
JUST POWER ON
06

• If the product's shell is cracked during transportation or use, do not use it and contact
BLUETTI support or your local BLUETTI dealers.
• Use of an attachment not recommended or sold by the manufacturer may result in a
risk of fire, electric shock, or injury to persons.
• Use genuine cables and accessories provided by BLUETTI.
• Keep the product away from heat sources, high temperatures.
• Do not store the product with flammable liquids, gases, or explosive materials.
• Make sure the area where you are using the product is well ventilated and spacious.
• In case of malfunction, turn off the product immediately and contact BLUETTI support
or your local BLUETTI dealers if this manual cannot adequately explain the malfunction
to you.
• Do not attempt to replace any other component of the product by anyone other than
authorized personnel. If such replacements are necessary, seek assistance from
qualified technical support personnel.
• Do not use the product in a humid environment, and make sure it's thoroughly dry
before use.
• Do not insert foreign objects into any ports and vents of the product.
• Do not put fingers or hands into the product.
• Keep the product out of reach of children and pets.
• To reduce the risk of damage to the electric plug and cord, pull the plug rather than the
cord when disconnecting the product.
• The D40 is compatible with LiFePO
4
, gel, lead-acid, and calcium batteries. Lead-acid
batteries contain corrosive and toxic liquids and can generate flammable and toxic
gases during charging or operation, which may cause an explosion. When handling
these batteries, wear safety goggles, gloves, or protective clothing, remove personal metal
items, and ensure good ventilation in the work area. Follow the battery manufacturer's user
manual for safe usage.
• Do not disconnect the cable while the product is in operation. There may still be
residual voltage present in certain parts of the product even after disconnection. Wait
for at least 5 minutes before performing any further operations.
JUST POWER ON 07
EN
1
1
1 Gray, 1 Red
1
6
6
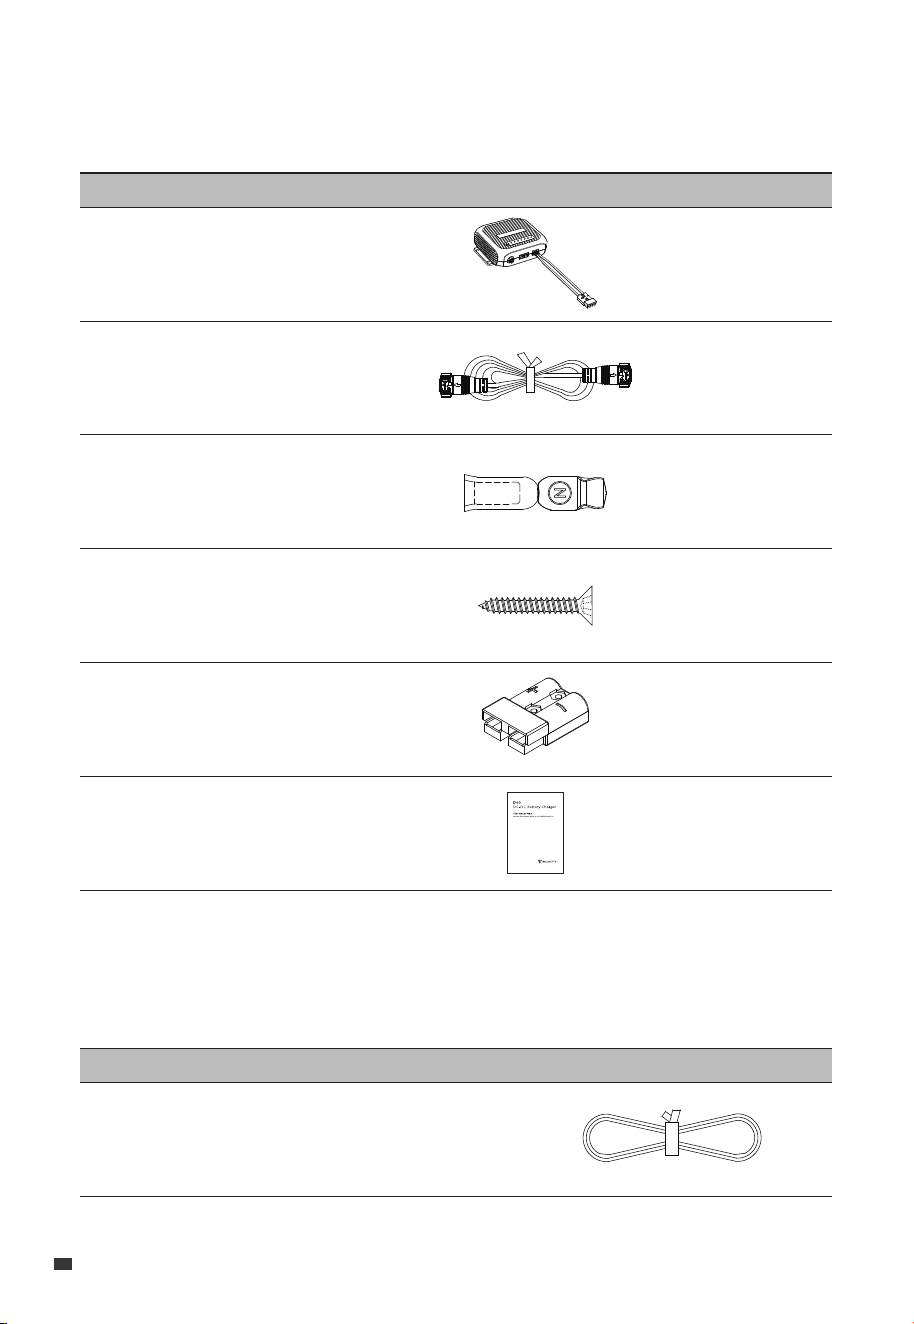
2. Packing List
Standard Accessories
Item Picture Qty.
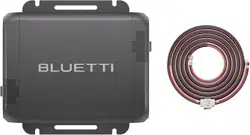
Product Documentation
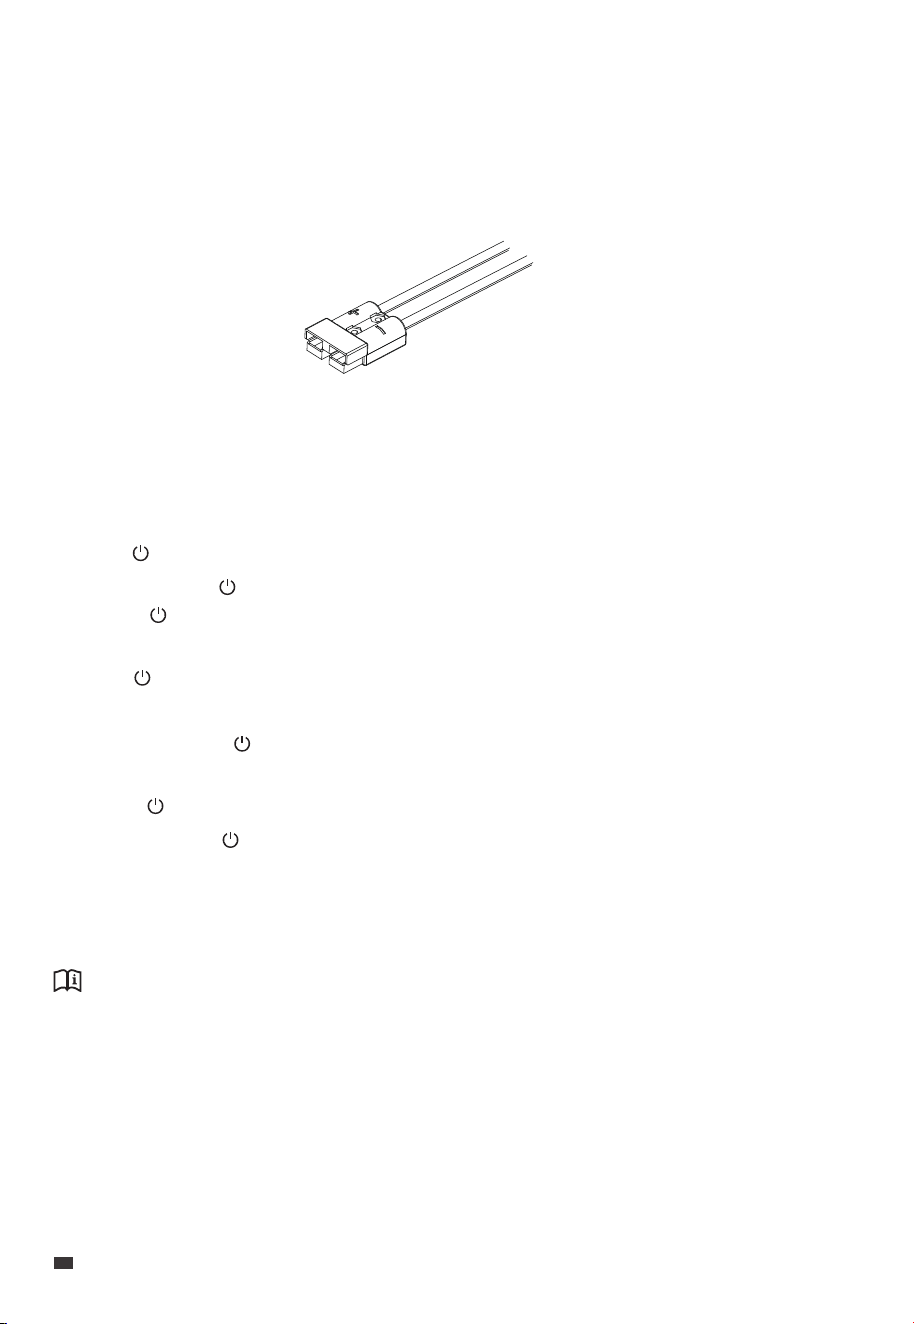
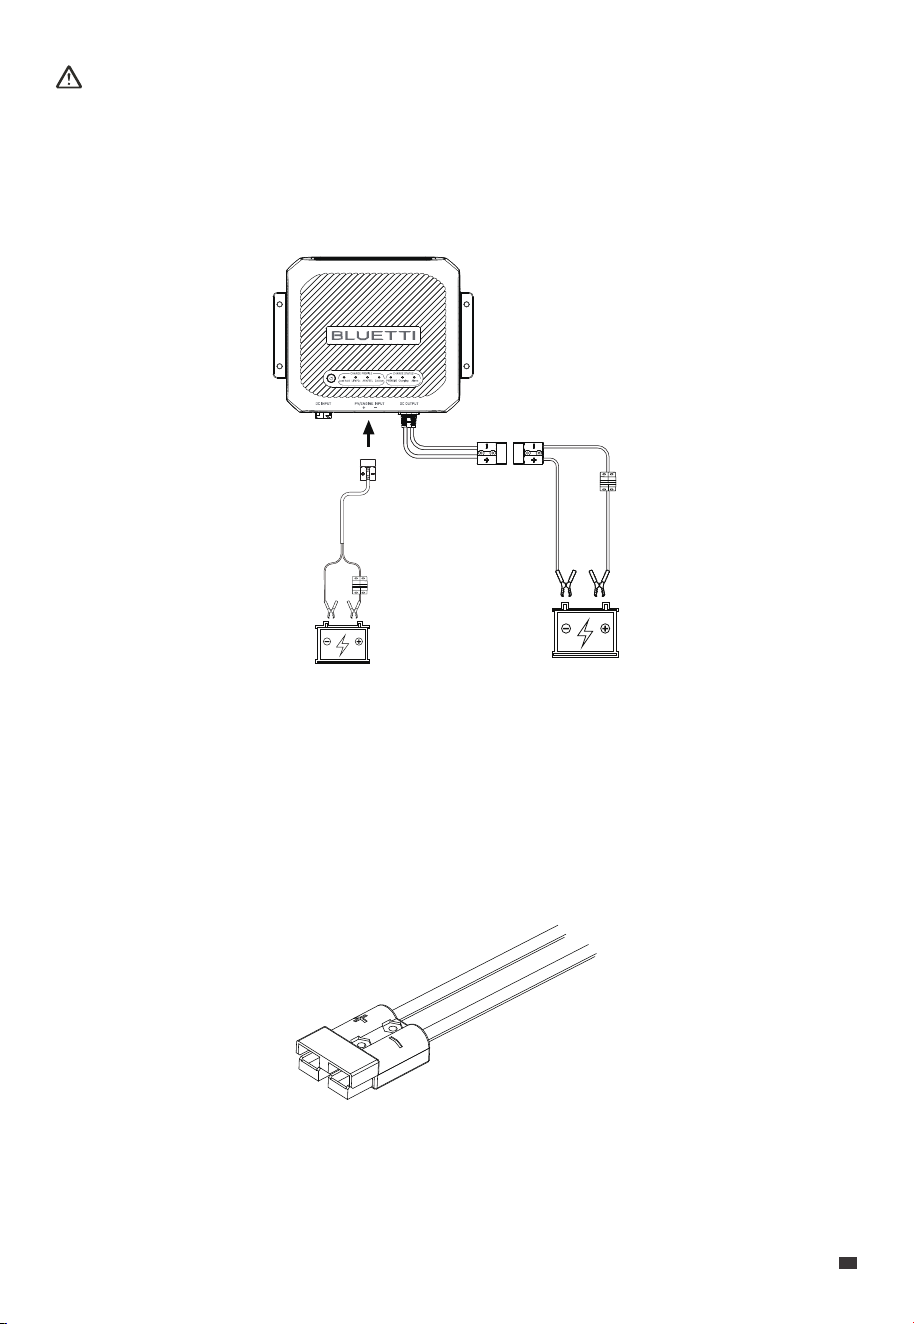
Anderson Connector
DC Power Cable
(For powering D40 from portable
power station's RV port)
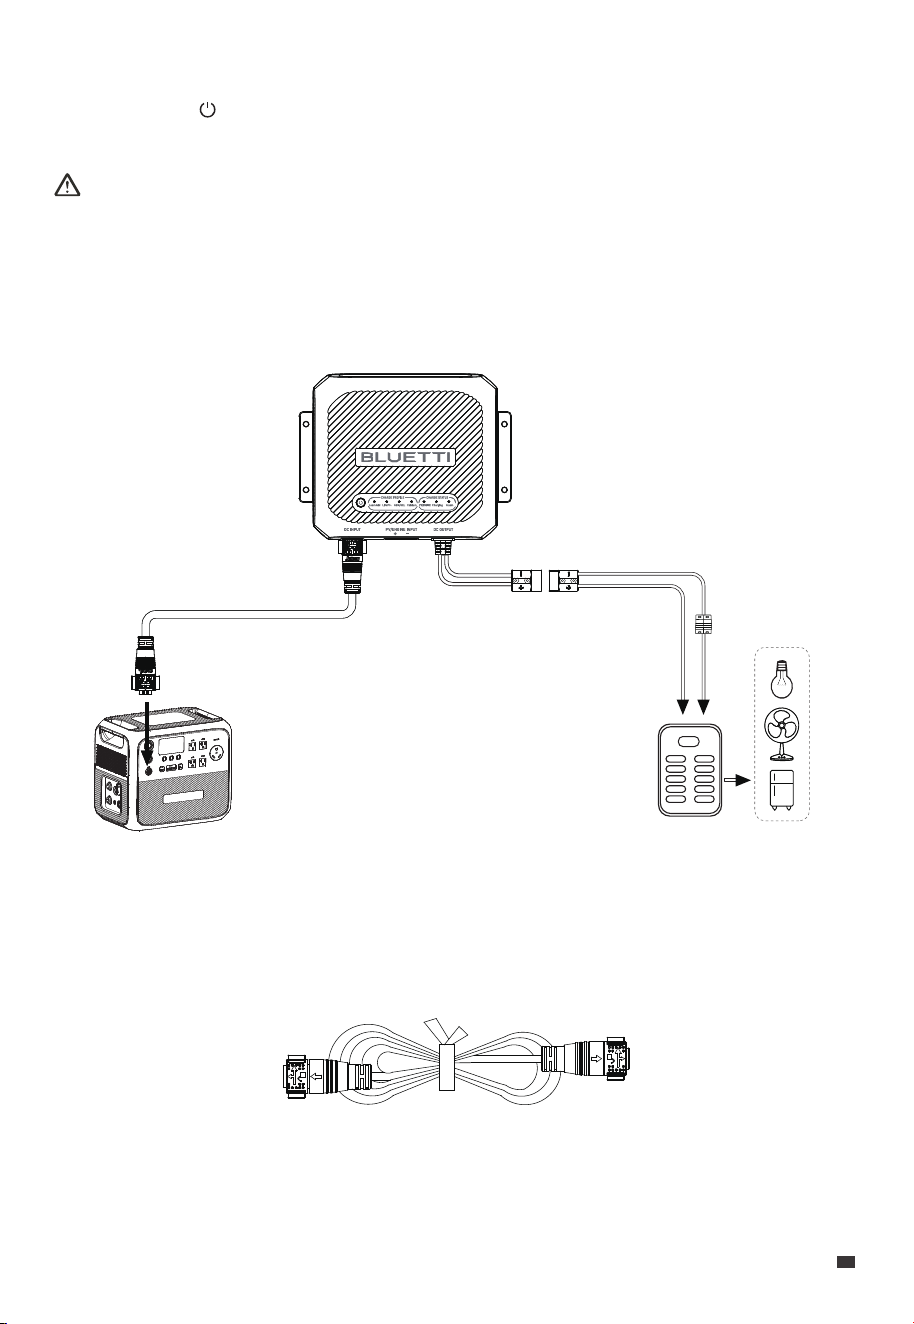
Connection Cable
(3m or 5m, for connecting solar panels, starter
batteries, and house batteries)
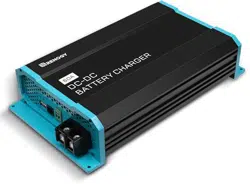
Anderson Connector Accessory
Mounting Screws
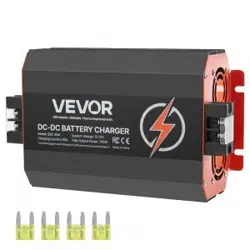
D40 DC-DC Battery Charger
Optional Accessory
(Available on the official BLUETTI website: https://www.bluettipower.com)
Item Picture
EN
JUST POWER ON
08
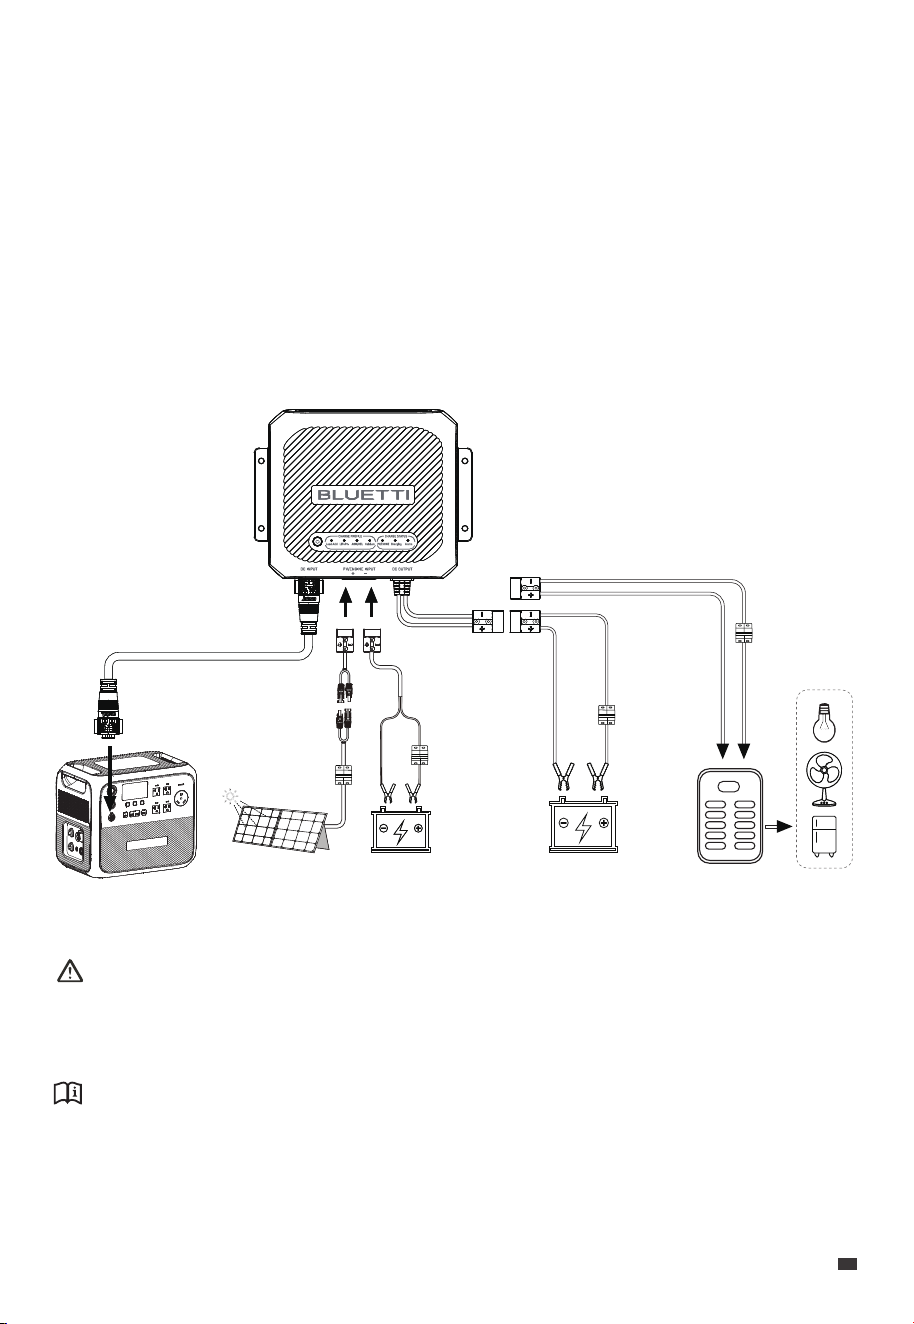
Attention:
Do not connect any ports of D40 to the grid.
Do not use solar panels that have an open circuit voltage higher than 36V.
Notice:
For safety reasons, it is recommended to install 40A circuit breakers on the PV, starter
battery, house battery, and RV appliance sides, as shown in the above figure.
3. Product Introduction
The D40 is a 400W DC-DC battery charger designed for charging various types of RV
house batteries, including LiFePO₄, AGM / gel, lead-acid, and calcium batteries. It's
compatible with BLUETTI portable power stations (via the 48V port), solar panels
(12V-36V), and starter batteries, providing a comprehensive solution for battery charging
needs. Plus, it powers up your 12V RV appliances with BLUETTI portable power stations.
When connecting to solar panels and the AC200L simultaneously, the D40 prioritizes
solar input if the open-circuit voltage of solar panels is within the range of 13V to 36V.
However, if the solar input falls below around 40W, the D40 automatically switches to
the AC200L for uninterrupted charging.
AC200L
12V Starter
Battery
12V House
Battery
Solar Panel
(MPPT)
Fuse / Breaker
(Optional)
Fuse / Breaker
(Optional)
Fuse / Breaker
(Optional)
Fuse / Breaker
(Optional)
12V DC Panel
JUST POWER ON 09
EN
1
2
3
4
5
6
7
8
9
10
11
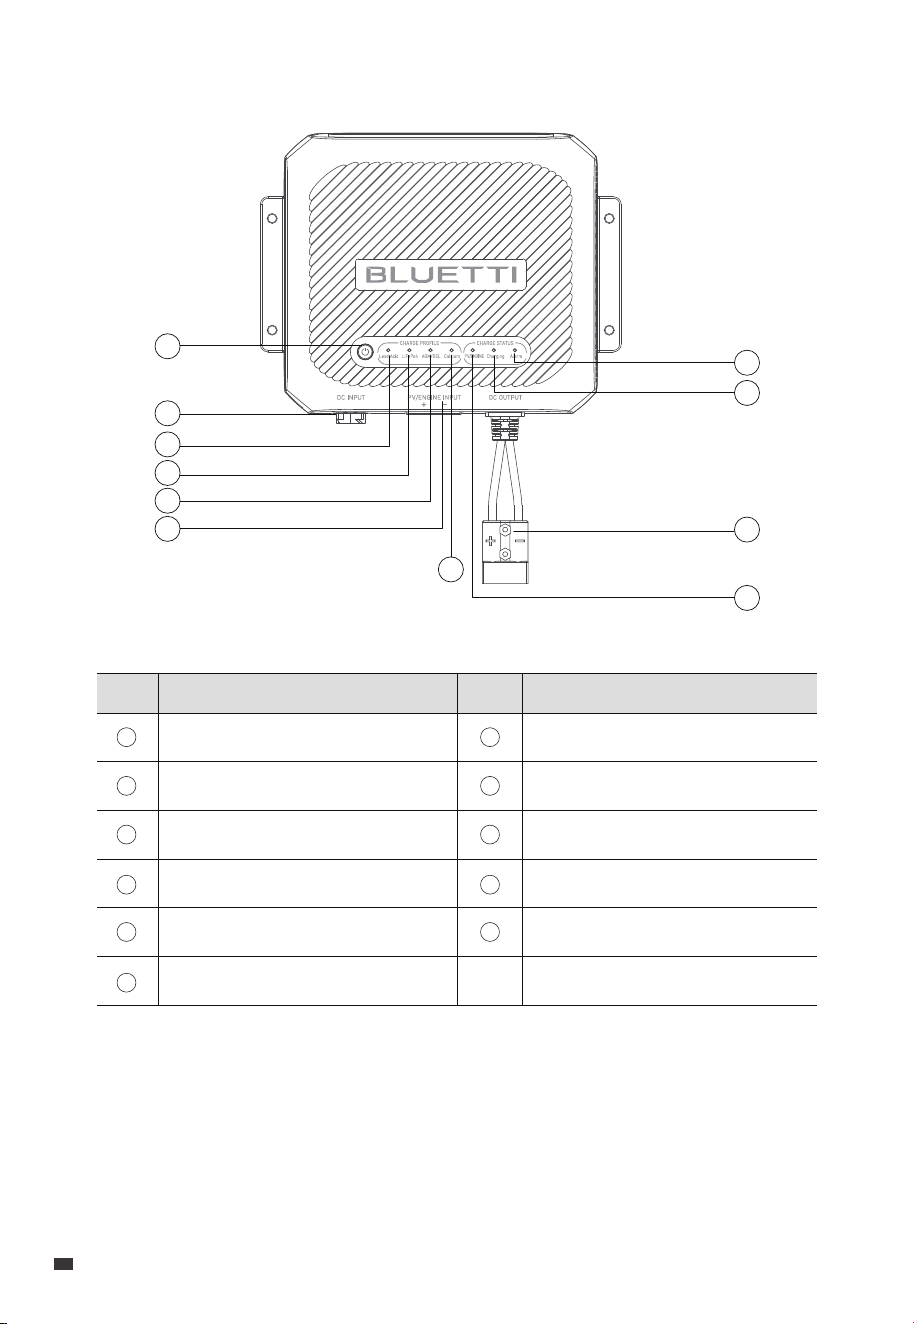
4. Product Overview
Power Button
48V DC Input
Lead-acid Indicator
LiFePO₄ Indicator
AGM / GEL Indicator
PV / ENGINE Input
Calcium Indicator
PV / ENGINE Indicator
DC Output
Charging Indicator
Alarm Indicator
ItemNo. ItemNo.
1
2
3
4
5
6
7
8
9
10
11
EN
JUST POWER ON
10
Attention:
When using the D40 near the lead-acid batteries:
1. Ensure proper ventilation.
2. Maintain a safe distance between batteries and the D40.
3. Follow the battery manufacturer's safety guidelines.
5. Mounting
Place the D40 inside the vehicle's cabin or trunk near the house battery. Make sure that
the area is not prone to moisture and avoids potential high-temperature conditions.
Securely mount the D40 on a stable surface, either horizontally or vertically.
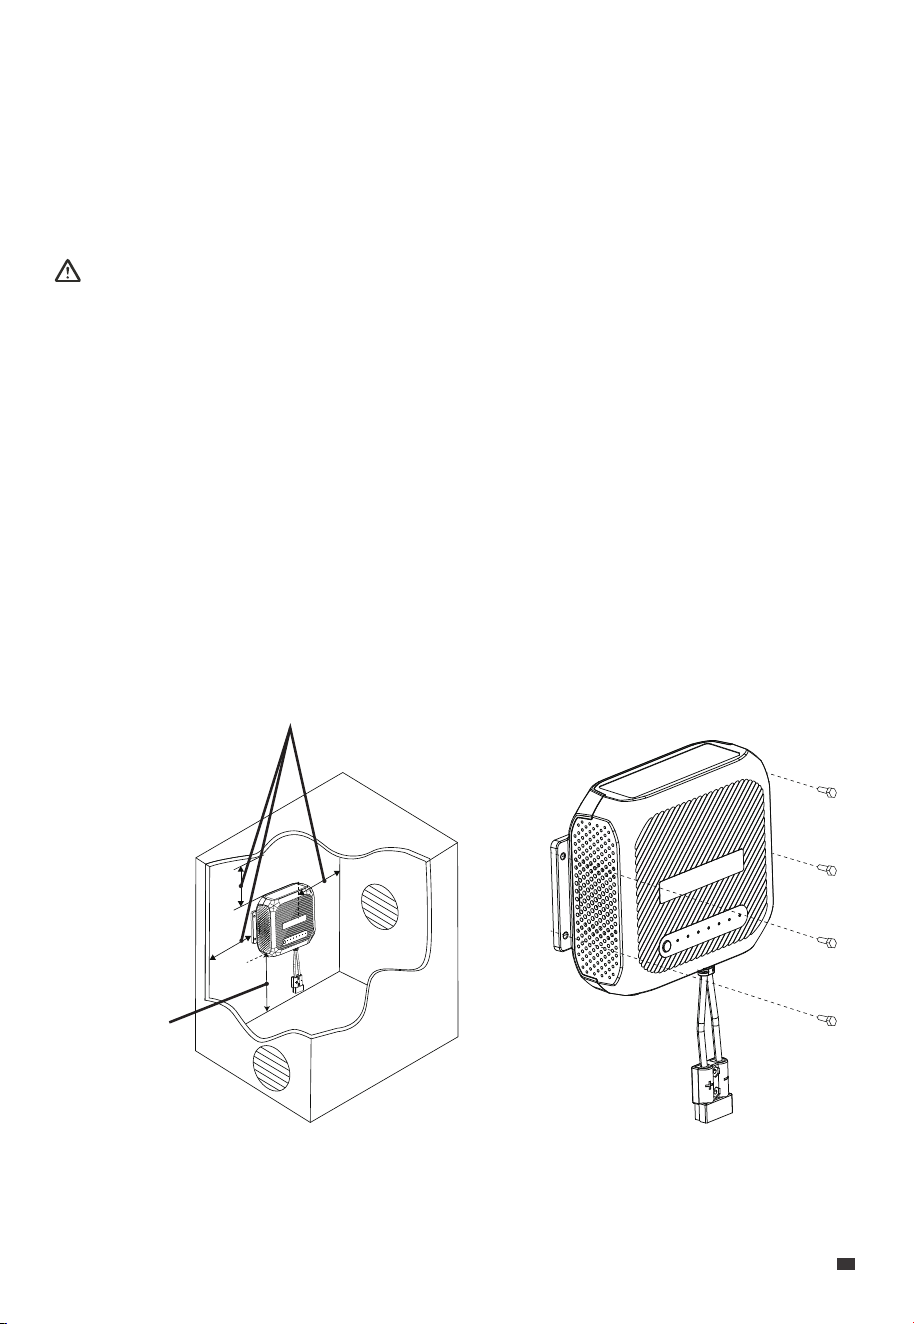
5.1 Location Requirements
1. Select an appropriate location. Provide at least 5cm (1.97in) of clearance above, to the
left, and to the right of the D40, with a minimum of 20cm (7.87in) clearance below it.
Note: Adequate ventilation is necessary for D40's optimal performance.
2. Place the D40 against the designated spot.
3. Secure the D40 in place using 4 self-tapping screws.
5.2 Mount the D40
5 cm / 1.97 in
20 cm / 7.87 in
JUST POWER ON 11
EN
Attention:
Refer to the battery manufacturer's specifications when selecting the appropriate battery
type for charging.
6. Applications
The D40 is compatible with 4 types of batteries:
6.1 Supported House Batteries
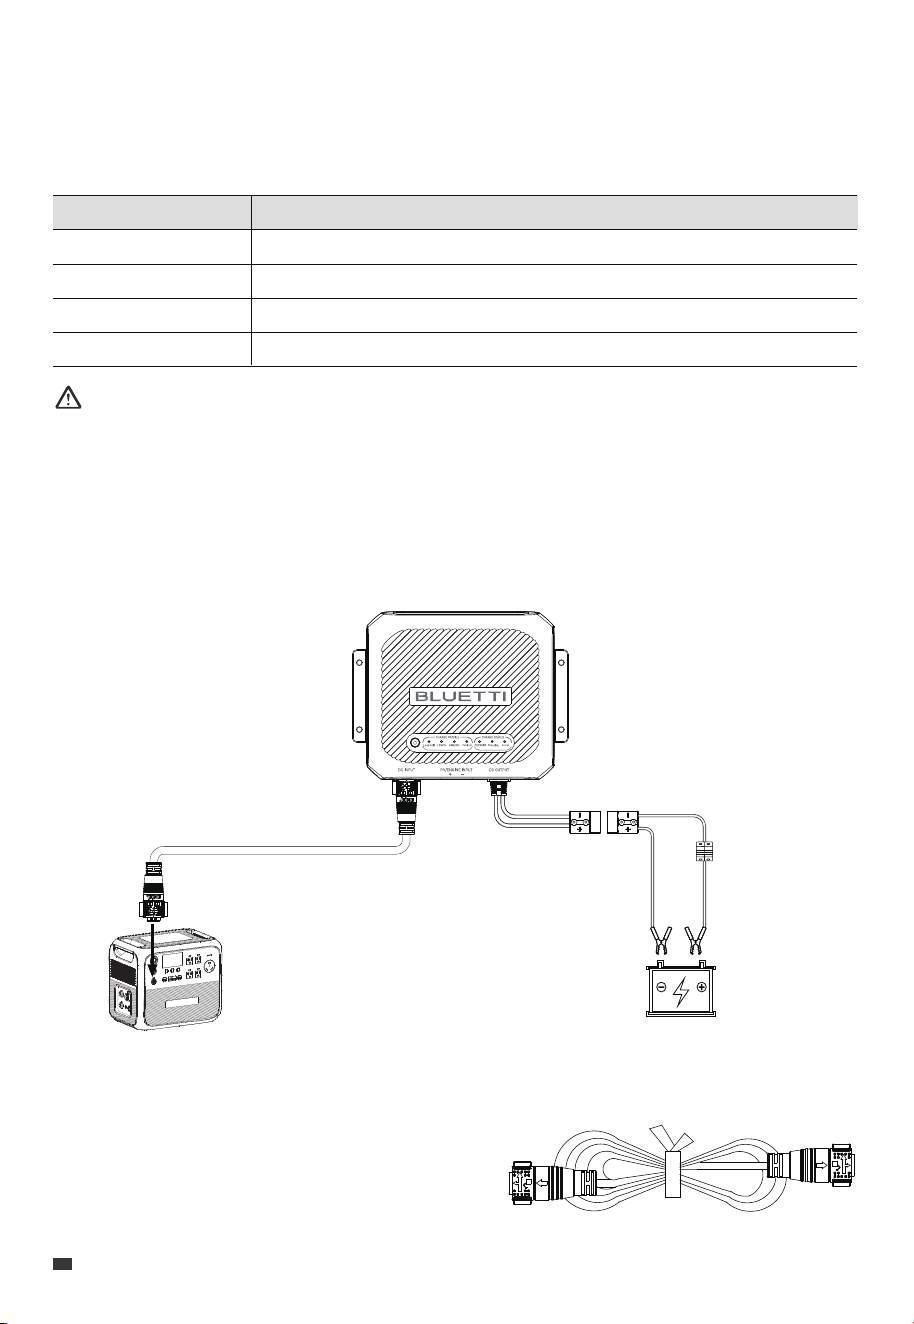
6.2.1 Charge via BLUETTI Portable Power Station
With the D40, you can charge the house battery via BLUETTI portable power station.
6.2 Charge the House Batteries (Battery Mode)
Preparation
• Check that the portable station and D40 are in good condition.
• Make sure that the house battery is compatible
with the D40.
• Prepare the necessary connection cables and
Anderson connector.
Fuse / Breaker
(Optional)
12V House Battery
AC200L
DC Power Cable
Battery Type Specifications
Lead-acid
LiFePO
4
AGM / gel
Calcium
Max. Input Voltage: 14.4V
Max. Input Voltage: 14.4V
Max. Input Voltage: 14.7V
Max. Input Voltage: 15.4V
Battery Capacity: >100Ah
Battery Capacity: >100Ah
Battery Capacity: >100Ah
Battery Capacity: >100Ah
EN
JUST POWER ON
12
Notice:
• When connecting to power stations like the AC200L, the D40 automatically turns on if the
power is on and the DC output is enabled. To avoid this, turn off the AC200L's DC output.
• When charging using BLUETTI portable power stations, you can monitor the charging
progress by reviewing the output status shown on the power station's screen.
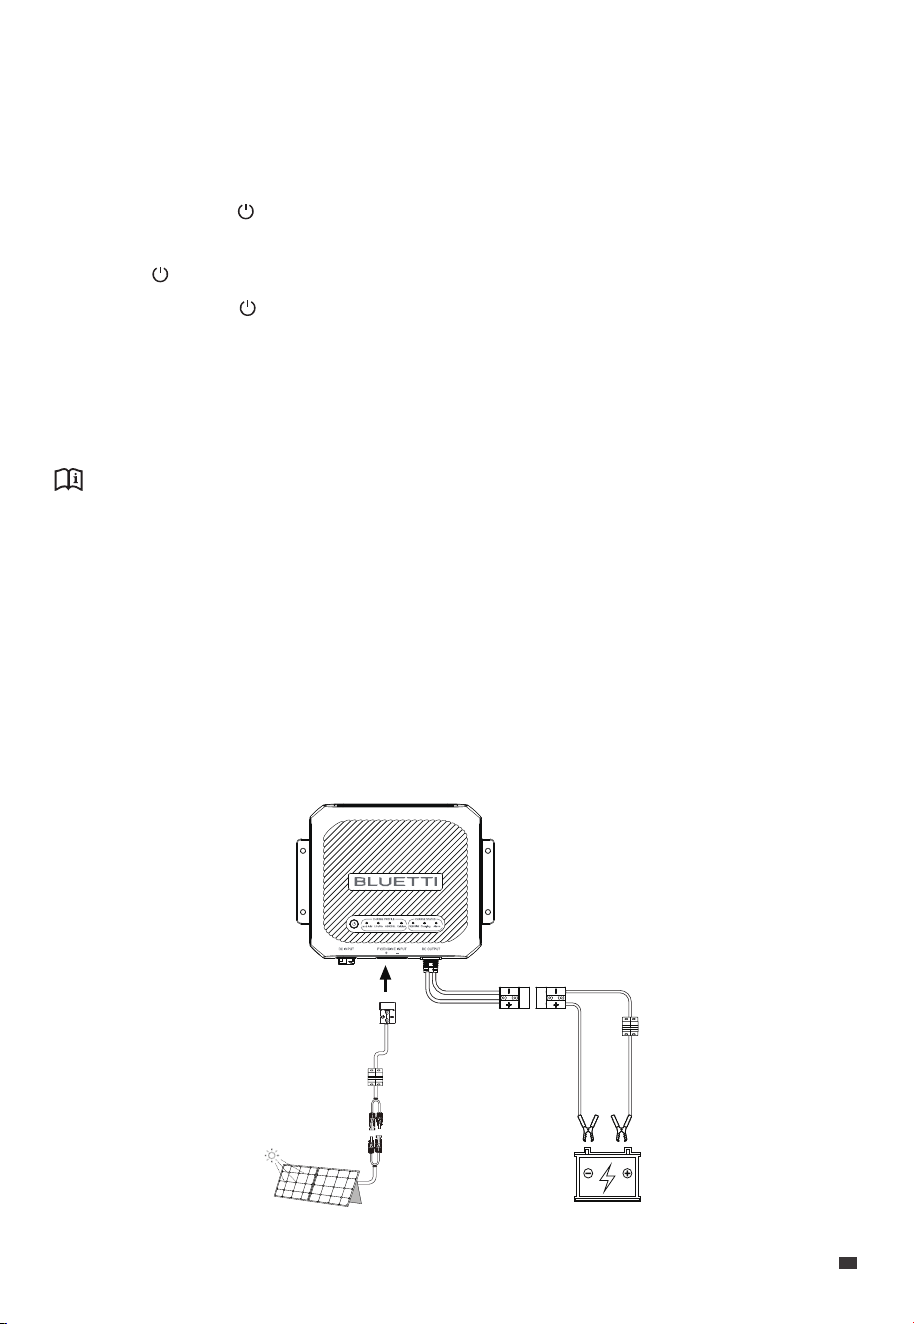
6.2.2 Charge via Solar Panels
With abundant sunlight, you can utilize high-performance solar panels to charge the
house battery.
Note: D40 has MPPT built-in, allowing it to operate efficiently and make the most of the
solar energy.
Wiring & Operations
1. Connect the AC200L and D40 via the DC Input Power Cable.
2. Turn on the AC200L and activate the DC output; this will automatically activate the D40.
3. Select the battery type for charging:
a. Press and hold ( ) for more than 3 seconds, and when the CHARGE PROFILE
indicator flashes, you can select the battery type.
b. Press ( ) to navigate and select the battery type; the corresponding indicator will flash.
c. Press and hold ( ) for more than 3 seconds until the flashing indicator becomes
steady.
4. Connect the D40's DC output to the battery using the Anderson connector, and make
sure to match the positive and negative terminals. The Charging indicator will remain lit
if the charging is successful.
Fuse / Breaker
(Optional)
12V House Battery
Fuse / Breaker
(Optional)
Solar Panel (MPPT)
JUST POWER ON 13
EN
Notice:
• Make sure that the solar panels have an open-circuit voltage of 13V-36V. The D40 automatically
turns on when the input voltage reaches 13V or higher and turns off when the voltage falls
below 11.7V.
• When connected to solar panels, the D40 supports a maximum input current of 20A and
a maximum output current of 30A.
• When both solar panels and the power station are connected, the D40 prioritizes solar
input when the solar input power reaches or exceeds around 40W, smoothly switching to
the power station below around 40W.
Preparation
• Check that the solar panels and D40 are in good condition, and that the PV input
voltage is in the 12V-36V range. The PV input activates automatically when the voltage
reaches 13V.
• Make sure that the house battery is compatible with the D40.
• Assemble the necessary connection cables and connectors correctly.
Wiring & Operations
1. Connect the solar panel to the D40 via the Anderson connector (red), ensuring correct
polarity.
Make sure that the PV input voltage falls within 12V to 36V. The D40 automatically
activates once the voltage reaches 13V.
2. Press ( ) to navigate until the PV/ENGINE indicator in CHARGE STATUS section flashes.
3. Press and hold ( ) for more than 3 seconds until the indicator turns off. Then, press
and hold ( ) for another 3 seconds until the indicator becomes steady, indicating the
power supply has switched to the PV.
4. Press ( ) again to navigate the flashing indicator back to the CHARGE PROFILE section.
5. Select the battery type for charging:
a. Press and hold ( ) for more than 3 seconds, and when the CHARGE PROFILE
indicator flashes, you can select the battery type.
b. Press ( ) to navigate and select the battery type; the corresponding indicator will flash.
c. Press and hold ( ) for more than 3 seconds until the flashing indicator becomes steady.
6. Connect the D40's DC output to the battery using the Anderson connector, and make
sure to match the positive and negative terminals. The Charging indicator will remain lit
if the charging is successful.
EN
JUST POWER ON
14
Attention:
• Do not use solar panels that have an open circuit voltage higher than 36V.
• Non-waterproof solar panels may experience reduced efficiency if exposed to prolonged rain.
6.2.3 Charge via Starter Battery
Moreover, with the D40, you can charge the house battery using the RV starter battery.
Preparation
• Check that the starter battery has a voltage of 11.7V or higher and that the D40 is in
good condition.
• Make sure that the house battery is compatible with the D40.
• Assemble the necessary connection cables and connectors correctly.
Fuse / Breaker
(Optional)
Fuse / Breaker
(Optional)
12V Starter Battery 12V House Battery
JUST POWER ON 15
EN

6.3.1 Preparation
Make sure that the replacement battery is compatible with the D40.
6.3.2 Replacement
1. Press and hold ( ) for more than 3 seconds until the battery type indicator starts
flashing. Charging stops.
2. Disconnect the battery from the D40.
3. Connect the replacement battery to the D40's DC output.
4. Press ( ) to navigate and select the new battery type. The corresponding indicator
flashes.
5. Press and hold ( ) for more than 3 seconds until the flashing indicator becomes
steady. The Charging indicator will remain lit if the charging is successful.
6.3 Replace the House Battery
• Pause charging
Press and hold ( ) for more than 3 seconds until the battery type indicator starts
flashing. Charging stops. If no further action is taken within 1 minute, the flashing
indicator goes off, leaving the power indicator on.
Note: To turn off all indicators, unplug all inputs. When using PV or starter battery as the
input source and the battery is charged, additionally press and hold ( ) for more than 3
seconds.
6.4 Pause / Resume Charging
Wiring & Operations
1. Connect the Anderson connector (red) on the starter battery to the PV/ENGINE input.
The D40 will activate when the voltage of the starter battery reaches or exceeds 11.7V.
2. Press ( ) to navigate until the PV/ENGINE indicator in CHARGE STATUS section flashes.
3. Press and hold ( ) for more than 3 seconds until the indicator turns off, indicating the
power supply has switched to the starter battery.
4. Press ( ) again to navigate the flashing indicator back to the CHARGE PROFILE section.
5. Select the battery type for charging:
a. Press and hold ( ) for more than 3 seconds, and when the CHARGE PROFILE
indicator flashes, you can select the battery type.
b. Press ( ) to navigate and select the battery type; the corresponding indicator will flash.
c. Press and hold ( ) for more than 3 seconds until the flashing indicator becomes steady.
6. Connect the D40's DC output to the battery using the Anderson connector, and make
sure to match the positive and negative terminals. The Charging indicator will remain lit
if the charging is successful.
EN
JUST POWER ON
16
Attention:
Match the selected battery type with the one being charged. BLUETTI shall not be liable
for any damages resulting from incorrect selections.
• Resume charging
Press and hold ( ) for more than 3 seconds, the D40 will resume charging using the
previously selected battery type and charging mode.
With the D40, you can also power your RV appliances via BLUETTI portable power
stations like the AC200L.
6.5 Power RV Appliances (Load Mode)
Preparation
• Check that the portable station and D40 are in good condition.
• Prepare the necessary connection cables and Anderson connector.
DC Input Power Cable
AC200L
12V DC Panel
Fuse / Breaker
(Optional)
JUST POWER ON 17
EN

Notice:
• When connecting to power stations like the AC200L, the D40 automatically turns on if the
power is on and the DC output is enabled. To avoid this, turn off the AC200L's DC output.
• When charging using BLUETTI portable power stations, you can monitor the charging
progress by reviewing the output status shown on the power station's screen.
• In this mode, the D40 produces 12V DC output.
Attention:
• Before powering on, make sure that the RV appliances are connected with the correct
polarity.
• The PV / ENGINE input is unavailable.
Wiring & Operations
1. Connect the AC200L and D40 via the DC Power Cable.
2. Connect the RV appliances to the D40's DC output, and make sure to match the
positive and negative terminals.
3. Turn on the AC200L and activate the DC output; this will automatically activate the D40.
4. Enable the Load Mode:
a. Press and hold ( ) for more than 3 seconds until the CHARGE PROFILE indicator
flashes.
b. Press ( ) to navigate until all indicators flash.
c. Press and hold ( ) for more than 3 seconds until the flashing indicators become
steady, indicating the Load Mode is enabled.
The Charging indicator will remain lit when the RV appliances are successfully powered.
EN
JUST POWER ON
18

7. Specifications
Charging Power
Weight
Dimensions (L × W × H)
Working Temperature
Storage Temperature
Working Humidity
Noise
Working Altitude
Protection Grade
Model D40
400 W
Approx. 2 kg / 4.4 lbs
232.7 mm × 180.7 mm × 69.2 mm / 9.2 in × 7.1 in × 2.7 in
-20°C to 50°C / -4°F to 122°F
10% to 90%
43 dB Max.
Up to 2,000 m / 6,561 ft
IP20
-20°C to 45°C / -4°F to 113°F
Voltage
DC Output
48V DC (AC200L)
PV / 12V Starter Battery
45V to 60VDC
12V to 36VDC, 20A Max.
DC Input
30A Max. (Connected to solar panel)
20A Max. (Connected to AC200L)
Current
14.4V Max.
14.4V Max.
14.7V Max.
15.4V Max.
When a Lead-acid battery is connected to the output , and set
to the Lead-acid mode
When a LiFePO
4
battery is connected to the output , and set to
the LiFePO
4
mode
When a AGM / gel battery is connected to the output , and set
to the AGM / gel mode
When a Calcium battery is connected to the output , and set to
the Calcium mode
JUST POWER ON 19
EN
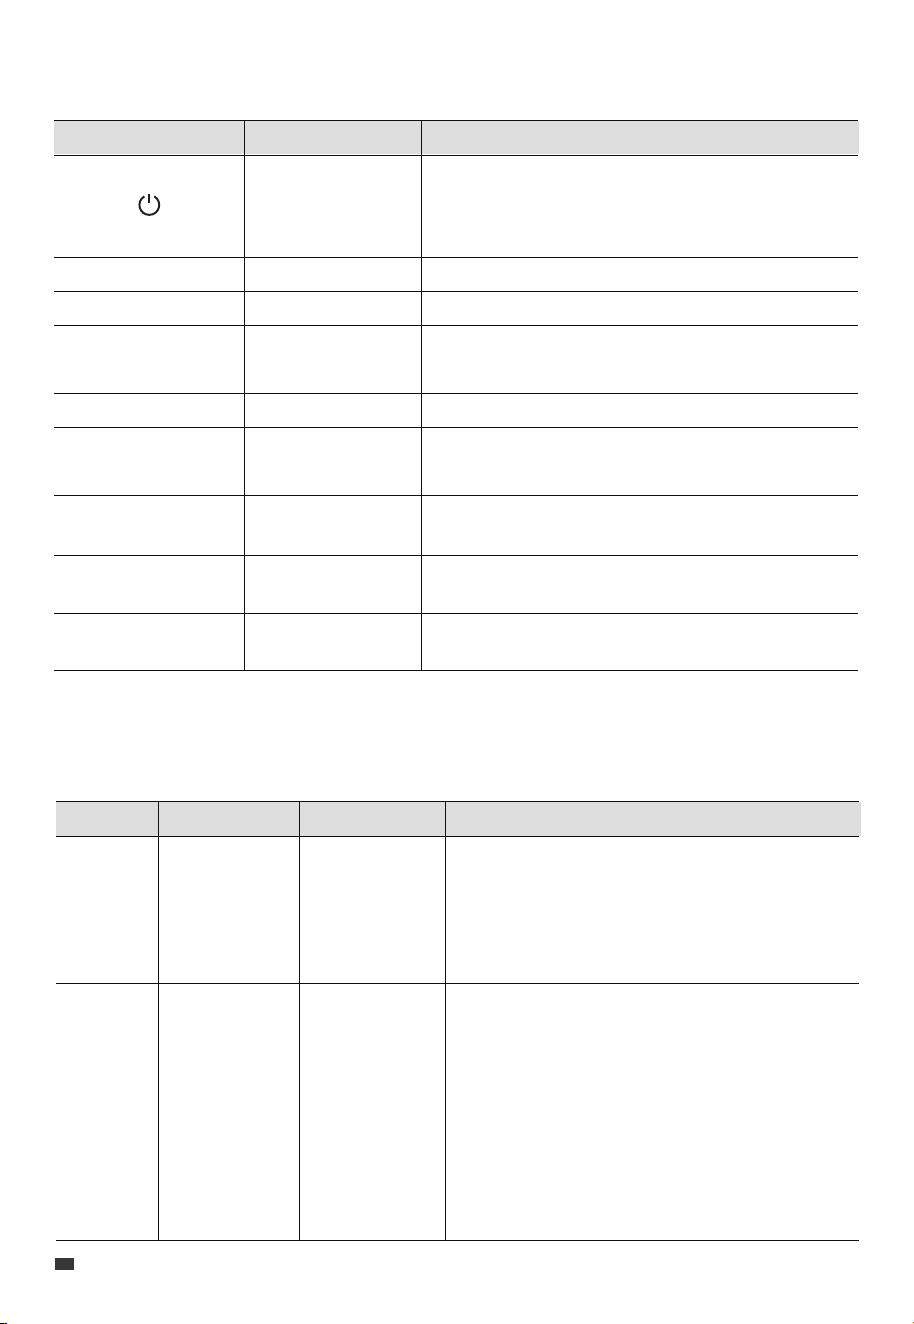
8. Indicator Instructions
Indicator Function Explanation
/
/
/
Lead Acid
LiFePO
4
Calcium
It lights up when the 48V DC input voltage exceeds
36V or the PV/ENGINE input voltage exceeds 12V,
indicating that the D40 is in standby mode;
otherwise, it remains off.
It lights up when charging a lead-acid house battery.
It lights up when charging a LiFePO
4
house battery.
It lights up when charging an AGM / gel house
battery.
It lights up when charging a calcium house battery.
/
/
AGM/GEL
Powering the
RV appliances
Lead Acid + LiFePO
4
+ AGM/GEL + Calcium
9. Troubleshooting
Fault Symptom Reason Solution
1. Check that the Anderson connector is connected
to the PV/ENGINE INPUT terminal with the correct
polarity.
2. Fix the connections, and check if the D40
functions properly. If the symptom persists, please
contact BLUETTI support for assistance.
1. Check that the Anderson connector is connected
to the DC OUTPUT terminal with the correct
polarity.
2. Fix the connections, and check if the D40
functions properly.
3. Make sure the D40 provides an output voltage
above 9V. If the symptom persists, please contact
BLUETTI support for assistance.
The polarity of
your
PV/ENGINE
INPUT is reversed.
The polarity of
DC OUTPUT is
reversed;
D40's output
voltage is below
9V;
RV house battery
is not connected
properly.
All indicators
off.
Alarm indicator
on;
Charging
indicator blinks
slowly (@
approx. 1.5Hz).
Reverse
Polarity
Protection
(Input)
Reverse
Polarity
Protection
(Output) /
Output
Undervoltage
Protection /
RV House
Battery
Connection
Abnormal
On: charge via solar panels
On & then off: charge via starter battery
It lights up when there is a malfunction. Please refer
to Chapter 9. Troubleshooting for details.
It lights up when the house battery is charging and
blinks slowly (@ approx. 1.0Hz) when fully charged.
/
Alarm indicator
PV/ENGINE
Alarm
Charging status
indicator
Charging
Display power
supply status
Battery Mode
EN
JUST POWER ON
20

Fault Symptom Reason Solution
1. Unplug the cable from the PV/ENGINE INPUT port.
2. Check the unit for damage, if damaged, replace
with a new unit.
3. Make sure the voltage on the PV / ENGINE INPUT
port falls within 12V-36V.
4. Reestablish the connection and check if the D40
works properly. If the symptom persists, please
contact BLUETTI support for assistance.
The voltage on
PV/ENGINE
INPUT exceeds
38V, which may
cause equipment
damage.
Charging
indicator off;
Alarm indicator
blinks rapidly (@
approx. 3Hz).
Input
Overvoltage
Check the battery voltage.
• If the voltage difference exceeds 0.4V, replace the
battery and attempt charging again. If charging is
still unsuccessful, please contact BLUETTI support for
assistance.
• If the voltage is below 0.4V, please also contact
BLUETTI support for assistance.
The battery
voltage exceeds
the maximum
input voltage by
0.4V.
Charging
indicator off;
Alarm indicator
on;
Battery indicator
blinks slowly (@
approx. 3Hz).
Battery
Overvoltage
Protection
1. Wait for 5 minutes. If the D40 resumes operation
after cooling down, it suggests inadequate
ventilation in the current location.
2. Power off the D40 and any related devices.
3. Disconnect all cables and remove the D40.
4. Move the D40 to a suitable location. If the
symptom persists, please contact BLUETTI support
for assistance.
When the unit's
temperature
reaches 70°C /
158°F, the fan
automatically
activates; when it
reaches 102°C /
215.6°F or if the
temperature falls
below 0°C / 32°F
when charging
with a LiFePO
4
battery, the
temperature
protection will be
triggered.
Charging
indicator off;
Alarm indicator
blinks slowly (@
approx. 1.5Hz).
Temperature
Protection
1. Check the LiFePO
4
battery and connections for
any abnormalities. Replace the battery and fix the
connections.
2. Press ( ) to restore the output. If the symptom
persists, please contact BLUETTI support for
assistance.
The voltage of
LiFePO
4
battery
drops suddenly.
D40 will stop
charging
Charging
indicator off;
Alarm indicator
on;
LiFePO
4
indicator
blinks rapidly (@
approx. 1.5Hz).
LiFePO
4
BMS
Protection
1. If charging doesn’t resume within 1 minute,
restart the unit.
2. If the symptom persists, please contact BLUETTI
support for assistance.
Alarm indicator
steady
Software
and
Hardware
Overcurrent
/
JUST POWER ON 21
EN

/
/
Fault Symptom Reason Solution
Restart the unit. If the symptom persists, please
contact BLUETTI support for assistance.
1. Wait for 5 minutes. If the D40 resumes operation
after cooling down, it suggests inadequate
ventilation in the current location.
2. Power off the D40 and any related devices.
3. Disconnect all cables and remove the D40.
4. Move the D40 to a suitable location. If the
symptom persists, please contact BLUETTI support
for assistance.
Charging
indicator off;
Alarm indicator
on;
Battery indicator
blinks slowly (@
approx. 3Hz).
Output
Overvoltage
Protection
When the unit's
temperature
reaches 70°C /
158°F, the fan
automatically
activates; when it
reaches 102°C /
215.6°F, the
temperature
protection will be
triggered.
Charging
indicator off;
Alarm indicator
blinks slowly (@
approx. 1.5Hz).
Temperature
Protection
Please check whether the output connection is a
battery, if so, please replace it with a load
connection in time.
Charging
indicator blinks
slowly (@ approx.
1.0Hz).
Battery
Connection
Protection
/
1. Reduce the load if necessary.
2. Check that the Anderson connector is connected
to the DC OUTPUT terminal with the correct
polarity.
3. Fix the connections, and check if the D40
functions properly.
4. Restart the unit. If the symptom persists, please
contact BLUETTI support for assistance.
Alarm indicator
steady
Reverse
Polarity
Protection
(Output) /
Overcurrent
Protection
Load Mode
EN
JUST POWER ON
22

Appx. 2 Abbreviations
• DC: Direct Current
• PV: Photovoltaic
• BMS: Battery Management System
Appx. 1 FAQ
Tips for maintaining the D40 DC-DC battery charger:
To keep the D40 charger in good condition:
a. Regularly inspect the connections.
b. Keep it clean and dry.
c. Ensure proper ventilation.
What kind of solar panels are compatible with the D40 charger?
Before connecting the solar panels, please make sure they meet the following
requirements:
a. Open circuit voltage: 13V-36V
b. Equipped with an MC4 connector. If the solar panel comes with an Anderson
connector, please prepare an Anderson to MC4 cable.
Note: The actual charging power may vary depending on factors such as weather
conditions, solar availability, and the orientation of the solar panels.
Q1:
A:
Q2:
A:
JUST POWER ON 23
EN

Appx. 3 FCC Statement
This equipment has been tested and found to comply with the limits for a Class B digital
device, pursuant to part 15 of the FCC Rules. These limits are designed to provide reasonable
protection against harmful interference in a residential installation. This equipment
generates, uses and can radiate radio frequency energy and, if not installed and used in
accordance with the instructions, may cause harmful interference to radio communications.
However, there is no guarantee that interference will not occur in a particular installation.
If this equipment does cause harmful interference to radio or television reception, which
can be determined by turning the equipment off and on, the user is encouraged to try to
correct the interference by one or more of the following measures:
—Reorient or relocate the receiving antenna.
—Increase the separation between the equipment and receiver.
—Connect the equipment into an outlet on a circuit different from that to which the
receiver is connected.
—Consult the dealer or an experienced radio/TV technician for help.
This device contains licence-exempt transmitter(s)/receiver(s) that comply with Innovation,
Science and Economic Development Canada’s licence-exempt RSS(s). Operation is subject
to the following two conditions:
(1) This device may not cause interference.
(2) This device must accept any interference, including interference that may cause
undesired operation of the device.
RF exposure statement: The equipment complies with IC Radiation exposure limits set
forth for uncontrolled environments. This equipment should be installed and operated
with a minimum distance of 20cm between the radiator and your body.
CAN ICES-3 (B)/NMB-3(B) (Canada)
This Class B digital apparatus complies with Canadian ICES-003.
Appx. 4 IC Caution
EN
JUST POWER ON
24