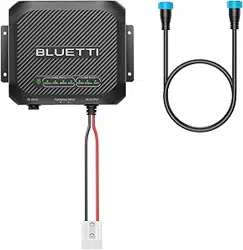

CHARGER 1
DC-DC Charger
User Manual V1.0
Please read this manual carefully before use and keep it for future reference.

Franch
Germany
Netherlands
Thank You!Thank You!
Thank you for making BLUETTI a part of your family.
From the very beginning, BLUETTI has tried to stay true to a sustainable future
through green energy storage solutions while delivering an exceptional eco-friendly
experience for our homes and our world.
That's why BLUETTI makes its presence in 100+ countries and is trusted by millions
of customers across the globe.
ShenzhenPowerOakNewenerCo., Ltd.
F19, BLD No.1, Kaidaer, Tongsha RD No.168, Xili street, Nanshan, Shenzhen, China
Web: https://www.bluettipower.com
Copyright © ShenzhenPowerOakNewenerCo., Ltd. All rights reserved.
No part of this document may be reproduced or transmitted in any form or by any
means without the prior written consent of ShenzhenPowerOakNewenerCo., Ltd.
Notice
BLUETTI's products, services, and features are subject to the agreed-upon terms and
conditions during purchase. Please note that some products, services, or features
described in this manual may not be available under your purchase contract. Unless
otherwise specified in the contract, BLUETTI makes no representations or warranties
of any kind, express or implied, with respect to the contents of this manual.
The contents of this manual are subject to change without notice. Please get the
latest version from: https://www.bluettipower.com/pages/user-guides
If you have any questions or concerns about this manual, please contact BLUETTI
support for further assistance.
About the Manual
Introduction
This manual provides information on the functionality, basic operation, and safety
instructions of the CHARGER 1 DC-DC Charger (hereinafter referred to as CHARGER 1).
Please read and understand all instructions in this manual before use.
Symbol Conventions
This manual uses the following symbols to highlight important information:
Symbol Category
Danger / Attention
Notice
Description
It indicates a hazardous situation which, if not avoided, could
result in death or serious injury.
It indicates a potentially hazardous situation which, if not
avoided, could cause substantial damage to property and
the environment.

Contents
Safety Instructions
Packing List
Product Introduction
Product Overview
Mounting
Location Requirements
Mount the CHARGER 1
Applications
Compatible BLUETTI Portable Power Stations
Wire up Your Charger
Specifications
Indicator Instructions
Troubleshooting
1
2
3
4
5
5.1
5.2
6
6.1
6.2
7
8
9
Appx. 1 FAQ
Appx. 2 Abbreviation
Appx. 3 App Instructions
Appx. 4 FCC Statement
Appx. 5 IC Warning statement
06
09
11
12
12
12
13
14
14
14
18
19
20
21
22
22
23
24

EN
JUST POWER ON
06
1. Safety Instructions
Read this manual for instructions on the proper use and safety information for the
product. The safety instructions provided herein are for illustrative purposes that include
but are not limited to those listed in this manual. Actual operation shall comply with all
applicable safety standards. If you have any questions, feel free to contact BLUETTI
support or your local BLUETTI dealers.
1.1. Statement
To ensure a safe operation, it's crucial to observe and adhere to the following:
• Always operate or store the product in the conditions specified in this manual.
• The ambient conditions must comply with the requirements in the relevant international,
national, or regional standards.
• Avoid unauthorized disassembly, component replacement, or modification of software
codes.
• Keep this manual carefully for future reference.
• Read all instructions and warnings on the CHARGER 1, car battery, and BLUETTI
portable products, and their respective user manuals.
• Use a standard 12V or 24V car battery, or two 12V batteries connected in series.
• Make sure the product's output voltage falls within the portable power station’s DC
input voltage.
BLUETTI shall not be liable for the following circumstances:
• Damage resulting from force majeure events such as earthquakes, fires, storms, floods,
or mudslides.
• Damage incurred during the customer’s own transportation.
• Damage resulting from inadequate storage conditions as specified in the manual.
• Damage caused by customer negligence or improper operation.
• Damage caused by customer’s intentional actions.
• Damage caused by misuse not in accordance with the instructions in this manual.

JUST POWER ON 07
EN
WARNING - When using this product, basic precautions should always be followed,
including the following:
• Always switch off the vehicle before starting any electrical work.
• Do not clean the product with water.
• Do not disassemble the product on your own.
• Keep the product away from heat resources and high temperatures.
• Do not use the product in an environment with fire, explosive gases, or smoke.
• Do not store the product with flammable liquids, gases, or explosive materials.
• Do not use the product in an environment with salty mist or high humidity.
• Do not insert foreign objects into any ports and vents of the product.
• Do not put fingers or hands into the product.
• Do not contact with any metal tools or objects while the product is in operation.
• Make sure the product is thoroughly dry before use.
• Use the product in a clear, clean, and well-ventilated area.
1.2 General Requirements
INSTRUCTIONS PERTAINING TO RISK OF FIRE, ELECTRIC SHOCK, OR INJURY TO PERSONS
IMPORTANT SAFETY INSTRUCTIONS
• Damage caused by third parties, including but not limited to improper shipping,
usage, and installation not in accordance with the instructions in this manual.
• Damage or negative outcomes caused by adjustments, changes, or removal of labels
in violation of this manual.
• Damage or negative outcomes resulting from using power sources not specified in
this manual, or from using this product to power non-BLUETTI portable products.
• Incidents involving personal safety, fire, equipment malfunction, or any adverse aftermath,
resulting from using this product with power-reliant equipment in critical sectors like
atomic, energy, aviation, medical, and other domains where safety is paramount.

EN
JUST POWER ON
08
1.3 Operation Requirements
• Ensure all screws are securely tightened.
• Make sure to match the correct positive and negative terminals.
• Install the product before starting the vehicle.
• Connect input cables to the product first, then to car battery.
• Ensure the product is firmly installed before use.
• Follow the portable power station’s user manual for usage and storage guidelines
when powering it.
• Do not attempt to install the product or perform any other operations by anyone other
than authorized personnel. If the replacement of components is necessary, seek
assistance from qualified technical support personnel.
• Do not operate the product with a damaged cord, plug, or output cable.
• To reduce the risk of damage to the electric plug and cord, pull the plug rather than
the cord when disconnecting the product.
• Switch off the circuit breaker immediately in case of malfunction.
• Regularly inspect the product and its accessories for damage or deterioration. If the
product’s shell is cracked, do not use it and contact BLUETTI support or your local
BLUETTI dealers.
• Keep children, pets, bugs, and other animals out of reach of the product.
• This product is designed for use with IT/AV products only.
• Wear goggles and protective gloves when wiring and installing.
JUST POWER ON 09
EN
1
4
4
2
2
1
1
1
6
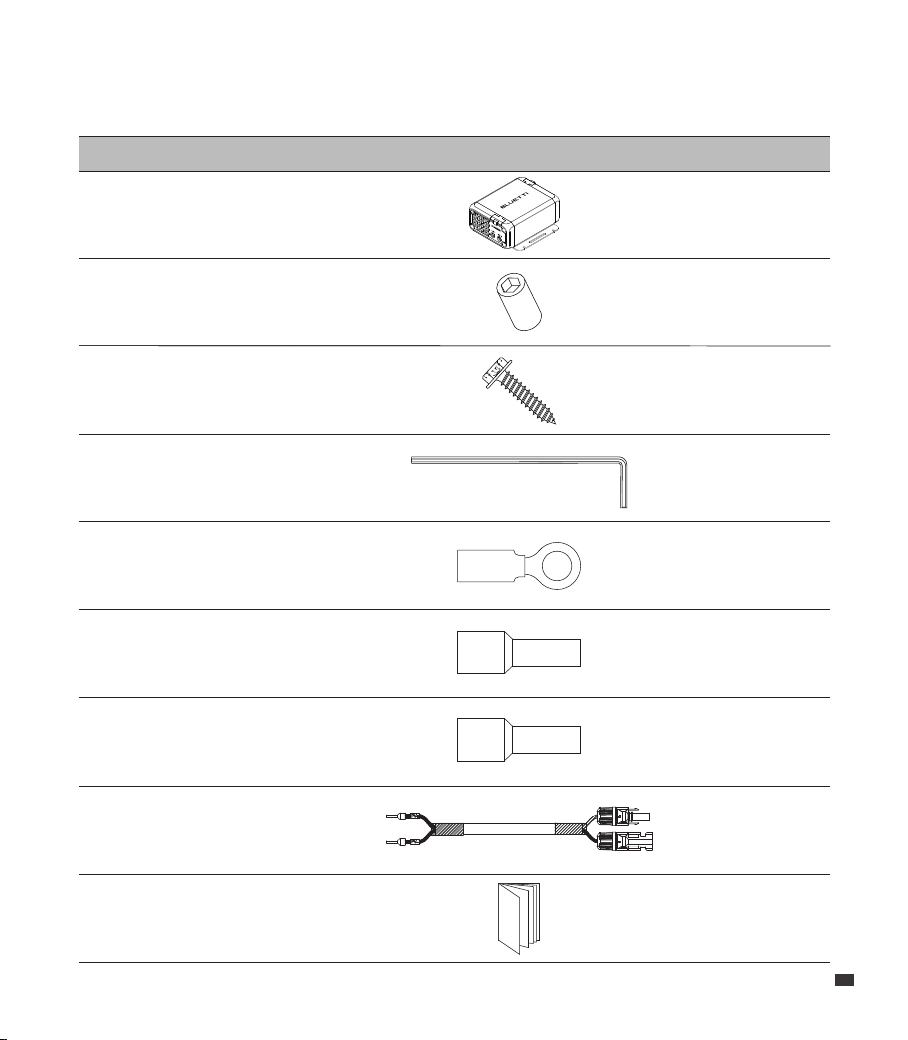
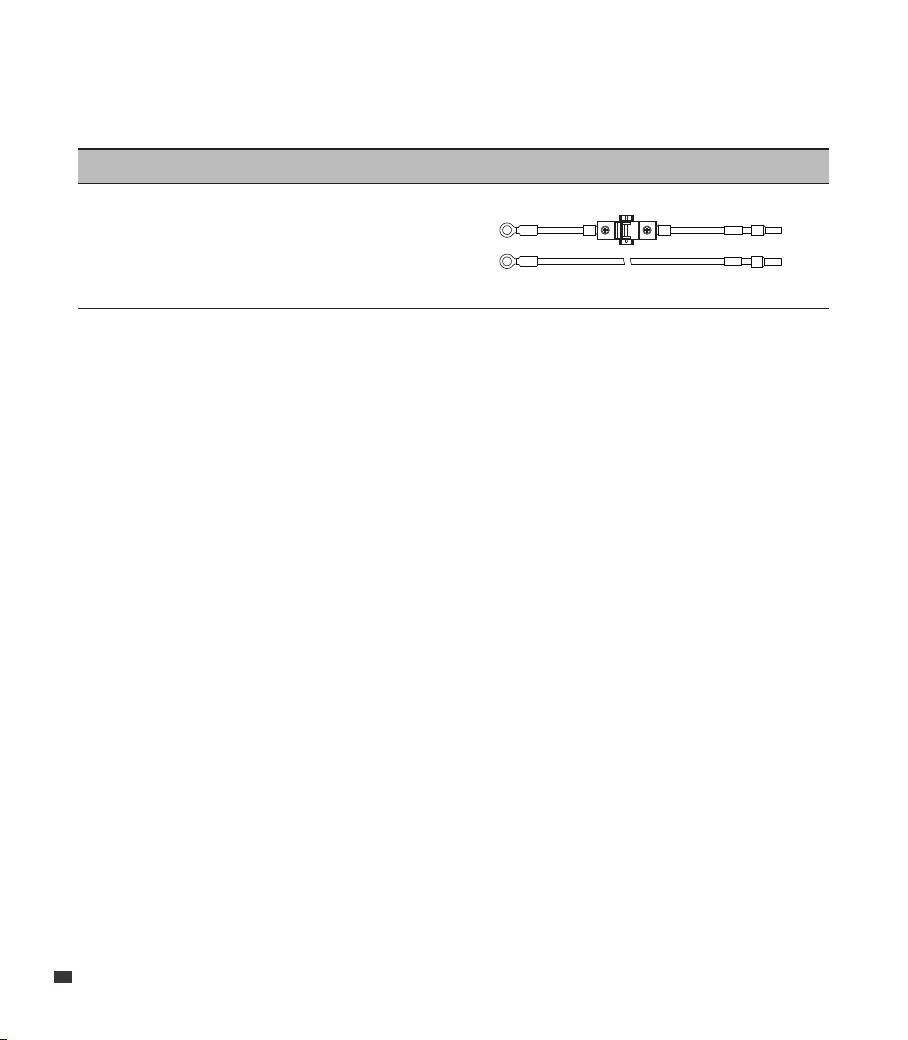
2. Packing List
Standard Accessories
Description Image Qty.
Tube Terminal
(red, positive)
Tube Terminal
(black, negative)
Product Documentation
OT Terminal
Hex Socket Screw
Self-tapping Screw
Hex Socket Wrench
MC4 Output Cable
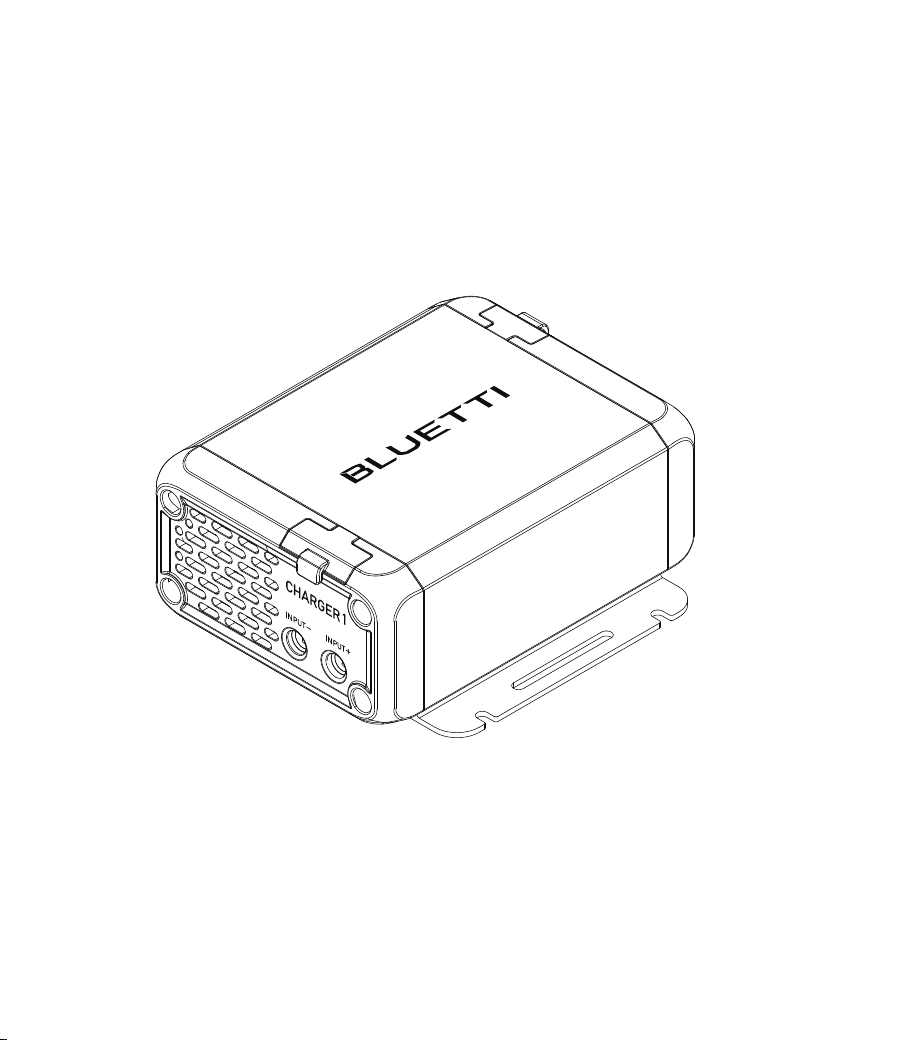
CHARGER 1 DC-DC Charger
EN
JUST POWER ON
10
Image
DC Input Cables
(5m, 6AWG, with a 60A circuit breaker)
Optional Accessory
(Available on the official BLUETTI website: https://www.bluettipower.com)
Description
BAT+
BAT- BAT-
BAT+
JUST POWER ON 11
EN
Attention:
• Do not connect any ports of CHARGER 1 to AC outlets, and avoid connecting them to
batteries exceeding 32V.
• Use BLUETTI's input cables or purchase compatible cables and a 60A circuit breaker.
• Install a 60A circuit breaker on the input cable for safety.
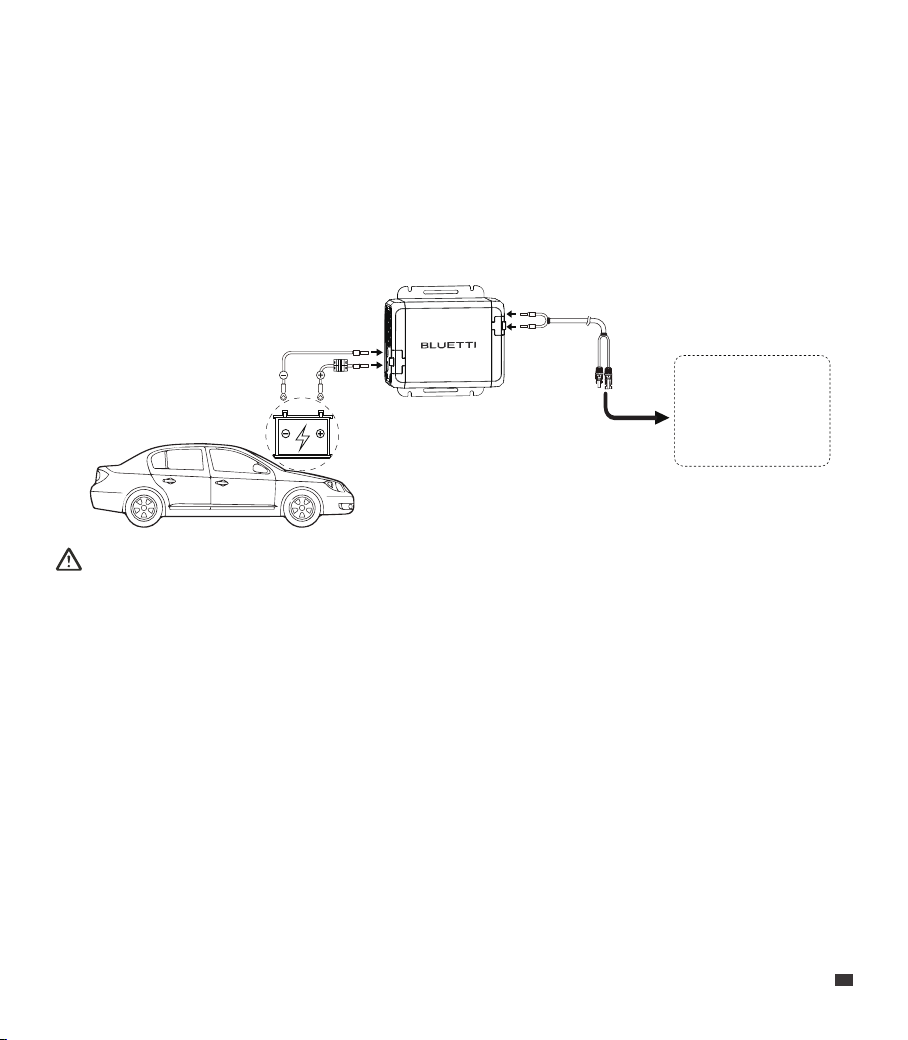
3. Product Introduction
The CHARGER 1 is your go-to for fast charging BLUETTI portable power stations using
extra power from your car's 12V or 24V battery. It fits perfectly in cars, SUVs, and RVs and
can replenish your power station up to 5 times faster than regular car outlets thanks to
its built-in booster module. Plus, it smartly detects your car battery's voltage to prevent
drainage, so you'll never be left without power on your adventures.
BLUETTI
Portable Power
Station
EN
JUST POWER ON
12
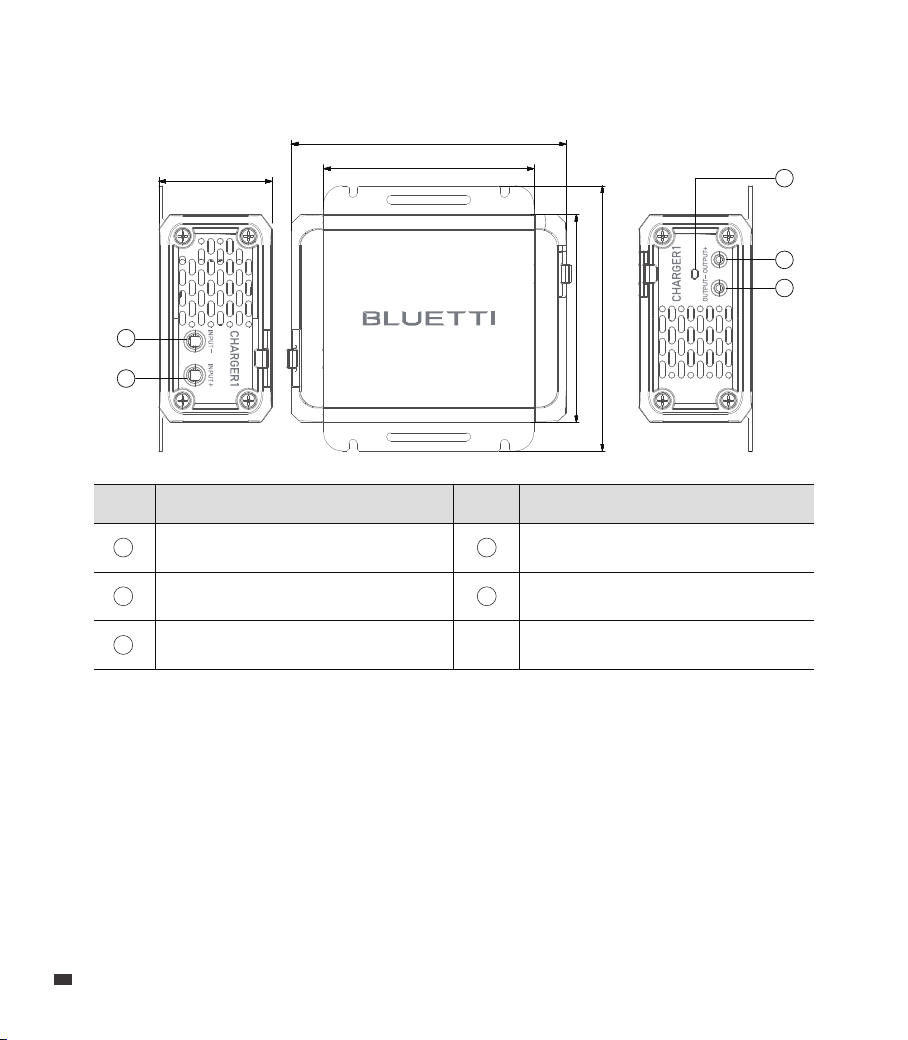
4. Product Overview
Negative Input
Positive Input
Negative Output
Positive Output
Status Indicator
ItemNo. ItemNo.
1
2
3
4
5
NNJO
NNJO
NNJO
NNJO
NNJO
1
2
3
4
5
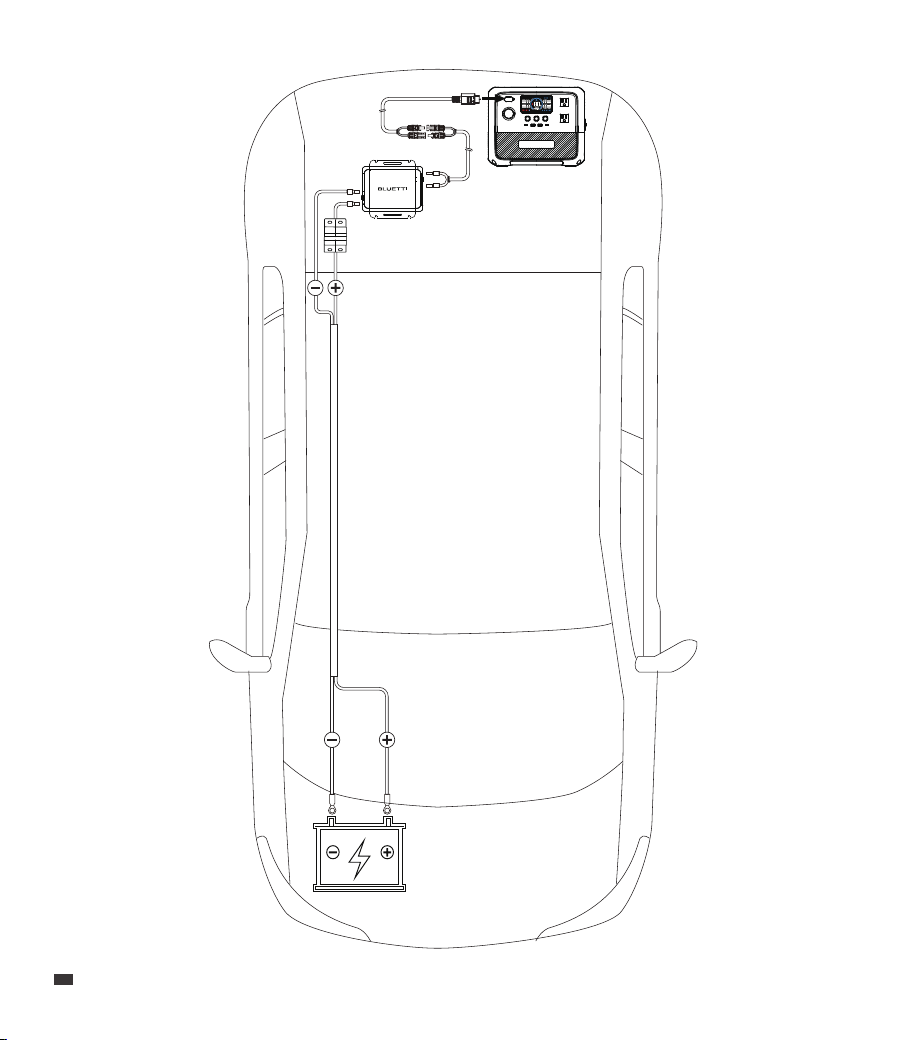
5. Mounting
Place the CHARGER 1 inside the vehicle's cabin or trunk near the portable power station.
Choose a dry area free from other substances and not susceptible to high temperatures.
Securely mount the CHARGER 1 on a stable surface, either horizontally or vertically.
5.1 Location Requirements
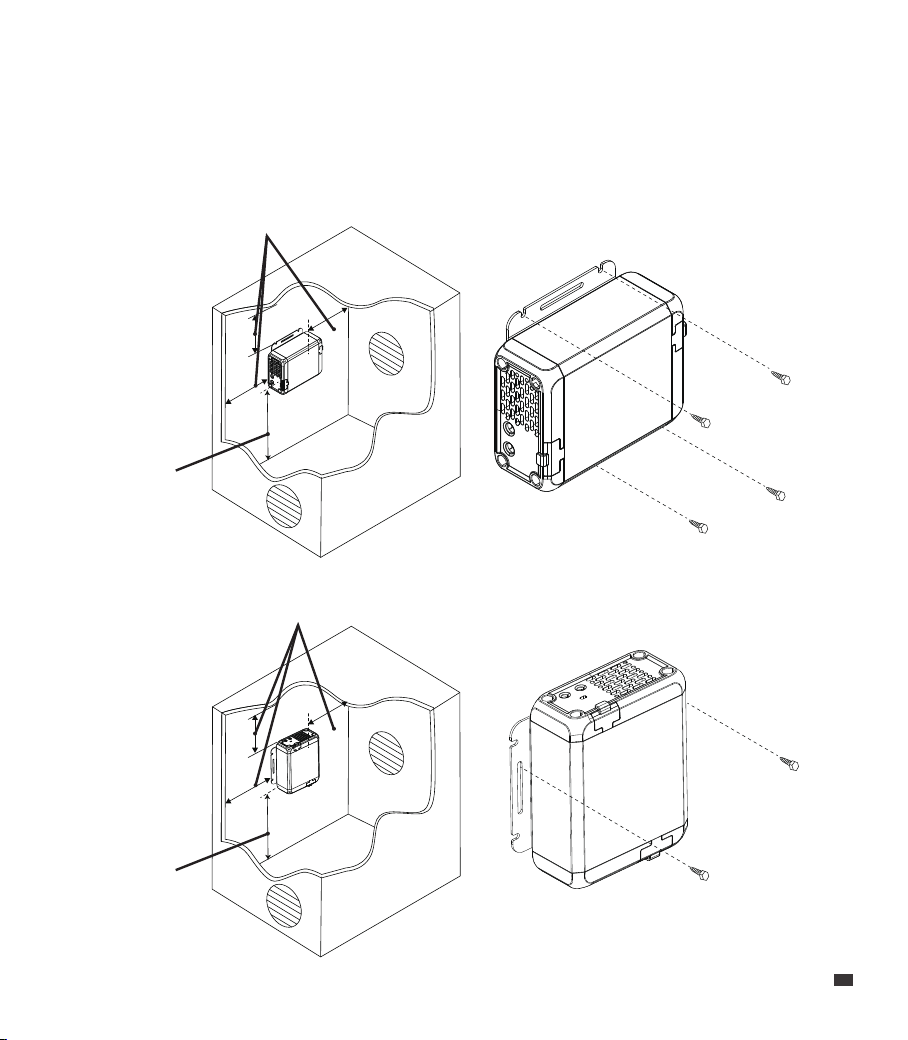
JUST POWER ON 13
EN
20 cm / 7.87 in
20 cm / 7.87 in
1. Select an appropriate location, leaving at least 20cm of clearance on all sides of
CHARGER 1.
2. Secure the CHARGER 1 in place using 4 self-tapping screws.
5.2 Mount the CHARGER 1
(Mount horizontally)
20 cm / 7.87 in
20 cm / 7.87 in
(Mount vertically)

EN
JUST POWER ON
14
Note:
• For unlisted products, please contact BLUETTI support for assistance.
• If the ambient temperature exceeds 40°C (104°F), the product won’t charge AC300,
AC500, EP500, and EP500Pro. Keep it in a cooler place.
Attention:
Make sure the CHARGER 1's output voltage falls within the power station’s specifications.
6. Applications
The CHARGER 1 is compatible with BLUETTI portable power stations that come with an
XT60, DC7909, or aviation port.
6.1 Compatible BLUETTI Portable Power Stations
Terminal DC Input Voltage Model
MC4-XT60
MC4-XT60
MC4-DC7909
MC4-DC7909
MC4-SP21-02PT Aviation
MC4-SP21-04PT Aviation
MC4-M25 Aviation
12V-28V
12V-60V
12V-28V
12V-60V
10V-150V
12V-150V
11V-60V
AC2A, AC2P, EB55, AC50B
AC70, AC70P, AC180T
EB3A, AC60, AC60P
AC180, AC180P
AC200MAX, AC200P, AC200L, AC200P L
AC300, AC500, EP500, EP500Pro
AC240, AC240P
JUST POWER ON 15
EN
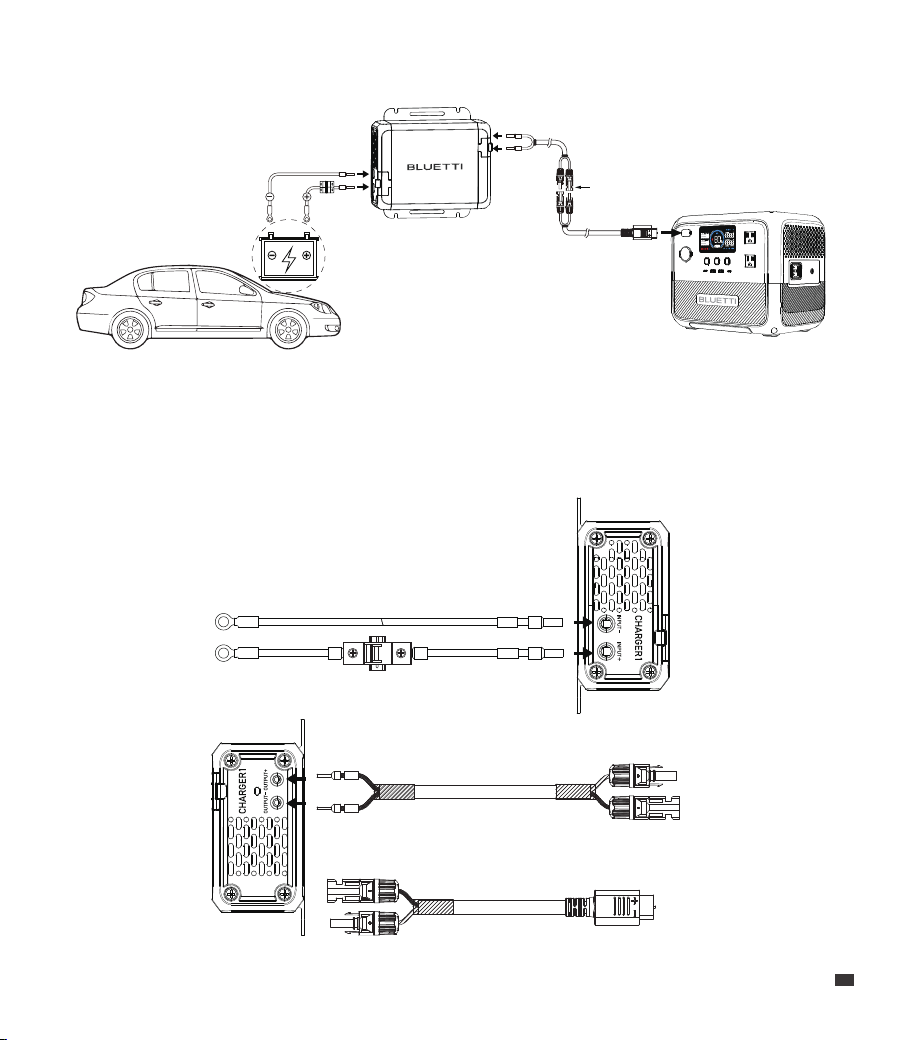
6.2 Wire up Your Charger
Preparation
• Make sure the vehicle is not started and its battery is in good condition.
• Make sure that the car battery and power station are compatible with CHARGER 1.
• Prepare a 2.5mm hex screwdriver and the necessary connection cables as shown below.
BAT- BAT-
BAT+
BAT+
Input Cables
MC4 Output Cable
Solar Charging Cable
(Compatible with the power station)
PV+
PV-
MC4 Connectors
EN
JUST POWER ON
16

JUST POWER ON 17
EN
Wiring & Operations
1. Connect the red input cable (BAT+) to the positive input port of CHARGER 1, and the
black input cable (BAT-) to the negative input.
2. Connect the red output cable (PV+) to the positive output of CHARGER 1, and the
black output cable (PV-) to the negative output.
3. Connect the MC4 connectors from both the output cable and the solar charging cable.
4. Connect the red input cable's OT terminal to the positive terminal of the car battery,
and the black input cable's OT terminal to the negative terminal.
5. Tighten all screws securely and turn on the circuit breaker.
6. Start the vehicle and wait for about 30 seconds. The status indicator flashes green
rapidly, about 4 times per second. When the CHARGER 1 successfully starts up, it turns
steady green.
7. Connect the solar charging cable to the power station for charging. The indicator
flashes green once per second.
8. Use the app to adjust CHARGER 1's output voltage to match the power station's
specifications.
9. You can check the charging status on the power station's display.
10. When charging is completed, the indicator turns steady green.
Note:
• When wiring, avoid high temperature, sharp edges, or friction spots, and secure cables
tightly to prevent wear or loose connections.
• Deactivate CHARGER 1 by either turning off the vehicle or using the app before
changing the cables.

EN
JUST POWER ON
18
7. Specifications
Weight
Dimensions (L × W × H)
Working Temperature
Working Humidity
Storage Temperature
Storage Humidity
Noise
Working Altitude
Protection Grade
Model CHARGER 1
Approx. 1.2kg / 2.645lbs
145mm × 110mm × 60mm / 5.7in × 4.33in × 2.36in
-20°C to 60°C / -4°F to 140°F
10% to 90%
-20°C to 60°C / -4°F to 140°F
0% to 90%
50dB Max.
<2,000m / 6,561ft
IP20
Default Voltage
Voltage Range (with 12V battery)
Voltage Range (with 24V battery)
Current
Power
27V
15.0V to 56.0V (adjustable via app)
27.0V to 56.0V (adjustable via app)
10A
560W
DC Output
DC Input
12V, 50A Max. (with 12V battery)
24V, 25A Max. (with 24V battery)

JUST POWER ON 19
EN
8. Indicator Instructions
Status Indicator
Battery voltage low
Starting up
Startup successful
Charging
Charging complete
Input overvoltage
Input overcurrent
Output short circuit
Output undervoltage
Output overvoltage
Overtemperature
Startup failed
Output overload
Flashing green once every 4 seconds
Flashing green 4 times per second
Steady green
Flashing green once per second
Steady green
Steady red
Flashing red twice with a 1-second interval
Flashing red 3 times with a 1-second interval
Flashing red 4 times with a 1-second interval
Flashing red 5 times with a 1-second interval
Flashing red 6 times with a 1-second interval
Flashing red once with a 1-second interval
Flashing red 7 times with a 1-second interval

EN
JUST POWER ON
20
9. Troubleshooting
Fault Symptom Reason Solution
1. Check the output ports for damage or foreign
objects causing short circuits.
2. Check the output cables for any surface damage.
3. Check for a short circuit in the portable power
station’s DC input port.
1. Check the output ports for damage or foreign
objects causing short circuits.
2. Check the output cables for any surface damage.
3. Check for a short circuit in the portable power
station’s DC input port.
The output
has a short
circuit.
The output
voltage is too
low.
Flashing red 3
times with a
1-second
interval
Flashing red 4
times with a
1-second
interval
Output
Short
Circuit
Output
Undervoltage
1. Check for loose cables in all connections.
2. Check if the fan is not spinning or obstructed by
foreign objects.
3. Make sure the air vents are clear.
4. Do not use and store CHARGER 1 in environments
above 60°C (140°F).
Please contact BLUETTI support for assistance.
The unit’s
temperature
is too high.
Flashing red 6
times with a
1-second
interval
Overtemperature
Others / /

JUST POWER ON 21
EN
Appx. 1 FAQ
Tips for maintaining the CHARGER 1:
To keep the CHARGER 1 in good condition:
a. Regularly tighten the screws.
b. Keep it clean and dry.
c. Ensure proper ventilation.
Why should I start the vehicle before using CHARGER 1?
Starting the vehicle ensures the car's battery has enough voltage. This prevents
draining the battery while charging, which could otherwise shorten the battery's
lifespan.
Does CHARGER 1 affect fuel consumption?
CHARGER 1 efficiently utilizes the excess power of the car's generator for the power
station, minimizing fuel consumption.
Does CHARGER 1 have safety features?
Absolutely. CHARGER 1 comes with protections for reverse polarity, overcurrent,
short circuit, overvoltage, and undervoltage.
Where should I place the CHARGER 1 in the car?
Place the CHARGER 1 inside the vehicle's cabin or trunk as the cooling fan may
produce noise when starting up.
Can CHARGER 1 damage my power station?
No. Simply adjust CHARGER 1's output voltage via the app to meet your power
station's specifications before connecting it.
Q1:
A:
Q2:
A:
Q3:
A:
Q4:
A:
Q5:
A:
Q6:
A:

EN
JUST POWER ON
22
Appx. 2 Abbreviations
• DC: Direct Current
• PV: Photovoltaic
Appx. 3 App Instructions
For details, please refer to CHARGER 1 BLUETTI App User Manual.
Scan the QR code below or search "BLUETTI" in the App Store or Google Play to download
the BLUETTI app.

JUST POWER ON 23
EN
Appx. 4 FCC Statement
This device complies with part 15 of the FCC Rules. Operation is subject to the following
two conditions:
(1) this device may not cause harmful interference, and (2) this device must accept any
interference received, including interference that may cause undesired operation.
Any changes or modifications not expressly approved by the party responsible for
compliance could void the user's authority to operate the equipment.
NOTE: This equipment has been tested and found to comply with the limits for a Class B
digital device, pursuant to Part 15 of the FCC Rules. These limits are designed to provide
reasonable protection against harmful interference in a residential installation. This
equipment generates, uses and can radiate radio frequency energy and, if not installed
and used in accordance with the instructions, may cause harmful interference to radio
communications. However, there is no guarantee that interference will not occur in a
particular installation.
If this equipment does cause harmful interference to radio or television reception,
which can be determined by turning the equipment off and on, the user is encouraged
to try to correct the interference by one or more of the following measures:
-- Reorient or relocate the receiving antenna.
-- Increase the separation between the equipment and receiver.
-- Connect the equipment into an outlet on a circuit different from that to which the
receiver is connected.
-- Consult the dealer or an experienced radio/TV technician for help.
To maintain compliance with FCC’s RF Exposure guidelines, this equipment should be
installed and operated with minimum distance between 20cm the radiator your body.
Use only the supplied antenna.

EN
JUST POWER ON
24
This device contains licence-exempt transmitter(s)/receiver(s) that comply with Innovation,
Science and Economic Development Canada’s licence-exempt RSS(s). Operation is
subject to the following two conditions:
1. This device may not cause interference.
2. This device must accept any interference, including interference that may cause
undesired operation of the device.
RF exposure statement(BT): The equipment complies with IC Radiation exposurelimits
set forth for uncontrolled environments. This equipment should be installed andoperated
with a minimum distance of 20cm between the radiator and your body.
L’émetteur/récepteur exempt de licence contenu dans le présent appareil est conforme
aux CNR d’Innovation, Sciences et Développement économique Canada applicables aux
appareils radio exempts de licence. L’exploitation est autorisée aux deux conditions
suivantes:
(1) L' appareil ne doit pas produire de brouillage;
(2) L' appareil doit accepter tout brouillage radioélectrique subi, même si le brouillage est
susceptible d' en compromettre le fonctionnement.
Déclaration d'exposition aux radiofréquences IC:( Con bluetooth)
Cet équipement est conforme aux limites d'exposition IC établies pour un environnement
non contrôlé. Cet équipement doit être installé et utilisé avec une distance minimale de
20 cm entre le radiateur et le corps.
CAN ICES-003 (B) / NMB-003 (B)
This Class B digital apparatus complies with Canadian ICES-003.
(Cet appareil numérique de la Classe B conforme à la norme NMB-003 du Canada).
Appx. 5 IC Warning statement


@ BLUETTI Support
@ BLUETTI Official
@bluetti.inc@ bluetti_inc @bluetti_official
For more information, please visit:
Web: https://www.bluettipower.com
Customer Service
Tel:
800-200-2980 (Monday to Sunday 9:00-17:00)
Email: sale@bluettipower.com (Pre-sales),
service@bluettipower.com (After-sales)
SHENZHEN POWEROAK NEWENER CO., LTD.
Add: F19, BLD No.1, Kaidaer, Tongsha Rd No.168,
Xili Street, Nanshan, Shenzhen, China
USA Responsible Party:
BLUETTI POWER INC
Add: 6185 S VALLEY VIEW BLVD STE D LAS VEGAS 89118
FRN: 0033559824
Email: liqy@bluetti.com

Warranty Card
Warranty Instructions
Manufacture Date
Sale Date
File No.
Manufacturer
1. The product comes with a 24-month warranty.
2. After-sale support: service@bluettipower.com
3. The warranty does not cover:
a. Damage caused by incorrect use, unauthorized repair, or disassembly.
b. Damage resulting from fire or force majeure events.
c. Lack of a clear, complete warranty card with the sales company seal.

P/N:17.0303.0774-00A0
Certificate
Inspector:
QC: