
Lithium Lead Acid Charger
Model: XFH-SS01, XFH-SS02, XFH-SS03,
XFH-SS04, XFH-SS05, XFH-SS07,
XFH-SS08, XFH-SS09

- 1 -
Model:XFH-SS01, XFH-SS02, XFH-SS03, XFH-SS04, XFH-SS05,
XFH-SS07, XFH-SS08, XFH-SS09
This is the original instruction, please read all manual instructions
carefully before operating. VEVOR reserves a clear interpretation of our
user manual. The appearance of the product shall be subject to the
product you received. Please forgive us that we won't inform you again if
there are any technology or software updates on our product.
- 2 -
Warning-To reduce the risk of injury, user must
read instructions manual carefully.
This device complies with Part 15 of the FCC Rules.
Operation is subject to the following two
conditions:(1)This device may not cause harmful
interference, and (2)this device must accept any
interference received, including interference that may
cause undesired operation.
This product is subject to the provision of European
Directive 2012/19/EC. The symbol showing a wheelie
bin crossed through indicates that the product
requires separate refuse collection in the European
Union. This applies to the product and all accessories
marked with this symbol. Products marked as such
may not be discarded with normal domestic waste,
but must be taken to a collection point for recycling
electrical and electronic devices
Electrical Shock. Product is an electrical device that
can shock and cause serious injury. Do not cut power
cords. Do not submerge in water or get wet.
Explosion. Unmonitored, incompatible, or damaged
batteries can explode if used with product. Do not
leave product unattended while in use. Do not
attempt to jump start a damaged or frozen battery.
Use product only with batteries of recommended
voltage. Operate product in well ventilated areas.
Fire. Product is an electrical device that emits heat
and is capable of causing burns. Do not cover
product.
Do not smoke or use any source of electrical spark
or fire when operating product. Keep product away
from combustible materials.

- 3 -
Eye Injury. Wear eye protection when operating
product. Batteries can explode and cause flying
debris.
Battery acid can cause eye and skin irritation. In the
case of contamination of eyes or skin, flush affected
area with running clean water and contact poison
control immediately.
Explosive Gases. Working in the vicinity of lead-acid
is dangerous.
Batteries generate explosive gases during normal
battery operation.
To reduce risk of battery explosion, follow all safety
information instructions and those published by the
battery manufacturer and manufacturer of any
equipment intended to be used in the vicinity of
battery. Review cautionary markings on these
products and on engine.

- 4 -
This VEVOR battery charger represents some of the most innovative and advanced technology
on the market, making each charge simple and easy. It is quite possibly the safest and most
efficient charger you will ever use.
This product is designed for charging all types of lead-acid batteries, including Lithium,
LiFePO4, Wet (Flooded), Gel, MF (Maintenance-Free), CA (Calcium), EFB (Enhanced Flooded
Battery), and AGM (Absorption Glass Mat) batteries. It is suitable for charging battery capacities
up to 400 Amp-Hours and maintaining all battery sizes.
Getting Started
Before using the charger, carefully read the battery manufacturer’s specific precautions
and recommended rates of charge. Determine the voltage and chemistry of your battery by
referring to your battery owner’s manual prior to charging.
Mounting
Consider the distance to the battery. The DC cable length from the charger, with either the
battery clamp or eyelet terminal connectors, is approximately 47. 2 inches (1200 mm).
Proposition 65 Warning
Battery posts, terminals, and related accessories contain chemicals, including lead. These
materials are known to the State of California to cause cancer, birth defects, and other
reproductive harm.
Personal Precaution
Use the product only as intended.
Ensure someone is within voice range to aid you in case of an emergency.
Keep a supply of clean water and soap nearby in case of battery acid contact.
Wear complete eye protection and protective clothing when working near a battery.
Always wash hands after handling batteries and related materials.
Do not handle or wear any metal objects (e. g. , tools, watches, or jewelry) when working with
batteries. If metal is dropped onto a battery, it may spark or create a short circuit, resulting in
electrical shock, fire, or explosion, which could cause injury, death, or property damage.
Minors
If the product is intended for use by a minor, the purchasing adult agrees to provide detailed
instructions and warnings to the minor prior to use. Failure to do so is the sole responsibility of
the purchaser, who agrees to indemnify the manufacturer for any unintended use or misuse by a
minor.
Choking Hazard
Accessories may present a choking hazard to children. Do not leave children unattended with
the product or any accessory. The product is not a toy.
Handling
Handle the product with care. It can be damaged if impacted.
Do not use a damaged product, including one with cracks in the casing or damaged cables.

- 5 -
Do not use the product with a damaged power cord.
Humidity and liquids may damage the product. Do not handle the product or any electrical
components near any liquid.
Store and operate the product in dry locations.
Do not operate the product if it becomes wet. If the product becomes wet during operation,
disconnect it from the battery and discontinue use immediately.
Do not disconnect the product by pulling on the cables.
Modifications
Do not attempt to alter, modify, or repair any part of the product.
Disassembling the product may cause injury, death, or property damage.
If the product becomes damaged, malfunctions, or contacts any liquid, discontinue use and
contact the manufacturer.
Any modifications will void your warranty.
Accessories
This product is only approved for use with manufacturer-approved accessories. The
manufacturer is not responsible for user safety or damage when using unapproved
accessories.
Location
Prevent battery acid from contacting the product.
Do not operate the product in a closed-in area or an area with restricted ventilation.
Do not place a battery on top of the product.
Position cable leads to avoid accidental damage by moving vehicle parts (e. g. , hoods, doors),
moving engine parts (e. g. , fan blades, belts, pulleys), or other potential hazards that may cause
injury or death.
Operating Temperature
This product is designed to work in ambient temperatures between -4°F and 104°F (-20°C and
40°C). Do not operate outside of these temperature ranges. Do not charge a frozen battery.
Discontinue use immediately if the battery becomes excessively warm.
Storage
Do not use or store the product in areas with high concentrations of dust or airborne materials.
Store the product on a flat, secure surface where it is not prone to falling.
Store the product in a dry location.
The storage temperature range is -4°F to 77°F (-20°C to 25°C) average temperature. Never
exceed 158°F (70°C) under any condition.
Compatibility
This product is only compatible with Lead-Acid, AGM, and LiFePO4 batteries. Do not attempt to use
the product with any other type of battery. Charging other battery chemistries may result in injury,
death, or property damage. Contact the battery manufacturer prior to attempting to charge the
battery. Do not charge a battery if you are unsure of its specific chemistry or voltage.

- 6 -
Medical Devices
This product may emit electromagnetic fields. It contains magnetic components that interfere
with pacemakers, defibrillators, or other medical devices. Consult with your physician prior to use
if you have any medical devices, including a pacemaker. If you suspect the product is interfering
with a medical device, stop using it immediately and consult your physician.
Cleaning
Power off the product before attempting any maintenance or cleaning. Clean and dry the
product immediately if it comes into contact with liquid or any contaminant. Use a soft, lint-free
(microfiber) cloth. Avoid getting moisture into openings.
Explosive Atmospheres
Obey all signs and instructions. Do not operate the product in any area with a potentially
explosive atmosphere, including fueling areas or areas that contain chemicals or particles such
as grain, dust, or metal powders.
High-Consequence Activities
This product is not intended for use where the failure of the product could lead to injury, death,
or severe environmental damage.
Radio Frequency Interference
This product is designed, tested, and manufactured to comply with regulations governing radio
frequency emissions. Such emissions can negatively affect the operation of other electronic
equipment, causing it to malfunction.
FCC Compliance Note
This device complies with Part 15 of the FCC Rules. Operation is subject to the following two
conditions:
(1) This device may not cause harmful interference.
(2) This device must accept any interference received, including interference that may cause
undesired operation.
This equipment has been tested and found to comply with the limits for a Class B digital
device, pursuant to Part 15 of the FCC Rules. These limits are designed to provide reasonable
protection against harmful interference in a commercial installation. This equipment generates,
uses, and can radiate radio frequency energy and, if not installed and used in accordance with
the instructions, may cause harmful interference to radio communications. Operation of this
equipment in a residential area is likely to cause harmful interference, in which case the user
will be required to correct the interference at their own expense.

- 7 -
HOW TO USE
Charging Modes
When supply mode is selected, you can charge by selecting different currents with different
voltages. Please select the battery type after turning on the switch. These modes are
advanced charging modes that require your full attention before selection. It is important to
understand the differences and purposes of each charging mode. Do not operate the charger
until you confirm the appropriate charging mode for your battery. Below is a brief description:
Model
Explanation (peak voltage measured at 25°c, amperage rating is bulk amperage when above
0°c)
Standby
In standby mode, the charger is not charging or providing any power to the battery. Energy
Save is activated during this mode, drawing microscopic power from the electrical outlet.
Can bus is enabled in Standby mode. When in Standby, the LCD will illuminate.
Charge
6V Lead
For charging 6-volt lead-acid batteries. When selected, the 6V will be lined by blue.
7. 3V | Up To 200AH Batteries
12V Lead
For charging 12-volt lead-acid batteries. When selected, the 12V will be lined in
blue.
14. 6V | Up To 600AH Batteries
24V Lead
For charging 24-volt lead-acid batteries. When selected, the 24V will be lined in
blue.
29. 2V | Up To 300AH Batteries
36V Lead
For charging 36-volt lead-acid batteries. When selected, the 36V will be lined in
blue.
43. 8V | Up To 100AH Batteries
48V Lead
For charging 48-volt lead-acid batteries. When selected, the 48V will be lined in
blue.
58. 4V | Up To 100AH Batteries
60V Lead
For charging 60-volt lead-acid batteries. When selected, the 60V will be lined in
blue. 73V | Up To 60AH Batteries
72V Lead
For charging 72-volt lead-acid batteries. When selected, the 72V will be lined in
blue.
87. 6V | Up To 60AH Batteries
12V
LiFePo4
For 12-volt LiFePo4 batteries. When selected, the 12V will be lined in blue.
14. 6V | Up To 600AH Batteries
24V
LiFePo4
For 24-volt LiFePo4 batteries. When selected, the 24V will be lined in blue.
29. 2V | Up To 200AH Batteries
36V
LiFePo4
For 36-volt LiFePo4 batteries. When selected, the 36V will be lined in blue.
43. 8V | Up To 100AH Batteries
48V
LiFePo4
For 48-volt LiFePo4 batteries. When selected, the 48V will be lined in blue.
58. 4V | Up To 100AH Batteries
60V
LiFePo4
For 60-volt LiFePo4 batteries. When selected, the 60V will be lined in
blue. 73V | Up To 60AH Batteries
72V
LiFePo4
For 72-volt LiFePo4 batteries. When selected, the 72V will be lined in blue.
87. 6V | Up To 60AH Batteries

- 8 -
Maintain
6V Lead
For charging 6-volt lead-acid batteries. When selected, the 6V will be lined in blue.
7. 3V | Up To 200AH Batteries
12V Lead
For charging 12-volt lead-acid batteries. When selected, the 12V will be lined in
blue.
14. 6V | Up To 600AH Batteries
24V Lead
For charging 24-volt lead-acid batteries. When selected, the 24V will be lined in
blue.
29. 2V | Up To 300AH Batteries
36V Lead
For charging 36-volt lead-acid batteries. When selected, the 36V will be lined in
blue.
43. 8V | Up To 100AH Batteries
48V Lead
For charging 48-volt lead-acid batteries. When selected, the 48V will be lined in
blue.
58. 4V | Up To 100AH Batteries
60V Lead
For charging 60-volt lead-acid batteries. When selected, the 60V will be lined in
blue. 73V | Up To 60AH Batteries
72V Lead
For charging 72-volt lead-acid batteries. When selected, the 72V will be lined in
blue.
87. 6V | Up To 60AH Batteries
Desulfation
6V Lead
For charging 6-volt lead-acid batteries. When selected, the 6V will be lined in blue.
7. 3V | Up To 200AH Batteries
12V Lead
For charging 12-volt lead-acid batteries. When selected, the 12V will be lined in
blue.
14. 6V | Up To 600AH Batteries
24V Lead
For charging 24-volt lead-acid batteries. When selected, the 24V will be lined in
blue.
29. 2V | Up To 300AH Batteries
Supply
Mode
6V Lead
For charging 6-volt lead-acid batteries. When selected, the 6V will be lined in blue.
7. 3V | Up To 200AH Batteries
12V Lead
For charging 12-volt lead-acid batteries. When selected, the 12V will be lined in
blue.
14. 6V | Up To 600AH Batteries
24V Lead
For charging 24-volt lead-acid batteries. When selected, the 24V will be lined in
blue.
29. 2V | Up To 300AH Batteries
36V Lead
For charging 36-volt lead-acid batteries. When selected, the 36V will be lined in
blue.
43. 8V | Up To 100AH Batteries
48V Lead
For charging 48-volt lead-acid batteries. When selected, the 48V will be lined in
blue.
58. 4V | Up To 100AH Batteries
60V Lead
For charging 60-volt lead-acid batteries. When selected, the 60V will be lined in
blue. 73V | Up To 60AH Batteries
72V Lead
For charging 72-volt lead-acid batteries. When selected, the 72V will be lined in
blue.
87. 6V | Up To 60AH Batteries

- 9 -
Lead-Acid Battery Charging
1. Firstly, press the "Battery Type" button to select "Lead". Secondly, press the "Voltage" button,
then press the "Start" button to begin charging.
2. Firstly, press the "Battery Type" button to select "Lead". Secondly, press the "Voltage"
button, then press the "Current" button, and finally press the "Start" button to begin charging.
Caution: When this mode is selected, please ensure your battery is a lead-acid battery. Please
make sure your battery voltage matches the selected voltage; otherwise, charging will fail.
LiFePO4 Battery Charging
1. Firstly, press the "Battery Type" button to select "LiFePO4", then press the "Voltage" button,
and finally press the "Start" button to begin charging.
2. Firstly, press the "Battery Type" button to select "LiFePO4". Secondly, press the "Voltage"
button, then press the "Current" button, and finally press the "Start" button to begin charging.
Caution: When this mode is selected, please ensure your battery is a LiFePO4 battery. Please
make sure your battery voltage matches the selected voltage; otherwise, charging will fail.
Maintain Mode
Firstly, press the "Battery Type" button to select "Lead". Secondly, press the "Maintain" button,
then press the "Voltage" button to select the appropriate voltage, and finally press the "Start"
button to begin charging. The charger will charge the battery with a low current to maintain a
fully charged state, and this mode will not damage your battery.
Desulfation Mode
Firstly, press the "Battery Type" button to select "Lead". Secondly, press the "Desulfation"
button, then press the "Voltage" button, and finally press the "Start" button to begin charging.
Caution: When the battery is seriously aged and has insufficient capacity, you can select this
mode to repair it. Please note that batteries can only be repaired one at a time.
Supply Mode
Firstly, press the "Battery Type" button to select "Lead". Secondly, press the "Voltage" button,
thirdly press the "Current" button, and finally press the "Start" button.
Caution: This mode can be selected when used as a power supply or when the battery
voltage cannot be detected.
Professional Mode
Firstly, press the "Battery Type" button, then turn on the power to enter professional mode.
When entering professional mode, please select different batteries using different steps:
Press the "Battery Type" button to select "LiFePO4", secondly press the "Voltage" button to
select the voltage and battery cells, and the current selection method is the same as in non-
professional mode.
Caution: In LiFePO4 mode, hidden battery cells will be displayed. Please note that non-
professionals should not select this mode. If selected, please contact the battery supplier;
otherwise, there will be risks. This mode cannot be memorized. After turning off the power, the
charger will return to non-professional mode.

- 10 -
Connecting to the Battery
Do not connect the AC power plug until all other connections are made. Identify the correct
polarity of the battery terminals on the battery. Do not make any connections to the carburetor,
fuel lines, or thin sheet metal parts. The instructions below are for a negative ground system
(most common). If your vehicle is a positive ground system (very uncommon), follow the
instructions below in reverse order.
1. Connect the positive (red) eyelet terminal connector to the positive (POS, P, +) battery
terminal.
2. Connect the negative (black) eyelet terminal connector to the negative (NEG, N, -) battery
terminal.
3. Connect the battery charger to a suitable electrical outlet. Do not face the battery when
making this connection.
4. When disconnecting, disconnect in the reverse sequence: remove the negative terminal first
(or the positive terminal first for positive ground systems).
Begin Charging
1. Verify the voltage and chemistry of the battery.
2. Confirm that you have connected the battery clamps or eyelet terminal connectors properly
and that the AC power plug is plugged into an electrical outlet.
3. [First time use] The charger will begin in Standby mode, and "Pause" will be circled in blue. In
Standby mode, the charger is not providing any power.
4. Press the "Battery Type" button to select the battery type, secondly press the "Voltage"
button, and thirdly press the "Current" button.
5. Press the "Start" button, and it will be highlighted in blue; secondly, the battery will be
detected. If the battery is normal, no battery indicator will turn off, and the charger will work
normally; otherwise, it will not.
6. The charger can now be left connected to the battery at all times to provide maintenance
charging.
Auto-Memory: The charger has built-in auto-memory and will return to the last charge mode
when connected. Select the appropriate mode and press the "Start" button, and the charger will
save the new working mode.
Caution: Professional Mode cannot be auto-memorized.
CHARGING TIMES
The estimated charging time for a battery is calculated as follows: Charging Time (hours)
= Battery Capacity (Ah) / Charging Current (A). The battery capacity (Ah) and its depth of
discharge (DoD) significantly affect charging duration. The calculated time is based on an
average depth of discharge to a fully charged state and is for reference only. Actual results may
vary depending on battery conditions. The charging time for a normally discharged battery is
based on a 50% DoD. Temperature also impacts charging efficiency.

- 11 -
VEVOR Battery Chargers feature thermal compensation technology, which automatically
adjusts charging parameters to optimize performance. Below is a charging time reference for
model :
XFH-SS01:
Battery size
Ah(Amp hour)
Approximate time to charge in hours
6V
12V
24V
36V
48V
40
3
3
6
10
13
60
5
5
10
15
20
80
6
6
12
20
26
120
10
10
20
200
17
17
XFH-SS02:
XFH-SS03/XFH-SS07:
Battery size
Ah(Amp hour)
Approximate time to charge in hours
6V
12V
24V
36V
48V
60V
72V
40
3
3
5
8
10
13
15
60
4
4
8
11
15
19
23
80
5
5
10
15
20
25
31
120
8
8
15
23
30
200
13
13
25
Battery size
Ah(Am phour)
Approximate time to charge in hours
6V
12V
24V
40
3
2
4
60
4
3
6
80
5
4
8
120
8
6
12
200
13
10
20
400
25
20

- 12 -
XFH-SS04/XFH-SS08
XFH-SS05/XFH-SS09:
UNDERSTANDING CHARGE INDICATION
Battery size
Ah(Amp hour)
Approximate time to charge in hours
6V
12V
24V
40
3
2
3
60
4
3
5
80
5
3. 5
7
120
8
5
10
200
13
8
16
400
25
16
Battery size
Ah(Amp hour)
Approximate time to charge in hours
6V
12V
24V
40
3
1. 5
3
60
4
2
4
80
5
3
5. 5
120
8
4
8
200
13
7
14
400
25
14

- 13 -
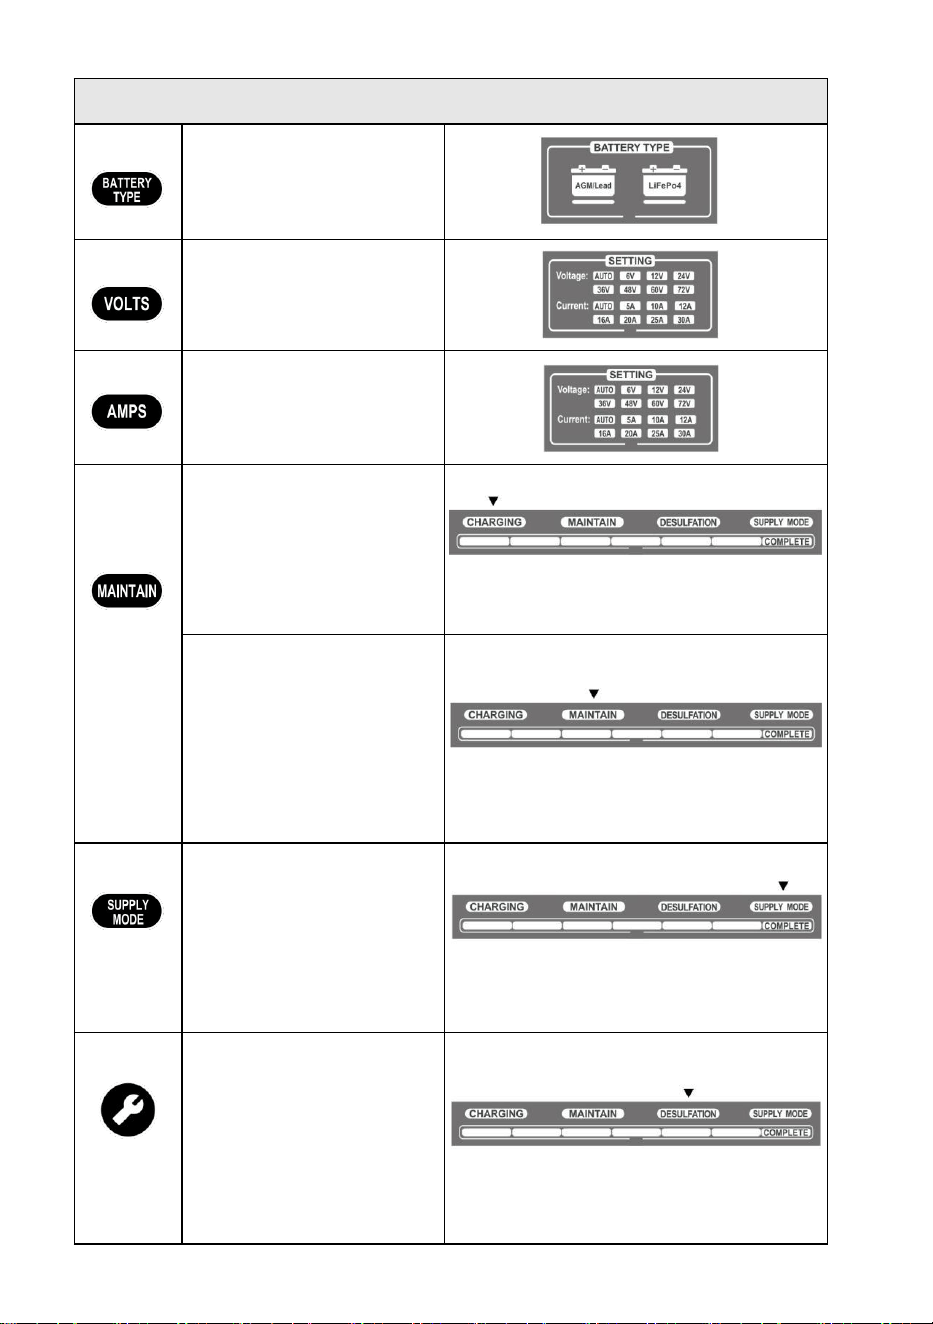
Button Illustration
Button
Battery Button: Push the
button to select the battery type;
the "Battery Type" indicator will
turn on.
Button
Voltage Button: Push the button
to select the voltage; the "Voltage"
indicator will turn on.
Button
Current Button: Push the button
to select the current; the "Current"
indicator will turn on.
Button
Charging and Maintain Mode:The
"Charging" indicator will turn on.
When the battery and power
supply are connected properly, the
progress bar indicator will turn on
according to the selected charging
mode.
If the battery has not been used
for a long time, push the button to
select Maintain mode. The battery
will be charged with a small
current to maintain its charge; the
"Maintain" indicator will turn on,
and the progress bar will flash
cyclically. (Maintain mode is only
for lead-acid batteries. )
Button
Supply Mode: When the battery
is connected properly but cannot
be detected, push the button to
use "Supply" mode for charging.
The "Supply" indicator will turn
on, and the progress bar will
flash cyclically.
Button
Desulfation Mode (Lead-Acid
Battery Only):If the battery has
been used for a long time and its
capacity decreases rapidly, push
the button to use "Desulfation"
mode for charging to repair
the battery. The"Desulfation"
indicator will turn on, and the
progress bar will flash cyclically.
Button
START and PAUSE Button: When settings are correct, push the button; the "Start"
indicator will turn on, and the charger will start working. Press the button while the charger
is operating; the "PAUSE" indicator will turn on, and the charger will stop working.
- 14 -
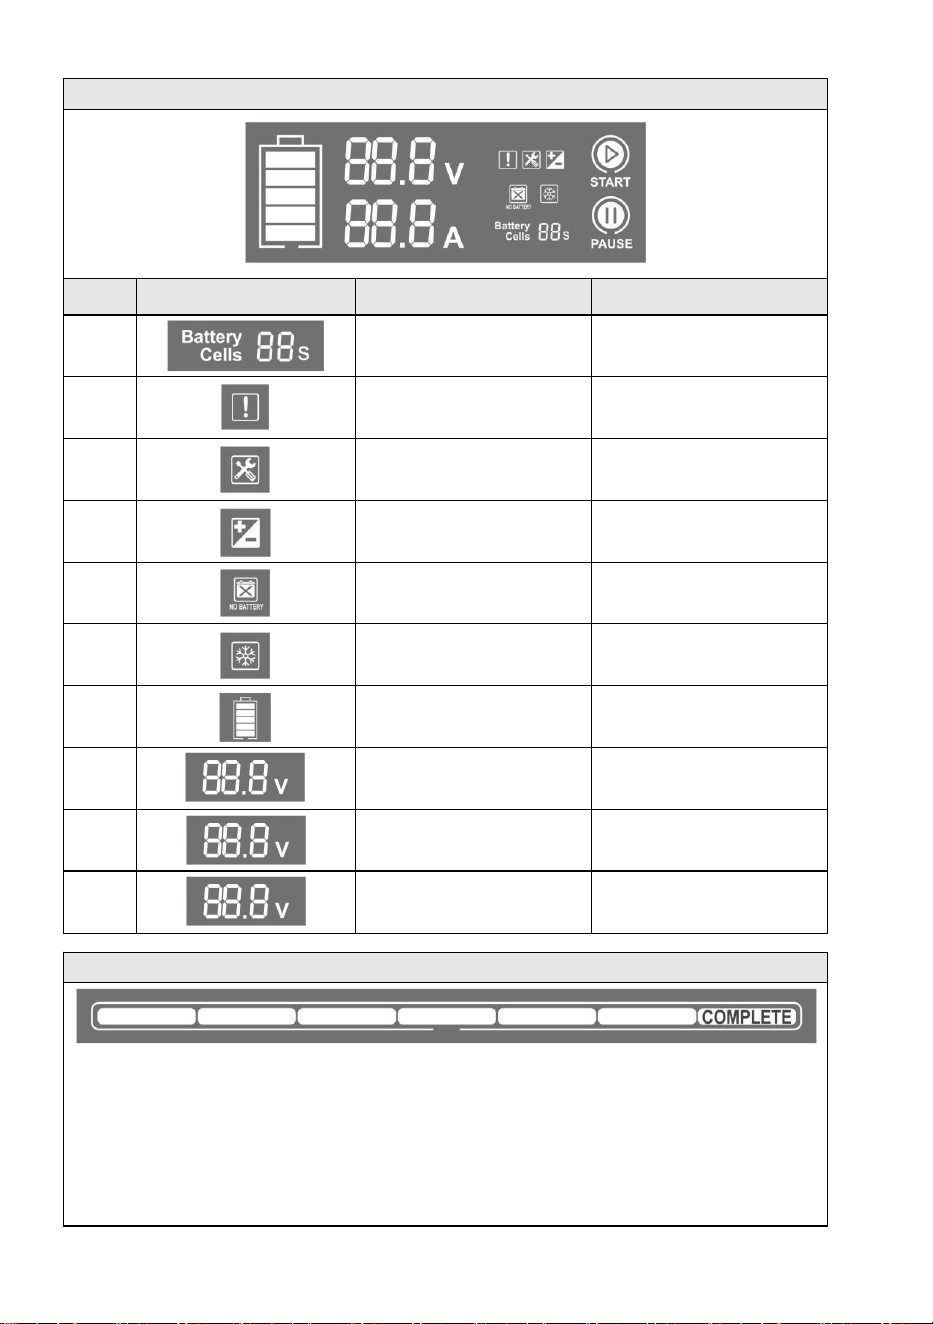
GraphicIndication
S/N
Graphic
Indicator
Explanation
1
Show Battery Cell Number
In professional mode,
display battery cell number;
In normal mode, no display
2
Flash
Warning:
Over Current, Short circuit
3
ON
Charging in “Desulfation”
4
Flash
Battery reverse connect
5
ON
Not connect battery
6
Flash
Ambient temperature
for charging
7
ON
Show battery capacity
8
-
Show charging voltage
9
-
Show charging current
10
Display number
For a description of the
fault codes
Progress Bar Indication
1. Desulfation Stage (only for lead-acid battery)
2. Small current charging mode
3. CC charging mode
4. CV charging mode
5. Battery self-check
6. Floating Charging Mode
7. Full Charged

- 15 -
Charger Specifications by Model
Product
Model
XFH-SS01
XFH-
SS02
XFH-
SS03
XFH-
SS07
XFH-
SS04
XFH-
SS08
XFH-
SS05
XFH-
SS09
Input
Voltage AC
120VAC 60Hz
Max250W
120VAC 60Hz
Max300W
120VAC
60Hz
Max400W
230VAC
50Hz
Max400W
120VAC
60Hz
Max480W
230VAC
50Hz
Max480W
120VAC
60Hz
Max550W
230VAC
50Hz
Max550W
Output
Power
175. 2W(Max)
234W(Max)
292W(Max)
365W(Max)
438W(Max)
Charging
Voltage
Various
Charging
Current
5A (6V), 10A (6V),
12A (6V), 5A (12V),
10A(12V), 12A
(12V),
5A(24V), 6A(24V),
4A/(36V), 3A(48V)
5A (6V), 10A (6V),
16A (6V), 5A (12V),
10A(12V), 16A
(12V),
5A(24V), 8A(24V),
5. 3A/(36V),
4A(48V),
3. 2A(60V), 2.
7A(72V)
5A (6V), 10A (6V),
16A (6V), 5A (12V),
10A(12V), 20A
(12V),
5A(24V), 10A(24V)
5A (6V), 10A (6V),
16A (6V), 5A (12V),
16A(12V), 25A
(12V),
5A(24V), 10A(24V),
12. 5A(24V)
5A (6V), 10A (6V),
16A (6V), 5A (12V),
16A(12V), 30A
(12V),
5A(24V), 10A(24V),
15A(24V)
Low-Voltage
Detection
2V(6V), 10V(12V),
20V(24V),
30V(36V),
40V(48V)
2V(6V), 10V(12V),
20V(24V),
30V(36V),
40V(48V),
50V(60V),
60V(72V)
2V(6V), 10V(12V), 20V(24V)
Back
Current
Drain
<0. 5mA
Ambient
Temperature
-20°C to 40°C
Type of
Batteries
6V, 12V, 24V,
36V, 48V
6V, 12V, 24V,
36V, 48V, 60V,
72V
6V, 12V, 24V
Battery
Chemistries
Wet, Gel, MF, CA, EFB, AGM, Calcium , LiFePO4
Battery
Capacity
Up to 200Ah,
Maintains
All Battery Sizes
Up to 300Ah,
Maintains
All Battery Sizes
Up to 400Ah,
Maintains All Battery
Sizes
Up to 500Ah,
Maintains All Battery
Sizes
Up to 600Ah,
Maintains All Battery
Sizes
Cooling
Input
Voltage AC
Fan Convection

- 16 -
Manual Battery Voltage Selection (Professional Mode)
Battery Types
Voltage Range
Series Cell
Count
Battery Nominal
Voltage(V)
Charging
Voltage(V)
Voltage
Threshold
Range(V)
LiFePo4
battery
12V
3
9. 6
10. 95
7. 5-10. 95
4
12. 8
14. 6
10-14. 6
24V
6
19. 2
21. 9
15-21. 9
8
25. 6
29. 2
20-29. 2
36V
11
35. 2
40. 15
27. 5-40. 15
12
38. 4
43. 8
30-43. 8
48V
14
44. 8
51. 1
35-51. 1
15
48
54. 75
37. 5-54. 75
16
51. 2
58. 4
40-58. 4
60V
18
57. 6
65. 7
45-65. 7
19
60. 8
69. 35
47. 5-69. 35
20
64
73
50-73
72V
22
70. 4
80. 3
55-80. 3
23
73. 6
83. 95
57. 5-83. 95
24
76. 8
87. 6
60-87. 6
Lead acid
battery
12V
4
13. 8
14. 6
10-14. 6
24V
8
27. 6
29. 2
20-29. 2
36V
12
41. 4
43. 8
30-43. 8
48V
16
55. 2
58. 4
40-58. 4
60V
20
69
73
50-73
72V
24
82. 8
87. 6
60-87. 6

- 17 -
FAILURE CODE
When the machine cannot be charged in use, the product display will show the fault code.
Please refer to the following fault code number description table and resolve the non-charging
issue caused by misoperation according to the corresponding fault number.
Fault code
Description of the fault
03E
The temperature inside the machine is too high
04E
The output charging mode is selected incorrectly
05E
Output voltage over voltage
06E
Output over power
42E
Output current over current
43E
Voltage or current no change for a long time
04E: Press the start button to clear.
Other: Disconnect the power plug.

- 18 -

- 19 -
Chargeur au lithium-plomb-acide
Modèle: XFH-SS01 , XFH-SS02 , XFH-SS03 ,
XFH-SS04 , XFH-SS05 , XFH-SS07 ,
XFH-SS08 , XFH-SS09

- 1 -
Modèle : XFH-SS01 , XFH-SS02 , XFH-SS03 , XFH-SS04 , XFH-SS05 ,
XFH-SS07 , XFH-SS08 , XFH-SS09
Voici les instructions originales . Veuillez lire attentivement toutes les
instructions du manuel avant utilisation . VEVOR se réserve le droit
d'interpréter ce manuel d'utilisation . L'apparence du produit peut varier
par rapport à celui que vous recevrez . Nous vous prions de nous
excuser si nous ne vous informons pas des mises à jour technologiques
ou logicielles concernant notre produit .
- 2 -
Avertissement - Afin de réduire les risques de
blessure , l'utilisateur doit lire attentivement le
manuel d'instructions .
Cet appareil est conforme à la partie 15 des règles
de la FCC . Son fonctionnement est soumis aux deux
conditions suivantes : (1) Cet appareil ne doit pas
causer d'interférences nuisibles , et (2) cet appareil
doit accepter toute interférence reçue , y compris les
interférences pouvant entraîner un fonctionnement
indésirable .
Ce produit est soumis aux dispositions de la directive
européenne 2012/19/CE . Le symbole représentant
une poubelle barrée indique que le produit doit être
collecté séparément des déchets ménagers dans
l'Union européenne . Ceci s'applique au produit et à
tous les accessoires portant ce symbole . Les
produits ainsi marqués ne doivent pas être jetés avec
les ordures ménagères ordinaires , mais doivent être
déposés dans un point de collecte pour le recyclage
des appareils électriques et électroniques (EEED).
Électrique Choc électrique . Ce produit est un
appareil électrique pouvant provoquer un choc
électrique. et provoquer des blessures graves . Ne
pas couper le courant. cordes . Faites pas
submerger dans eau ou obtenir mouillé .
Explosion . Les batteries non surveillées ,
incompatibles ou endommagées peuvent Exploser
en cas d'utilisation avec ce produit . Ne pas utiliser
avec ce produit. partir produit sans surveillance
pendant son utilisation . Ne tentez pas de démarrer
un appareil endommagé à l'aide de câbles de
démarrage. ou congelés Batterie . Utilisez ce produit
uniquement avec des batteries de la tension
recommandée . Fonctionnement produit dans des
zones bien ventilées .
- 3 -
Feu . Ce produit est un appareil électrique qui
émet chaleur et est capable de causant des
brûlures . Ne pas faire couverture produit .
Ne fumez pas et n'utilisez aucun produit. source de
électrique étincelle ou le feu quand Produit en
fonctionnement . Tenir le produit éloigné des
matières combustibles. matériaux .
Œil Risque de blessure . Portez des lunettes de
protection lors de l'utilisation du produit . Les
batteries peuvent exploser et projeter des débris .
L'acide de batterie peut provoquer des irritations
oculaires et cutanées. irritation . Dans le cas de En
cas de contamination des yeux ou de la peau , rincer
abondamment la zone affectée. eau courante propre
et centre antipoison par contact immédiatement .
Explosif Gaz . Travailler à proximité d'une
installation au plomb-acide est dangereux .
Batteries générer des gaz explosifs lors du
fonctionnement normal de la batterie .
À réduire Risque d'explosion de la batterie , veuillez
suivre toutes les consignes de sécurité. les
instructions et celles publiées par la batterie fabricant
et fabricant de tout équipement destiné à être utilisé
dans le environs de batterie . Consultez les
avertissements figurant sur ces produits et sur
moteur .

- 4 -
Ce chargeur de batterie VEVOR représente certains des la plupart novateur et technologie de
pointe sur le marché , simplifiant chaque recharge et facile . est assez peut-être le le plus sûr
et la plupart
Vous n'aurez jamais besoin d'un chargeur aussi efficace. utiliser .
Ce produit est conçu pour charger tous types de téléphones. de plomb-acide piles , y compris
Lithium ,
LiFePO4 , humide (Inondé) , Gel , MF (Sans entretien) , CA (Calcium) , EFB (Amélioré Inondé
Batterie) et AGM (Verre absorbant) Batteries (Mat) . Convient pour la charge batterie capacités
jusqu'à 400 ampères-heures et maintien de toutes les tailles de batterie .
Commencer
Avant À l'aide du chargeur , lisez attentivement la batterie fabricant spécifique précautions
charge recommandés . Déterminez la tension et chimie de votre batterie par Veuillez vous
référer au manuel d'utilisation de votre batterie. avant la mise en charge .
Montage
Considérez la distance jusqu'à la batterie . longueur du câble CC depuis le chargeur , avec
soit le Les connecteurs de bornes à œillet ou à pince pour batterie mesurent environ 47.2
pouces (1200 mm) .
Avertissement relatif à la Proposition 65
Les bornes , les cosses et les accessoires connexes de la batterie contiennent produits
chimiques , notamment Ces matériaux sont connus de l'État de Californie pour contenir du
plomb . cause cancer , naissance défauts et autre
dommages à la reproduction .
Précautions personnelles
Utilisez uniquement le produit comme destiné .
Assurez-vous que quelqu'un soit à portée de voix pour vous aider. dans cas de un urgence .
Ayez toujours une réserve d'eau propre et de savon. proche au cas où de batterie acide contact .
Portez une protection oculaire complète et des lunettes de protection. vêtements quand
fonctionnement près un batterie .
Lavez-vous toujours les mains après avoir manipulé des piles. et en rapport matériaux .
Ne manipulez pas et ne portez aucun objets métalliques (par exemple , des outils , des
montres ou des bijoux) pendant le travail avec batteries . Si du métal tombe sur une batterie , il
peut étincelle ou créer un court circuit , résultant en cas de choc électrique , d'incendie ou
d'explosion , ce qui pourrait entraîner des blessures , la mort ou propriété dommage .
Mineurs
Si le ce produit est destiné à être utilisé par un mineur , le achat adulte d'accord à fournir
détaillé
instructions et avertissements au mineur avant utiliser . Échec de faire donc est le seul
responsabilité de l'acheteur , qui accepte d'indemniser le fabricant pour n'importe lequel
involontaire utiliser ou abuser par un mineure .
Risque d'étouffement
Les accessoires peuvent présenter un risque d'étouffement. danger pour les enfants . pas
partir enfants sans surveillance avec le produit ou tout accessoire . Le produit est pas un jouet .

- 5 -
Manutention
Manipulez le produit avec précaution . Il peut être endommagé si impacté .
N’utilisez pas un appareil endommagé produit , y compris un avec fissures dans le enveloppe
ou endommagé câbles .

- 6 -
Faire pas utiliser le produit avec un cordon d'alimentation endommagé .
L'humidité et les liquides peuvent endommager le produit . Faites pas gérer le produit ou
n'importe lequel électrique al composants à proximité de n'importe quel liquide .
Stockez et utilisez le produit dans sec lieux .
N’utilisez pas le produit s’il devient mouillé . Si le produit devient mouillé pendant Pour le
fonctionnement , débranchez-le de la batterie et cessez de l'utiliser. immédiatement .
Ne débranchez pas le produit par tirer sur le câbles .
Modifications
Faire ne pas tenter d'altérer , de modifier ou de réparer quoi que ce soit partie de la produit .
Le démontage du produit peut entraîner des blessures , voire la mort . propriété dommage .
Si le produit est endommagé , présente un dysfonctionnement ou contacts n'importe lequel
liquide , interrompre utiliser et contacter le fabricant .
Toute modification annulera votre garantie .
Accessoires
Ce produit est uniquement approuvé pour l'utilisation avec approuvé par le fabricant
accessoires . Le fabricant n'est pas responsable de l'utilisateur sécurité ou
dommage quand en utilisant non approuvé accessoires .
Emplacement
Empêcher l'acide de la batterie d'entrer en contact avec la produit .
N’utilisez pas le produit dans un fermé zone ou un zone avec limité ventilation .
Faire pas placer une pile dessus de la produit .
Positionnez les câbles de manière à éviter tout dommage accidentel. par véhicule en mouvement
parties (par exemple , capots , portes ) , pièces mobiles du moteur (par exemple , pales de
ventilateur , courroies , poulies) , ou autre potentiel dangers qui peut cause blessure ou mort .
Température de fonctionnement
Ce produit est conçu pour fonctionner à température ambiante. entre -4°F et 104°F (-20°C et 40
°C) . Ne pas utiliser en dehors de ces plages de température . pas charge un gelé batterie .
Cessez immédiatement l'utilisation si la batterie devient excessivement chaud .
Stockage
Ne pas utiliser ni stocker le produit dans zones avec haut concentrations de poussière ou
aéroporté matériaux . Stockez le produit sur une surface plane et stable. il est pas sujet à chute .
Conserver le produit dans un sec emplacement .
La plage de températures de stockage est de -4°F à 77°F (-20°C à 25°C) température
moyenne . Jamais dépasser 158°F (70°C) dans toutes les conditions .
Compatibilité
Ce produit est uniquement compatible avec les batteries au plomb-acide , AGM et LiFePO4 . Ne
tentez pas de l'utiliser avec d'autres types de batteries . N’utilisez pas ce produit avec un autre type
de batterie . Charger des batteries d’une autre nature chimique peut entraîner des blessures .
décès ou dommages matériels . Contactez le fabricant de la batterie avant de tenter de la
recharger. batterie . Ne chargez pas une batterie si vous n'êtes pas sûr de sa composition
chimique ou de sa tension spécifiques .

- 7 -
Dispositifs médicaux
Ce produit peut émettre des champs électromagnétiques . Il contient magnétique composants
qui interfèrent avec les stimulateurs cardiaques , les défibrillateurs ou d'autres dispositifs
médicaux appareils . Consultez ton médecin avant utilisez si vous en avez-vous ? dispositifs
médicaux , y compris un stimulateur cardiaque . Si vous soupçonner le Le produit interfère avec
un dispositif médical , arrêtez-le. en utilisant il immédiatement et consultez votre médecin .
Nettoyage
Mettez le produit hors tension avant toute tentative. entretien ou nettoyage . Nettoyer et sécher
le
nettoyer immédiatement le produit en cas de contact avec liquide ou n'importe lequel
contaminant . Utiliser un Chiffon doux non pelucheux (microfibre) . Évitez toute infiltration
d'humidité dans les ouvertures .
Atmosphères explosives
Respectez tous les panneaux et instructions . Ne pas actionner le produit dans n'importe lequel
zone avec un potentiellement
atmosphère explosive , y compris les zones de ravitaillement en carburant ou les zones
contenant des produits chimiques ou particules tel comme du grain , de la poussière ou métal
poudres .
Activités à fort impact
Ce produit n'est pas destiné à utiliser là où le échec de la produit pourrait plomb à blessure ,
décès ou dommages environnementaux graves .
Interférences radiofréquences
Ce produit est conçu , testé et fabriqué à se conformer avec règlements gouvernant Les
émissions de radiofréquences peuvent avoir un impact négatif sur opération de autre
électronique
équipement , provoquant son dysfonctionnement .
Note de conformité FCC
Cet appareil est conforme aux Partie 15 de la F CC Règles . Fonctionnement sous réserve de
suivant deux conditions:
(1) Cet appareil peut ne pas cause nocif interférence .
(2) Cet appareil doit accepter toute interférence reçu , y compris interférence qui peut cause
fonctionnement indésirable .
Cet équipement a été testé et jugé conforme. se conformer aux limites pour un Classe B
numérique
dispositif , conformément à Partie 15 de la FCC Règles . Ces limites sont conçu pour fournir
protection raisonnable contre les interférences nuisibles dans une activité commerciale
installation . Ceci équipement génère , utilise et peut émettre de l' énergie radiofréquence et ,
si pas installé et utilisé dans conformément aux instructions , peut provoquer des interférences
nuisibles radio communications . Opération de ce
l'équipement dans une zone résidentielle est probablement cause nocif interférence , dans
laquelle cas le L'utilisateur devra corriger l' interférence à leur propre dépense .

- 8 -
COMMENT FAIRE UTILISER
Modes de charge
Lorsque le mode d'alimentation est sélectionné , vous pouvez charge par sélectionner
différent courants avec Différentes tensions . Veuillez sélectionner le type de batterie après
avoir allumé l' interrupteur . modes sont
Des modes de charge avancés qui requièrent toute votre attention. avant sélection . C'est est
important pour
comprendre les différences et les objectifs de chaque charge mode . Faire pas actionner le
chargeur jusqu'à ce que vous ayez confirmé le mode de charge approprié pour votre batterie .
Ci-dessous est un bref description:
Modèle
Explication (tension de crête mesurée à 25 °C , ampérage) la note est en gros intensité de
courant quand au-dessus de 0°c)
Attendre
En veille mode , le chargeur est ne pas facturer ou fournir tout pouvoir à le batterie .
Énergie La sauvegarde est activée pendant ce mode , dessinant des microscopiques
puissance de la électrique point de vente . Peut bus est activé en mode veille . En mode
veille , LCD volonté illuminer .
Charge
6V Plomb
Pour la charge de 6 volts Batteries au plomb - acide . Lorsqu'elles sont
sélectionnées , les 6V être doublé par bleu .
7,3 V | Jusqu'à 200AH Batteries
12V Plomb
Pour charger des appareils 12 volts Batteries au plomb - acide . Lorsqu'elle est
sélectionnée , la batterie 12 V volonté être doublé dans bleu .
14,6 V | Jusqu'à 600AH Batteries
24V Plomb
Pour la charge de 24 volts Batteries au plomb - acide . Lorsqu'elles sont
sélectionnées , les 24V être doublé dans bleu .
29.2V | Jusqu'à 300AH Séries de batteries
36V Plomb
Pour la charge de 36 volts Batteries au plomb - acide . Lorsqu'elles sont
sélectionnées , les 36V être doublé dans bleu .
43,8 V | Jusqu'à 100AH Batteries
48V Plomb
Pour la charge de 48 volts Batteries au plomb - acide . Lorsqu'elles sont
sélectionnées , les 48V être doublé dans bleu .
58,4 V | Jusqu'à 100AH Séries de batteries
60 V
Plomb
Pour la charge de 60 volts Batteries au plomb - acide . Lorsqu'elles sont
sélectionnées , les 60V être doublé dans bleu . 73V | Jusqu'à 60AH Batteries
72V Plomb
Pour la charge de 72 volts Batteries au plomb - acide . Lorsqu'elle est sélectionnée ,
la batterie 72 V sera être doublé dans bleu .
87,6 V | Jusqu'à 60AH Batteries
12V
LiFePo4
Pour 12 volts LiFePo4 batteries . Lorsqu'elle est sélectionnée , la batterie 12V sera
doublé dans bleu .
14,6 V | Jusqu'à 600AH Batteries
24V
LiFePo4
Pour 24 volts LiFePo4 batteries . Lorsqu'elle est sélectionnée , la batterie 24 V sera
être ligné dans bleu .
29.2V | Jusqu'à 200AH Séries de batteries
36V
LiFePo4
Pour 36 volts LiFePo4 batteries . Lorsqu'elle est sélectionnée , la batterie 36V sera
être doublé dans bleu .
43,8 V | Jusqu'à 100AH Batteries
48V
LiFePo4
Pour 48 volts LiFePo4 batteries . Lorsqu'elle est sélectionnée , la batterie 48V sera
doublé dans bleu .
58,4 V | Jusqu'à 100AH Séries de batteries

- 9 -
60 V
LiFePo4
Pour 60 volts LiFePo4 batteries . Lorsqu'elle est sélectionnée , la
batterie 60V sera doublé dans bleu . 73V | Jusqu'à 60AH Batteries
72V
LiFePo4
Pour 72 volts LiFePo4 batterie s . Lorsqu'elle est sélectionnée , la batterie 72V sera
doublé dans bleu .
87,6 V | Jusqu'à 60AH Batteries

- 10 -
Maintenir
6V Plomb
Pour charger 6 volts batteries au plomb-acide . Lorsqu'elles sont sélectionnées , les
6V être doublé en bleu .
7,3 V | En haut À 200AH Batteries
12V Plomb
Pour charger des appareils 12 volts batteries au plomb-acide . Lorsqu'elles sont
sélectionnées , les batteries 12 V volonté être doublé en bleu .
14,6 V | En haut À 600AH Batteries
24V Plomb
Pour la charge de 24 volts batteries au plomb-acide . Lorsqu'elles sont sélectionnées
, les 24V être doublé en bleu .
29.2V | En haut À 300AH Batteries
36V Plomb
Pour la charge de 36 volts batteries au plomb-acide . Lorsqu'elles sont sélectionnées
, les 36V être doublé en bleu .
43,8 V | En haut À 100AH Batteries
48V Plomb
Pour la charge de 48 volts batteries au plomb-acide . Lorsqu'elles sont
sélectionnées , les 48V être doublé en bleu .
58,4 V | En haut À 100AH Batteries
60 V
Plomb
Pour la charge de 60 volts batteries au plomb-acide . Lorsqu'elles sont
sélectionnées , les 60V être doublé en bleu . 73V | En haut À 60AH Batteries
72V Plomb
Pour la charge de 72 volts batteries au plomb-acide . Lorsqu'elle est sélectionnée ,
la batterie 72 V sera être doublé en bleu .
87,6 V | En haut À 60AH Batteries
Désulfatati
on
6V Plomb
Pour la charge de 6 volts batteries au plomb-acide . Lorsqu'elles sont sélectionnées
, les 6V être doublé en bleu .
7,3 V | En haut À 200AH Batteries
12V Plomb
Pour charger des appareils 12 volts batteries au plomb-acide . Lorsqu'elles sont
sélectionnées , les batteries 12 V volonté être doublé en bleu .
14,6 V | En haut À 600AH Batteries
24V Plomb
Pour la charge de 24 volts batteries au plomb-acide . Lorsqu'elles sont sélectionnées
, les 24V être doublé en bleu .
29.2V | En haut À 300AH Batteries
Fournir
Mode
6V Plomb
Pour la charge de 6 volts batteries au plomb-acide . Lorsqu'elles sont sélectionnées
, les 6V être doublé en bleu .
7,3 V | En haut À 200AH Batteries
12V Plomb
Pour charger des appareils 12 volts batteries au plomb-acide . Lorsqu'elles sont
sélectionnées , les batteries 12 V volonté être doublé en bleu .
14,6 V | En haut À 600AH Batteries
24V Plomb
Pour la charge de 24 volts batteries au plomb-acide . Lorsqu'elles sont sélectionnées
, les 24V être doublé en bleu .
29.2V | En haut À 300AH Batteries
36V Plomb
Pour la charge de 36 volts batteries au plomb-acide . Lorsqu'elles sont sélectionnées
, les 36V être doublé en bleu .
43,8 V | En haut À 100AH Batteries
48V Plomb
Pour la charge de 48 volts batteries au plomb-acide . Lorsqu'elles sont
sélectionnées , les 48V être doublé en bleu .
58,4 V | En haut À 100AH Batteries
60 V
Plomb
Pour la charge de 60 volts batteries au plomb-acide . Lorsqu'elles sont
sélectionnées , les 60V être doublé en bleu . 73V | En haut À 60AH Batteries
72V Plomb
Pour la charge de 72 volts batteries au plomb-acide . Lorsqu'elle est sélectionnée ,
la batterie 72 V sera être doublé en bleu .
87,6 V | En haut À 60AH Batteries

- 11 -
Charge des batteries au plomb-acide
1. Tout d'abord , appuyez sur
Appuyez
sur le bouton « Type de batterie » pour sélectionner
"Plomb " . Deuxièmement , appuyez sur "Tension" bouton , puis appuyez sur le bouton
« Démarrer » commencer la charge .
2. Tout d'abord , appuyez sur « Type de batterie » bouton n pour sélectionner « Pilote » .
Deuxièmement , appuyez sur "Tension"
bouton , puis appuyez sur le
Appuyez sur le bouton
« Actuel » , puis enfin sur le
"Commencer" bouton à commencer En charge . Attention : lorsque ce mode est sélectionné ,
veuillez… assurez-vous que votre batterie est un plomb-acide batterie . Veuillez vous assurer
que la tension de votre batterie correspond à la tension sélectionnée ; sinon , la facturation
échouera .
Charge de la batterie LiFePO4
1. Tout d'abord , appuyez sur « Type de batterie » bouton pour sélectionner « LiFePO4 » , puis
appuyez sur "Tension" bouton , puis appuyez sur le Appuyez sur le bouton « Démarrer »
pour commencer. recharge .
2. Tout d'abord , appuyez sur « Type de batterie » appuyez sur pour sélectionner « LiFePO4 » .
Deuxièmement , appuyez sur "Tension"
bouton , puis appuyez sur le
Appuyez sur le bouton
« Actuel » , puis enfin sur le
"Commencer" bouton à commencer En charge . Attention : lorsque ce mode est sélectionné ,
veuillez… assurez-vous que votre batterie est un LiFePO4 batterie . Veuillez vous assurer que
la tension de votre batterie correspond à la tension sélectionnée ; sinon , facturation
échouera .
Maintenir le mode
Tout d'abord , appuyez sur « Type de batterie » bouton pour sélectionner "Pilote " .
Deuxièmement , presse le
Appuyez
sur le bouton « Maintenir » , puis sur le Appuyez sur le
bouton « Tension » pour sélectionner la tension appropriée , et enfin presse le Appuyez sur
le bouton « Démarrer » pour lancer la charge . Le chargeur chargera l'appareil . batterie avec
un faible actuel à maintenir un état entièrement chargé , et ce mode ne le fera pas dommage
ton batterie .
Mode de désulfatation
Tout d'abord , appuyez sur « Type de batterie » bouton pour sélectionner « Pilote » .
Deuxièmement , appuyez sur le «Désulfatation»
bouton , puis appuyez sur le Bouton « Tension » , et enfin appuyez sur "Commencer" bouton
pour Commencez la charge . Attention : lorsque la batterie est très ancienne et a capacité
insuffisante , vous peut sélectionner ce mode à réparez-le . Veuillez noter que les piles peuvent
seulement être réparé un à un temps .
Mode d'approvisionnement
Tout d'abord , appuyez sur « Type de batterie » bouton pour sélectionner « Prendre la tête » .
Deuxièmement , appuyez sur "Tension" bouton , puis appuyez troisièmement sur le "Actuel"
mais ton , et enfin appuyez sur le "Commencer" bouton .
Attention : ce mode peut être sélectionné lorsque utilisé comme un pouvoir fournir ou
quand le batterie la tension ne peut pas être détecté .
Mode professionnel

- 12 -
Tout d'abord , appuyez sur
Appuyez sur
le bouton « Type de batterie » , puis allumez l’appareil.
à entrer professionnel mode .
Lorsque vous passez en mode professionnel , veuillez sélectionner différent batteries en utilisant
différent mesures:
Appuyez sur « Type de batterie » bouton pour sélectionner « LiFePO4 » , deuxièmement
appuyez sur "Tension" bouton pour sélectionner la tension et les cellules de la batterie , et le
courant sélection méthode est le même comme dans non- mode professionnel .
Prudence: Dans En mode LiFePO4 , les cellules de batterie cachées seront être affiché .
Veuillez note que non-
Les professionnels ne doivent pas sélectionner ce mode . Si vous le sélectionnez , veuillez…
contacter le batterie fournisseur;
Sinon , il y aura des risques . Ce mode ne peut pas être mémorisé . Après tournant hors du le
pouvoir , le Le chargeur retournera à un usage non professionnel mode .

- 13 -
Connexion à la batterie
Ne branchez pas la prise secteur. jusqu'à tous autre relations sont fabriqué . Identifier le correct
Polarité des bornes de la batterie . pas faire n'importe lequel liens avec carburateur , conduites
de carburant ou tôle mince parties . instructions ci-dessous sont pour un négatif sol système
(le plus courant) . Si votre véhicule est à la masse positive système (très (rare) , suivez le
instructions ci-dessous ordre inverse .
1. Connectez le positif (rouge) Cosse à œillet vers le positif Pile (POS , P , +) Terminal .
2. Connectez le négatif (noir) Connecteur à œillet pour borne négative (NÉG , N , -) batterie
Terminal .
3. Branchez le chargeur de batterie à une prise électrique appropriée . pas affronter le
batterie quand établir cette connexion .
4. Lors de la déconnexion , procédez dans l' ordre inverse : retirer le borne négative en premier
(ou borne positive en premier pour les systèmes à masse positive) .
Début de la charge
1. Vérifiez la tension et la chimie de la batterie .
2. Vérifiez que vous avez bien connecté les pinces de la batterie . ou œillet terminal
connecteurs correctement et que la prise d'alimentation secteur est branché sur un électrique
sortie .
3. [Première fois ] [utiliser] Le chargeur sera démarrer en mode veille , et "Pause" volonté être
encerclé dans bleu . Dans Attendre mode , le chargeur ne fournit pas n'importe lequel pouvoir .
4. Appuyez sur Bouton « Type de batterie » pour sélectionner le type de batterie ,
deuxièmement presse le "Tension" bouton , et troisièmement appuyez sur le Bouton
« Actuel » .
5. Appuyez sur Cliquez sur le bouton « Démarrer » , et ce sera… mis en évidence dans bleu;
deuxièmement , le batterie volonté être
détecté . Si la batterie est normale , aucun problème. batterie L'indicateur sera tourner éteint ,
et le chargeur volonté travail normalement ; sinon , il le fera pas .
6. Le chargeur peut maintenant être gauche connecté à le batterie à tous fois à fournir
entretien recharge .
Mémoire automatique : Le chargeur est doté d’une mémoire automatique intégrée et volonté
retour à le dernier charge mode une fois connecté . Sélectionnez le mode approprié et
appuyez sur "Commencer" bouton et le chargeur sauvegardera le nouveau travail mode .
Prudence: Professionnel Le mode ne peut pas être mémorisé automatiquement .
TEMPS DE CHARGE
Le temps de charge estimé d'une batterie est calculé comme suit : Chargement Temps (heures)
= Capacité de la batterie (Ah) / Courant de charge (A) . La batterie capacité (Ah) et c'est
profondeur de
décharge (DoD) affectent considérablement la durée de charge . Le temps calculé est basé sur
un
profondeur moyenne de décharge jusqu'à un état de charge complet et est pour référence
seulement . Réel résultats peut varier en fonction de l'état de la batterie . Le temps de charge
pour un normalement libéré batterie est
basé sur un 50% Le ministère de la Défense . La température a également un impact. recharge
efficacité .

- 14 -
VEVOR Les chargeurs de batterie sont dotés d' une technologie de compensation
thermique qui s'active automatiquement.
ajuste les paramètres de charge pour optimiser les performances . Ci-dessous un recharge
temps référence pour modèle :
XFH-SS01 :
Taille de la
batterie
Ah (Amp)
heure)
Temps de charge approximatif heures
6V
12V
24V
36V
48 V
40
3
3
6
10
13
60
5
5
10
15
20
80
6
6
12
20
26
120
10
10
20
200
17
17
XFH-SS0 2 :
XFH-SS03 / XFH - SS07 :
Taille de la
batterie
Ah (Amp)
heure)
Temps de charge approximatif heures
6V
12V
24V
36V
48V
60 V
72 V
40
3
3
5
8
10
13
15
60
4
4
8
11
15
19
23
80
5
5
10
15
20
25
31
120
8
8
15
23
30
200
13
13
25
Taille de la
batterie
Ah (Je suis)
phour)
Temps de charge approximatif heures
6V
12V
24V
40
3
2
4
60
4
3
6
80
5
4
8
120
8
6
12
200
13
10
20
400
25
20

- 15 -
XFH- SS04 / XFH- SS08
XFH- SS05 / XFH -SS09 :
COMPRENDRE L'INDICATION DE FRAIS
Taille de la
batterie
Ah (Amp)
heure)
Temps de charge approximatif heures
6V
12V
24V
40
3
2
3
60
4
3
5
80
5
3.5
7
120
8
5
10
200
13
8
16
400
25
16
Taille de la
batterie
Ah (Amp)
heure)
Temps de charge approximatif heures
6V
12V
24V
40
3
1.5
3
60
4
2
4
80
5
3
5. 5
120
8
4
8
200
13
7
14
400
25
14
- 16 -
Illustration du bouton
Bouton
Batterie Bouton: Poussez le
bouton pour sélectionner le type
de batterie ; le L'indicateur
« Type de batterie » s'allumera.
sur .
Bouton
Tension Bouton : Pousser le bouton
pour sélectionner la tension ;
"Tension" Le voyant s'allumera .
Bouton
Actuel Bouton: Poussez le bouton
pour sélectionner le courant; le
"Actuel" Le voyant s'allumera .
Bouton
Chargement et Maintenir Mode :
Le Le voyant « En charge »
s’allumera .
Lorsque la batterie et pouvoir
L' alimentation est correctement
connectée , L'indicateur de barre
de progression va tourner sur
selon la charge sélectionnée
mode .
Si le batterie a pas a été utilisé
pendant longtemps , poussez le
bouton pour sélectionner Mode de
maintien . batterie seront facturés
avec un petit courant pour
maintenir son charge ; le voyant «
Maintien » s'allumera , et les
progrès La barre clignotera de
manière cyclique . (Maintenir Le
mode est uniquement pour les
batteries au plomb-acide piles . )
Bouton
Fournir Mode : Lorsque la
batterie est correctement
connecté mais ne peut pas être
détecté , appuyez sur bouton
pour utiliser Mode
« Alimentation » pour la charge .
Le voyant « Approvisionnement »
s'allumera.
sur , et les progrès La barre
clignotera cycliquement .
Bouton
Désulfatation Mode (Plomb-acide)
Batterie Seulement) : Je si le
batterie a a été utilisé pour un
longue durée et c'est la capacité
diminue rapidement , poussez le
bouton pour utiliser
«Désulfatation»
mode de chargement réparation
la batterie . Le voyant
« Désulfatation » s’allumera ,
et le

- 17 -
La barre de progression clignotera
de manière cyclique .
Bouton
DÉMARRER et PAUSE Bouton : Lorsque les paramètres sont corrects , appuyez sur le
bouton. bouton; le Le voyant « Démarrage » s’allumera et le chargeur commencera à
fonctionner . Appuyez sur le bouton. alors que le chargeur est fonctionnement; le Le
voyant « PAUSE » s'allumera et le chargeur cessera de fonctionner .

- 18 -
Indication graphique
N° de
série
Graphique
Indicateur
Explication
1
Montrer Cellule de batterie
Nombre
Dans mode professionnel ,
afficher la cellule de la batterie
nombre;
En normal mode , pas
d'affichage
2
Éclair
Avertissement:
Surintensité , court-circuit circuit
3
SUR
Chargement dans «
Désulfatation »
4
Éclair
Connexion inversée de la
batterie
5
SUR
Non connecté batterie
6
Éclair
Température ambiante
pour recharge
7
SUR
Afficher la capacité de la batterie
8
-
Afficher la tension de charge
9
-
Afficher le courant de charge
10
Afficher le numéro
Pour une description du
défaut codes
Barre de progression Indication

- 19 -
1. Étape de désulfatation (uniquement pour les batteries au plomb-acide)
2. Mode de charge à faible courant
3. Recharge CC mode
4. Chargement CV mode
5. Autocontrôle de la batterie
6. Charge flottante Mode
7. Charge complète

- 20 -
Spécifications du chargeur par modèle
Modèle de
produit
XFH-SS01
XFH-
SS02
XFH-
SS03
XFH-
SS07
XFH-
SS04
XFH-
SS08
XFH-
SS05
XFH-
SS09
Tension
d'entrée CA
120 V CA 60 Hz
Max250W
120 V CA 60 Hz
Max300W
120 V CA
60 Hz
Max400W
230 V CA
50 Hz
Max400W
120 V CA
60 Hz
Max480W
230 V CA
50 Hz
Max480W
120 V CA
60 Hz
Max550W
230 V CA
50 Hz
Max550W
Sortir Pouvoir
175 . 2W(Max)
234 W (max.)
292 W (max.)
365 W (max.)
438 W (max.)
Tension de
charge
Divers
Courant de
charge
5A (6V) , 10A (6V) ,
12A (6V) , 5A (12V)
,
10 A (12 V) , 12 A
(12V) ,
5A (24V) , 6A (24V)
,
4A/(36V) , 3A(48V)
5A (6V) , 10A (6V) ,
16A (6V) , 5A (12V)
,
10 A (12 V) , 16 A
(12V) ,
5A (24V) , 8A (24V)
,
5. 3A /(36V) ,
4A(48V) ,
3,2 A ( 60 V) , 2,7 A
(72 V)
5A (6V) , 10A (6V) ,
16A (6V) , 5A (12V)
,
10 A (12 V) , 20 A
(12V) ,
5A (24V) , 10A
(24V)
5A (6V) , 10A (6V) ,
16A (6V) , 5A (12V)
,
16 A (12 V) , 25 A
(12V) ,
5A (24V) , 10A
(24V) ,
12,5 A (24 V)
5A (6V) , 10A (6V) ,
16A (6V) , 5A (12V)
,
16 A (12 V) , 30 A
(12V) ,
5A (24V) , 10A (24V)
,
15A (24V)
Basse tension
Détection
2V (6V) , 10V (12V)
,
20V (24V) , 30V
(36V) ,
40V (48V)
2V (6V) , 10V (12V)
,
20V (24V) , 30V
(36V) ,
40V (48V) , 50V
(60V) ,
60V (72V)
2V (6V) , 10V (12V) , 20V (24V)
Courant inverse
Vidange
< 0,5 mA
Ambiant
Température
-20°C à 40°C
Type de
Batteries
6V , 12V , 24V ,
36 V , 48 V
6V , 12V , 24V ,
36V , 48V , 60V ,
72V
6 V , 12 V , 24 V
Batterie
Chimie
Humide , Gel , MF , CA , EFB , AGM , Calcium , LiFePO4
Capacité de la
batterie
Jusqu'à 200 Ah ,
Maintient
Tous Tailles des
batteries
Jusqu'à 300 Ah ,
Maintient
Tous Tailles des
batteries
Jusqu'à 400 Ah ,
maintient toutes les
Batterie
Tailles
Jusqu'à 500 Ah ,
maintient toutes les
Batterie
Tailles
Jusqu'à 600 Ah ,
maintient toutes les
Batterie
Tailles

- 21 -
Refroidissement
Saisir
Tension
alternative
Ventilateur Convection

- 22 -
Sélection manuelle de la tension de la batterie (Mode professionnel)
Types de
batteries
Plage de
tension
Cellule en
série
Compter
Batterie
nominale
Tension (V)
Chargement
Tension (V)
Tension
Seuil
Portée (V)
LiFePo4
batterie
12V
3
9.6
10,95
7.5-10.95
4
12.8
14.6
10-14 . 6
24V
6
19.2
21.9
15-21 . 9
8
25.6
29.2
20-29 . 2
36V
11
35.2
40,15
27.5-40.15
12
38.4
43.8
30-43 . 8
48V
14
44.8
51.1
35-51 . 1
15
48
54,75
37 . 5-54 . 75
16
51.2
58.4
40-58 . 4
60 V
18
57.6
65.7
45-65 . 7
19
60,8
69,35
47,5-69,35
20
64
73
50-73
72V
22
70,4
80,3
55-80,3
23
73,6
83,95
57,5-83,95
24
76,8
87,6
60-87 . 6
acide au
plomb
batterie
12V
4
13.8
14.6
10-14 . 6
24V
8
27.6
29.2
20-29 . 2
36V
12
41.4
43.8
30-43 . 8
48V
16
55.2
58.4
40-58 . 4
60 V
20
69
73
50-73
72V
24
82.8
87.6
60-87 . 6

- 23 -
CODE D'ERREUR
Lorsque la machine ne peut pas être chargée dans utiliser , le produit afficher volonté montrer la
faute code .
Veuillez vous référer au tableau de description des codes de défaut ci- dessous. et résoudre le
Problème
de non-charge dû à une mauvaise manipulation, conformément au défaut
correspondant nombre .
Code d'erreur
Description du défaut
03E
La température à l'intérieur de la machine est trop élevée. haut
04E
Le mode de charge de sortie est sélectionné incorrectement
05E
Surtension de sortie
06E
Sortie sur pouvoir
42E
courant de sortie sur courant
43E
La tension ou le courant ne change pas pour un long temps
04E : Appuyez sur le bouton de démarrage pour clair .
Autre: Débranchez la prise électrique .

- 24 -

- 25 -
Lithium-Blei-Säure-Ladegerät
Modell: XFH-SS01 , XFH-SS02 , XFH-SS03 ,
XFH-SS04 , XFH-SS05 , XFH-SS07 ,
XFH-SS08 , XFH-SS09

- 1 -
Modell: XFH-SS01 , XFH-SS02 , XFH-SS03 , XFH-SS04 , XFH-SS05 ,
XFH-SS07 , XFH-SS08 , XFH-SS09
Dies ist die Originalanleitung . Bitte lesen Sie die gesamte
Bedienungsanleitung vor der Inbetriebnahme sorgfältig durch . VEVOR
behält sich die Auslegung der Bedienungsanleitung vor . Das Aussehen
des Produkts kann von dem gelieferten Produkt abweichen . Wir bitten
um Verständnis, dass wir Sie nicht erneut über etwaige Technologie-
oder Software-Updates informieren werden .

- 2 -
Warnung – Um das Verletzungsrisiko zu
verringern , muss der Benutzer die
Bedienungsanleitung sorgfältig lesen .
Dieses Gerät entspricht Teil 15 der FCC-
Bestimmungen . Der Betrieb unterliegt den folgenden
zwei Bedingungen: (1) Dieses Gerät darf keine
schädlichen Störungen verursachen , und (2) dieses
Gerät muss alle empfangenen Störungen
akzeptieren , einschließlich Störungen, die einen
unerwünschten Betrieb verursachen können .
Dieses Produkt unterliegt den Bestimmungen der
europäischen Richtlinie 2012/19/EG . Das Symbol
einer durchgestrichenen Mülltonne bedeutet, dass
das Produkt in der Europäischen Union separat
entsorgt werden muss . Dies gilt für das Produkt und
sämtliches Zubehör, das mit diesem Symbol
gekennzeichnet ist . Produkte dieser Art dürfen nicht
im normalen Hausmüll entsorgt werden , sondern
müssen zu einer Sammelstelle für das Recycling von
Elektro- und Elektronikgeräten gebracht werden.
Elektrische Schock . Das Produkt ist ein
elektrisches Gerät, das einen Stromschlag
verursachen kann. Und Kann schwere Verletzungen
verursachen . Strom nicht abschalten. Kabel . Tun
nicht tauchen In Wasser oder besorgen nass .
Explosionsgefahr . Nicht überwachte , inkompatible
oder beschädigte Batterien können eine Explosion
verursachen . Kann bei Verwendung mit dem
Produkt explodieren . Nicht verwenden. verlassen
Produkt unbeaufsichtigt Während des Gebrauchs .
Versuchen Sie nicht, ein beschädigtes Gerät mit
Starthilfe zu starten. oder gefroren Batterie .
Verwenden Sie das Produkt nur mit Batterien der
empfohlenen Spannung . Betrieb. Produkt in gut
belüfteten Bereichen .

- 3 -
Feuer . Das Produkt ist ein elektrisches Gerät, das
Feuer ausstößt. Hitze Und Ist fähig von
Verursacht Verbrennungen . Nicht Abdeckung
Produkt .
Rauchen Sie nicht und verwenden Sie keine …
Quelle von elektrisch Funke oder Feuer Wann
Betriebsgerät . Produkt von brennbaren Materialien
fernhalten . Materialien .
Auge Verletzungsgefahr . Tragen Sie beim Betrieb
des Produkts eine Schutzbrille . Batterien können
explodieren und umherfliegende Teile verursachen .
Batteriesäure kann Augen- und Hautreizungen
verursachen. Reizung . In der Fall von Bei Kontakt
mit Augen oder Haut die betroffene Stelle gründlich
mit Wasser spülen . Fließendes sauberes Wasser
und Kontakt mit Giftstoffen sofort .
Explosiv Gase . Arbeiten in der Nähe von Blei-Säure
-Lagern ist gefährlich .
Batterien können während des normalen
Batteriebetriebs explosive Gase erzeugen .
Zu reduzieren Batterieexplosionsgefahr , alle
Sicherheitshinweise beachten Anweisungen und die
vom Batteriehersteller veröffentlichten Anweisungen.
Hersteller Und Hersteller von Geräten, die dazu
bestimmt sind verwendet in Die Nähe von Batterie .
Beachten Sie die Warnhinweise auf diesen
Produkten und An Motor .

- 4 -
Dieser VEVOR-Batterieladegerät-Vertreter ist mit einigen der am meisten innovativ Und
fortschrittliche Technologie auf dem Markt , wodurch jede Ladung einfach wird Und Einfach .
Ist ganz möglicherweise Die am sichersten Und am meisten
ein effizientes Ladegerät, das Sie jemals brauchen werden verwenden .
Dieses Produkt ist zum Laden aller Arten von Geräten geeignet. von Blei-Säure Batterien ,
einschließlich Lithium ,
LiFePO4 , Nass (Überflutet) , Gel , MF (Wartungsfrei ) , CA (Calcium) , EFB (Erweitert Überflutet
Batterie) und AGM (Absorptionsglas) (Mat) Batterien . Es eignet sich zum Aufladen. Batterie
Kapazitäten bis zu 400 Amperestunden und Aufrechterhaltung aller Batteriegrößen .
Erste Schritte
Vor
Lesen Sie
mithilfe des Ladegeräts die Batterieanzeige sorgfältig ab . Hersteller spezifisch
Vorsichtsmaßnahmen
und empfohlene Laderaten . Bestimmen Sie die Spannung und Chemie von Batterie von
Siehe Bedienungsanleitung Ihres Akkus vor dem Aufladen .
Montage
Berücksichtigen Sie die Entfernung zur Batterie . DC- Kabellänge aus Die Ladegerät , mit
entweder Die Batterieklemmen oder Ösenanschlussklemmen sind ungefähr 47.2 Zoll
(1200 mm) .
Warnung gemäß Proposition 65
Batteriepole , Anschlüsse und zugehöriges Zubehör enthalten Chemikalien , einschließlich
Blei . Diese Materialien sind dem Staat Kalifornien als solche bekannt. Ursache Krebs ,
Geburt Mängel und andere
Schädigung der Fortpflanzung .
Persönliche Vorsichtsmaßnahme
Verwenden Sie das Produkt nur als beabsichtigt .
Stellen Sie sicher, dass sich jemand in Hörweite befindet, der Ihnen helfen kann. In Fall von ein
Notfall .
Halten Sie stets sauberes Wasser und Seife bereit. nahe falls von Batterie Säure Kontakt .
Tragen Sie eine vollständige Schutzbrille und Schutzkleidung. Kleidung, wenn Arbeiten nahe A
Batterie .
Waschen Sie sich immer die Hände, nachdem Sie Batterien angefasst haben. Und verwandt
Materialien .
Nicht anfassen oder tragen Sie keine Metallgegenstände (z . B. Werkzeuge , Uhren oder
Schmuck) bei der Arbeit mit Batterien . Wenn Metall auf eine Batterie fällt . Batterie , es Mai
Funke oder erstellen A kurz Schaltung , resultierende bei Stromschlag , Brand oder
Explosion , die zu Verletzungen , Tod oder Eigentum Schaden .
Minderjährige
Wenn die Das Produkt ist für die Verwendung durch A Minderjähriger Kauf Erwachsene
stimmt zu Zu bieten detailliert
Anweisungen und Warnungen an den Minderjährigen vor Nutzung . Versäumnis, Tun Also ist
die Sohle, einzig, alleinig Verantwortung von der Käufer , der sich verpflichtet, den Hersteller für
beliebig unbeabsichtigt verwenden oder Missbrauch von A unerheblich .
Erstickungsgefahr

- 5 -
Accessoires können eine Erstickungsgefahr darstellen. Gefahr für Kinder . Nicht tun. nicht
verlassen Kinder unbeaufsichtigt mit Die Produkt oder Zubehör . Das Produkt Ist nicht ein
Spielzeug .
Handhabung
Behandeln Sie das Produkt mit Sorgfalt . Es kann sein beschädigt Wenn betroffen .
Verwenden Sie kein beschädigtes Gerät Produkt , einschließlich eins mit Risse In Die
Gehäuse oder beschädigt Kabel .

- 6 -
Tun nicht Verwenden Sie die Produkt mit beschädigtem Netzkabel .
Feuchtigkeit und Flüssigkeiten können das Produkt beschädigen. Produkt . Tun . nicht die
Produkt oder beliebig elektrische Al Komponenten in der Nähe von beliebigen flüssig .
Lagern und betreiben Sie das Produkt in trocken Standorte .
Betreiben Sie das Produkt nicht, wenn es wird nass . Wenn die Produkt wird nass während
Bei Betrieb das Gerät von der Batterie trennen und die Verwendung einstellen. sofort .
Trennen Sie das Produkt nicht vom Stromnetz. von ziehen an der Kabel .
Änderungen
Tun Sie dürfen nicht versuchen, irgendetwas zu verändern , zu modifizieren oder zu
reparieren. Teil des Produkt .
Das Auseinandernehmen des Produkts kann zu Verletzungen , Tod oder Eigentum Schaden .
Wenn das Produkt beschädigt wird , Fehlfunktionen aufweist oder Kontakte beliebig
Flüssigkeit , einstellen verwenden Und Wenden Sie sich an den Hersteller .
Jegliche Änderungen führen zum Erlöschen der Garantie .
Zubehör
Dieses Produkt ist nur für die Verwendung zugelassen mit vom Hersteller zugelassen
Zubehör . Der Hersteller übernimmt keine Verantwortung für den Benutzer.
Sicherheit oder Schaden Wann Verwendung nicht genehmigt Zubehör .
Standort
Verhindern Sie, dass Batteriesäure mit dem/der/den Produkt .
Betreiben Sie das Produkt nicht in einem geschlossen Bereich oder ein Bereich mit
eingeschränkt Belüftung .
Tun nicht Legen Sie eine Batterie darauf. der Produkt .
Positionieren Sie die Kabelenden so, dass versehentliche Beschädigungen vermieden werden.
von fahrendes Fahrzeug Teile (z . B. Motorhauben , Türen ) , bewegliche Motorteile ( z . B.
Lüfterflügel , Riemen , Riemenscheiben ) oder andere Potenzial Gefahren, die Mai Ursache
Verletzung oder Tod .
Betriebstemperatur
Dieses Produkt ist für den Betrieb bei Umgebungstemperaturen ausgelegt. zwischen -4°F Und
104°F (-20°C Und 40 °C) . Außerhalb dieser Temperaturbereiche nicht betreiben . nicht
Aufladung eingefroren Batterie .
Die Nutzung sofort einstellen, wenn der Akku wird übermäßig warm .
Lagerung
Nicht verwenden oder lagern Sie das Produkt in Gebiete mit hoch Konzentrationen von Staub
oder in der Luft Materialien . Lagern Sie das Produkt auf einer ebenen , sicheren Oberfläche, wo
Es Ist nicht anfällig für fallend .
Lagern Sie das Produkt in A trocken Standort .
Der Lagertemperaturbereich liegt zwischen -4°F und 77°F (-20°C bis 25°C)
Durchschnittstemperatur . Niemals überschreiten 158°F (70°C) unter allen Bedingungen .
Kompatibilität
Dieses Produkt ist nur mit Blei-Säure- , AGM- und LiFePO4-Batterien kompatibel . Versuchen Sie
nicht, es mit anderen Batterien zu verwenden . Das Produkt darf nicht mit anderen Batterietypen

- 7 -
geladen werden . Das Laden von Batterien mit anderer chemischer Zusammensetzung kann zu
Verletzungen führen .
Tod oder Sachschaden . Wenden Sie sich an den Batteriehersteller, bevor Sie versuchen, die
Batterie aufzuladen. Batterie . Laden Sie eine Batterie nicht auf, wenn Sie sich über deren
genaue chemische Zusammensetzung oder Spannung nicht sicher sind .

- 8 -
Medizinprodukte
Dieses Produkt kann elektromagnetische Felder erzeugen . Es enthält magnetisch
Komponenten , die Herzschrittmacher , Defibrillatoren oder andere medizinische Geräte
beeinträchtigen. Geräte . Rücksprache halten mit dein Arzt vor Verwenden Sie es, wenn Sie
Haben Sie irgendwelche medizinische Geräte , einschließlich eines Herzschrittmacher . Wenn
Sie vermuten Das Produkt beeinträchtigt ein medizinisches Gerät , bitte stoppen. Verwendung
Es sofort Und konsultieren Sie Ihren Arzt .
Reinigung
Schalten Sie das Produkt aus , bevor Sie irgendetwas versuchen. Wartung oder Reinigung .
Sauber Und trocknen
Produkt sofort entsorgen, falls es mit folgendem in Berührung kommt: flüssig oder beliebig
Verunreinigung . Verwendung A Weiches , fusselfreies (Mikrofaser-)Tuch verwenden .
Vermeiden Sie , dass Feuchtigkeit in die Öffnungen eindringt .
Explosionsfähige Atmosphären
Beachten Sie alle Schilder und Anweisungen . Nicht bedienen. Die Produkt In beliebig Bereich
mit A potenziell
Explosionsgefährdete Bereiche , einschließlich Betankungsbereiche oder Bereiche, die
Chemikalien enthalten oder Partikel solch als Getreide , Staub oder Metall Pulver .
Aktivitäten mit hohem Gefahrenpotenzial
Dieses Produkt ist nicht für verwenden Sie dort, wo die Versagen der Produkt könnte führen Zu
Verletzung , Tod oder schwere Umweltschäden .
Funkstörungen
Dieses Produkt wurde entwickelt , getestet und hergestellt. Zu einhalten mit Vorschriften
regieren Hochfrequenzemissionen . Solche Emissionen können sich negativ auswirken auf die
Betrieb von andere elektronisch
Geräte , was zu deren Fehlfunktion führt .
FCC-Konformitätshinweis
Dieses Gerät entspricht den geltenden Bestimmungen. Teil 15 der F CC Regeln . Der Betrieb
ist vorbehaltlich der folgende zwei Bedingungen:
(1) Dieses Gerät darf nicht Ursache schädlich Störungen .
(2) Dieses Gerät darf keinerlei Störungen akzeptieren. erhalten , einschließlich Störungen Mai
Ursache Unerwünschter Eingriff .
Dieses Gerät wurde getestet und für geeignet befunden. einhalten Grenzen für A Klasse B
digital
Gerät , gemäß Teil 15 der FCC Regeln . Diese Grenzen Sind entworfen, um bieten
angemessener Schutz vor schädlichen Eingriffen in ein kommerzielles Geschäft Installation .
Dies Ausrüstung erzeugt , nutzt und kann Hochfrequenzenergie abstrahlen und wenn nicht
installiert Und gebraucht In Die Nichtbeachtung der Anweisungen kann schädliche Störungen
verursachen . Radio Kommunikation . Betrieb . davon
Ausrüstung in einem Wohngebiet ist wahrscheinlich Ursache schädlich Interferenz , bei der
Fall Die Der Benutzer ist verpflichtet, die Störung zu beheben. bei ihren eigen Kosten .

- 9 -
ANLEITUNG VERWENDEN
Lademodi
Wenn der Versorgungsmodus ausgewählt ist , können Sie Aufladung von Auswahl anders
Strömungen mit unterschiedliche Spannungen . Bitte wählen Sie den Batterietyp nach dem
Einschalten des Schalters . Modi Sind
Erweiterte Lademodi, die Ihre volle Aufmerksamkeit erfordern vor Auswahl . Es Ist wichtig für
und Zwecke der einzelnen Gebührenarten verstehen Modus . Tun nicht betreiben Ladegerät
bis Sie den geeigneten Lademodus für Ihr Gerät bestätigt haben Batterie . Unten ist ein knapp
Beschreibung:
Modell
Erläuterung (Spitzenspannung gemessen bei 25°C , Stromstärke) Bewertung ist Schüttgut
Stromstärke Wann über 0°C)
Stehen zu
Im Standby-Modus Modus , das Ladegerät ist nicht laden oder Bereitstellung jeglicher Strom
an Die Batterie . Energie . In diesem Modus wird der Speichermodus aktiviert , wodurch
mikroskopische Zeichnungen entstehen. Strom von der elektrisch Steckdose . Kann Bus Ist
Im Standby-Modus aktiviert . Wenn im Standby- Modus , LCD Wille beleuchten .
Aufladung
6V Führen
Zum Laden von 6-Volt-Geräten Blei - Säure-Batterien . Wenn diese Option
ausgewählt ist , 6V wird Sei gefüttert von Blau .
7,3 V | Bis zu 200AH Batterien
12 V
Führen
Zum Laden von 12-Volt-Geräten Blei - Säure-Batterien . Bei Auswahl von 12 V Wille
Sei gefüttert In Blau .
14,6 V | Bis zu 600 AH Batterien
24 V
Führen
Zum Laden von 24-Volt-Geräten Blei - Säure-Batterien . Wenn diese Option
ausgewählt ist , 24V werden Sei gefüttert In Blau .
29,2 V | Bis zu 300 AH Batterien
36 V
Führen
Zum Laden von 36-Volt-Geräten Blei - Säure-Batterien . Wenn diese Option
ausgewählt ist , 36V werden Sei gefüttert In Blau .
43,8 V | Bis zu 100AH Batterien
48 V
Führen
Zum Laden von 48-Volt-Geräten Blei - Säure-Batterien . Wenn diese Option
ausgewählt ist , 48V werden Sei gefüttert In Blau .
58,4 V | Bis zu 100AH Batterien
60 V
Führen
Zum Laden von 60-Volt-Geräten Blei - Säure-Batterien . Wenn diese Option
ausgewählt ist , 60V werden Sei gefüttert In blau . 73V | Bis zu 60AH Batterien
72 V
Führen
Zum Laden von 72-Volt-Geräten Blei - Säure-Batterien . Bei Auswahl von 72 V wird
Sei gefüttert In Blau .
87,6 V | Bis zu 60AH Batterien
12 V
LiFePo4
Für 12 Volt LiFePo4 Batterien . Wenn diese Option ausgewählt ist , wird die 12-V-
Batterie verwendet. gefüttert In Blau .
14,6 V | Bis zu 600 AH Batterien
24 V
LiFePo4
Für 24 Volt LiFePo4 Batterien . Bei Auswahl von 24 V wird Sei lin ed In Blau .
29,2 V | Bis zu 200AH Batterien
36 V
LiFePo4
Für 36 Volt LiFePo4 Batterien . Bei Auswahl der 36-V-Batterie wird Sei gefüttert In
Blau .
43,8 V | Bis zu 100AH Batterien
48 V
LiFePo4
Für 48 Volt LiFePo4 Batterien . Bei Auswahl von 48 V wird die 48-V-Batterie
verwendet . gefüttert In Blau .
58,4 V | Bis zu 100AH Batterien

- 10 -
60 V
LiFePo4
Für 60 Volt LiFePo4 Batterien . Bei Auswahl von 60 V wird die
Spannung eingestellt. gefüttert In blau . 73V | Bis zu 60AH Batterien
72 V
LiFePo4
Für 72 Volt LiFePo4 Batterie s . Bei Auswahl von 72 V wird die Spannung auf 72 V
eingestellt . gefüttert In Blau .
87,6 V | Bis zu 60AH Batterien

- 11 -
Pflegen
6V Führen
Zum Laden von 6-Volt-Geräten Blei-Säure-Batterien . Wenn diese Option
ausgewählt ist , 6V wird Sei gefüttert in Blau .
7,3 V | Hoch Zu 200AH Batterien
12 V
Führen
Zum Laden von 12-Volt-Geräten Bleiakkumulatoren . Bei Auswahl von 12 V Wille
Sei gefüttert in Blau .
14,6 V | Hoch Zu 600 AH Batterien
24 V
Führen
Zum Laden von 24-Volt-Geräten Blei-Säure -Batterien . Wenn diese Option
ausgewählt ist , 24V werden Sei gefüttert in Blau .
29,2 V | Hoch Zu 300 AH Batterien
36 V
Führen
Zum Laden von 36-Volt-Geräten Blei-Säure -Batterien . Wenn diese Option
ausgewählt ist , 36V werden Sei gefüttert in Blau .
43,8 V | Hoch Zu 100AH Batterien
48 V
Führen
Zum Laden von 48-Volt-Geräten Blei-Säure -Batterien . Wenn diese Option
ausgewählt ist , 48V werden Sei gefüttert in Blau .
58,4 V | Hoch Zu 100AH Batterien
60 V
Führen
Zum Laden von 60-Volt-Geräten Blei-Säure -Batterien . Wenn diese Option
ausgewählt ist , 60V werden Sei gefüttert in Blau . 73 V | Hoch Zu 60AH
Batterien
72 V
Führen
Zum Laden von 72-Volt-Geräten Bleiakkumulatoren . Bei Auswahl von 72 V wird Sei
gefüttert in Blau .
87,6 V | Hoch Zu 60AH Batterien
Desulfatier
ung
6V Führen
Zum Laden von 6-Volt-Geräten Blei-Säure -Batterien . Wenn diese Option
ausgewählt ist , 6V wird Sei gefüttert in Blau .
7,3 V | Hoch Zu 200AH Batterien
12 V
Führen
Zum Laden von 12-Volt-Geräten Bleiakkumulatoren . Bei Auswahl von 12 V Wille
Sei gefüttert in Blau .
14,6 V | Hoch Zu 600 AH Batterien
24 V
Führen
Zum Laden von 24-Volt-Geräten Blei-Säure -Batterien . Wenn diese Option
ausgewählt ist , 24V werden Sei gefüttert in Blau .
29,2 V | Hoch Zu 300 AH Batterien
Liefern
Modus
6V Führen
Zum Laden von 6-Volt-Geräten Blei-Säure -Batterien . Wenn diese Option
ausgewählt ist , 6V wird Sei gefüttert in Blau .
7,3 V | Hoch Zu 200AH Batterien
12 V
Führen
Zum Laden von 12-Volt-Geräten Bleiakkumulatoren . Bei Auswahl von 12 V Wille
Sei gefüttert in Blau .
14,6 V | Hoch Zu 600 AH Batterien
24 V
Führen
Zum Laden von 24-Volt-Geräten Blei-Säure -Batterien . Wenn diese Option
ausgewählt ist , 24V werden Sei gefüttert in Blau .
29,2 V | Hoch Zu 300 AH Batterien
36 V
Führen
Zum Laden von 36-Volt-Geräten Blei-Säure -Batterien . Wenn diese Option
ausgewählt ist , 36V werden Sei gefüttert in Blau .
43,8 V | Hoch Zu 100AH Batterien
48 V
Führen
Zum Laden von 48-Volt-Geräten Blei-Säure -Batterien . Wenn diese Option
ausgewählt ist , 48V werden Sei gefüttert in Blau .
58,4 V | Hoch Zu 100AH Batterien
60 V
Führen
Zum Laden von 60-Volt-Geräten Blei-Säure -Batterien . Wenn diese Option
ausgewählt ist , 60V werden Sei gefüttert in Blau . 73 V | Hoch Zu 60AH
Batterien
72 V
Führen
Zum Laden von 72-Volt-Geräten Bleiakkumulatoren . Bei Auswahl von 72 V wird Sei
gefüttert in Blau .
87,6 V | Hoch Zu 60AH Batterien

- 12 -
Laden von Blei-Säure-Batterien
1. Drücken Sie zunächst die Schaltfläche "Batterietyp" zum Auswählen "Lead " . Zweitens ,
Drücken Sie die "Stromspannung" dann die Taste drücken "Start" -Taste Ladevorgang starten .
2. Drücken Sie zunächst die "Akku-Typ" Schaltfläche zum Auswählen „Blei“ . Zweitens , Drücken
Sie die "Stromspannung"
dann die Taste drücken Drücken Sie schließlich die Taste „ Aktuell“ . Die "Start" Taste Zu
beginnen Laden . Achtung: Wenn dieser Modus ausgewählt ist , bitte stellen Sie sicher, dass
Ihre Batterie Ist A Blei-Säure Batterie . Bitte stellen Sie sicher, dass die Spannung Ihrer Batterie
der ausgewählten Spannung entspricht; andernfalls wird eine Gebühr erhoben wird scheitern .
LiFePO4-Akkuladung
1. Drücken Sie zunächst die "Akku-Typ" Schaltfläche zum Auswählen "LiFePO4" , dann Drücken
Sie die "Stromspannung" Drücken Sie schließlich die Taste . Zum Starten auf die Schaltfläche
„Start“ klicken Laden .
2. Drücken Sie zunächst die "Akku-Typ" Zum Auswählen drücken "LiFePO4" . Zweitens ,
Drücken Sie die "Stromspannung"
dann die Taste drücken Drücken Sie schließlich die Taste „ Aktuell“ . Die "Start" Taste Zu
beginnen Laden . Achtung: Wenn dieser Modus ausgewählt ist , bitte stellen Sie sicher, dass
Ihre Batterie Ist A LiFePO4 Batterie . Bitte stellen Sie sicher, dass die Spannung Ihrer Batterie
der ausgewählten Spannung entspricht; andernfalls wird aufgeladen wird scheitern .
Modus beibehalten
zunächst die Taste "Akku-Typ" Schaltfläche zum Auswählen "Blei " . Zweitens , drücke die
Drücken Sie dann die Schaltfläche "Beibehalten" . Mit der Taste „Spannung“ die passende
Spannung auswählen und schließlich drücken Die Drücken Sie die Taste „Start“ , um den
Ladevorgang zu starten . Das Ladegerät lädt den Akku auf. Batterie mit A niedrig aktuell Zu
pflegen ein vollständig geladener Zustand , und dieser Modus wird nicht Schaden dein Batterie .
Desulfatierungsmodus
zunächst die Taste "Akku-Typ" Schaltfläche zum Auswählen „Blei“ . Zweitens , Drücken Sie die
"Desulfatierung"
dann die Taste drücken Taste "Spannung" und schließlich Drücken Sie die "Start" Schaltfläche
Laden Sie den Akku auf . Achtung: Wenn der Akku stark gealtert ist und hat unzureichende
Kapazität , Sie dürfen wählen Das Modus zu Reparieren Sie es . Bitte beachten Sie, dass
Batterien nur Sei repariert eins bei eine Zeit .
Versorgungsmodus
Drücken Sie zunächst die "Akku-Typ" Schaltfläche zum Auswählen "Führend " . Zweitens ,
Drücken Sie die "Stromspannung" Drücken Sie die dritte Taste . "Aktuell", aber Ton , und
schließlich die Taste drücken "Start" Taste .
Achtung: Dieser Modus kann ausgewählt werden, wenn gebraucht als A Leistung liefern
oder Wann Die Batterie Spannung kann nicht sein erkannt .
Professioneller Modus
zunächst die Taste
Drücken
Sie die Taste „Batterietyp“ und schalten Sie dann das Gerät ein.
Zu eingeben Professional Modus .
Beim Wechsel in den professionellen Modus bitte wählen anders Batterien Verwendung anders
Schritte:

- 13 -
Drücken Sie die "Akku-Typ" Schaltfläche zum Auswählen zweitens " LiFePO4 " Drücken Sie
die "Stromspannung" Taste zur Auswahl von Spannung, Batteriezellen und Stromstärke
Auswahl Verfahren ist die Dasselbe als In nicht- Profi-Modus .
Vorsicht: In LiFePO4-Modus , versteckte Batteriezellen werden Sei angezeigt . Bitte Notiz Das
nicht-
Fachleute sollten diesen Modus nicht auswählen . Falls er ausgewählt ist , bitte Kontaktieren Sie
die Batterie Anbieter;
Andernfalls entstehen Risiken . Dieser Modus kann nicht Sei auswendig gelernt . Danach
Drehung vom Macht , die Das Ladegerät wird an den nicht-professionellen Gebrauch
zurückgegeben. Modus .

- 14 -
Anschluss an die Batterie
Schließen Sie den Netzstecker nicht an. bis alle andere Verbindungen Sind hergestellt .
Identifizieren Die richtig
Polarität der Batteriepole an der Batterie . nicht machen beliebig Verbindungen zu den Vergaser ,
Kraftstoffleitungen oder dünnes Blech Teile . Die Anweisungen unten sind für A Negativ Boden
System
(am häufigsten) . Wenn Ihr Fahrzeug eine positive Masse hat System (sehr (ungewöhnlich)
, folgen Sie dem Anweisungen unten in umgekehrte Reihenfolge .
1. Verbinden Sie die positiv (roter) Ösenanschlussstecker an Pluspol (POS , P , +)
Batterie Terminal .
2. Schließen Sie den Minuspol an . (schwarzer) Ösenanschlussstecker an Minuspol (NEG , N ,
-) Batterie Terminal .
3. Schließen Sie das Ladegerät an eine geeignete Steckdose an . nicht Gesicht Die
Batterie Wann Diese Verbindung herstellen .
4. Beim Trennen der Verbindung muss die Trennung in umgekehrter Reihenfolge erfolgen :
entfernen Minuspol zuerst (bzw. Pluspol zuerst bei Systemen mit positiver Erdung) .
Ladevorgang starten
1. Überprüfen Sie die Spannung und die chemische Zusammensetzung der Batterie .
2. Vergewissern Sie sich, dass Sie die Batterieklemmen angeschlossen haben . oder
Ösenanschluss Steckverbinder ordnungsgemäß und dass der Netzstecker ist angeschlossen
ein elektrisch Outlet .
3. [Zum ersten Mal ] [Verwendung] Das Ladegerät wird im Standby-Modus beginnen , "Pause"
Wille Sei eingekreist In blau . In Stehen zu Im Lademodus wird kein Strom geliefert . beliebig
Leistung .
4. Drücken Sie die Zweitens: Schaltfläche „Batterietyp“ zur Auswahl des Batterietyps
drücken Die "Stromspannung" Drücken Sie die Taste und drücken Sie als drittes Mal die
Schaltfläche „Aktuell“ .
5. Drücken Sie die "Start"-Taste , und es wird hervorgehoben In Blau; zweitens , die Batterie
Wille Sei
erkannt . Wenn die Batterie in Ordnung ist , kein Fehler. Batterie Indikator wird drehen aus
und Die Ladegerät Wille arbeiten normalerweise; andernfalls wird es nicht .
6. Das Ladegerät kann nun verwendet werden . links verbunden mit Die Batterie bei alle mal
Zu bieten Wartung Laden .
Automatische Speicherfunktion: Das Ladegerät verfügt über eine integrierte automatische
Speicherfunktion und Wille zurückkehren Zu Die zuletzt Aufladung Modus auswählen, wenn
angeschlossen . Drücken Sie die "Start" Knopf und Die Ladegerät wird die neue Arbeitsweise
speichern Modus .
Vorsicht: Professional Der Modus kann nicht automatisch gespeichert werden .
LADEZEITEN
Die geschätzte Ladezeit für eine Batterie wird berechnet als folgt: Laden Zeit (Std)
= Batteriekapazität (Ah) / Ladestrom (A) Die Batterie Kapazität (Ah) Und es ist Tiefe von
Entladung (DoD) beeinflussen die Ladedauer erheblich . Die berechnete Zeit beträgt basierend
An ein

- 15 -
durchschnittliche Entladetiefe bis zum vollständig geladenen Zustand und Ist für Referenz nur .
Tatsächlich Ergebnisse kann je nach Batteriezustand variieren . Die Ladezeit für A
normalerweise entlassen Batterie Ist
basierend auf einer 50%igen Verteidigungsministerium . Die Temperatur hat ebenfalls
Auswirkungen. Laden Effizienz .

- 16 -
VEVOR Die Ladegeräte verfügen über eine Technologie zur thermischen Kompensation , die
automatisch
Passt die Ladeparameter an, um die Leistung zu optimieren . Im Folgenden finden Sie weitere
Informationen. A Laden Zeit Referenz für Modell :
XFH-SS01 :
Batteriegröße
Ah (Ampere)
Stunde)
Ungefähre Ladezeit Std.
6V
12 V
24 V
36 V
48 V
40
3
3
6
10
13
60
5
5
10
15
20
80
6
6
12
20
26
120
10
10
20
200
17
17
XFH-SS0 2 :
XFH-SS0 3 / XFH- SS07:
Batteriegröße
Ah (Ampere)
Stunde)
Ungefähre Ladezeit Std.
6V
12 V
24 V
36 V
48 V
60 V
72 V
40
3
3
5
8
10
13
15
60
4
4
8
11
15
19
23
80
5
5
10
15
20
25
31
120
8
8
15
23
30
200
13
13
25
Batteriegröße
Ah(Am p-
Stunde)
Ungefähre Ladezeit Std.
6V
12 V
24 V
40
3
2
4
60
4
3
6
80
5
4
8
120
8
6
12
200
13
10
20
400
25
20
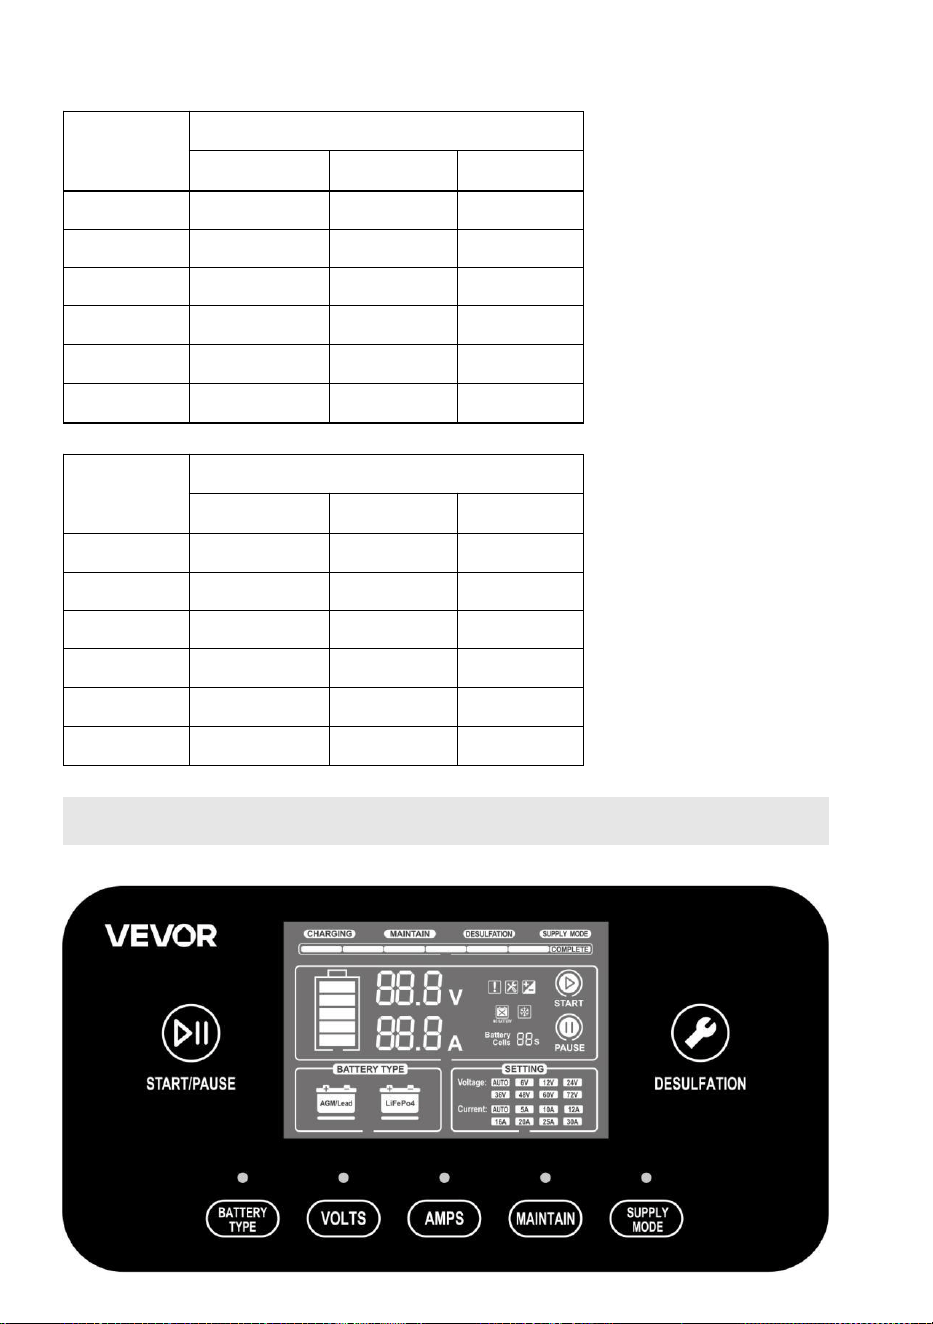
- 17 -
XFH- SS04 / XFH- SS08
XFH- SS0 5/ XFH- SS09:
VERSTÄNDNIS DER GEBÜHRANZEIGE
Batteriegröße
Ah (Ampere)
Stunde)
Ungefähre Ladezeit Std.
6V
12 V
24 V
40
3
2
3
60
4
3
5
80
5
3.5
7
120
8
5
10
200
13
8
16
400
25
16
Batteriegröße
Ah (Ampere)
Stunde)
Ungefähre Ladezeit Std.
6V
12 V
24 V
40
3
1. 5
3
60
4
2
4
80
5
3
5.5
120
8
4
8
200
13
7
14
400
25
14

- 18 -
Button-Illustration
Taste
Batterie Taste: Drücken Sie die
Taste zur Auswahl des
Batterietyps; Die Die Anzeige
„Batterietyp“ schaltet sich ein.
An .
Taste
Stromspannung Taste : Drücken
Die Taste
die Spannung auswählen; die
"Stromspannung" Die
Kontrollleuchte schaltet sich ein .
Taste
Aktuell Taste: Drücken Sie die
Taste
den aktuellen auswählen; den
"Aktuell" Die Kontrollleuchte
schaltet sich ein .
Taste
Laden und Pflegen Modus: Der
Die Anzeige „Ladevorgang“ schalt
et sich ein .
Wenn die Batterie und Leistung
Die Versorgungsleitungen sind
ordnungsgemäß angeschlossen .
Der Fortschrittsbalken wird sich
umdrehen An gemäß der
gewählten Ladung Modus .
Wenn die Batterie hat nicht
gewesen gebraucht
lange Zeit schieben Schaltfläche
wählen Aufrechterhaltungsmodus
. Der Batterie wird in Rechnung
gestellt mit A klein derzeitige
Laden; die Anzeige
„Aufrechterhalten“ schaltet sich
ein . und der Fortschritt Der
Balken blinkt zyklisch .
(Beibehalten) Der Modus ist nur
für Blei-Säure Batterien . )
Taste
Liefern Modus: Wenn die
Batterie ist ordnungsgemäß
angeschlossen aber nicht
erkannt werden , drücken Sie die
Schaltfläche verwenden
„Versorgungsmodus“ zum Laden
. Die Anzeige „Versorgung“ wird
sich umschalten.
und der Fortschritt Der Balken
blinkt zyklisch .
Taste
Desulfatierung Modus (Blei-Säure)
Batterie Nur): Wenn die
Batterie hat wurde verwendet für
ein lange Zeit Und es ist Die
Kapazität nimmt rapide ab ,
Druck die Schaltfläche
verwenden "Desulfatierung"
Lademodus reparieren
Die Batterie . Die Anzeige
„Desulfatierung“ schaltet sich

- 19 -
ein , und die
Der Fortschrittsbalken blinkt zyklisch
.
Taste
START und PAUSE Taste: Wenn die Einstellungen korrekt sind , drücken Sie die Taste.
Knopf; der Die „Start“-Anzeige leuchtet auf und das Ladegerät beginnt zu arbeiten .
Drücken Sie den Knopf. während Die Ladegerät Ist in Betrieb; die Die Anzeige „PAUSE“ s
chaltet sich ein und das Ladegerät stoppt den Ladevorgang .
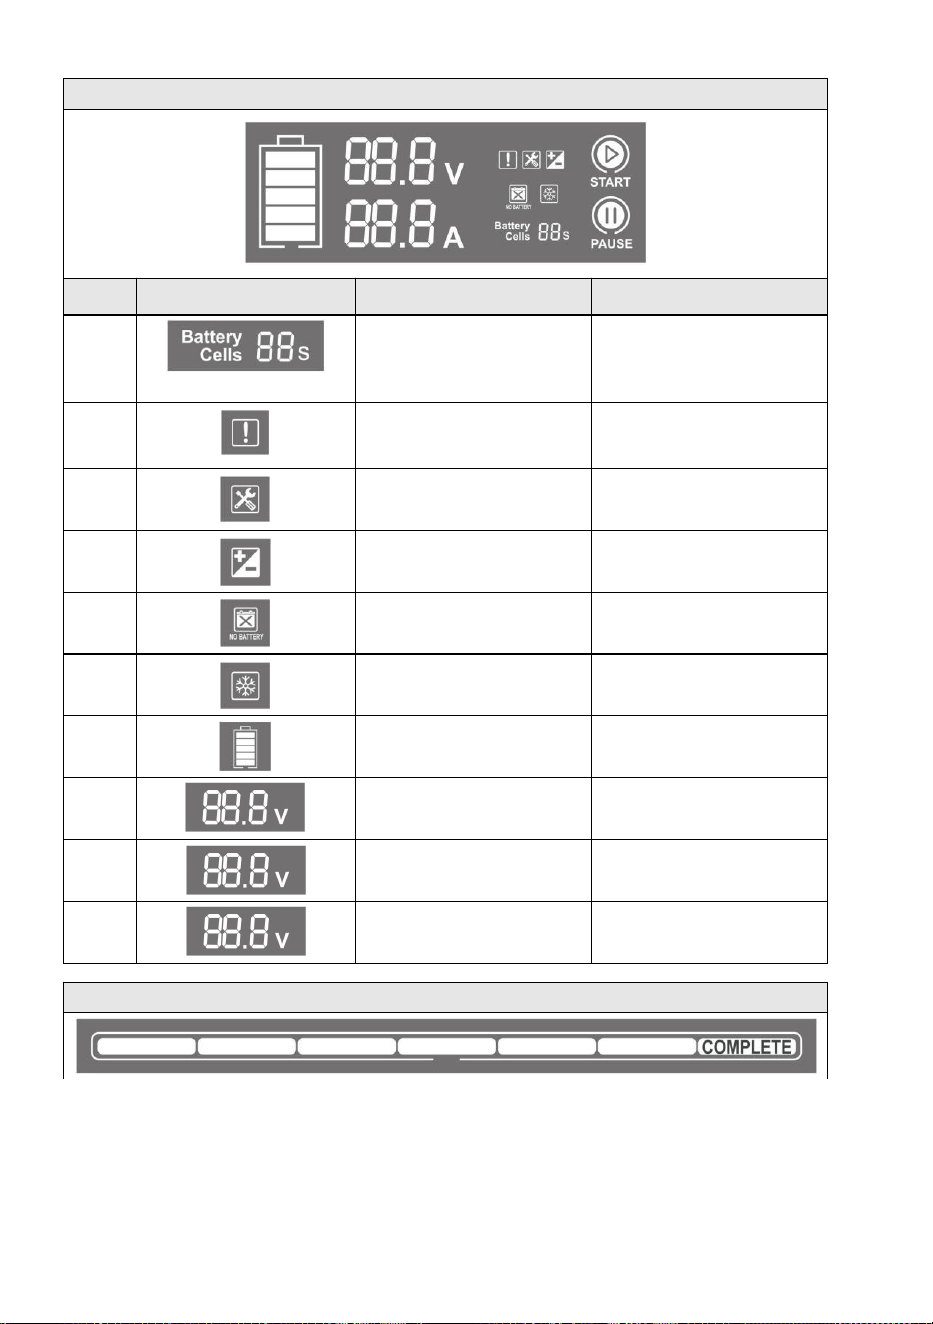
- 20 -
Grafische Anzeige
S/N
Grafik
Indikator
Erläuterung
1
Zeigen Batteriezelle Nummer
In Profi-Modus ,
Anzeige Batteriezelle l l
Nummer;
Im Normalzustand Modus ,
keine Anzeige
2
Blitz
Warnung:
Überstrom , Kurzschluss
Schaltung
3
AN
Laden in „ Desulfatierung “
4
Blitz
Batterie verpolt anschließen
5
AN
Keine Verbindung herstellen
Batterie
6
Blitz
Umgebungstemperatur
für Laden
7
AN
Akkukapazität anzeigen
8
-
Ladespannung anzeigen
9
-
Ladestrom anzeigen
10
Anzeigenummer
Eine Beschreibung des
Fehlers Codes
Fortschrittsanzeige Anzeige

- 21 -
1. Desulfatierungsstufe (nur für Blei-Säure-Batterien)
2. Kleinstrom - Lademodus
3. CC- Aufladung Modus
4. CV- Aufladung Modus
5. Batterie -Selbsttest
6. Erhaltungsladung Modus
7. Vollständig aufgeladen

- 22 -
Ladegerätspezifikationen nach Modell
Produktmodell
XFH-SS01
XFH-
SS02
XFH-SS03
XFH-SS07
XFH-SS04
XFH-SS08
XFH-SS05
XFH-SS09
Eingangsspann
ung
Wechselstrom
120 V
Wechselstro
m 60 Hz
Max. 250 W
120 V
Wechselstro
m 60 Hz
Max300W
120 V
Wechselstr
om 60 Hz
Max400W
230 V
Wechselstr
om 50 Hz
Max400W
120 V
Wechselstr
om 60 Hz
Max480W
230 V
Wechselstr
om 50 Hz
Max480W
120 V
Wechselstr
om 60 Hz
Max. 550 W
230 V
Wechselstr
om 50 Hz
Max. 550 W
Ausgabe
Leistung
175 .
2W(Max)
234 W
(Max.)
292 W (Max.)
365 W (Max.)
438 W (Max.)
Ladespannung
Verschieden
Ladestrom
5A (6V) ,
10A (6V) ,
12A (6V) ,
5A (12V) ,
10A (12V) ,
12A (12V) ,
5A (24V) ,
6A (24V) ,
4A/(36V) ,
3A(48V)
5A (6V) ,
10A (6V) ,
16A (6V) ,
5A (12V) ,
10 A (12 V) ,
16 A (12V) ,
5A (24V) ,
8A (24V) ,
5 . 3A/(36V)
, 4A(48V) ,
3,2 A ( 60 V)
, 2,7 A (72
V)
5A (6V) , 10A (6V) ,
16A (6V) , 5A (12V) ,
10 A (12 V) , 20 A (12V)
,
5A (24V) , 10A (24V)
5A (6V) , 10A (6V) ,
16A (6V) , 5A (12V) ,
16 A (12 V) , 25 A (12V)
,
5A (24V) , 10A (24V) ,
12,5 A (24 V)
5A (6V) , 10A (6V) ,
16A (6V) , 5A (12V) ,
16 A (12 V) , 30 A (12V)
,
5A (24V) , 10A (24V) ,
15A (24V)
Niederspannung
Erkennung
2 V (6 V) ,
10 V (12 V) ,
20 V (24 V) ,
30 V (36 V) ,
40 V (48 V)
2 V (6 V) ,
10 V (12 V) ,
20 V (24 V) ,
30 V (36 V) ,
40 V (48 V) ,
50 V (60 V) ,
60 V (72 V)
2 V (6 V) , 10 V (12 V) , 20 V (24 V)
Rückstrom
Abfluss
< 0,5 mA
Ambient
Temperatur
-20 °C bis 40 °C
Art von
Batterien
6 V , 12 V ,
24 V
36 V , 48 V
6 V , 12 V ,
24 V
36 V , 48 V ,
60 V
72 V
6 V , 12 V , 24 V
Batterie
Chemie
Nass , Gel , MF , CA , EFB , AGM , Calcium , LiFePO4
Batteriekapazitä
t
Bis zu 200
Ah ,
Unterhält
Alle
Batteriegröß
Bis zu 300
Ah
Unterhält
Alle
Batteriegröß
Bis zu 400 Ah , erhält
alle Batterie
Größen
Bis zu 500 Ah , erhält
alle Batterie
Größen
Bis zu 600 Ah , erhält
alle Batterie
Größen

- 23 -
en
en
Kühlung
Eingang
Wechselspannu
ng
Lüfter Konvektion

- 24 -
Manuelle Batteriespannungsauswahl (Professioneller Modus)
Batterietypen
Spannungsber
eich
Serienzelle
Zählen
Batterie
Nennwert
Spannung (V)
Laden
Spannung (V)
Stromspann
ung
Schwelle
Bereich (V)
LiFePo4
Batterie
12 V
3
9.6
10,95
7,5-10,95
4
12.8
14.6
10-14 . 6
24 V
6
19.2
21.9
15-21 . 9
8
25.6
29.2
20-29 . 2
36 V
11
35.2
40.15
27.5-40.15
12
38.4
43.8
30-43 . 8
48 V
14
44.8
51.1
35-51 . 1
15
48
54,75
37 . 5-54 . 75
16
51.2
58.4
40-58 . 4
60 V
18
57.6
65.7
45-65 . 7
19
60 . 8
69,35
47,5-69,35
20
64
73
50-73
72 V
22
70,4
80,3
55-80,3
23
73,6
83,95
57,5-83,95
24
76,8
87,6
60-87 . 6
Bleisäure
Batterie
12 V
4
13.8
14.6
10-14 . 6
24 V
8
27.6
29.2
20-29 . 2
36 V
12
41.4
43.8
30-43 . 8
48 V
16
55.2
58.4
40-58 . 4
60 V
20
69
73
50-73
72 V
24
82.8
87.6
60-87 . 6

- 25 -
FEHLERCODE
Wenn die Maschine nicht geladen werden kann Verwendung , die Produkt Anzeige Wille zeigen
der Fehler Code .
Bitte beachten Sie die folgende Tabelle mit den Fehlercode-Nummern und deren
Beschreibungen. Und lösen Ladeproblem aufgrund von Fehlbedienung gemäß der
entsprechenden Fehlermeldung Nummer .
Fehlercode
Fehlerbeschreibung
03E
Die Temperatur im Inneren der Maschine ist zu hoch. hoch
04E
Der Ausgangslademodus ist ausgewählt falsch
05E
Ausgangsspannung Überspannung
06E
Ausgabe über Leistung
42E
Ausgangsstrom über Strom
43E
Spannung oder Stromstärke ändert sich nicht für A lang Zeit
04E: Drücken Sie die Starttaste, um klar .
Andere: Ziehen Sie den Netzstecker .

- 26 -

- 27 -
Caricabatterie al litio e piombo
Modello: XFH-SS01 , XFH-SS02 , XFH-SS03 ,
XFH-SS04 , XFH-SS05 , XFH-SS07 ,
XFH-SS08 , XFH-SS09

- 1 -
Modello: XFH-SS01 , XFH-SS02 , XFH-SS03 , XFH-SS04 , XFH-SS05 ,
XFH-SS07 , XFH-SS08 , XFH-SS09
Queste sono le istruzioni originali , si prega di leggere attentamente tutte
le istruzioni del manuale prima di utilizzare il prodotto . VEVOR si riserva
una chiara interpretazione del nostro manuale utente . L'aspetto del
prodotto sarà soggetto al prodotto ricevuto . Vi preghiamo di perdonarci
se non vi informeremo nuovamente se ci sono aggiornamenti tecnologici
o software sul nostro prodotto .
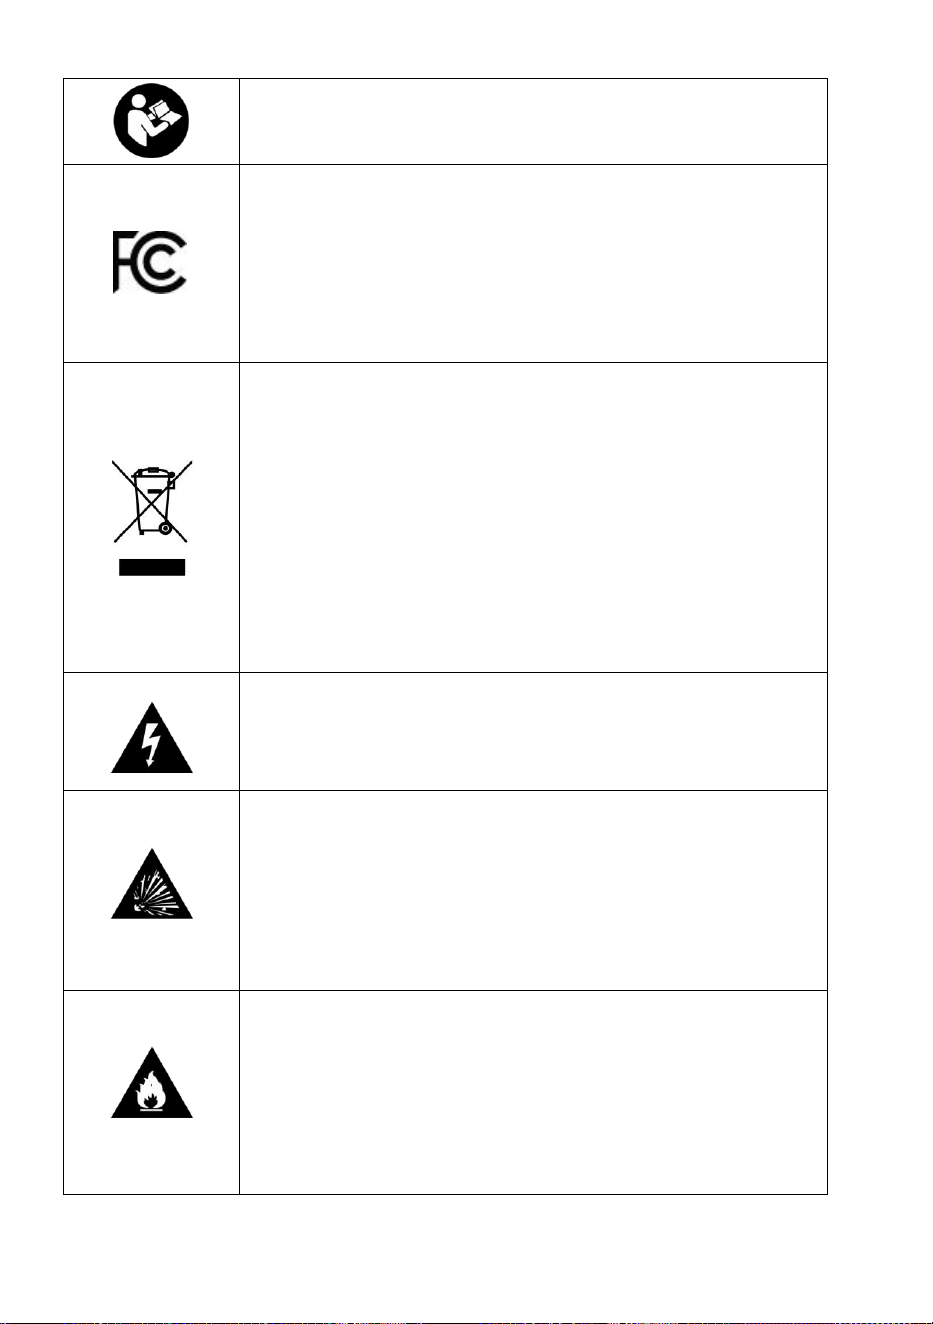
- 2 -
Avvertenza : per ridurre il rischio di lesioni ,
l'utente deve leggere attentamente il manuale di
istruzioni .
Questo dispositivo è conforme alla Parte 15 delle
Norme FCC . Il funzionamento è soggetto alle due
condizioni seguenti: (1) Questo dispositivo non può
causare interferenze dannose e (2) Questo
dispositivo deve accettare qualsiasi interferenza
ricevuta , comprese le interferenze che potrebbero
causare un funzionamento indesiderato .
Questo prodotto è soggetto alle disposizioni della
Direttiva Europea 2012/19/CE . Il simbolo raffigurante
un bidone della spazzatura barrato indica che il
prodotto richiede la raccolta differenziata nell'Unione
Europea . Questo vale per il prodotto e tutti gli
accessori contrassegnati da questo simbolo . I
prodotti contrassegnati come tali non possono essere
smaltiti con i normali rifiuti domestici , ma devono
essere consegnati a un punto di raccolta per il
riciclaggio di apparecchiature elettriche ed
elettroniche.
Elettrico Shock . Il prodotto è un dispositivo elettrico
che può provocare uno shock E causare gravi lesioni
. Non interrompere l'alimentazione corde . Fare non
immergere In acqua o ottenere Bagnato .
Esplosione . Batterie non monitorate , incompatibili
o danneggiate possono esplodere se utilizzato con il
prodotto . Non Partire prodotto incustodito durante
l'uso . Non tentare di avviare un motore danneggiato
o congelato batteria . Utilizzare il prodotto solo con
batterie di tensione raccomandata . Utilizzare
prodotto in aree ben ventilate .
Fuoco . Il prodotto è un dispositivo elettrico che
emette Calore E È capace Di provocando ustioni .
Non copertina prodotto .
Non fumare o usare alcun fonte Di elettrico scintilla o
fuoco Quando prodotto in funzione . Tenere il
prodotto lontano da combustibili materiali .

- 3 -
Occhio Lesioni . Indossare protezioni per gli occhi
quando si utilizza il prodotto . Le batterie possono
esplodere e provocare la proiezione di detriti .
L'acido della batteria può causare danni agli occhi e
alla pelle irritazione . Nel caso Di contaminazione
degli occhi o della pelle , sciacquare la zona
interessata con acqua corrente pulita e contattare il
centro antiveleni immediatamente .
Esplosivo Gas . Lavorare in prossimità di piombo-
acido è pericoloso .
Batterie generare gas esplosivi durante il normale
funzionamento della batteria .
A ridurre rischio di esplosione della batteria , seguire
tutte le informazioni di sicurezza istruzioni e quelle
pubblicate dalla batteria produttore E produttore di
qualsiasi apparecchiatura destinata ad essere
utilizzato in IL vicinanze Di batteria . Rivedere le
avvertenze riportate su questi prodotti e SU motore .

- 4 -
Questo caricabatterie VEVOR rappresenta alcuni dei maggior parte innovativo E tecnologia
avanzata sul mercato , rendendo ogni addebito semplice E facile . È abbastanza possibilmente
IL più sicuro E maggior parte
caricabatterie efficiente che troverai sempre utilizzo .
Questo prodotto è progettato per caricare tutti i tipi Di piombo-acido batterie , comprese Litio ,
LiFePO4 , umido (Alleviato) , Gel , MF (Senza manutenzione) , CA (Calcio) , EFB (Migliorato
Allagato
Batteria) e AGM (Vetro assorbente Mat) batterie . È adatto per la ricarica batteria capacità fino a
400 Ampere-ora e mantenimento di tutti dimensioni della batteria .
Iniziare
Prima utilizzando il caricabatterie , leggere attentamente la batteria del produttore specifico
precauzioni
e velocità di carica consigliate . Determinare la tensione e chimica del tuo batteria di facendo
riferimento al manuale del proprietario della batteria prima della ricarica .
Montaggio
Considerare la distanza dalla batteria . Lunghezza del cavo CC da IL caricabatterie , con O
IL morsetti della batteria o connettori terminali ad occhiello , è approssimativamente 47 . 2
pollici (1200 mm) .
Avvertenza sulla Proposta 65
I poli della batteria , i terminali e gli accessori correlati contengono prodotti chimici ,
compresi piombo . Questi materiali sono noti allo Stato della California per causa cancro ,
nascita difetti , e altro
danno riproduttivo .
Precauzioni personali
Utilizzare il prodotto solo COME previsto .
Assicurati che qualcuno sia nel raggio d'azione della tua voce per aiutarti In caso Di UN
emergenza .
Tieni a portata di mano acqua pulita e sapone nelle vicinanze nel caso Di batteria acido contatto .
Indossare una protezione completa per gli occhi e occhiali protettivi abbigliamento quando
lavorando vicino UN batteria .
Lavarsi sempre le mani dopo aver maneggiato le batterie E imparentato materiali .
Non maneggiare o indossare alcun oggetti metallici (ad esempio , utensili , orologi o gioielli )
quando si lavora con batterie . Se il metallo cade su un batteria , esso Maggio scintilla O
creare UN corto circuito , risultante in caso di scossa elettrica , incendio o esplosione , che
potrebbero causare lesioni , morte o proprietà danno .
Minorenni
Se il il prodotto è destinato all'uso da parte di UN minore , il acquisto adulto è d'accordo A
fornire dettagliato
istruzioni e avvertimenti al minore prima di uso . Mancato utilizzo . Fare COSÌ è il suola
responsabilità Di l'acquirente , che accetta di indennizzare il produttore per Qualunque
involontario utilizzo O abuso di UN minore .
Pericolo di soffocamento

- 5 -
Gli accessori possono presentare un rischio di soffocamento pericolo per i bambini . non Partire
bambini incustodito con IL prodotto o qualsiasi accessorio . Il prodotto È non un giocattolo .
Gestione
Maneggiare il prodotto con cura . Può essere danneggiato Se colpito .
Non utilizzare un prodotto danneggiato prodotto , incluso uno con crepe In IL involucro O
danneggiato cavi .

- 6 -
Fare non utilizzare il prodotto con cavo di alimentazione danneggiato .
L'umidità e i liquidi possono danneggiare il prodotto . Fare non gestire il prodotto O
Qualunque elettrico al componenti vicino a qualsiasi liquido .
Conservare e utilizzare il prodotto in Asciutto posizioni .
Non utilizzare il prodotto se diventa bagnato . Se il prodotto diventa Bagnato durante
funzionamento , scollegarlo dalla batteria e interromperne l'uso immediatamente .
Non scollegare il prodotto di tirando il cavi .
Modifiche
Fare non tentare di alterare , modificare o riparare alcun parte del prodotto .
smontaggio del prodotto può causare lesioni , morte o proprietà danno .
Se il prodotto si danneggia , non funziona correttamente o contatti Qualunque liquido ,
interrompere utilizzo E contattare il produttore .
Qualsiasi modifica invaliderà la garanzia .
Accessori
Questo prodotto è approvato solo per l'uso con approvato dal produttore accessori . Il
il produttore non è responsabile per l'utente sicurezza O danno Quando usando non
approvato accessori .
Posizione
Evitare che l'acido della batteria entri in contatto con prodotto .
Non utilizzare il prodotto in un chiuso zona O UN zona con limitato ventilazione .
Fare non posizionare una batteria sopra del prodotto ct .
Posizionare i cavi per evitare danni accidentali di veicolo in movimento parti (ad esempio , cofani
, porte ) , parti mobili del motore (ad esempio , pale del ventilatore , cinghie , pulegge) , o altro
potenziale pericoli che Maggio causa lesioni o morte .
Temperatura di esercizio
Questo prodotto è progettato per funzionare a temperatura ambiente fra -4°F E 104°F (-20°C E
40°C) . Non utilizzare al di fuori di questi intervalli di temperatura . Non non carica un congelato
batteria .
Interrompere immediatamente l'uso se la batteria diventa eccessivamente Caldo .
Magazzinaggio
Non utilizzare o conservare il prodotto in aree con alto concentrazioni Di polvere O in volo
materiali . Conservare il prodotto su una superficie piana e sicura dove Esso È non incline a
cadente .
Conservare il prodotto in UN Asciutto posizione .
L'intervallo di temperatura di conservazione è compreso tra -4°F e 25°C (da -20°C a 25°C)
temperatura media . Mai superare i 158°F (70°C) in qualsiasi condizione .
Compatibilità
Questo prodotto è compatibile solo con batterie al piombo-acido , AGM e LiFePO4 . Non tentare di
utilizzare il prodotto con qualsiasi altro tipo di batteria . La carica di batterie con componenti chimici
diversi può provocare lesioni ,

- 7 -
morte o danni alla proprietà . Contattare il produttore della batteria prima di tentare di caricare la
batteria . Non caricare una batteria se non si è sicuri della sua chimica specifica o della sua
tensione .

- 8 -
Dispositivi medici
Questo prodotto può emettere campi elettromagnetici . Contiene magnetico componenti che
interferiscono con pacemaker , defibrillatori o altri dispositivi medici dispositivi . Consultare tuo
medico precedente a usa se tu avere qualsiasi dispositivi medici , tra cui un pacemaker . Se tu
sospettare il il prodotto interferisce con un dispositivo medico , interrompere usando Esso
immediatamente E consultare il tuo medico .
Pulizia
Spegnere il prodotto prima di tentare qualsiasi operazione manutenzione O pulizia . Pulito E
asciugare il
prodotto immediatamente se entra in contatto con liquido O Qualunque contaminante . Utilizzare
UN panno morbido e privo di lanugine (microfibra) . Evitare che l'umidità penetri nelle aperture .
Atmosfere esplosive
Rispettare tutti i segnali e le istruzioni . Non azionare IL prodotto In Qualunque zona con UN
potenzialmente
atmosfera esplosiva , comprese le aree di rifornimento o le aree che contengono sostanze
chimiche O particelle come come grano , polvere o metallo polveri .
Attività ad alto rischio
Questo prodotto non è destinato a utilizzare dove il fallimento del prodotto Potevo Guida A
lesioni , morte o gravi danni ambientali .
Interferenza di radiofrequenza
Questo prodotto è progettato , testato e fabbricato A conformarsi con regolamenti governare
emissioni di radiofrequenza . Tali emissioni possono influire negativamente sull' operazione Di
altro elettronico
apparecchiatura , causandone il malfunzionamento .
Nota di conformità FCC
Questo dispositivo è conforme a Parte 15 del F CC Regole . L'operazione è soggetto al
seguente due condizioni:
(1) Questo dispositivo potrebbe non causa dannoso interferenza .
(2) Questo dispositivo non deve accettare alcuna interferenza ricevuto , compreso interferenza
che Maggio causa operazione indesiderata .
Questa apparecchiatura è stata testata e si è scoperto che rispettare il limiti per UN Classe B
digitale
dispositivo , ai sensi del Parte 15 del FCC Regole . Questi limiti Sono progettato per fornire
protezione ragionevole contro interferenze dannose in un contesto commerciale installazione .
Questo attrezzatura genera , utilizza e può irradiare energia a radiofrequenza e , se non
installato E usato In in conformità con le istruzioni , può causare interferenze dannose a radio
comunicazioni . Operazione di questo
le apparecchiature in un'area residenziale sono probabile che causa dannoso interferenza , in
cui caso IL l'utente sarà tenuto a correggere l' interferenza al loro Proprio spesa .

- 9 -
COME FARE UTILIZZO
Modalità di ricarica
Quando è selezionata la modalità di fornitura , è possibile carica di selezione diverso correnti
con diverse tensioni . Selezionare il tipo di batteria dopo aver acceso l'interruttore . Questi
modalità Sono
modalità di ricarica avanzate che richiedono la tua completa attenzione Prima selezione . Esso È
importante per
comprendere le differenze e gli scopi di ogni addebito modalità . Fare non operare il
caricabatterie finché non confermi la modalità di ricarica appropriata per il tuo batteria . Sotto è
un breve descrizione:
Modello
Spiegazione (tensione di picco misurata a 25°C , amperaggio la valutazione è massa
amperaggio Quando Sopra 0°C)
Stand-by
In standby modalità , il caricabatterie è non in carica o fornendo qualsiasi potere di IL batteria
. Energia Durante questa modalità il salvataggio è attivato , disegnando microscopici
potere dal elettrico presa di corrente . Può autobus È abilitato in modalità Standby . Quando
è in Standby , il LCD Volere illuminare .
Carica
6V Guida
Per la ricarica a 6 volt batterie al piombo - acido . Quando selezionato , il 6V sarà
Essere foderato di blu .
7. 3V | Fino a 200AH Batterie
12V Guida
Per la ricarica a 12 volt batterie al piombo - acido . Quando selezionato , il 12V
Volere Essere foderato In blu .
14. 6V | Fino a 600AH Batterie
24V Guida
Per la ricarica a 24 volt batterie al piombo - acido . Quando selezionato , il 24V sarà
Essere foderato In blu .
29 . 2V | Fino a 300AH Batterie
36V Guida
Per la ricarica a 36 volt batterie al piombo - acido . Quando selezionato , il 36V sarà
Essere foderato In blu .
43 . 8V | Fino a 100AH Batterie
48V Guida
Per la ricarica a 48 volt batterie al piombo - acido . Quando selezionato , il 48V sarà
Essere foderato In blu .
58. 4V | Fino a 100AH Batterie
60V Guida
Per la ricarica a 60 volt batterie al piombo - acido . Quando selezionato , il 60V
sarà Essere foderato In blu . 73V | Fino a 60AH Batterie
72V Guida
Per la ricarica a 72 volt batterie al piombo - acido . Quando selezionato , il 72V
Essere foderato In blu .
87 . 6V | Fino a 60AH Batterie
12V
LiFePo4
Per 12 volt LiFePo4 batterie . Quando selezionato , il 12V sarà foderato In blu .
14. 6V | Fino a 600AH Batterie
24V
LiFePo4
Per 24 volt LiFePo4 batterie . Quando selezionato , il 24V sarà Essere lin ed In blu .
29 . 2V | Fino a 200AH Batterie
36V
LiFePo4
Per 36 volt LiFePo4 batterie . Quando selezionato , il 36V sarà Essere foderato In
blu .
43 . 8V | Fino a 100AH Batterie
48V
LiFePo4
Per 48 volt LiFePo4 batterie . Quando selezionato , il 48V sarà foderato In blu .
58. 4V | Fino a 100AH Batterie

- 10 -
60V
LiFePo4
Per 60 volt LiFePo4 batterie . Quando selezionato , il 60V sarà foderato
In blu . 73V | Fino a 60AH Batterie
72V
LiFePo4
Per 72 volt LiFePo4 batterie s . Quando selezionato , il 72V sarà foderato In blu .
87 . 6V | Fino a 60AH Batterie

- 11 -
Mantener
e
6V Guida
Per la ricarica a 6 volt batterie al piombo . Quando selezionato , il 6V sarà Essere
foderato in blu .
7. 3V | Su A 200AH Batterie
12V Guida
Per la ricarica a 12 volt batterie al piombo . Quando selezionato , il 12V Volere
Essere foderato in blu .
14. 6V | Su A 600AH Batterie
24V Guida
Per la ricarica a 24 volt batterie al piombo . Quando selezionato , il 24V sarà Essere
foderato in blu .
29 . 2V | Su A 300AH Batterie
36V Guida
Per la ricarica a 36 volt batterie al piombo . Quando selezionato , il 36V sarà Essere
foderato in blu .
43 . 8V | Su A 100AH Batterie
48V Guida
Per la ricarica a 48 volt batterie al piombo . Quando selezionato , il 48V sarà Essere
foderato in blu .
58. 4V | Su A 100AH Batterie
60V Guida
Per la ricarica a 60 volt batterie al piombo . Quando selezionato , il 60V sarà
Essere foderato in blu . 73V | Su A 60AH Batterie
72V Guida
Per la ricarica a 72 volt batterie al piombo . Quando selezionato , il 72V Essere
foderato in blu .
87 . 6V | Su A 60AH Batteri es
Desolfatazi
one
6V Guida
Per la ricarica a 6 volt batterie al piombo . Quando selezionato , il 6V sarà Essere
foderato in blu .
7. 3V | Su A 200AH Batterie
12V Guida
Per la ricarica a 12 volt batterie al piombo . Quando selezionato , il 12V Volere
Essere foderato in blu .
14. 6V | Su A 600AH Batterie
24V Guida
Per la ricarica a 24 volt batterie al piombo . Quando selezionato , il 24V sarà Essere
foderato in blu .
29 . 2V | Su A 300AH Batterie
Fornitura
Modalità
6V Guida
Per la ricarica a 6 volt batterie al piombo . Quando selezionato , il 6V sarà Essere
foderato in blu .
7. 3V | Su A 200AH Batterie
12V Guida
Per la ricarica a 12 volt batterie al piombo . Quando selezionato , il 12V Volere
Essere foderato in blu .
14. 6V | Su A 600AH Batterie
24V Guida
Per la ricarica a 24 volt batterie al piombo . Quando selezionato , il 24V sarà Essere
foderato in blu .
29 . 2V | Su A 300AH Batterie
36V Guida
Per la ricarica a 36 volt batterie al piombo . Quando selezionato , il 36V sarà Essere
foderato in blu .
43 . 8V | Su A 100AH Batterie
48V Guida
Per la ricarica a 48 volt batterie al piombo . Quando selezionato , il 48V sarà Essere
foderato in blu .
58. 4V | Su A 100AH Batterie
60V Guida
Per la ricarica a 60 volt batterie al piombo . Quando selezionato , il 60V sarà
Essere foderato in blu . 73V | Su A 60AH Batterie
72V Guida
Per la ricarica a 72 volt batterie al piombo . Quando selezionato , il 72V Essere
foderato in blu .
87 . 6V | Su A 60AH Batteri es

- 12 -
Ricarica della batteria al piombo-acido
1. Per prima cosa , premere il tasto Pulsante "Tipo di batteria" per selezionare "Piombo " . In
secondo luogo , premere il "Voltaggio" pulsante , quindi premere il Pulsante "Avvia" per iniziare
la ricarica .
2. Per prima cosa , premere il tasto "Tipo di batteria" pulsante n per selezionare "Piombo" . In
secondo luogo , premere il "Voltaggio"
pulsante , quindi premere il
Pulsante
" Corrente" e infine premere IL "Inizio" pulsante A inizio
ricarica . Attenzione: quando questa modalità è selezionata , si prega di assicurati il tuo batteria
È UN piombo-acido batteria . Assicurarsi che la tensione della batteria corrisponda alla tensione
selezionata ; altrimenti , carica fallirà .
Ricarica della batteria LiFePO4
1. Per prima cosa , premere il tasto "Tipo di batteria" pulsante per selezionare "LiFePO4" , quindi
premere il "Voltaggio" pulsante e infine premere il Pulsante "Start" per iniziare ricarica .
2. Per prima cosa , premere il tasto "Tipo di batteria" premi per selezionare "LiFePO4" . In
secondo luogo , premere il "Voltaggio"
pulsante , quindi premere il
Pulsante
" Corrente" e infine premere IL "Inizio" pulsante A inizio
ricarica . Attenzione: quando questa modalità è selezionata , si prega di assicurati il tuo
batteria È UN LiFePO4 batteria . Assicurarsi che la tensione della batteria corrisponda alla
tensione selezionata ; altrimenti , carica fallirà .
Modalità di mantenimento
Per prima cosa , premere il tasto "Tipo di batteria" pulsante per selezionare "Piombo " . In
secondo luogo , premere il Pulsante "Mantieni" , quindi premere il Pulsante "Tensione" per
selezionare la tensione appropriata e infine premere IL Pulsante "Start" per iniziare la ricarica .
Il caricabatterie caricherà il batteria con UN Basso attuale A mantenere uno stato
completamente carico e questa modalità non lo farà danno tuo batteria .
Modalità di desolfatazione
Per prima cosa , premere il tasto "Tipo di batteria" pulsante per selezionare "Piombo" . In
secondo luogo , premere il "Desolfatazione"
pulsante , quindi premere il Pulsante "Tensione" e infine premere il "Inizio" pulsante per iniziare
la carica . Attenzione: quando la batteria è seriamente invecchiata e ha capacità
insufficiente , tu Potere selezionare Questo modalità a ripararlo . Si prega di notare che le
batterie possono soltanto Essere riparato uno A una volta .
Modalità di fornitura
Per prima cosa , premere il tasto "Tipo di batteria" pulsante per selezionare " Piombo" . In
secondo luogo , premere il "Voltaggio" pulsante , premere in terzo luogo il Pulsante "Corrente"
e infine premere il "Inizio" pulsante .
Attenzione: questa modalità può essere selezionata quando usato COME UN energia
fornitura O Quando IL batteria la tensione non può essere rilevato .
Modalità professionale
Per prima cosa , premere il tasto Pulsante "Tipo di batteria" , quindi accendere l'alimentazione A
entrare professionale modalità .
Quando si accede alla modalità professionale , per favore selezionare diverso batterie usando
diverso passaggi:

- 13 -
Premere il tasto "Tipo di batteria" pulsante per selezionare "LiFePO4 " , in secondo luogo
premere il "Voltaggio" pulsante per selezionare la tensione e le celle della batteria e la
corrente selezione metodo è il Stesso COME In non- modalità professionale .
Attenzione: In Modalità LiFePO4 , celle della batteria nascoste Essere visualizzato . Per favore
nota Quello non-
i professionisti non dovrebbero selezionare questa modalità . Se selezionata , si prega di
contattare il batteria fornitore;
altrimenti ci saranno rischi . Questa modalità non può Essere memorizzato . Dopo svolta fuori
dal potere , il il caricabatterie verrà restituito al non professionista modalità .

- 14 -
Collegamento alla batteria
Non collegare la spina di alimentazione CA Fino a Tutto altro connessioni Sono fatto .
Identificare IL corretto
polarità dei terminali della batteria sulla batteria . non Fare Qualunque collegamenti con il
carburatore , tubi del carburante o lamiera sottile parti . Il istruzioni sotto sono per UN negativo
terra sistema
(più comune) . Se il tuo veicolo è a massa positiva sistema (molto non comune) , seguire il
istruzioni di seguito in ordine inverso .
1 . Collegare il positivo (rosso) connettore terminale ad occhiello al positivo (POS , P , +)
batteria terminale .
2. Collegare il polo negativo (nero) connettore terminale ad occhiello al negativo (NEG , N , -)
batteria terminale .
3. Collegare il caricabatteria a una presa elettrica adatta . non viso IL batteria Quando
facendo questa connessione .
4. Per scollegare , scollegare nella sequenza inversa : rimuovere il prima il terminale negativo
(o prima il terminale positivo per i sistemi con messa a terra positiva) .
Inizia la ricarica
1. Verificare la tensione e la composizione chimica della batteria .
2. Verificare di aver collegato i morsetti della batteria O terminale ad occhiello connettori
correttamente e che la spina di alimentazione CA sia collegato a UN elettrico presa di corrente .
3 . [Prima volta [Usa] Il caricabatterie iniziare in modalità Standby e "Pausa" Volere Essere c
ircled In blu . Nel Stand-by modalità , il caricabatterie non fornisce Qualunque energia .
4. Premere il tasto Pulsante "Tipo di batteria" per selezionare il tipo di batteria , in secondo
luogo premere IL "Voltaggio" pulsante e in terzo luogo premere il pulsante Pulsante
"Corrente" .
5. Premere il tasto Pulsante "Start" e sarà evidenziato In blu; in secondo luogo , il batteria Volere
Essere
rilevato . Se la batteria è normale , no batteria l'indicatore sarà giro spento , e IL
caricabatterie Volere lavoro normalmente; altrimenti , lo farà non .
6. Il caricabatterie può ora essere lasciato collegato a IL batteria A Tutto volte A fornire
manutenzione ricarica .
Memoria automatica: il caricabatterie è dotato di memoria automatica integrata e Volere
ritorno A IL scorso carica modalità quando connesso . Selezionare la modalità appropriata e
premere il "Inizio" pulsante e IL caricabatterie salverà il nuovo lavoro modalità .
Attenzione: Professionale La modalità non può essere memorizzata automaticamente .
TEMPI DI RICARICA
Il tempo di ricarica stimato per una batteria viene calcolato COME segue: Ricarica Tempo (ore)
= Capacità della batteria (Ah) / Corrente di carica (A) . La batteria capacità (Ah) E suo
profondità Di
scarico (DoD) influenzano significativamente la durata della carica . Il tempo calcolato è basato
SU UN
profondità media di scarica fino a uno stato completamente carico e È per riferimento solo .
Attuale risultati può variare a seconda delle condizioni della batteria . Il tempo di ricarica per UN
normalmente dimesso batteria È
basato su un 50% DoD . Anche la temperatura ha un impatto ricarica efficienza .

- 15 -
VEVOR I caricabatterie sono dotati di tecnologia di compensazione termica , che
automaticamente
regola i parametri di carica per ottimizzare le prestazioni . Di seguito è riportato UN ricarica
tempo riferimento per modello:
XFH-SS01 :
Dimensioni
della batteria
Ah(Amp ora)
Tempo approssimativo per la ricarica ore
6V
12V
24V
36V
48 Volt
40
3
3
6
10
13
60
5
5
10
15
20
80
6
6
12
20
26
120
10
10
20
200
17
17
XFH-SS0 2 :
XFH-SS0 3 / XFH- SS07:
Dimensioni
della batteria
Ah(Amp ora)
Tempo approssimativo per la ricarica ore
6V
12V
24V
36V
48V
60V
72 V
40
3
3
5
8
10
13
15
60
4
4
8
11
15
19
23
80
5
5
10
15
20
25
31
120
8
8
15
23
30
200
13
13
25
Dimensioni
della batteria
Ah(Sono foora)
Tempo approssimativo per la ricarica ore
6V
12V
24V
40
3
2
4
60
4
3
6
80
5
4
8
120
8
6
12
200
13
10
20
400
25
20

- 16 -
XFH- SS0 4/ XFH -SS08
XFH- SS0 5/ XFH- SS09:
COMPRENDERE L'INDICAZIONE DI CARICA
Dimensioni
della batteria
Ah(Amp ora)
Tempo approssimativo per la ricarica ore
6V
12V
24V
40
3
2
3
60
4
3
5
80
5
3.5
7
120
8
5
10
200
13
8
16
400
25
16
Dimensioni
della batteria
Ah(Amp ora)
Tempo approssimativo per la ricarica ore
6V
12V
24V
40
3
1. 5
3
60
4
2
4
80
5
3
5.5
120
8
4
8
200
13
7
14
400
25
14

- 17 -
Illustrazione del pulsante
Pulsante
Batteria Pulsante: Spingere il
pulsante per selezionare il tipo
di batteria; IL L'indicatore "Tipo
di batteria" si accenderà SU .
Pulsante
Voltaggio Pulsante : Spingere IL
pulsante
per selezionare la tensione; il
"Voltaggio" l'indicatore si
accenderà .
Pulsante
Attuale Pulsante: Spingere il
pulsante
per selezionare la corrente; il
"Attuale" l'indicatore si accenderà .
Pulsante
Ricarica e Mantenere Modalità:
La L'indicatore "In carica" si
accenderà .
Quando la batteria e energia
l'alimentazione è collegata
correttamente , il l'indicatore della
barra di avanzamento si
accenderà SU in base alla tariffa
selezionata modalità .
Se il batteria ha non stato usato
per lungo tempo , spingere il
pulsante per selezionare Modalità
di mantenimento . Il batteria verrà
addebitato con UN piccolo
corrente per mantenere il suo
carica; l' indicatore "Mantieni" si
accenderà , e il progresso la barra
lampeggerà ciclicamente .
(Mantenere la modalità è solo per
piombo-acido batterie . )
Pulsante
Fornitura Modalità: quando la
batteria è collegato
correttamente ma non può
essere rilevato , spingere il
pulsante per utilizzo Modalità
"Alimentazione" per la ricarica . Il
L'indicatore "Alimentazione" si
accenderà
su , e il progresso la barra
lampeggerà ciclicamente .
Pulsante
Desolfatazione Modalità (Piombo-
acido
Batteria Solo):I f il batteria ha
stato utilizzato per un a lungo E
suo la capacità diminuisce
rapidamente , spingere il
pulsante per utilizzo
"Desolfatazione"
modalità per la ricarica a riparazione
la batteria . L' indicatore
"Desolfatazione" si accenderà

- 18 -
e
la barra di avanzamento
lampeggerà ciclicamente .
Pulsante
INIZIO e PAUSA Pulsante: quando le impostazioni sono corrette , premere il pulsante
pulsante; il L'indicatore "Start" si accenderà e il caricabatterie inizierà a funzionare .
Premere il pulsante Mentre IL caricabatterie È operativo; il L'indicatore "PAUSE" si
accenderà e il caricabatterie smetterà di funzionare .

- 19 -
Indicazione grafica
Numer
o di
serie
Grafico
Indicatore
Spiegazione
1
Spettacolo Cella della batteria
Numero
In modalità professionale ,
display batteria ce l l numero;
In condizioni normali modalità ,
nessun display
2
Flash
Avvertimento:
Sovracorrente , cortocircuito
circuito
3
SU
Ricarica in “ Desolfatazione ”
4
Flash
Collegamento inverso della
batteria
5
SU
Non connettersi batteria
6
Flash
Temperatura ambiente
per ricarica
7
SU
Mostra la capacità della batteria
8
-
Mostra la tensione di carica
9
-
Mostra la corrente di carica
10
Visualizza numero
Per una descrizione del
guasto codici
Barra di avanzamento Indicazione

- 20 -
1. Fase di desolfatazione (solo per batteria al piombo)
2. Modalità di ricarica a bassa corrente
3. Ricarica CC modalità
4. Ricarica CV modalità
5. Autocontrollo della batteria
6. Carica flottante Modalità
7. Completamente carico

- 21 -
Specifiche del caricabatterie per modello
del prodotto
XFH-SS01
XFH-
SS02
XFH-
SS03
XFH-
SS07
XFH-
SS04
XFH-
SS08
XFH-
SS05
XFH-
SS09
Tensione di
ingresso CA
120 V CA 60 Hz
Max250W
120 V CA 60 Hz
Max300W
120 V CA
60 Hz
Max400W
230 V CA
50 Hz
Max400W
120 V CA
60 Hz
Max480W
230 V CA
50 Hz
Max480W
120 V CA
60 Hz
Max550W
230 V CA
50 Hz
Max550W
Produzione
Energia
175 . 2W
(massimo)
234 W (massimo)
292 W (massimo)
365 W (massimo)
438 W (massimo)
Tensione di
carica
Vari
Corrente di
carica
5A (6 V) , 10 A (6V)
,
12A (6 V) , 5 A
(12V) ,
10A (12V) , 12A
(12V) ,
5A (24V) , 6A (24V)
,
4A/(36V) , 3A(48V)
5A (6 V) , 10 A (6V)
,
16A (6 V) , 5 A
(12V) ,
10A (12V) , 16A
(12V) ,
5A (24V) , 8A (24V)
,
5. 3A /(36V) ,
4A(48V) ,
3. 2A (60V) , 2. 7A
(72V)
5A (6 V) , 10 A (6V)
,
16A (6 V) , 5 A
(12V) ,
10A (12V) , 20A
(12V) ,
5A (24V) , 10A
(24V)
5A (6 V) , 10 A (6V)
,
16A (6 V) , 5 A
(12V) ,
16A (12V) , 25A
(12V) ,
5A (24V) , 10A
(24V) ,
12 . 5A (24V)
5A (6 V) , 10 A (6V)
,
16A (6 V) , 5 A
(12V) ,
16A (12V) , 30A
(12V) ,
5A (24V) , 10A (24V)
,
15A (24V)
Bassa tensione
Rilevamento
2V (6V) , 10V (12V)
,
20 V (24 V) , 30 V
(36 V) ,
40 V (48 V)
2V (6V) , 10V (12V)
,
20 V (24 V) , 30 V
(36 V) ,
40 V (48 V) , 50 V
(60 V) ,
60 V (72 V)
2V (6V) , 10V (12V) , 20V (24V)
Corrente di
ritorno
Drenare
<0 . 5mA
Ambiente
Temperatura
da -20°C a 40°C
Tipo di Batterie
6V , 12V , 24V ,
36 V , 48 V
6V , 12V , 24V ,
36V , 48V , 60V ,
72V
6V , 12V , 24V
Batteria
Chimiche
Bagnato , Gel , MF , CA , EFB , AGM , Calcio , LiFePO4
Capacità della
batteria
Fino a 200 Ah ,
Mantiene
Tutto Dimensioni
della batteria
Fino a 300 Ah ,
Mantiene
Tutto Dimensioni
della batteria
Fino a 400 Ah ,
mantiene tutto
Batteria
Dimensioni
Fino a 500 Ah ,
mantiene tutto
Batteria
Dimensioni
Fino a 600 Ah ,
mantiene tutto
Batteria
Dimensioni

- 22 -
Raffreddamento
Ingresso
Tensione CA
Fan Convezione

- 23 -
Selezione manuale della tensione della batteria (Modalità professionale)
Tipi di batteria
Gamma di
tensione
Cella in serie
Contare
Batteria
nominale
Tensione (V)
Ricarica
Tensione (V)
Voltaggio
Soglia
Gamma (V)
LiFePo4
batteria
12V
3
9 . 6
10 . 95
7 . 5-10 . 95
4
12 . 8
14 . 6
10-14 . 6
24V
6
19 . 2
21 . 9
15-21 . 9
8
25 . 6
29 . 2
20-29 . 2
36V
11
35 . 2
40 . 15
27 . 5-40 . 15
12
38 . 4
43 . 8
30-43 . 8
48V
14
44 . 8
51 . 1
35-51 . 1
15
48
54 . 75
37 . 5-54 . 75
16
51 . 2
58 . 4
40-58 . 4
60V
18
57 . 6
65 . 7
45-65 . 7
19
60 . 8
69 . 35
47,5-69,35
20
64
73
50-73
72V
22
70.4
80.3
55-80,3
23
73,6
83,95
57,5-83,95
24
76,8
87,6
60-87 . 6
Piombo-acido
batteria
12V
4
13 . 8
14 . 6
10-14 . 6
24V
8
27 . 6
29 . 2
20-29 . 2
36V
12
41 . 4
43 . 8
30-43 . 8
48V
16
55 . 2
58 . 4
40-58 . 4
60V
20
69
73
50-73
72V
24
82 . 8
87 . 6
60-87 . 6

- 24 -
CODICE DI ERRORE
Quando la macchina non può essere caricata in usare , il prodotto display Volere spettacolo la
colpa codice .
Fare riferimento alla seguente tabella descrittiva dei codici di errore E risolvere il
problema
di
mancata ricarica causato da un funzionamento errato in base al guasto corrispondente numero .
Codice di errore
Descrizione del guasto
03E
La temperatura all'interno della macchina è troppo alto
04E
La modalità di ricarica in uscita è selezionare d in modo errato
05E
Tensione di uscita su tensione
06E
Uscita su energia
42E
Corrente di uscita su corrente
43E
Tensione o corrente nessuna variazione per UN lungo tempo
04E: Premere il pulsante di avvio per chiaro .
Altro: Scollegare la spina di alimentazione .

- 25 -

- 26 -
Cargador de plomo-ácido de litio
Modelo: XFH-SS01 , XFH-SS02 , XFH-SS03 ,
XFH-SS04 , XFH-SS05 , XFH-SS07 ,
XFH-SS08 , XFH-SS09

- 1 -
Modelo: XFH-SS01 , XFH-SS02 , XFH-SS03 , XFH-SS04 , XFH-SS05 ,
XFH-SS07 , XFH-SS08 , XFH-SS09
Estas son las instrucciones originales . Lea atentamente todas las
instrucciones del manual antes de utilizarlo . VEVOR se reserva el
derecho de interpretar este manual de usuario . La apariencia del
producto dependerá del producto que usted recibió . Le rogamos que
nos disculpe si no le informaremos de nuevo si hay actualizaciones
tecnológicas o de software en nuestro producto .
- 2 -
Advertencia : Para reducir el riesgo de lesiones
, el usuario debe leer atentamente el manual de
instrucciones .
Este dispositivo cumple con la Parte 15 de las
Normas de la FCC . Su funcionamiento está sujeto a
las dos condiciones siguientes: (1) Este dispositivo
no puede causar interferencias perjudiciales y (2)
Este dispositivo debe aceptar cualquier interferencia
recibida , incluidas las que puedan causar un
funcionamiento no deseado .
Este producto está sujeto a la Directiva Europea
2012/19/CE . El símbolo de un contenedor de basura
tachado indica que el producto requiere recogida
selectiva de residuos en la Unión Europea . Esto
aplica al producto y a todos los accesorios marcados
con este símbolo . Los productos marcados con este
símbolo no pueden desecharse con la basura
doméstica normal , sino que deben llevarse a un
punto de recogida para el reciclaje de aparatos
eléctricos y electrónicos.
Eléctrico Descarga eléctrica . El producto es un
dispositivo eléctrico que puede causar descargas
eléctricas. y causar lesiones graves . No corte la
alimentación. cuerdas . Hacer no sumergir en agua o
conseguir húmedo .
Explosión . Las baterías no supervisadas ,
incompatibles o dañadas pueden Explotar si se usa
con el producto . No dejar producto desesperado
mientras esté en uso . No intente arrancar un
vehículo dañado. o congelado Batería . Utilice el
producto únicamente con baterías del voltaje
recomendado . Opere producto en áreas bien
ventiladas .
Fuego . El producto es un dispositivo eléctrico que
emite calor y es capaz de Provocando
quemaduras . No cubrir producto .
No fumar ni utilizar ningún fuente de eléctrico chispa
o fuego cuando producto en funcionamiento .
Mantenga el producto alejado de materiales
combustibles. materiales .
- 3 -
Ojo Lesiones . Use protección para los ojos al
operar el producto . Las baterías pueden explotar y
causar la proyección de residuos .
El ácido de la batería puede causar irritación en los
ojos y la piel. irritación . En el caso de
Contaminación de los ojos o la piel , enjuague el
área afectada con agua corriente limpia y contacto
con el centro de control de intoxicaciones
inmediatamente .
Explosivo Gases . Trabajar cerca de plomo-ácido
es... peligroso .
Baterías generar gases explosivos durante el
funcionamiento normal de la batería .
A reducir Riesgo de explosión de la batería , siga
toda la información de seguridad instrucciones y las
publicadas por la batería fabricante y fabricante de
cualquier equipo destinado a ser utilizado en el
vecindad de batería . Revise las marcas de
precaución en estos productos y en motor .

- 4 -
Este cargador de batería VEVOR representa algunos de los mayoría innovador y tecnología
avanzada en el mercado , haciendo que cada carga sea sencilla y Fácil . Es es bastante
probablemente el más seguro y mayoría
El cargador más eficiente que jamás hayas tenido usar .
Este producto está diseñado para cargar todo tipo de de plomo-ácido baterías , incluidas Litio ,
LiFePO4 , húmedo (Inundado) , Gel , MF ( Libre de mantenimiento) , CA (Calcio) , EFB
(Mejorado Inundado
Batería) y AGM (Vidrio de absorción Esterilla) baterías . Es adecuado para cargar batería
capacidades de hasta 400 amperios-hora y manteniendo todos tamaños de batería
Empezando
Antes Al utilizar el cargador , lea atentamente las instrucciones de la batería. del fabricante
específico precauciones
y tasas de carga recomendadas . Determine el voltaje y química de tu batería por
Consultando el manual del propietario de la batería Antes de cargar .
Montaje
Tenga en cuenta la distancia a la batería . Longitud del cable de CC de el cargador , con
cualquiera el Los conectores de terminal de abrazadera o de ojal de la batería son
aproximadamente 47 . 2 pulgadas (1200 mm) .
Advertencia sobre la Proposición 65
Los postes , terminales y accesorios relacionados de la batería contienen productos
químicos , incluidos Plomo . El estado de California reconoce que estos materiales causa
cáncer , nacimiento defectos , y otro
daño reproductivo
Precaución personal
Utilice únicamente el producto como destinado .
Asegúrese de que alguien esté dentro del alcance de voz para ayudarlo. en caso de un
emergencia .
Mantenga un suministro de agua limpia y jabón. cercano En caso de batería ácido contacto .
Use protección ocular completa y equipo protector. ropa cuando laboral cerca a batería .
Lávese siempre las manos después de manipular las baterías. y relacionado materiales .
No manipule ni use ningún objetos de metal (por ejemplo , herramientas , relojes o joyas ) al
trabajar con baterías . Si se cae metal sobre una batería , es puede chispa o crear a corto
circuito , resultando en descarga eléctrica , incendio o explosión , lo que podría causar
lesiones , muerte o propiedad daño .
Menores
Si el El producto está destinado a ser utilizado por a menor , el adquisitivo adulto está de
acuerdo a proporcionar detallado
Instrucciones y advertencias al menor antes de uso . Fallo en hacer entonces es el único
responsabilidad de el comprador , que se compromete a indemnizar al fabricante por cualquier
no intencionado usar o mal uso por a menor .
Peligro de asfixia
Los accesorios pueden presentar asfixia. Peligro para los niños . No no dejar niños
desesperado con el producto o cualquier accesorio . El producto es no un juguete

- 5 -
Manejo
Manipule el producto con cuidado . Puede ser dañado si impactado .
No utilice un producto dañado producto , incluyendo uno con grietas en el caja o dañado
cables .

- 6 -
Hacer no utilizar el producto con un cable de alimentación dañado .
La humedad y los líquidos pueden dañar el producto . Hacer no Manejar el producto o
cualquier al eléctrico componentes cerca de cualquier líquido .
Almacene y utilice el producto en seco ubicaciones .
No utilice el producto si: se convierte mojado . Si el producto se convierte húmedo durante
operación , desconéctelo de la batería y deje de usarlo inmediatamente .
No desconecte el producto por tirando de la cables .
Modificaciones
Hacer No intente alterar , modificar o reparar ningún parte del producto .
Desmontar el producto puede causar lesiones , muerte o propiedad daño .
Si el producto se daña , funciona mal o contactos cualquier líquido , descontinuar usar y
Póngase en contacto con el fabricante .
Cualquier modificación anulará la garantía .
Accesorios
Este producto solo está aprobado para su uso con aprobado por el fabricante
accesorios . Los El fabricante no es responsable del usuario. seguridad o daño
cuando usando no aprobado accesorios .
Ubicación
Evite que el ácido de la batería entre en contacto con producto .
No opere el producto en un cerrado área o un área con restringido ventilación .
Hacer no Coloque una batería encima del producto .
Coloque los cables de forma que eviten daños accidentales por vehículo en movimiento
regiones (p . ej ., capós , puertas) , piezas móviles del motor (por ejemplo , aspas de ventilador ,
correas , poleas) , o otro potencial peligros que puede causa lesiones o muerte .
Temperatura de funcionamiento
Este producto está diseñado para funcionar a temperatura ambiente. entre -4 °F y 104°F (-20°C
y 40 °C) . No lo utilice fuera de estos rangos de temperatura . no cargar un congelado batería .
Suspenda su uso inmediatamente si la batería se vuelve excesivamente cálido .
Almacenamiento
No utilice ni almacene el producto en áreas con alto concentraciones de polvo o
aerotransportado materiales . Guarde el producto en una superficie plana y segura donde él es
no propenso a descendente .
Conservar el producto en a seco ubicación .
El rango de temperatura de almacenamiento es de -4 °F a 77°F (-20°C a 25°C) temperatura
media . Nunca superar los 158°F (70°C) bajo cualquier condición .
Compatibilidad
Este producto solo es compatible con baterías de plomo-ácido , AGM y LiFePO4 . No intente
utilizarlo . El producto con cualquier otro tipo de batería . Cargar baterías con componentes químicos
diferentes puede provocar lesiones .
muerte o daños a la propiedad . Comuníquese con el fabricante de la batería antes de intentar
cargarla. batería . No cargue una batería si no está seguro de su composición química o voltaje
específicos .

- 7 -
Dispositivos médicos
Este producto puede emitir campos electromagnéticos . Contiene magnético componentes que
interfieren con marcapasos , desfibriladores u otros dispositivos médicos dispositivos . Consultar
con su médico Antes de Úsalo si tener alguna dispositivos médicos , incluido un marcapasos . Si
usted Sospecho que El producto está interfiriendo con un dispositivo médico , deténgase.
usando él inmediatamente y Consulte a su médico .
Limpieza
Apague el producto antes de intentar cualquier cosa. mantenimiento o limpieza . Limpiar y secar
el
producto inmediatamente si entra en contacto con líquido o cualquier contaminante . Uso a
Paño suave y sin pelusa (microfibra) . Evite que entre humedad en las aberturas .
Atmósferas explosivas
Obedezca todas las señales e instrucciones . No opere. el producto en cualquier área con a
potencialmente
Atmósfera explosiva , incluidas las zonas de abastecimiento de combustible o las zonas que
contienen productos químicos o partículas semejante como grano , polvo o metal polvos .
Actividades de alta consecuencia
Este producto no está destinado a utilizar donde el falla del producto podría dirigir a lesiones ,
muerte o daños ambientales graves .
Interferencia de radiofrecuencia
Este producto está diseñado , probado y fabricado a cumplir con regulaciones gobernante
emisiones de radiofrecuencia . Dichas emisiones pueden afectar negativamente a la operación
de otro electrónico
equipo , provocando un mal funcionamiento del mismo .
Nota de cumplimiento de la FCC
Este dispositivo cumple con Parte 15 de la F CC Reglas . La operación es sujeto a la
siguiente dos condiciones:
(1) Este dispositivo no puede causa dañino interferencia .
(2) Este dispositivo no debe aceptar ninguna interferencia. recibido , incluyendo interferencia
que puede causa operación no deseada
Este equipo ha sido probado y se ha comprobado que cumplir con la límites para a Clase B
digital
dispositivo , de conformidad con Parte 15 de la Comisión Federal de Comunicaciones (FCC)
Reglas . Estos límites son Diseñado para proporcionar protección razonable contra
interferencias perjudiciales en un entorno comercial Instalación . Esta equipo genera , utiliza y
puede radiar energía de radiofrecuencia y , si no instalado y usado en De acuerdo con las
instrucciones , puede causar interferencias perjudiciales. radio Comunicaciones . Operación
de esto
El equipo en un área residencial es Es probable que causa dañino interferencia , en la que
caso el El usuario deberá corregir la interferencia en su propio gasto .

- 8 -
CÓMO USAR
Modos de carga
Cuando se selecciona el modo de suministro , puede cargar por seleccionando diferente
corrientes con Diferentes voltajes . Seleccione el tipo de batería después de encender el
interruptor . modos son
modos de carga avanzados que requieren toda tu atención antes selección . Eso es importante
para
Comprender las diferencias y los propósitos de cada cargo. modo . Hacer no operar el
cargador hasta que confirme el modo de carga apropiado para su batería . Abajo es un breve
descripción:
Modelo
Explicación (voltaje pico medido a 25°c , amperaje La calificación es a granel amperaje cuando
arriba 0°c)
Apoyar
En espera modo , el cargador está No carga o Proporcionar cualquier poder para el batería .
Energía El guardado se activa durante este modo , dibujando microscópicos poder de la
eléctrico salida . Puede autobús es habilitado en modo de espera . Cuando está en modo de
espera , el Pantalla LCD voluntad iluminar .
Cargar
6 V Dirigir
Para cargar 6 voltios baterías de plomo - ácido . Cuando se seleccionan , las 6V
voluntad ser forrado por azul .
7.3 V | Arriba a 200 Ah Baterías
12 V Dirigir
Para cargar 12 voltios Baterías de plomo - ácido . Cuando se selecciona , la tensión
de 12 V voluntad ser forrado en azul .
14.6 V | Arriba a 600 Ah Baterías
24 V Dirigir
Para cargar 24 voltios baterías de plomo - ácido . Cuando se seleccionan , las 24V
ser forrado en azul .
29.2 V | Arriba a 300 Ah Baterías
36 V Dirigir
Para cargar 36 voltios baterías de plomo - ácido . Cuando se seleccionan , las 36V
ser forrado en azul .
43.8 V | Arriba a 100 Ah Baterías
48 V Dirigir
Para cargar 48 voltios baterías de plomo - ácido . Cuando se seleccionan , las 48V
ser forrado en azul .
58.4 V | Arriba a 100 Ah Baterías
60 V Dirigir
Para cargar 60 voltios baterías de plomo - ácido . Cuando se seleccionan , las 60
V ser forrado en azul . 73V | Arriba a 60 Ah Baterías
72 V Dirigir
Para cargar 72 voltios Baterías de plomo - ácido . Cuando se selecciona , la tensión
de 72 V... ser forrado en azul .
87.6 V | Arriba a 60 Ah Baterías
12 V
LiFePo4
Para 12 voltios LiFePo4 Baterías . Cuando se selecciona , se utilizarán 12 V.
forrado en azul .
14.6 V | Arriba a 600 Ah Baterías
24 V
LiFePo4
Para 24 voltios LiFePo4 Baterías . Cuando se selecciona , los 24 V ser alineado
en azul .
29.2 V | Arriba a 200 Ah Baterías
36 V
LiFePo4
Para 36 voltios LiFePo4 Baterías . Cuando se selecciona , los 36 V ser forrado en
azul .
43.8 V | Arriba a 100 Ah Baterías
48 V
LiFePo4
Para 48 voltios LiFePo4 Baterías . Cuando se selecciona , se cargarán 48 V.
forrado en azul .
58.4 V | Arriba a 100 Ah Baterías

- 9 -
60 V
LiFePo4
Para 60 voltios LiFePo4 Baterías . Cuando se selecciona , se activarán
los 60 V. forrado en azul . 73V | Arriba a 60 Ah Baterías
72 V
LiFePo4
Para 72 voltios LiFePo4 Baterías . Cuando se selecciona , se cargarán 72 V.
forrado en azul .
87.6 V | Arriba a 60 Ah Baterías

- 10 -
Mantener
6 V Dirigir
Para cargar 6 voltios baterías de plomo-ácido . Cuando se seleccionan , la 6V
voluntad ser forrado en azul .
7.3 V | Arriba A 200 Ah Baterías
12 V Dirigir
Para cargar 12 voltios Baterías de plomo-ácido . Cuando se selecciona , la tensión
de 12 V voluntad ser forrado en azul .
14.6 V | Arriba A 600 Ah Baterías
24 V Dirigir
Para cargar 24 voltios baterías de plomo-ácido . Cuando se seleccionan , la 24V ser
forrado en azul .
29.2 V | Arriba A 300 Ah Baterías
36 V Dirigir
Para cargar 36 voltios baterías de plomo-ácido . Cuando se seleccionan , la 36V ser
forrado en azul .
43.8 V | Arriba A 100 Ah Baterías
48 V Dirigir
Para cargar 48 voltios baterías de plomo-ácido . Cuando se seleccionan , la 48V ser
forrado en azul .
58.4 V | Arriba A 100 Ah Baterías
60 V Dirigir
Para cargar 60 voltios baterías de plomo-ácido . Cuando se seleccionan , la 60 V
ser forrado en azul . 73V | Arriba A 60 Ah Baterías
72 V Dirigir
Para cargar 72 voltios Baterías de plomo-ácido . Cuando se selecciona , la tensión
de 72 V... ser forrado en azul .
87.6 V | Arriba A 60 Ah Baterías
Desulfataci
ón
6 V Dirigir
Para cargar 6 voltios baterías de plomo-ácido . Cuando se seleccionan , la 6V
voluntad ser forrado en azul .
7.3 V | Arriba A 200 Ah Baterías
12 V Dirigir
Para cargar 12 voltios Baterías de plomo-ácido . Cuando se selecciona , la tensión
de 12 V voluntad ser forrado en azul .
14.6 V | Arriba A 600 Ah Baterías
24 V Dirigir
Para cargar 24 voltios baterías de plomo-ácido . Cuando se seleccionan , la 24V ser
forrado en azul .
29.2 V | Arriba A 300 Ah Baterías
Suministr
ar
Modo
6 V Dirigir
Para cargar 6 voltios baterías de plomo-ácido . Cuando se seleccionan , la 6V
voluntad ser forrado en azul .
7.3 V | Arriba A 200 Ah Baterías
12 V Dirigir
Para cargar 12 voltios Baterías de plomo-ácido . Cuando se selecciona , la tensión
de 12 V voluntad ser forrado en azul .
14.6 V | Arriba A 600 Ah Baterías
24 V Dirigir
Para cargar 24 voltios baterías de plomo-ácido . Cuando se seleccionan , las 24V
ser forrado en azul .
29.2 V | Arriba A 300 Ah Baterías
36 V Dirigir
Para cargar 36 voltios baterías de plomo-ácido . Cuando se seleccionan , la 36V ser
forrado en azul .
43.8 V | Arriba A 100 Ah Baterías
48 V Dirigir
Para cargar 48 voltios baterías de plomo-ácido . Cuando se seleccionan , la 48V ser
forrado en azul .
58.4 V | Arriba A 100 Ah Baterías
60 V Dirigir
Para cargar 60 voltios baterías de plomo-ácido . Cuando se seleccionan , la 60 V
ser forrado en azul . 73V | Arriba A 60 Ah Baterías
72 V Dirigir
Para cargar 72 voltios Baterías de plomo-ácido . Cuando se selecciona , la tensión
de 72 V... ser forrado en azul .
87.6 V | Arriba A 60 Ah Baterías

- 11 -
Carga de baterías de plomo-ácido
1. En primer lugar , presione el Botón "Tipo de batería" para seleccionar "Plomo " . En segundo
lugar , presione el "Voltaje" botón , luego presione el
Botón
"Inicio" para comenzar a cargar
2. En primer lugar , presione el "Tipo de batería" botón n para seleccionar "Plomo" . En segundo
lugar , presione el "Voltaje"
botón , luego presione el
Botón
" Actual" y finalmente presione el "Comenzar" botón a
comenzar Cargando . Precaución: Cuando se selecciona este modo , por favor asegurar su
batería es a plomo-ácido Batería . Asegúrese de que el voltaje de la batería coincida con el
voltaje seleccionado . De lo contrario , cargando fallará .
Carga de batería LiFePO4
1. En primer lugar , presione el "Tipo de batería" botón para seleccionar "LiFePO4" , entonces
presione el "Voltaje" botón y finalmente presione el Botón "Inicio" para comenzar cargando .
2. En primer lugar , presione el "Tipo de batería" Presione el botón para seleccionar "LiFePO4" .
En segundo lugar , presione el "Voltaje"
botón , luego presione el
Botón
" Actual" y finalmente presione el "Comenzar" botón a
comenzar Cargando . Precaución: Cuando se selecciona este modo , por favor asegurar su
batería es a LiFePO4 Batería . Asegúrese de que el voltaje de la batería coincida con el voltaje
seleccionado . De lo contrario , cargando fallará .
Modo de mantenimiento
En primer lugar , presione el "Tipo de batería" botón para seleccionar "Plomo " . En segundo
lugar , presione el Botón "Mantener" , luego presione el Botón "Voltaje" para seleccionar el
voltaje apropiado y , finalmente, prensa el Botón "Inicio" para comenzar la carga . El cargador
cargará el batería con a bajo actual a mantener un estado completamente cargado , y este
modo no lo hará daño su batería .
Modo de desulfatación
En primer lugar , presione el "Tipo de batería" botón para seleccionar "Plomo" . En segundo
lugar , presione el "Desulfatación"
botón , luego presione el Botón "Voltaje" y finalmente presione el "Comenzar" botón para
Comience a cargar . Precaución: Cuando la batería esté muy vieja y tiene capacidad
insuficiente , usted poder seleccionar este modo a repararlo . Tenga en cuenta que las baterías
pueden solo ser reparado uno en un tiempo .
Modo de suministro
En primer lugar , presione el "Tipo de batería" botón para seleccionar "Plomo " . En segundo
lugar , presione el "Voltaje" botón , presione en tercer lugar el Botón "Actual" y finalmente
presione el "Comenzar" botón .
Precaución: Este modo se puede seleccionar cuando usado como a fuerza suministrar
o cuando el batería El voltaje no puede ser detectado .
Modo profesional
En primer lugar , presione el Botón "Tipo de batería" , luego encienda el dispositivo. a ingresar
profesional modo .
Al ingresar al modo profesional , por favor seleccionar diferente baterías usando diferente pasos:
Presione el "Tipo de batería" botón para seleccionar "LiFePO4 " , en segundo lugar presione
el "Voltaje" Botón para seleccionar el voltaje y las celdas de la batería , y la corriente
selección método es el mismo como en no- modo profesional .

- 12 -
Precaución: En En modo LiFePO4 , las celdas de batería ocultas... ser mostrado . Por favor
nota eso no-
Los profesionales no deben seleccionar este modo . Si lo selecciona , por favor Contacte con el
batería proveedor;
De lo contrario , habrá riesgos . Este modo no puedo ser memorizado . Después torneado fuera
de la poder , el El cargador volverá a ser no profesional. modo .

- 13 -
Conexión a la batería
No conecte el enchufe de alimentación de CA hasta todo otro conexiones son hecho . Identificar
el correcto
polaridad de los terminales de la batería en la batería . no hacer cualquier conexiones a la
carburador , líneas de combustible o chapa fina partes . El instrucciones abajo son para a
negativo suelo sistema
(más común) . Si su vehículo tiene una conexión a tierra positiva sistema (muy poco
común) , siga las instrucciones a continuación en orden inverso .
1 . Conecte el positivo (rojo) conector de terminal de ojal al positivo (POS , P , +) batería
Terminal .
2. Conecte el negativo (negro) conector de terminal de ojal al negativo (NEG , N , -) batería
Terminal .
3. Conecte el cargador de batería a una toma de corriente adecuada . no rostro el batería
cuando haciendo esta conexión .
4. Al desconectar , desconéctelo en la secuencia inversa: quitar el terminal negativo primero (o
terminal positivo primero para sistemas de tierra positiva) .
Empezar a cargar
1. Verifique el voltaje y la química de la batería .
2. Confirme que haya conectado las pinzas de la batería . o terminal de ojal conectores
correctamente y que el enchufe de alimentación de CA esté enchufado a un eléctrico salida .
3 . [Primera vez uso] El cargador comenzar en modo de espera y "Pausa" voluntad ser en
círculo en azul . En Apoyar modo , el cargador no está proporcionando cualquier fuerza .
4 . Presione el Botón "Tipo de batería" para seleccionar el tipo de batería , en segundo lugar
prensa el "Voltaje" botón y , en tercer lugar, presione el Botón "Actual" .
5 . Presione el Botón "Inicio" y estará destacado en azul; En segundo lugar , el batería voluntad
ser
detectado . Si la batería está normal , no batería El indicador estará doblar apagado , y el
cargador voluntad trabajar normalmente; de lo contrario , lo hará no .
6 . Ahora se puede cargar el cargador. izquierda conectada a el batería en todo veces a
proporcionar mantenimiento cargando .
Memoria automática: el cargador tiene memoria automática incorporada y voluntad devolver
a el último cargar Modo cuando está conectado . Seleccione el modo apropiado y presione el
"Comenzar" botón , y el cargador Guardará el nuevo trabajo modo .
Precaución: Profesional El modo no se puede memorizar automáticamente .
TIEMPOS DE CARGA
El tiempo de carga estimado de una batería se calcula como Sigue: Cargando Tiempo (horas)
= Capacidad de la batería (Ah) / Corriente de carga (A) . La batería capacidad (Ah) y es
profundidad de
descargar (DoD) afectan significativamente la duración de la carga . El tiempo calculado es
basado en un
Profundidad media de descarga hasta un estado de carga completa y es para referencia
solamente . Real resultados puede variar según las condiciones de la batería . El tiempo de
carga para a normalmente descargado batería es
basado en un 50% Departamento de Defensa . La temperatura también afecta cargando
eficiencia .

- 14 -
VEVOR Los cargadores de batería cuentan con tecnología de compensación térmica , que
automáticamente
Ajusta los parámetros de carga para optimizar el rendimiento . A continuación se muestra a
cargando tiempo referencia para modelo :
XFH-SS01 :
Tamaño de la
batería
Ah(amperios
hora)
Tiempo aproximado de carga en horas
6 V
12 V
24 V
36 V
48 voltios
40
3
3
6
10
13
60
5
5
10
15
20
80
6
6
12
20
26
120
10
10
20
200
17
17
XFH-SS0 2 :
XFH-SS0 3 / XFH- SS07:
Tamaño de la
batería
Ah(amperios
hora)
Tiempo aproximado de carga en horas
6 V
12 V
24 V
36 V
48 V
60 V
72 voltios
40
3
3
5
8
10
13
15
60
4
4
8
11
15
19
23
80
5
5
10
15
20
25
31
120
8
8
15
23
30
200
13
13
25
Tamaño de la
batería
Ah(soy) phour)
Tiempo aproximado de carga en horas
6 V
12 V
24 V
40
3
2
4
60
4
3
6
80
5
4
8
120
8
6
12
200
13
10
20
400
25
20
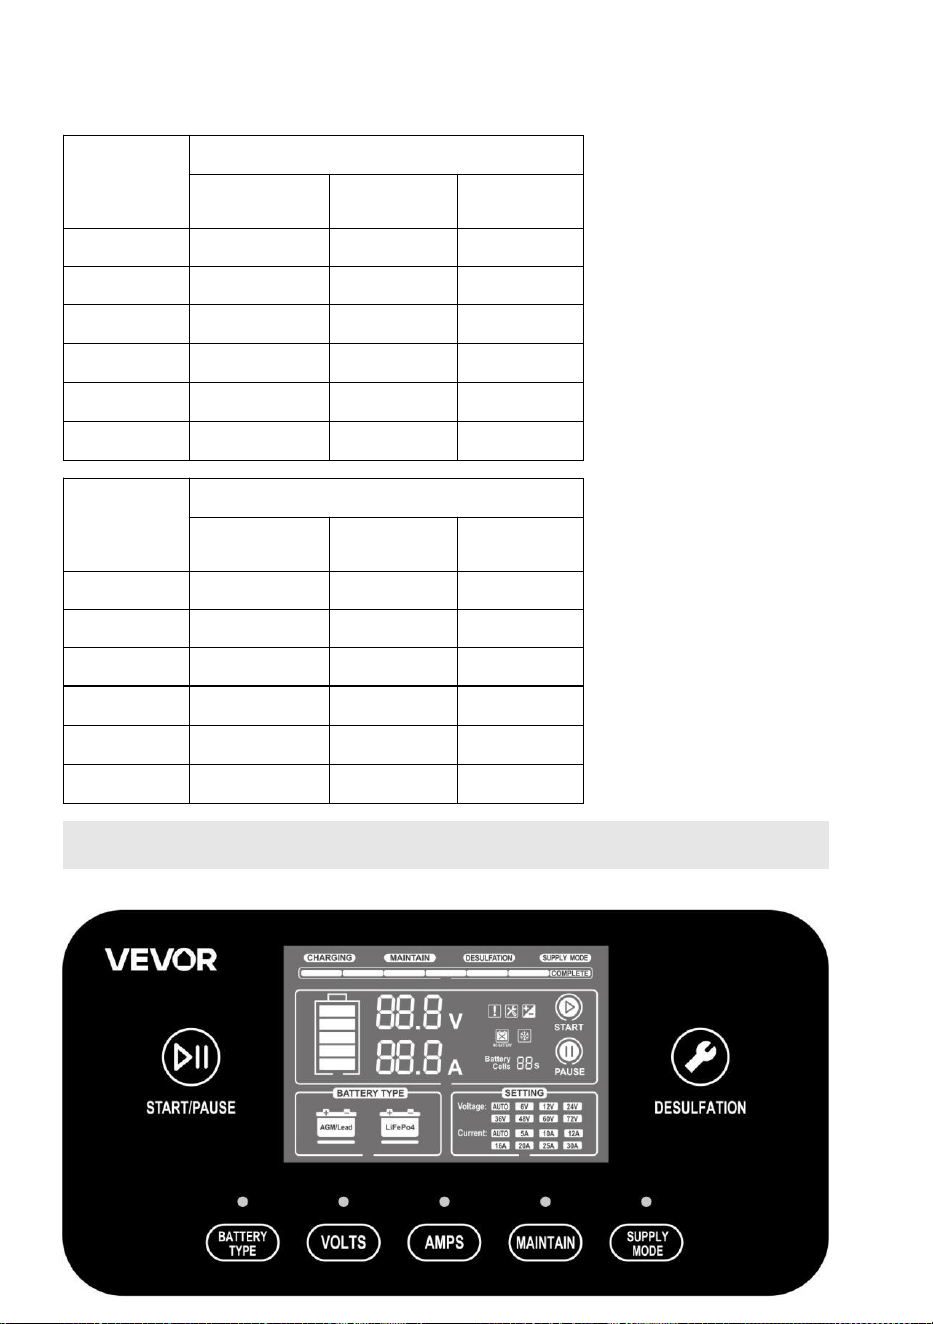
- 15 -
XFH- SS0 4/ XFH -SS08
XFH- SS0 5/ XFH- SS09:
COMPRENSIÓN DE LA INDICACIÓN DE CARGA
Tamaño de la
batería
Ah(amperios
hora)
Tiempo aproximado de carga en horas
6 V
12 V
24 V
40
3
2
3
60
4
3
5
80
5
3.5
7
120
8
5
10
200
13
8
16
400
25
16
Tamaño de la
batería
Ah(amperios
hora)
Tiempo aproximado de carga en horas
6 V
12 V
24 V
40
3
1.5
3
60
4
2
4
80
5
3
5.5
120
8
4
8
200
13
7
14
400
25
14
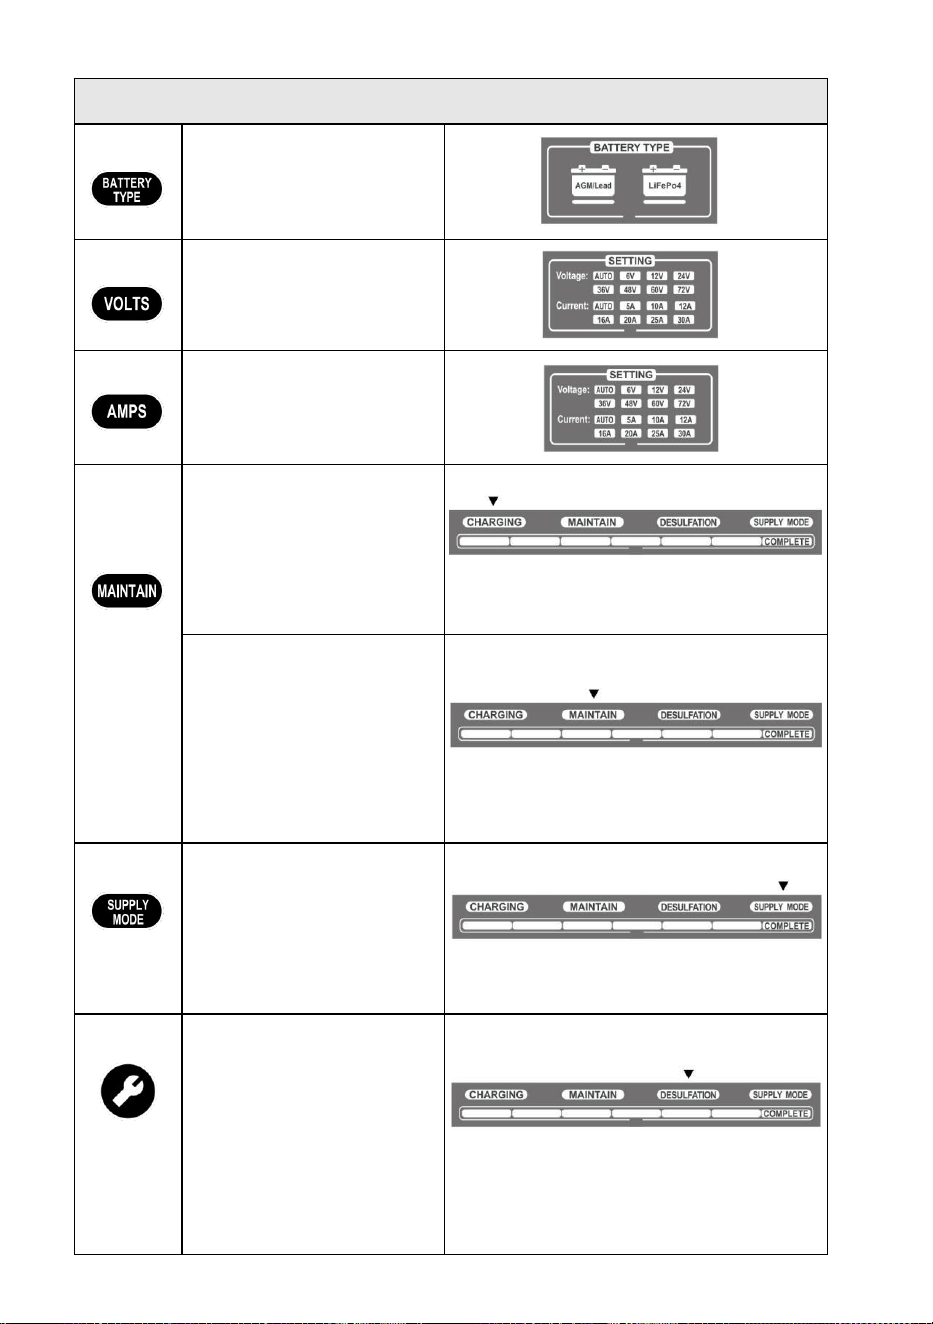
- 16 -
Ilustración del botón
Botón
Batería Botón: Empuja el botón
para seleccionar el tipo de
batería; el El indicador "Tipo de
batería" se encenderá en .
Botón
Voltaje Botón : Empujar el botón
para seleccionar el voltaje; el
"Voltaje" El indicador se
encenderá .
Botón
Actual Botón: Empuja el botón
para seleccionar la corriente; el
"Actual" El indicador se encenderá
.
Botón
Cargando y Mantener Modo: El
El indicador "Cargando" se
encenderá .
Cuando la batería y fuerza
El suministro está conectado
correctamente , el El indicador de
la barra de progreso se
encenderá. en según la carga
seleccionada modo .
Si el batería tiene no estado usado
Durante mucho tiempo , presione
el botón para seleccionar Modo
de mantenimiento . El batería se
cobrará con a pequeño actual
para mantener su cargar; el
indicador "Mantener" se
encenderá , y el progreso la barra
parpadeará cíclicamente .
(Mantener El modo es solo para
plomo-ácido baterías . )
Botón
Suministrar Modo: Cuando la
batería está conectado
correctamente pero no puede
ser detectado , presione el botón
para usar Modo "Suministro"
para carga . El El indicador de
"Suministro" se encenderá
en , y el progreso la barra
parpadeará cíclicamente .
Botón
Desulfatación Modo (Plomo-ácido
Batería Solamente):Si el
batería tiene Se ha utilizado para
un mucho tiempo y es La
capacidad disminuye
rápidamente , empuje el botón
para usar "Desulfatación"
modo para cargar a reparar
la batería . El indicador de
"Desulfatación" se encenderá
y el
La barra de progreso parpadeará
cíclicamente .

- 17 -
Botón
INICIO y PAUSA Botón: Cuando la configuración sea correcta , presione el botón botón;
el El indicador de inicio se encenderá y el cargador comenzará a funcionar . Presione el
botón. mientras el cargador es operando; el El indicador "PAUSA" se encenderá y el
cargador dejará de funcionar .

- 18 -
Indicación gráfica
Númer
o de
serie
Gráfico
Indicador
Explicación
1
Espectáculo Celda de batería
Número
En modo profesional ,
mostrar celda de batería
número;
En condiciones normales modo
, sin pantalla
2
Destello
Advertencia:
Sobrecorriente , cortocircuito
circuito
3
EN
Cargando en “ Desulfatación ”
4
Destello
Conexión inversa de la batería
5
EN
No conectar batería
6
Destello
Temperatura ambiente
para cargando
7
EN
Mostrar la capacidad de la
batería
8
-
Mostrar voltaje de carga
9
-
Mostrar corriente de carga
10
Número de pantalla
Para una descripción de la
falla códigos
Barra de progreso Indicación

- 19 -
1. Etapa de desulfatación (sólo para batería de plomo-ácido)
2. Modo de carga de corriente baja
3. Carga CC modo
4 . Carga de CV modo
5 . Autocomprobación de la batería
6 . Carga flotante Modo
7 . Carga completa

- 20 -
Especificaciones del cargador por modelo
Modelo de
producto
XFH-SS01
XFH-
SS02
XFH-
SS03
XFH-
SS07
XFH-
SS04
XFH-
SS08
XFH-
SS05
XFH-
SS09
Voltaje de
entrada CA
120 VCA 60 Hz
Máx. 250 W
120 VCA 60 Hz
Máx. 300 W
120 VCA
60 Hz
Máx. 400
W
230 VCA
50 Hz
Máx. 400
W
120 VCA
60 Hz
Máx. 480
W
230 V CA
50 Hz
Máx. 480
W
120 VCA
60 Hz
Máximo
550 W
230 VCA
50 Hz
Máximo
550 W
Producción
Fuerza
175,2 W (máx.)
234 W (máx.)
292 W (máx.)
365 W (máx.)
438 W (máx.)
Voltaje de
carga
Varios
Corriente de
carga
5A (6 V) , 10 A (6
V) ,
12A (6 V) , 5 A (12
V) ,
10 A (12 V) , 12 A
(12 V) ,
5 A (24 V) , 6 A (24
V) ,
4 A/(36 V) , 3 A(48
V)
5A (6 V) , 10 A (6 V)
,
16A (6 V) , 5 A (12
V) ,
10 A (12 V) , 16 A
(12 V) ,
5 A (24 V) , 8 A (24
V) ,
5.3A / (36V) ,
4A(48V) ,
3,2 A ( 60 V) , 2,7 A
(72 V)
5A (6 V) , 10 A (6 V)
,
16A (6 V) , 5 A (12
V) ,
10 A (12 V) , 20 A
(12 V) ,
5 A (24 V) , 10 A (24
V)
5A (6 V) , 10 A (6 V)
,
16A (6 V) , 5 A (12
V) ,
16 A (12 V) , 25 A
(12 V) ,
5 A (24 V) , 10 A (24
V) ,
12,5 A (24 V)
5A (6 V) , 10 A (6 V)
,
16A (6 V) , 5 A (12
V) ,
16 A (12 V) , 30 A
(12 V) ,
5 A (24 V) , 10 A (24
V) ,
15 A (24 V)
Bajo voltaje
Detección
2 V (6 V) , 10 V (12
V) ,
20 V (24 V) , 30 V
(36 V) ,
40 V (48 V)
2 V (6 V) , 10 V (12
V) ,
20 V (24 V) , 30 V
(36 V) ,
40 V (48 V) , 50 V
(60 V) ,
60 V (72 V)
2 V (6 V) , 10 V (12 V) , 20 V (24 V)
Contracorriente
Drenar
< 0,5 mA
Ambiente
Temperatura
-20°C a 40°C
Tipo de
Baterías
6 V , 12 V , 24 V ,
36 V , 48 V
6 V , 12 V , 24 V ,
36 V , 48 V , 60 V ,
72 V
6 V , 12 V , 24 V
Batería
Químicas
Húmedo , Gel , MF , CA , EFB , AGM , Calcio , LiFePO4
Capacidad de
la batería
Arriba a 200 Ah ,
Mantiene
Todo Tamaños de
batería
Arriba a 300 Ah ,
Mantiene
Todo Tamaños de
batería
Hasta 400 Ah ,
mantiene todos los
Batería
Tallas
Hasta 500 Ah ,
mantiene todos los
Batería
Tallas
Hasta 600 Ah ,
mantiene todos los
Batería
Tallas

- 21 -
Enfriamiento
Aporte
Voltaje CA
Admirador Convección

- 22 -
Selección manual del voltaje de la batería (Modo Profesional)
Tipos de
batería
Rango de
voltaje
Celda en
serie
Contar
Nominal de la
batería
Voltaje (V)
Cargando
Voltaje (V)
Voltaje
Límite
Rango(V)
LiFePo4
batería
12 V
3
9 . 6
10.95
7.5-10.95
4
12 . 8
14 . 6
10-14 . 6
24 V
6
19 . 2
21 . 9
15-21 . 9
8
25 . 6
29 . 2
20-29 . 2
36 V
11
35 . 2
40 . 15
27.5-40.15
12
38 . 4
43 . 8
30-43 . 8
48 V
14
44 . 8
51 . 1
35-51 . 1
15
48
54 . 75
37.5-54.75
16
51 . 2
58 . 4
40-58 . 4
60 V
18
57 . 6
65 . 7
45-65 . 7
19
60 . 8
69 . 35
47,5-69,35
20
64
73
50-73
72 V
22
70.4
80.3
55-80.3
23
73.6
83,95
57,5-83,95
24
76.8
87.6
60-87 . 6
Plomo ácido
batería
12 V
4
13 . 8
14 . 6
10-14 . 6
24 V
8
27 . 6
29 . 2
20-29 . 2
36 V
12
41 . 4
43 . 8
30-43 . 8
48 V
16
55 . 2
58 . 4
40-58 . 4
60 V
20
69
73
50-73
72 V
24
82 . 8
87 . 6
60-87 . 6

- 23 -
CÓDIGO DE FALLO
Cuando la máquina no se puede cargar en uso , el producto mostrar voluntad espectáculo la
culpa código .
Consulte la siguiente tabla de descripción de números de código de falla y resolver el
Problema
de no carga causado por un mal funcionamiento según la falla correspondiente
número .
Código de falla
Descripción de la falla
03E
La temperatura dentro de la máquina es demasiado alto
04E
El modo de carga de salida es seleccionar d incorrectamente
05E
Sobretensión de tensión de salida
06E
Salida sobre fuerza
42E
Corriente de salida sobre corriente
43E
El voltaje o la corriente no cambian a largo tiempo
04E: Presione el botón de inicio para claro .
Otro: Desconecte el enchufe de alimentación .

- 24 -

- 25 -
Ładowarka litowo-ołowiowo-
kwasowa
Model: XFH-SS01 , XFH-SS02 , XFH-SS03 ,
XFH-SS04 , XFH-SS05 , XFH-SS07 ,
XFH-SS08 , XFH-SS09
- 1 -
Model: XFH-SS01 , XFH-SS02 , XFH-SS03 , XFH-SS04 , XFH-SS05 ,
XFH-SS07 , XFH-SS08 , XFH-SS09
To jest oryginalna instrukcja obsługi . Przed użyciem prosimy o dokładne
zapoznanie się z treścią instrukcji . Firma VEVOR zastrzega sobie prawo
do jednoznacznej interpretacji niniejszej instrukcji obsługi . Wygląd
produktu zależy od stanu, w jakim go otrzymałeś . Prosimy o wybaczenie,
że nie będziemy Państwa ponownie informować o aktualizacjach
technologicznych lub oprogramowania naszego produktu .

- 2 -
Ostrzeżenie - Aby zmniejszyć ryzyko obrażeń ,
użytkownik powinien uważnie przeczytać
instrukcję obsługi .
To urządzenie jest zgodne z częścią 15 przepisów
FCC . Jego działanie podlega następującym dwóm
warunkom: (1) to urządzenie nie może powodować
szkodliwych zakłóceń oraz (2) to urządzenie musi
akceptować wszelkie odbierane zakłócenia , w tym
zakłócenia, które mogą powodować niepożądane
działanie .
Niniejszy produkt podlega przepisom Dyrektywy
Europejskiej 2012/19/WE . Symbol przekreślonego
kosza na śmieci na kółkach oznacza, że produkt
wymaga selektywnej zbiórki odpadów w Unii
Europejskiej . Dotyczy to produktu i wszystkich
akcesoriów oznaczonych tym symbolem . Produktów
oznaczonych tym symbolem nie wolno wyrzucać
razem z normalnymi odpadami domowymi , lecz
należy je oddać do punktu zbiórki urządzeń
elektrycznych i elektronicznych przeznaczonych do
recyklingu.
Elektryczny Wstrząs . Produkt jest urządzeniem
elektrycznym, które może porazić prądem. I
spowodować poważne obrażenia . Nie odcinaj
zasilania. sznury . Zrób nie zanurzać W woda lub
dostać mokry .
Wybuch . Niemonitorowane , niekompatybilne lub
uszkodzone baterie mogą wybuchnąć, jeśli zostanie
użyty z produktem . Nie Zostawić produkt bez opieki
podczas użytkowania . Nie próbuj uruchamiać
uszkodzonego lub zamrożone bateria . Używaj
produktu wyłącznie z bateriami o zalecanym napięciu
. produkt w dobrze wentylowanych pomieszczeniach
.
Ogień . Produkt jest urządzeniem elektrycznym,
które emituje ciepło I Jest zdolny z powodując
oparzenia . Nie okładka produkt .
Nie palić ani nie używać żadnych źródło z
elektryczny iskra lub ogień Kiedy produkt w użyciu .
Trzymać produkt z dala od materiałów łatwopalnych
materiały .
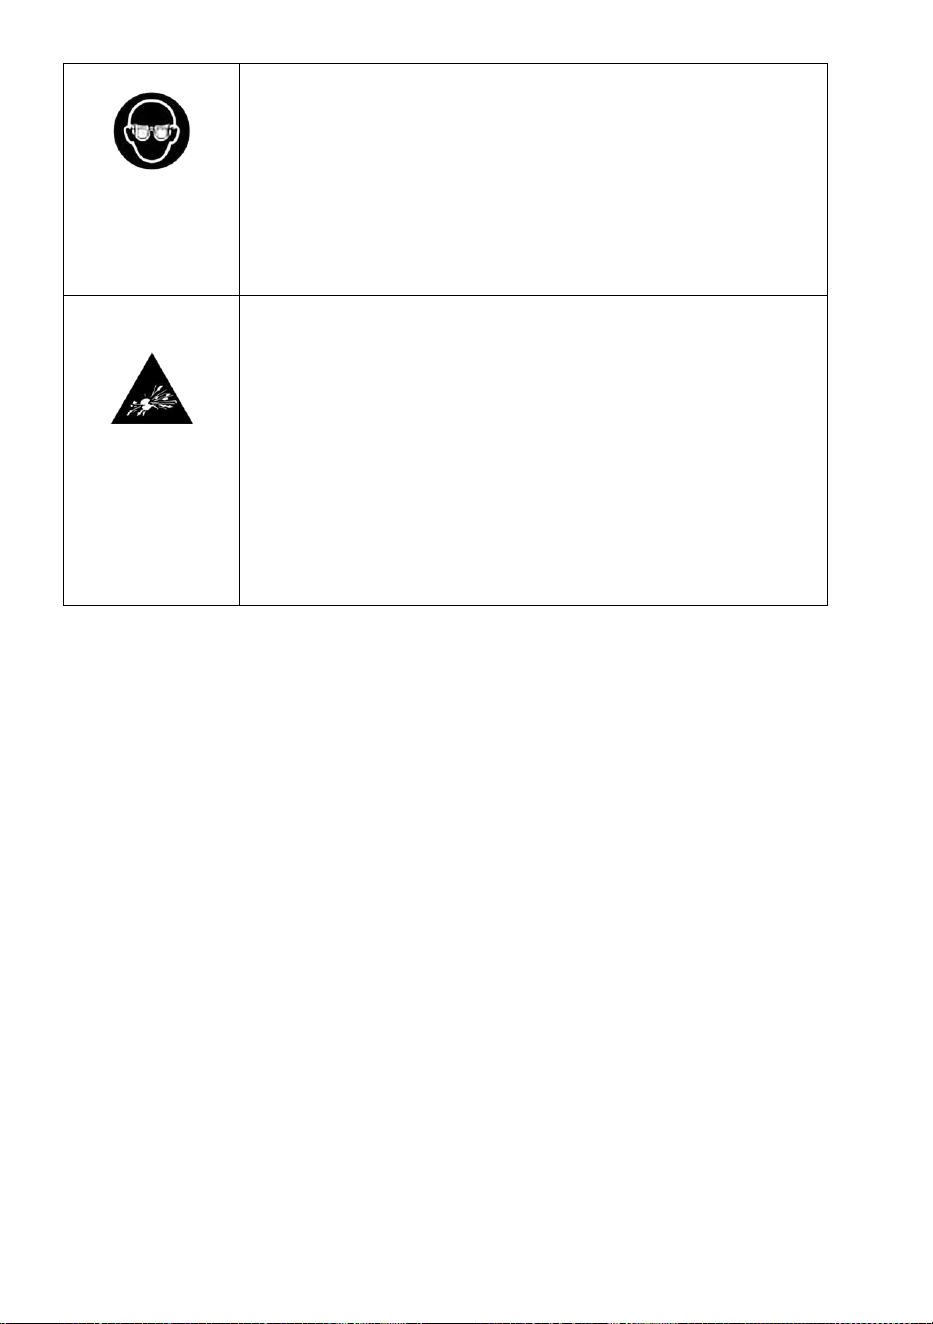
- 3 -
Oko Obrażenia . Podczas obsługi produktu należy
nosić okulary ochronne . Baterie mogą eksplodować
i powodować rozrzucanie odłamków .
Kwas akumulatorowy może powodować
podrażnienia oczu i skóry podrażnienie . W sprawa z
zanieczyszczenie oczu lub skóry , przemyć dotknięty
obszar wodą bieżąca czysta woda i kontaktowa
kontrola zatruć natychmiast .
Materiał wybuchowy Gazy . Praca w pobliżu kwasu
ołowiowego jest niebezpieczny .
Baterie wytwarzają wybuchowe gazy podczas
normalnej pracy akumulatora .
Do zmniejszyć ryzyko wybuchu baterii , należy
przestrzegać wszystkich informacji dotyczących
bezpieczeństwa instrukcje i te opublikowane przez
baterię producent I producent jakiegokolwiek sprzętu
przeznaczonego do używany w ten sąsiedztwo z
bateria . Sprawdź ostrzeżenia umieszczone na tych
produktach i NA silnik .

- 4 -
Ta ładowarka akumulatorów VEVOR reprezentuje niektóre z bardzo innowacyjny I
zaawansowana technologia na rynku , co sprawia, że każde ładowanie jest proste I łatwe . To
Jest całkiem prawdopodobnie ten najbezpieczniejszy I bardzo
wydajna ładowarka, jaką kiedykolwiek będziesz mieć używać .
Ten produkt jest przeznaczony do ładowania wszystkich typów z kwasowo-ołowiowy baterie , w
tym Lit
LiFePO4 , Mokry (Zalany) , Żel , MF ( Bezobsługowy) , CA (Wapń) , EFB (Wzmocniony Zalany
Akumulator) i AGM (Szkło absorpcyjne Mat) akumulatory . Nadaje się do ładowania bateria
pojemności do 400 amperogodzin i utrzymanie wszystkich rozmiary baterii .
Rozpoczęcie pracy
Zanim używając ładowarki , uważnie przeczytaj baterię producenta specyficzny środki
ostrożności
i zalecane stawki ładowania . Określ napięcie i chemia Twojego bateria przez zapoznaj się z
instrukcją obsługi akumulatora przed ładowaniem .
Montowanie
Weź pod uwagę odległość do akumulatora . Długość kabla prądu stałego z ten ładowarka z
albo ten zacisk akumulatora lub złącza oczkowe , to około 47 . 2 cale (1200 mm) .
Ostrzeżenie dotyczące propozycji 65
Zaciski akumulatora , zaciski i powiązane akcesoria zawierają chemikalia , w tym ołów .
Materiały te są znane stanowi Kalifornia, przyczyna rak , poród wady i Inny
szkody reprodukcyjne .
Środki ostrożności osobiste
Używaj produktu wyłącznie Jak przeznaczony .
Upewnij się, że ktoś jest w zasięgu głosu, aby Ci pomóc W sprawa z jakiś nagły wypadek .
Miej pod ręką zapas czystej wody i mydła w pobliżu na wypadek z bateria kwas kontakt .
Noś pełną ochronę oczu i okulary ochronne. ubrania kiedy pracujący w pobliżu A bateria .
Zawsze myj ręce po kontakcie z bateriami I powiązany materiały .
Nie dotykać ani nie nosić żadnych przedmioty me tal ( np . narzędzia , zegarki lub biżuteria )
podczas pracy z baterie . Jeśli metal spadnie na bateria , to móc iskra Lub tworzyć A krótki
obwód , w wyniku czego w przypadku porażenia prądem , pożaru lub wybuchu , co może
spowodować obrażenia , śmierć lub nieruchomość szkoda .
Nieletni
Jeśli produkt przeznaczony do użytku przez A nieletni , ten nabywczy dorosły zgadza się Do
dostarczać szczegółowy
instrukcje i ostrzeżenia dla nieletniego przed użycie . Niepowodzenie Do Więc jest podeszwa
odpowiedzialność z nabywca , który zgadza się zrekompensować producentowi każdy
niezamierzone używać Lub nadużywanie przez A drobny .
Niebezpieczeństwo zadławienia
Akcesoria mogą powodować zadławienie zagrożenie dla dzieci . Czy nie Zostawić dzieci bez
opieki z ten Produkt lub jakiekolwiek akcesorium . Produkt Jest nie zabawka .

- 5 -
Obsługiwanie
Należy obchodzić się z produktem ostrożnie . Może być uszkodzony Jeśli dotknięty .
Nie używaj uszkodzonego produkt , w tym jeden z spękanie W ten obudowa Lub uszkodzony
kable .

- 6 -
Do nie użyj produkt z uszkodzonym przewodem zasilającym d .
Wilgoć i płyny mogą uszkodzić produkt . Zrób nie poradzić sobie z produkt Lub każdy
elektryczny al komponenty w pobliżu dowolnego płyn .
Przechowywać i obsługiwać produkt w suchy lokalizacje .
Nie należy używać produktu, jeśli: staje się mokry . Jeśli produkt staje się mokry podczas
odłączyć urządzenie od akumulatora i zaprzestać jego używania natychmiast .
Nie odłączać produktu przez ciągnąc za kable .
Modyfikacje
Do nie podejmować prób zmiany , modyfikacji ani naprawy część z produkt .
Rozmontowanie produktu może spowodować obrażenia ciała , śmierć lub nieruchomość szkoda .
Jeśli produkt ulegnie uszkodzeniu , będzie działał nieprawidłowo lub łączność każdy płynny ,
przerwać używać I skontaktuj się z producentem .
Wszelkie modyfikacje spowodują utratę gwarancji .
Akcesoria
Ten produkt jest zatwierdzony wyłącznie do użytku z zatwierdzony przez producenta
akcesoria . producent nie ponosi odpowiedzialności za użytkownika bezpieczeństwo
Lub szkoda Kiedy używając niezatwierdzony akcesoria .
Lokalizacja
Zapobiegaj kontaktowi kwasu akumulatorowego z produkt .
Nie należy używać produktu w zamknięty obszar Lub jakiś obszar z ograniczony wentylacja .
Do nie umieść baterię na górze z produkt .
Ułóż przewody tak, aby uniknąć przypadkowego uszkodzenia przez pojazd w ruchu strony ( np .
maski , drzwi) , ruchome części silnika ( np . łopatki wentylatora , paski , koła pasowe ) lub Inny
potencjał zagrożenia, które móc przyczyna obrażenia lub śmierć .
Temperatura pracy
Ten produkt jest przeznaczony do pracy w temperaturach otoczenia między -4°F I 104°F (-20°C
I 40°C) . Nie należy używać urządzenia poza tymi zakresami temperatur . nie opłata zamrożony
bateria .
rozładowania baterii należy natychmiast przerwać jej używanie. staje się nadmiernie ciepły .
Składowanie
Nie używać i nie przechowywać produkt w obszary z wysoki stężenia z pył Lub przewieziony
drogą lotniczą materiałów . Przechowuj produkt na płaskiej , bezpiecznej powierzchni, gdzie To
Jest nie skłonny do spadający .
Przechowywać produkt w A suchy lokalizacja .
Zakres temperatur przechowywania wynosi od -4°F do 77°F (-20°C do (25°C) średnia
temperatura . Nigdy przekroczyć 158°F (70°C) w każdych warunkach .
Zgodność
akumulatorami kwasowo-ołowiowymi , AGM i LiFePO4 . Nie należy używać Nie używaj produktu z
żadnym innym rodzajem baterii . Ładowanie baterii o innych właściwościach chemicznych może
spowodować obrażenia .

- 7 -
śmierć lub uszkodzenie mienia . Przed próbą ładowania skontaktuj się z producentem
akumulatora. Akumulator . Nie ładuj akumulatora, jeśli nie masz pewności co do jego
konkretnego składu chemicznego lub napięcia .

- 8 -
Urządzenia medyczne
Ten produkt może emitować pola elektromagnetyczne . Zawiera magnetyczny elementy
zakłócające działanie rozruszników serca , defibrylatorów lub innych urządzeń medycznych
urządzenia . Skonsultuj się z twój lekarz przed użyj jeśli ty mieć jakieś wyrobów medycznych , w
tym rozrusznik serca . Jeśli podejrzewać produkt zakłóca działanie urządzenia medycznego ,
należy przerwać jego działanie używając To natychmiast I skonsultuj się z lekarz .
Czyszczenie
Przed podjęciem jakichkolwiek działań należy wyłączyć produkt. konserwacja Lub czyszczenie .
Czyścić I wysuszyć
natychmiast w przypadku kontaktu z produktem płyn Lub każdy zanieczyszczenie . Użyj A
Miękką , niepozostawiającą włókien ściereczką (z mikrofibry) . Unikaj dostania się wilgoci do
otworów .
Atmosfery wybuchowe
Przestrzegaj wszystkich znaków i instrukcji . Nie używaj ten produkt W każdy obszar z A
potencjalnie
atmosfera wybuchowa , w tym obszary tankowania lub obszary zawierające substancje
chemiczne Lub cząsteczki taki jako ziarno , pył lub metal proszki .
Działania o wysokim znaczeniu
Ten produkt nie jest przeznaczony do użyj tam, gdzie awaria z produkt mógł Ołów Do obrażenia
, śmierć lub poważne szkody środowiskowe .
Zakłócenia częstotliwości radiowych
Ten produkt został zaprojektowany , przetestowany i wyprodukowany Do zastosować się z
regulamin rządzenie emisje częstotliwości radiowych . Takie emisje mogą negatywnie wpływać
na działanie z Inny elektroniczny
sprzętu powodując jego nieprawidłowe działanie .
Notatka dotycząca zgodności z FCC
To urządzenie jest zgodne z Część 15 F CC Zasady . Operacja jest podlega następny dwa
warunki:
(1) To urządzenie może nie przyczyna szkodliwy zakłócenia .
(2) Urządzenie to nie może akceptować żadnych zakłóceń otrzymano , w tym zakłócenia, które
móc przyczyna niepożądana operacja .
Sprzęt ten został przetestowany i stwierdzono, że: przestrzegać ograniczenia Do A Klasa B
cyfrowy
urządzenie , zgodnie z Część 15 FCC Zasady . Te ograniczenia Czy zaprojektowany do
dostarczać rozsądna ochrona przed szkodliwymi zakłóceniami w działalności komercyjnej
instalacja . To sprzęt generuje , wykorzystuje i może emitować energię o częstotliwości
radiowej i jeśli nie zainstalowany I używany W zgodnie z instrukcją , może powodować
szkodliwe zakłócenia radio komunikacja . Operacja tego
sprzęt w obszarze mieszkalnym jest prawdopodobne przyczyna szkodliwy interferencja , w
której sprawa ten użytkownik będzie zobowiązany do skorygowania zakłóceń w ich własny
wydatek .

- 9 -
JAK UŻYWAĆ
Tryby ładowania
Po wybraniu trybu zasilania można opłata przez wybieranie różny prądy z Różne napięcia .
Proszę wybrać typ baterii po włączeniu przełącznika . Te tryby Czy
zaawansowane tryby ładowania wymagające Twojej pełnej uwagi zanim wybór . To Jest ważne
dla
zrozumieć różnice i cele każdego ładowania tryb . Zrób nie obsługiwać rumak dopóki nie
potwierdzisz odpowiedniego trybu ładowania dla swojego bateria . Poniżej jest krótki opis:
Model
Wyjaśnienie (napięcie szczytowe mierzone przy 25°C , natężenie prądu ocena to cielsko
natężenie w amperach Kiedy powyżej 0°C)
Gotowość
W trybie gotowości tryb , ładowarka jest nie ładuje się lub zapewniając jakiekolwiek moc do
ten bateria . Energia W tym trybie aktywowany jest zapis , rysowanie mikroskopijne moc z
elektryczny wylot . Może autobus Jest włączony w trybie gotowości . Gdy urządzenie jest w
trybie gotowości , LCD będzie oświetlić .
Opłata
6V Ołów
Do ładowania 6 V akumulatory kwasowo - ołowiowe . Po wybraniu 6V będzie Być
prążkowany przez niebieski .
7. 3V | Aż do 200AH Baterie
12V Ołów
Do ładowania 12 V akumulatory kwasowo - ołowiowe . Po wybraniu 12 V będzie Być
prążkowany W niebieski .
14 . 6V | Aż do 600AH Baterie
24V Ołów
Do ładowania 24 V akumulatory kwasowo - ołowiowe . Po wybraniu 24V będzie Być
prążkowany W niebieski .
29. 2V | Aż do 300AH Seria baterii
36 V Ołów
Do ładowania 36 V akumulatory kwasowo - ołowiowe . Po wybraniu 36V będzie Być
prążkowany W niebieski .
43,8 V | Aż do 100AH Baterie
48V Ołów
Do ładowania 48 V akumulatory kwasowo - ołowiowe . Po wybraniu 48V będzie Być
prążkowany W niebieski .
58 . 4V | Aż do 100AH Seria baterii
60 V Ołów
Do ładowania 60 V akumulatory kwasowo - ołowiowe . Po wybraniu 60V będzie
Być prążkowany W niebieski .73V | Aż do 60AH Baterie
72V Ołów
Do ładowania 72 V
a k u m u l a t o r y
kwasowo - ołowiowe . Po wybraniu 72 V
będzie Być prążkowany W niebieski .
87 . 6V | Aż do 60AH Baterie
12V
LiFePo4
Do 12 V LiFePo4 baterie . Po wybraniu , 12 V będzie prążkowany W niebieski .
14 . 6V | Aż do 600AH Baterie
24V
LiFePo4
Do 24 V LiFePo4 baterie . Po wybraniu 24 V będzie Być lin ed W niebieski .
29. 2V | Aż do 200AH Seria baterii
36 V
LiFePo4
Do 36 V LiFePo4 baterie . Po wybraniu 36 V będzie Być prążkowany W niebieski
.
43,8 V | Aż do 100AH Baterie
48V
LiFePo4
Do 48 V LiFePo4 baterie . Po wybraniu 48 V będzie prążkowany W niebieski .
58 . 4V | Aż do 100AH Seria baterii
60 V
LiFePo4
Do 60 woltów LiFePo4 baterie . Po wybraniu , 60 V będzie prążkowany
W niebieski .73V | Aż do 60AH Baterie

- 10 -
72V
LiFePo4
Do 72-woltowego LiFePo4 baterie s . Po wybraniu , 72 V będzie prążkowany W
niebieski .
87 . 6V | Aż do 60AH Baterie

- 11 -
Utrzymyw
ać
6V Ołów
Do ładowania 6 V
aku m u l a t o r y
kwasowo -ołowiowe . Po wybraniu 6V będzie
Być prążkowany na niebiesko .
7. 3V | W górę Do 200AH Baterie
12V Ołów
Do ładowania 12 V akumulatory kwasowo-ołowiowe . Po wybraniu 12 V będzie Być
prążkowany na niebiesko .
14 . 6V | W górę Do 600AH Baterie
24V Ołów
Do ładowania 24 V akumulatory kwasowo -ołowiowe . Po wybraniu 24V będzie Być
prążkowany na niebiesko .
29. 2V | W górę Do 300AH Baterie
36 V Ołów
Do ładowania 36 V akumulatory kwasowo -ołowiowe . Po wybraniu 36V będzie Być
prążkowany na niebiesko .
43,8 V | W górę Do 100AH Baterie
48V Ołów
Do ładowania 48 V akumulatory kwasowo -ołowiowe . Po wybraniu 48V będzie Być
prążkowany na niebiesko .
58 . 4V | W górę Do 100AH Baterie
60 V Ołów
Do ładowania 60 V akumulatory kwasowo -ołowiowe . Po wybraniu 60V będzie
Być prążkowany w kolorze niebieskim . 73V | W górę Do 60AH Baterie
72V Ołów
Do ładowania 72 V akumulatory kwasowo-ołowiowe . Po wybraniu 72 V będzie Być
prążkowany na niebiesko .
87 . 6V | W górę Do 60AH Batteri es
Desulfacja
6V Ołów
Do ładowania 6 V akumulatory kwasowo -ołowiowe . Po wybraniu 6V będzie Być
prążkowany na niebiesko .
7. 3V | W górę Do 200AH Baterie
12V Ołów
Do ładowania 12 V akumulatory kwasowo-ołowiowe . Po wybraniu 12 V będzie Być
prążkowany na niebiesko .
14 . 6V | W górę Do 600AH Baterie
24V Ołów
Do ładowania 24 V akumulatory kwasowo -ołowiowe . Po wybraniu 24V będzie Być
prążkowany na niebiesko .
29. 2V | W górę Do 300AH Baterie
Dostarcza
ć
Tryb
6V Ołów
Do ładowania 6 V akumulatory kwasowo -ołowiowe . Po wybraniu 6V będzie Być
prążkowany na niebiesko .
7. 3V | W górę Do 200AH Baterie
12V Ołów
Do ładowania 12 V akumulatory kwasowo-ołowiowe . Po wybraniu 12 V będzie Być
prążkowany na niebiesko .
14 . 6V | W górę Do 600AH Baterie
24V Ołów
Do ładowania 24 V akumulatory kwasowo -ołowiowe . Po wybraniu 24V będzie Być
prążkowany na niebiesko .
29. 2V | W górę Do 300AH Baterie
36 V Ołów
Do ładowania 36 V akumulatory kwasowo -ołowiowe . Po wybraniu 36V będzie Być
prążkowany na niebiesko .
43,8 V | W górę Do 100AH Baterie
48V Ołów
Do ładowania 48 V akumulatory kwasowo -ołowiowe . Po wybraniu 48V będzie Być
prążkowany na niebiesko .
58 . 4V | W górę Do 100AH Baterie
60 V Ołów
Do ładowania 60 V akumulatory kwasowo -ołowiowe . Po wybraniu 60V będzie
Być prążkowany w kolorze niebieskim . 73V | W górę Do 60AH Baterie
72V Ołów
Do ładowania 72 V akumulatory kwasowo-ołowiowe . Po wybraniu 72 V będzie Być
prążkowany na niebiesko .
87 . 6V | W górę Do 60AH Batteri es

- 12 -
Ładowanie akumulatora kwasowo-ołowiowego
1. Najpierw naciśnij Przycisk „Typ baterii” do wyboru „Ołów ” . Po drugie , naciśnij "Woltaż"
przycisk , a następnie naciśnij
Przycisk
„Start” do Rozpocznij ładowanie .
2. Najpierw naciśnij „Typ baterii” przycisk n do wyboru „Ołów” . Po drugie , naciśnij "Woltaż"
przycisk , a następnie naciśnij
Przycisk
„ Aktualny” i na koniec naciśnij ten "Start" przycisk Do
zaczynać ładowanie . Uwaga: Po wybraniu tego trybu , proszę zapewnij sobie bateria Jest A
kwasowo-ołowiowy akumulator . Upewnij się, że napięcie akumulatora jest zgodne z wybranym
napięciem; w przeciwnym razie ładowanie nie powiedzie się .
Ładowanie akumulatora LiFePO4
1. Najpierw naciśnij „Typ baterii” przycisk do wyboru „LiFePO4” , a następnie naciśnij
"Woltaż" przycisk i na koniec naciśnij Przycisk „Start” , aby rozpocząć ładowanie .
2. Najpierw naciśnij „Typ baterii” naciśnij , aby wybrać „LiFePO4” . Po drugie , naciśnij
"Woltaż"
przycisk , a następnie naciśnij
Przycisk
„ Aktualny” i na koniec naciśnij ten "Start" przycisk Do
zaczynać ładowanie . Uwaga: Po wybraniu tego trybu , proszę zapewnij sobie bateria Jest A
LiFePO4 akumulator . Upewnij się, że napięcie akumulatora jest zgodne z wybranym
napięciem; w przeciwnym razie ładowanie nie powiedzie się .
Utrzymaj tryb
Najpierw naciśnij „Typ baterii” przycisk do wyboru „Ołów ” . Po drugie , naciśnij s Naciśnij
przycisk „Utrzymaj” , a następnie naciśnij Przycisk „Napięcie” służy do wyboru odpowiedniego
napięcia i na koniec naciskać ten Naciśnij przycisk „Start” , aby rozpocząć ładowanie .
Ładowarka będzie ładować bateria z A Niski aktualny Do utrzymywać stan pełnego
naładowania , a ten tryb nie będzie szkoda twój bateria .
Tryb odsiarczania
Najpierw naciśnij „Typ baterii” przycisk do wyboru „Ołów” . Po drugie , naciśnij
"Odsiarczanie"
przycisk , a następnie naciśnij Przycisk „Napięcie” i na koniec naciśnij "Start" przycisk do
Rozpocznij ładowanie . Uwaga: Gdy akumulator jest poważnie stary i ma niewystarczająca
pojemność , ty Móc wybierać Ten tryb do Napraw to . Pamiętaj, że baterie mogą tylko Być
naprawiony jeden Na czas .
Tryb dostawy
Najpierw naciśnij „Typ baterii” przycisk do wyboru „ Ołów” . Po drugie , naciśnij "Woltaż"
przycisk , po trzecie naciśnij „Aktualny”, ale ton , a na końcu naciśnij "Start" przycisk .
Uwaga: Ten tryb można wybrać, gdy używany Jak A moc dostarczać Lub Kiedy ten
bateria napięcie nie może być wykryto .
Tryb profesjonalny
Najpierw naciśnij Naciśnij przycisk „Typ baterii” , a następnie włącz zasilanie Do Wchodzić
profesjonalny tryb .
Wchodząc w tryb profesjonalny , proszę wybierać różny baterie używając różny kroki:
Naciśnij „Typ baterii” przycisk do wyboru „LiFePO4 ” , po drugie naciśnij "Woltaż" przycisk do
wyboru napięcia i ogniw baterii oraz prądu wybór metoda jest To samo Jak W nie- tryb
profesjonalny .
Ostrożność: W Tryb LiFePO4 , ukryte ogniwa baterii będą Być Wyświetlane . Proszę notatka To
nie-

- 13 -
Specjaliści nie powinni wybierać tego trybu . Jeśli wybierzesz , proszę skontaktuj się z bateria
dostawca;
w przeciwnym razie będzie ryzyko . Ten tryb nie mogę Być zapamiętane . Po obrócenie z dala
od moc , ta ładowarka powróci do nieprofesjonalnego tryb .

- 14 -
Podłączanie do akumulatora
Nie podłączaj wtyczki zasilania prądem zmiennym dopóki Wszystko Inny znajomości Czy
zrobiony . Zidentyfikuj ten prawidłowy
biegunowość zacisków akumulatora na akumulatorze . Czy nie robić każdy połączenia z gaźnik ,
przewody paliwowe lub cienka blacha części . Ten instrukcje poniżej są dla A negatywny grunt
system
(najczęściej spotykane) . Jeśli Twój pojazd ma dodatnie uziemienie system (bardzo
(niezwykłe) , postępuj zgodnie z instrukcje poniżej w odwrotna kolejność .
1. Podłącz pozytywny (czerwony) zacisk oczkowy do bieguna dodatniego bateria (POS ,
P , +) terminal .
2. Podłącz minus (czarny) złącze zaciskowe oczkowe do bieguna ujemnego (NEG , N , -)
bateria terminal .
3. Podłącz ładowarkę akumulatora do odpowiedniego gniazdka elektrycznego . nie twarz
ten bateria Kiedy nawiązanie tego połączenia .
4. Podczas odłączania należy postępować w odwrotnej kolejności: usuń najpierw zacisk ujemny
(lub zacisk dodatni w przypadku systemów z uziemieniem dodatnim) .
Rozpocznij ładowanie
1. Sprawdź napięcie i skład chemiczny akumulatora .
2. Sprawdź , czy podłączyłeś zaciski akumulatora Lub zacisk przelotowy złącza prawidłowo i że
wtyczka zasilania prądem zmiennym jest podłączony do jakiś elektryczny wylot .
3. [ Pierwszy raz [Użyj] Ładowarka będzie rozpocząć w trybie gotowości i "Pauza" będzie Być
zakreślony W niebieski . W Gotowość tryb , ładowarka nie zapewnia każdy moc .
4. Naciśnij Przycisk „Typ baterii” do wyboru typu baterii , po drugie naciskać ten "Woltaż"
przycisk i po trzecie naciśnij Przycisk "Aktualne" .
5. Naciśnij Kliknij przycisk „Start” i będzie podświetlony W niebieski; po drugie , bateria będzie
Być
wykryto . Jeśli bateria jest w normie , nie bateria wskaźnik będzie zakręt wyłączony i ten
rumak będzie praca normalnie; w przeciwnym razie tak będzie nie .
6. Teraz można podłączyć ładowarkę lewy podłączony do ten bateria Na Wszystko czasy Do
dostarczać konserwacja ładowanie .
Pamięć automatyczna: Ładowarka ma wbudowaną pamięć automatyczną i będzie powrót Do
ten ostatni opłata tryb po podłączeniu . Wybierz odpowiedni tryb i naciśnij "Start" przycisk i
ten rumak zapisze nową pracę tryb .
Ostrożność: Profesjonalny Trybu nie można zapamiętać automatycznie .
CZASY ŁADOWANIA
Obliczono szacunkowy czas ładowania akumulatora Jak następuje: Ładowanie Czas (godziny)
= Pojemność baterii (Ah) / Prąd ładowania (A) . Bateria pojemność (Ach) I jego głębokość z
wypisać (DoD) znacząco wpływa na czas ładowania . Obliczony czas to na podstawie NA jakiś
średnia głębokość rozładowania do stanu pełnego naładowania i Jest Do odniesienie tylko .
Rzeczywiste wyniki może się różnić w zależności od stanu baterii . Czas ładowania A normalnie
zwolniony bateria Jest
na podstawie 50% DoD . Temperatura również ma wpływ ładowanie efektywność .

- 15 -
VEVOR Ładowarki akumulatorów wykorzystują technologię kompensacji termicznej , która
automatycznie
dostosowuje parametry ładowania w celu optymalizacji wydajności . Poniżej znajduje się A
ładowanie czas odniesienie do modelka:
XFH-SS01 :
Rozmiar
baterii
Ah(wzmacniacz
godzina)
Przybliżony czas ładowania godziny
6V
12V
24V
36 V
48 V
40
3
3
6
10
13
60
5
5
10
15
20
80
6
6
12
20
26
120
10
10
20
200
17
17
XFH-SS0 2 :
XFH-SS0 3 / XFH- SS07:
Rozmiar
baterii
Ah(wzmacniacz
godzina)
Przybliżony czas ładowania godziny
6V
12V
24V
36 V
48V
60 V
72 V
40
3
3
5
8
10
13
15
60
4
4
8
11
15
19
23
80
5
5
10
15
20
25
31
120
8
8
15
23
30
200
13
13
25
Rozmiar
baterii
Ach(jestem
(Phour)
Przybliżony czas ładowania godziny
6V
12V
24V
40
3
2
4
60
4
3
6
80
5
4
8
120
8
6
12
200
13
10
20
400
25
20

- 16 -
XFH- SS0 4/ XFH -SS08
XFH- SS0 5/ XFH- SS09:
ZROZUMIENIE WSKAŹNIKA ŁADOWANIA
Rozmiar
baterii
Ah(wzmacniacz
godzina)
Przybliżony czas ładowania godziny
6V
12V
24V
40
3
2
3
60
4
3
5
80
5
3.5
7
120
8
5
10
200
13
8
16
400
25
16
Rozmiar
baterii
Ah(wzmacniacz
godzina)
Przybliżony czas ładowania godziny
6V
12V
24V
40
3
1.5
3
60
4
2
4
80
5
3
5.5
120
8
4
8
200
13
7
14
400
25
14
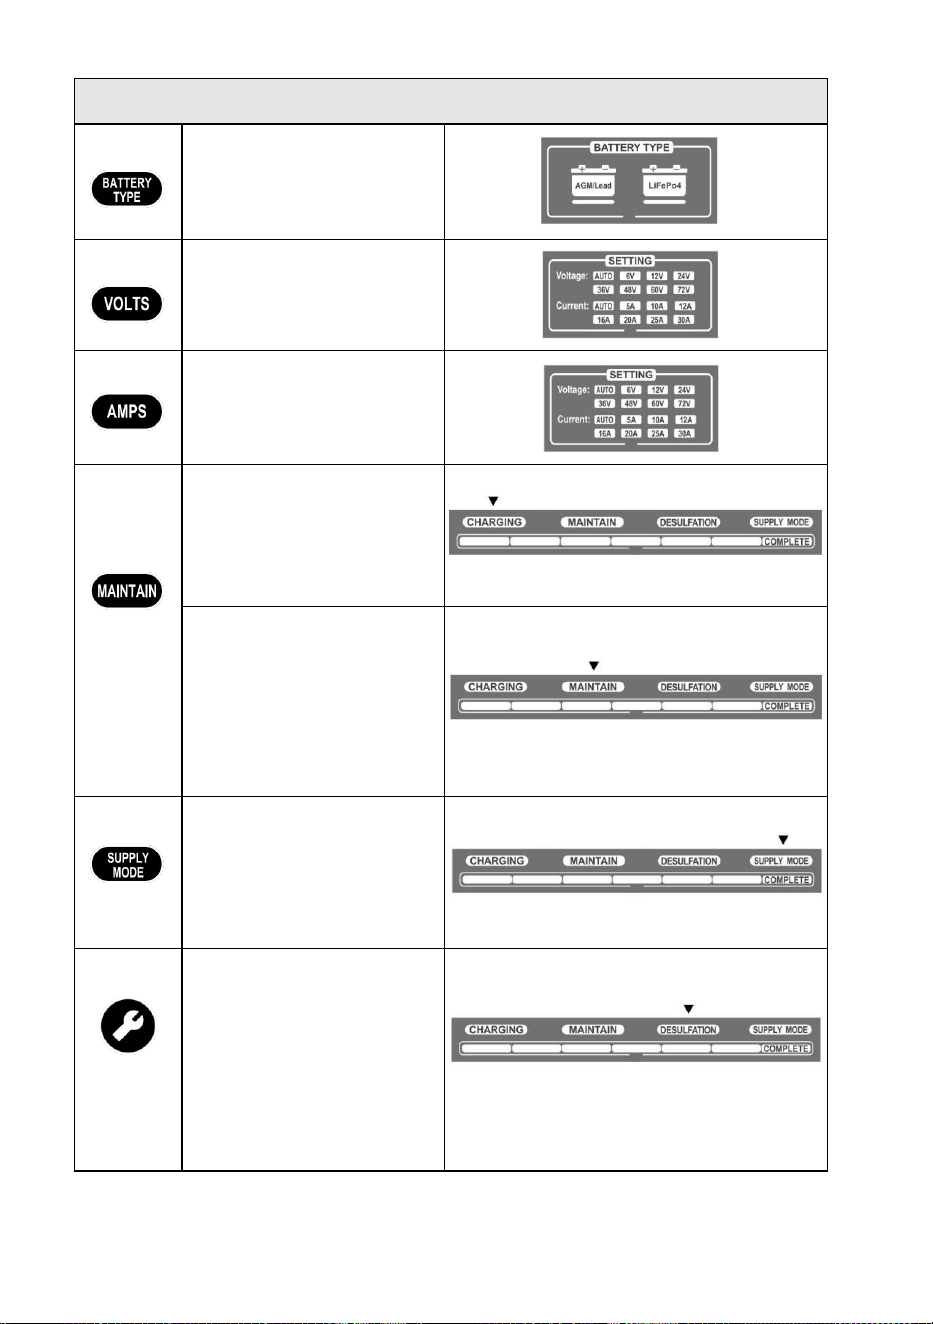
- 17 -
Ilustracja przycisku
Przycisk
Bateria Przycisk: Naciśnij
przycisk wyboru typu baterii; ten
Wskaźnik „Typ baterii” zacznie
świecić NA .
Przycisk
Woltaż Przycisk : Naciskać ten
przycisk
aby wybrać napięcie; "Woltaż"
Wskaźnik włączy się .
Przycisk
Aktualny Przycisk: Naciśnij
przycisk
aby wybrać bieżący; ten
"Aktualny" Wskaźnik włączy się .
Przycisk
Ładowanie i Utrzymywać Tryb :
Zapali się wskaźnik „Ładowanie” .
Kiedy bateria i moc
zasilanie jest prawidłowo
podłączone , wskaźnik paska
postępu zmieni się NA zgodnie z
wybranym ładowaniem tryb .
Jeśli bateria ma nie został używany
przez długi czas , pchać przycisk
do wybierać Utrzymaj tryb .
bateria zostanie obciążony z A
mały aktualne, aby utrzymać
swoje ładowanie; wskaźnik
„Utrzymaj” włączy się , i postęp
pasek będzie migać cyklicznie .
(Utrzymuj tryb jest tylko do
kwasowo-ołowiowych baterie . )
Przycisk
Dostarczać Tryb: Gdy bateria
jest prawidłowo podłączony ale
nie może zostać wykrytym ,
nacisnąć przycisk do używać
Tryb „zasilania” do ładowania .
Wskaźnik „Dostawa” zmieni kolor
na i postęp pasek będzie migać
cyklicznie .
Przycisk
Desulfacja Tryb (Ołowiano-
kwasowy
Bateria Tylko): Jeśli bateria ma
był używany przez długo I jego
pojemność spada szybko , pchnij
przycisk do używać
"Odsiarczanie"
tryb ładowania do naprawa
akumulator . Zapali się
wskaźnik „ Odsiarczania ” i
Pasek postępu będzie migał
cyklicznie .

- 18 -
Przycisk
START i PAUZA Przycisk: Gdy ustawienia są prawidłowe , naciśnij przycisk; ten
Zaświeci się wskaźnik „Start” , a ładowarka zacznie działać . Naciśnij przycisk chwila ten
rumak Jest operacyjny; ten Zapali się wskaźnik „PAUSE” , a ładowarka przestanie działać
.
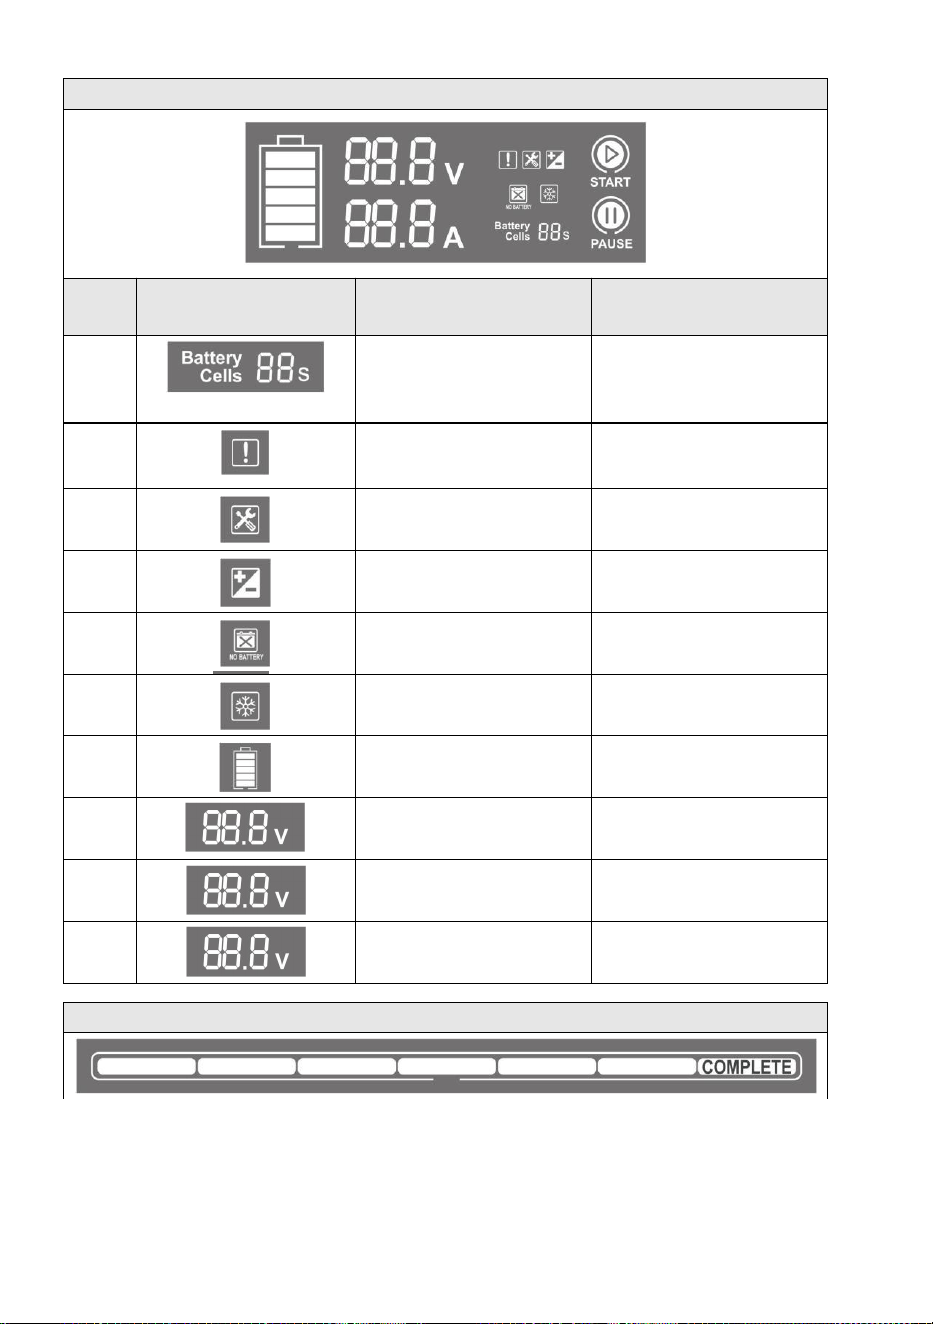
- 19 -
Wskaźnik graficzny
Numer
seryjn
y
Graficzny
Wskaźnik
Wyjaśnienie
1
Pokazywać Ogniwo baterii
Numer er
W tryb profesjonalny ,
wyświetl ogniwo baterii
numer;
W normalnym stanie tryb , brak
wyświetlacza
2
Błysk
Ostrzeżenie:
Nadmiar prądu , zwarcie
okrążenie
3
NA
Ładowanie w „ Desulfacji ”
4
Błysk
Odwrotne podłączenie
akumulatora
5
NA
Nie połączyć bateria
6
Błysk
Temperatura otoczenia
dla ładowanie
7
NA
Pokaż pojemność baterii
8
-
Pokaż napięcie ładowania
9
-
Pokaż prąd ładowania
10
Wyświetl numer
Aby uzyskać opis usterki
kody
Pasek postępu Wskazanie

- 20 -
1. Etap desulfacji (tylko dla akumulatorów kwasowo-ołowiowych)
2. Tryb ładowania małym prądem
3. Ładowanie CC tryb
4. Ładowanie CV tryb
5. Samokontrola akumulatora
6. Ładowanie pływające Tryb
7. W pełni naładowany
- 21 -
Specyfikacje ładowarki według modelu
Model
produktu
XFH-SS01
XFH-
SS02
XFH-
SS03
XFH-
SS07
XFH-
SS04
XFH-
SS08
XFH-
SS05
XFH-
SS09
Napięcie
wejściowe AC
120 V AC 60 Hz
Maks. 250 W
120 V AC 60 Hz
Maks. 300 W
120 V AC
60 Hz
Maks. 400
W
230 V AC
50 Hz
Maks. 400
W
120 V AC
60 Hz
Maks. 480
W
230 V AC
50Hz
Maks. 480
W
120 V AC
60 Hz
Max550W
230 V AC
50 Hz
Max550W
Wyjście Moc
175 . 2W (maks.)
234 W (maks.)
292 W (maks.)
365 W (maks.)
438 W (maks.)
Napięcie
ładowania
Różny
Prąd
ładowania
5A (6V) , 10A (6V) ,
12A (6V) , 5A (12V)
,
10A(12V) , 12A
(12V) ,
5A(24V) , 6A(24V) ,
4A/(36V) , 3A(48V)
5A (6V) , 10A (6V) ,
16A (6V) , 5A (12V)
,
10A(12V) , 16A
(12V) ,
5A(24V) , 8A(24V) ,
5. 3A /(36V) ,
4A(48V) ,
3,2 A (60 V) , 2,7 A
(72 V)
5A (6V) , 10A (6V) ,
16A (6V) , 5A (12V)
,
10A(12V) , 20A
(12V) ,
5A (24V) , 10A (24V)
5A (6V) , 10A (6V) ,
16A (6V) , 5A (12V)
,
16A(12V) , 25A
(12V) ,
5A(24V) , 10A(24V) ,
12,5 A (24 V)
5A (6V) , 10A (6V) ,
16A (6V) , 5A (12V) ,
16A(12V) , 30A
(12V) ,
5A(24V) , 10A(24V) ,
15A (24V)
Niskie
napięcie
Wykrywanie
2V(6V) , 10V(12V) ,
20V(24V) ,
30V(36V) ,
40 V (48 V)
2V(6V) , 10V(12V) ,
20V(24V) ,
30V(36V) ,
40V(48V) ,
50V(60V) ,
60 V (72 V)
2 V (6 V) , 10 V (12 V) , 20 V (24 V)
Prąd
wsteczny
Odpływ
< 0,5 mA
Otoczenia
Temperatura
-20°C do 40°C
Rodzaj
Baterie
6V , 12V , 24V ,
36 V , 48 V
6V , 12V , 24V ,
36V , 48V , 60V ,
72V
6 V , 12 V , 24 V
Bateria
Chemia
Mokry , żel , MF , CA , EFB , AGM , wapń , LiFePO4
Pojemność
baterii
Aż do 200Ah ,
Utrzymuje
Wszystko Rozmiary
baterii
Aż do 300Ah ,
Utrzymuje
Wszystko Rozmiary
baterii
Do 400Ah ,
utrzymuje wszystkie
Bateria
Rozmiary
Do 500Ah ,
utrzymuje wszystkie
Bateria
Rozmiary
Do 600Ah ,
utrzymuje wszystkie
Bateria
Rozmiary
Chłodzenie
Wejście
Napięcie
prądu
przemiennego
Wentylator Konwekcja

- 22 -
wybór napięcia akumulatora (Tryb profesjonalny)
Typy baterii
Zakres napięcia
Komórka
szeregowa
Liczyć
Nominalna moc
akumulatora
Napięcie (V)
Ładowanie
Napięcie (V)
Woltaż
Próg
Zasięg(V)
LiFePo4
bateria
12V
3
9 . 6
10 . 95
7. 5-10 . 95
4
12 . 8
14 . 6
10-14 . 6
24V
6
19 . 2
21 . 9
15-21 . 9
8
25 . 6
29.2
20-29 . 2
36 V
11
35 . 2
40 . 15
27 . 5-40 . 15
12
38 . 4
43 . 8
30-43 . 8
48V
14
44 . 8
51 . 1
35-51 . 1
15
48
54 . 75
37 . 5-54 . 75
16
51. 2
58 . 4
40-58 . 4
60 V
18
57 . 6
65 . 7
45-65 . 7
19
60 . 8
69 . 35
47,5-69,35
20
64
73
50-73
72V
22
70.4
80,3
55-80,3
23
73,6
83,95
57,5-83,95
24
76,8
87,6
60-87 . 6
Kwas
ołowiowy
bateria
12V
4
13.8
14 . 6
10-14 . 6
24V
8
27 . 6
29.2
20-29 . 2
36 V
12
41 . 4
43 . 8
30-43 . 8
48V
16
55 . 2
58 . 4
40-58 . 4
60 V
20
69
73
50-73
72V
24
82 . 8
87 . 6
60-87 . 6

- 23 -
KOD BŁĘDU
naładować urządzenia użyj , ten produkt wyświetlacz będzie pokazywać wina kod .
Proszę zapoznać się z poniższą tabelą opisów kodów błędów I rozwiązać
problem
braku
ładowania spowodowany nieprawidłową obsługą zgodnie z odpowiednią usterką liczba .
Kod błędu
Opis usterki
03E
Temperatura wewnątrz maszyny jest zbyt wysoka wysoki
04E
Tryb ładowania wyjściowego to wybierz nieprawidłowo
05E
Napięcie wyjściowe ponad napięcie
06E
Wyjście ponad moc
42E
Prąd wyjściowy ponad prąd
43E
Napięcie lub prąd nie ulegają zmianie A długi czas
04E: Naciśnij przycisk start, aby jasne .
Inny: Odłącz wtyczkę zasilającą .

- 24 -

- 25 -
Lithium-loodzuurlader
Model: XFH-SS01 , XFH-SS02 , XFH-SS03 ,
XFH-SS04 , XFH-SS05 , XFH-SS07 ,
XFH-SS08 , XFH-SS09

- 1 -
Model: XFH-SS01 , XFH-SS02 , XFH-SS03 , XFH-SS04 , XFH-SS05 ,
XFH-SS07 , XFH-SS08 , XFH-SS09
Dit is de originele handleiding . Lees alle instructies in de handleiding
zorgvuldig door voordat u het apparaat in gebruik neemt . VEVOR
behoudt zich het recht voor om de gebruikershandleiding anders te
interpreteren . Het uiterlijk van het product kan afwijken van het product
dat u ontvangt . Wij zullen u niet opnieuw informeren over eventuele
technologische of software-updates voor ons product .
- 2 -
Waarschuwing - Om het risico op letsel te
verminderen , dient de gebruiker de
gebruiksaanwijzing zorgvuldig te lezen .
Dit apparaat voldoet aan Deel 15 van de FCC-regels
. De werking is onderworpen aan de volgende twee
voorwaarden: (1) Dit apparaat mag geen schadelijke
interferentie veroorzaken , en (2) dit apparaat moet
alle ontvangen interferentie accepteren , inclusief
interferentie die een ongewenste werking kan
veroorzaken .
Dit product valt onder de bepalingen van de
Europese Richtlijn 2012/19/EC . Het symbool met
een doorgestreepte afvalcontainer geeft aan dat het
product in de Europese Unie apart moet worden
ingezameld voor huishoudelijk afval . Dit geldt voor
het product en alle accessoires die met dit symbool
zijn gemarkeerd . Producten die zo zijn gemarkeerd,
mogen niet bij het normale huisvuil worden
weggegooid , maar moeten worden ingeleverd bij
een inzamelpunt voor de recycling van elektrische en
elektronische apparaten.
Elektrisch Schok . Het product is een elektrisch
apparaat dat een schok kan veroorzaken. En
Veroorzaakt ernstig letsel . Schakel de stroom niet uit
. snoeren . Doe niet onderdompelen in water of
krijgen nat .
Explosie . Niet-gecontroleerde , incompatibele of
beschadigde batterijen kunnen Ontploft indien
gebruikt met dit product . Niet gebruiken. vertrekken
product onbeheerd tijdens gebruik . Probeer een
beschadigd apparaat niet met startkabels op te
starten. of bevroren Batterij . Gebruik het product
alleen met batterijen van de aanbevolen spanning .
Gebruik product in goed geventileerde ruimtes .
Vuur . Het product is een elektrisch apparaat dat
vuur uitstraalt. warmte En is geschikt van
brandwonden veroorzaken . Niet doen omslag
product .
Niet roken of andere drugs gebruiken. bron van
elektrisch vonk of vuur wanneer Gebruik het product
niet . Houd het product uit de buurt van brandbare

- 3 -
materialen. materialen .
Oog Letsel . Draag oogbescherming tijdens het
gebruik van het product . Batterijen kunnen
exploderen en rondvliegende brokstukken
veroorzaken .
Accuzuur kan oog- en huidirritatie veroorzaken.
irritatie . In de geval van Bij besmetting van de ogen
of huid , spoel het getroffen gebied met water.
stromend schoon water en contact met de
gifbestrijdingsdienst . onmiddellijk .
Explosief Gassen . Werken in de nabijheid van
loodzuur is gevaarlijk .
Batterijen produceren explosieve gassen tijdens
normaal gebruik van de batterij .
Naar verminderen Risico op batterijexplosie , volg
alle veiligheidsinstructies op. instructies en die
gepubliceerd door de batterij fabrikant En fabrikant
van apparatuur die bedoeld is om te worden gebruikt
in de nabijheid van batterij . Lees de
waarschuwingsmarkeringen op deze producten en
op motor .

- 4 -
Deze VEVOR-acculader vertegenwoordigt een aantal van de meest innovatief En geavanceerde
technologie op de markt , waardoor elke lading eenvoudig is En makkelijk . Het is nogal mogelijk
de veiligste En meest
de meest efficiënte oplader die je ooit zult vinden gebruik .
Dit product is ontworpen voor het opladen van alle soorten batterijen. van loodzuur batterijen ,
waaronder Lithium ,
LiFePO4 , nat (Overstroomd) , Gel , MF ( Onderhoudsvrij) , CA (Calcium) , EFB (Versterkt
Overstroomd
Accu) en AGM (Absorptieglas) Mat) batterijen . Het is geschikt om op te laden. batterij
capaciteiten tot 400 ampère-uur en het behoud van alle batterijformaten .
Aan de slag
Voor Lees de batterijgegevens zorgvuldig af wanneer u de oplader gebruikt . fabrikant specifiek
voorzorgsmaatregelen
en de aanbevolen laadsnelheden . Bepaal de spanning en scheikunde van uw batterij door
Raadpleeg de gebruikershandleiding van uw accu. voorafgaand aan het opladen .
Montage
Houd rekening met de afstand tot de batterij . DC- kabellengte van de oplader , met of de
accuklem- of oogterminalconnectoren , is ongeveer 47 . 2 inch (1200 mm) .
Waarschuwing volgens Proposition 65
Accupolen , -aansluitingen en bijbehorende accessoires bevatten chemicaliën , waaronder
lood . Deze materialen zijn bij de staat Californië bekend als oorzaak kanker , geboorte
defecten , en ander
reproductieve schade .
Persoonlijke voorzorgsmaatregelen
Gebruik het product uitsluitend als bedoeld .
Zorg ervoor dat er iemand in de buurt is om je te helpen. in geval van een noodgeval .
Zorg dat je altijd schoon water en zeep op voorraad hebt. in de buurt in geval van batterij zuur
contact .
Draag volledige oogbescherming en beschermende kleding. kleding wanneer werken in de buurt
van A batterij .
Was altijd uw handen na het hanteren van batterijen. En verwant materialen .
Raak geen van deze onderdelen aan en draag ze niet. metalen objecten (bijv . gereedschap ,
horloges of sieraden ) tijdens het werken met batterijen . Als er metaal op een batterij valt .
batterij , het kunnen vonk of creëren A kort circuit , resulterend in bij een elektrische schok ,
brand of explosie , die letsel , dood of eigendom schade .
Minderjarigen
Als de Het product is bedoeld voor gebruik door A klein , de aankoop volwassen gaat akkoord
naar voorzien gedetailleerd
instructies en waarschuwingen aan de minderjarige voorafgaand aan gebruik . Het niet
gebruiken van Doen Dus is de zool verantwoordelijkheid van de koper , die ermee instemt de
fabrikant te vrijwaren voor elk onbedoeld gebruik of misbruik door A minderjarige .
Verstikkingsgevaar

- 5 -
Accessoires kunnen verstikkingsgevaar opleveren. gevaar voor kinderen . niet vertrekken
kinderen onbeheerd met de product of accessoire . Het product is niet een speeltje .
Behandeling
Ga voorzichtig om met het product . Het kan zijn beschadigd als getroffen .
Gebruik geen beschadigd product. product , inclusief een met scheuren in de behuizing of
beschadigd kabels .

- 6 -
Doen niet gebruik de product met een beschadigd netsnoer d .
Vocht en vloeistoffen kunnen de product . Doe niet het hanteren van de product of elk
elektrische al onderdelen in de buurt van vloeistof .
Bewaar en gebruik het product in droog locaties .
Gebruik het product niet als het wordt nat . Als de product wordt nat tijdens Gebruik het
apparaat niet meer , koppel het los van de batterij en stop het gebruik ervan. onmiddellijk .
Koppel het product niet los. door trekken aan de kabels .
Wijzigingen
Doen Probeer niet om iets te veranderen , aan te passen of te repareren. deel van de product .
Het demonteren van het product kan letsel , overlijden of andere schade veroorzaken. eigendom
schade .
Als het product beschadigd raakt , niet goed functioneert of contacten elk vloeistof ,
stopzetten gebruik En Neem contact op met de fabrikant .
garantie ongeldig .
Accessoires
Dit product is alleen goedgekeurd voor gebruik. met door de fabrikant goedgekeurd
accessoires . De De fabrikant is niet verantwoordelijk voor de gebruiker. veiligheid of
schade wanneer gebruik niet goedgekeurd accessoires .
Locatie
Voorkom dat accuzuur in contact komt met de product .
Gebruik het product niet in een ingesloten gebied of een gebied met beperkt ventilatie .
Doen niet plaats een batterij bovenop van de product .
Plaats de kabeldraden zo dat ze niet per ongeluk beschadigd raken. door bewegend voertuig
onderdelen (bijv . motorkappen , deuren ) , bewegende motoronderdelen ( bijv . ventilatorbladen ,
riemen , katrollen ) , of ander potentieel gevaren die kunnen oorzaak letsel of overlijden .
Bedrijfstemperatuur
Dit product is ontworpen om te functioneren bij omgevingstemperaturen. tussen -4°F En 104°F (-
20°C En 40°C) . Niet gebruiken buiten dit temperatuurbereik . niet aanval een bevroren batterij .
Stop onmiddellijk met het gebruik als de batterij wordt buitensporig warm .
Opslag
Gebruik of bewaar de product in gebieden met hoog concentraties van stof of luchtgebonden
materialen . Bewaar het product op een vlakke , stabiele ondergrond waar Het is niet geneigd tot
vallend .
Bewaar het product in A droog locatie .
Het opslagtemperatuurbereik ligt tussen -4°F en 77°F (-20°C tot 25°C) gemiddelde
temperatuur . Nooit hoger dan 70°C (70°C) onder alle omstandigheden .
Verenigbaarheid
Dit product is alleen compatibel met loodzuur- , AGM- en LiFePO4-batterijen . Probeer het niet te
gebruiken met andere batterijen . Gebruik dit product niet met andere soorten batterijen . Het
opladen van batterijen met andere chemische samenstellingen kan letsel veroorzaken .

- 7 -
overlijden of materiële schade . Neem contact op met de batterijfabrikant voordat u de batterij
probeert op te laden. Batterij . Laad een batterij niet op als u niet zeker bent van de specifieke
chemische samenstelling of spanning .

- 8 -
Medische hulpmiddelen
Dit product kan elektromagnetische velden uitzenden . Het bevat magnetisch onderdelen die de
werking van pacemakers , defibrillatoren of andere medische apparaten kunnen verstoren
apparaten . Raadpleeg jouw arts voorafgaand aan gebruik als je Heeft u medische hulpmiddelen
, waaronder een pacemaker . Als u verdenk de Als het product een medisch apparaat verstoort ,
stop dan. gebruik Het onmiddellijk En raadpleeg uw arts .
Schoonmaak
Schakel het product uit voordat u iets probeert te doen. onderhoud of schoonmaken . Schoon En
droog de
product onmiddellijk als het ermee in contact komt vloeistof of elk verontreiniging . Gebruik A
Zachte , pluisvrije (microvezel)doek . Voorkom dat er vocht in de openingen komt .
Explosieve atmosferen
Volg alle aanwijzingen en borden op . Bedien de apparatuur niet. de product in elk gebied met A
potentieel
explosieve atmosfeer , inclusief brandstofgebieden of gebieden die chemicaliën bevatten of
deeltjes zo een als graan , stof of metaal poeders .
Activiteiten met grote gevolgen
Dit product is niet bedoeld voor gebruik waar de mislukking van de product zou kunnen leiding
naar letsel , overlijden of ernstige milieuschade .
Radiofrequentie-interferentie
Dit product is ontworpen , getest en gefabriceerd. naar voldoen aan met regelgeving besturen
radiofrequente emissies . Dergelijke emissies kunnen een negatieve invloed hebben op de
operatie van ander elektronisch
apparatuur , waardoor deze niet meer functioneert .
FCC-conformiteitsverklaring
Dit apparaat voldoet aan Deel 15 van de F CC Regels . De werking is onderworpen aan de
volgend twee voorwaarden:
(1) Dit apparaat mag niet oorzaak schadelijk interferentie .
(2) Dit apparaat moet elke vorm van interferentie accepteren. ontvangen , inclusief interferentie
die kunnen oorzaak ongewenste handeling .
Deze apparatuur is getest en is geschikt bevonden. voldoen aan de grenzen voor A Klas B
digitaal
apparaat , overeenkomstig Deel 15 van de FCC Regels . Deze beperkingen Zijn ontworpen om
voorzien redelijke bescherming tegen schadelijke inmenging in een commerciële installatie .
Dit apparatuur genereert , gebruikt en kan radiofrequente energie uitstralen en , indien niet
geïnstalleerd En gebruikt in in overeenstemming met de instructies , kan dit schadelijke
interferentie veroorzaken radio communicatie . Bediening hiervan
apparatuur in een woongebied is waarschijnlijk om oorzaak schadelijk interferentie , waarbij
geval de De gebruiker zal de storing moeten verhelpen. bij hun eigen kosten .

- 9 -
HOE GEBRUIK
Oplaadmodi
Wanneer de leveringsmodus is geselecteerd , kunt u aanval door selecteren verschillend
stromen met verschillende spanningen . Selecteer het batterijtype nadat u de schakelaar hebt
aangezet . Deze modi Zijn
geavanceerde oplaadmodi die uw volledige aandacht vereisen voor selectie . Het is belangrijk
om
en doelen van elke oplaadmethode begrijpen. modus . Doe niet bedienen oplader totdat u de
juiste oplaadmodus voor uw apparaat hebt bevestigd. batterij . Hieronder is een kort
beschrijving:
Model
Uitleg (piekspanning gemeten bij 25°C , stroomsterkte) beoordeling is bulk stroomsterkte
wanneer boven 0°C)
Standby
In standby modus , de oplader is niet opladen of het verstrekken van macht om de batterij .
Energie In deze modus is de opslagfunctie geactiveerd , waardoor microscopisch kleine
details worden weergegeven. kracht van de elektrisch stopcontact . Kan bus is ingeschakeld
in de standby-modus . Wanneer in de standby-modus , de LCD zullen verlichten .
Aanval
6V Leiding
Voor het opladen van 6 volt loodzuuraccu 's . Wanneer deze geselecteerd worden ,
6V zal zijn gevoerd door blauw .
7,3V | Tot 200AH Batterijen
12V
Leiding
Voor het opladen van 12 volt loodzuuraccu 's . Indien geselecteerd , de 12V zullen
zijn gevoerd in blauw .
14,6V | Tot 600AH Batterijen
24V
Leiding
Voor het opladen van 24 volt loodzuuraccu 's . Wanneer deze geselecteerd worden ,
24V zal zijn gevoerd in blauw .
29 . 2V | Tot 300AH Batterijseries
36V
Leiding
Voor het opladen van 36 volt loodzuuraccu 's . Wanneer deze geselecteerd worden ,
36V zal zijn gevoerd in blauw .
43,8V | Tot 100AH Vleermuizen
48V
Leiding
Voor het opladen van 48 volt loodzuuraccu 's . Wanneer deze geselecteerd worden ,
48V zal zijn gevoerd in blauw .
58,4V | Tot 100AH Batterijseries
60V
Leiding
Voor het opladen van 60 volt loodzuuraccu 's . Wanneer deze geselecteerd
worden , 60V zal zijn gevoerd in blauw . 73V | Tot 60AH Batterijen
72V
Leiding
Voor het opladen van 72 volt loodzuuraccu 's . Indien geselecteerd , zal de 72V zijn
gevoerd in blauw .
87,6V | Tot 60AH Batterijen
12V
LiFePo4
Voor 12 volt LiFePo4 batterijen . Indien geselecteerd , zal de 12V worden gevoerd in
blauw .
14,6V | Tot 600AH Batterijen
24V
LiFePo4
Voor 24 volt LiFePo4 batterijen . Indien geselecteerd , zal de 24V zijn gevoerd in
blauw .
29 . 2V | Tot 200AH Batterijseries
36V
LiFePo4
Voor 36 volt LiFePo4 batterijen . Indien geselecteerd , zal de 36V zijn gevoerd in
blauw .
43,8V | Tot 100AH Vleermuizen
48V
LiFePo4
Voor 48 volt LiFePo4 batterijen . Indien geselecteerd , zal de 48V worden gevoerd in
blauw .
58,4V | Tot 100AH Batterijseries

- 10 -
60V
LiFePo4
Voor 60 volt LiFePo4 batterijen . Indien geselecteerd , zal de 60V
worden gevoerd in blauw . 73V | Tot 60AH Batterijen
72V
LiFePo4
Voor 72 volt LiFePo4 batterijen . Indien geselecteerd , zal de 72V zijn gevoerd in
blauw .
87,6V | Tot 60AH Batterijen

- 11 -
Behoude
n
6V Leiding
Voor het opladen van 6 volt loodzuuraccu's . Indien geselecteerd , de 6V zal zijn
gevoerd in blauw .
7,3V | Omhoog Naar 200AH Batterijen
12V
Leiding
Voor het opladen van 12 volt loodzuuraccu 's . Indien geselecteerd , de 12V zullen
zijn gevoerd in blauw .
14,6V | Omhoog Naar 600AH Batterijen
24V
Leiding
Voor het opladen van 24 volt loodzuuraccu 's . Indien geselecteerd , de 24V zal zijn
gevoerd in blauw .
29 . 2V | Omhoog Naar 300AH Batterijen
36V
Leiding
Voor het opladen van 36 volt loodzuuraccu 's . Indien geselecteerd , de 36V zal zijn
gevoerd in blauw .
43,8V | Omhoog Naar 100AH Batterijen
48V
Leiding
Voor het opladen van 48 volt loodzuuraccu 's . Indien geselecteerd , de 48V zal zijn
gevoerd in blauw .
58,4V | Omhoog Naar 100AH Batterijen
60V
Leiding
Voor het opladen van 60 volt loodzuuraccu 's . Indien geselecteerd , de 60V zal
zijn gevoerd in blauw . 73V | Omhoog Naar 60AH Batterijen
72V
Leiding
Voor het opladen van 72 volt loodzuuraccu 's . Indien geselecteerd , zal de 72V zijn
gevoerd in blauw .
87,6V | Omhoog Naar 60AH Batterijen
Desulfatie
6V Leiding
Voor het opladen van 6 volt loodzuuraccu 's . Indien geselecteerd , de 6V zal zijn
gevoerd in blauw .
7,3V | Omhoog Naar 200AH Batterijen
12V
Leiding
Voor het opladen van 12 volt loodzuuraccu 's . Indien geselecteerd , de 12V zullen
zijn gevoerd in blauw .
14,6V | Omhoog Naar 600AH Batterijen
24V
Leiding
Voor het opladen van 24 volt loodzuuraccu 's . Indien geselecteerd , de 24V zal zijn
gevoerd in blauw .
29 . 2V | Omhoog Naar 300AH Batterijen
Levering
Modus
6V Leiding
Voor het opladen van 6 volt loodzuuraccu 's . Indien geselecteerd , de 6V zal zijn
gevoerd in blauw .
7,3V | Omhoog Naar 200AH Batterijen
12V
Leiding
Voor het opladen van 12 volt loodzuuraccu 's . Indien geselecteerd , de 12V zullen
zijn gevoerd in blauw .
14,6V | Omhoog Naar 600AH Batterijen
24V
Leiding
Voor het opladen van 24 volt loodzuuraccu 's . Indien geselecteerd , de 24V zal zijn
gevoerd in blauw .
29 . 2V | Omhoog Naar 300AH Batterijen
36V
Leiding
Voor het opladen van 36 volt loodzuuraccu 's . Indien geselecteerd , de 36V zal zijn
gevoerd in blauw .
43,8V | Omhoog Naar 100AH Batterijen
48V
Leiding
Voor het opladen van 48 volt loodzuuraccu 's . Indien geselecteerd , de 48V zal zijn
gevoerd in blauw .
58,4V | Omhoog Naar 100AH Batterijen
60V
Leiding
Voor het opladen van 60 volt loodzuuraccu 's . Indien geselecteerd , de 60V zal
zijn gevoerd in blauw . 73V | Omhoog Naar 60AH Batterijen
72V
Leiding
Voor het opladen van 72 volt loodzuuraccu 's . Indien geselecteerd , zal de 72V zijn
gevoerd in blauw .
87,6V | Omhoog Naar 60AH Batterijen

- 12 -
Loodzuuraccu opladen
1. Druk eerst op de
Gebruik
de knop "Batterijtype" om te selecteren. "Leiding " . Ten tweede ,
druk op de "Spanning" druk vervolgens op de knop en vervolgens op de "Start" -knop
Beginnen met opladen .
2. Druk eerst op de "Batterijtype" knop om te selecteren "Leiding" . Ten tweede , druk op de
"Spanning"
de knop en vervolgens op de
Druk op de knop
" Current" en vervolgens op de knop. de
"Begin" knop naar beginnen opladen . Let op: wanneer deze modus is geselecteerd , zorg
ervoor dat uw batterij is A loodzuur Batterij . Zorg ervoor dat de spanning van uw batterij
overeenkomt met de geselecteerde spanning; anders , opladen zal mislukken .
LiFePO4-batterij opladen
1. Druk eerst op de "Batterijtype" knop om te selecteren "LiFePO4" , dan druk op de "Spanning"
druk op de knop en druk tenslotte op de "Start" -knop om te beginnen opladen .
2. Druk eerst op de "Batterijtype" knop om te selecteren "LiFePO4" . Ten tweede , druk op de
"Spanning"
de knop en vervolgens op de
Druk op de knop
" Current" en vervolgens op de knop. de
"Begin" knop naar beginnen opladen . Let op: wanneer deze modus is geselecteerd , zorg
ervoor dat uw batterij is A LiFePO4 Batterij . Zorg ervoor dat de spanning van uw batterij
overeenkomt met de geselecteerde spanning; anders , opladen zal mislukken .
Onderhoudsmodus
eerst op de "Batterijtype" knop om te selecteren "Leiding " . Ten tweede , pres s de
Druk op
de
knop "Onderhouden" en vervolgens op de Gebruik de "Voltage"-knop om de juiste spanning te
selecteren en tot slot pers de Druk op de "Start" -knop om het opladen te starten . De oplader
zal de batterij opladen. batterij met A laag huidig naar behouden een volledig opgeladen
toestand , en deze modus zal niet schade jouw batterij .
Ontzwavelingsmodus
eerst op de "Batterijtype" knop om te selecteren "Leiding" . Ten tweede , druk op de
"Ontzwaveling"
de knop en vervolgens op de "Voltage"-knop , en tot slot druk op de "Begin" knop naar Begin
met opladen . Let op: Wanneer de batterij ernstig verouderd is en heeft onvoldoende
capaciteit , u kan selecteren dit modus naar Repareer het . Houd er rekening mee dat batterijen
kunnen alleen zijn gerepareerd een bij een tijd .
Leveringsmodus
Druk eerst op de "Batterijtype" knop om te selecteren " Leiding" . Ten tweede , druk op de
"Spanning" druk op de knop , en vervolgens op de derde knop. "Huidig" maar ton , en druk
tenslotte op de "Begin" knop .
Let op: deze modus kan worden geselecteerd wanneer gebruikt als A stroom levering of
wanneer de batterij spanning kan niet gedetecteerd .
Professionele modus
eerst op de
Druk op
de knop "Batterijtype" en schakel vervolgens de stroom in. naar
binnenkomen professioneel modus .
Wanneer u overschakelt naar de professionele modus , gelieve selecteren verschillend batterijen
gebruik verschillend stappen:

- 13 -
Druk op de "Batterijtype" knop om te selecteren "LiFePO4 " , ten tweede druk op de
"Spanning" knop om de spanning en batterijcellen te selecteren , en de stroomsterkte selectie
methode is de dezelfde als in niet- professionele modus .
Voorzichtigheid: In LiFePO4-modus , verborgen batterijcellen zullen zijn weergegeven .
Alstublieft opmerking Dat niet-
Professionals dienen deze modus niet te selecteren . Indien geselecteerd , gelieve... neem
contact op met de batterij leverancier;
anders zijn er risico 's . Deze modus kan niet zijn uit het hoofd geleerd . Daarna draaien van de
macht , de De oplader wordt teruggestuurd naar de niet-professionele gebruiker. modus .

- 14 -
Aansluiten op de batterij
Sluit de stekker van het stopcontact niet aan. tot alle ander verbindingen Zijn gemaakt .
Identificeren de juist
polariteit van de accupolen op de accu . niet maken elk verbindingen met de carburateur ,
brandstofleidingen of dun plaatmetaal onderdelen . De instructies onderstaand zijn voor A
negatief grond systeem
(meest voorkomend) Als uw voertuig een positieve aarding heeft systeem (erg
ongebruikelijk) , volg de onderstaande instructies in omgekeerde volgorde .
1. Verbind de positief (rode) oogklemconnector naar de positieve pool (POS , P , +)
batterij terminal .
2. Sluit de negatieve pool aan (zwarte) oogklemconnector naar de negatieve pool (NEG , N , -)
batterij terminal .
3. Sluit de acculader aan op een geschikt stopcontact . niet gezicht de batterij wanneer het
leggen van deze verbinding .
4. Bij het loskoppelen , dient u de stappen in omgekeerde volgorde uit te voeren : verwijder de
Eerst de negatieve pool (of eerst de positieve pool bij systemen met positieve aarding) .
Beginnen met opladen
1. Controleer de spanning en de chemische samenstelling van de batterij .
2. Controleer of u de accuklemmen hebt aangesloten . of oogje-eindstuk connectoren correct
en dat de AC-stroomstekker is aangesloten op een elektrisch verkooppunt .
3. [Eerste keer ] gebruik] De oplader zal start in de standby- modus en "Pauze" zullen zijn
omcirkeld in blauw . In Standby modus , de oplader levert geen elk stroom .
4. Druk op de Gebruik de knop "Batterijtype" om het batterijtype te selecteren . pers de
"Spanning" druk op de knop en druk vervolgens op de "Huidig" knop .
5. Druk op de Druk op de "Start"-knop en het zal zijn gemarkeerd in blauw; ten tweede , de
batterij zullen zijn
gedetecteerd . Als de batterij in orde is , geen batterij indicator zal draai uit , en de oplader
zullen werk normaal gesproken ; anders zal het niet .
6. De oplader kan nu worden links verbonden met de batterij bij alle tijden naar voorzien
onderhoud opladen .
Automatische geheugenfunctie: De oplader heeft een ingebouwde automatische
geheugenfunctie. zullen opbrengst naar de laatst aanval modus wanneer verbonden .
Selecteer de juiste modus en druk op de "Begin" knop , en de oplader zal de nieuwe werkende
opslaan modus .
Voorzichtigheid: Professioneel De modus kan niet automatisch worden onthouden .
OPLAADTIJDEN
De geschatte oplaadtijd voor een batterij wordt berekend. als volgt: Opladen Tijd (uren)
= Batterijcapaciteit (Ah) / Laadstroom (A) De batterij capaciteit (Ah) En zijn diepte van
afvoer (DoD) heeft een aanzienlijke invloed op de laadduur . De berekende tijd is gebaseerd op
een
gemiddelde ontladingsdiepte tot een volledig opgeladen toestand en is voor referentie alleen .
Werkelijk resultaten kan variëren afhankelijk van de batterijconditie . De oplaadtijd voor A
normaal ontslagen batterij is
gebaseerd op 50% DoD . Temperatuur heeft ook invloed. opladen efficiëntie .

- 15 -
VEVOR Batterijladers zijn voorzien van thermische compensatietechnologie , die automatisch
Past de laadparameters aan om de prestaties te optimaliseren . Hieronder staat... A opladen
tijd referentie voor model:
XFH-SS01 :
Batterijformaat
Ah(Amp uur)
Geschatte oplaadtijd uren
6V
12V
24V
36V
48 V
40
3
3
6
10
13
60
5
5
10
15
20
80
6
6
12
20
26
120
10
10
20
200
17
17
XFH-SS0 2 :
XFH-SS0 3 / XFH- SS07:
Batterijformaat
Ah(Amp uur)
Geschatte oplaadtijd uren
6V
12V
24V
36V
48V
60V
72 V
40
3
3
5
8
10
13
15
60
4
4
8
11
15
19
23
80
5
5
10
15
20
25
31
120
8
8
15
23
30
200
13
13
25
Batterijformaat
Ah(Am (uur)
Geschatte oplaadtijd uren
6V
12V
24V
40
3
2
4
60
4
3
6
80
5
4
8
120
8
6
12
200
13
10
20
400
25
20

- 16 -
XFH- SS04 / XFH -SS08
XFH - SS05 / XFH -SS09:
INZICHT IN DE LAADINDICATIE
Batterijformaat
Ah(Amp uur)
Geschatte oplaadtijd uren
6V
12V
24V
40
3
2
3
60
4
3
5
80
5
3. 5
7
120
8
5
10
200
13
8
16
400
25
16
Batterijformaat
Ah(Amp uur)
Geschatte oplaadtijd uren
6V
12V
24V
40
3
1. 5
3
60
4
2
4
80
5
3
5. 5
120
8
4
8
200
13
7
14
400
25
14
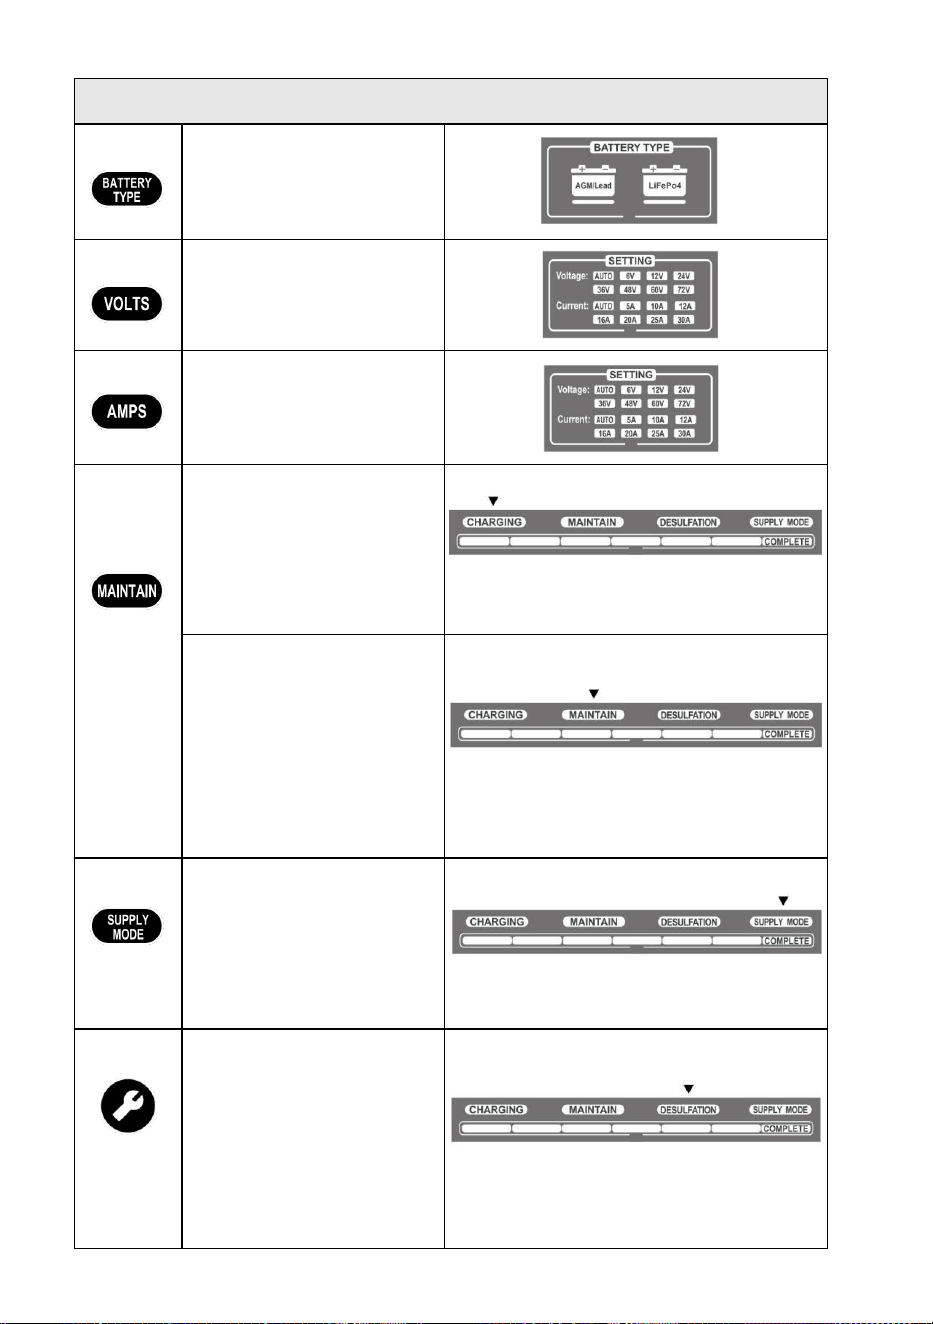
- 17 -
Knopillustratie
Knop
Batterij Knop: Druk op de knop
om het batterijtype te
selecteren; de De indicator
"Batterijtype" zal oplichten op .
Knop
Spanning Knop : Duw de knop
om de spanning te selecteren; de
"Spanning" Het indicatielampje
gaat branden .
Knop
Huidig Knop: Druk op de knop
om de huidige te selecteren; de
"Huidig" Het indicatielampje gaat
branden .
Knop
Opladen en Behouden Modus:
De Het "Opladen"-indicatielampje
gaat branden .
Wanneer de batterij en stroom
De voeding is correct aangesloten
, de voortgangsbalk indica tor zal
draaien op afhankelijk van de
geselecteerde laadmethode
modus .
Als de batterij heeft niet geweest
gebruikt
langdurig duwen knop naar
selecteren Onderhoudsmodus .
De batterij zullen kosten in
rekening worden gebracht met A
klein huidige om zijn opladen; de
"Onderhoud"-indicator gaat
branden . en de vooruitgang De
balk zal knipperen cyclisch .
(Onderhouden modus is alleen
voor loodzuur batterijen . )
Knop
Levering Modus: Wanneer de
batterij is correct aangesloten
maar kan niet worden
gedetecteerd , druk op de knop
naar gebruik "Supply"-modus
voor opladen . De De indicator
"Aanbod" zal veranderen
op en de voortgang De balk zal
knipperen cyclisch .
Knop
Desulfatie Modus (Loodzuur)
Batterij Alleen): Ik als de batterij
heeft is gebruikt voor een lange
tijd En zijn capaciteit neemt snel
af , duw de knop naar gebruik
"Ontzwaveling"
modus voor het opladen van
reparatie
de batterij . De "Desulfatatie" -
indicator gaat branden en de
De voortgangsbalk zal cyclisch
knipperen .

- 18 -
Knop
START en PAUZE Knop: Druk op de knop als de instellingen correct zijn . knop; de Het
"Start"-indicatielampje gaat branden en de oplader begint te werken . Druk op de knop.
terwijl de oplader is in bedrijf; de Het "PAUZE"-indicatielampje gaat branden en de
oplader stopt met werken .
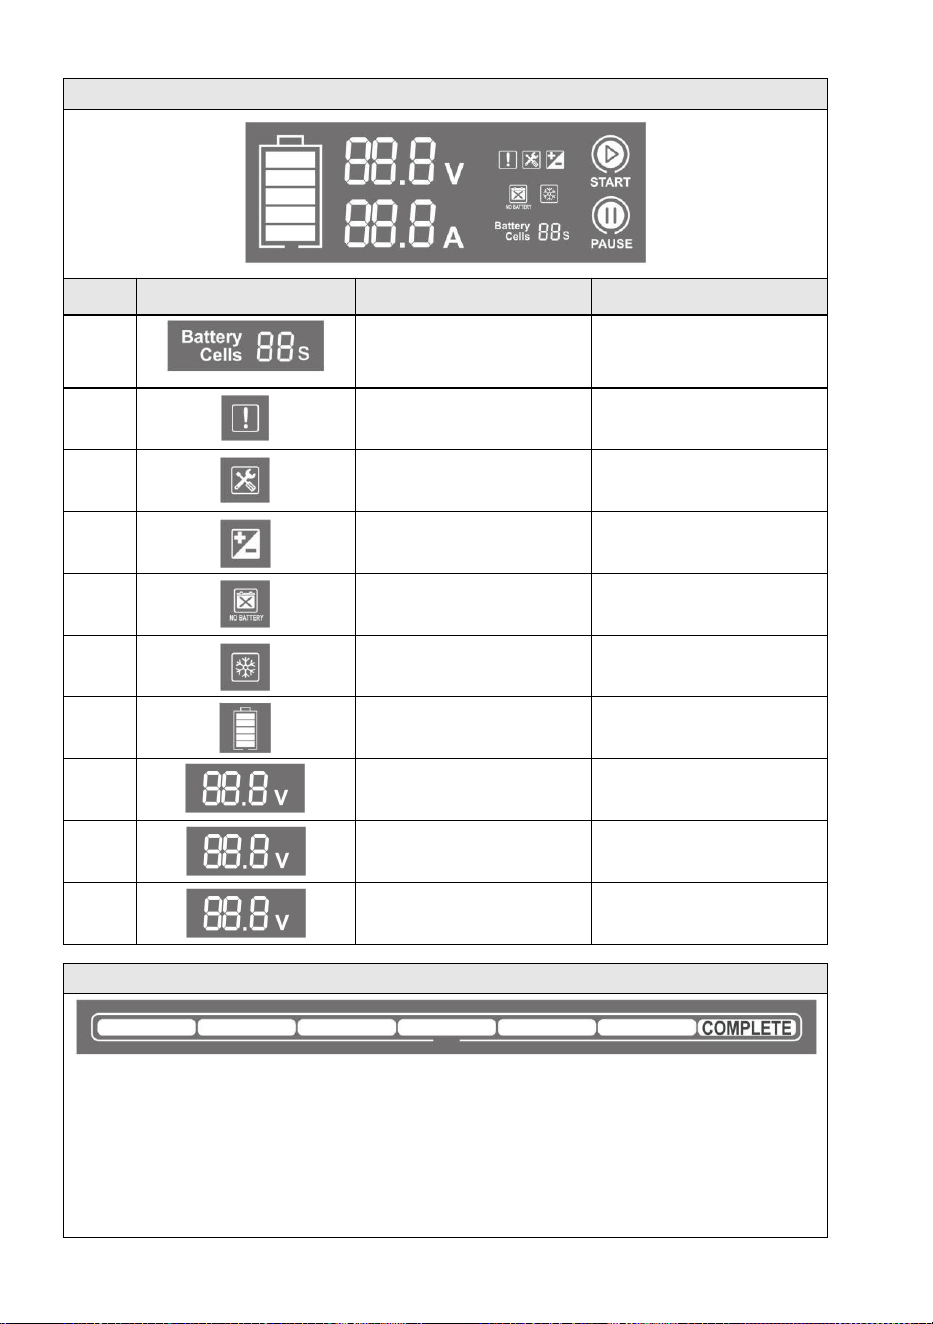
- 19 -
Grafische weergave
S/N
Grafisch
Indicator
Uitleg
1
Show Batterijcel Nummer
In professionele modus ,
display batterij cel l l nummer;
Normaal gesproken modus ,
geen weergave
2
Flash
Waarschuwing:
Overstroom , kortsluiting circuit
3
OP
Opladen in “ Ontzwaveling ”
4
Flash
Batterij omgekeerd aansluiten
5
OP
Niet verbinden batterij
6
Flash
Omgevingstemperatuur
voor opladen
7
OP
Batterijcapaciteit weergeven
8
-
Laadspanning weergeven
9
-
Toon laadstroom
10
Weergavenummer
Voor een beschrijving van
de storing codes
Voortgangsbalk Indicatie
1. Ontzwavelingsfase (alleen voor loodzuuraccu's)
2. Laadmodus met lage stroomsterkte
3. CC- laden modus
4. CV- laden modus
5. Batterijcontrole
6. Zwevend opladen Modus
7. Volledig opgeladen

- 20 -
Specificaties van de lader per model
Productmodel
XFH-SS01
XFH-
SS02
XFH-SS03
XFH-SS07
XFH-SS04
XFH-
SS08
XFH-SS05
XFH-SS09
Ingangsspanning
wisselstroom
120 V
wisselstroom
60 Hz
Max. 250W
120 V
wisselstroom
60 Hz
Max. 300W
120 V
wisselstroom
60 Hz
Max. 400W
230 V
wisselstroom
50 Hz
Max. 400W
120 V
wisselstroom
60 Hz
Max480W
230VAC
50Hz
Max480W
120 V
wisselstroom
60 Hz
Max. 550W
230 V
wisselstroom
50 Hz
Max. 550W
Uitvoer Stroom
175 . 2W
(max.)
234W (max.)
292W (max.)
365W (max.)
438W (max.)
Laadspanning
Verscheidene
Laadstroom
5A (6V) , 10A
(6V) ,
12A (6V) , 5A
(12V) ,
10A (12V) , 12A
(12V) ,
5A (24V) , 6A
(24V) ,
4A/(36V) ,
3A(48V)
5A (6V) , 10A
(6V) ,
16A (6V) , 5A
(12V) ,
10A (12V) , 16A
(12V) ,
5A (24V) , 8A
(24V) ,
5. 3A /(36V) ,
4A(48V) ,
3.2A (60V) ,
2.7A ( 72V )
5A (6V) , 10A (6V) ,
16A (6V) , 5A (12V) ,
10A (12V) , 20A (12V) ,
5A (24V) , 10A (24V)
5A (6V) , 10A (6V) ,
16A (6V) , 5A (12V) ,
16A (12V) , 25A (12V)
,
5A (24V) , 10A (24V) ,
12,5A ( 24V)
5A (6V) , 10A (6V) ,
16A (6V) , 5A (12V) ,
16A (12V) , 30A (12V) ,
5A (24V) , 10A (24V) ,
15A (24V)
Laagspanning
Detectie
2V (6V) , 10V
(12V) ,
20V (24V) ,
30V (36V) ,
40V (48V)
2V (6V) , 10V
(12V) ,
20V (24V) ,
30V (36V) ,
40V (48V) ,
50V (60V) ,
60V (72V)
2V (6V) , 10V (12V) , 20V (24V)
Terugstroom
Droogleggen
< 0,5 mA
Omgeving
Temperatuur
-20°C tot 40°C
Soort Batterijen
6V , 12V , 24V ,
36V , 48V
6V , 12V , 24V ,
36V , 48V , 60V
,
72V
6V , 12V , 24V
Batterij
Chemieën
Nat , Gel , MF , CA , EFB , AGM , Calcium , LiFePO4
Batterijcapaciteit
Tot 200Ah ,
Onderhoudt
Alle
Batterijformaten
Tot 300Ah ,
Onderhoudt
Alle
Batterijformaten
Tot 400 Ah , onderhoudt
alle Batterij
Maten
Tot 500 Ah ,
onderhoudt alle
Batterij
Maten
Tot 600 Ah , houdt alles in
stand. Batterij
Maten
Koeling Invoer
Wisselspanning
Fan Convectie

- 21 -
Handmatige selectie van de accuspanning (Professionele modus)
Batterijtypen
Spanningsbere
ik
Seriecel
Graaf
Nominale
batterij
Spanning (V)
Opladen
Spanning (V)
Spanning
Drempelwaar
de
Bereik (V)
LiFePo4
batterij
12V
3
9.6
10,95
7 . 5-10 . 95
4
12.8
14.6
10-14 . 6
24V
6
19.2
21.9
15-21 . 9
8
25.6
29.2
20-29 . 2
36V
11
35 . 2
40 . 15
27 . 5-40 . 15
12
38.4
43.8
30-43 . 8
48V
14
44.8
51 . 1
35-51 . 1
15
48
54,75
37 . 5-54 . 75
16
51 . 2
58 . 4
40-58 . 4
60V
18
57 . 6
65 . 7
45-65 . 7
19
60 . 8
69 . 35
47,5-69,35
20
64
73
50-73
72V
22
70.4
80.3
55-80,3
23
73,6
83,95
57,5-83,95
24
76,8
87,6
60-87 . 6
Loodzuur
batterij
12V
4
13.8
14.6
10-14 . 6
24V
8
27.6
29.2
20-29 . 2
36V
12
41.4
43.8
30-43 . 8
48V
16
55 . 2
58 . 4
40-58 . 4
60V
20
69
73
50-73
72V
24
82 . 8
87 . 6
60-87 . 6

- 22 -
FOUTCODE
Wanneer de machine niet kan worden opgeladen gebruik , de product weergave zullen show de
fout code .
Raadpleeg de onderstaande tabel met beschrijvingen van foutcodes. En oplossen
Het
probleem
met het niet opladen wordt veroorzaakt door een verkeerde bediening, zoals
beschreven in de bijbehorende foutmelding. nummer .
Foutcode
Beschrijving van de fout
03E
De temperatuur in de machine is te hoog. hoog
04E
De uitgangslaadmodus is selecte d onjuist
05E
Uitgangsspanning overspanning
06E
Uitvoer via stroom
42E
Uitgangsstroom overstroom
43E
Spanning of stroomsterkte verandert niet voor A lang tijd
04E: Druk op de startknop om duidelijk .
Ander: Haal de stekker uit het stopcontact .

- 23 -

- 24 -
Litium blysyraladdare
Modell: XFH-SS01 , XFH-SS02 , XFH-SS03 ,
XFH-SS04 , XFH-SS05 , XFH-SS07 ,
XFH-SS08 , XFH-SS09

- 1 -
Modell: XFH-SS01 , XFH-SS02 , XFH-SS03 , XFH-SS04 , XFH-SS05 ,
XFH-SS07 , XFH-SS08 , XFH-SS09
Detta är originalinstruktionerna , vänligen läs alla instruktioner noggrant
innan du använder produkten . VEVOR förbehåller sig en tydlig tolkning
av vår användarmanual . Produktens utseende ska vara beroende av
den produkt du mottagit . Vi ber om ursäkt för att vi inte kommer att
informera dig igen om det finns några teknik- eller programuppdateringar
för vår produkt .
- 2 -
Varning – För att minska risken för skador
måste användaren läsa instruktionsmanualen
noggrant .
Denna enhet uppfyller del 15 i FCC-reglerna .
Användning är underkastad följande två villkor: (1)
Denna enhet får inte orsaka skadliga störningar , och
(2) denna enhet måste acceptera alla mottagna
störningar , inklusive störningar som kan orsaka
oönskad drift .
Denna produkt omfattas av bestämmelserna i EU-
direktiv 2012/19/EG . Symbolen som visar en
överstruken soptunna indikerar att produkten kräver
separat sophämtning inom Europeiska unionen.
Detta gäller produkten och alla tillbehör som är
märkta med denna symbol . Produkter som är märkta
som sådana får inte kasseras med vanligt
hushållsavfall , utan måste lämnas till en
insamlingsplats för återvinning av elektriska och
elektroniska apparater.
Elektrisk Stöt . Produkten är en elektrisk apparat
som kan ge stötar. och orsaka allvarliga skador .
Stäng inte av strömmen sladdar . Gör inte dränka i
vatten eller få våt .
Explosion . Oövervakade , inkompatibla eller
skadade batterier kan explodera om den används
med produkten . Får inte lämna produkt utan tillsyn
under användning . Försök inte starta en skadad
eller fryst batteri . Använd produkten endast med
batterier med rekommenderad spänning . Använd
produkt i välventilerade utrymmen .
Brand . Produkten är en elektrisk apparat som
avger värme och är kapabel av orsakar
brännskador . Använd inte täcka produkt .
Röka inte eller använd någon källa av elektrisk gnista
eller eld när Använd produkten . Håll produkten borta
från brännbara ämnen material .

- 3 -
Öga Skada . Använd ögonskydd när du använder
produkten . Batterier kan explodera och orsaka
flygande skräp .
Batterisyra kan orsaka ögon- och hudskador irritation
. I fall av Vid kontaminering av ögon eller hud , skölj
det drabbade området med rinnande rent vatten och
kontakta giftkontroll omedelbart .
Explosiv Gaser . Att arbeta i närheten av bly-syra är
farligt .
Batterier generera explosiva gaser under normal
batteridrift .
Till minska risk för batteriexplosion , följ all
säkerhetsinformation instruktioner och de som
publicerats av batteriet tillverkare och tillverkare av
all utrustning som är avsedd att vara används i de
närhet av batteri . Läs varningsmarkeringarna på
dessa produkter och på motor .

- 4 -
Denna VEVOR-batteriladdare representerar några av de mest innovativ och avancerad teknik
på marknaden , vilket gör varje laddning enkel och lätt . Det är ganska eventuellt de säkraste och
mest
effektiv laddare du någonsin kommer att använda .
Denna produkt är avsedd för att ladda alla typer av av blysyra batterier , inklusive Litium ,
LiFePO4 , våt (Flödande) , Gel , MF ( Underhållsfritt) , Kalifornien (Kalcium) , EFB (Förbättrad
Översvämmad
Batteri) och AGM (Absorptionsglas Mat) batterier . Den är lämplig för laddning batteri kapaciteter
upp till 400 amperetimmar och underhåll av alla batteristorlekar .
Komma igång
Före läs noggrant batterianvisningen när du använder laddaren tillverkarens specifik
försiktighetsåtgärder
rekommenderade laddningshastigheter . Bestäm spänningen och kemi av dina batteri av
hänvisa till batteriets bruksanvisning före laddning .
Montering
Tänk på avståndet till batteriet . DC- kabelns längd från de laddare , med antingen de
batteriklämman eller öljettpolkontakterna är ungefär 47. 2 tum (1200 mm) .
Varning om förslag 65
Batteripoler , terminaler och relaterade tillbehör innehåller kemikalier , inklusive bly . Dessa
material är kända av delstaten Kalifornien för att orsaka cancer , födsel defekter , och andra
reproduktionsskada .
Personlig försiktighetsåtgärd
Använd endast produkten som avsedd .
Se till att någon finns inom rösträckhåll för att hjälpa dig i fall av en nödsituation .
Ha tillgång till rent vatten och tvål närliggande om av batteri syra kontakt .
Använd fullständigt ögonskydd och skyddsglasögon kläder när arbetssätt nära en batteri .
Tvätta alltid händerna efter att ha hanterat batterier och släkt material .
Hantera eller bär inte någon metallföremål ( t.ex. verktyg , klockor eller smycken) när du
arbetar med batterier . Om metall tappas på en batteri , det maj gnista eller skapa en kort
krets , resultat i elektriska stötar , brand eller explosion , vilket kan orsaka skada , dödsfall
eller egendom skada .
Minderåriga
Om produkten är avsedd att användas av en mindreårig , den köp av vuxen håller med till
tillhandahålla detaljerad
instruktioner och varningar till den minderårige före användning . Underlåtenhet att do så är den
enda ansvar av köparen , som samtycker till att ersätta tillverkaren för några oavsiktlig använda
eller missbruka av en mindreårig .
Kvävningsrisk
Tillbehör kan orsaka kvävning fara för barn . Gör inte lämna barn utan tillsyn med de produkten
eller något tillbehör . Produkten är inte en leksak .

- 5 -
Hantering
Hantera produkten varsamt . Den kan vara skadad om påverkad .
Använd inte en skadad produkt , inklusive en med sprickor i de hölje eller skadad kablar .

- 6 -
Do inte använd produkt med en skadad nätsladd .
Fukt och vätskor kan skada produkt . Gör inte hantera produkt eller några elektrisk al
komponenter nära någon vätska .
Förvara och använd produkten i torka platser .
Använd inte produkten om den blir våt . Om produkt blir våt under drift , koppla bort den från
batteriet och sluta använda den omedelbart .
Koppla inte bort produkten av dra på kablar .
Modifieringar
Do försök inte att ändra , modifiera eller reparera någon del av produkt .
Demontering av produkten kan orsaka skada , dödsfall eller egendom skada .
Om produkten skadas , inte fungerar som den ska , eller kontakter några vätska , avbryt
använda och kontakta tillverkaren .
Alla modifieringar upphäver garantin .
Tillbehör
Denna produkt är endast godkänd för användning med tillverkargodkänd tillbehör .
Den tillverkaren ansvarar inte för användaren säkerhet eller skada när använder ej
godkänd tillbehör .
Plats
Förhindra att batterisyra kommer i kontakt med produkt .
Använd inte produkten i en stängd område eller en område med begränsad ventilation .
Do inte placera ett batteri ovanpå av produkt .
Placera kabelledarna för att undvika oavsiktliga skador av fordon i rörelse delar ( t.ex.
motorhuvar , dörrar ) , rörliga motordelar ( t.ex. fläktblad , remmar , remskivor ) eller andra
potential faror som maj orsaka skada eller dödsfall .
Driftstemperatur
Denna produkt är konstruerad för att fungera i omgivningstemperaturer mellan -4°F och 38°C (-
20°C och 40°C) . Använd inte utanför dessa temperaturintervall . Gör inte avgift en fryst batteri .
Avbryt användningen omedelbart om batteriet blir överdrivet varm .
Lagring
Använd eller förvara inte produkt i områden med hög koncentrationer av damm eller luftburna
material . Förvara produkten på en plan , säker yta där det är inte benägen att fallande .
Förvara produkten i en torka plats .
Förvaringstemperaturen är -4 °F till 24°C (-20°C till 25°C) medeltemperatur . Aldrig överstiga
158°F (70°C) under alla förhållanden .
Kompatibilitet
Denna produkt är endast kompatibel med bly-syra- , AGM- och LiFePO4-batterier . Försök inte att
använda produkten med någon annan typ av batteri . Laddning av andra batterikemikalier kan
orsaka skador ,
dödsfall eller egendomsskada . Kontakta batteritillverkaren innan du försöker ladda batteriet.
Ladda inte ett batteri om du är osäker på dess specifika kemiska sammansättning eller spänning
.

- 7 -
Medicintekniska produkter
Denna produkt kan avge elektromagnetiska fält . Den innehåller magnetisk komponenter som
stör pacemakers , defibrillatorer eller andra medicinska enheter . Rådfråga din läkare före
använd om du ha någon medicintekniska produkter , inklusive en pacemaker . Om du misstänker
den produkten stör en medicinteknisk produkt , sluta använder det omedelbart och rådfråga din
läkare .
Rengöring
Stäng av produkten innan du försöker göra något underhåll eller rengöring . Rengör och torka
produkten omedelbart om den kommer i kontakt med flytande eller några förorening .
Användning en en mjuk , luddfri trasa (mikrofiber) . Undvik att fukt kommer in i öppningarna .
Explosiva atmosfärer
Följ alla skyltar och instruktioner . Använd inte de produkt i några område med en potentiellt
explosiv atmosfär , inklusive tankningsområden eller områden som innehåller kemikalier eller
partiklar sådan som korn , damm eller metall pulver .
Aktiviteter med hög konsekvens
Denna produkt är inte avsedd för använda där fel av produkt kunde leda till skada , dödsfall eller
allvarlig miljöskada .
Radiofrekvensstörningar
Denna produkt är designad , testad och tillverkad till följa med föreskrifter styrande
radiofrekvensutsläpp . Sådana utsläpp kan påverka drift av andra elektronisk
utrustningen , vilket orsakar att den inte fungerar korrekt .
FCC-efterlevnadsmeddelande
Denna enhet uppfyller Del 15 av F CC Regler . Driften är med förbehåll för följande två villkor:
(1) Den här enheten kanske inte orsaka skadlig störningar .
(2) Denna enhet får inte acceptera några störningar mottagen , inklusive störningar som maj
orsaka oönskad operation .
Denna utrustning har testats och befunnits följa gränser för en Klass B digital
enhet , i enlighet med Del 15 av FCC Regler . Dessa gränser är utformad för att förse rimligt
skydd mot skadlig störning i kommersiella installation . Detta utrustning genererar , använder
och kan utstråla radiofrekvensenergi och , om inte installerad och begagnad i i enlighet med
instruktionerna kan orsaka skadliga störningar på radio kommunikation . Drift av detta
utrustning i ett bostadsområde är sannolikt att orsaka skadlig interferens , där fall de
användaren kommer att vara skyldig att korrigera störningen på deras egen utgift .

- 8 -
HUR MAN ANVÄNDA
Laddningslägen
När matningsläge är valt kan du avgift av väljer olik strömmar med olika spänningar . Välj
batterityp efter att du slagit på strömbrytaren . Dessa lägen är
avancerade laddningslägen som kräver din fulla uppmärksamhet före val . Det är viktigt för
förstå skillnaderna och syftena med varje laddning läge . Gör inte driva laddare tills du bekräftar
lämpligt laddningsläge för din batteri . Nedan är en kort beskrivning:
Modell
Förklaring (toppspänning mätt vid 25°C , strömstyrka betyget är bulk strömstyrka när ovan 0°C)
Standby
I vänteläge läge , laddaren är laddas inte eller tillhandahållande av någon makt till de batteri .
Energi Spara aktiveras i detta läge och ritar mikroskopiskt kraft från elektrisk uttag . Burk
buss är aktiverad i standbyläge . När n är i standbyläge , LCD-skärm vilja belysa .
Avgift
6V Leda
För laddning av 6 volt blybatterier . När de är valda , 6V kommer vara fodrad av blå .
7. 3V | Fram till 200AH Batterier
12V Leda
För laddning av 12 volt blybatterier . När de är valda , 12V vilja vara fodrad i blå .
14,6V | Fram till 600AH Batterier
24V Leda
För laddning av 24 volt blybatterier . När de är valda , 24V kommer vara fodrad i blå
.
29. 2V | Fram till 300AH Batt- serier
36V Leda
För laddning av 36 volt blybatterier . När de är valda , 36V kommer vara fodrad i blå
.
43. 8V | Fram till 100AH Batterier
48V Leda
För laddning av 48 volt blybatterier . När de är valda , 48V kommer vara fodrad i blå
.
58. 4V | Fram till 100AH Batt- serier
60V Leda
För laddning av 60 volt blybatterier . När de är valda , 60V kommer vara fodrad i
blå . 73V | Fram till 60AH Batterier
72V Leda
För laddning av 72 volt blybatterier . När den är vald kommer 72V att vara fodrad i
blå .
87. 6V | Fram till 60AH Batterier
12V
LiFePo4
För 12-volts LiFePo4 batterier . När den är vald kommer 12V att vara fodrad i blå .
14,6V | Fram till 600AH Batterier
24V
LiFePo4
För 24-volts LiFePo4 batterier . När den är vald kommer 24V att vara lin ed i blå .
29. 2V | Fram till 200AH Batt- serier
36V
LiFePo4
För 36-volts LiFePo4 batterier . När den är vald kommer 36V att vara fodrad i b lue .
43. 8V | Fram till 100AH Batterier
48V
LiFePo4
För 48-volts LiFePo4 batterier . När den är vald kommer 48V att vara fodrad i blå .
58. 4V | Fram till 100AH Batt- serier
60V
LiFePo4
För 60 volt LiFePo4 batterier . När den är vald kommer 60V att vara
fodrad i blå . 73V | Fram till 60AH Batterier
72V
LiFePo4
För 72-volts LiFePo4 batterier . När valts kommer 72V att vara fodrad i blå .
87. 6V | Fram till 60AH Batterier

- 9 -
Upprätthå
lla
6V Leda
För laddning av 6 volt blybatterier . När den är vald , 6V kommer vara fodrad i blått .
7. 3V | Upp Till 200AH Batterier
12V Leda
För laddning av 12 volt Blybatterier . När de är valda , 12V vilja vara fodrad i blått .
14,6V | Upp Till 600AH Batterier
24V Leda
För laddning av 24 volt blybatterier . När den är vald , 24V kommer vara fodrad i
blått .
29. 2V | Upp Till 300AH Batterier
36V Leda
För laddning av 36 volt blybatterier . När den är vald , 36V kommer vara fodrad i
blått .
43. 8V | Upp Till 100AH Batterier
48V Leda
För laddning av 48 volt blybatterier . När den är vald , 48V kommer vara fodrad i
blått .
58. 4V | Upp Till 100AH Batterier
60V Leda
För laddning av 60 volt blybatterier . När den är vald , 60V kommer vara fodrad i
blått . 73V | Upp Till 60AH Batterier
72V Leda
För laddning av 72 volt blybatterier . När den är vald kommer 72V att vara fodrad i
blått .
87. 6V | Upp Till 60AH Batterier
Avsulfateri
ng
6V Leda
För laddning av 6 volt blybatterier . När den är vald , 6V kommer vara fodrad i blått .
7. 3V | Upp Till 200AH Batterier
12V Leda
För laddning av 12 volt Blybatterier . När de är valda , 12V vilja vara fodrad i blått .
14,6V | Upp Till 600AH Batterier
24V Leda
För laddning av 24 volt blybatterier . När den är vald , 24V kommer vara fodrad i
blått .
29. 2V | Upp Till 300AH Batterier
Förse
Läge
6V Leda
För laddning av 6 volt blybatterier . När den är vald , 6V kommer vara fodrad i blått .
7. 3V | Upp Till 200AH Batterier
12V Leda
För laddning av 12 volt Blybatterier . När de är valda , 12V vilja vara fodrad i blått .
14,6V | Upp Till 600AH Batterier
24V Leda
För laddning av 24 volt blybatterier . När den är vald , 24V kommer vara fodrad i
blått .
29. 2V | Upp Till 300AH Batterier
36V Leda
För laddning av 36 volt blybatterier . När den är vald , 36V kommer vara fodrad i
blått .
43. 8V | Upp Till 100AH Batterier
48V Leda
För laddning av 48 volt blybatterier . När den är vald , 48V kommer vara fodrad i
blått .
58. 4V | Upp Till 100AH Batterier
60V Leda
För laddning av 60 volt blybatterier . När den är vald , 60V kommer vara fodrad i
blått . 73V | Upp Till 60AH Batterier
72V Leda
För laddning av 72 volt blybatterier . När den är vald kommer 72V att vara fodrad i
blått .
87. 6V | Upp Till 60AH Batterier

- 10 -
Laddning av blybatterier
1. Tryck först på Knappen "Batterityp" n för att välja "Bly " . För det andra , tryck på "Spänning"
knappen och tryck sedan på "Start" -knappen för att börja ladda .
2. Tryck först på "Batterityp" knapp n för att välja "Bly" . För det andra , tryck på "Spänning"
knappen och tryck sedan på " Aktuell"-knappen och tryck slutligen på de "Start" knapp till börja
laddning . Varning: När detta läge är valt , vänligen se till att din batteri är en blysyra batteri . Se
till att batterispänningen matchar den valda spänningen; annars , laddning kommer att
misslyckas .
Laddning av LiFePO4-batterier
1. Tryck först på "Batterityp" knappen för att välja "LiFePO4" , då tryck på "Spänning" knappen
och tryck slutligen på "Start" -knappen för att börja laddning .
2. Tryck först på "Batterityp" rumpa på för att välja "LiFePO4" . För det andra , tryck på
"Spänning"
knappen och tryck sedan på " Aktuell"-knappen och tryck slutligen på de "Start" knapp till börja
laddning . Varning: När detta läge är valt , vänligen se till att din batteri är en LiFePO4 batteri .
Se till att batterispänningen matchar den valda spänningen; annars laddning kommer att
misslyckas .
Underhållsläge
Tryck först på "Batterityp" knappen för att välja "Bly " . För det andra , tryck på "Underhåll"-
knappen och tryck sedan på "Spänning"-knappen för att välja lämplig spänning och slutligen
trycka de Tryck på "Start" -knappen för att börja ladda . Laddaren laddar batteri med en låg
nuvarande till upprätthålla ett fulladdat tillstånd , och detta läge kommer inte skada din batteri .
Avsulfateringsläge
Tryck först på "Batterityp" knappen för att välja "Bly" . För det andra , tryck på "Avsulfatering"
knappen och tryck sedan på "Spänning"-knappen och slutligen tryck på "Start" knappen till
börja ladda . Varning: När batteriet är allvarligt åldrat och h som otillräcklig kapacitet , du burk
välja detta läge till reparera den . Observera att batterier kan endast vara reparerad en på en tid
.
Matningsläge
Tryck först på "Batterityp" knappen för att välja "Bly " . För det andra , tryck på "Spänning"
knappen , tryck för tredje gången på "Aktuell" -knapp och tryck slutligen på "Start" men tton .
Varning: Detta läge kan väljas när begagnad som en driva förse eller när de batteri
spänningen kan inte vara upptäckt .
Professionellt läge
Tryck först på knappen "Batterityp" och slå sedan på strömmen till skriva in professionell läge .
När du går in i professionellt läge , vänligen välja olik batterier använder olik steg:
Tryck på "Batterityp" knappen för att välja "LiFePO4 " , för det andra tryck på "Spänning"
knappen för att välja spänning och battericeller , samt strömmen urval metod är den samma
som i icke- professionellt läge .
Försiktighet: I LiFePO4-läge , dolda battericeller kommer att vara visas . Vänligen notera att
icke-Yrkesverksamma bör inte välja detta läge . Om det är valt , vänligen kontakta batteri
leverantör;
annars finns det risker . Detta läge kan inte vara memorerat . Efter vändning av makten , den
laddaren kommer att returneras till icke-professionell läge .

- 11 -
Ansluta till batteriet
Anslut inte nätkontakten tills alla andra anslutningar är gjord . Identifiera de rätta
polariteten på batteripolerna på batteriet . Gör inte göra några anslutningar till förgasare ,
bränsleledningar eller tunn plåt delar . Den instruktioner nedan är för en negativ jord system
(vanligast) . Om ditt fordon har positiv jord system (mycket ovanligt) , följ instruktionerna
nedan i omvänd ordning .
1. Anslut positiv (röd) öljettkontakt till pluspolen (POS , P , +) batteri terminalen .
2. Anslut den negativa polen (svart) öljettkontakt till negativ pol (NEG , N , -) batteri terminalen
.
3. Anslut batteriladdaren till ett lämpligt eluttag . Gör inte inte ansikte de batteri när att göra
denna koppling .
4. Vid frånkoppling , gör i omvänd ordning: ta bort negativa polen först (eller den positiva polen
först för positiva jordsystem) .
Börja ladda
1. Kontrollera batteriets spänning och kemi .
2. Bekräfta att du har anslutit batteriklämmorna eller öljettterminal kontakter ordentligt och att
nätuttaget är inkopplad en elektrisk utlopp .
3. [ Första gången [användning] Laddaren kommer att börja i standby-läge , och "Paus" vilja
vara cirklad i blå . I Standby läge , laddaren tillhandahåller inte några makt .
4. Tryck på Knappen "Batterityp" för att välja batterityp , sedan trycka de "Spänning"
knappen och tryck sedan på Knappen "Aktuell" .
5. Tryck på "Start"-knappen , så blir det markerad i blå; för det andra , den batteri vilja vara
upptäckt . Om batteriet är normalt , nej batteri indikatorn kommer att sväng av , och de
laddare vilja arbete normalt; annars kommer det att inte .
6. Laddaren kan nu vänster ansluten till de batteri på alla gånger till förse underhåll laddning .
Autominne: Laddaren har inbyggt autominne och vilja återvända till de sista avgift läge när
den är ansluten . Välj lämpligt läge och tryck på "Start" knappen och de laddare kommer att
spara det nya arbetssättet läge .
Försiktighet: Professionell Läget kan inte sparas automatiskt .
LADDNINGSTIDER
Den uppskattade laddningstiden för ett batteri beräknas som följande: Laddning Tid (timmar)
= Batterikapacitet (Ah) / Laddström (A) . Batteriet kapacitet (Ah) en d dess djup av
ansvarsfrihet (DoD) påverkar laddningstiden avsevärt . Den beräknade tiden är baserad på en
genomsnittligt urladdningsdjup till ett fulladdat tillstånd och är för hänvisning endast . Faktisk
resultat kan variera beroende på batteriets skick . Laddningstiden för en normalt utskriven batteri
är
baserat på 50 % Försvarsdepartementet . Temperaturen påverkar också laddning effektivitet .

- 12 -
VEVOR Batteriladdare har termisk kompensationsteknik , som automatiskt
justerar laddningsparametrar för att optimera prestanda . Nedan följer en laddning tid referens
för modell:
XFH-SS01 :
Batteristorlek
Ah(Amp timme)
Ungefärlig laddningstid timmar
6V
12V
24V
36V
48 V
40
3
3
6
10
13
60
5
5
10
15
20
80
6
6
12
20
26
120
10
10
20
200
17
17
XFH-SS0 2 :
XFH-SS0 3 / XFH- SS07:
Batteristorlek
Ah(Amp timme)
Ungefärlig laddningstid timmar
6V
12V
24V
36V
48V
60V
72 V
40
3
3
5
8
10
13
15
60
4
4
8
11
15
19
23
80
5
5
10
15
20
25
31
120
8
8
15
23
30
200
13
13
25
Batteristorlek
Ah(Am pour)
Ungefärlig laddningstid timmar
6V
12V
24V
40
3
2
4
60
4
3
6
80
5
4
8
120
8
6
12
200
13
10
20
400
25
20
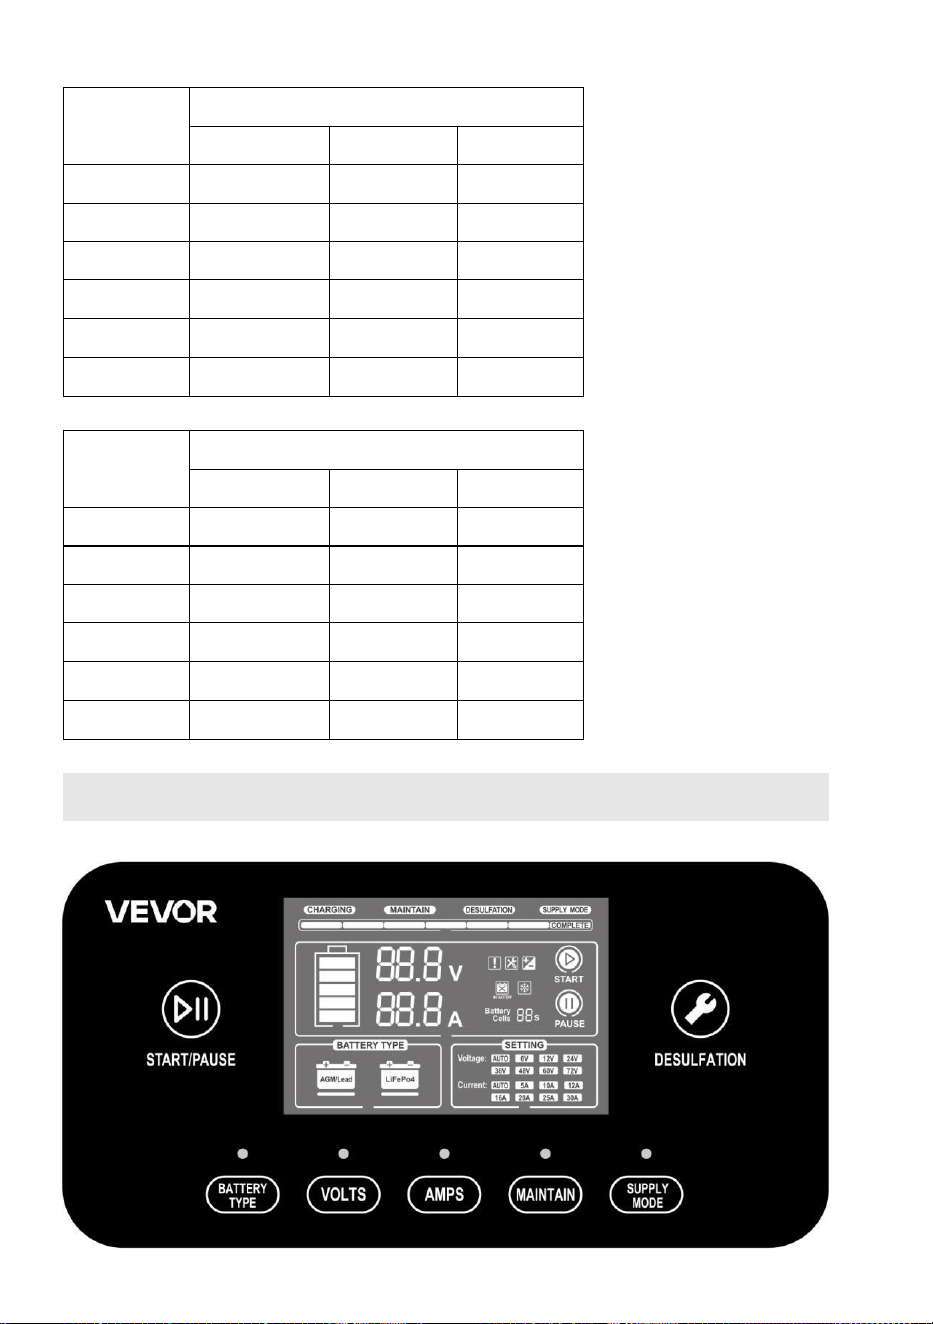
- 13 -
XFH- SS0 4/ XFH -SS08
XFH- SS0 5/ XFH- SS09:
FÖRSTÅ LADDNINGSINDIKATION
Batteristorlek
Ah(Amp timme)
Ungefärlig laddningstid timmar
6V
12V
24V
40
3
2
3
60
4
3
5
80
5
3. 5
7
120
8
5
10
200
13
8
16
400
25
16
Batteristorlek
Ah(Amp timme)
Ungefärlig laddningstid timmar
6V
12V
24V
40
3
1. 5
3
60
4
2
4
80
5
3
5. 5
120
8
4
8
200
13
7
14
400
25
14
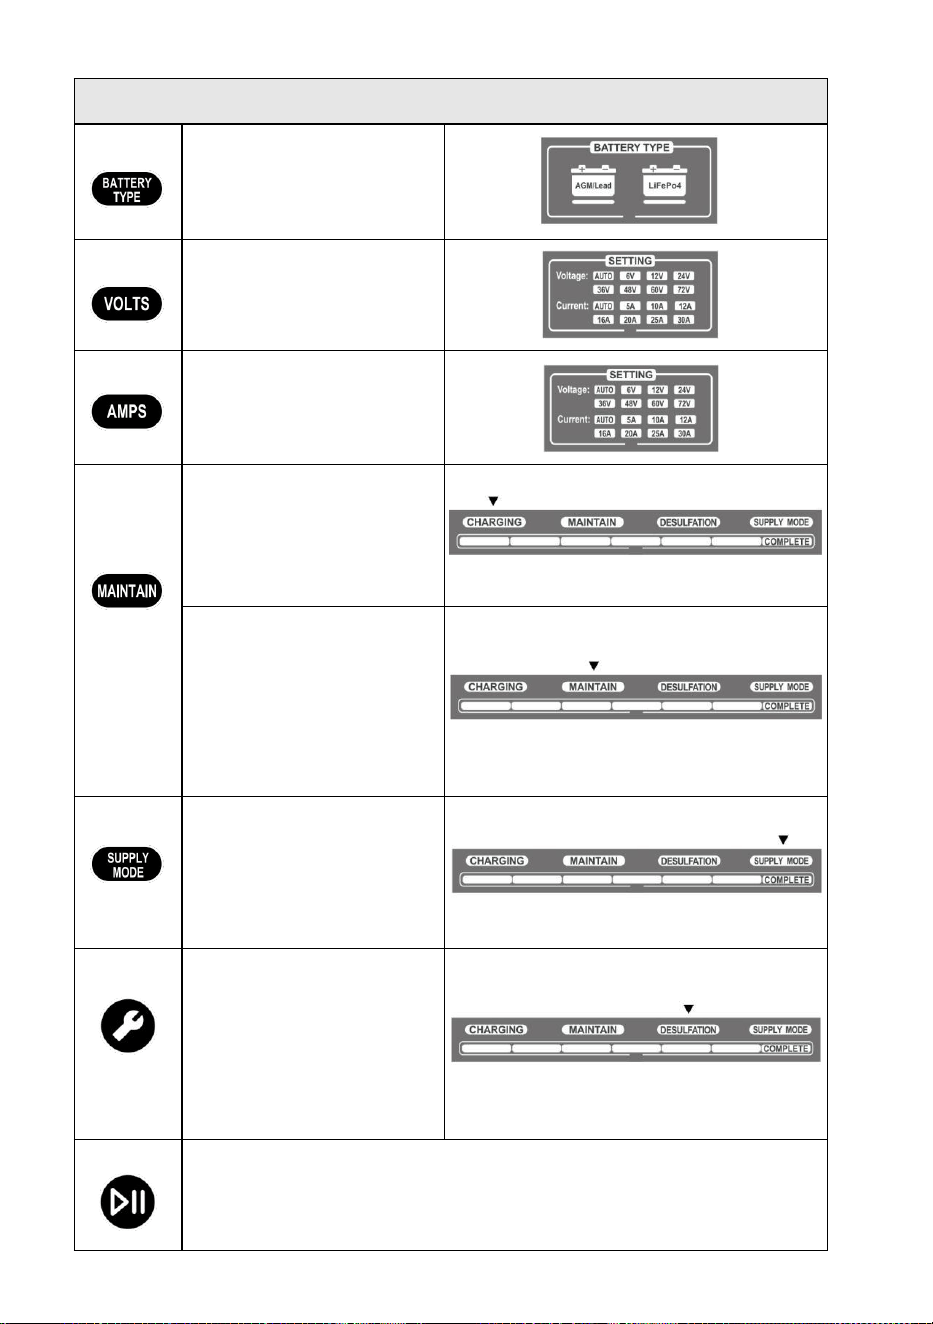
- 14 -
Knappillustration
Knapp
Batteri Knapp: Tryck på
knappen för att välja batterityp;
de Indikatorn för "Batterityp"
tänds på .
Knapp
Spänning Knapp : Tryck de knapp
för att välja spänning; "Spänning"
indikatorn kommer att tändas .
Knapp
Nuvarande Knapp: Tryck på knapp
för att välja strömmen;
"Nuvarande" indikatorn kommer att
tändas .
Knapp
Laddning och Upprätthålla Läge:
Den Indikatorn "Laddning" tänds .
När batteriet och driva
strömförsörjningen är korrekt
ansluten , förloppsindikatorn
kommer att tändas på enligt den
valda laddningen läge .
Om batteri har inte varit begagnad
under en längre tid , tryck på
knappen till välja Bibehåll läge .
Den batteri kommer att debiteras
med en små nuvarande för att
bibehålla sin laddning; indikatorn
"Underhåll" tänds , och
framstegen stapeln kommer att
blinka cykliskt . (Underhåll läget är
endast för bly-syra batterier . )
Knapp
Förse Läge: När batteriet är
korrekt ansluten men kan inte
detekteras , tryck på knappen till
använda "Matningsläge" för
laddning . Den Indikatorn för
"Matning" tänds
på , och framstegen stapeln
kommer att blinka cykliskt .
Knapp
Avsulfatering Läge (Blysyra
Batteri Endast):Jag f den batteri
har har använts för en lång tid
och dess kapaciteten minskar
snabbt , tryck knappen till
använda "Avsulfatering"
läge för laddning till reparera
batteriet . Indikatorn
"Avsulfatering " tänds och
förloppsindikatorn blinkar cykliskt .
Knapp
STARTA och PAUS Knapp: När inställningarna är korrekta , tryck på knappen; den
"Start"-indikatorn tänds och laddaren börjar fungera . Tryck på knappen medan de laddare
är i drift; den "PAUSE"-indikatorn tänds och laddaren slutar fungera .

- 15 -
Grafisk indikation
Serien
umme
r
Grafisk
Indikator
Förklaring
1
Visa Battericell Nummer
I professionellt läge ,
displayens battericell antal;
I normala fall läge , ingen
visning
2
Flash
Varning:
Överström , kortslutning krets
3
PÅ
Laddning i " Avsulfatering "
4
Flash
Batteriets omvända anslutning
5
PÅ
Inte ansluten batteri
6
Flash
Omgivningstemperatur
för laddning
7
PÅ
Visa batterikapacitet
8
-
Visa laddningsspänning
9
-
Visa laddningsström
10
Visa nummer
För en beskrivning av felet
koder
Förloppsindikator Indikation

- 16 -
1. Avsulfateringssteg (endast för blybatterier)
2. Laddningsläge med liten ström
3. CC- laddning läge
4. CV- laddning läge
5. Självkontroll av batteriet
6. Flytande laddning Läge
7. Fulladdat
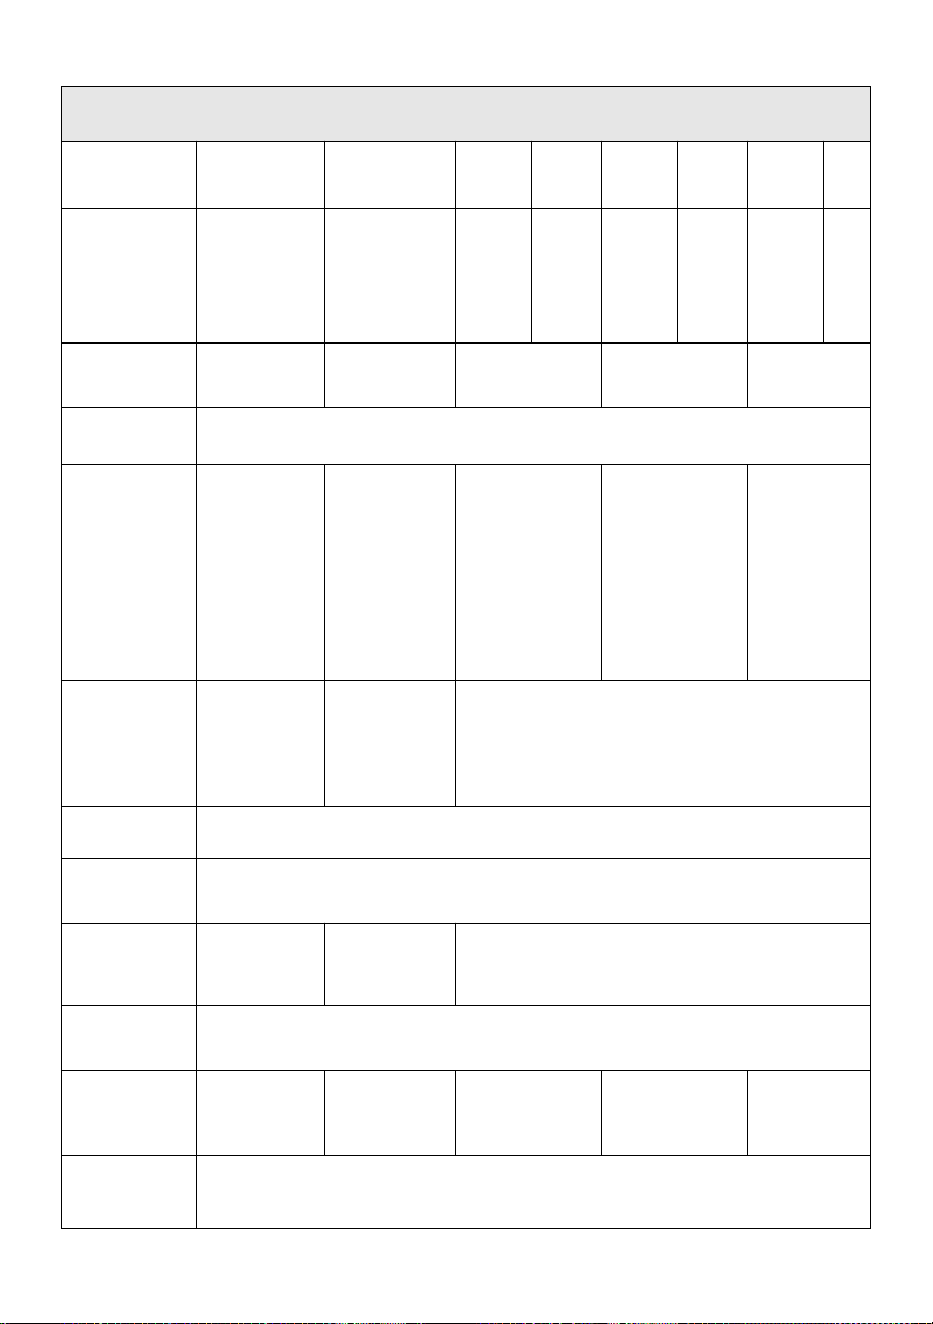
- 17 -
Laddarens specifikationer per modell
Produktmodell
XFH-SS01
XFH-
SS02
XFH-SS03
XFH-
SS07
XFH-SS04
XFH-
SS08
XFH-SS05
XFH-
SS09
Ingångsspänning
AC
120 V växelström
60 Hz
Max 250W
120 V växelström
60 Hz
Max 300W
120 V
växelström
60 Hz
Max400W
230 VAC
50 Hz
Max400W
120 V
växelström
60 Hz
Max480W
230 V AC
50Hz
Max480W
120 V
växelström
60 Hz
Max 550W
230
VAC
50 Hz
Max
550W
Produktion Driva
175 . 2W (max)
234W (max)
292W (max)
365W (max)
438W (max)
Laddningsspänning
Olika
Laddningsström
5A (6V) , 10A (6V)
,
12A (6V) , 5A
(12V) ,
10A (12V) , 12A
(12V) ,
5A (24V) , 6A
(24V) ,
4A/(36V) ,
3A(48V)
5A (6V) , 10A (6V)
,
16A (6V) , 5A
(12V) ,
10A (12V) , 16A
(12V) ,
5A (24V) , 8A
(24V) ,
5. 3A /(36V) ,
4A(48V) ,
3,2A ( 60V) , 2,7A
(72V )
5A (6V) , 10A (6V) ,
16A (6V) , 5A (12V) ,
10A (12V) , 20A
(12V) ,
5A (24V) , 10A (24V)
5A (6V) , 10A (6V) ,
16A (6V) , 5A (12V) ,
16A (12V) , 25A
(12V) ,
5A (24V) , 10A (24V)
,
12,5A ( 24V)
5A (6V) , 10A
(6V) ,
16A (6V) , 5A
(12V) ,
16A (12V) , 30A
(12V) ,
5A (24V) , 10A
(24V) ,
15A (24V)
Lågspänning
Upptäckt
2V (6V) , 10V
(12V) ,
20V (24V) , 30V
(36V) ,
40V (48V)
2V (6V) , 10V
(12V) ,
20V (24V) , 30V
(36V) ,
40V (48V) , 50V
(60V) ,
60V (72V)
2V (6V) , 10V (12V) , 20V (24V)
Motström
Dränera
< 0,5 mA
Omgivande
Temperatur
-20°C till 40°C
Typ av Batterier
6V , 12V , 24V
36V , 48V
6V , 12V , 24V
36V , 48V , 60V ,
72V
6V , 12V , 24V
Batteri
Kemikalier
Våt , Gel , MF , CA , EFB , AGM , Kalcium , LiFePO4
Batterikapacitet
Fram till 200 Ah ,
Underhåller
Alla
Batteristorlekar
Fram till 300 Ah ,
Underhåller
Alla
Batteristorlekar
Upp till 400 Ah ,
underhåller alla
Batteri
Storlekar
Upp till 500 Ah ,
underhåller alla
Batteri
Storlekar
Upp till 600 Ah ,
underhåller alla
Batteri
Storlekar
Kyl Input
Spänning AC
Fläkt Konvektion

- 18 -
val av batterispänning (Professionellt läge)
Batterityper
Spänningsomr
åde
Seriecell
Räkna
Batteriets
nominella
Spänning (V)
Laddning
Spänning (V)
Spänning
Tröskel
Område (V)
LiFePo4
batteri
12V
3
9. 6
10. 95
7. 5-10 . 95
4
12. 8
14. 6
10-14 . 6
24V
6
19. 2
21. 9
15-21 . 9
8
25. 6
29. 2
20-29 . 2
36V
11
35. 2
40. 15
27. 5-40 . 15
12
38. 4
43. 8
30-43 . 8
48V
14
44. 8
51. 1
35-51 . 1
15
48
54. 75
37. 5-54 . 75
16
51. 2
58. 4
40-58 . 4
60V
18
57. 6
65. 7
45-65 . 7
19
60 . 8
69. 35
47,5–69,35
20
64
73
50-73
72V
22
70,4
80,3
55–80,3
23
73,6
83,95
57,5–83,95
24
76,8
87,6
60-87 . 6
Blysyra
batteri
12V
4
13. 8
14. 6
10-14 . 6
24V
8
27. 6
29. 2
20-29 . 2
36V
12
41. 4
43. 8
30-43 . 8
48V
16
55. 2
58. 4
40-58 . 4
60V
20
69
73
50-73
72V
24
82. 8
87. 6
60-87 . 6

- 19 -
FELKOD
När maskinen inte kan laddas använda , den produkt visa vilja visa felet kod .
Se följande tabell med beskrivningar av felkoder och lösa
problem med
icke-laddning orsakat
av felaktig användning enligt motsvarande fel nummer .
Felkod
Beskrivning av felet
03E
Temperaturen inuti maskinen är för hög
04E
Utgångsladdningsläget är välj felaktigt
05E
Utgångsspänning överspänning
06E
Utgång över driva
42E
Utström över ström
43E
Spänning eller ström ingen förändring för en lång tid
04E: Tryck på startknappen för att klart .
Andra: Koppla ur strömsladden .