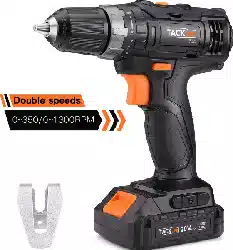

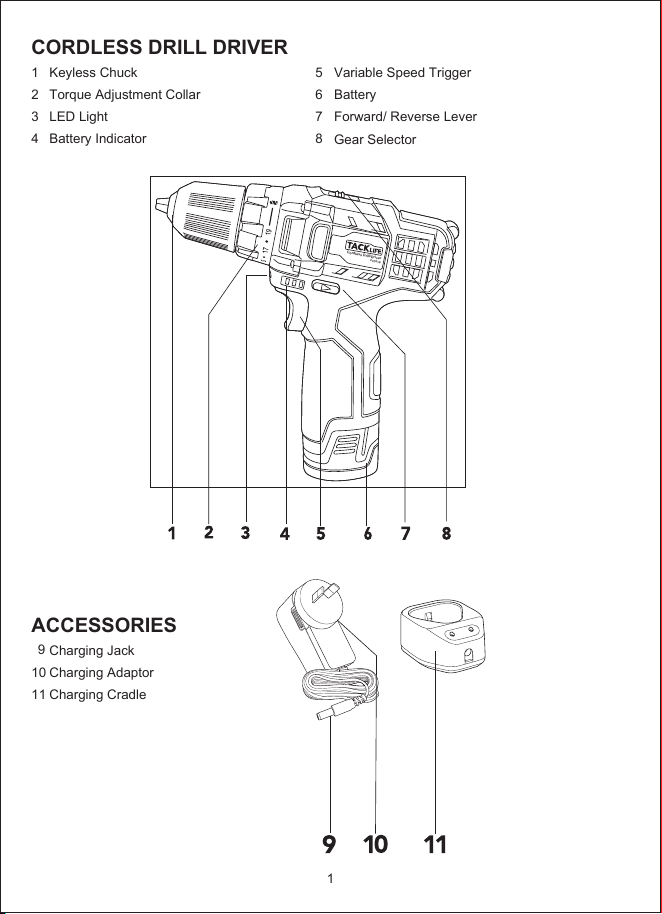
CORDLESS DRILL DRIVER
1
2
3
4
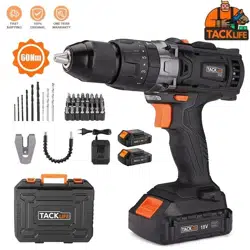
ACCESSORIES
9
10
11
5
6
7
8
Keyless Chuck
Torque Adjustment Collar
LED Light
Battery Indicator
Charging Jack
Charging Adaptor
Charging Cradle
Variable Speed Trigger
Battery
Forward/ Reverse Lever
Gear Selector
1
Cordless Drill/Driver
PCD01B
1. BATTERY
2.
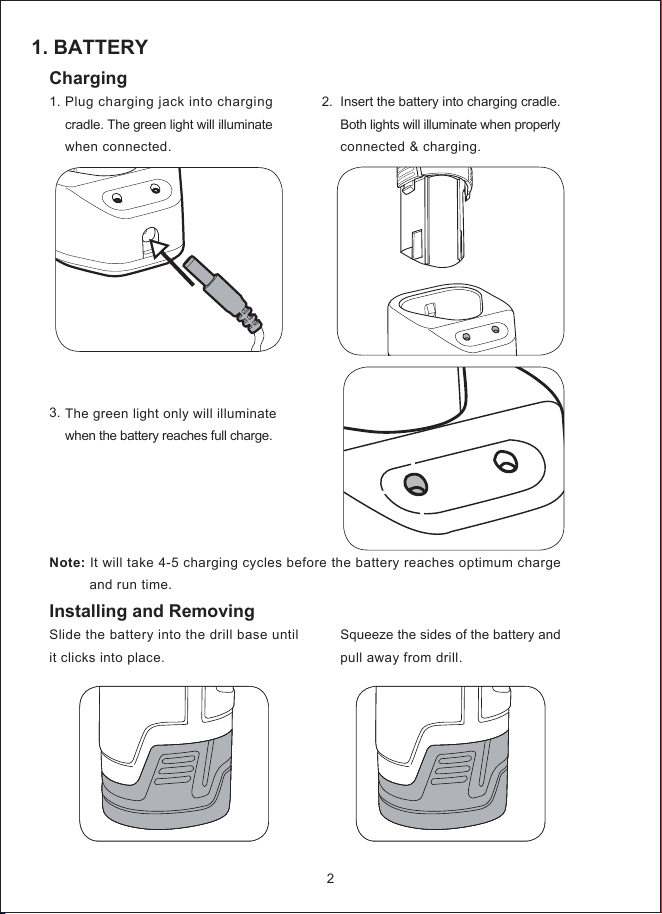
Charging
1.
3.
Installing and Removing
Slide the battery into the drill base until
it clicks into place.
Plug charging jack into charging
cradle. The green light will illuminate
when connected.
The green light only will illuminate
when the battery reaches full charge.
Insert the battery into charging cradle.
Both lights will illuminate when properly
connected & charging.
Squeeze the sides of the battery and
pull away from drill.
Note: It will take 4-5 charging cycles before the battery reaches optimum charge
and run time.
2
2. KEYLESS CHUCK
2.
4.
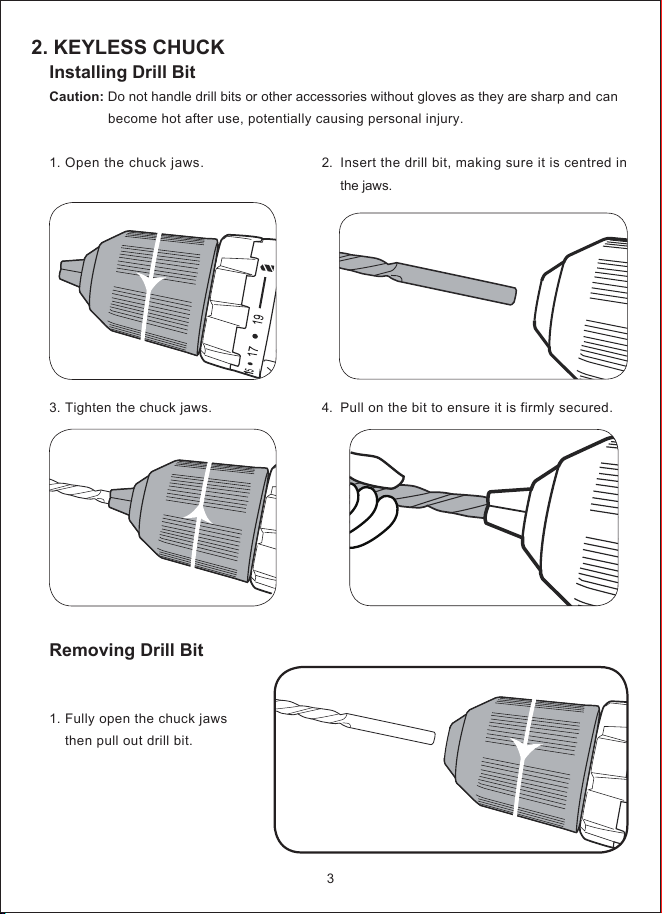
Installing Drill Bit
Caution: Do not handle drill bits or other accessories without gloves as they are sharp and can
become hot after use, potentially causing personal injury.
1.
3.
Removing Drill Bit
1.
Open the chuck jaws.
Tighten the chuck jaws.
Fully open the chuck jaws
then pull out drill bit.
Insert the drill bit, making sure it is centred in
the jaws.
Pull on the bit to ensure it is firmly secured.
3
a
3. CONTROLS
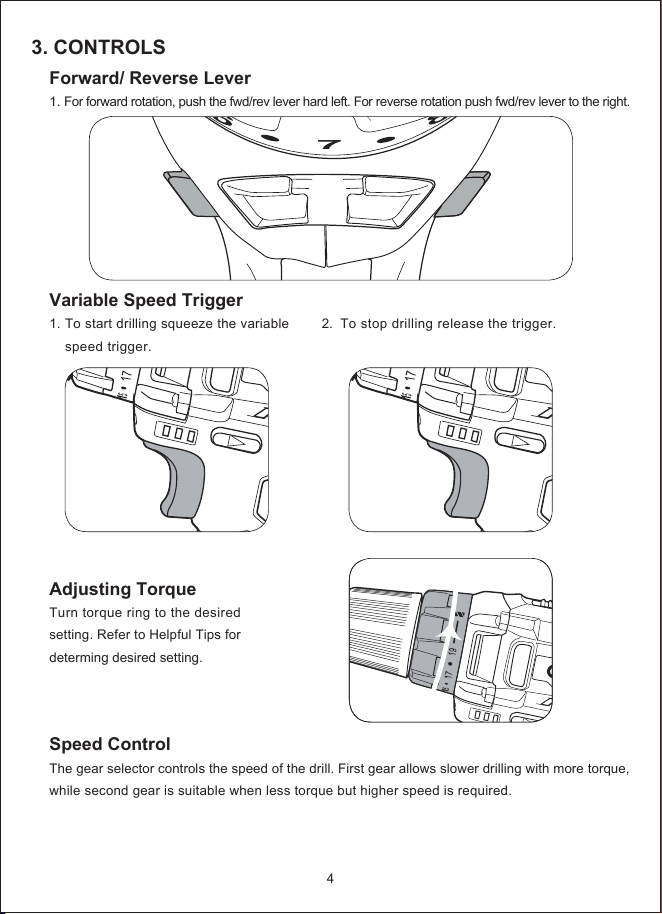
Forward/ Reverse Lever
1. For forward rotation, push the fwd/rev lever hard left. For reverse rotation push fwd/rev lever to the right.
Variable Speed Trigger
1.
Adjusting Torque
Turn torque ring to the desired
setting. Refer to Helpful Tips for
determing desired setting.
Speed Control
The gear selector controls the speed of the drill. First gear allows slower drilling with more torque,
while second gear is suitable when less torque but higher speed is required.
To start drilling squeeze the variable
speed trigger.
2.
To stop drilling release the trigger.
4
6
7
8
FWD
REV
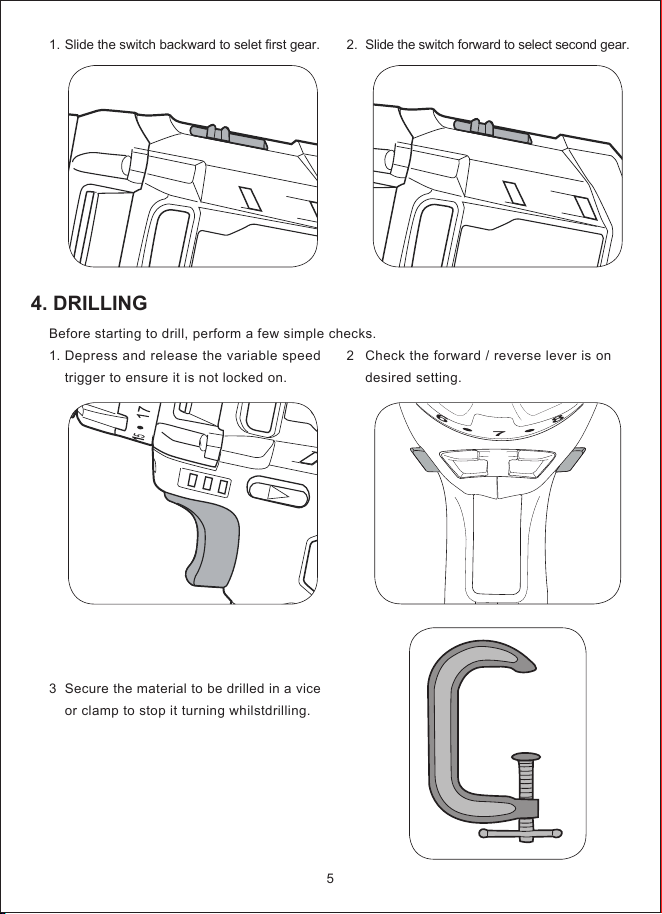
4. DRILLING
1.
Before starting to drill, perform a few simple checks.
1.
3
Slide the switch backward to selet first gear.
Depress and release the variable speed
trigger to ensure it is not locked on.
Secure the material to be drilled in a vice
or clamp to stop it turning whilstdrilling.
2.
2
Slide the switch forward to select second gear.
Check the forward / reverse lever is on
desired setting.
5
6
7
8
FWD
REV
5. HELPFUL TIPS
4.
6.
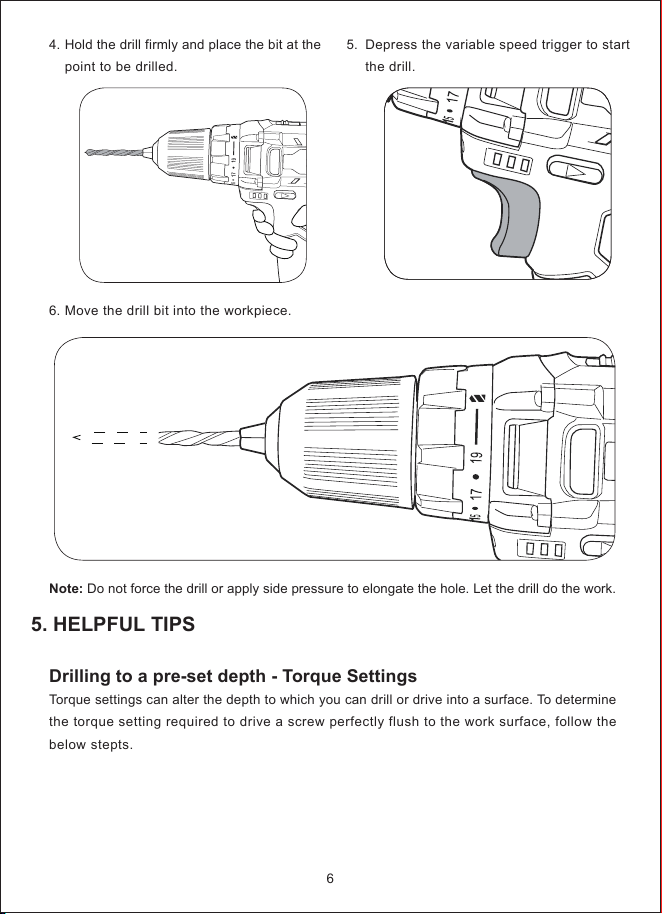
Hold the drill firmly and place the bit at the
point to be drilled.
Move the drill bit into the workpiece.
5.
Depress the variable speed trigger to start
the drill.
6
Note: Do not force the drill or apply side pressure to elongate the hole. Let the drill do the work.
Drilling to a pre-set depth - Torque Settings
Torque settings can alter the depth to which you can drill or drive into a surface. To determine
the torque setting required to drive a screw perfectly flush to the work surface, follow the
below stepts.
1.
3.
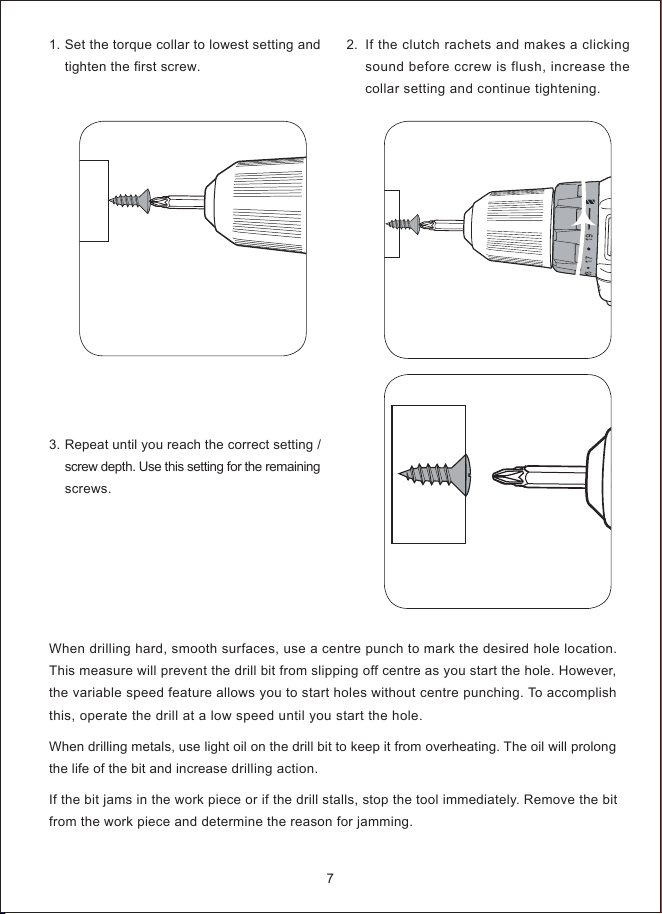
Set the torque collar to lowest setting and
tighten the first screw.
Repeat until you reach the correct setting /
screw depth. Use this setting for the remaining
screws.
2.
If the clutch rachets and makes a clicking
sound before ccrew is flush, increase the
collar setting and continue tightening.
7
When drilling hard, smooth surfaces, use a centre punch to mark the desired hole location.
This measure will prevent the drill bit from slipping off centre as you start the hole. However,
the variable speed feature allows you to start holes without centre punching. To accomplish
this, operate the drill at a low speed until you start the hole.
When drilling metals, use light oil on the drill bit to keep it from overheating. The oil will prolong
the life of the bit and increase drilling action.
If the bit jams in the work piece or if the drill stalls, stop the tool immediately. Remove the bit
from the work piece and determine the reason for jamming.
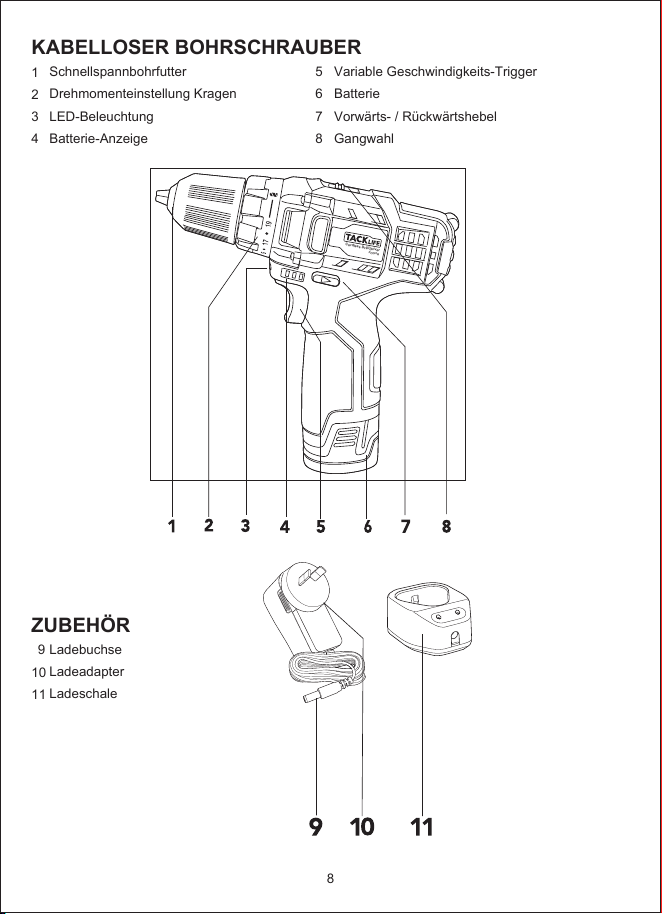
KABELLOSER BOHRSCHRAUBER
1
2
3
4
ZUBEHÖR
9
10
11
5
6
7
8
Schnellspannbohrfutter
Drehmomenteinstellung Kragen
LED-Beleuchtung
Batterie-Anzeige
Ladebuchse
Ladeadapter
Ladeschale
Variable Geschwindigkeits-Trigger
Batterie
Vorwärts- / Rückwärtshebel
Gangwahl
8
Cordless Drill/Driver
PCD01B
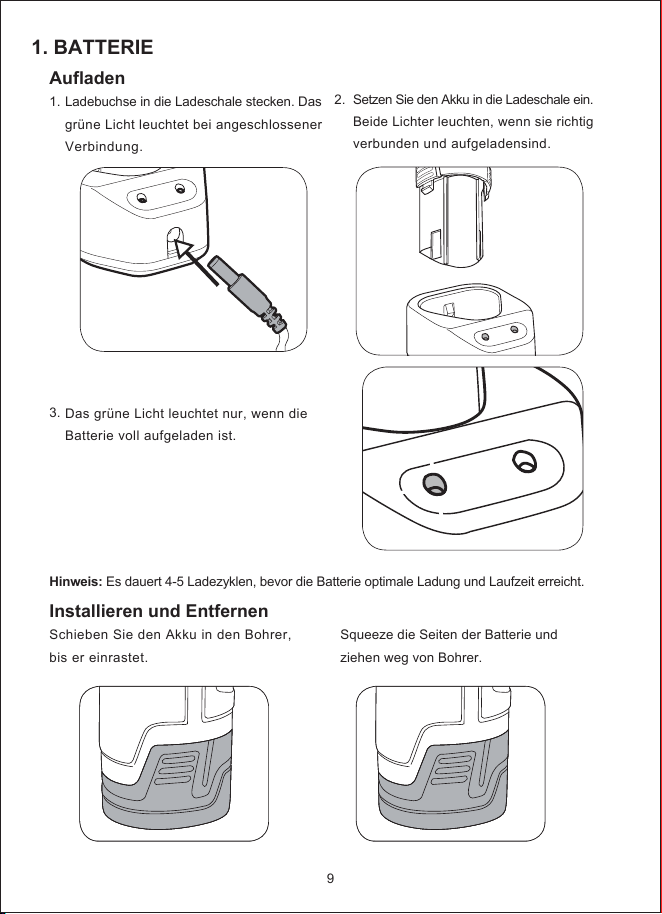
1. BATTERIE
2.
Aufladen
1.
3.
Installieren und Entfernen
Schieben Sie den Akku in den Bohrer,
bis er einrastet.
Ladebuchse in die Ladeschale stecken. Das
grüne Licht leuchtet bei angeschlossener
Verbindung.
Das grüne Licht leuchtet nur, wenn die
Batterie voll aufgeladen ist.
Setzen Sie den Akku in die Ladeschale ein.
Beide Lichter leuchten, wenn sie richtig
verbunden und aufgeladensind.
Squeeze die Seiten der Batterie und
ziehen weg von Bohrer.
Hinweis: Es dauert 4-5 Ladezyklen, bevor die Batterie optimale Ladung und Laufzeit erreicht.
9
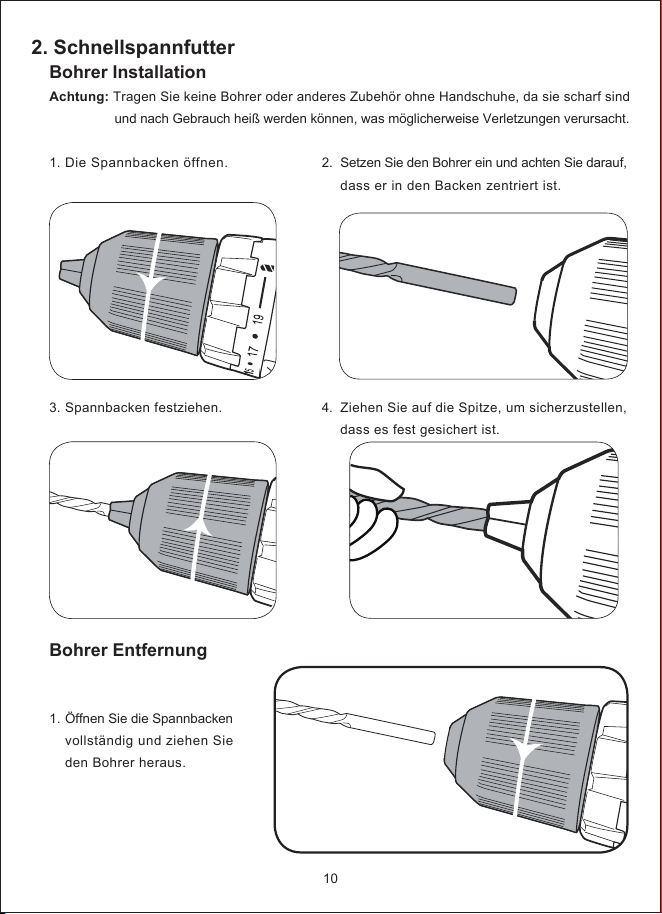
2. Schnellspannfutter
2.
4.
Bohrer Installation
Achtung: Tragen Sie keine Bohrer oder anderes Zubehör ohne Handschuhe, da sie scharf sind
und nach Gebrauch heiß werden können, was möglicherweise Verletzungen verursacht.
1.
3.
Bohrer Entfernung
1.
Die Spannbacken öffnen.
Spannbacken festziehen.
Öffnen Sie die Spannbacken
vollständig und ziehen Sie
den Bohrer heraus.
Setzen Sie den Bohrer ein und achten Sie darauf,
dass er in den Backen zentriert ist.
Ziehen Sie auf die Spitze, um sicherzustellen,
dass es fest gesichert ist.
10
a
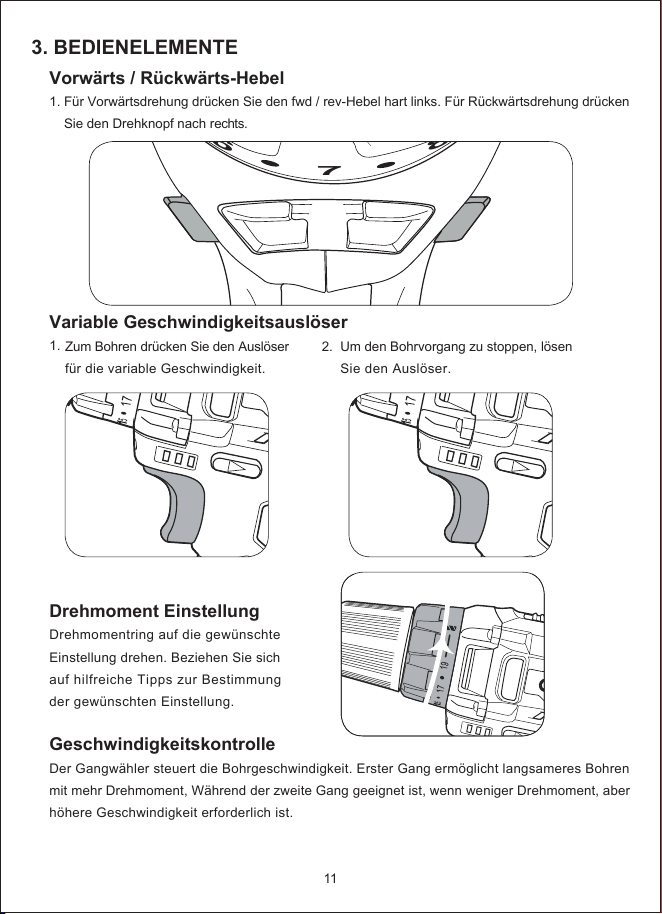
3. BEDIENELEMENTE
Vorwärts / Rückwärts-Hebel
1. Für Vorwärtsdrehung drücken Sie den fwd / rev-Hebel hart links. Für Rückwärtsdrehung drücken
Sie den Drehknopf nach rechts.
Variable Geschwindigkeitsauslöser
1.
Drehmoment Einstellung
Drehmomentring auf die gewünschte
Einstellung drehen. Beziehen Sie sich
auf hilfreiche Tipps zur Bestimmung
der gewünschten Einstellung.
Geschwindigkeitskontrolle
Der Gangwähler steuert die Bohrgeschwindigkeit. Erster Gang ermöglicht langsameres Bohren
mit mehr Drehmoment, Während der zweite Gang geeignet ist, wenn weniger Drehmoment, aber
höhere Geschwindigkeit erforderlich ist.
Zum Bohren drücken Sie den Auslöser
für die variable Geschwindigkeit.
2.
Um den Bohrvorgang zu stoppen, lösen
Sie den Auslöser.
11
6
7
8
FWD
REV
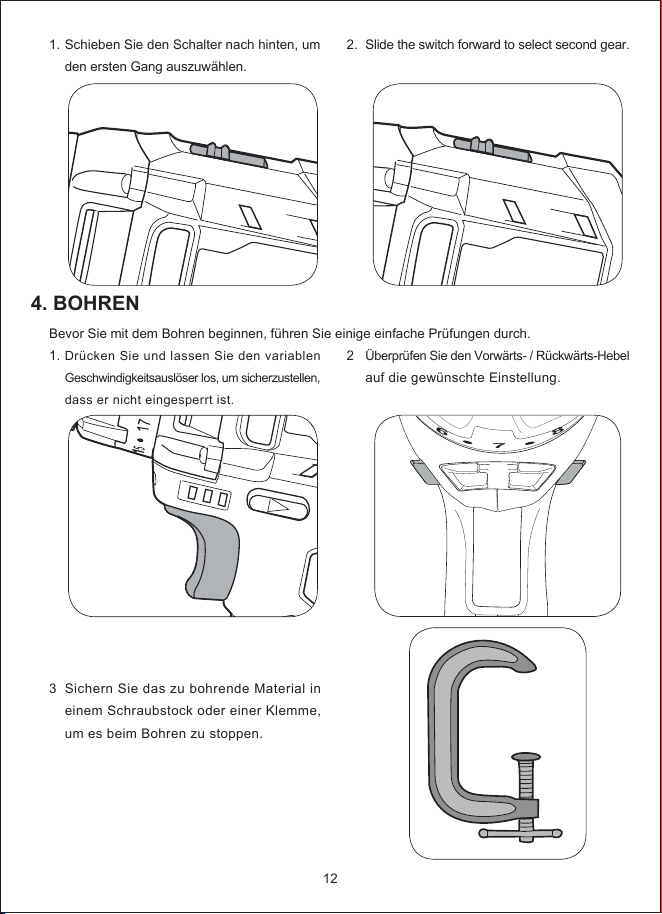
4. BOHREN
1.
Bevor Sie mit dem Bohren beginnen, führen Sie einige einfache Prüfungen durch.
1.
3
Schieben Sie den Schalter nach hinten, um
den ersten Gang auszuwählen.
Drücken Sie und lassen Sie den variablen
Geschwindigkeitsauslöser los, um sicherzustellen,
dass er nicht eingesperrt ist.
Sichern Sie das zu bohrende Material in
einem Schraubstock oder einer Klemme,
um es beim Bohren zu stoppen.
2.
2
Slide the switch forward to select second gear.
Überprüfen Sie den Vorwärts- / Rückwärts-Hebel
auf die gewünschte Einstellung.
12
6
7
8
FWD
REV
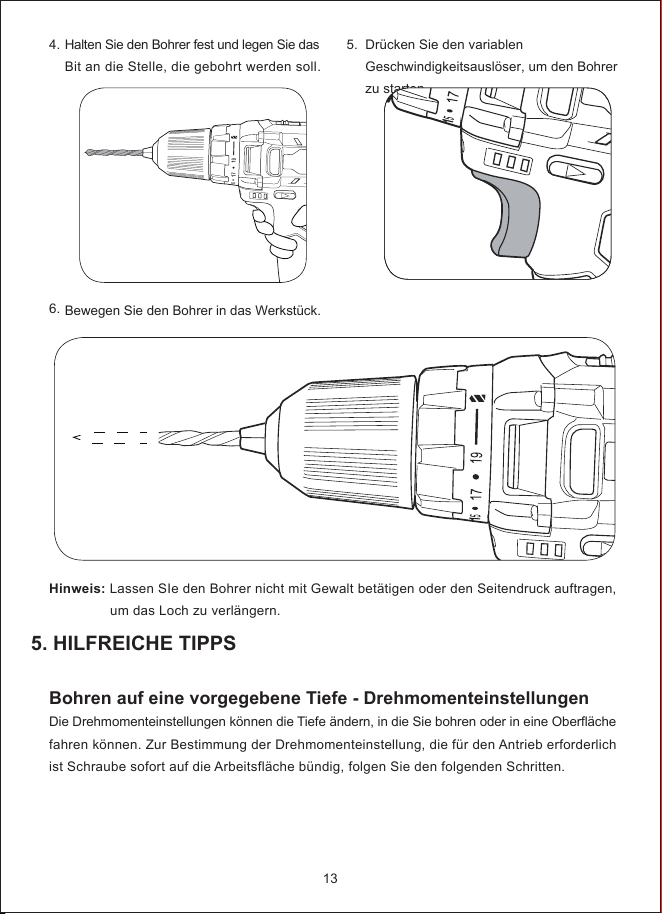
5. HILFREICHE TIPPS
4.
6.
Halten Sie den Bohrer fest und legen Sie das
Bit an die Stelle, die gebohrt werden soll.
Bewegen Sie den Bohrer in das Werkstück.
5.
Drücken Sie den variablen
Geschwindigkeitsauslöser, um den Bohrer
zu starten.
13
Hinweis: Lassen SIe den Bohrer nicht mit Gewalt betätigen oder den Seitendruck auftragen,
um das Loch zu verlängern.
Bohren auf eine vorgegebene Tiefe - Drehmomenteinstellungen
Die Drehmomenteinstellungen können die Tiefe ändern, in die Sie bohren oder in eine Oberfläche
fahren können. Zur Bestimmung der Drehmomenteinstellung, die für den Antrieb erforderlich
ist Schraube sofort auf die Arbeitsfläche bündig, folgen Sie den folgenden Schritten.
1.
3.
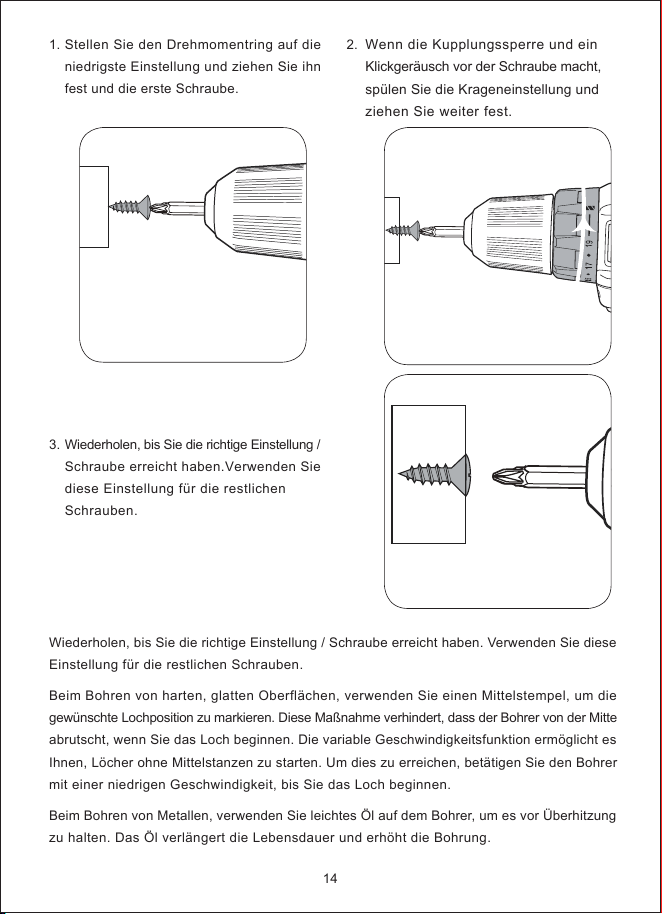
Stellen Sie den Drehmomentring auf die
niedrigste Einstellung und ziehen Sie ihn
fest und die erste Schraube.
Wiederholen, bis Sie die richtige Einstellung /
Schraube erreicht haben.Verwenden Sie
diese Einstellung für die restlichen
Schrauben.
2.
Wenn die Kupplungssperre und ein
Klickgeräusch vor der Schraube macht,
spülen Sie die Krageneinstellung und
ziehen Sie weiter fest.
14
Wiederholen, bis Sie die richtige Einstellung / Schraube erreicht haben. Verwenden Sie diese
Einstellung für die restlichen Schrauben.
Beim Bohren von harten, glatten Oberflächen, verwenden Sie einen Mittelstempel, um die
gewünschte Lochposition zu markieren. Diese Maßnahme verhindert, dass der Bohrer von der Mitte
abrutscht, wenn Sie das Loch beginnen. Die variable Geschwindigkeitsfunktion ermöglicht es
Ihnen, Löcher ohne Mittelstanzen zu starten. Um dies zu erreichen, betätigen Sie den Bohrer
mit einer niedrigen Geschwindigkeit, bis Sie das Loch beginnen.
Beim Bohren von Metallen, verwenden Sie leichtes Öl auf dem Bohrer, um es vor Überhitzung
zu halten. Das Öl verlängert die Lebensdauer und erhöht die Bohrung.

CONDUCTEUR DE FORAGE
1
2
3
4
ACCESSOIRES
9
10
11
5
6
7
8
Chuck sans clé
Collier de réglage du couple
Lumière LED
Indicateur de batterie
Chargeur Jack
Adaptateur de charge
Support de recharge
Déclencheur à vitesse variable
Batterie
Levier de marche avant / marche arrière
Sélecteur de vitesses
15
Cordless Drill/Driver
PCD01B
1. BATTERIE
2.
Charger
1.
3.
Installation et retrait
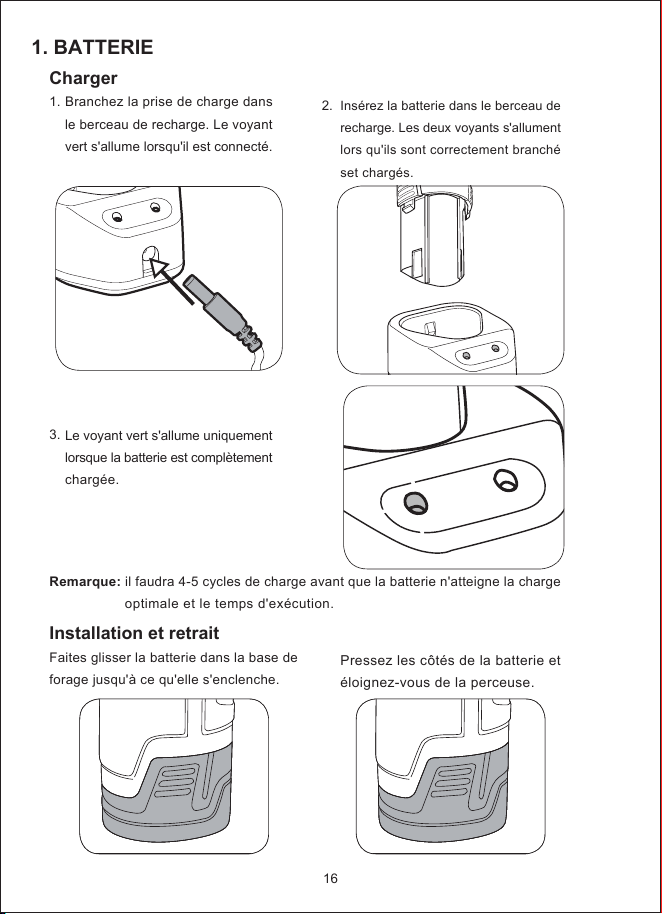
Faites glisser la batterie dans la base de
forage jusqu'à ce qu'elle s'enclenche.
Branchez la prise de charge dans
le berceau de recharge. Le voyant
vert s'allume lorsqu'il est connecté.
Le voyant vert s'allume uniquement
lorsque la batterie est complètement
chargée.
Insérez la batterie dans le berceau de
recharge. Les deux voyants s'allument
lors qu'ils sont correctement branché
set chargés.
Pressez les côtés de la batterie et
éloignez-vous de la perceuse.
Remarque: il faudra 4-5 cycles de charge avant que la batterie n'atteigne la charge
optimale et le temps d'exécution.
16
2. CHUCK KEYLESS
2.
4.
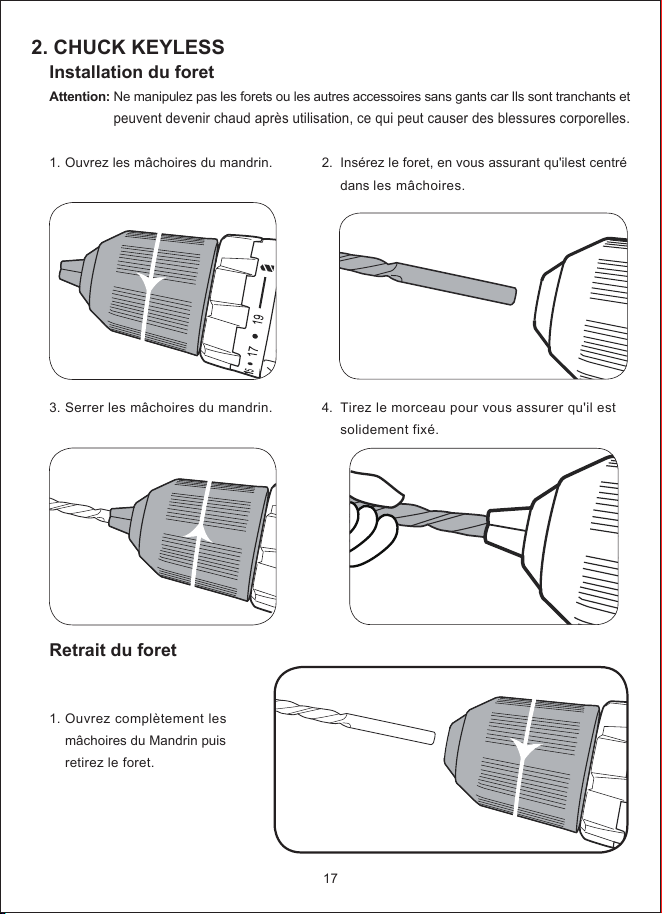
Installation du foret
Attention: Ne manipulez pas les forets ou les autres accessoires sans gants car Ils sont tranchants et
peuvent devenir chaud après utilisation, ce qui peut causer des blessures corporelles.
1.
3.
Retrait du foret
1.
Ouvrez les mâchoires du mandrin.
Serrer les mâchoires du mandrin.
Ouvrez complètement les
mâchoires du Mandrin puis
retirez le foret.
Insérez le foret, en vous assurant qu'ilest centré
dans les mâchoires.
Tirez le morceau pour vous assurer qu'il est
solidement fixé.
17
a
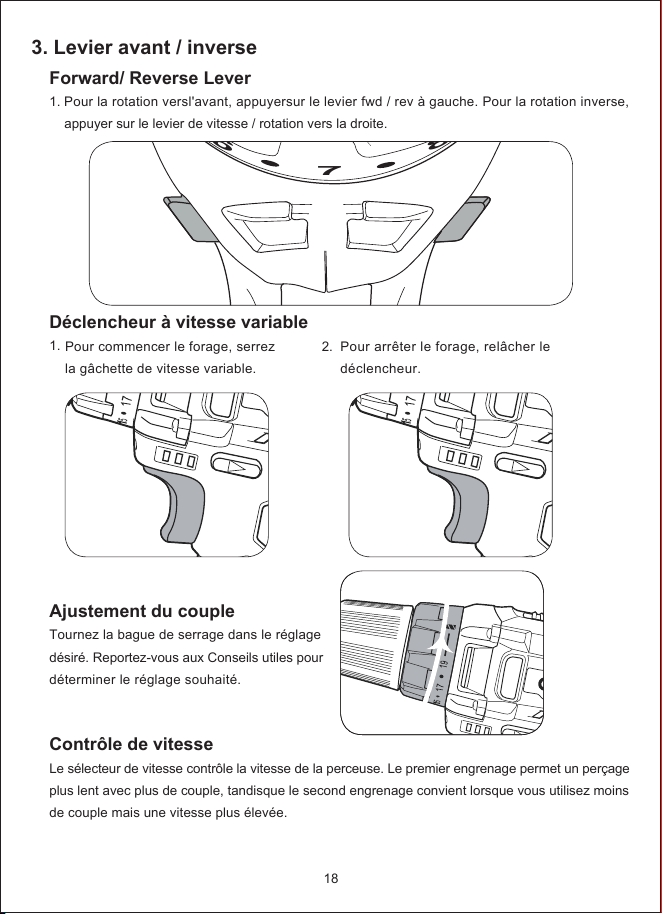
3. Levier avant / inverse
Forward/ Reverse Lever
1. Pour la rotation versl'avant, appuyersur le levier fwd / rev à gauche. Pour la rotation inverse,
appuyer sur le levier de vitesse / rotation vers la droite.
Déclencheur à vitesse variable
1.
Ajustement du couple
Tournez la bague de serrage dans le réglage
désiré. Reportez-vous aux Conseils utiles pour
déterminer le réglage souhaité.
Contrôle de vitesse
Le sélecteur de vitesse contrôle la vitesse de la perceuse. Le premier engrenage permet un perçage
plus lent avec plus de couple, tandisque le second engrenage convient lorsque vous utilisez moins
de couple mais une vitesse plus élevée.
Pour commencer le forage, serrez
la gâchette de vitesse variable.
2. Pour arrêter le forage, relâcher le
déclencheur.
18
6
7
8
FWD
REV

4. PERÇAGE
1.
Avant de commencer à forer, effectuez quelques vérifications simples.
1.
3
Faites glisser l'interrupteur vers l'arrière pour
sélectionner le premier équipement.
Appuyez et relâchez le déclencheur de
vitesse variable pour vous assurer qu'iln'est
pas verrouillé.
Fixez le matériau à forer dans un étau ou une
pince pour l'arrêter en tournant pendant le
forage.
2.
2
Faites glisser 'interrupteur vers l'avant pour
sélectionner une deuxième vitesse.
Vérifiez que le levier avant /arrière sur le
réglage désiré.
19
6
7
8
FWD
REV
5. CONSEILS UTILES
4.
6.
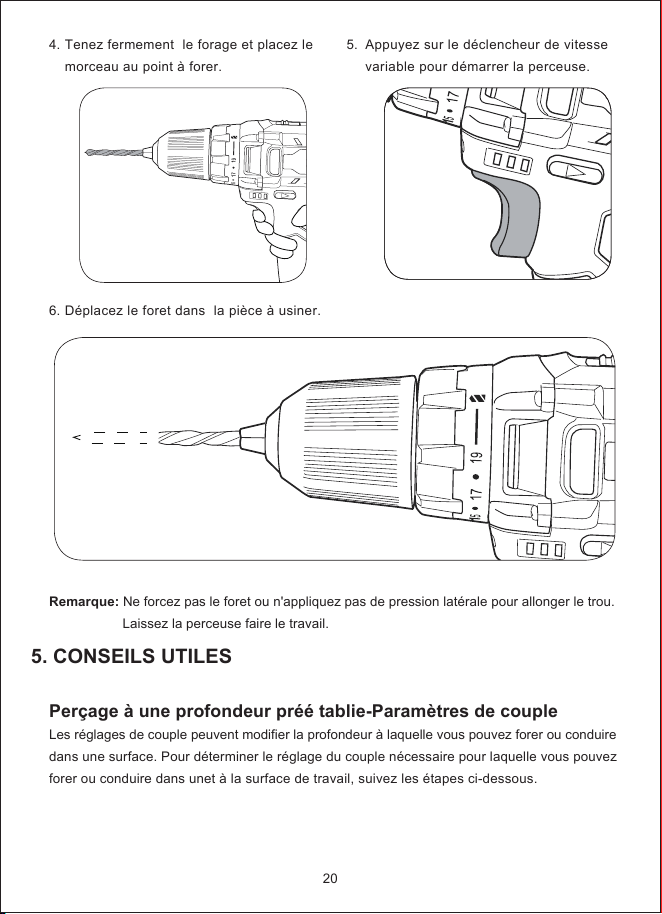
Tenez fermement le forage et placez le
morceau au point à forer.
Déplacez le foret dans la pièce à usiner.
5.
Appuyez sur le déclencheur de vitesse
variable pour démarrer la perceuse.
20
Remarque: Ne forcez pas le foret ou n'appliquez pas de pression latérale pour allonger le trou.
Laissez la perceuse faire le travail.
Perçage à une profondeur préé tablie-Paramètres de couple
Les réglages de couple peuvent modifier la profondeur à laquelle vous pouvez forer ou conduire
dans une surface. Pour déterminer le réglage du couple nécessaire pour laquelle vous pouvez
forer ou conduire dans unet à la surface de travail, suivez les étapes ci-dessous.
1.
3.
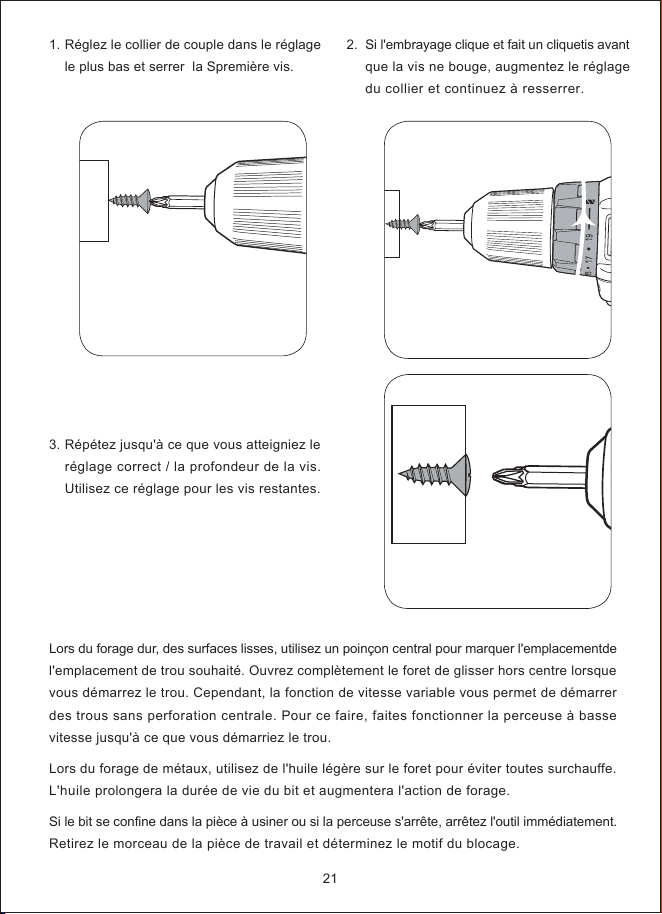
Réglez le collier de couple dans le réglage
le plus bas et serrer la Spremière vis.
Répétez jusqu'à ce que vous atteigniez le
réglage correct / la profondeur de la vis.
Utilisez ce réglage pour les vis restantes.
2.
Si l'embrayage clique et fait un cliquetis avant
que la vis ne bouge, augmentez le réglage
du collier et continuez à resserrer.
21
Lors du forage dur, des surfaces lisses, utilisez un poinçon central pour marquer l'emplacementde
l'emplacement de trou souhaité. Ouvrez complètement le foret de glisser hors centre lorsque
vous démarrez le trou. Cependant, la fonction de vitesse variable vous permet de démarrer
des trous sans perforation centrale. Pour ce faire, faites fonctionner la perceuse à basse
vitesse jusqu'à ce que vous démarriez le trou.
Lors du forage de métaux, utilisez de l'huile légère sur le foret pour éviter toutes surchauffe.
L'huile prolongera la durée de vie du bit et augmentera l'action de forage.
Si le bit se confine dans la pièce à usiner ou si la perceuse s'arrête, arrêtez l'outil immédiatement.
Retirez le morceau de la pièce de travail et déterminez le motif du blocage.
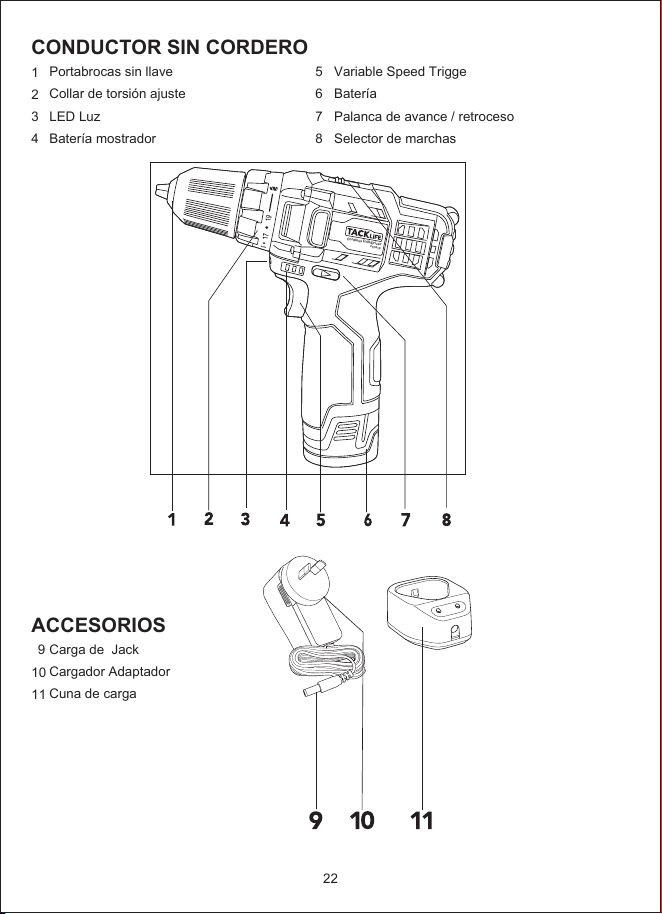
CONDUCTOR SIN CORDERO
1
2
3
4
ACCESORIOS
9
10
11
5
6
7
8
Portabrocas sin llave
Collar de torsión ajuste
LED Luz
Batería mostrador
Carga de Jack
Cargador Adaptador
Cuna de carga
Variable Speed Trigge
Batería
Palanca de avance / retroceso
Selector de marchas
22
Cordless Drill/Driver
PCD01B
1. BAERÍA
2.
Cargando
1.
3.
Instalar y Quitar
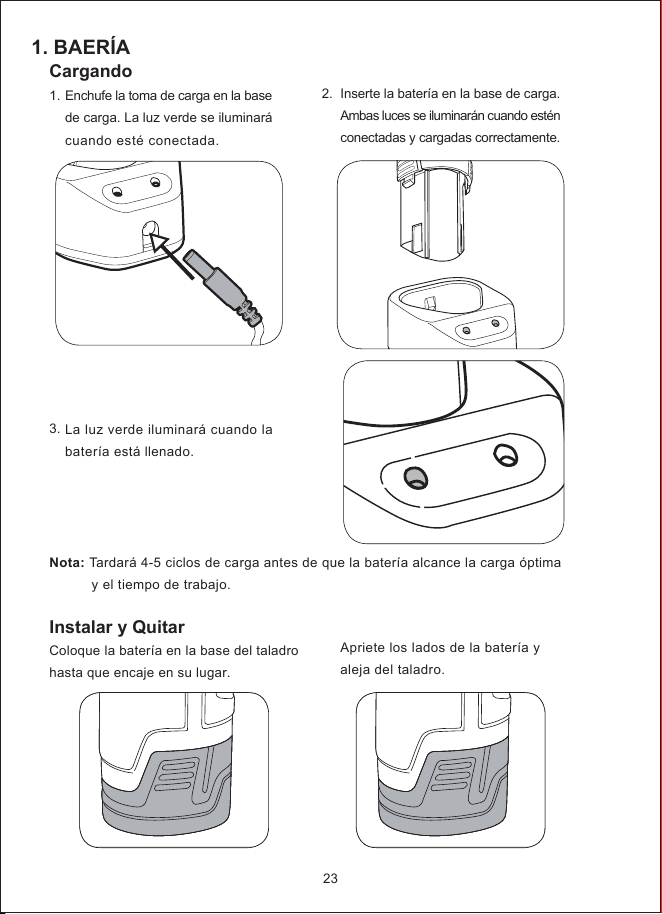
Coloque la batería en la base del taladro
hasta que encaje en su lugar.
Enchufe la toma de carga en la base
de carga. La luz verde se iluminará
cuando esté conectada.
La luz verde iluminará cuando la
batería está llenado.
Inserte la batería en la base de carga.
Ambas luces se iluminarán cuando estén
conectadas y cargadas correctamente.
Apriete los lados de la batería y
aleja del taladro.
Nota: Tardará 4-5 ciclos de carga antes de que la batería alcance la carga óptima
y el tiempo de trabajo.
23
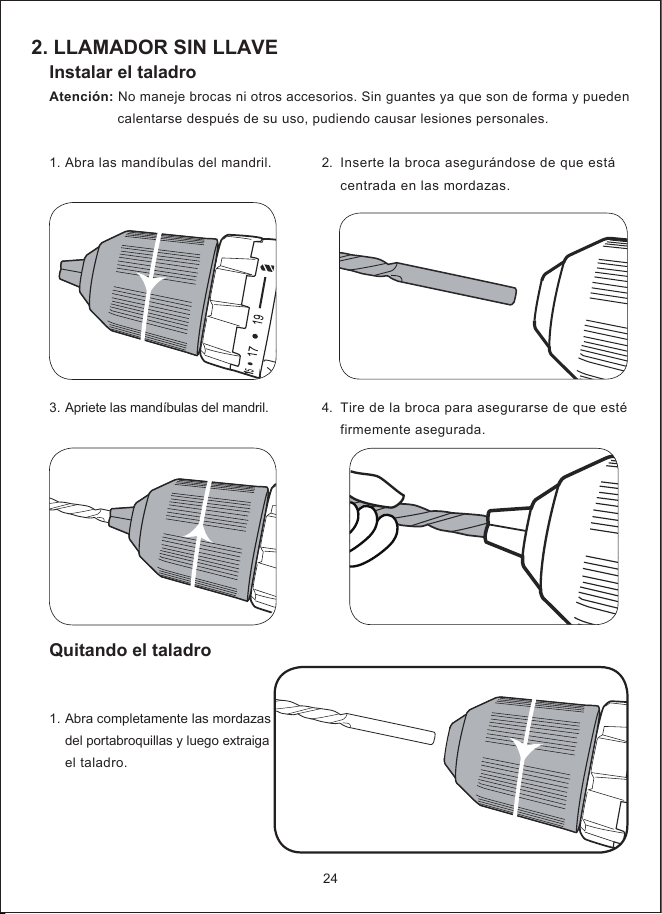
2. LLAMADOR SIN LLAVE
2.
4.
Instalar el taladro
Atención: No maneje brocas ni otros accesorios. Sin guantes ya que son de forma y pueden
calentarse después de su uso, pudiendo causar lesiones personales.
1.
3.
Quitando el taladro
1.
Abra las mandíbulas del mandril.
Apriete las mandíbulas del mandril.
Abra completamente las mordazas
del portabroquillas y luego extraiga
el taladro.
Inserte la broca asegurándose de que está
centrada en las mordazas.
Tire de la broca para asegurarse de que esté
firmemente asegurada.
24
a

3. Controles
Forward / Reverse Lever
1. Para la rotación hacia adelante, empuje la palanca de aceleración / revolución a la izquierda. Para
la rotación hacia atrás, presione la palanca de aceleración / freno hacia la derecha.
Disparador de velocidad variable
1.
Ajuste el esfuerzo de torsión
Gire el anillo de torsión al ajuste deseado.
Consulte los consejos útiles para determinar
el ajuste deseado.
Control de velocidad
El selector de engranajes controla la velocidad del taladro. El primer engranaje permite un taladrado
más lento con más par, mientras que el segundo engranaje es adecuado cuando se requiere
menor par, pero se requiere una mayor velocidad.
Comenzar a perforar presionar el
disparador de velocidad variable.
2.
Detener la perforación, suelte el gatillo.
25
6
7
8
FWD
REV
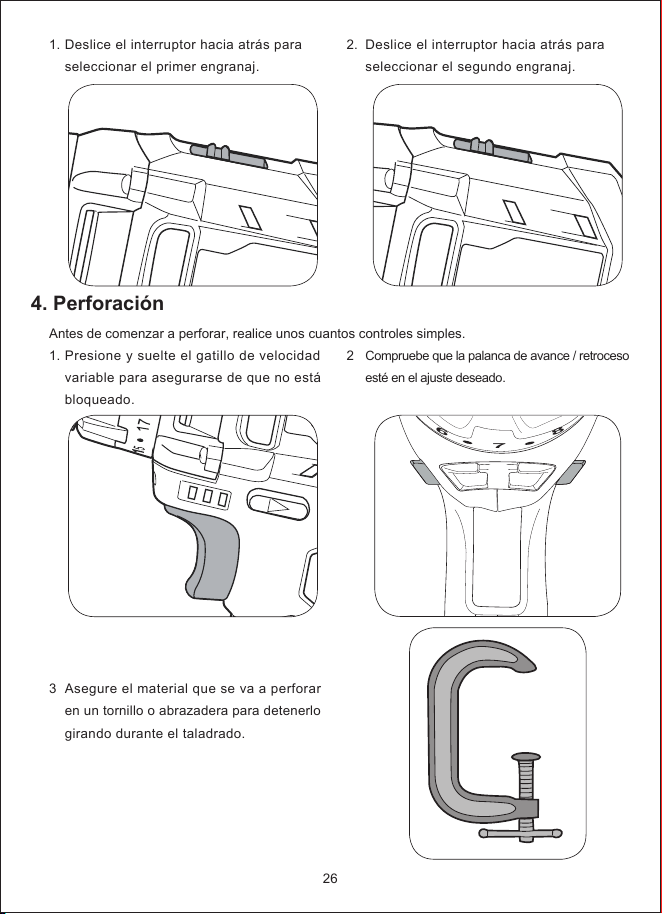
4. Perforación
1.
Antes de comenzar a perforar, realice unos cuantos controles simples.
1.
3
Deslice el interruptor hacia atrás para
seleccionar el primer engranaj.
Presione y suelte el gatillo de velocidad
variable para asegurarse de que no está
bloqueado.
Asegure el material que se va a perforar
en un tornillo o abrazadera para detenerlo
girando durante el taladrado.
2.
2
Deslice el interruptor hacia atrás para
seleccionar el segundo engranaj.
Compruebe que la palanca de avance / retroceso
esté en el ajuste deseado.
26
6
7
8
FWD
REV
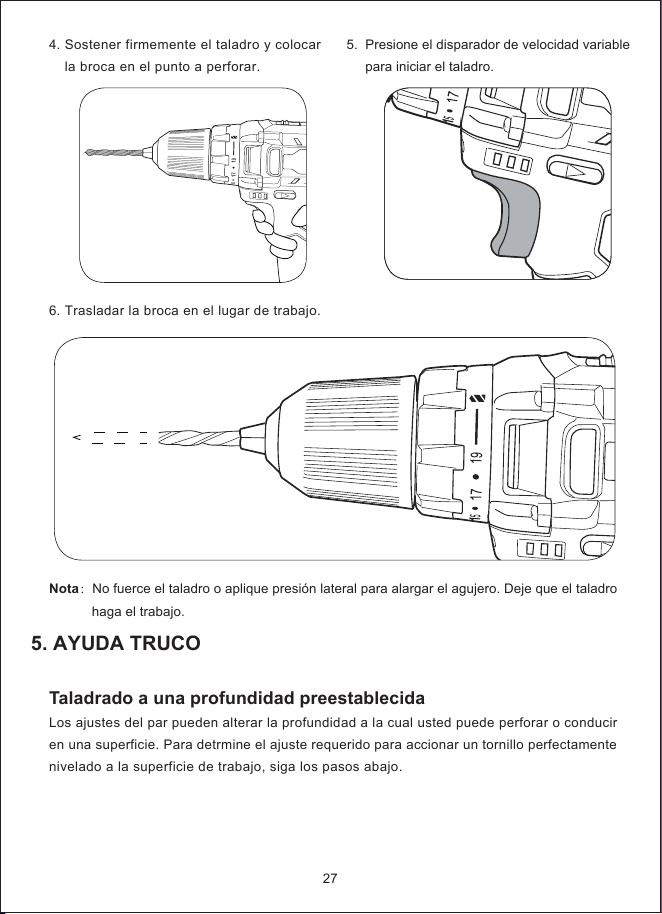
5. AYUDA TRUCO
4.
6.
Sostener firmemente el taladro y colocar
la broca en el punto a perforar.
Trasladar la broca en el lugar de trabajo.
5.
Presione el disparador de velocidad variable
para iniciar el taladro.
27
Nota:No fuerce el taladro o aplique presión lateral para alargar el agujero. Deje que el taladro
haga el trabajo.
Taladrado a una profundidad preestablecida
Los ajustes del par pueden alterar la profundidad a la cual usted puede perforar o conducir
en una superficie. Para detrmine el ajuste requerido para accionar un tornillo perfectamente
nivelado a la superficie de trabajo, siga los pasos abajo.

1.
3.
Ajuste el collar de par en el ajuste más bajo
y apriete el primer tornillo.
Repita hasta llegar al ajuste correcto /
profundidad del tornillo. Utilice este ajuste
para los tornillos restantes.
2.
Si el embrague atornilla y hace un sonido
de chasquido antes de que el tornillo sea fluch.
increase el ajuste del color y continúe apretando.
28
Al perforar superficies duras, use un punzón para marcar la ubicación del orificio deseado.
Esta medida evitará que la broca se deslice fuera del centro al comenzar el agujero. Sin embargo,
la variable lograr esto, haga funcionar el taladro a baja velocidad hasta que empiece el agujero.
Al perforar metales / utilizar aceite ligero en la broca para evitar que se sobrecaliente. El
aceite prolongará la vida útil de la broca y aumentará la acción de perforación.
Si el pedacito se atasca en la pieza de trabajo o si el taladro se estabiliza. Detenga inmediatamente
la herramienta de la pieza de trabajo lo descarga y determine la razón de atascamiento.
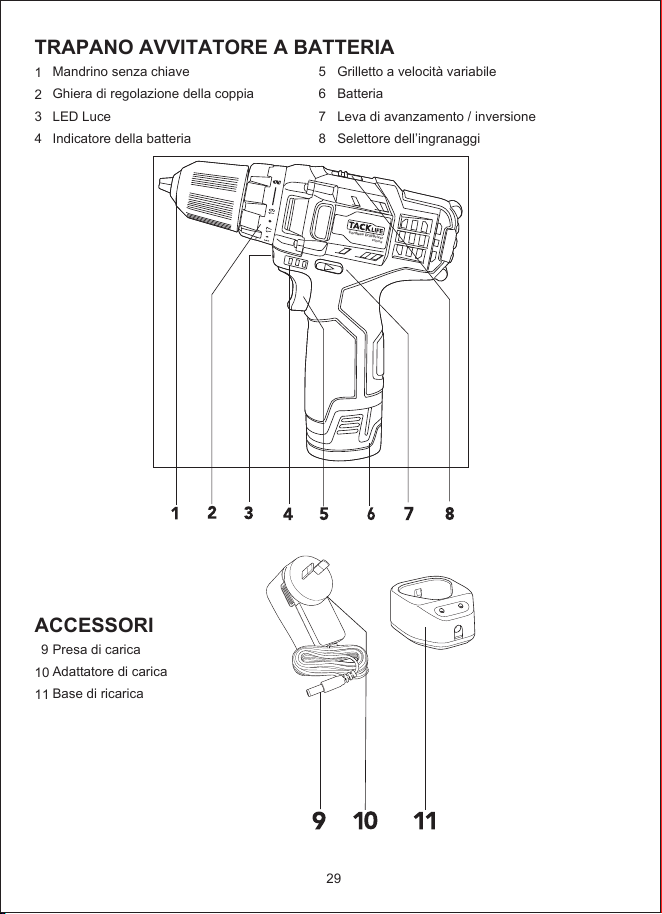
TRAPANO AVVITATORE A BATTERIA
1
2
3
4
ACCESSORI
9
10
11
5
6
7
8
Mandrino senza chiave
Ghiera di regolazione della coppia
LED Luce
Indicatore della batteria
Presa di carica
Adattatore di carica
Base di ricarica
Grilletto a velocità variabile
Batteria
Leva di avanzamento / inversione
Selettore dell’ingranaggi
29
Cordless Drill/Driver
PCD01B
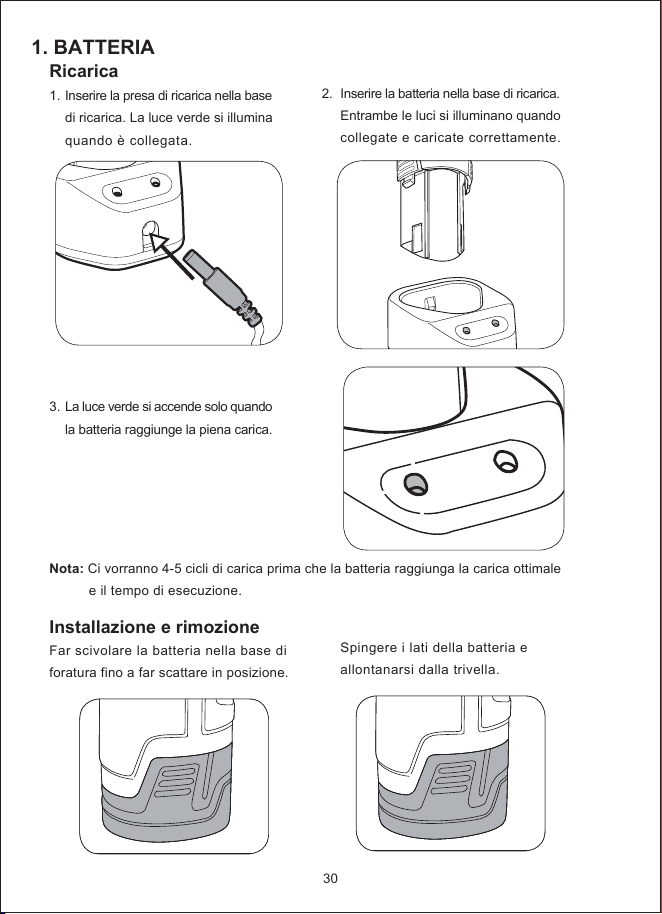
1. BATTERIA
2.
Ricarica
1.
3.
Installazione e rimozione
Far scivolare la batteria nella base di
foratura fino a far scattare in posizione.
Inserire la presa di ricarica nella base
di ricarica. La luce verde si illumina
quando è collegata.
La luce verde si accende solo quando
la batteria raggiunge la piena carica.
Inserire la batteria nella base di ricarica.
Entrambe le luci si illuminano quando
collegate e caricate correttamente.
Spingere i lati della batteria e
allontanarsi dalla trivella.
Nota: Ci vorranno 4-5 cicli di carica prima che la batteria raggiunga la carica ottimale
e il tempo di esecuzione.
30
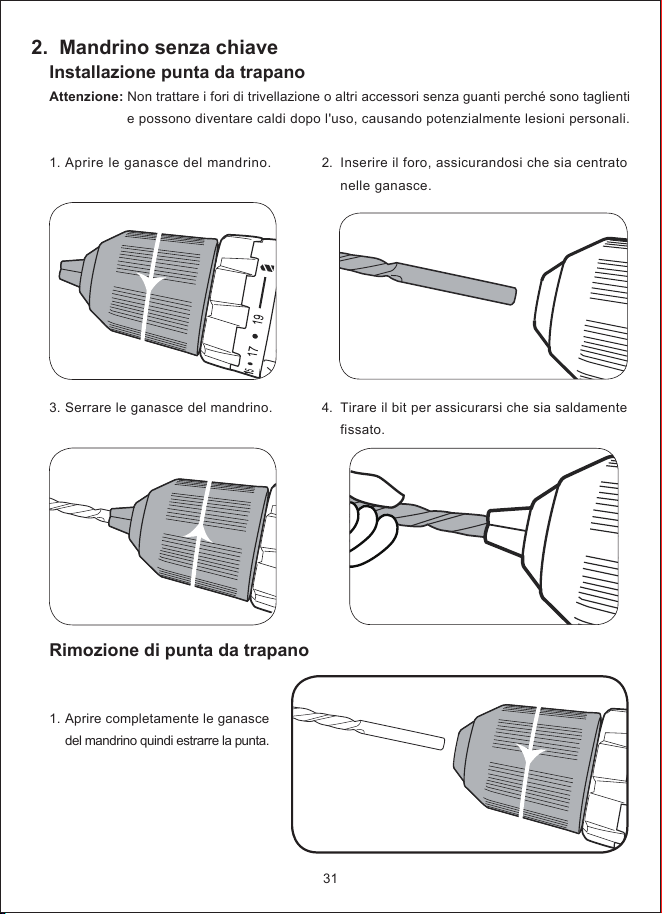
2. Mandrino senza chiave
2.
4.
Installazione punta da trapano
Attenzione: Non trattare i fori di trivellazione o altri accessori senza guanti perché sono taglienti
e possono diventare caldi dopo l'uso, causando potenzialmente lesioni personali.
1.
3.
Rimozione di punta da trapano
1.
Aprire le ganasce del mandrino.
Serrare le ganasce del mandrino.
Aprire completamente le ganasce
del mandrino quindi estrarre la punta.
Inserire il foro, assicurandosi che sia centrato
nelle ganasce.
Tirare il bit per assicurarsi che sia saldamente
fissato.
31
a
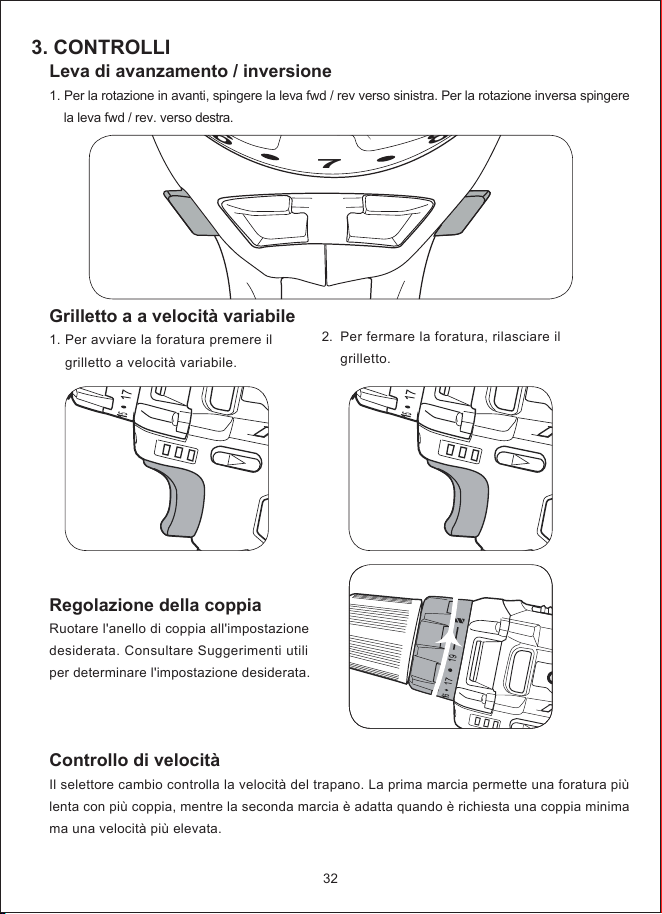
3. CONTROLLI
Leva di avanzamento / inversione
1. Per la rotazione in avanti, spingere la leva fwd / rev verso sinistra. Per la rotazione inversa spingere
la leva fwd / rev. verso destra.
Grilletto a a velocità variabile
1.
Regolazione della coppia
Ruotare l'anello di coppia all'impostazione
desiderata. Consultare Suggerimenti utili
per determinare l'impostazione desiderata.
Controllo di velocità
Il selettore cambio controlla la velocità del trapano. La prima marcia permette una foratura più
lenta con più coppia, mentre la seconda marcia è adatta quando è richiesta una coppia minima
ma una velocità più elevata.
Per avviare la foratura premere il
grilletto a velocità variabile.
2.
Per fermare la foratura, rilasciare il
grilletto.
32
6
7
8
FWD
REV
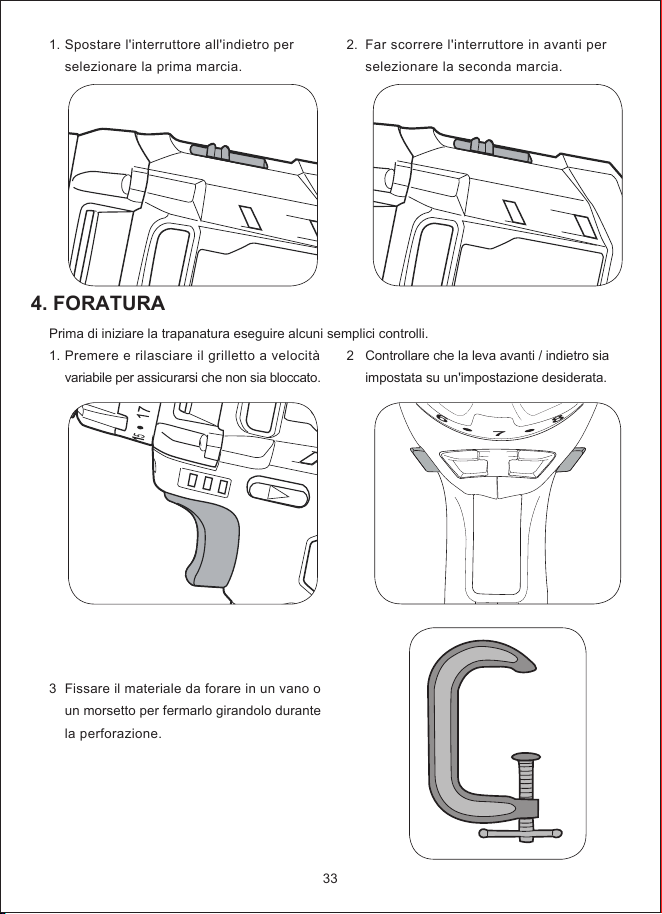
4. FORATURA
1.
Prima di iniziare la trapanatura eseguire alcuni semplici controlli.
1.
3
Spostare l'interruttore all'indietro per
selezionare la prima marcia.
Premere e rilasciare il grilletto a velocità
variabile per assicurarsi che non sia bloccato.
Fissare il materiale da forare in un vano o
un morsetto per fermarlo girandolo durante
la perforazione.
2.
2
Far scorrere l'interruttore in avanti per
selezionare la seconda marcia.
Controllare che la leva avanti / indietro sia
impostata su un'impostazione desiderata.
33
6
7
8
FWD
REV
5. CONSIGLI UTILI
4.
6.
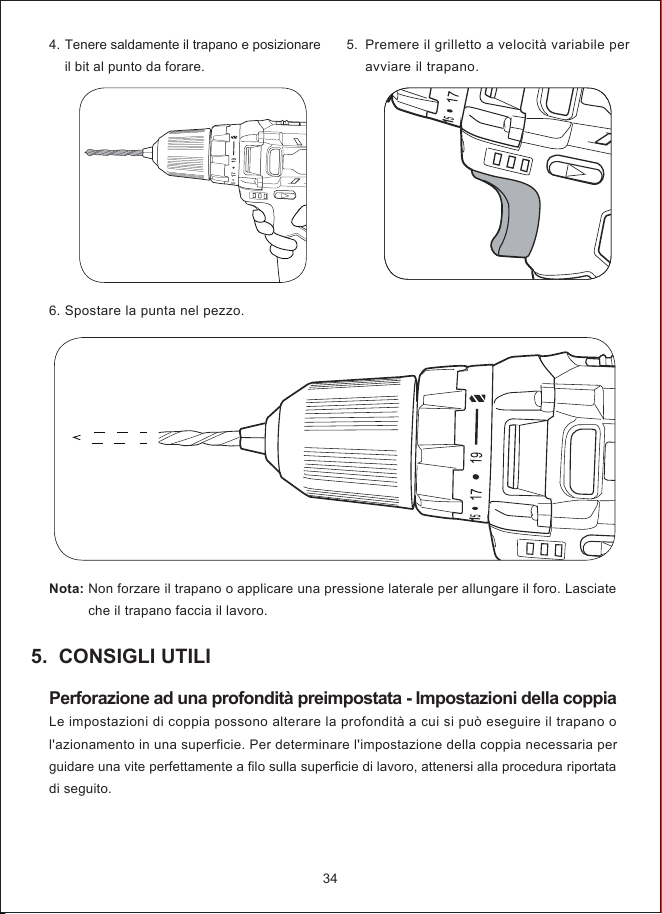
Tenere saldamente il trapano e posizionare
il bit al punto da forare.
Spostare la punta nel pezzo.
5.
Premere il grilletto a velocità variabile per
avviare il trapano.
34
Nota: Non forzare il trapano o applicare una pressione laterale per allungare il foro. Lasciate
che il trapano faccia il lavoro.
Perforazione ad una profondità preimpostata - Impostazioni della coppia
Le impostazioni di coppia possono alterare la profondità a cui si può eseguire il trapano o
l'azionamento in una superficie. Per determinare l'impostazione della coppia necessaria per
guidare una vite perfettamente a filo sulla superficie di lavoro, attenersi alla procedura riportata
di seguito.
1.
3.
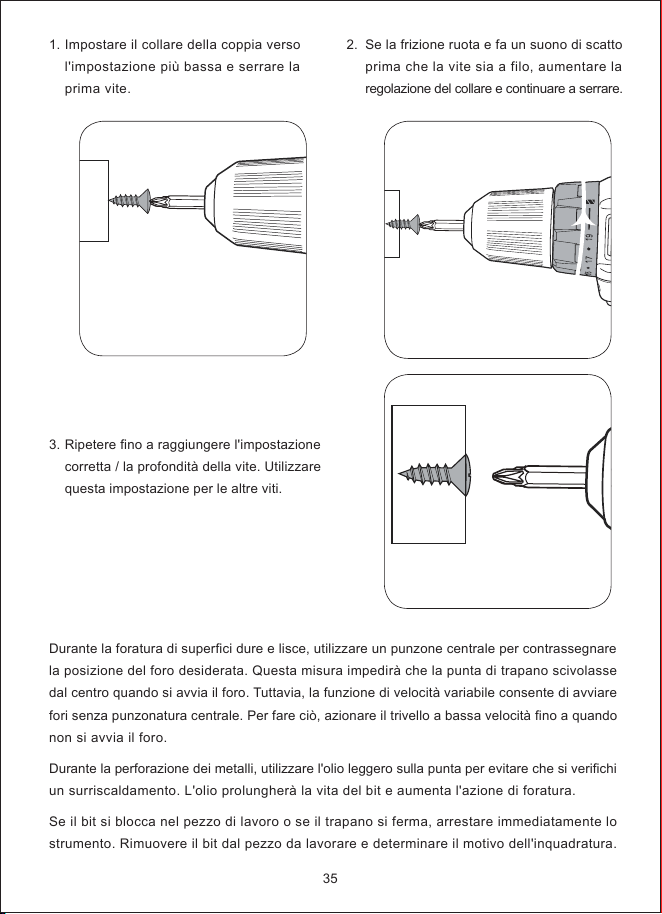
Impostare il collare della coppia verso
l'impostazione più bassa e serrare la
prima vite.
Ripetere fino a raggiungere l'impostazione
corretta / la profondità della vite. Utilizzare
questa impostazione per le altre viti.
2.
Se la frizione ruota e fa un suono di scatto
prima che la vite sia a filo, aumentare la
regolazione del collare e continuare a serrare.
35
Durante la foratura di superfici dure e lisce, utilizzare un punzone centrale per contrassegnare
la posizione del foro desiderata. Questa misura impedirà che la punta di trapano scivolasse
dal centro quando si avvia il foro. Tuttavia, la funzione di velocità variabile consente di avviare
fori senza punzonatura centrale. Per fare ciò, azionare il trivello a bassa velocità fino a quando
non si avvia il foro.
Durante la perforazione dei metalli, utilizzare l'olio leggero sulla punta per evitare che si verifichi
un surriscaldamento. L'olio prolungherà la vita del bit e aumenta l'azione di foratura.
Se il bit si blocca nel pezzo di lavoro o se il trapano si ferma, arrestare immediatamente lo
strumento. Rimuovere il bit dal pezzo da lavorare e determinare il motivo dell'inquadratura.
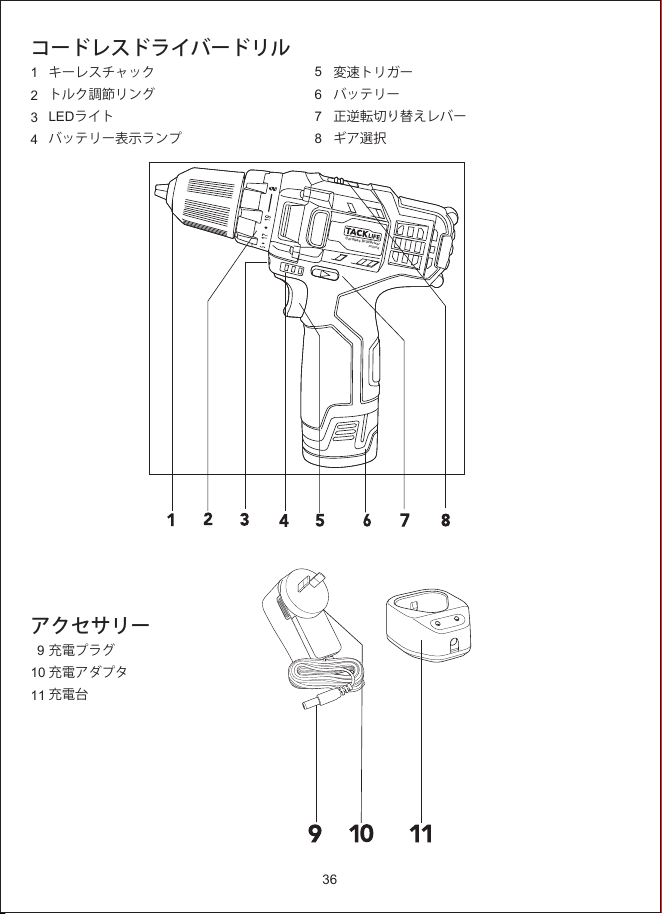
コードレスドライバードリル
1
2
3
4
アクセサリー
9
10
11
5
6
7
8
キーレスチャック
トルク調節リング
LEDライト
バッテリー表示ランプ
充電プラグ
充電アダプタ
充電台
変速トリガー
バッテリー
正逆転切り替えレバー
ギア選択
36
Cordless Drill/Driver
PCD01B
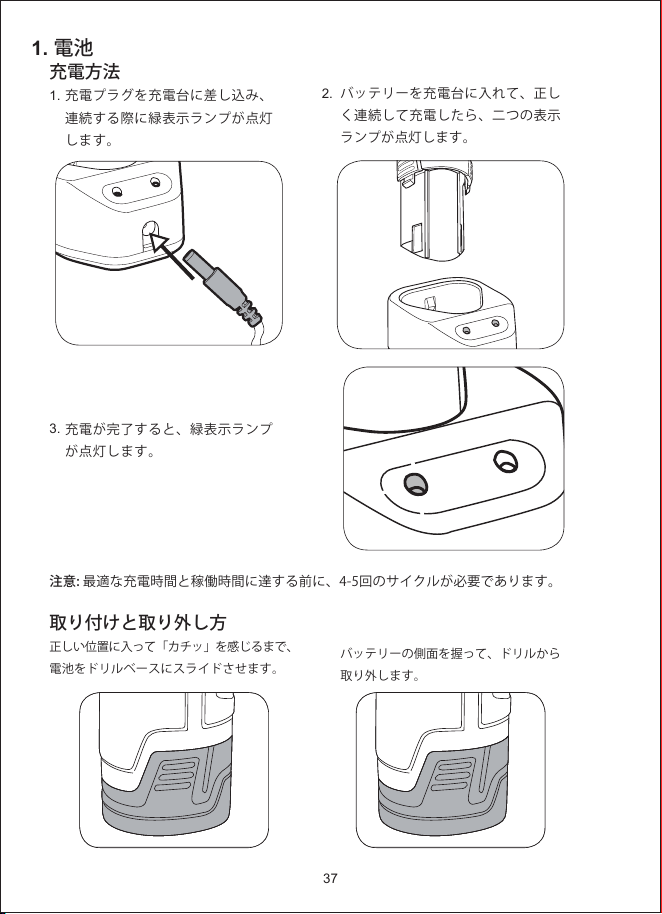
1. 電池
2.
充電方法
1.
3.
取り付けと取り外し方
正しい位置に入って「カチッ」を感じるまで、
電池をドリルベースにスライドさせます。
充電プラグを充電台に差し込み、
連続する際に緑表示ランプが点灯
します。
充電が完了すると、緑表示ランプ
が点灯します。
バッテリーを充電台に入れて、正し
く連続して充電したら、二つの表示
ランプが点灯します。
バッテリーの側面を握って、ドリルから
取り外します。
注意:最適な充電時間と稼働時間に達する前に、4-5回のサイクルが必要であります。
37
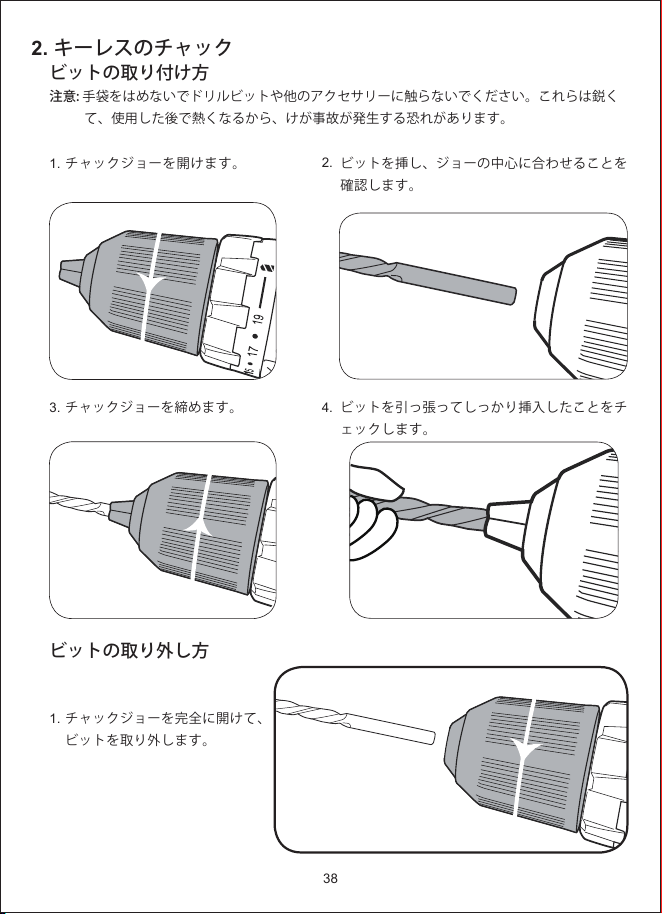
2. キーレスのチャック
2.
4.
ビットの取り付け方
注意: 手袋をはめないでドリルビットや他のアクセサリーに触らないでください。これらは鋭く
て、使用した後で熱くなるから、けが事故が発生する恐れがあります。
1.
3.
ビットの取り外し方
1.
チャックジョーを開けます。
チャックジョーを締めます。
チャックジョーを完全に開けて、
ビットを取り外します。
ビットを挿し、ジョーの中心に合わせることを
確認します。
ビットを引っ張ってしっかり挿入したことをチ
ェックします。
38
a
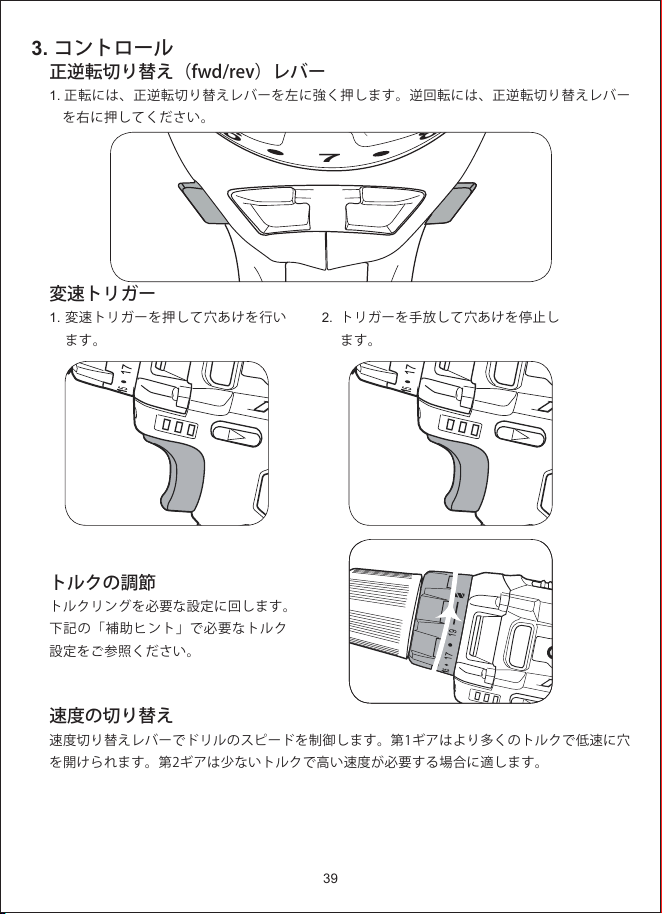
3. コントロール
正逆転切り替え(fwd/rev)レバー
1. 正転には、正逆転切り替えレバーを左に強く押します。逆回転には、正逆転切り替えレバー
を右に押してください。
変速トリガー
1.
トルクの調節
トルクリングを必要な設定に回します。
下記の「補助ヒント」で必要なトルク
設定をご参照ください。
速度の切り替え
速度切り替えレバーでドリルのスピードを制御します。第1ギアはより多くのトルクで低速に穴
を開けられます。第2ギアは少ないトルクで高い速度が必要する場合に適します。
変速トリガーを押して穴あけを行い
ます。
2.
トリガーを手放して穴あけを停止し
ます。
39
6
7
8
FWD
REV
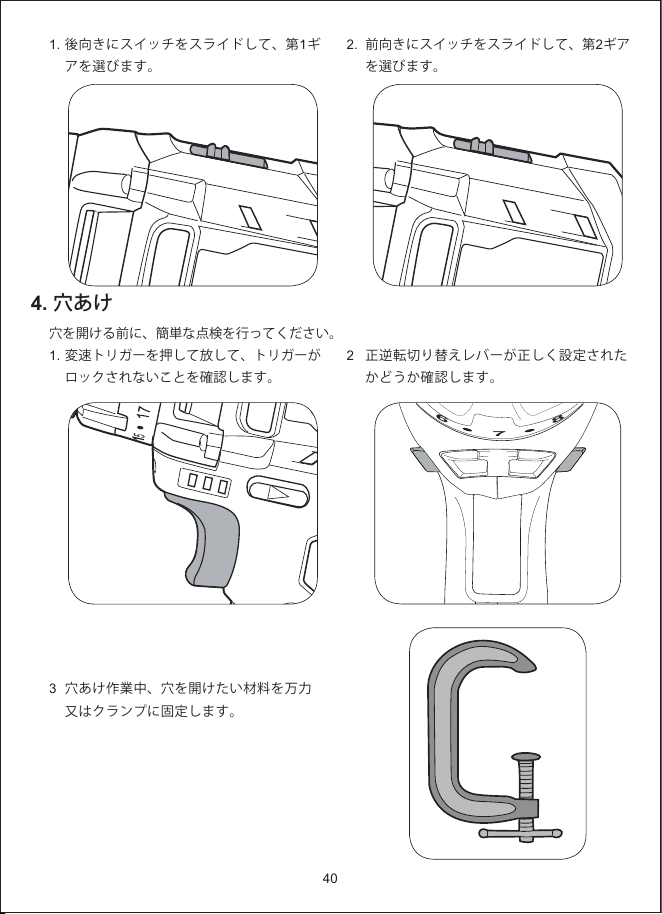
4. 穴あけ
1.
穴を開ける前に、簡単な点検を行ってください。
1.
3
後向きにスイッチをスライドして、第1ギ
アを選びます。
変速トリガーを押して放して、トリガーが
ロックされないことを確認します。
穴あけ作業中、穴を開けたい材料を万力
又はクランプに固定します。
2.
2
前向きにスイッチをスライドして、第2ギア
を選びます。
正逆転切り替えレバーが正しく設定された
かどうか確認します。
40
6
7
8
FWD
REV

5. 補助ヒント
4.
6.
しっかりドリルを握って、穴を開けたい
ところにビットを置きます。
ドリルビットをワークピースに移動させます。
5.
変速トリガーを押して、ドリルを始動し
ます。
41
注意:無理にドリルを押しないでください。また、側力を加えて穴を引き伸ばさないでください。ドリ
ルを任して作業を行います。
予め設定された深さまで穴をあける−トルク設定
トルク設定で穴を開ける深さを変更できます。ネジは作業面とぴったり平らになるために、以下の
ステップに従って必要なトルクを設定します。
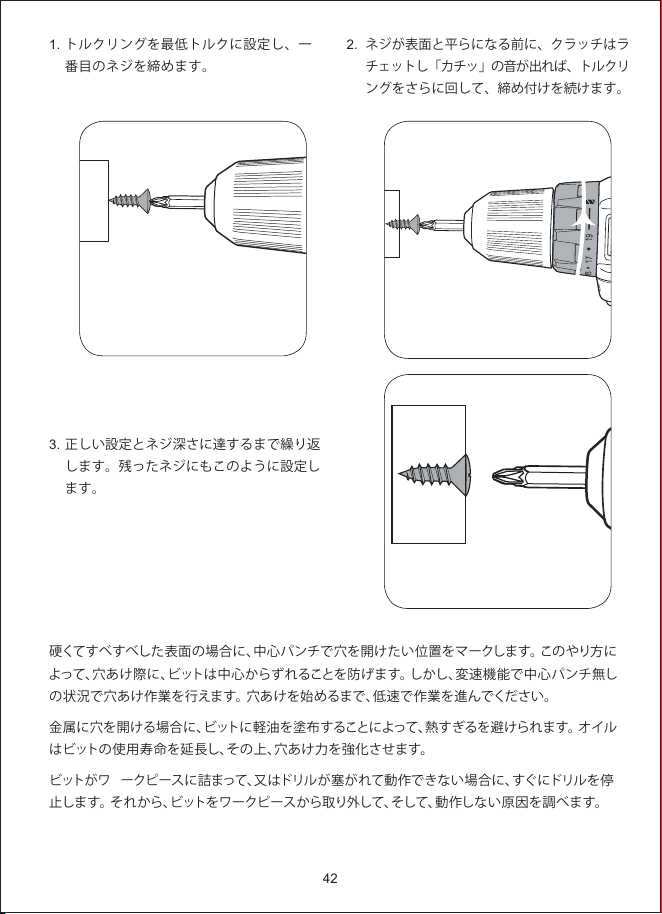
1.
3.
トルクリングを最低トルクに設定し、一
番目のネジを締めます。
正しい設定とネジ深さに達するまで繰り返
します。残ったネジにもこのように設定し
ます。
2.
ネジが表面と平らになる前に、クラッチはラ
チェットし「カチッ」の音が出れば、トルクリ
ングをさらに回して、締め付けを続けます。
42
硬くてすべすべした表面の場合に、中心パンチで穴を開けたい位置をマークします。このやり方に
よって、穴あけ際に、ビットは中心からずれることを防げます。しかし、変速機能で中心パンチ無し
の状況で穴あけ作業を行えます。穴あけを始めるまで、低速で作業を進んでください。
金属に穴を開ける場合に、ビットに軽油を塗布することによって、熱すぎるを避けられます。オイル
はビットの使用寿命を延長し、その上、穴あけ力を強化させます。
ビットがワークピースに詰まって、又はドリルが塞がれて動作できない場合に、すぐにドリルを停
止します。それから、ビットをワークピースから取り外して、そして、動作しない原因を調べます。


Shenzhen Temie Technology Co., Ltd.
Web: www.tacklifetools.com
E-mail: [email protected]
ADD: No.31, Qing Linxi Road, Longgang District,
Shenzhen, Guangdong, China 518172