

User Manual
Cordless Drill/Driver
Model: PCD06B/PCD06C
18V Li-ion
PCD06B


English
Deutsch
Français
Español
Italiano
日本語
01~15
16~32
33~48
49~65
66~81
82~95
Contents

Original Instructions
Description of Symbols
The rating plate on your tool may show symbols.These represent important informa-
tion about the product or instructions on its use.
Wear hearing protection
Wear eye protection
Wear breathing protection
Wear head protection
Wear hand protection
Read instruction manual
DO NOT incinerate batteries!
Caution!
For indoors use only !
Internal time lag fuse with a maximum current of 3.15A.
Class II construction
Environmental Protection Waste electrical products should not be
disposed of with household waste. Please recycle where facilities exist.
Check with your local authority or retailer for recycling advice.
Conforms to relevant legislation and safety standards.
- 01 -

Li-ion battery cells are recyclable and should not be disposed of with
household waste. Please recycle where facilities exist. Check with your
local authority or retailer for recycling advice
Specification
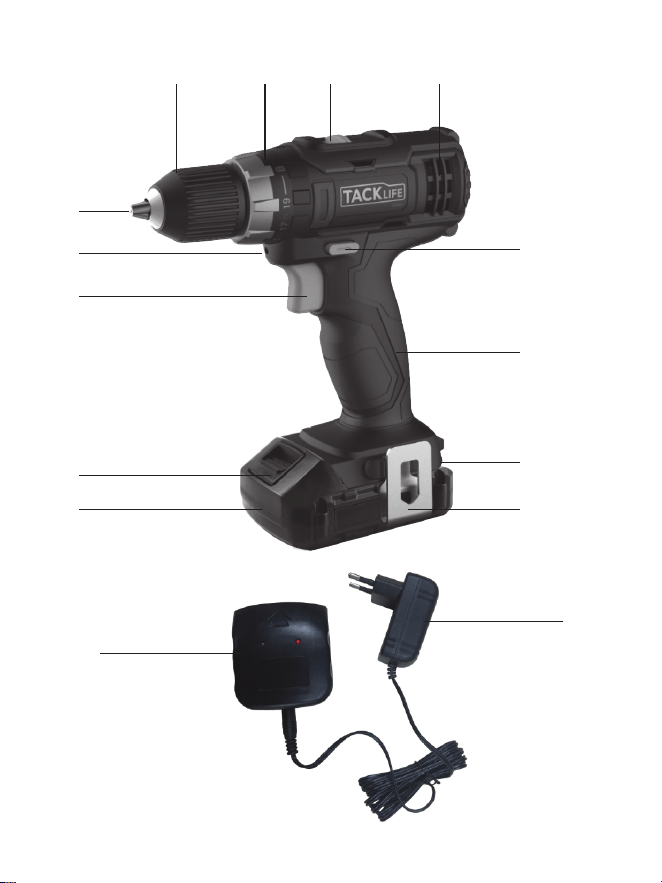
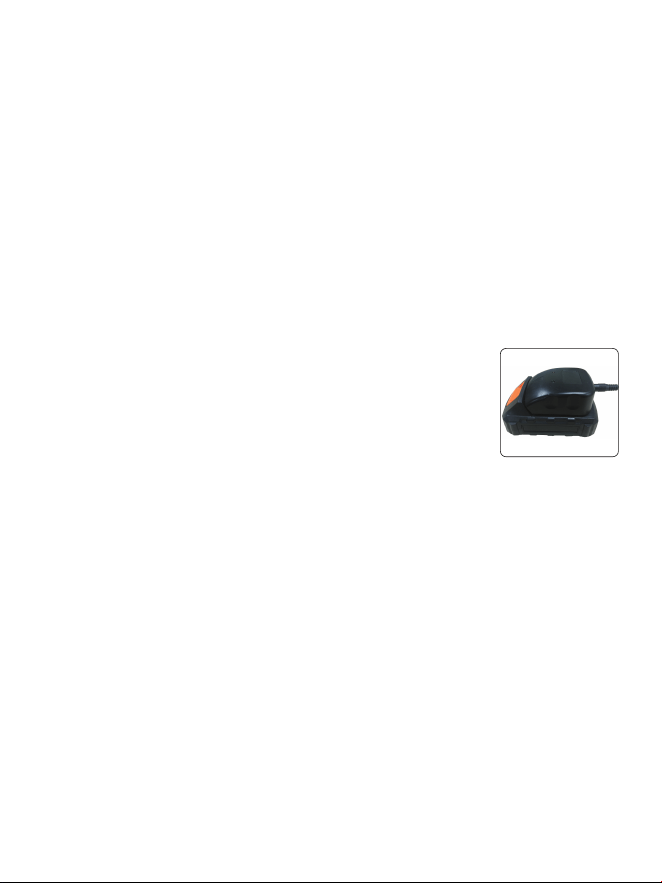
Product Features
1. Chuck Jaws 2. Chuck Collar
3. Torque Selector 4. Gear Switch
5. Motor Vents 6. Forward / Reverse Switch
7. Trigger Switch 8. Hand Grip
9. Work Light 10. Battery
11. Battery Charge Indicator 12. Battery Release
13. Belt Clip 14. Charger
15.Charger base
- 02 -
Rated Voltage
No-load Speed
Chuck Capacity
Max. Drilling Capacity
Battery pack Voltage
-Battery cell
Charger
-Rated Voltage
-Output Voltage
-Rated output current
-Charging Time
Protection class
Sound and Vibration Data
Sound pressure LPA
Sound power LWA
Uncertainty K:
Vibration (No load)
Vibration (Drilling)
Uncertainty K:
DC 18 V (MAX 20V)
0-350/0-1300 rpm
10 mm
Steel: Ø 6 mm
Wood: Ø18 mm
DC 18 V (MAX 20V)
Li-ion 1.5 Ah
100-240VAC 50-60HZ 15W
22.7VDC
380 mA
4 hr
66.13 dB(A)
77.13 dB(A)
3 dB(A)
1.349 m/s²
1.142 m/s²
1.5 m/s²

2 3 4 5
6
8
11
13
1
7
9
12
10
- 03 -
15
14

- 04 -
WARNING
Always wear ear protection where the sound level exceeds 85dB(A) and limit the
time of exposure if necessary. If sound levels are uncomfortable, even with ear
protection, stop using the tool immediately and check the ear protection is correctly
fitted and provides the correct level of sound attenuation for the level of sound
produced by your tool.
WARNING
User exposure to tool vibration can result in loss of sense of touch, numbness,
tingling and reduced ability to grip. Long term exposure can lead to a chronic
condition. If necessary, limit the length of time exposed to vibration and use
anti-vibration gloves. Do not operate the tool with hands below a normal comfortable
temperature, as vibration will have a greater effect. Use the figures provided in the
specification relating to vibration to calculate the duration and frequency of operating
the tool.
Sound and vibration levels in the specification are determined according to EN60745
or similar international standards. The figures represent normal use for the tool in
normal working conditions. A poorly maintained, incorrectly assembled, or misused
tool may produce increased levels of noise and vibration. www.osha.europa.eu
provides information on sound and vibration levels in the workplace that may be
useful to domestic users who use tools for long periods of time.
General Safety
WARNING
Read all safety warnings and all instructions. Failure to follow the warnings and
instructions may result in electric shock, fire and/or serious injury.
WARNING
This appliance is not intended for use by persons (including children) with reduced,
physical or mental capabilities or lack of experience or knowledge unless they have
been given supervision or instruction concerning use of the appliance by a person
responsible for their safety. Children must be supervised to ensure that they do not
play with the appliance.
Save all warnings and instructions for future reference
The term "power tool" in the warnings refers to your mains-operated (corded) power
tool or battery-operated (cordless) power tool.
1. Work area safety
a.Keep work area clean and well lit. Cluttered or dark areas invite accidents.

b.
c.
2. Electrical safety
a.
b.
c.
d.
e.
f.
3. Personal safety
a.
b.
c.
d.
e.
- 05 -
Do not operate power tools in explosive atmospheres, such as in the presence of
flammable liquids, gases or dust. Power tools create sparks which may ignite the
dust or fumes.
Keep children and bystanders away while operating a power tool. Distractions can
cause you to lose control.
Power tool plugs must match the outlet. Never modify the plug in any way. Do not
use any adapter plugs with earthed (grounded) power tools. Unmodified plugs
and matching outlets will reduce risk of electric shock.
Avoid body contact with earthed or grounded surfaces, such as pipes, radiators,
ranges and refrigerators. There is an increased risk of electric shock if your body
is earthed or grounded.
Do not expose power tools to rain or wet conditions. Water entering a power tool
will increase the risk of electric shock.
Do not abuse the cord. Never use the cord for carrying, pulling or unplugging the
power tool. Keep cord away from heat, oil, sharp edges or moving parts.
Damaged or entangled cords increase the risk of electric shock.
When operating a power tool outdoors, use an extension cord suitable for outdoor
use. Use of a cord suitable for outdoor use reduces the risk of electric shock.
If operating a power tool in a damp location is unavoidable, use a residual current
device (RCD) protected supply. Use of an RCD reduces the risk of electric shock.
Stay alert, watch what you are doing and use common sense when operating a
power tool. Do not use a power tool while you are tired or under the
influence of
drugs, alcohol or medication. A moment of inattention while operating power tools
may result in serious personal injury.
Use personal protective equipment. Always wear eye protection. Protective
equipment such as dust mask, non-skid safety shoes, hard hat, or hearing
protection used for appropriate conditions will reduce personal injuries.
Prevent unintentional starting. Ensure the switch is in the off-position before
connecting to power source and/or battery pack, picking up or carrying the tool.
Carrying power tools with your finger on the switch or energising power tools that
have the switch on invites accidents.
Remove any adjusting key or wrench before turning the power tool on. A wrench
or a key left attached to a rotating part of the power tool may result in personal injury.
Do not overreach. Keep proper footing and balance at all times. This enables
better control of the power tool in unexpected situations

f.
g.
4. Power tool use and care
a.
b.
c.
d.
e.
f.
g.
5. Battery tool use and care
a.
- 06 -
Dress properly. Do not wear loose clothing or jewellery. Keep your hair, clothing
and gloves away from moving parts. Loose clothes, jewellery or long hair can be
caught in moving parts.
If devices are provided for the connection of dust extraction and collection
facilities, ensure these are connected and properly used. Use of dust collection
can reduce dust-related hazards.
Do not force the power tool. Use the correct power tool for your application. The
correct power tool will do the job better and safer at the rate for which it was
designed.
Do not use the power tool if the switch does not turn it on and off. Any power tool
that cannot be controlled with the switch is dangerous and must be repaired.
Disconnect the plug from the power source and/or the battery pack from the
power tool before making any adjustments, changing accessories, or storing
power tools. Such preventive safety measures reduce the risk of starting the
power tool accidentally.
Store idle power tools out of the reach of children and do not allow persons
unfamiliar with the power tool or these instructions to operate the power tool.
Power tools are dangerous in the hands of untrained users.
Maintain power tools. Check for misalignment or binding of moving parts,
breakage of parts and any other condition that may affect the power tool’s
operation. If
damaged, have the power tool repaired before use. Many accidents
are caused by poorly maintained power tools.
Keep cutting tools sharp and clean. Properly maintained cutting tools with sharp
cutting edges are less likely to bind and are easier to control.
Use the power tool, accessories and tool bits etc. in accordance with these
instructions, taking into account the working conditions and the work to be
performed. Use of the power tool for operations different from those intended
could result in a hazardous situation.
WARNING: When used in Australia or New Zealand, it is recommended that this
tool is ALWAYS
supplied via Residual Current Device (RCD) with a rated residual current of 30mA
or less
Recharge only with the charger specified by the manufacturer. A charger that is
suitable for one type of battery pack may create a risk of fire when used with
another battery pack

b.
d.
e.
6. Service
a.
Additional Safety for Battery-Operated Drills
WARNING
Important: It is imperative to follow all national safety regulations concerning installa-
tion, operation and maintenance.
a.
b.
c.
d.
e.
f.
g.
h.
i.
- 07 -
Use power tools only with specifically designated battery packs. Use of any other
battery packs may create a risk of injury and fire.
When battery pack is not in use, keep it away from other metal objects, like paper
clips, coins, keys, nails, screws or other small metal objects that can make a
connection from one terminal to another. Shorting the battery terminals together
may cause burns or a fire.
If liquid contacts eyes, additionally seek medical help. Liquid ejected from the
battery may cause irritation or burns.
Under abusive conditions, liquid may be ejected from the battery; avoid contact. If
contact occurs, flush with water. If liquid contacts eyes, additionally seek medical
help. Liquid ejected from the battery may cause irritation or burns.
Have your power tool serviced by a qualified repair person using only identical
replacement parts. This will ensure that the safety of the power tool is maintained.
DO NOT allow anyone under the age of 18 years to use this tool, and ensure that
operators are qualified and familiar with the operating and safety instructions
Battery chargers are for indoors use only. Ensure that the power supply and
charger are protected against moisture at all times.
When using the drill, use safety equipment including safety glasses or shield, ear
defenders, and protective clothing including safety gloves. Wear respiratory
protection suitable for the work being undertaken. A minimum rating of FFP2 is
recommended. If operating the tool causes discomfort in any way, stop immedi-
ately and review your method of use.
Use metal and voltage detectors to locate concealed electric, water or gas lines.
Avoid touching live components or conductors.
Ensure that the lighting is adequate.
Ensure that the drill
bit is securely fixed in the chuck. Insecure drill bits can be
ejected from the machine causing a hazard
Ensure that the drill bit is not in contact with the workpiece prior to starting up the tool.
Before drilling, check that there is sufficient clearance for the drill bit under the
workpiece.
DO NOT exert pressure on to the tool. To do so would shorten its service life.
j.
k.
l.
m.
n.
o.
p.
Battery Safety
WARNING
Li-Ion batteries, if incorrectly used, stored or charged are a fire, burn and
explosion hazard.
●
●
●
●
●
●
●
●
Battery Charger Safety
Use the battery charger correctly
●
●
- 08 -
Drill bits get hot during operation, allow to cool prior to handling them.
NEVER use your hands to remove sawdust, chips or waste close by the bit.
lIf you are interrupted when operating the drill, complete the process and switch
off before looking up.
Where possible, use clamps or a vice to hold your work.
Examine the chuck regularly for signs of wear or damage. Have damaged parts
repaired by a qualified service centrer) ALWAYS wait until the drill has com.
ALWAYS wait until the drill has come to a complete stop before putting it down.
Periodically check all nuts, bolts and other fixings and tighten where necessary.
Keep the battery out of reach of children.
ONLY charge Li-Ion batteries using the charger provided or designed specifically
for your product.
ONLY use Li-Ion batteries provided with a product or specifically designed to be
compatible.
Allow batteries to cool for 15 minutes after charging or heavy use. Failure to follow
these instructions may cause overheating or fire
When not in use batteries should be stored at room temperature (approximately 20°C).
Ensure that battery contacts cannot accidentally short in storage. Keep batteries
clean; foreign objects or dirt may cause a short. Keep away from other metal
objects, for example, paperclips, coins, keys, nails and screws.
Under abusive conditions, liquid may be ejected from the battery. This liquid may
cause skin irritation or burns. Avoid contact. If contact accidentally occurs, flush
with water. If liquid contacts eyes, seek medical help.
DO NOT open, disassemble, crush, heat above 60°C or incinerate. Do not
dispose of in fire or similar.
Refer to the section of this manual relating to
use of the battery charger before
attempting to charge the battery.
Do not attempt to use the charger with any batteries other than those supplied.
Keep your battery charger clean; foreign objects or dirt may cause a short or block

●
WARNING
DO NOT attempt to recharge non-rechargeable batteries.
Before Use
Removing a battery
Remove the Battery from the tool by pressing the Battery Release, then slide the
Battery out of the Battery Slot.
WARNING
DO NOT try to remove the Battery without pressing the Battery Release button. The
tool or Battery could be damaged.
Fitting a battery
1.
Note
Make sure the Battery and tool are lined up correctly. If the Battery does not slide into
the tool easily, do not force it. Instead, slide the Battery out of the tool again, check
the top of Battery and the tool battery slot are clean and undamaged and that the
contacts are not bent.
Setting up the battery charger
1.
2.
Note
The RED LED on the Charger base will on to indicate that the charger is ready to
charge the battery.
WARNING
Use this charger ONLY to charge the supplied battery or additional purchased
batteries that are specifically designed for this tool.
WARNING
The charger is designed for indoor use only, and MUST NOT be used in damp or wet
conditions.
- 09 -
air vents. Failure to follow these instructions may cause overheating or fire.
If the supply cord is damaged, it must be replaced by the manufacturer, its service
agent or similarly qualified persons in order to avoid a hazard.
Fit a battery by sliding it on to the Battery Slot of the tool until it clicks and locks
into position.
If fitted, remove any Battery from the Battery Charger.
Insert the Battery Charger mains plug into a suitable mains socket.
Charging the battery
WARNING
Failure to follow the correct procedure when charging batteries will result in
permanent damage.
Note
Normal charging time is approximately 3-5hr for a recently discharged 1.5Ah
capacity battery. However, if the Battery has been left in a discharged state for some
time, it may take additional time to charge.
1. Slide a fully or partially discharged Battery on to the Battery Charger .
Note
Make sure the Battery and Battery Charger are lined up correctly.
If the Battery does not slide on to the Battery Charger easily, don’t
force it. Instead, remove the Battery, check the top of Battery and
the Battery Charger slot are clean and undamaged and that the
contacts are not bent.
2. Once charging commences, the Red LED will on. When the battery pack is not
connected to the charger, the green LED of the charger will be on.
3. When the Battery is fully charged, the Red LED will off and Green LED will on.
Battery Charge Level
The Battery has a built-in Battery Charge Indicator.
Pressing on the button to the right will indicate the charge level. The right LED
indicates a high charge level and the left a low charge level that will mean the battery
pack will require charging soon.
MPORTANT
When a low charge level is indicated, the tool may stop operating while in use, which
is dangerous when operating a circular saw. Always ensure the battery pack has a
good charge level.
Note
about battery charging:
●
●
●
●
●
- 10 -
The battery should be charged at ambient temperatures between 10 and 40°C
(ideally around 20°C).
After charging, allow 15 minutes for the battery to cool before use.
Ensure that the charger is disconnected from the mains supply after use, and is
stored correctly.
DO NOT leave batteries on charge
for extended periods and NEVER store batteries
on charge.
The Battery Charger monitors battery temperature and voltage while charging.

●
●
●
Fitting drill bits and accessories
WARNING
ALWAYS remove the Battery from the drill before attaching, adjusting or removing
accessories.
WARNING
DO NOT attempt to tighten drill bits (or any other accessory) by gripping the front
part of the chuck and switching the tool on. This can lead to personal injury and can
cause damage to the chuck
WARNING
NEVER fit any accessory or bit with a maximum speed lower than the no load speed
of he power tool.
1.
2.
3.
4.
- 11 -
Remove the Battery once charging is complete to maximise charge cycles of the
battery and not waste power.
Batteries can become faulty over time, individual cells in the battery can fail and
the battery could short. The charger will not charge faulty batteries. Use another
battery, if possible, to check correct functionality of the charger and purchase a
replacement battery if a faulty battery is indicated.
DO NOT store lithium-ion battery packs in a discharged state over a long period
as this can damage the lithium-ion cells. For long-term storage, store batteries in
a high charge state disconnected from the power tool.
The capacity of batteries will reduce over time. After 100 charge cycles, the
battery’s operation time and the maximum torque performance of the driver will
slightly reduce. This decline will continue until the battery has minimal capacity
after 500 charge cycles. This is normal and not a fault with the battery pack.
Open the Chuck Jaws (1) by rotating the Chuck Collar (2) anti-clockwise.
Place the drill bit or accessory centrally into the chuck.
Tighten the Chuck Jaws by rotating the Chuck Collar clockwise.
When the drill bit or accessory is securely fastened,
carefully run the machine to
test that it is running centrally, smoothly and evenly. If the bit is 'wobbling' or not
running centrally, release the chuck, check the accessory for damage, correct its
position, retighten and test again.

Operation
Direction control
WARNING
NEVER change the direction of rotation while the tool is running. This may cause
permanent damage to the tool.
●
●
●
Note
When the Forward/Reverse Switch is in the central position, the drill is locked and
cannot be switched on. Use this setting as a safety feature to prevent the drill from
being switched on accidentally.
Torque control
Note
This cordless drill is equipped with a torque control clutch allowing the machine to be
set to the correct torque for the individual application.
●
●
Gear selection
●
●
Note
ALWAYS read the documentation provided with drill bits and accessories for the
recommended or maximum speed setting and use the most appropriate gear. See
‘Specification’ for the maximum no load speed of each gear.
Switching on/off
WARNING
ALWAYS wear adequate personal protection equipment when setting up and operating
this machine.
- 12 -
The direction of rotation can be set using the Forward/Reverse Switch (6).
For anti-clockwise rotation, push the switch to the right.
For clockwise rotation, push the switch to the left.
The clutch settings are indicated by the symbols on the Torque Selector (3)
Rotate the Torque Selector to select the desired setting: the higher the number
displayed on the torque ring, the higher the torque produced by the too.
Select gear 1 on the Gear Switch (4) for the higher torque. A lower speed gear is
generally more suitable for driving screws and fasteners
Select gear 2 on the Gear Switch for the lower torque. A higher speed gear is for
drilling and must not be used for driving screws and fasteners.

1. To start the drill, squeeze the Trigger Switch (7).
2. The built-in Work Light (9) will illuminate when the Trigger Switch is squeezed.
Note
If the Trigger Switch cannot be pressed down, check that the Forward/Reverse
Switch (6) is not set to its middle position, which locks the device (see ‘Direction
control’).
3. The speed of the drill is controlled by the movement of the trigger: the further the
Trigger Switch is pressed down, the faster the drill will run.
4. Release the Trigger Switch to stop the machine.
Screwdriver use
Note
Always use a universal bit holder when working with screwdriver bits. Do not mount
screwdriver bits directly into the chuck.
1. Select gear 1 using the Gear Switch (4).
2. Rotate the Mode Selector (3) to Drive.
3. Adjust the drill to the appropriate torque setting (see ‘Torque control’).
● When driving screws NEVER use the machine in drill mode.
Note
If in doubt which torque setting best suits the application, start with a low setting and
increase, should more torque be required (e.g. if the screw is not being driven far
enough into the workpiece).
WARNING
The drill bit, especially the tip, will become very hot when drilling masonry and
concrete. DO NOT touch the bit and never allow it to come into contact with combus-
tible materials.
WARNING
DO NOT inhale masonry dust. Wear adequate breathing protection. Dust from
masonry, concrete and similar substances is harmful and may be toxic.
Drilling wood
1. Select the appropriate gear using the Gear Switch (4).
2. Rotate the Mode Selector (3) to the drill position.
● Ensure that drill bits are suitable for wood, and are within the maximum capacity of
this machine (see ‘Specification’)
WARNING
DO NOT inhale wood dust. Wear adequate breathing protection. Some wood dusts
- 13 -

may be toxic.
Drilling meta
1. Select the appropriate gear using the Gear Switch (4).
2. Rotate the Mode Selector (3) to the drill position.
● Ensure that drill bits are suitable for the grade of metal being drilled, and are within
the maximum capacity of the machine (see ‘Specification’)
● To ensure accuracy, mark the intended hole position using a hammer and centre punch.
WARNING
The drill bit and the workpiece will become very hot when drilling metal. DO NOT
touch the bit and never allow it to come into contact with combustible materials when
hot. Always use a suitable lubricant or cutting fluid, and drill at appropriate speeds.
● ONLY apply moderate pressure to the drill bit, ensuring efficient cutting and
prolonged drill bit life.
● Use a countersink bit to remove sharp burrs from the hole, preventing cuts and
other kinds of injury.
WARNING
If the power tool gets excessively hot in use, stop using the tool immediately and
allow to cool before continuing work. The cooling period can be reduced by operating
the drill at maximum speed with no load. Always make sure the Motor Vents (5) are
not blocked and do not allow dust to enter the body of the tool through the Motor
Vents; dust, especially metallic dust, may damage or destroy the tool.
Maintenance
WARNING
ALWAYS disconnect from the mains power supply, before carrying out any mainte-
nance/ cleaning of the charger. Remove the battery before carrying out any mainte-
nance/cleaning of the drill.
Note
Both the drill and the charger contain no user-serviceable parts. If the device does
not perform as outlined in this manual, return it to an authorised GMC service centre
for repair
General inspection
● Regularly check that all the fixing screws are tight
● Inspect the supply cord of the tool, prior to each use, for damage or wear. Repairs
should be carried out by an authorised service centre. This advice also applies to
extension cords used with this too.
Cleaning
- 14 -

- 15 -
● Keep your tool clean at all times. Dirt and dust will cause internal parts to wear quickly,
and shorten the machine’s service life. Clean the body of your machine with a soft
brush, or dry cloth. If available, use clean, dry, compressed air to blow through the
ventilation holes
● Clean the tool casing with a soft damp cloth using a mild detergent. Do not use
alcohol, petrol or strong cleaning agents
● Never use caustic agents to clean plastic parts
Lubrication
Slightly lubricate all moving parts at regular intervals with a suitable spray lubricant
Storage
Store this tool carefully in a secure, dry place out of the reach of children
Disposal
Always adhere to national regulations when disposing of power tools that
are no longer functional and are not viable for repair.
Do not dispose of power tools, or other waste electrical and electronic
equipment (WEEE), with household waste
Contact your local waste disposal authority for information on the correct
way to dispose of power tools

Originalanweisungen
Beschreibung der Symbole
Das Typenschild auf Ihrem Werkzeug kann Symbole zeigen. Diese stellen wichtige
Informationen über das Produkt oder die Gebrauchsanweisung dar.
Gehörschutz tragen
Augenschutz tragen
Atemschutz tragen
Kopfschutz tragen
Handschutz tragen
Betriebsanleitung lesen
NICHT Batterien verbrennen!
Vorsicht!
Für den Innenbereich verwenden!
Interne Zeitverzögerung mit maximalem Strom von 3,15 A.
Klasse-II-Konstruktion
Umweltschutz Die Abfälle vomn der Elektroprodukte dürfen nicht mit
Hausmüll entsorgt werden. Bitte recyceln, wo Einrichtungen vorhanden
sind. Überprüfen Sie mit Ihrer örtlichen Behörde oder Händler für
Recycling Beratung.
Entspricht den einschlägigen Rechtsvorschriften und Sicherheitsnormen.
- 16 -

Li-Ionen-Batteriezellen sind recycelbar und sollten nicht mit Hausmüll
entsorgt werden. Bitte recyceln, wo Einrichtungen vorhanden sind.
Überprüfen Sie mit Ihrer örtlichen Behörde oder Händler für Recycling-
beratung
Spezifikation
Produkt-Eigenschaften
1. Die Spannbacken 2. Das Spannfutter
3. Drehmomentauswahl 4. Getriebeschalter
5. Motorentlüftung 6. Vorwärts- / Rückwärtsschalter
7. Trigger-Schalter 8. Handgriff
9. Arbeitslicht 10. Batterie
11. Akku-Ladeanzeige 12. Batteriefreigabe
13. Gürtelschnalle
15. ladegerät basis
14. Ladegerät
- 17 -
Nennspannung
Leerlaufgeschwindigkeit
Futter -Kapazität
Max. Bohrleistung
Batteriespannung
- Batteriezelle
Ladegerät
-Nennspannung
-Ausgangsspannung
-Nennausgangsstrom
-Ladezeit
Schutzklasse
Schall- und Schwingungsdaten
Schalldruck LPA
Schallleistung LWA
Ungewissheit K:
Vibration (keine Last)
Vibration (Bohren)
Ungewissheit K:
DC 18 V
0-350/0-1300 rpm
10 mm
Stah: Ø 6 mm
Holz: Ø18 mm
DC 18 V
Li-ion 1.5 Ah
100-240VAC 50-60HZ 15W
22.7VDC
380 mA
4 hr
66.13 dB(A)
77.13 dB(A)
3 dB(A)
1.349 m/s²
1.142 m/s²
1.5 m/s²
2 3 4 5
6
8
11
13
1
7
9
12
10
- 18 -
15
14

- 19 -
WARNUNG
Tragen Sie immer einen Ohrenschutz, bei dem der Schallpegel 85dB (A) übersch-
reitet und ggf. die Belichtungszeit begrenzt. Wenn der Schallpegel auch bei
Gehörschutz unangenehm ist, stoppen Sie das Werkzeug sofort und überprüfen Sie,
ob der Gehörschutz korrekt montiert ist, und stellen Sie die richtige Schalldämpfung
für den von Ihrem Werkzeug erzeugten Schallpegel zur Verfügung.
WARNUNG
Benutzerbelastung von Werkzeugschwingungen kann zum Verlust von Berührungs-
gefühl, Taubheit, Kribbeln und reduzierter Griffigkeit führen. Langzeitbelastung kann
zu einem chronischen Zustand führen. Wenn nötig, beschränken Sie die Zeitdauer,
die Vibrationen ausgesetzt ist, und verwenden Sie Anti-Vibrations-Handschuhe.
Betreiben Sie das Werkzeug nicht mit den Händen unterhalb einer normalen,
angenehmen Temperatur, da die Vibration einen größeren Effekt hat. Verwenden
Sie die Angaben in der Spezifikation in Bezug auf Vibration, um die Dauer und
Häufigkeit des Betriebs des Werkzeugs zu berechnen.
Schall- und Schwingungsniveaus in der Spezifikation werden nach EN60745 oder
ähnlichen internationalen Normen bestimmt. Die Figuren stellen den normalen
Gebrauch für das Werkzeug unter normalen Arbeitsbedingungen dar. Ein schlecht
gepflegtes, falsch zusammengebautes oder missbrauchtes Werkzeug kann zu
erhöhtem Geräusch und Vibrationen führen. Www.osha.europa.eu informiert über
Ton- und Vibrationsniveaus am Arbeitsplatz, die für inländische Benutzer nützlich
sein können, die Werkzeuge für längere Zeit verwenden.
Allgemeine Sicherheit
WARNUNG
Lesen Sie alle Sicherheitshinweise und alle Anweisungen. Die Nichtbeachtung der
Warnungen und Anweisungen kann zu elektrischen Schlägen, Feuer und / oder
schweren Verletzungen führen.
WARNUNG
Dieses Gerät ist nicht für den Gebrauch von Personen (einschließlich Kindern) mit
eingeschränkter, körperlicher oder geistiger Leistungsfähigkeit oder mangelnder
Erfahrung oder Kenntnis bestimmt, es sei denn, sie wurden von einer für ihre
Sicherheit verantwortlichen Person beaufsichtigt oder instruiert. Kinder müssen
beaufsichtigt werden, um sicherzustellen, dass sie nicht mit dem Gerät spielen.
Speichern Sie alle Warnungen und Anweisungen für die Zukunft
Der Begriff "Elektrowerkzeug" in den Warnungen bezieht sich auf Ihr netzbetrieben-

es (kabelgebundenes) Elektrowerkzeug oder batteriebetriebenes (schnurloses)
Elektrowerkzeug
1. Arbeitsbereichsicherheit
a.
b.
c.
2. Elektrische Sicherheit
a.
b.
c.
d.
e.
f.
3. Persönliche Sicherheit
a.
b.
- 20 -
Halten Sie den Arbeitsbereich sauber und gut beleuchtet. Ungeklärte oder dunkle
Bereiche laden Unfälle ein.
Betreiben Sie keine Elektrowerkzeuge in explosionsgefährdeten Bereichen, z. B.
bei brennbaren Flüssigkeiten, Gasen oder Staub. Elektrowerkzeuge erzeugen
Funken, die den Staub oder Dämpfe entzünden können.
Halten Sie Kinder und Umstehende weg, während Sie ein Elektrowerkzeug
betreiben. Ablenkungen können dazu führen, dass Sie die Kontrolle verlieren.
Elektrowerkzeugstecker müssen mit der Steckdose übereinstimmen. Ändern Sie
den Stecker niemals in irgendeiner Weise. Verwenden Sie keine Adapterstecker
mit geerdeten (geerdeten) Elektrowerkzeugen. Unmodifizierte Stecker und passende
Steckdosen reduzieren das Risiko eines elektrischen Schlags.
Vermeiden Sie Körperkontakt mit geerdeten oder geerdeten Flächen wie Rohren,
Heizkörpern, Bereichen und Kühlschränken. Es besteht ein erhöhtes Risiko für
elektrischen Schlag, wenn Ihr Körper geerdet oder geerdet ist.
Setzen Sie keine Elektrowerkzeuge Regen oder Nässe aus. Wasser, das in ein
Elektrowerkzeug eintritt, erhöht das Risiko eines elektrischen Schlags.
Benutzen Sie das Kabel nicht. Verwenden Sie das Netzkabel niemals zum
Tragen, Ziehen oder Herausziehen des Elektrowerkzeugs. Halten Sie das Kabel
von Hitze, Öl, scharfen Kanten oder beweglichen Teilen fern. Beschädigte oder
verwickelte Schnüre erhöhen das Risiko eines elektrischen Schlags.
Wenn Sie ein Elektrowerkzeug im Freien betreiben, verwenden Sie ein Verlängerung-
skabel, das für den Außenbereich geeignet ist. Die Verwendung des Outdoor-Ka-
bels verringert den Stromunfall
Wenn ein Elektrowerkzeug an einem feuchten Ort bet
rieben wird, ist es unvermeidbar,
eine fehlerhafte Stromversorgung (RCD) zu verwenden. Die Verwendung eines
RCD reduziert die Gefahr eines elektrischen Schlags.
Bleiben Sie wachsam, beobachten Sie, was Sie tun und verwenden Sie gesunden
Menschenverstand beim Betreiben eines Elektrowerkzeugs. Verwenden Sie kein
Elektrowerkzeug, während Sie müde sind oder unter dem Einfluss von Drogen,
Alkohol oder Medikamenten. Ein Moment der Unaufmerksamkeit beim Betreiben
von Elektrowerkzeugen kann zu schweren Verletzungen führen.
Persönliche Schutzausrüstung verwenden. Tragen Sie immer Augenschutz.

c.
d.
e.
f.
g.
4. Elektrowerkzeug Gebrauch und Pflege
a.
b.
c.
d.
- 21 -
Schutzausrüstung wie Staubmaske, rutschsichere Sicherheitsschuhe, Schutzhelm
oder Gehörschutz, die für entsprechende Bedingungen verwendet werden, verringern
Körperverletzungen.
Vermeiden Sie unbeabsichtigtes Starten. Vergewissern Sie sich, dass sich der
Schalter in der Off-Position befindet, bevor Sie an die Stromversorgung und / oder
den Akku anschließen, das Werkzeug aufnehmen oder mitführen. Tragen von
Elektrowerkzeugen mit dem Finger auf den Schalter oder erregende Elektrow-
erkzeuge, die den Schalter einlädt, lädt Unfälle ein.
Entfernen Sie vor dem Einschalten des Elektrowerkzeuges einen beliebigen
Einstellschlüssel oder einen Schlüssel. Ein Schraubenschlüssel oder ein Schlüs-
sel, der an einem rotierenden Teil des Elektrowerkzeugs befestigt ist, kann zu
Verletzungen führen.
Nicht übertreffen .Halten Sie den richtigen Stand und Balance zu allen Zeiten.
Dies ermöglicht eine bessere Kontrolle des Elektrowerkzeugs in unerwarteten
Situationen
Ziehe dich richtig an. Tragen Sie keine lose Kleidung oder Schmuck. Halten Sie
Ihre Haare, Kleidung und Handschuhe weg von beweglichen Teilen. Lose Kleider,
Schmuck oder lange Haare können in bewegten Teilen gefangen werden.
Wenn Geräte für den Anschluss von Staubabsaug- und Sammelanlagen vorgesehen
sind, stellen Sie sicher, dass diese angeschlossen und ordnungsgemäß verwendet
werden
. Die Verwendung von Staubansammlungen kann staubbedingte Gefahren
reduzieren.
Das Elektrowerkzeug nicht mit Gewalt betätigen. Verwenden Sie für Ihre Anwendung
das richtige Elektrowerkzeug. Das richtige Elektrowerkzeug macht die Arbeit besser
und sicherer mit der Geschwindigkeit, für die es entworfen wurde.
Benutzen Sie das Elektrowerkzeug nicht, wenn der Schalter es nicht ein- und
ausschaltet. Jedes Elektrowerkzeug, das nicht mit dem Schalter gesteuert
werden kann, ist gefährlich und muss repariert werden.
Ziehen Sie den Netzstecker aus der Steckdose und / oder den Akku aus dem
Elektrowerkzeug, bevor Sie irgendwelche Einstellungen vornehmen, Zubehör wechseln
oder Elektrowerkzeuge speichern. Solche präventiven Sicherheitsmaßnahmen
reduzieren das Risiko, das Elektrowerkzeug versehentlich zu starten.
Bewahren Sie Leerlaufwerkzeuge außerhalb der Reichweite von Kindern auf und
lassen Sie Personen, die mit dem Elektrowerkzeug nicht vertraut sind, oder diese
Anleitung, um das Elektrowerkzeug zu bedienen. Elektrowerkzeuge sind gefährlich
in den Händen von ungeübten Benutzern.

e.
f.
g.
5. Batteriebetrieb und Pflege
a.
b.
C.
d.
e.
6. Bedienung
a.
- 22 -
Elektrowerkzeuge pflegen Überprüfen Sie auf Fehlausrichtung oder Bindung von
beweglichen Teilen, Bruch von Teilen und anderen Bedingungen, die den Betrieb
des Elektrowerkzeugs beeinträchtigen können. Wenn es beschädigt ist, muss das
Elektrowerkzeug vor dem Gebrauch repariert werden. Viele Unfälle werden durch
schlecht gepflegte Elektrowerkzeuge verursacht.
Schneidwerkzeuge scharf und sauber halten. Richtig gepflegte Schneidwerkze-
uge mit scharfen Schneidkanten sind weniger wahrscheinlich zu binden und sind
leichter zu kontrollieren.
Benutzen Sie das Elektrowerkzeug, Zubehör und Werkzeugbits usw. gemäß
dieser Anleitung unter Berücksichtigung der Arbeitsbedingungen und der
durchzuführenden Arbeiten. Die Verwendung des Elektrowerkzeugs für den
Betrieb, der sich von den beabsichtigten Betrieben unterscheidet, kann zu einer
gefährlichen Situation führen.
WARNUNG: Wenn es in Australien oder Neuseeland verwendet wird, empfiehlt
es sich, dass dieses Tool IMMER ist
Geliefert über Reststromgerät (RCD) mit einem Bemessungsfehlerstrom von
30mA oder weniger
Nur mit dem vom Hersteller angegebenen Ladegerät aufladen. Ein Ladegerät,
das für einen Akkupaket geeignet ist, kann bei Verwendung mit einem anderen
Akku ein Brandrisiko verursachen
Verwenden Sie Elektrowerkzeuge nur mit speziell gekennzeichneten Akkupacks.
Die Verwendung anderer Akkus kann zu Verletzungs- und Brandgefahr führen.
Wenn der Akku nicht benutzt wird, halten Sie ihn von anderen Metallgegenständen
wie Papierklammern, Münzen, Schlüsseln, Nägeln, Schrauben oder anderen
kleinen Metallgegenständen fern, die eine Verbindung von einem Terminal zum
anderen herstellen können. Kurzschluss der
Batterieklemmen zusammen können
Verbrennungen oder Feuer verursachen.
Wenn Flüssigkeit die Augen berührt, suchen Sie zusätzlich medizinische Hilfe.
Flüssigkeit, die aus der Batterie ausgestoßen wird, kann zu Reizungen oder
Verbrennungen führen.
Unter missbräuchlichen Bedingungen kann Flüssigkeit aus der Batterie ausgeworfen
werden. Kontakt vermeiden. Bei Berührung mit Wasser spülen. Wenn Flüssigkeit
die Augen berührt, suchen Sie zusätzlich medizinische Hilfe. Flüssigkeit, die aus
der Batterie ausgestoßen wird, kann zu Reizungen oder Verbrennungen führen.
Lassen Sie Ihr Elektrowerkzeug von einer qualifizierten Reparaturperson mit nur

Zusätzliche Sicherheit für batteriebetriebene Bohrer
WARNUNG
Wichtig: Es ist zwingend erforderlich, alle nationalen Sicherheitsbestimmungen
bezüglich Installation, Betrieb und Wartung zu beachten.
a.
b.
c.
d.
e.
f.
g.
h.
i.
j.
k.
l.
m.
- 23 -
identischen Ersatzteilen bedienen. Dadurch wird sichergestellt, dass die
Sicherheit des Elektrowerkzeuges beibehalten wird.
NICHT erlauben es jedermann unter 18 Jahren, dieses Werkzeug zu benutzen
und dafür zu sorgen, dass die Bediener mit den Betriebs- und Sicherheitshin-
weisen qualifiziert und vertraut sind
Batterieladegeräte sind nur für den Innenbereich geeignet. Vergewissern Sie sich,
dass die Stromversorgung und das Ladegerät jederzeit gegen Feuchtigkeit
geschützt sind.
Bei der Verwendung des Bohrers verwenden Sie bitte Sicherheitseinrichtungen wie
Schutzbrille oder Schild, Ohrenschützer und Schutzkleidung einschließlich
Schutzhandschuhe. Atemschutz tragen, der für die Arbeit geeignet ist. Eine
Mindestbewertung von FFP2 wird empfohlen. Wenn das Bedienung des Werkze-
ugs zu Unannehmlichkeiten führt, stoppen Sie sofort und überprüfen Sie Ihre
Gebrauchsmethode.
Verwenden Sie Metall- und Spannungsdetektoren, um verborgene Elektro-,
Wasser-oder Gasleitungen zu lokalisieren. Vermeiden Sie es, lebende Kompo-
nenten oder Leiter zu berühren.
Stellen Sie sicher, dass die Beleuchtung ausreichend ist.
Achten Sie darauf, dass der Bohrer fest im Spannfutter befestigt ist. Unsichere
Bohrer können aus
der Maschine ausgeworfen werden, was eine Gefahr verursacht.
Achten Sie darauf, dass der Bohrer vor dem Anfahren des Werkzeuges nicht mit
dem Werkstück in Berührung kommt.
Prüfen Sie vor dem Bohren, dass genügend Freiraum für den Bohrer unter dem
Werkstück vorhanden ist.
NICHT Druck auf das Werkzeug ausüben. Um dies zu tun, würde die Lebensdauer
verkürzt.
Bohrer werden während des Betriebes heiß, lassen sich vor dem Umgang abkühlen.
Verwenden Sie NIEMALS Ihre Hände, um Sägemehl, Späne oder Abfälle in der
Nähe zu entfernen.
Wenn Sie beim Betreiben des Bohrers unterbrochen werden, vervollständigen Sie
den Vorgang und schalten Sie ab, bevor Sie nach oben schauen.
Wo möglich, verwenden Sie Klemmen oder ein Laster, um Ihre Arbeit zu halten.
n.
o.
p.
Batteriesicherheit
WARNUNG
Li-Ionen-Batterien, wenn sie falsch verwendet, gelagert oder aufgeladen
sind, sind Brand-, Brand- und Explosionsgefahr.
●
●
●
●
●
●
●
●
Die Sicherheit des Batterieladegeräts
Benutzen Sie das Ladegerät richtig
●
- 24 -
Das Spannfutter regelmäßig auf Anzeichen von Verschleiß oder Beschädigung
prüfen. Beschädigte Teile, die von einem qualifizierten Servicezentrer repariert
werden.Warten Sie immer, bis der unbeschädigten Bohrer wird
IMMER warten, bis der Bohrer zu einem kompletten Stopp gekommen ist, bevor
er ihn heruntergelegt hat
Überprüfen Sie regelmäßig alle Muttern, Schrauben und andere Befestigungen
und ziehen Sie sie gegebenenfalls an
Halten Sie den Akku außerhalb der Reichweite von Kindern
NUR Ladung Li-Ion-Batterien mit dem Ladegerät zur Verfügung gestellt oder
speziell für Ihr Produkt entwickelt
Verwenden Sie ausschließlich Li-Ion-Batterien, die mit einem Produkt geliefert
oder speziell konstruiert sind, um kompatibel zu sein
Lassen Sie die Batterien 15 Minuten nach dem Aufladen oder starken Gebrauch
abkühlen. Die Nichtbeachtung dieser Anweisungen kann zu Überhitzung oder
Brand führen
Wenn Sie die Batterie nicht benutzen,sollten Batterien bei Raumtemperatur (ca.
20 ° C) gelagert werden
Vergewissern Sie sich, dass die Batteriekontakte nicht versehentlich in der Lagerung
kurzgeschlossen werden können. Halten Sie Batterien sauber; Fremdkörper oder
Schmutz können einen Kurzschluss verursachen. Von anderen Metallgegenständen
fernhalten, z. B. Büroklammern, Münzen, Schlüssel, Nägel und Schrauben
Unter missbräuchlichen Bedingungen kann Flüssigkeit aus der Batterie ausgeworfen
werden. Diese Flüssigkeit kann Hautreizungen oder Verbrennungen verursachen.
Kontakt vermeiden. Wenn Kontakt
versehentlich auftritt, mit Wasser spülen. Wenn
Flüssigkeit die Augen berührt, suchen Sie medizinische Hilfe.
NICHT öffnen, zerlegen, zerdrücken, über 60 ° C erhitzen oder verbrennen. Nicht
in Brand oder ähnliches entsorgen.
Beachten Sie den Abschnitt dieses Handbuchs zur Verwendung des Akkulade-
geräts, bevor Sie den Akku aufladen.

●
●
WARNUNG
NICHT versuchen, dass unaufladbare Batterien aufzuladen.
Vor dem Gebrauch
Entfernen einer Batterie
Entfernen Sie den Akku aus dem Werkzeug, indem Sie den Akku loslassen, und
schieben Sie den Akku aus dem Akku.
WARNUNG
Versuchen Sie NICHT, den Akku zu entfernen, ohne den Akku-Entriegelungsknopf
zu drücken. Das Werkzeug oder die Batterie könnte beschädigt werden.
Die Batterie anbringen
1.
HINWEISE
Vergewissern Sie sich, dass der Akku und das Werkzeug korrekt ausgerichtet sind.
Wenn der Akku nicht leicht in das Werkzeug schiebt, zwingen Sie ihn nicht. Stattdes-
sen schieben Sie den Akku wieder aus dem Werkzeug, überprüfen Sie die Oberseite
des Akkus und der Akku des Akkus ist sauber und unbeschädigt und die Kontakte
sind nicht gebogen.
Einrichten des Batterieladegerät
1. Falls vorhanden, entfernen Sie den Akku aus dem Akkuladegerät.
2. Stecken Sie den Netzstecker des Akkuladegeräts in eine geeignete Steckdose.
Hinweise
Die grüne LED am Ladegerät blinken, um anzuzeigen, dass das Ladegerät bereit ist,
den Akku aufzuladen.
WARNUNG
Verwenden Sie dieses Ladegerät NUR, um den mitgelieferten Akku oder die mitgelieferten
Akkus, die speziell für dieses Werkzeug entwickelt wurden, aufzuladen.
- 25 -
Versuchen Sie nicht, das Ladegerät mit anderen Batterien als den mitgelieferten
Batterien zu verwenden. Halten Sie Ihr Ladegerät sauber; Fremdkörper oder
Schmutz können zu Kurz- oder Blocklüftungsöffnungen führen. Die Nichtbeachtung
dieser Anweisungen kann zu Überhitzung oder Brand führen.
Wenn das Netzkabel beschädigt ist, muss es vom Hersteller, seinem Kundend-
ienst oder ähnlich qualifizierten Personen ausgetauscht werden, um eine Gefähr-
dung zu vermeiden.
Setzen Sie eine Batterie
ein, indem Sie sie auf den Akku-Steckplatz des Werkze-
ugs schieben, bis sie einrastet und einrastet.
WARNUNG
Das Ladegerät ist nur für den Gebrauch in Innenräumen konzipiert und darf nicht in
feuchtem oder nassem Zustand eingesetzt werden.
Die Batterie aufladen
WARNUNG
Wenn Sie die korrekte Vorgehensweise beim Laden der Batterien nicht befolgen,
wird ein dauerhafter Schaden verursacht.
Hinweise
Die normale Ladezeit beträgt ca. 4 Std. Für eine kürzlich entladene Batterie der
Batterie 1.5AH. Allerdings, wenn die Batterie in einem entladenen Zustand für einige
Zeit verlassen wurde, kann es zusätzliche Zeit zu laden.
1. Schieben Sie einen vollständig oder teilweise entladenen Akku auf das Ladegerät.
Hinweise
Vergewissern Sie sich, dass der Akku und das Ladegerät korrekt
ausgerichtet sind. Wenn der Akku nicht leicht auf das Ladegerät
aufschiebt, zwingen Sie ihn nicht. Stattdessen entfernen Sie den
Akku, überprüfen Sie die Oberseite des Akkus und der Akku-La-
degerät-Steckplatz ist sauber und unbeschädigt und die Kontak-
te sind nicht gebogen.
2. Sobald der Ladevorgang beginnt, leuchtet die rote LED Wenn das Batteriefach nicht
mit der Ladeeinheit verbunden ist, leuchtet die LED der Ladeeinheit grün.
3. Wenn der Akku vollständig aufgeladen ist, leuchtet die rote LED und die grüne
LED leuchtet auf.
Akkuladestand
Der Akku verfügt über eine eingebaute Akku-Ladeanzeige
Durch Drücken der Taste rechts wird der Ladezustand angezeigt. Die rechte LED
zeigt einen hohen Ladestand an und der linke ein niedriger Ladezustand, der
bedeutet, dass der Akku bald aufgeladen wird.
WICHTIG
Wenn ein niedriger Ladezustand angezeigt wird, kann das Werkzeug während des
Betriebs nicht mehr funktionieren, was beim Betreiben einer Kreissäge gefährlich ist.
Achten Sie immer darauf, dass der Akku einen guten Ladezustand hat.
Hinweise
über das Aufladen der Batterie:
● Der Akku sollte
bei Umgebungstemperaturen zwischen 10 und 40 ° C (idealerweise
ca. 20 ° C).
- 26 -

●
●
●
●
●
●
●
Die Montagarbeit vom Bohrer und Zubehör
WARNUNG
IMMER den Akku vor dem Anbringen, Einstellen oder Entfernen von Zubehör aus
dem Bohrer entfernen.
WARNUNG
Versuchen Sie NICHT, die Bohrer (oder ein anderes Zubehör) zu spannen, indem
Sie den vorderen Teil des Spannfutters ergreifen und das Werkzeug einschalten.
Dies kann zu Verletzungen führen und kann das Futter beschädigen.
WARNUNG
NIEMALS jedes Zubehör oder Bit mit einer maximalen Geschwindigkeit, die niedriger
ist als die keine Lastgeschwindigkeit des Elektrowerkzeugs.
1. Öffnen Sie die Spannbacken (1), indem Sie den Spannfutter (2) gegen den
- 27 -
Nach dem Aufladen, 15 Minuten für die Batterie vor dem Gebrauch abkühlen lassen.
Vergewissern Sie sich, dass das Ladegerät nach dem Gebrauch vom Netz
getrennt ist und korrekt gespeichert ist.
Lassen Sie die Batterien für längere Zeit nicht länger aufladen und Batterien
niemals aufladen.
Das Ladegerät überwacht die Batterietemperatur und die Spannung während des
Ladevorgangs. Entfernen Sie den Akku, sobald der Ladevorgang abgeschlossen
ist, um die Ladezyklen der Batterie zu maximieren und die Stromversorgung nicht
zu verringern.
Batterien können im Laufe der Zeit fehlerhaft werden, einzelne Zellen in der
Batterie können ausfallen und die Batterie könnte kurz sein. Das Ladegerät lädt
keine fehlerhaften Batterien auf. Benutzen Sie einen anderen Akku, wenn
möglich, um die korrekte Funktionalität des Ladegeräts zu überprüfen und eine
Ersatzbatterie zu kaufen, wenn eine fehlerhafte Batterie angezeigt wird
Lagern Sie keine
Lithium-Ionen-Akkus in einem entladenen Zustand über einen
längeren Zeitraum, da dies die Lithium-Ionen-Zellen beschädigen kann. Für die
Langzeitlagerung sollten Batterien in einem hohen Ladezustand abgelegt
werden, der vom Elektrowerkzeug getrennt ist
Die Kapazität der Batterien verringert sich im Laufe der Zeit. Nach 100
Ladezyklen wird die Betriebszeit der Batterie und die maximale Drehmomentleis-
tung des Fahrers geringfügig reduziert. Dieser Rückgang wird fortgesetzt, bis die
Batterie nach 500 Ladezyklen eine minimale Kapazität aufweist. Das ist normal
und kein Fehler mit dem Akku

Uhrzeigersinn drehen.
2. Legen Sie den Bohrer oder das Zubehör mittig in das Spannfutter.
3. Ziehen Sie die Spannbacken an, indem Sie den Spannfutter im Uhrzeigersinn drehen.
4. Wenn der Bohrer oder das Zubehör sicher befestigt ist, führen Sie die Maschine
sorgfältig aus, um zu prüfen, ob sie zentral, gleichmäßig und gleichmäßig läuft.
Wenn das Bit "wackelt" oder nicht zentral verläuft, lösen Sie das Spannfutter,
überprüfen Sie das Zubehör auf Beschädigung, korrigieren Sie seine Position,
ziehen Sie es wieder auf und testen Sie es erneut.
Bedienungen
Richtungssteuerung
WARNUNG
Niemals die Drehrichtung ändern, während das Werkzeug läuft. Dies kann zu
bleibenden Schäden am Werkzeug führen.
● Die Drehrichtung kann mit dem Vorwärts- / Rückwärtsschalter (6) eingestellt werden,
●Drehen Sie gegen den Uhrzeigersinn den Schalter nach rechts
●Im Uhrzeigersinn drehen Sie den Schalter nach links
Hinweise
Wenn sich der Vorwärts- / Rückwärtsschalter in der Mittelstellung befindet, ist der
Bohrer verriegelt und kann nicht eingeschaltet werden. Verwenden Sie diese
Einstellung als Sicherheitsfunktion, um zu verhindern, dass der Bohrer versehentlich
eingeschaltet wird.
Drehmomentregelung
Hinweise
Dieser Akku-Bohrer ist mit einer Drehmoment-Steuerkupplung ausgestattet, die es
ermöglicht, die Maschine auf das richtige Drehmoment für die jeweilige Anwendung
einzustellen.
● Die Kupplungseinstellungen werden durch die Symbole am Drehmomentwähler (3).
● Drehen Sie den Drehmomentwähler, um die gewünschte Einstellung zu wählen: je
höher die auf dem Drehmomentring angezeigte Zahl ist, desto höher ist das
Drehmoment.
Gangwähler
● Wählen Sie Getriebe 1 am Get
riebeschalter (4) für das höhere Drehmoment. Ein
niedrigerer Gang ist in der Regel besser geeignet für die Befestigung von Schrau-
ben und Befestigungselementen
- 28 -

● Wählen Sie Getriebe 2 am Getriebeschalter für das untere Drehmoment. Ein höherer
Gang ist zum Bohren und darf nicht zum Anfahren von Schrauben und Befesti-
gungselementen verwendet werden
Hinweise
Lesen Sie die Dokumentation mit Bohrer und Zubehör für die empfohlene oder maximale
Geschwindigkeitseinstellung und verwenden Sie die passende Ausrüstung. Siehe
"Spezifikation" für die maximale Ladegeschwindigkeit jedes Getriebes.
Ein- / Ausschalten
WARNUNG
IMMER bei der Einrichtung und Bedienung dieser Maschine eine angemessene
persönliche Schutzausrüstung tragen.
1. Um den Bohrer zu starten, drücken Sie den Trigger Switch (7)
2. Das eingebaute Arbeitslicht (9) leuchtet, wenn der Trigger-Schalter gequetscht wird.
Hinweise
Wenn der Trigger-Schalter nicht heruntergedrückt werden kann, ist zu prüfen, ob der
Vorwärts- / Rückwärts-Schalter (6) nicht auf die mittlere Position eingestellt ist, die
das Gerät verriegelt (siehe 'Richtungssteuerung').
3. Die Geschwindigkeit des Bohrers wird durch die Bewegung des Auslösers gesteuert:
Je weiter der Trigger-Schalter gedrückt wird, desto schneller läuft der Bohrer
4. Lassen Sie den Trigger-Schalter los, um das Gerät zu stoppen
Schraubendreher verwenden
Hinweise
Verwenden Sie bei der Arbeit mit Schraubendreher-Bits immer einen Universal-Bithal-
ter. Befestigen Sie die Schraubendreher nicht direkt in das Spannfutter.
1. Getriebe 1 mit dem Getriebeschalter (4).
2. Drehen Sie den Moduswahlschalter (3) zum Fahren .
3. Den Bohrer auf die entsprechende Drehmomente einstellen (siehe 'Drehmomen-
tregelung').
● Beim Fahren der Schrauben NIEMALS die Maschine im Bohrmodus verwenden.
Hinweise
Im Zweifelsfall, welche Drehmomentanpassung am besten für die Anwendung
geeignet ist, beginnen Sie mit einer niedrigen Einstellung und zu erhöhen,
wenn
mehr Drehmoment erforderlich ist (z. B. wenn die Schraube nicht weit genug in das
Werkstück getrieben wird).
- 29 -

- 30 -
WARNUNG
Der Bohrer, vor allem die Spitze, wird beim Bohren von Mauerwerk und Beton sehr heiß.
Berühren Sie das Bit NICHT und lassen Sie es niemals mit brennbaren Materialien
in Berührung kommen.
WARNUNG
NICHT Mauerwerkstaub einatmen. Tragen Sie einen ausreichenden Atemschutz.
Staub aus Mauerwerk, Beton und ähnlichen Stoffen ist schädlich und kann giftig sein.
Bohren von dem Holz
1. Wählen Sie den passenden Gang mit dem Getriebeschalter (4).
2. Drehen Sie den Moduswahlschalter (3) in die Bohrposition.
● Stellen Sie sicher, dass Bohrer für Holz geeignet sind und innerhalb der maximalen
Kapazität dieser Maschine liegen (siehe "Spezifikation").
WARNUNG
NICHT Holzstaub einatmen. Tragen Sie einen ausreichenden Atemschutz. Einige
Holzstäube können giftig sein.
Bohren von dem Metall
1. Wählen Sie den passenden Gang mit dem Getriebeschalter (4).
2. Drehen Sie den Moduswahlschalter (3) in die Bohrposition.
● Sicherstellen, dass die Bohrer für die Güte des zu bohrenden Metalls geeignet
sind und sich innerhalb der maximalen Kapazität der Maschine befinden (siehe
"Spezifikation")
● Um die Genauigkeit zu gewährleisten, markieren Sie die beabsichtigte Lochposi
tion mit einem Hammer und einem Mittelstempel
WARNUNG
Der Bohrer und das Werkstück werden beim Bohren von Metall sehr heiß. NICHT
berühren Sie das Bit und lassen Sie es niemals in Kontakt mit brennbaren Material-
ien kommen, wenn es heiß ist. Verwenden Sie immer ein geeignetes Schmiermittel
oder Schneidflüssigkeit und bohren Sie mit entsprechenden Geschwindigkeiten.
● NUR einen mäßigen Druck auf den Bohrer auftragen, um ein effizientes Schnei
den und eine verlängerte Bohrerlebensdauer zu gewährleisten
● Verwenden Sie eine Senkung Bit, um scharfe Grate aus
dem Loch zu entfernen,
verhindert Schnitte und andere Arten von Verletzungen
WARNUNG
Wenn das Elektrowerkzeug übermäßig heiß wird, stoppen Sie das Werkzeug sofort
und lassen Sie es abkühlen, bevor Sie die Arbeit fortsetzen. Die Kühlperiode kann
durch Betreiben des Bohrers bei maximaler Geschwindigkeit ohne Last reduziert

- 31 -
werden. Vergewissern Sie sich immer, dass die Motorentlüftungen (5) nicht blockiert
sind und erlauben Sie es nicht, dass Staub durch die Motorentlüftungen in den
Körper des Werkzeugs gelangt. Staub, vor allem metallischer Staub, kann das
Werkzeug beschädigen oder zerstören.
Wartung
WARNUNG
Trennen Sie das Gerät immer von der Stromversorgung, bevor Sie die Wartung /
Reinigung des Ladegeräts durchführen. Entfernen Sie den Akku, bevor Sie eine
Wartung / Reinigung des Bohrers durchführen.
Hinweis
Sowohl der Bohrer als auch das Ladegerät enthalten keine vom Benutzer zu warten-
den Teile. Wenn das Gerät nicht wie in diesem Handbuch beschrieben ausgeführt
wird, bringen Sie es zur Reparatur an ein autorisiertes GMC Service Center zurück.
Allgemeine Inspektion
● Überprüfen Sie regelmäßig, dass alle Befestigungsschrauben fest sitzen.
● Überprüfen Sie das Netzkabel des Werkzeugs vor jedem Gebrauch auf Beschädigung
oder Verschleiß. Reparaturen sollten von einem autorisierten Kundendienst
durchgeführt werden. Dieser Rat gilt auch für Verlängerungskabel, die mit diesem
auch verwendet werden.
Reinigung
● Halten Sie Ihr Werkzeug immer sauber. Schmutz und Staub verursachen interne Teile
schnell zu tragen und verkürzen die Lebensdauer der Maschine. Reinigen Sie den
Körper Ihrer Maschine mit einem weichen Pinsel oder trockenem Tuch. Falls
vorhanden, verwenden Sie saubere, trockene Druckluft, um durch die Lüftungss-
chlitze zu blasen.
● Reinigen Sie das Werkzeuggehäuse mit einem weichen, feuchten Tuch mit einem
milden Reinigungsmittel. Verwenden Sie keinen Alkohol, Benzin
oder starke
Reinigungsmittel.
● Verwenden Sie niemals ätzende Mittel, um Plastikteile zu reinigen.
Schmierung
Alle beweglichen Teile in regelmäßigen Abständen mit einem geeigneten Sprühschmierst-
off leicht schmieren.
Lagerung
Bewahren Sie dieses Werkzeug sorgfältig an einem sicheren, trockenen Ort außerh-
alb der Reichweite von Kindern auf.

- 32 -
Entsorgungen
Bei der Entsorgung von Elektrowerkzeugen, die nicht mehr funktional sind
und nicht reparaturfähig sind, immer die nationalen Vorschriften einhalten.
Entsorgen Sie keine Elektrowerkzeuge oder andere Elektro- und Elektron-
ik-Altgeräte (WEEE) mit Hausmüll.
Wenden Sie sich an Ihre örtliche Entsorgungsbehörde, um Informationen
über die korrekte Art der Entsorgung von Elektrowerkzeugen zu erhalten.
Instructions originales
Beschreibung der Symbole
La plaque signalétique de votre outil peut afficher des symboles. Ceux-ci représen-
tent des informations importantes sur le produit ou les instructions sur son utilisation.
Portez une protection auditive
Portez une protection oculaire
Portez une protection respiratoire
Portez une protection de la tête
Portez une protection de main
Lisez le manuel d’instructions
N’incinérez PAS les batteries!
Attention!
Pour une utilisation en intérieur seulement!
Fusible décalage temporel interne avec un courant maximum de 3.15A.
Construction de classe II
Protection de l'environnement Les produits électriques ne doivent pas
être jetés avec les ordures ménagères. Recyclez où les installations
existent. Renseignez-vous auprès de votre municipalité ou le détaillant
pour obtenir des conseils de recyclage.
Conformez aux normes de la législation et de sécurité pertinentes.
- 33 -

Les cellules de batterie Li-ion sont recyclables et ne doivent pas être
jetés avec recyclage des ménages waste.où les installations existent.
Vérifiez auprès de votre municipalité ou le détaillant pour obtenir des
conseils de recyclage.
Specification
Caractéristiques du produit
1. Chuck Jaws 2. Collier Chuck
3. Couple Sélecteur 4. Commutateur de Vitesse
5. Vents Moteur 6. Interrupteur marche avant / marche arrière
7. Commutateur de Déclenchement 8. Poignée
9. Lumière 10. Batterie
11. Indicateur de Charge de la Batterie 12. Libération de la Batterie
13. Clip de Ceinture
15. Chargeur de base
14. Chargeur
- 34 -
Tension nominale
Vitesse à vide
Capacité du mandrin
Max Capacité de perçage
Pack batterie Tension
- Cellule de batterie
Charger
--Evaluation Tension
-Output Tension
-Courant de sortie
-Temps Charging
Classe de protection
Le son et des données de vibration
Pression acoustique LPA
Puissance acoustique LWA
Incertitude K:
Vibration (sans charge)
Vibration (forage)
Incertitude K:
DC 18 V
0-350/0-1300 rpm
10 mm
Steel: Ø 6 mm
Wood: Ø18 mm
DC 18 V
Li-ion 1.5 Ah
100-240VAC 50-60HZ 15W
22.7VDC
380 mA
4 hr
66.13 dB(A)
77.13 dB(A)
3 dB(A)
1.349 m/s²
1.142 m/s²
1.5 m/s²

2 3 4 5
6
8
11
13
1
7
9
12
10
15
14
- 35 -

- 36 -
AVERTISSEMENT
Toujours portez une protection de l'oreille où le niveau sonore dépasse 85 dB (A) et
de limiter le temps d'exposition si nécessaire. Si les niveaux sonores sont mal à
l'aise, même avec la protection de l'oreille, arrêtez immédiatement d'utiliser l'outil et
vérifier la protection de l'oreille est correctement mis en place et fournit le bon niveau
d'atténuation acoustique pour le niveau du son produit par votre outil.
AVERTISSEMENT
L'exposition de l'utilisateur aux vibrations de l'outil peut entraîner une perte de sens
du toucher, un engourdissement, des picotements et une capacité réduite à
l'adhérence. L'exposition à long terme peut conduire à une maladie chronique. Le
cas échéant, limiter la durée de l'exposition aux vibrations et utiliser des gants
anti-vibrations . ne pas utiliser l'outil avec les mains en dessous d'une température
confortable normale, que les vibrations aura un plus grand effet. les chiffres fournis
dans le cahier des charges relatives aux vibrations pour calculer la durée et la
fréquence de fonctionnement de l'outil.
Les niveaux sonores et les vibrations dans la spécification sont déterminées selon la
norme EN60745 ou les normes internationales similaires. Les figures représentent
une utilisation normale de l'outil dans des conditions normales de travail. Un mal
entretenu, incorrectement assemblé, ou un outil mal utilisé peut produire des
niveaux accrus de bruit et de vibration. www.osha.europa.eu
fournit des informa-
tions sur les niveaux sonores et les vibrations sur le lieu de travail qui peuvent être
utiles aux utilisateurs nationaux qui utilisent des outils pour de longues périodes de
temps.
Sécurité Générale
AVERTISSEMENT
Lisez tous les avertissements de sécurité et toutes les instructions. Le non-respect
des avertissements et des instructions peut entraîner un choc électrique, un
incendie et / ou des blessures graves.
AVERTISSEMENT
Cet appareil n'est pas destiné à être utilisé par des personnes (y compris les
enfants) avec des capacités réduites, physiques ou mentales ou manque d'expéri-
ence ou de connaissances à moins qu'ils ne soient surveillées ou instructions
concernant l'utilisation de l'appareil par une personne responsable de leur sécurité.
Les enfants doivent être supervisé pour assurer qu'ils ne jouent pas avec l'appareil.
Conservez tous les avertissements et les instructions pour référence ultérieure

Le terme " outil électrique " dans les avertissements se rapporte à raccordés au
secteur (avec fil) outil électrique ou fonctionnant sur batterie outil électrique (sans
fil).
1. Sécurité de la zone de travail
a.
b.
c.
2. Sécurité Electrique
a.
b.
c.
d.
e.
f.
3. Sécurité Personnelle
a.
- 37 -
Gardez la zone de travail propre et bien éclairé. Les zones sombres ont souvent
des accidents.
N’utilisez pas d'outils électriques dans des atmosphères explosives, comme en
présence de liquides inflammables, de gaz ou de poussière. Les outils électriques
créent des étincelles qui peuvent enflammer les poussières ou fumées.
Tenez à l'écart des enfants et des personnes présentes lors de l'utilisation d'un
outil électrique. Distractions peut vous faire perdre le contrôle.
Les fiches des outils électriques doivent correspondre à la prise. Ne modifiez
jamais la fiche d'aucune façon. N’utilisez pas de fiches d'adaptateur avec des
outils électriques mis à la terre (la terre). Les prises et prises non modifiées
réduisent le risque de choc électrique.
Évitez tout contact corporel avec des surfaces mises à la terre ou à la masse,
comme les tuyaux, les radiateurs, les cuisinières et les réfrigérateurs. Il y a un
risque de choc électrique si votre corps est mis à la terre ou à la terre.
N’exposez pas les outils électriques à la pluie ou dans des conditions humides
d'eau dans un outil électrique augmente le risque de choc électrique.
Ne maltraitez pas le cordon. N’utilisez jamais le cordon pour transporter, tirez ou
débranchez l'outil électrique. Tenez le cordon éloigné de la chaleur, de l'huile, des
arêtes vives ou des pièces en mouvement. Les cordons endommagés ou
emmêlés augmentent le risque de choc électrique.
Lorsque vous
utilisez un outil électrique à l'extérieur, utilisez une rallonge pour
l'extérieur. L'utilisation d'un cordon adapté à une utilisation en extérieur réduit le
risque de choc électrique.
Si vous utilisez un outil électrique dans un endroit humide est inévitable, utilisez
un dispositif à courant résiduel (RCD) d'alimentation protégée. L'utilisation d'un
RCD réduit le risque de choc électrique.
Restez vigilant, regardez ce que vous faites preuve de bon sens lors de l'utilisation
d'un outil électrique. N’utilisez pas un outil lorsque vous êtes fatigué ou sous
l'influence de drogues, d'alcool ou de médicaments. Un moment d'inattention suffit
pour les outils électriques peuvent entraîner des blessures corporelles graves.

b.
c.
d.
e.
f.
g.
4. L'utilisation d'outils d'alimentation et de soins
a.
b.
c.
d.
e.
- 38 -
Utilisez un équipement de protection individuelle. Portez toujours des lunettes de
protection. Équipement de protection tels que les masques anti-poussière,
chaussures de sécurité antidérapantes, un casque ou une protection auditive
dans des conditions appropriées réduisent les blessures corporelles.
Empêchez les démarrages intempestifs. Assurez-vous que l'interrupteur est en
position d'arrêt avant de se connecter à une source d'alimentation et / ou de la
batterie, ramassez ou transportez l'outil. Portez un outil avec votre doigt sur
l'interrupteur ou des outils électriques qui ont l 'interrupteur en les accidents.
Retirez tout ou clé de réglage avant de mettre l'outil sous tension. Une clé ou une
clé attachée à une partie tournante de l'outil électrique peut entraîner des blessures
corporelles.
Ne penchez pas trop. Maintenez un bon équilibre en tout temps. Cela permet un
meilleur contrôle de l'outil dans des situations inattendues
Portez des vêtements appropriés. Ne portez pas de vêtements amples ou de
bijoux. Gardez vos cheveux, vêtements et gants des pièces en mouvement. Les
vêtements amples, les bijoux ou les cheveux longs peuvent être pris dans les
pièces mobiles.
Si des dispositifs sont prévus pour le raccordement d'aspiration des poussières et
des installations de collecte, assurez-vous qu'ils sont connectés et correctement
utilisés. L'utilisation de la collecte de la poussière peut réduire les risques liés à la
poussière.
Ne forcez pas
l'outil. Utilisez l'outil de puissance pour votre application. L'outil
électrique fera le travail meilleur et plus sûr à la vitesse pour laquelle il a été
conçu.
N’utilisez pas l'outil si le commutateur ne met pas en marche et hors tension. Tout
outil qui ne peut pas être contrôlé par le commutateur est dangereux et doit être
réparé.
Débranchez la fiche de la source d'alimentation et / ou la batterie de l'outil électrique
avant tout réglage, changement d'accessoires ou de ranger les outils électriques.
Ces mesures de sécurité préventives réduisent le risque de démarrage accidentel
de l'outil.
Entreposez les outils électriques hors de la portée des enfants et ne permettent
pas aux personnes qui ne connaissent pas l'outil ou ces instructions pour faire
fonctionner l'outil électrique. Les outils électriques sont dangereux entre les mains
des utilisateurs non formés.
Maintenez les outils électriques. Vérifiez les défauts d'alignement ou des pièces

f.
g.
5. L'utilisation des outils de la batterie et de soins
a.
b.
C.
d.
e.
6. Service
a.
- 39 -
mobiles, des pièces cassées ou toute autre condition qui pourrait affecter le
fonctionnement de l'outil. Si elle est endommagée, que l'outil de réparer avant
utilisation. De nombreux accidents sont causés par des outils mal entretenus.
Gardez les outils de coupe aiguisés et propres. Des outils correctement entrete-
nus avec des arêtes vives sont moins susceptibles de se lier et sont plus faciles à
contrôler.
Utilisez l'outil, les accessoires et les lames etc. conformément à ces instructions,
en tenant compte des conditions de travail et le travail à effectuer. L'utilisation de
l'outil pour des opérations différentes de celles prévues pourrait entraîner une
situation dangereuse.
AVERTISSEMENT: Lorsqu'il est utilisé en Australie ou en Nouvelle-Zélande, il est
recommandé que cet outil est toujours alimenté par l'appareil de courant résiduel
(RCD) avec un courant nominal résiduel de 30 mA ou moins
Rechargez uniquement avec le chargeur spécifié par le fabricant. Un chargeur qui
convient pour un type de batterie peut créer un risque d'incendie lorsqu'il est
utilisé avec une autre batterie
Utilisez des outils électriques uniquement avec des batteries spécifiquement
désignés. L'utilisation de toute autre batterie peut créer un risque de blessure et
d'incendie.
Lorsque la batterie est pas utilisé, gardez l'écart des autres objets métalliques,
comme des trombones, des pièces de monnaie, des clés, des clous, des vis ou
autres petits
objets métalliques qui peuvent faire une connexion d'un terminal à l'autre.
Court-circuiter les bornes de la batterie peut provoquer des brûlures ou un incendie.
Si contact avec les yeux liquides, consultez un médecin. Le liquide éjecté de la
batterie peut provoquer une irritation ou des brûlures.
Dans des conditions abusives, le liquide peut être éjecté de la batterie; Éviter tout
contact en cas de contact, rincez à l'eau si contact avec les yeux liquides, consult-
ez un médecin liquide éjecté de la batterie peut provoquer une irritation ou des
brûlures.
Demandez à votre outil électrique par un réparateur qualifié utilisant uniquement
des pièces de rechange identiques. Cela permettra d'assurer que la sécurité de
l'outil de puissance est maintenue.

Sécurité supplémentaire pour forets à pile
AVERTISSEMENT
Important: Il est impératif de respecter toutes les règles de sécurité nationales
concernant l'installation, l'exploitation et la maintenance.
a.
b.
c.
d.
e.
f.
g.
h.
i.
j.
k.
l.
m.
n.
o.
p.
- 40 -
Ne laissez personne de moins de 18 ans à utiliser cet outil, et veiller à ce que les
opérateurs sont qualifiés et familiarisés avec le mode d'emploi et de sécurité.
Les chargeurs de batterie sont destinés à une utilisation en intérieur uniquement.
Assurez-vous que l'alimentation et le chargeur sont protégés contre l'humidité en
tout temps.
Lors de l'utilisation de la perceuse, utilisez l'équipement de sécurité, y compris
des lunettes de sécurité ou un écran, les défenseurs de l'oreille et des vêtements
de protection, y compris des gants de sécurité. Portez une protection respiratoire
appropriée pour les travaux entrepris. Une note minimale FFP2 est recommandée.
En cas d'utilisation de l'outil provoque une gêne de quelque façon, arrêtez-vous
immédiatement et revoir votre mode d'emploi.
Utilisez des détecteurs de métaux et de tension pour localiser électriques, des
conduites d'eau ou de gaz cachés. Évitez de toucher des pièces sous tension ou
conducteurs.
Veillez à ce que l'éclairage est adéquat.
Assurez-vous que le foret est solidement fixé dans le mandrin. trépans de forage
non sécurisées peuvent être éjectés de la machine entraînant un danger.
Vérifiez que le foret soit pas en contact avec la pièce à usiner avant le démarrage
de l'outil.
Avant de percer, vérifiez qu'il ya suffisamment d'espace pour le foret dans la pièce.
Nexercez PAS de pression sur l'outil. Pour ce faire raccourcirait sa durée de vie.
Forets chauffent pendant le fonctionnement, laissez refroidir avant de les manipuler.
N’utilisez
jamais vos mains pour enlever la sciure, des copeaux ou à proximité
des déchets par le bit.
Si vous êtes interrompu lors de l'utilisation de la perceuse, terminez le processus
et éteindre avant de regarder.
Si possible, utilisez des colliers ou un étau pour maintenir votre travail.
Examinez le mandrin régulièrement pour des signes d'usure ou de détérioration.
Faites réparer les pièces endommagées par un service qualifié de centrer)
TOUJOURS attendez que le forage a com.
TOUJOURS attendez jusqu'à ce que la perceuse est un arrêt complet avant de le
mettre vers le bas.
Vérifiez périodiquement tous les écrous, boulons et autres fixations et serrer le
cas échéant.

Sécurité de la Batterie
AVERTISSEMENT
Les batteries Li-ion, si mal utilisés, stockés ou accusés sont un incendie,
de brûlure et d'explosion.
●
●
●
●
●
●
●
●
Sécurité Chargeur de batterie
Utilisez correctement le chargeur de batterie
●
●
●
- 41 -
Gardez la batterie hors de portée des enfants.
Ne chargez QUE les batteries Li-Ion avec le chargeur fourni ou conçu spécifique-
ment pour votre produit.
Utilisez UNIQUEMENT des batteries Li-ion fournies avec un produit ou
spécifiquement conçu pour être compatible.
Laissez les batteries refroidir pendant 15 minutes après la charge ou une
utilisation intensive. Le non respect de ces instructions peut provoquer une
surchauffe ou d'incendie.
Lorsqu'ils ne sont pas dans les batteries d'utilisation doivent être conservés à
température ambiante (environ 20°C).
Assurez-vous que les contacts de la batterie ne peut pas accidentellement court
dans le stockage Gardez les batteries proprer, objets étrangers ou la saleté peut
causer un court Tenez à l'écart des autres objets métalliques, par exemple, des
trombones, des pièces de monnaie, des clés, des clous et des vis.
Dans des conditions abusives, le liquide peut être éjecté de la batterie. Ce liquide
peut provoquer une irritation de la peau ou des brûlures. Évitez le contact. En cas
de contact accidentel, rincez à l'eau. Si contact avec les yeux liquides, demander
de l'aide médicale.
N’ouvrez, démontez, écrasez PAS, température supérieure à 60°C ou incinérez.
Ne jetez pas au feu ou similaire.
Reportez-vous à la section de ce manuel relatif à l'utilisation du chargeur de
batterie avant de charger la batterie.
Ne tentez pas d'utiliser le chargeur avec des piles autres que celles fournies.
Gardez votre chargeur de
batterie propre, objets étrangers ou la saleté peut
causer un court air ou bloquer les ouvertures non respect de ces instructions peut
provoquer une surchauffe ou un incendie.
Si le cordon d'alimentation est endommagé, il doit être remplacé par le fabricant,
son agent de service ou une personne qualifiée afin d'éviter un danger.

AVERTISSEMENT
NE tentez PAS de recharger des piles non rechargeables.
Avant Utilisation
Retrait d'une batterie
Retirez la batterie de l'outil en appuyant sur la libération de la batterie, puis faites
glisser la batterie hors de la fente de la batterie.
AVERTISSEMENT
N’essayez PAS d'enlever la batterie sans appuyer sur le bouton libération de la
batterie L'outil ou la batterie pourrait être endommagé.
Montage d'une batterie
1. Mettez en place une batterie en le faisant glisser à l'emplacement de la batterie
de l'outil jusqu'à ce qu'un déclic et se verrouille en position.
Note
Assurez-vous que la batterie et l'outil sont correctement alignés. Si la batterie ne
glisse pas dans l'outil facilement, faites-le. Force pas, faites glisser plutôt la batterie
de l'outil à nouveau, vérifiez la partie supérieure de la batterie et l'emplacement de
la batterie d'outils sont propres et en bon état et que les contacts ne sont pas pliés.
Configuration du chargeur de batterie
1. Le cas échéant, retirez toutes les batteries du chargeur de batterie.
2. Insérez le réseau Chargeur de batterie dans une prise de courant appropriée.
Note
Le voyant vert du chargeur clignote pour indiquer que le chargeur est prêt à charger
la batterie.
AVERTISSEMENT
Utilisez ce chargeur uniquement pour charger la batterie fournie ou des piles supplémen-
taires achetées qui sont spécialement conçues pour cet outil.
AVERTISSEMENT
Le chargeur est conçu pour une utilisation en intérieur et NE DOIT PAS être utilisé
dans des conditions humides ou mouillés.
Chargement de la Batterie
AVERTISSEMENT
Le non-respect de la procédure correcte lorsque les piles de charge entraînera des
dommages permanents.
- 42 -

Note
Temps de charge normale est d'environ 1 heure pour une batterie de capacité 2.0Ah
récemment déchargée. Toutefois, si la batterie a été laissé dans un état déchargé
pendant un certain temps, il peut prendre plus de temps à se charger.
1. Faites glisser une batterie complètement ou partiellement déchargée sur le chargeur
de batterie.
Note
Assurez-vous que la batterie et chargeur de batterie sont
correctement alignés. Si la batterie ne glisse pas sur le chargeur
de batterie facilement, ne forcez pas. Au lieu de cela, retirez la
batterie, vérifiez la partie supérieure de la batterie et la fente
chargeur de batterie sont propres et en bon état et que les
contacts ne sont pas pliés.
2. Une fois que la recharge commence, la LED rouge allume Lorsque la batterie n'est
pas connectée au chargeur, la LED verte du chargeur s'allume.
3. Lorsque la batterie est complètement chargée, la LED rouge éteint et LED verte allume.
Niveau de charge de la batterie
La batterie est intégré dans l'indicateur de charge de batterie
En appuyant sur le bouton à droite indique le niveau de charge. La LED droite
indique un haut niveau de charge et la gauche un faible niveau de charge qui se
traduira par la batterie, il faudra charger bientôt.
IMPORTANT
Quand un faible niveau de charge est indiqué, l'outil peut cesser de fonctionner
pendant l'utilisation, ce qui est dangereux lors de l'utilisation d'une scie circulaire.
Assurez-vous toujours la batterie a un bon niveau de charge.
Note
A propos de charge de la batterie:
●
●
●
●
●
●
- 43 -
La batterie doit être rechargée à des températures ambiantes comprises entre 10
et 40°C (de préférence d'environ 20 °C).
Après la charge, attendez 15 minutes la batterie refroidir avant de l'utiliser
Assurez-vous que le chargeur est débranché de l'alimentation secteur après
utilisation, et est stocké correctement.
NE laissez PAS les piles en charge pendant des périodes prolongées et ne
stockez jamais les batteries en charge.
Le chargeur de batterie surveille la température de la batterie et de la tension
pendant la charge. Retirez la batterie une fois la charge terminée pour optimiser
les cycles de charge de la batterie et ne perdez pas le pouvoir.
Les piles peuvent devenir défectueux au fil du temps, les cellules individuelles

●
●
Bits et accessoires de forage de montage
AVERTISSEMENT
TOUJOURS retirez la batterie de la perceuse avant de fixer, ajustez ou de retirez
des accessoires.
AVERTISSEMENT
NE tentez PAS de resserrer les mèches (ou tout autre accessoire) en saisissant la
partie avant du mandrin et l'outil de commutation. Cela peut entraîner des blessures
et peut causer des dommages au mandrin.
AVERTISSEMENT
Ne montez jamais tout accessoire ou peu avec une vitesse maximale inférieure à la
vitesse à vide de celui outil.
1. Ouvrez les mâchoires de mandrin (1) en faisant tourner le collier de serrage (2)
dans le sens antihoraire.
2. Placez le foret ou l'accessoire au centre dans le mandrin.
3. Serrez les mors du mandrin en tournant dans le sens horaire du collier Chuck.
4. Lorsque le foret ou l'accessoire est solidement fixé, exécutez soigneusement la
machine à tester qu'il fonctionne de manière centralisée, facilement et uniformé-
ment. Si le bit est « vaciller » ou ne fonctionne pas au centre, relâchez le mandrin,
vérifiez l'accessoire pour les dommages, corrigez sa la position, resserrez et
tester à nouveau.
- 44 -
dans la batterie peut échouer et que la batterie puisse court-circuiter. Le chargeur
ne se charge pas des batteries défectueuses. Utilisez une autre batterie, si
possible, pour vérifier la fonctionnalité correcte du chargeur et d'acheter une
batterie de remplacement si un défaut la batterie est indiqué
N'entreposez PAS les batteries au lithium-ion dans un état déchargé pendant une
longue période car cela peut endommager les cellules au lithium-ion. Pour le
stockage à long terme, les batteries de magasin
dans un état de charge élevée
déconnectés de l'outil électrique.
La capacité des batteries réduira au fil du temps. Au bout de 100 cycles de
charge, la durée de fonctionnement de la batterie et les performances du couple
maximal du conducteur sera légèrement réduire. Cette baisse se poursuivra
jusqu'à ce que la batterie a une capacité minimale après 500 cycles de charge.
Ceci est normal et non un défaut avec la batterie.

Operation
Contrôle de la Direction
AVERTISSEMENT
NE changez JAMAIS le sens de rotation pendant que l'outil fonctionne. Cela peut
causer des dommages permanents à l'outil.
● Le sens de rotation peut être réglé à l'aide du commutateur avant / marche arrière (6).
● Pour la rotation dans le sens inverse des aiguilles d'une montre, appuyez sur le bouton
vers la droite.
● Pour le sens des aiguilles d'une montre, appuyez sur le bouton vers la gauche.
Note
Lorsque le commutateur marche / arrêt est en position centrale, la perceuse est
verrouillée et ne peut pas être allumée. Utilisez ce paramètre comme une caractéris-
tique de sécurité pour éviter que la perceuse ne soit allumée accidentellement.
Contrôle de couple
Note
Cette perceuse sans fil est équipée d'un embrayage de contrôle de couple permet-
tant à la machine d'être réglée sur le couple correct pour chaque application.
● Les réglages de l'embrayage sont indiqués par les symboles du sélecteur de couple (3).
● Faites pivoter le sélecteur de couple pour sélectionner le réglage désiré: plus le nombre
affiché sur la bague de couple est élevé, plus le couple produit est élevé.
Sélection des vitesses
● Sélectionnez l'engrenage 1 sur le contacteur
d'engrenage (4) pour un couple plus
élevé. Un engrenage à vitesse inférieure est généralement plus adapté pour
entraîner des vis et des attaches
● Sélectionnez l'engrenage 2 sur le commutateur de vitesse pour le couple inférieur.
Un engrenage à vitesse supérieure est destiné au forage et ne doit pas être utilisé
pour la conduite de vis et de fixations
Note
TOUJOURS lisez la documentation fournie avec les forets et les accessoires pour le
réglage de vitesse recommandé ou maximum et utilisez l'équipement le plus approprié.
Voyez ‘Spécification’ pour la vitesse maximale sans charge de chaque équipement.
Mise en marche / arrêt
AVERTISSEMENT
TOUJOURS portez un équipement de protection individuelle adéquat lors de la mise
- 45 -

en service et de l'utilisation de cette machine.
1. Pour démarrer la perceuse, serrez le commutateur de déclenchement (7).
2. La lumière de travail intégrée (9) s'allume lorsque le commutateur de déclenche-
ment est pressé.
Note
Si le commutateur de déclenchement ne peut pas être enfoncé, vérifiez que le
commutateur avant / marche arrière (6) n'est pas réglé sur sa position centrale, qui
verrouille le périphérique (voir 'Contrôle de direction').
3. La vitesse de la perceuse est contrôlée par le mouvement de la gâchette: plus le
commutateur de déclenchement est pressé, plus vite la perceuse fonctionnera.
4. Relâchez le commutateur de déclenchement pour arrêter la machine.
Utilisation de tournevis
Note
Utilisez toujours un support de bit universel lorsque vous utilisez des broches de
tournevis. Ne montez pas de tournevis directement dans le mandrin.
1. Sélectionnez l'engrenage 1 à l'aide du commutateur d'engrenage (4).
2. Tournez le sélecteur de mode (3) sur le lecteur.
3. Ajustez le foret au réglage de couple approprié (voir 'Contrôle de couple').
● Lorsque vous tournez des vis, N’utiliser JAMAIS la machine en mode de forage.
Note
En cas de doute, quel réglage de couple convient le mieux à l'application, commencez
par un faible réglage et augmentez si le couple doit être nécessaire (par exemple, si
la vis n'est pas entraînée suffisamment loin dans la pièce à usiner).
AVERTISSEMENT
Le foret, en particulier la pointe, deviendra très chaud lors du forage de la maçonnerie et
du béton. NE touchez PAS le morceau et ne l'autorisez jamais à entrer en contact avec
des matériaux combustibles.
AVERTISSEMENT
N’ inhalez PAS la poussière de maçonnerie. Portez une protection respiratoire
adéquate. La poussière provenant de la maçonnerie, du béton et des substances
similaires est nocive et peut être toxique.
Forage de bois
1. Sélectionnez l'équipement approprié à l'aide du commutateur de vitesse (4) Rotate
the Mode Selector (3) to the drill position.
2. Assurez-vous que les forets sont appropriés pour le bois et sont dans la capacité
- 46 -

- 47 -
maximale de cette machine (voir 'Spécification').
AVERTISSEMENT
N’inhalez PAS les poussières de bois. Portez une protection respiratoire adéquate.
Certaines poussières de bois peuvent être toxiques.
Méthode de forage
1. Sélectionnez l'équipement approprié à l'aide du commutateur de vitesse (4).
2. Tournez le sélecteur de mode (3) sur la position de forage.
● Assurez-vous que les forets sont adaptés à la qualité du métal foré et sont dans la
capacité maximale de la machine (voir 'Spécification').
● Pour assurer la précision, marquez la position de trou souhaitée à l'aide d'un marteau
et d'un poinçon central.
AVERTISSEMENT
Le foret et la pièce de travail deviendront très chaud lors du forage de métal. NE
touchez PAS le morceau et ne le laissez jamais entrer en contact avec des matériaux
combustibles à chaud. Toujours utilisez un lubrifiant approprié ou un liquide de coupe,
et forer à des vitesses appropriées.
● SEULEMENT, appliquez une pression modérée sur le foret, en assurant une
coupe efficace et une durée de forage prolongée
● Utilisez un bit de fraisage pour éliminer les bavures tranchantes du trou, en
empêchant les coupures et autres blessures
AVERTISSEMENT
Si l'outil électrique est excessivement chaud, arrêtez d'utiliser l'outil immédiatement
et laissez refroidir avant de continuer à travailler. La période de refroidissement peut
être réduite en actionnant la perceuse à vitesse
maximale sans charge. Veillez
toujours à ce que les ventilateurs du moteur (5) ne soient pas bloqués et ne permet-
tez pas à la poussière d'entrer dans le corps de l'outil à travers les ventilateurs; La
poussière, en particulier la poussière métallique, peut endommager ou détruire
l'outil.
Entretien
AVERTISSEMENT
TOUJOURS débranchez l'alimentation secteur avant d'effectuer tout entretien /
nettoyage du chargeur. Retirez la batterie avant d'effectuer toute maintenance /
nettoyage de la perceuse.
Note
Le foret et le chargeur ne comportent pas de pièces pouvant être réparées par

- 48 -
l'utilisateur. Si l'appareil ne fonctionne pas comme indiqué dans ce manuel,
renvoyez-le à un centre de service agréé GMC pour réparation.
Inspection Générale
● Vérifiez régulièrement que toutes les vis de fixation sont serrées
● Inspectez le cordon d'alimentation de l'outil, avant chaque utilisation, pour les
dommages ou l'usure. Les réparations doivent être effectuées par un centre de
service agréé. Ce conseil s'applique également aux cordons de prolongement
utilisés avec cela.
Nettoyage
● Gardez votre outil propre en tout temps. La saleté et la poussière provoqueront des
pièces internes rapidement et réduiront la durée de vie de la machine. Nettoyez le
corps de votre machine avec une brosse douce ou un chiffon sec. Si disponible,
utilisez de l'air comprimé propre et sec pour souffler les trous de ventilation.
● Nettoyez le boîtier de l'outil avec un chiffon humide et doux à l'aide d'un détergent
doux. N’utiliser pas d'alcool, d'essence ou de produits de nettoyage puissants.
● N’utilisez jamais d'agents caustiques pour nettoyer les pièces en plastique.
Lubrification
Lubrifiez légèrement toutes les pièces mobiles à intervalles réguliers avec un lubrifiant de
pulvérisation approprié.
Espace de rangement
Rangez cet outil avec attention dans un endroit sûr et sec hors de la portée des
enfants.
Disposition
Respectez toujours les réglementations nationales lors de l'élimination des
outils électriques qui ne sont plus fonctionnels et ne sont pas viables pour
la réparation.
Ne jetez pas d'outils électriques ou d'autres déc
hets d'équipements électriques
et électroniques (DEEE), avec les ordures ménagères.
Contactez votre autorité locale d'élimination des déchets pour obtenir des
informations sur la bonne façon de disposer des outils électriques.

Manual original
Descripción de los símbolos
La placa de características de su herramienta puede mostrar símbolos. Estos
representan información importante sobre el producto o instrucciones sobre su uso.
Use protección auditiva
Use protección para los ojos
Use protección respiratoria
Use protección para la cabeza
Use protección para las manos
Lea el manual de instrucciones
¡NO incinere las baterías!
¡Precaución!
¡Sólo para el uso en el interior!
Fusible de retardo interno con una corriente máxima de 3,15A.
Clase II construción
Protección medioambiental Los productos eléctricos de desecho no
deben eliminarse con la basura doméstica. Recicle en caso de que
exista un centro habilitado para ello. Consulte a su autoridad local o
proveedor para obtener consejo con respecto al reciclaje.
Cumple con la legislación y las normas de seguridad pertinentes.
- 49 -

Las celdas de la batería Li-ion son reciclables y no deben desecharse
con la basura doméstica. Recicle en caso de que exista un centro
habilitado para ello. Consulte a su autoridad local o proveedor para
obtener consejo con respecto al reciclaje.
Especificación
Las Características de Productos
1. Las Mordazas 2. Selector de Par
3. Interruptor de Cambio de Velocidades 4. Ventilación del Motor
5. Interruptor Adelante/Reservo 6. Interruptor del Disparador
7. Empuñadura 8. La luz de trabajo
9. Batería 10. Indicador de Carga de Batería
11. Liberación de la Batería 12. El Clip para Cinturón
13. Cargador 14.El cargador
15. Base de cargador
- 50 -
Tensión Nominal
Velocidad sin Carga
Capacidad de Madril
Capacidad de perforación Máxima
Tensión del Paquete de Batería
- Celda de batería
Cargador
-Tensión Nominal
-Tensión de salida
-Corriente de salida nominal
-El tiempo de carga
Clase de protección
Datos de Sonidos y Vibraciones
Presión sonora LPA
Potencia acústica LWA
Incertidumbre K:
Vibración (sin Carga)
Vibración (Perforación)
Incertidumbre K:
DC 18 V
0-350/0-1300 rpm
10 mm
Steel: Ø 6 mm
Wood: Ø18 mm
DC 18 V
Li-ion 1.5 Ah
100-240VAC 50-60HZ 15W
22.7VDC
380 mA
4 hr
66.13 dB(A)
77.13 dB(A)
3 dB(A)
1.349 m/s²
1.142 m/s²
1.5 m/s²

2 3 4 5
6
8
11
13
1
7
9
12
10
15
14
- 51 -

- 52 -
ADVERTENCIA
Siempre use protección auditiva donde el nivel de sonido exceda 85 dB (A) y limite
el tiempo de exposición si es necesario.Si los niveles de sonido son incómodos,
incluso con protección para los oídos, deje de usar la herramienta inmediatamente
y compruebe que la protección auditiva está correctamente montada y proporciona
el nivel correcto de atenuación acústica para el nivel de sonido producido por la
herramienta.
ADVERTENCIA
La exposición del usuario a la vibración de la herramienta puede resultar en pérdida
del sentido del tacto, entumecimiento, hormigueo y disminución de la capacidad de
agarre. La exposición a largo plazo puede conducir a una condición crónica. Si es
necesario, limite la duración del tiempo expuesto a las vibraciones y use guantes
anti-vibración.No opere la herramienta con las manos por debajo de una temperatu-
ra normal y cómoda, ya que la vibración tendrá un efecto mayor.Utilice las cifras
proporcionadas en la especificación relativa a la vibración para calcular la duración
y la frecuencia de funcionamiento de la herramienta.
Los niveles de sonido y vibración en la especificación se determinan de acuerdo con
EN 60745 o normas internacionales similares.Las figuras representan un uso
normal para la herramienta en condiciones normales de trabajo. Una herramienta
mal mantenida, ensamblada incorrectamente o mal utilizada puede producir
mayores niveles de ruido
y vibraciones. www.osha.europa.eu proporciona
información sobre los niveles de sonido y vibración en el lugar de trabajo que
pueden ser útiles para los usuarios domésticos que utilizan herramientas durante
largos períodos de tiempo.
Seguridad general
ADVERTENCIA
Lea todas las advertencias de seguridad y todas las instrucciones. El incumplimien-
to de las advertencias e instrucciones puede provocar descargas eléctricas,
incendio y / o lesiones graves.
ADVERTENCIA
Este aparato no está diseñado para ser usado por personas (incluyendo niños) con
capacidades reducidas, físicas o mentales o por falta de experiencia o conocimien-
to, a menos que hayan recibido supervisión o instrucciones sobre el uso del aparato
por parte de una persona responsable de su seguridad.Los niños deben ser
supervisados para asegurarse de que no juegan con el aparato.

Guarde todas las advertencias e instrucciones para futuras referencias
El término "herramienta eléctrica" en las advertencias se refiere a su herramienta
eléctrica accionada por una red (con cable) o una herramienta eléctrica accionada
por batería (inalámbrica).
1. Seguridad en el área de trabajo
a.
b.
c.
2. Seguridad eléctrica
a.
b.
c.
d.
e.
f.
3. Seguridad personal
a.
- 53 -
Mantenga el área de trabajo limpia y bien iluminada. Las áreas desordenadas u
oscuras invitan a accidentes.
No utilice herramientas eléctricas en atmósferas explosivas, como en presencia
de líquidos inflamables, gases o polvo. Las herramientas eléctricas crean chispas
que pueden encender el polvo o los vapores.
Mantenga alejados a los niños y transeúntes mientras maneja una herramienta
eléctrica. Las distracciones pueden hacerte que pierda el control.
Los enchufes de la herramienta eléctrica deben coincidir con el tomacorrien-
te.Nunca modifique el enchufe de cualquier manera. No utilice enchufes adapta-
dores con herramientas eléctricas conectadas a tierra. Los enchufes no modifica-
dos y los tomacorrientes coincidentes reducirán el riesgo de descarga eléctrica.
Evite el contacto del cuerpo con superficies conectadas a tierra, tales como
tuberías, radiadores, estufas y refrigeradores. Existe un mayor riesgo de descar-
ga eléctrica si su cuerpo está conectado a tierra.
No exponga las herramientas eléctricas a la lluvia o a condiciones húmedas. El
hecho de que el agua que entre en una herramienta eléctrica aumentará el riesgo
de descarga eléctrica.
No abuse del cordón. Nunca use el cable para transportar, tirar o desenchufar la
herramienta eléctrica. Mantenga los cordones alejados del calor, aceite, bordes
afilados o partes móviles. Los cordón dañados o enredados aumentan el riesgo
de descarga eléctrica.
Al utilizar una herramienta eléctrica
al aire libre, utilice un cordón de extensión
adecuado para uso en exteriores. El uso de un cable adecuado para uso en
exteriores reduce el riesgo de descarga eléctrica.
Si el uso de una herramienta eléctrica en una ubicación húmeda es inevitable,
utilice un suministro protegido de dispositivo de corriente residual (RCD). El uso
de un RCD reduce el riesgo de descarga eléctrica.
Manténgase alerta, observe lo que está haciendo y use el sentido común al operar
una herramienta eléctrica. No use una herramienta eléctrica mientras esté cansado

b.
c.
d.
e.
f.
g.
4. Uso y cuidado de la herramienta eléctrica
a.
b.
c.
d.
- 54 -
o bajo la influencia de drogas, alcohol o medicamentos. Un momento de inatención
al operar herramientas eléctricas puede resultar lesiones personales graves.
Use equipo de protección personal. Siempre use protección para los ojos.
Equipos de protección tales como máscaras contra el polvo, zapatos de
seguridad antideslizantes, sombrero duro o protección auditiva usados para
condiciones apropiadas reducirán las lesiones personales.
Evite el arranque involuntario. Asegúrese de que el interruptor esté en la posición
de apagado antes de conectar la fuente de alimentación y / o la batería, recoger
o transportar la herramienta. Cargar las herramientas eléctricas con el dedo en el
interruptor o energizar las herramientas eléctricas con el interruptor encendido
invita a accidentes.
Traslade cualquier llave o llave de ajuste antes de encender la herramienta
eléctrica. Una llave o una llave izquierda unida a una parte giratoria de la herramienta
eléctrica puede resultar en lesiones personales.
Do not overreach. Keep proper footing and balance at all times. No estire el
cuerpo para alcanzar mayor distancia. Mantenga una postura firme y buen
equilibrio en todo momento.Esto permite un mejor control de la herramienta
eléctrica en situaciones inesperadas
Vístete apropiadamente. No ponga ropa suelta o joyas. Mantenga el cabello, la
ropa y los guantes alejados de las partes móviles. La ropa suelta, la joyería
o el
pelo largo pueden quedar atrapados en las partes móviles.
Si se proporcionan dispositivos para la conexión de las instalaciones de extracción
y recolección de polvo, asegúrese de que estén conectados y utilizados correcta-
mente. El uso de la acumulación de polvo puede reducir los peligros relacionados
con el polvo.
No fuerce la herramienta eléctrica. Utilice la herramienta eléctrica adecuada para
su aplicación. La herramienta eléctrica correcta hará el trabajo mejor y más
seguro a la velocidad para la que fue diseñado.
No utilice la herramienta eléctrica si el interruptor no la enciende y apaga.
Cualquier herramienta eléctrica que no pueda ser controlada con el interruptor es
peligrosa y debe ser reparada.
Desconecte el enchufe de la fuente de alimentación y / o la batería de la
herramienta eléctrica antes de realizar cualquier ajuste, cambio de accesorios o
almacenamiento de herramientas eléctricas. Estas medidas preventivas de
seguridad reducen el riesgo de arrancar la herramienta eléctrica accidentalmente.
Guarde las herramientas eléctricas inactivas fuera del alcance de los niños y no

e.
f.
g.
5. Uso y cuidado de la batería
a.
b.
C.
d.
e.
6. Servicio
a.
- 55 -
permita que las personas que no estén familiarizadas con la herramienta eléctrica
o estas instrucciones utilicen la herramienta eléctrica. Las herramientas eléctricas
son peligrosas en manos de usuarios inexpertos.
Mantenga las herramientas eléctricas. Compruebe la desalineación o el
atascamiento de las piezas móviles, la rotura de las piezas y cualquier otra
condición que pueda afectar el funcionamiento de la herramienta eléctrica. Si
está dañado, haga reparar la herramienta eléctrica antes de usarla. Muchos
accidentes son causados por herramientas eléctricas mal mantenidas.
Mantenga las herramientas de corte afiladas y limpias. Las herramientas de corte
adecuadamente mantenidas con filos afilados son menos propensas a unirse y
son más fáciles de controlar.
Utilice la herramienta eléctrica, accesorios y brocas de herramientas, etc. De
acuerdo con estas instrucciones, tomando en cuenta las condiciones de trabajo y
el trabajo a realizar. El uso de la herramienta eléctrica para operaciones diferentes
de las previstas podría resultar en una situación peligrosa.
ADVERTENCIA: Cuando se usa en Australia o Nueva Zelanda, se recomienda
que esta herramienta sea SIEMPRE suministrado a través de un dispositivo de
corriente residual (RCD) con una corriente residual nominal de 30 mA o menos.
Recargue sólo con el cargador especificado por el fabricante. Un cargador
adecuado para un tipo de batería puede crear un riesgo de incendio cuando se
usa con otra batería
Utilice las herramientas eléctricas con baterías específicamente designadas. El
uso de otras baterías puede crear un riesgo de lesiones y fuego.
Cuando no
esté utilizándose el paquete de pilas, manténgala alejada de otros
objetos metálicos, como clips de papel, monedas, claves, clavos, tornillos u otros
objetos metálicos pequeños que puedan realizar una conexión de un terminal a
otro. El cortocircuito de los terminales de la batería puede causar quemaduras o
un incendio.
Si el líquido entra en contacto con los ojos, se debe buscar asistencia médica. El
líquido expulsado de la batería puede causar irritación o quemaduras.
Bajo condiciones abusivas, el líquido puede ser expulsado de la batería; evitar el
contacto. En caso de contacto, enjuague con agua. Si el líquido entra en los ojos,
se debe buscar asistencia médica. El líquido expulsado de la batería puede
causar irritación o quemaduras.
Repare su herramienta eléctrica por una persona calificada usando solamente

piezas de repuesto idénticas. Esto asegurará que se mantenga la seguridad de la
herramienta eléctrica.
Seguridad adicional para los taladros de batería
ADVERTENCIA
Importante: Es imprescindible seguir todas las normas de seguridad nacionales
relativas a la instalación, funcionamiento y mantenimiento.
a.
b.
c.
d.
e.
f.
g.
h.
i.
j.
k.
l.
m.
n.
- 56 -
NO permita que cualquier persona menor de 18 años use esta herramienta y
asegúrese de que los operadores estén calificados y estén familiarizados con las
instrucciones de operación y seguridad.
Los cargadores de baterías son sólo para uso en interiores. Asegúrese de que la
fuente de alimentación y el cargador estén protegidos contra la humedad en todo
momento.
Al utilizar el taladro, use equipo de seguridad incluyendo gafas de seguridad o
escudo, protectores para los oídos y ropa protectora incluyendo guantes de
seguridad. Use protección respiratoria adecuada para el trabajo que se está
llevando a cabo. Se recomienda una clasificación mínima de FFP2. Si el
funcionamiento de la herramienta causa incomodidad de alguna manera,
deténgase inmediatamente y revise su método de uso.
Utilice detectores de metal y voltaje para ubicar líneas eléctricas, de agua o de
gas. Evite tocar componentes vivos o conductores.
Asegúrese de que la iluminación sea adecuada.
Asegúrese de que la broca esté bien fijada en el portabrocas. Se pueden expulsar
brocas de seguridad inseguras de la máquina causando un peligro.
Asegúrese de que la broca no esté en contacto con la pieza de trabajo antes de
poner en marcha la herramienta.
Antes de perforar, comprobar que hay suficiente espacio libre para la broca
debajo de la pieza de trabajo.
NO ejerza presión sobre la herramienta. Hacerlo acortaría su vida útil.
Las brocas se calientan durante el
funcionamiento, permiten enfriar antes de
manipularlas.
NUNCA use las manos para quitar el aserrín, las virutas o los residuos cerca de
la broca.
Si se interrumpe al operar el taladro, complete el proceso y apague antes de
encerrar.
Cuando sea posible, utilice abrazaderas o un vicio para mantener su trabajo.
Examine regularmente el portabroca para ver si hay signos de desgaste o daño.

o.
p.
Seguridad de la batería
ADVERTENCIA
Las baterías Li-Ion, si se usan, almacenan o cargan incorrectamente,
representan un riesgo de incendio, quemadura y explosión.
●
●
●
●
●
●
●
●
Seguridad del cargador de batería
Utilice el cargador correctamente
●
●
- 57 -
Haga reparar piezas dañadas por un centro de servicio calificado.
SIEMPRE espere hasta que el simulacro se haya detenido completamente antes
de bajarlo.
Revise periódicamente todas las tuercas, tornillos y otras fijaciones y apretarlas
cuando sea necesario
Guarde la batería fuera del alcance de los niños.
SOLO cargue baterías del Li-Ion usando el cargador proporcionado o diseñado
específicamente para su producto
SOLO utilice baterías Li-Ion suministradas con un producto o específicamente
diseñadas para ser compatibles
Deje que las baterías se enfríen por 15 minutos después de la carga o uso
intensivo. El incumplimiento de estas instrucciones puede causar sobrecalenta-
miento o incendio
Cuando no se usan las baterías se deben almacenar a temperatura ambiente
(aproximadamente 20 ° C)
Asegúrese de que los contactos de la batería no pueden cortarse accidental-
mente en el almacenamiento. Mantenga las baterías limpias; Objetos extraños o
suciedad puede causar un cortocircuito. Mantenga alejado de otros objetos
metálicos, por ejemplo, clips, monedas, llaves, clavos y tornillos
En caso de condiciones abusivas, el líquido puede ser expulsado de la batería.
Este líquido puede causar irritación o quemaduras en la piel. Evite el contacto. En
caso de contacto accidental, enjuague con agua. Si el líquido entra en contacto
con los ojos, busque ayuda médica
NO abra, desmonte, aplaste, calente por encima de 60 ° C o incinere. No deseche
en el fuego o la condición similar
Consulte la sección de este manual relativa al uso del cargador de baterías antes
de intentar cargar la batería.
No
intente utilizar el cargador con baterías que no sean las suministradas.
Mantenga su cargador limpio; Objetos extraños o suciedad puede causar un

●
ADVERTENCIA
NO intente recargar pilas no recargables.
Antes de usar
Extracción de una batería
Retire la batería de la herramienta presionando el botón de liberación de la batería,
luego deslice la batería fuera de la ranura de la batería.
ADVERTENCIA
NO intente extraer la batería sin presionar el botón de liberación de la batería. La
herramienta o la batería podrían estar dañadas.
Colocación de batería
Coloque una batería deslizándola en la ranura de la batería de la herramienta hasta
que clique y se bloquee en posición
Nota
Asegúrese de que la batería y la herramienta estén alineadas correctamente. Si la
batería no se desliza fácilmente en la herramienta, no la fuerce. En cambio, deslice
la batería fuera de la herramienta de nuevo, compruebe que la parte superior de la
batería y la ranura de la batería de herramientas están limpios y no dañados y que
los contactos no están doblados
Configuración del cargador de batería
1. Si está instalado, retire cualquier batería del cargador de batería
2. Inserte el enchufe de la batería en una toma de corriente adecuada
Nota
El LED verde del cargador parpadeará para indicar que el cargador está listo para
cargar la batería.
ADVERTENCIA
Utilice este cargador SOLAMENTE para cargar la batería suministrada o las adicionales
compradas específicamente diseñadas para esta herramienta.
ADVERTENCIA
El cargador está diseñado sólo para uso en interiores y NO se debe utilizar en
- 58 -
cortocircuito o bloquear las ventilaciones. El incumplimiento de estas instrucciones
puede causar sobrecalentamiento o incendio.
Si el cable de alimentación está dañado, debe ser reemplazado por el fabricante,
su agente de servicio o personas calificadas de manera similar para evitar un
peligro.
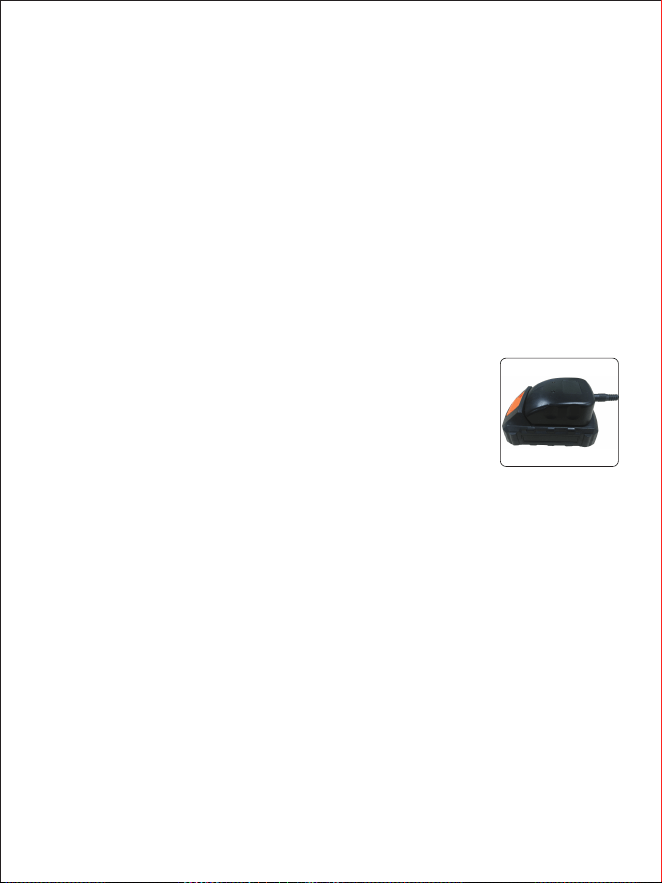
condiciones húmedas.
Carga de la batería
ADVERTENCIA
Si no se sigue el procedimiento correcto al cargar las baterías, resultará en un daño
permanente.
Nota
El tiempo de carga normal es de aproximadamente 4 hora para una batería de
1.5Ah de capacidad descargada recientemente. Sin embargo, si la batería se ha
dejado en un estado descargado durante algún tiempo, puede tardar más tiempo en
cargarse.
1.Deslice una batería totalmente o parcialmente descargada en el cargador de la
batería.
Nota
Asegúrese de que la batería y el cargador de la batería estén
alineados correctamente. Si la batería no se desliza fácilmente
al cargador de baterías, no la fuerce. En cambio, retire la
batería, compruebe que la parte superior de la batería y la
ranura del cargador de batería están limpias y sin daños y que
los contactos no están doblados.
2. En cuenta empieza la carga, el LED rojo encenderá. Cuando la batería no está
conectada al cargador, el LED verde del cargador estará encendido.
3. Cuando la batería esté completamente cargada, el LED rojo se apagará y el LED
verde se encenderá.
Nivel de carga de la batería
La batería tiene un indicador de carga de la batería incorporado
Presionar el botón a la derecha se indicará el nivel de carga. El LED derecho indica
un alto nivel de carga y la izquierda indica un nivel de carga bajo que significará que
el paquete de batería requerirá la carga pronto.
IMPORTANTE
Cuando se indique un nivel de carga bajo, la herramienta dejaría de funcionar
mientras está en uso, lo que es peligroso al operar una sierra circular. Asegúrese
siempre de que la batería tenga un buen nivel de carga.
Note
sobre la carga de la batería:
●
- 59 -
La batería debe cargarse a temperaturas del medio ambiente entre 10
y 40 ° C
(idealmente alrededor de 20 ° C).

●
●
●
●
●
●
●
Montaje de brocas y accesorios
ADVERTENCIA
SIEMPRE retire la batería del taladro antes de fijar, ajustar o quitar los accesorios.
ADVERTENCIA
NO intente apretar las brocas (o cualquier otro accesorio) agarrando la parte frontal
del portabrocas y encendiendo la herramienta. Esto puede ocasionar lesiones
personales y causar daños al portabrocas.
ADVERTENCIA
NUNCA coloque ningún accesorio o broca con una velocidad máxima inferior a la
velocidad sin carga de la herramienta eléctrica.
Abra las mandíbulas del mandril(1) Girando el collar del mandril(2)en sentido
antihorario. Coloque la broca o el accesorio centralmente en el portabrocas.
1. Apriete las mandíbulas del mandril girando el collar del mandril en el sentido de
- 60 -
Después de cargar, deje 15 minutos para que la batería se enfríe antes de usarla.
Asegúrese de que el cargador esté desconectado de la red después de su uso y
esté correctamente almacenado.
NO deje las baterías en carga por períodos prolongados y NUNCA almacene las
baterías en carga.
El cargador de batería supervisa la temperatura y el voltaje de la batería durante
la carga. Retire la batería una vez que la carga esté completa para maximizar los
ciclos de carga de la batería y no desperdiciar la energía.
Las baterías pueden fallar con el paso de tiempo, las celdas individuales de la
batería pueden fallar y la batería puede quedar corta. El cargador no cargará
baterías defectuosas. Utilice otra batería, si es posible, para comprobar la
funcionalidad correcta del cargador y comprar una batería de reemplazo si se
indica una batería defectuosa.
NO almacene los paquetes de baterías de iones de litio en un estado descargado
durante un período largo ya que esto puede dañar las células de iones de litio.
Para el almacenamiento a largo plazo, almacene las baterías
en un estado de
carga alta desconectado de la herramienta eléctrica.
La capacidad de las baterías se reducirá con el paso de tiempo. Después de 100
ciclos de carga, el tiempo de funcionamiento de la batería y el rendimiento de par
máximo del conductor se reducirán ligeramente. Esta disminución continuará
hasta que la batería tenga capacidad mínima después de 500 ciclos de carga.
Esto es normal y no es un fallo con el paquete de batería.

las agujas del reloj.
2. Cuando la broca o el accesorio estén firmemente sujetos, ejecute cuidadosa mente
la máquina para comprobar que está funcionando centralmente, suavemente y
uniformemente. Si la broca está "tambaleándose" o no está funcionanda en el
centro, suelte el portabrocas, compruebe si el accesorio está dañado, corrija su
posición, vuelva a apretar y pruebe de nuevo.
Funcionamiento
Control de dirección
ADVERTENCIA
NUNCA cambie la dirección de rotación mientras la herramienta está funcionando.
Esto causaría daños permanentes a la herramienta.
● La dirección de rotación se puede ajustar utilizando el interruptor de adelante / reverso (6).
● Para girar en sentido antihorario, empuje el interruptor a la derecha.
● Para girar en sentido horario, empuje el interruptor hacia la izquierda.
Nota
Cuando el interruptor de avance / retroceso está en la posición central, el taladro
está bloqueado y no se puede encender. Utilice este ajuste como característica de
seguridad para evitar que el taladro se encienda accidentalmente.
Control de par
Nota
Este taladro inalámbrico está equipado con un embrague de control de par que
permite que la máquina se ajuste al par correcto para la aplicación individual.
● Los ajustes del embrague están indicados por los símbolos en el selector de par (3).
● Rot
a el selector de par para seleccionar el ajuste deseado: cuanto mayor sea el
número mostrado en el anillo de par, mayor será el par producido por la
herramienta también.
Selección de marchas
● Seleccione la marcha 1 en el interruptor de marcha (4) para el par más alto. Una
marcha de velocidad inferior es generalmente más adecuado para accionar
tornillos y sujetadores.
● Seleccione la marcha 2 en el interruptor de marcha para el par de torsión más
bajo. Una marcha de mayor velocidad es para taladrar y no debe utilizarse para
apretar tornillos y sujetadores.
- 61 -

Nota
SIEMPRE lea la documentación suministrada con brocas y accesorios para la velocidad
recomendada o máxima y utilice el equipo más apropiado. Vea 'Especificación' para la
velocidad máxima sin carga de cada marcha.
Encendido / apagado
ADVERTENCIA
SIEMPRE use equipo de protección personal adecuado cuando configure y opere
esta máquina.
1. Para iniciar el taladro, apriete el interruptor de disparo (7)
2. La luz de trabajo incorporada (9) Se iluminará al apretar el interruptor de activación.
Nota
Si no se puede presionar el interruptor de disparo, compruebe que el interruptor de
avance / retroceso(6) no está ajustado a su posición media, que bloquea el dispositi-
vo (vea'Control de dirección').
4. La velocidad del taladro se controla por el movimiento del gatillo: cuanto más se
presiona el interruptor de gatillo, más rápido se ejecutará el taladro.
5. Suelte el interruptor de disparo para detener la máquina.
Uso del destornillador
Nota
Utilice siempre una portapunta universal al trabajar con un destornillador. No coloque
los destornilladores directamente en el portabrocas.
1. Seleccione la marcha 1 usando el interruptor de marcha (4).
2. Gire el selector de modo(3)para manejar.
3. Ajuste el taladro al ajust
e de par apropiado (vea "Control de par").
● Al conducir los tornillos NUNCA utilice la máquina en modo de perforación.
Nota
En caso de duda, cuál ajuste de par se ajusta mejor a la aplicación, comience con un
ajuste bajo y aumente, si se requiere más par (e.j. iSi el tornillo no está siendo acciona-
do suficientemente lejos en la pieza de trabajo).
ADVERTENCIA
La broca, especialmente la punta, se calentará mucho al perforar mampostería y
hormigón.NO toque la broca y nunca permita que entre en contacto con materiales
combustibles.
ADVERTENCIA
NO inhale el polvo de mampostería. Use protección respiratoria adecuada. El polvo
- 62 -

- 63 -
de mampostería, hormigón y sustancias similares es dañino y puede ser tóxico.
Perforación de madera
1. Seleccione la marcha apropiada usando el interruptor de marcha(4)
2. Gire el selector de modo (3) a la posición del taladro
● Asegúrese de que las brocas sean adecuadas para la madera y estén dentro de la
capacidad máxima de esta máquina(vea ‘Especificación’)
ADEVERTENCIA
NO inhale el polvo de madera. Use protección respiratoria adecuada. Algunos
polvos de madera serían tóxicos.
Perforación de metal
1. Seleccione la marcha apropiada usando el interruptor de marcha(4)
2. Gire el selector de modo (3) a la posición del taladro
● Asegúrese de que las brocas sean adecuadas para el grado de metal que se esté
perforando y estén dentro de la capacidad máxima de la máquina(vea ‘Especifi-
cación’).
● Para garantizar la exactitud, marque la posición de agujero deseada con un martillo
y un punzón central.
ADEVERTENCIA
La broca y la pieza de trabajo se calientarán mucho al perforar metal. NO toque la
broca y nunca permita que entre en contacto con materiales combustibles cuando
esté caliente. Utilice siempre un lubricante o fluido de corte adecuado y taladre a
velocidades apropiadas.
● SOLAMENTE aplique una presión moderada a la broca, asegurando un corte
eficiente y una vida útil de la broca prolongada.
● Utilice una broca de avellanado para eliminar las rebabas afiladas del agujero,
evitando cortes y otros tipos de lesiones.
ADEVERTENCIA
Si la
herramienta eléctrica se calienta excesivamente durante el uso, deje de usar la
herramienta inmediatamente y deje que se enfríe antes de continuar el trabajo. El
período de enfriamiento se puede reducir operando el taladro a máxima velocidad
sin carga. Asegúrese siempre de que los ventiladores del motor(5) no estén
bloqueados y no permita que el polvo entre en el cuerpo de la herramienta a través
de los respiraderos del motor; El polvo, especialmente el polvo metálico, puede
dañar o destruir la herramienta.

- 64 -
Mantenimiento
ADVERTENCIA
SIEMPRE desconecte de la red eléctrica, antes de realizar cualquier mantenimiento
/ limpieza del cargador. Retire la batería antes de realizar cualquier mantenimiento /
limpieza de la broca.
Nota
Tanto el taladro como el cargador no contienen piezas que el usuario pueda reparar.
Si el dispositivo no funciona como se describe en este manual, devuélvalo a un
centro de servicio GMC autorizado para su reparación.
Inspección general
● Regularmente compruebe que todos los tornillos de fijación están apretados.
● Inspeccione el cordón de alimentación de la herramienta, antes de usarlo cada
vez, para detectar daños o desgaste. Las reparaciones deben ser realizadas por
un centro de servicio autorizado. Este consejo también se aplica a los cordones de
extensión utilizados con esto también.
Limpieza
● Mantenga su herramienta limpia todo tiempo. La suciedad y el polvo provocarán que
las partes internas se desgasten rápidamente y acortarán la vida útil de la máquina.
Limpie el cuerpo de la máquina con un cepillo suave o un paño seco. Isi está
disponible, use aire limpio, seco y comprimido para soplar a través de los orificios de
ventilación.
● Limpie la carcasa de la herramienta con un paño suave y húmedo
usando un
detergente suave. No use alcohol, gasolina o productos de limpieza fuertes.
● Nunca utilice productos cáusticos para limpiar las partes plásticas.
Lubricación
Lubrifique ligeramente todas las piezas móviles a intervalos regulares con un lubricante
adecuado.
Almacenamiento
Guarde esta herramienta con cuidado en un lugar seguro y seco fuera del alcance
de los niños.
Disposición
Siempre cumpla los reglamentos al deshacerse de herramientas eléctricas
que ya no sean funcionales y no sean viables para su reparación.
● No arroje las herramientas eléctricas u otros desechos de aparatos
eléctricos y electrónicos (RAEE), con la basura doméstica
● Comuníquese con la autoridad local de eliminación de residuos para

- 65 -
obtener información sobre la forma correcta de deshacerse de las
herramientas eléctricas
Istruzione
Descrizione dei simboli
La targa del tuo strumento può mostrare simboli. Questi rappresentano informazioni
importanti sul prodotto o le istruzioni per l'uso.
Indossare la protezione uditiva
Indossare protezione agli occhi
Indossare la protezione dell'apparato respiratorio
Indossare la protezione della testa
Indossare la protezione della mano
Leggere il manuale di istruzioni
NON incenerire le batterie!
Attenzione
Solo per uso interno!
Fusibile intervallo di tempo interno con una corrente massima di 3,15A.
Costruzione di classe II
Protezione ambientale I rifiuti prodotti elettrici non devono essere
smaltiti con i rifiuti domestici. Riciclare dove esistono strutture.
Rivolgersi al proprio ente locale o al rivenditore per i consigli di riciclo.
Conforme alla legislazione e norme di sicurezza pertinenti.
- 66 -

Le celle della batteria agli ioni di litio sono riciclabili e non dovrebbero
essere smaltite con i rifiuti domestici. Riciclare dove esistono le
strutture. Rivolgersi al proprio ente locale o al rivenditore per i consigli
di riciclo.
Specifiche
Caratteristiche del prodotto
1. Mandrino a griffe 2. Mandrino a collare
3. Selettore della coppia 4. Interruttore di marcia
5. Ventole del motore 6. Interruttore avanti / indietro
7. Interruttore di grilletto 8. Impugnatura
9. Luce del lavoro 10. Batteria
11. Indicatore di carica della batteria 12. Rilascio della batteria
13. Clip della cinghia 14. Caricabatterie
15. Charger base
- 67 -
Tensione nominale
Velocità a vuoto
Capacità di mAndrino
Max. Capacità di foratura
Batteria Tensione
- Cella di batteria
Caricabatterie
-Tensione nominale
-Tensione di uscita
-Corrente di uscita nominale
-Tempo di carica
Classe di protezione
Dati sonori e vibranti
Pressione sonora LPA
Potenza sonora LWA
Incertezza K:
Vibrazione (a vuoto)
Vibrazione (perforazione)
Incertezza K:
DC 18 V
0-350/0-1300 rpm
10 mm
Acciaio: Ø 6 mm
Legna: Ø18 mm
DC 18 V
Li-ion 1.5 Ah
100-240VAC 50-60HZ 15W
22.7VDC
380 mA
4 hr
66.13 dB(A)
77.13 dB(A)
3 dB(A)
1.349 m/s²
1.142 m/s²
1.5 m/s²

2 3 4 5
6
8
11
13
1
7
9
12
10
15
14
- 68 -

- 69 -
AVVERTIMENTO
Indossa sempre la protezione dell'orecchio quando il livello del suono supera 85 dB
(A) e limita il tempo di esposizione, se necessario. Se i livelli di suono sono scomodi,
anche con la protezione auricolare, smettere di utilizzare immediatamente l'utensile
e controllare che la protezione dell'orecchio sia correttamente montata e fornisce il
giusto livello di attenuazione sonora per il livello di suono prodotto dal proprio
utensile.
AVVERTIMENTO
L'esposizione dell'utilizzatore alle vibrazioni dell'utensile può provocare la perdita di
senso di tocco, intorpidimento, formicolio e ridotta capacità di presa. L'esposizione a
lungo termine può portare ad una condizione cronica. Se necessario, limitare la
durata esposta alla vibrazione e utilizzare guanti anti vibrazioni. Non utilizzare
l'utensile con le mani al di sotto di una normale temperatura confortevole, in quanto
la vibrazione avrà un effetto maggiore. Utilizzare le figure fornite nella specifica
relativa alla vibrazione per calcolare la durata e la frequenza di funzionamento
dell'utensile.
I livelli sonori e di vibrazioni nella specifica sono determinati secondo EN60745 o
standard internazionali simili. Le cifre rappresentano l'uso normale dell'utensile in
normali condizioni di lavoro. Un attrezzo mal tenuto, non montato correttamente o
utilizzato in modo improprio può produrre un aumento dei livelli di rumore e
vibrazioni. Www.osha.europa.eu fornisce informazioni sui livelli
di suono e vibrazioni
sul posto di lavoro che possono essere utili agli utenti domestici che utilizzano
strumenti per lunghi periodi di tempo.
Sicurezza generale
AVVERTIMENTO
Leggere tutte le avvertenze di sicurezza e tutte le istruzioni. La mancata osservanza
delle avvertenze e delle istruzioni può causare scosse elettriche, incendi e / o gravi
lesioni.
AVVERTIMENTO
Questo apparecchio non è destinato ad essere utilizzato da persone (compresi i
bambini) con capacità ridotte, fisiche o mentali o mancanza di esperienza o
conoscenza, a meno che non siano stati sottoposti a supervisione o istruzioni
sull'utilizzo dell'apparecchio da parte di una persona responsabile della loro sicurez-
za. I bambini devono essere sorvegliati in modo da non giocare con l'apparecchio.
Salvare tutte le avvertenze e le istruzioni per il futuro riferimento.

Il termine "utensile elettrico" nelle avvertenze si riferisce al proprio utensile elettrico
a corrente (elettrica) oa potenza a batteria (a batteria).
1. Sicurezza della zona di lavoro
a.
b.
c.
2. Sicurezza elettrica
a.
b.
c.
d.
e.
f.
3. Sicurezza personale
a.
b.
- 70 -
Mantenere l'area di lavoro pulita e ben illuminata. Le zone scure o scure invitano
incidenti.
Non utilizzare utensili elettrici in atmosfere esplosive, ad esempio in presenza di
liquidi infiammabili, gas o polvere. Gli utensili elettrici creano scintille che possono
accendere la polvere o i fumi.
Tenere i bambini e gli astanti lontani durante l'utilizzo di un utensile elettrico. Le
distrazioni possono farti perdere il controllo.
Le spine degli utensili elettrici devono corrispondere alla presa. Non modificare
mai la spina in alcun modo. Non utilizzare tappi adattatori con utensili di messa a
terra (messa a terra). Le spine non modificate e le prese corrispondenti ridurranno
il rischio di scosse elettriche.
Evitare il contatto del corpo con superfici di terra o di terra, quali tubi, radiatori,
gamme e frigoriferi. Il rischio di scosse elettriche è aumentato se il corpo è messa
a terra o collegato a terra.
Non esporre gli utensili elettrici a pioggia oa bagnate. L'acqua che entra in un
utensile elettrico aumenta il rischio di scosse elettriche.
Non abusare del cavo. Non utilizzare mai il cavo per il trasporto, la tiratura o lo
scollegamento dell'attrezzo elettrico. Tenere il cavo lontano da calore, olio, bordi
affilati o parti in movimento. I cavi danneggiati o incastrati aumentano il rischio di
scosse elettriche.
Quando si utilizza uno strumento elettrico all'aperto, utilizzare un cavo di prolunga
adatto all'uso esterno. L'uso di un cavo adatto
all'uso esterno riduce il rischio di
scosse elettriche.
Se è inevitabile l'azionamento di uno strumento elettrico in una posizione umida,
utilizzare un'alimentazione protetta con dispositivo di corrente residua (RCD).
L'uso di un RCD riduce il rischio di scosse elettriche.
Rimani attento, guarda cosa stai facendo e usa il buon senso quando si utilizza uno
strumento elettrico. Non utilizzare uno strumento elettrico quando sei stanco o
sotto l'influenza di farmaci, alcol o farmaci. Un momento di disattenzione durante
l'utilizzo di utensili elettrici può causare gravi lesioni personali.
Usare dispositivi di protezione individuale. Indossare sempre protezione agli occhi.
Apparecchiature protettive come la maschera antipolvere, scarpe di sicurezza non

c.
d.
e.
f.
g.
4. Utilizzo e cura dell'utensile elettrico
a.
b.
c.
d.
e.
f.
- 71 -
antiscivolo, cappelli rigidi o protezione uditrice utilizzati in condizioni adeguate
riducono le lesioni personali.
Evitare l'inizio involontario. Accertarsi che l'interruttore sia in posizione di
spegnimento prima di connettersi alla fonte di alimentazione e / o alla batteria,
prendendo o portando l'utensile. Portare gli attrezzi elettrici con il dito sull'interrut-
tore o gli attrezzi elettrici che alimentano l'accensione invitano gli incidenti.
Rimuovere eventuali chiavi di regolazione o chiave prima di accendere l'utensile.
Una chiave o una chiave attaccata a una parte rotante dell'utensile elettrico
possono causare lesioni personali.
Non allungare. Tenere sempre il giusto livello e l'equilibrio. Ciò consente un migliore
controllo dello strumento elettrico in situazioni imprevist
e
Vesti bene. Non indossare abiti sciolti o gioielli. Tenere i capelli, gli indumenti ei
guanti lontani dalle parti in movimento. Abbigliamento, gioielli o capelli lunghi
possono essere catturati in parti in movimento.
Se sono previsti dispositivi per il collegamento di impianti di estrazione e raccolta di
polvere, assicurarsi che questi siano collegati e utilizzati correttamente. L'uso della
raccolta della polvere può ridurre i rischi legati alla polvere.
Non forzare l'utensile elettrico. Utilizzare lo strumento elettrico corretto per
l'applicazione. Lo strumento elettrico corretto renderà il lavoro migliore e più
sicuro alla velocità per cui è stato progettato.
Non utilizzare l'utensile elettrico se l'interruttore non lo accende e spegne.
Qualsiasi utensile elettrico che non può essere controllato con l'interruttore è
pericoloso e deve essere riparato.
Scollegare la spina dalla fonte di alimentazione e / o dalla batteria dall'utensile
elettrico prima di apportare qualsiasi regolazione, sostituzione degli accessori o
memorizzazione di utensili elettrici. Tali misure preventive di sicurezza riducono il
rischio di avviare accidentalmente l'utensile.
Conservare gli utensili elettrici a
vuoto fuori dalla portata dei bambini e non
permettere a persone che non conoscano l'utensile elettrico o queste istruzioni
per azionare l'utensile elettrico. Gli utensili elettrici sono pericolosi nelle mani degli
utenti non addestrati.
Mantenete gli attrezzi elettrici. Verificare il disallineamento o il legame delle parti
in movimento, la rottura delle parti e qualsiasi altra condizione che possa influire
sull'utilizzo dell'utensile. Se danneggiato, riparare l'utensile elettrico prima
dell'uso. Molti incidenti sono causati da attrezzi elettrici poco ottimizzati.
Tenere gli utensili da taglio affilati e puliti. Gli utensili di taglio correttamente

g.
5. Utilizzo e cura dello strumento della batteria
a.
b.
C.
d.
e.
6. Servizio
a.
Sicurezza aggiuntiva per le punte a batteria
AVVERTIMENTO
Importante: è necessario seguire tutte le norme nazionali di sicurezza relative
all'installazione, al funzionamento e alla manutenzione.
a.
- 72 -
mantenuti con taglienti taglienti hanno meno probabilità di legarsi e sono più facili
da controllare.
Utilizzare l'utensile elettrico, gli accessori e le punte degli utensili ecc. In
conformità a queste istruzioni, tenendo conto delle condizioni di lavoro e dei lavori
da eseguire. L'utilizzo dell'utensile elettrico per operazioni diverse da quelle
previste potrebbe causare una situazione pericolosa.
AVVERTIMENTO: Se utilizzato in Australia o Nuova Zelanda, si raccomanda che
questo utensile viene sempre fornito tramite dispositivo di corrente residua (RCD)
con una corrente residua nominale di 30 mA o inferiore.
Ricaricare solo con il caricabatterie specificato dal produttore. Un caricabatterie
adatto a un tipo di batteria può creare un rischio di incendio quando viene utilizza-
to con un'altra batteria
Utilizzare utensili elettrici solo con batterie specificatamente specificate. L'uso di
altre batterie potrebbe causare un rischio di lesioni e incendi.
Quando la batteria non è in uso, tenerla lontana da altri oggetti metallici, come
fermagli di carta, monete, chiavi, chiodi, viti o altri piccoli oggetti metallici che
possono collegare un terminale all'altro. Se si correggono i terminali della batteria
possono causare ustioni o incendi.
Se i liquidi contattano gli occhi, ricorrere inoltre a un aiuto medico. Il liquido espulso
dalla batteria può causare irritazioni o ustioni.
In condizioni abusive, il liquido può essere espulso dalla batteria; evita il contatto.
In caso di contatto, sciacquare con acqua. Se i liquidi
contattano gli occhi,
ricorrere inoltre a un aiuto medico. Il liquido espulso dalla batteria può causare
irritazioni o ustioni.
Assicurarsi che l'utensile elettrico sia riparato da una persona riparatrice qualifica-
ta utilizzando esclusivamente parti di ricambio identiche. Ciò assicurerà che la
sicurezza dell'elettroutensile sia mantenuta.
NON permettere a chiunque di età inferiore ai 18 anni di usare questo strumento
e assicurarsi che gli operatori siano qualificati e conosciuti con le istruzioni per
l'uso e la sicurezza.

b.
c.
d.
e.
f.
g.
h.
i.
j.
k.
l.
m.
n.
o.
p.
Sicurezza della batteria
AVVERTIMENTO
Le batterie Li-Ion, se utilizzate in modo errato, sono immagazzinate o
caricate, sono un incendio, un bruciore e un rischio di esplosione.
●
●
- 73 -
I caricabatterie sono solo per uso interno. Assicurarsi che l'alimentazione e il
caricabatterie siano sempre protetti contro l'umidità.
Quando si utilizza il trapano, utilizzare dispositivi di sicurezza, inclusi gli occhiali o
gli schermi di protezione, i dispositivi di protezione dell'orecchio e gli indumenti
protettivi, compresi i guanti di sicurezza. Indossare una protezione respiratoria
idonea per i lavori da intraprendere. Si consiglia una valutazione minima di FFP2.
Se il funzionamento dell'utensile provoca fastidio in qualsiasi modo, arrestare
immediatamente e rivedere il metodo di utilizzo.
Usare rivelatori di metallo e di tensione per individuare linee elettriche, acqua o
gas nascoste. Evitare di toccare componenti o conduttori in tensione.
Assicurarsi che l'illuminazione sia adeguata.
Assicurarsi che la punta sia saldamente fissato nel mandrino. I fori di perforazione
non sicuri possono essere espulsi dalla macchina causando un pericolo.
Assicurarsi che il foro di trapano non sia in contatto con il pezzo prima di avviare
lo strumento.
Prima di eseguire la foratura, controllare che ci sia sufficiente spazio per il trapano
sotto il pezzo.
NON esercitare pressione sull'attrezzo. A tal fine si abbreviava la durata di vita.
I fori di trapano si riscaldano durante il funzionamento, consentono di raffreddarsi
prima di manipolarli.
non usare mai le mani per rimuovere la segatura, le patatine oi rifiuti vicino al
punta.
Se si interrompe quando si esegue il trapano, completare il processo e spegnere
prima di cercare.
Dove possibile, utilizzare morsetti o un vice per tenere il lavoro.
Esaminare regolarmente il mandrino per segni di usura o
danni. Assicurarsi che le
parti danneggiate siano riparate da un centro di assistenza qualificato) SEMPRE
attendere che il trapano sia com.
Sempre attendere che il trapano venga fermato prima di metterlo in giù.
Controllare periodicamente tutti i dadi, bulloni e altri fissaggi e serrare se necessario.
Tenere la batteria fuori dalla portata dei bambini.
SOLO caricare le batterie Li-Ion utilizzando il caricabatterie fornito o progettato

●
●
●
●
●
●
Sicurezza del caricabatterie
Utilizzare correttamente il caricabatterie
●
●
●
AVVERTIMENTO
NON cercare di ricaricare le batterie non ricaricabili.
Prima dell'uso
Rimozione di batteria
Rimuovere la batteria dallo strumento premendo il pulsante di rilascio della batteria,
quindi scivolare la batteria dalla porta della batteria.
- 74 -
appositamente per il tuo prodotto.
SOLTANTO utilizzare batterie Li-Ion fornite con un prodotto o appositamente
progettate per essere compatibili.
Lasciare raffreddare le batterie per 15 minuti dopo la carica o l'uso pesante. La
mancata osservanza di queste istruzioni può causare surriscaldamento o
incendio.
Quando non è in uso, le batterie devono essere conservate a temperatura
ambiente (circa 20 ° C).
Assicurarsi che i contatti della batteria non possano accidentalmente cortocircuiti.
Mantenere le pile pulite; Oggetti stranieri o sporcizia possono causare un breve.
Tenere lontano da altri oggetti metallici, ad esempio, cartaccetti, monete, chiavi,
chiodi e viti.
In condizioni abusive, il liquido può essere espulso dalla batteria. Questo liquido
può provocare irritazioni cutanee o ustioni. Evita il contatto. In caso di contatto
accidentale, sciacquare con acqua. Se gli occhi contatti liquidi, consultare un
medico.
NON aprire, smontare, schiacciare, scaldare al di sopra di 60 ° C o incenerla. Non
smaltire in fuoco o simili.
Fare riferimento alla sezione del presente manuale relativa all'utilizzo del
caricabatterie prima di ricaricare la batteria.
Non tentare di utilizzare il caricabatterie con batterie diverse da quelle fornite.
Tenere il caricabatterie pulito; Oggetti estranei o sporcizia possono causare
cortocircuito o sfiati di blocco. La mancata osservanza di queste istruzioni può
causare surriscaldamento o incendio
Se il cavo di alimentazione
è danneggiato, deve essere sostituito dal produttore,
da un servizio di assistenza o da personale analogo in modo da evitare pericoli

AVVERTIMENTO
NON cercare di rimuovere la batteria senza premere il pulsante di rilascio della
batteria. L'utensile o la batteria potrebbero essere danneggiati.
Montaggio di batteria
Inserire una batteria facendola scorrere sulla fessura della batteria dello strumento
fino a quando non scatta e si blocca in posizione.
Nota
Assicurarsi che la batteria e l'utensile siano allineati correttamente. Se la batteria
non scivola facilmente nell'utensile, non forzarla. Spingere la batteria di nuovo fuori
dall'utensile, controllare la parte superiore della batteria e lo slot della batteria dello
strumento sono pulite e intatte e che i contatti non siano piegati.
Impostazione del caricabatterie
1. Se installato, rimuovere qualsiasi batteria dal caricabatteria.
2. Inserire la spina di alimentazione del caricabatteria in una presa di corrente
appropriata.
Nota
Il LED verde sul caricabatterie lampeggia per indicare che il caricabatterie è pronto
per ricaricare la batteria
AVVERTIMENTO
Utilizzare solamente questo caricabatterie per caricare la batteria in dotazione o altre
batterie acquistate aggiuntive appositamente progettate per questo utensile.
AVVERTIMENTO
Il caricabatterie è progettato solo per uso interno e NON DEVE essere utilizzato in
condizioni umide o umide.
Carica della batteria
AVVERTIMENTO
La mancata osservanza della procedura corretta durante il caricamento delle
batterie provoca danni permanenti.
Nota
Il tempo di carica normale è di circa 4 ora per una batteria ricaricabile di recente
1.5Ah. Tuttavia, se la batteria è stata lasciata in uno stato di scarico per un certo
tempo, può richiedere un tempo supplementare per caricare.
1. Far scorrere una batteria scarica completamente o parzialmente sul caricabatteria .
- 75 -

Nota
Assicurarsi che il caricabatteria e il caricabatterie siano allineati
correttamente. Se la batteria non scivola facilmente al caricabat-
teria, non forzarla. Invece, rimuovere la batteria, controllare che
la parte superiore della batteria e dello slot del caricabatteria
siano pulite e non intatte e che i contatti non siano piegati.
2. Al termine della ricarica, il LED rosso si accende. Quando la batteria non è collegata,
si accende il LED verde del caricabatterie.
3. Quando la batteria è completamente carica, il LED rosso si spegne e il LED verde
si accende.
Livello di carica della batteria
La batteria ha un indicatore di carica della batteria integrato
Premendo il pulsante a destra indica il livello di carica. Il LED a destra indica un
livello di carica elevato e il livello di carica basso a sinistra significa che la batteria
richiederà presto la ricarica.
IMPORTANTE
Quando è indicato un basso livello di carica, l'utensile potrebbe smettere di funzion-
are durante l'uso, pericoloso quando si utilizza una sega circolare. Assicurarsi
sempre che la batteria abbia un buon livello di carica.
Note
Sulla carica della batteria:
●
●
●
●
●
●
●
- 76 -
La batteria deve essere caricata a temperature ambiente tra 10 e 40 ° C
(idealmente intorno ai 20 ° C).
Dopo la carica, lasciare che la batteria si raffreddi prima dell'uso dopo 15 minuti
Assicurarsi che il caricabatterie sia scollegato dall'alimentazione di rete dopo l'uso
e sia stato memorizzato correttamente.
NON lasciare le batterie in carica per periodi prolungati e non conservare mai le
batterie in carica.
Il caricabatterie controlla la temperatura della batteria e la tensione durante la
ricarica. Rimuovere la batteria una volta che la carica è completa per massimizza-
re i cicli di carica della batteria e non sprecare energia.
Le batterie possono diventare difettose nel tempo, le singole celle della batteria
possono non funzionare
e la batteria potrebbe essere breve. Il caricabatterie non
caricherà le batterie difettose. Utilizzare un'altra batteria, se possibile, per
verificare la corretta funzionalità del caricabatterie e acquistare una batteria di
ricambio se è indicata una batteria difettosa.
NON conservare gli accumulatori di batterie agli ioni di litio in uno stato di scarico
per un lungo periodo poiché ciò può danneggiare le celle di litio. Per la conser-

●
Inserimento di punte e accessori
AVVERTIMENTO
Sempre rimuovere la batteria dal foro prima di fissare, regolare o rimuovere gli
accessori.
AVVERTIMENTO
NON cercare di stringere bit di trapano (o qualsiasi altro accessorio) prendendo la
parte anteriore del mandrino e accendendo lo strumento. Ciò può causare lesioni
personali e può causare danni al mandrino.
AVVERTIMENTO
MAI inserire nessun accessorio o bit con una velocità massima inferiore alla velocità
di carico dell'attrezzo elettrico.
1.
2.
3.
4.
Operazione
Controllo di direzione
AVVERTIMENTO
Mai cambiare la direzione di rotazione mentre l'utensile è in funzione. Ciò può
causare danni permanenti allo strumento.
● La direzione di rotazione può essere impostata utilizzando l'interruttore avanti /
indietro (6).
- 77 -
vazione a lungo termine, conservare le batterie in uno stato di carica elevato
scollegato dall'utensile.
La capacità delle batterie si ridurrà nel tempo. Dopo 100 cicli di carica, il tempo di
funzionamento della batteria e la portata massima del driver saranno leggermente
ridotti. Questa diminuzione continua fino a quando la batteria ha una capacità
minima dopo 500 cicli di carica. Questo è normale e non è un guasto con la
batteria.
Aprire le ganasce del mandrino (1) ruotando il collare del mandrino (2) in senso
antiorario.
Posizionare il foro o l'accessorio centralmente nel mandrino.
Serrare le mandibole del mandrino ruotando il collare del mandrino in senso orario.
Quando il perno o l'accessorio è fissato saldamente, eseguire attentamente la
macchina per verificare
che sia in funzione centralmente, liscia e uniforme. Se il
bit è "rovinato" o non funzionante centralmente, rilasciare il mandrino, controllare
l'accessorio per danni, correggere la posizione, riavvitare e testare nuovamente.

● Per la rotazione antioraria, spingere l'interruttore verso destra.
● Per la rotazione in senso orario, spingere l'interruttore verso sinistra.
Nota
Quando l'interruttore Forward / Reverse è in posizione centrale, il trapano viene
bloccato e non può essere acceso. Utilizzare questa impostazione come funzionalità
di sicurezza per impedire che il trapano venga acceso accidentalmente.
Controllo della coppia
Nota
Questo trapano cordless è dotato di una frizione di controllo della coppia che consente
di impostare la macchina alla coppia corretta per l'applicazione individuale.
●
●
Selezione degli ingranaggi
●
●
Nota
Sempre leggere la documentazione fornita con punte e accessori per la velocità
raccomandata o massima e utilizzare l'ingranaggio più appropriato. Vedere "Specifica"
per la massima velocità senza carico di ciascuna marcia.
Accensione / spegnimento
AVVERTIMENTO
SEMPRE indossare adeguate attrezzature di protezione personale durante la
messa in funzione e l'utilizzo di questa macchina.
1. Per avviare il trapano, premere l'interruttore Trigger (7).
2. La luce di lavoro integrata (9) si illumina quando l'interruttore di trigger è schiacciato.
Nota
Se l'interruttore di trigger non può essere premuto in basso, controllare che l'interrut-
tore di marcia avanti / indietro (6) non sia impostato sulla posizione centrale, che
- 78 -
Le impostazioni della frizione sono indicate dai simboli del selettore di coppia (3)
Ruotare il selettore di coppia per selezionare l'impostazione desiderata: maggiore
è il numero visualizzato sull'anello coppia, maggiore è la coppia prodotta
dal
troppo.
Selezionare la marcia 1 sull'interruttore di marcia (4) per la coppia più alta. Un
riduttore di velocità più basso è generalmente più adatto per le viti e le viti di
fissaggio
Selezionare la marcia 2 sull'interruttore per la coppia inferiore. Un ingranaggio di
velocità più elevato è destinato alla perforazione e non deve essere utilizzato per
la guida delle viti e dei fissaggi

blocca il dispositivo (vedere "Direction control").
4.
5.
Utilizzo del cacciavite
Nota
Utilizzare sempre un portabatteria universale quando si lavora con bit di cacciavite.
Non montare bit di cacciavite direttamente nel mandrino
1.
2.
3.
●
Nota
Se in dubbio quale impostazione della coppia più adatta all'applicazione, inizia con una
regolazione e un aumento più bassi, in caso di maggiore coppia (ad esempio, se la vite
non viene guidata abbastanza lontano nel pezzo da lavorare).
AVVERTIMENTO
La punta, specialmente la punta, diventerà molto calda quando si lavora la muratura e il
calcestruzzo. NON toccare il bit e non permettere che venga a contatto con materiali
combustibili.
AVVERTIMENTO
NON inalare la polvere di muratura. Indossare una protezione respiratoria adeguata.
La polvere da muratura, calcestruzzo e sostanze simili è dannosa e può essere tossica.
Foratura di legno
1.
2.
●
AVVERTIMENTO
NON inalare la polvere di legno. Indossare una protezione respiratoria adeguata.
Alcune polveri di legno possono essere tossiche.
Drilling meta
1.
2.
- 79 -
La velocità del trapano viene controllata dal movimento del grilletto: più l'interrut-
tore di trigger viene premuto, più veloce verrà eseguito il trapano.
Rilasciare l'interruttore di trigger per fermare la macchina.
Selezionare l'ingranaggio 1 utilizzando l'interruttore di marcia (4)
Ruotare il selettore di modalità (3) per guidare
Regolare la trapanatura sull'impostazione della coppia corretta (vedere 'Controllo
della coppia').
Durante la guida delle viti non utilizzare MAI la macchina in modalità drill.
Selezionare l'ingranaggio appropriato utilizzando l'interruttore di marcia (4)
Ruotare il selettore di modalità (3) nella posizione di trapano
Assicurarsi che i fori di perforazione siano adatti per il legno e siano entro la
massima capacità di questa macchina (vedi "Specifica")
Selezionare l'ingranaggio appropriato utilizzando l'interruttore di marcia (4).
Ruotare il selettore di modalità (3) nella posizione di trapano.

- 80 -
●
●
AVVERTIMENTO
Il foro di trapano e il pezzo diventano molto caldi quando si perforano il metallo. NON
toccare il bit e non permettere che venga a contatto con materiali combustibili
quando è caldo. Utilizzare sempre un idoneo lubrificante o un fluido di taglio e
eseguire un foro a velocità adeguate.
●
●
AVVERTIMENTO
Se l'utensile elettrico si presenta eccessivamente caldo in uso, interrompere
immediatamente l'uso dell'utensile e lasciar raffreddare prima di continuare a
lavorare. Il periodo di raffreddamento può essere ridotto operando il trapano alla
velocità massima senza carico. Assicurarsi sempre che i bocchettoni del motore (5)
non siano bloccati e non lasciare che la polvere entri nel corpo dell'utensile
attraverso le aperture del motore; Polvere, particolarmente polvere metallica, può
danneggiare o distruggere lo strumento.
Manutenzione
AVVERTIMENTO
Sempre scollegare l'alimentazione elettrica prima di effettuare qualsiasi manutenzi-
one / pulizia del caricabatterie. Rimuovere la batteria prima di effettuare qualsiasi
manutenzione / pulizia del trapano.
Nota
Sia il trapano che il caricabatterie non contengono parti riparabili dall'utente. Se il
dispositivo non esegue come descritto in questo manuale, restituirlo a un centro di
assistenza GMC autorizzato per la riparazione
Ispezione generale
●
●
Assicurarsi che i fori di trapano siano adatti per il grado di metallo in fase di
foratura e siano all'interno della capacità massima della macchina (vedi "Specifi-
ca").
Per garantire la precisione, contrassegnare la posizione del foro previsto
utilizzando un martello e un punzone centrale.
SOLTANTO applicare
una pressione moderata alla punta, assicurando un taglio
efficiente e una vita prolungata.
Utilizzare un pezzo di contatore per rimuovere le bave forti dal foro, impedendo
tagli e altri tipi di lesioni.
Controllare regolarmente che tutte le viti di fissaggio siano strette
IControllare il cavo di alimentazione dell'utensile, prima di ogni utilizzo, per danni
o usura. Le riparazioni devono essere eseguite da un centro di assistenza autoriz-
zato. Questo consiglio vale anche per i cavi di prolunga utilizzati con questo.

- 81 -
PULIZIA
●
●
●
Lubrificazione
Lubrificare leggermente tutte le parti in movimento ad intervalli regolari con un idoneo
lubrificante a spruzzo.
Conservazion
Conservare attentamente questo utensile in un luogo sicuro e asciutto fuori dalla
portata dei bambini.
Disposizione
Seguire sempre le normative nazionali per smaltire gli utensili elettrici che
non sono più funzionali e non sono idonei per la riparazione.
● Non smaltire utensili elettrici o altri rifiuti elettrici ed elettronici (WEEE) con
i rifiuti domestici.
● Rivolgersi all'ufficio locale di smaltimento dei rifiuti per informazioni sul
modo corretto di smaltire gli attrezzi elettrici.
Tenere sempre pulito il vostro utensile. Sporcizia e polvere causeranno
rapidamente le parti interne e accorceranno la vita utile della macchina. Pulire il
corpo della macchina con un pennello morbido o un panno asciutto. Se disponi-
bile, utilizzare aria pulita, asciutta e compressa per soffiare attraverso i fori di
ventilazione.
Pulire l'involucro dell'utensile con un panno umido morbido usando un detergente
delicato. Non usare alcool, benzina o detergenti forti.
Non usare mai agenti caustici per pulire le parti in plastica.

元の説明書
記号説明
ツールの定格プレートに記号が表示されることがあります。これらは、製品または使用
方法に関する重要な情報を表しています。
聴覚保護具を着用します
目の保護具を着用します
呼吸保護具を着用します
頭部保護具を着用します
手の保護具を着用します
取扱説明書を読みます
電池を焼却しないでください!
注意!
屋内での使用のみです!
最大電流3.15Aの内部タイムラグヒューズ.
クラスⅡの建設
環境保護廃棄物の電気製品は、家庭の廃棄物と一緒に廃棄しないでくだ
さい。施設がある場所をリサイクルしてください。リサイクルのアドバイス
については、自治体または販売店にお問い合わせください。
関連する法令および安全基準に準拠しています。
-82-

リチウムイオン電池セルはリサイクル可能であり、家庭廃棄物と一緒に廃
棄しないでください。施設が存在する場所でリサイクルしてください。リサ
イクルのアドバイスについては、自治体または販売店にお問い合わせく
ださい。
仕様
各部の名称
1.チャックジョーズ2.チャックカラー
3.トルクセレクタ4.ギアスイッチ
5.モーター通気口6.正転/逆転スイッチ
7.トリガースイッチ8.ハンドグリップ
9.ワークライト10.電池
11.電池充電インジケータ 12.電池リリース
13.ベルトクリップ14.充電器
15.充電器ベース
-83-
定格電圧
無負荷速度
チャック容量
最大掘削能力
電池パックの電圧
-電池セル
充電器
-定格電圧
-出力電圧
-定格出力電流
-充電時間
保護クラス
音と振動のデータ
音圧LPA
音響パワーLWA
不確実性K:
振動(無負荷)
振動(掘削)
不確実性K:
DC18V
0-350/0-1300rpm
10mm
鋼:Ø6mm
木材:Ø18mm
DC18V
Li-ion1.5Ah
100VAC50-60HZ15VA
22.7VDC
380mA
4hr
66.13dB(A)
77.13dB(A)
3dB(A)
1.349m/s²
1.142m/s²
1.5m/s²
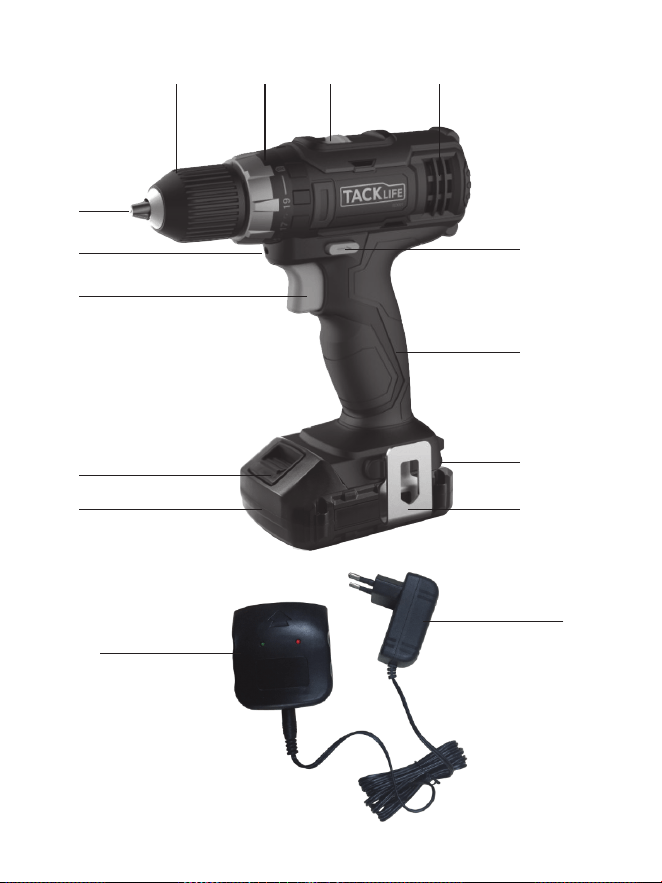
2 3 4 5
6
8
11
13
1
7
9
12
10
15
14
-84-

-85-
警告
音量が85dB(A)を超え、必要に応じて露出時間を制限する場合は、必ず耳保護具を着
用してください。音量が不快な場合は、耳の保護具を使用してもすぐに使用を中止し、
耳の保護具が正しく取り付けられていることを確認してください。またツールで生成さ
れた音のレベルに対して正確なレベルのサウンド減衰を提供します。
警告
工具の振動に対するユーザーの暴露は、接触感覚、麻痺、刺痛および握り能力の低下
を招く可能性があります。長期暴露は、慢性疾患につながることができます。必要に応
じて、振動にさらされる時間の長さを制限し、防振手袋を使用してください。振動がより
大きな影響を及ぼすので、通常の快適な温度以下の手で工具を操作しないでくださ
い。振動に関する仕様書の数値を参照して、工具の動作時間と頻度を計算してくださ
い。
仕様の音および振動レベルは、EN60745または同様の国際規格に従って決定されま
す。これらの数字は通常の作業条件での工具の通常の使用を表しています。維持が不
十分で、誤って組み立てられたり、誤用されたりすると、騒音や振動が増加することがあ
ります。www.osha.europa.euは、長期間ツールを使用しているユーザーにとって有用
な、職場における音と振動のレ
ベルに関する情報を提供します。
一般的な安全
警告
すべての安全に関する警告と指示をお読みください。警告や指示に従わないと、感電、
火災、および/または重傷を負う可能性があります。
警告
この機器は、安全性の責任者による機器の使用に関する監督または指示がない限り、
身体的または精神的能力の低下または経験または知識の欠如のある人(子供を含む)
による使用を目的としていません。子供は本製品で遊ぶことがないように監督する必
要があります。
将来の参照のためにすべての警告と指示を保存してください警告内の「パワーツー
ル」という用語は、主電源(コード付き)電動工具またはバッテリ駆動(コードレス)電動
工具を指します。
1.作業場の安全
a.
b.
c.
作業場所にきれいにして、点灯させてください。散らかった場所や暗い場所は事故
の原因になります。
可燃性の液体、ガス又は粉塵のある場所での使用は避けてください。電動工具から
発火られる火花がガス又は粉塵に引火する恐れがあります。
電動工具を使用する際には、お子供や第三者を近づけないでください。集中力が欠

2.電気安全
a.
b.
c.
d.
e.
f.
3.作業者の安全
a.
b.
c.
d.
e.
f.
-86-
け、誤操作の原因になります。
電源プラグに適合した電源コンセントを使用してください。電源プラグの改造は絶
対に行わないでください。アース回路付電動工具の電源プラグには、いかなるアダ
プターも取り付けないでください。純正電源プラグに適合した電源コンセントは感
電の危険性を低減します。
パイプ、ラジエーター、レンジ、冷蔵庫など、接地処理された媒体と身体が接触する
のを避けてください。身体が接触すると、感電の危険性増します。
電源工具を雨や濡れた環境にさらさないでください。電動工具の中に水が混入する
と、感電の危険性を増します。
電源コードを乱用しないでください。工具の持ち運びや引っ張りや電源ソケットから
の抜け止めには、絶対にコードを使用しないでください。電源コードは、熱、油、およ
び鋭利な端から遠ざけてください。コードが損傷したり絡まったりすると、感電の危
険性が増します。
屋外で作業を行う場合、屋外に適応した延長コードを使用してください。適切な延
長コードは感電の危険性を低減します。
濡れた場所で電動工具を使用することは避けられませんが、残存電流装置(RCD)で
保護された電源を使用してください。RCDを使用すると
、感電の危険が低減します。
周りの状況に十分注意払い、よそ見をせず慎重に作業を行ってください。常識を働
かせてください。疲れている場合、また薬物の投与、アルコールの摂取、薬物による
治療などを受けている場合は操作しないでください。一瞬の不注意が重大な事故に
つながることがあります。
保護具を着用してください。必ず保護メガネをかけてください。防じんマスク、滑り止
めのついた安全靴、ヘルメット、防音保護具などの適切な活用はけがの発生を低減
します。
不意な始動は避けてください。電源プラグを電源コンセントに差し込む際やバッテ
リーを工具に装着する際、あるいは工具を持ち運ぶ際は、スイッチがオフの位置に
あることを確認してください。スイッチを指で軽く動かすか、スイッチがオンになって
いる電源ツールに通電すると、事故が発生します。
電動工具を始動する前に、調節キーやレンチなど必ず取り外してください。電動工具
の回転部に、キーやレンチが残っているとけがの原因になります。
オーバーリーチしないでください。常に足元をしっかりさせ、バランスを保つようにし
てください。予期せぬ事態に対応しやすくなります。
きちんとした服装で作業してください。だぶだぶの服装やネックレスなどの
アクセサ
リーは着用しないでください。髪の毛、衣服や手袋が電動工具の回転部に触れない
でようにしてください。だぶだぶの服装、ネックレスなどのアクセサリー、あるいは長

g.
4.電動工具の使い方と手入れ
a.
b.
c.
d.
e.
f.
g.
5.電池ツールのの使い方と手入れ
a.
b.
C.
d.
e.
-87-
い髪の毛は回転部に巻き込まれる恐れがあります。
ちり排気や集じん装置に接続できる場合、必ず接続して適切に活用してください。粉
じんによる危険性を低減します。
無理な使い方はしないでください。作業に見合った能力の工具を使用してください。
適切な工具は、設計された通りの効率の良い安全な作業が臨めます。
スイッチで始動・停止操作ができない電動工具は使用しないでください。スイッチの
制御ができない電動工具が危険であり、修理する必要があります。
いかなる調整を行う場合、付属品の交換を行う場合、あるいは工具を保管する場合
は、電源プラグを電源コンセントから抜いてください。このような事前の安全対策は
電動工具が不意に始動する危険性を低減します。
使用しないときは、子供の手の届かない安全な場所に保管してください。また、電動
工具の取り扱いや手順に不慣れな人には操作させないでください。教育を受けてい
ない人の操作は大変危険です。
電動工具の手入れをしてください。可動部の位置調整、および締め付け状態、部品
の破損、その他運転に影響を及ぼすすべての個所に異常がないか確認してくださ
い。損傷した場合は、使用前に電動工具を修理してください。多くの事故は、整備さ
れていない電動工具によって引き起こされます。
切削工具をきれいにしてきださい
。鋭い切刃を備えた適切に維持された切削工具
は、結合する可能性が低く、制御が容易である。
電動工具、付属品、その他は作業環境や作業内容を考慮しながら取扱説明書に従っ
て使用してください。意図されていない使い方をした場合、危険な状況をもたらすこ
とがあります。
警告:オーストラリアまたはニュージーランドで使用する場合は、このツールを常に
使用することをお勧めします。
定格残留電流30mA以下の残留電流装置(RCD)を介して供給します。
製造元が指定した充電器でのみ充電してください。あるタイプの電池パックに適し
た充電器は、別の電池パックと一緒に使用すると火災の危険があります。
特定の電池パックのみで使用するパワーツールを使用してください。他の電池パッ
クを使用すると、けがや火災の危険があります。
電池パックを使用していない時は、ペーパークリップ、コイン、キー、爪、ネジ、または
他の小さな金属製の物など、ある端末から別のものに接続できる他の金属製の物
から離してください。電池端子を短絡すると、火傷や火災の原因となります。
液体が目と接触する場合は、医師の診察を受けてください。電池から液体が噴出す
ると、刺激や火傷の原因となることがあります。
苛酷な条件下では、液体が電池から排出されることがあります。接触を避けます。接

6.サービス
この電動工具は、同等の交換部品のみを使用して修理を受けた資格を持つ人がサー
ビスを受けてください。これにより、電動工具の安全性が確実に維持されます。
追加の電池駆動ドリルの安全性
警告
重要: 設置、運転、メンテナンスに関するすべての国の安全規則に従わなければなりま
せん。
a.
b.
c.
d.
e.
f.
g.
h.
i.
j.
k.
l.
m.
n.
o.
p.
-88-
触が起こったら、水で洗い流す。液体が目と接触する場合は、医師の診察を受けてく
ださい。電池から液体が噴出すると、刺激や火傷の原因となることがあります。
18歳未満の誰もがこのツールを使用することを許可しないでください。また、操作者
は、操作と安全に関する指示に適合し、熟知していることを確認してください。
バッテリー充電器は屋内でのみ使用できます。必ず電源と充電器が水分から保護さ
れていることを確認してください。
ドリルを使用する場合は、安全眼鏡やシールド、耳防護具、安全手袋などの保護服を
使用してください。作業に適した呼吸保護具を着用します。FFP2の最低定格を推奨
します。ツールを操作することが何らかの不快感を与える場合は、すぐに停止し、使
用方法を見直してください。
金属と電圧検出器を使用して、電気、水、またはガスラインを隠す場所を探します。実
際の部品や導体に触れな
いようにします。
照明が適切であることを確認します。
ドリルビットがチャックに確実に固定されていることを確認します。不安定なドリル
ビットが機械から排出され、危険を引き起こします。
工具を始動する前にドリルビットがワークピースと接触していないことを確認します。
穴あけを行う前に、ワークの下のドリルビットに十分なクリアランスがあることを確
認します。
工具に圧力をかけないでください。そうすることで、サービス寿命が短くなります。
ドリルビットは動作中に熱くなり、それらを扱う前に冷却することができます。
決して手でおがくず、切り屑、またはごみを取り除くことはできません。
ドリルを操作している時に中断された場合は、プロセスを完了し、検索する前にス
イッチをオフにします。
可能であればクランプやバイスを使用して作業を保持します。
チャックが摩耗または損傷の兆候がないか定期的に点検してください。資格のある
サービスセンタによって修理された損傷した部品を持っている)いつでもドリルに
コンがあるまで待ってください。
ドリルが完全に止まるまで
待ってから下に置いてください。
すべてのナット、ボルト、その他の固定具を定期的に点検し、必要な場所で締め付け
ます。

電池の安全
警告
リチウムイオン電池を誤って使用、保管、または充電した場合、火災、やけど、
爆発の危険があります。
●
●
●
●
●
●
●
●
電池充電器の安全性
電池充電器を正しく使用します
●
●
●
警告
充電式でない電池を充電しないでください。
-89-
電池を子供の手の届かない場所に保管してください。
専用の充電器のみを使用してリチウムイオンバッテリを充電してください。
製品と一緒に提供されている、または互換性があるように設計されたリチウムイオ
ン電池のみを使用してください。
充電または過度の使用の後、電池を15分間冷却してください。これらの指示に従わ
ないと過熱または火災の原因となることがあります。
使用しない時は、電池を室温(約20℃)で保存してください。
電池の接点が短絡事故ではないことを確認してください。電池をきれいに保つ。異
物や汚れは短絡になることがあります。クリップ、コイン、キー、釘、ネジなど他の金属
製のものは避けてください。
苛酷な条件下では、液体が電池から排出されることがあります。この液体は、皮膚刺
激や火傷を引き起こす可能性があります。接触を避けます。誤って接触した場合は、
水で洗い流してください。液体が目と接触する場合は、医師の診察を受けてくださ
い。
分解、粉砕、60℃
以上の加熱、焼却しないでください。火などに処分しないでくださ
い。
電池の充電を試みる前に、電池充電器の使用に関するこの説明書のセクションを参
照してください。
付属の充電器の以外のものを使用しないでください。電池充電器を清潔に保ちま
す。異物や汚れにより、通気口が短くまたは詰まる可能性があります。これらの指示
に従わないと過熱または火災の原因となることがあります。
電源コードが損傷している場合は、危険を避けるために、製造業者、サービス代理店
または同様の資格のある人物に交換する必要があります。

使用前
電池の取り外し
電池リリースを押して電池をツールから取り外し、電池を電池スロットから引き出します。
警告
電池リリースボタンを押さずに電池を取り外そうとしないでください。工具や電池が破
損する恐れがあります。
電池の取り付け
クリックして所定の位置にロックするまで電池をツールの電池スロットにスライドさせ
て取り付けます。
注意
電池と工具が正しく整列されていることを確認してください。電池がツールに滑りにく
い場合は、無理に押し込まないでください。代わりに、電池をツールから再びスライド
させ、電池の上部を確認し、工具の電池スロットがきれいで損傷していないこと、およ
び接点が曲がらないことを確認します。
充電器のセットアップ
1.装着されている場合は、電池を電池充電器から取り出します。
2.電池充電器の電源プラグを適切な電源ソケットに差し込みます。
注意
充電器の緑のLEDが点滅し、充電器が電池を充電する準備ができていることを示しま
す。
警告
この充電器は、付属の電池またはこのツール用に特別に設計された追加の電池を充電す
る場合にのみ使用してください。
警告
充電器は室内のみで使用するように設計されており、湿気や濡れた環境
では使用しな
いでください。
電池の充電
警告
電池を充電する時に正しい手順に従わないと、永久的な損傷が発生します。
注意
最近充電された1.5Ah容量の電池では、通常の充電時間は約4時間です。ただし、電池
をしばらく放置しておくと、充電に時間がかかることがあります。
1.完全にまたは部分的に放電された電池を電池充電器にスライドさせます。
-90-

注意
電池と電池充電器が正しく整列されていることを確認してくださ
い。電池が電池充電器に滑りにくい場合は、無理に押し込まないで
ください。代わりに、電池を取り外し、電池の上部をチェックし、電池
充電スロットがきれいで損傷していないこと、および接点が曲がっ
ていないことを確認してください。
2.充電が開始されると、赤色LEDが点灯します。電池組が充電器に接続されていない
場合は、充電器の緑色LEDが点灯します。
3.電池が完全に充電されると、赤色LEDが消灯し、緑色LEDが点灯します。
電池充電レベル
電池には、電池充電インジケータが内蔵されています。
右のボタンを押すと、充電レベルが表示されます。右側のLEDは高い充電レベルを示
し、左側は低い充電レベルを示します。これは、電池組がすぐに充電を必要とすること
を意味します。
重要
低充電レベルが表示されているときは、使用中に工具が動作を停止する可能性があり
ます。これは丸鋸を操作すると危険です。電池組の充電レベルが十分であることを常に
確認してください。
注意
電池充電について:
●
●
●
●
●
●
●
●
-91-
電池は周囲温度10〜40℃(理想的には約20℃)で充電する必要があります。
充電した後、使用する前に電池が冷えるまで15分間放置します。
使用後に充電器が主電源から切断され、正しく保
管されていることを確認してください。
電池を長期間充電して置かないでください。決して長時間充電しないでください。
充電中に電池充電器がバッテリの温度と電圧を監視します。充電が完了したら電池
を取り外して、電池の充電サイクルを最大にし、無駄な電力を節約してください。
電池は時間が経つと故障する可能性があり、電池の個々のセルが故障して電池が短
絡する可能性があります。充電器は故障した電池を充電しません。可能であれば、別
の電池を使用して、充電器の正しい機能をチェックし、不完全な電池が示された場合
は交換電池を購入してください。
リチウムイオン電池組を長期間にわたって放電状態で保管しないでください。リチ
ウムイオン電池が損傷する可能性があります。長期間保管する場合は、電池を電動
工具から外した高充電状態で保管してください。
電池の容量は時間の経過と共に減少します。充電サイクルが100回になると、電池の
動作時間とドライバの最大トルク性能がわずかに低下します。500回の充電サイクル
後にバッテリの容量が最小になるまで続きます。この低下は正常であり、電池組の
故障ではありません。」

フィッティングドリルビットと付属品
警告
付属品の取り付け、調整または取り外しを行う前に、常にドリルから電池を取り外してく
ださい。
警告
チャックの前部を掴んでツールをオンにして、ドリルビット(またはその他のアクセサ
リ)を締め付けないでください。これは人身事故につながり、チャックに損傷を与える可
能性があります。
警告
いかなるアクセサリやビットにも決して最高速度が彼の電動工具の無負荷速度よりも
低い速度を合わないようにしてください。
1.チャックカラー(2)を反時計回りに回してチャックジョー(1)を開きます。
2.ドリルビットまたはアクセサリーをチャックの中央に配置します。
3.チャック・カラーを時計回りに回してチャック・ジョーを締めます。
4.ドリルビットまたは付属品がしっかりと固定されたら、マシンを注意深く動かして、中
央で滑らかに均等に動いていることをテストします。ビットが「ぐらついている」か中
央で動いていない場合は、チャックを解放し、付属品が損傷していないか確認して位
置を修正し、再度締め直して再度テストします。
使用について
方向制御
警告
ツールが動作
している間は絶対に回転方向を変更しないでください。これにより工具
に永久的な損傷を与えることがあります。
●正転/逆転スイッチ(6)を使用して回転方向を設定できます。
●反時計回りの場合は、スイッチを右に押してください。
●時計回りの場合は、スイッチを左に押します。
注意
正転/逆転スイッチが中央の位置にある時、ドリルはロックされ、オンにすることはでき
ません。誤ってドリルがオンにならないようにするには、この機能を安全機能として使
用してください。
トルク制御
注意
このコードレスドリルにはトルク制御クラッチが装備されており、個々の用途に合わせ
-92-

て機械を正しいトルクに設定することができます。
● クラッチ設定は、トルクセレクタ(3)の記号で示されます。
● トルクセレクタを回して希望の設定を選択します: トルクリングに表示される数字が高
いほど、トルクリングによって生成されるトルクは高くなります。
ギヤ選択
● より高いトルクを得るには、ギアスイッチ(4)のギア1を選択します。 一般的に、より低
速のギアが、ねじおよび留め具を駆動するのにより適しています。
● より低いトルクのためにギアスイッチのギア2を選択します。より高速のギヤは穿孔の
ためのものであり、ネジや留め金具の駆動には使用しないでください。
注意
推奨または最大速度設定のドリルビットと付属品のマニュアルを常に読んで、最適なギ
ヤを使用してください。各ギアの最大無負荷速度については、「仕様」を参照してくださ
い。
オン/オフの切り替え
警告
この機械を設置して操作するときは、常に適切な個人用保護具を着用してください。
1.トリガースイッチ(7)を押して、ドリルを開始
します。
2.トリガースイッチを押し込むと、内蔵のワークライト(9)が点灯します。
注意
トリガースイッチを押し下げることができない場合は、正転/逆転スイッチ(6)が中間位
置に設定されていないことを確認してください(「方向制御」を参照)。
3.ドリルの速度は、トリガーの動きによって制御されます。さらに、トリガースイッチが押
されると、ドリルが速く動くようになります。
4.トリガースイッチを放してマシンを停止します。
ドライバーの使用
注意
ドライバービットを使用するときは、常にユニバーサルビットホルダーを使用してくだ
さい。スクリュードライバビットを直接チャックに取り付けないでください
1.ギアスイッチ(4)を使用してギア1を選択します。
2.モードセレクタ(3)をドライブ に回します。
3.ドリルを適切なトルク設定に調整します(「トルク制御」を参照)。
● 駆動ねじがドリルモードで機械を使用しないでください。
注意
どのトルク設定がアプリケーションに最も適しているのか疑問がある場合は、低い設
定
-93-

値から始めて、より多くのトルクが必要になります(たとえば、ねじがワークピース内で十
分に遠くまで駆動されていない場合)。
警告
ドリルビット、特に先端は、石積みやコンクリートを掘削するときに非常に熱くなります。
ビットに触れたり、可燃物と接触しないでください。
警告
石積みの塵を吸い込まないでください。適切な呼吸保護具を着用する。石積み、コンク
リートおよび類似の物質からの粉塵は有害であり、有毒である可能性があります。
掘削木材
1.ギアスイッチ(4)を使用して適切なギアを選択します。
2.モードセレクタ(3)をドリル位置 に回します。
● ドリルビットが木材に適しており、この機械の最大能力内にあることを確認してくださ
い(「仕様」を参照)。
警告
木粉を吸入しないでください。 適切な呼吸保護具を着用する。 いくつかの木粉は有毒
かもしれません。
掘削金属
1. ギアスイッチ(4)を使用して適切なギアを選択します。
2. モードセレクタ(3)をドリル位置 に回します。
● ドリルビットは、ドリル加工される金属のグレードに適しており、マシンの最大能力内に
ある
ことを確認してください(「仕様」を参照)。
● 精度を確保するには、ハンマーとセンターパンチを使用して穴の位置をマークします。
警告
金属を穿孔するときに、ドリルビットとワークピースは非常に熱くなります。ビットに触
れないでください。高温のときは可燃物と接触しないでください。常に適切な潤滑剤ま
たは切削液を使用し、適切な速度でドリルを行ってください。
● ドリルビットに適切な圧力をかけるだけで、効率的な切断とドリルビット寿命の延長を
確保します。
● カウンターシンクビットを使用して穴から鋭利なバリを除去し、切れや他の種類のけ
がを防ぎます。
警告
電動工具が使用中に過度に熱くなった場合は、すぐに工具の使用をやめ、作業を続け
る前に冷却してください。冷却時間は、無負荷で最大速度でドリルを操作することに
よって低減することができます。モーター通気口(5)が塞がれていないこと、モーター通
気口を通して工具本体に埃が入らないようにしてください。ほこり、特に金属粉塵は、工
-94-
具を損傷または破壊する可能性があります
メンテナンス
警告
充電器のメンテナンス/清掃を行う前に、主電源から切り離してください。ドリルのメン
テナンス/清掃を行う前に、バッテリを取り外してください。
注意: ドリルと充電器には、ユーザーが修理できる部品はありません。本書に記載され
ているようにデバイスが動作しない場合は、認可されたGMCサービスセンターに修理
を依頼してください。
一般検査
● すべての固定ネジがタイトであることを定期的に確認します。
● ツールの電源コードを使用する前に、損傷または磨耗を点検します。修理は、認可さ
れたサービスセンターが行う必要があります。このアドバイスは、これに使用される延
長コードにも適用されます。
お手入れ
● ツールは常に清潔に保ちます。汚れやほこりは、内部部品がすばやく摩耗し、機械の寿
命を短くします。柔らかいブラシや乾いた布で本体を清掃してください。可能であれば、
清潔で乾燥した圧縮空気を使用して、通気孔から吹き飛ばしてください。
● 中性洗剤を使用して柔らかい布で工具ケーシングを掃除してく
ださい。アルコール、ガ
ソリンまたは強力な洗浄剤を使用しないでください。
● プラスチック部品の清掃には腐食剤を使用しないでください。
潤滑
● 適切なスプレー潤滑剤を使用して定期的にすべての可動部品にわずかに潤滑油を塗
布します。
保管
● この道具は子供の手の届かない安全で乾燥した場所に保管してください。
廃棄
機能しなくなって修復可能がない電動工具を処分する時は、常に国の法規を
遵守してください。
● 電動工具やその他の電気・電子機器(WEEE)を家庭ゴミと一緒に処分しな
いでください。
● 電動工具を正しく処分する方法については地元の廃棄物処理当局に連絡
してください。
-95-

Made in China
Shenzhen Take Tools Co., Ltd.
Web: www.tacklifetools.com
Facebook: www.facebook.com/Tacklife.US/
E-mail: [email protected]
ADD: No.B714, Niulanqian Building, Minzhi Road,
Longhua District, Shenzhen, Guangdong, China 518000


