
User Manual
HOME THEATER PROJECTOR
Version: 240120
VOPLLS

Catalog
Basic Configuration
2. For Android Device
1. For iOS Device
1. Power Supply
2. Cleaning
3. Repairs
4. High Temperature Warning
3. For MAC OS
4. For Win10 or Above
1. Connecting to Windows Laptop/PC
2. Connecting to the DVD Player
3. Connecting to the External Storage Device
2. Bluetooth Setting
1. Network Setting
6. Projection Mode
3. Focus
4. Keystone
5. Zoom
7. Picture Mode & Audio
8. Setup
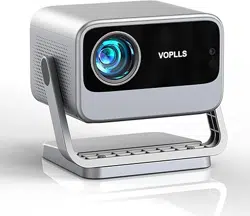
Projector Overview
Remote Control
Initial Power-On Settings
Important Safety Considerations
Wireless Connections
Wired Connections
Additional Entertainment Options
Settings
Product Features
Trouble Shooting
Trademarks
Statement
02
03
04
04
04
04
05
06
08
10
10
12
15
14
17
17
17
18
20
21
22
23
24
25
26
26
27
27
28
29
31
31
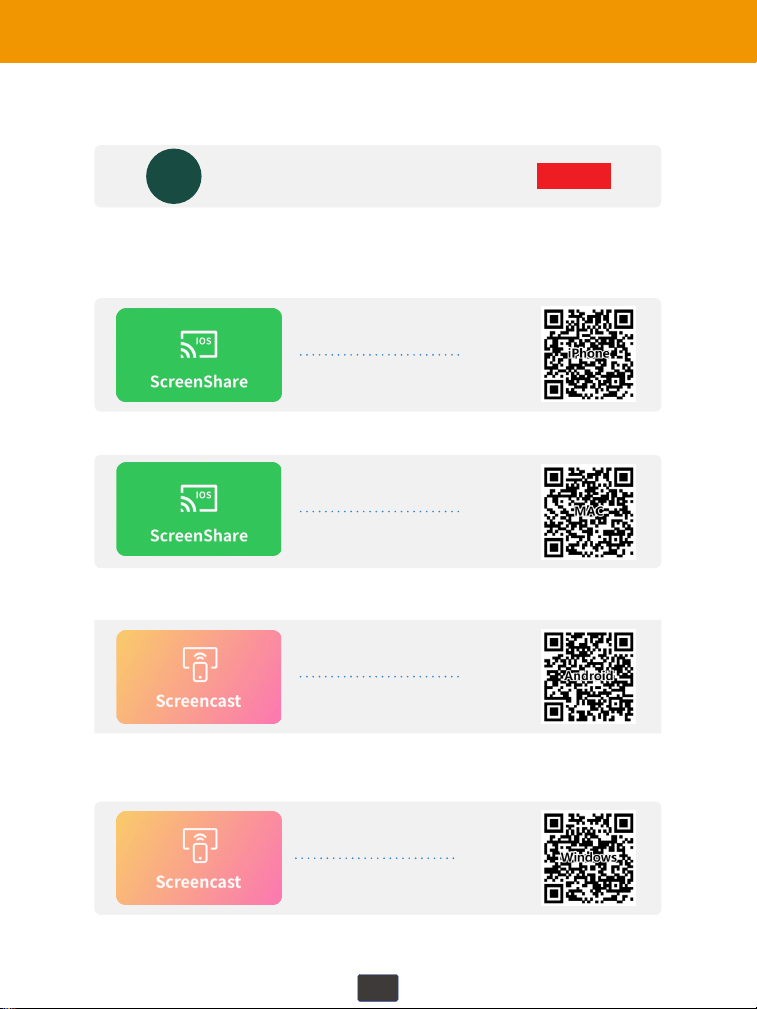
HOW TO CONNECT TO IPHONE/IPAD?
HOW TO CONNECT TO Mac?
HOW TO CONNECT TO ANDROID SMARTPHONE/TABLET?
HOW TO CONNECT TO WINDOWS LAPTOP?
Video Operation Guide
SUBSCRIBE
VIP PROJECTOR
Scan QR codes below or search for “VS-KING PROJECTOR”
on YouTube to get videos
SUBSCRIBE
VS-KING PROJECTOR
VS-KING
01
Basic Con�iguration
Basic Con�iguration
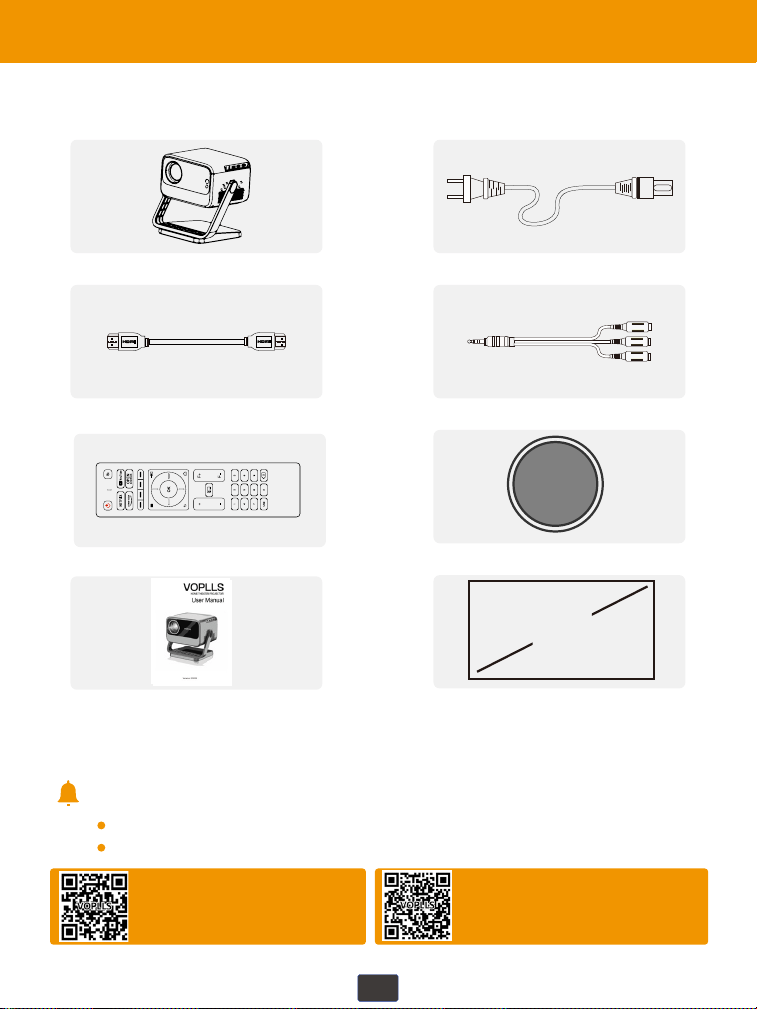
If there is any part missing, please contact VOPLLS support team.
Email address of VOPLLS support team:
Tips:
1 x 1080P Projector 1 x Power Cord
1 x HDMI Cord 1 x AV Signal Cord
1 x Lens Cap
1 x Projector Screen
1 x User Manual
1 x Remote Control
(battery not included)
North America Marketplace:
Europe Marketplace:
02
100"
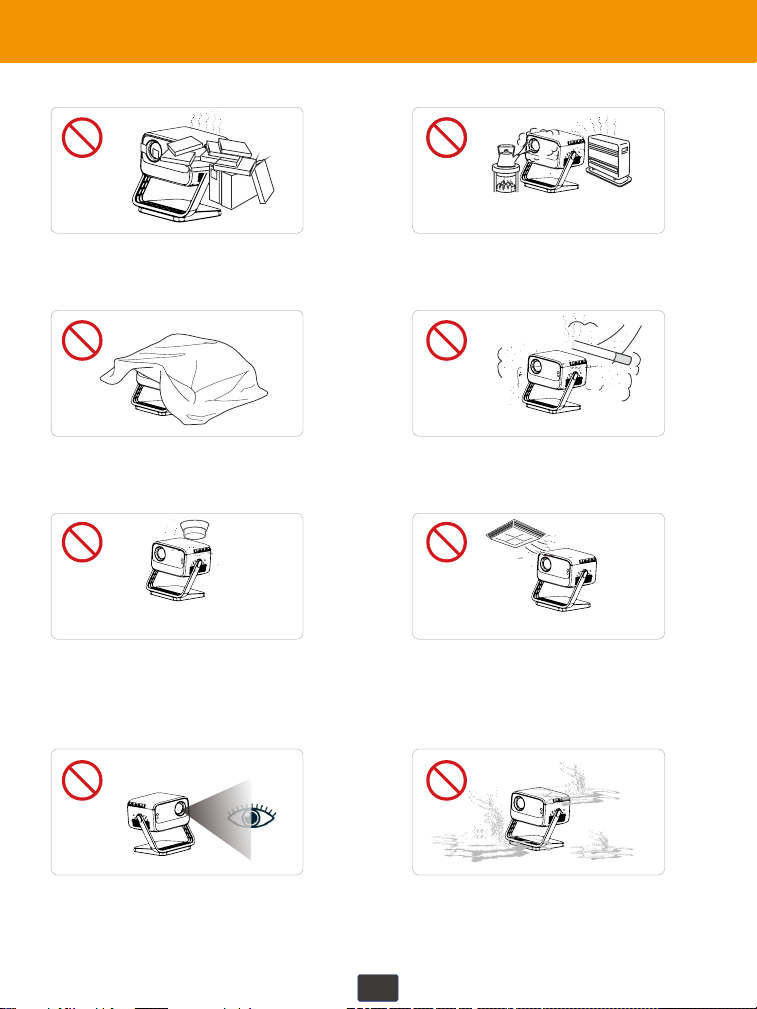
Important Safety Considerations
Important Safety Considerations
Do not install the projector in
hot and humid sites.
Do not block the ventilation
holes (intake or exhaust).
Do not install the projector in
dust and smoke sites.
Do not install the projector in
sites with improper ventilation.
Please keep the projector
away from water or any other
liquid as it is not waterproof.
Do not install the projector in
sites with direct blowing of
warm and cool air-condition
wind. Otherwise it may cause
the project failure.
Please do not look into the
lens when the projector is
working. Otherwise it may
hurt your eyes.
Do not install the projector near
the temperature and smoke
transducer. It may cause a
sensor failure.
03
Use only the provided power adapter.
Protect the power cord from being walked on or pinched, particularly at plugs,
convenience receptacles, and the point where they exit from this device.
Unplug this device if there are lightning storms or when unused for a long
period of time.
Where the power plug or an appliance coupler is used as the disconnect
device, the disconnect device shall remain readily operable.
Before you make or change any connections, ensure that all devices are
disconnected from the power outlet.
Never touch the power cable or the power connector with wet hands.
Use a soft, lint-free cloth. Never use liquid, gaseous or easily flammable
cleansers to clean.
Do not use any liquid cleaning agents to clean the lens to avoid damaging the
coating film on the lens.
Use lens cleaning paper to clean the lens.
Please clean the vents and speakers regularly with a soft brush. Dust
clogging can cause the projector to overheat, which can lead to malfunction.
Do not make any repairs to this device yourself. Only have your device
repaired by an authorized service center.
Improper maintenance can result in injuries or damage to this device.
Refer all servicing to qualified service personnel.
The temperature near the outlet will rise during and after the projection.
Please don't touch it, otherwise it may cause burns.
Power off the device before removing the power supply from the socket.
04
1. Power Supply
2. Cleaning
3. Repairs
4. High Temperature Warning
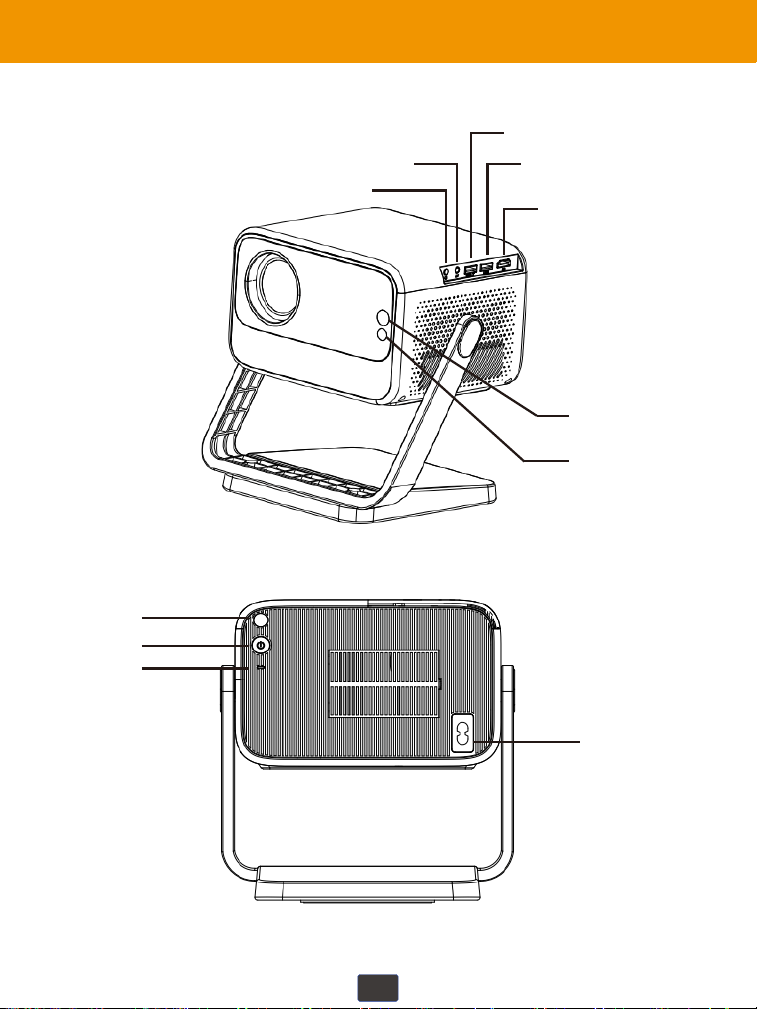
Projector Overview
05
3.5mm Audio
AV
USB-T
USB
HDMI
Infrared sensor
Power On/Off
Power Indicator
Power Input
CMOS Sensor
Infrared Sensor
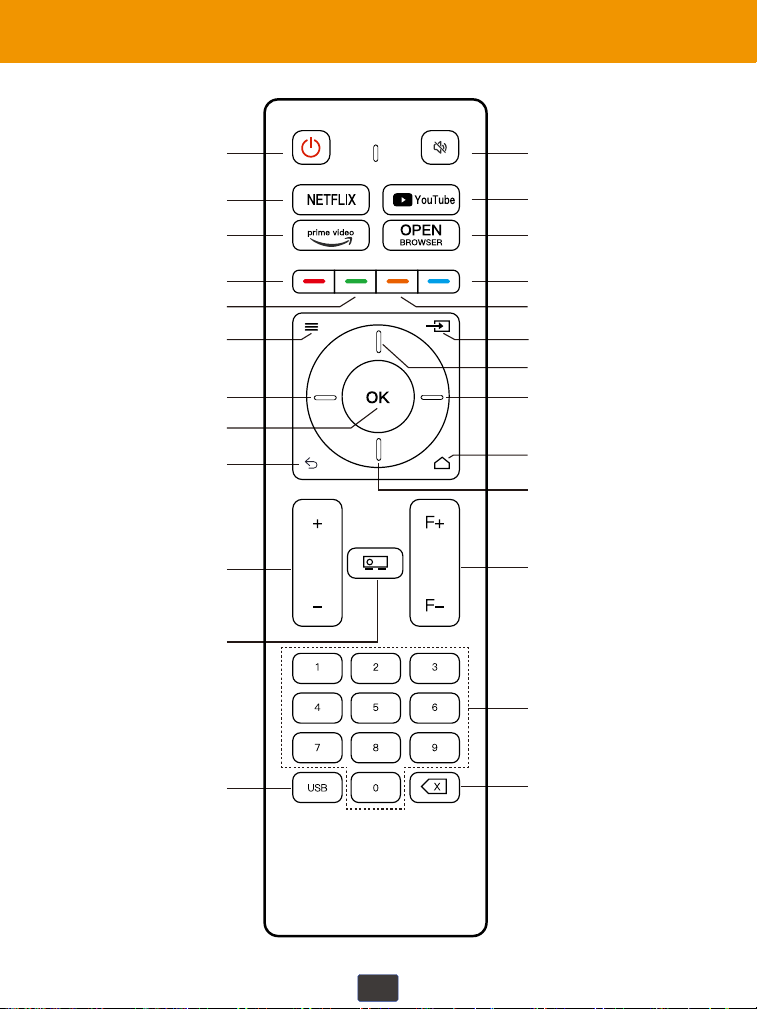
Remote Control
06
ON/OFF
Netflix hotkey
Prime Video hotkey
Red key
Green key
Setting
Left
OK
Return
Volume +/-
Projection mode
USB Source
Mute switch
YouTube hotkey
OPEN Browser hotkey
Blue key
Yellow key
Signal Source
Right
Up
Home
Down
Focus +/-
Number
Backspace
07
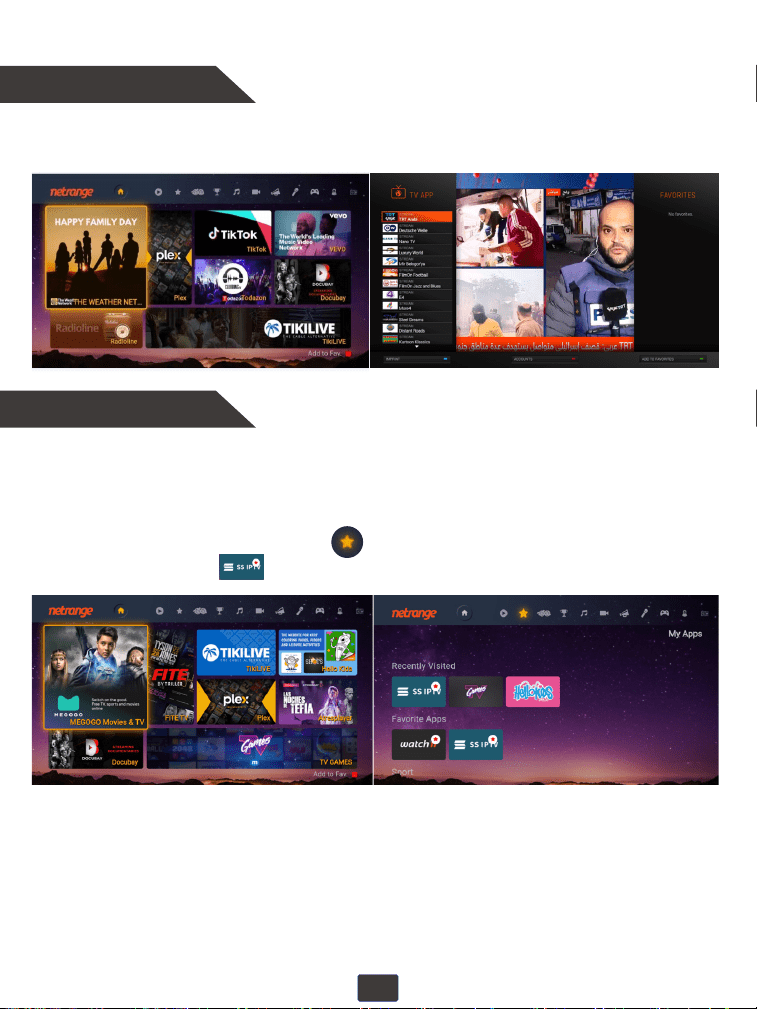
Shortcut Key Settings
One-click Favorites
The four shortcut keys of Red, Green, Yellow and Blue on the remote control
are only used when watching TV programs or video content in the APPstore.
When you browse your favorite TV shows and videos in the APPstore, press
the red shortcut key to quickly bookmark and add them to your ★ show
favorites list.
Meanwhile, in your favorites list , press the red shortcut key again to
cancel the favorited.
08
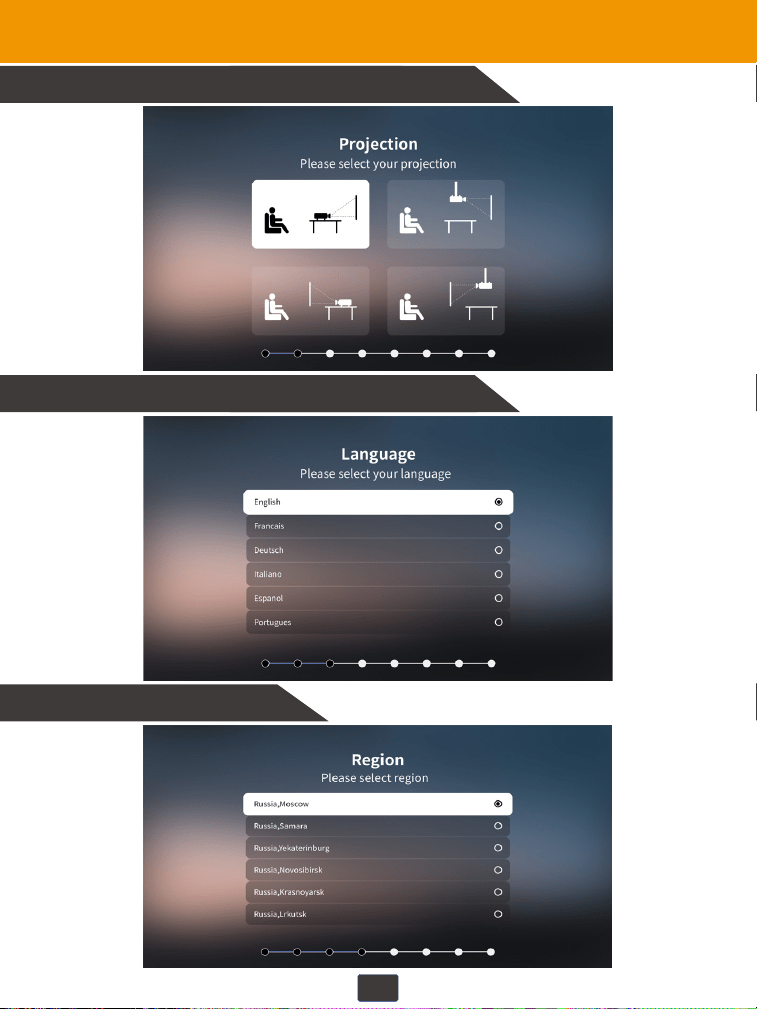
Initial Power-On Settings
1. Please set up your projection mode.
2. Please set your system language.
3. Select your region.
09
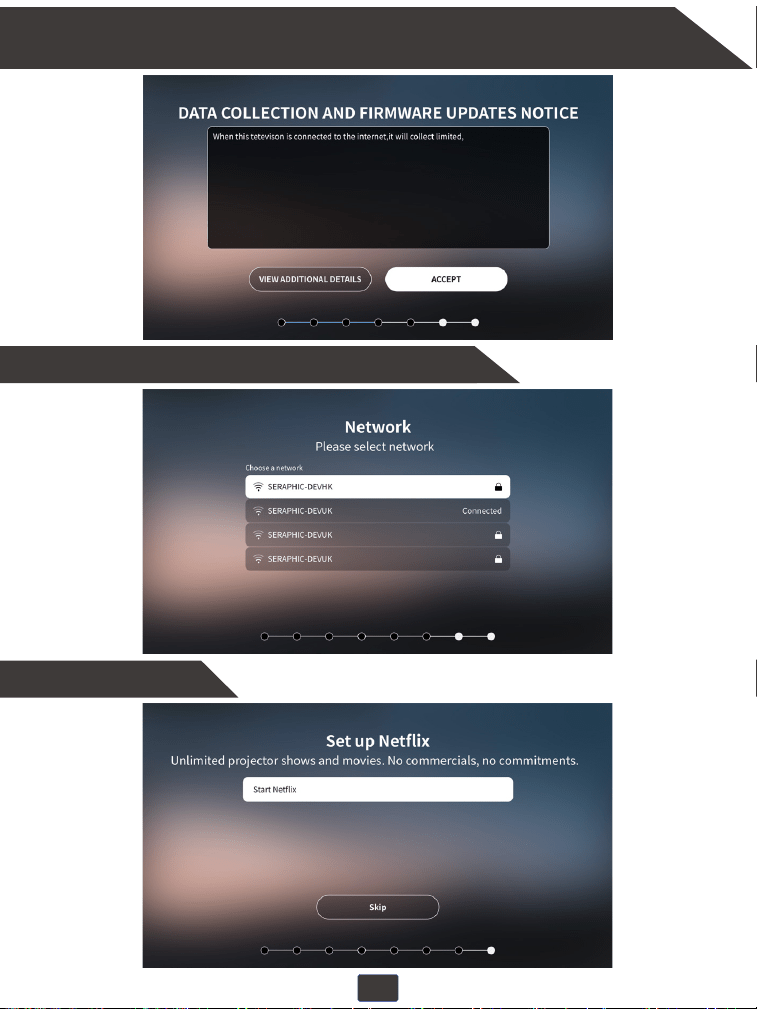
5. Network setup and connecting to your home WiFi.
6. Set up Net�lix.
4. Accept the data collection and �irmware updates notice. Please note that
we will not collect any private information that is not related to product use.
10
Wireless Connections
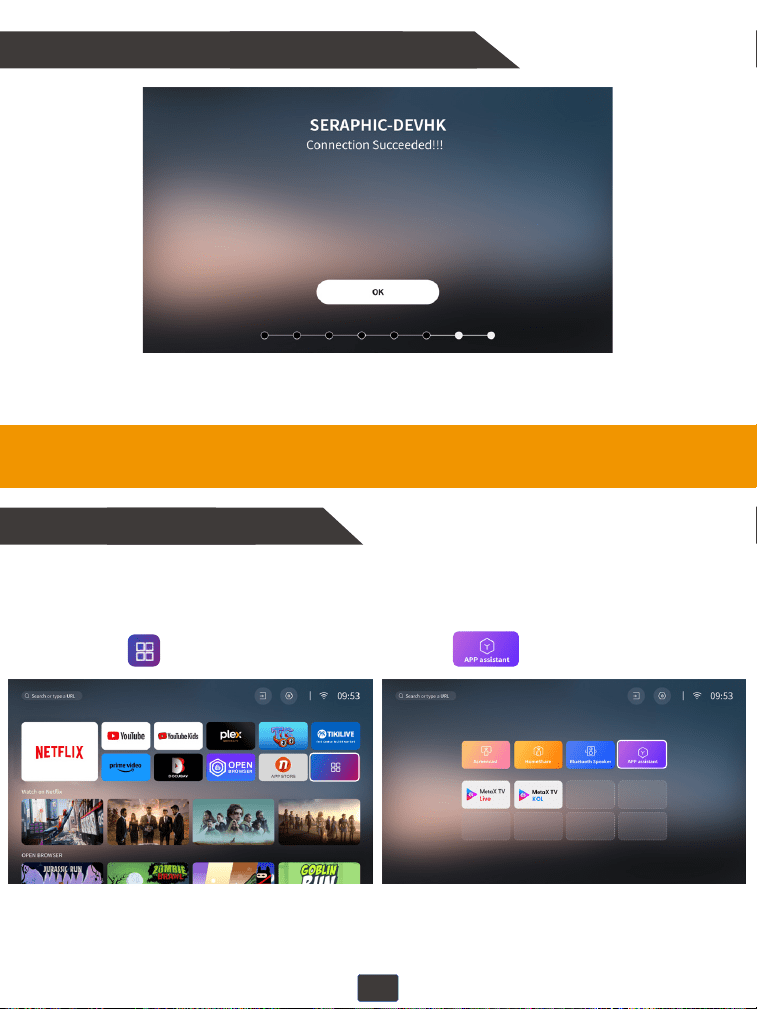
7. The setup is completed.
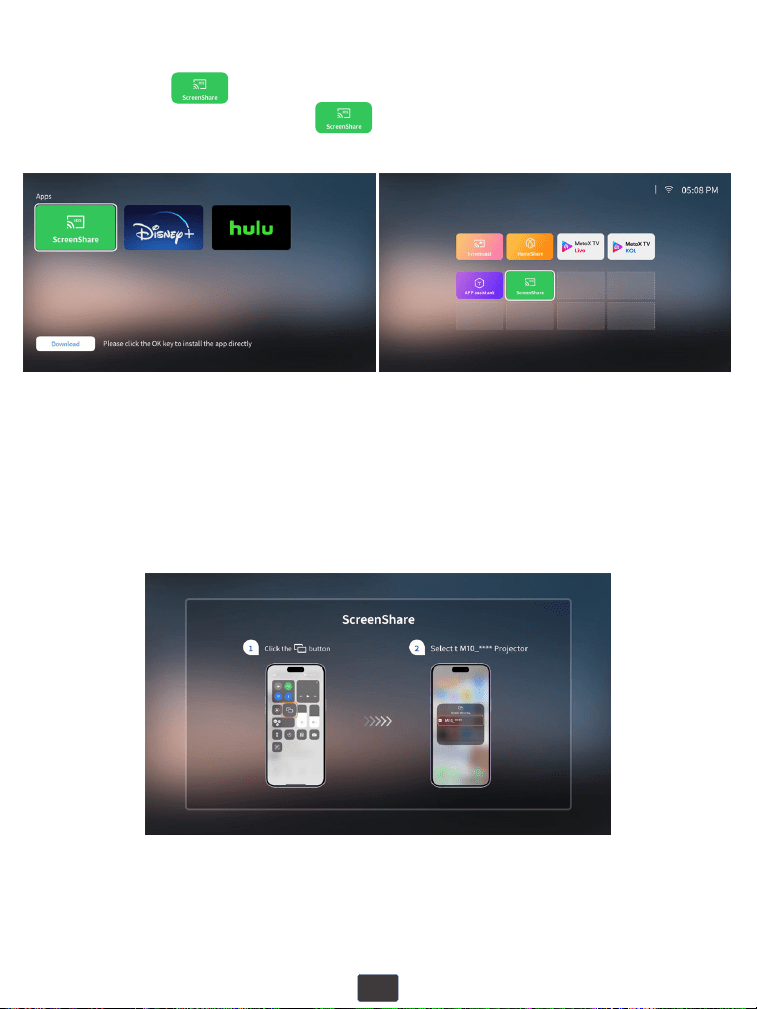
1. Connecting to the Mobile Device
Your projector and your devices need to be connected to the same home WiFi.
For iOS Device
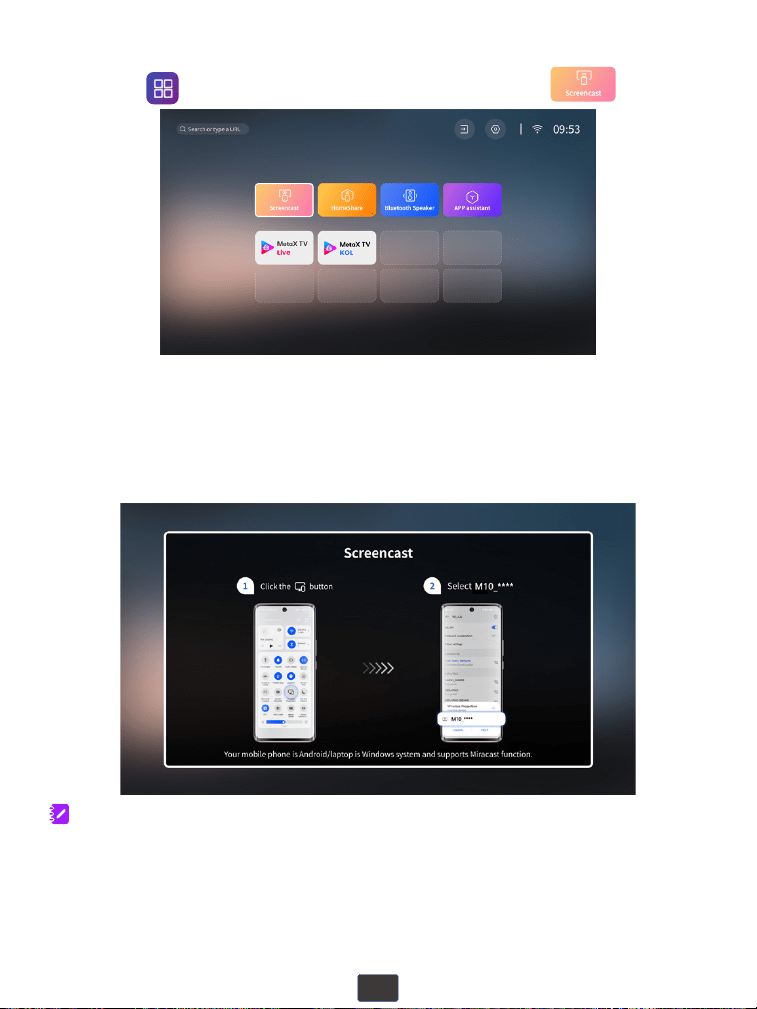
①Acess" "on the homepage, then select " ".
11
②Download " " in APP assistant and go back to the APP
Center homepage and select " " .
③Open the Control Center of your iOS device, click "Screen Mirroring"
and then select "M10_****" from the list to connect.
12
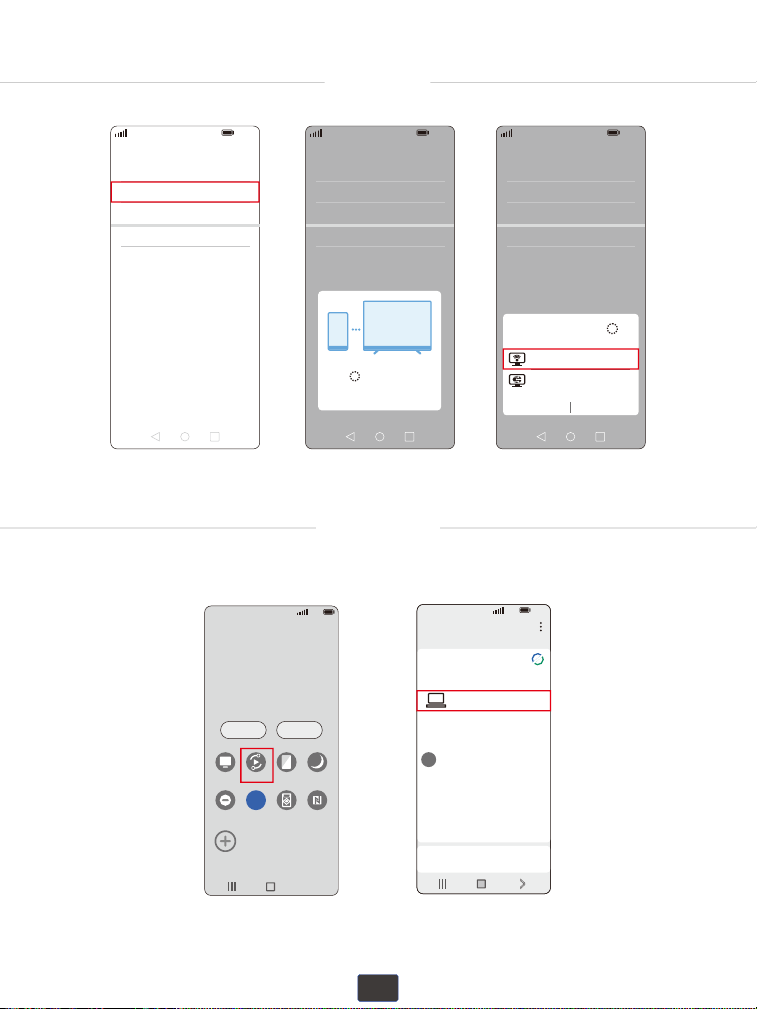
②Turn on the "WLAN" and "Bluetooth" on your Android device.
③Projector keeps staying in Screencast channel page.
Open the“Multi-Screen”function and select “M10_****” from the list.
①Acess " " on the homepage to enter, then select " ".
Note:
To activate this function, your Android device must support “Multi-Screen/Wireless”
display. Names of “Screen Mirroring” function may differ from different devices.
Google phones and partial Motorola phones prohibit screen mirroring directly from the
projector due to mirroring protocol issues. You need to have a Google Chromecast to
connect it.
For Android Device
13
HUAWEI
More connections - Wireless projection.
5G
100%
21:05
>
>
>
>
>
Huawei Share
Wireless projection
Pirnting
On
VPN
Private DNS
Of
f
5G
100%
21:05
>
>
>
>
>
Huawei Share
Wireless projection
Pirnting
On
VPN
Private DNS
Of
f
Connecting...
CANCEL
5G
100%
21:05
>
>
>
>
>
Huawei Share
Wireless projection
Pirnting
On
VPN
Private DNS
Of
f
M10 - ****
Wireless Projection
Available devices
CANCEL HELP
M10 - ****
SAMSUNG
5G
100%
>
18:45
Monday, July 5
Devices Media
DeX
DeX
Smart View
Blue light
filter
Dark mode
B
Do not
disturb
5G
Hongbao
accelerator
NFC
5G
5G
100%
18:45
>
Smart View
Phone Other device
Select a device below to mirror your phone’s
screen or play content
Mirror screen
>
Other device Phone
→
→
M10 - ****
Swipe up the screen of your Samsung device, then click “Smart View” and
search for the device of the projector.
14
XIAOMI
5G
100%
18:45
>
Cast
Cast
Cast screen contents to an external
monitor
>
Cancel Help
Select device(1)
Demos
Casting documents,games,photos,and
videos
>
SPECIAL FEATURES
M10 - ****
Swipe up the screen of your Xiaomi device, then click “Connection & Sharing”
and search for the device of the projector.
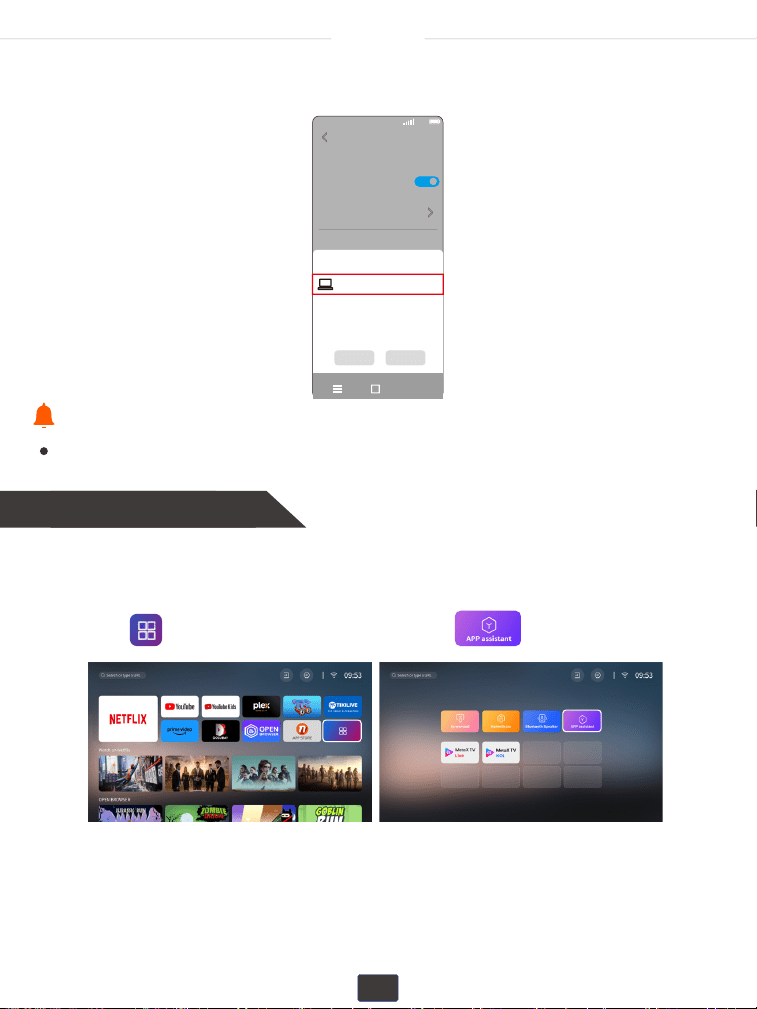
2. Connecting to computer
For MAC OS
Your projector and your devices need to be connected to the same home WiFi.
①Acess" "on the homepage, then select " ".
Tips:
Make sure your mobile device is closed to the projector when using wireless
connection. A distance within 1m/3.3ft is recommended.
15
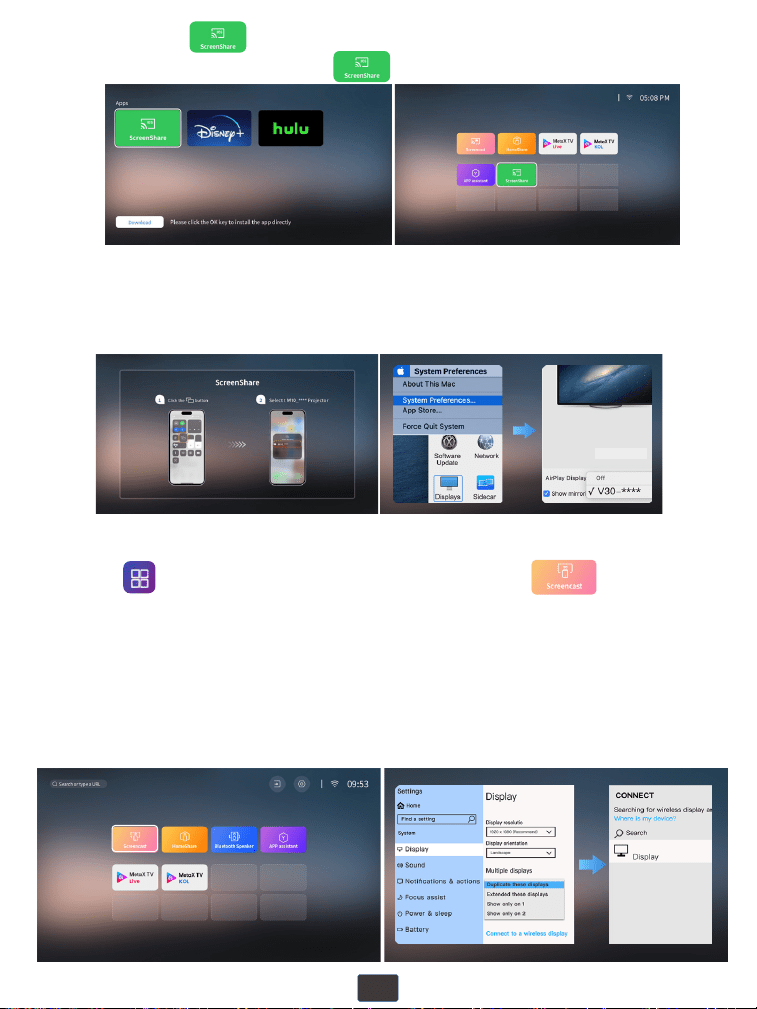
①Acess" " on the homepage to enter, then select " ".
②Turn on your computer's WiFi function
1. Access "System"-"Display" in the computer's "Settings".
Option 1:
2. Find "Connect to a Wireless Display".
3. Connect to "M10-****" and select "Duplicate these displays" in
“Multiple displays”.
③Projector keeps staying in Screenshare channel page.
Open“System Preferences” on your iOS device - Choose“Displays” -
Click “AirPlayDisplay”-Connect“M10_****”.
M10-****
②Download " " in APP assistant and go back to the APP
Center homepage and select " " .
For Win10 or Above
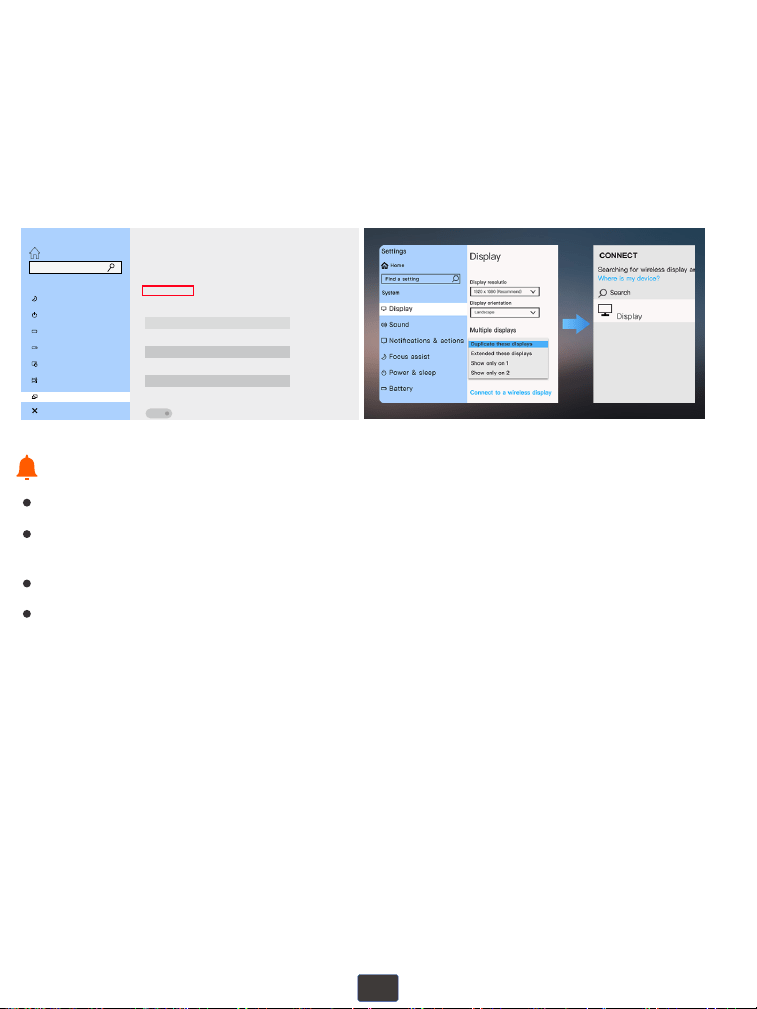
16
1. Access "Settings" - "System" - "Projecting to this PC" - "Optional Features" .
2. Add a "Wireless Display" to your computer then follow the steps in
Option 1 to try connecting again.
When the "Connect to a Wireless Display" option does not appear in the
"Multiple Displays" option list and cannot be connected.
Option 2:
Settings
Home
Projecting to this PC
System
Focus assist
Project your Windows phone or PC to this screen,and use its keyboard,
mouse,and other devices,too.
Some Windows and Android devices can project to this PC when you
say it's OK
This PC can be discovered for projection only when it’s pluged into a
power source
Add the "Wireless Display"optional feature to project to this PC:
Optional fegtures
Power & sleep
Battery
Storage
Tablet
Multitasking
Shared experiences
Find a setting
Always Off (Reemmended)
Ask to project to this PC
Everu time a connection is requested
Require PIN for pairing
Never
On
Projecting to this PC
Please ensure your laptop has a wireless display function.
Since some computers with WIN10 and above do not support the Miracast protocol,
mirroring connections not be possible.
Tips:
Please ensure you have selected “1920*1080 resolution” after you connect the projector.
You can also press the Windows logo key + P key at the same time and
select “DUPLICATE”.
17
Wired Connection
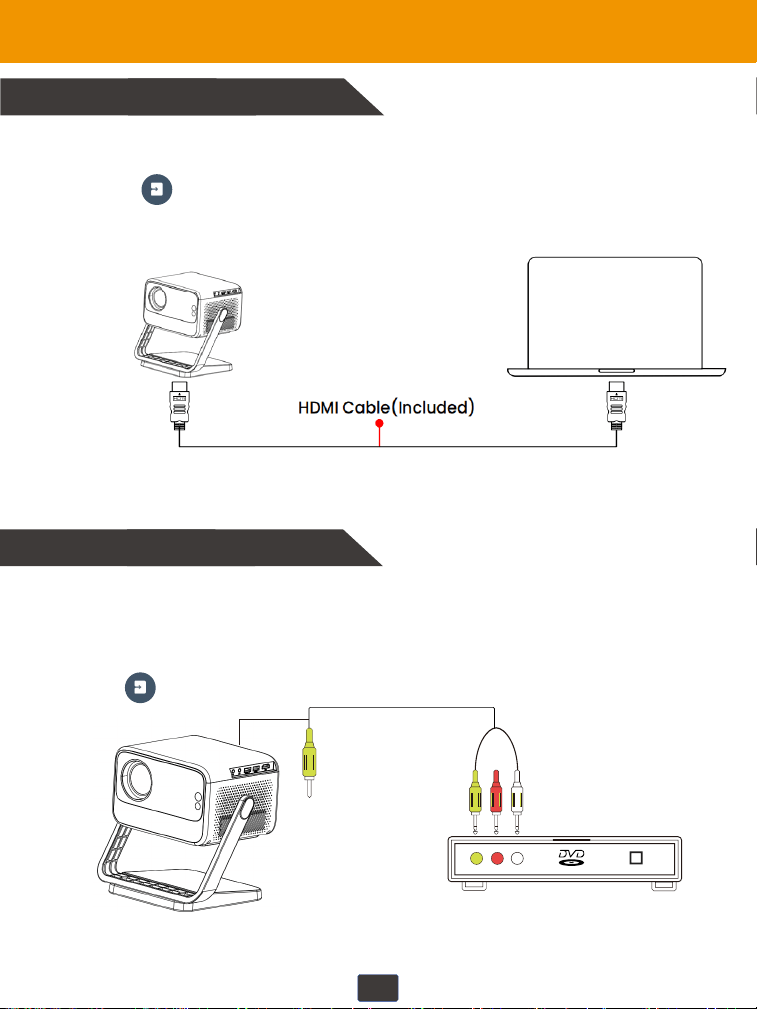
1. Connecting to Windows Laptop/PC
①Connect your Windows laptop/PC to the projector with the HDMI cable
from the accessory box.
2. Connecting to the DVD Player
Connect the projector to your DVD player using the AV cable included in the package.
①Turn on your DVD player and projector.
②Connect the colored female connector to the RCA cable of the DVD player,and then
connect the yellow male connector to the projector's AV input port.
③Access " " on the home page, select "AV" and connect it.
②Access " " on the home page, select "HDMI" in the Input Source page,
Then the connection is complete.
18
3. Connecting to the External Storage Device
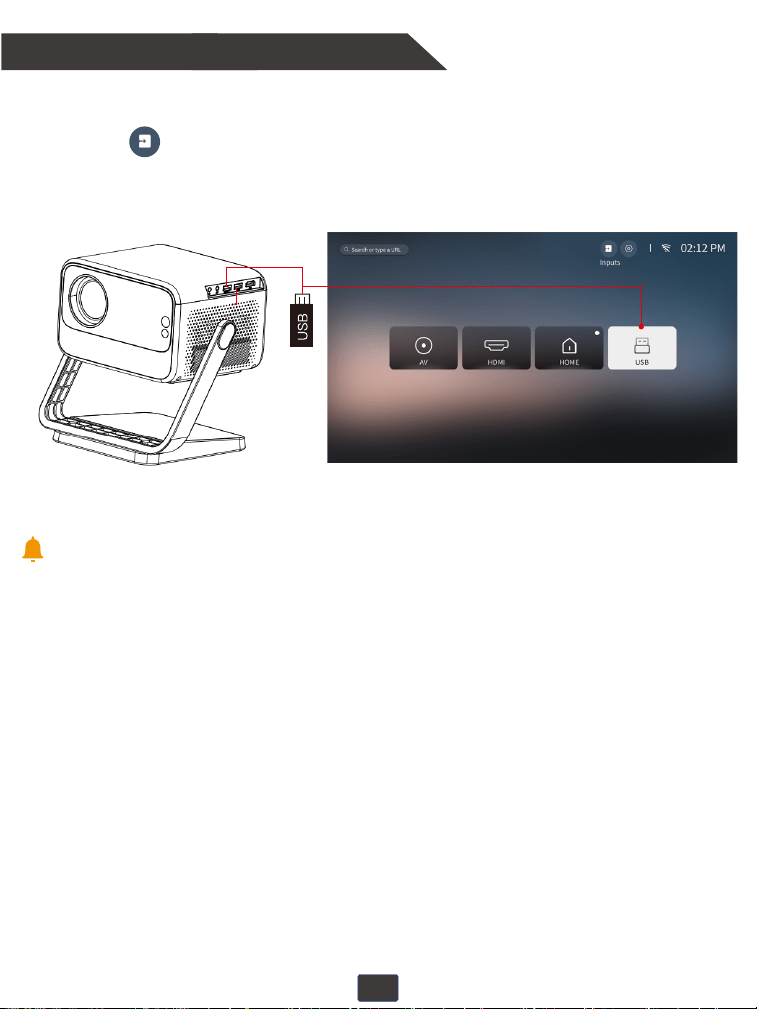
①Turn on the projector and insert the USB �lash drive.
②Access " " on the home page, select the "USB" in the Input
Source page and click to enter the USB �lash drive �ile.
Please note that your USB drive and �iles need to meet the following formats.
(For example: If the format of your USB drive is NTFS, the memory capacity
of USB drive must be under 128G and the memory of video must be under 2T.)
Tips:
19
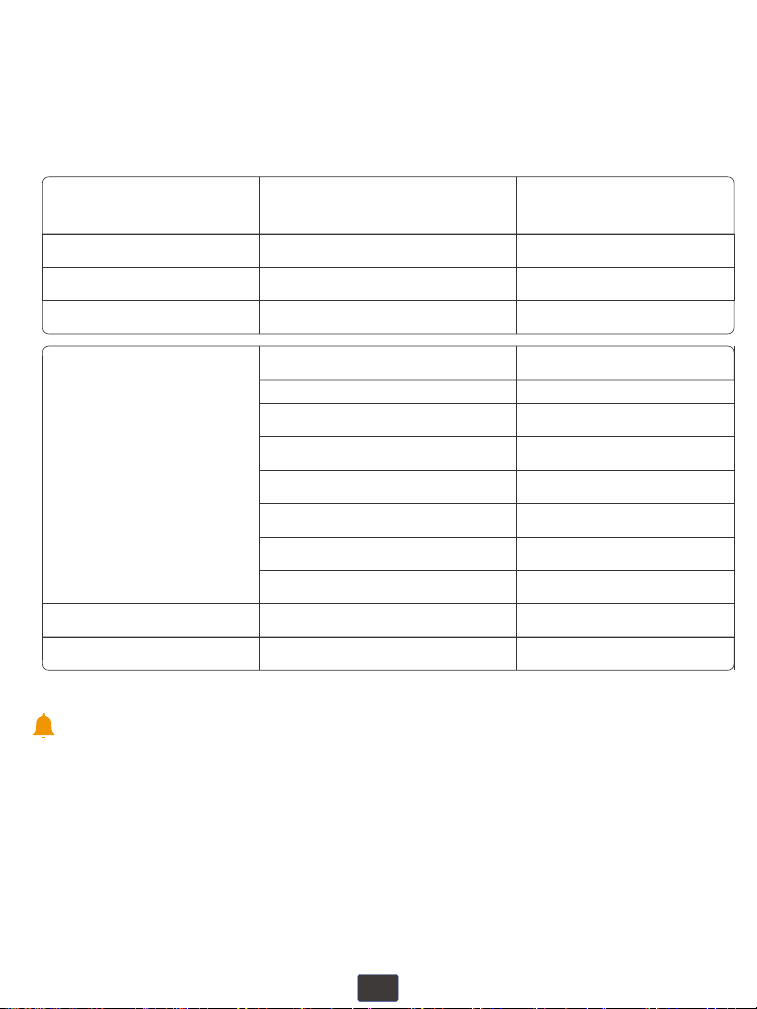
Formats of USB drive
NTFS
FAT32
FAT
128G
128G
128G
2T
4G
2G
Maximum memory capacity
of USB drive
Maximum memory
of each video
Video:
(Note: corresponding format and
encoder are required when play
via USB)
Music Format
Photo Format
Video formats Video encoder
AVI H.264 MJPE
FLV
COPX H.264
MOV
H.264 MPEG-4DIVX XIVD
MPEG1
VOB
FLV
MKV
MOV
MP4
MPG
VOB
Mp3, WMA, OGG, AAC, FLAC, APE, WAV etc
HPEG, BMP, PNG, JPG/JPEG
This model does not support direct playback of Text,Word,Excel and other
of�ice suites, we recommend that you connect to a laptop to play.
Tips:
20
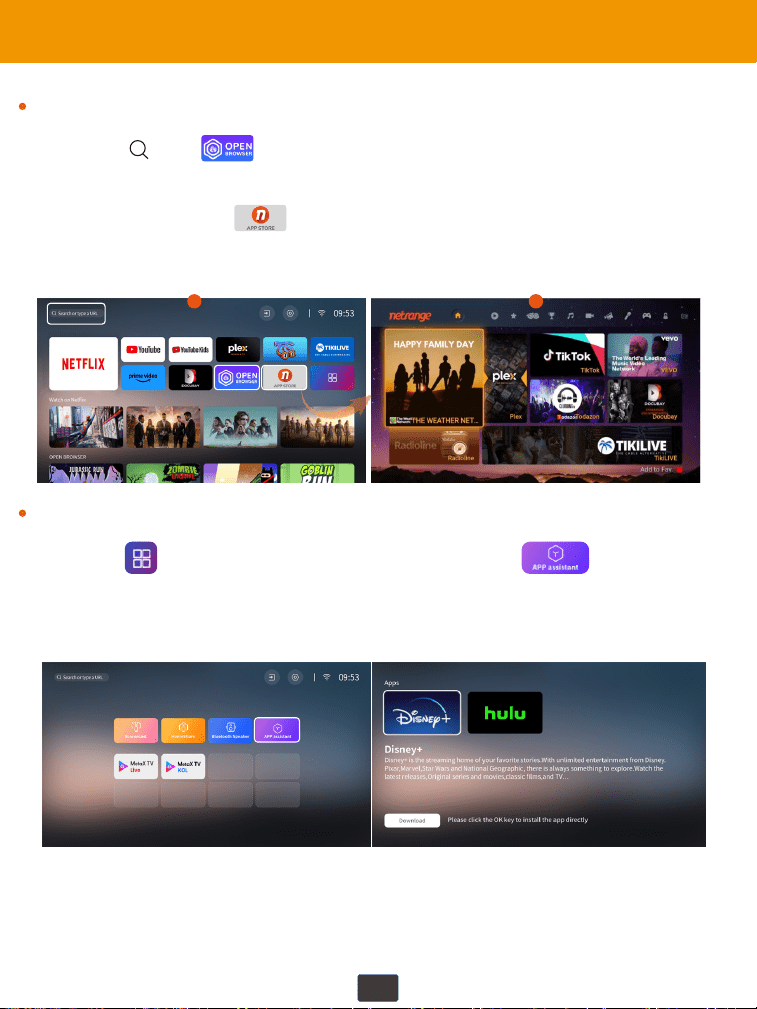
Additional Entertainment Options
①Select " " or " " icon on the homepage, then search for the
video, or news you want to watch.
②Select and access " " on the homepage, then search for the video or
news you want to watch.
①Acess" "on the homepage to enter,then select" "
②Download "Disney+" and"hulu"in Apps and add it to the App Center
homepage,then select and play it.
For Web Browsers
How to play Disney+, hulu etc streams
1 2

21
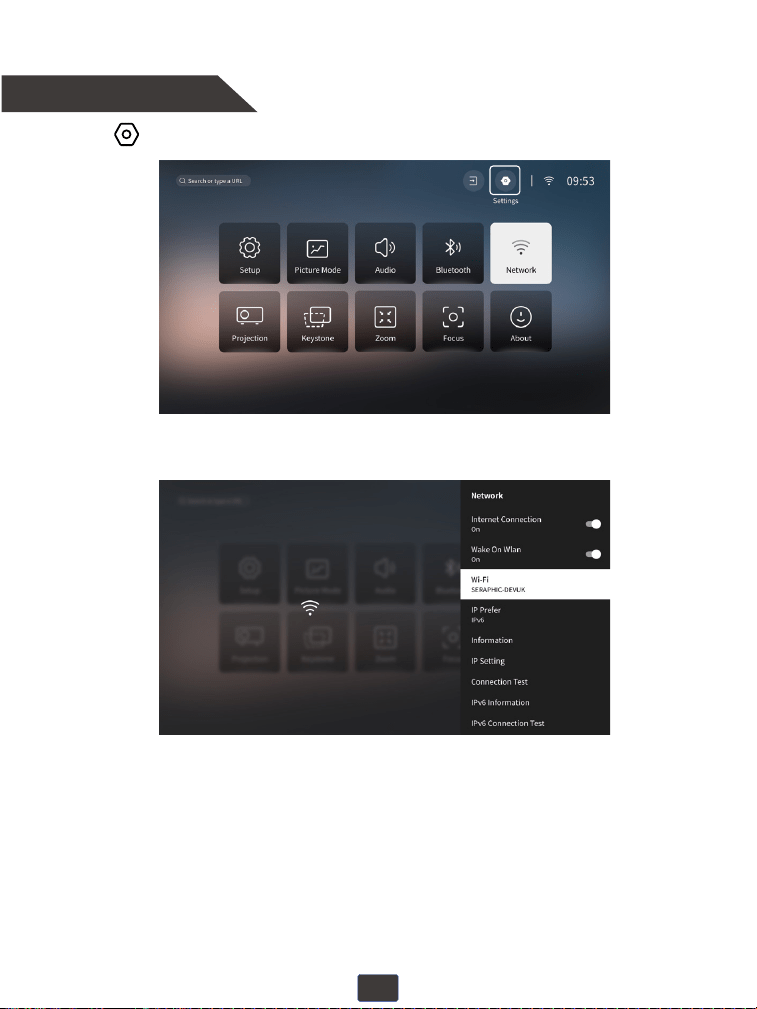
Settings
Select the [ ] icon of the homepage or press the " " shortcut key on the
remote control to enter the settings page.
Settings
22
1. Network Setting
①Select “ ” on the home page, and then access “Network”.
②Select "Wi-Fi" and then choose your wireless network from the "Available Networks".
③Press "OK" to enter the password page. Enter your home network password and press
"OK" to connect. The network is successfully connected.
23
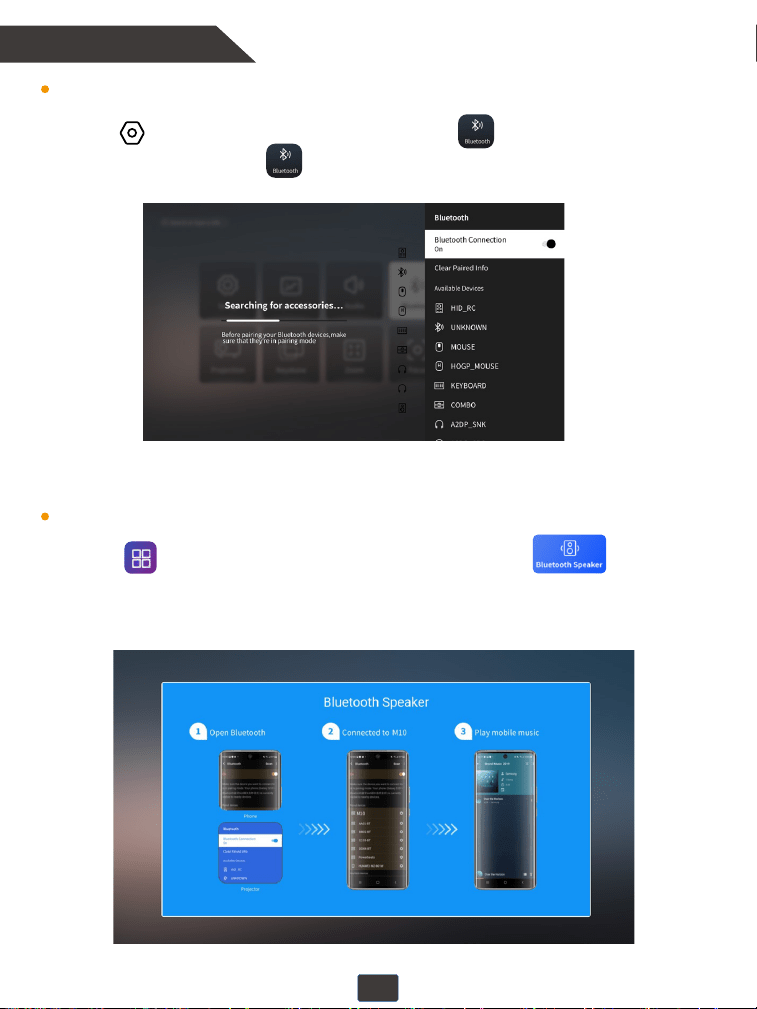
Use the projector as a bluetooth speaker for your phone/tablet.
When connecting to external bluetooth devices.
②Turn on your bluetooth of your phone/tablet and make sure Bluetooth is
in pairing mode. Scan and select your "M10_****" from the list and connect.
①Acess" " on the homepage to enter, then select " ".
2. Bluetooth Setting
②Turn on the projector's " " and also turn on your Bluetooth device, making
sure Bluetooth is in pairing mode.
③Please wait 3-8 seconds for the projector to search for available bluetooth devices,
then select your Bluetooth device.
①Select “ ” on the home page, and then access “ ”.
24
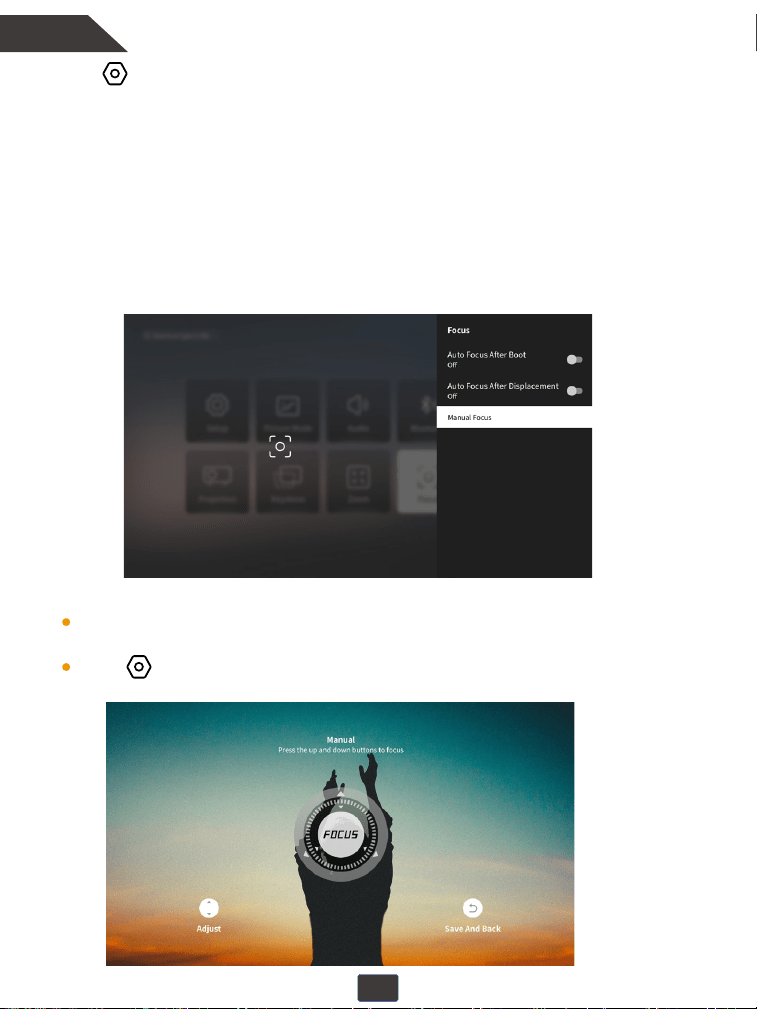
Manual Focus:
Click "F+" and "F-" shortcut keys on the remote control to quickly auto-focus to
get a clear projection image.
Enter " " - "Focus" - "Manual Focus" function, and adjust the "▲" or "▼"
button to obtain a sharper image.
4. Focus3. Focus
Auto Focus After Boot:The autofocus function is turned on by default. Once
powered on, the projector automatically focuses for the best clear image.
Tips: If you need to make focus adjustments, we recommend that you make
adjustments within the angle range of 0~30° and wait 3~5 seconds. When a
single angle adjustment exceeds 30°, the angle adjustment may be too large and
the projector cannot focus.
Autofocus after displacement:When the projector lens is detected by the CMOS
sensor to shake or move slightly, it will automatically focus immediately and adjust to
the best projected image.
Select “ ” on the home page,and then access "Focus".
25
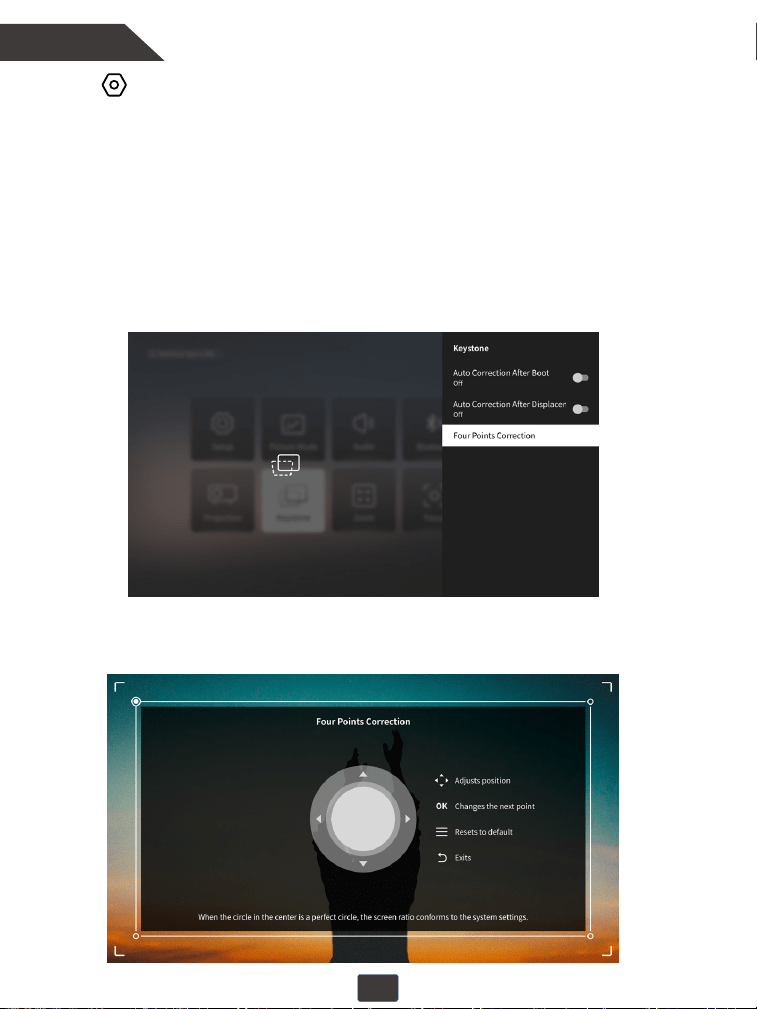
Four Points Correction Function: Adjust the "▲" , "▼", ""or""button to adjust the
picture shape to obtain better projection effects.
4. Keystone
Tips: If you need to make keystone correction, we recommend that you adjust the
angle within the range of 0~30° and wait for 3~5 seconds. When a single angle
adjustment exceeds 30°, it may cause the screen edge out of focus due to
excessive angle adjustment.
Auto Correction After Boot: This projector automatically turns on the automatic
trapezoidal function when it is turned on by default.
Auto Correction After Displacement:After turning on the Auto-Correct After
Displacement button, when the projector lens is detected by the CMOS sensor to shake
or move slightly, it will automatically correct and adjust to the best projected image.
Select “ ” on the home page,and then access "Keystone".
26
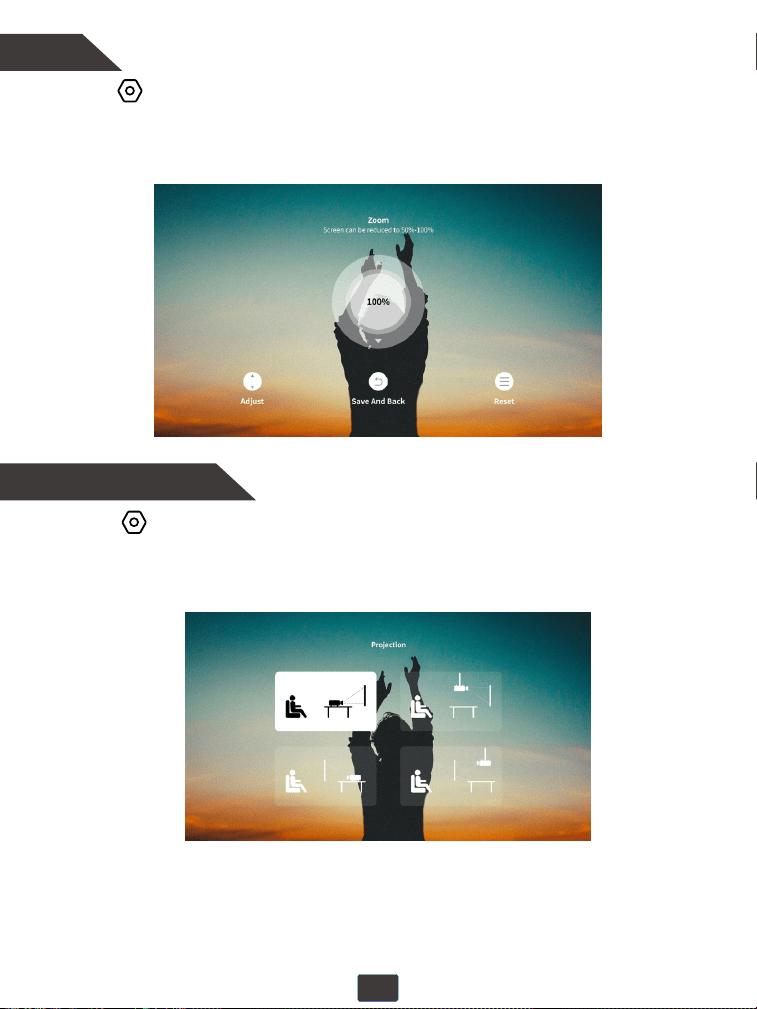
①Select “ ” on the home page, and then access “Zoom”
②Adjust screen size from 100% to 50% by pressing
the “▲”, “▼ ” . Press “ ▲” to reduce the screen size, and press “▼ ” to increase the
screen size.
5. Zoom
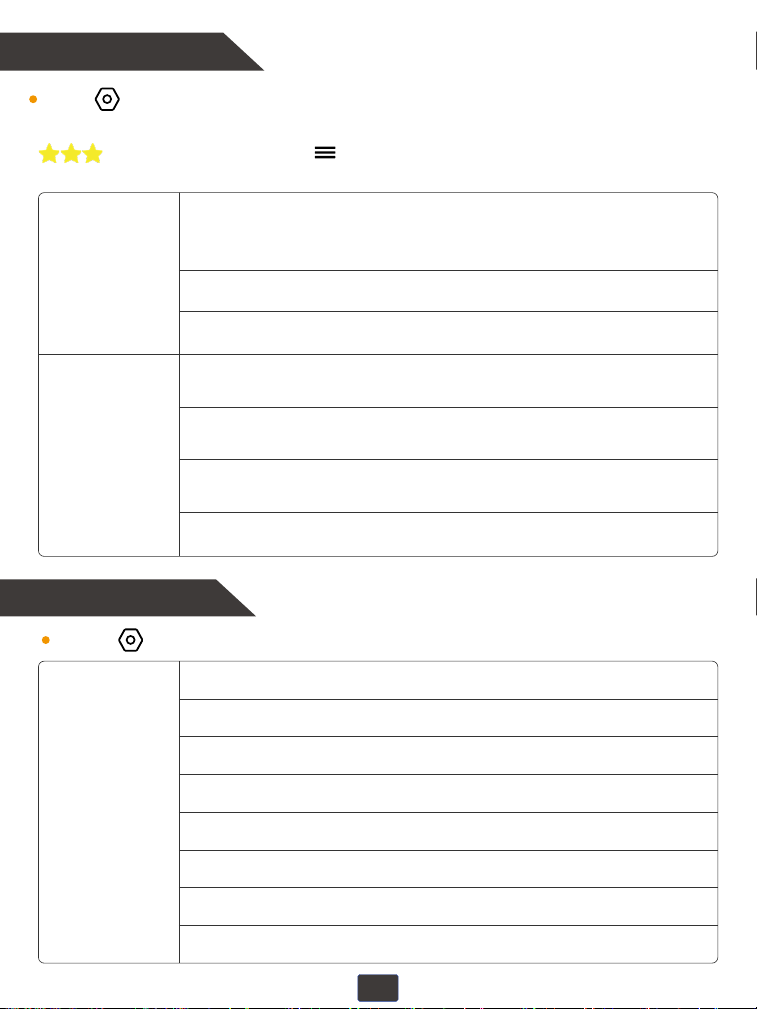
6. Projection Mode
②Select the appropriate projection mode according to your needs,including Front,
Rear, Ceiling, Rear Ceiling.
①Select “ ” on the home page, and then access “Projection Mode”.
27
Picture Mode: Custom, Cinema, Sport, Vivid, Hi-Bright, Standard
Custom: Brightness, Contrast, Contrast, Satura�on, HUE, Sharpness, Gamma,
Color Temperature
Gamma: Middle, Bright, Dark
Color Temperature: Standard, Warm, User, Cool
Audio: Bass, Treble, Sound Style, Digital Output Mode, Dialogue Enhancement
Sound Style: User, Standard, Vivid, Sport, Movie, Music, News
Digital Output Mode: Auto, PCM, Dolby Audio-Dolby Digital, Dolby Audio-Dolby
Digital Plus
Dialogue Enhancement: OFF, Low, Medium, High
OSD Language: English, Euskara, Dansk, Nederlands, etc.
Time Setup: Set The Time Automa�cally, Date, Time, Region, Use 24-Hours Format
Screensaver: Image, Default, Image-1, Image-2, Image-3, Image-4
Timer: OFF 1Minute, 2Minutes, 5Minutes, 10Minutes, 20Minutes
Sleep Timer: OFF, 10Minutes, 20Minutes, 30Minutes, 60Minutes, 90Minutes,
120Minutes
Auto Sleep: OFF, 30Minutes, 4Hours, 6Hours, 8Hours
USB Auto Upgrade
Internet Update Check
Reset Default
7. Picture Mode & Audio
8. Setup
Select " " on the homepage, then enter "Picture Mode" or "Audio", and adjust the corresponding
parameters according to your preference.
During playback, press the " " to enter "Picture Mode", and adjust the brightness with
"Brightness" or "Gamma".
Picture
Audio
Select " " on the homepage, then enter "Setup".
Setup
Product Model
Light Source
Physical Resolution
Power Input
Projector Consumption
Input
Output
Projection Ratio
Projection Size
Projection Distance
Keystone Correction
Focus mode
Dimension
Audio Frequency
M10
LED
1920*1080
AC 100V-240V 50/60 Hz
80W
HDMI×1,USB×2,AV×1
3.5 mm audio port(speakers/headphones)
1,4 : 1
40-300 inches
4.6-23.3 ft
Auto Correction, Four-Points Correction,
Auto Correction After Displacement
Auto Focus, Manual Focus,
Autofocus after displacement
7.72*4.33*6.15 in
5W
Signal Ports Video Input (1.OVp-p +/-5%)
HDMI Input (480i 480p 576i 720p 1080i 1080p 2k 4k)
Product Features
28
Trouble Shooting
29
2. Is it compatible with Google phones and how to connect?
1. Why does focusing fail when the adjustment angle is too large when focusing?
3. Can I download other apps besides Net�lix, Youtube, and Prime Video?
4. How to upside down the picture?
5. How do I update the �irmware?
Wireless connection is not possible due to Google protocol.
However, it is recommended that you use a Google adapter to connect the
projector to your phone via HDMI cable
When a single angle adjustment exceeds 30°, it may not be possible to focus
due to excessive angle adjustment. Therefore, we recommend adjusting
within the angle range of 0~30° and wait 3~5 seconds.
Press the "Projection" button on the remote control
Or select the "Settings", then select "Projection" and choose the projection
you need.
When a new version is detected you will be asked to reboot and update.
6. Why is there only sound but no image when connecting an extra device?
Because the copyright of some videos is only allowed to be played on mobile
phones/laptops/computers, and projectors are not allowed.
7. How can I do if the remote is unresponsive?
Make sure the batteries are installed correctly and the power is enough.
Please make sure the IR receiver is not covered.
You can open " " OPEN Browser or " " APP STORE on the homepage to
search and add the application you want.
30
9. How should I do if there is expanding dark spot or smoke when using the projector?
Check if the fan noise increases or the fan stops working. Unplug the
projector and contact VOPLLS team for assistance.
Make sure the outlet and projector power adapter are not wet or humid
which will cause sparks or smoke on outlet when power on the projector.
10. Why does the projector is shut off during playing?
Make sure the power plug is working and �irmly �itted into the outlet.
If the LED indicator on the projector is light up, but the fan doesn't work,
please contact VOPLLS team for assistance.
Overheat on the projector will activate built-in power-off protection panel.
Restart the projector when it gets cooler.
Please check if you set up the shutdown time.
11. Why doesn't the projector’s lamp light up or power on?
Please contact VOPLLS for assistance when this occurs.
8. How should I do if there are small dots on display?
Tap the projector slightly to shake off the dust which may be caused during
installing or shipping.
Clean the lens with clean non-woven fabrics.
North America Marketplace:
Europe Marketplace:
