
User Manual
Projector
K3
EN


01
CONTENTS
YABER Lifetime Professional Support ............................................................................................................02
1. PackageList .................................................................................................................................................................03
2.Projector Specifications .....................................................................................................................................04
3.Projector Overview ................................................................................................................................................05
4.Remote Control Overview ................................................................................................................................06
5. lnstallation ................................................................................................................................................................. 07
5.1. Install the TV Dongle .........................................................................................................................................07
5.2. Distance and Projection Size .....................................................................................................................08
5.3. Angle Adjustment .............................................................................................................................................08
5.4. Install on the Ceiling .......................................................................................................................................08
5.5. Connect Devices ...............................................................................................................................................09
6.Operation .....................................................................................................................................................................09
6.1. Starting up the Projector ...............................................................................................................................09
6.1.1. Prepare the remote control .......................................................................................................................10
6.1.2. Power on ................................................................................................................................................................ 10
6.1.3. First time setup ....................................................................................................................................................11
6.2. Image Adjustment ..............................................................................................................................................11
6.2.1. Focus ..........................................................................................................................................................................11
6.2.2. Keystone Correction ..................................................................................................................................... 12
6.2.2. Keystone Correction ..................................................................................................................................... 12
6.3. Picture Mode.......................................................................................................................................................... 13
6.3.1. Brightness ............................................................................................................................................................. 13
6.3.2. Image Adjustment ........................................................................................................................................ 13
6.4. Media ..........................................................................................................................................................................14
6.4.1. Google TV..............................................................................................................................................................14
6.4.2. Play Video / Music / Photo in the File Manager .........................................................................15
6.5. Screen Share .........................................................................................................................................................15
6.6. Bluetooth Settings ............................................................................................................................................. 16
6.6.1. Bluetooth Connection: ................................................................................................................................. 16
6.7. Quiet Mode .............................................................................................................................................................16
6.8. Alexa Setup .............................................................................................................................................................17
6.8.1Alexa Command List ....................................................................................................................................... 19
6.9. System Update ................................................................................................................................................... 20
6.9.1. Local Upgrade ..................................................................................................................................................20
6.9.2. Online Upgrade ..............................................................................................................................................20
6.10.Power on Mode ...................................................................................................................................................20
6.11. Safe Shutdown ....................................................................................................................................................20
7.Maintenance Tips .................................................................................................................................................... 21
7.1. Care of Projector .................................................................................................................................................. 21

02
YABER Lifetime Professional Support
Dear Valued Customer,
Thank you for choosing Yaber K3 projector.
This manual will help you navigate through all the features.
We understand that there may be many questions and concerns that arise during
the use of the projector. We are also eager to hear your feedback. However, leaving
a review on the product page does not get the fastest solution. Many common
problems, such as inability to auto focus or keystone, sound issues, WiFi or Bluetooth
connection issues, can usually be resolved with appropriate settings adjustments.
If you encounter any issues, feel free to send your order number and the problems to
us at
[email protected] (e.g.US+K3+000-0000000-0000000+Issues)
Rest assured,
our service team will offer a solution to you within 24 hours.
Your satisfaction is our top priority. If you encounter any issues, we sincerely hope you
can give us an opportunity to make things right.
We wish you have an outstanding experience with the K3 projector.
Yaber Customer Service Team
03
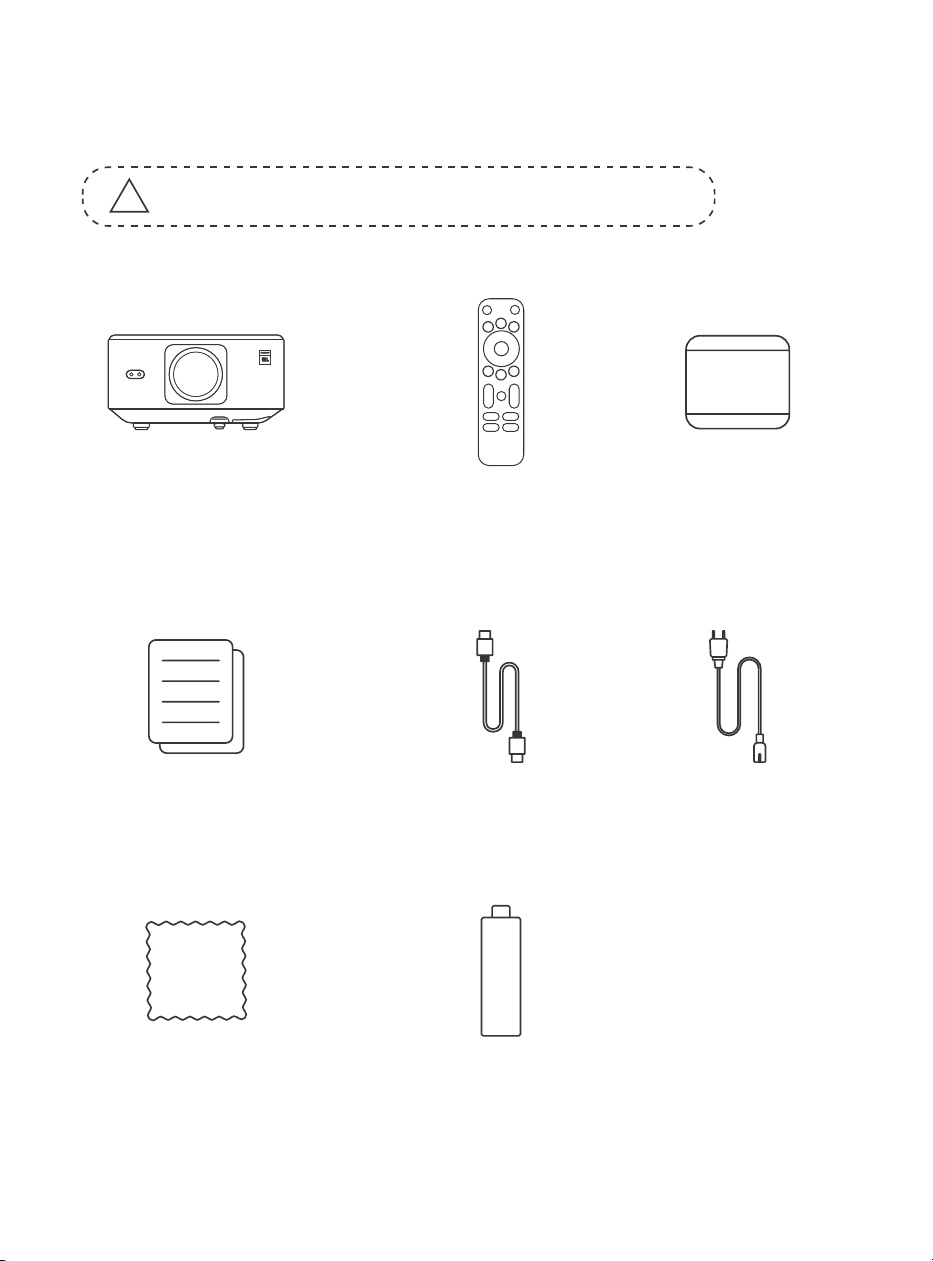
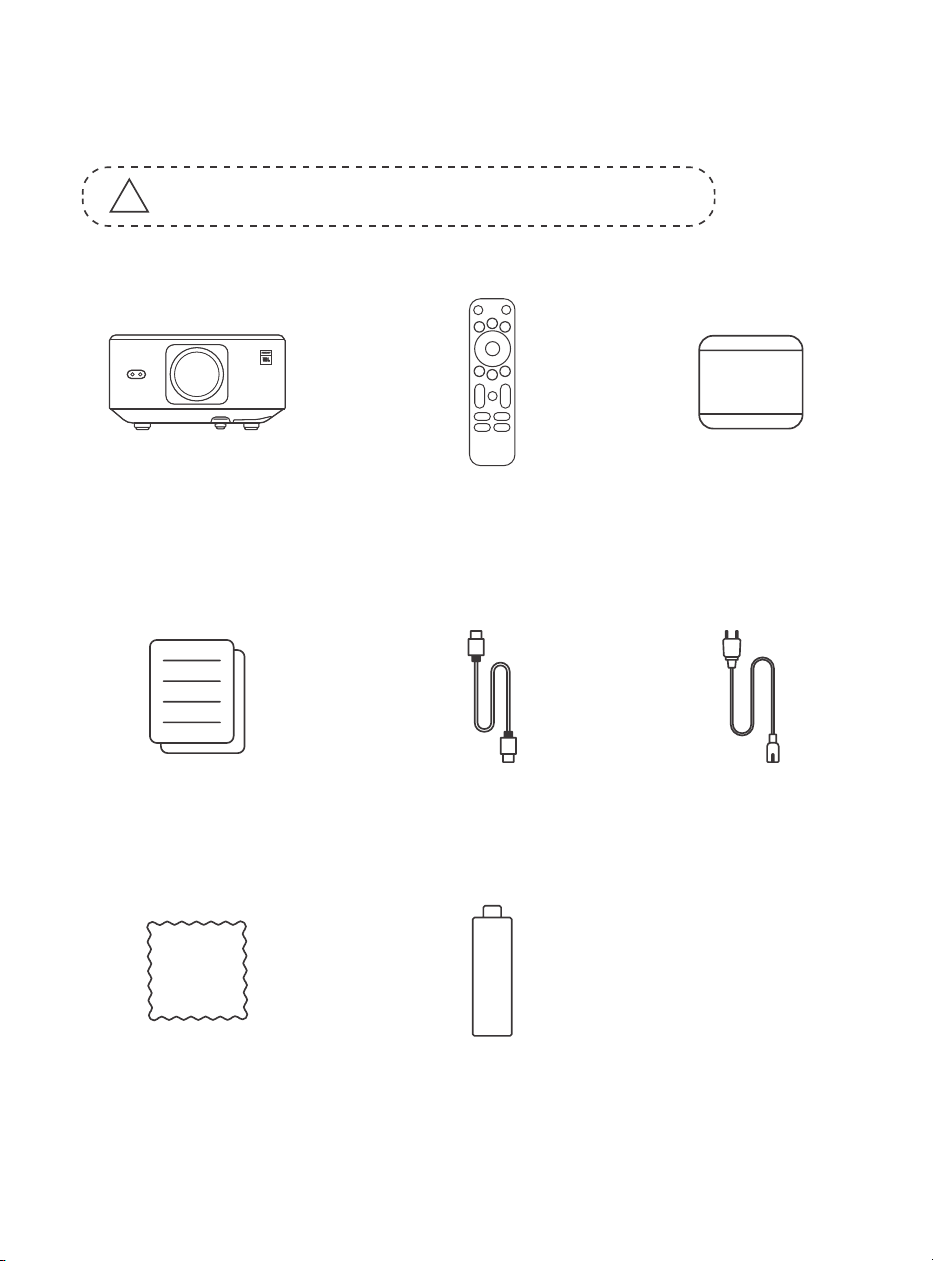
1. PackageList
!
Attention: The Dongle is already built into the projector.
K3 Projector
Remote Control
Lens Cap
QSG & FAQ
HDMI Cable
Power Cord
Cleaning Cloth
TV Dongle
04
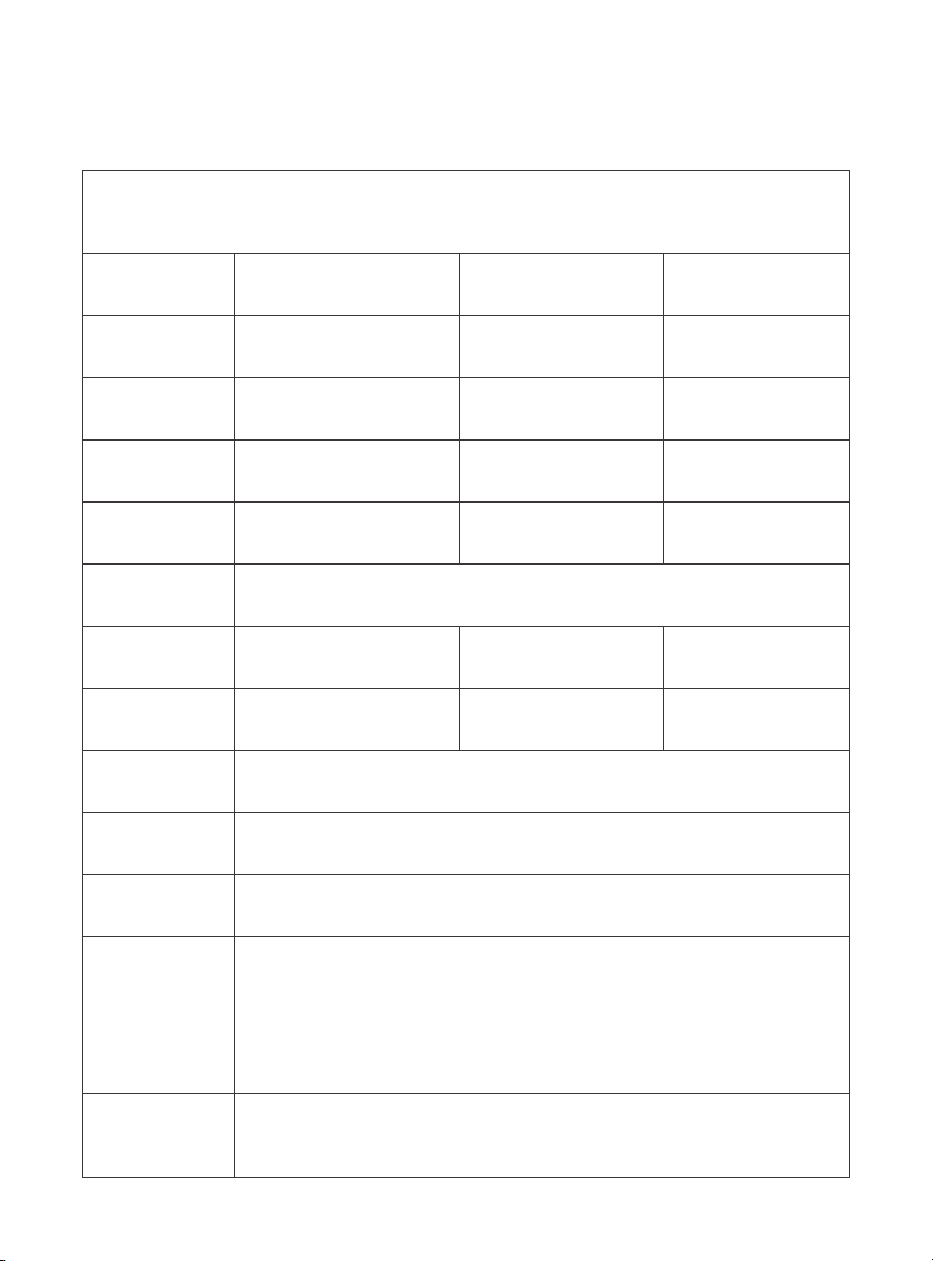
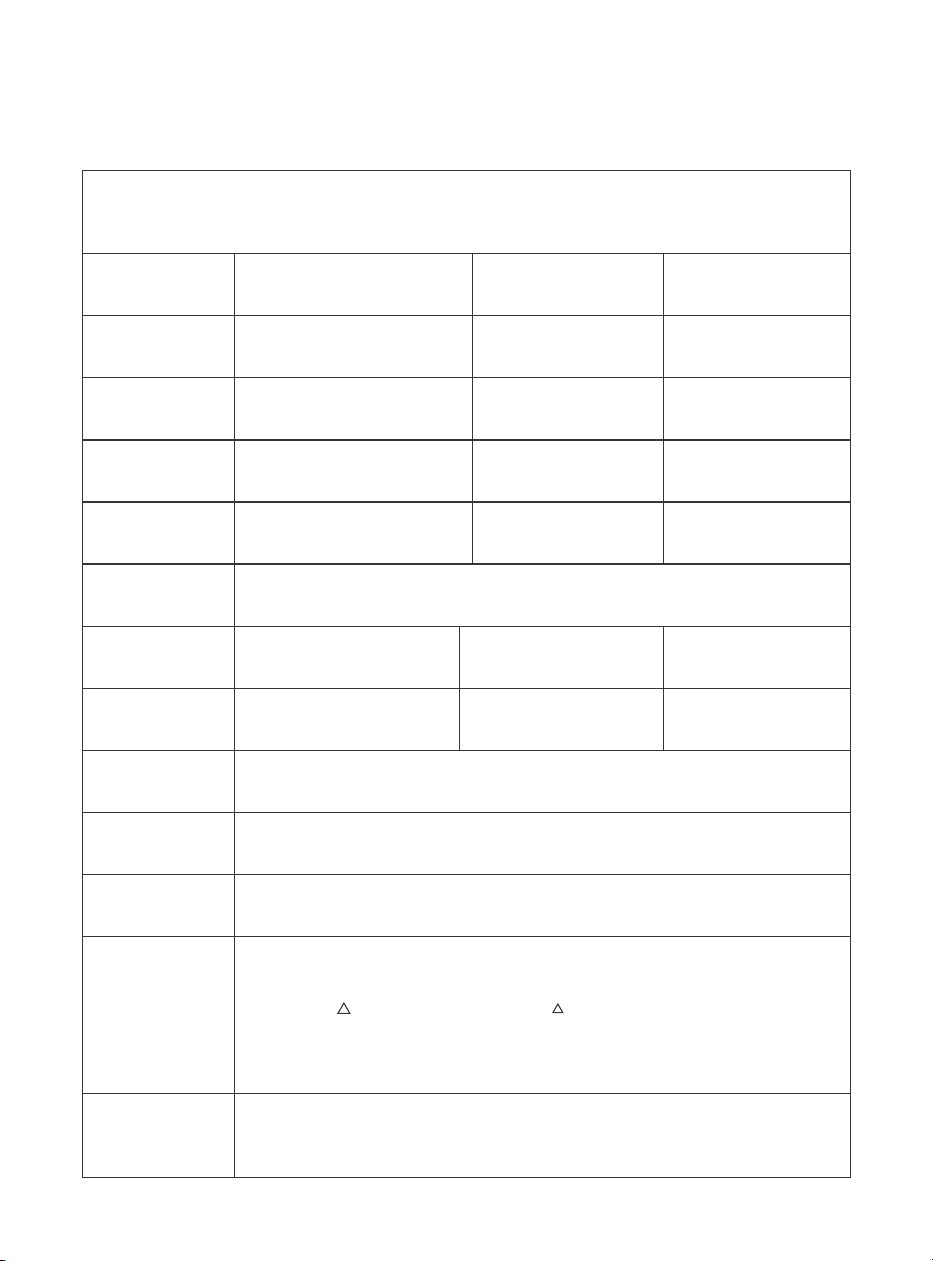
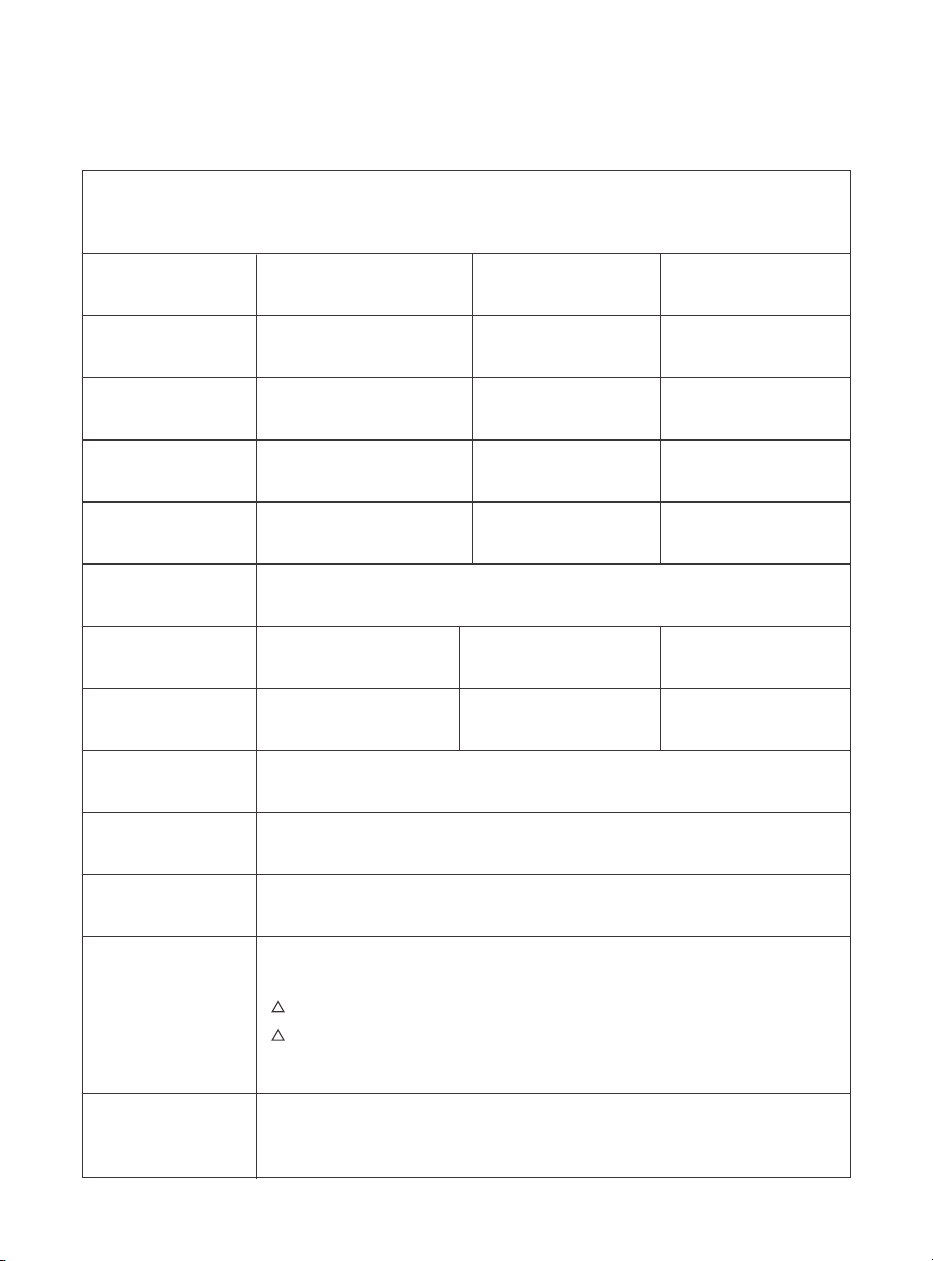
2.Projector Specifications
Model No. K3
Native
Resolution
Aspect Ratio
1920*1080
16:9/4:3
Auto/Eletric
Auto
LED
1.2.1
Auto/Eletric
Auto
Light Source
Projection Ratio
Keystone Correction
Obstacle Avoidance
Unit Dimension
Focus
Interface
Picture Format
Audio Format
Video Format
USB Format
WPS
Documents
Power Voltage
Projector
Weight
Screen
Alignment
Projection
Distance
Min1.1m~ Max3.3 m
Min43.3~Max129.9 inches
100-240V~/50-60Hz Power Consumption 110W
Front/Rear on Desk
Front/Rear on Celling
Projection Method
2.5 kg
5.5 lbs
USB 2.0×1, HDMI 1.4×1, Audio Out×1, Lan×1
JPG, PNG, BMP, JPEG
MP3, AAC, LPCM, APE, FLAC, OGG, AMR
MP4, MKV, WMV, 3GP, MPG, VOB, TP, TS, DAT, MOV, FLV
FAT 32, NTFS
txt, pdf, docx, xlsx, pptx
Unsupported format: Exfat
Attention: If the projector cannot recognize the contents of the USB flash
drive, please check whether your USB flash drive is formatted correctly.
165×140×290 mm
6.4×5.5×11.4 inches
05
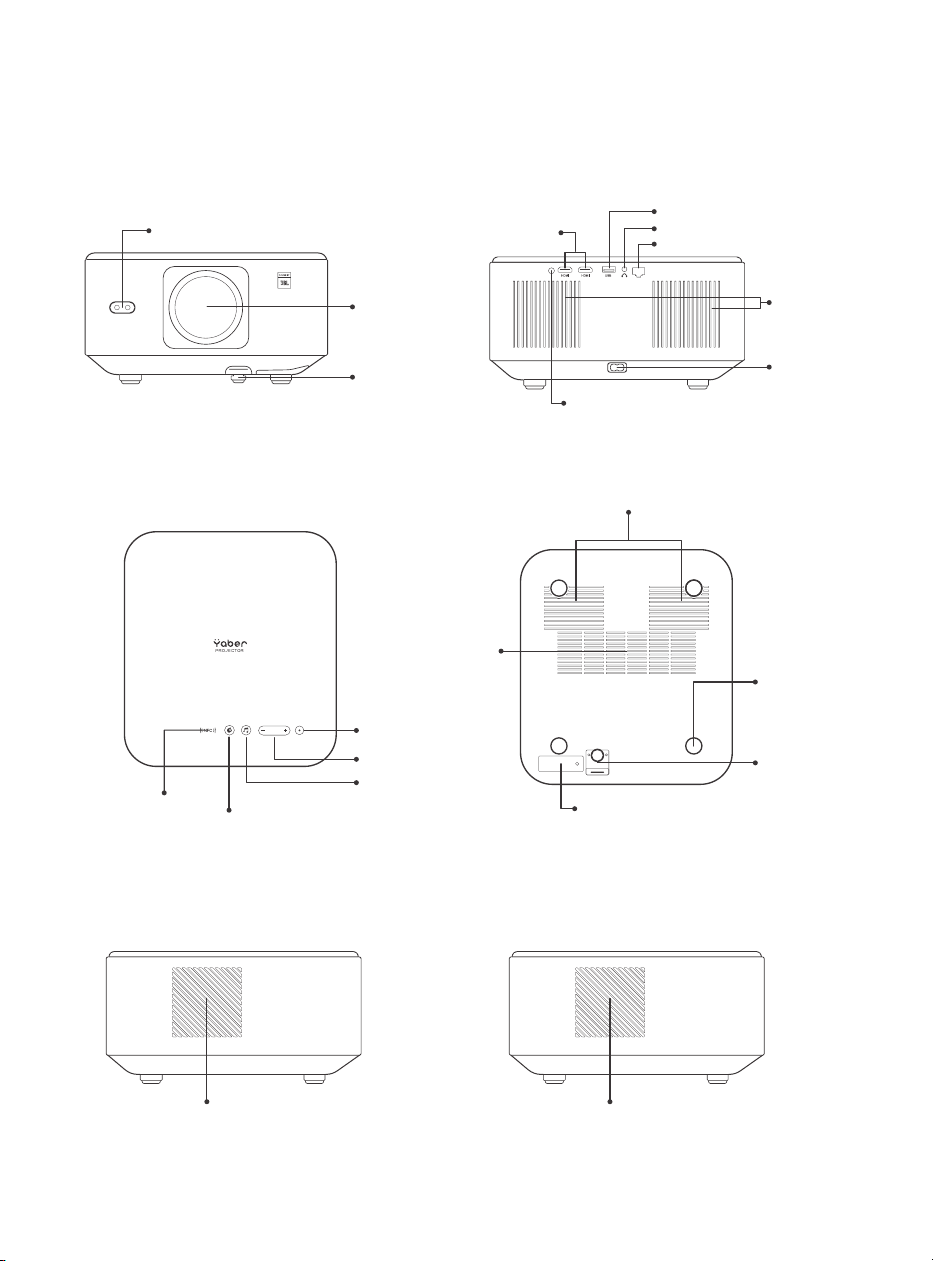
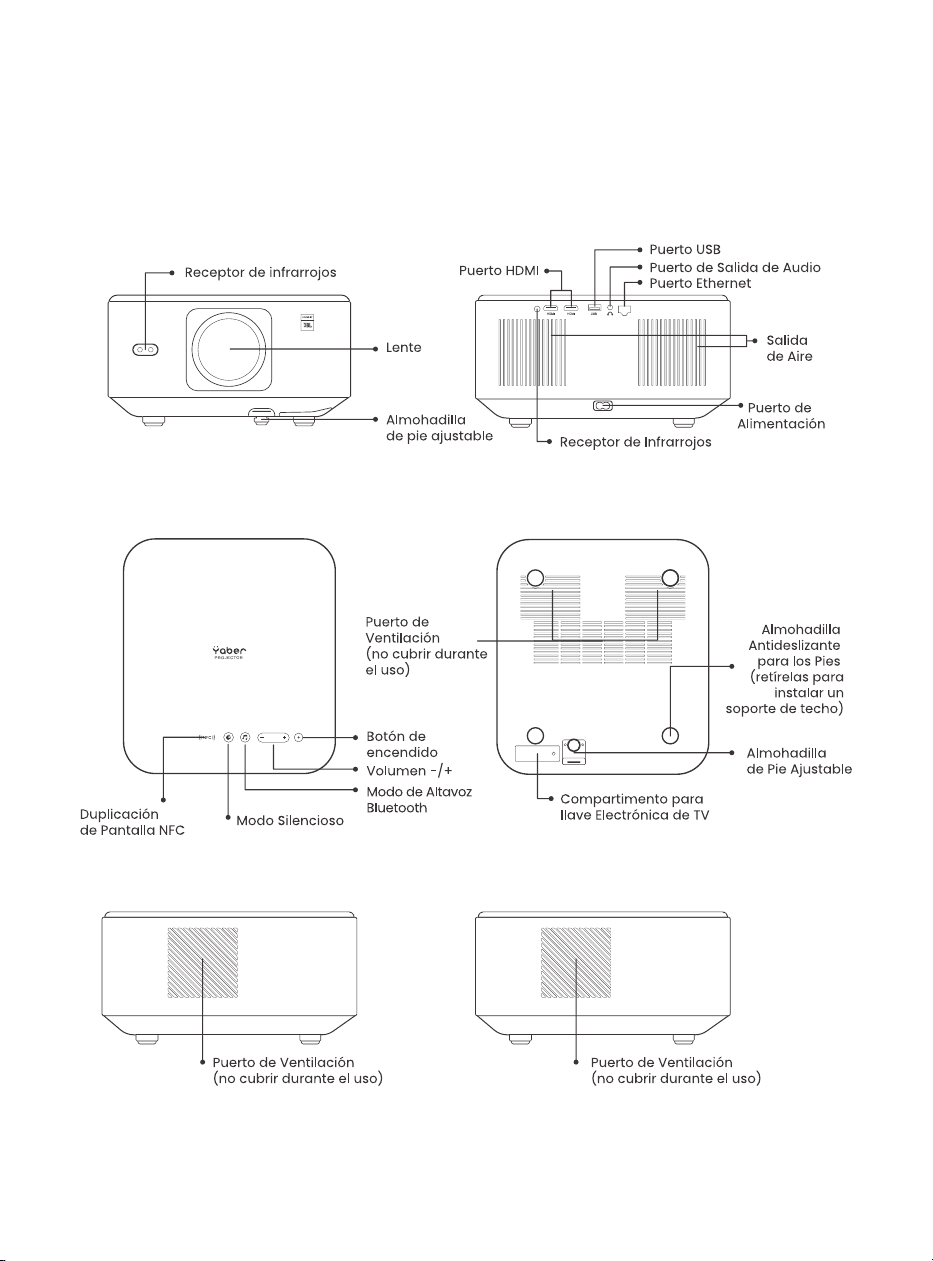
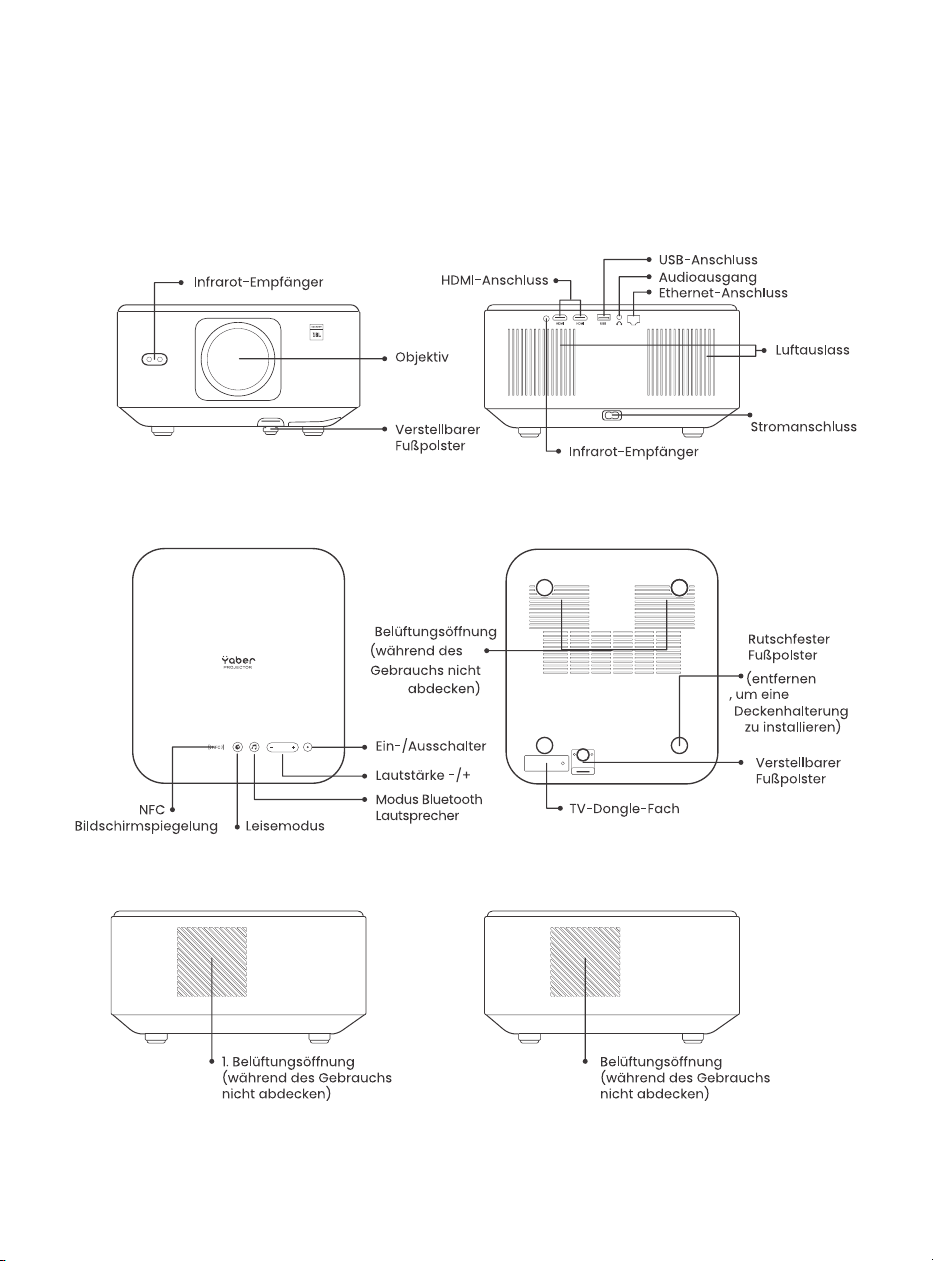
3.Projector Overview
Infrared Receiver
Lens
Adjustable
Foot Pad
HDMI Port
USB Port
Audio Output Port
Ethernet Port
Infrared Receiver
Air Outlet
Power Port
Power Button
Quiet Mode
NFC Screen
Mirroring
Volume -/+
Bluetooth Speaker
Mode
Ventilation port (do not cover
during use)
Ventilation port
(do not cover
during use)
Adjustable
Foot Pad
Anti-slip Foot
Pad (Remove
them to install
a ceiling
bracket)
TV Dongle Compartment
Ventilation port (do not cover
during use)
Ventilation port (do not cover
during use)
06
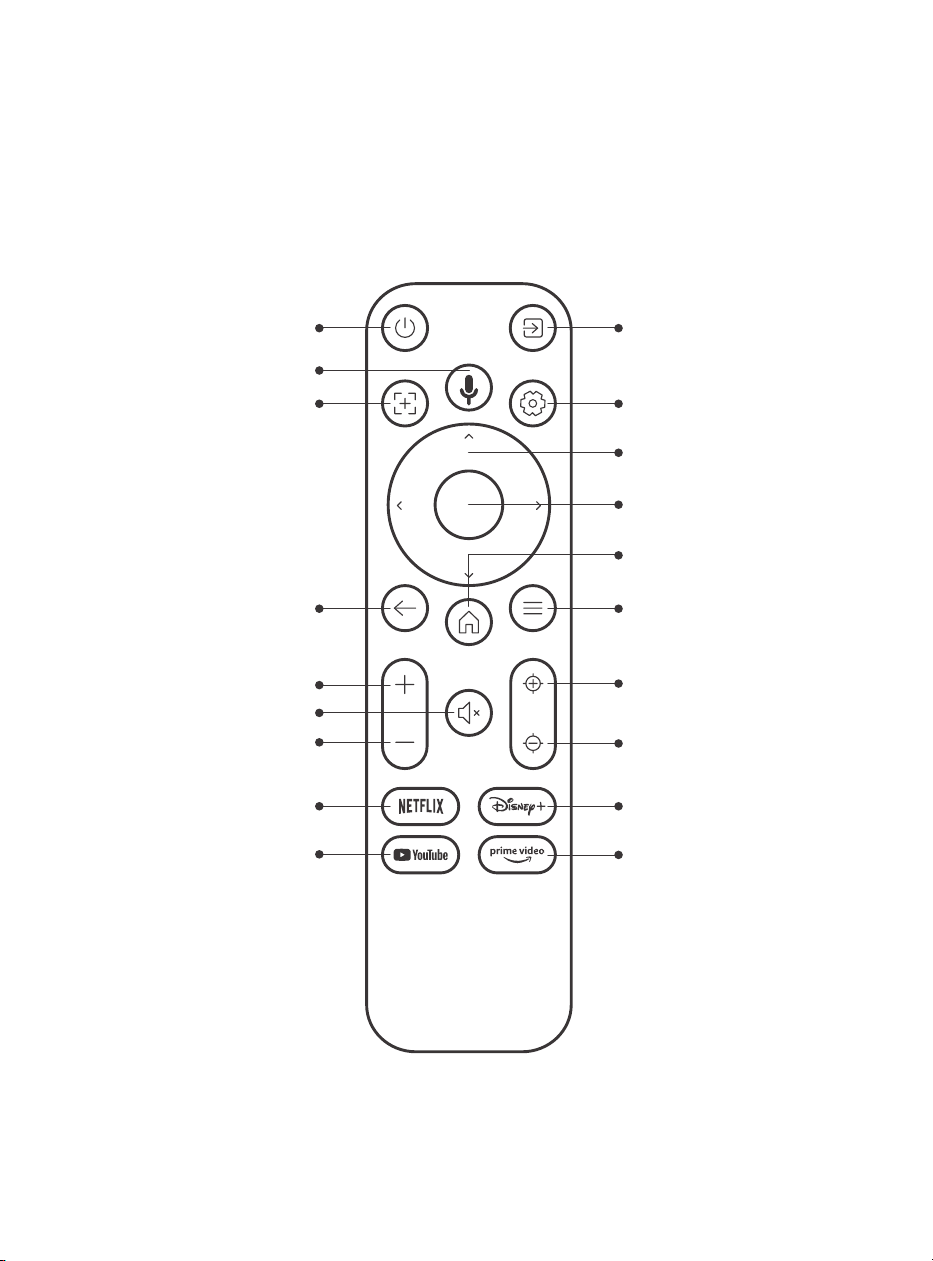
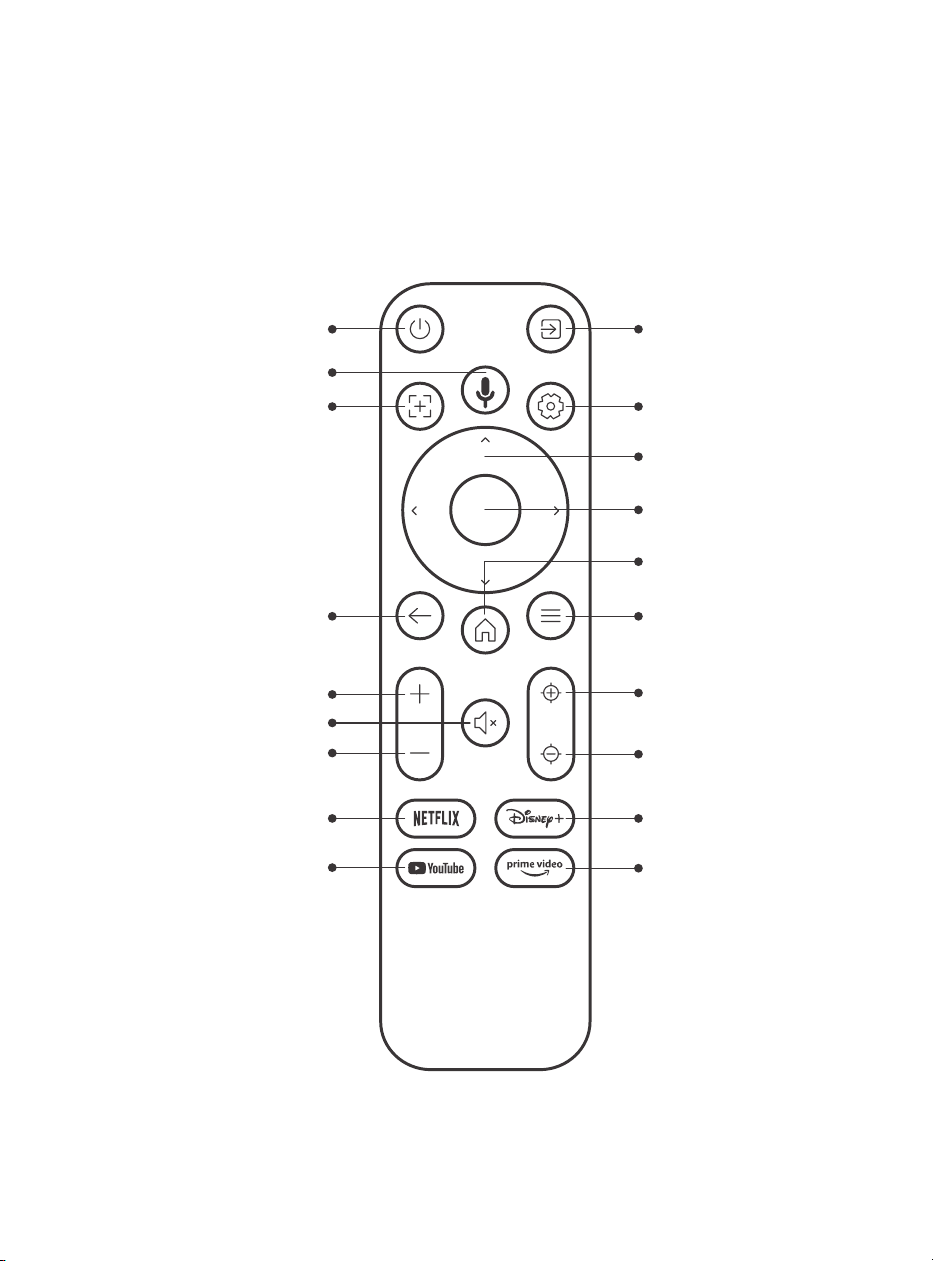
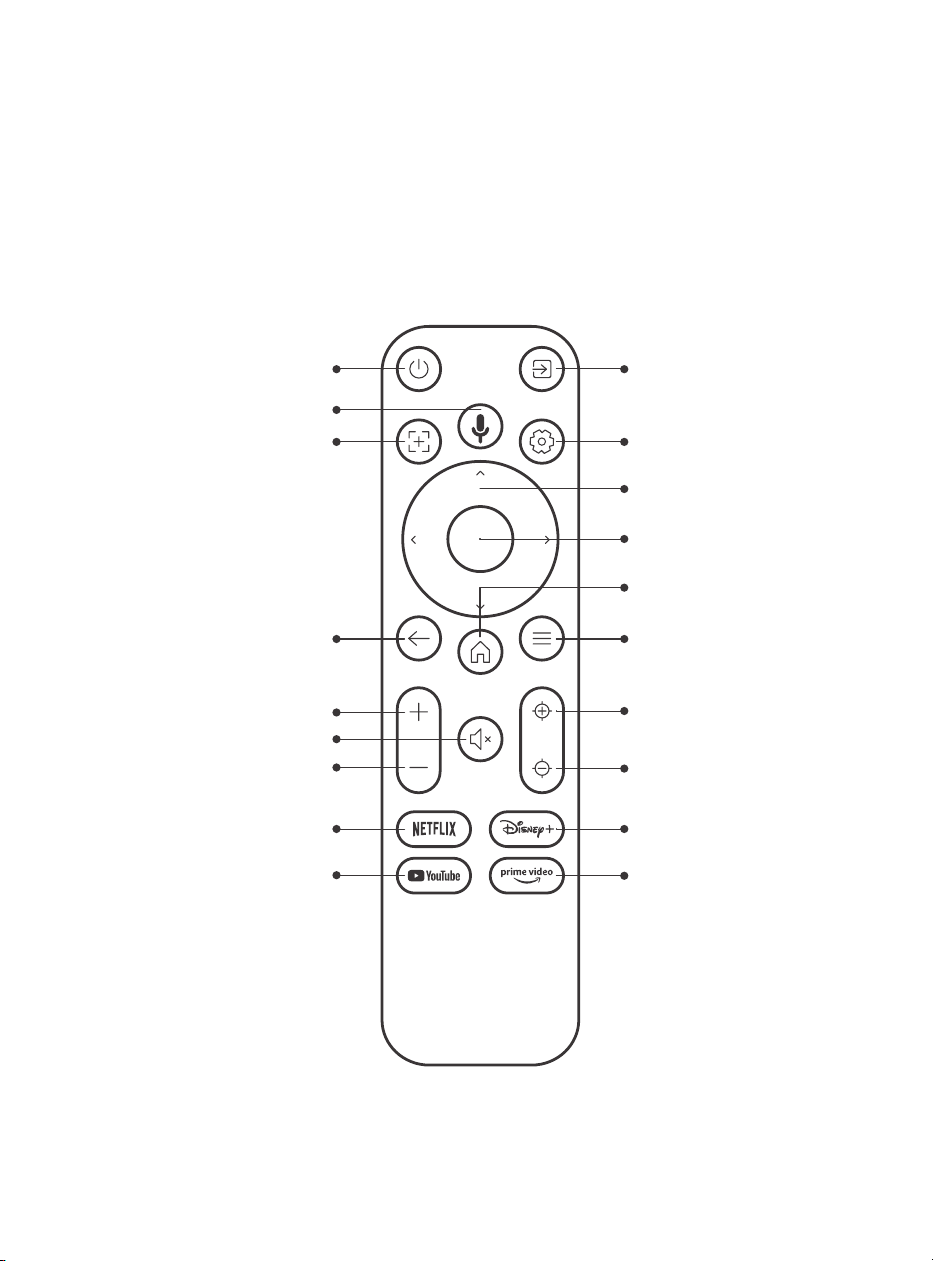
4.Remote Control Overview
Video SourcePower
Voice Search
Auto Focus
Back
Volume UP
Volume Down
Netflix
YouTube
Mute
Settings
Arrow Key
Confirm
Home
Menu
Focus +
Focus -
Disney+
Prime Video
07
5. lnstallation
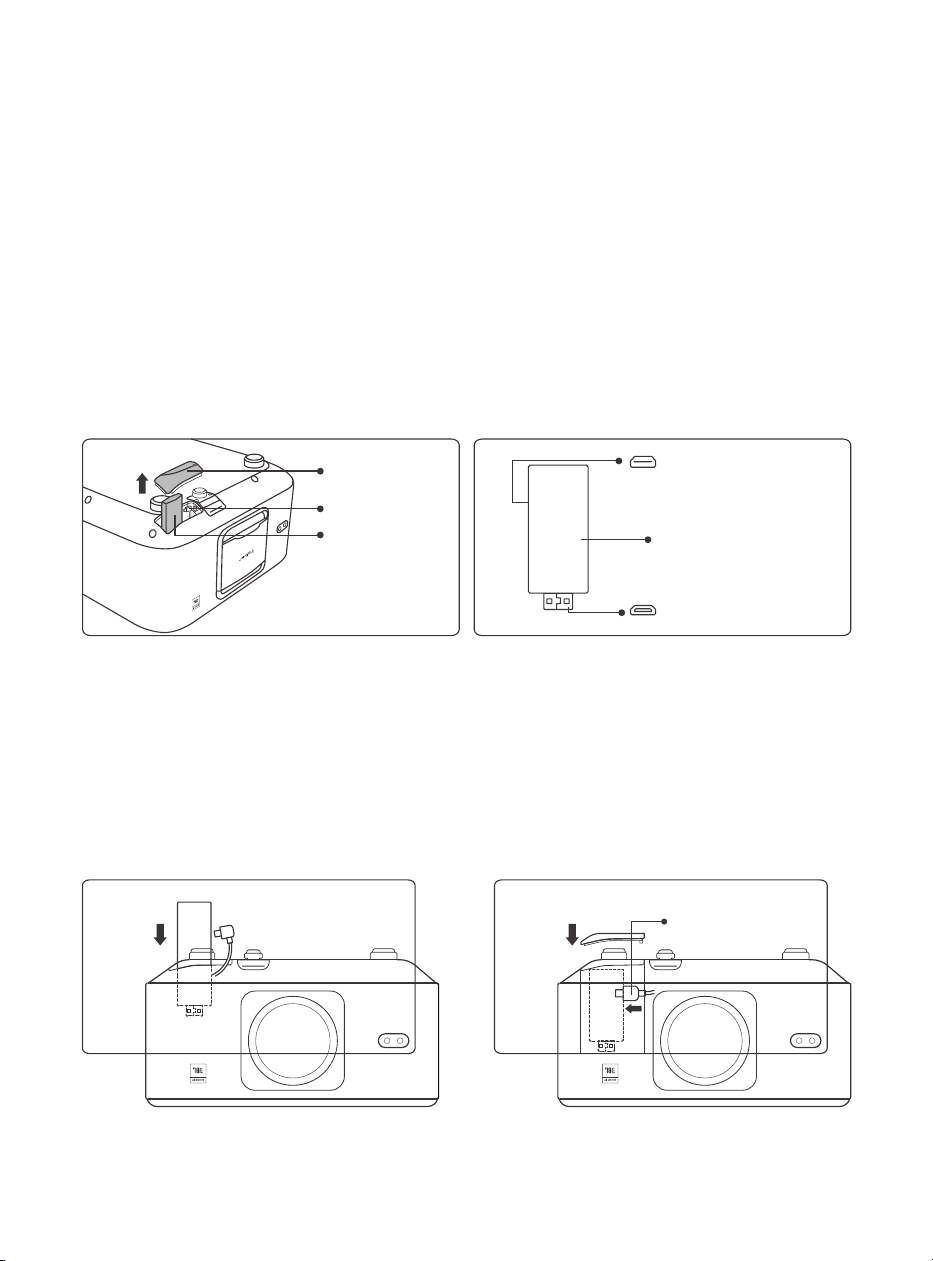
5.1. Install the TV Dongle
How to remove or install the Dongl
1. Use a screwdriver to remove the
screws from the cover of the Dongle
compartment. (Screw size:ST2.3×6mm)
3.Insert the TV Dongle into the HDMI
port inside the compartment. (Make
sure the Dongle is inserted firmly for
identification.)
2.Make sure that the TV Dongle's ports
have not been broken (as shown in the
following figure).
4. Connect the Micro USB cable to TV
Dongle and close the lid.
Lid
Tray
TV Dongle
Slot
Micro USB port
(Mark on the Back)
Micro HDMI port
(Mark on the Back)
Mounted TV Dongle
USB Power Cable
08
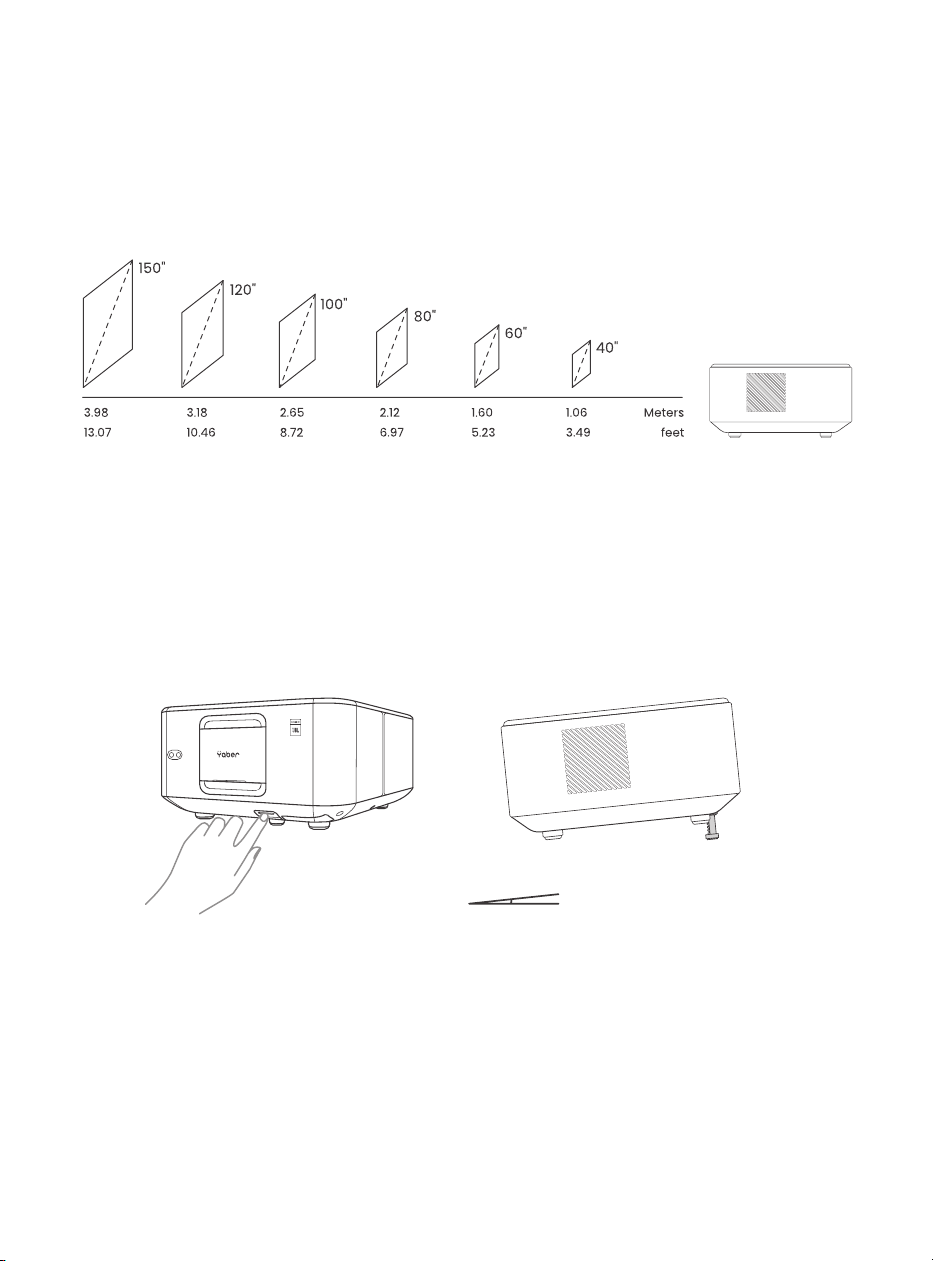
5.2. Distance and Projection Size
5.3. Angle Adjustment
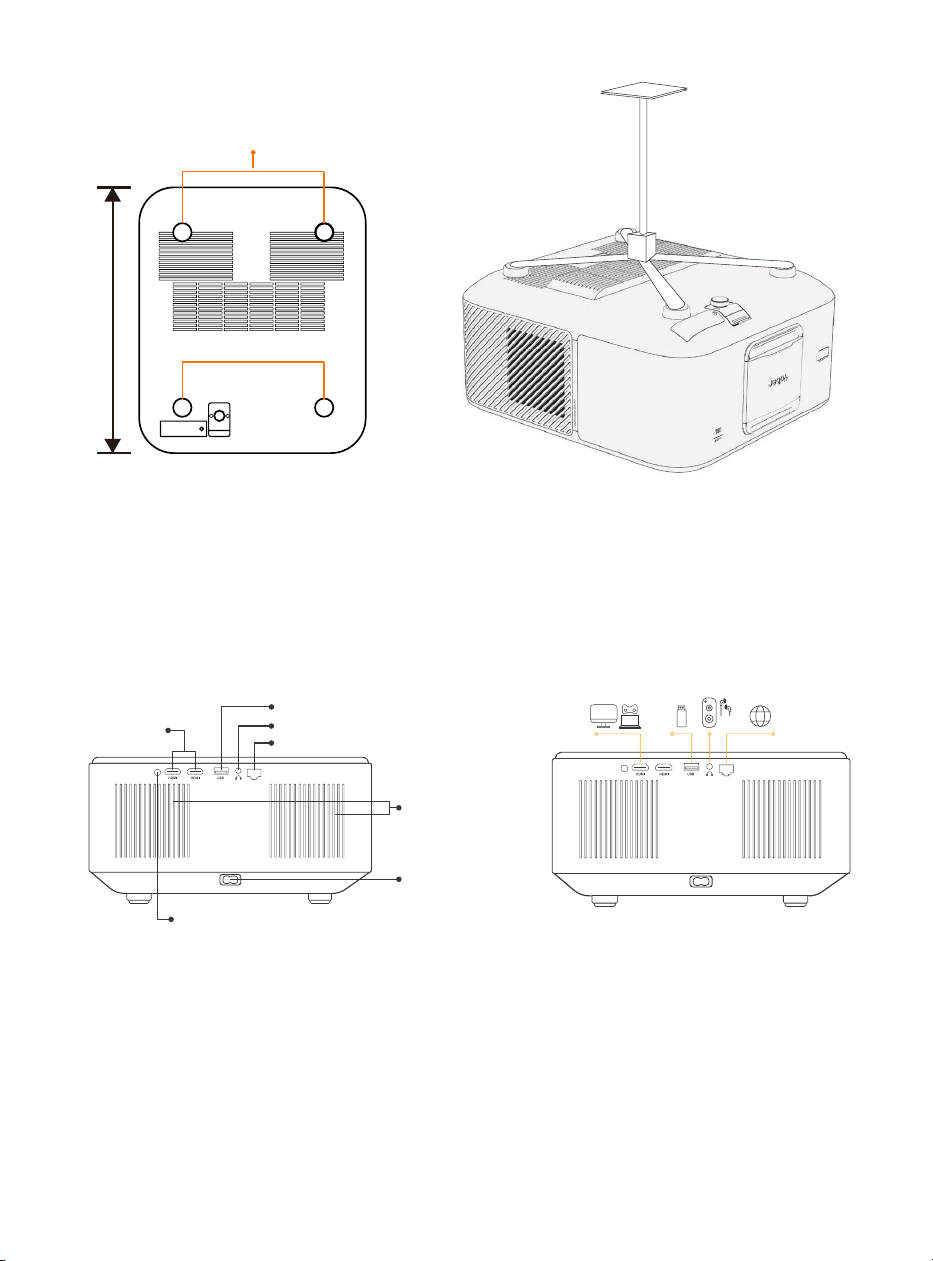
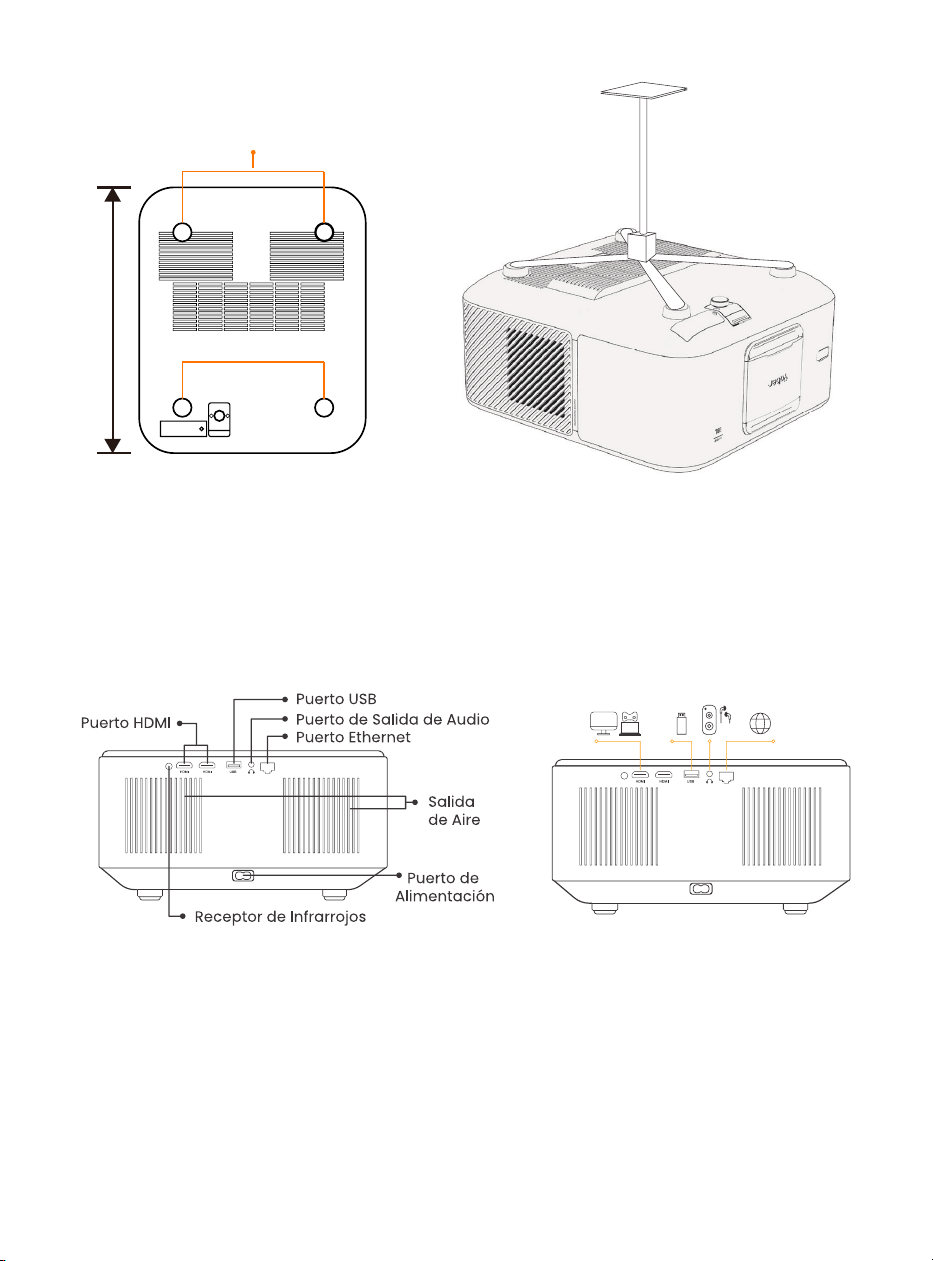
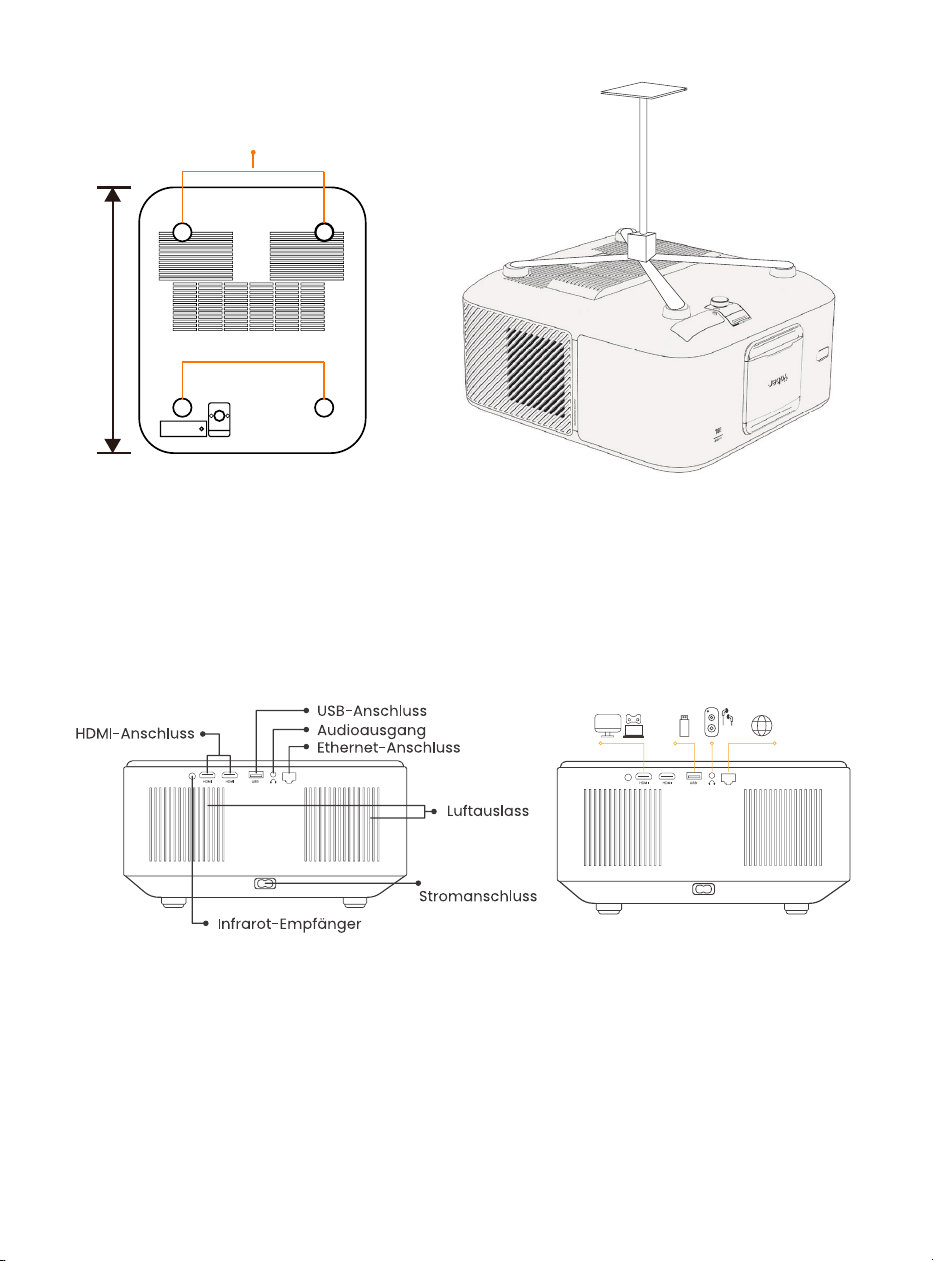
5.4. Install on the Ceiling
The projection ratio of the K3 is 1.2:1. Please place the projector according to
the corresponding distances in the table below with your desired screen size.
If needed, press this & button to release the adjustable foot pad. Further
adjustments can be made by rotating
the nut.
Step 1: Make sure you have a universal mounting bracket that can fit the
projector.
Step 2: Remove the four rubber pads on the bottom of the projector and
use M5*10mm screws to fix the projector on the bracket to complete the
installation.
9898989898989898989898989898
Massimo grado: 10˚
09
5.5. Connect Devices
6.Operation
6.1. Starting up the Projector
The projector has 5 ports, HDMI port *2 /USB port *1 /Audio out port*1/ Lan port
(RJ45)*1. Please select the correct connecting ports to connect your devices.
Screw holes: M5*10mm
200 mm
HDMI Port
USB Port
Audio Output Port
Ethernet Port
Infrared Receiver
Air Outlet
Power Port
10
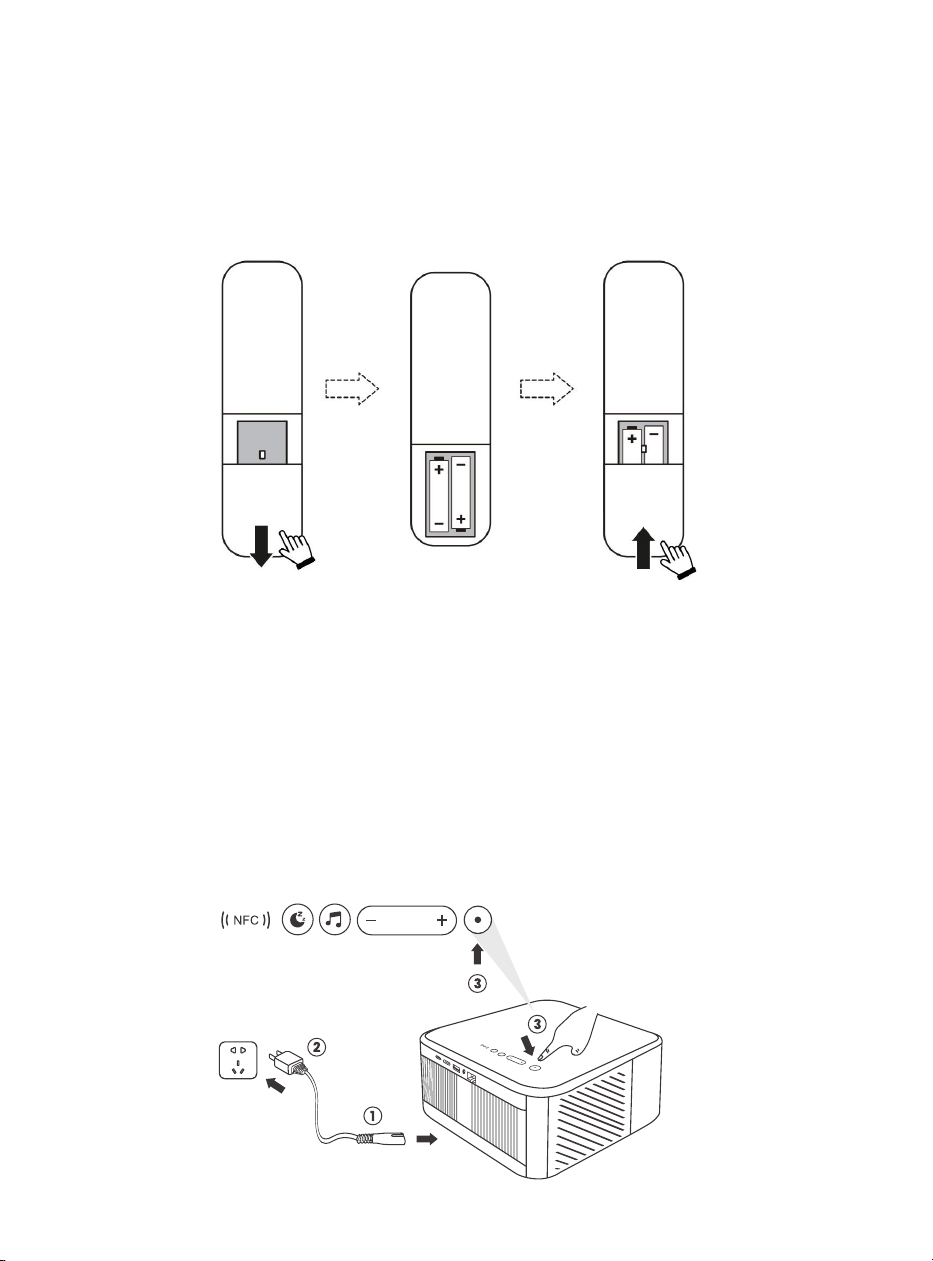
6.1.1. Prepare the remote control
6.1.2. Power on
Open the battery compartment.
Insert 2 AAA batteries with correct polarity indicated.
Close the battery compartment.
Note: You must use the Yaber remote control to complete the first time
setup of the projector.
Press the power key on the remote controller or projector. The power LED on the
projector turns from orange to off.
To turn off the projector, press once and then press it again when the power menu
pops up.The power LED on the projector lights up.
11
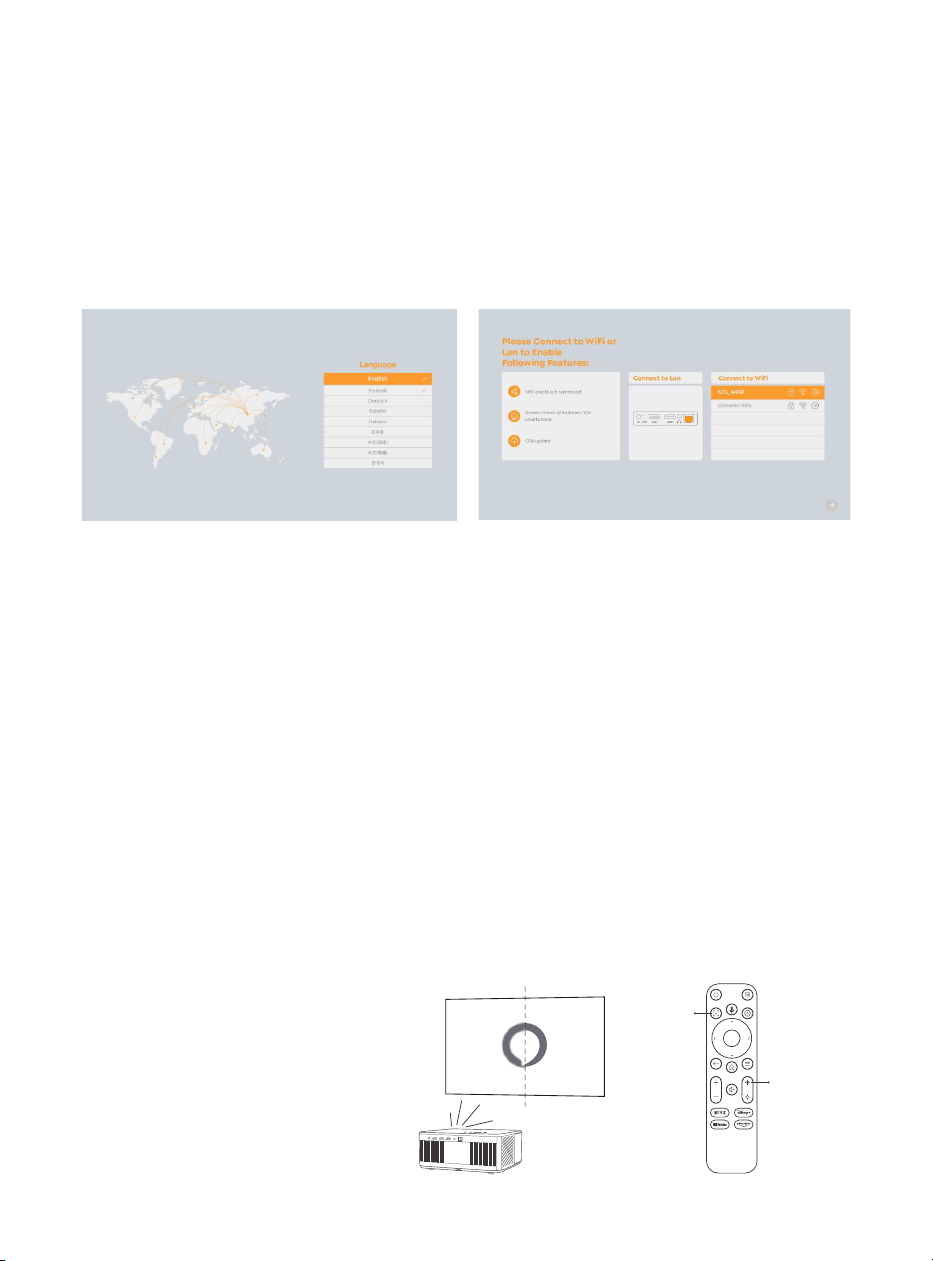
6.1.3. First time setup
6.2. Image Adjustment
6.2.1. Focus
Auto Focus
Manual Focus
When you turn on the projector for the first time or the projector is reset to the Factory
Default Settings, you are prompted to make the first time setup.
You can select your system language, Wi-Fi, and learn about the new features and tips
of the projector. After setup, the projector will go to the Home Page.
When using the projector for the first time, it normally displays an unclear image. This
is due to the lens being out of focus or the incorrect keystone setting.
Please use the auto focus and manual focus key on remote control to get the best
image. The auto focus can also be triggered by moving the projector to another
location.
Auto-focus is enabled by default and will refocus each time the machine is moved.
If further focus adjustments are
necessary, use the focus button on
the remote control to achieve the
desired image.
Auto Focus
Focus +/-
12
6.2.2. Keystone Correction
6.2.2. Keystone Correction
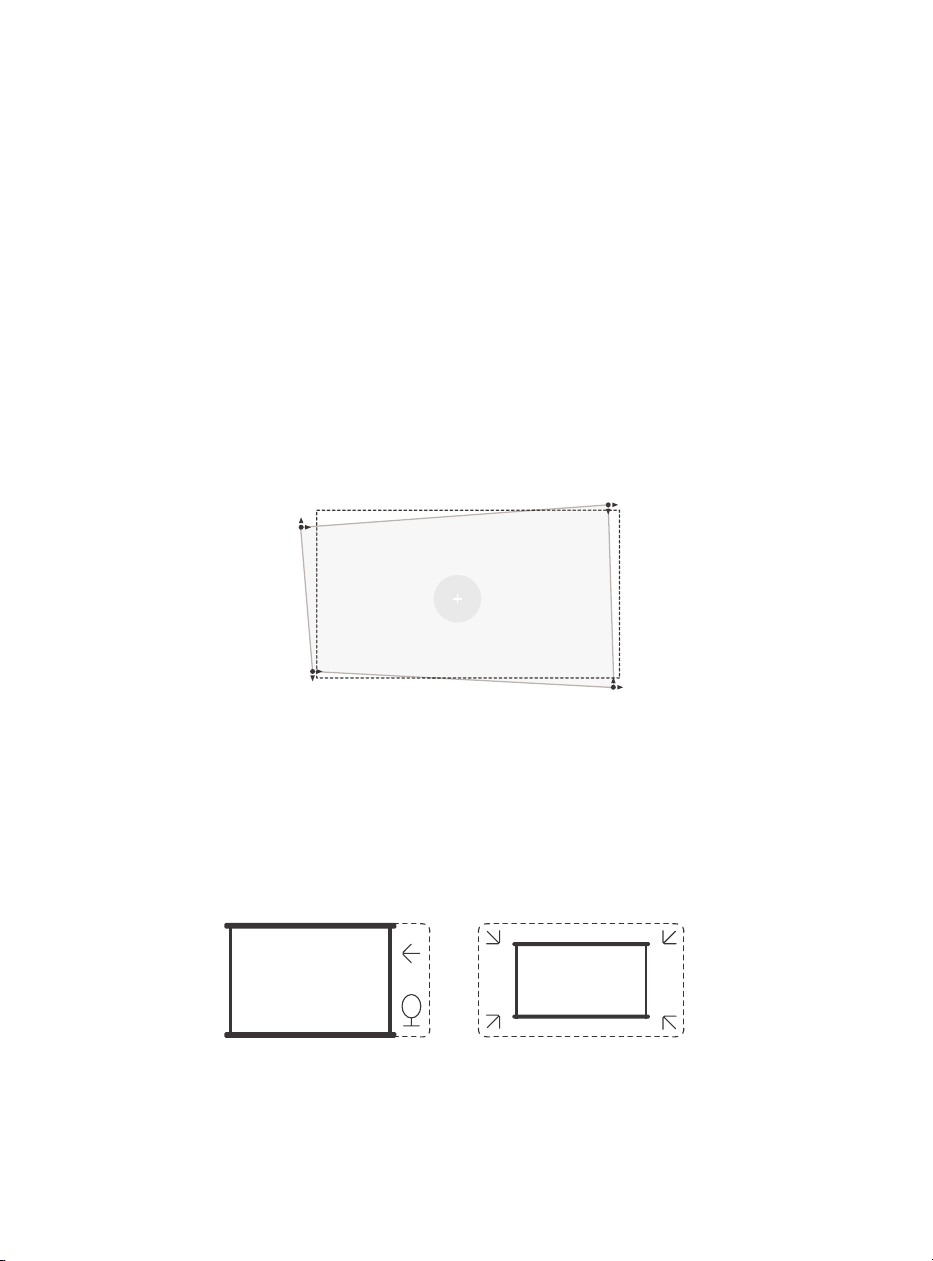
Attention: The range of auto keystone correction is ±18 degrees horizontally and
vertically.
Auto keystone is enabled by default. If you need to disable this feature, navigate
through [Home] - [Settings] - [Projection Mode] - [Auto Keystone].
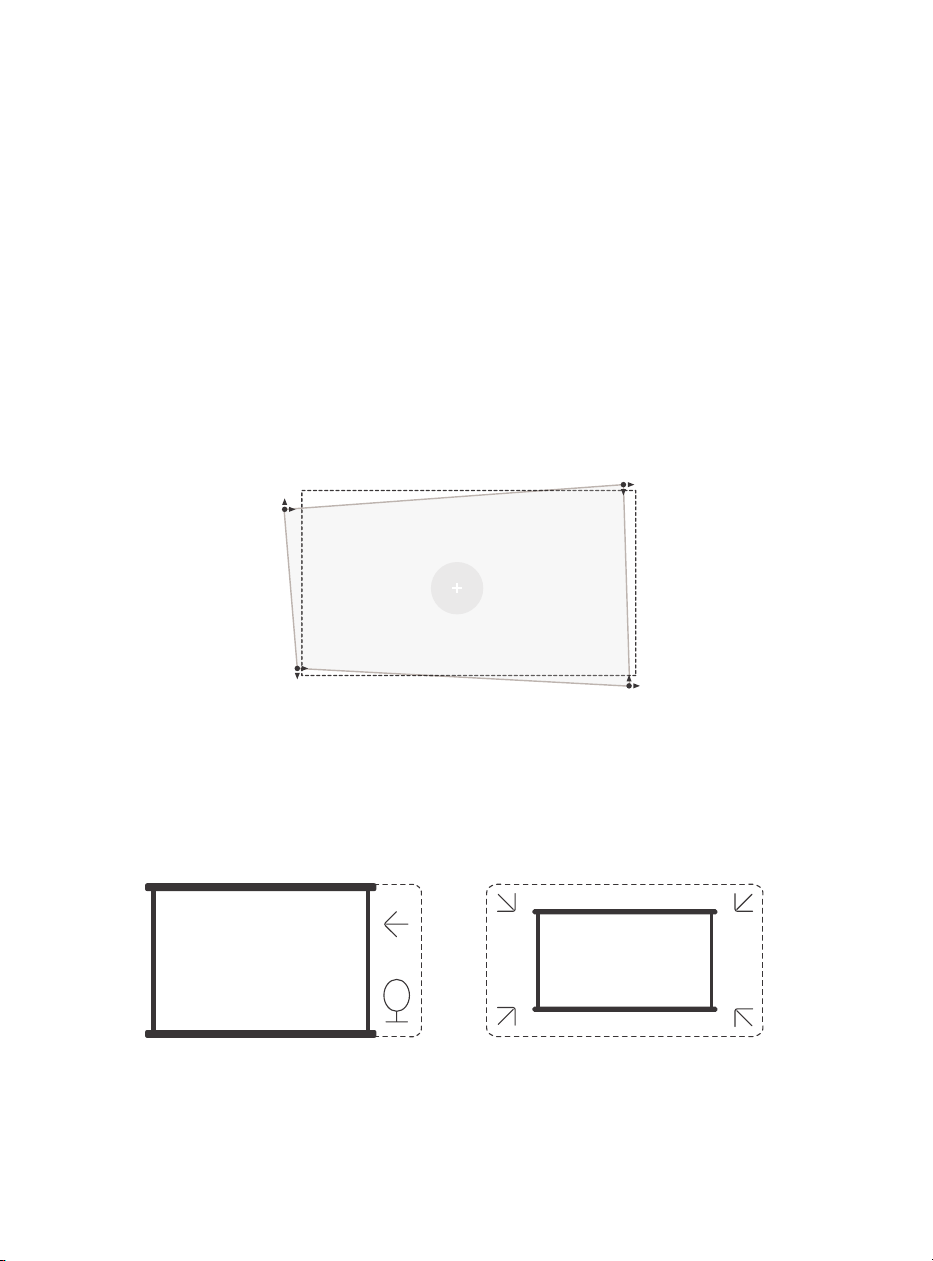
If further screen adjustments are needed, please select [Manual Keystone in [Projection
Mode and adjust the screen by dragging the arrows.
Attention: If you have already set the screen through the manual keystone, please
turn off the automatic keystone, otherwise the screen will be reset after the next
movement of the projector.
1. If there are white or other light-colored objects on the target screen, obstacles may
not be avoided.
2. The backdrop should have a distinct black or other colored border, except for anti-
light screens which do not require a border.
3. Before using the auto screen fitting function:
Please ensure the projection screen is larger than the screen area and do not block
the central area of the screen.
Please do not block the area within the central square frame of the screen.
Manual keystone

13
6.3. Picture Mode
6.3.1. Brightness
6.3.2. Image Adjustment
Attention: Hold the menu button on the remote to access settings while playing
videos or images. Besides, color adjustments only take effect during these activities.
Adjust the screen brightness through [Home] - [Settings] - [Image Quality]
-[Brightness Setting].
Adjust the image color through [Home] - [Settings] - [Image Quality] - [Picture Mode].
Attention: Only works with picture or video players
14
6.4. Media
6.4.1. Google TV
Click on TV to enter the system on the home page.
Attention: When using TV for the first time, follow the on-screen prompts for remote
control pairing and other settings.
Attention: If there is no signal, please try unplugging and unplugging the TV Dongle
again. For detailed steps, please refer to section 5.1
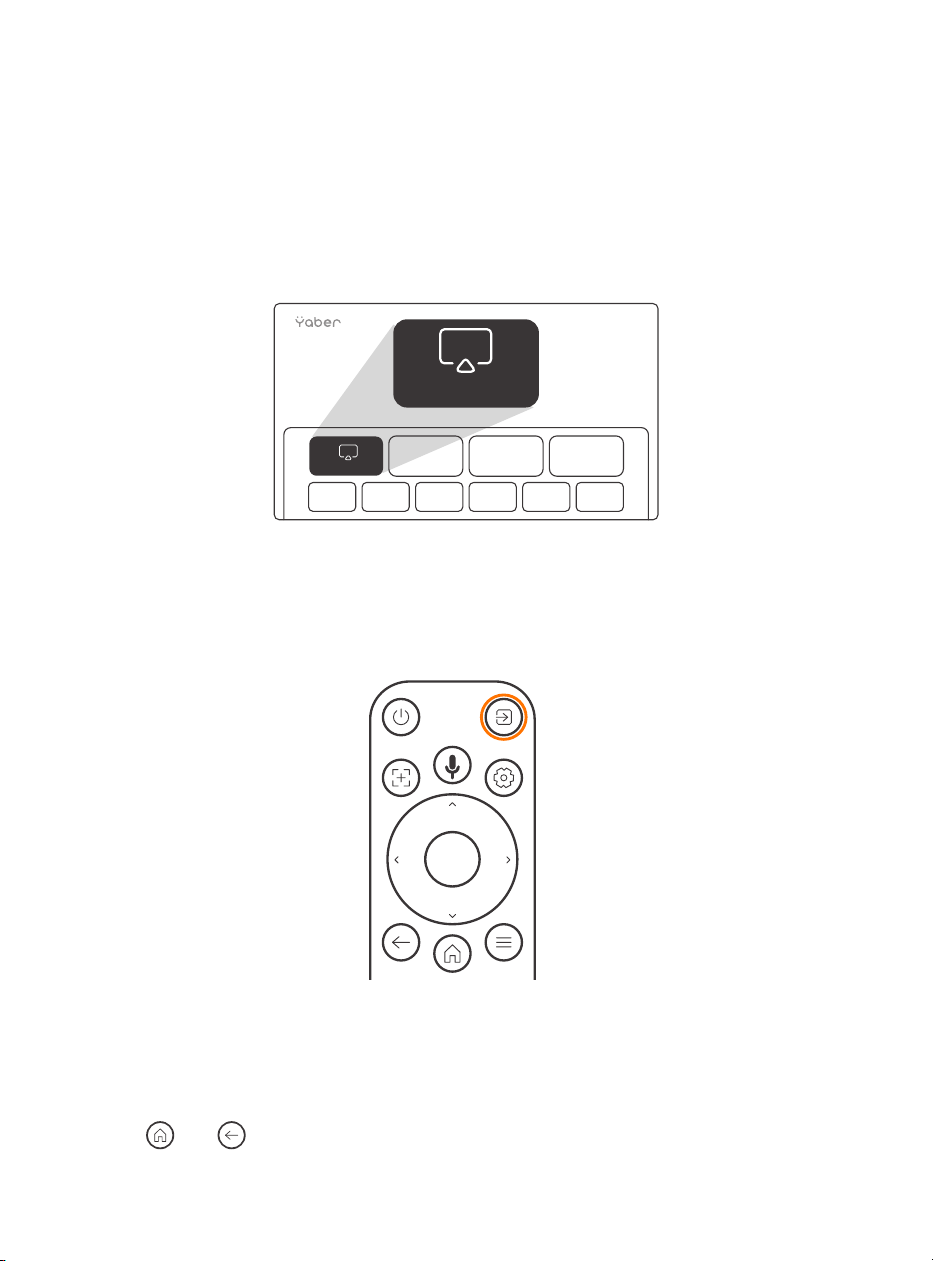
If you need to exiting Google TV, please click the video source button on the remote
control
TV
TV
Attention: When using TV for the first time, follow the on-screen prompts for remote
control pairing and other settings.
If you are using a new remote control or using google tv first time, please press.
button and for 10~30 seconds.
15
6.4.2. Play Video / Music / Photo in the File
Manager
6.5. Screen Share
1. Insert the USB Disk, the [USB] icon of the homepage will turn white.
2. Select the [USB] icon, or File Manager.
3. Select the desired file (or folder to enter the subfolder) in the USB disk, then press the
[OK] button to play.
The fluency of screen mirroring with wireless connection will be affected by the
network environment. A bandwidth of 100Mbit or more is recommended when using
screen mirroring.
Make sure your mobile device is close to the projector when using wireless connection.
The distance within 1 meter is recommended.
Some mobile devices may not support screen mirroring due to the compatibility.
Any questions, please feel free to email Yaber service team via
Before sharing your phone screen to the projector, Please ensure your phone and the
projector are connected to the same Wi-Fi network.
In the Yaber app, tap [Connect Device] and select the device named [Yaber_K3_xxxx]
to connect.
Once connected, select the screen mirroring option in the Yaber app to share your
phone screen with the projector.
When you wish to end the screen share, go to your phone's control center, select the
device, and stop sharing.
Attention: If you need to share the screen from streaming apps like Netflix, Disney, or
Prime Video, enter the Dongle system to share.
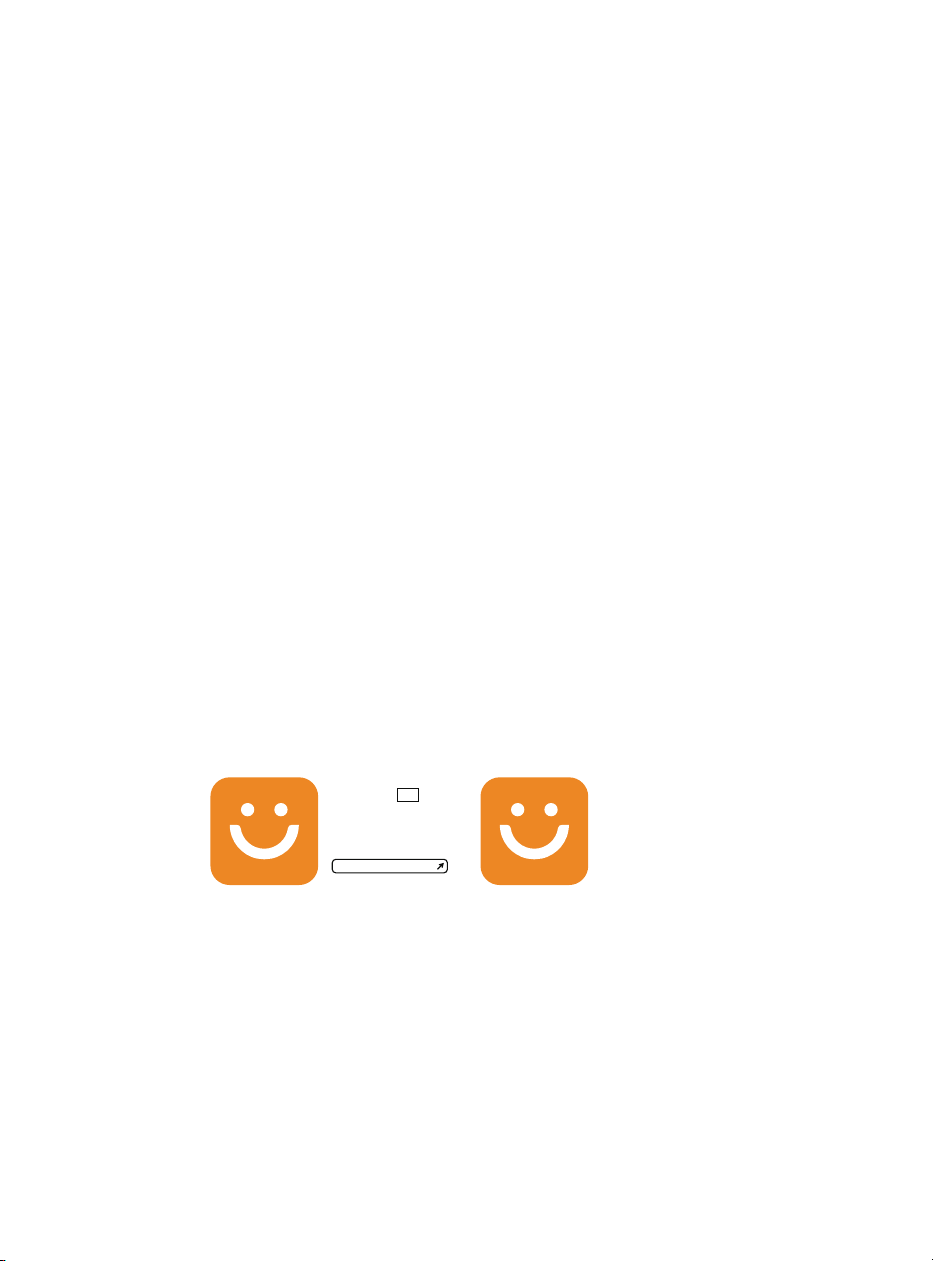
To enhance your experience during screen sharing, download the [Yaber] app from
the Apple App Store or Google Play Store.
Warming Tips:
How to share:
yaber
Yaber
yaber
4+
Designed for iphone
Dawnwin Techonology
Free
View in Mac App Store

16
6.6. Bluetooth Settings
6.6.1. Bluetooth Connection:
6.7. Quiet Mode
Connecting the Projector to External Speakers/Headphones
Go to home page -> Select the | Settings ] -> [ Bluetooth ] - Scan the Bluetooth devices
nearby automatically - Choose the Bluetooth device desired - it will be paired and
connected automatically.
Connecting External Devices to the Projector (Using the Projector as a Bluetooth
Speaker)
This projector supports the function of Bluetooth speaker. Press the [ ] button on
projector, or select the [Bluetooth Speaker Mode] on home page, then you can search
and pair your projector [K3_xxxx] with your mobile device as a Bluetooth speaker for
music playing.
Using the quiet mode, you can control the noise of the projector to keep it at a
low level. The device will work under lower power consumption, and the projection
brightness will also be slightly lower than the normal state.

17
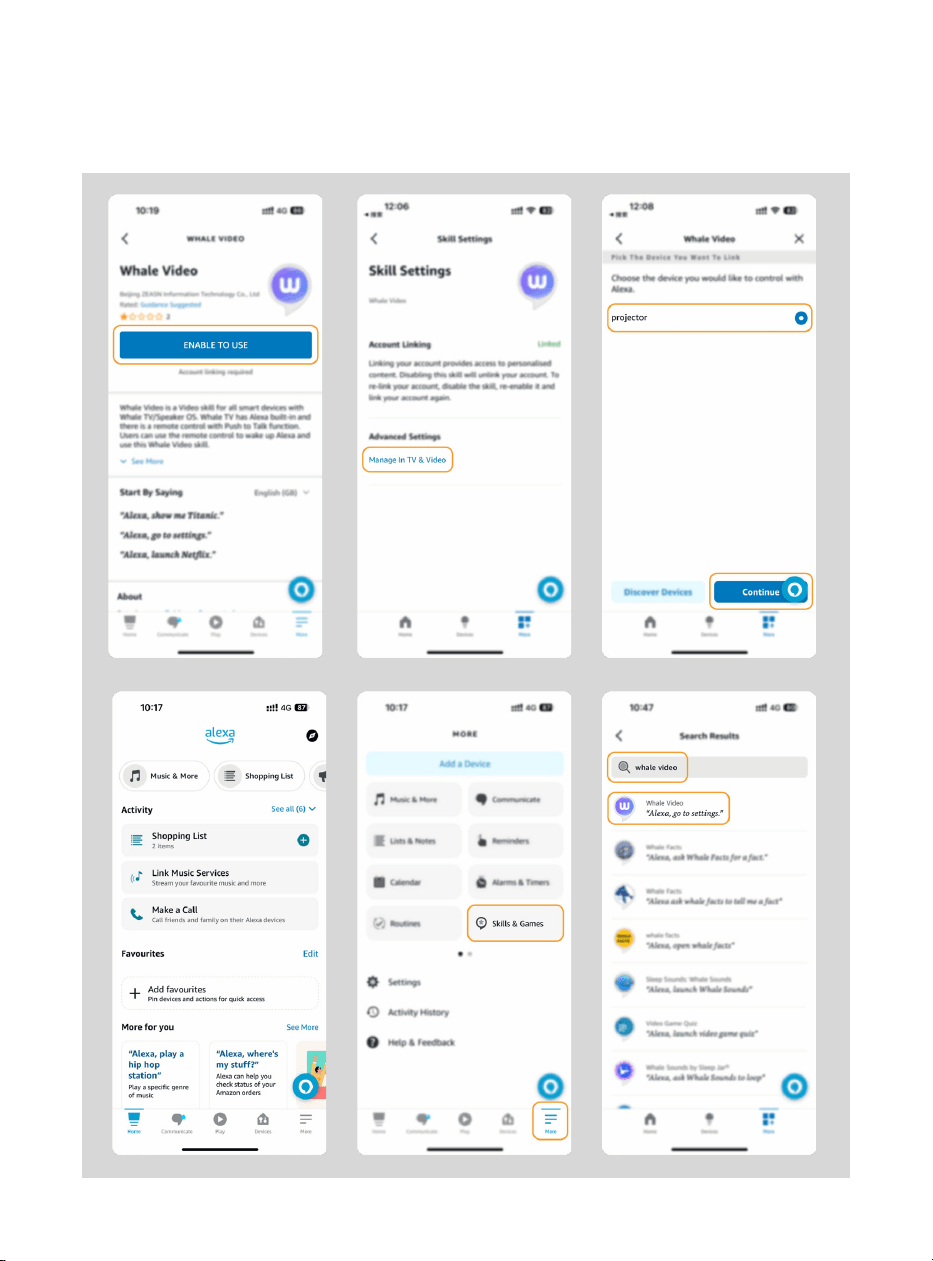
6.8. Alexa Setup
Using Steps:
Attention: Alexa supports only English
and German. If Alexa is not activated,
please contact the after-sales team.
This function needs to be used with Alexa
enabled smart speakers, and must be
configured through the Alexa App on the
mobile phone.
1. Connect the projector to WiFi, activate Alexa on the projector's home screen, and log
in to your Amazon account.
2. Open the Alexa app on your phone and log in to your Amazon account. Go to [Go to
More]. - [Skills & Game and search for Skills], find and enable [Whale video].
Account
Tap "Sign in with Amazon" below and follow the instructions to link projector with Alexa.
Try saying "Alexa, turn off projector" or "Alexa, switch to hdmi on projector."
Additionally, you can also find a list of available voice commands on projector's Alexa Skills page.
Sign In

18
3. In [Whale Screen Settings] - [Advanced Settings], pair the projector with a smart
speaker (with built-in Alexa).

19
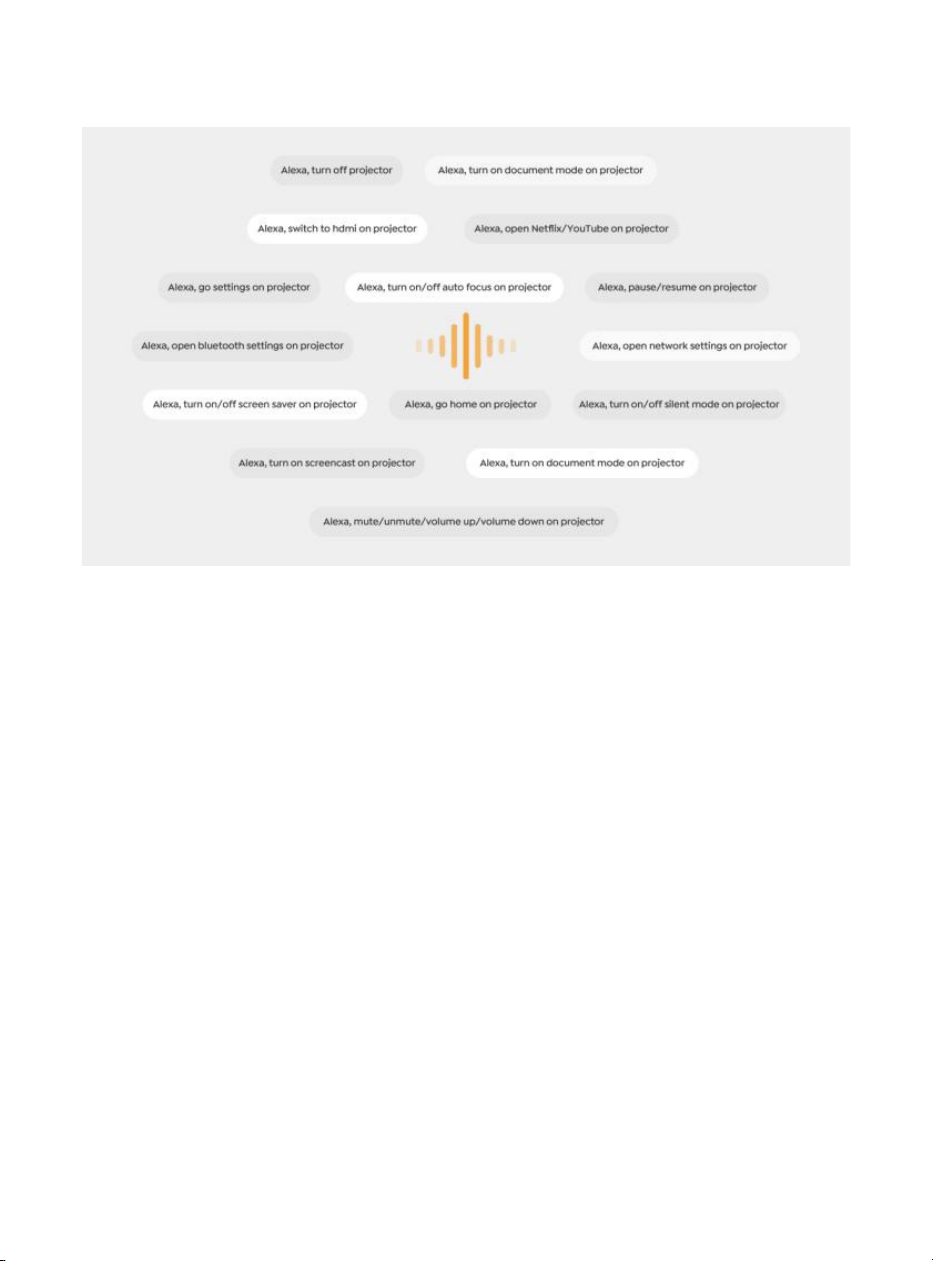
4. Now try saying, "Alexa, open YouTube on the projector".
6.8.1Alexa Command List
1. ALexa, turn off projector
2. Alexa, switch to hdmi on projector
3. Alexa, open Netflix/YouTube on projector
4. Alexa, go settings on projector
5. Alexa, go home on projector
6. Alexa, mute/unmute/volume up/volume down on projector
7. Alexa, /resume on projector
8. Alexa, open bluetooth settings on projector
9. Alexa, open network settings on projector
10. Alexa, turn on/off screen saver on projector
11. Alexa, turn on/off auto focus on projector
12. Alexa, turn on/off silent mode on projector
13. Alexa, turn on screencast on projector
14. Alexa, turn on document mode on projector
15. Alexa, next/previous/start over on projector
16. Alexa, turn on/off screen on projector

20
6.9. System Update
6.9.1. Local Upgrade
6.9.2. Online Upgrade
6.10.Power on Mode
6.11. Safe Shutdown
Download the software upgrading package at the company website and copy it
to the root directory of portable hard drive or USB drive, and plug the drive into the
USB port. Go to [About] > [Upgrade] and select [Local Upgrade], then the system will
automatically detect the upgrading package and install it for upgrading.
Go to [About] -> [Upgrade] and select [Online Upgrade]. The system will automatically
detect whether there is new version available and ask your permission to upgrade it.
In the Power On Standby mode, plug in the power supply, and the Power LED on the
projector will light up. You need to press the power button to turn on the projector.
If switched to Power On, the machine will automatically turn on after plugging in the
power cord.
Press the button on the projector or remote controller, then press OK key to power
off the projector. Unplug the power cord of the projector.Cover the lens and store the
projector in a cool and dry place.

21
7.Maintenance Tips
7.1. Care of Projector
Please use the device correctly:
Do not block the air inlets/outlets to avoid damage to internal electronics due to
improper cooling.
Do not point the lens directly at your eyes, as the strong light from the projector may
hurt the eyes.
Do not clean the lens directly with paper, cloth, or other cleaning tools to avoid lens
damage.
Do not clean the product with chemical reagents, detergents, or any liquids to avoid
corrosion of the circuit
board by rainwater or mineral-laden moist liquids.
Keep the device and its components and accessories out of reach of children.
Ensure the device is used in a dry and well-ventilated environment.
Do not store the device in overly hot or cold places, as extreme temperatures can
shorten the lifespan of
electronic devices.
Do not place the device in any heating equipment (such as dryers and microwaves)
to dry.
Do not forcefully squeeze the device or place obstacles on top of or behind it to avoid
damage.
Do not throw, hit, or shake the device violently to avoid damaging internal circuit
boards.
Do not attempt to disassemble and reassemble the device yourself. If any issues arise,
contact Yaber
after-sales service.

22
Manual de Usuario
Proyector
K3
ES

23

24
CONTENIDO
Soporte profesional de por vida de YABER ...............................................................................................25
1. Lista de Paquetes ................................................................................................................................................... 26
2. Especificaciones del Proyector ................................................................................................................... 27
3. Descripción General del Proyector ........................................................................................................... 28
4. Descripción General del ...................................................................................................................................29
5. Instalación .................................................................................................................................................................30
5.1. Instalación del dispositivo de seguridad para TV .................................................................30
5.2. Distancia y tamaño de proyección ................................................................................................. 31
5.3. Ajuste del ángulo .......................................................................................................................................... 31
5.4. Instalación en el techo ............................................................................................................................. 31
5.5. Conectar dispositivos ...............................................................................................................................32
6. Funcionamiento.....................................................................................................................................................32
6.1. Puesta en marcha del proyector .......................................................................................................32
6.1.1. Preparación del control remoto .................................................................................................... 33
6.1.2. Encendido ....................................................................................................................................................33
6.1.3. Configuración Inicial ............................................................................................................................34
6.2. Ajuste de la Imagen ................................................................................................................................... 34
6.2.1. Enfoque ..........................................................................................................................................................34
6.2.2. Corrección Trapezoidal Automática .......................................................................................35
6.2.3. Evitación Automática de Obstáculos y Alineación Automática de Pantalla 35
6.3. Modo de Imagen .......................................................................................................................................... 36
6.3.1. Brillo ..................................................................................................................................................................36
6.3.2. Ajuste de Imagen ..................................................................................................................................36
6.4. Medios ................................................................................................................................................................. 37
6.4.1. Google TV .....................................................................................................................................................37
6.4.2. Reproducir Video/Música/Foto en el Administrador de Archivos ......................38
6.5. Compartir pantalla ....................................................................................................................................38
6.6. Configuración de Bluetooth ................................................................................................................. 39
6.6.1. Conexión Bluetooth: .............................................................................................................................. 39
6.7. Modo silencioso ............................................................................................................................................39
6.8. Configuración de Alexa ...........................................................................................................................40
6.8.1 Lista de Comandos de Alexa...........................................................................................................42
6.9. Actualización del Sistema .....................................................................................................................43
6.9.1. Actualización Local ...............................................................................................................................43
6.9.2. Actualización en línea ........................................................................................................................ 43
6.10. Modo de Encendido .................................................................................................................................43
6.11. Apagado Seguro ..........................................................................................................................................43
7. Consejos de mantenimiento ........................................................................................................................44
7.1. Cuidado del Proyector ...............................................................................................................................44

25
Soporte profesional de por
vida de YABER
Estimado cliente:
Gracias por elegir el proyector Yaber K3.
Este manual le ayudará a navegar por todas las funciones.
Entendemos que pueden surgir muchas preguntas e inquietudes durante el uso del
proyector. También estamos ansiosos por escuchar sus comentarios. Sin embargo,
dejar una reseña en la página del producto
no brinda la solución más rápida. Muchos problemas comunes, como la incapacidad
de enfocar automáticamente o la corrección trapezoidal, problemas de sonido,
problemas de conexión WiFi o Bluetooth, generalmente se pueden resolver con
los ajustes de configuración apropiados.
Si tiene algún problema, no dude en enviarnos su número de pedido y los problemas
a
[email protected] (por ejemplo, ES+K3+000-0000000-0000000+Issues).
Tenga
la seguridad de que nuestro equipo de servicio le ofrecerá una solución dentro de las
24 horas.
Su satisfacción es nuestra máxima prioridad. Si tiene algún problema, esperamos
sinceramente que pueda darnos
la oportunidad de solucionarlo.
Deseamos que tenga una experiencia excepcional con el proyector K3.
Equipo de Atención al Cliente de Yaber
26
1. Lista de Paquetes
!
Atención: El Dongle ya está integrado en el proyector.
Proyector K3
Control Remot
Tapa de Lente
QSG & FAQ
Cable HDMI
Cable de
Alimentación
Paño de Limpieza
TV Dongle
27
2. Especificaciones del Proyector
Modelo No. K3
Resolución
Nativa
Relación de
Aspecto
1920*1080
16:9/4:3
Automático / Eléctrico
Automático
LED
1.2.1
Automático/eléctrico
Automático
Fuente de luz
Relación de Proyección
Corrección Trapezoidal
Evitación de Obstáculos
Dimensiones de la unidad
Enfoque
Interfaz
Formato de
Imagen
Formato de
Audio
Formato de
Video
Formato USB
Documentos
WPS
Voltaje de
Alimentación
Peso del
Proyector
Alineación de
Pantalla
Distancia de
Proyección
Mín. 1,1 m ~ Máx. 3,3 m
Mín. 43,3 ~ Máx. 129,9 pulgadas
100-240V~/50-60Hz Power Consumption 110W
Front/Rear on Desk
Front/Rear on Celling
Projection Method
5,1 kg 11,24 lbs
USB 2.0 × 1, HDMI 1.4 × 1, Salida de audio × 1, Lan × 1
JPG, PNG, BMP, JPEG
MP3, AAC, LPCM, APE, FLAC, OGG, AMR
MP4, MKV, WMV, 3GP, MPG, VOB, TP, TS, DAT, MOV, FLV
FAT 32, NTFS
txt, pdf, docx, xlsx, pptx
FAT 32, NTFS Formato no compatible: Exfat Atención: Si el proyector no puede
reconocer el contenido de la unidad flash USB, verifique si su unidad flash USB está
formateada correctamente.
165 × 140 × 290 mm
6,4 × 5,5 × 11,4 pulgadas
!
!
28
3. Descripción General del Proyector
29
4. Descripción General del
Control Remoto
Fuente de VideoRendimiento
Búsqueda por voz
Enfoque Automático
Atrás
Volumen ARRIBA
Volumen Bajo
Netflix
YouTube
Silenciar
Ajustes
Tecla de flecha
Confirmar
Inicio
Menú
Enfoque +
Enfoque -
Disney+
Prime Video

30
5. Instalación
5.1. Instalación del dispositivo
de seguridad para TV
Cómo quitar o instalar el dispositivo de seguridad
1. Utilice un destornillador para quitar los
tornillos de la tapa del compartimento
del dispositivo de seguridad. (Tamaño
de los tornillos: ST2,3 × 6 mm)
3. Inserte el TV Dongle en el puerto HDMI
dentro del compartimento. (Asegúrese
de que el Dongle esté insertado
firmemente para su identificación).
2. Asegúrese de que los puertos del TV
Dongle no estén dañados (como se
muestra en la siguiente figura).
4. Conecte el cable micro USB al TV
Dongle y cierre la tapa.
Puerto Micro USB
(Marca en la Parte
Posterior)
Puerto Micro HDMI
(Marca en la parte
posterior)
Dongle de TV
montado
Tapa
Bandeja
Dongle de
TV Ranura
Cable de
alimentación USB

31
5.2. Distancia y tamaño de proyección
5.3. Ajuste del ángulo
5.4. Instalación en el techo
La relación de proyección del K3 es de 1,2:1. Coloque el proyector de acuerdo
con las distancias correspondientes en la tabla a continuación con el
tamaño de pantalla deseado.
Si es necesario, presione este botón y para liberar la almohadilla de la pata
ajustable. Se pueden realizar más ajustes girando la tuerca.
Paso 1: Asegúrese de tener un soporte de montaje universal que pueda
adaptarse al proyector.
Paso 2: Retire las cuatro almohadillas de goma en la parte inferior del
proyector y use tornillos M5*10 mm para fijar el proyector en el soporte para
completar la instalación.
9898989898989898989898989898
Metros Pies
Grado máximo: 10°
32
5.5. Conectar dispositivos
6. Funcionamiento
6.1. Puesta en marcha del proyector
El proyector tiene 5 puertos: puerto HDMI *2 / puerto USB *1 / puerto de
salida de audio *1 / puerto LAN (RJ45) *1. Seleccione los puertos de conexión
correctos para conectar sus dispositivos.
200 mm
Orificios para tornillos: M5*10 mm

33
6.1.1. Preparación del control remoto
6.1.2. Encendido
Abra el compartimento de las pilas.
Inserte 2 pilas AAA con la polaridad correcta indicada.
Cierre el compartimento de las pilas.
Nota: Debe utilizar el control remoto Yaber para completar la configuración
inicial del proyector.
Presione la tecla de encendido en el control remoto o en el proyector. El LED de
encendido del proyector cambia de color naranja a apagado.
Para apagar el proyector, presione una vez y luego presiónelo nuevamente cuando
aparezca el menú de encendido. El LED de encendido del proyector se enciende.

34
6.1.3. Configuración Inicial
6.2. Ajuste de la Imagen
6.2.1. Enfoque
Enfoque automático
Enfoque manual
Cuando enciende el proyector por primera vez o cuando se restablece la configuración
predeterminada de fábrica, se le solicita que realice la configuración inicial.
Puede seleccionar el idioma del sistema, la conexión Wi-Fi y obtener información sobre
las nuevas funciones y sugerencias del proyector.
Después de la configuración, el proyector irá a la página de inicio.
Cuando se utiliza el proyector por primera vez, normalmente muestra una imagen
poco clara. Esto se debe a que la lente está desenfocada o a una configuración de
corrección trapezoidal incorrecta.
Utilice la tecla de enfoque automático y enfoque manual del control remoto para
obtener la mejor imagen. El enfoque automático también se puede activar moviendo
el proyector a otra ubicación.
El enfoque automático está habilitado de manera predeterminada y volverá a enfocar
cada vez que se mueva la máquina.
Si es necesario realizar más
ajustes de enfoque, utilice el botón
de enfoque del control remoto
para lograr la imagen deseada.
Enfoque Automático
Enfoque +/-
35
6.2.2. Corrección Trapezoidal Automática
6.2.3. Evitación Automática de Obstáculos y
Alineación Automática de Pantalla
Atención: El rango de corrección trapezoidal automática es de ±18 grados horizontal y
verticalmente.
La corrección trapezoidal automática está habilitada de manera predeterminada. Si
necesita deshabilitar esta función, navegue a través de [Inicio] - [Configuración] -
[Modo de proyección] - [Corrección trapezoidal automática].
Si se necesitan más ajustes de pantalla, seleccione [Corrección trapezoidal manual]
en [Modo de proyección] y ajuste la pantalla arrastrando las flechas.
Atención: Si ya ha configurado la pantalla a través de la corrección trapezoidal
manual, desactive la corrección trapezoidal automática; de lo contrario, la pantalla se
restablecerá después del siguiente movimiento del proyector.
1. Si hay objetos blancos u otros de color claro en la pantalla de destino, es posible que
no se puedan evitar los obstáculos.
2. El fondo debe tener un borde negro o de otro color distintivo, excepto en el caso de
las pantallas antiluz que no requieren un borde.
3. Antes de utilizar la función de ajuste automático de la pantalla:
Asegúrese de que la pantalla de proyección sea más grande que el área de la
pantalla y no bloquee el área central de la pantalla.
No bloquee el área dentro del marco cuadrado central de la pantalla.
Corrección trapezoidal manual

36
6.3. Modo de Imagen
6.3.1. Brillo
6.3.2. Ajuste de Imagen
Atención: Mantenga presionado el botón de menú en el control remoto para acceder
a la configuración mientras reproduce videos o imágenes. Además, los ajustes de
color solo tienen efecto durante estas actividades.
Ajuste el brillo de la pantalla a través de [Inicio] - [Configuración] - [Calidad de
imagen] - [Configuración de brillo].
Ajuste el color de la imagen a través de [Inicio] - [Configuración] - [Calidad de
imagen] - [Modo de imagen].
Atención: Solo funciona con reproductores de imágenes o videos

37
6.4. Medios
6.4.1. Google TV
Haga clic en TV para ingresar al sistema en la página de inicio.
Atención: Cuando utilice el televisor por primera vez, siga las instrucciones en pantalla
para emparejar el control remoto y realizar otras configuraciones.
Atención: Si no hay señal, intente desconectar y volver a desconectar el adaptador de
TV. Para conocer los pasos detallados, consulte la sección 5.1.
Si necesita salir de Google TV, haga clic en el botón de fuente de video en el control
remoto.
TV
TV
Atención: Cuando utilice el televisor por primera vez, siga las instrucciones en pantalla
para emparejar el control remoto y realizar otras configuraciones.
Si está utilizando un control remoto nuevo o está utilizando Google TV por primera vez,
presione el botón y durante 10 a 30 segundos.

38
6.4.2. Reproducir Video/Música/Foto en el
Administrador de Archivos
6.5. Compartir pantalla
1. Inserte el disco USB, el ícono [USB] de la página de inicio se volverá blanco.
2. Seleccione el ícono [USB] o el Administrador de Archivos.
3. Seleccione el archivo deseado (o la carpeta para ingresar la subcarpeta) en el
disco USB, luego presione el botón [OK] para reproducir.
La fluidez de la duplicación de pantalla con conexión inalámbrica se verá afectada
por el entorno de red. Se recomienda un ancho de banda de 100 Mbit o más cuando
se utiliza la duplicación de pantalla.
Asegúrese de que su dispositivo móvil esté cerca del proyector cuando utilice una
conexión inalámbrica. Se recomienda una distancia de 1 metro.
Es posible que algunos dispositivos móviles no admitan la duplicación de pantalla
debido a la compatibilidad.
Si tiene alguna pregunta, no dude en enviar un correo electrónico al equipo de servicio
de Yaber a través de [email protected]
Antes de compartir la pantalla de su teléfono con el proyector, asegúrese de que su
teléfono y el proyector estén conectados a la misma red Wi-Fi.
En la aplicación Yaber, toque [Conectar dispositivo] y seleccione el dispositivo
llamado [Yaber_K3_xxxx] para conectarlo.
Una vez conectado, seleccione la opción de duplicación de pantalla en la aplicación
Yaber para compartir la pantalla de su teléfono con el proyector.
Cuando desee finalizar la pantalla compartida, vaya al centro de control de su
teléfono, seleccione el dispositivo y deje de compartir.
Atención: si necesita compartir la pantalla desde aplicaciones de transmisión como
Netflix, Disney o Prime Video, ingrese al sistema Dongle para compartir.
Para mejorar su experiencia durante la compartición de pantalla, descargue la
aplicación [Yaber] desde la App Store de Apple o Google Play Store.
Consejos de Advertencia:
Cómo compartir:
yaber
Yaber
yaber
4+
Designed for iphone
Dawnwin Techonology
Free
View in Mac App Store

39
6.6. Configuración de Bluetooth
6.6.1. Conexión Bluetooth:
6.7. Modo silencioso
Conexión del proyector a altavoces/auriculares externos
Vaya a la página de inicio -> Seleccione | Configuración ] -> [ Bluetooth ] - Escanee
automáticamente los dispositivos Bluetooth cercanos - Elija el dispositivo Bluetooth
deseado - se emparejará y conectará automáticamente.
Conexión de dispositivos externos al proyector (Uso del proyector como altavoz
Bluetooth)
Este proyector admite la función de altavoz Bluetooth. Presione el botón [ ] en el
proyector o seleccione [Modo de altavoz Bluetooth] en la página de inicio, luego
puede buscar y emparejar su proyector [K3_xxxx] con su dispositivo móvil como
altavoz Bluetooth para reproducir música.
Usando el modo silencioso, puede controlar el ruido del proyector para mantenerlo a
un nivel bajo. El dispositivo funcionará con un menor consumo de energía y el brillo de
la proyección también será ligeramente inferior al estado normal.

40
6.8. Configuración de Alexa
Pasos de Uso:
Atención: Alexa solo admite inglés y
alemán. Si Alexa no está activada,
comuníquese con el equipo de posventa.
Esta función debe usarse con parlantes
inteligentes habilitados para Alexa
y debe configurarse a través de la
aplicación Alexa en el teléfono móvil.
1. Conecte el proyector a WiFi, active Alexa en la pantalla de inicio del proyector e inicie
sesión en su cuenta de Amazon.
2. Abra la app Alexa en su teléfono e inicie sesión en su cuenta de Amazon. Vaya a [Ir
a Más]. - [Habilidades & Juegos & Busque Habilidades], busque y habilite [Video de
Ballena].
Account
Tap "Sign in with Amazon" below and follow the instructions to link projector with Alexa.
Try saying "Alexa, turn off projector" or "Alexa, switch to hdmi on projector."
Additionally, you can also find a list of available voice commands on projector's Alexa Skills page.
Sign In
41
3. En [Configuración de Pantalla de Ballena] - [Configuración Avanzada], empareje el
proyector con un altavoz inteligente (con Alexa integrada).
42
4. Ahora intenta decir: "Alexa, open YouTube on the projector"
6.8.1 Lista de Comandos de Alexa
1. Alexa, apaga el proyector
2. Alexa, cambia a HDMI en el proyector
3. Alexa, abre Netflix/YouTube en el proyector
4. Alexa, ve a configuración en el proyector
5. Alexa, ve a inicio en el proyector
6. Alexa, silencia/activa/sube/baja volumen en el proyector
7. Alexa, reanuda en el proyector
8. Alexa, abre la configuración de Bluetooth en el proyector
9. Alexa, abre la configuración de red en el proyector
10. Alexa, activa/desactiva el protector de pantalla en el proyector
11. Alexa, activa/desactiva el enfoque automático en el proyector
12. Alexa, activa/desactiva el modo silencioso en el proyector
13. Alexa, activa la captura de pantalla en el proyector
14. Alexa, activa el modo documento en el proyector
15. Alexa, siguiente/anterior/reinicio en el proyector
16. Alexa, enciende/apaga la pantalla en el proyector

43
6.9. Actualización del Sistema
6.9.1. Actualización Local
6.9.2. Actualización en línea
6.10. Modo de Encendido
6.11. Apagado Seguro
Descargue el paquete de actualización de software en el sitio web de la empresa y
cópielo en el directorio raíz del disco duro portátil o la unidad USB, y conecte la unidad
al puerto USB. Vaya a [Acerca] > [Actualizar] y seleccione [Actualización Local]; luego,
el sistema detectará automáticamente el paquete de actualización y lo instalará para
realizar la actualización.
Vaya a [Acerca de] -> [Actualizar] y seleccione [Actualización en Línea]. El sistema
detectará automáticamente si hay una nueva versión disponible y le solicitará
permiso para actualizarla.
En el modo de espera de encendido, conecte la fuente de alimentación y se
encenderá el LED de encendido del proyector.
Debe presionar el botón de encendido para encender el proyector.
Si se cambia a encendido, la máquina se encenderá automáticamente después de
enchufar el cable de alimentación.
Presione el botón en el proyector o en el control remoto y luego presione la tecla OK
para apagar el proyector.
Desconecte el cable de alimentación del proyector. Cubra la lente y guarde el
proyector en un lugar fresco y seco.

44
7. Consejos de mantenimiento
7.1. Cuidado del Proyector
Utilice el dispositivo correctamente:
No bloquee las entradas y salidas de aire para evitar daños en los componentes
electrónicos internos debido a una refrigeración inadecuada.
No apunte la lente directamente a sus ojos, ya que la luz intensa del proyector puede
dañarlos.
No limpie la lente directamente con papel, paño u otras herramientas de limpieza
para evitar dañarla.
No limpie el producto con reactivos químicos, detergentes ni ningún líquido para
evitar la corrosión de la placa de circuitos por el agua de lluvia o líquidos húmedos
cargados de minerales.
Mantenga el dispositivo y sus componentes y accesorios fuera del alcance de los
niños.
Asegúrese de utilizar el dispositivo en un entorno seco y bien ventilado.
No guarde el dispositivo en lugares demasiado calientes o demasiado fríos, ya que las
temperaturas extremas pueden acortar la vida útil de los dispositivos electrónicos.
No coloque el dispositivo en ningún equipo de calefacción (como secadoras y
microondas) para secarlo.
No apriete con fuerza el dispositivo ni coloque obstáculos encima o detrás de él para
evitar daños.
No arroje, golpee ni agite el dispositivo con violencia para evitar dañar las placas de
circuitos internos.
No intente desmontar y volver a montar el dispositivo usted mismo. Si surge algún
problema, póngase en contacto con el servicio posventa de Yaber.

45
Benutzerhandbuch
Projektor K3
DE

46

47
INHALT
YABER Professioneller Support auf Lebensdauer ............................................................................................................. 48
1. Lieferumfang .........................................................................................................................................................................................49
2. Projektor-Spezifikationen ............................................................................................................................................................50
3. Projektorübersicht ..............................................................................................................................................................................51
4. Übersicht der Fernbedienung .................................................................................................................................................. 52
5. Installation ............................................................................................................................................................................................. 53
5.1. TV-Dongle installieren ........................................................................................................................................................... 53
5.2. Abstand und Projektionsgröße .....................................................................................................................................54
5.3. Winkeleinstellung ....................................................................................................................................................................54
5.4. Deckenmontage ..................................................................................................................................................................... 54
5.5. Geräte anschließen .............................................................................................................................................................. 55
6. Bedienung ............................................................................................................................................................................................55
6.1. Projektor starten .......................................................................................................................................................................55
6.1.1. Fernbedienung vorbereiten ...................................................................................................................................... 56
6.1.2. Einschalten ..........................................................................................................................................................................56
6.1.3. Ersteinrichtung ....................................................................................................................................................................57
6.2. Bildanpassung ...........................................................................................................................................................................57
6.2.1. Fokus .........................................................................................................................................................................................57
6.2.2. Trapezkorrektur ...............................................................................................................................................................58
6.2.3. Automatische Hindernisvermeidung und automatische Bildausrichtung ...........................58
6.3. Bildmodus ....................................................................................................................................................................................59
6.3.1. Helligkeit .................................................................................................................................................................................59
6.3.2. Bildanpassung .................................................................................................................................................................59
6.4. Medien .............................................................................................................................................................................................60
6.4.1. Google TV ..............................................................................................................................................................................60
6.4.2. Video / Musik / Foto im Dateimanager abspielen ...................................................................................61
6.5. Bildschirmfreigabe ..................................................................................................................................................................61
6.6. Bluetooth-Einstellungen .................................................................................................................................................... 62
6.6.1. Bluetooth-Verbindung: ............................................................................................................................................... 62
6.7. Leisemodus ................................................................................................................................................................................. 62
6.8. Alexa-Einrichtung .................................................................................................................................................................... 63
6.9. System-Update ........................................................................................................................................................................66
6.9.1. Lokales Upgrade ............................................................................................................................................................... 66
6.9.2. Online-Upgrade ..............................................................................................................................................................66
6.10. Einschaltmodus .......................................................................................................................................................................66
6.11. Sicheres Herunterfahren .....................................................................................................................................................66
7. Wartungstipps ................................................................................................................................................................................... 67
7.1. Pflege des Projektors .............................................................................................................................................................. 67

48
YABER Professioneller Support auf
Lebensdauer
Sehr geehrte/r Kunde/in,
vielen Dank, dass Sie sich für den Yaber K3-Projektor entschieden haben.
Dieses Handbuch führt Sie durch alle Funktionen.
Wir wissen dass während der Nutzung des Projektors viele Fragen und Anliegen
aufkommen können. Wir freuen uns auch auf Ihr Feedback. Bitte beachten Sie jedoch,
dass das Hinterlassen einer Bewertung auf der Produktseite nicht immer zur schnellen
Lösung führt. Viele häufige Probleme, wie z. B. Schwierigkeiten bei der automatischen
Fokussierung oder Trapezkorrektur, Tonprobleme sowie WiFi- oder Bluetooth-
Verbindungsprobleme, können oft durch entsprechende Einstellungen behoben
werden.
Sollten Sie auf Probleme stoßen, senden Sie uns gerne Ihre Bestellnummer und eine
Beschreibung der Probleme an
[email protected] (z.B. DE+K3+000-0000000-
0000000+Probleme).
Unser Serviceteam wird Ihnen innerhalb von 24 Stunden eine
Lösung anbieten.
Ihre Zufriedenheit hat für uns oberste Priorität. Sollten Sie auf Probleme stoßen,
hoffen wir aufrichtig, dass Sie uns die Gelegenheit geben, die Angelegenheit zu Ihrer
Zufriedenheit zu klären.
Wir wünschen Ihnen ein hervorragendes Erlebnis mit dem K3 Projektor.
Yaber-Kundendienstteam

49
1. Lieferumfang
!
Achtung: Der Dongle ist bereits im Projektor eingebaut.
K3 Projektor
Fernbedienung
Objektivkappe
QSG & FAQ
HDMI-Kabel
Stromkabel
Reinigungstuch
TV-Dongle
50
2. Projektor-Spezifikationen
Modell-Nr.: K3
Native
Auflösung
Seitenverhältnis
1920*1080
16:9/4:3
Automatisch/Elektrisch
Automatisch
LED
1.2.1
Automatisch/Elektrisch
Automatisch
Lichtquelle
Projektionsverhältnis
Trapezkorrektur
Fokus
Interface
Bildformate
Audioformate
Videoformate
USB-Formate
WPS-Dokumente
Stromversorgung
Projektor-Gewicht
Bildausrichtung
Schnittstellen
min. 1,1m - max 3,3m
min. 43,3 - max 129,9 Zoll
Hindernisvermeidung
Abmessungen
100-240V~/50-60Hz Stromverbrauch 300W
Vorne/Hinten auf dem Tisch,
Vorne/Hinten an der Decke
Projektionsmethoden
5.1 kg (11.24 lbs)
1 x USB 2.0, 1 x HDMI 1.4, 1 x Audioausgang, 1 x LAN
JPG, PNG, BMP, JPEG
MP3, AAC, LPCM, APE, FLAC, OGG, AMR
MP4, MKV, WMV, 3GP, MPG, VOB, TP, TS, DAT, MOV, FLV
FAT 32, NTFS
txt, pdf, docx, xlsx, pptx
165x140x290mm
6,4x5,5x11,4 Zoll
Nicht unterstütztes Format: Exfat
Achtung: Wenn der Projektor den Inhalt des USB-Sticks nicht erkennt, prüfen Sie
bitte, ob Ihr USB-Stick richtig formatiert ist.
!
!
51
3. Projektorübersicht
52
4. Übersicht der Fernbedienung
VideoquelleLeistung
Sprachsuche
Auto Fokus
Zurück
Lautstärke HOCH
Lautstärke verringern
Netflix
YouTube
Stummschalten
Einstellungen
Pfeiltaste
Bestätigen
Zuhause
Menü
Fokus +
Fokus -
Disney+
Prime Video

53
5. Installation
5.1. TV-Dongle installieren
So entfernen oder installieren Sie den Dongle:
1. Entfernen Sie mit einem
Schraubenzieher die Schrauben
vom Deckel des Dongle-Fachs.
(Schraubengröße: ST 2,3x6mm)
3. Setzen Sie den Dongle in sein Fach ein.
(Stellen Sie sicher, dass der Dongle fest
eingesteckt ist, damit er erkannt wird.)
2. Setzen Sie den Dongle in sein Fach ein.
(Stellen Sie sicher, dass der Dongle fest
eingesteckt ist, damit er erkannt wird.)
4. Schließen Sie das USB-Stromkabel an
und setzen Sie den Deckel des Dongle-
Fachs wieder auf.
Deckel
Micro-USB-Anschluss
(Markierung auf der
Rückseite)
Montierter TV-Dongle
Micro-HDMI-Anschluss
(Markierung auf der
Rückseite)
USB-Stromkabel
Fach
TV-Dongle-
Steckplatz

54
5.2. Abstand und Projektionsgröße
5.3. Winkeleinstellung
5.4. Deckenmontage
Das Projektionsverhältnis des K3 beträgt 1,2:1. Bitte platzieren Sie den
Projektor gemäß den entsprechenden Abständen mit der gewünschten
Bildschirmgröße in der folgenden Tabelle.
Drücken Sie bei Bedarf diese Taste, um das verstellbare Fußpolster zu lockern.
Weitere Anpassungen können durch Drehen der Mutter vorgenommen
werden.
Schritt 1: Stellen Sie sicher, dass Sie eine universelle Halterung haben, die dem
Projektor passt.
Schritt 2: Entfernen Sie die vier Gummipolster auf der Unterseite des Projektors
und verwenden Sie M5x10mm Schrauben, um den Projektor an der Halterung
zu befestigen und die Installation abzuschließen.
9898989898989898989898989898
Meter Fuß
Maximaler Winkel: 10°
55
5.5. Geräte anschließen
6. Bedienung
6.1. Projektor starten
Der Projektor verfügt über 5 Anschlüsse: 2 x HDMI-Anschluss / 1 x USB-
Anschluss / 1 x Audioausgang / 1 x LAN-Anschluss (RJ45). Bitte schließen Sie
Ihre Geräte an die richtigen Anschlüsse an.
200 mm
Schraubenlöcher: M5x10mm

56
6.1.1. Fernbedienung vorbereiten
6.1.2. Einschalten
Öffnen Sie das Batteriefach.
Legen Sie 2 AAA-Batterien mit der angegebenen Polarität ein.
Schließen Sie das Batteriefach.
Hinweis: Sie müssen die Yaber-Fernbedienung verwenden, um die
Ersteinrichtung des Projektors abzuschließen.
Drücken Sie die Power-Taste auf der Fernbedienung oder am Projektor. Die Power-LED
am Projektor wechselt von orange zu Aus.
Zum Ausschalten des Projektors drücken Sie einmal und dann erneut die Power-Taste,
wenn das Strommenü erscheint. Die Power-LED am Projektor leuchtet auf.

57
6.1.3. Ersteinrichtung
6.2. Bildanpassung
6.2.1. Fokus
Autofokus
Manueller Fokus
Wenn Sie den Projektor zum ersten Mal einschalten oder auf die Werkseinstellungen
zurückgesetzt haben, werden Sie zur Ersteinrichtung aufgefordert.
Sie können Ihre Systemsprache und WiFi auswählen und sich über neue Funktionen
und Tipps zum Projektor informieren.
Nach der Einrichtung wechselt der Projektor zur Startseite.
Bei der ersten Verwendung des Projektors wird normalerweise ein unscharfes Bild
angezeigt. Dies liegt daran, dass das Objektiv unscharf eingestellt ist oder die
Trapezeinstellung nicht korrekt ist.
Verwenden Sie die Autofokus- und manuelle Fokus-Taste auf der Fernbedienung,
um das beste Bild zu erzielen. Der Autofokus kann auch ausgelöst werden, wenn der
Projektor an einen anderen Ort bewegt wird.
Der Autofokus ist standardmäßig aktiviert und fokussiert jedes Mal neu, wenn das
Gerät bewegt wird.
Falls weitere Fokusanpassungen
erforderlich sind, verwenden Sie die
Fokustaste auf der Fernbedienung,
um das gewünschte Bild zu erzielen.
Enfoque Automático
Enfoque +/-

58
6.2.2. Trapezkorrektur
6.2.3. Automatische Hindernisvermeidung und
automatische Bildausrichtung
Achtung: Der Bereich der automatischen Trapezkorrektur beträgt horizontal und
vertikal jeweils ±18 Grad.
Die automatische Trapezkorrektur ist standardmäßig aktiviert. Wenn Sie diese
Funktion deaktivieren möchten, navigieren Sie zu [Startseite] - [Einstellungen] -
[Projektionsmodus] - [Automatische Trapezkorrektur].
Falls weitere Bildanpassungen erforderlich sind, wählen Sie [Manuelle Trapezkorrektur]
im [Projektionsmodus] und passen Sie den Bildschirm durch Ziehen der Pfeile an.
Achtung: Wenn Sie den Bildschirm bereits manuell angepasst haben, deaktivieren Sie
bitte die automatische Trapezkorrektur, da der Bildschirm sonst nach der nächsten
Bewegung des Projektors zurückgesetzt wird.
1. Wenn weiße oder andere helle Objekte auf dem Zielbildschirm sind, können
Hindernisse möglicherweise nicht vermieden werden.
2. Der Bildhintergrund sollte einen deutlich schwarzen oder andersfarbigen Rand
haben, außer bei lichtabweisenden Bildschirmen, die keinen Rand benötigen.
3. Bevor Sie die Funktion zur automatischen Bildschirmanpassung verwenden:
Bitte stellen Sie sicher, dass die Projektionsfläche größer als der Bildschirmbereich ist,
und blockieren Sie nicht den zentralen Bereich des Bildschirms.
Bitte blockieren Sie nicht den Bereich innerhalb des zentralen quadratischen Rahmens
des Bildschirms.
Manuelle Trapezkorrektur

59
6.3. Bildmodus
6.3.1. Helligkeit
6.3.2. Bildanpassung
Achtung: Halten Sie die Menütaste auf der Fernbedienung gedrückt, um die
Einstellungen beim Abspielen von Videos oder Bildern aufzurufen. Farbkorrekturen
wirken nur während dieser Aktivitäten.
Passen Sie die Bildschirmhelligkeit an über [Startseite] - [Einstellungen] - [Bildqualität]
- [Helligkeitseinstellung].
Passen Sie die Bildfarbe an über [Startseite] - [Einstellungen] - [Bildqualität] -
[Bildmodus].
Achtung: Funktioniert nur mit Bild- oder Videoplayern

60
6.4. Medien
6.4.1. Google TV
Klicken Sie auf TV, um das System auf der Startseite zu öffnen.
Achtung: Bei der ersten Nutzung des TV folgen Sie bitte den Anweisungen auf dem
Bildschirm zur Kopplung der Fernbedienung und weiteren Einstellungen.
Achtung: Wenn kein Signal vorhanden ist, versuchen Sie, den TV-Dongle erneut ein-
und auszustecken. Detaillierte Schritte finden Sie im Abschnitt 5.1.
Um Google TV zu verlassen, drücken Sie bitte auf die Taste Videoquelle auf der
Fernbedienung.
TV
TV
Achtung: Wenn Sie zum ersten Mal TV verwenden, folgen Sie bitte den
Bildschirmanweisungen für die Kopplung der Fernbedienung und andere Einstellungen.
Falls Sie eine neue Fernbedienung verwenden oder Google TV zum ersten Mal
verwenden, halten Sie die Taste gedrückt für 10~30 Sekunden.

61
6.4.2. Video / Musik / Foto im Dateimanager
abspielen
6.5. Bildschirmfreigabe
1. Stecken Sie das USB-Laufwerk ein, das [USB]-Symbol auf der Startseite wird weiß.
2. Wählen Sie das [USB]-Symbol oder den Dateimanager.
3. Wählen Sie die gewünschte Datei (oder den Ordner, um in den Unterordner zu
gelangen) im USB-Laufwerk und drücken Sie die [OK]-Taste, um die Wiedergabe zu
starten.
Die Leistung der Bildschirmspiegelung bei drahtloser Verbindung wird von der
Netzwerkumgebung beeinflusst. Eine Bandbreite von 100 Mbit oder mehr wird bei der
Nutzung der Bildschirmspiegelung empfohlen.
Stellen Sie sicher, dass Ihr Mobilgerät nahe am Projektor ist, wenn Sie die drahtlose
Verbindung nutzen. Ein Abstand von weniger als 1 Meter wird empfohlen.
Einige Mobilgeräte unterstützen die Bildschirmspiegelung aufgrund der Kompatibilität
evtl. nicht.
Bei Fragen wenden Sie sich bitte per E-Mail an das Yaber-Service-Team unter
Bevor Sie den Bildschirm Ihres Handys auf den Projektor übertragen, stellen Sie bitte
sicher, dass Ihr Handy und der Projektor mit demselben WiFi-Netzwerk verbunden sind.
Öffnen Sie in der Yaber-App [Gerät verbinden] und wählen Sie das Gerät namens
[Yaber_K3_xxxx], um eine Verbindung herzustellen.
Nach dem Verbinden wählen Sie die Bildschirmspiegelungsoption in der Yaber-App,
um den Bildschirm Ihres Handys mit dem Projektor zu teilen.
Wenn Sie die Bildschirmfreigabe beenden möchten, gehen Sie zum Kontrollzentrum
Ihres Handys, wählen Sie das Gerät und beenden Sie die Freigabe.
Achtung: Wenn Sie den Bildschirm von Streaming-Apps wie Netflix, Disney oder Prime
Video teilen möchten, rufen Sie dazu das Dongle-System auf.
Um Ihr Bildschirmfreigabe-Erlebnis zu verbessern, laden Sie die [Yaber]-App aus dem
Apple App Store oder Google Play Store herunter.
Warme Tipps:
So teilen Sie den Bildschirm:
yaber
Yaber
yaber
4+
Designed for iphone
Dawnwin Techonology
Free
View in Mac App Store

62
6.6. Bluetooth-Einstellungen
6.6.1. Bluetooth-Verbindung:
6.7. Leisemodus
Verbinden des Projektors mit externen Lautsprechern/Kopfhörern
Gehen Sie zur Startseite -> Wählen Sie [Einstellungen] -> [Bluetooth] - Suchen Sie
automatisch nach Bluetooth-Geräten in der Nähe - Wählen Sie das gewünschte
Bluetooth-Gerät - es wird automatisch gekoppelt und verbunden.
Verbinden externer Geräte mit dem Projektor (Projektor als Bluetooth-Lautsprecher
verwenden)
Dieser Projektor unterstützt die Funktion eines Bluetooth-Lautsprechers. Drücken
Sie die Taste [ ] am Projektor oder wählen Sie [Bluetooth-Lautsprechermodus] auf
der Startseite, dann können Sie Ihren Projektor [K3_xxxx] mit Ihrem Mobilgerät als
Bluetooth-Lautsprecher für die Musikwiedergabe suchen und koppeln.
Im Leisemodus können Sie das Geräuschniveau des Projektors steuern, um es auf einer
niedrigen Stufe zu halten. Das Gerät arbeitet mit geringerer Leistungsaufnahme, und
die Projektionshelligkeit ist etwas niedriger als im normalen Zustand.

63
6.8. Alexa-Einrichtung
Anleitung:
Achtung: Alexa unterstützt nur Englisch
und Deutsch. Wenn Alexa nicht aktiviert ist,
wenden Sie sich bitte an das Kundendienst-
Team.
Diese Funktion muss mit Alexa-fähigen
Smart-Lautsprechern verwendet und über
die Alexa-App auf dem Handy konfiguriert
werden.
1. Verbinden Sie den Projektor mit WiFi, aktivieren Sie Alexa auf der Startseite des
Projektors und melden Sie sich in Ihrem Amazon-Konto an.
2. Öffnen Sie die Alexa-App auf Ihrem Handy und melden Sie sich in Ihrem Amazon-
Konto an. Gehen Sie zu [Mehr] - [Skills & Spiele] und suchen Sie nach Skills, finden und
aktivieren Sie [Whale Video].
Account
Tap "Sign in with Amazon" below and follow the instructions to link projector with Alexa.
Try saying "Alexa, turn off projector" or "Alexa, switch to hdmi on projector."
Additionally, you can also find a list of available voice commands on projector's Alexa Skills page.
Sign In

64
3. In den [Whale Screen-Einstellungen] - [Erweiterte Einstellungen] koppeln Sie den
Projektor mit einem Smart-Lautsprecher (mit integriertem Alexa).

65
4. Versuchen Sie nun zu sprechen: "Alexa, öffne YouTube auf dem Projektor".
Alexa-Befehlsliste
1. Alexa, schalte den Projektor aus
2. Alexa, wechsle zu HDMI auf dem Projektor
3. Alexa, öffne Netflix/YouTube auf dem Projektor
4. Alexa, öffne die Einstellungen auf dem Projektor
5. Alexa, gehe zur Startseite auf dem Projektor
6. Alexa, stummschalten/Ton einschalten/Lautstärke erhöhen/verringern auf dem
Projektor
7. Alexa, fortsetzen auf dem Projektor
8. Alexa, öffne die Bluetooth-Einstellungen auf dem Projektor
9. Alexa, öffne die Netzwerkeinstellungen auf dem Projektor
10. Alexa, aktiviere/deaktiviere den Bildschirmschoner auf dem Projektor
11. Alexa, aktiviere/deaktiviere den Autofokus auf dem Projektor
12. Alexa, aktiviere/deaktiviere den Leisemodus auf dem Projektor
13. Alexa, aktiviere Screencast auf dem Projektor
14. Alexa, aktiviere den Dokumentmodus auf dem Projektor
15. Alexa, nächster/vorheriger/neu starten auf dem Projektor
16. Alexa, Bildschirm ein-/ausschalten auf dem Projektor

66
6.9. System-Update
6.9.1. Lokales Upgrade
6.9.2. Online-Upgrade
6.10. Einschaltmodus
6.11. Sicheres Herunterfahren
Laden Sie das Software-Upgrade-Paket von der Unternehmenswebsite herunter und
kopieren Sie es in das Stammverzeichnis einer tragbaren Festplatte oder eines USB-
Laufwerks und stecken Sie das Laufwerk in den USB-Anschluss. Gehen Sie zu [Über] ->
[Upgrade] und wählen Sie [Lokales Upgrade]. Das System erkennt das Upgrade-Paket
automatisch und installiert es für das Upgrade.
Gehen Sie zu [Über] -> [Upgrade] und wählen Sie [Online-Upgrade]. Das System
erkennt automatisch, ob eine neue Version verfügbar ist und fragt Sie um Erlaubnis, sie
zu installieren.
Im Standby-Modus leuchtet die Power-LED am Projektor, wenn das Stromkabel
eingesteckt wird.
Sie müssen die Power-Taste drücken, um den Projektor einzuschalten.
Wenn Power-Taste eingeschaltet ist, schaltet sich das Gerät automatisch ein, wenn
das Stromkabel eingesteckt wird.
Drücken Sie die Taste am Projektor oder auf der Fernbedienung und dann die OK-
Taste, um den Projektor auszuschalten.
Stecken Sie das Stromkabel des Projektors aus. Decken Sie das Objektiv ab und lagern
Sie den Projektor an einem kühlen und trockenen Ort.

67
7. Wartungstipps
7.1. Pflege des Projektors
Bitte verwenden Sie das Gerät korrekt:
Blockieren Sie nicht die Luftein- und -austritte, um Schäden an der inneren Elektronik
durch unzureichende Kühlung zu vermeiden.
Richten Sie das Objektiv nicht direkt auf Ihre Augen, da das starke Licht des Projektors
die Augen schädigen kann.
Reinigen Sie das Objektiv nicht direkt mit Papier, Tuch oder anderen
Reinigungswerkzeugen, um eine Beschädigung des Objektivs zu vermeiden.
Reinigen Sie das Produkt nicht mit chemischen Reagenzien, Reinigungsmitteln
oder anderen Flüssigkeiten, um Korrosion der Leiterplatte durch Regenwasser oder
mineralhaltige Flüssigkeiten zu vermeiden.
Halten Sie das Gerät sowie seine Komponenten und Zubehörteile außerhalb der
Reichweite von Kindern.
Stellen Sie sicher, dass das Gerät in einer trockenen und gut belüfteten Umgebung
verwendet wird.
Lagern Sie das Gerät nicht an übermäßig heißen oder kalten Orten, da extreme
Temperaturen die Lebensdauer elektronischer Geräte verkürzen können.
Platzieren Sie das Gerät nicht in Heizgeräten wie Trocknern und Mikrowellen, um es zu
trocknen.
Üben Sie keinen starken Druck auf das Gerät aus und legen Sie keine Gegenstände
darauf oder dahinter, um Beschädigungen zu vermeiden.
Werfen, schlagen oder schütteln Sie das Gerät nicht gewaltsam, um Schäden an den
inneren Leiterplatten zu vermeiden.
Versuchen Sie nicht, das Gerät selbst zu zerlegen und wieder zusammenzubauen
Wenden Sie sich bei Problemen an den Yaber-Kundendienst.
68
Manuel d'utilisation
Videoprojecteur
K3
DE

69

70
SOMMAIRE
Assistance professionnelle à vie de YABER ............................................................................................................................ 71
1. Contenu de l'emballage.................................................................................................................................................................72
2. spécifications du projecteur ......................................................................................................................................................73
3.Aperçu du projecteur .......................................................................................................................................................................74
4.Vue d'ensemble de la ......................................................................................................................................................................75
5.Installation .............................................................................................................................................................................................. 76
5.1 Installation de la clé TV .......................................................................................................................................................... 76
5.2. Distance et taille de projection .......................................................................................................................................77
5.3. Réglage de l'angle....................................................................................................................................................................77
5.4. Installation au plafond ..........................................................................................................................................................77
5.5. Connecter les appareils.......................................................................................................................................................78
6.Fonctionnement...................................................................................................................................................................................78
6.1. Démarrage du projecteur ....................................................................................................................................................78
6.1.1. Préparation de la télécommande ........................................................................................................................79
6.1.2. Mise sous tension .............................................................................................................................................................79
6.1.3. Première configuration ............................................................................................................................................... 80
6.2. Réglage de l'image .................................................................................................................................................................80
6.2.1. Mise au point ......................................................................................................................................................................80
6.2.2. Correction du trapèze/keystone ...........................................................................................................................81
6.2.3. Évitement automatique des obstacles et alignement automatique de l'écran ................81
6.3. Mode image ................................................................................................................................................................................ 82
6.3.1. Luminosité ............................................................................................................................................................................ 82
6.3.2. Réglage de l'image....................................................................................................................................................... 82
6.4. Médias ............................................................................................................................................................................................. 83
6.4.1. Google TV ............................................................................................................................................................................. 83
6.4.2. Lecture d'une vidéo, d'une musique ou d'une photo dans le gestionnaire de fichiers 84
6.5. Partage d'écran ........................................................................................................................................................................ 84
6.6. Paramètres Bluetooth ..........................................................................................................................................................85
6.6.1. Connexion Bluetooth : ..................................................................................................................................................85
6.7. Mode silencieux .........................................................................................................................................................................85
6.8. Configuration de l'Alexa ...................................................................................................................................................... 86
6.9. Mise à jour du système ........................................................................................................................................................89
6.9.1. Mise à jour locale ............................................................................................................................................................ 89
6.9.2. Mise à niveau en ligne ...............................................................................................................................................89
6.10. Mise sous tension ...................................................................................................................................................................89
6.11. Arrêt sécurisé ..............................................................................................................................................................................89
7. conseils d'entretien ..........................................................................................................................................................................90
7.1. Entretien du projecteur ..........................................................................................................................................................90

71
Assistance professionnelle à vie de
YABER
Cher client,
Nous vous remercions d'avoir choisi le projecteur Yaber K3.
Ce manuel vous aidera à naviguer à travers toutes les fonctionnalités.
Nous comprenons que de nombreuses questions et préoccupations peuvent surgir
pendant l'utilisation du projecteur. Nous sommes également impatients de connaître
votre avis. Cependant, laisser un commentaire sur la page n'apporte pas de solution
plus rapide.
De nombreux problèmes courants, tels que l'absence de mise au point automatique
ou de son, les problèmes de connexion WiFi ou Bluetooth, peuvent généralement être
résolus en ajustant les paramètres appropriés.
Si vous rencontrez des problèmes, n'hésitez pas à nous envoyer votre numéro de
commande et les problèmes rencontrés à l'adresse suivante à l'adresse
service@
yaber.com (par exemple, FR+K3+Numéro de commande 000-000000 0-0000000
+Problème)
Soyez assuré que notre équipe de service vous proposera une solution dans les
meilleurs délais.
Votre satisfaction est notre priorité absolue. Si vous rencontrez un problème, nous
espérons sincèrement que vous nous donnerez l'occasion d'arranger les choses.
Nous vous souhaitons une excellente expérience avec le projecteur K3.
Équipe du service clientèle de Yaber
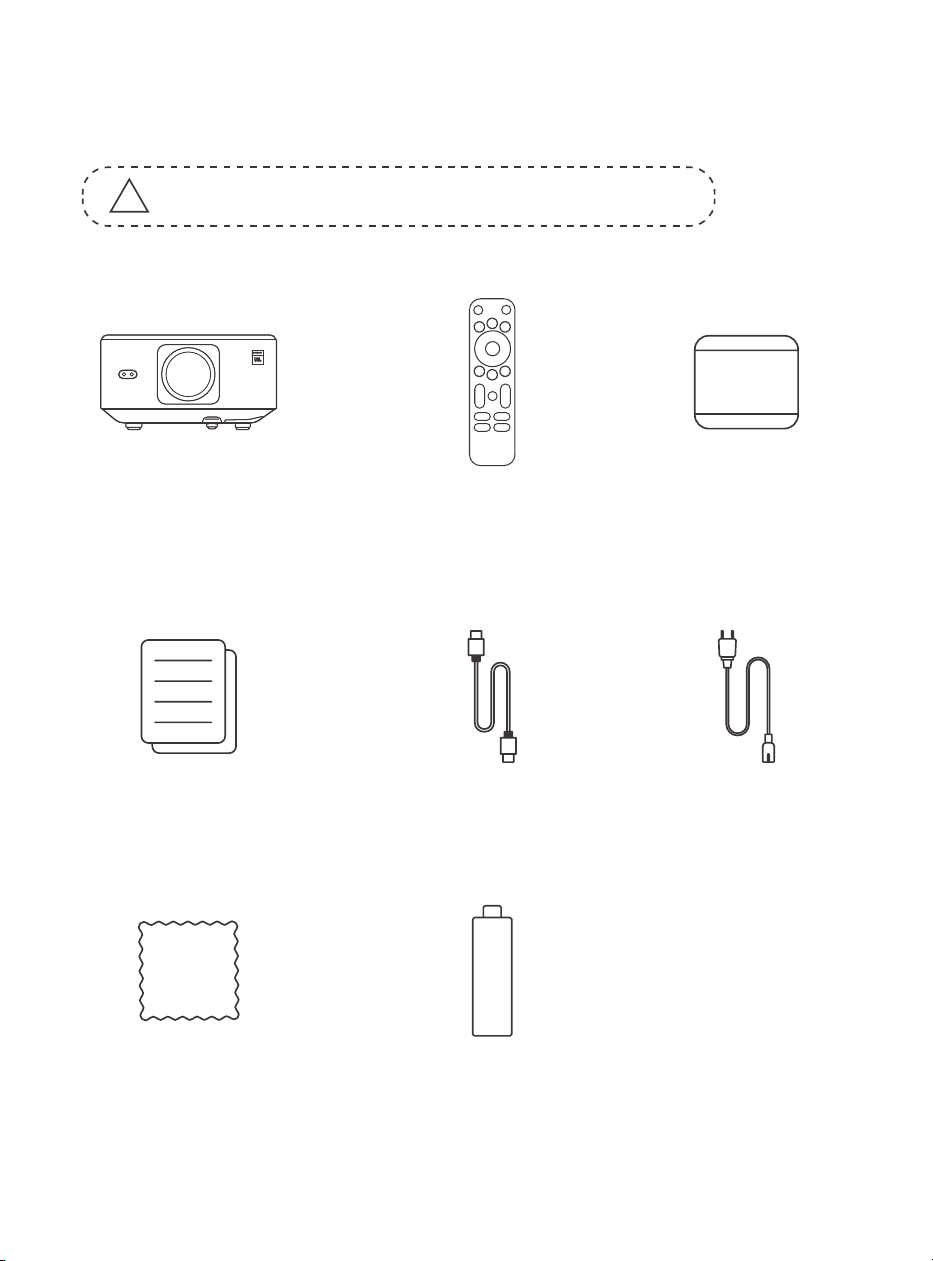
72
1. Contenu de l'emballage
!
Attention : la clé est déjà connectée au projecteur.
Projecteur K3
Télécommande
Cache de
l'objectif
Guide de
démarrage
rapode &FAQ
Câble HDMI
Cordon
d'alimentation
Chiffon de
nettoyage
Dongle TV
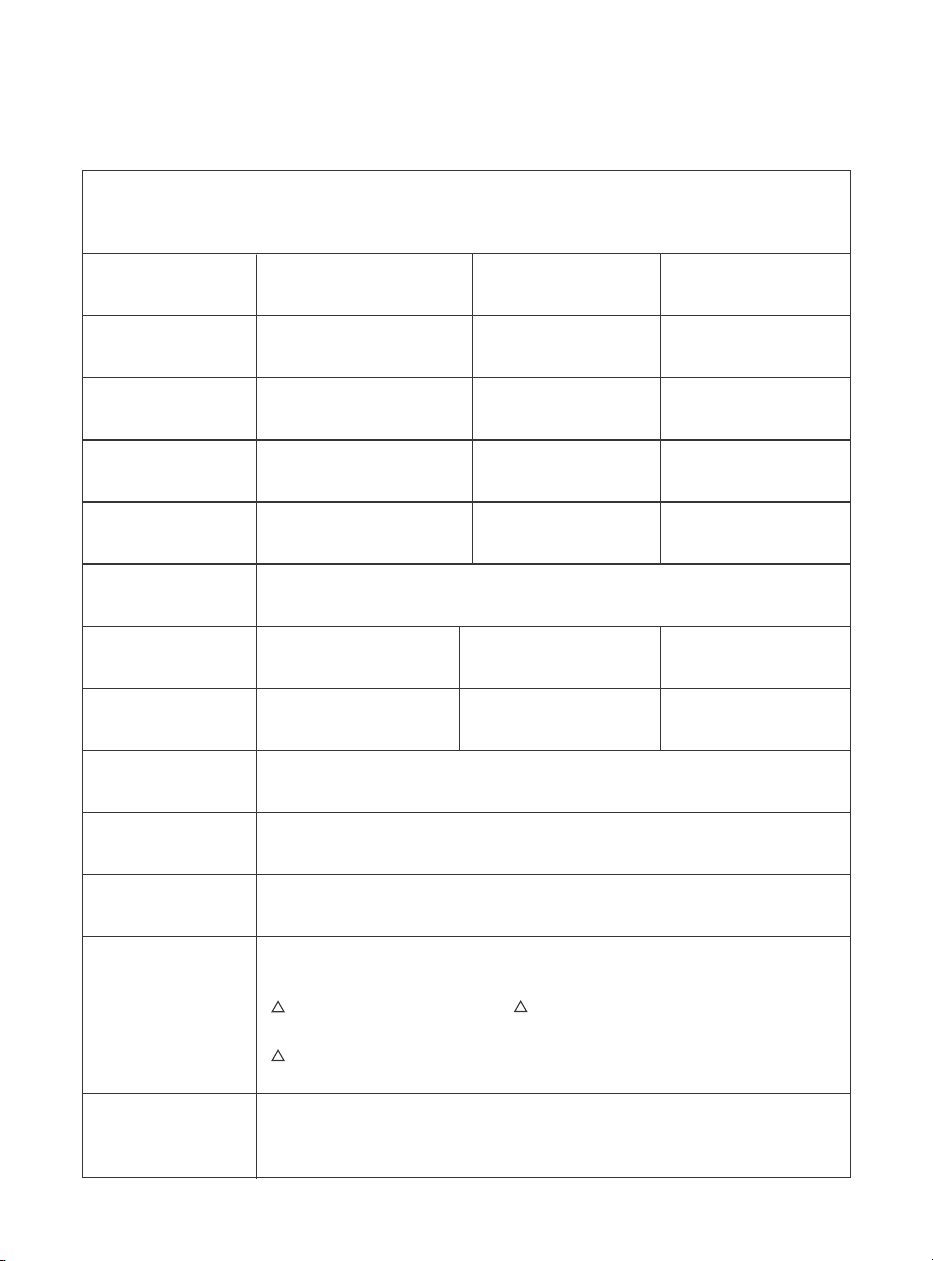
73
2. spécifications du projecteur
Modèle n° K3
Résolution
native
Rapport d'aspect
1920*1080
16:9/4:3
Auto/Electrique
Auto
LED
1.2.1
Auto/Eletrique
Auto
Source lumineuse
Rapport de projection
Correction de la distorsion
trapézoïdale
Mise au point
Interface
Format d'image
Format audio
Format vidéo
Format USB
Documents WPS
Tension
d'alimentation
Poids du projecteur
Alignement
de l'écran
Distance de
projection
Min1.1m~ Max3.3 m
min. 43,3 - max 129,9 Zoll
Évitement des obstacles
Dimension de l'unité
100-240V~/50-60Hz Consommation électrique 300W
Avant/arrière sur le bureau
Avant/arrière sur le plafond
Méthode de projection
5.1 kg (11.24 lbs)
USB 2.0×1, HDMI 1.4×1, Sortie audio×1, Lan×1
JPG, PNG, BMP, JPEG
MP3, AAC, LPCM, APE, FLAC, OGG, AMR
MP4, MKV, WMV, 3GP, MPG, VOB, TP, TS, DAT, MOV, FLV
FAT 32, NTFS
txt, pdf, docx, xlsx, pptx
165x140x290mm
6,4x5,5x11,4 Zoll
Format non pris en charge : Exfat Attention: Si le projecteur ne peut pas
reconnaître le contenu de la clé USB, veuillez vérifier si votre clé USB est formatée.
vérifier si votre clé USB est correctement formatée.
!
!
!
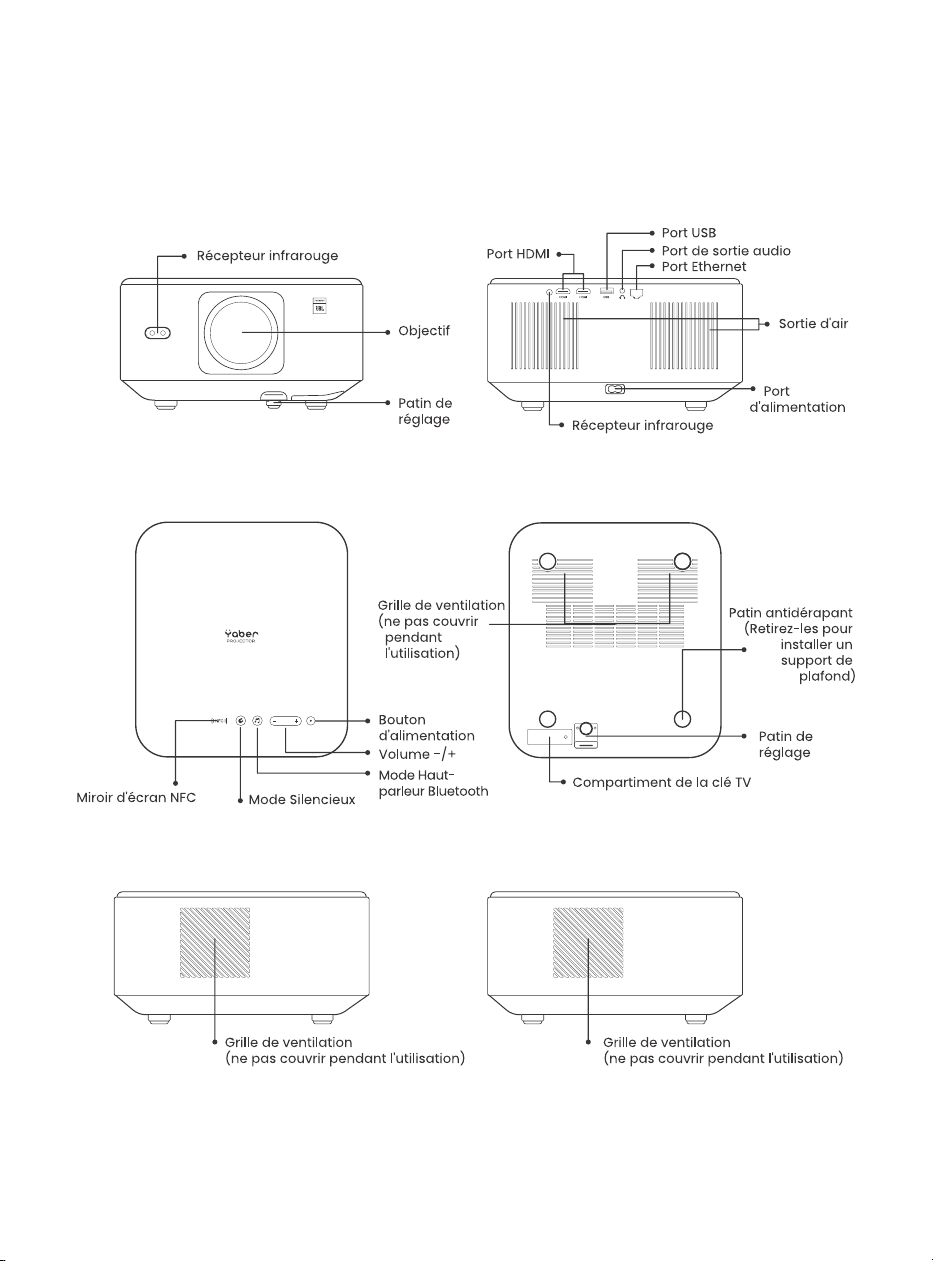
74
3.Aperçu du projecteur
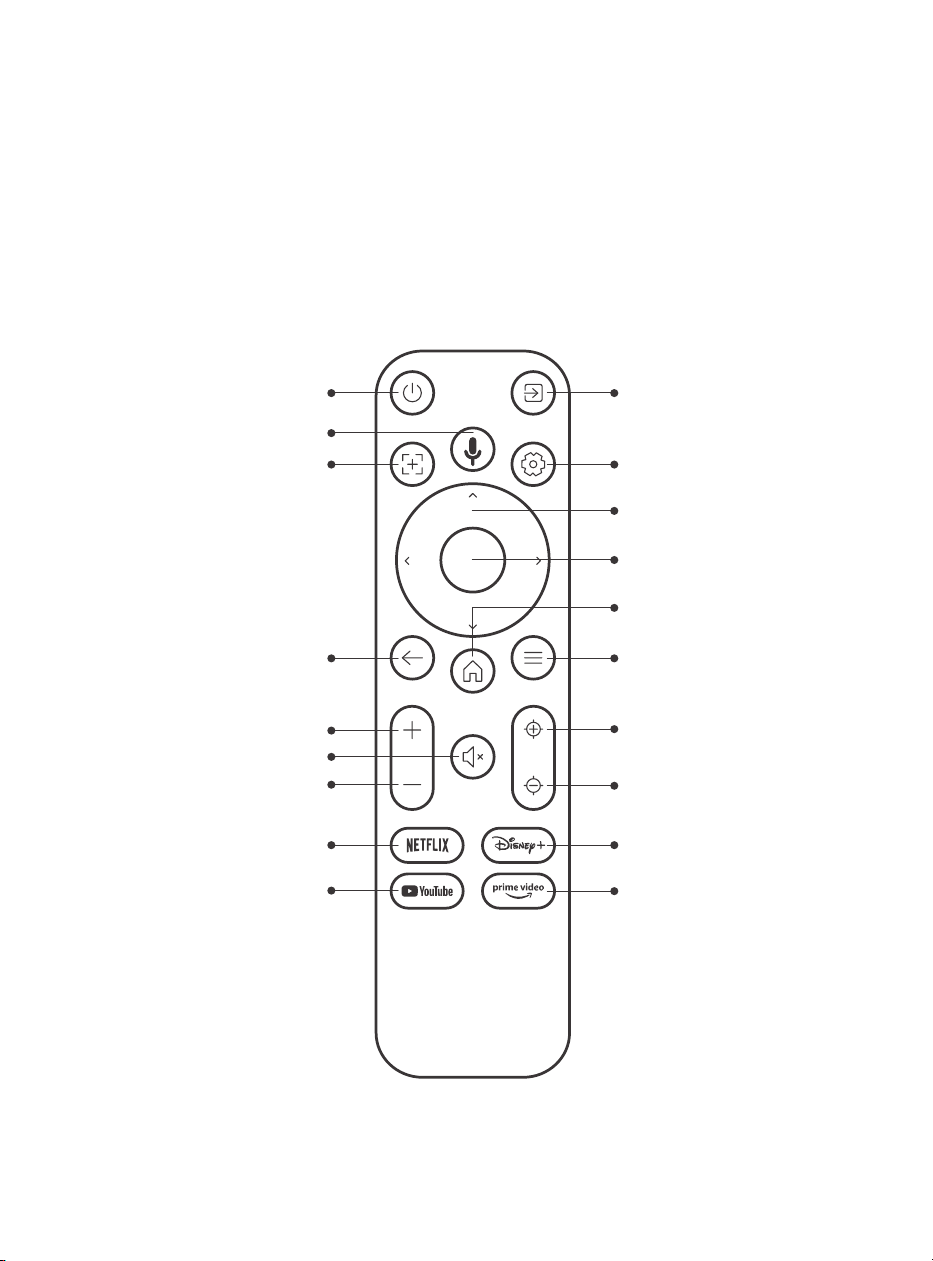
75
4.Vue d'ensemble de la
télécommande
Source VidéoPerformance
Recherche vocale
Mise au point
automatique
Retour
Volume PLUS
Volume Bas
Netflix
YouTube
Muet
Paramètres
Touche Flèche
Confirmer
Accueil
Menu
Focalisation +
Focalisation -
Disney+
Prime Video

76
5.Installation
5.1 Installation de la clé TV
Comment retirer ou installer la clé électronique
1. Utilisez un tournevis pour retirer les
vis du couvercle du compartiment du
Dongle (taille des vis : ST2.3×6mm).
3. Insérez le dongle dans le port HDMI à
l'intérieur du compartiment. (Assurez-
vous que la clé électronique est bien
insérée pour l'identifier).
2. Assurez-vous que le port du dongle
n'est pas endommagé (comme illustré
ci-dessous).
4. connectez le câble micro USB au
dongle TV et fermez le couvercle.
Couvercle
Port Micro USB (Marque
à l'arrière)
Dongle TV monté
Port Micro HDMI
(Marquer au dos)
Câble
d'alimentation USB
Plateau
Dongle TV
Emplacement

77
5.2. Distance et taille de projection
5.3. Réglage de l'angle
5.4. Installation au plafond
Le rapport de projection du K3 est de 1,2:1. Veuillez placer le projecteur en
fonction des distances correspondantes dans le tableau ci-dessous et de la
taille d'écran souhaitée.
Si nécessaire, appuyez sur ce bouton & pour débloquer le réglage du pied.
D'autres réglages peuvent être effectués en tournant l'écrou.
Étape 1 : Assurez-vous que vous disposez d'un support de montage universel
adapté au projecteur.
Étape 2 : Retirez les quatre tampons en caoutchouc situés sous le projecteur
et utilisez les vis M5*10mm pour fixer le projecteur sur le support afin de
terminer l'installation.
9898989898989898989898989898
Mètres
Angle maximal : 10°
Câble
d'alimentation USB
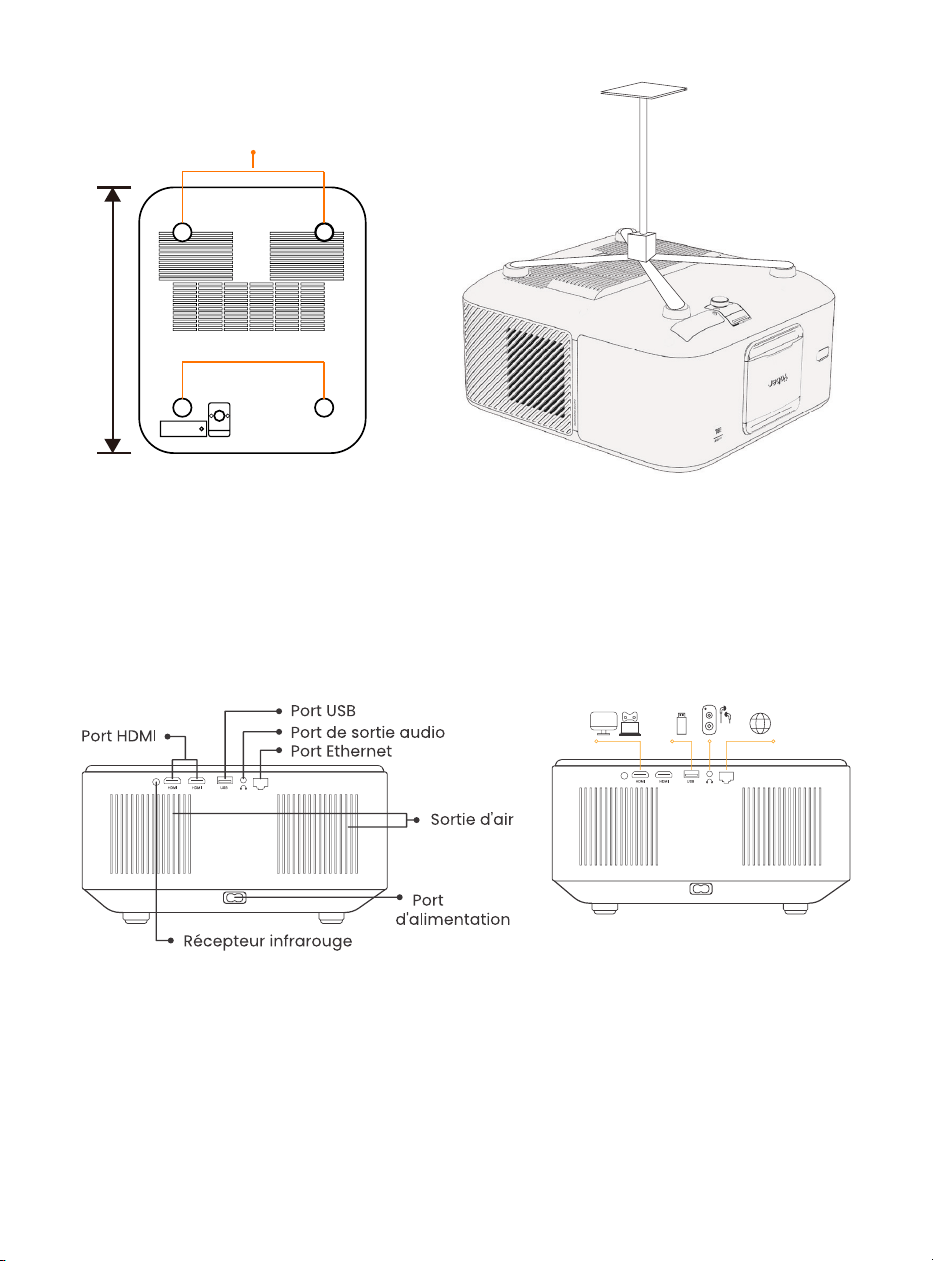
78
5.5. Connecter les appareils
6.Fonctionnement
6.1. Démarrage du projecteur
Le projecteur dispose de 5 ports, port HDMI *2 /port USB *1 /port de sortie
audio*1/port LAN (RJ45)*1. Veuillez sélectionner les ports de connexion
appropriés pour connecter vos appareils.
200 mm
Trous de vis : M5*10mm

79
6.1.1. Préparation de la télécommande
6.1.2. Mise sous tension
Ouvrez le compartiment à piles.
Insérez 2 piles AAA en respectant la polarité indiquée.
Fermez le compartiment à piles.
Remarque : Vous devez utiliser la télécommande Yaber pour effectuer la
première configuration du projecteur.
Appuyez sur la touche d'alimentation de la télécommande ou du projecteur. Le voyant
d'alimentation du projecteur passe de l'orange à l'éteint.
Pour éteindre le projecteur, appuyez une fois sur la touche, puis appuyez à nouveau
sur la touche lorsque le menu d'alimentation s'affiche.

80
6.1.3. Première configuration
6.2. Réglage de l'image
6.2.1. Mise au point
Mise au point automatique
Mise au point manuelle
Lorsque vous allumez le projecteur pour la première fois ou que le projecteur est
réinitialisé aux paramètres d'usine par défaut, vous êtes invité à effectuer la première
configuration.
Vous pouvez sélectionner la langue de votre système, le Wi-Fi et découvrir les
nouvelles fonctions et astuces du projecteur.
Après la configuration, le projecteur passe à la page d'accueil.
Lorsque le projecteur est utilisé pour la première fois, il affiche normalement une
image peu claire. Cela est dû au fait que l'objectif n'est pas au point ou que le réglage
de la distorsion trapézoïdale est incorrect.
Veuillez utiliser les touches de mise au point automatique et de mise au point manuelle
de la télécommande pour obtenir la meilleure image. La mise au point automatique
peut également être déclenchée en déplaçant le projecteur vers un autre endroit.
La mise au point automatique est activée par défaut et refait la mise au point chaque
fois que l'appareil est déplacé.
Si d'autres réglages de la mise
au point sont nécessaires, utilisez
la touche de mise au point de la
télécommande pour obtenir l'image
souhaitée.
Enfoque Automático
Enfoque +/-
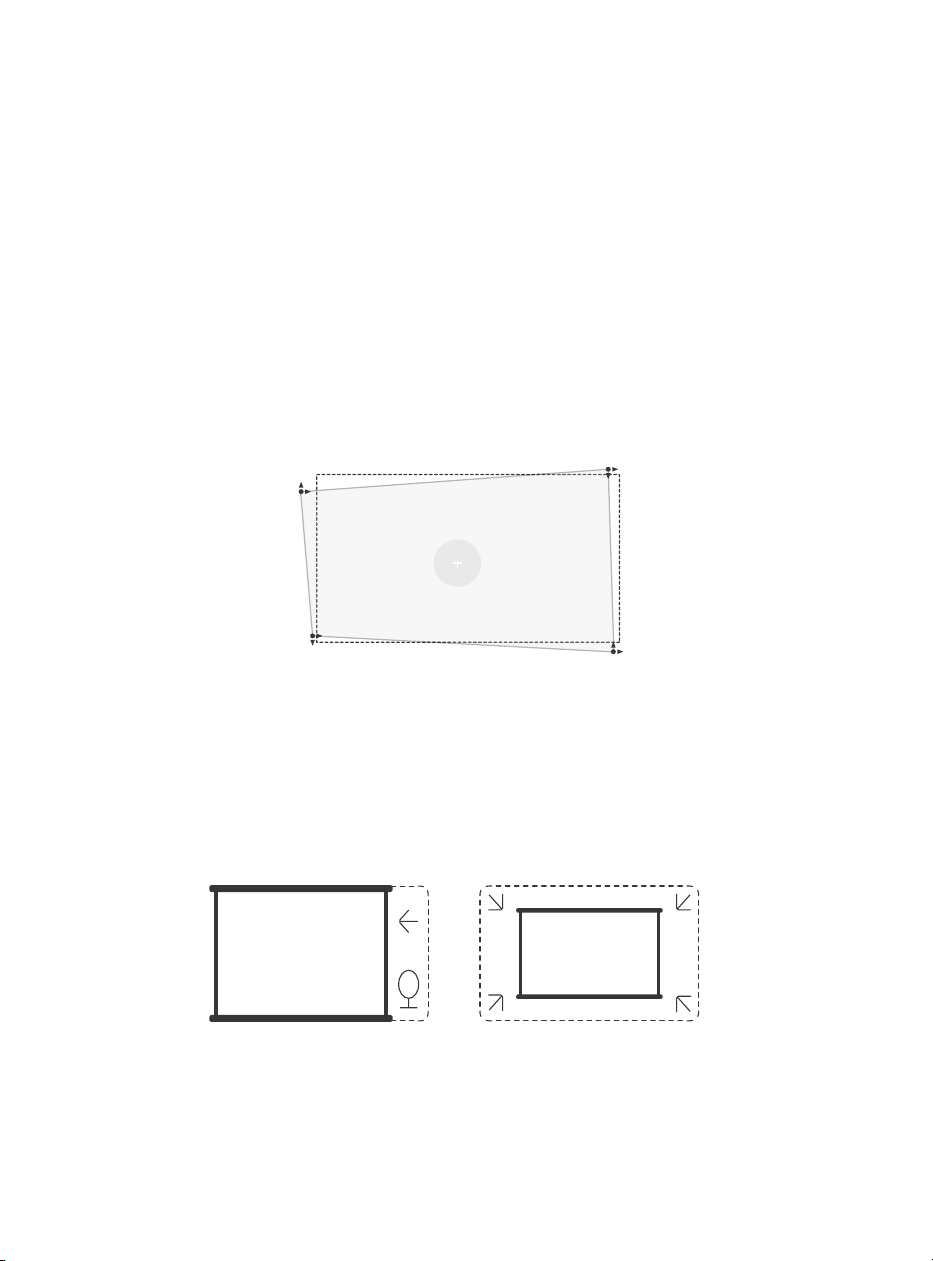
81
6.2.2. Correction du trapèze/keystone
6.2.3. Évitement automatique des obstacles et
alignement automatique de l'écran
Attention : La plage de correction automatique du trapèze est de ±18 degrés
horizontalement et verticalement.
La correction automatique du trapèze est activée par défaut. Si vous devez désactiver
cette fonction, naviguez dans [Accueil] - [Paramètres] - [Mode de projection] - [Auto
Keystone].
Si d'autres ajustements de l'écran sont nécessaires, veuillez sélectionner [Keystone
manuel dans [Mode de projection] et ajuster l'écran en faisant glisser les flèches.
Attention : Si vous avez déjà réglé l'écran à l'aide du trapèze manuel, veuillez désactiver
le trapèze automatique, sinon l'écran sera réinitialisé après le prochain mouvement du
projecteur.
1. S'il y a des objets blancs ou de couleur claire sur l'écran cible, les obstacles peuvent
ne pas être évités.
2. La toile de fond doit avoir une bordure noire ou d'une autre couleur distincte, sauf
pour les écrans anti-lumière qui n'ont pas besoin de bordure.
3. Avant d'utiliser la fonction d'ajustement automatique de l'écran :
Veillez à ce que l'écran de projection soit plus grand que la surface de l'écran et ne
bloquez pas la zone centrale de l'écran.
Ne bloquez pas la zone située à l'intérieur du cadre central de l'écran.
Correction manuelle de la distorsion trapézoïdale

82
6.3. Mode image
6.3.1. Luminosité
6.3.2. Réglage de l'image
Attention : Maintenez la touche menu de la télécommande enfoncée pour accéder
aux réglages pendant la lecture de vidéos ou d'images. En outre, les réglages de
couleur ne prennent effet que pendant ces activités.
Réglez la luminosité de l'écran via [Accueil] - [Réglages] - [Qualité image] - [Réglage
luminosité].
Réglez la couleur de l'image via [Accueil] - [Paramètres] - [Qualité de l'image] - [Mode
image].
Attention : Ne fonctionne qu'avec les lecteurs d'images ou de vidéos
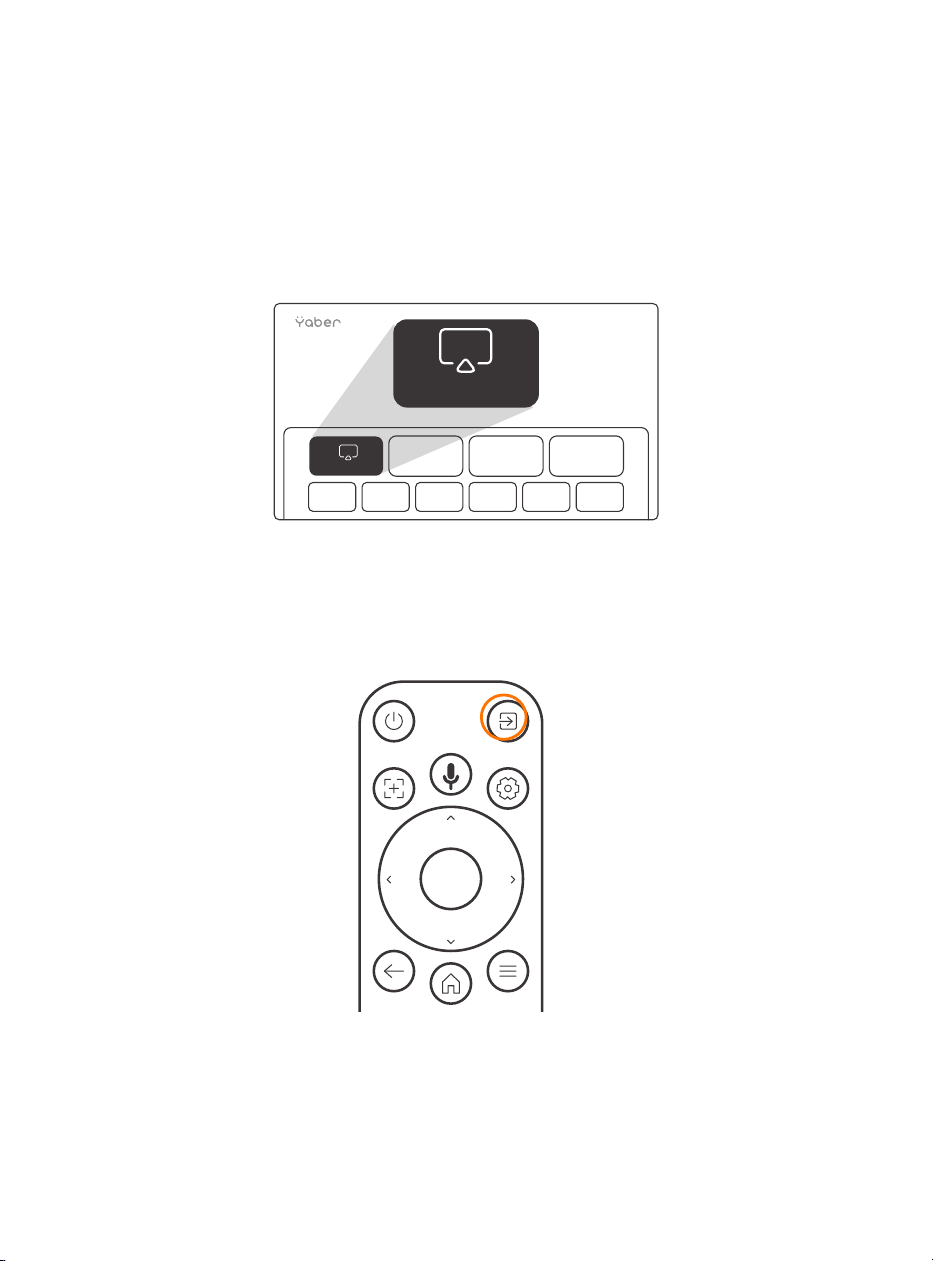
83
6.4. Médias
6.4.1. Google TV
Cliquez sur TV pour accéder au système sur la page d'accueil.
Attention : Lorsque vous utilisez TV pour la première fois, suivez les invites à l'écran pour
l'appairage de la télécommande et d'autres paramètres.
Attention : S'il n'y a pas de signal, essayez de débrancher et de rebrancher la clé TV.
Pour les étapes détaillées, veuillez vous référer à la section 5.1.
Si vous souhaitez quitter Google TV, cliquez sur le bouton « source vidéo » de la
télécommande.
TV
TV
Attention : Lorsque vous utilisez la télévision pour la première fois, suivez les instructions
à l'écran pour l'appairage de la télécommande et les autres paramètres.
Si vous utilisez une nouvelle télécommande ou si vous utilisez Google TV pour la
première fois, appuyez sur le bouton et pendant 10 à 30 secondes.

84
6.4.2. Lecture d'une vidéo, d'une musique ou
d'une photo dans le gestionnaire de fichiers
6.5. Partage d'écran
1. Insérez la clé USB, l'icône [USB] de la page d'accueil devient blanche.
2. Sélectionnez l'icône [USB] ou le gestionnaire de fichiers.
3. Sélectionnez le fichier souhaité (ou le dossier pour accéder au sous-dossier) sur la
clé USB, puis appuyez sur le bouton [OK] pour lancer la lecture.
La fluidité du partage d'écran avec une connexion sans fil dépend de l'environnement
du réseau. Une bande passante de 10 Mbits ou plus est recommandée lors de
l'utilisation du partage d'écran.
Assurez-vous que votre appareil mobile est proche du projecteur lors de l'utilisation de
la connexion sans fil. Une distance de 1 mètre est recommandée.
Certains appareils mobiles peuvent ne pas prendre en charge la fonction miroir d'écran
en raison de la compatibilité.
Si vous avez des questions, n'hésitez pas à envoyer un courriel à l'équipe de service de
Yaber à l'adresse [email protected].
Avant de partager l'écran de votre téléphone avec le projecteur, assurez-vous que
votre téléphone et le projecteur sont connectés au même réseau Wi-Fi.
Dans l'application Yaber, appuyez sur [Connecter un appareil] et sélectionnez l'appareil
nommé [Yaber_K3_xxxx] pour vous connecter.
Une fois connecté, sélectionnez l'option de partage d'écran dans l'application Yaber
pour partager l'écran de votre téléphone avec le projecteur.
Lorsque vous souhaitez mettre fin au partage d'écran, accédez au centre de contrôle
de votre téléphone, sélectionnez l'appareil et arrêtez le partage.
Attention : Si vous avez besoin de partager l'écran à partir d'applications de streaming
comme Netflix, Disney ou Prime Video, entrez dans le système Dongle pour partager.
Pour améliorer votre expérience lors du partage d'écran, téléchargez l'application
[Yaber] sur l'App Store d'Apple ou le Play Store de Google.
Conseils importants :
Comment partager :
yaber
Yaber
yaber
4+
Designed for iphone
Dawnwin Techonology
Free
View in Mac App Store
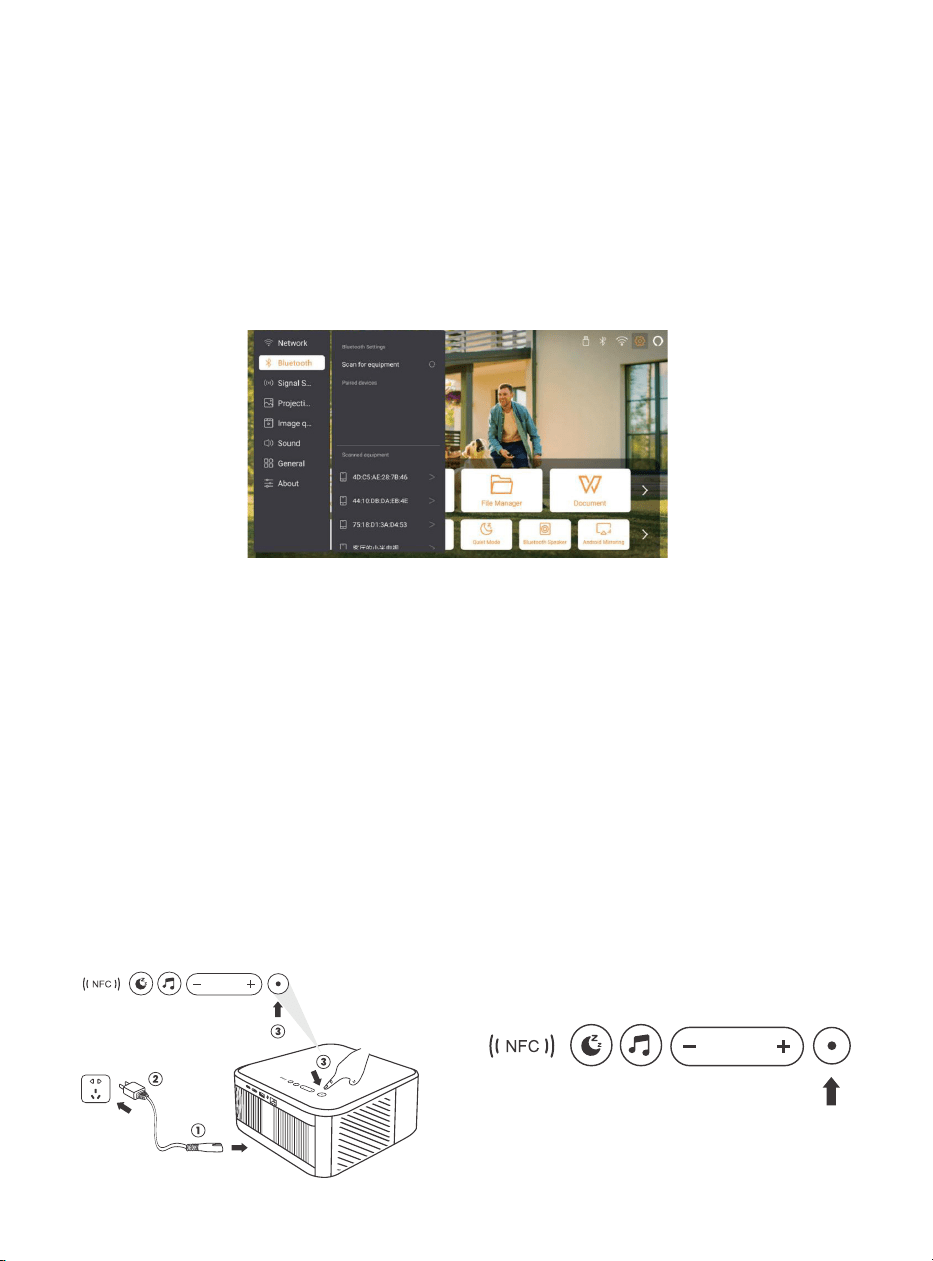
85
6.6. Paramètres Bluetooth
6.6.1. Connexion Bluetooth :
6.7. Mode silencieux
Connecter le projecteur à des haut-parleurs/écouteurs externes
Allez à la page d'accueil -> Sélectionnez le | Paramètres ] -> [ Bluetooth ] - Balayez les
appareils Bluetooth à proximité automatiquement - Choisissez l'appareil Bluetooth
désiré - il sera jumelé et connecté automatiquement.
Connexion d'appareils externes au projecteur (Utilisation du projecteur en tant que
haut-parleur Bluetooth)
Ce projecteur prend en charge la fonction de haut-parleur Bluetooth. Appuyez sur le
bouton [ ] du projecteur, ou sélectionnez [Mode Haut-parleur Bluetooth] sur la page
d'accueil, puis vous pouvez rechercher et coupler votre projecteur [K3_xxxx] avec votre
appareil mobile en tant que haut-parleur Bluetooth pour écouter de la musique.
En utilisant le mode silencieux, vous pouvez contrôler le bruit du projecteur pour le
maintenir à un niveau bas. L'appareil fonctionnera en consommant moins d'énergie et
la luminosité de la projection sera également légèrement inférieure à la normale.

86
6.8. Configuration de l'Alexa
Étapes d'utilisation :
Attention : Alexa ne prend en charge que
l'anglais et l'allemand. Si Alexa n'est pas
activé, veuillez contacter l'équipe après-
vente.
Cette fonction doit être utilisée avec des
haut-parleurs intelligents compatibles avec
Alexa et doit être configurée via l'application
Alexa sur le téléphone portable.
1. Connectez le projecteur au WiFi, activez Alexa sur l'écran d'accueil du projecteur et
connectez-vous à votre compte Amazon.
2. Ouvrez l'application Alexa sur votre téléphone et connectez-vous à votre compte
Amazon. Allez dans [Aller à Plus] - [Compétences et jeux et recherchez Compétences],
trouvez et activez [Vidéo].
Account
Tap "Sign in with Amazon" below and follow the instructions to link projector with Alexa.
Try saying "Alexa, turn off projector" or "Alexa, switch to hdmi on projector."
Additionally, you can also find a list of available voice commands on projector's Alexa Skills page.
Sign In

87
3. Dans [Paramètres de l'écran] - [Paramètres avancés], associez le projecteur à un
haut-parleur intelligent (avec Alexa intégré).

88
4. Essayez maintenant de dire : « Alexa, open YouTube on the projector »
Liste des commandes d'Alexa
1. ALexa, turn off projector
2. Alexa, switch to hdmi on projector
3. Alexa, open Netflix/YouTube on projector
4. Alexa, go settings on projector
5. Alexa, go home on projector
6. Alexa, mute/unmute/volume up/volume down on projector
7. Alexa, resume on projector
8. Alexa, open bluetooth settings on projector
9. Alexa, open network settings on projector
10. Alexa, turn on/off screen saver on projector
11. Alexa, turn on/off auto focus on projector
12. Alexa, turn on/off silent mode on projector
13. Alexa, turn on screencast on projector
14. Alexa, turn on document mode on projector
15. Alexa, next/previous/start over on projector
16. Alexa, turn on/off screen on projector

89
6.9. Mise à jour du système
6.9.1. Mise à jour locale
6.9.2. Mise à niveau en ligne
6.10. Mise sous tension
6.11. Arrêt sécurisé
Téléchargez le logiciel de mise à niveau sur le site web de l'entreprise et copiez-le
dans le répertoire racine du disque dur portable ou de la clé USB, puis branchez la clé
sur le port USB. Allez dans [A propos] > [Mise à jour] et sélectionnez [Mise à jour locale],
le système détectera alors automatiquement le pack de mise à niveau et l'installera
pour la mise à niveau.
Allez dans [À propos] -> [Mise à niveau] et sélectionnez [Mise à niveau en ligne]. Le
système détectera automatiquement si une nouvelle version est disponible et vous
demandera la permission de la mettre à niveau.
En mode veille, branchez l'alimentation électrique et la LED d'alimentation du
projecteur s'allume.
Vous devez appuyer sur le bouton d'alimentation pour allumer le projecteur.
Si le projecteur est en mode Marche, il s'allumera automatiquement après avoir
branché le cordon d'alimentation.
Appuyez sur le bouton du projecteur ou de la télécommande, puis sur la touche OK
pour éteindre le projecteur.
Débranchez le cordon d'alimentation du projecteur, couvrez l'objectif et rangez le
projecteur dans un endroit frais et sec.

90
7. conseils d'entretien
7.1. Entretien du projecteur
Veuillez utiliser l'appareil correctement :
Ne bloquez pas les entrées/sorties d'air pour éviter d'endommager les composants
électroniques internes en raison d'un mauvais refroidissement.
Ne dirigez pas l'objectif directement vers vos yeux, car la forte lumière du projecteur
peut blesser les yeux.
Ne nettoyez pas l'objectif directement avec du papier, un chiffon ou d'autres outils de
nettoyage afin d'éviter d'endommager l'objectif.
Ne nettoyez pas le produit avec des réactifs chimiques, des détergents ou tout autre
liquide afin d'éviter la corrosion du circuit imprimé par l'eau de pluie ou les liquides
humides chargés de minéraux.
Conservez l'appareil, ses composants et ses accessoires hors de portée des enfants.
Veillez à ce que l'appareil soit utilisé dans un environnement sec et bien ventilé.
Ne rangez pas l'appareil dans des endroits trop chauds ou trop froids, car les
températures extrêmes peuvent réduire la durée de vie des appareils électroniques.
Ne placez pas l'appareil dans un appareil chauffant (tel qu'un sèche-linge ou un four
à micro-ondes) pour le faire sécher.
Ne pressez pas l'appareil avec force et ne placez pas d'obstacles sur ou derrière lui
pour éviter de l'endommager.
Ne pas jeter, frapper ou secouer violemment l'appareil pour éviter d'endommager les
circuits imprimés internes.
N'essayez pas de démonter et de remonter l'appareil vous-même. En cas de problème,
contactez le service après-vente de Yaber.

91
ユーザーマニュアル
Projector K3
JP

92

93
目次
YABER ライフタイムプロフェッショナルサポート ............................................................. 94
1. パッケージ内容 ............................................................................................................ 95
2. プロジェクター仕様 ...................................................................................................... 96
3. プロジェクター概要 ...................................................................................................... 97
4. リモコン概要 ................................................................................................................ 98
5. 設置 ............................................................................................................................. 99
5.1 TV ドングルの取り付け ............................................................................................ 99
5.2 距離と投影サイズ .................................................................................................. 100
5.3 角度調整................................................................................................................ 100
5.4 天井への取り付け .................................................................................................. 100
5.5. デバイスの接続 .................................................................................................... 101
6. 操作 ........................................................................................................................... 101
6.1 プロジェクターの起動 ........................................................................................... 101
6.1.1 リモコンの準備................................................................................................ 102
6.1.2 電源オン .......................................................................................................... 102
6.1.3 初回設定 .......................................................................................................... 103
6.2 画像調整................................................................................................................ 103
6.2.2 台形補正 .......................................................................................................... 104
6.2.3 自動障害物回避と自動スクリーン合わせ ........................................................... 104
6.3. 画面モード ........................................................................................................... 105
6.3.1 明るさ ............................................................................................................. 105
6.3.2 画像調整 .......................................................................................................... 105
6.4 メディア................................................................................................................ 106
6.4.1. Google TV ...................................................................................................... 106
6.4.2 ファイルマネージャーでビデオ / 音楽 / 写真を再生する .................................... 107
6.5 スクリーンシェア .................................................................................................. 107
6.6 Bluetooth 設定 ..................................................................................................... 108
6.6.1 Bluetooth 接続: ............................................................................................ 108
6.7 静音モード ............................................................................................................ 108
6.8 Alexa 設定 ............................................................................................................. 109
6.9 システムアップデート ........................................................................................... 112
6.9.1 ローカルアップグレード .................................................................................. 112
6.9.2 オンラインアップグレード ............................................................................... 112
6.10 電源オンモード.................................................................................................... 112
6.11 安全なシャットダウン ......................................................................................... 112
7. メンテナンスのヒント ................................................................................................ 113
7.1 プロジェクターの取り扱い ..................................................................................... 113

94
YABER ライフタイムプロフェッショナルサポ
ート
お客様
いつも YABER をご愛顧いただき、誠にありがとうございます!
本マニュアルは、すべての機能をスムーズにご利用いただくためのガイドです。プロジェクター
をご使用になる前に、このマニュアルをよくお読みください。プロジェクターをご使用中に様々
なご質問や問題が生じることがあるかと思いますが、製品ページにレビューを残されるだけでは、
お客様のご体験を直接向上させることは難しい場合がございます。ぜひ私たちにお手伝いさせて
ください!お客様のフィードバックに心から感謝し、迅速にご満足いただける解決策をご提供い
たします。
多くの一般的な問題(例えば、オートフォーカスの不具合、音声の問題、WiFi や Bluetooth 接
続の問題など)は、適切な設定調整で解決できます。何か問題がございましたら、注文番号と問
題の詳細を記載の上、以下のメールアドレスまでご連絡ください:service@yaber.com
(例:JP+K3+000-0000000-0000000+ 問題)私たちのサービスチームは 24 時間以内に解決
策を提供いたします。
お客様に満足していただける製品開発に努めてまいりますので、今後ともより一層のご愛
顧を賜りますようお願い申し上げます。
敬具
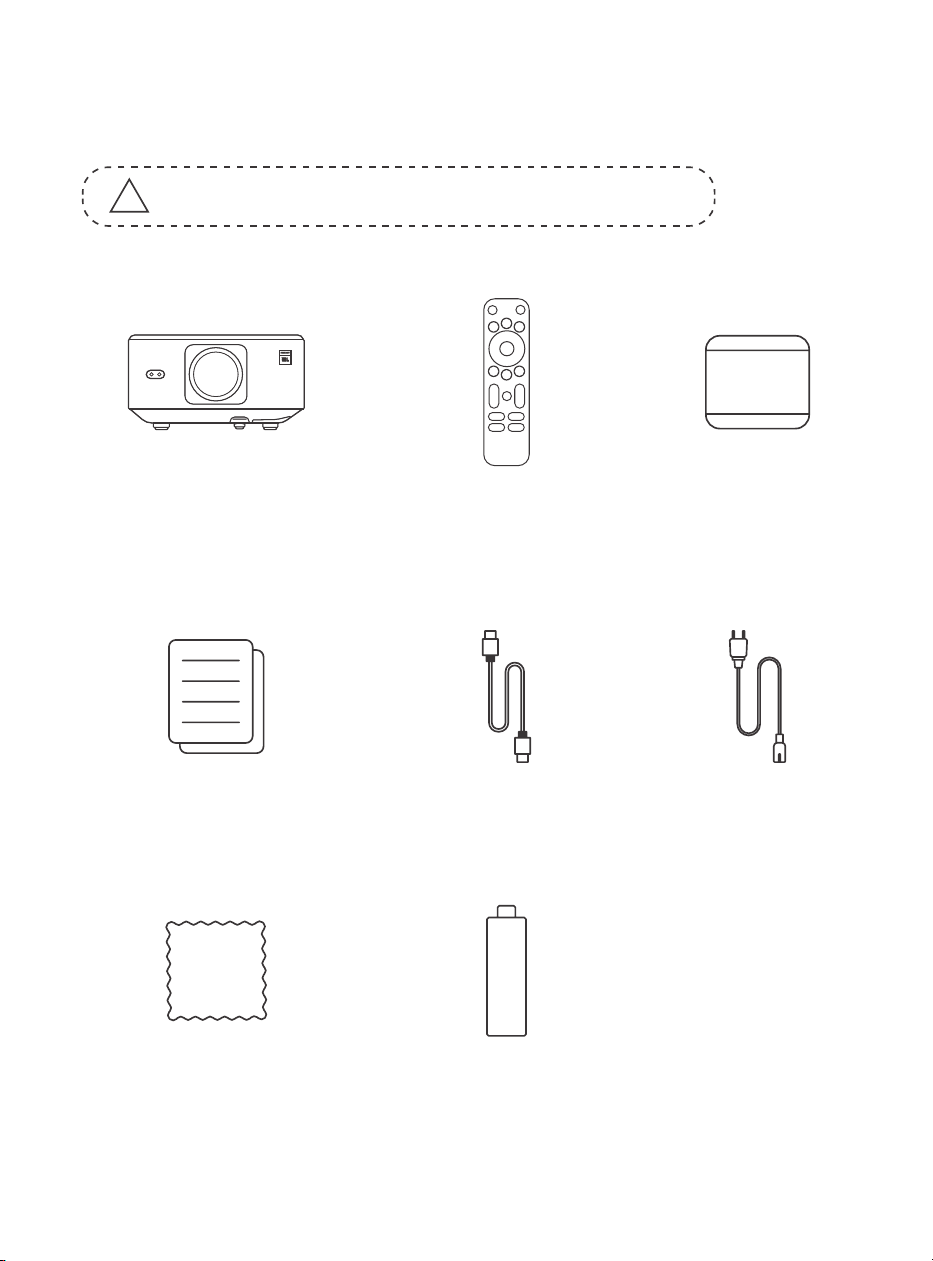
95
1. パッケージ内容
!
注意:ドングルは既にプロジェクターに内蔵されています。
K3 プロジェクター
リモコン
レンズカバー
クイックスタートガ
イド & FAQ
HDMI ケーブル
電源コード
クリーニング布
TV ドングル

96
2. プロジェクター仕様
モデル番号 : K3
ネイティブ解像度
アスペクト比
1920*1080
16:9/4:3
自動 / 電動
LED
1.2.1
自動 / 電動
自動
光源
投影比
台形補正
フォーカス
インターフェース
画像フォーマット
音声フォーマット
動画フォーマット
USB フォーマット
WPS ドキュメント
電圧
プロジェクター重量
画面調整
投影距離
最小 1.1m 〜最大 3.3m
(43.3 〜 129.9 インチ)
自動
障害物回避
本体サイズ
100-240 V ~ / 50-60 Hz 消費電力 300W
前面 / 背面(デスク上)
前面 / 背面(天井取り付け)
投影方法
5.1kg(11.24 ポンド)lbs)
USB 2.0 × 1、HDMI 1.4 × 1、オーディオ出力× 1、LAN × 1
JPG, PNG, BMP, JPEG
MP3, AAC, LPCM, APE, FLAC, OGG, AMR
MP4, MKV, WMV, 3GP, MPG, VOB, TP, TS, DAT, MOV, FLV
FAT 32, NTFS
txt, pdf, docx, xlsx, pptx
165 × 140 × 290 mm(6.4 ×
5.5 × 11.4 インチ)
非対応フォーマット : Exfat
USB メモリの内容をプロジェクターが認識しない場合、USB メモリが正しくフォーマットさ
れているかご確認ください。
!
!
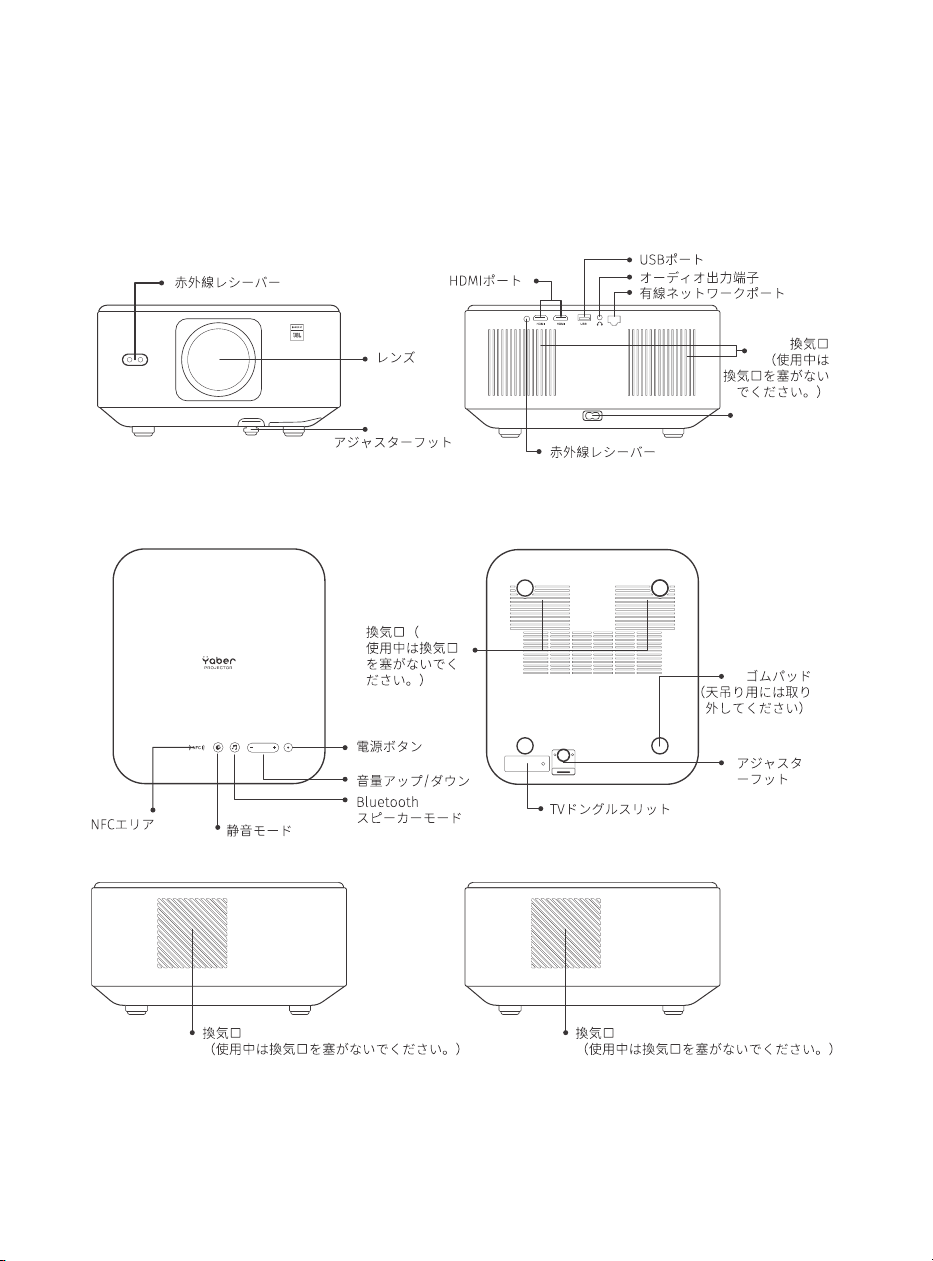
97
3. プロジェクター概要
���電源入力
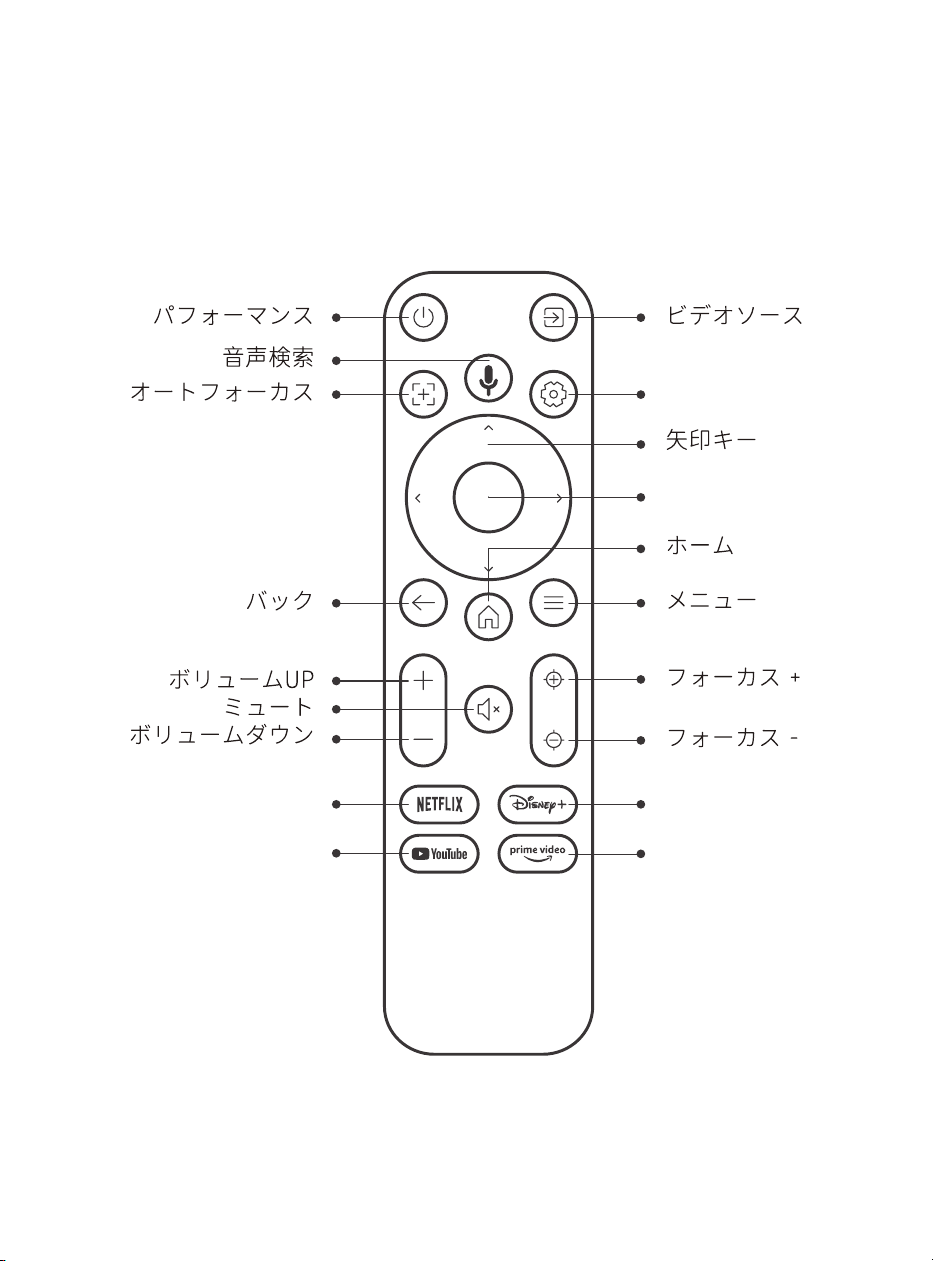
98
4. リモコン概要
Netflix
YouTube
設定
確認
Disney+
5€5 5 5 5 5P5 5 5 5 5
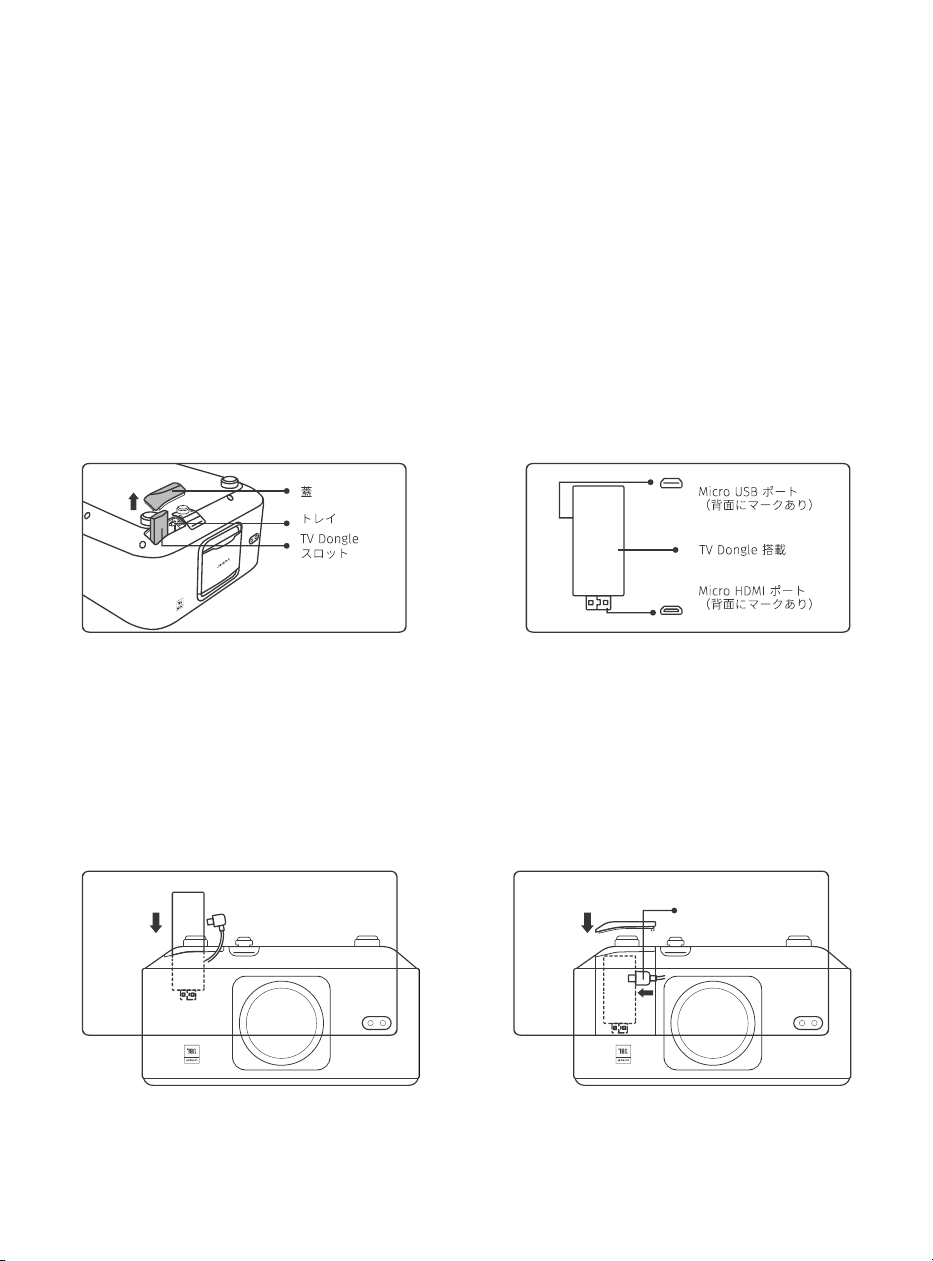
99
5. 設置
5.1 TV ドングルの取り付け
ドングルの取り外しまたは取り付け方法
1. ドングル収納部のカバーからネジを外し
ます。(ネジサイズ:ST2.3 × 6mm)
3. コンパートメント内の HDMI ポートに TV
ドングルを差し込んでください。(確実に認
識されるよう、しっかりと差し込んでくださ
い。)
2. 下図のように、TV ドングルのポートが破
損していないかご確認ください。
4. マイクロ USB ケーブルを TV ドングルに接
続し、フタを閉めます。
USB 電源ケーブル
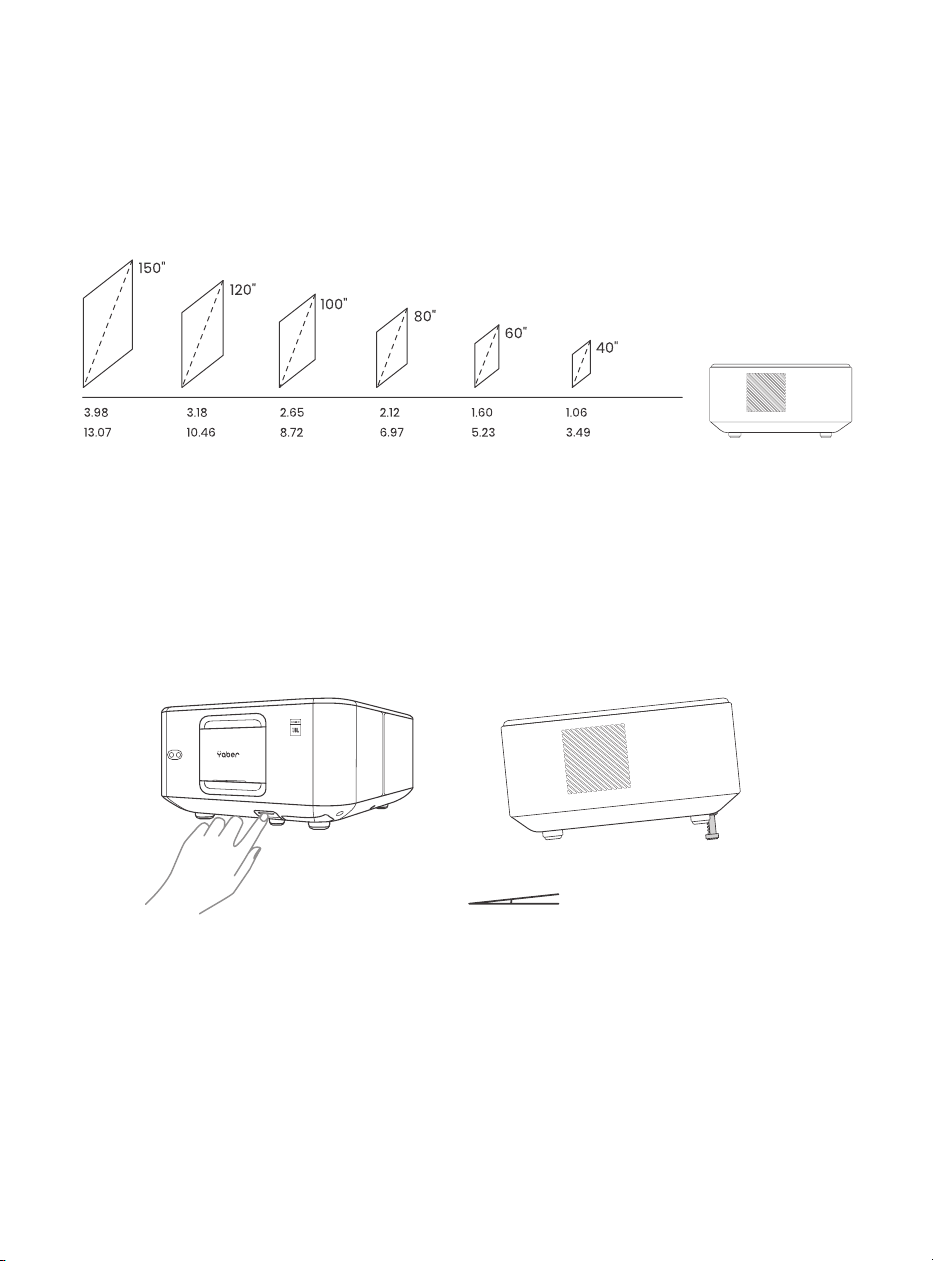
100
5.2 距離と投影サイズ
5.3 角度調整
5.4 天井への取り付け
K3 の投影比率は 1.2:1 です。希望するスクリーンサイズに応じて、下表の対応する距
離にプロジェクターを設置してください。
必要に応じて、このボタンを押してアジャスターフットを解放します。さらに細かい
調整はナットを回して行います。
手順 1:プロジェクターに合うユニバーサル取付ブラケットがあることを確認してく
ださい。
手順 2:プロジェクター底部の 4 つのゴムパッドを取り外し、M510mm のネジを使
用してプロジェクターをブラケットに固定し、取り付けを完了します。
9898989898989898989898989898
メートル フィート
最大角度:10°

101
5.5. デバイスの接続
6. 操作
6.1 プロジェクターの起動
プロジェクターには 5 つのポートがあります:HDMI ポート 2 / USB ポート 1 / オーデ
ィオ出力端子 *1 / LAN ポート (RJ45)*1。接続するデバイスに応じて正しい接続ポー
トを選択してください。
200 mm
ネジ穴:M5*10mm
5P5P5P�e�U�]�b

102
6.1.1 リモコンの準備
6.1.2 電源オン
バッテリーコンパートメントを開けます。
正しい極性に従って、AAA 電池を 2 本挿入します。
バッテリーコンパートメントを閉じます。
注:プロジェクターの初回設定を完了するには、Yaber のリモコンを使用する必要が
あります。
リモコンまたはプロジェクター本体の電源ボタンを押します。プロジェクターの電源 LED がオ
レンジから消える状態に変わります。
プロジェクターをオフにするには、電源ボタンを 1 回押し、電源メニューが表示されたら再度押
します。プロジェクターの電源 LED が点灯します。
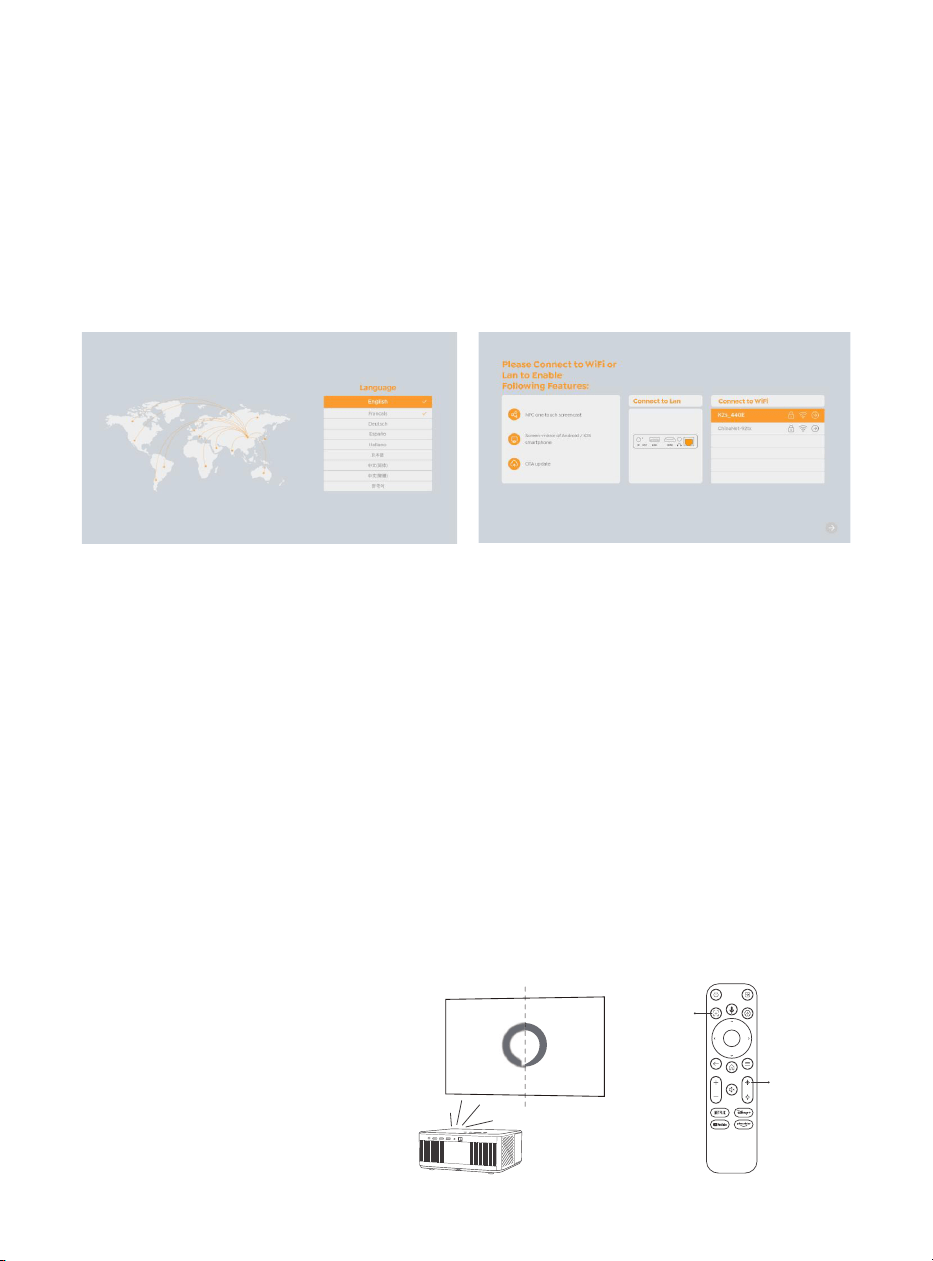
103
6.1.3 初回設定
6.2 画像調整
6.2.1 フォーカス
プロジェクターを初めて使用する際、不鮮明な画像が表示される場合があります。これは、レン
ズが焦点から外れているか、台形補正設定が正しくないことが原因です。リモコンの自動フォー
カスボタンまたは手動フォーカスボタンを使用して、最適な画像を調整してください。プロジェ
クターを別の場所に移動すると、自動フォーカスが再度作動します。
自動フォーカス
手動フォーカス
プロジェクターを初めて起動する場合、または工場出荷時設定にリセットした場合、初回設定が
求められます。
システム言語、Wi-Fi の選択、プロジェクターの新機能やヒントについて学ぶことができます。
設定完了後、プロジェクターはホームページに移行します。
自動フォーカスはデフォルトで有効になっており、プロジェクターを移動させるたびに再フォー
カスします。
さらにフォーカス調整が必要な場合は、リ
モコンのフォーカスボタンを押して調整
します。
Enfoque Automático
Enfoque +/-

104
6.2.2 台形補正
6.2.3 自動障害物回避と自動スクリーン合わせ
注意:自動台形補正の範囲は、水平および垂直に± 18 度です。
自動台形補正はデフォルトで有効になっています。無効にする場合は、[ ホーム ] - [Settings] - [ 投
影モード ] - [ 自動キーストン ] で設定を行います。
手動台形補正
さらに画面調整が必要な場合は、[ 投影モード ] 内の [ 手動キーストーン ] を選択し、リモコンの
矢印キーを使って投影画面を調整します。
注意:手動台形補正で画面を設定した場合、自動台形補正をオフにしてください。次回プロジェ
クターを移動した際に、画面がリセットされるのを防ぎます。
1. 目標画面内に白または他の淡い色の物体がある場合、障害物を回避できない可能性があります。
2. 白いスクリーンには、黒またはその他の明確な色の枠が必要です。アンチライトスクリーンに
は枠の必要はありません。
3. 自動画像適応の使用前に
投影画面がスクリーンより大きいことを確認し、スクリーン中央のエリアを遮らないでください。
スクリーン中央の四角形の枠内を遮らないでください。

105
6.3. 画面モード
6.3.1 明るさ
6.3.2 画像調整
注意:ビデオや画像を再生中にリモコンのメニューボタンを長押しすると、設定にアクセスでき
ます。また、色の調整はこれらの再生中のみ反映されます。
[ ホームボタン ] - [ 設定 ] - [ 画質 ] - [ 明るさ設定 ] で画面の明るさを調整します。
[ ホームボタン ] - [ 設定 ] - [ 画質 ] - [ 画面モード ] で画像の色を調整します。
注意:この機能は画像やビデオ再生時にのみ使用できます。

106
6.4 メディア
6.4.1. Google TV
ホーム画面で「TV」を選択し、システムに入ります。
注意:初めて TV を使用する際は、画面上の指示に従い、リモコンのペアリングやその他の設定
を行ってください。
注意:信号がない場合は、TV ドングルを一度抜いて再度差し込んでみてください。詳細な手順
については、セクション 5.1 を参照してください。
Google TV から退出するには、リモコンのビデオソースボタンを押してください。
TV
TV
注意:初めて Google TV を使用する際は、画面上の指示に従ってリモコンのペアリングやその他
の設定を行ってください。
新しいリモコンを使用する場合や初めて Google TV を使用する場合は、ボタンを 10 〜 30 秒間
押し続けてください。

107
6.4.2 ファイルマネージャーでビデオ / 音楽 / 写真を再生
する
6.5 スクリーンシェア
1.USB ディスクを挿入すると、ホームページの [USB] アイコンが白に変わります。
2.[USB] アイコンまたはファイルマネージャーを選択します。
3.USB ディスク内で再生したいファイル(またはサブフォルダに入るフォルダ)を選択し、[OK]
ボタンを押して再生します。
ワイヤレス接続での画面ミラーリングのスムーズさは、ネットワーク環境に影響を受けます。画
面ミラーリングを使用する際は、100Mbit 以上の帯域幅を推奨します。
ワイヤレス接続を使用する場合、モバイルデバイスをプロジェクターの近くに置いてください。
1 メートル以内の距離を推奨します。
一部のモバイルデバイスは互換性の問題で画面ミラーリングをサポートしない場合があります。
ご質問があれば、service@yaber.com までお気軽にメールでお問い合わせください。
スマホ画面をプロジェクターに共有する前に、スマホとプロジェクターが同じ Wi-Fi ネットワー
クに接続されていることを確認してください。
Yaber アプリで [Connect Device] をタップし、[Yaber_K3_xxxx] という名前のデバイスを選択
して接続します。
接続が完了したら、Yaber アプリ内の画面で「ScreenShare」を選択して、スマホの画面をプロ
ジェクターに共有します。
スクリーンミラーリングを終了したい場合は、スマホのコントロールセンターで投影をタップし、
デバイスを選択して共有を停止します。
注意:Netix、Disney、Prime Video などのストリーミングアプリから画面を共有する必要が
ある場合は、ドングルシステムに入って共有してください。
スクリーンミラーリングの体験を向上させるために、Apple App Store または Google Play
Store から [Yaber] アプリをダウンロードしてください。
ヒント:
スクリーンシェア方法:
yaber
Yaber
yaber
4+
Designed for iphone
Dawnwin Techonology
Free
View in Mac App Store

108
6.6 Bluetooth 設定
6.6.1 Bluetooth 接続:
6.7 静音モード
プロジェクターを外部スピーカー / ヘッドホンに接続する
ホームページに進み、[Settings] -> [Bluetooth] を選択します。周囲の Bluetooth デバイスを自
動でスキャンし、希望の Bluetooth デバイスを選択すると、自動でペアリングおよび接続されま
す。
外部デバイスをプロジェクターに接続する(プロジェクターを Bluetooth スピーカーとして使
用する)
このプロジェクターは Bluetooth スピーカー機能をサポートしています。プロジェクターの [ ]
ボタンを押すか、ホームページで [Bluetooth スピーカーモード ] を選択すると、プロジェクタ
ー [K3_xxxx] をモバイルデバイスと Bluetooth スピーカーとしてペアリングし、音楽再生が可
能です。
静音モードを使用することで、プロジェクターの騒音を低レベルに抑えることができます。この
モードでは消費電力が低くなり、通常の状態よりもプロジェクションの明るさがわずかに低くな
ります。

109
6.8 Alexa 設定
使用手順:
注意:Alexa は英語とドイツ語のみをサポートし
ています。Alexa が有効にならない場合は、アフ
ターサービスにお問い合わせください。
この機能は、Alexa 対応のスマートスピーカーと
連携して使用する必要があり、スマートフォン
の Alexa アプリを通じて設定する必要がありま
す。
1. プロジェクターを WiFi に接続し、プロジェクターのホーム画面で Alexa をアクティベートし、
Amazon アカウントにログインします。
2. スマートフォンで Alexa アプリを開き、Amazon アカウントにログインします。[Go to More]
-> [Skills & Game and search for Skills] に移動し、スキルを検索して [Whale Video] を見つけ、
有効にします。
Account
Tap "Sign in with Amazon" below and follow the instructions to link projector with Alexa.
Try saying "Alexa, turn o projector" or "Alexa, switch to hdmi on projector."
Additionally, you can also nd a list of available voice commands on projector's Alexa Skills page.
Sign In

110
3.[Whale Screen Settings] -> [Advanced Settings] で、プロジェクターを Alexa 内蔵のスマー
トスピーカーとペアリングし、設定を完了します。

111
4. 次に、「Alexa, open YouTube on the projector」と試してみてください。
Alexa コマンド一覧
1. ALexa, turn o projector
2. Alexa, switch to hdmi on projector
3. Alexa, open Netix/YouTube on projector
4. Alexa, go settings on projector
5. Alexa, go home on projector
6. Alexa, mute/unmute/volume up/volume down on projector
7. Alexa, resume on projector
8. Alexa, open bluetooth settings on projector
9. Alexa, open network settings on projector
10. Alexa, turn on/o screen saver on projector
11. Alexa, turn on/o auto focus on projector
12. Alexa, turn on/o silent mode on projector
13. Alexa, turn on screencast on projector
14. Alexa, turn on document mode on projector
15. Alexa, next/previous/start over on projector
16. Alexa, turn on/o screen on projector

112
6.9 システムアップデート
6.9.1 ローカルアップグレード
6.9.2 オンラインアップグレード
6.10 電源オンモード
6.11 安全なシャットダウン
会社のウェブサイトからソフトウェアのアップグレードパッケージをダウンロードし、ポータブ
ルハードドライブまたは USB ドライブのルートディレクトリにコピーして USB ポートに挿入し
ます。[ 情報 ] -> [ アップグレード ] に進み、[ ローカルアップグレード ] を選択すると、システ
ムが自動的にアップグレードパッケージを検出してインストールを開始します。
[ 情報 ] -> [ アップグレード ] に進み、[ オンラインアップグレード ] を選択します。システムは
新しいバージョンが利用可能かどうかを自動的に検出し、アップグレードするか確認します。
電源オンスタンバイモードでは、電源を接続するとプロジェクターの電源 LED が点灯します。
プロジェクターを起動するには、電源ボタンを押す必要があります。
電源オンモードに切り替えると、電源コードを接続した後に自動的にプロジェクターが起動しま
す。
プロジェクターまたはリモコンのボタンを押し、OK ボタンを押してプロジェクターの電源をオ
フにします。
プロジェクターの電源コードを抜き、レンズにカバーをかけて冷暗所に保管してください。

113
7. メンテナンスのヒント
7.1 プロジェクターの取り扱い
デバイスを正しく使用してください:
デバイスの通常の放熱ができないと、内部電子機器が損傷する恐れがあるため、デバイスの空気
出入口をふさがないでください。
レンズを目に向けないでください。プロジェクターの強い光により目が損傷する恐れがあります。
レンズの損傷を防ぐため、紙や布などの清掃用具でレンズを直接拭かないでください。
雨水、湿気、ミネラル分を含む液体による回路基板の腐食を防ぐため、化学薬品、洗剤、または
しめった液体で本デバイスを洗浄しないでください。
デバイスおよびその構成部品や付属品は、お子様の手に届かないところに置いてください。
デバイスは必ず乾燥した換気の良い環境で使用してください。
極端な温度下では電子機器の寿命が短くなるため、極度の高温または低温になる場所にデバイス
を保管しないでください。許容される保管と使用環境温度は 0℃から 40℃の範囲です。
デバイスを加熱機器(乾燥機や電子レンジなど)に入れて乾燥させないでください。
デバイスの損傷を防ぐため、デバイスを強く押し出したり、デバイス上やデバイスの背面に障害
物を置いたりしないでください。
内部回路基板の破損を防ぐため、デバイスを投げつけたり、叩いたり、激しく振動させたりしな
いでください。
お客様ご自身によるデバイスの分解や組み立てを行わないでください。問題が発生した場合は、
Yaber のアフターサービスに連絡してください。

114
User Manual
Projector
K3
IT

115

116
CONTENUTO
Supporto professionale a vita YABER ...........................................................................................................117
1.Elenco dei pacchetti ..............................................................................................................................................118
2.Specifiche del proiettore ...................................................................................................................................119
3.Panoramica del proiettore ............................................................................................................................ 120
4.Panoramica del telecomando .....................................................................................................................121
5.Installazione ..............................................................................................................................................................122
5.1.Installare il dongle TV .................................................................................................................................122
5.2. Distanza e dimensioni di proiezione ..............................................................................................123
5.3. Regolazione dell'angolo .........................................................................................................................123
5.4. Installare sul soffitto ..................................................................................................................................123
5.5. Collegare i dispositivi .............................................................................................................................. 124
6.Operazione ............................................................................................................................................................... 124
6.1. Accensione del proiettore ..................................................................................................................... 124
6.1.1. Preparazione del comando. ........................................................................................................ 125
6.1.2. SU ................................................................................................................................................................... 125
6.1.3. Prima configurazione, prima ..................................................................................................... 126
6.2. Regolazione dell'immagine ................................................................................................................ 126
6.2.1. Messa a fuoco ...................................................................................................................................... 126
6.2.2. Correzione trapezoidale ................................................................................................................ 127
6.2.3. Evitamento automatico degli ostacoli e allineamento
automatico dello schermo ....................................................................................................................127
6.3. Modalità immagine .................................................................................................................................. 128
6.3.1. Incandescenza .................................................................................................................................... 128
6.3.2. Regolazione dell'immagine........................................................................................................ 128
6.4. Nella media .................................................................................................................................................... 129
6.4.1. Google TV ................................................................................................................................................ 129
6.4.2. Riproduci video/musica/foto in File Manager .............................................................. 130
6.5. Bildschirmfreigabe .................................................................................................................................. 130
6.6. Impostazioni Bluetooth ............................................................................................................................ 131
6.6.1. Connessione Bluetooth: ...................................................................................................................131
6.7. Modalità silenziosa......................................................................................................................................131
6.8. Impostazioni Alexa .....................................................................................................................................132
6.9. Aggiornamento del sistema .............................................................................................................. 135
6.9.1. Aggiornamento locale ................................................................................................................... 135
6.9.2. Aggiornamenti in linea ................................................................................................................. 135
6.10. Modalità di accensione ....................................................................................................................... 135
6.11. Spegnimento sicuro ................................................................................................................................ 135
7.Consigli per la manutenzione ..................................................................................................................... 136
7.1. Cura del proiettore ..................................................................................................................................... 136

117
Supporto professionale a vita YABER
Gentile e stimato cliente,
Grazie per aver scelto il proiettore Yaber K3.
Questo manuale ti aiuterà a navigare attraverso tutte le funzionalità.
Comprendiamo che potrebbero sorgere molte domande e preoccupazioni durante
l'utilizzo di proiettore. Siamo anche ansiosi di sentire la tua opinione al riguardo,
ma tieni presente che ci sono molti problemi comuni come l'incapacità della
messa a fuoco automatica o Keystone, problemi audio, problemi di connessione
WiFi o Bluetooth, di solito possono essere risolti con impostazioni di configurazione
appropriate.
In caso di problemi, non esitate a inviarci il numero dell'ordine e il problema a
[email protected] (ad esempio IT+K3+000-0000000-0000000+Issues).
Ti
assicuriamo che il nostro servizio Il team ti offrirà una soluzione entro 24 ore. La
vostra soddisfazione è la nostra massima priorità. In caso di problemi, speriamo
sinceramente che tu possa fornircelo l'opportunità di risolverlo.
Ci auguriamo che tu possa vivere un'esperienza eccezionale con il proiettore K3.
Team di assistenza clienti Yaber
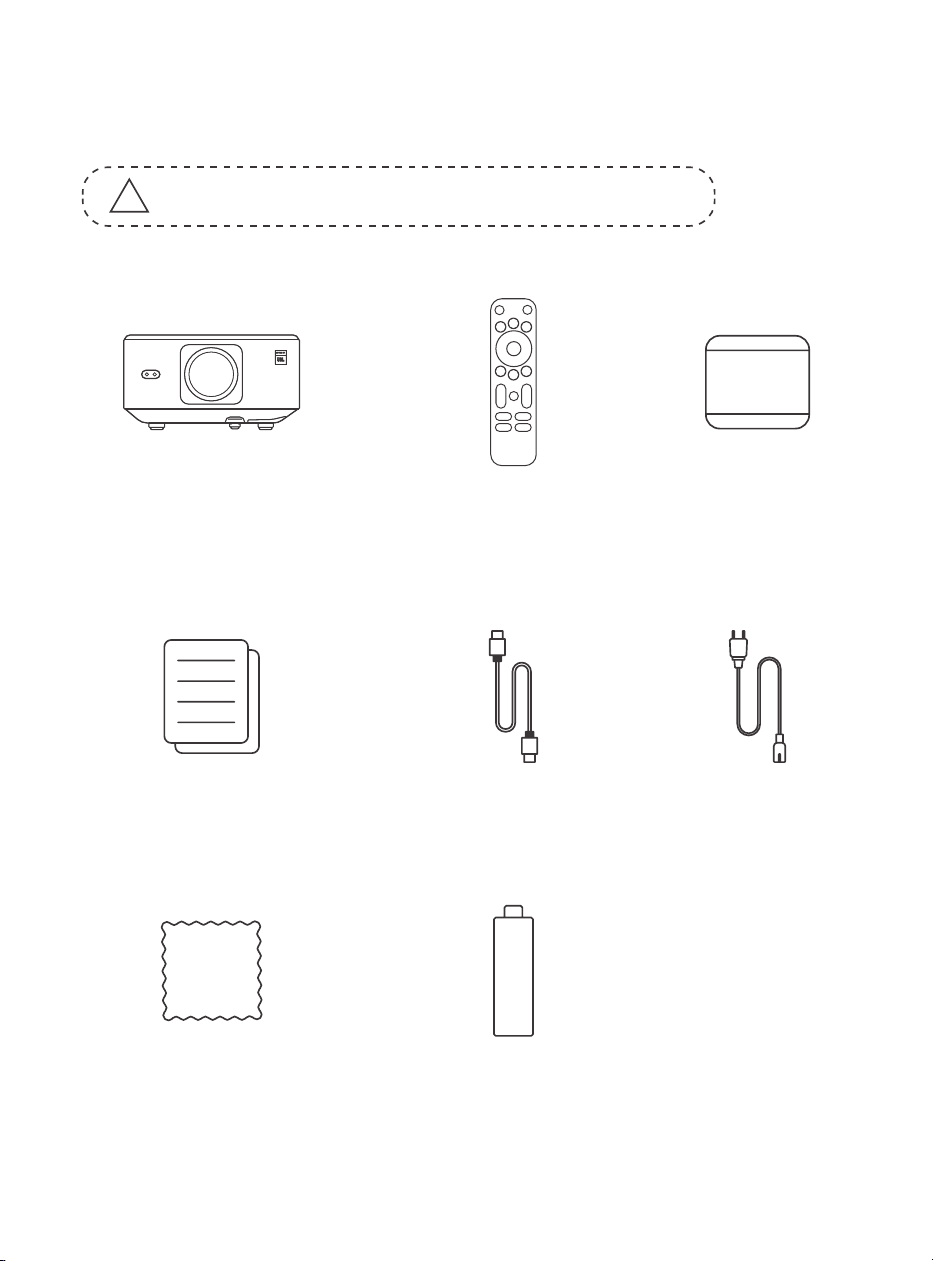
118
1.Elenco dei pacchetti
!
Attenzione: il Dongle è già integrato nel proiettore.
Proiettore K3
Telecomando
Copriobiettivo
Domande frequenti e
domande frequenti
Cavo HDMI
Cavo di
alimentazione
panno per la pulizia
Dongle TV

119
2.Specifiche del proiettore
Modello n. K3
Risoluzione
nativa
Proporzioni
1920*1080
16:9/4:3
Automatisch/Elektrisch
Auto
LED
1.2.1
Auto/Eletrique
Auto
Sorgente luminosa a LED
Rapporto di proiezione 1,2:1
Correzione trapezoidale
automatica/elettrica
Messa a fuoco
Interfaccia
Formato immagine
Formato audio
Formato video
Formato USB
Documenti WPS
Tensione di
alimentazione
Peso del proiettore
Allineamento
automatico
Distanza di
proiezione
Min1,1m~ Max3,3 m
Min43,3~Max129,9 pollici
dello schermo
Auto per evitare gli ostacoli
Dimensioni
100-240 V ~ / 50-60 Hz Stromverbrauch 300W
Fronte/retro su scrivania
Fronte/retro su soffitto
Projektionsmethoden
5.1 kg (11.24 lbs)
USB 2.0×1, HDMI 1.4×1, Uscita audio×1, Lan×1
JPG, PNG, BMP, JPEG
MP3, AAC, LPCM, APE, FLAC, OGG, AMR
MP4, MKV, WMV, 3GP, MPG, VOB, TP, TS, DAT, MOV, FLV
FAT 32, NTFS
txt, pdf, docx, xlsx, pptx
165×140×290 mm
6,4×5,5×11,4 pollici
Formato non supportato: Exfat
Attenzione: se il proiettore non riesce a riprodurre il contenuto dell'unità flash USB,
formattare e riprovare.
!
!
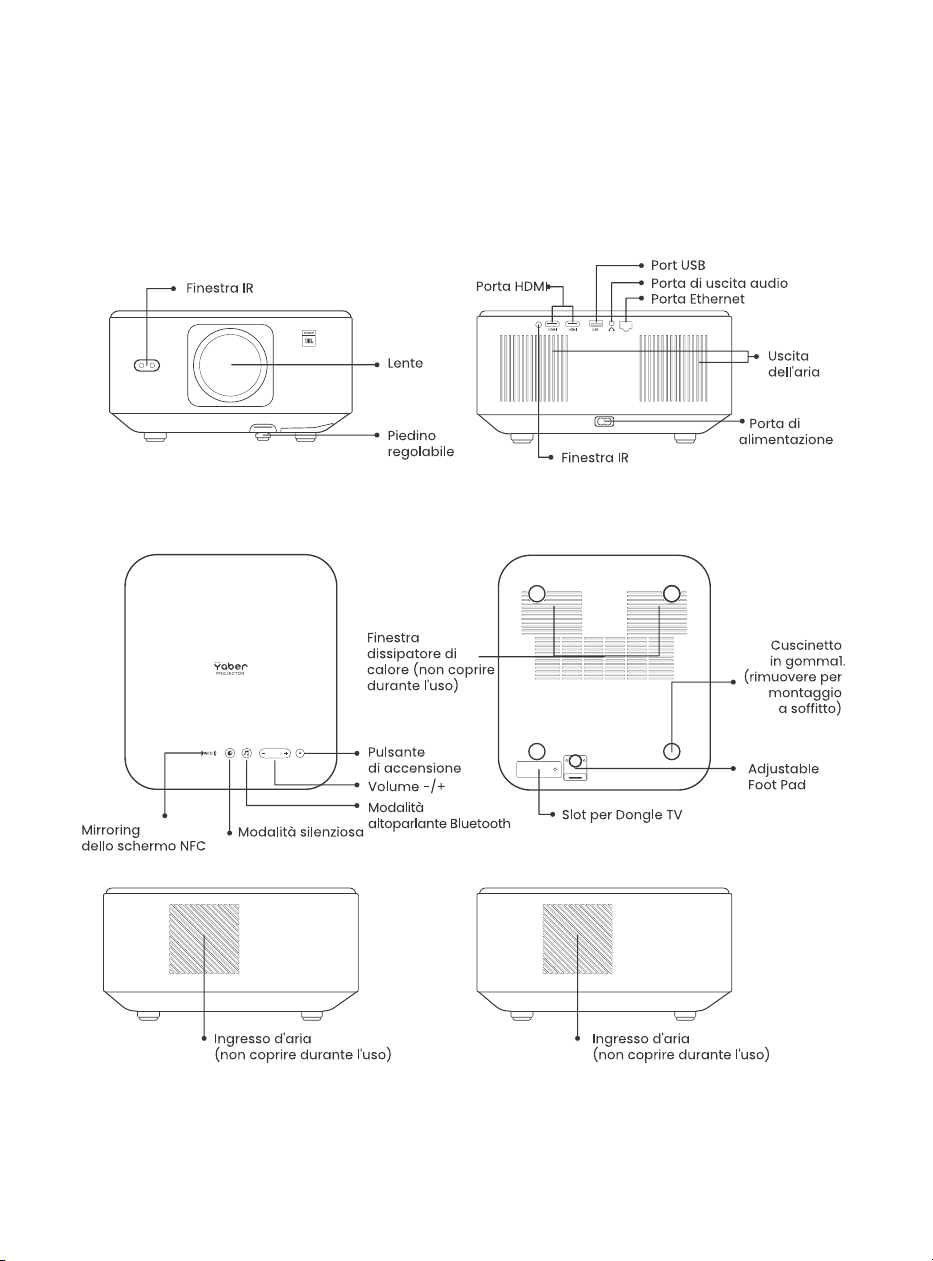
120
3.Panoramica del proiettore
Panoramica del prodotto
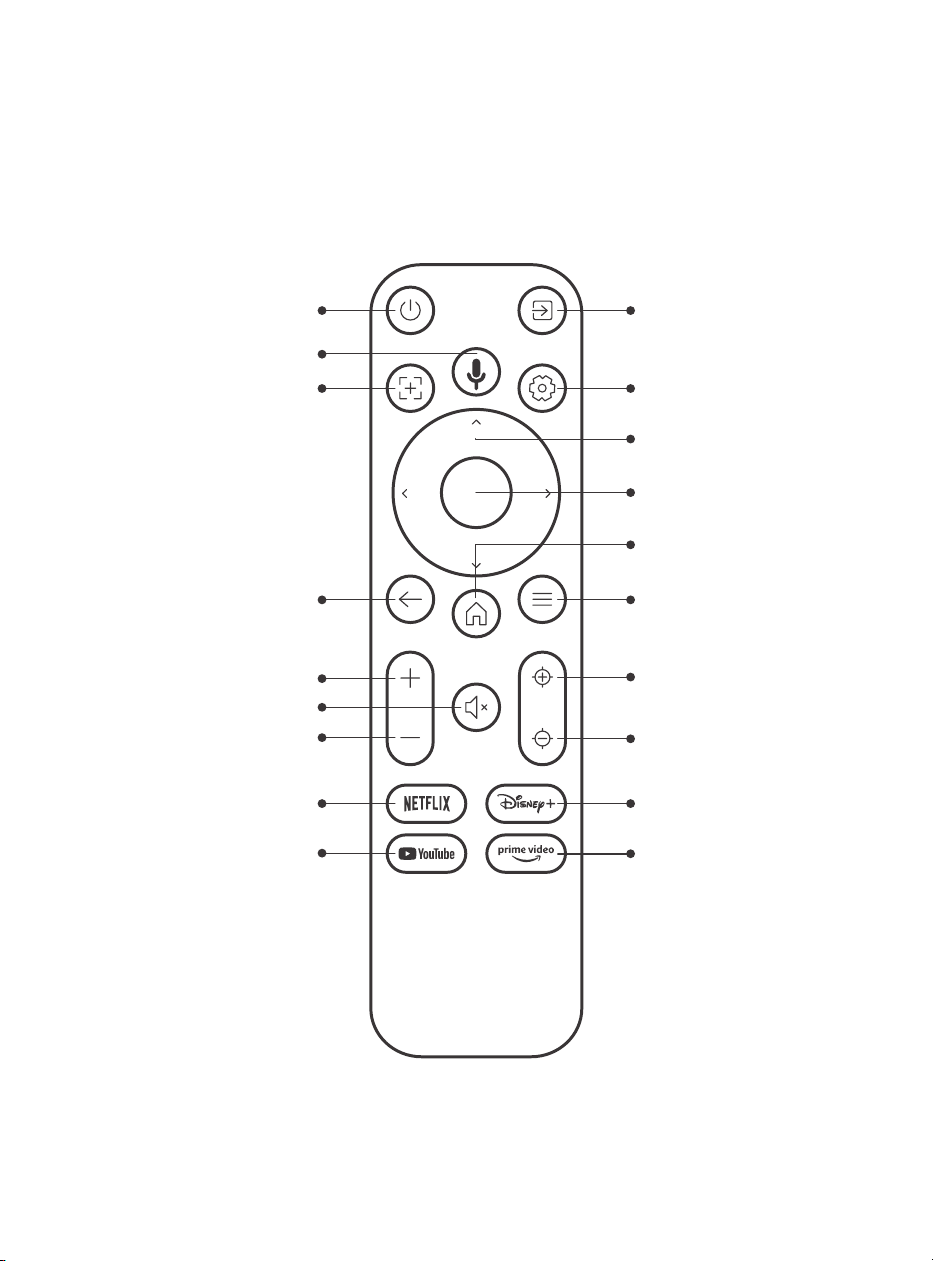
121
4.Panoramica del telecomando
Sorgente VideoPrestazione
Ricerca vocale
Messaggio di
Fuoco Automatico
Indietro
Volume SU
Volume Giù
Netflix
YouTube
Muto
Impostazioni
Tasto Freccia
Conferma
Casa
Menu
Messa a fuoco +
Messa a fuoco -
Disney+
Prime Video
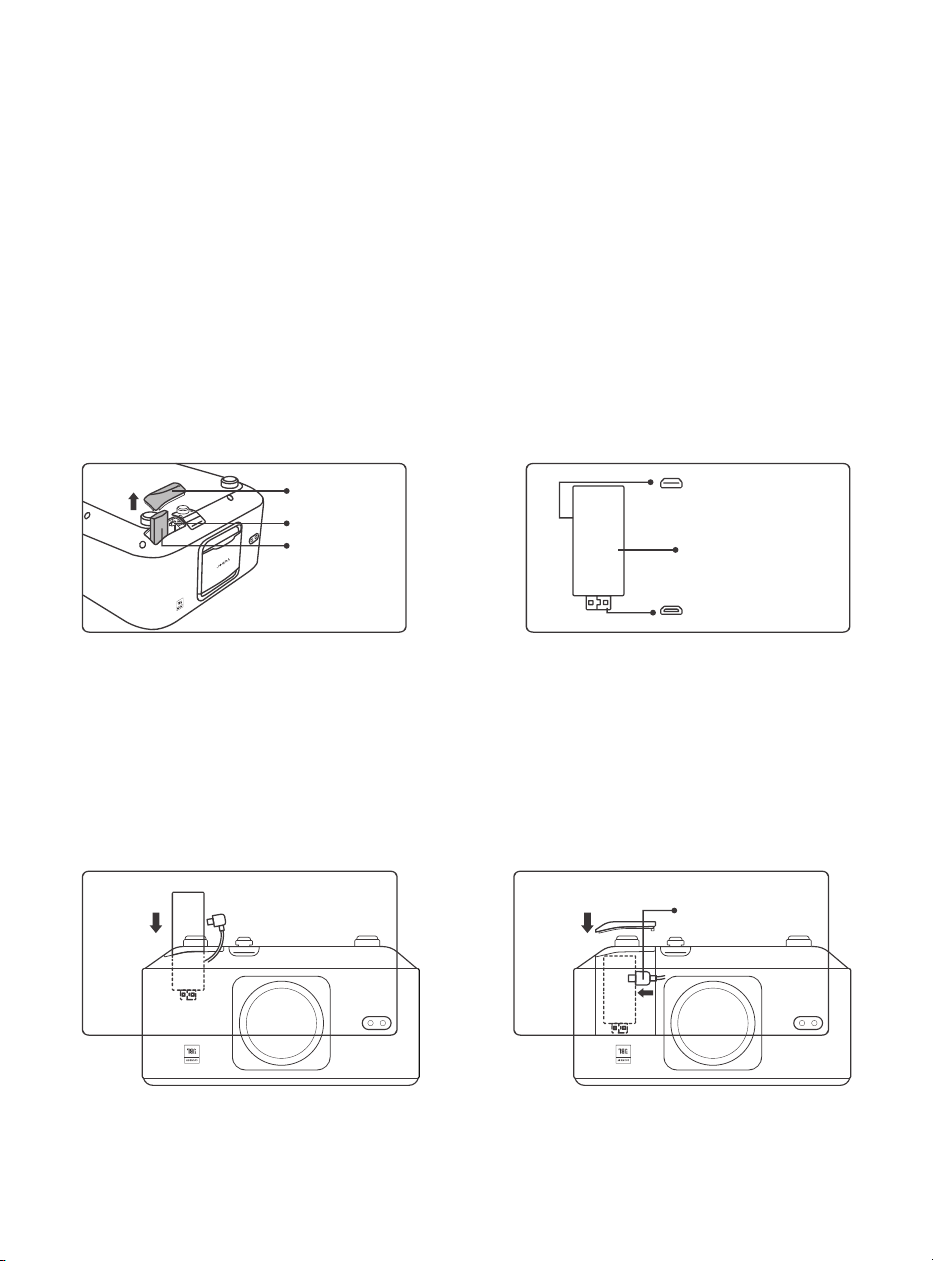
122
5.Installazione
5.1.Installare il dongle TV
Come rimuovere o installare il Dongle
1. Utilizzare un cacciavite per rimuovere
le viti sul coperchio del vano dongle.
(Dimensione vite: ST2,3×6 mm)
3. Inserisci il dongle TV nella porta HDMI
all'interno del vano. (Assicurarsi che
il dongle sia inserito saldamente per
l'identificazione.)
2. Assicurarsi che le porte del dongle TV
non siano danneggiate (come mostrato
nella figura seguente).
4.4. Collegare il cavo Micro USB al dongle
TV e chiudere il coperchio.
Copertina
Micro-USB-Anschluss
(Markierung auf der
Rückseite)
Montierter TV-Dongle
Micro-HDMI-Anschluss
(Markierung auf der
Rückseite)
Cavo di
alimentazione USB
Vassoio
Slot per chiave
TV

123
5.2. Distanza e dimensioni di proiezione
5.3. Regolazione dell'angolo
5.4. Installare sul soffitto
Il rapporto di proiezione del K3 è 1,2:1. Posizionare il proiettore in base alle
distanze corrispondenti nella tabella seguente con la dimensione dello
schermo desiderata.
Se necessario, premere questo pulsante & per rilasciare il poggiapiedi
regolabile. Ulteriori regolazioni possono essere effettuate ruotando il dado.
Passaggio 1: assicurati di disporre di una staffa di montaggio universale
adatta al proiettore.
Passaggio 2: rimuovere i quattro cuscinetti in gomma sul fondo del proiettore
e utilizzare viti M5*10 mm per fissare il proiettore sulla staffa per completare
l'installazione.
9898989898989898989898989898
metri piedi
Grado massimo: 10°
Cavo di
alimentazione USB
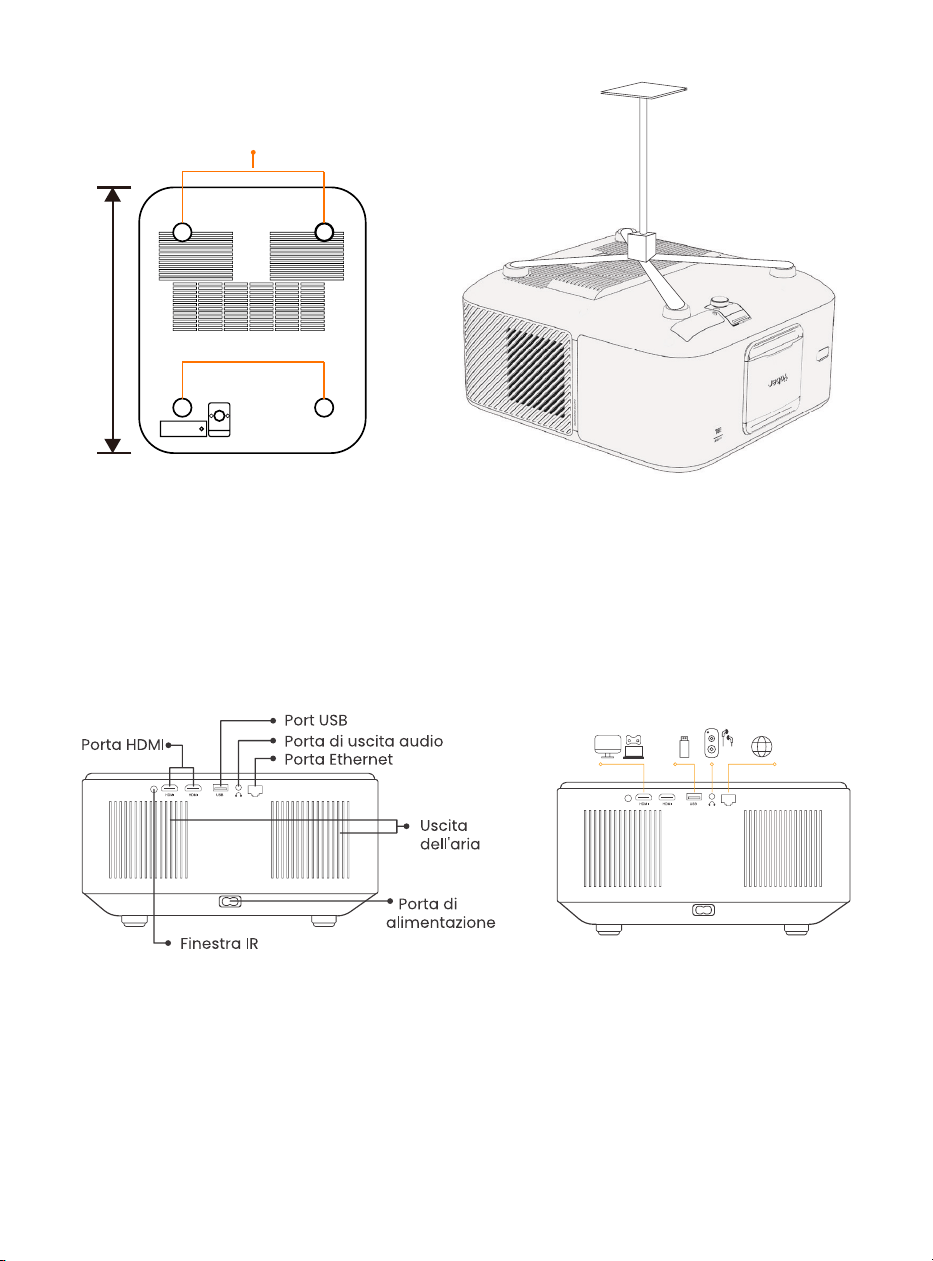
124
5.5. Collegare i dispositivi
6.Operazione
6.1. Accensione del proiettore
Il proiettore è dotato di 5 porte, porta HDMI *2 / porta USB *1 / porta uscita
audio *1 / porta Lan (RJ45) *1. Seleziona le porte di connessione corrette per
connettere i tuoi dispositivi.
6.Operazione
200 mm
Fori per viti: M5*10mm

125
6.1.1. Preparazione del comando.
Aprire il vano batterie.
6.1.2. SU
Inserire 2 batterie AAA con la polarità corretta indicata.
Chiudere il vano batterie.
Nota: è necessario utilizzare il telecomando Yaber per completare la prima
configurazione del proiettore.
Premere il tasto di accensione sul telecomando o sul proiettore. Il LED di alimentazione
del proiettore passa da arancione a spento.
Per spegnere il proiettore, premere una volta, quindi premere nuovamente quando
viene visualizzato il menu di accensione. Il LED di alimentazione del proiettore si
accende.

126
6.1.3. Prima configurazione, prima
6.2. Regolazione dell'immagine
6.2.1. Messa a fuoco
Messa a fuoco automatica
messa a fuoco manuale
accensione o dopo il ripristino delle impostazioni di fabbrica, ti verrà richiesto di
configurare per la prima volta.
È possibile selezionare la lingua del sistema, il Wi-Fi e conoscere le nuove funzionalità e
i suggerimenti del proiettore.
Dopo la configurazione, il proiettore andrà alla home page.
Quando si utilizza il proiettore per la prima volta, solitamente viene visualizzata
un'immagine poco chiara. Ciò è dovuto alla lente fuori fuoco o a una configurazione
trapezoidale errata.
Utilizza i tasti di messa a fuoco automatica e di messa a fuoco manuale sul controller
per ottenere l'immagine migliore. La messa a fuoco automatica può essere attivata
anche spostando il proiettore in un'altra posizione.
La messa a fuoco automatica è abilitata per impostazione predefinita e verrà messa
a fuoco nuovamente ogni volta che ti sposti.
Se sono necessarie ulteriori
regolazioni della messa a fuoco,
utilizzare il pulsante di messa a
fuoco sul telecomando per ottenere
l'immagine desiderata.
Enfoque Automático
Enfoque +/-

127
6.2.2. Correzione trapezoidale
6.2.3. Evitamento automatico degli ostacoli e
allineamento automatico dello schermo
Attenzione: l'intervallo di correzione trapezoidale automatica è di ±18 gradi in
orizzontale e in verticale.
La correzione trapezoidale automatica è abilitata per impostazione predefinita. Se è
necessario disabilitare questa funzione, navigare attraverso [Home] - [Impostazioni] -
[Modalità di proiezione] - [Correzione trapezoidale automatica].
pietra trapezoidale manuale
Se sono necessarie ulteriori regolazioni dello schermo, selezionare [Correzione
trapezoidale manuale in [Modalità di proiezione] e regolare lo schermo trascinando le
frecce.
Attenzione: se hai già configurato lo schermo utilizzando la correzione trapezoidale
manuale, disattiva la correzione trapezoidale automatica; Altrimenti, lo schermo si
ripristinerà dopo il successivo movimento del proiettore.
1. Se sullo schermo di destinazione sono presenti oggetti bianchi o altri oggetti di
colore chiaro, non è possibile evitare gli ostacoli.
2. Lo sfondo deve avere un bordo distintivo nero o di altro colore, tranne nel caso dei
display anti-luce che non richiedono un bordo.
3. Prima di utilizzare la funzione di regolazione automatica dello schermo:
Assicurarsi che lo schermo di proiezione sia più grande dell'area dello schermo e non
blocchi l'area centrale dello schermo.
Si prega di non bloccare l'area all'interno della cornice quadrata centrale dello
schermo.
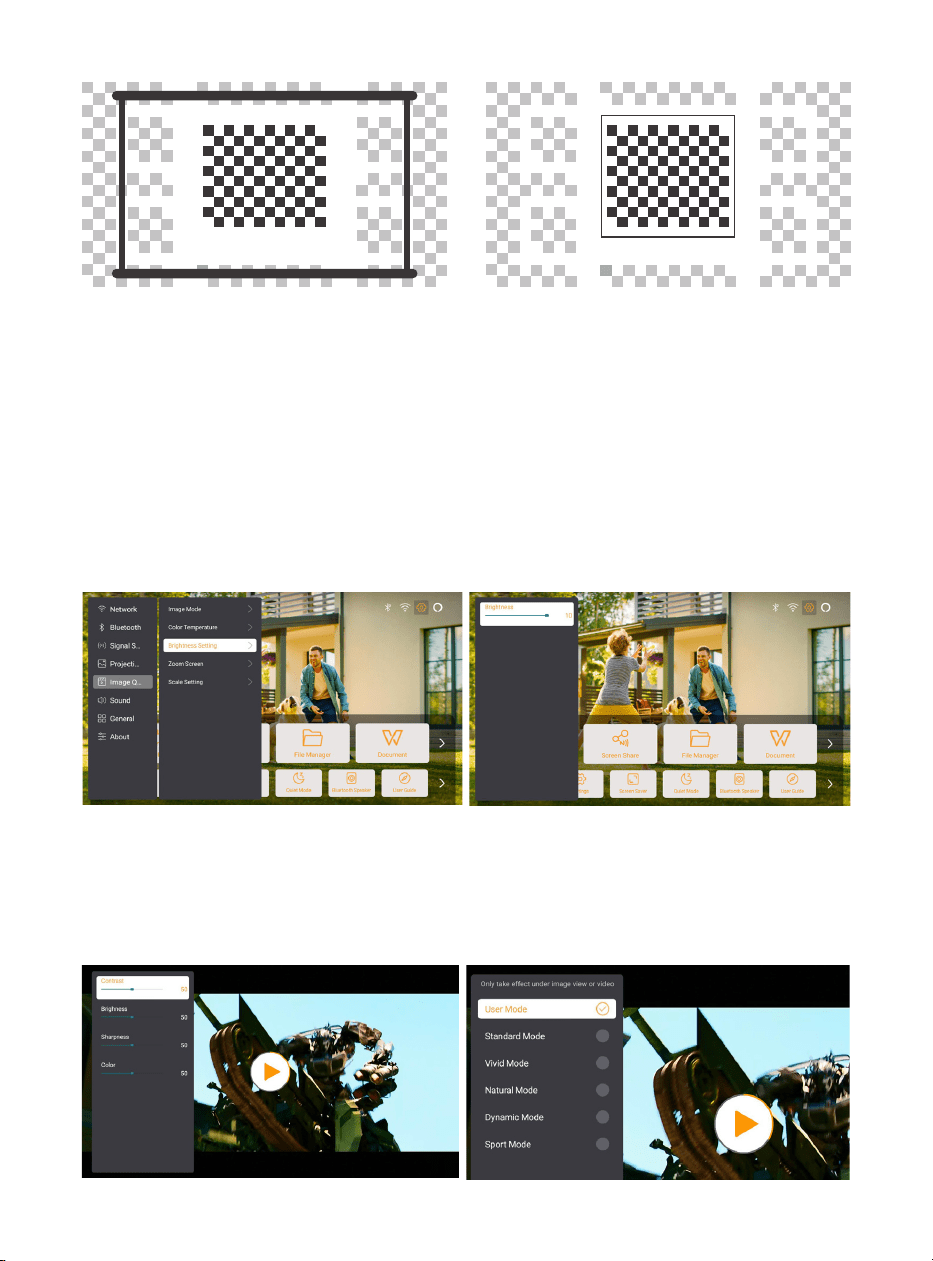
128
6.3. Modalità immagine
6.3.1. Incandescenza
6.3.2. Regolazione dell'immagine
Attenzione: tenere premuto il pulsante menu sul telecomando per accedere alle
impostazioni durante la riproduzione di video o immagini. Inoltre, le regolazioni del
colore hanno effetto solo durante questi periodi.
Regola la luminosità dello schermo tramite [Home] - [Impostazioni] - [Qualità
immagine] -[Impostazioni luminosità].
Regolare il colore dell'immagine tramite [Home] - [Impostazioni] - [Qualità immagine]
- [Modalità immagine].
Attenzione: funziona solo con lettori di immagini o video
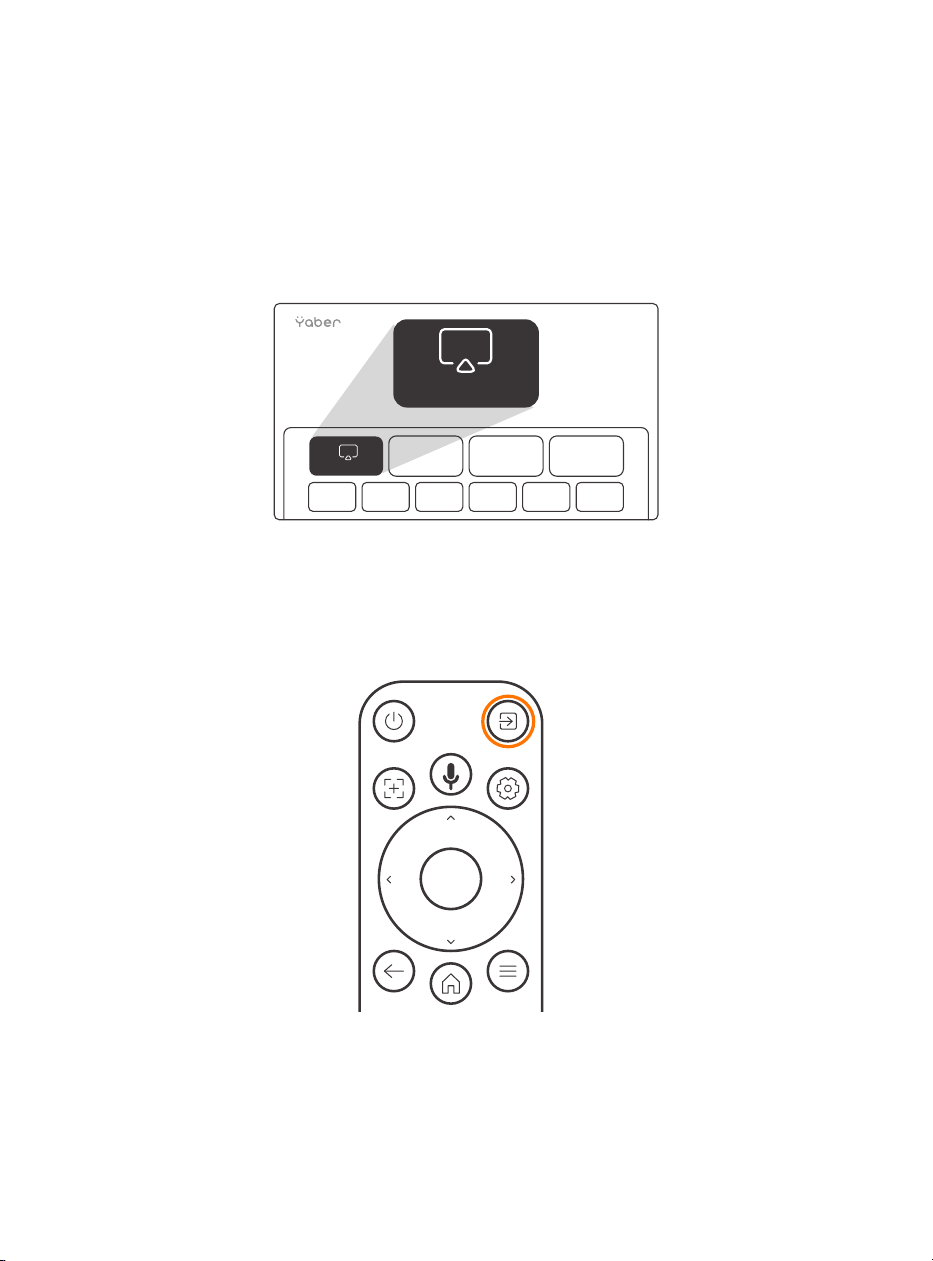
129
6.4. Nella media
6.4.1. Google TV
Fare clic su TV per accedere al sistema nella home page.
Attenzione: quando si utilizza il televisore per la prima volta, seguire le istruzioni
visualizzate sullo schermo per l'associazione del telecomando e altre impostazioni.
Attenzione: se non c'è segnale, provare a scollegare e scollegare nuovamente il dongle
TV. Per i passaggi dettagliati, fare riferimento alla sezione 5.1.
Se devi uscire da Google TV, fai clic sul pulsante della sorgente video sul telecomando
TV
TV
Attenzione: quando si utilizza la TV per la prima volta, seguire le istruzioni visualizzate
sullo schermo per associare il telecomando e altre impostazioni.
Se utilizzi un nuovo telecomando o usi Google TV per la prima volta, premi il pulsante y
per 10-30 secondi.

130
6.4.2. Riproduci video/musica/foto in File
Manager
6.5. Bildschirmfreigabe
1. Inserire il disco USB, l'icona [USB] sulla home page diventerà bianca.
2. Selezionare l'icona [USB] o File Manager.
3. Selezionare il file desiderato (o la cartella per accedere alla sottocartella) sul disco
USB, quindi premere il pulsante [OK] per riprodurre.
La fluidità del mirroring dello schermo wireless sarà influenzata dall'ambiente di rete.
Si consiglia una larghezza di banda di 100 Mbit o più quando si utilizza il mirroring dello
schermo.
Assicurati che il tuo dispositivo mobile sia vicino al proiettore quando usi la
connessione wireless. Si consiglia la distanza entro 1 metro.
Alcuni dispositivi mobili potrebbero non supportare il mirroring dello schermo a causa
della compatibilità.
In caso di domande, non esitate a inviare un'e-mail al team di assistenza Yaber
tramite [email protected]
Prima di condividere lo schermo del telefono con il proiettore, assicurati che il telefono
e il proiettore siano connessi alla stessa rete Wi-Fi.
Nell'app Yaber, tocca [Connetti dispositivo] e seleziona il dispositivo denominato
[Yaber_K3_xxxx] per connetterti.
Una volta connesso, seleziona l'opzione di mirroring dello schermo nell'app Yaber per
condividere lo schermo del tuo telefono con il proiettore.
Quando desideri interrompere la condivisione dello schermo, vai al centro di controllo
del telefono, seleziona il dispositivo e interrompi la condivisione.
Attenzione: se è necessario condividere lo schermo da app di streaming come Netflix,
Disney o Prime Video, accedere al sistema Dongle per condividere.
Per migliorare la tua esperienza di condivisione dello schermo, scarica l'app [Yaber]
dall'App Store di Apple o da Google Play Store.
Suggerimenti per il riscaldamento:
Come condividere:
yaber
Yaber
yaber
4+
Designed for iphone
Dawnwin Techonology
Free
View in Mac App Store
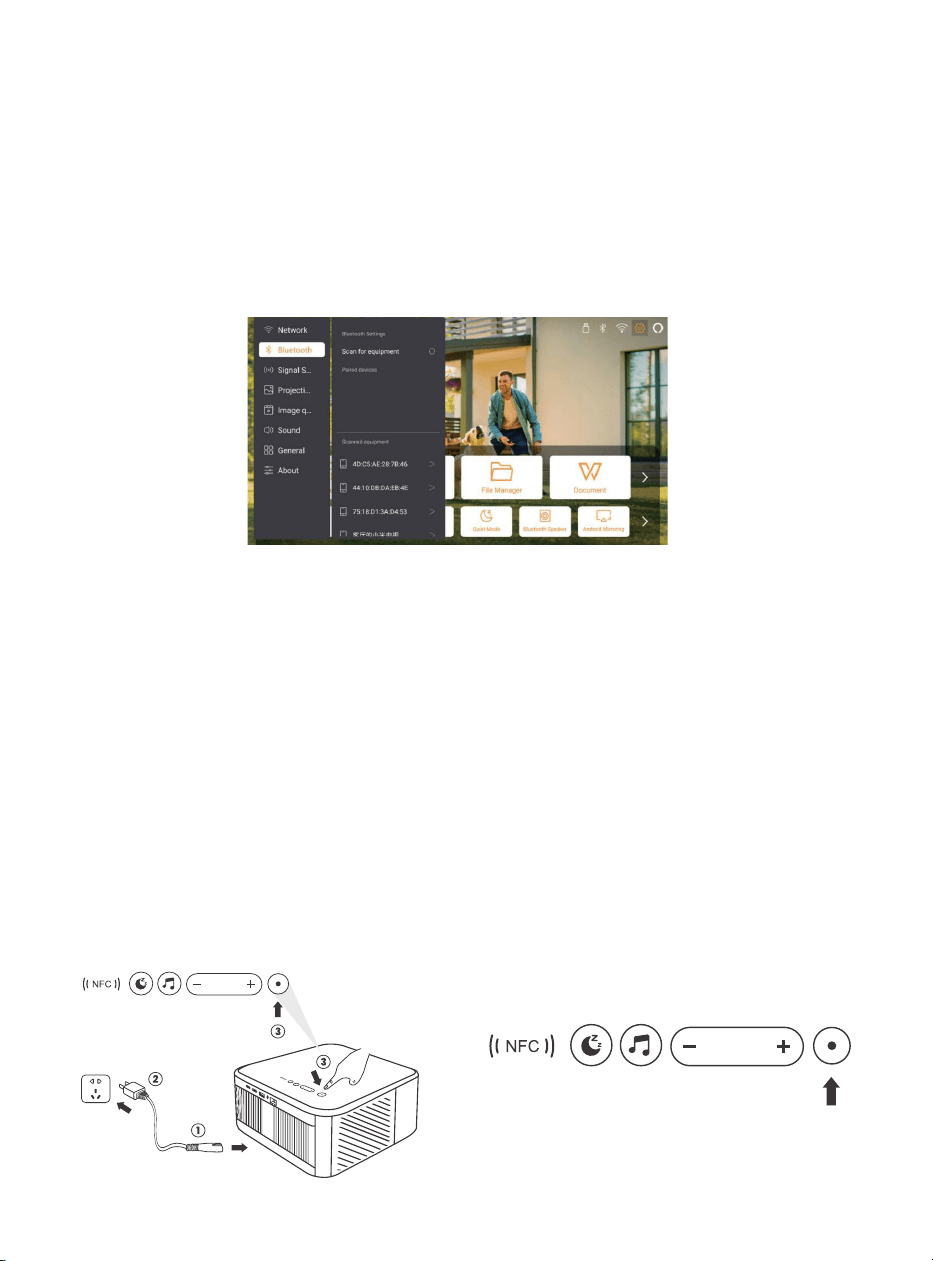
131
6.6. Impostazioni Bluetooth
6.6.1. Connessione Bluetooth:
6.7. Modalità silenziosa
Collegamento del proiettore ad altoparlanti/cuffie esterni
Vai alla home page -> Seleziona | Impostazioni] -> [Bluetooth] - Scansiona
automaticamente i dispositivi Bluetooth nelle vicinanze - Scegli il dispositivo Bluetooth
che desideri: si accoppierà e si connetterà automaticamente.
Collegamento di dispositivi esterni al proiettore (utilizzando il proiettore come
altoparlante Bluetooth)
Questo proiettore supporta la funzione altoparlante Bluetooth. Premere il pulsante [ ]
sul proiettore o selezionare [Modalità altoparlante Bluetooth] sulla home page, quindi
è possibile cercare e associare il proiettore [K3_xxxx] al dispositivo mobile come
altoparlante Bluetooth per riprodurre la musica.
Utilizzando la modalità silenziosa, è possibile controllare il rumore del proiettore per
mantenerlo a un livello basso. Il dispositivo funzionerà con un consumo energetico
inferiore e anche la luminosità della proiezione sarà leggermente inferiore rispetto allo
stato normale.
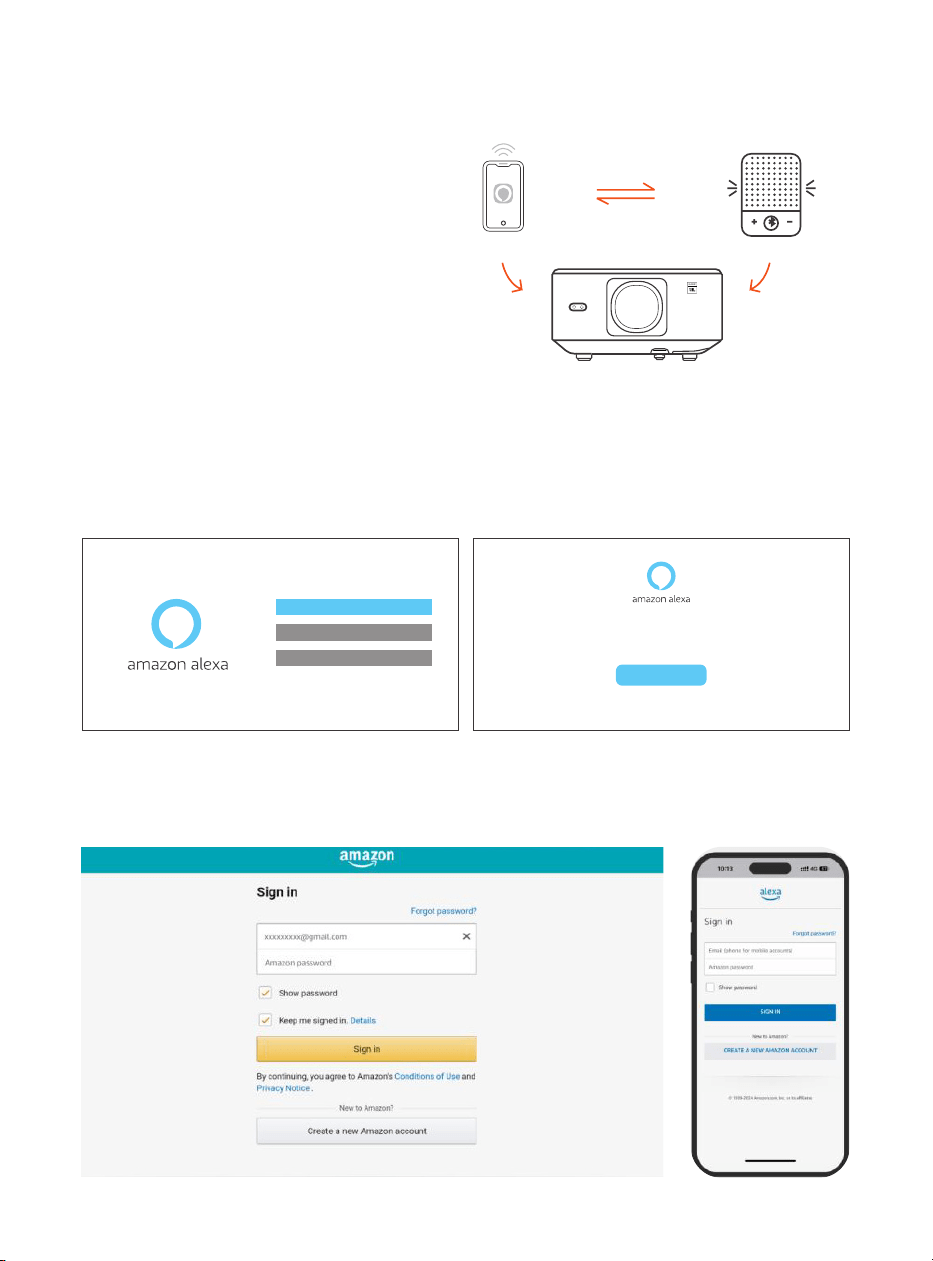
132
6.8. Impostazioni Alexa
Utilizzando i passaggi:
Attenzione: Alexa supporta solo la lingua
inglese e tedesca. Se Alexa non è attivata,
contatta il team post-vendita.
Questa funzione deve essere utilizzata con
gli altoparlanti intelligenti abilitati per Alexa
e deve essere configurata tramite l'app
Alexa sul telefono cellulare.
1. Connetti il proiettore al WiFi, attiva Alexa sulla schermata iniziale del proiettore e
accedi al tuo account Amazon.
2. Apri l'app Alexa sul tuo telefono e accedi al tuo account Amazon. Vai su [Vai a Altro].
- [Skills & Games e cerca Skills], trova e attiva [Whale Video].
Account
Tap "Sign in with Amazon" below and follow the instructions to link projector with Alexa.
Try saying "Alexa, turn off projector" or "Alexa, switch to hdmi on projector."
Additionally, you can also find a list of available voice commands on projector's Alexa Skills page.
Sign In

133
3. In [Impostazioni schermo Whale] - [Impostazioni avanzate], associa il proiettore a
un altoparlante intelligente (con Alexa integrato).

134
4. Ora prova a dire: "Alexa, open YouTube on the projector"
Elenco comandi Alexa
1. ALexa, turn off projector
2. Alexa, switch to hdmi on projector
3. Alexa, open Netflix/YouTube on projector
4. Alexa, go settings on projector
5. Alexa, go home on projector
6. Alexa, mute/unmute/volume up/volume down on projector
7. Alexa, resume on projector
8. Alexa, open bluetooth settings on projector
9. Alexa, open network settings on projector
10. Alexa, turn on/off screen saver on projector
11. Alexa, turn on/off auto focus on projector
12. Alexa, turn on/off silent mode on projector
13. Alexa, turn on screencast on projector
14. Alexa, turn on document mode on projector
15. Alexa, next/previous/start over on projector
16. Alexa, turn on/off screen on projector

135
6.9. Aggiornamento del sistema
6.9.1. Aggiornamento locale
6.9.2. Aggiornamenti in linea
6.10. Modalità di accensione
6.11. Spegnimento sicuro
Scarica il pacchetto di aggiornamento software dal sito Web dell'azienda, copialo nella
directory principale del disco rigido portatile o dell'unità USB e collega l'unità alla porta
USB. Vai su [Informazioni] > [Aggiorna] e seleziona [Aggiornamento locale], quindi il
sistema rileverà automaticamente il pacchetto di aggiornamento e lo installerà per
eseguire l'aggiornamento.
Vai su [Informazioni] -> [Aggiornamento] e seleziona [Aggiornamento online]. Il
sistema rileverà automaticamente se è disponibile una nuova versione e chiederà il
tuo permesso per aggiornarla.
In modalità standby, collegare l'alimentatore e il LED di alimentazione del proiettore si
accenderà.
Accendi il proiettore.
Se impostato su On, il proiettore si accenderà automaticamente dopo aver collegato il
cavo di alimentazione.
6.11. Spegnimento sicuro
Premere il pulsante sul proiettore o sul telecomando, quindi premere il tasto OK per
spegnere il proiettore.
Scollegare il cavo di alimentazione dal proiettore. Coprire l'obiettivo e conservare il
proiettore in un luogo fresco e asciutto.

136
7.Consigli per la manutenzione
7.1. Cura del proiettore
Utilizzare correttamente il dispositivo:
Non bloccare le entrate/uscite dell'aria per evitare danni ai componenti elettronici
interni a causa di un raffreddamento inadeguato.
Non puntare l'obiettivo direttamente verso gli occhi, poiché la luce intensa del
proiettore potrebbe danneggiarli.
Non pulire l'obiettivo direttamente con carta, panno o altri strumenti di pulizia per
evitare di danneggiarlo.
Non pulire il prodotto con reagenti chimici, detergenti o qualsiasi liquido per evitare
la corrosione del circuito stampato da acqua piovana o liquidi bagnati carichi di
minerali.
Tenere il dispositivo, i suoi componenti e accessori fuori dalla portata dei bambini.
Assicurarsi che il dispositivo venga utilizzato in un ambiente asciutto e ben ventilato.
Non conservare il dispositivo in luoghi eccessivamente caldi o freddi, poiché le
temperature estreme possono ridurre la vita dei dispositivi elettronici.
Non posizionare il dispositivo in apparecchiature di riscaldamento (come asciugatrici
e forni a microonde) per asciugarlo.
Non premere con forza il dispositivo né posizionare ostacoli sopra o dietro di esso per
evitare danni.
Non lanciare, colpire o scuotere violentemente il dispositivo per evitare di danneggiare
i circuiti interni.
Non tentare di smontare e rimontare il dispositivo da soli. In caso di problemi,
contattare il servizio post-vendita Yaber.