YABER V2
INSTRUCTION MANUAL


01 02 03 04 05 06 07 08 09 10 11 12 13 14 15 16 17 18 19 20 21 22 23
24 25 26 27 28 29 30 31 32 33 34 35 36 37 38 39 40 41 42 43 44 45
46 47 48 49 50 51 52 53 54 55 56 57 58 59 60 61 62 63 64 65 66 67
68 69 70 71 72 73 74 75 76 77 78 79 80 81 82 83 84 85 86 87 88 89 90
91 92 93 94 95 96 97 98 99 100 101 102 103 104 105 106 107 108 109 110 111 112
113 114 115 116 117 118 119 120 121 122 123 124 125 126 127 128 129 130 131 132 133 134
Language
EN
FR
DE
IT
ES
JP
01-23
24-45
46-67
68-90
91-112
113-134


YABER Lifetime Professional Support
Product Packing List
Dear Customer,
Woohoo! Your projector is already in your hands! Let's get started!
Do you have any questions on how it works? Please read this manual
thoroughly before using the projector. Are you satisfied with your projec-
tor? If you have any issues, email your order number and description of
your issue to: support01@yaberauto.com. Send your email ASAP,
as we want to fix your issues the first time you have them.
Customers sometimes can experience some confusion when using the
projector. Rather than trying to communicate directly with us, many buyers
instead just leave a review on the product page. However, most negative
reviews are caused by non-standardized use rather than a defect in the
product itself. Actually, many problems can be easily solved by setting,
such as no signal, no sound etc. We promise all the projectors have been
carefully checked and packaged before shipping.
Therefore, if you have any questions, please contact us and give us an
opportunity to improve. We guarantee that we will provide you more
satisfactory solution.
Thanks for your understanding!
Best regards,
YABER TEAM
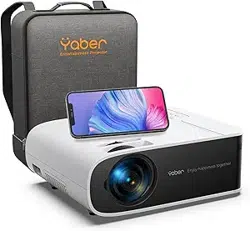
●V2 Projector * 1 ●Power Cord * 1 ●Instruction Manual * 1
●3-in-1 AV Cable * 1 ●HDMI Cable * 1 ●Lens Cleaning * 1
●Support Base*1 ●Remote Control * 1 (Batteries not included)
support01@yaberauto.com
EN
01 02 03 04 05 06 07 08 09 10 11 12 13 14 15 16 17 18 19 20 21 22 23
24 25 26 27 28 29 30 31 32 33 34 35 36 37 38 39 40 41 42 43 44 45
46 47 48 49 50 51 52 53 54 55 56 57 58 59 60 61 62 63 64 65 66 67
68 69 70 71 72 73 74 75 76 77 78 79 80 81 82 83 84 85 86 87 88 89 90
91 92 93 94 95 96 97 98 99 100 101 102 103 104 105 106 107 108 109 110 111 112
113 114 115 116 117 118 119 120 121 122 123 124 125 126 127 128 129 130 131 132 133 134
Some video tutorials please refer to YABER's YouTube channel:
https://www.youtube.com/channel/UCcU4wy4vPRQa_uNcolDd2hA

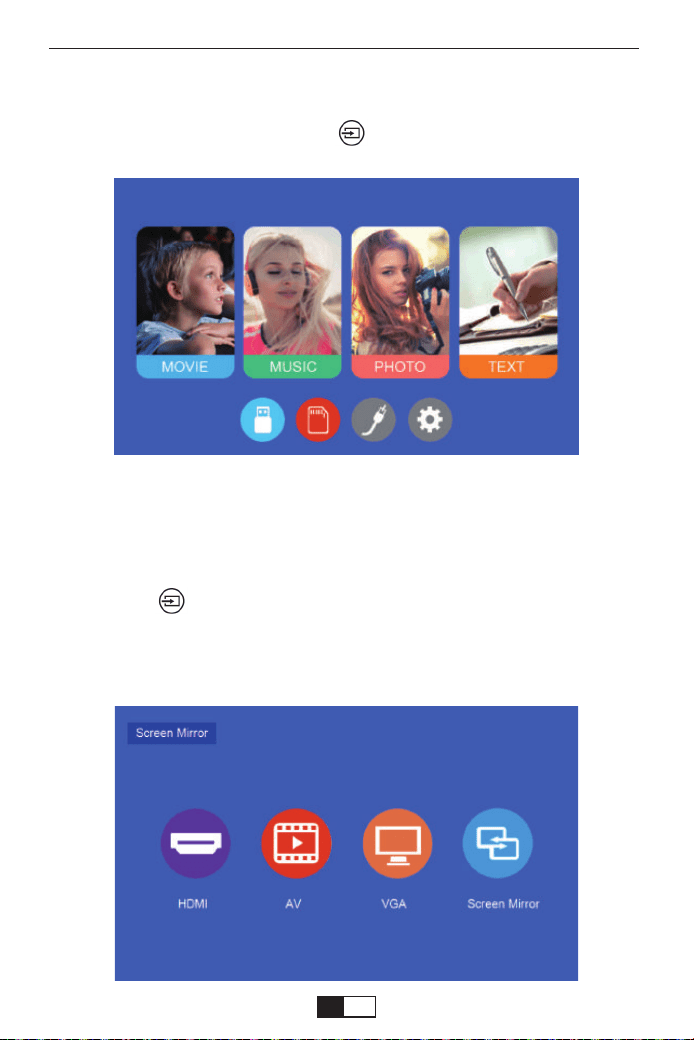
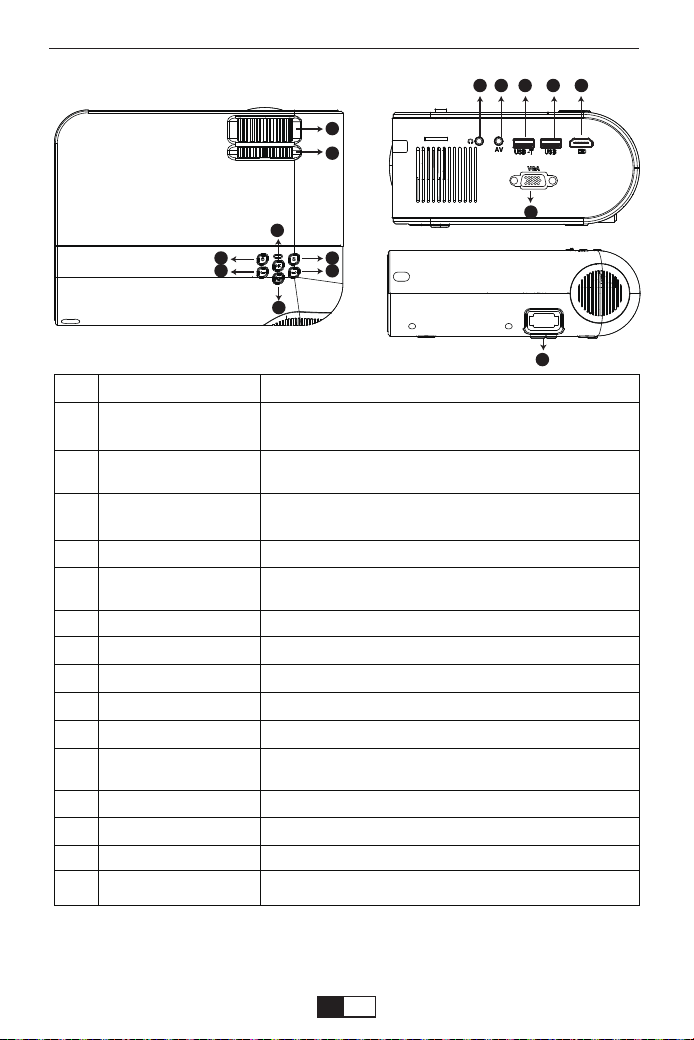
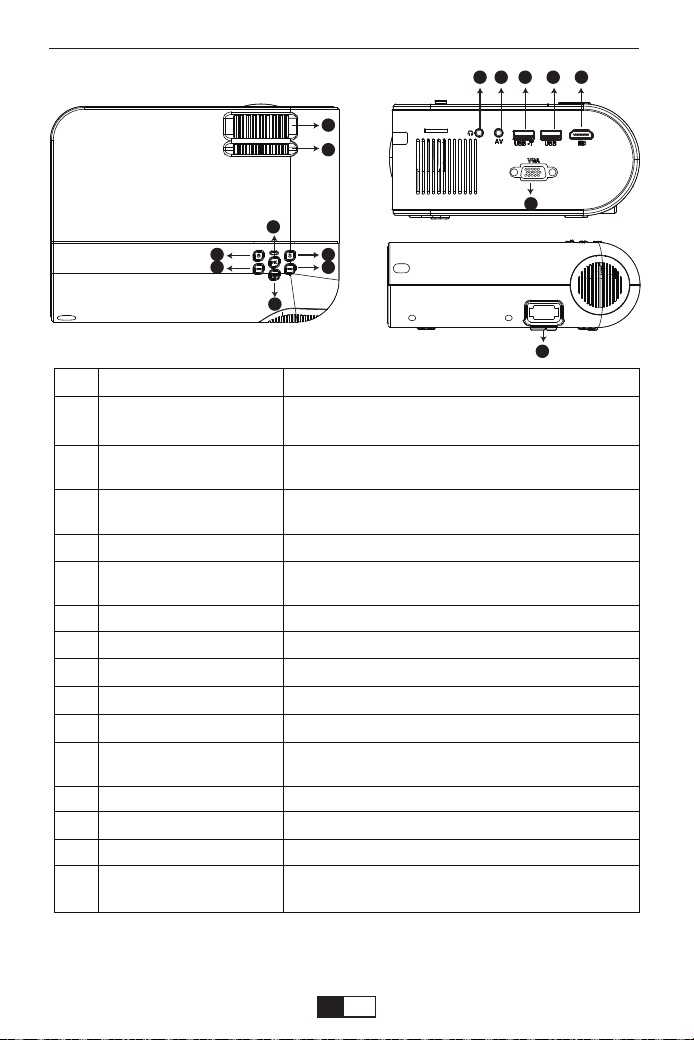
Product Description
01.Focus Ring
02.Keystone Ring
03.Power
04.OK
05.Source
06.Left Move
07.Right Move
08.Return
09.Earphone Port
10.AV Port
11.USB -T
12.USB
13.HDMI
14.VGA
15.Power Cable Port
03
05
04
08
06
07
02
01
10
11 1312
09
15
14
01
02
03
04
05
06
07
08
09
10
Name
Focus Ring
Keystone Correction
Power
OK
Source
Left Move
Right Move
Return
Earphone Port
AV Port
Description
Adjust the focus ring to get the clearest image.
Adjust the keystone ring to get a rectangle shape.
This button can lead the projector to working/
standby mode.
Confirm
Choose Source (Screen Mirror,PC-RGB,HDMI,
USB, AV,etc.)
Left Move
Right Move
Back
Earphone port
Audio input
support01@yaberauto.com
EN
01 02 03 04 05 06 07 08 09 10 11 12 13 14 15 16 17 18 19 20 21 22 23
24 25 26 27 28 29 30 31 32 33 34 35 36 37 38 39 40 41 42 43 44 45
46 47 48 49 50 51 52 53 54 55 56 57 58 59 60 61 62 63 64 65 66 67
68 69 70 71 72 73 74 75 76 77 78 79 80 81 82 83 84 85 86 87 88 89 90
91 92 93 94 95 96 97 98 99 100 101 102 103 104 105 106 107 108 109 110 111 112
113 114 115 116 117 118 119 120 121 122 123 124 125 126 127 128 129 130 131 132 133 134
Projector Specification
Pictures shown are for illustration purpose only.Actual product may vary
due to product enhancement.
INative Resolution
Display Technology
Light Source
Display Colors
Aspect Ratio
Projector Weight
Picture File
Video File
Port
1080*720p
LCD
LED
16.7M Full Color
4:3/16:9/auto
2.2lb
bmp./jpg/png/gif
Recommended
Projection Distance
Minimum Projection
Distance
Keystone Correction
Power Voltage
Projection Method
Focus
Audio File
7-10 ft
3 ft
±15°Manual
AC 100-240V
Front/ Rear /Ceiling
Manual Operation
AAC/MP2/MP3/PC-
M/FLAC/WMA/AC3
11
12
13
14
15
USB-T
USB
HDMI
VGA
Power Cable Port
Wired screen mirroring port (With Original USB cable)
USB port
HDMI input
VGA input
Plug the power cable
AVI/ MP4/ MKV/ FLV/ MOV/ RMVB/ 3GP/ MPEG1/
MPEG2/ XVID (WMV NOT Suported)
AV, USB, USB-T, HDMI, VGA
support01@yaberauto.com
EN
01 02 03 04 05 06 07 08 09 10 11 12 13 14 15 16 17 18 19 20 21 22 23
24 25 26 27 28 29 30 31 32 33 34 35 36 37 38 39 40 41 42 43 44 45
46 47 48 49 50 51 52 53 54 55 56 57 58 59 60 61 62 63 64 65 66 67
68 69 70 71 72 73 74 75 76 77 78 79 80 81 82 83 84 85 86 87 88 89 90
91 92 93 94 95 96 97 98 99 100 101 102 103 104 105 106 107 108 109 110 111 112
113 114 115 116 117 118 119 120 121 122 123 124 125 126 127 128 129 130 131 132 133 134

Thanks
Thank you very much for purchasing the YABER V2 projector.
Please read this instruction manual carefully before use. Also, please
keep it handy so you can check it at any time.
If in doubt, do not hesitate to contact
support01@yaberauto.com.
We can provide after-sales service until satisfaction.
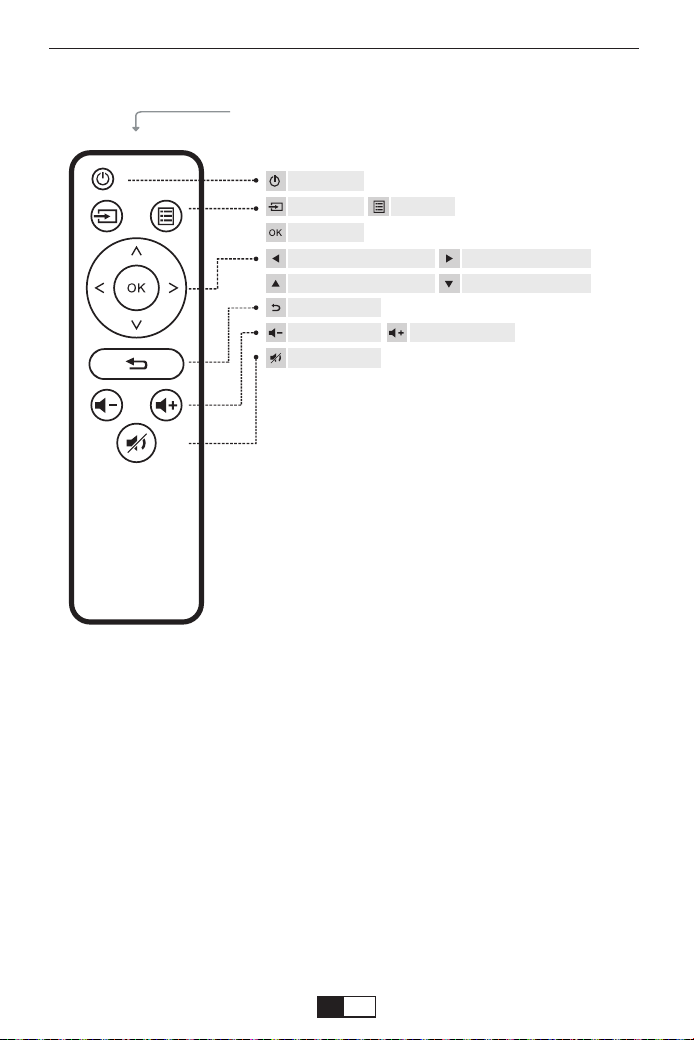
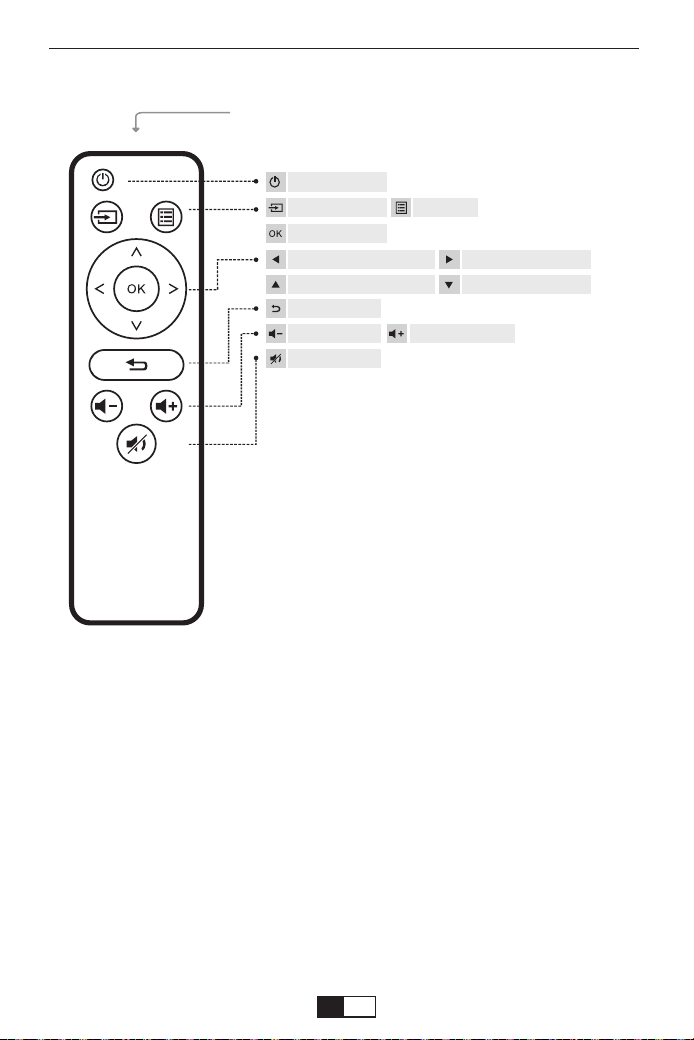
Remote control
Replace the remote control battery
1. Push to open the battery cover.
2. Remove both old batteries and install new ones (AA). Make sure that
the polarity of the batteries (+/-) is correctly aligned.
(Batteries not included)
IR Transmitter
Power
Input Source Menu
OK
Move Left Move Right Move Up Move Down
Return
Volume Down Volume Up
Mute
support01@yaberauto.com
EN
01 02 03 04 05 06 07 08 09 10 11 12 13 14 15 16 17 18 19 20 21 22 23
24 25 26 27 28 29 30 31 32 33 34 35 36 37 38 39 40 41 42 43 44 45
46 47 48 49 50 51 52 53 54 55 56 57 58 59 60 61 62 63 64 65 66 67
68 69 70 71 72 73 74 75 76 77 78 79 80 81 82 83 84 85 86 87 88 89 90
91 92 93 94 95 96 97 98 99 100 101 102 103 104 105 106 107 108 109 110 111 112
113 114 115 116 117 118 119 120 121 122 123 124 125 126 127 128 129 130 131 132 133 134

Please Attention:
The Mirror display function doesn't support protected videos due to
copyright protection. (Netflix, Amazon Prime Video and Hulu etc.)
Important safeguards
These safety instructions are to ensure the long life of the projector and
to prevent fires and shocks. Read them carefully and pay attention to all
warnings.
Installation
1. For best results, use the projector in a dark room.
2. Place the projector on a flat, level surface in a dry area away from dust
and moisture.
4. Exposure to direct sunlight, smoke or steam may damage internal
components.
5. Handle the projector carefully. Falling or shaking can damage internal
components.
6. Do not place heavy objects on top of the projector.
1. The projector is designed to operate with a 110-240 V ~ 50/60 Hz AC
adapter. Ensure that the power supply meets this requirement before
attempting to use the projector.
2. Handle the power cord carefully and avoid bending it too much. A
damaged cord can cause electric shock or fire.
3. If the projector will not be used for a long time, unplug the power cord
from the outlet.
Supply
1. Unplug the projector before cleaning it.
2. Periodically clean the cabinet with a damp cloth. If it is very dirty, use a
mild detergent. Never use strong detergents or solvents such as alcohol
or thinners.
3. Use a blower or lens paper to clean the lens and be careful not to
scratch or damage the lens.
Cleaning
support01@yaberauto.com
EN
01 02 03 04 05 06 07 08 09 10 11 12 13 14 15 16 17 18 19 20 21 22 23
24 25 26 27 28 29 30 31 32 33 34 35 36 37 38 39 40 41 42 43 44 45
46 47 48 49 50 51 52 53 54 55 56 57 58 59 60 61 62 63 64 65 66 67
68 69 70 71 72 73 74 75 76 77 78 79 80 81 82 83 84 85 86 87 88 89 90
91 92 93 94 95 96 97 98 99 100 101 102 103 104 105 106 107 108 109 110 111 112
113 114 115 116 117 118 119 120 121 122 123 124 125 126 127 128 129 130 131 132 133 134

FAQ
1. At the time of switching on, the indicative light does not work
①. The power supply may not be well connected
②. Check the overheating protection system
2. Pressing the power button on the remote control does not turn on the
projector
①. The remote control batteries are empty
②. The signal between the remote control and the IR sensor is obstructed
③. Strong direct light on the IR sensor?
3. No image on the screen
①. Is the channel setting correct?
②. Is there an input signal?
③. Is the input cable inserted correctly or is it in the wrong position?
④. In PC mode the refresh rate is> 75KHz?
4. The image works but there is no sound
①. Are the input cables connected correctly?
②. Volume at minimum or silent
③. Check that the audio format of the video is in the supported list
5. Turns off automatically after being turned on for a while
①. Is there a barrier around the fan?
②. Small or large voltage fluctuations
③. Check the overheating protection system
6. I can not find devices connected with hard drives or flash drives
①. Re-insert the device
②. Check if the device is working
7. Unable to play video
①. Is the video format correct?
②. The file is corrupted?
③. The device is damaged
support01@yaberauto.com
EN
01 02 03 04 05 06 07 08 09 10 11 12 13 14 15 16 17 18 19 20 21 22 23
24 25 26 27 28 29 30 31 32 33 34 35 36 37 38 39 40 41 42 43 44 45
46 47 48 49 50 51 52 53 54 55 56 57 58 59 60 61 62 63 64 65 66 67
68 69 70 71 72 73 74 75 76 77 78 79 80 81 82 83 84 85 86 87 88 89 90
91 92 93 94 95 96 97 98 99 100 101 102 103 104 105 106 107 108 109 110 111 112
113 114 115 116 117 118 119 120 121 122 123 124 125 126 127 128 129 130 131 132 133 134
The fluency of screen mirroring with wireless connection will be affected
by the network environment. A bandwidth of 100Mbit or more is recom-
mended when using screen mirroring.
Make sure your mobile device is close to the projector when using
wireless connection. A distance within 1 meter is recommended.
Some mobile devices may not support screen mirroring due to the
compatibility.
Any questions, please feel free to contact YABER via
support01@yaberauto.com
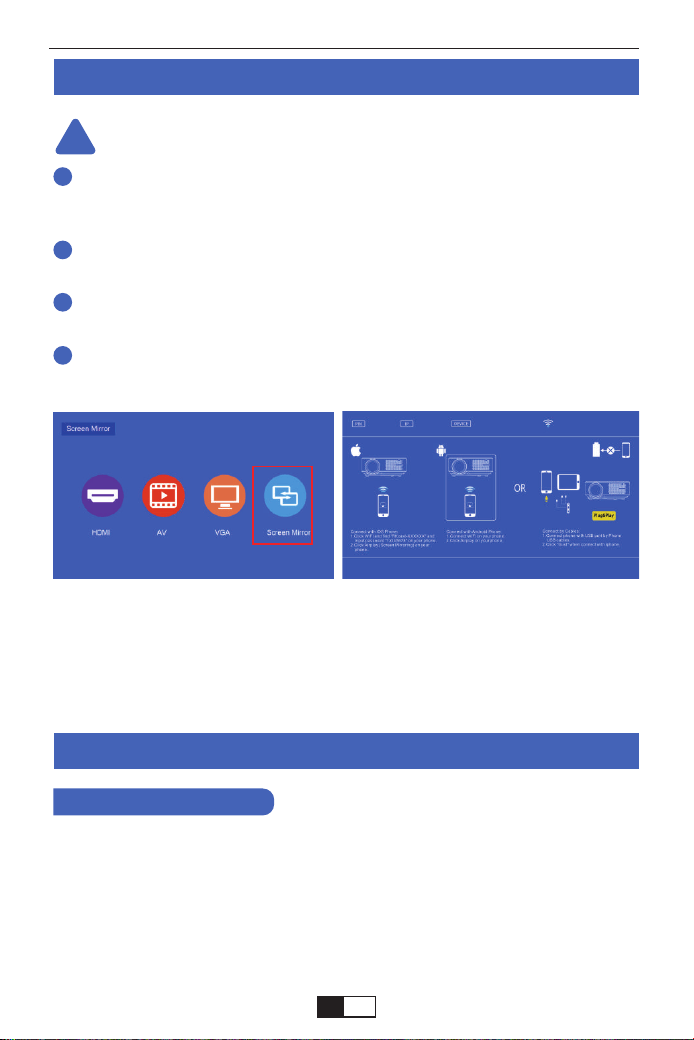
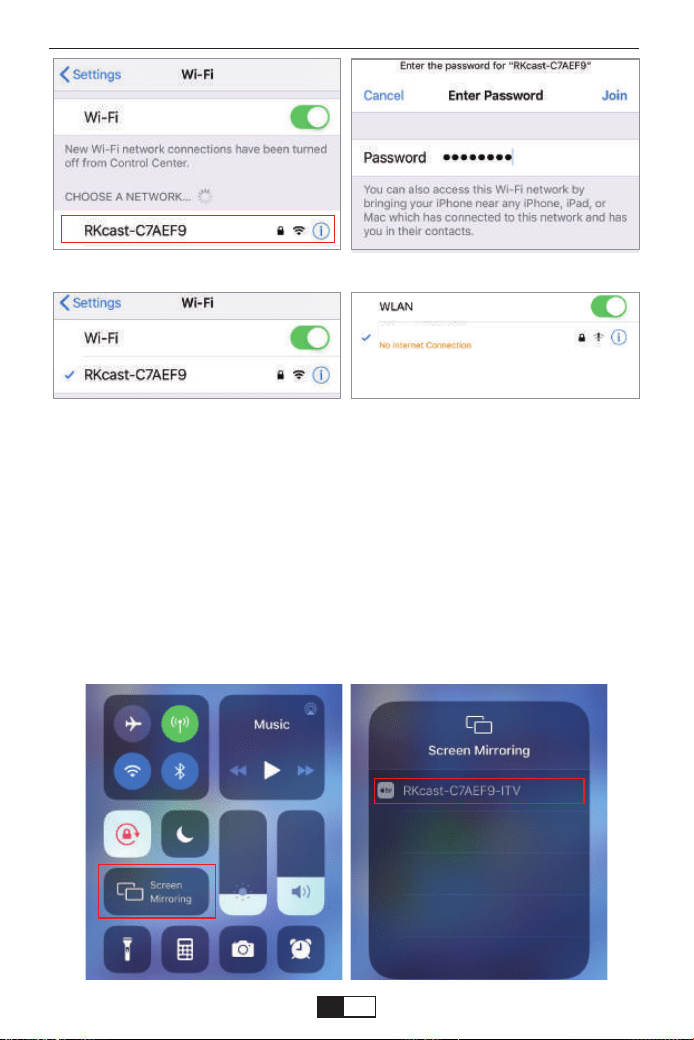
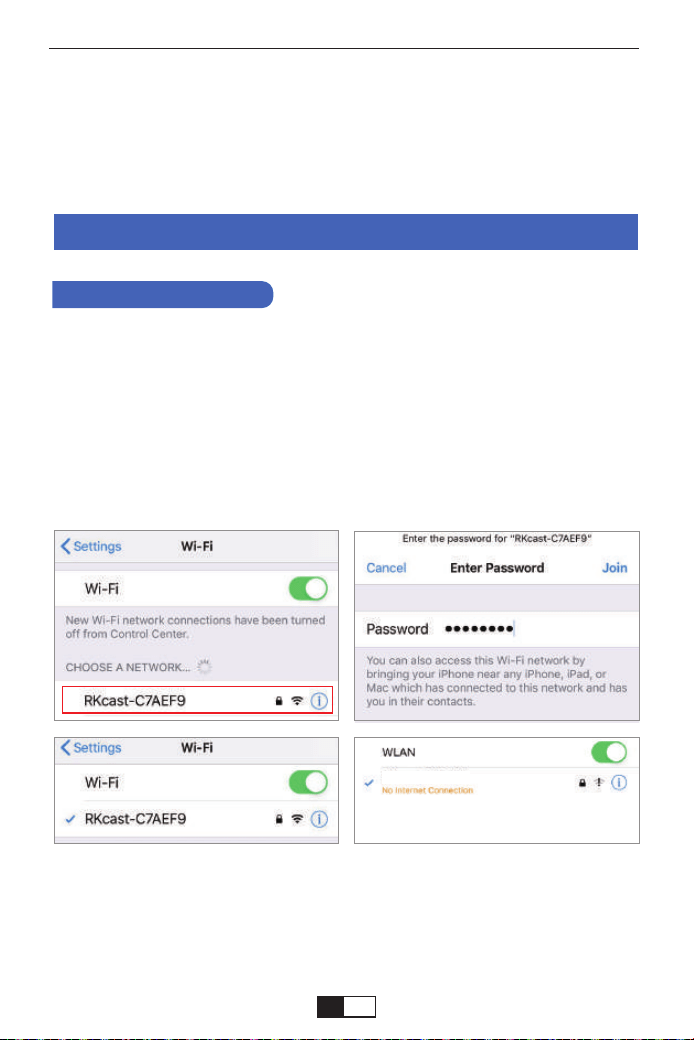
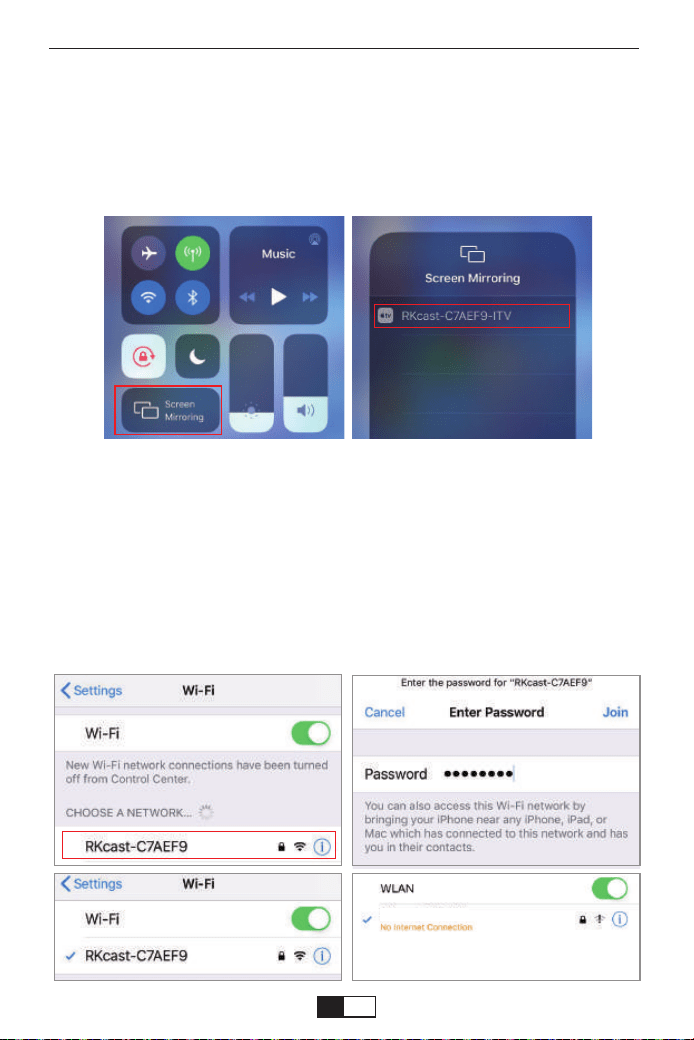
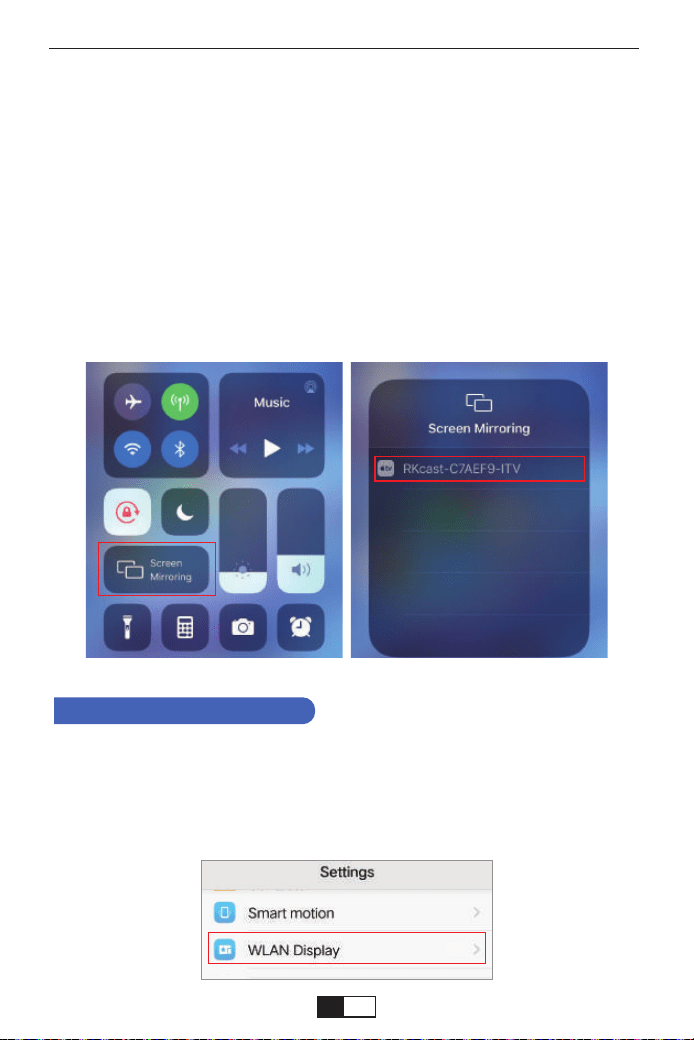
On your iOS device, tap [Settings] -[Wi-Fi] -Turn [Wi-Fi] ON. Available
networks are shown.
Choose the WiFi name like [RKcast-xxxxxx], Connect it and enter the
password [12345678] which is on the Projector’s menu.
At first, turn on the the projector, press the "source" bottom on the remote,
then it will shows " Input Source" option on the projection image. Choose
the "Screen Mirroring", then press "OK" you will get this menu:
Wireless Projection Method
Screen Mirroring Methods
Warming Tips:
Step 1
Method 1: IP-Use Your Home WIFI Network
1. For iOS Users
!
1
2
3
4
support01@yaberauto.com
EN
01 02 03 04 05 06 07 08 09 10 11 12 13 14 15 16 17 18 19 20 21 22 23
24 25 26 27 28 29 30 31 32 33 34 35 36 37 38 39 40 41 42 43 44 45
46 47 48 49 50 51 52 53 54 55 56 57 58 59 60 61 62 63 64 65 66 67
68 69 70 71 72 73 74 75 76 77 78 79 80 81 82 83 84 85 86 87 88 89 90
91 92 93 94 95 96 97 98 99 100 101 102 103 104 105 106 107 108 109 110 111 112
113 114 115 116 117 118 119 120 121 122 123 124 125 126 127 128 129 130 131 132 133 134
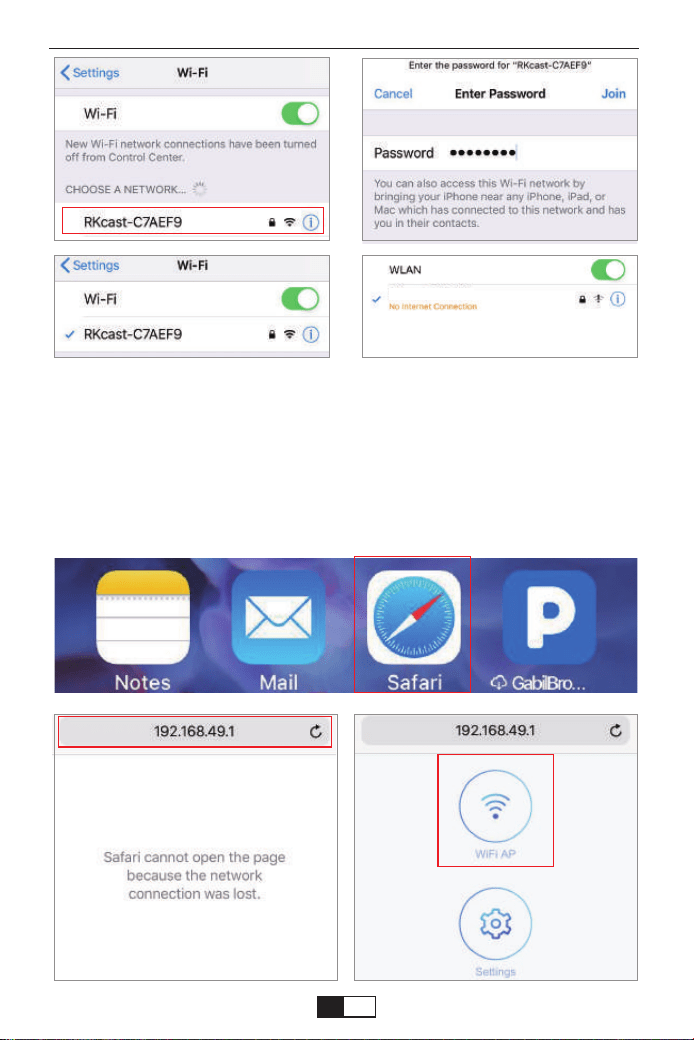
Note: After connecting, if "No Internet Connection" is displayed, please
ignore it because it will not affect the use.
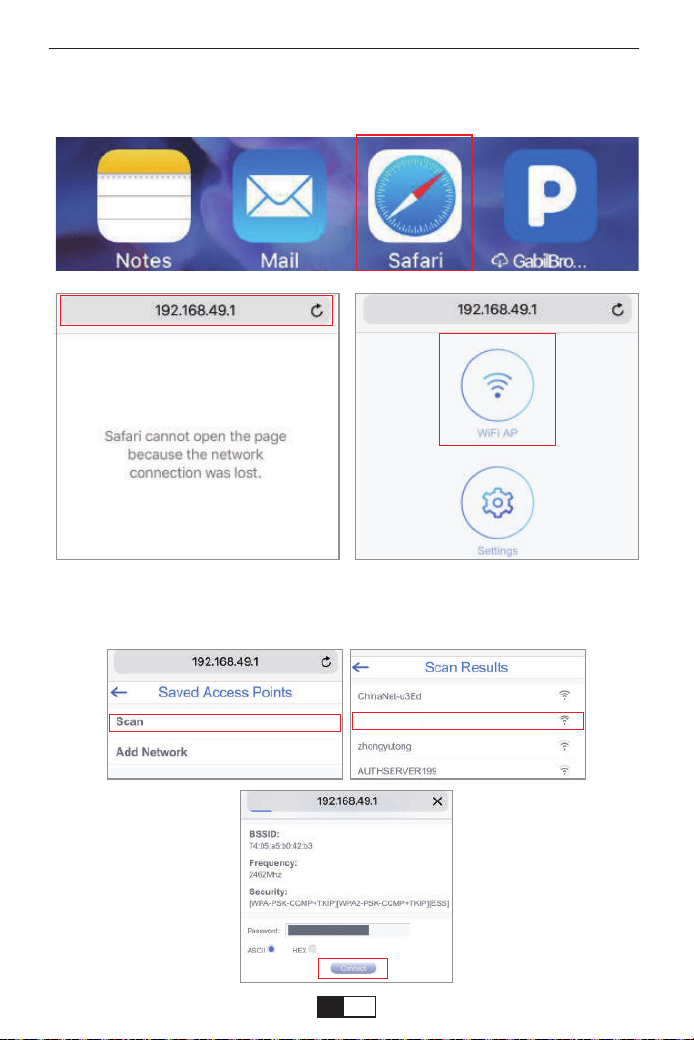
① Go to Safari--Enter “192.168.49.1”
Step 2
RKcast-C7AEF9
support01@yaberauto.com
EN
01 02 03 04 05 06 07 08 09 10 11 12 13 14 15 16 17 18 19 20 21 22 23
24 25 26 27 28 29 30 31 32 33 34 35 36 37 38 39 40 41 42 43 44 45
46 47 48 49 50 51 52 53 54 55 56 57 58 59 60 61 62 63 64 65 66 67
68 69 70 71 72 73 74 75 76 77 78 79 80 81 82 83 84 85 86 87 88 89 90
91 92 93 94 95 96 97 98 99 100 101 102 103 104 105 106 107 108 109 110 111 112
113 114 115 116 117 118 119 120 121 122 123 124 125 126 127 128 129 130 131 132 133 134
On your iOS device, tap [Settings] -[Wi-Fi] -Turn [Wi-Fi] ON. Available
networks are shown.
Choose the WiFi name like [RKcast-xxxxxx], Connect it and enter the
password [12345678] which is on the Projector’s menu.
Step 1
Method 2: AP-Use cellular network from your mobile phone card.
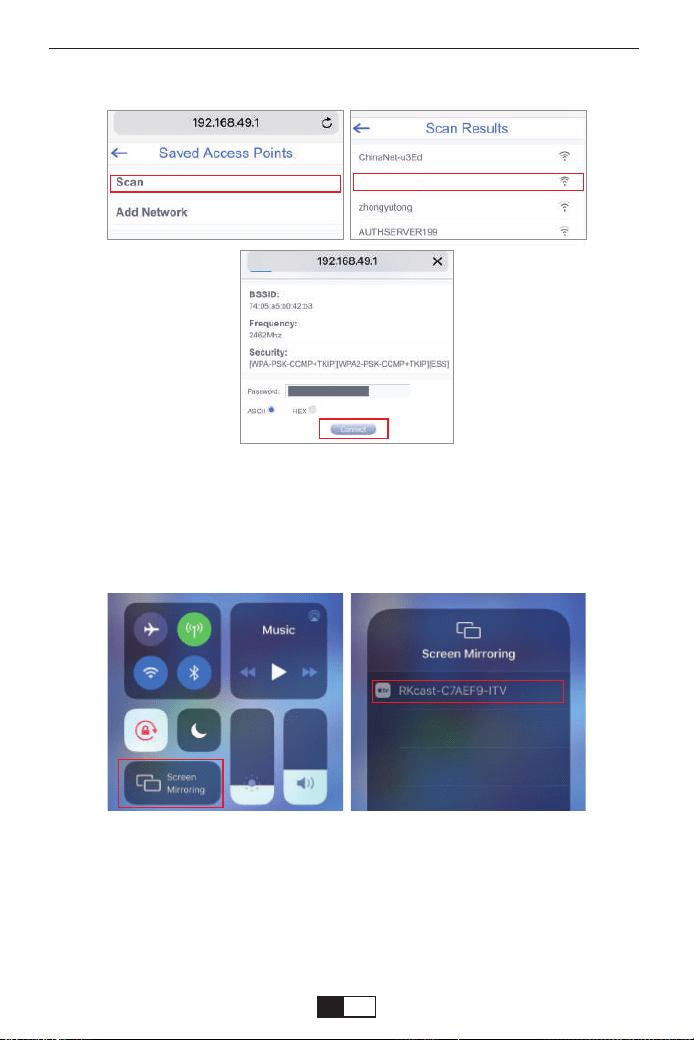
②Tap WiFi AP -- Scan-- Select your WIFI--enter your WiFi’s password--Tap
Connect
Open Control Center- Tap the Screen Mirroring button-Connect
[RKcast-xxxxxx]
① Open control center.
② Tap on Screen Mirroring-Select the Device name [RKcast-xxxxxx]
Step 3
YABER
support01@yaberauto.com
EN
01 02 03 04 05 06 07 08 09 10 11 12 13 14 15 16 17 18 19 20 21 22 23
24 25 26 27 28 29 30 31 32 33 34 35 36 37 38 39 40 41 42 43 44 45
46 47 48 49 50 51 52 53 54 55 56 57 58 59 60 61 62 63 64 65 66 67
68 69 70 71 72 73 74 75 76 77 78 79 80 81 82 83 84 85 86 87 88 89 90
91 92 93 94 95 96 97 98 99 100 101 102 103 104 105 106 107 108 109 110 111 112
113 114 115 116 117 118 119 120 121 122 123 124 125 126 127 128 129 130 131 132 133 134
Open Control Center- Tap the Screen Mirroring button-Connect
[RKcast-xxxxxx]
① Open control center.
② Tap on Screen Mirroring-Select the Device name [RKcast-xxxxxx]
Step 2
Note: After connecting, if "No Internet Connection" is displayed, please
ignore it because it will not affect the use.
RKcast-C7AEF9
support01@yaberauto.com
EN
01 02 03 04 05 06 07 08 09 10 11 12 13 14 15 16 17 18 19 20 21 22 23
24 25 26 27 28 29 30 31 32 33 34 35 36 37 38 39 40 41 42 43 44 45
46 47 48 49 50 51 52 53 54 55 56 57 58 59 60 61 62 63 64 65 66 67
68 69 70 71 72 73 74 75 76 77 78 79 80 81 82 83 84 85 86 87 88 89 90
91 92 93 94 95 96 97 98 99 100 101 102 103 104 105 106 107 108 109 110 111 112
113 114 115 116 117 118 119 120 121 122 123 124 125 126 127 128 129 130 131 132 133 134
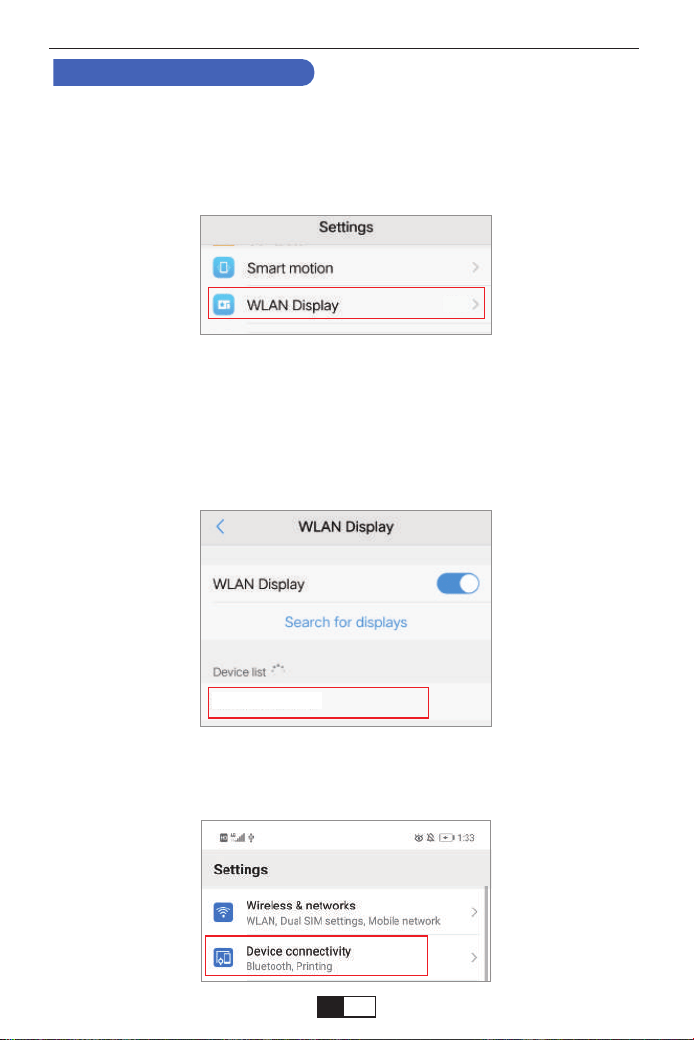
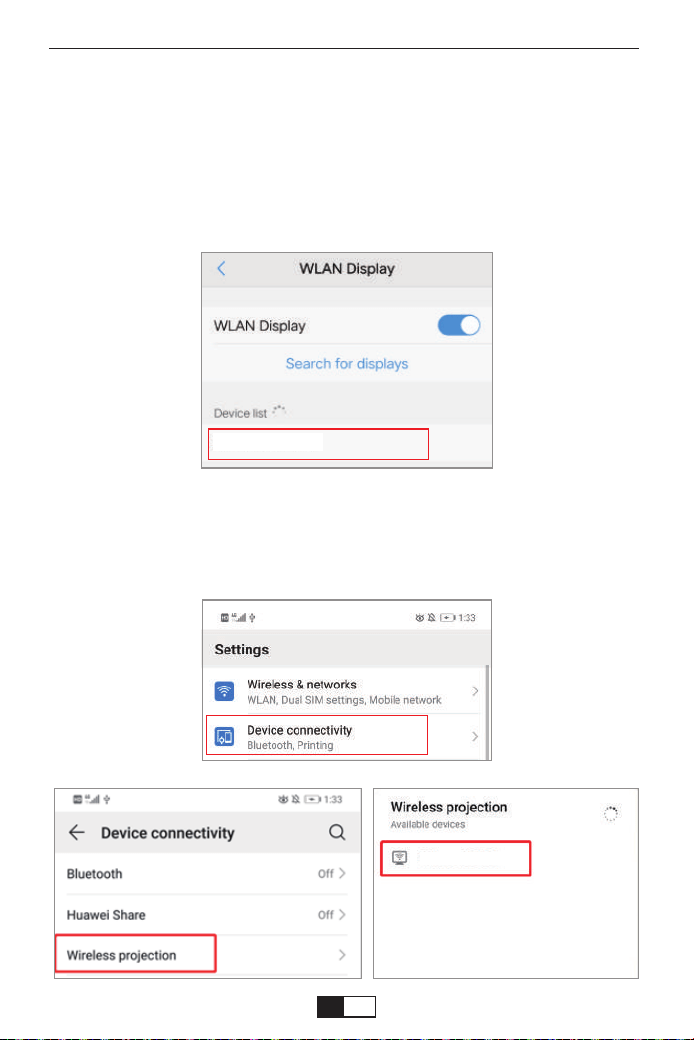
Note: different brands of Android phones have different operations for
select WLAN Display, please refer to your phone’s manual.
On your Android device, tap [Settings] -[WLAN Display] -Turn [Wi-Fi] ON.
Available networks are shown.
Step 1
Method 1: IP-Use Your Home WIFI Network
2. For Android Users
Choose your home WiFi name (Ex. YABER), Connect it and enter your
password [XXXXXXXX].
Step 2
Tap [Settings] -[Device connectivity] -Turn [Wireless projection] ON
Step 3
YABER
On
support01@yaberauto.com
EN
01 02 03 04 05 06 07 08 09 10 11 12 13 14 15 16 17 18 19 20 21 22 23
24 25 26 27 28 29 30 31 32 33 34 35 36 37 38 39 40 41 42 43 44 45
46 47 48 49 50 51 52 53 54 55 56 57 58 59 60 61 62 63 64 65 66 67
68 69 70 71 72 73 74 75 76 77 78 79 80 81 82 83 84 85 86 87 88 89 90
91 92 93 94 95 96 97 98 99 100 101 102 103 104 105 106 107 108 109 110 111 112
113 114 115 116 117 118 119 120 121 122 123 124 125 126 127 128 129 130 131 132 133 134
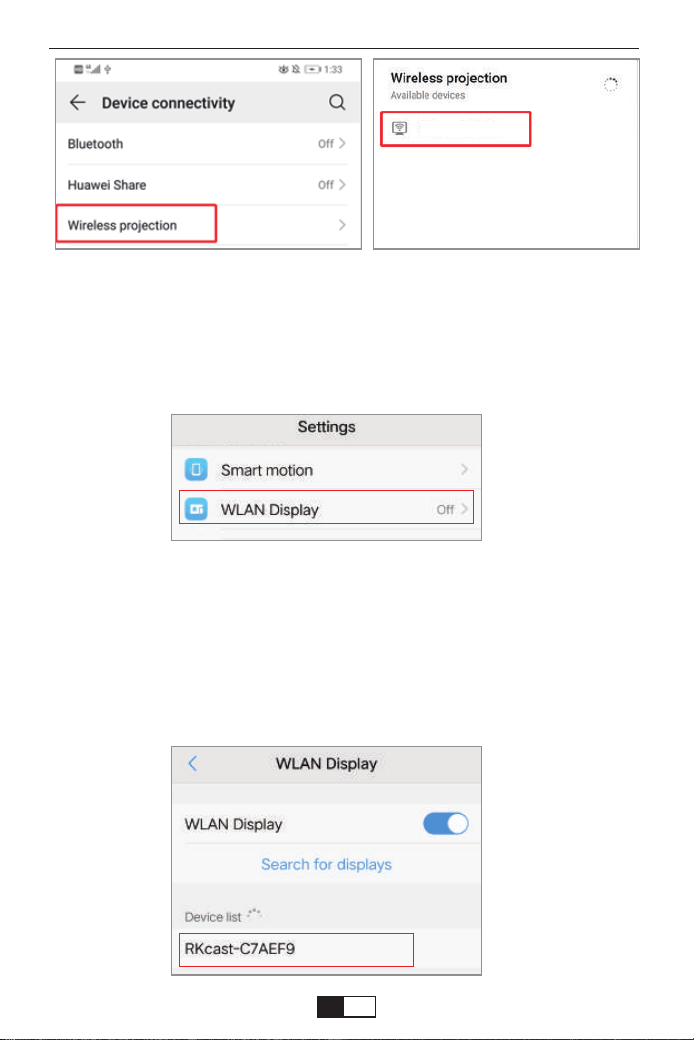
Note: different brands of Android phones have different operations for
select WLAN Display, please refer to the phone’s manual.
On your Android device, tap [Settings] -[WLAN Display] -Turn [Wi-Fi] ON.
Available networks are shown.
Step 1
Choose the WiFi name like [RKcast-xxxxxx], Connect it and enter the
password [12345678] which is on the Projector’s menu.
Step 2
Method 2: AP-Use cellular network from your mobile phone card.
RKcast-C7AEF9
RKcast-C7AEF9
RKcast-C7AEF9
support01@yaberauto.com
EN
01 02 03 04 05 06 07 08 09 10 11 12 13 14 15 16 17 18 19 20 21 22 23
24 25 26 27 28 29 30 31 32 33 34 35 36 37 38 39 40 41 42 43 44 45
46 47 48 49 50 51 52 53 54 55 56 57 58 59 60 61 62 63 64 65 66 67
68 69 70 71 72 73 74 75 76 77 78 79 80 81 82 83 84 85 86 87 88 89 90
91 92 93 94 95 96 97 98 99 100 101 102 103 104 105 106 107 108 109 110 111 112
113 114 115 116 117 118 119 120 121 122 123 124 125 126 127 128 129 130 131 132 133 134
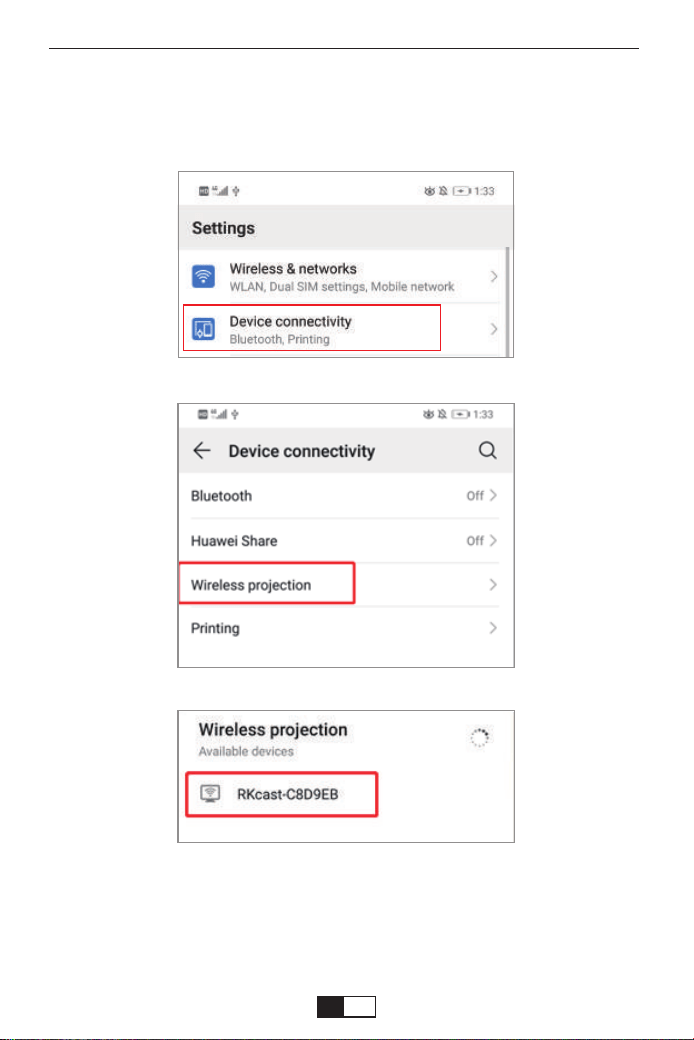
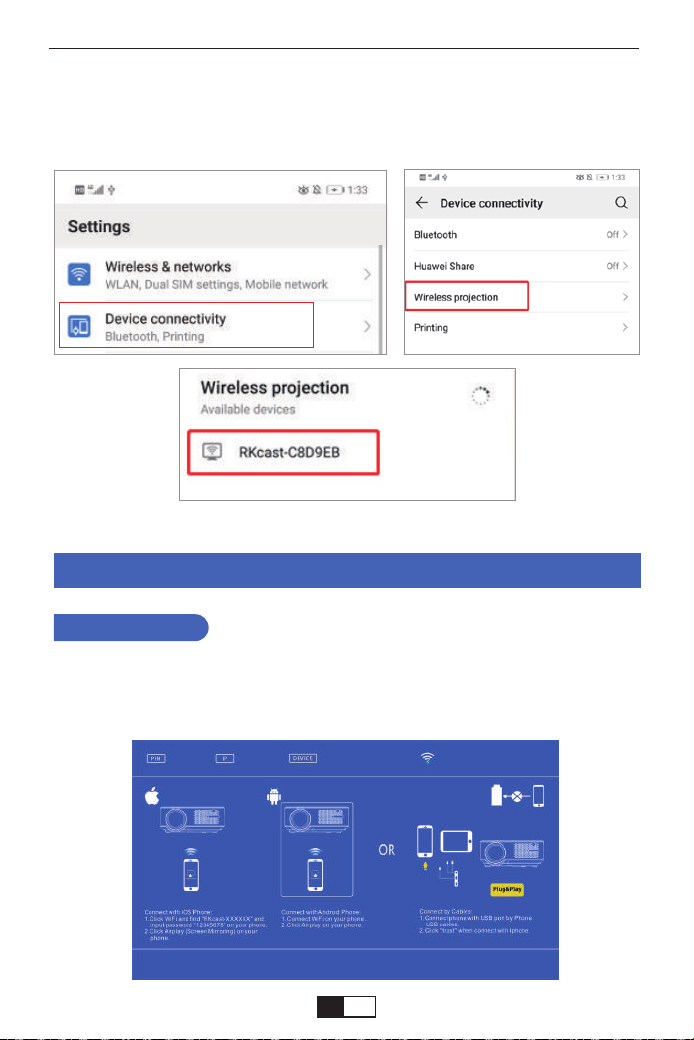
Tap [Settings] -[Device connectivity] -Turn [Wireless projection] ON-Select
the projector name like [RKcast-xxxxxx]
Step 3
support01@yaberauto.com
EN
01 02 03 04 05 06 07 08 09 10 11 12 13 14 15 16 17 18 19 20 21 22 23
24 25 26 27 28 29 30 31 32 33 34 35 36 37 38 39 40 41 42 43 44 45
46 47 48 49 50 51 52 53 54 55 56 57 58 59 60 61 62 63 64 65 66 67
68 69 70 71 72 73 74 75 76 77 78 79 80 81 82 83 84 85 86 87 88 89 90
91 92 93 94 95 96 97 98 99 100 101 102 103 104 105 106 107 108 109 110 111 112
113 114 115 116 117 118 119 120 121 122 123 124 125 126 127 128 129 130 131 132 133 134
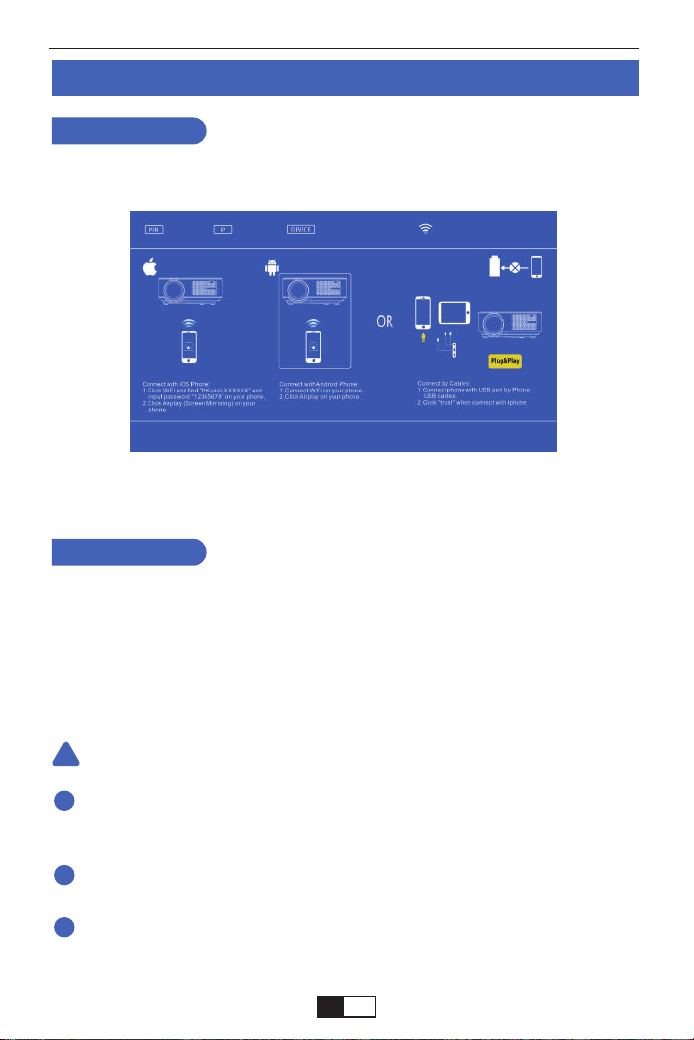
Wired Screen mirroring (With Original USB cable)
1. Turn on the projector -- Press the “S” button on the remote -- “Input Source” --
Select “Screen Mirroring” -- Press the “OK” button.
2.Plug the original cable of your IOS equipment to the USB-T Port.
3. Show with "Do you trust this equipment?", tap "Trust".
For IOS
1. Turn on the projector -- Press the “S” button on the remote -- “Input Source” --
Select “Screen Mirroring” -- Press the “OK” button.
2. Plug the original cable of your Android equipment to the USB-T Port.
3. On the "Do you allow debugging via USB?" Prompt, tap "OK".
4. After a while, Android screen will be displayed on the projector.
For Android
The USB cable MUST be the ORIGINAL cable or the cable which can
transfer the data, otherwise screen mirroring may fail. You can plug the cable
into your laptop to check the availability of transferring the data.
Some mobile devices may not support screen mirroring due to the compati-
bility.
Some Android mobile devices may only transfer the display without audio
due too the protocol restrictions.
Warming Tips:
!
1
2
3
support01@yaberauto.com
EN
01 02 03 04 05 06 07 08 09 10 11 12 13 14 15 16 17 18 19 20 21 22 23
24 25 26 27 28 29 30 31 32 33 34 35 36 37 38 39 40 41 42 43 44 45
46 47 48 49 50 51 52 53 54 55 56 57 58 59 60 61 62 63 64 65 66 67
68 69 70 71 72 73 74 75 76 77 78 79 80 81 82 83 84 85 86 87 88 89 90
91 92 93 94 95 96 97 98 99 100 101 102 103 104 105 106 107 108 109 110 111 112
113 114 115 116 117 118 119 120 121 122 123 124 125 126 127 128 129 130 131 132 133 134
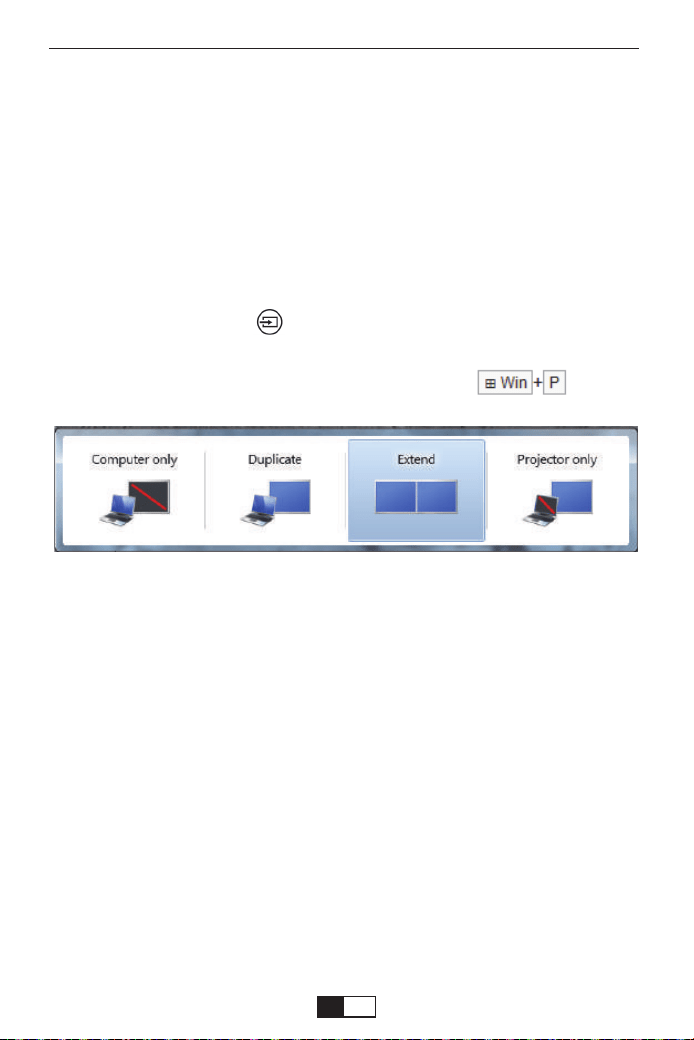
Using the HDMI or VGA cable to connect with projector.
(An HDMI connection is recommended for projecting movies, videos, and
other files which need to be HD.)
(1)Turn on your computer and the projector;
(2)Connect the HDMI/VGA cable to your computer's HDMI/VGA port;
(3)Connect the other end to any available HDMI/VGA port on your projector;
(4)Press the “Source” button to enter the interface of Input Source;
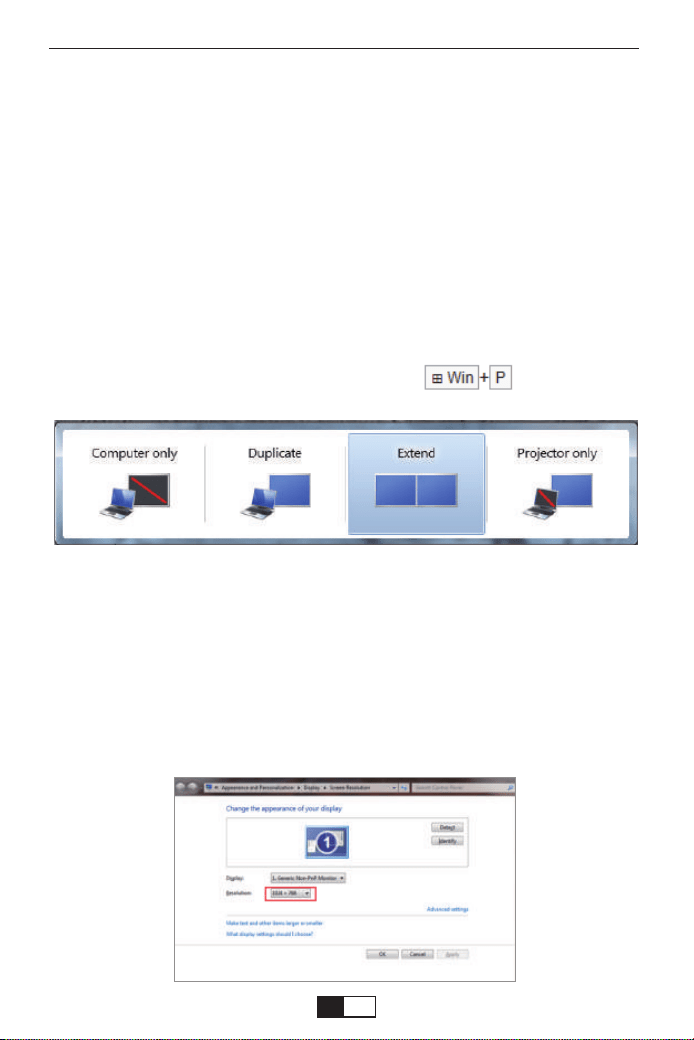
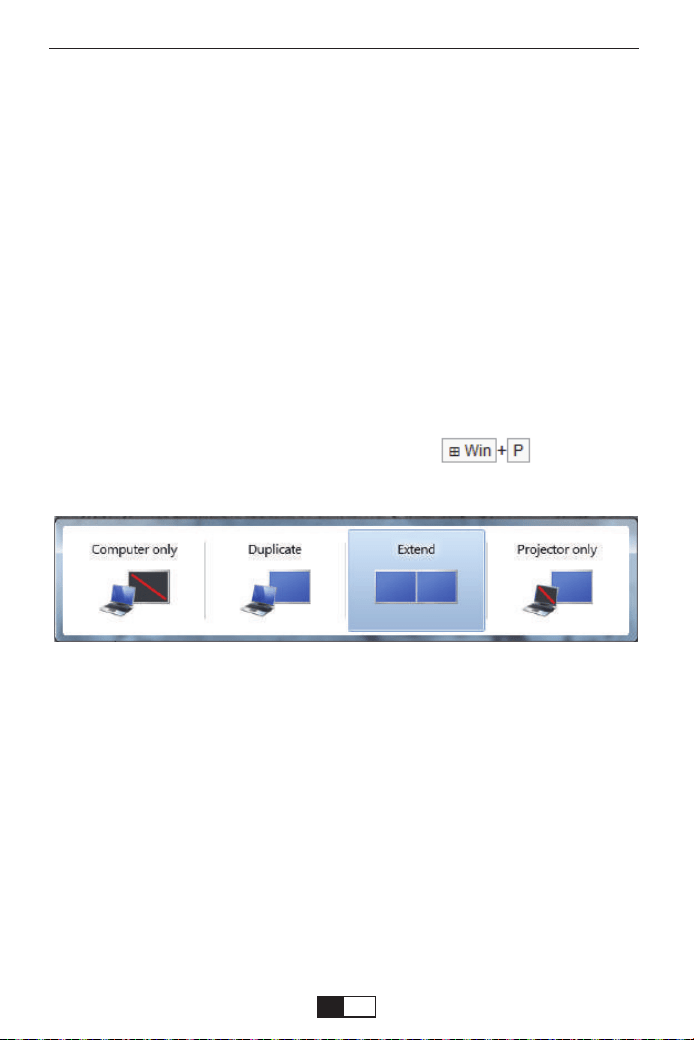
(5)Select HDMI/ PC-RGB source to project any files on your computer;
(6)On your laptop, hold down the keyboard keys to change your
display mode:
Computer only: is the default option – only displays on the main monitor.
Duplicate: makes all of the monitors display the same thing duplicating the
desktop on each monitor.
Extend: makes all of your monitors act like one big monitor extending the
desktop across all of them
Projector only: Displays only on the secondary monitor like a projector
(7)You can change your screen resolution:
Choose Start→Control Panel→Appearance and Personalization → Adjust
Screen Resolution
1. Connecting to the Computer
PROJECTOR CONNECTIONS
support01@yaberauto.com
EN
01 02 03 04 05 06 07 08 09 10 11 12 13 14 15 16 17 18 19 20 21 22 23
24 25 26 27 28 29 30 31 32 33 34 35 36 37 38 39 40 41 42 43 44 45
46 47 48 49 50 51 52 53 54 55 56 57 58 59 60 61 62 63 64 65 66 67
68 69 70 71 72 73 74 75 76 77 78 79 80 81 82 83 84 85 86 87 88 89 90
91 92 93 94 95 96 97 98 99 100 101 102 103 104 105 106 107 108 109 110 111 112
113 114 115 116 117 118 119 120 121 122 123 124 125 126 127 128 129 130 131 132 133 134
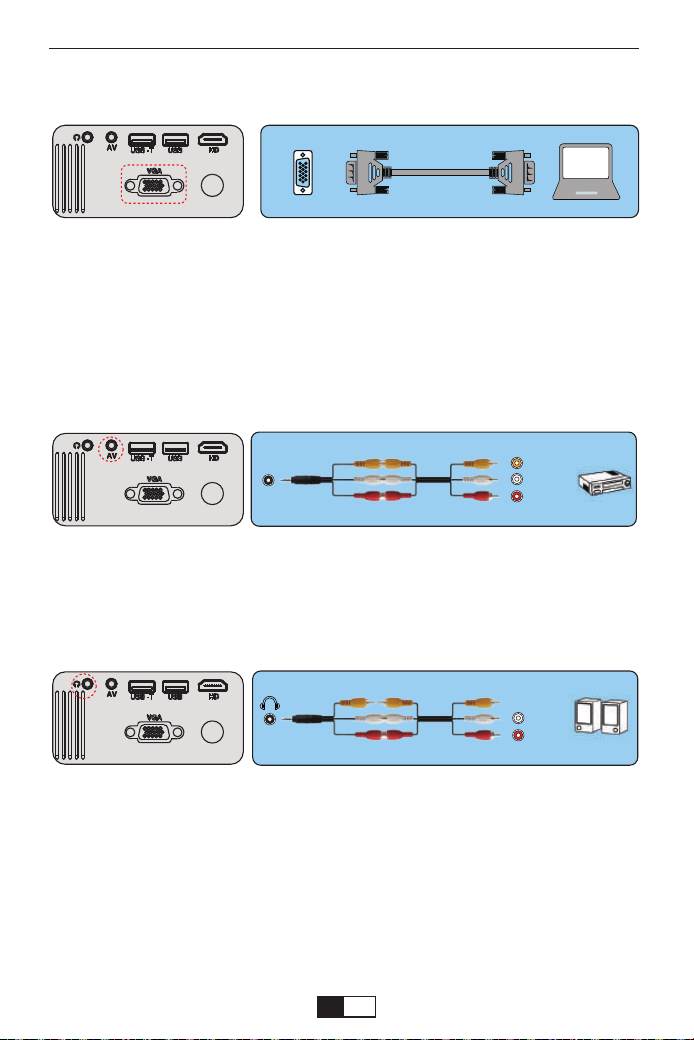
(Note: VGA connection can only transmit analog signal of video not audio. An
external speaker is required when the device is connected via VGA cable.)
3. Connect the soundbar
1. Use the supplied AV cable to connect the soundbar to the projector.
2. Turn on the projector and the sound bar.
2.Connecting a DVD player
1. Use the supplied AV cable to connect the DVD player to the projector.
2. Turn on the projector and DVD player.
If your player has an HDMI output, it is best to use it over the analog (AV)
option. Audio output must be configured from the DVD player menu if
external speakers are installed.
(3-in-3 AV cable not included)
(3-in-3 AV cable not included)
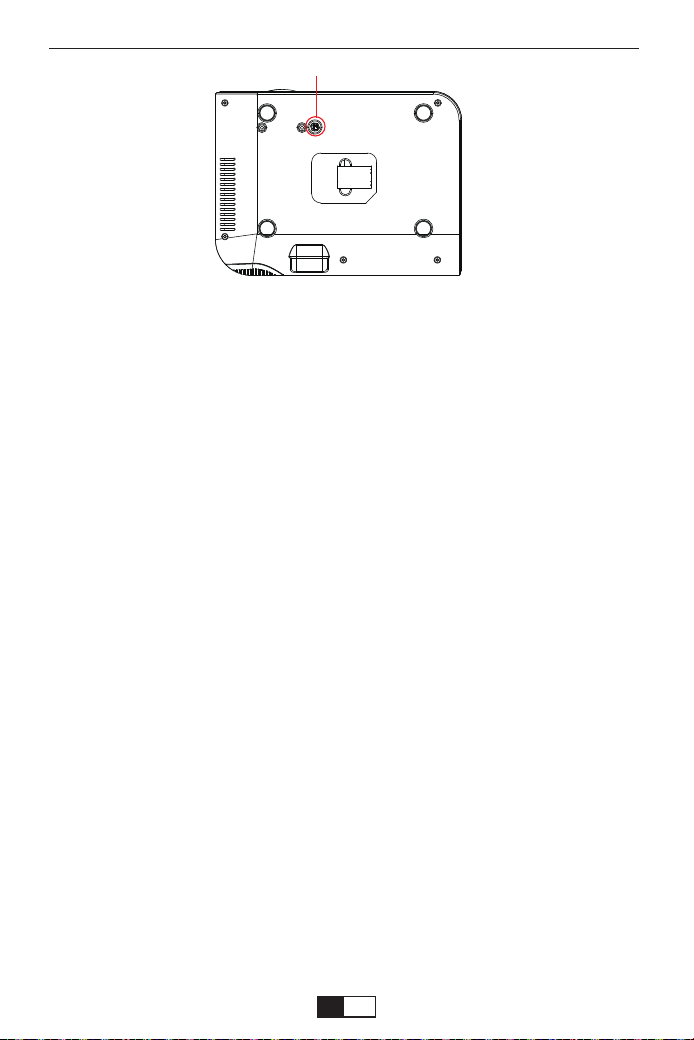
Adjust the Tilt Base and Hang Ceiling
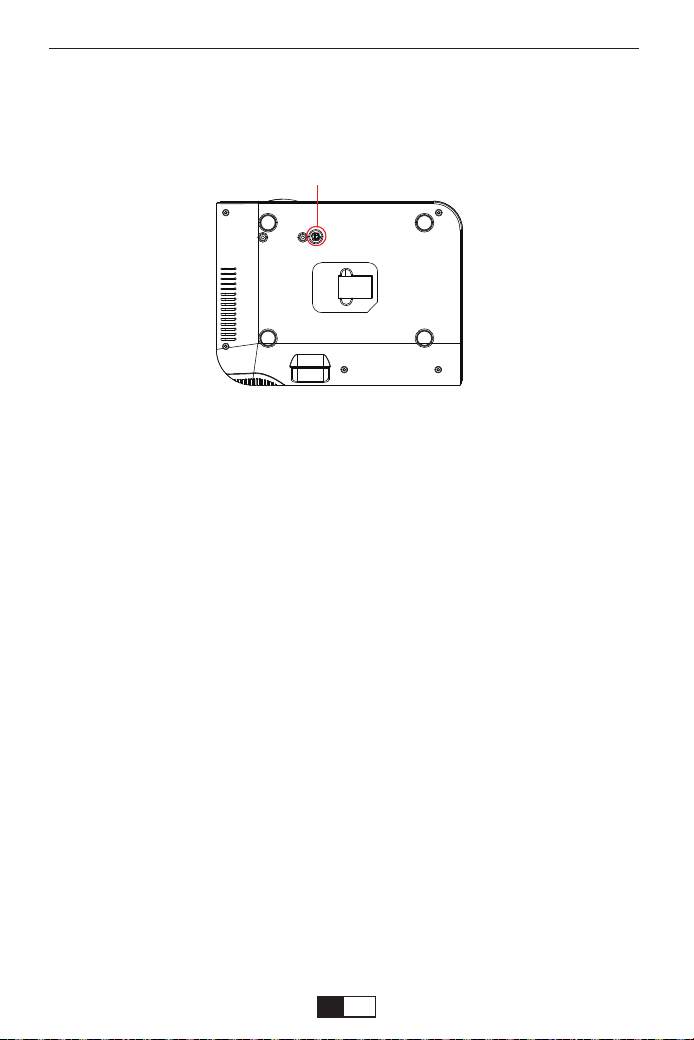
Adjust the tilt base:
Install the screws (included in the package) to place ①, lift the front edge of the
projector to the desired height, turn the presser foot and release the button to
lock the tilt base to the appropriate position.
VGA
AV
video
audio out
(L/R)
audio out
(L/R)
support01@yaberauto.com
EN
01 02 03 04 05 06 07 08 09 10 11 12 13 14 15 16 17 18 19 20 21 22 23
24 25 26 27 28 29 30 31 32 33 34 35 36 37 38 39 40 41 42 43 44 45
46 47 48 49 50 51 52 53 54 55 56 57 58 59 60 61 62 63 64 65 66 67
68 69 70 71 72 73 74 75 76 77 78 79 80 81 82 83 84 85 86 87 88 89 90
91 92 93 94 95 96 97 98 99 100 101 102 103 104 105 106 107 108 109 110 111 112
113 114 115 116 117 118 119 120 121 122 123 124 125 126 127 128 129 130 131 132 133 134
STARTING PROJECTOR
Turn on the projector
Hang ceiling:
Please purchase the projector stand and M5 screw additionally.
Install the projector stand to place ①, and hang the projector on the ceiling.
( Note: You can install the Tripod Stand to the place ① )
1.Install two AAA batteries in the remote control before using.
2.Press the Power key on the remote or panel, the indicator light will turn red.
3.Remove the lens cover of the projector, the lamp will start working 2 seconds
later, when an image is projected on the screen the machine is working
smoothly. If the first projection screen is not the start up screen, press the "S"
button on the remote and select USB source.
4.Adjust the keystone ring to get a rectangle shape.
5.Adjust the focus ring or rotate the lens of the projector to get the best image
performance. (If it is still blurry, please try to adjust the projection distance.)
6.If you connect other devices, be sure to select the corresponding source. If
you do not select the correct source, the projector will not be able to detect the
signal.
7.Press the Menu button on the remote control to enter the OSD Language to
set your preferred language;
①
support01@yaberauto.com
EN
01 02 03 04 05 06 07 08 09 10 11 12 13 14 15 16 17 18 19 20 21 22 23
24 25 26 27 28 29 30 31 32 33 34 35 36 37 38 39 40 41 42 43 44 45
46 47 48 49 50 51 52 53 54 55 56 57 58 59 60 61 62 63 64 65 66 67
68 69 70 71 72 73 74 75 76 77 78 79 80 81 82 83 84 85 86 87 88 89 90
91 92 93 94 95 96 97 98 99 100 101 102 103 104 105 106 107 108 109 110 111 112
113 114 115 116 117 118 119 120 121 122 123 124 125 126 127 128 129 130 131 132 133 134
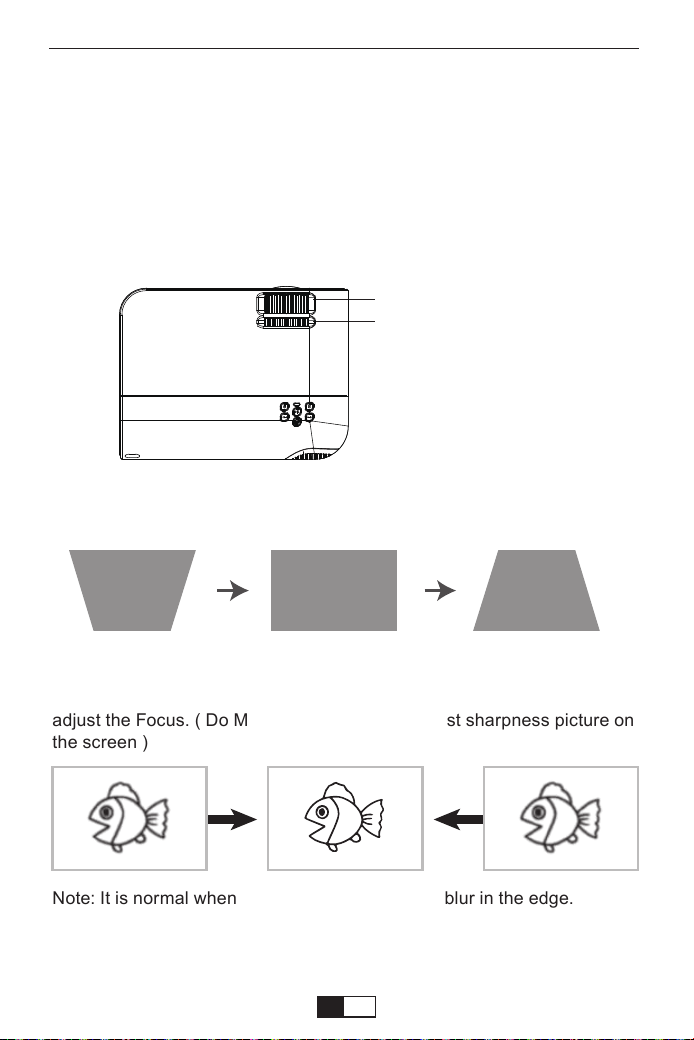
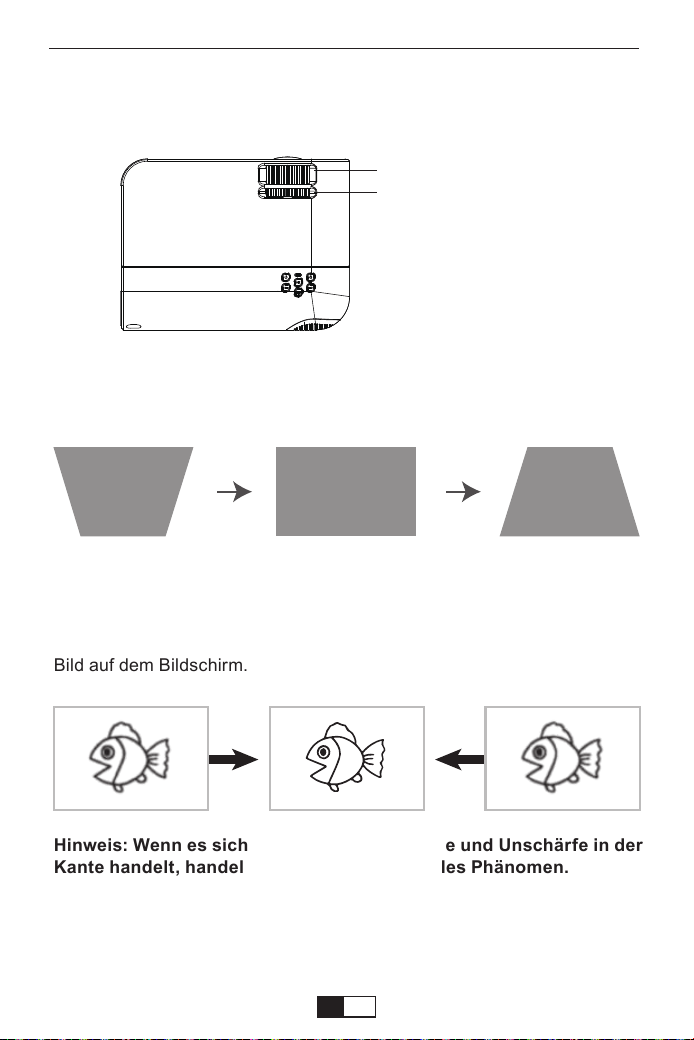
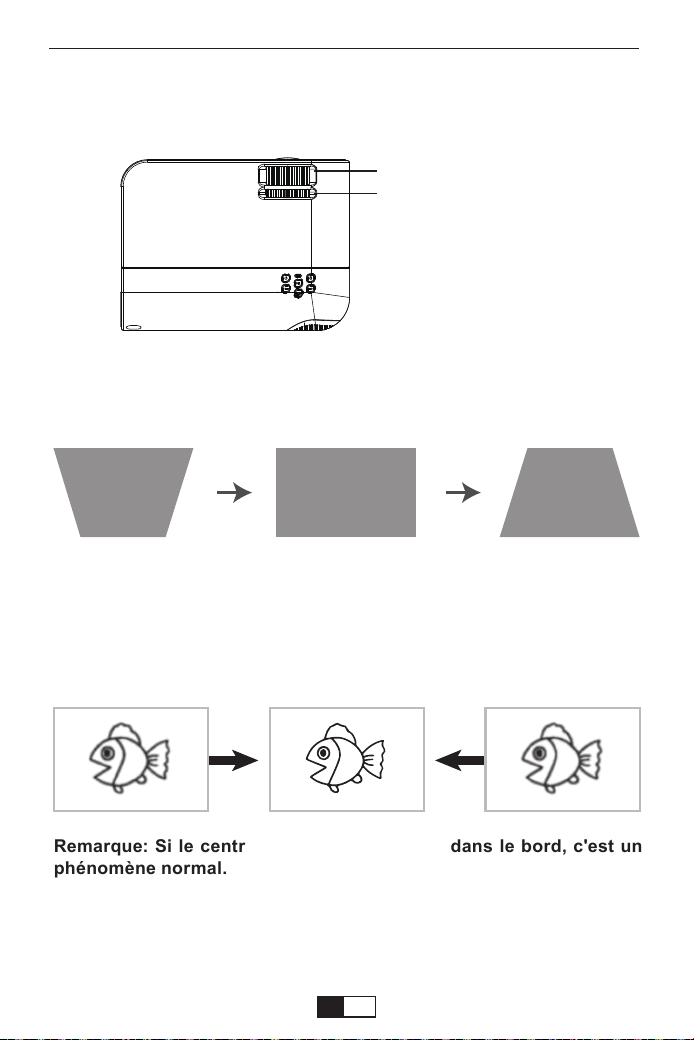
Keystone and Focus
If the projected image is in a trapezoidal shape, it can be resolved by
Keystone correction. ( Do Manual Keystone Correction )
Note: If the Keystone correction fail to resolve image shape, please
reduce the vertical height of the projector in relation to the center of the
screen.
The projected image may be blurry or difficult to see, this is due to lack of
Focus adjustment with the lens, please follow the processes below to
adjust the Focus. ( Do Manual Focus, find the most sharpness picture on
the screen )
Note: It is normal when sharpness in the central, blur in the edge.
Turn off the projector
1.Press the Power button when the projector is in use, this will cause it to
switch to standby mode.
2.When the projector switch into standby mode, the light will blink red.
Manual Focus
Keystone Correction
support01@yaberauto.com
EN
01 02 03 04 05 06 07 08 09 10 11 12 13 14 15 16 17 18 19 20 21 22 23
24 25 26 27 28 29 30 31 32 33 34 35 36 37 38 39 40 41 42 43 44 45
46 47 48 49 50 51 52 53 54 55 56 57 58 59 60 61 62 63 64 65 66 67
68 69 70 71 72 73 74 75 76 77 78 79 80 81 82 83 84 85 86 87 88 89 90
91 92 93 94 95 96 97 98 99 100 101 102 103 104 105 106 107 108 109 110 111 112
113 114 115 116 117 118 119 120 121 122 123 124 125 126 127 128 129 130 131 132 133 134
The projector's normal start up screen is as follows. If the first projection
screen is not this one, press the “ ” button on the remote control to
select USB source.
Setting the Main Menu:
When the "No Signal" prompt appears, you need to select the input
source:
1. Press the “ ” button on the remote control to select the desired signal,
then press the OK button on the remote control.
2. Once the signal is detected, the selected source information will be
displayed on the screen after a few seconds.
Select the Input Source
support01@yaberauto.com
EN
01 02 03 04 05 06 07 08 09 10 11 12 13 14 15 16 17 18 19 20 21 22 23
24 25 26 27 28 29 30 31 32 33 34 35 36 37 38 39 40 41 42 43 44 45
46 47 48 49 50 51 52 53 54 55 56 57 58 59 60 61 62 63 64 65 66 67
68 69 70 71 72 73 74 75 76 77 78 79 80 81 82 83 84 85 86 87 88 89 90
91 92 93 94 95 96 97 98 99 100 101 102 103 104 105 106 107 108 109 110 111 112
113 114 115 116 117 118 119 120 121 122 123 124 125 126 127 128 129 130 131 132 133 134

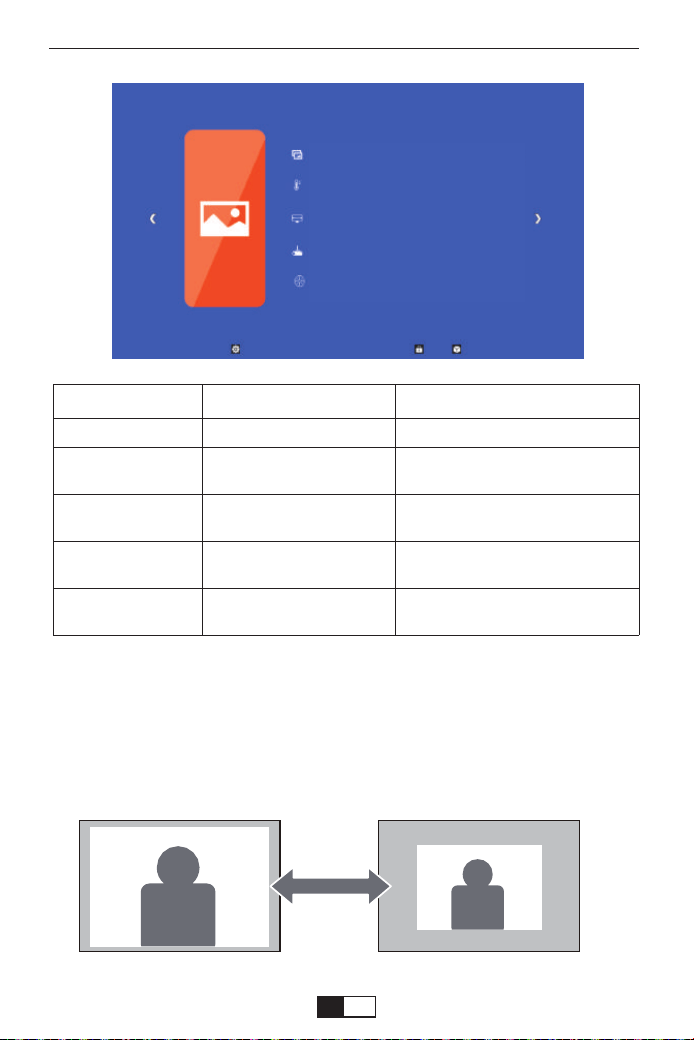
PICTURE MENU
1.Press the “ ” on the remote, then the menu picture will display on
screen.
Or you need to select the “ ” key on the projector to enter the 4 menus
without the remote control
2.Press“
◀/▶
”key, the menu will move to “PICTURE”>“SOUND”
>“TIME”>“OPTION”.
3.Select the adjust interface,use“▲/▼” key to choose the wanted item.
4.Press“OK” or “
◀/▶
”to adjust the item parameter.
Menu Setting Method
PICTURE MENU MODE FUNCTION
Picture Mode Standard, Soft, User, Vivid
Switch among the color
temperature mode
Color Temperature
Aspect Ratio
Projection Mode
ZOOM
Medium, Warm, User, Cool
Front/Rear on Desk,
Front/ Rear on Ceiling
75%-100%
Auto/ 4:3/ 16:9
Switch among the image mode
Set up the aspect ratio of the image.
Set up the projection mode
Reduce the screen size from to -25%
support01@yaberauto.com
EN
01 02 03 04 05 06 07 08 09 10 11 12 13 14 15 16 17 18 19 20 21 22 23
24 25 26 27 28 29 30 31 32 33 34 35 36 37 38 39 40 41 42 43 44 45
46 47 48 49 50 51 52 53 54 55 56 57 58 59 60 61 62 63 64 65 66 67
68 69 70 71 72 73 74 75 76 77 78 79 80 81 82 83 84 85 86 87 88 89 90
91 92 93 94 95 96 97 98 99 100 101 102 103 104 105 106 107 108 109 110 111 112
113 114 115 116 117 118 119 120 121 122 123 124 125 126 127 128 129 130 131 132 133 134
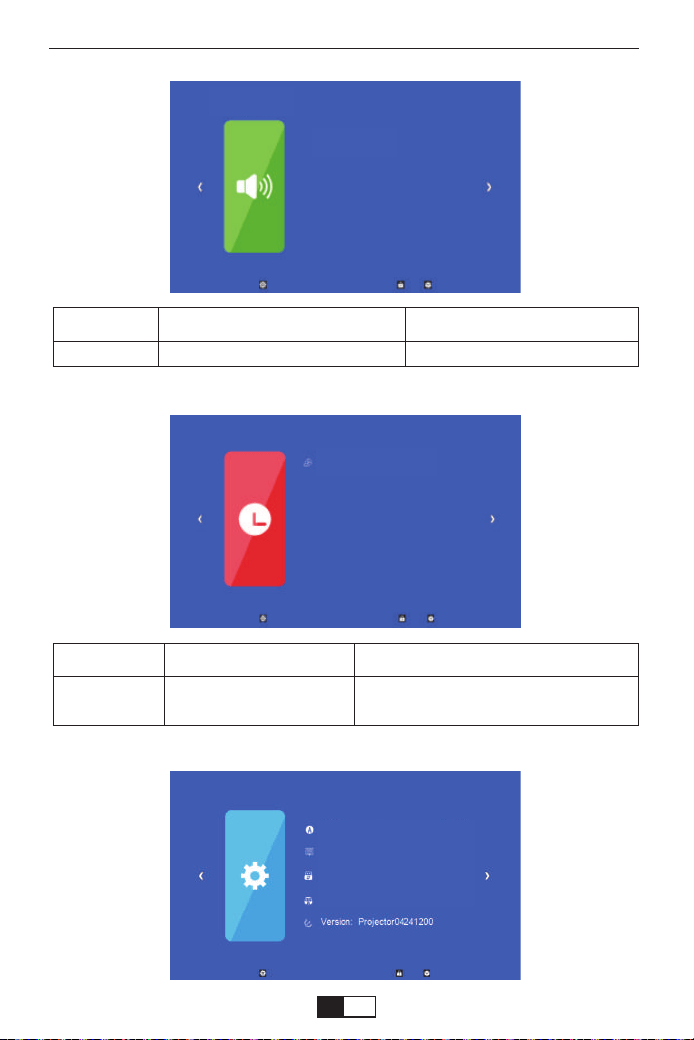
TIME MENU
<ZOOM Function>
When playing an image or video, if you want to reduce the size of the
projected image or video, you can use the remote control to select the
ZOOM to adjust the projection size:
You can reduce the height and width of original size up to -25%.
SOUND MENU MODE FUNCTION
Sound Mode User,Standard,Music,Movie,Sports Set up the sound mode
SOUND MEMU
support01@yaberauto.com
EN
01 02 03 04 05 06 07 08 09 10 11 12 13 14 15 16 17 18 19 20 21 22 23
24 25 26 27 28 29 30 31 32 33 34 35 36 37 38 39 40 41 42 43 44 45
46 47 48 49 50 51 52 53 54 55 56 57 58 59 60 61 62 63 64 65 66 67
68 69 70 71 72 73 74 75 76 77 78 79 80 81 82 83 84 85 86 87 88 89 90
91 92 93 94 95 96 97 98 99 100 101 102 103 104 105 106 107 108 109 110 111 112
113 114 115 116 117 118 119 120 121 122 123 124 125 126 127 128 129 130 131 132 133 134
Projection Distance and Size
Please follow the data in chart below, to adjust the image size and the
distance. (Aspect Ratio: 16 : 9, Default)
SOUND MENU MODE FUNCTION
Sleep Timer Off/10min/20/min,etc. Shut off the projector after a set amount of time.
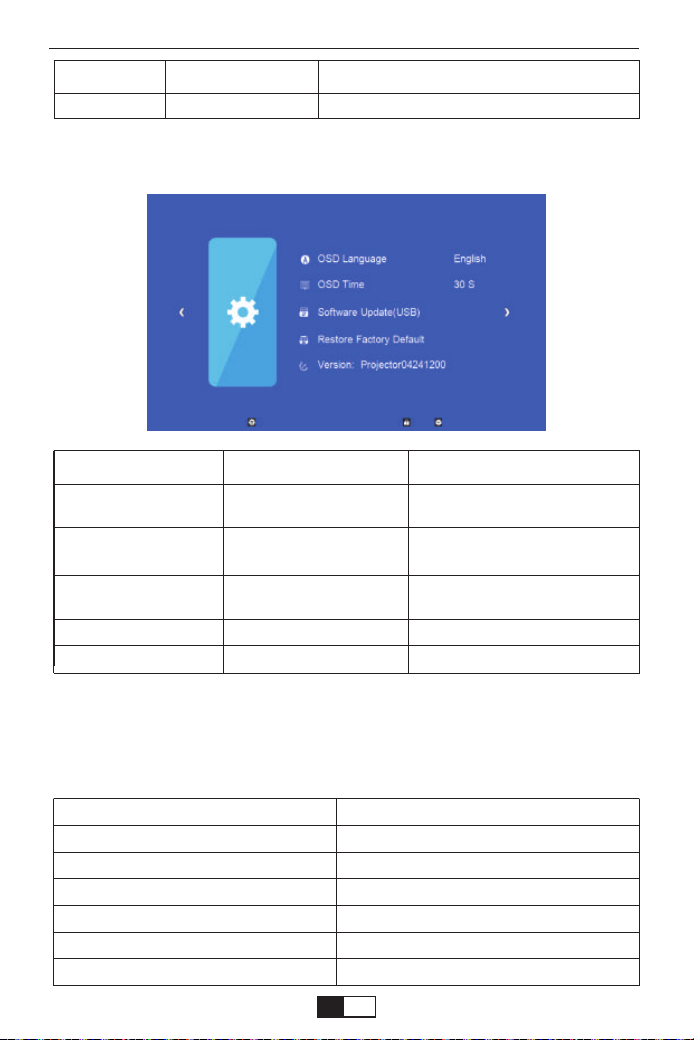
OPTION MEMU MODE FUNCTION
OSD Language
OSD Time
Software Update(USB)
Restore Factory Default
Version
English, France, Italian,
Spanish,etc.
Off, 5Sec, 10Sec, 15Sec
Update software
Set up the language displayed in
the operation interface
Adjust the duration of keeping
the menu interface
Update the projector's software
version
Reset the projector
Show the version
Screen Size
33"
60"
80"
100"
120"
150"
Distance (ft.)
3.4
5.9
7.8
9.7
11.6
14.4
OPTION MENU
support01@yaberauto.com
EN
01 02 03 04 05 06 07 08 09 10 11 12 13 14 15 16 17 18 19 20 21 22 23
24 25 26 27 28 29 30 31 32 33 34 35 36 37 38 39 40 41 42 43 44 45
46 47 48 49 50 51 52 53 54 55 56 57 58 59 60 61 62 63 64 65 66 67
68 69 70 71 72 73 74 75 76 77 78 79 80 81 82 83 84 85 86 87 88 89 90
91 92 93 94 95 96 97 98 99 100 101 102 103 104 105 106 107 108 109 110 111 112
113 114 115 116 117 118 119 120 121 122 123 124 125 126 127 128 129 130 131 132 133 134

The image size depends on the distance between projector and screen,
there may be 3% deviation among above listed data. Different settings
cause various distances.
Thank you very much for purchasing the YABER V2 projector.
Please read this instruction manual carefully before use. Also, please
keep it handy so you can check it at any time.
If you have any problem, please feel free to contact us
(Email:
support01@yaberauto.com), we will always try to offer you
a satisfactory solution.
support01@yaberauto.com
EN
01 02 03 04 05 06 07 08 09 10 11 12 13 14 15 16 17 18 19 20 21 22 23
24 25 26 27 28 29 30 31 32 33 34 35 36 37 38 39 40 41 42 43 44 45
46 47 48 49 50 51 52 53 54 55 56 57 58 59 60 61 62 63 64 65 66 67
68 69 70 71 72 73 74 75 76 77 78 79 80 81 82 83 84 85 86 87 88 89 90
91 92 93 94 95 96 97 98 99 100 101 102 103 104 105 106 107 108 109 110 111 112
113 114 115 116 117 118 119 120 121 122 123 124 125 126 127 128 129 130 131 132 133 134

YABER lebenslange professionelle Unterstützung
Sehr geehrter Kunde,
Vielen Dank für den Kauf unseres V2-Projektors.
Haben Sie Fragen zur Funktionsweise? Bitte lesen Sie dieses Handbuch
sorgfältig durch, bevor Sie den Projektor verwenden. Sind Sie mit Ihrem
Projektor zufrieden? Wenn Sie Probleme haben, senden Sie Ihre Bestell-
nummer und eine Beschreibung Ihres Problems per E-Mail an:
support01@yaberauto.com. Senden Sie Ihre E-Mail so schnell wie
möglich, da wir Ihre Probleme beim ersten Mal beheben möchten.
Kunden können manchmal Verwirrung stiften, wenn sie den Projektor
verwenden. Anstatt zu versuchen, direkt mit uns zu kommunizieren,
hinterlassen viele Käufer einfach eine Bewertung auf der Produktseite.
Die meisten negativen Bewertungen werden jedoch eher durch eine nicht
standardisierte Verwendung als durch einen Fehler im Produkt selbst
verursacht. Tatsächlich können viele Probleme leicht durch Einstellen
gelöst werden, z. B. kein Signal, kein Ton usw. Wir versprechen, dass alle
Projektoren vor dem Versand sorgfältig geprüft und verpackt wurden.
Wenn Sie Fragen haben, kontaktieren Sie uns bitte und geben Sie uns die
Möglichkeit, uns zu verbessern. Wir garantieren, dass wir Ihnen eine
zufriedenstellendere Lösung bieten.
Danke für dein Verständnis!
Freundliche Grüße,
YABER TEAM
Diese Sicherheitshinweise garantieren die Langlebigkeit Ihres Projektors
und vermeiden Feuer und Stöße. Lesen Sie sie sorgfältig durch und
beachten Sie alle Warnungen.
Wichtige Garantien
1. Verwenden Sie für optimale Ergebnisse den Projektor in a Dunkelkammer.
2. Stellen Sie den Projektor an einer Stelle auf eine ebene Fläche trocken, fern
von Staub und Feuchtigkeit.
Installation
support01@yaberauto.com
DE
01 02 03 04 05 06 07 08 09 10 11 12 13 14 15 16 17 18 19 20 21 22 23
24 25 26 27 28 29 30 31 32 33 34 35 36 37 38 39 40 41 42 43 44 45
46 47 48 49 50 51 52 53 54 55 56 57 58 59 60 61 62 63 64 65 66 67
68 69 70 71 72 73 74 75 76 77 78 79 80 81 82 83 84 85 86 87 88 89 90
91 92 93 94 95 96 97 98 99 100 101 102 103 104 105 106 107 108 109 110 111 112
113 114 115 116 117 118 119 120 121 122 123 124 125 126 127 128 129 130 131 132 133 134

3. Stellen Sie den Projektor nicht in direktem Sonnenlicht in der Nähe von
Heizgeräten oder Wärmeerzeugungsgeräten auf.
4. Direkte Sonneneinstrahlung, Rauch oder Dampf können interne Kompo-
nenten beschädigen.
5. Gehen Sie vorsichtig mit Ihrem Projektor um. Fallen oder zittern kann
interne Komponenten beschädigen.
6.Stellen Sie keine schweren Gegenstände auf den Projektor
1. Der Projektor ist für die Arbeit mit einer Quelle von ausgelegt Wechselstrom
110-240 V ~ 50/60 Hz Stellen Sie sicher, dass Ihre Stromquelle diese
Anforderung erfüllt, bevor Sie versuchen, Ihren Projektor zu verwenden.
2. Gehen Sie vorsichtig mit dem Netzkabel um und vermeiden Sie es, es zu
stark zu verbiegen. Ein beschädigtes Kabel kann einen Stromschlag oder
einen Brand verursachen.
3. Wenn der Projektor längere Zeit nicht benutzt wird Ziehen Sie den Stecker
aus der Steckdose.
Netzteil
1. Ziehen Sie den Netzstecker aus der Steckdose, bevor Sie ihn reinigen.
2. Reinigen Sie das Gehäuse regelmäßig mit einem feuchten Tuch. Wenn
es sehr schmutzig ist, verwenden Sie ein mildes Reinigungsmittel.
Verwenden Sie niemals starke Reinigungs- oder Lösungsmittel wie
Alkohol oder Verdünner.
Reinigung
Die Spiegelanzeigefunktion unterstützt geschützte Videos aus urheber-
rechtlichen Gründen nicht. (Netflix, Amazon Prime Video und Hulu).
Beachtung:
support01@yaberauto.com
DE
01 02 03 04 05 06 07 08 09 10 11 12 13 14 15 16 17 18 19 20 21 22 23
24
25 26 27 28 29 30 31 32 33 34 35 36 37 38 39 40 41 42 43 44 45
46 47 48 49 50 51 52 53 54 55 56 57 58 59 60 61 62 63 64 65 66 67
68 69 70 71 72 73 74 75 76 77 78 79 80 81 82 83 84 85 86 87 88 89 90
91 92 93 94 95 96 97 98 99 100 101 102 103 104 105 106 107 108 109 110 111 112
113 114 115 116 117 118 119 120 121 122 123 124 125 126 127 128 129 130 131 132 133 134
Projektorspezifikation
Produktverpackungsliste
●YABER V2 Projektor * 1 ●Netzkabel * 1 ●Bedienungsanleitung * 1
●3-in-1-AV-Kabel * 1 ●HDMI-Kabel * 1 ●Fußschraube * 1
●Fernbedienung * 1 (Batterien nicht im Lieferumfang enthalten)
●Reinigungstuch für Linsen * 1
Native Auflösung
Anzeigetechnologie
Lichtquelle
Anzeigefarben
Seitenverhältnis
Projektorgewicht
Bildformat
Videoformat
Schnittstelle
1080*720p
LCD
LED
16.7M Full Color
4:3/16:9/auto
2.2lb
bmp./jpg/png/gif
Empfohlener
Projektionsabstand
Mindestprojektionsab-
stand
Trapezkorrektur
Netzspannung
Projektionsmethode
Fokussierungsmethode
Audio format
1.05-4.39m
1.05m
±15°Manual
AC 100-240V
Front/ Rear /Ceiling
Handbetrieb
AAC/MP2/MP3/PC-
M/FLAC/WMA/AC3
Einige Video-Tutorials finden Sie auf dem YouTube-Kanal von YABER:
https://www.youtube.com/channel/UCcU4wy4vPRQa_uNcolDd2hA
.AVI/.MP4/.MKV/.FLV/.MOV/.RMVB/.3GP/.MPEG1/
.MPEG2/.XVID (nicht unterstützt WMV)
AV, USB, USB-T, HDMI, VGA
support01@yaberauto.com
DE
01 02 03 04 05 06 07 08 09 10 11 12 13 14 15 16 17 18 19 20 21 22 23
24 25
26 27 28 29 30 31 32 33 34 35 36 37 38 39 40 41 42 43 44 45
46 47 48 49 50 51 52 53 54 55 56 57 58 59 60 61 62 63 64 65 66 67
68 69 70 71 72 73 74 75 76 77 78 79 80 81 82 83 84 85 86 87 88 89 90
91 92 93 94 95 96 97 98 99 100 101 102 103 104 105 106 107 108 109 110 111 112
113 114 115 116 117 118 119 120 121 122 123 124 125 126 127 128 129 130 131 132 133 134
Produktbeschreibung
Das Obige dient nur als Referenz. Das tatsächliche Produkt kann aufgrund
von Produktverbesserungen variieren.
03
05
04
08
06
07
02
01
10 11
1312
09
15
14
01
02
03
04
05
06
07
08
09
10
11
12
13
14
15
Vorname
Fokusring
Trapezkorrektur
Leistung
OK
Eingabequelle
Links bewegen
Rechts bewegen
Rückkehr
Kopfhöreranschluss
AV-Schnittstelle
USB-T
USB
HDMI
VGA
Netzkabelanschluss
Beschreibung
Passen Sie den Fokusring an, um das klarste Bild zu
erhalten.
Passen Sie den Trapezring an, um eine rechteckige
Form zu erhalten.
Diese Taste kann den Projektor in den Arbeits- /
Standby-Modus führen.
Bestätigen
Wählen Sie Quelle (Bildschirmspiegel, PC-RGB,
HDMI, USB, AV usw.)
/
/
/
/
/
Kabelgebundener Bildschirmspiegelungsanschluss
(mit Original-USB-Kabel)
Schließen Sie die Festplatte an
HDMI-Eingang
VGA-Eingang
Stecken Sie das Netzkabel ein
support01@yaberauto.com
DE
01 02 03 04 05 06 07 08 09 10 11 12 13 14 15 16 17 18 19 20 21 22 23
24 25 26
27 28 29 30 31 32 33 34 35 36 37 38 39 40 41 42 43 44 45
46 47 48 49 50 51 52 53 54 55 56 57 58 59 60 61 62 63 64 65 66 67
68 69 70 71 72 73 74 75 76 77 78 79 80 81 82 83 84 85 86 87 88 89 90
91 92 93 94 95 96 97 98 99 100 101 102 103 104 105 106 107 108 109 110 111 112
113 114 115 116 117 118 119 120 121 122 123 124 125 126 127 128 129 130 131 132 133 134
Stellen Sie die Neigungsbasis ein:
Bringen Sie die Schrauben (im Lieferumfang enthalten) an, um ① zu
platzieren, heben Sie die Vorderkante des Projektors auf die gewünschte
Höhe an, drehen Sie den Nähfuß und lassen Sie den Knopf los, um die
Kippbasis in der entsprechenden Position zu verriegeln.
Decke hängen:
Bitte kaufen Sie zusätzlich den Projektorständer und die M5-Schraube.
Installieren Sie den Projektorständer an ① und hängen Sie den Projektor
an die Decke.
(Hinweis: Sie können den Stativständer an der Stelle installieren ①)
Fernbedienung
Passen Sie die Neigungsbasis an und hängen Sie die
Decke auf
( Batterien nicht enthalten )
IR Transmitter
Netzschalter
Eingabequelle Speisekarte
OK
Bewege dich nach links Bewege dich nach rechts
Bewegen Sie sich nach oben Nach unten bewegen
Rückkehr
Lautstärke runter Lautstärke erhöhen
Stumm
support01@yaberauto.com
DE
01 02 03 04 05 06 07 08 09 10 11 12 13 14 15 16 17 18 19 20 21 22 23
24 25 26 27
28 29 30 31 32 33 34 35 36 37 38 39 40 41 42 43 44 45
46 47 48 49 50 51 52 53 54 55 56 57 58 59 60 61 62 63 64 65 66 67
68 69 70 71 72 73 74 75 76 77 78 79 80 81 82 83 84 85 86 87 88 89 90
91 92 93 94 95 96 97 98 99 100 101 102 103 104 105 106 107 108 109 110 111 112
113 114 115 116 117 118 119 120 121 122 123 124 125 126 127 128 129 130 131 132 133 134
Schalten Sie den Projektor ein
Schalten Sie den Projektor ein
Schalten Sie den Projektor aus
1.Drücken Sie die Ein- / Aus-Taste, wenn der Projektor verwendet wird.
Dadurch wechselt er in den Standby-Modus.
2.Wenn der Projektor in den Standby-Modus wechselt, blinkt die Anzeige rot.
1. Legen Sie vor der Verwendung zwei AAA-Batterien in die Fernbedienung
ein.
2.Drücken Sie die Ein- / Aus-Taste auf der Fernbedienung oder dem Bedien-
feld. Die Anzeigelampe leuchtet rot.
3.Entfernen Sie die Objektivabdeckung des Projektors. Die Lampe beginnt 2
Sekunden später zu arbeiten. Wenn ein Bild auf den Bildschirm projiziert wird,
funktioniert das Gerät reibungslos. Wenn der erste Projektionsbildschirm nicht
der Startbildschirm ist, drücken Sie die Taste "S" auf der Fernbedienung und
wählen Sie die USB-Quelle.
4.Stellen Sie den Trapezring so ein, dass eine rechteckige Form entsteht.
5.Stellen Sie den Fokusring ein oder drehen Sie das Objektiv des Projektors,
um die beste Bildleistung zu erzielen. (Wenn es immer noch verschwommen
ist, versuchen Sie bitte, den Projektionsabstand anzupassen.)
6.Wenn Sie andere Geräte anschließen, müssen Sie die entsprechende
Quelle auswählen. Wenn Sie nicht die richtige Quelle auswählen, kann der
Projektor das Signal nicht erkennen.
7.Drücken Sie die Menütaste auf der Fernbedienung, um die OSD-Sprache
einzugeben und Ihre bevorzugte Sprache festzulegen.
①
support01@yaberauto.com
DE
01 02 03 04 05 06 07 08 09 10 11 12 13 14 15 16 17 18 19 20 21 22 23
24 25 26 27 28
29 30 31 32 33 34 35 36 37 38 39 40 41 42 43 44 45
46 47 48 49 50 51 52 53 54 55 56 57 58 59 60 61 62 63 64 65 66 67
68 69 70 71 72 73 74 75 76 77 78 79 80 81 82 83 84 85 86 87 88 89 90
91 92 93 94 95 96 97 98 99 100 101 102 103 104 105 106 107 108 109 110 111 112
113 114 115 116 117 118 119 120 121 122 123 124 125 126 127 128 129 130 131 132 133 134
Das projizierte Bild ist möglicherweise verschwommen oder schwer zu
erkennen. Dies liegt an der fehlenden Fokuseinstellung mit dem Objektiv.
Befolgen Sie die nachstehenden Schritte, um den Fokus anzupassen.
(Führen Sie den manuellen Fokus durch und finden Sie das schärfste
Bild auf dem Bildschirm.)
Hinweis: Wenn die Trapezkorrektur die Bildform nicht auflösen kann,
bitte Reduzieren Sie die vertikale Höhe des Projektors in Bezug auf
die Mitte des Bildschirms.
Hinweis: Wenn es sich um Schärfe in der Mitte und Unschärfe in der
Kante handelt, handelt es sich um ein normales Phänomen.
Wenn das projizierte Bild eine trapezförmige Form hat, kann es durch
aufgelöst werden trapezkorrektur. (Manuelle Trapezkorrektur durchführen)
B
Manueller Fokus
Trapezkorrektur
Trapezkorrektur und Fokus
support01@yaberauto.com
DE
01 02 03 04 05 06 07 08 09 10 11 12 13 14 15 16 17 18 19 20 21 22 23
24 25 26 27 28 29
30 31 32 33 34 35 36 37 38 39 40 41 42 43 44 45
46 47 48 49 50 51 52 53 54 55 56 57 58 59 60 61 62 63 64 65 66 67
68 69 70 71 72 73 74 75 76 77 78 79 80 81 82 83 84 85 86 87 88 89 90
91 92 93 94 95 96 97 98 99 100 101 102 103 104 105 106 107 108 109 110 111 112
113 114 115 116 117 118 119 120 121 122 123 124 125 126 127 128 129 130 131 132 133 134
Verwenden des HDMI- oder VGA-Kabels zum Anschließen an den Projektor.
(Eine HDMI-Verbindung wird zum Projizieren von Filmen, Videos und anderen
Dateien empfohlen, die HD sein müssen.)
(1) Schalten Sie Ihren Computer und den Projektor ein.
(2) Schließen Sie das HDMI / VGA-Kabel an den HDMI / VGA-Anschluss
Ihres Computers an.
(3) Schließen Sie das andere Ende an einen verfügbaren HDMI / VGA-An-
schluss Ihres Projektors an.
(4) Drücken Sie die Taste “Source”, um die Schnittstelle der Eingangsquelle
aufzurufen.
(5) Wählen Sie eine HDMI / PC-RGB-Quelle aus, um alle Dateien auf Ihren
Computer zu projizieren.
(6) Halten Sie auf Ihrem Laptop die Tastaturtasten gedrückt, um
den Anzeigemodus zu ändern:
Nur Computer: ist die Standardoption - wird nur auf dem Hauptmonitor
angezeigt.
Duplizieren: Lässt alle Monitore dasselbe anzeigen, wodurch der Desktop
auf jedem Monitor dupliziert wird.
Erweitern: Alle Ihre Monitore verhalten sich wie ein einziger großer Monitor,
der den Desktop auf alle erweitert
Nur Projektor: Wird wie ein Projektor nur auf dem sekundären Monitor
angezeigt
(7) Sie können Ihre Bildschirmauflösung ändern:
Wählen Sie Start → Systemsteuerung → Darstellung und Personalisierung →
Bildschirmauflösung anpassen
Verbindung zum Computer herstellen
PROJEKTORANSCHLÜSSE
support01@yaberauto.com
DE
01 02 03 04 05 06 07 08 09 10 11 12 13 14 15 16 17 18 19 20 21 22 23
24 25 26 27 28 29 30
31 32 33 34 35 36 37 38 39 40 41 42 43 44 45
46 47 48 49 50 51 52 53 54 55 56 57 58 59 60 61 62 63 64 65 66 67
68 69 70 71 72 73 74 75 76 77 78 79 80 81 82 83 84 85 86 87 88 89 90
91 92 93 94 95 96 97 98 99 100 101 102 103 104 105 106 107 108 109 110 111 112
113 114 115 116 117 118 119 120 121 122 123 124 125 126 127 128 129 130 131 132 133 134

(Hinweis: Die VGA-Verbindung kann nur analoge Videosignale und keine
Audiosignale übertragen. Ein externer Lautsprecher ist erforderlich, wenn das
Gerät über ein VGA-Kabel angeschlossen ist.)
Schließen Sie einen DVD-Player an
1. Schließen Sie Ihren DVD-Player mit dem mitgelieferten AV-Kabel an
den Projektor an.
2. Schalten Sie den Projektor und den DVD-Player ein.
Hinweis: Bitte kaufen Sie ein zusätzliches 3-in-3-AV-Kabel.]
Schließen Sie die Soundbar an
1. Schließen Sie die Soundbar mit dem mitgelieferten AV-Kabel an den
Projektor an.
2. Schalten Sie den Projektor und die Soundleiste ein.
(3-in-3-AV-Kabel nicht im Lieferumfang enthalten)
(3-in-3-AV-Kabel nicht im Lieferumfang enthalten)
VGA
AV
video
audio out
(L/R)
audio out
(L/R)
support01@yaberauto.com
DE
01 02 03 04 05 06 07 08 09 10 11 12 13 14 15 16 17 18 19 20 21 22 23
24 25 26 27 28 29 30 31
32 33 34 35 36 37 38 39 40 41 42 43 44 45
46 47 48 49 50 51 52 53 54 55 56 57 58 59 60 61 62 63 64 65 66 67
68 69 70 71 72 73 74 75 76 77 78 79 80 81 82 83 84 85 86 87 88 89 90
91 92 93 94 95 96 97 98 99 100 101 102 103 104 105 106 107 108 109 110 111 112
113 114 115 116 117 118 119 120 121 122 123 124 125 126 127 128 129 130 131 132 133 134

Der normale Startbildschirm des Projektors sieht wie folgt aus. Wenn der
erste Projektionsbildschirm nicht dieser ist, drücken Sie die Taste “ ” auf
der Fernbedienung, um die USB-Quelle auszuwählen.
PROJEKTOR EINRICHTEN
Wenn die Eingabeaufforderung "Kein Signal" angezeigt wird, müssen Sie
die Eingangsquelle auswählen:
1. Drücken Sie die Taste “ ” auf der Fernbedienung, um das gewünschte
Signal auszuwählen, und drücken Sie dann die Taste OK auf der Fernbedi-
enung.
2. Sobald das Signal erkannt wurde, werden die ausgewählten Quellinfor-
mationen nach einigen Sekunden auf dem Bildschirm angezeigt.
Wählen Sie die Eingangsquelle
support01@yaberauto.com
DE
01 02 03 04 05 06 07 08 09 10 11 12 13 14 15 16 17 18 19 20 21 22 23
24 25 26 27 28 29 30 31 32
33 34 35 36 37 38 39 40 41 42 43 44 45
46 47 48 49 50 51 52 53 54 55 56 57 58 59 60 61 62 63 64 65 66 67
68 69 70 71 72 73 74 75 76 77 78 79 80 81 82 83 84 85 86 87 88 89 90
91 92 93 94 95 96 97 98 99 100 101 102 103 104 105 106 107 108 109 110 111 112
113 114 115 116 117 118 119 120 121 122 123 124 125 126 127 128 129 130 131 132 133 134

Menüeinstellungsmethode
1.Drücken Sie auf der Fernbedienung auf " ". Das Menübild wird auf
dem Bildschirm angezeigt.
Oder Sie müssen die Taste " " am Projektor auswählen, um die 4
Menüs ohne Fernbedienung aufzurufen.
2.Drücken Sie die Taste “
◀/▶
”. Das Menü wechselt zu “PICTURE”>
“SOUND”> “TIME”> “OPTION”.
3.Wählen Sie die Einstelloberfläche und wählen Sie mit den Tasten "▲ / ▼“
das gewünschte Element aus.
4.Drücken Sie "OK" oder "
◀/▶
”, um den Elementparameter anzupassen
Die fließende Bildschirmspiegelung mit drahtloser Verbindung wird von
der Netzwerkumgebung beeinflusst. Bei Verwendung der Bildschirm-
spiegelung wird eine Bandbreite von 100 Mbit oder mehr empfohlen.
Stellen Sie sicher, dass sich Ihr Mobilgerät bei Verwendung in der Nähe
des Projektors befindet kabellose Verbindung. Ein Abstand innerhalb
von 1 Meter wird empfohlen.
Einige mobile Geräte unterstützen aufgrund der Kompatibilität
möglicherweise keine Bildschirmspiegelung.
Bei Fragen senden Sie bitte eine E-Mail an YABER über
support01@yaberauto.com
Methoden zur Bildschirmspiegelung
Erwärmungstipps:
!
1
2
3
4
support01@yaberauto.com
DE
01 02 03 04 05 06 07 08 09 10 11 12 13 14 15 16 17 18 19 20 21 22 23
24 25 26 27 28 29 30 31 32 33
34 35 36 37 38 39 40 41 42 43 44 45
46 47 48 49 50 51 52 53 54 55 56 57 58 59 60 61 62 63 64 65 66 67
68 69 70 71 72 73 74 75 76 77 78 79 80 81 82 83 84 85 86 87 88 89 90
91 92 93 94 95 96 97 98 99 100 101 102 103 104 105 106 107 108 109 110 111 112
113 114 115 116 117 118 119 120 121 122 123 124 125 126 127 128 129 130 131 132 133 134
Tippen Sie auf Ihrem iOS-Gerät auf [Einstellungen] - [Wi-Fi] - Schalten Sie
[Wi-Fi] ein. Verfügbar Netzwerke werden angezeigt.
Wählen Sie den WiFi-Namen wie [RKcast-xxxxxx], verbinden Sie ihn und
geben Sie den ein Passwort [12345678], das sich im Menü des Projektors
befindet.
Schalten Sie zuerst den Projektor ein, drücken Sie die "Quelle" unten auf
der Fernbedienung, dann werden einige Optionen auf dem Projektionsbild
angezeigt. Wählen Sie die "Bildschirmspiegelung" und drücken Sie "OK".
Sie erhalten das Menü.Schalten Sie zuerst den Projektor ein, drücken Sie
die "Quelle" unten auf der
Hinweis: Wenn nach dem Herstellen der Verbindung "Keine Internet-
verbindung" angezeigt wird, bitte Ignorieren Sie es, da es die Verwendung
nicht beeinträchtigt.
Drahtlose Projektionsmethode
Schritt 1
Methode 1: IP-Nutzung Ihres Heim-WIFI-Netzwerks
1. Für iOS-Benutzer
RKcast-C7AEF9
support01@yaberauto.com
DE
01 02 03 04 05 06 07 08 09 10 11 12 13 14 15 16 17 18 19 20 21 22 23
24 25 26 27 28 29 30 31 32 33 34
35 36 37 38 39 40 41 42 43 44 45
46 47 48 49 50 51 52 53 54 55 56 57 58 59 60 61 62 63 64 65 66 67
68 69 70 71 72 73 74 75 76 77 78 79 80 81 82 83 84 85 86 87 88 89 90
91 92 93 94 95 96 97 98 99 100 101 102 103 104 105 106 107 108 109 110 111 112
113 114 115 116 117 118 119 120 121 122 123 124 125 126 127 128 129 130 131 132 133 134
① Gehen Sie zu Safari - Geben Sie "192.168.49.1" ein.
② Tippen Sie auf WiFi AP - Scan - Wählen Sie Ihr WIFI aus - geben Sie das
Passwort Ihres WiFi ein - Tippen Sie auferbinden
Schritt 2
YABER
support01@yaberauto.com
DE
01 02 03 04 05 06 07 08 09 10 11 12 13 14 15 16 17 18 19 20 21 22 23
24 25 26 27 28 29 30 31 32 33 34 35
36 37 38 39 40 41 42 43 44 45
46 47 48 49 50 51 52 53 54 55 56 57 58 59 60 61 62 63 64 65 66 67
68 69 70 71 72 73 74 75 76 77 78 79 80 81 82 83 84 85 86 87 88 89 90
91 92 93 94 95 96 97 98 99 100 101 102 103 104 105 106 107 108 109 110 111 112
113 114 115 116 117 118 119 120 121 122 123 124 125 126 127 128 129 130 131 132 133 134
Tippen Sie auf Ihrem iOS-Gerät auf [Einstellungen] - [Wi-Fi] - Schalten Sie
[Wi-Fi] ein. Verfügbar Netzwerke werden angezeigt.
Wählen Sie den WiFi-Namen wie [RKcast-xxxxxx], verbinden Sie ihn und
geben Sie den ein Passwort [12345678], das sich im Menü des Projektors
befindet.
Schritt 1
Methode 2: AP-Verwenden Sie das Mobilfunknetz von Ihrer
Mobiltelefonkarte.
Kontrollzentrum öffnen - Tippen Sie auf die Schaltfläche Bildschirmspiege-
lung - Verbinden [RKcast-xxxxxx]
① Kontrollzentrum öffnen.
② Tippen Sie auf Bildschirmspiegelung. Wählen Sie den Gerätenamen
[RKcast-xxxxxx].
Schritt 3
RKcast-C7AEF9
support01@yaberauto.com
DE
01 02 03 04 05 06 07 08 09 10 11 12 13 14 15 16 17 18 19 20 21 22 23
24 25 26 27 28 29 30 31 32 33 34 35 36
37 38 39 40 41 42 43 44 45
46 47 48 49 50 51 52 53 54 55 56 57 58 59 60 61 62 63 64 65 66 67
68 69 70 71 72 73 74 75 76 77 78 79 80 81 82 83 84 85 86 87 88 89 90
91 92 93 94 95 96 97 98 99 100 101 102 103 104 105 106 107 108 109 110 111 112
113 114 115 116 117 118 119 120 121 122 123 124 125 126 127 128 129 130 131 132 133 134
Kontrollzentrum öffnen - Tippen Sie auf die Schaltfläche Bildschirmspiege-
lung - Verbinden [RKcast-xxxxxx]
① Kontrollzentrum öffnen.
② Tippen Sie auf Bildschirmspiegelung. Wählen Sie den Gerätenamen
[RKcast-xxxxxx].
Schritt 2
Tippen Sie auf Ihrem Android-Gerät auf [Einstellungen] - [WLAN-Anzeige] -
Schalten Sie [Wi-Fi] ein. Verfügbare Netzwerke werden angezeigt.
Schritt 1
Methode 1: IP-Nutzung Ihres Heim-WIFI-Netzwerks
2. Für Android-Benutzer
Hinweis: Wenn nach dem Herstellen der Verbindung "Keine Internet-
verbindung" angezeigt wird, bitte Ignorieren Sie es, da es die Verwendung
nicht beeinträchtigt.
On
support01@yaberauto.com
DE
01 02 03 04 05 06 07 08 09 10 11 12 13 14 15 16 17 18 19 20 21 22 23
24 25 26 27 28 29 30 31 32 33 34 35 36 37
38 39 40 41 42 43 44 45
46 47 48 49 50 51 52 53 54 55 56 57 58 59 60 61 62 63 64 65 66 67
68 69 70 71 72 73 74 75 76 77 78 79 80 81 82 83 84 85 86 87 88 89 90
91 92 93 94 95 96 97 98 99 100 101 102 103 104 105 106 107 108 109 110 111 112
113 114 115 116 117 118 119 120 121 122 123 124 125 126 127 128 129 130 131 132 133 134
Hinweis: Verschiedene Marken von Android-Handys haben unterschiedli-
che Funktionen für Wählen Sie WLAN-Anzeige. Weitere Informationen
finden Sie im Handbuch Ihres Telefons.
Wählen Sie Ihren WLAN-Heimnamen (z. B. YABER), verbinden Sie ihn und
geben Sie Ihren ein Passwort [XXXXXXXX]
Schritt 2
Tippen Sie auf [Einstellungen] - [Gerätekonnektivität] - Schalten Sie [Draht-
lose Projektion] ein
Schritt 3
YABER
RKcast-C7AEF9
RKcast-C7AEF9
RKcast-C7AEF9
support01@yaberauto.com
DE
01 02 03 04 05 06 07 08 09 10 11 12 13 14 15 16 17 18 19 20 21 22 23
24 25 26 27 28 29 30 31 32 33 34 35 36 37 38
39 40 41 42 43 44 45
46 47 48 49 50 51 52 53 54 55 56 57 58 59 60 61 62 63 64 65 66 67
68 69 70 71 72 73 74 75 76 77 78 79 80 81 82 83 84 85 86 87 88 89 90
91 92 93 94 95 96 97 98 99 100 101 102 103 104 105 106 107 108 109 110 111 112
113 114 115 116 117 118 119 120 121 122 123 124 125 126 127 128 129 130 131 132 133 134

Hinweis: Verschiedene Marken von Android-Handys haben unterschiedli-
che Funktionen für Wählen Sie WLAN-Anzeige. Weitere Informationen
finden Sie im Handbuch des Telefons.
Tippen Sie auf Ihrem Android-Gerät auf [Einstellungen] - [WLAN-Anzeige]
- Schalten Sie [Wi-Fi] ein. Verfügbare Netzwerke werden angezeigt.
Schritt 1
Wählen Sie den WiFi-Namen wie [RKcast-xxxxxx], verbinden Sie ihn und
geben Sie den ein Passwort [12345678], das sich im Menü des Projektors
befindet.
Schritt 2
Methode 2: AP-Verwenden Sie das Mobilfunknetz von Ihrer Mobiltele-
fonkarte.
support01@yaberauto.com
DE
01 02 03 04 05 06 07 08 09 10 11 12 13 14 15 16 17 18 19 20 21 22 23
24 25 26 27 28 29 30 31 32 33 34 35 36 37 38 39
40 41 42 43 44 45
46 47 48 49 50 51 52 53 54 55 56 57 58 59 60 61 62 63 64 65 66 67
68 69 70 71 72 73 74 75 76 77 78 79 80 81 82 83 84 85 86 87 88 89 90
91 92 93 94 95 96 97 98 99 100 101 102 103 104 105 106 107 108 109 110 111 112
113 114 115 116 117 118 119 120 121 122 123 124 125 126 127 128 129 130 131 132 133 134
Tippen Sie auf [Einstellungen] - [Gerätekonnektivität] - Schalten Sie [Draht-
lose Projektion] ein. Wählen Sie den Projektornamen wie [RKcast-xxxxxx].
Schritt 3
Kabelgebundene Bildschirmspiegelung (mit Original-USB-Kabel)
1.Schalten Sie den Projektor ein - Drücken Sie die Taste “S” auf der Fernbedi-
enung - "Eingangsquelle” - “ Wählen Sie Bildschirmspiegelung” - Drücken Sie
die Taste “OK”.
Für IOS
support01@yaberauto.com
DE
01 02 03 04 05 06 07 08 09 10 11 12 13 14 15 16 17 18 19 20 21 22 23
24 25 26 27 28 29 30 31 32 33 34 35 36 37 38 39 40
41 42 43 44 45
46 47 48 49 50 51 52 53 54 55 56 57 58 59 60 61 62 63 64 65 66 67
68 69 70 71 72 73 74 75 76 77 78 79 80 81 82 83 84 85 86 87 88 89 90
91 92 93 94 95 96 97 98 99 100 101 102 103 104 105 106 107 108 109 110 111 112
113 114 115 116 117 118 119 120 121 122 123 124 125 126 127 128 129 130 131 132 133 134
2. Stecken Sie das Originalkabel Ihres IOS-Geräts in den USB-T-An-
schluss.
3. Zeigen Sie mit "Vertrauen Sie diesem Gerät?" Und tippen Sie auf
"Vertrauen".
1. Schalten Sie den Projektor ein - Drücken Sie die Taste "S" auf der Fernbedi-
enung - "Eingangsquelle" -
Wählen Sie "Bildschirmspiegelung" - Drücken Sie die "OK" -Taste.
2. Stecken Sie das Originalkabel Ihres Android-Geräts in den USB-T-An-
schluss.
3. Klicken Sie auf "Erlauben Sie das Debuggen über USB?" Tippen Sie auf
"OK".
4. Nach einer Weile wird der Android-Bildschirm auf dem Projektor angezeigt.
Für Android
Das USB-Kabel MUSS das ORIGINAL-Kabel oder das Kabel sein, das dies
kann Übertragen Sie die Daten, da sonst die Bildschirmspiegelung
fehlschlagen kann. Sie können das Kabel an Ihren Laptop anschließen, um
die Verfügbarkeit der Datenübertragung zu überprüfen.
Einige mobile Geräte unterstützen aufgrund der Kompatibilität möglicher-
weise keine Bildschirmspiegelung.
Einige Android-Mobilgeräte übertragen die Anzeige aufgrund der Protokoll-
beschränkungen möglicherweise nur ohne Audio.
Tipps
!
1
2
3
support01@yaberauto.com
DE
01 02 03 04 05 06 07 08 09 10 11 12 13 14 15 16 17 18 19 20 21 22 23
24 25 26 27 28 29 30 31 32 33 34 35 36 37 38 39 40 41
42 43 44 45
46 47 48 49 50 51 52 53 54 55 56 57 58 59 60 61 62 63 64 65 66 67
68 69 70 71 72 73 74 75 76 77 78 79 80 81 82 83 84 85 86 87 88 89 90
91 92 93 94 95 96 97 98 99 100 101 102 103 104 105 106 107 108 109 110 111 112
113 114 115 116 117 118 119 120 121 122 123 124 125 126 127 128 129 130 131 132 133 134
BILDMENÜ
<ZOOM-Funktion>
Wenn Sie bei der Wiedergabe eines Bilds oder Videos die Größe des projizier-
ten Bilds oder Videos verringern möchten, können Sie mit der Fernbedienung
den ZOOM auswählen, um die Projektionsgröße anzupassen:
Sie können die Höhe und Breite der Originalgröße um bis zu -25% reduzieren.
BILDMENÜ MODUS FUNKTION
Bildmodus Standard
Farbtemperatur
Seitenverhaltnis
Projektionsmodus
ZOOM
Standard,Soft,User, Vivid
Medium, Warm, User, Cool
Auto/ 4:3/ 16:9
Front/Rear on Desk, Front/
Rear on Ceiling
75-100
Wechseln Sie in den Bildmodus
Wechseln Sie in den Farbtem-
peraturmodus
Stellen Sie das Seitenverhältnis
des Bildes ein.
Richten Sie den Projektionsmo-
dus ein
Reduzieren Sie die
Bildschirmgröße von auf -25%
Bildmodus Standard
Farbtemperatur Warm
Seitenverhaltnis 16:9
Projektionsmodus Front
Zoom 100
support01@yaberauto.com
DE
01 02 03 04 05 06 07 08 09 10 11 12 13 14 15 16 17 18 19 20 21 22 23
24 25 26 27 28 29 30 31 32 33 34 35 36 37 38 39 40 41 42
43 44 45
46 47 48 49 50 51 52 53 54 55 56 57 58 59 60 61 62 63 64 65 66 67
68 69 70 71 72 73 74 75 76 77 78 79 80 81 82 83 84 85 86 87 88 89 90
91 92 93 94 95 96 97 98 99 100 101 102 103 104 105 106 107 108 109 110 111 112
113 114 115 116 117 118 119 120 121 122 123 124 125 126 127 128 129 130 131 132 133 134
Zeitmenü
Sound-Menü MODUS FUNKTION
Klangmodus User,Standard,Music,Movie,Sports Richten Sie den Soundmodus ein
Zeitmenü MODUS FUNKTION
Schlaf-Timer Off/10min/20/min,etc.
Schalten Sie den Projektor nach
einer festgelegten Zeit aus.
Optionsmenü
Sound-Menü
Klangmodus
Schlaf-Timer abschalten
Sprache Deutschland
Menudauer noch nie
Software update(USB)
Werkseinstellungen
support01@yaberauto.com
DE
01 02 03 04 05 06 07 08 09 10 11 12 13 14 15 16 17 18 19 20 21 22 23
24 25 26 27 28 29 30 31 32 33 34 35 36 37 38 39 40 41 42 43
44 45
46 47 48 49 50 51 52 53 54 55 56 57 58 59 60 61 62 63 64 65 66 67
68 69 70 71 72 73 74 75 76 77 78 79 80 81 82 83 84 85 86 87 88 89 90
91 92 93 94 95 96 97 98 99 100 101 102 103 104 105 106 107 108 109 110 111 112
113 114 115 116 117 118 119 120 121 122 123 124 125 126 127 128 129 130 131 132 133 134
Projektionsabstand und Größe
Bitte folgen Sie den Daten in der folgenden Tabelle, um die Bildgröße
und die Entfernung. (Seitenverhältnis: 16: 9, Standard)
Die Bildgröße hängt vom Abstand zwischen Projektor und Bildschirm ab.
Es kann zu einer Abweichung von 3% kommen. Unterschiedliche
Einstellungen verursachen unterschiedliche Entfernungen.
Vielen Dank, dass Sie sich für den YABER V2-Projektor entschieden
haben. Bitte lesen Sie diese Bedienungsanleitung vor Gebrauch
sorgfältig durch. Also bitte Halten Sie es griffbereit, damit Sie es jederzeit
überprüfen können.
Wenn Sie ein Problem haben, können Sie sich gerne an uns wenden
(E-Mail:
support01@yaberauto.com), wir werden immer
versuchen, Ihnen eine anzubieten zufriedenstellende Lösung.
Optionsmenü MODUS FUNKTION
Sprache Deutschland
Menudauer noch nie
Software Update(USB)
Werkseinstellungen
Version
English, France,
Italian, Spanish,etc.
Off, 5Sec, 10Sec,
15Sec
Update software
Richten Sie die in der Bedienober-
fläche angezeigte Sprache ein
Passen Sie die Dauer der Beibehal-
tung der Menüoberfläche an
Aktualisieren Sie die Softwareversion
des Projektors
Setzen Sie den Projektor zurück
Zeigen Sie die Version
Projektionsgröße
33"
60"
80"
100"
120"
150"
Entfernung (m)
1.05
1.8
2.4
2.97
3.53
4.39
support01@yaberauto.com
DE
01 02 03 04 05 06 07 08 09 10 11 12 13 14 15 16 17 18 19 20 21 22 23
24 25 26 27 28 29 30 31 32 33 34 35 36 37 38 39 40 41 42 43 44
45
46 47 48 49 50 51 52 53 54 55 56 57 58 59 60 61 62 63 64 65 66 67
68 69 70 71 72 73 74 75 76 77 78 79 80 81 82 83 84 85 86 87 88 89 90
91 92 93 94 95 96 97 98 99 100 101 102 103 104 105 106 107 108 109 110 111 112
113 114 115 116 117 118 119 120 121 122 123 124 125 126 127 128 129 130 131 132 133 134

Assistance professionnelle à vie YABER
Cher client,
Merci beaucoup d'avoir acheté notre projecteur.
Avez-vous des questions sur son fonctionnement? Veuillez lire attentivement
ce manuel avant d'utiliser le projecteur. Êtes-vous satisfait de votre project-
eur? Si vous avez des problèmes, envoyez votre numéro de commande et
une description de votre problème à:
support01@yaberauto.com.
Envoyez votre e-mail dès que possible, car nous voulons résoudre vos
problèmes la première fois que vous les avez.
Les clients peuvent parfois éprouver une certaine confusion lors de
l'utilisation du projecteur. Plutôt que d'essayer de communiquer directe-
ment avec nous, de nombreux acheteurs préfèrent simplement laisser un
avis sur la page du produit. Cependant, la plupart des critiques négatives
sont causées par une utilisation non standardisée plutôt que par un défaut
du produit lui-même. En fait, de nombreux problèmes peuvent être
facilement résolus en réglant, comme aucun signal, aucun son, etc. Nous
promettons que tous les projecteurs ont été soigneusement vérifiés et
emballés avant l'expédition.
Par conséquent, si vous avez des questions, veuillez nous contacter et
nous donner l'occasion de nous améliorer. Nous garantissons que nous
vous fournirons une solution plus satisfaisante.
Merci pour votre compréhension.
Meilleures salutations,
ÉQUIPE YABER
Ces consignes de sécurité garantissent la longévité de votre projecteur et
évitent les incendies et les chocs. Lisez-les attentivement et faites
attention à tous les avertissements.
Garanties importantes
support01@yaberauto.com
FR
01 02 03 04 05 06 07 08 09 10 11 12 13 14 15 16 17 18 19 20 21 22 23
24 25 26 27 28 29 30 31 32 33 34 35 36 37 38 39 40 41 42 43 44 45
46 47 48 49 50 51 52 53 54 55 56 57 58 59 60 61 62 63 64 65 66 67
68 69 70 71 72 73 74 75 76 77 78 79 80 81 82 83 84 85 86 87 88 89 90
91 92 93 94 95 96 97 98 99 100 101 102 103 104 105 106 107 108 109 110 111 112
113 114 115 116 117 118 119 120 121 122 123 124 125 126 127 128 129 130 131 132 133 134

1. Pour obtenir les meilleurs résultats, utilisez le projecteur dans une pièce
sombre.
Installation
2. Placez le projecteur sur une surface plane et plane dans un endroit sec, à
l'écart de la poussière et de l'humidité.
3. Ne placez pas le projecteur à la lumière directe du soleil, près d'appareils de
chauffage ou d'appareils dégageant de la chaleur.
4. L'exposition directe au soleil, à la fumée ou à la vapeur peut endommager les
composants internes.
5. Manipulez votre projecteur avec soin. La chute ou les secousses peuvent
endommager les composants internes.
6.Ne placez pas d'objets lourds sur le projecteur.
1.Le projecteur est conçu pour fonctionner avec une source de Alimentation
CA 110-240V ~ 50/60 Hz. Assurez-vous que votre source de L’alimentation
répond à cette exigence avant de tenter d’utiliser votre projecteur.
2. Manipulez le cordon d'alimentation avec précaution et évitez de le plier trop.
Un câble endommagé peut provoquer un choc électrique ou unincendie.
3. Si le projecteur ne sera pas utilisé pendant une période prolongée temps,
débranchez la fiche de la prise.
Source de courant
1. Débranchez le projecteur avant de le nettoyer.
2. Nettoyez régulièrement le boîtier avec un chiffon humide. Si c'est très
sale, utilisez un détergent doux. Ne jamais utiliser de détergents forts ou
les solvants tels que l'alcool ou les diluants.
Nettoyage
support01@yaberauto.com
FR
01 02 03 04 05 06 07 08 09 10 11 12 13 14 15 16 17 18 19 20 21 22 23
24 25 26 27 28 29 30 31 32 33 34 35 36 37 38 39 40 41 42 43 44 45
46
47 48 49 50 51 52 53 54 55 56 57 58 59 60 61 62 63 64 65 66 67
68 69 70 71 72 73 74 75 76 77 78 79 80 81 82 83 84 85 86 87 88 89 90
91 92 93 94 95 96 97 98 99 100 101 102 103 104 105 106 107 108 109 110 111 112
113 114 115 116 117 118 119 120 121 122 123 124 125 126 127 128 129 130 131 132 133 134

.AVI/.MP4/.MKV/.FLV/.MOV/.RMVB/.3GP/.MPEG1/
.MPEG2/.XVID (WMV non supporté)
AV, USB, USB-T, SD card, HDMI, VGA
Spécifications du projecteur
Liste d'emballage des produits
●YABER V2 Projecteur * 1 ●Cordon d'alimentation * 1
●Manuel d'instructions * 1 ●Câble AV 3 en 1 * 1
●Câble HDMI * 1 ● Vis de pied * 1
●Télécommande * 1 (piles non incluses)
●Chiffon de nettoyage pour lentilles * 1
Résolution native
Technologie
d'affichage
Source de lumière
Couleurs d'affichage
Ratio d'aspect
Poids du projecteur
Fichier image
Fichier vidéo
Port
1080*720p
LCD
LED
16.7M Full Color
4:3/16:9/auto
2.2lb
bmp./jpg/png/gif
Distance de projection
recommandée
Distance de projection
minimale
Correction trapézoïdale
Tension d'alimentation
Méthode de projection
Concentrer
Fichier audio
1.05-4.39m
1.05m
±15°Manual
AC 100-240V
Front/ Rear /Ceiling
Handbetrieb
AAC/MP2/MP3/PC-
M/FLAC/WMA/AC3
Pour certains didacticiels vidéo, veuillez vous référer à la chaîne
Youtube:
https://www.youtube.com/channel/UCcU4wy4vPRQa_uNcolDd2hA
AVI/.MP4/.MK V/.FLV/.MOV/.RMVB/.3GP/.MPEG1/
.MPEG2/.XVID (nicht unterstützt WMV)
AV, USB, USB-T, HDMI, VGA
support01@yaberauto.com
FR
01 02 03 04 05 06 07 08 09 10 11 12 13 14 15 16 17 18 19 20 21 22 23
24 25 26 27 28 29 30 31 32 33 34 35 36 37 38 39 40 41 42 43 44 45
46 47
48 49 50 51 52 53 54 55 56 57 58 59 60 61 62 63 64 65 66 67
68 69 70 71 72 73 74 75 76 77 78 79 80 81 82 83 84 85 86 87 88 89 90
91 92 93 94 95 96 97 98 99 100 101 102 103 104 105 106 107 108 109 110 111 112
113 114 115 116 117 118 119 120 121 122 123 124 125 126 127 128 129 130 131 132 133 134
Produktbeschreibung
Ce qui précède est pour référence seulement. Le produit réel peut varier
en raison des améliorations apportées au produit.
03
05
04
08
06
07
02
01
10 11 131209
15
14
01
02
03
04
05
06
07
08
09
10
11
12
13
14
15
Nom
Bague de mise au point
Correction trapézoïdale
Bouton marche
OK
La source d'entrée
Déplacer vers la gauche
Déplacer vers la droite
Revenir
Port écouteurs
AV Port
USB-T
USB
HDMI
VGA
Port du câble
d'alimentation
La description
Ajustez la bague de mise au point pour obtenir
l'image la plus claire.
Ajustez la clé de voûte pour obtenir une forme
rectangulaire.
Ce bouton peut conduire le projecteur en mode de
travail / veille.
Confirmer
Choisissez la source (Screen Mirror, PC-RGB,
HDMI, USB, AV, etc.)
/
/
/
/
Entrée audio
Port de mise en miroir d'écran câblé (avec câble
USB d'origine)
/
/
/
Branchez le câble d'alimentation
support01@yaberauto.com
FR
01 02 03 04 05 06 07 08 09 10 11 12 13 14 15 16 17 18 19 20 21 22 23
24 25 26 27 28 29 30 31 32 33 34 35 36 37 38 39 40 41 42 43 44 45
46 47 48
49 50 51 52 53 54 55 56 57 58 59 60 61 62 63 64 65 66 67
68 69 70 71 72 73 74 75 76 77 78 79 80 81 82 83 84 85 86 87 88 89 90
91 92 93 94 95 96 97 98 99 100 101 102 103 104 105 106 107 108 109 110 111 112
113 114 115 116 117 118 119 120 121 122 123 124 125 126 127 128 129 130 131 132 133 134
Réglez la base d'inclinaison:
Installez les vis (incluses dans l'emballage) pour placer ①, soulevez le
bord avant du projecteur à la hauteur souhaitée, tournez le pied-de-biche
et relâchez le bouton pour verrouiller la base inclinable dans la position
appropriée.
Plafond suspendu:
Veuillez acheter le support de projecteur et la vis M5 en plus.
Installez le support du projecteur pour placer ① et accrochez le project-
eur au plafond.
(Remarque: vous pouvez installer le trépied à l'endroit ①)
Instructions de la télécommande
Ajuster la base inclinable et suspendre le plafond
( Batterien nicht enthalten )
IR Transmitter
Démarrage
La source d'entrée Menu
OK
Se déplacer vers la gauche Se déplacer vers la droite
Déplacer vers le haut Descendre
Revenir
Baisser le volume Monter le son
Muet
support01@yaberauto.com
FR
01 02 03 04 05 06 07 08 09 10 11 12 13 14 15 16 17 18 19 20 21 22 23
24 25 26 27 28 29 30 31 32 33 34 35 36 37 38 39 40 41 42 43 44 45
46 47 48 49
50 51 52 53 54 55 56 57 58 59 60 61 62 63 64 65 66 67
68 69 70 71 72 73 74 75 76 77 78 79 80 81 82 83 84 85 86 87 88 89 90
91 92 93 94 95 96 97 98 99 100 101 102 103 104 105 106 107 108 109 110 111 112
113 114 115 116 117 118 119 120 121 122 123 124 125 126 127 128 129 130 131 132 133 134

PROJECTEUR DE DÉPART
Allumez le projecteur
Éteignez le projecteur
1. Appuyez sur le bouton d'alimentation lorsque le projecteur est en cours
d'utilisation, cela le fera passer en mode veille.
2. Lorsque le projecteur passe en mode veille, le voyant clignote en rouge.
1. Installez deux piles AAA dans la télécommande avant de l'utiliser.
2. Appuyez sur la touche Marche / Arrêt de la télécommande ou du panneau,
le voyant deviendra rouge.
3. Retirez le couvercle de l'objectif du projecteur, la lampe commencera à
fonctionner 2 secondes plus tard, lorsqu'une image est projetée sur l'écran, la
machine fonctionne correctement. Si le premier écran de projection n'est pas
l'écran de démarrage, appuyez sur le bouton "S" de la télécommande et
sélectionnez la source USB.
4. Ajustez la bague trapézoïdale pour obtenir une forme rectangulaire.
5. Réglez la bague de mise au point ou faites pivoter l'objectif du projecteur
pour obtenir les meilleures performances d'image. (S'il est toujours flou,
veuillez essayer d'ajuster la distance de projection.)
6. Si vous connectez d'autres appareils, assurez-vous de sélectionner la
source correspondante. Si vous ne sélectionnez pas la bonne source, le
projecteur ne pourra pas détecter le signal.
7. Appuyez sur le bouton Menu de la télécommande pour entrer la langue
OSD pour définir votre langue préférée;
①
support01@yaberauto.com
FR
01 02 03 04 05 06 07 08 09 10 11 12 13 14 15 16 17 18 19 20 21 22 23
24 25 26 27 28 29 30 31 32 33 34 35 36 37 38 39 40 41 42 43 44 45
46 47 48 49 50
51 52 53 54 55 56 57 58 59 60 61 62 63 64 65 66 67
68 69 70 71 72 73 74 75 76 77 78 79 80 81 82 83 84 85 86 87 88 89 90
91 92 93 94 95 96 97 98 99 100 101 102 103 104 105 106 107 108 109 110 111 112
113 114 115 116 117 118 119 120 121 122 123 124 125 126 127 128 129 130 131 132 133 134
L'image projetée peut être floue ou difficile à voir, cela est dû au manque
de réglage de la mise au point avec l'objectif, veuillez suivre les proces-
sus ci-dessous pour régler la mise au point. (Faites la mise au point
manuelle, trouvez l'image la plus nette sur l'écran)
Remarque: Si la correction Keystone ne parvient pas à résoudre la
forme de l'image, veuillez réduisez la hauteur verticale du projecteur
par rapport au centre de l'écran.
Remarque: Si le centre est la netteté, le flou dans le bord, c'est un
phénomène normal.
Si l'image projetée est de forme trapézoïdale, elle peut être résolue par
Correction trapézoïdale. (Effectuer la correction manuelle de la distorsion
trapézoïdale)
B
Mise au point manuelle
Correction trapézoïdale
Correction trapézoïdale et mise au point
support01@yaberauto.com
FR
01 02 03 04 05 06 07 08 09 10 11 12 13 14 15 16 17 18 19 20 21 22 23
24 25 26 27 28 29 30 31 32 33 34 35 36 37 38 39 40 41 42 43 44 45
46 47 48 49 50 51
52 53 54 55 56 57 58 59 60 61 62 63 64 65 66 67
68 69 70 71 72 73 74 75 76 77 78 79 80 81 82 83 84 85 86 87 88 89 90
91 92 93 94 95 96 97 98 99 100 101 102 103 104 105 106 107 108 109 110 111 112
113 114 115 116 117 118 119 120 121 122 123 124 125 126 127 128 129 130 131 132 133 134
( Deux options: Connecter en utilisant un câble VGA, Connecter en utilisant un
câble HDMI )
(1) Allumez votre ordinateur et projecteur;
(2) Connectez le câble VGA / HDMI au port VGA / HDMI de votre ordinateur.
(3) Connectez l’autre extrémité à n’importe quel port VGA / HDMI disponible
sur votre projecteur;
(4) Appuyez sur le bouton “ ” pour accéder à l'interface de la source d'entrée.
(5) Sélectionnez VGA / HDMI pour projeter des fichiers sur l’ordinateur.
(6) Sur l'ordinateur, Utiliser le raccourci clavier Touche “ ” pour
changer le mode d'affichage.
Ordinateur uniquement: Cette option affiche uniquement le contenu de
l'écran de votre ordinateur.
Dupliquer: Cette option affiche simultanément le contenu de l'écran de
l'ordinateur sur l'écran de l'ordinateur et le projecteur.
Étendre: Cette option divise l'image entre l'ordinateur et le projecteur.
Projecteur uniquement: Comme son nom l’indique, cette option permet
d’afficher le contenu de votre présentation sur le projecteur, mais d’afficher un
écran vide sur votre ordinateur.
S'il vous plaît se référer au lien ci-dessous:
https://www.youtube.com/watch?v=k2Zh9lmrerc
(7) Affichage ---> Personnaliser votre écran---> Resolution
Veuillez vous référer au lien ci-dessous:
https://www.youtube.com/watch?v=YJ6moceE13Y
Remarque:
1.Parce que le port VGA ne peut pas transmettre de signal audio, vous devez
connecter un haut-parleur externe lors de la connexion à un ordinateur avec
un câble VGA.
Connexion du PC
Connexion à l'ordinateur
support01@yaberauto.com
FR
01 02 03 04 05 06 07 08 09 10 11 12 13 14 15 16 17 18 19 20 21 22 23
24 25 26 27 28 29 30 31 32 33 34 35 36 37 38 39 40 41 42 43 44 45
46 47 48 49 50 51 52
53 54 55 56 57 58 59 60 61 62 63 64 65 66 67
68 69 70 71 72 73 74 75 76 77 78 79 80 81 82 83 84 85 86 87 88 89 90
91 92 93 94 95 96 97 98 99 100 101 102 103 104 105 106 107 108 109 110 111 112
113 114 115 116 117 118 119 120 121 122 123 124 125 126 127 128 129 130 131 132 133 134
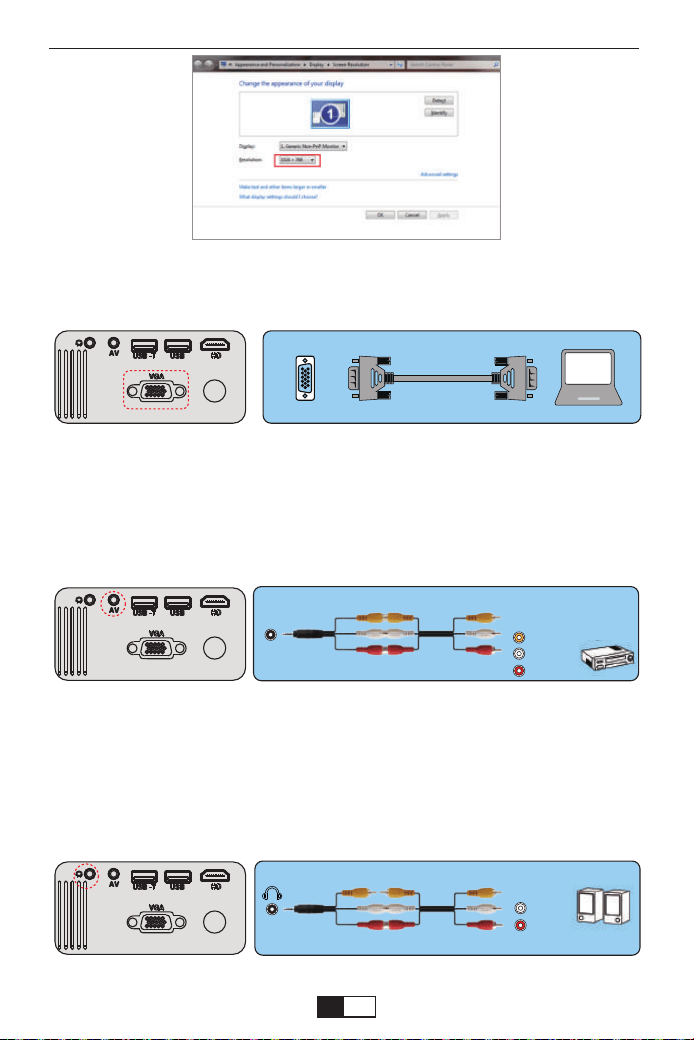
( Remarque: la connexion VGA peut uniquement transmettre un signal
analogique de vidéo et non audio. Un haut-parleur externe est requis lorsque
l'appareil est connecté via un câble VGA. )
Connecter un lecteur DVD
1. Utilisez le câble AV fourni pour connecter votre lecteur DVD au projecteur.
2. Allumez le projecteur et le lecteur DVD.
3.Remarque: veuillez acheter un câble AV 3 en 3 en plus.
Connecter la barre de son
1. Utilisez le câble AV fourni pour connecter votre barre de son au projecteur.
2. Allumez le projecteur et la barre de son.
Remarque: veuillez acheter un câble AV 3 en 3 en plus
(3-in-3-AV-Kabel nicht im Lieferumfang enthalten)
(3-in-3-AV-Kabel nicht im Lieferumfang enthalten)
VGA
AV
video
audio out
(L/R)
audio out
(L/R)
support01@yaberauto.com
FR
01 02 03 04 05 06 07 08 09 10 11 12 13 14 15 16 17 18 19 20 21 22 23
24 25 26 27 28 29 30 31 32 33 34 35 36 37 38 39 40 41 42 43 44 45
46 47 48 49 50 51 52 53
54 55 56 57 58 59 60 61 62 63 64 65 66 67
68 69 70 71 72 73 74 75 76 77 78 79 80 81 82 83 84 85 86 87 88 89 90
91 92 93 94 95 96 97 98 99 100 101 102 103 104 105 106 107 108 109 110 111 112
113 114 115 116 117 118 119 120 121 122 123 124 125 126 127 128 129 130 131 132 133 134
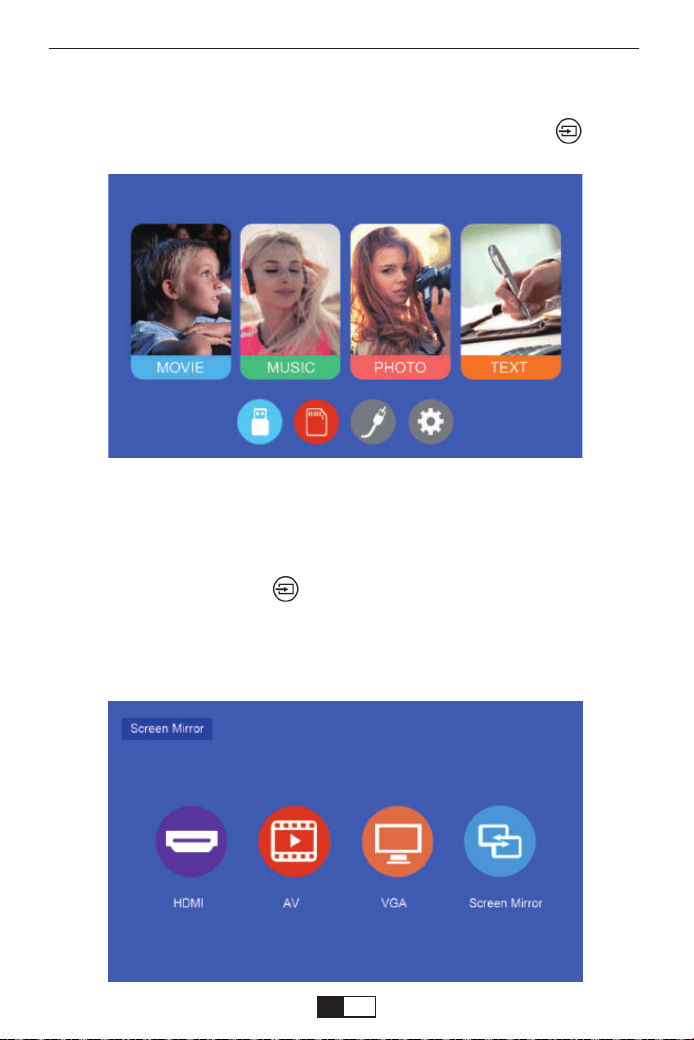
L'écran de démarrage normal du projecteur est le suivant. Si le premier
écran de projection n'est pas celui-ci, appuyez sur le bouton “ ” de la
télécommande pour sélectionner la source USB.
INSTALLATION DU PROJECTEUR
Lorsque l'invite "No Signal" apparaît, vous devez sélectionner la source
d'entrée:
1. Appuyez sur le bouton “ ” de la télécommande pour sélectionner le
signal souhaité, puis appuyez sur le bouton OK de la télécommande.
2. Une fois le signal détecté, les informations sur la source sélectionnée
seront affichées à l'écran après quelques secondes.
Sélectionnez la source d'entrée
support01@yaberauto.com
FR
01 02 03 04 05 06 07 08 09 10 11 12 13 14 15 16 17 18 19 20 21 22 23
24 25 26 27 28 29 30 31 32 33 34 35 36 37 38 39 40 41 42 43 44 45
46 47 48 49 50 51 52 53 54
55 56 57 58 59 60 61 62 63 64 65 66 67
68 69 70 71 72 73 74 75 76 77 78 79 80 81 82 83 84 85 86 87 88 89 90
91 92 93 94 95 96 97 98 99 100 101 102 103 104 105 106 107 108 109 110 111 112
113 114 115 116 117 118 119 120 121 122 123 124 125 126 127 128 129 130 131 132 133 134
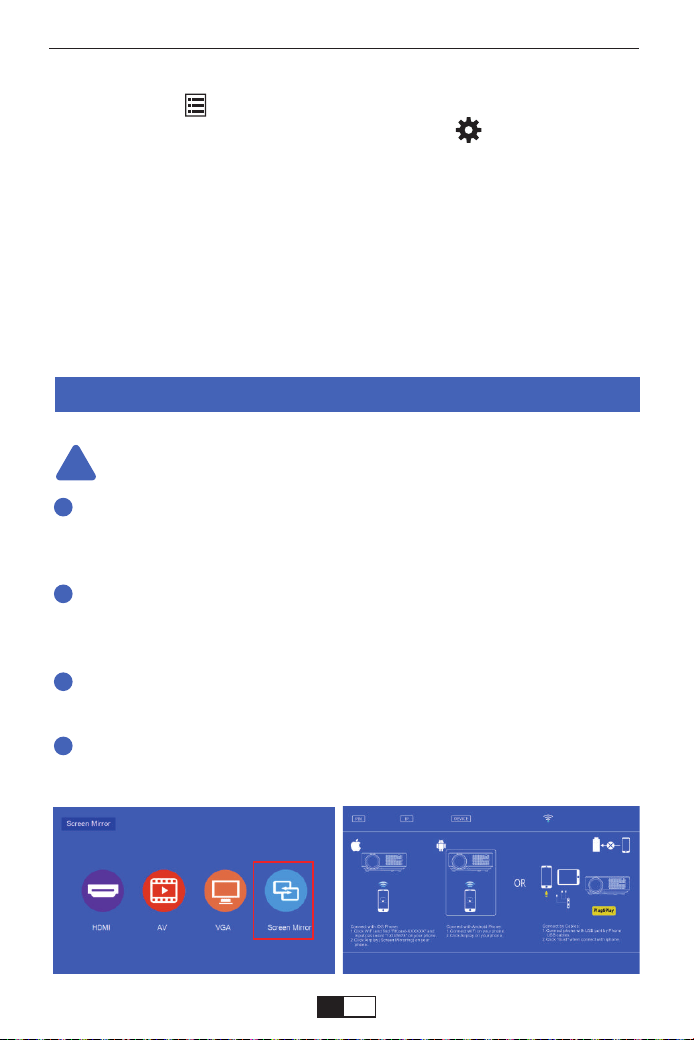
Méthode de réglage du menu
1.Appuyez sur “ ” sur la télécommande, puis l'image du menu s'affichera
à l'écran. Ou vous pouvez sélectionner la touche “ ” du projecteur pour
accéder aux 4 menus sans la télécommande.
2.Appuyez sur la touche “
◀/▶
”, le menu se déplacera vers “Image”>“Son”
>“Heure”>“OPTION”.
3.Sélectionnez l'interface de réglage, utilisez la touche “▲/▼” pour choisir
l'élément souhaité.
4.Appuyez sur “OK” ou “
◀/▶
” pour régler le paramètre de l'élément
Méthodes de mise en miroir d'écran
!
1
2
3
4
La fluidité de la mise en miroir d'écran sans fil sera affectée par la
vitesse du réseau domestique. Nous recommandons la mise en miroir
d'écran dans un environnement sans fil stable.
Pour plus de fluidité et de stabilité, il est recommandé de connecter un
routeur WIFI à moins d'un mètre du projecteur. Si le projecteur est trop
loin du routeur, cela affectera la fluidité de l'image de lecture.
Certains téléphones intelligents peuvent ne pas prendre en charge la
mise en miroir d'écran.
Toutes les questions, n'hésitez pas à contacter YABER via
support01@yaberauto.com
Conseils:
support01@yaberauto.com
FR
01 02 03 04 05 06 07 08 09 10 11 12 13 14 15 16 17 18 19 20 21 22 23
24 25 26 27 28 29 30 31 32 33 34 35 36 37 38 39 40 41 42 43 44 45
46 47 48 49 50 51 52 53 54 55
56 57 58 59 60 61 62 63 64 65 66 67
68 69 70 71 72 73 74 75 76 77 78 79 80 81 82 83 84 85 86 87 88 89 90
91 92 93 94 95 96 97 98 99 100 101 102 103 104 105 106 107 108 109 110 111 112
113 114 115 116 117 118 119 120 121 122 123 124 125 126 127 128 129 130 131 132 133 134
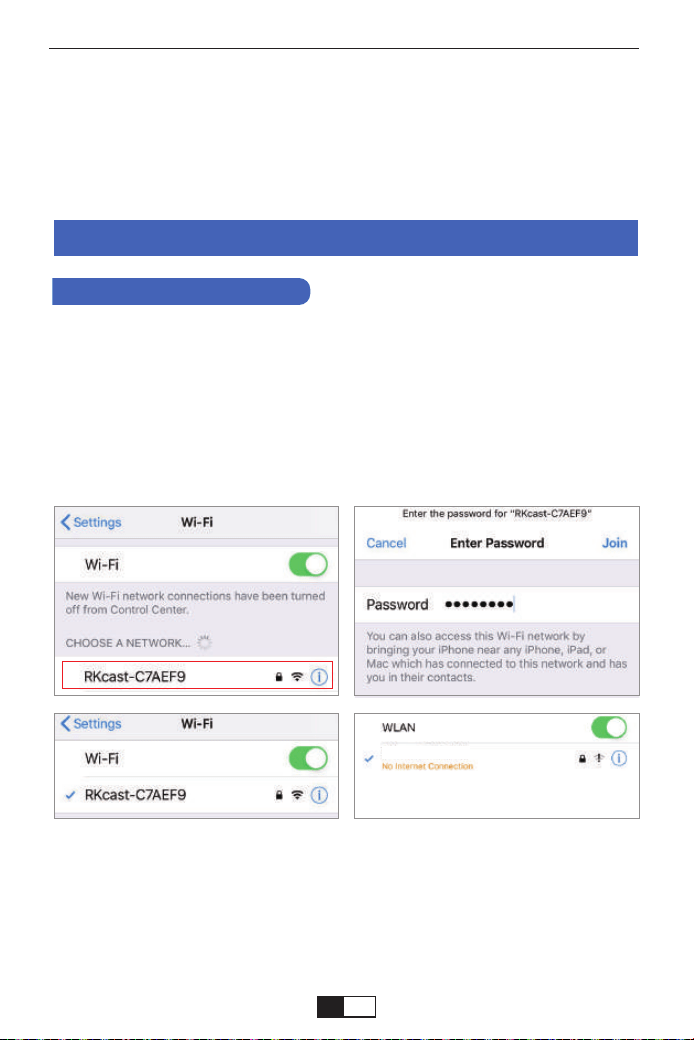
RKcast-C7AEF9
Dans un premier temps, allumez le projecteur, appuyez sur le bas "source"
de la télécommande, puis il affichera l'option "Source d'entrée" sur l'image
de projection. Choisissez le "Screen Mirroring", puis appuyez sur "OK" vous
obtiendrez ce menu:
Sur votre appareil iOS, appuyez sur [Settings] - [Wi-Fi] -Activez [Wi-Fi]. Les
réseaux disponibles sont affichés.
Choisissez le nom WiFi comme [RKcast-xxxxxx], connectez-le et entrez le
mot de passe [12345678] qui se trouve dans le menu du projecteur.
Méthode de projection sans fil
Étape 1
Méthode 1: utilisez votre réseau WIFI domestique sur IP
Pour les utilisateurs IOS
Remarque: Après la connexion, si "Pas de connexion Internet" s'affiche,
veuillez l'ignorer car cela n'affectera pas l'utilisation.
① Aller à Safari - Entrez "192.168.49.1"
Étape 2
support01@yaberauto.com
FR
01 02 03 04 05 06 07 08 09 10 11 12 13 14 15 16 17 18 19 20 21 22 23
24 25 26 27 28 29 30 31 32 33 34 35 36 37 38 39 40 41 42 43 44 45
46 47 48 49 50 51 52 53 54 55 56
57 58 59 60 61 62 63 64 65 66 67
68 69 70 71 72 73 74 75 76 77 78 79 80 81 82 83 84 85 86 87 88 89 90
91 92 93 94 95 96 97 98 99 100 101 102 103 104 105 106 107 108 109 110 111 112
113 114 115 116 117 118 119 120 121 122 123 124 125 126 127 128 129 130 131 132 133 134
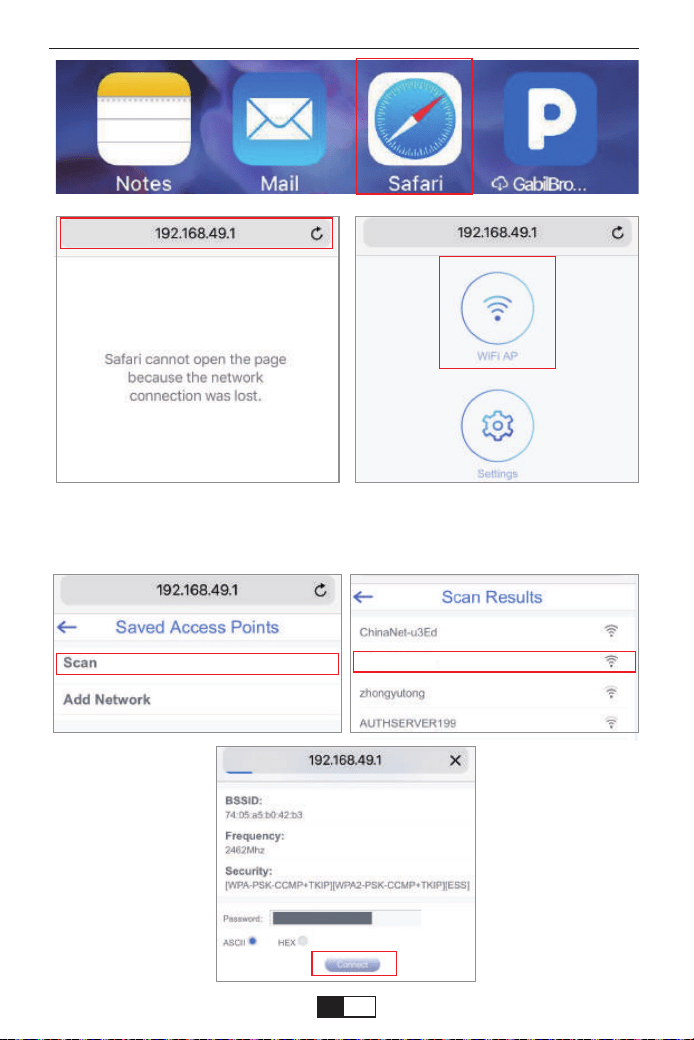
YABER
② Appuyez sur WiFi AP - Scannez - Sélectionnez votre WIFI(Ex. YABER) -
entrez le mot de passe WiFi de votre domicile - Appuyez sur Connecter.
support01@yaberauto.com
FR
01 02 03 04 05 06 07 08 09 10 11 12 13 14 15 16 17 18 19 20 21 22 23
24 25 26 27 28 29 30 31 32 33 34 35 36 37 38 39 40 41 42 43 44 45
46 47 48 49 50 51 52 53 54 55 56 57
58 59 60 61 62 63 64 65 66 67
68 69 70 71 72 73 74 75 76 77 78 79 80 81 82 83 84 85 86 87 88 89 90
91 92 93 94 95 96 97 98 99 100 101 102 103 104 105 106 107 108 109 110 111 112
113 114 115 116 117 118 119 120 121 122 123 124 125 126 127 128 129 130 131 132 133 134
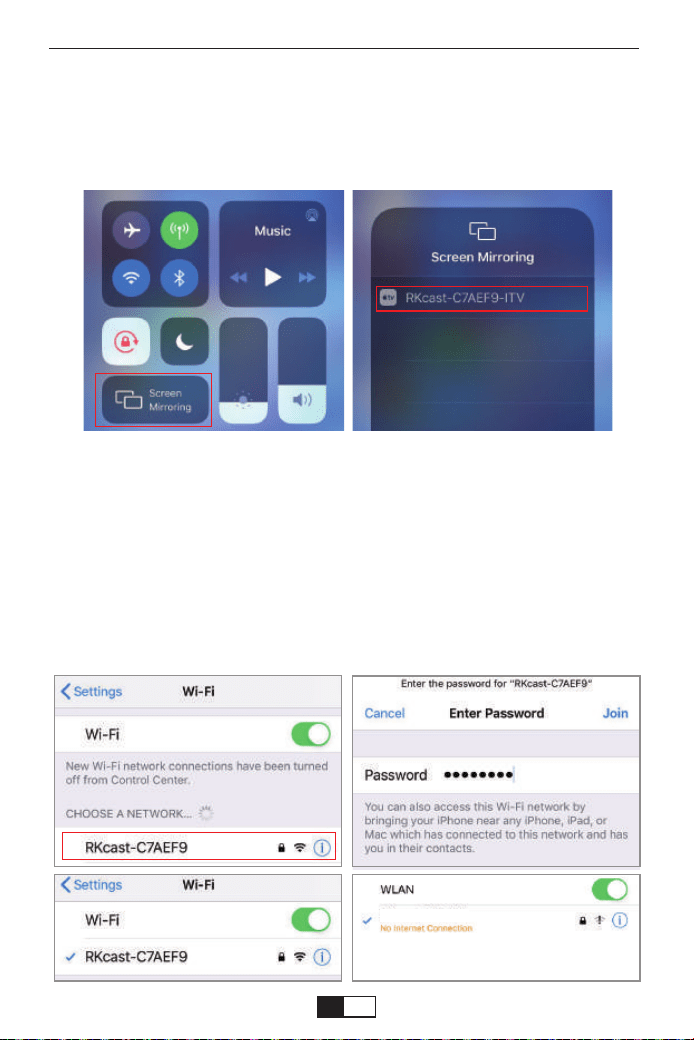
RKcast-C7AEF9
Ouvrez le Centre de contrôle - Appuyez sur le bouton Screen Mirroring - Connect-
ez [RKcast-xxxxxx]
① Ouvrez le centre de contrôle
② Tapez sur Screen Mirroring - Sélectionnez le nom de l'appareil [RKcast-xxxxxx]
Étape 3
Sur votre appareil iOS, appuyez sur [Settings] - [Wi-Fi] -Activez [Wi-Fi]. Les
réseaux disponibles sont affichés.
Choisissez le nom WiFi comme [RKcast-xxxxxx], connectez-le et entrez le
mot de passe [12345678] qui se trouve dans le menu du projecteur.
Étape 1
Méthode 2: AP-Utilisez le réseau cellulaire de votre carte de
téléphone mobile.
support01@yaberauto.com
FR
01 02 03 04 05 06 07 08 09 10 11 12 13 14 15 16 17 18 19 20 21 22 23
24 25 26 27 28 29 30 31 32 33 34 35 36 37 38 39 40 41 42 43 44 45
46 47 48 49 50 51 52 53 54 55 56 57 58
59 60 61 62 63 64 65 66 67
68 69 70 71 72 73 74 75 76 77 78 79 80 81 82 83 84 85 86 87 88 89 90
91 92 93 94 95 96 97 98 99 100 101 102 103 104 105 106 107 108 109 110 111 112
113 114 115 116 117 118 119 120 121 122 123 124 125 126 127 128 129 130 131 132 133 134
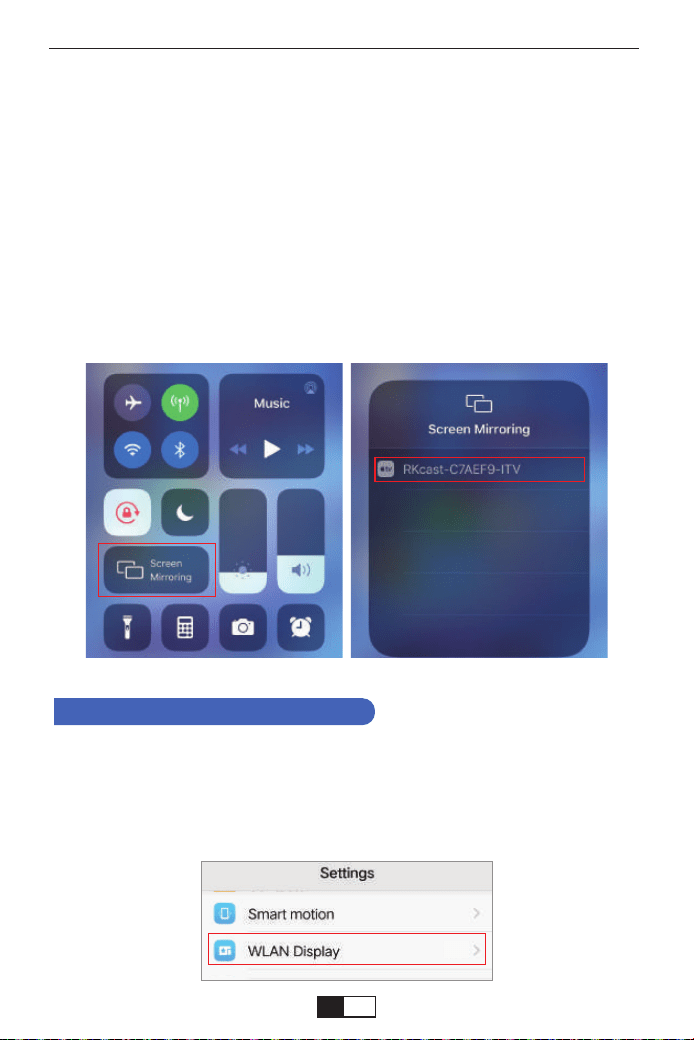
On
Remarque: Après la connexion, si "Pas de connexion Internet" s'affiche,
veuillez l'ignorer car cela n'affectera pas l'utilisation.
Ouvrez le Centre de contrôle - Appuyez sur le bouton Screen Mirroring -
Connectez [RKcast-xxxxxx]
①Ouvrez le centre de contrôle
②Tapez sur Screen Mirroring - Sélectionnez le nom de l'appareil
[RKcast-xxxxxx]
Étape 2
Sur votre appareil Android, appuyez sur [Paramètres] - [Sans fil & réseaux]
-Activez [WLAN]. Les réseaux disponibles sont affichés.
Étape 1
Méthode 1: utilisez votre réseau WIFI domestique sur IP
Pour les utilisateurs Android
support01@yaberauto.com
FR
01 02 03 04 05 06 07 08 09 10 11 12 13 14 15 16 17 18 19 20 21 22 23
24 25 26 27 28 29 30 31 32 33 34 35 36 37 38 39 40 41 42 43 44 45
46 47 48 49 50 51 52 53 54 55 56 57 58 59
60 61 62 63 64 65 66 67
68 69 70 71 72 73 74 75 76 77 78 79 80 81 82 83 84 85 86 87 88 89 90
91 92 93 94 95 96 97 98 99 100 101 102 103 104 105 106 107 108 109 110 111 112
113 114 115 116 117 118 119 120 121 122 123 124 125 126 127 128 129 130 131 132 133 134
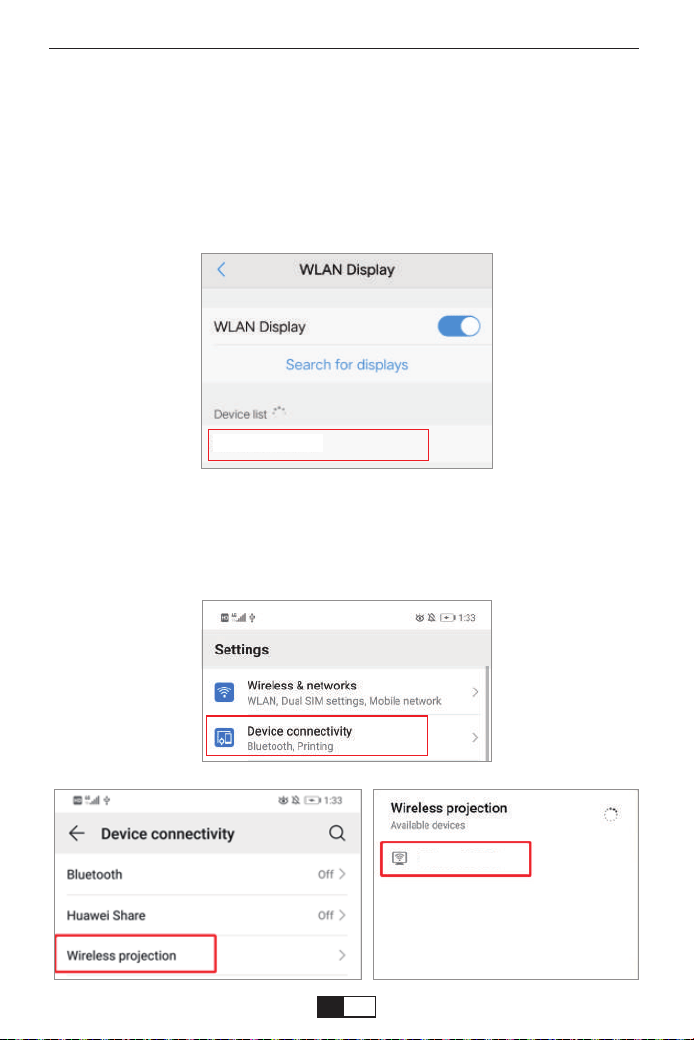
YABER
RKcast-C7AEF9
RKcast-C7AEF9
RKcast-C7AEF9
Remarque: différentes marques de téléphones Android ont des opérations
différentes pour sélectionner l'affichage WLAN, veuillez vous référer au manuel
de votre téléphone.
Choisissez votre nom WiFi domestique (Ex. YABER), connectez-le et entrez
votre mot de passe [XXXXXXXX].
Étape 2
Appuyez sur [Paramètres] -[Connectivité de l'appareil]-Activez [Projection sans fil]
Étape 3
support01@yaberauto.com
FR
01 02 03 04 05 06 07 08 09 10 11 12 13 14 15 16 17 18 19 20 21 22 23
24 25 26 27 28 29 30 31 32 33 34 35 36 37 38 39 40 41 42 43 44 45
46 47 48 49 50 51 52 53 54 55 56 57 58 59 60
61 62 63 64 65 66 67
68 69 70 71 72 73 74 75 76 77 78 79 80 81 82 83 84 85 86 87 88 89 90
91 92 93 94 95 96 97 98 99 100 101 102 103 104 105 106 107 108 109 110 111 112
113 114 115 116 117 118 119 120 121 122 123 124 125 126 127 128 129 130 131 132 133 134
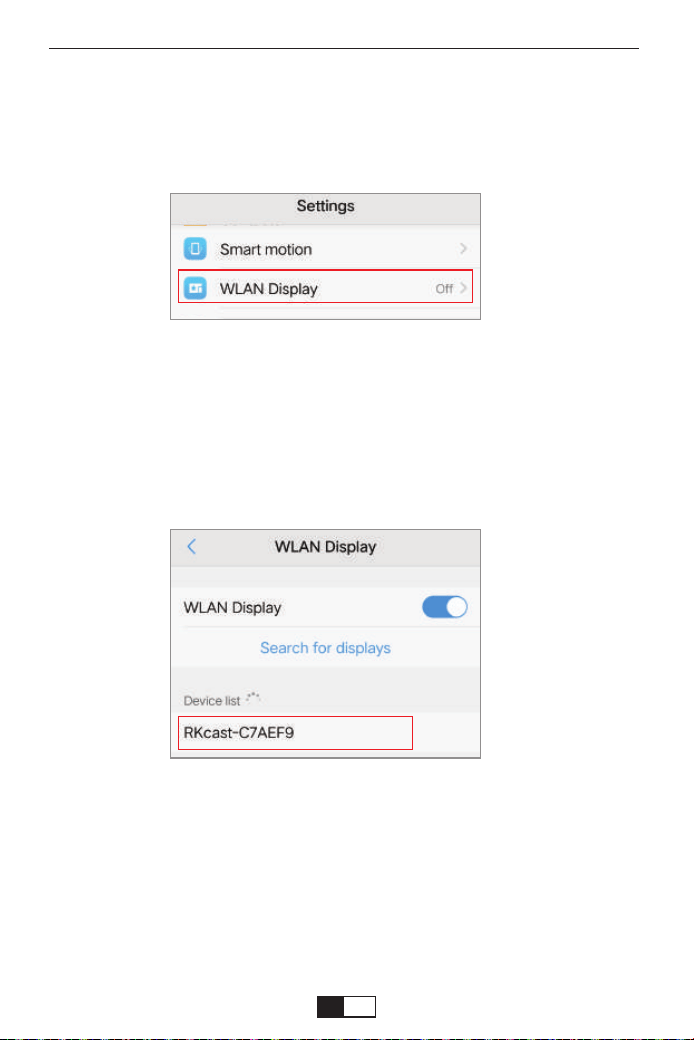
Remarque: différentes marques de téléphones Android ont différentes
opérations pour sélectionner l'affichage WLAN, veuillez vous reporter au
manuel du téléphone.
Sur votre appareil Android, appuyez sur [Paramètres] - [Sans fil & réseaux]
-Activez [WLAN. Les réseaux disponibles sont affichés.
Étape 1
Choisissez le nom WiFi comme [RKcast-xxxxxx], connectez-le et entrez le
mot de passe [12345678] qui se trouve dans le menu du projecteur.
Étape 2
Méthode 2: AP-Utilisez le réseau cellulaire de votre carte de
téléphone mobile.
support01@yaberauto.com
FR
01 02 03 04 05 06 07 08 09 10 11 12 13 14 15 16 17 18 19 20 21 22 23
24 25 26 27 28 29 30 31 32 33 34 35 36 37 38 39 40 41 42 43 44 45
46 47 48 49 50 51 52 53 54 55 56 57 58 59 60 61
62 63 64 65 66 67
68 69 70 71 72 73 74 75 76 77 78 79 80 81 82 83 84 85 86 87 88 89 90
91 92 93 94 95 96 97 98 99 100 101 102 103 104 105 106 107 108 109 110 111 112
113 114 115 116 117 118 119 120 121 122 123 124 125 126 127 128 129 130 131 132 133 134
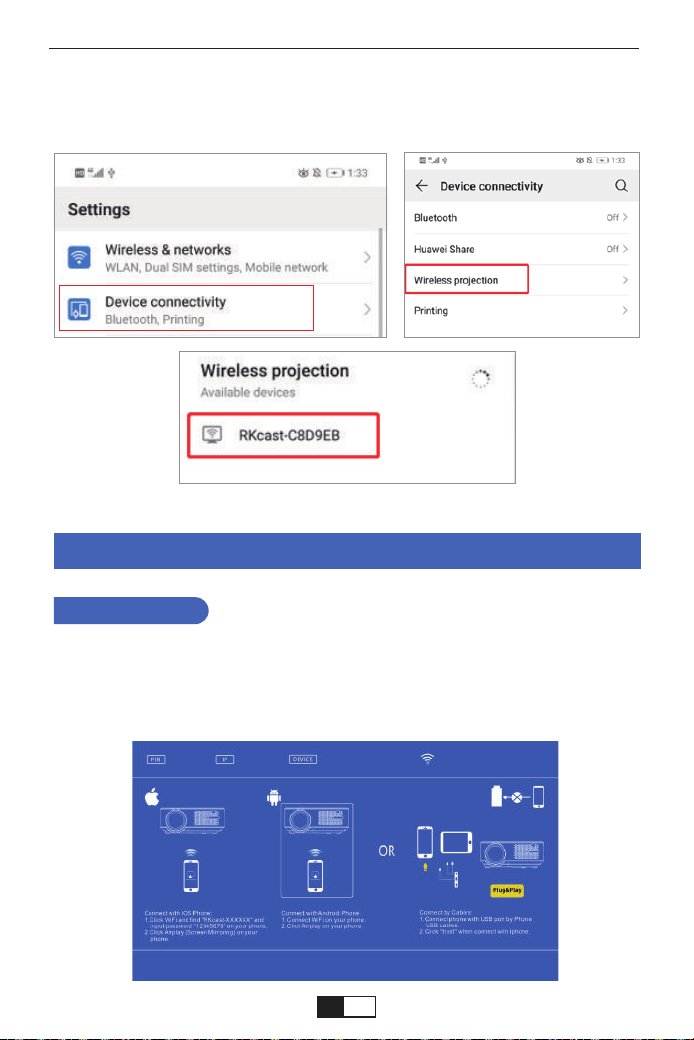
Appuyez sur [Paramètres] -[Connectivité de l'appareil]-Activez [Projection
sans fil]
Étape 3
Miroir d'écran filaire (câble de données USB d'origine)
1. Tout d'abord, allumez le projecteur et appuyez sur le bouton "S" de la
télécommande ou du projecteur lui-même, et l'option "Input Source" apparaîtra
sur l'image projetée. Sélectionnez "Screen Mirroring" et appuyez sur le bouton
"OK".
Pour IOS
support01@yaberauto.com
FR
01 02 03 04 05 06 07 08 09 10 11 12 13 14 15 16 17 18 19 20 21 22 23
24 25 26 27 28 29 30 31 32 33 34 35 36 37 38 39 40 41 42 43 44 45
46 47 48 49 50 51 52 53 54 55 56 57 58 59 60 61 62
63 64 65 66 67
68 69 70 71 72 73 74 75 76 77 78 79 80 81 82 83 84 85 86 87 88 89 90
91 92 93 94 95 96 97 98 99 100 101 102 103 104 105 106 107 108 109 110 111 112
113 114 115 116 117 118 119 120 121 122 123 124 125 126 127 128 129 130 131 132 133 134
!
1
2
3
2. Connectez le projecteur et l'équipement iphone avec un câble USB d'origine
via le port USB-T.
3. Sur "Faites-vous confiance à cet équipement?" Dans l'écran de présentation,
appuyez sur "Trust".
1. Tout d'abord, allumez le projecteur et appuyez sur le bouton "S" de la télécom-
mande ou du projecteur lui-même, et l'option "Input Source" apparaîtra sur l'image
projetée. Sélectionnez "Screen Mirroring" et appuyez sur le bouton "OK".
2. Connectez le projecteur et l'équipement Android avec un câble USB d'origine
via le port USB-T.
3. Sur le "Autorisez-vous le débogage via USB?" Invite, appuyez sur "OK".
4. Après un certain temps, l'écran Android s'affiche sur le projecteur.
Pour Android
Utilisez un véritable câble USB. Si le câble n'est pas un câble authentique,
la connexion peut échouer ou une mise en miroir nette peut ne pas être
possible.
Certains smartphones peuvent ne pas prendre en charge la mise en miroir
d'écran.
Certains smartphones Android transfèrent uniquement l'écran en raison de
sa propre fonction, et aucune voix n'est produite.
Notez s'il vous plaît:
support01@yaberauto.com
FR
01 02 03 04 05 06 07 08 09 10 11 12 13 14 15 16 17 18 19 20 21 22 23
24 25 26 27 28 29 30 31 32 33 34 35 36 37 38 39 40 41 42 43 44 45
46 47 48 49 50 51 52 53 54 55 56 57 58 59 60 61 62 63
64 65 66 67
68 69 70 71 72 73 74 75 76 77 78 79 80 81 82 83 84 85 86 87 88 89 90
91 92 93 94 95 96 97 98 99 100 101 102 103 104 105 106 107 108 109 110 111 112
113 114 115 116 117 118 119 120 121 122 123 124 125 126 127 128 129 130 131 132 133 134

BILDMENÜ
<ZOOM>
Lors de la lecture d'une image ou d'une video, si vous souhaitez reduire la taille
de l'image ou de la video projetee, vous pouvez utiliser la telecommande pour
selectionner le ZOOM pour ajuster la taille de la projection:
Vous pouvez reduire la hauteur et la largeur du format d'origine jusqu'a -25%.
MENU IMAGE MODE FONCTION
Mode Image
Température de
couleur
Aspect ratio 16:9
Mode de projection
ZOOM
Doux/Utilisateur/Dynamique/-
Standard
Froid/ Med/ Chaud/ Utilisateur
Auto/ 4:3/ 16:9
Avant / arrière sur le bureau,
avant / arrière sur le plafond
75-100
4 modes d'image.
Ajustez la température de couleur.
Le rapport hauteur / largeur vous
permet de configurer le mode
d'affichage des images.
Ajustez la direction de projection.
Réduisez la taille de la projection.
Mode Image Doux
Température de couleur Med
Aspect ratio 16:9
Mode de projection Front
Zoom 85
support01@yaberauto.com
FR
01 02 03 04 05 06 07 08 09 10 11 12 13 14 15 16 17 18 19 20 21 22 23
24 25 26 27 28 29 30 31 32 33 34 35 36 37 38 39 40 41 42 43 44 45
46 47 48 49 50 51 52 53 54 55 56 57 58 59 60 61 62 63 64
65 66 67
68 69 70 71 72 73 74 75 76 77 78 79 80 81 82 83 84 85 86 87 88 89 90
91 92 93 94 95 96 97 98 99 100 101 102 103 104 105 106 107 108 109 110 111 112
113 114 115 116 117 118 119 120 121 122 123 124 125 126 127 128 129 130 131 132 133 134
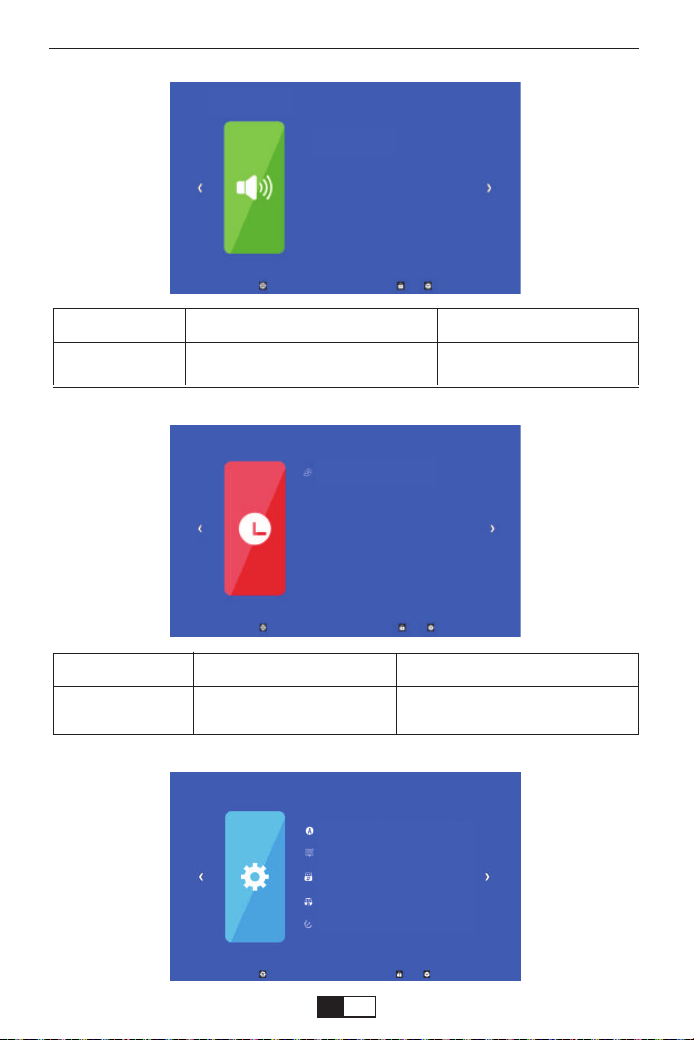
MENU HEURE
SOUND MENU MODE FONCTION
Mode sonore
Standard/ MUSIQUE/ VIDO
/ Sport/ Utilisateur
Configurer le mode sonore
MENU HEURE MODE FUNCTION
Minuterie de
sommeil Arret
Arret/10min/20/min,etc.
Éteignez le projecteur après
l'heure définie
Optionsmenü
MENU SON
Mode sonore
Minuterie de sommeil Arret
Langue OSD Francais
Heure OSD Arret
Mise a jour USB
Reinitialiser
Version Projector042701
support01@yaberauto.com
FR
01 02 03 04 05 06 07 08 09 10 11 12 13 14 15 16 17 18 19 20 21 22 23
24 25 26 27 28 29 30 31 32 33 34 35 36 37 38 39 40 41 42 43 44 45
46 47 48 49 50 51 52 53 54 55 56 57 58 59 60 61 62 63 64 65
66 67
68 69 70 71 72 73 74 75 76 77 78 79 80 81 82 83 84 85 86 87 88 89 90
91 92 93 94 95 96 97 98 99 100 101 102 103 104 105 106 107 108 109 110 111 112
113 114 115 116 117 118 119 120 121 122 123 124 125 126 127 128 129 130 131 132 133 134

Distance et taille de projection
Veuillez suivre les données du tableau ci-dessous pour ajuster la taille de
l'image et distance. (Format d'image: 16: 9, par défaut)
La taille de l'image dépend de la distance entre le projecteur et l'écran, il
peut y avoir un écart de 3% parmi les données énumérées ci-dessus.
Différents réglages entraînent différentes distances.
Merci beaucoup d'avoir acheté le projecteur YABER V2.
Veuillez lire attentivement ce manuel d'instructions avant utilisation.
Veuillez également
gardez-le à portée de main pour pouvoir le vérifier à tout moment.
En cas de problème, n'hésitez pas à nous contacter ( Courriel:
support01@yaberauto.com ), nous essaierons toujours de vous
offrir un solution satisfaisante.
Nota: En raison de la protection des droits d'auteur, la fonction
d'affichage miroir ne prend pas en charge les vidéos protégées. ( Netflix,
Amazon Prime Video, Hulu etc ).
MENU OPTION MODE FUNCTION
Langue OSD Franais
Heure OSD Arret
Mise à jour USB
Réinitialiser
Version: Projector042701
English, Franais,
Italian, Spanish,etc.
Arret, 5Sec, 10Sec,
15Sec
Mettre à jour le
logiciel
Configurer la langue affichée dans
l'interface de fonctionnement.
Ajustez la durée d'affichage à l'écran
Mettre à jour la version du logiciel du
projecteur
Réinitialisez le projecteur
Afficher la version
Taille de projection
33"
60"
80"
100"
120"
150"
Distance (m)
1.05
1.8
2.4
2.97
3.53
4.39
support01@yaberauto.com
FR
01 02 03 04 05 06 07 08 09 10 11 12 13 14 15 16 17 18 19 20 21 22 23
24 25 26 27 28 29 30 31 32 33 34 35 36 37 38 39 40 41 42 43 44 45
46 47 48 49 50 51 52 53 54 55 56 57 58 59 60 61 62 63 64 65 66
67
68 69 70 71 72 73 74 75 76 77 78 79 80 81 82 83 84 85 86 87 88 89 90
91 92 93 94 95 96 97 98 99 100 101 102 103 104 105 106 107 108 109 110 111 112
113 114 115 116 117 118 119 120 121 122 123 124 125 126 127 128 129 130 131 132 133 134

support01@yaberauto.com
Supporto professionale a vita YABER
Product Packing List
Caro cliente,
Woohoo! Il tuo proiettore è già nelle tue mani! Iniziamo!
Hai domande su come funziona? Leggere attentamente questo manuale
prima di utilizzare il proiettore. Sei soddisfatto del tuo proiettore? In caso
di problemi, inviare per e-mail il numero dell'ordine e la descrizione del
problema a: support01@yaberauto.com. Invia la tua email al più
presto, poiché vogliamo risolvere i tuoi problemi la prima volta che li hai.
A volte i clienti possono provare confusione quando usano il proiettore.
Invece di provare a comunicare direttamente con noi, molti acquirenti
invece lasciano una recensione sulla pagina del prodotto. Tuttavia, la
maggior parte delle recensioni negative sono causate da un uso non
standardizzato piuttosto che da un difetto del prodotto stesso. In realtà,
molti problemi possono essere facilmente risolti impostando, come
nessun segnale, nessun suono, ecc. Promettiamo che tutti i proiettori
sono stati attentamente controllati e imballati prima della spedizione.
Pertanto, se avete domande, vi preghiamo di contattarci e darci l'opportu-
nità di migliorare. Garantiamo che ti forniremo una soluzione più soddisfa-
cente.
Grazie per la tua comprensione!
I migliori saluti,
TEAM YABER
●YABER V2 Proiettore * 1 ●Power Cavo * 1 ●Telecomando * 1
●Manuale di istruzioni * 1 ●Cavo AV 3 in 1 * 1 ●Pulizia dell'obiettivo * 1
●Pulizia dell'obiettivo * 1 ●Cavo HDMI * 1
Per alcuni tutorial video, fare riferimento al canale Youtube
https://www.youtube.com/channel/UCcU4wy4vPRQa_uNcolDd2hA
I T
01 02 03 04 05 06 07 08 09 10 11 12 13 14 15 16 17 18 19 20 21 22 23
24 25 26 27 28 29 30 31 32 33 34 35 36 37 38 39 40 41 42 43 44 45
46 47 48 49 50 51 52 53 54 55 56 57 58 59 60 61 62 63 64 65 66 67
68 69 70 71 72 73 74 75 76 77 78 79 80 81 82 83 84 85 86 87 88 89 90
91 92 93 94 95 96 97 98 99 100 101 102 103 104 105 106 107 108 109 110 111 112
113 114 115 116 117 118 119 120 121 122 123 124 125 126 127 128 129 130 131 132 133 134

support01@yaberauto.com
10 11
1312
09
15
14
Product Description
01.Messa a fuoco
02.Keystone Correction
03.Interruttore
04.OK
05.Source
06.Spostamento a sinistra
07.Sposta a destra
08.Ritorno
09.Porta per auricolari
10.AV Porta
11.USB -T
12.USB
13.HDMI
14.VGA
15.Presa di alimentazione
03
05
04
08
06
07
02
01
01
02
03
04
05
06
07
08
09
10
Nome
Messa a fuoco
Keystone Correction
Interruttore
OK
Source
Spostamento a sinistra
Sposta a destra
Ritorno
Porta per auricolari
AV Porta
Descrizione
Regola l'anello di messa a fuoco per ottenere
l'immagine più nitida.
Regola l'anello trapezoidale per ottenere una
forma rettangolare.
Questo pulsante può portare il proiettore in
modalità di funzionamento / standby.
Confermare
Scegli la sorgente (Screen Mirror, PC-RGB,
HDMI, USB, AV, ecc.)
Spostamento a sinistra
Sposta a destra
Ritorno
Porta per auricolari
Audio input
I T
01 02 03 04 05 06 07 08 09 10 11 12 13 14 15 16 17 18 19 20 21 22 23
24 25 26 27 28 29 30 31 32 33 34 35 36 37 38 39 40 41 42 43 44 45
46 47 48 49 50 51 52 53 54 55 56 57 58 59 60 61 62 63 64 65 66 67
68
69 70 71 72 73 74 75 76 77 78 79 80 81 82 83 84 85 86 87 88 89 90
91 92 93 94 95 96 97 98 99 100 101 102 103 104 105 106 107 108 109 110 111 112
113 114 115 116 117 118 119 120 121 122 123 124 125 126 127 128 129 130 131 132 133 134
.AVI/.MP4/.MKV/.FLV/.MOV/.RMVB/.3GP/.MPEG1/
.MPEG2/.XVID (WMV non supportato)
AV, USB, USB-T, SD card, HDMI, VGA
support01@yaberauto.com
Projector Specification
Le immagini mostrate sono solo a scopo illustrativo. Il prodotto reale può
variare a causa del miglioramento del prodotto.
Risoluzione Nativa
Display Technology
Fonte di luce
Visualizza i colori
Aspect Ratio
Peso del proiettore
File immagine
Video File
Port
1080*720p
LCD
LED
16.7M a colori
4:3/16:9/auto
2.2lb
bmp./jpg/png/gif
Distanza di proiezione
consigliata
Distanza minima di
proiezione
Correzione Trapezoidale
Tensione di alimentazione
Metodo di proiezione
Messa a fuoco
File audio
2-3M
1.05M
±15°Manual
AC 100-240V
Front/ Rear /Ceiling
Operazione manuale
AAC/MP2/MP3/PC-
M/FLAC/WMA/AC3
11
12
13
14
15
USB-T
USB
HDMI
VGA
Presa di alimentazione
Porta di mirroring dello schermo cablata (con
cavo USB originale)
porta USB
Ingresso HDMI
Ingresso VGA
Collegare il cavo di alimentazione
I T
01 02 03 04 05 06 07 08 09 10 11 12 13 14 15 16 17 18 19 20 21 22 23
24 25 26 27 28 29 30 31 32 33 34 35 36 37 38 39 40 41 42 43 44 45
46 47 48 49 50 51 52 53 54 55 56 57 58 59 60 61 62 63 64 65 66 67
68 69
70 71 72 73 74 75 76 77 78 79 80 81 82 83 84 85 86 87 88 89 90
91 92 93 94 95 96 97 98 99 100 101 102 103 104 105 106 107 108 109 110 111 112
113 114 115 116 117 118 119 120 121 122 123 124 125 126 127 128 129 130 131 132 133 134
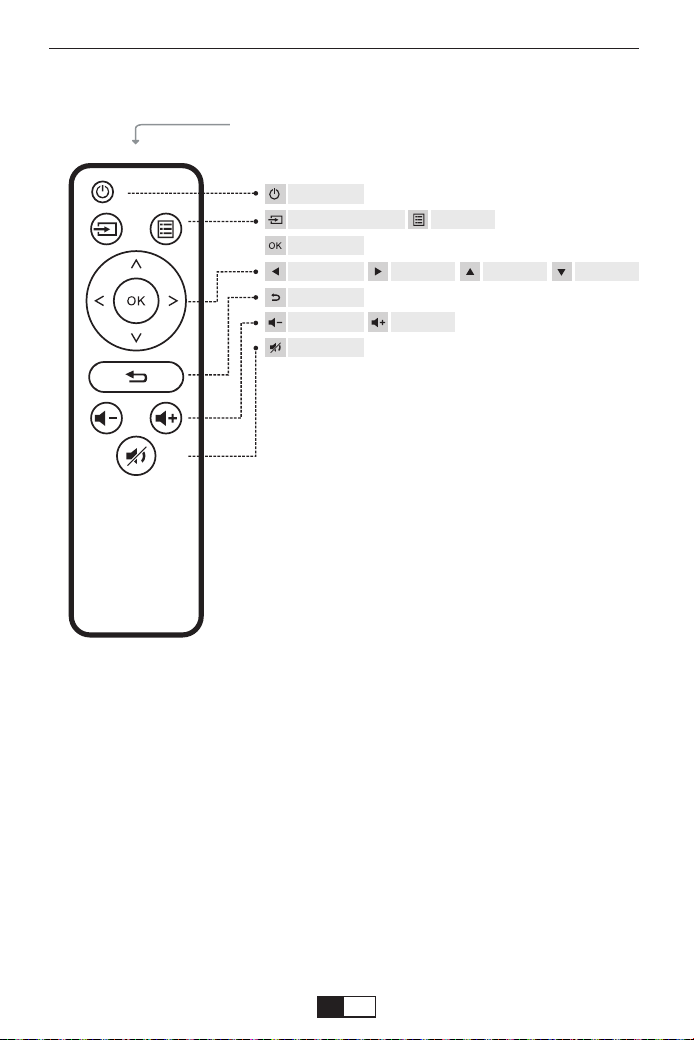
support01@yaberauto.com
Telecomando
(Batterie non incluse)
IR Transmitter
Interruttore
Sorgente del segnale Menù
OK
Sinistra Destra Su Sotto
Ritorno
Volume- Volume+
Muto
Per favore attenzione:
La funzione di visualizzazione Mirror non supporta i video protetti a causa
di protezione del copyright. (Netflix, Amazon Prime Video e Hulu ecc.)
Installare la batteria del telecomando (la batteria non è inclusa perché la
batteria non può essere trasportata)
1. Premere per aprire il coperchio della batteria.
2. Installare la batteria (AA) e accertarsi che la polarità (+/-) della batteria
sia allineata correttamente.
I T
01 02 03 04 05 06 07 08 09 10 11 12 13 14 15 16 17 18 19 20 21 22 23
24 25 26 27 28 29 30 31 32 33 34 35 36 37 38 39 40 41 42 43 44 45
46 47 48 49 50 51 52 53 54 55 56 57 58 59 60 61 62 63 64 65 66 67
68 69 70
71 72 73 74 75 76 77 78 79 80 81 82 83 84 85 86 87 88 89 90
91 92 93 94 95 96 97 98 99 100 101 102 103 104 105 106 107 108 109 110 111 112
113 114 115 116 117 118 119 120 121 122 123 124 125 126 127 128 129 130 131 132 133 134

support01@yaberauto.com
Queste istruzioni di sicurezza servono a garantire la lunga durata del
proiettore e a prevenire incendi e scosse. Leggeteli attentamente e
prestate attenzione a tutti gli avvertimenti.
Grazie
Grazie mille per aver acquistato il proiettore YABER Y2.
Si prega di leggere attentamente questo manuale di istruzioni prima
dell'uso. Inoltre, ti preghiamo di tenerlo a portata di mano in modo da
poterlo verificare in qualsiasi momento.
In caso di dubbi, non esitare a contattare
support01@yaberauto.com.
Possiamo fornire il servizio post-vendita fino alla soddisfazione.
Osservaz
Salvaguardie importanti
4. L'esposizione alla luce solare diretta, al fumo o al vapore può dannegg-
iare i componenti interni.
5. Maneggiare il proiettore con cura. Cadere o tremare può danneggiare i
componenti interni.
6. Non posizionare oggetti pesanti sopra il proiettore.
1. Il proiettore è progettato per funzionare con un alimentatore CA da
110-240 V ~ 50/60 Hz. Assicurarsi che l'alimentazione soddisfi questo
requisito prima di tentare di utilizzare il proiettore.
2. Maneggiare con cura il cavo di alimentazione ed evitare di piegarlo
troppo. Un cavo danneggiato può provocare scosse elettriche o incendi.
3. Se il proiettore non verrà utilizzato per un lungo periodo di tempo,
scollegare la spina dalla presa.
Alimentazione
Una parte del video in Netflix e i formati video principali non possono
essere esportati esternamente a causa della protezione del copyright
(protocollo HDCP). Ma dato che Amazon Fire TV è compatibile con HDCP,
puoi giocare a Netflix e primo video tramite fuoco amazzone.
1. Per risultati ottimali, utilizzare il proiettore in una stanza buia.
2. Collocare il proiettore su una superficie piana e orizzontale in un'area
asciutta, lontano da polvere e umidità.
3. Non collocare il proiettore alla luce diretta del sole, vicino a caloriferi o
apparecchi che emettono calore.
installazione
I T
01 02 03 04 05 06 07 08 09 10 11 12 13 14 15 16 17 18 19 20 21 22 23
24 25 26 27 28 29 30 31 32 33 34 35 36 37 38 39 40 41 42 43 44 45
46 47 48 49 50 51 52 53 54 55 56 57 58 59 60 61 62 63 64 65 66 67
68 69 70 71
72 73 74 75 76 77 78 79 80 81 82 83 84 85 86 87 88 89 90
91 92 93 94 95 96 97 98 99 100 101 102 103 104 105 106 107 108 109 110 111 112
113 114 115 116 117 118 119 120 121 122 123 124 125 126 127 128 129 130 131 132 133 134

support01@yaberauto.com
1. Scollegare il proiettore prima di pulirlo.
2. Pulire periodicamente l'armadio con un panno umido. Se è molto
sporco, utilizzare un detergente delicato. Non usare mai detergenti forti o
solventi come alcool o diluenti.
3. Utilizzare un soffietto o una carta per lenti per pulire l'obiettivo e fare
attenzione a non graffiare o danneggiare l'obiettivo.
Pulizia
FAQ
1. Al momento dell’accensione la luce indicativa non funziona
①. L’alimentazione potrebbe non essere ben collegata
②. Controllare il sistema di protezione dal surriscaldamento
2. Premendo il tasto di accensione sul telecomando il proiettore non si
accende
①. Le batterie del telecomando sono scariche
②. Il segnale tra il telecomando e il sensore IR è ostruito
③. Forte luce diretta sul sensore IR?
3. Nessuna immagine sullo schermo
①. L’impostazione del canale è corretta?
②. C’è un segnale di input?
③. Il cavo di input è inserito correttamente o è nella posizione sbagliata?
④. Nella modalità PC la velocità di refresh è >75KHz?
4. L’immagine funziona ma non c’è suono
①. I cavi di input sono connessi correttamente?
②. Volume al minimo o su muto
③. Controllare che il formato audio del video sia nella lista supportata
5. Si spegne in automatico dopo essere stato acceso per un po
①. C’è una barriera intorno alla ventola?
②. Piccole o grandi fluttuazioni di voltaggio
③. Controllare il sistema di protezione dal surriscaldamento
6. Non trovo i dispositivi connessi con hard drive o flash drive
①. Reinserire il dispositivo
②. Controllare se il dispositivo è funzionante
7. Impossibile riprodurre video
①. Il formato del video è corretto?
②. Il file è danneggiato?
I T
01 02 03 04 05 06 07 08 09 10 11 12 13 14 15 16 17 18 19 20 21 22 23
24 25 26 27 28 29 30 31 32 33 34 35 36 37 38 39 40 41 42 43 44 45
46 47 48 49 50 51 52 53 54 55 56 57 58 59 60 61 62 63 64 65 66 67
68 69 70 71 72
73 74 75 76 77 78 79 80 81 82 83 84 85 86 87 88 89 90
91 92 93 94 95 96 97 98 99 100 101 102 103 104 105 106 107 108 109 110 111 112
113 114 115 116 117 118 119 120 121 122 123 124 125 126 127 128 129 130 131 132 133 134
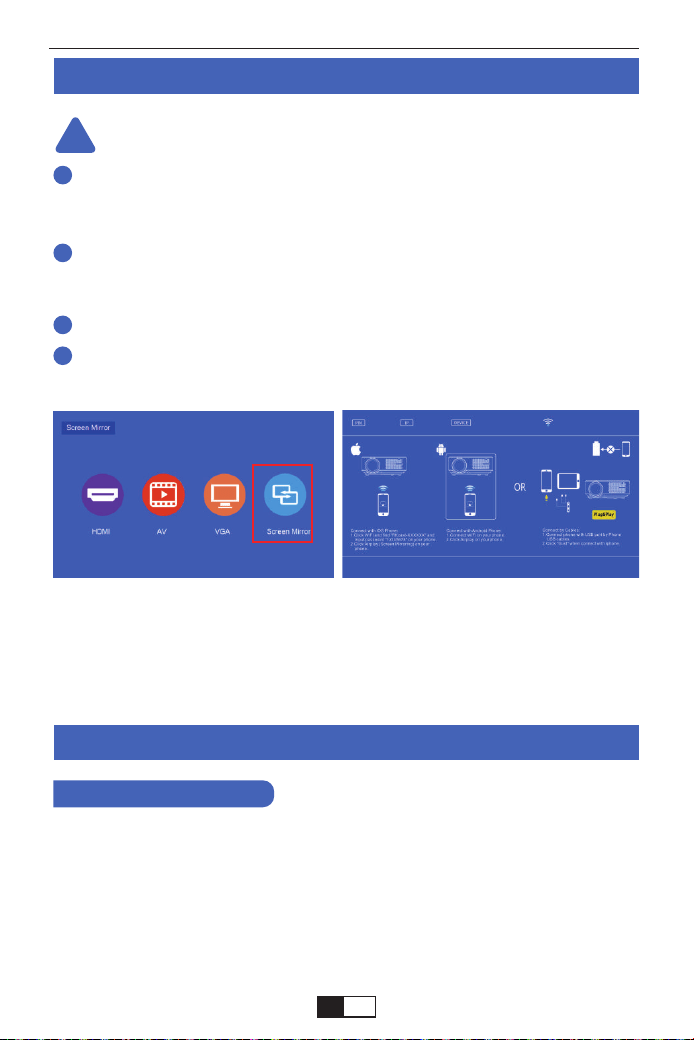
support01@yaberauto.com
Metodi di mirroring dello schermo
!
1
2
3
4
La fluidità del mirroring dello schermo wireless sarà influenzata dalla velocità
della rete domestica. Raccomandiamo il mirroring dello schermo in un
ambiente wireless stabile.
Per scorrevolezza e stabilità, si consiglia di collegare un dispositivo router
WIFI entro 1 m dal proiettore. Se il proiettore è troppo lontano dal router,
influirà sulla scorrevolezza dell'immagine riprodotta.
Alcuni smartphone potrebbero non supportare il mirroring dello schermo.
Eventuali domande, non esitate a contattarci via
support01@yaberauto.com
Sul tuo dispositivo iOS, tocca [Impostazioni] -Accendi [WLAN]. Vengono
visualizzate le reti disponibili.
Scegli il nome WiFi come [RKcast-xxxxxx], collegalo e inserisci la password
[12345678] che si trova nel menu del proiettore.
Inizialmente, accendi il proiettore, premi il pulsante "source" sul telecomando,
quindi mostrerà l'opzione "Input Source" sull'immagine di proiezione. Scegli
"Screen Mirroring", quindi premi "OK" per visualizzare questo menu:
Metodo di proiezione wireless
Suggerimenti per il riscaldamento:
Passo 1
Metodo 1: IP-Usa la tua rete WIFI domestica
1. Per utenti IOS
I T
01 02 03 04 05 06 07 08 09 10 11 12 13 14 15 16 17 18 19 20 21 22 23
24 25 26 27 28 29 30 31 32 33 34 35 36 37 38 39 40 41 42 43 44 45
46 47 48 49 50 51 52 53 54 55 56 57 58 59 60 61 62 63 64 65 66 67
68 69 70 71 72 73
74 75 76 77 78 79 80 81 82 83 84 85 86 87 88 89 90
91 92 93 94 95 96 97 98 99 100 101 102 103 104 105 106 107 108 109 110 111 112
113 114 115 116 117 118 119 120 121 122 123 124 125 126 127 128 129 130 131 132 133 134

support01@yaberauto.com
RKcast-C7AEF9
Nota: dopo la connessione, se viene visualizzato "Nessuna connessione
Internet", ignorarlo perché non influirà sull'uso.
① Vai a Safari: inserisci "192.168.49.1"
Passo 2
I T
01 02 03 04 05 06 07 08 09 10 11 12 13 14 15 16 17 18 19 20 21 22 23
24 25 26 27 28 29 30 31 32 33 34 35 36 37 38 39 40 41 42 43 44 45
46 47 48 49 50 51 52 53 54 55 56 57 58 59 60 61 62 63 64 65 66 67
68 69 70 71 72 73 74
75 76 77 78 79 80 81 82 83 84 85 86 87 88 89 90
91 92 93 94 95 96 97 98 99 100 101 102 103 104 105 106 107 108 109 110 111 112
113 114 115 116 117 118 119 120 121 122 123 124 125 126 127 128 129 130 131 132 133 134
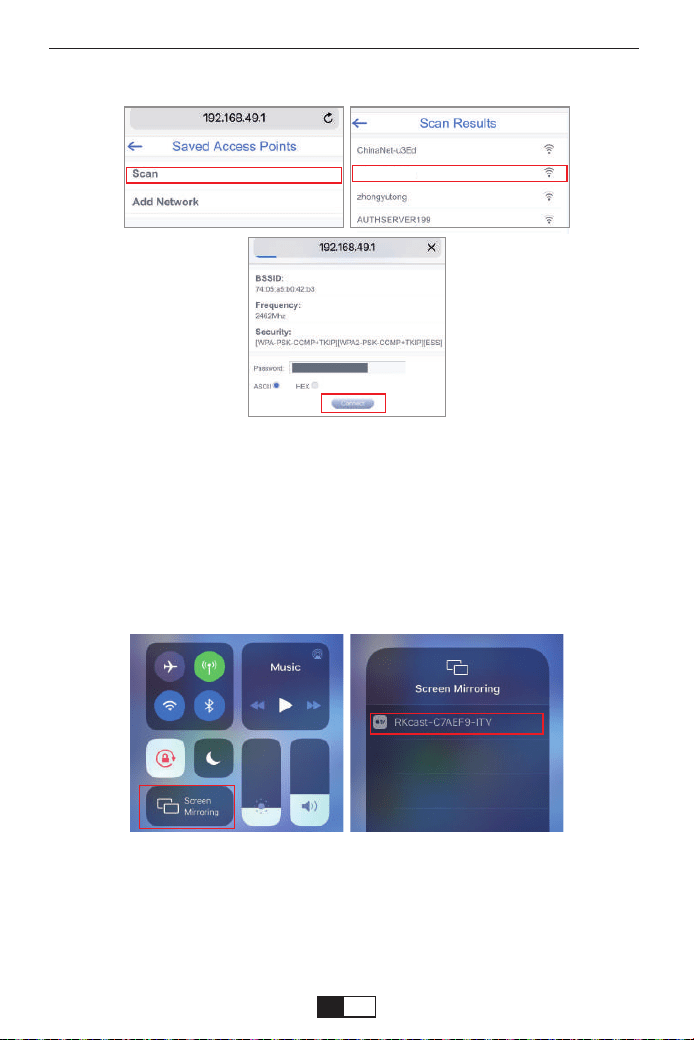
support01@yaberauto.com
YABER
② ApToccare AP WiFi - Scansione - Seleziona il tuo WIFI - inserisci la
password WiFi della tua casa - Tocca Connetti
Apri Control Center - Tocca il pulsante Duplica schermo - Connetti
[RKcast-xxxxxx]
① Apri il centro di controllo facendo scorrere un dito verso il basso dall'angolo in
alto a destra dello schermo sul modello della famiglia iPhone X e serie X. (Apri il
centro di controllo scorrendo verso l'alto dal basso sui modelli iPhone 8 Plus e
precedenti.)
② Tocca Duplica schermo-Seleziona il nome del dispositivo [RKcast-xxxxxx]
Passaggio 3
Sul tuo dispositivo iOS, tocca [Impostazioni] -Accendi [WLAN]. Vengono
visualizzate le reti disponibili.
Passo 1
Metodo 2: AP-Usa la rete cellulare dalla scheda del tuo cellulare.
I T
01 02 03 04 05 06 07 08 09 10 11 12 13 14 15 16 17 18 19 20 21 22 23
24 25 26 27 28 29 30 31 32 33 34 35 36 37 38 39 40 41 42 43 44 45
46 47 48 49 50 51 52 53 54 55 56 57 58 59 60 61 62 63 64 65 66 67
68 69 70 71 72 73 74 75
76 77 78 79 80 81 82 83 84 85 86 87 88 89 90
91 92 93 94 95 96 97 98 99 100 101 102 103 104 105 106 107 108 109 110 111 112
113 114 115 116 117 118 119 120 121 122 123 124 125 126 127 128 129 130 131 132 133 134
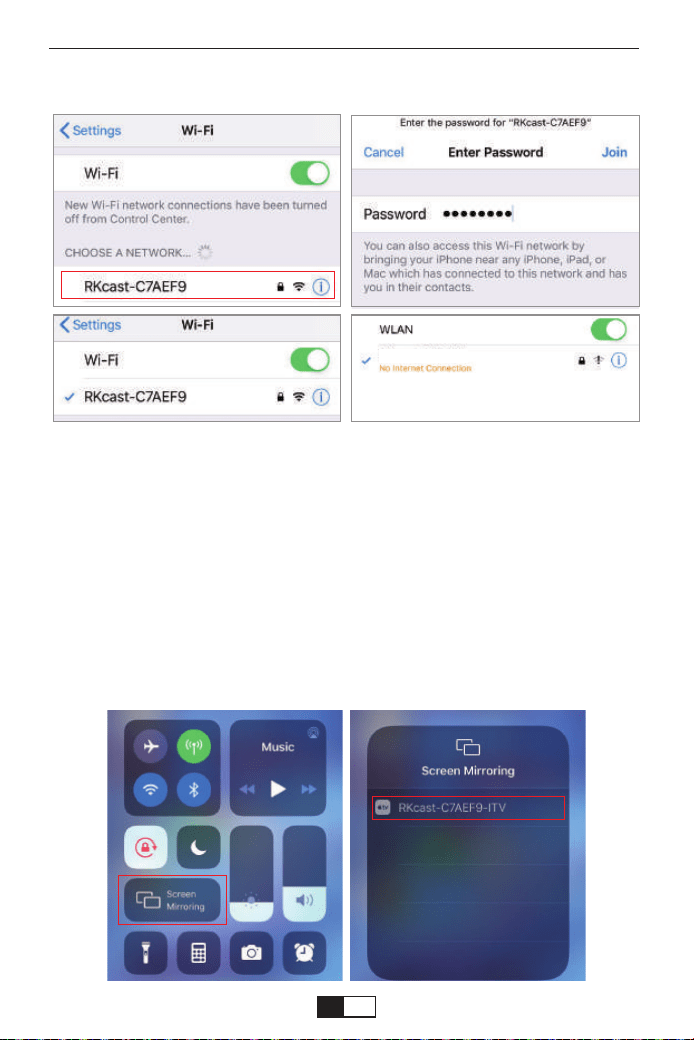
support01@yaberauto.com
RKcast-C7AEF9
Scegli il nome WiFi come [RKcast-xxxxxx], collegalo e inserisci la password
[12345678] che si trova nel menu del proiettore.
Apri Control Center- Tocca il pulsante Screen Mirroring-Connetti
[RKcast-xxxxxx]
① Apri il centro di controllo facendo scorrere un dito verso il basso dall'angolo in
alto a destra dello schermo sul modello della famiglia iPhone X e serie X. (Apri
il centro di controllo scorrendo verso l'alto dal basso sui modelli iPhone 8 Plus e
precedenti.)
② Tocca Screen Mirroring-Seleziona il nome del dispositivo [RKcast-xxxxxx]
Passo 2
Nota: dopo la connessione, se viene visualizzato "Nessuna connessione
Internet", ignorarlo perché non influirà sull'uso.
I T
01 02 03 04 05 06 07 08 09 10 11 12 13 14 15 16 17 18 19 20 21 22 23
24 25 26 27 28 29 30 31 32 33 34 35 36 37 38 39 40 41 42 43 44 45
46 47 48 49 50 51 52 53 54 55 56 57 58 59 60 61 62 63 64 65 66 67
68 69 70 71 72 73 74 75 76
77 78 79 80 81 82 83 84 85 86 87 88 89 90
91 92 93 94 95 96 97 98 99 100 101 102 103 104 105 106 107 108 109 110 111 112
113 114 115 116 117 118 119 120 121 122 123 124 125 126 127 128 129 130 131 132 133 134

support01@yaberauto.com
YABER
On
Nota: diverse marche di telefoni Android hanno operazioni diverse per selezion-
are il display WLAN, fare riferimento al manuale del telefono.
Sul tuo dispositivo Android, tocca [Impostazioni] - [Wireless e reti] -Accendi
[WLAN]. Vengono visualizzate le reti disponibili.
Passo 1
Metodo 1: IP-Usa la tua rete WIFI domestica
2. Per utenti Android
Scegli il nome WiFi della tua casa (es. YABER), collegalo e inserisci la tua
password [XXXXXXXX].
Passo 2
Toccare [Impostazioni] - [Connessione dispositivo] -Accendere [Proiezione
wireless]
Passo 3
I T
01 02 03 04 05 06 07 08 09 10 11 12 13 14 15 16 17 18 19 20 21 22 23
24 25 26 27 28 29 30 31 32 33 34 35 36 37 38 39 40 41 42 43 44 45
46 47 48 49 50 51 52 53 54 55 56 57 58 59 60 61 62 63 64 65 66 67
68 69 70 71 72 73 74 75 76 77
78 79 80 81 82 83 84 85 86 87 88 89 90
91 92 93 94 95 96 97 98 99 100 101 102 103 104 105 106 107 108 109 110 111 112
113 114 115 116 117 118 119 120 121 122 123 124 125 126 127 128 129 130 131 132 133 134
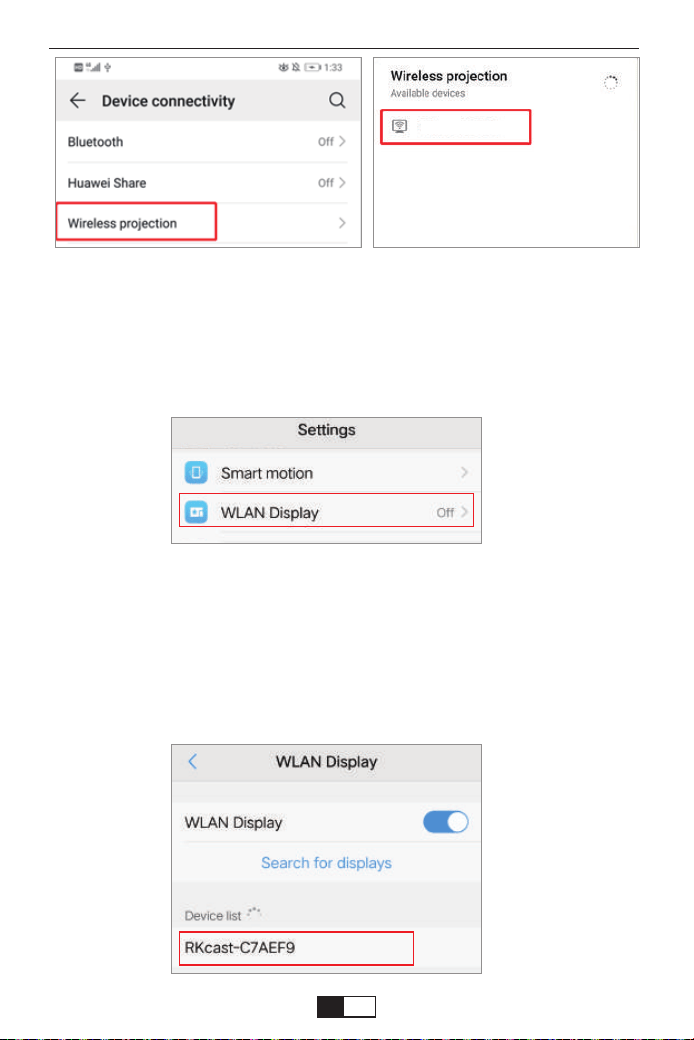
support01@yaberauto.com
RKcast-C7AEF9
RKcast-C7AEF9
RKcast-C7AEF9
Nota: diverse marche di telefoni Android hanno operazioni diverse per
selezionare il display WLAN, fare riferimento al manuale del telefono.
Sul tuo dispositivo Android, tocca [Impostazioni] - [Wireless e reti] -Accendi
[WLAN]. Vengono visualizzate le reti disponibili.
Passo 1
Scegli il nome WiFi come [RKcast-xxxxxx], collegalo e inserisci la
password [12345678] che si trova nel menu del proiettore.
Passo 2
Metodo 2: AP-Usa la rete cellulare dalla scheda del tuo cellulare.
I T
01 02 03 04 05 06 07 08 09 10 11 12 13 14 15 16 17 18 19 20 21 22 23
24 25 26 27 28 29 30 31 32 33 34 35 36 37 38 39 40 41 42 43 44 45
46 47 48 49 50 51 52 53 54 55 56 57 58 59 60 61 62 63 64 65 66 67
68 69 70 71 72 73 74 75 76 77 78
79 80 81 82 83 84 85 86 87 88 89 90
91 92 93 94 95 96 97 98 99 100 101 102 103 104 105 106 107 108 109 110 111 112
113 114 115 116 117 118 119 120 121 122 123 124 125 126 127 128 129 130 131 132 133 134
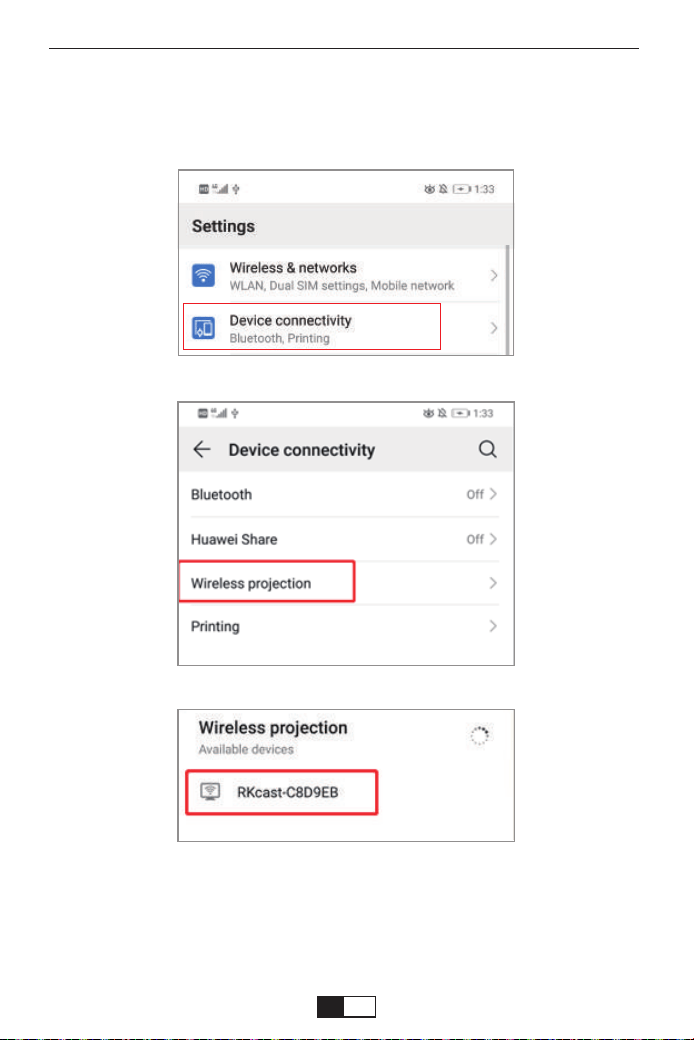
support01@yaberauto.com
Toccare [Impostazioni] - [Connessione dispositivo] -Accendere [Proiezione
wireless]
Passo 3
I T
01 02 03 04 05 06 07 08 09 10 11 12 13 14 15 16 17 18 19 20 21 22 23
24 25 26 27 28 29 30 31 32 33 34 35 36 37 38 39 40 41 42 43 44 45
46 47 48 49 50 51 52 53 54 55 56 57 58 59 60 61 62 63 64 65 66 67
68 69 70 71 72 73 74 75 76 77 78 79
80 81 82 83 84 85 86 87 88 89 90
91 92 93 94 95 96 97 98 99 100 101 102 103 104 105 106 107 108 109 110 111 112
113 114 115 116 117 118 119 120 121 122 123 124 125 126 127 128 129 130 131 132 133 134
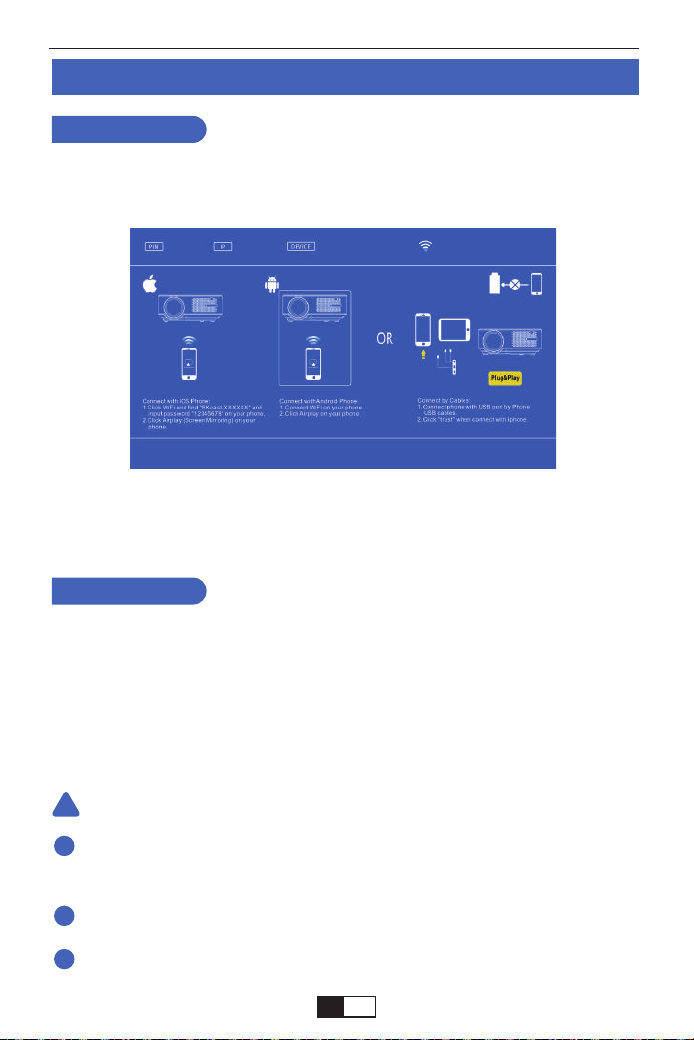
support01@yaberauto.com
!
1
2
3
Mirroring dello schermo cablato (con cavo USB originale)
1.Innanzitutto, accendere il proiettore e premere il tasto “S” sul telecomando o
sul proiettore stesso, e l'opzione “Origine input” apparirà sull'immagine proietta-
ta. Selezionare "Screen Mirroring" e premere il pulsante "OK".
2.Collegare il proiettore e l'apparecchiatura IOS con un cavo USB originale.
3.Sulla "Ti fidi di questa attrezzatura?" Schermata di presentazione, tocca
"Affidabilità".
Per IOS
1. Innanzitutto, accendere il proiettore e premere il tasto “S” sul telecomando o sul
proiettore stesso, e l'opzione “Origine input” apparirà sull'immagine proiettata.
Selezionare "Screen Mirroring" e premere il pulsante "OK".
2.Collegare il proiettore e l'apparecchiatura Android con un cavo USB originale.
3. In "Consenti il debug tramite USB?" Richiedi, tocca "OK".
4.Dopo qualche istante, sul proiettore verrà visualizzato lo schermo Android.
Per Android
Utilizzare un cavo USB originale. Se il cavo non è un cavo originale, la
connessione potrebbe non riuscire o il mirroring pulito potrebbe non essere
possibile.
Alcuni smartphone potrebbero non supportare il mirroring dello schermo.
Alcuni smartphone Android trasferiscono solo lo schermo a causa della
propria funzione e non viene prodotta alcuna voce.
notare che:
I T
01 02 03 04 05 06 07 08 09 10 11 12 13 14 15 16 17 18 19 20 21 22 23
24 25 26 27 28 29 30 31 32 33 34 35 36 37 38 39 40 41 42 43 44 45
46 47 48 49 50 51 52 53 54 55 56 57 58 59 60 61 62 63 64 65 66 67
68 69 70 71 72 73 74 75 76 77 78 79 80
81 82 83 84 85 86 87 88 89 90
91 92 93 94 95 96 97 98 99 100 101 102 103 104 105 106 107 108 109 110 111 112
113 114 115 116 117 118 119 120 121 122 123 124 125 126 127 128 129 130 131 132 133 134
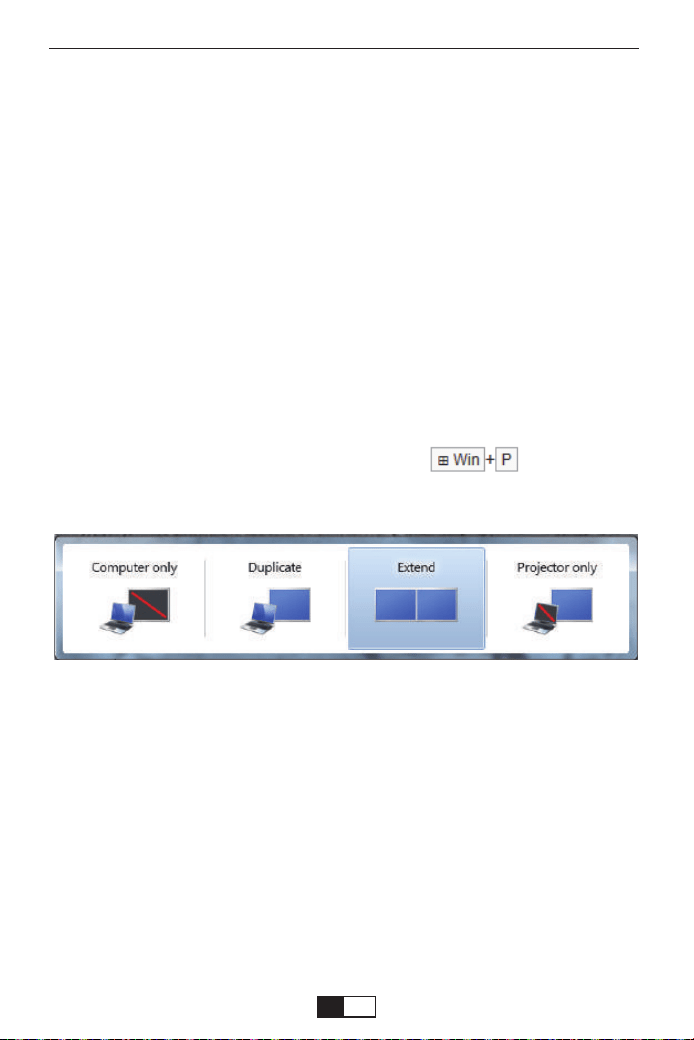
support01@yaberauto.com
Utilizzando il cavo HDMI o VGA per il collegamento con il proiettore.
(Si consiglia una connessione HDMI per proiettare film, video e altri file che
devono essere HD.)
(1) Accendi il computer e il proiettore;
(2) Collegare il cavo HDMI / VGA alla porta HDMI / VGA del computer;
(3) Collegare l'altra estremità a qualsiasi porta HDMI / VGA disponibile sul
proiettore;
(4) Premere il pulsante "Sorgente" per accedere all'interfaccia della sorgente
di input;
(5) Selezionare la sorgente HDMI / PC-RGB per proiettare qualsiasi file sul
computer;
(6) Sul laptop, tenere premuti i tasti della tastiera per modificare
la modalità di visualizzazione:
Solo computer: è l'opzione predefinita: viene visualizzata solo sul monitor
principale.
Duplica: consente a tutti i monitor di visualizzare la stessa cosa duplicando il
desktop su ciascun monitor.
Estendi: fa sì che tutti i tuoi monitor si comportino come un unico grande
monitor estendendo il desktop su tutti
Solo proiettore: viene visualizzato solo sul monitor secondario come un
proiettore
(7) È possibile modificare la risoluzione dello schermo:
Scegli Start → Pannello di controllo → Aspetto e personalizzazione → Regola
risoluzione schermo
1. Connessione al computer
CONNESSIONI DEL PROIETTORE
I T
01 02 03 04 05 06 07 08 09 10 11 12 13 14 15 16 17 18 19 20 21 22 23
24 25 26 27 28 29 30 31 32 33 34 35 36 37 38 39 40 41 42 43 44 45
46 47 48 49 50 51 52 53 54 55 56 57 58 59 60 61 62 63 64 65 66 67
68 69 70 71 72 73 74 75 76 77 78 79 80 81
82 83 84 85 86 87 88 89 90
91 92 93 94 95 96 97 98 99 100 101 102 103 104 105 106 107 108 109 110 111 112
113 114 115 116 117 118 119 120 121 122 123 124 125 126 127 128 129 130 131 132 133 134
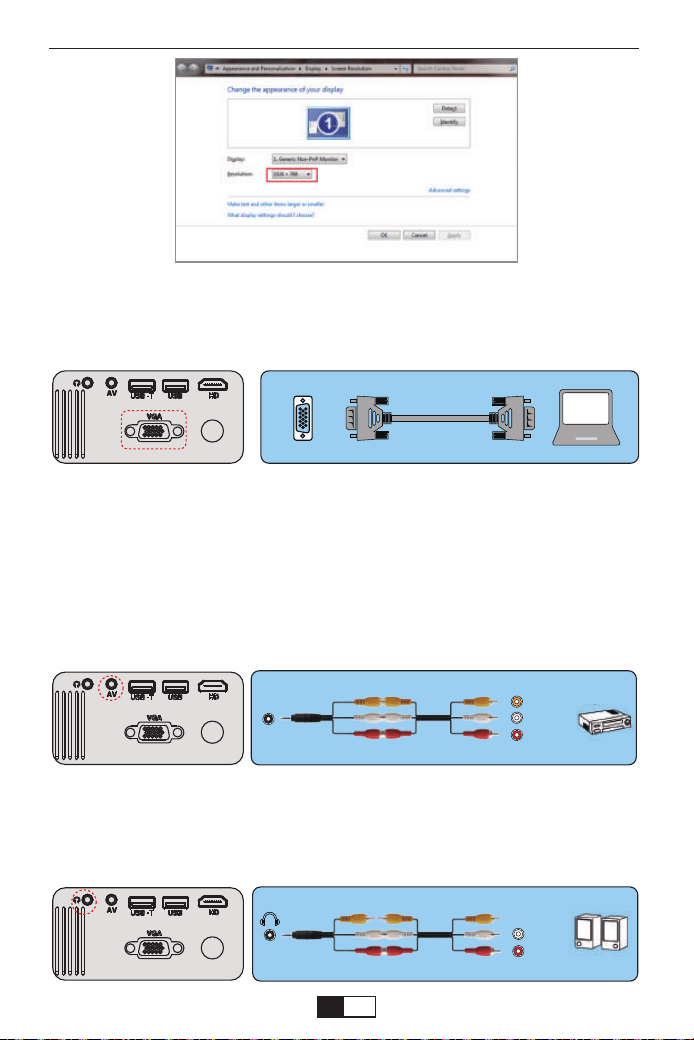
support01@yaberauto.com
(Nota: la connessione VGA può trasmettere solo segnali analogici di video e
non audio. È richiesto un altoparlante esterno quando il dispositivo è collegato
tramite cavo VGA.)
VGA
AV
video
audio out
(L/R)
audio out
(L/R)
Se il tuo lettore ha un'uscita HDMI, è preferibile usarlo sopra l'opzione
analogica (AV). È necessario configurare l'uscita audio dal menu del
lettore DVD se sono installati altoparlanti esterni.
2.Collegamento di un lettore DVD
1. Utilizzare il cavo AV in dotazione per collegare il lettore DVD al proiettore.
2. Accendere il proiettore e il lettore DVD.
3.Collega la soundbar
1.Utilizzare il cavo AV in dotazione per collegare la soundbar al proiettore.
2. Accendere il proiettore e la barra audio.
I T
01 02 03 04 05 06 07 08 09 10 11 12 13 14 15 16 17 18 19 20 21 22 23
24 25 26 27 28 29 30 31 32 33 34 35 36 37 38 39 40 41 42 43 44 45
46 47 48 49 50 51 52 53 54 55 56 57 58 59 60 61 62 63 64 65 66 67
68 69 70 71 72 73 74 75 76 77 78 79 80 81 82
83 84 85 86 87 88 89 90
91 92 93 94 95 96 97 98 99 100 101 102 103 104 105 106 107 108 109 110 111 112
113 114 115 116 117 118 119 120 121 122 123 124 125 126 127 128 129 130 131 132 133 134
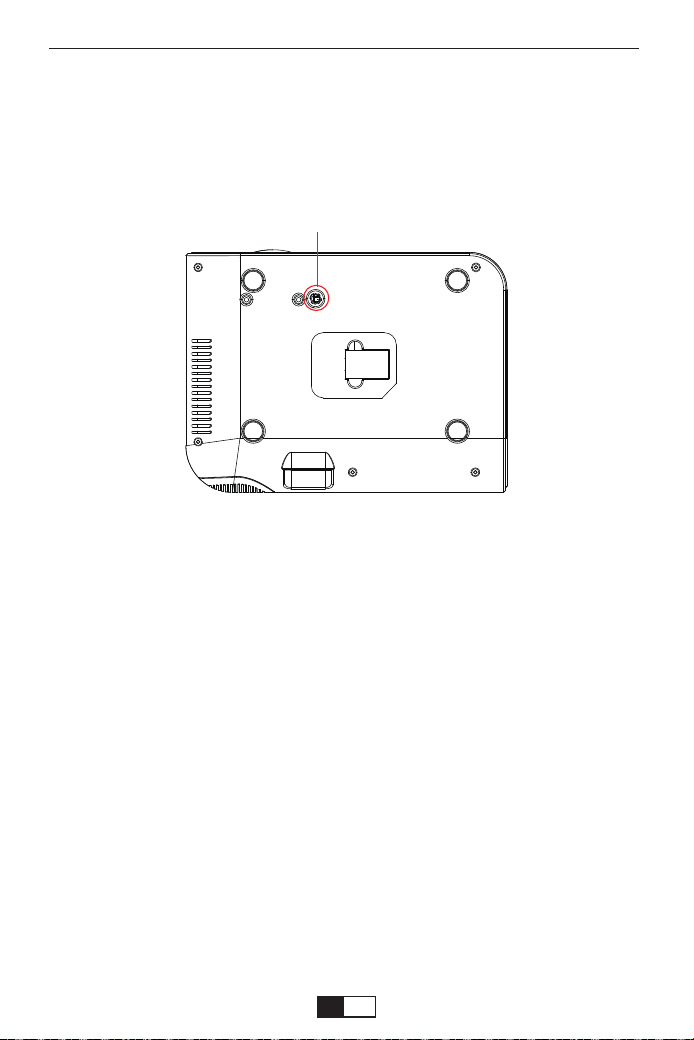
support01@yaberauto.com
PROIETTORE DI AVVIAMENTO
Accendi il proiettore
1. Installare due batterie AAA sul telecomando prima dell'uso.
2. Prima di accendere il proiettore, la luce del proiettore lampeggerà in rosso.
3. Premere il tasto di accensione sul telecomando o sul pannello, la spia
diventerà rossa. Rimuovere il copriobiettivo del proiettore, la lampada inizierà
a funzionare 2 secondi dopo, quando un'immagine viene proiettata sullo
schermo, la macchina funziona senza problemi. Se la prima schermata di
proiezione non è la schermata di avvio, premere il tasto "S" sul telecomando e
selezionare la sorgente USB.
4. Regolare l'anello trapezoidale per ottenere una forma rettangolare.
5. Regolare l'anello di messa a fuoco o ruotare l'obiettivo del proiettore per
ottenere le migliori prestazioni dell'immagine. (Se è ancora sfocato, provare a
regolare la distanza di proiezione.)
6. Se si collegano altri dispositivi, assicurarsi di selezionare la sorgente
corrispondente. Se non si seleziona la sorgente corretta, il proiettore non sarà
in grado di rilevare il segnale.
7. Premere il pulsante Menu sul telecomando per inserire la lingua OSD per
impostare la lingua preferita;
①
Regola la base di inclinazione
Si prega di acquistare il supporto del proiettore e la vite M5 in aggiunta.
Installare il supporto del proiettore in posizione ① e appendere il
proiettore al soffitto.
(Nota: è possibile installare il treppiede sul posto ①)
I T
01 02 03 04 05 06 07 08 09 10 11 12 13 14 15 16 17 18 19 20 21 22 23
24 25 26 27 28 29 30 31 32 33 34 35 36 37 38 39 40 41 42 43 44 45
46 47 48 49 50 51 52 53 54 55 56 57 58 59 60 61 62 63 64 65 66 67
68 69 70 71 72 73 74 75 76 77 78 79 80 81 82 83
84 85 86 87 88 89 90
91 92 93 94 95 96 97 98 99 100 101 102 103 104 105 106 107 108 109 110 111 112
113 114 115 116 117 118 119 120 121 122 123 124 125 126 127 128 129 130 131 132 133 134
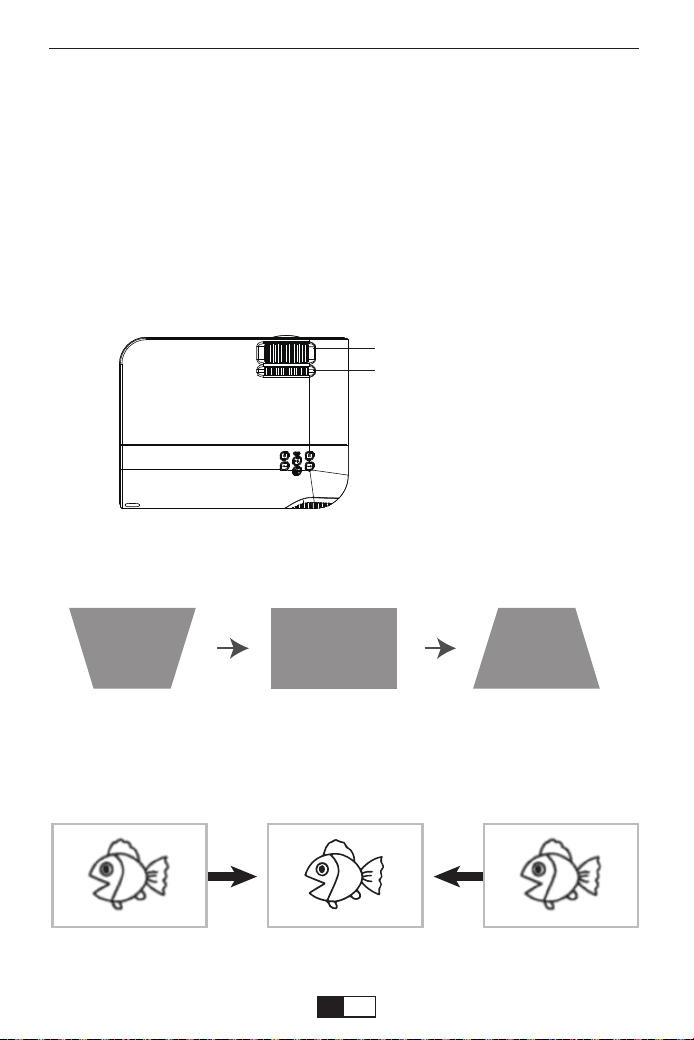
support01@yaberauto.com
Spegni il proiettore
1. Premere il pulsante di accensione quando il proiettore è in uso, per farlo
passare alla modalità standby.
2. Quando il proiettore passa in modalità standby, la luce lampeggia in rosso.
Se l'immagine proiettata è di forma trapezoidale, può essere risolta con
la correzione trapezoidale. (Eseguire la correzione trapezoidale manuale)
Nota: se la correzione trapezoidale non riesce a risolvere la forma
dell'immagine, ridurre l'altezza verticale del proiettore rispetto al centro
dello schermo.
L'immagine proiettata potrebbe essere sfocata o difficile da vedere, a
causa della mancanza di regolazione della messa a fuoco con l'obiettivo,
seguire i processi sottostanti per regolare la messa a fuoco. (Fai fuoco
manuale, trova l'immagine più nitida sullo schermo)
Nota: è normale quando la nitidezza è centrale, sfoca il bordo.
Keystone e Focus
Correzione trapezoidale
Regola la messa a fuoco
I T
01 02 03 04 05 06 07 08 09 10 11 12 13 14 15 16 17 18 19 20 21 22 23
24 25 26 27 28 29 30 31 32 33 34 35 36 37 38 39 40 41 42 43 44 45
46 47 48 49 50 51 52 53 54 55 56 57 58 59 60 61 62 63 64 65 66 67
68 69 70 71 72 73 74 75 76 77 78 79 80 81 82 83 84
85 86 87 88 89 90
91 92 93 94 95 96 97 98 99 100 101 102 103 104 105 106 107 108 109 110 111 112
113 114 115 116 117 118 119 120 121 122 123 124 125 126 127 128 129 130 131 132 133 134

support01@yaberauto.com
The projector's normal start up screen is as follows. If the first projection
screen is not this one, press the “ ” button on the remote control to
select USB source.
Avvio del proiettore
Quando viene visualizzato il messaggio "Nessun segnale", è necessario
selezionare la sorgente di ingresso:
1.Premere il tasto “ ” sul telecomando o sul proiettore per selezionare
il segnale desiderato, quindi premere il tasto OK.
2.Una volta rilevato il segnale, le informazioni sulla sorgente selezionata
verranno visualizzate sullo schermo dopo alcuni secondi.
Seleziona la sorgente di input
Cinema Musica Foto Txt
I T
01 02 03 04 05 06 07 08 09 10 11 12 13 14 15 16 17 18 19 20 21 22 23
24 25 26 27 28 29 30 31 32 33 34 35 36 37 38 39 40 41 42 43 44 45
46 47 48 49 50 51 52 53 54 55 56 57 58 59 60 61 62 63 64 65 66 67
68 69 70 71 72 73 74 75 76 77 78 79 80 81 82 83 84 85
86 87 88 89 90
91 92 93 94 95 96 97 98 99 100 101 102 103 104 105 106 107 108 109 110 111 112
113 114 115 116 117 118 119 120 121 122 123 124 125 126 127 128 129 130 131 132 133 134
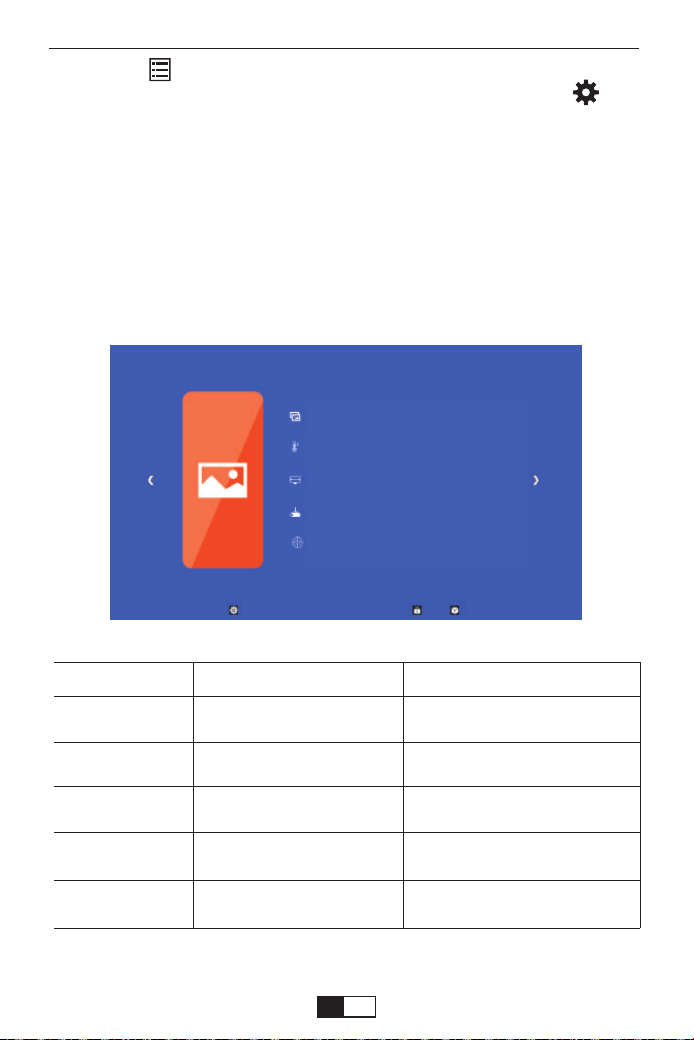
support01@yaberauto.com
IMMAGINE Menù
1.Premere “ ” sul telecomando, quindi l'immagine del menu verrà visual-
izzata sullo schermo. Oppure è necessario selezionare il tasto " " per
accedere ai 4 menu senza il telecomando
2.Premere il tasto “
◀/▶
”, il menu si sposterà su “IMMAGINE”> “SUONO”>
“ORA”> “Impostazione”.
3. Selezionare l'interfaccia di regolazione, utilizzare il tasto “
▲/▼
” per
selezionare l'elemento desiderato.
4.Premere “OK” o “
◀/▶
” per regolare il parametro della voce.
IMMAGINE Menù MODALITÀ FUNZIONE
Modalità immagine
Color-del colore
Aspect Ratio
Modalità di
proiezione
ZOOM
Standard, morbido,
Utente,dinamico
Freddo, Medio, Caldo, Utente
Auto/ 4:3/ 16:9
Front/Rear on Desk
75-100
Passa tra la modalità immagine
Passa dalla modalità temperatura
colore
Imposta le proporzioni
dell'immagine.
Imposta 4 modalità di proiezione
Riduci le dimensioni dello
schermo da -25%
Modalità immagine Standard
Color-del colore Freddo
Rapporto d’aspetto 16:9
Modalità di proiezione Front
ZOOM 100
I T
01 02 03 04 05 06 07 08 09 10 11 12 13 14 15 16 17 18 19 20 21 22 23
24 25 26 27 28 29 30 31 32 33 34 35 36 37 38 39 40 41 42 43 44 45
46 47 48 49 50 51 52 53 54 55 56 57 58 59 60 61 62 63 64 65 66 67
68 69 70 71 72 73 74 75 76 77 78 79 80 81 82 83 84 85 86
87 88 89 90
91 92 93 94 95 96 97 98 99 100 101 102 103 104 105 106 107 108 109 110 111 112
113 114 115 116 117 118 119 120 121 122 123 124 125 126 127 128 129 130 131 132 133 134
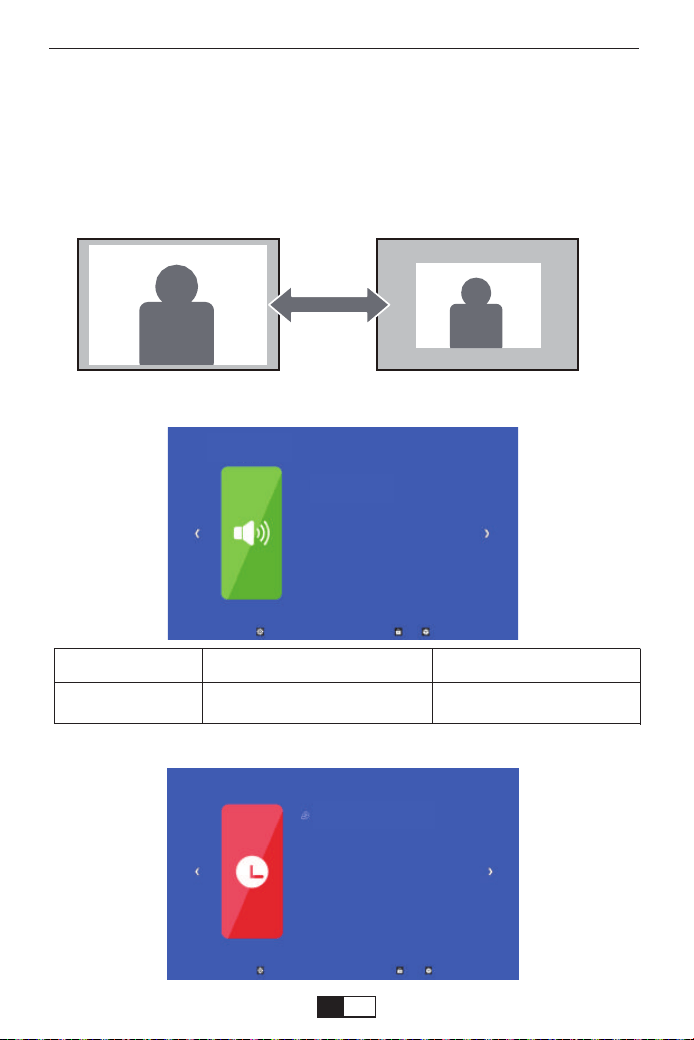
support01@yaberauto.com
Orario Menu
<ZOOM>
Quando si riproduce un'immagine o un video, se si desidera ridurre le
dimensioni dell'immagine o del video proiettato, è possibile utilizzare il
telecomando per selezionare ZOOM per regolare le dimensioni della
proiezione:
È possibile ridurre l'altezza e la larghezza delle dimensioni originali fino al
-25%.
Suono Menù MODALITÀ FUNZIONE
Suono MODALITÀ
Standard, Utente, Musica,
Cinema,Sport
Imposta la modalità audio
Suono Menù
Suono
Timer di spegnimento Off
I T
01 02 03 04 05 06 07 08 09 10 11 12 13 14 15 16 17 18 19 20 21 22 23
24 25 26 27 28 29 30 31 32 33 34 35 36 37 38 39 40 41 42 43 44 45
46 47 48 49 50 51 52 53 54 55 56 57 58 59 60 61 62 63 64 65 66 67
68 69 70 71 72 73 74 75 76 77 78 79 80 81 82 83 84 85 86 87
88 89 90
91 92 93 94 95 96 97 98 99 100 101 102 103 104 105 106 107 108 109 110 111 112
113 114 115 116 117 118 119 120 121 122 123 124 125 126 127 128 129 130 131 132 133 134
support01@yaberauto.com
Orario Menu
MODALITÀ FUNZIONE
Ora di dormire Off/10min/20/min,etc.
Spegnere il proiettore dopo un
determinato periodo di tempo.
OPZIONI MEMU MODALITÀ FUNZIONE
Scegli una lingua
OSD Time
Aggiornamento
software(USB)
Ripristina.imp.predefinite
Edzione
English, France, Italian,
Spanish,etc.
Off, 5Sec, 10Sec, 15Sec
Aggiornamento software
Impostare la lingua visualizzata
nell'interfaccia operativa
Regola la durata del manteni-
mento dell'interfaccia del menu
Aggiorna la versione del
software del proiettore
Ripristinare il proiettore
Mostra la versione
Opzioni Menu
Lingua Italiano
Durate del menu 30S
Aggiornamento software (USB)
Ripristina.imp. Predefinite
Edzione: Projector 042701
Distanza di proiezione e dimensioni
Si prega di seguire i dati nella tabella sottostante, per regolare le
dimensioni dell'immagine e la distanza. (Aspect Ratio: 16: 9, Default)
Screen size
50”
72”
100”
120”
200”
Distance
1.50m
2.15m
2.95m
3.55m
5m
I T
01 02 03 04 05 06 07 08 09 10 11 12 13 14 15 16 17 18 19 20 21 22 23
24 25 26 27 28 29 30 31 32 33 34 35 36 37 38 39 40 41 42 43 44 45
46 47 48 49 50 51 52 53 54 55 56 57 58 59 60 61 62 63 64 65 66 67
68 69 70 71 72 73 74 75 76 77 78 79 80 81 82 83 84 85 86 87 88
89 90
91 92 93 94 95 96 97 98 99 100 101 102 103 104 105 106 107 108 109 110 111 112
113 114 115 116 117 118 119 120 121 122 123 124 125 126 127 128 129 130 131 132 133 134

support01@yaberauto.com
La dimensione dell'immagine dipende dalla distanza tra proiettore e
schermo, potrebbe esserci una deviazione del 3% tra i dati sopra
elencati. Impostazioni diverse causano varie distanze.
Si prega di notare qui:
Si prega di leggere attentamente questo manuale di istruzioni prima
dell'uso. Inoltre, ti preghiamo di tenerlo a portata di mano in modo da
poterlo verificare in qualsiasi momento.
In caso di dubbi, non esitare a contattare
support01@yaberauto.com.
Possiamo fornire il servizio post-vendita fino alla soddisfazione.
Grazie mille per aver acquistato il proiettore YABER V2.
Il proiettore può solo leggere il formato video MP4 in Chiavetta USB. Se
si desidera riprodurre video AVI, MKV, WMV, collegare il computer al
proiettore per la riproduzione.
I T
01 02 03 04 05 06 07 08 09 10 11 12 13 14 15 16 17 18 19 20 21 22 23
24 25 26 27 28 29 30 31 32 33 34 35 36 37 38 39 40 41 42 43 44 45
46 47 48 49 50 51 52 53 54 55 56 57 58 59 60 61 62 63 64 65 66 67
68 69 70 71 72 73 74 75 76 77 78 79 80 81 82 83 84 85 86 87 88 89
90
91 92 93 94 95 96 97 98 99 100 101 102 103 104 105 106 107 108 109 110 111 112
113 114 115 116 117 118 119 120 121 122 123 124 125 126 127 128 129 130 131 132 133 134

Soporte profesional de por vida de YABER
Lista de embalaje del producto
Estimado cliente,
¡Tu proyector ya está en tus manos! ¡Empecemos!
¿Tienes alguna pregunta sobre cómo funciona? Lea este manual detenid-
amente antes de usar el proyector. ¿Estás satisfecho con tu proyector? Si
tiene algún problema, envíe su número de pedido y la descripción de su
problema a: support01@yaberauto.com. Envíe su correo electróni-
co lo antes posible, ya que queremos solucionar sus problemas la primera
vez que los tenga.
Los clientes a veces pueden experimentar cierta confusión al usar el
proyector. En lugar de tratar de comunicarse directamente con nosotros,
muchos compradores simplemente dejan un comentario en la página del
producto. Sin embargo, la mayoría de las críticas negativas son causadas
por un uso no estandarizado en lugar de un defecto en el producto en sí.
En realidad, muchos problemas se pueden resolver fácilmente mediante
la configuración, como sin señal, sin sonido, etc. Prometemos que todos
los proyectores han sido cuidadosamente revisados y empaquetados
antes del envío.
Le garantizamos que le proporcionaremos una solución más satisfactoria.
¡Gracias por su comprensión!
Atentamente,
EQUIPO YABER
●YABER V2 Proyector * 1 ●Manual * 1 ●Cabe de alimentación * 1
●Cable AV 3 en 1 * 1 ●Cable HDMI * 1 ●Tornillo de pie * 1
●Control remoto * 1 (Sin batería) ●Paño de limpieza para lentes * 1
Algunos tutoriales en video, consulte el canal de YABER en YouTube:
https://www.youtube.com/channel/UCcU4wy4vPRQa_uNcolDd2hA
support01@yaberauto.com
ES
01 02 03 04 05 06 07 08 09 10 11 12 13 14 15 16 17 18 19 20 21 22 23
24 25 26 27 28 29 30 31 32 33 34 35 36 37 38 39 40 41 42 43 44 45
46 47 48 49 50 51 52 53 54 55 56 57 58 59 60 61 62 63 64 65 66 67
68 69 70 71 72 73 74 75 76 77 78 79 80 81 82 83 84 85 86 87 88 89 90
91 92 93 94 95 96 97 98 99 100 101 102 103 104 105 106 107 108 109 110 111 112
113 114 115 116 117 118 119 120 121 122 123 124 125 126 127 128 129 130 131 132 133 134
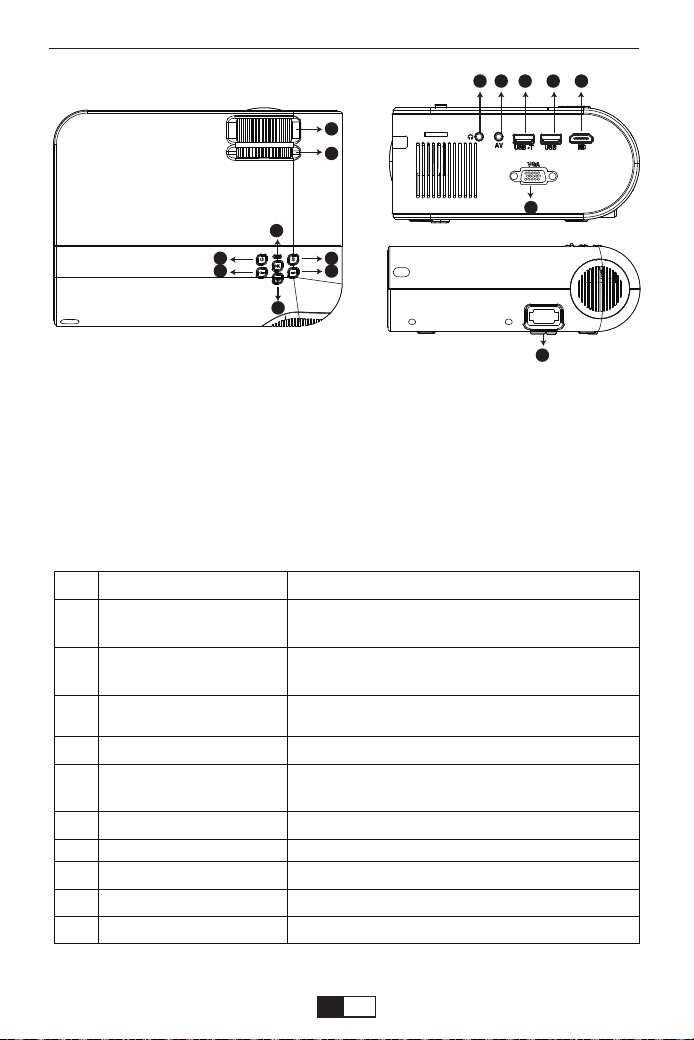
10 11 131209
15
14
01 Enfoque
02.Corrección Trapezoidal
03.Poder
04.OK
05 Fuente
06 Volumen - / Izquierda
07 Volumen + / Derecha
08 Regreso
09 Puerto de auriculares
10 Puerto AV
11 USB -T
12 USB
13 HDMI
14 VGA
15 Puerto de Cable de alimentación
Descripción del producto
03
05
04
08
06
07
02
01
01
02
03
04
05
06
07
08
09
10
Nome
Enfoque
Corrección Trapezoidal
Poder
OK
Fuente
Volumen - / Izquierda
Volumen + / Derecha
Regreso
Puerto de auriculares
Puerto AV
Descrizione
Ajuste el anillo del enfoque para obtener la
imagen más clara.
Ajuste el anillo trapezoidal para obtener una
forma rectangular.
Este botón puede hacer que el proyector
funcione / modo de espera.
Confirmar
Elija Fuente (Screen Mirror, PC-RGB, HDMI,
USB, AV, ecc.)
Movimiento izquierdo
Movimiento correcto
Volver
Puerto de auriculares
Puerto AV
support01@yaberauto.com
ES
01 02 03 04 05 06 07 08 09 10 11 12 13 14 15 16 17 18 19 20 21 22 23
24 25 26 27 28 29 30 31 32 33 34 35 36 37 38 39 40 41 42 43 44 45
46 47 48 49 50 51 52 53 54 55 56 57 58 59 60 61 62 63 64 65 66 67
68 69 70 71 72 73 74 75 76 77 78 79 80 81 82 83 84 85 86 87 88 89 90
91
92 93 94 95 96 97 98 99 100 101 102 103 104 105 106 107 108 109 110 111 112
113 114 115 116 117 118 119 120 121 122 123 124 125 126 127 128 129 130 131 132 133 134
Projector Specification
Las imágenes que se muestran son solo para fines ilustrativos. El producto
real puede variar debido a la mejora del producto.
El tamaño de la imagen depende de la distancia entre el proyector y la
pantalla, puede haber una desviación del 3% entre los datos enumerados
anteriormente. Diferentes configuraciones causar varias distancias.
Resolucion nativa
Tecnología de
pantalla
Fuente de luz
Colore de Pantalla
Relación de aspecto
Peso del proyector
Formato de imagen
Formato de Video
Puerto
1080*720p
LCD
LED
16.7M Full
4:3/16:9/auto
2.2lb
bmp./jpg/png/gif
.AVI/.MP4/.MKV/.FLV/.MOV/.RMVB/.3GP/.MPEG1/
.MPEG2/.XVID (WMV no soportado)
AV, USB, USB-T, HDMI, VGA
Distancia de proyección
recomendada
Distancia de proyección
mínima
Corrección Trapezoidal
Tensión de alimentación
Método de proyección
Enfoque
Formato de audio
2-3M
1M
±15°Manual
AC 100-240V
Delantero/Trasero/ Techo
Manual de operación
AC3/.AAC/.MP2/.MP3/
.PCM/.FLAC/.WMA
Screen Size
33"
60"
80"
100"
120"
150"
Distance (m)
1.05
1.8
2.4
2.97
3.53
4.39
11
12
13
14
15
USB-T
USB
HDMI
VGA
Puerto de Cable de
alimentación
Puerto de espejo de pantalla con cable (con
cable USB original)
Puerto USB
Puerto HDMI
Puerto VGA
Enchufe el cable de alimentación
support01@yaberauto.com
ES
01 02 03 04 05 06 07 08 09 10 11 12 13 14 15 16 17 18 19 20 21 22 23
24 25 26 27 28 29 30 31 32 33 34 35 36 37 38 39 40 41 42 43 44 45
46 47 48 49 50 51 52 53 54 55 56 57 58 59 60 61 62 63 64 65 66 67
68 69 70 71 72 73 74 75 76 77 78 79 80 81 82 83 84 85 86 87 88 89 90
91 92
93 94 95 96 97 98 99 100 101 102 103 104 105 106 107 108 109 110 111 112
113 114 115 116 117 118 119 120 121 122 123 124 125 126 127 128 129 130 131 132 133 134
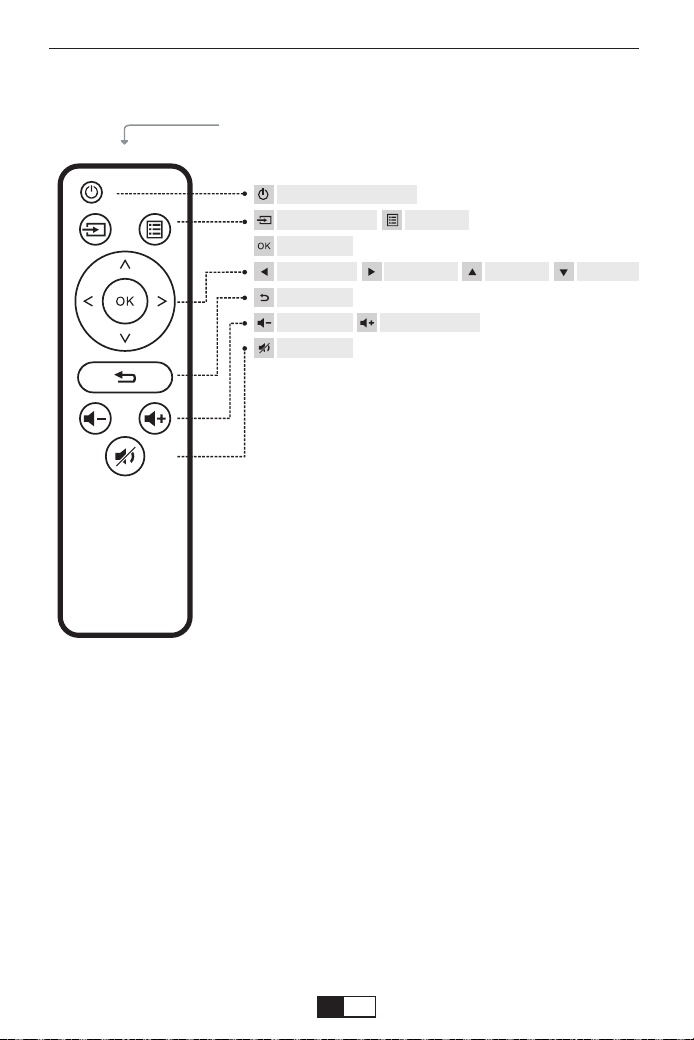
Descripción del Control remoto
(Baterías no incluidas)
IR Transmitter
Interruptor de alimentación
Fuente de entrada Menú
OK
Tecla Izquierda Tecla derecha Tecla Arriba Tecla abajo
Regreso
Bajar volumen Sube el volumen
Mudo
Observación
Reemplace la batería del control remoto
Si desea ver videos en streaming como Netflix, Amazon Prime o HBO, le
recomendamos que compre un Chromecast / TVStick. Debido a sus
derechos de autor, no se permite que ningún proyector reproduzca el
video cuando está conectado a un teléfono inteligente / iPad.
1. Presione para abrir la tapa de la batería.
2. Retire las dos baterías viejas e instale otras nuevas (AA). Asegúrate de
eso La polaridad de las baterías (+/-) está correctamente alineada.
support01@yaberauto.com
ES
01 02 03 04 05 06 07 08 09 10 11 12 13 14 15 16 17 18 19 20 21 22 23
24 25 26 27 28 29 30 31 32 33 34 35 36 37 38 39 40 41 42 43 44 45
46 47 48 49 50 51 52 53 54 55 56 57 58 59 60 61 62 63 64 65 66 67
68 69 70 71 72 73 74 75 76 77 78 79 80 81 82 83 84 85 86 87 88 89 90
91 92 93
94 95 96 97 98 99 100 101 102 103 104 105 106 107 108 109 110 111 112
113 114 115 116 117 118 119 120 121 122 123 124 125 126 127 128 129 130 131 132 133 134

!
1
2
3
4
Consideraciones importantes
Estas instrucciones de seguridad son para garantizar la larga vida útil del
proyector y para evitar incendios y descargas eléctricas. Léalos detenida-
mente y preste atención a todas las advertencias.
Instalación
1. Desenchufe el proyector antes de limpiarlo.
2. Limpie periódicamente el gabinete con un paño húmedo. Si está muy
sucio, use un detergente suave. Nunca use detergentes o solventes
fuertes como alcohol o diluyentes.
3. Use un soplador o papel para lentes para limpiar la lente y tenga
cuidado de no rayarla ni dañarla.
Limpieza
1. Para obtener mejores resultados, use el proyector en una habitación
oscura.
2. Coloque el proyector sobre una superficie plana y nivelada en un área
seca, lejos del polvo y la humedad.
4. La exposición a la luz solar directa, humo o vapor puede dañar los
componentes internos.
5. Maneje el proyector con cuidado. Caerse o sacudirse puede dañar los
componentes internos.
6. No coloque objetos pesados encima del proyector.
La suavidad de la duplicar pantalla se verá afectada por la velocidad de la red
doméstica. Recomendamos duplicar la pantalla en un entorno inalámbrico
estable.
Para una mayor suavidad y estabilidad, se recomienda conectar un enrutador
WIFI a menos de 1 m del proyector. Si el proyector está demasiado lejos del
enrutador, afectará la suavidad de la imagen reproducida.
Algunos teléfonos inteligentes pueden no ser compatibles con la duplicación
de pantalla.
Cualquier pregunta, no dude en ponerse en contacto con YABER a través de
support01@yaberauto.com
Consejos Calientes:
support01@yaberauto.com
ES
01 02 03 04 05 06 07 08 09 10 11 12 13 14 15 16 17 18 19 20 21 22 23
24 25 26 27 28 29 30 31 32 33 34 35 36 37 38 39 40 41 42 43 44 45
46 47 48 49 50 51 52 53 54 55 56 57 58 59 60 61 62 63 64 65 66 67
68 69 70 71 72 73 74 75 76 77 78 79 80 81 82 83 84 85 86 87 88 89 90
91 92 93 94
95 96 97 98 99 100 101 102 103 104 105 106 107 108 109 110 111 112
113 114 115 116 117 118 119 120 121 122 123 124 125 126 127 128 129 130 131 132 133 134
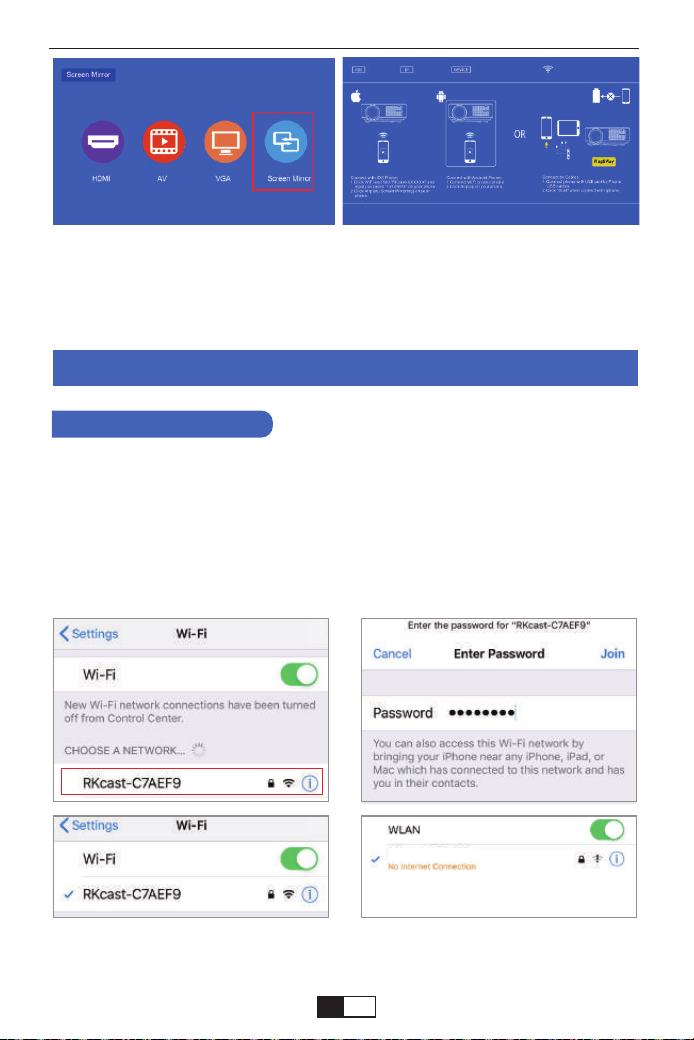
RKcast-C7AEF9
Primero, encienda el proyector, presione la parte inferior de "S" en el control
remoto, luego mostrará la opción "Fuente de entrada" en la imagen de proyec-
ción. Elija "Screen Mirroring", luego presione "OK" y obtendrá este menú:
En su dispositivo iOS, toque [Ajustes] - [WLAN] -Active [Wi-Fi]. Se
muestran las redes disponibles.
Elija el nombre de WiFi como [RKcast-xxxxxx], conéctelo e ingrese la
contraseña [12345678] que se encuentra en el menú del Proyector.
Método de Proyección Inalámbrica
Paso 1
Método 1: use IP la red WIFI de su hogar
1. Para Dispositivo IOS
Nota: Después de conectarse, si se muestra "Sin conexión a Internet",
ignórelo porque no afectará el uso.
support01@yaberauto.com
ES
01 02 03 04 05 06 07 08 09 10 11 12 13 14 15 16 17 18 19 20 21 22 23
24 25 26 27 28 29 30 31 32 33 34 35 36 37 38 39 40 41 42 43 44 45
46 47 48 49 50 51 52 53 54 55 56 57 58 59 60 61 62 63 64 65 66 67
68 69 70 71 72 73 74 75 76 77 78 79 80 81 82 83 84 85 86 87 88 89 90
91 92 93 94 95
96 97 98 99 100 101 102 103 104 105 106 107 108 109 110 111 112
113 114 115 116 117 118 119 120 121 122 123 124 125 126 127 128 129 130 131 132 133 134

YABER
① Ir a Safari - Ingrese “192.168.49.1”
Paso 2
② Toque WiFi AP--Buscar--Seleccione su WIFI--ingrese la contraseña de su
WiFi--Toque Conectar
support01@yaberauto.com
ES
01 02 03 04 05 06 07 08 09 10 11 12 13 14 15 16 17 18 19 20 21 22 23
24 25 26 27 28 29 30 31 32 33 34 35 36 37 38 39 40 41 42 43 44 45
46 47 48 49 50 51 52 53 54 55 56 57 58 59 60 61 62 63 64 65 66 67
68 69 70 71 72 73 74 75 76 77 78 79 80 81 82 83 84 85 86 87 88 89 90
91 92 93 94 95 96
97 98 99 100 101 102 103 104 105 106 107 108 109 110 111 112
113 114 115 116 117 118 119 120 121 122 123 124 125 126 127 128 129 130 131 132 133 134
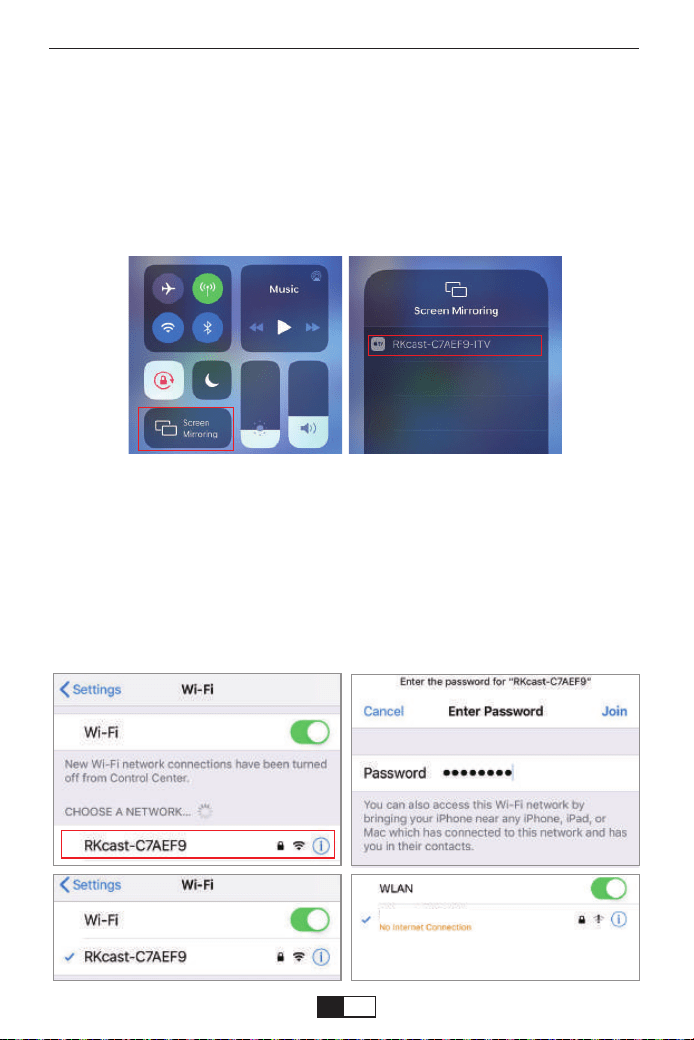
RKcast-C7AEF9
Abrir el Centro de control - Toque el botón Screen Mirroring - Conectar
[RKcast-xxxxxx]
①Abra el centro de control deslizando un dedo hacia abajo desde la esquina
superior derecha de la pantalla en el modelo familiar de las series iPhone X y X.
(Abra el centro de control deslizando hacia arriba desde la parte inferior en los
modelos iPhone 8 Plus y anteriores).
②Toque Screen Mirroring: seleccione el nombre del dispositivo [RKcast-xxxxxx]
Paso 3
En su dispositivo iOS, toque [Ajustes] - [WLAN] -Active [Wi-Fi]. Se
muestran las redes disponibles.
Elija el nombre de WiFi como [RKcast-xxxxxx], conéctelo e ingrese la
contraseña [12345678] que se encuentra en el menú del Proyector.
Paso 1
Método 2: AP-Use la red celular desde su tarjeta de teléfono
móvil.
support01@yaberauto.com
ES
01 02 03 04 05 06 07 08 09 10 11 12 13 14 15 16 17 18 19 20 21 22 23
24 25 26 27 28 29 30 31 32 33 34 35 36 37 38 39 40 41 42 43 44 45
46 47 48 49 50 51 52 53 54 55 56 57 58 59 60 61 62 63 64 65 66 67
68 69 70 71 72 73 74 75 76 77 78 79 80 81 82 83 84 85 86 87 88 89 90
91 92 93 94 95 96 97
98 99 100 101 102 103 104 105 106 107 108 109 110 111 112
113 114 115 116 117 118 119 120 121 122 123 124 125 126 127 128 129 130 131 132 133 134
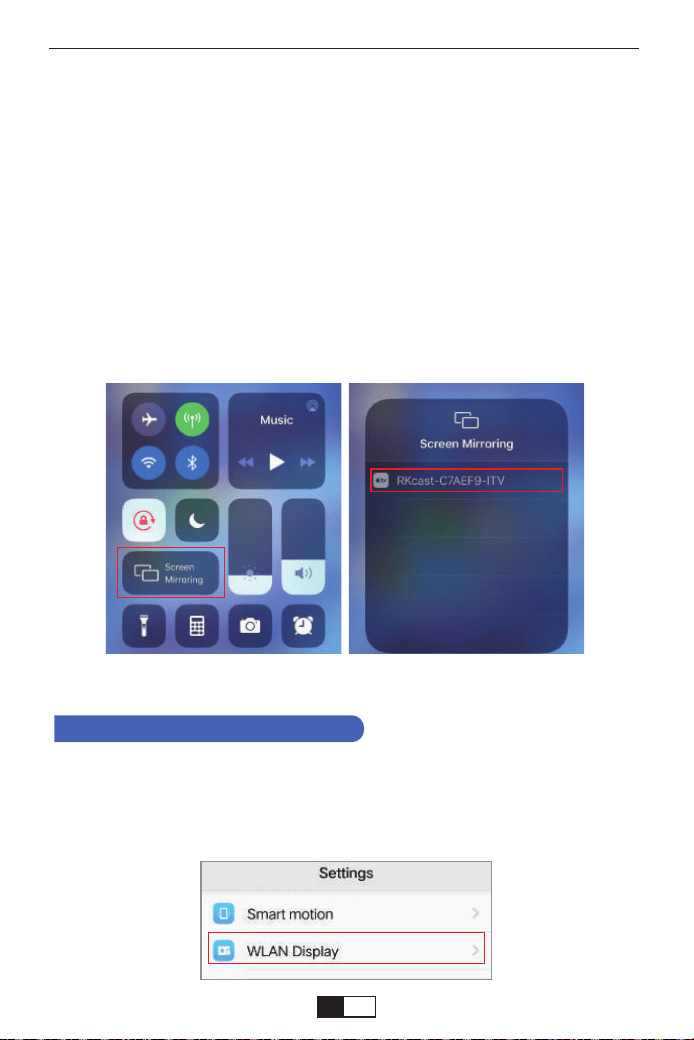
On
Nota: Después de conectarse, si se muestra "Sin conexión a Internet",
ignórelo porque no afectará el uso.
Abrir el Centro de control - Toque el botón Screen Mirroring - Conectar
[RKcast-xxxxxx]
①Abra el centro de control deslizando un dedo hacia abajo desde la
esquina superior derecha de la pantalla en el modelo familiar de las series
iPhone X y X. (Abra el centro de control deslizando hacia arriba desde la
parte inferior en los modelos iPhone 8 Plus y anteriores).
②Toque Screen Mirroring: seleccione el nombre del dispositivo
[RKcast-xxxxxx]
Paso 2
En su dispositivo Android, toque [Ajustes] - [WLAN] -Active [Wi-Fi]. Se
muestran las redes disponibles.
Paso1
Método 1: use IP la red WIFI de su hogar
2. Para Dispositivo Android
support01@yaberauto.com
ES
01 02 03 04 05 06 07 08 09 10 11 12 13 14 15 16 17 18 19 20 21 22 23
24 25 26 27 28 29 30 31 32 33 34 35 36 37 38 39 40 41 42 43 44 45
46 47 48 49 50 51 52 53 54 55 56 57 58 59 60 61 62 63 64 65 66 67
68 69 70 71 72 73 74 75 76 77 78 79 80 81 82 83 84 85 86 87 88 89 90
91 92 93 94 95 96 97 98
99 100 101 102 103 104 105 106 107 108 109 110 111 112
113 114 115 116 117 118 119 120 121 122 123 124 125 126 127 128 129 130 131 132 133 134
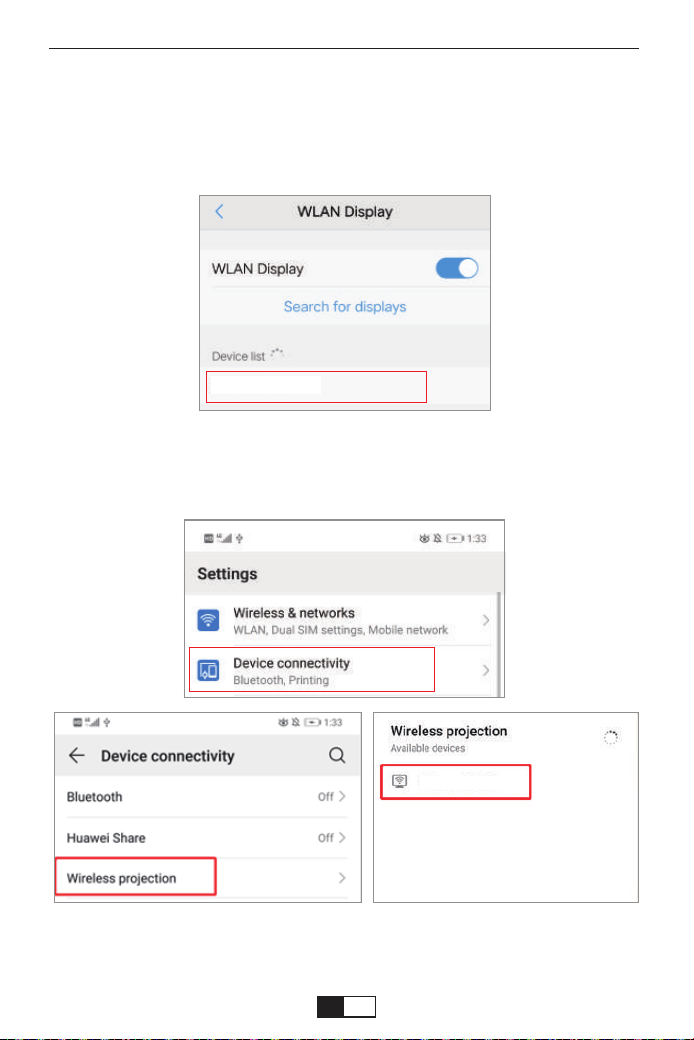
YABER
RKcast-C7AEF9
RKcast-C7AEF9
RKcast-C7AEF9
Diferentes marcas de teléfono Android tienen diferentes operaciones para abrir
WLAN, debe consultar el manual del teléfono.
Elija el nombre de WiFi de su hogar (Ej. YABER), conéctelo e ingrese su
contraseña [XXXXXXXX].
Paso 2
Toque [Ajustes] -[Conectividad del dispositivo] -Active [Proyección inalámbrica]
en ON
Paso 3
support01@yaberauto.com
ES
01 02 03 04 05 06 07 08 09 10 11 12 13 14 15 16 17 18 19 20 21 22 23
24 25 26 27 28 29 30 31 32 33 34 35 36 37 38 39 40 41 42 43 44 45
46 47 48 49 50 51 52 53 54 55 56 57 58 59 60 61 62 63 64 65 66 67
68 69 70 71 72 73 74 75 76 77 78 79 80 81 82 83 84 85 86 87 88 89 90
91 92 93 94 95 96 97 98 99
100 101 102 103 104 105 106 107 108 109 110 111 112
113 114 115 116 117 118 119 120 121 122 123 124 125 126 127 128 129 130 131 132 133 134
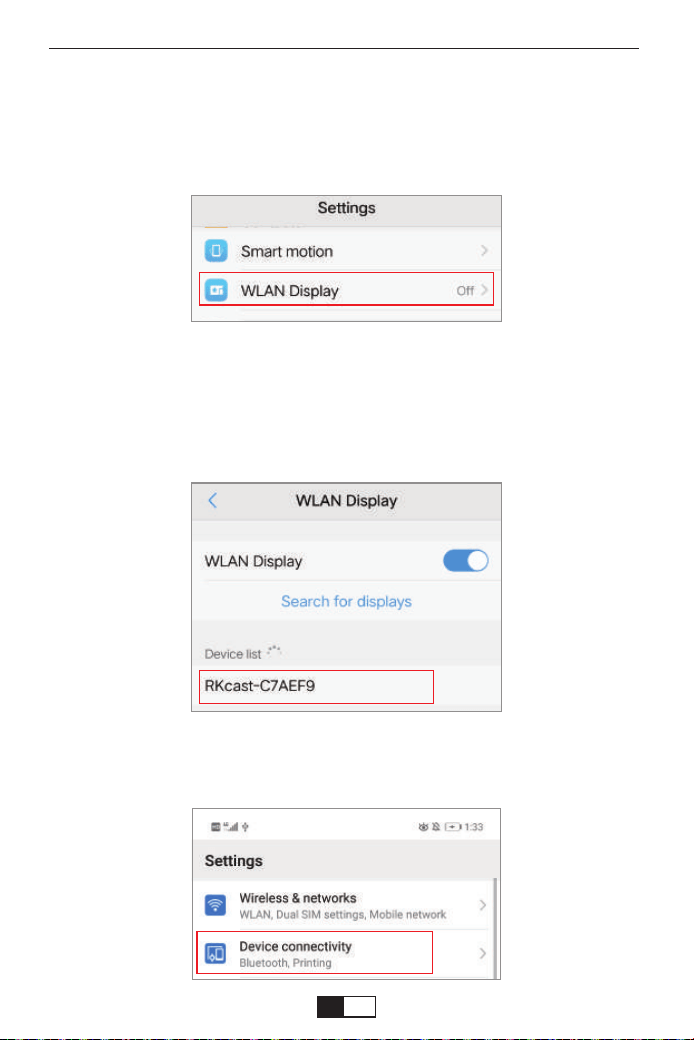
Diferentes marcas de teléfono Android tienen diferentes operaciones para abrir
WLAN, debe consultar el manual del teléfono.
En su dispositivo Android, toque [Ajustes] - [WLAN] -Active [Wi-Fi]. Se
muestran las redes disponibles.
Paso 1
Elija el nombre de WiFi como [RKcast-xxxxxx], conéctelo e ingrese la
contraseña [12345678] que se encuentra en el menú del Proyector.
Paso 2
Método 2: AP-Use la red celular desde su tarjeta de teléfono
móvil.
Toque [Ajustes] -[Conectividad del dispositivo] -Active [Proyección inalám-
brica] en ON
Paso 3
support01@yaberauto.com
ES
01 02 03 04 05 06 07 08 09 10 11 12 13 14 15 16 17 18 19 20 21 22 23
24 25 26 27 28 29 30 31 32 33 34 35 36 37 38 39 40 41 42 43 44 45
46 47 48 49 50 51 52 53 54 55 56 57 58 59 60 61 62 63 64 65 66 67
68 69 70 71 72 73 74 75 76 77 78 79 80 81 82 83 84 85 86 87 88 89 90
91 92 93 94 95 96 97 98 99 100
101 102 103 104 105 106 107 108 109 110 111 112
113 114 115 116 117 118 119 120 121 122 123 124 125 126 127 128 129 130 131 132 133 134
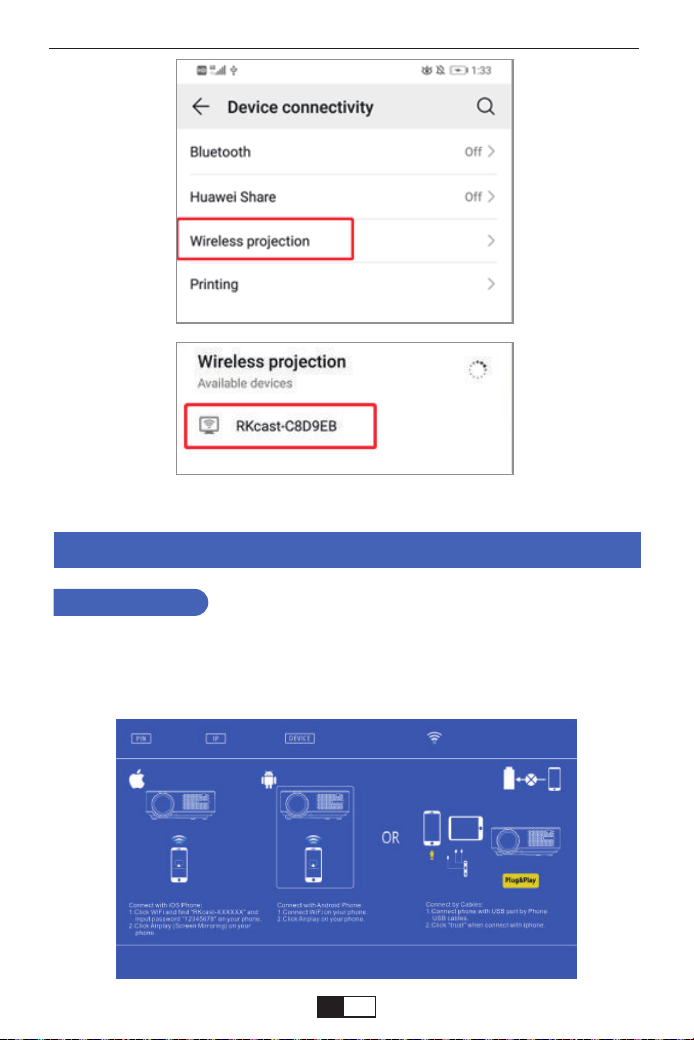
Espejo de Pantalla con Cable
1. Primero, encienda el proyector, presione la parte inferior de "S" en el control
remoto, luego mostrará la opción "Fuente de entrada" en la imagen de proyec-
ción. Elija "Screen Mirroring", luego presione "OK".
Para IOS
support01@yaberauto.com
ES
01 02 03 04 05 06 07 08 09 10 11 12 13 14 15 16 17 18 19 20 21 22 23
24 25 26 27 28 29 30 31 32 33 34 35 36 37 38 39 40 41 42 43 44 45
46 47 48 49 50 51 52 53 54 55 56 57 58 59 60 61 62 63 64 65 66 67
68 69 70 71 72 73 74 75 76 77 78 79 80 81 82 83 84 85 86 87 88 89 90
91 92 93 94 95 96 97 98 99 100 101
102 103 104 105 106 107 108 109 110 111 112
113 114 115 116 117 118 119 120 121 122 123 124 125 126 127 128 129 130 131 132 133 134
Usando el cable HDMI o VGA para conectar con el proyector.
(Se recomienda una conexión HDMI para proyectar películas, videos y otros
archivos que necesitan ser HD)
(1)Encienda su computadora y el proyector;
(2)Conecte el cable HDMI / VGA al puerto HDMI / VGA de su computadora;
(3) Conecte el otro extremo a cualquier puerto HDMI / VGA disponible en su
proyector;
(4) Presione el botón “Fuente” para ingresar a la interfaz de Fuente de entrada;
(5) Seleccione la fuente HDMI / PC-RGB para proyectar cualquier archivo en
su computadora;
(6) En su computadora portátil, mantenga presionadas del
teclado para cambiar su modo de visualización:
Conectando a la computadora
CONEXIONES DEL PROYECTOR
!
1
2
3
2.Conecte el proyector y el equipo IOS con un cable USB original.
3.En "¿Confía en este equipo?" Pantalla de presentación, toque "Confiar".
1.Primero, encienda el proyector, presione la parte inferior de "S" en el control
remoto, luego mostrará la opción "Fuente de entrada" en la imagen de proyec-
ción. Elija "Screen Mirroring", luego presione "OK".
2. Conecte el proyector y el equipo Android con un cable USB original.
3.En "¿Confía en este equipo?" Pantalla de presentación, toque "OK".
4.Después de un tiempo, se mostrará la pantalla Android en el proyector.
Para Android
Utilice un cable USB original. Si el cable no es un cable original, es posible
que la conexión no sea exitosa o que no sea posible una duplicación limpia.
Algunos teléfonos inteligentes pueden no ser compatibles con la Duplicar
Pantalla.
Algunos teléfonos inteligentes Android transfieren solo la pantalla debido a
su propia función, y no se produce ninguna voz.
Tenga en cuenta:
support01@yaberauto.com
ES
01 02 03 04 05 06 07 08 09 10 11 12 13 14 15 16 17 18 19 20 21 22 23
24 25 26 27 28 29 30 31 32 33 34 35 36 37 38 39 40 41 42 43 44 45
46 47 48 49 50 51 52 53 54 55 56 57 58 59 60 61 62 63 64 65 66 67
68 69 70 71 72 73 74 75 76 77 78 79 80 81 82 83 84 85 86 87 88 89 90
91 92 93 94 95 96 97 98 99 100 101 102
103 104 105 106 107 108 109 110 111 112
113 114 115 116 117 118 119 120 121 122 123 124 125 126 127 128 129 130 131 132 133 134
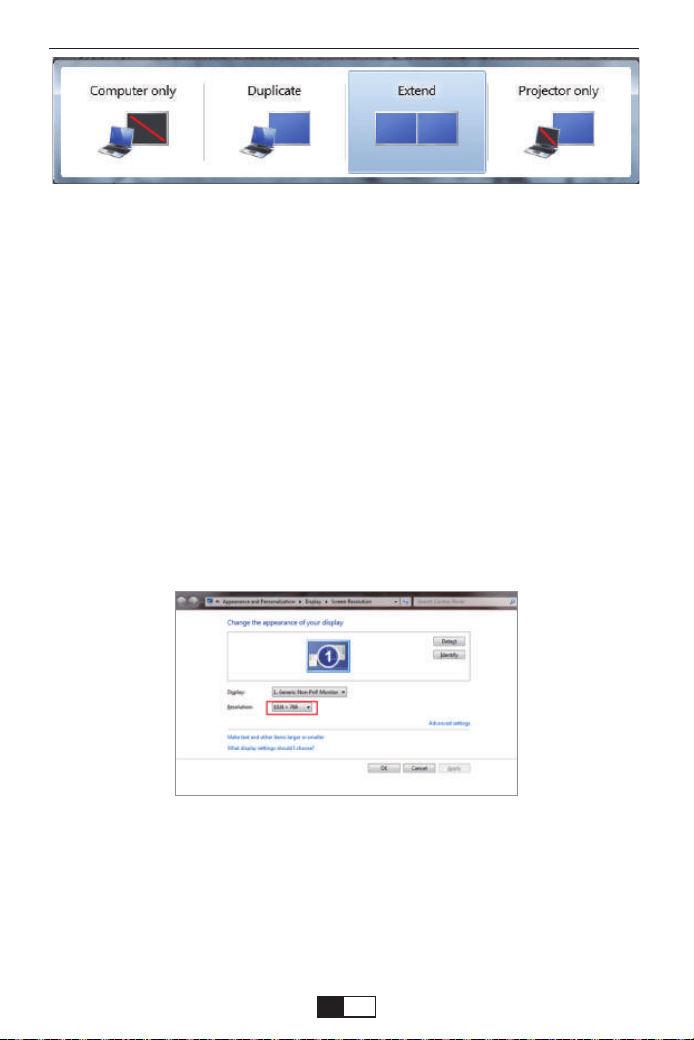
Solo computadora: es la opción predeterminada - solo se muestra en el
monitor principal.
Duplicar: hace que todos los monitores muestren lo mismo duplicando el
escritorio en cada monitor.
Extender: hace que todos sus monitores actúen como un gran monitor que
extiende el escritorio a todos ellos.
Solo proyector: se muestra solo en el monitor secundario como un proyec-
tor.
Por favor, consulte el siguiente enlace:
https://www.youtube.com/watch?v=k2Zh9lmrerc
(7)Puedes cambiar la resolución de tu pantalla:
Por favor, consulte el siguiente enlace:
https://www.youtube.com/watch?v=YJ6moceE13Y
Elija Inicio → Panel de control → Apariencia y personalización → Ajustar
resolución de pantalla
(Nota: la conexión VGA solo puede transmitir señales analógicas de video, no
audio. Se requiere un altavoz externo cuando el dispositivo está conectado
mediante un cable VGA.)
support01@yaberauto.com
ES
01 02 03 04 05 06 07 08 09 10 11 12 13 14 15 16 17 18 19 20 21 22 23
24 25 26 27 28 29 30 31 32 33 34 35 36 37 38 39 40 41 42 43 44 45
46 47 48 49 50 51 52 53 54 55 56 57 58 59 60 61 62 63 64 65 66 67
68 69 70 71 72 73 74 75 76 77 78 79 80 81 82 83 84 85 86 87 88 89 90
91 92 93 94 95 96 97 98 99 100 101 102 103
104 105 106 107 108 109 110 111 112
113 114 115 116 117 118 119 120 121 122 123 124 125 126 127 128 129 130 131 132 133 134
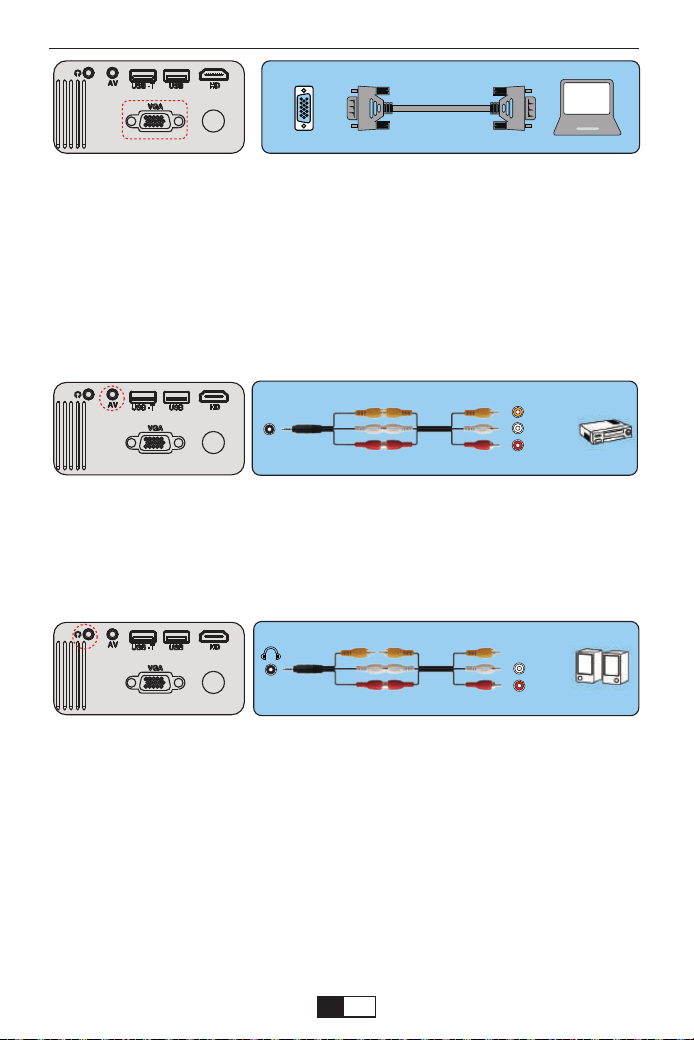
VGA
AV
video
audio out
(L/R)
audio out
(L/R)
2.Conectando un reproductor de DVD
1. Use el cable AV suministrado para conectar el reproductor de DVD al
proyector.
2. Encienda el proyector y el reproductor de DVD.
Si su reproductor tiene una salida HDMI, es mejor usarlo en la opción
analógica (AV). La salida de audio debe configurarse desde el menú del
reproductor de DVD si hay instalados altavoces externos.
3. Conecte la barra de sonido
1. Use el cable AV suministrado para conectar la barra de sonido al
proyector.
2. Encienda el proyector y la barra de sonido.
Ajuste la Base de Inclinación y Suspender el Techo
Ajuste la base de inclinación: Instale los tornillos (incluidos en el
paquete) para colocar ①, levante el borde frontal del proyector a la
altura deseada, gire el prensatelas y suelte el botón para bloquear la
base de inclinación en la posición adecuada.
Suspender el techo: Compre el soporte del proyector y el tornillo M5
adicionalmente. Instale el soporte del proyector en su lugar ①, y
cuelgue el proyector en el techo. (Nota: puede instalar el soporte del
trípode en el lugar ①)
(Cable AV 3 en 3 no incluido)
(Cable AV 3 en 3 no incluido)
support01@yaberauto.com
ES
01 02 03 04 05 06 07 08 09 10 11 12 13 14 15 16 17 18 19 20 21 22 23
24 25 26 27 28 29 30 31 32 33 34 35 36 37 38 39 40 41 42 43 44 45
46 47 48 49 50 51 52 53 54 55 56 57 58 59 60 61 62 63 64 65 66 67
68 69 70 71 72 73 74 75 76 77 78 79 80 81 82 83 84 85 86 87 88 89 90
91 92 93 94 95 96 97 98 99 100 101 102 103 104
105 106 107 108 109 110 111 112
113 114 115 116 117 118 119 120 121 122 123 124 125 126 127 128 129 130 131 132 133 134

PROYECTOR DE ARRANQUE
Enciende el proyector
Apague el proyector
1. Presione el botón de encendido cuando el proyector esté en uso para
cambiarlo al modo de espera.
2. Cuando el proyector entra en modo de espera, la luz parpadea en rojo.
1.Instale dos baterías AAA en el control remoto antes de usar.
2.Presione la tecla Encendido en el control remoto o panel, la luz indicadora
se pondrá roja.
3.Quite la tapa de la lente del proyector, la lámpara comenzará a funcionar 2
segundos después, cuando se proyecta una imagen en la pantalla, la máqui-
na funciona sin problemas. Si la primera pantalla de proyección no es la
pantalla de inicio, presione el botón "S" en el control remoto y seleccione la
fuente USB.
4.Ajuste el anillo trapezoidal para obtener una forma rectangular.
5.Ajuste el anillo de enfoque o gire la lente del proyector para obtener el mejor
rendimiento de imagen. (Si todavía está borroso, intente ajustar la distancia de
proyección).
6. Si conecta otros dispositivos, asegúrese de seleccionar la fuente
correspondiente. Si no selecciona la fuente correcta, el proyector no podrá
detectar la señal.
7.Presione el botón Menú en el control remoto para ingresar el Idioma OSD
para configurar su idioma preferido;
①
support01@yaberauto.com
ES
01 02 03 04 05 06 07 08 09 10 11 12 13 14 15 16 17 18 19 20 21 22 23
24 25 26 27 28 29 30 31 32 33 34 35 36 37 38 39 40 41 42 43 44 45
46 47 48 49 50 51 52 53 54 55 56 57 58 59 60 61 62 63 64 65 66 67
68 69 70 71 72 73 74 75 76 77 78 79 80 81 82 83 84 85 86 87 88 89 90
91 92 93 94 95 96 97 98 99 100 101 102 103 104 105
106 107 108 109 110 111 112
113 114 115 116 117 118 119 120 121 122 123 124 125 126 127 128 129 130 131 132 133 134
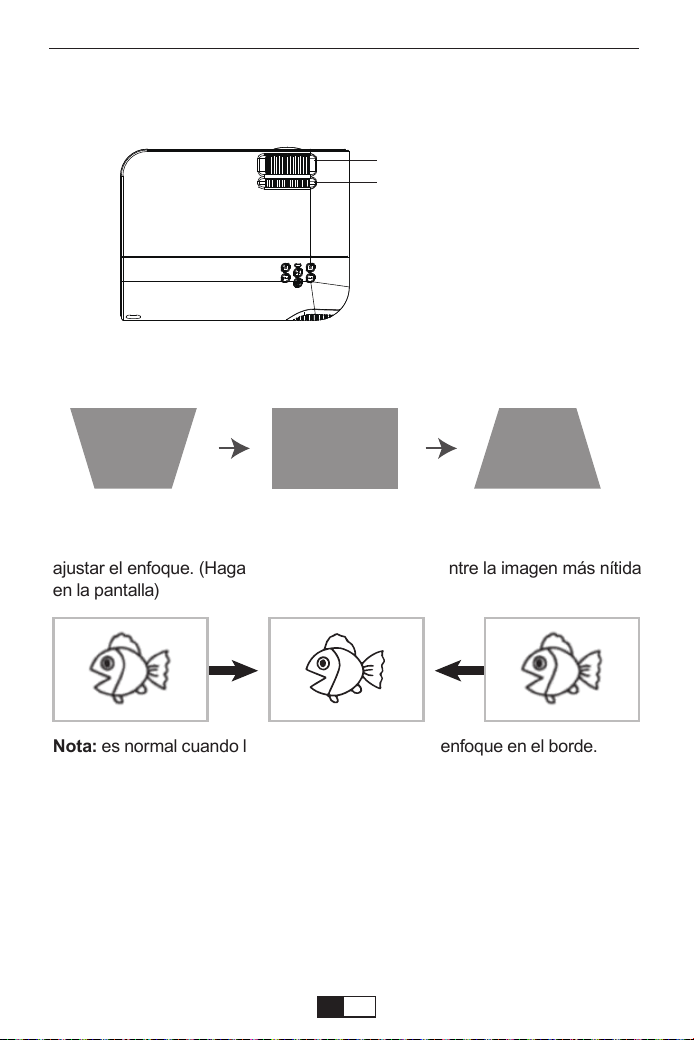
Si la imagen proyectada tiene forma trapezoidal, se puede resolver mediante
la corrección Keystone. (Realizar corrección trapezoidal manual)
Nota: Si la corrección Keystone no resuelve la forma de la imagen, reduzca la
altura vertical del proyector en relación con el centro de la pantalla.
La imagen proyectada puede ser borrosa o difícil de ver, esto se debe a la falta
de ajuste de enfoque con la lente, siga los procesos a continuación para
ajustar el enfoque. (Haga el enfoque manual, encuentre la imagen más nítida
en la pantalla)
Nota: es normal cuando la nitidez en el centro, desenfoque en el borde.
B
Corrección Keystone y Enfoque
Enfoque manual
Corrección Keystone
support01@yaberauto.com
ES
01 02 03 04 05 06 07 08 09 10 11 12 13 14 15 16 17 18 19 20 21 22 23
24 25 26 27 28 29 30 31 32 33 34 35 36 37 38 39 40 41 42 43 44 45
46 47 48 49 50 51 52 53 54 55 56 57 58 59 60 61 62 63 64 65 66 67
68 69 70 71 72 73 74 75 76 77 78 79 80 81 82 83 84 85 86 87 88 89 90
91 92 93 94 95 96 97 98 99 100 101 102 103 104 105 106
107 108 109 110 111 112
113 114 115 116 117 118 119 120 121 122 123 124 125 126 127 128 129 130 131 132 133 134
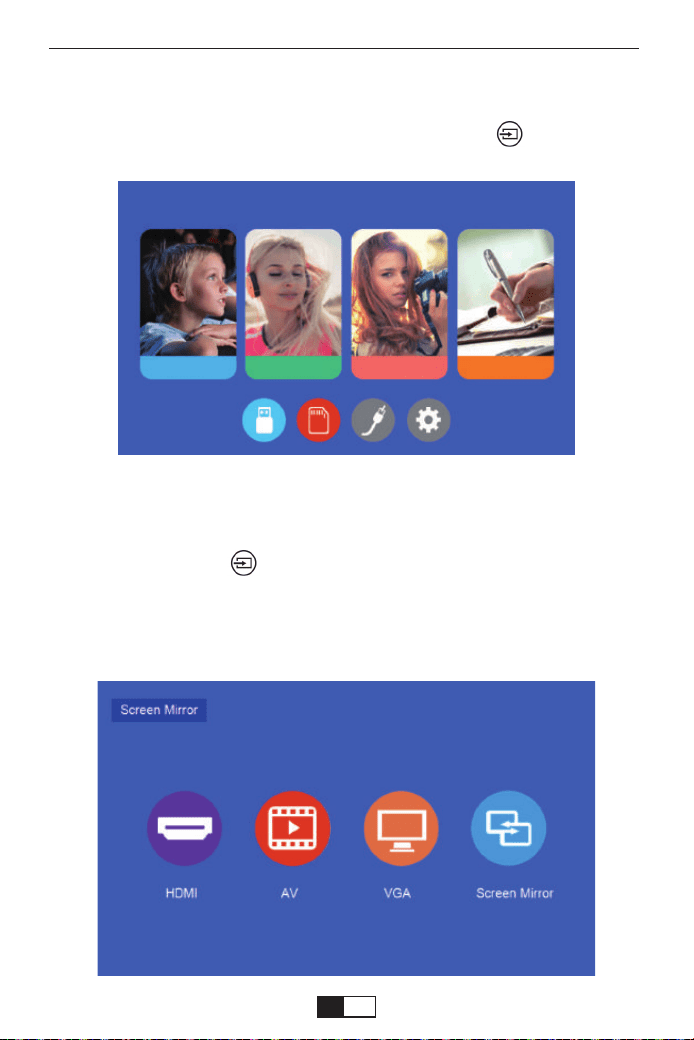
La pantalla de inicio normal del proyector es la siguiente. Si la primera
pantalla de proyección no es esta, presione el botón “ ” en el control
remoto para seleccionar la fuente USB.
CONFIGURACIÓN DEL PROYECTOR
1. Presione el botón “ ” en el control remoto para seleccionar la señal
deseada, luego presione el botón OK en el control remoto.
2. Una vez que se detecta la señal, la información de la fuente selecciona-
da se mostrará en la pantalla después de unos segundos.
Seleccione la fuente de entrada
Cinema Musica Foto Txt
support01@yaberauto.com
ES
01 02 03 04 05 06 07 08 09 10 11 12 13 14 15 16 17 18 19 20 21 22 23
24 25 26 27 28 29 30 31 32 33 34 35 36 37 38 39 40 41 42 43 44 45
46 47 48 49 50 51 52 53 54 55 56 57 58 59 60 61 62 63 64 65 66 67
68 69 70 71 72 73 74 75 76 77 78 79 80 81 82 83 84 85 86 87 88 89 90
91 92 93 94 95 96 97 98 99 100 101 102 103 104 105 106 107
108 109 110 111 112
113 114 115 116 117 118 119 120 121 122 123 124 125 126 127 128 129 130 131 132 133 134
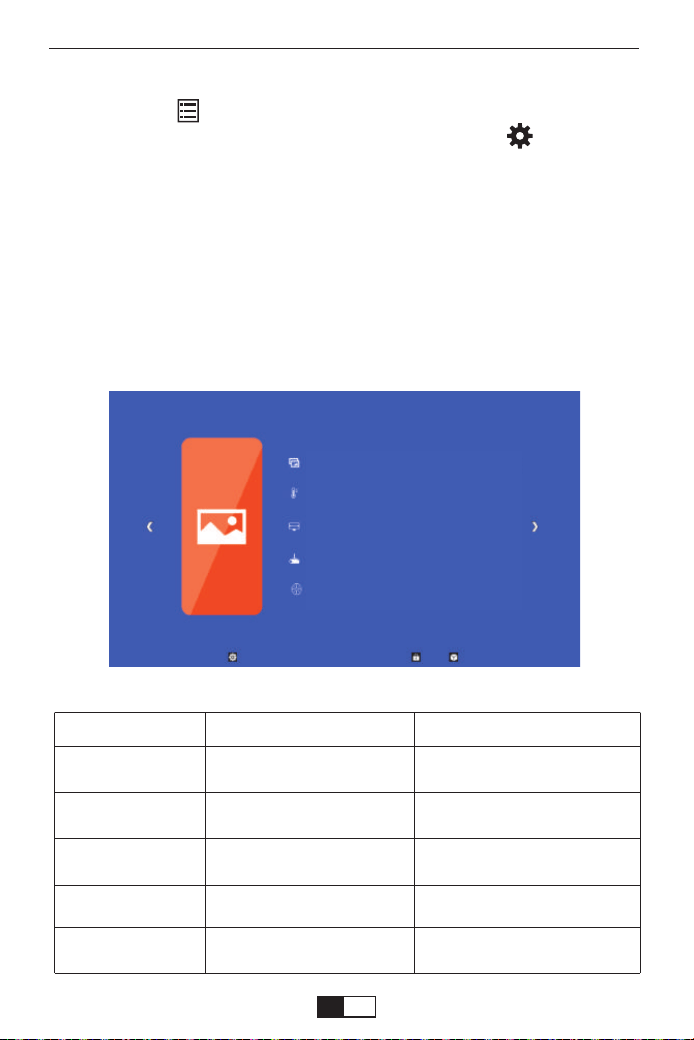
MENÚ IMAGEN
1.Presione la " " en el control remoto, luego la imagen del menú se
mostrará en la pantalla. O necesita seleccionar el botón " " para acced-
er a los 4 menús sin el control remoto.
2.Presione la tecla “
◀/▶
”, el menú se moverá a “IMAGEN”>“SONIDO”
>“TIEMPO”>“OPCIÓN”.
3.Seleccione la interfaz de ajuste, use la tecla “▲/▼” para elegir el
elemento deseado.
4.Presione “OK” o “
◀/▶
”para ajustar el parámetro del elemento.
Método de configuración del menú
MENÚ IMAGEN MODO FUNCIÓN
Modo de imagen
Temp.de Color Med
Aspect Ratio
Modo de proyección
ZOOM
Estandar/Soft/Usuario/Vivid
Med/Callente/Usuario/Frio
Auto/ 4:3/ 16:9
Frontal, Invertida, Frontal/te-
cho, Invertida/techo
75-100
Cambiar entre el modo de
imagen
Cambiar entre el modo de
temperatura de color
Configure la relación de
aspecto de la imagen.
Configurar el modo de
proyección
Reduce el tamaño de la
pantalla de -25%
Modo Imagen Estandár
Temperatura de color Cálido
Relación 16:9
Modo de proyección Front
ZOOM 100
support01@yaberauto.com
ES
01 02 03 04 05 06 07 08 09 10 11 12 13 14 15 16 17 18 19 20 21 22 23
24 25 26 27 28 29 30 31 32 33 34 35 36 37 38 39 40 41 42 43 44 45
46 47 48 49 50 51 52 53 54 55 56 57 58 59 60 61 62 63 64 65 66 67
68 69 70 71 72 73 74 75 76 77 78 79 80 81 82 83 84 85 86 87 88 89 90
91 92 93 94 95 96 97 98 99 100 101 102 103 104 105 106 107 108
109 110 111 112
113 114 115 116 117 118 119 120 121 122 123 124 125 126 127 128 129 130 131 132 133 134
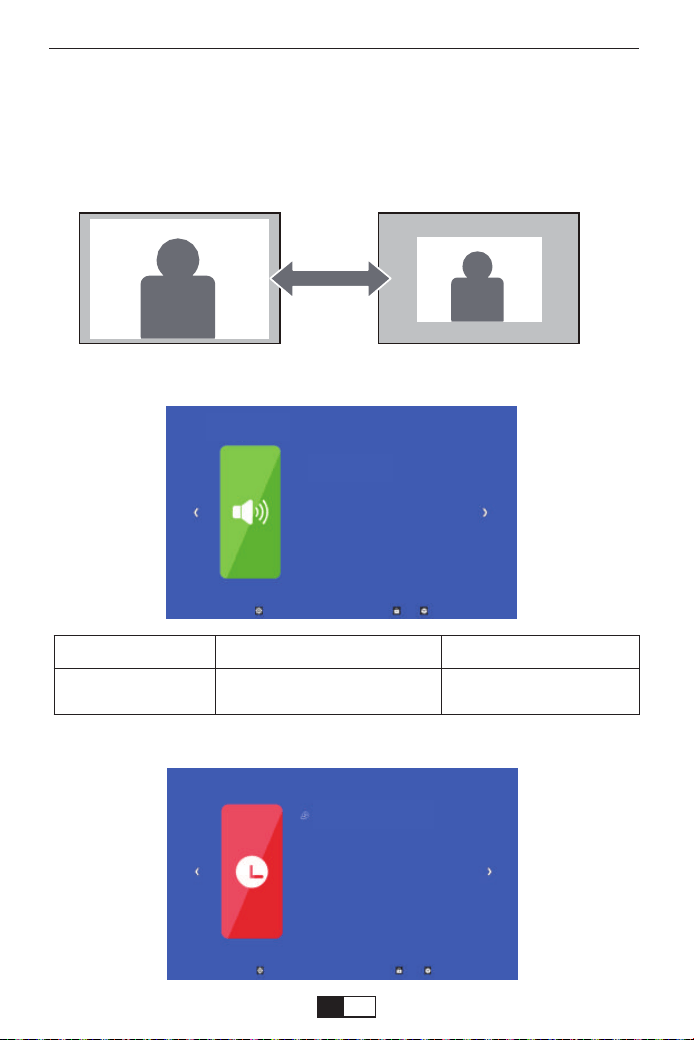
MENÚ HORA
<Función ZOOM>
Al reproducir una imagen o video, si desea reducir el tamaño de la imagen
o video proyectado, puede usar el control remoto para seleccionar el
ZOOM para ajustar el tamaño de proyección:
Puede reducir la altura y el ancho del tamaño original hasta -25%.
MENÚ de SONIDO MODO FUNCIÓN
Modo de sonido
Usuario, Estándar, Música,
Película, Deportes
Configurar el modo
de sonido
MENÚ de SONIDO
Modo de sonido
Hora de dormir OFF
support01@yaberauto.com
ES
01 02 03 04 05 06 07 08 09 10 11 12 13 14 15 16 17 18 19 20 21 22 23
24 25 26 27 28 29 30 31 32 33 34 35 36 37 38 39 40 41 42 43 44 45
46 47 48 49 50 51 52 53 54 55 56 57 58 59 60 61 62 63 64 65 66 67
68 69 70 71 72 73 74 75 76 77 78 79 80 81 82 83 84 85 86 87 88 89 90
91 92 93 94 95 96 97 98 99 100 101 102 103 104 105 106 107 108 109
110 111 112
113 114 115 116 117 118 119 120 121 122 123 124 125 126 127 128 129 130 131 132 133 134
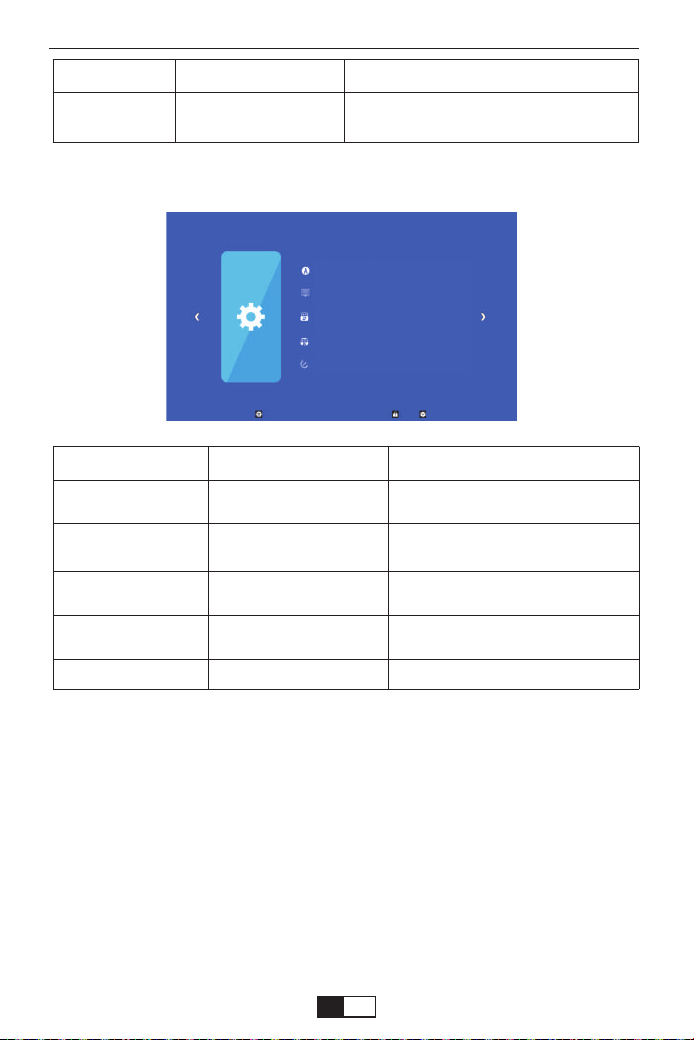
1. En el momento del encendido, la luz indicadora no funciona
①. La fuente de alimentación puede no estar bien conectada
②. Compruebe el sistema de protección contra sobrecalentamiento.
2. Al presionar el botón de encendido en el control remoto no se enciende
elproyector
①. Las pilas del control remoto están agotadas.
②. La señal entre el control remoto y el sensor IR está obstruida
③. ¿Fuerte luz directa en el sensor IR?
MENÚ HORA MODO FUNCIÓN
Modo de sueño Off/10min/20/min,etc.
Apague el proyector después de un
período de tiempo establecido.
MENÚ OPCIONAL MODO FUNCIÓN
Lenguaje OSD
Tiempo de OSD
Actualizando el
software(USB)
Restaurar parámetros
fábrica
Versión
Inglés, francés, italiano,
español, etc.
Off, 5S, 10S, 15S
Actualiza el software
Configure el idioma que se muestra
en la interfaz de operación
Ajuste la duración de mantener la
interfaz del menú
Actualice la versión del software
del proyector
Restablecer el proyector
Mostrar la versión
MENÚ OPCIONAL
FAQ
Lenguaje OSD Español
Tiempo de OSD
Actualizando el software(USB)
Restaurar parámetros fábrica
Versión Proyector042701
support01@yaberauto.com
ES
01 02 03 04 05 06 07 08 09 10 11 12 13 14 15 16 17 18 19 20 21 22 23
24 25 26 27 28 29 30 31 32 33 34 35 36 37 38 39 40 41 42 43 44 45
46 47 48 49 50 51 52 53 54 55 56 57 58 59 60 61 62 63 64 65 66 67
68 69 70 71 72 73 74 75 76 77 78 79 80 81 82 83 84 85 86 87 88 89 90
91 92 93 94 95 96 97 98 99 100 101 102 103 104 105 106 107 108 109 110
111 112
113 114 115 116 117 118 119 120 121 122 123 124 125 126 127 128 129 130 131 132 133 134

3. No hay imagen en la pantalla
①. ¿Es correcto el ajuste del canal?
②. ¿Hay una señal de entrada?
③. ¿El cable de entrada está insertado correctamente o está en la
posición incorrecta?
④. En modo PC, ¿la frecuencia de actualización es> 75KHz?
4. La imagen funciona pero no hay sonido.
①. ¿Están los cables de entrada conectados correctamente?
②. Volumen mínimo o silencioso
③. Verifique que el formato de audio del video se encuentre en la lista
admitida
5. Se apaga automáticamente después de estar encendido por un tiempo
①. ¿Hay una barrera alrededor del ventilador?
②. Pequeñas o grandes fluctuaciones de voltaje
③. Compruebe el sistema de protección contra sobrecalentamiento.
6. No puedo encontrar dispositivos conectados con discos duros o
unidades flash
①. Vuelva a insertar el dispositivo.
②. Compruebe si el dispositivo funciona
7. No se puede reproducir el video
①. ¿Es correcto el formato de video?
②. ¿El archivo está dañado?
③. El dispositivo está dañado
Muchas gracias por comprar el proyector YABER V2.
Lea este manual de instrucciones detenidamente antes de usar. Además,
manténgalo a mano para que pueda verificarlo en cualquier momento.
Si tiene algún problema, no dude en contactarnos (Correo Electrónico:
support01@yaberauto.com), siempre intentaremos ofrecerle una
solución satisfactoria.
support01@yaberauto.com
ES
01 02 03 04 05 06 07 08 09 10 11 12 13 14 15 16 17 18 19 20 21 22 23
24 25 26 27 28 29 30 31 32 33 34 35 36 37 38 39 40 41 42 43 44 45
46 47 48 49 50 51 52 53 54 55 56 57 58 59 60 61 62 63 64 65 66 67
68 69 70 71 72 73 74 75 76 77 78 79 80 81 82 83 84 85 86 87 88 89 90
91 92 93 94 95 96 97 98 99 100 101 102 103 104 105 106 107 108 109 110 111
112
113 114 115 116 117 118 119 120 121 122 123 124 125 126 127 128 129 130 131 132 133 134
はじめに
このたびは、YABERV2プロジェクターーをお買い上げいただき誠にありがとうございました。
ご使用前にこの取扱説明書をよく読みください。また、お手元に置き、いつでも確認できるよう
にしておいてください。
万一ご使用中何がございましたら、遠慮なく
support01@yaberauto.com
までご
連絡ください。
YABERプロジェクターの使用方法説明の動画はYABERYutubeチャネルをご参考ください。
最初にご確認ください
お使いになる前に、セット内容がすでに揃っているかご確認ください。万一、足りないものがご
ざいましたら、遠慮なく
support01@yaberauto.com
までご連絡ください。
セ ット 内 容
警告
プロジェクターー本体*1
取扱説明書(本書*1)
3in1AVケーブル*1
HDMIケーブル*1
レンズ拭き*1
電源コード*1
リモートコン*1(単四電池2本別売り)
高さ調整ネジ*1
安全にお使いいただくためのご注意(必ず守りください)
●お子様が本製品や付属品を口に入れないようにご注意ください。
●本製品のカバーを開けたり、分解したりしないでください。
●濡れた手で本製品やケーブルに触らないでください。
●本製品内部に液体、金属などの異物が入らないようにしてください。
●本製品は水分湿気の多い場所、直射日光の当たる場所、ホコリや油煙などの多い場所、車中
や暖房器具の傍などの高温となる場所に設置したり、保管したりしないでください。
●本製品に強い振動や衝撃を与えないでください。
●本製品を重ねて設置したり、本製品の上に重いものを置いたりしないでください。
●本製品は不安定な場所に設置したり、保管したりしないでください。
●本製品のケーブルを抜き差し時は、必ずコネクタ部分を持ち、無理な力を加えないでくださ
い。
●本製品のお手に入れをする場合には、ベンジンやシンナーなどの揮発性有機溶剤が含まれ
ているものは使用しないでください。
*
support01@yaberauto.com
JP
01 02 03 04 05 06 07 08 09 10 11 12 13 14 15 16 17 18 19 20 21 22 23
24 25 26 27 28 29 30 31 32 33 34 35 36 37 38 39 40 41 42 43 44 45
46 47 48 49 50 51 52 53 54 55 56 57 58 59 60 61 62 63 64 65 66 67
68 69 70 71 72 73 74 75 76 77 78 79 80 81 82 83 84 85 86 87 88 89 90
91 92 93 94 95 96 97 98 99 100 101 102 103 104 105 106 107 108 109 110 111 112
113 114 115 116 117 118 119 120 121 122 123 124 125 126 127 128 129 130 131 132 133 134

support01@yaberauto.com
IR Transmitter
リモコン各部の説明:
ご 注 意:
リモコ用単四電池2本は別売りので、ご使用前に電池を入れてください。
ミュート
メニュー
確認ボタン
音量+
電源ボタン
上 下左
戻す
右
ソース
音量-
JP
01 02 03 04 05 06 07 08 09 10 11 12 13 14 15 16 17 18 19 20 21 22 23
24 25 26 27 28 29 30 31 32 33 34 35 36 37 38 39 40 41 42 43 44 45
46 47 48 49 50 51 52 53 54 55 56 57 58 59 60 61 62 63 64 65 66 67
68 69 70 71 72 73 74 75 76 77 78 79 80 81 82 83 84 85 86 87 88 89 90
91 92 93 94 95 96 97 98 99 100 101 102 103 104 105 106 107 108 109 110 111 112
113
114 115 116 117 118 119 120 121 122 123 124 125 126 127 128 129 130 131 132 133 134

support01@yaberauto.com
10 11 131209
15
14
項目
01
02
03
04
05
06-07
08
09
10
11
12
13
14
15
名称
フォーカスリング
キーストーンング
電源
okボタン
ソース
左/右
戻す
イヤホンポ ート
AVポート
USB-Tポート
USBポート
VGAポート
HDMIポート
電源ポート
説明
ピントを合わせます。
台形歪みを補正します
電源をON/OFFします
選択を確定します。
信号源を選択します。
左/右に移動
前の画面に戻す
オーディオ信号を出力端子です。
オーディオとビデオーからの信号入力端子です。
充電ケーブルでつなげばミラーリングポート
USBからの信号入力端子です。
パソコンまたはコンポーネント機器からの信号入力端子です。
HDMI機器からのHDMIケーブルを接続します。
電源コードを接続します。
03
05
04
08
06
07
02
01
本体各部の説明:
JP
01 02 03 04 05 06 07 08 09 10 11 12 13 14 15 16 17 18 19 20 21 22 23
24 25 26 27 28 29 30 31 32 33 34 35 36 37 38 39 40 41 42 43 44 45
46 47 48 49 50 51 52 53 54 55 56 57 58 59 60 61 62 63 64 65 66 67
68 69 70 71 72 73 74 75 76 77 78 79 80 81 82 83 84 85 86 87 88 89 90
91 92 93 94 95 96 97 98 99 100 101 102 103 104 105 106 107 108 109 110 111 112
113 114
115 116 117 118 119 120 121 122 123 124 125 126 127 128 129 130 131 132 133 134

①
ご 注 意:
1.すべてのアイテムのパラメータを設置完了まで2〜5のステップを繰り返してく
ださい。長い時間操作がないと設置は自動的に退出になります。
2.入力や選択ができないアイテムが薄いグレーで表示さてます。
天吊り固定部/フロントフット 井から吊り下げ用/高さを調整
底面図
①
1.リモコンのMenu(メニュー)ボタンを押してOSDメニューを開きます。
2.カーソル◀/▶ボタンを押して、「映像」--「音声モード」--「時間」--「設定」の順
に設置を進めできます。
3.主メニューに選択した後、カーソル▲/▼ボタンを押して、ご希望調整アイテ
ムを選択できます。
4.リモコンのOK(確定)ボタンを押して、選択されたアイテムのパラメータを調整
できます。
5.すべてのアイテムのパラメータを調整した後リモコンのMenu(メニュー)ボタ
ンを押して戻すことができます。
プロジェクターOSDメーニュの説明
support01@yaberauto.com
JP
01 02 03 04 05 06 07 08 09 10 11 12 13 14 15 16 17 18 19 20 21 22 23
24 25 26 27 28 29 30 31 32 33 34 35 36 37 38 39 40 41 42 43 44 45
46 47 48 49 50 51 52 53 54 55 56 57 58 59 60 61 62 63 64 65 66 67
68 69 70 71 72 73 74 75 76 77 78 79 80 81 82 83 84 85 86 87 88 89 90
91 92 93 94 95 96 97 98 99 100 101 102 103 104 105 106 107 108 109 110 111 112
113 114 115
116 117 118 119 120 121 122 123 124 125 126 127 128 129 130 131 132 133 134
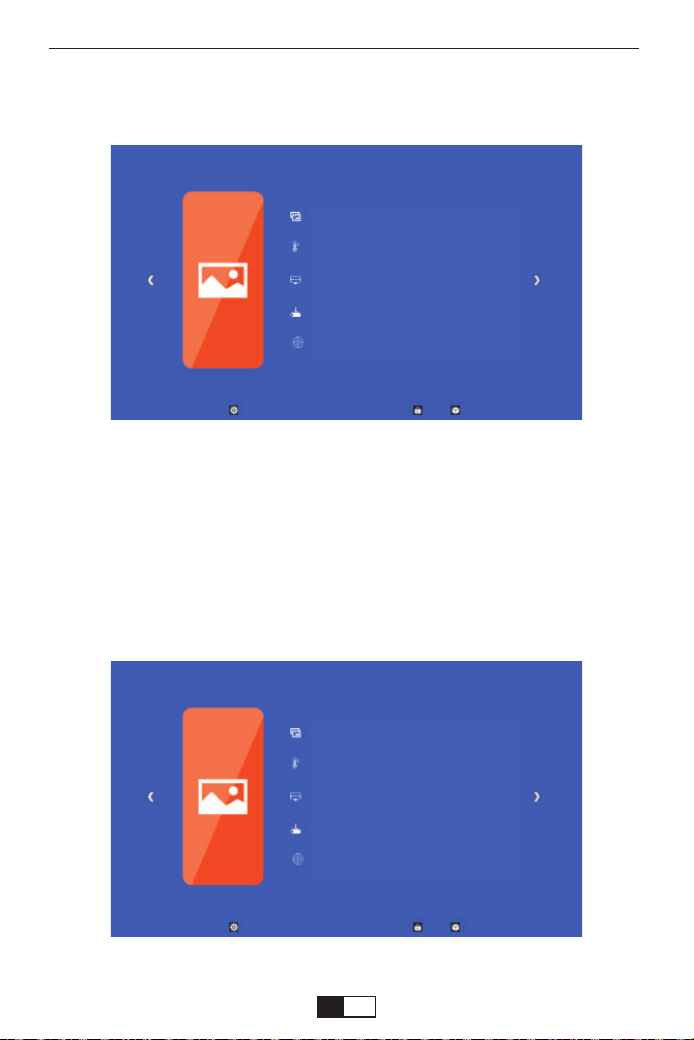
写真モード 標準
色温度
アスべクト比 16:9
投 影モード フロント
Z00m 99
写真モード 標準
色温度
アスべクト比 16:9
投 影モード フロント
Z00m 99
1.下記の画面が出るまでリモコンのMenu(メニュー)ボタンを押してください。
2.カーソル◀/▶ボタンを押して、選択されたアイテムを黄色いになります。
3.はリモコンのOK(確定)ボタンを押して、カーソル◀/▶ボタン対応パラメータ
を調整できます。
4.リモコンのMenu(メニュー)ボタンを押して戻すことができます。
写 真メーニュ
メーニュのアイテムのパラメータの調整(映像調整を例として)
support01@yaberauto.com
JP
01 02 03 04 05 06 07 08 09 10 11 12 13 14 15 16 17 18 19 20 21 22 23
24 25 26 27 28 29 30 31 32 33 34 35 36 37 38 39 40 41 42 43 44 45
46 47 48 49 50 51 52 53 54 55 56 57 58 59 60 61 62 63 64 65 66 67
68 69 70 71 72 73 74 75 76 77 78 79 80 81 82 83 84 85 86 87 88 89 90
91 92 93 94 95 96 97 98 99 100 101 102 103 104 105 106 107 108 109 110 111 112
113 114 115 116
117 118 119 120 121 122 123 124 125 126 127 128 129 130 131 132 133 134
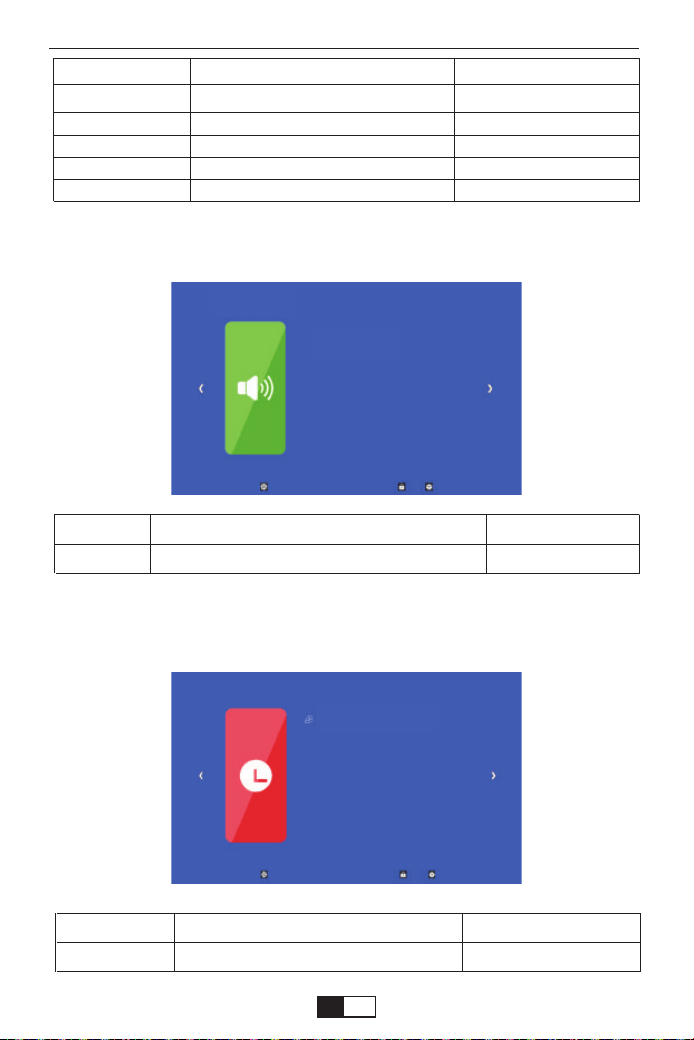
音楽 モード
スリープタイマー オフ
時 間メーニュ
画像 内容 説明
写真モード 標準
色温度
アスペクト比 16:9
投影モ ード
zoom99
標準/柔らかい/ユーザー/鮮やか
クール/暖色/ユーザー/標準(赤・緑・青)
オート/4:3/16:9
フロント/天井吊り/リア/ロック搭載リア
75%~100%
コントラストなどの 調 整
色温度の調整
投影アスペクトの調整
投影方式の調整
投影画面を縮小
音声モード 内容 説明
音楽モ ード 高音/ベス/120Hz/500Hz/1.5KHz/5KHz/10KHz 音声状態の調整
時間 内容 説明
スリープタイマー オフ/10min/20min/30min/60min/90min 表示時間の設定
音 声メーニュ
support01@yaberauto.com
JP
01 02 03 04 05 06 07 08 09 10 11 12 13 14 15 16 17 18 19 20 21 22 23
24 25 26 27 28 29 30 31 32 33 34 35 36 37 38 39 40 41 42 43 44 45
46 47 48 49 50 51 52 53 54 55 56 57 58 59 60 61 62 63 64 65 66 67
68 69 70 71 72 73 74 75 76 77 78 79 80 81 82 83 84 85 86 87 88 89 90
91 92 93 94 95 96 97 98 99 100 101 102 103 104 105 106 107 108 109 110 111 112
113 114 115 116 117
118 119 120 121 122 123 124 125 126 127 128 129 130 131 132 133 134
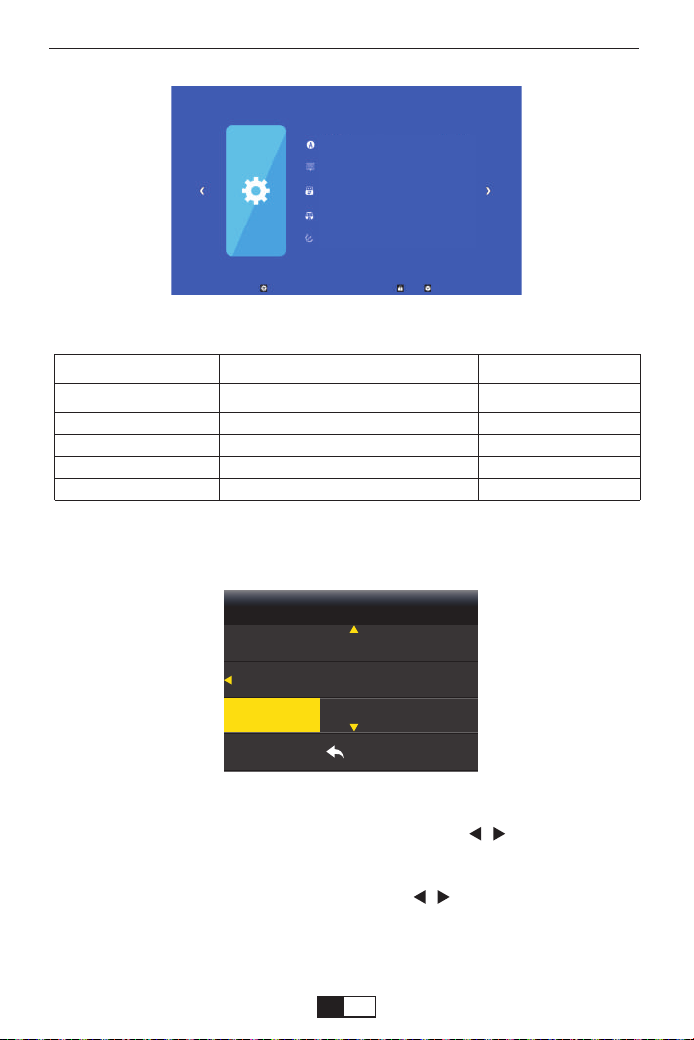
言語 日本語
メニュー滞 在時間
ソフトウェアップ デ ート
初期化
パーション projector042701
言語の設定
1.リモコンのMenu(メニュー)ボタンを押してOSDメニューを開きます。
2.「メニュー言語日本語」強調表示されるまで、カーソル/ボタンを押します。
3.リモコンのOK(確定)ボタンを押して、言語選択画面に移動します。
4.希望する言語が強調表示されるまで、カーソル/ボタンを押します。モコン
のOK(確定)ボタンを押します。
5.リモコンのMenu(メニュー)ボタンを押して最初画面に戻すことができます。
設定 内容 説明
メニュー言語 日本語
メニュー滞在時間
ソフトツェアアップデート
初期化する
パ ー ション
中国語、日本語、英語など20種類の言語
オフ/5秒/10秒/15秒
プグレード
はい/いいえ
projector042701
言語の調整
設置メニュー
ソフトのアップグレード
初期化
現在のソフト版本
設 定メーニュ
メニュー
suomi
MENU
svenska 中国語
繁体中文
日本語
support01@yaberauto.com
JP
01 02 03 04 05 06 07 08 09 10 11 12 13 14 15 16 17 18 19 20 21 22 23
24 25 26 27 28 29 30 31 32 33 34 35 36 37 38 39 40 41 42 43 44 45
46 47 48 49 50 51 52 53 54 55 56 57 58 59 60 61 62 63 64 65 66 67
68 69 70 71 72 73 74 75 76 77 78 79 80 81 82 83 84 85 86 87 88 89 90
91 92 93 94 95 96 97 98 99 100 101 102 103 104 105 106 107 108 109 110 111 112
113 114 115 116 117 118
119 120 121 122 123 124 125 126 127 128 129 130 131 132 133 134
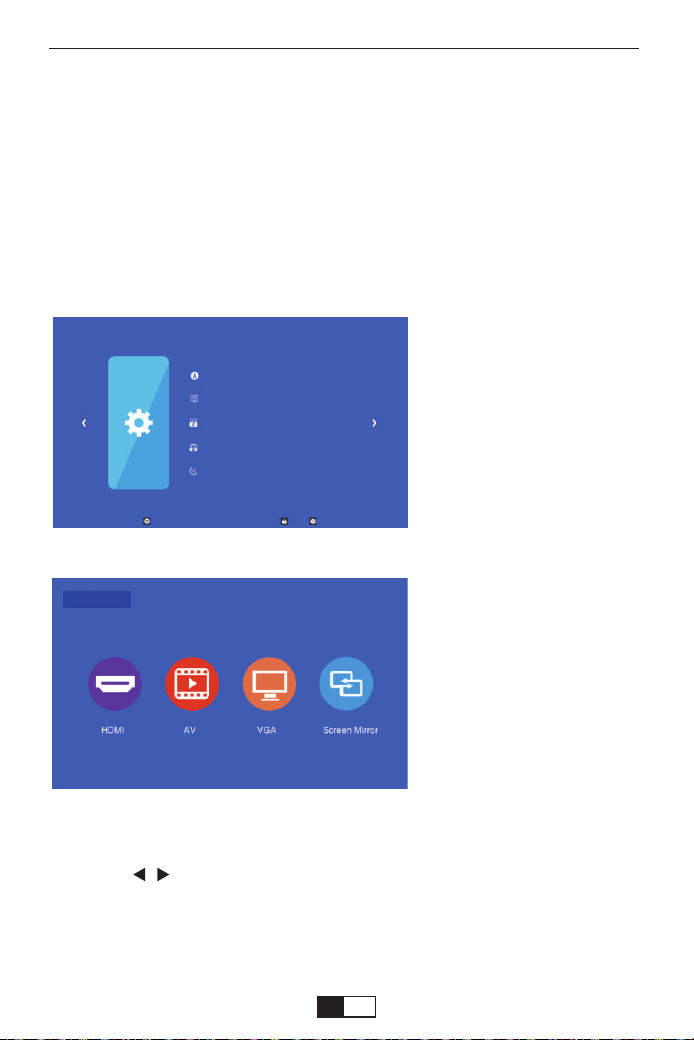
言語 日本語
メニュー滞 在時間
ソフトウェアップ デ ート
初期化
パーション projector042701
入力ソースの選択と入力内容の再生
3.カーソル/ボタンを押してご希望の入力ソースを選択して、次にリモコンの
「OK」ボタン、ご覧になりたい映画や写真などを選択します。次にボタンを押し、ご
選択内容を再生します。
4.「Exit」ボタンを押して、戻すことができます。
このプロジェクターは同時に複数の装置と接続することができます。
入力ソースを選択するには:
1.リモコンの「S」ボタンまたを押して任意の信号を選択します。
2.任意の信号が選択されるまでを押し、次にリモコンの「OK」ボタンを押します。
信号が検出されたら、選択したソース情報が画面に数秒間表示されます。プロジ
ェクターに複数の装置が接続されている場合は、ソース選択バーに戻り別の信
号を検出することができます。
ご注意:他の信号源を選択し
て対応設備が接続していない
場合は、投影画面は無信号と
表示されています。
USB信号源の画面
信号源
support01@yaberauto.com
JP
01 02 03 04 05 06 07 08 09 10 11 12 13 14 15 16 17 18 19 20 21 22 23
24 25 26 27 28 29 30 31 32 33 34 35 36 37 38 39 40 41 42 43 44 45
46 47 48 49 50 51 52 53 54 55 56 57 58 59 60 61 62 63 64 65 66 67
68 69 70 71 72 73 74 75 76 77 78 79 80 81 82 83 84 85 86 87 88 89 90
91 92 93 94 95 96 97 98 99 100 101 102 103 104 105 106 107 108 109 110 111 112
113 114 115 116 117 118 119
120 121 122 123 124 125 126 127 128 129 130 131 132 133 134

まずはプロジェクターの電源を入れ、リモコンの「ソース」ボタンを押し、投影画像に「入力ソー
ス」オプションが表示され、映像入力を「スクリーンミラーリング」に切り替え、「OK」を押してく
ださい。
1 .プ ロジェクター 操 作
スクリーンミラーリング機 能
適 用システム
iSO
Android
iOS7以降、iPhone4+、iPad2+、iPad4+
Android4.2以降、少なくとも1GBのストレージがあります。
OK
信号源
support01@yaberauto.com
JP
01 02 03 04 05 06 07 08 09 10 11 12 13 14 15 16 17 18 19 20 21 22 23
24 25 26 27 28 29 30 31 32 33 34 35 36 37 38 39 40 41 42 43 44 45
46 47 48 49 50 51 52 53 54 55 56 57 58 59 60 61 62 63 64 65 66 67
68 69 70 71 72 73 74 75 76 77 78 79 80 81 82 83 84 85 86 87 88 89 90
91 92 93 94 95 96 97 98 99 100 101 102 103 104 105 106 107 108 109 110 111 112
113 114 115 116 117 118 119 120
121 122 123 124 125 126 127 128 129 130 131 132 133 134
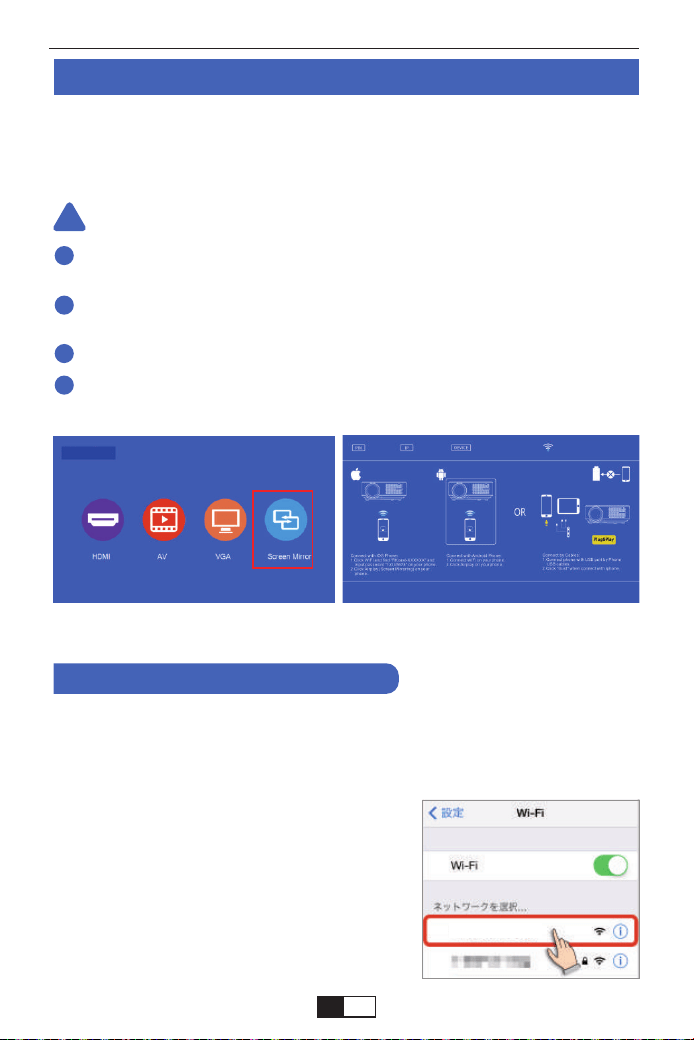
信号源
ワイヤレズでスクリンミラーリングの流暢性は、ネットワーク環境の影響を係わります。
安定性がよくの環境でワイヤレズでスクリンミラーリングことをお勧めます。
流暢性と安定性のためにワイヤレスで接続する時スマホなので設備はプロジェクター
に1m以内の距離でご使用お勧めます。
一部分のスマホは、スクリンミラーリングをサポートできない場合があります。
ご使用中もし何ございましたら遠慮なく[email protected]までお問い合わ
せください。
まず、プロジェクタの電源を入れ、リモコンあるいはプロジェクター本体の「S」ボタンを
押すと、投影画像に「入力ソース」オプションが表示されます。「スクリーンミラーリング」
を選択し、「OK」を押すとく次のメニューが表示されます。
1.[設定]をタップします。[設定]画面が表示
されますので、[Wi-Fi]をタップします。※
[OFF]の場合は、スライドさせて[ON]にしま
す。利用可能なネットワークが表示されます。
スクリンミラーリング 方 法
ご 注 意:
IOSの場合
※ 携 帯 デ ー タで ストリーミング
※ 携 帯 デ ー タで ストリーミング
1 . ワイヤレスでスクリンミラーリング
!
1
2
3
4
RKcast-xxxxxx
support01@yaberauto.com
JP
01 02 03 04 05 06 07 08 09 10 11 12 13 14 15 16 17 18 19 20 21 22 23
24 25 26 27 28 29 30 31 32 33 34 35 36 37 38 39 40 41 42 43 44 45
46 47 48 49 50 51 52 53 54 55 56 57 58 59 60 61 62 63 64 65 66 67
68 69 70 71 72 73 74 75 76 77 78 79 80 81 82 83 84 85 86 87 88 89 90
91 92 93 94 95 96 97 98 99 100 101 102 103 104 105 106 107 108 109 110 111 112
113 114 115 116 117 118 119 120 121
122 123 124 125 126 127 128 129 130 131 132 133 134
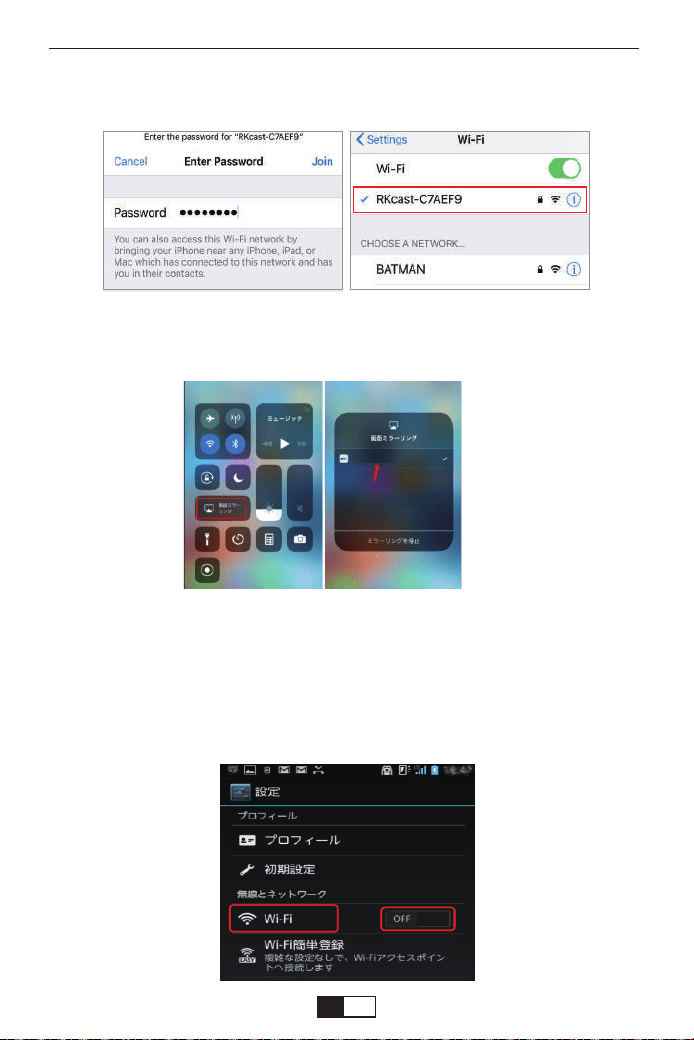
2.プロジェクターのネットワーク名[RKcast-xxxxxx]をタップします。プロジェクターのメニ
ューにあるパスワード[12345678]を入力します。選択したネットワーク名[RKcast-xxxxxx]
のパスワード[12345678]を入力して、[接続]をタップします。
3.[設定]をタップします。[画面ミラーリング」ボタンをタップ→キャスト先「RKcast-xxxxxx
」を選んでタップすれば、IOSの画面がプロジェクターに表示されます。
1.[設定]をタップします。[設定]画面が表示されますので、[Wi-Fi]をタップします。
※ [OFF]の場合は、スライドさせて[ON]にします。利用可能なネットワークが表示され
ます。
Androidの場合
RKcast-xxxxxx
support01@yaberauto.com
JP
01 02 03 04 05 06 07 08 09 10 11 12 13 14 15 16 17 18 19 20 21 22 23
24 25 26 27 28 29 30 31 32 33 34 35 36 37 38 39 40 41 42 43 44 45
46 47 48 49 50 51 52 53 54 55 56 57 58 59 60 61 62 63 64 65 66 67
68 69 70 71 72 73 74 75 76 77 78 79 80 81 82 83 84 85 86 87 88 89 90
91 92 93 94 95 96 97 98 99 100 101 102 103 104 105 106 107 108 109 110 111 112
113 114 115 116 117 118 119 120 121 122
123 124 125 126 127 128 129 130 131 132 133 134
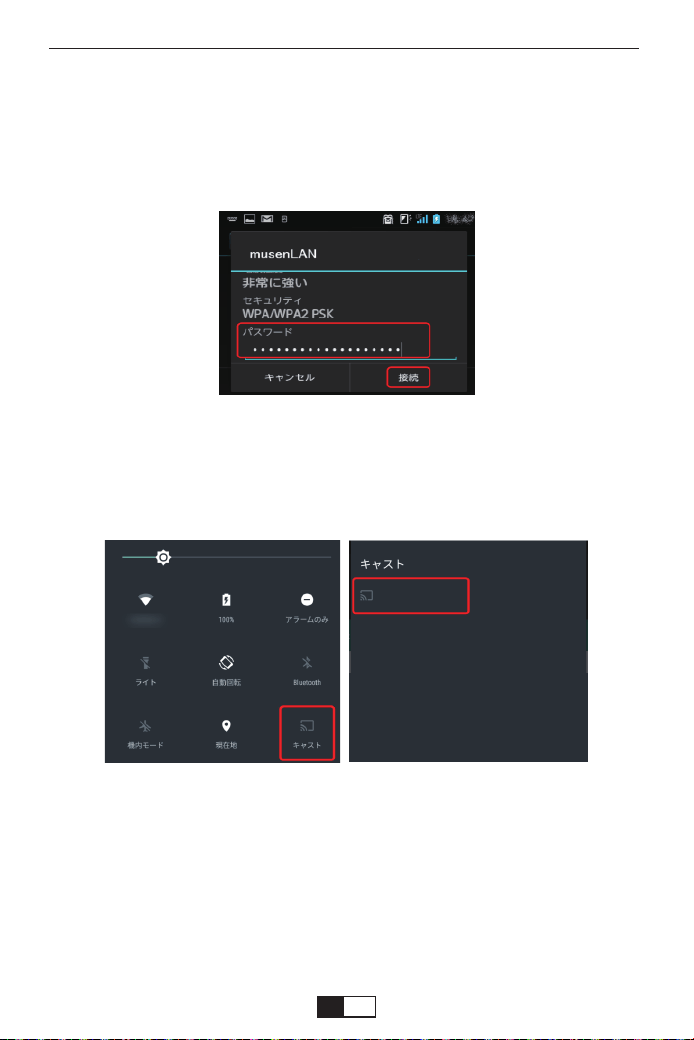
3.[設定]をタップします。[キャスト」ボタンをタップ→キャスト先「RKcast-xxxxxx」を選ん
でタップすれば、Androidの画面がプロジェクターに表示されます。
ご 注 意:
1.純正なUSBケーブルを使用してください。純正なケーブルではないと、接続不成功ある
いはクリンミラーリングできないの恐れがあります。
2.一部分のスマホは、スクリンミラーリングをサポートできない場合があります。
3.一部分のAndroidスマホは自体機能の関係で画面だけ転送して、声が出ないです。
4.ご使用中もし何ございましたら遠慮なく
support01@yaberauto.comまでお
問い合わせください。
注: auのArrows ef(FJL21、OS:Android 4.0)を例に説明します。 画面の表示は、機種や
設定によって異なります。
2.プロジェクターのネットワーク名[RKcast-xxxxxx]をタップします。プロジェクターのメニ
ューにあるパスワード[12345678]を入力します。選択したネットワーク名[RKcast-xxxxxx]
のパスワード[12345678]を入力して、[接続]をタップします。
ご 注 意:接続後「接続済みWPS利用不可」の提示がありますが、使用に影響がないですの
で無視してください。
※ ネットワ ークで ストリーミング
RKcast-xxxxxx
support01@yaberauto.com
JP
01 02 03 04 05 06 07 08 09 10 11 12 13 14 15 16 17 18 19 20 21 22 23
24 25 26 27 28 29 30 31 32 33 34 35 36 37 38 39 40 41 42 43 44 45
46 47 48 49 50 51 52 53 54 55 56 57 58 59 60 61 62 63 64 65 66 67
68 69 70 71 72 73 74 75 76 77 78 79 80 81 82 83 84 85 86 87 88 89 90
91 92 93 94 95 96 97 98 99 100 101 102 103 104 105 106 107 108 109 110 111 112
113 114 115 116 117 118 119 120 121 122 123
124 125 126 127 128 129 130 131 132 133 134
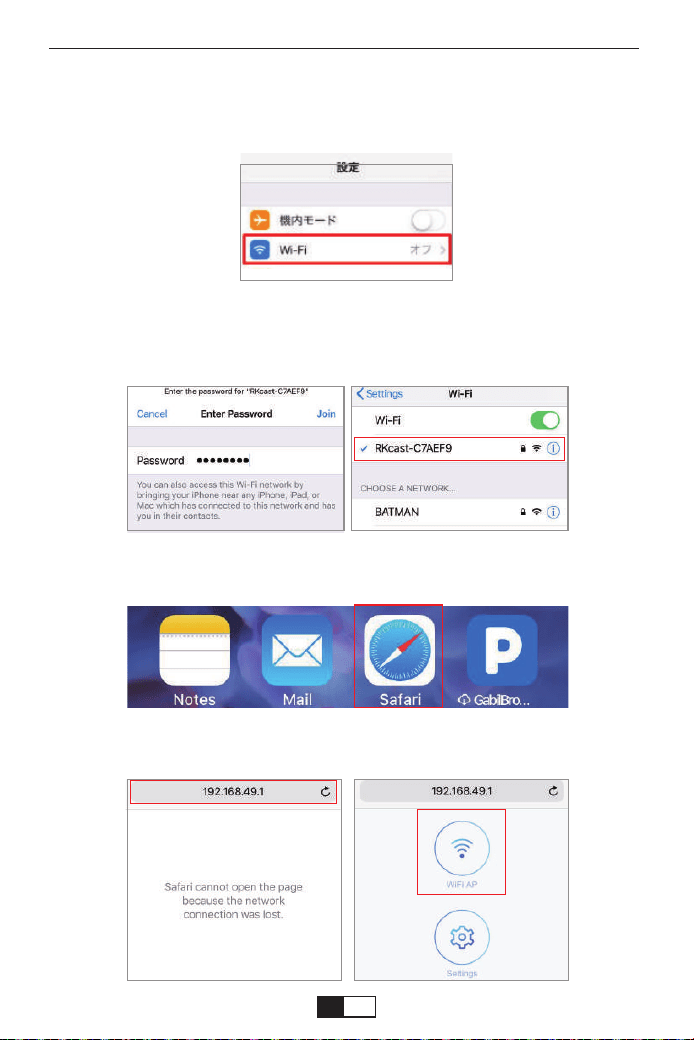
2.プロジェクターのネットワーク名[RKcast-xxxxxx]をタップします。プロジェクターのメニ
ューにあるパスワード[12345678]を入力します。選択したネットワーク名[RKcast-xxxxxx]
のパスワード[12345678]を入力して、[接続]をタップします。
3.Safariタップして「192.168.49.1」を入力してください。
4.WiFiAPがでるまで検索して、WiFiAPをタップしてください。
1.[設定]をタップします。[設定]画面が表示されますので、[Wi-Fi]をタップします。
※ [OFF]の場合は、スライドさせて[ON]にします。利用可能なネットワークが表示さ
れます。
IOSの場合
support01@yaberauto.com
JP
01 02 03 04 05 06 07 08 09 10 11 12 13 14 15 16 17 18 19 20 21 22 23
24 25 26 27 28 29 30 31 32 33 34 35 36 37 38 39 40 41 42 43 44 45
46 47 48 49 50 51 52 53 54 55 56 57 58 59 60 61 62 63 64 65 66 67
68 69 70 71 72 73 74 75 76 77 78 79 80 81 82 83 84 85 86 87 88 89 90
91 92 93 94 95 96 97 98 99 100 101 102 103 104 105 106 107 108 109 110 111 112
113 114 115 116 117 118 119 120 121 122 123 124
125 126 127 128 129 130 131 132 133 134
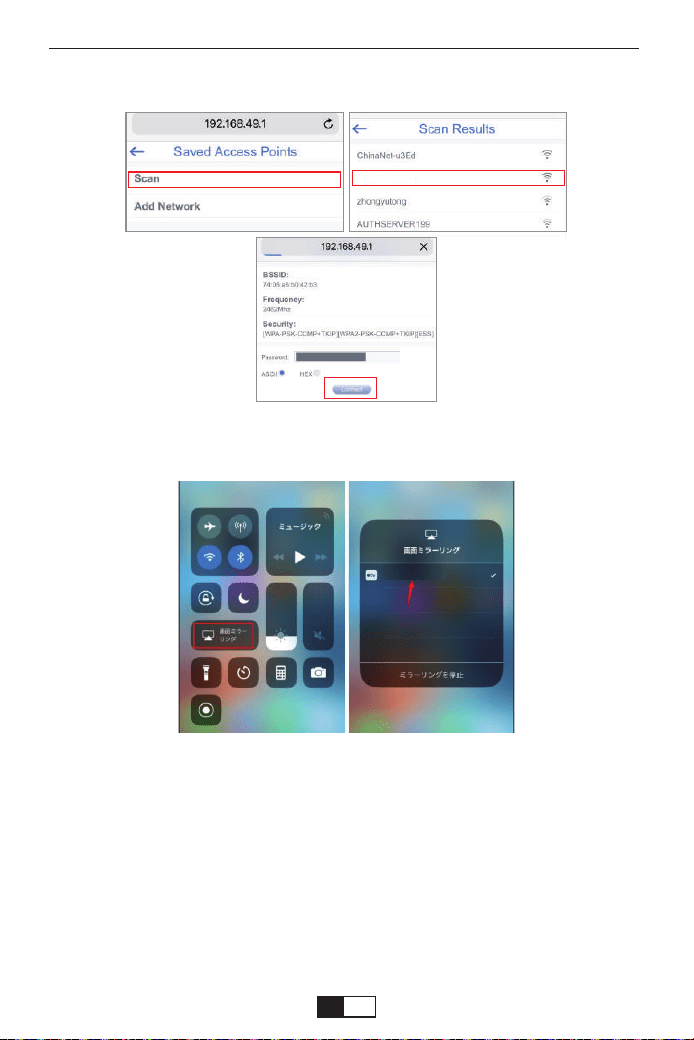
5.WiFiAP--Scan--をタープして、ご家庭用ネットワーク名を選択してパスワードを入力
して接 続してください。
6.[設定]をタップします。[画面ミラーリング」ボタンをタップ→キャスト先「
RKcast-xxxxxx」を選んでタップすれば、IOSの画面がプロジェクターに表示されます。
1.[設定]をタップします。[設定]画面が表示されますので、[Wi-Fi]をタップします。
※ [OFF]の場合は、スライドさせて[ON]にします。利用可能なネットワークが表示さ
れます。
2.ご使用予定のネットワーク名をタップして接続してください。
3.[設定]をタップします。[キャスト」ボタンをタップ → キャスト先「RKcast-xxxxxx」を選
んでタップすれば、Androidの画面がプロジェクターに表示されます。
Androidの場合
YABER
RKcast-xxxxxx
support01@yaberauto.com
JP
01 02 03 04 05 06 07 08 09 10 11 12 13 14 15 16 17 18 19 20 21 22 23
24 25 26 27 28 29 30 31 32 33 34 35 36 37 38 39 40 41 42 43 44 45
46 47 48 49 50 51 52 53 54 55 56 57 58 59 60 61 62 63 64 65 66 67
68 69 70 71 72 73 74 75 76 77 78 79 80 81 82 83 84 85 86 87 88 89 90
91 92 93 94 95 96 97 98 99 100 101 102 103 104 105 106 107 108 109 110 111 112
113 114 115 116 117 118 119 120 121 122 123 124 125
126 127 128 129 130 131 132 133 134
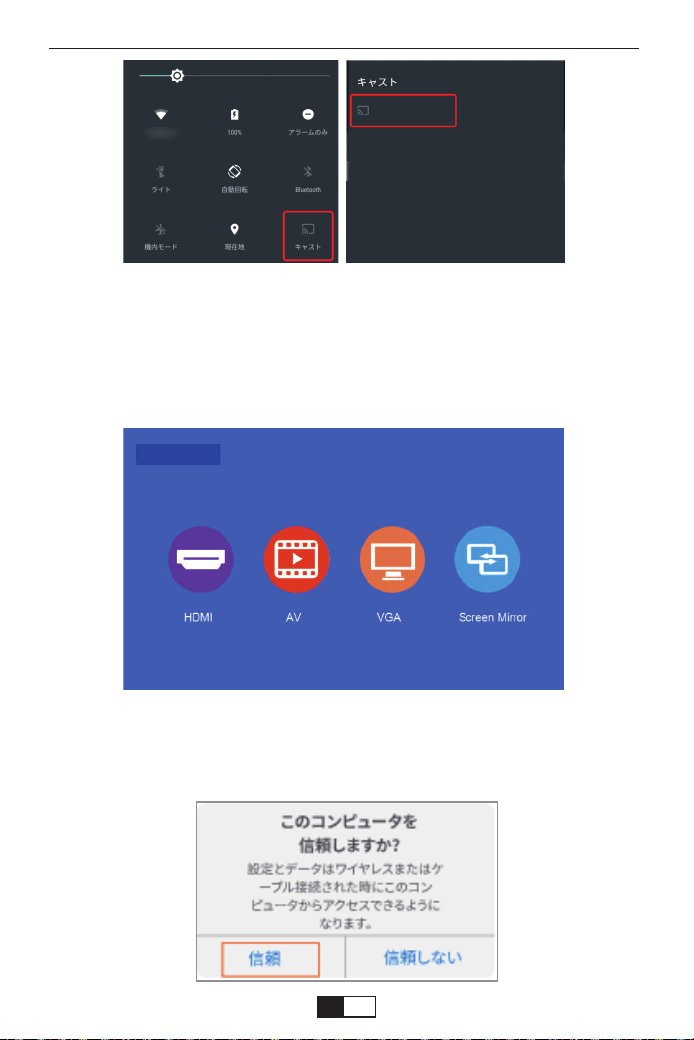
信号源
1.まず、プロジェクタの電源を入れ、リモコンあるいはプロジェクター本体の「S」ボタンを
押すと、投影画像に「入力ソース」オプションが表示されます。「スクリーンミラーリング」
を選択し、「OK」ボタンを押してください。
2.純正なUSBケーブルをプロジェクターのUSB-Tポート挿入してプロジェクターとIOS設
備を接続してください。
3.「この設備を信頼するか」の提示画面で、「信頼」をタープしてください。
IOSの場合
U S B ケーブ ル でスクリンミラーリング
RKcast-xxxxxx
support01@yaberauto.com
JP
01 02 03 04 05 06 07 08 09 10 11 12 13 14 15 16 17 18 19 20 21 22 23
24 25 26 27 28 29 30 31 32 33 34 35 36 37 38 39 40 41 42 43 44 45
46 47 48 49 50 51 52 53 54 55 56 57 58 59 60 61 62 63 64 65 66 67
68 69 70 71 72 73 74 75 76 77 78 79 80 81 82 83 84 85 86 87 88 89 90
91 92 93 94 95 96 97 98 99 100 101 102 103 104 105 106 107 108 109 110 111 112
113 114 115 116 117 118 119 120 121 122 123 124 125 126
127 128 129 130 131 132 133 134
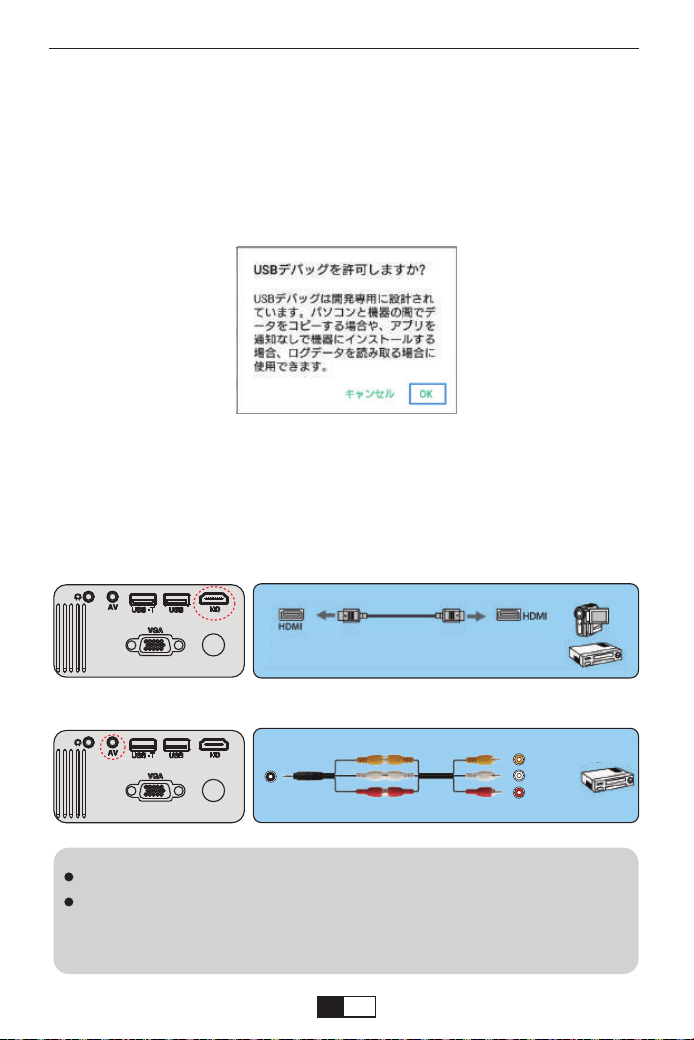
AV
video
audio out
(L/R)
①DVDプレーヤーやビデオなどの映像を投写するには、次の方法で接続します。
HDMIケーブルを使用するとき
②ビデオケーブルを使用するとき
ビデオ機器の接続
ビデオ機器によっては、数種類の信号を出力できます。出力できる信号の種
類は、お使いのビ
デオ機器に同梱の取扱説明書で確認してください。
使用するケーブルは、接続するビデオ機器の出力信号によって異なります
別売り
① まず、プロジェクタの電源を入れ、リモコンあるいはプロジェクター本体の「S」ボタ
ンを押すと、投影画像に「入力ソース」オプションが表示されます。「スクリーンミラーリ
ング」を選択し、「OK」ボタンを押してください。
②純正なUSBケーブルをプロジェクターのUSB-Tポート挿入してプロジェクターとIOS
設備を接続してください。
③「USBでデバッグを許可しますか?」の提示画面で、「OK」をタープしてください。
2.暫くおまちして、IOSの画面がプロジェクターに表示されます。
Androidの場合
1.
support01@yaberauto.com
JP
01 02 03 04 05 06 07 08 09 10 11 12 13 14 15 16 17 18 19 20 21 22 23
24 25 26 27 28 29 30 31 32 33 34 35 36 37 38 39 40 41 42 43 44 45
46 47 48 49 50 51 52 53 54 55 56 57 58 59 60 61 62 63 64 65 66 67
68 69 70 71 72 73 74 75 76 77 78 79 80 81 82 83 84 85 86 87 88 89 90
91 92 93 94 95 96 97 98 99 100 101 102 103 104 105 106 107 108 109 110 111 112
113 114 115 116 117 118 119 120 121 122 123 124 125 126 127
128 129 130 131 132 133 134
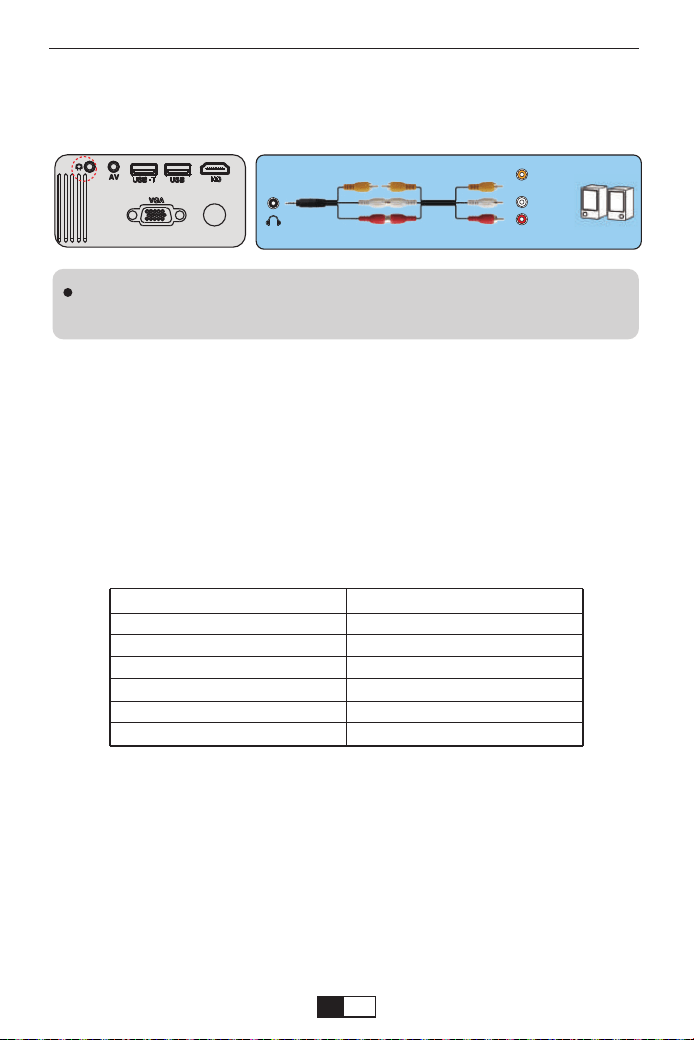
外部スピーカーから音声を出力するには、オーディオケーブルで、外部スピーカ
ーと本機のAudioOut端子を接続します。
画面サイズは、プロジェクターーのレンズからスクリーンまでの距離によって決まり
ます。スクリーンからレンズまでの距離が約1.5m~3mの範囲に設置してください。
下記の投写サイズと投写距離の関係をご参考ください。
※投映画像の内容により画面サイズは異なります。
外部スピーカーから音声を出力するときは、[音声出力機器]を[プロジェク
タ ー ]に 設 定 し ま す 。
外部スピーカーの接続
スクリーンからのおよその距離と画面サイズの関係
投 写 サイズ
3 3 インチ
6 0 インチ
8 0 インチ
100インチ
120インチ
150インチ
投写距離(16:9ズーム)
1.05m
1.888m
2.4m
3m
3.5m
4.39m
audio out
(L/R)
接続必要ない。接続必要ない。
プ ロジェクター の 設 置
別売り
support01@yaberauto.com
JP
01 02 03 04 05 06 07 08 09 10 11 12 13 14 15 16 17 18 19 20 21 22 23
24 25 26 27 28 29 30 31 32 33 34 35 36 37 38 39 40 41 42 43 44 45
46 47 48 49 50 51 52 53 54 55 56 57 58 59 60 61 62 63 64 65 66 67
68 69 70 71 72 73 74 75 76 77 78 79 80 81 82 83 84 85 86 87 88 89 90
91 92 93 94 95 96 97 98 99 100 101 102 103 104 105 106 107 108 109 110 111 112
113 114 115 116 117 118 119 120 121 122 123 124 125 126 127 128
129 130 131 132 133 134
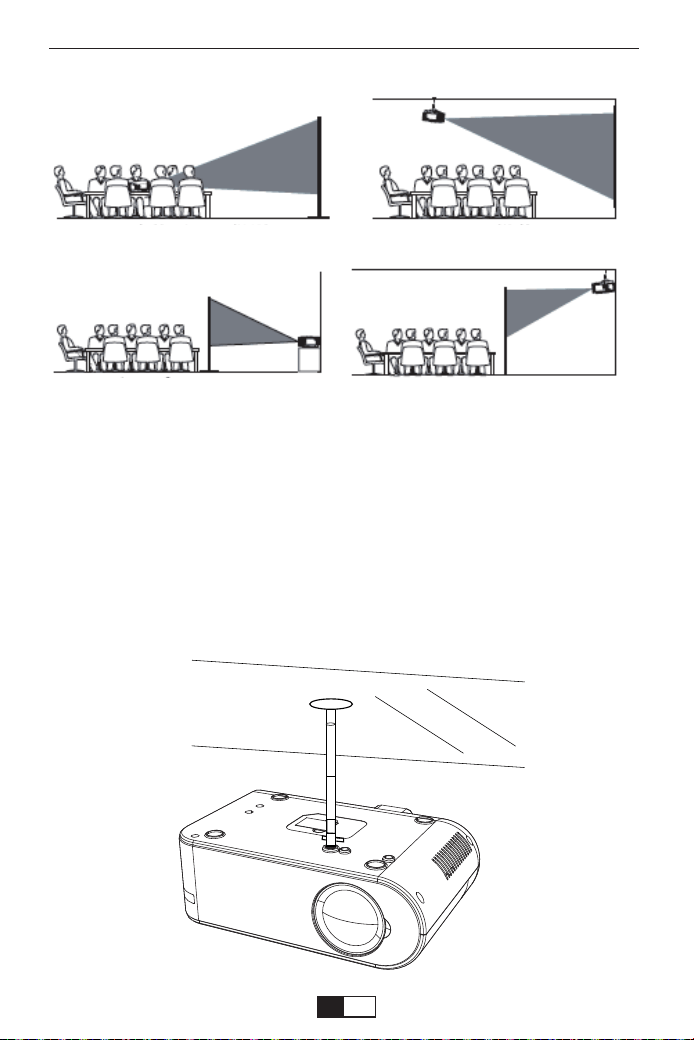
必要に応じて、プロジェクターは安定した面に設置したり、本製品のマウントを使
用して天井から吊るしたり
することができます。また、外部ディスプレイと接続したり、背面投影(リアプロ)を
楽しむことが可能です。
プロジェクターの天井への取り付けは下記の説明図をご参考ください。
投写場所の選択
天井吊り
固定位置での投影 マウント搭 載
リアプロ ラック搭 載リアプロ
support01@yaberauto.com
JP
01 02 03 04 05 06 07 08 09 10 11 12 13 14 15 16 17 18 19 20 21 22 23
24 25 26 27 28 29 30 31 32 33 34 35 36 37 38 39 40 41 42 43 44 45
46 47 48 49 50 51 52 53 54 55 56 57 58 59 60 61 62 63 64 65 66 67
68 69 70 71 72 73 74 75 76 77 78 79 80 81 82 83 84 85 86 87 88 89 90
91 92 93 94 95 96 97 98 99 100 101 102 103 104 105 106 107 108 109 110 111 112
113 114 115 116 117 118 119 120 121 122 123 124 125 126 127 128 129
130 131 132 133 134
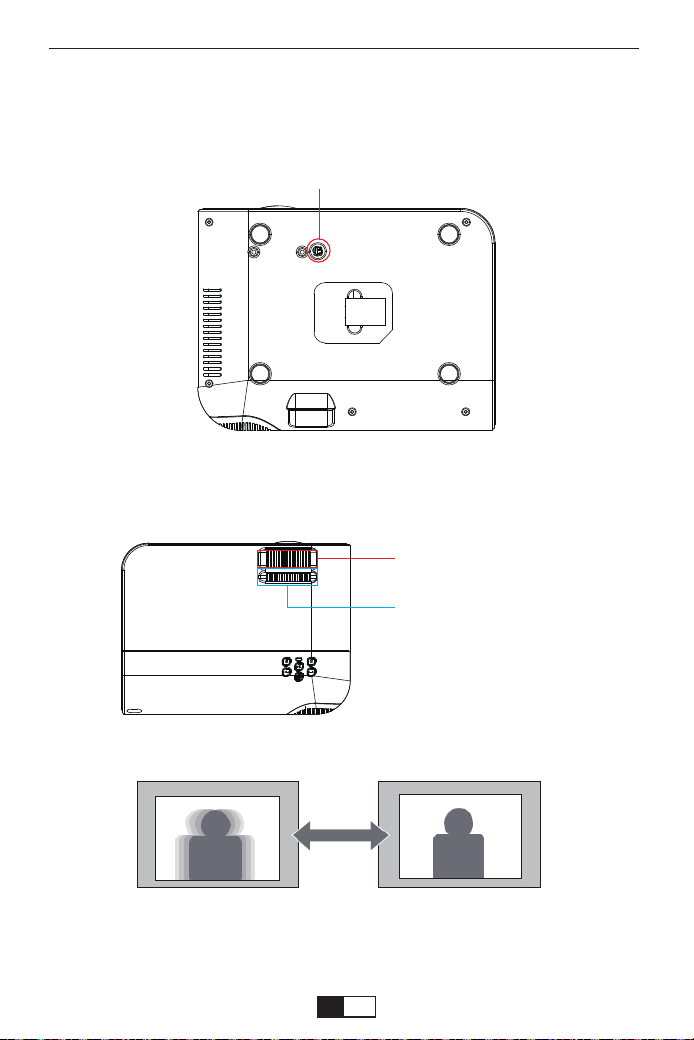
2.1台形補正(タテ補正)
A:投影画面はタテ斜めの場合は、プロジェクター本体の台形調整リングを回して
、台形を調整してください。
①プロジェクターエアコンやヒーターの熱源の近くに設置しないでください。
②プロジェクターの取り付けの際は、ネジの品質、本体へのネジ込み深さに注意し
てください。Y61プロジェクター用の天吊りは市場汎用のはほとんど使えます。天吊
りの固定用のネジの仕様はM5ネジです。
投写イメージの調整
画像の台形歪みの補正と明瞭さの微調整
1.レンズ回して投写画面のピントを合わせます。
レンズ回して投写画面のピ
ントを合わせます。
台形補正(タテ補正)
①
support01@yaberauto.com
JP
01 02 03 04 05 06 07 08 09 10 11 12 13 14 15 16 17 18 19 20 21 22 23
24 25 26 27 28 29 30 31 32 33 34 35 36 37 38 39 40 41 42 43 44 45
46 47 48 49 50 51 52 53 54 55 56 57 58 59 60 61 62 63 64 65 66 67
68 69 70 71 72 73 74 75 76 77 78 79 80 81 82 83 84 85 86 87 88 89 90
91 92 93 94 95 96 97 98 99 100 101 102 103 104 105 106 107 108 109 110 111 112
113 114 115 116 117 118 119 120 121 122 123 124 125 126 127 128 129 130
131 132 133 134
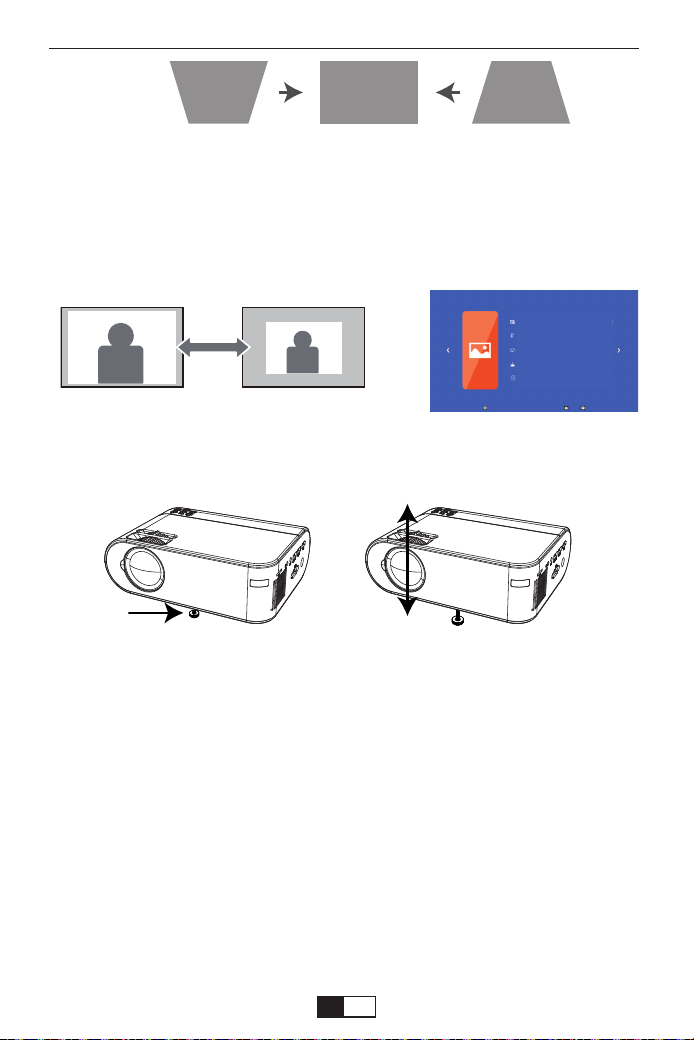
写真モード 標準
色温度
アスべクト比 16:9
投 影 モ ード フロント
Z00m 99
2.4映像のサイズを調整する(ズーム調整)
A:投写距離を変更して画像のサイズご調整してください。
B:投影中で、設置メニューの写真メニューで、リモコン或いは本体の▶ボタンを
押しでプロジェクターズーム値を調整すること通して、投影画面を25%まで縮小
できます。
(ズームは動画再生中しか調整できますです。)
3.映像の高さを調整する
フットレバーを押してフロントフットを伸ばします。最大12°まで傾けて、映像の高
さを調整できます。
ご注意:傾斜角度が大きくなると、ピントが合いにくくなります。傾斜角度が小さく
なるように設置してください。
縦横比とは、イメージの幅と高さの比率のことです。デジタルTVは通常縦横比
16:9です。こ
れはこのプロジェクターのデフォルト値に設定されています。またアナログTVと
DVDは4:3です。
①16:9この設定は、縦と横のサイズを別々に処理することを除き、画像をリニア方
式で引き伸ばし、リサイズします。ソース画像の高さと幅はそれぞれ投写高と投写
幅の最大値まで引き伸ばされます。この方法では、元のソース画像の縦横比によ
っては投写縦横比が変わる場合があります。アナモフィックの設定は、縦横比を変
更する必要がないため高精度TVなど、すでに縦横比が16:9になっている画像に
適しています。
ズーム(縦横比)調整
support01@yaberauto.com
JP
01 02 03 04 05 06 07 08 09 10 11 12 13 14 15 16 17 18 19 20 21 22 23
24 25 26 27 28 29 30 31 32 33 34 35 36 37 38 39 40 41 42 43 44 45
46 47 48 49 50 51 52 53 54 55 56 57 58 59 60 61 62 63 64 65 66 67
68 69 70 71 72 73 74 75 76 77 78 79 80 81 82 83 84 85 86 87 88 89 90
91 92 93 94 95 96 97 98 99 100 101 102 103 104 105 106 107 108 109 110 111 112
113 114 115 116 117 118 119 120 121 122 123 124 125 126 127 128 129 130 131
132 133 134
②4:3:スクリーンの中央が4:3の縦横比になるように画像を調整します。これは縦
横比を変更せずにすむため、コンピュータモニタ、標準精度のTV、縦横比4:3の
DVDムービーなどの4:3画像に適しています。
■音が出ません。
当商品の対応できるのファイルは下記の通りです。
ビデオ対応:MP4,RMVB,AVI,RM,MKV,etc
オーディオファイル対応:.AC3/AAC/.MP2/.MP3/.PCM/.FLAC/.WMA
画像対応:JEPG,PNG,BMP,MPO
Amazonファイアースティック側の設定でドルビーデジイタルプラスをドルビー
デジタルに設定すると直します。
■使用中に電源が切れる
1.タイマーメニューの「オートオフ」を「オン(時間を選択)」にしていませんか。「電
源切時間」を「オン(時間を選択)」にしていませんか。
2.電源ケーブルのプラグをちゃんと差し込みしているかをご確認ください。
■映像が出ない
接続している入力源を選んでいますか。本体またはリモコンの入力信号選択ボ
タンを再度押してください。
入力端子のケーブルが正しく接続されていますか。
それでも解決しない場合は、[リセット]を行ってみてください。
故障かな?と思ったら
仕 様:
1280P*720P(1080pサポート)
日本語対応
1.3KG
29*19*11cm
LCD
38w
110-220V
HDMI/USB/VGA/AV
解像度
言語
正味重量
本体寸法
ディスプレイ
消費電力
入力電圧
入力ポート
support01@yaberauto.com
JP
01 02 03 04 05 06 07 08 09 10 11 12 13 14 15 16 17 18 19 20 21 22 23
24 25 26 27 28 29 30 31 32 33 34 35 36 37 38 39 40 41 42 43 44 45
46 47 48 49 50 51 52 53 54 55 56 57 58 59 60 61 62 63 64 65 66 67
68 69 70 71 72 73 74 75 76 77 78 79 80 81 82 83 84 85 86 87 88 89 90
91 92 93 94 95 96 97 98 99 100 101 102 103 104 105 106 107 108 109 110 111 112
113 114 115 116 117 118 119 120 121 122 123 124 125 126 127 128 129 130 131 132
133 134

■映像が歪む
正しく設置されていますか。
台形状に歪む場合は台形補正を行ってください。
■映像がぼやける
レンズのフォーカスは合っていますか。
投写画面と本機が正しい角度で設置されていますか。
投写距離がフォーカスの範囲を超えていませんか。
投写レンズが汚れていないことを確認します。
■画像の上辺または下辺が長い(台形歪み
プロジェクターーは、スクリーンに対してできるだけ垂直になるように置きしてい
ますか。
本体のキーストーンリングを使って、台形歪みを補正して見てください。
■リモコンで操 作できない
リモコンのリモコン送信部を本体のリモコン受光部に向けていますか。
リモコンの電池が消耗していませんか。新しい電池と交換してください。
リモコンと本体のリモコン受光部との間に障害物がありませんか。
リモコンの有効範囲を超えていませんか。
■保証期間
保証期間はお買い上げ日より3年間です。何が問題がございましたら、遠慮なく
support01@yaberauto.com
までご連絡ください。
保証とアフターサービス
support01@yaberauto.com
JP
01 02 03 04 05 06 07 08 09 10 11 12 13 14 15 16 17 18 19 20 21 22 23
24 25 26 27 28 29 30 31 32 33 34 35 36 37 38 39 40 41 42 43 44 45
46 47 48 49 50 51 52 53 54 55 56 57 58 59 60 61 62 63 64 65 66 67
68 69 70 71 72 73 74 75 76 77 78 79 80 81 82 83 84 85 86 87 88 89 90
91 92 93 94 95 96 97 98 99 100 101 102 103 104 105 106 107 108 109 110 111 112
113 114 115 116 117 118 119 120 121 122 123 124 125 126 127 128 129 130 131 132 133
134

01 02 03 04 05 06 07 08 09 10 11 12 13 14 15 16 17 18 19 20 21 22 23
24 25 26 27 28 29 30 31 32 33 34 35 36 37 38 39 40 41 42 43 44 45
46 47 48 49 50 51 52 53 54 55 56 57 58 59 60 61 62 63 64 65 66 67
68 69 70 71 72 73 74 75 76 77 78 79 80 81 82 83 84 85 86 87 88 89 90
91 92 93 94 95 96 97 98 99 100 101 102 103 104 105 106 107 108 109 110 111 112
113 114 115 116 117 118 119 120 121 122 123 124 125 126 127 128 129 130 131 132 133 134