01 02 03 04 05 06 07 08 09 10 11 12
13 14 15 16 17 18 19 20 21 22 23
24 25 26 27 28 29 30 31 32 33 34
35 36 37 38 39 40 41 42 43 44 45
46 47 48 49 50 51 52 53 54 55 56 57 58 59 60
61 62 63
YABER Y61
INSTRUCTION MANUAL

01 02 03 04 05 06 07 08 09 10 11 12
13 14 15 16 17 18 19 20 21 22 23
24 25 26 27 28 29 30 31 32 33 34
35 36 37 38 39 40 41 42 43 44 45
46 47 48 49 50 51 52 53 54 55 56 57 58 59 60
61 62 63
Language
EN
FR
IT
ES
JP
01-12
13-23
24-34
35-45
46-63

YABER Lifetime Professional Support
Dear Customer,
Woohoo! Your projector is already in your hands! Let's get started!
Do you have any questions on how it works? Please read this manual
thoroughly before using the projector.
Are you satisfied with your projector? If you have any issues, email your
order number and description of your issue to:
Send your email ASAP, as we want to fix your issues the first time you have
them.
Customers sometimes can experience some confusion when using the
projector. Rather than trying to communicate directly with us, many buyers
instead just leave a review on the product page. However, most negative
reviews are caused by non-standardized use rather than a defect in the
product itself.
Actually, many problems can be easily solved by setting, such as no signal,
no sound,cannot connect with WiFi etc. We promise all the projectors have
been carefully checked andpackaged before shipping.
Therefore, if you have any questions, please contact us and give us an
opportunity to improve. We guarantee that we will provide you more
satisfactory solution.
Thanks for your understanding!
Best regards,
YABER TEAM
01 02 03 04 05 06 07 08 09 10 11 12
13 14 15 16 17 18 19 20 21 22 23
24 25 26 27 28 29 30 31 32 33 34
35 36 37 38 39 40 41 42 43 44 45
46 47 48 49 50 51 52 53 54 55 56 57 58 59 60
61 62 63
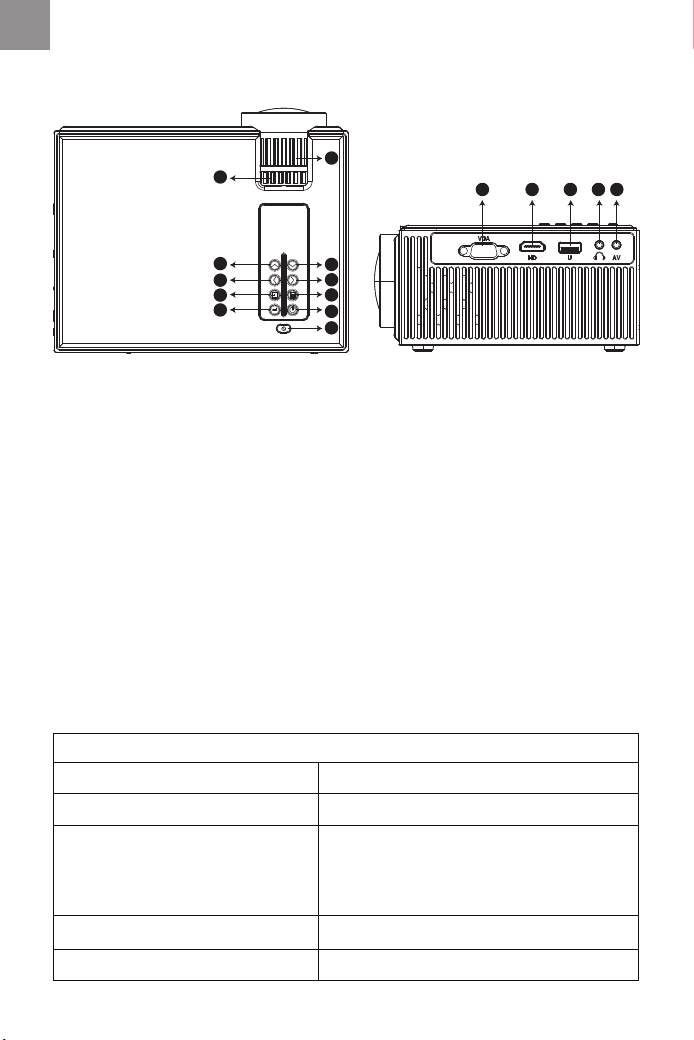
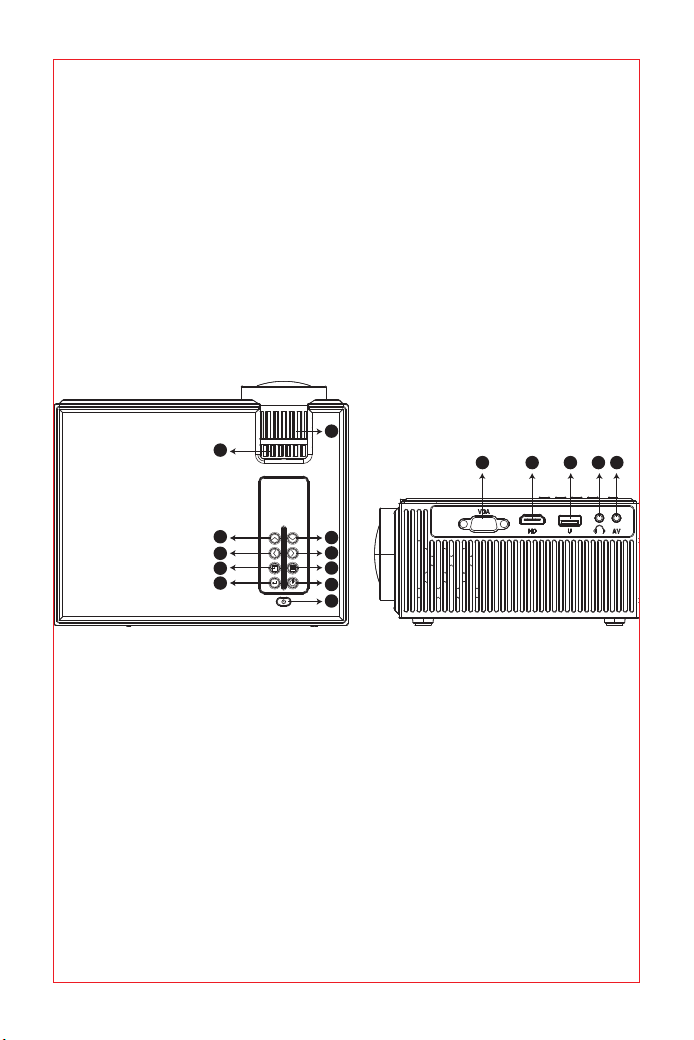
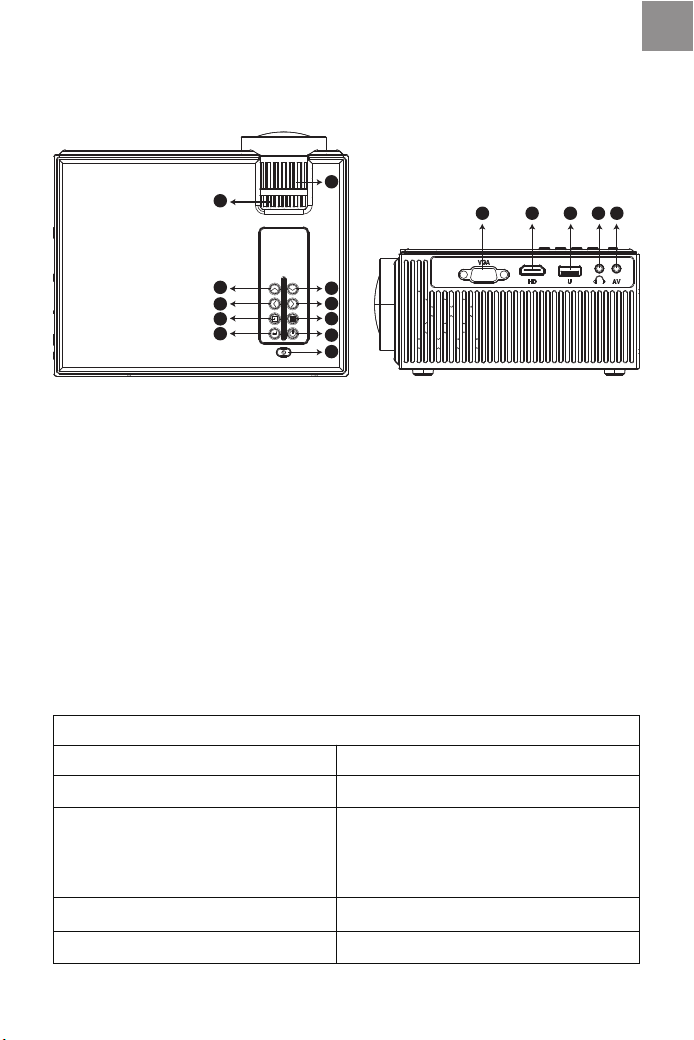
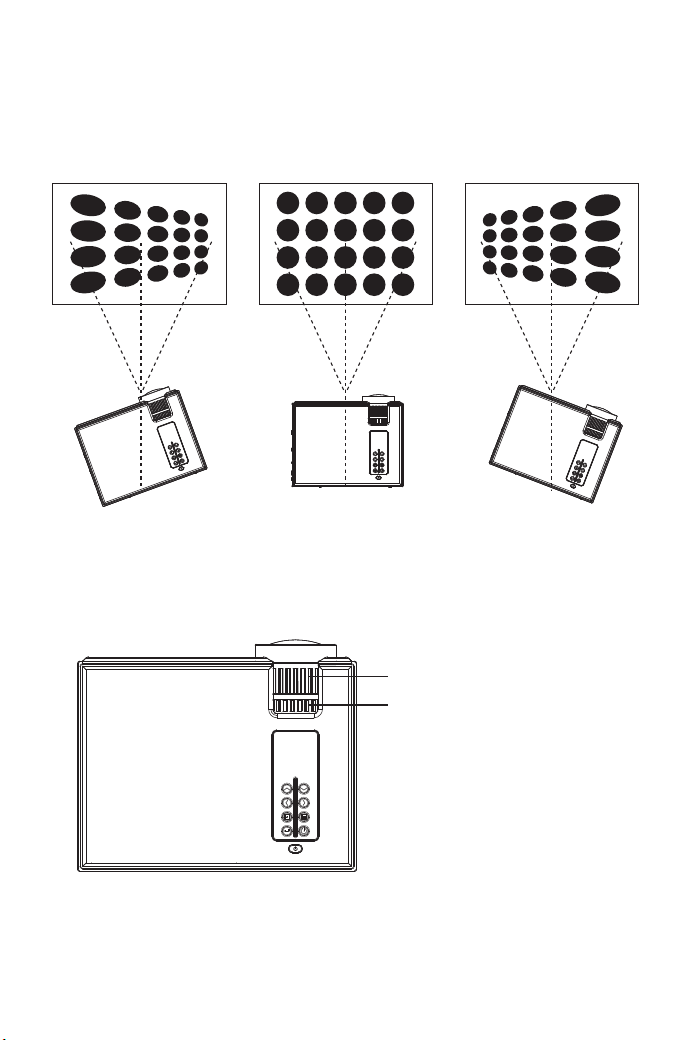
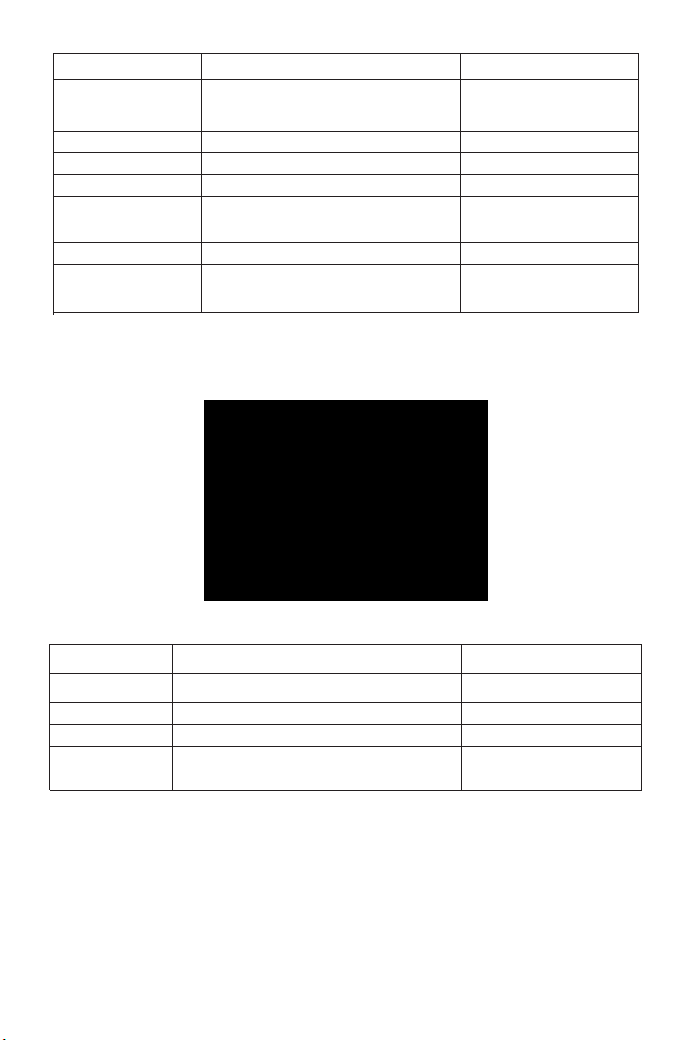
Product description
Pictures shown are for illustration purpose only.Actual product may vary
due to product enhancement.
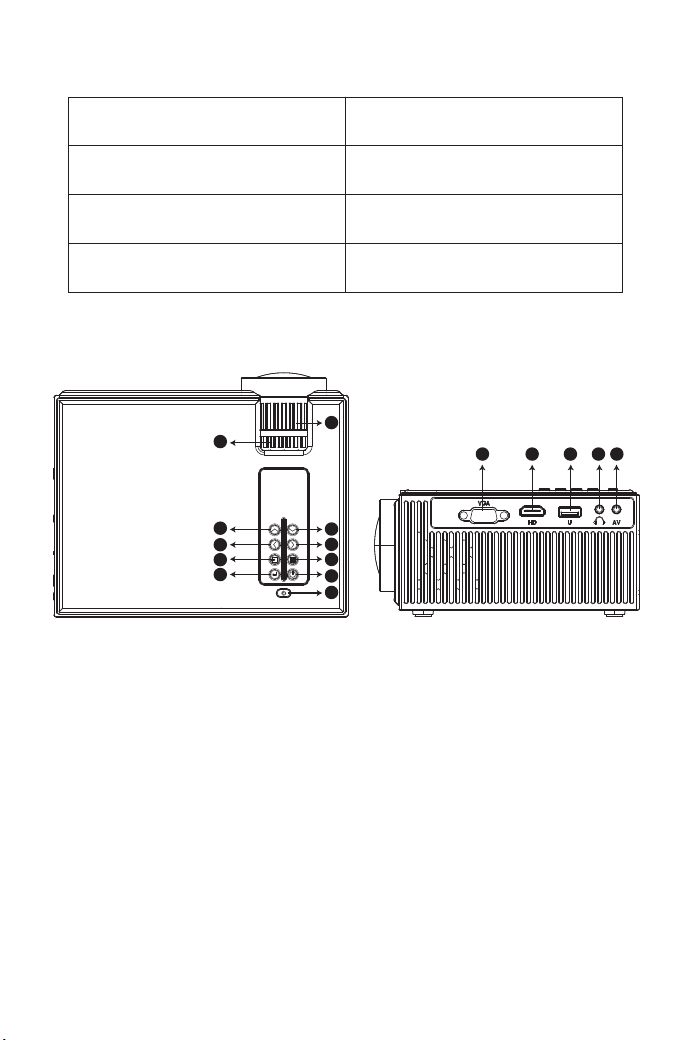
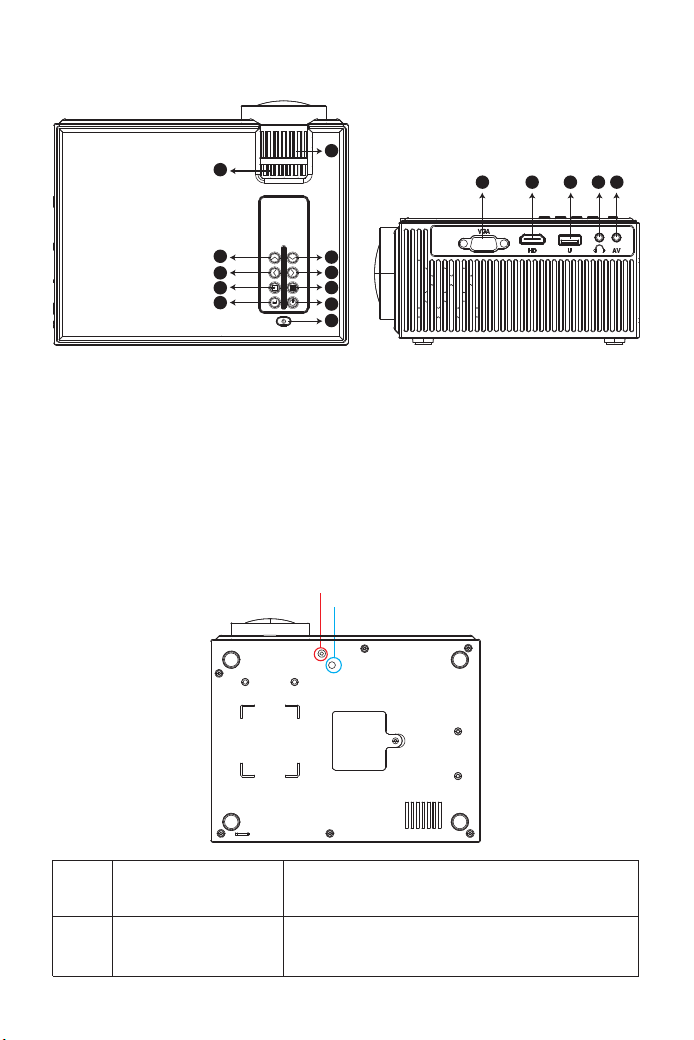
01. Channel+ / Up
02. Channel- / Down
03. Volume- / Left
04. Volume+ / Right
05. Source
06. Menu
07. Return
08. OK
9. VGA Port
10. HDMI Port
11. USB Port
12. Audio Output
13. AV Port
14. Power Button
15. Keystone Correction
16. Manual Focus
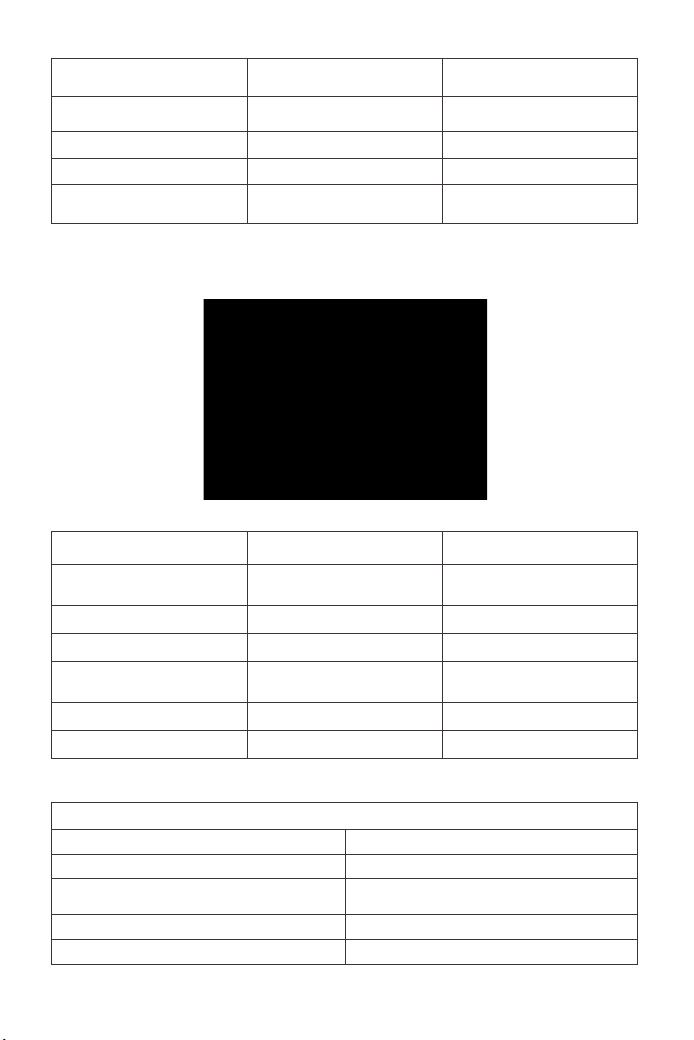
Imaging System: LCD
Light Source: LED
Projection Size: 50"-200"
Aspect Ratio: 16:9/ 4:3
Power: 110-240V~50/60HZ
Resolution:1280*720 (Support 1920*1080)
Interface Input:
HDMI/USB/VGA/AV/
Headphone Jack(3.5mm)
Keystone Correction: ±15°Manual
Projector Weight: 1.4KG
Projection Distance: 1.5M-5M
YABER Y61 Projector
EN
01
08
07
02
03
04
05
06
09 10 11
13
14
12
15
16
01 02 03 04 05 06 07 08 09 10 11 12
13 14 15 16 17 18 19 20 21 22 23
24 25 26 27 28 29 30 31 32 33 34
35 36 37 38 39 40 41 42 43 44 45
46 47 48 49 50 51 52 53 54 55 56 57 58 59 60
61 62 63
01
04
06
08
11
14
02
05
03
07
10
09
12
15
13
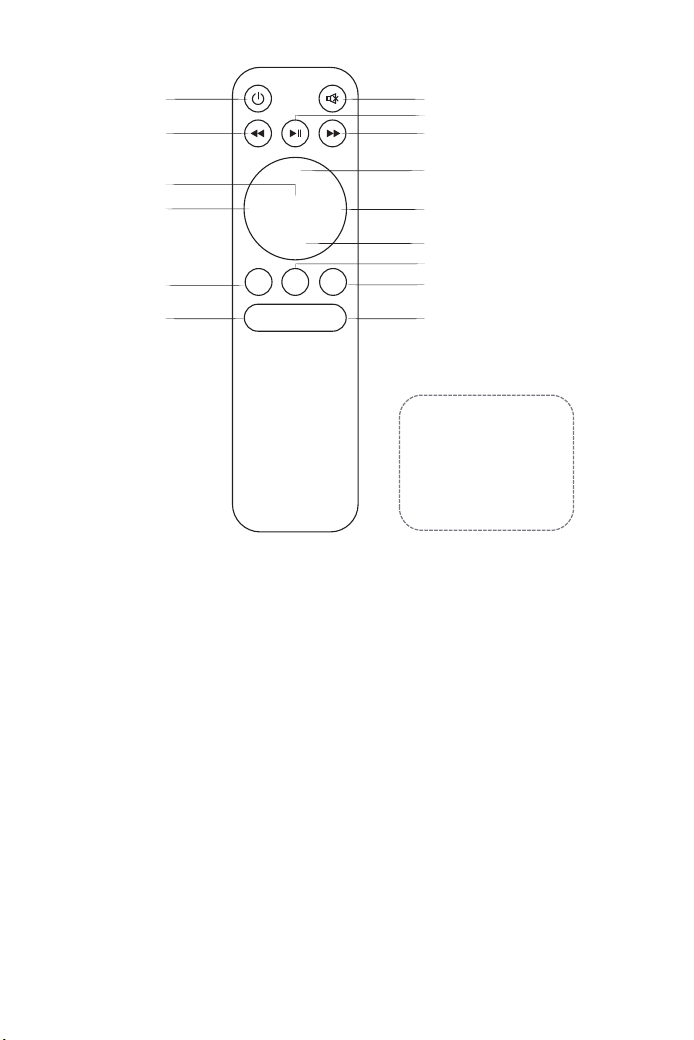
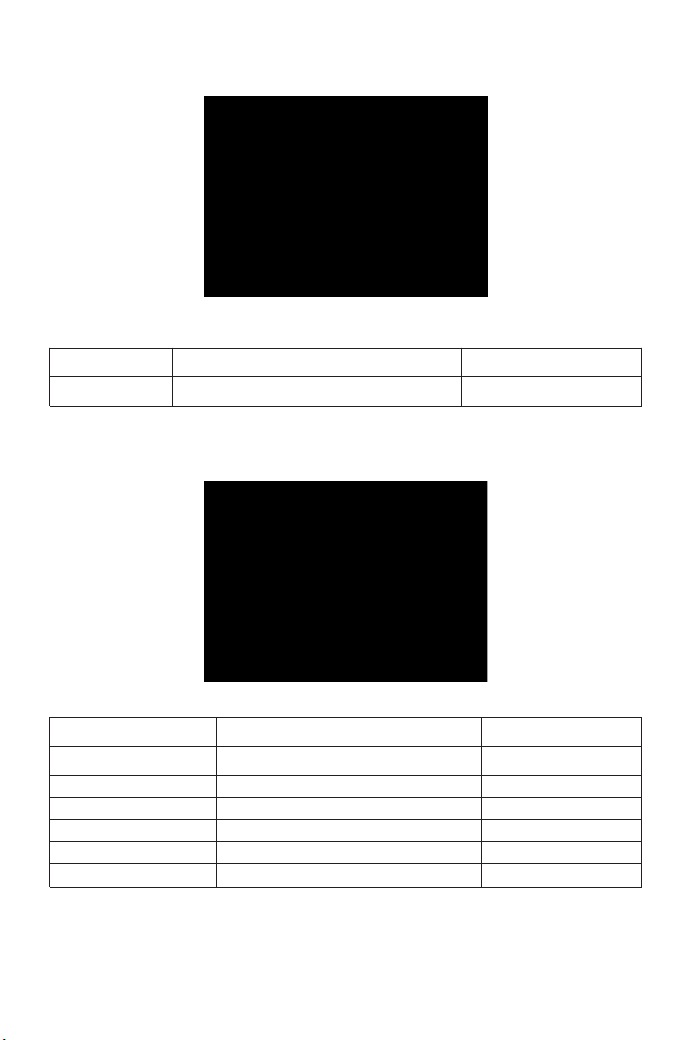
SOURCE MENU EXIT
VOL- VOL+
OK
< >
< >
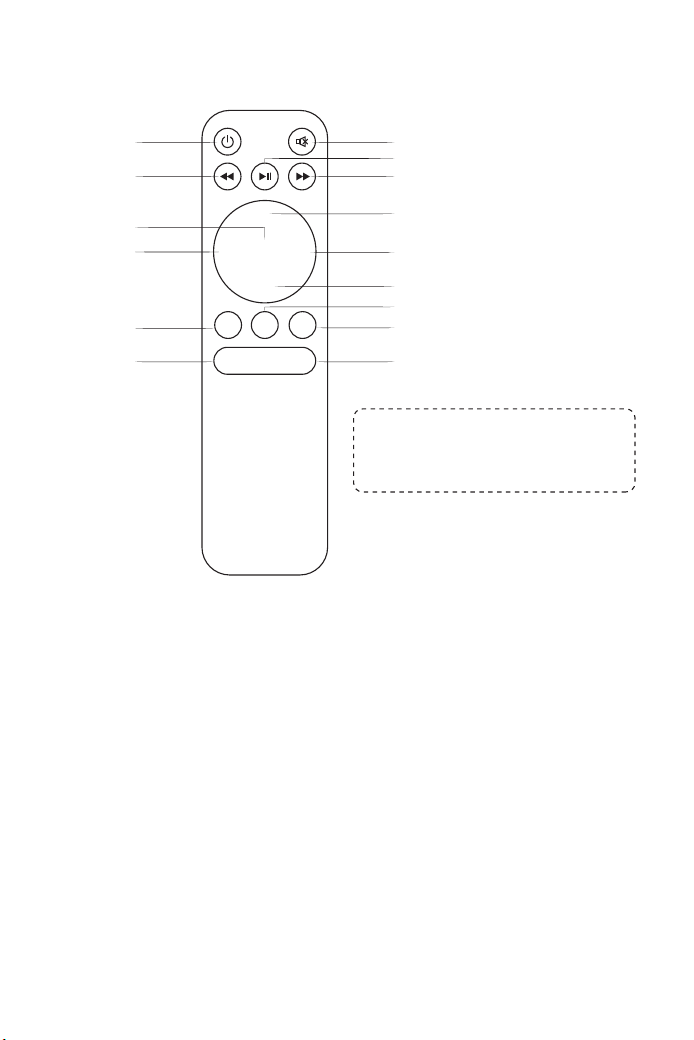
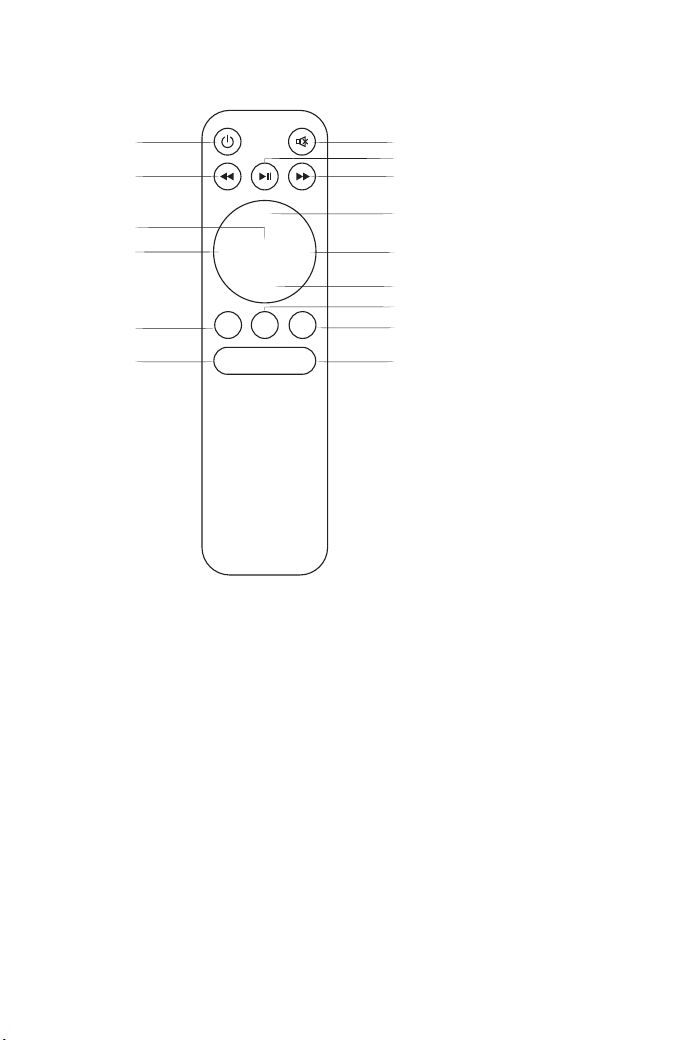
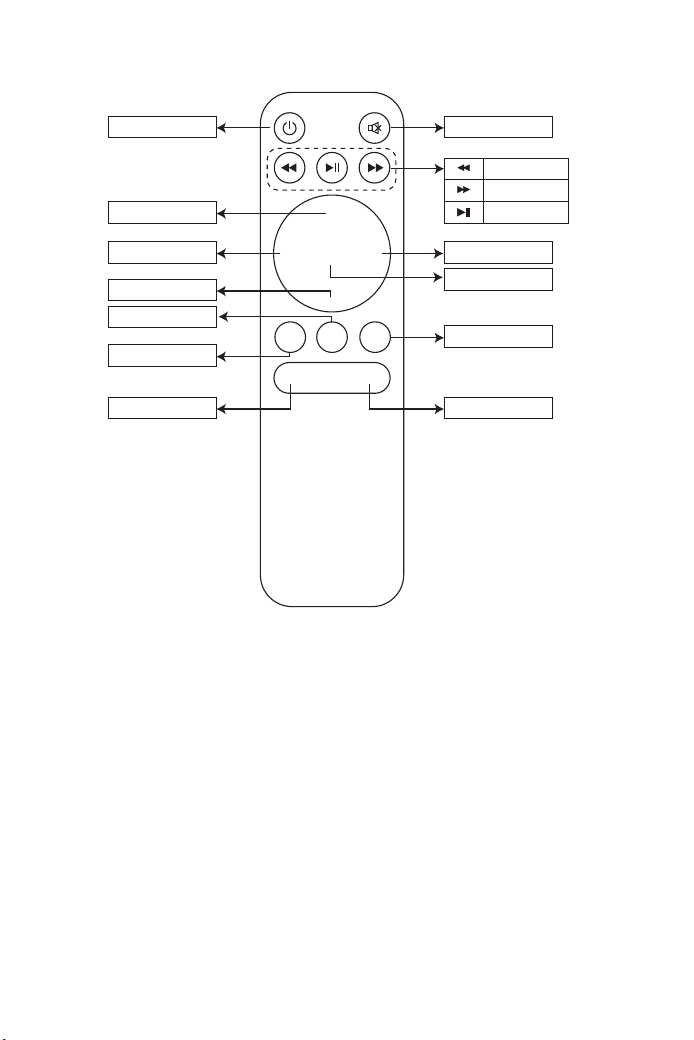
1. Power: Press this switch when turning on or off the power
2. Mute:Turns the sound on or off
3. Fast Forward Button: Move forward at a speed faster than that at
which it would usually be played
4. Fast Rewind Button: Move rewind at a speed faster than that at which
it would usually be played
5. Play Button: Play or Pause
6. OK Button: Confirm
7/8/9/10. Arrows Key: Move the pointer up, down, left and right
11. Source: Change the signal source
12. Menu: Call or exit the projector main menu
13. Exit
14/15. Volume Keys: Volume up / volume down
While using the remote control,
point it toward IR receiver.
(Batteries not included)
Remote control
01 02 03 04 05 06 07 08 09 10 11 12
13 14 15 16 17 18 19 20 21 22 23
24 25 26 27 28 29 30 31 32 33 34
35 36 37 38 39 40 41 42 43 44 45
46 47 48 49 50 51 52 53 54 55 56 57 58 59 60
61 62 63
Thanks
Thank you very much for purchasing the YABER Y61 projector.
Please read this instruction manual carefully before use. Also, please
keep it handy so you can check it at any time.
If in doubt, do not hesitate to contact [email protected]
We can provide after-sales service until satisfaction.
Observation
Part of the video in Netflix and the main video formats can not be
exported externally due to copyright protection (HDCP protocol). But
since Amazon Fire TV is HDCP compatible, you can play Netflix and the
first video via Amazon fire.
Important safeguards
These safety instructions are to ensure the long life of the projector and
to prevent fires and shocks. Read them carefully and pay attention to all
warnings.
Installation
1. For best results, use the projector in a dark room.
2. Place the projector on a flat, level surface in a dry area away from dust
and moisture.
Main unit of the projector * 1
Instruction manual * 1
3 in 1 * 1 AV cable
HDMI cable * 1 Support Base*1
Lens cleaning * 1
Power cord * 1
Remote control * 1
Replace the remote control battery
1. Push to open the battery cover.
2. Remove both old batteries and install new ones (AA). Make sure that
the polarity of the batteries (+/-) is correctly aligned.
Included
01 02 03 04 05 06 07 08 09 10 11 12
13 14 15 16 17 18 19 20 21 22 23
24 25 26 27 28 29 30 31 32 33 34
35 36 37 38 39 40 41 42 43 44 45
46 47 48 49 50 51 52 53 54 55 56 57 58 59 60
61 62 63

FAQ
4. Exposure to direct sunlight, smoke or steam may damage internal
components.
5. Handle the projector carefully. Falling or shaking can damage internal
components.
6. Do not place heavy objects on top of the projector.
1. At the time of switching on, the indicative light does not work
①. The power supply may not be well connected
②. Check the overheating protection system
2. Pressing the power button on the remote control does not turn on the
projector
①. The remote control batteries are empty
②. The signal between the remote control and the IR sensor is obstructed
③. Strong direct light on the IR sensor?
3. No image on the screen
①. Is the channel setting correct?
②. Is there an input signal?
③. Is the input cable inserted correctly or is it in the wrong position?
④. In PC mode the refresh rate is> 75KHz?
1. The projector is designed to operate with a 110-240 V ~ 50/60 Hz AC
adapter. Ensure that the power supply meets this requirement before
attempting to use the projector.
2. Handle the power cord carefully and avoid bending it too much. A
damaged cord can cause electric shock or fire.
3. If the projector will not be used for a long time, unplug the power cord
from the outlet.
Supply
1. Unplug the projector before cleaning it.
2. Periodically clean the cabinet with a damp cloth. If it is very dirty, use a
mild detergent. Never use strong detergents or solvents such as alcohol
or thinners.
3. Use a blower or lens paper to clean the lens and be careful not to
scratch or damage the lens.
Cleaning
01 02 03 04 05 06 07 08 09 10 11 12
13 14 15 16 17 18 19 20 21 22 23
24 25 26 27 28 29 30 31 32 33 34
35 36 37 38 39 40 41 42 43 44 45
46 47 48 49 50 51 52 53 54 55 56 57 58 59 60
61 62 63
4. The image works but there is no sound
①. Are the input cables connected correctly?
②. Volume at minimum or silent
③. Check that the audio format of the video is in the supported list
5. Turns off automatically after being turned on for a while
①. Is there a barrier around the fan?
②. Small or large voltage fluctuations
③. Check the overheating protection system
6. I can not find devices connected with hard drives or flash drives
①. Re-insert the device
②. Check if the device is working
7. Unable to play video
①. Is the video format correct?
②. The file is corrupted?
③. The device is damaged
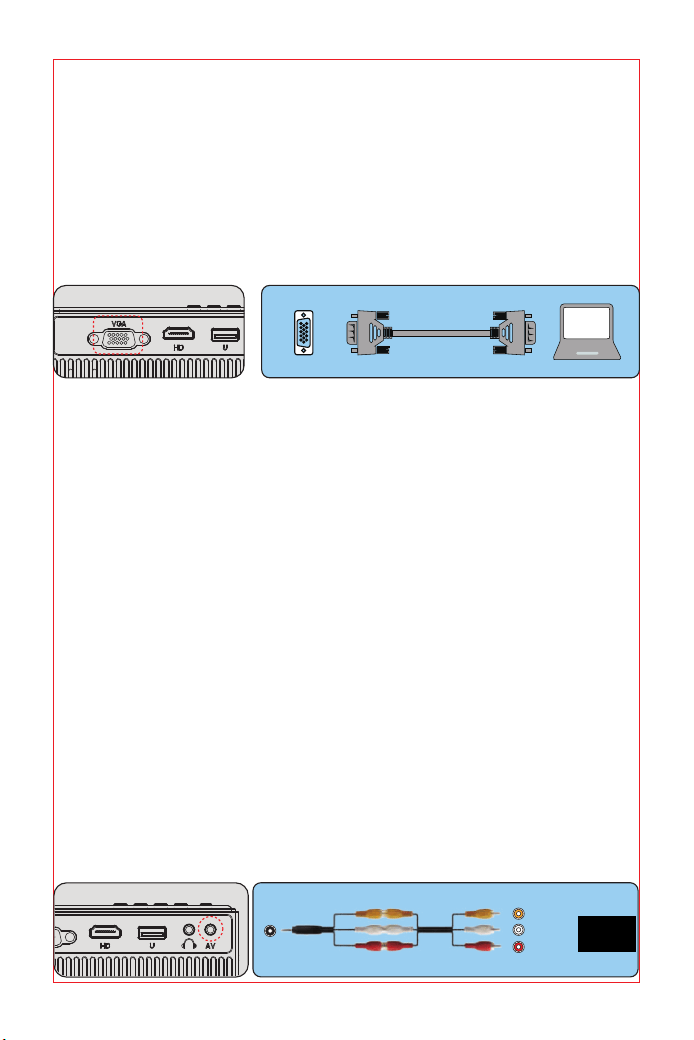
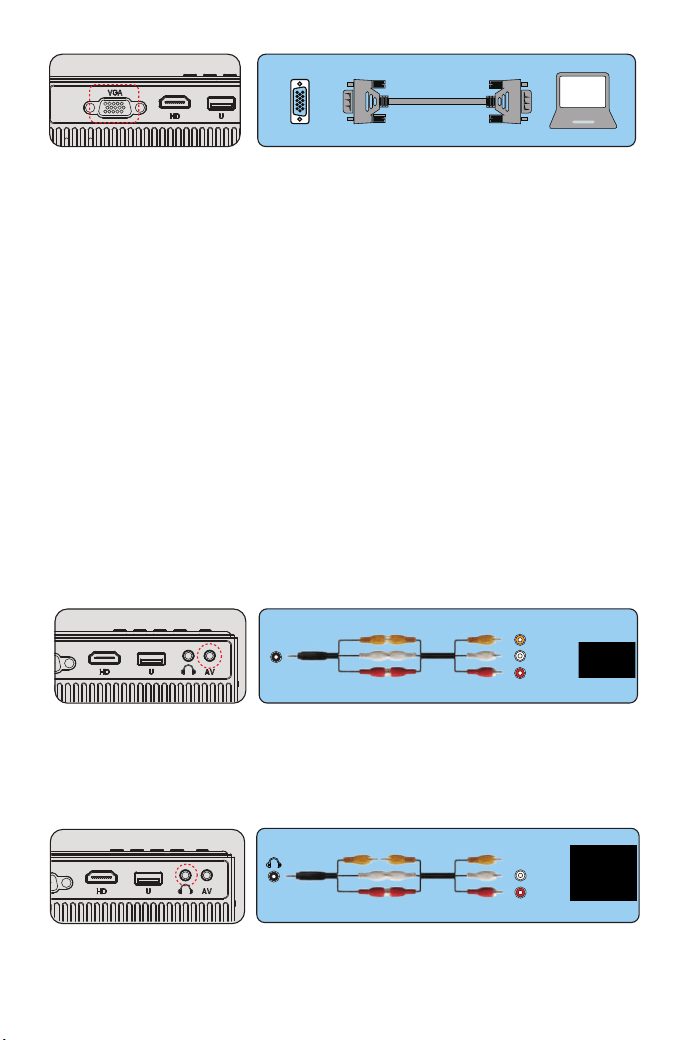
Connection device
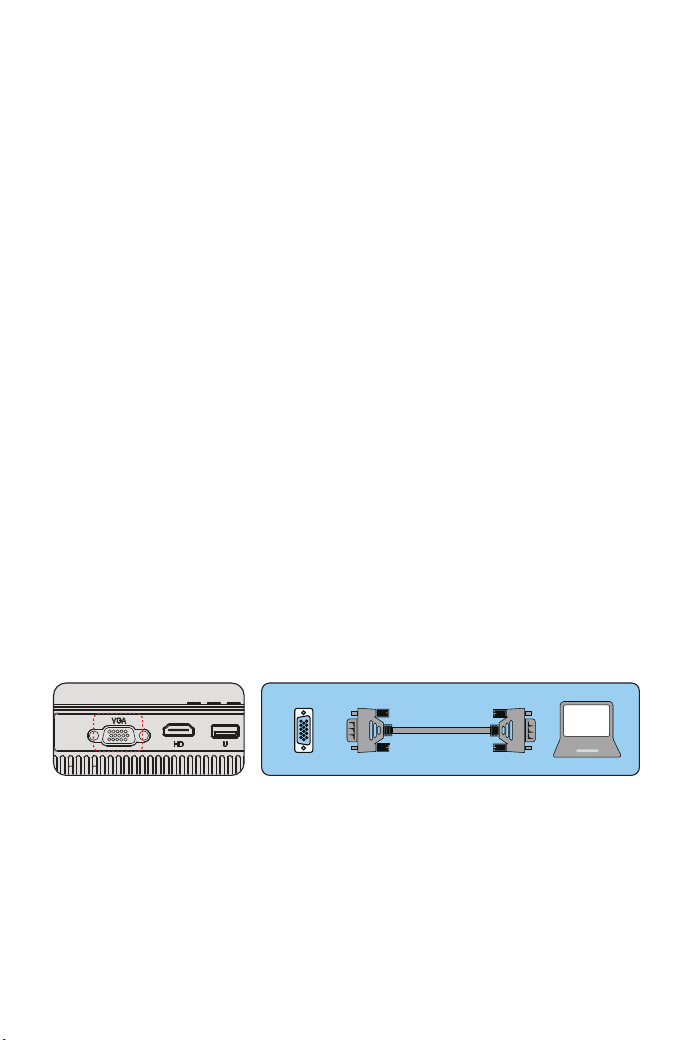
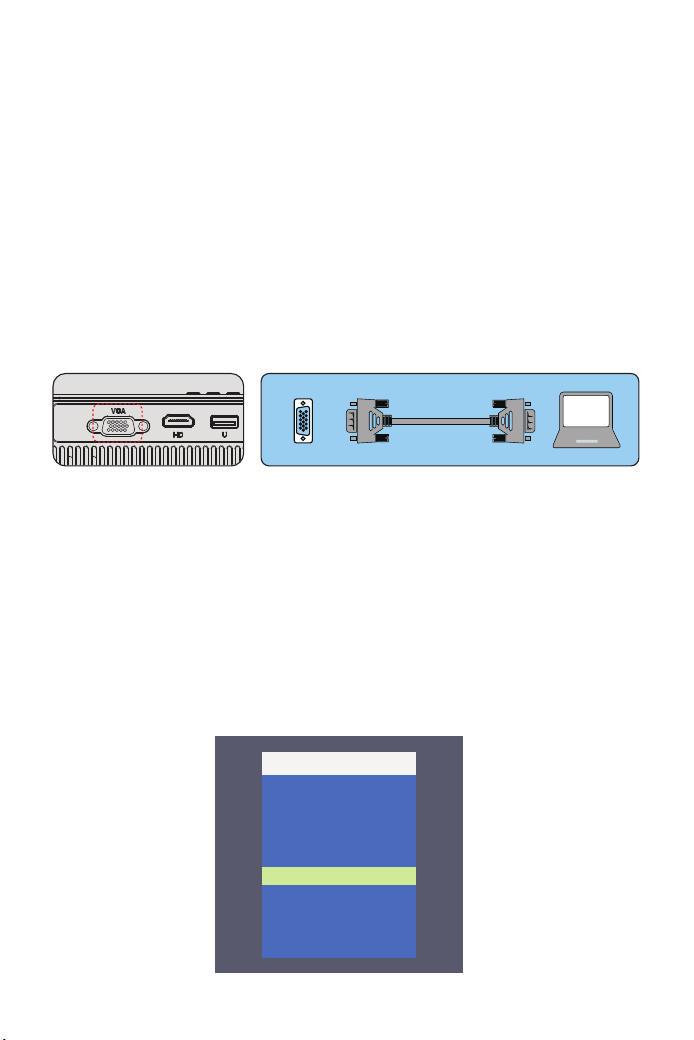
1.Connecting a PC
1.Use the supplied VGA cable to connect the PC to the projector.
2. Turn on the projector and the computer.
* NOTE: You can also connect an HDMI cable, remember that VGA
connections do not transmit audio, so the sound will be output from the
computer. If you connect an HDMI cable, the audio will be output to the
projector.
2. Connecting a smartphone
Connect a phone with Android system:
(Note: check if your Android phone supports MHL function.) MHL-HDMI
cable not included)
1. Connect the projector and the Android smartphone with the
MHL-HDMI cable.
2. Choose the signal source: "HDMI"
VGA
01 02 03 04 05 06 07 08 09 10 11 12
13 14 15 16 17 18 19 20 21 22 23
24 25 26 27 28 29 30 31 32 33 34
35 36 37 38 39 40 41 42 43 44 45
46 47 48 49 50 51 52 53 54 55 56 57 58 59 60
61 62 63
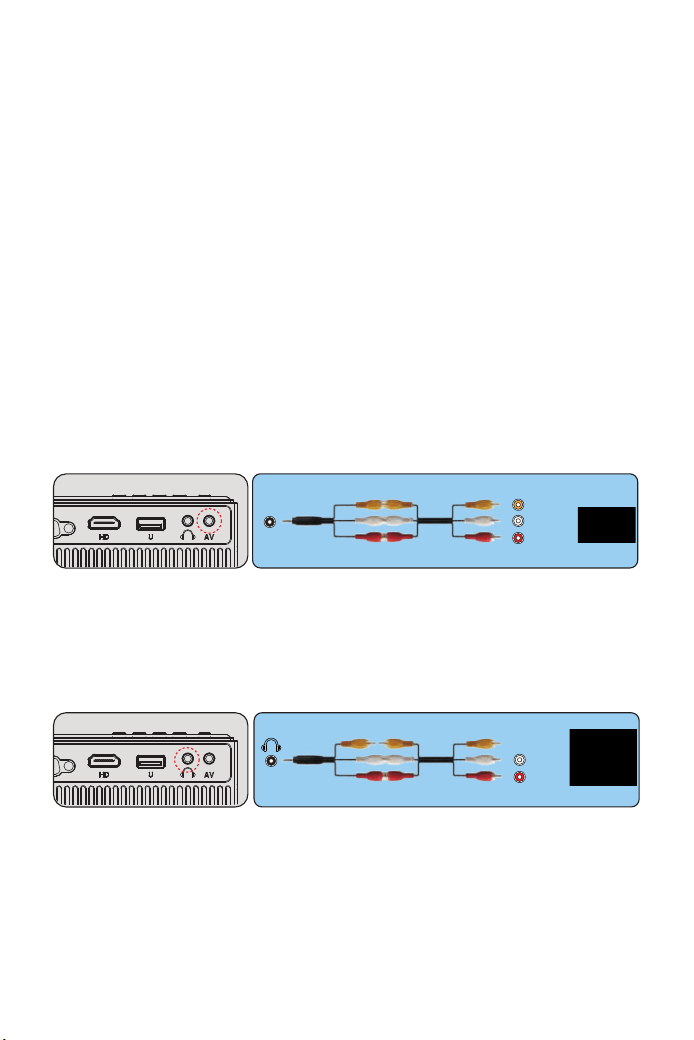
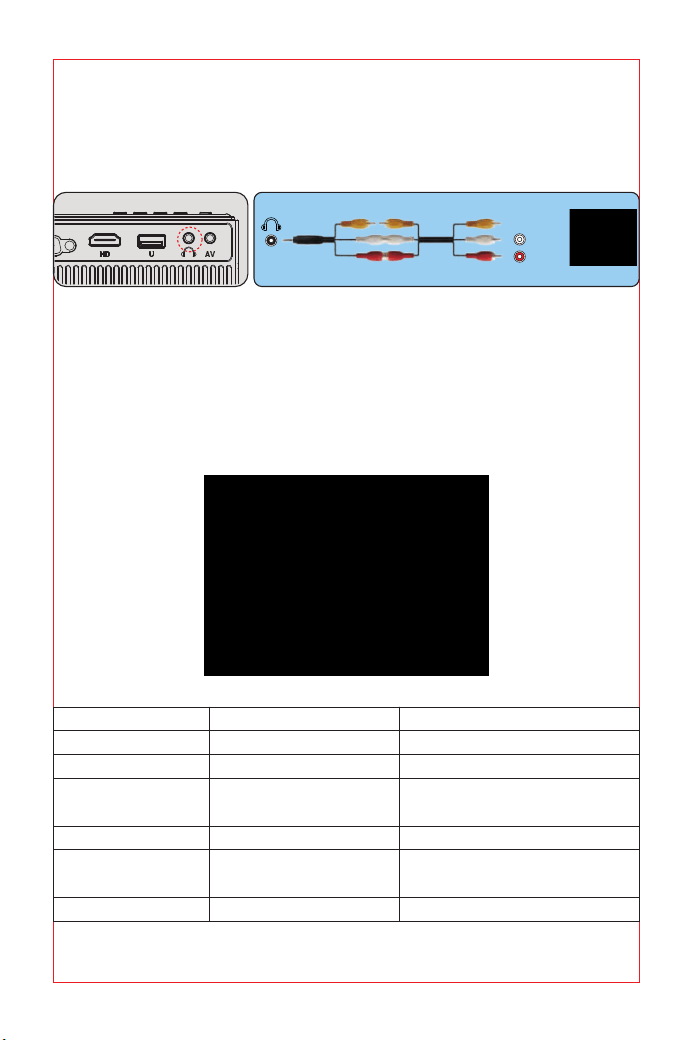
4. Connect the soundbar
1. Use the supplied AV cable to connect the soundbar to the projector.
2. Turn on the projector and the sound bar.
Connect a phone with IOS system:
1. Connect the projector and iPhone with Lightning-to-HDMI cable (not
included)
2. Choose the signal source: "HDMI"
Connect with an Anycast:
1: Plug in Anycast with the micro usb port and another usb port to your
power adapter.
2: Connect Anycast to your Projector's HDMI port and switch the
Projector source to HDMI.
3: You will see the Anycast main menu on the Projector screen.
3.Connecting a DVD player
1. Use the supplied AV cable to connect the DVD player to the projector.
2. Turn on the projector and DVD player.
If your player has an HDMI output, it is best to use it over the analog (AV)
option. Audio output must be configured from the DVD player menu if
external speakers are installed.
(3-in-3 AV cable not included)
(3-in-3 AV cable not included)
AV
video
audio out
(L/R)
audio out
(L/R)
01 02 03 04 05 06 07 08 09 10 11 12
13 14 15 16 17 18 19 20 21 22 23
24 25 26 27 28 29 30 31 32 33 34
35 36 37 38 39 40 41 42 43 44 45
46 47 48 49 50 51 52 53 54 55 56 57 58 59 60
61 62 63
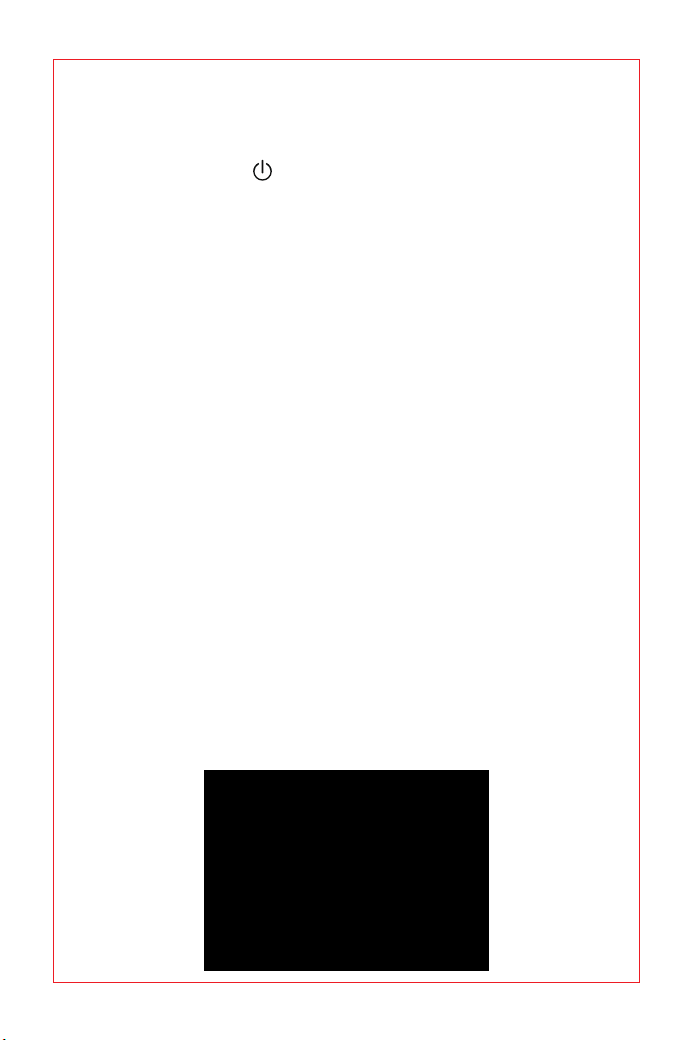
Starting the projector
Turn on the projector by connecting the supplied power cord to the outlet, and
then pressing the main power switch. The projector will go into standby mode
and the power indicator will light red.
Only after pressing the "POWER" button on the projector or remote control
will the power indicator turn green and the projector will become ready to use.
Select the signal source:
Press the "source" button on the remote control or the projector and choose
between: "AV", "PC-RGB", "HDMI 1", "HDMI 2", "USB".
1. Adjust the image size to get the best image size by moving the projector
back and forth, then use the focus ring to get the best focus.
Select the language menu
Language menu you have to select it when you turn on the projector for the
first time, you will see the interface in English. You can select one of the
menu languages: German, French, Italian, Spanish, Japanese and so on.
Please follow these steps:
1. Press the "meun" button and find the "OPTION" interface, then find the
"OSD Language English".
2. Press the ENTER button to execute the selection.
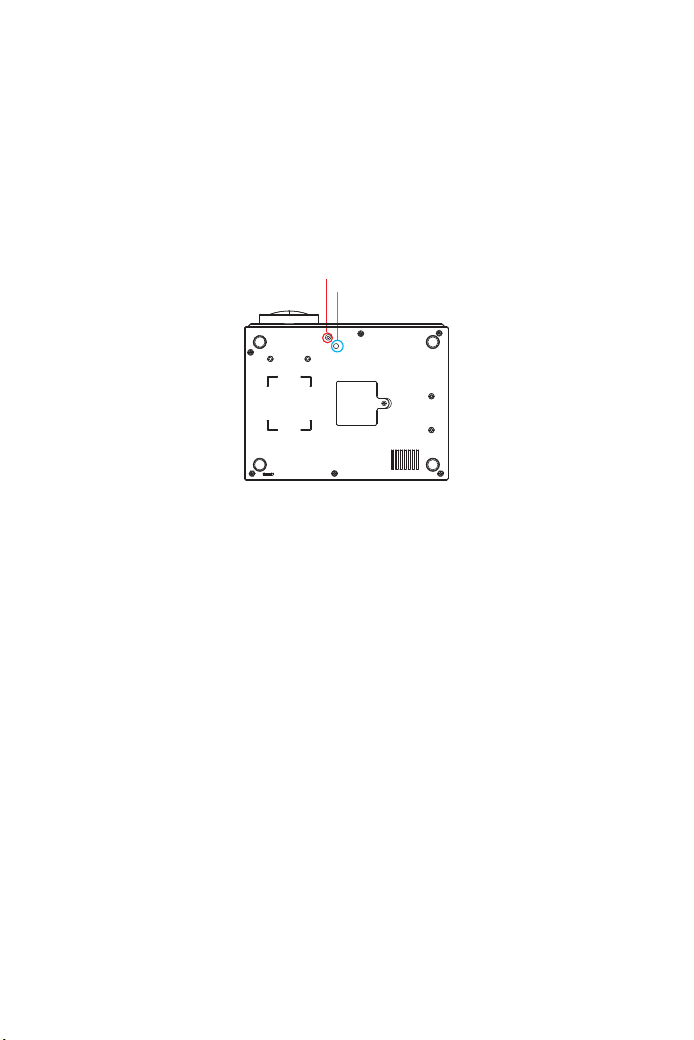
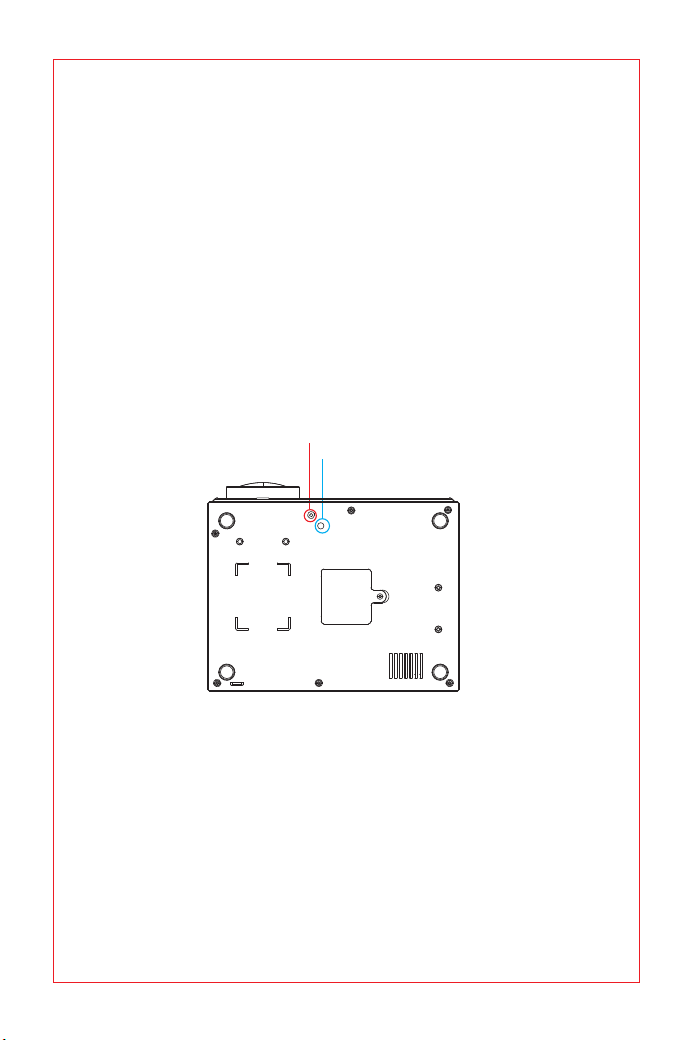
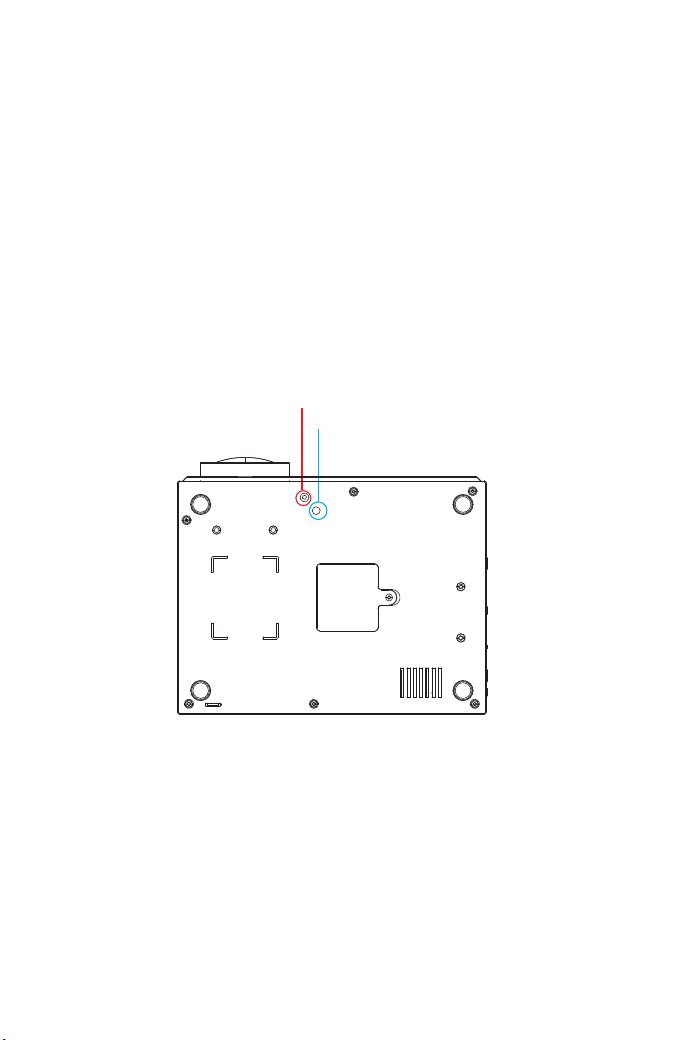
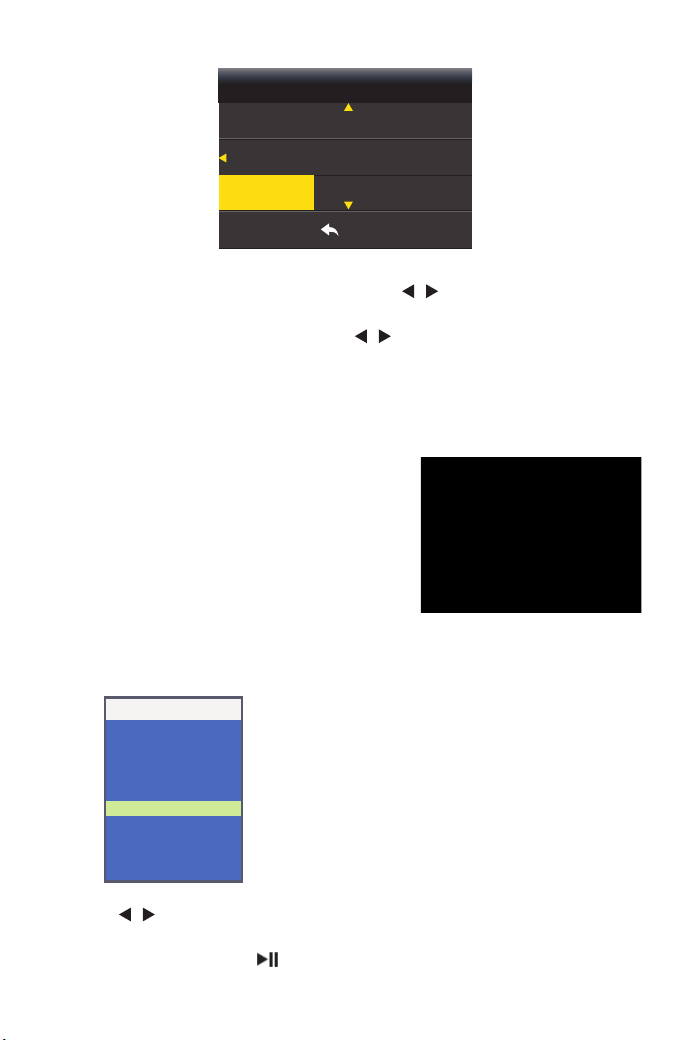
Adjust the Tilt Base and Hang Ceiling
Adjust the tilt base:
Install the screws (included in the package) to place ①, lift the front edge of
the projector to the desired height, turn the presser foot and release the
button to lock the tilt base to the appropriate position.
Hang ceiling:
Please purchase the projector stand and 1/4 inch screw additionally.
Install the projector stand to place ②, and hang the projector on the ceiling.
( Note: You can install the Tripod Stand to the place ② )
①
②
01 02 03 04 05 06 07 08 09 10 11 12
13 14 15 16 17 18 19 20 21 22 23
24 25 26 27 28 29 30 31 32 33 34
35 36 37 38 39 40 41 42 43 44 45
46 47 48 49 50 51 52 53 54 55 56 57 58 59 60
61 62 63
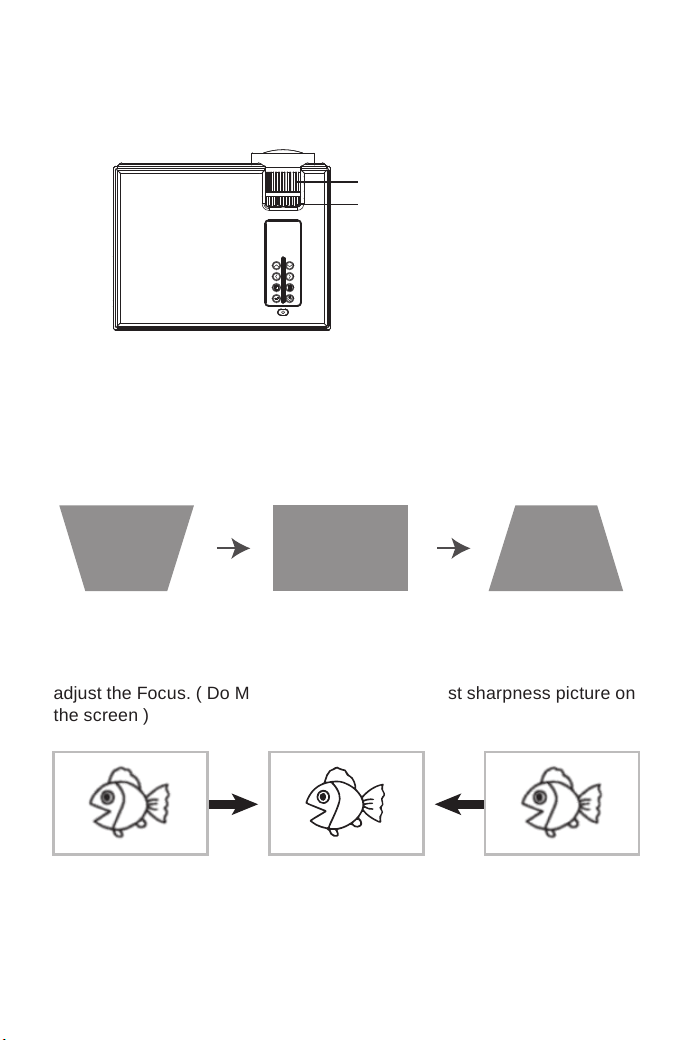
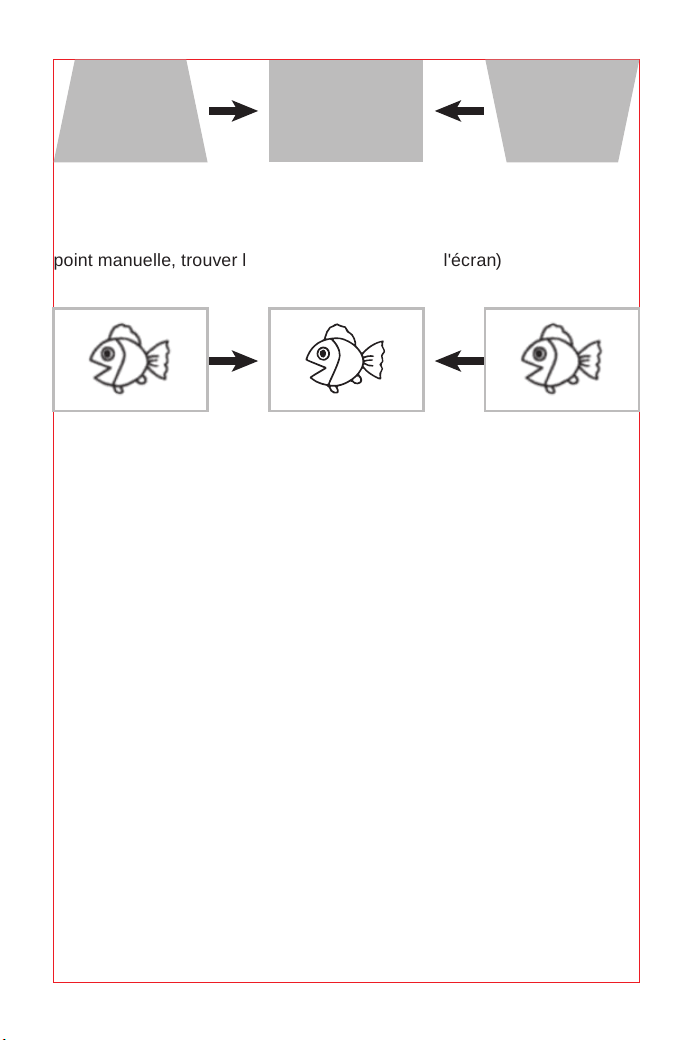
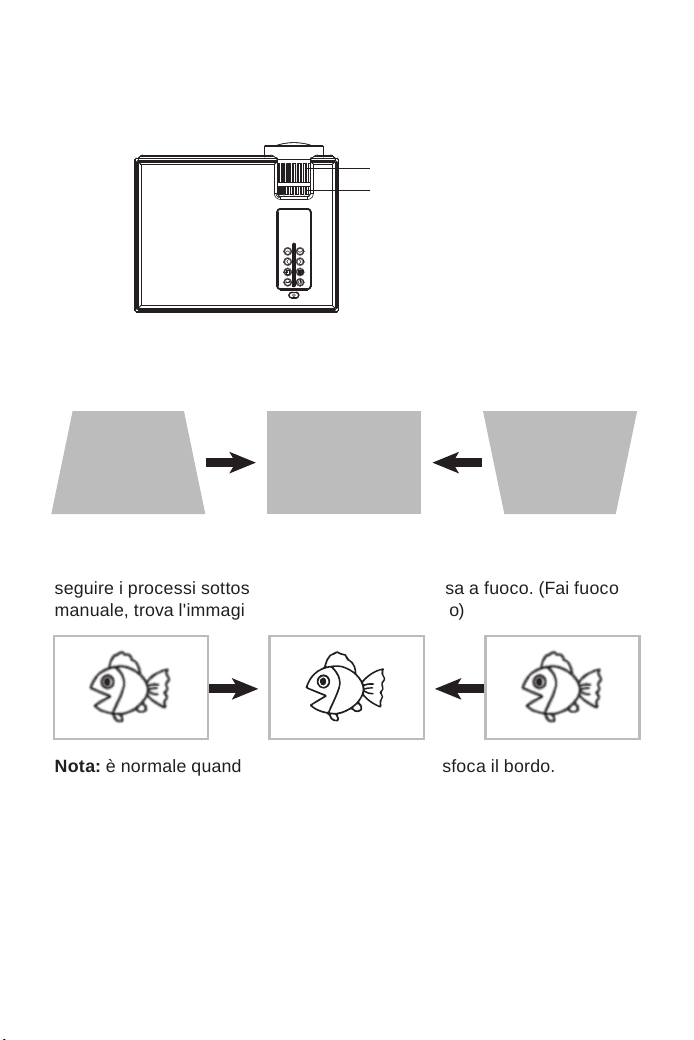
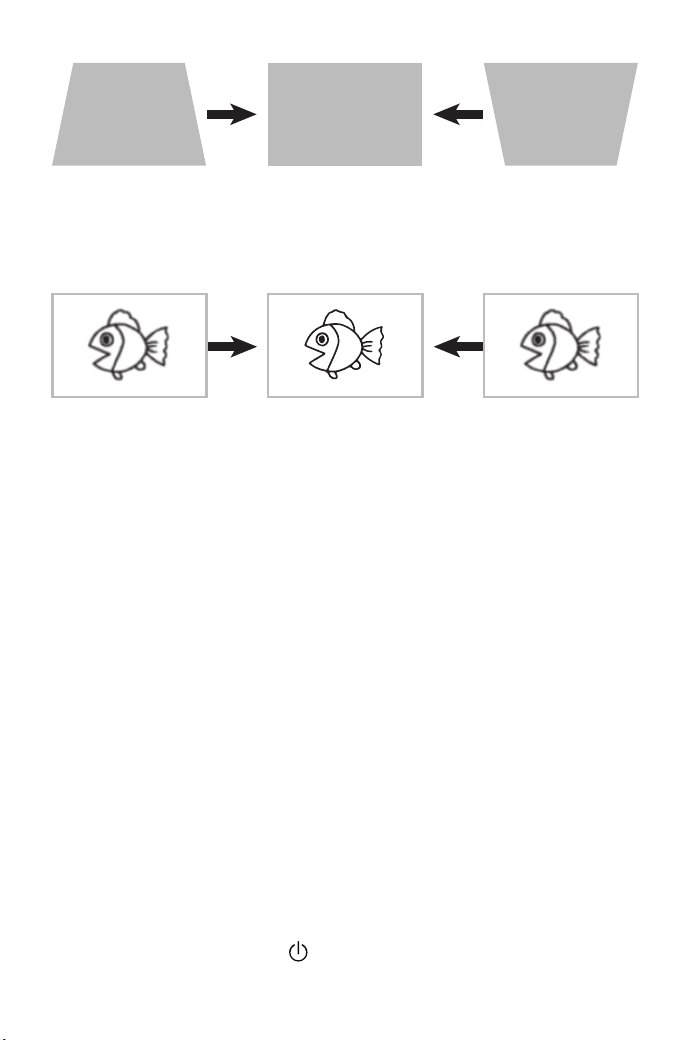
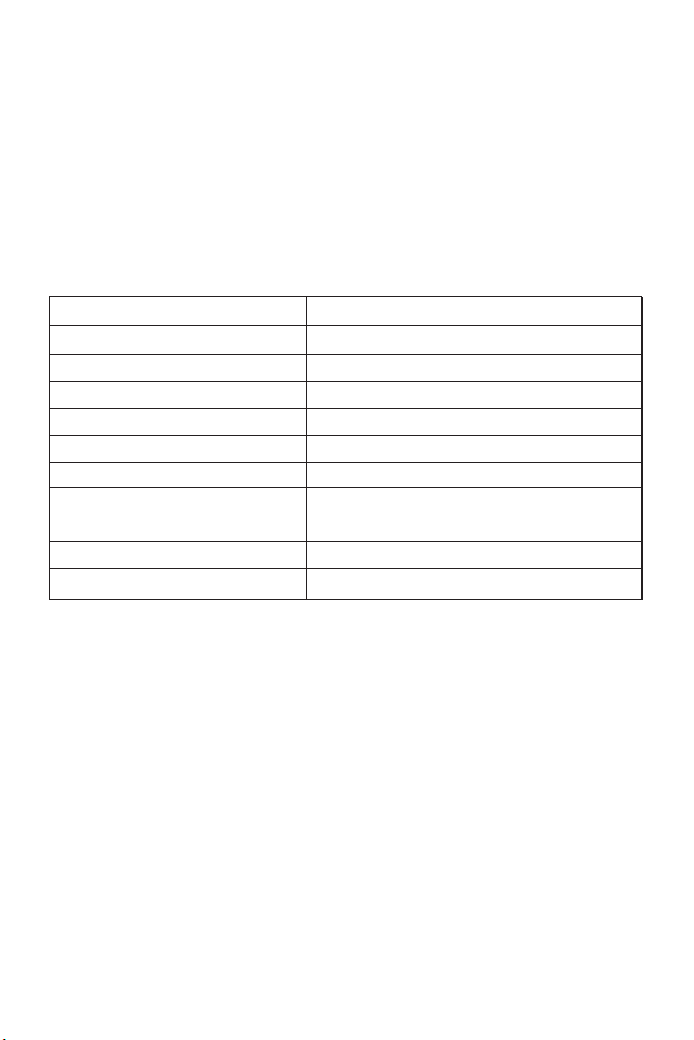
Keystone and Focus
If the projected image is in a trapezoidal shape, it can be resolved by
Keystone correction. ( Do Manual Keystone Correction )
Note: If the Keystone correction fail to resolve image shape, please
reduce the vertical height of the projector in relation to the center of the
screen.
The projected image may be blurry or difficult to see, this is due to lack of
Focus adjustment with the lens, please follow the processes below to
adjust the Focus. ( Do Manual Focus, find the most sharpness picture on
the screen )
Note: It is normal when sharpness in the central, blur in the edge.
B
Manual Focus
Keystone Correction
01 02 03 04 05 06 07 08 09 10 11 12
13 14 15 16 17 18 19 20 21 22 23
24 25 26 27 28 29 30 31 32 33 34
35 36 37 38 39 40 41 42 43 44 45
46 47 48 49 50 51 52 53 54 55 56 57 58 59 60
61 62 63
Multimedia File Specification
Image Format
Audio Format
Support File Extension
JEPG, PNG, BMP, MPO .jpg / .png / .bmp
Doesn’t Support : Dolby AC3 / AAC, DTS, WMA, DivX, VC1, etc
Video Format ( Bit Rate up to 30~40 Mbs )
Doesn’t support : MSVC / CRAM , MP42, GMC, IV32, RLE, cvid, RV20,
DivX, RM,
RMVB, VC1, FLV , etc.
Support
MPEG1, MPEG2, LPCM, MP3
File Extension
.avi / .ts / .dat / .vob / .wav / .mkv /
.mp3 / .mp4 / .m4a
Support
MPEG1, MPEG2, H.263, H.264,
AVS, VC1, MJPEG, RV30, RV40,
HEVC
File Extension
.dat / .ts / .mp4 / .mpg / .mpeg /
.avi / .mkv / .mov / .wmv / .asf /
.flv / .3gp. / .3gpp / .tp / .trp
01 02 03 04 05 06 07 08 09 10 11 12
13 14 15 16 17 18 19 20 21 22 23
24 25 26 27 28 29 30 31 32 33 34
35 36 37 38 39 40 41 42 43 44 45
46 47 48 49 50 51 52 53 54 55 56 57 58 59 60
61 62 63
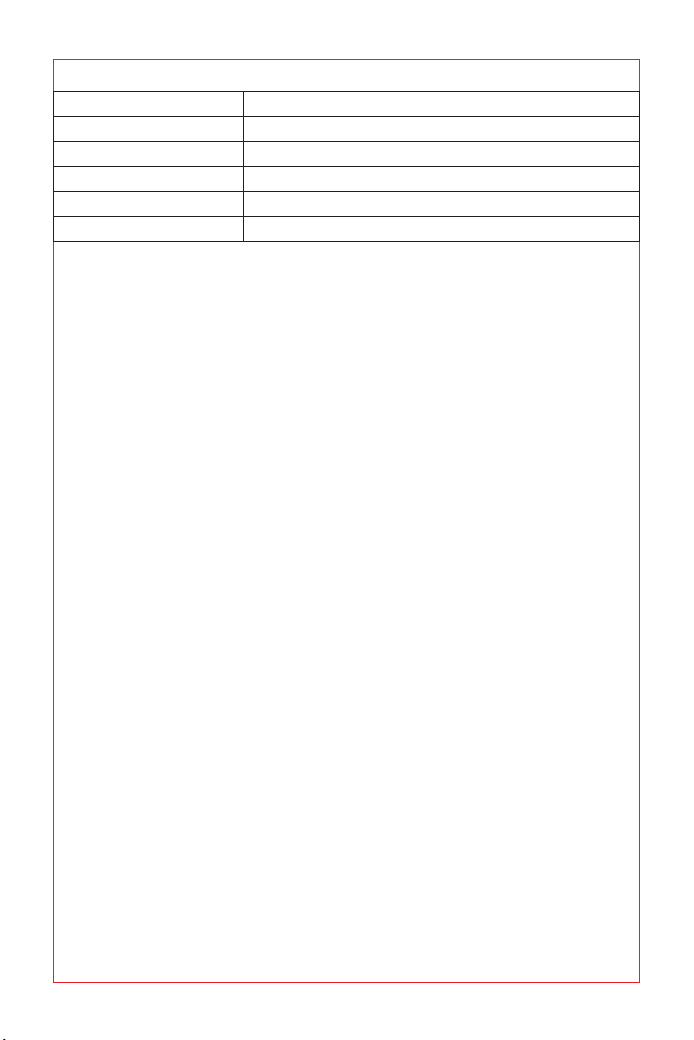
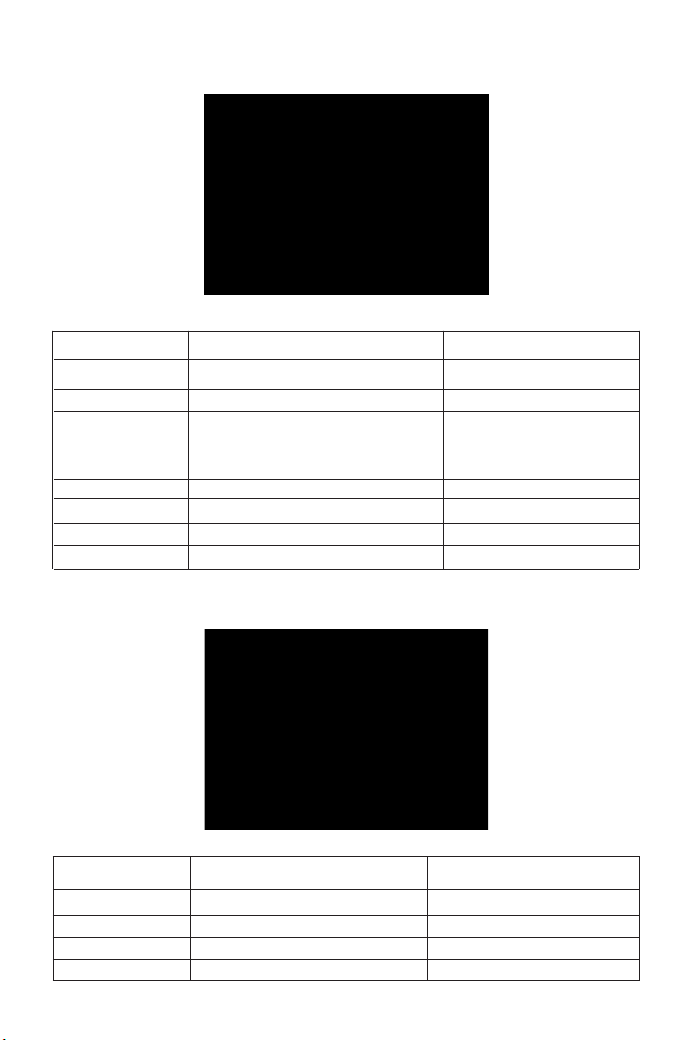
Setting the Main Menu:
Press the "MENU" button on the projector or remote control, there are 4
menu options: "Movie", "Music", "Photo", "Text".
OPTION Menu included Function
OSD Language
Restore Factory Default
Blending
OSD Duration
Blue Screen
Software Update (USB)
20 kinds of languages:English, France,
Italian, Spanish, Japanese etc
Reset
Off, Low, Middle, High
Off, 5Sec, 10Sec, 15Sec
On, Off
Update software
Choose a language
Reset the device to original
manufacturer settings
Adjust the sound quality
Adjust the on-screen display time
Adjust the background color of the screen
Update software
Option Menu
01 02 03 04 05 06 07 08 09 10 11 12
13 14 15 16 17 18 19 20 21 22 23
24 25 26 27 28 29 30 31 32 33 34
35 36 37 38 39 40 41 42 43 44 45
46 47 48 49 50 51 52 53 54 55 56 57 58 59 60
61 62 63
PICTURE MENU
PICTURE MENU Mode Function
Picture Mode Standard, Soft, User, Vivid
Adjusts the color temperature
Sound Menu Mode Function
Sound Mode
Balance
Auto Volume
Standard, Music, Movie, Sports, User
-50~50
On, Off
Adjust the sound mode
Adjust the balance degree
Automatic volume adjustment
Color Temperature
Aspect Ratio
Noise Reduction
Projection Direction
Reduce Display
Medium, Warm, User, Cool
Off, Low, Middle, High, Default
Front/Rear on Desk, Front/ Rear on Ceiling
75%-100%
Auto/ 4:3/ 16:9
4 image modes
Aspect Ratio lets you configure
how images are displayed
Adjust the Noise reduction mode
Adjust the projection direction
Reduce the projection size
HDMI Mode AV/PC
Sound Menu
01 02 03 04 05 06 07 08 09 10 11 12
13 14 15 16 17 18 19 20 21 22 23
24 25 26 27 28 29 30 31 32 33 34
35 36 37 38 39 40 41 42 43 44 45
46 47 48 49 50 51 52 53 54 55 56 57 58 59 60
61 62 63
Time Menu
Sleep Time Mode:Off, 10min, 20min, 30min, 60min, 90min
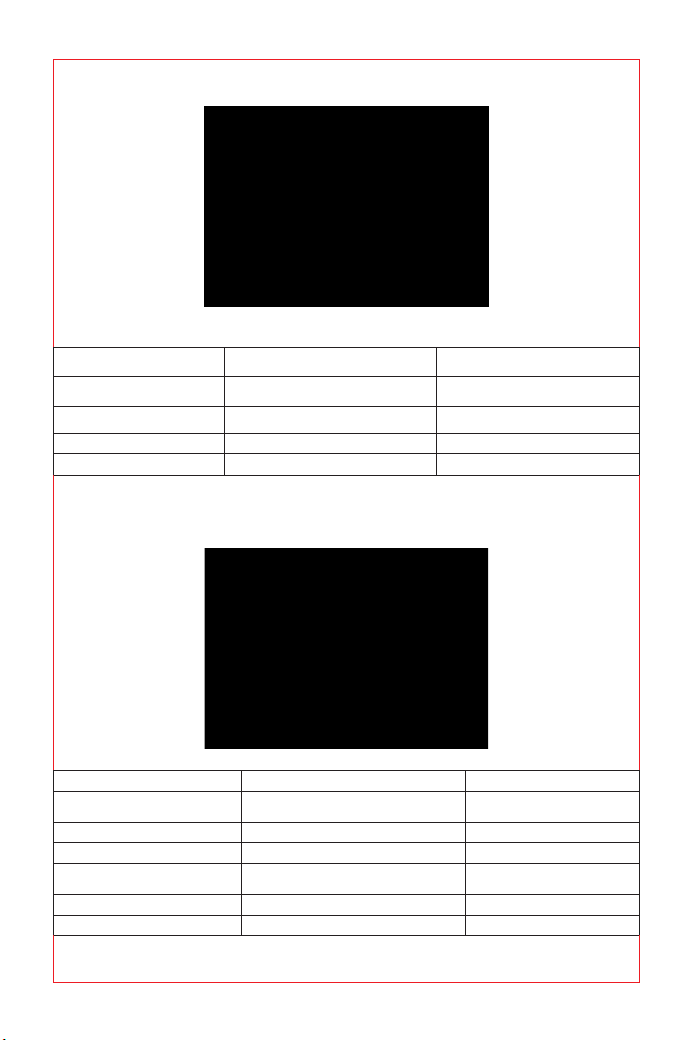
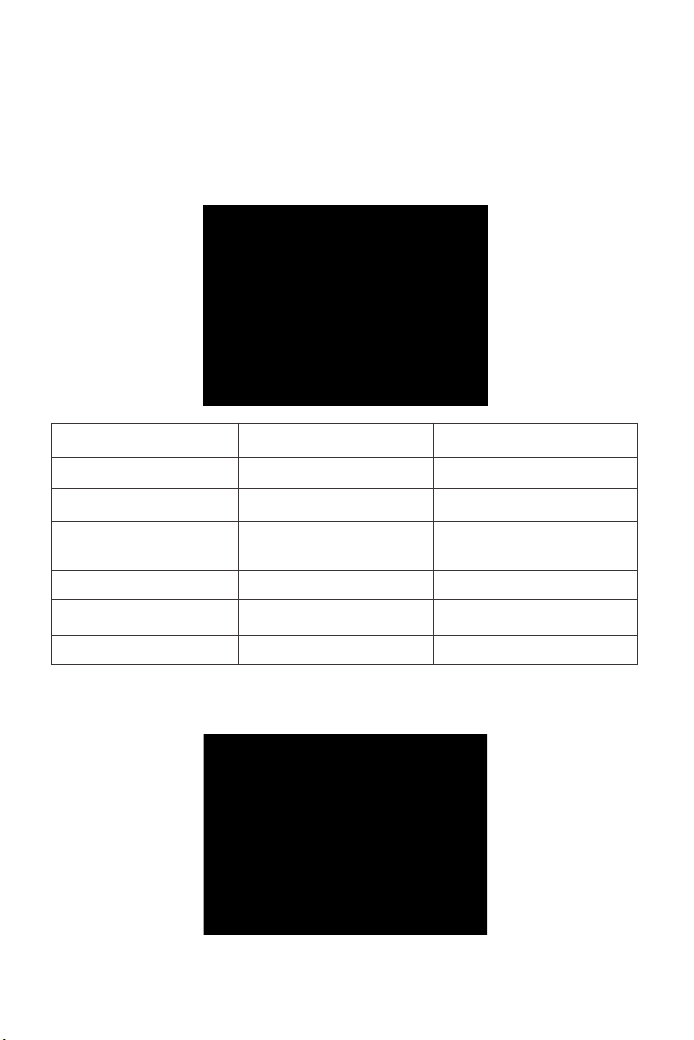
Projection Distance and Size
Please follow the data in chart below, to adjust the image size and the
distance. (Aspect Ratio: 16 : 9, Default)
The image size depends on the distance between projector and screen,
Thank you very much for purchasing the YABER Y61 projector.
Please read this instruction manual carefully before use. Also, please
keep it handy so you can check it at any time.
If you have any problem, please feel free to contact us
(Email: [email protected]), we will always try to offer you a
satisfactory solution.
Screen size
50”
72”
100”
120”
200”
Distance
1.5m
2.15m
2.95m
3.55m
5m
01 02 03 04 05 06 07 08 09 10 11 12
13 14 15 16 17 18 19 20 21 22 23
24 25 26 27 28 29 30 31 32 33 34
35 36 37 38 39 40 41 42 43 44 45
46 47 48 49 50 51 52 53 54 55 56 57 58 59 60
61 62 63
Précautions
Lisez attentivement ce manuel avant d’utiliser votre projecteur Y61 et
conservez-le à portée de la main pour pouvoir vous y référer ultérieure-
ment.
Garanties importantes
Ces consignes de sécurité garantissent la longévité de votre projecteur et
évitent les incendies et les chocs. Lisez-les attentivement et faites
attention à tous les avertissements.
Installation
1. Pour obtenir les meilleurs résultats, utilisez le projecteur dans une
pièce sombre.
2. Placez le projecteur sur une surface plane et plane dans un endroit
sec, à l'écart de la poussière et de l'humidité.
3. Ne placez pas le projecteur à la lumière directe du soleil, près d'appar-
eils de chauffage ou d'appareils dégageant de la chaleur.
4. L'exposition directe au soleil, à la fumée ou à la vapeur peut endom-
mager les composants internes.
5. Manipulez votre projecteur avec soin. La chute ou les secousses
peuvent endommager les composants internes.
6. Ne placez pas d'objets lourds sur le projecteur.
Source de courant
1.Le projecteur est conçu pour fonctionner avec une source de
Alimentation CA 110-240V ~ 50/60 Hz. Assurez-vous que votre source de
L’alimentation répond à cette exigence avant de tenter d’utiliser votre
projecteur.
2. Manipulez le cordon d'alimentation avec précaution et évitez de le plier
trop. Un câble endommagé peut provoquer un choc électrique ou un
incendie.
3. Si le projecteur ne sera pas utilisé pendant une période prolongée
temps, débranchez la fiche de la prise.
Nettoyage
1. Débranchez le projecteur avant de le nettoyer.
2. Nettoyez régulièrement le boîtier avec un chiffon humide. Si c'est très
sale, utilisez un détergent doux. Ne jamais utiliser de détergents forts ou
les solvants tels que l'alcool ou les diluants.
FR
01 02 03 04 05 06 07 08 09 10 11 12
13 14 15 16 17 18 19 20 21 22 23
24 25 26 27 28 29 30 31 32 33 34
35 36 37 38 39 40 41 42 43 44 45
46 47 48 49 50 51 52 53 54 55 56 57 58 59 60
61 62 63
01
08
07
02
03
04
05
06
09 10 11 13
14
12
15
16
01. Channel+ / Up
02. Channel- / Down
03. Volume- / Gauche
04. Volume +/ Droite
05. Source
06. Menu
7. Retour
08. Confirmer
FR
09. Port VGA
10. Port HDMI
11. Port USB
12. sortie audio
13. Port AV
14. Bouton d'alimentation
15. Correction du trapèze
16. Mise au point manuelle
Accessoires
1x Projecteur
1x Câble AV 3 en 1
1x Câble d'alimentation
1x Câble HDMI
1x Télécommande
1x Manuel de l'utilisateur
1x Nettoyage des lentilles
1x Base de support
Description du produit
01 02 03 04 05 06 07 08 09 10 11 12
13
14 15 16 17 18 19 20 21 22 23
24 25 26 27 28 29 30 31 32 33 34
35 36 37 38 39 40 41 42 43 44 45
46 47 48 49 50 51 52 53 54 55 56 57 58 59 60
61 62 63

01
04
06
08
11
14
02
05
03
07
10
09
12
15
13
SOURCE MENU EXIT
VOL- VOL+
OK
< >
< >
( Remarque: lorsque vous utilisez la télécommande, dirigez-la vers
le récepteur IR. )
1. Alimentation: appuyez sur cet interrupteur pour allumer ou éteindre
2. Mute: active ou désactive le son
3. Bouton de transfert rapide
4. Bouton Rembobinage Rapide
5. Play Button: Lecture ou Pause
6. Touche OK: confirmer
7/8/9/10. Touche Flèches: déplace le pointeur vers le haut, le bas, la
gauche et la droite
11. Source: Change la source du signal
12. Menu: Appeler ou quitter le menu principal du projecteur.
13. Exit
14/15. Touches de volume: augmentation / diminution du volume
Description de la télécommande
01 02 03 04 05 06 07 08 09 10 11 12
13 14
15 16 17 18 19 20 21 22 23
24 25 26 27 28 29 30 31 32 33 34
35 36 37 38 39 40 41 42 43 44 45
46 47 48 49 50 51 52 53 54 55 56 57 58 59 60
61 62 63
Précautions d'emploi de la télécommande
-Manipulez la télécommande avec précaution.
-Si la télécommande est mouillée, essuyez-la immédiatement.
-Éviter la chaleur et l'humidité excessives.
-Si vous n'utilisez pas la télécommande pendant une longue période,
retirez les piles. (Les piles ne sont pas fournies avec la télécom-
mande et sont à acheter séparément).
1.Ouvrez le capot arrière de la télécommande.
2.Installez des piles neuves (piles de type AA). Assurez-vous de
respecter la polarité des piles (+/-).
(Attention, veillez à ne pas mélanger différents types de piles et/ou des
piles neuves avec des piles usagées.)
Ajustez la base d’inclinaison & accrochez le plafond
Ajustez la base d’inclinaison: installez les vis (incluses dans l’embal-
lage) sur la position ①, soulevez le bord avant du projecteur à la hauteur
souhaitée, tournez le pied presseur et relâchez le bouton pour verrouiller
la base d’inclinaison à la position appropriée.
Suspendre le plafond: veuillez acheter le support de projecteur et la vis
1/4 pouce en plus.
Installez le support de projecteur sur la position ② et suspendez le
projecteur au plafond.
( Remarque: vous pouvez installer le support de trépied à l'endroit ② )
①
②
01 02 03 04 05 06 07 08 09 10 11 12
13 14 15
16 17 18 19 20 21 22 23
24 25 26 27 28 29 30 31 32 33 34
35 36 37 38 39 40 41 42 43 44 45
46 47 48 49 50 51 52 53 54 55 56 57 58 59 60
61 62 63

B
Correction de trapézoïdale et mise au point
Avant de démarrer le projecteur. Suivez la figure ci-dessous pour régler
la correction trapézoïdale. Gardez le projecteur vertical avec l’écran du
projecteur et maintenez-le au même niveau.
Si l'image projetée est de forme trapézoïdale, elle peut être résolue par
correction de trapèze. (Correction manuelle de la distorsion trapézoïdale)
Remarque: si la correction de la distorsion trapézoïdale ne parvient pas
à résoudre la forme de l'image, veuillez réduire la hauteur verticale du
projecteur par rapport au centre de l'écran.
Mise au point manuelle
Correction de trapézoïdale
01 02 03 04 05 06 07 08 09 10 11 12
13 14 15 16
17 18 19 20 21 22 23
24 25 26 27 28 29 30 31 32 33 34
35 36 37 38 39 40 41 42 43 44 45
46 47 48 49 50 51 52 53 54 55 56 57 58 59 60
61 62 63
L'image projetée peut être floue ou difficile à voir. Ceci est dû au manque
de réglage de la mise au point avec l'objectif. Veuillez suivre les
procédures ci-dessous pour régler la mise au point. (Faire la mise au
point manuelle, trouver la photo la plus nette sur l'écran)
Remarque: il est normal que la netteté au centre et les bords flous.
AVERTISSEMENT
- L'installation du projecteur au plafond doit être effectuée par un
technicien qualifié (nous ne pourrons pas être tenu responsable en cas
de blessures et/ou dommage sur l’appareil et son environnement).
- Utilisez uniquement votre projecteur sur une surface solide et plane. Si
le projecteur tombe au sol, vous risquez de vous blesser et d'endom-
mager gravement le projecteur.
- Ne pas exposer le projecteur à de l'humidité excessive, à de la
poussière ou à de la fumée. Cela endommagera le projecteur et l'image
projeté sur l'écran.
- Assurez-vous d'avoir une ventilation adéquate et suffisante dans la
pièce et autour de votre projecteur pour que la chaleur puisse se dissiper
correctement. Ne recouvrez pas les évents du projecteur. En cas de non
respect de ces préconisations, cela pourrait entrainer une surchauffe et
une dégradation de l’appareil.
Fonctionnement
Contrôles généraux
Avant d'allumer le projecteur, assurez-vous que l'ordinateur ou la source
vidéo est sous tension et que le cache de l'objectif est retiré.
01 02 03 04 05 06 07 08 09 10 11 12
13 14 15 16 17
18 19 20 21 22 23
24 25 26 27 28 29 30 31 32 33 34
35 36 37 38 39 40 41 42 43 44 45
46 47 48 49 50 51 52 53 54 55 56 57 58 59 60
61 62 63
1. Allumer le projecteur
Branchez le câble d'alimentation fourni dans la prise et appuyez sur
l'interrupteur principal. Le projecteur passe en mode veille et le voyant
d'alimentation s'allume en rouge.
Appuyez sur la touche " " du boîtier du projecteur ou de la télécom-
mande afin que l'indicateur d'alimentation passe au vert : le projecteur
est prêt à l'emploi.
2. Sélectionner la source du signal
Appuyez sur la touche "S" (source) de la télécommande ou du boîtier du
projecteur pour sélectionner votre signal source:"AV", "PC-RGB",
"HDMI 1", "HDMI 2", "USB".
3. Ajustez la taille de l'image et le focus
Ajustez la taille de l'image et la mise au point
Pour obtenir la meilleure taille d'image possible, vous devez modifier la
distance entre le projecteur et l'écran de projection.
Pour obtenir la meilleure mise au point, vous devez faire pivoter l'objectif
pour la mise au point.
Sélection de la langue
Lorsque vous allumez le projecteur pour la première fois, vous verrez
l'interface en anglais.
Vous pouvez sélectionner une autre langue pour le menu parmi :
Allemand, Français, Italien, Espagnol, Espagnol, Japonais, etc.
Pour régler la langue, veuillez suivre ces étapes :
1. Appuyez sur la touche "M" et sélectionnez "OPTIONS", puis trouvez
"Reglages langue France".
2. Appuyez sur le bouton « OK » pour enregistrer la sélection.
01 02 03 04 05 06 07 08 09 10 11 12
13 14 15 16 17 18
19 20 21 22 23
24 25 26 27 28 29 30 31 32 33 34
35 36 37 38 39 40 41 42 43 44 45
46 47 48 49 50 51 52 53 54 55 56 57 58 59 60
61 62 63
VGA
Connexion d'appareils externes
Connexion du PC
1. Utilisez le câble VGA fourni pour connecter votre PC au projecteur.
(Remarque: le câble VGA ne transmet pas le signal audio. Vous devez
connecter un haut-parleur externe.)
2. Allumez le projecteur et le PC.
Remarque : il est également possible de brancher le PC au projecteur
avec un câble HDMI.
Connexion d'un Smartphone
Connectez un smartphone sous Android
(Remarque : Veuillez vérifier au préalable que le Smartphone Androïd
supporte la fonction MHL. Veuillez noter que le câble MHL-HDMI n’est pas
fourni)
1. Connectez le projecteur et le Smartphone Androïd avec le câble
MHL-HDMI (non fourni).
2. Choisissez la source du signal : "HDMI"
Connecter un iPhone
1. Connectez le projecteur et l'iPhone avec un câble Lightning-HDMI (non
fourni)
2. Choisissez la source du signal : "HDMI"
Connecter un lecteur DVD
1. Utilisez le câble AV fourni pour connecter votre lecteur DVD au project-
eur.
2. Allumez le projecteur et le lecteur DVD.
Remarque: veuillez acheter un câble AV 3 en 3 en plus.
AV
video
audio out
(L/R)
01 02 03 04 05 06 07 08 09 10 11 12
13 14 15 16 17 18 19
20 21 22 23
24 25 26 27 28 29 30 31 32 33 34
35 36 37 38 39 40 41 42 43 44 45
46 47 48 49 50 51 52 53 54 55 56 57 58 59 60
61 62 63
audio out
(L/R)
Connecter la barre de son
1. Utilisez le câble AV fourni pour connecter votre barre de son au
projecteur.
2. Allumez le projecteur et la barre de son.
Remarque: veuillez acheter un câble AV 3 en 3 en plus.
Réglage du menu principal
Appuyez sur la touche "M" (Menu) du boîtier du projecteur ou de la
télécommande.
Il y a 4 sous-menus : "IMAGE", "SONER", "Horaire", "OPTIONS"
IMAGE MENU
PICTURE MENU
Mode Image Standard
Temp.de Couleur Med
Aspect Ratio
Noise Reduction
Projection Directi Front On D
Reduce Display Si 100%
Mode
Standard /Soft /Utilisateu/ Vivid
Med / Chaud / Utilisateu / Froid
Auto/ 4:3/ 16:9
Arret / Bas / Middle / Haut / Default
Front on Desk; Rear on Desk;
Front on Ceiling; Rear on Ceiling
75%-100%
Fonction
4 modes d'image.
Ajustez la température de couleur.
Le rapport hauteur / largeur vous permet de
configurer le mode d'affichage des images.
Ajustez le mode de réduction du bruit.
Ajustez la direction de projection.
Réduisez la taille de la projection.
01 02 03 04 05 06 07 08 09 10 11 12
13 14 15 16 17 18 19 20
21 22 23
24 25 26 27 28 29 30 31 32 33 34
35 36 37 38 39 40 41 42 43 44 45
46 47 48 49 50 51 52 53 54 55 56 57 58 59 60
61 62 63
OPTIONS Menu
SONNER Menu
SONNER Menu
Mode De Son Standard
Balance
Auto Volume Arret
Surreund Sound SRS TruSur
Mode
Standard, Musique, Cinema, Sports,
Utilisateu
-50~50
Arret / Marche
Arret /SRS TraSurround X / Surround
Fonction
Ajustez le mode sonore.
Ajustez le degré d'équilibre.
Réglage automatique du volume.
Réglage du mode Surround Sound.
Mise a jour logiciel( USB )
Menu FonctionOPTIONS
Reglages langue France
Restaurer les reglages usine
Blending Arret
OsdDuration
Blue Screen
20 sortes de langues: English, France,
Italian, Spanish, Japanese etc
Reset
Bas /Middle / Haut / Arret
Arret/ 5 Sec / 10 Sec / 15 Sec/
Arret / Marche
Logiciel de mise à jour
Choisissez une langue
Réinitialisation d'usine
Ajustez la qualité du son
Ajustez la durée d'affichage
à l'écran
Logiciel de mise à jour
01 02 03 04 05 06 07 08 09 10 11 12
13 14 15 16 17 18 19 20 21
22 23
24 25 26 27 28 29 30 31 32 33 34
35 36 37 38 39 40 41 42 43 44 45
46 47 48 49 50 51 52 53 54 55 56 57 58 59 60
61 62 63
Especificaciones
YABER Y61 Projecteur
Système d'imagerie: LCD
Source de lumière: LED
Poids du projecteur: 1.4KG
Distance de projection: 1.5M-5M
Taille de projection: 50 "-200"
Puissance: 110-240V ~ 50 / 60HZ
Résolution: 1280 * 720 (prise en charge 1920 * 1080)
Entrée d'interface: HDMI / USB / VGA / AV / Headphone Jack(3.5mm)
Correction de trapézoïdale: ± 15 ° Manuel
Aspect Ratio: 16:9/ 4:3
Période de garantie
La période de garantie est de 3 ans à compter de la date d'achat. Si vous
avez des problèmes, n'hésitez pas à contacter
FAQ
■ Pas de son
Le format compatible avec le projecteur est le suivant:
Format vidéo: MPG, AVI, TS, MOV, MKV, DAT, MP4
Format audio: MP3, WMA, AAC
Format d'image: JPG, JPEG, BMP, PNG.
* En ce qui concerne la sortie audio, ne pouvant pas prendre en charge le
son Dolby, fermez la fonction Dolby Sound.
Si vous n'êtes toujours pas bon, suivez les étapes ci-dessous.
1. Réglez le volume avec la télécommande.
2. Vérifiez s'il est en mode silencieux.
■ La télécommande ne fonctionne pas
1. La télécommande pointe-t-elle sur le récepteur du projecteur?
2. La pile de la télécommande est-elle épuisée? Veuillez remplacer par
une nouvelle pile.
3. Y a-t-il un obstacle entre la télécommande et le projecteur?
4. Avez-vous dépassé la portée effective de la télécommande?
■ Les images sont floues
1. La mise au point de l'objectif est-elle correcte?
2. L’écran de projection et le projecteur sont-ils installés à l’angle
approprié?
3. La distance de projection est-elle au-delà de la plage de mise au point?
4. Assurez-vous que l’objectif de projection n’est pas sale.
01 02 03 04 05 06 07 08 09 10 11 12
13 14 15 16 17 18 19 20 21 22
23
24 25 26 27 28 29 30 31 32 33 34
35 36 37 38 39 40 41 42 43 44 45
46 47 48 49 50 51 52 53 54 55 56 57 58 59 60
61 62 63
Descrizione del prodotto
Note: Si prega di fare riferimento al proiettore reale, la foto è solo illustrativa
01. Channel+ / Su
02. Channel+ / Giù
03. Volume- / Sinistra
04. Volume+ / Destra
05. Source
06. Menu
07. Ritorno
08. Confermare
09. VGA interfaccia
10. HDMI interfaccia
11. USB interfaccia
12. Audio Output
13. AV interfaccia
14. Presa di alimentazione
15. Keystone Correction
16. Messa a fuoco manuale
IT
Sistema di imaging: LCD
Sorgente luminosa: LED
Distanza di proiezione: 1.5M-5M
Aspect Ratio: 16: 9/4: 3
Power: 110-240V ~ 50 / 60HZ
Risoluzione: 1280*720 (Supporto 1920*1080)
Ingresso interfaccia:
HDMI / USB / VGA / AV /
Headphone Jack(3.5mm)
Dimensione di proiezione: 50 "-200"
Peso del proiettore: 1.4 kg
Correzione trapezoidale: ± 15 °
YABER Y61 Proiettore 720P
01
08
07
02
03
04
05
06
09 10 11
13
14
12
15
16
01 02 03 04 05 06 07 08 09 10 11 12
13 14 15 16 17 18 19 20 21 22 23
24 25 26 27 28 29 30 31 32 33 34
35 36 37 38 39 40 41 42 43 44 45
46 47 48 49 50 51 52 53 54 55 56 57 58 59 60
61 62 63
01
04
06
08
11
14
02
05
03
07
10
09
12
15
13
SOURCE MENU EXIT
VOL- VOL+
OK
< >
< >
Telecomando
1. Power: accendere o spegnere l'alimentazione
2. Mute: attiva o disattiva l'audio
3. Pulsante di avanzamento veloce: video avanti veloce
4. Pulsante Rewind: restituisce il video
5. Pulsante Riproduci: riproduce o mette in pausa
6. Pulsante OK: conferma
7/8/9/10. Tasti freccia
11. SOURCE: Seleziona la fonte
12. MENU: Scegli una varietà di menu
13. EXIT: Esci dall'interfaccia
14. Suono riduzione
15. Suono aumentato
Note: durante l'uso
del telecomando,
puntarlo verso il
ricevitore IR.
Installare la batteria del telecomando (la batteria non è inclusa perché la
batteria non può essere trasportata)
1. Premere per aprire il coperchio della batteria.
2. Installare la batteria (AA) e accertarsi che la polarità (+/-) della batteria
sia allineata correttamente.
01 02 03 04 05 06 07 08 09 10 11 12
13 14 15 16 17 18 19 20 21 22 23
24
25 26 27 28 29 30 31 32 33 34
35 36 37 38 39 40 41 42 43 44 45
46 47 48 49 50 51 52 53 54 55 56 57 58 59 60
61 62 63
Queste istruzioni di sicurezza servono a garantire la lunga durata del
proiettore e a prevenire incendi e scosse. Leggeteli attentamente e
prestate attenzione a tutti gli avvertimenti.
Grazie
Grazie mille per aver acquistato il proiettore YABER Y61.
Si prega di leggere attentamente questo manuale di istruzioni prima
dell'uso. Inoltre, ti preghiamo di tenerlo a portata di mano in modo da
poterlo verificare in qualsiasi momento.
In caso di dubbi, non esitare a contattare [email protected]
Possiamo fornire il servizio post-vendita fino alla soddisfazione.
Sostituire la batteria del telecomando
1. spingere per aprire il coperchio della batteria.
2. rimuovere entrambe le vecchie batterie e installarla di nuove (AA).
Accertarsi che la polarità delle batterie (+/–) sia allineata correttamente.
Possiamo fornire il servizio post-vendita fino alla soddisfazione.
Osservaz
Contenuto
Salvaguardie importanti
Una parte del video in Netflix e i formati video principali non possono
essere esportati esternamente a causa della protezione del copyright
(protocollo HDCP). Ma dato che Amazon Fire TV è compatibile con
HDCP, puoi giocare a Netflix e primo video tramite fuoco amazzone.
Unità principale del proiettore * 1
Manuale di istruzioni * 1
Cavo AV 3 in 1 * 1
Cavo HDMI * 1
Pulizia obiettivo * 1
Cavo di alimentazione * 1
Telecomando * 1
1. Per risultati ottimali, utilizzare il proiettore in una stanza buia.
2. Collocare il proiettore su una superficie piana e orizzontale in un'area
asciutta, lontano da polvere e umidità.
3. Non collocare il proiettore alla luce diretta del sole, vicino a caloriferi o
apparecchi che emettono calore.
installazione
01 02 03 04 05 06 07 08 09 10 11 12
13 14 15 16 17 18 19 20 21 22 23
24 25
26 27 28 29 30 31 32 33 34
35 36 37 38 39 40 41 42 43 44 45
46 47 48 49 50 51 52 53 54 55 56 57 58 59 60
61 62 63

4. L'esposizione alla luce solare diretta, al fumo o al vapore può dannegg-
iare i componenti interni.
5. Maneggiare il proiettore con cura. Cadere o tremare può danneggiare i
componenti interni.
6. Non posizionare oggetti pesanti sopra il proiettore.
1. Il proiettore è progettato per funzionare con un alimentatore CA da
110-240 V ~ 50/60 Hz. Assicurarsi che l'alimentazione soddisfi questo
requisito prima di tentare di utilizzare il proiettore.
2. Maneggiare con cura il cavo di alimentazione ed evitare di piegarlo
troppo. Un cavo danneggiato può provocare scosse elettriche o incendi.
3. Se il proiettore non verrà utilizzato per un lungo periodo di tempo,
scollegare la spina dalla presa.
Alimentazione
1. Scollegare il proiettore prima di pulirlo.
2. Pulire periodicamente l'armadio con un panno umido. Se è molto
sporco, utilizzare un detergente delicato. Non usare mai detergenti forti o
solventi come alcool o diluenti.
3. Utilizzare un soffietto o una carta per lenti per pulire l'obiettivo e fare
attenzione a non graffiare o danneggiare l'obiettivo.
Pulizia
FAQ
1. Al momento dell’accensione la luce indicativa non funziona
①. L’alimentazione potrebbe non essere ben collegata
②. Controllare il sistema di protezione dal surriscaldamento
2. Premendo il tasto di accensione sul telecomando il proiettore non si
accende
①. Le batterie del telecomando sono scariche
②. Il segnale tra il telecomando e il sensore IR è ostruito
③. Forte luce diretta sul sensore IR?
3. Nessuna immagine sullo schermo
①. L’impostazione del canale è corretta?
②. C’è un segnale di input?
③. Il cavo di input è inserito correttamente o è nella posizione sbagliata?
④. Nella modalità PC la velocità di refresh è >75KHz?
01 02 03 04 05 06 07 08 09 10 11 12
13 14 15 16 17 18 19 20 21 22 23
24 25 26
27 28 29 30 31 32 33 34
35 36 37 38 39 40 41 42 43 44 45
46 47 48 49 50 51 52 53 54 55 56 57 58 59 60
61 62 63

4. L’immagine funziona ma non c’è suono
①. I cavi di input sono connessi correttamente?
②. Volume al minimo o su muto
③. Controllare che il formato audio del video sia nella lista supportata
5. Si spegne in automatico dopo essere stato acceso per un po
①. C’è una barriera intorno alla ventola?
②. Piccole o grandi fluttuazioni di voltaggio
③. Controllare il sistema di protezione dal surriscaldamento
6. Non trovo i dispositivi connessi con hard drive o flash drive
①. Reinserire il dispositivo
②. Controllare se il dispositivo è funzionante
7. Impossibile riprodurre video
①. Il formato del video è corretto?
②. Il file è danneggiato?
Avvio del proiettore
Controlli generali dell'operazione prima di accendere il proiettore:
Accendere il proiettore collegare il cavo di alimentazione in dotazione
alla presa e quindi premere l'interruttore di alimentazione principale. Il
proiettore andrà in modalità standby e l'indicatore di alimentazione si
illumina di rosso.
Solo dopo aver premuto il pulsante "POWER" sul proiettore o sul
telecomando, l'indicatore di alimentazione si trasformerà in verde e il
proiettore diventerà pronto per l'uso.
selezionare la sorgente segnale:
premere il tasto "SOURCE" sul telecomando o sul proiettore e scegliere
tra : "HDMI1", "HDMI2" "AV" "USB"
1. regolare le dimensioni dell'immagine per ottenere la migliore dimensi-
one dell'immagine spostando il proiettore avanti e indietro, quindi
utilizzare l'anello di messa a fuoco per ottenere la migliore messa a
fuoco.
Seleziona il menu lingua
Menu lingua lo devi selezionare quando si accende per la prima volta il
proiettore, si vedrà l'interfaccia in lingue inglesi. È possibile selezionare
una delle lingue del menù: tedesco, francese, italiano, spagnolo,
giapponese e così via.
01 02 03 04 05 06 07 08 09 10 11 12
13 14 15 16 17 18 19 20 21 22 23
24 25 26 27
28 29 30 31 32 33 34
35 36 37 38 39 40 41 42 43 44 45
46 47 48 49 50 51 52 53 54 55 56 57 58 59 60
61 62 63
Collegamento di dispositivi esterni
1.Collegamento di un PC
1.Usare il cavo VGA in dotazione per collegare il PC al proiettore.
2. Accendere il proiettore e il computer.
* NOTA: puoi anche collegare un cavo HDMI, ricorda che le connessioni
VGA non trasmettono audio, quindi il suono verrà emesso dal computer.
Se si collega un cavo HDMI, l'audio verrà trasmesso al proiettore.
Si prega di attenersi alla seguente procedura:
1. Premere il pulsante "MENU" e trovare l'interfaccia "OPTION", quindi
trovare il "OSD Language Italian".
2. Premere il pulsante ENTER per eseguire la selezione.
2.Collegamento di uno smartphone
Connetti un telefono con sistema Android:
(Nota: verificare se il telefono Android supporta la funzione MHL.) Cavo
MHL-HDMI non incluso)
1. Collegare il proiettore e lo smartphone Android con il cavo MHL-HDMI.
2. Scegli la sorgente del segnale: "HDMI"
Collegamento di un iPhone:
1. Collegare il proiettore e l'iPhone con il cavo da Lightning a HDMI (non
incluso)
2. Scegli la sorgente del segnale: "HDMI"
FONTE SEGNALE
PC.RGB
HDMI1
HDMI2
AV
USB
VGA
01 02 03 04 05 06 07 08 09 10 11 12
13 14 15 16 17 18 19 20 21 22 23
24 25 26 27 28
29 30 31 32 33 34
35 36 37 38 39 40 41 42 43 44 45
46 47 48 49 50 51 52 53 54 55 56 57 58 59 60
61 62 63

Regola la base di inclinazione
3.Collegamento di un lettore DVD
1. Utilizzare il cavo AV in dotazione per collegare il lettore DVD al proiettore.
2. Accendere il proiettore e il lettore DVD.
Se il tuo lettore ha un'uscita HDMI, è preferibile usarlo sopra l'opzione
analogica (AV). È necessario configurare l'uscita audio dal menu del
lettore DVD se sono installati altoparlanti esterni.
4.Collega la soundbar
1.Utilizzare il cavo AV in dotazione per collegare la soundbar al proiettore.
2. Accendere il proiettore e la barra audio.
1. Adeguare la base di inclinazione: installare le viti (incluse nella
confezione) in 1 posizione, sollevare il bordo anteriore del proiettore
all'altezza desiderata, ruotare il piedino e rilasciare il pulsante per
bloccare la base di inclinazione nella posizione appropriata.
2. Si prega di acquistare il supporto per proiettore e vite da 1/4 di pollice
in aggiunta.Installare il supporto del proiettore per posizionare ② e
appendere il proiettore al soffitto. (Nota: è possibile installare il cavalletto
nel luogo ②)
AV
video
audio out
(L/R)
Audio-out
audio out
(L/R)
①
②
01 02 03 04 05 06 07 08 09 10 11 12
13 14 15 16 17 18 19 20 21 22 23
24 25 26 27 28 29
30 31 32 33 34
35 36 37 38 39 40 41 42 43 44 45
46 47 48 49 50 51 52 53 54 55 56 57 58 59 60
61 62 63
MENU immagine
Menu audio
IMMAGINE Menu incluso funzione
Modalità immagine
Temp.del Color
Aspect Ratio
Noise Reduction
Projection Directi Front on
HDMI Mode
Reduce Display
Standard,Soft,Utente,Vivid
Medio,Caido,Utente, Freddo
Auto/ 4:3/ 16:9
Off, Basso, Alto, Middle, Default
Front /Roar on desk, Front /Roar on Celling
AV, HDMI
Si 75%-100%
Ajustar el contraste etc
Regola la temperatura del colore
Le proporzioni consentono di
configurare il modo in cui vengono
visualizzate le immagini.
Riduci dall'asse X
Regolazione del rumore
Regolazione della configurazione del PC
Regolazione trapezoidale
Audio Menu incluso Funzione
Sound Mode
Balance
Auto Volume
Surround Suono
Sport, Utente, Standard, Musica, Cinema
+8
On, Off
OFF, SRS TruSurround X ,Surround
Regola la modalità audio
Regola il grado di equilibrio
Regolazione automatica del volume
Regolazione della modalità Sound Surround
01 02 03 04 05 06 07 08 09 10 11 12
13 14 15 16 17 18 19 20 21 22 23
24 25 26 27 28 29 30
31 32 33 34
35 36 37 38 39 40 41 42 43 44 45
46 47 48 49 50 51 52 53 54 55 56 57 58 59 60
61 62 63

Menu OPZIONI
OPZIONI Menu incluso Function
Impost. Lingua, Italinano
Impost. Lingua, Italinano
Blending OFF
OSdDuration 5 Sec
Blue Sreen ON
Aggiornamento software(USB)
Standard,Soft,Utente,Vivid
Medio, Caido, Utente, Freddo
OFF, Middle
5 Sec, 10 Sec, 15 Sec
Front /Roar on desk, Front /Roar on Celling
YES/NO
Ajustar el contraste etc
Reset the device to original
Le proporzioni consentono di
configurare il modo in cui vengono
visualizzate le immagini
Riduci dall'asse X
Ridimensiona dall'asse Y
Regolazione del rumore
Distanza di proiezione e dimensioni
Si prega di seguire i dati nella tabella sottostante, per regolare le
dimensioni dell'immagine e la distanza. (Aspect Ratio: 16: 9, Default)
La dimensione dell'immagine dipende dalla distanza tra proiettore e
schermo, potrebbe esserci una deviazione del 3% tra i dati sopra
elencati. Impostazioni diverse causano varie distanze.
Screen size
50”
72”
100”
120”
200”
Distance
1.50m
2.15m
2.95m
3.55m
5m
01 02 03 04 05 06 07 08 09 10 11 12
13 14 15 16 17 18 19 20 21 22 23
24 25 26 27 28 29 30 31
32 33 34
35 36 37 38 39 40 41 42 43 44 45
46 47 48 49 50 51 52 53 54 55 56 57 58 59 60
61 62 63
Se l'immagine proiettata è di forma trapezoidale, può essere risolta con
la correzione trapezoidale. (Eseguire la correzione trapezoidale manuale)
Nota: se la correzione trapezoidale non riesce a risolvere la forma
dell'immagine, ridurre l'altezza verticale del proiettore rispetto al centro
dello schermo.
L'immagine proiettata potrebbe essere sfocata o difficile da vedere, a
causa della mancanza di regolazione della messa a fuoco con l'obiettivo,
seguire i processi sottostanti per regolare la messa a fuoco. (Fai fuoco
manuale, trova l'immagine più nitida sullo schermo)
Nota: è normale quando la nitidezza è centrale, sfoca il bordo.
Keystone e Focus
Si prega di notare qui:
1. A causa di problemi di copyright, questo proiettore non supporta il
suono Dolby. Se si riproduce un video con audio Dolby sul proiettore, il
proiettore non emetterà alcun suono. Pertanto, quando si riproduce un
video online o si scarica un video, disattivare l'opzione audio Dolby.
2. Il proiettore può solo leggere il formato video MP4 in Chiavetta USB.
Se si desidera riprodurre video AVI, MKV, WMV, collegare il computer al
proiettore per la riproduzione.
Correzione trapezoidale
Regola la messa a fuoco
01 02 03 04 05 06 07 08 09 10 11 12
13 14 15 16 17 18 19 20 21 22 23
24 25 26 27 28 29 30 31 32
33 34
35 36 37 38 39 40 41 42 43 44 45
46 47 48 49 50 51 52 53 54 55 56 57 58 59 60
61 62 63

Si prega di leggere attentamente questo manuale di istruzioni prima
dell'uso. Inoltre, ti preghiamo di tenerlo a portata di mano in modo da
poterlo verificare in qualsiasi momento.
In caso di dubbi, non esitare a contattare [email protected]
Possiamo fornire il servizio post-vendita fino alla soddisfazione.
Grazie mille per aver acquistato il proiettore YABER Y61.
01 02 03 04 05 06 07 08 09 10 11 12
13 14 15 16 17 18 19 20 21 22 23
24 25 26 27 28 29 30 31 32 33
34
35 36 37 38 39 40 41 42 43 44 45
46 47 48 49 50 51 52 53 54 55 56 57 58 59 60
61 62 63

Precauciones
Lea este manual detenidamente antes de usar su proyector Y61 y
mantenga el manual a mano para futuras referencias.
Salvaguardias importantes
Estas instrucciones de seguridad son para garantizar la larga vida de su
proyector y para evitar incendios y descargas. Léalos detenidamente y
preste atención a todas las advertencias.
Instalación
1. Para obtener los mejores resultados, use el proyector en una habitación
oscura.
2. Coloque el proyector en una superficie plana y nivelada en un área
seca, lejos del polvo y la humedad.
3. No coloque el proyector bajo la luz solar directa, cerca de calentadores
o aparatos que emitan calor.
4. La exposición a la luz solar directa, el humo o el vapor puede dañar los
componentes internos.
5. Maneje su proyector con cuidado. Caer o sacudir puede dañar los
componentes internos.
6.No coloque objetos pesados encima del proyector.
Fuente de alimentación
1.El proyector está diseñado para funcionar con una fuente de
alimentación de 110-240V~ 50/60 Hz CA. Asegúrese de que su fuente de
alimentación cumpla con este requisito antes de intentar usar su proyec-
tor.
2. Maneje el cable de alimentación con cuidado y evite doblarlo demasia-
do. Un cable dañado puede provocar descargas eléctricas o incendios.
3. Si el proyector no se va a utilizar durante un período prolongado de
tiempo, desconecte el enchufe de la toma de corriente.
Limpieza
1.Desenchufe el proyector antes de limpiarlo.
2. Limpie el gabinete periódicamente con un paño húmedo. Si está muy
sucio, use un detergente suave. Nunca utilice detergentes fuertes o
disolventes como alcohol o diluyentes.
3.Utilice un soplador o papel para lentes para limpiar la lente, y tenga
cuidado de no rayar o estropear la lente.
ES
01 02 03 04 05 06 07 08 09 10 11 12
13 14 15 16 17 18 19 20 21 22 23
24 25 26 27 28 29 30 31 32 33 34
35 36 37 38 39 40 41 42 43 44 45
46 47 48 49 50 51 52 53 54 55 56 57 58 59 60
61 62 63
01. Canal + / Arriba
02. Canal + / Abajo
03. Volumen- / Izquierda
04. Volumen + / Derecha
05. Fuente
06. Menú
07.Regreso
08. Confirmar
09. Puerto VGA
10. Puerto HDMI
11. Puerto USB
12. Salida de Audio
13. Puerto AV
14. Botón de encendido
15. Corrección trapezoidal
16. Enfoque manual
Accesorios
Descripción Producto
1x 3 en1 Cable AV
1x Proyector
1x Cable de alimentación
1x Cable HDMI
1x Control remoto
1x Manual del usuario
1x Limpieza de lentes
1x Base de apoyo
01
08
07
02
03
04
05
06
09 10 11
13
14
12
15
16
01 02 03 04 05 06 07 08 09 10 11 12
13 14 15 16 17 18 19 20 21 22 23
24 25 26 27 28 29 30 31 32 33 34
35
36 37 38 39 40 41 42 43 44 45
46 47 48 49 50 51 52 53 54 55 56 57 58 59 60
61 62 63
01
04
06
08
11
14
02
05
03
07
10
09
12
15
13
SOURCE MENU EXIT
VOL- VOL+
OK
< >
< >
Instrucciones de control remoto
1. Encendido: presione este interruptor para encender o apagar
2. Silencio: enciende o apaga el sonido
3. Botón de transferencia rápida
4. Botón de rebobinado rápido
5. Botón de reproducción: Reproducir o Pausa
6. Tecla OK: confirmar
7/8/9/10. Tecla de flecha: mueve el cursor hacia arriba, abajo, izquierda y
derecha
11. Fuente: Cambia la fuente de la señal.
12. Menú: Llame o salga del menú principal del proyector.
13. Salir
14/15. Teclas de volumen: aumentar / disminuir volumen
Nota: Cuando use el control
remoto, apúntelo al receptor
de infrarrojos.
01 02 03 04 05 06 07 08 09 10 11 12
13 14 15 16 17 18 19 20 21 22 23
24 25 26 27 28 29 30 31 32 33 34
35 36
37 38 39 40 41 42 43 44 45
46 47 48 49 50 51 52 53 54 55 56 57 58 59 60
61 62 63
• Use el mando a distancia con cuidado.
• Si el mando a distancia se moja, séquelo inmediatamente.
• Evite ambientes con demasiada calor o humedad.
• Si no va a utilizar el mando a distancia durante mucho tiempo, retire las
pilas. (NOTA: El mando a distancia no incluye pilas, necesitará
adquirir unas pilas por su cuenta).
1. Abra la tapa trasera del control remoto.
2. Instale unas nuevas (AA). Al colocarlas, asegúrese de que la polaridad
de las pilas (+/–) son las correctas.
( NOTA: No use diferentes tipos de pilas o pilas nuevas con pilas viejas)
Precauciones con el mando a distancia
Ajusta la base de inclinación & cuelga el techo.
Ajuste la base de inclinación: instale los tornillos (incluidos en el
paquete) en la posición
① , levante el borde frontal del proyector a la
altura deseada, gire el pie prensatela y suelte el botón para bloquear la
base de inclinación en la posición deseada. posición apropiada
Suspender el techo: adquiera además el soporte del proyector y el
tornillo de 1/4 pulgada.
Instale el soporte del proyector en la posición
② y cuelgue el proyector en
el techo.
(Nota: puede instalar el soporte del trípode en la ubicación
②)
①
②
01 02 03 04 05 06 07 08 09 10 11 12
13 14 15 16 17 18 19 20 21 22 23
24 25 26 27 28 29 30 31 32 33 34
35 36 37
38 39 40 41 42 43 44 45
46 47 48 49 50 51 52 53 54 55 56 57 58 59 60
61 62 63
Corrección keystone y enfoque
Antes de arrancar el proyector. Siga la figura de abajo para ajustar la
corrección de la distorsión trapezoidal. Mantenga el proyector en posición
vertical con la pantalla del proyector y manténgalo en el mismo nivel.
Si la imagen proyectada es trapezoidal, se puede resolver mediante la
corrección de la distorsión trapezoidal. (Corrección manual de la
distorsión trapezoidal)
B
Nota: Si la corrección de distorsión trapezoidal no resuelve la forma de la
imagen, reduzca la altura vertical del proyector desde el centro de la
pantalla.
Enfoque manual
Corrección Keystone
01 02 03 04 05 06 07 08 09 10 11 12
13 14 15 16 17 18 19 20 21 22 23
24 25 26 27 28 29 30 31 32 33 34
35 36 37 38
39 40 41 42 43 44 45
46 47 48 49 50 51 52 53 54 55 56 57 58 59 60
61 62 63
Antes de encender el proyector, asegúrese de que el ordenador o cualqui-
era que sea la fuente de video a la que esté enchufado, esté encendida.
Revise que ha quitado la tapa de la lente.
Después de presionar el botón " " en el proyector o en el mando a distancia, el
indicador de encendido cambiará a verde y el proyector estará listo para usar.
1. Encienda el proyector.
Conecte el cable de alimentación a una toma de corriente y luego presione
el interruptor de alimentación principal. El proyector entrará en modo de
espera (stand-by) y el indicador de encendido se iluminará en rojo.
USO DEL PROYECTOR
CONTROLES GENERALES
• La instalación del proyector en el techo debe ser realizada por un técnico
especializado.
• Utilice el proyector únicamente en una superficie estable y nivelada. Si
el proyector se cae al suelo, puede sufrir graves daños o romperse.
• No exponga el proyector a la humedad, polvo o humo. Esto podría dañar
la imagen.
• Asegúrese de no obstruir el sistema de ventilación del proyector. Procure
una ventilación adecuada en la zona de alrededor del proyector que
facilite la disipación del calor.
ADVERTENCIA
Nota: Es normal que la nitidez en el centro y los bordes se empañen.
La imagen proyectada puede ser borrosa o difícil de ver. Esto se debe a la
falta de ajuste de enfoque con la lente. Por favor, siga los procedimientos
a continuación para ajustar el enfoque. (Enfoque manualmente, encuentra
la imagen más nítida en la pantalla)
01 02 03 04 05 06 07 08 09 10 11 12
13 14 15 16 17 18 19 20 21 22 23
24 25 26 27 28 29 30 31 32 33 34
35 36 37 38 39
40 41 42 43 44 45
46 47 48 49 50 51 52 53 54 55 56 57 58 59 60
61 62 63

Cuando encienda el proyector por primera vez, verá la interfaz de idiomas
en inglés. Puede seleccionar uno de los idiomas del menú: alemán,
francés, italiano, español, japonés, etc.
Por favor siga estos pasos:
1.Presione el botón "M" (Menú) y busque la interfaz "OPCIÓNES", luego
busque el "Ajustes de idioma Espaol".
2.Presione el botón “OK” para guardar la configuración.
1.Use el cable VGA suministrado para conectar su PC al proyector.
(Nota: Conexiones VGA no transmiten audio, por lo que el sonido se
emitirá desde el ordenador, la computadora necesita conectar un altavoz.)
2.Encienda el proyector y el ordenador.
*NOTA: Si su computadora tiene la interfaz HDMI, también puede usar el
cable HDMI para conectar la computadora con el proyector, la conexión
HDMI puede transmitir la señal de audio, no necesita conectar el altavoz.
2. Seleccione la fuente de señal
Presione el botón "S" (source) en el mando a distancia o en el propio
proyector para seleccionar la fuente de señal: "AV", "PC-RGB", "HDMI 1",
"HDMI 2", "USB".
3. Ajuste el tamaño de la imagen.
Ajustar el tamaño de la imagen y el enfoque
Para obtener el mejor tamaño de imagen posible, debe cambiar la distan-
cia desde el proyector a la pantalla de proyección.
Para obtener el mejor enfoque, debe girar la lente para enfocar.
Seleccione el idioma del menú
CONEXIÓN DE DISPOSITIVO EXTERNO
Conectando un PC
01 02 03 04 05 06 07 08 09 10 11 12
13 14 15 16 17 18 19 20 21 22 23
24 25 26 27 28 29 30 31 32 33 34
35 36 37 38 39 40
41 42 43 44 45
46 47 48 49 50 51 52 53 54 55 56 57 58 59 60
61 62 63
Nota: Verifique si el teléfono Android es compatible con la función MHL.
Cable MHL-HDMI no incluido)
1.Conecte el proyector y el Smartphone Android con el cable MHL-HDMI.
2.Elija la fuente de señal: “HDMI”
Conectando un Smartphone
Conecta un teléfono con sistema Android
1.Conecte el proyector y el iPhone con el cable Lightning a HDMI (no
incluido)
2.Elija la fuente de señal: “HDMI”
Conectando un iPhone
1.Use el cable AV suministrado para conectar su reproductor de DVD al
proyector.
2.Encienda el proyector y el reproductor de DVD.
Si su reproductor dispone de salida HDMI, es preferible usar esta sobre la
opción analógica (AV). Deberá configurar la salida de audio desde el
menú de su reproductor DVD si dispone de altavoces externos instalados.
Conectando un reproductor de DVD
1. Use el cable AV suministrado para conectar su barra de sonido al proyector.
2. Encienda el proyector y la barra de sonido.
Conectar barra de sonido
VGA
AV
video
audio out
(L/R)
Nota: por favor compre 3 en 3 cable AV adicionalmente.
Nota: por favor compre 3 en 3 cable AV adicionalmente.
01 02 03 04 05 06 07 08 09 10 11 12
13 14 15 16 17 18 19 20 21 22 23
24 25 26 27 28 29 30 31 32 33 34
35 36 37 38 39 40 41
42 43 44 45
46 47 48 49 50 51 52 53 54 55 56 57 58 59 60
61 62 63
CONFIGURACIÓN DEL MENÚ PRINCIPAL
IMAGEN MENU
Presione el botón "M" (menú) en el proyector o en el mando a distancia.
Hay 4 opciones de menú: "IMAGEN", "SONAR", "HORA", "OPCIÓNES"
Modo Imagen Soft
IMAGEN
Modo
Función
Estandar /Soft /Usuario/ Vivid
4 modos de imagen.
Temp.de Color Med
Med / Callente / Usuario / Frio Ajustar la temperatura de color.
Aspect Ratio
Auto/ 4:3/ 16:9
La relación de aspecto le permite
configurar cómo se muestran las
imágenes.
Noise Reduction Middle
Apagado / Baj / Middle / Alt / Default
Ajuste el modo de reducción de ruido.
Dirección de prey Frontal
Frontal, Invertida, Frontal/techo,
Invertida/techo
Ajustez la direction de projection.
Escalado de panta 100% 75%-100%
Reducir el tamaño de la
SONAR MENU
01 02 03 04 05 06 07 08 09 10 11 12
13 14 15 16 17 18 19 20 21 22 23
24 25 26 27 28 29 30 31 32 33 34
35 36 37 38 39 40 41 42
43 44 45
46 47 48 49 50 51 52 53 54 55 56 57 58 59 60
61 62 63
OPCIÓNES MENU
Especificaciones
SONAR
Modo Función
Modo Do So.Estandar
Estandar/ Musica/ Cine/
Deportes/Usuario
Ajuste el modo de sonido.
Balance
-50~50
Ajustar el grado de equilibrio.
Auto Volume Encendido
Encendido/ Apagado
Ajuste automático del volumen.
Surround Sound SRS TruSur
Apagado / SRS TruSurround X/
Surround
Configuración del modo de
sonido envolvente.
OPCIONES
Modo Función
Ajustes de idioma Espaol
20 tipos de idiomas: English, France,
Italian, Spanish, Japanese etc.
Elige un idioma.
Restaurar parametres fabrica
Reiniciar
Restablecimiento de fábrica
Blending Baj Baj /Middle / Alt / Apagado
Ajustar la calidad del sonido.
OsdDuration
Apagado/ 5 Sec / 10 Sec / 15
Sec/
Ajuste el tiempo de visualización
en la pantalla.
Pant.Azul Encendido
Apagado / Encendido
Actualizando el software(USB)
Actualizar software
Actualiza el software
YABER Y61 Proyector
Sistema de imagen: LCD
Potencia: 110-240V ~ 50 / 60HZ
Fuente de luz: LED
Peso del proyector: 1.4kg
Distancia de proyección: 1.5M-5M
Tamaño de proyección: 50 "-200"
Resolución: 1280 * 720 (Soporte 1920 * 1080)
Interfaz de entrada: HDMI / USB / VGA / AV /
Jack para auriculares (3.5mm)
Corrección trapezoidal: ± 15 ° Manual
Aspect Ratio: 16:9/ 4:3
01 02 03 04 05 06 07 08 09 10 11 12
13 14 15 16 17 18 19 20 21 22 23
24 25 26 27 28 29 30 31 32 33 34
35 36 37 38 39 40 41 42 43
44 45
46 47 48 49 50 51 52 53 54 55 56 57 58 59 60
61 62 63

Período de garantía
FAQ
El período de garantía es de 3 años a partir de la fecha de compra. Si
tiene algún problema, no dude en ponerse en contacto con
3. ¿Hay algún obstáculo entre el control remoto y el proyector?
4. ¿Ha excedido el alcance efectivo del control remoto?
■ No hay sonido
El formato compatible con el proyector es el siguiente:
Formato de video: MPG, AVI, TS, MOV, MKV, DAT, MP4
Formato de audio: MP3, WMA, AAC
Formato de imagen: JPG, JPEG, BMP, PNG.
* En cuanto a la salida de sonido, ya que no puede soportar el sonido
Dolby, cierre la función de sonido Dolby.
Si todavía no eres bueno, sigue los pasos a continuación.
1. Ajuste el volumen con el control remoto.
2. Compruebe si está en modo silencioso.
■ El control remoto no funciona
1. ¿Apunta el control remoto al receptor del proyector?
2. ¿Está agotada la batería del control remoto? Por favor, reemplace con
una batería nueva.
■ Las imágenes están borrosas
1. ¿Es correcto el enfoque de la lente?
2. ¿La pantalla de proyección y el proyector están instalados en el ángulo
correcto?
3. ¿Está la distancia de proyección más allá del rango de enfoque?
4. Asegúrese de que la lente de proyección no esté sucia.
01 02 03 04 05 06 07 08 09 10 11 12
13 14 15 16 17 18 19 20 21 22 23
24 25 26 27 28 29 30 31 32 33 34
35 36 37 38 39 40 41 42 43 44
45
46 47 48 49 50 51 52 53 54 55 56 57 58 59 60
61 62 63

目次
はじめに
安全にお使いいただくためのご注意
リモコンの各部の名称
47
プロジェクターーの各部の説明
仕様
故障かな?と思ったら
メニューの設置方法
メーニュのアイテムのパラメータの調整
画像メーニュ
音声メーニュ
時間メーニュ
設定メーニュ
言語の設定
プロジェクター の 接 続
パソコンとの接続
MACとの接続
スマートフォン、ipadとの接続
ビデオ機器の接続
外部スピーカーの接続
プロジェクター の 設 置
スクリーンからのおよその距離と画面サイズの関係
投写場所の選択
天井吊り
投写イメージの調整
画像サイズと明瞭さの微調整
前面図
底面図
設置のときのご注意
61
61
62
47
47
48
48
49
50-53
50
50
50
51
52
53
54-58
55
57
57
57
58
58-61
58
58
60
59
JP
47-49
01 02 03 04 05 06 07 08 09 10 11 12
13 14 15 16 17 18 19 20 21 22 23
24 25 26 27 28 29 30 31 32 33 34
35 36 37 38 39 40 41 42 43 44 45
46 47 48 49 50 51 52 53 54 55 56 57 58 59 60
61 62 63
はじめに
このたびは、YABERY30プロジェクターーをお買い上げいただき誠にありがとうございました。
ご使用前にこの取扱説明書をよく読みください。また、お手元に置き、いつでも確認できるよう
にしておいてください。
万一ご使用中何がございましたら、遠慮なく
までご連絡くだ
さい。
ご満足までのアフターサービスを提供できます。
最初にご確認ください
お使いになる前に、セット内容がすでに揃っているかご確認ください。万一、足りないものがご
ざいましたら、遠慮なく
までご連絡ください。
セ ット 内 容
警告
プロジェクターー本体*1
取扱説明書(本書*1)
3in1AVケーブル*1
HDMIケーブル*1
レンズ拭き*1
電源コード*1
リモートコン*1(単四電池2本別売り)
高さ調整ネジ*1
安全にお使いいただくためのご注意(必ず守りください)
●お子様が本製品や付属品を口に入れないようにご注意ください。
●本製品のカバーを開けたり、分解したりしないでください。
●濡れた手で本製品やケーブルに触らないでください。
●本製品内部に液体、金属などの異物が入らないようにしてください。
●本製品は水分湿気の多い場所、直射日光の当たる場所、ホコリや油煙などの多い場所、車中
や暖房器具の傍などの高温となる場所に設置したり、保管したりしないでください。
●本製品に強い振動や衝撃を与えないでください。
●本製品を重ねて設置したり、本製品の上に重いものを置いたりしないでください。
●本製品は不安定な場所に設置したり、保管したりしないでください。
●本製品のケーブルを抜き差し時は、必ずコネクタ部分を持ち、無理な力を加えないでくださ
い。
●本製品のお手に入れをする場合には、ベンジンやシンナーなどの揮発性有機溶剤が含まれ
ているものは使用しないでください。
*
01 02 03 04 05 06 07 08 09 10 11 12
13 14 15 16 17 18 19 20 21 22 23
24 25 26 27 28 29 30 31 32 33 34
35 36 37 38 39 40 41 42 43 44 45
46
47 48 49 50 51 52 53 54 55 56 57 58 59 60
61 62 63
SOURCE MENU EXIT
VOL- VOL+
OK
< >
< >
リモコン各部の説明:
ご注意:リモコ用単四電池2本は別売りの
で、ご使用前に電池を入れてください。
早戻し
早送り
再生/一時停止
ミュート
戻すボタン
確認ボタン
次へ
電源ボタン
上ボタン
メーニュー
下ボタン
左/音量- 右/音量+
ソース
前へ
01 02 03 04 05 06 07 08 09 10 11 12
13 14 15 16 17 18 19 20 21 22 23
24 25 26 27 28 29 30 31 32 33 34
35 36 37 38 39 40 41 42 43 44 45
46 47
48 49 50 51 52 53 54 55 56 57 58 59 60
61 62 63
リモコン各部の説明:
1.チャネル+/次
2.チャネル-/前
3.音量−
4.音量+
5.ソース
6.メニュー
07.戻す
08.確定
9.VGAポート
10.HDMIポート
11.USBポート
13.AVポート
14.電源ポート
15.台形補正
16.ピント合わせ
フ ロ ント フ ット
三脚/天吊り固定部
机上に設置したとき、フットを伸縮させて映像の
高さを 調 整します。
三脚/天井から吊り下げて使うとき、オプションの
天吊り金具を取り付 けます。
底面図
①
②
01
08
07
02
03
04
05
06
09 10 11 13
14
12
15
16
①
②
01 02 03 04 05 06 07 08 09 10 11 12
13 14 15 16 17 18 19 20 21 22 23
24 25 26 27 28 29 30 31 32 33 34
35 36 37 38 39 40 41 42 43 44 45
46 47 48
49 50 51 52 53 54 55 56 57 58 59 60
61 62 63

メーニュのアイテムのパラメータの調整(映像調整を例として)
1.右の画面が出るまでリモコンのMenu(メニュー)ボタンを押してください。
2.カーソル/ボタンを押して、選択されたアイテムを黄色いになります。
3.リモコンのOK(確定)ボタンを押して、カーソル/ボタン対応パラメータを調整でき
ます。
4.リモコンのMenu(メニュー)ボタンを押して戻すことができます。
写真メーニュ
ご注意:
1.すべてのアイテムのパラメータを設置完了まで2〜5のステップを繰り返してください。
長い時間操作がないと設置は自動的に退出になります。
2.入力や選択ができないアイテムが薄いグレーで表示さてます。
プロジェクターOSDメーニュの説明
1.リモコンのMenu(メニュー)ボタンを押してOSDメニューを開きます。
2.カーソル/ボタンを押して、「写真」--「音声」--「時間」--「選択」の順に設置を進めできます。
3.主メニューに選択した後、カーソル▲/▼ボタンを押して、ご希望調整アイテムを選択できます。
4.リモコンのOK(確定)ボタンを押して、選択されたアイテムのパラメータを調整できます。
5.すべてのアイテムのパラメータを調整した後リモコンのMenu(メニュー)ボタンを押して戻す
ことができます。
01 02 03 04 05 06 07 08 09 10 11 12
13 14 15 16 17 18 19 20 21 22 23
24 25 26 27 28 29 30 31 32 33 34
35 36 37 38 39 40 41 42 43 44 45
46 47 48 49
50 51 52 53 54 55 56 57 58 59 60
61 62 63
画像 内容 説明
写真モード 標準
色温度
ズームモード 自動
ノイズ低减
フリップ
HDMIモードビデオ
画面サイズ縮小100%
標準/ソフトネーズ/ダイナミツ/シャ
ープネス/色合い
暖色/ユーザー/寒色(赤色・緑色・青色)
自動/4:3/16:9
オフ/低/中/高/初期値
フロント/リア/フロント
・天 吊り/リア・天吊り
コンピュータ接続後設定は有効になる
75%〜100%
コントラストなどの 調 整
色温度の調整
投影アスペクトの調整
ノイズの調整
投影モードの調整
PC設定の調整
投影画面の大きさを
調整する。
音声モード 内容 説明
音楽モ ード
バランス+8
自動音量
サラウンドサ
ウンド
ユーザー/標準/音楽/映画
(50〜100)
オン/オフ(動画再生する時調整可能)
オフ/SRSサラウンド/サラウンド
音声状態の調整
バランスの調整
自動音量の調整
ステレオの調整
音声メーニュ
01 02 03 04 05 06 07 08 09 10 11 12
13 14 15 16 17 18 19 20 21 22 23
24 25 26 27 28 29 30 31 32 33 34
35 36 37 38 39 40 41 42 43 44 45
46 47 48 49 50
51 52 53 54 55 56 57 58 59 60
61 62 63
時間メーニュ
時間 内容 説明
スリープタイマー オフ/10min/20min/30min/60min/90min 表示時間の設定
設定 内容 説明
メニュー言語 日本語
初期化
メニュー透明度
OSD持続時間
蓝 スクリーンオフ
バージョンアップ
中国語、日本語、英語など20種類の言語
はい/いいえ
オフ/低/中/高
オフ/5秒/10秒/15秒
オン/オフ
言語の調整
初期化
メニュの透明度の調整
設置メニュー
メニュー色の調整
ソフトのアップグレード
設定メーニュ
01 02 03 04 05 06 07 08 09 10 11 12
13 14 15 16 17 18 19 20 21 22 23
24 25 26 27 28 29 30 31 32 33 34
35 36 37 38 39 40 41 42 43 44 45
46 47 48 49 50 51
52 53 54 55 56 57 58 59 60
61 62 63
言語の設定
入力ソースの選択と入力内容の再生
1.リモコンのMenu(メニュー)ボタンを押してOSDメニューを開きます。
2.「メニュー言語日本語」強調表示されるまで、カーソル/ボタンを押します。
3.リモコンのOK(確定)ボタンを押して、言語選択画面に移動します。
4.希望する言語が強調表示されるまで、カーソル/ボタンを押します。モコンのOK(確定)
ボタンを押します。
5.リモコンのMenu(メニュー)ボタンを押して最初画面に戻すことができます。
3.カーソル/ボタンを押してご希望の入力ソースを選択して、次にリモコンの「OK」ボタン、
ご覧になりたい映画や写真などを選択します。次にボタンを押し、ご選択内容を再生します。
4.映画や写真を再生する状態で、ボタンを押しすると一時停止、再生できます。
5.「Exit」ボタンを押して、戻すことができます。
このプロジェクターは同時に複数の装置と接続す
ることができます。
入力ソースを選択するには:
1.リモコンの「S」ボタンまたを押して任意の信号を
選択します。
2.任意の信号が選択されるまでを押し、次にリモコ
ンの「OK」ボタンを押します。信号が検出されたら、
選択したソース情報が画面に数秒間表示されます。
プロジェクターに複数の装置が接続されている場合
は、ソース選択バーに戻り別の信号を検出することが
できます。
メニュー
suomi
MENU
svenska 中国語
繁体中文
日本語
ご注意:他の信号源を選択し
て対応設備が接続していない
場合は、投影画面は無信号と
表示されています。
USB信号源の画面
FONTE SEGNALE
PC.RGB
HDMI1
HDMI2
AV
USB
01 02 03 04 05 06 07 08 09 10 11 12
13 14 15 16 17 18 19 20 21 22 23
24 25 26 27 28 29 30 31 32 33 34
35 36 37 38 39 40 41 42 43 44 45
46 47 48 49 50 51 52
53 54 55 56 57 58 59 60
61 62 63
1.パソコンとMACの接続
プロジェクター の 接 続
しかし自動で投写されない場合もあります。そのときは手動で映像出力先を変更する必要があ
ります。その操作はキーボードで特定のキーを同時押しするのですが、一般的なキーを載せま
したので、下の表で確認してください。
ただし音声は設定をしないと出ない場合もあります。そのときはPCのサウンド設定を確認し、
出力方法を変更してください。スピーカーの選択項目に、繋いでいるプロジェクターーのメーカ
ー名などが表示されているはずです。
MiniDisplayPort-VGAアダプタでVGA-ケーブルとMacのサンダーボルト端子を接続してくだ
さい。
※一般的な例となるため、同メーカーでも操作が異なる可能性があります。上手くいかないと
きは連打せず、ゆっくりと同時押しして反応をみてください。
1.1.2HDMIで接続する。
付属されたHDMIケーブルをプロジェクターのVAG端子と繋げてください。HDMIは映像と音声
を1本のケーブルで伝送できる便利な規格です。VGAのときと同様、HDMIで繋ぐ場合もインス
トール等の作業はありません。
1.1パソコンとの接続
1.1.1VGAで接続する。
付属されたVGAケーブルをプロジェクターのVAG端子と繋げてください。ドライバのインストー
ル等は不要で、最近のWindowsパソコンですと繋ぐだけで認識、投写されます。
NEC
「Fn」+「F3」
東芝
「Fn」+「F5」
SONY
「Fn」+「F7」
EPSON
「Fn」+「F7」
または「Fn」+「F8」
マウスコンピューター
「Fn」+「F7」
Panasonic
「Fn」+「F3」
Lenovo
「Fn」+「F7」
富士通
「Fn」+「F10」
DELL
「Fn」+「F7」
Mac
再起動後ミラーリング設定
1.2Macとの接続
1.2.1VGAで繋ぐ
01 02 03 04 05 06 07 08 09 10 11 12
13 14 15 16 17 18 19 20 21 22 23
24 25 26 27 28 29 30 31 32 33 34
35 36 37 38 39 40 41 42 43 44 45
46 47 48 49 50 51 52 53
54 55 56 57 58 59 60
61 62 63
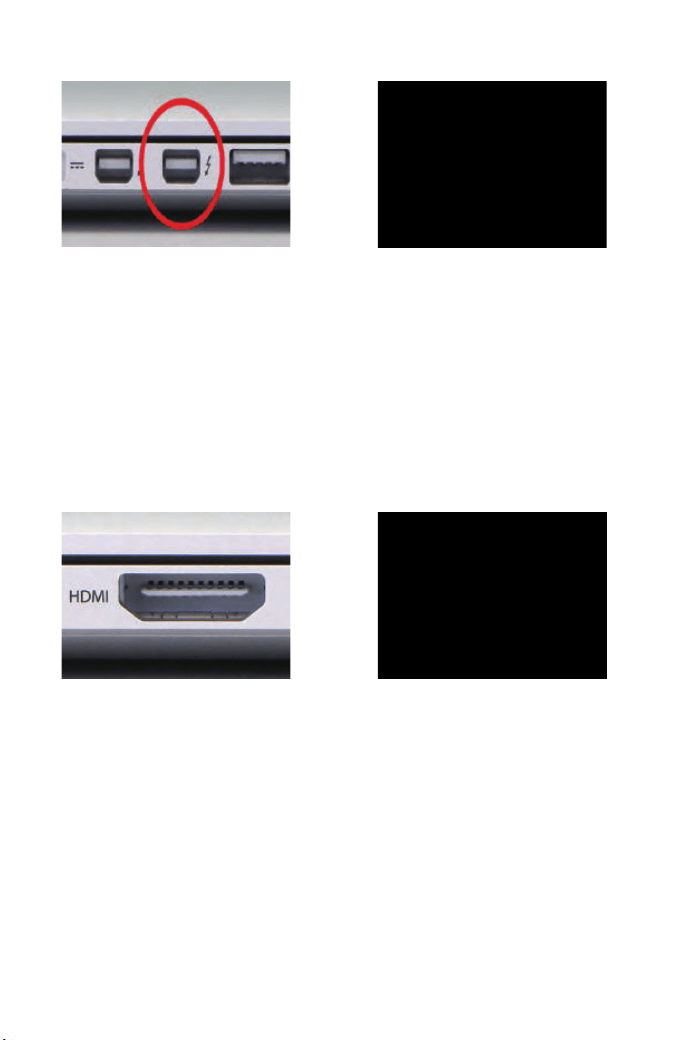
※Thunderboltはこれまでは「minidisplayport(ミニディスプレイポート)」という名前でしたが、
データ伝送速度が違うだけで、プロジェクターーとはどちらでも問題なく繋ぐことができます。
VGA接続は映像のみ伝送します。
HDMI出力が可能なMac(執筆時点ではMacBookProRetinaモデル)では、HDMIケーブルでの
接続がおすすめです。VGAと違いデジタル出力になるため、画質の劣化も最小限に抑えること
ができます。
※HDMIはケーブル1本の接続で、映像と音声を伝送できるのもポイント。ただし、HDMIケーブ
ルはVGAケーブルよりも規格上のケーブル長制限が短いため、10メートル以上の長さが必要
な場合はHDMIは使えません。VGAを使って下さい。
音声の出力先はMacかプロジェクターーかを選べます。設定は「システム環境設定」の「サウン
ド」から、サウンドを出力する装置を選ぶだけ。下記画像も参考にして下さい。
1.2.2HDMIで繋ぐ
Thunderbolt(サンダーボルト)端子 VGAアダプタ((付属されていません)
HDMI端子
HDMIケーブルなら1本で映像と音声が伝送
01 02 03 04 05 06 07 08 09 10 11 12
13 14 15 16 17 18 19 20 21 22 23
24 25 26 27 28 29 30 31 32 33 34
35 36 37 38 39 40 41 42 43 44 45
46 47 48 49 50 51 52 53 54
55 56 57 58 59 60
61 62 63
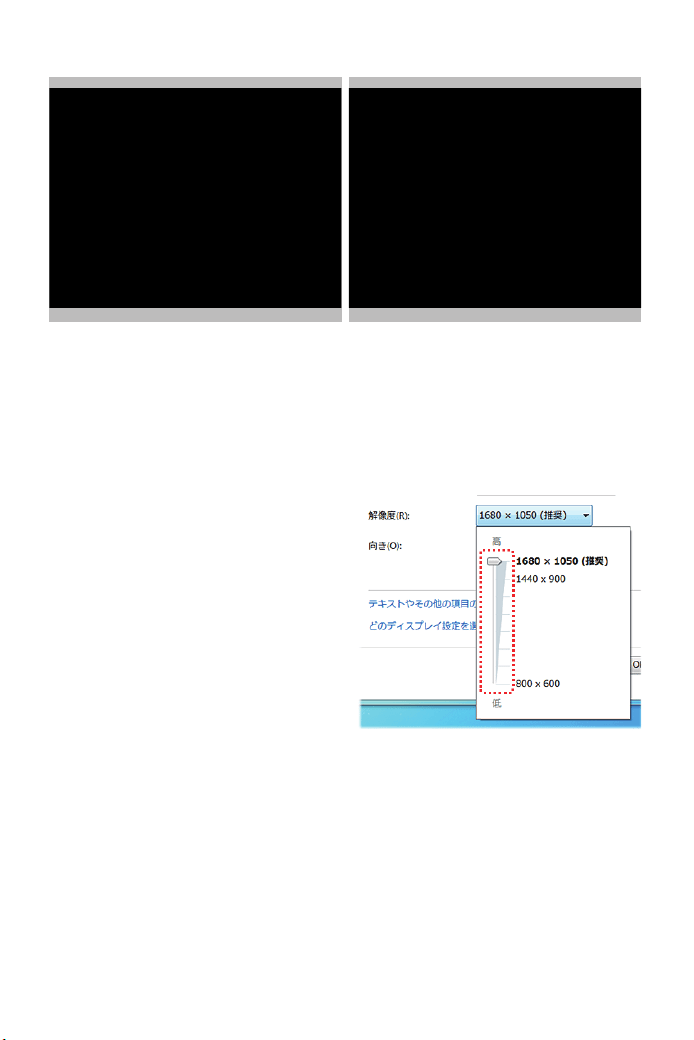
※接続後、投写画面が暗い場合は、次に手順の通りパソコンの解像度をご調整してください。良
い効果のため、解像度を1280*720に調整することをお薦めます。
①コントロールパネルを起動します。
②「デスクトップのカスタマイズ」--「ディスプレイ」--「解像度の調整」--「解像度(R):」欄をクリッ
クします。
③スライダーを上下に動かし、お好みの解像度
に調節して、Enter」キーを一回だけ押します。
④「OK」ボタンをクリックして、「変更を維持す
る(K)」ボタンをクリックします。
iphoneの場合:lightningtoHDMI交換ケーブルが必要します。(別売り)
Androidの場合:MHLHDMI変換アダプター(別売り)をご利用ください。(Androidスマートフォ
ンはMHL機能が搭載されるが必要です。)
①.Lightning/MHL接続端子をプロジェクターと接続します。
②.Lightning/MHL接続端子をiPhone/Androidと接続する。
③プロジェクターの「入力信号」で「HDMI」を選択してください。
④プロジェクターのに出っている「信頼」のメッセージを選びます。
⑤30秒〜1分ほどを待つと、設定が自動的に設定完了します。
サウンドを出力する装置を選択 システム環境設定
2.スマートフォン、ipadとの接続
01 02 03 04 05 06 07 08 09 10 11 12
13 14 15 16 17 18 19 20 21 22 23
24 25 26 27 28 29 30 31 32 33 34
35 36 37 38 39 40 41 42 43 44 45
46 47 48 49 50 51 52 53 54 55
56 57 58 59 60
61 62 63
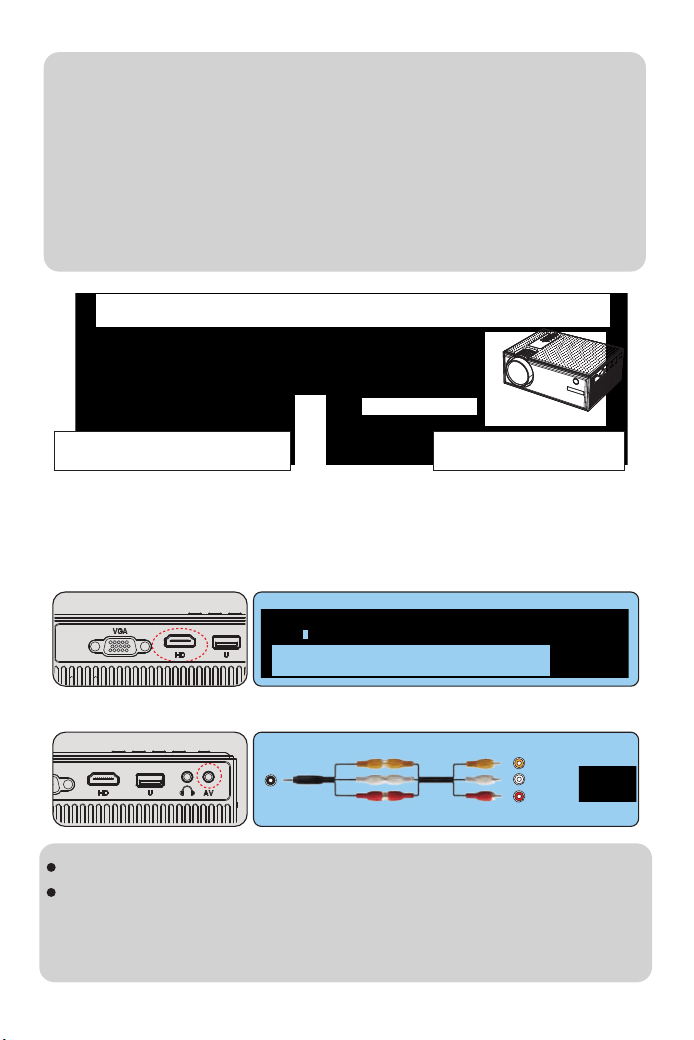
AV
video
audio out
(L/R)
①DVDプレーヤーやビデオなどの映像を投写するには、次の方法で接続します。HDMIケーブ
ルを使用するとき
②ビデオケーブルを使用するとき
ご注意:
1.必ずMHL規格に対応したケーブルで接続してください。
2.一般的には、プロジェクターがHDMIケーブルと接続した後、入力ソースタイプが自動的に
HDMIに切り替えするが、もし、画面が出て来ない場合は、手で入力ソースタイプをHDMIに切り
替えしえくだ さい 。
3.もし、上記で接続した後、ちゃんと映ない場合は一応iPhone、iPad、iPodを再起動して、挿しな
おしてください。
4.iPhone5以降のLightningでHDMI接続した場合、アプリケーションによって表示できないアプ
リもあるようですので大事な打ち合わせに使用する際などには事前に確認しておきましょう。
3.ビデオ機器の接続
MHL対応スマートフォン、iPhone プロジェクター
ビデオ機器によっては、数種類の信号を出力できます。出力できる信号の種類は、お使いのビ
デオ機器に同梱の取扱説明書で確認してください。
使用するケーブルは、接続するビデオ機器の出力信号によって異なります
交換アダプター(別売り)
別売り
01 02 03 04 05 06 07 08 09 10 11 12
13 14 15 16 17 18 19 20 21 22 23
24 25 26 27 28 29 30 31 32 33 34
35 36 37 38 39 40 41 42 43 44 45
46 47 48 49 50 51 52 53 54 55 56
57 58 59 60
61 62 63
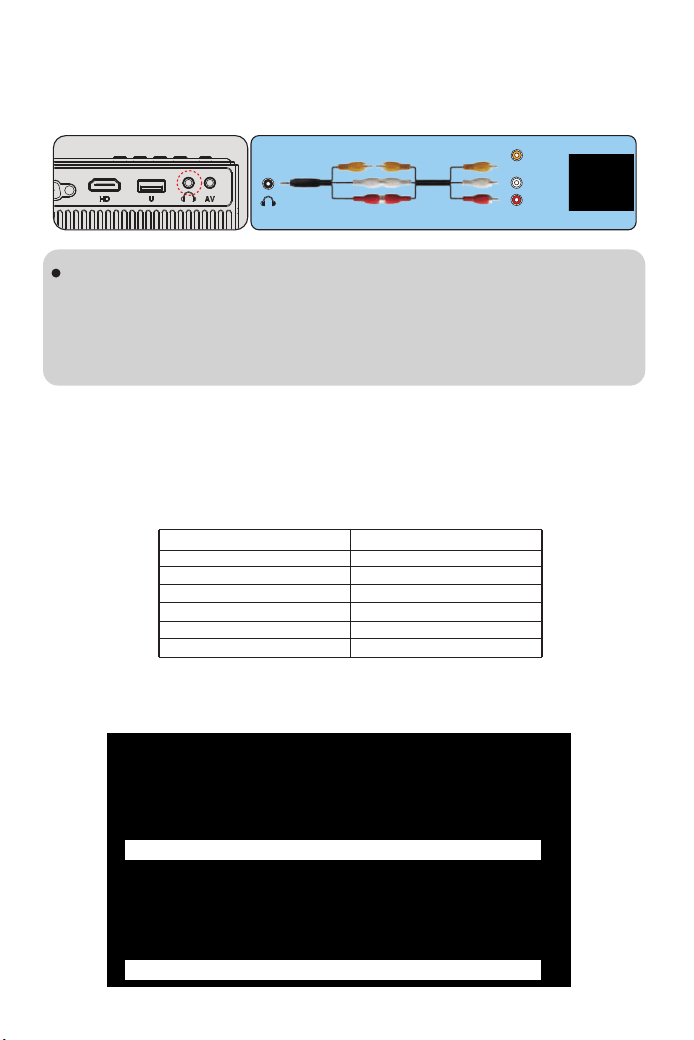
外部スピーカーから音声を出力するには、オーディオケーブルで、外部スピーカーと本機の
AudioOut端子を接続します。
画面サイズは、プロジェクターーのレンズからスクリーンまでの距離によって決まります。スクリ
ーンからレンズまでの距離が約1.5m~3mの範囲に設置してください。
下記の投写サイズと投写距離の関係をご参考ください。
※投映画像の内容により画面サイズは異なります。
外部スピーカーから音声を出力するときは、[音声出力機器]を[プロジェクター]に設定し
ます。s[設定]-[HDMIリンク]-[音声出力機器]
外部スピーカーの接続
スクリーンからのおよその距離と画面サイズの関係
投写場所の選択
投写サイズ
50インチ
72インチ
100インチ
120インチ
160インチ
200インチ
投写距離(16:9ズーム)
1.52m
2.15m
2.93m
3.2m
4m
5.5m
固定位置での投影 マウント搭 載
リアプ ロ ラック搭載リアプロ
audio out
(L/R)
接続必要ない。接続必要ない。
プロジェクター の 設 置
別売り
01 02 03 04 05 06 07 08 09 10 11 12
13 14 15 16 17 18 19 20 21 22 23
24 25 26 27 28 29 30 31 32 33 34
35 36 37 38 39 40 41 42 43 44 45
46 47 48 49 50 51 52 53 54 55 56 57
58 59 60
61 62 63
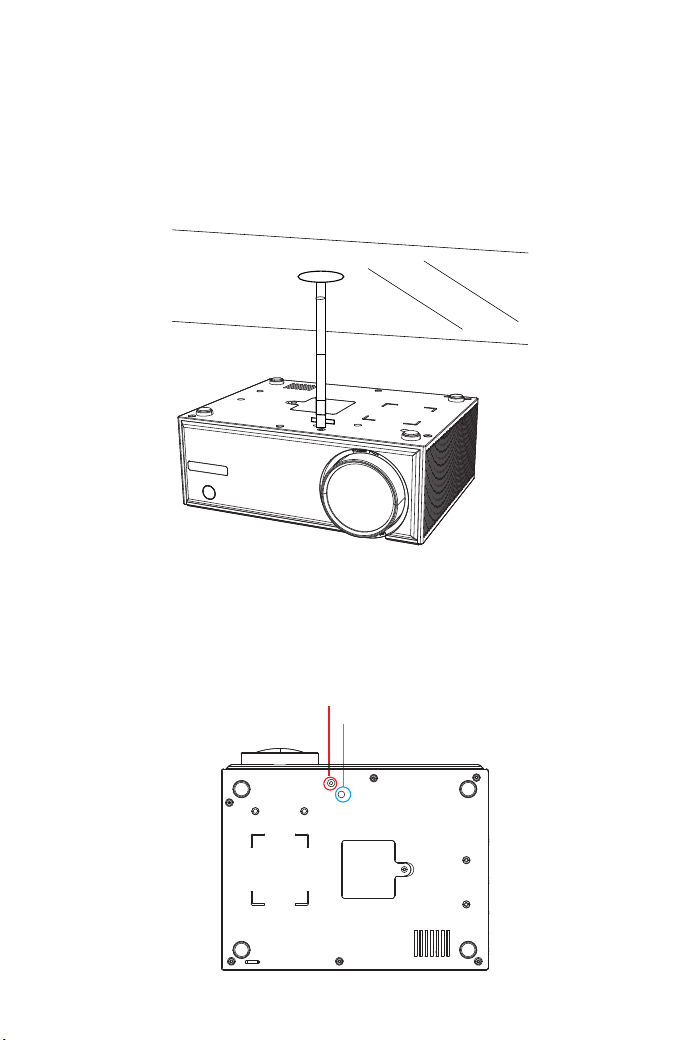
必要に応じて、プロジェクターは安定した面に設置したり、本製品のマウントを使用して天井か
ら吊るしたり
することができます。また、外部ディスプレイと接続したり、背面投影(リアプロ)を楽しむことが
可能です。
プロジェクターの天井への取り付けは下記の説明図をご参考ください。
①プロジェクターエアコンやヒーターの熱源の近くに設置しないでください。
②プロジェクターの取り付けの際は、ネジの品質、本体へのネジ込み深さに注意してください。
Y61プロジェクター用の天吊りは市場汎用のはほとんど使えます。天吊りの固定用のネジの仕様
は4/1インチネジです。
天井吊り
①
②
01 02 03 04 05 06 07 08 09 10 11 12
13 14 15 16 17 18 19 20 21 22 23
24 25 26 27 28 29 30 31 32 33 34
35 36 37 38 39 40 41 42 43 44 45
46 47 48 49 50 51 52 53 54 55 56 57 58
59 60
61 62 63
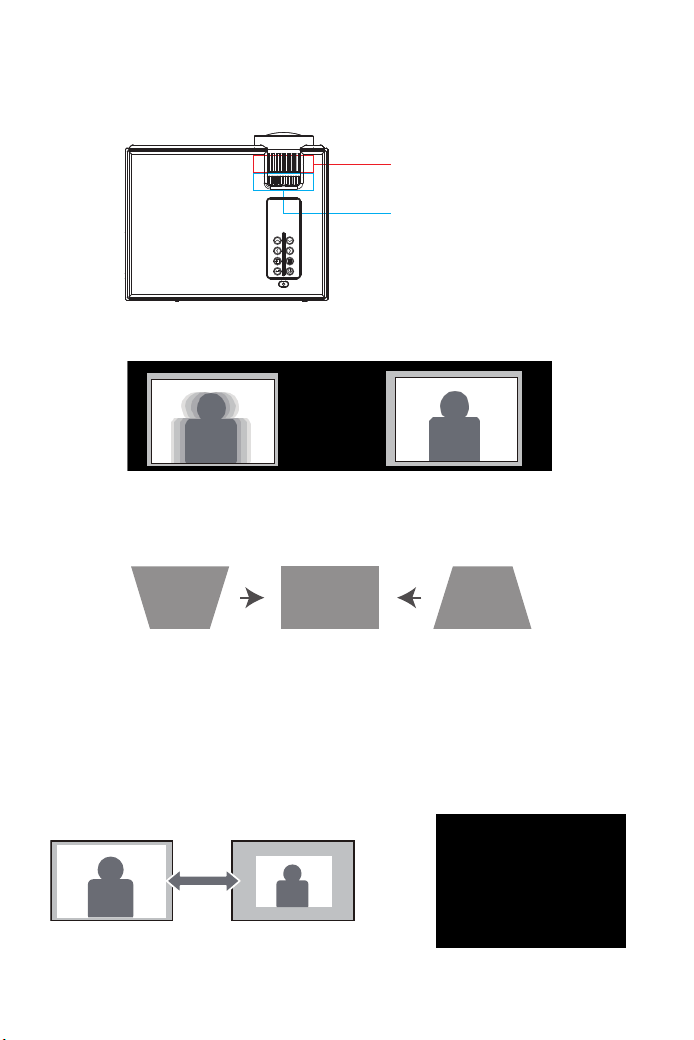
2.1台形補正(タテ補正)
A:投影画面はタテ斜めの場合は、プロジェクター本体の台形調整リングを回して、台形を調整
してください。
2.4映像のサイズを調整する(ズーム調整)
A:投写距離を変更して画像のサイズご調整してください。
B:投影中で、設置メニューの写真メニューで、リモコン或いは本体の▶ボタンを押しでプロジ
ェクターズーム値を調整すること通して、投影画面を25%まで縮小できます。
(ズームは動画再生中しか調整できますです。)
投写イメージの調整
画像の台形歪みの補正と明瞭さの微調整
1.レンズ回して投写画面のピントを合わせます。
レンズ回して投写画面のピ
ントを合わせます。
台形補正(タテ補正)
01 02 03 04 05 06 07 08 09 10 11 12
13 14 15 16 17 18 19 20 21 22 23
24 25 26 27 28 29 30 31 32 33 34
35 36 37 38 39 40 41 42 43 44 45
46 47 48 49 50 51 52 53 54 55 56 57 58 59
60
61 62 63
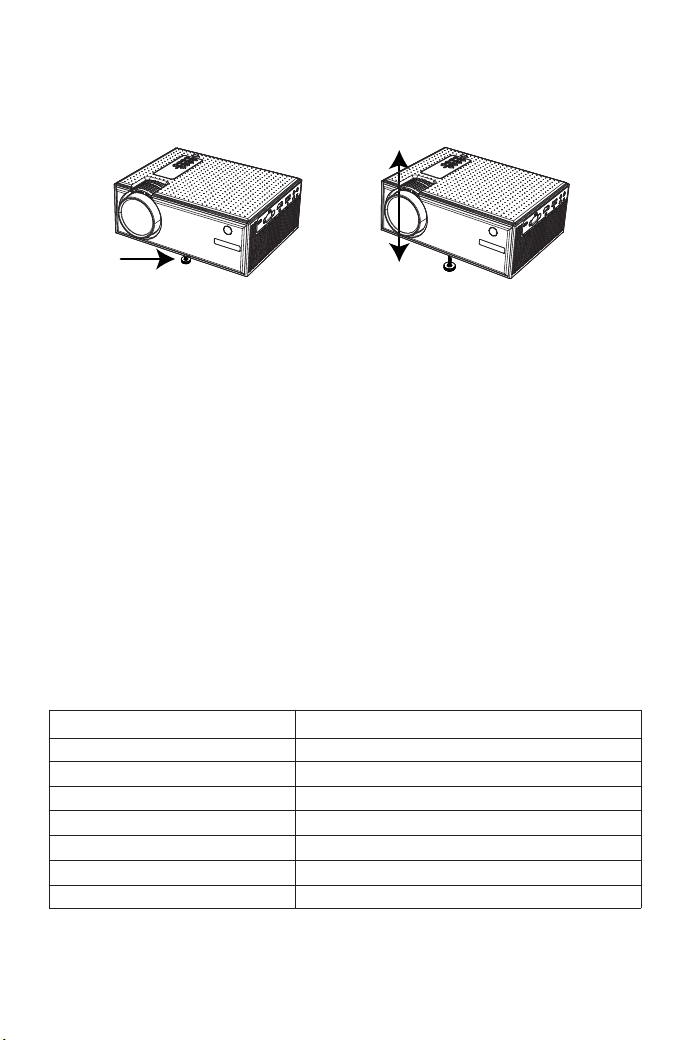
3.映像の高さを調整する
フットレバーを押してフロントフットを伸ばします。最大12°まで傾けて、映像の高さを調整でき
ます。
ご注意:傾斜角度が大きくなると、ピントが合いにくくなります。傾斜角度が小さくなるように設
置してください。
縦横比とは、イメージの幅と高さの比率のことです。デジタルTVは通常縦横比16:9です。こ
れはこのプロジェクターのデフォルト値に設定されています。またアナログTVとDVDは4:3です。
①16:9この設定は、縦と横のサイズを別々に処理することを除き、画像をリニア方式で引き伸ば
し、リサイズします。ソース画像の高さと幅はそれぞれ投写高と投写幅の最大値まで引き伸ばさ
れます。この方法では、元のソース画像の縦横比によっては投写縦横比が変わる場合があります。
アナモフィックの設定は、縦横比を変更する必要がないため高精度TVなど、すでに縦横比が
16:9になっている画像に適しています。
②4:3:スクリーンの中央が4:3の縦横比になるように画像を調整します。これは縦横比を変更せ
ずにすむため、コンピュータモニタ、標準精度のTV、縦横比4:3のDVDムービーなどの4:3画像
に適しています。
ズーム(縦横比)調整
仕 様:
1280P*720P(1080pサポート)
日本語対応
1.45KG
22*16*8cm
LCD
70w
110-220V
HDMI/USB/VGA/AV
解像度
言語
正味重量
本体寸法
ディスプレイ
消費電力
入力電圧
入力ポート
01 02 03 04 05 06 07 08 09 10 11 12
13 14 15 16 17 18 19 20 21 22 23
24 25 26 27 28 29 30 31 32 33 34
35 36 37 38 39 40 41 42 43 44 45
46 47 48 49 50 51 52 53 54 55 56 57 58 59 60
61 62 63

■音が出ません。
当商品の対応できるのファイルは下記の通りです。
ビデオ対応:MPEG1,MPEG2,H.263,H.264,AVS,VC1,MJPEG,RV30,RV40,HEVC
オーディオファイル対応:MPEG1,MPEG2,LPCM,MP3
画像対応:JEPG,PNG,BMP,MPO
Amazonファイアースティック側の設定でドルビーデジイタルプラスをドルビーデジタルに設
定すると直します。
※音声出力に関しては、ドルビーサウンド(dolbysound)がサポートできないため、BDプレー
ヤーの場合、ドルビーサウンド機能を閉じてください。
まだダメなら、下記の手順によりご確認ください。
1、リモコンで音量を調整します。
2、マナーモードになっているかをご確認ください。
3、USBメモリー、音楽などを試して、ビデオ(入力ソース)の問題かどうかをご確認ください。
■使用中に電源が切れる
1.タイマーメニューの「オートオフ」を「オン(時間を選択)」にしていませんか。「電源切時間」を
「オン(時間を選択)」にしていませんか。
2.電源ケーブルのプラグをちゃんと差し込みしているかをご確認ください。
■映像が出ない
接続している入力源を選んでいますか。本体またはリモコンの入力信号選択ボタンを再度押し
てください。
入力端子のケーブルが正しく接続されていますか。
それでも解決しない場合は、[リセット]を行ってみてください。
■映像が歪む
正しく設置されていますか。
台形状に歪む場合は台形補正を行ってください。
■映像がぼやける
レンズのフォーカスは合っていますか。
投写画面と本機が正しい角度で設置されていますか。
投写距離がフォーカスの範囲を超えていませんか。
投写レンズが汚れていないことを確認します。
■画像の上辺または下辺が長い(台形歪み
プロジェクターーは、スクリーンに対してできるだけ垂直になるように置きしていますか。
本体のキーストーンリングを使って、台形歪みを補正して見てください。
故障かな?と思ったら
01 02 03 04 05 06 07 08 09 10 11 12
13 14 15 16 17 18 19 20 21 22 23
24 25 26 27 28 29 30 31 32 33 34
35 36 37 38 39 40 41 42 43 44 45
46 47 48 49 50 51 52 53 54 55 56 57 58 59 60
61
62 63

■リモコンで操作できない
リモコンのリモコン送信部を本体のリモコン受光部に向けていますか。
リモコンの電池が消耗していませんか。新しい電池と交換してください。
リモコンと本体のリモコン受光部との間に障害物がありませんか。
リモコンの有効範囲を超えていませんか。
■保証期間
保証期間はお買い上げ日より3年間です。何が問題がございましたら、遠慮なく
service@y-
abertech.com
までご連絡ください。
保証とアフターサービス
01 02 03 04 05 06 07 08 09 10 11 12
13 14 15 16 17 18 19 20 21 22 23
24 25 26 27 28 29 30 31 32 33 34
35 36 37 38 39 40 41 42 43 44 45
46 47 48 49 50 51 52 53 54 55 56 57 58 59 60
61 62
63