
Instruction Manual

Instruction Manual ��������������������������������������������������������������������������������������������EN I P03
說明書 ����������������������������������������������������������������������������������������������������������� ZH-TW I P30

3 EN
1� This Appliance is not intended for use by
persons (including children) with reduced
physical, sensory or metal capabilities, or lack
of experience and knowledge, unless they
have been given supervision or instruction
concerning use of the Appliance by a person
responsible for their safety�
2� Children should be supervised to ensure that
they do not play with the Appliance�
3� Clear the area to be cleaned� Remove power
cords and small objects from the oor that could
entangle the Appliance� Tuck rug fringe under
the rug base, and lift items such as curtains and
tablecloths off the oor�
4� If there is a drop off in the cleaning area due to a
step or stairs, you should operate the Appliance
to ensure that it can detect the step without
falling over the edge� It may become necessary
to place a physical barrier at the edge to keep
the unit from falling� Make sure the physical
barrier is not a trip hazard�
5� Only use as described in this manual� Only
use attachments recommended or sold by the
manufacturer�
6� For INDOOR household use ONLY� Do not
use the Appliance in outdoor, commercial or
industrial environments�
7� Do not use without dust bin and/or lters in place�
8� Do not operate the Appliance in an area
where there are lit candles or fragile objects�
9� Keep hair, loose clothing, ngers, and all parts of
body away from any openings and moving parts�
10� Do not use and store in extremely hot or
cold environments (below -5˚C /23˚F or
above 40˚C/104˚F)� Please charge the robot
in temperature above 0°C/32°F and below
40°C/104°F�
11� Do not operate the Appliance in a room where
an infant or child is sleeping�
12� Do not use Appliance on wet surfaces or
surfaces with standing water�
IMPORTANT SAFETY INSTRUCTIONS
IMPORTANT SAFETY INSTRUCTIONS
When using an electrical Appliance, basic
precautions should always be followed,
including the following:
READ ALL INSTRUCTIONS BEFORE
USING THIS APPLIANCE
SAVE THESE INSTRUCTIONS

4EN
13� Do not allow the Appliance to pick up large
objects like stones, large pieces of paper or
any item that may clog the Appliance�
14� Do not use Appliance to pick up ammable or
combustible materials such as gasoline, printer
or copier toner, or use in areas where they may
be present�
15� Do not use Appliance to pick up anything that is
burning or smoking, such as cigarettes, matches,
hot ashes, or anything that could cause a re�
16� Do not put objects into the suction intake� Do
not use if the suction intake is blocked� Keep
the intake clear of dust, lint, hair, or anything
that may reduce air ow�
17� If the power cord is damaged, it must be
replaced by the manufacturer or its service
agent in order to avoid a hazard�
18� Turn OFF the power switch before cleaning or
maintaining the Appliance�
19� The lithium battery type suitable for CH2497A
is Max� 8 cells, max� nominal voltage DC 14�4V,
rated capacity 5,800mAh�The battery must be
removed and discarded according to local laws
and regulations before disposal of the Appliance�
20� Please dispose of used batteries according to
local laws and regulations�
21� Do not incinerate the Appliance even if it is severely
damaged� The batteries can explode in a re�
22� The Appliance must be used in accordance
with the directions in this Instruction Manual�
Ecovacs Home Service Robotics cannot be
held liable or responsible for any damages or
injuries caused by improper use�
23� The robot contains batteries that are only
replaceable by skilled persons� To replace the
robot’s battery, please contact Customer Service�
24� Please make sure your power supply source
voltage matches the power voltage marked
on the OMNI Station�
25� Use only the original rechargeable battery and
OMNI Station provided with the Appliance
from the manufacturer� Non-rechargeable
batteries are prohibited�
26� Take care not to damage the power cord� Do not
pull on or carry the Appliance or OMNI Station
by the power cord, use the power cord as a
handle, close a door on the power cord, or pull
power cord around sharp edges or corners� Do
not run Appliance over the power cord� Keep
power cord away from hot surfaces�

5 EN
27� Do not use the OMNI Station if it is damaged�
The power supply is not to be repaired and not to
be used any longer if it is damaged or defective�
28� Do not use with a damaged power cord or
receptacle� Do not use the Appliance or OMNI
Station if it is not working properly, has been
dropped, damaged, left outdoors, or come in
contact with water� It must be repaired by the
manufacturer or its service agent in order to
avoid a hazard�
29� The plug must be removed from the
receptacle before cleaning or maintaining the
OMNI Station�
30� Remove the Appliance from the OMNI
Station, and turn OFF the power switch to
the Appliance before removing the battery for
disposal of the Appliance�
31� When not using the OMNI Station for a long
period of time, please unplug it�
32� If the robot will not be used for a long time,
power OFF the robot for storage and unplug
the OMNI Station�
33� WARNING-Add clean water into the clean
tank only�
34. WARNING: For the purposes of recharging
the battery, only use the detachable supply
unit CH2497A provided with the Appliance�
To satisfy RF exposure requirements, a separation
distance of 20 cm or more should be maintained
between this device and persons during device
operation�
To ensure compliance, operations at closer than
this distance is not recommended� The antenna
used for this transmitter must not be co-located in
conjunction with any other antenna or transmitter�
Device Update
Typically, some devices are updated bi-monthly,
but not always so specic�
Some devices, especially those that went on sale
more than three years ago, will only be updated if
a critical vulnerability is found and xed�
6EN
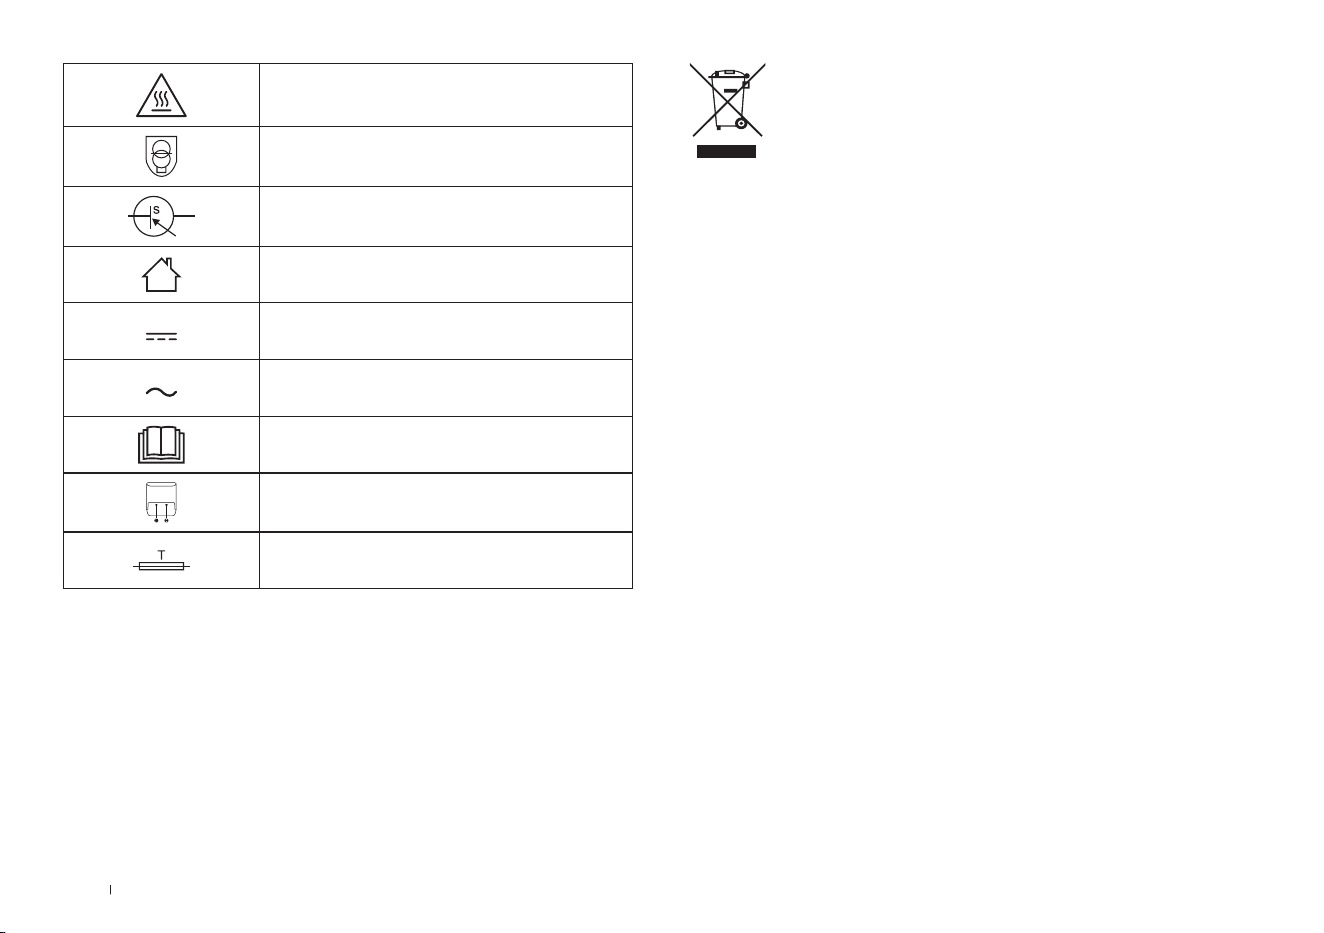
Caution: hot surface
Short-circuit-proof safety isolating
transformer
Switch mode power supply
For indoor use only
Direct current
Alternating current
Before charging, read the
instructions�
Polarity of the charging port
Time-lag miniature fuse-link
Correct Disposal of this Product
This marking indicates that this product should
not be disposed of with other household waste
throughout the EU� To prevent possible harm to the
environment or human health from uncontrolled
waste disposal, recycle it responsibly to promote
the sustainable reuse of material resources� To
recycle your used device, please use the return and
collection systems or contact the retailer where the
product was purchased� They can safely recycle
this product�
7 EN
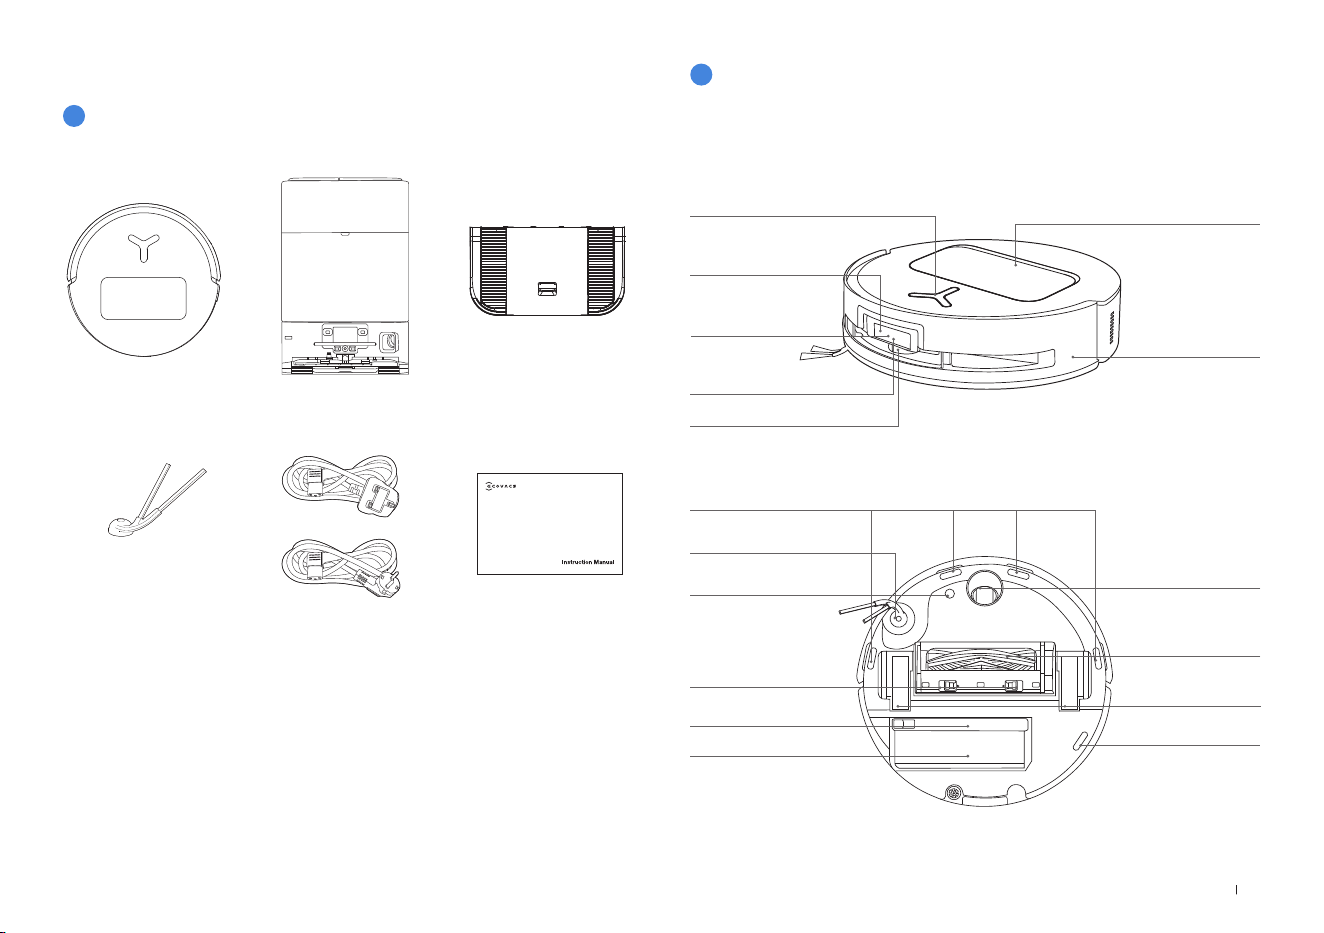
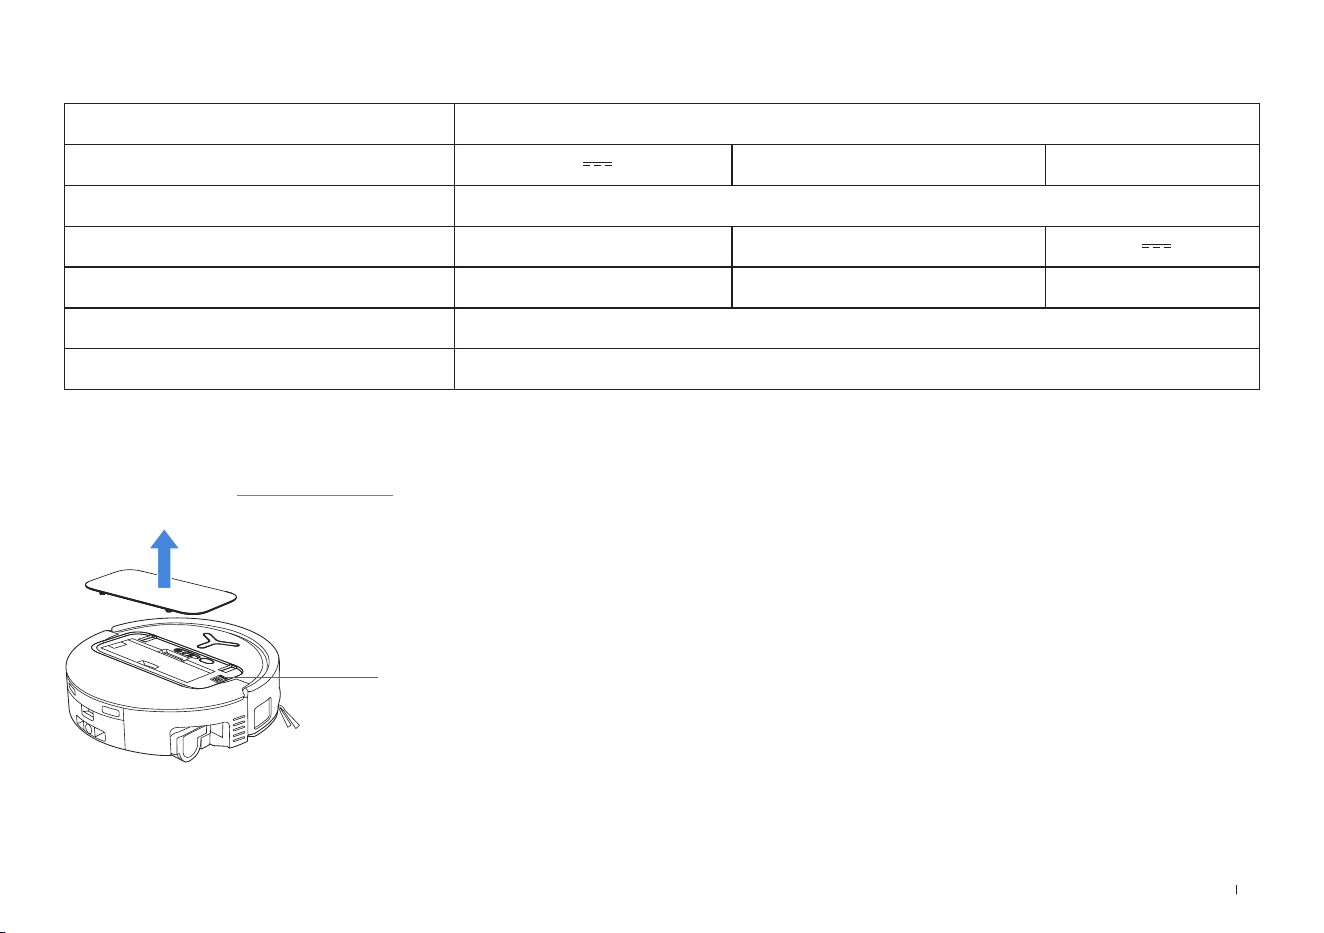
PACKAGE CONTENTS
Robot OMNI Station Base
Instruction ManualSide Brush
Power Cord
1
PACKAGE CONTENTS
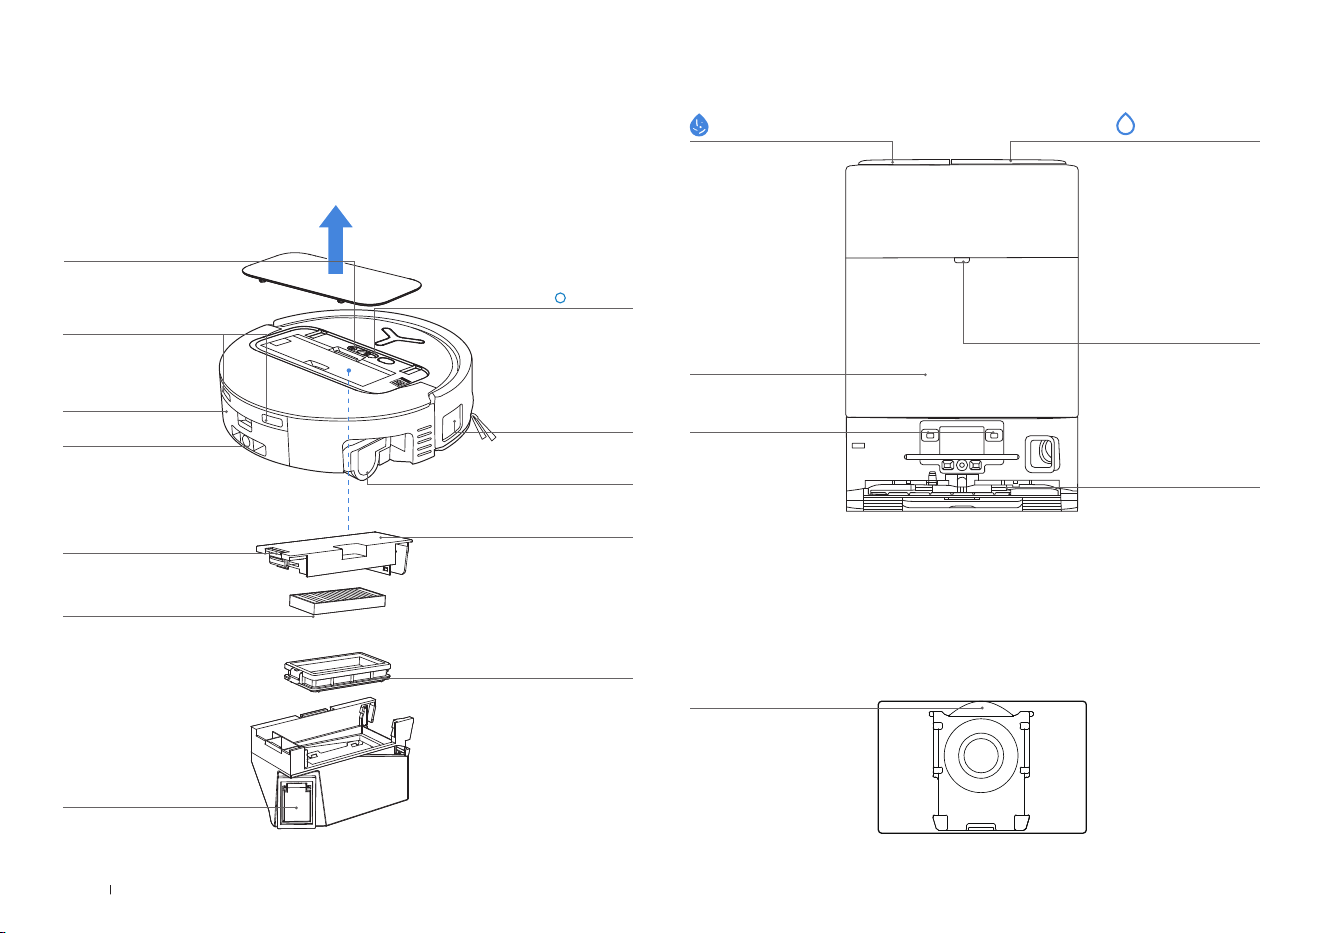
3D structure light
sensor
1. Robot Front View
Top Cover
Button on the robot
Short Press: Start/Pause
Long Press for 3s: Return to charge
Double Tap: Roller Mop Release/Retract
(Robot not in the Station)
Bumper
2
Product Diagram
d-ToF Laser Module
2. Robot Bottom View
Driving Wheels
Universal Wheel
Side Brush
Carpet Detection Sensor
Main Brush
Anti-drop Sensors
Anti-drop Sensors
Brush Release Button
Replaceable Roller Mop
Water Tray
AIVI Camera
Supplementary Light
Note:
*Figures and illustrations are for reference only and may differ from actual product
appearance� Product design and specications are subject to changes without
notice�

8EN
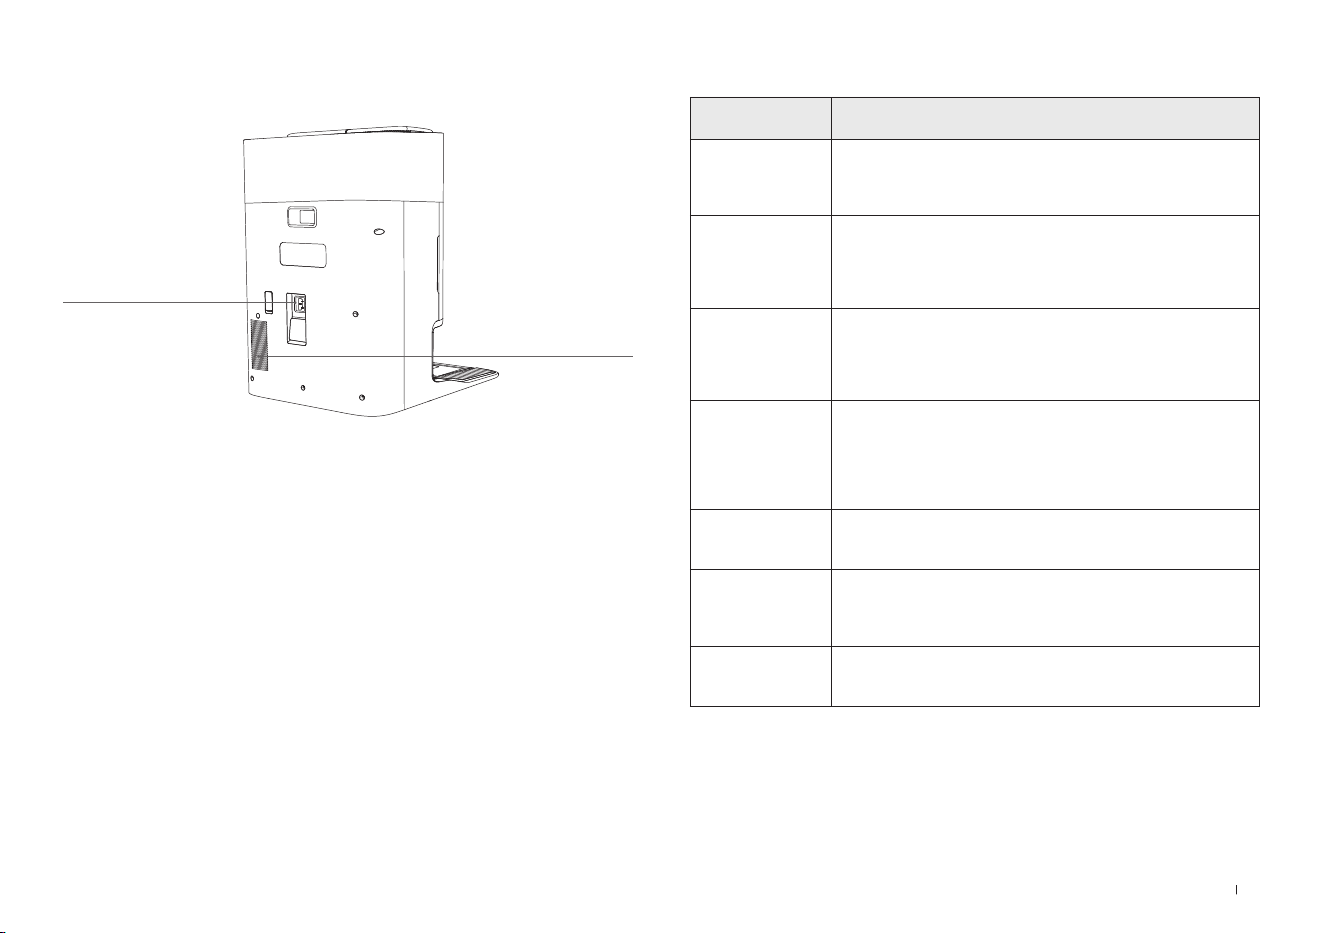
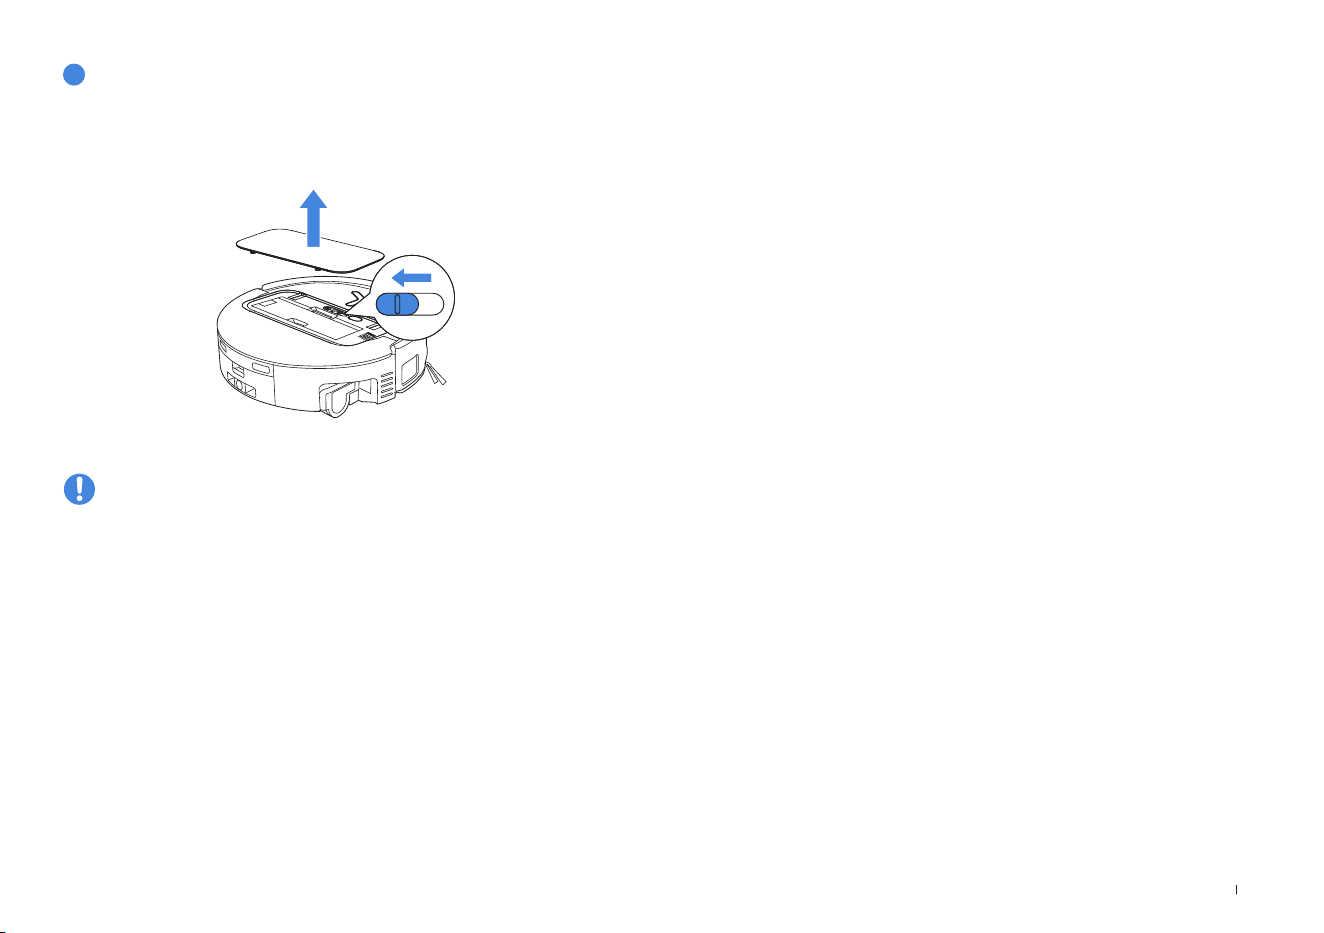
3. Internal View (Under the Cover)
Power Switch
"I" = ON
" " = OFF
RESET Button
Network Setup: Press the RESET Button and follow the voice prompt to set up the network�
Restore to default settings: Long press the RESET Button for 5 seconds� After you hear the
voice prompt, the startup music will be played and the robot will be restored to default settings�
Wi-Fi Status Indicator/
RESET Button
4. Dust Bin
Filter
Filter Latch
Dust Bin Cover
Dust Disposal Port
Filter Net
Water Filling Port
Dirty Water Box
Edge Sensor
Roller End Cover
Charging Contacts
5. OMNI Station Front View
Dust Collection Cabin
Note:
• If the Indicator ashes red, go to the ECOVACS HOME App for details about the malfunction�
• If the robot cannot charge, wipe the corresponding Charging Contacts on the OMNI Station
with a dry cloth�
6. Dust Bag
Dust Bag Handle
Indicator
Solid White: Standby/Running
Flashing Red: Malfunction
Goes out: Power Outage/
Deep Sleep Mode
Mop Washing Tray
Clean Water Tank
Charging Contacts
on the Station
Dirty Water Tank
9 EN
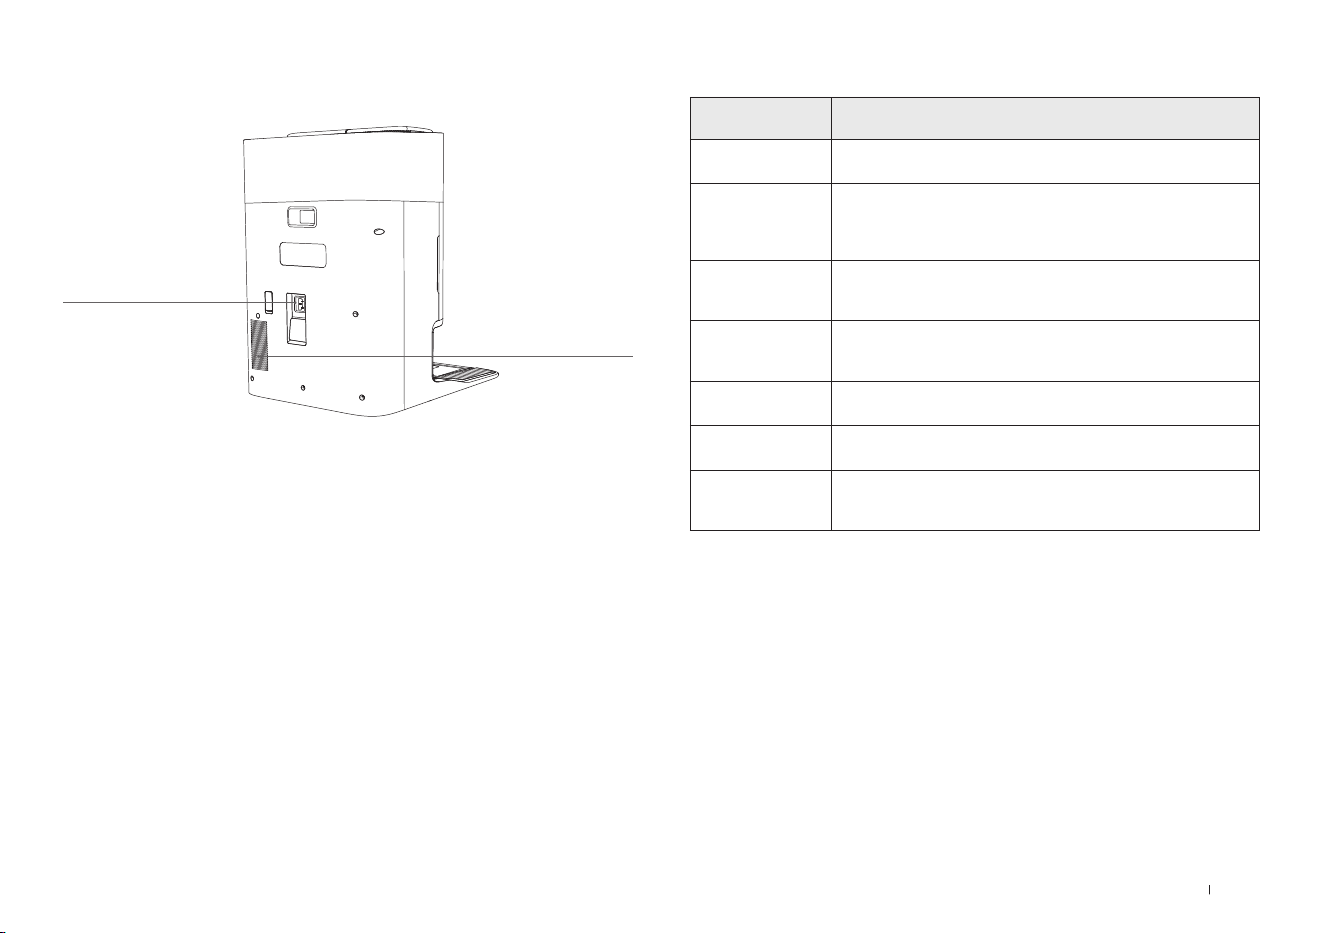
7. OMNI Station Back View
Air Vent
Power Socket
Product Diagram Functional Description
d-ToF
Laser Module
Laser Ranging is applied to measure the distance between the robot
and surrounding objects based on the time difference of reection,
allowing the module to map against the objects around while the
robot is moving� The detection range is 12 m�
TrueDetect 3D
Sensor
With Infrared Ranging-detection and the concept of similar triangles, the
sensor emits infrared rays and receives the light from the objects ahead
to calculate the distance between the object and the robot�
When the sensor detects an object nearby, the robot will automatically
take a turn toavoid bumping into the object� The detection range is 0�3 m�
Anti-drop Sensors
Infrared Ranging is applied by the sensor at the bottom of the robot to
measure the height between the bottom of the robot and the ground�
When at the top of the stairs, for example, with a height above 55mm on
white-colored ground or a height above 30mm on black-colored ground,
the robot will stop advancing, fullling the feature of Anti-drop�
Carpet Detection
Sensor
The ultrasound probe can emit ultrasonic waves with a frequency
of 300KHZ� The energy of the ultrasonic waves can be absorbed
by carpets� If the reected energy is below the threshold, the robot
will recognize the presence of a carpet� According to ECOVACS lab
tests, currently, over 50 types of carpets available on the market can
be identied�
Anti-collision Sensor
When the transmitted signal is blocked by an object, the signal
receiver will not be able to receive it� With this principle, the robot will
avoid obstacles when encountering them�
Edge
Sensor
With ToF distance measurement, the robot can detect the distance
between itself and objects on its right side� When there is a wall or
obstacle on the right side, the robot will perform edge cleaning to
avoid missing spots or collisions�
AIVI Camera
Use AI cameras to collect images of the surrounding environment�
*Realize video recording� Through interaction with MIC, remote video
call can be realized (For some models)�
8. Sensors

10EN
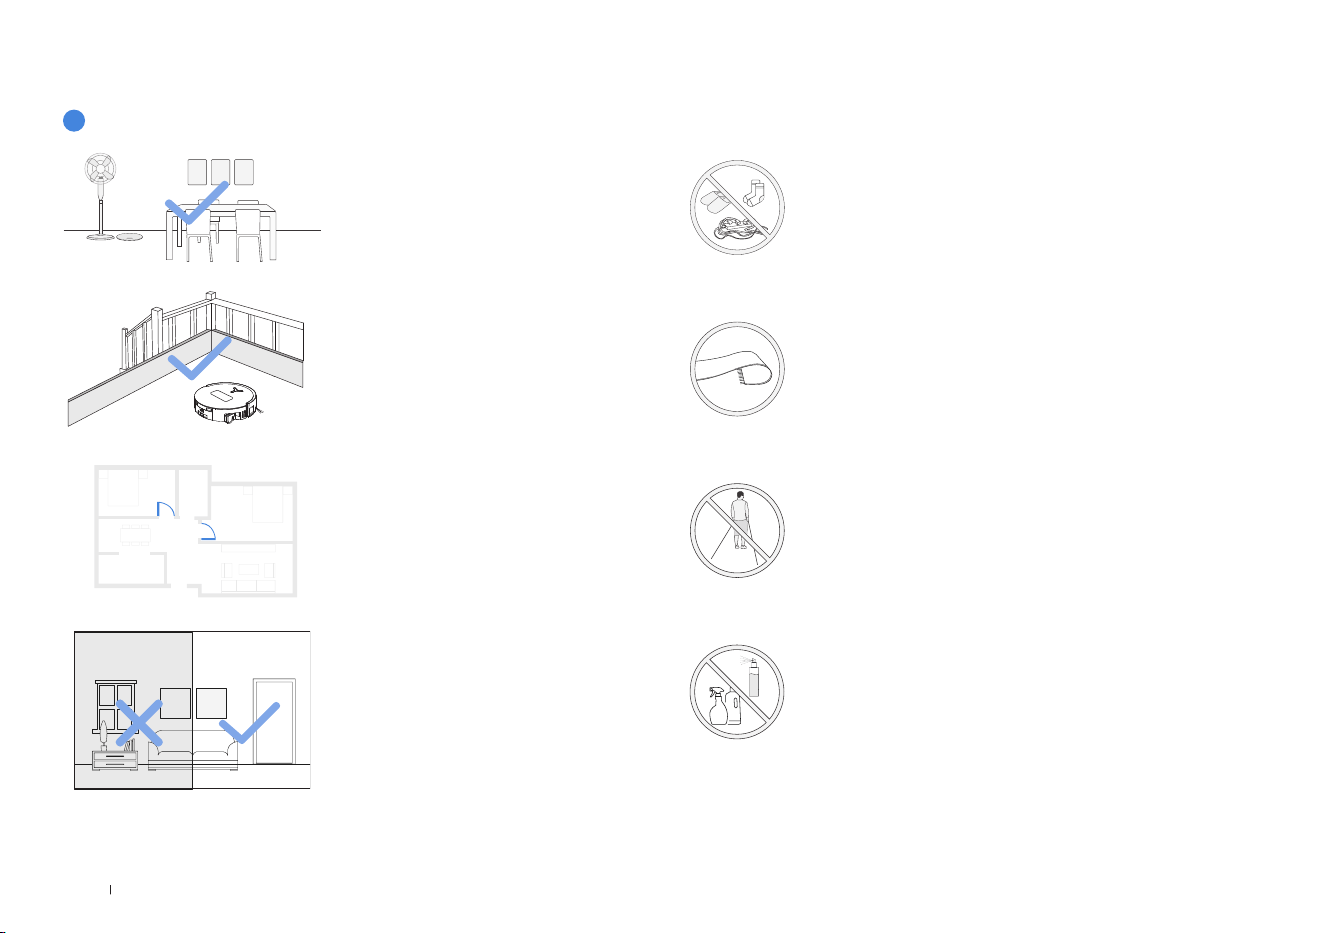
NOTES BEFORE CLEANING
Tidy up the area to be cleaned by putting
furniture, such as chairs, in their proper
place�
During the rst use, make sure each
room door is open to help the robot fully
explore your house�
Prepare the Area
Keep Doors Open
It may be necessary to place a physical
barrier at the edge of a steep drop to
stop the robot from falling over the edge�
Set up Protective Barriers
1
Warnings
The robot can avoid shoes, sockets and
cords etc�, and make sure all areas to be
cleaned are well illuminated, which can
improve obstacle avoidance�
Provide Sufcient Lighting
Put away objects including cables, cloths and slippers, etc� on
the oor to improve the cleaning efciency�
Before using the product on a rug or carpet with tasseled edges,
please fold the rug and tuck the tassles under the rug�
Please do not stand in tight spaces such as doorways and
hallways, and make sure not to block the robot’s path when it's
identifying areas�
Ensure the clarity of the robot’s vision and avoid scratching or
smudging the AI camera lens with ngerprints or oily stains�
Use a clean, soft cloth to wipe the camera, instead of cleaning
agents, detergents, or sprays�
11 EN
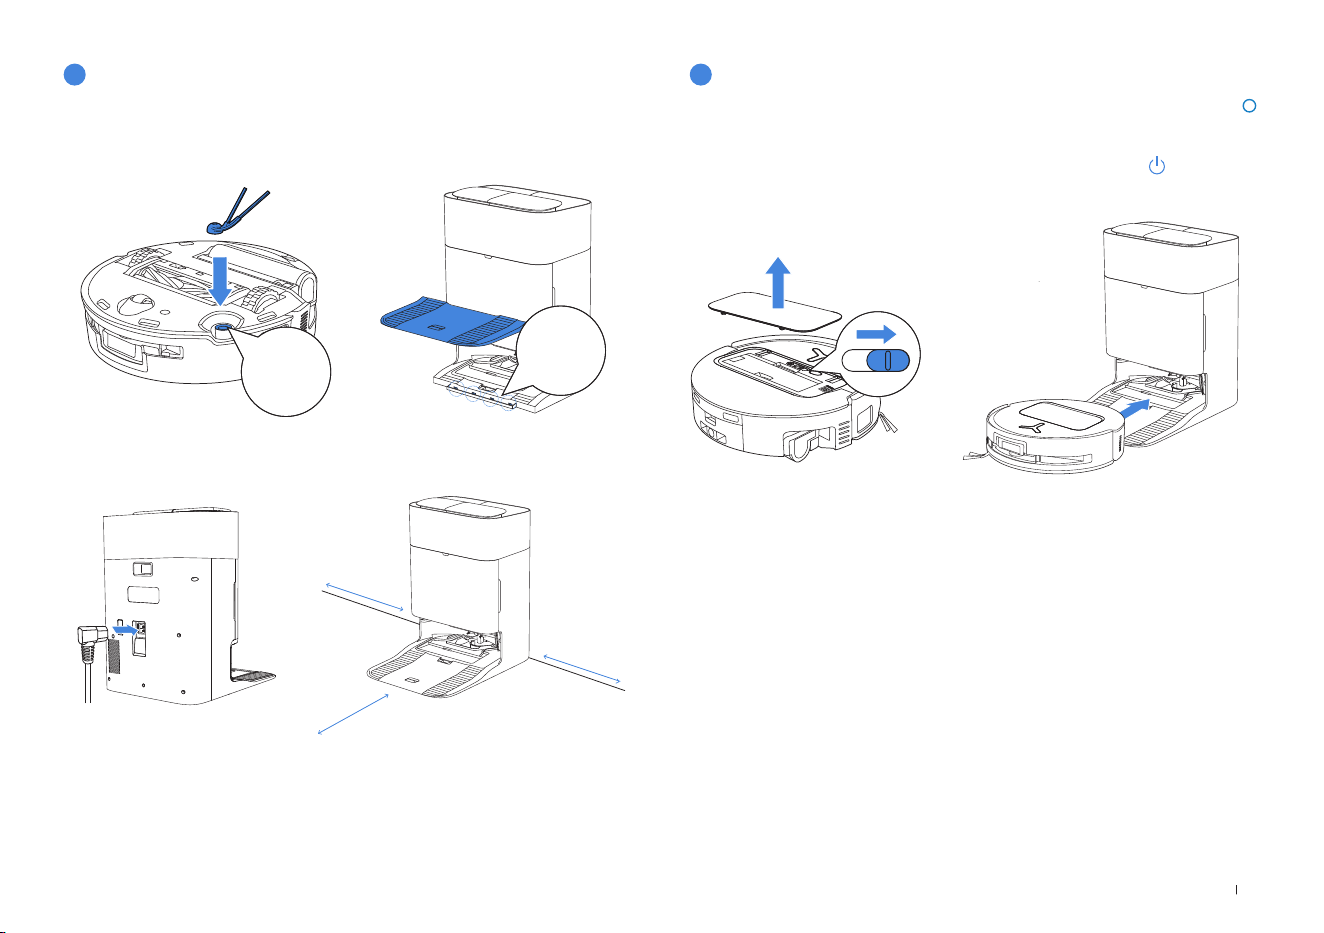
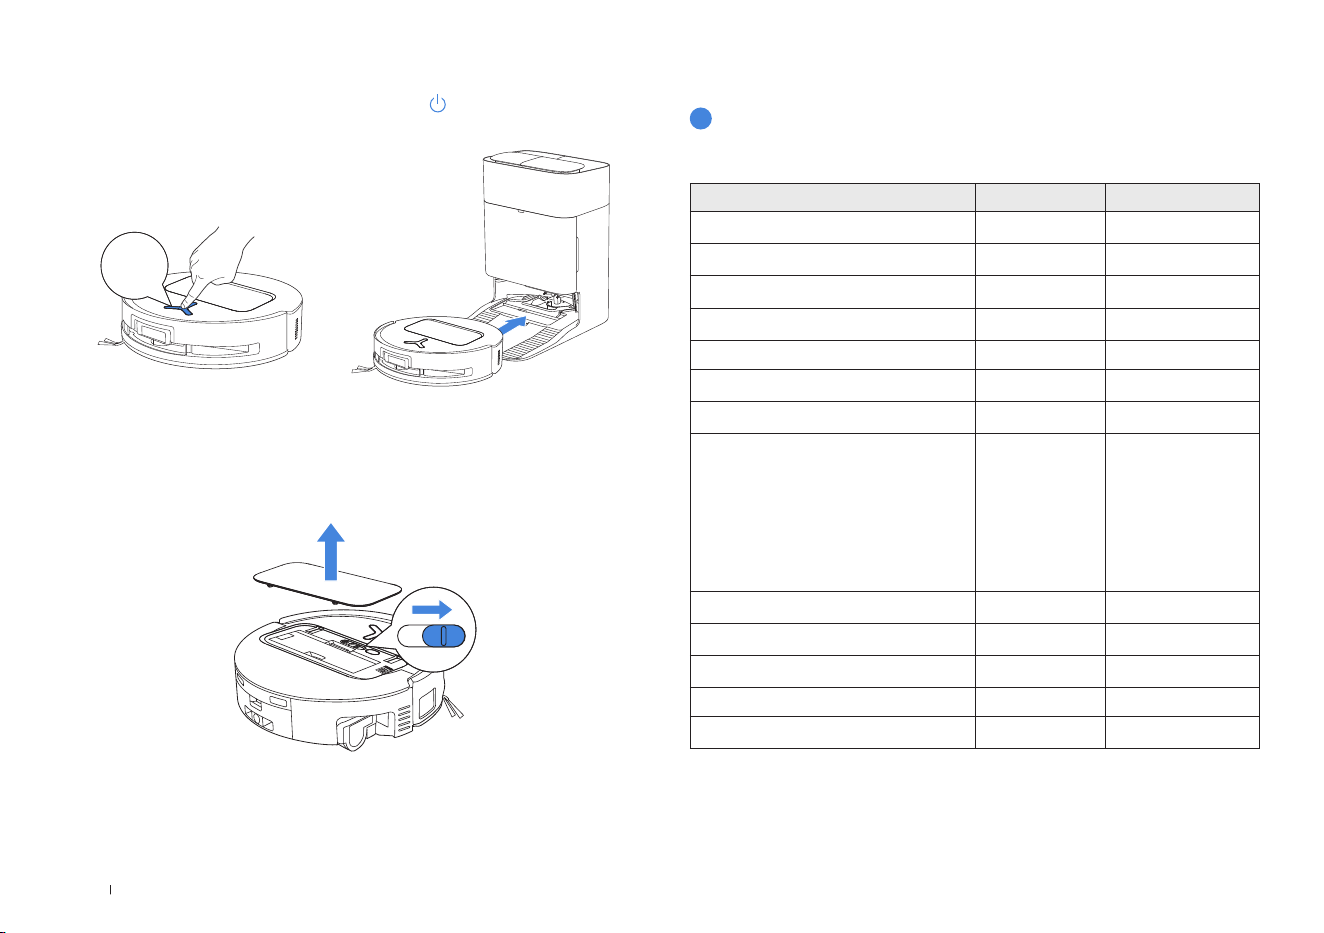
1� Installation
Before using, please remove all protective materials from the robot and OMNI Station�
The sound of Click indicates proper installation�
2
Quick Start
3
Power ON and Charge the Robot
Click
Click
2� Power Cord Connection and Station Placement
Note:
• If there are reective objects such as mirrors and skirting lines near the OMNI Station, the
bottom 14 cm of them should be covered�
• Do not place the OMNI Station under direct sunlight�
• Place the Station in a location with a strong Wi-Fi signal�
Place the Station against a wall on a level, hard ground� Ensure there are no objects
within 0�05 m on either side and 0�8 m in front of it�
Turn on the Power Switch under the robot’s cover('I' indicates power on, and ' '
indicates power off).Place the robot in front of the Station, ensuring the Station is
connected to a power supply� Use the ECOVACS HOME App to recall the robot to
start charging at the OMNI Station, or long press the robot button for 3 seconds,
and it will return to the Station to charge�
Note:
• The robot can't be charged when the power is turned off�
• After the robot nishes its cleaning task, it is recommended not to power it off but to keep it
charging, to better prepare for the next cleaning session�
• It is recommended that the robot start cleaning from the OMNI Station� Do not move the
OMNI Station while cleaning�
≥
0.05m (0.16’)
≥
0.05m (0.16’)
≥
0.8m (2.62’)
12EN
Wi-Fi Indicator Light
White Flashing Slow Disconnected to Wi-Fi
White Flashing Fast Connecting
Solid White Connected to Wi-Fi
5
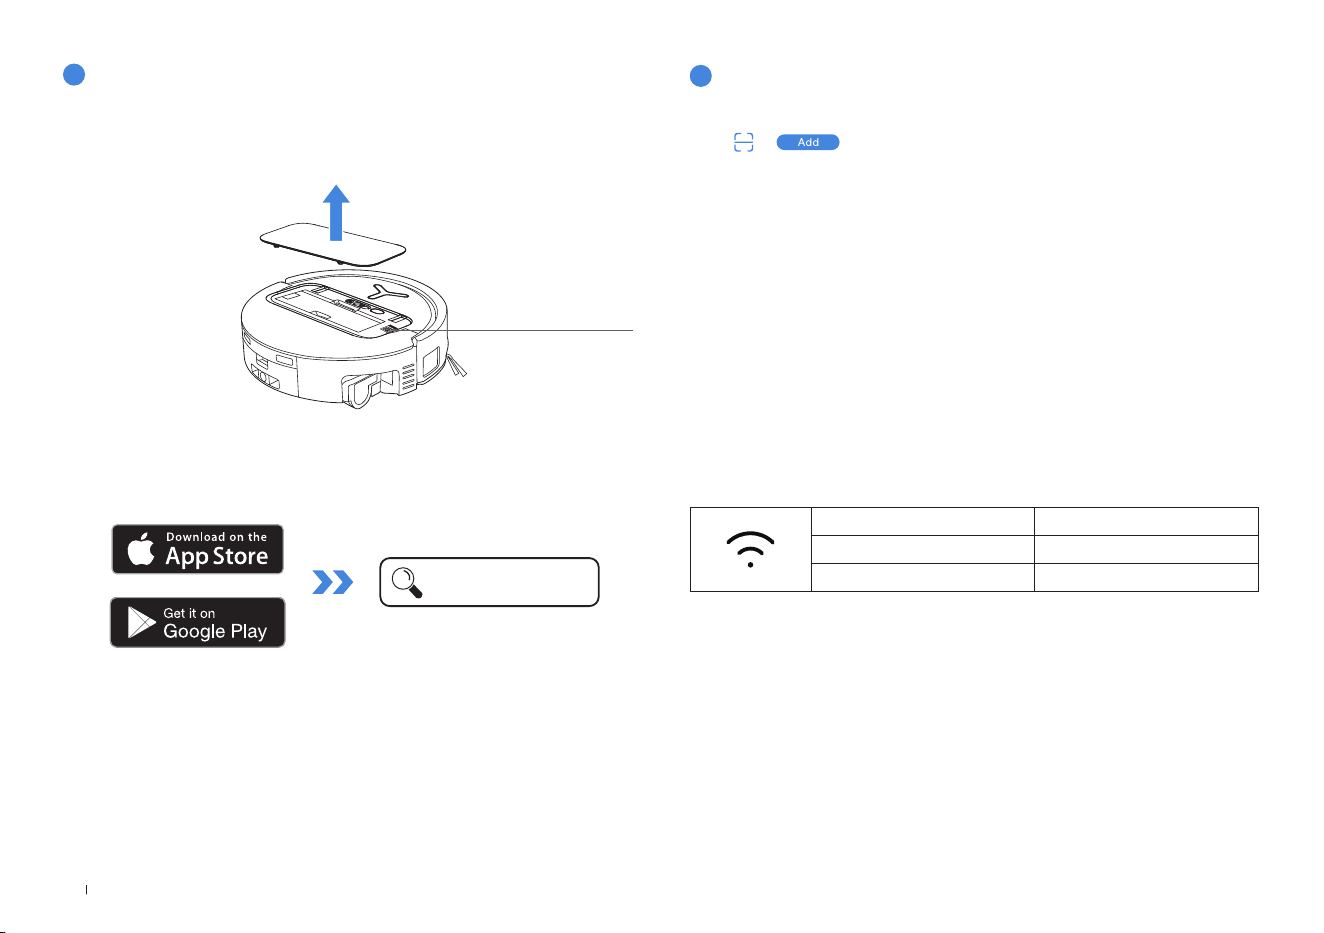
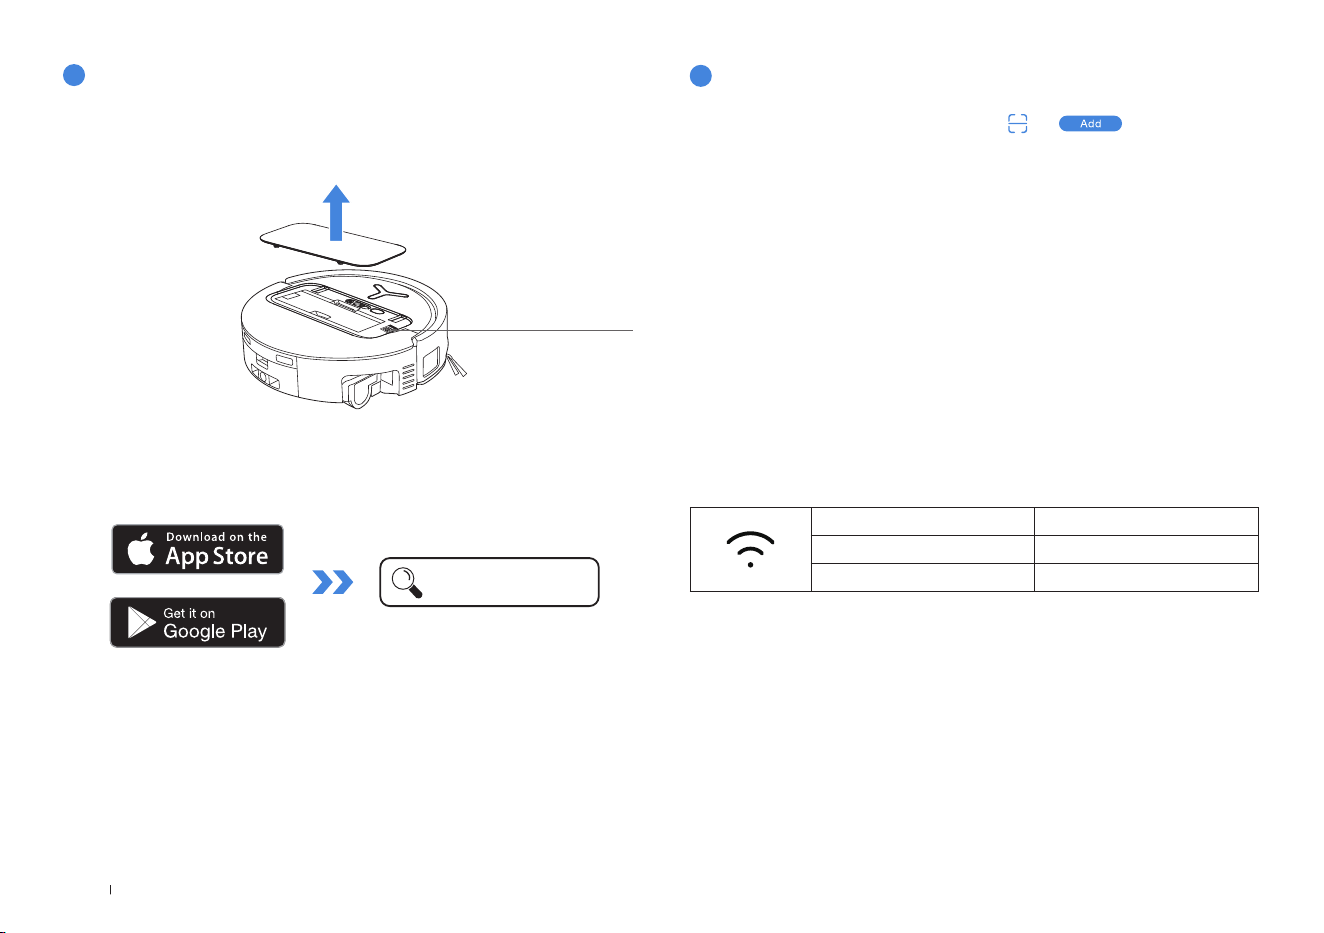
Connect Robot with App
Via Bluetooth: Turn on the robot and mobile phone Bluetooth� Allow the App to
obtain mobile phone Bluetooth permission� Tap to scan the QR Code on the robot
or tap or
in the App to nd the nearby robot�
Via Wi-Fi: You can also choose to connect the robot with the App through other
methods according to the prompts on the App's page�
Note: Please connect via Bluetooth for a better experience�
Wi-Fi Network Requirements:
• You are using a 2�4GHz or 2�4/5 GHz mixed network�
• Your router supports 802�11b/g/n and IPv4 protocol�
• Do not use a VPN (Virtual Private Network) or Proxy Server�
• Do not use a hidden network�
• WPA and WPA2 using TKIP, PSK, AES/CCMP encryption�
• WEP EAP (Enterprise Authentication Protocol) is not supported�
• Use Wi-Fi channels 1-11 in North America and channels 1-13 outside North
America (refer to local regulatory agency)�
• If you are using a network extender/repeater, the network name (SSID) and
password are the same as your primary network�
• Please enable the WPA2 on your router�
Note: Follow the guide of the App to register, log in, and connect the product with the App�
4
Download the ECOVACS HOME App
You may scan the QR Code on the robot to download the App�
Download the ECOVACS HOME App to enjoy more features.
Or search for the ECOVACS HOME in your mobile App store to download the App�
Please note that to access smart features such as remote startup, voice
interaction, 2D/3D map display and control settings, and personalized cleaning
(features may vary depending on the product), you'll need to download and use
the ECOVACS HOME App, which receives constant updates� You must agree
to our Privacy Policy and User Agreement before we can process some of your
basic and necessary information and enable you to operate the product via the
ECOVACS HOME App� Without your agreement, some of the aforementioned
smart features cannot be accessed through the ECOVACS HOME App�
Nevertheless, you can still use the product's basic functions for manual operation�
ECOVACS HOME
Under the Top Cover
13 EN
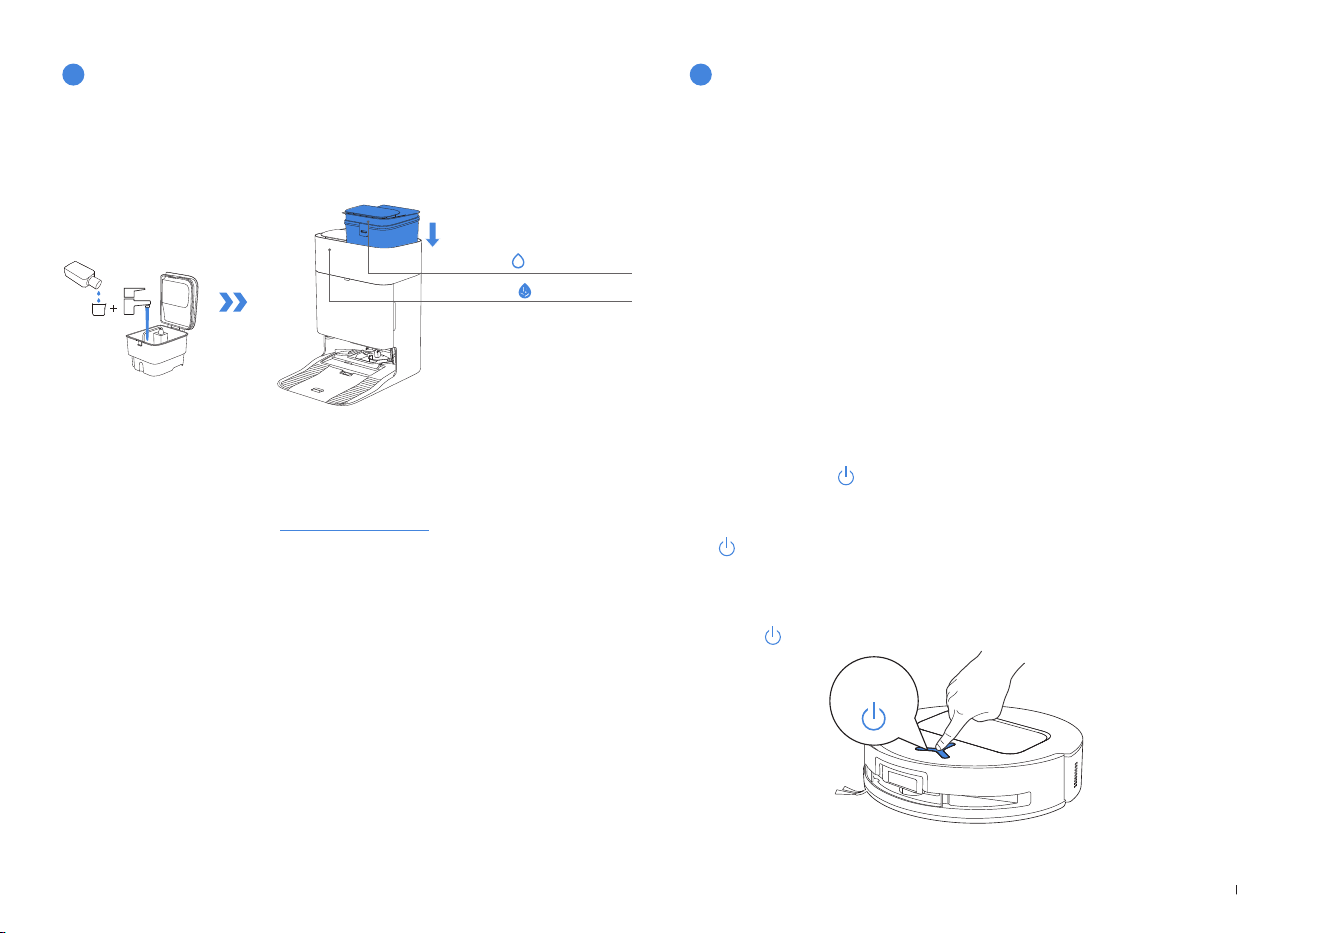
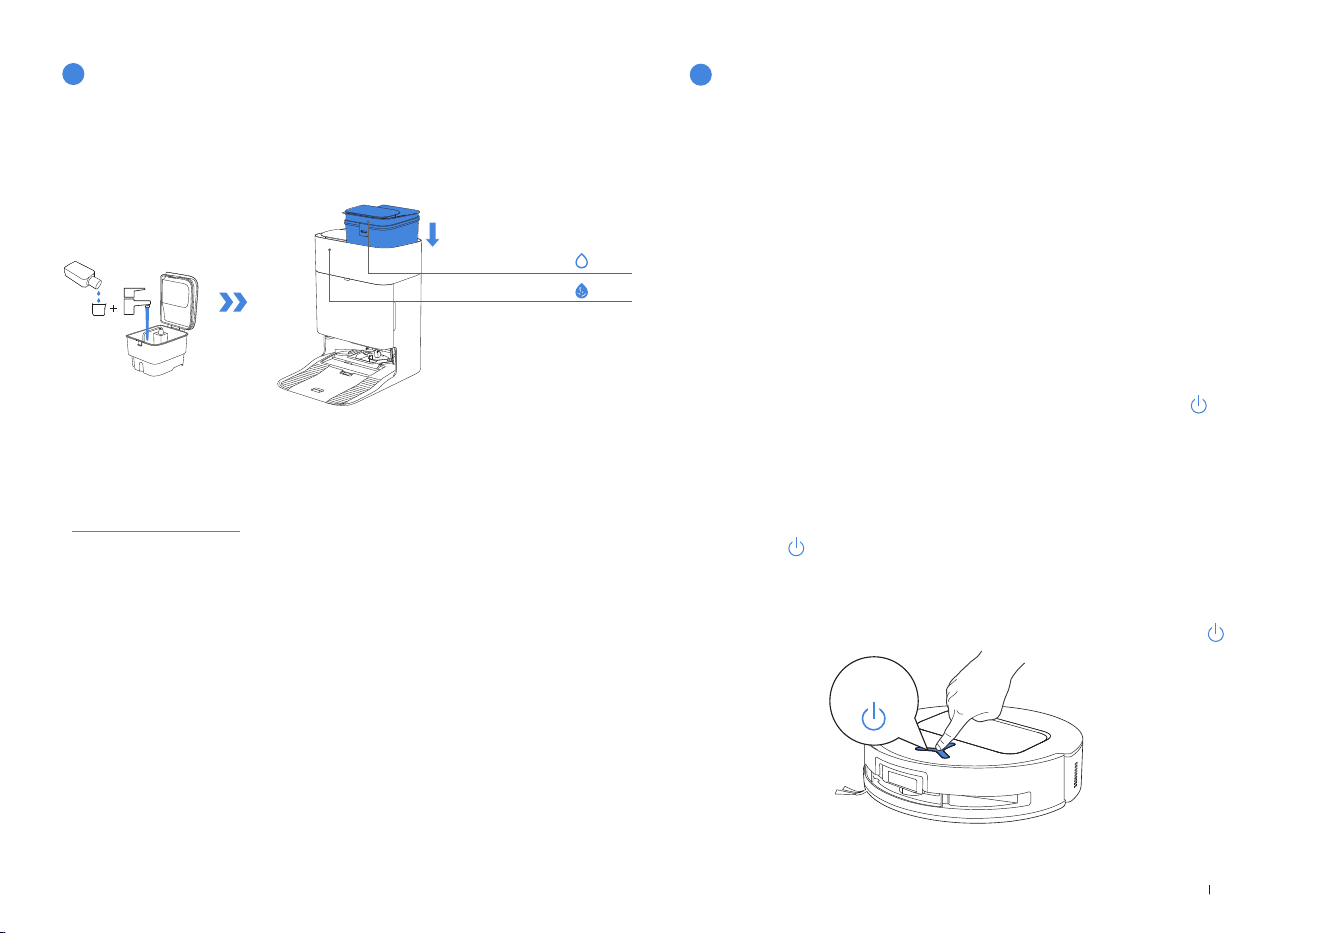
Note:
• Use a clean, dry cloth to wipe off the water on the surface of the tank before putting it in place�
• Please lock the top covers of the Water Tanks tightly before use�
• The water drops in the Water Tank are left over from the function test, please rest assured to use�
• For optimal cleaning results, it is recommended to use only ECOVACS Cleaning Solution� It is sold
separately and can be purchased at
https://www�ecovacs�com�
Fill the Clean Water Tank with water� If desired, add the appropriate amount of
Cleaning Solution using the bottle cap� Secure the tank's cover, gently shake to mix,
and then use�
6
Fill Clean Water Tank and Cleaning Solution
(sold separately)
Clean Water Tank
Dirty Water Tank
Tap
on the robot to pause while it is working� You can also use the ECOVACS
HOME App to pause the robot�
3. Pause
After pausing for a while, all indicator lights on the robot will go out� To wake up the robot,
short press �
4. Wake up
Before cleaning for the rst time, please make sure the robot is in the OMNI Station
and fully charged� Tap button on the robot to start cleaning� You can also use the
ECOVACS HOME App to start cleaning�
2. Start Cleaning
1. Start Mapping
When creating a map for the rst time, please follow the robot to help eliminate some minor issues�
For example, the robot may get stuck under the furniture� Please refer to the following solutions:
1� Raise the low sitting furniture if possible;
2�Cover the bottom of the furniture;
3�Set up Virtual Boundary via the App�
When mapping, the robot will explore the house environment automatically� The exploration
path may be different from cleaning path�
Start mapping via ECOVACS HOME App�
7
Start Cleaning
• The robot’s Water Tank is automatically relled through the OMNI Station�
Manual relling is not needed�
• When mopping, the robot will recognize oor types and is able to lift mops
automatically when encountering carpets� Please do not use the robot on
shaggy rugs or carpets with bres longer than 10 mm� It is recommended to fold
up the shaggy rugs with bres longer than 10 mm during the cleaning process,
or go to Map > Carpet Cleaning Stategy in the ECOVACS HOME App to set the
shaggy carpeted area as a No-Entry Zone�
Short press
14EN
Use the ECOVACS HOME App or long press the robot button for 3 seconds to
recall the robot back to the Station for charging�
5. Return to OMNI Station
3 s
The robot will enter Deep Sleep Mode to protect the battery if it stays outside the
OMNI Station for about 10h� Please switch OFF and ON to wake up the robot�
6. Deep Sleep Mode
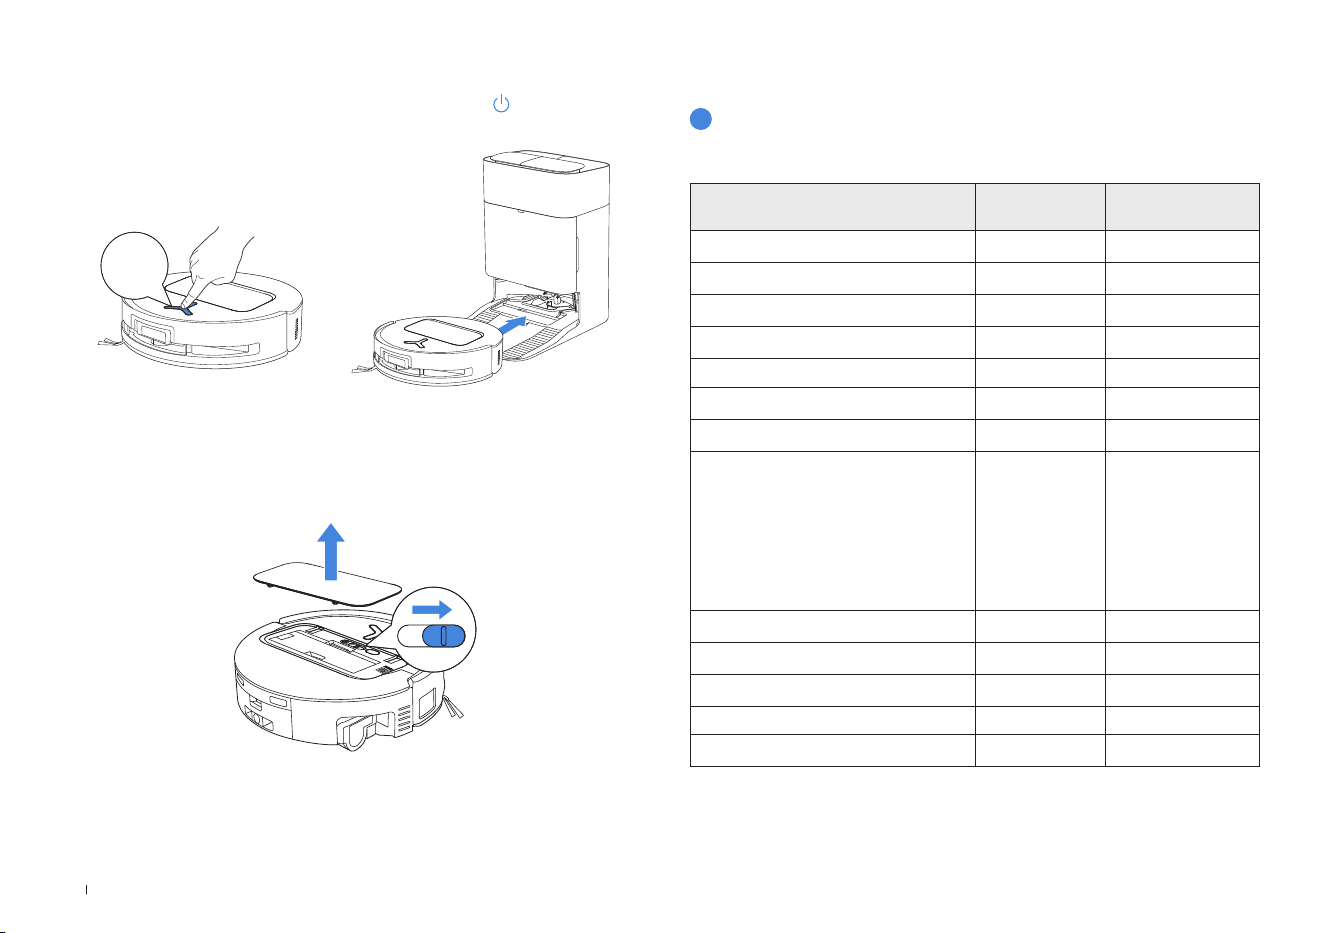
Regular Maintenance
To ensure optimal performance, maintain and replace parts at the following
frequencies:
Part Maintenance
Frequency
Replacement
Frequency
Replaceable Roller Mop Every week Every 1-2 months
Water Tray Every week /
Dirty Water Box Every week /
Dust Bag / Every 2-3 months
Side Brush Every 2 weeks Every 3-6 months
Main Brush Every week Every 6-12 months
Filter Every week Every 3-6 months
Edge Sensor
Universal Wheel
Anti-drop Sensors
Bumper
Charging Contacts on Robot
Charging Contacts on OMNI Station
d-ToF Laser Module
AIVI Camera
Approx� every
month
/
Clean Water Tank Every 3 months /
Dirty Water Tank Every month /
Dust Container Inside Every month /
Body and Bottom of Station Every month /
Mop Washing Tray Every 5 months /
1
Maintenance Frequency

15 EN
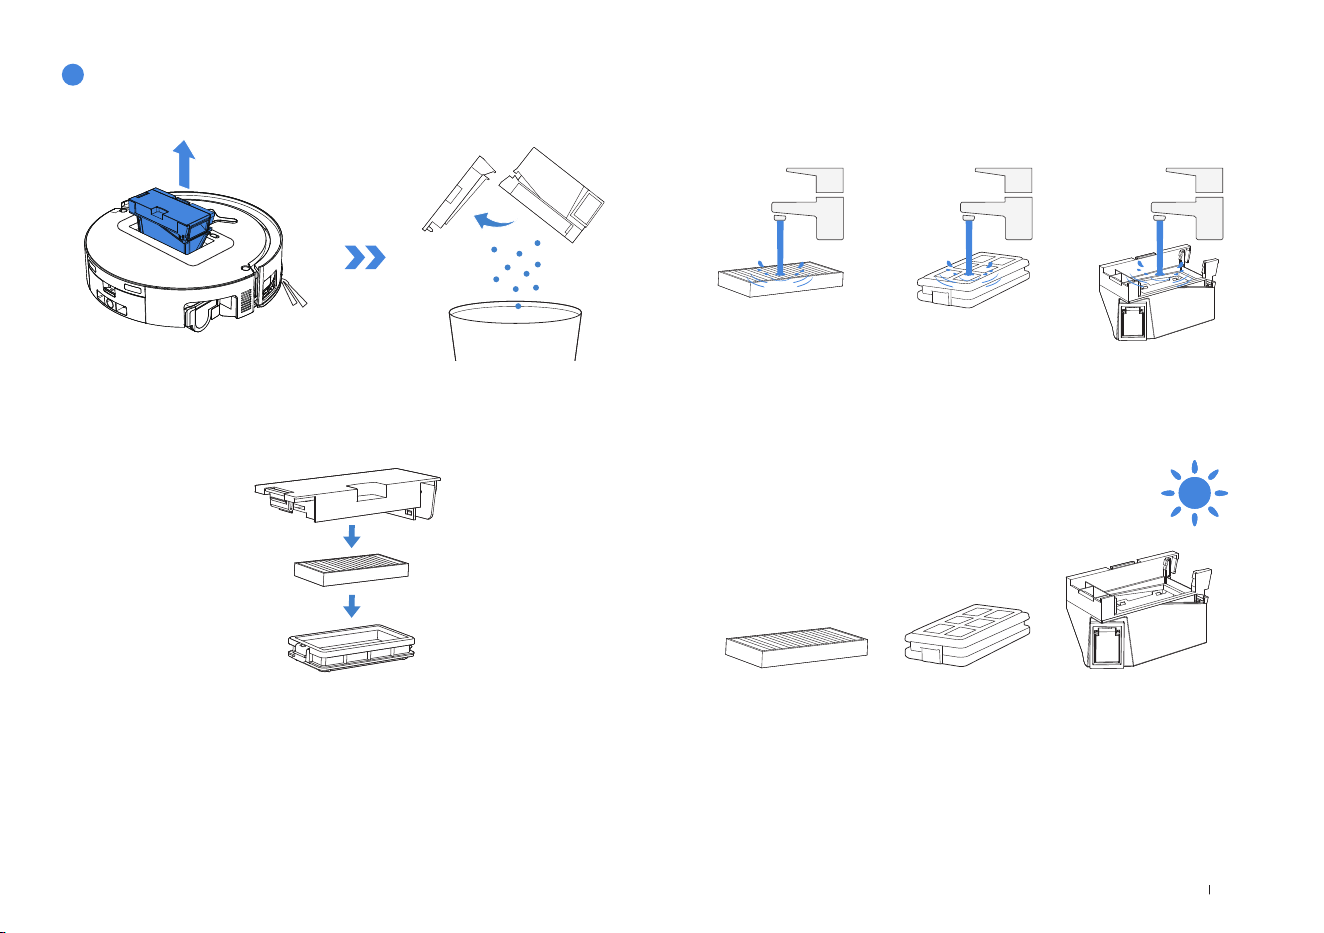
2� Open the Dust Bin cover to remove the Filter and Filter Net�
1� Remove the Dust Bin and then open its cover to empty the Dust Bin�
2
Dust Bin
Note:
• Please rinse the Filter with water�
• Do not use ngers or brushes to clean the Filter�
Note: Completely dry the Filter before use�
4� Air-dry the Dust Bin and Filter�
3� You can rinse the components� Afterwards, give them a good shake to remove
leftover water droplets�
16EN
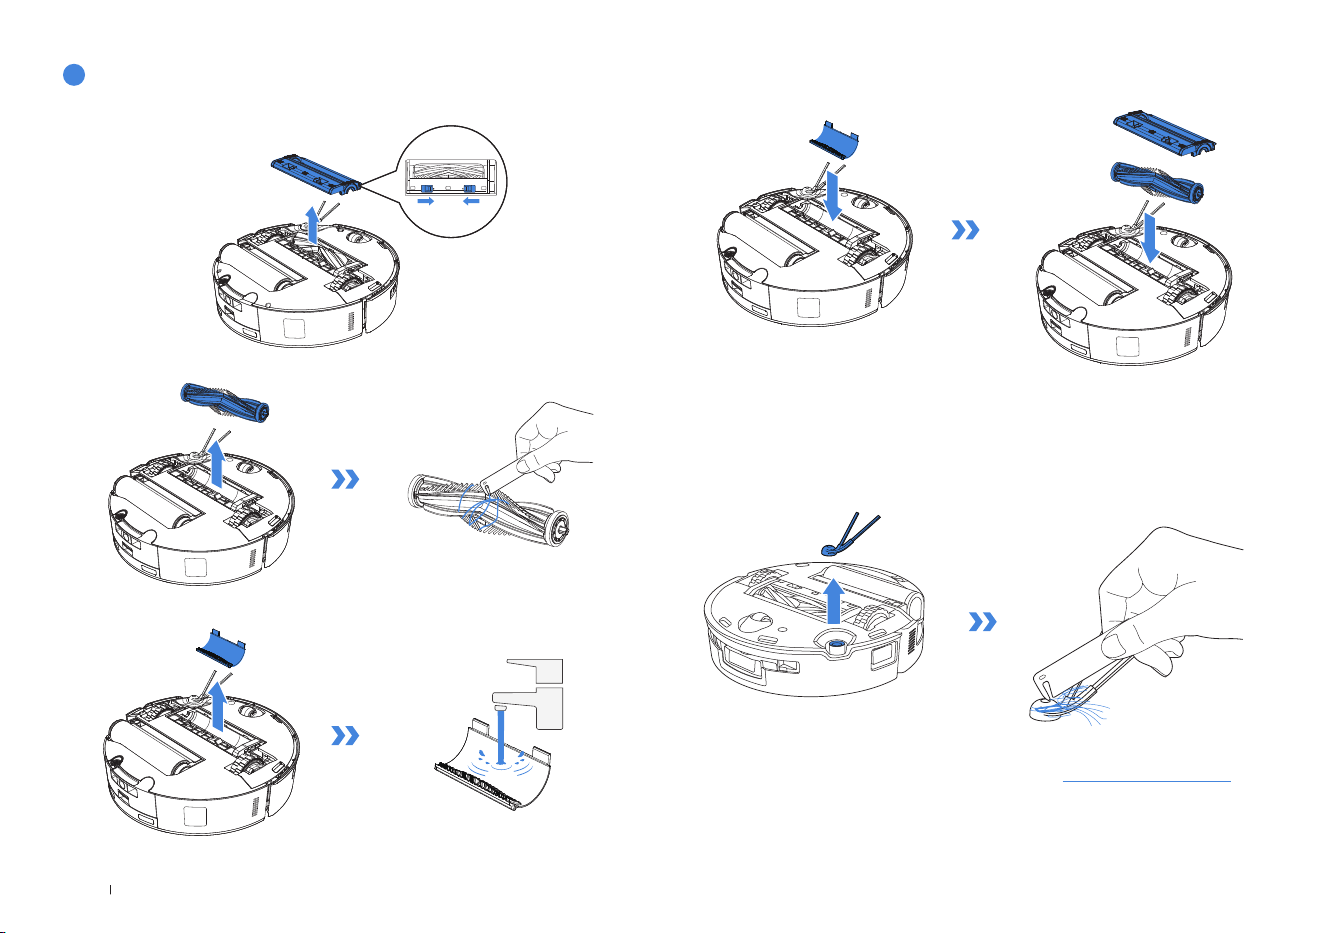
Clean the Main Brush.
1� Remove the cover on the Main Brush�
3� Remove, clean and dry the Brush Comb�
2� Remove and clean the Main Brush�
4� Install the Brush Comb, Main Brush and Main Brush Cover�
3
Main Brush and Side Brush
Clean the Side Brush.
Remove and clean the Side Brush�
Note:
Explore Muti-Function Cleaning Tools and more acessories at https://www�ecovacs�com�

17 EN
Clean the Roller Mop.
1� Double tap button to release Roller Mop component�
2� Press the unlock button to remove the Roller�
3� Clean the Roller Mop�
4� Clean inside the Roller�
5� Push Roller Mop into Roller End Cover and double tap button to retract�
4
Roller Mop, Water Tray and Dirty Water Box.
Note:Please avoid excessive force when handling the roller; it should be removed and placed
with care�
Note: Do not use water to clean the main body�
Double
Tap
Double
Tap
18EN
Clean the Water Tray Clean the Dirty Water Box
1� Remove the Water Tray �
2� Remove and clean the Water Tray Components�
3� Please install the Water Tray Components as shown in the illustration�
1� Remove the Dirty Water Box and the Filter�
2� Clean the Filter, Box and Sewage Outlet�
3� Reinstall the Filter, press securely and then reattach the Dirty Water Box's cover�
Note: A small amount of residual water may leak out when ipping the robot if it's not in drying
mode�

19 EN
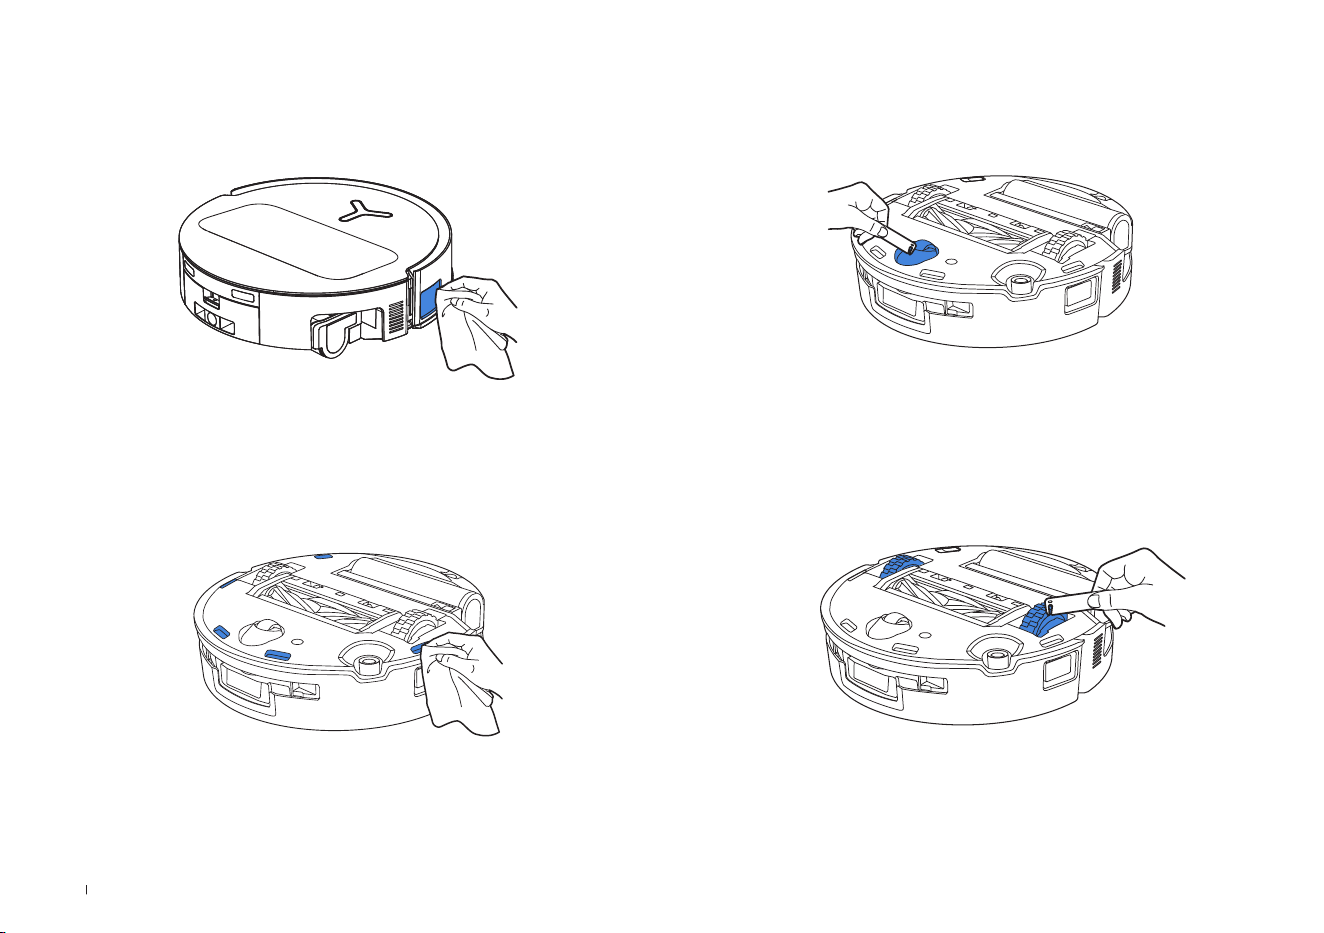
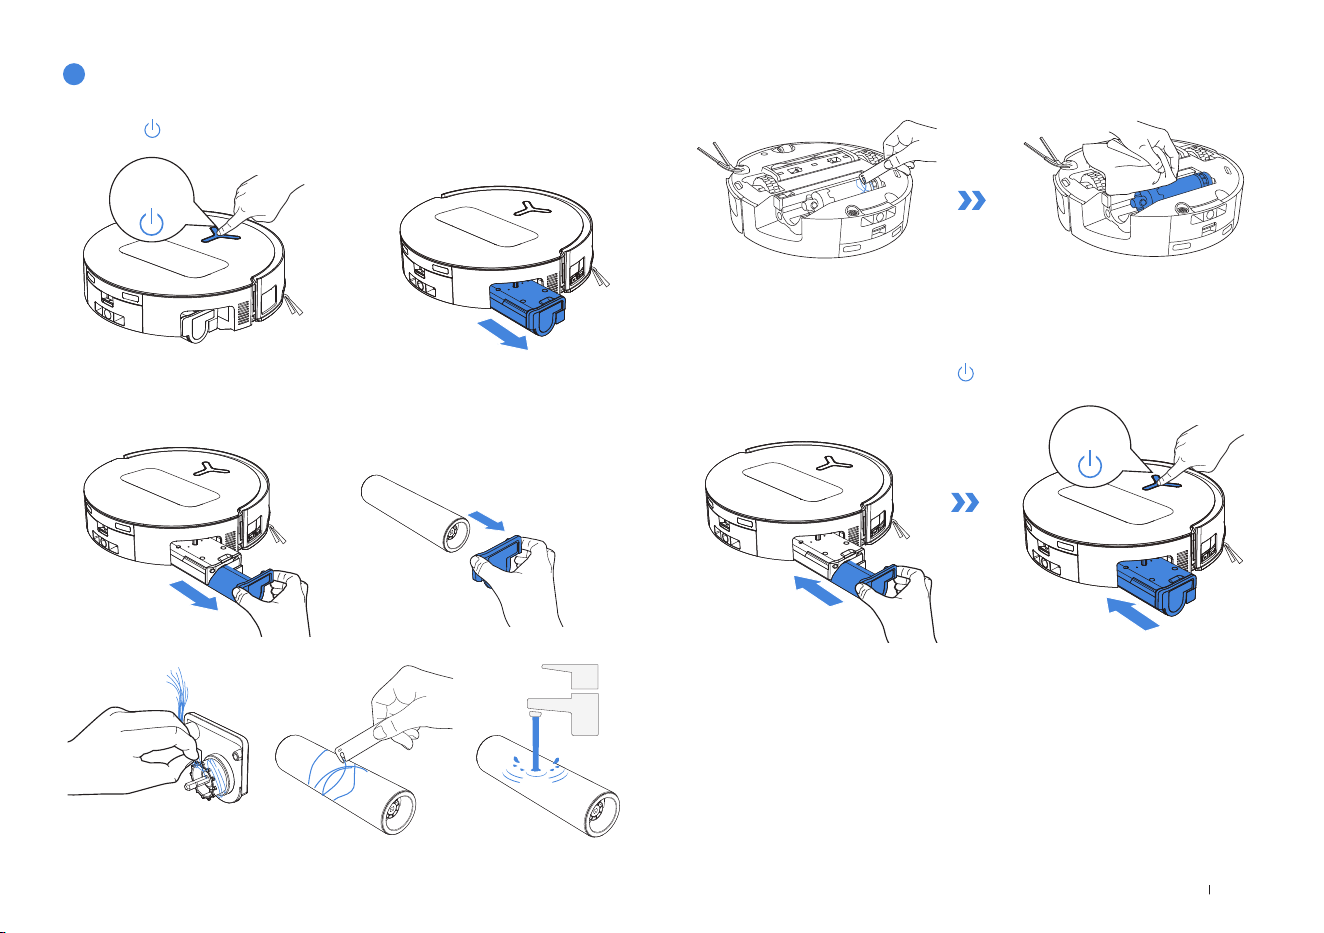
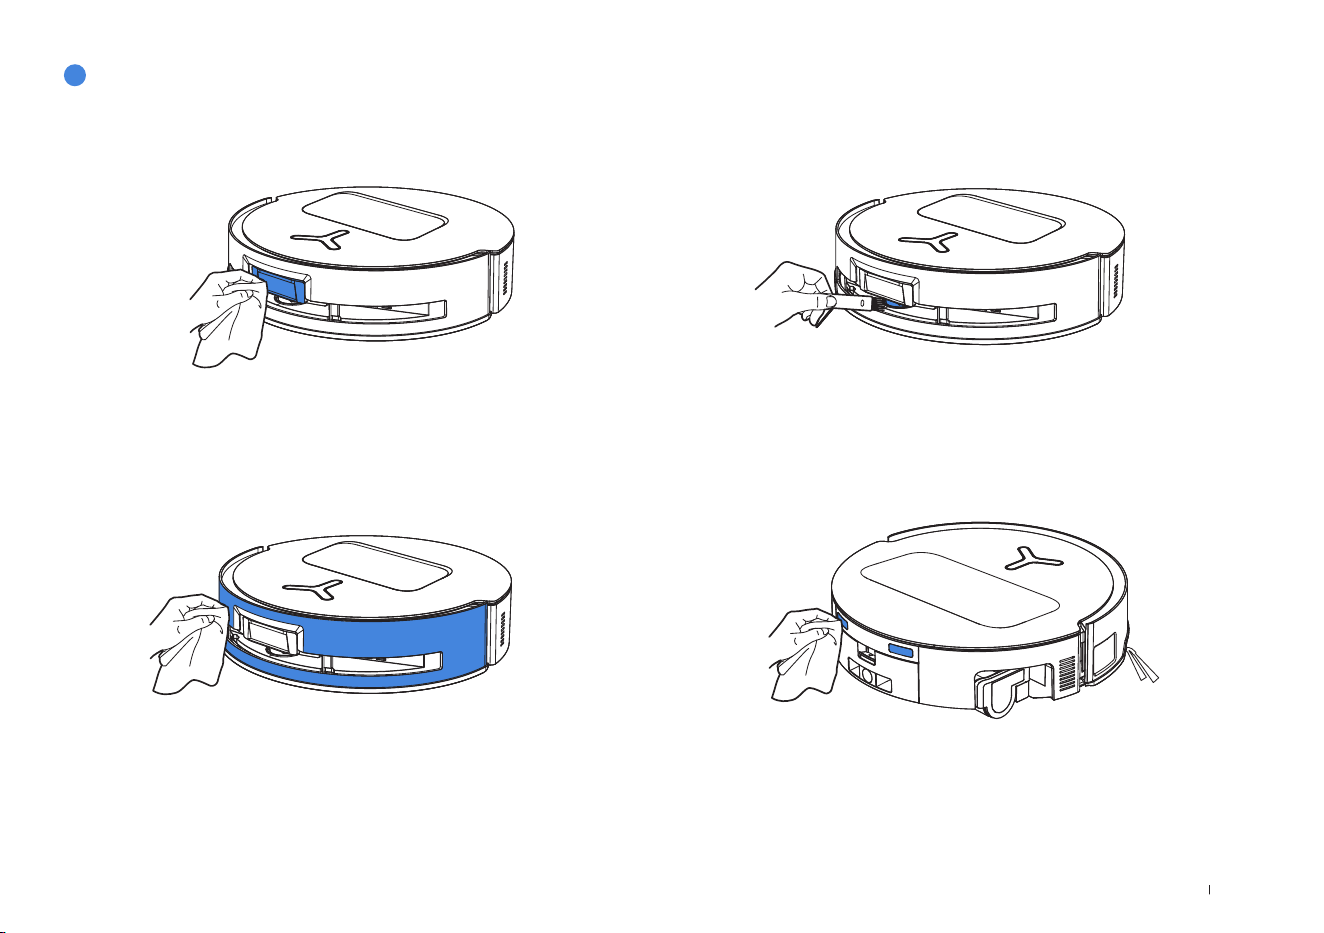
Clean the Sensor Lens
5
Other Components
Clean the Bumper
Note: Use a dry cloth when cleaning the Anti-drop Sensors and Bumper to prevent water
damage�
Note: Wipe the contacts with a dry cloth� Avoid using wet cloth to prevent water damage�
Clean Charging Contacts
Clean d-ToF Laser Module
Note: Rotate the Module lens to the front and clean it gently with a brush when cleaning the
Laser Module�
20EN
Clean the Anti-drop Sensors
Clean Edge Sensor
Clean the Driving Wheels
Note: Use dry cloth when cleaning the Charging Contacts to prevent water damage�
Clean the Universal Wheel
21 EN
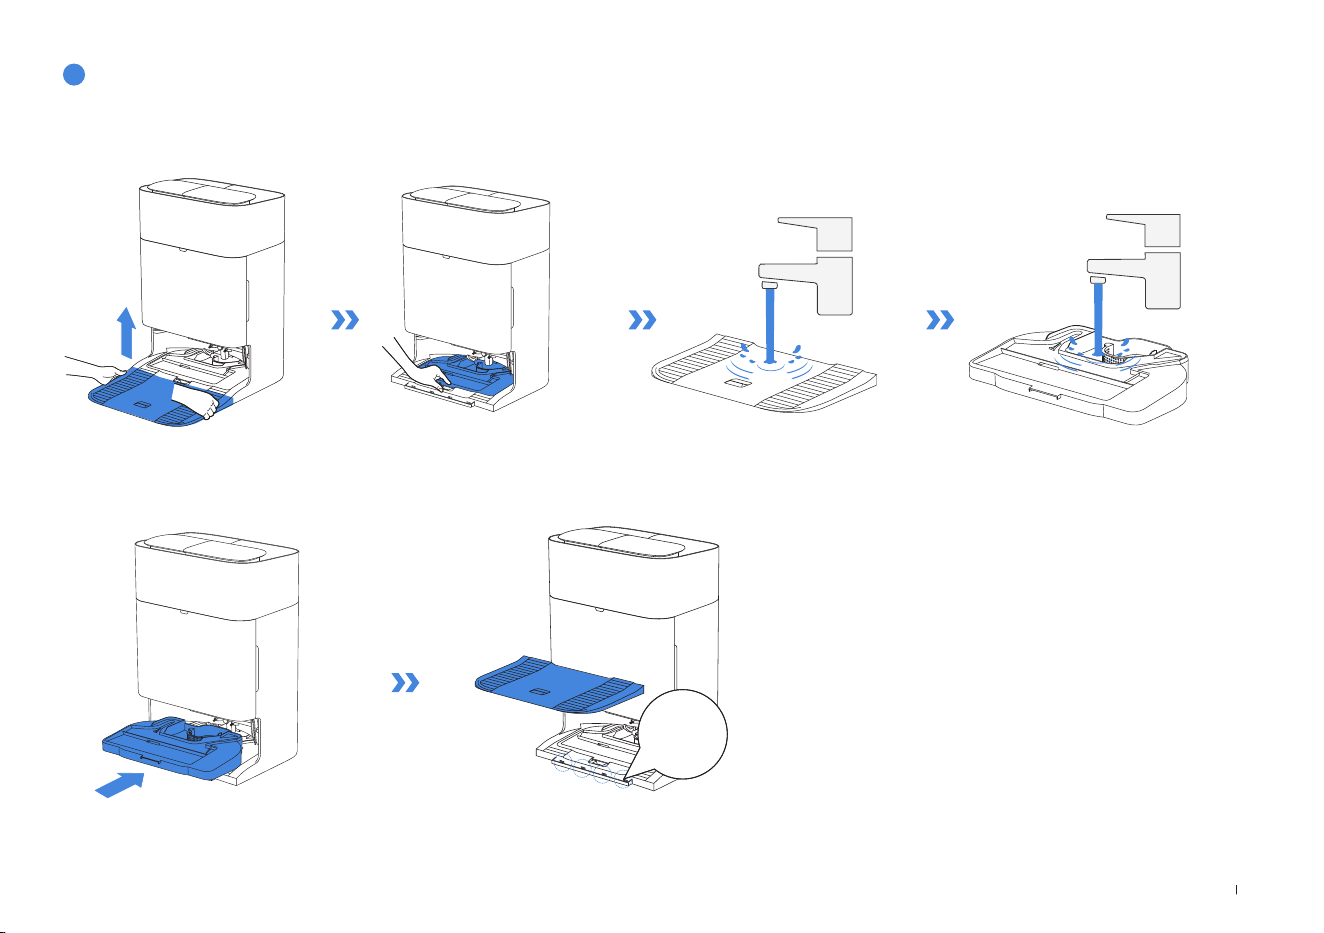
2� Install the Tray and Base�
1� Remove and clean the Mop Washing Tray and Station Base�
6
Mop Washing Tray and Station Base
Note: Please install the Tray and Base properly to prevent malfunction�
Click
22EN
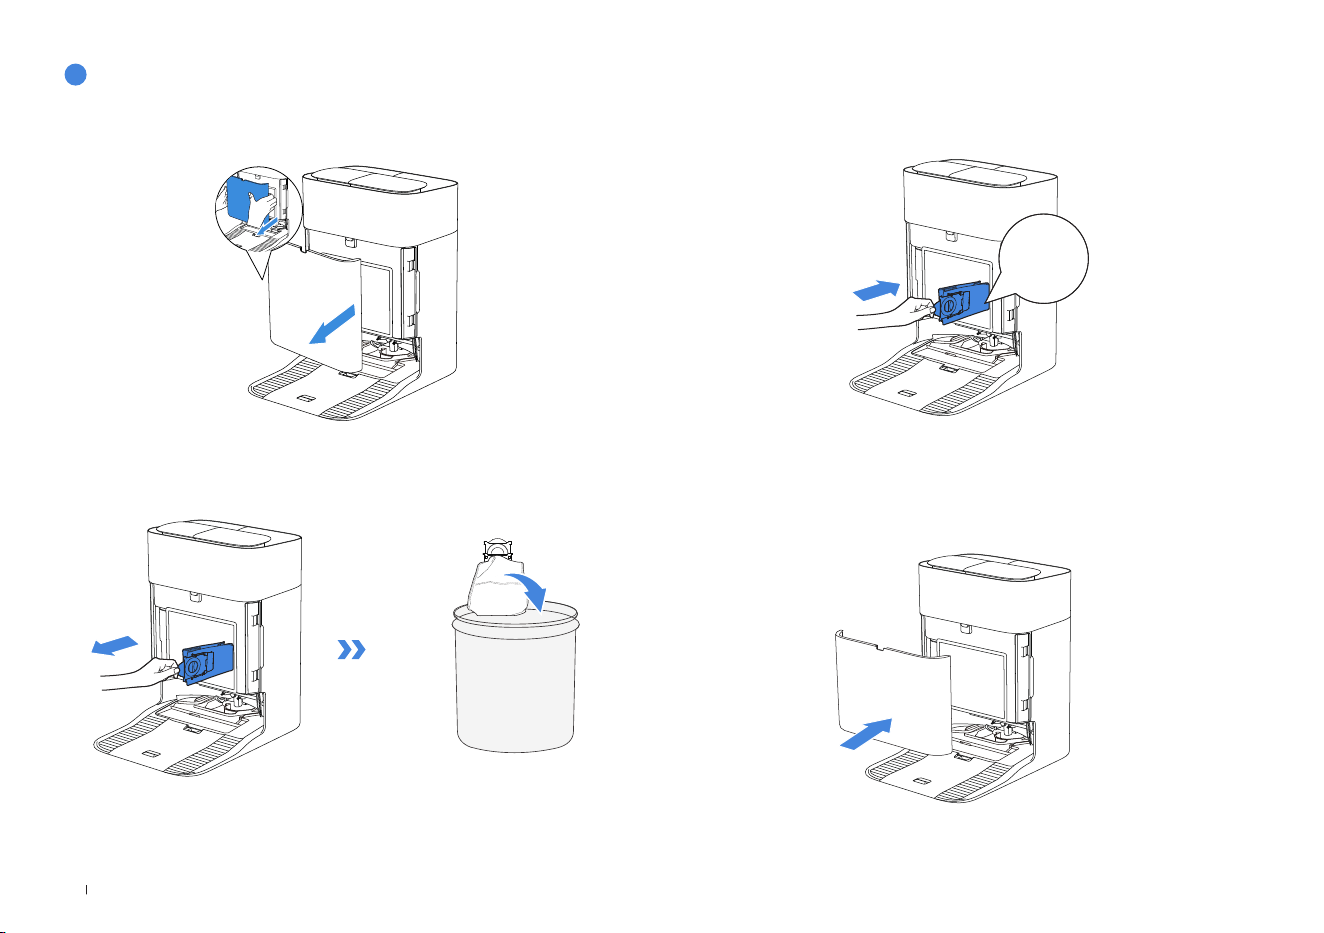
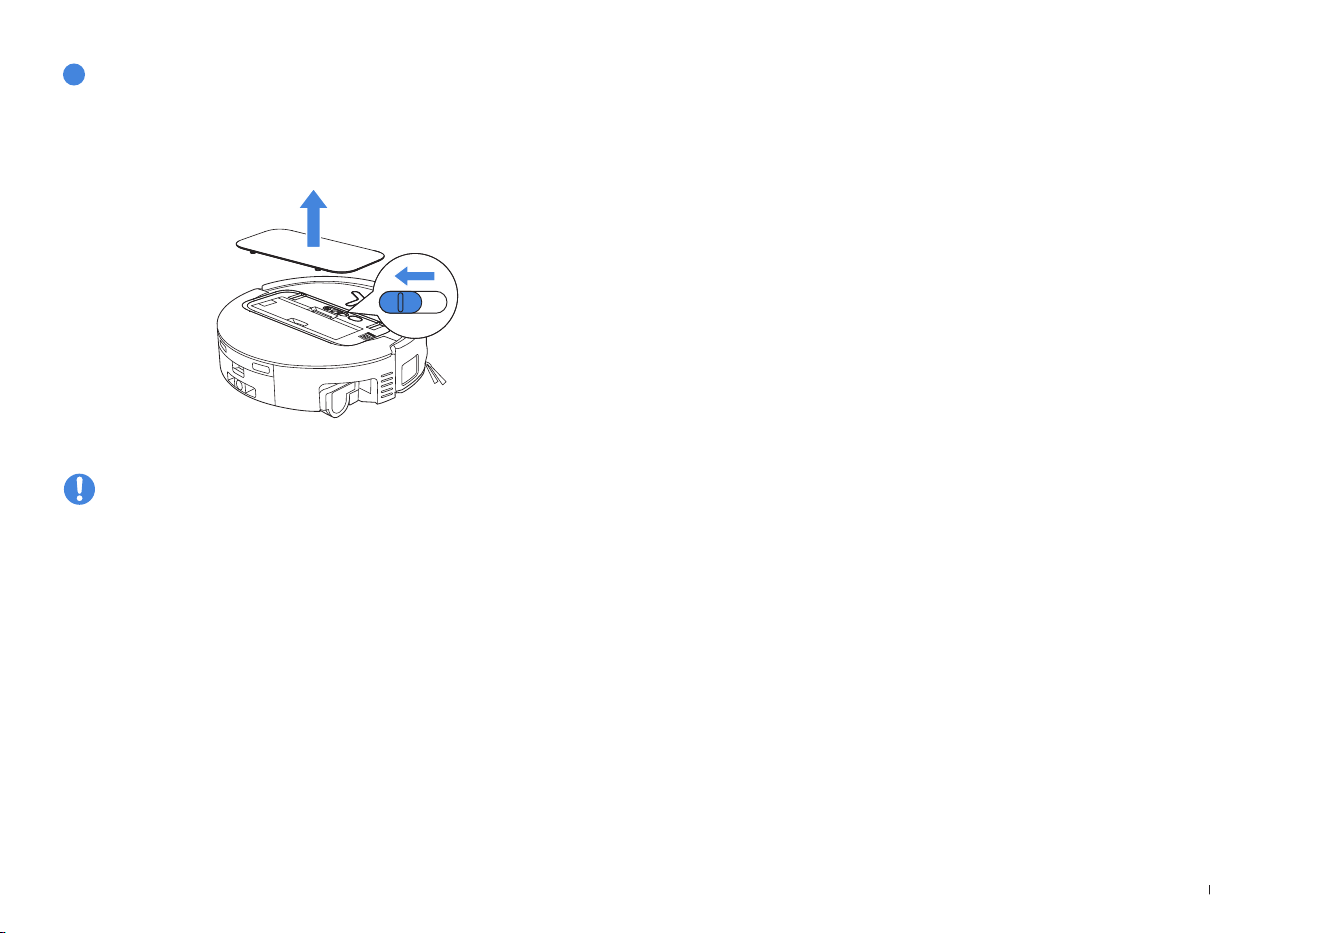
1� Remove the Dust Container Cover� 3�Clean the Dust Container with a dry cloth, install a new Dust Bin, and
conrm proper installation with a secure click sound�
Note: Hold the Handle to lift out the Dust Bag, which can effectively prevent dust leakage�
2� Remove the Disposable Dust Bag in the direction of the arrow and discard it� 4�Return Dust Bag and press the cover rmly to secure it in position�
7
Dust Bag
Click
23 EN
Please note that the robot cannot charge when powered OFF�
Please fully charge and switch OFF the robot before storage� Please recharge it
every 1�5 months to prevent the battery from over-discharging�
Note:
• After the robot nishes its cleaning task, it is recommended not to power it off but to keep it
charging, to better prepare for the next cleaning session�
• If the battery is over-discharged or not used for a long time, the robot may not be charged�
Please contact ECOVACS for help� Do not disassemble battery by yourself�
• If you do not use the product for a long time, keep the Dirty Water Box, Water Tanks empty
and the Roller Mop dry�
8
Storage

24EN
For the following possible issue, refer to the corresponding solutions.
No. Malfunction Possible Cause Solution
1
The robot is not able to
connect to the ECOVACS
HOME App�
Incorrect Wi-Fi username or password entered� Enter the correct Wi-Fi username and password�
The robot is not within range of your home Wi-Fi signal�
Make sure the robot is within range of your home Wi-Fi signal� Try to
stay as close to the router as possible�
The robot is not in the conguration state�
Press the Reset Button to connect the robot to your phone by
Bluetooth� If failed, please press the Reset Button +
,
and to connect
via the ECOVACS HOME App�
There is no home Wi-Fi on the Wi-Fi list�
Check if the Wi-Fi name contains special characters� Please do not use
special characters like ! @#& ¥%/\�
Do not use a 5 Ghz network�
Incorrect App installed� Please download and install the ECOVACS HOME App�
2
Unable to create the
furniture map in the App�
Move the robot when cleaning might cause the map to
be lost�
During cleaning, do not move the robot�
Auto cleaning is not nished�
Make sure the robot automatically return to the OMNI Station after
cleaning�
3
The Side Brush drops out of
place during use�
The Side Brush is not properly installed� During cleaning, do not move the robot�
4
No signal found� Unable to
return to the Station�
The Station is incorrectly placed�
Please place the Station correctly according to the instructions in the
[QUICK START] section�
The Station is out of power or moved�
Check whether the OMNI Station is connected to the power supply� Do
not move the OMNI Station�
The robot does not start cleaning from the OMNI Station�
It is recommended that the robot starts cleaning from the OMNI
Station�
The docking route is blocked� For example, the door is
closed to the room where the Station is placed�
Keep the charging route clear�
TROUBLESHOOTING
25 EN
No. Malfunction Possible Cause Solution
5
The robot returns to the
Station before it has nished
cleaning�
The room is so large that the robot needs to return to
recharge�
Please enable auto resume� For more details, please follow the App
instructions�
In highly complex home layouts, cleaning efciency
may decrease, possibly resulting in incomplete
cleaning�
Simplify your home layout�
6
The robot is unable to
charge�
The robot is not switched ON� Switch ON the robot�
The robot’s Charging Contacts are not connected to
the OMNI Station‘s Charging Contacts�
Make sure that the robot's Charging Contacts have connected to the
Station's Charging Contacts and
ashes� Check whether the robot's
and OMNI Station's Charging Contacts are dirty� Please clean these parts
according to the instructions in the [ REGULAR MAINTENANCE ] section�
The OMNI Station is not connected to the power
supply�
Make sure the OMNI Station is connected to power supply�
Base has not been installed in place� Refer to the [QUICK START] section for correct installation�
7
The robot is very loud
during cleaning�
The Main Brush/Side Brush is tangled, or the Dust Bin/
Filter is blocked�
It is recommended to clean the Main Brush, Side Brush, Dust Bin, Filter,
etc� regularly�
The robot is in Strong Mode� Switch to Standard Mode�
8
The robot gets stuck while
working and stops�
The robot is tangled with objects on the oor (electrical
wires, curtains, carpet fringing, etc�)�
The robot will try various ways to free itself� If its attempts fail, manually
remove the obstacles and restart�
The robot might be stuck under furniture with an
entrance of similar height�
Please raise the furniture, set a physical barrier, or set a virtual boundary
via the ECOVACS HOME App�
The robot is stuck in a narrow area�
Tidy up your home, set a physical barrier, or set a virtual boundary via
the ECOVACS HOME App�

26EN
No. Malfunction Possible Cause Solution
9
During cleaning, the robot
may encounter issues like
a disorderly route, biased
movement, repeated
cleaning over the same
spots, and missing small
areas� (If there is a large
area that has not been
cleaned temporarily, the
robot will automatically
clean the missed area�
Sometimes the robot will
re-enter a cleaned room,
which may not be repeated
cleaning, but the robot
nds any missed area�)
Objects such as wires and slippers placed on the
ground block the robot�
Before cleaning, please tidy up scattered wires, slippers, and other
objects on the ground as possibly can� If there is any area missed
during cleaning, the robot will correct it automatically� Please refrain
from interfering (such as moving the robot or blocking its route)�
The Driving Wheels may slip on the ground when
the robot climbs steps, thresholds, and door bars,
which can affect its judgement of the entire home
environment�
It is recommended to close the door of the affected area and clean it
separately� After cleaning, the robot will return to its starting location�
On freshly waxed or polished oors, as well as smooth
tiles, there may be less friction between the Driving
Wheels and the oor�
Please wait for the wax to dry before cleaning�
Due to variations in home layouts, some areas cannot
be entered by the robot�
Tidy up your home to ensure that the robot can enter the areas to be
cleaned�
10 Delay in remote control�
The Wi-Fi signal is poor, causing the video loading to
be slow�
Use the robot in areas with good Wi-Fi signal�
11
After returning to the OMNI
Station, the robot does not
empty its Dust Bin�
The Auto-Empty function has not been turned on in the
ECOVACS HOME App�
Turn on the auto-empty function in the ECOVACS HOME App�
Manually moving the robot back to the Station may not
trigger the auto-empty function�
It is recommended to allow The robot return to the OMNI Station on its
own� Please do not manually move it�
In Do Not Disturb mode, the robot will not empty the
dust after returning back to the OMNI Station�
Turn off Do Not Disturb in the ECOVACS HOME App or manually start
dust-emptying�
The Station detects a decrease in empty efciency�
Replace the Dust Bag according to the [ REGULAR MAINTENANCE ]
section and close the Dust Collection Cabin� If the Dust Bag is not full
when prompted by the App, you can put it back again�
If the above possible causes have been ruled out,
components of the Station may be abnormal�
Please contact customer service for assistance�
27 EN
No. Malfunction Possible Cause Solution
12 Auto-empty unsuccessful�
The Station detects a decrease in empty
efciency�
Replace the Dust Bag according to the [ REGULAR MAINTENANCE ] section
and close the Dust Collection Cabin� If the Dust Bag is not full when
prompted by the App, you can put it back again�
The outlet of the Dust Bin is blocked by foreign
objects�
Remove the Dust Bin and clear the foreign objects on the outlet�
13
The inner side of the Dust
Collection Cabin is dirty�
Fine particles pass through the Dust Bag
and accumulate on the inner side of the Dust
Collection Cabin�
Clean the inner side of the Dust Collection Cabin�
The Dust Bag is broken� Check and replace the Dust Bag�
The Dust Bag is not properly installed� Please install the Dust Bag properly�
The Dust Container Cover is not closed� Please check if the Dust Container Cover is closed properly�
14
Dust leakage occurs while
the robot is working
The outlet of the Dust Bin is blocked by foreign
objects�
Remove the Dust Bin and clear the foreign objects on the outlet�
15 Roller Mop will not rotate�
Roller Mop is not correctly installed�
Install the Roller Mop properly according to the [ REGULAR MAINTENANCE ]
section�
Roller Mop is blocked by foreign objects� Clean and install Roller Mop properly according to the [ REGULAR
MAINTENANCE ] section�
16 The Driving Wheel is stuck�
The Wheel is entangled or stuck due to foreign
objects�
Rotate and press the Driving Wheel to check for any wrapping or obstruction by
foreign objects� If any foreign objects are found, please clean them promptly�
If this issue persists, please contact customer service for assistance�

28EN
No. Malfunction Possible Cause Solution
17
The Mop Washing Tray is
full of water and can't be
emptied� A voice prompt
reports Mop Washing Tray
malfunction�
The Dirty Water Tank is not properly installed� Tap down on the Dirty Water Tank to ensure it is properly installed�
The sealing plugs in the Dirty Water Tank are not installed
properly�
Make sure that the two sealing plugs are properly installed�
Mop Washing Tray is not properly installed�
Follow the App instructions to see if the Station can drain properly�
If draining attempts fail, please check for possible foreign objects
between the Dirty Water Tank and the Station�
Mop Washing Tray Base gets dirty�
Ensure that there is no foreign object in the suction port of the Mop
Washing Tray�
Check if the oating ball gets stuck when there is no water
in the Mop Washing Tray Base�
Take out the Mop Washing Tray to put the oating ball back in
place�
The OMNI Station cannot pump water normally�
Put the robot into the Station and double tap
, if the issue persists,
please contact our customer service for help�
The suction port of the Mop Washing Tray is blocked by
foreign objects�
Ensure that there is no foreign object in the suction port of the Mop
Washing Tray�
The voice alert persists after all the above solutions are
tried�
Power off and on the Station� If this issue persists, please contact
customer service for assistance�
18
Dirty Water Box
malfunction�
The drainage outlet of Dirty Water Box gets blocked and
the Draining Pole can't work normally�
Remove and empty the Dirty Water Box, and then rinse it and
reinstall� If this issue persists, please contact customer service for
assistance�
Please contact our customer service for assistance if the problem persists despite the recommended solutions.
29 EN
TECHNICAL SPECIFICATIONS
Output power of the wireless module is less than 100 mW�
Note: Technical and design specications may be changed for continuous product improvement�
Explore more accessories at https://www�ecovacs�com�
Please use the mobile camera to scan
the QR code and obtain the user guide.
Model DEX68
Rated Input 20 V 2 A Charging Time about 4�5 h
Station Model CH2497A
Rated Input 220-240 V
~
50-60 Hz Rated Output 20 V 2 A
Rated Input Current (Charging) 0�5 A Power (Emptying) 650 W
Power (Hot Water Washing Mop) 1650 W
Networked Standby Power Less than 2�00 W

ZH-TW 30
重要安全指示
重要安全指示
使用電器設備時,應務必遵守基本注意事項,包
括下列各項:
使用本產品前請仔細閱讀所有指示
妥善保管這些指示
1.除非有負責其安全者監督或解說如何使用本產
品,否則兒童以及生
理
、感官或精神能
力
不足
或缺乏相關經驗與知
識
者,不可使用本產品。
2.請看好兒童,確保他們不會將本產品當作玩具。
3.清潔前請先清空需要清潔的區域。移除地板上
可能會纏繞本產品的電線和小型物品。將地毯
的流蘇邊塞到地毯下,並將窗簾和桌布等物品
提高,使其不會接觸到地板。
4.如有臺階或樓梯等懸空區域,請先測試產品,
看其是否可以偵測到臺階而不會從邊緣掉落。
如有掉落的風險,則必須在邊緣放置實體柵欄,
以防止本產品掉落。請確保實體柵欄不會導致
絆倒。
5.請僅依照操作手冊所述的方式使用產品。請僅
使用製造商推薦或銷售的配件。
6.僅供居家室內使用。請勿在戶外、商業或工業
環境中使用本產品。
7.請勿在未安裝塵盒和 / 或濾材的情況下使用本
產品。
8.請勿在有點燃蠟燭或易碎物品的區域內操作本
產品。
9.請將頭髮、寬鬆的衣服、手指和身體的所有部
位遠離任何開口和運作零件。
10.請勿在極端高溫或低溫環境中使用和存放
機器人(低於 -5℃/23
˚
F或高於40℃ /
104
˚
F)。請在0℃/32
˚
F以上和40℃/
104
˚
F以下的溫度範圍內為機器人充電。
11.請勿於嬰幼兒正在睡覺的房間內操作本產品。
12.請勿在潮濕或積水的表面上使用本產品。
13.請勿讓本產品吸入大型物品( 例如石頭 )、大型
紙張或任何可能堵塞本產品的物品。
14.請勿使用本產品吸取易燃物或可燃物( 例如汽
油、印表機或影印機碳粉 ),或在可能有這些物
品的區域內使用本產品。
15.請勿使用本產品吸取任何正在燃燒或冒煙的物
品,例如香煙、火柴、灰燼,或任何可能引起
火災的物品。
16.請勿將物品放入吸口處。吸口處堵塞時請勿使
用本產品。請清理吸口處的灰塵、棉絮、毛髮,
或任何可能會減少氣流的物品。
17.如果電線損壞,則必須由製造商或其維修代理
商進行更換,以避免危險。

ZH-TW31
18.在清潔或保養本產品前,請先關閉電源開關。
19.CH2497A適用的鋰電池類型:最多8個
電池、最大額定電壓DC14.4V、額定容量
5,800mAh。在丟棄本產品前,必須先按照當
地的法律和法規取出並丟棄電池。
20.請按照當地的法律和法規處理舊電池。
21.即使本產品已嚴重損壞,也請勿焚燒。電池在
火中可能會爆炸。
22.請務必依照本操作手冊中的指示使用本產品。
如因不當使用造成任何損害或傷害,Ecovacs
HomeServiceRobotics概不負責。
23.本機器人包含僅可由專業人員更換的電池。若
需更換機器人電池,請聯絡客戶服務。
24.確保電源電壓符合OMNI全能基座上標註的電壓。
25.僅使用製造商專為產品配備的原裝可充電電池
及OMNI全能基座。嚴禁使用非充電式電池。
26.請小心不要損壞電線。禁止利用電源線拖曳或
提拉產品及OMNI全能基座、禁止將電源線當
作提把、禁止把電源線夾在門縫裡、禁止在尖
銳和彎角處拉動電源線。請勿讓本產品輾過電
線。請讓電線遠離高溫表面。
27.禁止使用損壞的OMNI全能基座。電源供應器
不可維修,若發生損壞或故障,則不應再使用。
28.電線或插座已損壞時,請勿使用本產品。當產
品或OMNI全能基座因跌落、損壞、室外使用
或進水導致無法正常工作時,請勿使用。為避
免危險,產品必須由製造商或其維修代理商進
行維修。
29.在清潔和維護OMNI全能基座前必須先將插頭
從電源插座拔出。
30.在丟棄產品前,請先將產品從OMNI全能基座
上取下、關閉產品電源開關並取出電池。
31.若長時間不使用OMNI全能基座,請拔除
OMNI全能基座電源插頭。
32.若長時間不使用主機,將主機關機後再行存放,
並拔除OMNI全能基座電源插頭。
33.警告-淨水箱中僅能加入清水。
34. 警告:若要為電池充電,請僅使用本產品隨附
的外接式供電裝置CH2497A。
為滿足射頻暴露需求,裝置作業期間應與人身保持
20公分或更遠的間隔距離。
為確保合規,不建議於少於此距離的狀況下作業。
此發送器所使用的天線不得與其他天線或是發送器
放置於同一地點。
裝置更新
有些裝置通常會兩個月更新一次,但不是每次都非
這麼做不可。
有些裝置( 尤其是三年多前就已經上市的裝置 )只
有在發現並修復嚴重漏洞後,才會進行更新。
ZH-TW 32
注意:表面高溫
短路防護安全隔離變壓器
交換式電源供應器
僅供室內使用
直流電
交流電
充電前,請閱讀指示。
充電埠的正負極方向
延時微型保險絲
請正確丟棄本產品
此標誌表示在歐盟不能以丟棄家庭垃圾的方法處置
本產品。為防止未受控制的廢物處理對環境或人體
健康造成危害,請以負責任的方式回收,確保物質
資源的可持續運用。如要回收使用後的裝置,請利
用退還及回收系統,或聯絡當初將產品販售給您的
銷售商。銷售商能安全回收本產品。

ZH-TW33
包裝內容
機器人
全能基站 底座
使用說明書邊刷
電源線
1
包裝內容
3D結構光感應器
1. 機器人正面視圖
頂蓋
機器人上的按鈕
短按:開始 / 暫停
長按3秒:返回充電
輕按兩下:滾筒拖布釋放 / 收回
(機器人不在基站內)
防撞桿
2
產品圖解
d-ToF雷射模組
2. 機器人底部視圖
驅動輪
萬向輪
邊刷
地毯偵測感應器
主刷
防掉落感應器
防掉落感應器
刷子釋放按鈕
可換式滾筒拖布
水槽
AIVI攝影機
補光燈
附註:
* 圖表和插圖僅供參考,可能與實際產品外觀有所不同。產品設計及規格如有變更,
恕不另行通知。
ZH-TW 34
3. 內部視圖(蓋板下方)
電源開關
「I」=開啟
「 」=關閉
RESET(重設)按鈕
網路設定:按下RESET(重設)按鈕並依照語音提示設定網路。恢復預設設定:長按RESET(重
設)按鈕5秒。聽到語音提示後,接著會播放啟動音樂,此時機器人會恢復預設設定。
Wi-Fi狀態指示燈 /
RESET(重設)按鈕
4. 集塵盒
過濾器
過濾器卡扣
集塵盒蓋板
清理口
濾網
注水口
汙水盒
邊緣感應器
滾筒端蓋
充電接觸點
5. 全能基站正面視圖
集塵盒
附註:
•
如果指示燈閃爍紅色,請前往ECOVACSHOME應用程式瞭解故障的詳細資訊。
•
如果機器人無法充電,請用乾布擦拭全能基站上對應的充電接觸點。
6. 集塵袋
集塵袋把手
指示燈
白色恆亮:待機 / 執行中
閃紅色:故障
熄滅:電源耗盡 / 深度睡眠模
式
拖布清洗盤
淨水箱
基站上的
充電接觸點
汙水箱
ZH-TW35
7. 全能基站背面視圖
通風口
電源插座
產品圖解 功能說明
d-ToF
雷射模組
雷射測距可根據反射時間差來測量機器人與周圍物體之間的距離,使模
組能夠在機器人移動時映射周圍物體。偵測範圍為12公尺。
TrueDetect3D感
應器
透過紅外線測距和相似三角形的概念,感應器會發射紅外線並接收前方
物體發出的光線,從而計算出物體與機器人之間的距離。
當感應器偵測到附近有物體時,機器人會自動轉彎以免碰撞物體。檢測
範圍為0.3公尺。
防掉落感應器
紅外線測距是透過機器人底部的感應器來測量機器人底部與地面之間
的高度。例如,當位於樓梯頂部,白色地面高出超過55公釐或黑色地
面高出超過30公釐時,機器人就會停止前進,以此功能防止掉落。
地毯偵測感應器
超音波探頭可發射頻率為300KHZ的超音波。超音波的能量可以被地
毯吸收。如果反射能量低於臨界值,機器人就會辨識出地毯的存在。根
據ECOVACS實驗室測試,目前可成功辨識市場的超過50款地毯。
防撞感應器
發射的訊號被物體阻擋時,訊號接收器就無法接收。利用此原理,機器
人遇到障礙物時會避開。
邊緣
感應器
透過ToF測距,機器人可以偵測自身與其右側物體之間的距離。當右
側有牆壁或障礙物時,機器人會進行邊緣清潔,避免遺漏髒汙處或碰撞。
AIVI攝影機
使用AI攝影機擷取周圍環境影像。
* 進行視訊錄製。藉由麥克風進行互動,可實現遠端視訊通話(適用於
部分機型)。
8. 感應器
ZH-TW 36
清潔前注意事項
將椅子等家具放置在適當的位置,將要清
潔的區域整理好。
首次使用時,請確認每個房間的門都打開,
以利機器人充分探索您的房屋。
完成區域準備
請保持房門敞開
可能需要在高低差較大的邊緣放置實體障
礙物,以免機器人從邊緣掉落。
設立防護障礙物
1
警告
機器人可以避開鞋子、插座和電線等,請
確保所有待清潔的區域都有良好的照明,
進而提高避開障礙的能力。
提供充足的照明
將地板上的纜線、衣物、拖鞋等物品收起來,以提高清潔效率。
在地毯或流蘇邊地毯上使用本產品之前,請將地毯折起並將流蘇塞
到地毯下方。
請勿站在門口、走廊等狹窄空間,且在機器人辨識區域時,切勿阻
擋機器人的路徑。
確認機器人視線的清晰度,避免指甲刮傷或是指紋或油漬弄髒人工
智慧攝影機鏡頭。使用乾淨的軟布擦拭攝影機,請勿使用清潔劑、
去汙劑或噴霧劑。
ZH-TW37
1.安裝
使用前,請先除去機器人和多功能基站上的所有防護材料。
聽到「咔噠」聲表示安裝正確。
2
快速入門
3
開啟機器人電源並為其充電
咔噠
咔噠
2.電源線連接和基站定位
附註:
•
若全能基站附近有鏡子、踢腳板等反光物體,則應覆蓋其底部(遮蔽高度至少達14公分)。
•
請勿將全能基站放置於陽光直射的地方。
•
將基站放置在 Wi-Fi訊號較強的位置。
將基站靠牆放置在水平、穩固的地面上。確保基站兩側0.05公尺及正前方0.8公
尺的範圍內沒有物體。
開啟機器人蓋板下方的電源開關(「I」表示電源已開啟,「 」表示電源關閉)。
將機器人置於基站前方,確保基站已連接電源。使用ECOVACSHOME應用程式
將機器人召回全能基站開始充電,或長按機器人按鈕 3秒使其返回基站充電。
附註:
•
電源關閉時,機器人無法充電。
•
機器人完成清潔任務後,建議不要關閉電源,而是保持充電狀態,以便為進行下一次的清潔工
作準備就緒。
•
建議機器人從全能基站出發清潔。清潔時請勿移動
全能基站。
≥
0.05m (0.16’)
≥
0.05m (0.16’)
≥
0.8m (2.62’)
ZH-TW 38
Wi-Fi 指示燈
白色慢速閃爍 已中斷Wi-Fi連線
白色快速閃爍 正在連線
白色恆亮 已連線至Wi-Fi
5
連接機器人與應用程式
透過藍牙:開啟機器人和手機藍牙功能。允許應用程式取得手機藍牙權限。輕按以
掃描機器人上的QR圖碼或輕按應用程式中的 或
找到附近的機器
人。
透過 Wi-Fi:您也可以根據應用程式頁面的提示,選擇透過其他方式連接機器人與
應用程式。
附註:請透過藍牙連接以獲得更好的體驗。
Wi-Fi 網路需求:
•
您使用的是2.4GHz或2.4/5GHz混合網路。
•
您的路由器支援802.11b/g/n和IPv4通訊協定。
•
請勿使用VPN(虛擬私人網路)或代理伺服器。
•
請勿使用隱藏網路。
•
使用TKIP、PSK、AES/CCMP加密的WPA和WPA2。
•
不支援 WEPEAP(企業身分驗證通訊協定)。
•
北美使用Wi-Fi頻道1-11,北美以外使用頻道1-13(請洽當地主管機關)。
•
如果您使用網路擴充器 / 中繼器,網路名稱(SSID)和密碼與您的主要網路相同。
•
請在您的路由器上啟用WPA2。
附註:依照應用程式的引導完成產品註冊、登入以及產品與應用程式的連接。
4
下載 ECOVACS HOME 應用程式
您可以掃描機器人上的QR圖碼,下載應用程式。
下載 ECOVACS HOME 應用程式,可使用更多功能。
或在手機應用程式商店中搜尋ECOVACSHOME,下載本應用程式。
請注意,要使用遠端啟動、語音互動、2D/3D地圖顯示和控制設定、個人化清潔等
智慧功能(功能可能因產品而異),您就需要下載並使用會不斷更新的ECOVACS
HOME應用程式。您必須同意我們的隱私權政策和使用者協議,然後我們才能處
理您的部分基本和必要資訊,並使您能夠透過ECOVACSHOME應用程式操作產
品。未經您同意,上述部分智慧功能無法透過ECOVACSHOME應用程式存取。
儘管如此,您仍然可以手動操作使用本產品的基本功能。
ECOVACSHOME
頂蓋下方
ZH-TW39
附註:
•
將水箱安裝到定位之前,請使用乾淨的乾布擦去水箱表面的水。
•
使用前請將水箱的頂蓋鎖緊。
•
水箱內的水滴是功能測試後所遺留的,請放心使用。
•
為達到最佳清潔效果,建議僅使用ECOVACS品牌清潔液。此產品單獨販售,請造訪
https://www.ecovacs.com
購買。
對淨水箱注入淨水。如果需要,可使用瓶蓋加入適量的清潔液,然後蓋緊蓋子並輕
晃均勻後即可使用。
6
注滿淨水箱及清潔液(單獨販售)
淨水箱
汙水箱
輕按機器上的
可在其工作時暫停。您還可以使用ECOVACSHOME應用程式
使機器人暫停工作。
3. 暫停
暫停一段時間後,機器人上的所有指示燈都會熄滅。若要喚醒機器人,請短按 。
4. 喚醒
在首次清掃前,請確認機器人在全能基站中且充飽電量。輕按機器人上的 按鈕以
開始清潔。您也可以使用ECOVACSHOME應用程式以開始清潔。
2. 開始清潔
1. 開始測繪
第一次建立地圖時,請跟在機器人後方,協助排除一些小問題。
例如,機器人可能會卡在家具下方。請參考以下解決方案:
1. 如果可以的話,請先抬高低矮的家具;
2.蓋住家具底部;
3.透過應用程式設定虛擬邊界。
進行測繪時,機器人會自動探索房屋環境。探索路徑可能與清潔路徑不同。
透過ECOVACSHOME應用程式開始測繪。
7
開始清潔
•機器人的水箱會透過全能基站自動加水。不必手動補水。
•拖地時,機器人會辨識地板類型,且遇到地毯時會自動升高拖布。請勿在長毛地
毯或纖維長度超過10公釐的地毯上使用機器人。建議在清潔過程中將纖維長度超
過10公釐的長毛地毯折起來,或者前往ECOVACSHOME應用程式,在「地
圖」>「地毯清潔策略」中將長毛地毯的區域設置為禁入區。
短按
ZH-TW 40
使用ECOVACSHOME應用程式或長按機器人按鈕 3秒將機器人召回基站進
行充電。
5. 返回全能基站
3 秒
如果機器人在全能基站外停留約10小時,它將進入深度睡眠模式以保護電池。請
關閉電源後再開啟以喚醒機器人。
6. 深度睡眠模式
定期保養
為確保最佳效能,請按以下頻率進行保養並更換零件:
零件 保養頻率 更換頻率
可換式滾筒拖布 每週 每1-2個月一次
水槽 每週 /
汙水盒 每週 /
集塵袋 / 每2-3個月一次
邊刷 每2週一次 每3-6個月一次
主刷 每週 每6-12個月一次
過濾器 每週 每3-6個月一次
邊緣感應器
萬向輪
防掉落感應器
防撞桿
機器人上的充電接觸點
全能基站上的充電接觸點
d-ToF雷射模組
AIVI攝影機
大約每個月一次 /
淨水箱 每3個月一次 /
汙水箱 每個月 /
集塵盒內部 每個月 /
基站站體及底座 每個月 /
拖布清洗盤 每5個月一次 /
1
保養頻率
ZH-TW41
2.打開集塵盒蓋板,取出過濾器和濾網。
1.取下集塵盒,然後打開其蓋子以將其清空。
2
集塵盒
附註:
•
請用水沖洗過濾器。
•
請勿使用手指或刷子清潔過濾器。
附註:使用前過濾器必須完全乾燥。
4.將集塵盒和過濾器晾乾。
3.您可以沖洗組件。然後,充分搖晃以除去殘留的水滴。
ZH-TW 42
清潔主刷。
1.取下主刷上的蓋子。
3.取下、清潔並晾乾刷梳。
2.取下主刷並清潔。
4.安裝刷梳、主刷和主刷蓋。
3
主刷和邊刷
清潔邊刷。
取下邊刷並清潔。
附註:
如需購買多功能清潔小工具與其他配件,請訪問科沃斯官方商城 https://www.ecovacs.com。
ZH-TW43
清潔滾筒拖布。
1.輕按兩下 按鈕鬆開滾筒拖布組件。
2.按下解鎖按鈕即可取下滾筒。
3.清潔滾筒拖布。
4.清潔滾筒內部。
5.將滾筒拖布推入滾筒端蓋並輕按兩下 按鈕收回。
4
滾筒拖布、水槽和汙水盒。
附註:處理滾筒時請避免用力過度;應小心取下及放置。
附註:請勿用水清潔主機。
輕按兩下
輕按兩下

ZH-TW 44
清潔水槽 清潔汙水盒
1.取下水槽。
2.取下水槽組件並清潔。
3.請如圖所示安裝水槽組件。
1.取下汙水盒和過濾器。
2.清潔過濾器、盒體及排汙水口。
3.重新安裝過濾器,然後穩固地壓緊,接著重新蓋上汙水盒蓋板。
附註:如果未處於乾燥狀態,翻轉機器人時可能會有少量殘留水漏出。
ZH-TW45
清潔感應器鏡頭
5
其他組件
清潔防撞桿
附註:清潔防跌落感應器和防撞桿時請使用乾布,以防止進水造成損壞。 附註:用乾布擦拭接觸點。避免使用濕布以防止進水造成損壞。
清潔充電接觸點
清潔 d-ToF 雷射模組
附註:清潔雷射模組時,請將模組鏡頭旋轉至前方,用刷子輕輕清潔。

ZH-TW 46
清潔防掉落感應器
清潔邊緣感應器
清潔驅動輪
附註:清潔充電接觸點時請使用乾布,以防止進水造成損壞。
清潔萬向輪

ZH-TW47
2.安裝水槽和底座。
1.卸下拖布清洗盤和基站底座並清潔。
6
拖布清洗盤和基站底座
附註:請正確安裝水槽和底座,以免發生故障。
咔噠

ZH-TW 48
1.取下集塵盒蓋板。 3.用乾布清潔集塵盒,然後安裝新的集塵盒,並藉由聽見明顯的「咔噠」聲
來確認已正確安裝。
附註:握住把手提起集塵袋,可有效防止灰塵漏出。
2.依箭頭方向取出一次性集塵袋並丟棄。 4.將集塵袋放回原位並壓下蓋板,使其安裝到定位。
7
集塵袋
咔噠
ZH-TW49
請注意,機器人在關機時無法充電。
存放前請將機器人充滿電後再關閉電源。請每1.5個月充電一次以防止電池過度放
電。
附註:
•機器人完成清潔任務後,建議不要關閉電源,而是保持充電狀態,
以便為進行下一次的清潔工作準備就緒。
•若電池過度放電或長時間未使用,機器人可能無法充電。
請聯絡ECOVACS尋求協助。請勿自行拆解電池。
•若長時間不使用本產品,請將汙水盒、水箱排空並保持滾筒拖布乾燥。
8
存放
ZH-TW 50
針對以下可能發生的問題,請參考相應的解決方案。
序號 故障情況 可能原因 解決方案
1
機器人無法連接至ECOVACS
HOME應用程式。
輸入的Wi-Fi使用者名稱或密碼不正確。 輸入正確的Wi-Fi使用者名稱和密碼。
機器人不在您家中Wi-Fi訊號範圍內。 確保機器人位於您家中Wi-Fi訊號的範圍內。盡可能地靠近路由器。
機器人未處於組態狀態。
按下Reset(重設)按鈕以透過藍牙將機器人連接至您的手機。如果失敗,
請按下RESET(重設)按鈕+
,並透過ECOVACSHOME應用程
式進行連接。
Wi-Fi清單中找不到家中Wi-Fi。
檢查Wi-Fi名稱是否包含特殊字元。請勿使用特殊字元,像是!@#&
¥%/\.
請勿使用5Ghz網路。
安裝了錯誤的應用程式。 請下載並安裝ECOVACSHOME應用程式。
2
無法在應用程式中
建立家具地圖。
在機器人清潔時搬動它,可能會導致地圖
遺失。
請勿在機器人清潔期間搬動它。
自動清潔未完成。
確保機器人完成清潔後會自動返回全能
基站。
3 邊刷在使用過程中會脫落。 邊刷未正確安裝。 請勿在機器人清潔期間搬動它。
4 收不到訊號。無法返回基站。
基站放置位置不正確。 請依照說明書中[ 快速入門 ]一節的指示正確放置基站。
基站斷電或遭人為移動。
檢查全能基站是否已連接電源。請
勿移動全能基站。
機器人未從全能基站出發清潔。 建議機器人從全能基站出發清潔。
對接路線受到阻礙。例如,放置基站的房間房門關上了。 請保持充電路線通暢。
5
機器人在完成清潔之前就返回
基站。
房間太大,機器人需要中途返回充電。 請啟用斷點續掃。如需詳細資訊,請參考應用程式指示。
在高度複雜的居家環境佈局中,清潔效率可能會下降,甚
至有可能無法完成清潔工作。
請簡化您的居家環境佈局。
疑難排解
ZH-TW51
序號 故障情況 可能原因 解決方案
6 機器人無法充電。
未開啟機器人。 開啟機器人。
機器人的充電接觸點並未連接至全能基站的充電接觸點。
請確保機器人的充電接觸點已連接至基站的充電接觸點,並且
開
始閃爍。檢查機器人和全能基站的充電接觸點是否髒汙。請
依照說明書中[ 定期保養 ]一節的指示清潔這些零件。
全能基站並未連接電源。 請確保全能基站已連接電源。
底座並未安裝到位。 請參閱[ 快速入門 ]章節正確安裝。
7 機器人在清潔時聲響較大。
主刷 / 邊刷被纏繞,或是集塵盒 / 過濾器堵塞。 建議定期清潔主刷、邊刷、集塵盒、過濾器等。
機器人處於強力模式。 切換為標準模式。
8
機器人工作時卡住且停止運
作。
機器人被地板上的物體(電線、窗簾、地毯鬚邊等)纏繞。
機器人會嘗試各種方式自行脫困。如果未能脫困,請協助清除障礙物
並重新啟動機器人。
如果家具底下間隙高度碰巧與機器人的高度相近,便可能導
致機器人卡住。
請墊高家具、放置實體障礙物或透過ECOVACSHOME應用程式
設定虛擬邊界。
機器人卡在狹窄區域。
請收拾家中環境、放置實體障礙物或透過ECOVACSHOME應用
程式設定虛擬邊界。
9
在清潔過程中,機器人偶爾
出現行進路線混亂、偏離路
線、重複清潔相同位置、小
面積區域漏掃等情況。(如
果目前尚有大面積區域暫未
清潔,機器人會自動返回清
掃該遺漏區域。有時機器人
會再次進入已清潔過的房
間,但這也許並非是在重複
清潔,而是機器人找到了任
何先前遺漏的區域)。
地面擺放的電線、拖鞋等物體會阻礙機器人的行動。
進行清潔前,請盡可能地先收拾好地上散落的電線、拖鞋等物體。如
在清潔過程中有任何遺漏區域,機器人會自動補掃。請勿干擾機器人
的運作(例如移動機器人或阻擋機器人的行進路線)。
機器人可能在攀爬台階、門檻、門擋時造成驅動輪在地面上
打滑,進而影響其對整個居家環境的判斷。
建議將受影響區域的房門關上,然後單獨清潔該區域。機器人在清潔
完畢後會返回起點。
在剛打蠟或拋光的地板,以及光滑的磁磚上作業,驅動輪與
地板之間的摩擦力可能較低。
請等待地板蠟乾燥後再行清潔。
由於居家環境佈局的不同,機器人無法進入某些區域進行清
潔。
請收拾家中環境,確保機器人能夠進入要清潔的區域。
10 遙控時發生延遲。 Wi-Fi訊號較差,導致影片載入緩慢。 在Wi-Fi訊號良好的區域使用機器人。
ZH-TW 52
序號 故障情況 可能原因 解決方案
11
返回全能基站後,機器人不會清
空集塵盒。
尚未開啟ECOVACSHOME應用程式中的自動清空
功能。
在ECOVACSHOME應用程式中開啟自動清空功能。
手動將機器人放回基站,可能不會觸發自動清空功能。 建議讓機器人自行返回全能基站。請不要手動搬動它。
在「請勿打擾」模式下,機器人返回全能基站後不會清
空灰塵。
關閉ECOVACSHOME應用程式中的「請勿打擾」或是手動清空
灰塵。
基站偵測到清空灰塵的效率下降。
請依照[ 定期保養 ]章節所述更換集塵袋,然後關上集塵盒。若應
用程式提示集塵袋尚未裝滿,將其再次裝回即可。
若已排除上述可能原因,則有可能是基站元件異常 請聯絡客戶服務以尋求協助。
12 自動清空未能成功。
基站偵測到清空灰塵的效率下降。
請依照[ 定期保養 ]章節所述更換集塵袋,然後關上集塵盒。若應
用程式提示集塵袋尚未裝滿,將其再次裝回即可。
集塵盒的出口被異物堵塞。 拆下集塵盒並清潔出口上的異物。
13 集塵盒內部髒汙。
有細微塵粒經由集塵袋吸附在集塵盒內側。 清潔集塵盒內側。
集塵袋破損。 檢查並更換集塵袋。
集塵袋未正確安裝。 請正確安裝集塵袋。
未關閉集塵盒蓋板。 請檢查集塵盒蓋板是否已正確關好。
14 機器人作業時有灰塵外洩 集塵盒的出口被異物堵塞。 拆下集塵盒並清潔出口上的異物。
15 滾筒拖布不會轉動。
滾筒拖布未正確安裝。
根據【定期保養】一節正確安裝
滾筒拖布。
滾筒拖布被異物堵塞。 根據【定期保養】一節正確清潔並安裝
滾筒拖布。
16 驅動輪卡住。 輪子遭異物纏繞或卡住。
轉動並按壓驅動輪,檢查是否有異物纏繞或堵塞。如有發現任何異物,
請即刻清理。如果問題持續發生,請聯絡客戶服務以尋求協助。
ZH-TW53
序號 故障情況 可能原因 解決方案
17
拖布清洗盤水滿且無法清
空。語音提示通報拖布清洗
盤異常。
未正確安裝汙水箱。 輕壓汙水箱,確保其已正確安裝。
汙水箱內的密封塞未正確安裝。 確保兩個密封塞已正確安裝。
拖布清洗盤未正確安裝。
請依照應用程式指示,確認基站是否能夠正常抽水。如果嘗試抽水
失敗,請檢查汙水箱與基站之間是否存在異物。
拖布清洗盤底座變髒。 確保拖布清洗盤吸水口內並無異物。
如果拖布清洗盤底座沒有水,請檢查浮球是否卡住。 取出拖布清洗盤,並將浮球放回原位。
全能基站無法正常抽水。
將機器人放入基站並雙擊
,如果問題仍然存在,請聯絡我們的客
戶服務以尋求協助。
拖布清洗盤的吸水口被異物堵塞。 確保拖布清洗盤吸水口內並無異物。
已嘗試上述所有解決方案,但仍持續發出語音提示。
關閉基站電源,然後再開啟。如果問題持續發生,請聯絡客戶服務
以尋求協助。
18 汙水盒異常。 汙水盒的排水口堵塞,排水桿無法正常運作。
取下並清空汙水盒,進行沖洗然後重新安裝。如果問題持續發生,
請聯絡客戶服務以尋求
協助。
如已採行建議的解決方案卻仍無法解決問題,請聯絡我們的客戶服務以尋求協助。

ZH-TW 54
技術規格
無線模組的輸出功率小於100mW。
附註:為了持續改進本產品,技術和設計規格可能會改變。
前往https://www.ecovacs.com查看更多配件。
請使用手機鏡頭掃描
QR 圖碼,取得使用指南。
型號 DEX68
額定輸入 20V 2A 充電時間 約4.5小時
基站型號 CH2497A
額定輸入 220-240V~50-60Hz 額定輸出 20V 2A
額定輸入電流(充電中) 0.5A 功率(排空) 650W
功率(熱水清洗拖布) 1650W
網路待機電源 小於2.00W

Ecovacs Home Service Robotics Co�, Ltd�
No�518 Songwei Road, Wusongjiang Industry Park, Guoxiang Street,
Wuzhong District, Suzhou, Jiangsu, China�
451-2488-0038
