Q3 Projector
USER MANUAL


EN
English P02-19
DE
Deutsch P21-39
FR
Français P40-58
JP
日本語
P59-77

EN
2
CONTENT
PACKAGE LIST - - - - - - - - - - - - - - - - - - - - - - - - 3
PRODUCT STRUCTURE - - - - - - - - - - - - - - - - - - - - - 4
REMOTE CONTROL - - - - - - - - - - - - - - - - - - - - - - 5
PROJECTOR SPECIFICATIONS - - - - - - - - - - - - - - - - - - 6
IMAGE ADJUSTMENT - - - - - - - - - - - - - - - - - - - - - 7
1.Focus Adjustment 7
2.Projection Mode 7
3.Auto Keystone Correction 7
4.Manual Keystone Correction 8
5.Zoom Mode 9
6.Brightness & Color Adjustment 9
7.Other Setting 10
SETTING UP THE PROJECTOR - - - - - - - - - - - - - - - - - - 11
WIRELESS CONNECTION - - - - - - - - - - - - - - - - - - - - 12
1.For IOS System (Airplay) 12
2.For Android System(Miracast) 13
3.Eshare 14
BLUETOOTH SETTINGS - - - - - - - - - - - - - - - - - - - - - 14
Connect Bluetooth Speakers 14
SIGNAL LINES CONNECTION- - - - - - - - - - - - - - - - - - - 15
1.Connecting with Laptop 15
2.Connecting with MacBook or Mac Book Air 15
3.Connecting with Sound bar 15
4.Connecting with Fire TV Stick 16
5.Connecting with XBOX/PS4 16
App Download - - - - - - - - - - - - - - - - - - - - - - - 16
LANGUAGE SETTING- - - - - - - - - - - - - - - - - - - - - - 17
OTHER SETTING - - - - - - - - - - - - - - - - - - - - - - - 17
Application Setting 17
Factory Reset Setting 17
System Info 18
DATE AND TIME SETTING - - - - - - - - - - - - - - - - - - - - 18
SYSTEM UPGRADE - - - - - - - - - - - - - - - - - - - - - - 19
FAQ - - - - - - - - - - - - - - - - - - - - - - - - - - - - 19
EN
3
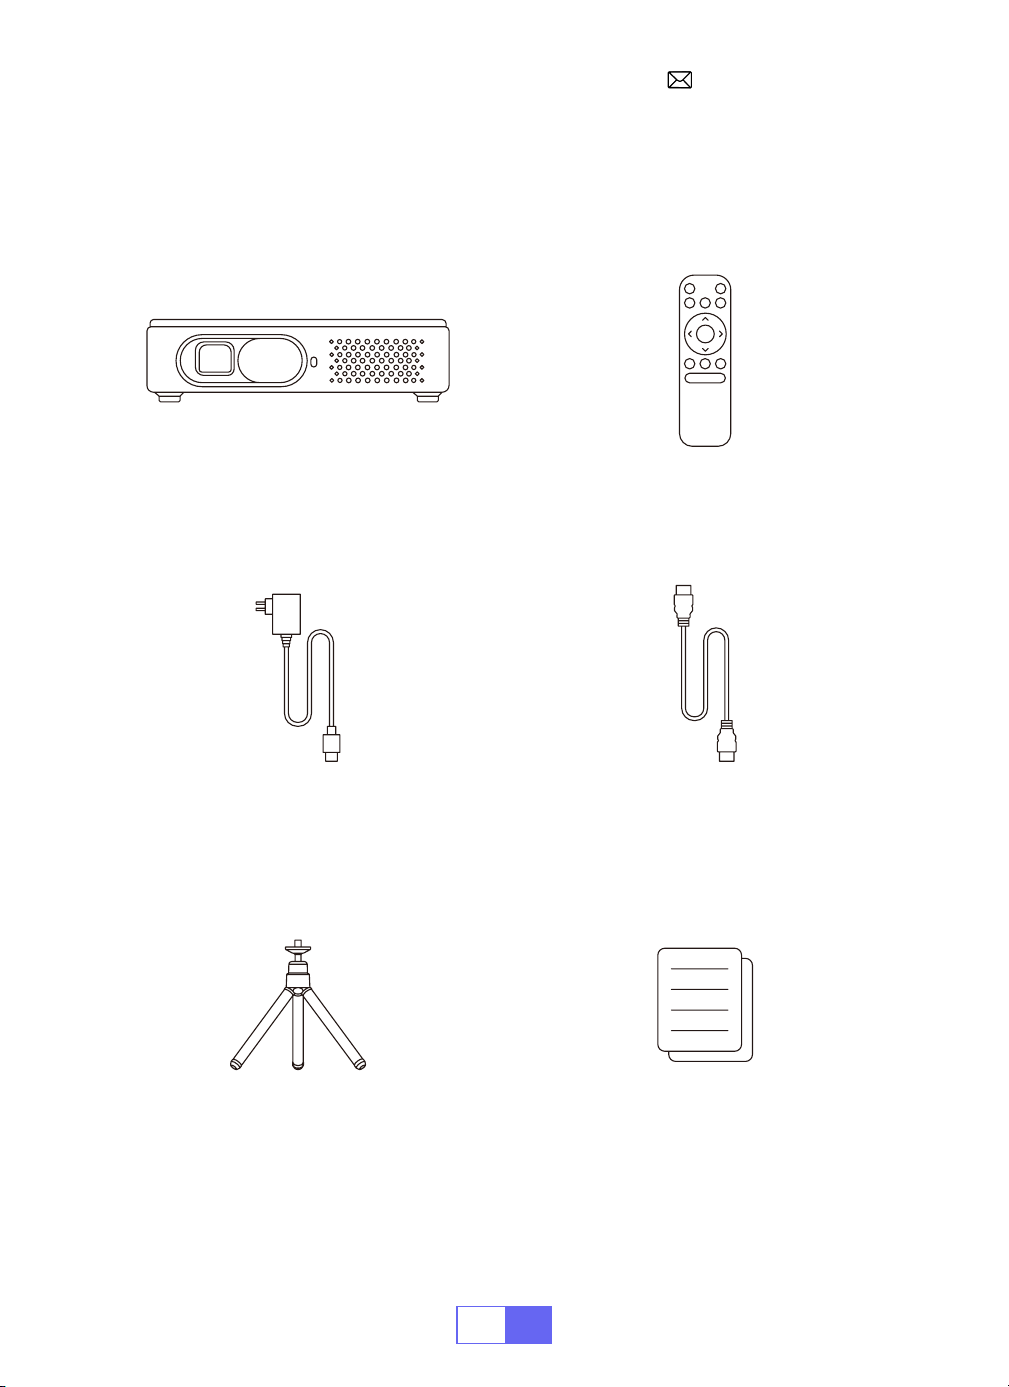
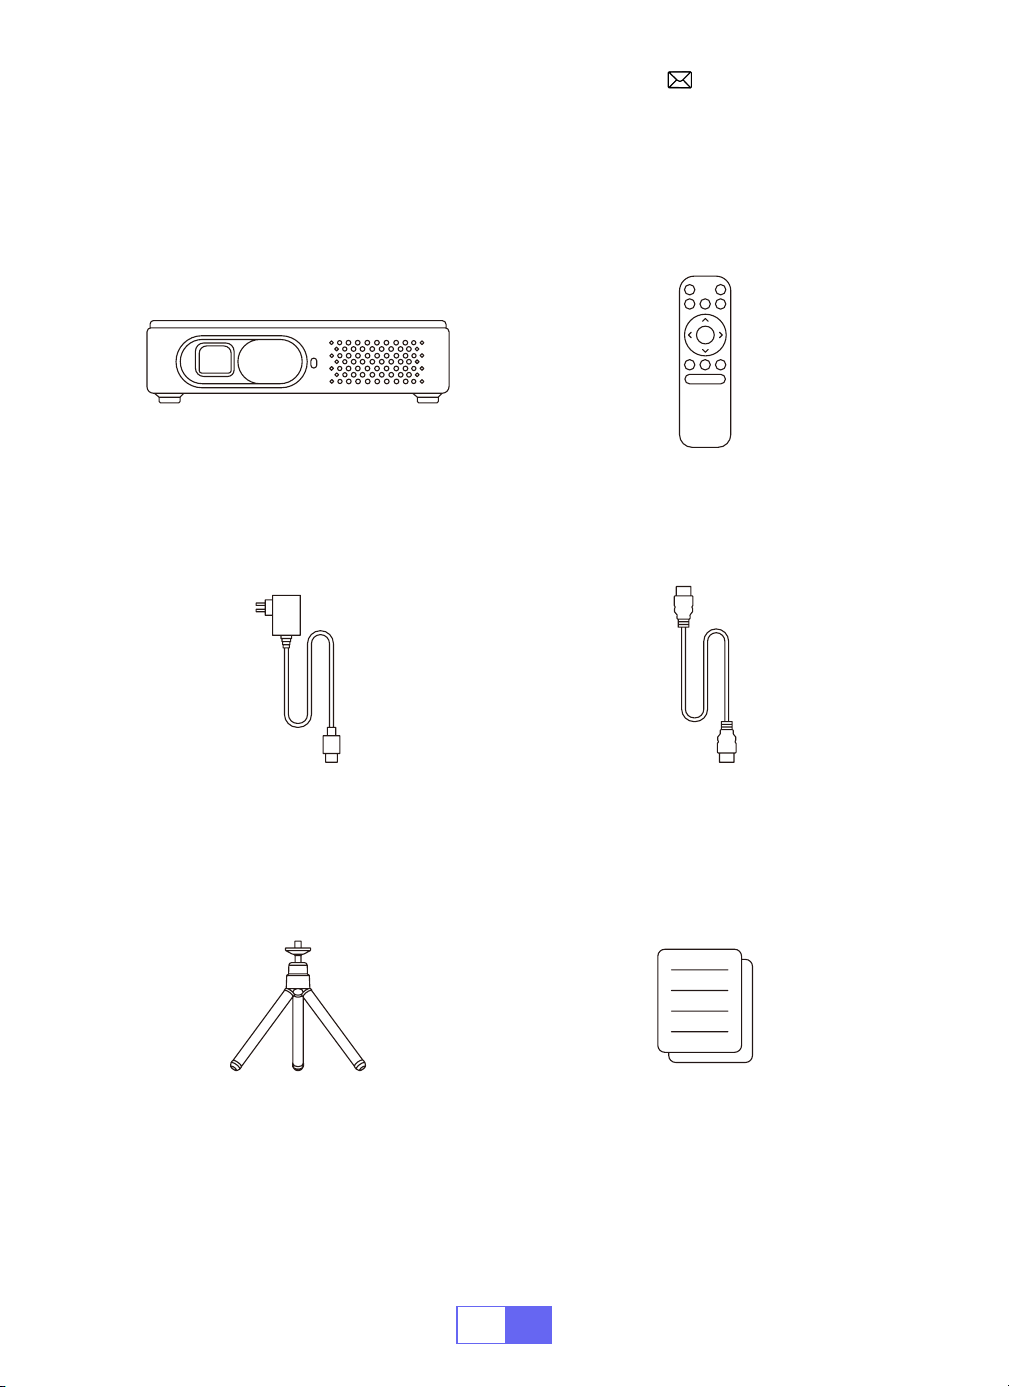
PACKAGE LIST
WiMiUS Q3 Projector Remote Control
Power Cable HDMI to HDMI Cable
Tripod Stand User Manual
EN
4
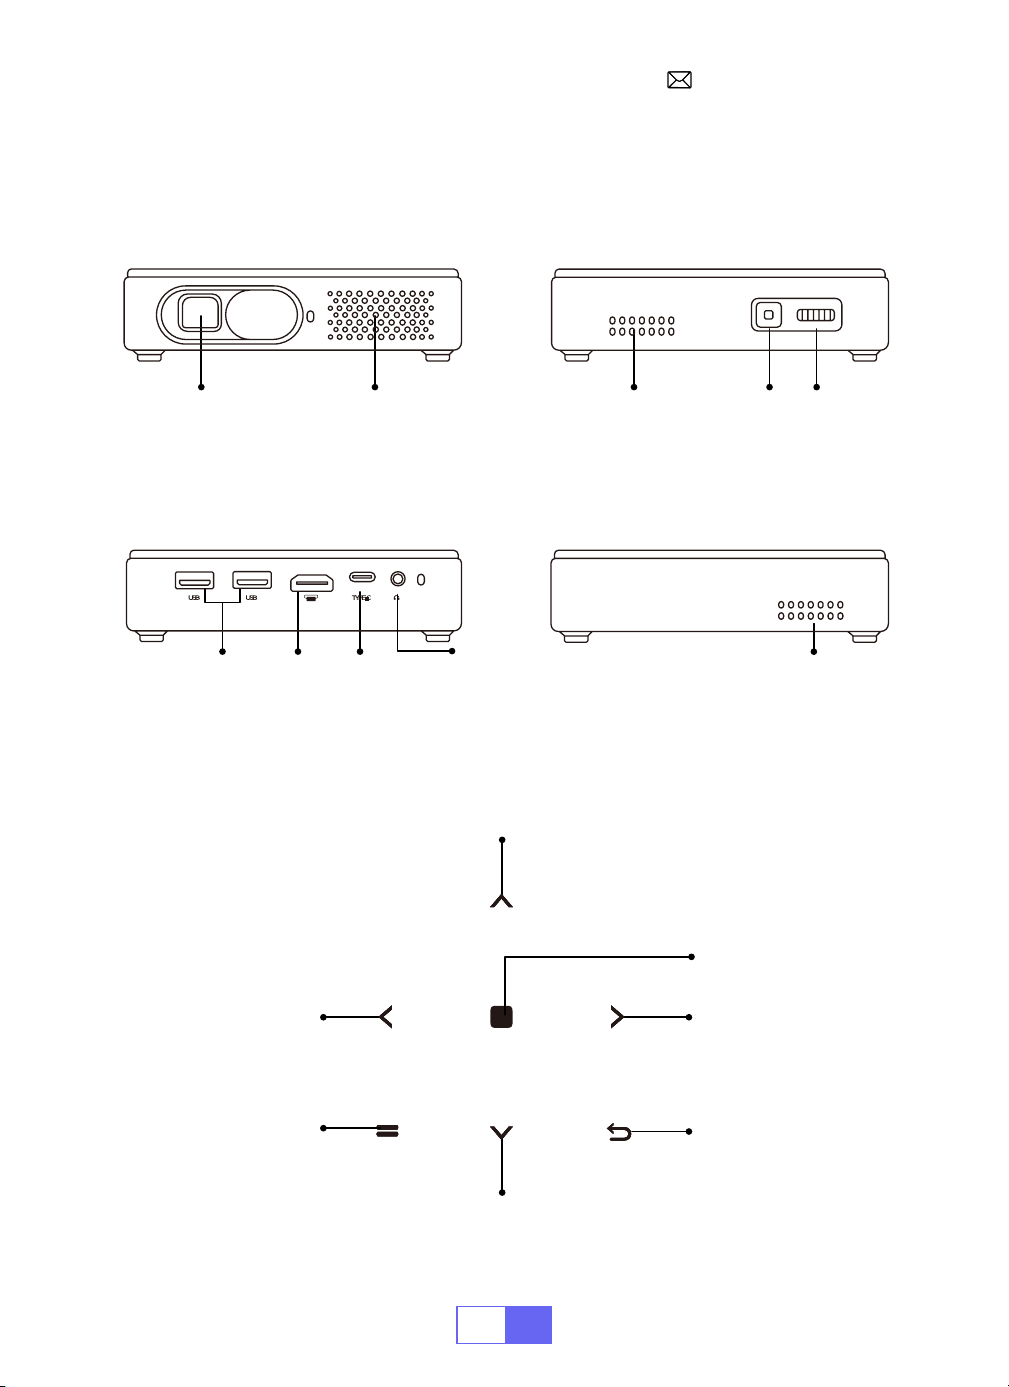
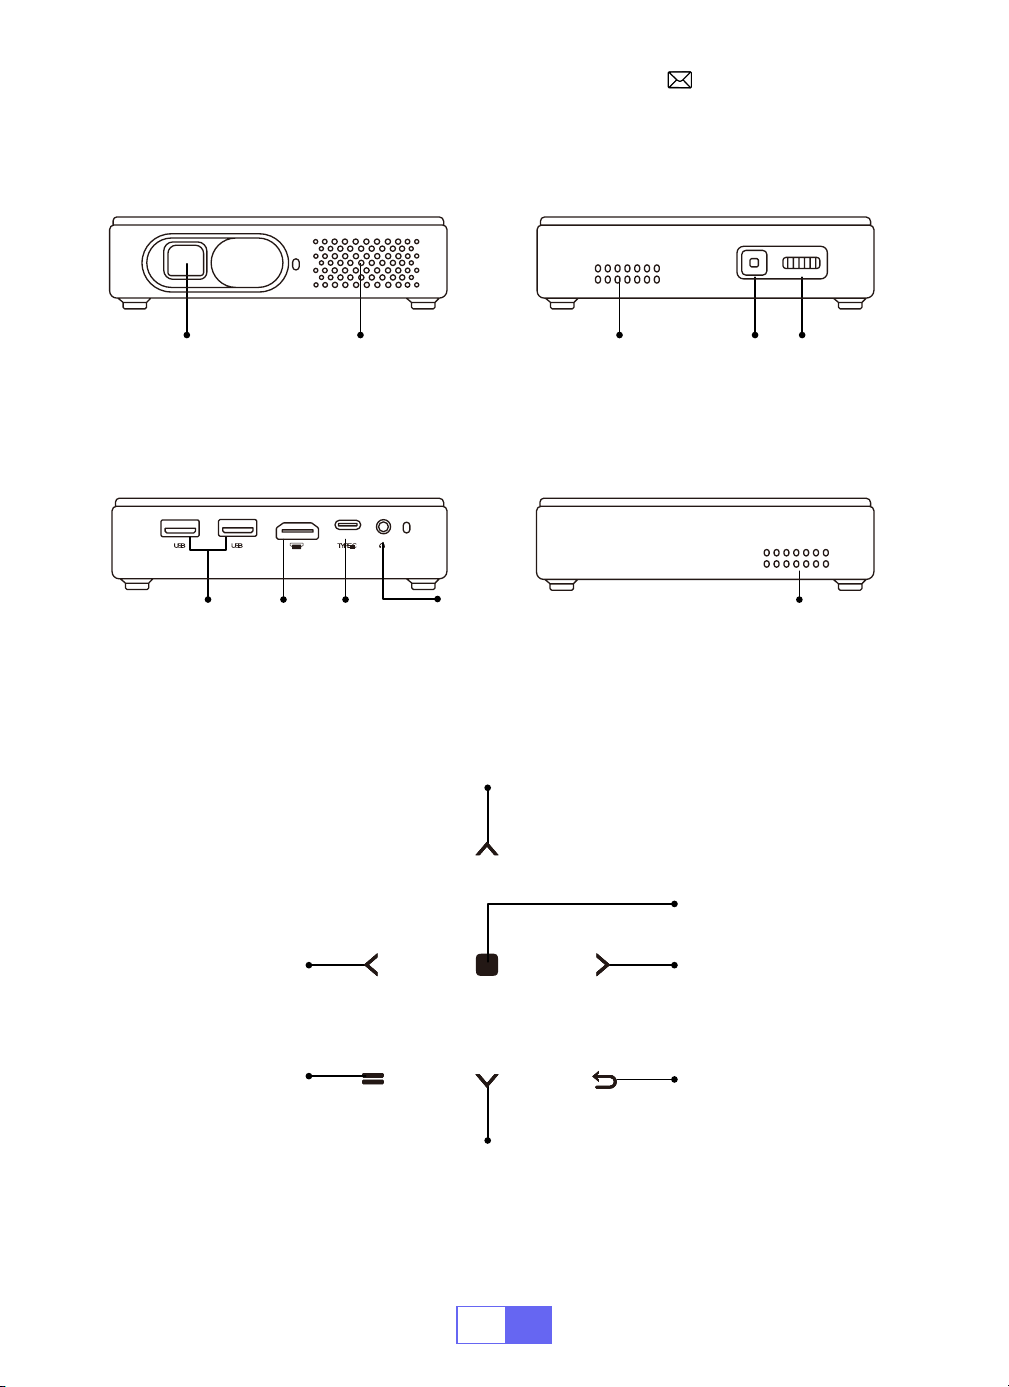
PRODUCT STRUCTURE
Ventilation hole Ventilation hole
Ventilation hole
ON/OFF Focus PinionLens
USB HDMI TYPE C
Left Right
Up
Down
Menu Return
3.5mm
audio out
port
OK

EN
5
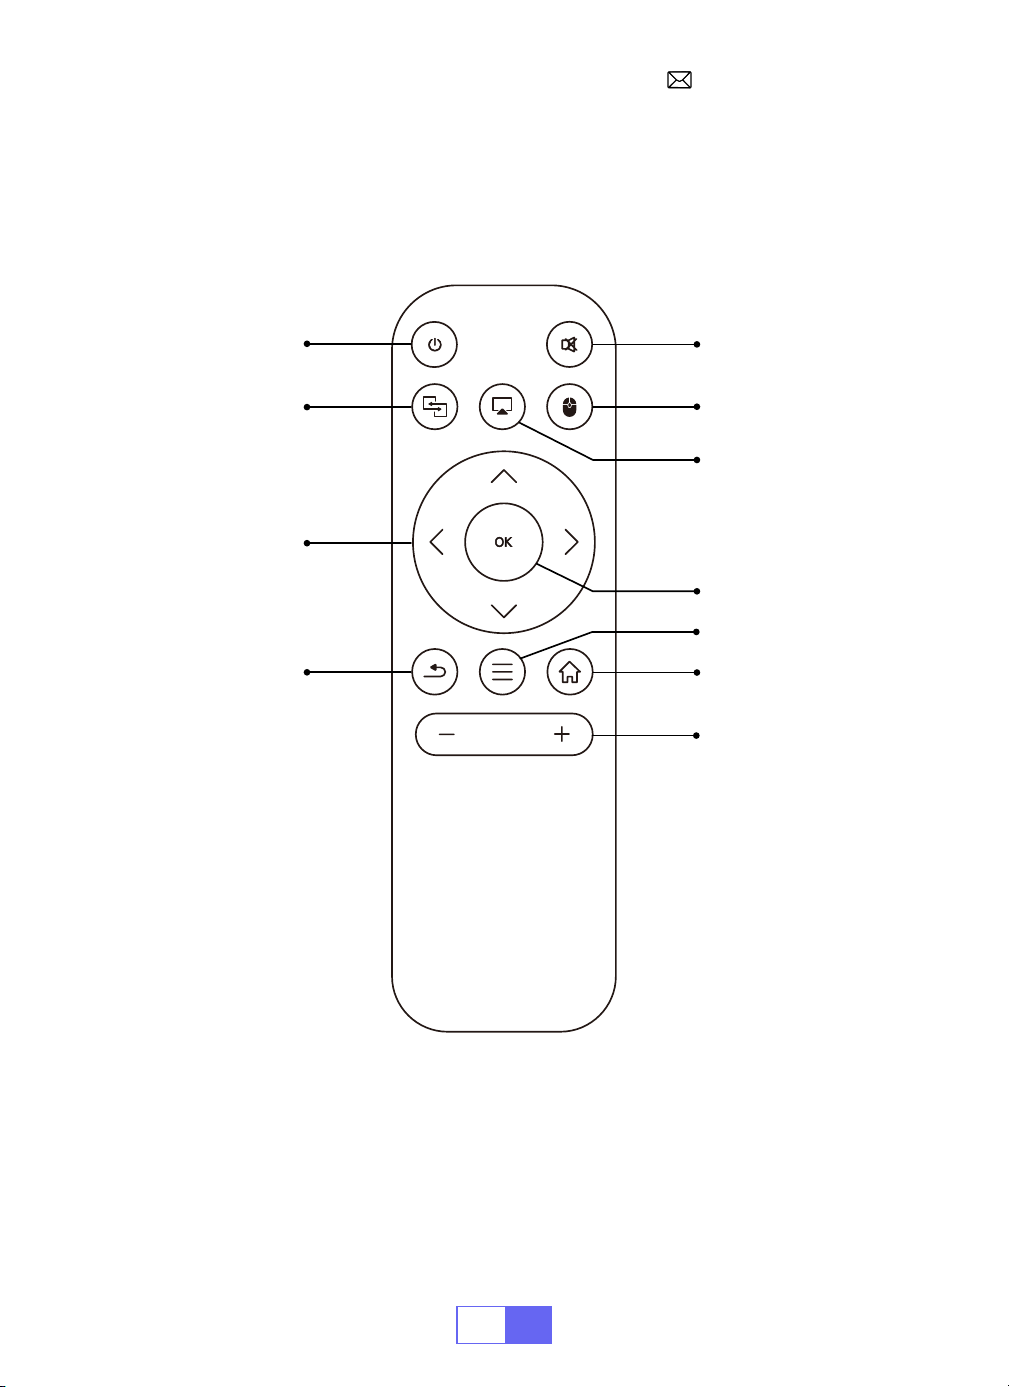
REMOTECONTROL
ON/OFF
Mute
Switch to mouse
control
Home
Menu
VOL+/
OK
Airplay
Eshare
Directions
Return
Note:
Install 2 pieces of AAA batteries(not included) into the remote
before using.
EN
6
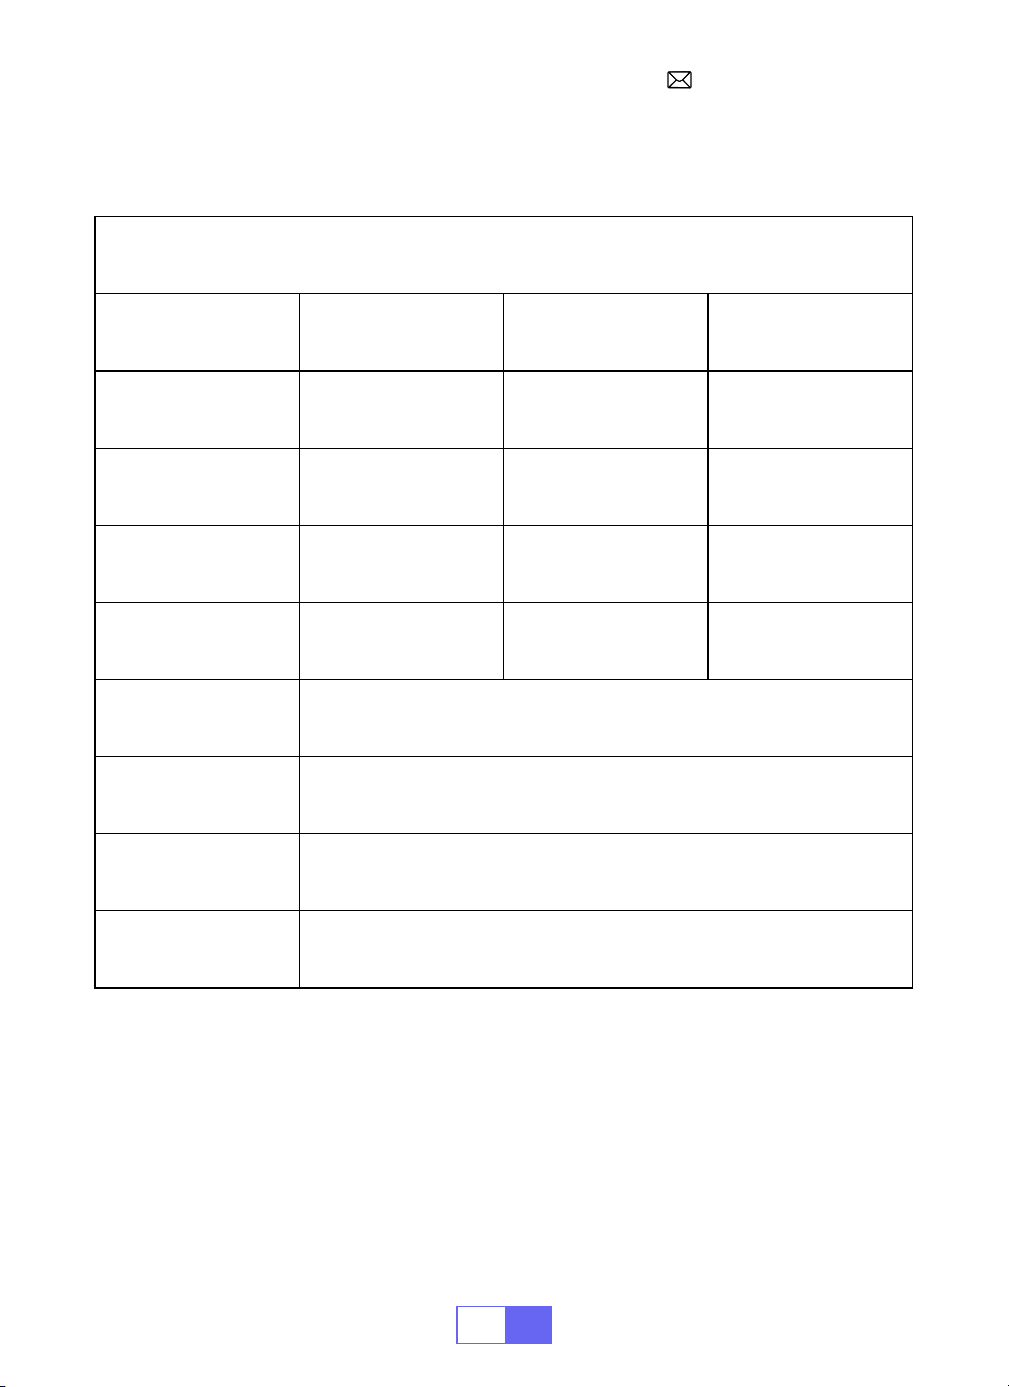
PROJECTOR SPECIFICATIONS
Model No.: Q3
Display Technology DLP Light Source LED
Software System Android 11 Projector Type Seale
Installation Type
Front/Rear on Desk,
Front/Rear on Ceiling
Aspect Ratio 16:9/4:3
Product Size 12cm*12cm*2.8cm Product Weight 350g
Keystone Correction
Auto vertical
correction
Focus Manual
Input Interface HDMI/USB*2/3.5mm audio output
Video Format H.264,H.265,Vp9,MPEG1,MPEG2,MPEG4,H.263,XVID,VP8,etc
Audio Format MP3,OGG,FLAC,APE, etc
Image Format jpg,png,bmp, etc
EN
7
IMAGE ADJUSTMENT
1.Focus Adjustment
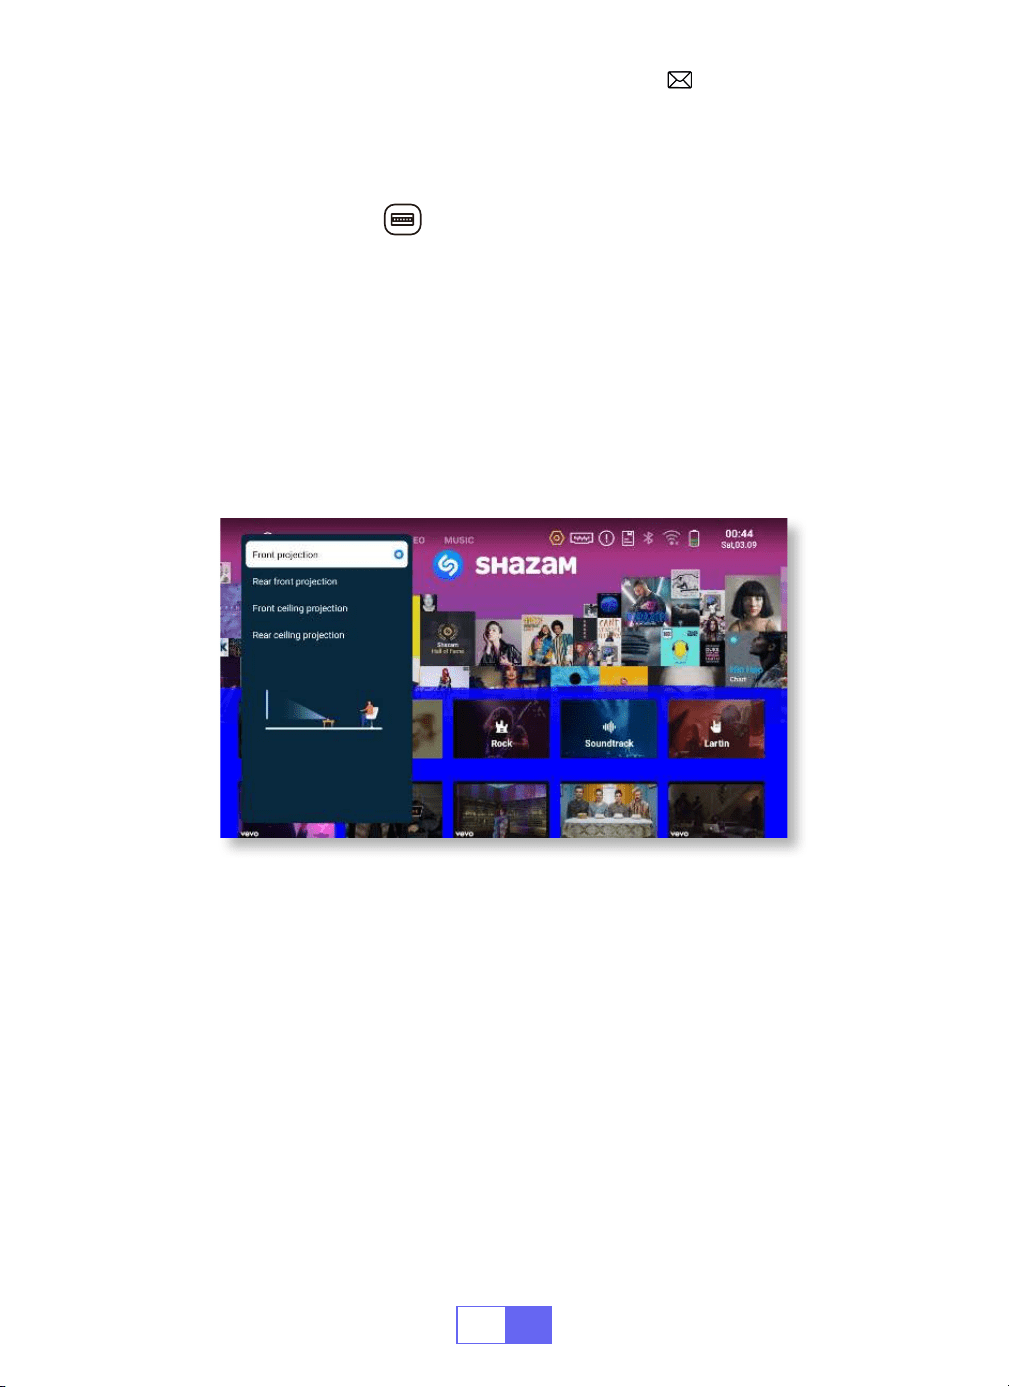
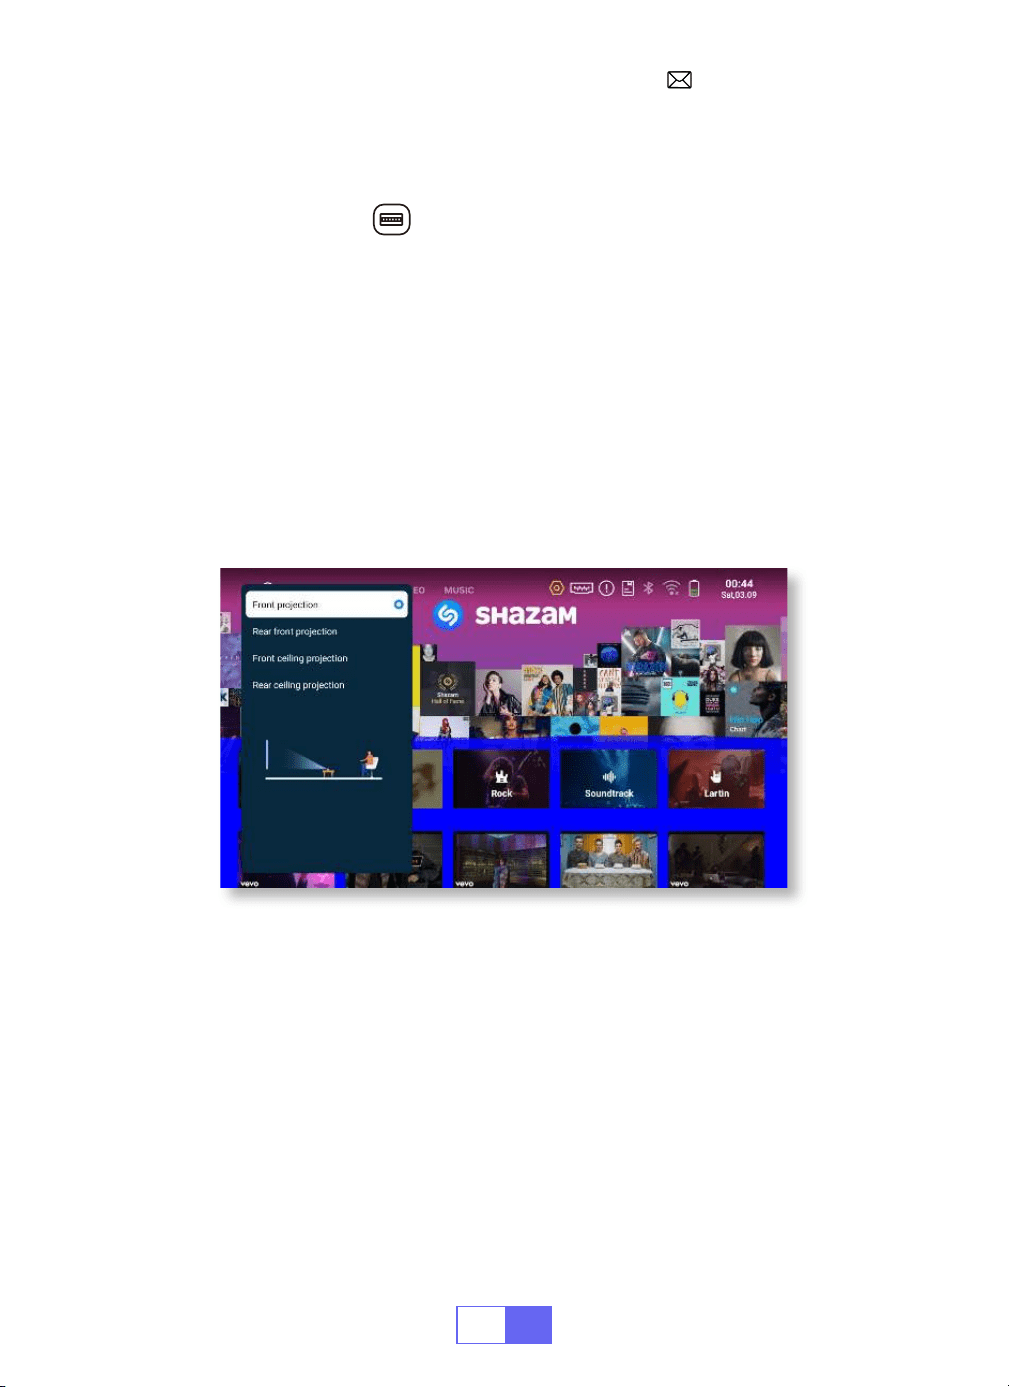
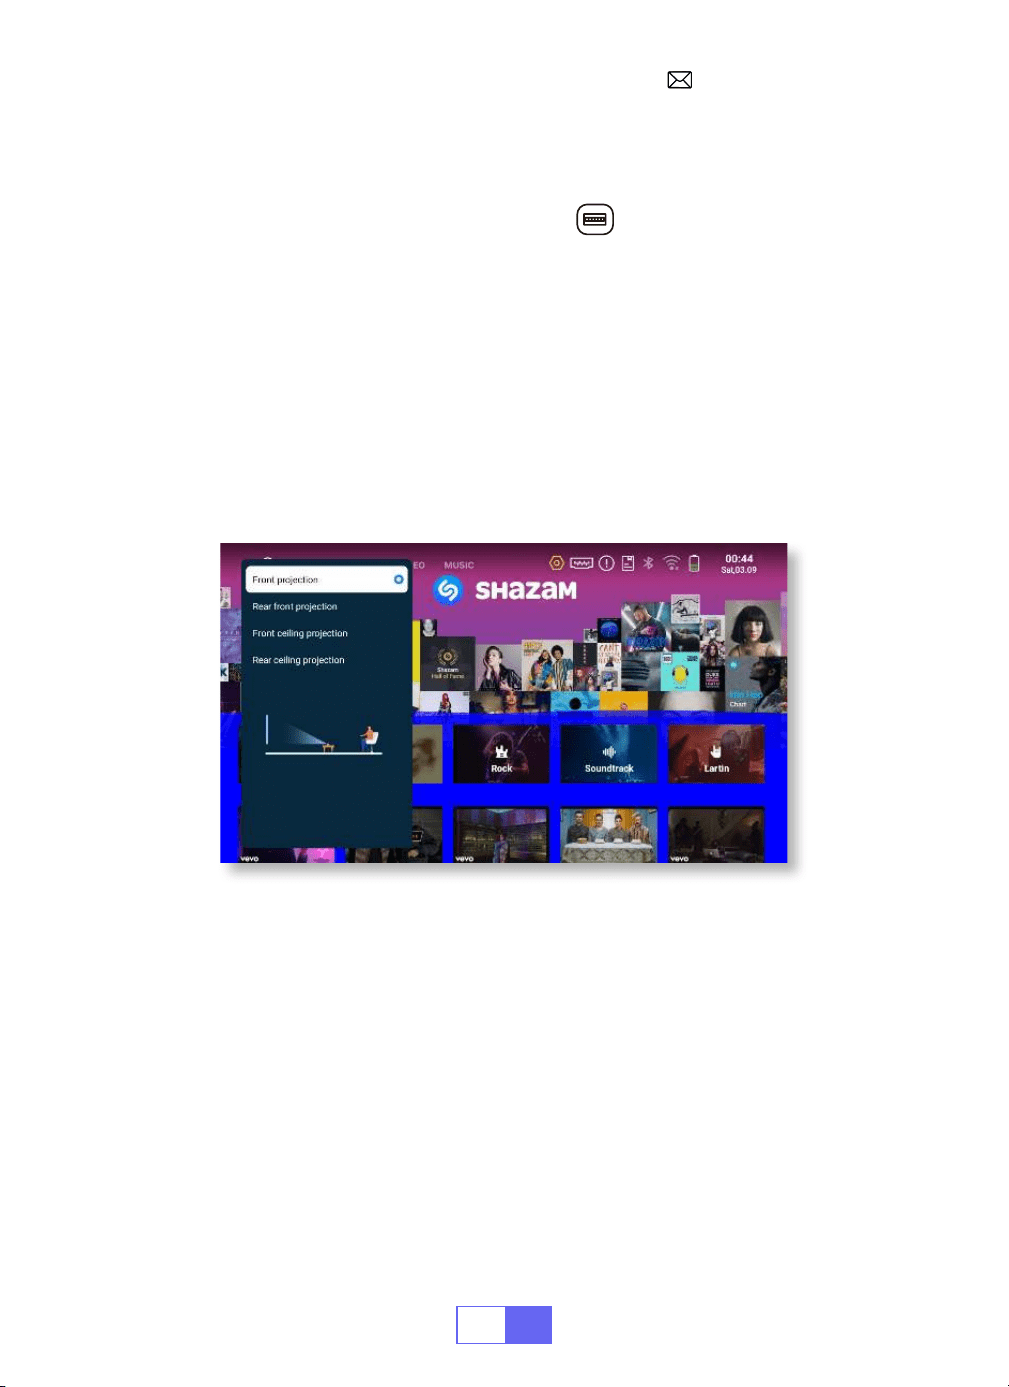
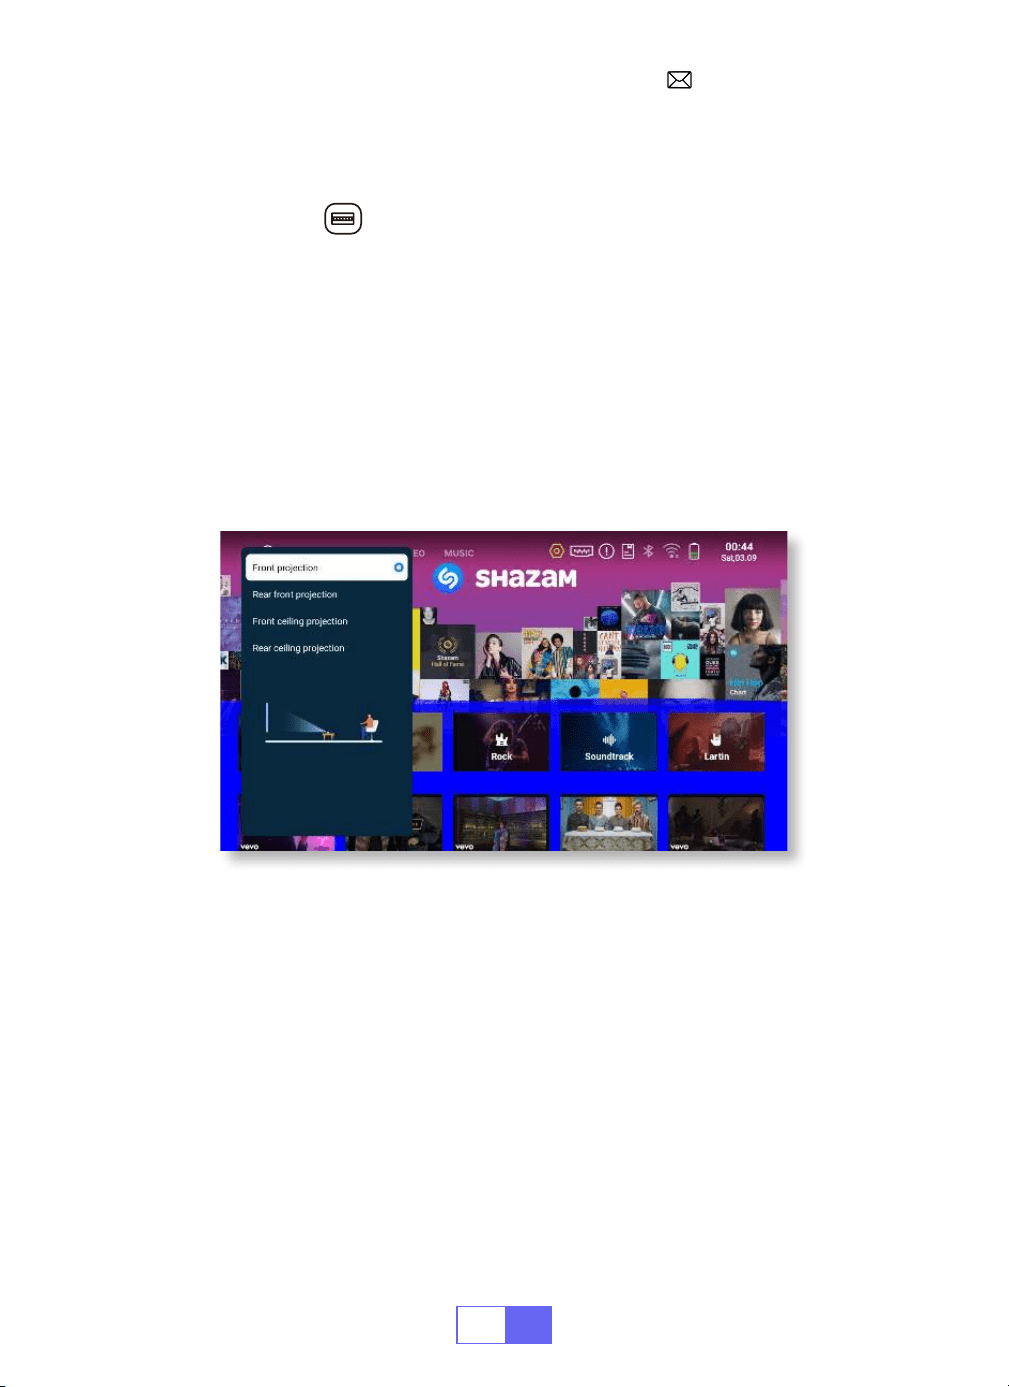
2.Projection Mode
Auto Keystone Correction
3.Auto Keystone Correction
Slide pinion on the left of the device to adjust sharpness.
Select [Settings]menu Select [Display] Select [Projection Mode], Press
the projection position you need and press "OK" to conrm.
There are 4 modes: Front projection/Rear front projection/Front ceiling
projection/Rear ceiling projection.
Select[Settings]menu Select [Display] Select [Auto Keystone
Correction], and press "OK" to conrm.
The projector can auto adjust the vertical plane to get the rectangle
image. The tilted angle doesn't exceed ±30°.

EN
8
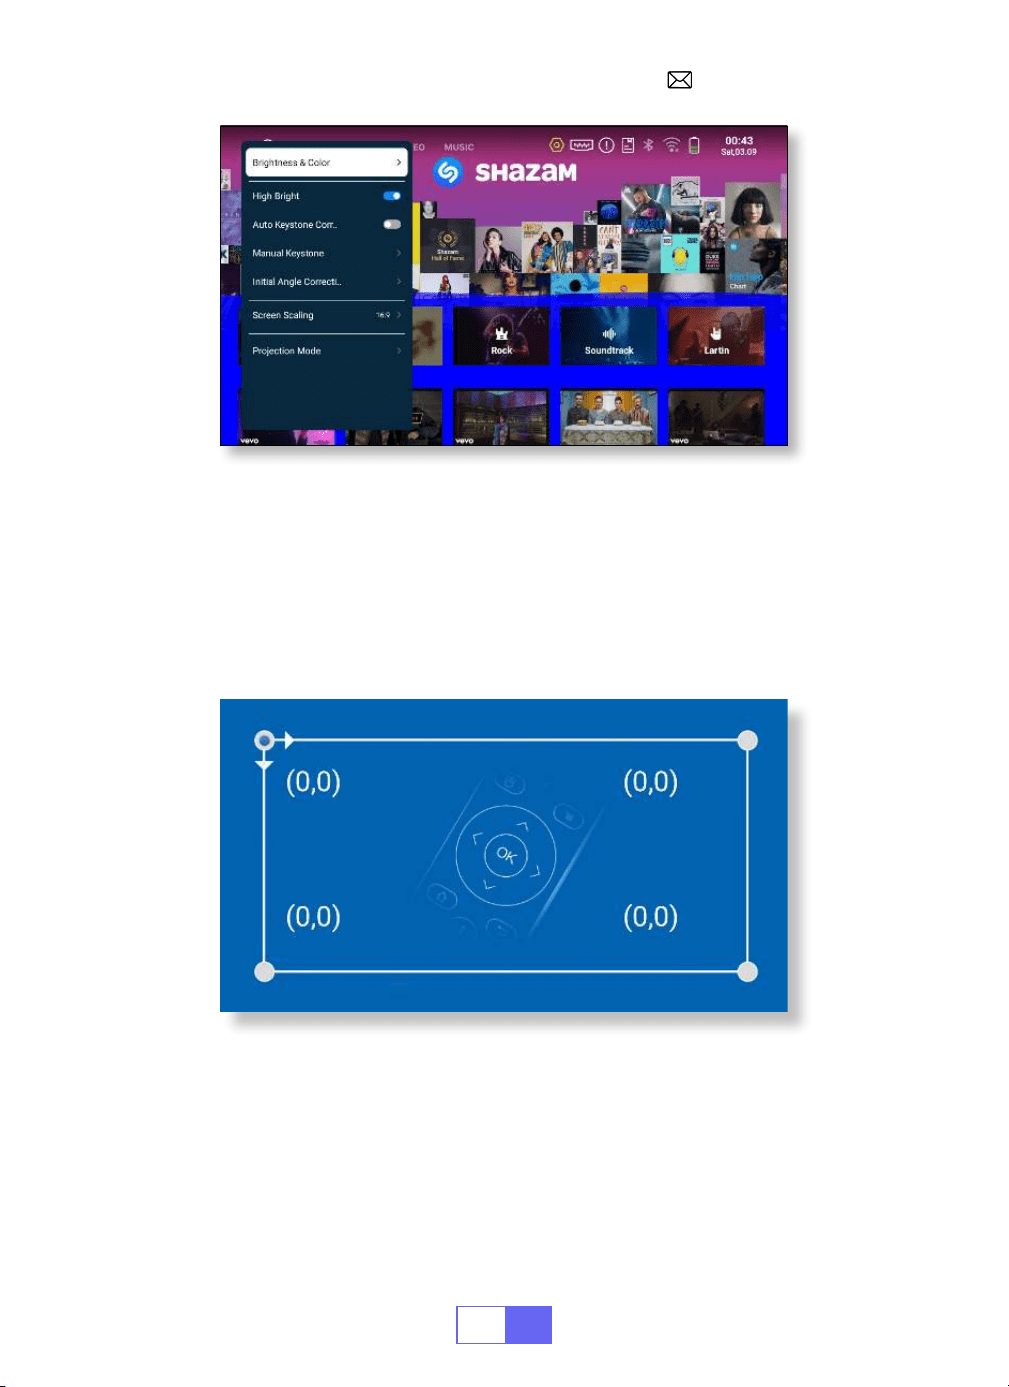
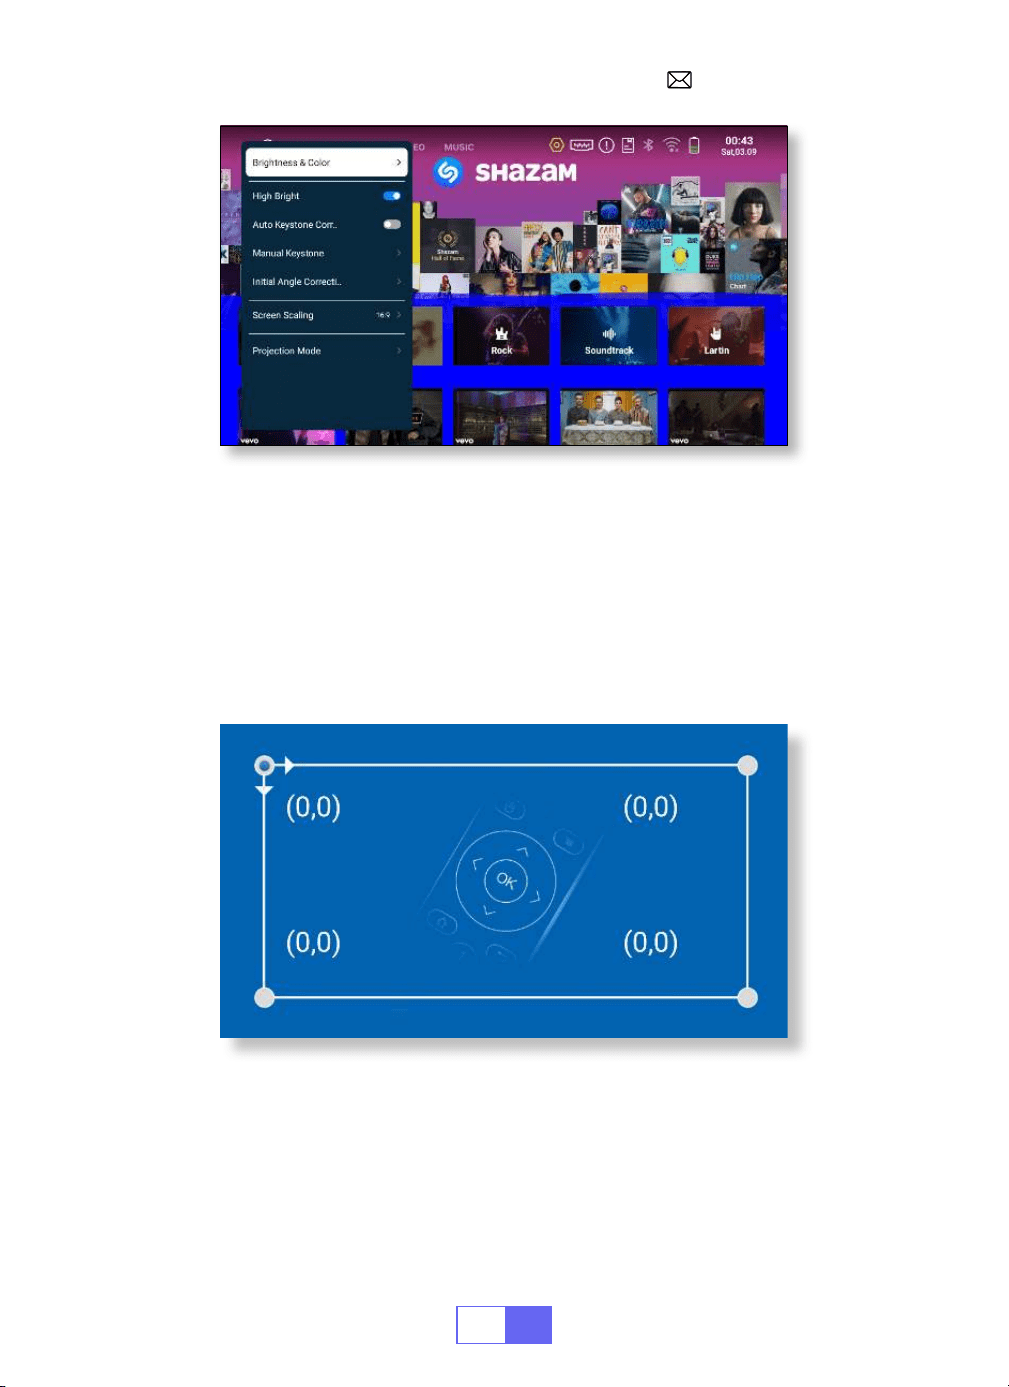
4.Manual Keystone Correction
Initial Angle Correction
Select [Settings]menu Select [Display] Select [Manual Keystone],
press "OK" to pick the point you want to adjust at first, and then press
the arrow keys to set the value(Horizontal and Vertical±30°)needed as
shown below.
Place the device on the horizontal plane and press the OK to correct it.
Don’t move the device during the correction.
EN
9
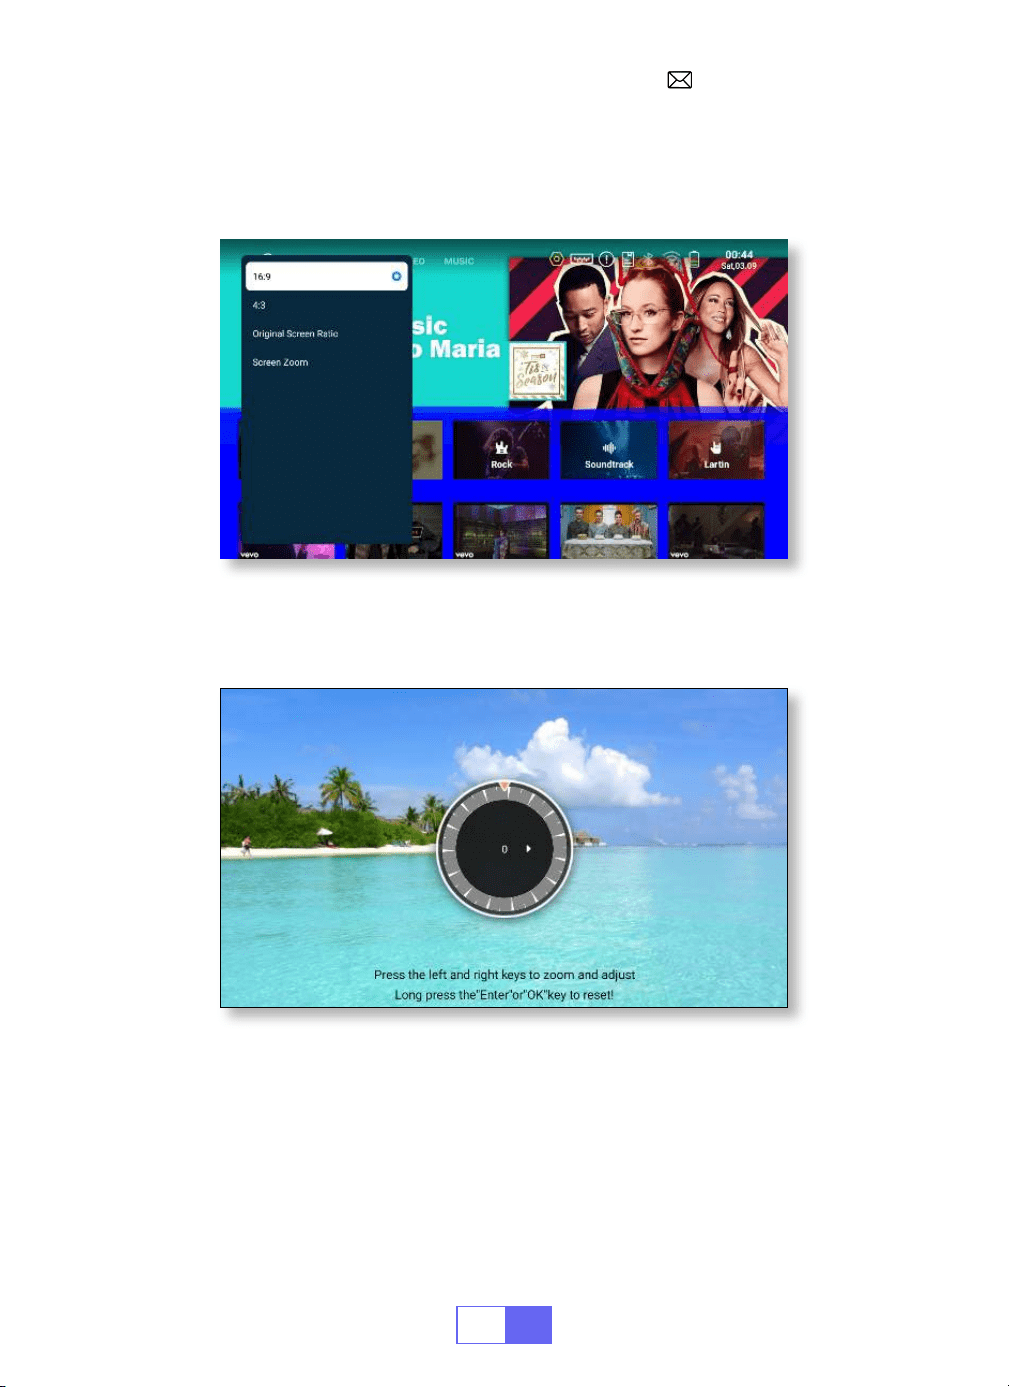
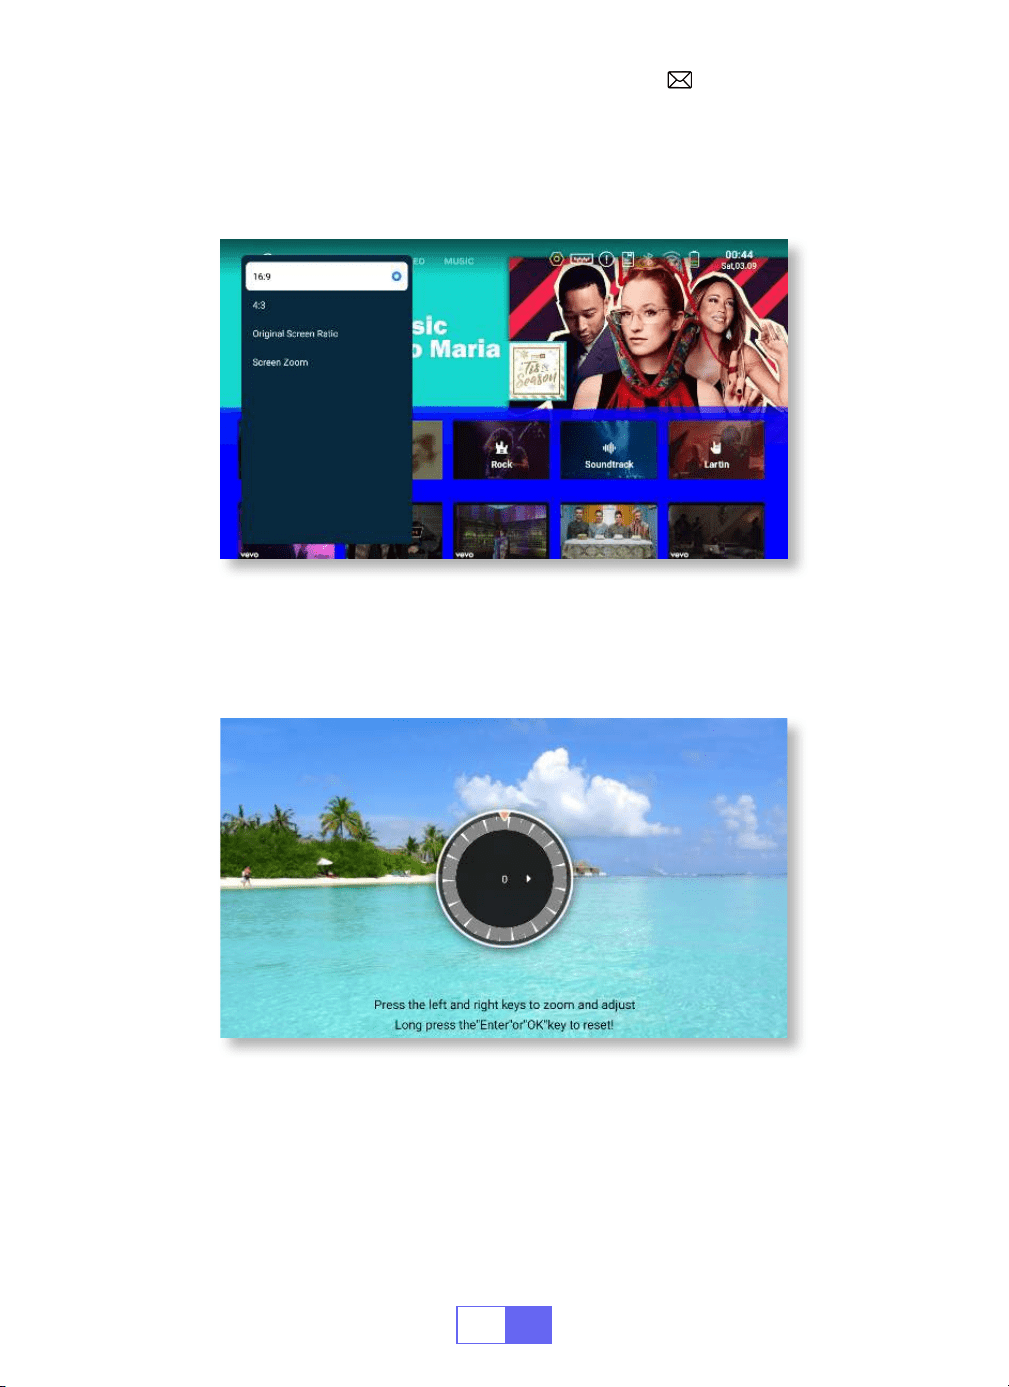
5.Zoom Mode
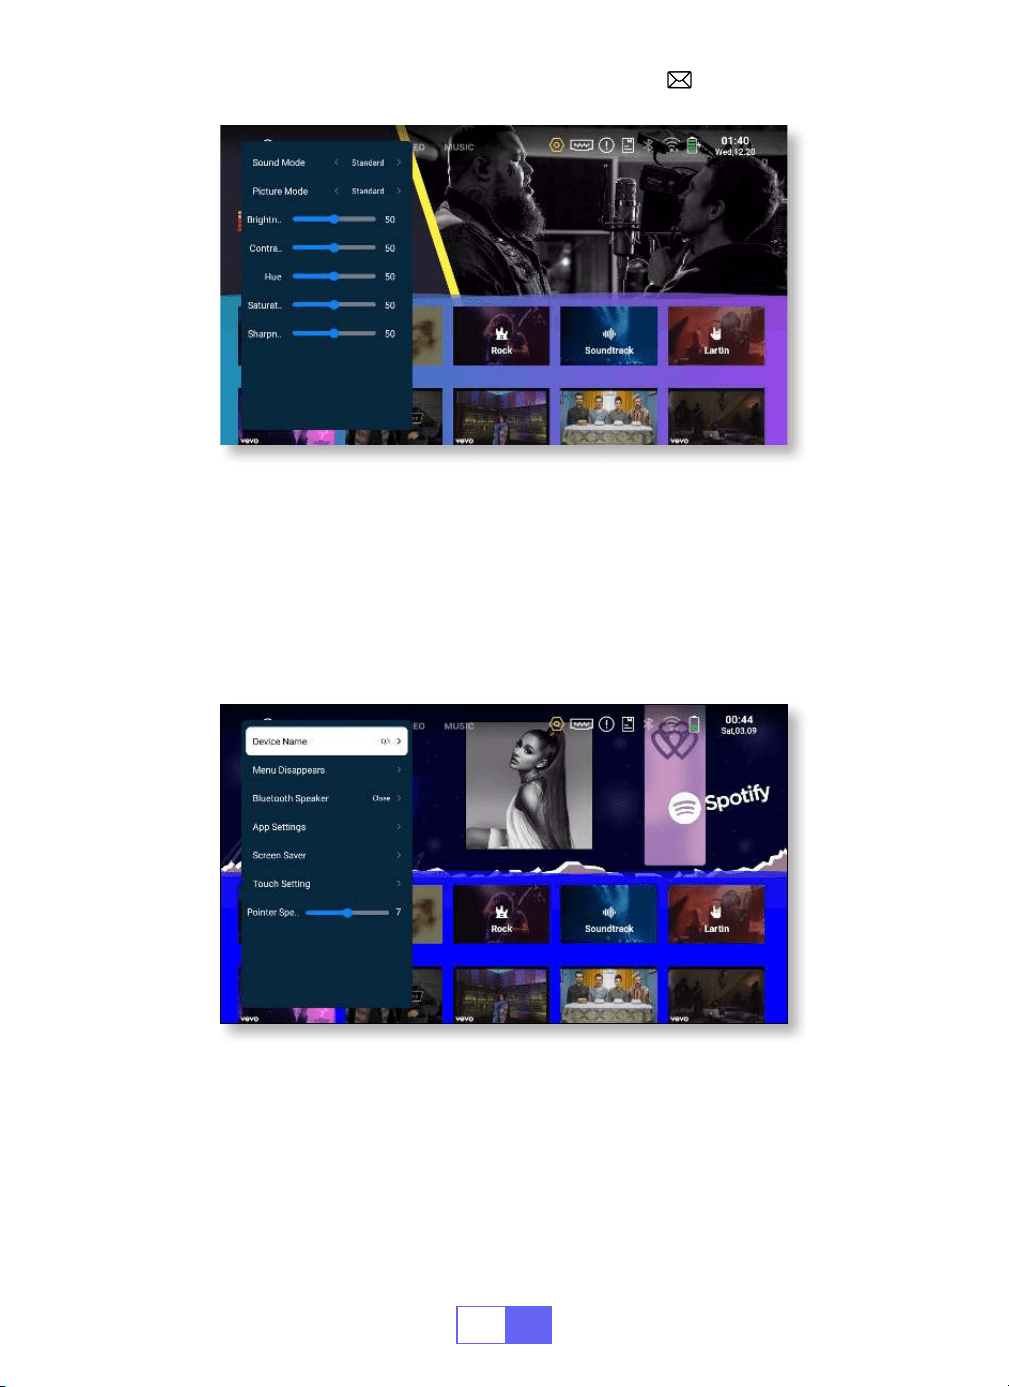
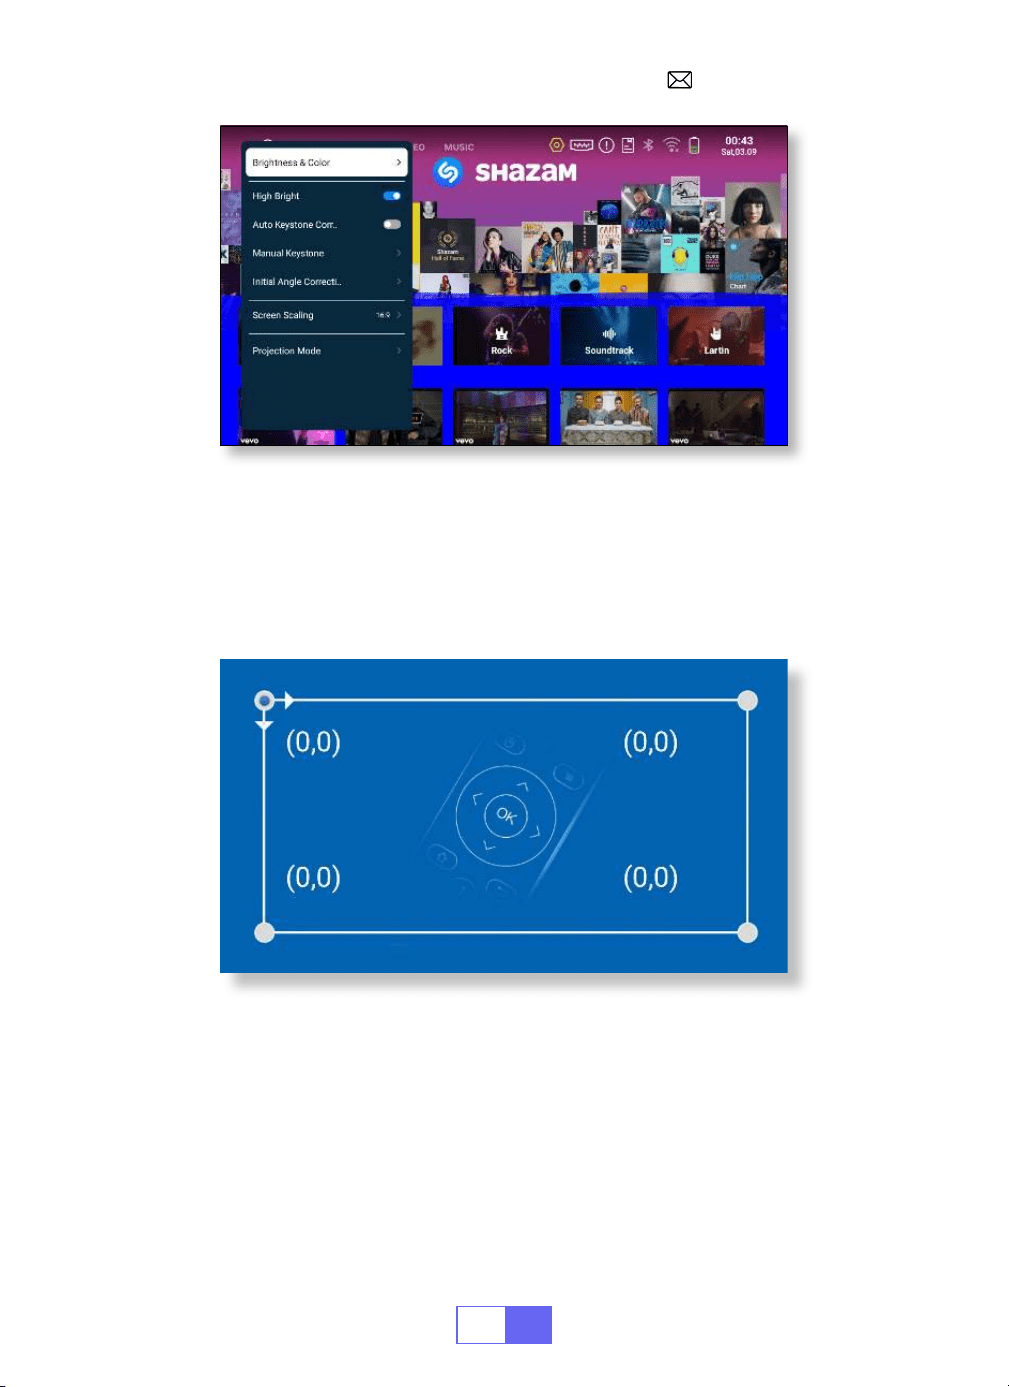
6.Brightness & Color Adjustment
There are 2 modes of Aspect Ratio: 16:9 or 4:3.
Select [Settings] menu Select [Display] Select [Screen Scaling]
Select [Screen Zoom], the projection screen can be zoomed 50%~100%,
Press the button "
◀
" or "
▶
" to set the value needed.
Select [Settings] menu Select [ Display] Select [Brightness &
Colour], select the options you want to adjust.
EN
10
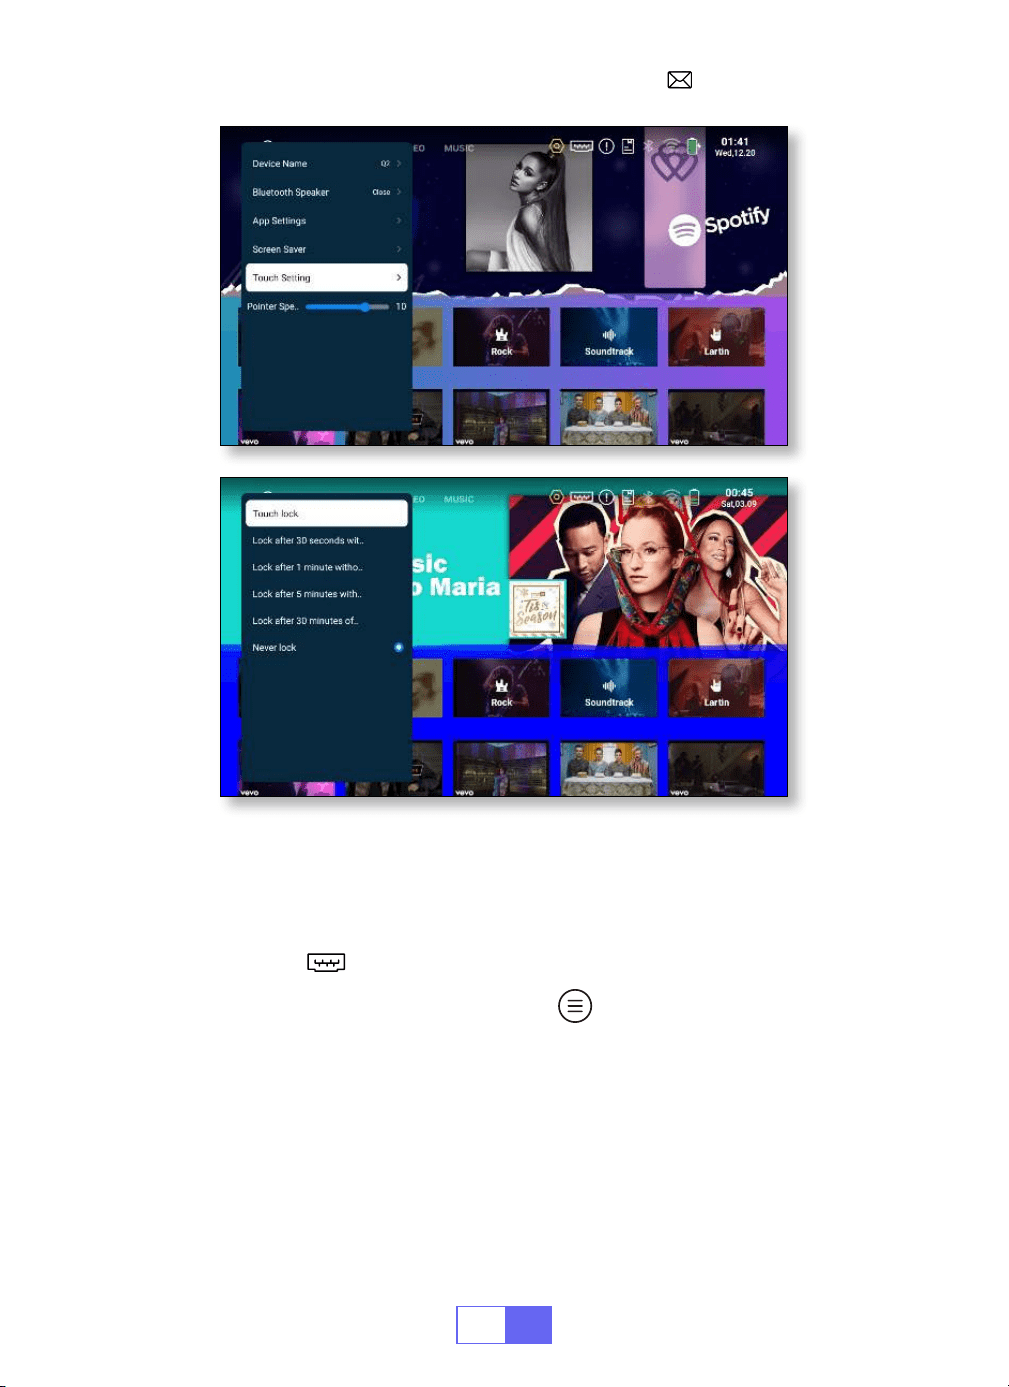
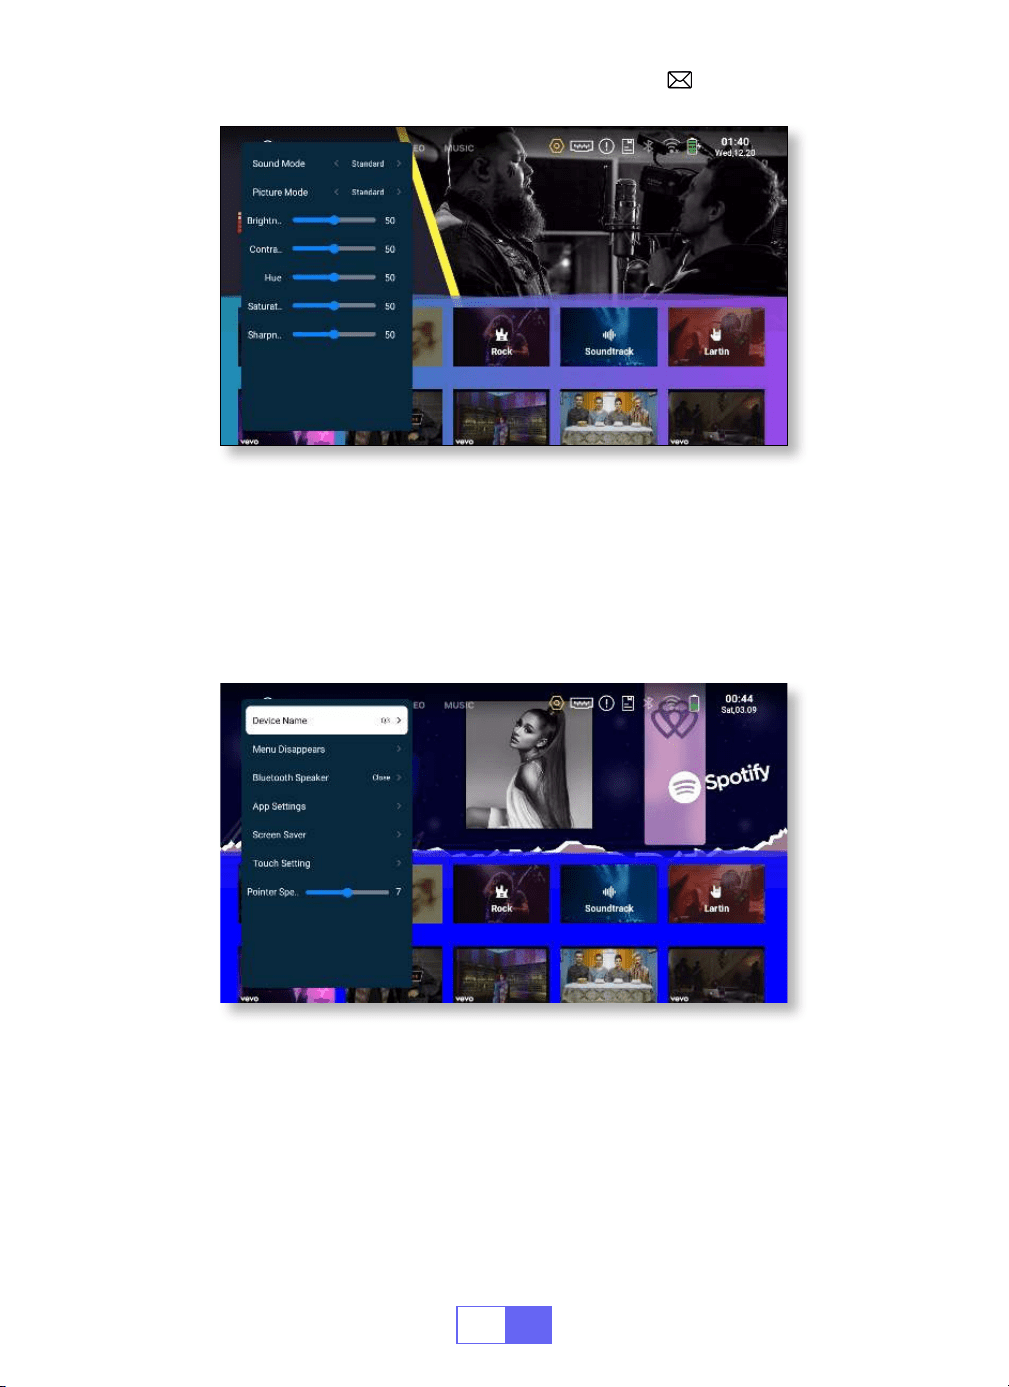
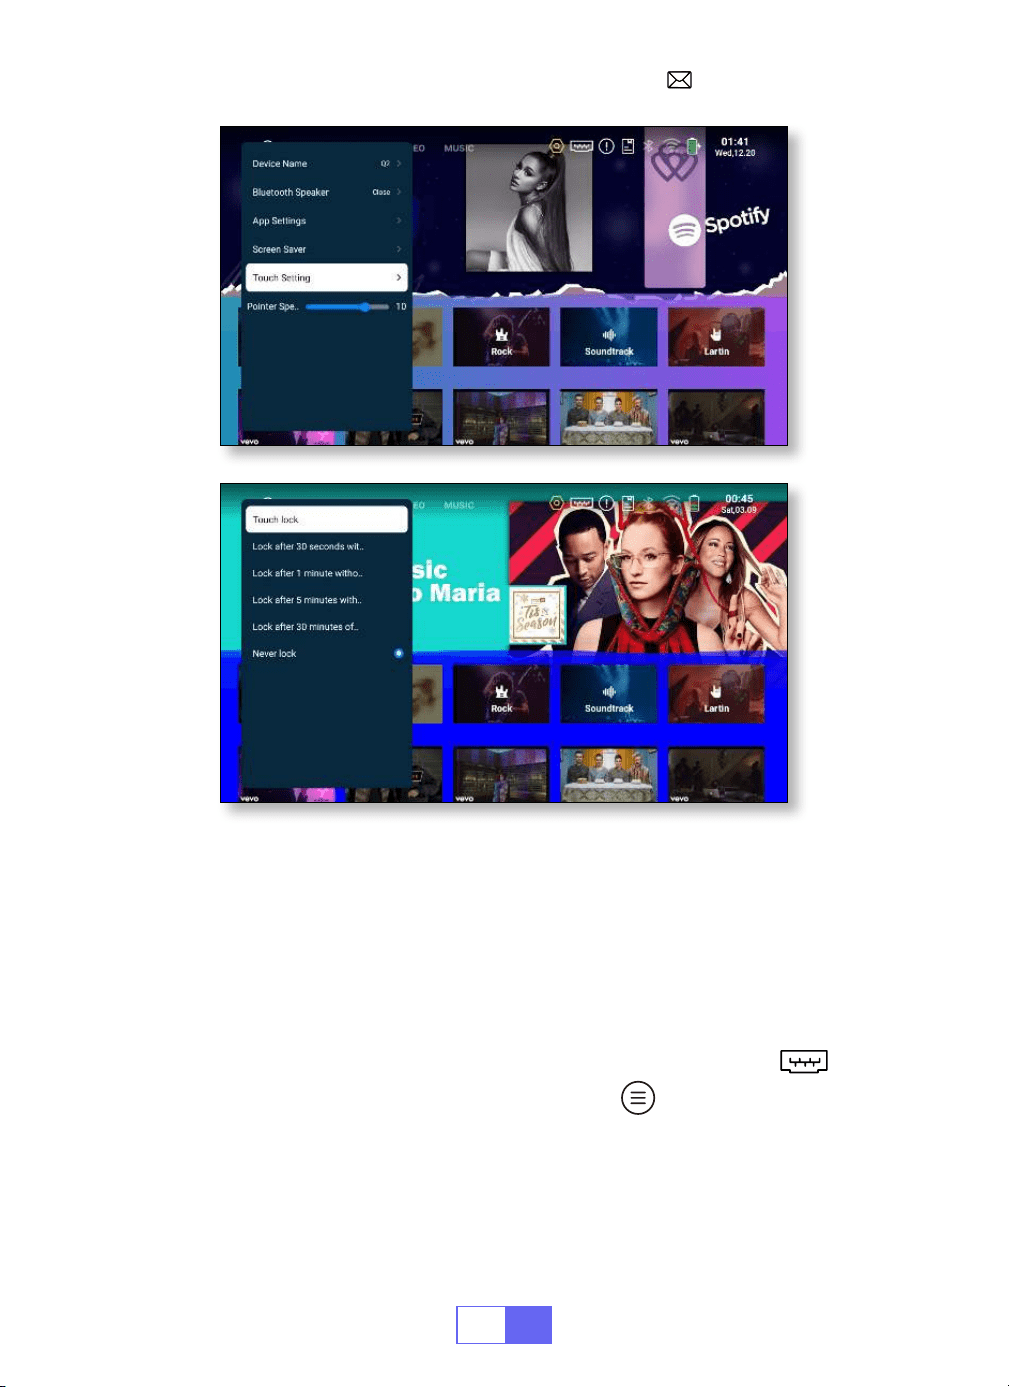
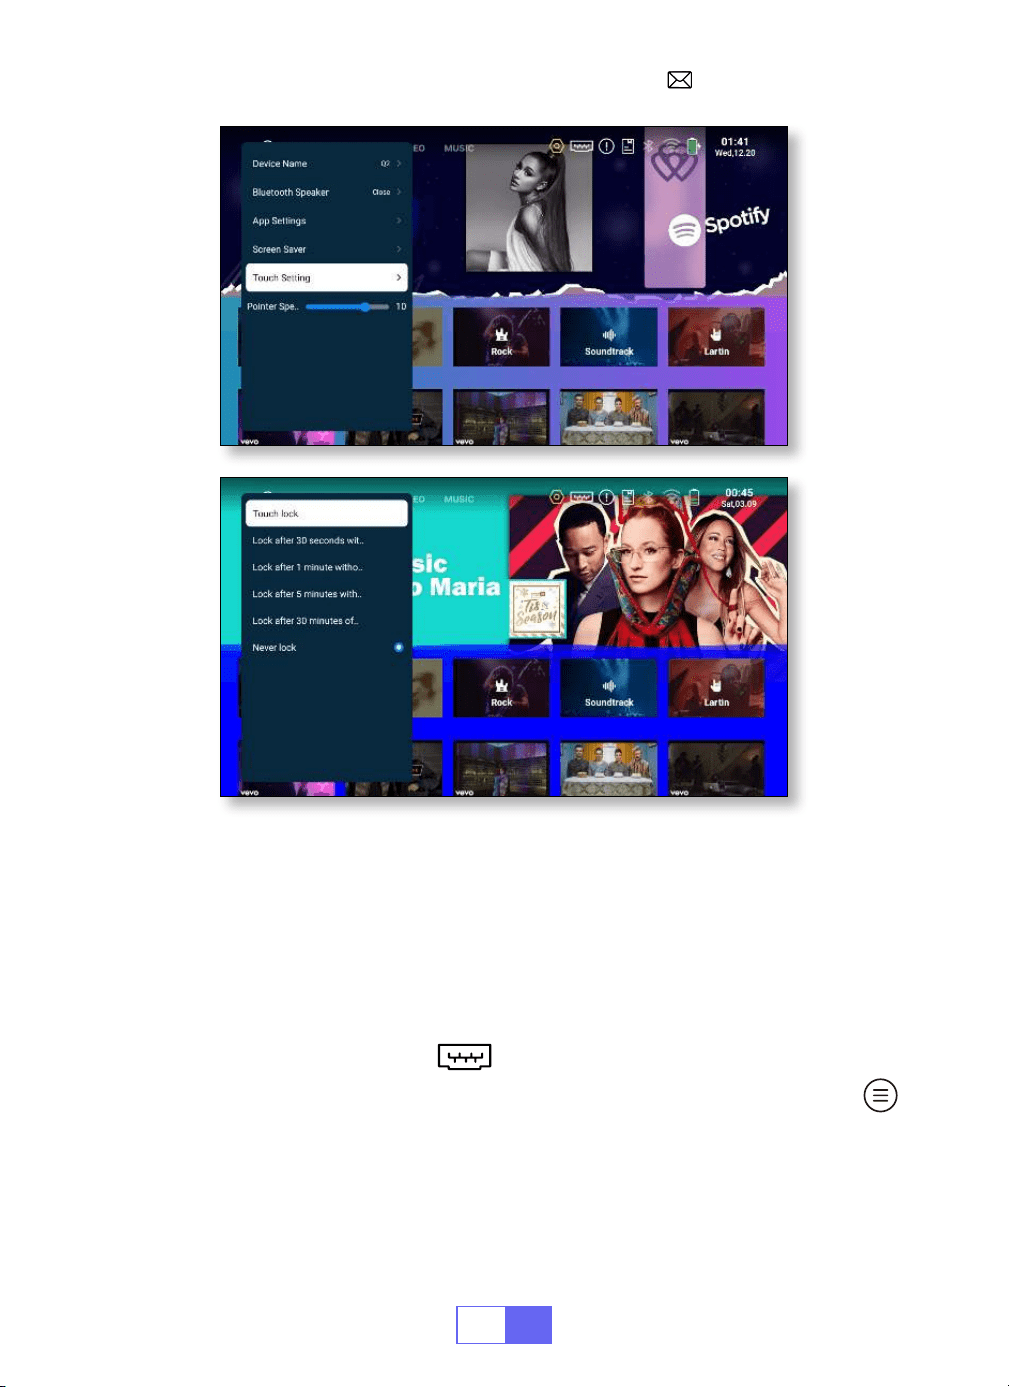
7.Other Setting
Pointer Speed
Prevention of Accidental Contact
Select [Settings] menu Select [General] Select [Pointer Speed],
press"
◀
" or "
▶
" to adjust the mouse pointer move speed you need.
Select [Settings] menu Select [General] Select [Touch Setting], to
choose the period you need, to prevent accidental operation.
EN
11
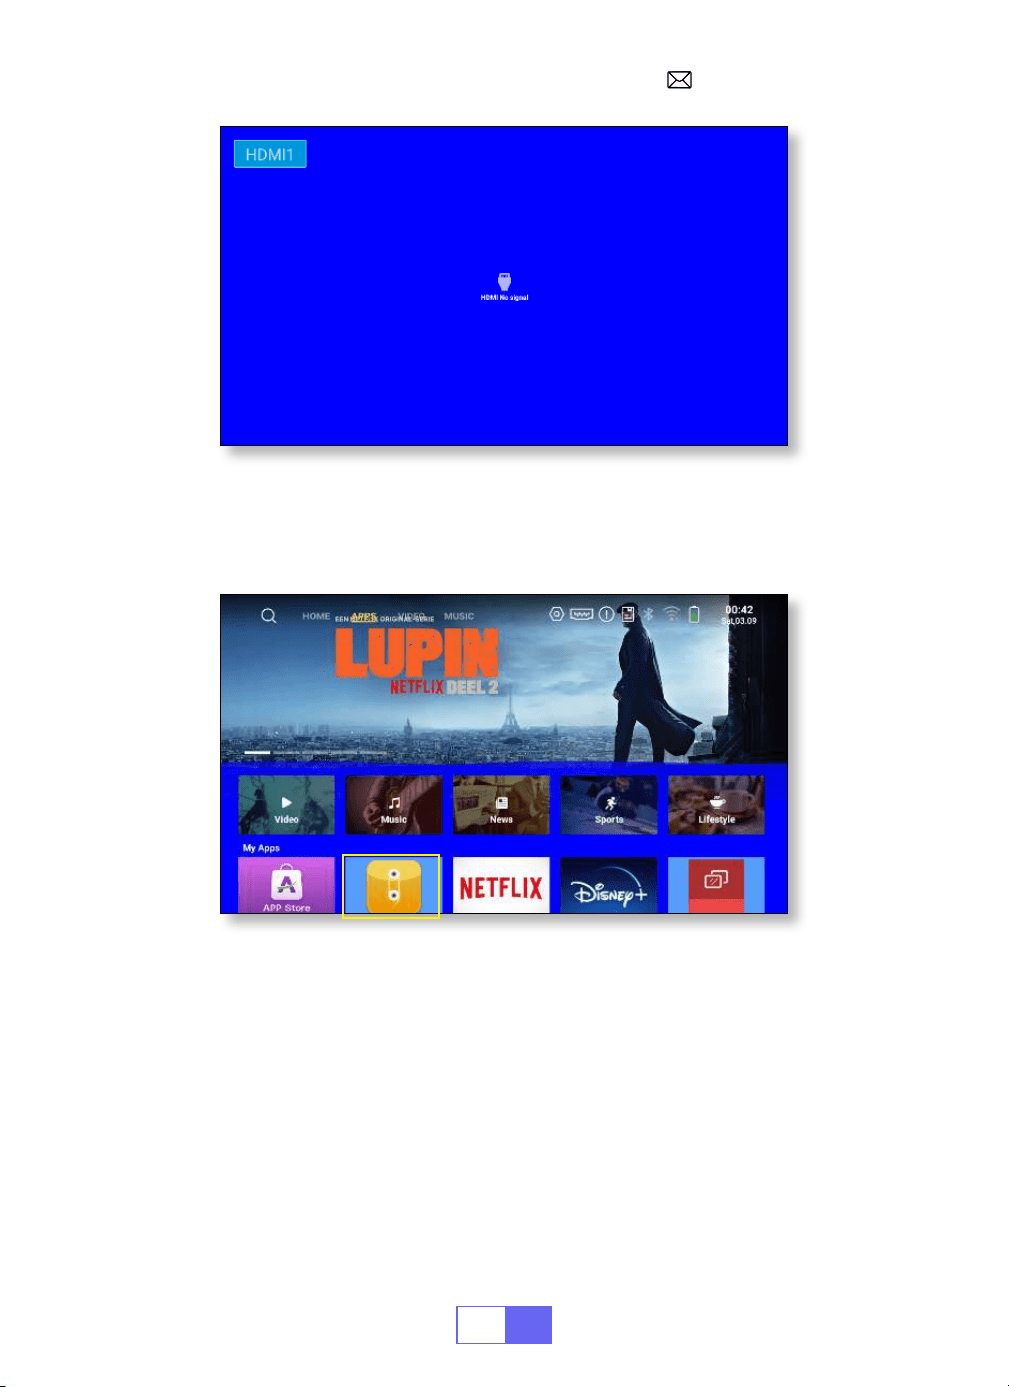
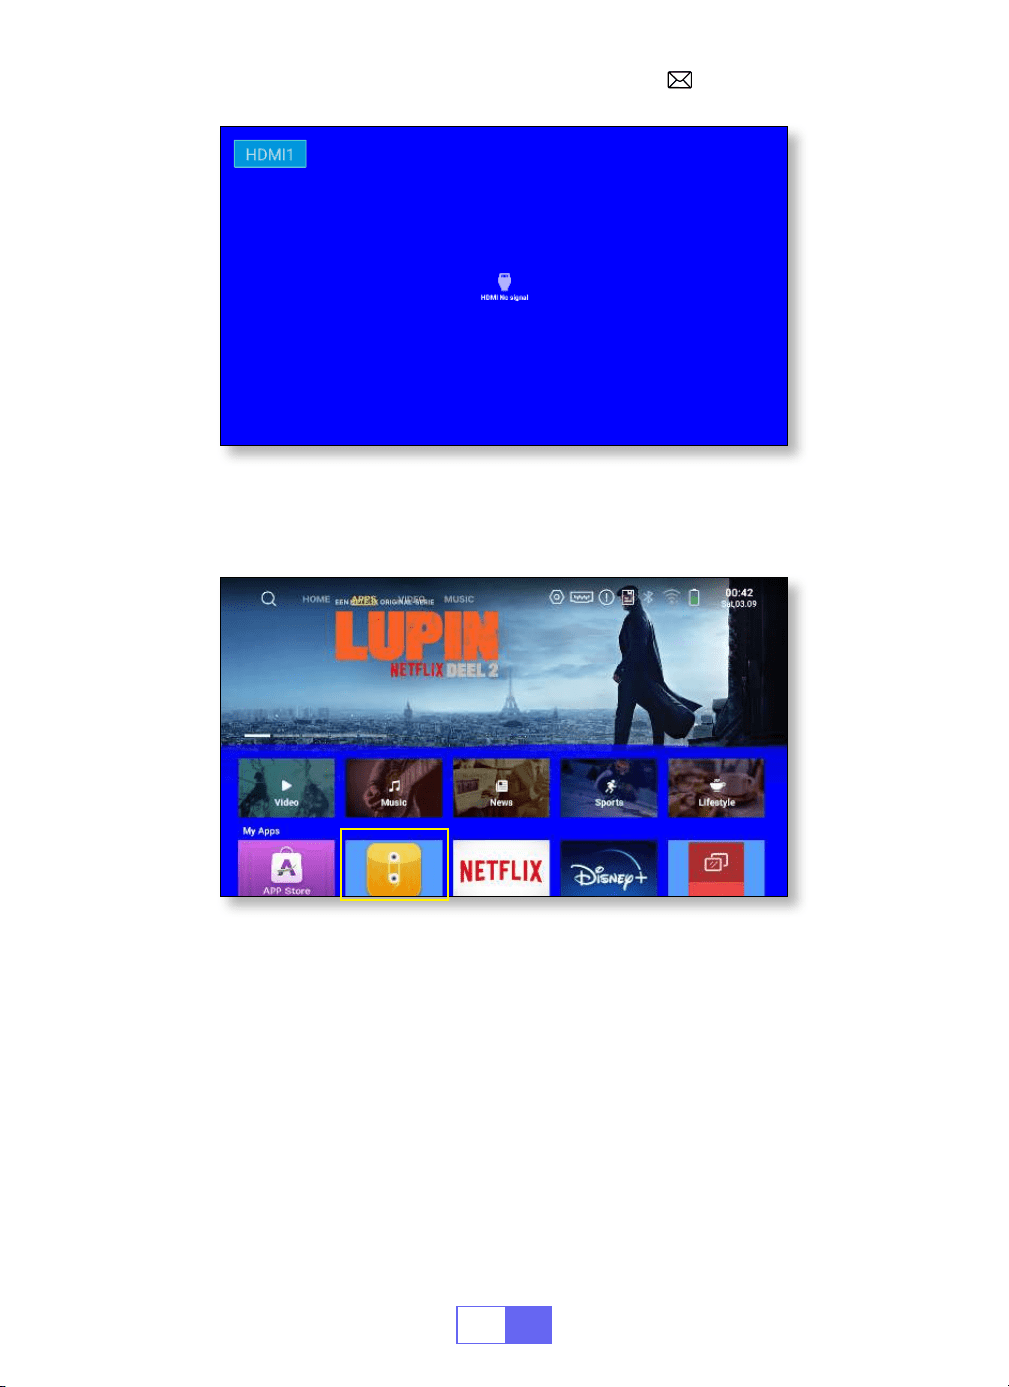
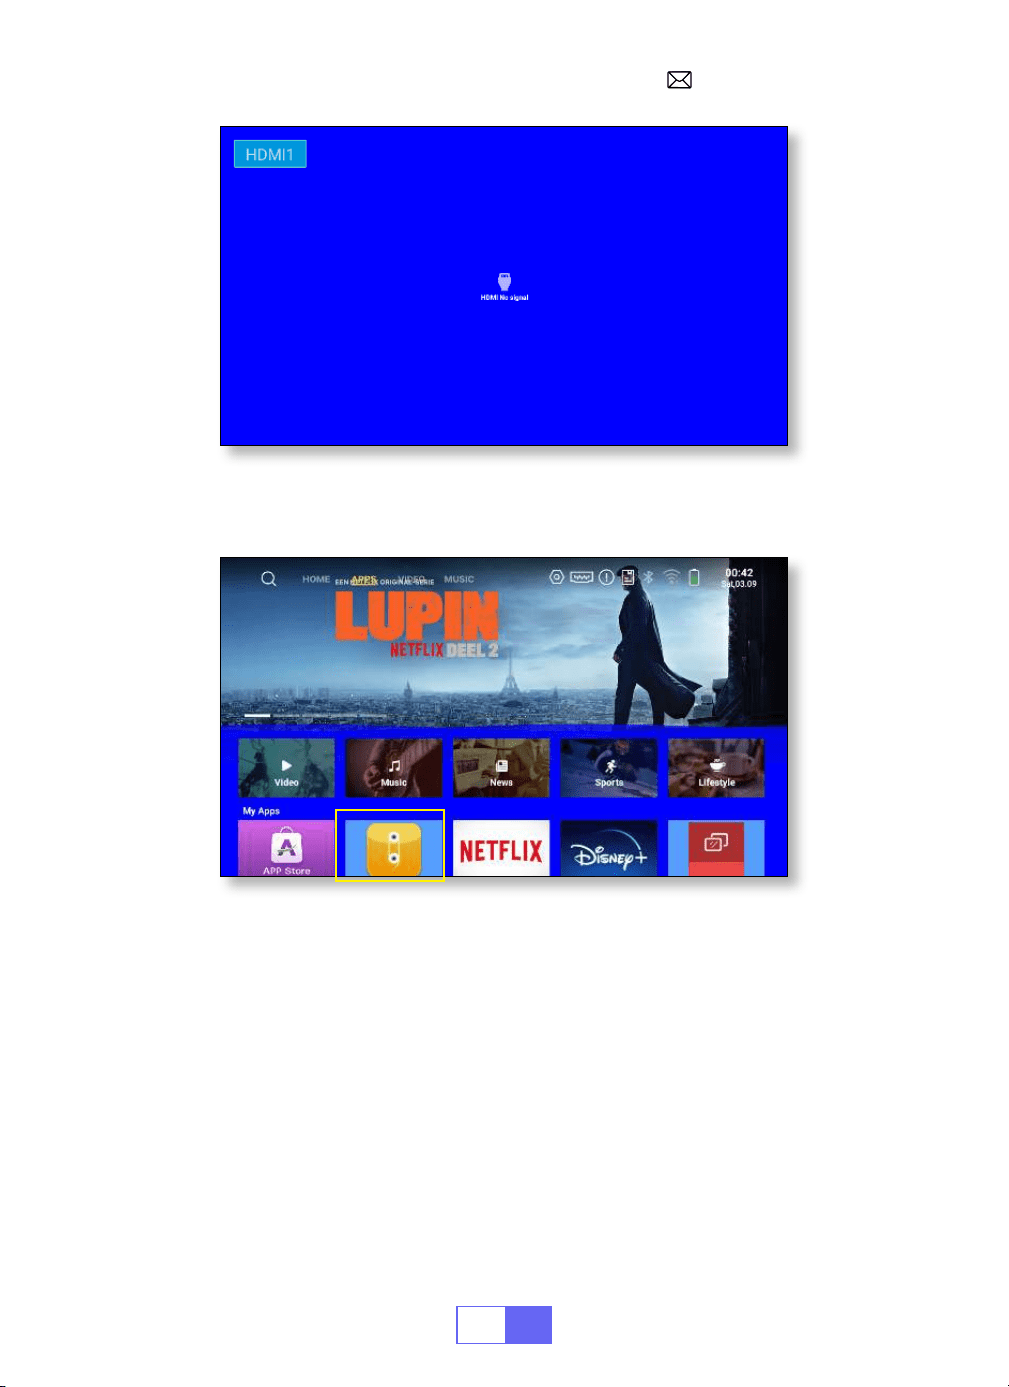
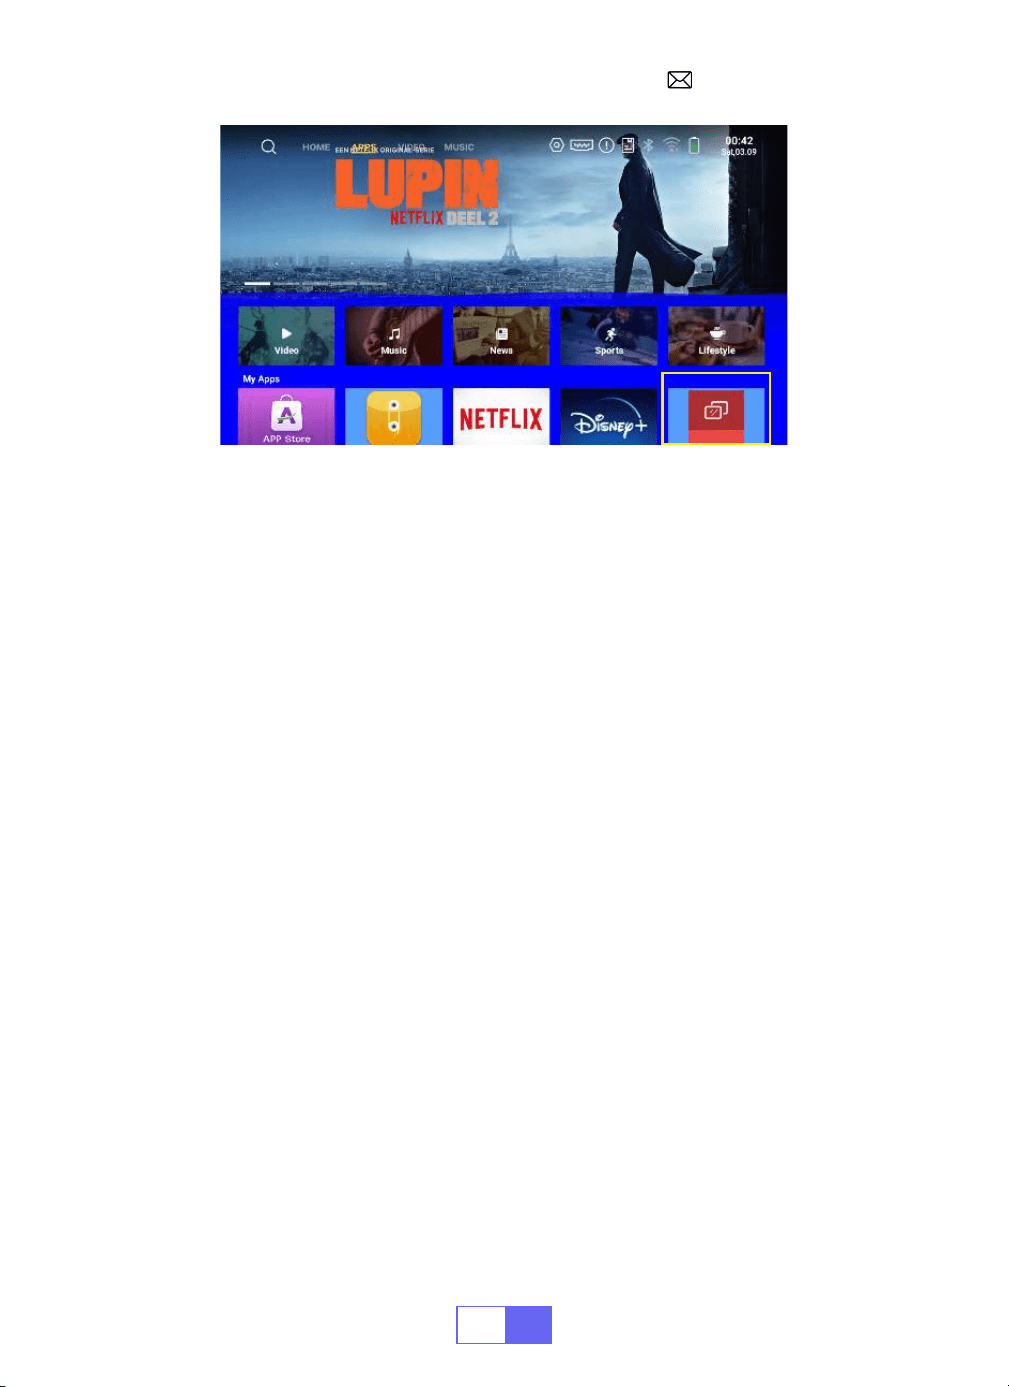
SETTING UP THE PROJECTOR
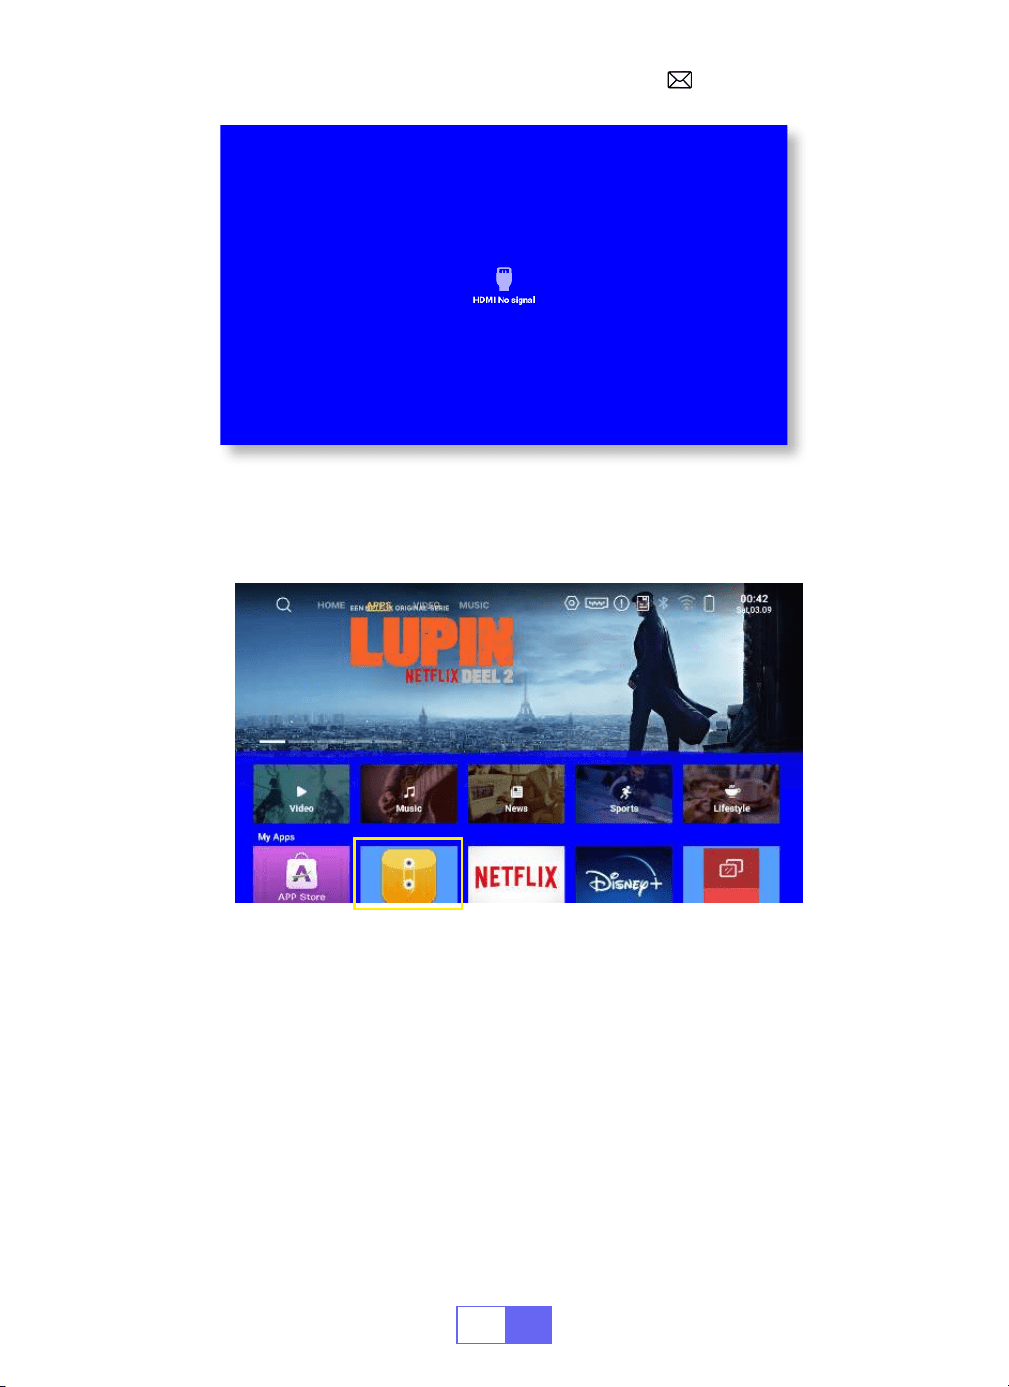
Select The Input Signal Source
HDMI: Choose the “ ” at the top of the home page.
When playing a video, you can press the " " button, to set the sound
and mode of playback.
EN
12
USB:
The device will detect the USB stick automatically. Click "APPS" on the
homepage and select "File Maneger" on the page.
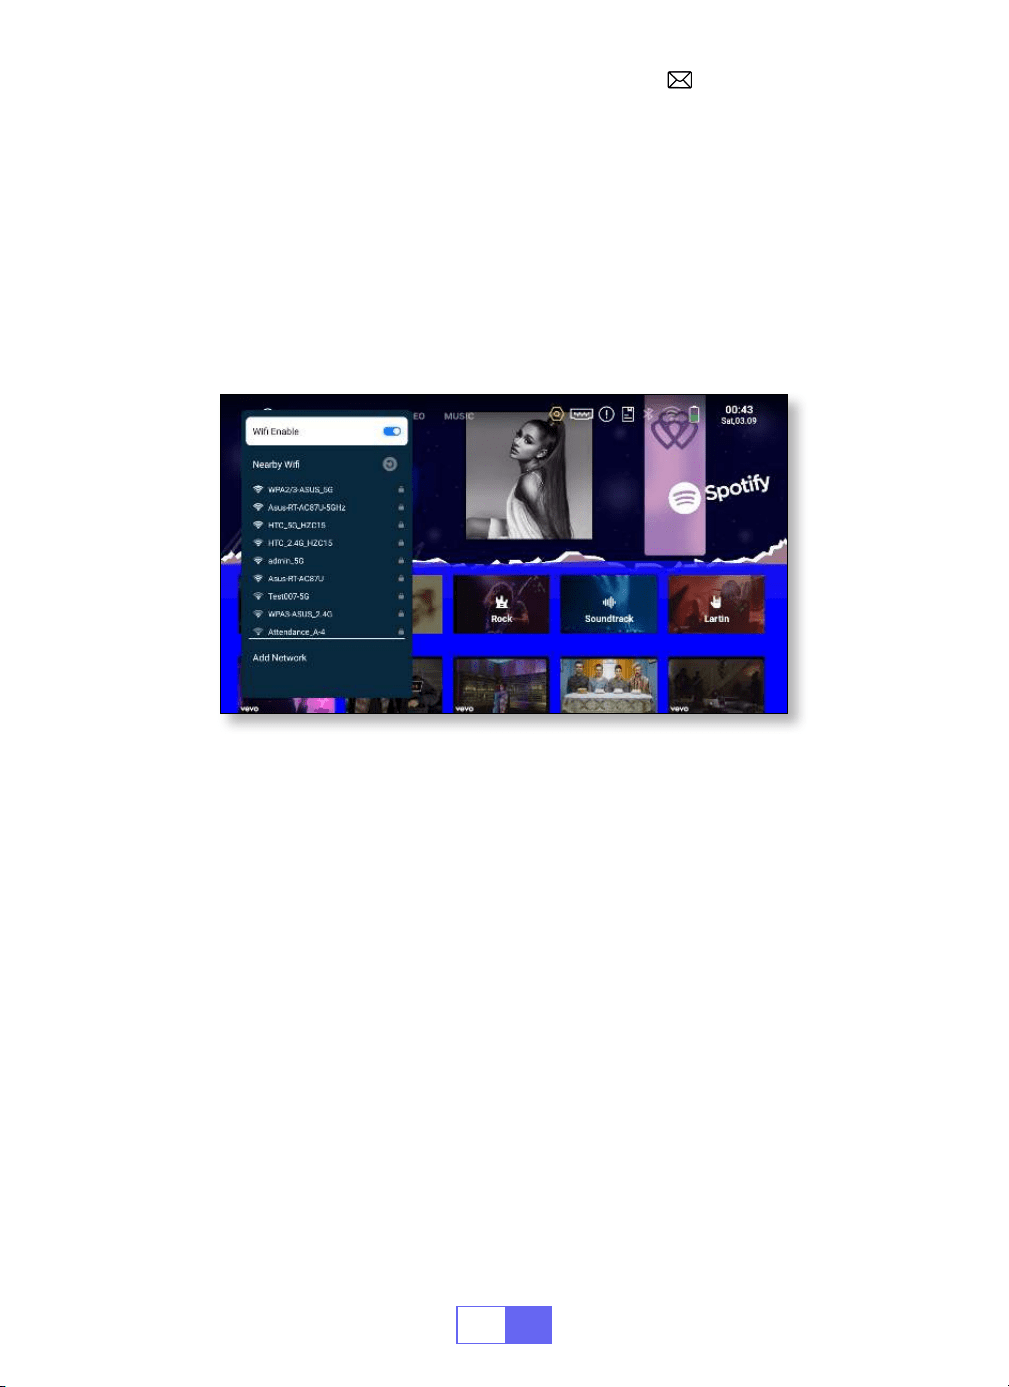
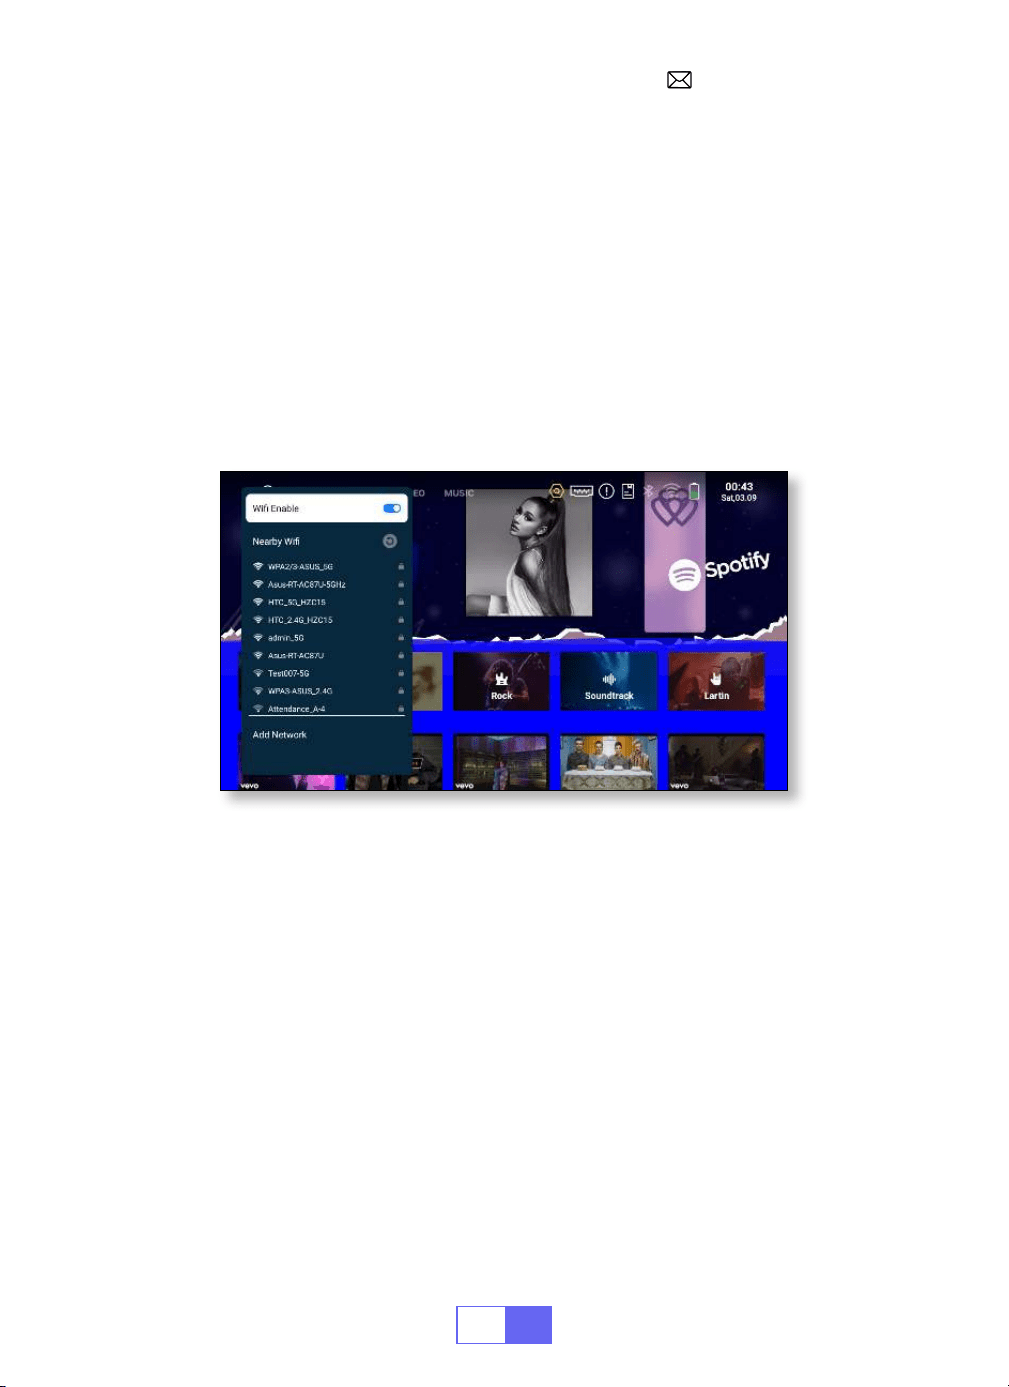
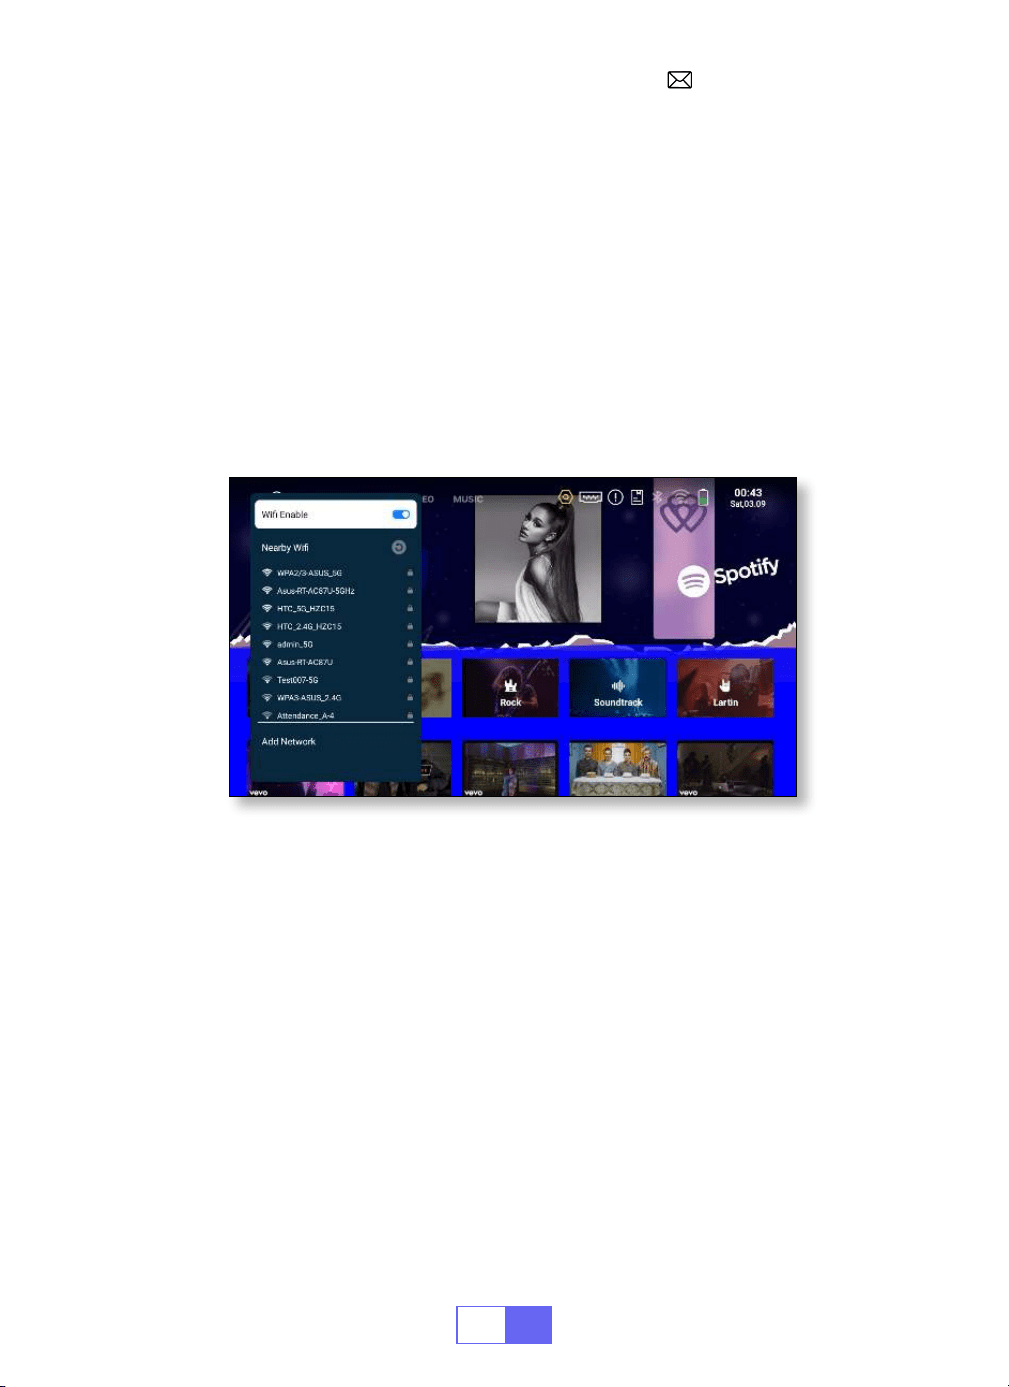
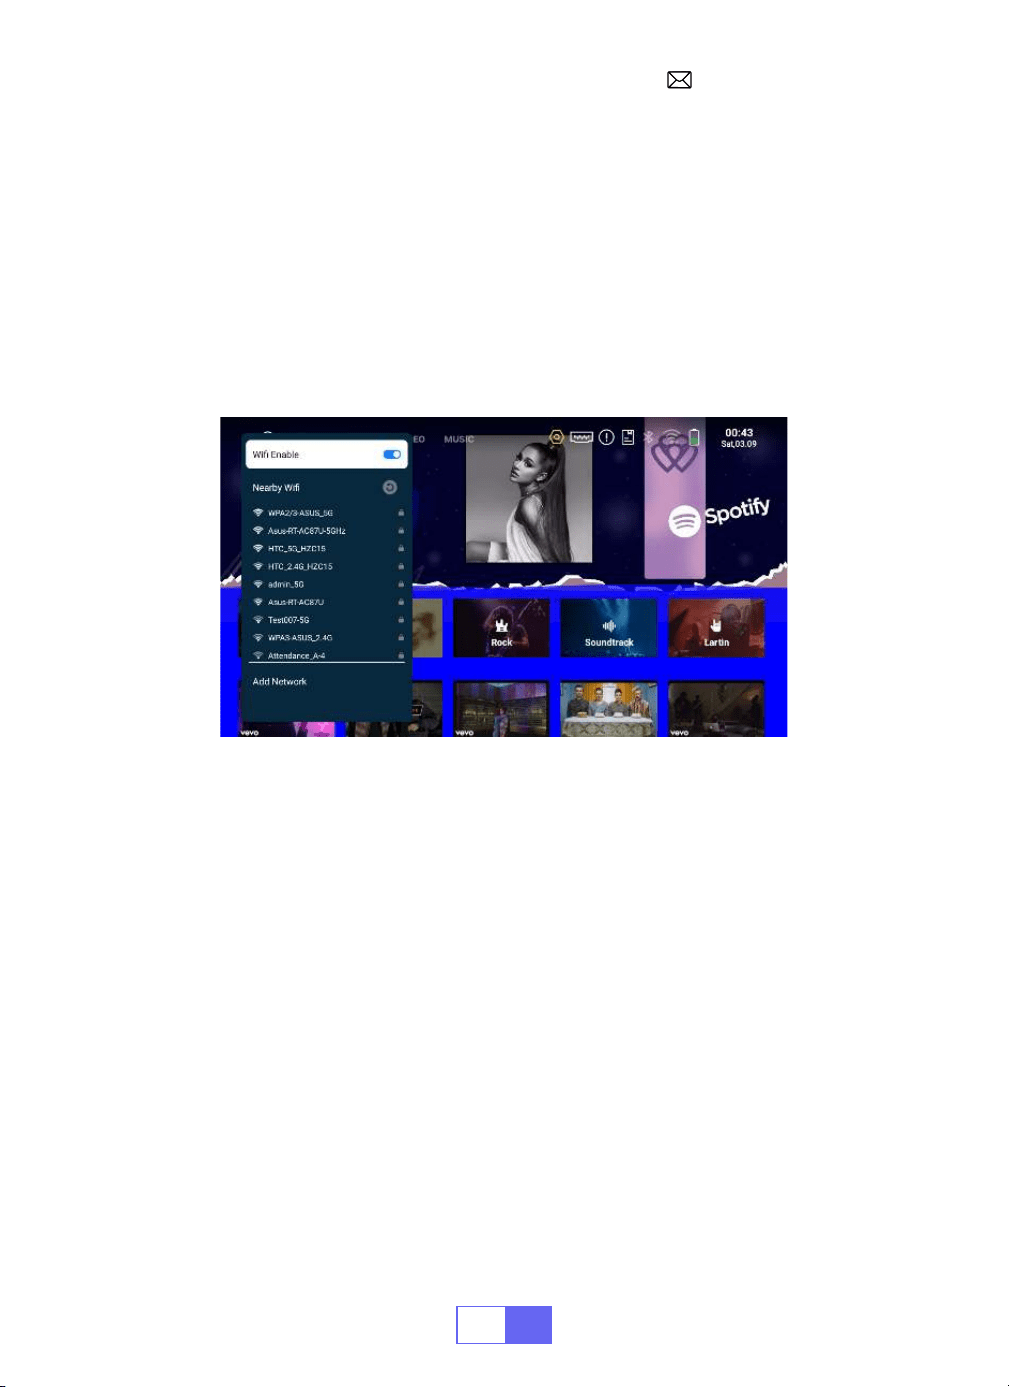
WIRELESS CONNECTION
1.For IOS System (Airplay)
Attention:
Your device and the projector should be in the same Home
WiFi.
1.Turn on the Network setting of the projector.
2.Choose your Home WiFi to connect and enter the right password, then
click “OK”, please wait 3 seconds to establish the connection.
EN
13
2.For Android System(Miracast)
Attention:
Your device and the projector should be in the same Home
WiFi.
1. Turn on the Network setting of the projector.
2. Choose your Home WiFi to connect and enter the right password, then
click “OK”, please wait 3 seconds to establish the connection.
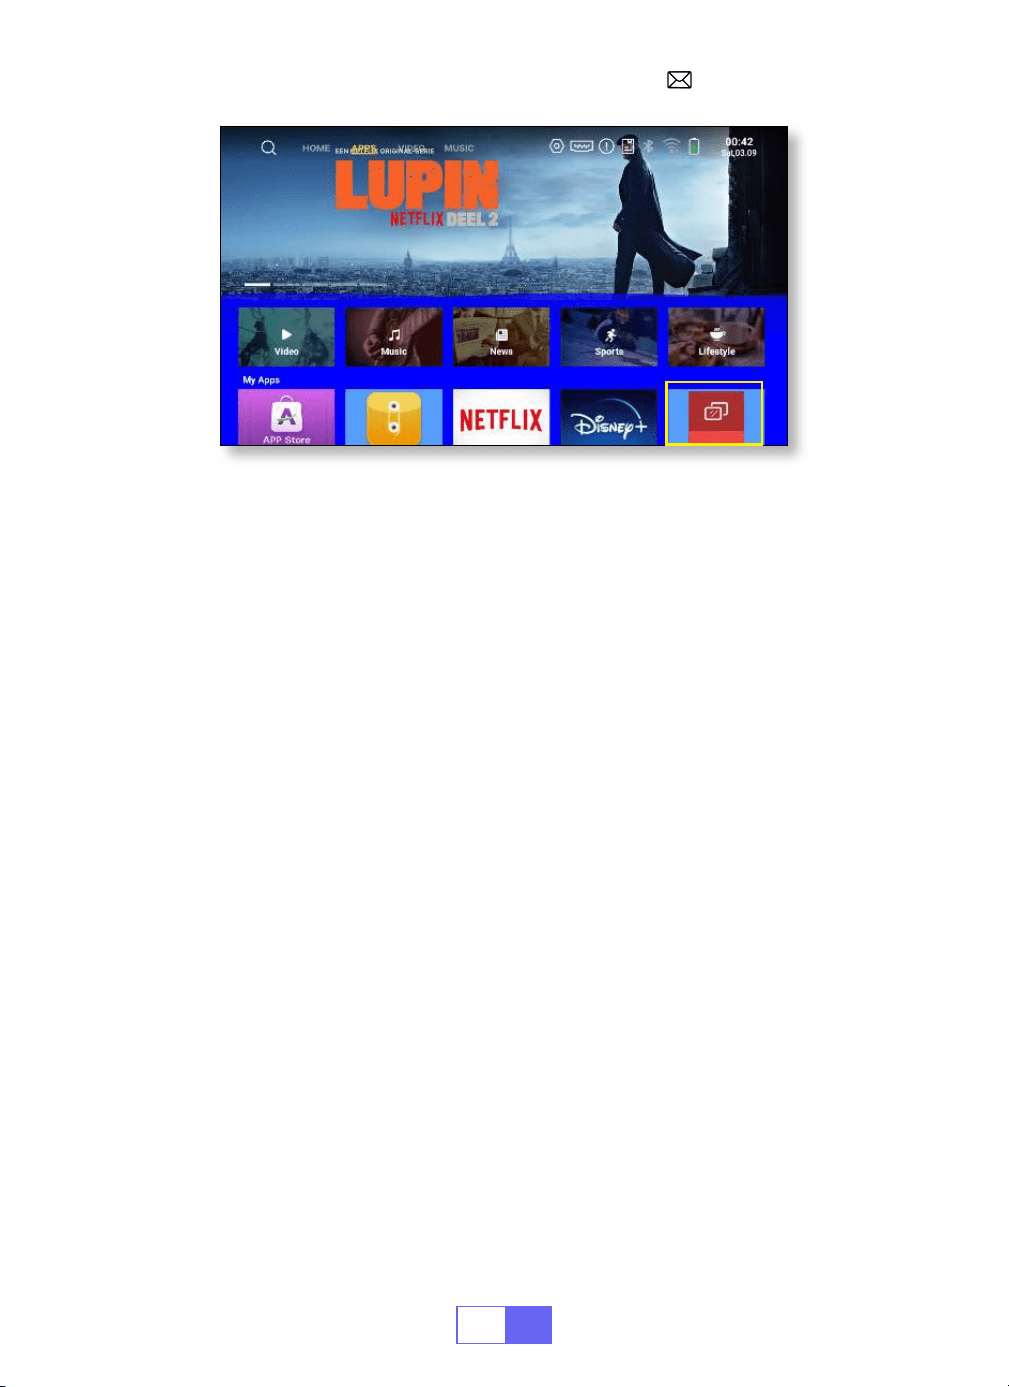
4. Click "APPS" on the homepage and select "Miracast Receiver" on the
page (or press the "E share" button on the remote control and select
"Android Wireless").
5. Turn on the WiFi setting of your mobile device, then connect to the
same Home WiFi.
6. Turn on the wireless screen mirroring function of your Android phone
and select “Q3 7817” from the search results to connect.
7. Succeed.
3 seconds to establish the connection. Once connected, it will remember
the password of the connected WiFi.
4. Turn on the Wi setting of your mobile device, then connect to the same
Home Wi.
5. Then click"Airplay" or"Miracast" on the smartphone.
6. Select"Q3 7817" from the search results to connect.
7. Succeed.
EN
14
3.Eshare
Use your phone as the wireless mouse, keyboard, and remote control, and
transform the way you control and engage with large screen devices.
1. Connect your device to Home WiFi.
2. Use a browser to access "https://h.eshare.app" to download and install
the app.
3.Open the Eshare app and click"Q3 7817" to connect.
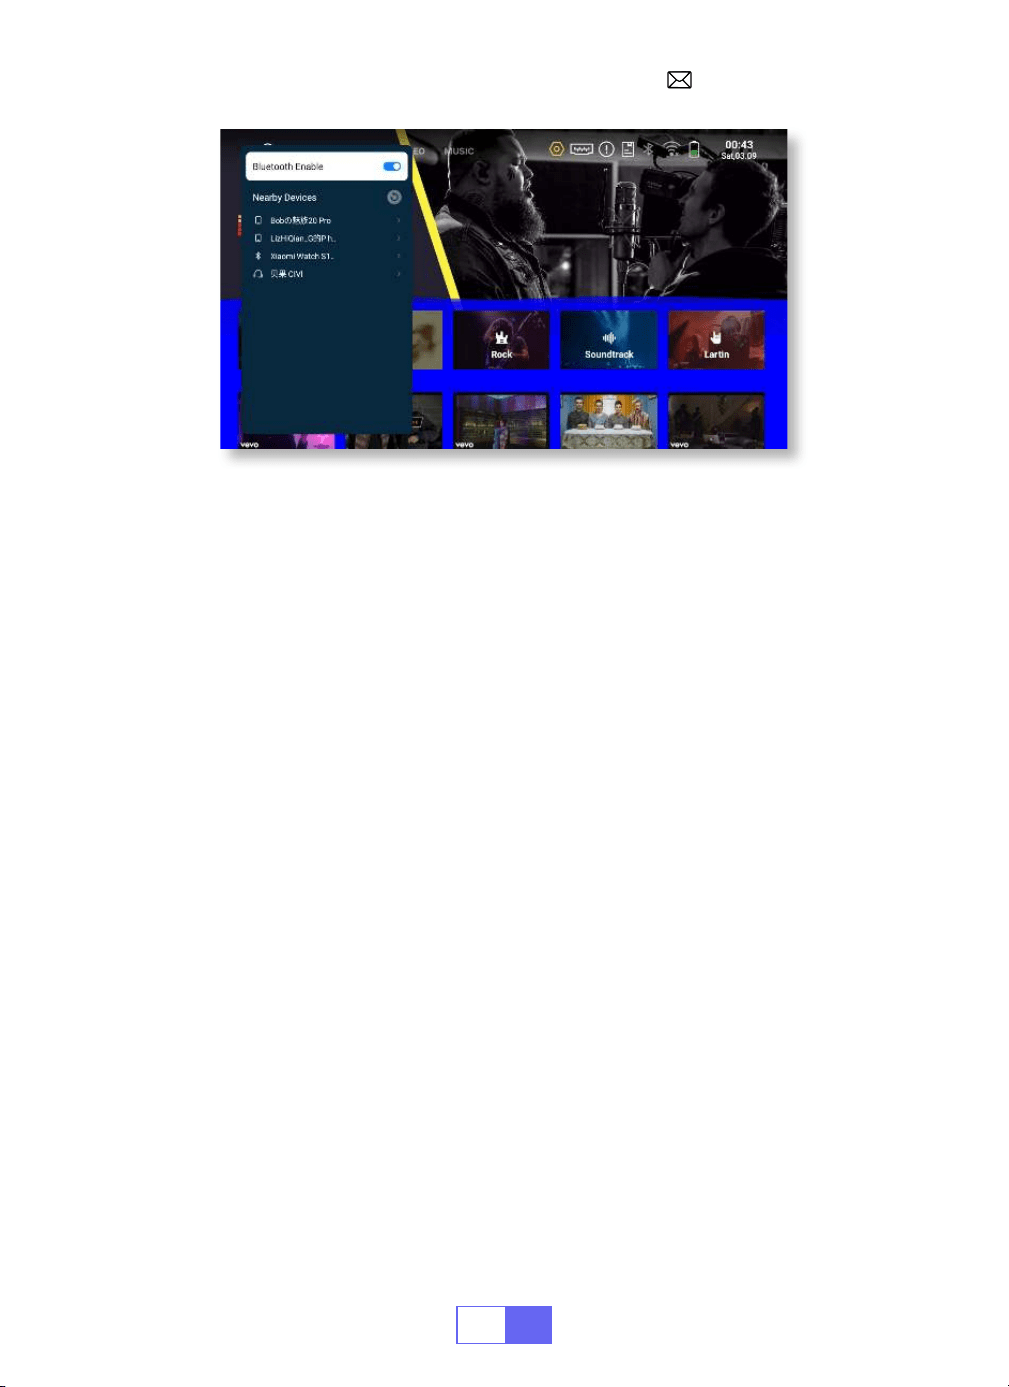
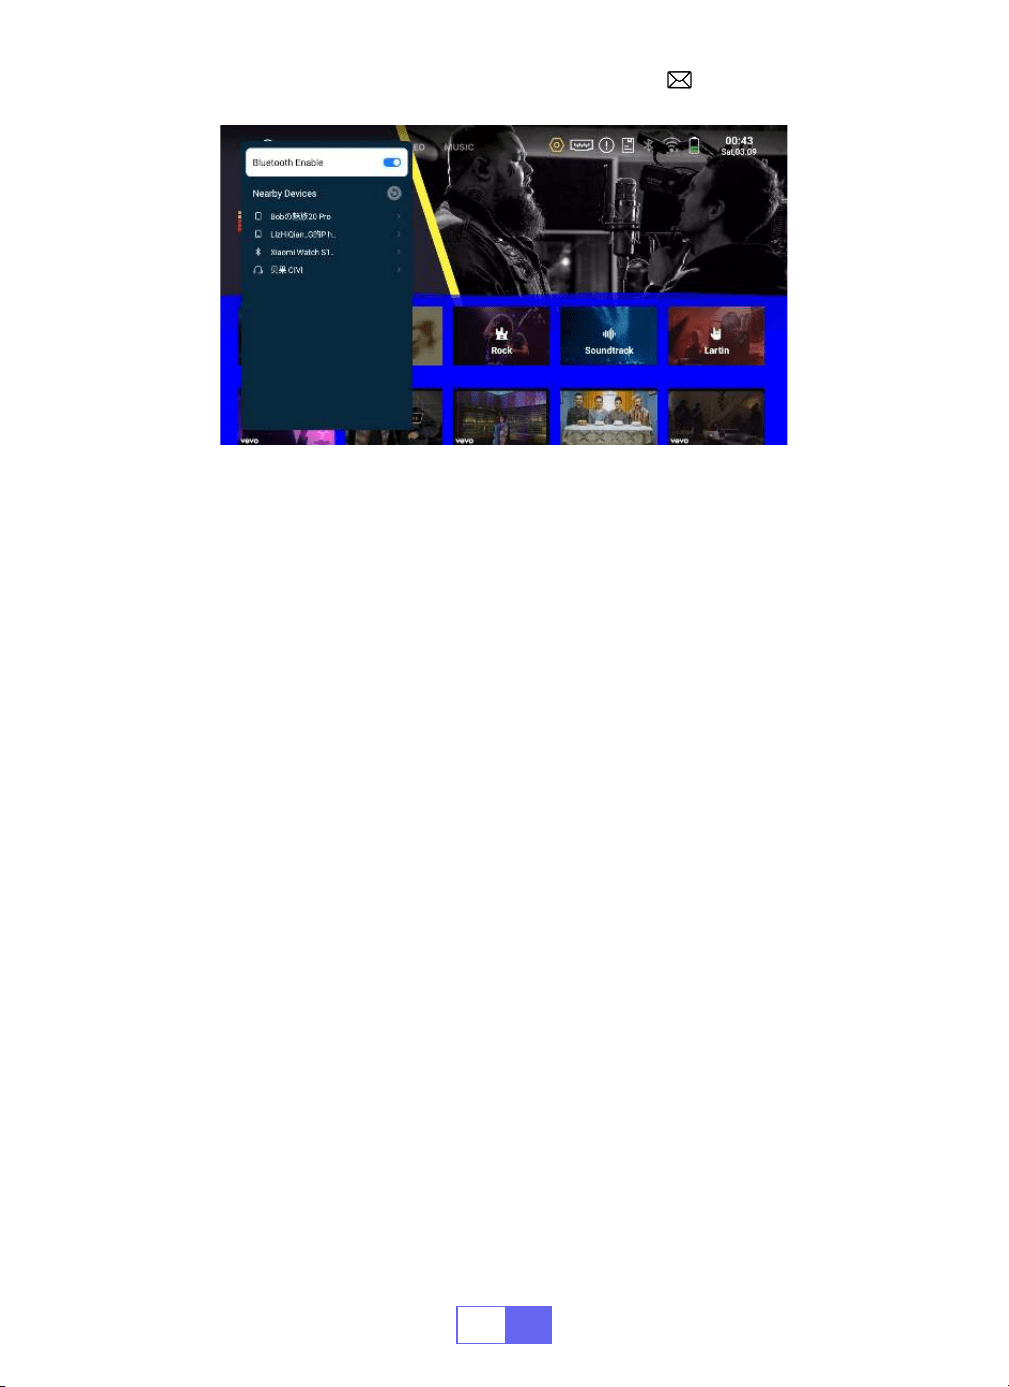
BLUETOOTH SETTINGS
Connect Bluetooth Speakers
1.Turn on your Bluetooth Speaker.
2.Select [Settings] [Bluetooth ] to turn on the projector's Bluetooth
3.Select your Bluetooth speaker to connect.
4.Succeed.

EN
15
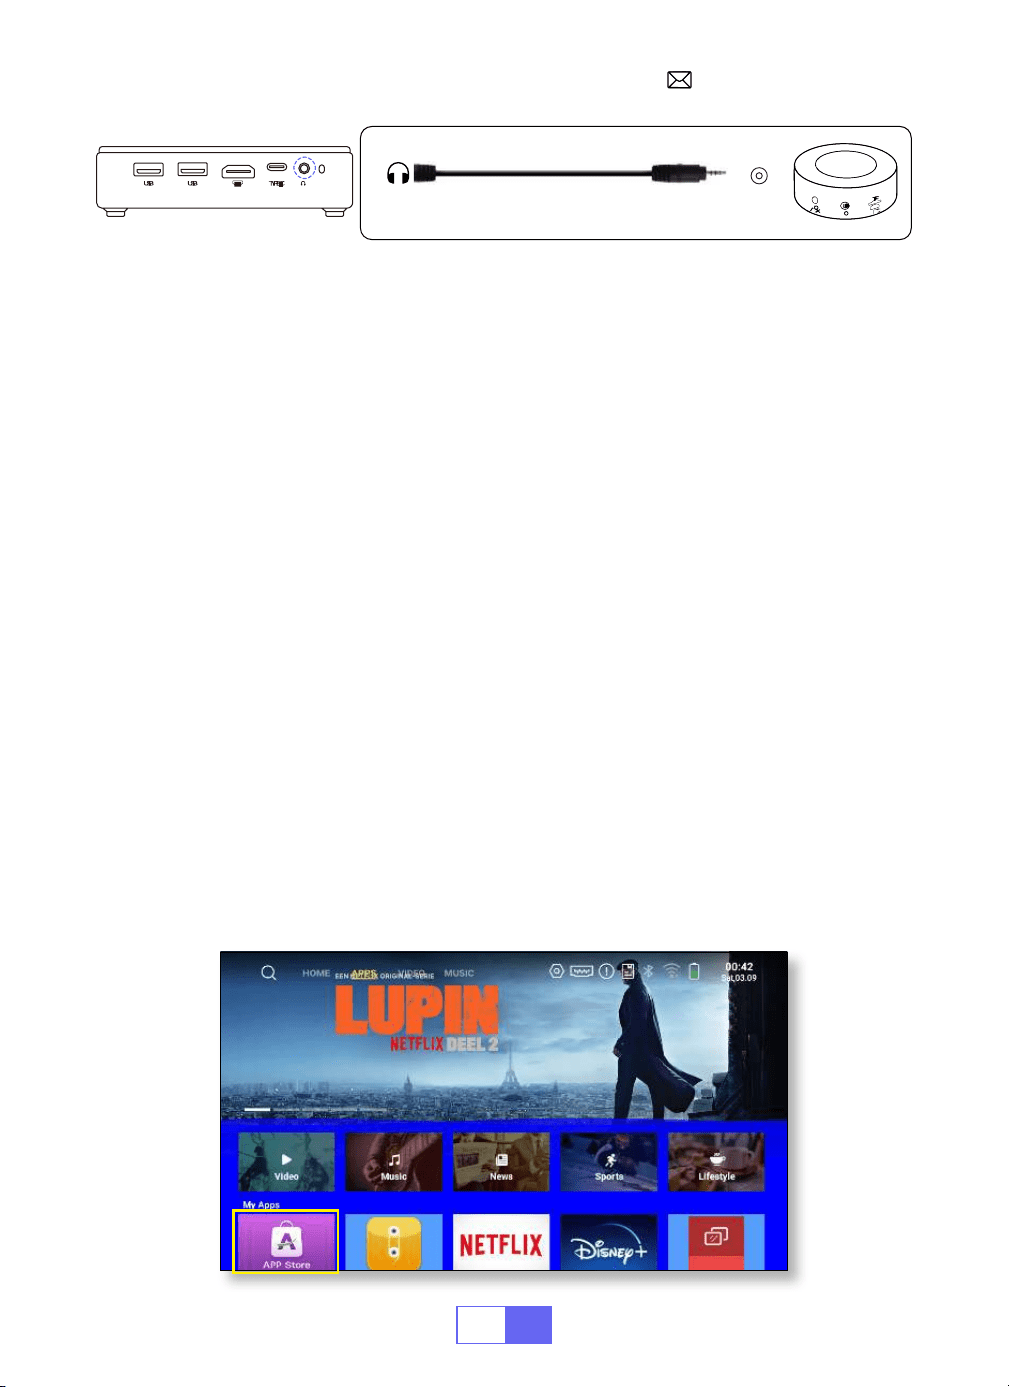
SIGNAL LINES CONNECTION
1.Connecting with Laptop
WiMiUS Q3 projector has 3 interfaces, HDMI ports/USB ports/3.5mm
headphone output. Please select the correct connecting port to connect
your device (PC, Phone, DVD Player, Soundbar, USB, PS4, etc.)
•Connect the projector with PC by HDMI cable.
•Choose the media signal channel :“HDMI”.
2.Connecting with MacBook or Mac Book Air
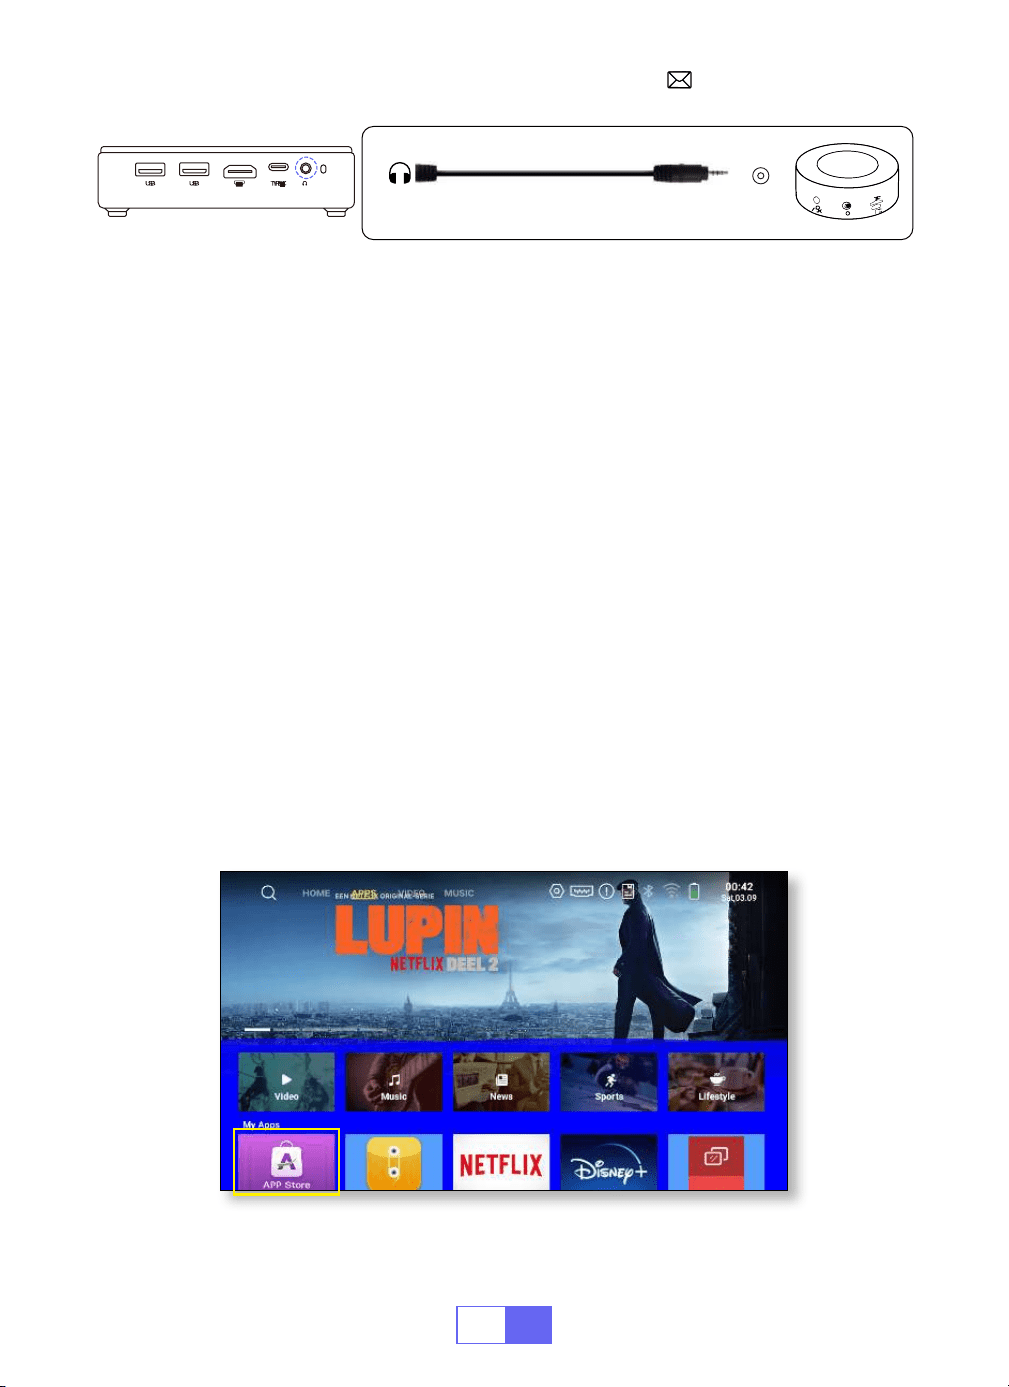
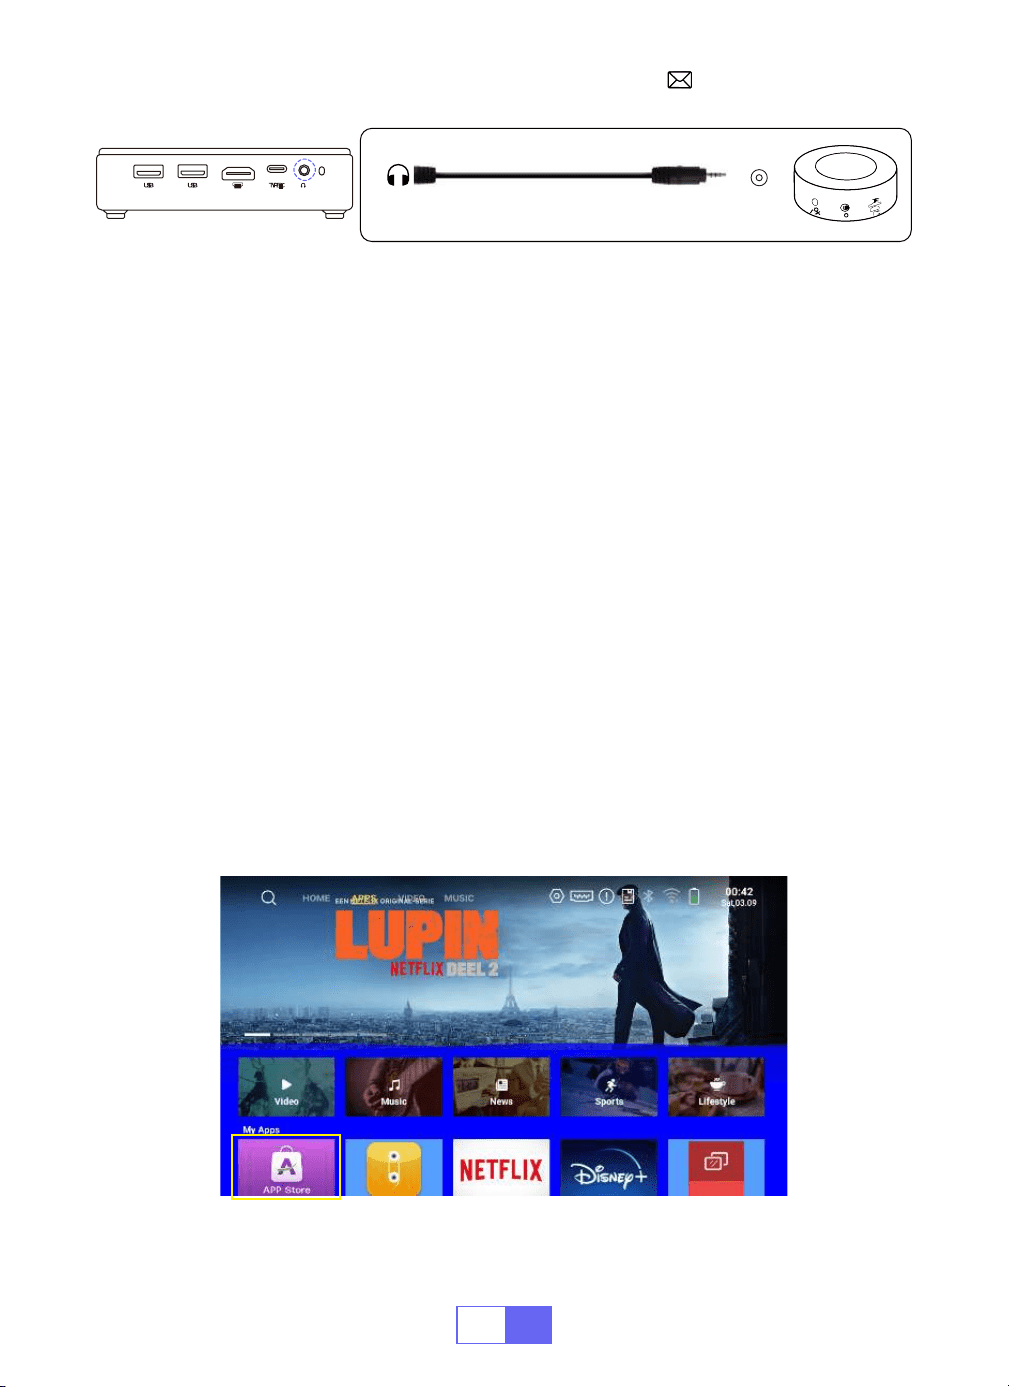
3.Connecting with Sound bar
•Choose the media signal channel :“HDMI”.
•
Use a Type-C to HDMI adapter
to connect your MacBook, or a Mini
Display to HDMI adapter to connect with your MacBook Air (adapter not
included).
•Use the 3.5mm audio cable coming with the projector to connect with
sound bar.
•Turn on the projector and the sound bar(choose AUX mode).
•
For more details, please contact the seller at
.
EN
16
4.Connecting with Fire TV Stick
5.Connecting with XBOX/PS4
•Plug the TV stick into the HDMI port of the projector.
•Choose the media signal channel :“HDMI”.
•Choose the media signal channel :“HDMI”.
•Use HDMI cable to connect to XBOX/PS4.
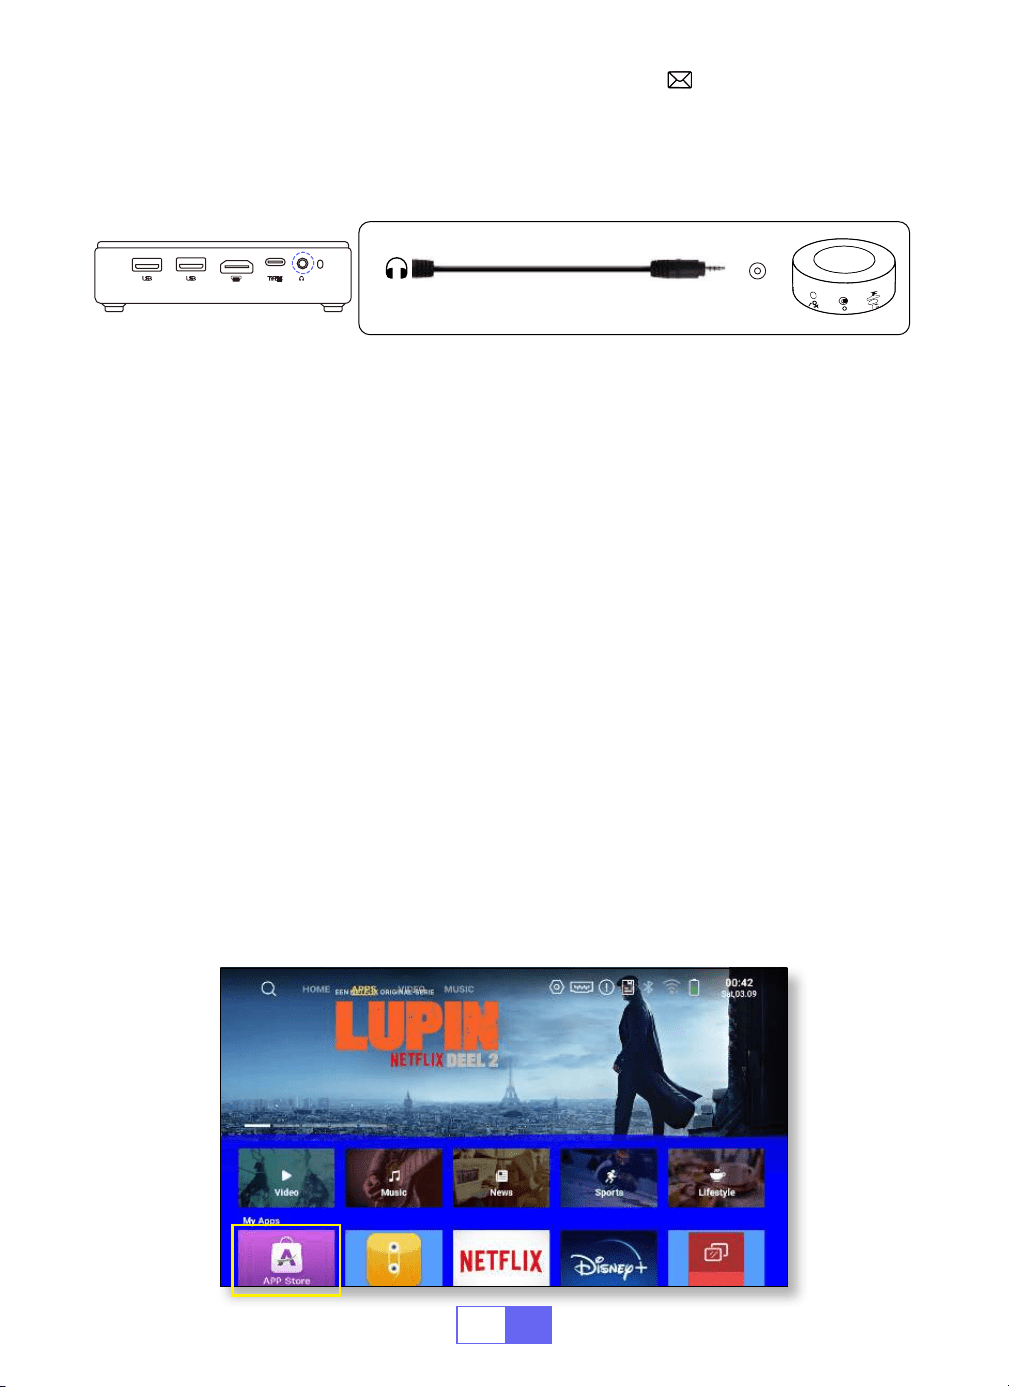
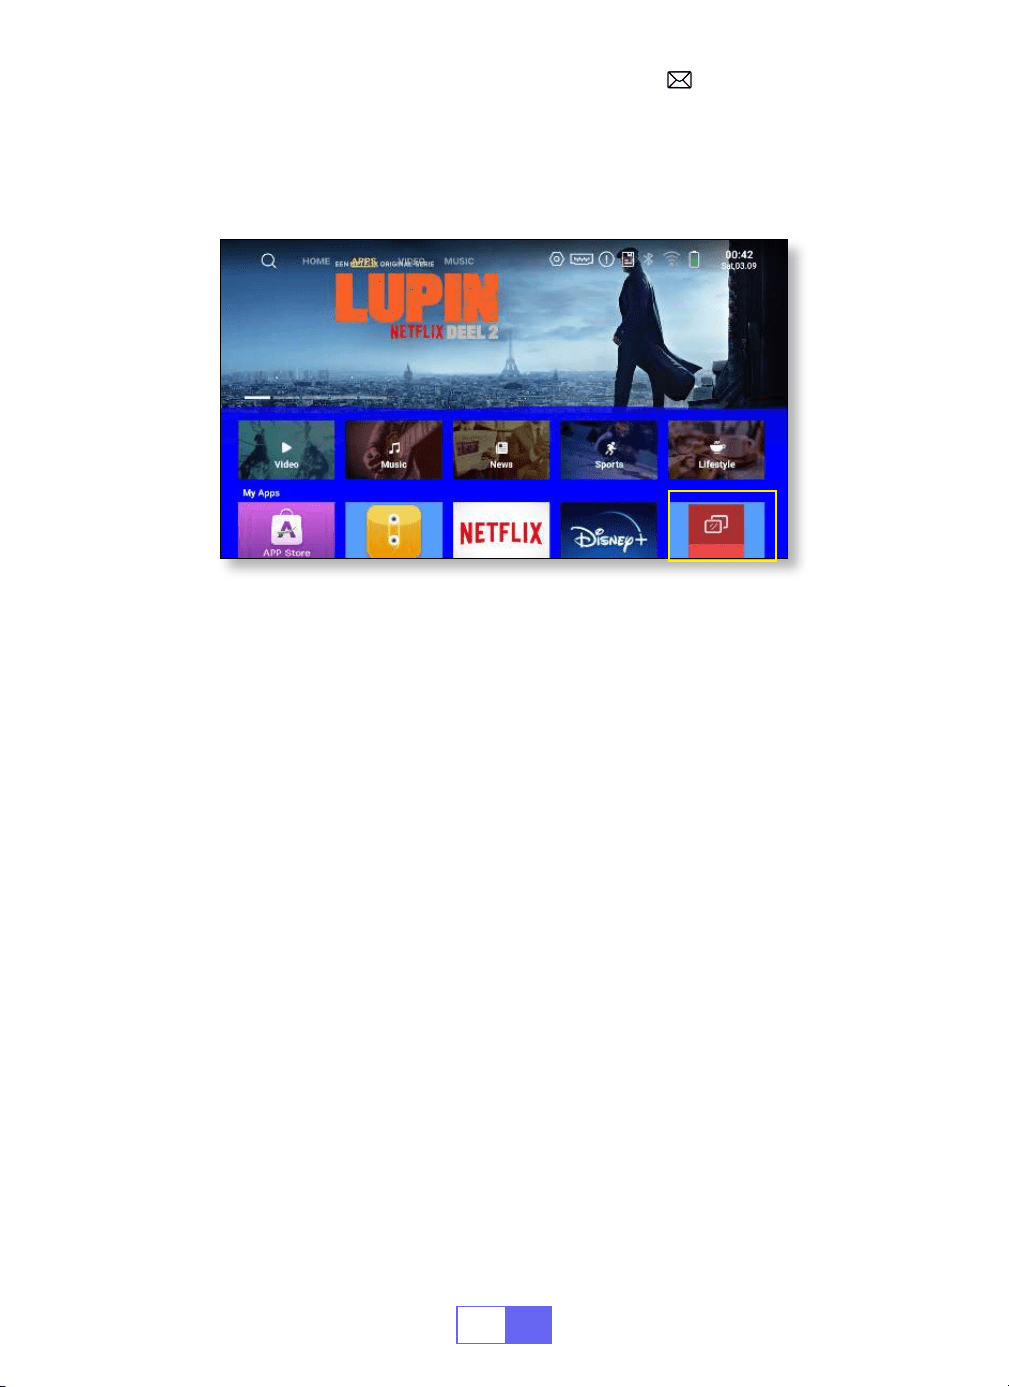
App Download
Click "APPS" on the home page and select "App Store" on the page.
1. Select your favourite app to download on the App Store homepage.
2. Search for the app you want to download in the search bar.
Audio
out
AUX
port
EN
17
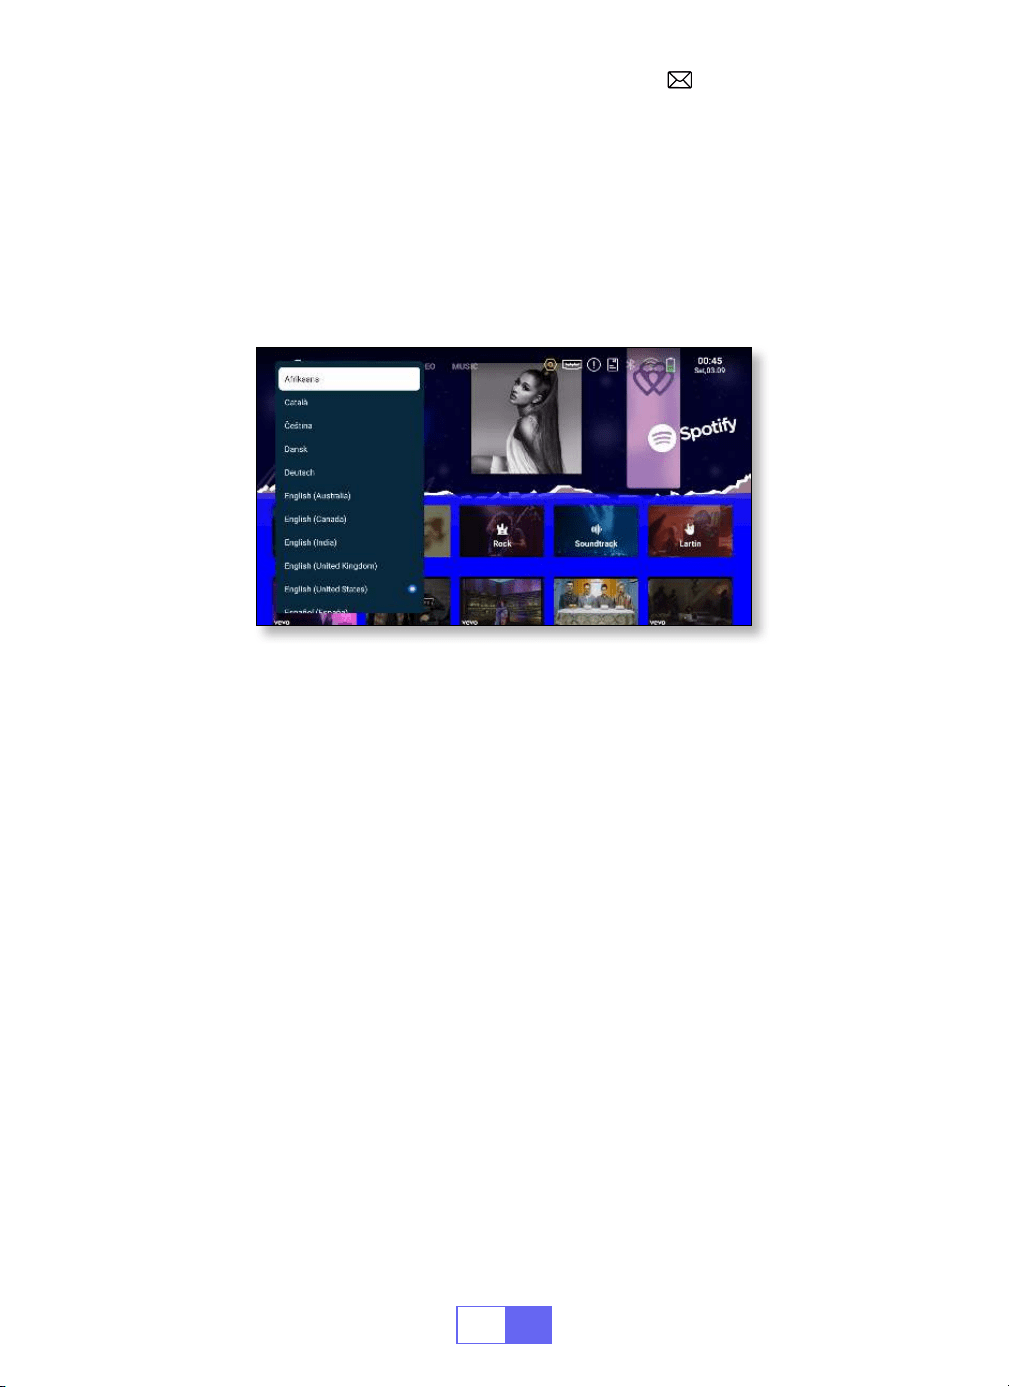
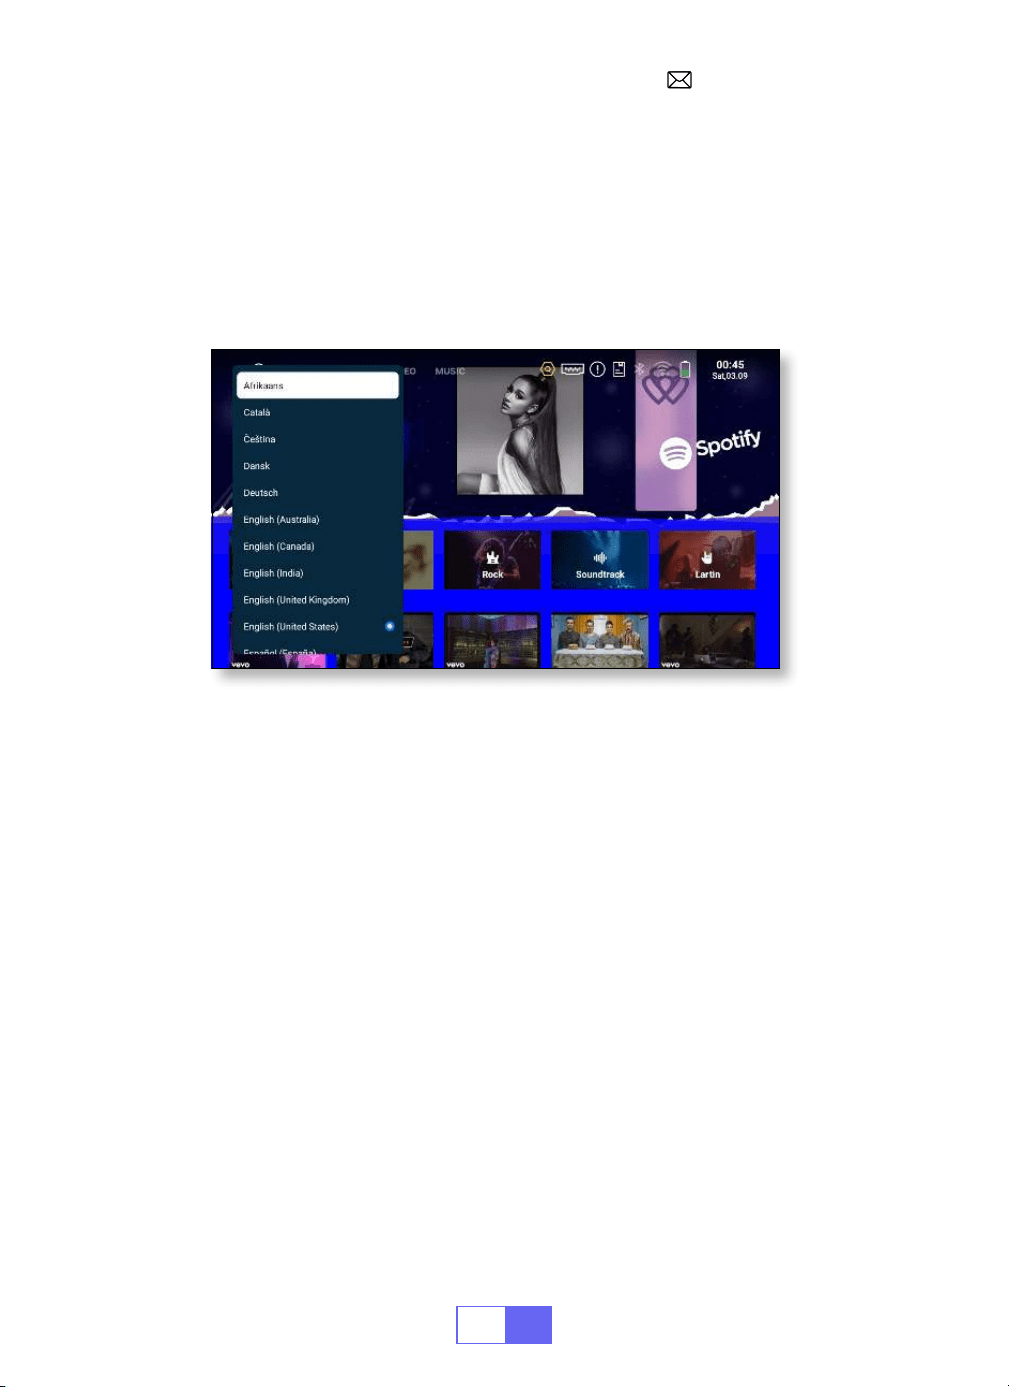
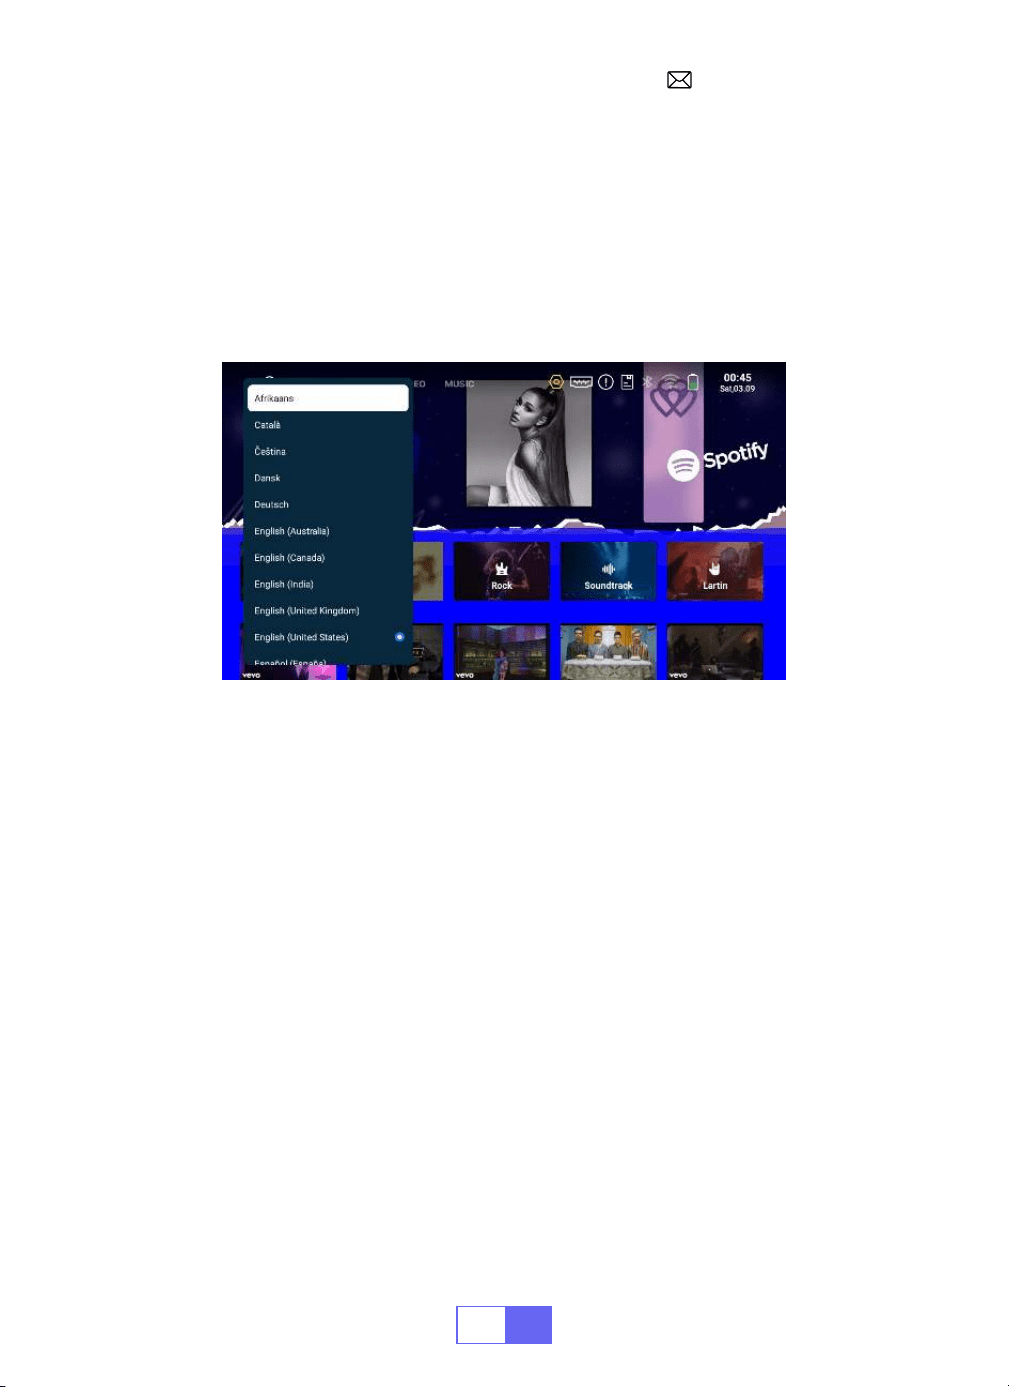
LANGUAGE SETTING
OTHER SETTING
There are more than 50 languages to choose from, English, French,
German, Italian, Spanish, Japanese, etc.
•Select [Settings] [System] [Language], choose the language you
need.
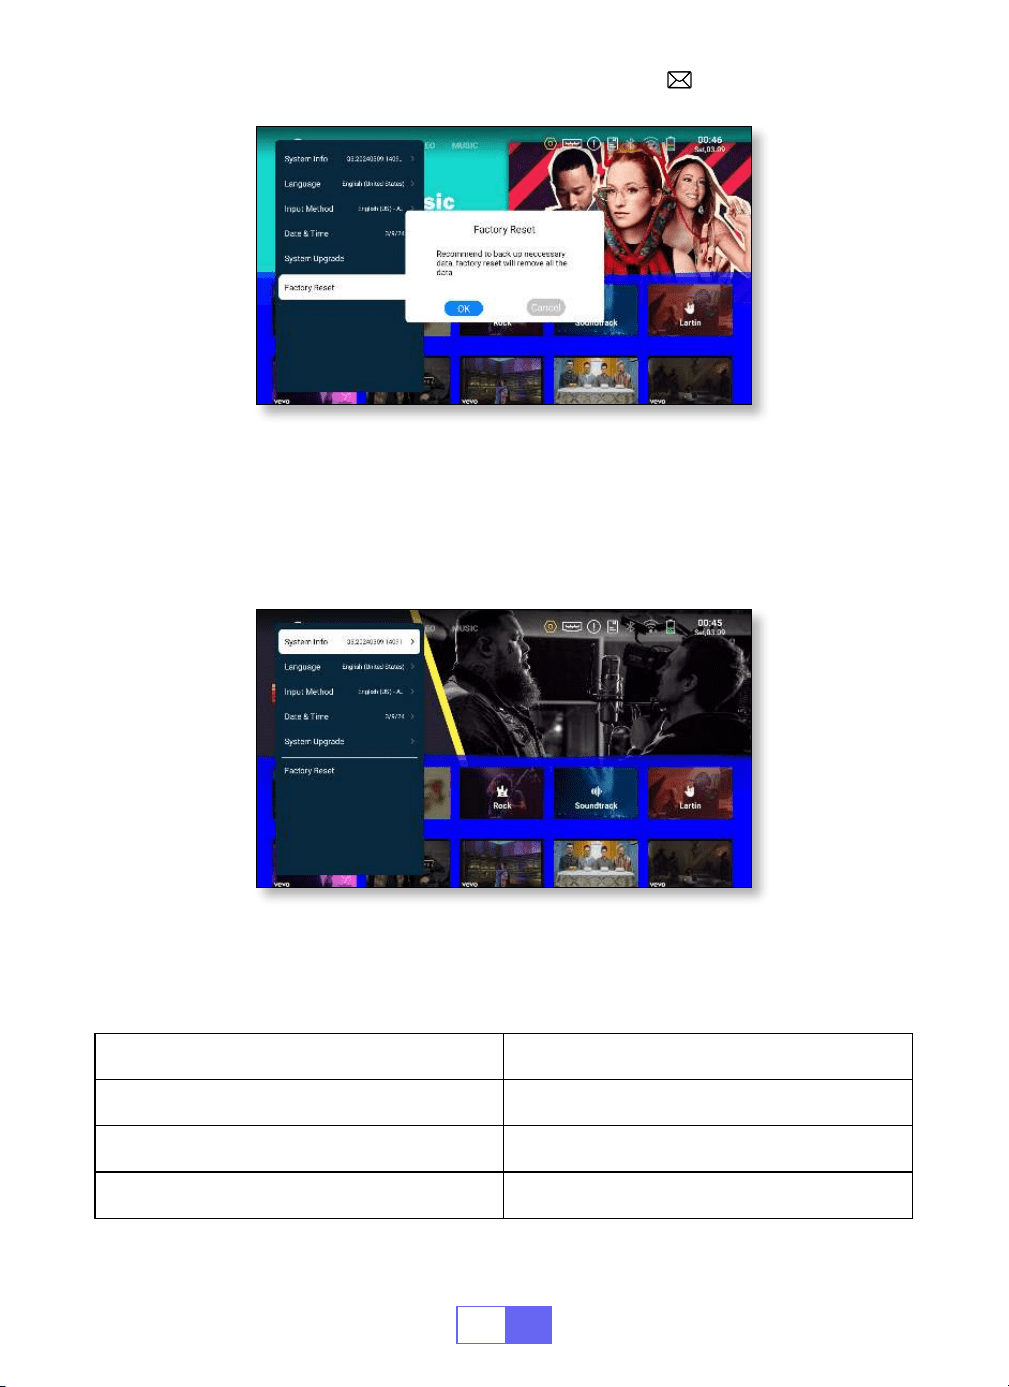
• In the other settings menu, you can nd the "Application Setting" option,
click it to view all installed applications and congure them.
Location: [Settings] [General] [App Settings].
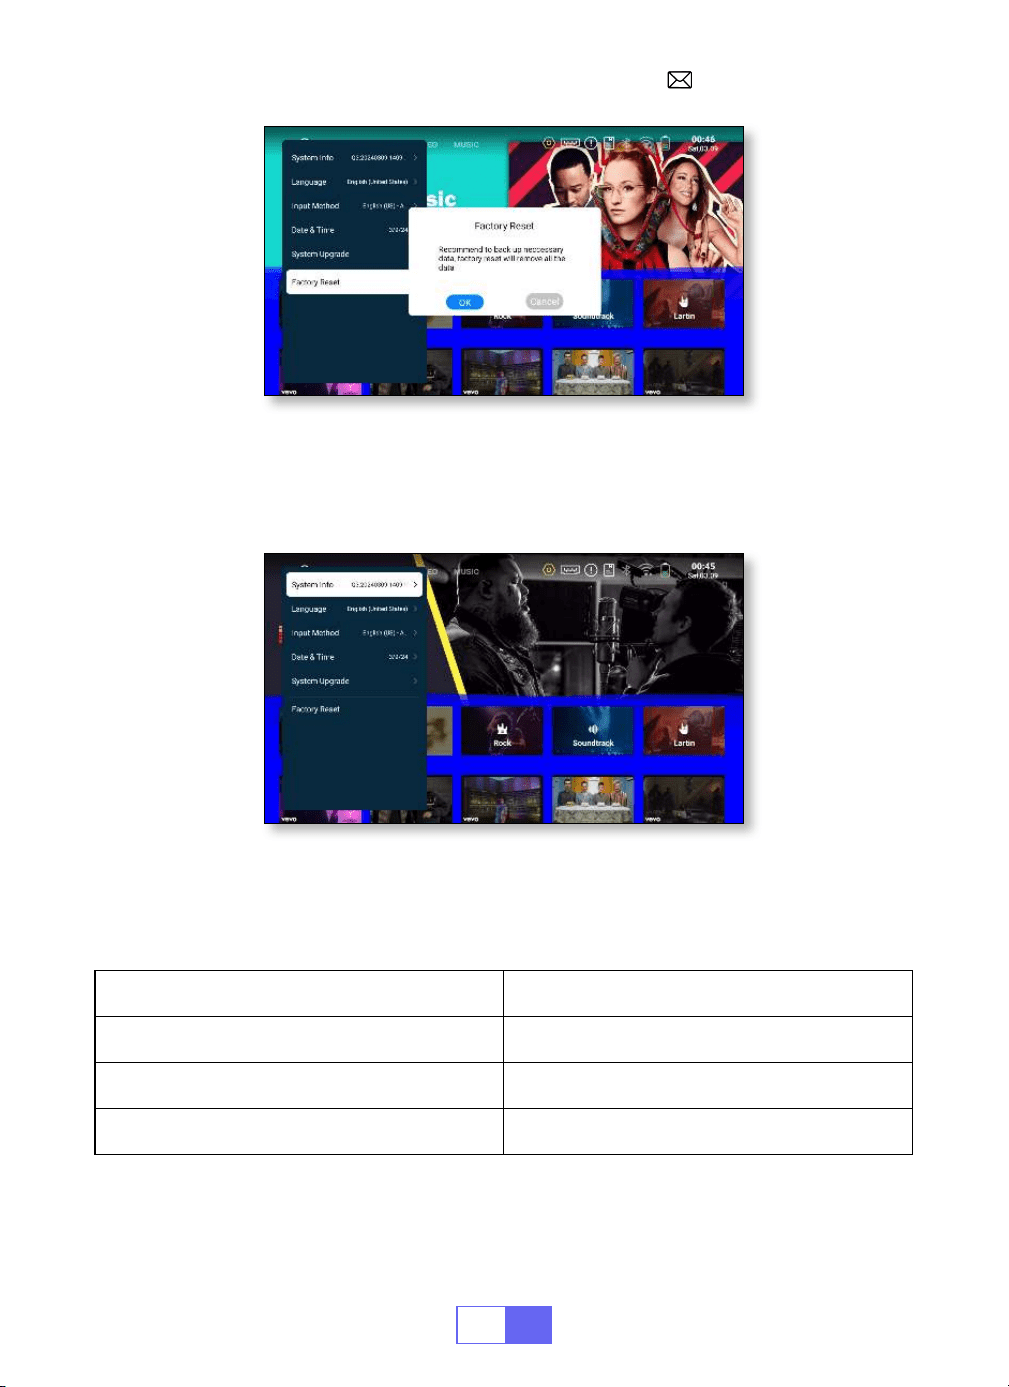
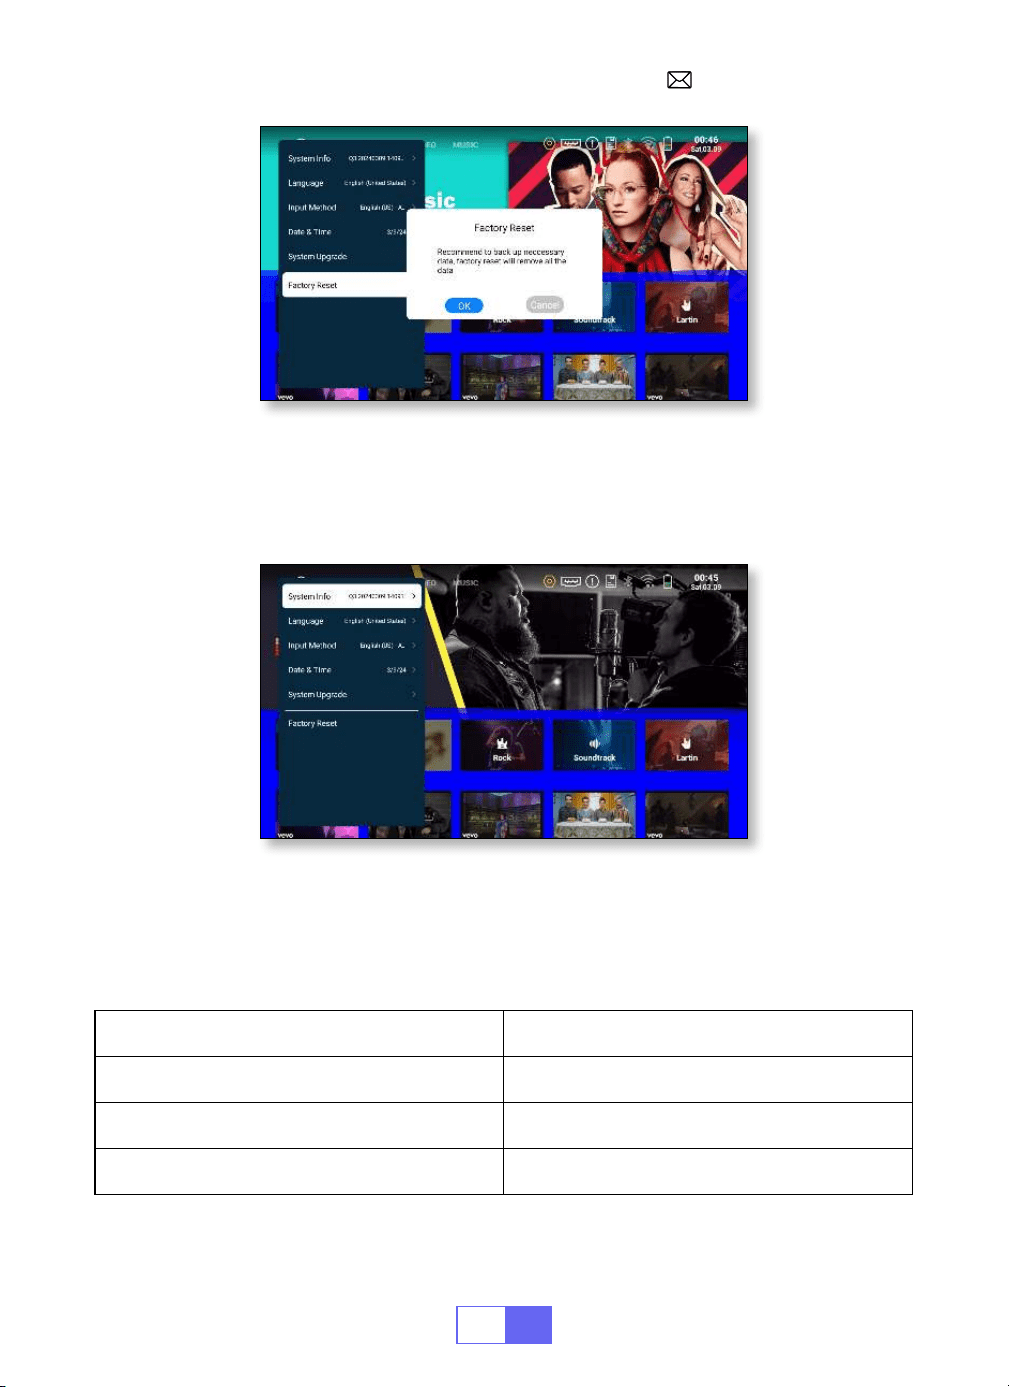
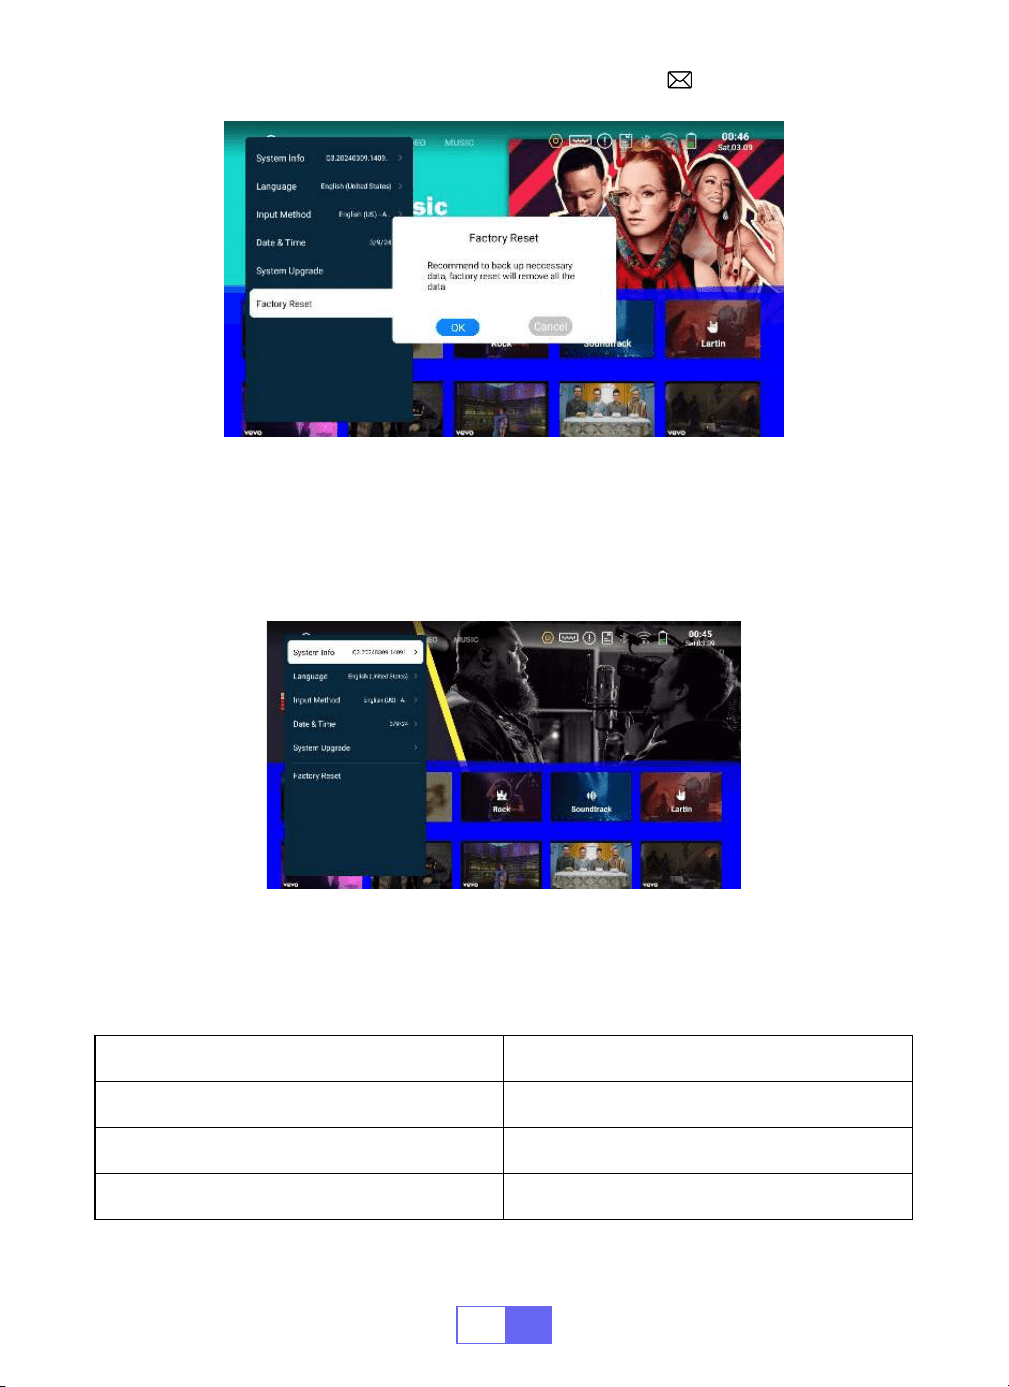
• Reset and delete all data
Location: [Settings] [System] [Factory Reset]
Application Setting
Factory Reset Setting
EN
18
Check the projector’s software version number, serial number, memory
and other information.
DATE AND TIME SETTING
Setting Function
Time Zone Select your time zone
Date Select current date
Time Select current time
System Info
EN
19
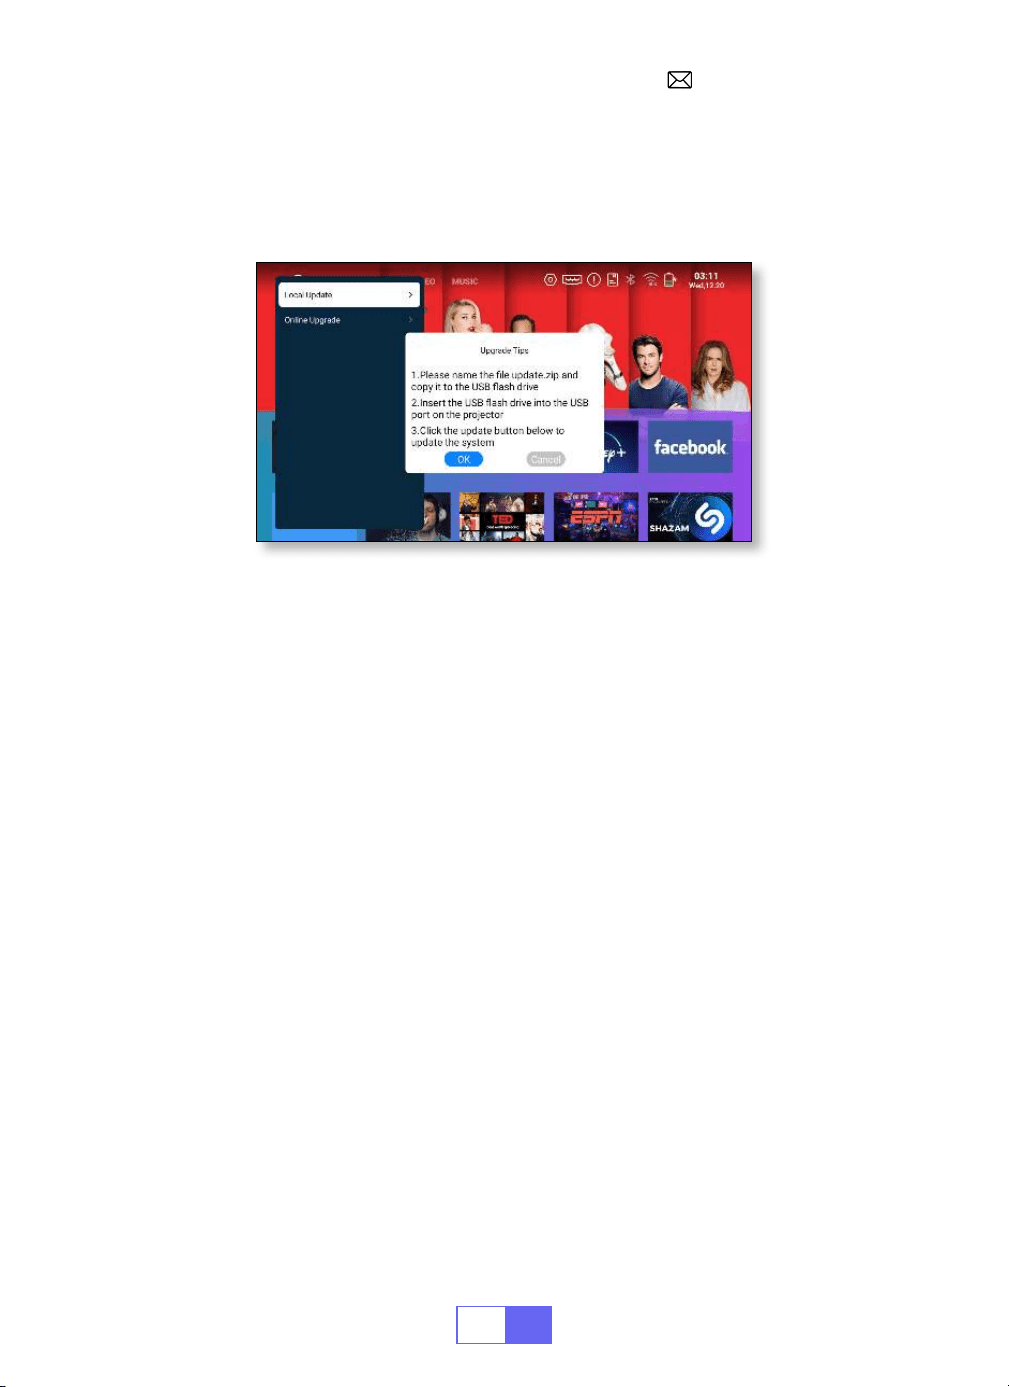
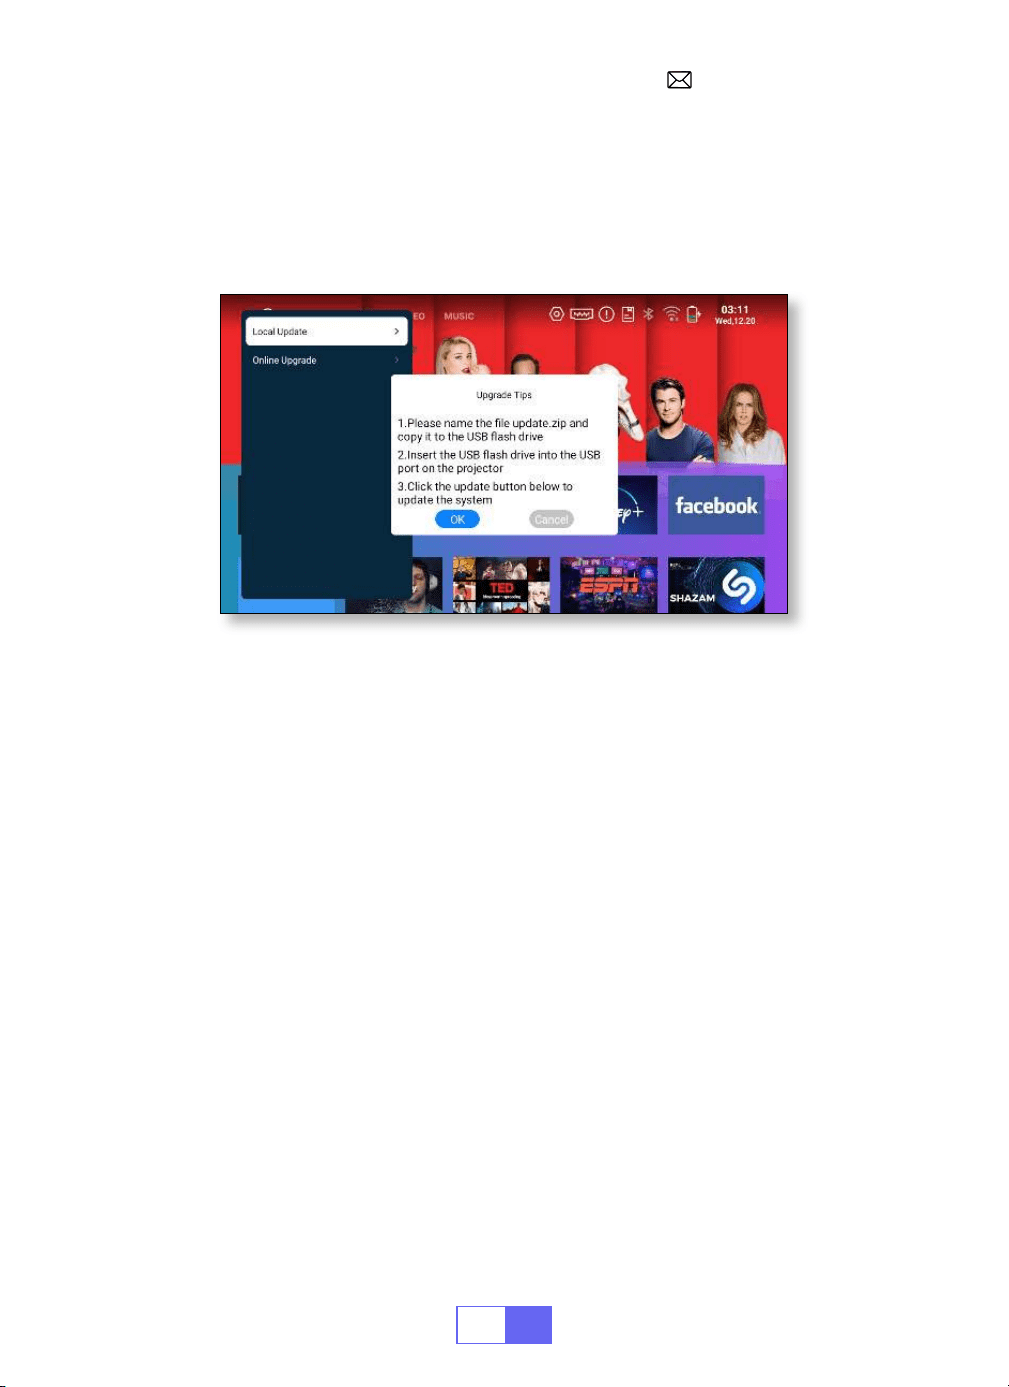
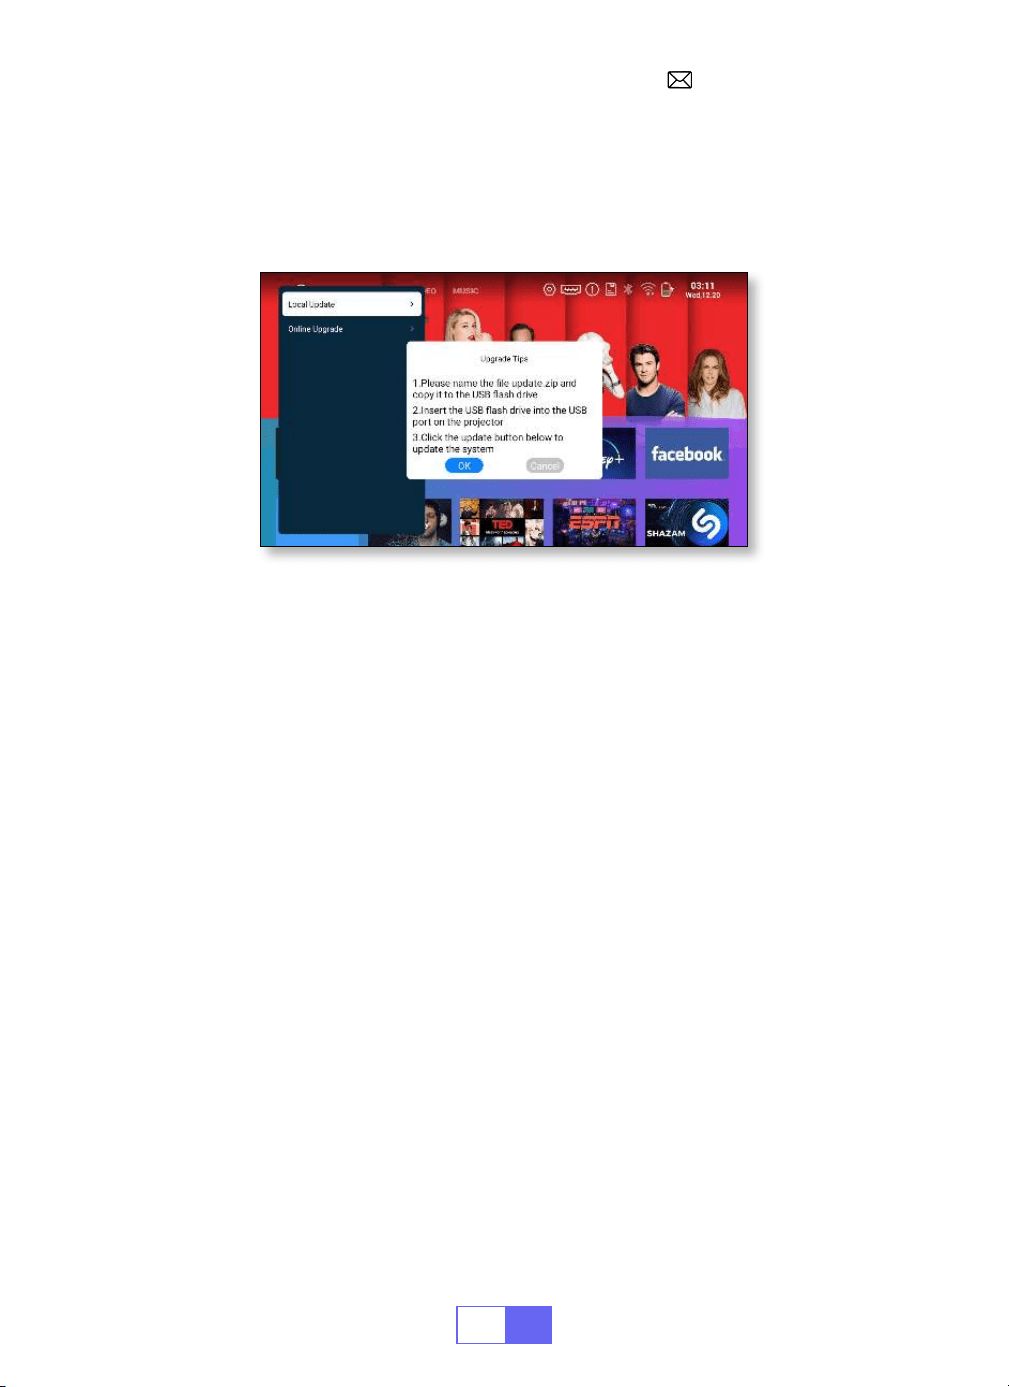
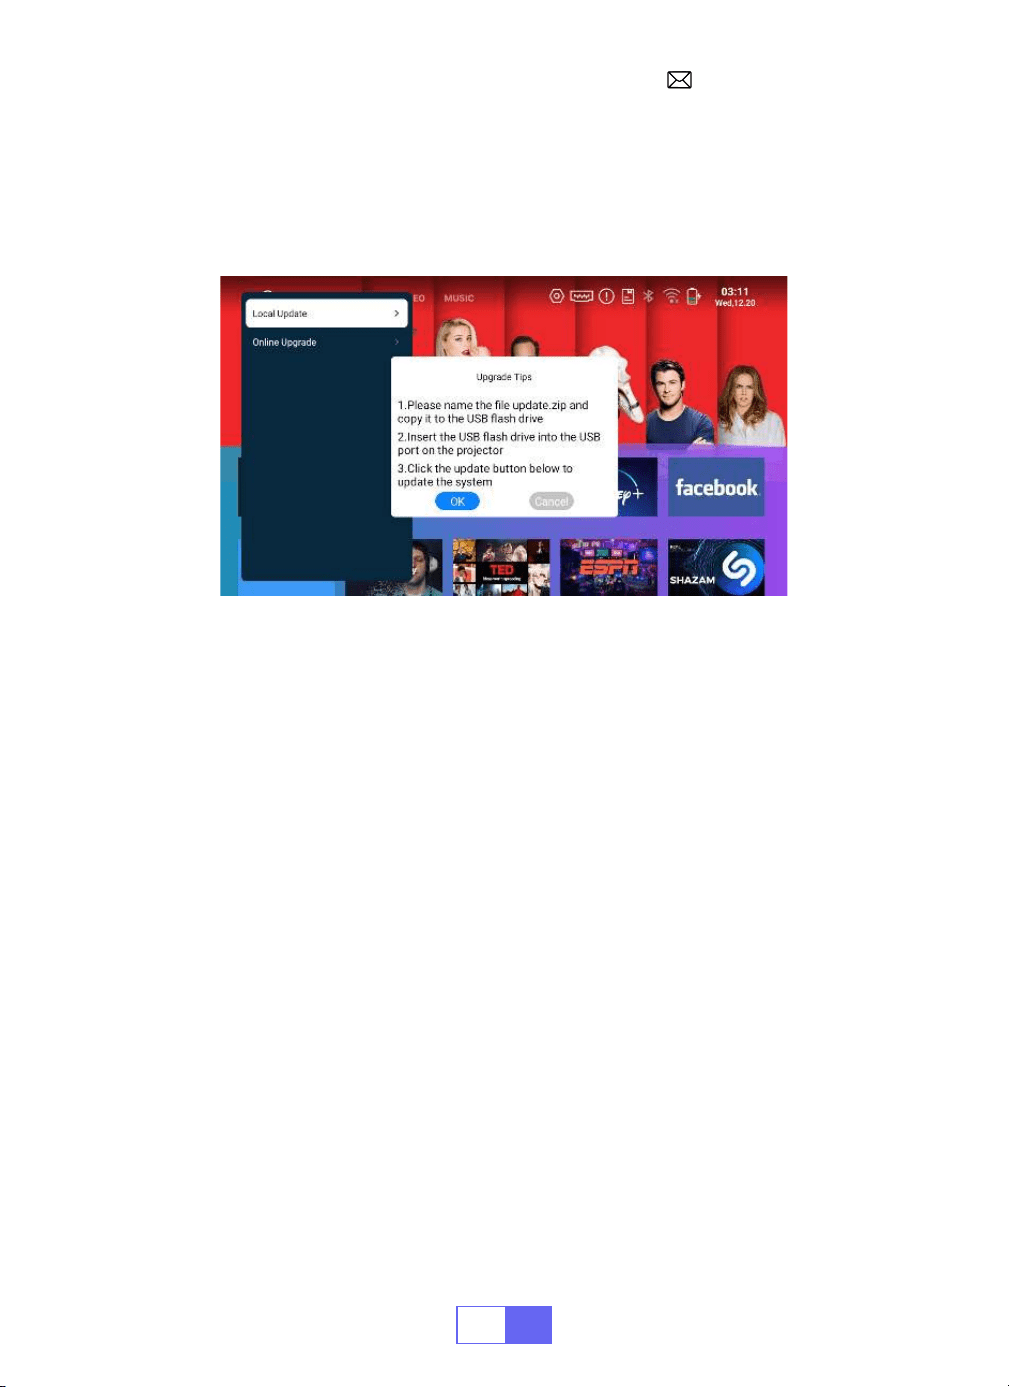
When new software is available for upgrade, you can choose local
upgrade or online upgrade.
SYSTEM UPGRADE
FAQ
1.There is no image on the black screen or a blue screen with no picture or
sound.
a.Is the channel set up correct?
b.Is there an input signal?
c.Is the input cable plugged well?
d.Under PC mode, is the refresh rate > 75KHz?
e. The input device doesn't connect well with the projector.
2.Picture right, no sound.
a.Please turn off the Dolby of the input device, and then it will have sound.
b.The decoding system of the video is not supported by the projector.
3.Auto off after working for a while.
a.The projector ventilation is blocked.
b.The voltage is not stable.
c.The over heat protection system.
4.WiFi connection is not stable?
a.Please check whether the network of your phone is well.
b.Make the distance of the phone and projector within 1 meter.
5.Not compatible with your Bluetooth speaker?

EN
20
a.The projector may not be compatible with some kinds of Bluetooth
speakers.
b.Contact our after sales email at
immediately
and tell us the brand and model of your Bluetooth speaker.
6.Black spot or white line on the picture
Contact our after sales service
immediately.
7.Why is the image out of focus no matter how I adjust it?
a: 1) Place the projector in line with the centre of the screen. Or the offset
angle should be within 15°) Use Automatic Keystone Correction or Manual
Keystone to achieve a rectangular screen display. 3) Use Manual Focus to
adjust lens focus.
8.Can't access the website successfully to download the application?
Please contact us immediately at our after sales email address:
and tell us about the page prompt that
appeared during your application download.
9.What if my order is past the platform return window? Why haven't I
received a reply after 24 hours?
A: The WiMiUS support team will promptly assist with solutions, even if
your order is past the platform return window. If no reply within 24 hours, it
could be due to time zone differences or your email landing in the spam
folder. Please contact us again, we'll ensure your query is addressed
promptly.

DE
21
INHALT
PAKETLISTE - - - - - - - - - - - - - - - - - - - - - - - - - 22
PRODUKTSTRUKTUR - - - - - - - - - - - - - - - - - - - - - -23
FERNBEDIENUNG - - - - - - - - - - - - - - - - - - - - - - - 24
PROJEKTOR SPEZIFIKATIONEN - - - - - - - - - - - - - - - - - -25
BILDANPASSUNG - - - - - - - - - - - - - - - - - - - - - - - 26
1.Fokuseinstellung 26
2.Projektionsmodus 26
3.Automatische Trapezkorrektur 26
4.Manuelle Trapezkorrektur 27
5.Zoom Modus 28
6.Helligkeits und Farbanpassung 28
7.Andere Einstellungen 29
EINRICHTEN DES PROJEKTORS- - - - - - - - - - - - - - - - - -30
KABELLOSE VERBINDUNG - - - - - - - - - - - - - - - - - - - - 31
1.Für IOS System (Airplay) 31
2.Für Android System (Miracast) 32
3.Eshare 33
BLUETOOTH-EINSTELLUNG - - - - - - - - - - - - - - - - - - - 33
Verbinden Sie Bluetooth Lautsprecher 33
SIGNALLEITUNGSVERBINDUNG- - - - - - - - - - - - - - - - - -34
1.Verbindung mit Laptop herstellen 34
2.Verbindung mit MacBook oder MacBook Air herstellen 34
3.Mit Soundbar verbinden 34
4.Verbindung mit dem Fire TV Stick herstellen 35
5.Verbindung mit XBOX/PS4 35
SPRACHEINSTELLUNGEN - - - - - - - - - - - - - - - - - - - - 36
ANDERE EINSTELLUNGEN - - - - - - - - - - - - - - - - - - - - 36
Anwendungseinstellung 36
Einstellung zum Zurücksetzen auf Werkseinstellungen 36
EINSTELLUNG VON DATUM UND ZEIT - - - - - - - - - - - - - - - 37
SYSTEM VERBESSERUNG - - - - - - - - - - - - - - - - - - - - 38
FAQ - - - - - - - - - - - - - - - - - - - - - - - - - - - - 38

DE
22
PAKETLISTE
WiMiUS Q3 Beamer Fernbedienung
Netzkabel HDMI Kabel
Stativ Benutzerhandbuch
DE
23
PRODUKTSTRUKTUR
Belüftungsloch Belüftungsloch
Belüftungsloch
Power Taste FokusringLinse
USB HDMI TYP C
Links Rechts
OK
Aufwärts
Runter
Speisekarte Zurückkehren
3.5 mm
Audioausgang

DE
24
FERNBEDIENUNG
Power Taste
Stumm
Wechseln
Sie zur
Maussteuerung
Startseite
Menü
VOL+/
OK
Airplay
Eshare
Pfeiltaste
Zurückkehren
Hinweis:
Legen Sie vor der Verwendung zwei AAA Batterien (nicht im
Lieferumfang enthalten) in die Fernbedienung ein.

DE
25
PROJEKTOR SPEZIFIKATIONEN
Modell-Nr.: Q3
Display Technologie DLP Lichtquelle LED
Software System Android 11 Projektortyp Versiegelt
Installationstyp
Vorne/hinten am
Schreibtisch, vorne/
hinten an der Decke
Bildseitenverhältnis 16:9/4:3
Produktgröße 12cm*12cm*2.8cm Produktgewicht 350g
Keystone Korrektur
Automatische
vertikale Korrektur
Fokus Handbuch
Eingabeschnittstelle HDMI/USB*2/3.5mm audio output
Videoformat H.264,H.265,Vp9,MPEG1,MPEG2,MPEG4,H.263,XVID,VP8,etc
Audio Format MP3,OGG,FLAC,APE,etc
Bildformat jpg,png,bmp,etc
DE
26
BILDANPASSUNG
1.Fokuseinstellung
2.Projektionsmodus
3.Automatische Trapezkorrektur
Schieben Sie das Ritzel auf der linken Seite des Geräts, um die Schärfe
einzustellen.
Wählen Sie das Menü [Einstellungen] – wählen Sie [Anzeige] – wählen Sie
[Projektionsmodus], drücken Sie die gewünschte Projektionsposition und
drücken Sie zur Bestätigung „OK“.
Es gibt 4 Modi: Vorne/hinten am Schreibtisch, vorne/hinten an der Decke.
WählenSiedasMenü[Einstellungen]–wählenSie[Anzeige]–wählenSie
[AutomatischeTrapezkorrektur]unddrückenSiezurBestätigung„OK“.
DerProjektorkanndievertikaleEbeneautomatischanpassen,umein
rechteckigesBildzuerhalten.DerNeigungswinkelüberschreitetnicht±30°.
DE
27
4.Manuelle Trapezkorrektur
Anfängliche Winkelkorrektur
Wählen Sie das Menü [Einstellungen] – wählen Sie [Anzeige] – wählen Sie
[Manuelle Trapezkorrektur], drücken Sie „OK“, um den Punkt auszuwählen,
den Sie zuerst anpassen möchten, und drücken Sie dann die Pfeiltasten,
um den Wert einzustellen (Horizontal und Vertikal ±30). °)wird wie unten
gezeigt benötigt.
Platzieren Sie das Gerät auf der horizontalen Ebene und drücken Sie OK,
um es zu korrigieren. Bewegen Sie das Gerät während der Korrektur nicht.

DE
28
5.Zoom-Modus
6.Helligkeits und Farbanpassung
Es gibt zwei Aspect Rotio Modi: 16:9 oder 4:3
Wählen Sie das Menü [Einstellungen] – wählen Sie [Anzeige] – wählen Sie
[Helligkeit und Farbe] und wählen Sie die Optionen aus, die Sie anpassen
möchten.
Wählen Sie das Menü [Einstellungen] – wählen Sie [Anzeige] –
wählen Sie [Bildschirmskalierung] – wählen Sie [Bildschirmzoom], der
Projektionsbildschirm kann um 50 % bis 100 % gezoomt werden. Drücken
Sie zum Einstellen die Taste „
◀
“ oder „
▶
“. der benötigte Wert.
DE
29
7.Andere Einstellungen
Zeigergeschwindigkeit
Verhinderung von unbeabsichtigtem Kontakt
Wählen Sie das Menü [Einstellungen] – wählen Sie [Allgemein] –
wählen Sie [Zeigergeschwindigkeit], drücken Sie „
◀
“ oder „
▶
“ um die
gewünschte Bewegungsgeschwindigkeit des Mauszeigers anzupassen.
Wählen Sie das Menü [Einstellungen] – wählen Sie [Allgemein] – wählen
Sie [Touch Einstellung], um den gewünschten Zeitraum auszuwählen, um
eine versehentliche Bedienung zu verhindern.
DE
30
EINRICHTEN DES PROJEKTORS
Wählen Sie die Eingangssignalquelle aus.
HDMI:
Wählen Sie oben auf der Startseite die Signalquelle
„
” Beim
Abspielen eines Videos können Sie die Taste
„
“ drücken, um den Ton
und den Wiedergabemodus festzulegen.
DE
31
USB:
Das Gerät erkennt den USB Stick automatisch. Klicken Sie auf der
Startseite auf „APPS“ und wählen Sie auf der Seite „Dateimanager“.
KABELLOSE VERBINDUNG
1.Für IOS-System (Airplay)
Achtung:
Ihr Gerät und der Projektor sollten sich im selben Zuhause
benden WLAN.
1. Schalten Sie die Netzwerkeinstellung des Projektors ein.
2. Wählen Sie Ihr Heim WLAN aus, um eine Verbindung herzustellen,
DE
32
2.Für Android-System (Miracast)
Achtung:
Ihr Gerät und der Projektor sollten sich im selben Heim WLAN
benden.
1. Schalten Sie die Netzwerkeinstellung des Projektors ein.
2. Wählen Sie Ihr Heim WLAN aus, um eine Verbindung herzustellen, geben
Sie das richtige Passwort ein und klicken Sie dann auf „OK“. Bitte warten Sie
3 Sekunden, um die Verbindung herzustellen.
3. Klicken Sie auf der Startseite auf „APPS“ und wählen Sie auf der Seite
„Miracast Receiver“ (oder drücken Sie die „E Share“ Taste auf der
Fernbedienung und wählen Sie „Android Wireless“).
4. Schalten Sie die WLAN Einstellung Ihres Mobilgeräts ein und stellen Sie
dann eine Verbindung zum gleichen Heim WLAN her.
5. Schalten Sie die drahtlose Bildschirmspiegelungsfunktion Ihres Android
Telefons ein und wählen Sie „Q3 7817“ aus den Suchergebnissen aus, um
geben Sie das richtige Passwort ein und klicken Sie dann auf „Verknüpfen“.
Bitte warten Sie 3 Sekunden, um die Verbindung herzustellen. Sobald die
Verbindung hergestellt ist, merkt es sich das Passwort des verbundenen
WLAN.
3. Schalten Sie die WLAN Einstellung Ihres Mobilgeräts ein und stellen Sie
dann eine Verbindung zum gleichen Heim WLAN her.
4. Klicken Sie anschließend auf dem Smartphone auf „Airplay“.
5. Wählen Sie „Q3 7817“ aus den Suchergebnissen aus, um eine
Verbindung herzustellen.
6. Erfolg haben.

DE
33
3.Eshare
Nutzen Sie Ihr Telefon als kabellose Maus, Tastatur und Fernbedienung
und verändern Sie die Art und Weise, wie Sie Großbildgeräte steuern und
mit ihnen interagieren.
1. Verbinden Sie Ihr Gerät mit dem Heim WLAN.
2. Greifen Sie mit einem Browser auf „https://h.eshare.app“ zu, um es
herunterzuladen und zu installieren die App.
3. Öffnen Sie die Eshare App und klicken Sie auf „Q3 7817“, um eine
Verbindung herzustellen.
eine Verbindung herzustellen.
6. Erfolg haben.
BLUETOOTH-EINSTELLUNG
Verbinden Sie Bluetooth-Lautsprecher
1.Schalten Sie Ihren Bluetooth Lautsprecher ein.
2.Wählen Sie [Einstellungen] – [Bluetooth], um Bluetooth des Projektors
einzuschalten
3.Wählen Sie Ihren Bluetooth Lautsprecher aus, den Sie verbinden
möchten.
4. Erfolg haben.
DE
34
SIGNALLEITUNGSVERBINDUNG
1.Verbindung mit Laptop herstellen
DerWiMiUSQ3Beamerverfügtüber5Schnittstellen:USB-
Anschlüsse*2/HMDI Anschluss/3,5 mm Audioausgang Ausgang/
Typ-C-Anschluss(zum Aufladen).BittewählenSiedenrichtigenAn
schlussfürdenAnschlussIhresGerätsaus (FireStick,Telefon,DVD-
Player,Soundbar,USB,PS4usw.
• Schließen Sie den Projektor über ein HDMI-Kabel an den Laptop an.
• Wählen Sie den Mediensignalkanal: „HDMI“.
2.Verbindung mit MacBook oder MacBook Air herstellen
• Wählen Sie den Mediensignalkanal: „HDMI“.
• Verwenden Sie einen Typ C auf HDMI Adapter, um Ihr MacBook
anzuschließen, oder einen Mini Display auf HDMI Adapter, um
eine Verbindung mit Ihrem MacBook Air herzustellen (Adapter nicht
inbegriffen).
3.Mit Soundbar verbinden
• Verwenden Sie das mit dem Projektor gelieferte 3,5 mm Audiokabel für
die Verbindung mit der Soundbar.
• Schalten Sie den Projektor und die Soundbar ein (wählen Sie den AUX
Modus).
DE
35
4.Verbindung mit dem Fire TV Stick herstellen
5.Verbindung mit XBOX/PS4
• Schließen Sie den TV Stick an den HDMI Anschluss des Projektors an.
• Wählen Sie den Mediensignalkanal: „HDMI“.
• Wählen Sie den Mediensignalkanal: „HDMI“.
• Verwenden Sie ein HDMI Kabel zum Anschluss an XBOX/PS4.
App Download
• Klicken Sie auf der Startseite auf „APPS“ und wählen Sie auf der Seite „App
Store“ aus.
1. Wählen Sie auf der App Store Startseite Ihre Lieblings App zum
Herunterladen aus.
2. Suchen Sie in der Suchleiste nach der App, die Sie herunterladen
möchten.
• Für weitere Informationen wenden Sie sich bitte an den Verkäufer unter
.
Audio
out
AUX
port
DE
36
Anwendungseinstellung
Einstellung zum Zurücksetzen auf Werkseinstellungen
SPRACHEINSTELLUNGEN
ANDERE EINSTELLUNGEN
Es stehen mehr als 50 Sprachen zur Auswahl: Englisch, Französisch,
Deutsch, Italienisch, Spanisch, Japanisch usw.
•Wählen Sie [Einstellungen] – [System] – [Sprache] und wählen Sie die
gewünschte Sprache.
• Im anderen Einstellungsmenü nden Sie die Option „Anwendungseinstell-
ungen“. Klicken Sie darauf, um alle installierten Anwendungen anzuzeigen
und zu kongurieren.
Speicherort: [Einstellungen] – [Allgemein] – [App Einstellungen].
• Alle Daten zurücksetzen und löschen
Speicherort: [Einstellungen] – [System] – [Werksreset].
DE
37
EINSTELLUNG VON DATUM UND ZEIT
Einstellung Funktion
Zeitzone Wählen Sie Ihre Zeitzone aus
Datum Aktuelles Datum auswählen
Zeit Wählen Sie die aktuelle Uhrzeit aus
Systeminformationen
Überprüfen Sie die Softwareversionsnummer, die Seriennummer, den
Speicher und andere Informationen des Projektors.
DE
38
SYSTEM VERBESSERUNG
Wenn neue Software für ein Upgrade verfügbar ist, können Sie zwischen
lokalem Upgrade und Online Upgrade wählen.
FAQ
1. Es gibt kein Bild auf dem schwarzen Bildschirm oder einen blauen Bilds
chirm ohne Bild oder Ton.
a.Ist die Kanaleinstellung korrekt?
b.Gibt es ein Eingangssignal?
c.Ist das Eingangskabel richtig eingesteckt?
d.Ist die Bildwiederholfrequenz im PC Modus > 75 kHz?
e. Das Eingabegerät verbindet sich nicht richtig mit dem Projektor.
2. Bild stimmt, kein Ton.
a.Bitte schalten Sie Dolby am Eingabegerät aus, damit der Ton ausgege
ben wird.
b.Das Dekodierungssystem des Videos wird vom Projektor nicht unterstü
tzt.
3. WiFi Verbindung ist nicht stabil?
a.Bitte überprüfen Sie, ob das Netzwerk Ihres Telefons in Ordnung ist.
b. Stellen Sie sicher, dass der Abstand zwischen Telefon und Projektor
höchstens 1 Meter beträgt.
4. Nicht kompatibel mit Ihrem Bluetooth Lautsprecher?

DE
39
a.Der Projektor ist möglicherweise nicht mit einigen Arten von Bluetooth
kompatibel Lautsprecher.
b.Kontaktieren Sie umgehend unsere Kundendienst E Mail Adresse unter
und teilen Sie uns die Marke und das Modell
Ihres Bluetooth Lautsprechers mit.
5. Schwarzer Fleck oder weiße Linie auf dem Bild
Bitte senden Sie das Projektionsbild umgehend an unseren Kundendienst
6. Warum ist das Bild unscharf, egal wie ich es einstelle?
a.Platzieren Sie den Projektor in einer Linie mit der Mitte der Leinwand.
Oder der Versatzwinkel sollte innerhalb von 15° liegen.
b.Verwenden Sie die automatische Trapezkorrektur oder die manuelle
Trapezkorrektur, um eine rechteckige Bildschirmanzeige zu erreichen.
c.Verwenden Sie den manuellen Fokus, um den Objektivfokus anzupassen.
7. Sie können nicht erfolgreich auf die Website zugreifen, um die Anwend
ung herunterzuladen?
Bitte kontaktieren Sie uns umgehend unter unserer After Sales E Mail
Adresse:
und erzählen Sie uns von der Seitena
ufforderung erschien während des Herunterladens Ihrer Anwendung.

FR
40
CATALOGUE
LISTE DES COLIS - - - - - - - - - - - - - - - - - - - - - - - 41
STRUCTURE DU PRODUIT - - - - - - - - - - - - - - - - - - - -42
TÉLÉCOMMANDE - - - - - - - - - - - - - - - - - - - - - - -43
SPÉCIFICATIONS DU PROJECTEUR - - - - - - - - - - - - - - - -44
AJUSTEMENT DE L'IMAGE - - - - - - - - - - - - - - - - - - - -45
1.Ajustement de la Mise au Point 45
2.Mode de Projection 45
3.Correction Trapézoïdale Auto 45
4.Correction Trapézoïdale Manuelle 46
5.Mode de Zoom 47
6.Réglage de la Luminosité & des Couleurs 47
7.Autre Réglage 48
CONFIGURATION DU PROJECTEUR - - - - - - - - - - - - - - - -49
CONNEXION SANS FIL - - - - - - - - - - - - - - - - - - - - -50
1.Pour le Système iOS (Airplay) 50
2.Pour le Système Android (Miracast) 51
3.Eshare 52
PARAMÈTRES BLUETOOTH - - - - - - - - - - - - - - - - - - -52
Connecter des Haut Parleurs Bluetooth 52
CONNEXION DES LIGNES DE SIGNAUX- - - - - - - - - - - - - - -53
1.Connexion avec Ordinateur Portable 53
2.Connexion avec MacBook/Mac Book Air 53
3.Connexion avec Barre de Son 53
4.Connexion avec Fire TV Stick 54
5.Connexion avec XBOX/PS4 54
Téléchargement de l'Application - - - - - - - - - - - - - - - -54
PARAMÈTRES DE LANGUE- - - - - - - - - - - - - - - - - - - -55
AUTRE RÉGLAGE - - - - - - - - - - - - - - - - - - - - - - -55
Paramètres d'Application 55
Paramètres de Réinitialisation d'Usine 55
Information Système 56
RÉGLAGE DE LA DATE ET DE L'HEURE - - - - - - - - - - - - - - -56
MISE À NIVEAU DU SYSTÈME - - - - - - - - - - - - - - - - - - 57
FAQ - - - - - - - - - - - - - - - - - - - - - - - - - - - - 57
FR
41
LISTE DES COLIS
Projecteur WiMiUS Q3 Télécommande
Câble d'alimentation Câble HDMI vers HDMI
Trépied Mode d'emploi

FR
42
STRUCTURE DU PRODUIT
Trou d'aération Trou d'aération
Trou d'aération
ON/OFF
Pignon de
mise au
point
Lentille
USB HDMI TYPE C
Gauche Droite
Haut
Bas
Menu Retour
Sortie
audio
3.5mm
OK

FR
43
TÉLÉCOMMANDE
ON/OFF
Muet
Passer au
contrôle de la
souris
Home
MENU
VOL+/
OK
Airplay
Eshare
Directions
Retour
Remarque:
Veuillez installer 2 piles AAA (non incluses) dans la télécom
mande avant de l'utilisation.

FR
44
SPÉCIFICATIONS DU PROJECTEUR
Modèle: Q3
Technologie
d'Afchage
DLP Source de Lumière LED
Système logiciel Android 11 Type de Projecteur Scellé
Type d'Installation
Avant/Arrière sur
bureau; Avant/Arrière
au Plafond
Ratio d'Aspect 16:9/4:3
Taille du Produit 12cm*12cm*2.8cm Poids du Produit 350g
Correction
Trapézoïdale
Correction verticale
automatique
Mise au point Manuel
Interface d'Entrée HDMI/USB/Sortie audio 3,5mm
Format Vidéo H.264, H.265, Vp9, MPEG1, MPEG2, MPEG4, H.263, XVID, VP8, etc.
Format Audio MP3, OGG, FLAC, APE, etc.
Format d'Image jpg, png, bmp, etc.
FR
45
AJUSTEMENT DE L'IMAGE
1.Ajustement de la Mise au Point
2.Mode de Projection
3.Correction Trapézoïdale Auto
Faites glisser le pignon situé à droite de l'appareil pour régler la netteté.
Sélectionnez le menu [Paramètres] Sélectionnez [Affichage]
Sélectionnez [Mode de projection], appuyez sur la position de
projection dont vous avez besoin et appuyez sur "OK" pour conrmer.
Il existe 4 modes:
Projection avant/Projection arrière/Projection au plafond
avant/Projection au plafond arrière.
Sélectionnez le menu [Paramètres] Sélectionnez [Affichage]
Sélectionnez [Correction automatique du trapèze] et appuyez sur "OK"
pour conrmer.
Remarque:
Le projecteur peut ajuster automatiquement le plan
vertical pour obtenir l'image rectangulaire. L'angle d'inclinaison ne
dépasse pas ±30°.
FR
46
4.Correction Trapézoïdale Manuelle
Correction d'Angle Initiale
Sélectionnez le menu [Paramètres] Sélectionnez [Affichage]
Sélectionnez [Trapèze manuel], appuyez sur "OK" pour choisir le point que
vous souhaitez ajuster en premier, puis appuyez sur les touches échées
pour définir la valeur (Horizontal et Vertical ±30 ° ) nécessaire comme
indiqué ci dessous:
Placez l'appareil sur le plan horizontal et appuyez sur OK pour le corriger.
Ne déplacez pas l'appareil pendant la correction.
FR
47
5.Mode de Zoom
6.Réglage de la Luminosité & des Couleurs
Il existe 2 modes de format d'image: 16:9 ou 4:3.
Sélectionnez le menu [Paramètres] Sélectionnez [ Affichage]
Sélectionnez [ Luminosité & Couleur], sélectionnez les options que vous
souhaitez régler.
Sélectionnez le menu [Paramètres] Sélectionnez [Affichage]
Sélectionnez [Mise à l'échelle de l'écran] Sélectionnez [Zoom de l'écran],
l'écran de projection peut être zoomé de 50% à 100%, appuyez sur le
bouton “
◀
“ ou “
▶
” pour régler la valeur nécessaire.

FR
48
7.Autre Réglage
Vitesse Du Pointeur
Prévention des Contacts Accidentels
Sélectionnez le menu [Paramètres] – Sélectionnez [ Projection] –
Sélectionnez [Vitesse du pointeur], appuyez sur “
◀
“ ou “
▶
” pour régler
la vitesse de déplacement du pointeur de la souris dont vous avez besoin.
Sélectionnez le menu [Paramètres] Sélectionnez [Général]
Sélectionnez [Réglage Tactile] pour choisir la période dont vous avez
besoin et éviter toute opération accidentelle.
FR
49
CONFIGURATION DU PROJECTEUR
Sélectionnez la Source du Signal D’Entrée
HDMI:
Choisissez la «Source» en haut de la page d'accueil.
Lors de la lecture d'une vidéo, vous pouvez appuyer sur le bouton " "
pour dénir le son et le mode de lecture.
FR
50
USB:
L'appareil détectera automatiquement la clé USB. Cliquez sur "APPS"
sur la page d'accueil et sélectionnez "Gestionnaire de chiers" sur la page.
CONNEXION SANS FIL
1.Pour le Système iOS (Airplay)
Attention:
Votre appareil et le projecteur doivent être sur le même WiFi
domestique.
1. Activez le paramètre Réseau du projecteur.
FR
51
2.Pour le Système Android (Miracast)
Attention:
Votre appareil et le projecteur doivent être dans le même
réseau WiFi domestique.
1. Activez les paramètres Réseau du projecteur.
2. Choisissez votre Home WiFi pour vous connecter et entrez le bon mot
de passe, puis cliquez sur « OK », veuillez attendre 3 secondes pour établir
la connexion.
3. Cliquez sur « APPS » sur la page d'accueil et sélectionnez « Miracast
Receiver » sur la page (Ou appuyez sur le bouton « E-Share » de la téléc-
ommande et sélectionnez « Android Wireless »).
4. Activez le paramètre WiFi de votre appareil mobile, puis connectezvous
au même WiFi domestique.
5. Activez la fonction de mise en miroir d'écran sans l de votre téléphone
2. Choisissez votre WiFi domestique pour vous connecter et entrez le bon
mot de passe, puis cliquez sur « Link », veuillez attendre 3 secondes pour
établir la connexion. Une fois connecté, il mémorisera le mot de passe du
WiFi connecté.
3. Activez le paramètre WiFi de votre appareil mobile, puis connectez
vous au même Home Wi.
4. Cliquez ensuite sur « Airplay » sur le smartphone.
5. Sélectionnez «Q3-7817» dans les résultats de la recherche pour vous
connecter.
6. Réussissez.
FR
52
3.Eshare
Utilisez votre téléphone comme souris, clavier et télécommande sans
fil, et transformez la façon dont vous contrôlez et interagissez avec les
appareils à grand écran.
1. Connectez votre appareil au WiFi domestique.
2. Utilisez un navigateur pour accéder à « https://h.eshare.app » pour tél-
écharger et installer l'application.
3. Ouvrez l'application EShare et cliquez sur « Q3-7817 » pour vous connecter.
PARAMÈTRES BLUETOOTH
Connecter des Haut-Parleurs Bluetooth
1. Allumez votre haut parleur Bluetooth.
2.Sélectionnez [Paramètres] [Bluetooth] pour activer le Bluetooth du
projecteur.
3.Sélectionnez votre haut parleur Bluetooth à connecter.
4.Réussir.
Android et sélectionnez « Q3-7817 » dans les résultats de recherche pour
vous connecter.
6. Réussissez.

FR
53
CONNEXION DES LIGNES DE SIGNAUX
1.Connexion avec Ordinateur Portable
2.Connexion avec MacBook/Mac Book Air
Le projecteur WiMiUS Q3 dispose de 5 interfaces: Ports USB*2/port HDMI/
sortie audio casque 3,5mm/TYPE C. Veuillez sélectionner le bon port de
connexion pour connecter votre appareil (PC, téléphone, lecteur DVD,
barre de son, USB, PS4, etc.)
• Connectez le projecteur au PC via un câble HDMI.
• Choisissez le canal du signal multimédia:«HDMI».
Choisissez le canal du signal multimédia : «HDMI».
•
Utilisez un adaptateur Type-C vers HDMI
pour connecter votre
MacBook ou un adaptateur Mini Display vers HDMI pour vous connecter à
votre MacBook Air (adaptateur non inclus).
3.Connexion avec Barre de Son
• Utilisez le câble audio 3,5mm fourni avec le projecteur pour vous
connecter à la barre de son.
• Allumez le projecteur et la barre de son (choisissez le mode AUX)
•
Pour plus de détails, veuillez contacter le vendeur à
FR
54
4.Connexion avec Fire TV Stick
5.Connexion avec XBOX/PS4
•Branchez le Fire Stick sur le port HDMI du projecteur.
•Choisissez le canal de signal multimédia : «HDMI»
•Choisissez le canal de signal multimédia: «HDMI»
•Utilisez le câble HDMI pour vous connecter à XBOX/PS4
Téléchargement de l'Application
• Cliquez sur « APPS » sur la page d'accueil et sélectionnez « App Store »
sur la page.
1. Sélectionnez votre application préférée à télécharger sur la page
d'accueil de l'App Store.
2. Recherchez l'application que vous souhaitez télécharger dans la barre
de recherche.
Audio
out
AUX
port

FR
55
PARAMÈTRES DE LANGUE
Vous avez le choix entre plus de 50 langues: Anglais, français, allemand,
italien, espagnol, japonais, etc.
• Sélectionnez [Paramètres] [Système] [Langue], choisissez la
langue dont vous avez besoin.
AUTRE RÉGLAGE
Paramètres d'Application
Paramètres de Réinitialisation d'Usine
• Dans l'autre menu de paramètres, vous pouvez trouver l'option "Param
ètres de l'application", cliquez dessus pour afcher toutes les applications
installées et les congurer.
Emplacement: [Paramètres] [Général] [Paramètres de l'application]
• Réinitialiser et supprimer toutes les données.
Emplacement: [Paramètres] [Système] [Réinitialisation d'usine].
FR
56
Information Système
Vériez le numéro de version du logiciel du projecteur, le numéro de série,
la mémoire et d’autres informations.
RÉGLAGE DE LA DATE ET DE L'HEURE
Paramètre Fonction
Fuseau horaire Sélectionnez votre fuseau horaire
Date Sélectionnez la date actuelle
Temps Sélectionnez l'heure actuelle
FR
57
MISE À NIVEAU DU SYSTÈME
Lorsqu'un nouveau logiciel est disponible pour la mise à niveau, vous
pouvez choisir une mise à niveau locale ou une mise à niveau en ligne.
FAQ
1. Il n'y a aucune image sur l'écran noir ou sur un écran bleu sans
image ni son.
a. La conguration des canaux est-elle correcte?
b. Y a-t-il un signal d'entrée?
c. Le câble d'entrée est-il bien branché?
d. En mode PC, le taux de rafraîchissement est-il > 75KHz?
e. Le périphérique d'entrée ne se connecte pas bien au projecteur.
2.Image correcte, pas de son.
a. Veuillez désactiver le Dolby du périphérique d'entrée, puis il aura du son.
b. Le système de décodage de la vidéo n'est pas pris en charge par le
projecteur.
3. Arrêt automatique après avoir travaillé pendant un certain temps.
a. La ventilation du projecteur est bloquée.
b. La tension n'est pas stable.
c. Le système de protection contre la surchauffe.
4. La connexion WiFi n’est pas stable ?
a. Veuillez vérier si le réseau de votre téléphone fonctionne bien.
b. Faites en sorte que la distance entre le téléphone et le projecteur soit

FR
58
inférieure à 1 mètre.
5. Vous n’êtes pas compatible avec votre enceinte Bluetooth ?
a. Le projecteur peut ne pas être compatible avec certains types de haut
parleurs Bluetooth.
b. Contactez immédiatement notre e mail après vente à
et indiquez nous la marque et le modèle de
votre haut parleur Bluetooth.
6. Tache noire sur la photo.
Contactez immédiatement nnotre e mail SAV à
7. Pourquoi l'image est-elle oue, quelle que soit la manière dont je
la règle ?
a. Placez le projecteur aligné avec le centre de l'écran. Ou l'angle de
décalage doit être inférieur à 15°.
b. Utilisez la correction trapézoïdale automatique ou la correction
trapézoïdale manuelle pour obtenir un afchage sur écran rectangulaire.
c. Utilisez la mise au point manuelle pour régler la mise au point de
l'objectif.
8.Vous ne parvenez pas à accéder au site Web pour télécharger
l'application?
Veuillez nous contacter immédiatement à notre adresse e mail après
vente:
et parlez-nous de l'invite de page qui
est apparue lors du téléchargement de votre application.

JP
59
目次
パッケージ一覧
- - - - - - - - - - - - - - - - - - - - - - - - 60
製品構成
- - - - - - - - - - - - - - - - - - - - - - - - - - 61
リモコン
- - - - - - - - - - - - - - - - - - - - - - - - - - 62
プロジェクターの仕様
- - - - - - - - - - - - - - - - - - - - - 63
画像調整
- - - - - - - - - - - - - - - - - - - - - - - - - - 64
1.
フォーカス調整
64
2.
投影モード
64
3.
自動台形補正
64
4.
ズームモード
66
5.
明るさと色の調整
66
6.
その他の設定
67
プロジェクターの設定
- - - - - - - - - - - - - - - - - - - - - 68
ワイヤレス接続
- - - - - - - - - - - - - - - - - - - - - - - - 69
1. iOS
システムの場合(
Airplay
)
69
2.Android
システム用(
Miracast
)
70
3.Eshare 71
Bluetooth 設定
- - - - - - - - - - - - - - - - - - - - - - - - 71
Bluetooth
スピーカーを接続
71
信号線接続
- - - - - - - - - - - - - - - - - - - - - - - - - - 72
1.
ノートパソコンとの接続
72
2. MacBook
または
Mac Book Air
と接続
72
3.
サウンドバーとの接続
72
4
. Fire TV Stick
と接続
73
5
.XBOX/PS4
と接続
73
アプリダウンロード
- - - - - - - - - - - - - - - - - - - - - - 73
言語設定
- - - - - - - - - - - - - - - - - - - - - - - - - - 74
その他の設定
- - - - - - - - - - - - - - - - - - - - - - - - -74
アプリケーション設定
74
出荷時リセット設定
74
日付と時刻の設定
- - - - - - - - - - - - - - - - - - - - - - - 75
システム
・
アップグレード
- - - - - - - - - - - - - - - - - - - -76
よくある質問
- - - - - - - - - - - - - - - - - - - - - - - - -76


JP
62
リモコン
電源ボタン
消音
マウス操作への
切り替え
ホームページ
メニュー
VOL+/-
OK ボタン
Airplay
Eshare
矢印キー
戻る
ご注意 : 使用前に単 4 電池 2 本(付属していません)をリモコンに挿入してくだ
さい。

JP
63
プロジェクターの仕様
Model No.: Q3
ディスプレイ技術 DLP 光源 LED
ソフトウェア
・
シス
テム
Android 11
プロジェクタータイ
プ
密閉型
取り付けタイプ
前面 / 背面が机上
前面 / 背面が天井
アスペクト比 16:9/4:3
製品サイズ 12cm*12cm*2.8cm 製品重量 350g
台形補正 自動垂直補正 フォーカス 手動
入力インターフェー
ス
HDMI/USB/3.5mm audio output
ビデオフォーマット H.264,H.265,Vp9,MPEG1,MPEG2,MPEG4,H.263,XVID,VP8,etc
音声フォーマット MP3.OGG,FLAC,APE, etc
画像フォーマット jpg,png,bmp,etc
JP
64
画像調整
1. フォーカス調整
2. 投影モード
3. 自動台形補正
装置左側のピニオンをスライドさせて、シャープネスを調整します。
[ 設定 ] メニューを選択し、[ ディスプレイ ] を選択し、[ 投影モード ] を選択し、
必要な投影位置を押し、[OK] を押して確定します。
4 つのモードがあります: 前面投射 / 背面投射 / 前面天井投射 / 背面天井投射。
[ 設定 ] メニューを選択し、[ ディスプレイ ] を選択し、[ 自動台形補正 ] を選択し、
[OK] を押して確定します。
プロジェクターは、長方形の画像を得るために垂直面を自動調整することができ
ます。傾斜角度は ±30°を超えない。
JP
65
手動台形補正
初期角度補正
[ 設定 ] メニューを選択し、[ ディスプレイ ] を選択し、[ 手動キーストーン ] を選
択し、[OK] を押して、最初に調整したいポイントを選び、次に矢印キーを押して、
下図のように必要な値 ( 水平および垂直 ±30° ) を設定します。
デバイスを水平面に置き、OK を押して補正します。
補正中は装置を動かさないでください。

JP
66
4. ズームモード
5. 明るさと色の調整
アスペクト比には 2 つのモードがある:16:9 または 4:3。
[ 設定 ] メニューを選択 -- [ ディスプレイ ] を選択 -- [ 明るさと色 ] を選択し、調
整したいオプションを選択します。
[ 設定 ] メニューを選択する -- [ ディスプレイ ] を選択する -- [ 画面スケーリング ]
を選択する -- [ 画面ズーム ] を選択する、投影画面を 50%~100% ズームすること
ができます、ボタン "
◀
" または "
▶
" を押して必要な値を設定します。

JP
67
6. その他の設定
ポインター速度
誤接触防止
[ 設定 ] メニューを選択 -- [ 一般 ] を選択 -- [ ポインタ速度 ] を選択し、"
◀
" また
は "
▶
" を押して、必要なマウスポインタの移動速度を調整します。
[ 設定 ] メニューを選択 -- [ 一般 ] を選択 -- [ タッチ設定 ] を選択し、必要な期間
を選択し、誤操作を防止します。

JP
68
プロジェクターの設定
入力信号ソースの選択
HDMI:ホームページの一番上にある" "を選択します。ビデオを再生するとき、
" " ボタンを押して、サウンドと再生モードを設定することができます。
JP
69
ワイヤレス接続
1. iOS システムの場合(Airplay)
注意 : デバイスとプロジェクターが同じホーム WiFi 内にある必要があります。
USB: デバイスは自動的に USB スティックを検出します。トップページの "APPS
" をクリックし、"File Maneger " を選択します。
JP
70
2.Android システム用(Miracast)
注意 : デバイスとプロジェクターが同じホーム WiFi 内にある必要があります。
1. プロジェクターのネットワーク設定をオンにします。
2. 接続するホーム WiFi を選択し、正しいパスワードを入力し、"OK " をクリック
します。
3. ホームページで "APPS " をクリックし、ページで "Miracast Receiver " を選択
する(またはリモコンの "E-share " ボタンを押して、"Android Wireless " を選択
します)。
4. モバイルデバイスの WiFi 設定をオンにして、同じホーム WiFi に接続します。
5. Android 携帯のワイヤレススクリーンミラーリング機能をオンにし、検索結果
から「Q3-7817」を選択して接続します。
6. 成功。
1. プロジェクターのネットワーク設定をオンにします。
2. 接続するホーム WiFi を選択し、正しいパスワードを入力し、" リンク " をクリ
ックします。一度接続すると、接続した WiFi のパスワードを記憶します。
3. モバイルデバイスの Wifi 設定をオンにして、同じホーム Wifi に接続します。
4. スマートフォンの「Airplay」または「Miracast」をクリックしてください。
5. 検索結果から "Q3-7817 " を選択して接続します。
6. 成功。
JP
71
3.Eshare
お使いの携帯電話をワイヤレスマウス、キーボード、リモコンとして使用し、大
画面のデバイスを操作する方法を変えます。
1. デバイスをホーム WiFi に接続します。
2. ブラウザを使って「https://h.eshare.app」にアクセスし、アプリをダウンロー
ドしてインストールします。
3. Eshare アプリを開き、「Q3-7817」をクリックして接続します。
Bluetooth 設定
Bluetooth スピーカーを接続
1. Bluetooth スピーカーをオンにします。
2 . 設定 ]--[Bluetooth] を選択し、プロジェクターの Bluetooth をオンにします。
3. 接続する Bluetooth スピーカーを選択します。
4. 成功。
JP
72
信号線接続
WiMiUS Q3 プロジェクターには、HDMI ポート /USB ポート /3.5mm ヘッドフォ
ン出力の 3 つのインターフェイスがあります。お使いのデバイス(PC、電話、
DVD プレーヤー、サウンドバー、USB、PS4 など)を接続するために、正しい接
続ポートを選択してください。
1. ノートパソコンとの接続
• プロジェクターと PC を HDMI ケーブルで接続します。
• メディア信号チャンネルを選択します :「HDMI 」を選択します。
2. MacBook または Mac Book Air と接続
3. サウンドバーとの接続
• メディア信号チャンネルを選択します :「HDMI」を選択します。
•MacBook との接続には Type-C - HDMI アダプタを、MacBook Air との接続に
は Mini Display - HDMI アダプタを使用します(アダプタは付属していません)。
• サウンドバーとの接続には、プロジェクター付属の 3.5mm オーディオケーブ
ルを使用します。
• プロジェクターとサウンドバーの電源を入れます。
• 詳細については、
JP
73
4. Fire TV Stick と接続
5.XBOX/PS4 と接続
• プロジェクターの HDMI ポートに TV スティックを接続します。
• メディア信号チャンネルを選択します :「HDMI」を選択します。
• メディア信号チャンネルを選択します : 「HDMI」を選択します。
•HDMI ケーブルで XBOX/PS4 と接続してください。
アプリダウンロード
• トップページの「APPS」をクリックし、ページ上の「App Store」を選択します。
1. App Store のトップページでダウンロードしたいアプリを選択します。
2. 検索バーでダウンロードしたいアプリを検索します。
Audio
out
AUX
port
JP
74
言語設定
その他の設定
アプリケーション設定
出荷時リセット設定
英語、フランス語、ドイツ語、イタリア語、スペイン語、日本語など、50 以上の
言語から選択できます。
•[ 設定 ] - [ システム ] - [ 言語 ] を選択し、必要な言語を選択します。
その他の設定メニューの中に、「アプリケーション設定」オプションがあります。
これをクリックすると、インストールされているすべてのアプリケーションが表
示され、設定することができます。
場所は以下の通りです: [ 設定 ] -- [ 一般 ] -- [ アプリ設定]。
- リセットし、すべてのデータを削除します。
場所 [ 設定 ] -- [ システム ] -- [ 出荷時リセット]。
JP
75
日付と時刻の設定
設定 機能
タイムゾーン タイムゾーンの選択
日付 現在の日付を選択
時刻 現在時刻を選択
システム情報
プロジェクターのソフトウェアのバージョン番号、製品番号、メモリなどの情報
を確認します。
JP
76
新しいソフトウェアが公開された場合、ローカルアップグレードまたはオンライ
ンアップグレードを選択できます。
システム
・
アップグレード
よくある質問
1. 黒い画面に映像が映らない、または青い画面で映像も音も出ない。
a. チャンネル設定は正しいですか?
b. 入力信号はありますか?
c. 入力ケーブルは正しく接続されていますか?
d.PC モードで、リフレッシュレートは 75KHz 以上ですか?
e. 入力デバイスがプロジェクターとうまく接続されていない。
2. 映像は正しいが、音が出ない。
a. 入力デバイスのドルビーをオフにしてください。
b. ビデオのデコードシステムは、プロジェクターによってサポートされていませ
ん。
3. しばらく作業すると自動オフになる。
a. プロジェクターの換気が妨げられている。
b. 電圧が安定していない。
c. 過熱保護システム。
4.WiFi 接続が不安定?

JP
77
a. お使いの携帯電話のネットワークが良好であるかどうかを確認してください。
b. 携帯電話とプロジェクターの距離を 1 メートル以内にしてください。
5. Bluetooth スピーカーと互換性がありませんか?
a. プロジェクターは Bluetooth スピーカーと互換性がない場合があります。
b. 私たちのアフターセールスの電子メールに連絡してください。
support01@
wimius.com
Bluetooth スピーカーのブランドとモデルをお知らせください。
6. 画像に黒い点または白い線が表示される。
すぐに私たちのアフターサービス [email protected]。
7. どのように調整しても画像がピンぼけするのはなぜですか?
a: 1) プロジェクターをスクリーンの中心に合わせる。2) オフセット角度が 15°以
内であること)自動台形補正または手動台形補正を使用して、長方形の画面表示
を実現する。3) マニュアルフォーカスを使用してレンズの焦点を調整できます。
8. アプリケーションをダウンロードするために、ウェブサイトに正常にアクセス
できませんか?
すぐに弊社のアフターサービスメールアドレス:[email protected] まで
ご連絡ください。
9. 注文がプラットフォームの返品期限を過ぎている場合はどうすればよいです
か?なぜ 24 時間経っても返信がないのですか?
A: WiMiUS のサポートチームは、お客様のご注文が返品期限を過ぎている場合で
も、迅速に解決策をご提案いたします。24 時間以内に返信がない場合は、時差や
迷惑メールフォルダに入っている可能性があります。お手数ですが、再度お問い
合わせください。

This device complies with Part 15 of the FCC Rules. Operation is subject to
the following two conditions:
(1)This device may not cause harmful interference, and
(2)This device must accept any interference received, including interfe
rence that may cause undesired operation.
Warning: Changes or modications not expressly approved by the party
responsible for compliance could void the user's authority to operate the
equipment.
NOTE: This equipment has been tested and found to comply with the limits
for a Class B digital device, pursuant to Part 15 of the FCC Rules. These
limits are designed to provide reasonable protection against harmful
interference in a residential installation. This equipment generates uses
and can radiate radio frequency energy and, if not installed and used in
accordance with the instructions, may cause harmful interference to radio
communications. However, there is no guarantee that interference will not
occur in a particular installation. If this equipment does cause harmful
interference to radio or television reception, which can be determined by
turning the equipment off and on, the user is encouraged to try to correct
the interference by one or more of the following measures: Reorient or
relocate the receiving antenna.
Increase the separation between the equipment and receiver.
Connect the equipment into an outlet on a circuit different from that to
which the receiver is connected.
Consult the dealer or an experienced radio/TV technician for help.
This equipment complies with FCC radiation exposure limits set forth for
an uncontrolled environment. This equipment should be installed and
operated with minimum distance 20cm between the radiator & your
body.
This device contains licence exempt transmitter(s)/receiver(s) that
comply with Innovation, Science and Economic Development Canada’s
licence exempt RSS(s). Operation is subject to the following two
conditions:
(1)This device may not cause interference.
(2)This device must accept any interference, including interference that
FCC Statement:
FCC Radiation Exposure Statement:

may cause undesired operation of the device.
L’émetteur/récepteur exempt de licence contenu dans le présent appareil
est conforme aux CNR d’Innovation, Sciences et Développement
économique Canada applicables aux appareils radio exempts de
licence. L’exploitation est autorisée aux deux conditions suivantes :
(1)L' appareil ne doit pas produire de brouillage;
(2)L' appareil doit accepter tout brouillage radioélectrique subi, même
si le brouillage est susceptible d' en compromettre le fonctionnement.
This equipment complies with IC exposure limits set forth for an
uncontrolled environment. This equipment shall be installed and operated
with minimum distance 20cm between the radiator & body.
Correct Disposal of this product
This marking indicates that this product should not be disposed with other
household wastes throughout the EU. To prevent possible harm to the
environment or human health from uncontrolled waste disposal, recycle it
responsibly to promote the sustainable reuse of material resources. To return
your used device, please use the return and collection systems or contact
the retailer where the product was purchased. They can take this product for
environmental safe recycling.

We (Manufacturer is responsible for this declaration)
Ekoo Electronic Co.,Ltd.
(Company name)
B09,block B,f2,bldg.b,runfeng Pioneer Park,no.973, minzhi Avenue, Minzhi St., Longhua,
Shenzhen, CN
(Company address)
declare under our sole responsibility that the product
Trade name: WIMIUS
Equipment: Entertainment Projector
Model No. : Q3
to which this declaration relates is in conformity with the essential requirement set out in
the Council Directive on the Approximation of the laws of the Member States relating to RED
Directive(2014/53/EU) & RoHS(2011/65/EU) product is responsible to afx CE marking, the
following standards were applied:
EN 62368 1:2014+A11:2017
EN IEC 62311:2020
ETSI EN 301 489 1 V2.2.3(2019 11)
ETSI EN 301 489 17 V3.2.4(2020 09)
EN 55032:2015
EN 55035:2017
EN 61000 3 2:2019
EN 61000 3 3:2013+A1:2019
ETSI EN 300 328 V2.2.2(2019 07)IEC62321 3 1:2013
IEC62321 4:2013
IEC62321 5:2013
IEC62321 6:2015
IEC62321 7 1:2015
IEC62321 7 2:2017
IEC62321 8:2017
Full Name: George.wang Position: Approbation Manager
Signature: George.wang Place/Date: Shenzhen, China/June 05 2024
Declaration of Conformity