
1 2 3 4
5 6 7 8 9 10 11 12
13 14 15 16 17 18 19 20
21 22 23 24 25 26 27 28
29 30 31 32 33 34 35 36
37 38
L
3
Ultra HD
Waterproof 30m
2.45” LCD Screen
Gyro Stabilization
Touch Screen

1 2 3 4
5 6 7 8 9 10 11 12
13 14 15 16 17 18 19 20
21 22 23 24 25 26 27 28
29 30 31 32 33 34 35 36
37 38
Any problem,please feel free to contact us:
Email:[email protected]
Website:http://www.wimius.com/support.html
Facebook:https://www.facebook.com/wimiusocial/
Allen Probleme bezüglich des Produkts können Sie uns kontaktieren:
Email: [email protected]
Website: http://www.wimius.com/support.html
Facebook: https://www.facebook.com/wimiusocial/
Si vous avez le souci sur le produit, n’hésitez pas à nous contacter :
E-mail: [email protected]
Site Internet: http://www.wimius.com/support.html
Facebook: https://www.facebook.com/wimiusocial/
なにか不明な点などがございましたら、お気軽にお問い合わせ下さい:
Eメ ー ル: [email protected]
ウェ ブ サ イ ト: http://www.wimius.com/support.html
Facebook: https://www.facebook.com/wimiusocial/
Contact us
1
Notes
1. Please do not use in > 65 ℃ high temperature / < - 20 ℃ low temperature
environment.
2. Keep it away from any strong magnetic interference objects like electrical machine
or image quality.
3. Do not contact the liquid or wipe directly with wet cloth.
4. Pay attention to fasten the waterproof case when used underwater.
5. Please keep the camera and accessories in a dry, cool and clean environment.
6. Do not place the camera down or contact the rough surface to prevent scratches.
7. Do not remove the machine without authorization.
8. Please do not use the camera and accessories for children under 5 years of age.
9. Please charge in a place where children are not accessible.
10. We recommend using high quality Micro SD Card for the best results.
11. Don’t place your Micro SD card near strong magnetic objects to avoid data error.
2
Introduction
Thank you so much for purchasing our touch screen action camera of L3. The camera is a
wide variety of the leading features for digital video recording, photo shooting, audio recording
with touch screen and detachable battery. Best suitable for vehicle recording, outdoor sports, home
security, diving and more related activities, allowing you to enjoy the moments while capturing
every scene anytime and anywhere.
To obtain the best performance, please read this manual carefully before using. The information
contained in this manual, including pictures and words, is subject to change without notice.
Product Features
2. 2.45 inch HD touch widescreen display for convenient capture and image playback.
3. 1000mAh removable battery for easy replacement to a longer life.
4. 170 degrees wide angle lens in 12 megapixels.
5. 6 axis gyroscope anti shake technology.
6. HDMI Output.
7. Proprietary underwater shooting mode.
8. Supports Micro SD card, up to 64GB. (Please make sure that 64GB memory card has been
formatted on the camera before use.)
9. Kinds of video recording resolution: 4K, 2K, 1080P, 720P, VGA.
10. MP4 format video recording, H.264 compression format.
11. Supports WIFI connection.
EnglishEnglish
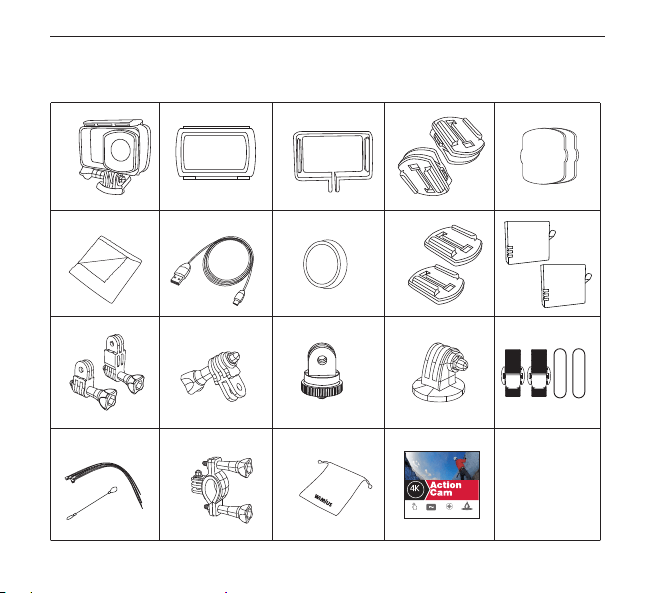
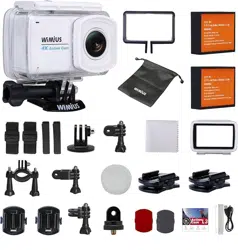
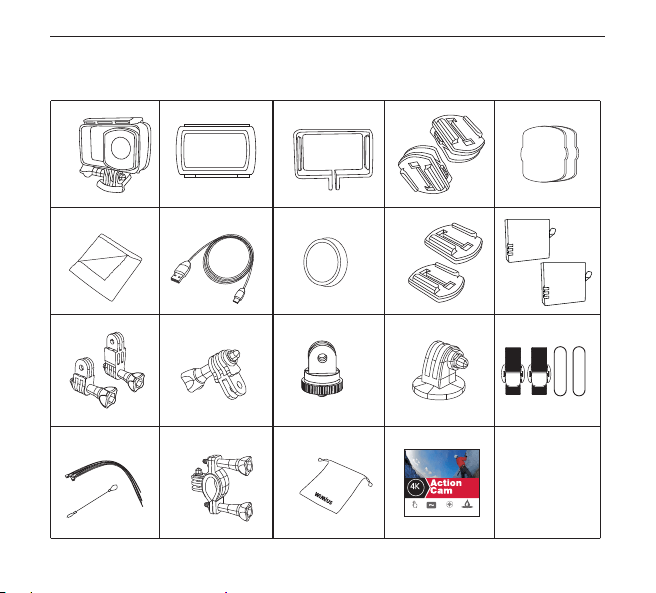
Accessories
English
1 3 4
5 6 7 8 9 10 11 12
13 14 15 16 17 18 19 20
21 22 23 24 25 26 27 28
29 30 31 32 33 34 35 36
37 38
L
3
Ultra HD
Waterproof 30m
2.45” LCD Screen
Gyro Stabilization
Touch Screen
4
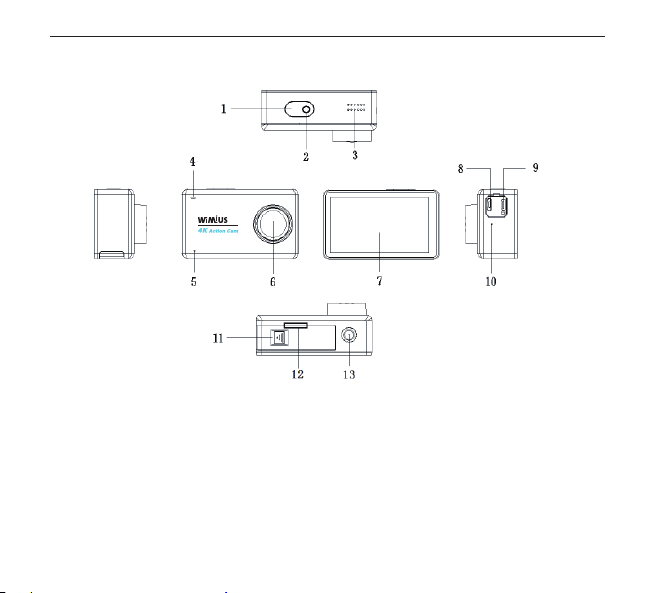
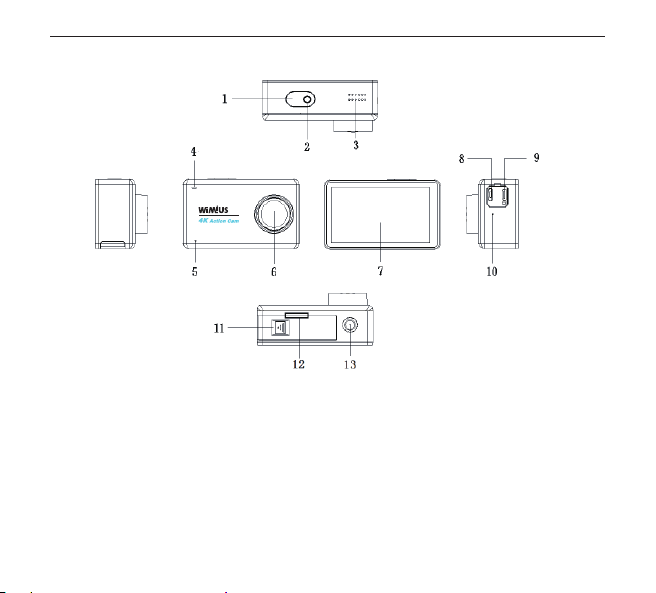
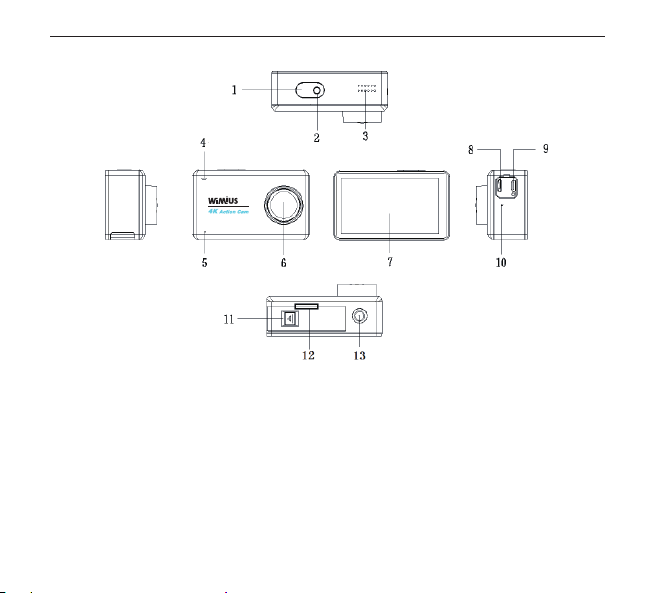
Camera Schematic
1.Shutter/Power Button 2. Video Indicator 3. Speaker
4. Working / Charging Indicator 5. MIC 6. Lens
7. Touch Screen 8. Micro USB Interface 9.HDMI Interface
10. MIC 11. Battery Cover Switch
12. Micro SD Card Slot (need to open the battery cover) 13. 1/4” Screw Hole
English
1 2 4
5 6 7 8 9 10 11 12
13 14 15 16 17 18 19 20
21 22 23 24 25 26 27 28
29 30 31 32 33 34 35 36
37 38
5

Start your motion DV
1. Insert an SD card in the slot (it is recommended to adopt the high-speed Micro SD
card with class 10 or above).
2. Insert the battery in the belt and close the battery cover
3. Long press Power/Mode key 3s, the motion DV screen will appear
4. Recommend to format the Micro SD card in camera (note that this operation will
result in loss of all information in SD card)
English
Basic Operation
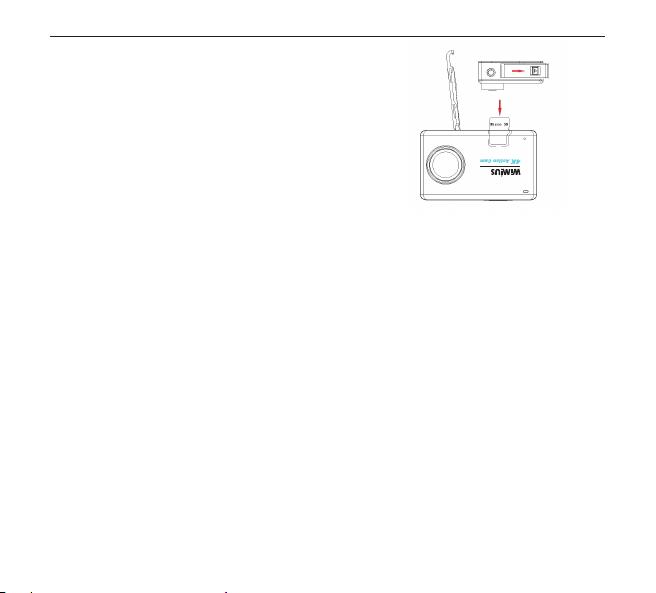
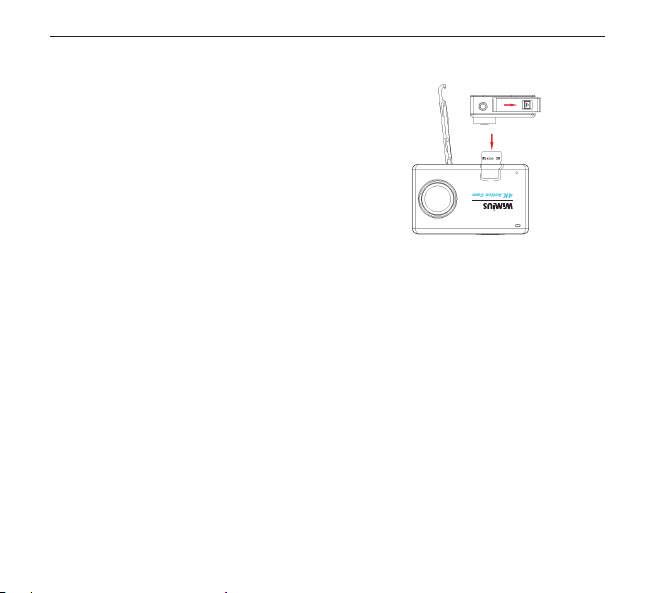
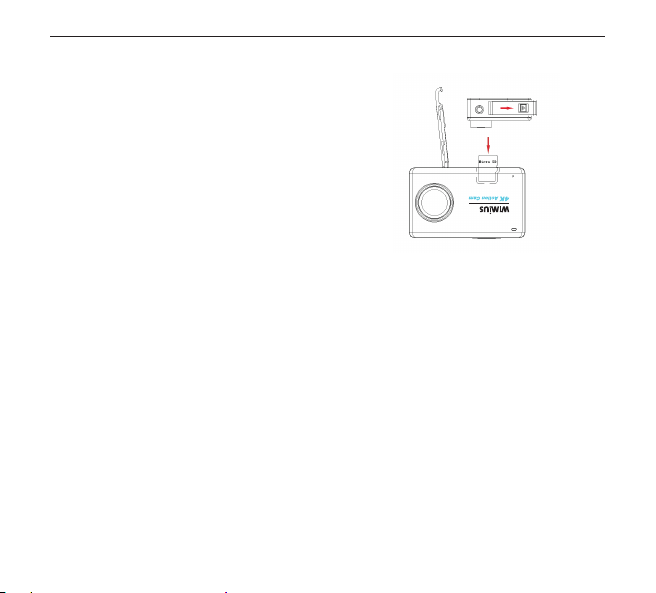
1. Inserting Micro SD Card
A. Push the battery cover switch in accordance with the
direction of the arrow to open it. You will see the Micro SD
card slot and then insert the card as the picture shown.
B. Note: Please choose a branded Micro SD card, and then
format it with the computer before use. We suggest a
high quality memory card for the perfect result.
2. Charging the Battery
A. You can recharge the camera by connecting it directly to the computer (Not including) or with the
power adapter (Not in the package).
B. The camera can record the video and take photos while charging.
C. The camera can be charge even the power is o.
D. When charging, the charging indicator will be on. And the indicator will be o when it is full charged.
3. Power on / o
A. Press the Power button for 1 second to turn it on.
B. Press and hold the Power button to switch o.
4. Capture Videos and Photos
A. In the video mode, press the Shutter button to record videos and press it again to stop. The video
indicator will be ash while the video is recording.
B. In the photo mode, press the Shutter button to take a photo.
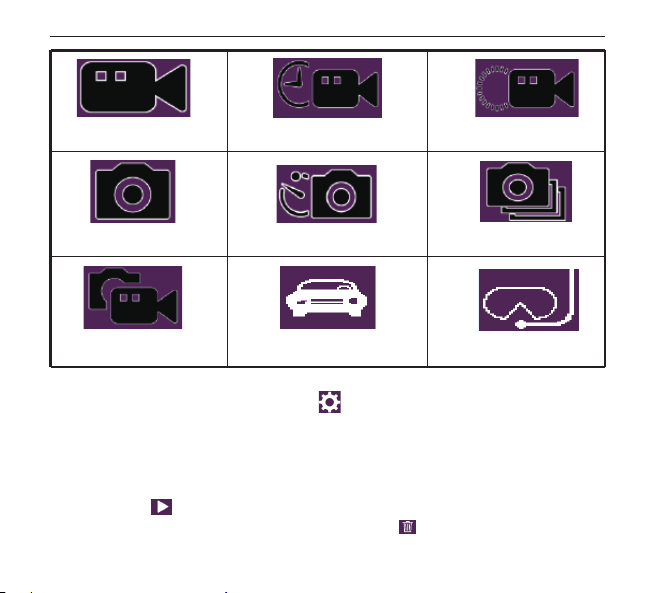
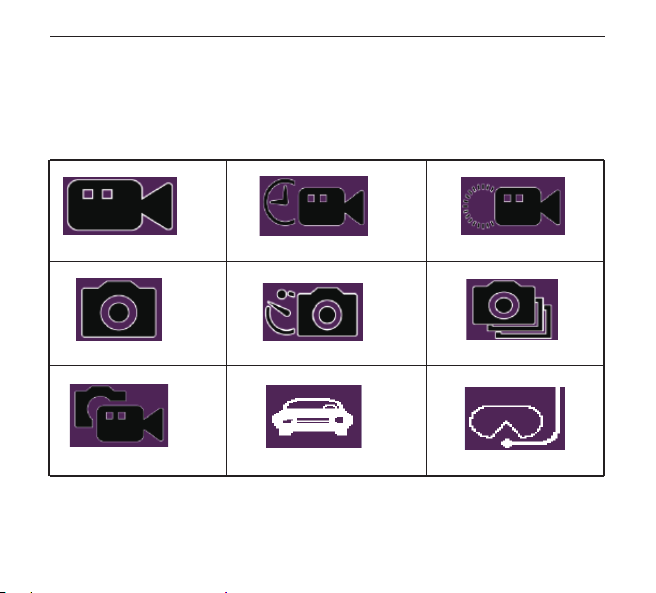
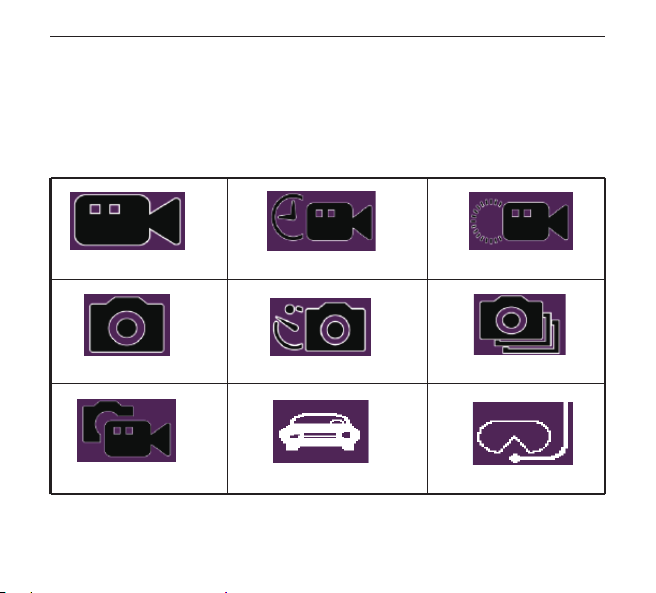
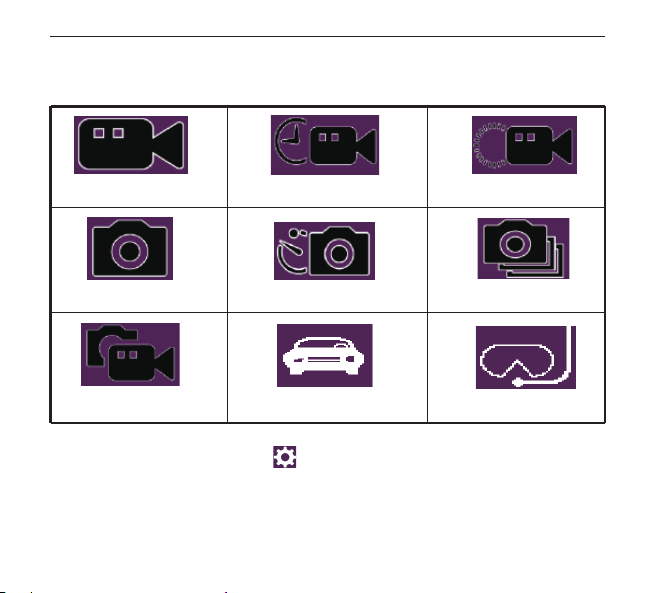
5. Switching Mode
Power on the camera, there are 9 shooting modes can be selected by touching the middle of the
bottom screen.
Video + Photo: With Photo Lapse Time setting, press the Shutter button to start recording video. In
the meanwhile, the camera will take a photo automatically according to the interval until video
recording is stopped.
English
1 2 3
5 6 7 8 9 10 11 12
13 14 15 16 17 18 19 20
21 22 23 24 25 26 27 28
29 30 31 32 33 34 35 36
37 38
7
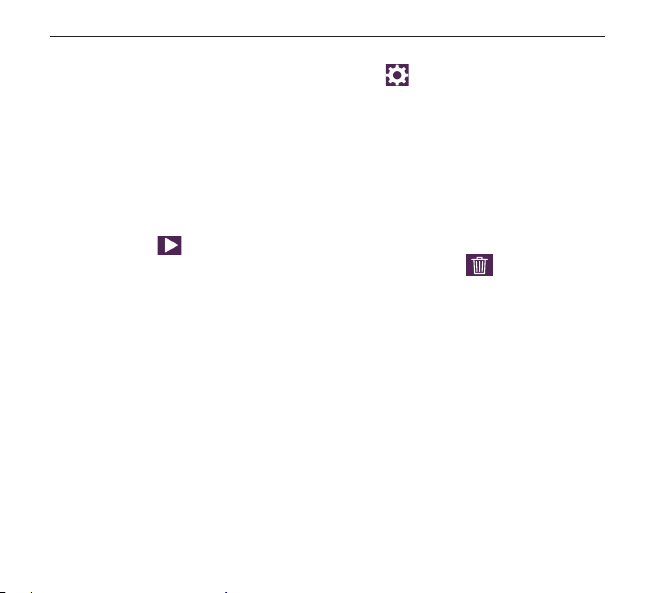
6. Settings
A. Turn the camera on and click on settings icon in the lower-right corner of the screen to enter
the settings menu.
B. In the settings menu, you can set in the dierent shooting mode and the submenu will dier.
C. Shooting mode setting: includes resolution, white balance, color, ISO and exposure, etc.
D. System setting: includes date/time, language, format and screen save, etc.
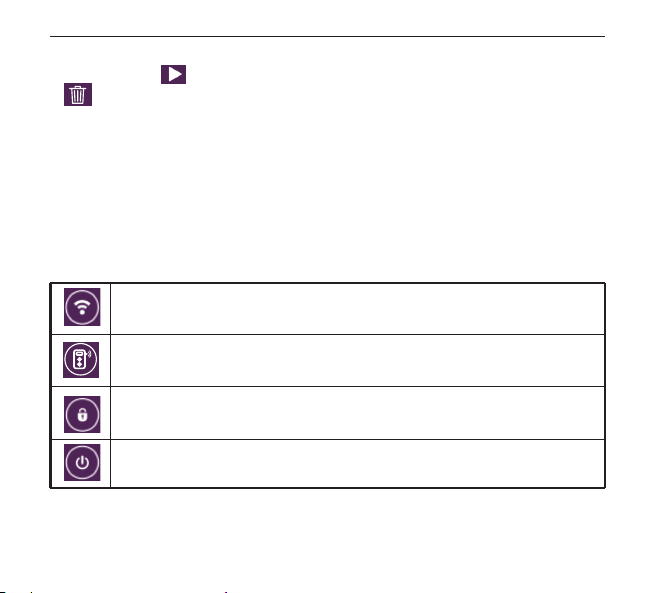
7. Playback
Click on the icon in the bottom-left corner of the screen and you can go into the playback
mode. Also, you can delete the current le by clicking the icon .
Normal Video
Normal Photo
Video + Photo Car mode Aqua mode
Photo lapse Sequence
Time-lapse record Slow motion
English
1 2 3 4
6 7 8 9 10 11 12
13 14 15 16 17 18 19 20
21 22 23 24 25 26 27 28
29 30 31 32 33 34 35 36
37 38
8
8. Data Storage
A. It can be connected to a computer with a Micro USB cable. The screen will show “Mass Storage”
and “PC Camera”. Select the Mass Storage mode and enter into the removable disk, then you can
copy or delete les on the computer.
B. You can also take the Micro SD card out, and use the card reader to replay or operate les.
9. Shortcut Key
In the shooting mode interface, there will be a shortcut menu coming out by sliding down from the
upper screen with your nger.
10. WIFI Connection
Step 1: Download and install the APP named “WIMIUS CAM Pro” on the phone or tablet (Android
system can be searched on the Google Play and IOS system can be searched from the APP Store.)
Step 2: Power on the camera and turn on WIFI. The camera screen will display the WIFI icon
and then the SSID and password will show as following:
SSID: WIMIUS
Password: 123456789
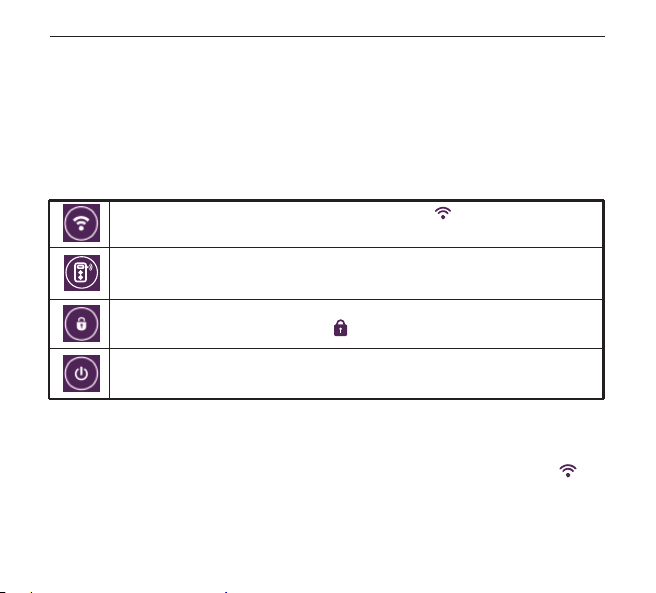
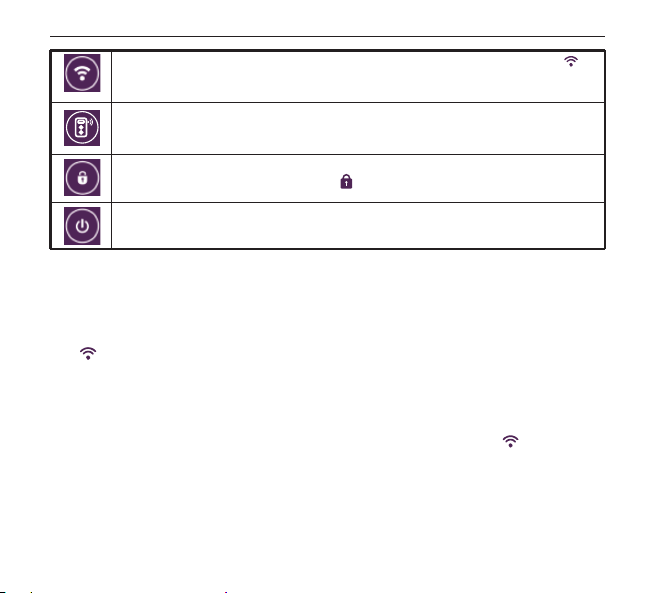
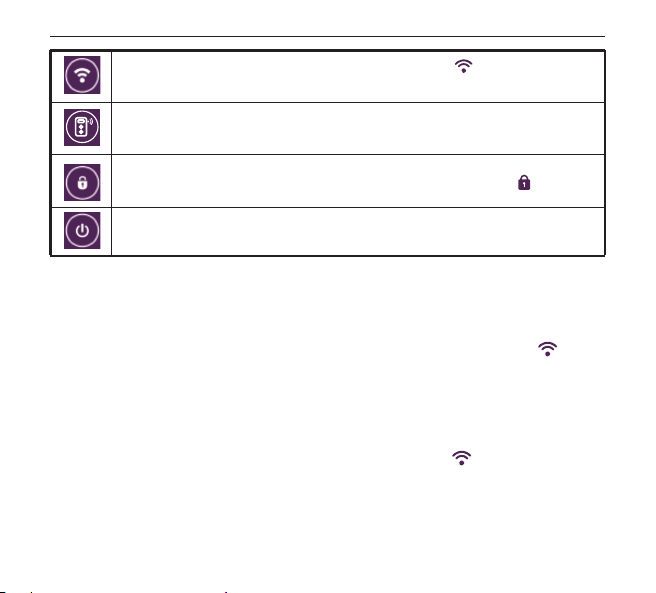
WIFI OFF / ON: Click to turn on WIFI. You will see the icon on the screen and wait
for a few seconds, the SSID and password will show.
Remote Controller (Not in the package) Connection: By default, the remote controller
is disconnected. Click to connect with the camera.
Screen Lock: Click to lock screen and the screen will be o. Press the Power button to
wake up the screen and click the icon to unlock.
Shutdown: Click and select to power o the camera.
English
1 2 3 4
5
7 8 9 10 11 12
13 14 15 16 17 18 19 20
21 22 23 24 25 26 27 28
29 30 31 32 33 34 35 36
37 38
9
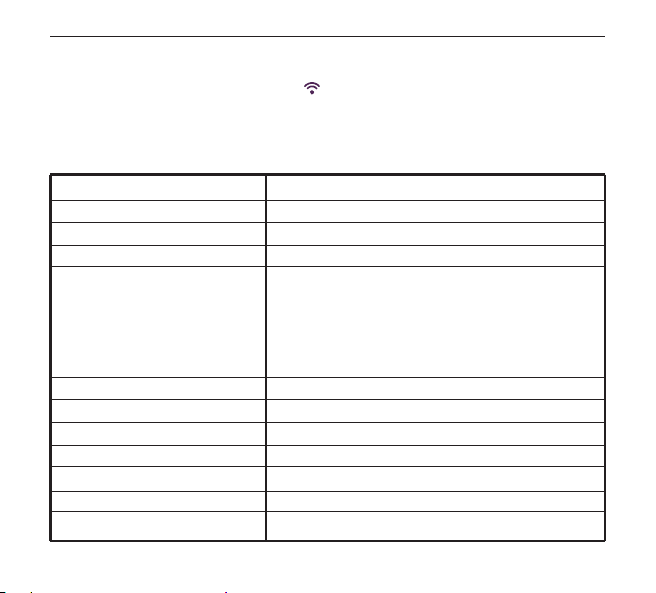
Specications
Step 3: Turn on WIFI search on your phone or table PC. Search the camera’s WIFI account and input
the initial password. Then click to link. After the connection is successful, it comes back to the
interface of shooting mode and the WIFI icon will be show inthe lower-leftcorner.
Step 4: After successful connection, open the APP "WIMIUS CAM Pro" on your phone for the
corresponding operation or image sharing.
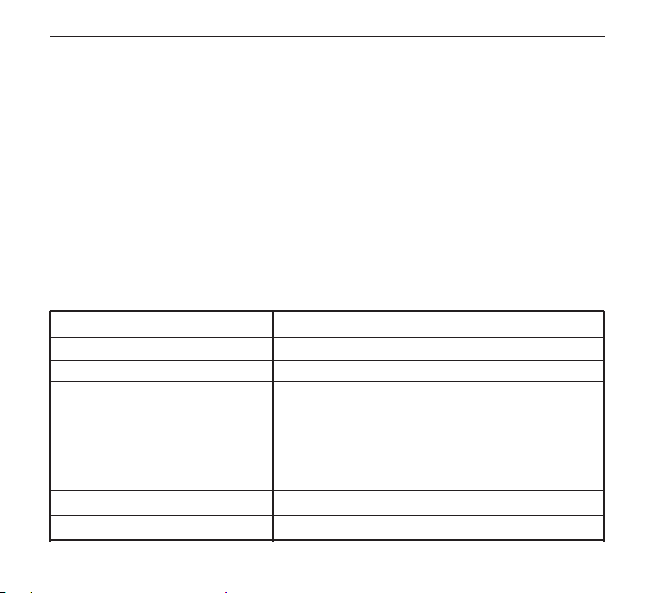
WIMIUS L3
Sony IMX078, 12 mega pixels
170°A+ high resolution wide angle lens
2.45 inch LCD touch screen
4K (3840*2160) 24FPS
2K (2560*1440)30FPS
1080P (1920*1080) 60/30FPS
720P (1280*720) 120/60/30FPS
VGA (640*480) 240FPS
16M / 14M / 12M / 10M / 8M / 5M
Normal video / Time-lapse record / Slow motion
1s / 5s / 10s / 30s / 1min
-2X / -4X / -8X
Normal Photo / Photo Lapse / Sequence
2s timer / 5s timer / 10s timer / 20s timer
Burst 3 / Burst 5 / Burst 10
Model
Sensor
Lens
Screen
Photo Resolution
Video Mode
Time-lapse Record
Slow Motion
Photo Mode
Self Timer
Burst
Video Resolution
English
1 2 3 4
5 6
8 9 10 11 12
13 14 15 16 17 18 19 20
21 22 23 24 25 26 27 28
29 30 31 32 33 34 35 36
37 38
10
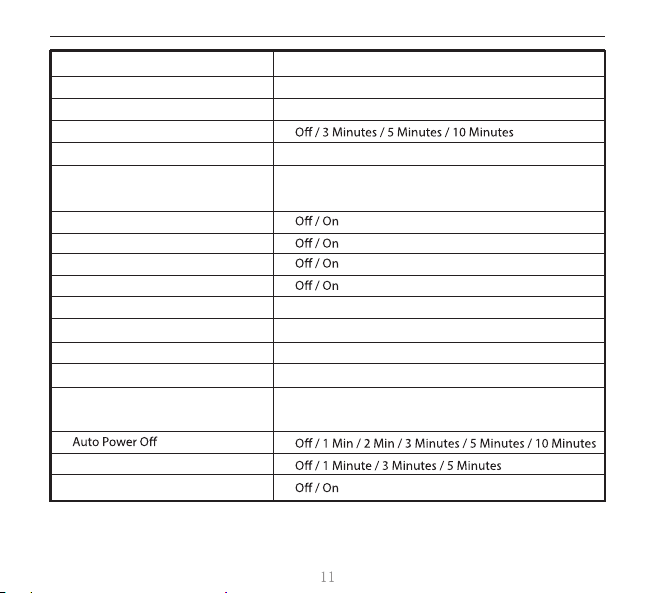
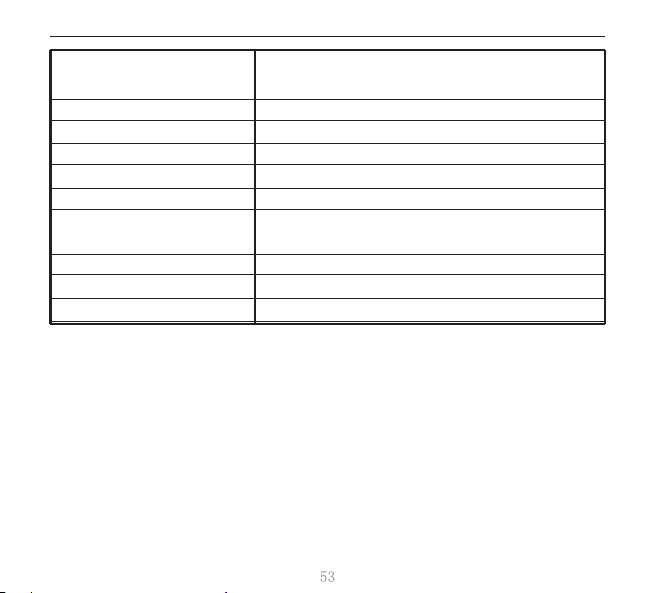
5s / 10s / 30s / 1min
MP4 / H.264
JPG
Wide / Medium / Narrow
Micro SD card, up to 64GB (Must format 64GB memory
card on the camera before use.)
50 Hz / 60 Hz
Auto / Daylight / Cloudy / Tungsten / Fluorescent
Color / Black & White / Sepia
Auto / 100 / 200 / 400 / 800 / 1600
-2.0,-5/3,-4/3,-1.0,-2/3,-1/3,+0.0,+1/3
,
+2/3,+1.0,+4/3,+5/3,+2.0
Photo Lapse Time(Video + Photo)
Video / Compression Format
Picture Format
Loop Recording
Field of View
Motion Detection
Power On Record
RSC
WDR
Frequency
White Balance
Color
ISO
Screen Save
Image Rotation
Exposure
Storage
English

USB 2.0, 5 Pin USB
Support (The remote controller is option.)
English / French / German / Spanish / Italian /
Portuguese / Simple Chinese / Japanese / Traditional
Chinese / Russian
Waterproof 30M with waterproof case
Windows XP /Mac OS
3.7V 1000mAh rechargeable battery
USB
2.4G Remote Control
Waterproof Standard
Operating System
Battery
Language
English
1 2 3 4
5 6 7 8
10 11 12
13 14 15 16 17 18 19 20
21 22 23 24 25 26 27 28
29 30 31 32 33 34 35 36
37 38
12

FAQ(Frequently Asked Questions)
1. The camera cannot be turned on:
A. Long press power button 3s
B. Remove the battery, reload and restart
C. Format the SD card and restart it
D. Please charge the battery
2. Video cannot be recorded
A. Check the SD card has been inserted or not
B. Remove the battery, reload and restart
C. Format the SD card on the camera and restart it
3. Fast Battery power consumption
A. Check the battery for any apparent damage. If there is any damage or deformation,
please replace the battery.
B. When a camera works under water or in a high temperature/low temperature
environment, it is normal to consume electricity quickly due to pressure and
temperature.
English

4. The camera cannot identify the SD card
A. Check the SD card is damage or not
B. Remove the battery, reload and restart
C. Replace the SD card (recommended class10) and restart it
D. Format the SD card by computer
5. The camera WIFI can’t be connected to the phone
A. Check the camera WIFI function is enabled or not
B. Check the SSID or the password that connects to WIFI is correct or not
C. Replace your phone with WIFI
D. Try to connect to WIFI after you restart the camera
E. Resume to default setting
6. The camera can’t be connected to the phone APP
A. Check the APP is open or not
B. Update APP for the latest version
C. Try to connect the APP after you restart the camera
D. Resume to default setting
English

Deutsh
Kenntnisnahme
1. verwenden Sie nicht> 65 ℃ hohe Temperatur / <- 20 ℃ niedrige Temperatur
Umgebung.
2. Von starken Magnetfeldern (wie Motoren) fernhalten.
3. Halten Sie bitte die Kamera von der Flüssigkeit fern, wischen Sie sie nicht direkt mit
einem feuchten Tuch ab.
4.Stellen Sie bitte sicher, dass das wasserdichtes Gehäuse vor dem Tauchen oder
Schnorcheln fest zugeschlossen.
5. Lagern Sie die Kamera und deren Zubehör in einer trockenen, kühlen, staubfreien
Umgebung.
6. Lassen Sie bitte die Linse der Kamera nicht nach unten Legen, wodurch die Linse
sich aufgekratzt werden könnte.
7. Zerlegen Sie sich diese Kamera bitte nicht.
8. Kinder, die unter dem Alter von 5 sind, dürfe diese Kamera und die mitgelieferte
Zubehöre nicht verwenden.
9. Legen Sie die Kamera beim Auaden in einen Ort, in dem die Kindern die Kamera
nicht zu leicht erreichen können.
10. Eine hochwertige Micro SD Karte, die mindestens eine 10 Klass ist, ist sehr
empfehlenswert.
11. Verlassen Sie Ihre Micro SD-Karte nicht in einer starken magnetischen Umgebung,
um Datenfehler zu vermeiden.
Einführung
Vielen Dank dafür, dass Sie bei uns die L3 Action Kamera mit Touch Bildschirm gekauft haben. Die
beinhaltet viele führenden Funktionen, z.B, Videoaufnahme, Fotograf, Audioaufzeichnung mit Touch
Bildschirm und abnehmbarer Batterie. Unser Gerät ist geeignet für Verkehrsmittel-Rekorder,
Outdoor-Aktivitäten, Sicherheit beim Zuhause, Fahren und alle relativen Aktivitäten. Sie können
Ihre Zeit genießen, während Sie irgendwo und irgendwann Foto machen.
Um das beste Performance zu haben, bitte Lesen Sie diese Bedienungsanleitung vor dem Benutzen.
Die Information und die Zeichnungen können verändert werden.
Produkt Funktionen
1. Mit dem wasserdichten Gehäuse, können Sie Unterwasser 30 Metern aufnahmen.
2. 2.45 inch HD touch weiter Bildschirm für Wiedergabe.
3. 1000mAh abnehmbare Batterie für leicht Herausnehmen, um lange Zeit zu benutzen.
4. 170 Grad weit Winkel Linse in 12 Megapixel
5. 6 Achse Gyroskop gegen Schütteln.
6. HDMI Ausgang.
7. Geeignete Shooting Modus.
8. Unterstützt Micro SD Karte bis zu 64 GB(Max). (Wenn Sie 64GB Speicherkarte benutzen,
formatieren Sie vor dem Gebrauch die Karte auf die Kamera zuerst, sonst kann die Karte nicht
funktioniert werden.)
9. Sorte von Videoaufnahme Resolution: 4K, 2K, 1080P, 720P, VGA.
10. MP4 Format Videoaufnahme, H.264 Kompression Format.
Deutsh

Zubehör
Deutsh
1 2 3 4
5 6 7 8 9 10
12
13 14 15 16 17 18 19 20
21 22 23 24 25 26 27 28
29 30 31 32 33 34 35 36
37 38
L
3
Ultra HD
Waterproof 30m
2.45” LCD Screen
Gyro Stabilization
Touch Screen
17
Kamera Schaubild
1.Shutter/Power-Taste 2. Video Anzeige 3. Sprecher
4. Arbeit / Auaden Anzeige 5. MIC 6. Linsen
7. Touch Bildschirm 8. Micro USB Schnittstelle 9.HDMI Schnittstelle
10. MIC 11. Batterie Deckung Schalterhalle
12. Micro SD Karte Steckplatz (zuerst die Deckung der Batterie önen)
13. 1/4” Schraube Loch
Deutsh
1 2 3 4
5 6 7 8 9 10 11
13 14 15 16 17 18 19 20
21 22 23 24 25 26 27 28
29 30 31 32 33 34 35 36
37 38
18

Beginnen die Kamera zu benutzen
1,Eine SD-Karte in den Kartenschlitz einzusetzen (eine Klasse 10 oder mehr höhere
High-Speed-Micro-SD-Karte ist sehr empfehlenswert)
2,Einen der mitgelieferte Akkus in den Akkufach einzusetzen und dann den
Akkufachdeckel zuzuschließen
3, Den Knopf"An/Aus" oder "Mode" für etwa 3-4s zu drücken, bis die Boot screen auf
dem Bildschirm der Kamera angezeigt wird.
4, Wir empfehlen, die Speicherkarte in der Kamera zu formatieren(Achtung: diese
Handhabung könnte das verusachen, dass alle Dateien in der Speicherkarte gelöscht
wird)
Deutsh
Grundlegende Bedienung
1. Micro SD Karte einstecken
A. Drücken Sie bitte die Taste, um die Batterie-Deckung
zu önen. Dann können Sie den Micro SD Karte
Steckplatz sehen. Stecken bitte die Karte ein wie die
Zeichnung zeigt.
B. Notiz: Bitte benutzen Sie eine Karte mit Marke, und
formatieren Sie die Karte auf Computer vor dem
Benutzen. Wir empfehlen eine Karte mit High-Qualität
für Ihr Genossen. Wenn Sie 64GB Speicherkarte
benutzen, formatieren Sie vor dem Gebrauch die Karte
auf die Kamera zuerst, sonst kann die Karte nicht
funktioniert werden.
2. Die Batterie auaden
A. Sie können die Kamera mit dem Computer verbinden, um aufzuladen. Oder Sie können Ihre
Kamera mit Stromadapter auaden(nicht incl.)
B. Beim Auaden können Sie auch Foto machen und Video aufnehmen.
C. Wenn die Batterie ganz leer ist, können Sie die Kamera auch auaden
D. Beim Auaden beleuchtet die Anzeige. Wenn die Kamera voll aufgeladen ist, geht die Anzeige aus.
3. Einschalten / Ausschalten
A. Drücken Sie die Taste für ein Sekund, um die Kamera einzuschalten.
B. Drücken und halten Sie die Taste, um die Kamera auszuschalten.
4. Video aufnehmen und Foto machen
A. Beim Video Modus drücken Sie die Verschluss Taste, um Video aufzunehmen. Drücken Sie noch
mal zu stoppen. Die Video Anzeige glimmert bei Videoaufnahme.
B. Beim Foto Modus drücken Sie die Verschluss Taste zu photographieren .
Deutsh
1 2 3 4
5 6 7 8 9 10 11 12
14 15 16 17 18 19 20
21 22 23 24 25 26 27 28
29 30 31 32 33 34 35 36
37 38
20
5. Wechsel Modus
Wenn die Kamera ist eingeschaltet, gibt es 9 Modus zu shooting. Beim Touch an der Mitte des
Bildschirm kann man das Modus wählen.
Video + Foto: Bei Einstellung des Fehlertritts des Fotos drücken Sie die Verschluss Taste, um
Videoaufnahme zu anfangen. Gleichzeitig macht die Kamera automatisch ein Foto nach dem
Intervall, bis zum Ende der Videosaufnahme.
Normal Video
Normal Foto
Video + Foto Car mode Aqua mode
Foto laps
Sequenz
Zeitraer Zeitlupe
Deutsh
1 2 3 4
5 6 7 8 9 10 11 12
13
15 16 17 18 19 20
21 22 23 24 25 26 27 28
29 30 31 32 33 34 35 36
37 38
21

6. Einstellungen
A. Schalten Sie die Kamera ein und drücken Sie die Einstellung Taste in der unten rechts Ecke
des Bildschirms, so können Sie einstellen.
B. In Einstellung Menü können Sie verschiedene shooting Modus einstellen. Das Untermenüs ist
auch unterschiedlich.
C. Shooting Modus Einstellung: Resolution, weiß Balance, Farbe, ISO und Belichtung, usw.
D. System Einstellung : Tag/Zeit, Sprache, Format und Bildschirm Sparen, usw.
7. Wiedergabe
Drücken Sie die Taste in der links Ecke des Bildschirms. Dann kommt es zum Wiedergabe
Modus. Mit einem Druck auf diese Taste können Sie die Daten löschen.
8. Dateien Lagerung
A. Mit einer Micro USB Kabel kann man die Kamera mit dem Computer verbinden. Beim Bildschirm
zeigt es “Mass Storage” und “PC Camera”. Wählen Sie Mass Storage Modus. Dann kommt es zu
abnehmbarer Diskette. Dann könne Sie die Daten löschen oder eine Kopie machen auf dem
Computer.
B. Sie können auch die Micro SD Karte ausnehmen, mit dieser Karte können Sie die Daten lesen oder
behandeln.
9. Short-Cut Taste
In der Schnittstelle des shooting Modus kommt es Short-cut Menü vor , wenn Ihr Finger auf dem
Bildschirm rutscht.
Deutsh
1 2 3 4
5 6 7 8 9 10 11 12
13 14
16 17 18 19 20
21 22 23 24 25 26 27 28
29 30 31 32 33 34 35 36
37 38
22
10. WIFI Verbindung
Schritt 1: Das APP “WIMIUS CAM Pro” herunterladen und auf das Handy oder Laptop installieren
(Android System in Google Play und IOS System in APP Store.)
Schritt 2: Schalten Sie die Kamera ein und mit wi verbinden. Im Bildschirm der Kamera zeigt es WIFI
Icon , SSID und Code zeigen wie im Folgenden:
SSID: WIMIUS
Code: 123456789
Schritt 3: auf Ihr Handy oder Laptop Wi recherchieren. Finden Sie den Wi Account der Kamera
und geben Sie den Code ein. Dann verbinden mit einem Druck. Nach der Verbindung kommt es
zurück zu der Schnittstelle des Shooting Modus. Und Sie bekommen WIFI Symbol in der rechts
unten Ecke des Bildschirms.
Schiritt 4: Nach der Verbindung önen Sie das APP " WIMIUS CAM Pro" auf Ihr Handy für weitere
Bedienung und Fotos oder Videos einteilen.
WIFI OFF / ON: Drücken Sie das Icon, um Wi zu verbinden. Sie können das Icon
auf dem Bildschirm sehen. Warten Sie bitte einige Sekunde, dann komme SSID und
password vor.
Fernbedienung (Nicht in der Packung)Verbindung : In der Standardeinstellung ist
Fernbedienung und die Kamera nicht angeschlossen. Drücken Sie die Taste, um zu
verbinden.
Bildschirm sperren: Drücken Sie das Icon, um Bildschirm zu sperren. Drücken Sie die
Strom Taste, dann drücken Sie das Icon wieder, um den Bildschirm zu entsperren.
Ausschalten: Drücken und wählen, um die Kamera auszuschalten.
Deutsh
1 2 3 4
5 6 7 8 9 10 11 12
13 14 15
17 18 19 20
21 22 23 24 25 26 27 28
29 30 31 32 33 34 35 36
37 38
23

Specications
Sony IMX078, 12 Megapixel
170 ° A + hochauösendes Weitwinkelobjektiv
2.45 inch LCD touch screen
4K (3840*2160) 24FPS
2K (2560*1440)30FPS
1080P (1920*1080) 60/30FPS
720P (1280*720) 120/60/30FPS
VGA (640*480) 240FPS
16M / 14M / 12M / 10M / 8M / 5M
Normal video / Zeitraer / Zeitlupe
1s / 5s / 10s / 30s / 1min
-2X / -4X / -8X
Normales Foto / Foto Lapse / Foro Burst
2s timer / 5s timer / 10s timer / 20s timer
Burst 3 / Burst 5 / Burst 10
5s / 10s / 30s / 1min
MP4 / H.264
JPG
Aus / 3 Minuten / 5 Minuten / 10 Minuten
Breit / mittel / schmal
Sensor
Linsen
Bildschirm
Fotoauösung
Video Modus
Zeitraer
Zeitlupe
Foto Modus
Self Timer
Foto Burst
Foto Lapse Time(Video + Photo)
Video / Komprimierungsformat
Bildformat
Loop Aufnahme
Sichtfeld
Video Resolution
Deutsh
1 2 3 4
5 6 7 8 9 10 11 12
13 14 15 16
18 19 20
21 22 23 24 25 26 27 28
29 30 31 32 33 34 35 36
37 38
24

Micro SD Karte, bis zu 64GB (Vor dem Gebrauch
muss die 64GB Speicherkarte auf der Kamera
formatiert werden.)
Aus/an
Aus/an
Aus/an
Aus/an
50 Hz / 60 Hz
Auto / Tageslicht / Bewölkt / Wolfram / Fluoreszenz
Farbe / Schwarz & Weiß / Sepia
Auto / 100 / 200 / 400 / 800 / 1600
-2.0,-5/3,-4/3,-1.0,-2/3,-1/3,+0.0,+1/3,
+2/3,+1.0,+4/3,+5/3,+2.0
Aus / 1 Min / 2 Min / 3 Minuten / 5 Minuten /
10 Minuten
Aus / 1 Minute / 3 Minuten / 5 Minuten
Aus/an
USB 2.0, 5 Pin USB
Unterstützung (Die Fernbedienung ist optional.)
Bewegungserkennung
Power On Record
RSC
WDR
Frequenz
Weiß Balance
Farbe
ISO
Bildschirm sperren
Bild Rotation
USB
2.4G Fernbedienung
Belichtung
Lagerung
Deutsh
Auto Ausschalten
Englisch / Französisch / Deutsch / Spanisch / Italienisch /
Portugiesisch / Einfach Chinesisch / Japanisch /
Traditionelles Chinesisch / Russisch
Wasserdicht bis zu 30M mit wasserdichtem Gehäuse
Windows XP /Mac OS
3.7V 1000mAh wiederauadbare Batterie
Wasserdicht Standard
Betriebssystem
Batterie
Sprache
Deutsh
1 2 3 4
5 6 7 8 9 10 11 12
13 14 15 16 17 18
20
21 22 23 24 25 26 27 28
29 30 31 32 33 34 35 36
37 38
26

FAQ
1. Die Kamera lässt sich nicht mehr einschalten
(1)“An-Aus”Knopf für etwa 3s zu drücken
(3) Die Speicherkarte in der Kamera zu fomatieren, und dann neu zu starten
(4)Den Akku aufzuladen
2. keine Video wird aufgenommen
(1)Bitte checken, ob die Speicherkarte schon eingesetzt ist
(3)Die Speicherkarte in der Kamera zu fomatieren, und dann neu zu starten
3. Der Akku ist sehr schnell leer geworden
(1) Bitte checken, ob der Akku äußerlich beschädigt oder deformiert ist, falls ja, bitte
den Akku zu ersetzen
Temperatur wesentlich schneller als üblich, besonders wenn die Kamera unter Wasser
oder in einer Hochtemperatur- / Tieftemperaturumgebung arbeitet
Deutsh
4. Die Speicherkarte lässt sich nicht von Kamera erkennen
(1)Bitte checken, Ob die Speicherkarte beschädigt ist
(3)Die Kamera ausschalten. Eine andere Mirco SD Karte zu ersetzen(Mindestens eine
Class 10 Karte). Dann die Kamera neue zu starten
(4)Die Speicherkarte in PC zu formatieren
(5)Zur Werkseinstellungen zurückzusetzen, dann die Speicherkarte in der Karte zu
formatieren
5. Keine Verbindung mit Kamera über WiFi
(1)Bitte checken, ob die WiFi Funktion aktiviert ist
(2)Bitte checken, ob die SSID und die Passwort richtig eingegeben werden
(3)Versuchen bitte, andere Smartphones zu ersetzen,dann an die Kamera über WiFi
anzuschließen .
(4)Versuchen bitte, WIFI nach dem Neustart der Kamera wieder zu verbinden
(5)Die Kamera zur Wereinstellungen zurückzusetzen
6. Keine Verbindung mit der App
(1)Bitte checken, ob die App anschaltet werden kann
(2)Die neueste Version der App herunterzuladen
(3)Versuchen bitte, App nach dem Neustart der Kamera wieder zu verbinden
(4)Die Kamera zur Wereinstellungen zurückzusetzen
Deutsh

Francais
Précautions
1. Ne pas en utilisant dans un environnement de > 65 ℃ température / < - 20 ℃
température.
2. Gardez la caméra loin de tous les objets d'interférence magnétique forts comme
machine électrique pour éviter de fortes ondes radioélectriques qui pourraient
endommager la caméra et aecter la qualité de sonore ou d'image.
3. Ne pas placer la caméra directement en contact avec un chion humide ou liquid.
4. S’il vous plaît fermer bien le caisson étanche lors de dans sous l’eau
5. Gardez votre caméra et les accessoires placés dans une préservation de l'environne-
ment sec, frais, propre
6. Ne pas soumettre à entrer en contact avec une surface rugueuse ou face vers le bas,
pour éviter les rayures
7. Ne pas démonter la caméra
8. Ne placez pas la caméra et les accessoires pour les enfants moins de 5 ans d’utiliser
ou de jeu
9. Chargez la caméra dans un lieu où les enfants n’arrivent pas à toucher
10. Il vaut mieux utiliser Micro SD de haute qualité pour la meilleure carte résultats.
11. Ne placez pas votre carte Micro SD près de forts objets magnétiques àéviter toute
erreur de données.
Introduction
Merci beaucoup d'avoir acheté notre caméra d'action tactile de L3. L'appareil photo est un appareil
possède une grande variété de fonctionnalités principales pour l'enregistrement vidéo numérique,
la prise de photos, l'enregistrement audio avec écran tactile et la batterie détachable. Le mieux
adapté pour l'enregistrement des véhicules, les sports de plein air, la sécurité à la maison, la plongée
scène n'importe quand et n'importe où.
Pour obtenir les meilleures performances, lisez attentivement ce manuel avant d'utiliser. Les
sans préavis.
Caractéristiques du produit
2. Écran panoramique tactile HD de 2,45 pouces pour une capture et une lecture d'image pratiques.
3. 1000mAh batterie amovible pour un remplacement facile à une vie plus longue.
4. Objectif grand angle de 170 degrés en 12 mégapixels.
5. Technologie anti-vibration à gyroscope à 6 axes.
6. Sortie HDMI.
7. Mode de prise de vue sous-marin propriétaire.
8. Prise en charge de la carte Micro SD, jusqu'à 64 Go. (S’il vous plaît formater la carte mémoire de 64
Go sur la caméra avant utilisation, sinon la carte ne peut pas fonctionner.)
9. Types de résolution d'enregistrement vidéo: 4K, 2K, 1080P, 720P, VGA.
10. Enregistrement vidéo au format MP4, format de compression H.264.
11. Prise en charge de la connexion WIFI.
Francais

Accessoires
Francais
1 2 3 4
5 6 7 8 9 10 11 12
13 14 15 16 17 18 19 20
22 23 24 25 26 27 28
29 30 31 32 33 34 35 36
37 38
L
3
Ultra HD
Waterproof 30m
2.45” LCD Screen
Gyro Stabilization
Touch Screen
31
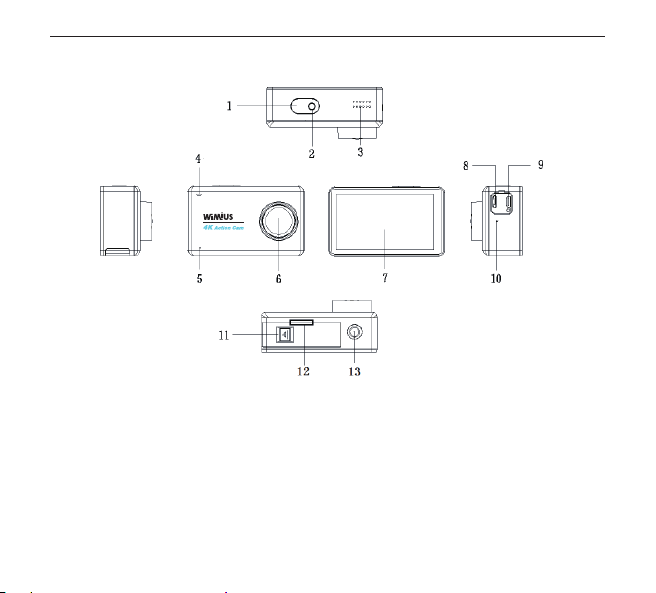
Schéma de caméra
1. Obturateur / bouton d'alimentation 2.Indicateur vidéo 3. Haut-parleur
4. Indicateur de fonctionnement / charge 5. MIC 6. Lentille
7. Écran tactile 8. Micro interface USB
9. Interface HDMI 10. MIC
11. Interrupteur de couverture de batterie 12. Fente pour carte micro SD
13. Trou de vis 1/4 "
Francais
1 2 3 4
5 6 7 8 9 10 11 12
13 14 15 16 17 18 19 20
21
23 24 25 26 27 28
29 30 31 32 33 34 35 36
37 38
32

Commencez à utiliser votre sport DV:
1. Insérer une carte SD dans la fente de carte (Recommandée de la carte classe 10,
grande vitesse carte Micro SD)
2. Insérer la batterie fournie et fermer le couverture de le batterie.
3. Longue de presse le bouton puissance / mode pour 3s, écran de démarrage
apparaîtra sur l’écran de sport DV.
4. Carte mémoire doit être formatée dans la caméra (notez que cela entraînera toutes
les informations contenues dans la carte SD est perdue)
Francais
Opération de base
1. Insertion de la carte Micro SD
A.Poussez le commutateur du couvercle de la batterie en
suivant la direction de la èche pour l'ouvrir. Vous verrez
l'emplacement de la carte Micro SD, puis insérez la carte
comme l'indique l'image.
B.Remarque: choisissez une carte Micro SD de marque,
puis formatez-la avec l'ordinateur avant utilisation. Nous
vous proposons une carte mémoire de haute qualité
pour un résultat parfait. S’il vous plaît formater la carte
mémoire de 64 Go sur la caméra avant utilisation, sinon
la carte ne peut pas fonctionner.
2. Chargement de la batterie
A.Vous pouvez recharger l'appareil photo en le connectant directement à l'ordinateur (non inclus) ou
à l'adaptateur secteur (pas dans l'emballage).
B.L'appareil photo peut enregistrer la vidéo et prendre des photos en cours de chargement.
C.L'appareil photo peut être chargé même si l'appareil est hors tension.
D.Lors de la charge, l'indicateur de charge sera activé. Et l'indicateur sera éteint lorsqu'il est chargé.
3. Marche / arrêt
A.Appuyez sur le bouton d'alimentation pendant 1 seconde pour l'allumer.
B.Appuyez et maintenez enfoncé le bouton d'alimentation pour éteindre.
4. Capturez des vidéos et des photos
A.En mode vidéo, appuyez sur le déclencheur pour enregistrer des vidéos et appuyez à nouveau pour
arrêter. L'indicateur vidéo clignote lorsque la vidéo est enregistrée.
B.En mode photo, appuyez sur le bouton Obturateur pour prendre une photo.
Francais
1 2 3 4
5 6 7 8 9 10 11 12
13 14 15 16 17 18 19 20
21 22
24 25 26 27 28
29 30 31 32 33 34 35 36
37 38
34
5. Mode de commutation
Mise sous tension de l'appareil photo, il est possible de sélectionner 9 modes de prise de vue en
appuyant sur le milieu de l'écran inférieur.
Vidéo + Photo: Avec le réglage de l'heure de la prise de vue photo, appuyez sur le bouton Obturateur
pour commencer l'enregistrement de la vidéo. Dans l'intervalle, la caméra prend automatiquement
une photo selon l'intervalle jusqu'à ce que l'enregistrement vidéo soit arrêté.
Vidéo normale
Photo Normale
Vidéo + Photo Mode voiture Aqua mode
Photo lapse Séquence
Enregistrement Time-laspe Ralenti
Francais
1 2 3 4
5 6 7 8 9 10 11 12
13 14 15 16 17 18 19 20
21 22 23
25 26 27 28
29 30 31 32 33 34 35 36
37 38
35
6. Paramètres
A. Allumez l'appareil photo et cliquez sur l'icône de réglage dans le coin inférieur droit de
l'écran pour accéder au menu des paramètres.
B. Dans le menu des réglages, vous pouvez régler le mode de prise de vue diérent et le sous-menu
dière.
C. Réglage du mode de prise de vue: comprend la résolution, la balance des blancs, la couleur, l'ISO
et l'exposition, etc.
D. Réglage du système: comprend la date / l'heure, la langue, le format et l'enregistrement de
l'écran, etc.
7. Lecture
Cliquez sur l'icône dans le coin inférieur gauche de l'écran et vous pouvez accéder au mode
de lecture. De plus, vous pouvez supprimer le chier en cliquant sur l'icône .
8. Date de stockage
A. Il peut être connecté à un ordinateur avec un câble Micro USB. L'écran ache "Mass Storage" et
"PC Camera". Sélectionnez le mode de stockage de masse et entrez dans le disque amovible, puis
vous pouvez copier ou supprimer des chiers sur l'ordinateur.
B. Vous pouvez également retirer la carte Micro SD et utiliser le lecteur de carte pour reproduire ou
utiliser les chiers.
9. Touche de raccourci
Dans l'interface du mode de prise de vue, il y aura un menu contextuel en glissant vers le bas à
partir de l'écran supérieur avec votre doigt.
Francais
1 2 3 4
5 6 7 8 9 10 11 12
13 14 15 16 17 18 19 20
21 22 23 24
26 27 28
29 30 31 32 33 34 35 36
37 38
36
10. Connexion Wi
Étape 1: téléchargez et installez l'APP nommé " WIMIUS CAM Pro " sur le téléphone ou la tablette (le
système Android peut être recherché sur le système Google Play et IOS peut être recherché dans le
APP Store).
Étape 2: Allumez la caméra et allumez le WIFI. L'écran de la caméra achera l'icône WIFI , puis
le SSID et le mot de passe s'acheront comme suit:
SSID: WIMIUS
Password: 123456789
Étape 3: Activez la recherche WIFI sur votre téléphone ou votre PC. Recherchez le compte WIFI de la
caméra et saisissez le mot de passe initial. Ensuite, cliquez pour créer un lien. Une fois la connexion
réussie, elle revient à l'interface de mode de prise de vue et l'icône WIFI s'ache dans le coin
inférieur gauche.
Étape 4: Après une connexion réussie, ouvrez l'APP " WIMIUS CAM Pro" sur votre téléphone pour
l'opération correspondante ou le partage d'image.
WIFI OFF / ON: Cliquez pour activer WIFI. Vous verrez l'icône Sur l'écran et
attendez quelques secondes, le SSID et le mot de passe s'acheront.
Contrôleur à distance (pas dans le paquet) Connexion: par défaut, la télécommande
est déconnectée. Cliquez pour vous connecter à l'appareil photo.
Verrouillage de l'écran: cliquez pour verrouiller l'écran et l'écran sera éteint. Appuyez
sur le bouton d'alimentation pour réveiller l'écran et cliquez sur l'icône pour
déverrouiller.
Arrêt: cliquez et sélectionnez pour éteindre la caméra.
Micro SD Karte, bis zu 64GB (Vor dem Gebrauch
muss die 64GB Speicherkarte auf der Kamera
formatiert werden.)
Aus/an
Aus/an
Aus/an
Aus/an
Aus/an
50 Hz / 60 Hz
Auto / Tageslicht / Bewölkt / Wolfram / Fluoreszenz
Farbe / Schwarz & Weiß / Sepia
Auto / 100 / 200 / 400 / 800 / 1600
-2.0,-5/3,-4/3,-1.0,-2/3,-1/3,+0.0,+1/3,
+2/3,+1.0,+4/3,+5/3,+2.0
Aus / 1 Min / 2 Min / 3 Minuten / 5 Minuten / 10
Minuten
Aus / 1 Minute / 3 Minuten / 5 Minuten
Aus/an
Dual Channel Stereo
USB 2.0, 5 Pin USB
Unterstützung (Die Fernbedienung ist optional.)
Francais
1 2 3 4
5 6 7 8 9 10 11 12
13 14 15 16 17 18 19 20
21 22 23 24 25
27 28
29 30 31 32 33 34 35 36
37 38
37

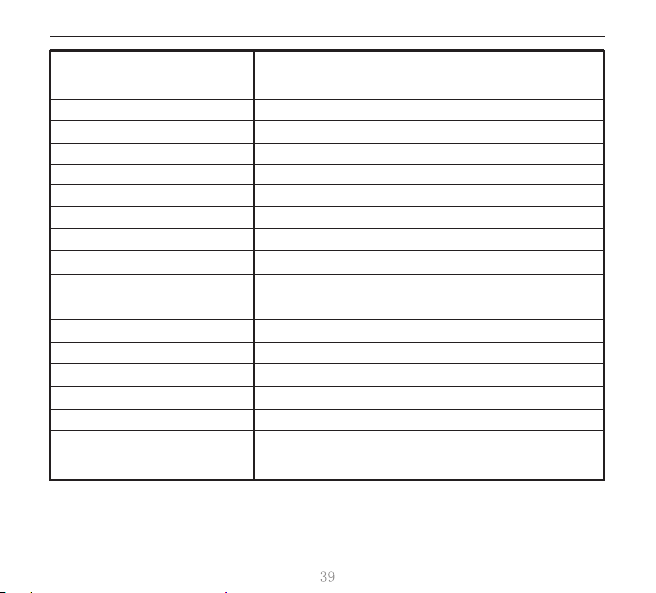
Caractéristiques
Sony IMX078, 12 mega pixels
170°A+ Lentille grand angle haute résolution
2.45 inch LCD écran tactile
4K (3840*2160) 24FPS
2K (2560*1440)30FPS
1080P (1920*1080) 60/30FPS
720P (1280*720) 120/60/30FPS
VGA (640*480) 240FPS
16M / 14M / 12M / 10M / 8M / 5M
Vidéo normale / Enregistrement Time-lapse/ Ralenti
1s / 5s / 10s / 30s / 1min
-2X / -4X / -8X
Photo Normale / Photo Lapse / Séquence
2s timer / 5s timer / 10s timer / 20s timer
Burst 3 / Burst 5 / Burst 10
5s / 10s / 30s / 1min
MP4 / H.264
JPG
O / 3 Minutes / 5 Minutes / 10 Minutes
Large/ Moyen/ Étroit
Sensor
Lentille
Ecran
Résolution de la Photo
Mode de Vidéo
Enregistrement Time-lapse
Ralenti
Mode de la Photo
Retardateur
Burst
Photo Lapse Time(Video + Photo)
Vidéo / Format de compression
Picture Format
Enregistrement en boucle
Champ de vision
Résolution de Vidéo
Francais
1 2 3 4
5 6 7 8 9 10 11 12
13 14 15 16 17 18 19 20
21 22 23 24 25 26
28
29 30 31 32 33 34 35 36
37 38
38
Carte Micro SD, jusqu’à 64GB ( Doit formater une carte
mémoire de 64 Go sur la caméra avant utilisation.)
Éteint/allumé
Éteint/allumé
Éteint/allumé
Éteint/allumé
50 Hz / 60 Hz
Auto / Daylight / Cloudy / Tungsten / Fluorescent
Color / Black & White / Sepia
Auto / 100 / 200 / 400 / 800 / 1600
-2.0,-5/3,-4/3,-1.0,-2/3,-1/3,+0.0,+1/3,
+2/3,+1.0,+4/3,+5/3,+2.0
Éteint/ 1 Min / 2 Min / 3 Minutes / 5 Minutes / 10 Minutes
Éteint/ 1 Minute / 3 Minutes / 5 Minutes
Éteint/allumé
USB 2.0, 5 Pin USB
Support (La télécommande est une option.)
English / French / German / Spanish / Italian / Portuguese /
Simple Chinese / Japanese / Traditional Chinese / Russian
Détection de mouvement
Power On Record
RSC
WDR
La fréquence
Balance des blancs
Couleur
ISO
Exposition
Arrêt automatique
Économise d'écran
Rotation d'image
USB
2.4G Télécommande
stockage
La langue
Francais
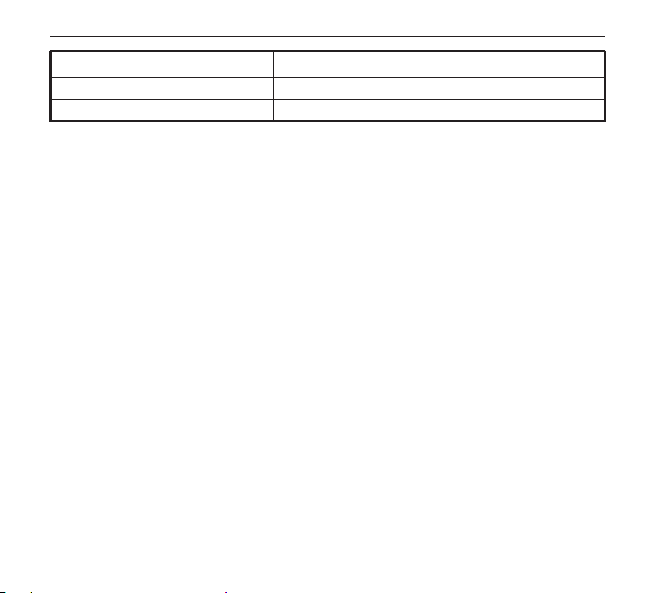
Imperméable 30M Avec caisson étanche
Windows XP /Mac OS
3.7V 1000mAh Batterie rechargeable
Standard imperméable à l'eau
Système opérateur
Batterie
Francais
1 2 3 4
5 6 7 8 9 10 11 12
13 14 15 16 17 18 19 20
21 22 23 24 25 26 27 28
30 31 32 33 34 35 36
37 38
40
Foire aux questions
1. Si la caméra ne s’allume pas.
(1)Appui long sur le bouton d'alimentation pour 3s.
(2)Débranchez la batterie, remplacer et redémarrer.
(3)Formater la carte SD, puis redémarrez
(4)S'il vous plaît charger la batterie
2. Si vous ne pouvez pas enregistrer de la vidéo
(2)Débranchez la batterie, remplacer et redémarrer.
(3)Formater la carte SD dans la caméra, puis redémarrez
3. Si la puissance de la batterie vide rapidement
endommagées ou déformé, remplacez la batterie.
(2)Lors de l'utilisation dans sous l'eau ou une température élevée / environnement à
basse température, en raison de la pression ou de la température provoque une
consommation rapide est normal
Francais
4、Si la caméra ne reconnaît pas la carte SD
(2)Débranchez la batterie, remplacer et redémarrer.
(3)Arrêter la caméra, et remplacez la carte SD (Class10 recommandé), puis redémarrez
(4)Carte SD formatée dans un ordinateur
5、Si le téléphone ne peut pas connecter le WIFI de la caméra
(3)Remplacement d'une autre téléphone pour connecter WIFI
(4)Après le redémarrage de le caméra tente de se connecter le WIFI
Après le redémarrage de le caméra tente de se connecter le WIFI
(5)Restaurer les paramètres d'usine pour la caméra
6、Si caméra ne peut pas connecter le APP du téléphone
(2)Mise à jour à la dernière version de l'APP
(3)Après le redémarrage de la caméra tente de se connecter le APP
(4)Restaurer les paramètres d'usine pour la caméra
Francais

日本語
注意事項
1、>65℃高温/<-20℃低温環境で使用しないように。
2、強い磁場をご遠慮してください。
3、濡れた紙でカメラを拭わないこと。
4、水中で防水ケースの蓋をしっかりと締めたことを確認する必要です。
5、カメラ及びアクセサリーを乾燥、爽やかで煙なしの場所に置くこと。
6、カメラのレンズを下向きにして置かないようご注意ください。
7、勝手にカメラを解体しないでください。
8、五歳以下の子供を接触されないようにします。
9、子供が触らない場所で充電すること。

前書き
弊社のL3タッチワイドスクリーンアクションカメラをお買い上げ頂き、誠に有難うございます。本製
品はアウトドアスポーツのマーケットニーズに応じて、開発されたハイエンドHDスポーツ防水製
品です。デジタル録画、写真、録音、タッチスクリーン、取り外し可能な電池などの機能を搭載して
おります。ダイビング、アウトドアスポーツ、ホームセキュリティなどに最適です。
使用前に、本マニュアルをよくお読みください。本マニュアルの情報(文字と画像)が変更される場
合がございますので、予めご了承ください。
製品特徴
1.付属の防水ケースを使って、30mの水で撮影できます。
2.2.45インチのタッチワイドHDモニターは撮影と再生に完璧です。
3.1000mAh充電バッテリー、取り外し可能で、使用時間が長くなります。
4.170°広角レンズ、1200万画素センサチップ
5.6軸ジャイロ手ぶれ補正技術
6.HDMI出力
7.水の中で撮影できます
8.最大64GBMicroSDカードまで対応(64GBカードを使用する場合は、使用前に、必ずカメラでフ
ォーマットしてください。)
9.いろいろなビデオ解像度と撮影モードが選択できます
10.MP4形式のビデオ、H.264の圧縮形式
11.WIFI接続できます
日本語
アクセサリー
日本語
1 2 3 4
5 6 7 8 9 10 11 12
13 14 15 16 17 18 19 20
21 22 23 24 25 26 27 28
29 30
32 33 34 35 36
37 38
L
3
Ultra HD
Waterproof 30m
2.45” LCD Screen
Gyro Stabilization
Touch Screen
45
製品構造
1、シャッター/電源ボタン 2、ビデオランプ 3、スピーカー
4、動作/充電ランプ 5、マイク 6、レンズ
7、タッチスクリーン 8、MicroUSBポート9、HDMIポート
10、マイク 11、電池蓋スイッチ
12、MicroSDカードスロット(電池蓋を開く)
13、1/4”ねじ穴
日本語
1 2 3 4
5 6 7 8 9 10 11 12
13 14 15 16 17 18 19 20
21 22 23 24 25 26 27 28
29 30 31
33 34 35 36
37 38
46

初めてカメラを利用の場合
1、SDカードを挿しください(Class10以上のMicroSDカードを推奨します)
2、バッテリーを装着して電池蓋を元に戻す
3、電源ボタン/確認ボタンーを3s押すと,カメラがONにします。
4、初めてご利用になる場合、MicroSDカードをフォーマットしてください。(データーが
消えます)
日本語

基本操作
1、MicroSDカードを挿入
①電池蓋の矢印に従って電池蓋を開き、MicroSDカードス
ロットがあり、図のようにカードを挿入します。
②注意:ブランド品のMicroSDカードをご使用ください。そ
して、PCでフォーマットしてから使用します。普通の中性カ
ードは使用に影響しますので、できるだけご使用にならな
いでください。64GBカードを使用する場合は、使用前に、必
ずカメラでフォーマットしてください。
2 、バッテリー充 電
①MicroUSBケーブルでPC又は電源アダプター(付属無し)に接続して充電できます。
②充電しながら撮影できます。
③電源オフの状態でも充電できます。
④充電中、充電ランプが赤点灯します。充電完了したら、ランプが消灯します。
3、電源オン/オフ
①電源ボタンを1秒ほど押すと、電源が入ります。
②電源ボタンを3秒ほど押すと、電源オフになります。
4、録画/撮影
①録画モードで、シャッターボタンを押して録画開始します。もう一度押すと、録画停止します。録
画中、ビデオランプが点滅します。
②撮影モードで、シャッターボタンを押して写真を一枚撮ります。
5、撮影モードの選択
電源が入ったら、モニターの下をタッチすると、九つの撮影モード(図のように)が選べます。
日本語
1 2 3 4
5 6 7 8 9 10 11 12
13 14 15 16 17 18 19 20
21 22 23 24 25 26 27 28
29 30 31 32
34 35 36
37 38
48
6 、メ ニ ュ ー 設 定
①電源が入ったら、モニターの右下のをクリックしてメニュー設定に入ります。
②各撮影モードでメニュー設定ができます。異なるモードではメニュー項目も異なります。
③ 撮影モードのサブメニュー:解像度、色彩、ホワイトバランス、露出などを含まれています。
④システム設定のサブメニュー:時間設定、言語、スクリーンセーバー、フォーマットなどを含まれ
ています。
録画+撮影:設定の中で間隔撮影の時間を設定してから撮影モードに戻り、シャッターボタンを押
して録画開始します。そして、カメラは設定された時間間隔で録画停止まで自動に写真を一枚撮り
ます。
ノーマル
ノーマル
録画+撮影 車載 モード 水中モード
間隔撮影 連写
タイムラプス スローモーション
日本語
1 2 3 4
5 6 7 8 9 10 11 12
13 14 15 16 17 18 19 20
21 22 23 24 25 26 27 28
29 30 31 32 33
35 36
37 38
49
7 、再 生
モニターの左下のという再生マークをクリックして、再生モードに入ります。そして、削除マー
ク をクリックして現行ファイルを削除できます。
8 、保 存
①MicroUSBケーブルでPC(付属なし)に接続したら、モニターに「メモリー」、「カメラ」という項目
が出ます。「メモリー」をクリックしたら、SDカードの内容に入ります。保存されたファイルをコピー
又は削除することができます。
②MicroSDカードを取り出して、カードリーダーでカードの内容を読み取ります。
9、ショートカットキ ー
撮影モードで、モニターの上から下までスライドすると、ショートカットメニューが出て、ショートカ
ット操作ができます。
WIFI:クリックすると、WIFIを開きます。そして、WIFIマークがモニターの真ん中に現れ
ます。数秒後、WIFI名称とパスワードが出ます。
リモコン(付属なし)接続:初期状態ではリモコンとカメラは接続しておりません。マ
ークをクリックすると、接続できます。
画面ロック:クリックすると、スクリーン画面がロックされ 、消灯します。電源ボタンを
押したら、画面が明るくなり、ロック解除のマークをクリックすればロック解除します
シャットダウン:クリックすると、カメラは電源オフになります。
日本語
1 2 3 4
5 6 7 8 9 10 11 12
13 14 15 16 17 18 19 20
21 22 23 24 25 26 27 28
29 30 31 32 33 34
36
37 38
50
10、WIFI接続
一:スマホやタブレットで「WIMIUSCAMPro」というAPPをダウンロードします。(androidシステム
の場合は、GooglePlayでダウンロードします。IOSシステムはAPPStoreでダウンロードします。)
二:カメラは電源が入ったら、WIFIを開き、モニターにWIFIマークが現れます。数秒後、WIFI名称と
パスワードが出ます:
SSID:WIMIUS
パスワード:123456789
三:スマホやタブレットのWIFIを開き、カメラのWIFI名称を検索してパスワードを入力します。接続
できたら、カメラは撮影モードの画面に戻り、左下にはWIFIマークが現れます。
四:接続完了したら、スマホやタブレットで「WIMIUSCAMPro」というAPPを開き、アプリで関係操
作ができます。
製品規格
1200万ピクセルSony IMX078
170°A+ HD広角レンズ
2.45インチタッチワイドスクリーンLCD
4K (3840*2160) 24FPS
2K (2560*1440)30FPS
1080P (1920*1080) 60/30FPS
720P (1280*720) 120/60/30FPS
VGA (640*480) 240FPS
16M / 14M / 12M / 10M / 8M / 5M
ノーマル/タイムラプス/スローモーション
センサー
レンズ
モニター
写真解像度
ビデオモード
ビデオ解像度
日本語
1 2 3 4
5 6 7 8 9 10 11 12
13 14 15 16 17 18 19 20
21 22 23 24 25 26 27 28
29 30 31 32 33 34 35
37 38
51

1秒/5秒/10秒/30秒/1分
-2X/-4X/-8X
ノーマル/間隔撮影/連写
2秒定時/5秒定時/10秒定時/20秒定時
三枚連写/五枚連写/十枚連写
5秒/10秒/30秒/1分
MP4/H.264
JPG
オフ/3分/5分/10分
ワイド/ミッド/ナロー
MicroSDカード、最大64GBまで対応(64GBカードを使用
する場合は、使用前に、必ずカメラでフォーマットしてくだ
さい。)
オフ/オン
オフ/オン
オフ/オン
オフ/オン
50Hz/60Hz
自動/日光/曇り/タングステン電球/蛍光灯
カラー/黒白/ブラウン
自動/100/200/400/800/1600
タイムラプス
スローモーション
写真モード
定時間隔
連写
間隔撮影(録画+撮影)
ビデオ形式/圧縮形式
写真形式
ループ録画
撮影視野
動き検出
クイック録画
ジャイロ手ぶれ補正
WDR
光源周波数
ホワイトバランス
色彩
ISO
メモリー
日本語
-2.0,-5/3,-4/3,-1.0,-2/3,-1/3,+0.0,+1/3,+2/3,+1.0,
+4/3,+5/3,+2.0
オフ/1分/2分/3分/5分/10分
オフ/1分/3分/5分
オフ/オン
USB2.0,5-PinUSB
あり(付属なし、販売元にお問い合わせください)
簡体字中国語/繁体字中国語/英語/日本語/ロシア語/ドイ
ツ語/フランス語/イタリア語/スペイン語/ポルトガル語
防水ケース付きで約30m
WindowsXP/MacOS
3.7V1000mAh充電可能
自動電源オフ
スクリーンセーバー
画像回転
USB
リモコン
防水性能
対応システム
バッテリー
露出補正
言語
日本語

FAQ
1、電源繋がない
(1)電源ボタンを長押すしてください
(2) バッテリーを取り出す,もう一度取り付けしてください
(3)SDカードをフォーマットして再起動
(4)バッテリーを充電してください
2、録画できない
(1)SDカード認識されるかどうか
(2) バッテリーを取り出す,もう一度取り付けしてください
(3)SDカードをカメラにフォーマットして再起動
3、バッテリー損耗が早い
(1)バッテリーが損傷があるかどうか、ご確認ください
(2)高温/低温、水中など環境で,圧力など原因で、バッテリーの損耗が早いのは正常
です。
日本語

4、SDカード認識されない
(1)SDカードが損傷があるかどうか、ご確認ください
(2)バッテリーを取り出す,もう一度取り付けしてください
(3)Class10以上のMicroSDカードを交換して再起動
(4)PCを利用して;MicroSDカードをフォーマットしてください
5、カメラWIFI連接失敗
(1)カメラのWi-FiモードをONにしましたか
(2)カメラのWi-Fi名称とパースワードが正確がどうかを確認
(3)他の携帯を利用してください
(4)カメラを再起動してから連接してください
(5)カメラを工場出荷状態を戻ります
6、携帯APPとカメラ連接できない
(1)APPを正常的に開始できますか
(2)APPを最新版を更新してください
(3)カメラを再起動してから連接してください
(4)カメラを工場出荷状態を戻ります
日本語

1 2 3 4
5 6 7 8 9 10 11 12
13 14 15 16 17 18 19 20
21 22 23 24 25 26 27 28
29 30 31 32 33 34 35 36
37 38


1 2 3 4
5 6 7 8 9 10 11 12
13 14 15 16 17 18 19 20
21 22 23 24 25 26 27 28
29 30 31 32 33 34 35 36
37 38
