4
K
Q6
Action
Cam
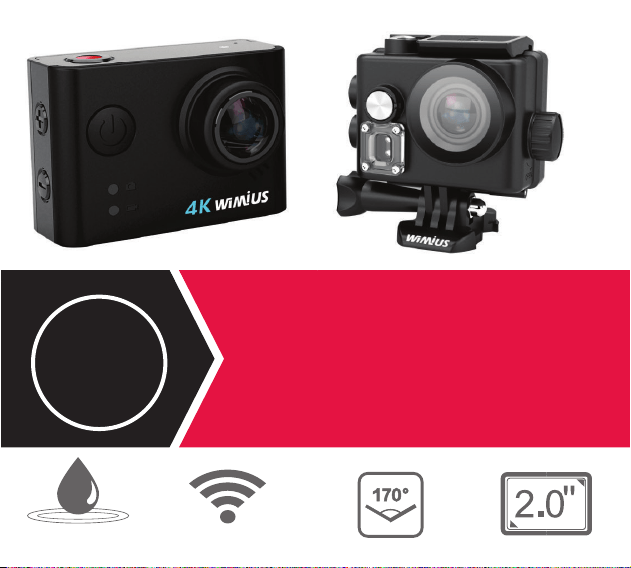
Waterproof 60m
WiFi
170° wide angle
LCD Screen
Ultra HD
This instruction also applies to Q6+.


Warning
1. Keep it from falling and dropping.
2. Keep it away from any strong magnetic interference objects like electrical machine to avoid strong
radio waves that might be damaging the product and affect the sound or image quality.
3. Don’t expose the product directly to high temperatures and strong sunlight.
4.
We recommend using high quality Micro SD Card for the best results.
5. Don’t place your Micro SD card near strong magnetic objects to avoid data error.
6. In case of overheating, unwanted smoke or unpleasant smell from the device, unplug it immediately
from the power outlet to prevent hazardous fire
7.Keep it away from children while on charging.
8.Stored the device in a cool, dry and dust free location.
1

Product Features
1.
With a water proof casing, allowing you to film 60 meters under water scene.
2.HD screen display for convenient videos and image playback.
3.Detachable battery for easy replacement and help extend product lifespan.
4.Record videos while charging.
5.HD 16 Megapixel wide angle lens.
6.
HDMI Output.
7.Web Camera.
8.Supports SD card memory expandable up to 64GB(Maximum).
9.Supports multiple video recording formats:4K/2.7K/1080P/720P.
10.Supports MP4 recording format.
11.Supports multiple photo shooting modes: Single shot & Snapper.
12.Super light weight, small in size and available in 2 colors.
2
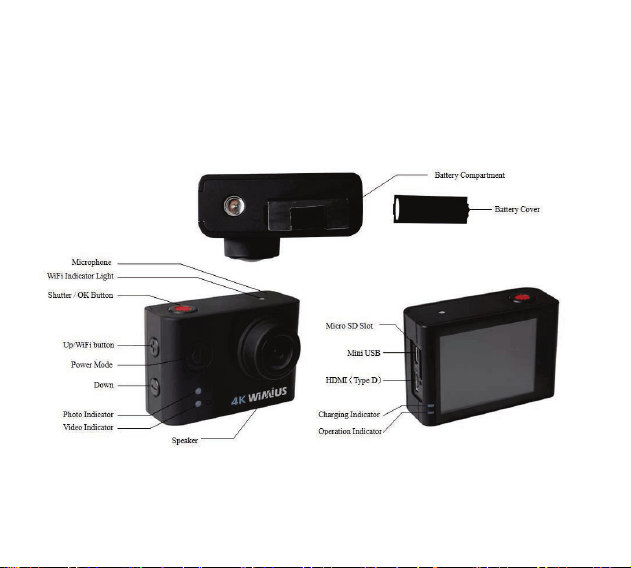
asic tructure
3
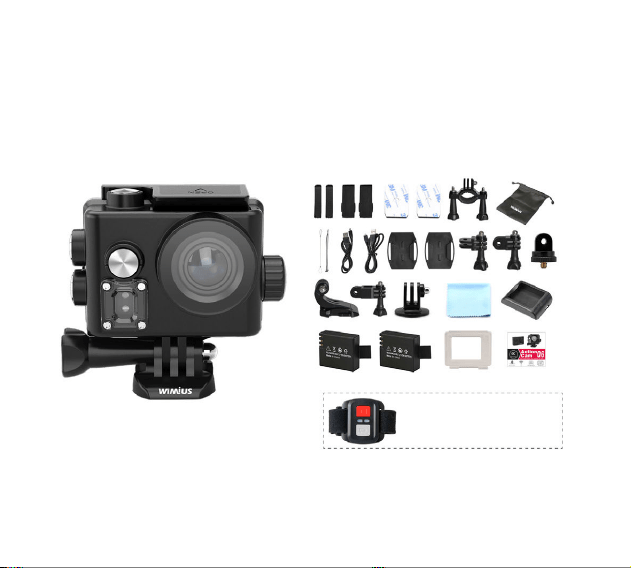
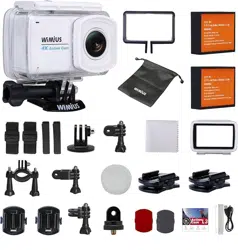
Camera and Accessories
(This is only for Q6+)
4

Basic Operation
1. Turn on/off the camera
·To power ON:
Press and hold the “Power/Mode” button.
·To power OFF:
Press and hold the “Power/Mode” button.
2. Mode Switching
·Turn camera ON and repeatedly press the “Power/Mode” button to cycle through camera modes
and settings.
·Press the “OK” button to enter the settings menu. Repeatedly press the “Power/Mode” button to
cycle through options and press the “OK” button to select desired option.
3. Video Mode
·To record video, verify the camera is in Video mode.
·If the video icon“ ”on screen is showing, press the “OK” button to start recording.
In the meanwhile, a “red icon” at the bottom of the screen and the operation indicator will be
flashing at the same time.
·Click the “OK” button again to stop the video, also the “red icon” will disappear and the
operation indicator will stop flashing.
5

4. Photo Mode
·To take a photo, verify the camera is in Photo mode.
·If the picture icon “ ” on screen is showing, press the “OK” button to take photos.
5. Slow Motion
·To record slow motion video, verify the camera is in Slow Motion mode.
·If the slow motion video icon“ ” on screen is showing, press the “OK” button to start video. In
the meanwhile, a “red icon” at the bottom of the screen and the operation indicator will be flashing at
the same time.
·Click the “OK” button again to stop the video, also the “red icon” will disappear and the operation
indicator will stop flashing.
6.
Timelapse Video
·Enter the setting menu, open Timelapse Video function, return to Video mode.
·If the video icon“ ” on screen is showing at the down left corner of the screen, press the “OK”
button to start video. In the meanwhile, a “red icon” at the bottom of the screen and the operation
indicator will be flashing at the same time.
·Click the “OK” button again to stop the video, also the “red icon” will disappear and the operation
indicator will stop flashing.
6

7. Playback
Playing back videos and photos.
·Verify the camera is in Playback menu.
·Press Up or Down button to select file, press “OK” button to playback video.
8. Battery
·Install and remove the battery.
a. Pull the battery cover with your finger to open the battery compartment.
b. According to the battery label plus or minus sign and the direction of the arrow, right put
the battery into the camera, until the installation in position.
c. Take out battery, push away the battery cover can take out the battery.
·Charge
a. Charging can be done by either connecting the camera via USB to a computer or plugging the
charger in.
b. Charge the camera on vehicle by connecting it to car charger.
c. The camera can record video while being charged.
d. Charging can be done even when it’s powered off.
7

Camera WiFi APP
1.Scan the quick response code on the box and download the APP client and install it to the smart
phone, which displays the “WIMIUS CAM” application icon after installation. After the installation,
the mobile phone interface will appear a APP application icon.
Click to enter the APP “WIMIUS CAM” interface .
2.The open WIFI function
a. Select the “WiFi” menu, press “OK” button to enter, select “open”, the screen will show the WiFi
icon
SSID:WIMIUS
Password:123456789
b. Click the UP button to return. At this time to open the phone to set the WiFi function, to find a
new set of WiFi name of the network.
c. Connect after entering the new WiFi password and confirm the connection.
d. At this time to open the phone has been installed “WIMIUS CAM” APP client, and search to add
the camera ID code, after the completion of the camera and video operations can be performed.
8
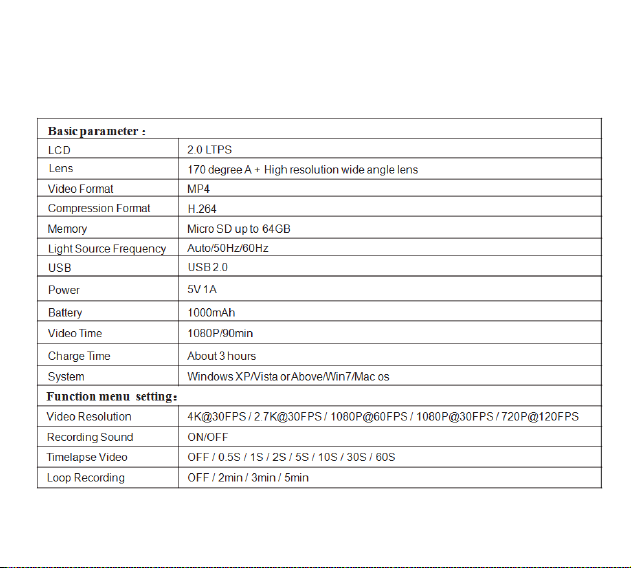
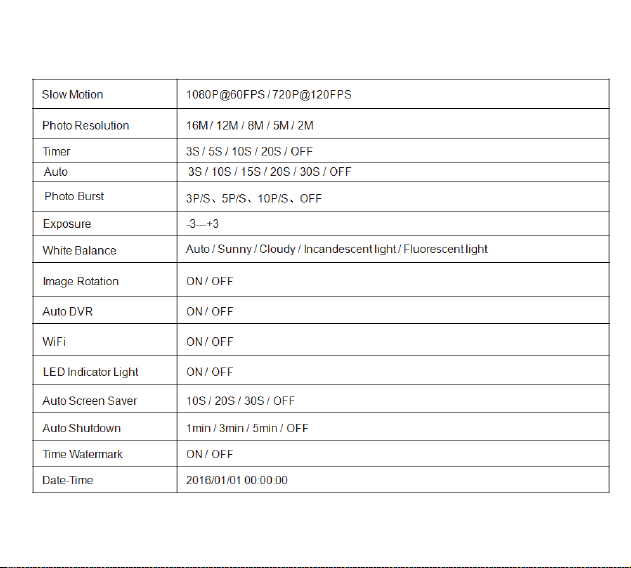
Specification Parameter
9
10

3. Three rotating shaft installation:
1.Base pasting plane installation:
2. Bicycle frame installation:
Accessories Installing
11
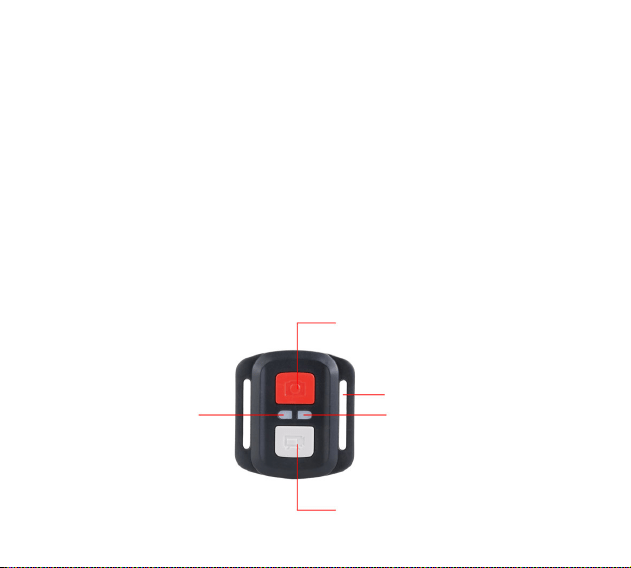
2.4G wireless Wristband remote control instruction
(this is only for Q6+)
Shutter button
Wrist buckle
Status indicator light2
Status indicator light1
Record button
1.Use precautions
1. Remote bracelet is of rain waterproof design, cannot be used in diving.
2. Remote effective distance is 10m-20m which changes with environment.
3. Remote effective distance will be shortened in case of insufficient battery power.
4. Remote control bracelet using standard 2032/3.3V button cell.
5. Replacing the battery requires the use of a screwdriver.
2.Structure display
12

3.Operation instructions
Prompt: Please confirm the camera in the picture mode or video mode
1.Record
•Start recording
a. Video mode: Press the Record button to start recording, at the same time the "state indicator light
1" (blue) flashes once.
b. Picture mode: Press the Record button, the "status indicator light 1" (blue) flashes once, camera
automatically switches to video mode, and start recording.
•Stop recording: In the recording process, press the Record button, the "status indicator light
1" (blue) flashes once, the recording stops.
2.Photograph
•Picture mode: Press the shutter button, the "state light 2" (red) flashes once, while the camera to
take pictures;
•Video mode: Press the shutter button, the "state light 2" (red) flashes once, the camera
automatically switches to the camera mode, while the camera to take pictures;
•Recording process: In the recording process, press the shutter button, can be performed to take
pictures, while the "state light 2" (red) flashes once; video recording continues after taking pictures;
13

Deusche Anleitung für Q6
Anleitung:
1.Ein/Ausschalten
Einschalten: Drücken und halten Sie die”Power/Mode Button” für 3 bis 5 Sekunden, um die Kamera
einzuschalten.
Ausschalten:Drücken und halten Sie die”Power/Mode Button” für 3 bis 5 Sekunden, um die Kamera
auszuschalten.
2.Moduswechsel
Drücken Sie Mode Button beim Einschalten, können Sie Modus wechseln und Einstellung eingeben.
Sie können OK Button drücken, um die gewünschte Einstellung zu stellen.
3.Aufnahme
Stellen Sie sicher, ob die Kamera in Aufnahme Modus ist.
Es gibt auf Linkeseit bei Bildschirm, drücken Sie einfach OK Button, dann wird es aufnehmen. Im
gleichzeitig blinkt Kamera Anzeiger und Rot Punkt auf Display.
Drücken Sie Ok Button nochmal, wird die Aufnahme beenden und blinkt Kamera Anzeiger und Rot
Punkt auf Display nicht mehr.
14

4. Fotografieren
Stellen Sie sicher, ob die Kamera in Foto Modus ist.
Es gibt auf Linkeseit bei Display. Sie können OK Button drücken, damit die Kamera
fotografieren kann.
5. Zeitlupe Aufnahme
Stellen Sie sicher, ob die Kamera in Zeitlupe Aufnahme Modus ist.
Es gibt auf Linkeseit bei Bildschirm, drücken Sie mal OK Button zu aufnehmen. Im
gleichzeitig blinkt das Operation Indicator.
6. Zeitraffer Aufnahme/Time-lapse
Einschalten Sie bitte die Zeitraffer Aufnahme bei Menüeinstellung und zrück an Aufnahme
Modus.Es gibt bei Linkeseit(unten) auf Display.
Drücken Sie einfach OK Button, dann wird es aufnehmen. Im gleichzeitig blinkt Kamera Anzeiger
und Rot Punkt auf Display.Drücken Sie Ok Button nochmal, wird die Aufnahme beenden und
blinkt Kamera Anzeiger und Rot Punkt auf Display nicht mehr.
7. Wiedergabe
Es kann Bild und Video wiedergeben.
Stellen Sie sicher, dass die Kamera in Wiedergabe Modus ist.
Sie können mit Up und Down Button das Bild oder Viedeo auswählen und OK Button drücken,
um es wiederzugeben.
15

8. Akku
Löschen Sie die Batterieabdeckung aus, um die Abdeckung zu entfern.
Bauen Sie die Batterie(Anschlussende zuerst) in der Kamera ein, so dass die Anschlüsse auf der
richtigen Seite sind.
Aufladen
a. Die Kamera kann aufgeladen werden, wenn Sie mit einem USB Kabel die Kamera zu einem
Computer verbinden oder direkt mit dem Adpater verbinden.
b. Im Auto können Sie die Kamera mit einem Auto Ladegerät aufladen.
c. Beim Aufladen können Sie auch mit der Kamera aufnehmen, aber nicht empfehlen.
d.Es kann bei Ausschalten aufladen.
9. WiFi und App verbinden
a. Scan die QR Code auf die Verpackung, um App herunterzuladen.
b. WiFi öffnen
Wählen Sie WiFi Funktion aus, drücken Sie Ok Button und die Funtkion ausschalten. Es wird WiFi
Sysbol bei Display zeigen.
SSID:WIMIUS
Password: 123456789
Noch mal drücken Sie up/WiFi Button, können Sie dann WiFi Funktion ausschalten.
Öffnen Sie die WiFi Ihrem Handy oder Tablet PC, suchen Sie die WiFi der Kamera und geben Sie die
Password ein.
Danach verwenden Sie die App durch Handy oder Tablet PC und zuerst suchen und hinzufügen
Kamera ID. Wenn es fertig ist, können Sie durch App die Kamera kontrollieren und aufnehmen.
16

WiFi Fernbedienung mit Armband
(Es ist nur fit für Kamera Q6+)
Oben(Rot): Fotografie TasteUnten: Aufnahme Taste
Link: Zustand Anzeiger 1 Rechte oben: Armband Schnalle
Recht Uten: Zustand Anzeiger 2
Anleitung:
HINWEIS: Stellen Sie sicher, dass die Kamera im Zustand des Foto-/ Aufnahme Modus ist.
1.Aufnahme
A: Wenn die Kamera in Aufnahme Modus ist, drücken Sie Aufnahme Taste, blinkt der Zustand
Anzeiger 1(blau) einmal, wird die Kamera aufnehmen.
B: Wenn die Kamera im Foto Modus ist, drücken Sie mal Aufnahme Taste, blinkt der Zustand
Anzeiger 1(blau) ein mal, wird es automatisch auf Aufnahme Modus welchseln und aufnehmen.
C: Drücken Sie nochmal Aufnahme Taste, blinkt der Zustand Anzeiger 1(blau) noch einmal, wird
Aufnahme beenden.
2.Fotografieren
A: Wenn die Kamera in Foto Modus ist, drücken Sie Fotografie Taste, blinkt der Zustand Anzeiger
2(rot) mal und wird ein Foto machen.
B: Wenn die Kamera im Aufnahme Modus ist, drücken Sie Fotografie Taste, blinkt der Zustand
Anzeiger 2(rot) ein mal, wird es automatisch auf Foto Modus welchseln und fotografieren.
C: Wenn die Kamera noch aufnimmt, drücken Sie Fotografie Taste, wird der Zustand Anzeiger
2(rot) mal blinken und ein Foto machen. Nach Bild Speichern wird es weiter aufnehmen.
17

Opérations de base
1. Allumer/éteindre
Allumer
Appuyez long sur le bouton Power / Mode, l'appareil photo est allumé;
éteindre
Appuyez long sur le bouton Power / Mode, l'appareil photo est éteint;
2. Changement de mode
Mode de démarrage, appuyez sur le bouton Power / Mode pour basculer le mode;Cliquez sur "OK"
pour entrer dans les paramètres du menu, répétez appuyer sur le bouton l'interrupteur / Mode
pour changer le mode, cliquez sur le bouton "OK" pour sélectionner l'option désirée;
3. Mode vidéo
Lors de l'enregistrement, assurez-vous que l'appareil est en mode d'enregistrement;
Lorsque le coin supérieur gauche de l'écran lorsque le signe " ", appuyez sur le bouton "OK"
pour lancer l'enregistrement, écran vidéo et simultanément l'indicateur de fonctionnement juste en
dessous du point de logo rouge clignote;
Appuyez à nouveau sur "OK" pour arrêter l'enregistrement, le fonctionnement simultané de
lumières et l'écran juste en dessous du logo clignotant disparaît point rouge;
18

4. Mode caméra
Pour prendre des photos, assurez-vous que l'appareil photo en mode photo;
Lorsque le coin supérieur gauche de l'écran lorsque le signe " ", appuyez sur le bouton
"OK" pour commencer à prendre des photos;
5. Ralenti Vidéo
Lorsque lente photographie vidéo, assurez-vous que la vidéo de la caméra en mode ralenti;
Lorsque le coin supérieur gauche de l'écran lorsque le signe " ", appuyez sur le bouton
"OK" pour démarrer l'enregistrement, l'indicateur d'enregistrement et de fonctionnement
pendant que l'écran juste en dessous du point de logo rouge clignote;
Appuyez à nouveau sur "OK" pour arrêter l'enregistrement, le fonctionnement simultané de
lumières et l'écran juste en dessous du logo clignotant disparaît point rouge;
6. Time-lapse
Entrez dans le menu de configuration, ouvrez la fonction d'enregistrement de retard, revenir au
mode d'enregistrement;
Lorsque la partie inférieure gauche de l'écran apparaît le symbole " ", appuyez sur le bouton
"OK" pour démarrer l'enregistrement, l'indicateur et le fonctionnement d'enregistrement alors
que l'écran juste en dessous du point de logo rouge clignote;
19

B. Selon le signe marqué sur la batterie et le sens de la flèche, le droit d'insérer les piles dans
l'appareil photo jusqu'à ce qu'il soit assis;
C. Retirez la batterie, ouvrez le couvercle de la batterie pour retirer la batterie;
Charge de la batterie
A. Ordinateur connecté et un adaptateur d'alimentation pour la recharge;
B. Dans la voiture peut également être connecté directement à un chargeur de voiture pour charger;
C. Peut pendant le chargement lors de l'enregistrement;
D. Peut être chargé dans l’état éteint ;
A. Utilisez vos doigts pour retirer le couvercle de la batterie pour ouvrir le compartiment de la batterie;
7. Lecture
Lecture vidéo et photo
Assurez-vous que l'appareil est en mode de lecture;
Appuyez sur les touches Haut ou Bas pour sélectionner le bouton "OK" pour lire fichier vidéo, appuyez
sur;
8. Batterie
Installation et retrait de la batterie
20

9. Caméra connexion WiFi APP
a.Scannez le code à deux dimensions sur la boîte pour télécharger le client APP, installé sur le
téléphone, l'installation apparaîtra sur votre téléphone "WIMIUS CAM" icône de l'application,
cliquez sur pour accéder à l'interface de l'APP "WIMIUS CAM";
b.Ouvrir WIFI
Sélectionnez la fonction WiFi, cliquez sur le bouton "OK" pour entrer, sélectionnez "Open" signe
apparaît sur le WiFi de l'écran de la caméra:
SSID: WIMIUS
Mot de passe: 123456789
Appuyez sur la touche haut pour quitter WIFI. Allumez la fonction WiFi de votre téléphone ou
tablette , ouvrir la connexion WiFi du téléphone, le nom de la recherche à une gamme de WiFi;
choisir le nom de WiFi de la Caméra , entrez un mot de passe, confirmer la connexion;
Ouvre APP téléchargé "WIMIUS CAM" , cliquez sur Entrée, rechercher et ajouter l'ID de la
caméra, vous pouvez accéder à la fonction d'enregistrement après l'achèvement;
21

Télécommande sans fil bracelet de contrôle
(Cette partie d'introduction est adapté uniquement pour la caméra Q6+ )
Instructions
Rapide: Assurez-vous que l'appareil est en mode caméra ou en mode vidéo.
A. L'appareil est en mode vidéo: Appuyez sur le bouton d'enregistrement de la télécommande, "LED
état 1" (bleu) clignote une fois, l'appareil photo pour commencer l'enregistrement;
B. L'appareil est en mode caméra: Appuyez sur le bouton d'enregistrement de la télécommande, "LED
état 1" (bleu) clignote une fois, l'appareil passe automatiquement en mode vidéo, et commencer
l'enregistrement;
C. Arrêter l'enregistrement: L'appareil photo pendant l'enregistrement, appuyez sur le bouton
d'enregistrement de la télécommande, "LED état 1" (bleu) clignote une fois, l'enregistrement est arrêté;
2. Photographie
L'appareil est en mode caméra: Appuyez sur le bouton de la caméra sur la télécommande, "LED
état2" (rouge) clignote une fois, alors que l'appareil effectue la photographie;
L'appareil est en mode vidéo: Appuyez sur le bouton de la caméra sur la télécommande,"LED Etat
2"(rouge) clignote une fois, l'appareil passe automatiquement au mode de la caméra en
photographiant;
L'appareil photo pendant l'enregistrement: Appuyez sur le bouton de la caméra sur la télécommande,
vous pouvez faire des photos, et "Indicateurs d'état 2" (rouge) clignote une fois, après que la caméra
continue d'enregistrer;
22
1.Enregistrement
Commencer l'enregistrement
23

基本操作について
1.電源オン/オフ
オン
電源/モードボタンを長押すと、電源が入ります。
オフ
電源/モードボタンを長押すと、電源オフにします。
2.モード切り替え
電源が入った後、繰り返して電源/モードボタンを押せばモード切り替えでき
ます。
OKボタンを押すと設定メニューに入ります。電源/モードボタンを押して切り
替えます。OKボタンを押して選択を確認します。
3.録画
録画モードに切り替えます。
モニターの左上に“ ”という表示が出たら、OKボタンを押して録画開始し
ます。録画中、操作インジケータランプとモニターの下にある赤い点が点滅し
ます。
OKボタンを押して録画停止します。そしてランプと赤い点は消えます。
4.写真
写真モードに入ります。
モニターの左上に“ ”という表示が出たら、OKボタンを押して写真を撮り
ます。
24

5.スローモーション
スローモーション モードに入ります。
モニターの左上に“ ”という表示が出たら、OKボタンを押して録画開始しま
す。録画中、操作インジケータランプとモニターの下にある赤い点が点滅しま
す。
OKボタンを押して録画停止します。そしてランプと赤い点は消えます。
6.タイムラプス
設定に入ります。そしてタイムラプスというオプションをオンにします。そし
て録画モードに戻ります。
モニターの左下に“ ”という表示が出たら、OKボタンを押して録画開始しま
す。録画中、操作インジケータランプとモニターの下にある赤い点が点滅しま
す。
OKボタンを押して録画停止します。そしてランプと赤い点は消えます。
7.再生
再生モードに入ります。
アップ、ダウンボタンを押してファイルを選択します。OKボタンを押して再生
します。
8.
充電について
a.パソコンや電源アダプターに接続すれば充電できます。
b.車の車載充電器に接続すれば充電できます。
c.充電しながら録画するのは可能です。
d.電源オフの状態でも充電できます。
充電時間:約3時間。
25

9.カメラWiFi APPの接続について
1.パッケージの箱にある二次元コードをスキャンしてAppをダウンロードしま
す。そして『WIMIUS CAM』というアプリケーションをインストールします。
2.WiFiをオンにする
設定の中にWiFiを選択します。そして、OKボタンを押して入ります。オンを
選択します。カメラのモニターに下記WIFI表示が出ます。
SSID:WIMIUS
パスワード:123456789
アップボタンを押してWIFI画面から戻ります。スマホ又はタブレットのWIFI
を開き、カメラのWIFI名称(WIMIUS)を選択してパスワードを入力して接続
します。
WIFI接続完了になった後、インストールしたアプリ『WIMIUS CAM』を開きま
す。クリックして入ります。カメラのID を検索して添加します。完了したら
録画できます。
26
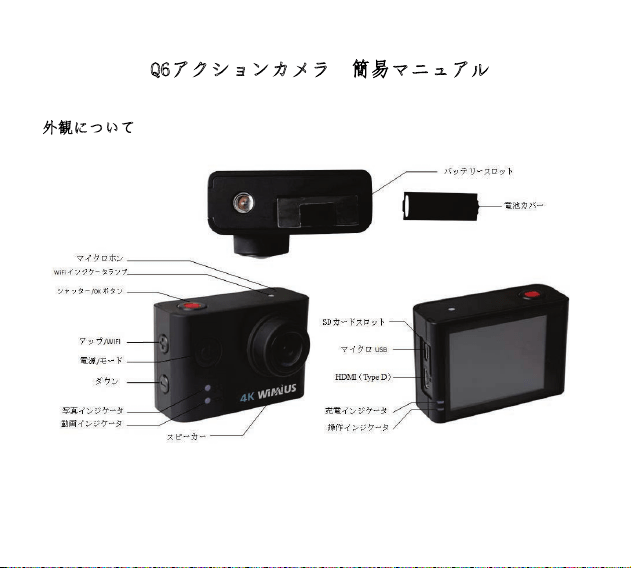
二.操作について
※ご注意:カメラ本体は写真モード又は録画モードが前提です。
1.録画
·録画開始:
a.カメラ本体は録画モードで、リモコンの動画ボタンを押してインジケータ
ランプ1(青)が一回点滅します。カメラが録画開始します。
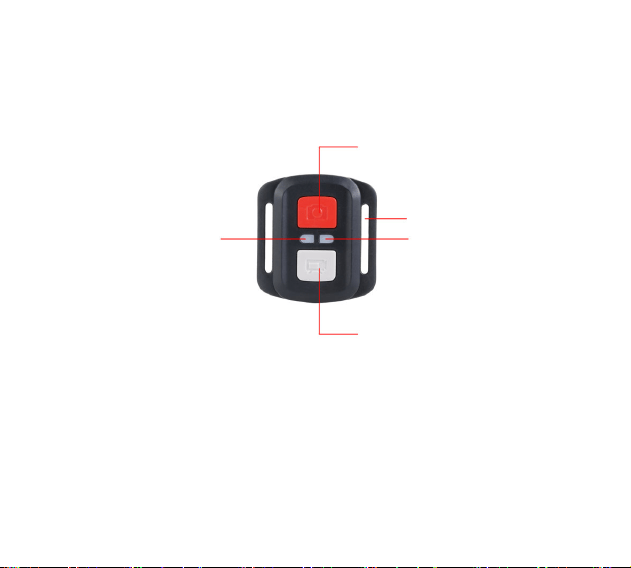
2.4Gワイヤレス ベルト リモコン
一.外観について
写真ボタン
ベルトバックル
インジケータランプ2
動画ボタン
インジケータランプ1
27

b.カメラ本体は写真モードで、リモコンの動画ボタンを押して、インジケー
タランプ1(青)が一回点滅します。カメラは自動的に録画モードに切り替
え、録画開始します。
·録画停止:録画中に、リモコンの動画ボタンを押してインジケータランプ
1(青)が一回点滅して、録画停止になります。
2.写真
·カメラ本体が写真モードで、リモコンの写真ボタンを押して、インジケー
タランプ2(赤)が一回点滅してカメラが写真を撮ります。
·カメラ本体が録画モードで、リモコンの写真ボタンを押してインジケータ
ランプ2(赤)が一回点滅して、カメラが自動的に写真モードに切り替え、
写真を撮ります。
·カメラが録画中に、リモコンの写真ボタンを押して写真を撮れます。イン
ジケータランプ2(赤)が一回点滅します。写真を撮った後、録画を続けま
す。
28