Loading ...
Loading ...
Loading ...
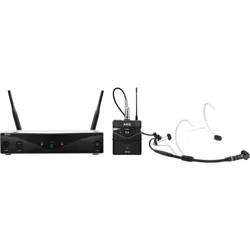
WMS420 27
Setting up
1) Depress the snap hook on the battery compartment cover.
2) Pull the battery compartment cover off the transmitter in the direction shown by the
arrow.
3) Insert the supplied battery into the battery compartment conforming to the polarity marks.
The transmitter will not function if you insert the battery the wrong way round.
4) To turn the transmitter on, set the on/off switch to "ON".
If the battery is in good condition, the status LED will be lit green.
If the status LED is lit red, the battery will be flat within about one hour. Replace the
battery with a new one as soon as possible.
If the status LED is not lit, the battery is flat. Insert a new battery.
NOTE
If you use a rechargeable battery, the LED will change to red approximately 15 minutes before
the battery goes flat.
5) To close the battery compartment, slide the battery compartment cover onto the battery
compartment from below until the snap hook engages.
Set the transmitter and receiver to the same frequency:
1) Set the desired channel number by pressing CHANNEL. With each press of the button,
the channel number increases by one.
2) The set channel is indicated on the display and activated immediately.
1) Switch the receiver on or, if it is already on, press CHANNEL. The selected channel
(e.g. 1) blinks for 3 seconds after which it is displayed without blinking, indicating that
the selected channel is active.
2) During those 3 seconds, press CHANNEL to obtain the required channel number. Each
press of the button increases the channel number by one.
3) Once you have reached the required channel number, the display blinks for a further 3
seconds after which the channel you have just selected becomes active.
1) Set the SQUELCH control on the receiver to minimum and switch the receiver on.
2) To turn the handheld transmitter on, set the on/off switch to "ON".
3) Switch on your PA system or amplifier.
4) Set the transmitter and receiver to the same frequency.
5) Speak or sing into the microphone and watch the LEDs on the receiver:
If the CLIP LED does not light up at all, the input sensitivity of the transmitter is too
low. Set the GAIN to "HIGH".
If the CLIP LED lights up frequently or all the time, the input sensitivity of the
transmitter is too high. Set the GAIN to "LOW".
6) Set the volume of the PA system or amplifier referring to the appropriate instruction
manual or by ear.
The pocket transmitter PT420 is designed for use with AKG microphones.
If you would like to connect microphones from other manufacturers to the PT420, please note
that you may have to replace the connector plug of your microphone with a 3 pole mini XLR
plug.
Contact assignment of the audio input plug:
Contact 1: Shield
Contact 2: Audio inphase (+)
Contact 3: Supply voltage
A positive supply voltage (4 V) is provided on contact 3 for condenser microphones.
ATTENTION
A
KG cannot guarantee that the PT420
pocket
transmitter will work perfectly with products
from other manufacturers and any damage that may result from such use is not covered by the
AKG warranty scheme.
Inserting and testing batteries in the
handheld/pocket transmitters
Setting the frequency on the receiver
Setting the frequency on the
handheld/pocket transmitter
Setting up the handheld transmitter
Setting up the pocket transmitter
Loading ...
Loading ...
Loading ...