Description of control
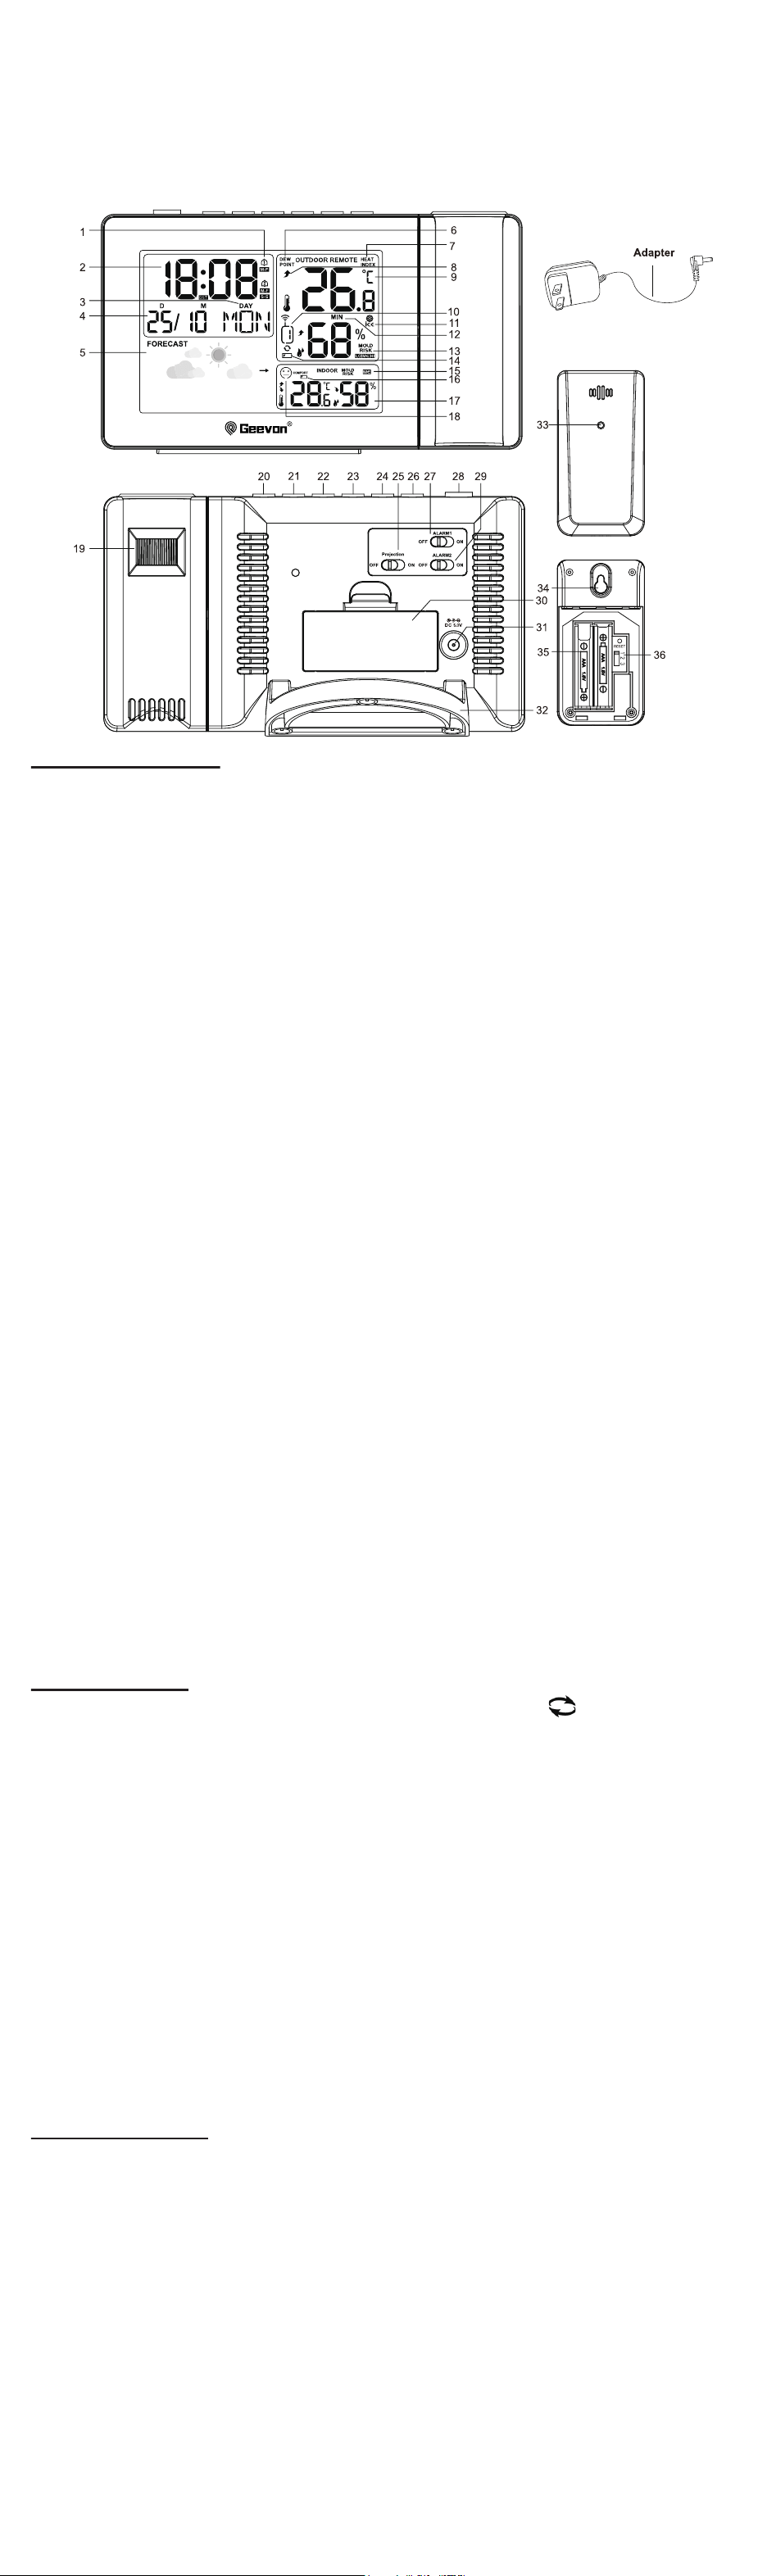
1. Alarm Clock icons 1 and icons 2
2. Time display
3. Weekday
4. Calendar
5. Icons weather forecast(Based on the barometer but do not have barometer display)
6. Dew point temperature
7. Heat index temperature
8. Tendency outdoor temperature
9. Outdoor temperature / humidity external sensor
10. Channel external sensor and outdoor sensor signal strength
11. Ice point icon
12. Temperature and humidity MAX/MIN records
13. Outdoor moldy index
14. Sensor low battery indicator
15. Indoor moldy index
16. Display low battery indicator
17. Indoor temperature / humidity
18. Indoor comfort display
19. Projection adjustment
20. ROTATE button
21. MAX/MIN button
22. ALARM button
23. SET/LIGHT button
24. -/C/F button
25. Projection ON/OFF
26. +/CH button
27. ALARM 1 ON/ OFF
28. SNZ button
29. ALARM 2 ON/OFF
30. Battery Compartment 2xAAA (not included)
31. External power supply socket
32. Pedestal
33. Wireless signal indicator
(Flashes when data is being sent to the display unit)
34. Integrated hang hole
35. Compartment 2xAAA batteries (not included)
36.TX channel selector, select external sensor channel
Main functions:
a. 7 buttons: SNZ, +/CH, -/C/F, SET/LIGHT, ALARM, MAX/MIN, (Rotate)
3 push switches: Projection ON/OFF, ALARM1 ON/OFF, ALARM2 ON/OFF
b. Time: Hour, Minute
c. Calendar: Month, Date
d. 12H/24H selection
e. C/F selection
f. Indoor temperature: -9.9 °C - 50 °C (14.18 °F - 122 °F)
g. Outdoor temperature: -40 °C - 70 °C (-40 °F - 158 °F)
h. Indoor and outdoor humidity: 20% -95%
i. Two projection mode: time and indoor temperature, time and outdoor temperature, 5s
to switch display
j. Rotatable 180 degree
k. Double alarms and Snooze function
l. Max./Min. temperature and humidity memory
m. Indoor and outdoor moldy index
n. Indoor comfort display
o. Dew point and heat index display
Function of buttons:
1. SNZ
a. Press this button to open backlight for 15 seconds (with adapter and when you set the
backlight to MI/LO/OFF mode).
b. Press to activate the snooze function when alarming.
2. +/CH
a. Press to increase the setting value during setting.
b. Press and hold 3 seconds button for fast adjust during setting mode.
c. Press this button to select the channel.
d. In normal mode, press and hold to search RF.
3.-/C/F
a. Press to decrease the setting value during setting.
b. Press and hold 3 seconds button for fast adjust during setting mode.
c. In normal mode, press -/C/F button to select °C or °F
4. SET/LIGHT
a. Press this button to adjust the backlight: HI-MI-LO-OFF (with adapter).
b. Press and hold 3 seconds button to enter the time setting.
5. ALARM
a. Press this button to check Alarm 1 and Alarm 2
b. Press and hold this button to enter alarm setting
6. MAX/MIN
a. Press this button to check Max/Min indoor temperature and humidity memory, dew
point and heat index.
b. In checking MAX/MIN mode, press and hold this button for approx. 3 seconds to clear
the memory
7.
a. Press this button to rotate the projection 180 degrees
b. Press and hold this button to adjust the projection light: HI-LO.
Default settings
1. The LCD display fully for 2 seconds when power on, then with three sounds BI BI BI
into 3 minutes RF receiving.
2. Default time: 00:00 12H(US), 12:00 24H(EU)
3. Date: 01/01 2018, MONDAY
4. AL 1: AM 6:00 AL 2: PM12:00
5. Weather forecast: Partly sunny
6. Default temperature:°F (US), °C (EU)
7. Default projection: on
Note: The battery is only used as a backup battery, don’t use as main power supply,
please use the switch adaptor.
Setting the Wireless Sensor
This weather station is able to pair with three wireless sensors. One of these comes with
the unit, the remaining two are optional.
1. Power up the weather station.
2. Insert the batteries in the wireless sensor, set the selector to the desired transmission
channel (1, 2 or 3). Automatic data will be transmitted.
Notes: The weather station away from equipment that generates magnetic fields such as
mobile phones, televisions, etc.
3. Press the +/CH button to select the channel number that has been set on the wireless
sensor in the previous step. The icon of channel number flashes in sequence of 1, 2, and
3. If signal of the sensor is not received, the symbol "-" will be displayed.
Time setting mode
• Press " SET/LIGHT " button to confirm your setting, the language start to flash, use
“+/CH” and “-/C/F” buttons set the correct language. Default is ENG(US),GER(EU).
• Press " SET/LIGHT " button to confirm your setting,the 12/24 hour mode display starts
to flash, use “+/CH” and “-/C/F” buttons to set the correct 12/24 hour mode.
• Press " SET/LIGHT " button to confirm your setting, the hour display starts to flash, use
“+/CH” and “-/C/F” buttons to set the correct hour.
• Press " SET/LIGHT " button to confirm your setting, the minute display starts to flash,
use “+/CH” and “-/C/F” buttons to set the correct minute.
• Press " SET/LIGHT " button to confirm your setting, the year display start to flash, use
“+/CH” and “-/C/F” buttons set a correct year.
• Press " SET/LIGHT " button to confirm your setting, the month display starts to flash,
use “+/CH” and “-/C/F” buttons to set the correct month.
• Press " SET/LIGHT " button to confirm your setting, the date display starts to flash, use
“+/CH” and “-/C/F” buttons to set the correct date.
• Press " SET/LIGHT " button to confirm your setting, the Month and Date icon display
starts to flash, use “+/CH” and “-/C/F”buttons to set the date display on Month/Date or
Date/Month
• Press " SET/LIGHT " button to confirm your setting, the weather forecast icon starts to
flash, use “+/CH” and “-/C/F”buttons to set the weather forecast icon.
• Press “SET/LIGHT” (or no key for 30 seconds) so exit and save the setting.
• In setting mode, press SNZ/LIGHT button exit the setting mode return to time mode.
Alarm setting mode
• In standard mode, press “ALARM” to enter alarm mode. The “AL1” will be displayed in
the position of weekday.
• In alarm mode, press and hold ALARM button for 2s until Alarm Time hour display of the
alarm 1 starts to flash. Use the “+/CH” and “-/C/F” buttons to set the required hour.
• Press “ALARM” button to confirm your setting, the minute display starts to flash, use
“+/CH” and “-/C/F” buttons to set the required minute.
• Press “ALARM” button to confirm your setting, the alarm mode starts to flash, use
“+/CH” and “-/C/F” buttons to set the required M-F or S-S or M-F and S-S.
• Press “ALARM” button to confirm your setting, the snooze time (5 min -60 min) starts to
flash, use “+/CH” and “-/C/F” buttons to set the required snooze time or turn off the
snooze function.
• Press “ALARM” button to confirm your setting, Alarm Time hour display of the alarm 2
starts to flash. Use the “+/CH” and “-/C/F” buttons to set the required hour.
• Press “ALARM” button to confirm your setting, the minute display starts to flash, use
“+/CH” and “-/C/F” buttons to set the required minute.
• Press “ALARM” button to confirm your setting, the alarm mode starts to flash, use
“+/CH” and “-/C/F” buttons to set the required M-F or S-S or M-F and S-S.
• Press “ALARM” button to confirm your setting, the snooze time (5 min -60 min) starts to
flash, use “+/CH” and “-/C/F” buttons to set the required snooze time or turn off the
snooze function.
• Press “ALARM” (or no key for 30 seconds) so exit and save the setting.
• In setting mode, press SNZ/LIGHT button exit the setting mode return to time mode.
• Push ALARM1 button to ON:ALARM 1 open,signal “ ” will be display; Push
ALARM1 button to OFF: ALARM 1 closed, signal “ ” will be disappear. The ALARM 2
works the same as the ALARM 1.
NOTE: Three items can be set for alarm repeat:1. “M-F”:alarm will ringfrom Monday to
Friday;2. “S-S”:alarm will ringfrom Saturday to Sunday;3. “M-F” and “S-S”: alarm will
ring throughout the weekend.
Alarm and snooze
• While the alarm is beeping, the alarm icon will flash. It will stop automatically after 2
minutes.
• While the alarm is beeping, press the “SNZ” to active snooze. The alarm will “snooze”
and then resume beeping.
• To turn the alarm off, press any key other than SNZ button.
• Alarm sounds as below:
0-10S:BI once/second
11-20S: BI twice/second
21-30S: BI three times/second
After 30S continuous BI four times sound until the alarm finish.
Indoor temperature and humidity
a. The indoor temperature range is -9.9 °C to 50 °C (14.18 °F to 122 °F).
b. The indoor humidity range is 20% - 95%
c. The current temperature exceed the maximum temperature, it will show HH.H, the
current temperature lower than the minimum temperature, show the LL.L.
d. The current humidity exceed the maximum humidity, it will show 96%, the current
humidity lower than the minimum humidity, show the 19%.
e. The detection cycle is 60 seconds.
f. When meet ALARM/RF, the clock stop temperature and humidity checking.
Item No.W22120
User Manual
Thank you for purchasing W22120 Smart Color Weather Station.
Please take a moment to read this guide and store it for future reference.
GEEVON Smart Color Weather Station with
Projection Clock

Description of control
1. Alarm Clock icons 1 and icons 2
2. Time display
3. Weekday
4. Calendar
5. Icons weather forecast(Based on the barometer but do not have barometer display)
6. Dew point temperature
7. Heat index temperature
8. Tendency outdoor temperature
9. Outdoor temperature / humidity external sensor
10. Channel external sensor and outdoor sensor signal strength
11. Ice point icon
12. Temperature and humidity MAX/MIN records
13. Outdoor moldy index
14. Sensor low battery indicator
15. Indoor moldy index
16. Display low battery indicator
17. Indoor temperature / humidity
18. Indoor comfort display
19. Projection adjustment
20. ROTATE button
21. MAX/MIN button
22. ALARM button
23. SET/LIGHT button
24. -/C/F button
25. Projection ON/OFF
26. +/CH button
27. ALARM 1 ON/ OFF
28. SNZ button
29. ALARM 2 ON/OFF
30. Battery Compartment 2xAAA (not included)
31. External power supply socket
32. Pedestal
33. Wireless signal indicator
(Flashes when data is being sent to the display unit)
34. Integrated hang hole
35. Compartment 2xAAA batteries (not included)
36.TX channel selector, select external sensor channel
Main functions:
a. 7 buttons: SNZ, +/CH, -/C/F, SET/LIGHT, ALARM, MAX/MIN, (Rotate)
3 push switches: Projection ON/OFF, ALARM1 ON/OFF, ALARM2 ON/OFF
b. Time: Hour, Minute
c. Calendar: Month, Date
d. 12H/24H selection
e. C/F selection
f. Indoor temperature: -9.9 °C - 50 °C (14.18 °F - 122 °F)
g. Outdoor temperature: -40 °C - 70 °C (-40 °F - 158 °F)
h. Indoor and outdoor humidity: 20% -95%
i. Two projection mode: time and indoor temperature, time and outdoor temperature, 5s
to switch display
j. Rotatable 180 degree
k. Double alarms and Snooze function
l. Max./Min. temperature and humidity memory
m. Indoor and outdoor moldy index
n. Indoor comfort display
o. Dew point and heat index display
Function of buttons:
1. SNZ
a. Press this button to open backlight for 15 seconds (with adapter and when you set the
backlight to MI/LO/OFF mode).
b. Press to activate the snooze function when alarming.
2. +/CH
a. Press to increase the setting value during setting.
b. Press and hold 3 seconds button for fast adjust during setting mode.
c. Press this button to select the channel.
d. In normal mode, press and hold to search RF.
3.-/C/F
a. Press to decrease the setting value during setting.
b. Press and hold 3 seconds button for fast adjust during setting mode.
c. In normal mode, press -/C/F button to select °C or °F
4. SET/LIGHT
a. Press this button to adjust the backlight: HI-MI-LO-OFF (with adapter).
b. Press and hold 3 seconds button to enter the time setting.
5. ALARM
a. Press this button to check Alarm 1 and Alarm 2
b. Press and hold this button to enter alarm setting
6. MAX/MIN
a. Press this button to check Max/Min indoor temperature and humidity memory, dew
point and heat index.
b. In checking MAX/MIN mode, press and hold this button for approx. 3 seconds to clear
the memory
7.
a. Press this button to rotate the projection 180 degrees
b. Press and hold this button to adjust the projection light: HI-LO.
Default settings
1. The LCD display fully for 2 seconds when power on, then with three sounds BI BI BI
into 3 minutes RF receiving.
2. Default time: 00:00 12H(US), 12:00 24H(EU)
3. Date: 01/01 2018, MONDAY
4. AL 1: AM 6:00 AL 2: PM12:00
5. Weather forecast: Partly sunny
6. Default temperature:°F (US), °C (EU)
7. Default projection: on
Note: The battery is only used as a backup battery, don’t use as main power supply,
please use the switch adaptor.
Setting the Wireless Sensor
This weather station is able to pair with three wireless sensors. One of these comes with
the unit, the remaining two are optional.
1. Power up the weather station.
2. Insert the batteries in the wireless sensor, set the selector to the desired transmission
channel (1, 2 or 3). Automatic data will be transmitted.
Notes: The weather station away from equipment that generates magnetic fields such as
mobile phones, televisions, etc.
3. Press the +/CH button to select the channel number that has been set on the wireless
sensor in the previous step. The icon of channel number flashes in sequence of 1, 2, and
3. If signal of the sensor is not received, the symbol "-" will be displayed.
Time setting mode
• Press " SET/LIGHT " button to confirm your setting, the language start to flash, use
“+/CH” and “-/C/F” buttons set the correct language. Default is ENG(US),GER(EU).
• Press " SET/LIGHT " button to confirm your setting,the 12/24 hour mode display starts
to flash, use “+/CH” and “-/C/F” buttons to set the correct 12/24 hour mode.
• Press " SET/LIGHT " button to confirm your setting, the hour display starts to flash, use
“+/CH” and “-/C/F” buttons to set the correct hour.
• Press " SET/LIGHT " button to confirm your setting, the minute display starts to flash,
use “+/CH” and “-/C/F” buttons to set the correct minute.
• Press " SET/LIGHT " button to confirm your setting, the year display start to flash, use
“+/CH” and “-/C/F” buttons set a correct year.
• Press " SET/LIGHT " button to confirm your setting, the month display starts to flash,
use “+/CH” and “-/C/F” buttons to set the correct month.
• Press " SET/LIGHT " button to confirm your setting, the date display starts to flash, use
“+/CH” and “-/C/F” buttons to set the correct date.
• Press " SET/LIGHT " button to confirm your setting, the Month and Date icon display
starts to flash, use “+/CH” and “-/C/F”buttons to set the date display on Month/Date or
Date/Month
• Press " SET/LIGHT " button to confirm your setting, the weather forecast icon starts to
flash, use “+/CH” and “-/C/F”buttons to set the weather forecast icon.
• Press “SET/LIGHT” (or no key for 30 seconds) so exit and save the setting.
• In setting mode, press SNZ/LIGHT button exit the setting mode return to time mode.
Alarm setting mode
• In standard mode, press “ALARM” to enter alarm mode. The “AL1” will be displayed in
the position of weekday.
• In alarm mode, press and hold ALARM button for 2s until Alarm Time hour display of the
alarm 1 starts to flash. Use the “+/CH” and “-/C/F” buttons to set the required hour.
• Press “ALARM” button to confirm your setting, the minute display starts to flash, use
“+/CH” and “-/C/F” buttons to set the required minute.
• Press “ALARM” button to confirm your setting, the alarm mode starts to flash, use
“+/CH” and “-/C/F” buttons to set the required M-F or S-S or M-F and S-S.
• Press “ALARM” button to confirm your setting, the snooze time (5 min -60 min) starts to
flash, use “+/CH” and “-/C/F” buttons to set the required snooze time or turn off the
snooze function.
• Press “ALARM” button to confirm your setting, Alarm Time hour display of the alarm 2
starts to flash. Use the “+/CH” and “-/C/F” buttons to set the required hour.
• Press “ALARM” button to confirm your setting, the minute display starts to flash, use
“+/CH” and “-/C/F” buttons to set the required minute.
• Press “ALARM” button to confirm your setting, the alarm mode starts to flash, use
“+/CH” and “-/C/F” buttons to set the required M-F or S-S or M-F and S-S.
• Press “ALARM” button to confirm your setting, the snooze time (5 min -60 min) starts to
flash, use “+/CH” and “-/C/F” buttons to set the required snooze time or turn off the
snooze function.
• Press “ALARM” (or no key for 30 seconds) so exit and save the setting.
• In setting mode, press SNZ/LIGHT button exit the setting mode return to time mode.
• Push ALARM1 button to ON:ALARM 1 open,signal “ ” will be display; Push
ALARM1 button to OFF: ALARM 1 closed, signal “ ” will be disappear. The ALARM 2
works the same as the ALARM 1.
NOTE: Three items can be set for alarm repeat:1. “M-F”:alarm will ringfrom Monday to
Friday;2. “S-S”:alarm will ringfrom Saturday to Sunday;3. “M-F” and “S-S”: alarm will
ring throughout the weekend.
Alarm and snooze
• While the alarm is beeping, the alarm icon will flash. It will stop automatically after 2
minutes.
• While the alarm is beeping, press the “SNZ” to active snooze. The alarm will “snooze”
and then resume beeping.
• To turn the alarm off, press any key other than SNZ button.
• Alarm sounds as below:
0-10S:BI once/second
11-20S: BI twice/second
21-30S: BI three times/second
After 30S continuous BI four times sound until the alarm finish.
Indoor temperature and humidity
a. The indoor temperature range is -9.9 °C to 50 °C (14.18 °F to 122 °F).
b. The indoor humidity range is 20% - 95%
c. The current temperature exceed the maximum temperature, it will show HH.H, the
current temperature lower than the minimum temperature, show the LL.L.
d. The current humidity exceed the maximum humidity, it will show 96%, the current
humidity lower than the minimum humidity, show the 19%.
e. The detection cycle is 60 seconds.
f. When meet ALARM/RF, the clock stop temperature and humidity checking.
Item No.W22120
User Manual
Thank you for purchasing W22120 Smart Color Weather Station.
Please take a moment to read this guide and store it for future reference.
GEEVON Smart Color Weather Station with
Projection Clock
Outdoor temperature and humidity
a. The outdoor temperature range is -40 °C to 70 °C (-40 °F - 158 °F).
b. The outdoor humidity range is 1% - 99%
c. The current humidity exceed the maximum humidity, it will show 99%, the current
humidity lower than the minimum humidity, show the 1%.
d. The detection cycle: CH 1: 68s; CH 2: 72s; CH 3: 76s.
e. When the outdoor temperature in -1.0 °C to 2.9 °C (30.2 °F to 37.3 °F), the ice icon
starts to flash, until the temperature out of this range, the icon will disappear.
f. Moldy index has 3 levels: HI, ME and LO. When display LO or ME, the icon will display
all time, when display HI, the icon will flash.
Accuracy
• Temperature accuracy:
-30°C ~ -20°C: ± 4°C (-22°F ~ -4°F: ±7.2°F)
-20°C ~ 0°C: ± 2°C (-4°F ~ -32°F: ±3.6°F)
0°C ~ +50°C: ±1°C (32°F ~ 122°F: ±1.8°F)
• Humidity accuracy: ±5% from 35% to 75% and ±10% from 20% to 35% & 75% to 95%
Note: Other ranges are for reference only.
Checking the MAX/MIN temperature and humidity
a. Press the “MAX/MIN” button to check MAX/MIN temperature and humidity memory,
dew point and heat index..
b. Press and hold the “MAX/MIN” button to clear the record of MAX/MIN temperature and
humidity when display shows MAX or MIN temperature and humidity.
Receiving RF
1. Automatically receive 3 minutes after power on or reset
2. Press the “+/CH” key for two seconds to re-register the current channel RF data
3. Synchronous reception
a. RF reception time up to 3 minutes
b. During RF registration, the antenna icon starts to flash
c. When the RF is successfully registered, the icon is displayed
d. In the subsequent synchronization, if the reception fails once, the icon will
disappear
e. In the subsequent synchronization, if the reception is successful, the icon is
displayed and the outdoor temperature and humidity will be updated.
f. RF registration failure or missing code time more than 1 hour after the temperature and
humidity section will display last data.
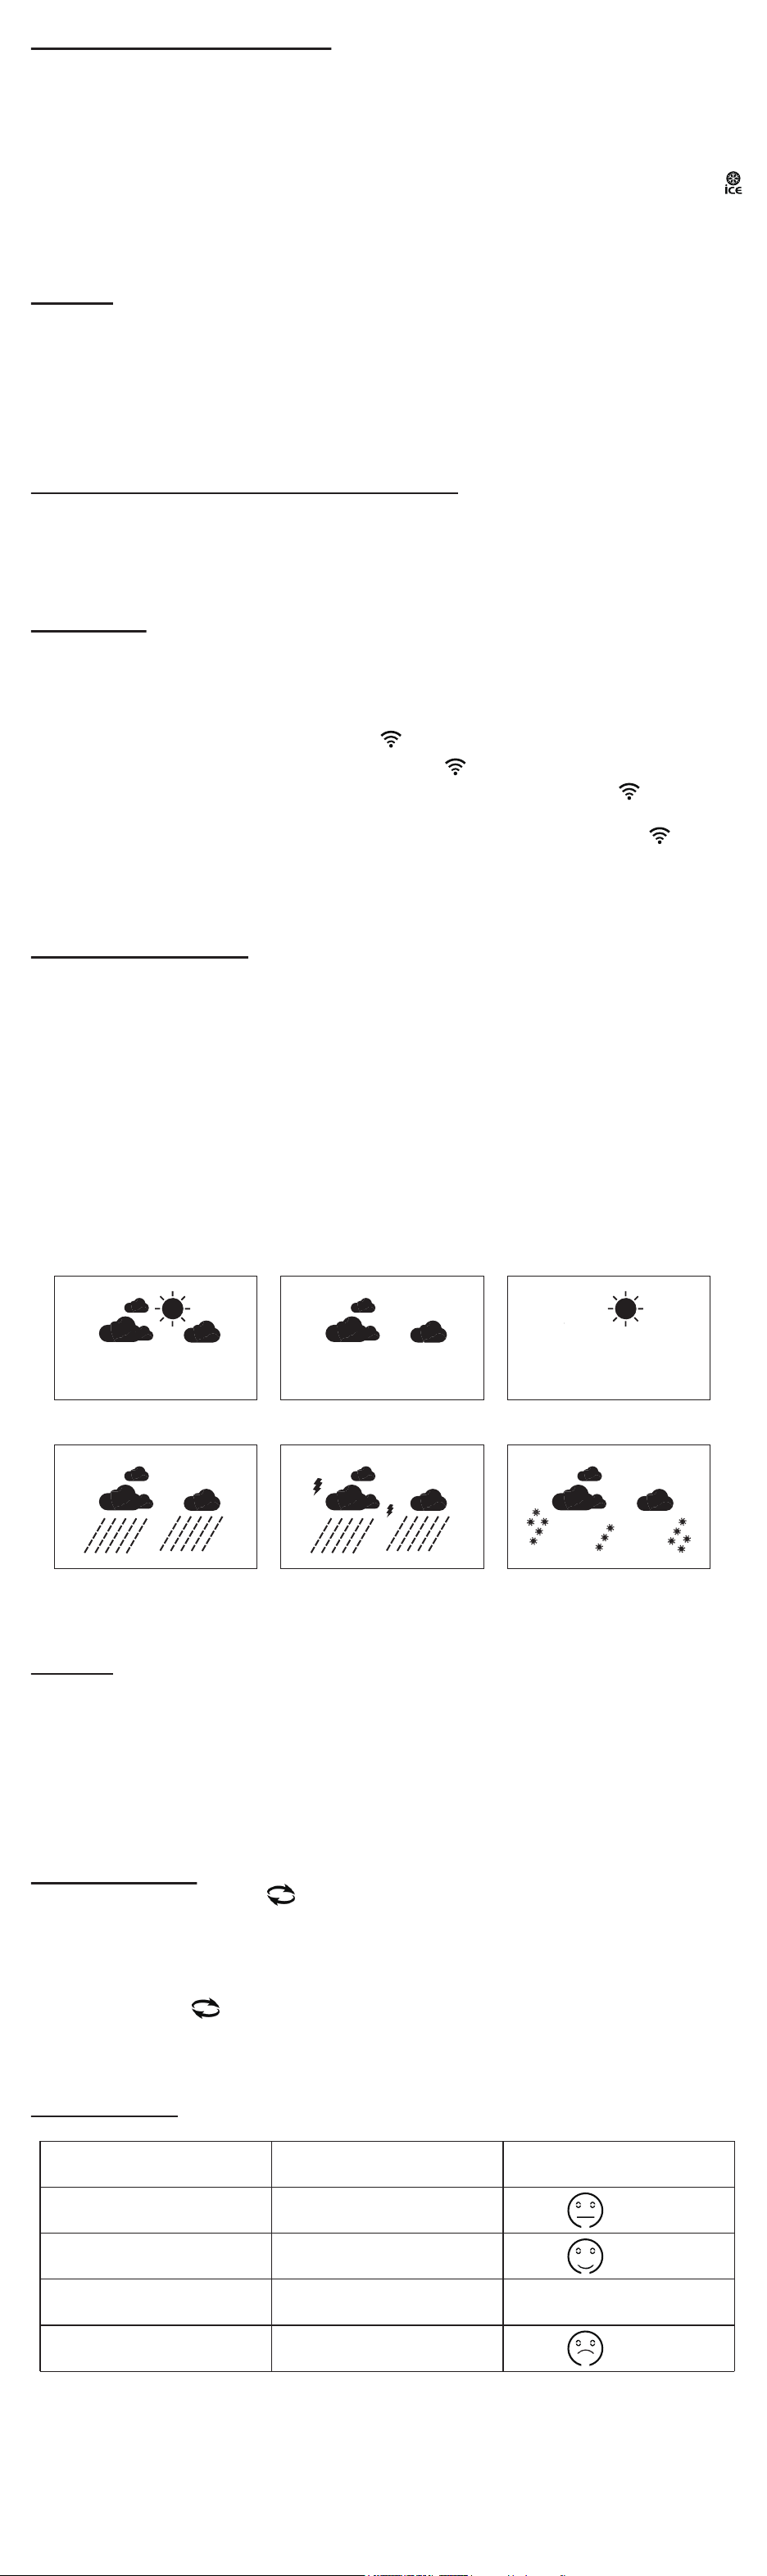
Weather station graphics
a. The unit predicts weather condition of the next 12-24 hours based on the change of
atmospheric pressure. The weather forecast is based on atmospheric pressure change
and is about 70-75% correct.
b. If you want to set the weather forecast icon, press and hold the SET/LIGHT button
enter the time setting, press SET/LIGHT button 11 times, the weather forecast icon starts
to flash, use “+/CH” and “-/C/F”buttons to set the weather forecast icon.
NOTE: After setting up, weather forecast readings should be disregarded for the next 24
hours. This will allow sufficient time for the weather station to collect data and therefore
result in a more accurate forecast.Common to weather forecasting,absolute accuracy
cannot be guaranteed. The weather forecasting feature is estimated to have an accuracy
level of about 75% due to the varying areas the weather station has been designed for
use in.
Week display
Indoor and Outdoor Moldy Display:
Temp. Range
T < 9,5°C
(T < 49°F)
9,5°C < = T < 26,5°C
(49°F < = T < = 79.9°F)
26,5 °C < = T < 30,5 °C)
(80°F < = T < = 86.9°F)
30,5 °C < = T < = 40,5 °C
(87°F < = T < = 104°F)
T > 40,5°C
(T > = 104.1°F)
Humidity Range Mold Risk
0
0
0
0
0
0
0
0
0
LOW
MED
MED
MED
MED
MED
LOW
LOW
LOW
HI
HI
H < = 48%
H < = 48%
49% < = H < = 78%
49% < = H < = 78%
79% < = H < = 87%
79% < = H < = 87%
H > = 88%
H > = 88%
H < = 48%
49% < = H < = 78%
79% < = H < = 87%
H > = 88%
H < = 48%
49% < = H < = 78%
79% < = H < = 87%
H > = 88%
H < = 48%
49% < = H < = 78%
79% < = H < = 87%
H > = 88%
Backlight
• When powered by switch adapter, the backlight will always be on.
• Press the SET/LIGHT button to adjust the brightness from High >> Middle >> Low >>
OFF.
• When powered by battery only, the backlight will be off.
Note: a. The battery is only used as a backup battery, don’t use as main power supply.
b. When the backlight is in MI/LO/OFF mode, press the SNZ button to activate the
backlight for 15s.
Projection function
a. In standard mode, press “ ” button, projection rotation 180 degrees.
b. When powered by switch adapter, the projection is turn on. If you want to enter into the
short projection state, turn offthe projection, press SNZ button to project only 15s.
c. Two projection mode: time and indoor temperature, time and outdoor temperature, 5s
to switch display
d. Press and hold “ ” button to adjust the projection light: HI-LO
e. Adjust the projection focus by turning the buttons on the rear of the projection
Comfort Display:
Temperature range
20 °C < = T < 28 °C
/
/
T < 20°C or T > = 28°C
40% < = H < 70%
40% < = H < 70%
H > = 70%
(Comfort)
No display
(Wet)
Humidity range
H < 40%
Comfort icon
(Dry)

Outdoor temperature and humidity
a. The outdoor temperature range is -40 °C to 70 °C (-40 °F - 158 °F).
b. The outdoor humidity range is 1% - 99%
c. The current humidity exceed the maximum humidity, it will show 99%, the current
humidity lower than the minimum humidity, show the 1%.
d. The detection cycle: CH 1: 68s; CH 2: 72s; CH 3: 76s.
e. When the outdoor temperature in -1.0 °C to 2.9 °C (30.2 °F to 37.3 °F), the ice icon
starts to flash, until the temperature out of this range, the icon will disappear.
f. Moldy index has 3 levels: HI, ME and LO. When display LO or ME, the icon will display
all time, when display HI, the icon will flash.
Accuracy
• Temperature accuracy:
-30°C ~ -20°C: ± 4°C (-22°F ~ -4°F: ±7.2°F)
-20°C ~ 0°C: ± 2°C (-4°F ~ -32°F: ±3.6°F)
0°C ~ +50°C: ±1°C (32°F ~ 122°F: ±1.8°F)
• Humidity accuracy: ±5% from 35% to 75% and ±10% from 20% to 35% & 75% to 95%
Note: Other ranges are for reference only.
Checking the MAX/MIN temperature and humidity
a. Press the “MAX/MIN” button to check MAX/MIN temperature and humidity memory,
dew point and heat index..
b. Press and hold the “MAX/MIN” button to clear the record of MAX/MIN temperature and
humidity when display shows MAX or MIN temperature and humidity.
Receiving RF
1. Automatically receive 3 minutes after power on or reset
2. Press the “+/CH” key for two seconds to re-register the current channel RF data
3. Synchronous reception
a. RF reception time up to 3 minutes
b. During RF registration, the antenna icon starts to flash
c. When the RF is successfully registered, the icon is displayed
d. In the subsequent synchronization, if the reception fails once, the icon will
disappear
e. In the subsequent synchronization, if the reception is successful, the icon is
displayed and the outdoor temperature and humidity will be updated.
f. RF registration failure or missing code time more than 1 hour after the temperature and
humidity section will display last data.
Weather station graphics
a. The unit predicts weather condition of the next 12-24 hours based on the change of
atmospheric pressure. The weather forecast is based on atmospheric pressure change
and is about 70-75% correct.
b. If you want to set the weather forecast icon, press and hold the SET/LIGHT button
enter the time setting, press SET/LIGHT button 11 times, the weather forecast icon starts
to flash, use “+/CH” and “-/C/F”buttons to set the weather forecast icon.
NOTE: After setting up, weather forecast readings should be disregarded for the next 24
hours. This will allow sufficient time for the weather station to collect data and therefore
result in a more accurate forecast.Common to weather forecasting,absolute accuracy
cannot be guaranteed. The weather forecasting feature is estimated to have an accuracy
level of about 75% due to the varying areas the weather station has been designed for
use in.
Week display
Indoor and Outdoor Moldy Display:
Temp. Range
T < 9,5°C
(T < 49°F)
9,5°C < = T < 26,5°C
(49°F < = T < = 79.9°F)
26,5 °C < = T < 30,5 °C)
(80°F < = T < = 86.9°F)
30,5 °C < = T < = 40,5 °C
(87°F < = T < = 104°F)
T > 40,5°C
(T > = 104.1°F)
Humidity Range Mold Risk
0
0
0
0
0
0
0
0
0
LOW
MED
MED
MED
MED
MED
LOW
LOW
LOW
HI
HI
H < = 48%
H < = 48%
49% < = H < = 78%
49% < = H < = 78%
79% < = H < = 87%
79% < = H < = 87%
H > = 88%
H > = 88%
H < = 48%
49% < = H < = 78%
79% < = H < = 87%
H > = 88%
H < = 48%
49% < = H < = 78%
79% < = H < = 87%
H > = 88%
H < = 48%
49% < = H < = 78%
79% < = H < = 87%
H > = 88%
Backlight
• When powered by switch adapter, the backlight will always be on.
• Press the SET/LIGHT button to adjust the brightness from High >> Middle >> Low >>
OFF.
• When powered by battery only, the backlight will be off.
Note: a. The battery is only used as a backup battery, don’t use as main power supply.
b. When the backlight is in MI/LO/OFF mode, press the SNZ button to activate the
backlight for 15s.
Projection function
a. In standard mode, press “ ” button, projection rotation 180 degrees.
b. When powered by switch adapter, the projection is turn on. If you want to enter into the
short projection state, turn offthe projection, press SNZ button to project only 15s.
c. Two projection mode: time and indoor temperature, time and outdoor temperature, 5s
to switch display
d. Press and hold “ ” button to adjust the projection light: HI-LO
e. Adjust the projection focus by turning the buttons on the rear of the projection
Comfort Display:
Temperature range
20 °C < = T < 28 °C
/
/
T < 20°C or T > = 28°C
40% < = H < 70%
40% < = H < 70%
H > = 70%
(Comfort)
No display
(Wet)
Humidity range
H < 40%
Comfort icon
(Dry)