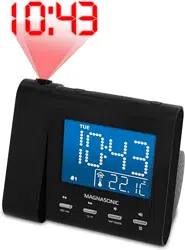
Alarm Clock Radio
with USB Charging and Time Projection
CR20
User Manual v1.1
Thank you for your purchase of this Magnasonic product.
Please read this user manual carefully before using product
to ensure proper use. Keep this manual in a safe place
for future reference.
magnasonic.com/support
We reserve the right to change models, congurations, or specication without notice or liability. Product may not
be exactly as shown. © MAGNASONIC®, MAGNASONIC®, the MAGNASONIC® marks may be registered. All other
trademarks are property of their respective owners

Since 1954, Magnasonic has been a leader in developing innovative
and unique products. We are dedicated to empowering people using
six key fundamentals: superior quality, performance, simplicity, style,
value and a fanatical obsession with outstanding customer service.
At Magnasonic, our mission is a simple one – create people-driven
products that make life’s daily adventures easier and more fun.
We believe everyday experiences should be extraordinary.
2

IMPORTANT SAFETY INFORMATION
1. Read these instructions.
2. Keep these instructions.
3. Heed all warnings.
4. Follow all instructions.
5. Do not use this apparatus near water.
6. Clean only with a dry cloth.
7. Do not block any ventilation openings. Install in accordance with the
manufacturer’s instructions.
8. Do not install near any heat sources such as radiators, heat registers,
stoves or other apparatus (including ampliers) that produce heat.
9. Do not defeat the safety purpose of the polarized or grounding-type
plug. A polarized plug has two blades with one wider then the other.
A grounding type plug has two blades and a third grounding prong.
The wide blade or the third prong are provided for your safety. If the
provided plug does not t into your outlet, consult an electrician for
replacement of the obsolete outlet.
10. Protect the power cord from being walked on or pinched
particularly at plugs, convenience receptacles, and the point where
they exit from the apparatus.
11. Only use attachments/accessories specied by the manufacturer.
12. Use only with the cart, stand, tripod, bracket, or table specied by
the manufacturer, or sold with the apparatus. When a cart is used,
use caution when moving the cart/apparatus combination to avoid
injury from tip-over.
13. Unplug this apparatus during lightning storms or when unused for
long periods of time.
3

14. Refer all servicing to qualied service personnel. Servicing is
required when the apparatus has been damaged in any way, such
as power-supply cord or plug is damaged, liquid has been spilled
or objects have fallen into the apparatus, the apparatus has been
exposed to rain or moisture, does not operate normally, or has
been dropped.
15. Clean the screen only with a dry cloth. Do not clean the inside of this
product.
16. Check that the power voltage stated on the rating label corresponds
to your local electricity supply.
17. Do not immerse this product, the power cord or any accessories in
water or any other liquid.
18. Unwind and straighten the power cord before use.
19. Damage Requiring Service: Unplug the power cord and refer
servicing to qualied service professional under the following
conditions:
• If liquid has been spilled on or into the product.
• If the product has been exposed to rain, water, or
other liquids.
• If the product does not operate normally by following the
operating instructions. Adjust only those controls that are
covered by the operating instructions. Improper adjustment
of other controls may result in damage and will often require
extensive work by a qualied technician to restore the
product to its normal operation.
• If the product has been dropped or damaged in any way.
20. When the product exhibits a distinct change in performance. This
may indicate a need for service.
4

21. Servicing: Do not attempt to service this product yourself as
opening or removing covers may expose you to dangerous voltages
or other hazards. Refer all servicing to a qualied service
professional.
22. Replacement Parts: When replacement parts are required, be sure
the service technician has used replacement parts specied by the
manufacturer, or have the same characteristics as the original parts.
Unauthorized substitutions may result in re, electric shock, or other
hazards.
23. Safety Check: Upon completion of any service or repairs to this
product, ask the service technician to perform safety checks to
determine that the product is in proper operating condition.
24. Caution marking is located at the back of apparatus.
25. The marking information is located on the bottom of apparatus.
5
WARNING INFORMATION
WARNING
To reduce the risk of re or electric shock, do not expose this appliance
to rain or moisture.
The lightning ash with arrowhead symbol, within an equilateral
triangle, is intended to alert the user to the presence of
uninsulated “dangerous voltage” within the product’s enclosure
that may be of sucient magnitude to constitute a risk of electric
shock to persons.
CAUTION
Use of controls or adjustments or performance of procedures other than
those specied may result in hazardous radiation exposure.
RISK OF ELECTRIC SHOCK
ATTENTION
DO NOT OPEN
CAUTION - TO REDUCE THE RISK OF ELECTRIC SHOCK,
DO NOT REMOVE COVER (OR BACK).
NO USER-SERVICEABLE PARTS INSIDE, REFER TO
QUALIFIED USER PERSONNEL.
The exclamation point within an equilateral triangle is intended to
alert the user to the presence of important operating and
maintenance (servicing) instructions in the literature
accompanying the appliance.
6

CAUTION
Danger of explosion if battery is incorrectly replaced. Replace only with
the same or equivalent type.
WARNING
To prevent electric shock; do not use this plug with an extension cord
receptacle or other outlet unless the blades can be fully inserted to
prevent blade exposures. To prevent re or shock hazard; do not install
this product in a conned spaced such as a book case or similar unit.
WARNING: DO NOT INGEST BATTERY, CHEMICAL BURN HAZARD
• This product contains a coin/button cell battery. If the
coin/button cell battery is swallowed, it can cause severe
internal burns in just 2 hours and can lead to death.
• Keep new and used batteries away from children. If the battery
compartment does not close securely, stop using the product
and keep it away from children.
• If you think batteries might have been swallowed or placed
inside any part of the body, seek immediate medical attention.
1. No naked ame sources, such as lighted candles, should be
placed on the apparatus.
2. Do not place the product in closed bookcases or racks without
proper ventilation.
3. The mains plug is used as the disconnect device, the disconnect
device shall remain readily operable.
4. The ventilation should not be impeded by covering the ventilation
openings with items, such as newspapers, table-cloths, curtains, etc.
5. It shall not be exposed to dripping or splashing and that no objects
lled with liquids, such as vases, shall be placed on the apparatus.
6. Do not connect FM antenna to outside antenna.
7

7. The unit should not be exposed to direct sunlight, very high or low
temperature, moisture, vibrations or placed in dusty environment.
8. Do not use abrasive, benzene, thinner or other solvents to clean the
surface of the unit. To clean, wipe it with mild non-abrasive
detergent solution and clean soft cloth.
9. Never attempt to insert wires, pins or other such objects into the
vents or opening of the unit.
10. Batteries shall not be exposed to excessive heat such as sunshine,
re or the like.
11. Attention should be drawn to the environmental aspects of battery
disposal.
12. Minimum distances 5 cm around the apparatus for sucient
ventilation.
13. The use of apparatus in moderate climates.
Do not dispose this product into usual household garbage at the
end of its life cycle; hand it over to a collection center for recycling
the electrical and electronic appliances. By recycling, some of the
materials can be reused. You are making an important
contribution to protect our environment. Please inquire your
community administration for the authorized disposal center.
8

WHAT’S INCLUDED . . . . . . . . . . . . . . . . . . . . . . . . . . . . . . . . . . . . . . . . . . . . . . . . 10
PRODUCT INFORMATION . . . . . . . . . . . . . . . . . . . . . . . . . . . . . . . . . . . . . . . . . . 10
LED DISPLAY. . . . . . . . . . . . . . . . . . . . . . . . . . . . . . . . . . . . . . . . . . . . . . . . . . . . . . . . 10
BUTTONS AND FUNCTIONS. . . . . . . . . . . . . . . . . . . . . . . . . . . . . . . . . . . . . . . . 11
TOP VIEW. . . . . . . . . . . . . . . . . . . . . . . . . . . . . . . . . . . . . . . . . . . . . . . . . . . . . . . . . . . 11
BACK VIEW . . . . . . . . . . . . . . . . . . . . . . . . . . . . . . . . . . . . . . . . . . . . . . . . . . . . . . . . . 11
QUICK START GUIDE . . . . . . . . . . . . . . . . . . . . . . . . . . . . . . . . . . . . . . . . . . . . . . . 12
CONNECTING POWER . . . . . . . . . . . . . . . . . . . . . . . . . . . . . . . . . . . . . . . . . . . . . . . 12
SETTING THE DATE/TIME . . . . . . . . . . . . . . . . . . . . . . . . . . . . . . . . . . . . . . . . . . 12
DIMMER FUNCTION . . . . . . . . . . . . . . . . . . . . . . . . . . . . . . . . . . . . . . . . . . . . . . . . . 12
SETTING AN ALARM . . . . . . . . . . . . . . . . . . . . . . . . . . . . . . . . . . . . . . . . . . . . . . . . . 13
SNOOZE FUNCTION . . . . . . . . . . . . . . . . . . . . . . . . . . . . . . . . . . . . . . . . . . . . . . . . . 14
RADIO FUNCTION . . . . . . . . . . . . . . . . . . . . . . . . . . . . . . . . . . . . . . . . . . . . . . . . . . . 14
RADIO PRESET FUNCTION . . . . . . . . . . . . . . . . . . . . . . . . . . . . . . . . . . . . . . . . . . . 15
SETTING A RADIO PRESET . . . . . . . . . . . . . . . . . . . . . . . . . . . . . . . . . . . . . . . . . . . 15
SELECTING A RADIO PRESET . . . . . . . . . . . . . . . . . . . . . . . . . . . . . . . . . . . . . . . . . 15
SLEEP FUNCTION . . . . . . . . . . . . . . . . . . . . . . . . . . . . . . . . . . . . . . . . . . . . . . . . . . . 15
USB CHARGING FUNCTION . . . . . . . . . . . . . . . . . . . . . . . . . . . . . . . . . . . . . . . . . . 16
PROJECTION FUNCTION. . . . . . . . . . . . . . . . . . . . . . . . . . . . . . . . . . . . . . . . . . . . . 16
BATTERY BACKUP . . . . . . . . . . . . . . . . . . . . . . . . . . . . . . . . . . . . . . . . . . . . . . . . . . . 17
ATTENTION - REPLACING THE BATTERY . . . . . . . . . . . . . . . . . . . . . . . . . . . . . . 17
DISABLING BATTERY BACKUP . . . . . . . . . . . . . . . . . . . . . . . . . . . . . . . . . . . . . . . 17
REPLACING THE BATTERY . . . . . . . . . . . . . . . . . . . . . . . . . . . . . . . . . . . . . . . . . . . 18
TROUBLESHOOTING . . . . . . . . . . . . . . . . . . . . . . . . . . . . . . . . . . . . . . . . . . . . . . . 19
CARE AND MAINTENANCE . . . . . . . . . . . . . . . . . . . . . . . . . . . . . . . . . . . . . . . . . 20
SPECIFICATIONS . . . . . . . . . . . . . . . . . . . . . . . . . . . . . . . . . . . . . . . . . . . . . . . . . . . 20
IC AND FCC STATEMENT . . . . . . . . . . . . . . . . . . . . . . . . . . . . . . . . . . . . . . . . . . . 21
WARRANTY . . . . . . . . . . . . . . . . . . . . . . . . . . . . . . . . . . . . . . . . . . . . . . . . . . . . . . . . 22
TABLE OF CONTENTS
9
WHAT’S INCLUDED
PRODUCT INFORMATION
• Clock Radio
• Power Adapter
• User Manual
• Flat Lithium Battery (installed)
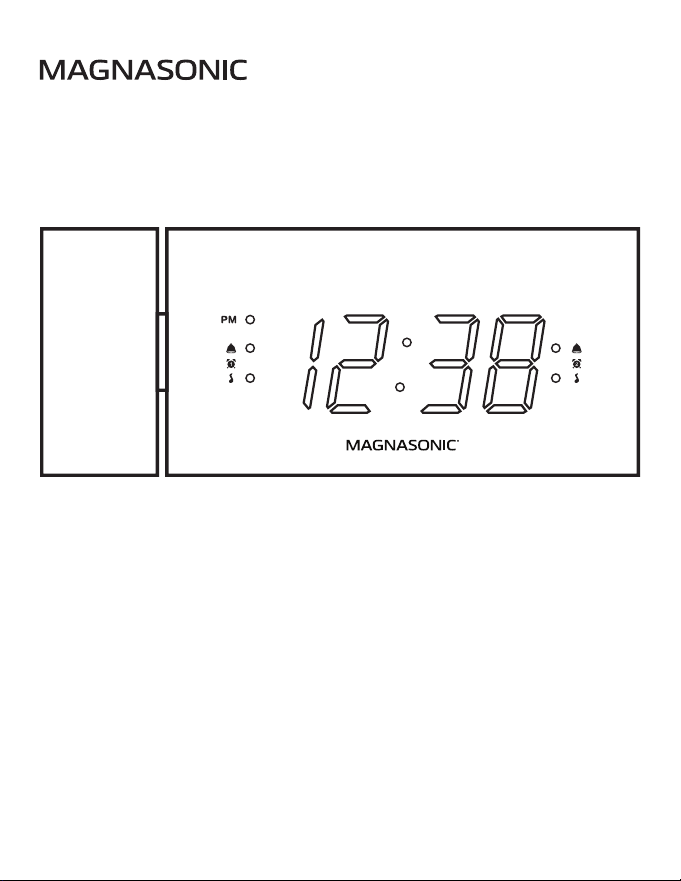
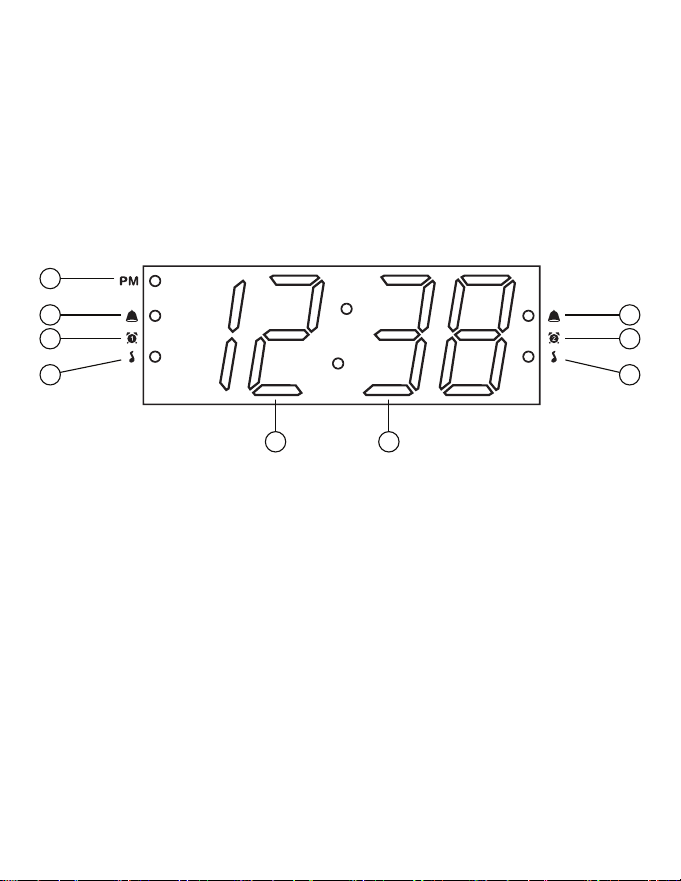
1. PM Indicator
2. Alarm 1 Buzzer Indicator
3. Alarm 1 Indicator
4. Alarm 1 Music Indicator
5. Hour
6. Minute
7. Alarm 2 Music Indicator
8. Alarm 2 Indicator
9. Alarm 2 Buzzer Indicator
LED DISPLAY
1
2
3
4
9
8
7
5 6
10
ALARM OFF
DC 5V 1.0A
USB CHARGING
DC 5V 1.5A
PRESETS MIN HR SLEEP ON/OFF
180
º
FLIPTIME SET
Y-M-D
FM ON/OFF
PROJECTION DIMMER
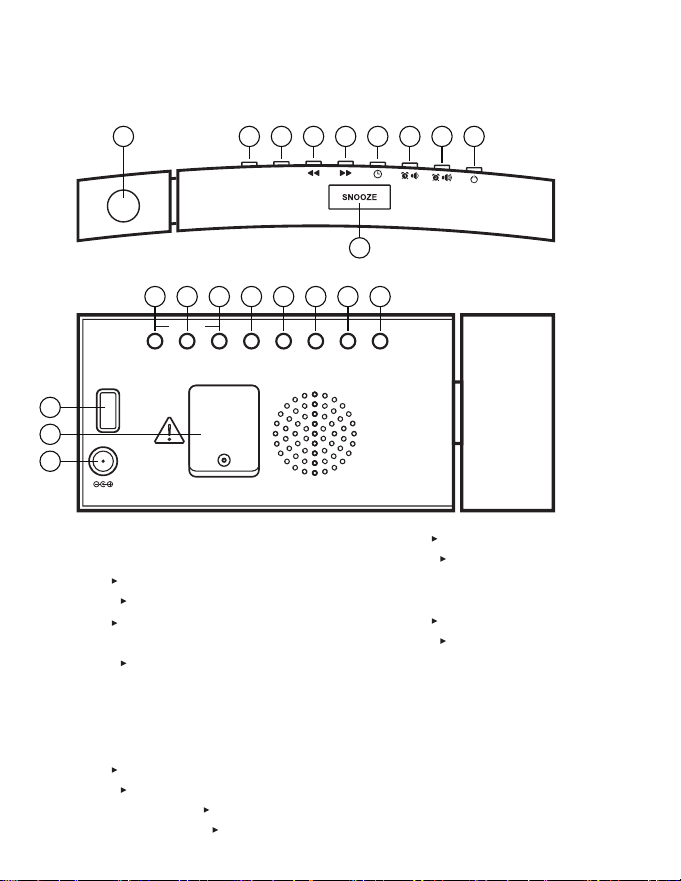
BUTTONS AND FUNCTIONS
1. Projection Lens
2. Projection Control
Tap – ON/OFF
Hold – Flip 180°
3. Tap – Dimmer Button (HI, LO1,
LO2, LO3, OFF)
Hold – Sleep (90, 60, 30, 15 min)
4. Back Arrow Button/Hour
Adjustment
5. Forward Arrow Button/Minute
Adjustment
6. Tap – Year/Month/Day Display
Hold – Time Set Button
Radio On – Tap – Preset Cycle
Radio On – Hold – Set Preset
7. Tap – Alarm 1 Display – On/O
Hold – Set Alarm 1
Radio On – Volume Up
Alarm O
8. Tap – Alarm 2 Display – On/O
Hold – Set Alarm 2
Radio On – Volume Down
Alarm O
9. FM Radio On/O
Alarm O
10. Snooze (9 min)
11. USB Charging Port
12. Backup Battery
13. DC Power Input
TOP VIEW
BACK VIEW
2
9 8 7 6 5 4 3 2
3 4 5 6 7 8 9
10
11
13
12
1
11
ALARM OFF
DC 5V 1.0A
USB CHARGING
DC 5V 1.5A
PRESETS MIN HR SLEEP ON/OFF
180
º
FLIPTIME SET
Y-M-D
FM ON/OFF
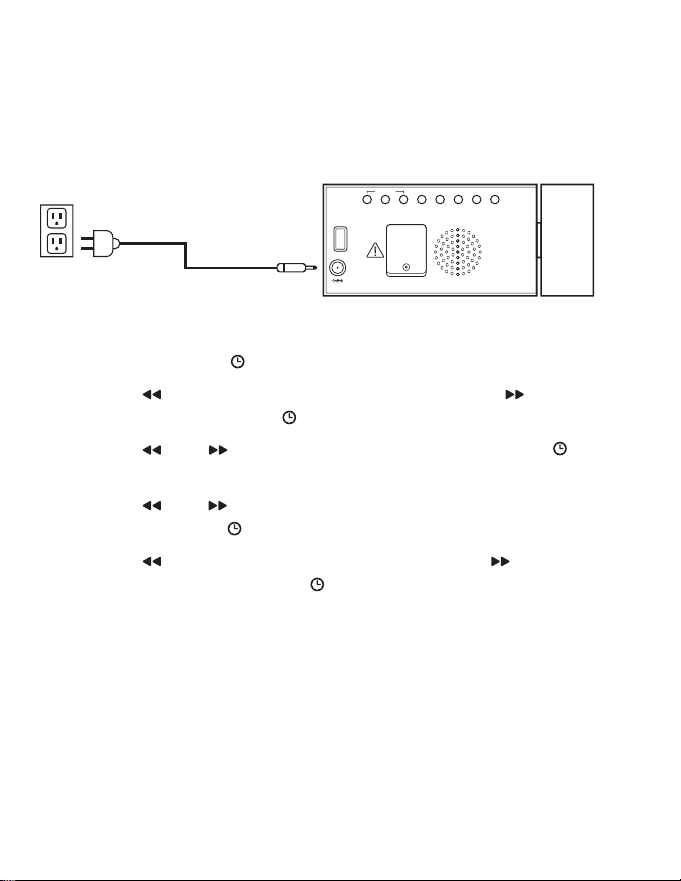
1. Press and hold the button to enter time set mode.
2. Use the button to adjust the Month and use the button to
adjust the Day. Press the button to proceed to the Year.
3. Use the and buttons to change the Year. Press the button
to proceed to the Time Format.
4. Use the and buttons to change between 12hr and 24hr
formats. Press the button to proceed to the Time.
5. Use the button to adjust the Hour and use the button to
adjust the Minute. Press the button to nish setting the time.
Note: When setting the Hour you can select AM or PM by cycling
through all 24 hours. An LED dot will appear next to PM on the LED
display indicating time is set to PM. If setting to AM, ensure there is no
dot next to PM.
QUICK START GUIDE
CONNECTING POWER
Connect the power adapter to the DC input on the back of the clock.
Then connect the adapter plug to a standard AC wall outlet.
SETTING THE DATE/TIME
DIMMER FUNCTION
Press the DIMMER button to cycle through the LED display brightness
options of HI, LO1, LO2, LO3 (lowest), and OFF.
Note: Selecting OFF will turn the display o completely. Pressing a button
will bring the display back temporarily.
12

1. To set Alarm 1, press and hold the button and alarm time will
ash.
2. Use the button to adjust the Hour and use the button to
adjust the Minute. Press the button to proceed to setting the
Alarm Type.
3. Use the and buttons to change between Bell Alarm and
Radio Alarm. The radio station for the alarm will be the last selected
station on the radio. Press the button to proceed.
4. If Radio Alarm was selected, the next step will be selecting the
volume of the alarm. Use the and buttons to pick between
the minimum 5 and maximum 15. Press the button to proceed
to setting the Alarm Mode.
5. Alarm Mode allows you to customize the days of week that the
alarm sounds. Use the and buttons to pick the desired mode.
Press the button to complete setting Alarm:
1 - 7: Whole Week
1 - 5: Monday to Friday
6 - 7: Saturday & Sunday
The Bell or Music LED alarm indicator will light up once the setting
process is complete.
6. When the alarm is sounding, press any of the ALARM OFF buttons
to silence the alarm.
Note: If the Alarm is not silenced it will sound for 30 minutes and turn
o automatically.
7. To enable or disable the alarm press the button. The Bell or
Music LED alarm indicator will disappear if alarm is disabled.
SETTING AN ALARM
13
Note: The Snooze button is a touch sensitive button. To ensure proper
operation, press directly on the button.
When the alarm is sounding, press to silence the alarm for 9
minutes. After 9 minutes the alarm will resume. The snooze function
can be used seven times after which the alarm is cancelled.
Press any of the ALARM OFF buttons to cancel the Snooze function and
turn o the alarm.
SNOOZE FUNCTION
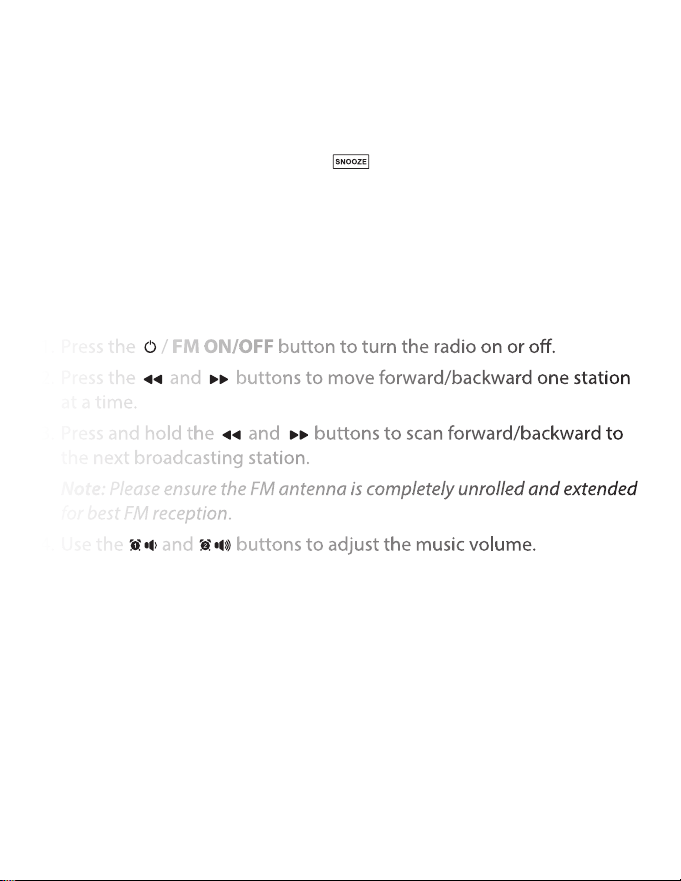
RADIO FUNCTION
1. Press the / FM ON/OFF button to turn the radio on or o.
2. Press the and buttons to move forward/backward one station
at a time.
3. Press and hold the and buttons to scan forward/backward to
the next broadcasting station.
Note: Please ensure the FM antenna is completely unrolled and extended
for best FM reception.
4. Use the and buttons to adjust the music volume.
14

SLEEP FUNCTION
The Sleep timer allows you to listen to music for a preset amount of
time. It is commonly used to fall asleep to music.
1. Press the / FM ON/OFF button to turn the radio on. Press and hold
the SLEEP button for 2 seconds to enter Sleep Timer setting mode.
2. Press the SLEEP button to select the desired time from the available
preset times of 90, 60, 30, and 15 minutes.
Note: You can also select OFF to cancel a Sleep Timer.
3. Press and hold the SLEEP button to check the time remaining on the
Sleep Timer.
SELECTING A RADIO PRESET
Press the PRESETS button to cycle through the 10 presets until the
desired preset is displayed
SETTING A RADIO PRESET
RADIO PRESET FUNCTION
1. Press the / FM ON/OFF button to turn the radio on.
2. Press the and buttons to select your desired radio station.
3. Press and hold the PRESETS button to begin the radio preset setting
process.
4. Use the and buttons to select your desired preset number.
There are a total of 10 preset slots.
5. Press the PRESETS button to set the selected preset number to the
current radio station.
Note: The preset number will ash twice to conrm the preset was
set successfully.
15

Important: The projected image works best in a dark
environment and at a range of 3 to 6 ft.
1. Press the PROJECTION button to turn the
projection On or O.
2. Adjust the angle of the projection unit forward or
backward until the projection is in the desired location.
3. Press and hold the PROJECTION button to ip the
projected time 180°.
PROJECTION FUNCTION
Connect your electronic device to the USB port on the back of the clock
to charge it. The USB port cannot be used for music playback.
Note: Charging time will vary depending on the charging current that your
device requires. Therefore, some devices will take longer to charge than
others. For best charging results, your device’s screen should be turned o.
USB CHARGING FUNCTION
16

If the alarm clock is unplugged when an alarm is enabled, the battery
backup feature will ensure the alarm sounds. To disable the alarm
without connecting to power, remove the battery from the back
of the unit.
DISABLING BATTERY BACKUP
This alarm clock is equipped with a battery backup feature. This feature
will restore your alarm clock settings as well as ensure your alarm
sounds in the event of a power outage. The 3V, CR2032 Flat Lithium
battery is pre-installed. Should you need to replace the battery, please
read the following instructions.
BATTERY BACKUP
• Batteries must be installed by an adult.
• Use only the recommended size and type of battery specied.
• Please be sure to follow the correct polarity when installing the
battery in the battery compartment. A reversed battery may
cause damage to the clock radio.
• When not using the unit for a prolonged period of time, please
remove the battery to avoid possible damage caused by leaking.
• Do not plug or unplug the power cable if you have wet hands.
• If you are not planning to use the unit for an extended period of
time, disconnect the power cable from the wall outlet.
• Do not pull on the cord! You may damage the power cord and
may cause an electric shock when disconnecting the power cord
from the wall outlet. Pull rmly at the base of the plug.
ATTENTION - REPLACING THE BATTERY
17

ALARM OFF
DC 5V 1.0A
USB CHARGING
DC 5V 1.5A
PRESETS MIN HR SLEEP ON/OFF
180
º
FLIPFM ON/OFF
ALARM OFF
DC 5V 1.0A
USB CHARGING
DC 5V 1.5A
PRESETS MIN HR SLEEP ON/OFF
180
º
FLIPTIME SET
Y-M-D
FM ON/OFF
4. Close the battery compartment and
tighten the screw to secure the battery
panel.
Note: The Date, Time, and Alarm settings
will need to be set again once connected
to power.
2. Remove the battery compartment panel.
3. Remove and recycle the depleted
battery. Replace with a new 3V, CR2032
Flat Lithium battery.
If your clock does not save settings after a power outage the backup
battery may need to be replaced. Remove power by unplugging the clock
and follow the below steps to replace the 3V, CR2032 Flat Lithium battery.
REPLACING THE BATTERY
ALARM OFF
DC 5V 1.0A
USB CHARGING
DC 5V 1.5A
PRESETS MIN HR SLEEP ON/OFF
180
º
FLIPFM ON/OFF
1. Loosen the screw using a small Phillips
Head screwdriver. Note: The screw is
designed to be held by the battery
panel and cannot be fully removed
from the panel.
Note: The screw is designed to be held
by the battery panel and cannot be
fully removed from the panel.
18
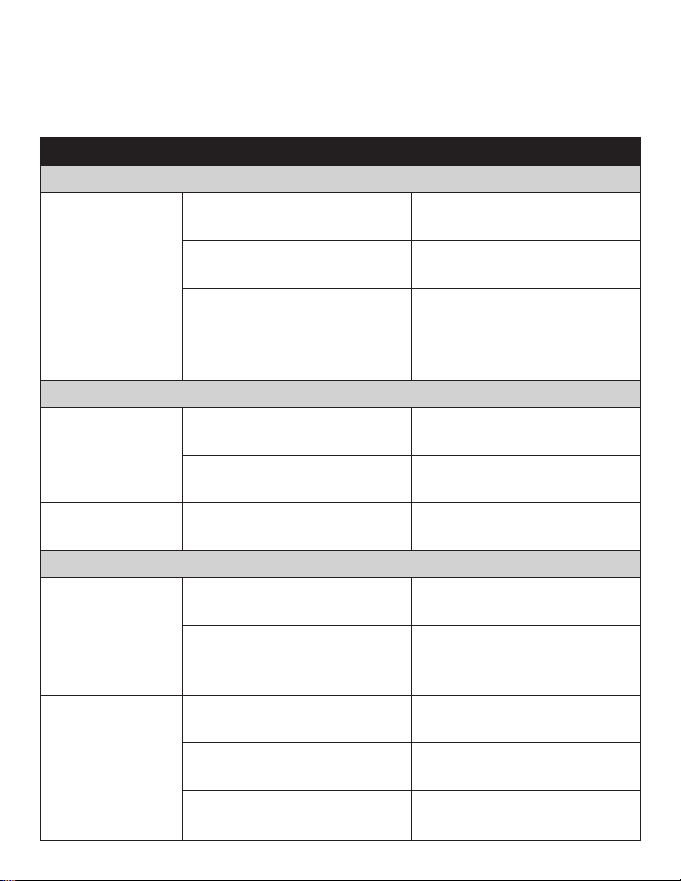
Incorrect time
Alarm does not
turn on
Alarm is not set to turn on Set Alarm 1 or Alarm 2 to
Music or Bell to enable
Clock is set to incorrect
time/date
Set the time to correct
time/date
Alarm time is not set Set alarm time for Alarm 1
or Alarm 2
Please consult the Troubleshooting chart below before communicating
with Magnasonic Customer Support.
TROUBLESHOOTING
SYMPTOM
GENERAL
POSSIBLE CAUSE POSSIBLE SOLUTION
No Display
No Sound
Noise or sound
distorted on FM
Power Cord not plugged in
to wall outlet or to clock
Ensure power cord is rmly
connected
Screen brightness is set to
OFF
Tap DIMMER button to
change LED brightness
Screen brightness is set to
LOW
Low brightness is best for
darker environments. Tap
DIMMER button to change
LED brightness
Radio is not on
Press the FM ON/OFF
button
Volume is at minimum
setting
Press the VOLUME UP
button
FM antenna is not fully
extended
Unroll and extend the
antenna
RADIO
Clock not set to correct
time
Ensure clock is set to
correct time
Battery is inserted
incorrectly, or depleted
Check/replace the battery
and ensure time is set to
correct time
CLOCK
19
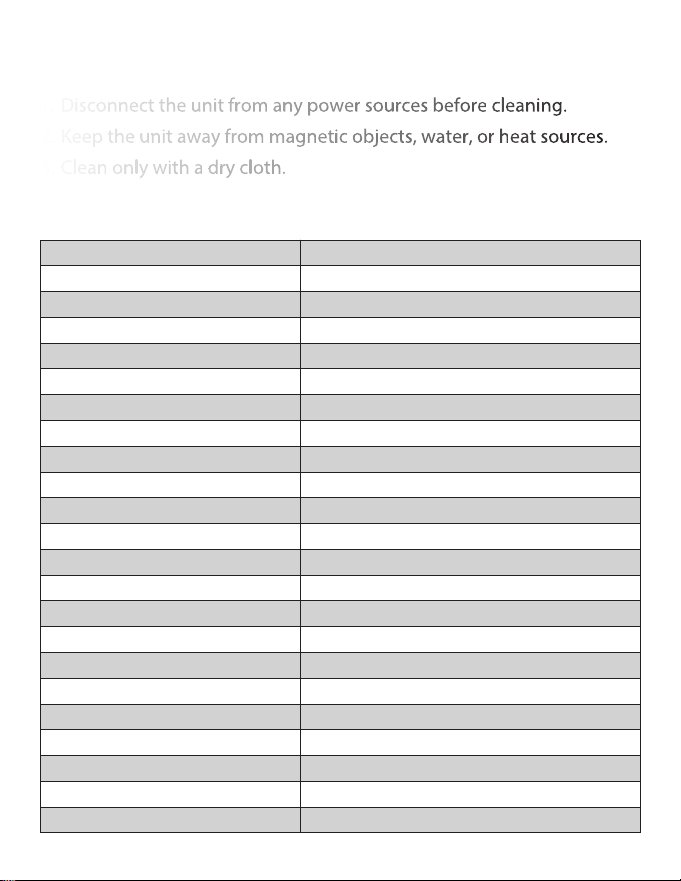
CARE AND MAINTENANCE
SPECIFICATIONS
1. Disconnect the unit from any power sources before cleaning.
2. Keep the unit away from magnetic objects, water, or heat sources.
3. Clean only with a dry cloth.
Display Size 1.2" LED
Adjustable Brightness HI, LO1, LO2, LO3, OFF
Volume Indicator LED Yes
Automatic Time Set No
Daylight Savings No
Time Zones No
Number of Alarms 2 (week, weekday, weekend)
Time Restore/ Sure Alarm 1 x 3V, CR2032 Flat Lithium Battery
Alarm Type Radio, Buzzer
PLL Digital Radio Tuner FM
Frequency Range 87.5 – 108 MHz,
Radio Station Pre-Sets 10 pre-sets
USB Charging Yes, 1 port 5V 1.0A (5W)
Calendar Display Yes
Sleep Timer Yes – up to 90 mins
Snooze Function Yes – 9 mins
Speaker Size 1.6 inches
Projection 180° Tilt, Flip
Power Adapter Input AC 100-240V, 50/60Hz
Power DC 5V 1.5A
Dimensions 3.2 x 7.4 x 1.0 inches (HxWxD)
Unit Weight 0.9 lbs
Unit Color Black
20

FCC statement on regulation
This device complies with Part 15 of the FCC Rules. Operation is subject
to the following two conditions:
1. This device may not cause harmful interference, and
2. This device must accept any interference received, including
interference that may cause undesired operation.
This class[B] digital apparatus complies with Canadian ICES-003.
Déclaration de la FCC sur la réglementation
Cet appareil est conforme a la partie 15 des regles FCC. Le
fonctionnement est autorise sous reserce des deux conditions
suivantes:
1. Cet appareil ne doit pas provoquer d’interference nuisible, et
2. Cet appareil doit accepter toute interference recue, y compris les
interferences pouvant provoquer un mauvais fonctionnement.
Cet appareil numérique de classe [B] est conforme à la norme ICES-003
canadienne.
IC AND FCC STATEMENTT
21

Thank you for choosing Magnasonic. We guarantee your investment in
our products is a solid one! Extensive thought, research, planning, and
design goes into every product we make. High quality components
combined with precision manufacturing allows us to maintain the
highest possible production standards. All items are guaranteed against
defects in materials and craftsmanship.
Magnasonic products come with a complete one year parts and labour
warranty. Proof of purchase from an authorized Magnasonic dealer is
required when seeking warranty assistance.
Magnasonic has outstanding quality control, if something should go
wrong with any of our products, we will repair it free of charge! If the
product cannot be repaired, we will replace the product. If the product
has been discontinued, we will replace the product with either the
newest version of said product or current equivalent. Replacement
parts furnished in connection with this warranty shall be warranted to a
period equal to the unexpired portion of the original product warranty.
This warranty shall not apply to:
A. Any defects caused or repairs required as a result of abusive
operation, negligence, accident, improper installation or
inappropriate use as outlined in the owner’s manual.
B. Any Magnasonic product tampered with, modied, adjusted or
repaired by any party other than Magnasonic.
C. Any cosmetic damage to the surface or exterior that has been
defaced or caused by normal wear and tear.
D. Any damage caused by external or environmental conditions,
including but not limited to transmission line/power line voltage or
liquid spillage.
WARRANTY
22

E. Any product received without appropriate model, serial number, and
CSA/cUL/cULus/cETL/cETLus markings.
F. Any products used for rental or commercial purposes.
G. Any installation, setup and/or programming charges.
If in any situation your purchase displays a manufacturer’s defect during
the warranty period and does not function correctly, Magnasonic will
repair your product and cover all parts, labour, and return costs upon
delivery of the Magnasonic product together with proof of purchase.
Products returned to Magnasonic for warranty service must be shipped
prepaid (paid by customer). Products must be shipped in the original
shipping container or its equivalent; in any case the risk of loss or
damage in transit is to be borne by you. We believe everyday
experiences should be extraordinary. We pledge to work with you in
resolving any issue that occurs with your product. If you are in need of
assistance do not hesitate to visit our support page at:
www.magnasonic.com/support/
23
www.magnasonic.com
www. magnasonic.com/resources
www. magnasonic.com/support
www. magnasonic.com/contact
Don’t forget to register your product with us!
Receive faster, easier warranty assistance | Receive product safety or recall alerts
www.magnasonic.com/registration/
Thank you for your purchase of your Magnasonic product.
We hope you enjoy your experience.
Help others make the right choice, leave a product review
and share your experience.
Questions? Give us a chance to help, we’re just a click away.
www.magnasonic.com/videos