- 02 -
Chapter 2 OUTLET POWERED & BATTERY BACKUP
Chapter 3 TIME SETTING
- 01 -
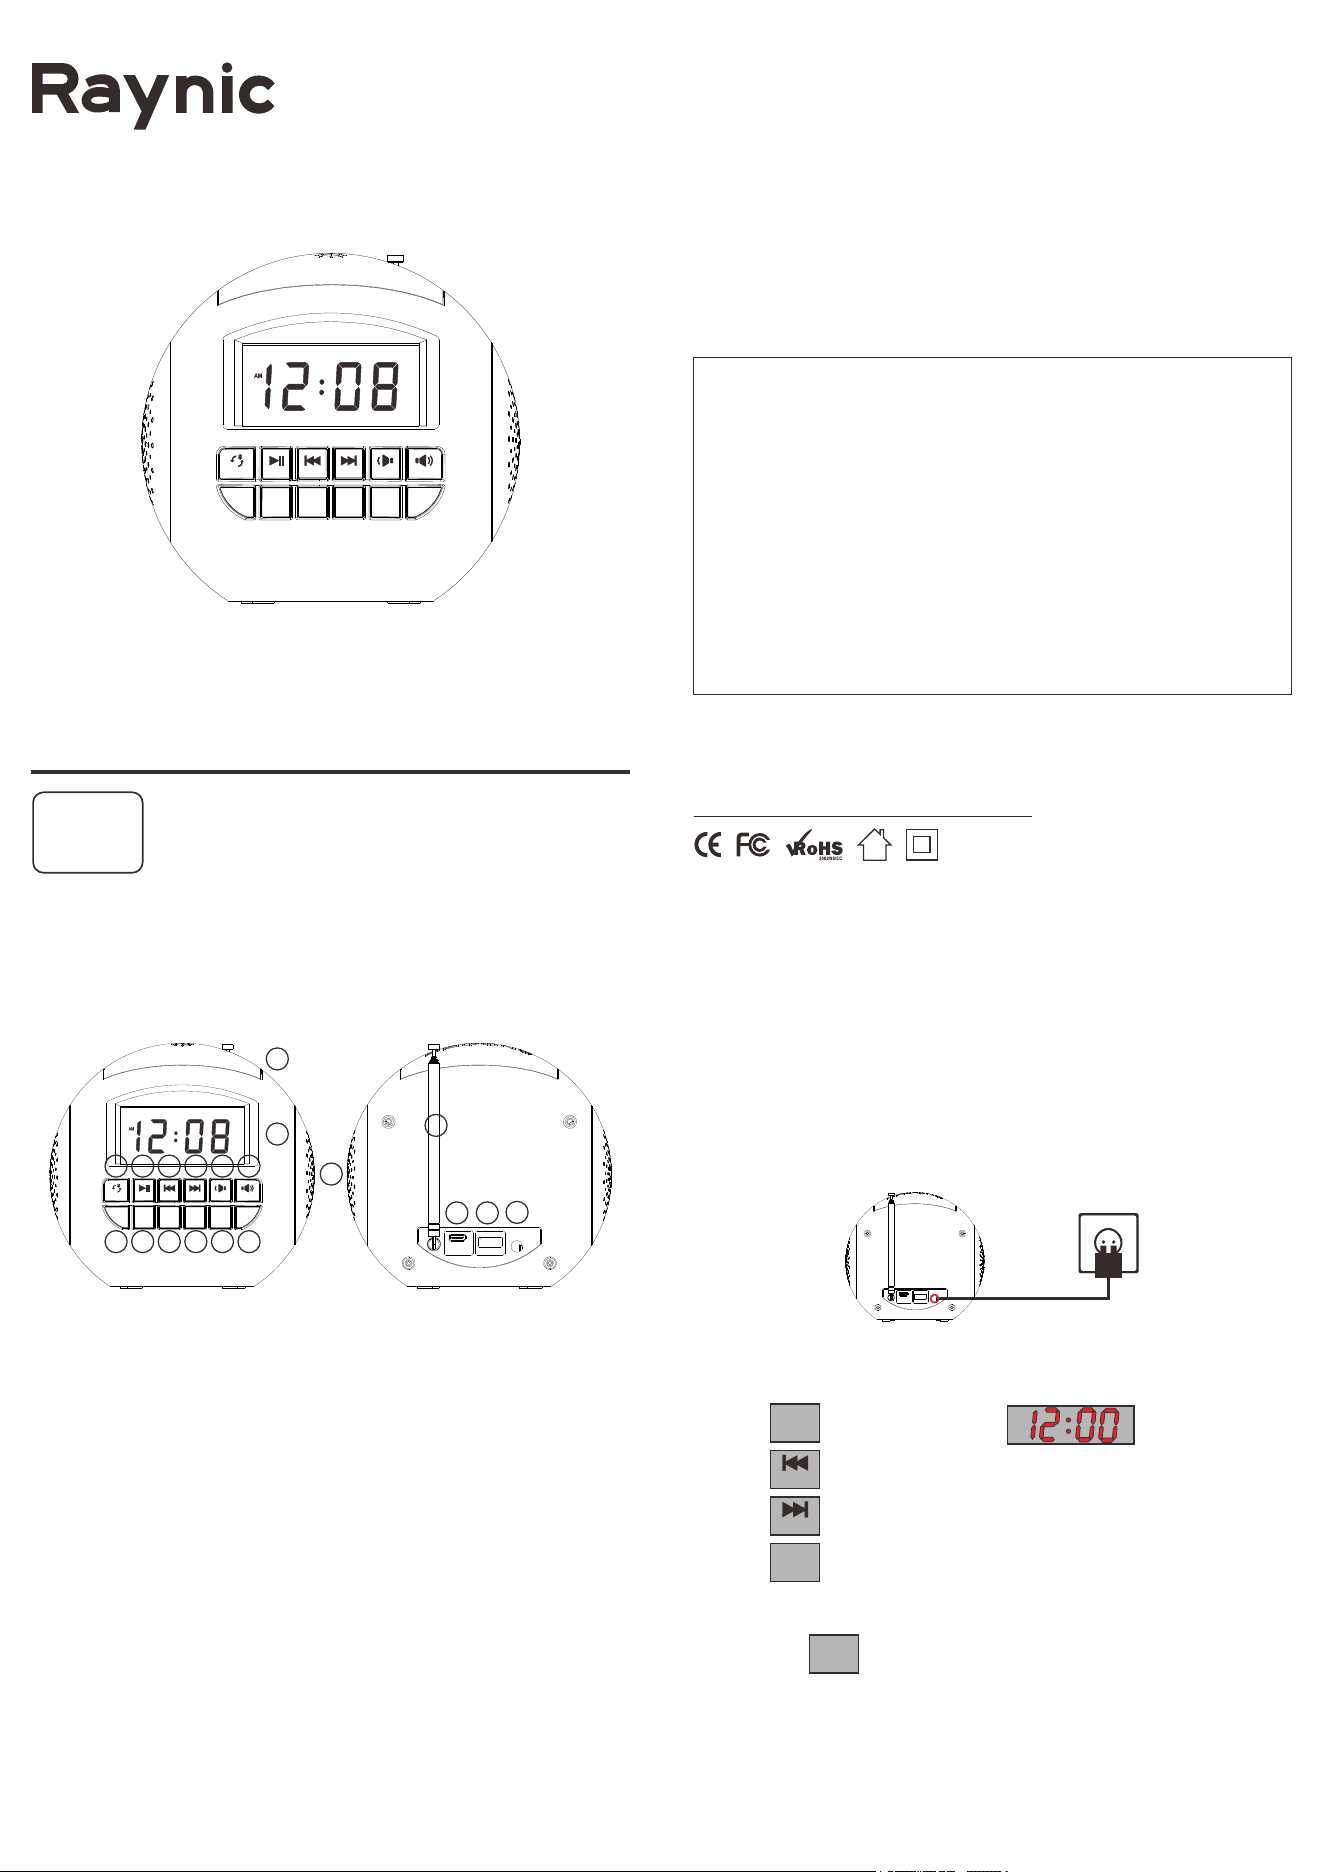
Chapter 1 PRODUCT DIAGRAM
1. FM & Bluetooth Mode
2. Play & Scan
3. Previous & Hour
4. Next & Minute
5. Volume Down
6. Volume Up
7. Dimmer & DST
8. Store & Pair
9. Recall & Sleep
10. Time & 12/24H
11. Set Alarm
12. Alarm ON/OFF
13. Snooze & Night Light
14. Display
15. Radio Antenna
16. Speaker
17. Type C Charging Port
18. USB Charging Port
19. DC IN Port
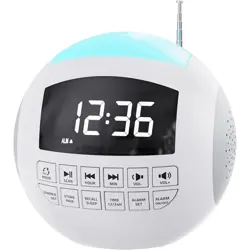
CR1002
FM & BLUETOOTH Clock Radio
CREATE A PERFECT SLEEP ENVIRONMENT
Contact our experts
Version 1.3
Mad e in PRC
https://www.raynic.com
7 8 9 10
PAIR
STORE
SLEEP
RECALL
12/24H
TIME
SET
ALARM
ON/OFF
ALARM
DST
DIMMER
VOL-HOUR MIN VOL+SCANMODE
FM
1 2 3 4 5 6
11 12
13
14
15
16
17 18
19
1. Pull the insulator out of battery compartment to activate Cr2032 as
backup battery.
NOTE: Backup battery(included) doesn't support time display, only support back up
Time & Alarm setting.
2. Connect the adapter to DC jack , then plug into a 100~240V AC wall power
outlet.
1. Press button once, display starts flashing.
2. Press button to set the hour and
press button to set the minute.
3. Press button to save time or wait for another 10 seconds to
confirm automatically.
4.Hold press button to change 12H/24H time format.
PAIR
STORE
SLEEP
RECALL
12/24H
TIME
SET
ALARM
ON/OFF
ALARM
DST
DIMMER
VOL-HOUR MIN VOL+SCANMODE
FM
HOUR
MIN
12/24H
TIME
12/24H
TIME
12/24H
TIME
Buttons Parts
Changes or modifications not expressly approved by the party responsible for compliance could void
the user's authority to operate the equipment.
This equipment has been tested and found to comply with the limits for a Class B digital device,
pursuant to Part 15 of the FCC Rules. These limits are designed to provide reasonable protection
against harmful interference in a residential installation. This equipment generates uses and can
radiate radio frequency energy and, if not installed and used in accordance with the instructions, may
cause harmful interference to radio communications. However, there is no guarantee that interference
will not occur in a particular installation. If this equipment does cause harmful interference to radio or
television reception, which can be determined by turning the equipment off and on, the user is
encouraged to try to correct the interference by one or more of the following measures:
-- Reorient or relocate the receiving antenna.
-- Increase the separation between the equipment and receiver.
-- Connect the equipment into an outlet on a circuit different from that to which the receiver is
connected.
-- Consult the dealer or an experienced radio/TV technician for help
This device complies with part 15 of the FCC rules. Operation is subject to the following two conditions
(1)this device may not cause harmful interference, and (2) this device must accept any interference
received, including interference that may cause undesired operation.
FCC Statement
1. Repeat or button to adjust the volume.
2. Press button to play or pause the music.
3. Press button to play previous music, press button to play
the next music.
- 05 - - 06 -
Chapter 4 ALARM SETTING
- 03 - - 04 -
1. Repeat button until indicator light up which means FM
radio is turned on.
2. Manual Tuning Radio Channel
Repeat or button to tune into the desired channel.
3. Auto Scanning Radio Channel.
Press button to start auto channel scanning, radio will store
available channel to P01, P02, P03........P20.
4. Manual Store Radio Channel
Select the radio channel which you desire, press button, display will
show <P+number>, such as P05, press or to select
new < P+number> such as P06, then press directly channel, the
channel will be stored.
5. Preset Channel Recall
Press button to switch preset channel, then press
or button to select the channel which you desire, such as P03
then press button, radio will confirm your selection.
6. Adjust Radio Volume
Repeat or button to adjust the FM radio volume.
Chapter 5 FM RADIO
1. Press button, the alarm indicator lights up,
the display starts flashing.
2. Press button to set hour, press button to set minute.
3. Press button to save setting or wait for another 10 seconds to
confirm automatically.
Chapter 6 BLUETOOTH
Chapter 7 SLEEP TIMER SETTING
1. Hold press Button to add an hour to the current time on the
display, the indicator will light up .
2. To turn off DST, hold press utton again, the indicator will
disappear from the display and the current time will be cut down one hour.
In Bluetooth mode or FM mode, hold press button to set the
sleep timer, fallasleepwiththeradiobypresettingittoplayfora
certainamountof time.
Chapter 8 DST SWITCH
Repeatedly press button to adjust the brightness of display to
your preference.
Chapter 9 DIMMER
Chapter 10 NIGHT LIGHT
1. Turn on NIGHT LIGHT
Press button then the night light will turn on.
2. Turn off NIGHT LIGHT
Long press button for 2 seconds or press it
repeatedly until the night light turns off.
3. Switch NIGHT LIGHT Color
When the night light turns on, you can press button
to switch to the color as you desired.
The night light colors are as below: Oyster White, Cobalt Blue,
Sky Blue, Green, Sunrise Orange, Shocking Pink, Violet.
Chapter 11 USB CHARGING
Plug charging cable into device such as phone or tablet.
Then clock can charge your phone or tablet .
The maximum charge current is 1 Ampere.
SNOOZE / LIGHT
SNOOZE / LIGHT
SNOOZE / LIGHT
SET
ALARM
HOUR
MIN
SET
ALARM
MODE
FM
HOUR
MIN
SCAN
PAIR
STORE
HOUR
MIN
PAIR
STORE
SLEEP
RECALL
HOUR
MIN
SLEEP
RECALL
VOL- VOL+
SLEEP
RECALL
DST
DIMMER
DST
DIMMER
HOUR
MIN
CONNECTING & DISCONNECTING
1. Repeat button until it's in Bluetooth mode.
2. Once in Bluetooth mode the indicator will flash while searching for the
last connected device.
3. If the Last connected device is not found, the CR1002 will search for
another available device.
4. Select CR1002 from the Bluetooth list on your device to start pairing.
5. Once pairing is successful, the indicator will stop flashing and a beep
will sound for speaker.
6. Press button to disconnect your device from CR1002. A beep sound
to confirm the device has been disconnected successfully. CR1002 will
now be in pairing mode again, allowing you to pair a new device.
PLAY OPERATION
PAIR
STORE
HOUR
MIN
SCAN
MODE
FM
4. The alarm indicator flash. Press or
select to wake up with buzzer or FM radio.
5. Press or wait for 10 seconds to save alarm setting.
NOTE: If you select wake up to FM Radio, Radio channel you listened last time will be
the default radio alarm.
In standby mode
Press and button to adjust the volume alarm ring of
your preference.
Press to turn on or turn off the most recent alarm.
When alarm goes off
1. Alarm will ring every next 9 minutes.
2. Press to turn off the alarm for 24 hours, the alarm
indicator Still be on, alarm will be activated again after 24 hours.
3. To completely turn off the alarm, double press , the
indicator will turn off.
HOUR
MIN
SET
ALARM
VOL- VOL+
ON/OFF
ALARM
OFF
ALARM
ON/OFF
ALARM
DST
DIMMER