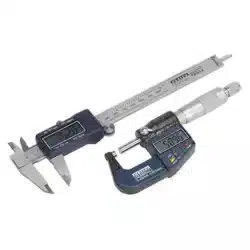
DIGITAL MEASURING SET
MODEL NO: AK9637D.V2
Thank you for purchasing a Sealey product. Manufactured to a high standard, this product will, if used according to these
instructions, and properly maintained, give you years of trouble free performance.
IMPORTANT: PLEASE READ THESE INSTRUCTIONS CAREFULLY. NOTE THE SAFE OPERATIONAL REQUIREMENTS, WARNINGS & CAUTIONS. USE
THE PRODUCT CORRECTLY AND WITH CARE FOR THE PURPOSE FOR WHICH IT IS INTENDED. FAILURE TO DO SO MAY CAUSE DAMAGE AND/OR
PERSONAL INJURY AND WILL INVALIDATE THE WARRANTY. KEEP THESE INSTRUCTIONS SAFE FOR FUTURE USE.
1. SAFETY
WARNING! Ensure Health and Safety, local authority and general workshop practice regulations are adhered to when using tools and
equipment.
8 DO NOT use caliper or micrometer if damaged.
9 Maintain caliper or micrometer in good and clean condition for best and safest performance.
9 Keep the work area clean, uncluttered and ensure there is adequate lighting.
9 Maintain correct balance and footing. Ensure the floor is not slippery and wear non-slip shoes.
9 Remove ill fitting clothing. Remove ties, watches, rings and other loose jewellery. Contain or tie back long hair.
9 Keep children and unauthorised persons away from the work area.
8 DO NOT use the micrometer or caliper for any purpose other than for which it is designed.
8 DO NOT get micrometer or caliper wet or use in damp or wet locations, or areas where there is condensation. Keep micrometer clean
using a dry cotton cloth only.
8 DO NOT dip or submerge the micrometer or caliper in any type of liquid.
8 DO NOT expose micrometer or caliper to bright sunlight or dust.
8 DO NOT dis-assemble micrometer or caliper. The device must be checked by qualified service personnel only.
8 DO NOT apply any voltage to the micrometer or caliper i.e. with an electric marker pen.
9 The micrometer and caliper are precision instruments, treat with care, avoid using force and DO NOT subject to knocks or shocks.
9 Take particular care not to damage or scratch the scale surface.
9 Use micrometer or caliper in reasonably constant temperature conditions of approximately 20°C.
9 When not in use, store micrometer in a safe, dry, childproof location.
2. INTRODUCTION
Seven button digital micrometer with satin chrome thimble and sleeve with hardened and tempered, satin nish stainless steel digital
vernier caliper. Large, easy-to-read LCD read-outs. Displays switchable between Metric and Imperial units. Zero display at any point allows
comparative measurement. Supplied in storage case with micrometer adjustment wrench.
3. SPECIFICATION
Micrometer
Range: ................................................................0-25mm (0-1”)
Graduation: ............................................... 0.001mm (0.00005”)
Battery: ...................................................... 1 x LR44 (supplied)
Accuracy: .................................................. ±0.002mm (0.0001”)
Vernier Caliper
Range: ..........................................................0-150mm(0-6”)
Resolution: ................................................ 0.01mm(0.0005”)
Accuracy <100mm: ................................... ±0.02mm(0.001”)
Accuracy >100mm: ................................... ±0.03mm(0.001”)
Battery: ................................................. 1 x LR44 (supplied)
AK9637D.V2 Issue 3 02/07/2020
Original Language Version
© Jack Sealey Limited
Refer to
instructions
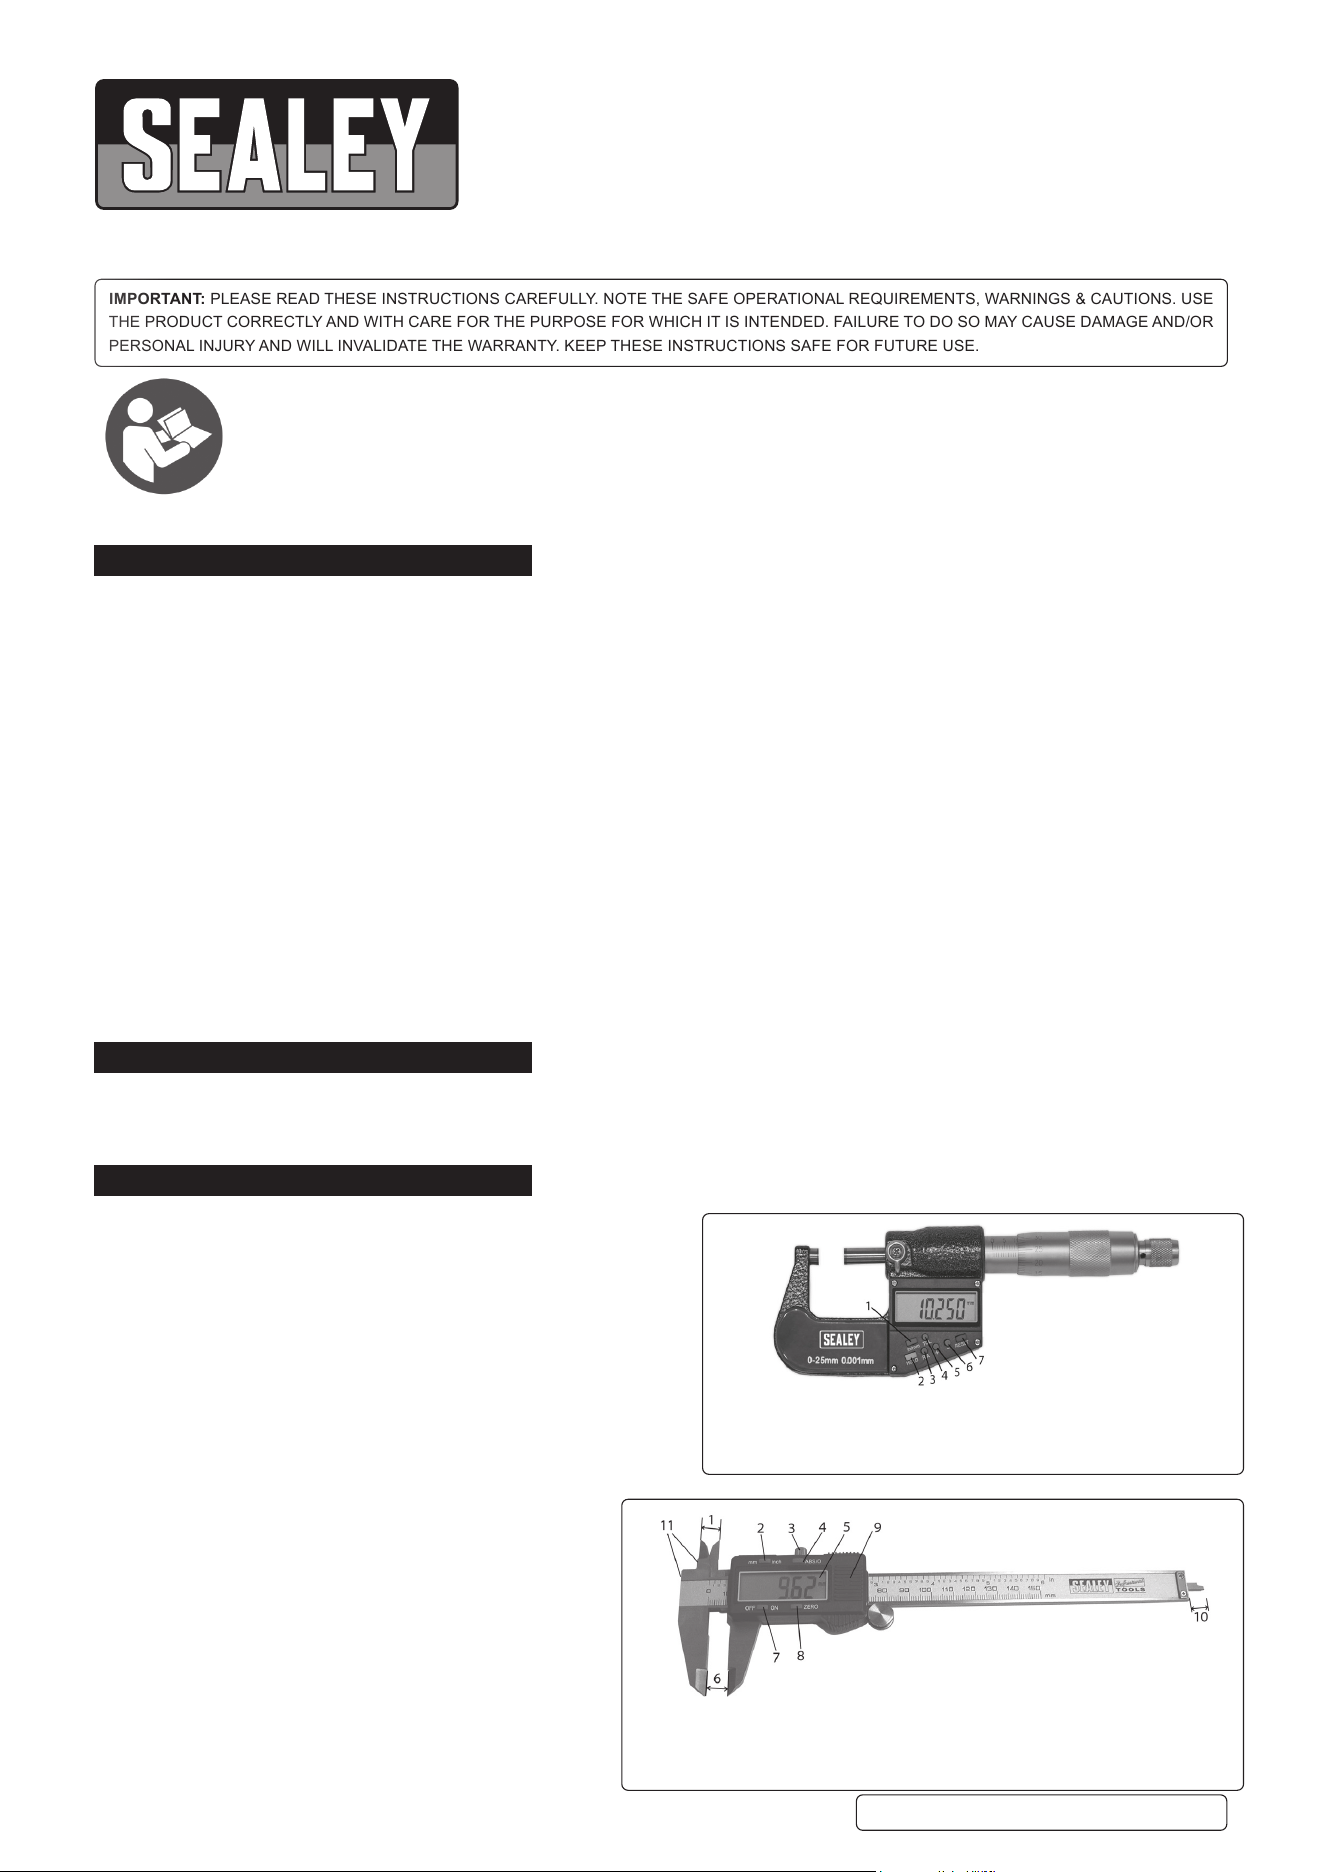
1. Internal Measure
2. Metric/Imperial
Selector
3. Locking Screw
4. ABS/0 Switch
5. LCD Display
6. External Measure
7.On/Off Control
8. Zero Control
9. Battery Cover
10. Depth Measure
11. Step Measure
1. Metric/Imperial conversion
2. Data hold
3. Relative/absolute measuring
4. Tolerance setting
5. Positive setting
6. Negative setting
7. Reset
4. CALIPER OPERATION
WARNING! Ensure that you have read and understood Section 1 safety instructions before commencing.
4.1. Ensure all measuring surfaces are clean and then turn on caliper by pressing ‘On-Off’ switch. Wait at least one second before use.
4.2. Loosen locking screw/thumb lock and close caliper; if read-out does not show zero when in closed position, reset by pressing ‘Zero’
switch again.
4.3. Select ‘inch’ or ‘mm’ units, as required, with the ‘Inch/mm’ selector switch. Check that display shows the required units.
4.4. Measurements will now be shown directly on the LCD display.
4.5. A new ‘zero’ may be obtained, at any open position of the instrument, by pressing the ‘Zero’ switch.
5. MICROMETER OPERATION
WARNING! Ensure that you have read and understood
Section 1 safety instructions before commencing.
5.1. Ensure all measuring surfaces are clean.
5.2. ORIGIN SETTING. Use this function to preset the origin
value.
(Value can be anything from 0-25mm and can be used for
calibration purposes).
5.2.1. Press (RESET) and (-) buttons together and hold until
“SET” begins to flash on the LCD.
5.2.2. Press the (+) or (-) button to preset the origin value as
required. Now press (RESET) to confirm the setting.
5.3. ORIGIN RESETTING. Use this function to calibrate the
device using the preset origin value entered in step 5.2.
5.3.1. Ensure the measuring faces of the micrometer are in
contact with the object being used to calibrate it and
that the measurement is precisely the distance required
(i.e. identical to the preset origin value) and press (RESET).
5.4. TO MEASURE AN OBJECT; open the micrometer by
revolving the large barrel, place the object between the
measuring surfaces and close the micrometer using the smaller ratchet barrel (the ratchet is used to prevent over tightening which
could other wise result in inaccurate measurement, damage to the micrometer and damage to the object being measured).
The reading is taken from the LCD display.
5.5. METRIC/IMPERIAL CONVERSION. Press the “in/mm” button (1) to convert the display format from inches to millimetres and visa
versa.
5.6. DATA HOLD. This function is used to temporarily hold or x data on the LCD display for ease of recording.
5.6.1. Once a measurement has been taken, press the HOLD button (2). The letter H will appear at the top of the display and the data
currently shown will become xed. When the data has been recorded, press the HOLD button again to release the display.
5.7. RELATIVE/ABSOLUTE MEASURING. To use relative measuring e.g. to determine the dierence in width of two objects,
measure the rst object (as explained in section 5.4), press the R/A button (the letters “REL” should appear in the LCD)
and immediately measure the second object. The LCD will display the dierence between the two objects. To revert back
to absolute measuring simply press the R/A button once more.
5.8. TOLERANCE SETTING. Use to set a tolerance e.g. for use when measuring a large number of components to check they are
within acceptable size limits.
5.8.1. Press the TOL button. “TOL up” should appear in the LCD. Turn the micrometer to set the upper level.
5.8.2. Press the TOL button again, “TOL down” should now appear in the LCD. Turn the micrometer once more to set the lower level.
Press the TOL button again to conrm the settings, “OK” should appear in the LCD.
5.8.3. To wipe the tolerance setting, press the TOL button three times in quick succession.
6. BATTERY FITTING
6.1. FITTING A NEW BATTERY IN CALIPER
A flashing display indicates that the battery is exhausted - replace as follows:
1. Switch off and then remove battery cover (9) by firmly sliding towards the right.
2. Remove exhausted battery and fit replacement with positive side uppermost (fig.1).
3. Refit battery cover.
4. Dispose of old battery in a safe and approved manner. DO NOT burn.
NOTE: If the display fails to alter when the slide is moved, remove the battery -
wait at least 30 seconds and then refit the battery.
6.2. FITTING A NEW BATTERY IN MICROMETER
A flashing display indicates that the battery is exhausted - replace as follows:
1. Remove battery cover using the semi-circular side of the supplied wrench (fig. 2.).
2. Remove exhausted battery and fit replacement with positive side uppermost, Refit
cover.
3. Dispose of old battery in a safe and approved manner. DO NOT burn.
NOTE: If the display fails to alter when the slide is moved, remove the battery -
wait at least 30 seconds and then refit the battery.
1. Metric/Imperial conversion
2. Data hold
3. Relative/absolute measuring
4. Tolerance setting
5. Positive setting
6. Negative setting
7. Reset
g.1
g.2
AK9637D.V2 Issue 3 02/07/2020
Original Language Version
© Jack Sealey Limited
Sealey Group, Kempson Way, Suffolk Business Park, Bury St Edmunds, Suffolk. IP32 7AR
01284 757500 01284 703534 sales@sealey.co.uk www.sealey.co.uk
ENVIRONMENT PROTECTION
Recycle unwanted materials instead of disposing of them as waste. All tools, accessories and packaging should be sorted, taken to
a recycling centre and disposed of in a manner which is compatible with the environment. When the product becomes completely
unserviceable and requires disposal, drain any fluids (if applicable) into approved containers and dispose of the product and fluids
according to local regulations.
BATTERY REMOVAL PLEASE SEE SECTION 6
Under the Waste Batteries and Accumulators Regulations 2009, Jack Sealey Ltd are required to inform potential purchasers of products
containing batteries (as defined within these regulations), that they are registered with Valpak’s registered compliance scheme. Jack
Sealey Ltd Batteries Producer Registration Number (BPRN) is BPRN00705.
Note: It is our policy to continually improve products and as such we reserve the right to alter data, specifications and component parts without prior
notice.
Important: No Liability is accepted for incorrect use of this product.
Warranty: Guarantee is 12 months from purchase date, proof of which is required for any claim.
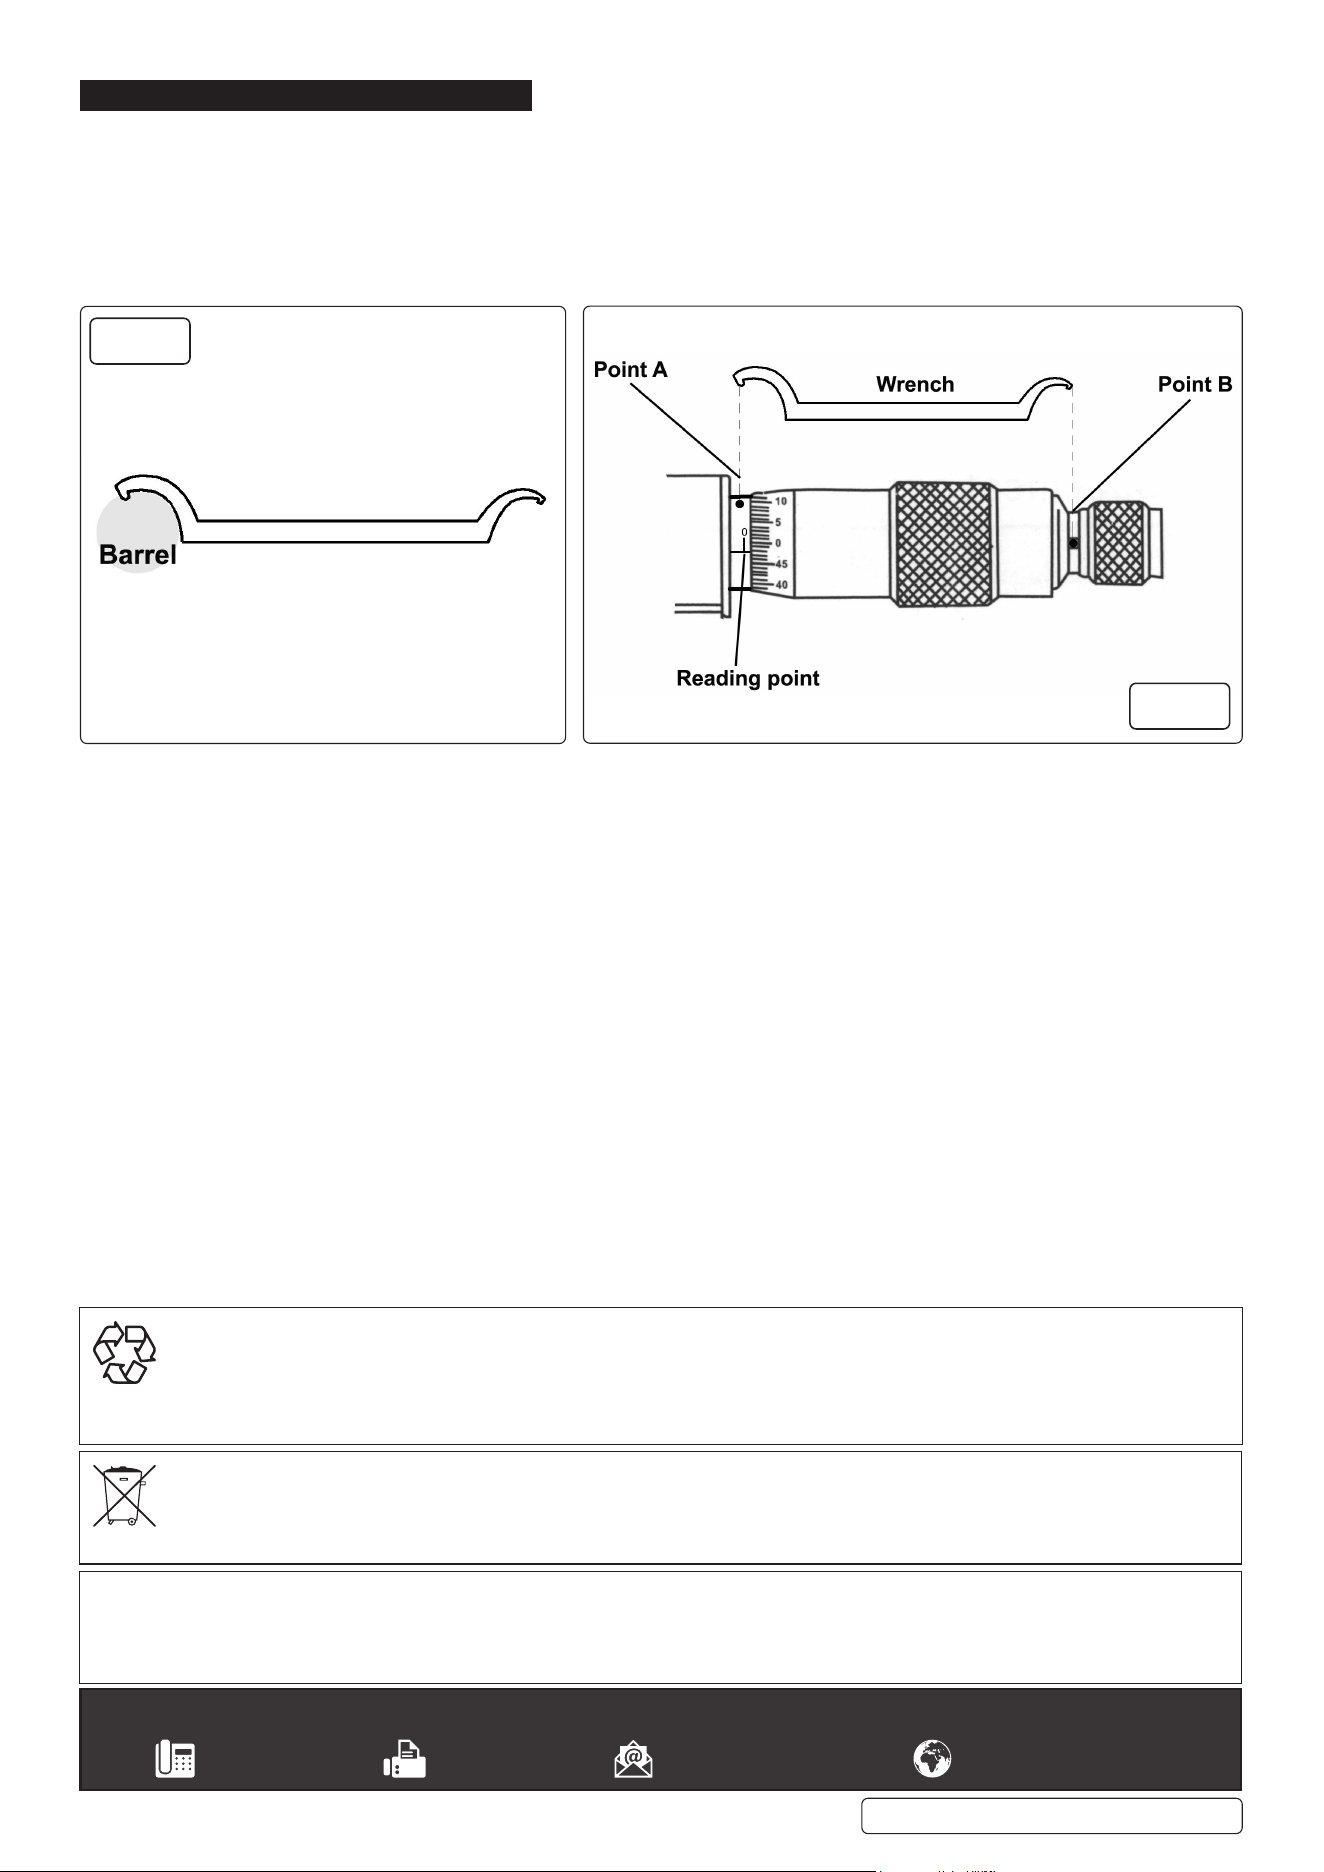
7. MICROMETER MAINTENANCE
7.1. If the micrometer is not to be used for an extended period of time, remove the battery for storage.
7.2. After prolonged service, the reading point may become slightly loose and misaligned. This can be corrected using the wrench
provided. Fully close the micrometer. Place the wrench as shown in Fig 2 i.e. with the small protrusion hooking the hole at Point A.
Using the wrench, alter the position of the reading point until it is once more aligned with the “0” on the barrel scale.
7.3. The ratchet barrel may also become lose over time. The wrench is then used in a similar fashion (i.e. with the smaller end of the
wrench hooked in Point B) to tighten the ratchet barrel.
7.4. The micrometer contains no user serviceable parts. See your authorised stockist for advice/repairs.
fig.1
fig.2
AK9637D.V2 Issue 3 02/07/2020
Original Language Version
© Jack Sealey Limited
